AD240 series
Version:1.1
Thermal Label Printer
Instruction Manual

1. Packing List ........................................................................................... 1
2. Appearance and Components ....................................................... 2
3. Preparation ........................................................................................... 3
4. Basic Functions ................................................................................... 13
5. Trouble shooting ................................................................................ 18
6. Bluetooth connection and usage ................................................. 19
7. Clean the printer ................................................................................ 20
8. Technical Parameters ........................................................................ 22
Table of Content
About this Manual
This manual contains information about the use and installation
of the product. Please read this instruction carefully before using
the printer and follow the instructions.
International conventions
For your convenience, the following symbols (ICONS) and
conventions are used in this manual:
Warning: This sign warns that improper use may result in property
damage, serious injury or death.
Caution: This sign indicates caution. Improper use may cause
personal injury or damage to items.
Remarks: This mark represents remarks. The information listed
can enable you to better use the product or extend the service
life of the product.
Preface
Instruction Manual
Instruction
Manual
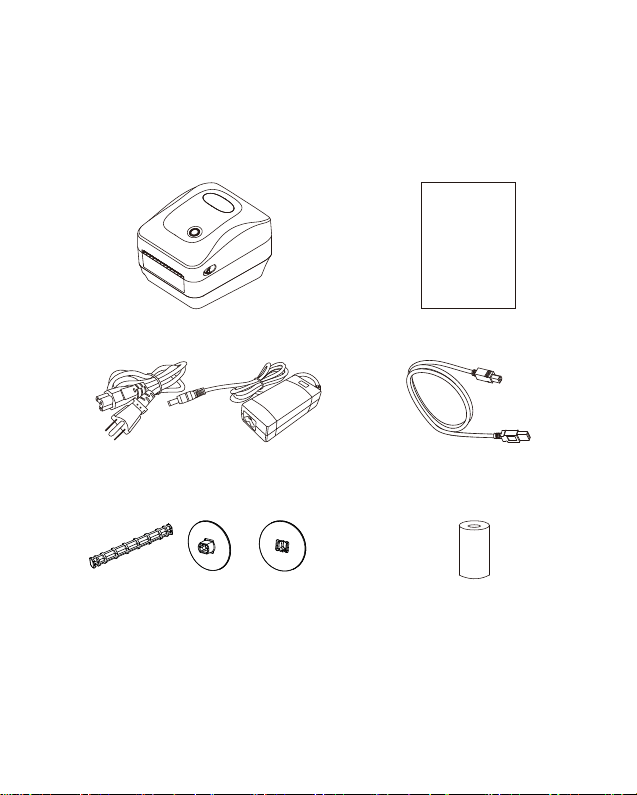
1.Packing list
After unpacking the package, check whether the product
appearance is intact and check all accessories. If there is
any defect, please contact the dealer!
Printer
Power Adapter and Cable
Note: due to the continuous improvement of the product, the
specifications, accessories and programs described in the
manual are subject to real machines, and we reserve the right
to change without notice.
USB Cable
-1-
Paper reel and stoppers 1 Roll Label
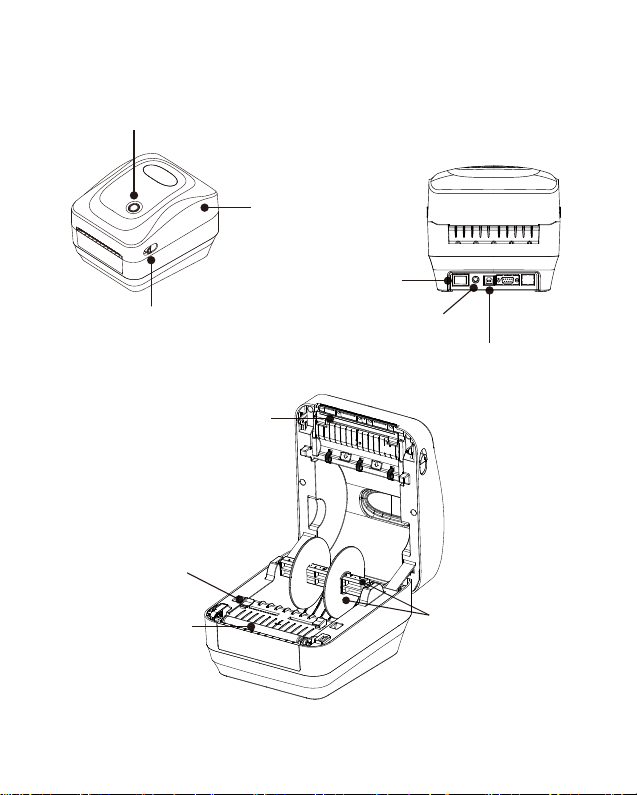
2.Appearance and Components
-2-
Power port
USB port
Print head
Paper guide
Paper reel
and stoppers
Rubber roll
Release latch
Power switch
Advance button
Top cover
3.Preparation
1) Power must be turned off with a power switch. If the power
is turned off by unplugging the power plug, the circuit in the
printer will be damaged and the printed data will be destroyed.
2) Please use the original power supply of the machine, otherwise
the printing quality may be reduced or the printer may be damaged.
3) Wait for a certain time (≧5S) when turning on the power again
after the power is turned off. If the power supply is turned on
immediately without a certain period of time, faults may occur.
4) After the power is turned off, the power lamp on the operation
panel will be off after 2-3 seconds. This is a normal condition,
not a malfunction.
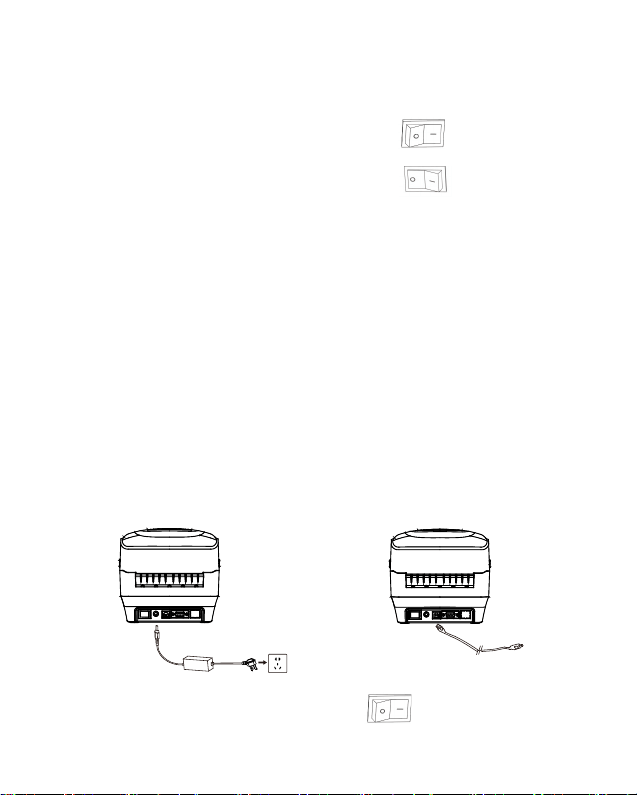
3.2 Connect the power supply
1) Connect the power cable. 2) Connect the USB cable
3) Turn on the power
Set the printer power switch to I.
-3-
3.1 Power switch
Turn the printer power switch to I state, that is, turn on
the power switch.
Turn the printer power switch to O state, that is, turn off
the power switch.
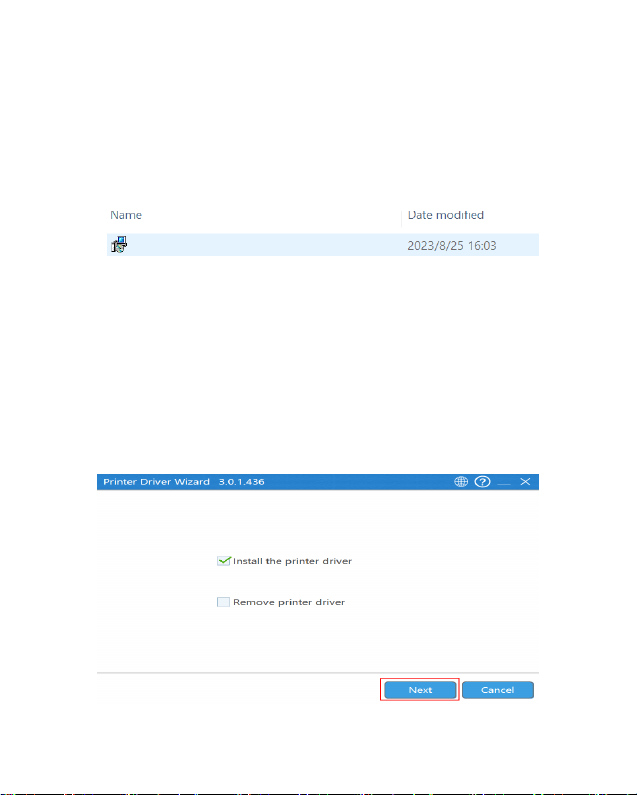
3.3 Install the driver
Please access help.ayinprinter.com to download and install
the driver, as shown below.
3.3.1 Installation for Windows
a. Download exe format driver file. Click to install.
-4-
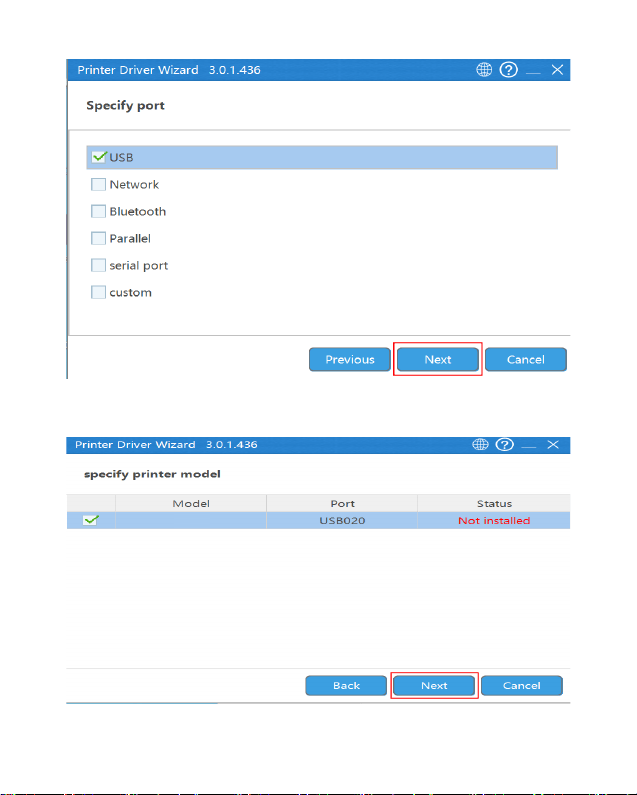
b. Follow the prompts to complete the installation step by step.
Aiyin_Printer_Driver
-5-
AD240
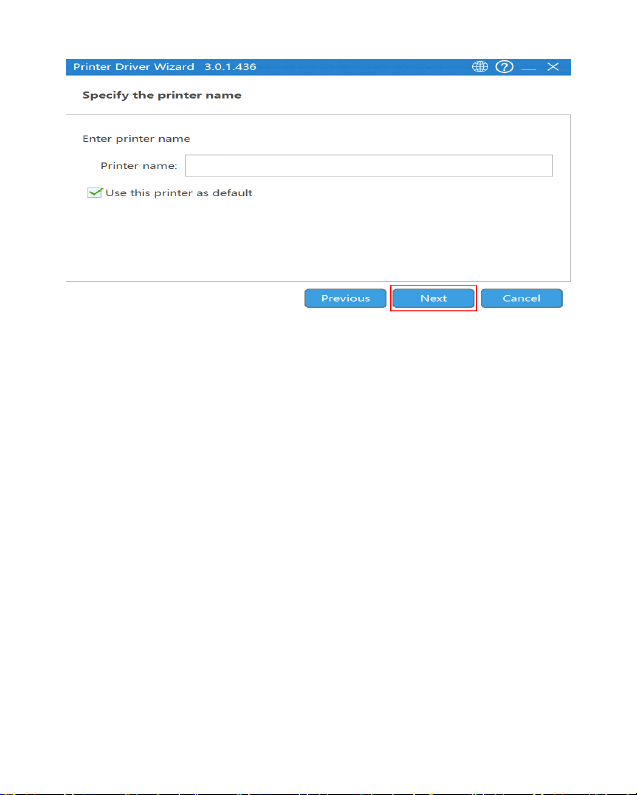
-6-
3.3.2 Installation for Mac
a. Connect power and computer
1) Connect the power to the printer through power cord.
2) Connect the printer to your computer through USB cord.
3) Put the labels in, switch on the printer.
Note:
Make sure these three steps are completed before printing in
case failing toinstall the printer driver.
b.You can download the driver "Driver for Mac (AD240/AD240-bt)"
from"help.aiyin.com")
AD240
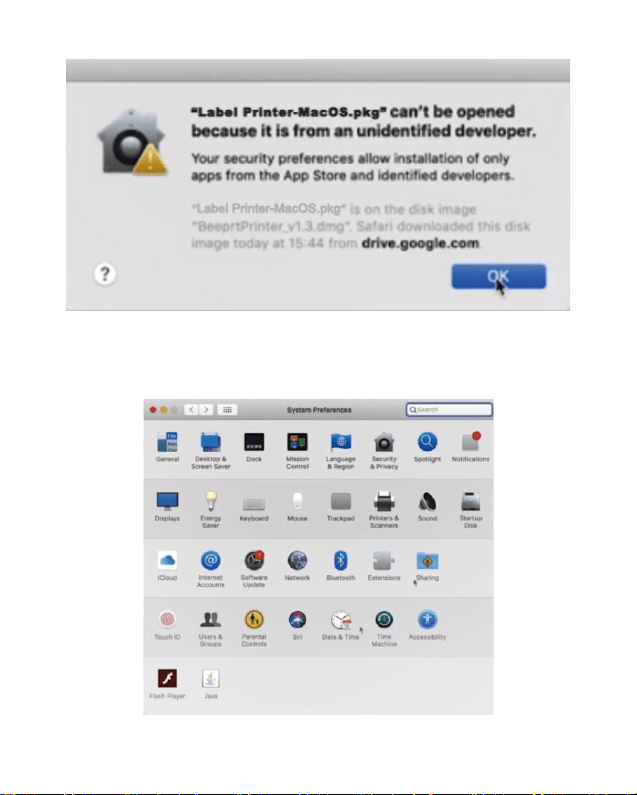
-7-
c. Open "System Preferences", and click on Security & Privacy'".
(lf you don't see the warning , you can skip this step)
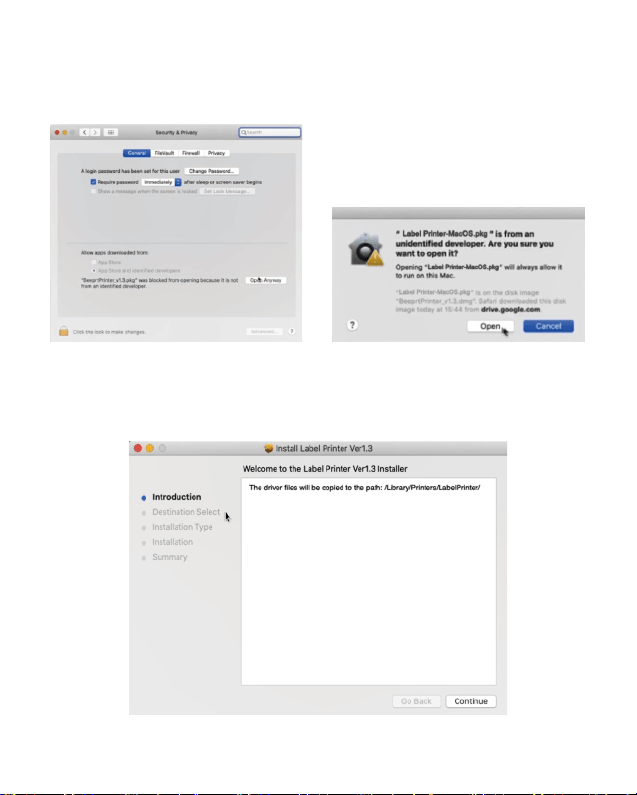
-8-
d. Click on "Open AnyWay"button. (lf you don't see the warning,
you can skip this step)
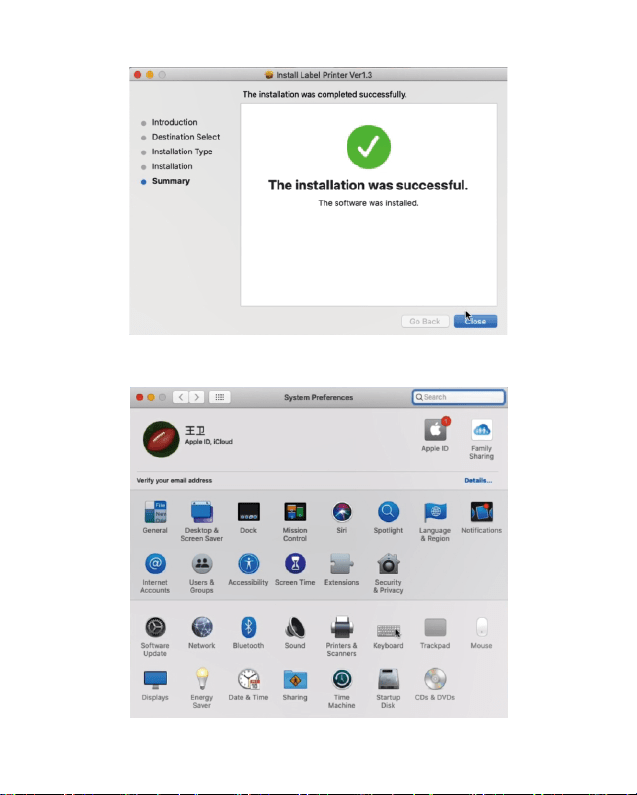
e. Click on open" and continue to install the printer. Follow the
installationsteps until you see " The installation was successful"
window.
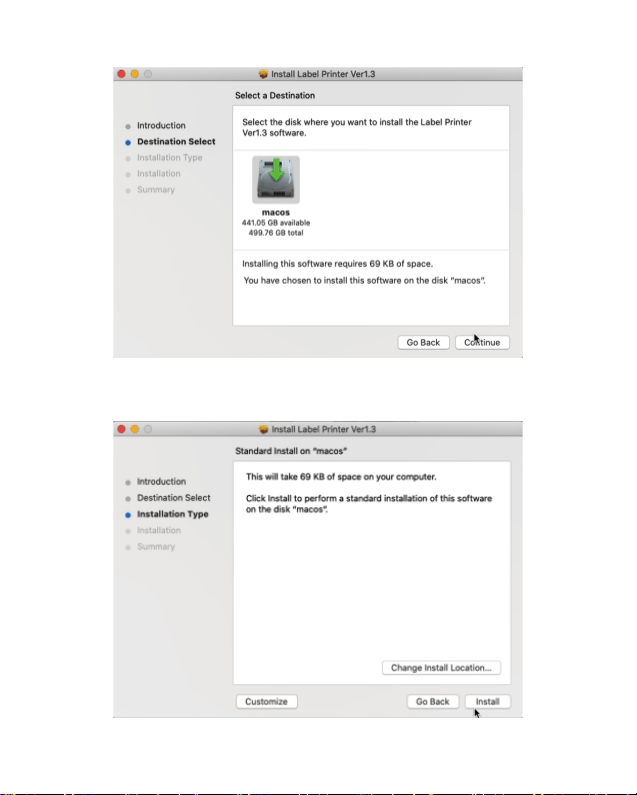
-9-
-10-
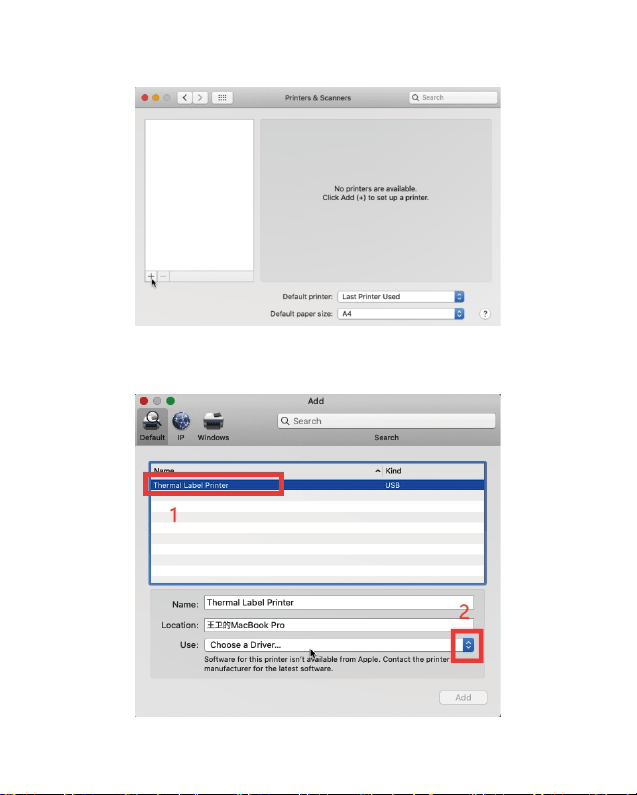
f. Open "System Preferences">>click on "Printer and Scanners".
-11-
g. Click "+" to add a new printer.
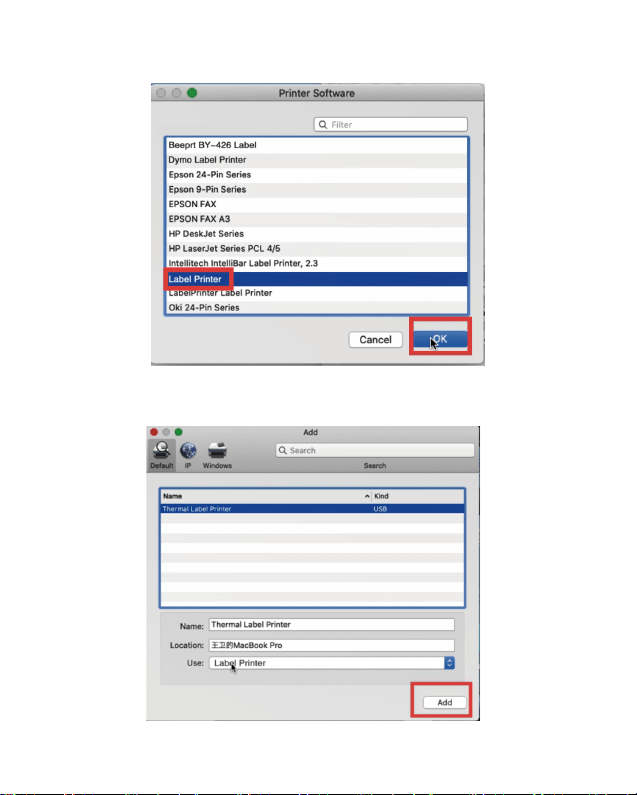
h. Click on Thermal Label Printer, and choose "Select Software"
in the drop down menu.
-12-
i. Choose"Label Printer",click"OK".
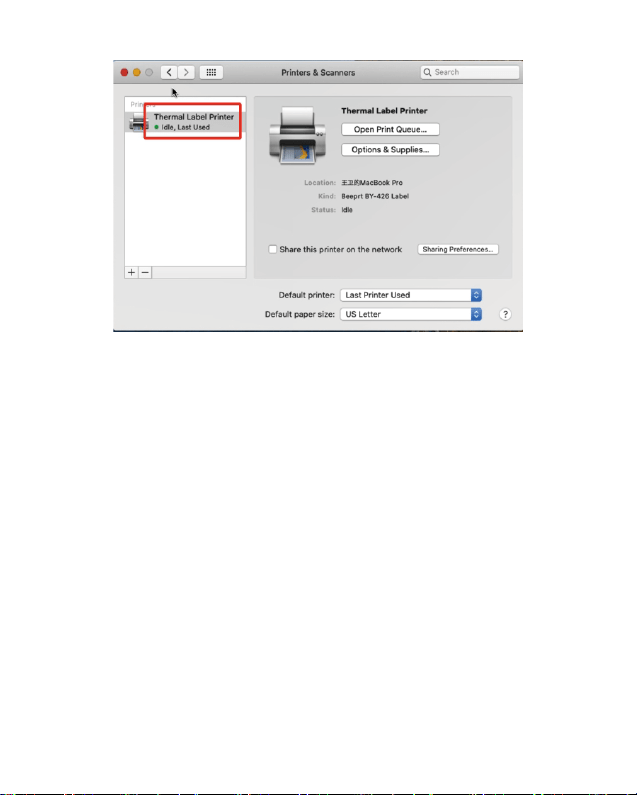
j. Click Add, now the printer has been installed in your Mac
book successfully.
4.Basic Functions
The status and fault of the printer can be determined by the
color of the button indicators and the buzzer, and the printer
can be operated simply by the buttons.
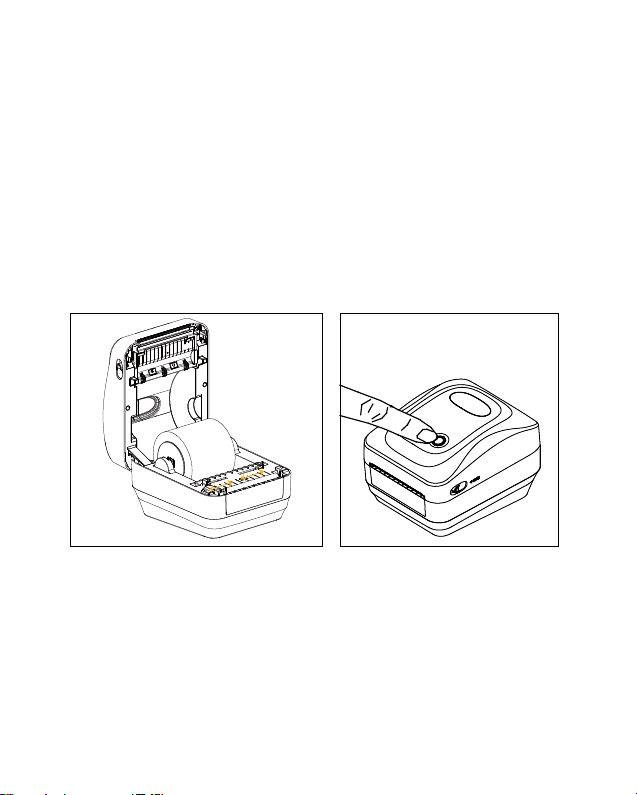
4.1 Paper advance function
Turn on the power of the printer, press the "Advance" button,
and the printer will send the paper to the specified location
according to the type of paper. When using thermal sensitive
paper, press the "Advance" button once to release a whole sheet
of paper.
-13-
Note:
1. Now you can print directly, if you want to adjust the printing
density,printing speed or other parameter, please refer to part
4 Basic Functions".
2. If you can't print seccessfully, please restart your computer
and try again.
4.2 Intelligent learning of paper
Turn off the power supply of the printer, open the upper cover,
load the labels and close the upper cover, turn on the power
supply of the printer, wait until the normal initialization of the
printer is completed(about 3-5 seconds), press the "Advance
button" and hold it until the "Dee" sound is heard, and the printer
can automatically carry out the intelligent learning of the paper.
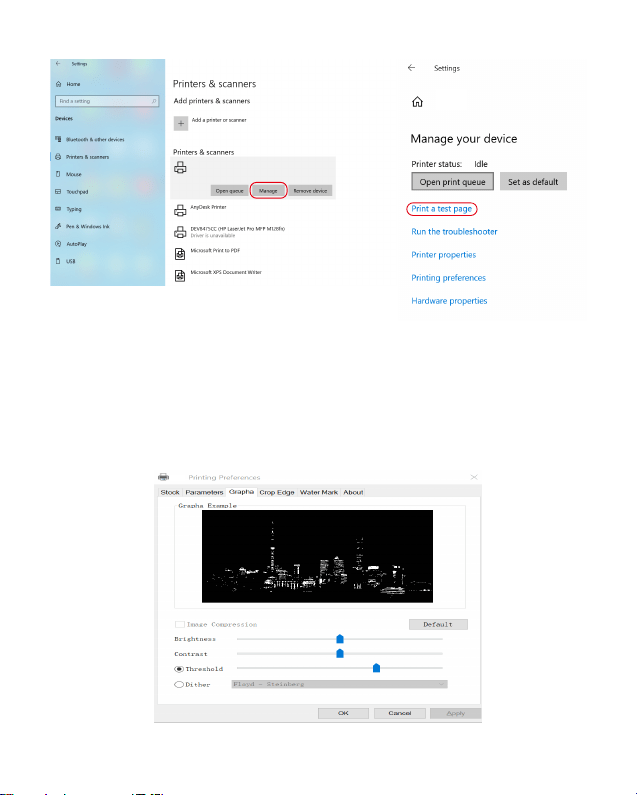
4.4 Print the device self-check page
When the printer is in standby state and the paper is loaded
correctly, press the "Advance" button to remove the paper and
hold it until "Dee, Dee Dee" is heard, and then the printer can
print the self-check page of the device.
“Setting”→select print→“Manage”→“Print a test page”
-14-
4.3 Paper loading
Put the roll label in or insert the fan-fold label from outside,
adjust the paper guide to fit the width of paper.
4.5 Adjust the print grayscale
Note: If your printer content is not clear, you can set the print
grayscale to "none".
-15-
Note:
Before printing a test page,
please check that your printer has
drivers and labels installed.
A81
AD240
AD240
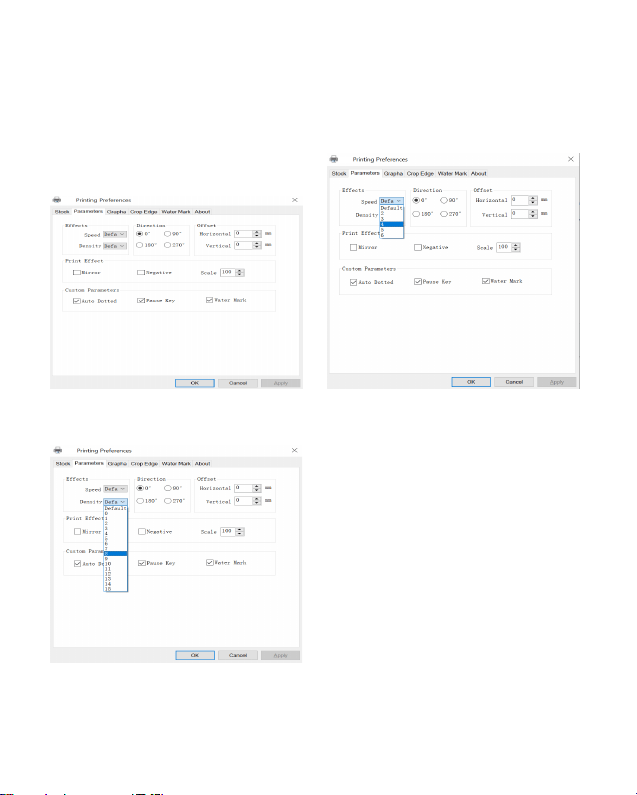
4.6 Adjust printer speed and print density
Note:
If you need to adjust the printing speed and printing density,
you can adjust it here.
-16-
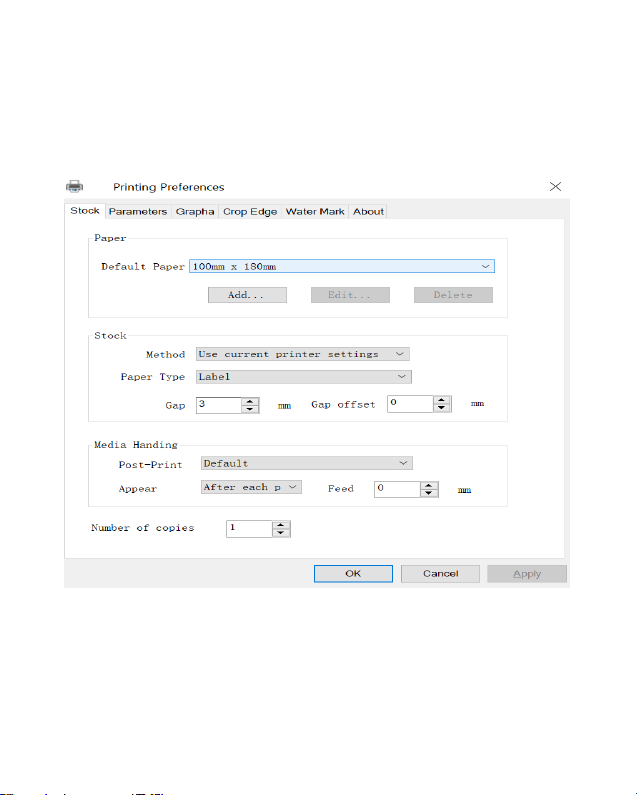
4.7 Adjust the paper size:
Note:
If you need to create a new paper size, you can do so here.
Page”→“Paper”→“Paper Manage”
-17-

5.Trouble shooting
-18-
Indicator light
Green
Flashing alternately
red and green
Red flashing slowly
(Once every 2 seconds)
Red flashing quickly
(Twice a second)
Top cover not closed
Check that top cover is
closed completely
Paper error Lack of paper
Status
The Printer is normal
Print head overheating
Wait for the printer to
cool down and continue
working automatically.
Note ①
Make sure there is no
paper adhesion or paper
jam. Note①②
Make sure the printer
loads the paper correctly.
Note①②
Perform automatic
intelligent label learning.
Trouble shooting
Note:
①These faults can be eliminated without shutting down the
printer. After trouble shooting, the printer can continue to work
automatically without causing the loss of printing content.
②Check the faults in sequence. If the previous fault can not be
removed, perform the next operation.
6.Bluetooth connection and usage
-19-
6.1 How to use it in Android phones:
Step 1: Turn on the printer power;
Step 2: Search the mobile phone on the Bluetooth interface,
then click the printer to connect, input the PIN code "0000" or
"1234" to complete the pairing;
Step 3: Open the corresponding APP and select the printer that
has been paired from the device list.
Note: It is suitable for devices with Bluetooth.
6.2 How to use it in iPhone:
Step 1: Turn on Bluetooth and printer power
Step 2: Open the corresponding APP and select the printer that
has been paired from the device list.
Remark:
1. It is suitable for devices with Bluetooth.
2. The Bluetooth of the mobile phone shall be turned on during
the above connection process.
3. IOS devices can use APP to connect without PIN-code pairing.
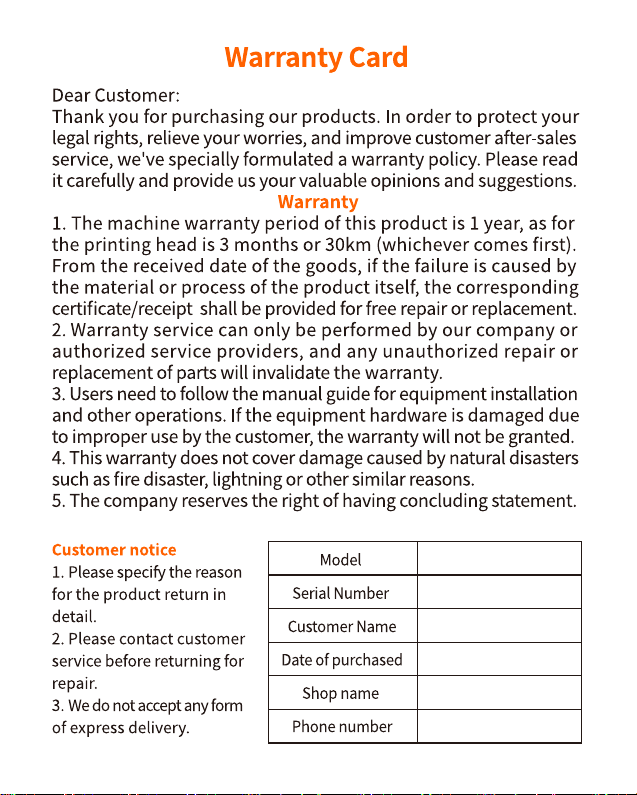
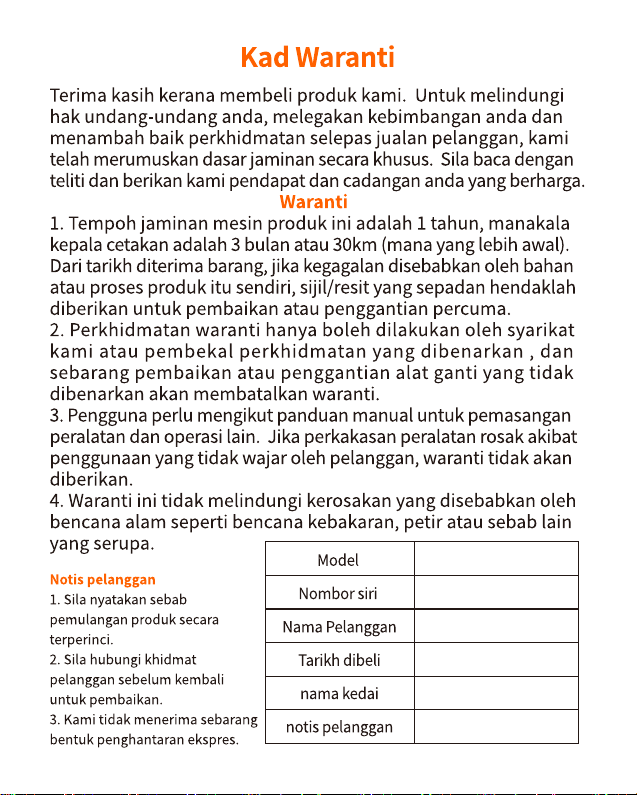
6.3 We recommend the APP:
“Label expert”. You can download it on Google Play Store and
APP Store. Or you can scan the QR code below to download the
APP.
iOS users scan this
code to download
Android users scan
this code to download

7.Clean the printer
-20-
Dust, foreign matter, sticky matter, or other contaminants sticking
to the print head or printer may degrade print quality. If it’s
contaminated, please clean the print head as follows.
Matters needing attention:
1) Turn off the power supply of the printer before cleaning.
2) The print head gets very hot when printing. Therefore, if you
want to clean the print head, turn off the printer power and wait
2 to 3 minutes before starting.
3) When cleaning the print head, do not touch the heating part
of the print head, so as not to damage the print head due to
static electricity.
4) Be careful not to scratch or damage the print head.
7.1 Cleaning the Printer
1) Please open the top cover and use a Clean Pen (or a cotton
swab dipped in diluted alcohol (alcohol or isopropyl alcohol) )
to clean the top cover from the middle of the print head to both
sides.
2) After cleaning the print head, do not use the printer
immediately. Wait until the clean alcohol used is completely
volatilized (1 to 2 minutes) and the print head is completely dry
before use.
7.2 Clean sensor, rubber roll and paper path
1) Please open the top cover of the printer and take out the
paper roll.
2) Use a dry cotton cloth or cotton swab to wipe away dust or
foreign matter.

-21-
3) Soak a cotton cloth or cotton swab in medical alcohol and use
it to wipe away sticky foreign matter or other contaminants.
4) Do not use the printer immediately after cleaning the parts.
Before using it, please wait for alcohol evaporating completely
(1 to 2 minutes) and the printer drying completely.
Note: Clean parts when print quality or paper test performance
deteriorates.

-22-
8.Technical Parameters
Method
Printing Speed
Supported Paper
Paper width
Paper Thickness
Power adapter
Printing life
Operating Environment
Storage Environment
Dimension
Thermal
150mm/s
Thermal Label Paper
25-
112mm
0.11-0.13mm
24V/2.0A
TPH 30km
Temperature: 5-40℃
Humidity: 20-90%
Temperature: -25-55℃
Humidity: 20-93%
225*177*168mm
Connection USB or USB+Bluetooth

Find out more product knowledge
and after-sales service
Xiamen AiYin Technology Co., Ltd.
Index: www.aiyin.com
Driver: help.aiyin.com
E-mail: [email protected]

