Rebel 2.0 #20226-5
Thank you for purchasing the Rebel 2.0. To see more Lucky Duck products please visit your local Sporting
Goods dealer or online at www.luckyduck.com.
Parts Include: 1ea - Rebel 2.0 Electronic Call, 1ea - LDX Rebel 2.0 Remote Control, 1ea – Decoy, 1ea - Antenna, and 1ea - 10AA Battery Cartridge
Battery Installation: The Rebel 2.0 includes a 10AA battery cartridge (batteries not included). The battery compartment is located on the back of the call.
Install 10AA batteries into the included cartridge, with the negative ends of batteries up against the large springs within the cartridge for proper
orientation. Simply insert the battery cartridge into the compartment, with the protrusions on the battery cartridge in the downward position. To
remove the battery cartridge from the electronic call, push the “EJECT” button under the battery compartment. The remote control uses 3AA
batteries (not included). Remove the battery cover on the back of the remote control and install the batteries, replace the battery cover on the
remote.
Note: The Rebel 2.0 is compatible with the “E-Caller Battery & Charger Kit 2.0”. Sold separately.
Antenna: The antenna will either be in the box or installed on the call. If the antenna is in the box, simply locate the antenna port on the back corner of
the caller and screw the antenna onto the caller.
Decoy: The decoy will either be in the box or stored on the side of the call. Insert the decoy into the hole on the top of the handle. Make sure to align the
keyed protrusion on the decoy base with the slot on the decoy joint located in the handle of the caller. A strong magnet holds the decoy in place.
The decoy can be stored on the left side of the call.
Tripod Insert: The bottom of the Rebel 2.0 has a 1/4-20 insert that can accommodate most aftermarket camera tripods or any other base system that
utilizes a 1/4-20 thread. This may be helpful if you want to further elevate the caller depending on the hunting terrain.
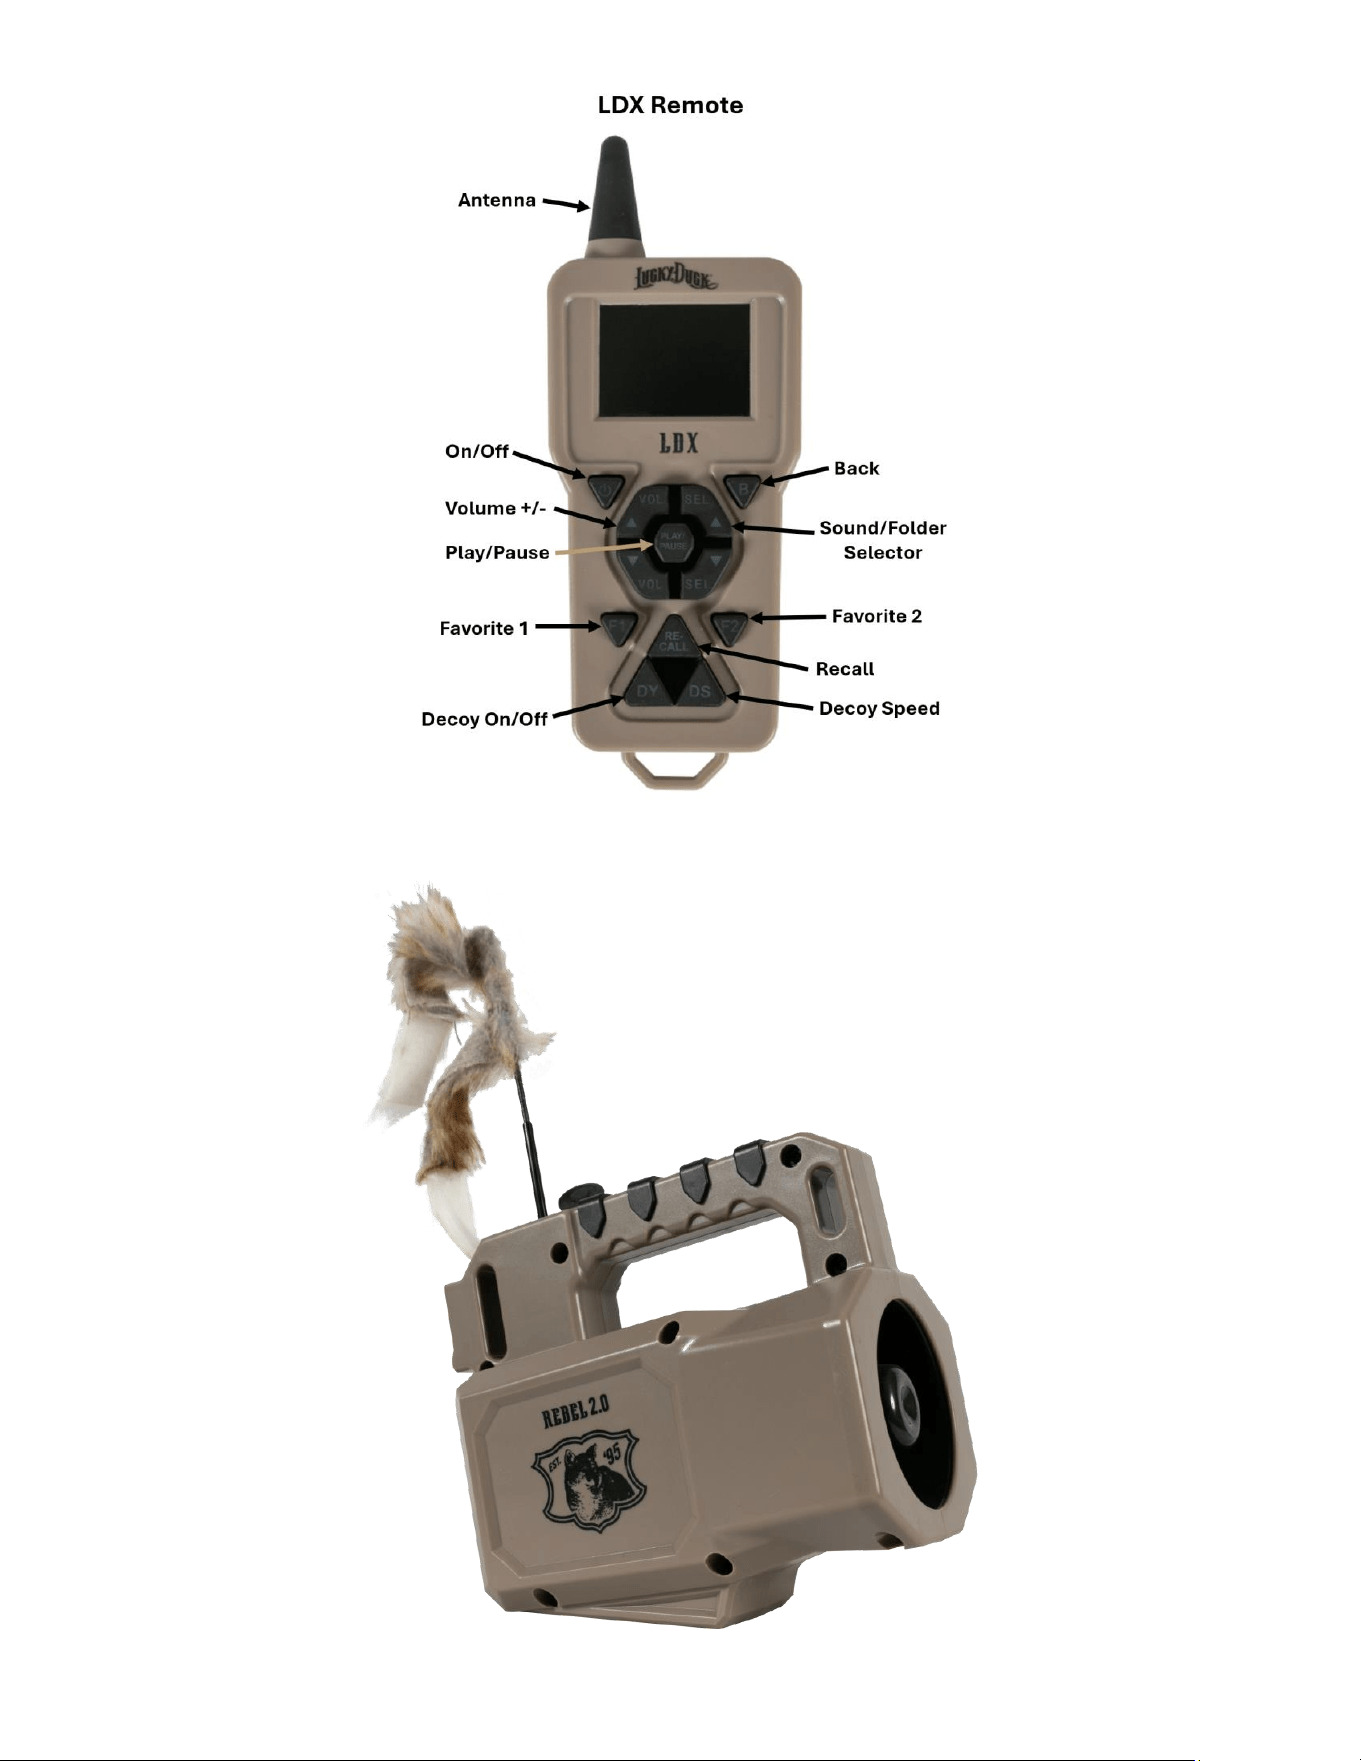
Electronic Call Operation: With the battery inserted into the caller, slide the power switch on the electronic caller to the “ON” position. A red LED light on
the back of the call will illuminate when the power is on. Hold down the power button on the remote control. The remote will turn on. The remote
screen will display “Finding Caller” while it searches for a connection with the caller. Once the remote connects to the caller, the remote screen
(showing sound folders) will be displayed. DO NOT PRESS ANY BUTTONS WHEN REMOTE IS SEARCHING FOR THE CALLER.
Remote Control Operation:
• Sound Selection – All sounds are stored within folders. Use the “SEL” up/down arrows to highlight the folder you want to select. Press the
play/pause button to select the folder. Use the “SEL” up/down arrows to highlight the sound you want to play. Press the play/pause button to
play the sound. Pressing and holding the “SEL” up/down arrows for 1 second will cycle through the folders/sounds faster.
• Volume Selection – Use the “VOL” up/down buttons to lower (down button) or increase (up button) the volume level. The volume level ranges
from 1 to 32. Pressing and holding the “VOL” up/down buttons for 1 second will raise or lower the volume level quickly.
• Back Button – The back button (“B”) is used to go from the sound list back to the folder list.
• Recall Button – The recall button will play the previous sound.
• Display Screen – The remote display screen includes information on the top line as well as the bottom line.
Top Line (Left to Right)
- Volume level from 1 – 32
- Stand timer which starts from zero when the remote is turned on
- Remote control battery level indicator
Bottom Line:
- Informational line showing what function is happening.
- Functions: Play/Pause/Stop – Brightness Level – Decoy On/Off/Speed
Remote Screen Mode and Brightness: The LDX with the Rebel 2.0 has the ability to adjust the display screen brightness with 10 levels. To adjust the
brightness level, hold the back (“B”) button down for 3 seconds. Followed by quickly using the “VOL” up/down buttons to adjust the brightness.
Remote Control Distance: The Rebel 2.0 utilizes the LDX remote, with an extended range and industry leading remote technology, which does not
require a line of site between the remote and the caller up to at least 100 yards.
Decoy Operation:
• “DY” Button – Press the “DY” button to turn the decoy on. The decoy will spin back and forth.
• “DS” Button – Press the “DS” button to control the speed of the decoy. There are 3 speed settings.
Favorite Buttons: The “F1” and “F2” buttons are designed to store your two favorite sounds for quick access when hunting. Press the F1 or F2 buttons
once to play the programmed sound at the predefined volume level.
Program F1 and F2: Simply highlight the sound you want to program as a favorite and adjust the volume to your preferred level. Hold down the
corresponding F1 or F2 button. The highlighted sound will flash on the display screen confirming the programming is complete. IF THE F1
BUTTON WILL NOT PROGRAM, TRY PROGRAMMING F2 FIRST AND THEN PROGRAM F1.
Sound Management: The Rebel 2.0 comes preloaded with 50 live animal sounds, organized within 20 folders for quick access. These sounds have been
professionally recorded by The Verminator, Rick Paillet. We firmly believe this is the best sound library on the market. The 50 preloaded sounds
have the extension .LD and will only play on Lucky Duck electronic calls. Any reproduction of these sounds is strictly prohibited. Check out
www.luckyduck.com for additional sounds available to purchase.
To Recharge the 12 Volt E-Caller Battery & Charger Kit 2.0 – Purchased Separately:
1. Remove the battery cartridge from the back of the caller.
2. Plug the charger into the charging port located near the bottom of the front face of the battery cartridge.
3. Plug the charger into a 110V wall outlet. The LED light on the charger will turn red when charging and green when fully charged. It should take
approximately 6 hours to fully recharge the battery cartridge.
Care and Maintenance:
• The Rebel 2.0 and corresponding LDX remote units are not waterproof. Take caution to keep rain and snow away from the caller and remote. If
the caller or remote becomes wet, make sure to dry it off/out.
• There is a small drain on batteries even when the power is off. It is recommended to remove the batteries from the remote and remove the battery
cartridge from the caller between hunts to extend battery life.
• The caller has a remote storage slot located on the back of the caller. Insert the remote clip into the storage adapter. It is not recommended to
transport the caller with the remote in the storage slot, as the remote may come unattached.
Troubleshooting:
1. If the caller or remote does not seem to be operating properly, turn the caller and remote off and remove the batteries from each unit. Reinstall
the batteries and turn the remote and caller back on as described in the operations section.
2. If the removal and reinsertion of fully charged batteries does not allow for proper operation, please contact Lucky Duck Customer Service by
email or phone at customerservice@luckyduck.com or 715-338-3183.
The Lucky Duck 2.0 Electric Callers (Super Revolt 2.0, Revolt 2.0, Roughneck 2.0, Riot 2.0, and Rebel 2.0) feature a 5-year warranty against all
manufacturing defects. Proof of purchase is required, and the warranty is valid for the original purchaser only. Customers should contact Lucky
Duck directly via phone or email to discuss the potential warranty issue, and to receive a return authorization number if applicable. Damaged
products must be returned directly to Lucky Duck at the customer's expense. Based on Lucky Duck's determination, if the warranty applies, Lucky
Duck will repair or replace the call and/or its components at no cost to the customer. Lucky Duck will then ship the repaired or replaced call back
to the customer at no cost to the customer. The warranty does NOT include: -Damage from abuse, misuse or neglect - Normal wear and tear -
Alterations or modifications to the call - Impact related damage from an accident or other event -Damage due to any act of nature - Used for any
purpose for which it was not intended Lucky Duck Customer Service: 715-338-3183 or customerservice@luckyduck.com .
To register your Lucky Duck
®
product, please enter your information in the section below.
https://www.luckyduck.com/warranty-repair/
Lucky Duck
®
1950 8
th
Ave
Baldwin, WI 54002
www.luckyduck.com

This equipment has been tested and found to comply with the limits for a Class
B digital device, pursuant to part 15 of the FCC Rules. These limits are
designed to provide reasonable protection against harmful interference in a
residential installation. This equipment generates, uses and can radiate radio
frequency energy and, if not installed and used in accordance with the
instructions, may cause harmful interference to radio communications.
However, there is no guarantee that interference will not occur in a particular
installation. If this equipment does cause harmful interference to radio or
television reception, which can be determined by turning the equipment off and
on, the user is encouraged to try to correct the interference by one or more of
the following measures:
• Reorient or relocate the receiving antenna.
• Increase the separation between the equipment and receiver.
• Connect the equipment into an outlet on a circuit different from that to which
the receiver is connected.
• Consult the dealer or an experienced radio/TV technician for help.
Caution: Any changes or modifications to this device not explicitly approved
by manufacturer could void your authority to operate this equipment.
This device complies with part 15 of the FCC Rules. Operation is subject to the
following two conditions: (1) This device may not cause harmful interference,
and (2) this device must accept any interference received, including
interference that may cause undesired operation.
The device has been evaluated to meet general RF exposure requirement.
FCC Warning Statement: