1 1
1:1
K
A
1
2
4
6
3
5
1
2
4
6
3
5
B
C
D
E
F
G
H
A
B
C
D
E
F
G
H
技术要求(版本号:B,2023-06)
2.该说明书的幅面大小为: A5 ,未注直线尺寸公差应符合GB/T1804-v;
4.说明书警语及认证标志应满足CE/UL标准,CE:警语部分大写字母高度不低于3mm,CE标志不低于5mm,WEEE标志不低于7mm;
UL:大写字母字高不小于1/12”(2.11mm),小写字母字高不小于1/16”(1.6mm),“IMPORTANT SAFEGUARDS”,“SAVE
THESE INSTRUCTIONS”等词,其字高不小于3/16”(4.8mm),IMPORTANT SAFEGUARDS 必须在最前面。
5.产品应符合QMG-J53.021《产品说明书技术条件》的有关要求。
6.有ROHS指令要求的物料应符合美的企业标准QML-J11.006《产品中限制使用有害物质的技术标准》。
1.文字图案印刷颜色为:封面+封底 4色+1专色,内页黑色 ,印刷字体需清晰可见,文字不能粘到一起;
广东美的生活电器制造有限公司
会 签
麦影涛
A0:修订电控内容- 麦影涛-20240507
陈学森
卢灿飞
古广君
古广君
2024-02-19
制 图
设 计
校 对
审 核
标准化
审 定
日 期
标记
处数 更改文件号 签 字 日 期
电饭煲
说明书
重点
校对项
1.物料编码
2.版面尺寸
3.材质标注
4.颜色标注
5.客户型号
6.产品名称
7.产品参数
8.电压功率
-----
-----
9.单位符号
10.认证标志
16.LOGO比例
17.LOGO留白
18.东芝字体
11.回型标志
15.目录及
页码
12.ROHS标志
13.警语警语
及字高
14.控制面板
及功能
3.该说明书的装订方式为: 钉装 ;[ 70P以下为钉装,70P以上为胶装(特殊要求除外)]
图号:RC-5MFM(RC-5DRUSG(W) -0501
编码:P0000012097367
材料: 105g铜版纸
认证图标
商标LOGO
单位表述
产地表述
字体要求
变更要求
0 0 0 0 0 0
0000000
UL只有C+US或无ETL有C或US或C+US大于5mm
说明书、保修卡类
交流电: 频率: 功率: 容量: 电流: 压强:V~
Myriad pro Myriad pro Italic Myriad pro Condensed
MADE IN CHINA
图标丝印
Made in China
宽度不得小于16mm,四周留白大于T,商标不可变形,色值要求专色panton 485C或黑色
Made in P.R.C
Hz
正文: Myriad pro semibold小粗体:
Myriad pro semibold大粗体: 倾斜体: 缩进体:
W mL/L A Pa/kPa/MPa 长度:mm/cm/m 时间:s/min/h 重量:kg
直流电:
核对图标及丝印是否与面板一致(东芝有图标规范)
大于5mm 大于5mm 大于5mm 大于7mm GS图标无高度要求,印刷可见即可
标准元素核对表(此表仅用于印刷品制作过程核对标准内容,非印刷内容)
PAP
22
图纸变更需要核实变更内容点以及涉及的物料和MO单,尤其关注92的在途MO单
USER
MANUAL
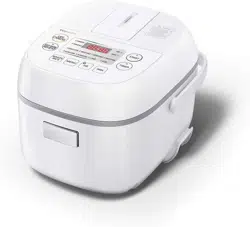
RICE COOKER
RC-5DRUSG(W)
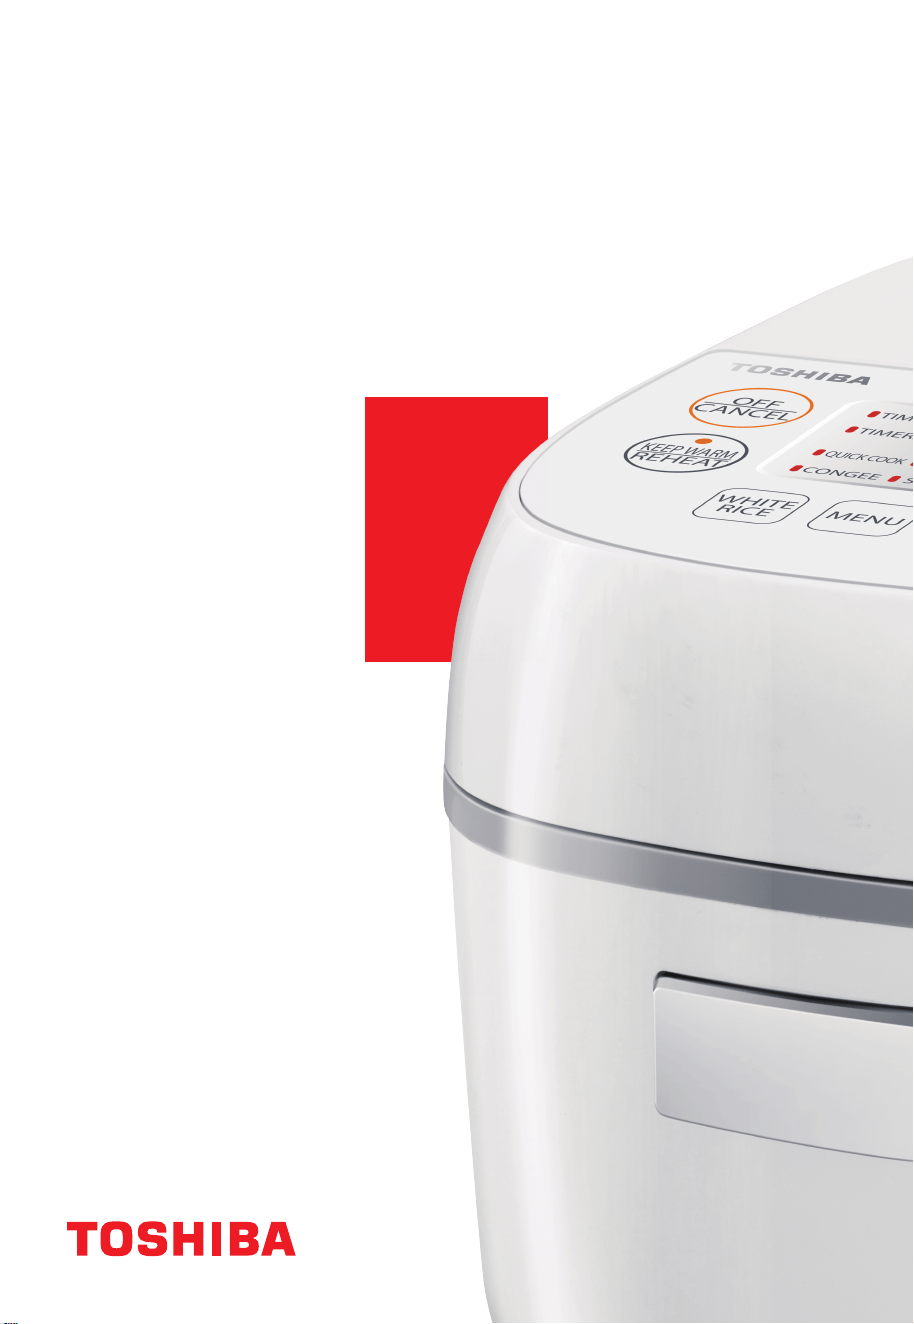
USER
MANUAL
RICE COOKER
RC-5DRUSG(W)

CONTENTS
01
0 2
1 0
1 4
24
2 1
SAFETY INSTRUCTIONS
SPECIFICATIONS
1 1
PRODUCT OVERVIEW
1 2
PRODUCT INSTALLATION
OPERATION INSTRUCTIONS
CLEANING AND MAINTENANCE
TROUBLESHOOTING
02
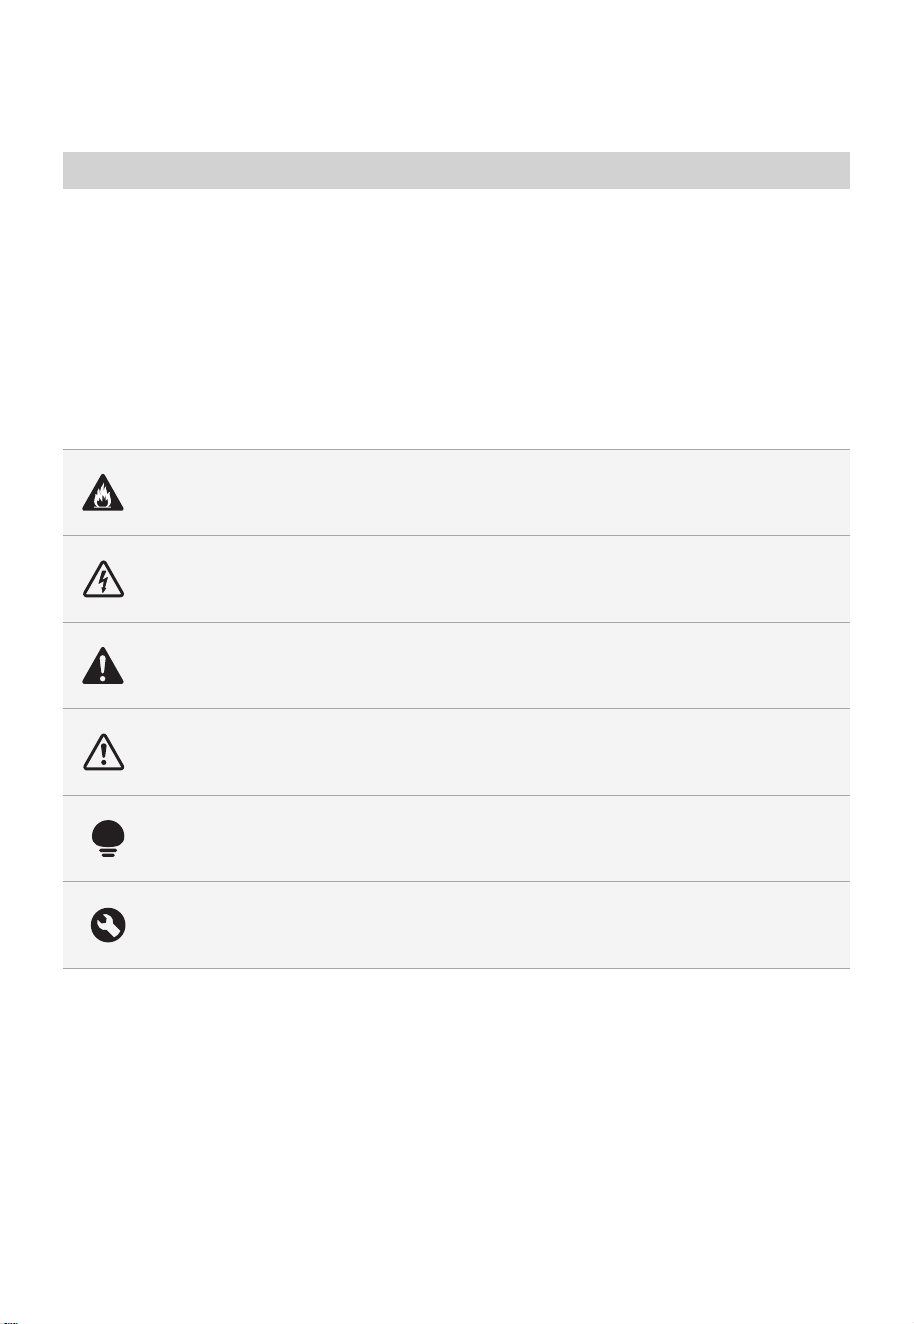
Danger
This symbol indicates that there are dangers to the life and health of
persons due to extremely flammable gas.
Warning of electrical voltage
This symbol indicates that there is a danger to life and health of
persons due to voltage.
Warning
The signal word indicates a hazard with a medium level of risk which, if
not avoided, may result in death or serious injury.
Caution
The signal word indicates a hazard with a low degree of risk which, if
not avoided, may result in minor or moderate injury.
Attention
The signal word indicates important information (e.g. damage to
property), but not danger.
Observe instructions
This symbol indicates that a service technician should only operate and
maintain this appliance in accordance with the operating instructions.
The following safety guidelines are intended to prevent unforeseen risks or damage from
unsafe or incorrect operation of the appliance. Please check the packaging and appliance
on arrival to make sure everything is intact to ensure safe operation. If you find any
damage, please contact the retailer or dealer. Please note modifications or alterations to
the appliance are not allowed for your safety concern. Unintended use may cause
hazards and loss of warranty claims.
Read these operating instructions carefully and attentively before using/commissioning the
unit and keep them in the immediate vicinity of the installation site or unit for later use!
Intended Use
Explanation of Symbols
SAFETY INSTRUCTIONS
CAUTION
03
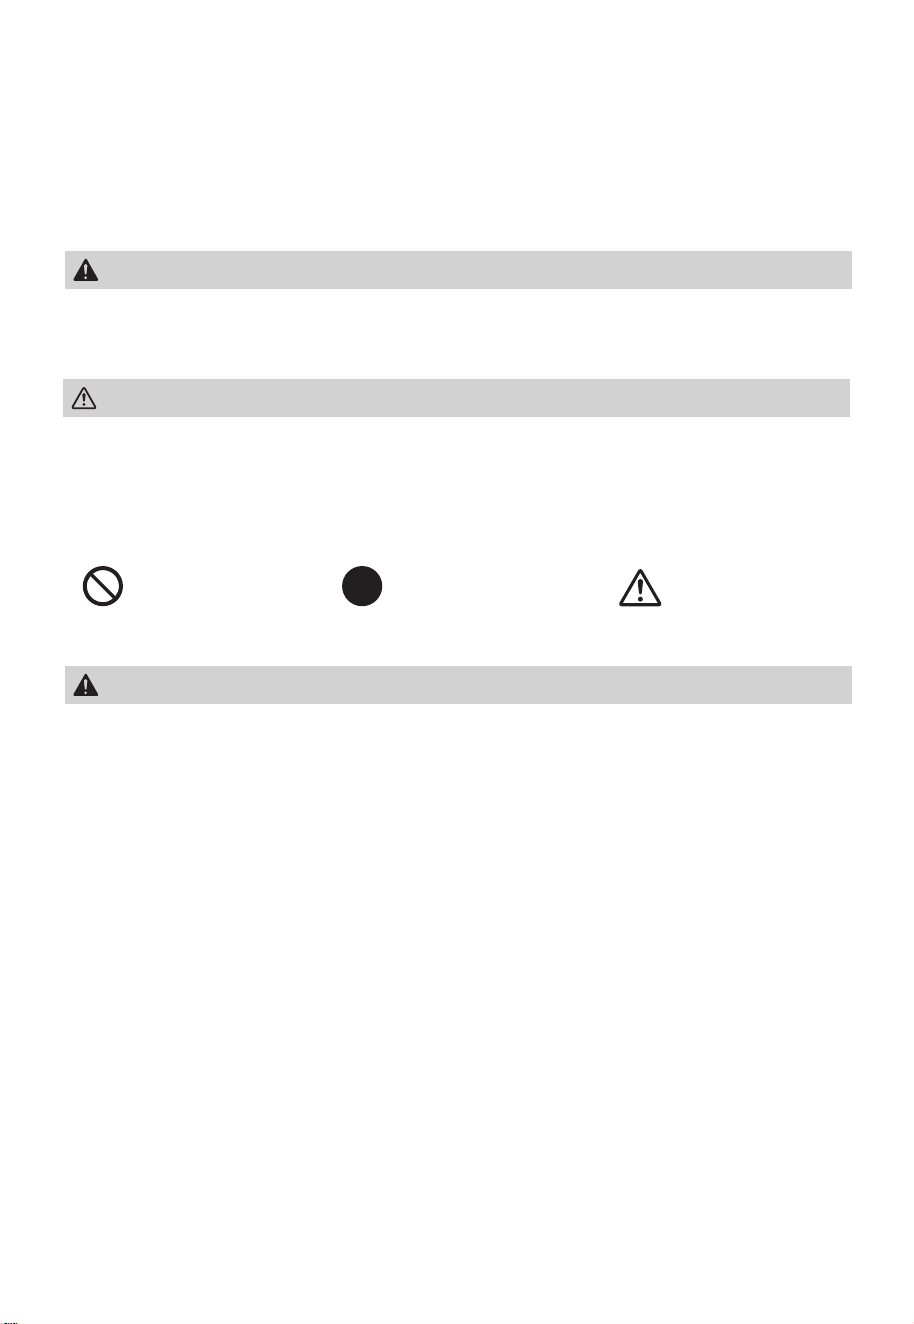
SAFETY CAUTIONS
WARNING
• This is to explain the extent of injuries and damages that may occur if
the instructions are not followed.
• The explanation are divided into sections according to instruction
details.
• Probable causes of “severe injuries”or “death”.
WARNING
• Warning: Misuse may cause potential injury.
• Do not immerse any part of the appliance in water or other liquid.
• Warning: Avoid spilling to the connector.
• Children should be supervised to ensure that they do not play with
the appliance.
• The heating element surface is subject to residual heat after use, do
not touch.
This appliance is not intended for use by persons (including children)
with reduced physicaI, sensory or mental capabilities, or lack of
experience and knowledge, unless they have been given supervision
or instruction concerning use of the appliance by a person
responsible for their safety.
This appliance is for household use only. Do not use outdoors.
• Probable causes of “bodily harm”or “property damages”.
“PROHIBITION”
cases
“OBSERVATION”
cases
“CAUTION”
cases
• Don’t place the appliance to the place close to heat-sensitive
curtains.
• This appliance is intended to be used in house-hold and similar
locations such as:
- Sta kitchen areas in shops, office and other working environments;
- farm houses;
- by clients in hotels, motels and other residential type environments;
- bed and breakfast type environments.
• If the supply cord is damaged, it must be replaced by a special cord
or assembly available from the manufacturer or its service agent.
• Please turn o and unplug the appliance before cleaning,
maintenance or relocation and whenever it is not in use.
To prevent fires, burns, electric shocks, electricity leakage, short
circuits

04
• Don’t place the appliance to the place close to heat-sensitive
curtains.
• This appliance is intended to be used in house-hold and similar
locations such as:
- Sta kitchen areas in shops, office and other working environments;
- farm houses;
- by clients in hotels, motels and other residential type environments;
- bed and breakfast type environments.
• If the supply cord is damaged, it must be replaced by a special cord
or assembly available from the manufacturer or its service agent.
• Please turn o and unplug the appliance before cleaning,
maintenance or relocation and whenever it is not in use.
• Do not disassemble, repair, or modify the cooker by yourself.
For any repair, please consult the Store from which the product was
bought or Toshiba service center.
• Do not insert any foreign object into the air vent or blank gaps at
bottom of the cooker. Especially metal articles e.g. pins, wire, etc.
• Do not immerse the cooker body and the power plug and cord in
water or pour water over them.
Do not place them in a place exposed to water.
• Do not allow anyone unfamiliar with this cooker handling to use it by
themselves. Do not use the cooker where children can reach,
particularly keep your eyes on children during cooking or right after
cooked.
• While cooking, do not open the inner lid or move/carry the rice
cooker to other places.
• Stop using immediately if abnormalities/malfunctions are found.
Unplug immediately and contact the Store from which the product
was bought or Toshiba service center for examination and repair.
- The power plug / cord is abnormally hot.
- The cooker has a burnt smell.
- The cooker is partly cracked, loosen, wobbling.
- The inner pot, outer lid, or inner lid is broken or deformed.
- The cooking heater becomes bent.
Misuse may cause potential injury

05
Use the power plug / cord correctly.
Use the power plug/cord correctly, (continued)
To prevent fires, burns, electric shocks, electric leakage, short circuit,
etc.
• Use a separate socket of 220-240V. Using the cooker with other
appliances will result in overheating leading to fire hazards. Do not
connect the product to the power source which is not specified in the
operation manual.
• If an extension cord is necessary, use it separately.
• Fully insert the plug into the socket.
• Periodically remove dust from the power plug. Accumulation of dust,
due to humidity, will cause insulation failure leading to fire hazards.
Use dry cloth to wipe dust away.
• Make sure there is no metallic articles or trash (e.g., pin, etc.) left at the
pointed end of cooker-plug.
• Do not allow children to flap the plug.
• Hold the power plug head when pulling it out from the outlet. If not, it
may catch fire, due to an electric shock, a short circuit, etc. Insert the
power plug into the power outlet as far as the base of the power plug.
• Always unplug when not in use. If not, due to insulation deterioration,
it may cause an electric shock, electricity leakage, fire hazards, etc.
• Do not use damaged cords/power plugs, etc., or those with loose
insertion.
• Do not let steam reach the power plug or other electrical appliances.
Especially be careful when using any kitchen storage shelf.
• Do not use any power cords other than the cooker attachments and
do not use the cooker attached cords for other appliances.
• Do not place the power plug or cord in the place with high
temperature, flooded water, and high humidity or touch it with
sharp-edge object.
Illustration in the instruction manual might be dierent from the
product you purchased.
• If power cord damaged, purchase specified replacement from the
producer.
• Handle the power cords with care. Do not pull, tuck, twist, bend them
with force in unnatural ways or turn on electricity while they are still
coiled. Do not place heavy objects on their tops. Do not modify or
deform them in any way.
• Do not insert or pull out the power plug or the cooker-plug with wet
hands. Make sure your hands are dry before touching the power plug.
• Do not touch the product, cord, or power plug with wet hands. Do
not operate the product if the cord or power plug is damaged, or the
power plug is inserted improperly.

06
Use the power plug/cord correctly, (continued)
• The steam vent is hot. Keep your face or hands away from it.
Be careful, especially with babies and infants.
• Make sure to install the steam vent.
• Do not use the cooker for any purposes other than those indicated in
the instruction manual.
Because it may cause food or steam contained inside spill or burst out,
resulting in burn wounds/injuries.
«Examples of inappropriate cooking ways »
• Putting materials that may block the steam vent, for example, cooking
sheets, aluminum foil, lye-removing sheets, food wraps, or thin-layer
ingredients such as greens, tomatoes, beans, etc.
• Cooking the food that’s easy to spill out e.g., jams, beans, etc.
• Putting ingredients in plastic bags and heating in the cooker.
• Do not use damaged cords/power plugs, etc., or those with loose
insertion.
• Do not let steam reach the power plug or other electrical appliances.
Especially be careful when using any kitchen storage shelf.
• Do not use any power cords other than the cooker attachments and
do not use the cooker attached cords for other appliances.
• Do not place the power plug or cord in the place with high
temperature, flooded water, and high humidity or touch it with
sharp-edge object.
• If power cord damaged, purchase specified replacement from the
producer.
• Handle the power cords with care. Do not pull, tuck, twist, bend them
with force in unnatural ways or turn on electricity while they are still
coiled. Do not place heavy objects on their tops. Do not modify or
deform them in any way.
• Do not insert or pull out the power plug or the cooker-plug with wet
hands. Make sure your hands are dry before touching the power plug.
• Do not touch the product, cord, or power plug with wet hands. Do
not operate the product if the cord or power plug is damaged, or the
power plug is inserted improperly.

07
• Congee is to be cooked with lots of water, so we don’t use “White
Rice” or “Quick Cook” menu.
Please cook rice porridge by “Congee” menu.
• Do not add water too much more than the indicated water level scale.
The standard is within 2 mm against the indicated water level scale.
CAUTION
To prevent electricity leakage, electric shocks, bodily harm, burn
wounds, fire hazards, and property damages.
To prevent boiling over or spilling out
• While using or after using, do not touch hot parts including the inner
lid, the cooking heater, the inner pot, the steam vent, the heat sink,
etc.
• When not in use, do not press the “START” key or
“KEEP WARM/REHEAT” key.
Because the cooking heater, the inner pot, the outer pot, the inner lid
will be at high temperature.
• While moving the cooker, do not touch the hook button.
• Do not shake the cooker while holding the handle.
• While cooking, do not set up the handles.
• Do not turn on the cooker, when the pot is empty.
Because it may cause overheating, breakdowns, and malfunctions.
• To maintain or repair, do it after unplugging and the cooker has
cooled down.
There may be hot water still gathering in the steam vent.
• After cooking, beware of steam or hot water dripping from the inner
lid, while opening it.
• Before take out the inner pot, press the “KEEP WARM/REHEAT” key.
Although the inner pot is taken out during cooking or warming, the
power will not be automatically cut o.
• Please use a dry dishcloth, mittens, etc. to take out the hot inner pot.
To prevent burn wounds / injuries.

08
• Do not use any other things instead of the inner pot which is
specifically designed for the cooker.
• Do not bring any flammable object, hazardous object, chemicals, or
flammable gas near or in the product.
• Read the instruction manual carefully and thoroughly before using
the product.
• Always inspect that the product is in a good operating condition
before using by following the recommendation in the instruction
manual.
• Remove all packing materials.
• A place where near the naked flame, wet area.or hot and high
humidity area.
Also beware for the accessories and attachments.
• An uneven/unstable place or on heat-sensitive carpets, mats, etc.
They may cause burn wounds, fire hazards.
• On materials that may block the air vent, for example paper, cloth,
carpet, etc.
• A place where the lid cannot be fully opened. It may cause burn
injuries and damages.
• The high electromagnetic area.
• A place close to walls, furniture, etc.
When putting the cooker on a kitchen storage shelf, be careful not to let
steam be confined.
To prevent electricity leakage, electric shocks, bodily harm, burn
wounds, fire hazards, and property damages.
Do not use the cooker in the following places
For safe use

09
• Do not use the cooker in the following places.
• They may cause malfunctions, deformation, discoloration, etc.
- A place which is exposed to direct sunlight
- A place where oil, etc., splashes
• Do not put any dishcloth on the lid, especially on the steam vent.
• Steam may be confined, resulting in malfunctions, deformation,
discoloration, etc. of the lid, the steam vent, and operation parts.
• Keep the cooker and surroundings clean and ready to use. Dust, bugs,
etc. entering inside of function-maintaining parts (such as the air vent,
etc.,) may cause malfunctions of the cooker.
• Wipe away water droplets or any foreign substances.
• If using while foreign substances are left, stuck to the cooking heater,
the temperature sensor, the outer part of inner pot, the packing of
inner lid, etc., rice will not be well cooked, resulting in malfunctions.
• Do not use the inner pot with a gas range, IH cooking appliances,
microwave ovens, etc. If may cause deformation, discoloration,
malfunctions, etc.
• Stop using if the cooker become loose, cracked, fell down.
• Please contact the store from which the product was bought or
Toshiba service center for examination and repair.
PLEASE OBSERVE AND FOLLOW
Do not use the cooker in the following ways to prevent coating
inside the inner pot from getting scratched and getting unstuck
• Do not put dishes in the inner pot and use it as a washing-up bowl.
• Do not use a scrubbing brush or dish washer to wash the inner pot.
• Do not use any cleanser, bleaching agent to wash the inner pot. (use
neutral detergent for kitchen use.)
• Rice seasoned and cooked with various ingredients cannot be kept
warm. (Please wash right after using seasonings.)
• Do not use vinegar.
• Do not scrub with a scoop or strike with a sieve.
• Do not use a metal ladle or a whisk.

10
SPECIFICATIONS
RC-5DRUSG(W)Model Name
Power Supply
Power Consumption (Cooking)
Frequency
220-240V~
379-451W
50/60Hz
Capacity
0.54L
PRODUCT OVERVIEW
Product Features
Accessories
11
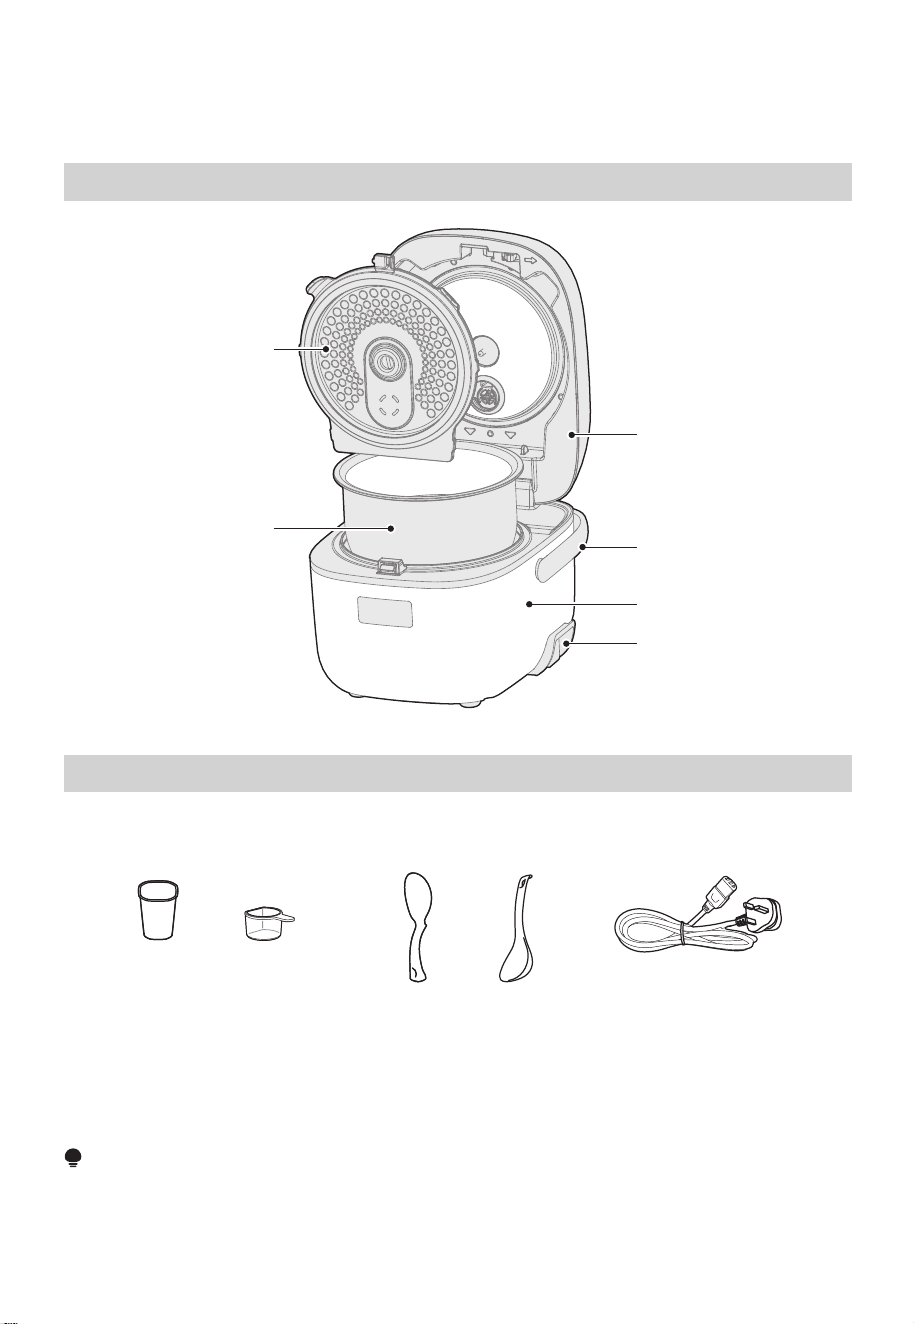
Upper Housing
Detachable
inner lid
Inner Pot
NOTE
All the pictures in this manual are for explanation purpose only. Any discrepancy between the real object
and the illustration in the drawing shall be subject to the real subject.
Remove parts from the component before performing installation.
Handle
Outer body
Power
(About 180mL) (About 90mL)
Standable
rice spoon
Measuring cup
Small
Suspensible
spoon
Power cord

12
NOTE
PRODUCT INSTALLATION
Unpacking
Remove all packing materials.
Wash the cooking pot, inner lid, steam port and other accessories, and then dry thoroughly before using.
Location Requirements
This rice cooker is designed for household use only; the cooker should not be used for
commercial use.
Use indoors on a stable, level, non-heat sensitive surface such as a countertop in a location
where the lid can be fully opened; do NOT use outdoors.
Do not place the rice cooker on an area of the countertop that is exposed to direct sunlight,
or where it might be splashed with cooking oil.
AC 220-240 V, grounded electrical supply is required. It is recommended that a separate circuit serving only
the rice cooker is used. Sharing the power supply with other appliances will result in overheating.
This Rice Cooker has a 3-prong grounded plug. To reduce the risk of electrical shock, the plug will fit into an
outlet only one way. If the plug does not fit in the outlet, contact a qualified electrician. Do not modify the
plug.
A short power supply cord is used to reduce the risks of becoming entangled in, or tripping over a longer
cord, or of the cord being grabbed by children.
If the power supply cord is too short, have a qualified electrician or technician install an outlet near the
appliance. Do NOT use an extension cord.
Electrical Requirements
Electrical Shock Hazard
• Plug into a grounded 3 prong outlet.
• Do not remove the ground prong.
• Do not use an adapter.
• Do not use an extension cord.
Failure to do so can result in death, fire or electrical shock.
Power Supply Cord
WARNING
13
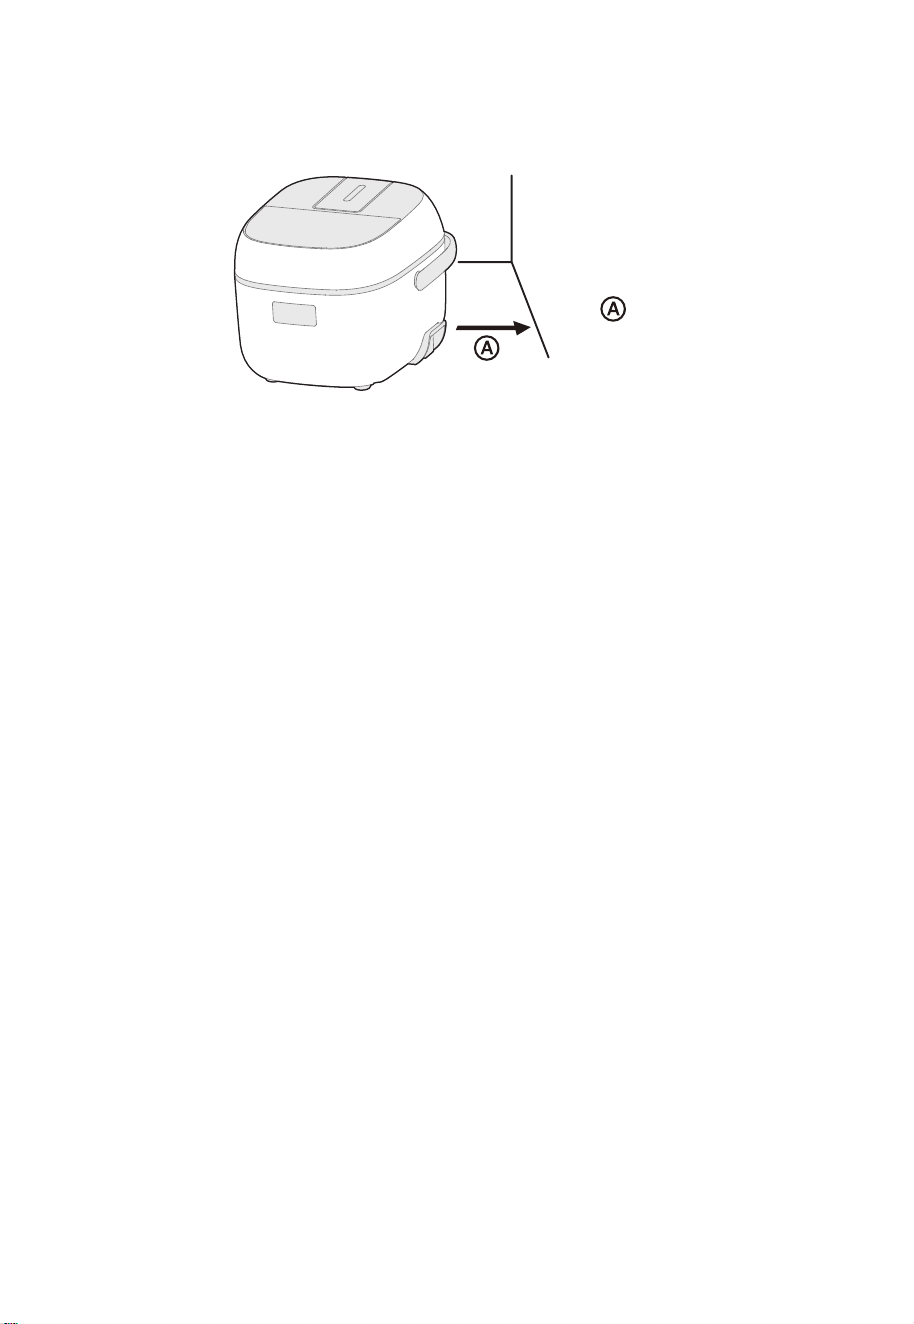
Steam and heat emitted from the rice cooker may damage or discolor nearby walls or cabinets. It is
recommended that the rice cooker be placed a minimum distance of 12" (30.5 cm) from walls or cabinets.
Power Supply Cord
At least12" (30.5 cm)
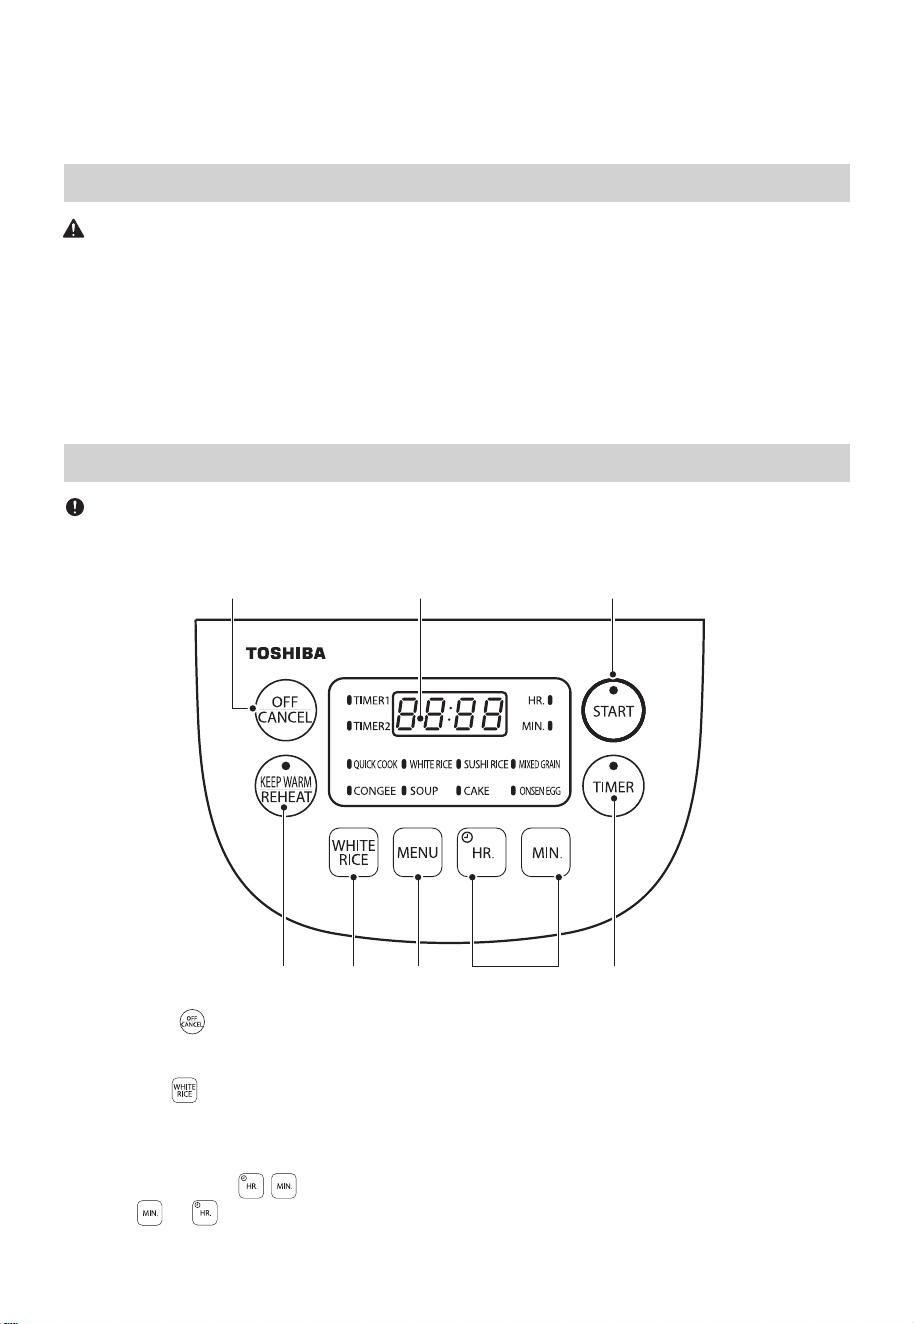
4 HR.and MIN.buttons
Press the or button to set the current time/delay time/the cooking time of Congee and Soup.
OPERATION INSTRUCTIONS
Operation Panel
Controls
14
Fire/Burn Hazard
Unplug immediately and do not use rice cooker if:
• The power supply cord becomes abnormally hot during use.
• Smoke is emitted from the rice cooker or a burning odor is detected.
• The rice cooker is cracked or there are loose or rattling parts.
• The cooking pot, outer lid or inner lid is broken or deformed.
Failure to do so may result in fire, electric shock or injury.
1 OFF/CANCEL
Press the OFF/CANCEL button to stop cooking and return to ON (standby mode).
To select a cooking program, the rice cooker must first be plugged into a grounded 3 prong electrical outlet
(ON).
WARNING
IMPORTANT
2 WHITE RICE
Press the WHITE RICE button to set the program to cook white rice.
3 Cooking Programs and Time Display
1
2
3
4
5
6 7 8
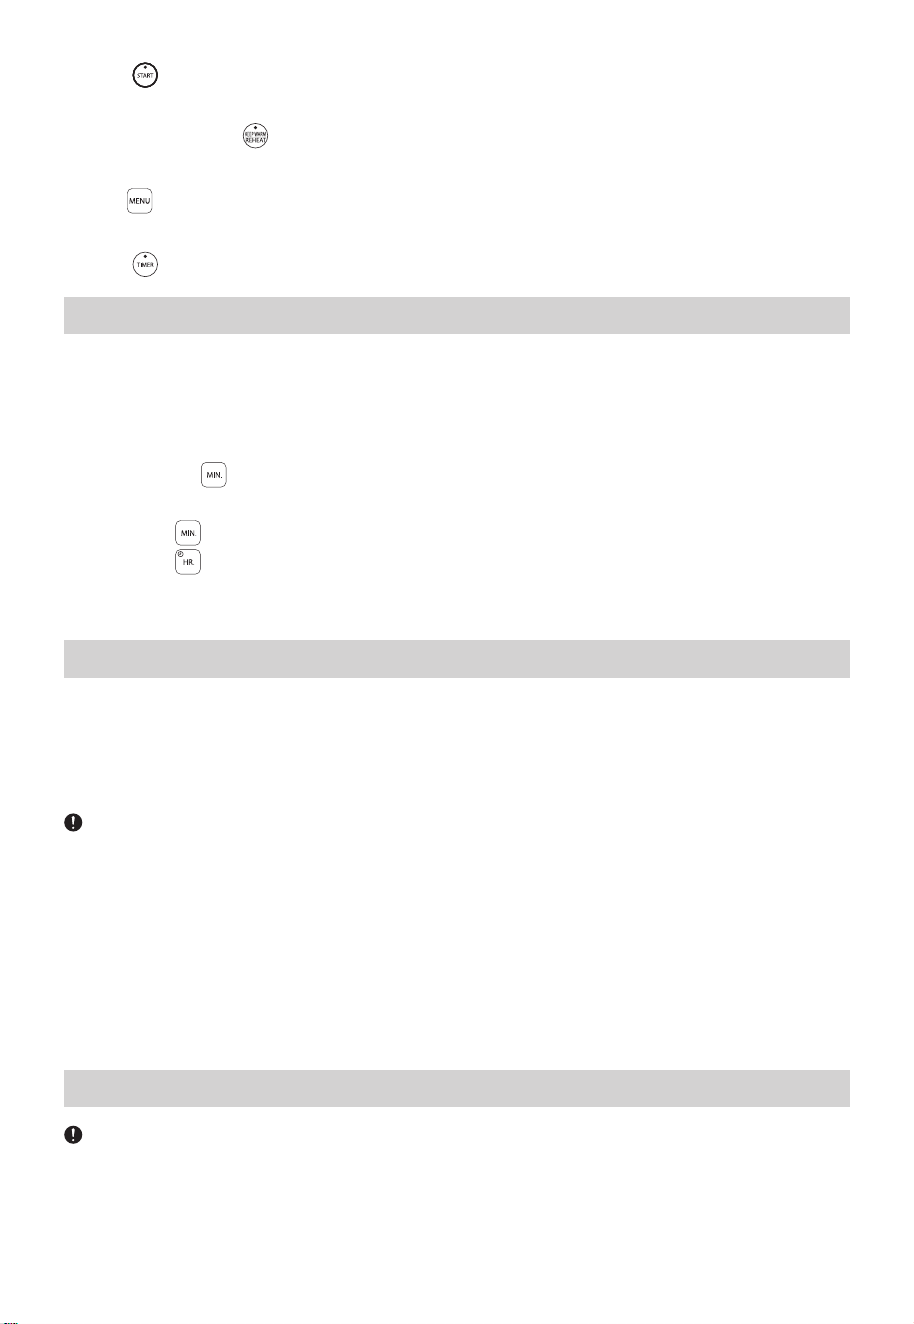
The rice cooker uses a 24-hour clock (0:00 [midnight] to 23: 59 [11:59pm]). The clock cannot
be set while the rice cooker is being used for: cooking, keeping warm or reheating, or after the
delay timer has been set.
1. Plug the power supply cord into a grounded 3-prong electrical outlet to turn on the rice cooker.
2. Long press the " " button for 2 seconds, then the digital screen will flicker to display the current
timer. At this time, it enters the timer adjustment state.
3. Short press " " to increase 1 minute per time, and long press for more than 1S to quickly increase.
4. Short press " " to decrease 1 hour per time, and long press for more than 1S to quickly decrease.
5. When the correct time-of-day appears on the display, quickly press START to set the time.
15
• Do NOT place anything on or over the rice cooker lid, during use.
• Do NOT touch the steam vent during cooking.
• Do NOT place the interior cooking pot on a cooktop burner; the high temperature will warp the pot. The
cooking pot is designed to be used only in the rice cooker.
• Do not use a pot or container other than the cooking pot (provided) in the rice cooker.
• Do not insert any foreign objects into the air vent or gaps at the bottom of the rice cooker.
• Do not season rice while it is being kept warm in the cooking pot. Seasonings left in contact with the
interior of the cooking pot may damage the non-stick coating.
• Do not use metal cooking utensils. Metal utensils may scratch or damage the non-stick coating.
IMPORTANT
5 START
Press START to begin cooking. The control panel will illuminate with the set program.
6 KEEP WARM/REHEAT
Press the KEEP WARM/REHEAT button to keep warm or reheat the cooked rice.
7 MENU
Press the MENU button to select from the preset cooking programs listed on the display.
8 TIMER
Set Current Time
Using the Rice Cooker
IMPORTANT
Measuring Rice
INTRODUCTION
The Toshiba® 5 Rice and Grain Cooker benefits from the use of Fuzzy Logic, a technology that senses
moisture levels to accurately cook food. Cooking time and temperature are defined by the appliance. Our
highly intelligent Rice and Grain Multicooker automatically adjusts the heat and timing for perfect results
every time.
The total amount of rice and water should NOT exceed the 3 cup MAX level marked inside the cooking pot.
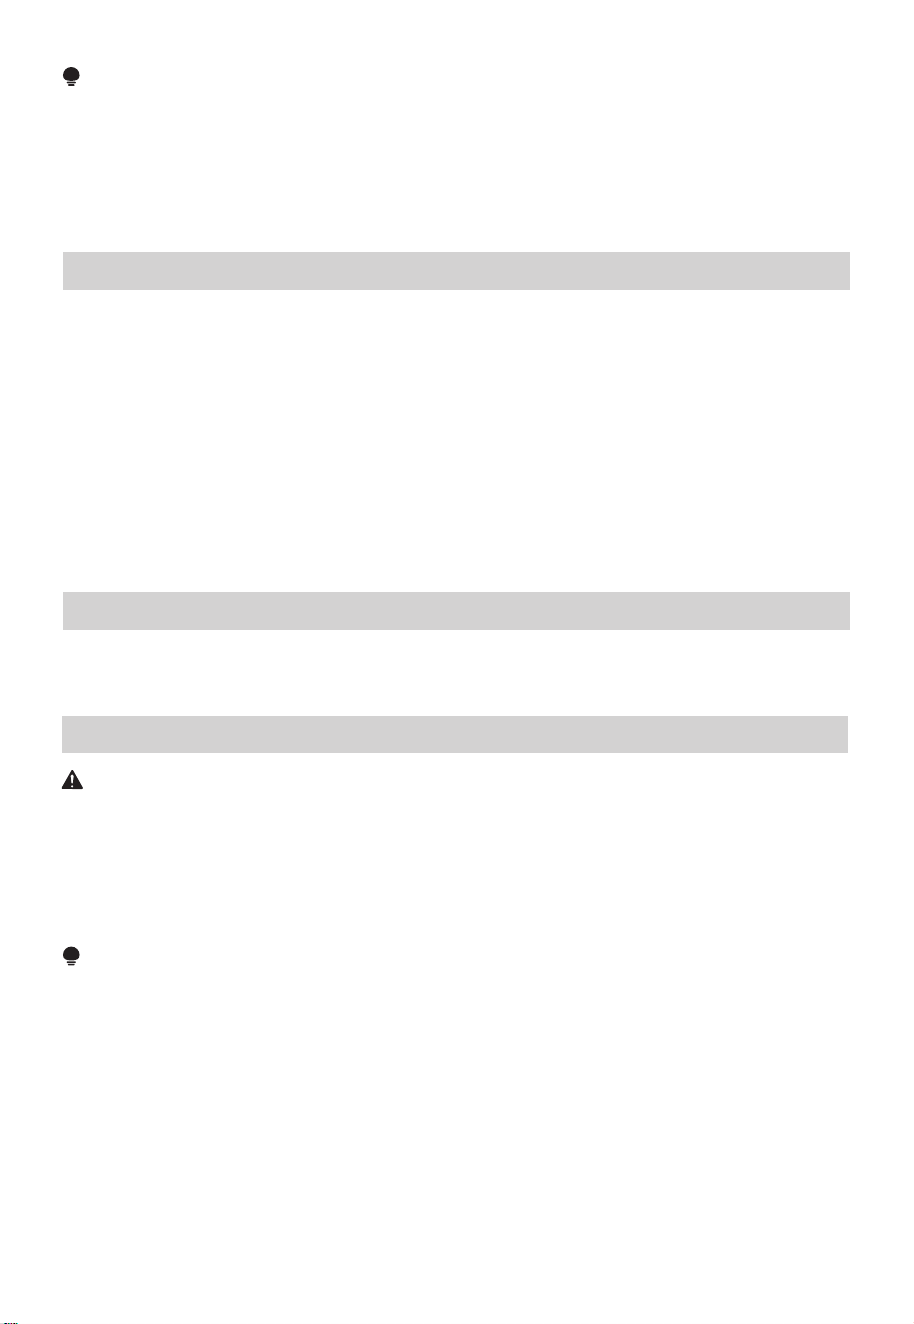
16
NOTE
The Rice Measure is significantly smaller than the standard U.S. cup measure.
To Rinse Rice Quickly:
1. Place a colander inside a larger bowl
2. Place the rice in the colander and rinse under cool running water.
Rinsing rice in hot water may prevent the rice from cooking properly.
3. Using your hand stir the rice around 3 to 4 times to separate the grains.
4. Continue to rinse until the water in the bowl is clear.
Some types of rice are rinse-free and other types require rinsing before use to remove excess starch
which may make the rice sticky. Also, cooking rice with starchy water may result in the rice burning or
being improperly cooked.
If the water should turn white or cloudy, when added to rinse-free rice, drain and replace the water
before cooking. Many recipes recommend rinsing quickly so the rice does not absorb water prior to
cooking.
RINSING RICE
If you wish to add other ingredients or seasonings to the rice, do so after adding the water.
The rice will not cook properly and be too firm if ingredients are added before the water.
ADDING OTHER INGREDIENTS
• To achieve the correct ratio of rice to water, use ONLY the Rice Measure (cup provided).
• Level the rice in the Rice Measure cup so that it is even with the top.
• For softer or firmer rice adjust the ratio of water to rice accordingly.
• If the rice requires rinsing before cooking, measure the rice before you rinse it, Follow the rinsing
directions for that specific type of rice.
NOTE
Cooking time will vary depending on the type of rice or grain being cooked.
1. Before using for the first time, wash the cooking pot, inner lid, steam port, other accessories and
attachments, and then dry each thoroughly.
2. Measure rice, and then rinse rice, if needed.
3. Add measured rice to the cooking pot.
4. Add water until it reaches the corresponding numbered Water Line marked on the interior of the cooking
pot. For example, when cooking 3 measures of white rice, add water to third line from the bottom of the
pot.
COOKING RICE
Electrical Shock Hazard
• Plug into a grounded 3 prong outlet.
• Do not remove the ground prong.
• Do not use an adapter.
• Do not use an extension cord.
Failure to do so can result in death, fire or electrical shock.
WARNING
17
To suit your personal preference, the amount of liquid can be adjusted slightly (no more
than
1
/
3
of the distance between the lines).
NOTE
The rice cooker is powered ON, but in standby mode (no heat).
5. Stir the rice into the water, so that each grain is immersed in the water.
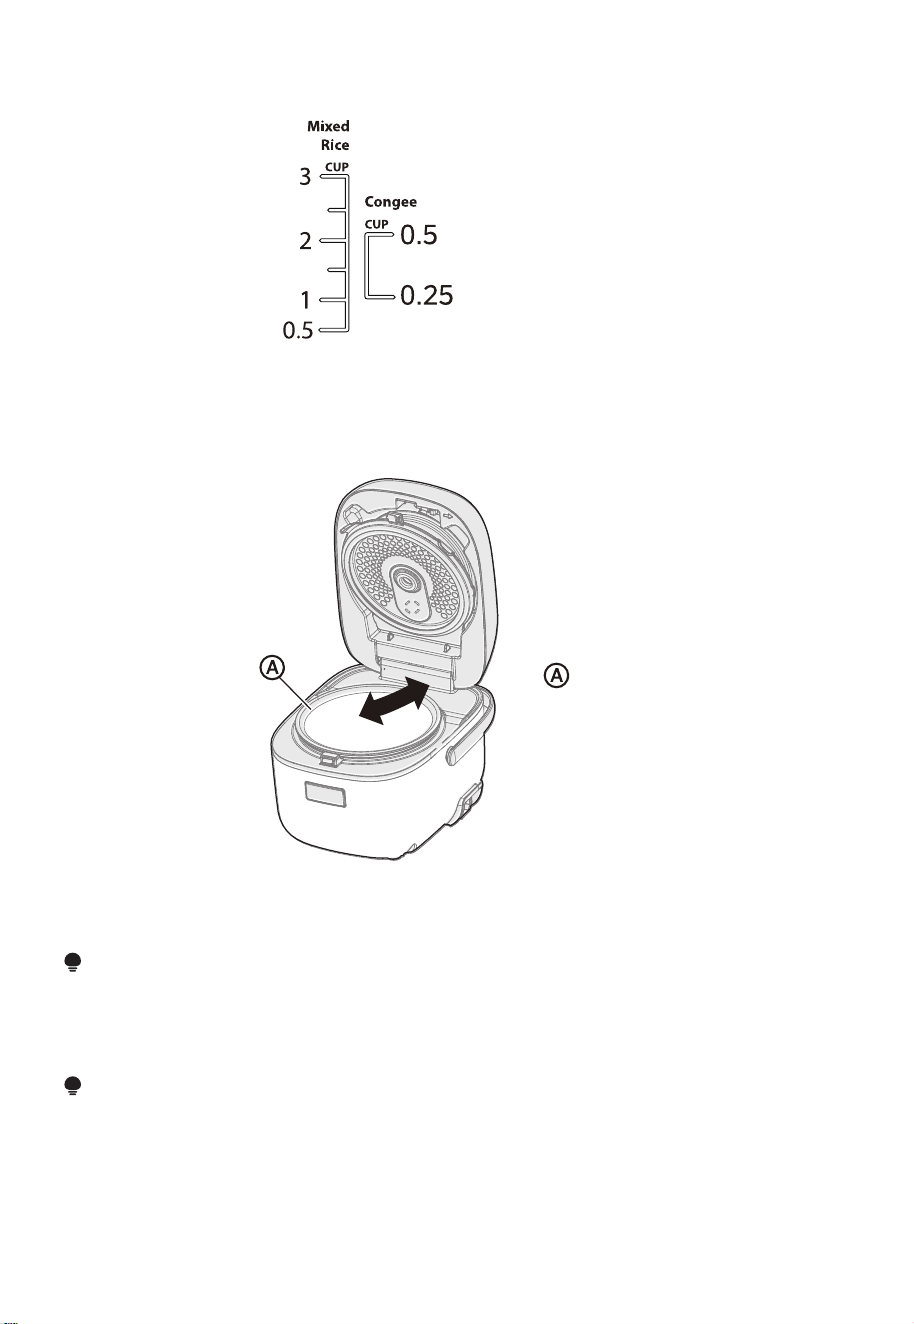
6. Place the cooking pot into the rice cooker.
7. Rotate the pot two to three times to ensure a solid contact between the bottom of the cooking pot and
the heating plate.
8. Close the lid, and then press downward until it clicks into place.
9. Plug the power supply cord into a grounded 3 prong electrical outlet.
NOTE
During first use, there may be a plastic odor which will dissipate after using.
10. Select desired cooking program. See "Controls"for explanation of options.
11. Press START.
13. When cooking is completed, 5 beeps will sound. The START light will turn off and the
KEEP WARM/REHEAT light will illuminate.
Cooking Pot
18
START button
Plug in power supply, LED displays current time, multi-cooker is on Standby mode. Under the standby
state, select the desired function and press "START" to start the program. If there is not any operation for
more than two minutes, it will return to the standby state automatically.
OFF/CANCEL button
1. Press "OFF/CANCEL" button to return to the standby state.
2. Under the working state, press "OFF/CANCEL" button to exit the working state and return to the
standby state.
MENU
Under the "standby" state, press the "MENU" button to select various functions.
Every time we press the "MENU" key," " mark will move and the selection will consequently change. The
functions cycle as follow:
QUICK COOK/WHITE RICE/SUSHI RICE/MIXED GRAIN/CONGEE/SOUP/CAKE/ONSEN EGG
WHITE RICE
Under the "standby" state, press "WHITE RICE" button, The " " mark in the display area corresponding
to "WHITE RICE" will be displayed.
and button.
Press the or button to adjust the cooking time of slow cook and porridge.
Select the reserving set state, press the or button to set the time of stopping reserving.
Press the button to decrease the timer by 10 minutes, long press to quickly decrease by 10
minutes, Press the button to increase the timer by 10 minutes, and long press to quickly
increase by 10 minutes.
KEEP WARM/REHEAT
When desiring to keep rice warm after cutting power, press "KEEP WARM/REHEAT" button,
"KEEP WARM/REHEAT" light on.lt will start to keep the rice warm.When desiring to reheat rice during
the"KEEP WARM/REHEAT" functionjoosen it ,close the lid and press the"KEEP WARM/REHEAT" button,
Reheating will start.
MIXED GRAIN
1. Under the standby mode, press the "MENU"button, select "MIXED GRAIN" function, "START" light flashs.
2. Press the "START' button to start the "MIXED GRAIN" program, "START" and "MIXED GRAIN" stay on, and
digital screen display countdown timer.
3. The MIXED GRAIN function automatically enters the stew stage after cooking automatically "MIXED
GRAIN" lights enters the temperature preservation function when program completes.
The MIXED GRAIN function Recommended cooking range 0.5-3 cups of rice.
NOTE: Mixed grains need to be soaked in hot water for 2~3 hours before cooking.
TIMER
After selecting the function need to pre-set the cooking time, press "TIMER" button, "TIMER1" light on,
and the corresponding function light flashs on, press the "TIMER" button again, "TIMER1" light o and
"TIMER2" light on.set the time and press "START" button.
The preset time is the cooking completion time.
Application of Function Buttons

19
QUICK COOK
1. Under the standby mode, press the "MENU" button, select "QUICK COOK" function/"START" light flashs.
2. Press the "START" button to start the "QUICK COOK" program, "START' and "QUICK COOK"lights stay on,
and digital screen display countdown timer.
3. The "QUICK COOK" function automatically enters the stew stage after cooking automatically enters the
temperature preservation function when program completes.
BROWN RICE
1. Under the standby mode, press the "MENU" button, select "BROWN RICE" function/"START" light flashs.
2. Press the "START' button to start the "BROWN RICE" program, "START' and "BROWN RICE"lights stay on,
and digital screen display countdown timer.
3. The BROWN RICE function automatically enters the stew stage after cooking automatically enters the
temperature preservation function when program completes.
The BROWN RICE function Recommended cooking range 0.5-3 cups of rice.
WHITE RICE
1. Under the standby mode, press the "MENU" button , select "WHITE RICE"function,"START" light flashs.
2. Press the "START' button to start the "WHITE RICE" program, "START' and "WHITE RICE" lights stay on,
and digital screen display countdown timer.
3. The WHITE RICE function automatically enters the stew stage after cooking automatically enters the
temperature preservation function when program completes.
CAKE
1. Under the standby mode, press the "MENU" button, select "CAKE" function, "START" light flashs.
2. Press the "START" button to start the "CAKE" function, "START' and "CAKE" lights stay on, and digital
screen display countdown timer.
3. The "CAKE" function automatically enters the temperature preservation.
ONSEN EGG
1. Under the standby mode, press the "MENU" button, select "ONSEN EGG" function, "START" light flashs.
2. Press the "START" button to start the "ONSEN EGG" function, "START" and "ONSEN EGG" lights stay on,
and digital screen display countdown timer.
3. The "ONSEN EGG" function automatically enters the standby state when program completes.
Recipes:
3 eggs, white sugar 100g, cake mix 120g, unmelted butter 30g.
1. Put the sugar and eggs into a bowl, then stir with a whisk until foaming.
2. Add the cake flour, stir with a wooden spoon evenly; add the melted butter and mix quickly.
3. Pour it into the rice cooker before the bubbles disappear quickly.
Recipes:
Appropriate amount of eggs and water
1. Put the eggs into the inner pot.
2. Add water until eggs are soaked in, and do not exceed maximum water level.
3. Closing the cover, select the "ONSEN EGG" function to start cooking.
Timer per-set method (QUICK COOK/WHITE RICE/SUSHI RICE/MIXED GRAIN/CONGEE/SOUP)
1. Select the function requires pre-set timer, press the button, light on and enter the setting
state. Press the button again, light off and light on.
Press or to pre-set the completion time.
Press the button to decrease the timer by 10 minutes, long press to quickly decrease by 10
minutes, Press the button to increase the timer by 10 minutes, and long press to quickly increase
by 10 minutes.
2. Press button to start the pre-set timer function. The screen displays the completion time and starts
the countdown.
3. Timer can be pre-set up to 24 hours.
4. Temperature preservation: The cooker enters to temperature preservation mode once cooking
completed. The temperature preservation time is up to 24 hours, cooker returns to standby state after
24 hours. The shorter the preservation time, the better the taste.
Note: Recommended timer pre-setting is no more than 12 hours to avoid food deterioration.
20
CONGEE
1. Under the standby mode, press the "MENU" button, select "CONGEE" function, "START" light flashs.
2. Press and button to adjust Congee cooking time, the default timing is 1 hour 20 minutes.
Time can be adjusted between 1 hour 20 minutes to 4 hours.
3. Press the "START" button to start the "CONGEE" function, "CONGEE" lights stay on, and digital screen
display countdown timer.
4. "CONGEE" function automatically enters the temperature preservation function when program
completes.
SOUP
1. Under the standby mode, press the "MENU" button, select "SOUP" function, "START" light flashs.
2. Press and button to adjust "SOUP" cookingtime, the default timing is 1 hour 30 minutes.
Time can be adjusted between 1 hour 30 minutes to 4 hours.
3. Press the "START" button to start the "SOUP" function/"START" lights stay on, and digital screen display
countdowntimer.
4. "SOUP" function automatically enters the temperature preservation function when program completes.
21
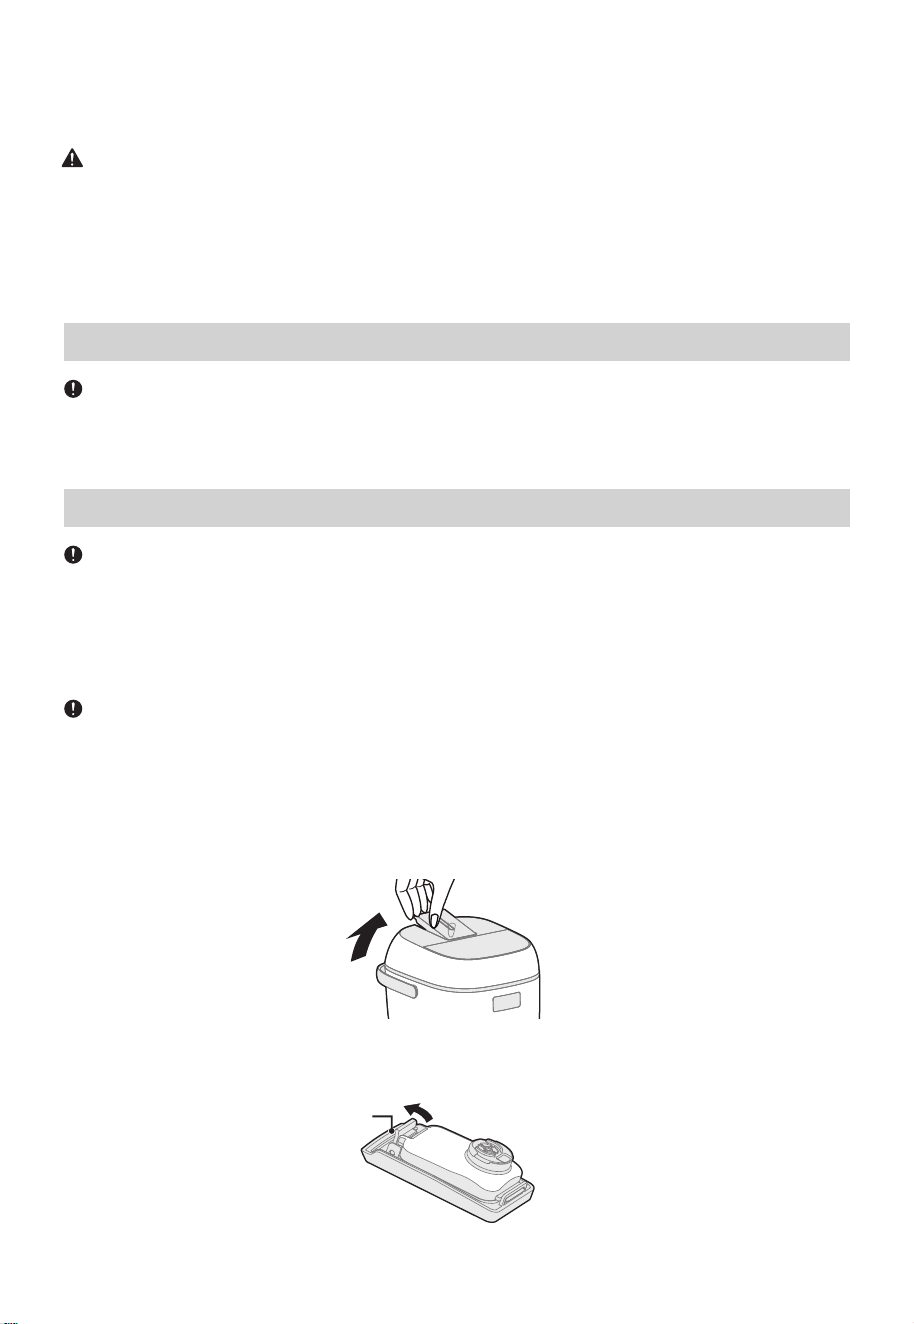
1. Remove the steam valve from the body.
Pull up
• Please press to install.
2. Open
Hold the steam valve and open the small buckle.
CLEANING AND MAINTENANCE
Burn Hazard
• Wait until the rice cooker has cooled before cleaning.
Failure to do so may result in burns
Steam Valve
Unplug the rice cooker from the electrical outlet, allow it to cool, and then clean and dry the cooker and all
its parts after each use to avoid odors and poor performance.
WARNING
The rice cooker is not dishwasher safe. Use only soft cloths with a mild dish soap solution to clean the rice
cooker. Do not wash either the rice cooker or its interior cooking pot in the dishwasher.
IMPORTANT
General Care
Do NOT immerse the rice cooker in water.
Using a soft, damp cloth, clean the outer surfaces of the rice cooker.
Using a soft, dry cloth thoroughly dry the outer surfaces.
IMPORTANT
• Clean the steam valve frequently to ensure proper venting.
• The rice cooker should be cool to the touch before cleaning the steam valve.
IMPORTANT
Cleaning the Cooker Exterior
Small buckle
22
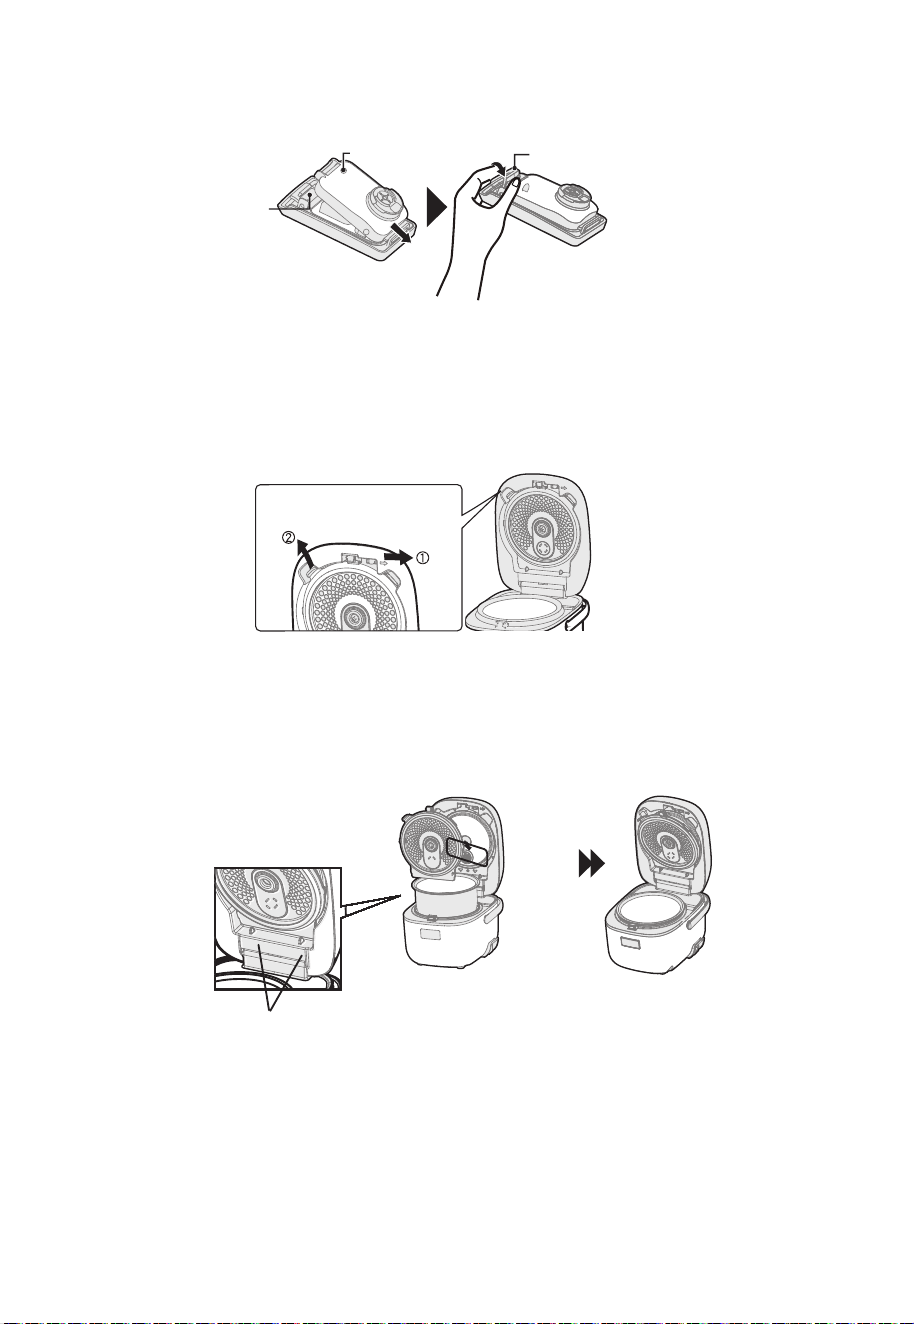
3. Cut-out
Insert the buckle on the steam valve base into the pinhole of the steam valve cover, and fasten the small
buckle.
The rice cooker will prevent you from cooking after the detachable lid is removed.
Remove the detachable inner lid
1. Push the inner lid slider to the right according to the arrow (the removable lid leans forward).
2. Grab the handle and pull up the detachable inner lid.
Installation of the detachable lid
1. Lean and insert the detachable lid into the slot from above.
2. Push and press the handle until you hear a “clicking” sound.
Heating Plate
1. Using a steel wool pad, remove any residue burned onto the metal heating plate.
2. Using a soft, damp cloth, wipe the heating plate, and then dry thoroughly.
• When the sealing bar of the steam valve inside the cover is removed, please press it in to prevent it from
appearing from the slot.
steam valve base
steam valve cover
small buckle
handle
Inner cover
slider
Inside the slot

23
1. Wash the cooking pot, using a soft cloth and a nonabrasive cleanser or a mild solution of dish soap and
warm water.
2. Using a soft cloth, dry both the interior and exterior of the cooking pot.
3. Any other servicing should be performed by an authorized service representative.
• The inside of the cooking pot has a non-stick coating that can lose its non-stick properties if it becomes
scratched or damaged.
• Do not use abrasive cleansers, vinegar, bleaching agents, steel wool or other harsh scrubbing brushes to
clean the cooking pot.
• Do not use metal cooking utensils.
• Wash the cooking pot immediately after removing rice that has been seasoned.
Seasonings may damage the non-stick coating of the cooking pot if left in contact for any length of time.
IMPORTANT
Cooking Pot

24
TROUBLESHOOTING
Troubleshooting Tips
Before calling for service, review the following tips. It may save you time and money.
This list includes common occurrences that are not the result of poor workmanship or defective materials.
Electrical Shock Hazard
• Plug into a grounded 3 prong outlet.
• Do not remove the ground prong.
• Do not use an adapter.
• Do not use an extension cord.
Failure to do so can result in death, fire or electrical shock.
WARNING
POSSIBLE CAUSE
PROBLEM
Rice cooker does
not operate
• The power supply cord is not
completely plugged into a working
3 prong electrical outlet.
SOLUTION
• Plug the power supply cord into the
electrical outlet.
• There has been a power failure.
• During a power failure, the time-
of-day, not the countdown time,
will appear in the display during a
cooking program.
• Reset the circuit breaker or replace
the fuse once power is restored.
Rice is hard or dry
• Rice was not cooked with enough
water or it was cooked with mineral
water.
• Use more water when cooking rice.
• Soak the rice for a short time before
cooking.
Rice is mushy,
sticky or
clumping
• Rice was cooked with too much
water
• Use less water when cooking rice.
Once cooked, fluff rice immediately
using a fork to separate the grains.
• Another appliance was plugged into
the same electrical outlet, which
tripped the circuit breaker or blown
a household fuse.
• Reset the circuit breaker or replace
the fuse. Plug power supply cord
into a separate, dedicated circuit.
• Rice was rinsed or soaked before
cooking
• Pre-rinsing can cause the rice to
crack and become mushy and sticky
during cooking.
• Soaking before cooking softens the
texture of rice.
• If rinsing is required, rinse the rice
quickly and drain as much water as
possible. Do not allow rice to soak in
liquid prior to cooking.

25
POSSIBLE CAUSE
PROBLEM
Rice is scorched
NOTE: Rice
turning a light
brown color is not
a result of rice
cooker failure.
Rice does not
taste good
• Dirt or a foreign substance is stuck
to the temperature sensor.
SOLUTION
• Remove foreign substance and
clean well.
• Other ingredients and/or
seasonings were added to the rice
before cooking.
• Cook only rice with the proper ratio
of water.
• The cooking pot and inner cover are
warm or hot when cooking begins.
• Allow rice cooker to cool completely
before cooking a new batch.
• Dirt or a foreign substance is stuck
to the temperature sensor, inner lid,
or steam vent.
• Remove foreign substance a clean
well.
• The inner lid or steam vent was not
attached to the rice cooker.
• After cleaning replace both the
inner lid and steam vent into the
rice cooker. See "Care and
Cleaning."
• Used wrong ratio of ingredients to
water or wrong cooking program
for
• Accurately measure the correct ratio
of ingredients to water.
Unpleasant odor
NOTE: Aplastic
odor is normal
the first few times
the cooker is
used.
• Keep Warm mode was used too
long.
• Do not allow rice to remain in Keep
Warm mode indefinitely.
• Serve rice soon after the 10-minute
resting period.
• Rice left in the cooking pot after
Keep Warm mode has turned off.
• Remove cooked rice from cooker.
• The rice was not rinsed thoroughly.
• Rinse rice until the water runs clear.
• The cooking pot, inner lid and/or
steam vent is dirty.
• The plastic scoop was left in the
cooking pot.
• Clean and dry parts thoroughly. See
"Cleaning."
• Remove plastic scoop and all
accessories from the rice cooker
before using.
Rice is dry and
turned color
• Rice has been reheated repeatedly.
• Steam vent is not attached correctly.
• Rice should be reheated only once
to maintain the quality.
• Sprinkle rice with water to help keep
it from drying out during reheating.
• After washing, attach the steam
vent correctly to the rice cooker. See
"Cleaning."
• Rice was soaked for too long.
• Soak rice for a shorter period of
time.

26
POSSIBLE CAUSE
PROBLEM
Steam escaping
from the rice
cooker
• The inner lid is not attached
properly.
• The inner lid and/or cooking is
deformed.
• Foreign substances are stuck to the
inner lid, cooking pot rim or the
frame of the rice cooker.
SOLUTION
• Check the condition of the inner lid
and gasket. Confirm that the inner
lid is correctly seated in the cooker
cover.
Rice cooker
boiling over and
spattering
NOTE: It is normal
for moisture to
appear on the
inner lid or
cooking pot
and drip when
the lid is opened.
• The inner lid is not attached
properly.
• The inner lid and/or cooking is
deformed.
• After cleaning replace both the inner
lid and steam vent into the rice
cooker. See "Care and Cleaning."
• The steam vent and/or temperature
sensor is dirty.
• Clean the steam vent and
temperature sensor.
• Porridge program was
unintentionally used to cook rice.
• Select the cooking program for the
ingredients you are cooking.
• Clean both the cooking pot and rice
cooker after each use.
Difficult to close
the cooker lid
• The inner lid is not attached
properly.
NOTE: The outer lid will not close
unless the inner lid is attached
correctly.
• Foreign substances in the lid latch
well are preventing the outer lid
from latching.
• Replace the inner lid into the top
cover of the rice cooker. See "Care
and Cleaning."
Film on interior of
cooking pot
• The starch in the rice will melt
during cooking and dry onto the
interior of the cooking pot.
• During washing, use a non-abrasive
plastic scouring pad or utensil to
gently remove the film.
• Remove debris from the lid latch
well.
POSSIBLE CAUSE
PROBLEM
E1,E2, E5,
E6, EU
Circuit Board and Sensor Fault
Immediately unplug rice cooker.
After error is resolved, plug in rice cooker,
and then press CANCEL to remove error
code from display.
SOLUTION
Error Display

# MatterDetails