
1.单页尺寸: 140x144mm (骑马钉)
2.材质:128G双铜,双面印刷
Model:DU3L-WY
Huizhou Dudu Pet Products Co.,ltd
12 Months Warranty
Seice@imipaw.com
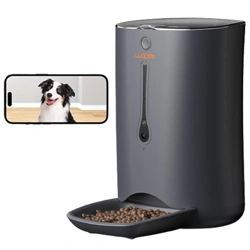
Automatic Pet Feeder
User Manual
WiFi Edition
English / Español
Specication
Capacity: 3L/4L/5L
Power supply: DC 5V/1A power adapter
Power adapter: AC110-240V input, DC5V output
BE-031-D

CONTENTS
01-Safety Instructions
02-Notices
03-Product lmage
04-Buttons and Display Overreview
05-In The Box
06-Fcc Warning
07-Instructions
08-Cleaning and Maintenance
09-PETTECH APP specic operations
10-Troubleshooting
02
02
03
04
05
06
07
09
10
12
English

English
01-Instrucciones de seguridad
02-Aviso
03-Imágenes del producto
04-Resumen de botones y pantalla
05-EN LA CAJA
06-ADVERTENCIA FCC
07-Instrucciones
08-Reinigung und Pege
09-PETTECH APP Operaciones Especícas
10-SOLUCIÓN DE PROBLEMAS
14
14
15
16
17
18
19
21
22
24
CONTENIDO
Español

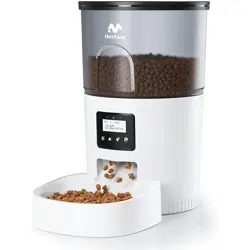
Product lmageSafety Instructions
1.Children must be accompanied by adults to use it.
2.Do not use the feeder for pets which cannot reach the food tray or have physical disabilities.
3.Do not immerse the base pa in water, which will damage electronic components such as control panel.
4.Do not put any foreign objects into the pet feeder.
5.Do not put canned or wet food into the feeder.
6.Do not disassemble the equipment by yourself.
7.Do not modify the pet feeder.
8.lf the equipment can not work or have damaged accessories, do not t to repair the pet feeder by yourself. Contact the
seller immediately and solve it.
9.Please make sure the the feeder is unplug and power o when not using or cleaning it.
10.If the plug is damp, please turn o the socket rather than ting to unplug the power.
1.Please purchase hard plastic protector from hardware store to protect plugs and power cord then prevent your pet from
damaging the accessories.
2.Do not put the pet feeder in an high temperature place.The temperature should be within therange of - 10 'C~40 '℃.
3.Please use alkaline Size D batte for power supply. Do not use rechargeable batteries.
4.Check the batte regularly. Please replace the batte before having a trip.
5.Do not lift the pet feeder directly with the cover, food bucket and food tray. Hold the base with both hands to lift and
car, while keeping the device in an upright position.
6.Only applicable to d food with a diameter of 2-10mm. Larger food may get stuck or block the food outlet.
7.Please read all the notices on the packing and manuals carefully.
Notices
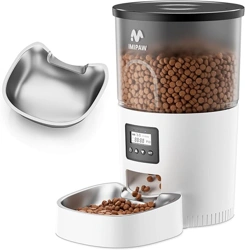
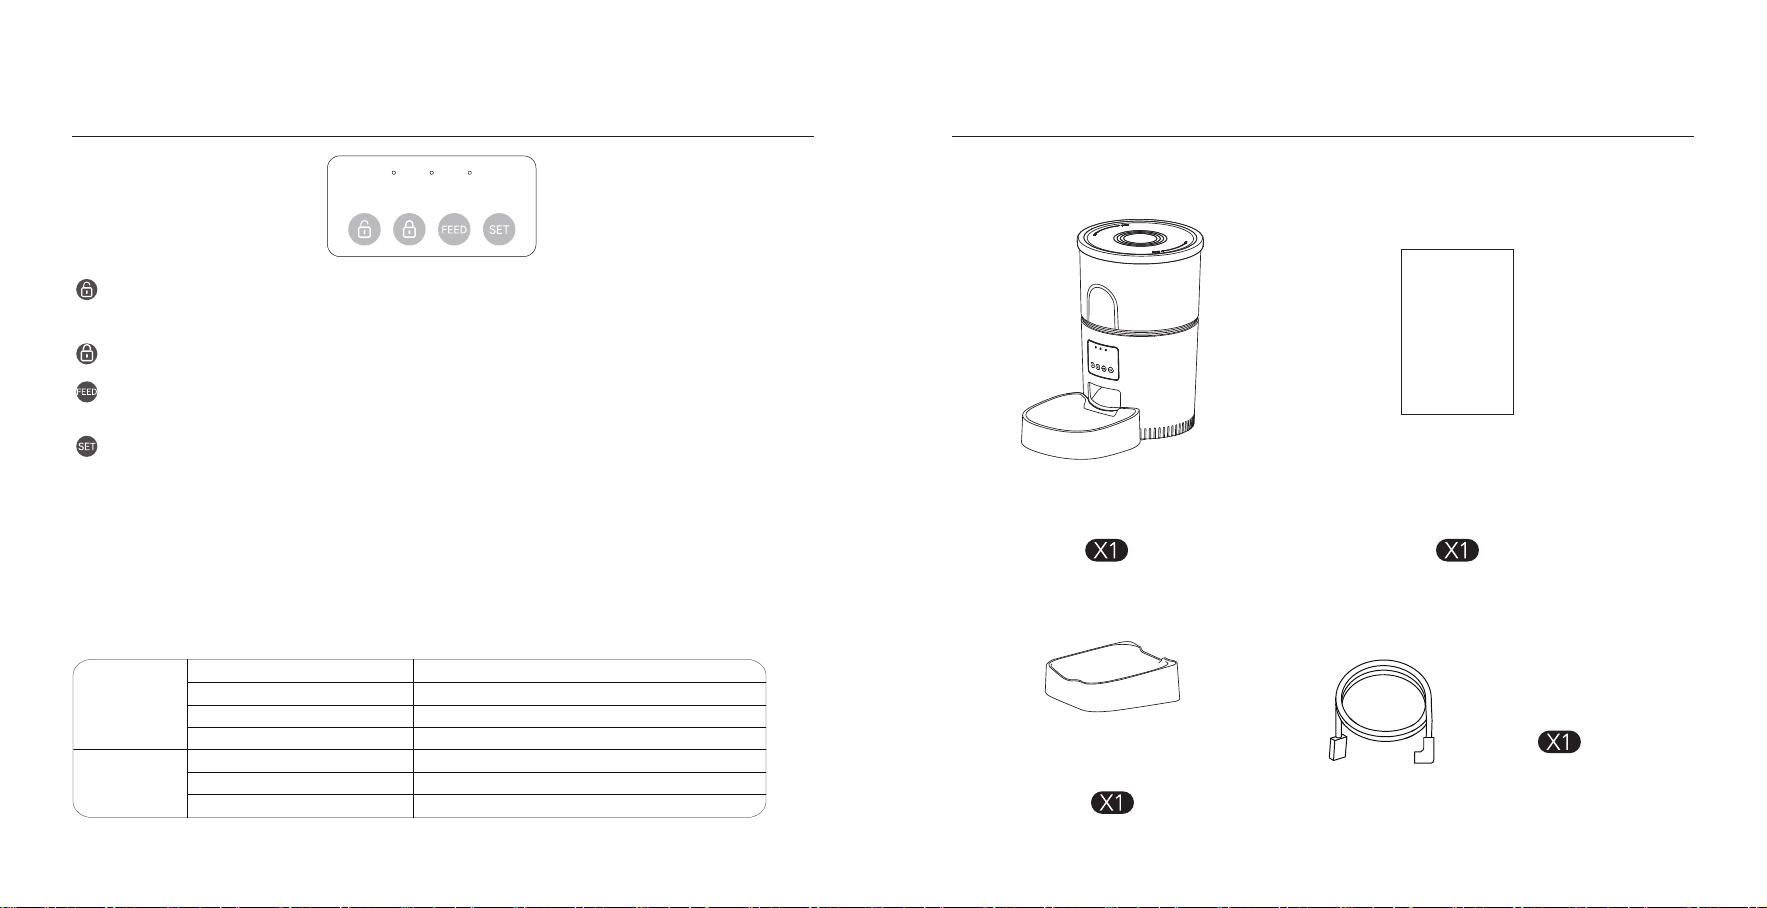
Front view
Bottom View
Food Tank Lid
Food Tank
Food Outlet
Batte Compament
DC Inteace
Speaker
Control Panel
Body
Food Bowl
Product
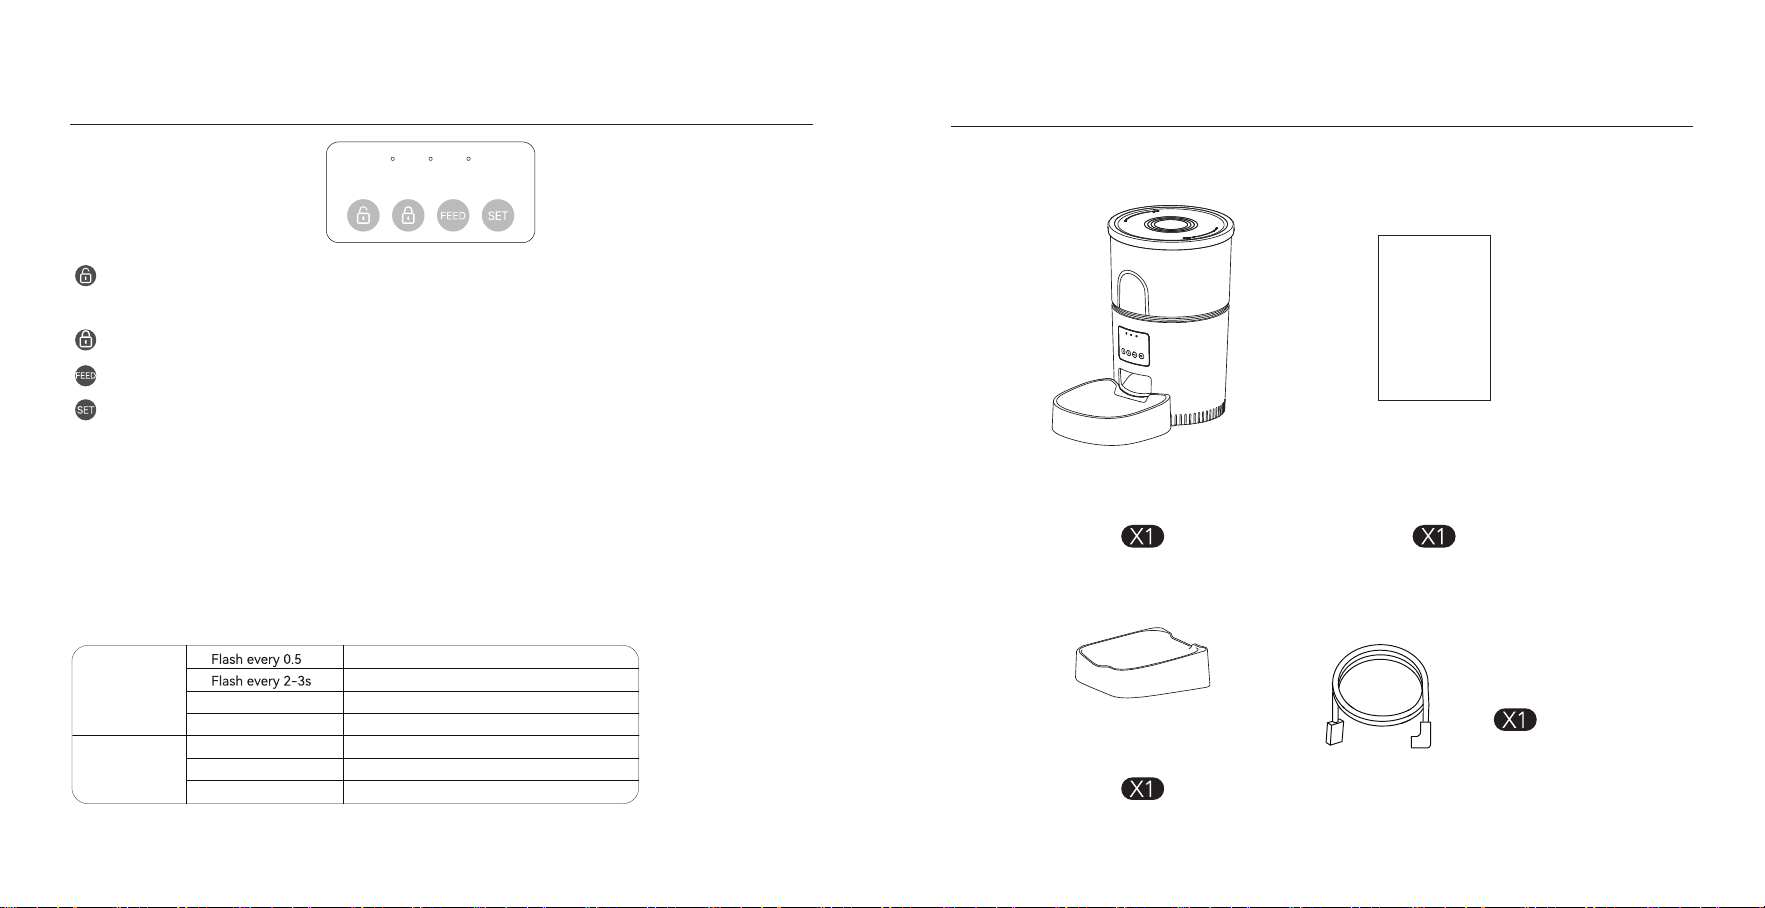
In The Box
Bowl Tray
User Manual
User
Manual
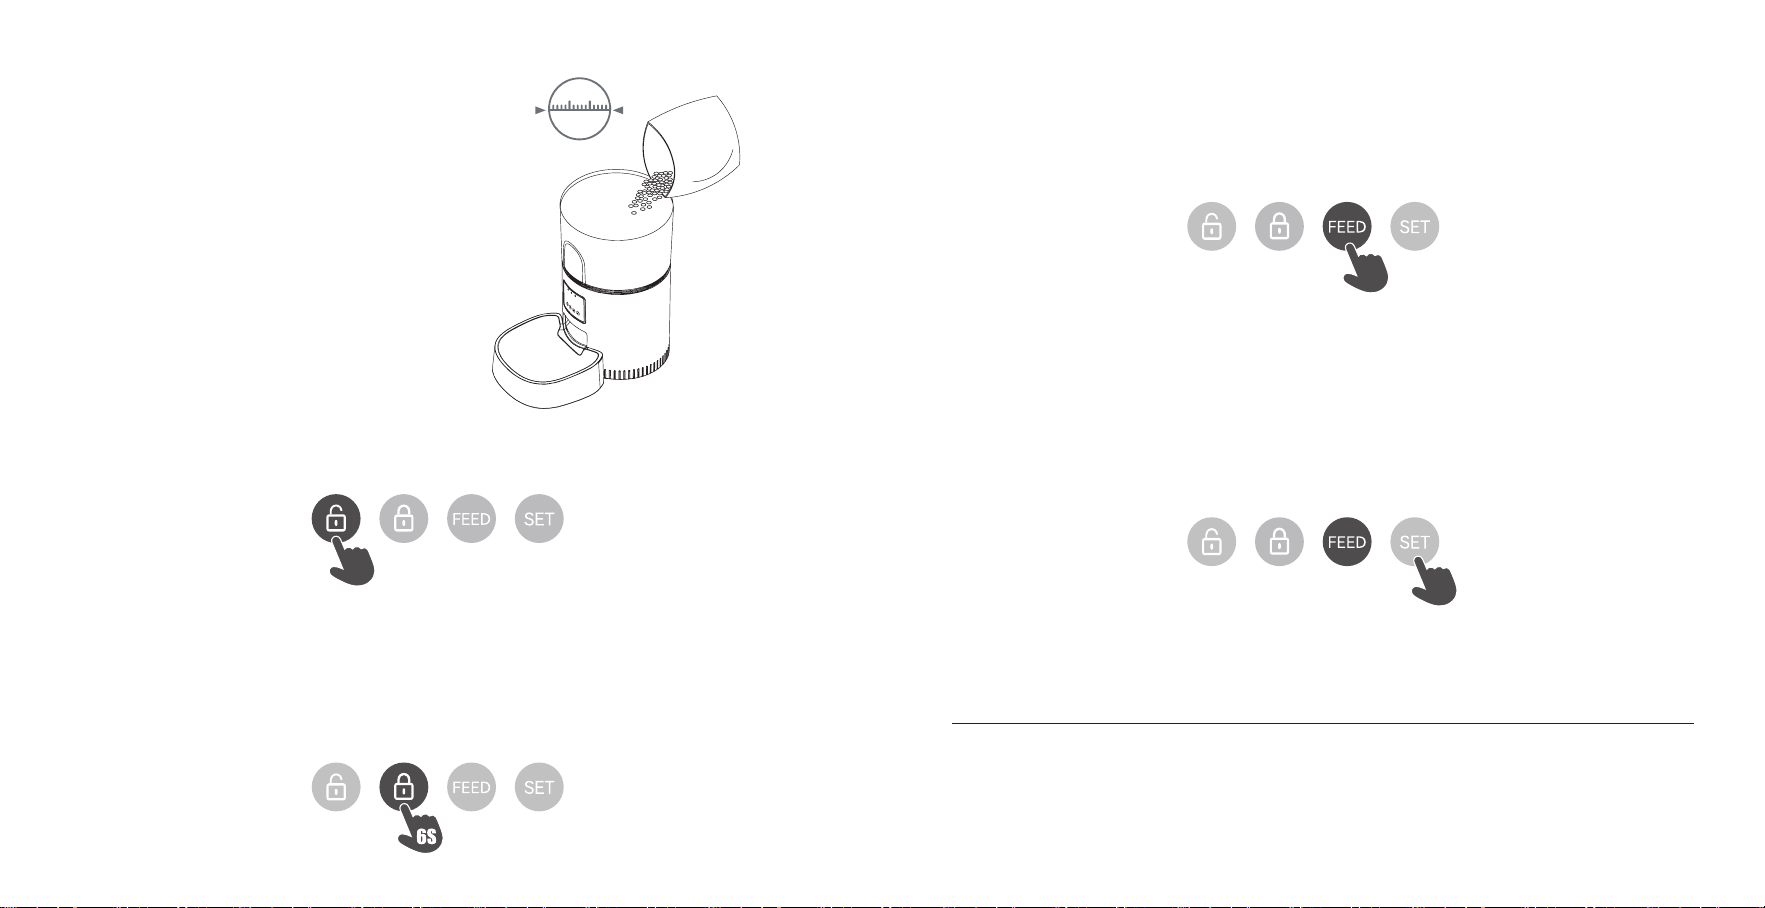
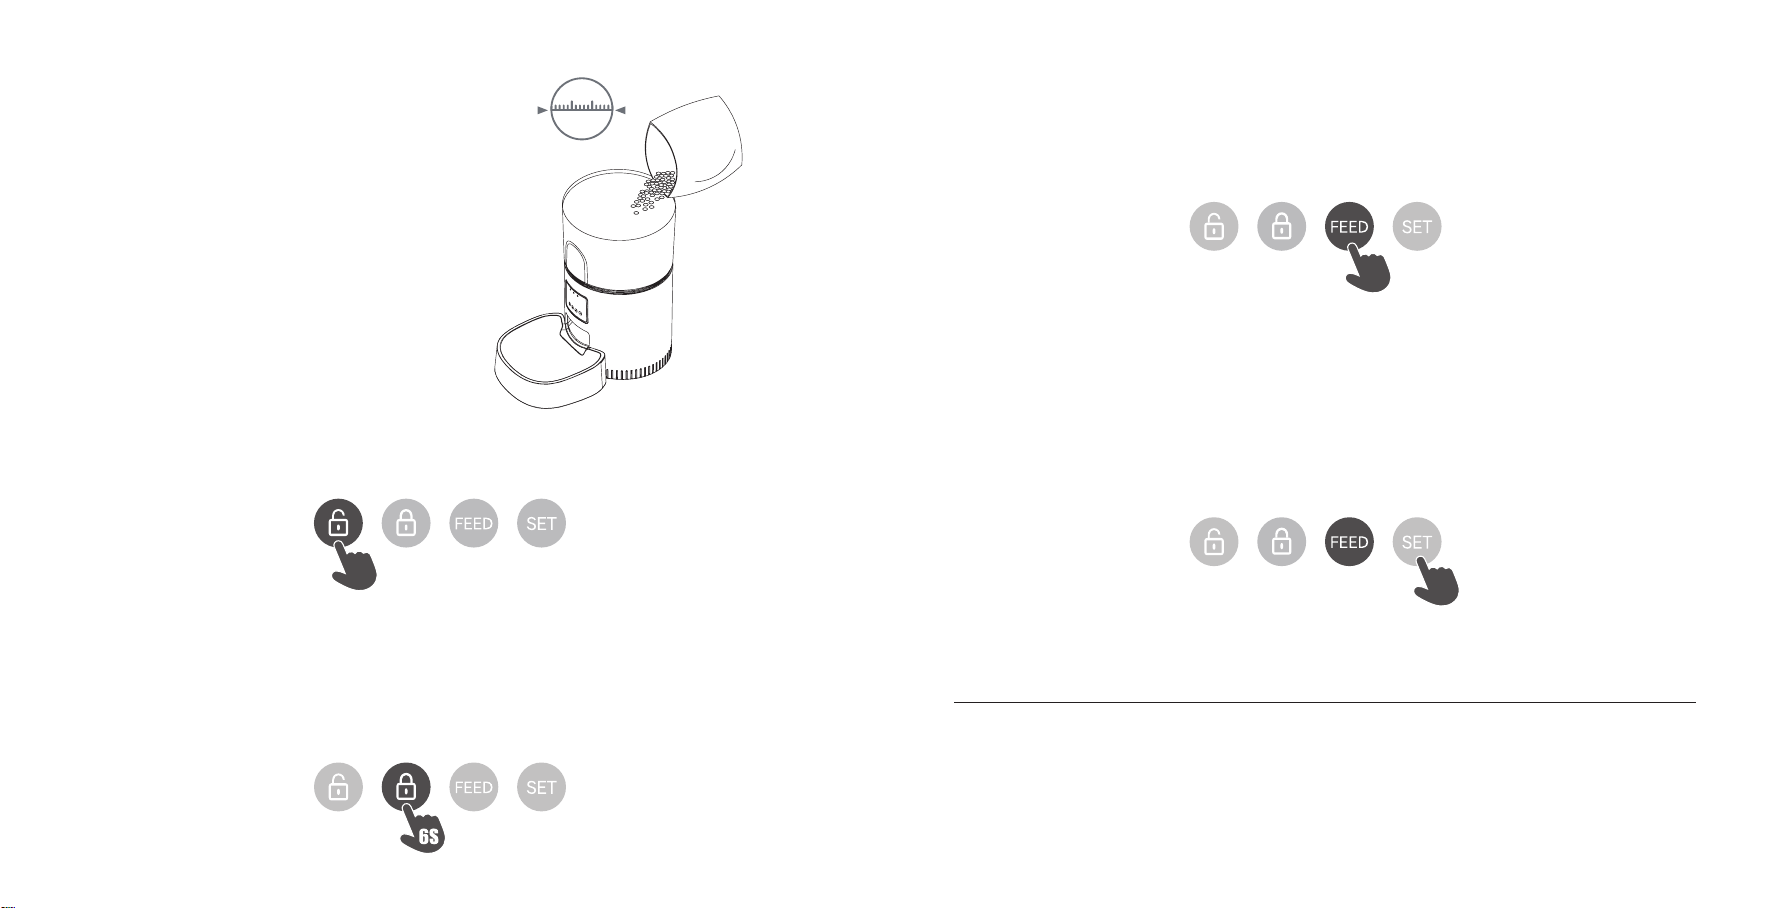
Unlock Button: Press and hold for 6 seconds. When you hear a beep, the red light ashes twice, indicating successful
unlocking.
Locked Button: Under unlock state, long press for 6s and the red led light ashes twice, lock the device.
Set Button: When the power is turned on and the network is not congured, the blue indicator ashes quickly by
default, which is WiFi conguration mode. Press and hold for 6 seconds to hear three beeps, the red indicator is on for 6
seconds and the blue indicator switches to slow ashing, which is hot spot network conguration mode. Repeat the
operation to switch between the two network modes.
Feed Button: When the feeder is unlocked, press once to feed a poion manually.
Notice:
When the device is locked, press and hold the settings button for 6 seconds to restore facto settings.
Buttons and Display Oveiew
LED INDICATORS
Red
Flash
Flash Twice
Locked/Unlocked
Abnormal or low voltage
Stay for about 6s
WiFi mode/Hot Spot mode switch
Blue
Stay Solid
Stay for about 6s
WiFi mode/Hot Spot mode switch
Connected to WiFi and fully operational
The feeder is in WiFi mode, ready to connect with App.
The feeder is in hot spot mode, ready to connect with App.
Power Cable
This device complies with pa 15 of the FCC Rules. Operation is subject to the following two conditions : (1) this device may
not cause harmful inteerence, (2) and this device must accept any inteerence received,inc luding inteerence that may
cause undesired operation.
Any changes or modications not expressly approved by the pay responsible for compliance could void the user's
authority to operate the equipment.
NOTE:This equipment has been tested and found to comply with the limits for a Class B digital device, pursuant to Pa l5
of the FCC Rules. These limits are designed to provide reasonable protection against harmful inteerence in a residential
installation. This equipment generates, uses and can radiate radio frequency energy and, if not installed and used in
accordance with the instructions, may cause harmful inteerence to radio communications.
However, there is no guarantee that inteerence will not occur in a paicular installation. If this equipment does cause
harmful inteerence to radio or televis ion reception, which can be determined by turning the equipment o and on, the
user is encouraged to t to correct the inteerence by one or more of the following measures:
-- Reorient or relocate the receiving antenna.
-- Increase the separation between the equipment and receiver.
-- Connect the equipment into an outlet on a circuit dierent
from that to which the receiver is connected.
-- Consult the dealer or an experienced radio/TV technic ian for help.
To maintain compliance with FCC's RF Exposure guidelines,This equipment should be installed and operated with minimum
distance between 20cm the radiator your body: Use only the supplied antenna.
Fcc Warning
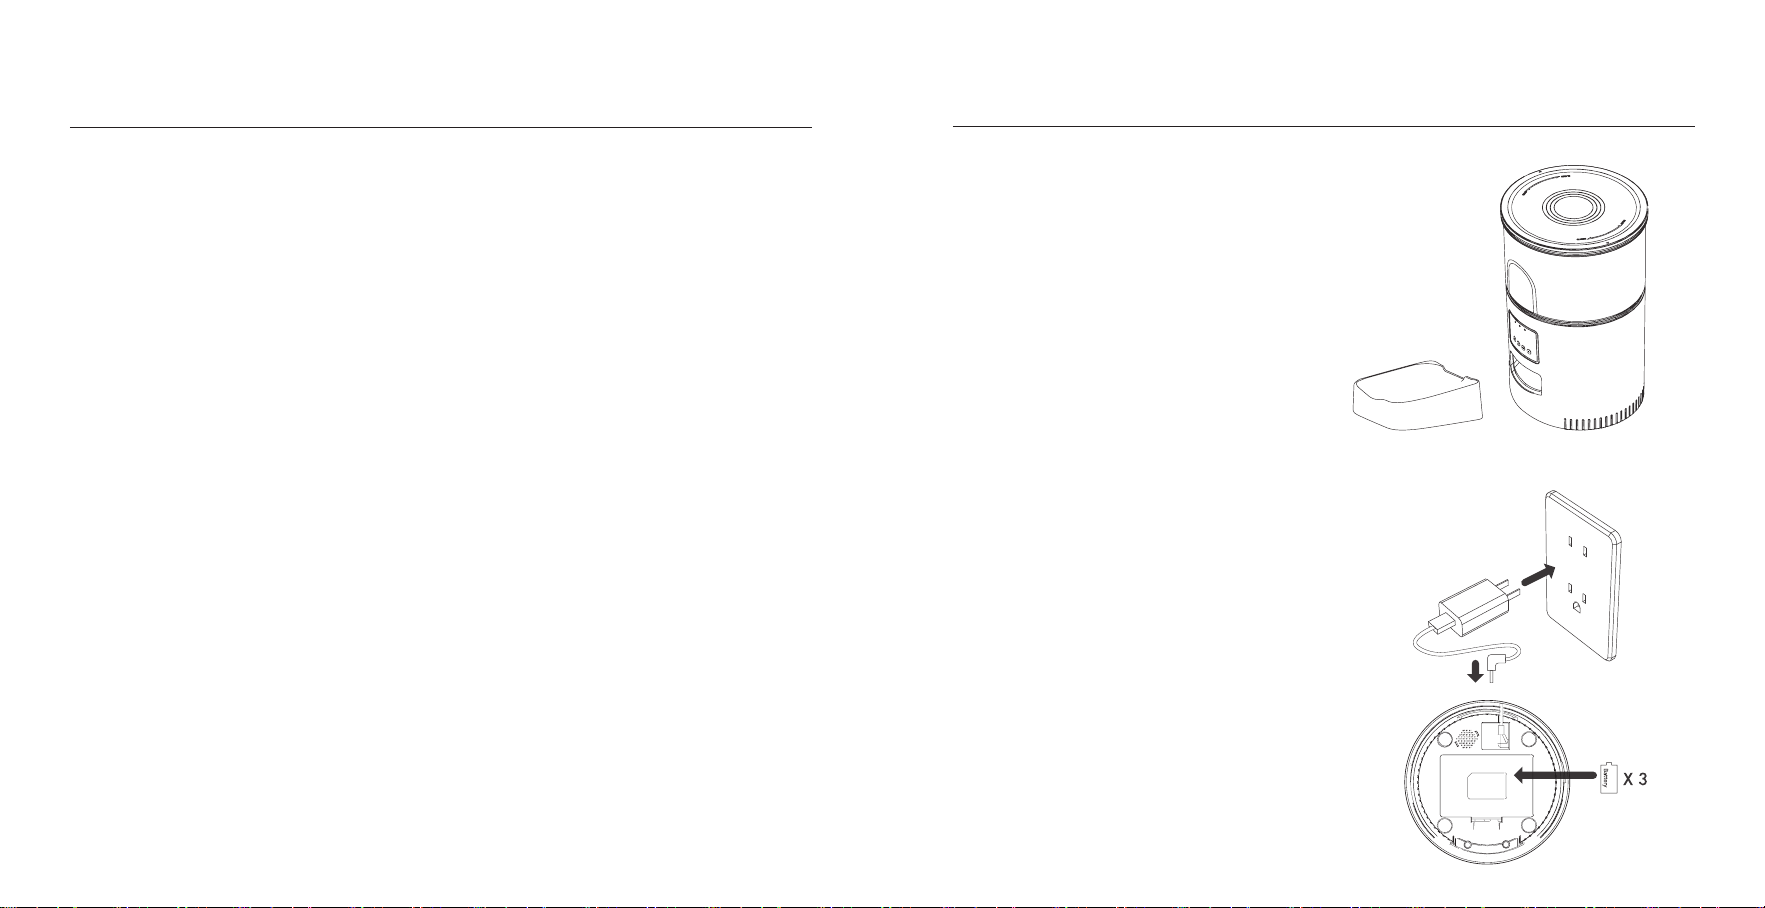
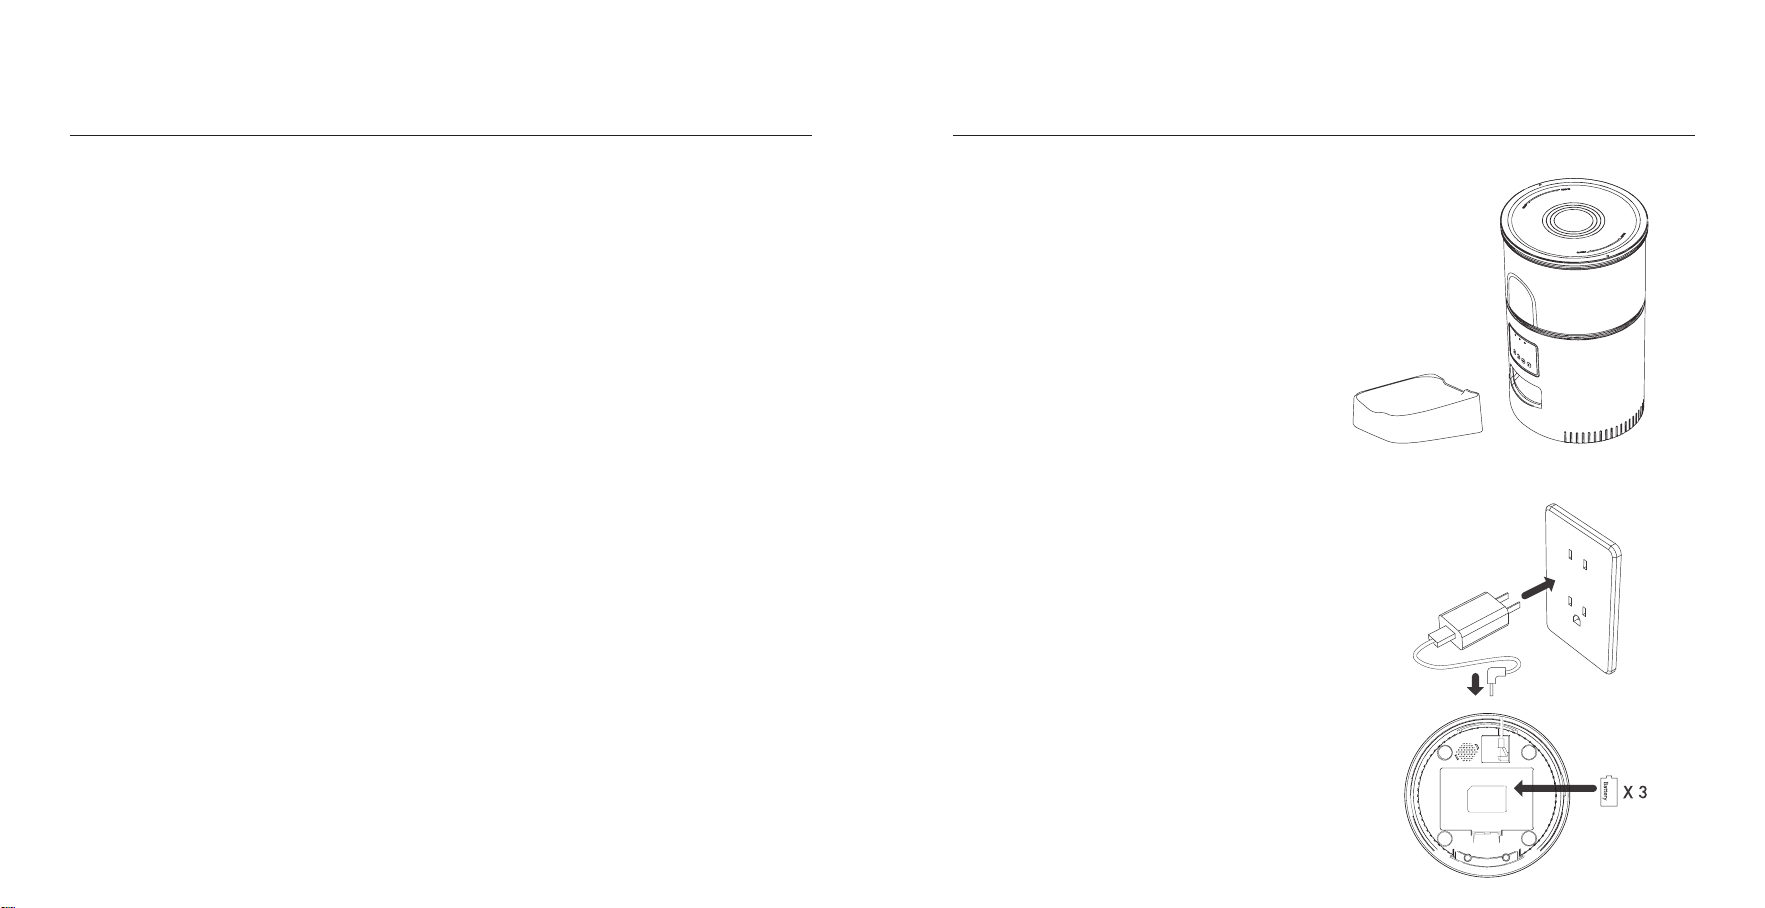
01 | Installation
◎ Remove the feeder from the box.
◎ Place the feeder in the suitable location.
◎ Combine the food tray with the base of the feeder.
02 | Connect the power supply
◎ Plug the 5V/1A power adapter into the wall socket and
connect the device.
◎ Open the batte compament at the bottom of the
feeder, and install 3 pcs alkaline D size batteries (not
including) in case of outa.
◎ The LED light is turn on to indicate that the feeder is
powered on.
Note:
Does not including batte .
Before turning on the power, make sure that all pas are
clean and completely d.
Instructions
D Size
Please clean the feeder regularly to keep your pet's health.
When it stas to get diy and a lot of loose food in the food trough, you can remove thefood cover to clean it.
Use a soft damp cloth to clean the base of the feeder and the control panel. Do not get wetthis pa, and do not to clean it
with running water.
Do not put the product in the dishwasher, otherwise it will be permanently damaged!
Cleaning and Maintenance
03 | Put pet food into food tank
◎ Fill the food tank with d pet food then close the lid.
Note:
Do not place canned, wet or wet pet food.
The recommended pet food size range from
2-10 mm in diameter.
04 | Unlock
◎ Press and hold for 6 seconds. When you hear a beep, the red light ashes twice, indicating successful unlocking.
10mm
6S
05 | Lock button
◎ Under unlock state,Long press for 6 seconds and the red indicator light ashes twice to lock the machine.
Note:
Pressing the feeding button in the locked state does not work, it must be unlocked for normal use.
The APP operation is not aected in the locked state.
06 | Feeding
◎ Manual feeding: sho press to see 1 poion.
Note:
The feeding plan will not be aected.
07 | Reset
◎ Switching the network conguration mode: When the power is turned on and the network is not congured, the blue
indicator ashes quickly by default (WiFi quick connection conguration mode), press and hold for 6 seconds to hear three
beeps, The red/blue indicator is always on for 6 seconds and then switches to slow ashing (hot spot network conguration
mode). Repeat the operation to switch between the two network modes.
Note:
When the device is locked, press and hold the settings button for 6 seconds to restore facto settings.
6S

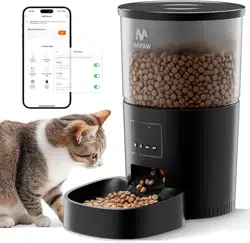
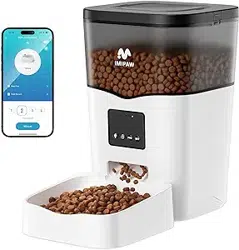
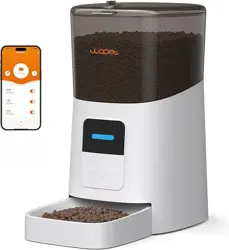
PETTECH APP SPECIFIC OPERATIONS
1. Scan the QR code or search for
“PETTECH” on APP Store to download the
app. Sign up or log in to your account
4. Enter a WiFi password (the name cannot
be used in Chinese, the password cannot be
used for special symbols)
7. Manually Feeding: enter the inteace,
you can choose the poions as
requirement, click”Feed”to feed
immediately
11. View the logs: click”Feed Record”,
you can view the feeding records
8. Click“ Meal Plan” on the main
inteace to add feeding schedule
12. Share your feeder: enter the
inteace, click the icon in the upper
right corner to enter the settings option
9. Choose feeding time, feeding days,
and feed number. Click “save”
13. Enter the setting menu option and
click”Share Device”
10. Slide the scheduletimer to delete it
14. Click”Add” and enter the account
and save. Share the device with multiple
people
2. Open the APP, select Home page, tap
“Add Device”or"in the upper right
corner
5. Waiting for the device to connect the
network, showing successfully added,
then next step
3. Enter the add device inteace, you
can wait for automatic search and add,
or click ‘Pet Feeder 2.4GHz&5GHz’ to
add device
6. After successful, you can customize
the name of device, click on the upper
right corner to nishe this step

Español
Question Answer
Q: The food won’t come out
A:
1. Please ensure you are using d food with kibble sizes ranging from 2-10mm (0.07-0.4 inches) in diameter.
2. Check for any foreign objects. Disassemble the food tank and inspect the chute and food outlet.
3. Verify the batte level. Ensure the power adapter is connected, or check if there is a power outage when no batte is
installed.
Q: Food volume for each poion is not the same
A: The rst few poions may va slightly, but this does not indicate a faulty device. After approximately 6 feedings, the
poions should become consistent.
Q: I can't congure the feeder on my mobile
A:
1. Incorrect account or password format: Use only numbers and letters for the username and password, with a maximum
of 12 characters.
2. Application issue: Some program conicts may occur. T restaing your mobile device.
Q: Feeder appears disconnected from WiFi
A:
1. Weak signal: Ensure the distance between the feeder and the router is no more than 10 meters (33 feet). Avoid concrete
walls or too many obstacles, as they can weaken the WiFi signal and cause unstable connections.
2.Hotspot distribution network (optional): Follow these steps to switch to hotspot distribution mode when the feeder's
LED light ashes slowly:
·Open the PETTECH APP, select Add Device > Manually Add > Pet Feeder 2.4GHz&5GHz.
·Enter the WiFi password and click Next.
·Select Blink Slowly and click Go to Connect.
·Connect to the PETTECH APP-XXXX WiFi signal.
·Return to the previous inteace and wait for the network conguration to complete.
Troubleshooting

Imágenes del productoInstrucciones de seguridad
1.Los niños deben ir acompañados de adultos para utilizarlo.
2.No utilice el comedero para mascotas que no puedan alcanzar la bandeja de comida o tengan discapacidades físicas.
3.No sumerja la base en agua, ya que se dañarían los componentes electrónicos, como el panel de control.
4.No introduzca objetos extraños en el comedero para mascotas.
5.No introduzca comida enlatada o húmeda en el comedero.
6.No desmonte el equipo usted mismo.
7.No modique el comedero para mascotas.
8.Si el equipo no funciona o tiene accesorios dañados, no intente repararlo usted mismo. Póngase en contacto con el
vendedor inmediatamente y resuélvalo.
9.Asegúrese de que el comedero está desenchufado y apagado cuando no lo utilice o no lo limpie.
10.Si el enchufe está húmedo, apáguelo en lugar de intentar desenchufarlo.
1.Compre un protector de plástico duro en una ferretería para proteger los enchufes y el cable de alimentación y evitar que
su mascota dañe los accesorios.
2.No coloque el comedero para mascotas en un lugar con altas temperaturas, ya que éstas deben oscilar entre -10 ℃~40 ℃.
3.Utilice pilas alcalinas de tamaño D como fuente de alimentación. No utilice pilas recargables.
4.Compruebe la batería con regularidad. Por favor, cambie la batería antes de tener un viaje.
5.No levante el comedero para mascotas directamente con la tapa, el cubo de comida y la bandeja de comida. Sujete la base
con ambas manos para levantarlo y transpoarlo, manteniendo el aparato en posición veical.
6.Sólo aplicable a alimentos secos con un diámetro de 2-10 mm. Los alimentos más grandes pueden atascarse u obstruir la
salida de alimentos.
7.Lea atentamente todos los avisos del embalaje y los manuales.
Aviso
Vista Frontal
Vista Inferior
Tapa del tanque de comida
Tanque de comida
Salida de comida
Compaimento de la batería
Inteaz de corriente continua
Altavoz
Panel de control
Cuerpo
Tazón de comida
Producto
EN LA CAJA
Bandeja
Manual del usuario
User
Manual
Botón de desbloqueo: Manténgalo pulsado durante 6 segundos. Cuando oiga un pitido, la luz roja parpadeará dos
veces, indicando que el desbloqueo se ha realizado correctamente.
Botón de bloqueo: Cuando el alimentador está desbloqueado, pulse una vez para alimentar una porción manualmente.
Botón Set: Mantenga pulsado durante 6 segundos para escuchar tres pitidos, el indicador rojo se enciende durante 6
segundos y el indicador azul cambia a parpadeo lento, que es el modo de conguración de red hot spot. Repita la operación
para cambiar entre los dos modos de red.
Botón de alimentación: Cuando el alimentador está encendido y la red no está congurada, el indicador azul
parpadea rápidamente por defecto, es el modo de conguración WiFi.
Nota:
Cuando el dispositivo esté bloqueado, mantenga pulsado el botón de conguración durante 6 segundos para
restablecer la conguración de fábrica.
Resumen de botones y pantalla
Indicadores LED
Rojo
Parpadea
Parpadea dos veces
Bloqueado/Desbloqueado
Tensión anormal o baja
Permanecer unos 6s
Modo WiFi/interruptor de modo Hot Spot
Azul
Permanece jo
Permanece durante unos 6s
Parpadeo cada 2-3s
Parpadeo cada 0,5
Conmutación modo WiFi/modo Hot Spot
Conectado a WiFi y totalmente operativo.
El alimentador está en modo WiFi, listo para conectarse con la App.
El alimentador está en modo hot spot, listo para conectarse con App.
Cable de alimentación
Este dispositivo cumple con la pae 15 de las normas de la FCC. El funcionamiento está sujeto a las siguientes dos
condiciones: (1) este dispositivo no puede causar inteerencias dañinas, (2) y este dispositivo debe aceptar cualquier
inteerencia recibida, incluidas las inteerencias que puedan causar un funcionamiento no deseado.
Cualquier cambio o modicación no aprobado expresamente por la pae responsable del cumplimiento podría anular la
autoridad del usuario para operar el equipo.
NOTA: Este equipo ha sido probado y cumple con los límites para un dispositivo digital Clase B, de conformidad con la Pae
l5 de las Reglas de la FCC. Estos límites están diseñados para proporcionar una protección razonable contra inteerencias
dañinas en una instalación residencial. Este equipo genera, usa y puede irradiar energía de radiofrecuencia y, si no se instala
y usa de acuerdo con las instrucciones, puede causar inteerencias dañinas en las comunicaciones por radio.
Sin embargo, no hay garantía de que no se produzcan inteerencias en una instalación en paicular. Si este equipo causa
inteerencias dañinas en la recepción de radio o televisión, que se puede determinar apagando y encendiendo el equipo,
Se recomienda al usuario que intente corregir la inteerencia mediante una o más de las siguientes medidas:
--Reorientar o reubicar la antena receptora.
--Aumente la separación entre el equipo y el receptor.
Conecte el equipo a una toma de corriente de un circuito diferente al que está conectado el receptor.
--Consulte al distribuidor o a un técnico experimentado en radio/TV para obtener ayuda.
Para mantener el cumplimiento de las pautas de exposición a RF de la FCC, este equipo debe instalarse y operarse con una
distancia mínima de 20 cm entre el radiador y el cuerpo: utilice únicamente la antena suministrada.
ADVERTENCIA FCC
01 | Instalación
◎ Saque el alimentador de la caja.
◎ Coloque el alimentador en el lugar adecuado.
◎ Combine la bandeja de comida con la base del comedero.
02 | Conectar la fuente de alimentación
◎ Enchufe el adaptador de corriente de 5V/1A a la toma de
corriente y conecte el aparato.
◎ Abra el compaimento de las pilas situado en la pae
inferior del alimentador e instale 3 pilas alcalinas de tamaño
D (no incluidas) por si se agotan.
◎ La luz LED se enciende para indicar que el alimentador
está encendido.
Nota:
No incluye batería .
Antes de conectar la alimentación, asegúrese de que
todas las piezas estén limpias y completamente secas.
Instrucciones
D Size
Por favor, limpie regularmente el comedero para mantener la salud de su mascota.
Si el comedero se ensucia y acumula restos de comida sueltos, puede retirar la tapa para limpiarlo.
Limpie la base del dispensador de comida y el panel de control con un paño suave y húmedo. No sumerja estas paes en
agua.
¡No introduzca el dispositivo en el lavavajillas, ya que podría dañarse permanentemente!
Limpieza y mantenimiento
03 | Poner comida para mascotas en el depósito de
comida
◎ Llene el depósito de comida con comida seca para mascotas y
luego cierre la tapa.
Aviso:
No coloque comida para mascotas enlatada,
húmeda o mojada.
El tamaño recomendado de la comida para
mascotas oscila entre 2-10 mm de diámetro.
04 | Desbloqueo
◎ Mantenga pulsado durante 6 segundos. Cuando oiga un pitido, la luz roja parpadeará dos veces, lo que indica que el
desbloqueo se ha realizado correctamente.
10mm
6S
05 | Botón de bloqueo
◎ bajo estado de desbloqueo,Pulsación larga durante 6 segundos y la luz indicadora roja parpadea dos veces para
bloquear la máquina.
Aviso:
Presionando el botón de alimentación en el estado bloqueado no funciona, debe ser desbloqueado para el uso normal.
El funcionamiento de la APP no se ve afectado en el estado bloqueado.
06 | Alimentación
◎ Alimentación manual: pulsación coa para seir 1 ración.
Aviso:
El plan de alimentación no se verá afectado
07 | Revisión
◎ Commutazione della modalità di congurazione della rete: Quando l'apparecchio è acceso e la rete non è congurata,
l'indicatore blu lampeggia rapidamente per impostazione predenita (modalità di congurazione della connessione rapida
WiFi), tenere premuto per 6 secondi per udire tre segnali acustici, L'indicatore rosso/blu è sempre acceso per 6 secondi e poi
passa a lampeggiare lentamente (modalità di congurazione della rete hot spot). Ripetere l'operazione per passare da una
modalità di rete all'altra.
Aviso:
Quando il dispositivo è bloccato, tenere premuto il pulsante delle impostazioni per 6 secondi per ripristinare le impostazioni
di fabbrica.
6S
PETTECH APP OPERACIONES ESPECÍFICAS
1. Escanee el código QR o busque
"PETTECH" en APP Store para descargar la
app.Regístrese o inicie sesión en su cuenta
4. Introduzca una contraseña WiFi (el
nombre no se puede utilizar en chino, la
contraseña no se puede utilizar símbolos
especiales).
7. Alimentación manual: entre en la
inteaz, puede elegir las porciones según
sus necesidades, haga clic en "Alimentar"
para alimentar inmediatamente
11. Ver los registros: haga clic en
"Registro de alimentación", puede ver
los registros de alimentación
8. Haga clic en "Plan de comidas" en la
inteaz principal para añadir el horario
de alimentación
12. Compaa su alimentador: entre en
la inteaz, haga clic en el icono en la
esquina superior derecha para entrar en
la opción de conguración.
9. Elija la hora, los días y el número de
comidas. Haga clic en "Guardar"
13. Entre en el menú de conguración y
haga clic en "Share Device"
10. Deslice el programador para
borrarlo
14. Pulsa "Add", introduce la cuenta y
guarda. Compair el dispositivo con
varias personas
2. Abra la APP, seleccione la página de
inicio, pulse "Añadir dispositivo" o "+" en
la esquina superior derecha
5. Esperar a que el dispositivo para conectar la
red, mostrando añadido con éxito, entonces el
siguiente paso
3. Entra en la inteaz de añadir
dispositivo, puedes esperar a la
búsqueda automática y añadir, o hacer
clic en 'Comedero para mascotas
2.4GHz&5GHz' para añadir dispositivo
6. Después del éxito, puede personalizar
el nombre del dispositivo, haga clic en
la esquina superior derecha para
nalizar este paso.

P: La comida no sale
R:
1.Asegúrate de usar comida seca con croquetas de un tamaño entre 2-10 mm (0.07-0.4 pulgadas) de diámetro.
2.Revisa si hay objetos extraños. Desmonta el depósito de comida e inspecciona la rampa y la salida de comida.
3.Verica el nivel de la batería. Asegúrate de que el adaptador de corriente esté conectado o comprueba si hay un coe
de energía cuando no hay batería instalada.
P: El volumen de comida por porción no es el mismo
R: Las primeras porciones pueden variar ligeramente, pero esto no indica un fallo en el dispositivo. Después de aproximada-
mente 6 alimentaciones, las porciones deberían ser consistentes.
P: No puedo congurar el alimentador en mi móvil
R:
1.Formato incorrecto de cuenta o contraseña: Usa solo números y letras para el nombre de usuario y la contraseña, con
un máximo de 12 caracteres.
2.Problema con la aplicación: Pueden ocurrir conictos de programa. Intenta reiniciar tu dispositivo móvil.
P: El alimentador parece desconectado del WiFi
R:
1.Señal débil: Asegúrate de que la distancia entre el alimentador y el router no sea mayor a 10 metros (33 pies). Evita
paredes de concreto o demasiados obstáculos, ya que pueden debilitar la señal WiFi y causar conexiones inestables.
2.Red de distribución de hotspot (opcional): Sigue estos pasos para cambiar al modo de distribución de hotspot cuando
la luz LED del alimentador parpadee lentamente:
·Abre la aplicación PETTECH, selecciona Añadir Dispositivo > Añadir Manualmente > Alimentador Mascotas
2.4GHz&5GHz.
·Ingresa la contraseña del WiFi y haz clic en Siguiente.
·Selecciona Parpadear Lentamente y haz clic en Ir a Conectar.
·Conéctate a la señal WiFi PETTECH APP-XXXX.
·Regresa a la inteaz anterior y espera a que se complete la conguración de la red.
SOLUCIÓN DE PROBLEMAS