
Packing list
After opening the product package, please conrm whether the machine is in good condition.
Please check the list to conrm whether the accessories are complete.
The Feeder ×1
The power adapter ×1
Power Cord ×1
Product Manual ×1
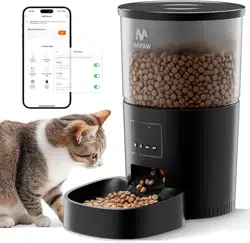
Automatic Pet Feeder
Please Read the Manual Carefully
Before Using the Product
Model: DU3L-WY
Safety Instruction
1.Children must be accompanied by adults to use it.
2.Do not use the feeder for pets which cannot reach the food tray or have physical disabilities.
3.Do not immerse the base pa in water, which will damage electronic components such as
control panel.
4.Do not put any foreign objects into the pet feeder.
5. Do not put canned or wet food into the feeder.
6.Do not disassemble the equipment by yourself.
7.Do not modify the pet feeder.
8.lf the equipment can not work or have damaged accessories, do not t to repair the pet
feeder by yourself. Contact the seller immediately and solve it.
9.Please make sure the the feeder is unplug and power o when not using or cleaning it.
10.lf the plug is damp, please turn o the socket rather than ting to unplug the power.
Notice
1.Please purchase hard plastic protector from hardware store to protect plugs and power cord
then prevent your pet from damaging the accessories.
2.Do not put the pet feeder in an high temperature place.The temperature should be within the
range of - 10 ℃~40 ℃.
3.Please use alkaline Size D batte for power supply. Do not use rechargeable batteries.
4.Check the batte regularly. Please replace the batte before having a trip.
5.Do not lift the pet feeder directly with the cover, food bucket and food tray. Hold the base
with both hands to lift and car, while keeping the device in an upright position.
6.Only applicable to d food with a diameter of 2-12mm. Larger food may get stuck or block
the food outlet.
7.Please read all the notices on the packing and manuals carefully.
FCC WARNING
This device complies with pa 15 of the FCC Rules. Operation is subject to the following two
conditions : (1) this device may not cause harmful inteerence, (2) and this device must accept
any inteerence received,inc luding inteerence that may cause undesired operation.
Any changes or modications not expressly approved by the pay responsible for compliance
could void the user's authority to operate the equipment.
NOTE:This equipment has been tested and found to comply with the limits for a Class B digital
device, pursuant to Pa l5 of the FCC Rules. These limits are designed to provide reasonable
protection against harmful inteerence in a residential installation. This equipment generates,
uses and can radiate radio frequency energy and, if not installed and used in accordance with
the instructions, may cause harmful inteerence to radio communications.
However, there is no guarantee that inteerence will not occur in a paicular installation. If this
equipment does cause harmful inteerence to radio or televis ion reception, which can be
determined by turning the equipment o and on, the user is encouraged to t to correct the
inteerence by one or more of the following measures:
-- Reorient or relocate the receiving antenna.
-- Increase the separation between the equipment and receiver.
-- Connect the equipment into an outlet on a circuit dierent
from that to which the receiver is connected.
-- Consult the dealer or an experienced radio/TV technic ian for help.
To maintain compliance with FCC's RF Exposure guidelines,This equipment should be installed
and operated with minimum distance between 20cm the radiator your body: Use only the
supplied antenna.
5
6
1
2
3
4
8
97
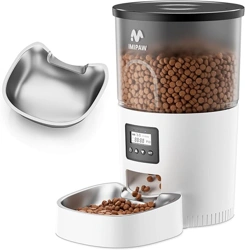
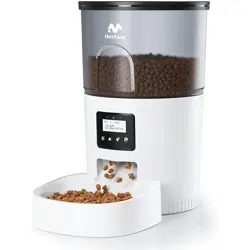
Product Image
Front View
1.Food Tank Lid
2.Food Tank
3.Control Panel
4.Food Outlet
5.Body
6.Food Bowl
Bottom View
7.Speaker
8.Batte Compament
9.DC Inteace
LED INDICATORS
Red
Flash
Flash Twice
Locked/Unlocked
Abnormal or low voltage
Stay for about 6s
WiFi mode/Hot Spot mode switch
Blue
Flash eve 2-3s
Flash eve 0.5
Stay Solid
Stay for about 6s
WiFi mode/Hot Spot mode switch
Connected to WiFi and fully operational
The feeder is in WiFi mode, ready to connect with App.
The feeder is in hot spot mode, ready to connect with App.
BUTTONS AND DISPLAY OVERREVIEW
Recording Button: When the device is unlocked, press and hold for 3s until a beep is heard
then the device stas to record. Keep holding the button throughout your recording. Release
the button when you hear the beep twice, this indicates that the recording has ended. The
device suppos a maximum of 10s recording.
Note:
·
The default of the meal call playback is 1 time, and the meal call plays when feeding time is
up.
·
When the device is unlocked, to delete your recording, press and hold the recording button
for 3s. Release immediately after a beep is heard. When 2 beeps are heard, no recording is
taken.
Locked Button: Under unlock state, long press for 6s and the red led light ashes twice,
lock the device. Under locked state, long Press for 6s and the red led light ashes twice, unlock
the device.
Note:
·
When press the feed button, feed a poion manually, it is unlocked
·
When the device is locked status, long press set button for 6s to restore facto setting.
Feed Button: When the feeder is unlocked, press once to feed a poion manually.
Set Button: When the power is turned on and the network is not congured, the blue
indicator ashes quickly by default, which is WiFi conguration mode. Press and hold for 7
seconds to hear three beeps, the red indicator is on for 6 seconds and the blue indicator
switches to slow ashing, which is hot spot network conguration mode. Repeat the operation
to switch between the two network modes.
IN THE BOX
Power Cable
Power Adapter
Bowl Tray
User Manual

Cleaning and Maintenance
Please clean the feeder regularly to keep your pet's health.
When it stas to get diy and a lot of loose food in the food trough, you can remove the food
cover to clean it.
Please clean the feeder base and the control panel with a soft, damp cloth. Do not put these
pas into water.
Do not put the product in the dishwasher, otherwise it will be permanently damaged!
Specication
Food Tank Capacity:3L
Power supply: DC 5V/1A power adapter; 3pcs alkaline D Size batteries
Power adapter: AC110-240V input, DC5V output
G.W:1.65KG
Size: 18.2×18.2×28.3cm
BC-091-D
3S
D Size
Batte
Instructions
01 丨 Installation
◎ Remove the feeder from the box.
◎ Place the feeder in the suitable location.
◎ Combine the food tray with the base of the feeder.
02 丨 Connect the power supply
◎ Plug the 5V/1A power adapter into
the wall socket and connect the
device.
◎ Open the batte compament at
the bottom of the feeder, and install 3
pcs alkaline D size batteries (not
including) in case of outa.
◎ The LED light is turn on to indicate
that the feeder is powered on.
Note:
Does not including batte .
Before turning on the power, make
sure that all pas are clean and
completely d.
03 丨 Put pet food into food tank
◎Fill the food tank with d pet food then close the lid.
Note:
Do not place canned, wet or wet pet food.
The recommended pet food size range from 2-12 mm in diameter.
04 丨 Recording
◎ Long press for 3s until you hear "di" and sta recording.The recording time does not exceed
10s, After you release your hand, you will hear "didi" to indicate that it has been saved. If you
are not satised, you can repeat this step to replace the previous recording.
note:
1) Recording will be played by pressing the recording button
2) Recording will be played when feeding
05 丨 Lock/unlock button
◎ under unlock state,Long press for 6 seconds and the red indicator light ashes twice to lock
the machine, then long press again for 6 seconds and the red indicator light ashes 2 times to
unlock.
◎ In the locked state, you can press and hold the RESET button to restore the facto settings
Note:
Pressing the feeding button in the locked state does not work, it must be unlocked for normal
use.
The APP operation is not aected in the locked state.
06 丨 Feeding
◎ Manual feeding: sho press to see 1 poion.
Note:
The feeding plan will not be aected
07 丨 Reset
◎ Switching the network conguration mode: When the power is turned on and the network
is not congured, the blue indicator ashes quickly by default (WiFi quick connection congu-
ration mode), press and hold for 7 seconds to hear three beeps, The red/blue indicator is
always on for 6 seconds and then switches to slow ashing (hot spot network conguration
mode). Repeat the operation to switch between the two network modes.
7. Manually Feeding: enter the inteace,
you can choose the poions as
requirement, click”Feed” to feed
immediately
8. Click” Meal Plan” on the main
inteace to add feeding schedule
9. Choose feeding time, feeding days,
and feed number. Click “save”
12. Share your feed: enter the inteace,
click the icon in the upper right
corner to enter the settings option
13. Enter the setting menu option and
click”Share device”
14. Click”Add” and enter the account
and save. Share the device with multiple
people
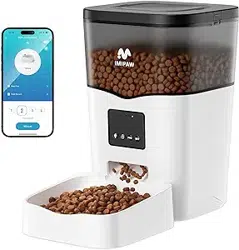
1. Scan the QR code or search for
“PETTECH” on APP Store to download
the app.Sign up or log in to your
account
2. Open the APP, select Home page, tap
“Add Device” or “+” in the upper right
corner
3. Turn on the Bluetooth on your phone.
Enter the inteace, wait for the device
“DU3L-W-01” to be discovered
automatically, then click add
4. Enter a WiFi password (the name
cannot be used in Chinese, the
password cannot be used for special
symbols)
5. Waiting for the device to connect the
network, showing successfully added,
then next step
6. After successful, you can customize
the name of device, click on the upper
right corner to nishe this step
PETTECH APP SPECIFIC OPERATIONS
TROUBLESHOOTING
Q: The food won’t come out
A: 1) Please be sure to ll in with d food; kibble size should range from 2-10mm / 0.07-0.4
inch in diameter.
2)Check whether any foreign objects are placed - disassemble the food tank and check the
chute. Also check the food outlet.
3)Check whether it’s low batte level-whether the power adapter is connected or there is
any outage when no batte is installed.
Q: I can’t here any voice recordings when feeding
A: Make sure you’ve recorded successfully unlock the control panel, press the Feed button to
check. If no sound is heard, you may need to record again and be sure to save following
instructions in Recording a meal call section.
Q: Food volume for each poion is not the same
A: The rst few poions may va, and it doesn’t mean a faulty equipment. After about 6
feedings it should be almost even.
Q: I can’t congure the feeder on my mobile
A: Incorrect account and password format
Use only number and letter for username and password, 12 digits at most.
5G not suppoed- Please use 2.4G wireless network.
Application problem - Some program conicts may happen. Please resta your mobile
Q: Feeders appears disconnected from WiFi
A: Weak disconnection -Please check that the distance between your feeder and router is no
more than 10m/33ft, and no concrete walls or too many obstacles between them. Otherwise
the WiFi network can be weak and cause unstable connection.
Hotspot distribution network (optional)
Please follow the button instructions to switch the network distribution mode to hotspot
distribution. When the feeder's LED light ashes slowly, the specic operation steps are as
following:
1. Open the PETTECH APP, select Add Device - Manually Add - Small Home Appliances - Pet
Feeder
(Wi-Fi) - Enter the WiFi Password Next - Click "Next", select “Blink Slowly” - Click " Go to
Connect" - then go to connect the PETTECH APP -XXXX WiFi signal.
2. After connecting, return to the previous inteace, and then enter the network conguration
inteace to wait for the connection.
10. Slide the scheduletimer to delete it 11. View the logs: click”Feed Record”,
you can view the feeding records