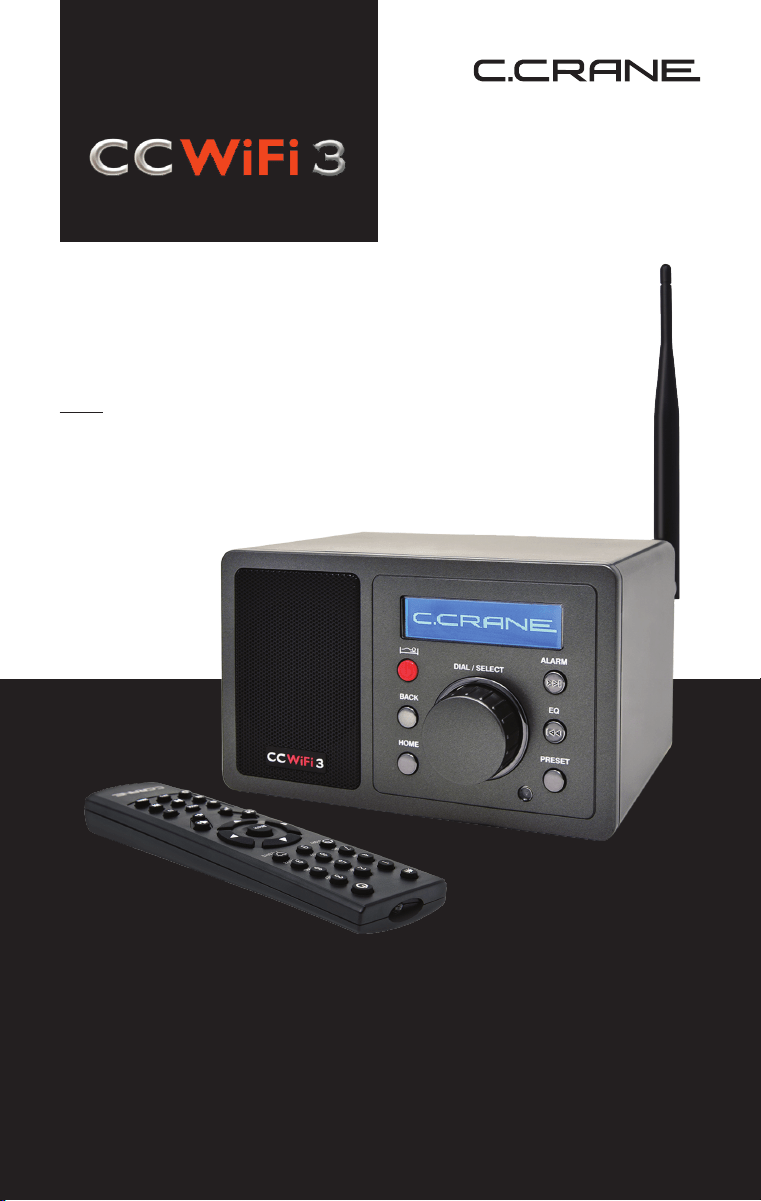
INTERNET RADIO
INSTRUCTION
MANUAL
Please read all the instructions completely before use
and save this manual for future reference.

This page was left blank intentionally.
3
CC WiFi 3
Owners Record
Thank you for purchasing a CC WiFi 3 Internet Radio from
C. Crane. We hope the CC WiFi 3 Internet Radio will give you
many years of learning, news and entertainment. If you have
questions about your radio, please give us a call 1-800-522-8863
or email: [email protected]
FOR YOUR FUTURE REFERENCE:
Date of purchase/Name & address of dealer:
Serial No. (Found inside battery compartment):
UNPACKING
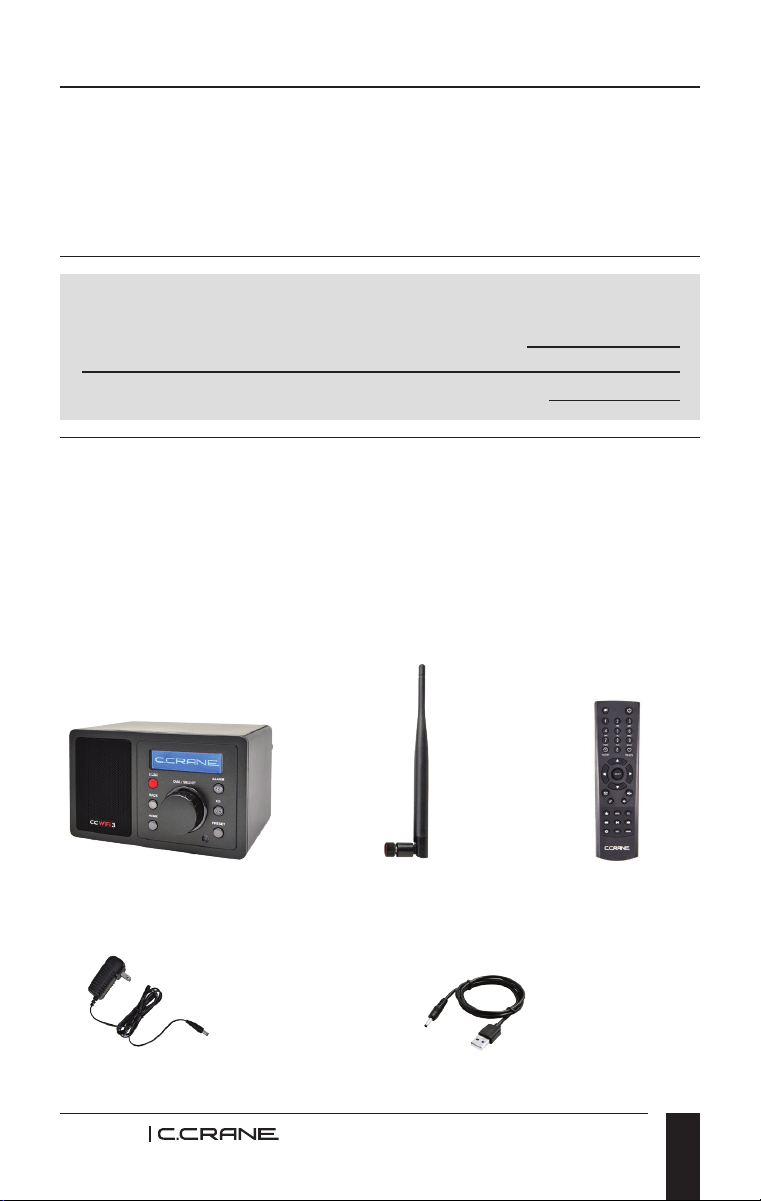
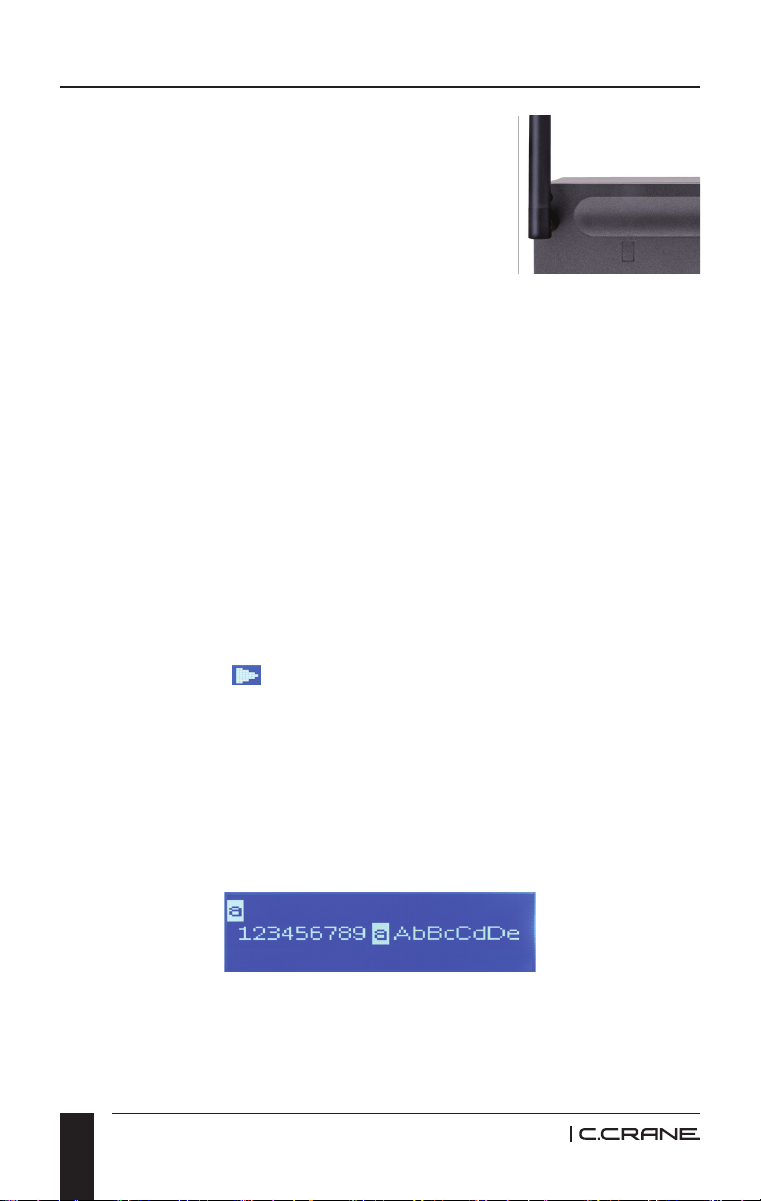
The box should contain the CC WiFi 3 Internet Radio, Antenna,
Remote Control, an AC Power Adapter, 3’ USB to Radio Cable,
this manual and a warranty card. If anything is missing or
damaged, please contact C. Crane immediately. We recommend
that you keep the box in the unlikely event that your radio needs
servicing.
Included:
CC WIFI 3
INTERNET RADIO
AC POWER
ADAPTER
3’ USB TO RADIO CABLE AN ALTERNATE WAY
TO POWER THE RADIO FROM ANY USB PORT
5DBI ANTENNA
CONNECT TO BACK
OF RADIO FOR MORE
RECEPTION
REMOTE CONTROL
(2 X “AAA”
BATTERIES,
NOT INCLUDED)
CC WiFi 3
4
Safety Instructions
Please read IMPORTANT SAFETY INSTRUCTIONS before
use. It is important to read and understand all instructions. Keep
these precautions and instructions where all who will use this
radio will read them.
WARNING: TO PREVENT FIRE OR ELECTRIC SHOCK
HAZARD DO NOT EXPOSE THIS PRODUCT TO RAIN
OR MOISTURE.
CAUTION
• Slowly increase the sound until you can hear it comfortably
and clearly without distortion.
• Long-term exposure to loud sounds may cause hearing
damage. It is best to avoid high volume levels when using
headphones/earbuds, especially for extended periods.
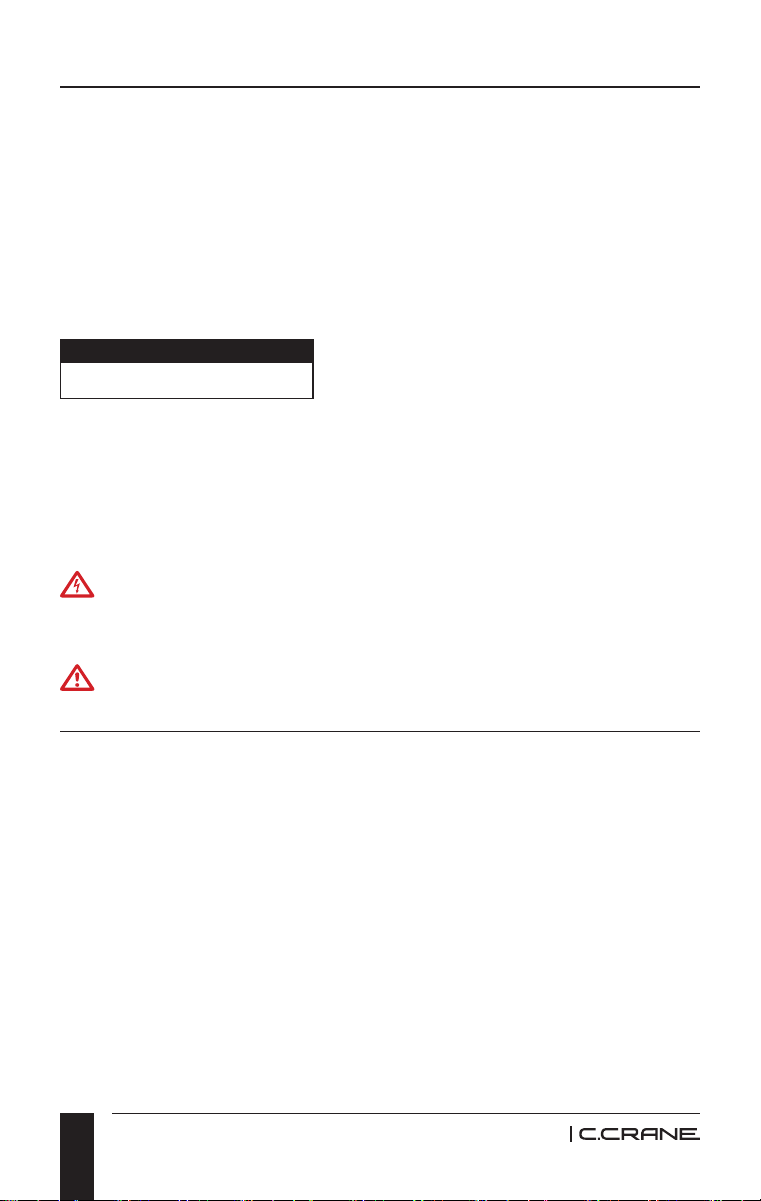
To prevent damage to your radio or possible injury to you or
others, read these safe ty precautions and instructions entirely
before applying power to your radio.
CAUTION
RISK OF ELECTRIC SHOCK
DO NOT OPEN
CAUTION: TO REDUCE THE RISK OF ELECTRIC
SHOCK, DO NOT REMOVE THE RADIO BACK. NO USER
SERVICEABLE PARTS INSIDE. REFER SERVICING TO
QUALIFIED SERVICE PERSONNEL.
The lightning ash and arrowhead within the triangle is
a warning sign alerting you of “Dangerous Voltage” inside
the radio.
The exclamation point within the triangle is a warning
sign alerting you of important instructions accompanying
this radio.

5
CC WiFi 3
1. COMMON CARE
Check the radio, AC adapter, and any accessories regularly.
Do not use the radio if there is any sign of damage. Only
operate in accordance with the instructions in this manual.
2. DISCONNECT THE RADIO IN CASE OF MALFUNCTION
If you smell or notice smoke, disconnect the AC adapter
immediately to avoid burns. Contact C. Crane for inspection
and service before any future operation. Only use the AC
adapter supplied with the unit and replace it if wires become
frayed or exposed.
3. KEEP OUT OF REACH OF CHILDREN
Use only on a stable, level surface. Dropping the radio can
cause damage or injury. Keep the AC Adapter cord in a
position so someone cannot trip and cause the radio to fall.
4. KEEP AWAY FROM WATER AND MOISTURE
Keep the radio dry. Liquids and moisture can damage the
radio. If a liquid leaks into the radio do not operate and seek
a qualied service shop. To clean, remove the power adapter
and use a damp cloth on the exterior only.
5. KEEP AWAY FROM EXTREME TEMPERATURES
Extreme temperatures can damage the radio. Do not leave or
use the radio where it can be subjected to high or very cold
temperatures.
6. DO NOT ATTEMPT TO SERVICE RADIO
Refer all service work to a qualied service shop when the
radio does not appear to operate normally, exhibits a change
in performance or the radio has received damage. Never open
the radio as this may expose you to dangerous voltages and
this will void all warranties.
Safety Instructions

CC WiFi 3
6
Owners Record/Unpacking _________________________
Safety Instructions ________________________________
Location of Controls/Features Radio __________________
Location of Controls/Features Remote ________________
First Time Setup
Using the BACK and HOME buttons __________________
Finding a Radio Station ____________________________
Searching Directly for a Specic Station _______________
Changing the Volume ______________________________
4 Ways to Store a Radio Station as a Preset ____________
4 Ways to Play a Stored Radio Station Preset __________
Radio Preset Page (Optional for Advanced Users) _______
Using Bluetooth
®
Functionality _______________________
Bluetooth Radio Controls ___________________________
Setting the Time and Date __________________________
Setting the Alarm _________________________________
Setting the Sleep Timer ____________________________
Settings Menu Options _____________________________
About Your Network Name (SSID) ____________________
About Your Wireless Security Key (password) ___________
Having Trouble Connecting to a Wireless Network _______
Error Messages
Troubleshooting/FAQ’s _____________________________
Menu Flow Chart _________________________________
Specications ____________________________________
Memory Preset Log _______________________________
Terms of Service __________________________________
Accessories _____________________________________
03
04
07
08
10
11
11
13
13
14
15
16
19
19
20
20
21
22
24
25
25
26
29
34
36
38
39
39
Table of Contents
7
CC WiFi 3
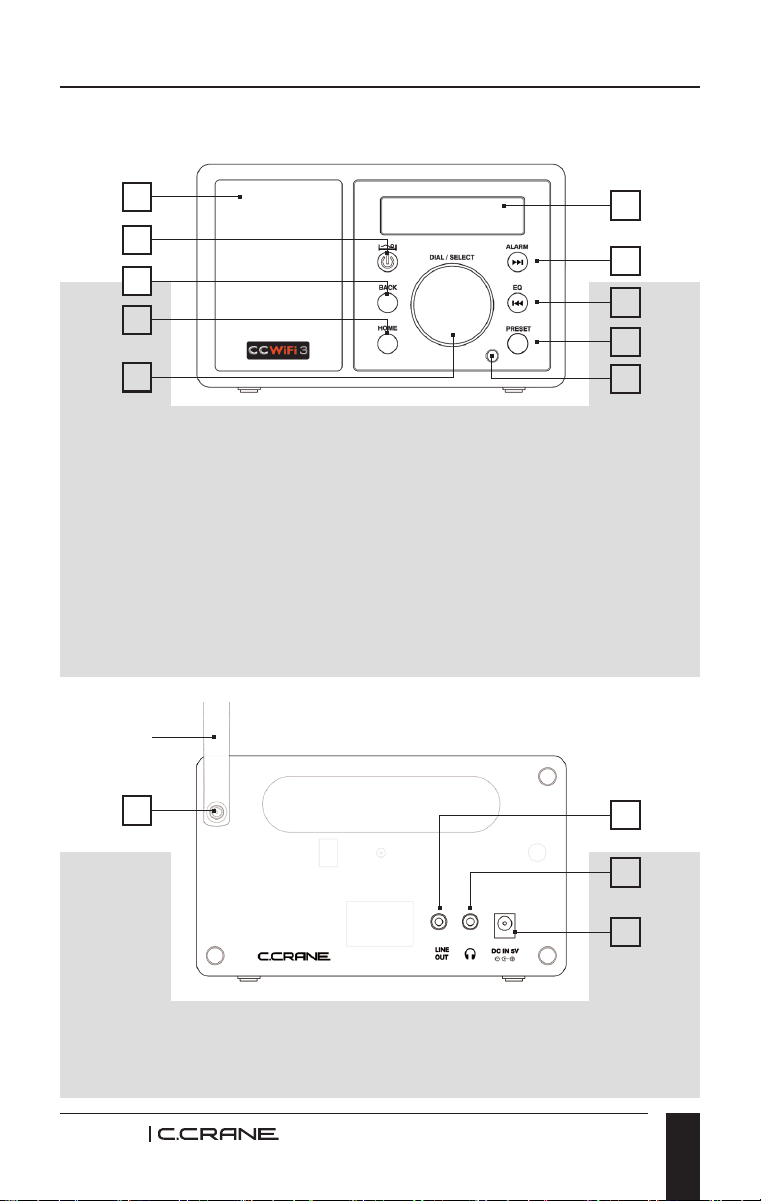
1. LCD Display
2. Alarm Button or Play
Next
3. Equalizer Button or Play
Previous
4. Preset Button
5. Remote Sensor
11. DC Power Jack
12. Headphone Jack
6. Dial/Volume/Select/Pause
7. Home Menu Button
8. Back Button
9. Power Button or Sleep
Timer
10. Speaker
13. Line Out Jack
14. WiFi Antenna Jack
FRONT
1
11
12
13
2
3
4
7
10
14
6
8
9
5
Location of Controls and Features
BACK
Antenna
CC WiFi 3
8
1
3
5
6
16
19
22
20
17
14
12
11
9
4
2
8
15
1821
13
10
7
Location of Controls – Remote Control

9
CC WiFi 3
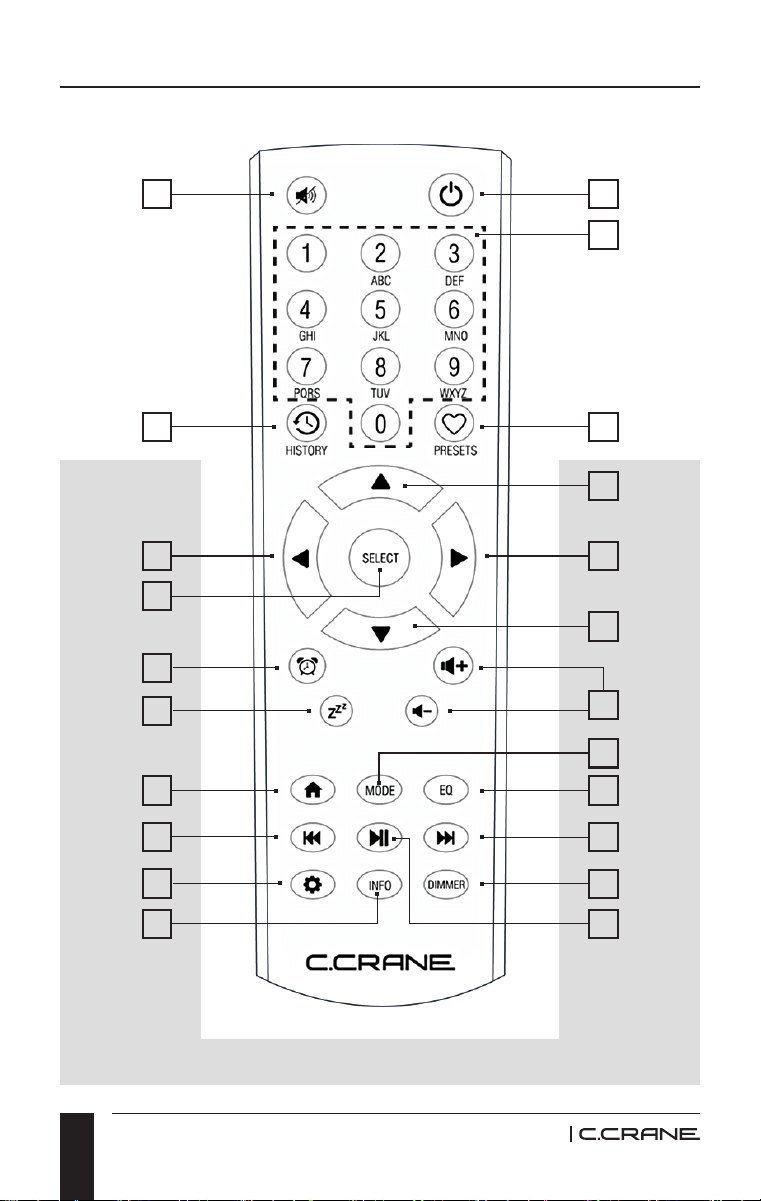
1. (POWER) Switches radio ON/ OFF.
2. (MUTE) Mutes audio.
3. (0-9) Store presets and recall 0-9.
4. (HISTORY) Accesses a list of recently played stations.
5. (PRESETS) Stores and recalls favorite stations.
6. (UP) Scrolls menu up.
7. (DOWN) Scrolls menu down.
8. (SELECT) Selects the indicated item on the display.
9. (LEFT) Reverts to previous menu level.
10. (RIGHT) Goes to next menu level for the current selection.
11. (ALARM) Enters alarm menu options.
12. (SLEEP TIMER) Enters sleep timer menu selections.
13. (VOLUME +/-) Adjust volume up and down.
14. (HOME) Returns to primary menu selections.
15. (MODE) Selects between My Presets, Internet Radio
Stations or Bluetooth mode.
16. (EQ) Enters equalizer menu options.
17. (PLAY PREVIOUS) Plays previous station or song/track.
18. (PLAY/PAUSE) Play/pause song/track or play/stop
stations.
19. (PLAY NEXT) Plays next station or song/track.
20. (SETTINGS) Enters settings menus for various functions.
21. (INFO) Enters network and system information menu.
22. (DIMMER) Enters display bright menu.
Location of Controls – Remote Control
CC WiFi 3
10
Plug the power adapter cube into a 120V AC
power outlet. Connect the power adapters
small plug into the jack on the back of the
radio that is labeled “DC in 5V”. Attach
Antenna to the back of the radio.
After a few seconds, the display on the front
of the radio will light up and show:
1. C.Crane > Powered by Skytune > Starting… Please wait >
Select Language.
2. When the radio nds wireless networks, they will show in a
list…
Example:
Bob’s Network
Internet.service-A19B0
MediaNet_1A4260
NOTE: If the radio cannot nd any wireless networks, then
see page 26, error #3 for troubleshooting assistance.
3. Rotate the dial until your desired network has the triangle
shaped cursor in front of the name.
4. Press and release DIAL/SELECT to make your selection.
Need Help? Refer to page 24 for help nding which SSID
(Network Name) is yours.
5. The password entry screen will be displayed. This mode
contains upper case letters, lower case letters, numbers, and
special characters.
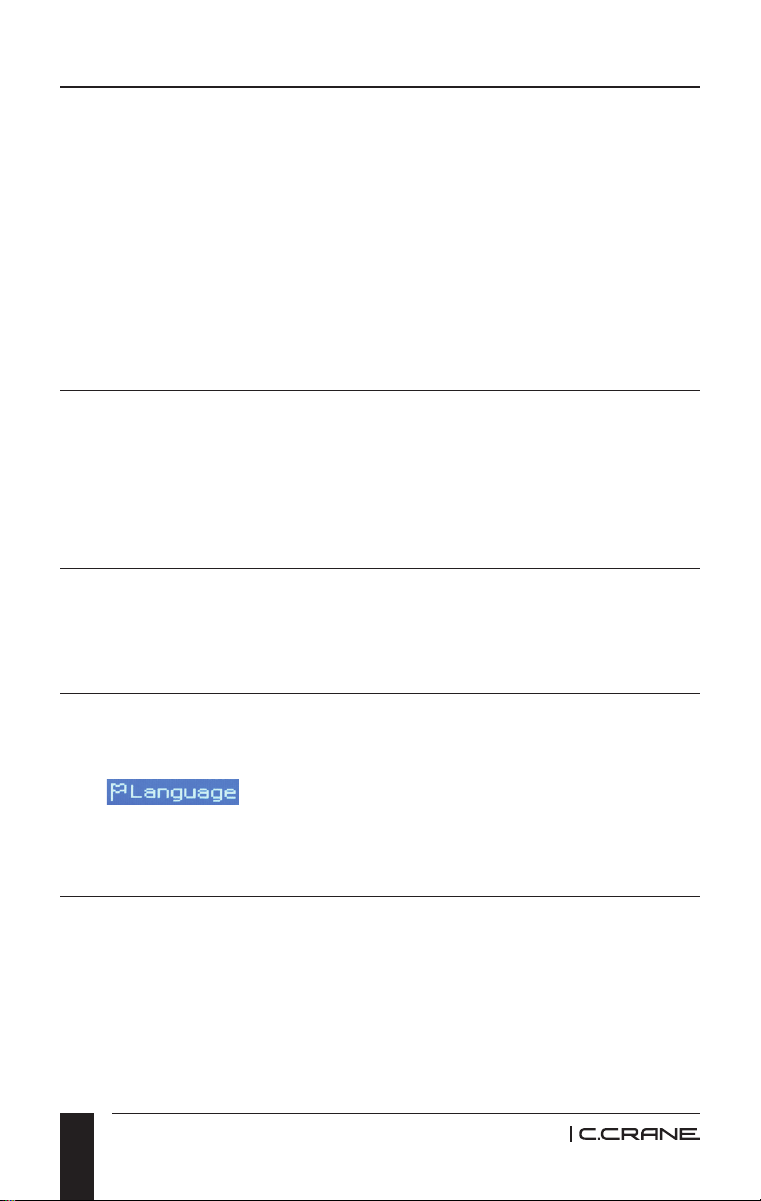
Notice that the letter “a” is highlighted in center of the display.
Rotate the dial and you will see that the highlighted character is
always in the center. To enter the password for the network that
you have selected follow these steps:
First Time Setup

11
CC WiFi 3
A. Rotate the dial until the rst character of your password is
highlighted in the center of the display.
B. Select it by pressing and releasing DIAL/SELECT. After
you have selected the rst character of your password, it will
appear at the top.
C. Turn the dial to the next character in the password.
D. Press and release DIAL/SELECT.
Repeat this process until your entire wireless password is
entered at the top of the screen. Passwords are case sensitive to
upper and lower-case letters, so you must enter them exactly.
After the nal character is entered, press and hold DIAL/SELECT
in for 4 seconds to nish. When nished the radio automatically
goes to the “Primary Menu” that contains six options: My
Presets, Internet Radio Stations, Bluetooth, Alarm, Sleep Timer,
and Settings. You may see “Updating Please Wait...”. Do not
unplug or turn radio off.
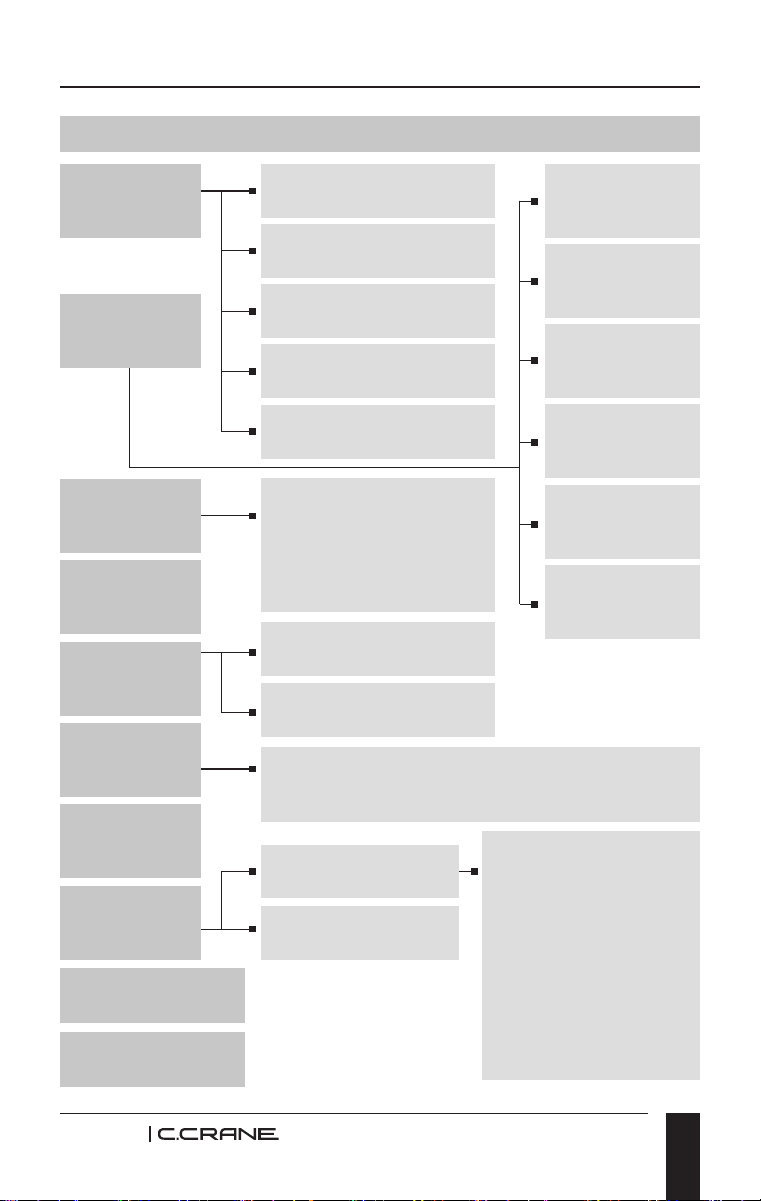
NOTE: Menu tree ow charts are located on pages 34-35.
USING THE BACK AND HOME BUTTONS
While viewing any selection or menu, the BACK button will return
you to your previous location. If you are feeling stuck or lost,
press it enough times and you will return to the Primary menu or
to the station that is playing. The HOME button is a quick way to
return to the Primary menu. Press it again to return to the station
that is playing.
FINDING A RADIO STATION
1. From the Primary Menu, turn the dial until the triangle shaped
cursor is in front of “Internet Radio Stations”, then press
and release DIAL/SELECT.
2. Next, turn the dial to choose a radio station from either the
“Most Popular (U.S.)”, “By Genre” or “By Location” menu.
First Time Setup

CC WiFi 3
12
Press and release DIAL/SELECT to continue into the selected
menu.
NOTE: The “Most Popular (U.S.)” menu lets you choose from
the top 40 USA based radio stations that are most popular
with CC WiFi 3 Radio users. This list will evolve and change
over time as more users acquire the radio. The “By Location”
menu lets you choose a radio station from a large continental
or multicontinental area, then by country inside the selected
area. The “By Genre” menu lets you choose a radio station by
categorized content – for example” Dance, Classical, Rock, Talk”
etc. For direct station name entry, skip ahead to “Enter Search
Words”.
3. After pressing and releasing DIAL/SELECT on “Most Popular
(U.S.)”, “By Location”, or “By Genre” rotate the dial to scroll
through the remaining submenus until station names are listed.
4. Stations are listed in numerical and alphabetical order
depending how the station is named in the list. You may
need to turn the dial many times until your desired station is
reached.
5. Press and release DIAL/ SELECT to play your selected
station.
6. As the station connects, the display will show “Awaiting server”
followed by “Connecting”, followed by “Buffering”. This can
some times take up to a minute or two, depending on the
speed and popularity of the station.
NOTE: Once the station is fully buffered, it will begin to play. You
may need to turn up the volume by rotating DIAL/SELECT.
NOTE: C. Crane has no control over the station list or quality of
each station. The CC WiFi 3 is fully dependent on the Skytune
service for gathering URLs and information from each station
that has been made available for public use by the station itself.
First Time Setup

13
CC WiFi 3
SEARCHING DIRECTLY FOR A SPECIFIC STATION
You can search for an Internet radio station by directly entering
the station name or call letters into the radio.
1. From the Primary Menu, turn the dial until the triangle shaped
cursor is in front of “Internet Radio Stations”, then press
and release DIAL/SELECT.
2. Next, turn the dial clockwise (past the other selections) to
“Enter Search Words”, then press and release DIAL/SELECT.
3. Rotate the dial until the rst character of the desired station
name is in the center of the display. (Note: To enter a space
select this symbol )
4. Select it by pressing and releasing DIAL/SELECT. Your
selected characters will appear at the top of the screen.
5. Turn the dial to the next character in station name. Press and
release DIAL/SELECT.
6. Repeat this process until all the characters in the station name
are entered at the top of the screen. After the nal character
is entered, press and hold DIAL/SELECT in for 4 seconds to
nish.
7. The radio will now display the station names resulting from
your search. You can rotate the dial to browse through the
results. When you are ready to play a station, align the cursor
in front of your selection and press and release DIAL/
SELECT.
CHANGING THE VOLUME
While a station is playing, you can change the volume by
turning DIAL/SELECT clockwise to increase the volume and
counterclockwise to decrease the volume. The display shows
the volume bar. You cannot change the volume when you are in
a menu, except when using the remote control. After a station is
selected and begins to play, you can then change the volume by
turning the dial.
First Time Setup

CC WiFi 3
14
4 WAYS TO STORE A RADIO STATION AS A PRESET
1. The remote control is likely the easiest way to set a one button
preset and can store up to 10 presets. This is the only way to
store presets 1-10. Using the remote control to store presets
0-9 (0=10): While a radio station is playing, press and hold the
preset number on the remote control that you want the station
to be stored to. After three seconds the display screen will
show a downwards arrow icon.
2. Using the controls on the front of the radio to store presets:
While a radio station is playing, press and hold the PRESET
button for three seconds or until the display screen shows a
downwards arrow icon. The radio station has now been saved
as the next available preset after preset 10.
3. Using the remote control: While a radio station is playing,
press and hold the PRESETS button for three seconds or
until the display screen shows a downwards arrow icon.
The radio station has now been saved as the next available
preset after preset 10.
NOTE: To delete a preset in the list align the cursor in front of
your selection and press the or alarm button on the front of
your radio or the right arrow button on the remote control. This
opens an options menu where you can delete the station.
4. Advanced users can enter their own custom URL to the radio
presets page with a computer or other device such as a tablet
or smartphone. See page 16 for more details.
4 Ways to Store a Radio Station as a Preset

15
CC WiFi 3
4 WAYS TO PLAY A STORED RADIO STATION PRESET
1. The remote control is the easiest way to recall presets 1-10.
Using the remote control to recall presets 0-9 (0=10): Briey
press and release the corresponding number button assigned
to the station you want to play.
2. Using the controls on the front of the radio to recall presets:
Briey press the PRESET button and a list of your preset
stations will be displayed. Rotate the dial until the cursor
is in front of the station you desire, then press and release the
DIAL/SELECT in to select it.
3. Using the remote control: Briey press the PRESETS
button and your list of preset stations will be displayed. Press
the DOWN arrow .until the cursor is in front of the station
you desire, then press the SELECT button to play it.
4. Advanced users can play radio presets using a computer
or other device such as a tablet or smartphone. See Page 16
for more details.
4 Ways to Play a Stored Radio Station Preset

CC WiFi 3
16
Advanced users can access the radio presets page with a
computer or other device such as a tablet or smartphone. The
computer or device must be connected to the same WiFi network
as the CC WiFi 3 radio. To Access the Radio Preset Page:
1. Open a web browser such as Chrome
®
, Safari
®
, Firefox
®
,
or Edge
®
.
2. In the address bar at the top of the screen, enter your radios
IP address.
a. To nd the IP address, navigate on your radio to: Home
Settings Information Network Information IP: *****
a.i. Write down your radios IP address numbers and include
the dots between the numbers. It should look something like
this (example): 192.168.1.184
NOTE: IP addresses are usually dynamic and likely to change
every time your radio is restarted.
3. After entering your IP address into to address bar of your web
browser, press enter on your keyboard. Loading this page
may take a minute.
4. If successful, your web browser will navigate to “My CC WiFi
Radio 3 Presets” page. This page will contain your radios
station preset list and information about each.
• ID: This is the preset number for your preset station.
Example “Preset #1”.
• Channel Name: These are the names of your radio station
presets.
• Channel URL: This will likely say something like “Channel
URL is maintained by Skytune”… unless you have entered a
custom URL for the station you desire.
• Play: Clicking this button will begin playing the station preset
through your CC WiFi Radio 3.
• Edit: Clicking this button will allow you to change the Station
name to anything you desire. Example “Bob’s Rock Station”.
Radio Preset Page (Optional for Advanced Users)

17
CC WiFi 3
This new name will only show up on your radio.
• Delete: Clicking this button will remove the station as a
preset.
• Move: This allows you to change the order of your preset
listings. Enter the preset number that you wish to move in
the rst “ID” box, then enter the destination number in the
next box (named “To ID”). Lastly press the move button to
complete the move.
• Previous/Next: If you have many presets then they will be
separated into pages. Use the Previous and Next buttons to
navigate pages.
• Add Channel: Warning, this is for advanced users. If you
desire a station that is not found on the CC WiFi Radio 3,
and you know the exact “Stream URL” of this station, then
it can be added in this area. Keep in mind that your radio
will only play the correct “Stream URL” and not just any
web address that works on your computer. Computers are
designed differently in this aspect.
TIP: Stream URLs are not easy to nd. They are usually hidden
and will usually look something like this:
“http://live.*******.com:2470/live43.m3u”. Notice that the correct
URL will usually end with .m3U or .mp3 or something similar.
TIP: Here is another way to look for a Stream URL. (This does
not always work, but is a good attempt).
1. Try searching with Google Chrome for your desired station
name (Example: KMUD) followed by “Stream URL”.
2. Select the Google result that looks best (usually the top
result).
3. If the page result gives you a link to play the station, then try
right-clicking on the link, then select “Inspect”.
4. The highlighted result in the code may contain the Stream
URL that you are looking for. Write down the portion of the
Radio Preset Page (Optional for Advanced Users)

CC WiFi 3
18
result that has the blue underline (or copy with your computer)
starting with “http”.
5. Try adding the station URL to the “Add Channel” area of the
Radio Presets Page. You do not need to enter exact
information for Channel name, Country, or Genre. Only the
Channel URL needs to be exact with the Station URL that you
have found.
6. Click “Save” and then try playing it from your radio presets.
NOTE: Some stations use JavaScript or some other method
to play stations and do not have a listed MP3 or M3U station
stream. These stations will be impossible to play on the radio.
As a last resort you can attempt to nd the stream URL by
contacting the station and asking them if they have an “MP3” or
“M3U” URL station stream so that you can play it on your device.
FOR FUTURE REFERENCE: The CC WiFi Radio 3 uses
Skytune as the main directory for looking up and playing stations.
If for some reason in the future the Skytune radio service is not
available or cannot connect to your radio, you have the ability to
continue listening to your preset stations. To add new stations to
your preset list, you will need to enter the stream URL into the
Radio Preset Page via a computer, tablet, or smartphone. This
is a good feature to remember and will hopefully give peace of
mind knowing that the CC WiFi Radio 3 is not fully dependent on
the success of the Skytune radio service.
Radio Preset Page (Optional for Advanced Users)

19
CC WiFi 3
Bluetooth mode allows your CC WiFi Radio 3 to become a
wireless speaker for your smartphone or tablet.
1. From the Primary Menu, turn the dial until the triangle shaped
cursor is in front of “Bluetooth”, then press and release
DIAL/SELECT.
2. The radio screen will display “CC WiFi 3-**** Not connected”
3. Go to your smartphone or tablet and enable Bluetooth.
A. Bluetooth is usually accessible from “Settings”
“Bluetooth” if using an Apple
®
device.
B. Bluetooth is usually accessible from “Settings”
“Connections” if using an Android device.
4. After enabling Bluetooth, look for “CC WiFi 3-***” in the listed
devices and select it.
5. Your smartphone or tablet will connect to the CC WiFi 3
and use it as the speaker. Try playing any audio from your
smartphone or tablet. You will need to adjust the volume on
your radio and the volume on your phone or tablet. Bluetooth
will only play while in the Bluetooth mode.
BLUETOOTH RADIO CONTROLS
The CC WiFi 3 can control your phones Bluetooth audio
playback if the option is available in the app that you are using.
Play or Pause: Press and release DIAL/SELECT.
Skip: Press the ALARM Button on the radio.
Play Previous: Press the EQ button on the radio.
NOTE: Using the remote control, the arrow buttons (at the
bottom) will control playback.
Using Bluetooth
®
Functionality

CC WiFi 3
20
SETTING THE TIME AND DATE
NOTE: The CC WiFi 3 radio is equipped with “Auto Time”
detection and will self-adjust the time once it is connected to your
WiFi network. It is likely that the time will be correct without any
adjustment. If the time is incorrect then follow the instructions
below. At any point, you can use the BACK button to start over at
the previous screen.
1. If you are currently listening to a radio station, briey press the
HOME button to access the Primary Menu.
2. Rotate the dial until the cursor is in front of “Settings” –
press and release DIAL/SELECT.
3. Rotate the dial clockwise to “Date & Time” – press and release
DIAL/SELECT.
4. Rotate the dial to “Time Zone” – press and release DIAL/
SELECT.
5. Rotate the dial to “Manual-Set Time Zone” – press and release
DIAL/SELECT.
6. Rotate the dial to “Americas” – press and release DIAL/
SELECT.
7. Rotate the dial and scroll through a list of large cities in many
time zones. Choose a large city that is close to your location
and in the same time zone (for example Los Angeles, Denver,
Chicago, New York, etc.) - press and release DIAL/SELECT.
8. When nished, the radio will show the correct time and date
while the power is off, or a radio station is playing.
SETTING THE ALARM
NOTE: At any point, you can use the BACK button to start over
at the previous screen.
1. If you are currently listening to a radio station, briey press the
HOME button to access the Primary Menu.
Setting the Time/Date and Alarm/Sleep Timer

21
CC WiFi 3
2. Rotate the dial until the cursor (show icon) is in front of “Alarm”
– press and release DIAL/SELECT.
3. Rotate the dial to “Alarm 1” – press and release DIAL/
SELECT.
4. Rotate the dial to “Turn On” – press and release DIAL/
SELECT. NOTE: “Turn OFF” can be selected later to disable
the alarm if desired.
5. Rotate the dial to “Time” – press and release DIAL/SELECT.
6. Rotate the dial to the correct hour – press the “Right Arrow”
button.
7. Rotate the dial to the correct minute – press the “Right Arrow”
button.
8. Rotate the dial to “am” or “pm” – press and release DIAL/
SELECT. NOTE: By default, the alarm will wake-up with a
beeping tone. The loudness (alarm volume by default is 5%)
of the alarm, duration, repetition, and type (i.e. tone or pre
set radio station) can also be modied in the Alarm menu. To
wake-up with a radio station playing, you must rst store the
station as a memory preset. See page 14.
SETTING THE SLEEP TIMER
NOTE: The sleep timer needs to be activated after the radio is
turned on. It is deactivated when the radio is turned off.
1. Press and hold the POWER button for 3 seconds to
access the sleep timer menu. Or from the Primary Menu
select Sleep Timer.
2. Rotate the dial and choose how long you want the radio to
play before shutting itself off. The choices are 15, 30, 45, 60,
120, 150, and 180 minutes. When the cursor is in front on
your selection – press and release DIAL/SELECT. A small icon
will show on the top of the screen to remind you that the
sleep timer is set.
Setting the Time/Date and Alarm/Sleep Timer
CC WiFi 3
22
SETTINGS MENU OPTIONS
To access the “Settings” menu follow these steps:
1. Press the “HOME” button ones quickly to access the primary
menu.
2. Rotate the dial until the cursor arrow is in front of “Settings” –
press and release DIAL/SELECT.
3. Rotate the dial clockwise to access all the options in the
“Settings” menu.
NETWORK
This option is used for connecting your radio to your WiFi
network or changing existing network parameters. Once the
radio has established a connection to the network, the settings
will be saved to the radio for later use.
DATE & TIME
Use this option to set the time, date, and clock format. See
“Setting the Time and Date” on page 20.
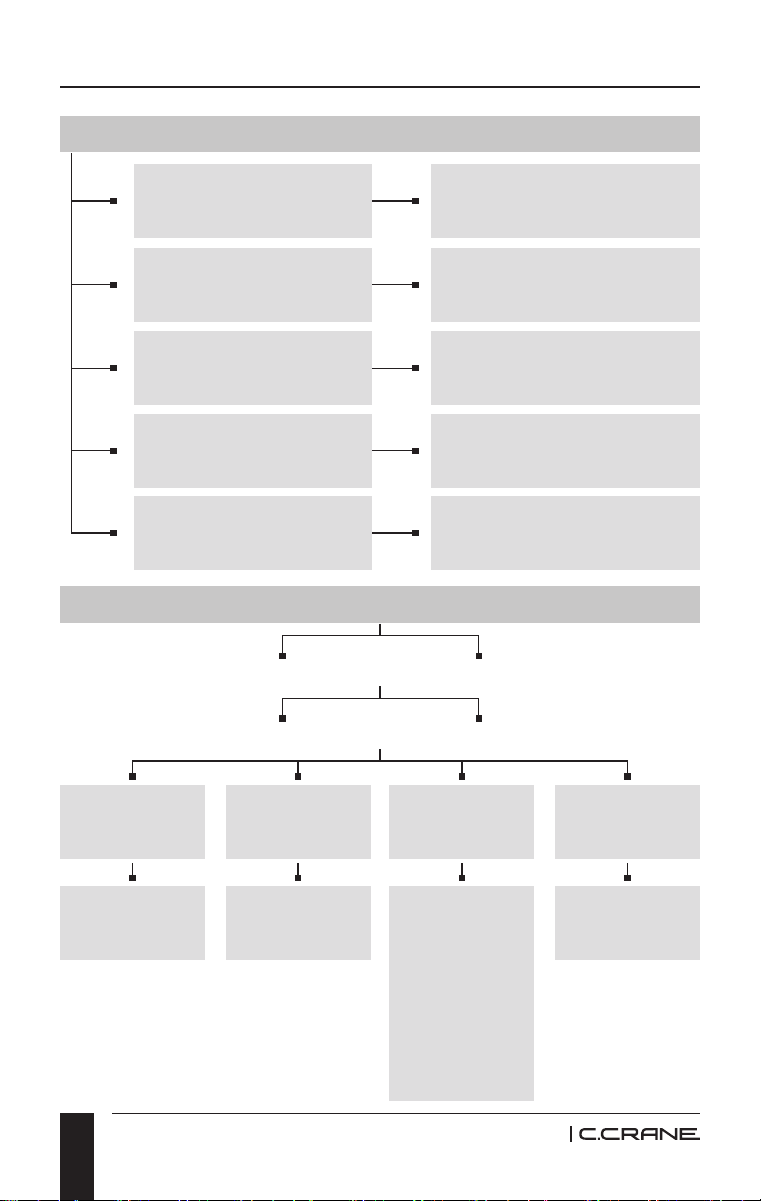
LANGUAGE
Allows you to change the display language. There is a “Flag”
icon in front of the setting for “Language”. This is
an important clue in the case the language setting is changed by
accident. To return to English, select the “Flag” icon and choose
the rst option in the list thereafter.
POWER OUTAGE RECOVERY
By default, when the radio has lost power and the power is
restored, the radio will go into Standby Mode. This way it will not
power on to a station in the middle of the night to wake you while
sleeping. To power on to play a station, you will need to press
and release the red power button.
Settings Menu Options

23
CC WiFi 3
If you prefer to have the radio automatically play the last selected
station when power is restored, select "Resume Last Play".
DISPLAY BRIGHTNESS
The radio will detect when any button or control is used, and
it will make your screen brighter for 20 seconds to help you
navigate the menus. This setting is called “First 20 seconds” and
can be increased to the level you desire. If no buttons are used
within 20 seconds, then the radio will revert to regular brightness
or “After 20 seconds” brightness. Both settings can be changed
to your desired brightness level. When radio is OFF, turning the
dial can change the display brightness.
CONTRAST
The contrast can be adjusted for better viewing from angles and
further away.
EQ
This setting allows you to control the way your radio sounds
from the Speaker, headphones, and the Line-out jack. There
are several different preset combinations, or you can choose to
customize your sound using the “Advanced” option.
BUFFER TIME
Before a station is played, the radio takes a few seconds to
record ahead of the audio stream. This is called buffering and it
keeps the station playing smoothly, even if there are tiny breaks
in the audio stream. If the buffering time is increased then the
station should play longer without problems, but there will be
extra time for the station to begin playing. For most high-quality
stations longer buffering is not needed.
Setting Menu Options

CC WiFi 3
24
INFORMATION
This section contains network and system information such as
the radios current IP Address, WiFi Network Name (SSID), WiFi
signal strength percentage, and hardware (MAC) address. You
can also nd the radio model and rmware version in this area.
SOFTWARE UPDATE
Check here to see if your radio software is up to date. Most
software updates will be automatic when the radio is started but
if you are experiencing problems then it is always good to check
for software updates.
RESET TO DEFAULT
Restore your radio programming to the way it was when you rst
received it. A reset to default will erase your WiFi password
and network information, your preset stations, and any custom
settings that you have made since receiving the radio. In
some cases, this may correct a problem that is not cured by
unplugging the power briey.
About Your Network Name (SSID): This is the name which was
assigned to your wireless router by the person who set it up
(often your high speed Internet or Cable provider).
Alternatively, your routers network name (SSID) may be printed
on your router (usually on the back or bottom label). After
scanning for your wireless network on the radio, rotate the dial
through all the results. You may recognize your network name
(SSID). If your router’s manufacturer name or your internet
service provider name is displayed, try selecting it. NOTE:
Hidden Networks are not supported.
Setting Menu Options/About Your Network Name (SSID)

25
CC WiFi 3
About Your Wireless Security key (password): This can
also be called “WPA key” or “Pre Shared Key” and is used to
keep unwanted “guests” from your wireless network. If you are
unaware of what your password is, you can follow our suggested
steps for nding it:
1. Check the label on the back or bottom of your router.
2. Search your records for a document that was printed out after
your router was setup by the technician or user. This
document should contain the Wireless password.
3. If your wireless network has been renamed and password
changed to something unknown, then it is possible to reset
your router. You may need to call the manufacturer of the
router or your Internet service provider for more assistance.
C. Crane cannot assist you with WiFi network setup.
Having Trouble Connecting to a Wireless Network: This
problem can be caused by several possible scenarios.
1. Double check the wireless password entry. The password
must be exact including upper case, lower case, and special
characters.
2. Make sure that you do not accidentally add extra spaces or
characters to the end.
3. Passwords are usually 8 - 26 characters. It is unusual to
see passwords with fewer than 8 characters.
4. You may have received an error number. See our “Error
Messages Explained” on page 26.
About your Wireless Security Key

CC WiFi 3
26
ERROR MESSAGES EXPLAINED
Error #1: The radio could not connect to the router for some
reason. Always try again, this may have been a glitch. 90%
of the time this error is caused by entering the wrong WiFi
password. Another cause could be related to DHCP not enabled
on your router. Most routers come with DHCP enabled. For static
IP networks the radio can be setup manually as an option in
network settings.
If you have enabled MAC ltering on your router then the radio
will not be allowed to connect until the MAC address is allowed.
There may be some incompatibility with the radio and your
routers encryption method that it is currently using. If all else
fails, try changing your routers encryption to “WPA2 PSK AES
only”. Unplug your radio for 10 seconds and try again.
Error #2: There has been a glitch with the WiFi chip inside your
radio. Unplug your radio for 10 seconds and try again. Contact
C. Crane customer support for further assistance.
Error #3: After scanning for nearby WiFi networks, no networks
are found.
• Sometimes your wireless network will not show on the rst
scan. Try scanning for networks again on your radio. You must
have access to nearby WiFi to operate the radio (except in
Bluetooth mode).
• You may be out of range from your WiFi router. As a test, move
closer to the WiFi router that you are attempting to connect to.
• Check your WiFi router, it must be powered on and ready. Be
sure that the “power and “wireless” LED lights are on. If they
are not on, you may need to call the manufacturer of the router
for more assistance.
• Try unplugging the power to your router and then wait 2
minutes before trying to connect with the radio again.
Error Messages

27
CC WiFi 3
• Your WiFi router may not be broadcasting on the 2.4 GHz band
therefor it is not showing up in the list. Most new routers have
dual band. Please make sure that the 2.4 GHz band is enabled.
• There is a setting on your WiFi router called “Enable SSID
Broadcast”. This is usually enabled by default on most routers.
This must be enabled. You may need to call the manufacturer
of the router for more assistance.
• Unplug your radio for 10 seconds and try again.
Error #4: The radio has connected to the WiFi signal but cannot
access the Internet.
• You may be connecting to a public network (like a hotel or RV
park) that requires web browser authentication per device.
Since the radio does not have a web browser you may need to
speak with the hotel technical staff about allowing the radio to
connect.
• Make sure the WiFi network that you are connected to has
working internet. Try connecting to the same WiFi network with
another device such as a smartphone or tablet and browse
the internet as a test. If the internet is working, then you can
rule out this as the problem. If you have saved preset stations,
then try playing one. If the station does not play, then you can
furthermore assume that the router does not have internet. If
the station does play, then there may be a temporary problem
with the radio station server. Wait some time before browsing
the radio for new stations. Unplug your radio for 10 seconds
and try again.
Error #5: The Internet and WiFi is working but the Skytune
stations list is not responding making it impossible to browse for
new stations. You should however have access to your saved
radio station presets. Wait a few minutes and try again later. This
problem should not last long. After a few unsuccessful tries, the
radio will offer a backup list of saved stations. Unplug your radio
for 10 seconds and try again.
Error Messages

CC WiFi 3
28
Error #6 & 7: The radio failed to authenticate with the Skytune
server. There may be maintenance underway. Wait a few
minutes and try again later. This problem should not last long.
Unplug your radio for 10 seconds and try again. Another reason
can be the radio is not connected to the internet.
Error #8: The radio tried to upgrade its rmware (user interface)
programming but could not download it to the radio. Wait a few
minutes and try again later. This problem should not last long.
Unplug your radio for 10 seconds and try again.
Error #9: The radio downloaded the new rmware (user
interface) programming but could not install it to the radio. Wait
a few minutes and try again later. This problem should not last
long. Unplug your radio for 10 seconds and try again. There
may be some incompatibility regarding the rmware and your
radio. Recommend contacting C. Crane customer support for
assistance.
Error Messages

29
CC WiFi 3
Having Trouble Playing a Radio Station:
1. If you tried playing several radio stations but none are
working, the radio may have lost connection to your router
or internet connection. Unplug the radios power cord
momentarily and reconnect.
2. The radio is “buffering” and constantly reconnecting to a
particular station:
A. Try moving the radio closer to the router.
B. The station may be overloaded with connected listeners.
Try other stations to test if they are working properly.
C. The station may have changed their streaming information.
If using a preset to play the station, you may want to try
searching for the station again using the Search function.
If the station plays, then you can re-assign the station to
your preset.
D. If the above does not help, please contact C. Crane.
Having Trouble Finding a Particular Radio Station: If you are
unable to nd a radio station using the radio search functionality
then you can visit www.skytune.net to search it. It is possible
to add stations to your radio from this web site (by clicking the
“heart” icon next to the search results). You will need to know
your radios IP address. This can be found in your radio’s settings
(Settings Information Network information IP).
NOTE: Your computer, smartphone, or tablet that you are using
needs to be connected via WiFi to the same WiFi network router
as your radio for this to work.
Adding a New Station to Skytune: If you are a “non-technical”
person there is an easy way to request a station to be added to
the Skytune radio service. It may take several days for Skytune
to add the new station to the radio. There may also be a chance
that the station does not have a normal radio stream URL or
Troubleshooting/FAQ’s

CC WiFi 3
30
one that is not compatible to be played on a radio. Some station
stream URLs will only work with computers.
1. Visit www.skytune.net
2. Click on “Suggest Station” (usually located on the top-right of
the screen).
3. Enter the station information. You do not need to have all the
details, but more details help.
4. Click the “Send” button.
FAQ’s
I am having trouble assigning presets with the preset
button. I see EMPTY # instead of the station I preset.
To store presets 1-9 and 0 (for 10), you will need to use the
remote control. Using the remote control, press and hold down
the corresponding preset number button you want to assign to
the station you are listening to. Otherwise, stations stored with
the Preset button on the radio get added in to favorites after the
10 preset slots.
Can my CC WiFi 3 Internet Radio connect to my WiFi
router’s 5Ghz?
No. The radio will only display and connect to WiFi routers that
use 2.4Ghz.
Will the alarm be audible on the CC WiFi 3 Internet Radio if
the volume is turned down or muted?
Yes. You can set the Volume Level in the Alarm settings to your
desired volume.
Does the mute function work when I have headphones or
earphones plugged into the headphone jack?
Yes.
Troubleshooting/FAQ’s

31
CC WiFi 3
Where do I locate the MAC address on the CC WiFi 3
Internet Radio?
1. Press the Home button
2. Select Settings
3. Select Information
4. Select Network Information
5. Scroll down to Wi-Fi MAC to view the MAC address
Can I listen to Major League Baseball or on the CC WiFi 3
Internet Radio?
No, due to licensing rules, major league baseball games are
typically not permitted to be broadcast via a radio stations
internet stream. The same would be true of NBA, NFL, and
NHL games. If you subscribe to a service or an app such as,
MLB Network, NBA League Pass, or NFL Game Pass, on your
smartphone or tablet you can listen on the CC WiFi 3’s speaker
via Bluetooth from that device.
Can I connect to WiFi networks that require agreeing to a
user license agreement and/or a username and a password?
No. Many hotels, hospitals and airports are adding on a user
license agreement that you must accept in order to access
the Internet or requiring a username and password for using
their WiFi networks. The radio has no way of displaying these
webpages or accepting such agreements so it will not work in
these situations.
Can I connect to a WiFi network that has the Network SSID
hidden?
No. You will need to unhide the network in your router’s settings.
How do I enter a space when in the Enter Search Words
menu?
The space looks like an empty tray between the tilde and
the zero.
Troubleshooting/FAQ’s

CC WiFi 3
32
How do I reset the WiFi 3 Internet Radio back to factory
defaults?
1. Press and release the HOME button
2. Select Settings
3. Select Reset to default
4. Select Yes
My radio is connected to WiFi but it intermittently drops out
while playing a station. Why?
This could be due to the signal between the radio and the router
being too weak or too much interference. Check to make sure
the 5dBi WiFi antenna (included with the radio) is attached
completely to the back of the radio. You may want to detach and
reattach it.
Can I Add or Play a station using the Skytune website?
It is possible to add or play a station using the Skytune.net
website.
To do this the computer, laptop, smartphone, iPad or other
device needs to be connected to the same WiFi network as the
CC WiFi 3 Internet Radio.
The radio must be powered on and connected to your WiFi
network.
Go to www.skytune.net.
Use the Browse/Search (green button at the bottom right hand of
the Skytune.net homepage) to nd the station.
Enter the name or station call letters in the box and click on the
magnier to search.
When you see the station you want, click on the Heart below the
station.
Choose “Add station” or “Listen to station”.
Enter your radios IP Address in the elds. You may need to click
in each box as you enter the IP address. (See note below to nd
your radios IP address.)
Troubleshooting/FAQ’s

33
CC WiFi 3
Click Send.
If you chose Add station, go to the radio and press and release
the Preset button. Turn the dial and you should be able to locate
the station that was added. Select it to play the station.
If you chose Listen to station, your radio should be playing the
station you selected.
NOTE: To locate the radios IP address, press and release the
HOME button.
Select Settings.
Select Information.
Select Network Information.
Turn the dial to locate where it starts with IP. This is your radios
IP address. It will look similar to 192.168.00.0.
For more expanded FAQ’s, please visit our website at
ccrane.com.
Troubleshooting/FAQ’s
CC WiFi 3
34
Contains Stations That You
Previously Played
Contains 40 Most Popular
USA Stations From Skytunes
News, Talk, Rock, Jazz
Oldies...And Many More
USA, UK, Germany, France,
China...And Many More
Directly Enter A Station
Name To Search
History
By Genre (World)
Most Popular (U.S.)
By Location
Enter Search Words
Alarm
Volume: 80%
(Set Alarm
Volume)
Time:
12:00 am
(Set Alarm
Time)
Sound
Tone
Tone/Radio
Repeat:
Everyday
Everyday
Once
Monday
Tuesday
Wednesday
Thursday
Friday
Saturday
Sunday
INTERNET RADIO STATIONS
ALARM
ALARM 1
TURN ON
ALARM 2
TURN OFF
Menu Flow Chart
35
CC WiFi 3
Network
Language
Contrast
Buffer Time
Information
EQ: [Flat]
Display
Brightness
Software Update
Reset to Default
Date & Time
Time Zone:
[Los Angeles]
Set Date
Format
Set Time
Format
DST [Daylight
Saving Time]
NTP: [Use
Network Time]
NTP: Server:
[Pool.NTP.ORG]
Connect to WIFI
WIFI Signal
Remove a WIFI Network
IP: [Dynamic]
DNS: [Dynamic]
First 20 Seconds
Network Information
After 20 Seconds
System Information
English - Espanol -
Francais - Italiano -
Nederlands - Polski -
Pyccknn - Cesky -
Chinese
Flat - Rock - Jazz - Pop - Classical - Dancing -
Heavy Metal - Disco - Live - Soft - Hall - Advanced
SETTINGS
Connection: Wireless
SSID: Medianet_192
Signal: -57 DBM
IP: 192.168.10.1
NM: 255.255.255.0
DNS: 192.168.10.1
Wi MAC:
30:AE:FF:PF:D7:C4
Menu Flow Chart
CC WiFi 3
36
GENERAL SPECIFICATIONS
INPUT POWER
Radio: AC Adapter 100-240V 50/60Hz,
5VDC 1200mA center tip positive
Remote Control: “AAA” Battery
AUDIO OUTPUT
1.0 Watts RMS
SPEAKER
Full range dynamic speaker (2.5”)
8 ohms 5W
STATION AGGREGATOR
Skytune
©
based
CONNECTION
WiFi:
• 802.11b
• 802.11g
• 802.11n
BlueTooth
®
:
Audio (receiver)
SECURITY
WEP, WPA & WPA2
DISPLAY LINES
3
EARPHONE JACK
1/8” (3.5mm) Stereo
LINE OUT JACK
1/8” (3.5mm) Stereo
Specications

37
CC WiFi 3
PRESETS
First 10 using the remote buttons, 100+ in sequence list.
SUPPORTED AUDIO FORMATS
Sampling rate: 44.1, 48.0 KHz
Bit depth: 16-bit
CODEC: AAC+, AAC, MP3, OGG
Playlist format: PLS, M3U, M3U8
Streaming format: HLS, Icecast, Shoutcast.
SLEEP TIMER
15-180 minutes (8 selections, 15 minutes apart except last 2).
ALARM
Yes, 2 independent.
CLOCK
12/24 Hour modes, Auto-set with Internet time or choose zone.
DIMENSIONS
6.5” W x 3.9” H x 3.9” D
WEIGHT
1 lb. 2.6 oz.
WARRANTY
1-Year Limited Warranty
INCLUDED ACCESSORIES
AC adapter, Remote Control, manual, USB to Radio power cord,
and warranty card.
NOTE: Specications are subject to change without notice.
Specications
CC WiFi 3
38
1
2
3
4
5
6
7
8
9
10
11
12
13
14
15
16
17
18
19
20
Preset Location/Genre
Station Host
Memory Preset Log
39
CC WiFi 3
Skytune
©
only plays on a Skytune enabled radio. It is not
accessible from your cellphone but most stations are available
from other stream sources using your phone by using apps.
C. Crane has no control over content or the stream provider and
cannot be responsible for Internet radio programs or availability.
If Skytune goes down, you will lose service. Anticipating this,
we made sure you can put the URL of a station into the radio
and continue listening to your radio. This feature does require
a computer and technical knowledge. Finding the URL of a
streaming station for this purpose is sometimes difcult or
impossible as they often change dynamically each time they
are accessed.
ACCESSORIES
Visit ccrane.com for the following accessories:
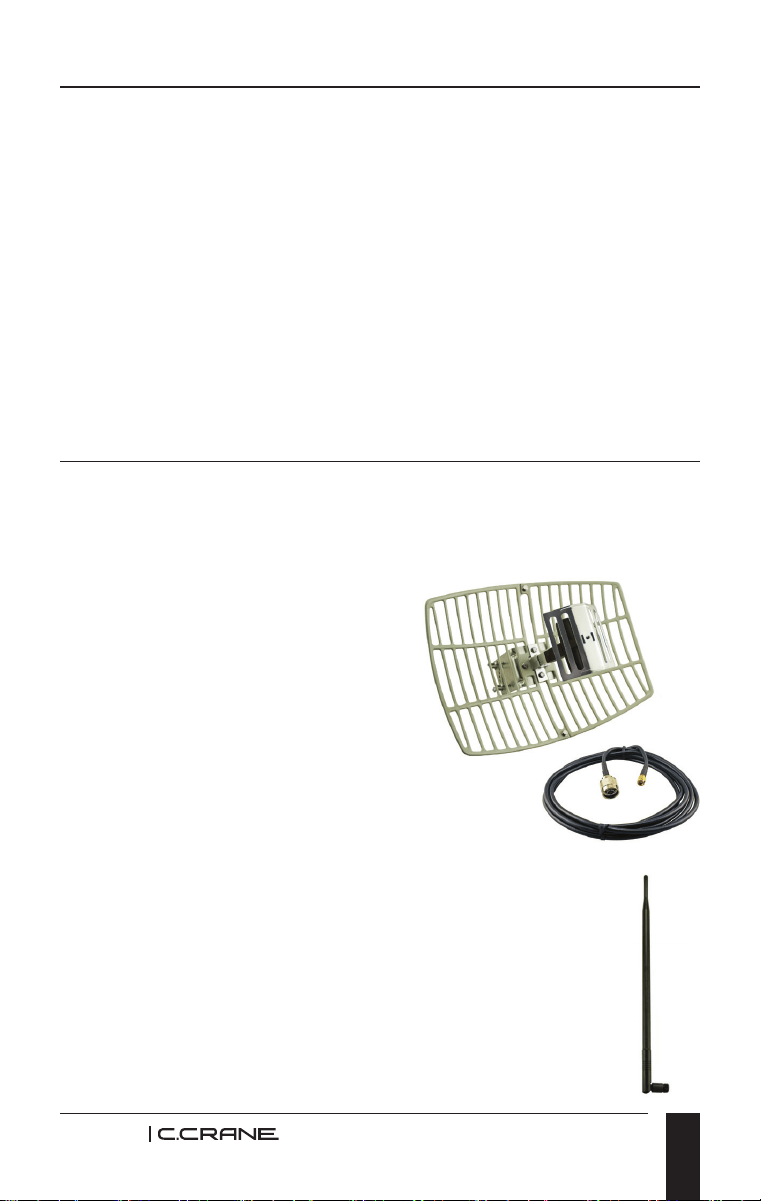
PARABOLIC POWER ANTENNA
Need Long Reception for your
CC WiFi 3?
If you have a distant shop or
garage, our Parabolic antenna
with a 10’ cable can deliver a
signal to your CC WiFi 3 up to
400’ away, as long as there are
no obstructions and your router
is in a favorable position.
Item #PARA
HI-GAIN 7dBi WiFi ANTENNA WITH MALE RPSMA
Need to increase the WiFi receiving range of the
radio in your large one story home or ofce?
This 2.4 GHz 7dBl omni-directional antenna is
lightweight and well made. The large twist-on-twist-off
connector makes installation a breeze.
Item #7SMA
Skytune
©
- Terms of Service

MODEL: CC WiFi 3
FCC STATEMENT:
This device complies with part 15 of the FCC Rules. Operation is subject
to the following two conditions: (1) This device may not cause harmful
interference, and (2) this device must accept any interference received,
including interference that may cause undesired operation. This equipment
has been tested and found to comply with the limits for a Class B digital
device, pursuant to part 15 of the FCC Rules.
These limits are designed to provide reasonable protection against
harmful interference in a residential installation. This equipment
generates, uses and can radiate radio frequency energy and, if not
installed and used in accordance with the instructions, may cause
harmful interference to radio communications. However, there is no
guarantee that interference will not occur in a particular installation.
If this equipment does cause harmful interference to radio or television
reception, which can be determined by turning the equipment off and on,
the user is encouraged to try to correct the interference by one or more
of the following measures:—Reorient or relocate the receiving antenna.
• Increase the separation between the equipment and receiver.
• Connect the equipment into an outlet on a circuit different from that to
which the receiver is connected.
• Consult the dealer or an experienced radio/TV technician for help.
NOTICE/CAUTION: Any changes or modications not expressly
approved by the party responsible for compliance could void the user’s
authority to operate the equipment.
This equipment complies with FCC radiation exposure limits set forth for
an uncontrolled environment. This transmitter must not be co-located or
operating in conjunction with any other antenna or transmitter.
FCC ID: 2ABD3-MA200
Copyright © 2024 C. Crane. All rights reserved. No part of this booklet may be reproduced,
in any form or means whatsoever, without permission in writing from C. Crane. (Ver 4)
172 Main Street
Fortuna, CA 95540-1816
Phone: 1-800-522-8863 | Web: ccrane.com