What’s in the Box? ...................................... 3
Assembly ........................................................ 3
Controls and Cleaning Modes ................ 3
Filling the Clean Water Tank...................4
Three Modes of Cleaning ......................... 5
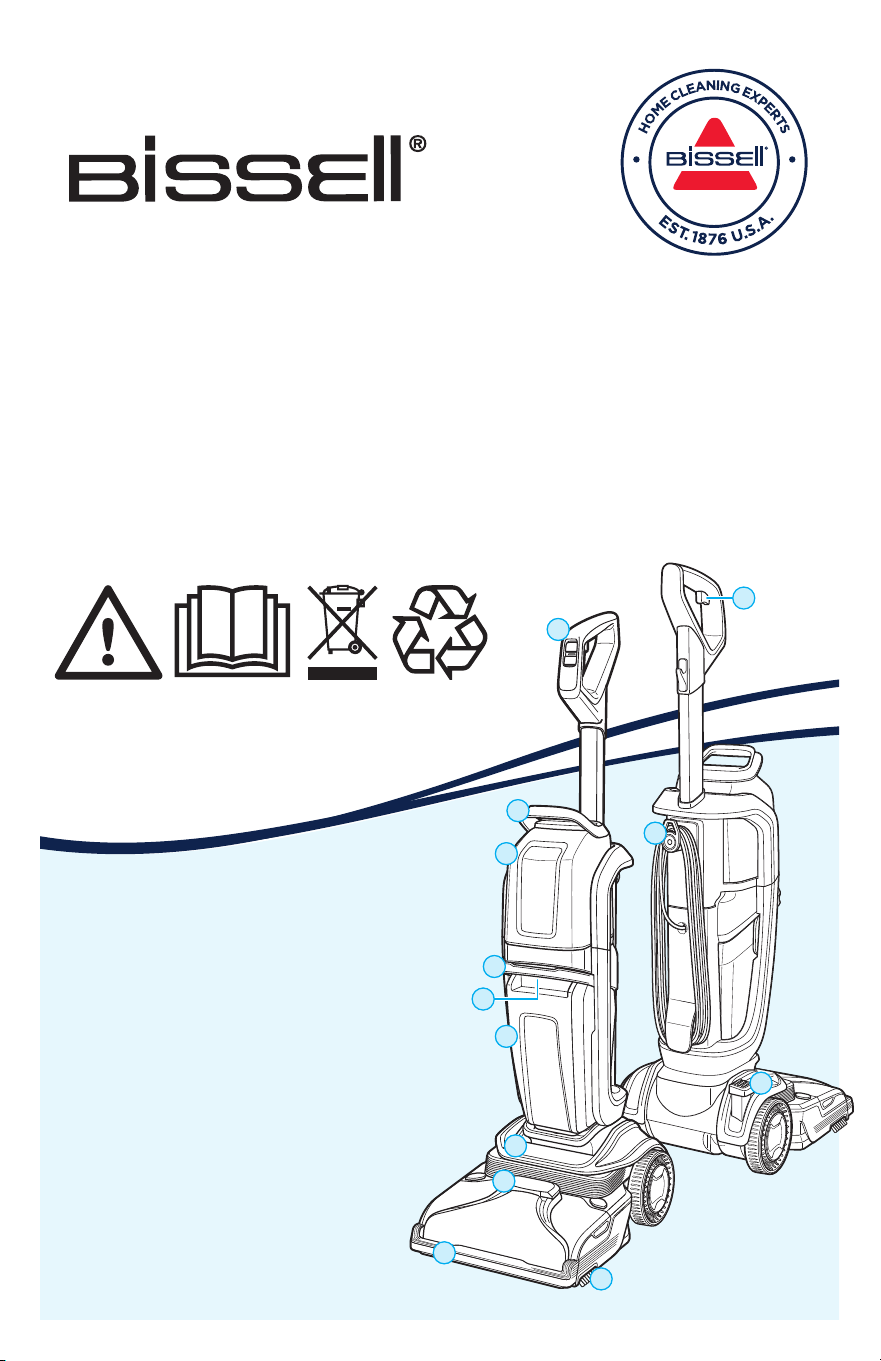
Product Overview
1. Handle with Fingertip Controls
2. Clean Water Tank Handle
3. Clean Water Tank
4. Dirty Water Tank Handle
5. Machine Handle
6. Dirty Water Tank
7. Mode Indicator Lights
8. Accessory Hose Door
9. HydroSteam Bar
10. EdgeSweep® Brushes
11. Formula & Steam Spray Trigger
12. Quick Release™ Cord Wrap
13. Recline Pedal
12
13
11
6
8
7
9
10
2
4
5
3
1
Cleaning with the Hose and Tools ........ 7
After-Cleaning Care ................................... 8
Replacing Belts and Brush Rolls ...........11
Troubleshooting ...........................................11
Limited Warranty .......................................12
REVOLUTION® HYDROSTEAM™
UPRIGHT CARPET CLEANER WITH STEAM
MODELS 3670F, 3672H (PROFESSIONAL)
2 global.BISSELL.com
IMPORTANT INFORMATION
• To reduce the risk of a leaking condition, do not store where freezing may occur. Damage to internal components may result.
• Brush roll continues to turn while product is turned ON and handle is in use. To avoid damage to carpet, rugs, furniture and flooring, avoid
tipping cleaner or setting it on furniture, fringed area rugs, or carpeted stairs during tool use.
• With brush roll on, do not allow cleaner to sit in one location for an extended period of time, as damage to floor can result.
IMPORTANT SAFETY INSTRUCTIONS
WARNING
TO REDUCE THE RISK OF FIRE, ELECTRIC SHOCK OR INJURY:
• This appliance can be used by children aged from 8 years and above and
persons with reduced physical, sensory or mental capabilities or lack
of experience and knowledge if they have been given supervision or
instruction concerning use of the appliance in a safe way and understand
the hazards involved.
• Children being supervised not to play with the appliance.
• Cleaning and user maintenance shall not be made by children without
supervision.
• Keep the appliance out of reach of children when it is energized or
cooling down.
• Do not leave appliance when it is plugged in. Unplug from outlet when
not in use and before servicing.
• Use indoors only.
• Do not immerse. Use only on carpet moistened by cleaning process.
• Always install float before any wet pick-up operation.
• Use only cleaning products intended for use with this appliance to
prevent internal component damage. See the Cleaning Formulas section
of this guide.
• Do not allow to be used as a toy. Close attention is necessary when used
by or near children.
• Do not use for any purpose other than described in this user guide. Use
only manufacturer’s recommended attachments.
• Do not use with damaged cord or plug. If appliance is not working as
it should, has been dropped, damaged, left outdoors, or dropped into
water; do not attempt to operate it and have it repaired at an authorized
service center.
• Do not pull or carry by cord, use cord as a handle, close door on cord, or
pull cord around sharp edges or corners. Do not run appliance over cord.
Keep cord away from heated surfaces.
• Do not unplug by pulling on cord. To unplug, grasp the plug, not the cord.
• Do not handle plug or appliance with wet hands.
• Do not put any object into openings. Do not use with any opening
blocked; keep openings free of dust, lint, hair, and anything that may
reduce air flow.
• Keep hair, loose clothing, fingers, and all parts of body away from
openings and moving parts of the appliance and its accessories.
• Turn OFF all controls before plugging or unplugging appliance.
• Use extra care when cleaning on stairs.
• Do not use to pick up flammable or combustible materials (lighter fluid,
gasoline, kerosene, etc.) or use in areas where they may be present.
• Do not pick up anything that is burning or smoking, such as cigarettes,
matches or hot ashes.
• Unplug from outlet before filling, rinsing or cleaning.
• Do not turn over the steam-cleaning nozzle, or touch the surface of the
nozzle when using the steam-cleaner.
• Do not apply steam directly to any person or animal.
• Do not touch the steam cleaning nozzle or adjacent surfaces when
steam-cleaning or when the nozzle is heated.
• Risk of injury from moving parts. “Brushes” may start unexpectedly.
Unplug before cleaning or servicing.
• Do not turn your appliance ON until you are familiar with all instructions
and operating procedures.
• Keep appliance on a level surface.
• Do not leave steam cleaner unattended.
• Liquid must not be directed towards equipment containing electrical
components.
• Do not use appliance in an enclosed space filled with vapors given off
by oil-based paint, paint thinner, some moth-proofing substances,
flammable dust, or other explosive or toxic vapors.
• Do not use to pick up toxic material (chorine bleach, ammonia, drain
cleaner, etc.)
• Do not pick up hard or sharp objects such as glass, nails, screws, coins, etc.
• Plastic film can be dangerous. To avoid danger of suffocation, keep away
from children.
• Connect to a properly grounded outlet only. See grounding instructions.
Do not modify the three-prong grounded plug.
• Unplug before connecting Turbo Brush.
• Do not carry the appliance while in use.
SAVE THESE INSTRUCTIONS
THIS MODEL IS FOR HOUSEHOLD USE ONLY. COMMERCIAL USE OF THIS UNIT VOIDS THE MANUFACTURER’S WARRANTY.
READ ALL INSTRUCTIONS BEFORE USING YOUR APPLIANCE.
When using an electrical appliance, basic precautions should be observed, including the following:
WARNING
Grounded
Outlets
Grounding
Pin
Improper connection of the equipment-grounding conductor can
result in a risk of electrical shock. Check with a qualified electrician or
service person if you aren’t sure if the outlet is properly grounded.
DO NOT MODIFY THE PLUG. If it will not fit the outlet, have a proper
outlet installed by a qualified electrician. This appliance is designed
for use on a nominal 120-volt circuit, and has a grounding attachment
plug that looks like the plug in the illustration. Make certain that the
appliance is connected to an outlet having the same configuration as
the plug. No plug adapter should be used with this appliance.
GROUNDING INSTRUCTIONS
This appliance must be connected to a grounded
wiring system. If it should malfunction or break
down, grounding provides a safe path of least
resistance for electrical current, reducing the
risk of electrical shock. The cord for this appliance has an equipment-
grounding conductor and a grounding plug. It must only be plugged into
an outlet that is properly installed and grounded in accordance with all
local codes and ordinances.
global.BISSELL.com 3
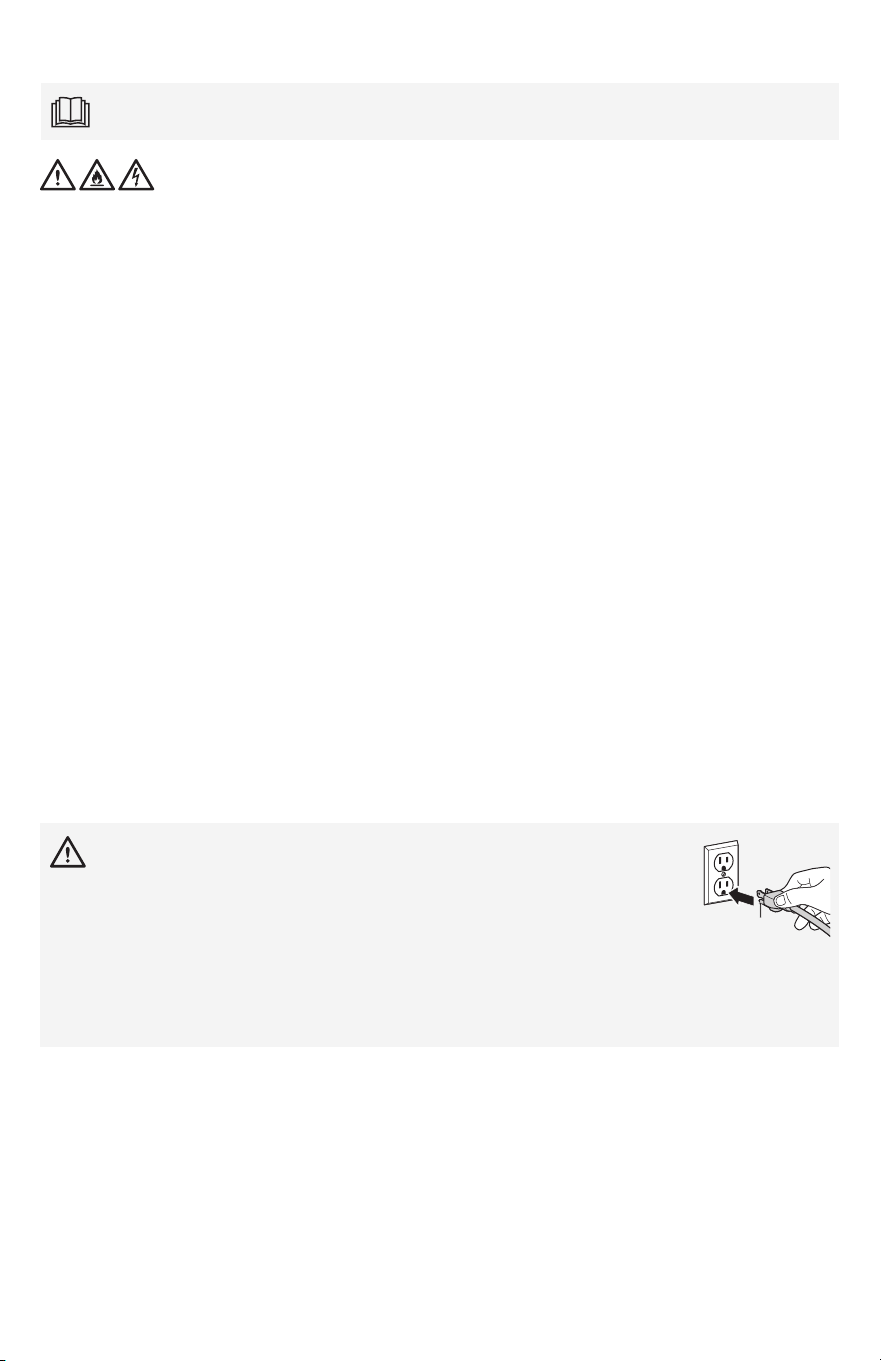
Upper Body and
Clean Water Tank
Lower Body with
Dirty Water Tank
Handle Hose &
Tool Bag
Tools
(vary by model)
Trial Formula
What’s in the Box?
Standard accessories may vary by model.To identify what should be included with your purchase,
please refer to the “Carton Contents” list located on the carton top flap.
1. Remove clean tank from
upper body. Ensure upper
body is level with lower body.
Tip machine forward and slide
the upper body into the lower
body from the back as shown.
2. Insert handle into machine
until it clicks into place.
3. Insert clean tank into
machine until it clicks into
place.
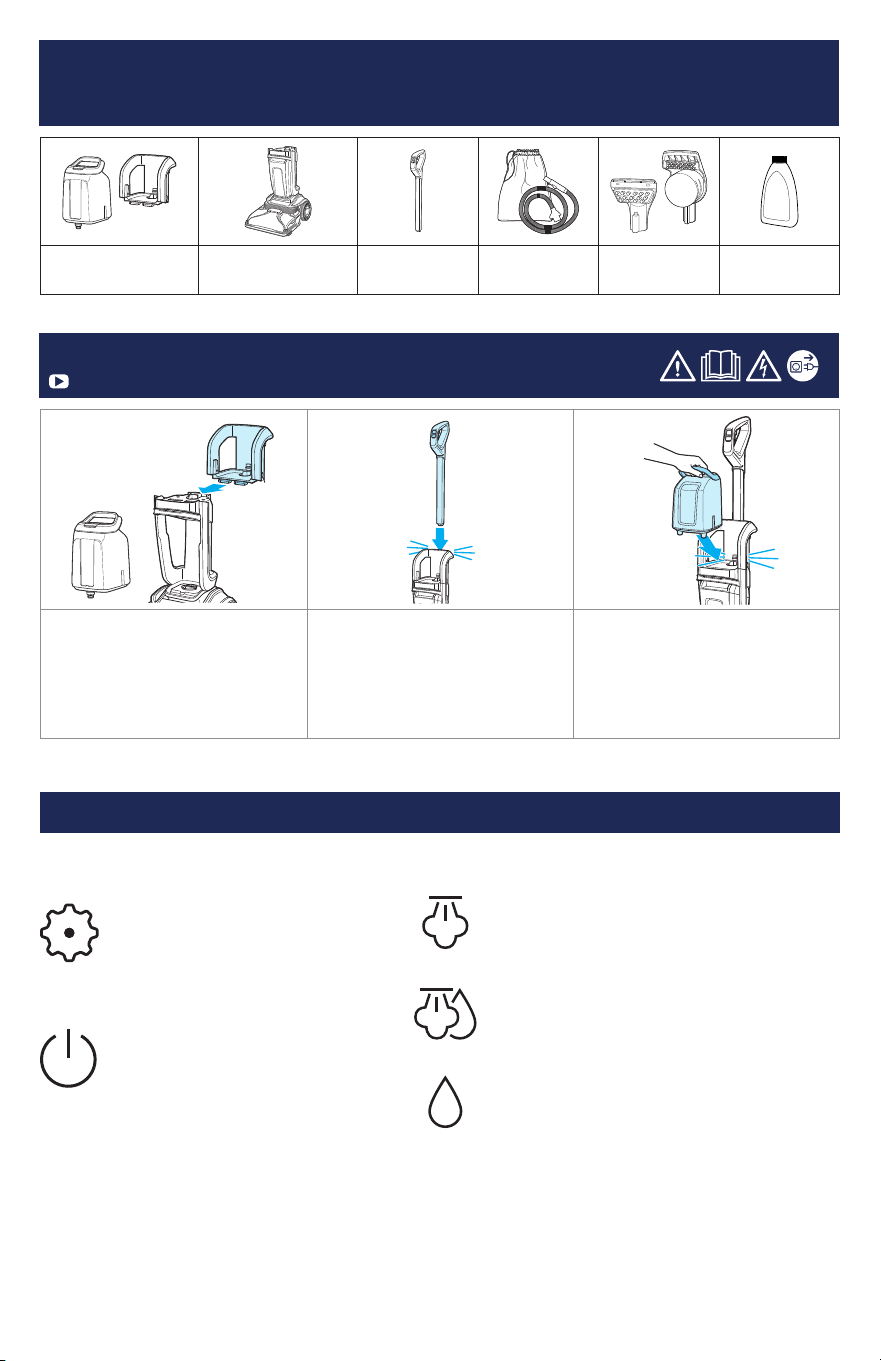
Mode
Switch between Steam Pretreat,
SteamWash Max Clean, and
Quick Dry modes. Mode
selection appears on the foot
display.
Power
Turn the machine ON and OFF.
Quick Dry Mode
Use water and formula for a quick clean.
Carpets will dry in about 30 minutes.
Steam Pretreat Mode
Loosen tough stains before removing
with SteamWash Max Clean mode.
SteamWash™ Max Clean Mode
Use water, formula and steam to clean
your carpet.
Fingertip Controls Foot Display & Cleaning Modes
Controls and Cleaning Modes
Assembly
Go to global.BISSELL.com for assembly videos.
4 global.BISSELL.com
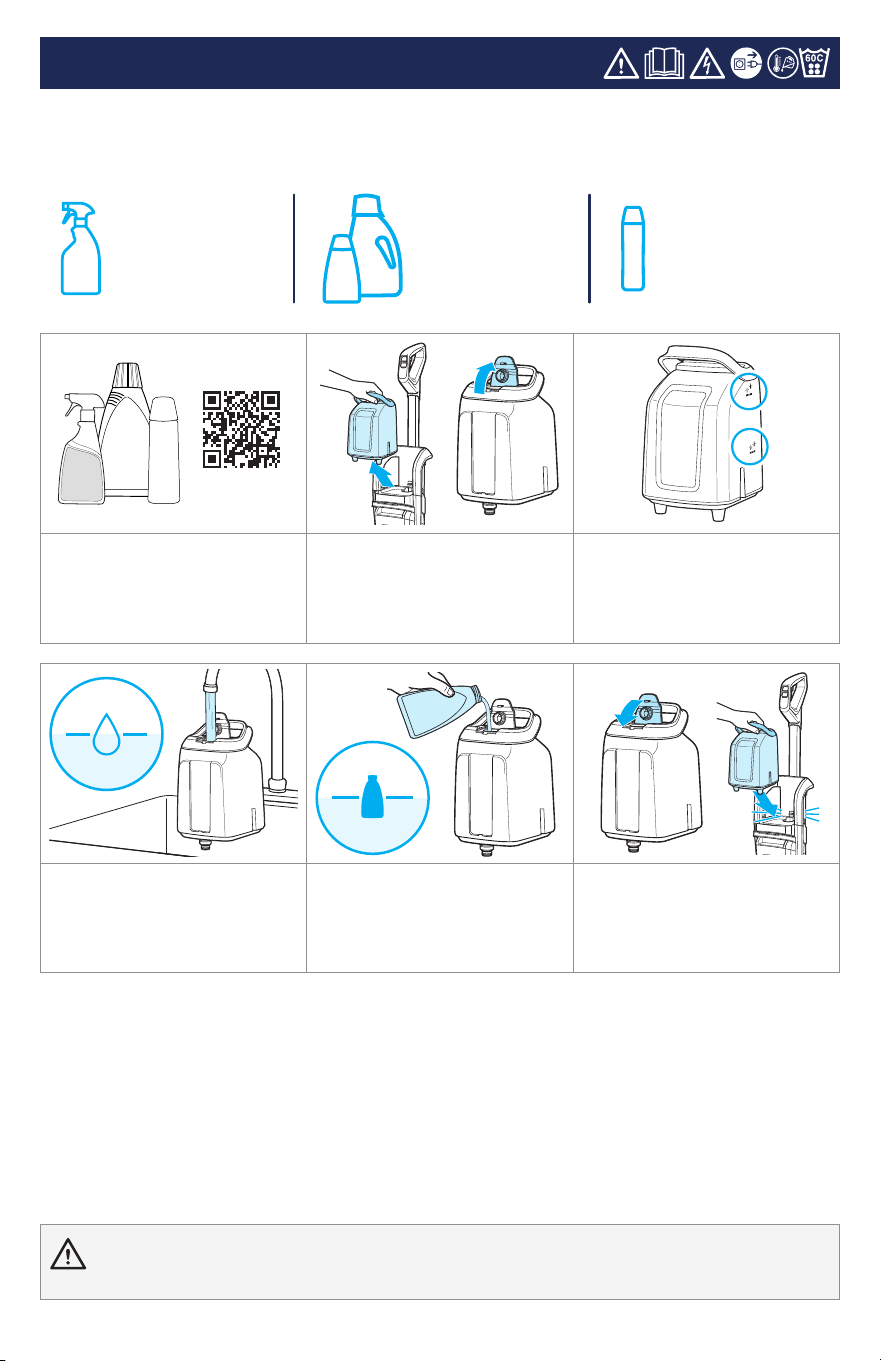
This machine is compatible with BISSELL® formulas made for upright carpet cleaners.
Always use genuine BISSELL formulas in your machine. Other formulas may harm the machine
Note: Fill with warm (140°F/60°C MAX) tap water and add the appropriate BISSELL® formula.
Do not use boiling water. Do not heat water or tank in microwave.
1. Choose your formula.*
Scan the QR code with your
smartphone camera or visit
global.BISSELL.com for
formulas.
2. Lift tank to remove from
machine. Flip open lid.
3. Choose large or small area
fill lines to suit your needs.
4. Add warm tap water
(140°F/60°C max) to water
fill line. Do not use boiling
water. Do not heat water in
microwave.
5. Add BISSELL formula to
formula fill line.
6. Close lid until it clicks.
Reinstall clean tank. It will click
into place.
*Compatible formulas include: Pro Stain & Odour, Pet Stain & Odour, Stain & Odour, Ambipur
Blossom & Breeze, Pet Urine Eliminator + Oxy, Allergen
WARNING To reduce the risk of fire and electric shock due to internal component damage, use only BISSELL
cleaning formula intended for use with this machine.
Filling the Clean Water Tank
Pretreat spots and
stains to improve
carpet cleaning
performance.
Keep plenty of
BISSELL cleaning
formulas on hand
so you can clean
whenever it fits
your schedule.
Add Boost carpet
cleaning formula
enhancers to any
formula to increase
its effectiveness.
global.BISSELL.com 5
Three Modes of Cleaning
Visit global.BISSELL.com for how-to videos.
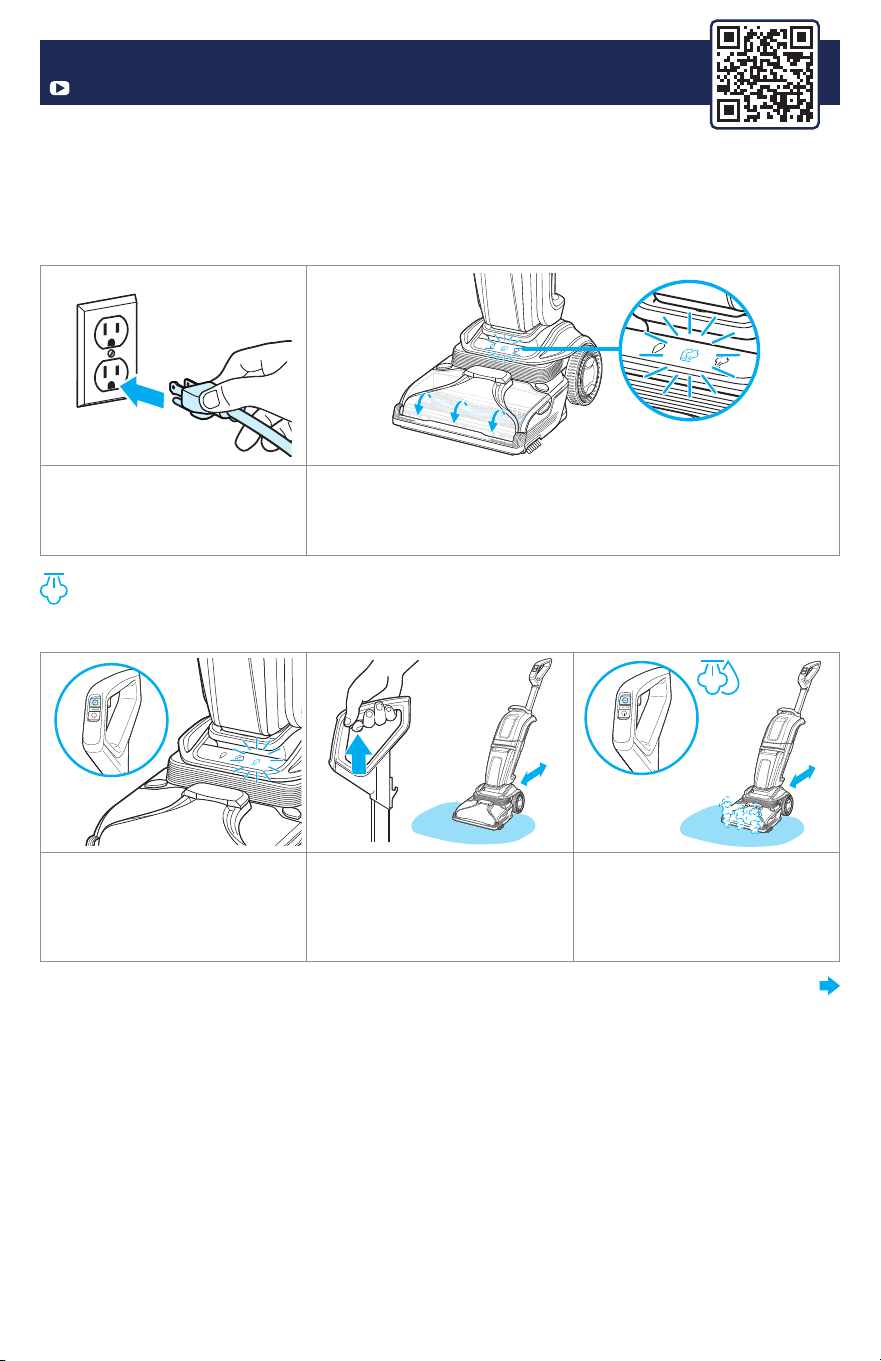
Startup
• This appliance is primarily a carpet cleaner with a steam-cleaning feature.
• Remove any solids and use a dry vacuum cleaner over area before using your deep cleaner.
• To prevent damage to Berber-style carpets, avoid repeated strokes in the same area. Before
cleaning area rugs, check the manufacturer’s tag and test an inconspicuous spot on the rug
for colorfastness. Do not use on silk or delicate rugs.
• Stay off carpet until dry.
1. Plug into a properly
grounded outlet. Press power
button on handle to turn ON.
2. Water heater will turn on. Machine defaults to Steamwash Max
mode with brush rolls and vacuum motor on. Icon on foot will
blink then turn solid when heater is ready to make steam
(<60 seconds).
Steam Pretreat Mode
Loosen tough stains before removing with SteamWash Max Clean mode. Brush rolls and vacuum
motor will shut off in this mode.
1. Press mode button until
Steam Pretreat icon is
illuminated. Icon will blink until
heater is ready to make steam.
2. Press recline pedal to
recline machine. Pull trigger
to release steam and move
machine forward and back
over stain for 20 seconds.
3. After steam pretreat, press
mode button to clean the stain
in SteamWash Max mode.
CONTINUED ON NEXT PAGE
6 global.BISSELL.com
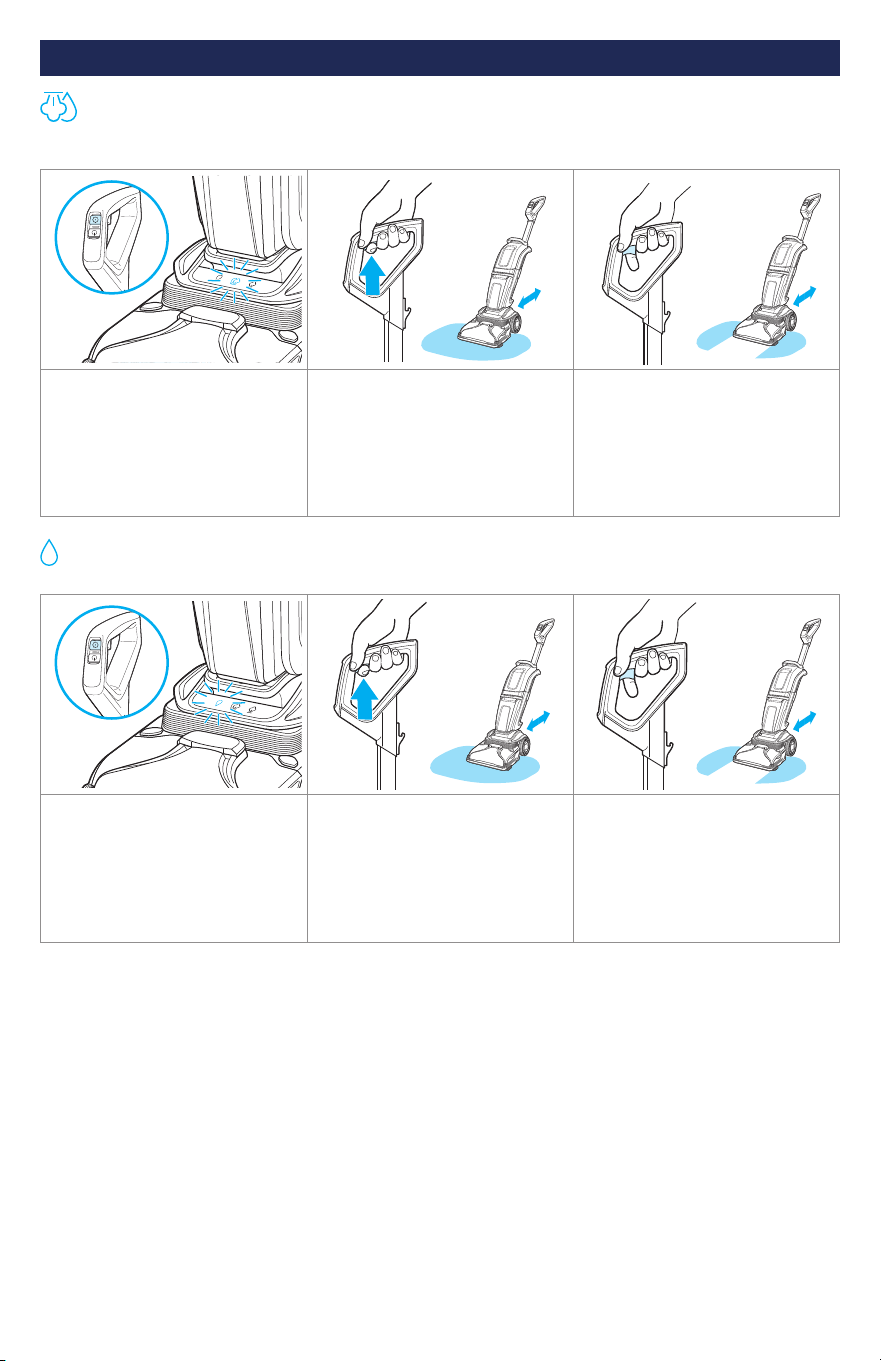
Three Modes of Cleaning (continued)
SteamWash™ Max Clean Mode
Use water, formula, and steam to clean your carpet. Steam is present but not visible in this mode.
Carpets will dry in about 8 hours.
1. Press mode button until
SteamWash Max Clean icon
illuminates on foot. When
ready, indicator light will stay
illuminated.
2. Press recline pedal to
recline machine. Pull trigger to
dispense water, formula, and
steam. While holding trigger,
make two “wet passes,”
moving machine forward and
back across carpet.
3. Release trigger and make
“dry passes” by pushing
machine forward and back,
at least two times, across
carpet or until water can no
longer be seen in nozzle.
Quick Dry Mode
Water and formula for a quick clean. Carpets will dry in about 30 minutes.
1. Press mode button until
Quick Dry icon illuminates on
foot.
2. Press recline pedal to
recline machine. Pull trigger
to dispense water and formula.
While holding trigger, make
two “wet passes,” moving the
machine forward and back
across carpet.
3. Release trigger and make
“dry passes” by pushing
machine forward and back,
at least two times, across
carpet or until water can no
longer be seen in nozzle.
global.BISSELL.com 7
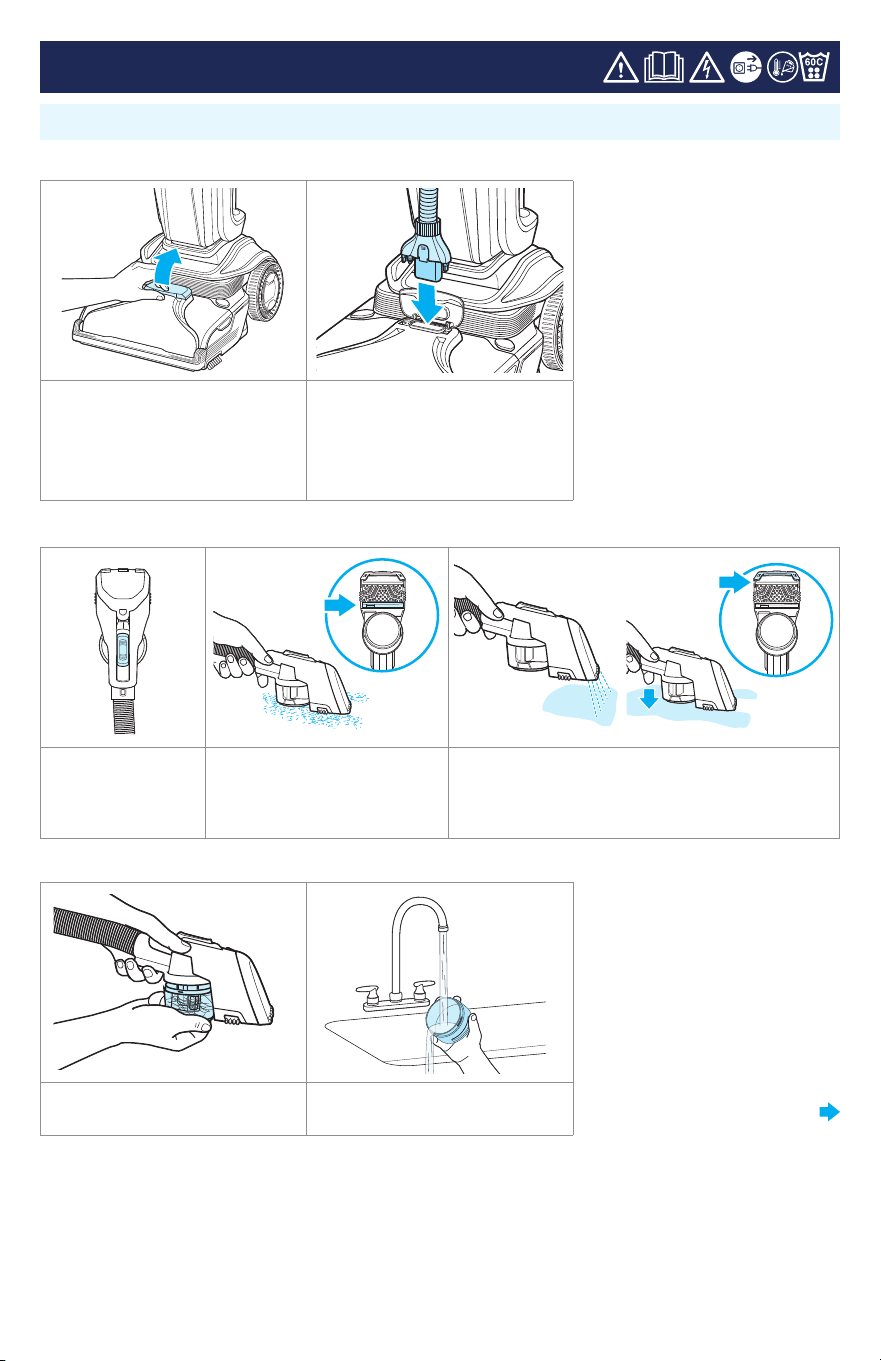
Attaching the Hose
1. Lift accessory hose door
on top of foot on the front
of machine. Flip door toward
machine to open.
2. Insert hose until it clicks into
place. Be sure colored hose
release clip is facing out, away
from machine.
Attach tool to end of hose.
2-in-1 Upholstery Tool
Dry
Suction
Channel
Wet
Suction
Channel
1. Switch between
Dry and Wet
settings and turn
machine ON.
2a. Dry Cleaning
Vacuum up debris from
carpet or upholstery.
2b. Wet Cleaning
Hold down trigger to activate spray. Release
trigger and suction up the stain.
Cleaning the 2-in-1 Upholstery Tool
1. Twist dirt cup to open.
Empty into a garbage bin.
2. Rinse dirt cup. Let dry
completely before reinstalling.
Note: Only water and formula flows through hose and tool, not steam.
CONTINUED ON NEXT PAGE
Cleaning with the Hose and Tools
8 global.BISSELL.com
After-Cleaning Care
For more helpful maintenance tips, check out global.BISSELL.com.
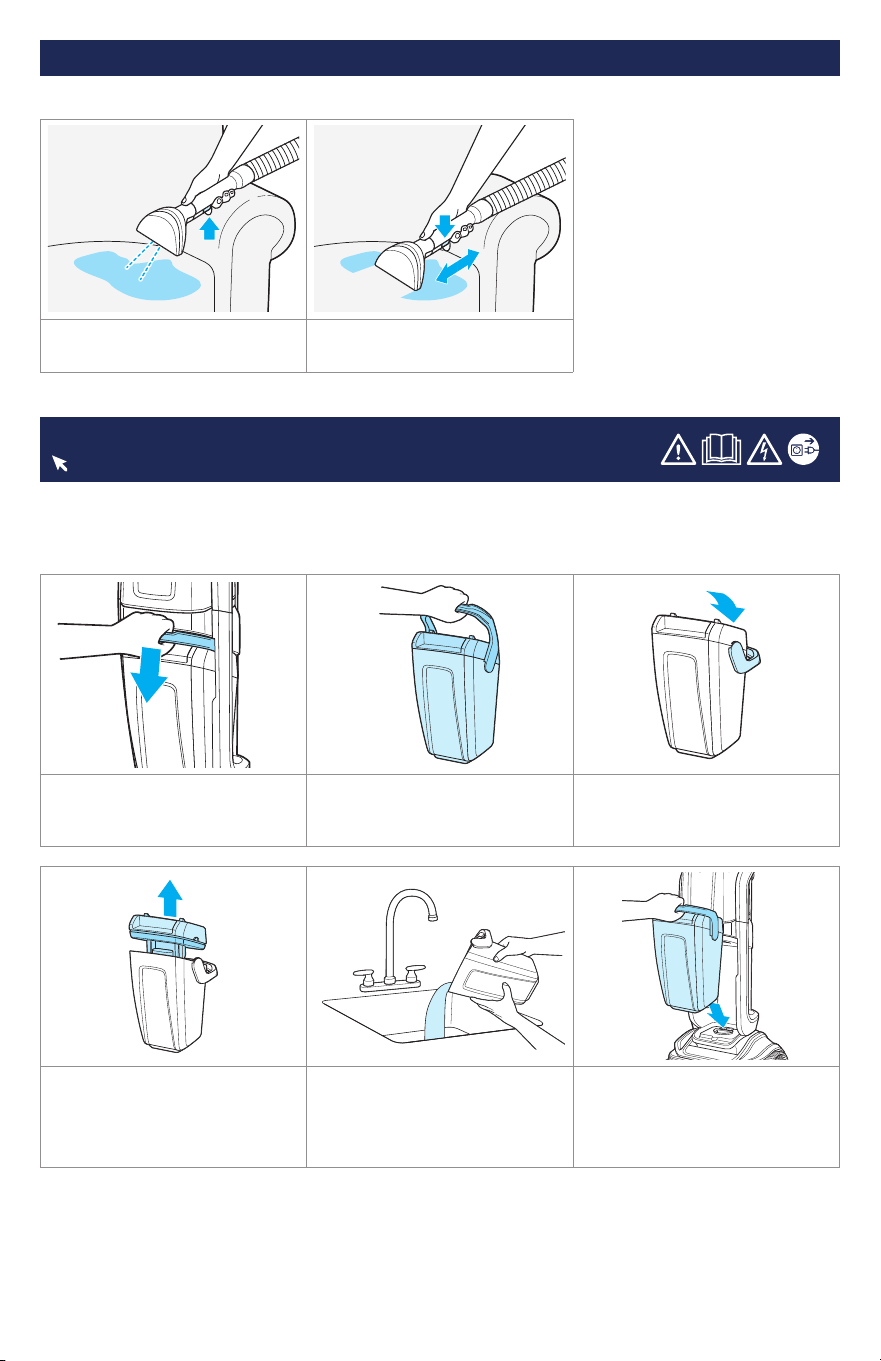
Cleaning with the Hose and Tool (continued)
3" and 6" Tool
1. Point tool above spot or
stain and press spray trigger.
2. Release spray trigger and
gently scrub the stain.
Emptying the Dirty Water Tank
Note: When the tank is full, the float will shut off suction and emit a high-pitched sound indicating it
is time to empty your tank.
1. To release dirty water tank,
press down on tank handle and
tilt tank toward you.
2. Remove tank and carry to
disposal area.
3. Unlock by rotating handle
back.
4. Grab lid in recessed area
on both sides and pull up to
remove.
5. Empty dirty water into
utility sink.
Reinstall lid and rotate handle
forward to lock in place.
6. Reinstall tank. Insert
bottom first. Then, tilt tank
toward machine and push top
in until it clicks into place.
global.BISSELL.com 9
WARNING To reduce the risk of injury, do not touch the steam cleaning nozzle or adjacent surfaces when
steam-cleaning or when the nozzle is heated.
CONTINUED ON NEXT PAGE
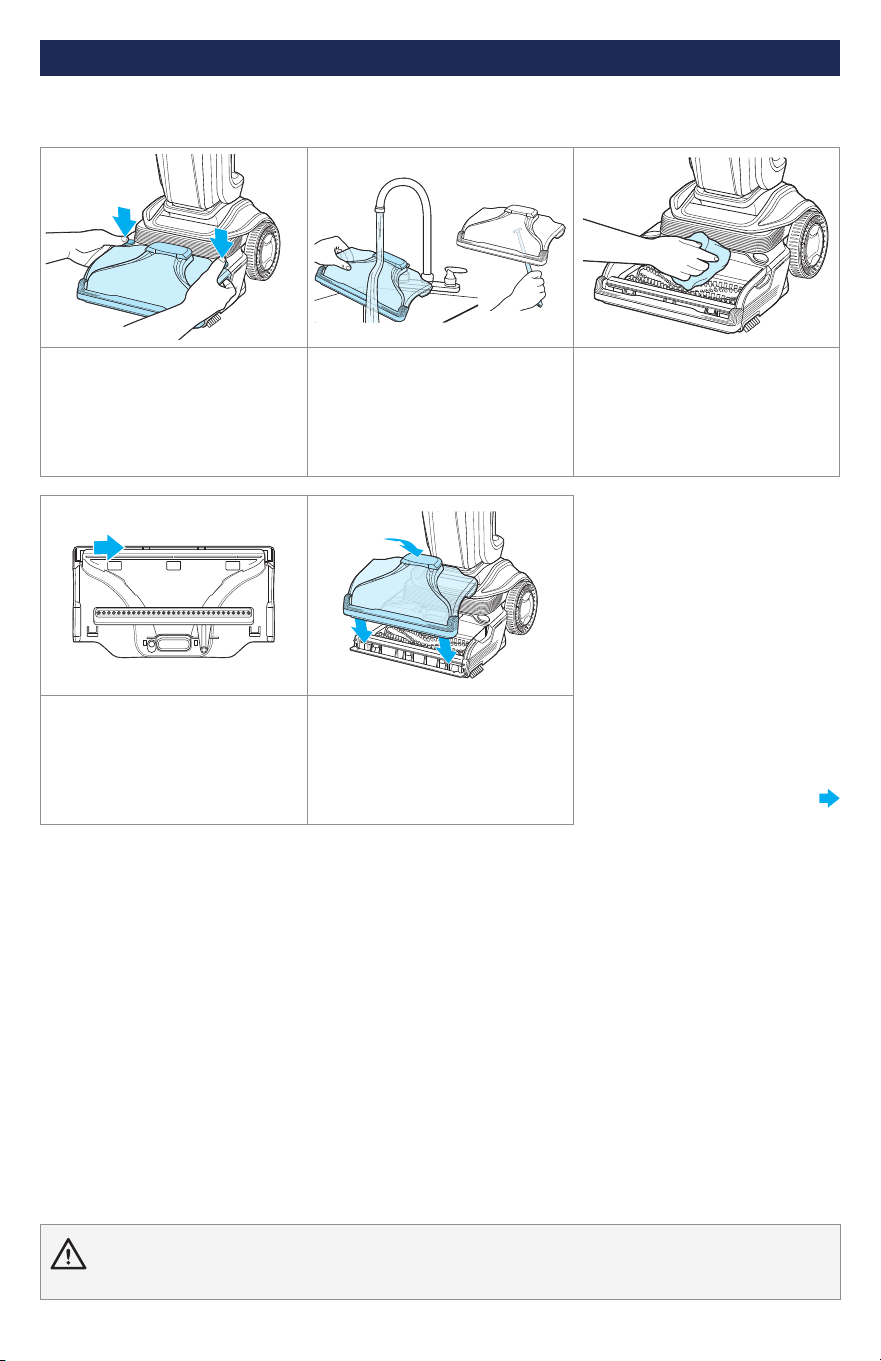
Cleaning the Machine
Nozzle may be HOT. Let machine cool before touching.
1. Place fingertips into grips
on both sides of nozzle. Press
release buttons with thumbs
and rotate nozzle to remove.
2. Open hose door. Rinse
nozzle with warm water.
Remove debris with clean
out tool. Note: Parts are not
dishwasher or automatic
washing machine safe.
3. If brush roll chamber is
dirty, clean with a cloth.
4. Check steam bar for clogs.
Wipe underside of steam bar
with a wet towel or manually
remove visible clogs if
necessary.
5. Let nozzle dry before
reassembling. Reinstall nozzle
by first lining up tabs with
grooves of foot. Rotate nozzle
back into place until you feel
two clicks.
After-Cleaning Care (continued)
10 global.BISSELL.com
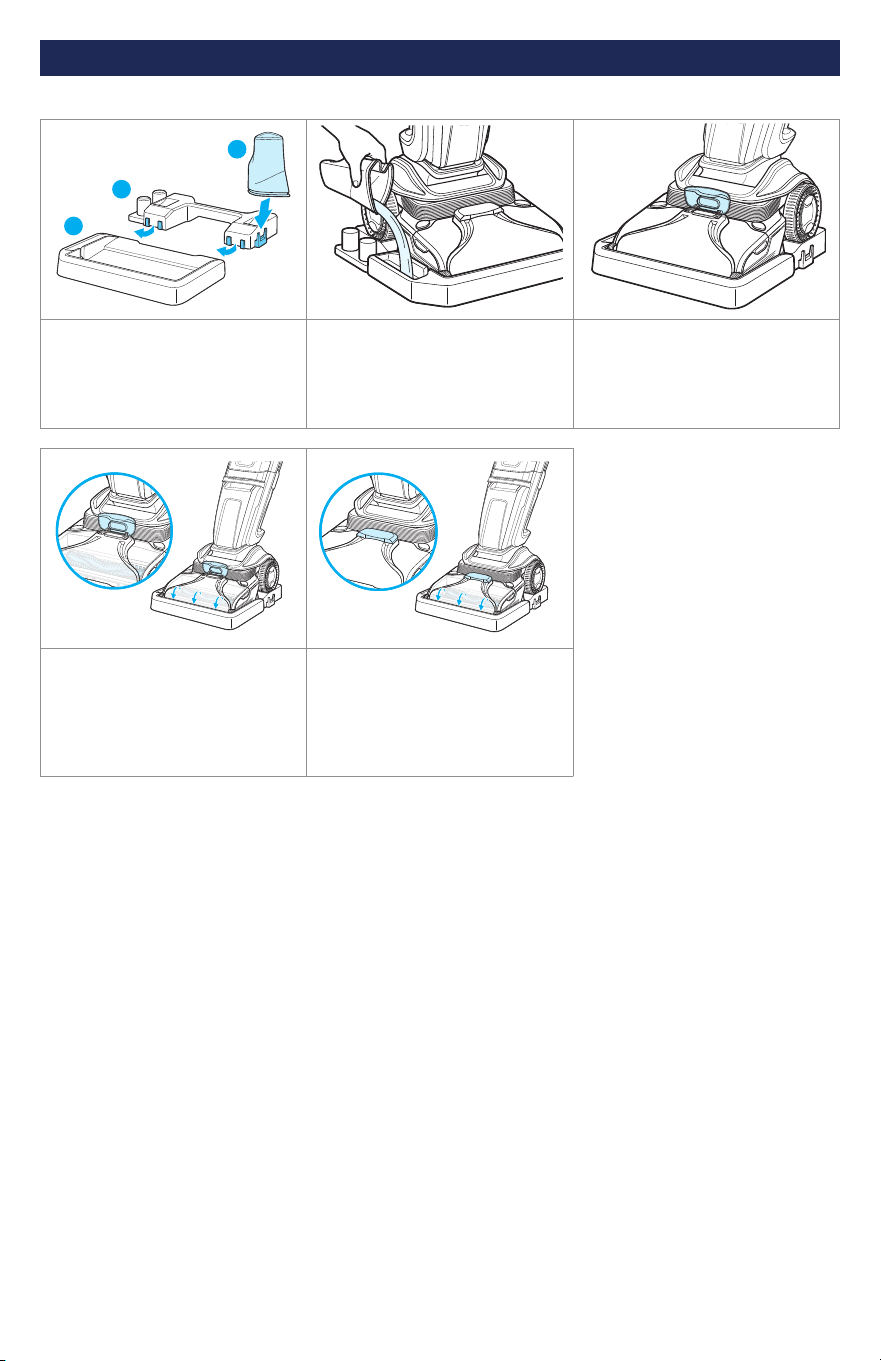
Using the Rinse and Storage Tray (select models)
A
B
C
1. There are 2 hooks on each
side of part A that hook under
part B. Press B down onto
A. The water cup (C) can be
stored on the side of the tray.
2. Place machine on tray. Fill
rinse cup with fresh tap water
to the fill line printed on cup.
Pour water into tray as shown.
3. Open hose door on foot.
4. With hose tool door open,
recline machine and press
power button to turn ON.
Run for 6-8 seconds to rinse
brush rolls.
5. Close hose tool door. Press
power button to turn ON and
run until all water is picked up.
Repeat steps 3-4 until foam is
completely rinsed. Press power
button to turn machine OFF.
Storing Your Machine
Once your cleaning is complete, make sure both the dirty and clean water tanks are emptied, rinsed
out, and dried before the next use. Wrap cord around cord wrap for storage. Store machine in a
protected, dry area.
After-Cleaning Care (continued)
global.BISSELL.com 11
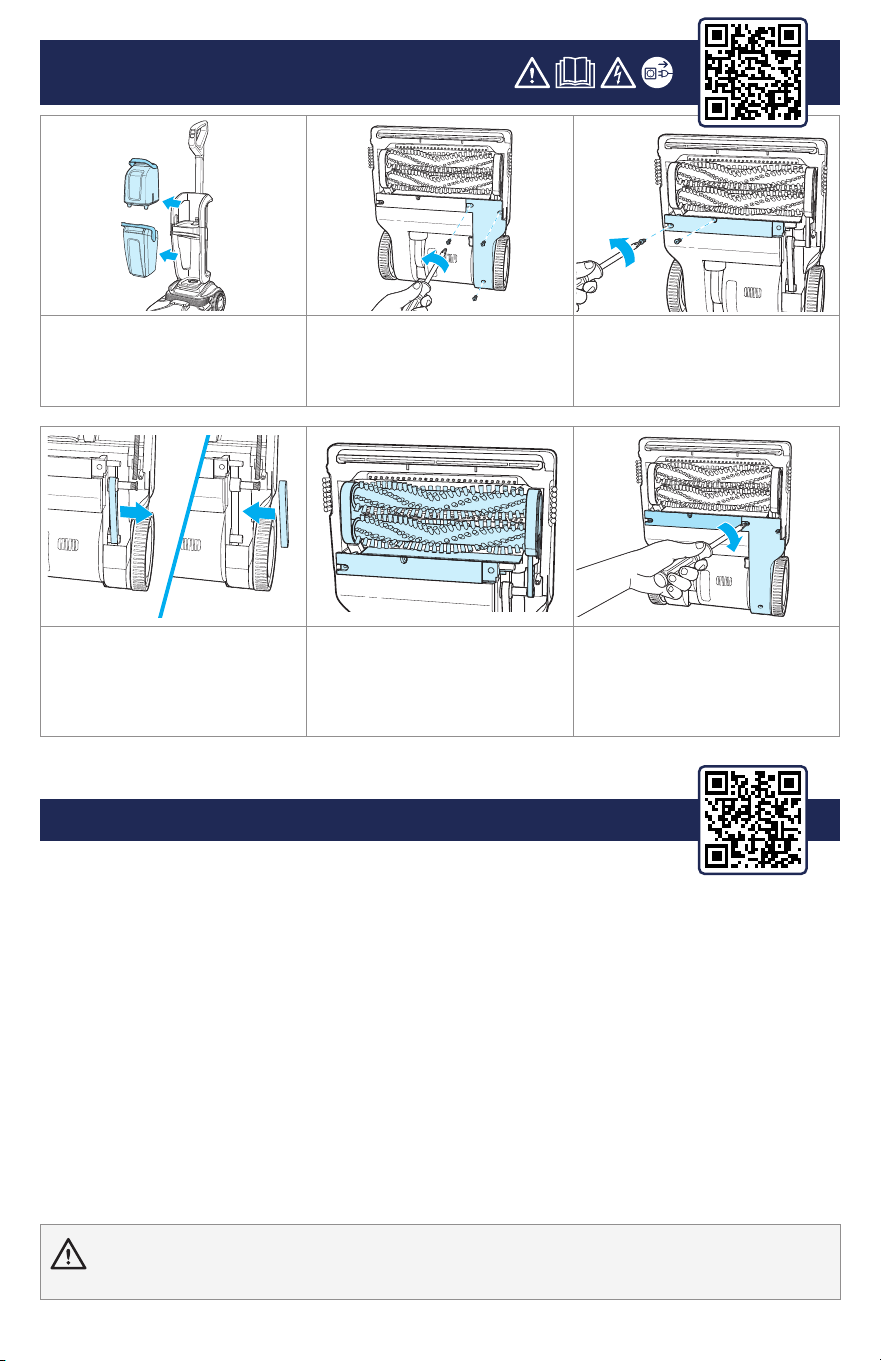
Replacing Belts and Brush Rolls
Scan the QR code for a how-to video.
1. Unplug machine and remove
both tanks. While reclined, lay
machine on its front.
2. Remove belt cover. Use
Phillips-head screwdriver to
remove three screws.
3. Use Phillips-head
screwdriver to remove two
screws. Then remove brush roll
assembly by unhooking belt.
4. If flat belt is broken, place
a new belt around red pulley.
Stretch belt toward back of
machine and around metal
shaft.
5. If brush roll belts or brush
roll assembly is broken, replace
with new brush roll assembly.
6. Reinstall brush roll
assembly, making sure to loop
belt over the shaft. Reinstall
belt cover.
WARNING To reduce the risk of injury, do not touch the steam cleaning nozzle or adjacent surfaces when
steam-cleaning or when the nozzle is heated.
Troubleshooting
Visit global.BISSELL.com or scan the QR code with your smartphone camera
for troubleshooting.
Note: Any other servicing should be performed by an authorised service representative.

12
©2023 BISSELL Inc. All rights reserved.
Part Number 1634045 01/23 RevH
Limited Warranty
This limited warranty is provided by BISSELL® International Trading
Company B.V. (“BISSELL”) and applies in Australia and New Zealand. It
gives you specific rights. It is offered as an additional benefit to your rights
under law. You also have other rights under The Australian Consumer Law
or New Zealand Consumer Laws, whichever applies to you. You can find out
about your legal rights and remedies by contacting your local consumer
advice service. Nothing in this warranty will replace or lessen any of your
legal rights or remedies. If you need additional instruction regarding this
warranty or have questions regarding what it may cover, please contact
BISSELL Consumer Care or contact your local distributor.
This warranty is given to the current owner of the product with the
original sales receipt. The original sales receipt must include the
product(s) purchased, the date purchased, and which country it was
purchased from new. You must be able to evidence the date of purchase
and show the product was purchased in Australia or New Zealand to
submit a claim under this warranty. You will receive the warranty that is
applicable to the country where your product was originally purchased,
as shown on the original sales receipt. If you use the product outside
of the country where it was purchased, your warranty may be void in
BISSELL’s sole discretion. It may be necessary to obtain some of your
personal information, such as a mailing address, to fulfill the terms of
this warranty. Any personal data will be handled pursuant to BISSELL’s
Privacy Policy, which can be found at global.BISSELL.com/privacy-policy.
Limited 2- or 3-Year Warranty (varies by model)
Model 3670F: Limited 2-Year Warranty
Model 3672H: Limited 3-Year Warranty
From the date of purchase by the original purchaser, subject to the
*EXCEPTIONS AND EXCLUSIONS identified below, BISSELL will repair
or replace (with new, refurbished, lightly used, or remanufactured
components or products), at BISSELL’s option, free of charge, any
defective or malfunctioning part or product.
BISSELL recommends that the original packaging and original proof of
purchase with the date of purchase and country where purchased be
kept for the duration of the warranty period in case you want to redeem
the warranty during the warranty period. Keeping the original packaging
will assist with any necessary re-packaging and transportation but is not
a condition of the warranty.
If your product is replaced by BISSELL under this warranty, then the
new item will benefit from the remainder of the term of this warranty
(calculated from the date of the original purchase). The period of this
warranty shall not be extended whether or not your product is repaired
or replaced.
*Conditions of Warranty
This warranty applies to products used for personal domestic use
and not commercial or hire purposes. Consumable components and
attachments such as filters, belts, shells, water tanks, scraping strips,
brushes, and mop pads, which must be replaced or serviced by the user
from time to time, are not covered by this warranty.
This warranty does not apply to any defect arising from fair wear and
tear, including but not limited to the battery discharging time shortening
due to the aging or use. Damage or malfunction caused by the user
or any third party whether as a result of accident, negligence, abuse,
neglect, or any other use not in accordance with the user guide is not
covered by this warranty. An unauthorised repair (or attempted repair)
may void this warranty whether or not damage has been caused by that
repair/attempt. Removing or tampering with the Product Rating Label on
the product or rendering it illegible will void this warranty.
Except as set out below, BISSELL and its distributors are not liable for any
loss or damage that is not foreseeable or for incidental or consequential
damages of any nature associated with the use of this product including
without limitation loss of profit, loss of business, business interruption,
loss of opportunity, distress, inconvenience, or disappointment. Except
as set out below, BISSELL’s liability will not exceed the purchase price of
the product.
BISSELL does not exclude or limit in any way its liability for (a) death
or personal injury caused by our negligence or the negligence of
our employees, agents or subcontractors; (b) fraud or fraudulent
misrepresentation; (c) or for any other matter which cannot be excluded
or limited under law.
To make a claim under this warranty contact BISSELL Australia PTY LTD
(details below). Contact BISSELL prior to returning any goods. Where
agreed, BISSELL will reimburse reasonable postage / handling costs
(if any) for returning goods to BISSELL. To claim expenses incurred in
making a claim under this warranty please provide BISSELL with a copy
of the receipt of the expenses by email or post.
For Australian Consumers Only: Our goods come with guarantees that
cannot be excluded under the Australian Consumer Law. You are entitled
to a replacement or refund for a major failure and compensation for any
other reasonably foreseeable loss or damage. You are also entitled to
have the goods repaired or replaced if the goods fail to be of acceptable
quality and the failure does not amount to a major failure.
Important Notes
Please keep your original sales receipt. It provides proof of the date of
purchase and where it was purchased in the event of a warranty claim.
See warranty for details.
Please note that using your BISSELL machine outside of its country of
original purchase and/or use with a power converter may damage your
BISSELL machine and damage caused by mismatched power voltage will
not be covered by your warranty.
Please note that putting vinegar, bleach, dish soap, detergent,
homemade soap, and other non-BISSELL products in your BISSELL machine
may damage your BISSELL machine. Damage caused by using non-BISSELL
products in your machine will not be covered by your warranty.
Consumer Care
If your BISSELL product should require service or to claim under our
limited guarantee, please contact us.
Australia
Telephone: 1300 247 735
Website: BISSELL.com.au
Address: 789 Springvale Road, Mulgrave, Victoria 3170
Email: [email protected]
New Zealand
Telephone: 0800 247 735
Website: BISSELL.co.nz
Address: 789 Springvale Road, Mulgrave, Victoria 3170
Email: [email protected]om
