Blast Freezer
User Manual
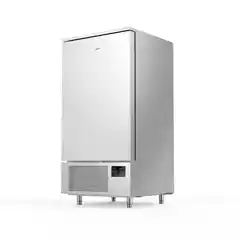
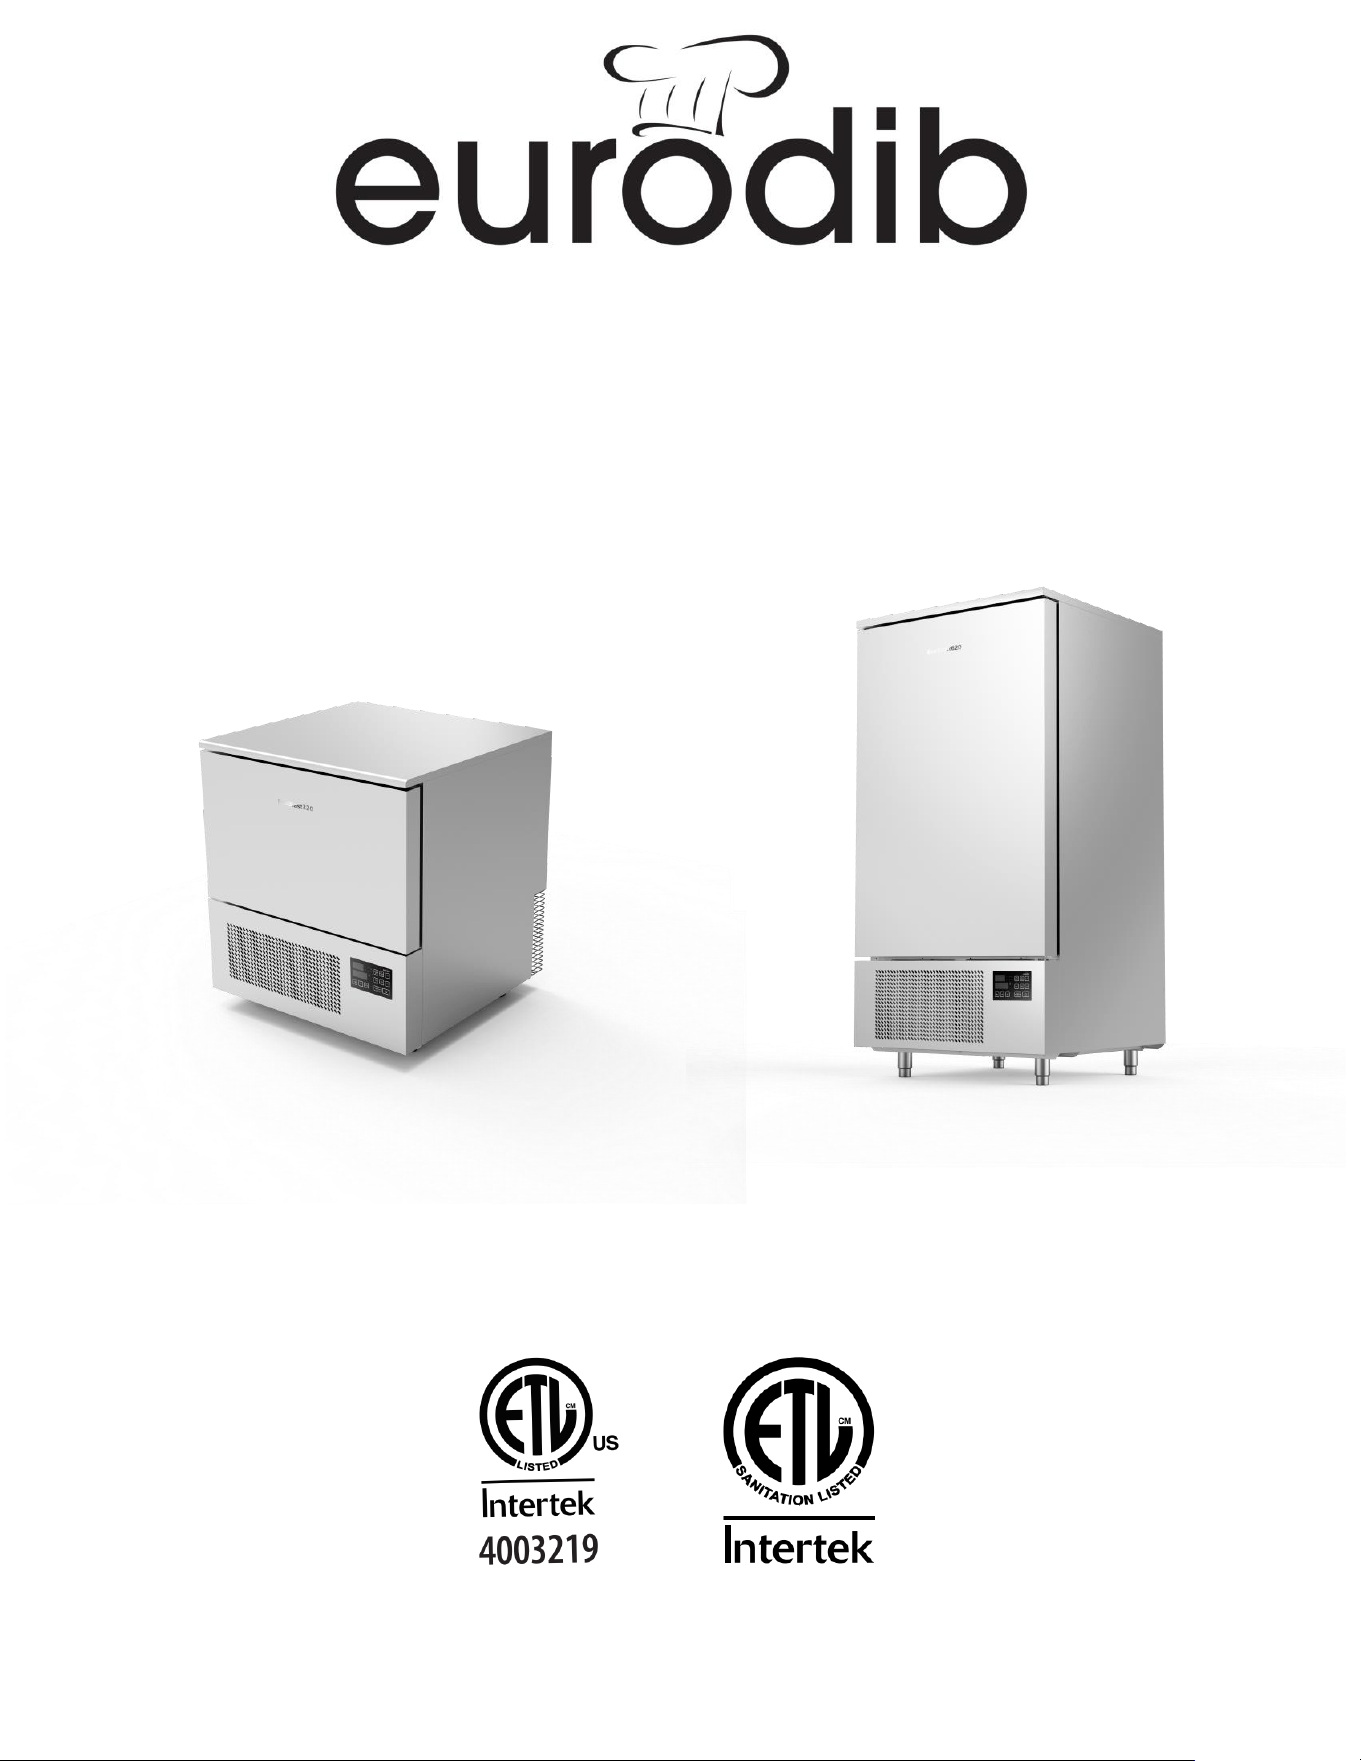
Model:EcoBlast 320
Model:EcoBlast 620
Please read this instruction manual carefully before use. It contains all safety instructions related to the
machine and aims to inform qualified personnel for proper installation, operation and maintenance.
Eurodib will not be responsible for any consequences caused by failure to follow these instructions.

Introduction
Quick-freeze is a method of cooling food quickly to prevent bacteria growth, which happens fastest
between 8°C (46°F) and 68°C (154°F). Rapid cooling of cooked food, from 90°C (158°F) to 3°C (37°F)
within 90 minutes, makes food storage and subsequent consumption safer. This method of food
preservation is already common in the catering industry and more recently, due to its characteristics of
ensuring food safety and quality, has been popularized in ready-to-eat food. Presently, it mainly appears
in small and medium-sized catering operations, bars, restaurants, small hotels, nursing centers and
schools.
Table of Contents
Safety Instructions…………………………………………………………………………………………………………. 3
Installation, Transportation, Handling Storage and Demolition………………………………………. 5 - 6
Functions
Quick-Cooling Program………………………………………………………………………………………. 7
Quick-Freezing Program……………………………………………………………………………………… 7
Save Program……………………………………………………………………………………………………… 7
Food Storage………………………………………………………………………………………………………. 7
Control Panel and Functions………………………………………………………………………………. 8 - 10
Technical Specifications…………………………………………………………………………………………………… 11
Maintenance
Safety………………………………………………………………………………………………………………….. 12
Cleaning………………………………………………………………………………………………………………. 12
Special Maintenance……………………………………………………………………………………………. 12
Periodic Inspection………………………………………………………………………………………………. 12 - 13
Error Codes and Troubleshooting
Machine Error Codes……………………………………………………………………………………………. 13
Troubleshooting…………………………………………………………………………………………………… 14 - 16
Warranty and Service……………………………………………………………………………………………………….. 17

3
Safety Instructions
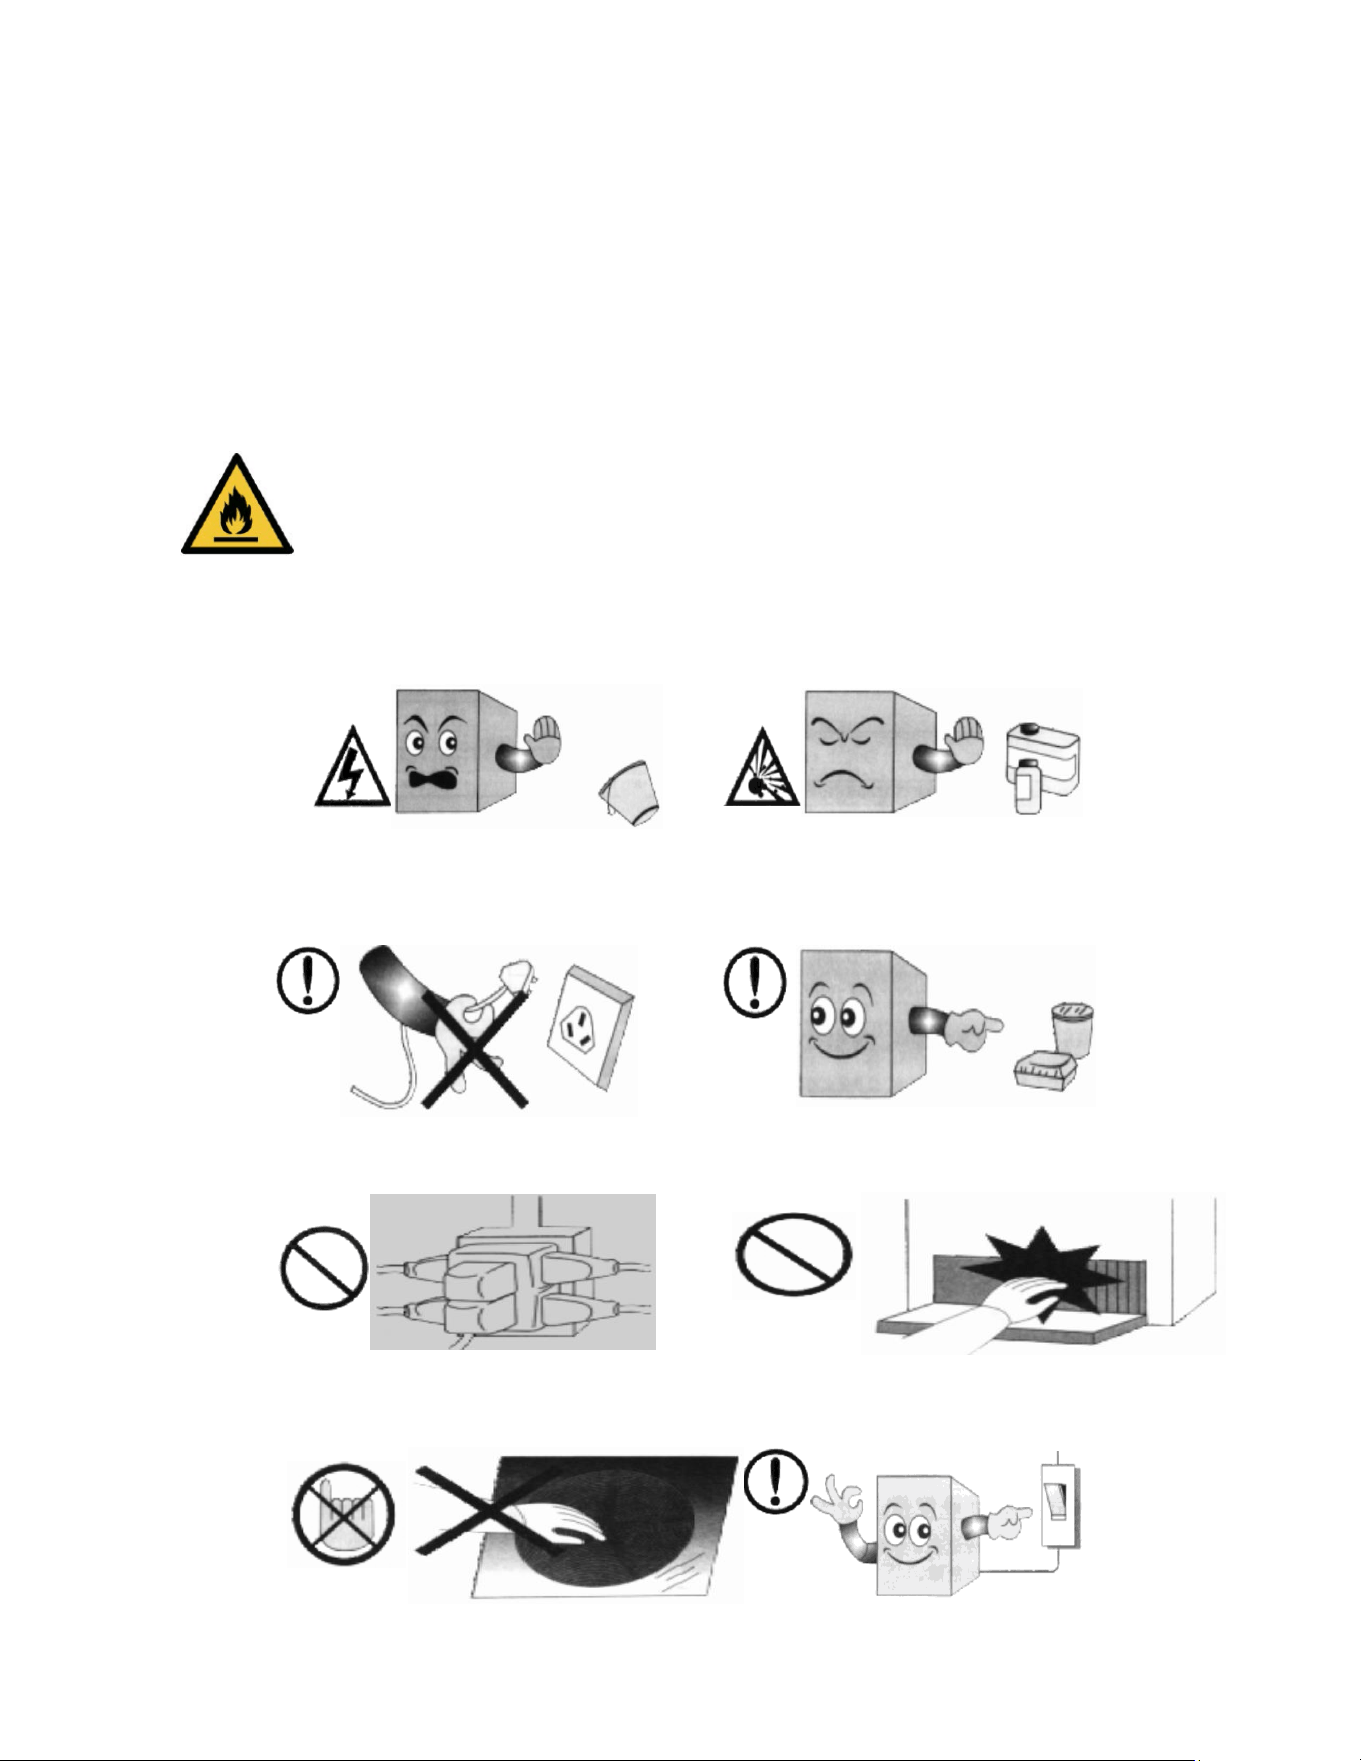
• Before connecting the power to the machine, make sure the voltage and frequency are consistent with
those on the rating label of the machine.
• Be sure to connect the machine to a suitable high sensitivity leakage switch (30mA)
• The socket must meet the requirements of current national laws and regulations, and the safety laws
and regulations require mandatory grounding of the machine. To protect the machine from
electrical overload or short circuit, the power supply is connected through a differential leakage
switch with manual reset and high sensitivity
• Be sure to disconnect the power supply before performing any cleaning or maintenance
• Wear gloves for maintenance of the motor and the refrigeration system, located within the machine
• Do not insert a screwdriver or other devices into the protective fence (e.g. heat exchange vent,
evaporator, etc.)
• Do not touch electric parts with wet hands or bare feet
• Do not block the heat exchange port of compressor or evaporator to ensure proper operation of the
machine
• Must only be operated by properly trained personnel
• Installation, routine, and special maintenance (e.g. cleaning and maintenance of cleaning systems)
shall be performed exclusively by authorized technicians who are professionally trained and have
sufficient knowledge of refrigeration and electrical systems
• This device is not suitable for use by persons (including children) with physical, sensory, or intellectual
deficiencies or lack of experience and knowledge
• Children should be supervised to make sure they don't play around machines
• If the machine’s power supply fails, be sure to ask the manufacturer’s identified professionals to
replace (to avoid accidents)
• It is absolutely forbidden to modify or remove the safety devices provided (protective grills, hazard
labels, etc.). The manufacturer shall not be responsible for any consequences caused by the
violation of this instruction
• In the event of a fire, do not douse with water. Use a carbon dioxide fire extinguisher to cool the motor
room as soon as possible
• Do not use mechanical devices or other means to accelerate the defrosting process, other than those
recommended by the manufacturer
• Do not damage the refrigerant circuit
• Do not use electrical appliances inside the food storage compartments of the appliance, unless they
are recommended by the manufacturer
• The refrigerant and insulation gases are flammable. When disposing of the appliance, do so only at an
authorized waste disposal center. Do not expose to flames.
• If the power supply cord is damaged, it must be replaced by the manufacturer, its service agent(s) or
similarly qualified personnel in order to avoid hazard.
• Do not store explosive substances such as aerosol cans with a flammable propellant in this appliance.
• WARNING: Keep all ventilation openings in the appliance enclosure or in the structure for building-in
4
clear of obstruction.
• The sound level is below 70 dB(A).
• The appliance must be disconnected from its power source during cleaning or maintenance, and when
replacing parts. The operator must have access to all sides and areas of the machine. The plug must
remain disconnected to do so.
• The alpha-numeric characters on the label define the climatic class of the appliance as below:
– 32 °C ± 2 °C on appliances of test room climatic class 0, 1, 2, 3, 4, 6 or 8;
– 43 °C ± 2 °C on appliances of test room climatic class 5 or 7.
• WARNING: Risk of fire / flammable materials
• Inner tray holders cannot be loaded more than 5KGS each.
CAUTION: Burst
PROHIBITED
DO NOT TOUCH
CAUTION
WARNING: Electric Shock
5
Installation, Transportation, Storage and Demolition
Packing and Shipping
• Packed in wooden cases, the machine should be transported with appropriate equipment, do not
move manually
• When using a lifting system, such as forklifts or pallets, pay special attention to balance and prevent
tipping
• Normally, the machine should be fixed on wooden pallets to ensure safety during transportation and
storage
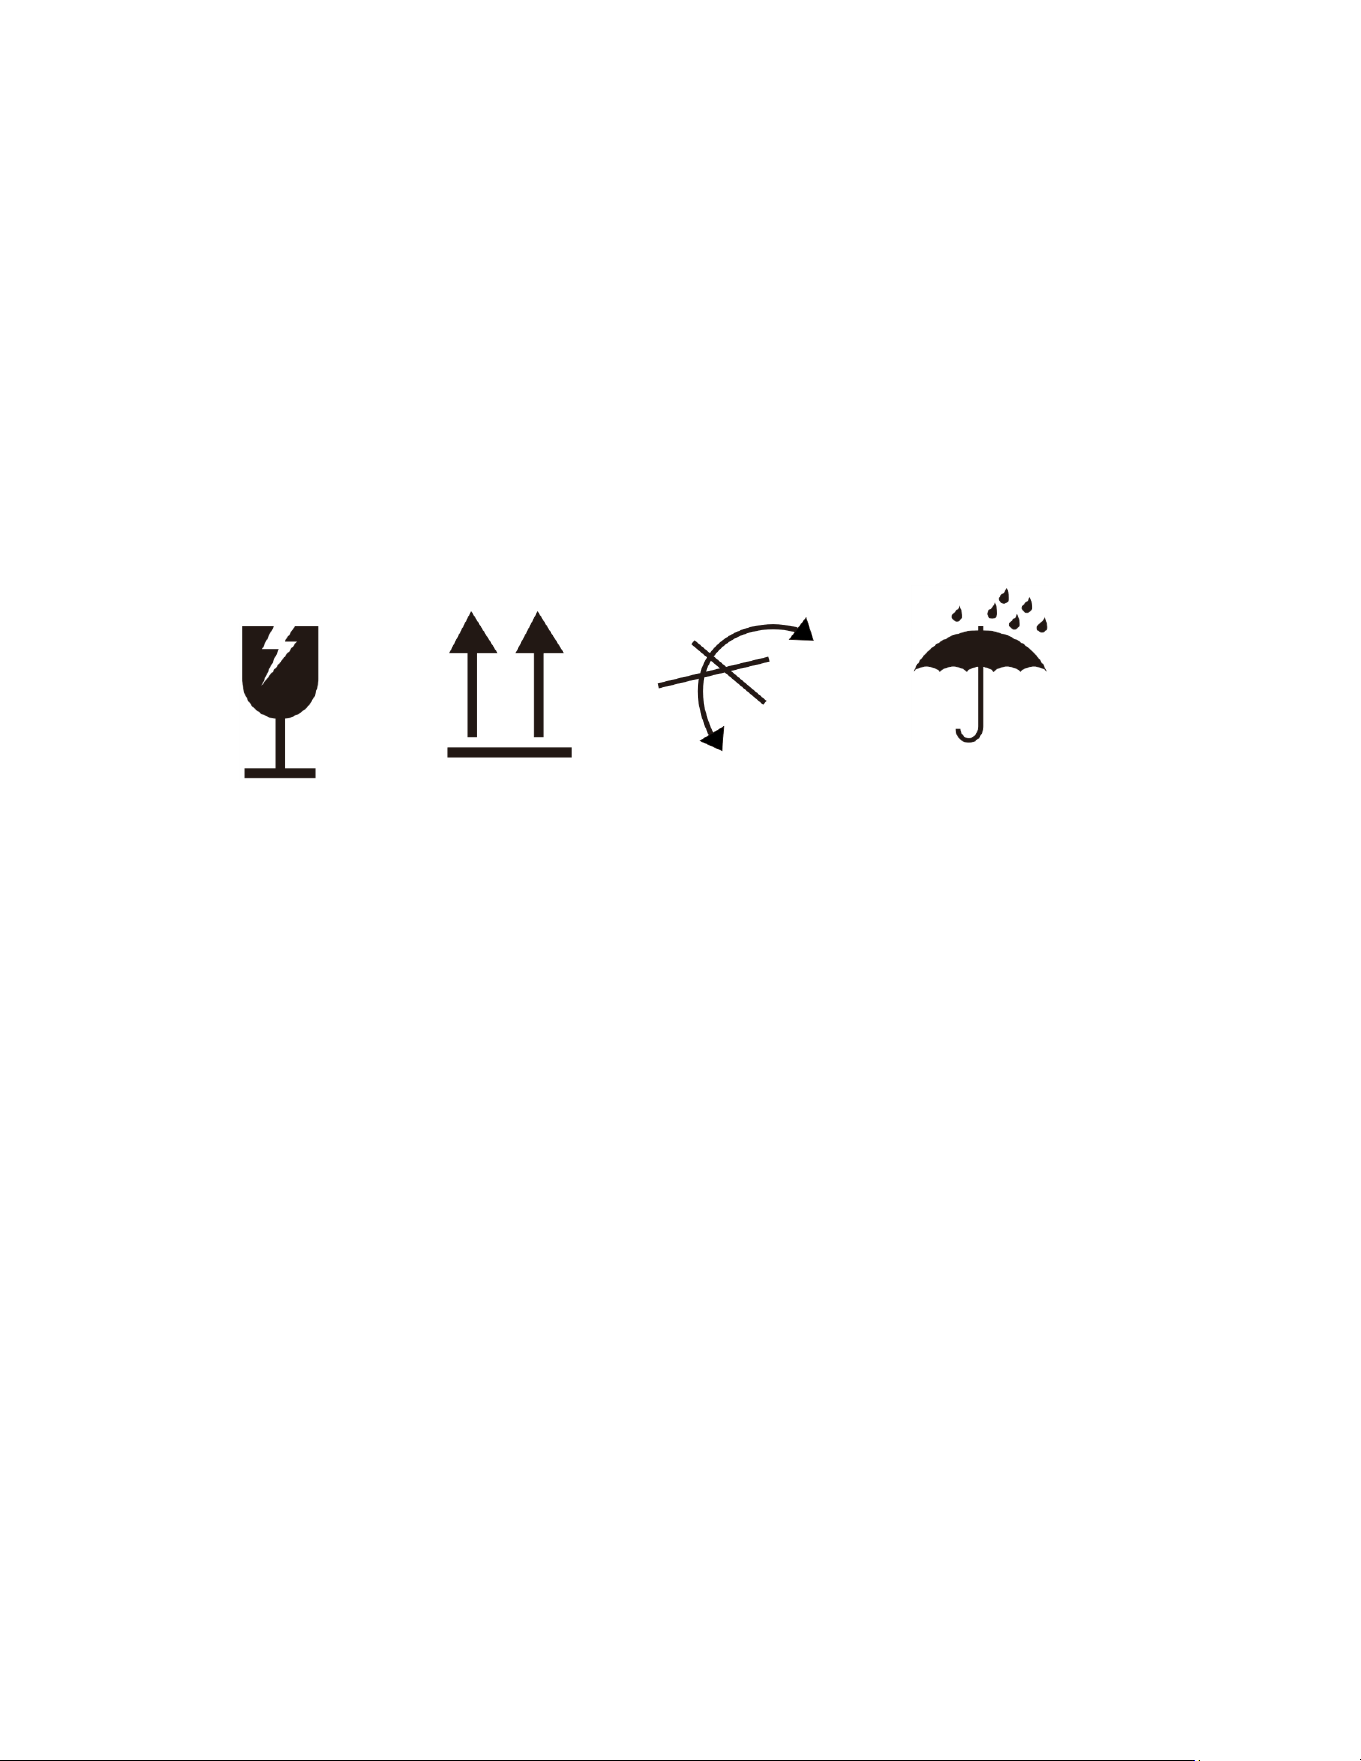
• Warning symbols shall be printed on the package to ensure that the machine will not be damaged
during loading, unloading and transportation.
fragile upward Do not turn Stay dry
Stacking limit
• When storing or handling machines, the maximum stacking quantity is two machines, unless otherwise
specified on the appropriate sticker.
• As the center of gravity of the machine is not consistent with the geometric center, take care not to tilt
during handling.
Unpacking
• Due to the packing of wooden cases, please use appropriate tools for unpacking. After unpacking, if
any damage is found, please inform the carrier immediately.
Installation
• Do not push or pull the machine during handling to avoid capsizing or damaging parts
• Do not lean the machine against the door
• The machine should be placed in a well-ventilated place, and away from heat sources, and explosive
objects
• The installation plane must be flat
• The minimum gap ≥100mm (4") must be maintained to ensure adequate operating performance,
ventilation and maintainability, and the back of the machine must be placed against the wall for use.
• Before connecting power to the machine, make sure the voltage and frequency are consistent with
those on the rating label. To allow normal voltage variations of +/-10%, the machine must be
connected to a valid ground connection.
6
Storage
• Turn off the power and unplug the machine
• Empty the refrigerated bin and clean it carefully
• Keep the door slightly open to ensure ventilation and avoid mildew or odors
Demolition
Temporary storage of special wastes may be permitted before disposal or final disposal
In all cases, the applicable environmental laws of the user's country must be complied with.
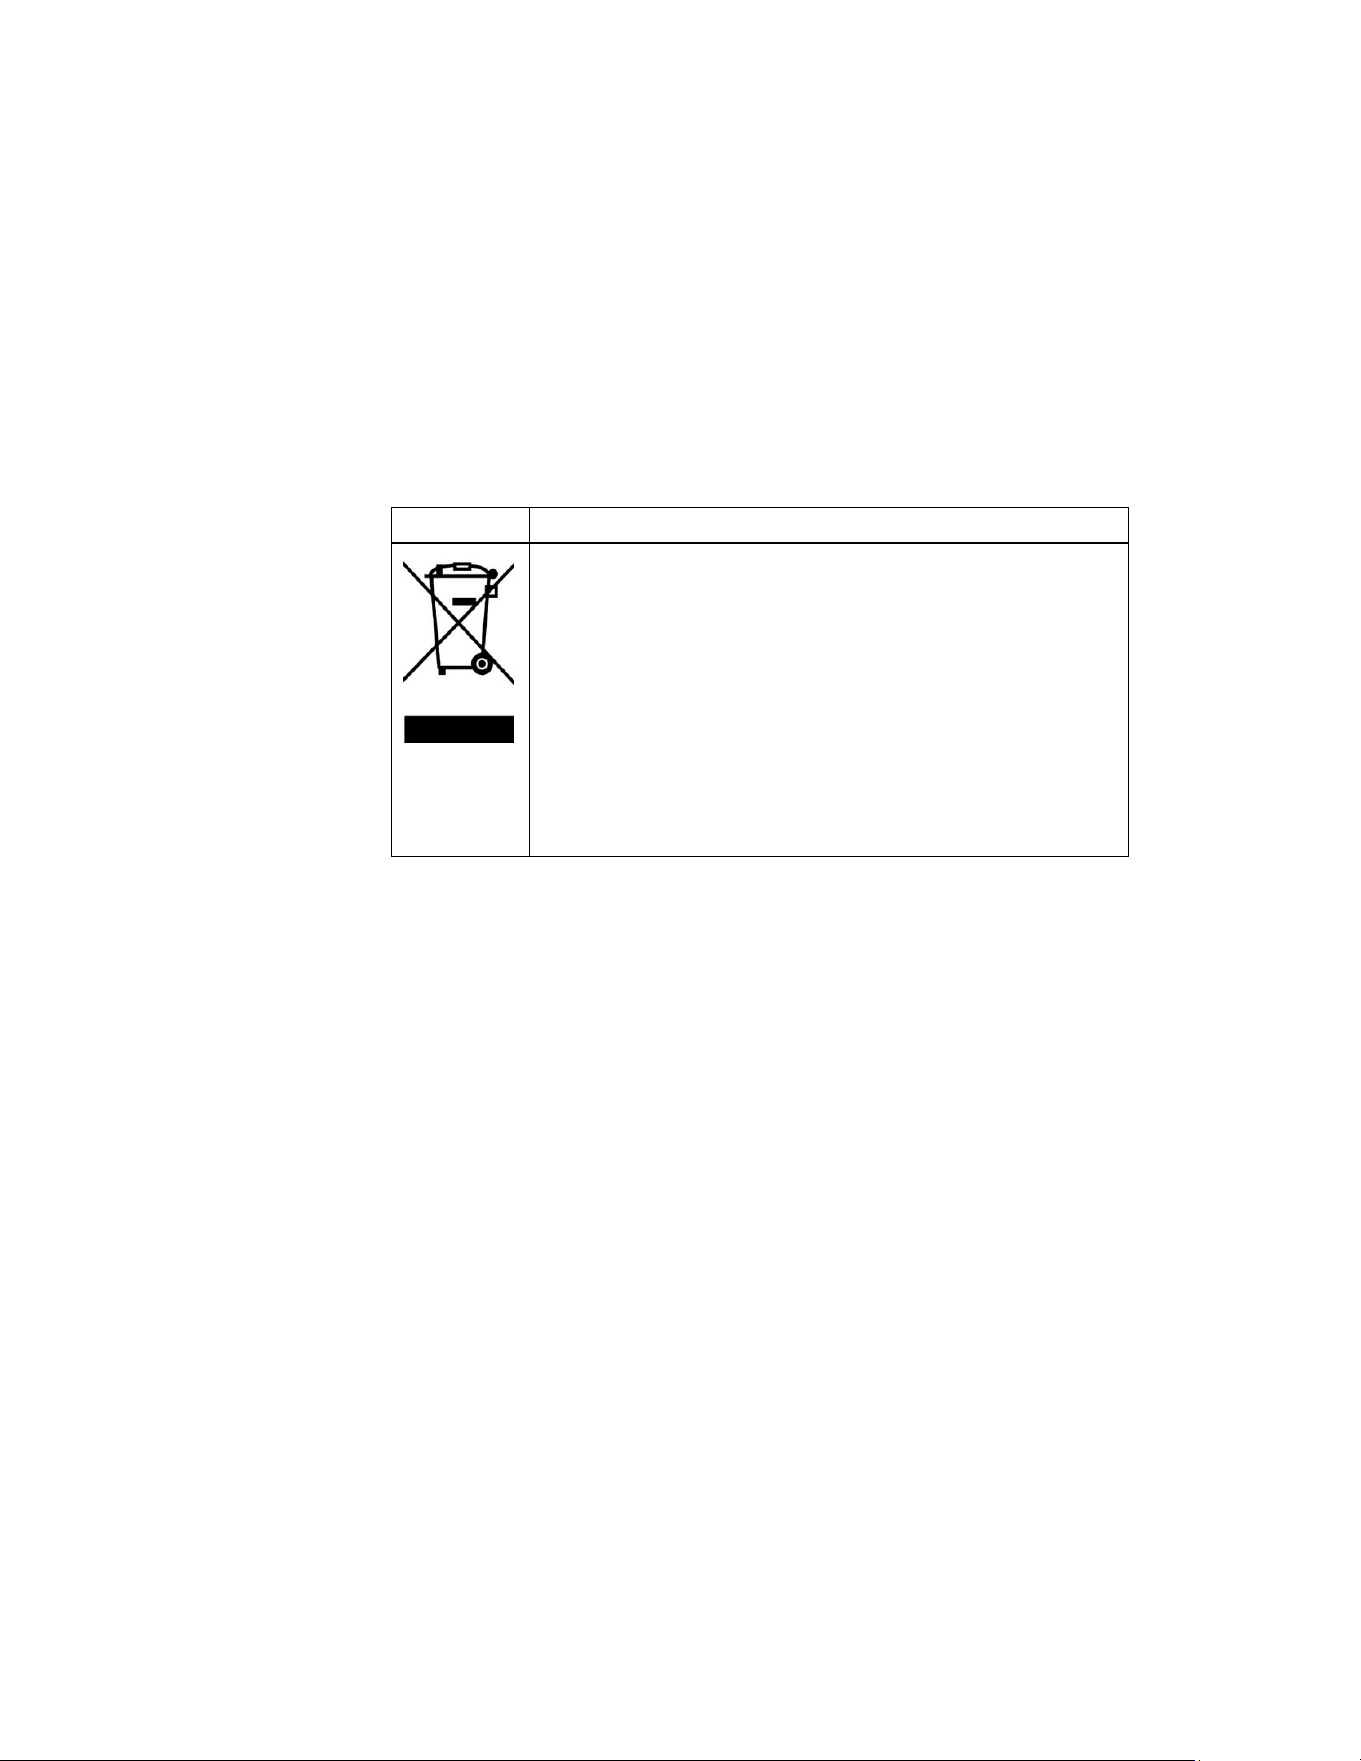
Correct Disposal of this Product
This marking indicates that this product should not be
disposed with other household wastes throughout the
EU. To prevent possible harm to the environment or
human health from uncontrolled waste disposal, recycle
it responsibly to promote the sustainable reuse of
material resources. To return your used device, please
use the return and collection systems or contact the
retailer where the product was purchased. They can take
this product for environmentally safe recycling.

7
Functional Specifications
Quick-Cooling Program
This program can quickly reduce the temperature of cooked food (from +90°C to +3°C in 90 minutes) to
avoid being in the critical range of +8°C to +68°C, thus preventing spoilage.
Quick-cooled cooked food can be stored in refrigerator at +3°C for up to five days
Quick-Freezing Program
Quick-freeze (reduced from +90°C to -18°C in 240 minutes) prevents the formation of ice crystals in foods,
thereby reducing loss of juice and vitamins.
This procedure applies to cooked and raw foods. Frozen cooked and raw foods can be stored at -18°C for
up to 2 months and 12 months respectively.
Save Program
At the end of each quick-cooling or quick-freezing program, the machine will automatically enter the
preservation program, and keep the food center temperature.
Food storage
For optimal storage results, please follow the following instructions:
Save Program Stage
• Do not place hot food or uncovered liquids in the machine
• Wrap or protect foods, especially if they contain aroma. Avoid splashing/spilling. Avoid using lids which
close the containers completely.
• Arrange your food properly so that it doesn't block air flow. Avoid placing food on paper trays,
cardboard, or wooden boards, which may hinder air flow
• Try to avoid opening the door frequently and for long periods of time.
Quick-Cooling or Quick-Freezing Stage
• Do not open the door throughout the duration of the program(s)
• To achieve faster and better quick-cooling and quick-freezing efficiency of food and better
low-temperature sterilization effect of the machine, please start the machine at the lowest temperature
and run it for 20 minutes before quick-cooling and quick-freezing food.
• Do not use trays or containers deeper than 65mm (2.5")
• Do not stack food. The thickness of the food/containers should be less than 40mm (1.6").
• Use aluminum or Stainless-Steel containers without a lid
8
Control Panel and its Functions
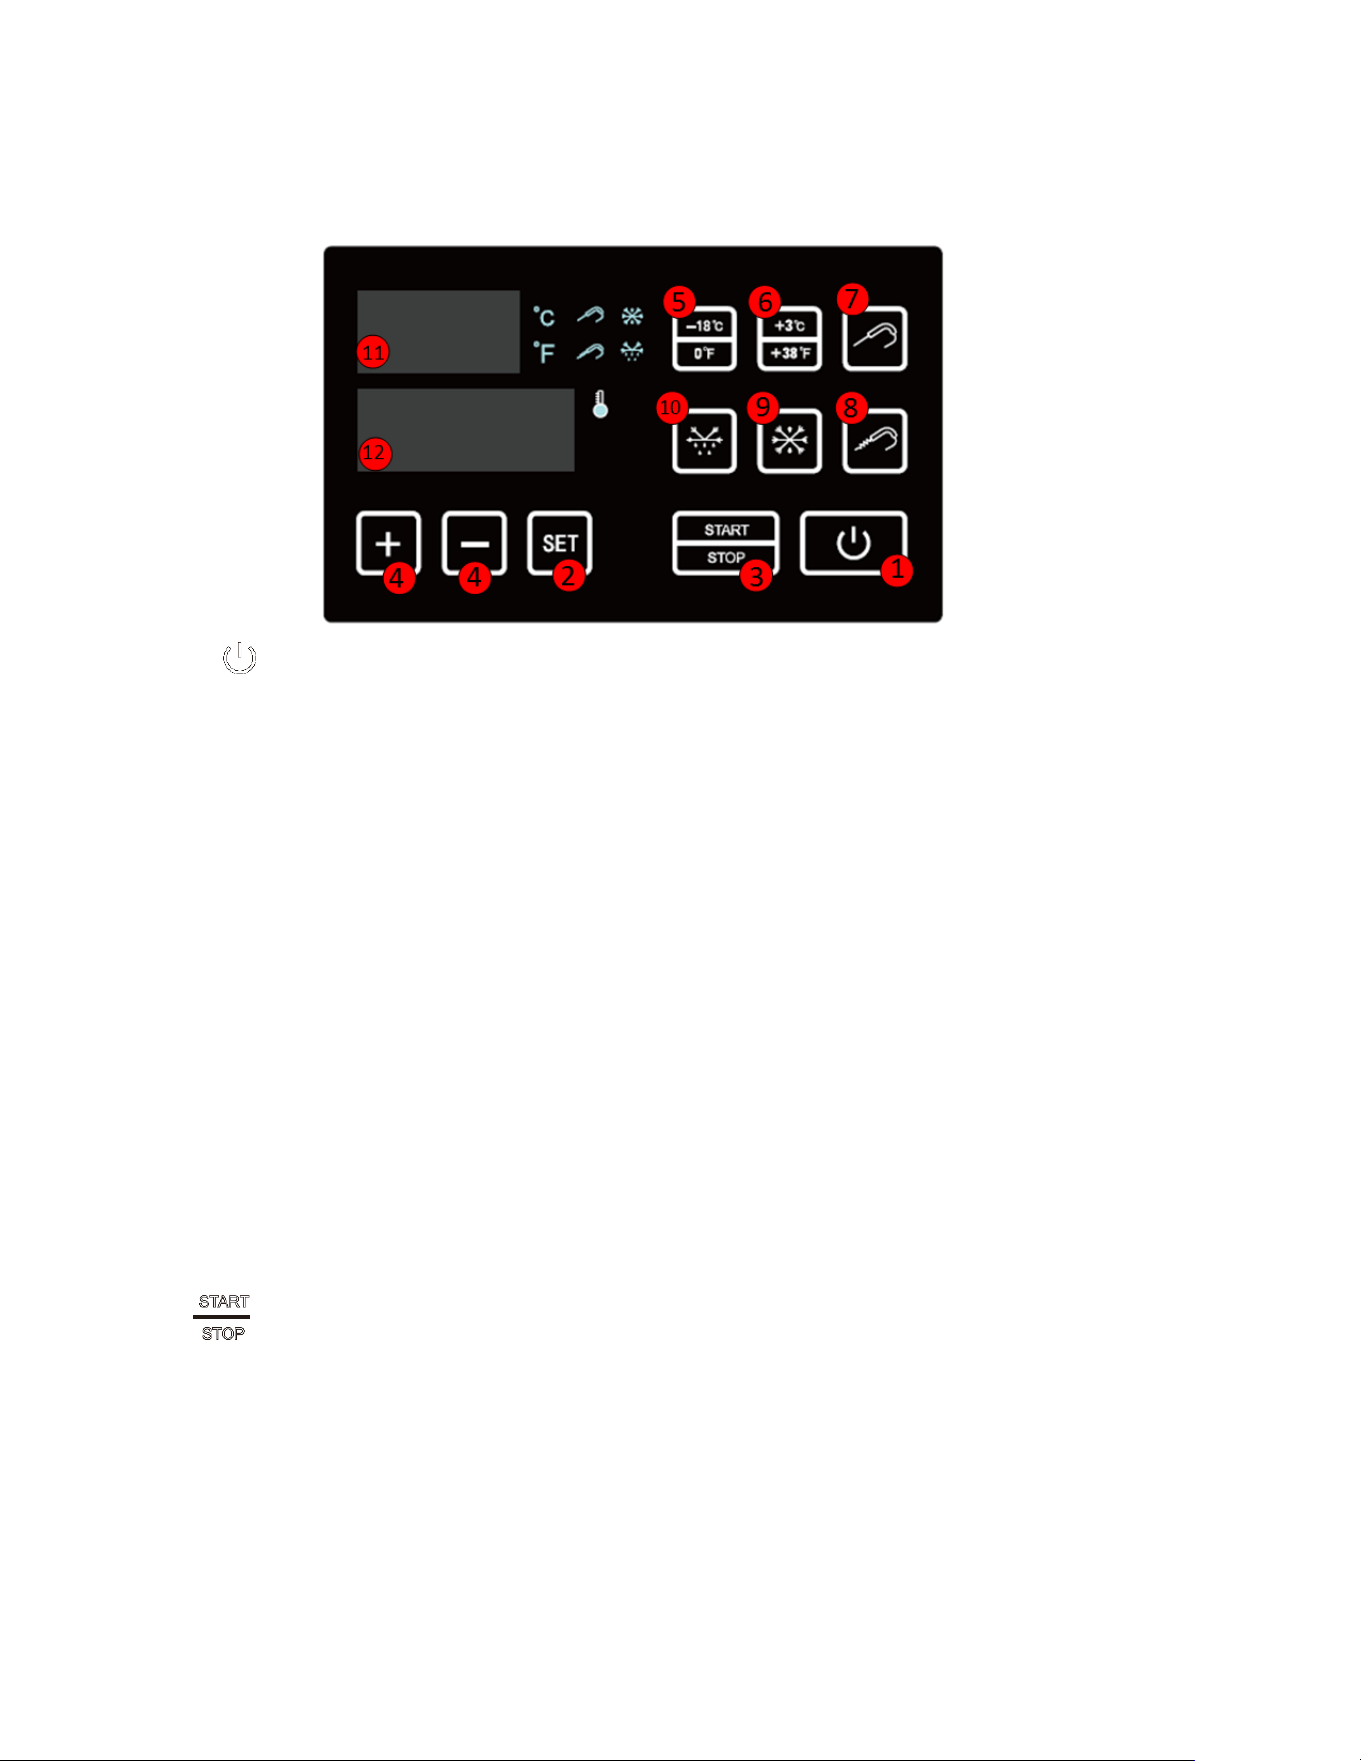
1. ( )Power button
-- When the power is connected, the machine defaults to Standby Mode. In Standby Mode, press the
Power key to enter Preparation Mode. At this time, the temperature displays the current temperature in
the cabinet, and the time displays the time value set last time.
-- When the machine is in Preparation Mode or during operation, press the Power button and the
machine returns to Standby Mode.
2. Set Key
-- In Preparation Mode, press the SET button to switch between temperature and time (hour or minutes)
settings. When the temperature flashes, set the temperature by “+” and “-”, the range can be set :- 30 °C
~ +25 °C (-22 °F ~ +77 °F); When the digits of the hours and minutes flash, set hour and minutes by “+”
and “-”, the range can be: 00:10~99:59. Press the SET button to back after all settings are completed.
** It will exit automatically if no other setting is selected after you press SET. Temperature will be the
room temperature or the food sensor temperature in the display.
-- In Preparation Mode, the temperature unit (°C and °F) can be switched by pressing and holding the
SET button and the “-” button for three seconds while the temperature value and time value are not set.
-- While the machine is operating, press and hold the SET button to view the set temperature and time.
3. ( )Start/Stop Button
-- After setting the required temperature and time, press the START/STOP button: the machine starts
operating, the cooling indicator lights up, and the time starts counting down.
-- Pressing the START/STOP button during operation: the machine stops and displays the temperature
inside the cabinet (if the food probe button is pressed, the food probe temperature is displayed).
**(1)Considering the problem of the internal pressure of the compressor: To protect the life of the
compressor, it should not be started frequently within a short time. The cooling equipment should be
delayed for a few minutes after the machine is restarted, that is, a delayed start. Press the START/STOP
9
button. After 2 minutes, the compressor starts, and after another 2 minutes, the evaporator fan starts.
(2)In the soft Quick-Freezing mode: when the START/STOP button is pressed to start, if the
temperature inside the cabinet is less than or equal to the set temperature, the compressor will only
start when the temperature in the cabinet is greater than or equal to the set temperature.
(3)In the hard Quick-Freezing mode: when the START/STOP button is pressed to start, if the food probe
temperature is less than or equal to the set temperature, the compressor will not start. It will only start
when the food probe temperature is greater than or equal to the set temperature. **
4. (+-) Adjust Button
-- Use the SET button to choose the desired setting, and increase/decrease the temperature and time by
“+” and “-”.
5. ( ) Quick-Freeze Shortcut Keys
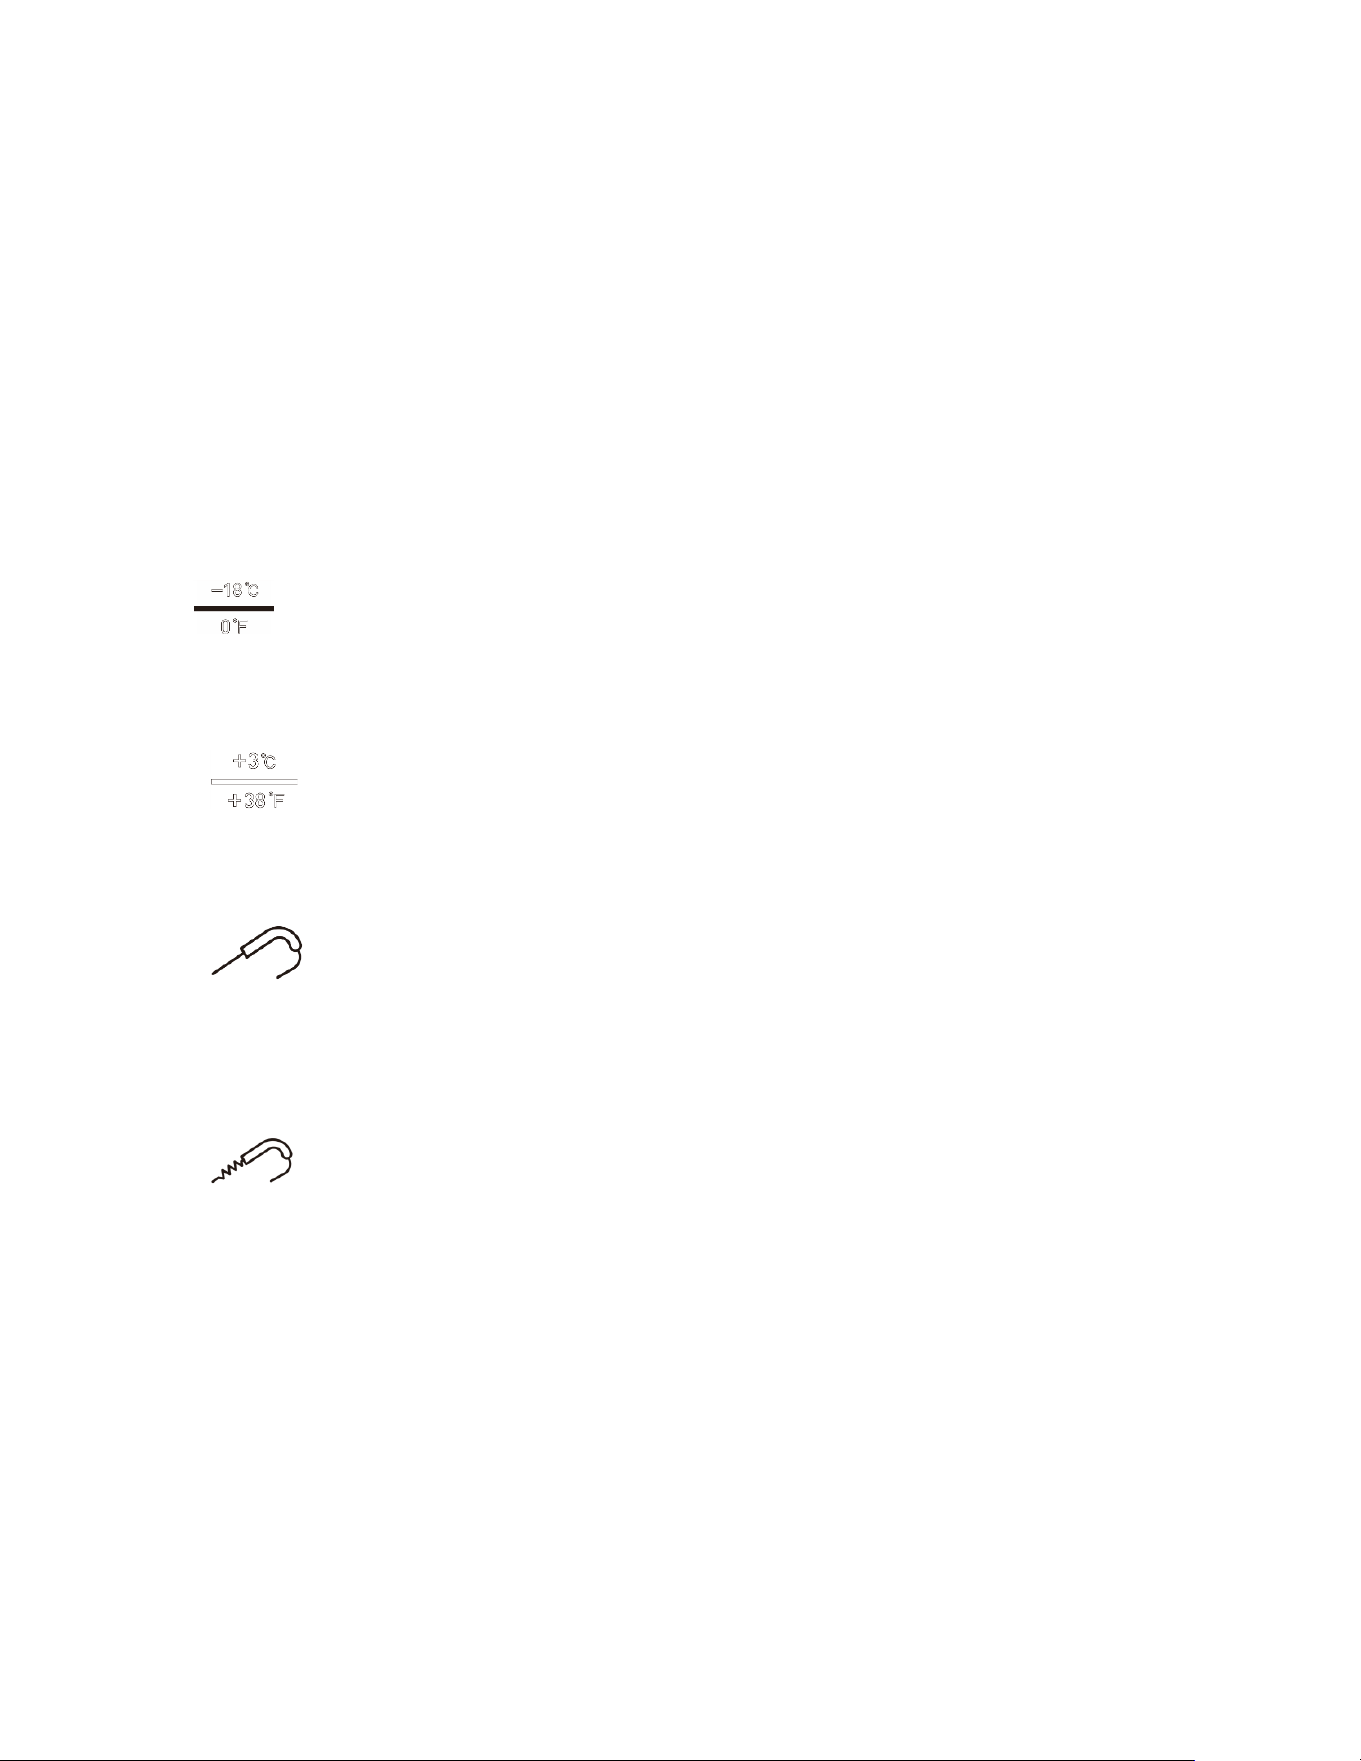
-- Press this shortcut key: the temperature has been set to -18 °C / 0 °F, the time is 04:00; then press the
START / STOP button, and the machine starts to work with this set target temperature and time.
6. ( ) Quick-Cool Shortcut Keys
-- Press this shortcut key: the temperature has been set to +3 °C / +38 °F, the time is 01:30. Press the
START / STOP button, and the machine starts to work with this set target temperature and time.
7. ( )Food Probe Keys
-- Insert the food probe into the inside of the food and press the key. The probe icon will light up and the
temperature digital tube shows the temperature of the food probe. Then press the key to switch back to
the temperature inside the cabinet.
8. ( ) Heat probe for food
-- When the food probe needs to be pulled out from the frozen food: press the button, and the food
probe heating icon is illuminated. The probe heating function is performed, the temperature indicates
the temperature of the food probe, and when the food probe heating icon is off, the probe is heated,
and the food probe can be removed from the food.
Food Probe Precautions
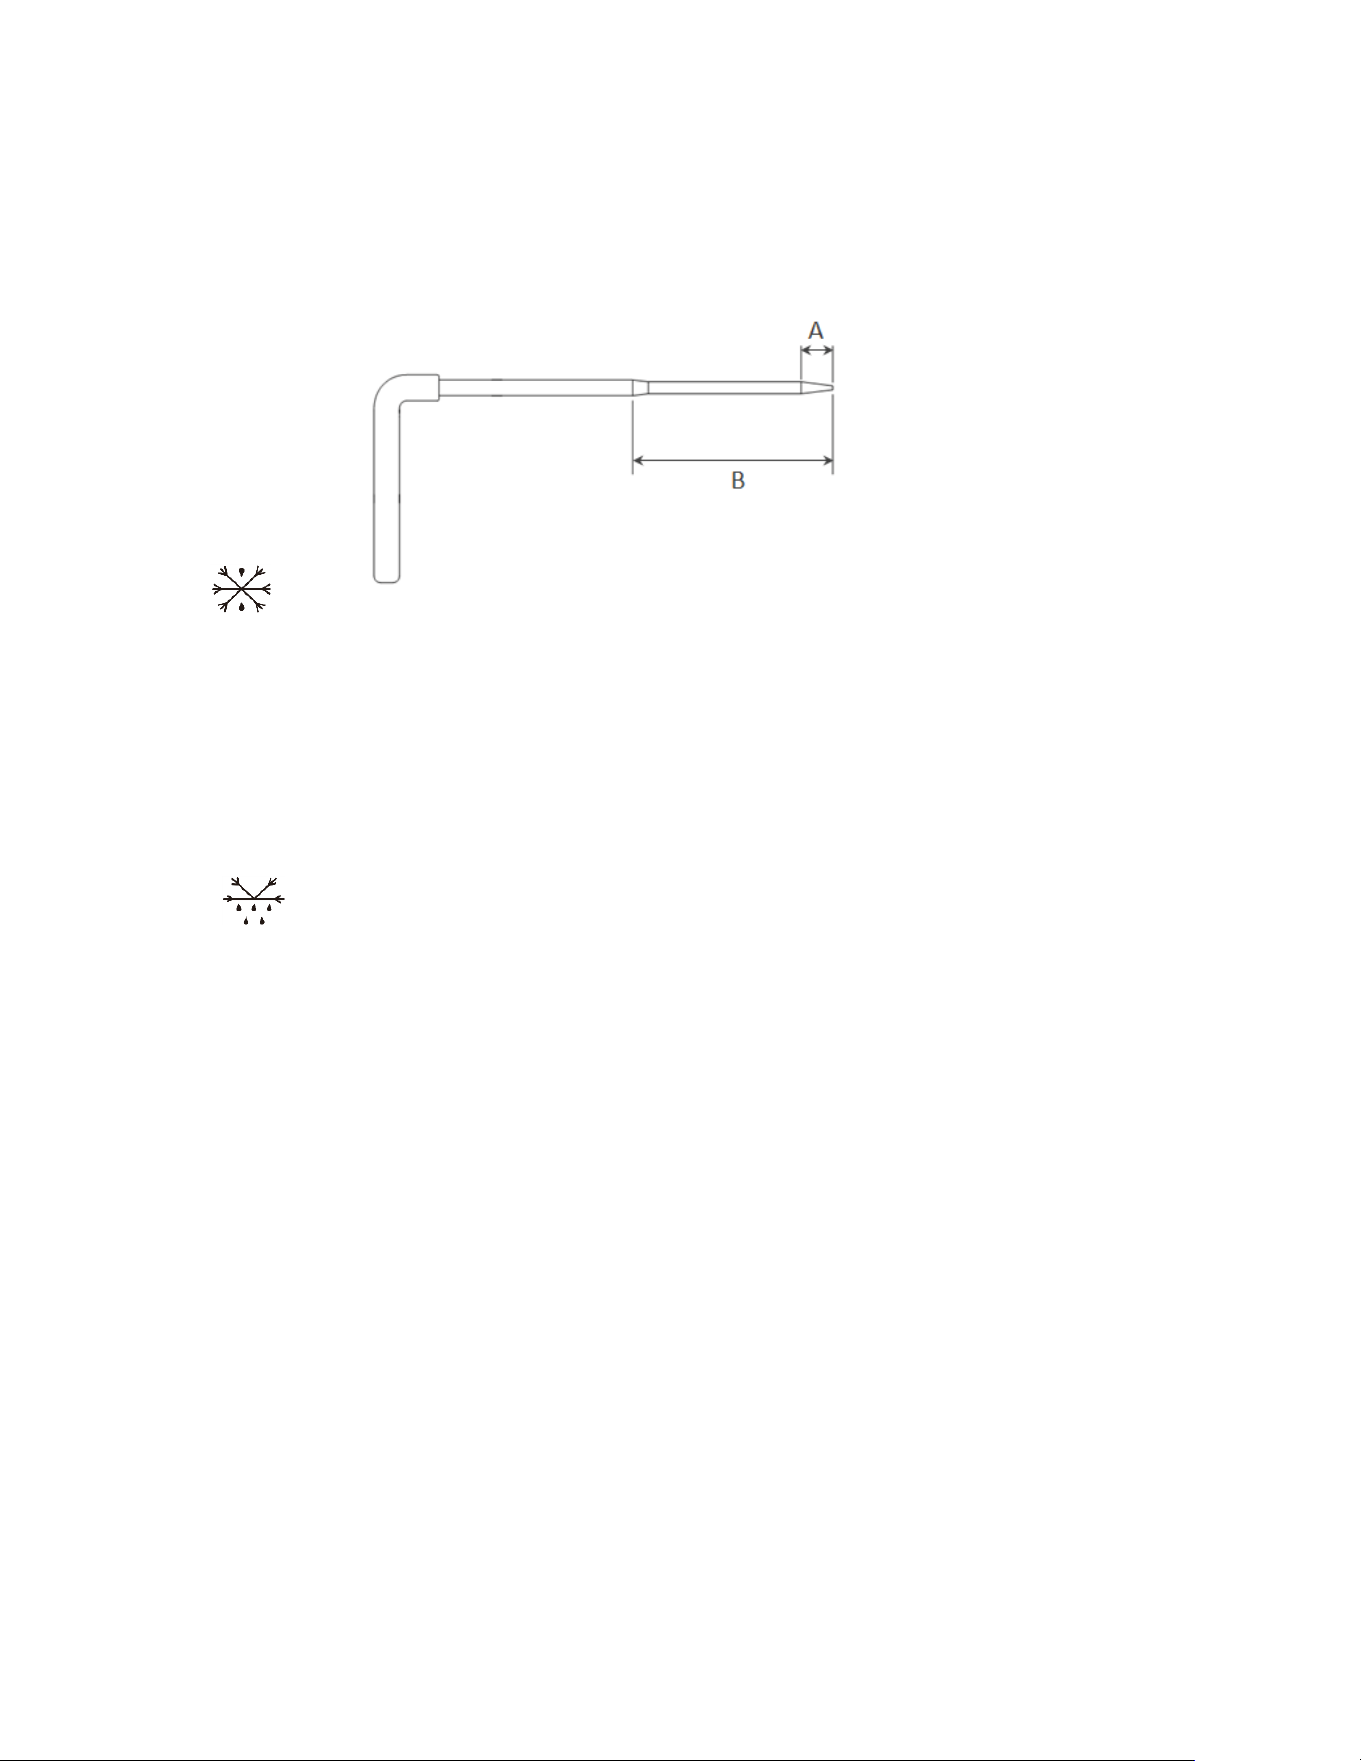
(1)The tip portion (A) of the food probe is a temperature sensor. When inserted into the food, the tip
portion cannot be sticking out, otherwise the temperature detected by the probe is not accurate.
(2)The food probe heating function is only to be used when the probe needs to be pulled out from the
food. It is recommended to use after the set program is completed. If you need to use it during a set
program, please press the START/STOP button to stop the machine and then execute the food probe
10
heating function.
(3)After the probe is pulled out of the food, the residual temperature of the probe will rise. In this case,
please do not touch the heating section (B) of the food probe to avoid further heating.
(4)Removal of the food sensor is prohibited in any situation.
9. ( )Hard-Freeze Button
-- Press this button: the hard Quick-Freeze indicator lights, and the machine runs at the target
temperature of the food probe, which is hard freeze. Without pressing this button, the machine runs at
the target temperature of the cabinet, which is soft freeze.
**To use the hard freeze mode, make sure the food probe is inserted into the food and press the hard
freeze button before pressing the START/STOP button. Otherwise, you need to stop the machine first,
press the hard freeze button and proceed to starting the machine. **
10. ( ) Defrost Button
-- Press this button: the defrost indicator lights, the machine performs the defrost function. When the
defrost is completed, the defrost indicator is off. During the cooling process, the program automatically
defrosts every 6 hours by default.
11. Temperature Display
-- Displays the current temperature inside the cabinet after powering on
-- Displays the actual temperature value inside the cabinet or probe during operation
12. Time Display
-- Displays the last set time value after starting
-- Displays the remaining operating time during the set program
Temperature Return Difference Function
During the cooling process, when the temperature reaches the set value, the compressor stops working.
The compressor will not restart until two minutes have elapsed and the temperature is greater than or
equal to the set temperature of 3 °C (5 °F).
Food probe schematic
11
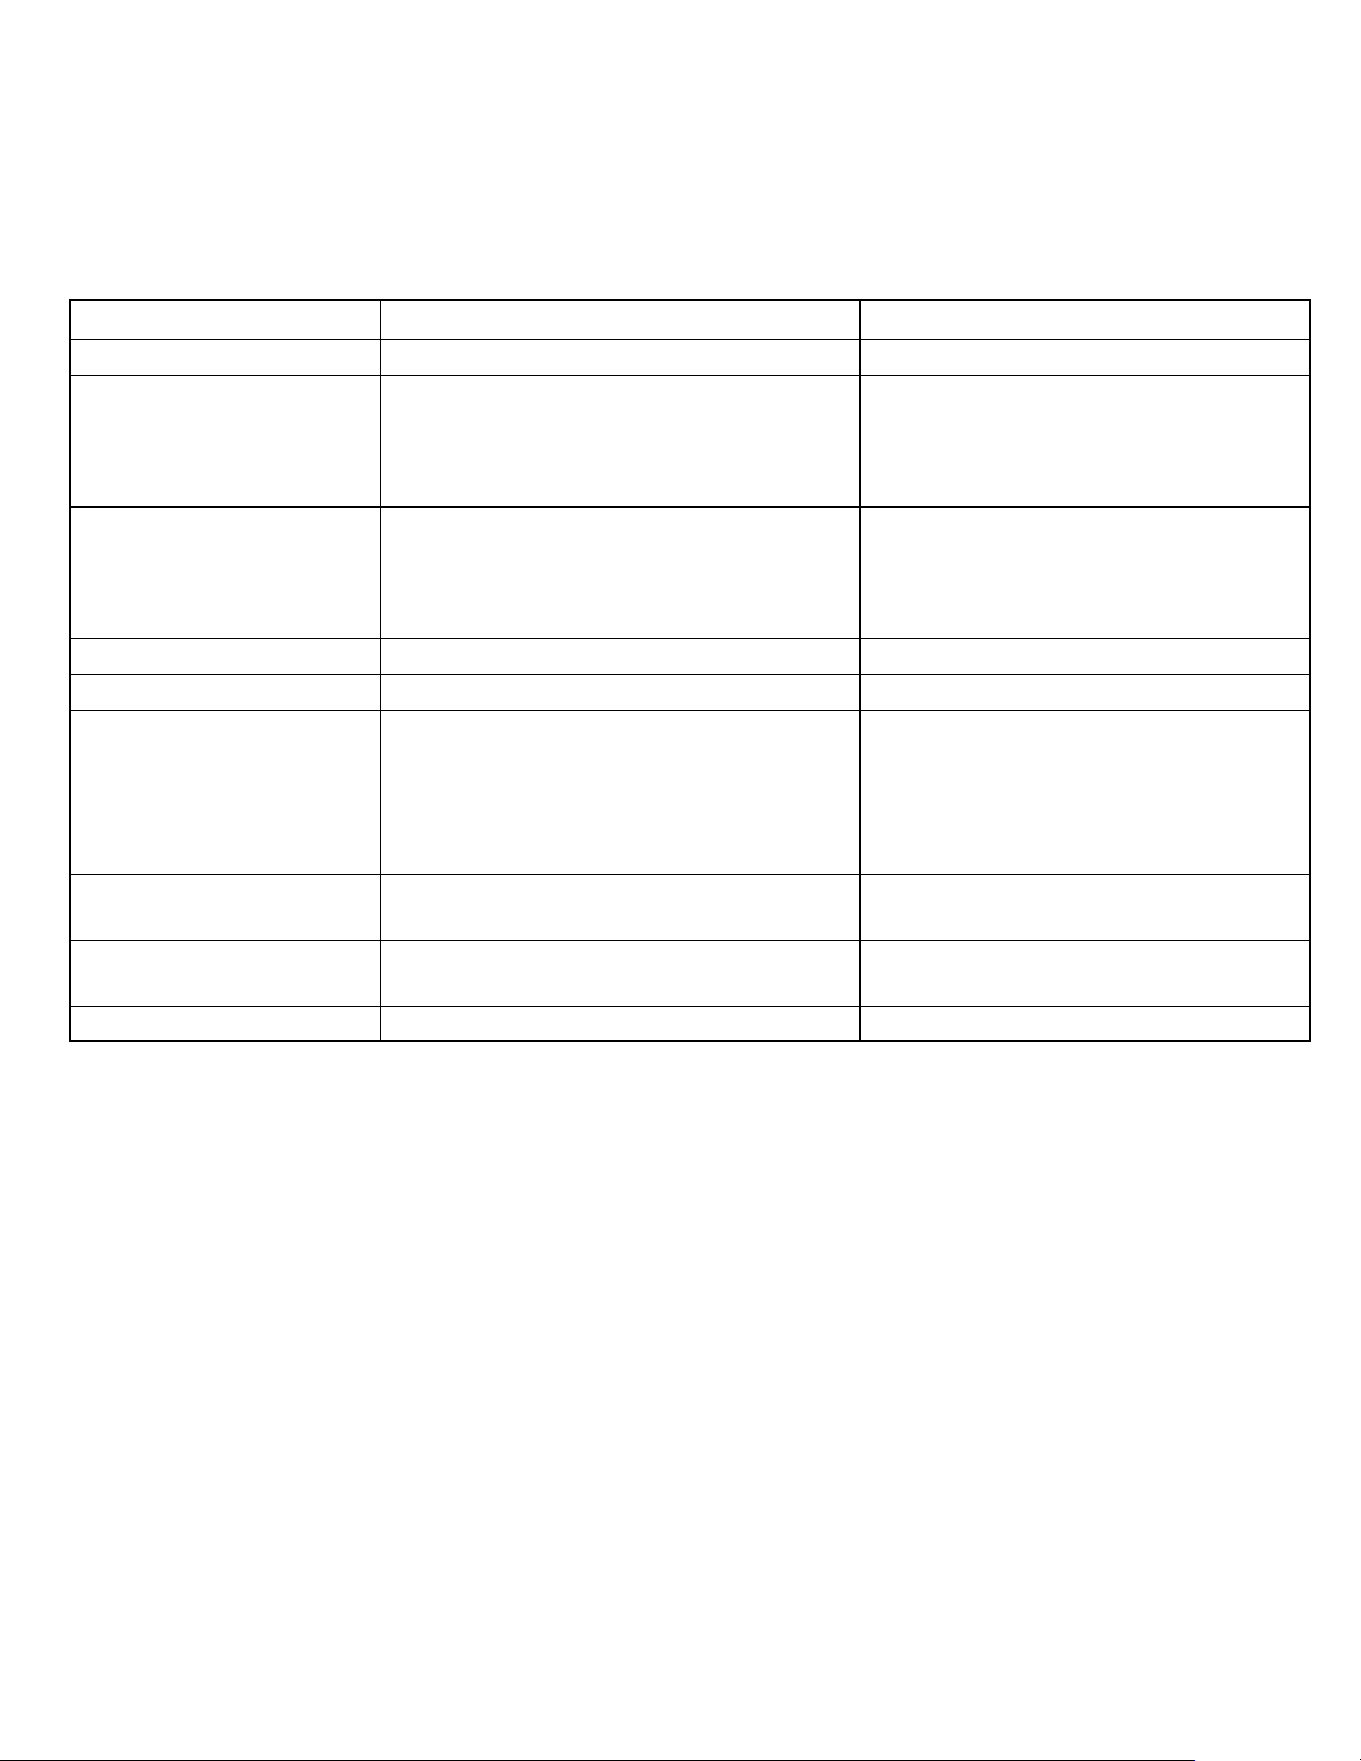
Technical Specifications
Model
EcoBlast 320
EcoBlast 620
Voltage, Power
110-120V, 60Hz, 660W, 6A
110-120V, 60Hz, 1300W, 16A
Rapid-Cooling Capacity
(food core temperature)
+90°C to +3°C in 90mins
(+194°F to + 37.4°F)
14 kg / 31 lbs
40 kg / 88 lbs
Quick-Freeze Capacity
(food core temperature)
+90℃ to -18℃ in 240mins
(+194°F to -0.4°F)
12 kg / 26.5 lbs
35 kg / 77 lbs
Foaming agent
C5H10
C5H10
Refrigerant
R290
R290
Shelf Capacity
3-5 × GN1/1 (530 × 325mm × 40-65mm)
(20.9" x 12.8" x 1.6 – 2.6")
3-5 x (600 x 400 oven tray)
(23.6" x 15.75" oven tray)
10 × GN1/1 (530 × 325mm × 40-65mm)
(20.9" x 12.8" x 1.6 – 2.6")
10 x (600 x 400 oven tray)
(23.6" x 15.75" oven tray)
Outer Dimensions
W × D × H
(751×747×842) mm
(29.5" x 29.5" x 33")
(785×776×1564) mm
(31" x 30.5" x 61.6")
Cavity Size W × D × H
(624×410×375) mm
(24.5" x 16.1" x 14.75")
(645×409×1045) mm
(25.4" x 16" x 41.1")
Net Weight
66 kg / 145.5 lbs
126 kg / 278 lbs

12
Maintenance
This section is applicable to routine maintenance by properly trained personnel. Special maintenance
and program related contents shall be performed by authorized professionals.
• To ensure the stability of the whole machine, cleaning and maintenance must be carried out.
• The refrigeration system (condenser) must be cleaned by a professional.
• The drain hole should be cleaned regularly to avoid being blocked. After cleaning, make sure to cover
the drain hole lid. The drain hole should be closed during normal use.
Safety
• It is necessary to turn off the machine power before performing any cleaning and maintenance.
• For daily maintenance, it is forbidden to remove the protective/safety device (grid and sticker, etc.)
Cleaning the Machine
• Before the initial cleaning (before first use), clean the interior and accessories with a small amount of
water and a mild soap to remove the characteristic "new" odor. Properly arrange all the accessories in
the cabinet
• Use a damp cotton cloth to carefully clean the outer surface of the machine as described below
• Use a neutral detergent, do not use chlorine or abrasive cleaners to avoid the formation of dirt
residues
• Do not use utensils that may cause scratches and rust, use water to rinse and dry carefully
• If hard residue occurs, use soap and water or a neutral detergent. If necessary, use a wooden or plastic
scraper
• Rinse with a little water and dry thoroughly after cleaning
• Do not sprinkle water directly onto the machine because water can seep into the electrical
components, affecting their normal function.
• Clean the lower part of the machine and adjacent areas daily with soap, water, and non-toxic
chlorine-free cleaners
• If the food probe is black, it can be washed with lemonade.
Special Maintenance (only performed by professionals)
• Clean the condenser regularly
• Check door seal strip to ensure good seal
• Check that the electrical system is working properly
• Check the surrounding heating elements (using amps)
• To repair or replace parts, the serial number of the machine is required
Periodic Inspection
• Check that the plug is correctly inserted into the power socket
• Check if it is affected by heat source

13
• Check if the machine is placed horizontally
• Check if the door seal is properly sealed
• Check if the heat exchange tube is blocked
• Check if the condenser air filter is full of dust. If found, clean the air filter immediately.
Error Codes and Troubleshooting
Machine error codes: HI, LO, E01
HI: Cabinet temperature probe high temperature alarm. Cabinet temperature high temperature alarm
temperature set to 45°C/113°F.
Press the START/STOP button to start the cooling. After 2 hours, check the temperature inside the
cabinet. If the cabinet temperature is greater than or equal to the high temperature alarm temperature
of 45 °C / 113 °F, the temperature display alternately displays the cabinet temperature and HI until the
temperature is lower than the alarm temperature. At this time, check whether the door of the machine
is closed, or stop the machine to check whether the temperature probe or compressor is faulty.
LO: The cabinet temperature probe is low temperature alarm, and the cabinet temperature low
temperature alarm temperature is set to -45 °C / -49 °F.
Press START/STOP to START the refrigeration and test the temperature inside the cabinet 2 hours
later. If the temperature of the cabinet is less than or equal to the low temperature alarm temperature
of -45°C/-49°F, the temperature display bar will alternately display the temperature of the cabinet and
LO until the temperature is higher than the alarm temperature. At this time, stop the cabinet
temperature probe and other devices to check whether there is a fault.
Communication failure code E01: if the motherboard and panel cannot communicate normally, the
panel displays E01. At this time, power off and restart the machine or check the connection between the
motherboard and the panel cable is connected to the right.
Restore factory value parameters: In Preparation Mode, press the "+" and "-" keys simultaneously for 3
seconds, the temperature bar will display "rS", and then automatically shut down. Press the Power
button to start the machine, and the machine parameters will be restored to factory Settings. The
factory value parameters are… temperature unit: ℃; Set the temperature value: -18°C; Setting time:
4:00.
If there is no mention of the error, do not disassemble the machine at will. Please contact our authorized
professionals for related testing and maintenance to avoid safety failure.
14
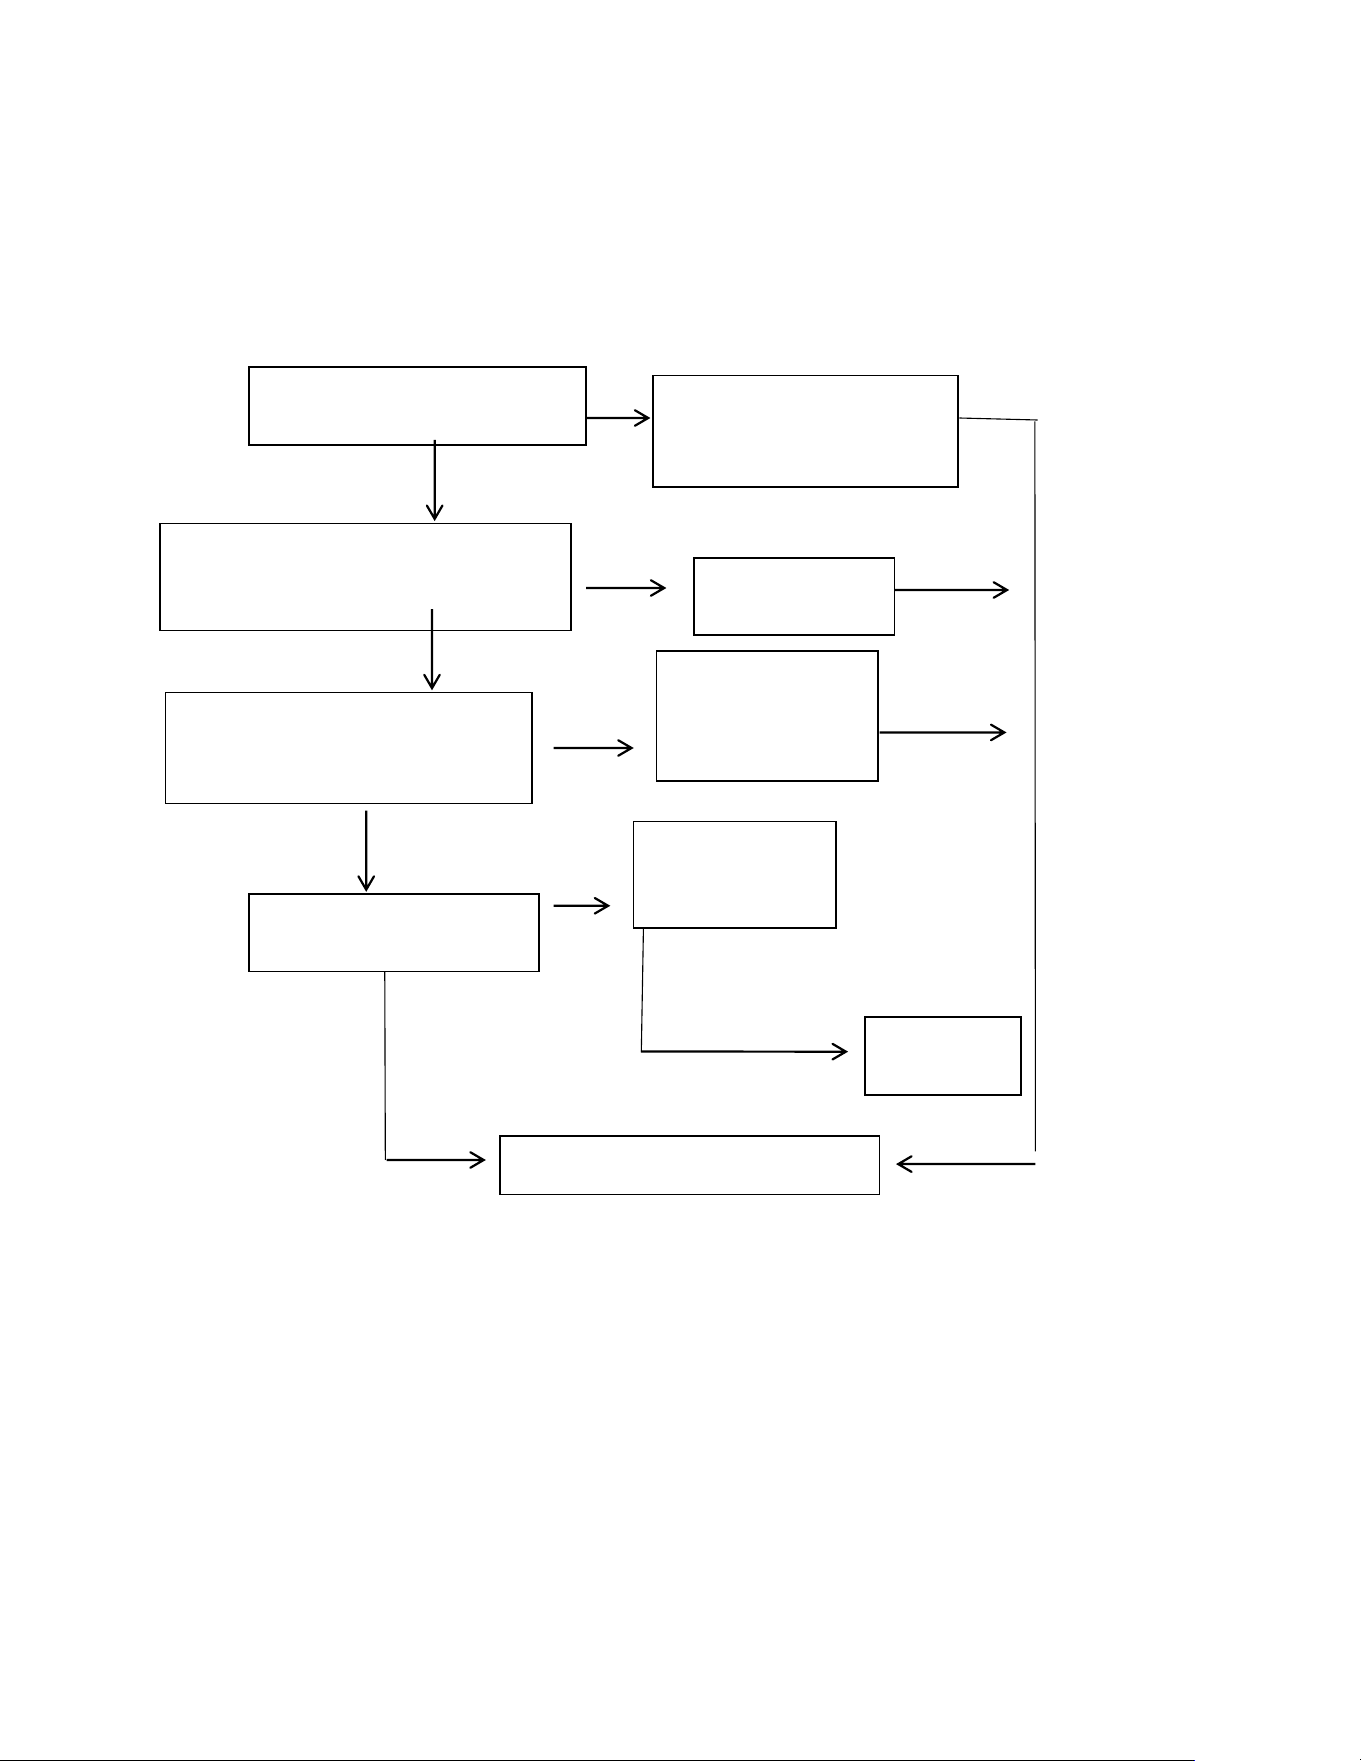
Troubleshooting
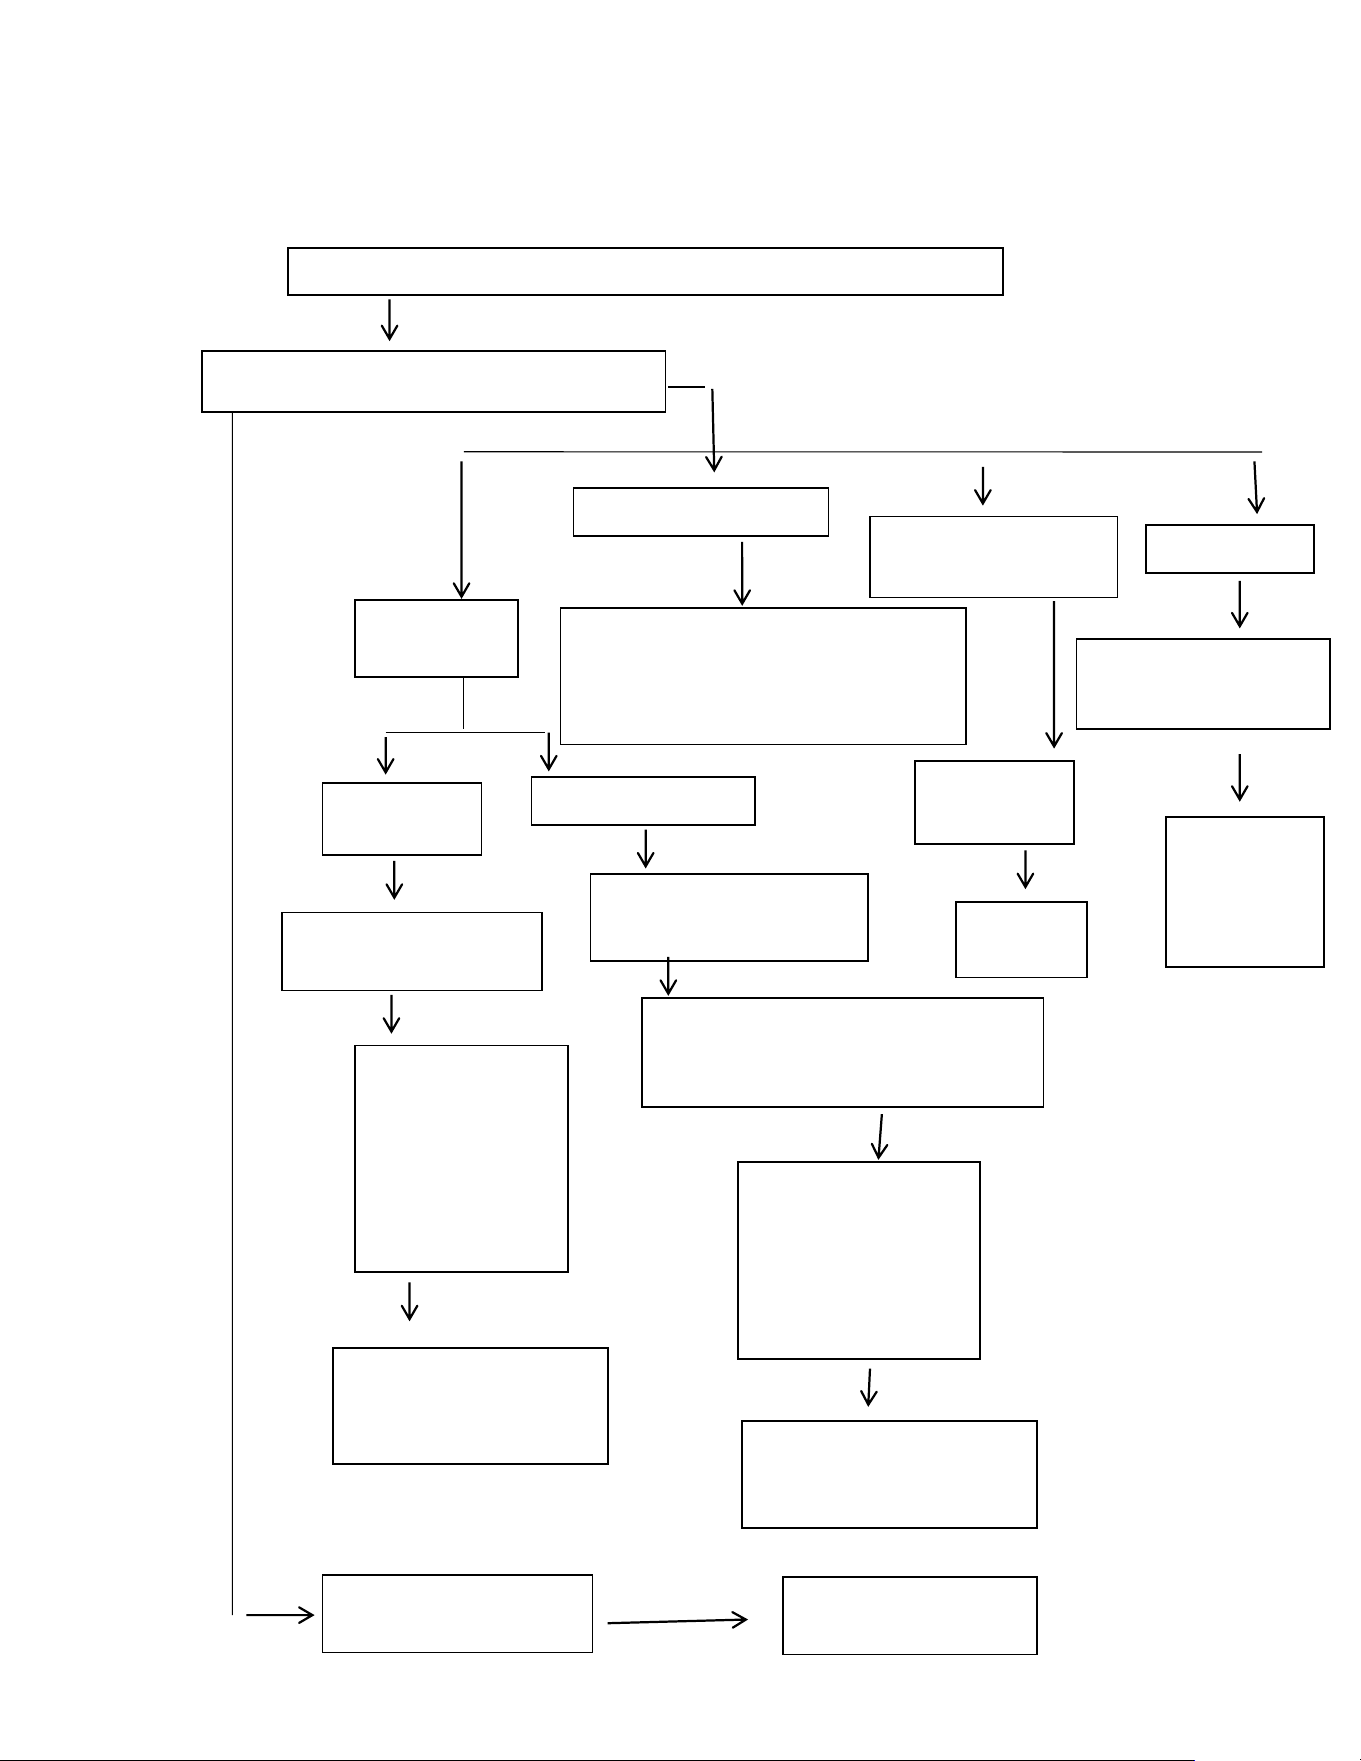
No power supply, compressor does not work
No
Yes
No
No
Whether the evaporating fan
is working (long rotation)
Check the power supply,
power cord, and wiring
terminals
Yes
Does the Circuit Board have an
output? (delayed for three minutes to
supply the compressor)
Replace the
circuit board
Check if the compressor thermal
protector and starter relay are in
good condition
No
Replace the
thermal protector
and start the relay
Yes
Check if the compressor
is running.
Measure
compressor coil
resistance
Resistance is normal
but shaft is seizing
Resistance is abnormal
Replace the
compressor
Yes
The equipment operates normally
Yes
15
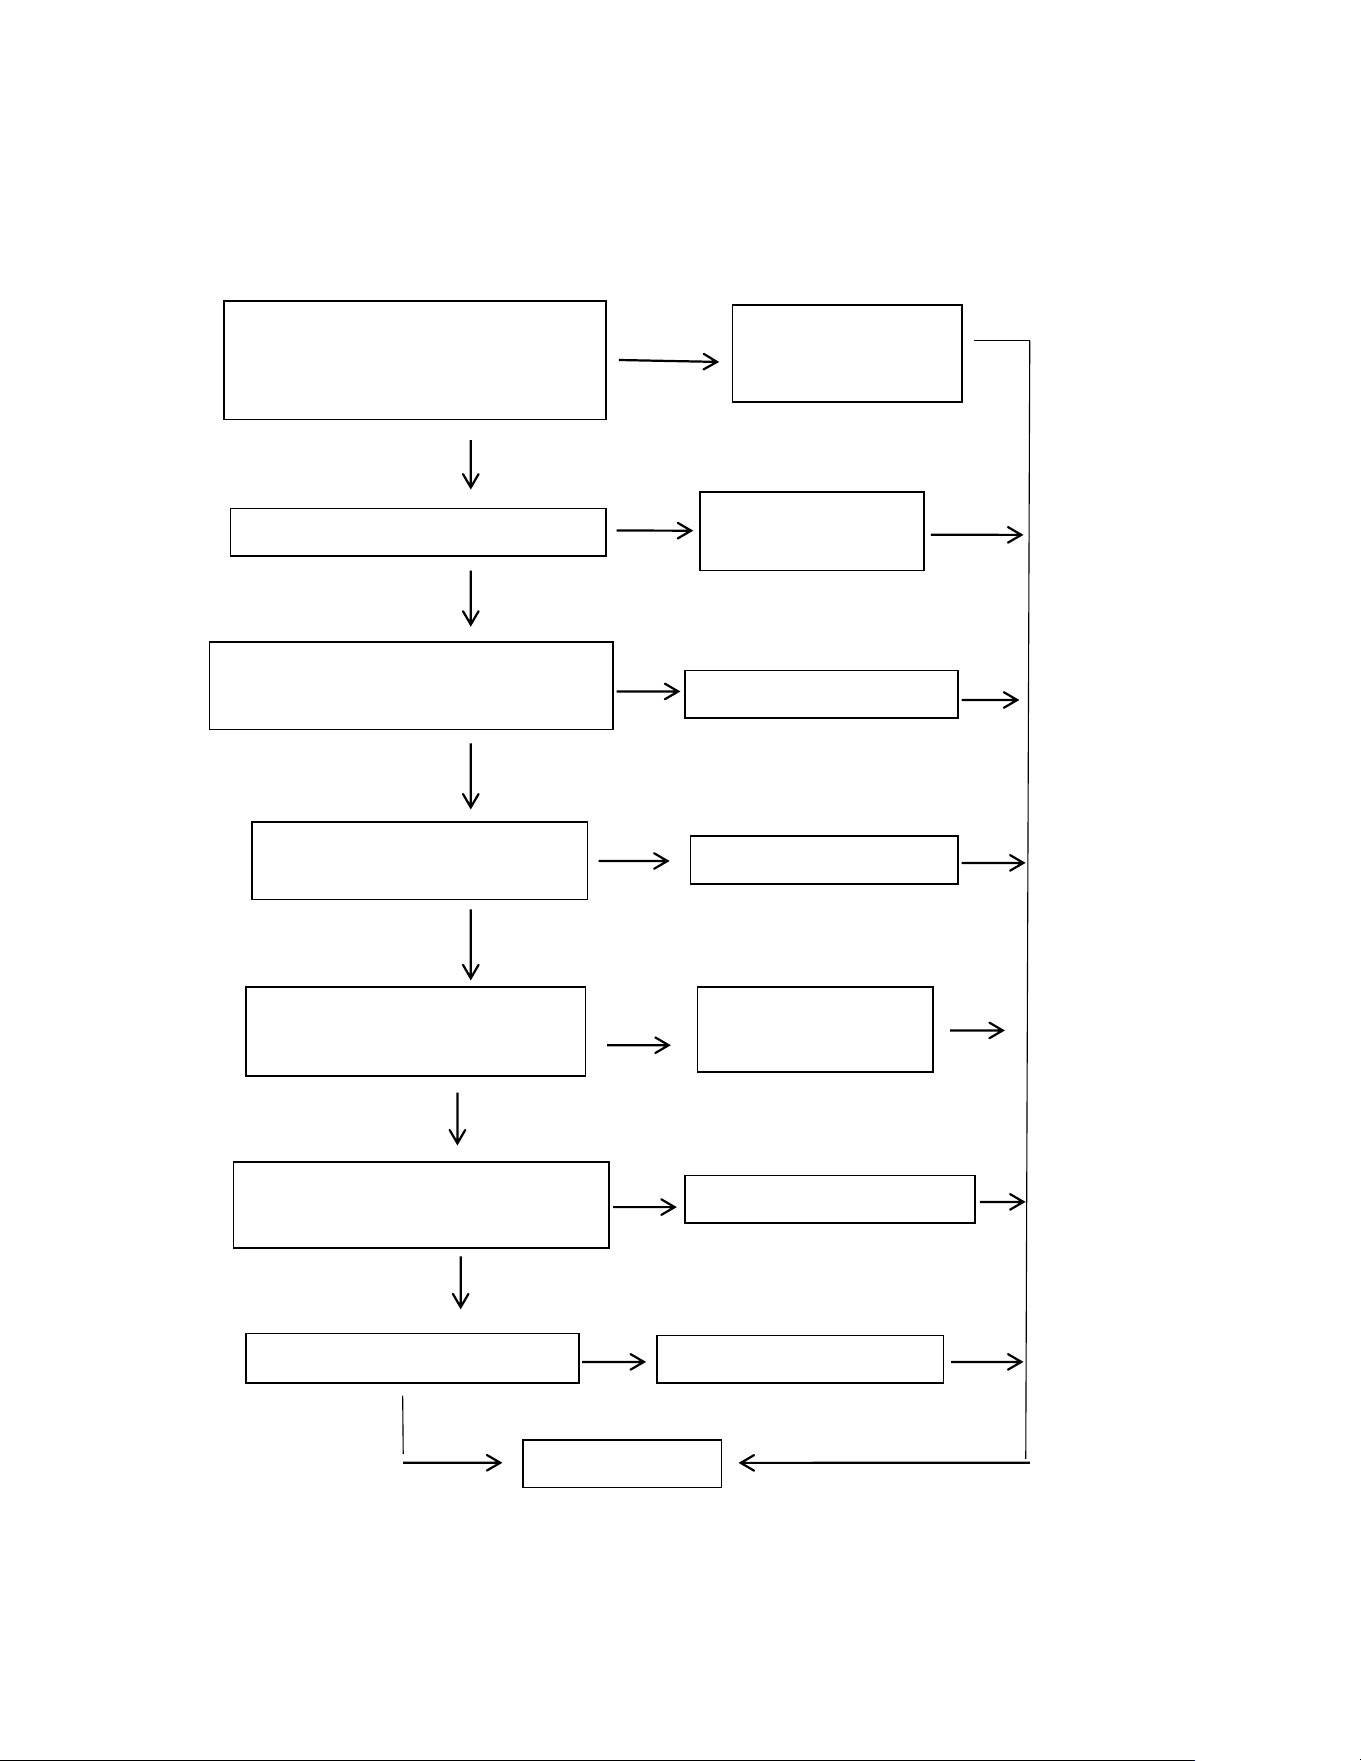
Not Cooling, Compressor Works
Does the compressor run continuously without stopping?
Does the cabinet evaporator have frost?
Partially
frosted
Small amount of frost
Frosting defrosting
alternates
All frosting
Partially
blocked
Refrigerant leak
Condensate tube
temperature is low
Condensate tube
temperature is low
After the
shutdown, the
pressure balance
is very slow, the
liquid stays weak
and the duration
is long.
After the shutdown,
the pressure balance
is faster, and the
sound of running
water disappears
quickly.
Remove obstructions.
Re-vacuum, fill
insufficient refrigerant
After the shutdown, the pressure
balance is faster, and the sound of
running water disappears quickly.
Find the leak point and
refill the refrigerant after
repair
Refrigeration system
failure
Repair refrigeration
system
If condensing tube is hot, then there
is excessive refrigerant. If the
temperature of condenser tube is
low, then it’s compressor failure
Excessive
moisture
Replace
filter
Too much food or too
long running time
Please
follow the
instructions
when using
16
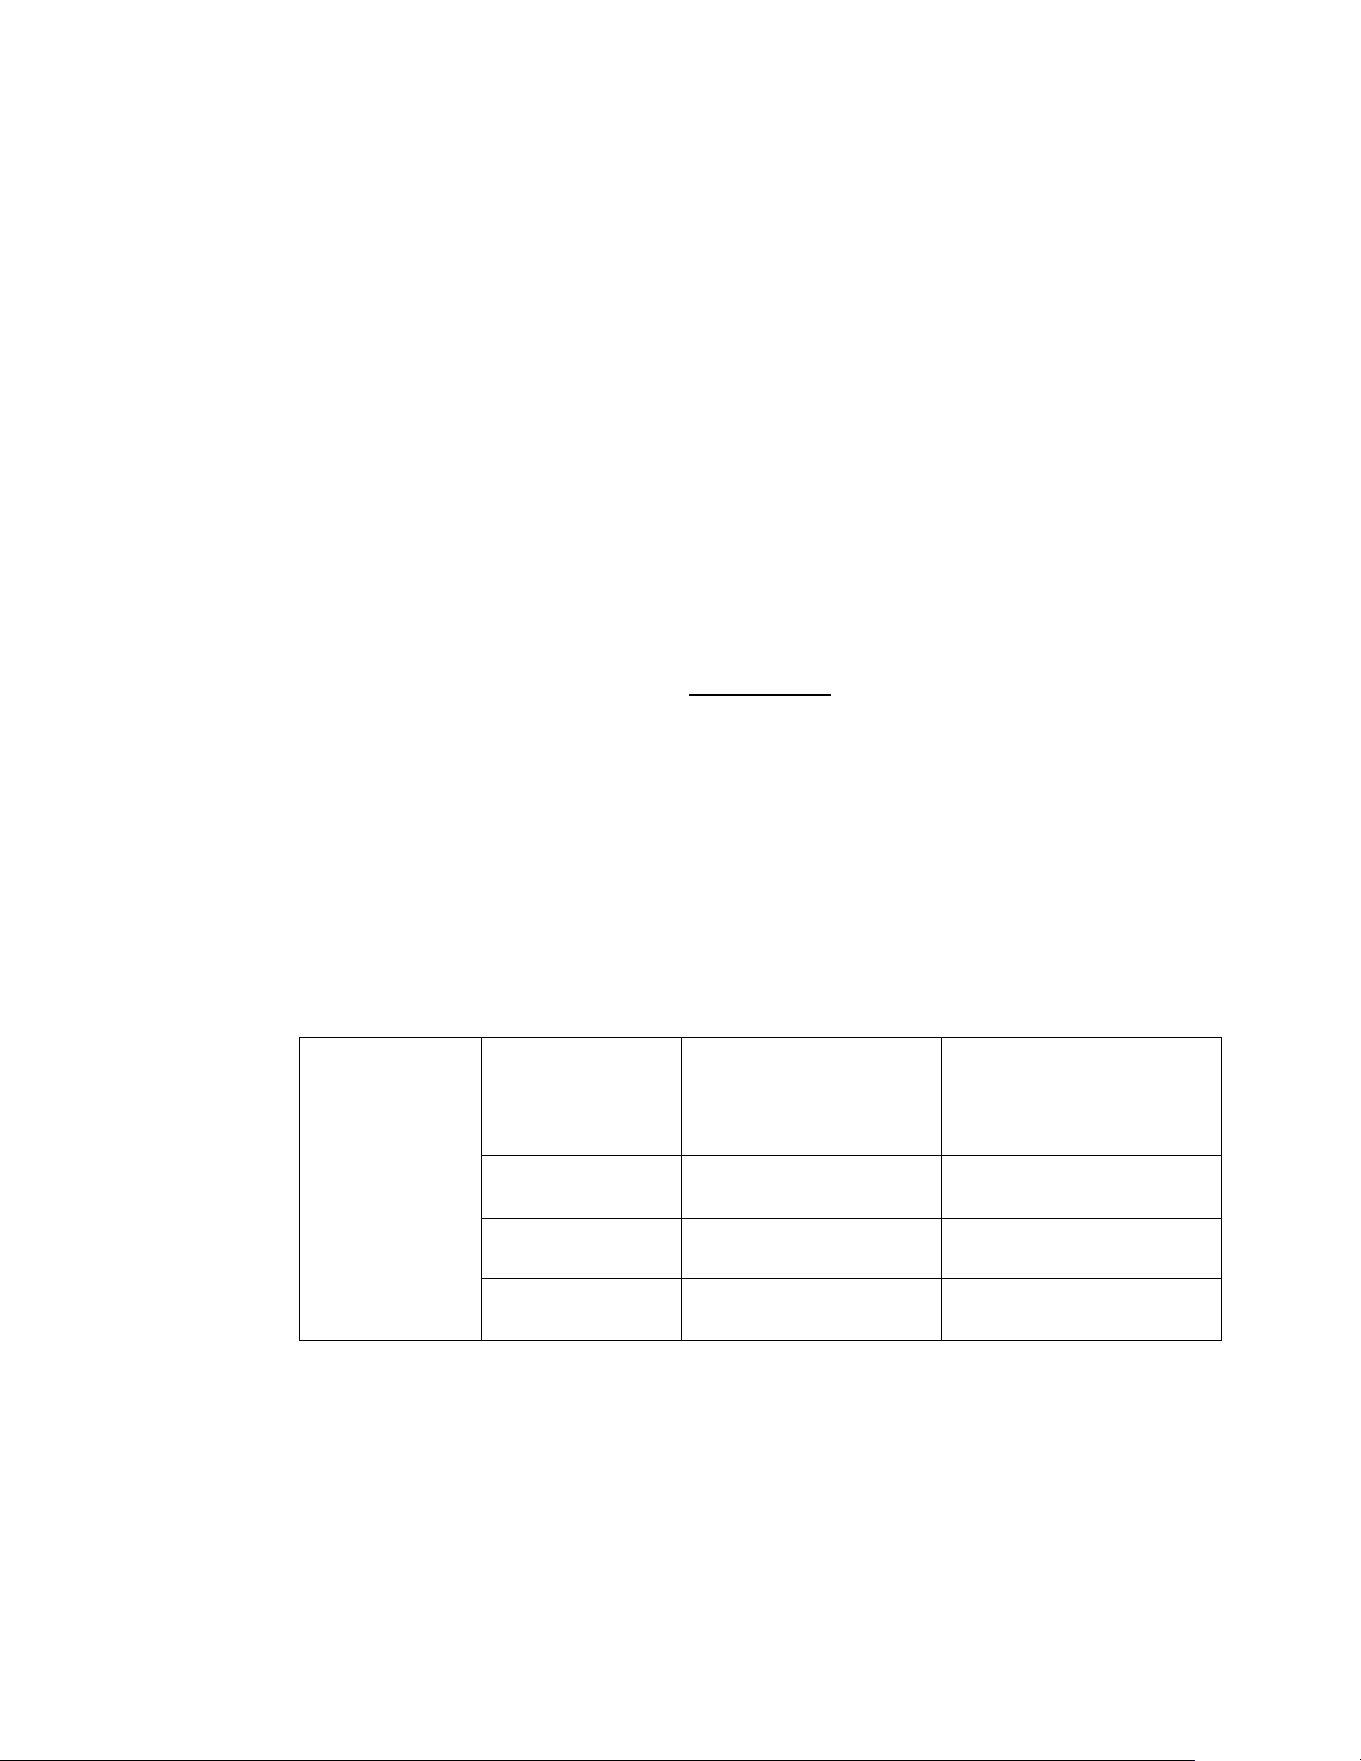
Poor Refrigeration Effect
Confirm the location of the
equipment, whether it is close to
the heat source, direct sunlight
Yes
Put the equipment
in the right place
No
Is the door seal in good condition?
No
Replace or repair
the door seal
Yes
Check if there is too much food or
open doors too frequently.
Yes
Follow the instructions
No
Check if the thermostat gear
setting is too high
Yes
Follow the instructions
No
Confirm that the thermostat
probe is in place?
Yes
Re-install the probe
into the right place
No
Thermostat aging or damage
leading to functional defects
Yes
Replace the thermostat
No
Low compressor efficiency
Yes
Replace the compressor
Problem solved
17
Warranty and Service
1. During use, please ensure that the work area is flat, clean and tidy.
2. The warranty is limited to production defects and damage caused prior to household
use.
3. Part cost and maintenance fee will be charged for damage caused by improper use or
other quality problems other than the product itself.
4. Please keep relevant purchase voucher
Repair card
Customer Name: Contact Number:
Contact Email: Contact Address:
Product model: Date of purchase:
Dealer:
Maintenance
Records
Repair Date
Maintenance Reason
Maintenance Staff