1
USE AND MAINTENANCE MANUAL
Pizza Ovens
LPR
Ed. 10/2024 - ver. 003

2

3
FOREWORD
- This manual is meant to provide Customers with information on the Oven and its
specifications, and provides all the necessary operating and maintenance
instructions in order to ensure Oven performance and longevity.
- This manual should be accessible to all maintenance and operating personnel.
CONTENTS
CHAP. 1 - INFORMATION ON THE OVEN page 4
1.1 - GENERAL SAFETY PRECAUTIONS
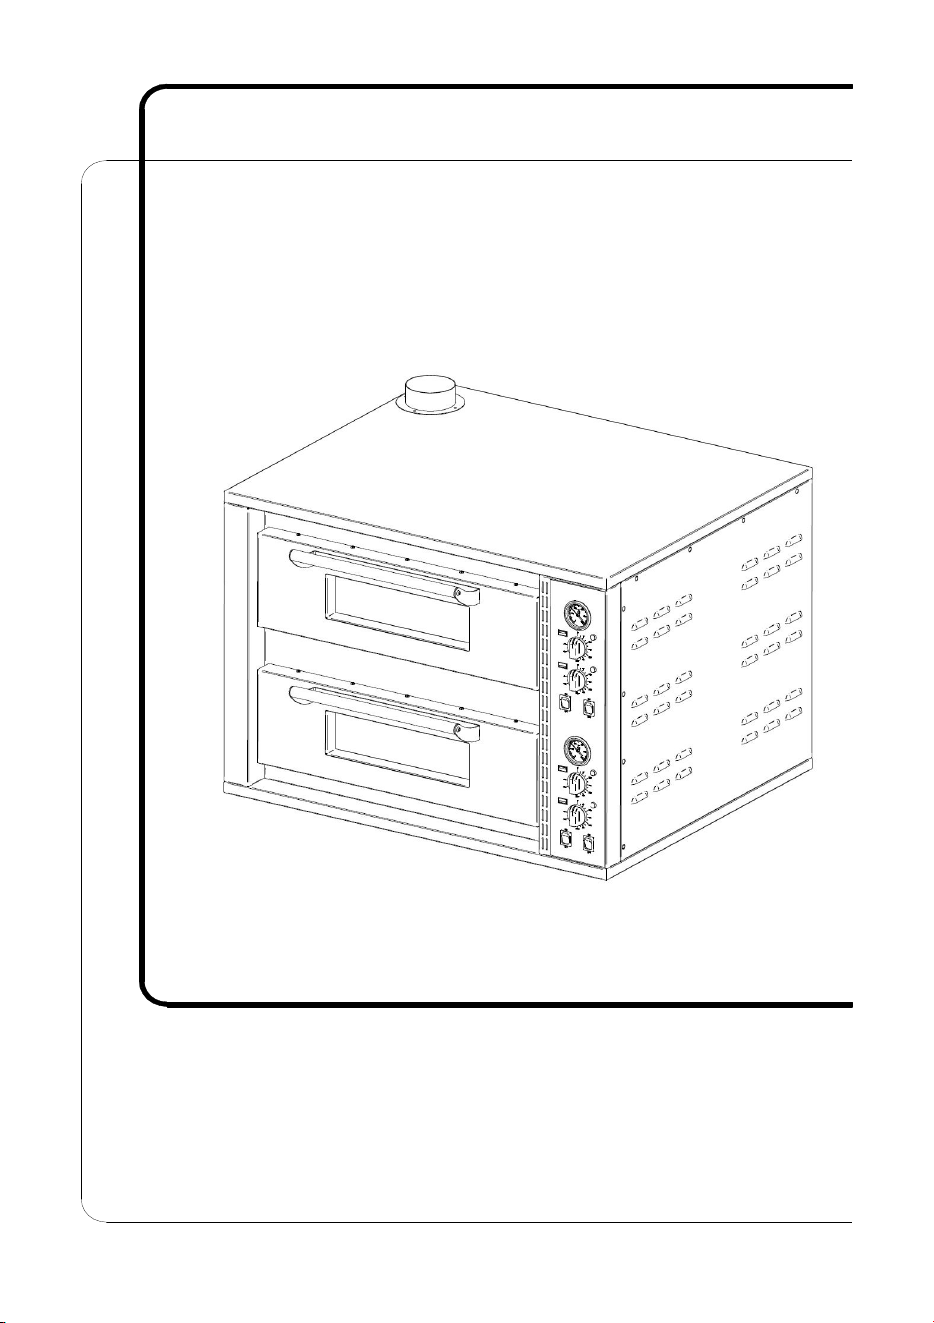
1.2 - DESCRIPTION OF THE OVEN
1.2.1 - general description
1.2.2 - construction features
1.2.3 - Oven parts
CHAP. 2 - TECHNICAL SPECIFICATION page 5
2.1 - OVERALL DIMENSIONS, WEIGHT, FEATURES
CHAP. 3 - RECEIVING THE OVEN page 7
3.1 - DESPATCH OF THE OVEN
3.2 - CHECKING PACKAGING UPON RECEIPT
3.3 - PACKAGING DISPOSAL
CHAP. 4 - INSTALLATION page 7
4.1 - OVEN LOCATION
4.2 - ELECTRICAL CONNECTION
4.2.1 - electrical connection of the oven
4.3 - OPERATIONAL CHECK
CHAP. 5 - USE OF THE OVEN page 9
5.1 - CONTROLS
5.2 - LOADING AND COOKING THE PRODUCT
CHAP. 6 - ROUTINE CLEANING page 10
6.1 - FOREWORD
6.2 - HOW TO CLEAN THE OVEN
CHAP. 7 - MAINTENANCE page 10
7.1 - FOREWORD
7.2 - POWER SUPPLY CABLE
7.3 - TROUBLESHOOTING
CHAP. 8 - DISMANTLING page 10
8.1 - PUTTING THE OVEN OUT OF SERVICE
8.2 - WEEE Waste Electrical and Electronic Equipment
CHAP. 9 - WIRING DIAGRAM
page 11
9.1 - wiring diagram - 3ph 208V / 220V.

4
CHAP. 1 - INFORMATION ON THE OVEN
1.1 - GENERAL PRECAUTIONS
• The Oven must be operated only by highly qualified personnel who are fully aware
of the safety measures described in this manual.
• In case of a personnel turnover, training is to be provided in advance.
• Before starting cleaning and maintenance operations, disconnect the plug from the
supply socket.
• To carry out cleaning and maintenance of the Oven, assess the residual risks
carefully.
• Cleaning and maintenance require concentration.
• A regular check of the power supply cable is absolutely necessary; a worn-out or
damage cord is very dangerous.
• If the Oven shows signs of failure or malfunction, do not use and do not repair the
appliance. Contact your local Service Assistance Centre.
• Do not use the Oven for processing frozen products and non food products.
•
The manufacturer shall not be liable for damage to things or injury to persons in
the event:
The Oven or the safety devices and protections have been tampered with by non
authorised personnel.
Parts are replaced with non original spares.
The instructions provided in this manual are not followed scrupulously.
The Oven surface is not cleaned with the right product.
1.2 - DESCRIPTION OF THE OVEN
1.2.1 - general description
The Oven has been designed and manufactured by our firm with the aim of ensuring:
- the highest degree of safety during use, cleaning and maintenance;
- the highest standard of hygiene due to a careful selection of materials which come
into contact with food products;
- robust and stable components;
- practical and easy to move.
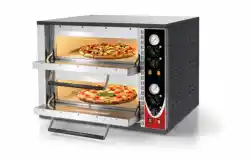
The oven has been designed for cooking pizzas, focaccia, piadine, etc. Do not use it
for cooking other foods (meat, vegetables, etc.)
1.2.2 - construction features
This appliance is manufactured utilising the following materials:
- Internal chamber and outer casing in stainless steel, aluminized steel and pre-
painted steel;
- Refractory stone cooking floor.
5
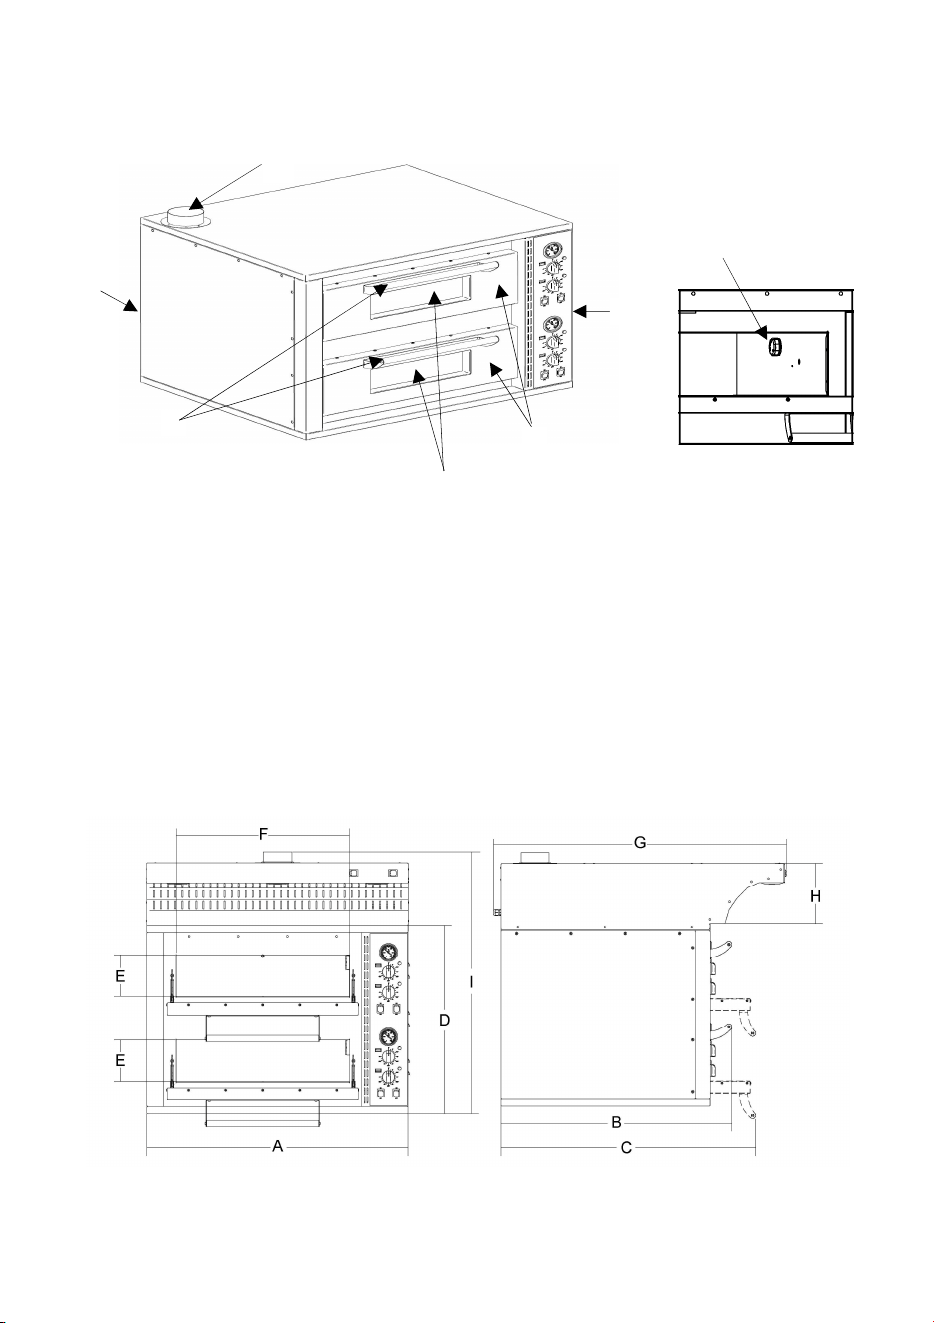
1.2.3 - Oven parts
LEGEND:
1. Outer casing
2. Door handle
3. Door glass
4. Door
5. Controls
6. Flue for expelling cooking fumes
7. Internal chamber light
7
2
5
1
3
4
6
WARNING: Oven electrical specifications are indicated on the rating plate affixed to
the side of the oven; before connecting to power supply, please read § 4.2 Wiring.
CHAP. 2 - TECHNICAL SPECIFICATION
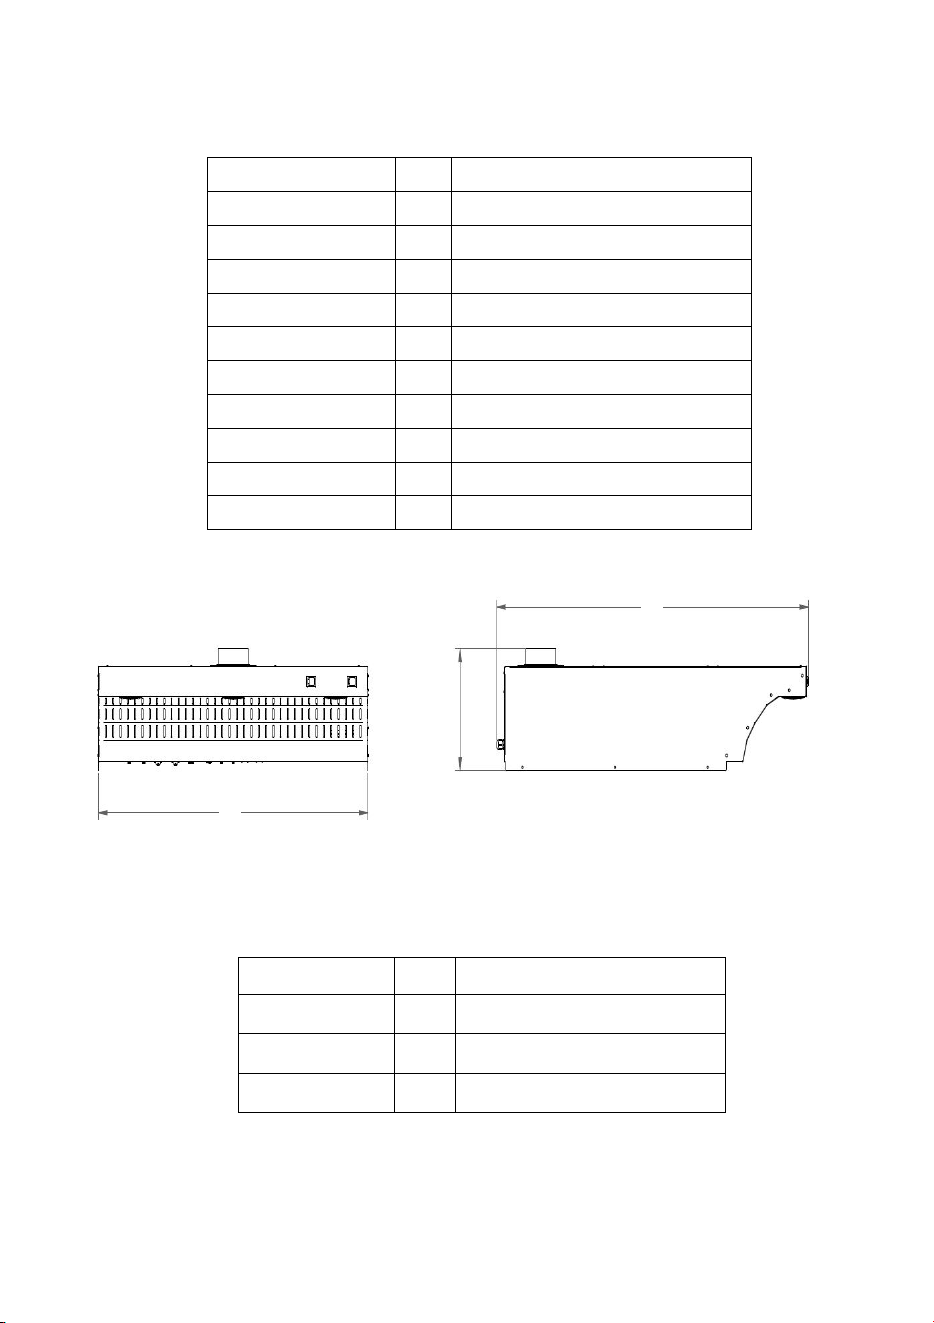
2.1 - OVERALL DIMENSIONS, WEIGHT, FEATURES...
FIG. n°2 - Overall dimensions
6
TAB. n°1 - OVERALL DIMENSIONS AND TECHNICAL SPECIFICATIONS
FIG. n°3 - Hood Volume drawings
TAB. n°2 - HOOD DIMENSIONS (optional)
Model LPR
Power watt 9200
Power supply 208V / 220V 60 Hz 3Ph
Temperature °C 95÷450
Inside dimensions mm 620x625 h.147 (x2)
A x B x D mm 930x850x672
C mm 940
E x F mm 147x618
G x H mm 1080x220
I mm 932
Net weight kg 115
B
A
C
Modello LPR
A mm 282
B mm 1080
C mm 932
7
CHAP. 3 - RECEIVING THE OVEN
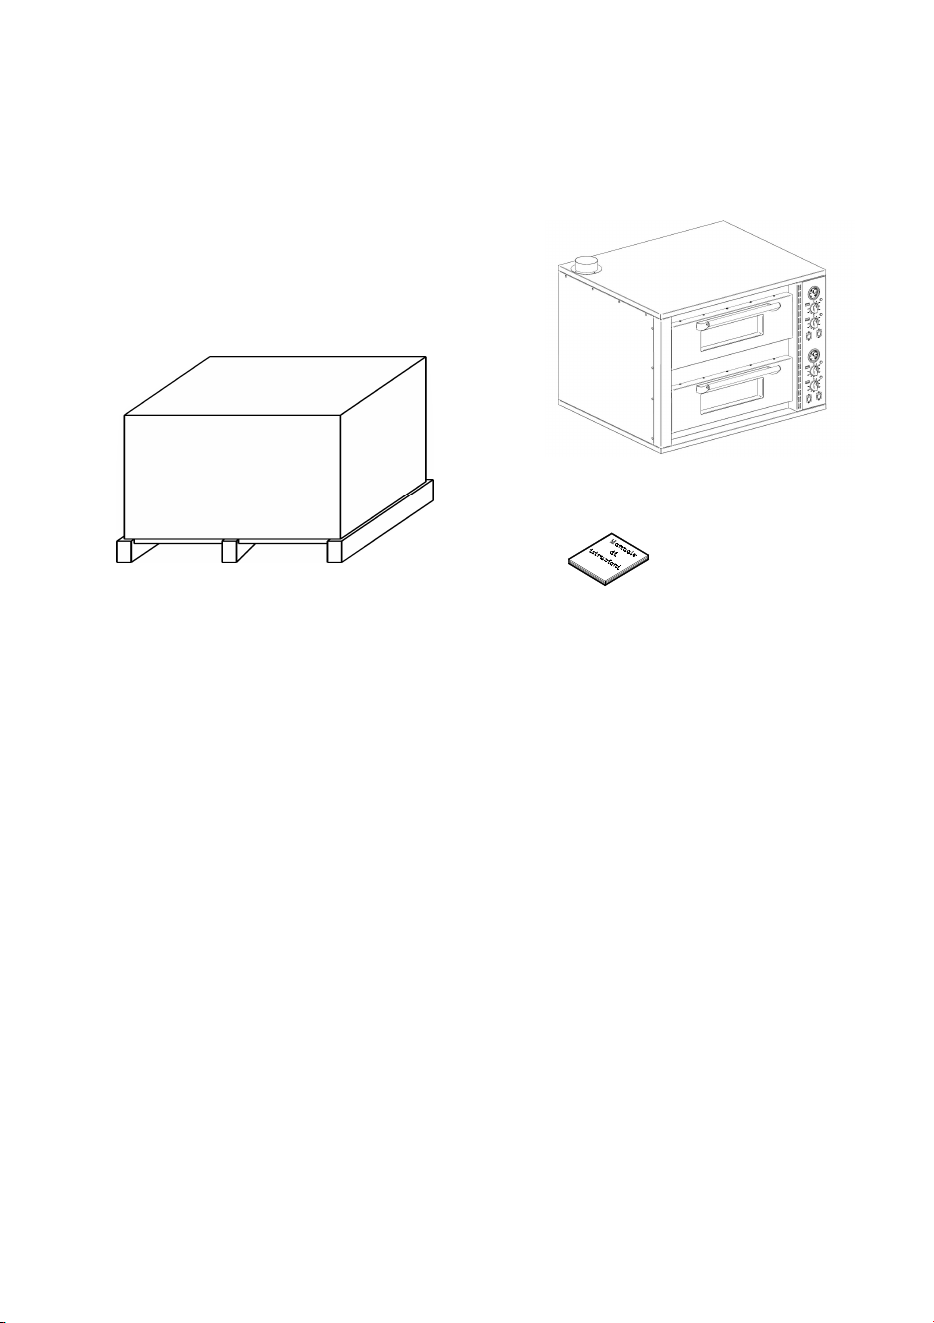
3.1 - DESPATCH OF THE OVEN (see FIG. n°4)
The oven is accurately packed and then despatched from our warehouses.
The package includes:
a) a solid cardboard box on a pallet;
b) the Oven;
c) this manual.
FIG. n°4 - Package description
3.2 - PACKAGE CHECK UPON RECEIPT
Upon receipt of the appliance if the external packaging shows no signs of damage,
open and check that there are no missing parts. If upon receipt of the appliance the
packaging shows signs of damage or seems to have been dropped or hit, inform the
carrier of the damage and within three days of the date of delivery provided in the
transport document, send a report detailing the damage to the appliance.
3.3 - PACKAGING DISPOSAL
The components of the packaging (cardboard, pallet, plastic straps and polyurethane
foam) are urban solid waste; therefore they can be easily disposed of.
If the Oven has to be installed in countries where specific regulations are in force,
packaging must be disposed of in compliance with such regulations.
CHAP. 4 - INSTALLATION
4.1 - OVEN LOCATION
Once having removed the Oven from its packaging, remove the protective adhesive
film affixed to the outer casing of the oven. This film must always be removed before
using the oven (check that no plastic film is left on the appliance and do not use
abrasive substances to remove the plastic film). Check that the counter top where the
appliance is to be positioned is large enough (refer to technical specifications pag.6),
level, robust, dry, stable and resistant to high temperatures.
Make sure the appliance is positioned at least 10 cm from walls which have to be
resistant to high temperatures.
Connect the chimney ref 6, underlined at page no 6 of
this manual, to the chimney flue for the smoke evacuation.
a)
c)
b)
8
4.3 - OPERATIONAL CHECK
Before testing the appliance makes sure the plug is securely plugged into the power
socket, and proceed with testing the appliance following each step of the below
procedure:
1. Start the oven by shifting the switches to “ON” to turn on the heating elements.
2. With the oven on, set the temperatures to 200°C.
3. Check that the lamp inside the oven lights up and switches off by pressing the “ON”
switch.
4. Once the set temperature is reached, operate the oven empty under the
supervision of an operator for at least 2 hours, opening the front doors from time to
time. Besides ascertaining whether the oven works properly, this operation causes
any processing residues and humidity to evaporate from the cooking stones.
5. Turn off the oven’s heating elements through the “OFF” switch.
6. If there is a hood, verify whether it works by shifting its switches to “ON” and
checking that the fan starts and the lights switch on.
4.2 - ELECTRICAL CONNECTION
4.2.1 - Electrical connection of the oven
The appliance is supplied without either power cable or plug: they must both be fitted
by qualified personnel. The cable must be only of the type stated and the plug fitted to
it must be suitable for the consumption and connection of the oven to the electrical
mains.
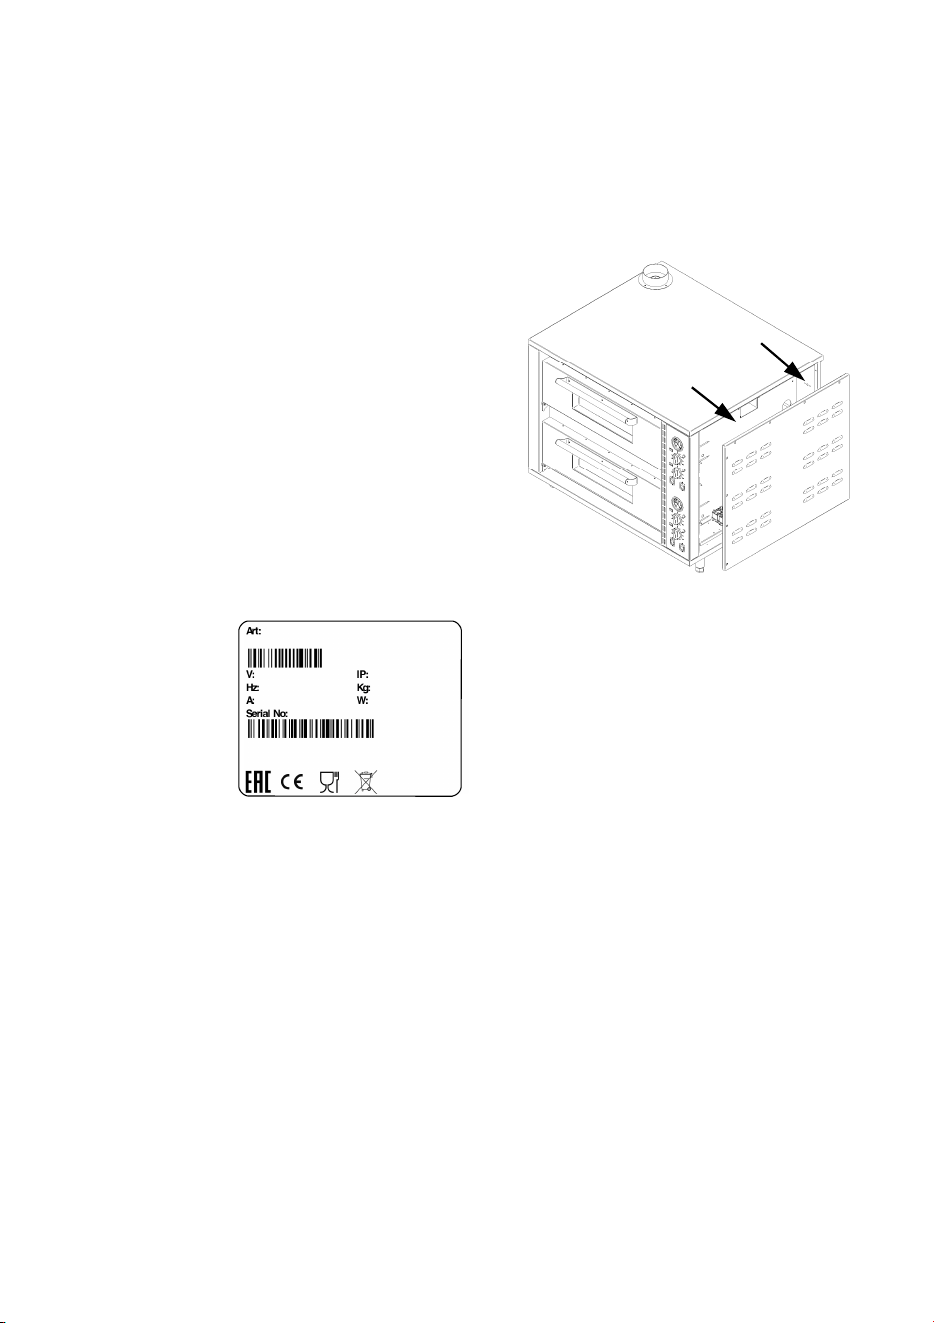
The appliance must be connected to a power supply with a min. 8AWG type cable
(supplied by the installer). To carry out this
operation, remove the right side oven panel
(FIG. n°5), connect the cable to the terminal
board and secure it with the relative cable
gland located on the back of the appliance
itself.
Connect the oven to 208/220 Volt 60 Hz 3
phase, by interposing a differential
thermomagnetic switch 35A, ∆ I = 0.03A.
Check correct Oven earthing. Moreover check
that the specifications on the rating plate-serial
number (FIG. n°6) correspond to the
specifications provided in the consignment and
delivery note.
FIG. n°6 - Rating plate - serial number
LEGEND
(A) = Product code and name
(B) = Power supply
(C) = Motor frequency
(D) = Amperage
(E) = Serial number
(F) = Barcode
(G) = Manifacturer
(H) = International Protection
(I) = Weight
(L) = Power
(M) = Origin
(A)
(B)
(C)
(D)
(E)
(H)
(I)
(L)
(F)
(G)
(M)
FIG. n°5
9
5.2 - LOADING AND COOKING
THE PRODUCT
(refer to Fig.n°7)
To cook proceed as follows:
1. Turn on the oven by pressing the ON/OFF
power switch to “ON” (ref.4).
2. Set the temperature control (ref. 2 - 3) to the
correct temperature for the type of product to
cook.
3. Once the oven has reached the required
cooking temperature place the food product to
cook inside the oven. Always use the door
handle to open the oven door.
4. Once cooking has been completed press the
ON/OFF switch to “OFF” (ref.4).
5. WARNING! While baking, the external surface
of the oven reaches very high temperatures.
Avoid getting too close.
6. WARNING! Wait until the Oven has cooled
down completely before coming into direct
contact with it, always use the door handle to
open the door.
7.
While baking, it is possible to remove the
baking residuals from the worktop by using a
fireproof brush.
FIG. n°7
CHAP. 5 - USE OF THE OVEN
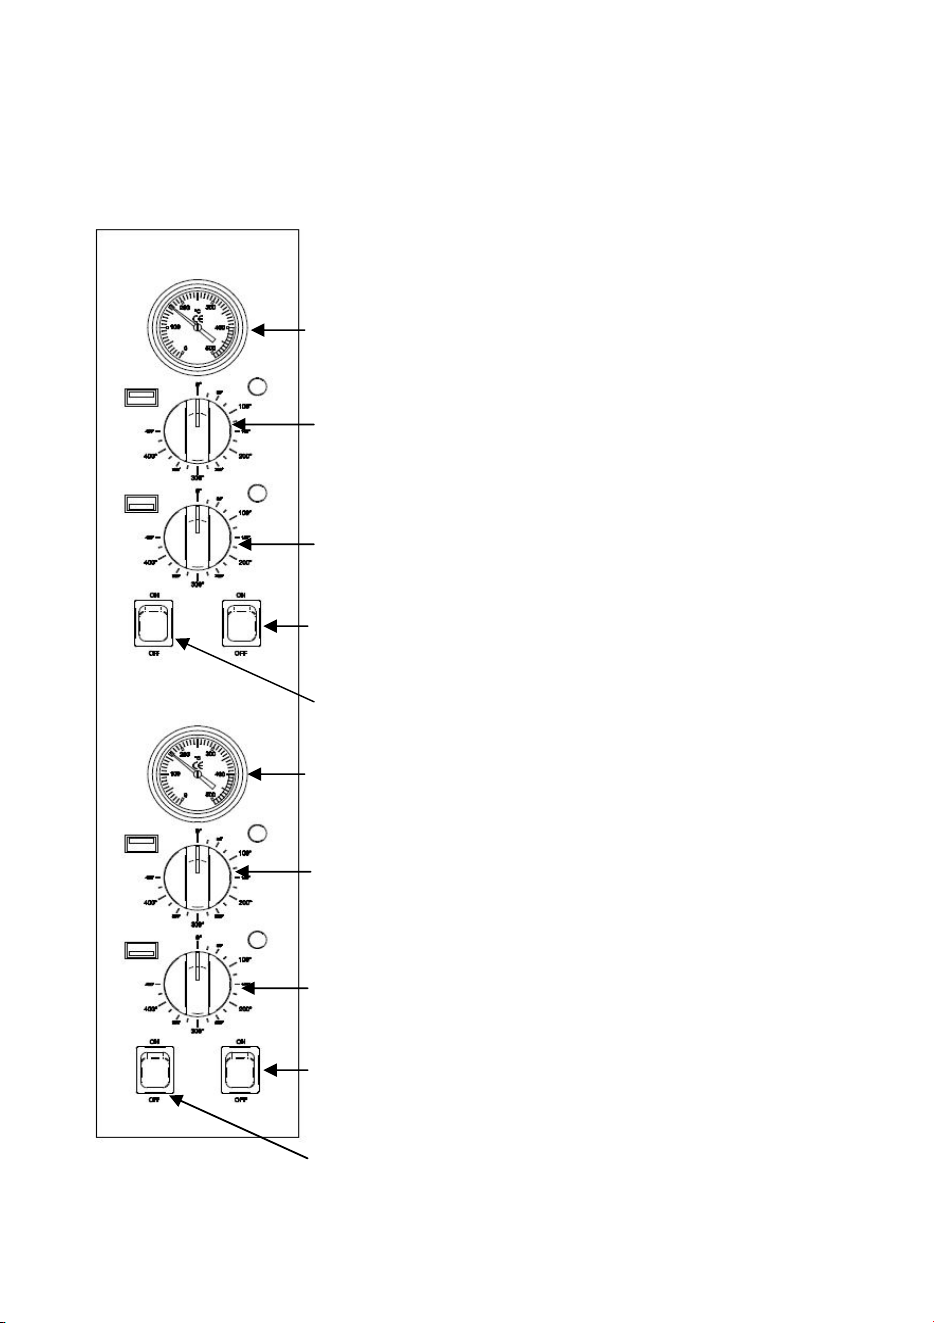
5.1 - CONTROLS
The controls are positioned on the front right of the Oven as illustrated in the below
figure.
1
2
3
4
5
1
2
3
5
4
1. Thermometer for monitoring the chamber
temperature
2. Thermostat for adjusting the temperature of the
upper heating element
3. Thermostat for adjusting the temperature of the
lower heating element
4. Switch for turning on the heating elements
5. Switch for turning on the light inside the oven.
The two chambers can be accessed both
simultaneously and separately.

10
CHAP. 6 - ROUTINE CLEANING
6.1 - FOREWORD
- The Oven must be cleaned at least once a day. If necessary clean when required
during the day.
- All the oven parts that come into contact directly or indirectly with the food product
must be cleaned thoroughly.
- The oven must never be cleaned with pressurised water, water jets (to avoid any
water penetration inside the Oven); do not use brushes or other tools or anything
that could damage the external surface of the oven.
Before starting cleaning operations, it is necessary to:
1. press the main ON/OFF switch to “OFF”(Fig.n.6 -ref.4);
2. disconnect the Oven plug from the mains to isolate it from the mains power supply.
6.2 - HOW TO CLEAN THE OVEN
N.B. Only clean the appliance after it has cooled down completely. To prevent burns
we recommend the use of burn-proof gloves when cleaning.
To clean proceed as follows:
1. Using the door handle open the oven door.
2. Brush the refractory stone floor clean.
3. WARNING! DO NOT pour cold water or any other substance onto the refractory
cooking stone to clean. ONLY USE a purpose oven brush to remove any waste
food product.
4. Use a damp cloth and neutral detergent to clean the glass and the door.
5. Once having cleaned the internal cooking chamber and the outer casing make
sure all Oven parts are thoroughly dry.
CHAP. 7 - MAINTENANCE
7.1 - FOREWORD
Before performing any maintenance operation, it is necessary to :
1. Press the main ON/OFF switch to “ OFF”(Fig.n.6 -ref.4).
2. Disconnect the plug from the mains to isolate it from the mains power supply.
7.2 - POWER SUPPLY CABLE
Periodically check for wear in the power supply cable. If the power supply cable shows
signs of wear or damage call the “SERVICE CENTRE” for a replacement.
7.3 - TROUBLESHOOTING
In the event of faults or malfunctions contact your “LOCAL SERVICE ASSISTANCE
CENTRE ”.
CHAP. 8 - DISMANTLING
8.1 - PUTTING THE OVEN OUT OF SERVICE
If for some reason, you decide to put the Oven out of service, make sure nobody can use it:
disconnect it from the mains and eliminate electrical connections.
11
8.2 - WEEE Waste Electrical and Electronic Equipment
This symbol, crossed out wheelie bin, on the product or on its packaging
indicates that this product must not be disposed of with your other household waste.
Separate waste collection of this appliance is organised and managed by the
manufacturer. It is the user’s responsibility to contact the manufacturer and follow the
waste treatment system the manufacturer has adopted for separate waste collection
of this appliance when it is to be scrapped.
The separate collection and recycling of your waste equipment at the time of disposal
will help to conserve natural resources and ensure that it is recycled in a manner that
protects human health and the environment.
Illegal dumping of the appliance by the user is liable to prosecution by law.
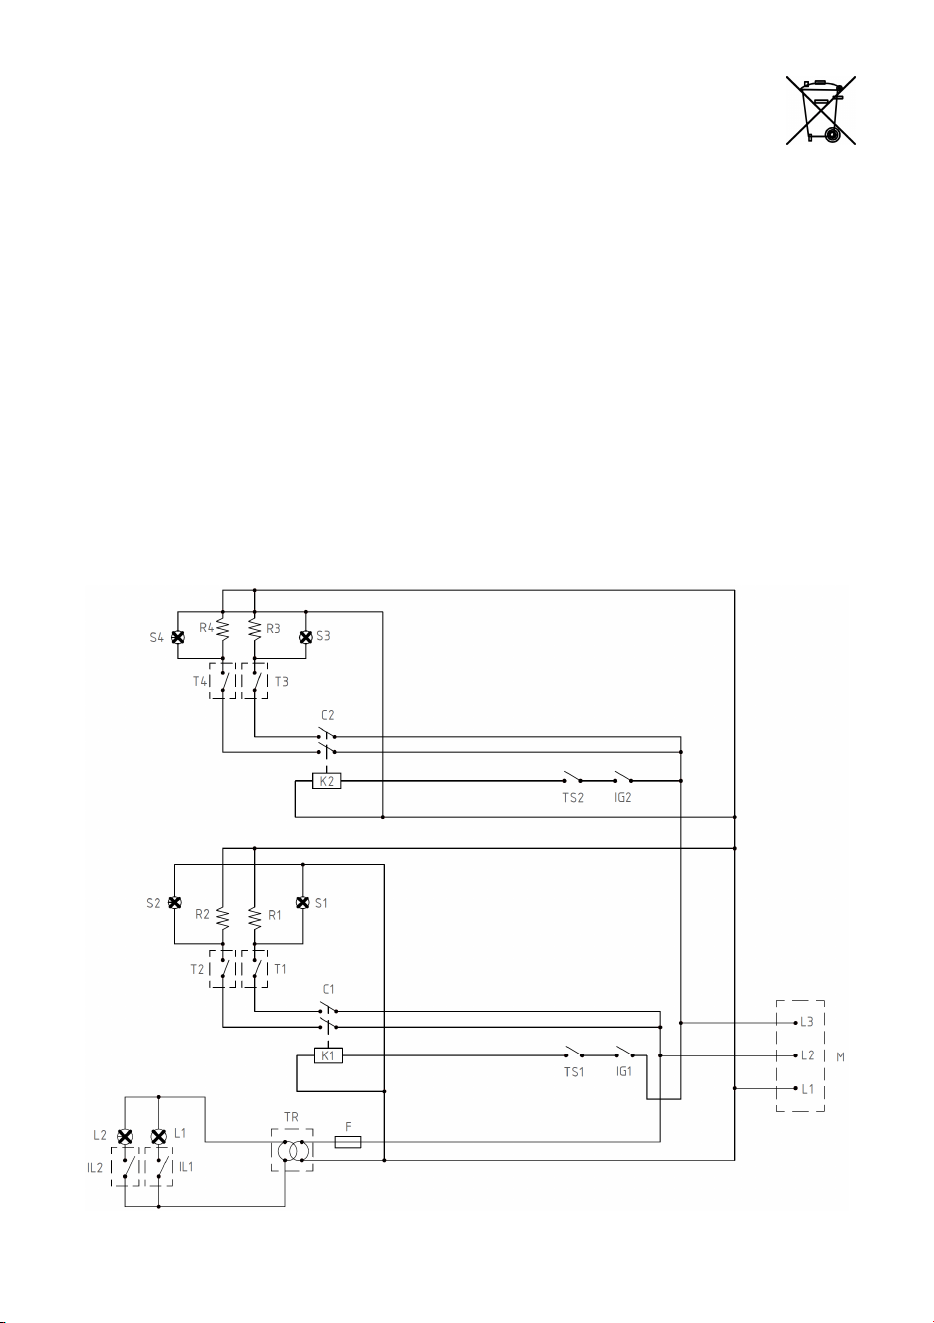
CHAP. 9 - WIRING DIAGRAM
9.1 - wiring diagram - 3ph 208V / 220V.
FIG. n°.8

12
SERVICE CENTRE
AUTHORISED DEALER