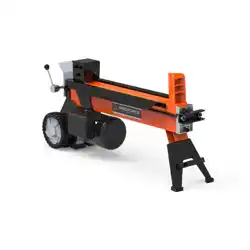
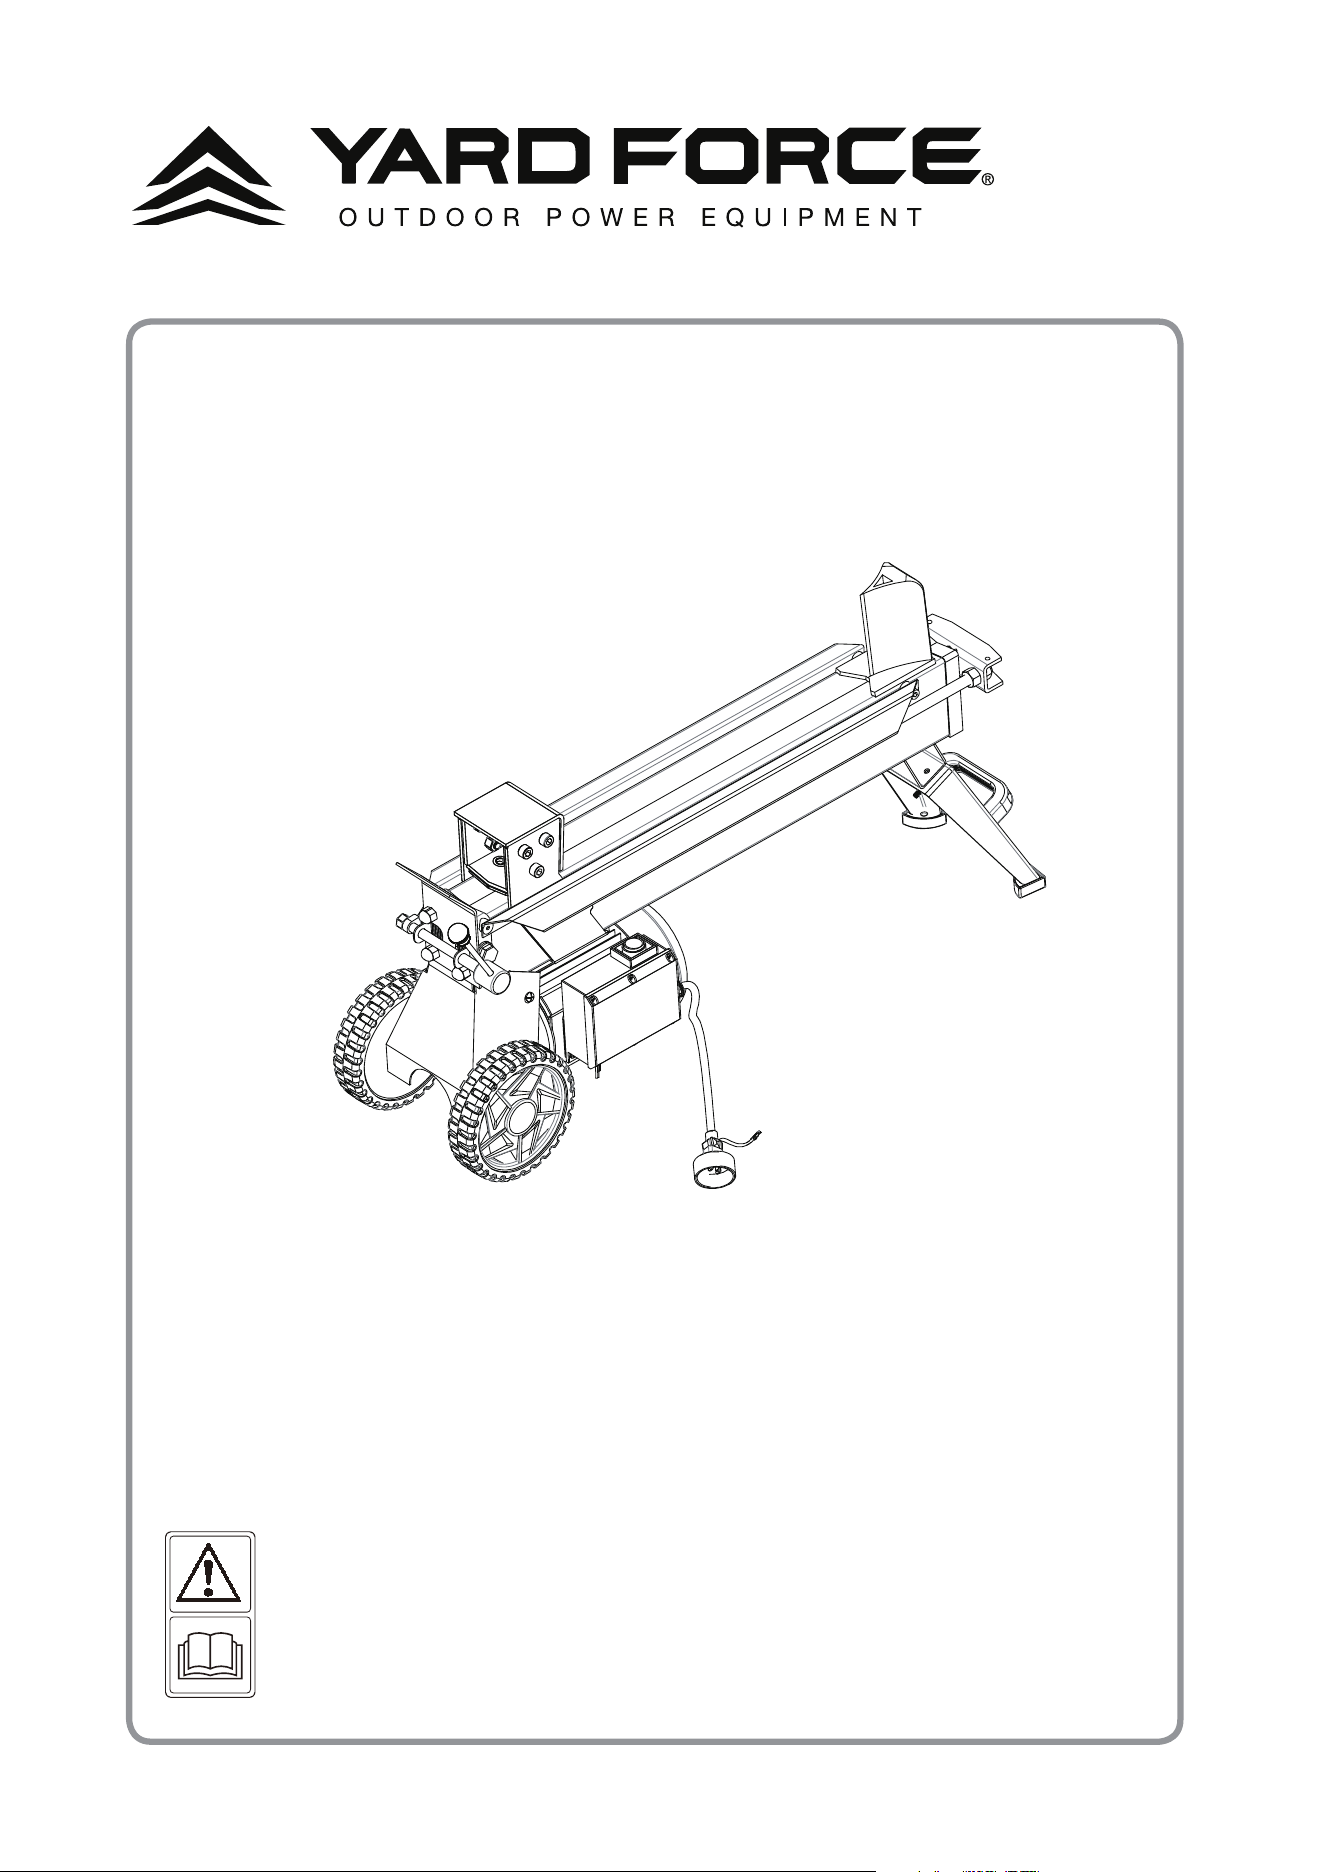
YF15LS
YF15LS
ELECTRIC LOG SPLITTER
OWNER'S MANUAL
Our Customer Service staff is ready to provide assistance.
In the case of a damaged or missing part, most replacement parts ship directly from Merotec
USA in Atlanta or from one of our service partners in the US & Canada.
For immediate help with assembly, or for additional product information, email support@
MerotecUSA.com. Or for the USA call 1-866-902-9690 M-F 8:30am – 5:00pm ET, for Canada
call 1-833-818-4111 M-F 8:30am - 4:30pm ET.
More information can be found on www.MerotecUSA.com.
SAVE THIS MANUAL FOR REFERENCE
You will need this manual for safety
instructions, operating procedures, and Warranty.
The original sales receipt is required for warranty service.

2
1-866-902-9690
Safety Instructions…………………………………………………………………………………………3
Description of Symbols……………………………………………………………………………………3
Parts List…………………………………………………………………………………………………….8
Technical Specifications……………………………………………………………………………….12
Assembly…………………………………………………………………………………….……………13
Operation………………………………………………………………………………………….………..19
Maintenance and Storage………………………………………………………………………………22
Troubleshooting………………………………………………………………………………….………23
Warranty…………………………………………………………………………………….…………….24
TABLE OF CONTENTS
YF15LS Original Instructions

3
1-866-902-9690
SAFETY INSTRUCTIONS
IMPORTANT!
SAFETY INSTRUCTIONS
ALL OPERATORS MUST READ THESE INSTRUCTIONS
BEFORE USE
Always follow these safety guidelines. Failure to do so may result in serious bodily
injury or death.
GENERAL SAFETY WARNINGS!
When using the log splitter, basic safety precautions should always be followed to reduce the risk
of re,electric shock,and personal injury,including the following:
WARNING!
The use of any other accessory or attachment might increase the risk of injury.
TRAINING
1. Read, understand and follow all instructions on the machine and in the manual(s) before
operating this unit. Be thoroughly familiar with the controls and the proper use of the
equipment. Know how to stop the unit and disengage the controls quickly.
2. Never allow children to operate the equipment. Never allow adults to operate the equipment
without proper instruction.
3. Keep the area of operation clear of all persons, particularly small children.
4. Only one person should operate, load and unload the log splitter.
5. High uid pressures are developed in hydraulic log splitters. Pressurized hydraulic uid
escaping through a pin hole opening can puncture skin and cause severe blood poisoning.
Therefore, the following instructions should be heeded at all times.
a) Do not operate the unit with frayed, kinked, cracked or damaged hoses, ttings, or tubing.
b) Stop the engine and relieve hydraulic system pressure before changing or adjusting ttings,
hoses, tubing, or other system components.
c) Do not adjust the pressure settings of the pump or valve, or increase engine governed
speed.
d) Do not check for leaks with your hand. Leaks can be located by passing cardboard or
wood over the suspected area. Look for discoloration. If injured by escaping uid, see a
doctor immediately. Serious infection or reaction can develop if proper medical treatment
is not administered.
6. Keep the operator zone and adjacent area clear of debris for safe, secure footing.
7. If your log splitter is equipped with an internal-combustion engine and intended for use near
any unimproved forest, brush, or grass covered land, the engine exhaust should be equipped
with a spar arrester. Make sure you comply with applicable local, state, and federal codes.
8. Log splitters should be used only for splitting wood. Do not use for any other purpose.

4
1-866-902-9690
PREPARATION
1. Be thoroughly familiar with all controls and with the proper use of the equipment.
a) Always wear safety shoes or heavy boots.
b) Always wear eye protection when operating or servicing the machine.
c) Never wear jewelry, loose-tting clothing, or clothing with hanging cords or ties that might
become entangled in moving or rotating parts of the machine.
2. Make sure the log splitter is on a at, level surface. Chock the wheels to prevent unintended
movement.
3. Always operate the log splitter from the manufacturer’s specied operator zone.
4. Logs should be cut as squarely as possible.
SAFETY OPERATION RULES
1. Before starting this log splitter, review the safety instructions both on the machine and in
the operator’s manual. Failure to follow these instructions may result in serious injury to the
operator and/or bystanders.
2. Never leave a running machine unattended.
3. Never operate the machine when under the inuence of alcohol, drugs, or medication.
4. Always operate the log splitter with all safety equipment in place and all controls operating
properly.
5. Always observe the surface conditions to avoid slipping, falling, and unexpected objects.
6. Always keep hands and feet clear of moving parts and partially split logs during the splitting
operation.
7. When loading a log splitter, place your hands on the sides of the log, not on the ends. Never
place your hands or any part of your body between a log and any part of the log splitter.
8. Never attempt to split more than one (1) log at a time unless the ram has been fully extended
and a second log is needed to complete separation of the rst log.
9. When splitting logs that are not cut square, the longest portion of the log should be rotated
towards the supporting frame and facing the splitting wedge.
10. Use only your hand to operate the log splitter controls.
11. Stop the engine (motor) when leaving the machine unattended or when making any
repairs,adjustments and inspections.
12. Do not operate the engine indoors where dangerous carbon monoxide fumes from the exhaust
can accumulate.
13. Only operate machine in daylight or good articial light.
14. Plan your log splitting pattern to avoid discharge of material toward people, pets, and property.
Thrown objects can cause serious personal injury.
15. Always inspect the area where the log splitter is to be used. Ensure the surface the machine is
on is 23.6 inch – 29.5 inch (60 cm – 75 cm) high, stable, level and free from overhanging items
such as limbs, wires etc.
16. Operation of the log splitter where temperatures are below 41°F (5°C) or above 104°F (40°C),
at a high altitude and/or high humidity may result in a malfunction of the machine. Do not use
the log splitter in poor environmental conditions.
SAFETY INSTRUCTIONS

5
1-866-902-9690
ADDITIONAL SAFETY PRACTICES
1. Avoid wet operating conditions.
2. Do not abuse the power cord. Never pull the machine by the cord or yank it to disconnect it
from the receptacle. Keep cords away from excessive heat, oil, and sharp edges.
3. Disconnect the power cord when not in use, before servicing, and when changing
attachments.
4. Be sure power switch is off before plugging the power cord into the wall receptacle to avoid
unintended operation.
5. To prevent shock hazard, the machine should be used with an extension power cord suitable
for outdoor use as recommended by the machine manufacturer. Make sure the cord is in
good condition. Inspect the cord before each use. If the cord is damaged in any manner while
operating your machine, immediately remove the extension cord from receptacle.
6. Never use an indoor type of extension power cord, these cords are designed for use with
lamps and small appliances and are inadequate for high amperage machines used outdoors.
7. Circuit Capacity and Fuses
a) Use only an electrical circuit having adequate capacity as recommended by the machine
manufacturer.
b) “Blowing” a fuse or tripping a circuit breaker is usually a warning that you are overloading
your machine or have too many devices taking power from that circuit, or both. Do not
install a higher capacity fuse!
MAINTENANCE AND STORAGE
1. Maintain or replace safety and instruction labels. Ensure safety guards are in place.
2. Disconnect the power and ensure built up pressure has been released from the tool before
cleaning, repairing, or inspecting the log splitter.
3. For best operation keep the blade sharp, moving parts lubricated and the ma- chine cleaned.
4. Always check for damaged or worn parts, alignment of moving parts, and tightness of bolts
and screws before each use.
5. Replace oil as specied in the Maintenance section. Follow all local regulations and laws
concerning disposal of waste oil.
6. Qualied mechanics and electricians must carry out repairs.
7. When not in use, always store the machine in a secure location that children cannot access.
Store the machine in a dry environment. The machine can be transported or stored in the
ambient temperature between 77°F - 131°F (25°C - 55°C).
8. When cleaning, repairing or inspecting, stop the engine (motor) and make certain that all
moving parts have stopped. Disconnect the spark plug wire and ground against engine to
prevent unintended operation. Disconnect the power cord on electric log splitters.
9. Clear debris from movable parts, but only when the power source is shut off.
10. Check to be sure all nuts and bolts are tight to assure the equipment is in safe working
condition.
11. Always refer to the operator’s manual for important details if the machine is to be stored for an
extended period.
SAFETY INSTRUCTIONS
6
1-866-902-9690
WOOD CONDITION
1. Do not split oversized logs (max. log diameter: 10 inch, max log length: 20.5 inch). Do not
attempt to split “hard" wood that requires more than 5 seconds to split.
2. Ensure the log is free from items that may be projected or cause damage to the machine (ie.:
nails, wire).
3. Ensure the end of the log is cut square and all branches have been cut ush.
OPERATION
OPERATOR REQUIREMENTS
1. Only one person shall operate the log splitter. All other individuals and animals shall maintain a
safe distance during operation (see safety warning in Preparation).
2. Always operate the machine in a standing position and in a location that is not in the path of
projected debris. The location of the machine should provide safe footing and balance for the
operator.
3. Do not operate the machine while under the inuence of alcohol, drugs or physically, mentally
fatigued. Always be alert and watch what you are doing!
4. Contact with the moving parts can amputate body parts. Do not put any part of your body
near moving parts.
WORKLOAD REQUIREMENTS
1. Never exceed the operating capacity of the log splitter.
2. Always split the log in the direction of the grain. Do not place a log across the log splitter.
3. Never split more than one log at a time.
4. Do not load a log when the ram is moving.
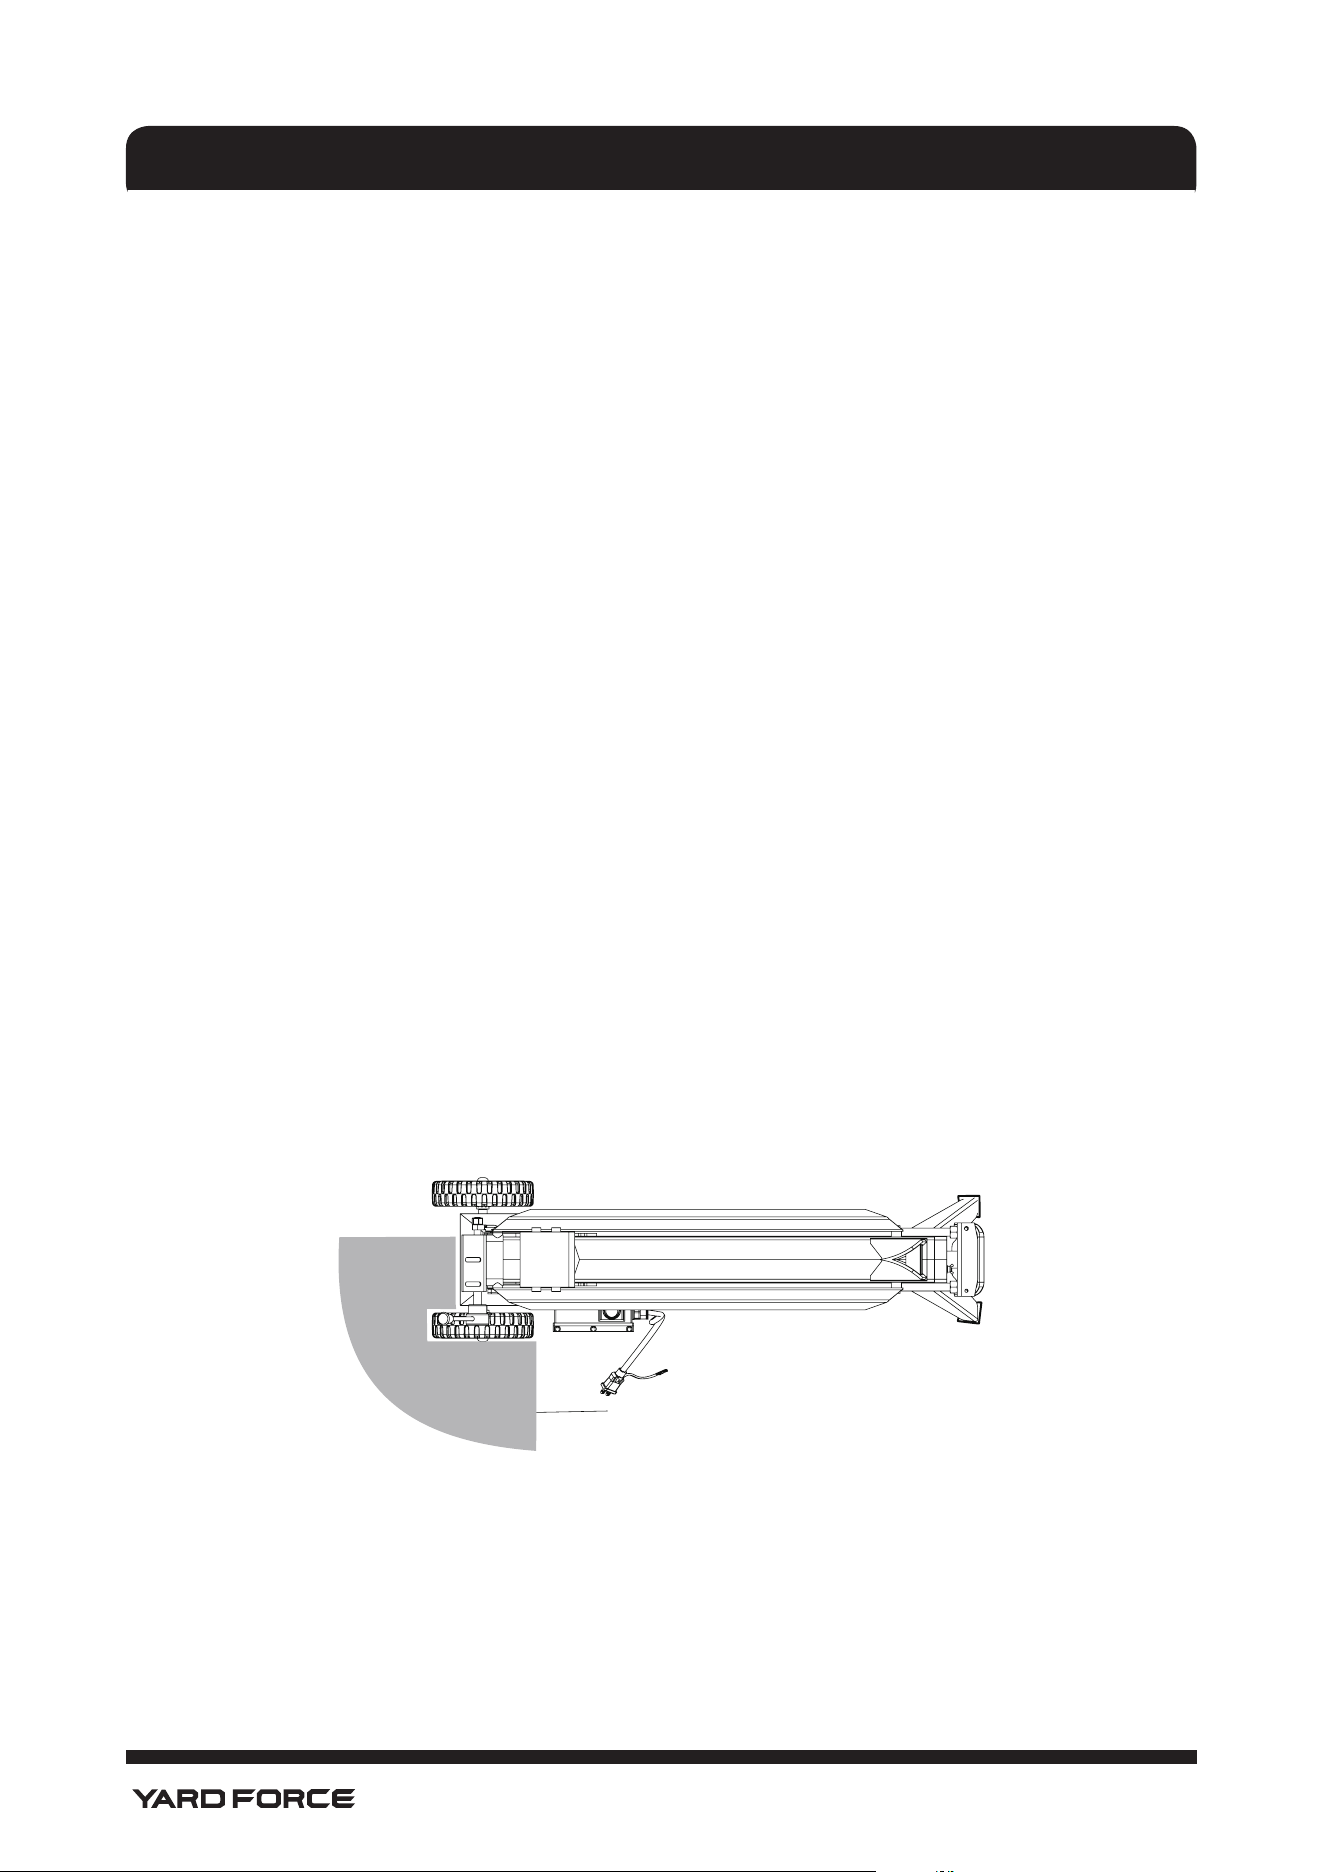
5. Operate zone - Operate the log splitter from the operator zone to reduce the risk of injury. (See
Fig.A)
Operator zone
Fig.A
LOG SPLITTING
1. Remove any keys and adjusting wrenches before turning the machine ON.
2. Do not use accessories or attachments that are not recommended in this manual.
SAFETY INSTRUCTIONS

7
1-866-902-9690
3. Place the log on the log retention brackets. Do not hold or secure the log with your hands.
4. Do not split wood that takes more than 5 seconds to split. Doing so will apply excessive
pressure on the ram cylinder and damage the machine.
5. Do not push/force the log onto blade. Always let the blade initiate splitting the log.
6. If the log moves during operation, stop and reset.
7. If a log is jammed do not request assistance of a second person. Ensure the machine power is
disconnected and built up pressure released before attempting to release log.
8. Ensure the machine is turned OFF when not in use. If the machine is left un- attended then
disconnect power to the machine.
ELECTRICAL SAFETY
1. Ground fault circuit interrupter (GFCI) protection should be provided on the circuit(s) or outlet(s)
to be used for the log splitter. Receptacles are available having built-in GFCI protection and
may be used for this measure of safety.
2. To reduce the risk of electric shock, this appliance has a 3-prong grounding plug. Use
this appliance only with a 3-prong, UL-listed (CSA certied in Canada) extension cord
recommended for outdoor use. Use only 3-wire extension cords that have 3-prong grounding
plugs and 3-pole receptacles that accept the tool's plug.
3. To prevent electric shock, use only with an extension cord suitable for outdoor use, such as
SW, sow, STW, STOW, SJTW, or SJTOW.
Before use, check that the extension cord is in good condition. When using an extension cord,
make sure to use one heavy enough to carry the current your product will draw. An undersized
cord will cause a drop in line voltage resulting in loss of power and overheating.
WARNING!
Some dust created by power sanding, sawing, grinding, drilling and other construction
activities contains chemicals known to the state of California to cause cancer, birth defects
or other reproductive harm. Some examples of these chemicals are:
• Lead from lead - based paints
• Crystalline silica from bricks and cement and other masonry products, and
• Arsenic and chromium from chemically -treated lumber.
Your risk from these exposures varies,depending on how often you do this type of work.
To reduce your exposure to these chemical:work in a well ventilated area,and work with
approved safety equipment,such as those dust masks that are specially designed to lter
out microscopic particles.
For more information go to www.P65warnings.ca.gov.
WARNING
Electric shock may cause SEVERE INJURY or DEATH. Heed these warnings:
• Do not allow any part of the log splitter to make contact with water while it is in
operation. If the appliance becomes wet while turned off, wipe dry before starting.
• Use only a UL-, CSA-, or ETL-rated extension cord for outdoor, all-weather use. Do not
use an extension cord over 50 ft (15 m).
• Do not touch the appliance or its plug with wet hands or while standing in water.
Wearing rubber boots offers some protection.
SAFETY INSTRUCTIONS
8
1-866-902-9690
SAFETY INSTRUCTIONS
EXTENSION CORD CHART
Extension Cord Length Up to 25 ft (7.5 m) 25 ft - 50 ft
Wire Gauge (A.W.G.): 14 12
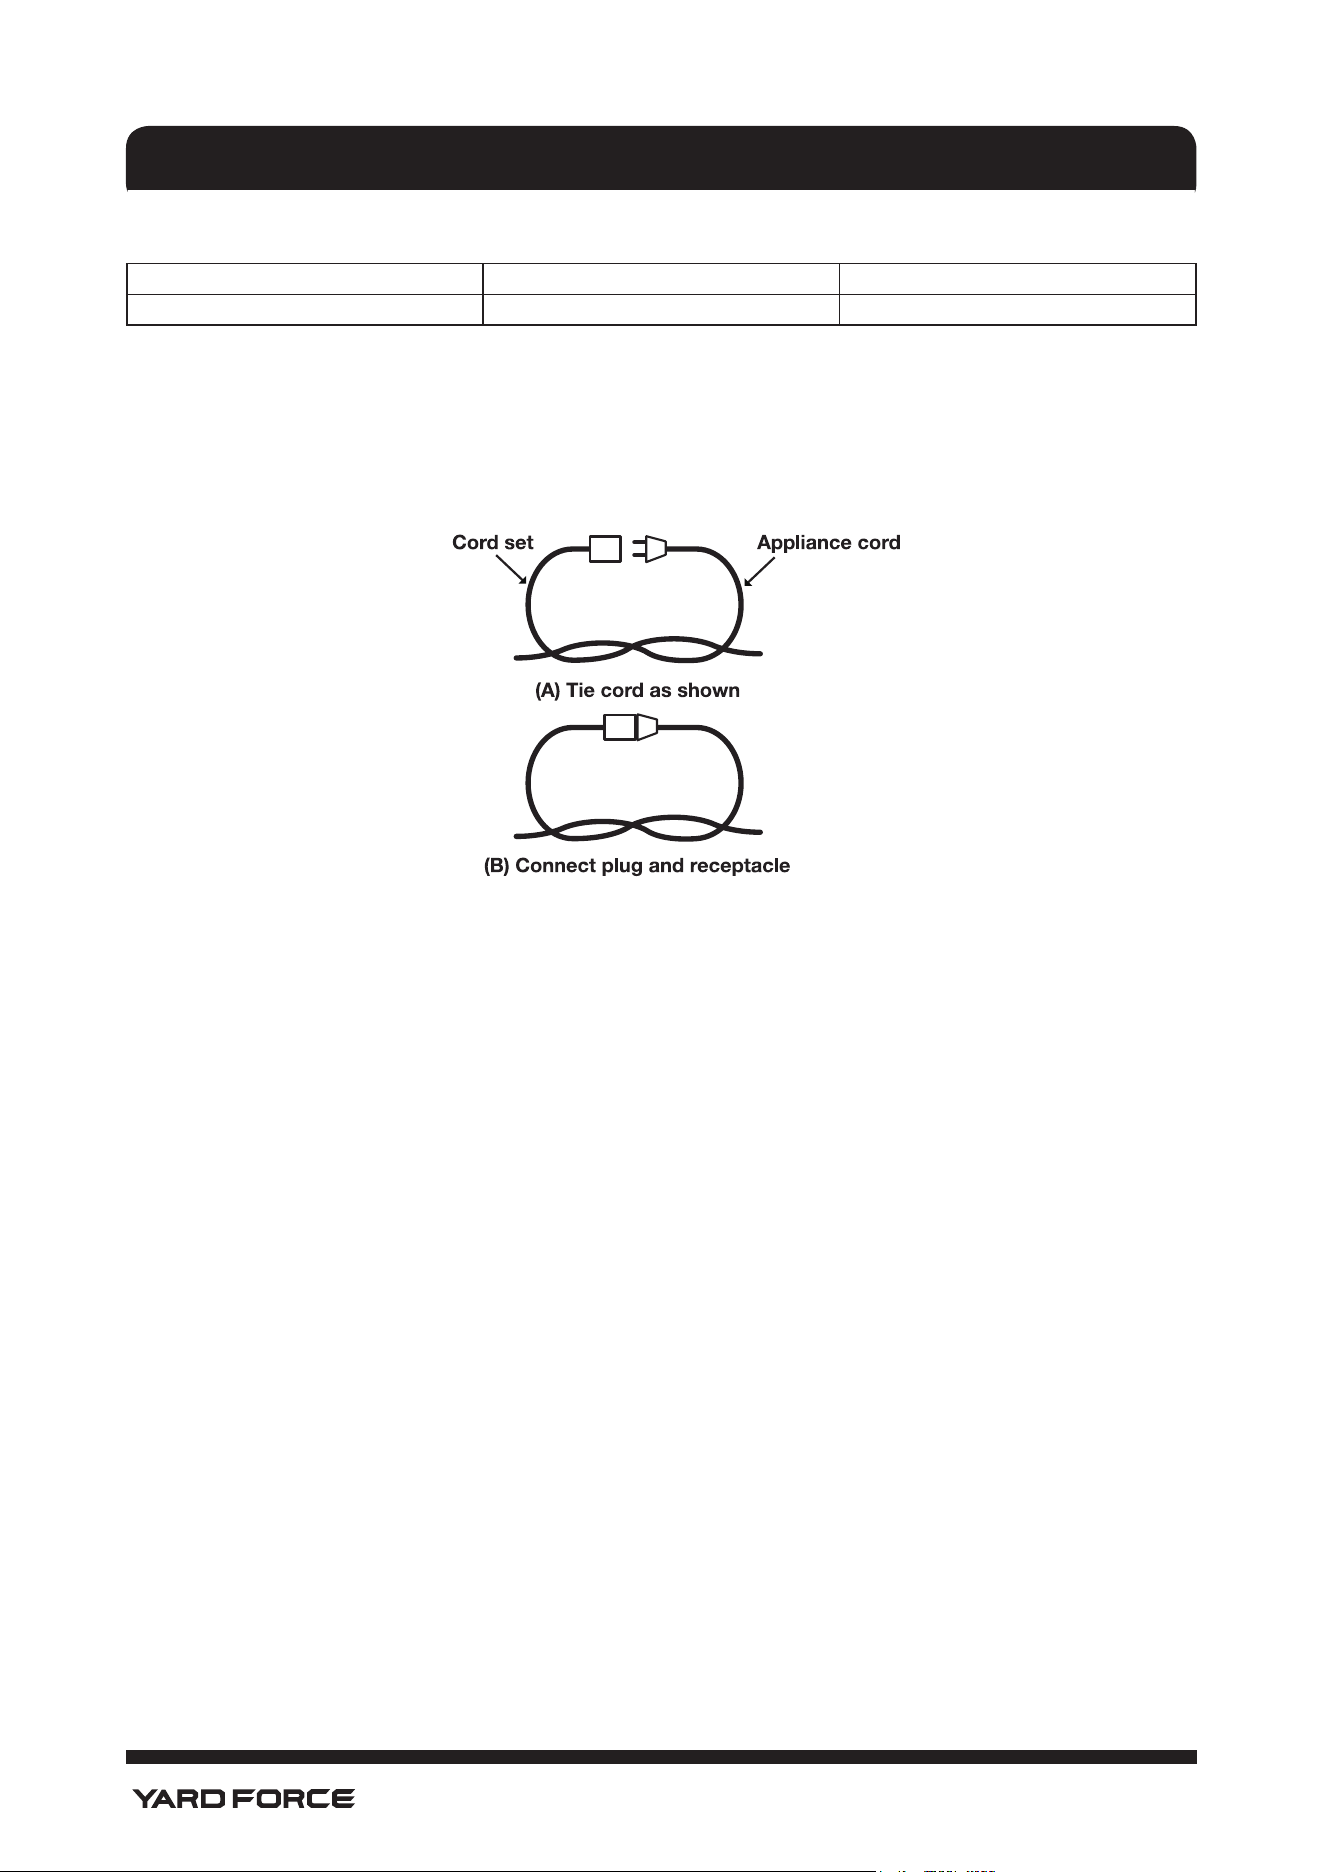
4. To prevent the appliance cord from disconnecting from the extension cord during operation,
make a knot with the two cords as shown in Table 1.
TABLE 1. METHOD OF SECURING EXTENSION CORD
5. Do not abuse the cord. Never pull the log splitter by the cord or yank the cord to disconnect it
from the receptacle. Keep the cord away from heat, oil, and sharp edges.
GROUNDING INSTRUCTIONS
1. In the event of a malfunction or breakdown, grounding provides a path of least resistance for
electric current to reduce the risk of electric shock. This tool is equipped with an electric cord
having an equipment-grounding conductor and a grounding plug.
2. The plug must be plugged into a matching outlet that is properly installed and grounded in
accordance with all local codes and ordinances.
3. Do not modify the plug provided - if it will not t the outlet, have the proper outlet installed by
a qualied electrician.
4. Improper connection of the equipment-grounding conductor can result in a risk of electric
shock. The conductor with insulation having an outer surface that is green with or without
yellow stripes is the equipment- grounding conductor. If repair or replacement of the electric
cord or plug is necessary, do not connect the equipment-grounding conductor to a live
terminal.
5. Check with a qualied electrician or service personnel if the grounding instructions are not
completely understood, or if in doubt as to whether the tool is properly grounded.
6. Use only 3-wire extension cords that have 3-prong grounding plugs and 3-pole receptacles
that accept the tool's plug.
9
1-866-902-9690
7. Repair or replace damaged or worn cord immediately.
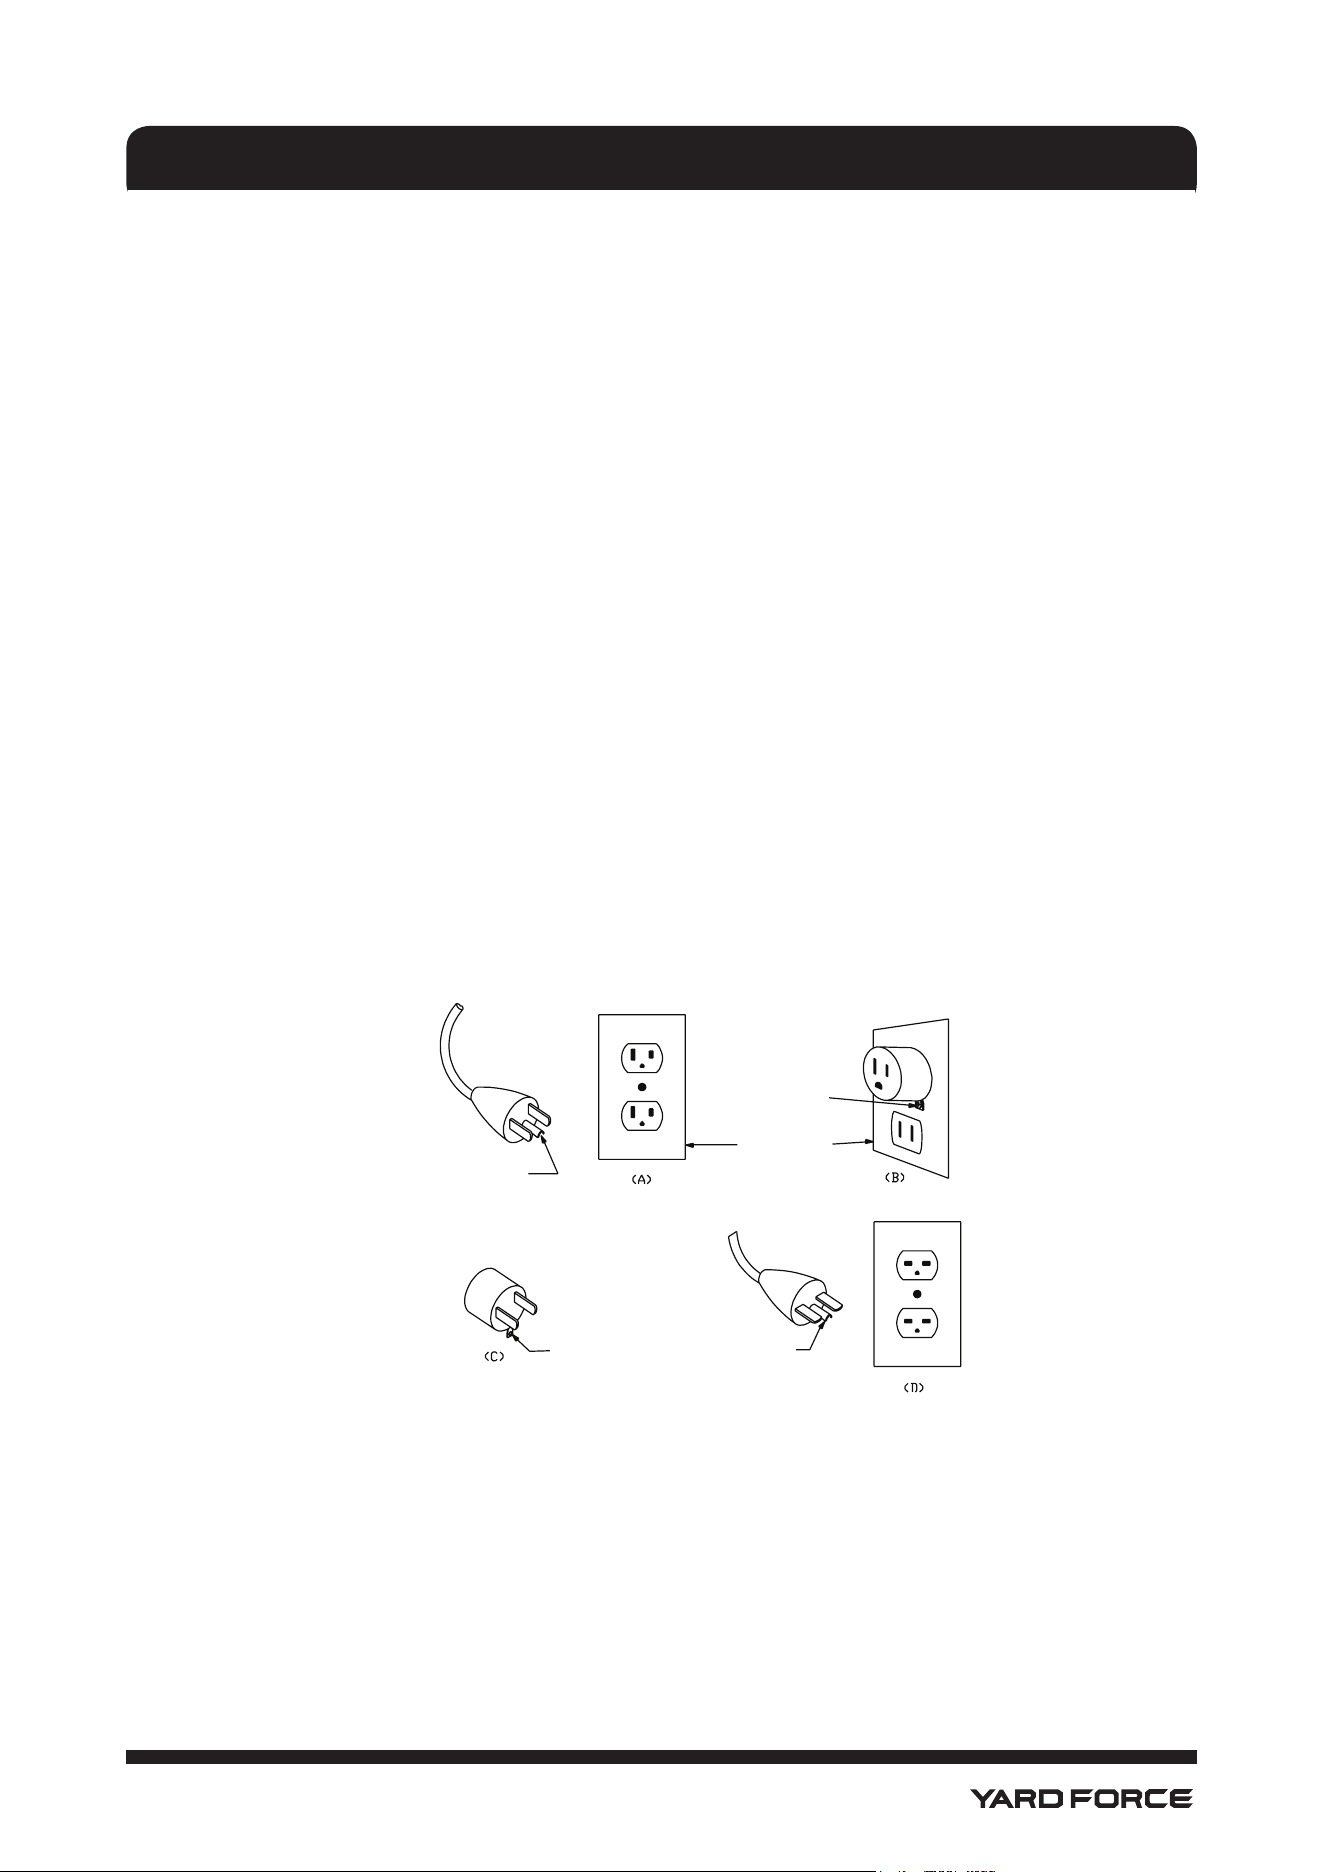
8. This tool is intended for use on a circuit that has an outlet that looks like the one illustrated in
Sketch A in Figure 2. The tool has a grounding plug that looks like the plug illustrated in Sketch
A in Figure 2. A temporary adapter, which looks like the adapter illustrated in Sketches B and
C, may be used to connect this plug to a 2-pole receptacle as shown in Sketch B if a properly
grounded outlet is not available. The temporary adapter should be used only until a properly
grounded outlet can be installed by a qualied electrician. The green-colored rigid ear, lug,
and the like, extending from the adapter must be connected to a permanent ground such as a
properly grounded outlet box.
PERMANENTLY CONNECTED TOOLS
1. This tool should be connected to a grounded metal permanent wiring system; or to a system
having an equipment-grounding conductor.
2. USE PROPER EXTENSION CORD. Make sure your extension cord is in good condition. When
using an extension cord, be sure to use one heavy enough to carry the current your product
will draw. An undersized cord will cause a drop in line voltage resulting in loss of power and
overheating. Table 2 shows the correct size to use depending on cord length and nameplate
ampere rating.
If in doubt, use the next heavier gauge. The smaller the gauge number, the heavier the cord.
Table 2
Grounding methods
GROUNDING PIN
COVER OF
GROUNDED
OUTLET BOX
ADAPTER
METAL SCREW
GROUNDING
PIN
GROUNDING
MEANS
EXTENSION CORDS
1. Use only three-wire outdoor extension cords that have three-prong grounding plugs and
grounding receptacles that accept the appliance’s plug.
SAFETY INSTRUCTIONS
10
1-866-902-9690
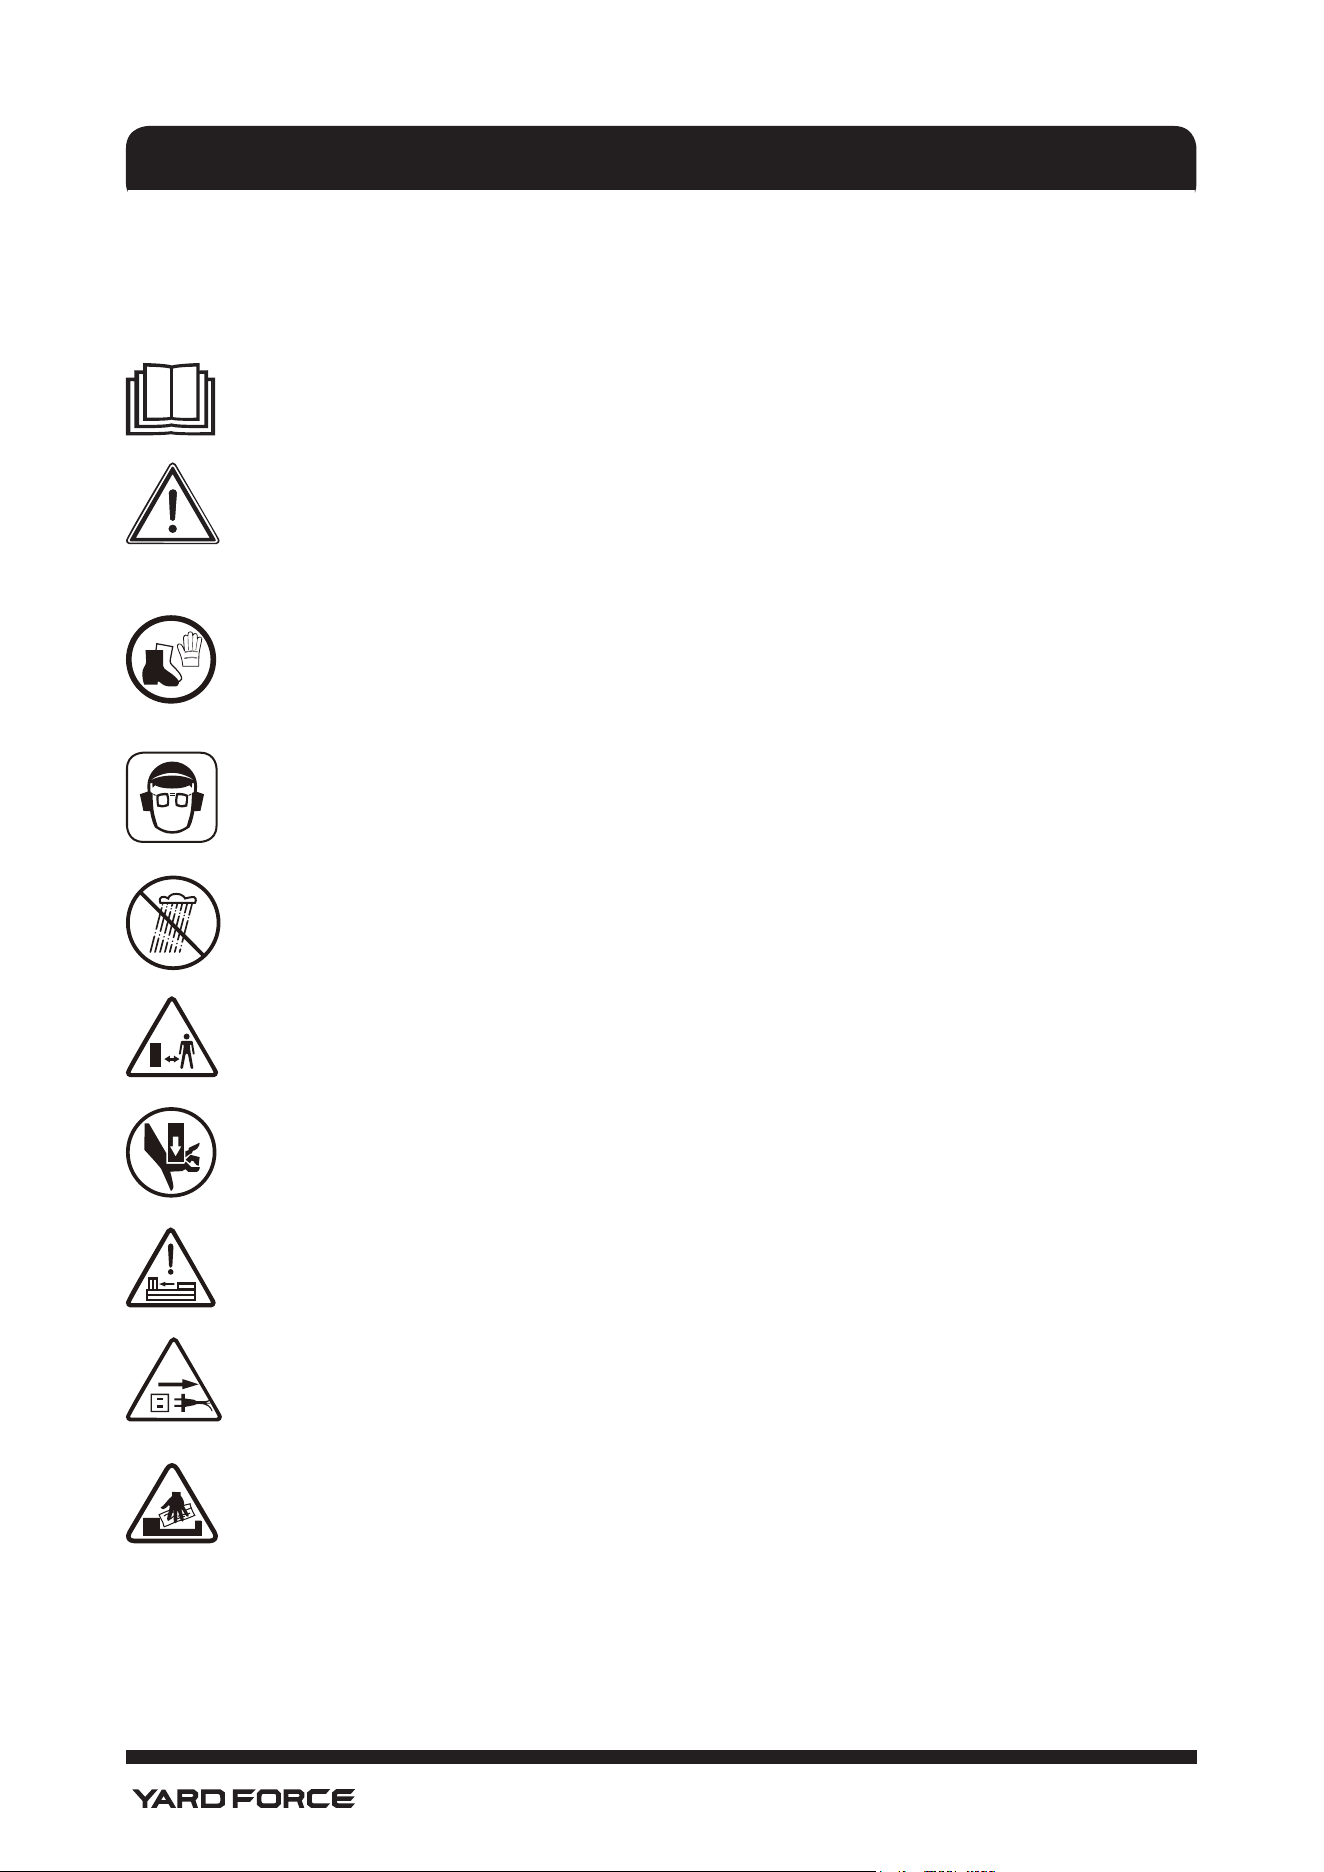
SAFETY SYMBOLS
The following table depicts and describes safety symbols that may appear on this product.
Read, understand, and follow all instructions on the machine before attempting to assemble and
operate.
To reduce the risk of injury, user must read instruction manual.
SAFETY ALERT –
Indicates a pre- caution,a warning, or a danger.
Wear heavy-duty gloves and steeltoed boots when using the machine and handling
debris.
Wear eye and hearing protection. For protection against injury, wear ear defenders and
safety goggles.
WARNING! Do not expose or operate the unit in rain or wet conditions. Keep dry.
Keep bystanders and children a safe distance away.
Moving parts can crush and cut hands and ngers. Keep hands clear of the ram plate,
wedge, and logs while splitting.
WARNING! Always be aware of the movement of the log splitter.
Disconnect the mains plug if the cord is damaged or entangled.
Keep your hands away from splits and cracks which open in the log. Do not remove
jammed logs with your hands.
DESCRIPTION OF SYMBOLS
11
1-866-902-9690
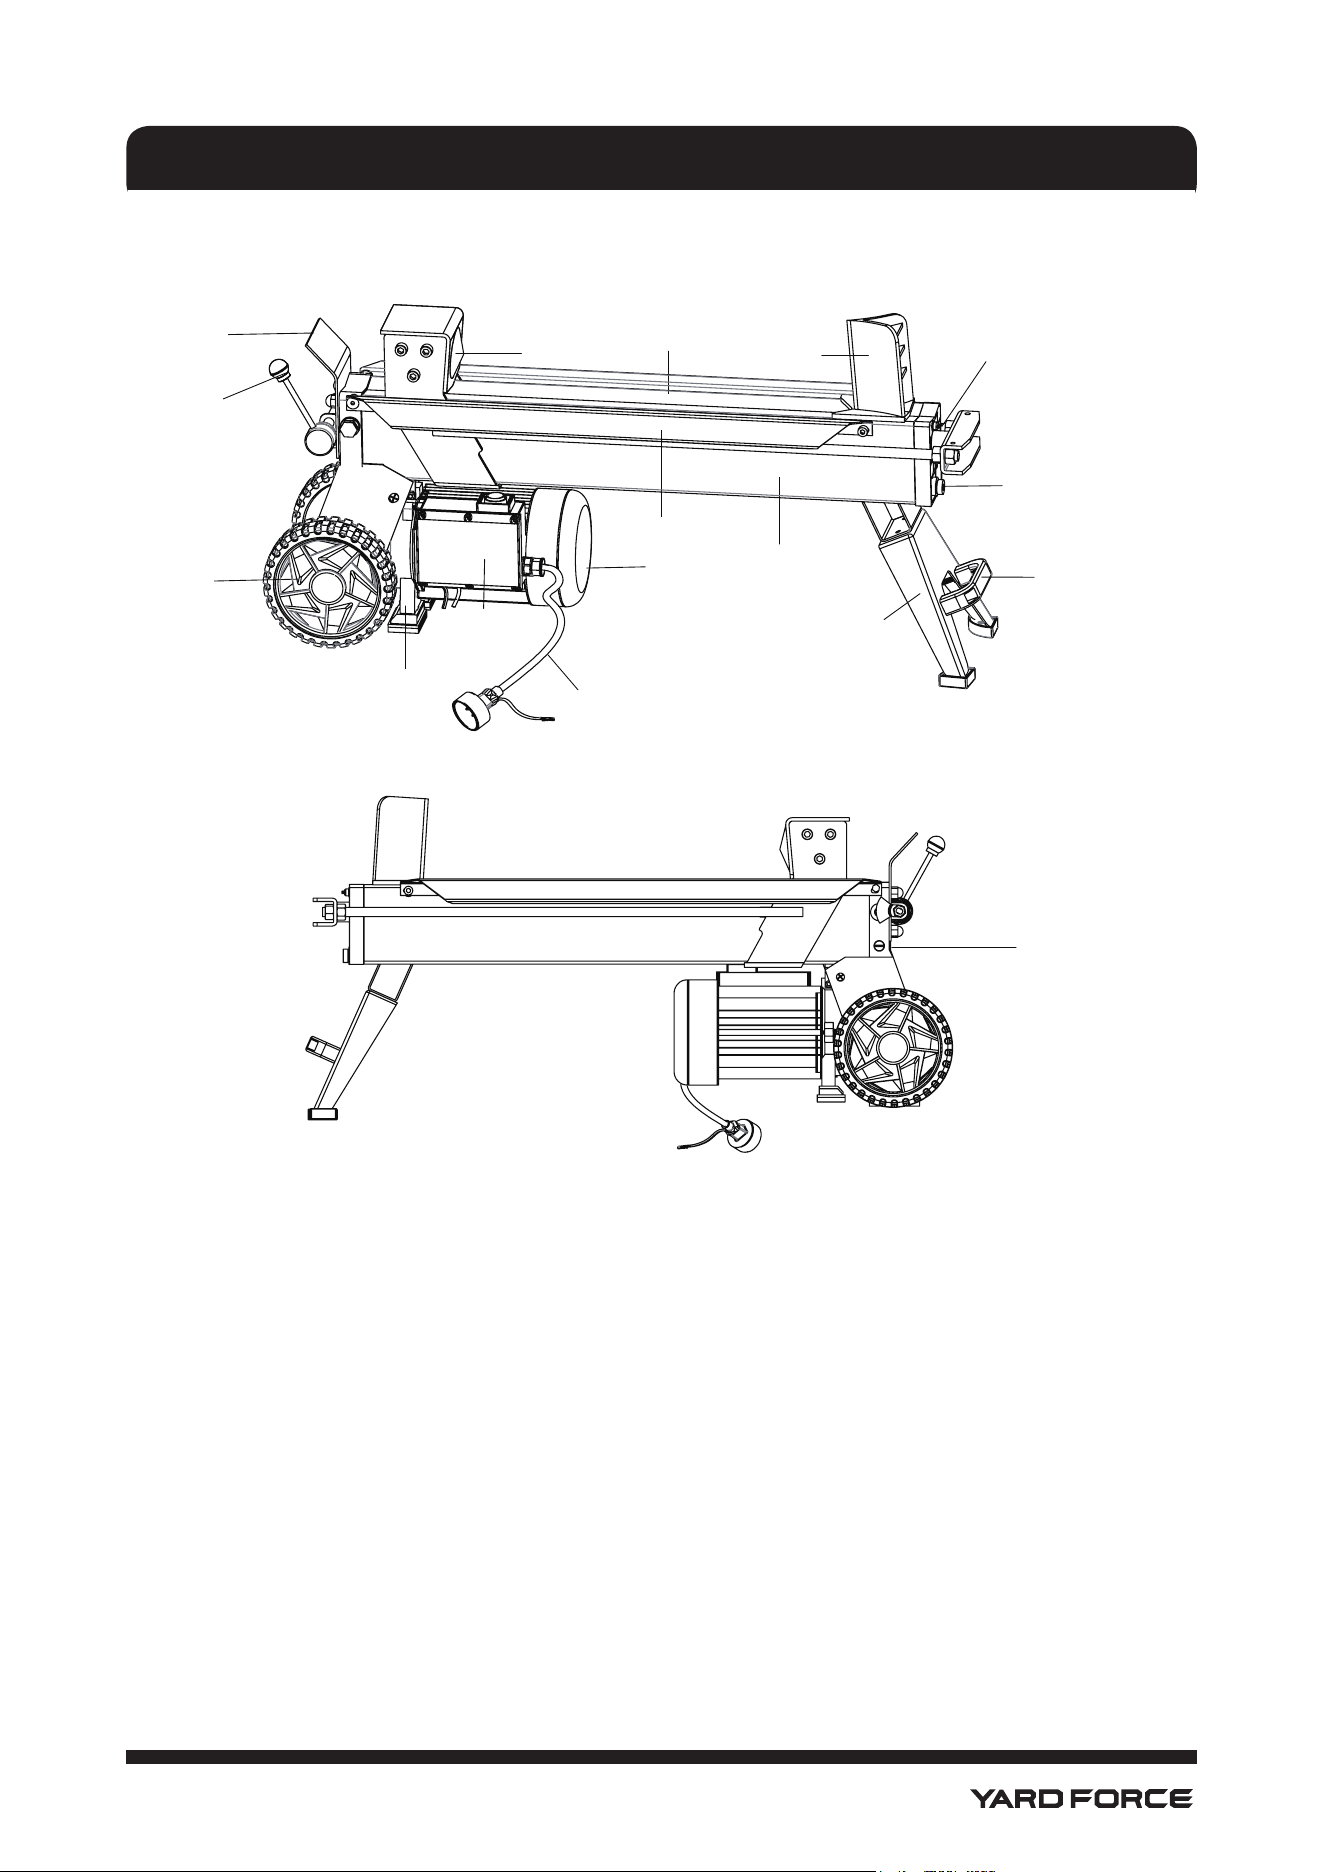
KNOW YOUR LOG SPLITTER
PARTS LIST
1. Log pusher
2. Log rail
3. Splitting wedge
4. Bleed screw
5. Oil drain bolt
6. Lifting handle
7. Supporting leg
8. Log catch plates
9. Motor
10. Power cable
11. On/Off switch box
12. Leg
13. Rear wheels
14. Hydraulic control lever
15. Control lever guard
16. Beam
17. Max pressure limit screw
17
1
2
3
4
5
6
7
8
9
10
11
12
13
14
15
16
12
1-866-902-9690
UNPACKING THE LOG SPLITTER
PARTS LIST
Carefully remove all parts from their packaging and check that the following parts are included.
• Electric log splitter x 1
• Lifting handle x 1
• Bolts, nuts and washers (2 sets)
• Manual
1. Carefully remove the log splitter and check to see that all of the above items are supplied.
2. Inspect the product carefully to make sure no breakage or damage occurred during shipping.
NOTE: Do not discard the shipping carton and packaging material until you are ready to use your new
electric log splitter. The packaging is made of recyclable materials.
Properly dispose of these materials in accordance with local regulations.
IMPORTANT! The equipment and packaging material are not toys. Do not let children play with plastic
bags, foils, or small parts. These items can be swallowed and pose a suffocation risk!
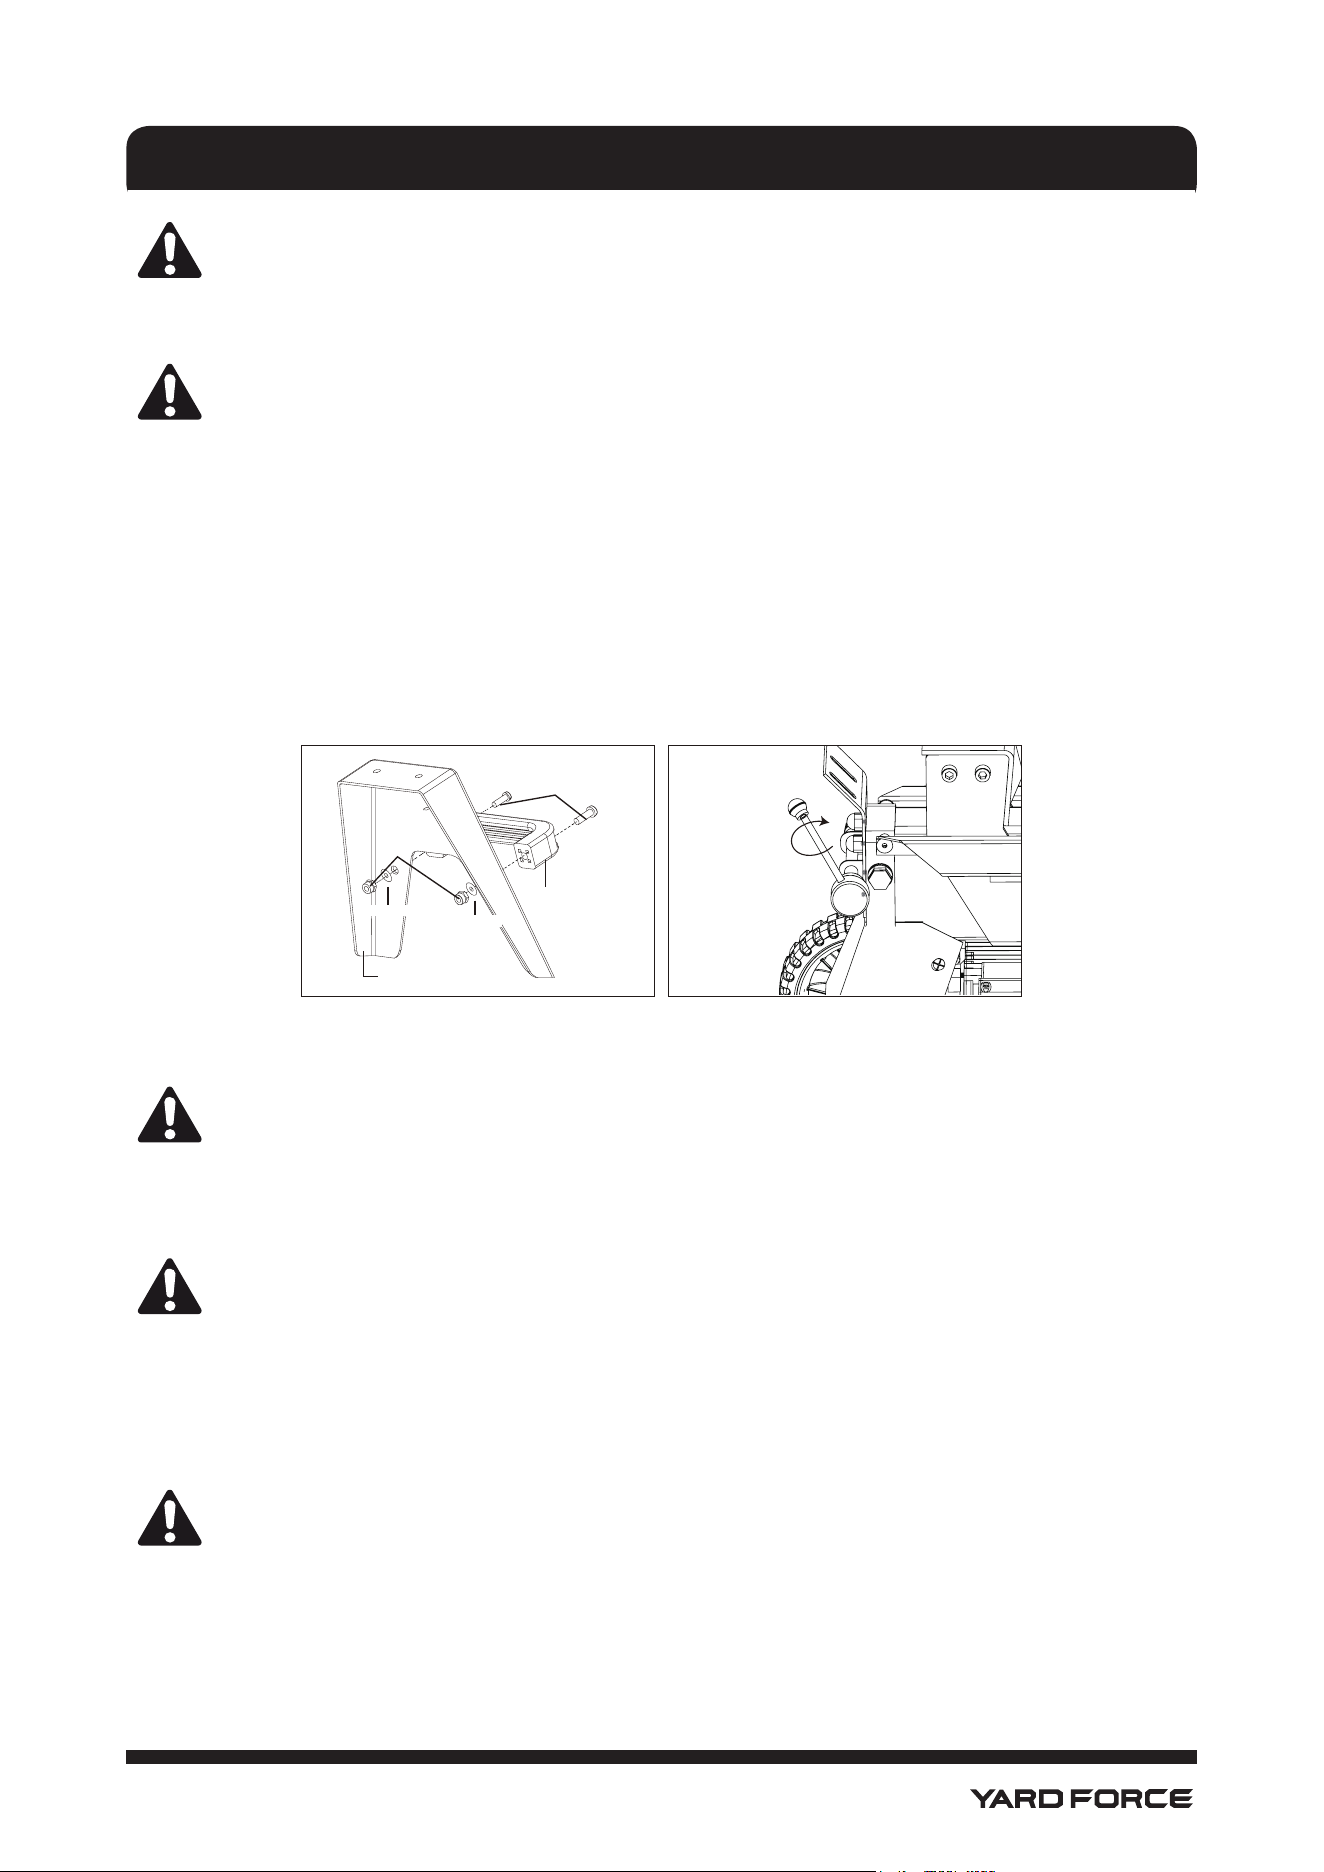
Model No. YF15LS
Maximum Splitting Force 5-Tons
Motor 15A (S3,5min on/10 min off)
Rated Voltage 120V AC 60 Hz
Splitting Force Max 5 ton
Ram Force/ Continuous Force 5 ton
Beam Material Steel
Log Length Max 20.5 in. (52 cm)
Log Diameter Max 10 in. (25.4 cm)
Wedge Height 5 in. (12.7 cm)
Beam Height 5.5 in. (14 cm)
Hydraulic Cylinder Size
(length x Diameter)
29.7 in. x 2.3 in. (75.5 cm x 5.9 cm)
Hydraulic Rod Size
(length x Diameter)
30.2 in. x 1.2 in. (76.8 cm x 3 cm)
Hydraulic Capacity 1.1 gal (4.2L)
Wheel Size 7 in. (17.8 cm)
Net Weight 99 lbs (45 kgs)
PRODUCT SPECIFICATIONS
13
1-866-902-9690
ASSEMBLY
WARNING!
Do not connect to the power supply until assembly is complete. Failure to comply could
result in accidental starting and serious personal injury.
WARNING!
The product must be fully assembled before operation. Do not use a product that is only
partially assembled or assembled with dama- ged parts.
NOTE: Before using the log splitter, follow these instructions to assemble the lifting handle and
the supporting leg.
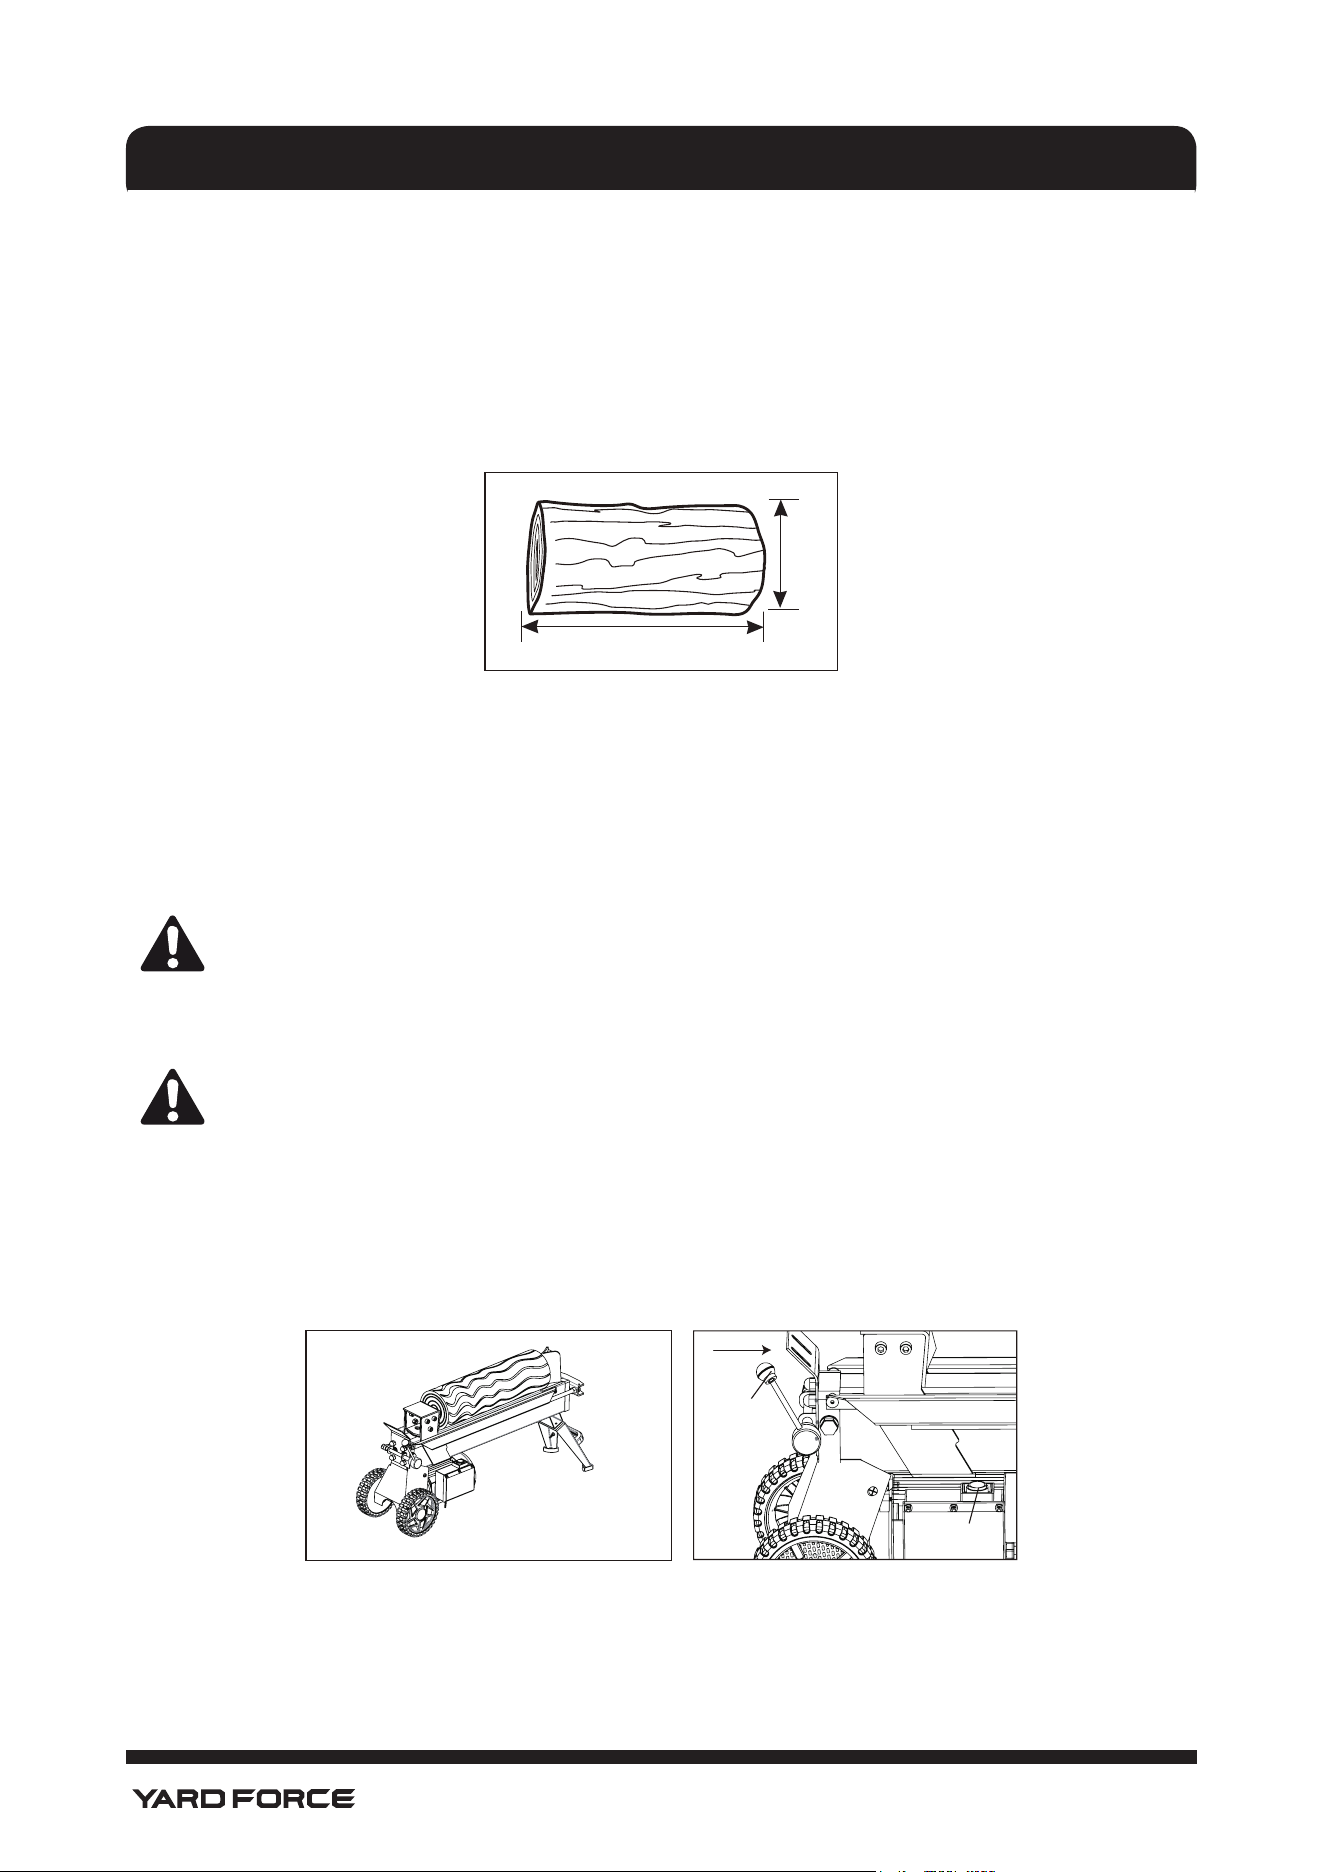
1. Place the lifting handle on the supporting leg, x them together with the provided bolts, nuts
and washers. Tighten securely (Fig. 1).
2. Align the hydraulic control lever to the hole of the connector, then turn it clockwise and tighten
securely. (Fig. 2)
Supporting leg
Lifting handle
Nuts
Bolts
Washer
Washer
Fig. 1 Fig. 2
WARNING!
Before using the log splitter, review the instructions below and all safety information.
Failure to follow these instructions may result in property damage or injury to the operator
or bystanders.
WARNING!
Before the initial operation, the bleed screw should be adjusted to allow air to go in
and out of the oil tank. (loosen three to four turns). Airow should be detectable during
operation. To avoid leaking oil close the bleed screw when moving the machine.
Important! Failure to open the bleed screw during operation will result in permanent
damage to the log splitter.
WARNING!
Do not adjust the max. pressure limiting screw. This was set at the factory so the log
splitter works under the maximum pressure limit of 5 tons. Tampering with the screw
will result in hydraulic pump failure. Only a professional mechanic shall adjust the max.
pressure limiting screw.
14
1-866-902-9690
ASSEMBLY
SPLITTING OPERATION
Follow these instructions to operate the log splitter:
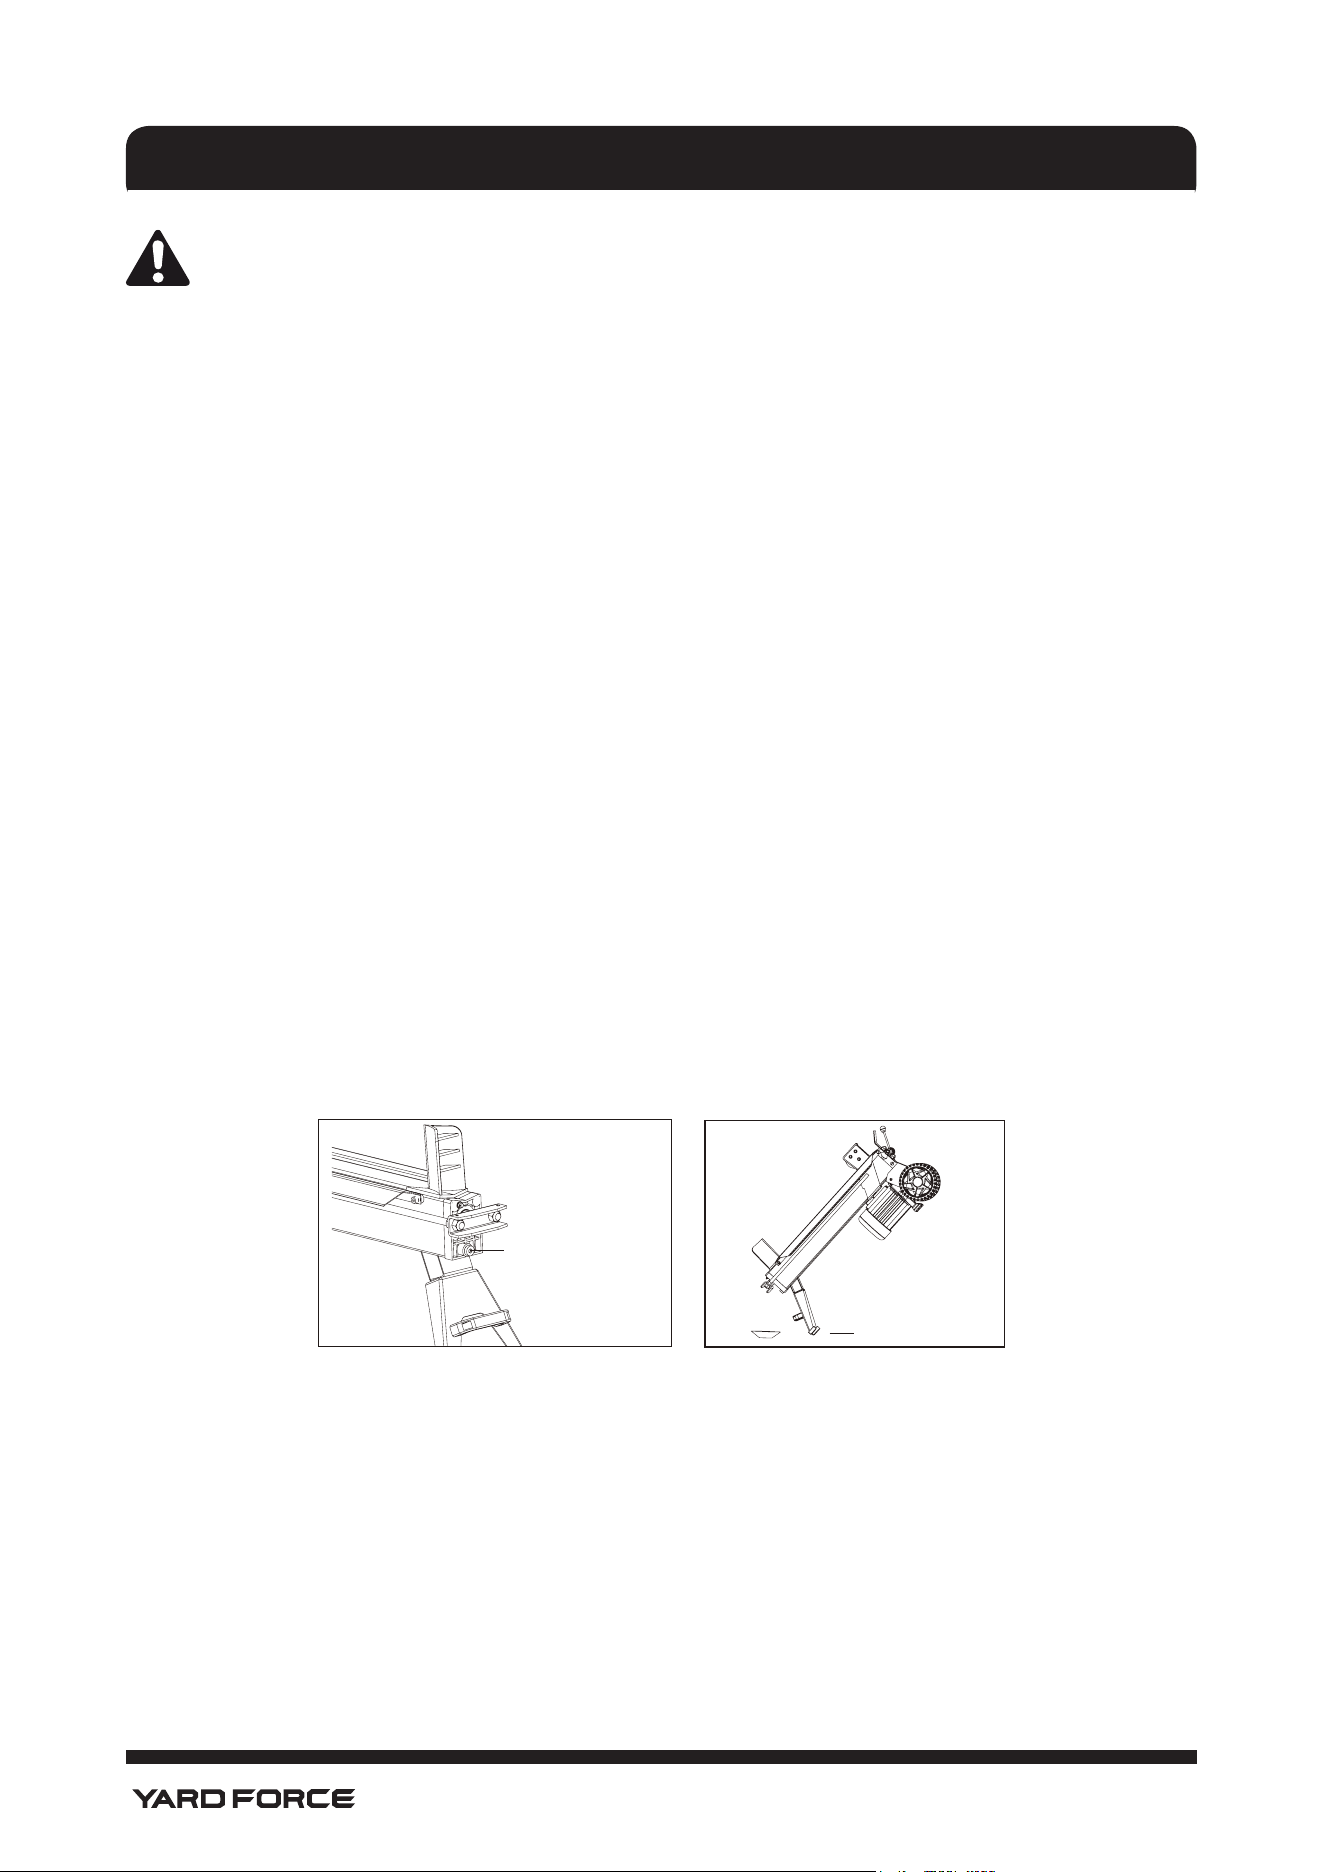
1. Ensure all logs meet the proper size requirements [(max log diameter: 10 in. (25.4 cm); max log length:
20.5 in. (52 cm)].
IMPORTANT! Logs vary in hardness and structure. Small logs with knots or harder wood may be more
difcult to split. Larger logs with less hardness may not be difcult to split. Do not force the log splitter if the
log fails to split on the rst attempt.
10 in. (25.4 cm)
20.5 in. (52 cm)
2. When loading or positioning a log, always handle the bark side; never handle the ends. Never place
your hands or body parts between the log and the splitter.
3. Make sure all moving parts are completely stopped before loading or unloading. Never load or unload
logs while the log pusher is moving.
4. Check that bleed Screw is open.
5. Load the log lengthwise into the unit between the wedge and the log pusher. Be sure that the split will
be along the grain. Check to make sure the log is xed stably.
WARNING!
Always set logs rmly on the log catch plates and the log rail. Make sure logs will not
twist, rock or slip while being split. Do not force the blade by splitting the log on the
upper part. This will break the blade or damage the machine (Fig. 3).
WARNING!
Never load or unload logs while the log pusher is moving.
6. Plug the appliance cord into an appropriate power outlet.
7. Engage the log pusher by using your left hand to push the hydraulic control lever and your right hand to
push the On/Off switch (Fig. 4).
NOTE: This log splitter is equipped with ZHB control system, which requires both the On/Off switch and the
hydraulic control lever to be engaged simultaneously to start the machine.
Hydraulic
control lever
On/Off switch
Fig. 3 Fig. 4
8. The log pusher will move forward and the log will be split by the splitting wedge.

15
1-866-902-9690
DUTY CYCLE
1. The electric log splitter is designed for occasional use. Use over a long period will overheat the motor
and may cause damage.
2. The electric log splitter should not operate at 15A load for more than 5 minutes at a time, after which it
must be switched off and allowed to cool down for at least 10 minutes before restarting.
WARNING!
If the log cannot be split within 5 seconds, do not engage the log pusher any more, otherwise the
log splitter will be damaged. For extremely hard logs, rotate it by 90° to see if it can be split in a
different direction. If the log still cannot be split, its hardness exceeds the capacity of the machine
and thus that log should be discarded to protect the log splitter.
WARNING!
Break log in the direction of its growing grain. Do not place log across the log splitter for splitting.
It may be dangerous and may seriously damage the machine.
WARNING!
Do not attempt to split 2 log pieces at the same time. A piece may y up and cause personal
injury.
WARNING!
Accidents occur when there is more than one person involved in loading and operating the log
splitter; only one person should operate the splitter. If a second person is assisting in loading the
splitter, NEVER allow an assistant to hold the log in place while the operator is using the unit.
3. Release both the hydraulic control lever and the On/Off switch, the log pusher will move to the original
position. Wait until the pusher completely stops, and remove the split log.
REMOVING A JAMMED LOG
If the log gets stuck on the wedge base, or the wedge becomes embedded in
the log and will not completely split or separate from the log, follow the directions below to remove the log.
WARNING!
Do not attempt to remove the jammed log with your hands or knock it off. It may cause serious
injury or damage to the machine.
1. Release both the hydraulic control lever and the On/Off switch.
2. After the log pusher moves back and completely stops at its starting position, insert a wedge wood
under the jammed log (Fig. 5).
3. Start the log splitter to push the wedge wood to go completely under the jammed one.
4. Repeat above instructions 2 - 3 with a sharper sloped wooden wedge as needed until the log is free.
WARNING!
Do not try to knock the jammed log off. It will damage the machine or may launch the log and
cause an accident or injury (Fig. 6).
Wedged wood
Fig. 5 Fig. 6
ASSEMBLY
16
1-866-902-9690
WARNING!
Always disconnect the power and ensure built up pressure has been released from the tool before
cleaning, repairing, or inspecting the log splitter.
GENERAL
• Periodically apply a light coat of rust resistant oil, such as 3-in-1 oil or WD- 40, to the springs to keep
them in proper working order.
• Periodically check all fasteners for tightness.
• Annually clean and lightly lubricate parts.
• Use a glossy enamel spray paint to touch up scratched or worn painted metal surfaces.
• Never exceed the load capacity rating of 5 tons; it will damage the log splitter and void the
manufacturer's warranty.
• Periodically sharpen the wedge. Use a ne tooth le, take off burrs and smooth rough sections of the
cutting edge.
IMPORTANT! If a part needs replacement, only use parts that are specically recommended by the
manufacturer. Replacement parts that do not meet these specications may result in a safety hazard, may
compromise the tool's performance, and will void the manufacturer's warranty.
REPLACING THE HYDRAULIC OIL
After every 150 hours of use, the hydraulic oil needs to be replaced. The following hydraulic oils or
equivalent are recommend for the log splitter’s hydraulic transmission system.
• SHELL Tellus 22
• MOBIL DTE 11
• ARAL Vitam GF 22
• BP Energol HLP-HM 22
To replace the hydraulic oil, follow the instructions below.
1. Turn off and unplug the log splitter. Make sure all moving parts have come to a complete stop.
2. Unscrew to remove the oil drain bolt with dipstick (Fig. 7).
3. Turn the log splitter and let it stand on the supporting leg to drain the hydraulic oil off (Fig. 8).
Oil drain bolt
with dipstick
Supporting leg
Fig. 7 Fig. 8
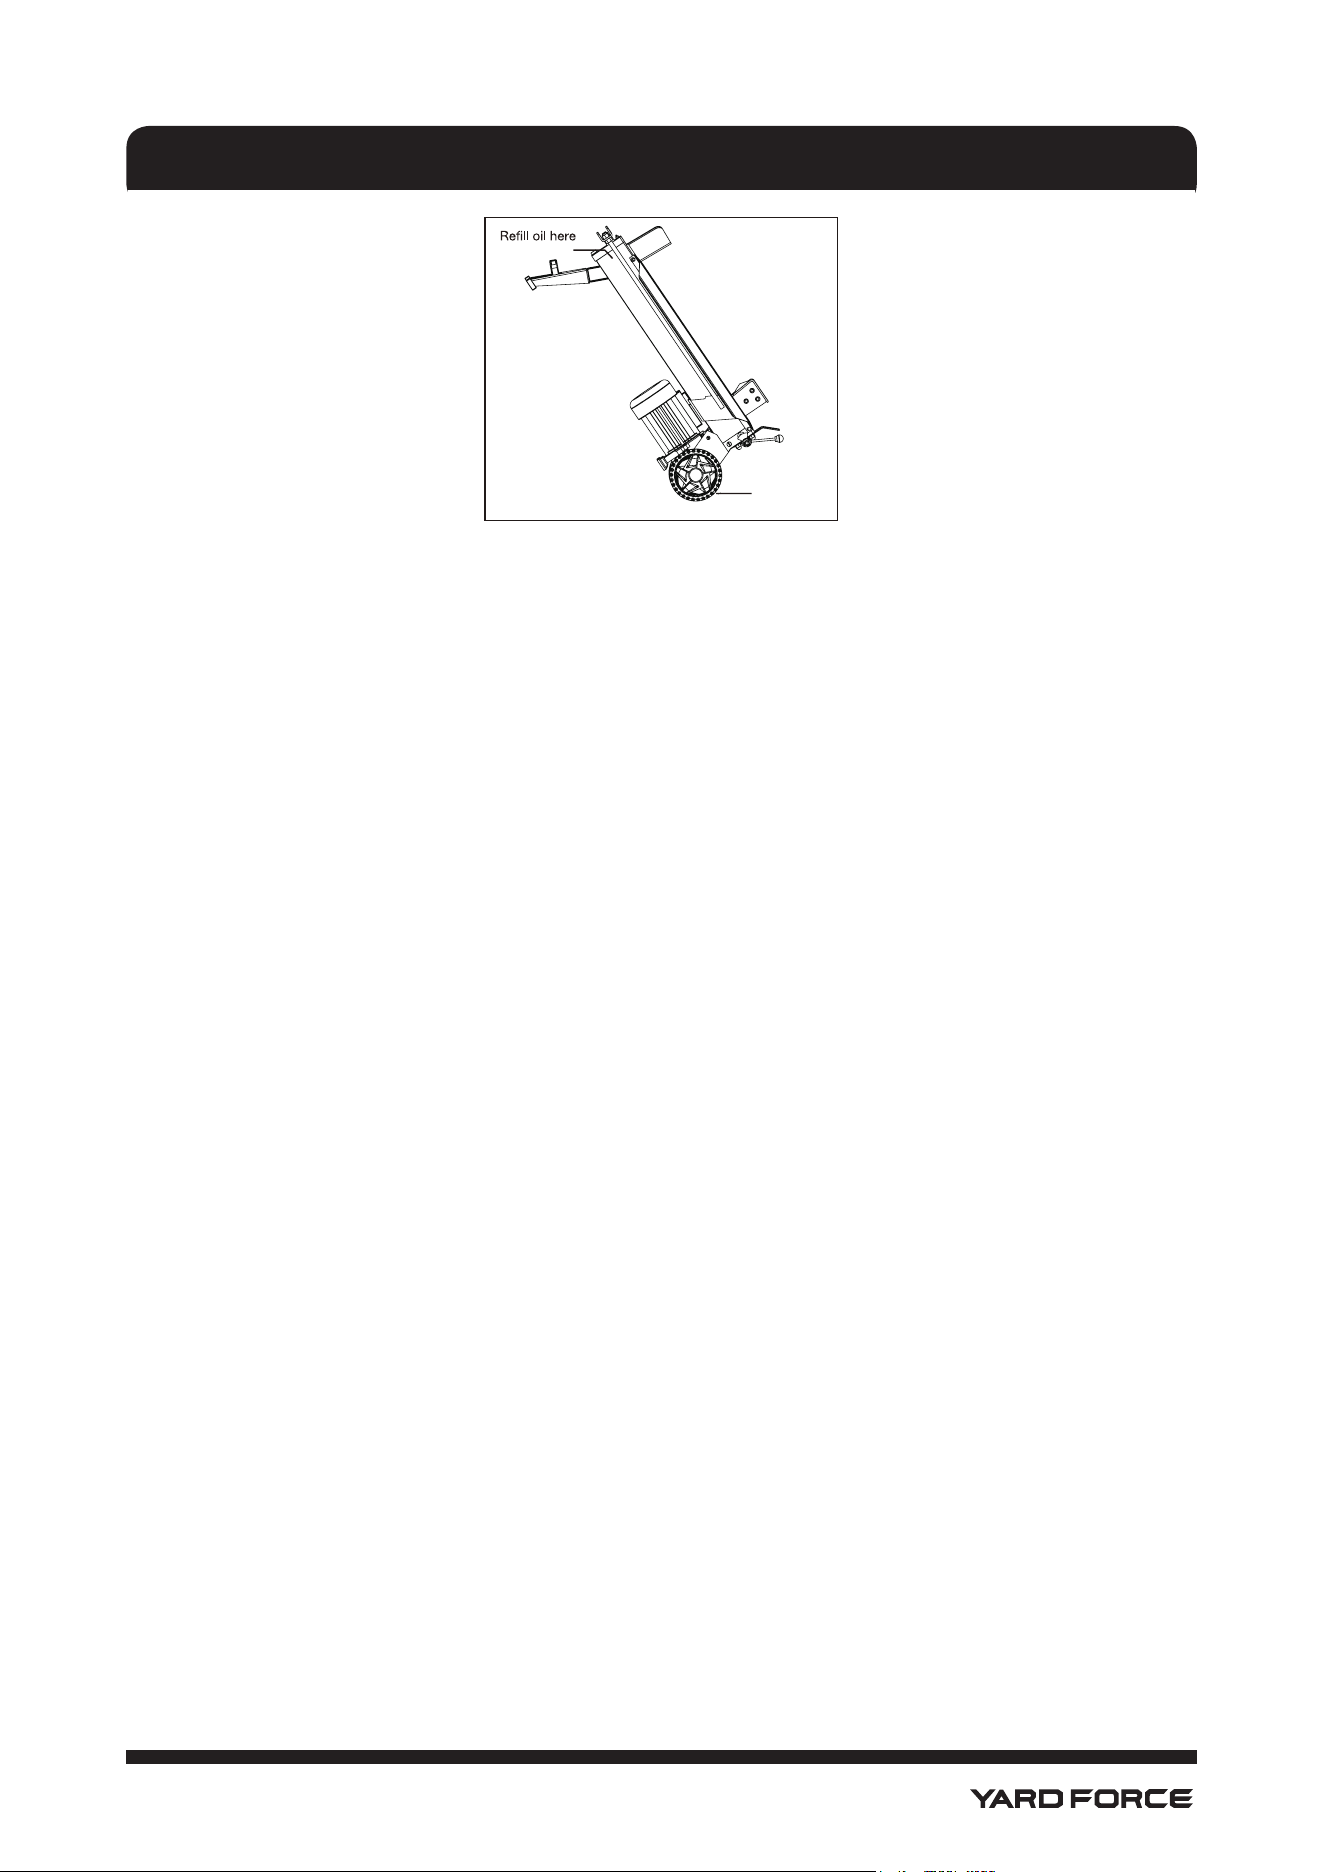
4. Turn the log splitter and let it stand on the rear wheels, and rell the hydraulic oil into the hole behind the
oil drain bolt with dipstick (Fig. 9).
5. Clean the oil drain bolt before thread it back in. Make sure it is tightened to avoid leakage before place
the log splitter horizontally.
MAINTENANCE AND STOARGE
17
1-866-902-9690
Rear wheel
Fig. 9
STORAGE
• Before storing, make sure the log splitter is clean and dry. Such upkeep is necessary to ensure years of
trouble-free performance.
• Lightly lubricate all metal surfaces before storing.
• Store the machine in a secure location that children cannot access. Store the machine in a dry
environment. The machine can be transported or stored in the ambient temperature between 77°F –
131°F (25°C – 55°C). Examine the log splitter thoroughly for worn, loose, or damaged parts.
MAINTENANCE AND STOARGE

18
1-866-902-9690
TROUBLESHOOTING
Problem Possible Causes Recommended Remedy
Motor does not run
Overload protection device
disengaged to protect the log splitter
from being damaged
Switch off the motor and unplug the
power cable. Let motor cool down
for half an hour and restart. If this
does not solve the problem, call
customer support.
The machine fails
to split logs
Log is improperly positioned
The sizes or hardness of the log
exceeds the capacity of the machine
Wedge cutting edge is blunt
Oil leaks Unauthorized adjust- ment
was made on Max. Pressure Limiting
Screw. Lower max pressure rating
was set.
Refer to Operation section for log
loading.
Reduce the log size before splitting
Refer to the maintenance section for
sharpening the wedge.
Locate leak(s). Contact the dealer.
Contact Authorized Service Center
The log pusher moves jerkily,
generating unusual noise or
vibrating a lot
Unit is not placed on level ground.
Lack of hydraulic oil.
Excessive air in the hydraulic system.
Log is too hard for splitter.
Reposition the log splitter to ensure
that the wheel end of the unit is no
higher than the other end.
Check oil level for possible oil
relling.
Ensure vent plug is loose during
operation.
Turn off and restart the unit.
Oil leaks around the ram or
from other points.
Air sealed in hydraulic system while
operating.
Bleed screw is not tightened before
moving the log splitter.
Oil drain bolt with dipstick is not
tightened.
Hydraulic control valve assembly
and/or seal(s) is worn.
Loosen bleed screw by 3 ~ 4
rotations before operating the log
splitter.
Tighten the bleed screw up before
moving the log splitter.
Tighten the oil drain bolt with
dipstick.

19
1-866-902-9690
USA WARRANTY
YARD FORCE LIMITED WARRANTY
Product Warranty
Please keep your original purchase receipt in a safe place as proof of purchase. Warranty coverage for
This product must be veried by the original purchase receipt. The warranty period begins on the day the
product was purchased from an authorized retailer of Yard Force products. Warranty coverage
only applies to the original purchaser and is not transferable. Warranty coverage is only provided on
products purchased and used in the USA and Puerto Rico from authorized Yard Force retailers. Products
purchased or used outside of the USA and Puerto Rico are not covered by this warranty.
(2) Two-Year Warranty - Log Splitter
(1) One-Year Warranty - Hydraulic System Components
The YF15LS has a Two-Year Limited Warranty and hydraulic system components have a One-Year Limited
Warranty from the date of purchase against manufacturer defects for residential use only. Commercial
use voids the warranty. This warranty does not cover accidental damage, unreasonable use, normal wear
and tear, neglect or non-compliance with the Operating, Safety and Maintenance Instructions. All service,
outside of normal maintenance as described in this manual, must be done by an authorized service
technician. Any unauthorized service or changes to the original conguration of this product will void the
warranty. All parts and accessories used on and with this product must be manufacturer/or and authorized
by Merotec Inc.
(90) Ninety-Day Warranty – Accessories
The accessories included with the YF15LS; are warranted against manufacturer defects for residential use
only for a period of 90 days from date of purchase.
Warranty does not cover loss of use or other consequential damages arising from any of the above, nor
does it cover repairs made or attempted by unauthorized persons. This warranty is void if the product
is used for commercial, rental or industrial purposes. Certain parts, attachments and accessories are
subject to normal wear and tear and are excluded from the warranty.
Service and Warranty Claims Process
Contact the Yard Force Customer Service toll-free at (866) 902-9690 Monday-Friday between 8:30 AM
and 5:00 PM Eastern Time for service and warranty support.
Yard Force USA Service Support agents can help you troubleshoot problems over the phone to get
you back up and running as quickly as possible. In the situation where service or warranty inspection is
needed, please follow these steps:
1. Contact Yard Force Customer Service at (866) 902-9690 or [email protected] Monday-
Friday between 8:30 AM and 5:00 PM Eastern Time.
2. Send in proof-of-purchase and serial number (if applicable) to conrm warranty coverage.
3. If service or a warranty evaluation is requested, Yard Force USA will provide an RGA number that should
be used in all communications with Yard Force USA and if necessary, a list of local authorized service
centers to bring your lawn mower to for evaluation and repair.
4. All shipments to Yard Force USA must have an RGA number. Any shipment received that does not have
an RGA number clearly marked on the outside of the box will be refused.
5. All shipments must be sent pre-paid; Yard Force USA does not pay for any shipping or transportation
costs for service or warranty evaluation. Yard Force USA is not responsible for any packages that are
lost by carrier. We recommend that shipments are made by a carrier that provides tracking and delivery
conrmation.
For more information or to ask questions, please call toll-free (866) 902-9690 or [email protected]
Monday-Friday between 8:30 AM and 5:00 PM Eastern Time.
WARRANTY

20
1-866-902-9690
WARRANTY
CANADA WARRANTY
YARD FORCE LIMITED WARRANTY
Product Warranty
Please keep your original purchase receipt in a safe place as proof of purchase. Warranty coverage for
This product must be veried by the original purchase receipt. The warranty period begins on the day the
product was purchased from an authorized retailer of Yard Force products. Warranty coverage
only applies to the original purchaser and is not transferable. Warranty coverage is only provided on
products purchased and used in Canada from authorized Yard Force retailers. Products
purchased or used outside of Canada are not covered by this warranty.
(2) Two-Year Warranty - Log Splitter
(1) One-Year Warranty - Hydraulic System Components
The YF15LS has a Two-Year Limited Warranty and hydraulic system components have a One-Year Limited
Warranty from the date of purchase against manufacturer defects for residential use only. Commercial
use voids the warranty. This warranty does not cover accidental damage, unreasonable use, normal wear
and tear, neglect or non-compliance with the Operating, Safety and Maintenance Instructions. All service,
outside of normal maintenance as described in this manual, must be done by an authorized service
technician. Any unauthorized service or changes to the original conguration of this product will void the
warranty. All parts and accessories used on and with this product must be manufacturer/or and authorized
by Merotec Inc.
(90) Ninety-Day Warranty – Accessories
The accessories included with the YF15LS; are warranted against manufacturer defects for residential use
only for a period of 90 days from date of purchase.
Warranty does not cover loss of use or other consequential damages arising from any of the above, nor
does it cover repairs made or attempted by unauthorized persons. This warranty is void if the product
is used for commercial, rental or industrial purposes. Certain parts, attachments and accessories are
subject to normal wear and tear and are excluded from the warranty.
Service and Warranty Claims Process
Contact the Yard Force Customer Service toll-free at 1-833-818-4111 Monday - Friday between 8:30 AM
and 4:30 PM Eastern Time for service and warranty support.
Yard Force Service Support agents can help you troubleshoot problems over the phone to get
you back up and running as quickly as possible. In the situation where service or warranty inspection is
needed, please follow these steps:
1. Contact Yard Force Customer Service at 1-833-818-4111 Monday - Friday between 8:30 AM and 4:30
PM Eastern Time.
2. Send in proof-of-purchase and serial number (if applicable) to conrm warranty coverage.
3. If service or a warranty evaluation is requested, Yard Force will provide an RGA number that should be
used in all communications with Yard Force and if necessary, a list of local authorized service centers to
bring your lawn mower to for evaluation and repair.
4. All shipments to Yard Force must have an RGA number. Any shipment received that does not have an
RGA number clearly marked on the outside of the box will be refused.
5. All shipments must be sent pre-paid; Yard Force does not pay for any shipping or transportation costs
for service or warranty evaluation. Yard Force is not responsible for any packages that are lost by carrier.
We recommend that shipments are made by a carrier that provides tracking and delivery conrmation.
For more information or to ask questions, please call toll-free 1-833-818-4111 or support@merotecusa.
com Monday - Friday between 8:30 AM and 4:30 PM ET.

www.YardForceUSA.com
1-866-902-9690 (US)
1-833-818-4111 (CA)
Scan Code to connect with Yard Force Support
Need Help?
Please do not return the product to your place of purchase yet. We’re here to help and take care
of all your needs.
Contact our customer service department for help with:
• Product assembly or use
• Missing or damaged parts
• Troubleshooting
• Replacement parts and accessories
You can submit a support request by scanning the QR code on this page, or by visiting:
www.YardForceUSA.com/contact-support
Register your product today to maintain warranty coverage and stay up to date with
information on the use, care, maintenance and service of your product.
Register online today at:
www.yardforceusa.com/product-registration
Merotec Inc.
3655 Kennesaw North Industrial Parkway
Kennesaw, GA 3014
4
Copyright © 2023 Merotec Inc.
Made in China
Part Number: YF15LS-MAN-A
2301