1
Regulatory Information
The following additional information is provided in compliance with U.S. Food and Drug Administration
(FDA) regulations:
WARNING: If you are younger than 18, do not use this.
You should go to a doctor, preferably an ear-nose-throat doctor (an ENT), because your condition needs
specialized care. Over-the-counter hearing aids are only for users who are 18 or older.
This OTC hearing aid is for users who are 18 and older. People who are younger than 18 with hearing loss should
see a doctor, preferably an ENT, because they may need medical testing and management. Hearing loss can
affect speech and learning, so professional fitting and continuing care are also important.
Intended Use
Good Voice Nexus Hearing Aids are designed to enhance and deliver sound directly to the ear, addressing mild to
moderate hearing loss in individuals aged 18 and above. No prior programming or hearing assessment is
required. These aids are intended for use independently, without the need for hearing care professional’s
assistance.

2
WARNING: When to See a Doctor
If you have any of the problems listed below, please see a doctor, preferably an ear nose throat doctor (an ENT).
• Your ear has a birth defect or an unusual shape. Your ear was injured or deformed in an accident.
• You saw blood, pus, or fluid coming out of your ear in the past 6 months
• You ear feels painful or uncomfortable
• You have a lot of ear wax, or you think something could be in your ear
• You get really dizzy or have a feeling of spinning or swaying (called vertigo)
• Your hearing changed suddenly in the past 6 months
• Your hearing changes: it gets worse then gets better again
• You have worse hearing in one ear
• You hear ringing or buzzing in only one ear
WARNING: This hearing aid should not cause pain when inserting it.
Remove this device from your ear if it causes pain or discomfort when you insert or place it. To try again, make
sure to follow the instructions. If you feel pain or discomfort again, contact the manufacturer. If your pain or
discomfort does not go away, contact your hearing healthcare professional. You can also report this to FDA as an
adverse event according to the instructions that appear later.
Caution: This is not hearing protection.

3
You should remove this device if you experience overly loud sounds, whether short or long-lasting. If you’re in a
loud place, you should use the right kind of hearing protection instead of wearing this device. In general, if you
would use ear plugs in a loud place, you should remove this device and use ear plugs.
Caution: The sound output should not be uncomfortable or painful.
You should turn down the volume or remove the device if the sound output is uncomfortably loud or painful. If
you consistently need to turn the volume down, you may need to further adjust your device.
Caution: You might need medical help if a piece gets stuck in your ear.
If any part of your hearing aid, like the eartip (dome), gets stuck in your ear, and you can’t easily remove it with
your fingers, get medical help as soon as you can. You should not try to use tweezers or cotton swabs because
they can push the part farther into your ear, injuring your eardrum or ear canal, possibly seriously.
Note: If you remain concerned, consult a professional
If you try this device and continue to struggle with or remain concerned about your hearing, you should consult
with a hearing healthcare professional.
Note: What you might expect when you start using a hearing aid
A hearing aid can benefit many people with hearing loss. However, you should know it will not restore normal
hearing, and you may still have some difficulty hearing over noise. Further, a hearing aid will not prevent or
improve a medical condition that causes hearing loss.

4
People who start using hearing aids sometimes need a few weeks to get used to them. Similarly, many people
find that training or counseling can help them get more out of their devices.
If you have hearing loss in both ears, you might get more out of using hearing aids in both, especially in situations
that make you tired from listening—for example, noisy environments.
Note: Tell FDA about injuries, malfunctions, or other adverse events.
To report a problem involving your hearing aid, you should submit information to FDA as soon as possible after
the problem. FDA calls them “adverse events,” and they might include: skin irritation in your ear, injury from the
device (like cuts or scratches, or burns from an overheated battery), pieces of the device getting stuck in your
ear, suddenly worsening hearing loss from using the device, etc.
Instructions for reporting are available at https://www.fda.gov/Safety/MedWatch, or call 1-800-FDA-1088.
You can also download a form to mail to FDA.
Possible Side Effects
You may experience minor itchiness, redness, or irritation as your ear adjusts to having an object in it. If these or
any related symptoms occur, please see the back page for full contact details. Should you experience an allergic
reaction, inflammation, ear discharge, excessive wax buildup, or any other unusual conditions, seek medical
help from a physician.

5
Table of Contents:
Regulatory Information ..................................................................................................................................................................... 1
Intended Use ...................................................................................................................................................................................... 1
Table of Contents: .............................................................................................................................................................................. 5
Welcome ............................................................................................................................................................................................. 8
Important Guidelines for Optimal Performance .............................................................................................................................. 8
Operating Principle .......................................................................................................................................................................... 10
Getting to Know Your Good Voice Nexus ....................................................................................................................................... 11
Included Accessories ...................................................................................................................................................................... 13
Care and Maintenance Guidelines .................................................................................................................................................. 14
Instruction for Product Use ............................................................................................................................................................. 16
Getting the Right Fit with Earbuds and Ear tips ............................................................................................................................. 17
Device Setting .................................................................................................................................................................................. 20
Choose Display style................................................................................................................................................................. 20
Adjust the Screen Orientation .................................................................................................................................................. 20
Set the date display format. ..................................................................................................................................................... 21
Adjust screen brightness .......................................................................................................................................................... 22

6
Set the date and time ............................................................................................................................................................... 23
Microphone-input selection ..................................................................................................................................................... 24
Device Control .................................................................................................................................................................................. 25
Adjust the Volume .................................................................................................................................................................... 25
Activate Noise Reduction Level ............................................................................................................................................... 26
Power Off the Watch (Controller) ............................................................................................................................................ 27
Bluetooth Devices Pairing Instructions................................................................................................................................... 28
Audio Streaming Bluetooth Devices ........................................................................................................................................ 29
Answering Phone Calls ............................................................................................................................................................. 30
Daily Use of the Hearing Aids .......................................................................................................................................................... 31
Charging Instructions ...................................................................................................................................................................... 32
Charging Your Watch (Controller) ............................................................................................................................................ 32
Charging Your Bluetooth Earbuds ........................................................................................................................................... 34
Troubleshooting Guide .................................................................................................................................................................... 36
Symbol Information ......................................................................................................................................................................... 41
Wireless Technical Description ...................................................................................................................................................... 43
Technical Specifications .................................................................................................................................................................. 45
FCC Warning Statement .................................................................................................................................................................. 48

7
Manufacturer Information............................................................................................................................................................... 49
Service and Warranty ...................................................................................................................................................................... 49
General Warranty Information: ............................................................................................................................................... 49
Warranty Period and Coverage: ............................................................................................................................................... 50
Customer Responsibilities: ...................................................................................................................................................... 50
How to Claim Warranty Service: .............................................................................................................................................. 51
Out-of-Warranty Cases: ........................................................................................................................................................... 51
Your Warranty Information ...................................................................................................................................................... 52
Contact Details ................................................................................................................................................................................. 52

8
Welcome
Thank You for Choosing Good Voice Nexus Hearing Aid. We appreciate your purchase as a greater step
toward hearing what MATTERS.
Please thoroughly review this manual before using your Good Voice Nexus Hearing Aid. It contains important
information on product features, safety precautions, and regulatory guidelines. Similar to trying on any new
devices, it may take some time to get used to the Good Voice Nexus Hearing Aid.
Important: Please retain this manual for future reference. If you have any questions, please see the back page
for full contact details. Follow the safety information to avoid damage or injury.
Important Guidelines for Optimal Performance
Ensure the earbuds fit securely and comfortably in your ears. Improper fitting may result in discomfort or
reduced performance. Gradually increase the volume to a comfortable level to avoid discomfort.
Regularly clean or replace the ear tips as instructed to maintain optimal functionality. Accumulation of
earwax or residue may cause irritation or impair performance.
To ensure the best performance of your Good Voice Nexus use only authentic Good Voice accessories
purchased from authorized dealers.

9
This hearing device is intended exclusively for individuals with hearing loss. It is not recommended for use
by individuals with normal hearing.
Remove the earbuds immediately if exposed to excessively loud sounds.
“Enhanced Noise Reduction Mode” reduces environmental sound awareness. Avoid using this mode
when full awareness of the user's surroundings is necessary
Consult your healthcare professional before using the device if you have an active implanted medical device
(e.g. pacemaker).
Avoid using the hearing devices or charger in areas with oxygen enrichment or a risk of explosion.
Protect the product from exposure to electromagnetic fields, humidity, smoke, direct sunlight, fire, and
extreme temperatures.
This devices complies with the IP54 rating, offering limited protection against dust and dripping water. It is
not fully waterproof, so avoid exposing it to water or immersing it in any liquid.
CAUTION: Please keep away from children and pets, because small parts may be inhaled or swallowed.
CAUTION: Please keep this device away from pets, pests, and children.
WARNING: The equipment not suitable for use in the presence of a flammable anesthetic mixture with air or
with oxygen or nitrous: Not AP or APG Category
WARNING: No modification of this equipment is allowed.

10
IMPORTANT: Accessory equipment connected to the analog and digital interfaces must be in compliance with
the respective nationally harmonized IEC standards (i.e. IEC 60950 for data processing equipment, IEC 60065
for video equipment, IEC 62368-1 for audio, video, information and communication technology, IEC 61010-1 for
laboratory equipment, and IEC 60601-1 for medical equipment.) Furthermore, all configurations shall comply
with the system standard IEC 60601-1. Everybody who connects additional equipment to the signal input part or
signal output part configures a medical system, and is therefore, responsible that the system complies with the
requirements of the system standard IEC 60601-1. The unit is for exclusive interconnection with IEC 60601-1
certified equipment in the patient environment and IEC 60XXX certified equipment outside of the patient
environment. If in doubt, consult the technical services department or your local representative.
Operating Principle
Good Voice Nexus hearing aid amplifies sounds to help users with mild to moderate hearing loss hear more
clearly.
The Watch (Controller) uses a built-in microphone to pick up sound, a digital signal processor (DSP) to analyze
and enhance speech while reducing unwanted noise, and a speaker (receiver) to deliver the amplified sound into
the ear by Bluetooth earbuds, allowing wireless audio streaming from compatible device
11
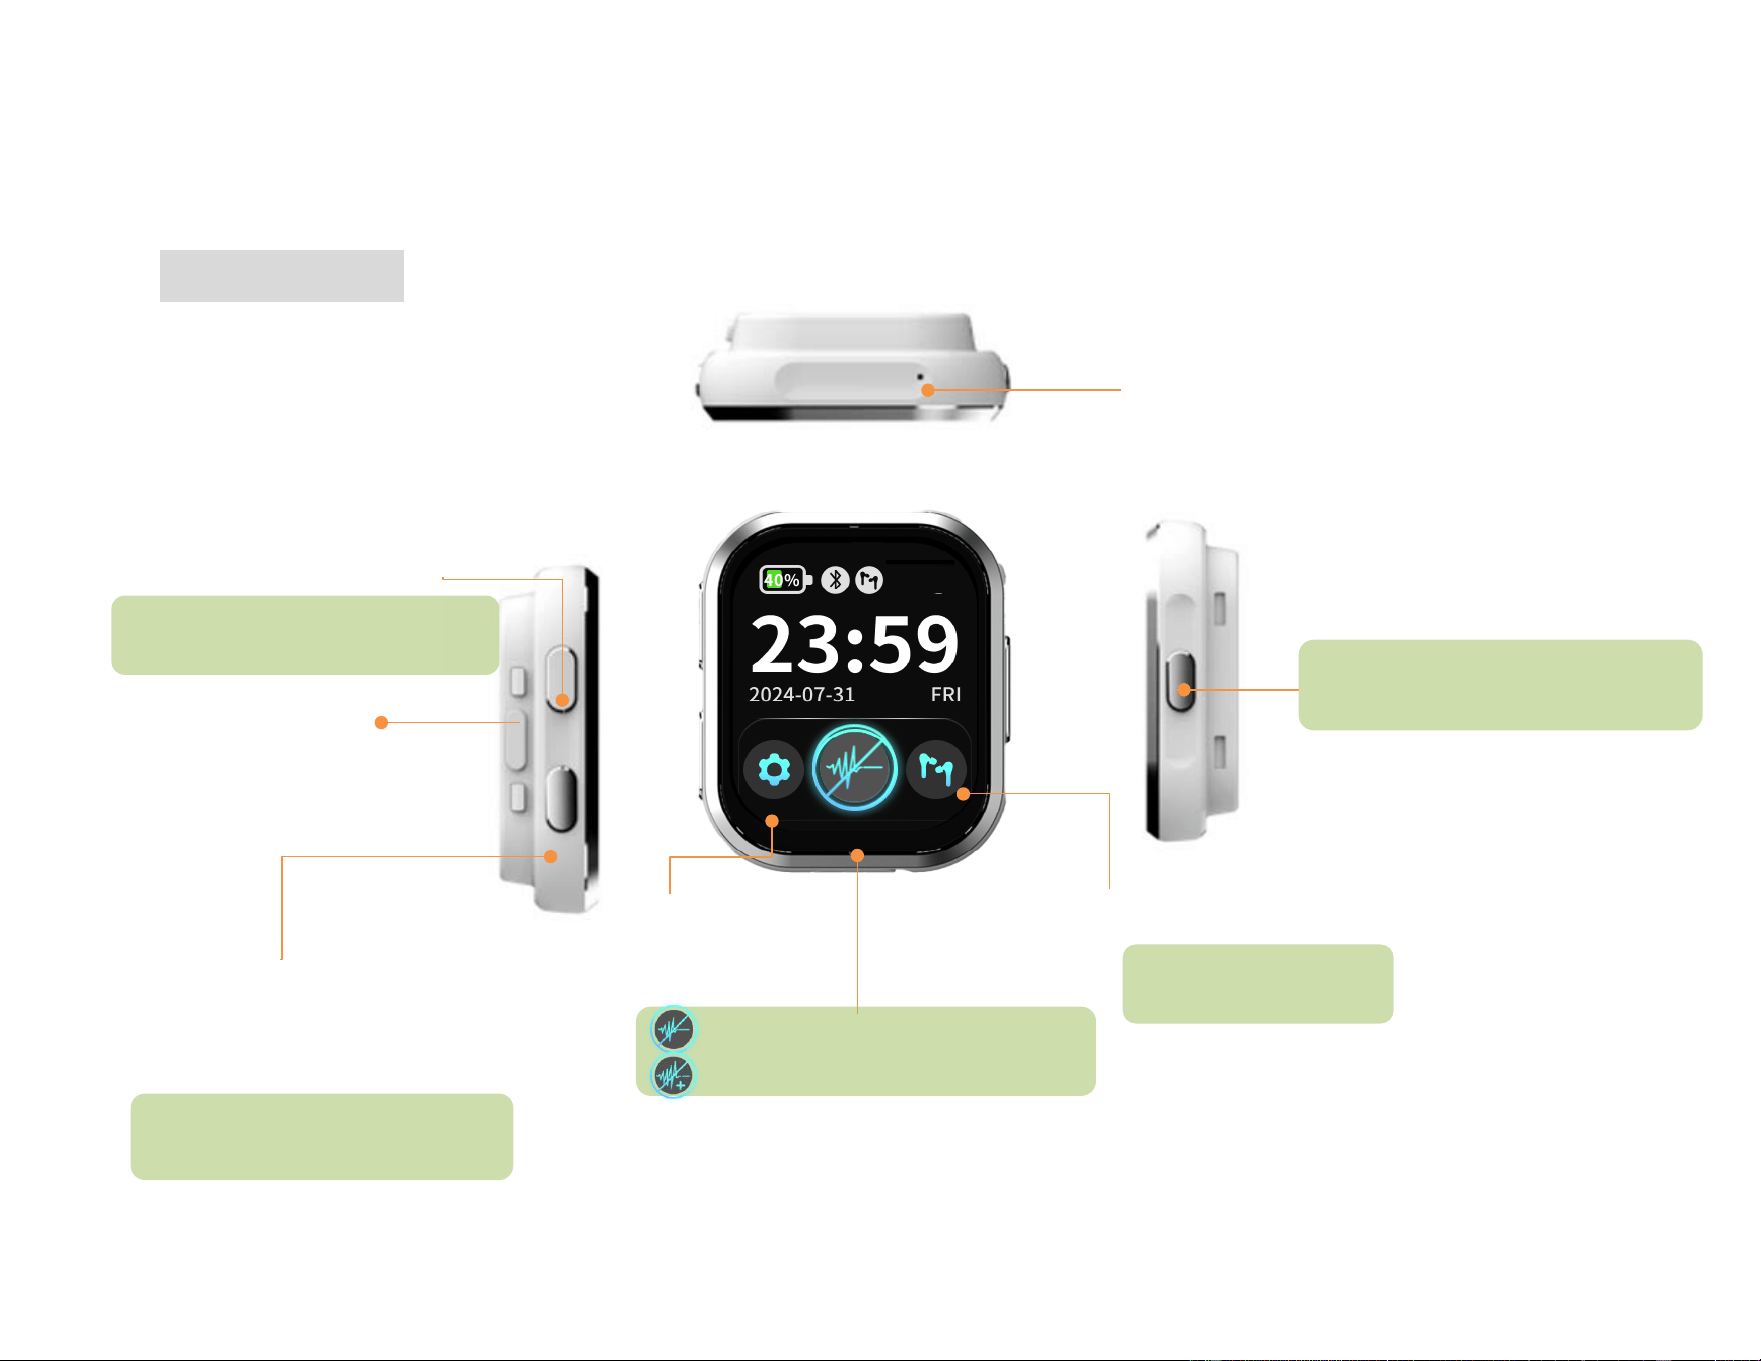
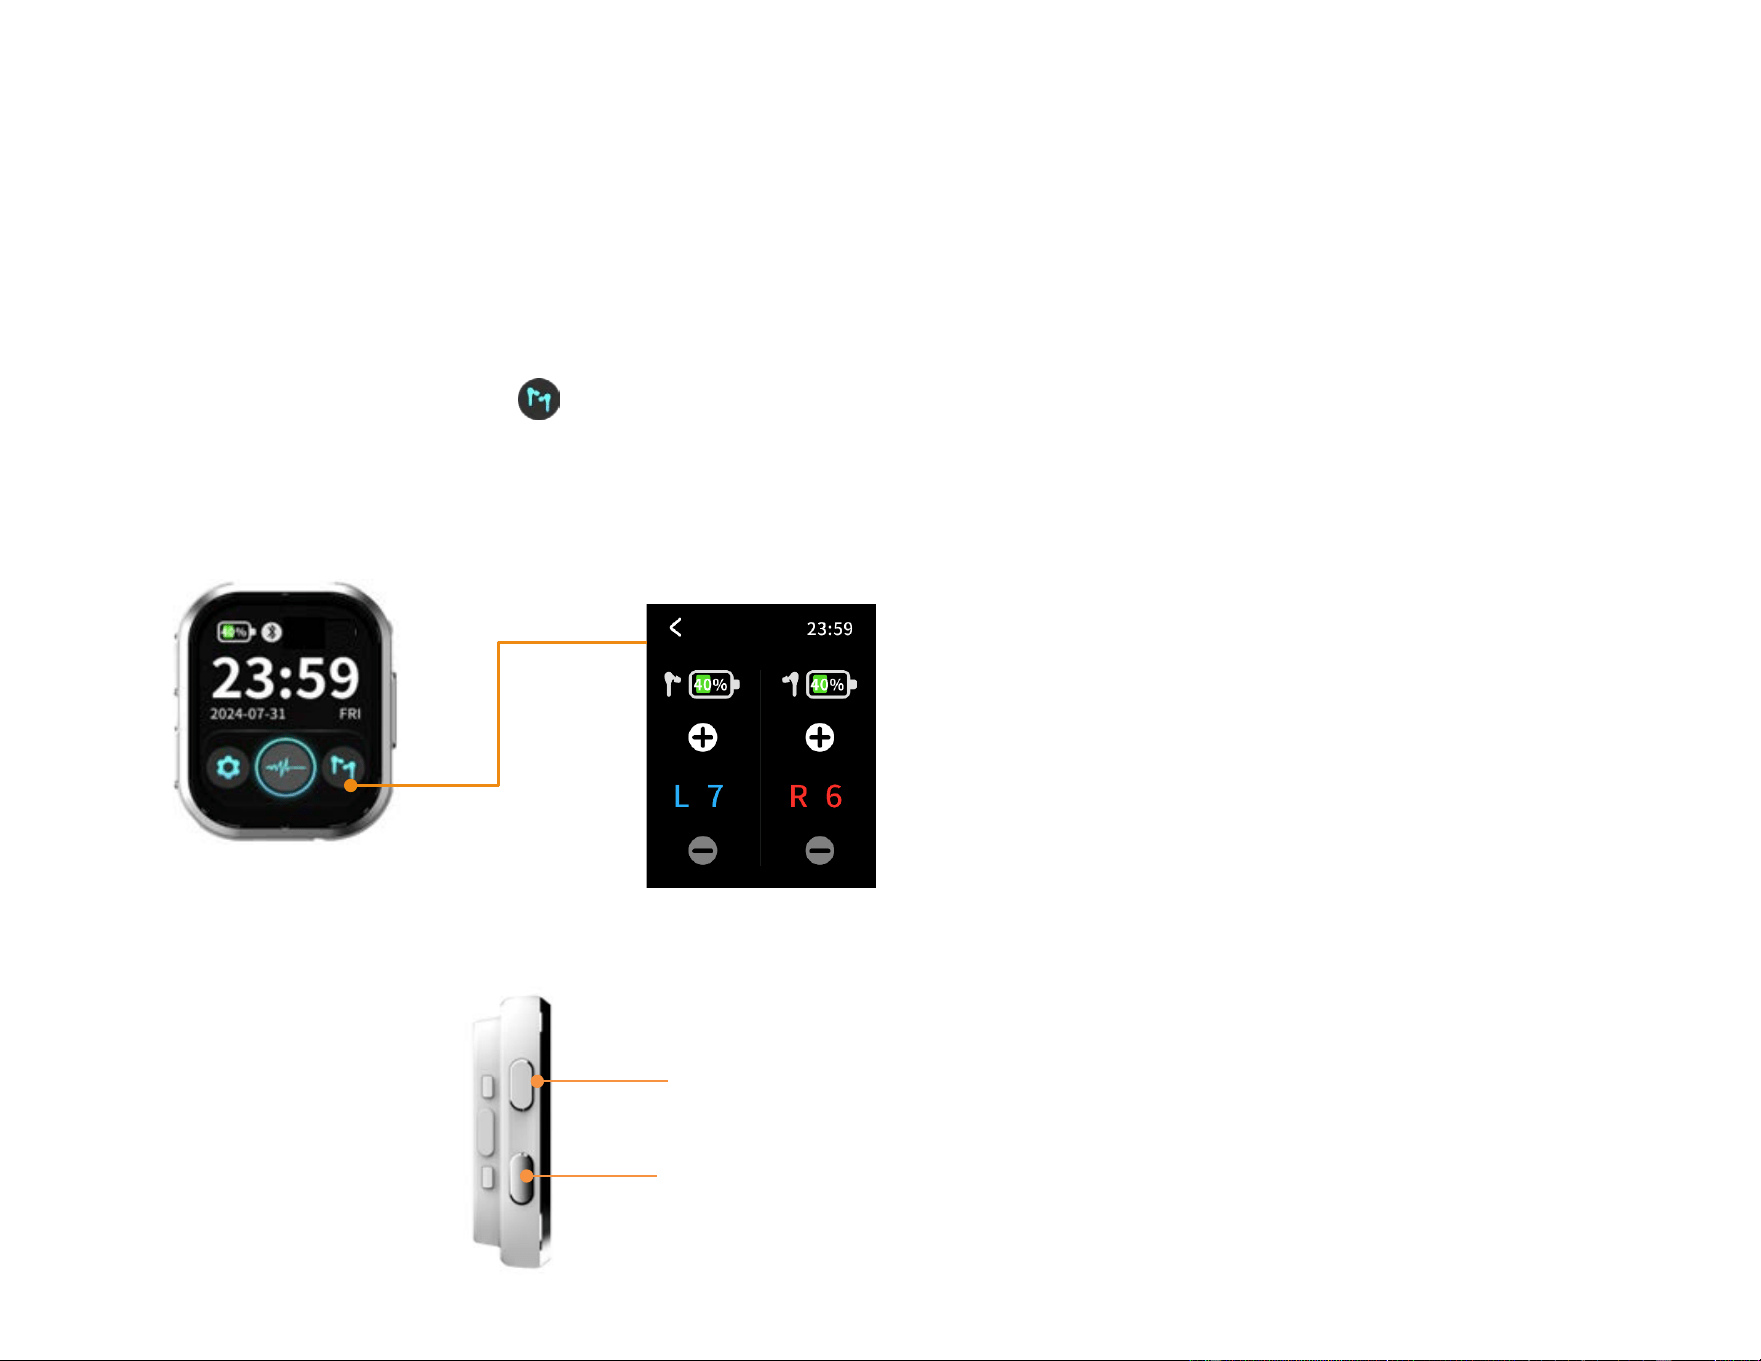
Safety lock
L/R volume adjustment
Touch to adjust left/right
volume independently.
Getting to Know Your Good Voice Nexus
Watch (Controller)
Volume up Button
Volume down Button
Press once to increase the volume of
both left and right ears by one level.
Press once to decrease the volume of
both left and right ears by one level.
Sound inlet
(Microphone)
Settings
Noise reduction
Standard Noise reduction mode
Enhanced Noice reductions mode
Power Button
Press and hold 2 seconds to power on
Press and hold 3 seconds to power off
12
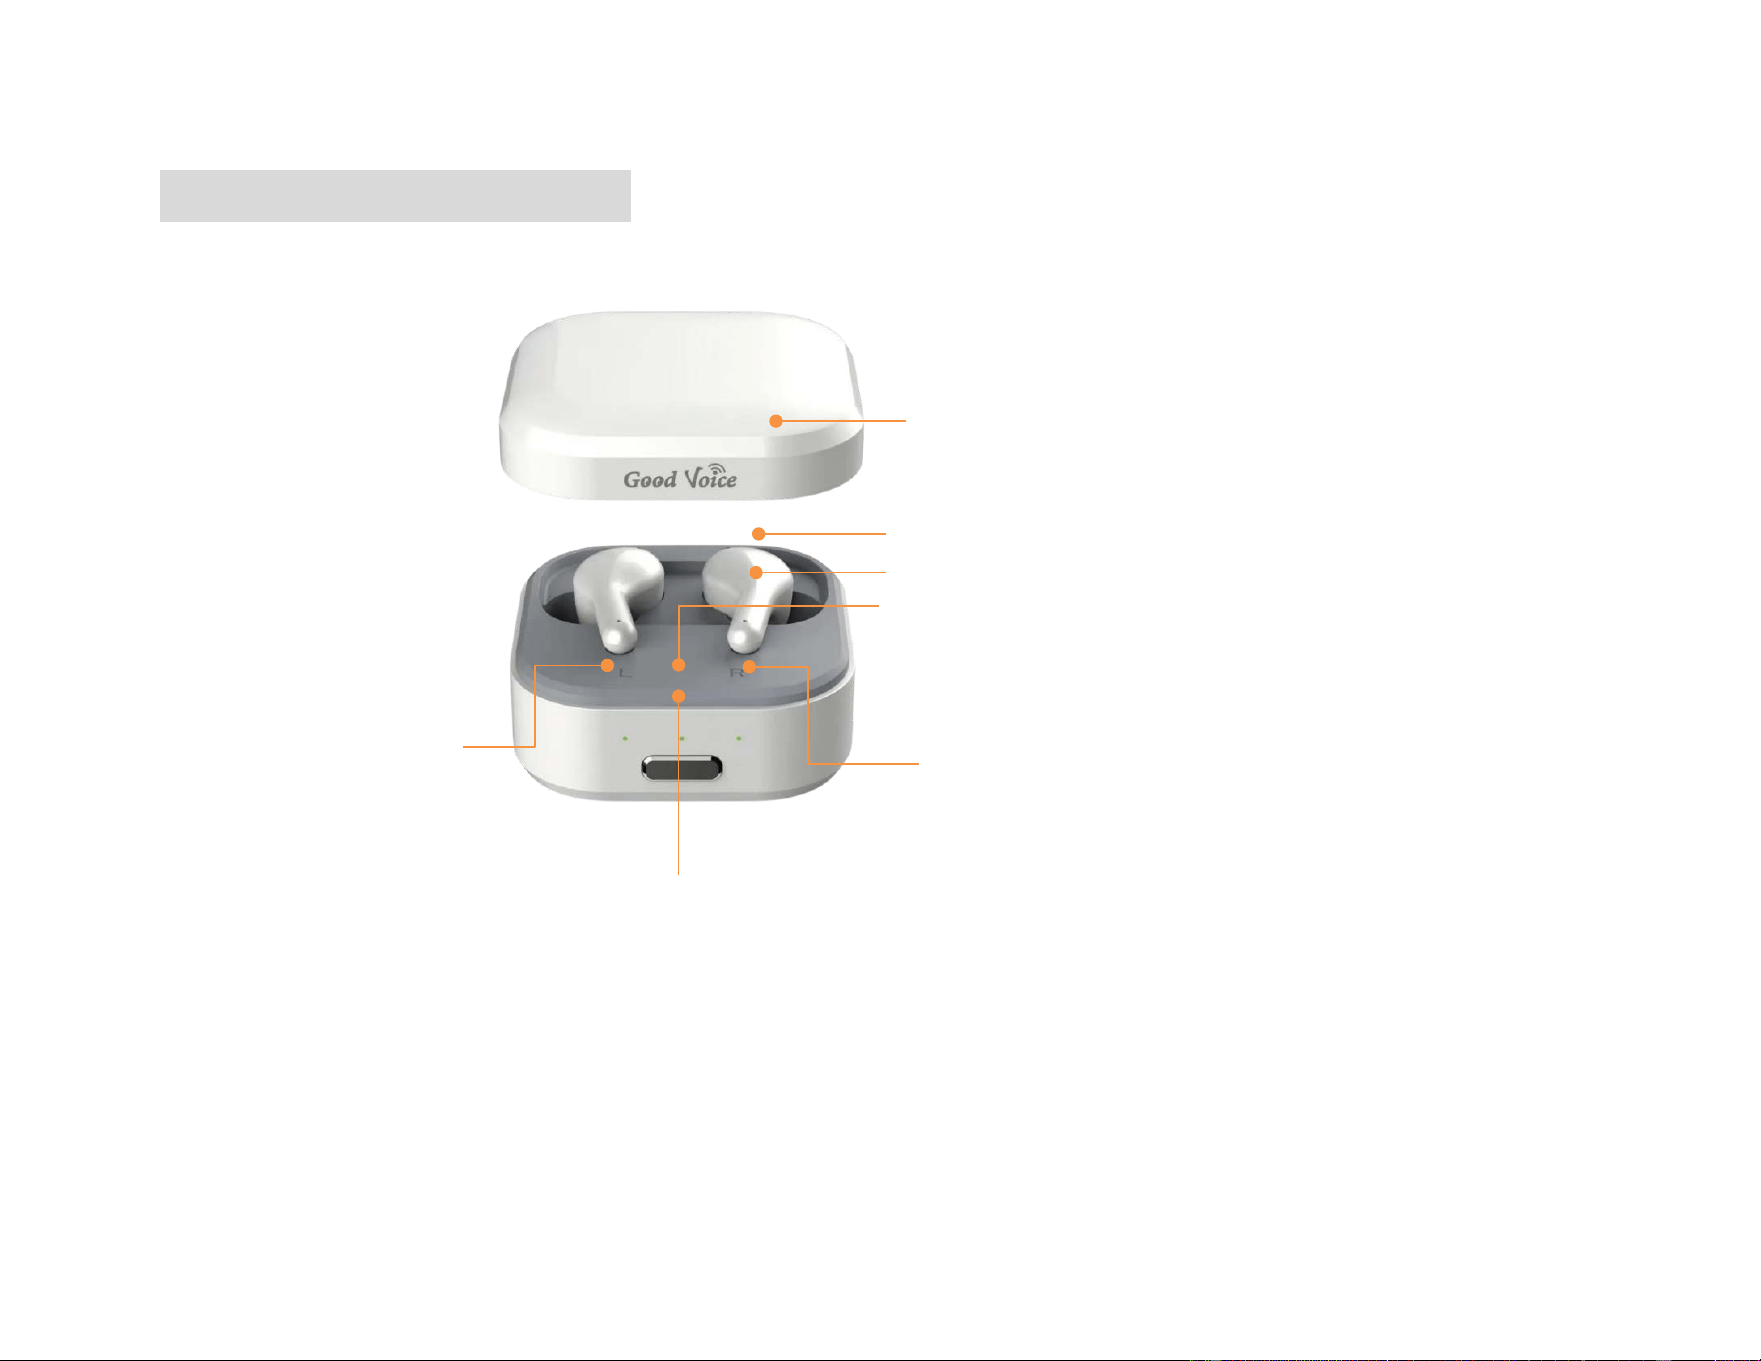
Bluetooth Earbuds (Model: HT-002)
Note: The included Bluetooth earbuds are exclusively designed for pairing with the Good Voice Nexus Watch
(Controller)
Lid
Right ear
battery status LED
Charging case battery
Status LED
Battery status button
Left ear
battery status LED
Touch area
Sound inlet (Microphone)
13
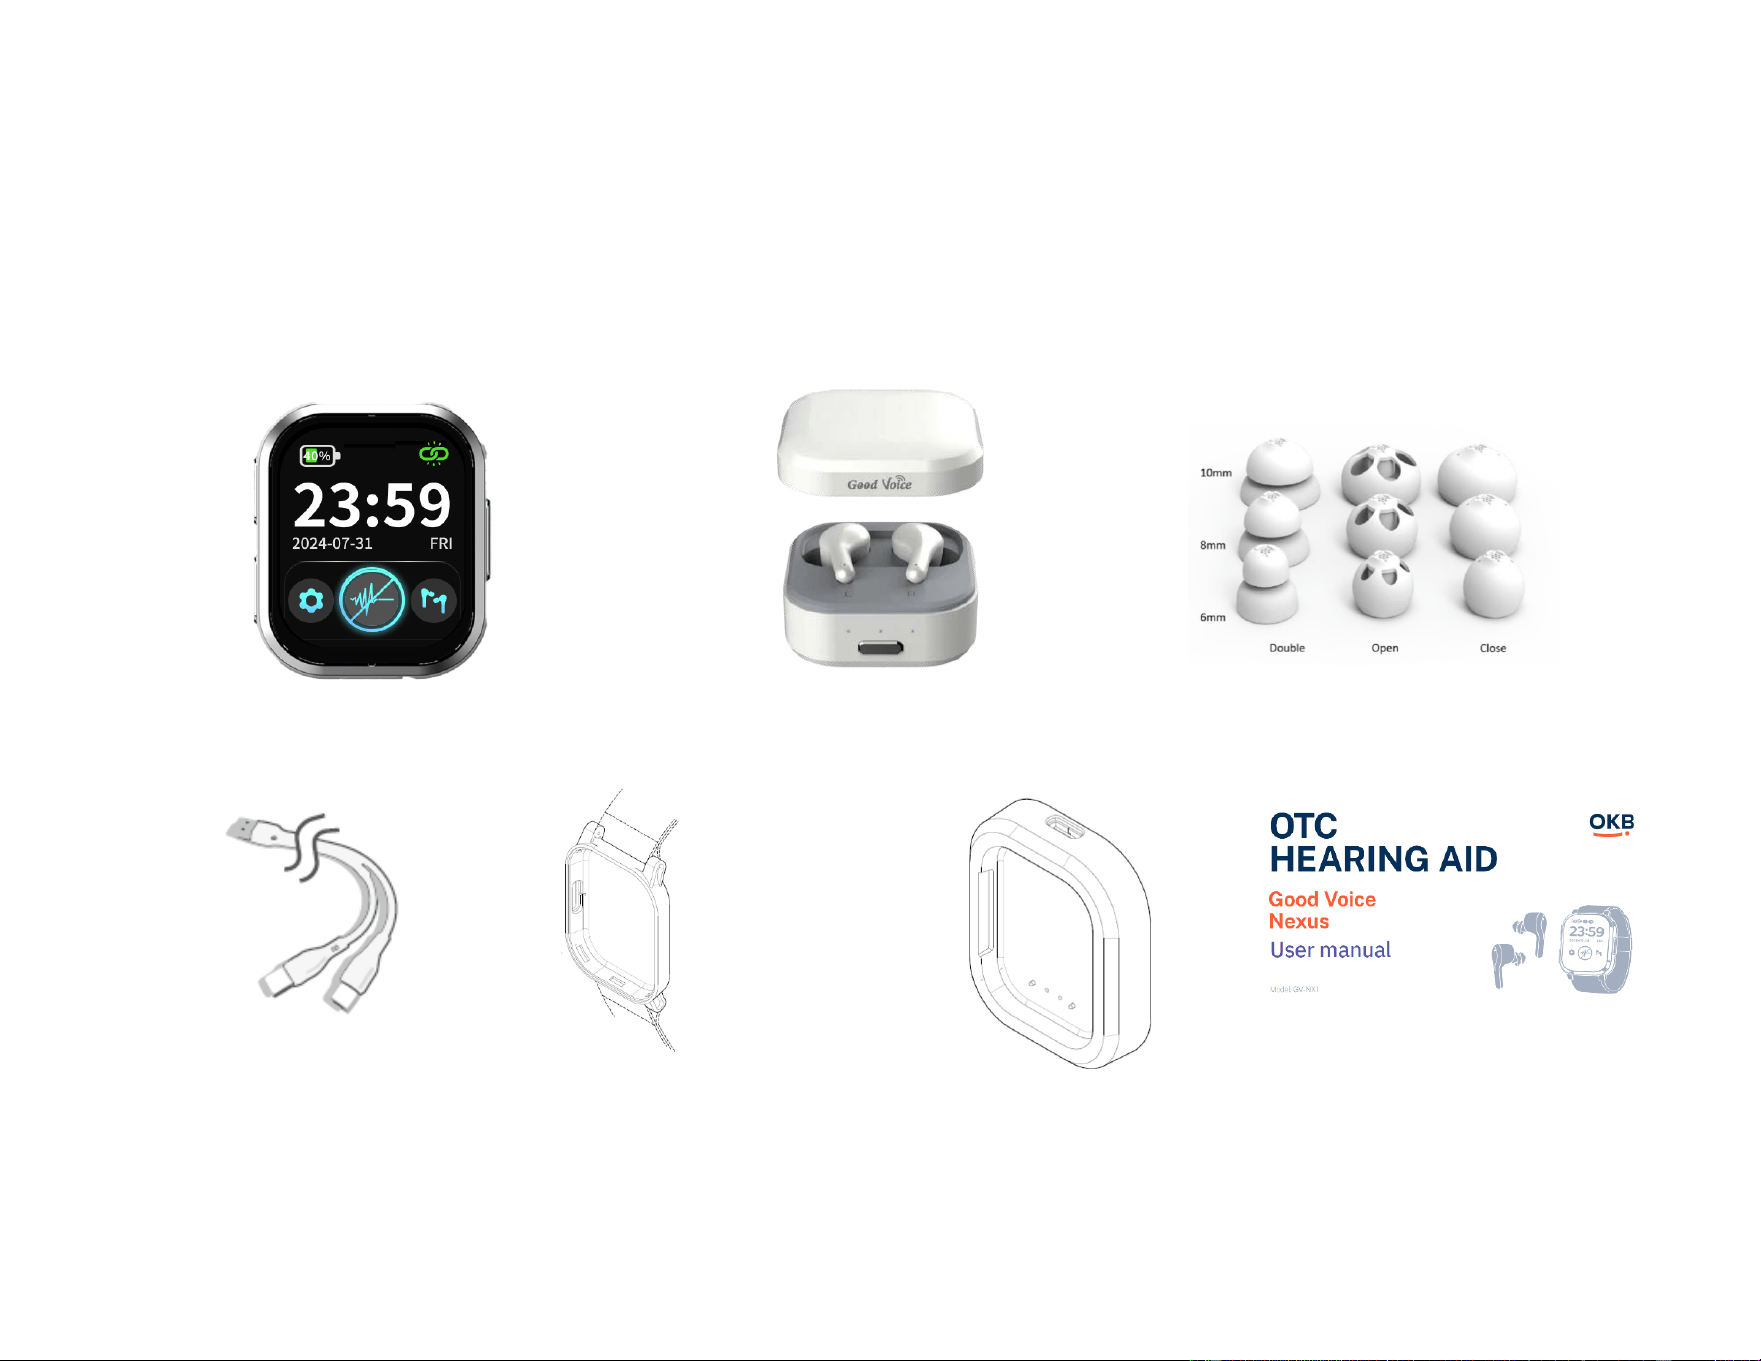
Included Accessories
Please ensure all the following items are included in the package. If any of the following accessories are missing,
please see the back page for full contact details.
Watch (Controller) Bluetooth Earbuds Replacement Ear Tips
Charging Cable Watch strap & strap holder Watch charger dock User Manual
(USB-A to Dual Type-C)

14
Care and Maintenance Guidelines
To maximize the life of your rechargeable hearing aid batteries, do not store the devices for extended periods
without recharging them. Recharge at least once every three months if it is not used.
● Avoid storing the hearing aids in extreme temperatures or harsh weather conditions to prevent battery
deterioration.
● Do not expose the hearing aids or charging case to sand, dust, or other fine particulates, as this may cause
permanent damage to the device.
● Store and charge your devices in a dry location. Prolonged exposure to moisture can harm the hearing aids
and charging case.
● Avoid using a hairdryer or other heating devices to dry the hearing aids as excessive heat may cause
damage.
● Clean the hearing aids as instructed to prevent earwax or residue buildup for maximum product
performance.
● To prevent a voided warranty, do not attempt to repair, disassemble, or modify the product.
● To Clean the Watch (Controller), Earbuds and Charging case: Wipe with a cloth lightly dampened with
water. Do not use alcohol for cleaning.
● It is recommended to clean the Watch (Controller), Earbuds and Charging case whenever visible dirt is
observed to maintain hygiene and proper function.
Battery Safety Warning
● The in-built lithium battery can only be replaced by the manufacturer or an authorized service provider.
● Replacement of batteries with an incorrect type that can defeat a safeguard, especially with some lithium
battery types.

15
● Disposal of batteries into fire or a hot oven, or mechanically crushing or cutting of a battery, that can result
in an explosion.
● Leaving batteries in an extremely high-temperature environment can result in an explosion or the leakage
of flammable liquid or gas.
● Batteries are subjected to extremely low air pressure that may result in an explosion or the leakage of
flammable liquid or gas.
CAUTION: Risk of fire or explosion
● Do not replace the battery with an incorrect type.
● Dispose of used batteries according to the instructions.
16
Instruction for Product Use
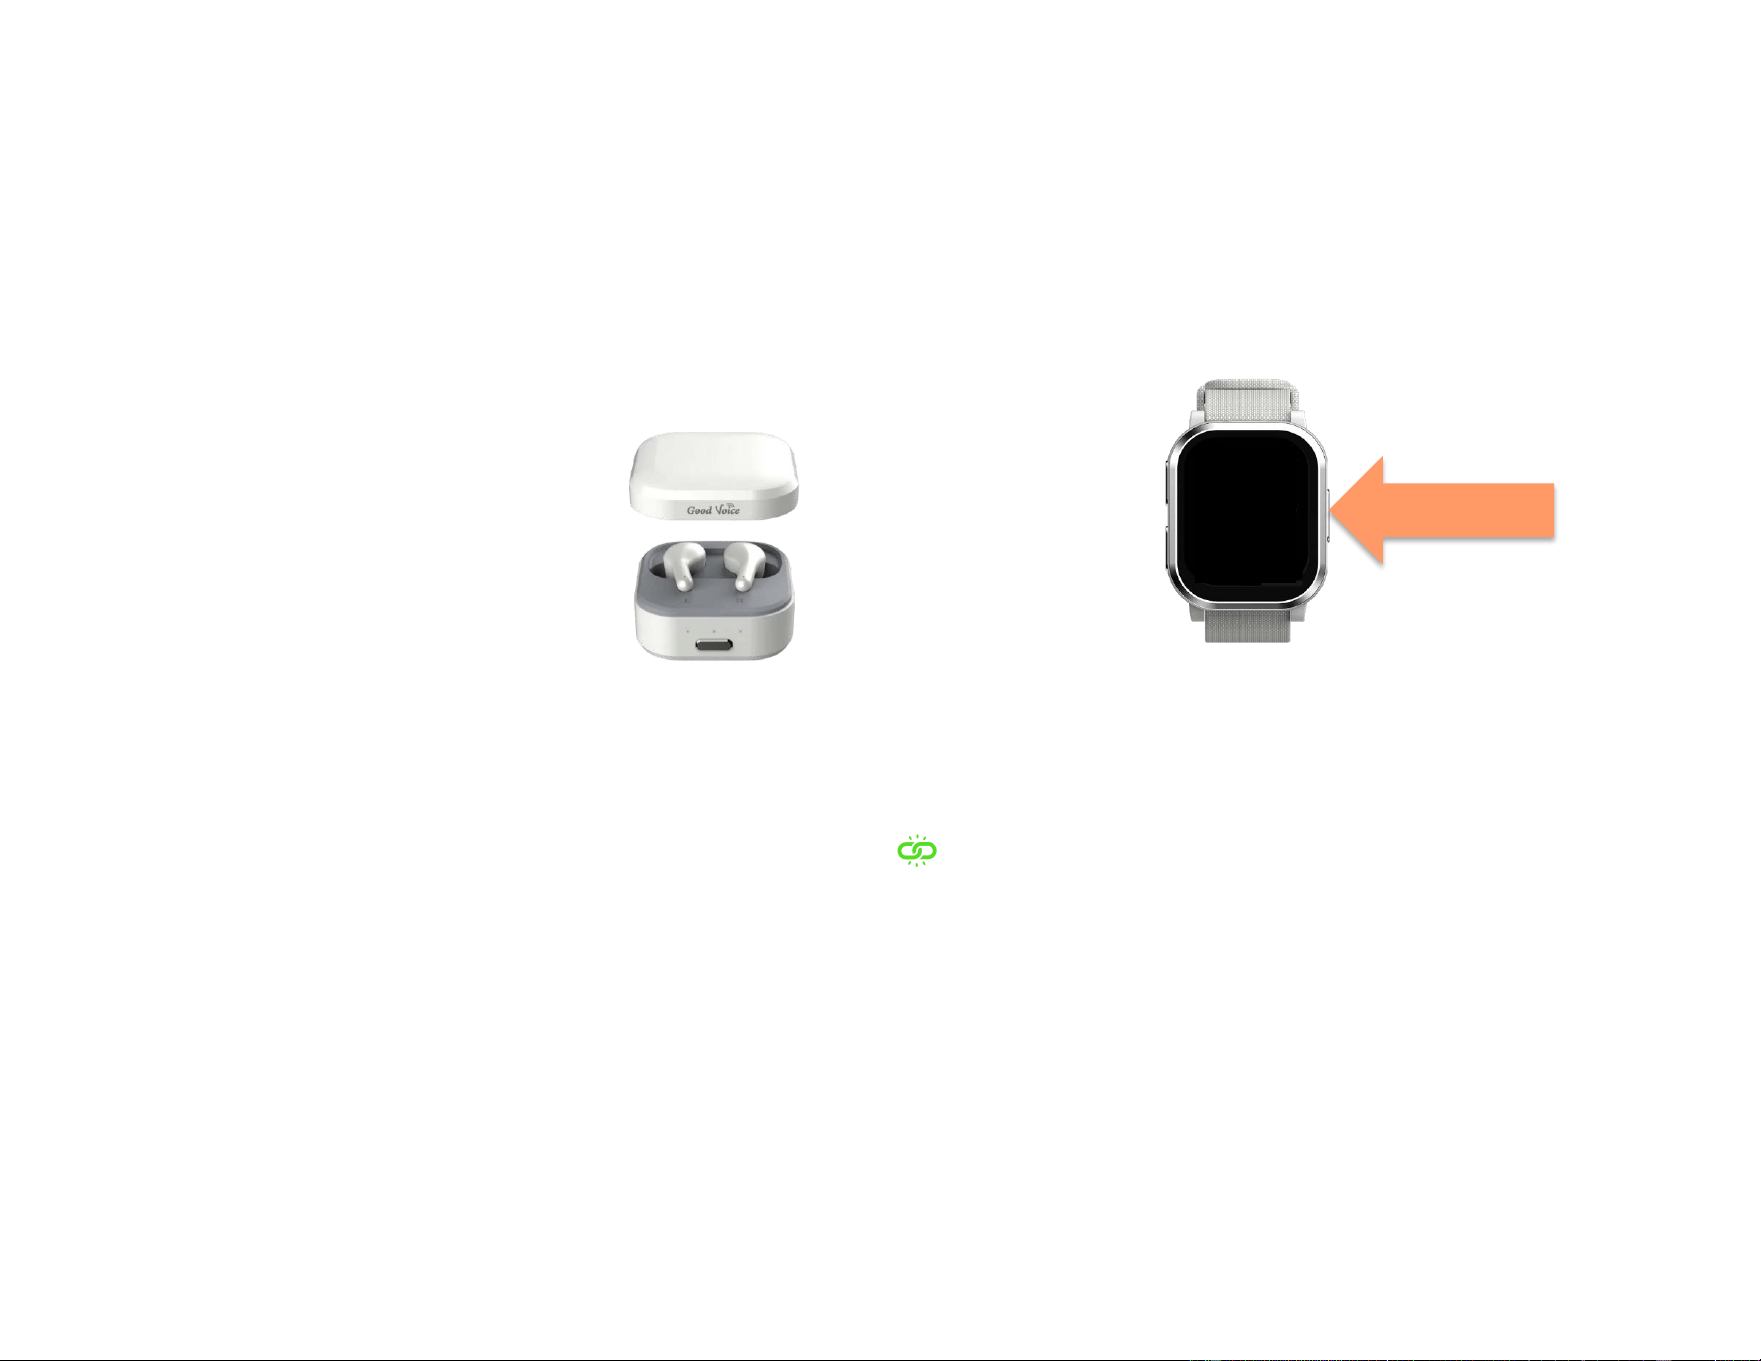
1. Turn on the Controller
Press and hold the Power button for 2 seconds to turn on the Watch (Controller),
you will see the “Good Voice” shows on the screen.
2. Open the lid of charging case.
3. Automatic Pairing
The left and right earbuds will automatically attempt to connect to the Watch (Controller) once the lid is
opened.
If successful, you will hear the "connected" voice prompt, indicating that the earbuds and watch have
been successfully paired. Then the connected icon will appear at the top of the Controller (watch)
screen.
4. Wearing the Earbuds
Remove the earbuds from the charging case.
Place the earbuds in your ears according to the left (L) and right (R) indicators for proper fit and function.
Press and hold
for 2 seconds.
17
Getting the Right Fit with Earbuds and Ear tips
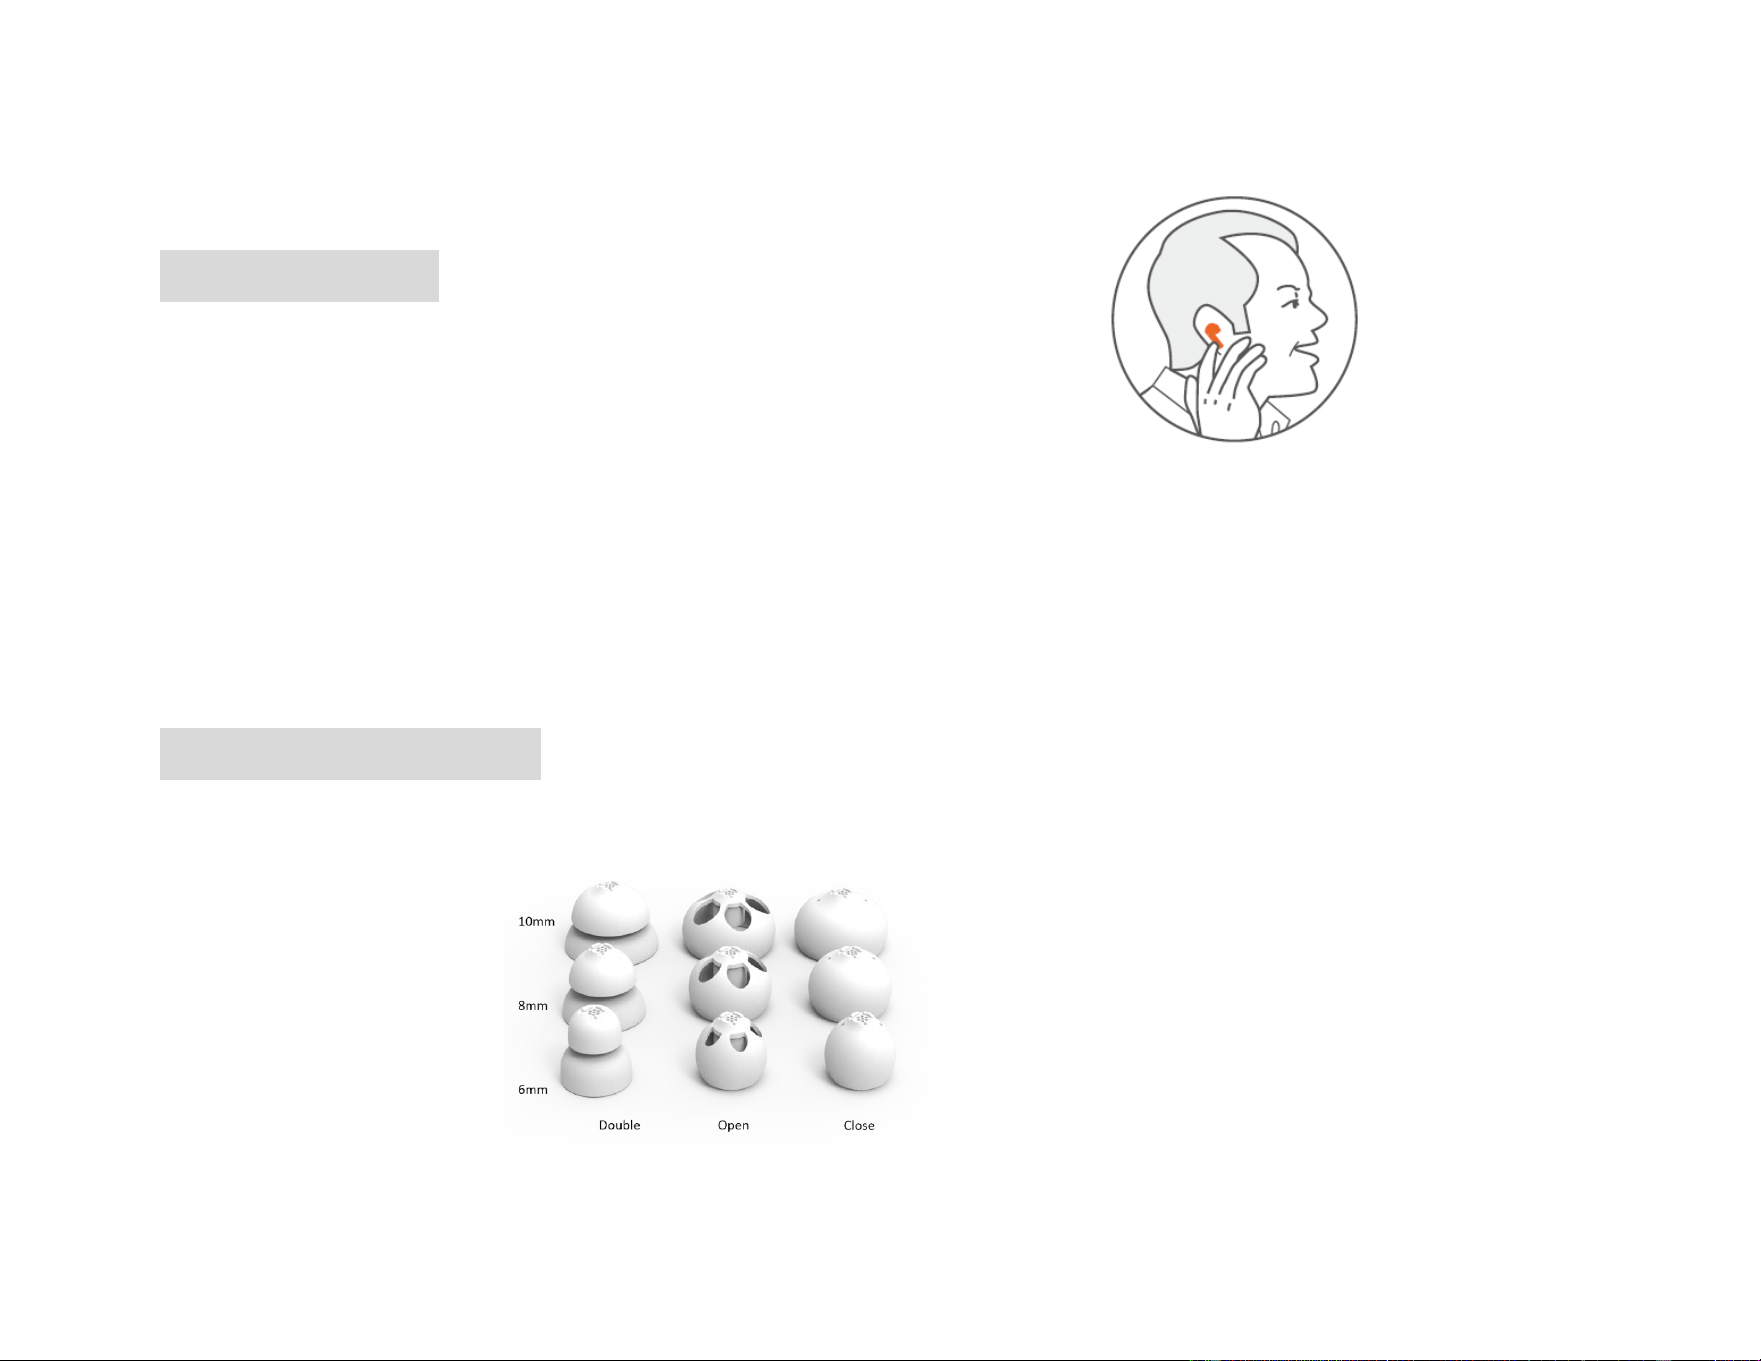
Wearing Your Earbud
1. Consider practicing in front of a mirror
○ Hold the earbuds stem with the ear tips facing inward.
○ The “L” (Left) or “R” (Right) symbol on the stem will be facing you.
2. Place the Earbuds into Your Ear
3. Rotate the Earphone Stem
○ Rotate about 45 degrees toward your face and gently press the earbuds further into your ear.
Finding the Suitable Ear Tips
• The package comes with three types of ear tips. Each type is available in three sizes (6 mm, 8 mm, and 10
mm) for replacement.

18
Double-flange (Double): Provide two physical barriers for the most secure seal, helping prevent the tips
from slipping out during movement. Suitable for users with more severe hearing loss or those who
require higher volume.
Open dome (Open): Feature large side vents to reduce the feeling of blockage, helping to avoid echo or
“plugged” sensations when speaking. As they allow natural ambient sound to enter the ear canal, some
interference may occur. Suitable for users with mild hearing loss.
Closed dome (Closed): Have a full dome structure. Compared to open ear tips, they more effectively
retain sound energy within the ear canal.
• The earbuds are pre-installed with 8 mm closed ear tips. If they do not fit comfortably, please try other
sizes.
• Choose the ear tip type and size that provide the best fit and comfort to achieve optimal performance.
19
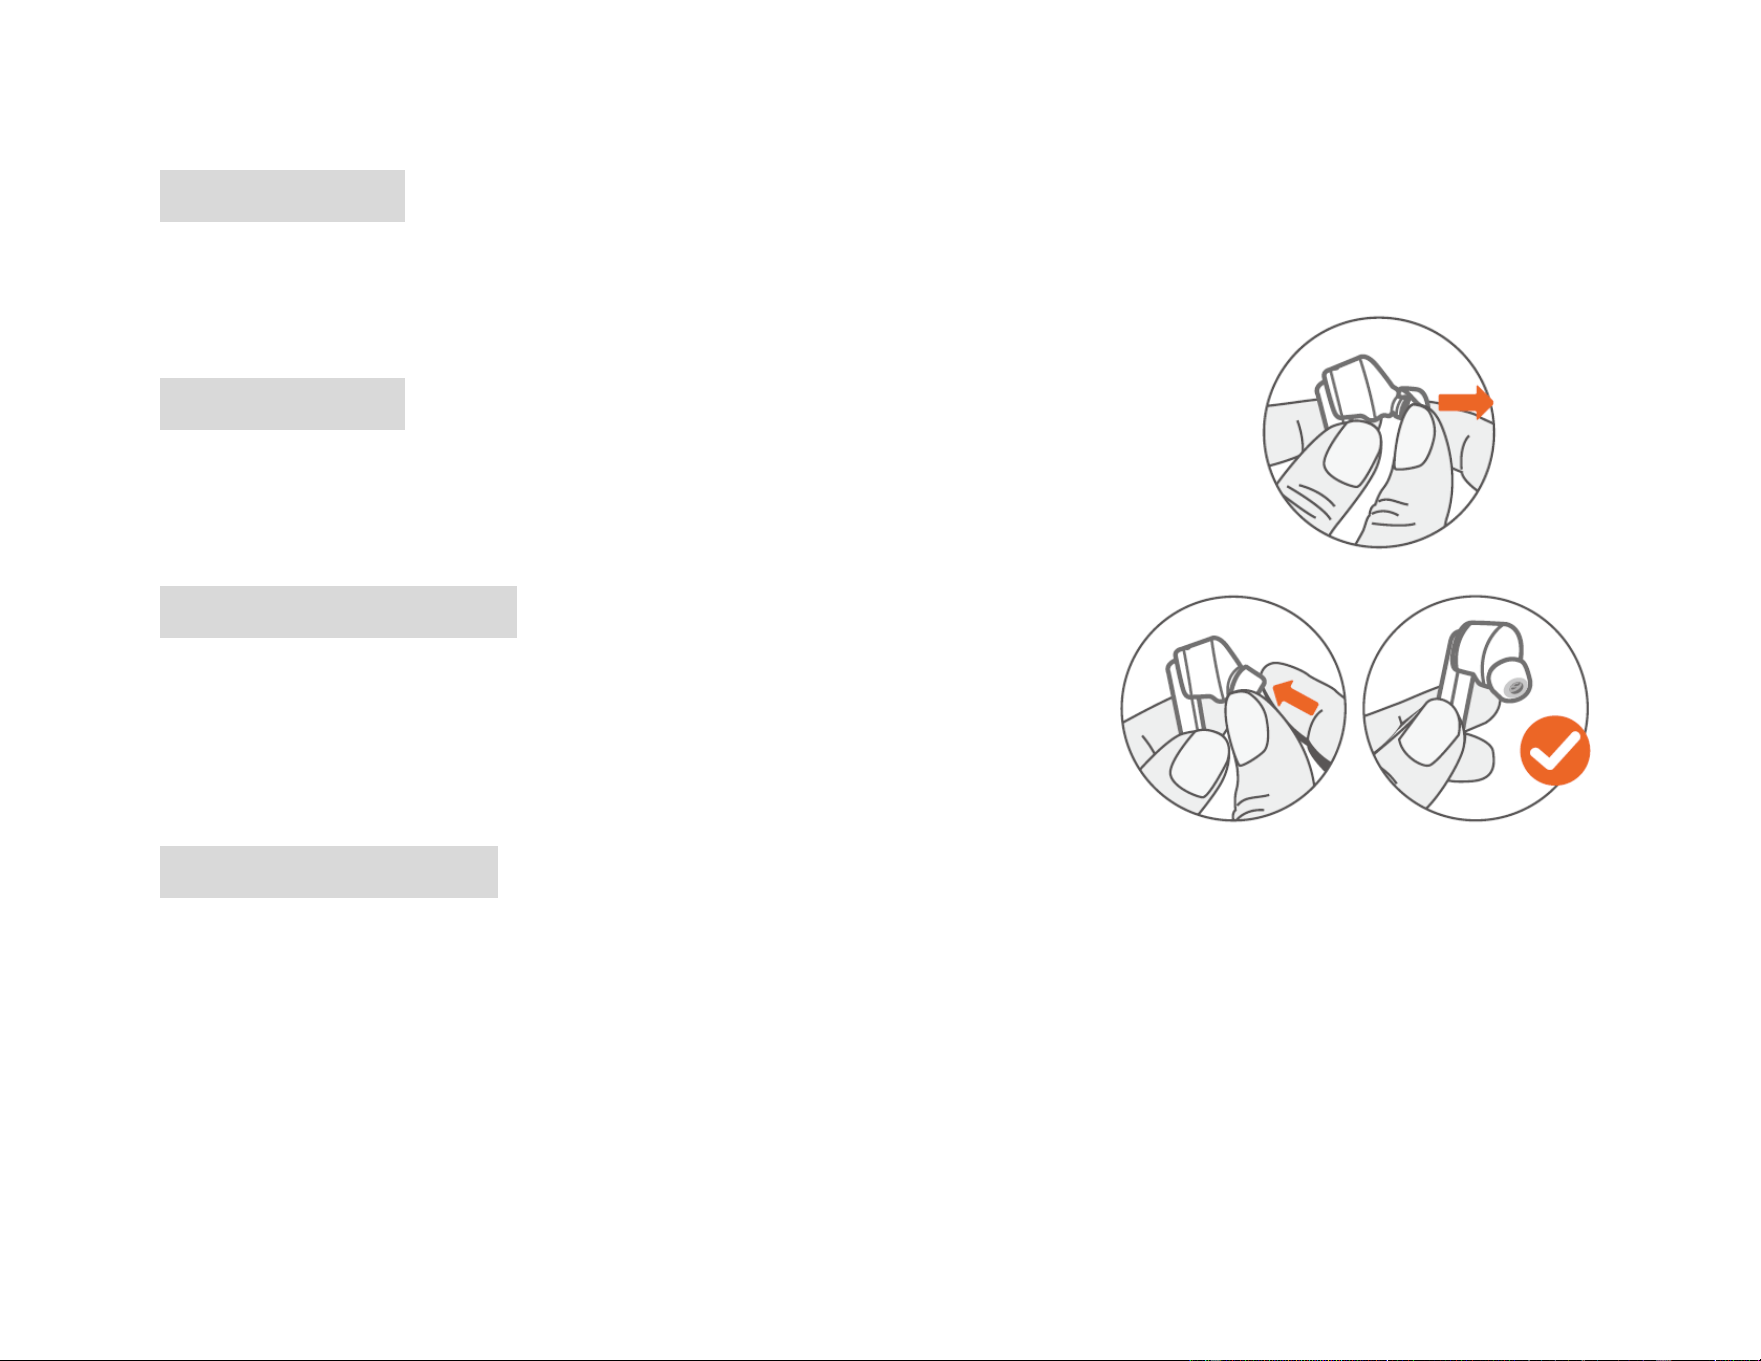
Removing Ear Tips
1. Hold the earbud stem securely in one hand.
2. Use the other hand to grasp the ear tip.
3. Gently pull the ear tip away from the earbud to detach.
Replacing Ear Tips
1. Align the chosen ear tip with the sound outlet of the earbud.
2. Press the ear tip firmly onto the sound outlet.
3. Ensure the ear tip is fully and securely mounted on the sound outlet before use.
When to Discard an Ear Tip
Dispose of the ear tips when:
● Ear tips appear noticeably dirty or stained.
● Signs of wear and tear, such as cracks or deformation, are visible.
● Ear tips no longer fit securely or comfortably.
When to Reuse an Ear Tip
Ear tips can be reused if they remain intact and show minimal signs of wear or damage. To clean:
● Soak the ear tip in a mixture 1:100 ratio of soap to warm water
● Rinse thoroughly with clean water.
● Allow the ear tip to dry completely before reattaching it to the earbud.
20
Device Setting
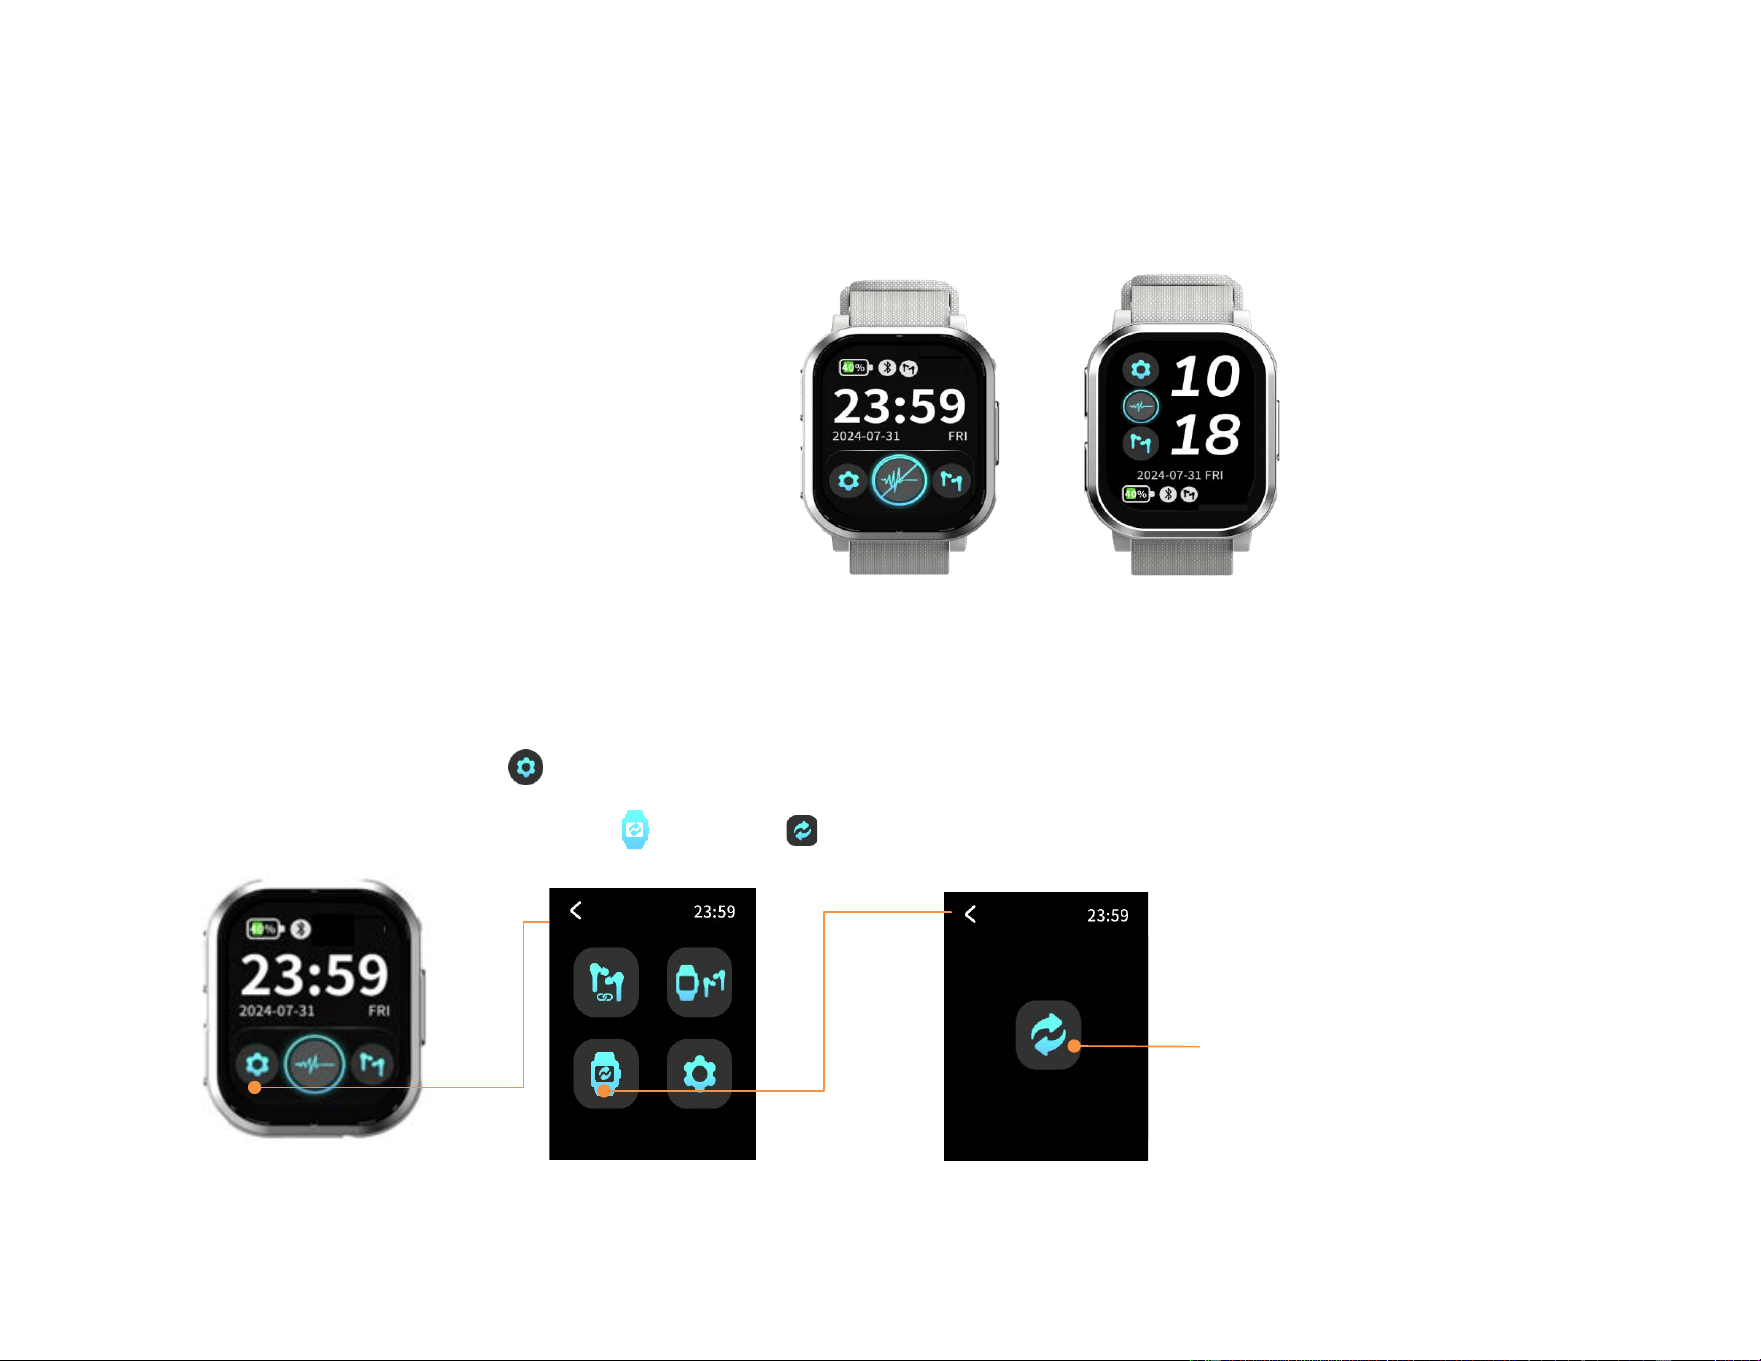
Choose Display style
Swipe left choose the wallpaper display style.
Adjust the Screen Orientation
Since everyone wears their watch differently, the screen may sometimes appear upside down.
You can follow the steps below to adjust the screen orientation and ensure it displays correctly at all times.
1. Tap the Settings icon to enter the menu.
2. Select the watch rotation icon ,then tap to set the screen to the correct orientation.
Tap to rotate
21
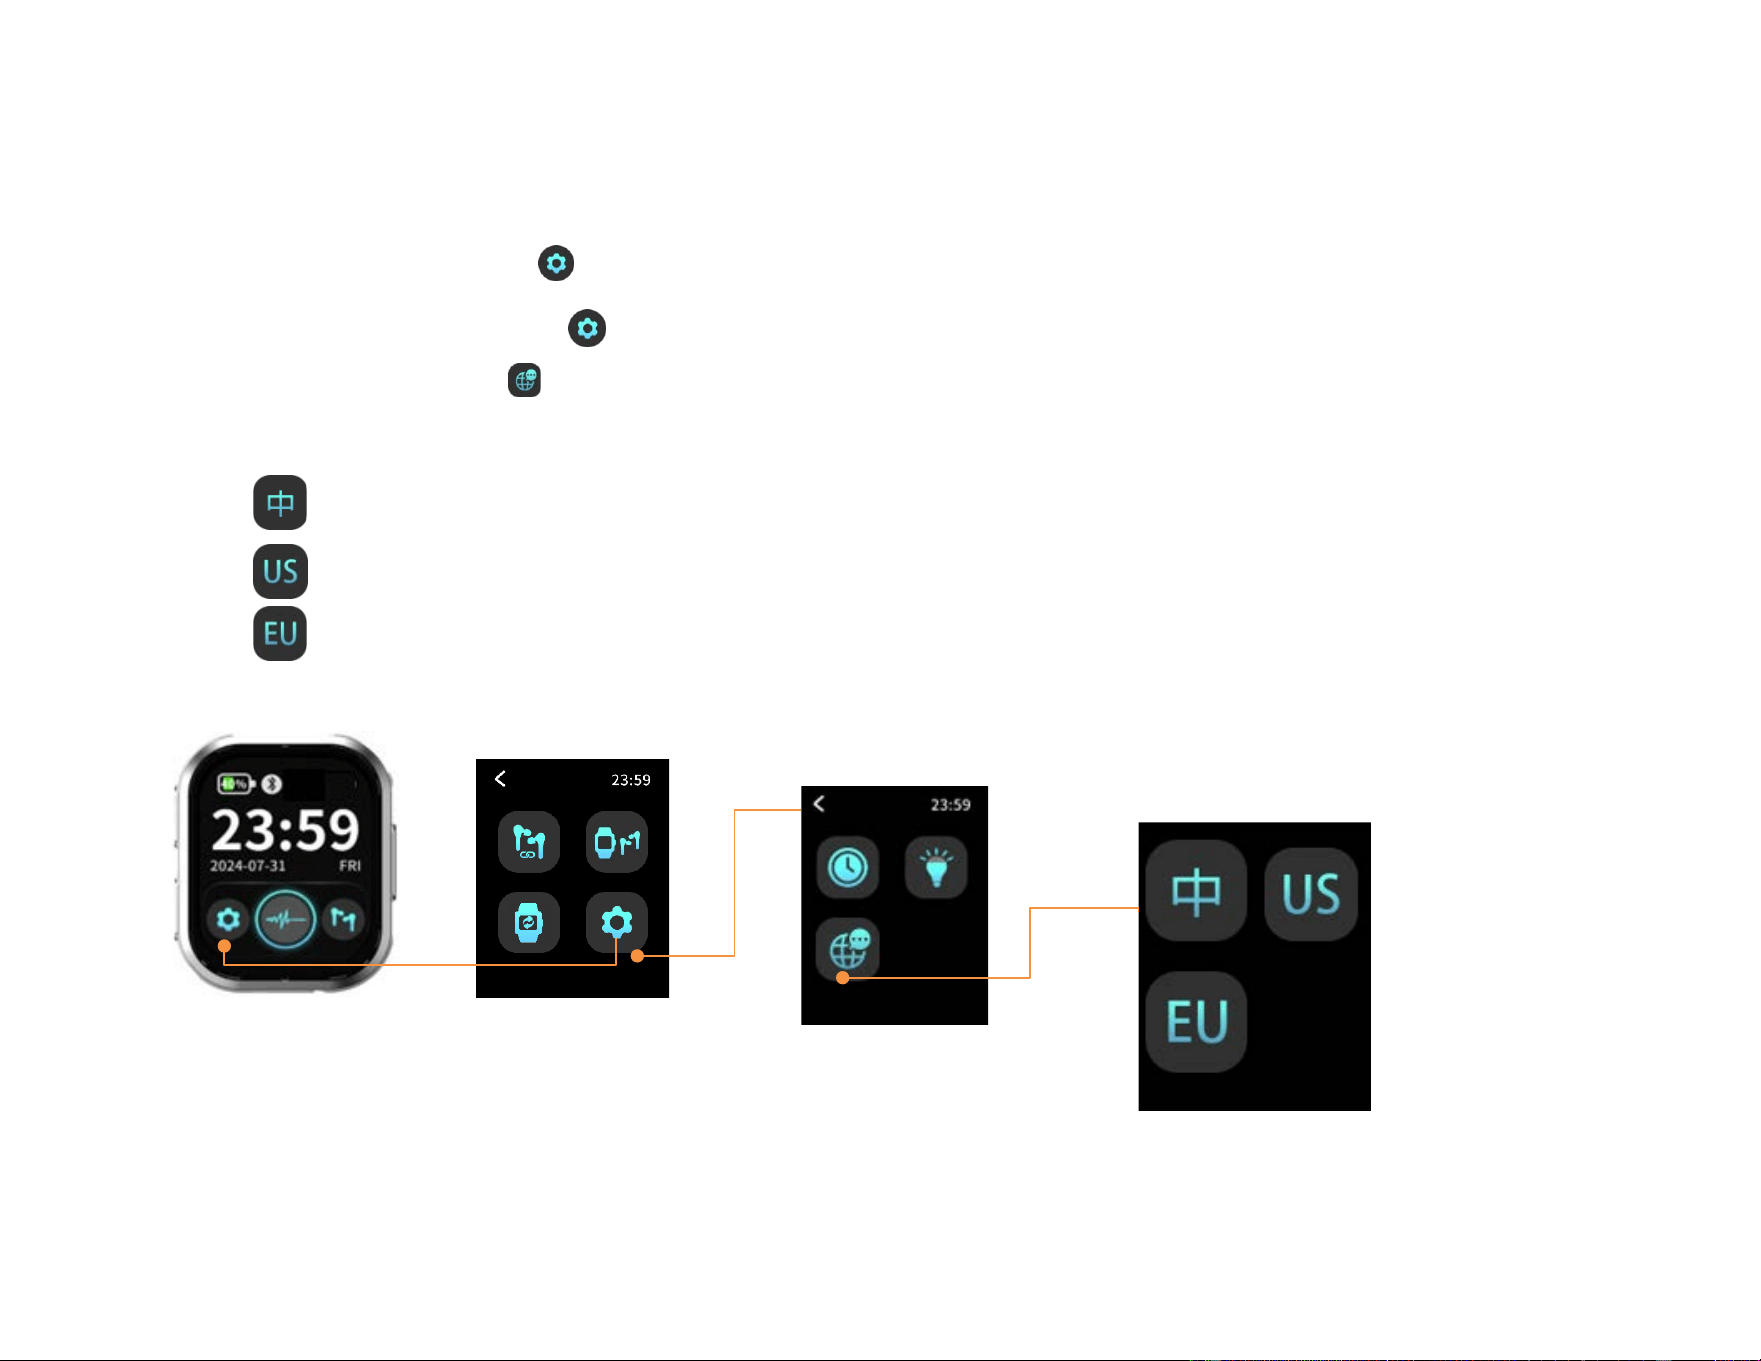
Set the date display format.
1. Tap the Settings icon to enter the menu.
2. Select the Settings icon again.
3. Tap the Globe icon to Select date format:
Standard date format (YY/MM/DD)
US date format (MM/DD/YY)
European date format (DD/MM/YY)
Select date display format
22
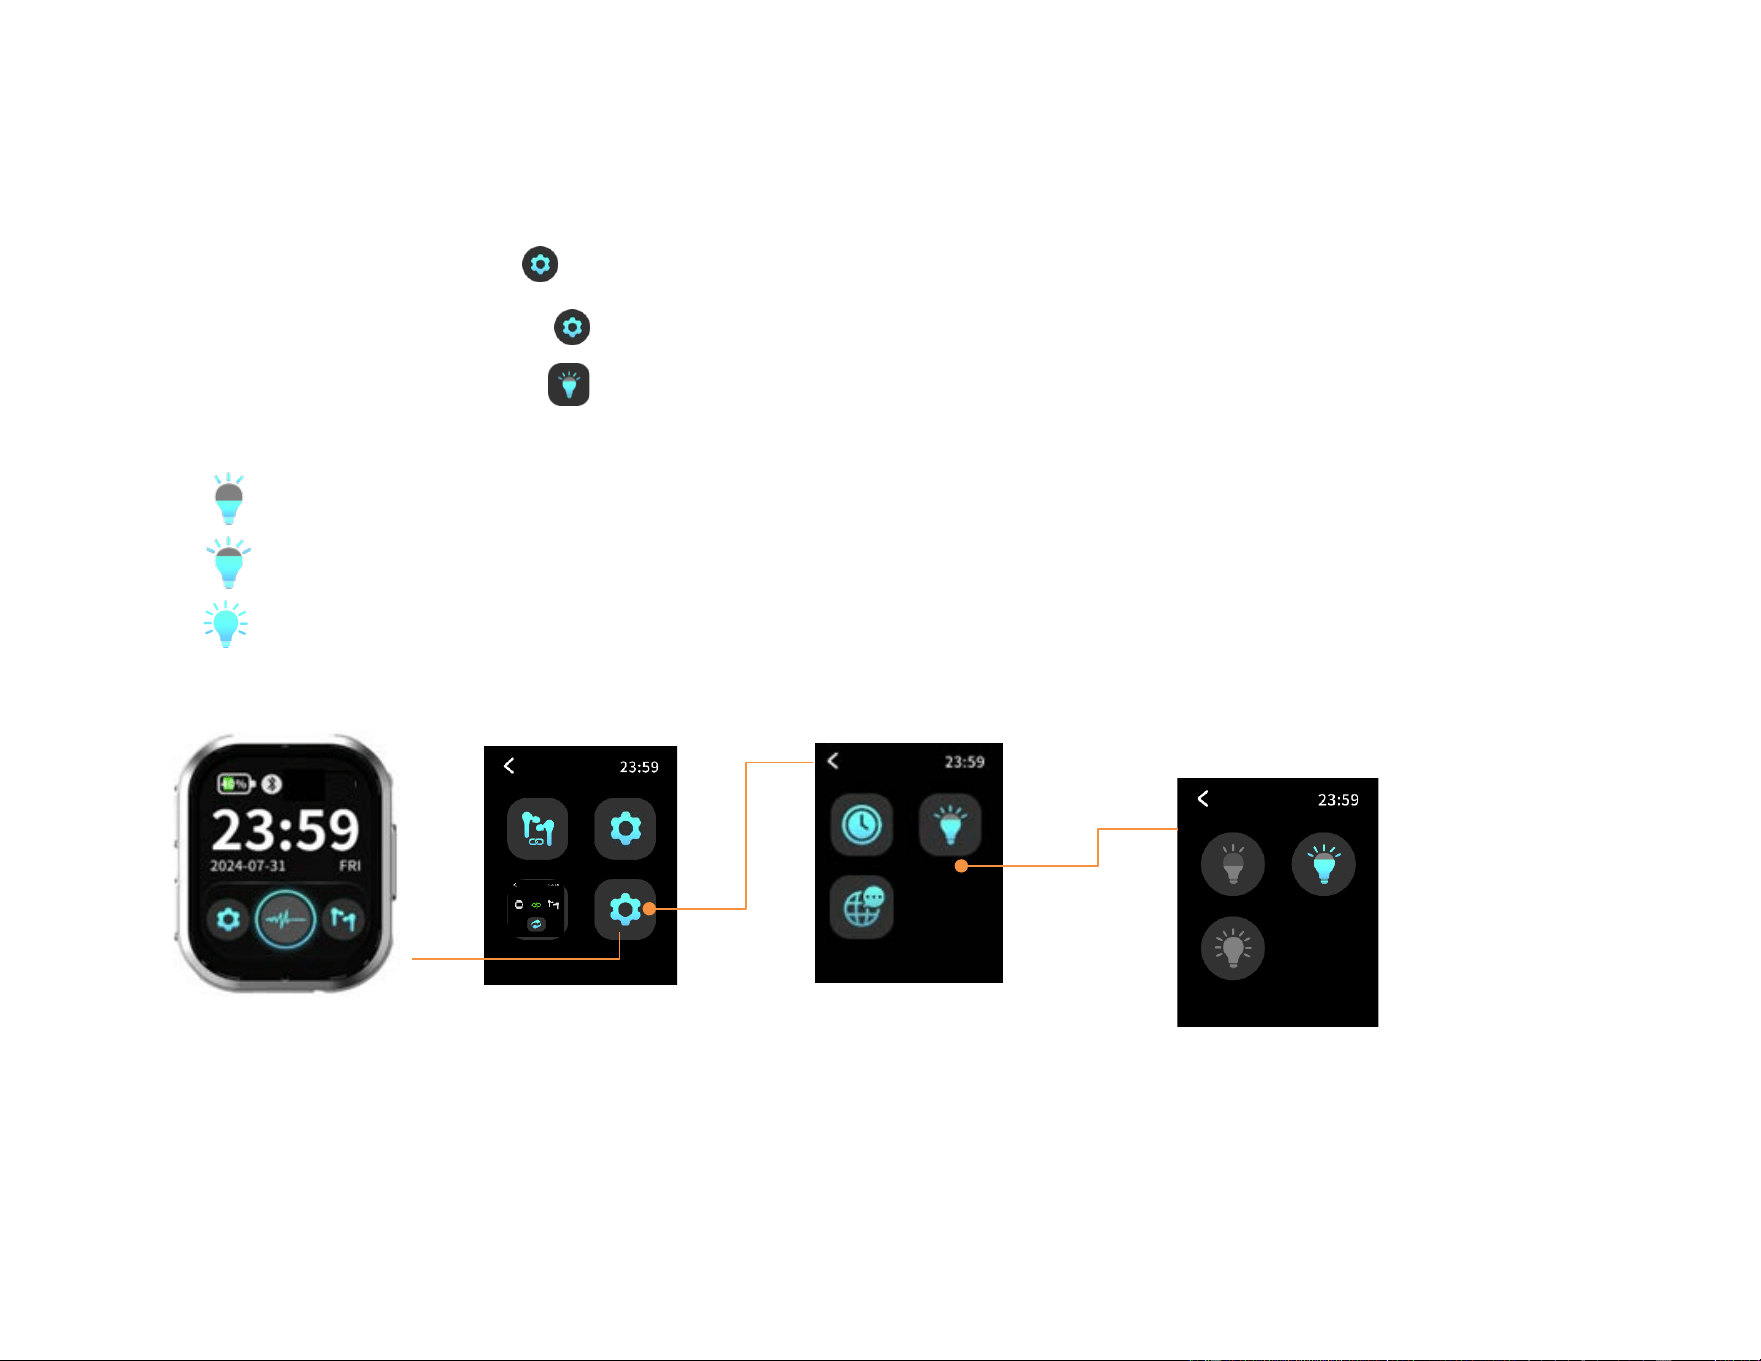
Adjust screen brightness
1. Tap the Settings icon to enter the menu.
2. Select the Settings icon again.
3. Tap the Brightness icon to select preferred brightness
The brightness is set to 50%
The brightness is set to 75%
The brightness is set to 100%
Select Brightness
23
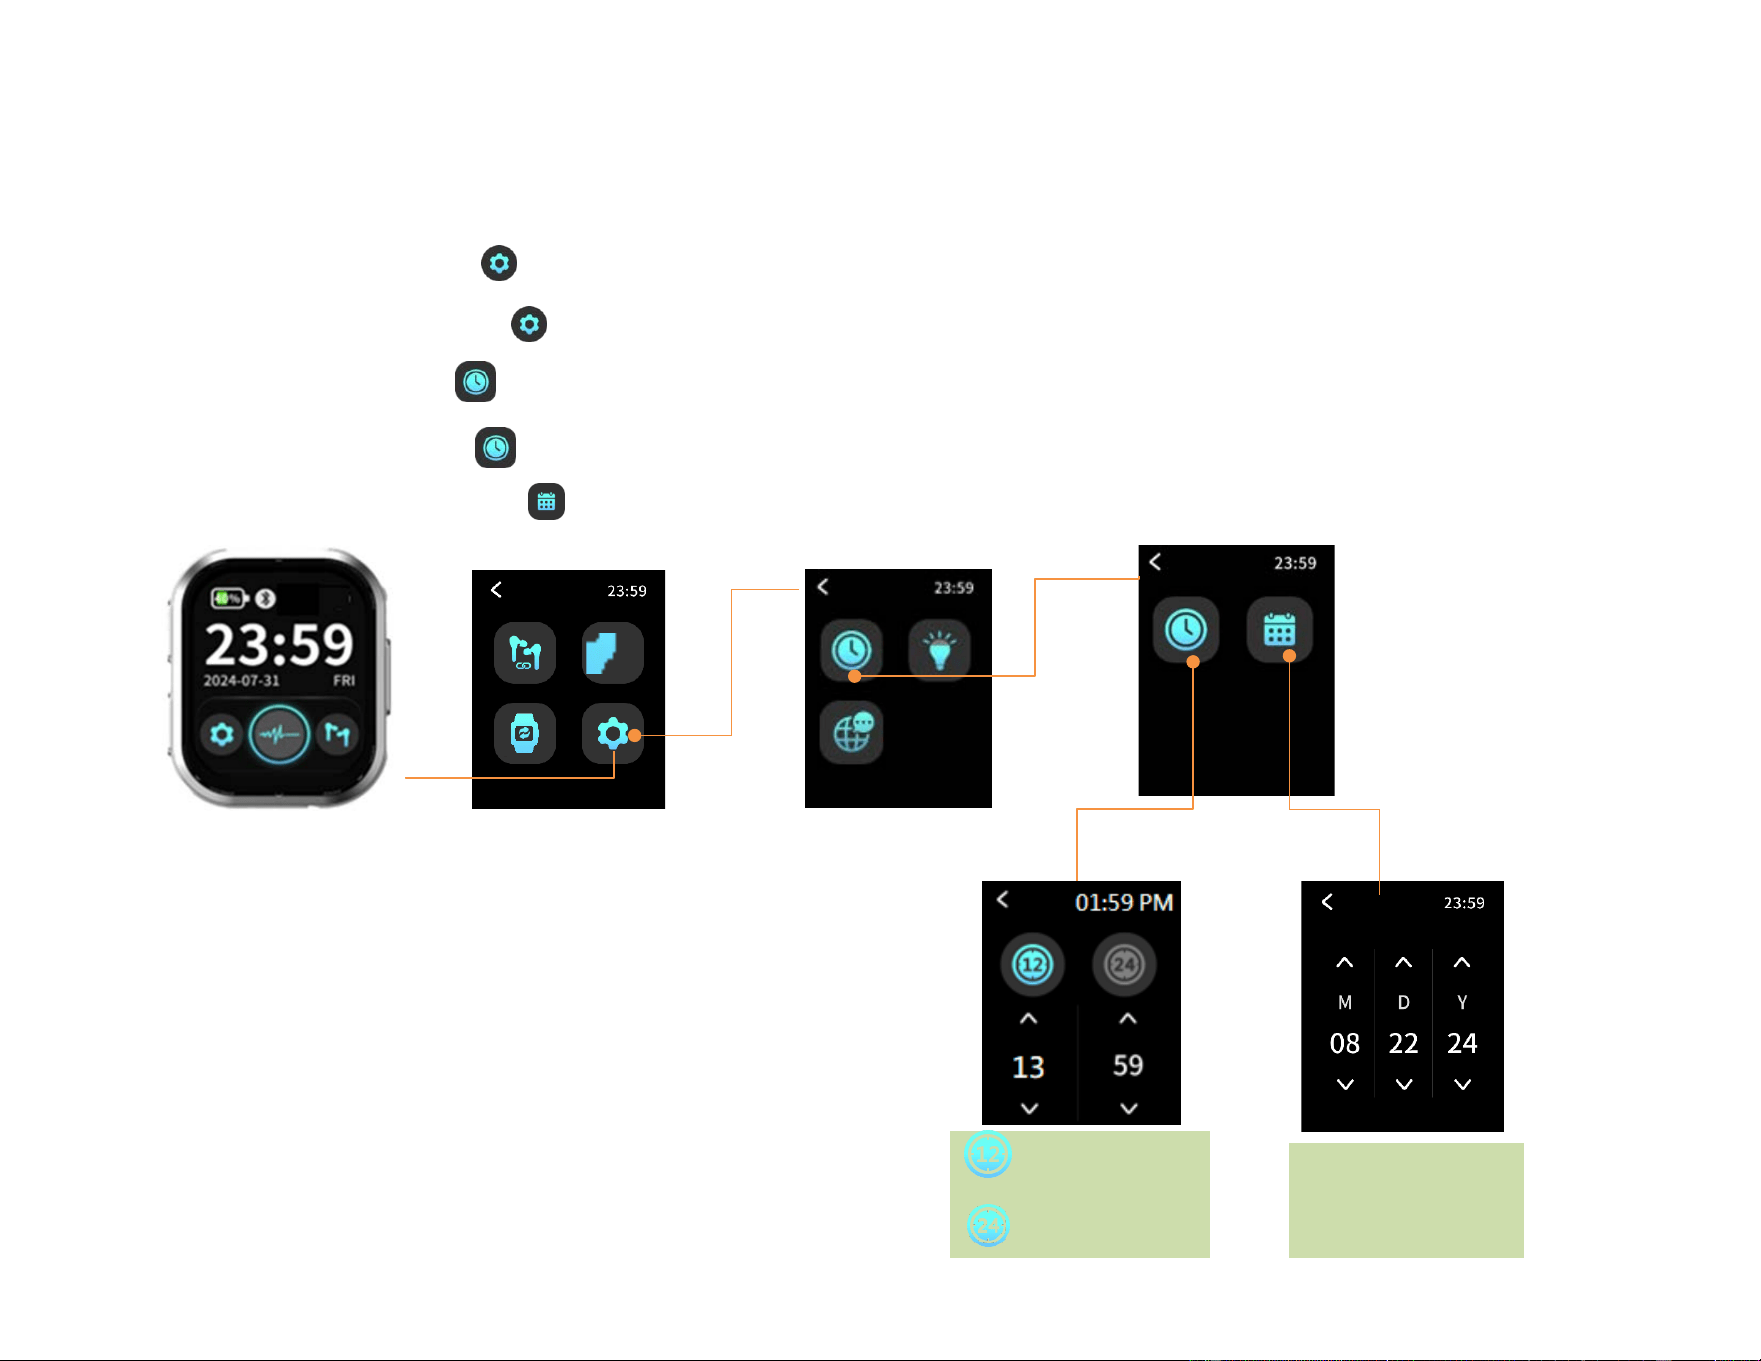
Set the date and time
1. Tap the Settings icon to enter the menu.
2. Select the Settings icon again
3. Tap the clock icon
4. Select the clock icon again to set the time
5. Select the calendar icon to set the date
M: Month
D: Day
Y: Year
Set the Time
Set the Date
12-Hour clock
24-Hour clock
24
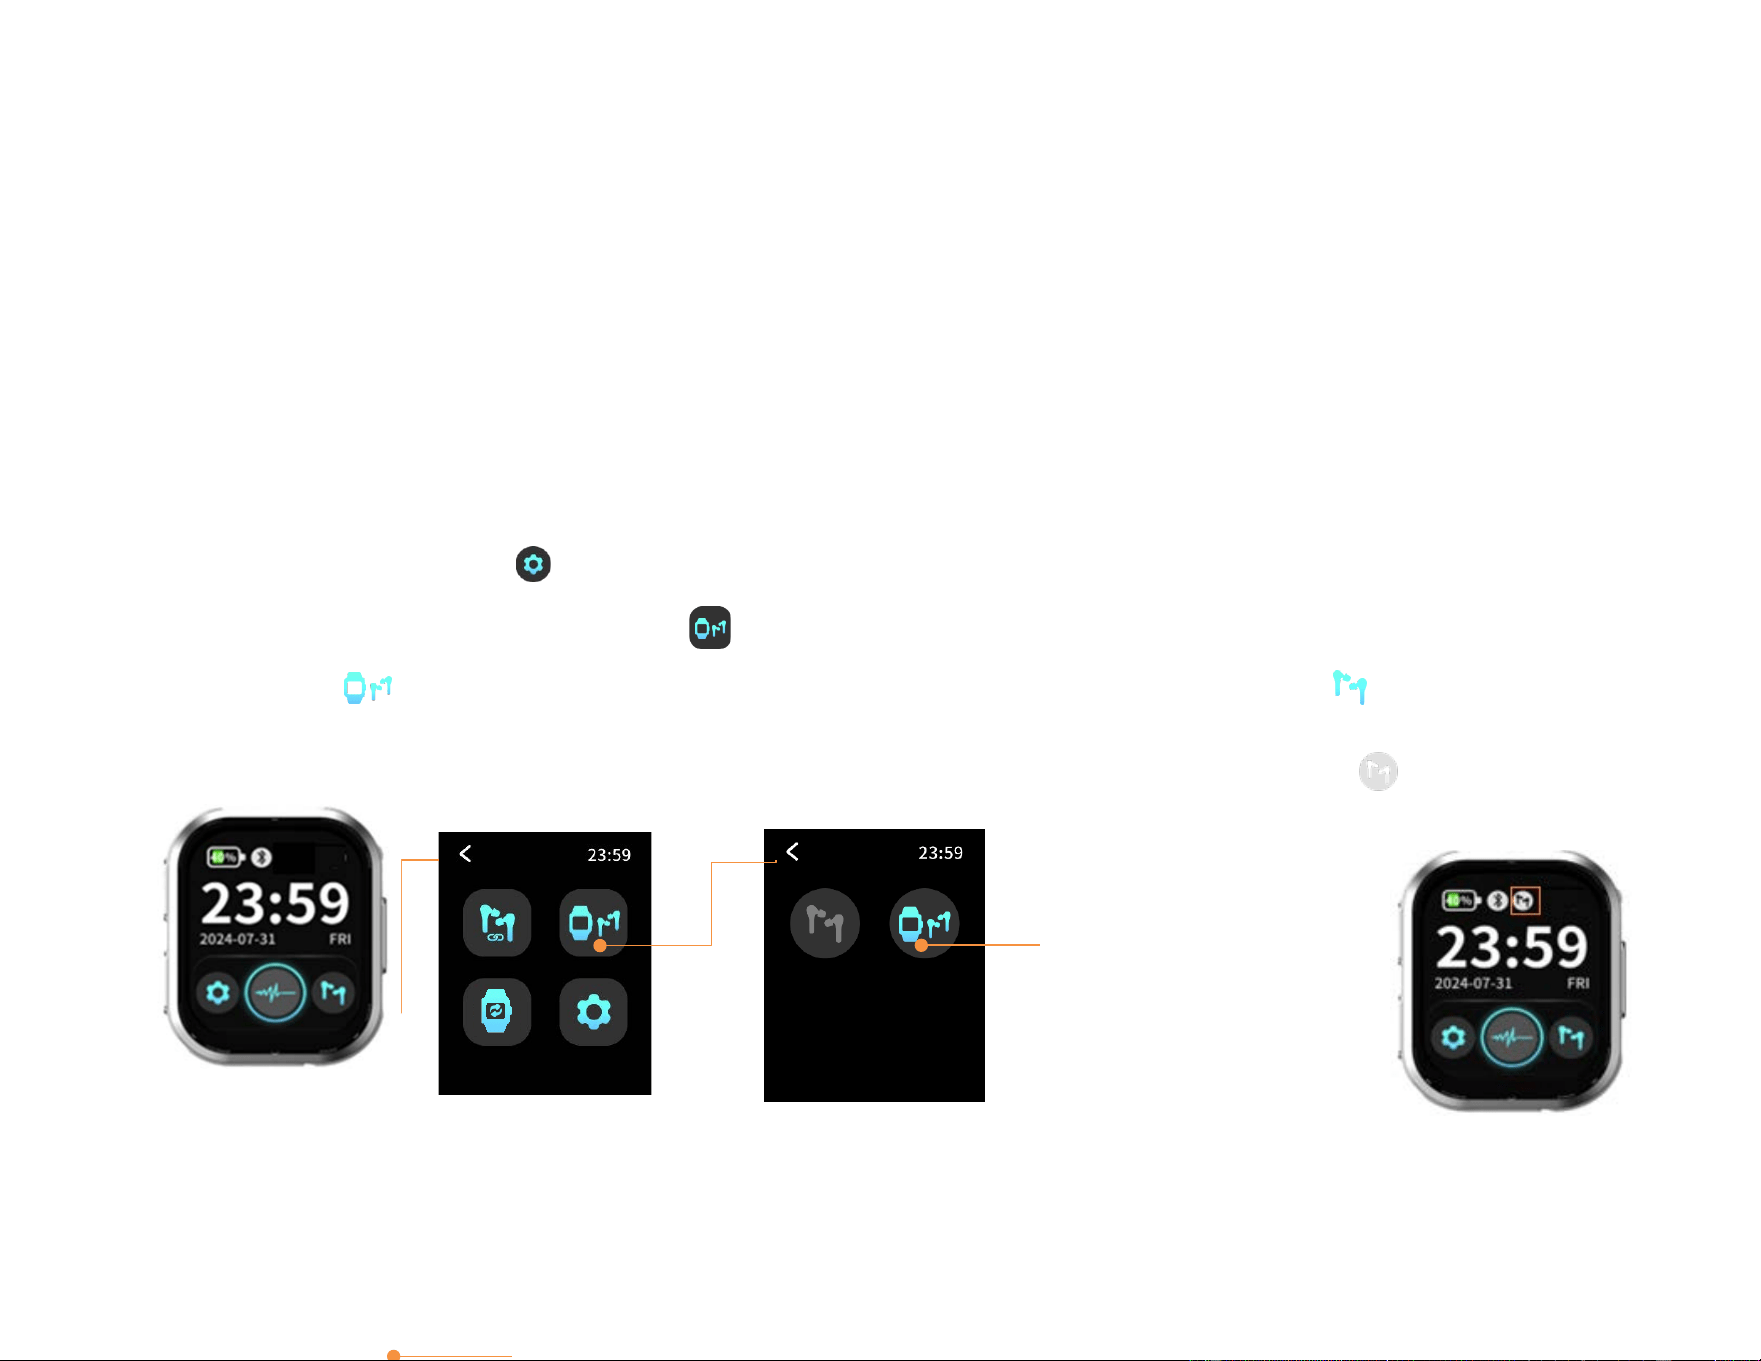
Microphone-input selection
The Good Voice Nexus hearing aid uses the Watch (Controller) microphone as the default audio input. If the
Watch (Controller) is out of range or the Bluetooth connection is lost, the system will seamlessly and
automatically switch to the earbuds’ microphones to ensure continuous sound pickup.
You have full flexibility to choose your preferred microphone source at any time. You can freely select either the
Watch (Controller) microphone or the earbuds’ microphones as the audio input, depending on your environment
and preference. To manually select your preferred source, simply follow the steps below:
1. Tap the Settings icon to enter the menu.
2. Select the Microphone switch icon
3. Select to use Watch’s (controller) microphone as the default audio input; Select to use earbuds’
microphone as the default audio input
Use watch’s
Microphone to
capture sound
Note: For optimal hearing experience, we recommend using the Watch’s (Controller) microphone to receive sound.
When appears, it means the earbuds’
microphones are being used to capture
sound.
25
Device Control
Adjust the Volume
By Touch control
4. Tap the earbuds icon to enter for volume control page, where you can adjust the volume for the left
and right ears independently.
5. Tap the "+" icon to increase the volume, up to a maximum of level 16.
6. Tap the "−" icon to decrease the volume, down to a minimum of level 1.
By Physical button
Press the side volume button on the watch to adjust the volume of both the left and right ears up or down
simultaneously.
L/R volume adjustment
Volume up Button
Volume down Button
26
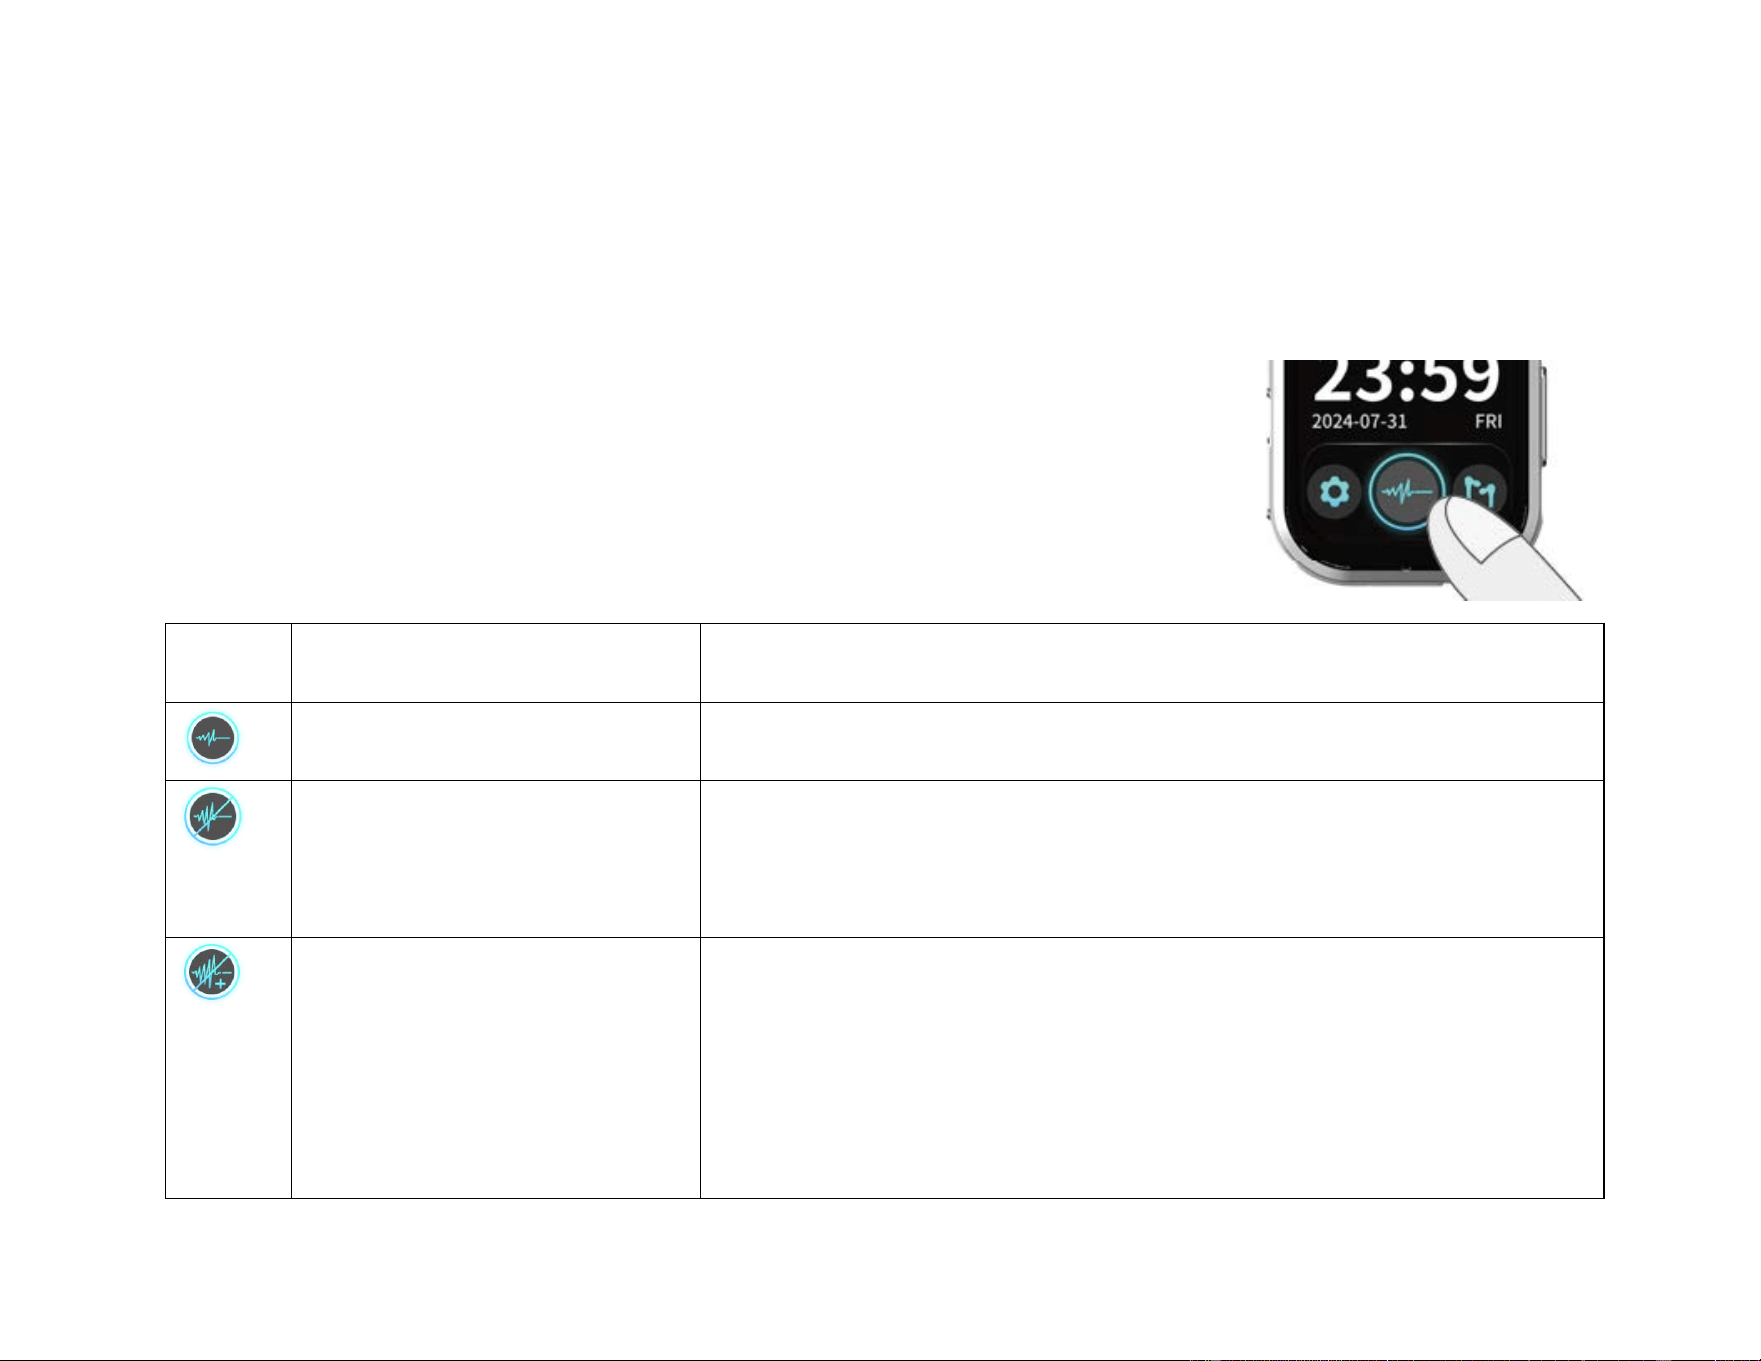
Activate Noise Reduction Level
To ensure an optimal hearing experience, you can freely adjust the noise reduction mode to suit your current
surroundings. Whether in a quiet room or a noisy crowd, these settings allow you to maintain crystal-clear sound
quality at all times.
1. Tap the Noise Reduction icon once to activate “Standard Noise Reduction Mode.”
2. Tap the icon again to switch to “Enhanced Noise Reduction Mode.”
3. Tap the icon once more to return to “Regular Mode.”
Icon Meaning Usage Scenario
Regular mode Moderately quiet environments, like home or office
Standard Noise Reduction
mode
Use in relatively noisy environments when conversations are easily
disturbed by background noise
Enhanced Noise Reduction
mode
Use in very noisy environments, like restaurants, markets, or social
gatherings.
���Enhanced Noise Reduction Mode reduces environmental sound
awareness. Avoid using this mode when full awareness of the user's
surroundings is necessary.
27
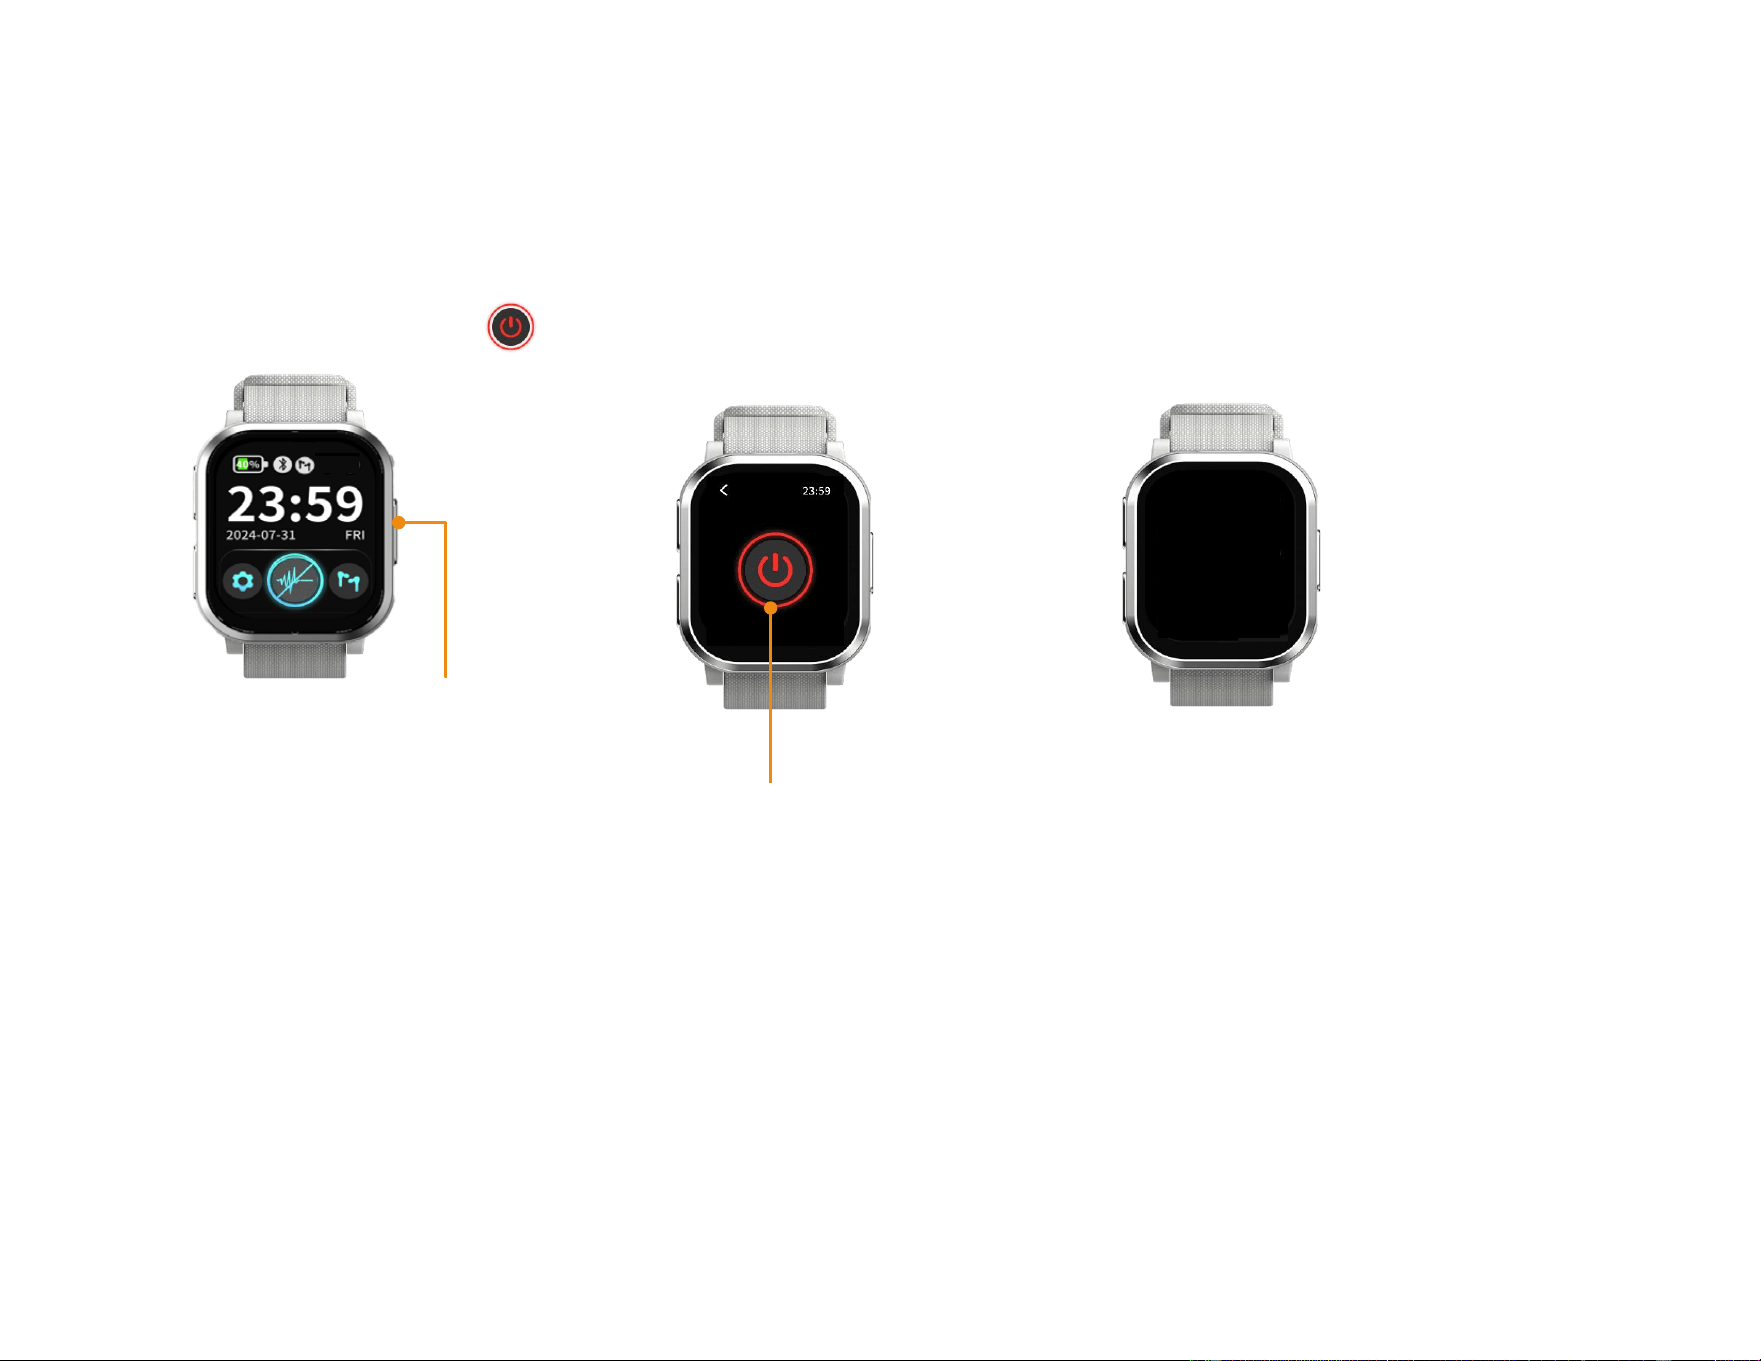
Power Off the Watch (Controller)
1. Press and hold the side power button on the watch for 3 seconds.
2. The power-off icon will appear on the screen, press the icon to turn off the watch.
Tap to power off
Press and hold the power
button for 3 seconds.
Watch is powered off.

28
Bluetooth Devices Pairing Instructions
For first-time use, please follow the steps below to pair your hearing aid with your mobile phone or other
Bluetooth devices (such as a tablet). Once the setup is complete, the Bluetooth connection will
automatically reconnect whenever both the hearing aid and the mobile device are turned on.
1. Turn on the Watch (Controller) and open the charging case lid of earbuds.
2. Once the Watch (Controller) and earbuds are successfully paired, the connection icon will appear at
the top of the screen.
3. Enable the Bluetooth function on your phone or tablet
4. Find “GV-NX1” in the list of available Bluetooth devices and tap to connect.
If “GV-NX1” does not appear in the Bluetooth device list on your mobile phone, please place the earbuds
back into the charging case and press and hold the “battery status button” on the charging case for 5
seconds until the battery status LED flashes orange. Then release the button. Once the LED light turns off,
repeat the pairing steps above.
Watch (Controller) and earbuds are successfully paired

29
Audio Streaming Bluetooth Devices
Once your Good Voice Nexus Hearing Aid has successfully paired with your mobile phone or Bluetooth device,
any audio or video streaming from the phone or connected Bluetooth device will automatically switch the
hearing aid to streaming mode.
When the audio or video playback is stopped, the hearing aid will automatically return to hearing mode within
approximately 10 seconds.
30
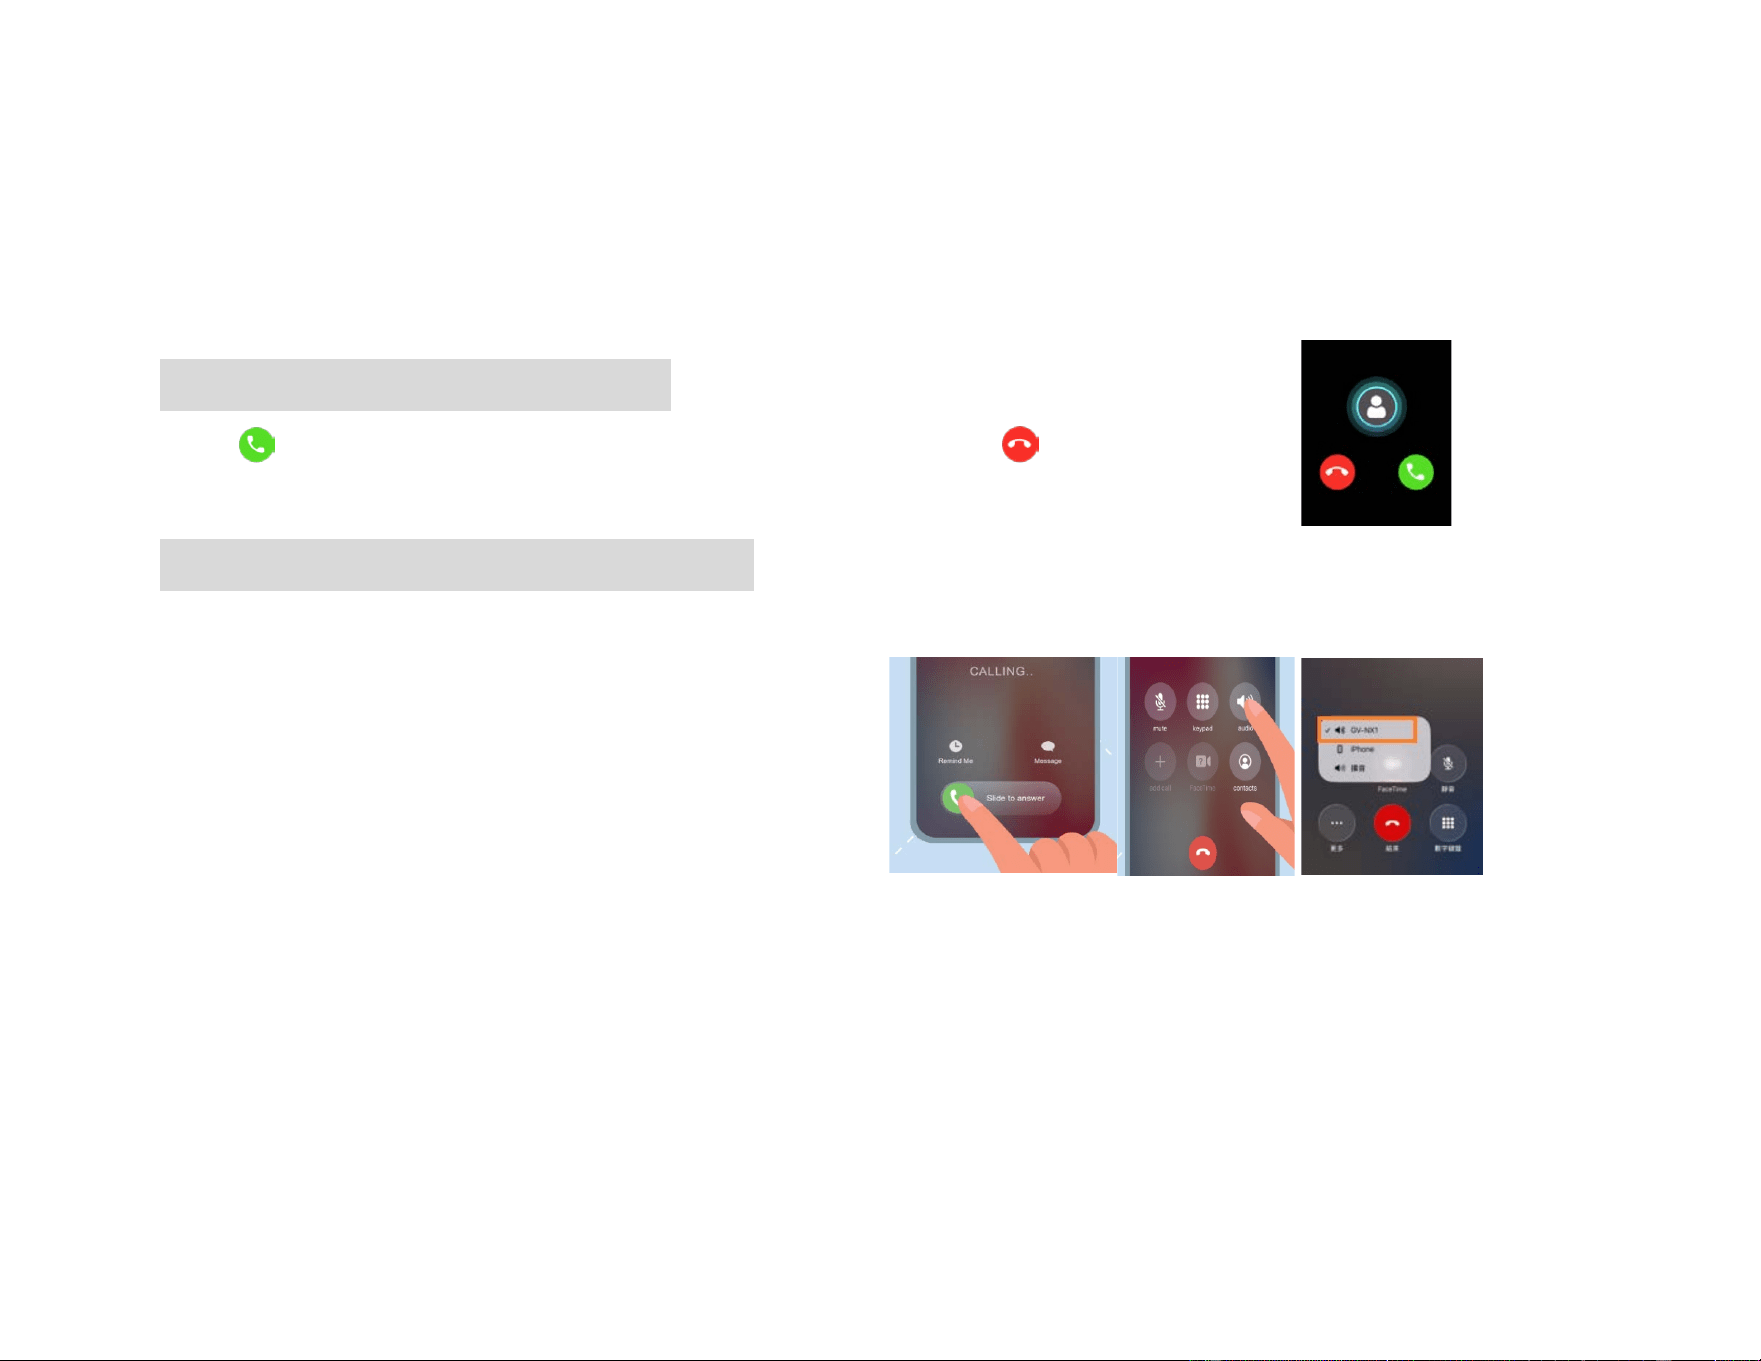
Answering Phone Calls
Once your hearing aids are paired with your phone via Bluetooth, phone call audio will be automatically
streamed to your hearing aids for maximum clarity.
Answering Calls via your Mobile Phone
Press on the Watch (Controller) to pick up the phone, or press to reject the call.
Answer the phone call via your Mobile Phone
1. Swipe right or Tap "Accept" to answer the call
2. Tap "audio"
3. Choose “GV-NX1” as the audio source.
General Warnings:
● During Bluetooth streaming, ensure that the volume is adjusted directly on the phone or Bluetooth
devices.
● IOS 6.0 or higher is required to use the watch (controller) with an iPhone, and Android 5.0 or later for
Android phones. Please ensure your device meets the required operation system version before use.
● Bluetooth streaming will lead to higher power consumption on your Good Voice Nexus Hearing aids.
Incoming phone
31
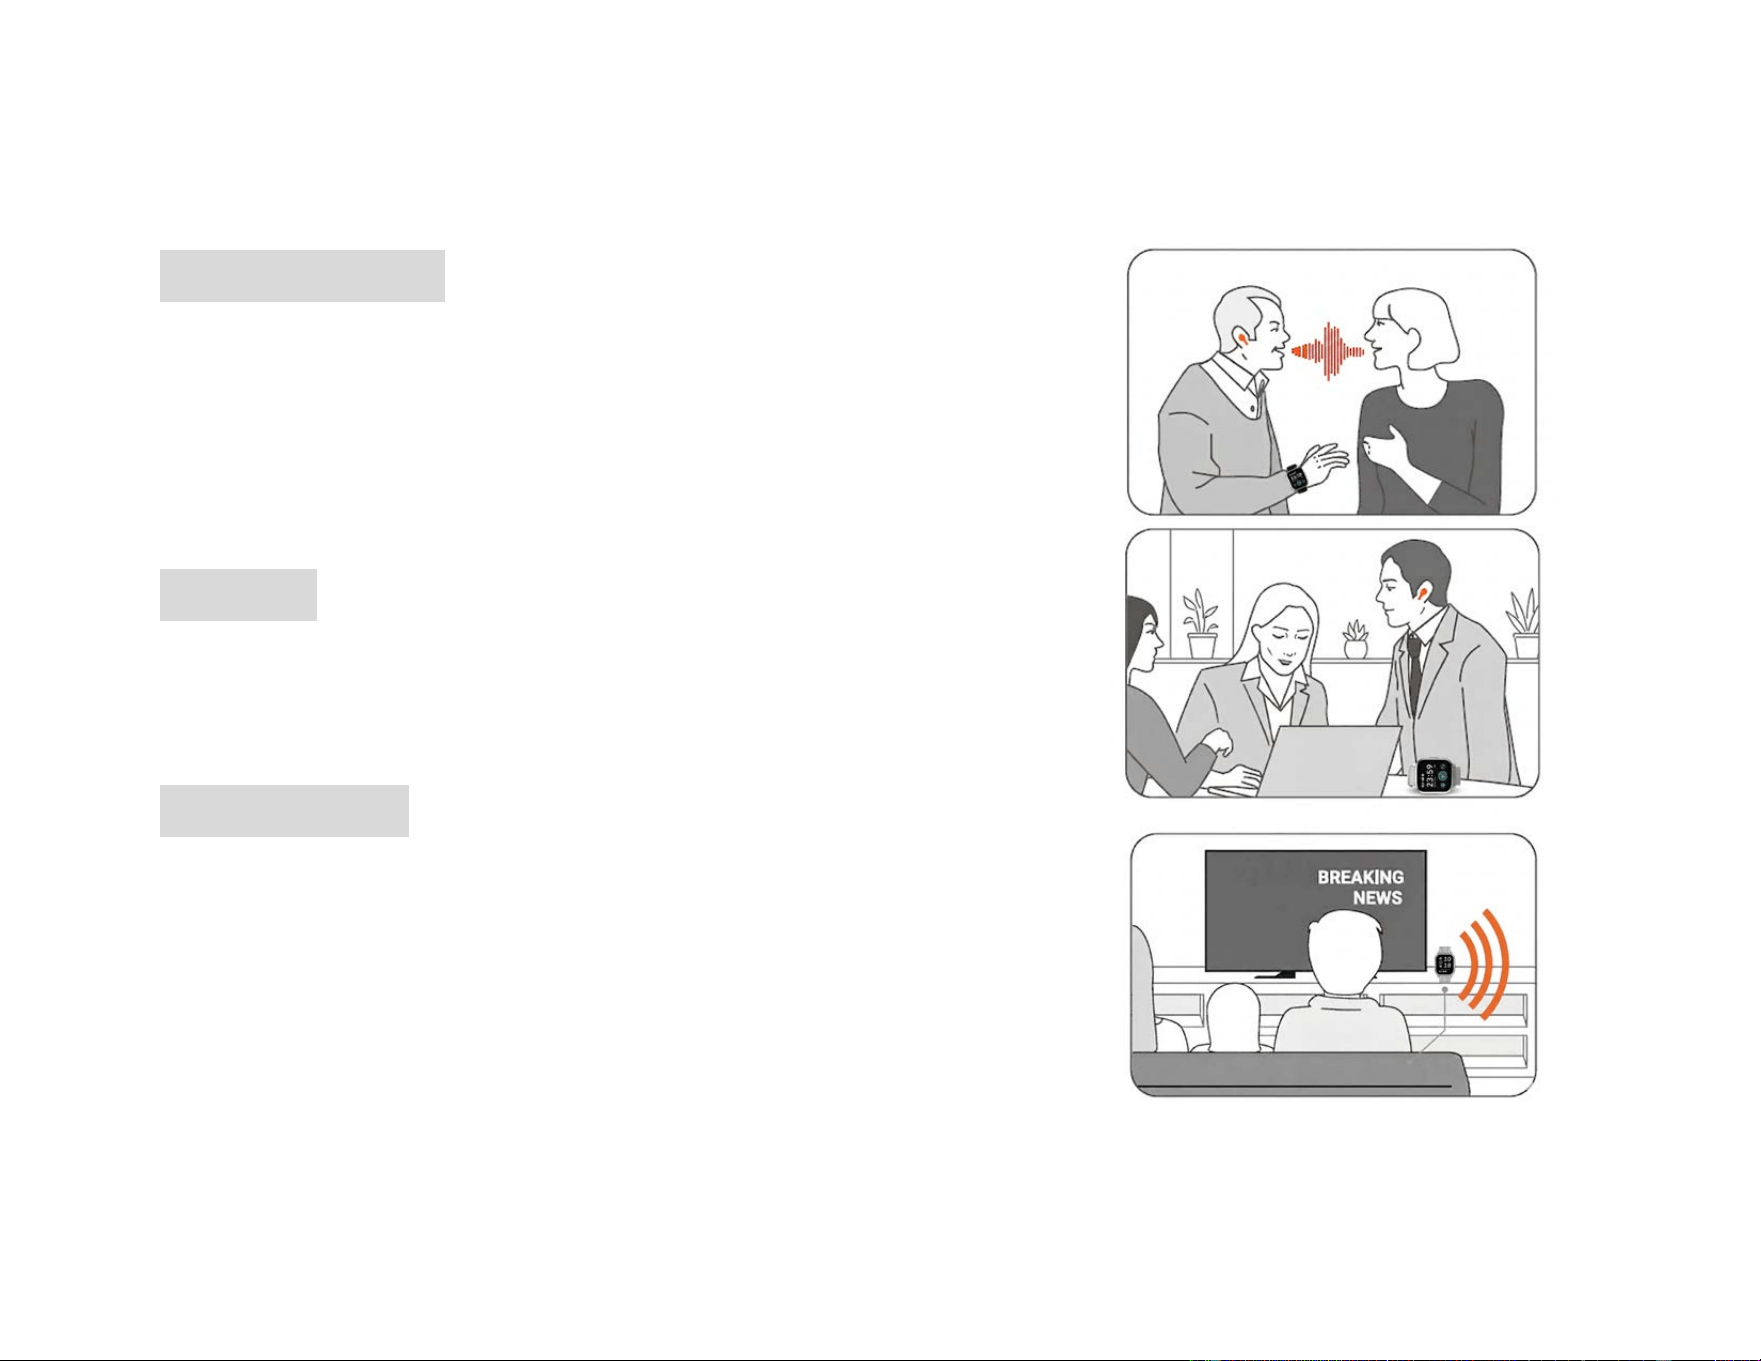
Daily Use of the Hearing Aids
Extension of Your Ear
The device is suitable for various environments, ensuring seamless
communication with others and helping users to hear WHAT MATTERS.
Consider the Watch (Controller) as an extension of your ears. For optimal
audio reception, position the Watch (controller) close to the speaker or
sound source in different situations.
In Meetings
For effective participation and easier follow-up on conversations, place
the Watch (Controller) in the center of the conference room table or
close to the speaker to capture discussions clear
When Watching TV
Position the Watch (Controller) near the TV to enhance audio clarity.
If the Watch (Controller) cannot be placed close to the sound source,
adjust the volume for each ear to achieve optimal audio performance.
Note: When watching TV, please do not enable “Enhanced Noise Reduction
Mode” to ensure the best listening experience.
32
Charging Instructions
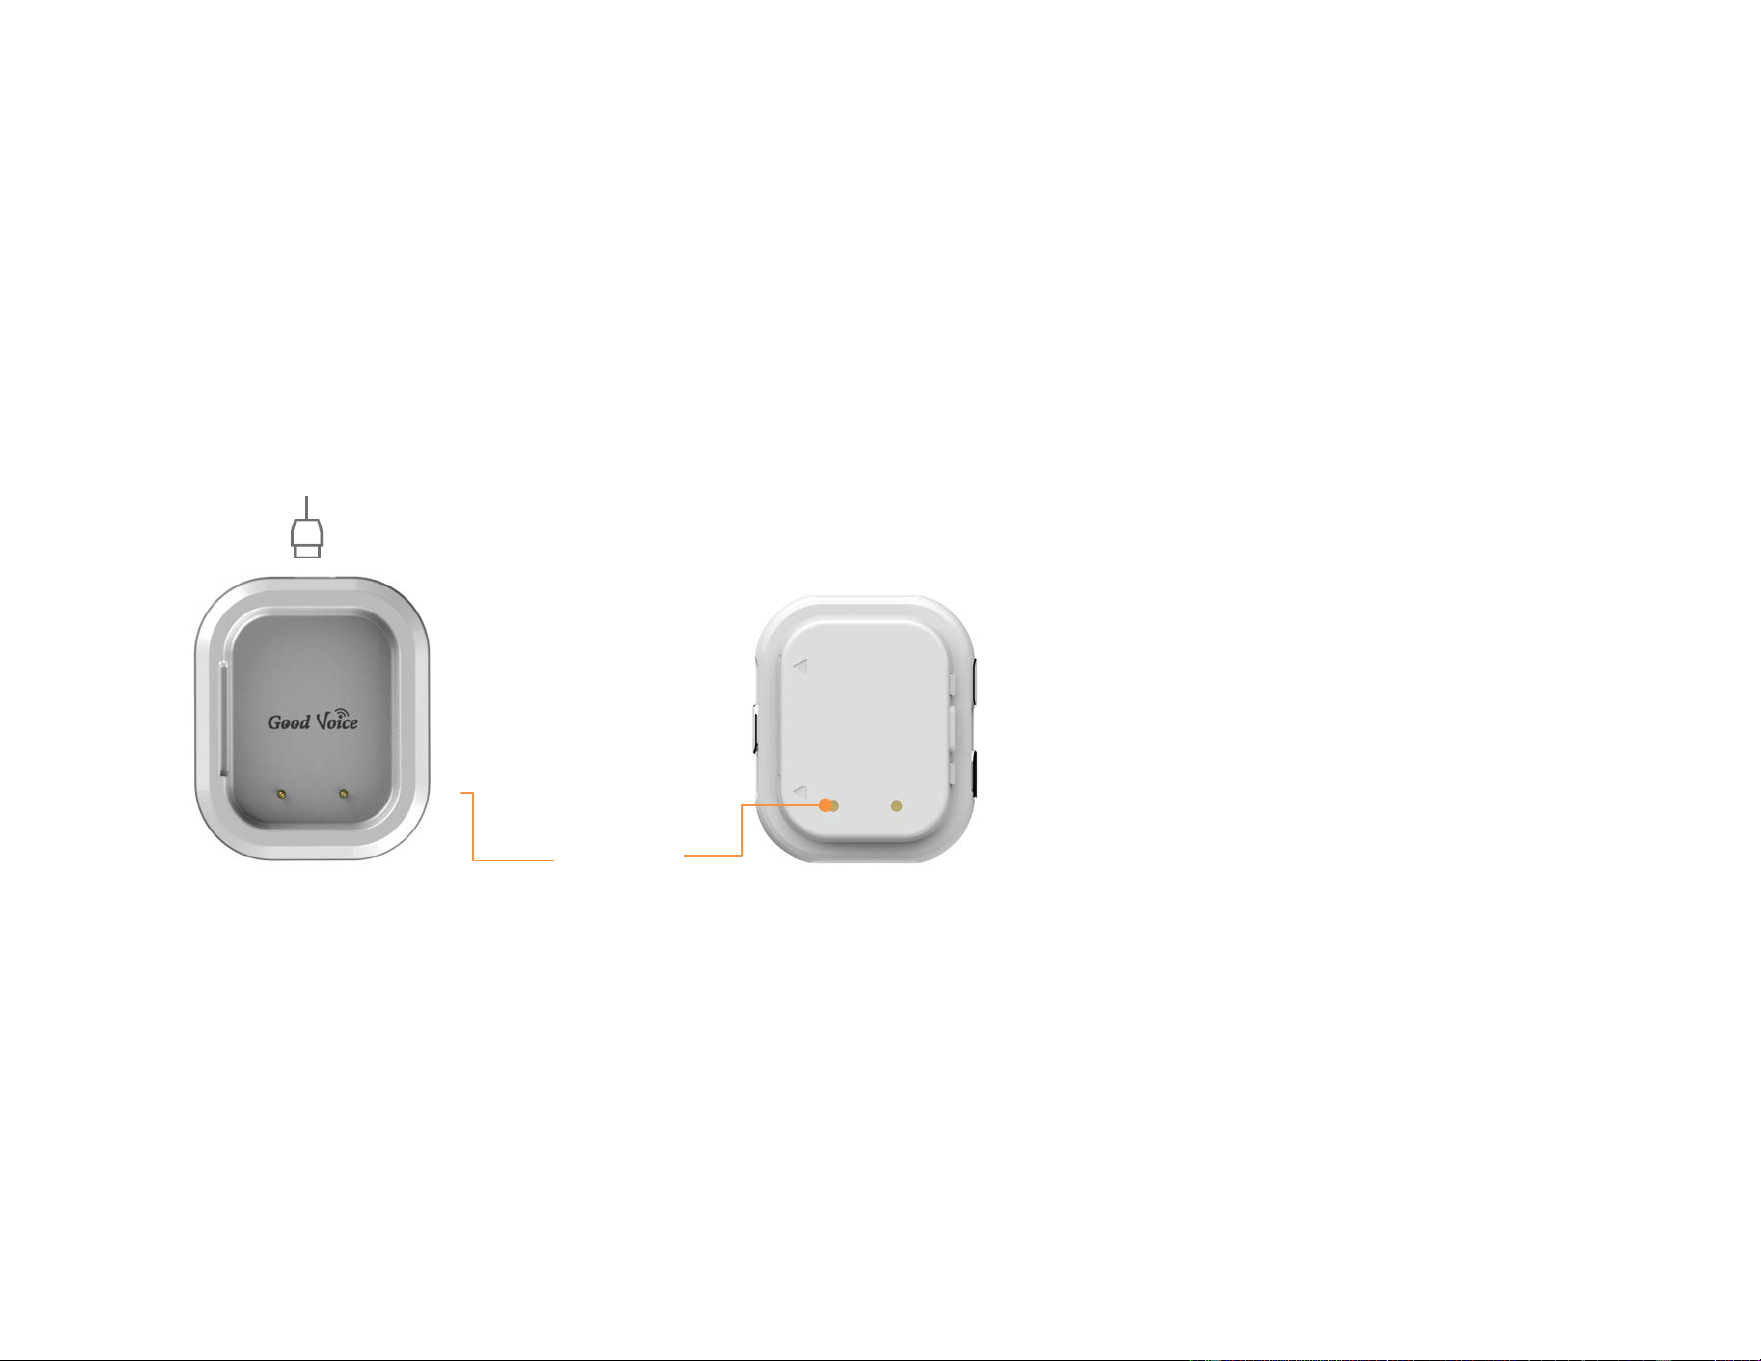
Charging Your Watch (Controller)
Battery brand/Model: Zhongshan Zhongwangde New Energy Technology Co., Ltd./702528
Ensure the charging contacts on the back of the Watch (Controller) are aligned with the pins on the charging
cradle. Then, use the included USB cable to connect the charging port to a power source for charging.
The Watch (Controller) is designed to provide a battery life of up to 28 hours on a full charge.
A fully depleted Watch (Controller) takes approximately 1.5 hours to recharge completely.
Watch Charging Cradle
Rear of the watch
Type-C Charging Cable
Charging
contact

33
Watch (Controller) Battery Status Indicators
● Low Battery :
The battery level of the Watch (controller) is displayed at the top-left corner of the screen. When it drops
below 20%, the battery icon turns red, indicating a low battery that needs to be charged.
● Charging :
The red charging icon appears in the center of the screen to indicate that the device is charging. When the
battery level exceeds 20%, the charging icon turns light blue.
● Charging Completed :
A progress bar moves along the outer edge of the circle to show the charging progress. When the charging
is complete, the progress bar forms a full circle and the battery level shows 100%.
Battery Life
The Good Voice Nexus Watch's battery capacity gradually decreases with use. Lithium-ion batteries lose a small
amount of capacity with each full charge cycle, which consists of a complete discharge and recharge. After 500
cycles, the battery retains 80% of its capacity. However, it can be recharged at any time without needing a full
discharge, ensuring long-lasting performance.
Warning: Risk of explosion if battery is replaced by an incorrect type. Dispose of used batteries according to the
instructions.
34
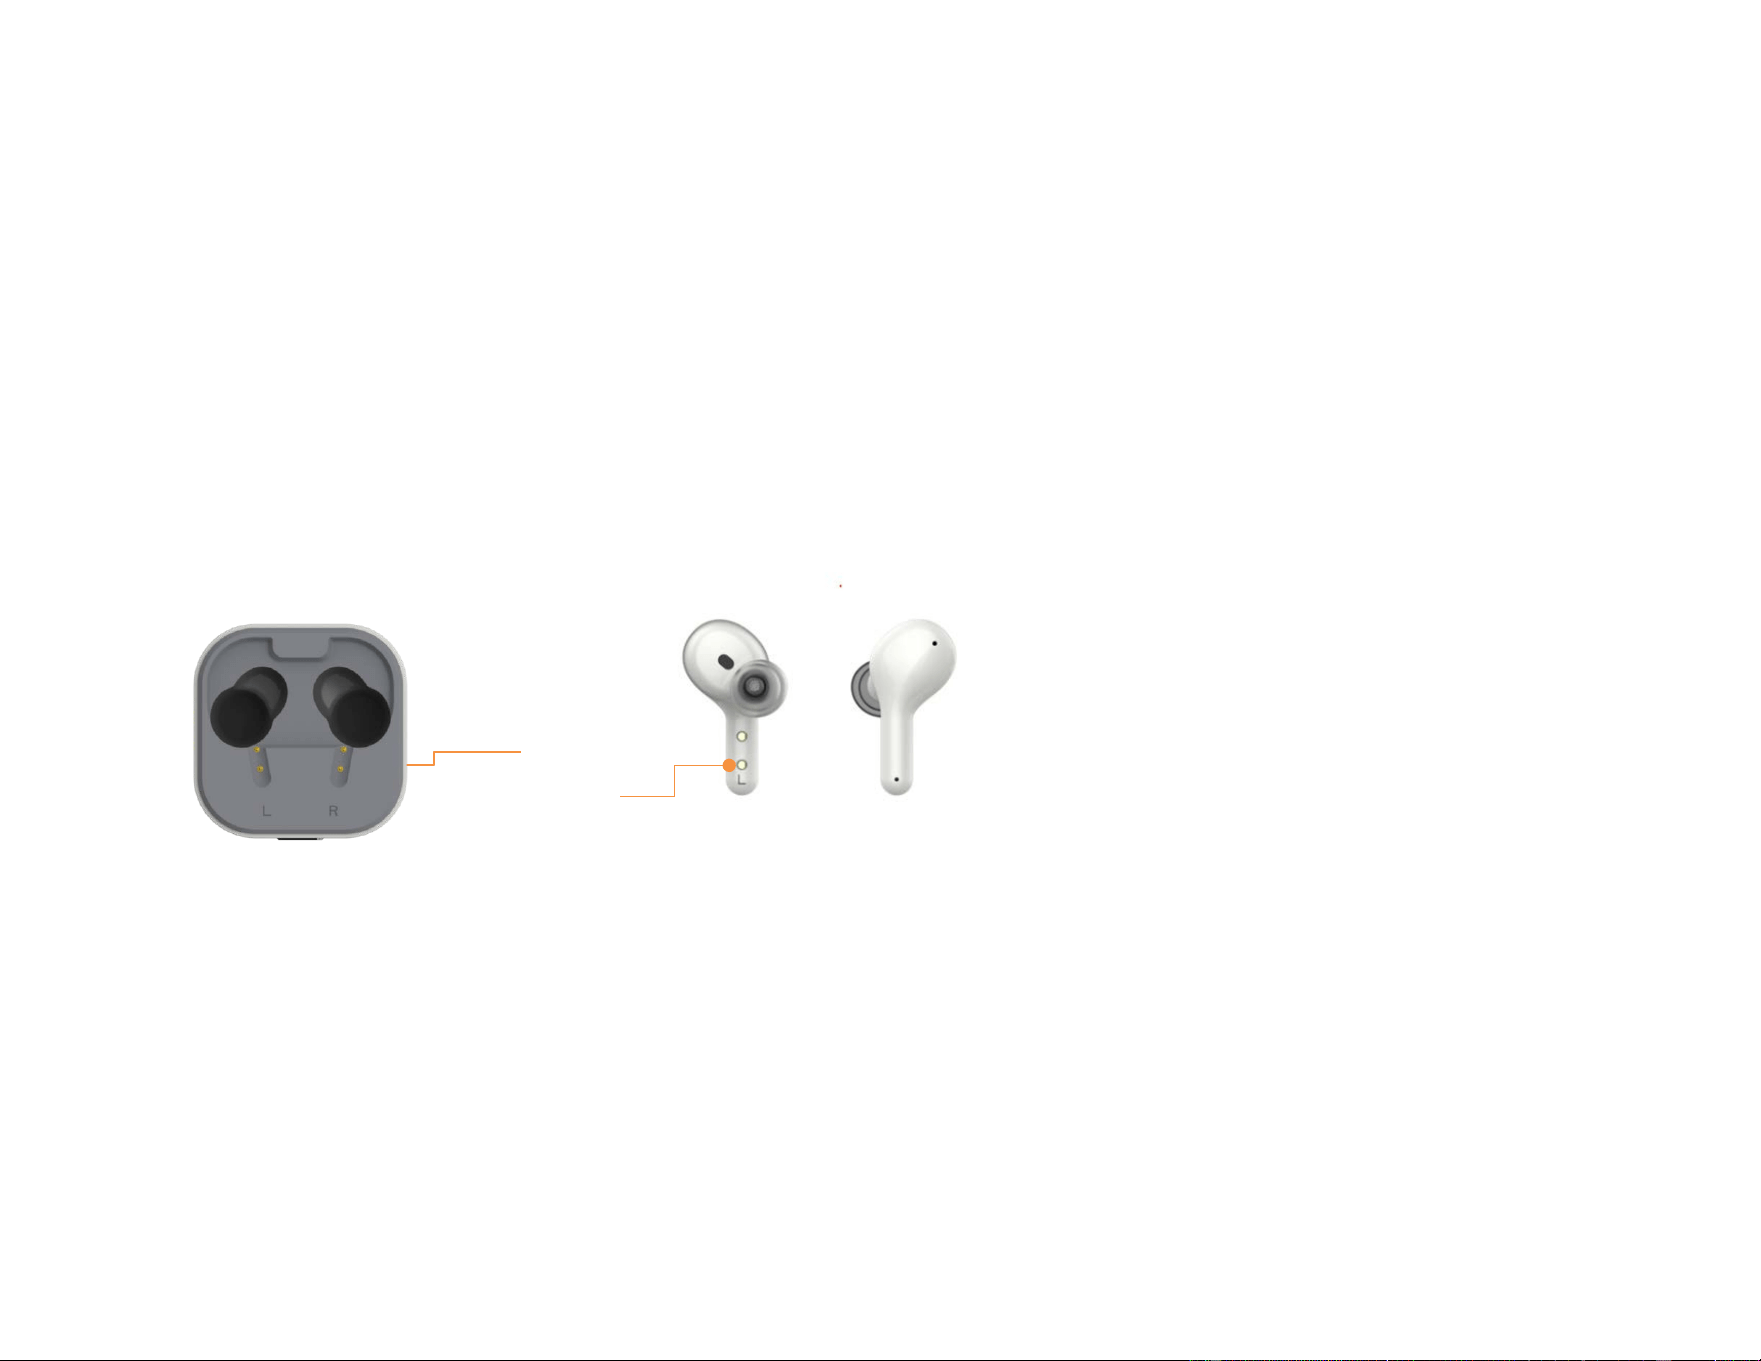
Charging Your Bluetooth Earbuds
● Place the left earbud in the left cradle and the right earbud in the right cradle of the charging case.
● Ensure the charging contacts on the earbuds and the charging cradles are properly aligned.
● Once the earbuds are properly seated and make good contact with the charging pins, the indicator lights
on the charging case will remain solid, confirming a secure connection. The leftmost light indicates the left
earbud, and the rightmost light indicates the right earbud.
● Each light color reflects the battery level of that earbud. Once the lid is closed, the earbuds will turn off
automatically while inside the charging case.
It takes approximately 2 hours to fully charge a fully depleted charging case.
Fully charged earbuds provide up to 8 hours of use. The on-the-go charging case offers up to three additional
full charges (approximately 24 hours), ensuring all-day use.
A 5-minute charge in the charging case provides approximately 35 minutes of use.
Charging
contacts
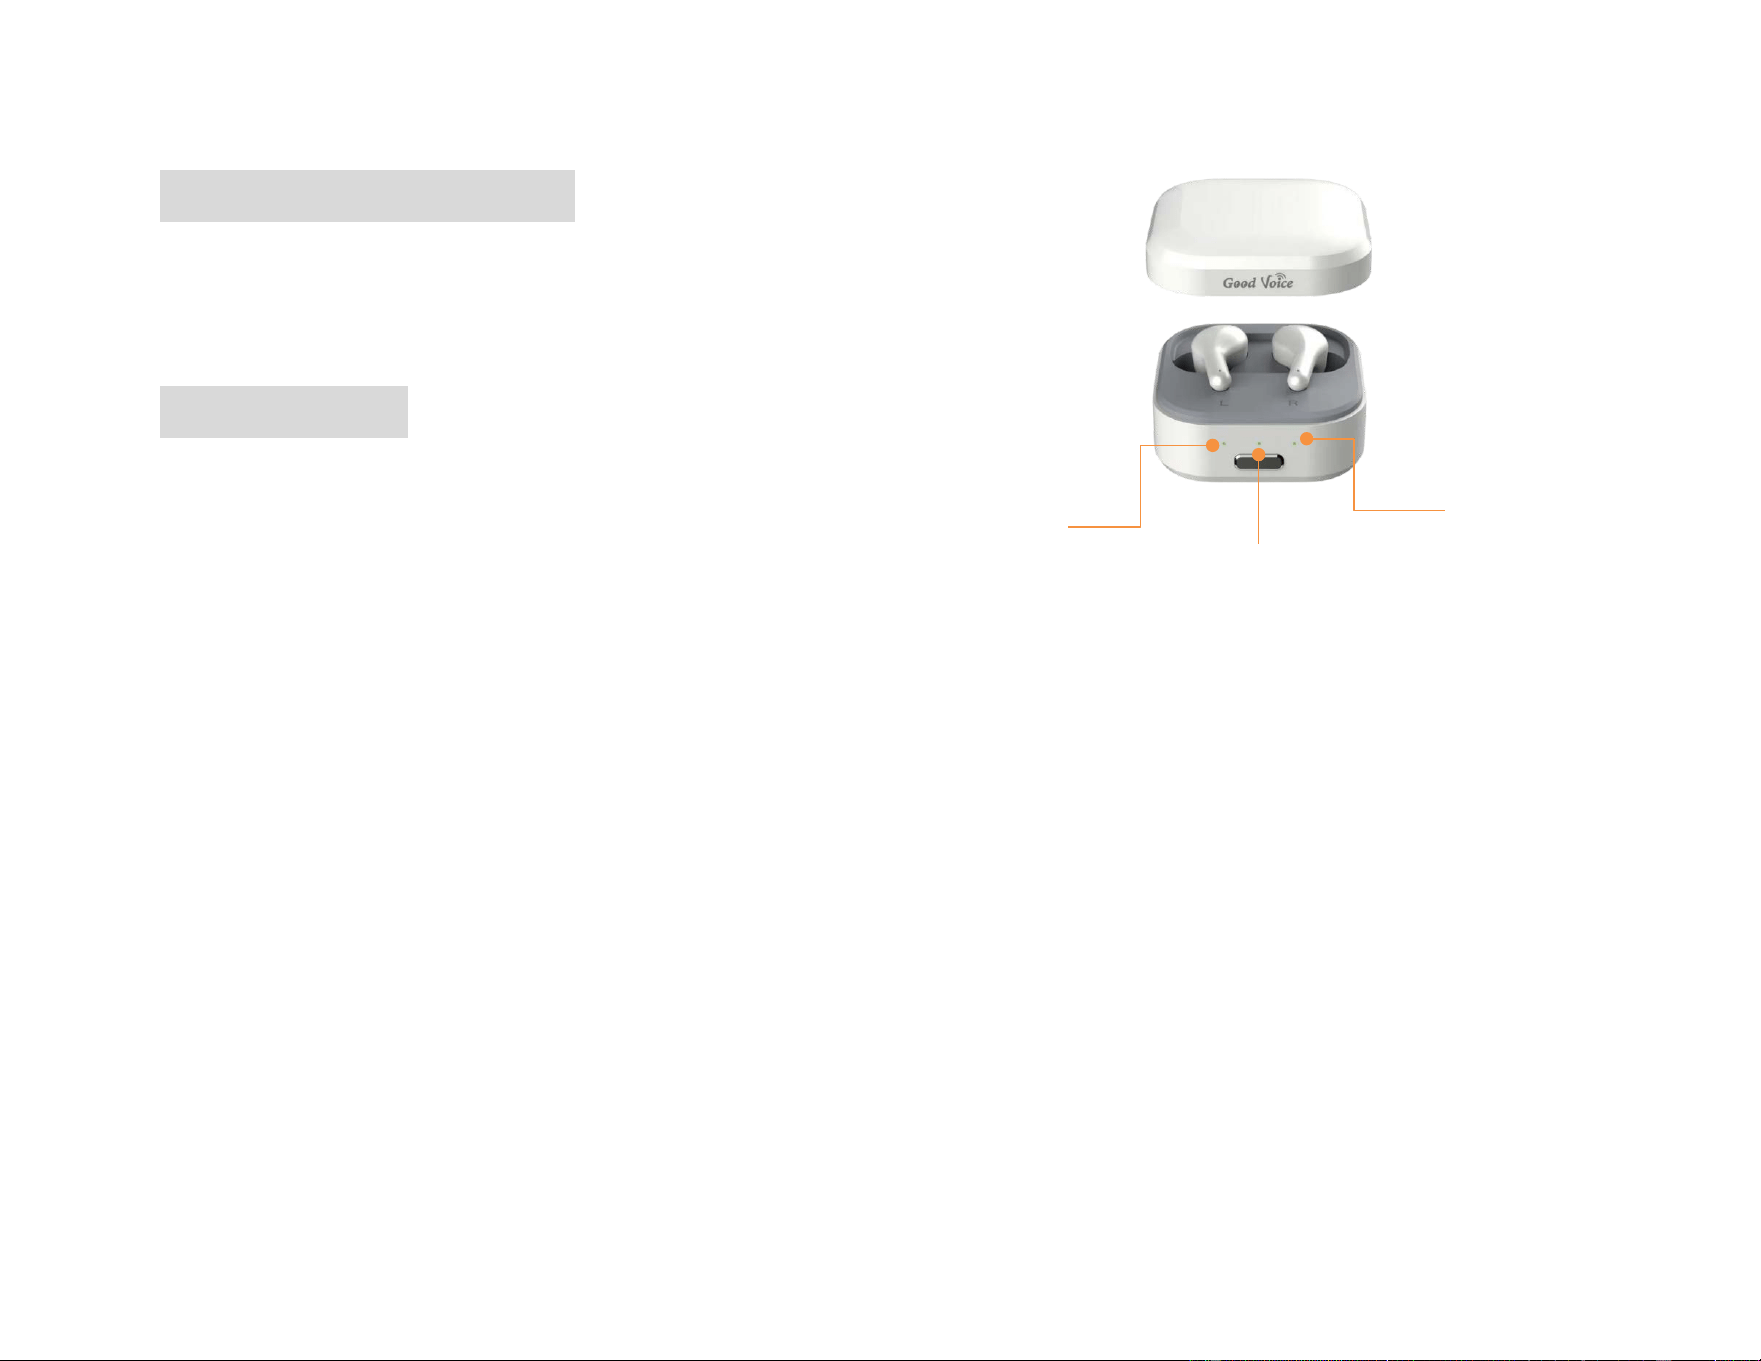
35
Charging case battery indicator
• Left LED: Indicates the battery level of the left earbud.
• Center LED: Indicates the battery level of the charging case.
• Right LED: Indicates the battery level of the right earbud.
LED Color Meaning
• Green light: Battery level is sufficient, above 80%.
• Yellow light: Battery level is approximately 30~80%.
• Amber light: Battery level is below 30%.
Note: You will hear a “Low battery please charge.” alert when the battery level falls below 20%
Notes:
● Always use the USB cable provided in the packaging.
● Do not use non-specified chargers or adapters, as this may damage the device.
● The shelf life of your Good Voice Nexus Watch (controller) and wireless earbuds (including the charging
case) is 1 years. During this time, if stored properly under recommended conditions, the product is
expected to remain functional and safe for use.
● You can expect reliable operation of Your Good Voice Nexus Watch (controller) and wireless earbuds
(included charging case) for up to 1 years, beyond this decreased battery life may occur.
Left LED
Center LED
Right LED

36
Troubleshooting Guide
If you encounter any issues with your device, please try the following steps:
No. Description Possible Cause Solution
1 The Watch (Controller) and
earbuds have never been paired.
Earbuds were replaced with a
new set.
Step 1:
Place the earbuds back to the
charging case and close the lid.
If the hearing aids are paired
with a mobile phone, please
disconnect the Bluetooth pairing
between the phone and the
hearing aids first.
Step 2:
Turn on your Watch (controller).
On the touchscreen, tap the
Setting
icon「 」 , then tap
the
Earbud Pairing
icon
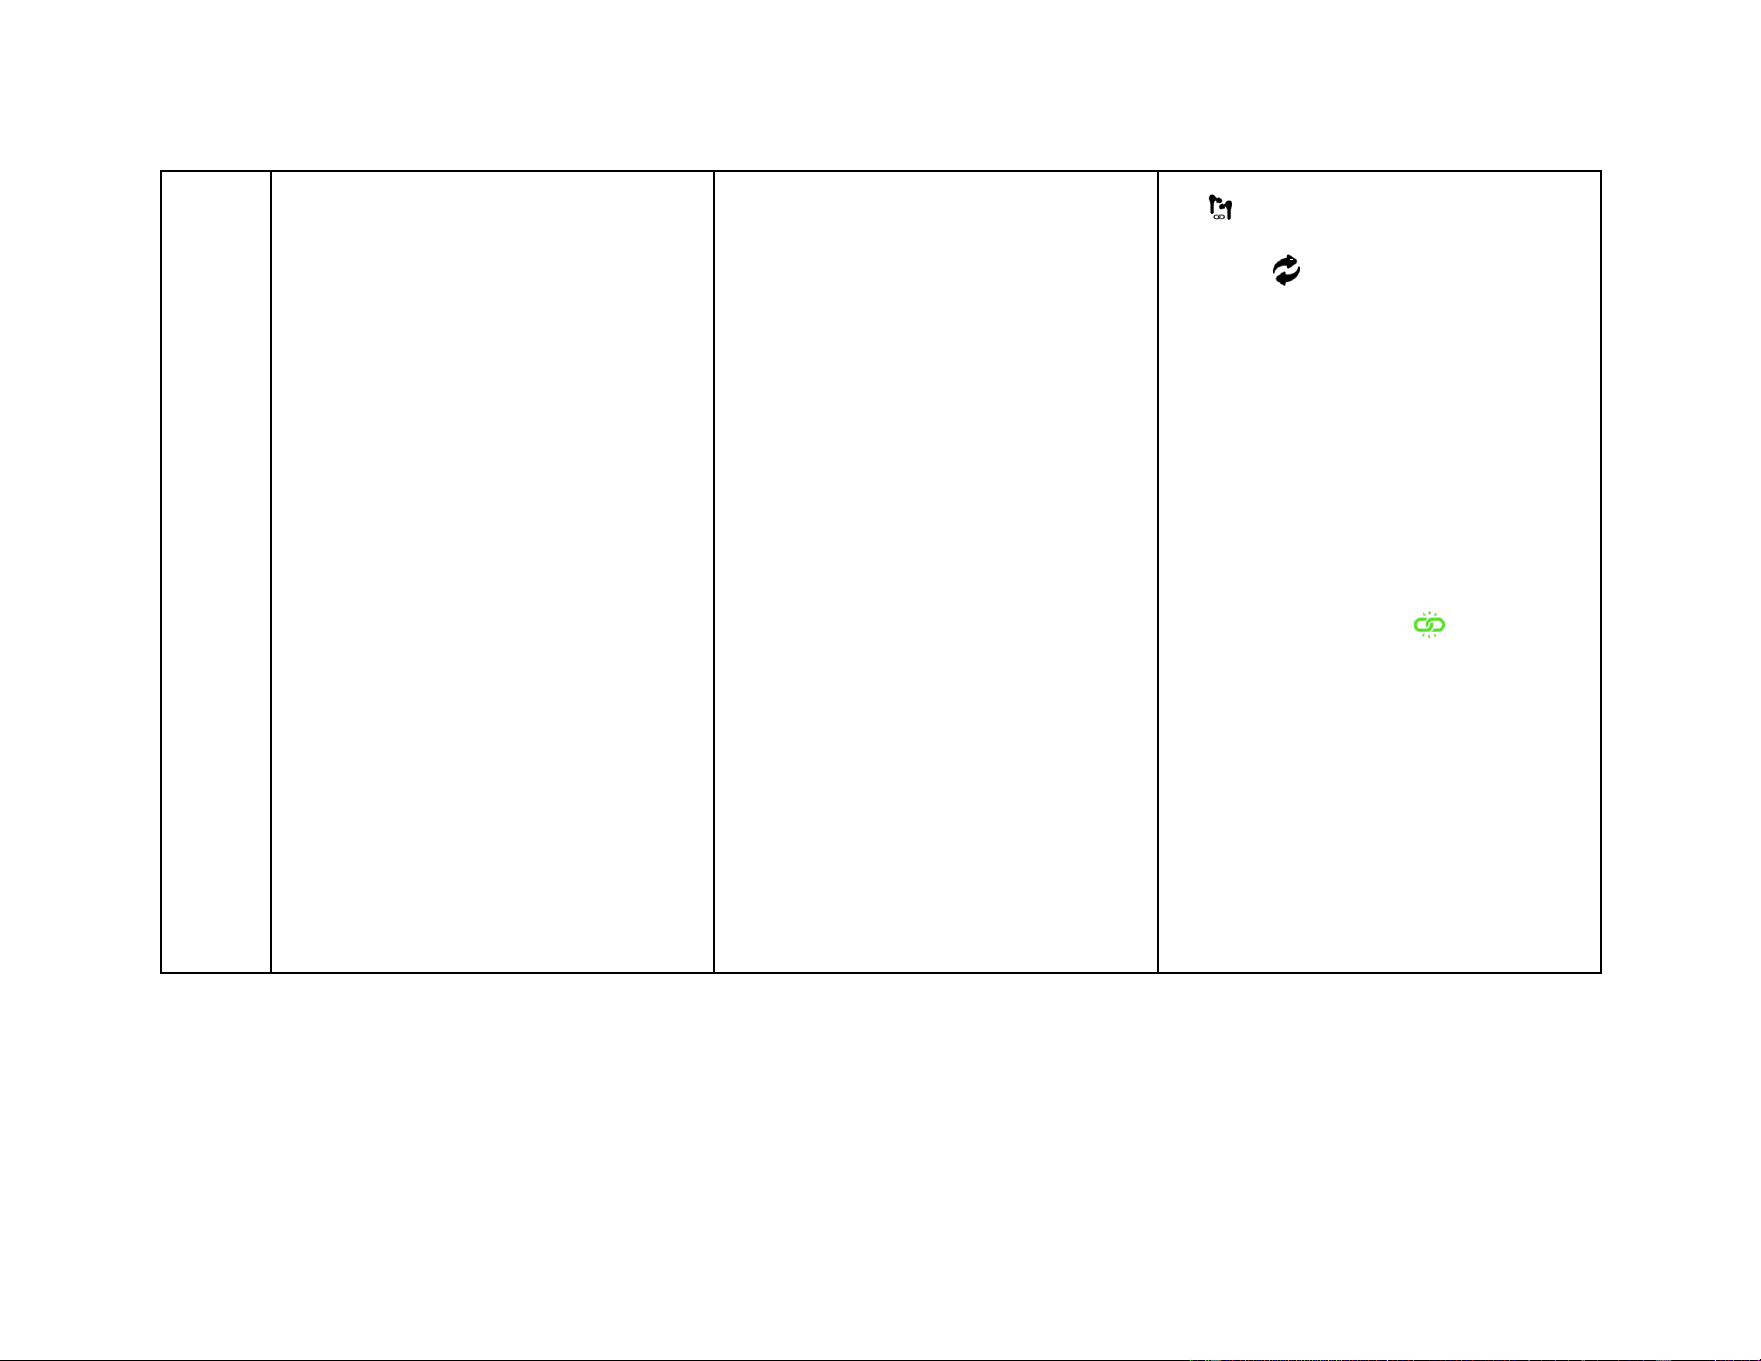
37
「 」, and finally tap the
Pair
icon 「 」 to start pairing.
Step 3:
Remove the earbuds from the
charging case. You will hear a
"Connected" prompt within 5
seconds, At the same time, the
connection icon 「 」 will
appear in the top-right corner of
the watch screen, indicating that
the earbuds and the
Watch(controller) have been
successfully paired.

38
2 The Watch (controller) and
earbuds have been paired, but
they cannot re-pair when both
are powered on.
The Bluetooth connect issue. Place the earbuds into the
charging case and close the lid.
After a few seconds, remove
earbuds from the charging case;
the earbuds and Watch
(Controller) should automatically
re-pair.
If the connection is not restored,
please repeat the first
troubleshooting steps to
manually pair the devices.
3 Loud feedback noise. Earbuds are too close to the
Watch (Controller).
Increase the distance between
the earbuds and the Watch
(Controller), especially when the
volume is set high or when
replacing the ear tips.

39
4 No sound coming from one or
both earbuds
Audio signal transmission error
between the Watch (Controller)
and earbuds.
Place the earbuds back in the
charging case and close the lid
for a few seconds. Then, remove
them from the case again.
The earbuds were not properly
seated in the ear, causing no
sound.
Insert the earbuds into the ear
canal, ensuring they fit snugly
against the concha.
5 No sound in phone calls or audio
streaming mode, even when
your hearing aids is connected to
the mobile phone or Bluetooth
device
The Bluetooth device is muted. During Bluetooth streaming,
ensure that the volume is
adjusted directly on the
connected phone or Bluetooth
device.
6 The watch (controller) screen is
frozen, and tapping any button
The system crashed. Step 1:
When the Watch (Controller) is

40
If there is any other problem, please consult or return the device to your distributor. Do not try to repair a
defective device by yourself.
has no response. already on, press and hold the
physical Power button on the
right side for 10 seconds until
the red power-off icon
disappears from the screen to
reset the system.
Step 2:
After the screen goes completely
dark, wait 5 seconds, then press
the physical power button to
turn on the Watch (Controller)
again.

41
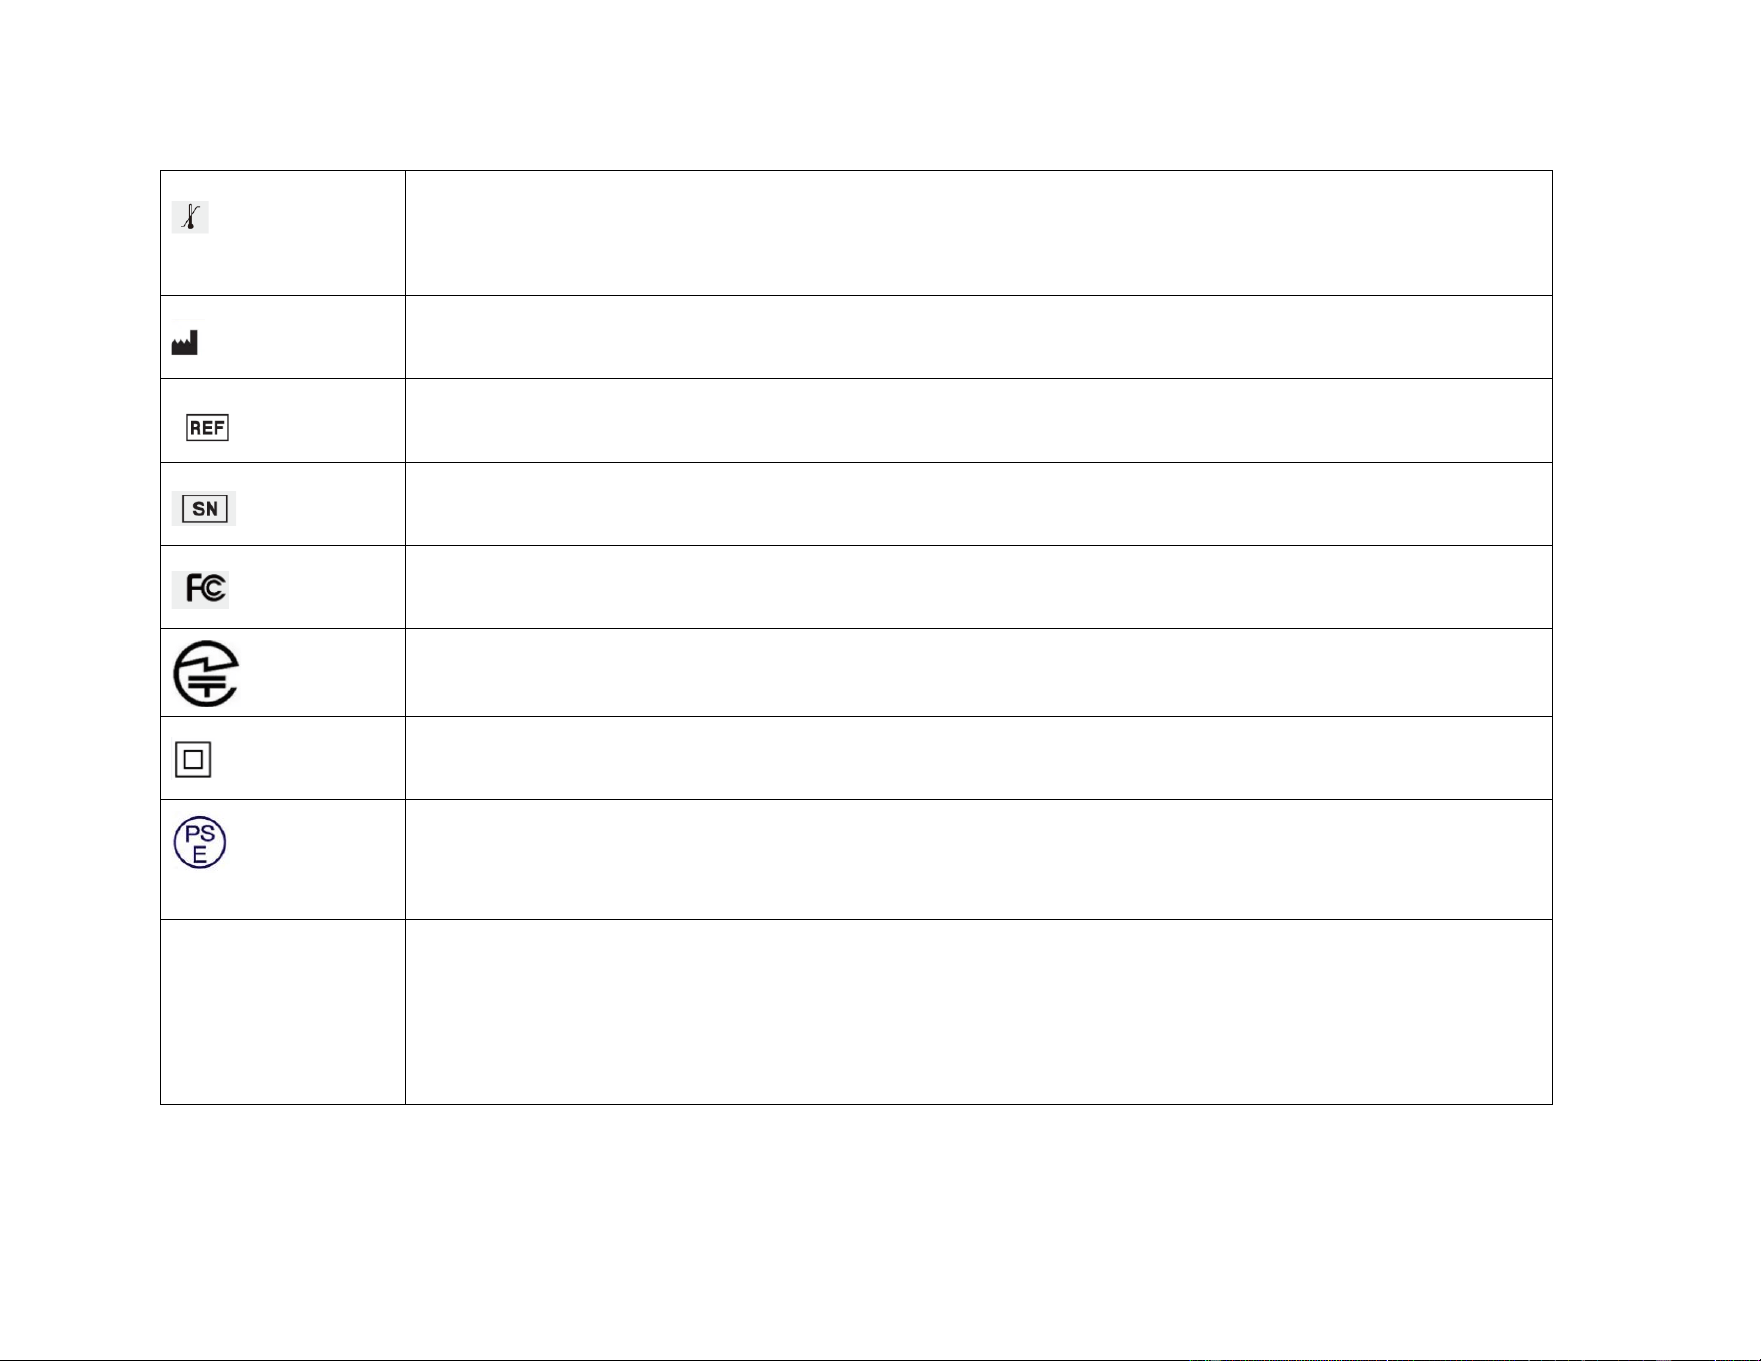
Symbol Information
Symbol Description
Caution: Consult accompanying document.
Consult instructions for use.
Medical device
CE marking indicates that this product complies with applicable European Union directives regarding
health, safety, and environmental protection requirements.
Please follow the national guidelines for electronic product disposal.
Keep away from direct sunlight
Protected from moisture
Do not use it if packaging is damaged.
Humidity limitation: Maintain within recommended levels.
42
Temperature limits: Maintain within recommended levels.
Manufacturer.
Catalogue number.
Serial number.
Federal Communications Commission symbol
This device complies with the technical standards of the Radio Law and the Telecommunications
Business Law of Japan.
Class II devices
This product complies with the Japanese Electrical Appliance and Material Safety Law (DENAN) and
bears the PSE Circle Mark, indicating it meets the required safety standards for electrical products in
Japan
IP54
Protected against limited dust ingress. Dust may enter but will not interfere with the normal operation of
the device.
Protected against water splashes from any direction.
Important: The device is not waterproof or completely dustproof. Do not submerge it in water or expose
it to heavy moisture, such as strong rain or water jets.

43
Wireless Technical Description
Your Good Voice Nexus hearing aid system is classified as Class II Exempt per 21 CFR 874 and Class II Type BF
per IEC 60601-1 Medical Electrical Equipment.
This hearing aid model has been tested to, and has passed, the following EMC, emissions, and immunity tests:
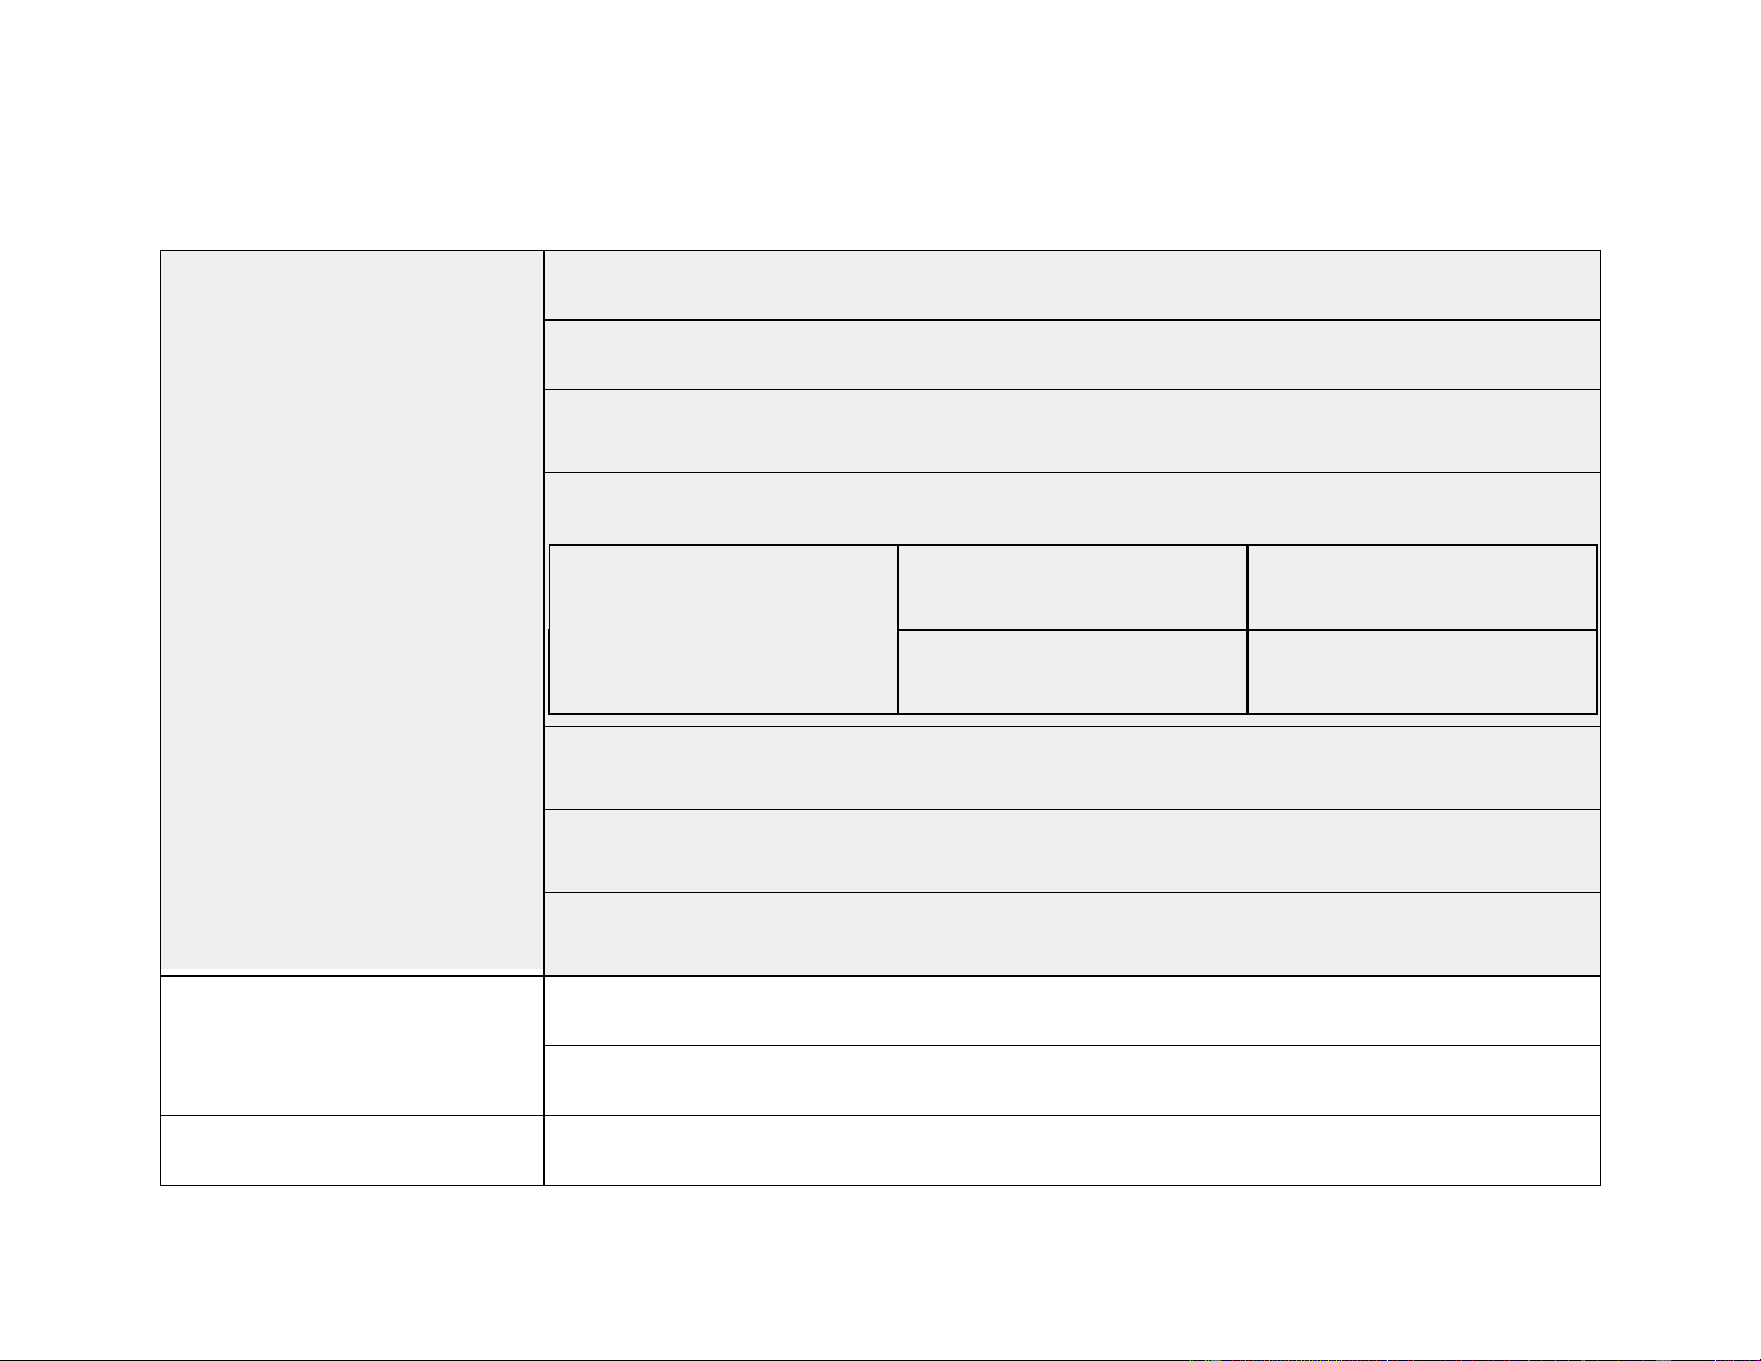
Electromagnetic Emission
Good Voice Nexus hearing aids are intended for use in the Electromagnetic environment specified below.
The user should assure that your Good Voice Nexus is used in such an environment
Emission Compliance Electromagnetic environment guidance
RF emissions
CISPR 11
Group 1 The Good Voice Nexus uses RF energy only for its
internal function. Therefore, its RF emissions are very
low and are not likely to cause any interference in
nearby electronic equipment.
RF emissions
CISPR 11
Class B The Good Voice Nexus is suitable for use in all
establishments, including domestic establishments and
those directly connected to the public low-voltage
Harmonic current emissions
IEC 61000-3-2
Class A

44
Voltage Fluctuations/flicker
emissions
IEC61000-3-2
Compliance power supply network that supplies buildings used for
domestic purposes.
Electromagnetic Immunity
Good Voice hearing aids are intended for use in the Electromagnetic environment specified below.
The user should assure that your Good Voice Nexus is used in such an environment
Immunity Test IEC60601 test
level
Compliance
level
Electromagnetic environment guidance
Electrostatic
discharge (ESD)
IEC 6100-1-2
±8 kV contact
±- 15 kV .
Compliant Floors should be wood, concrete, or ceramic tile. If
floors are covered with synthetic material, the relative
humidity should be at least 30%.
45
Technical Specifications
Audio Specs
Max Output: 116dB (OSPL90)
Max Output Gain: 39 dB (HFA-FOG)
Frequency Range: 200~8KHz
THD+N @ 500Hz 70dB 1.6%
100 dB <1%
Equivalent Input Noise <32dBA
Latency : 5.6 ms
Frequency response smoothness : 4.4 dB
Compatibility
Bluetooth Version: BT 5.3
Bluetooth Codecs: LC3, SBC, AAC
Input Rating Watch (Controller): 5Vdc, 0.63A

46
Charging case: I/P 5Vdc, 0.6A; O/P:5Vdc, 0.32A
Bluetooth Earbuds: 5Vdc, 0.095A
Battery Life
Watch (Controller): Approx. 28 hours
Wireless Earbuds: 8 hours
With Charging Case: Approx. 32 hours
Charging Time
Watch (Controller): Approx. 1.5 hours
Wireless Earphones: Approx. 1 hours
With Charging Case: Approx. 2 hours
Battery Capacity
Watch (Controller)r: 600 mAh / 3.7V
Wireless Earbuds: 60mAh / 3.7V
Charging Case: 600mAh / 3.7V
Charging Port Type-C
Operating Conditions
Temperature: 32°F to 122°F (0°C to 50°C)
Humidity: 5% to 85% RH (must consider all components: Watch (controller), and
earbuds

47
Atmospheric pressure: 70~106KPa
Storage/Transportation
Conditions
Temperature: -4°F to 158°F (-20°C to 70°C)
Humidity: 5% to 85% RH
Atmospheric pressure: 70~106KPa

48
FCC Warning Statement
Changes or modifications not expressly approved by the party responsible for compliance could void the user's
authority to operate the equipment.
This device complies with Part 15 of the FCC Rules. Operation is subject to the following two conditions: (1) this
device may not cause harmful interference, and (2) this device must accept any interference received, including
interference that may cause undesired operation
This device has been tested and found to comply with the limits for a Class B digital device, pursuant to Part 15
of the FCC Rules. These limits are designed to provide reasonable protection against harmful interference in a
residential installation. This device generates, uses and can radiate radio frequency energy and, if not installed
and used in accordance with the instructions, may cause harmful interference to radio communications.
However, there is no guarantee that interference will not occur in a particular installation. If this device does
cause harmful interference to radio or television reception, which can be determined by turning the device off
and on, the user is encouraged to try to correct the interference by one or more of the following measures:
● Reorient or relocate the receiving antenna.
● Increase the separation between the device and receiver.
● Connect the device into an outlet on a circuit different from that to which the receiver is connected.
● Consult the dealer or an experienced radio/TV technician for help.

49
Manufacturer Information
OK Biotech Co., Ltd.
Address: No. 91, Sec. 2, Gongdao 5th Rd., Hsinchu City 30070, Taiwan (ROC)
Website: www.okbiotech.com
Tel: +886-3-5160258
Made in Taiwan
Service and Warranty
General Warranty Information:
OKB warrants the product to be free from defects in workmanship and materials for the duration of the warranty
period. If the product fails during normal and proper use within the warranty period, OKB may, at its discretion,
repair or replace the defective parts or the product itself with new or reconditioned parts/products of equal or
superior functionality.
The warranty applies only to products newly manufactured at the time of purchase and does not cover used,
refurbished, or manufacturing seconds. Please retain your original purchase invoice for warranty claims.

50
Warranty Period and Coverage:
● 30-Day Money-Back Guarantee: Begins on the delivery date and expires on the 31st day.
● 1-Year Manufacturer’s Warranty: Starts on the delivery date and lasts 365 days. For replacements, the
warranty duration is calculated from the original purchase date.
● If proof of purchase is unavailable, the manufacturer’s recorded date will be used as the warranty start
date.
This warranty covers all OKB Hearing aids and accessories purchased directly from OKB and includes defects in
materials or workmanship under normal use.
This warranty excludes damage or failure caused by:
● Improper installation, operation, cleaning, or maintenance
● Tampering, unauthorized repairs, or modifications
● Loss or theft
● Wear and tear, including changes in texture, color, or finish
● External factors such as accidents, natural disasters, or electrical faults
● Use outside recommended operational conditions as stated in the user manual
Customer Responsibilities:
● Read the user manual and follow instructions carefully.

51
● Avoid overcharging; unplug the product once fully charged.
● Keep the original packaging for transportation if servicing is required.
How to Claim Warranty Service:
1. Contact customer support in the back page with a description of the issue.
2. Provide proof of purchase.
3. Follow instructions for sending the product for evaluation.
Out-of-Warranty Cases:
If the warranty period has expired or exclusions apply, OKB will offer a service estimate. Repairs will proceed
only after customer approval and payment.
International Warranty:
The warranty applies only in the country of purchase.
Limitation of Liability:
OKB is not responsible for incidental or consequential damages beyond the scope of this warranty.

52
Your Warranty Information
Thank You for Choosing OKB OTC Hearing Aid. This warranty is valid for a period of 12 months from the date
of purchase. To ensure smooth service, please keep your warranty card in a safe place.
- Name:
- Address:
- Phone:
- E-mail:
- Production Lot Number:
- Date of Purchase:
- Purchased from (Dealer’s Name)
Contact Details
Email: [email protected]
Phone: +1 626-225-0621
Business Hours: 9:00 AM – 6:00 PM (PST) | Monday - Friday
Business Address: 414C Cloverleaf Dr, Baldwin Park, CA 91706
GV-NX1_UG_EN_V2APR26