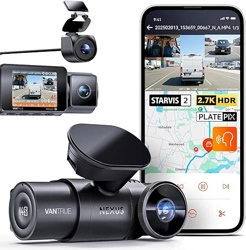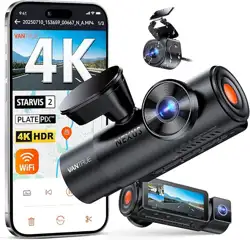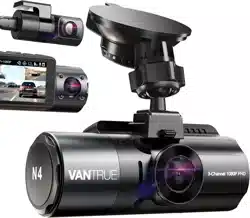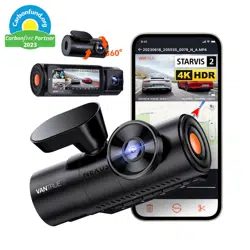
3-Channel Voice Controlled
Sma Dash Cam
Nexus 4 Pro (N4 Pro)
User Manual

Hey, find us here:
www.vantrue.net/contact
facebook.com/vantrue.live

CONTENTS
01
02
03
04
05
06
07
What’s in the box?
Camera Oveiew
Installation
Basic Operation
Specications
Warnings
Warranty & Suppo
1
2
5
14
36
38
39

Warm Tips:
Please read the User Manual carefully before use;
The dash cam must be plugged in to operate;
Please do not debug the product or use your mobile
phone to watch driving videos during driving, and pay
attention to driving safety;
This product requires the inseion of an SD card for
use. Please use a functional SD card;
Do not disassemble or repair the dash cam casing by
yourself. If the product malfunctions, please contact
the ocial VANTRUE.
Do not install the dash cam in a location that may
obstruct the driving view;
Please use this product away from high temperature
and humid environments;
In order to improve the product experience, the
rmware of the product will be updated periodically. If
necessa, you can update the rmware to experience
it;
Do not install the dash cam directly in front of
passengers to prevent accidental detachment and
potential safety hazards;
Please note that it may not be possible to connect to
the app when using CarPlay or Android Auto;
Please use this product within the scope permitted by
law.
1.
2.
3.
4.
5.
6.
7.
8.
9.
10.
11.
- 1 -
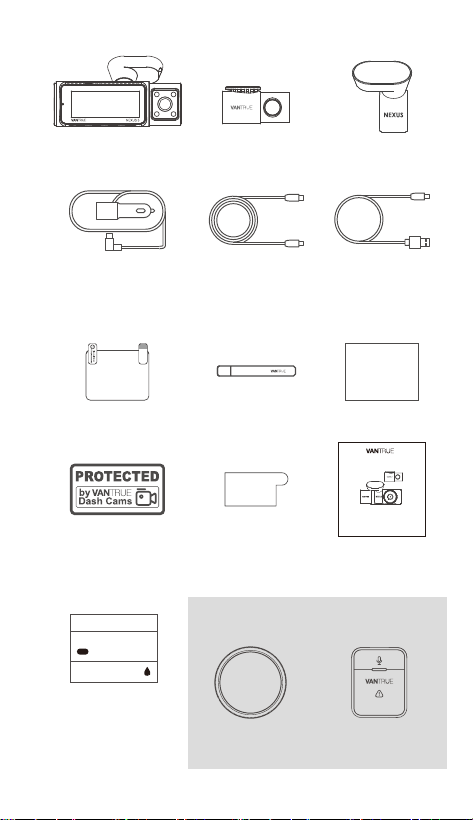
1. What’s in the Box?
A. Vantrue N4 Pro
Dash Cam
B. Rear Camera C. GPS Adhesive
Mount
D. Car Charger with
Built-in Type-C
Cable (11.5ft)
E. Rear Camera
Cable (20ft)
F. Type-C USB
Data Cable (3.3ft,
for data transfer
only)
H. CrowbarG. Electrostatic
Stickers*2
J. Warning Stickers
*2
K. 3M Adhesive
Stickers*2
I. Dust-free Cloth
L. User Guide
3M
3-Channel Voice Controlled
Sma Dash Cam
Nexus 4 Pro (N4 Pro)
Quick User Guide
CPL Filter Wireless Remote
Control
Optional Accesso
M. Bracket
Adhesion
Promoter
CONNECTS THE WORLD
Primer
Adhesion promoter
EN
Non-woven wipes
2.0ml
- 2 -
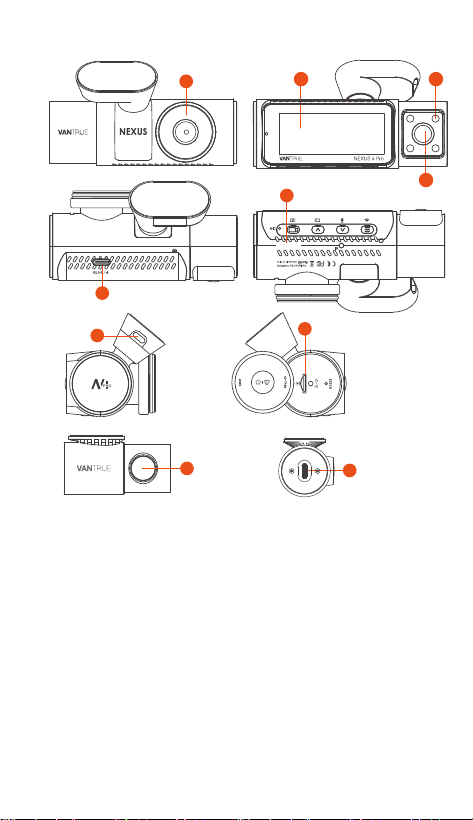
2. Camera Oveiew
5
6
VTE22L1577
9
10
8
7
1
2 3
4
1. Front Camera
2. 3.19" IPS screen
3. Infrared Lights for Cabin Camera
4. Cabin Camera
5.
TYPE-C Po for Connecting Rear Camera Cable or
Transferring Data
6. Serial Number
7. TYPE-C Po for Charging
8. Memo Card Slot
9. Rear Camera
10. TYPE-C Po on Rear Camera
- 3 -- 3 -
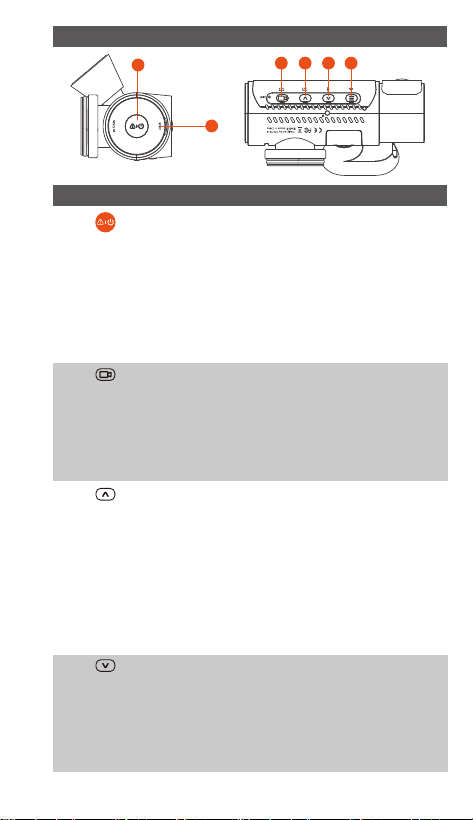
KEYS AND FUNCTIONS
1. In the power-on state, long press to turn
o the camera; in the power-o state,
sho press to turn on the camera.
In the recording inteace, sho press to
turn on emergency recording and
snapshot.
In le browsing, sho press to pop up
the menu for deleting les
2.
3. During video recording, sho press to
switch the video window;
In the menu setting and le browsing
screen, sho press to select the previous
option or le, and long press to scroll
through the above options or les.
When playing back the le, sho press to
play back the video at 2X and 4X times
speed.
In the recording screen, sho press to
turn on or pause the recording.
In the menu settings, sho press to
conrm the option.
In the playback video, sho press to
play the video or pause the video.
During video recording, sho press to
turn on/o the microphone; Long press
to enter parking mode (this operation
can be done with parking mode on)
In the menu settings and le browsing
screen, sho press to select the next
4.
No. Key Instruction
6
1
2 3 4 5
5.
During video recording, long press to
turn on/o Wi-Fi;
In the menu setting and le browsing
inteace, sho press to return to the
previous inteace.
option or le and long press to scroll
through the options or les below.
When playing a le, sho press to pop
up a menu for deleting les.
6.
Sho press to resta the camera
LED Indicator
LED LED Status Description
REC Steady green light
Blinking green light
Instandby
Camera is recording
Screen Oveiew
- 4 -
C
R
F
MP/H
14:25:35 06-01-202300:00:37
35
2160P+1080P+1080P 30FPS
G-Sensor is ON
G-Sensor is OFF
GPS is located
GPS is OFF
Memo card inseed
Loop recording for 1
min
Loop recording for 3
mins
Loop recording for 5
mins
Loop recording OFF
Video
Resolution
R means Rear
Camera
Time and Date
F means Front Camera
Voice control is ON
Voice control is OFF
Recording Time(Current Clip)
Collision Detection ON
1080P Low Bitrate Recording ON 15FPS
720P Low Bitrate Recording ON 15FPS
Motion Detection
Low Framerate Mode
Time Lapse ON
IR Auto Mode
IR Always On Mode
IR Mode is OFF
Mic is ON
Mic is O
C means Cabin
Camera
Display
Emergency
File Locked
NO Memo card/SD
card error
Remote control is
connected
Privacy Mode
2.4G Wi-Fi is ON
5G Wi-Fi is ON
2.4G Wi-Fi is Connected
5G Wi-Fi is Connected
Wi-Fi is Turned OFF
ACC normal
Recorded Driving Speed
(KMH/MPH)
- 5 -
File Format Denition
20300128_140933_0008_N_A.MP4
20300128_140833_0007_P_B.MP4
20300128_140733_0006_T_C.MP4
20300128_140633_0005_S_A.MP4
A for the front camera
B for cabin camera
C for rear Camera
N for loop recording
T for time lapse video
S for privacy recording
E for event recording
Year Date Time
P for the video recorded
in the parking mode
Sequence
Number
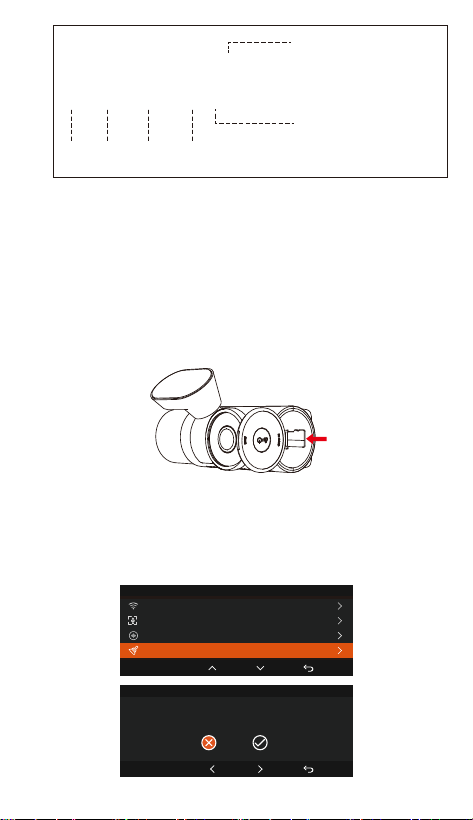
3. Installation
3.1 Inseing a Memo Card (Recommended: Vantrue
high-speed microSD card).
You need to push the memo card(Memo card
capacity: 32GB -512GB, card speed requirements: U3/
Class10/A2) into the slot with your ngernail (in the
direction shown) until you hear a "click" from the slot,
which indicates that the card has been inseed
correctly.
After inseing the memo card, if the screen prompts
"SD Card Error" (please note that the dash cam does not
record at this time), please go to the "System Set up"
menu and select "Format", click OK to "Format memo
card" until it prompts "Format successful".
Format SD Card
OK
All data will be deleted!
OK
System Setup
5/14
Format SD Card
Wi-Fi
Voice Control
Voice Content
- 6 -
Format SD Card
OK
Format SD Card
Format SD Card
OK
Format successful
The dash cam has ceain requirements for the card
speed of the memo card. It requires a U3/Class10/
A2 memo card. If the card speed is not fast, there
may be problems such as missing les, frequent error
repoing by the memo card, and abnormal video
les.
Memo cards are sold separately. We recommend
choosing VANTURE's custom high-speed A2-class
memo cards.
We recommend formatting the card once a month to
ensure the normal operation of the dash cam.
Do not remove or inse the memo card during
recording to avoid losing impoant videos.
REMINDER:
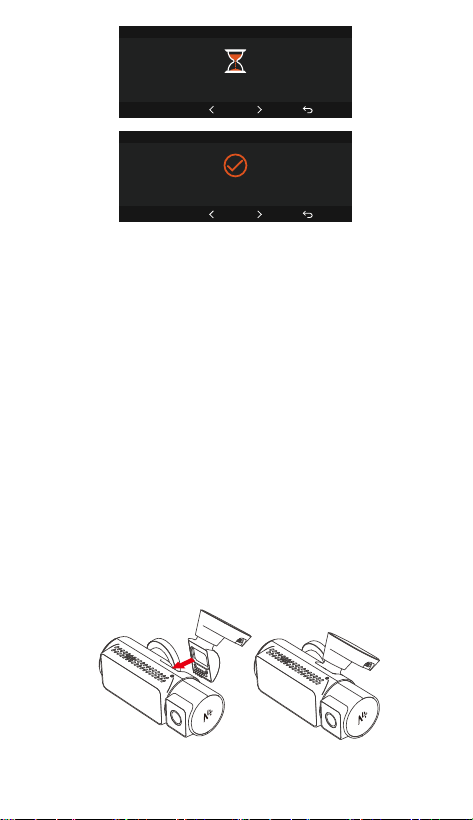
3.2 Installation
3.2.1 Installation of Front Camera Mount
Align the mount with the dash cam mount inteace
then push in until the mount is installed.
•
•
•
•
- 7 -
Before installing the N4 Pro front camera, please turn it
on and check whether the shooting angles of the front
camera and the cabin camera are suitable through the
screen of the N4 Pro.
3.2.2 Car Charger Installation
Connect one end of the car charger to the car cigarette
lighter and the other end to the Type C po on the
front camera mount. Sta the ignition, waiting for the
dash cam to sta.
3.2.3 Power on the Dash Cam to Select the
Installation Location
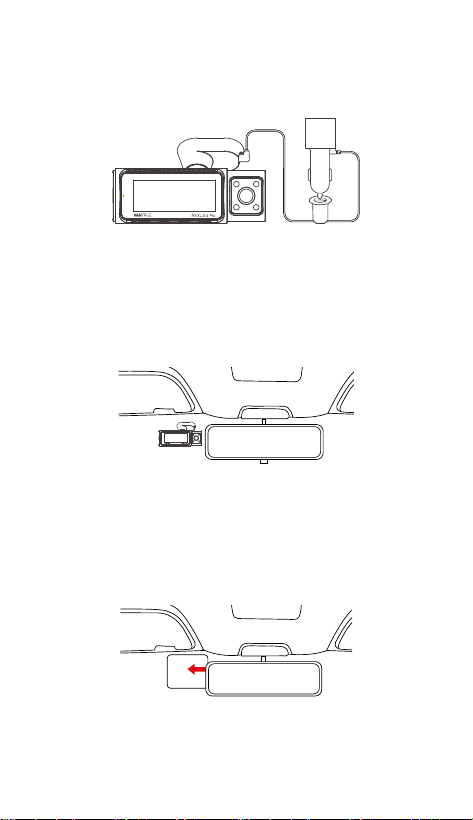
3.2.4 Installation of electrostatic stickers
Thoroughly clean the windshield with water or alcohol,
then wipe it with a d cloth. Stick the electrostatic
sticker next to the rear- view mirror, which is the
recommended position to prevent blocking your view
while driving.
Note: There are two protective lms numbered 1 and 2.
Please remove the protective lm from No. 1, paste the
electrostatic sticker on the windshield, and then remove
Electrostatic
sticker
- 8 -
3.2.5 Front Camera Installation
Remove the protective lm from the mount, then x the
mount and camera on the electrostatics stickers.
Please peel o this mask
AFTER application completed
Please peel o this
mask BEFORE application
the protective lm from No.2. Remove the 3M tape
from the mount, then x the mount and camera on the
electrostatics stickers.
Note: In order to install the bracket more rmly, we
recommend applying bracket adhesion promoter on
the ② side of the electrostatic sticker before installing
the bracket.
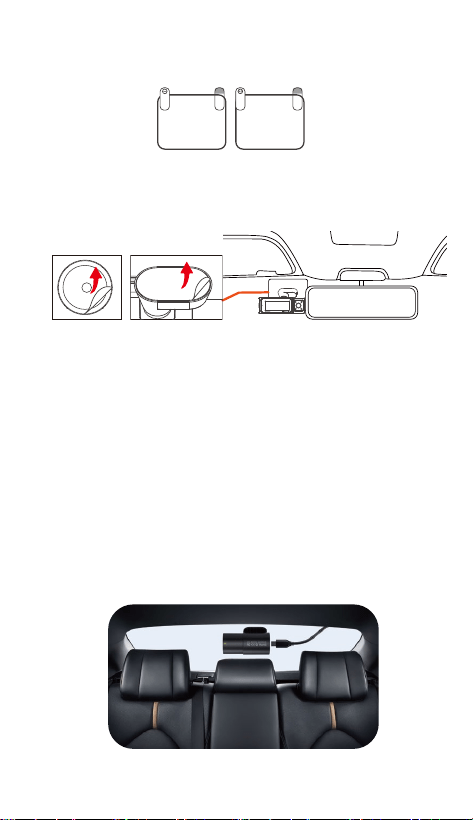
3.2.6 Rear Camera Installation
Please select the installation position on the rear
windshield. Remove the protection lm of the sticky
pad and rear camera lens. Take out the rear camera
cable and connect the rear camera to the front main
camera with the rear camera cable, and connect the
car charger to power on.
After the camera is powered on, choose a suitable
location and install it.
- 9 -
Note:
•
•
•
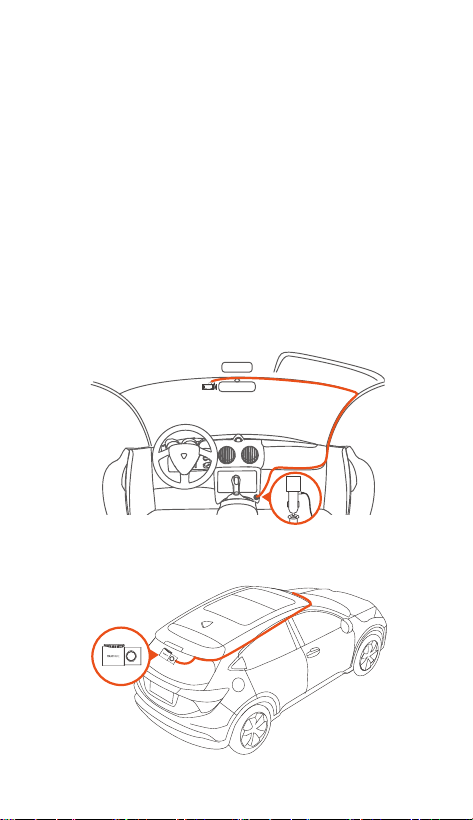
3.2.7 Wire Arrangement
Car charger cable: Use the VANTRUE included p bar
to inse the car charger cable into the seal of the
A-pillar and windshield, from the passenger position to
the cigarette lighter.
We recommend that you select a position close to
the center of the rear windshield, and avoid the
defogging line on the rear windshield, so as not to
aect the video eect.
After the rear camera is xed, it is recommended that
the lens be cleaned with the VANTRUE matching
dust-free cloth.
The angle of the cabin camera can be adjusted up
and down by 45°, and the rear camera can be
adjusted by 360°.
Rear camera cable: Arrange the rear camera cable from
the front windshield to the rear windshield, as shown in
the picture below.
- 10 -
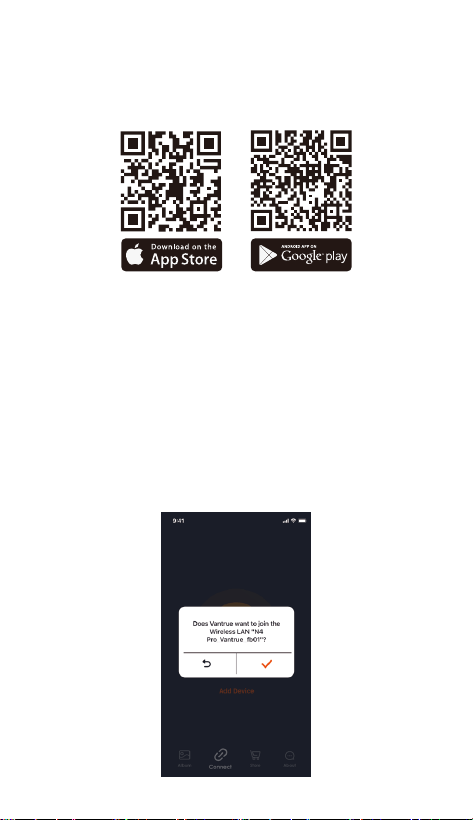
3.3 APP Download
Please scan the QR code for the relevant version below
to download the app and install it. Search for the
"Vantrue" app in App Store or Google Play Store to nd
the app and then download and install it on your phone.
3.4 Wi-Fi Connection
The camera's Wi-Fi will automatically turn on for 10
minutes when the N4 Pro dash cam is turned on, and
the Wi-Fi will automatically turn o after 10 minutes of
no operation. Users can re-enable the camera's Wi-Fi
through shocut keys, voice control or go to the menu
to set these 3 ways.
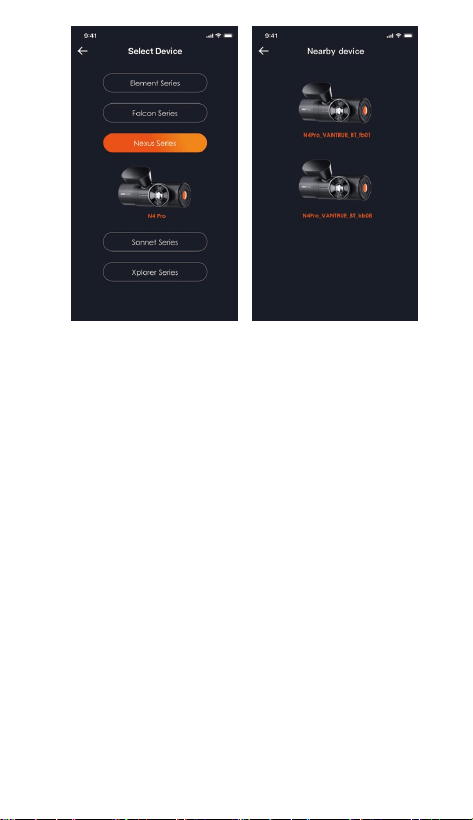
After the Wi-Fi of N4 Pro dash cam is turned on, click
"Add Device", select Nexus series, choose N4 Pro model,
conrm the corresponding Wi-Fi name, and nally click
to conrm the Wi-Fi connection.
- 11 -
Before connecting to the camera's Wi-Fi, please check
if the phone's Wi-Fi function is on.
The initial password for this device is only used for
initial login. In order to prevent potential security
risks, please be sure to change the initial password
after the initial login to prevent others from logging
into your device without authorization or other
adverse consequences.
If you forget the Wi-Fi password, you can restore the
default setting of the device, and the Wi-Fi of the
device will also be restored to the default
password(12345678).
After your phone successfully connects to the
camera's Wi-Fi, you can operate live video preview,
change camera settings, play back videos on the dash
cam on your phone, and other functions. However,
the GPS track playback and video sharing functions
will depend on the internet or telecom value-added
seices (requires you to turn o/disconnect the
camera Wi-Fi).
Note:
•
•
•
•

- 12 -
After entering the APP real-time preview, you can do
the following operations.
3.5 APP Connection
Camera Setting
Camera
Correction
Auxilia Line
Mileage
Statistics
Full-screen Icon
Microphone
ON/OFF
Switching Front,
Cabin and Rear
Displays
Stop Recording
Icon
Album
Snapshot
1.
2.
3.
4.
Video preview: After the APP connects to the
recorder successfully, the recorder enters the
real-time preview page, click the full screen button
or cell phone horizontal playback, the real-time
screen automatically switches to full screen preview
mode. Click the window switch button to switch the
front, cabin and rear video windows, but only
multi-channel recording mode can use this function.
Playback video: You can view the recorded video or
photo les in the SD card in the APP, click "File" and
then select the video to play back.
Video download: You can choose to download
videos or pictures in the SD card browse le
inteace or in the video playback. After downloading
the video, you can play it in the App local le and
view the GPS track of the video.
Video capture: App real-time preview inteace can
capture the current picture.
- 13 -
5.
7.
6.
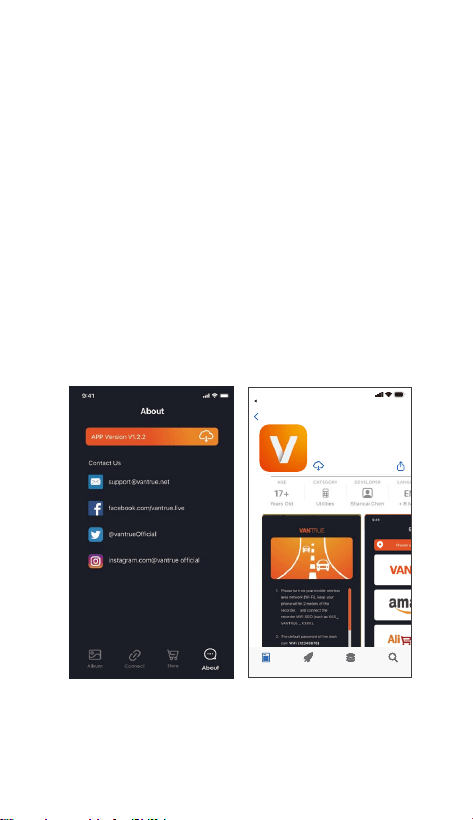
3.6 APP Upgrade
Open "Vantrue" App, connect the camera Wi-Fi, go to
"Settings> About", click "Detect new version", the App
will automatically detect whether the App version is the
latest version. If there is a new version of the App, follow
the instructions of the App to operate and upgrade the
version.
Vantrue Ltd.
Vantrue
Vantrue
9:41
Today Games Apps Search
Back
Mileage statistics: users can click to download the
mileage information according to their needs. The
mileage information will be saved in the APP as a
picture or PDF le.
Camera correction line: The lens balance is corrected
by the accurate cross line, so that the recording
image will not be skewed.
OTA upgrade: Remote upgrade N4 Pro front and
rear camera through APP, please refer to 4.2.12
content description for details.

- 14 -
The N4 Pro dash cam has 3 function menus, which are:
record setup, system set up, and les. You can set your
dash cam according to your requirements with these
function setting.
Press the button, pause the video rst, then press
the button to enter the menu settings.
4. Basic Operation
4.1 Menu Settings
Record Setup
OK
A.Record Setup
-Resolution: The N4 Pro camera has 4 resolution modes:
Front + Inside + Rear Recording:
2160P+1080P+1080P 30FPS;
2160P+720P+720P 30FPS;
1440P+1080P+1080P 30FPS;
1440P+720P+720P 30FPS;
1080P+1080P+1080P 30FPS;
1080P+720P+720P 30FPS;
720P+720P+720P 30FPS
Front + Cabin Recording:
2160P+1080P 30FPS;
2160P+720P 30FPS;
1440P+1080P 30FPS;
1440P+720P 30FPS;
1080P+1080P 30FPS;
1080P+720P 30FPS;
720P+720P 30FPS;
Front + Rear Recording:
2160P+1080P 30FPS;
2160P+720P 30FPS;
1440P+1080P 30FPS;
1440P+720P 30FPS;

- 15 -
1080P+1080P 30FPS;
1080P+720P 30FPS;
720P+720P 30FPS
Front Recording:
3840x2160P 30FPS;
2560x1440P 30FPS;
1920x1080P 30FPS;
1280x720P 30FPS
-Loop Recording: Default setting is 1 min. You can
choose the options among 1/3/5 min and OFF.
-IR LEDs: The default setting is Auto. You can set it to
auto/o/ on.
-G-Sensor: Select the level of G-sensor you need, then
you can set 3 directions (Front + Rear/Left + Right/Up
+ Down). The G-sensor value in each direction can be
selected as 1/2/3/4/5/ O. The higher the sensitivity
level, the easier it is to trigger event recording.
G-sensor is most sensitive when set to 5.
-Privacy Mode: The default setting is o. You can
choose to turn it on, and it will record in private mode
after turning it on.
-Audio Recording: The default is ON. Set recording to
on or o.
-Exposure: You can set the camera exposure value of
the front/inside/rear camera of the car separately. The
default is +0.0.
-REC Status Light: Default setting is ON. You can
choose to turn on/o the recording status light.
-HDR: The default setting is on. You can adjust the
HDR on or o of the front, interior, and rear cameras
separately.
-Rotate Display: Default is o. You can choose to ip
the video screen up and down (180 degrees) for the
front + cabin, and rear camera.
-Mirror: The default setting is on. When it is on, the
screen of the cabin and rear camera is displayed in
mirror mode.
-Number Plate: Select the number or letter to be set.
After setting, your license plate number can be
displayed in the recorded video.
-Stamp: Enable or disable the watermark stamp on
video and photos. The watermark stamp includes time
and date label, VANTRUE label, license plate number,
GPS location information, and speed label. All enabled
by default.
-Time Lapse: The default value is disabled. You can
choose to enable 1FPS/5FPS/10FPS/15FPS.
-Parking Mode: You can choose the parking mode you
need, including Collision Detection/Motion
Detection/Low Bitrate Recording/Low Framerate
Mode/OFF.
-Low-light Night Vision in Parking Mode: Default is
on. When turned on, it can optimize the recording
eect of videos in parking mode.
-Motion Detection Area: Adjust the motion detection
range of the front area and the rear area of the car
respectively.
-Mileage Statistics: The default setting is on. Turn on
this function, the dash cam will record the mileage
information, and you can expo the mileage statistics
through the mileage statistics function in APP.
-GPS Settings: GPS is enabled by default. GPS ON/OFF
settings, speed unit settings, and GPS information are
all set here.
B. System Setup
-Language: Available languages are Engish/Français
/Español/Deutsch/Italiano/简体中文/русский/日本語
/Polski/한국어.
-Wi-Fi: You can choose Wi-Fi mode, view Wi-Fi
information, etc.
The Wi-Fi auto-on option means that the Wi-Fi will
automatically turn o after 10 minutes of turning on. If
you choose on, Wi-Fi will always stay on; if you choose
o, Wi-Fi needs to be turned on manually.
Wi-Fi mode is 5G by default.
Wi-Fi information displays the Wi-Fi name and Wi-Fi
password.
-Voice Control: The default sensitivity is Standard.
Voice commands can be recognized after the option is
turned on. You can choose options such as low
sensitivity/high sensitivity/standard/o.
-Voice Content: You can use dierent commands to
remote control the camera to work.
-Format SD Card: Format all data on the memo card.
-Format Reminder Setup: Select the reminder options:
15 Days, 1 Month, and O. Default is o.
To prevent you from forgetting to format the memo
card regularly, we have added a format reminder time
setting. You can choose to be reminded after 15 days
or 1 month, and calculate 15 days or 1 month from the
set date. When the time is up, you can choose "OK" to
format, or choose "Next."
Note: If you changing the format reminder option, the
timing will resta as soon as the option is changed.
-Date&Time: There are two ways to set the time and
date:
1. GPS auto update: GPS will update the time
automatically when it is turned on by default. GPS auto
update date and time is based on the time zone where
you set, so you need to choose the correct time zone
rst;
2. Manual set date/time: Turn o GPS auto update and
set date and time manually.
Summer/Winter time auto switch: The default setting is
o.
When turned on, it will switch automatically according
to the daylight saving time and winter time dates.
*This feature is only available in Noh America, if used
in other regions, it may cause time errors.
The date format and time zone settings are also set in
this menu.
-Auto LCD O: Set the time to automatically turn o
the LCD display after no operation.
If you set the Auto LCD O to 3 min, the camera’s LCD
screen will auto light o after 3 min but recording will
continue. If the setup is O, the screen will not turn o.
You can choose the options among 30s, 1Min, 3Min and
OFF.
-Device Sound: Set the volume of the device. The
default volume level is 2, the lowest is 0, and the highest
is 5.
-Warning Tone: According to dierent situations, the
dash cam is set with 5 kinds of prompt tones, which are
power-on/o sound, keys sound, le locked sound,
format sound, and abnormal stop recording reminder.
All prompt tones are turned on by default.
-Frequency: Dierent countries have dierent
frequencies. In order to avoid aecting the video, you
can choose 50Hz or 60Hz frequency according to
dierent regions.
-System Info: Check the current model, rmware
version, and the Vantrue ocial website.
-Ceication Info: You can view the ceication
information of N4 Pro dash cam.
-Default Settings: Reset the device back to facto
settings.
C. Files
Review the video and photo les recorded by the
camera.

- 16 -
-Loop Recording: Default setting is 1 min. You can
choose the options among 1/3/5 min and OFF.
-IR LEDs: The default setting is Auto. You can set it to
auto/o/ on.
-G-Sensor: Select the level of G-sensor you need, then
you can set 3 directions (Front + Rear/Left + Right/Up
+ Down). The G-sensor value in each direction can be
selected as 1/2/3/4/5/ O. The higher the sensitivity
level, the easier it is to trigger event recording.
G-sensor is most sensitive when set to 5.
-Privacy Mode: The default setting is o. You can
choose to turn it on, and it will record in private mode
after turning it on.
-Audio Recording: The default is ON. Set recording to
on or o.
-Exposure: You can set the camera exposure value of
the front/inside/rear camera of the car separately. The
default is +0.0.
-REC Status Light: Default setting is ON. You can
choose to turn on/o the recording status light.
-HDR: The default setting is on. You can adjust the
HDR on or o of the front, interior, and rear cameras
separately.
-Rotate Display: Default is o. You can choose to ip
the video screen up and down (180 degrees) for the
front + cabin, and rear camera.
-Mirror: The default setting is on. When it is on, the
screen of the cabin and rear camera is displayed in
mirror mode.
-Number Plate: Select the number or letter to be set.
After setting, your license plate number can be
displayed in the recorded video.
-Stamp: Enable or disable the watermark stamp on
video and photos. The watermark stamp includes time
and date label, VANTRUE label, license plate number,
GPS location information, and speed label. All enabled
by default.
-Time Lapse: The default value is disabled. You can
choose to enable 1FPS/5FPS/10FPS/15FPS.
-Parking Mode: You can choose the parking mode you
need, including Collision Detection/Motion
Detection/Low Bitrate Recording/Low Framerate
Mode/OFF.
-Low-light Night Vision in Parking Mode: Default is
on. When turned on, it can optimize the recording
eect of videos in parking mode.
-Motion Detection Area: Adjust the motion detection
range of the front area and the rear area of the car
respectively.
-Mileage Statistics: The default setting is on. Turn on
this function, the dash cam will record the mileage
information, and you can expo the mileage statistics
through the mileage statistics function in APP.
-GPS Settings: GPS is enabled by default. GPS ON/OFF
settings, speed unit settings, and GPS information are
all set here.
B. System Setup
-Language: Available languages are Engish/Français
/Español/Deutsch/Italiano/简体中文/русский/日本語
/Polski/한국어.
-Wi-Fi: You can choose Wi-Fi mode, view Wi-Fi
information, etc.
The Wi-Fi auto-on option means that the Wi-Fi will
automatically turn o after 10 minutes of turning on. If
you choose on, Wi-Fi will always stay on; if you choose
o, Wi-Fi needs to be turned on manually.
Wi-Fi mode is 5G by default.
Wi-Fi information displays the Wi-Fi name and Wi-Fi
password.
-Voice Control: The default sensitivity is Standard.
Voice commands can be recognized after the option is
turned on. You can choose options such as low
sensitivity/high sensitivity/standard/o.
-Voice Content: You can use dierent commands to
remote control the camera to work.
-Format SD Card: Format all data on the memo card.
-Format Reminder Setup: Select the reminder options:
15 Days, 1 Month, and O. Default is o.
To prevent you from forgetting to format the memo
card regularly, we have added a format reminder time
setting. You can choose to be reminded after 15 days
or 1 month, and calculate 15 days or 1 month from the
set date. When the time is up, you can choose "OK" to
format, or choose "Next."
Note: If you changing the format reminder option, the
timing will resta as soon as the option is changed.
-Date&Time: There are two ways to set the time and
date:
1. GPS auto update: GPS will update the time
automatically when it is turned on by default. GPS auto
update date and time is based on the time zone where
you set, so you need to choose the correct time zone
rst;
2. Manual set date/time: Turn o GPS auto update and
set date and time manually.
Summer/Winter time auto switch: The default setting is
o.
When turned on, it will switch automatically according
to the daylight saving time and winter time dates.
*This feature is only available in Noh America, if used
in other regions, it may cause time errors.
The date format and time zone settings are also set in
this menu.
-Auto LCD O: Set the time to automatically turn o
the LCD display after no operation.
If you set the Auto LCD O to 3 min, the camera’s LCD
screen will auto light o after 3 min but recording will
continue. If the setup is O, the screen will not turn o.
You can choose the options among 30s, 1Min, 3Min and
OFF.
-Device Sound: Set the volume of the device. The
default volume level is 2, the lowest is 0, and the highest
is 5.
-Warning Tone: According to dierent situations, the
dash cam is set with 5 kinds of prompt tones, which are
power-on/o sound, keys sound, le locked sound,
format sound, and abnormal stop recording reminder.
All prompt tones are turned on by default.
-Frequency: Dierent countries have dierent
frequencies. In order to avoid aecting the video, you
can choose 50Hz or 60Hz frequency according to
dierent regions.
-System Info: Check the current model, rmware
version, and the Vantrue ocial website.
-Ceication Info: You can view the ceication
information of N4 Pro dash cam.
-Default Settings: Reset the device back to facto
settings.
C. Files
Review the video and photo les recorded by the
camera.

- 17 -
-Loop Recording: Default setting is 1 min. You can
choose the options among 1/3/5 min and OFF.
-IR LEDs: The default setting is Auto. You can set it to
auto/o/ on.
-G-Sensor: Select the level of G-sensor you need, then
you can set 3 directions (Front + Rear/Left + Right/Up
+ Down). The G-sensor value in each direction can be
selected as 1/2/3/4/5/ O. The higher the sensitivity
level, the easier it is to trigger event recording.
G-sensor is most sensitive when set to 5.
-Privacy Mode: The default setting is o. You can
choose to turn it on, and it will record in private mode
after turning it on.
-Audio Recording: The default is ON. Set recording to
on or o.
-Exposure: You can set the camera exposure value of
the front/inside/rear camera of the car separately. The
default is +0.0.
-REC Status Light: Default setting is ON. You can
choose to turn on/o the recording status light.
-HDR: The default setting is on. You can adjust the
HDR on or o of the front, interior, and rear cameras
separately.
-Rotate Display: Default is o. You can choose to ip
the video screen up and down (180 degrees) for the
front + cabin, and rear camera.
-Mirror: The default setting is on. When it is on, the
screen of the cabin and rear camera is displayed in
mirror mode.
-Number Plate: Select the number or letter to be set.
After setting, your license plate number can be
displayed in the recorded video.
-Stamp: Enable or disable the watermark stamp on
video and photos. The watermark stamp includes time
and date label, VANTRUE label, license plate number,
GPS location information, and speed label. All enabled
by default.
-Time Lapse: The default value is disabled. You can
choose to enable 1FPS/5FPS/10FPS/15FPS.
-Parking Mode: You can choose the parking mode you
need, including Collision Detection/Motion
Detection/Low Bitrate Recording/Low Framerate
Mode/OFF.
-Low-light Night Vision in Parking Mode: Default is
on. When turned on, it can optimize the recording
eect of videos in parking mode.
-Motion Detection Area: Adjust the motion detection
range of the front area and the rear area of the car
respectively.
-Mileage Statistics: The default setting is on. Turn on
this function, the dash cam will record the mileage
information, and you can expo the mileage statistics
through the mileage statistics function in APP.
-GPS Settings: GPS is enabled by default. GPS ON/OFF
settings, speed unit settings, and GPS information are
all set here.
B. System Setup
-Language: Available languages are Engish/Français
/Español/Deutsch/Italiano/简体中文/русский/日本語
/Polski/한국어.
-Wi-Fi: You can choose Wi-Fi mode, view Wi-Fi
information, etc.
The Wi-Fi auto-on option means that the Wi-Fi will
automatically turn o after 10 minutes of turning on. If
you choose on, Wi-Fi will always stay on; if you choose
o, Wi-Fi needs to be turned on manually.
Wi-Fi mode is 5G by default.
Wi-Fi information displays the Wi-Fi name and Wi-Fi
password.
-Voice Control: The default sensitivity is Standard.
Voice commands can be recognized after the option is
turned on. You can choose options such as low
sensitivity/high sensitivity/standard/o.
-Voice Content: You can use dierent commands to
remote control the camera to work.
-Format SD Card: Format all data on the memo card.
-Format Reminder Setup: Select the reminder options:
15 Days, 1 Month, and O. Default is o.
To prevent you from forgetting to format the memo
card regularly, we have added a format reminder time
setting. You can choose to be reminded after 15 days
or 1 month, and calculate 15 days or 1 month from the
set date. When the time is up, you can choose "OK" to
format, or choose "Next."
Note: If you changing the format reminder option, the
timing will resta as soon as the option is changed.
-Date&Time: There are two ways to set the time and
date:
1. GPS auto update: GPS will update the time
automatically when it is turned on by default. GPS auto
update date and time is based on the time zone where
you set, so you need to choose the correct time zone
rst;
2. Manual set date/time: Turn o GPS auto update and
set date and time manually.
Summer/Winter time auto switch: The default setting is
o.
When turned on, it will switch automatically according
to the daylight saving time and winter time dates.
*This feature is only available in Noh America, if used
in other regions, it may cause time errors.
The date format and time zone settings are also set in
this menu.
-Auto LCD O: Set the time to automatically turn o
the LCD display after no operation.
If you set the Auto LCD O to 3 min, the camera’s LCD
screen will auto light o after 3 min but recording will
continue. If the setup is O, the screen will not turn o.
You can choose the options among 30s, 1Min, 3Min and
OFF.
-Device Sound: Set the volume of the device. The
default volume level is 2, the lowest is 0, and the highest
is 5.
-Warning Tone: According to dierent situations, the
dash cam is set with 5 kinds of prompt tones, which are
power-on/o sound, keys sound, le locked sound,
format sound, and abnormal stop recording reminder.
All prompt tones are turned on by default.
-Frequency: Dierent countries have dierent
frequencies. In order to avoid aecting the video, you
can choose 50Hz or 60Hz frequency according to
dierent regions.
-System Info: Check the current model, rmware
version, and the Vantrue ocial website.
-Ceication Info: You can view the ceication
information of N4 Pro dash cam.
-Default Settings: Reset the device back to facto
settings.
C. Files
Review the video and photo les recorded by the
camera.

- 18 -
-Loop Recording: Default setting is 1 min. You can
choose the options among 1/3/5 min and OFF.
-IR LEDs: The default setting is Auto. You can set it to
auto/o/ on.
-G-Sensor: Select the level of G-sensor you need, then
you can set 3 directions (Front + Rear/Left + Right/Up
+ Down). The G-sensor value in each direction can be
selected as 1/2/3/4/5/ O. The higher the sensitivity
level, the easier it is to trigger event recording.
G-sensor is most sensitive when set to 5.
-Privacy Mode: The default setting is o. You can
choose to turn it on, and it will record in private mode
after turning it on.
-Audio Recording: The default is ON. Set recording to
on or o.
-Exposure: You can set the camera exposure value of
the front/inside/rear camera of the car separately. The
default is +0.0.
-REC Status Light: Default setting is ON. You can
choose to turn on/o the recording status light.
-HDR: The default setting is on. You can adjust the
HDR on or o of the front, interior, and rear cameras
separately.
-Rotate Display: Default is o. You can choose to ip
the video screen up and down (180 degrees) for the
front + cabin, and rear camera.
-Mirror: The default setting is on. When it is on, the
screen of the cabin and rear camera is displayed in
mirror mode.
-Number Plate: Select the number or letter to be set.
After setting, your license plate number can be
displayed in the recorded video.
-Stamp: Enable or disable the watermark stamp on
video and photos. The watermark stamp includes time
and date label, VANTRUE label, license plate number,
GPS location information, and speed label. All enabled
by default.
-Time Lapse: The default value is disabled. You can
choose to enable 1FPS/5FPS/10FPS/15FPS.
-Parking Mode: You can choose the parking mode you
need, including Collision Detection/Motion
Detection/Low Bitrate Recording/Low Framerate
Mode/OFF.
-Low-light Night Vision in Parking Mode: Default is
on. When turned on, it can optimize the recording
eect of videos in parking mode.
-Motion Detection Area: Adjust the motion detection
range of the front area and the rear area of the car
respectively.
-Mileage Statistics: The default setting is on. Turn on
this function, the dash cam will record the mileage
information, and you can expo the mileage statistics
through the mileage statistics function in APP.
-GPS Settings: GPS is enabled by default. GPS ON/OFF
settings, speed unit settings, and GPS information are
all set here.
B. System Setup
-Language: Available languages are Engish/Français
/Español/Deutsch/Italiano/简体中文/русский/日本語
/Polski/한국어.
-Wi-Fi: You can choose Wi-Fi mode, view Wi-Fi
information, etc.
The Wi-Fi auto-on option means that the Wi-Fi will
automatically turn o after 10 minutes of turning on. If
you choose on, Wi-Fi will always stay on; if you choose
o, Wi-Fi needs to be turned on manually.
Wi-Fi mode is 5G by default.
Wi-Fi information displays the Wi-Fi name and Wi-Fi
password.
-Voice Control: The default sensitivity is Standard.
Voice commands can be recognized after the option is
turned on. You can choose options such as low
sensitivity/high sensitivity/standard/o.
-Voice Content: You can use dierent commands to
remote control the camera to work.
-Format SD Card: Format all data on the memo card.
-Format Reminder Setup: Select the reminder options:
15 Days, 1 Month, and O. Default is o.
To prevent you from forgetting to format the memo
card regularly, we have added a format reminder time
setting. You can choose to be reminded after 15 days
or 1 month, and calculate 15 days or 1 month from the
set date. When the time is up, you can choose "OK" to
format, or choose "Next."
Note: If you changing the format reminder option, the
timing will resta as soon as the option is changed.
-Date&Time: There are two ways to set the time and
date:
1. GPS auto update: GPS will update the time
automatically when it is turned on by default. GPS auto
update date and time is based on the time zone where
you set, so you need to choose the correct time zone
rst;
2. Manual set date/time: Turn o GPS auto update and
set date and time manually.
Summer/Winter time auto switch: The default setting is
o.
When turned on, it will switch automatically according
to the daylight saving time and winter time dates.
*This feature is only available in Noh America, if used
in other regions, it may cause time errors.
The date format and time zone settings are also set in
this menu.
-Auto LCD O: Set the time to automatically turn o
the LCD display after no operation.
If you set the Auto LCD O to 3 min, the camera’s LCD
OK
Files
1/4
Event Video
Normal Video
Photo
All Files
-Event: Critical event videos detected by G-Sensor
activity or manually locked by user.
20300128_140633_0008_E_A.MP4
20300128_140633_0008_E_B.MP4
20300128_140633_0008_E_C.MP4
-Normal: Standard videos recorded. This folder saves
loop
recording video, parking mode video, and time-lapse video
screen will auto light o after 3 min but recording will
continue. If the setup is O, the screen will not turn o.
You can choose the options among 30s, 1Min, 3Min and
OFF.
-Device Sound: Set the volume of the device. The
default volume level is 2, the lowest is 0, and the highest
is 5.
-Warning Tone: According to dierent situations, the
dash cam is set with 5 kinds of prompt tones, which are
power-on/o sound, keys sound, le locked sound,
format sound, and abnormal stop recording reminder.
All prompt tones are turned on by default.
-Frequency: Dierent countries have dierent
frequencies. In order to avoid aecting the video, you
can choose 50Hz or 60Hz frequency according to
dierent regions.
-System Info: Check the current model, rmware
version, and the Vantrue ocial website.
-Ceication Info: You can view the ceication
information of N4 Pro dash cam.
-Default Settings: Reset the device back to facto
settings.
C. Files
Review the video and photo les recorded by the
camera.

- 19 -
4.2.1 Loop Recording
After inseing the memo card and connecting the
power, the N4 Pro dash cam will automatically turn on
and enter loop recording. The duration of each
recorded video will be saved based on the loop
recording time you set, saved in the normal video folder.
When the capacity of the normal video folder reaches
70% of the total capacity, the new loop recording le
will automatically overwrite the original loop recording
les. After this function is enabled, the video le will
automatically overwrite the loop, so as not to stop
recording during the driving process.
4.2 Key Features
C
R
F
MP/H
14:25:35 06-01-202300:00:37
35
2160P+1080P+1080P 30FPS
and private mode video.
The le name format of Loop Recording video is:
20300128_140933_0008_N_A.MP4;
the le name format of Parking Mode video is:
20300128_140833_0007_P_A.MP4;
the le name format of Time-Lapse video is:
20300128_140733_0006_T_A.MP4;
the le name format of Privacy Mode video is:
20300128_140633_0005_S_A.MP4
-Photo: Photos les. The le name format of Loop
Recording video is: 20300128_140633_0005A.JPEG、
20300128_140633_0005B.JPEG.
-All: All the standard videos and critical event videos
recorded.
Note: The sux A represents the les recorded by
thefront camera, the sux B represents the les
recorded by the cabin camera, the sux C represents
the les recorded by the rear camera.

4.2.2 Event Recording
Event video is triggered by the G-sensor(Gravity
Sensor), which can be automatically triggered or
manually locked.
During driving, in case of special circumstances, the
camera will automatically lock for event recording or
you can manually lock it for event recording.
To manually lock the video, just press the button to
lock the current video and capture it. During the lock
video period, you can press the button to capture
multiple times. After the event recording is nished,
the video will be automatically saved in the event video
folder and the photo will be saved in the photo folder.
- 20 -
The normal operation of the loop recording function
is ve dependent on the speed of the memo card,
so please format the memo card regularly to avoid
problems such as excessive memo card les and
card aging that aect the normal loop recording.
Please check the loop recording video regularly to
avoid the necessa videos being overwritten by loop.
After loop recording is turned o, the lock video
function will no longer work.
When the loop recording setting is turned o, the
length of each recording is 20 minutes. When the
memo card is full, the camera will stop recording
and prompt "card is full!"
Note:
•
•
•
•
Auto-lock event recording: When the car is hit by a
collision or vibration, the recorder will automatically
trigger and lock the current video when it senses the
vibration. You can also press the button to capture
F
MP/H
14:25:35 06-01-202300:00:37
35
2160P+1080P+1080P 30FPS

- 21 -
F
MP/H
14:25:35 06-01-202300:00:37
35
2160P+1080P+1080P 30FPS
pictures during the locking recording period.
After the emergency recording is nished, the video will
be automatically saved in the emergency video folder
and the photo will be saved in the photo folder.
4.2.3 Low-light Night Vision in Parking Mode
In order to enhance the safety of parking at night, we
make full use of the lens peormance combined with
low-light night vision technology to improve the night
vision eect in parking mode. This function is in the
open mode by default. It will be triggered only after
entering the parking mode and will not aect normal
recording.
The sensitivity of the automatic locking video trigger
is determined by the sensitivity of the collision. The
higher the sensitivity setting, the greater the
probability of being triggered.
The total capacity of the event video le accounts for
30% of the total capacity of the current memo card.
When the event video le reaches the upper limit, the
new event video le will automatically overwrite the
old event video le. It is recommended to periodically
check and save your event video les to avoid loss.
Lock recording will not trigger in either of the
following situations: Loop recording is o or Time
lapse recording is on. When loop recording is turned
o/time-lapse recording is turned on, only pictures
can be captured when locking the recording.
Note:
•
•
•
- 22 -
•
•
4.2.4 Motion Detection Area
The detection range of the front camera and rear
camera can be set on the N4 Pro dash cam, and the set
range can be adjusted up and down as well as left and
right.
This feature is only available when motion detection
parking mode is on.
You can select 1X, 2X, 3X, 4X, or 5X range. 5X range
for global detection mode.
Note:
Low-light Night Vision O
Low-light Night Vision On
MP/H
14:25:35 06-01-202300:00:37
35
2160P+1080P+1080P 30FPS
MP/H
14:25:35 06-01-202300:00:37
35
2160P+1080P+1080P 30FPS
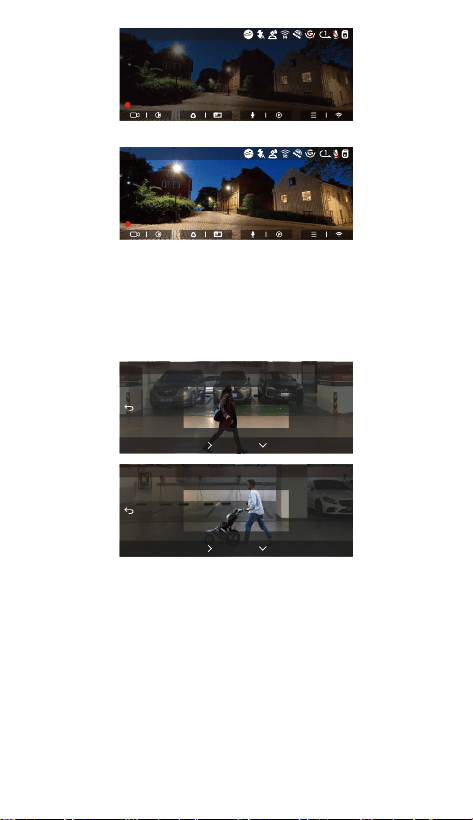
4.2.5 Parking Mode(When the parking mode is turned
on, the time-lapse video function will not work. These
two functions cannot run at the same time)
Parking Mode operates as a sent function under
dierent situations. You can switch to dierent parking
OK
2X
Rear Area Detection
OK
2X
Front Area Detection

- 23 -
After parking, wait for 5 minutes to enter automati-
cally;
long press the button to begin manually;
Connected to the ACC Hardwire Kit cable, the camera
will enter parking mode immediately after turning o
the engine. (ACC cable is an optional accesso, need
to buy extra).
1.
2.
3.
OK
Parking Mode
Collision Detection
Motion Detection
Low Bitrate Mode
Low Framerate Mode
To ensure the camera works properly in park mode,
please use the hardwire kits or other stable and
continuous power supply to power the dash cam.
Please use Vantrue hardwire kit for ACC hardwire,
ACC hardwire kit from other brands may not work.
If the dash cam is in an extremely hot environment,
we recommend selecting the collision detection
mode. When the temperature inside the vehicle is up
to 60°C(140°F), we recommend turning o the
camera to avoid improper operation of the camera
caused by high temperature.
Time-lapse video recording and parking mode
(including collision detection, motion detection, low
bitrate recording, and low framerate mode) can only
be enabled one at a time. When one is enabled, the
other will be automatically disabled.
All videos recorded in parking mode(Collison
Detection, Motion Detection, Low Bitrate Recording,
Low Framerate mode) will be saved in the normal
video folder. In order to prevent the video in parking
Note:
If parking mode is on, there are three ways to sta
parking mode recording:
•
•
•
•
•
monitoring modes according to dierent parking
situations.
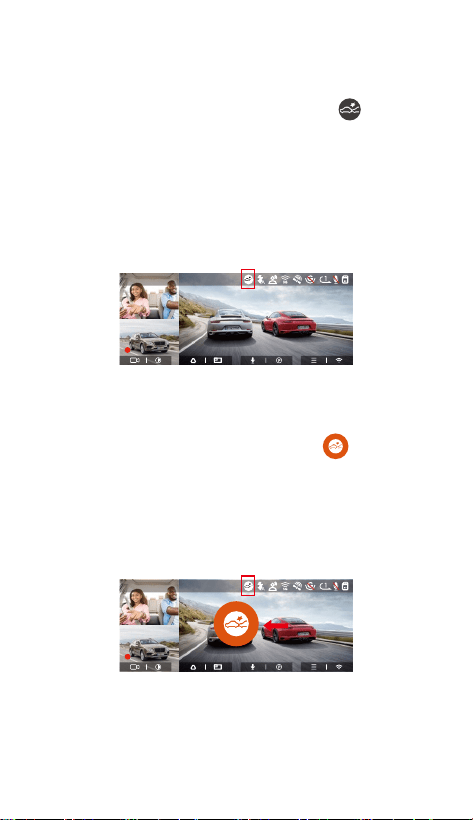
Motion Detection
When the motion detection is turned on, the icon
will be displayed on the recording inteace, indicating
that the dash cam is currently in motion detection
mode. You can go to "Motion Detection Area" in the
menu settings to set the detection area.
- 24 -
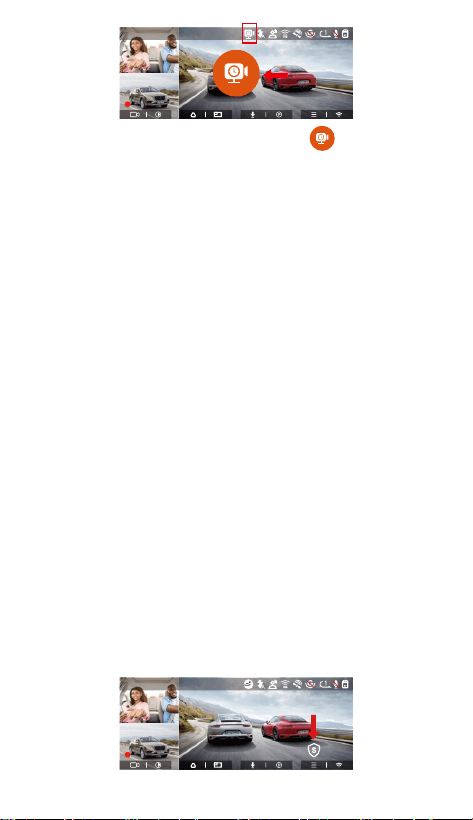
Collision Detection
When collision detection is enabled, the icon will be
displayed on the recording inteace, indicating that the
dash cam is currently in collision detection mode. The
sensitivity of the collision detection has 1 to 5 levels of
sensitivity can be adjusted. The sensitivity of collision
detection can be adjusted from 1 to 5 levels of
sensitivity. You can adjust the sensitivity of collision
detection according to the car's environment and usage
habits.
When the Collision Detection is turned on, and no
movement or vibration is detected after 5 minutes of
recording (5-minute ent mechanism for sho), then
Collision Detection is activated with a icon in the
middle of the screen, and the camera automatically
turn o.
After the dash cam is turned o, if the G-sensor detects
that the car is vibrating or moving, the recorder will
automatically turn on and record for 1 minute, and then
turn o.
F
MP/H
14:25:35 06-01-202300:00:37
35
2160P+1080P+1080P 30FPS
Note:
If the dash cam constantly detects a collision during the
collision detection recording process, it will exit the
collision detection mode, enter normal recording, and
resta the 5-minute ent mechanism.
F
MP/H
14:25:35 06-01-202300:00:37
35
2160P+1080P+1080P 30FPS
mode from being overwritten in a loop, please check
and save the required les in time to prevent loss.

Motion Detection
When the motion detection is turned on, the icon
will be displayed on the recording inteace, indicating
that the dash cam is currently in motion detection
mode. You can go to "Motion Detection Area" in the
menu settings to set the detection area.
- 25 -
Note:
If the dash cam constantly detects a collision during the
collision detection recording process, it will exit the
collision detection mode, enter normal recording, and
resta the 5-minute ent mechanism.
When the motion Detection is turned on, and no
movement is detected after 3 minutes of recording,
then an icon will appear in the center of the screen,
and the screen will turn o after 3 minutes.
F
MP/H
14:25:35 06-01-202300:00:37
35
2160P+1080P+1080P 30FPS
Note: Motion detection mode can only be engaged
when the camera is turned on. Once the camera is
turned o, the motion detection mode will not work.
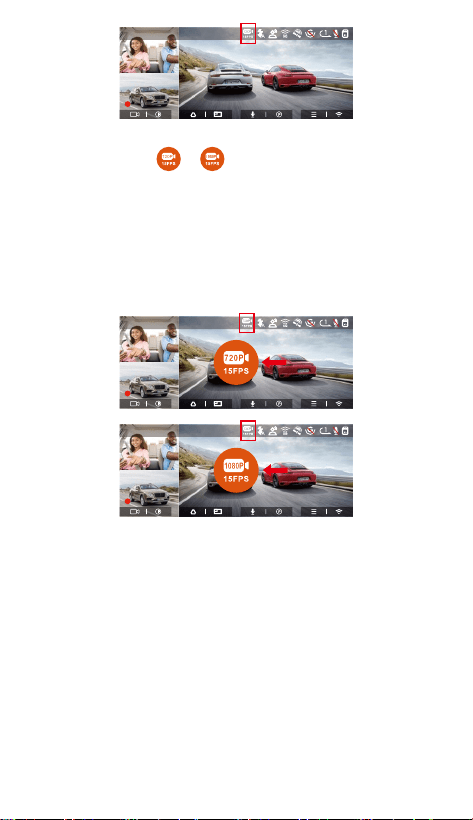
Low Bitrate Recording
When Low Bitrate recording is enabled, the icons or
will be displayed in the upper right corner of the
screen, depending on whether you choose 1080P
15FPS or 720P 15FPS.
F
MP/H
14:25:35 06-01-202300:00:37
35
2160P+1080P+1080P 30FPS
F
MP/H
14:25:35 06-01-202300:00:37
35
2160P+1080P+1080P 30FPS
- 26 -
If no movement is detected after 5 minutes of recording,
there will be a or icon that appears in the center
of the screen. The resolution of all current video will be
automatically switched to 1080P 15FPS or 720P 15FPS
for recording, and the recording duration will be
determined according to the currently set loop
recording duration. When the camera is vibrates or is
moved, it will automatically exit, wait 5 minutes, and
enter again.
F
MP/H
14:25:35 06-01-202300:00:37
35
2160P+1080P+1080P 30FPS
F
MP/H
14:25:35 06-01-202300:00:37
35
2160P+1080P+1080P 30FPS
F
MP/H
14:25:35 06-01-202300:00:37
35
2160P+1080P+1080P 30FPS
Note: Low Bitrate recording can only be engaged when
the camera is turned on. Once the camera is turned o,
the Low Bitrate recording will not work.
Low Framerate mode
When the low framerate mode is selected, the camera
will record according to your selection among
1FPS/5FPS/10FPS/15FPS.
For example, if you select 1FPS and the current video
resolution frame rate is 30FPS, the camera will generate
a 30FPS video per second. Low framerate mode can
greatly presee the integrity of the video and save
space on the memo card.
- 27 -
•
•
•
F
MP/H
14:25:35 06-01-202300:00:37
35
2160P+1080P+1080P 30FPS
In low frame rate recording mode, a icon is displayed
in the center of the screen to indicate that the low
frame rate recording parking mode has been entered.
[Normal Recording Time = Low Framerate Recording
Time (Sec) x Recording Frame Rate FPS/Low Framerate
Option] (Time should be conveed into seconds)
The time unit of the calculation formula is seconds, so
the nal normal recording time calculated is also in
seconds. If you need to conve it into other time units,
please check the units and conve by yourself.
The low framerate mode is similar to the time-lapse
recording function, but the dierence is that there is
no 5-minute ent mechanism for time-lapse
recording, which will be directly turned on after
setting.
In low framerate mode, the camera also needs a stable
power supply. Once the power is o or exhausted, the
camera will shut down.
Note:
4.2.6 Privacy Mode
If privacy mode is turned on, the recording le will only
keep the last 3 loops of the recorded video.
For example, if you select 1-minute loop recording and
turn on privacy mode, the recording le will be
overwritten at the end of the 3rd 1-minute loop
recording.
F
MP/H
14:25:35 06-01-202300:00:37
35
2160P+1080P+1080P 30FPS

•
•
•
•
The privacy le will be saved in the Normal folder with
the "S" character added to the le name.
For example: 20300128_140633_0006_S_A.MP4;
If loop recording is turned o, privacy mode cannot
be staed.
Privacy mode cannot be staed if the G-sensor
function is turned o.
If you turn on privacy mode, please format the
memo card rst.
In privacy mode, the manually locked recording le are
saved in Event folder, and the le name of the saved
le is the same as the event recording le name.
Note:
•
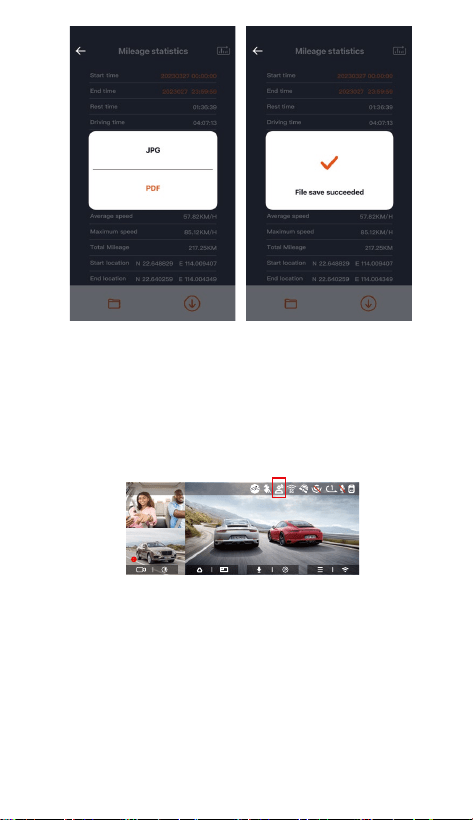
4.2.7 Mileage Statistics
N4 Pro dash cam records and analyzes the user's
driving time, driving mileage, altitude, driving speed
and other information through the GPS information
during the driving process. Users can expo mileage
les through APP.
Users can select the sta time and end time in the APP
real-time preview inteace, and then make sure to
download it as PDF or JPG le and save it locally in APP.
- 28 -
- 29 -
4.2.8 Voice Control
You can control the camera with voice command, such
as take photo, video sta, turn on/o Wi-Fi, lock the
video, etc. Currently suppoed languages are English,
Japanese, Russian, and Chinese. For more detailed
voice commands, please go to System Settings > Voice
Content to view them.
Voice recognition has options of low sensitivity/
standard/high sensitivity/o. The default is standard
sensitivity.
4.2.9 GPS Function
The GPS function is one of the impoant functions of
the dash cam. GPS is enabled by default, and the
camera receives GPS signals through the GPS mount. It
can automatically correct the time and date in your
area, recording the location where the video was taken
F
MP/H
14:25:35 06-01-202300:00:37
35
2160P+1080P+1080P 30FPS
- 30 -
and the speed of the car at the time.
The GPS connection will be completed within 1 minute
after you turn on the device. If the GPS connection is
not successful within 1 minute, please check whether
the DEVICE has turned on the GPS function, whether
the GPS bracket is properly connected, and whether
your environment (underground parking lot, densely
populated residential area, subway, tunnel, etc.)is
aecting the reception of GPS signal.
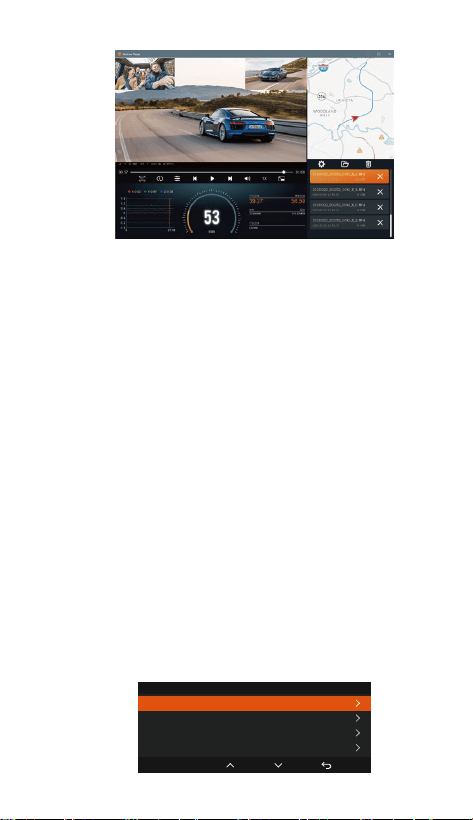
GPS information is recorded along with the video. To
view it, please download and install the Vantrue App
and Vantrue GPS Player (available for download at
www.vantrue.net).
Note:
•
•
4.2.10 Automatic time correction via GPS
The default setting of GPS auto time correction for N4
Pro is on. If your location is Los Angeles, you can select
GMT-08:00. If you don't know the time zone of your
location, you can connect your phone to the Wi-Fi of
the camera, and open the automatic time correction
function in Vantrue APP, so the camera will correct the
time zone of the camera according to the time zone of
your phone.
OK
Time & Date
GPS Automatic Update
Set Date/Time Manually
ST/WT Auto Switch
Date Format
Note: GPS automatic time correction needs to set the
correct time zone, you can refer to the representative
cities of each time zone.
4.2.11 Viewing and Deleting Video/Photos
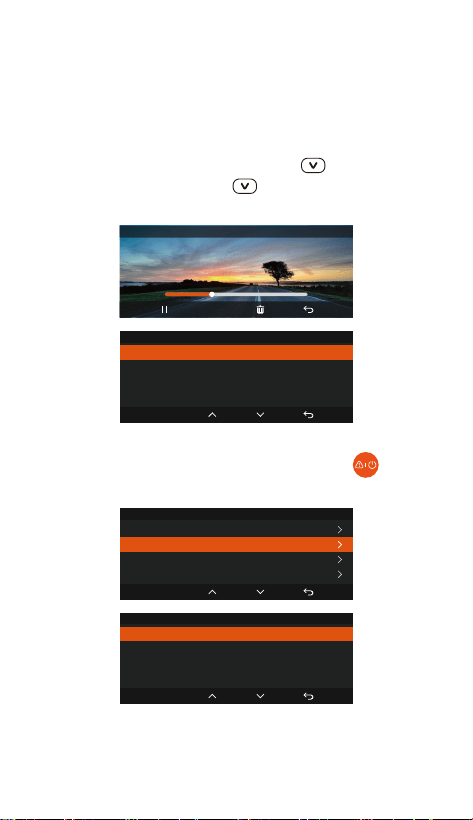
a.Viewing les on the Camera
After clicking "Files," enter any folder, and after opening
the video folder, you can press the button to select
the next le, or press the button to delete the le
during playback.
- 31 -
--Delete Videos
Delete the video on the camera. Press the button in
the le browsing inteace to pop up the delete menu.
20230601_140633_0006_T_C.MP4
00:30 01:07
1X
OK
Event Video
Delete This File?
Delete All Files?
OK
20230601_140633_0005_T_C.MP4
20230601_140633_0006_T_C.MP4
20230601_140633_0007_T_C.MP4
20230601_140633_0008_T_C.MP4
Event Video
2/5
OK
Event Video
Delete This File?
Delete All Files?
- 32 -
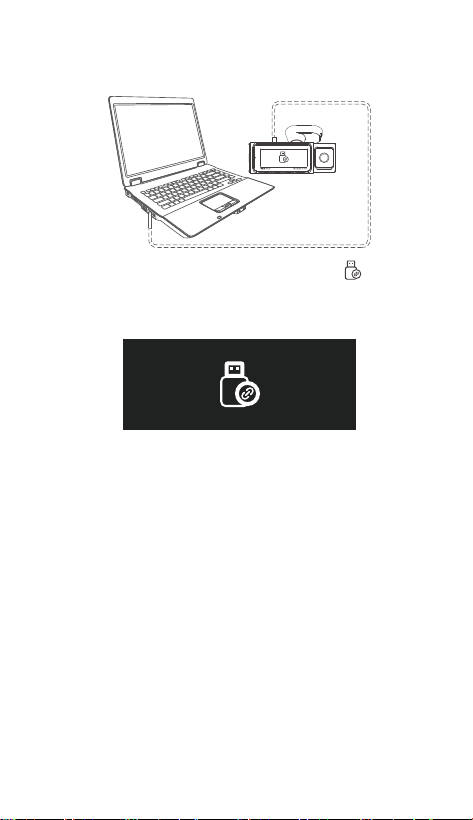
Connect the included TYPE-C USB data cable to the
camera and the computer.
After the connection is successful, the icon will
appear on the display of the camera to transfer data,
and then you can view the video les in the computer
folder.
b. Viewing les on a Computer
1.
2.
Depending on the computer systems of dierent
users, after the camera is connected to the computer,
it will be displayed as a removable drive or a
removable folder.
To view the les on the computer, you can directly
access, right-click to open the menu and delete them.
You can also use a USB card reader to read the
memo card information.
When connecting the dashboard to a desktop
computer, we recommend connecting the USB po
on the back of the desktop computer (make sure it is
a USB 3.0 po) in order to ensure a stable power
supply when connecting to the computer.
3.
4.
5.
6.
- 33 -
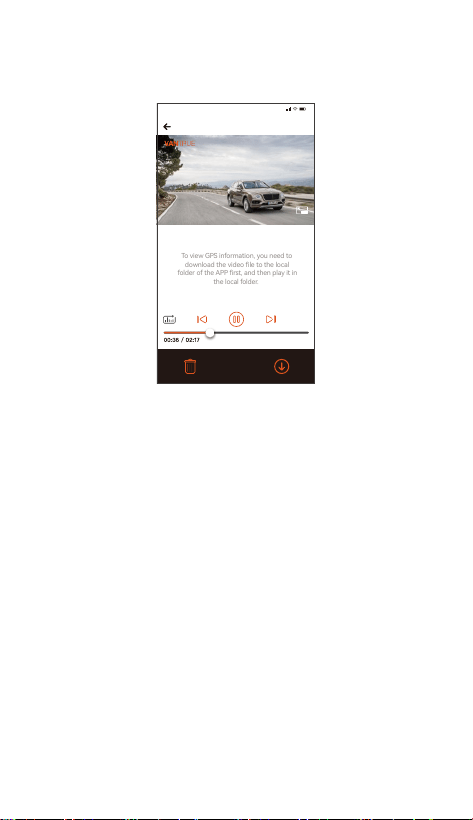
•
•
20230601115036_0079_N_A.MP4
06/01/2023 11:05:35 N4 Pro 000.000000. 000.000000. 36MK/H
To view GPS information, you need to
download the video le to the local
folder of the APP rst, and then play it in
the local folder.
Note:
9:41
For video playback in the app, or downloads to SD
card, there will be no network trac consumption.
You can view GPS track information only after the
video le is downloaded and played back locally. At
the same time, you need to disconnect the Wi-Fi of
the dash cam, otherwise the map information will be
blank.
Note:
c.View on the ”Vantrue” App
After the phone successfully connects to the camera's
Wi-Fi, you can play, download and delete les in the
Vantrue app.
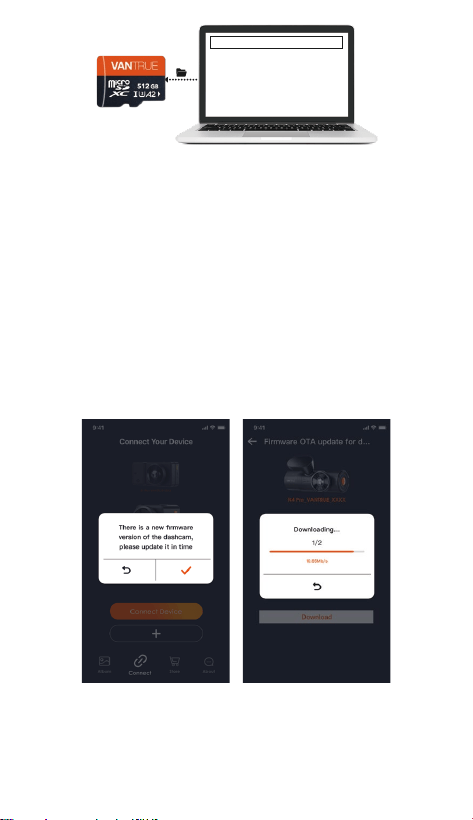
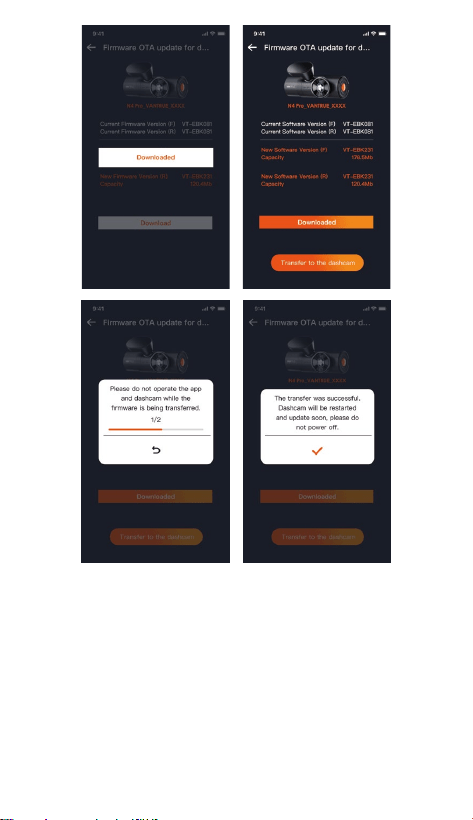
4.2.12 N4 Pro Dash Cam Firmware Upgrade
Upgrade method 1: Upgrade via le
Go to VANTRUE website to download the latest N4 Pro
dashcam rmware, copy the rmware le to the root
directo of the memo card, then inse the memo
card back into the N4 Pro main unit, the system will
automatically upgrade with the updated rmware of
the Micro SD card after the dash cam is turned on.
- 34 -
•
•
Upgrade method 2: OTA upgrade OTA (Over the Air)
Firmware Update
After opening the APP, if you receive an update
reminder of the dashcam software, please conrm the
upgrade, and then it will jump to the OTA upgrade
inteace, and then upgrade according to the APP
guidelines.
To upgrade rmware via le or OTA upgrade, N4 Pro
front and rear camera needs to keep power on.
To upgrade via OTA, internet data trac is required
to download the upgrade le.
Note:
Upgraded Files
- 35 -

- 36 -
5. Specications
N4 ProModel
Front: F/1. 8 wide apeure
Inside: F/1. 8 wide apeure
Rear: F/1. 8 wide apeure
Engish/Français/Español/Deutsch/
Italiano/简体中文/русский/日本語/
Polski/한국어
The specications of this product may change without
prior notice due to product improvements.
Chips
Front: 158° wide viewing angle;
Inside: 160° wide viewing angle;
Rear: 165° wide viewing angle
Apeure
Languages
Video Resolution
Camera Angle
Front+ Cabin+ Rear:
2160P+1080P+1080P 30FPS;
2160P+720P+720P 30FPS
1440P+1080P+1080P 30FPS;
1440P+720P+720P 30FPS
1080P+1080P+1080P 30FPS;
1080P+720P+720P 30FPS
720P+720P+720P 30FPS
Front and Cabin:
2160P+1080P 30FPS; 2160P+720P 30FPS;
1440P+1080P 30FPS; 1440P+720P 30FPS;
1080P+1080P 30FPS; 1080P+720P 30FPS;
720P+720P 30FPS
Front + Rear:
2160P+1080P 30FPS; 2160P+720P 30FPS;
1440P+1080P 30FPS; 1440P+720P 30FPS;
1080P+1080P 30FPS; 1080P+720P 30FPS;
Novatek high-peormance
processor
Sony CMOS Sensor
3-Axis G-sensor
3.19” IPS Screen
Built-in 2.4GHz&5GHz
Image Sensor
G-sensor
Screen
Wi-Fi
720P+720P 30FPS
Single front recording mode:
3840x2160P 30FPS; 2560x1440P 30FPS;
1920x1080P 30FPS; 1280x720P 30FPS

- 37 -
Built-in microphone and speaker
Type C
Built-in super capacitor
MP4
DC 5V 2.4A
6W
-4°F to 140°F(-20°C to 60°C)
-4°F to 158°F(-20°C to 70°C)
Front+ Cabin+ Rear:
2160P+1080P+1080P 30FPS;
2160P+720P+720P 30FPS
1440P+1080P+1080P 30FPS;
1440P+720P+720P 30FPS
1080P+1080P+1080P 30FPS;
1080P+720P+720P 30FPS
720P+720P+720P 30FPS
Front and Cabin:
2160P+1080P 30FPS; 2160P+720P 30FPS;
1440P+1080P 30FPS; 1440P+720P 30FPS;
1080P+1080P 30FPS; 1080P+720P 30FPS;
720P+720P 30FPS
Front + Rear:
2160P+1080P 30FPS; 2160P+720P 30FPS;
1440P+1080P 30FPS; 1440P+720P 30FPS;
1080P+1080P 30FPS; 1080P+720P 30FPS;
Audio
Memo Storage
USB Po
Power Source
Video File Format
Supply voltage
current
Power
Working
Temperature
Storage
Temperature
External: 32GB-512GB Micro SD
Card, U3, A2 Class 10 (not included
in the package)
720P+720P 30FPS
Single front recording mode:
3840x2160P 30FPS; 2560x1440P 30FPS;
1920x1080P 30FPS; 1280x720P 30FPS

- 38 -
6. Safety Warnings
This product is an auxilia device for the purpose of
recording exterior images of vehicles, and some
functions may not be suppoed due to dierent
driving and vehicle environments.
Firmware upgrade will be carried out from time to
time to fuher improve the product, please pay
attention to the ocial notice of VANTRUE according
to the specic upgrade.
This product can record and save images of vehicle
accidents, but it does not guarantee that all accident
images can be recorded. The image may not be
recorded in a special folder because the crash sensor
cannot be activated for minor crashes.
Be sure to turn o the power when inseing or
removing the memo card.
For stable use of the product, please format the
memo card at least once a month.
Generally, memo cards have a life span, and
long-term use of memo cards may result in data not
being saved. In this case, it is recommended to
purchase a new memo card for use. If the data is
destroyed due to the long-term use of the memo
card, the company will not be held responsible.
Do not install or operate this product while the vehicle
is running.
Do not subject the product to strong shocks or
vibrations, which may damage the product and cause
malfunction or inoperability.
Do not use chemical solvents or cleaning agents to
clean the product.
The ambient temperature range for normal use of this
device is -20 degrees Celsius to 60 degrees Celsius.
Exceeding this ambient temperature range may cause
the product to malfunction.
Do not place the product in an open ame. Do not use
the product in high temperature and high humidity
•
•
•
•
•
•
•
•
•
•
•
•
areas, as this may cause electric shock, sho circuit,
and other hazards and damage the product.
It is forbidden to disassemble or modify the car
charger by yourself, or use a sho-circuit car charger,
otherwise it will cause personal inju, electric shock,
re and other dangers or damage the product.
Please do not disassemble or modify the product
without permission to avoid damaging the recorder,
generating heat and causing re.
Please use this product within the scope of the law.

This product is an auxilia device for the purpose of
recording exterior images of vehicles, and some
functions may not be suppoed due to dierent
driving and vehicle environments.
Firmware upgrade will be carried out from time to
time to fuher improve the product, please pay
attention to the ocial notice of VANTRUE according
to the specic upgrade.
This product can record and save images of vehicle
accidents, but it does not guarantee that all accident
images can be recorded. The image may not be
recorded in a special folder because the crash sensor
cannot be activated for minor crashes.
Be sure to turn o the power when inseing or
removing the memo card.
For stable use of the product, please format the
memo card at least once a month.
Generally, memo cards have a life span, and
long-term use of memo cards may result in data not
being saved. In this case, it is recommended to
purchase a new memo card for use. If the data is
destroyed due to the long-term use of the memo
card, the company will not be held responsible.
Do not install or operate this product while the vehicle
is running.
Do not subject the product to strong shocks or
vibrations, which may damage the product and cause
malfunction or inoperability.
Do not use chemical solvents or cleaning agents to
clean the product.
The ambient temperature range for normal use of this
device is -20 degrees Celsius to 60 degrees Celsius.
Exceeding this ambient temperature range may cause
the product to malfunction.
Do not place the product in an open ame. Do not use
the product in high temperature and high humidity
•
•
•
- 39 -
7. Warranty & Suppo
Warranty
The VANTRUE® N4 Pro Dash Cam comes with a full 12
months warranty. If you register your product on our
ocial site (www.vantrue.net/register), you can extend
the warranty to 18 months.
Suppo new
If you have any questions about the product, please
feel free to contact us at suppo@vantrue.net, or leave
us a message through the instant chat box:
www.vantrue.net, or open the Vantrue APP, and nd it
in the FAQ on the "About" page Answer.
Your opinion matters
VANTRUE® is rmly committed to always improving our
products, seices, and user experience. If you have any
thoughts on how we can do even better, we welcome
your constructive feedback and suggestions. Connect
with us today at suppo@vantrue.net.
Thank You for Choosing Vantrue !
areas, as this may cause electric shock, sho circuit,
and other hazards and damage the product.
It is forbidden to disassemble or modify the car
charger by yourself, or use a sho-circuit car charger,
otherwise it will cause personal inju, electric shock,
re and other dangers or damage the product.
Please do not disassemble or modify the product
without permission to avoid damaging the recorder,
generating heat and causing re.
Please use this product within the scope of the law.