
English/Deutsch/Français/Polski
装订方式:胶装
单页尺寸:103*145MM
封 面:157G双铜纸过哑胶
内 页:80G双胶纸
User Manual
3-Channel Mirror Dash Cam
Mirror 3
00:10:15
13:32
9-1
Fri
English/Deutsch/Français/Polski
装订方式:胶装
单页尺寸:103*145MM
封 面:157G双铜纸过哑胶
内 页:80G双胶纸
User Manual
3-Channel Mirror Dash Cam
Mirror 3
00:10:15
13:32
9-1
Fri

Always a surprise in Vantrue
Hey, find us here:
www.vantrue.net/contact
facebook.com/vantrue.live

CONTENTS
VERZEICHNIS
CONTENU
SPIS TREŚCI
4
32
60
88
Installation
Installations-und Menübeschreibung
Insallation
Instalacja
3.
Camera Overview
Beschreibung der Maschinenteile
Vue d'ensemble de la caméra
Budowa kamery
2
30
58
86
2.
28
56
84
113
Warranty & Support
Kundendienst
Garantie & Support
Gwarancja & wsparcie
6.
27
55
83
112
Specifications
Produktspezifikationen
Spécifications
Dane techniczne
5.
12
40
68
96
Basic Operation
Funktion
Fonction
Podstawowe funkcje
4.
1
29
57
85
What's in the box?
Was ist in der Box?
Qu'ya-t-ildanslaboîte?
Co znajdziemy w pudełku?
1.
- 1 -
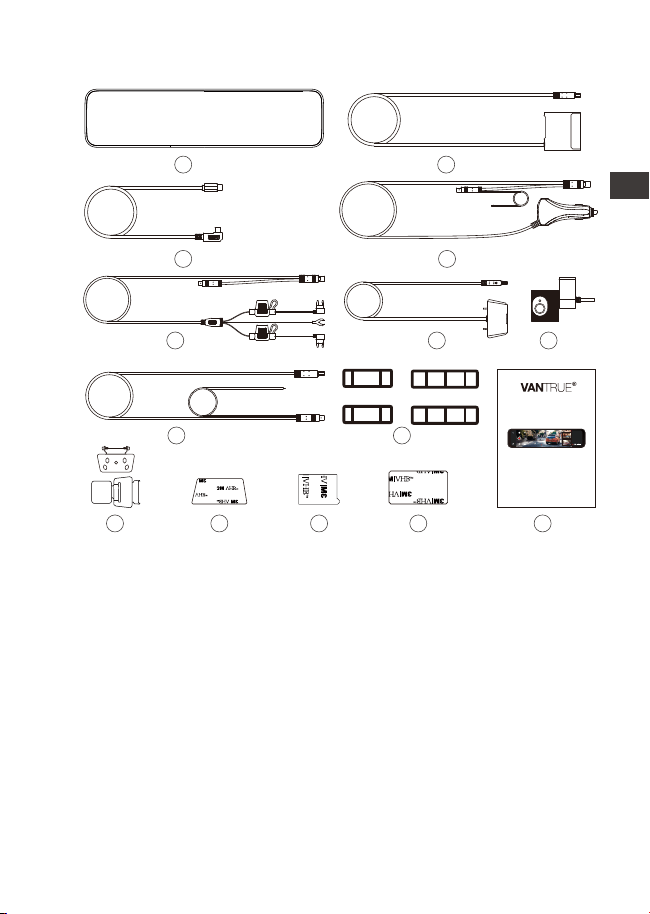
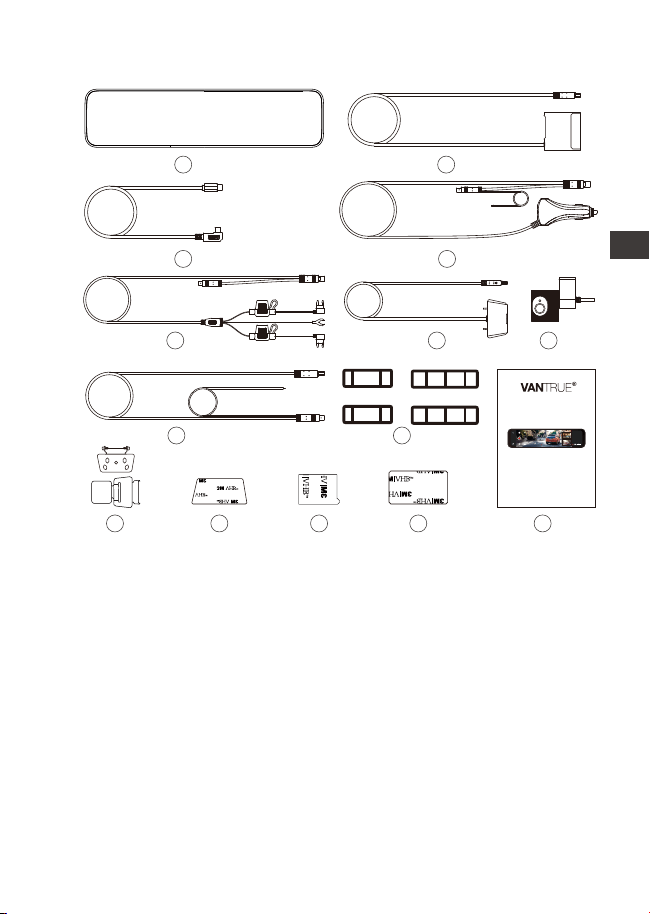
1. What’s in the Box?
A. Vantrue M3 Mirror
Dash Cam
B. Docking Station
C. Type-C Power Cable
D. Car Charger
E. Hardwire Kit
G. Interior Camera
I. Rubber Mounting Straps*2 Set
J. Rear Camera Bracket *2 Set
K. Rear Camera 3M Adhesive
Pad*1
L. Interior Camera 3M Adhesive
Pad*1
M. Docking Station 3M Adhesive
Pad*1
N. User Manual
H. Backup Camera
Extension Cable
A
E F
H
J
I
G
B
C D
F. Backup Camera
User Manual
3-Channel Mirror Dash Cam
Mirror 3
00:10:15
13:32
9-1
Fri
K L M N
EN
EN
EN
EN

- 2 -
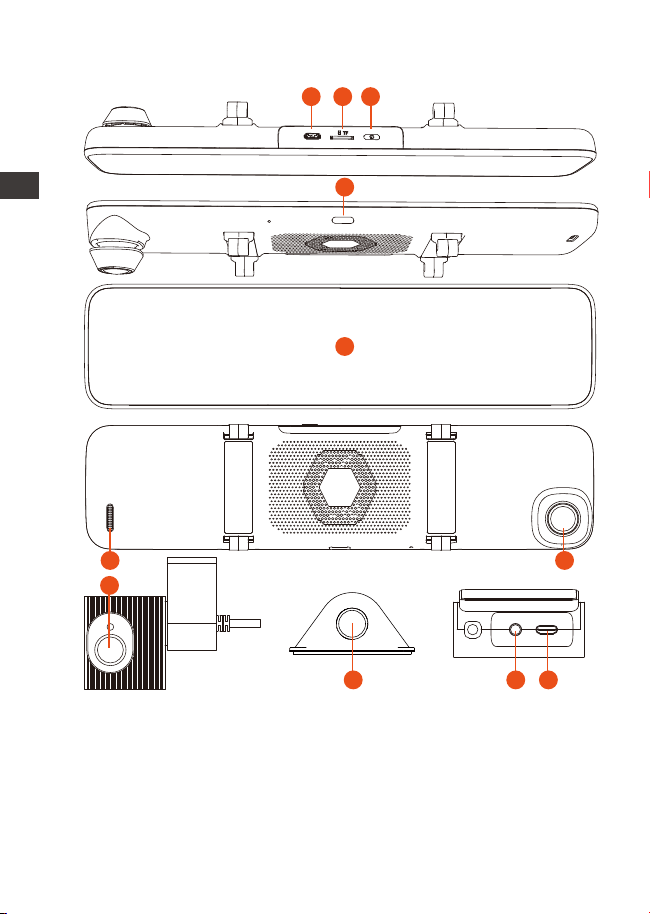
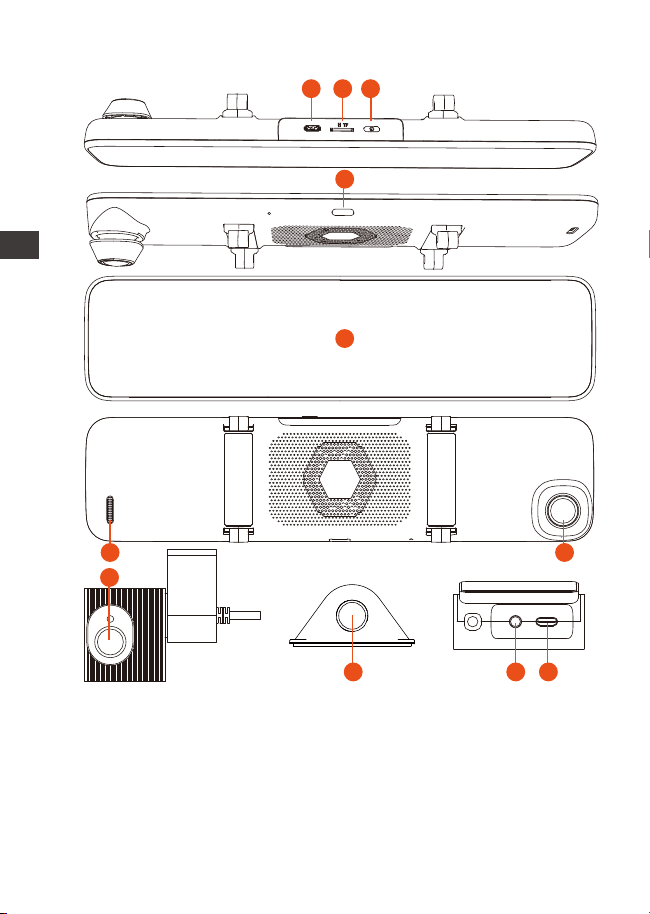
2. Camera Overview
2 SD Card Slot Supports Micro SD Card up to 512GB
in FAT32, Class 10;
3 Button Power ON/OFF; long press to turn on/
off the dash cam;
No.
1 Power Port Connect to Type C cable or car
charger for external power supply;
Name Description
ENEN
1 2 3
5
6
7
8
9 10 11
4
- 3 -
4 Button Short press for screen off;
5 Screen 12(11.88)inch LCD Display Screen;
6
Front Camera7
Speaker Delivers sound during video playback;
8 Interior
Camera
Camera for in-car video recording;
9
10
11
External Camera External Camera for video recording
rear road events.
Front Facing Camera for video
recording road Events;
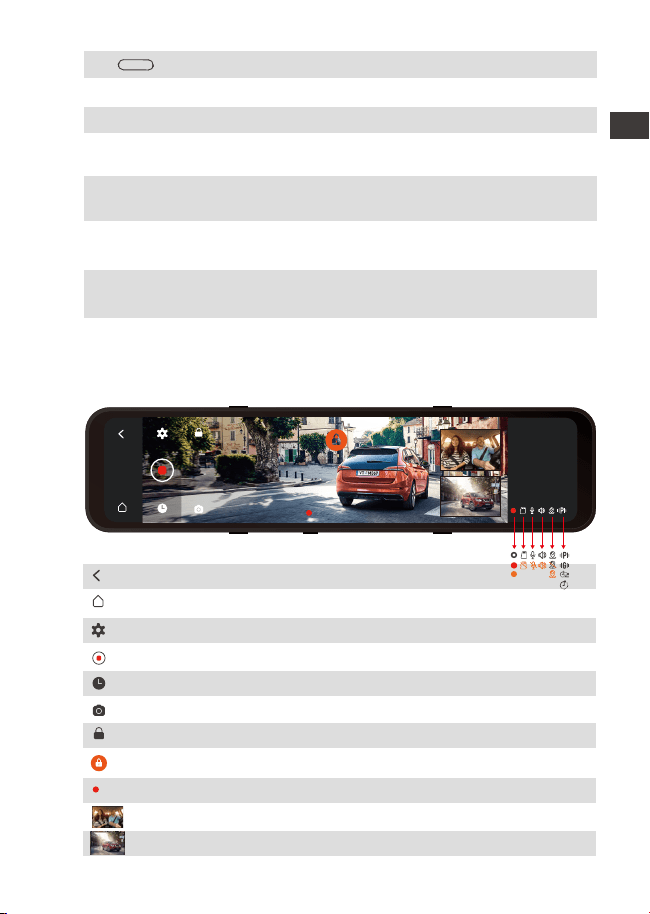
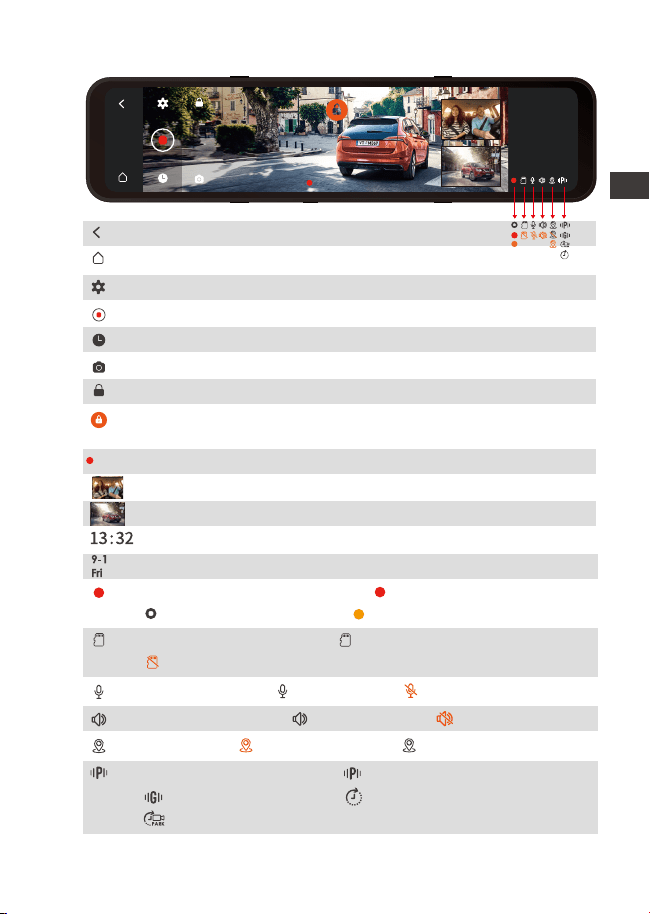
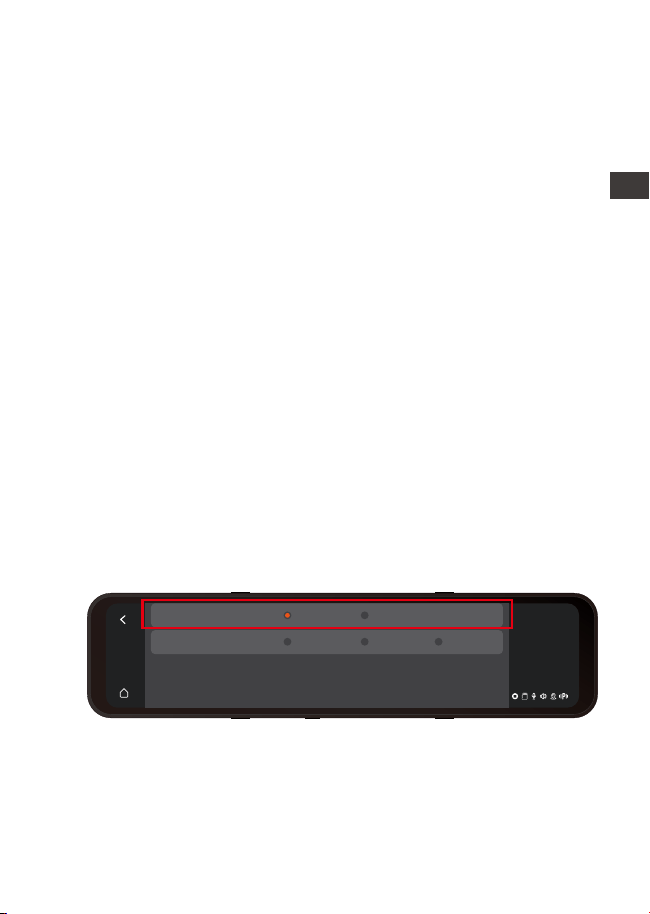
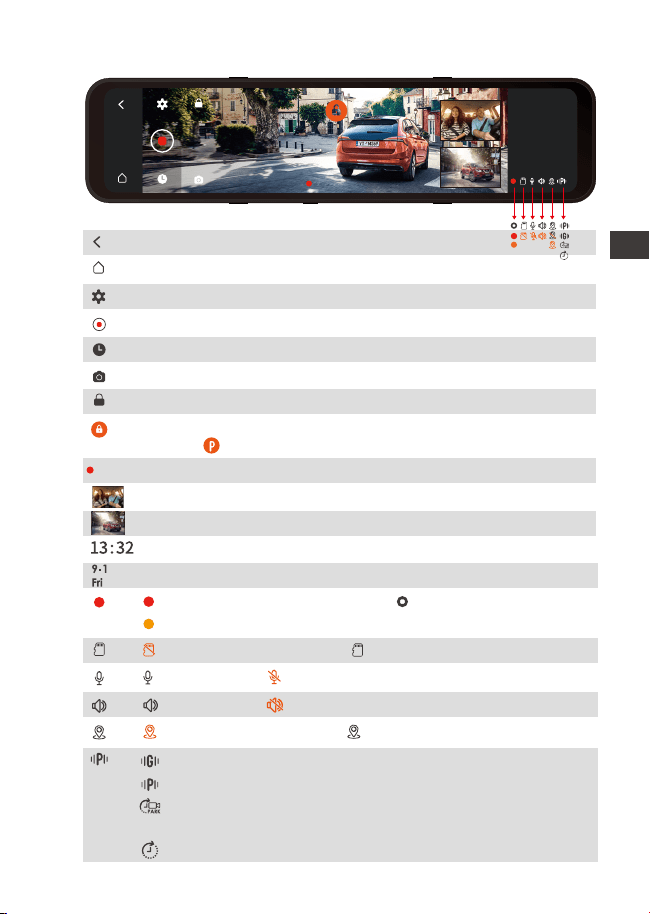
Screen Overview
00:10:15
Return to the previous menu;
Go back DVR interface;
Menu Setting;
Start/Stop Recording;
File Browsing;
Snapshot;
Recording Lock;
Emergency File Locked;
Recording Time (current clip);
Interior Image;
Rear Image;
EN
EN
EN
EN
00:10:15
13:32
9-1
Fri
Interior Camera
interface
Video stream port for streaming
interior camera’s recording;
Docking station
power interface
Type-C USB port for charging the
front camera.
- 4 -
3. Installation
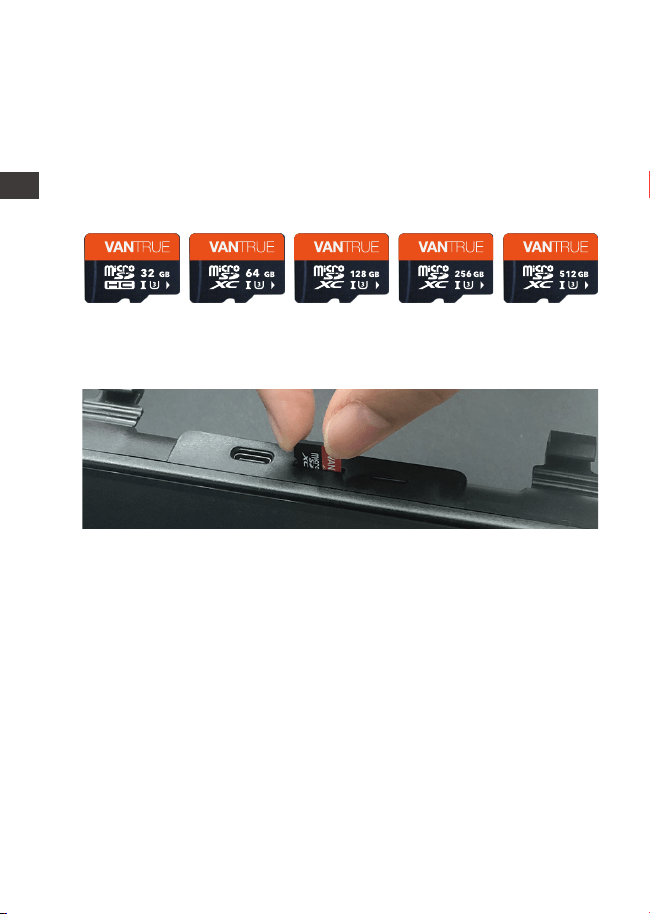
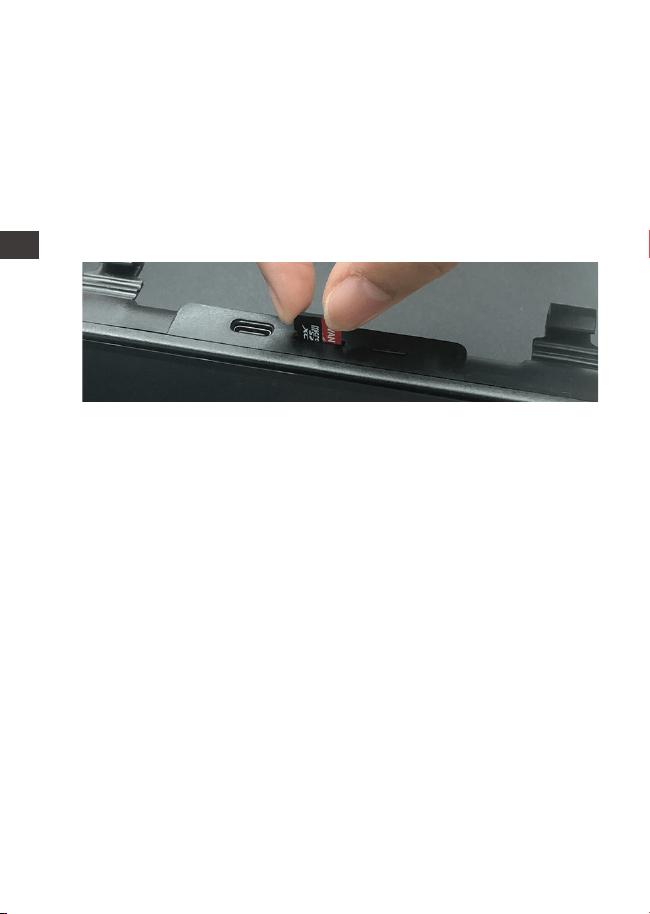
3.1 Installing a Memory Card (Recommended: Vantrue U3 high-
speed microSD card).
Please insert a memory card (memory card capacity:
32GB-512GB, card speed: U3/Class10/A2). The dashcam
has certain requirements on the card speed of the memory
card. For reliable operation, we recommend using a
VANTRUE SD card(sold separately).
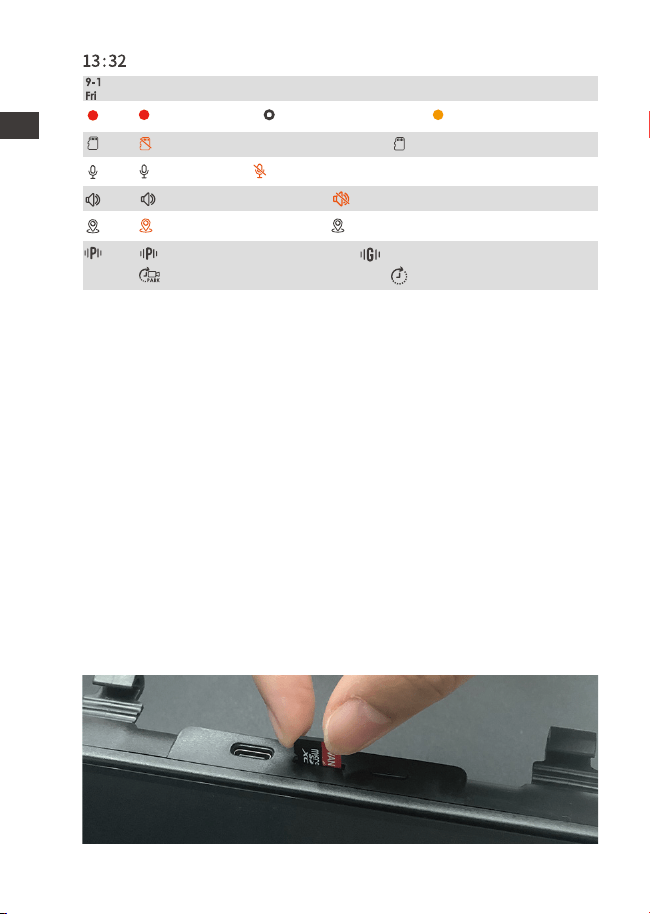
Memory Card Installation: There is an icon indicating the
insertion direction of the memory card. Please push the
memory card into the card slot according to the direction
indicated by this icon, until a "click" sound is heard in the
card slot, indicating that the memory card is inserted
properly.
Motion Detection ON; Collision Detection ON
Low Framerate Mode ON; Time Lapse ON.
Device sound ON; Device sound OFF;
GPS Signal Locked; GPS Signal Connecting;
NO memory card inserted; Memory card inserted;
Mic is ON; Mic is OFF;
Recording; Stop Recording; Video Locked;
ENEN
Current Time (24H);
Current Date (MM/DD/YY);
- 5 -
The docking station perfectly connected the front, inside,
and rear cameras, making the installation of the dash cam
more convenient and flexible. The M3 dash cam comes with
a car charger and a hardwire kit. If connecting the car
charger, the dash cam will power off after the car engine is
off; if connecting the hardwire kit, the car will continue to
supply power to the dash cam in parking mode.
Reminder:
Before using the SD card, please format it to FAT32 on the
camera.
We recommend turning on the format reminder setup,
and formatting the card regularly. Too many files on the
memory card will affect its read and write performance.
1.
2.
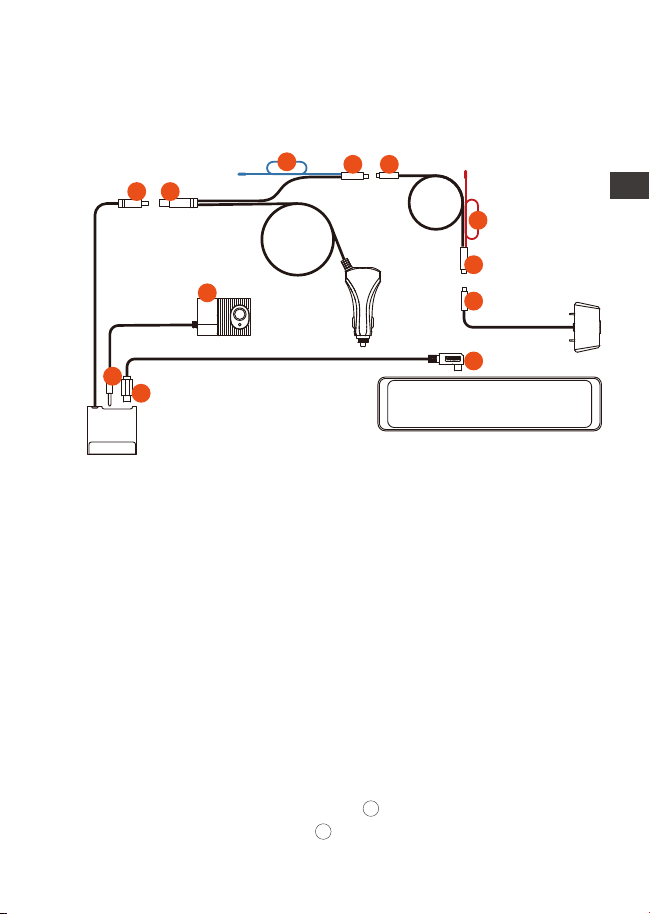
3.2 All Accessories Installation
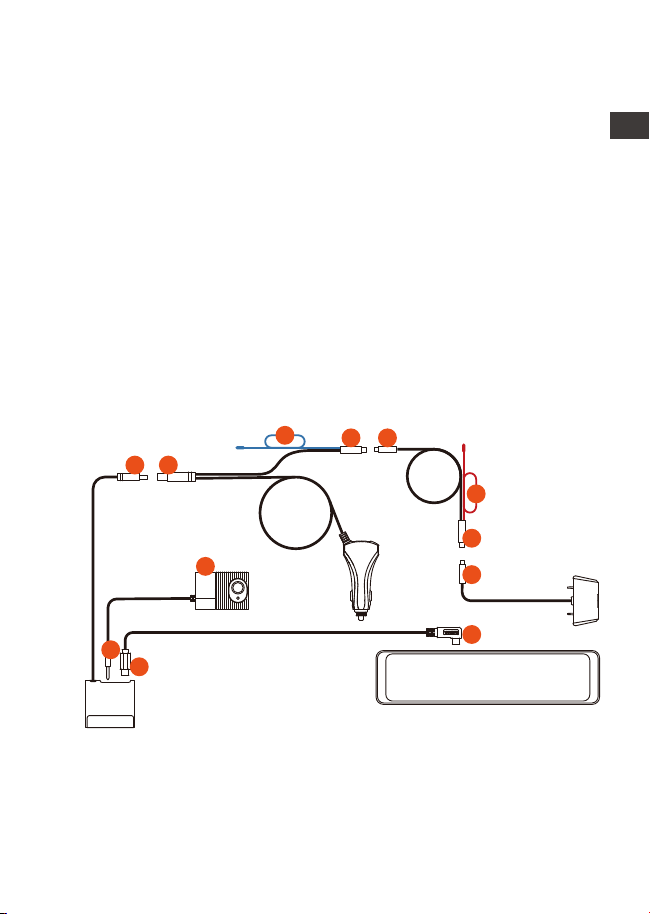
3.2.1 Car Charger Installation
1.
2.
3.
Connect the docking station ① to the car charger ②;
Connect the car charger ③ with the rear lens extension
cable ④;
Connect the rear lens extension cable ⑥ to the rear lens
⑦;
EN
EN
EN
EN
10
9
12
11
1 2
5
3
4
6
7
8
- 6 -
1.
3.
4.
2.
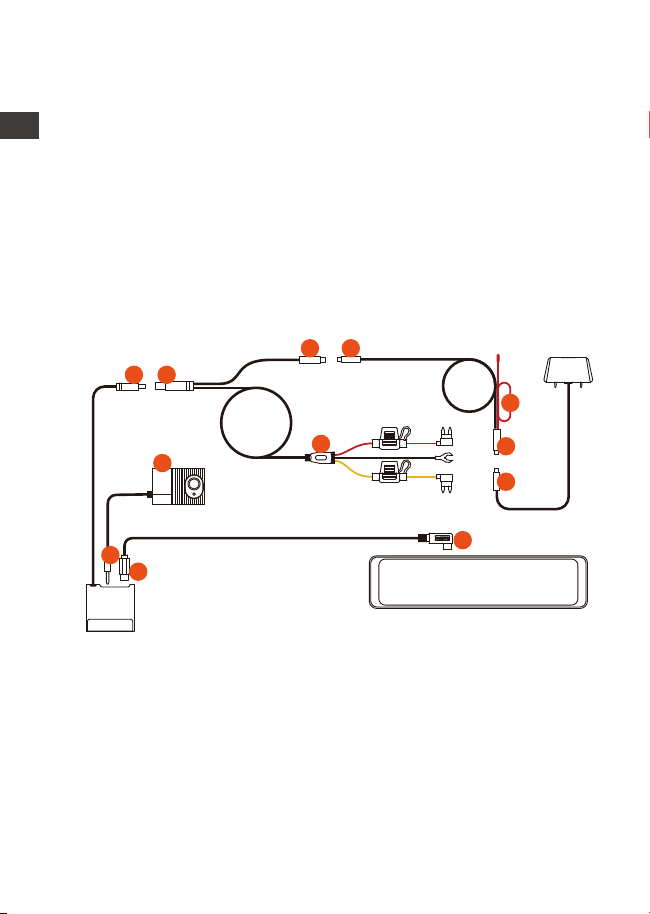
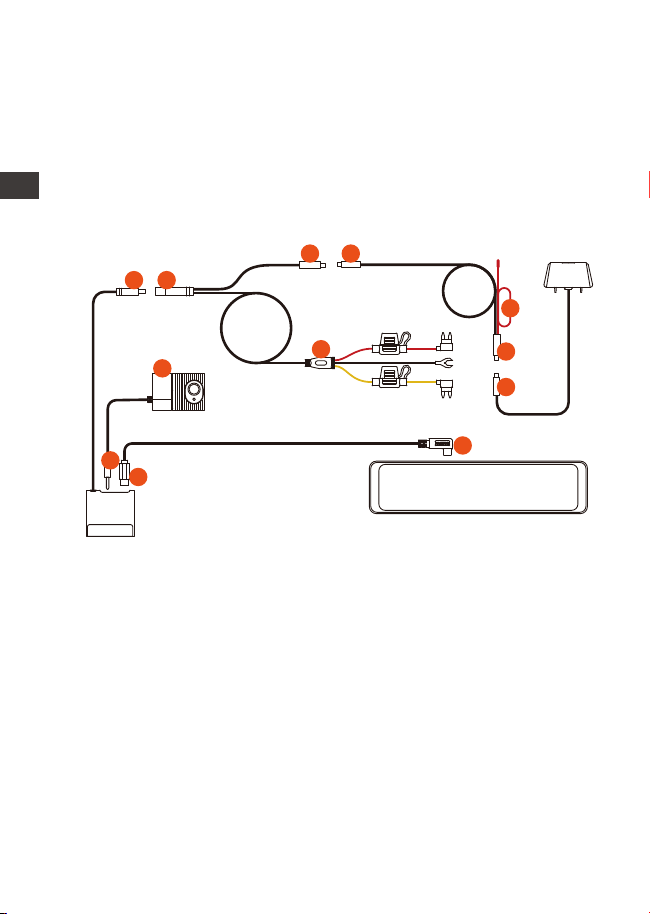
3.2.2 Hardwire Kit Installation(For 24 Hours Parking Mode)
Note:
⑤ is the reversing light wire, which is connected to the
reversing light in the fuse box;
⑧ is the rear reversing light wire, which is connected to the
rear reversing light of the car.
Please connect one of the reversing light wires as needed.
Connect the docking station ① to the Hardwire kit②;
Connect the Hardwire kit ③ with the rear lens extension
cable ④;
Connect the rear lens extension cable ⑤ to the rear lens ⑥;
The hardware kit ⑦ is the same as the installation method
of the normal ACC hardwire kit:
The black wire is the negative wire, which is connected to
the metal of the car; The red line is the ACC signal line,
which is connected to the ACC fuse of the car fuse box;
4.
5.
Connect the docking station ⑨ with the M3 main dash
cam ⑩ via the TYPE-C power cable;
Plug the interior camera ⑪ into the docking station
headphone jack ⑫ .
ENEN
10
9
12
11
1 2
3 4
5
6
8
7
- 7 -
5.
6.
The yellow wire is the positive wire, which is connected to
the constant current fuse of the car fuse box.
Connect the docking station ⑨ with the M3 main dash
cam ⑩via the TYPE-C power cable;
Plug the interior camera ⑪ into the docking station
headphone jack ⑫ .
Note: Red cable ⑧ is the rear reversing light line.
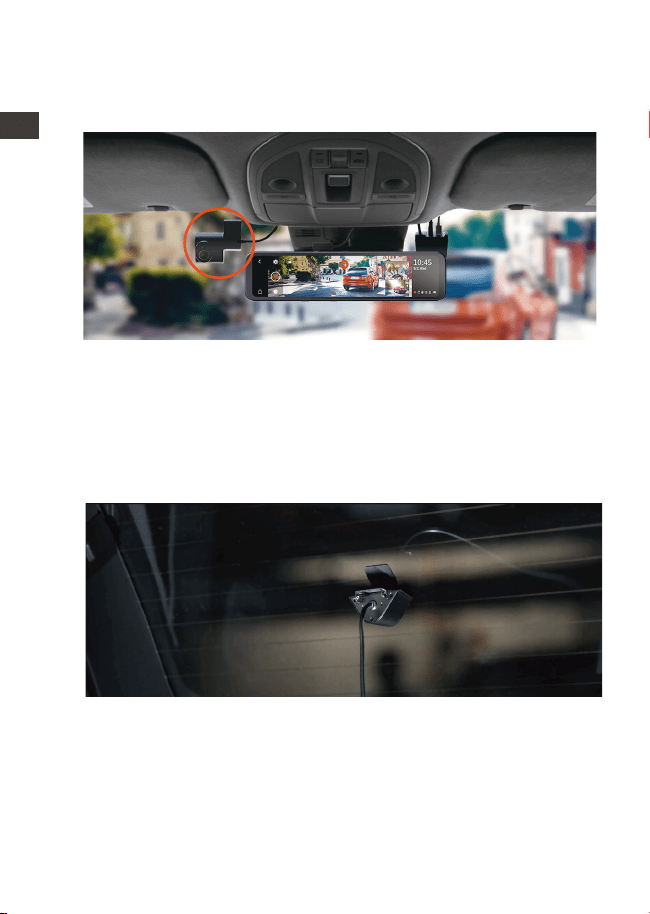
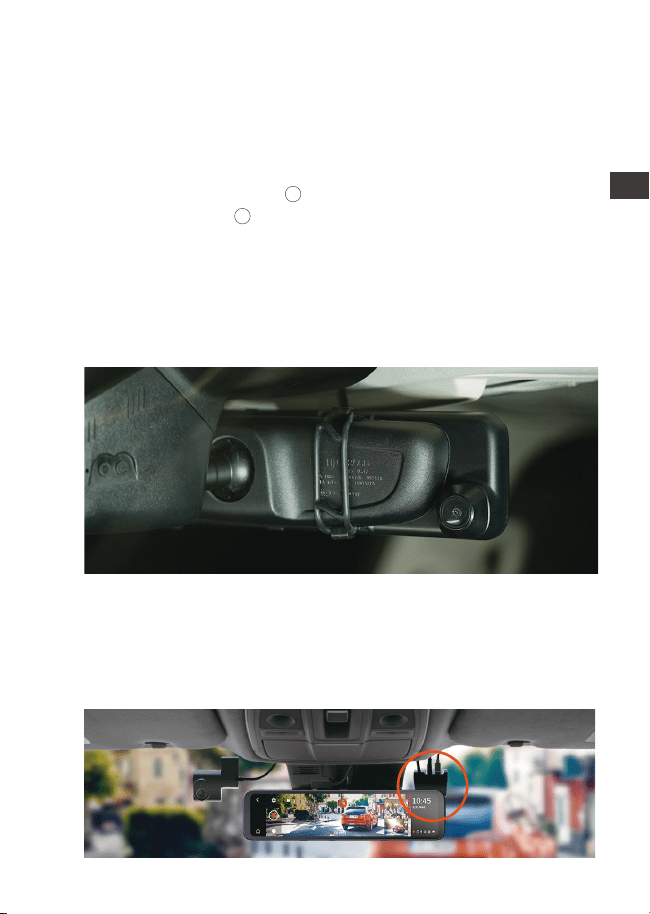
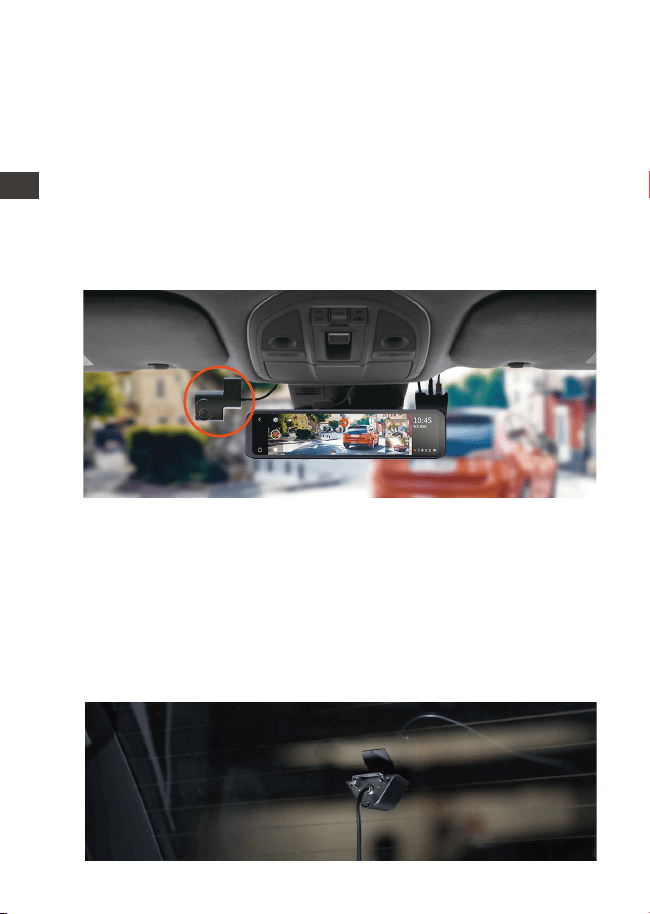
3.3 Front Camera Installation
Mount the M3 mirror dash cam over the rearview mirror and
use the included rubber ring to fix it.
3.4 Docking Station Installation
Take out the docking station, tear off its 3M adhesive
protective film, and stick it on the front windshield. After
installation, use the TYPE-C cable to connect the mirror dash
cam to the dock.
EN
EN
EN
EN
- 8 -
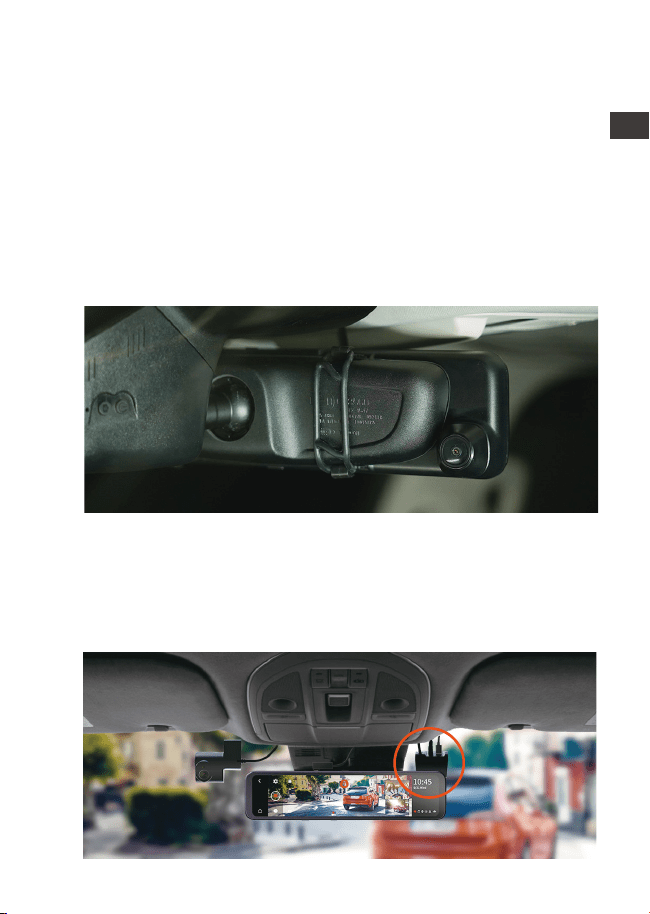
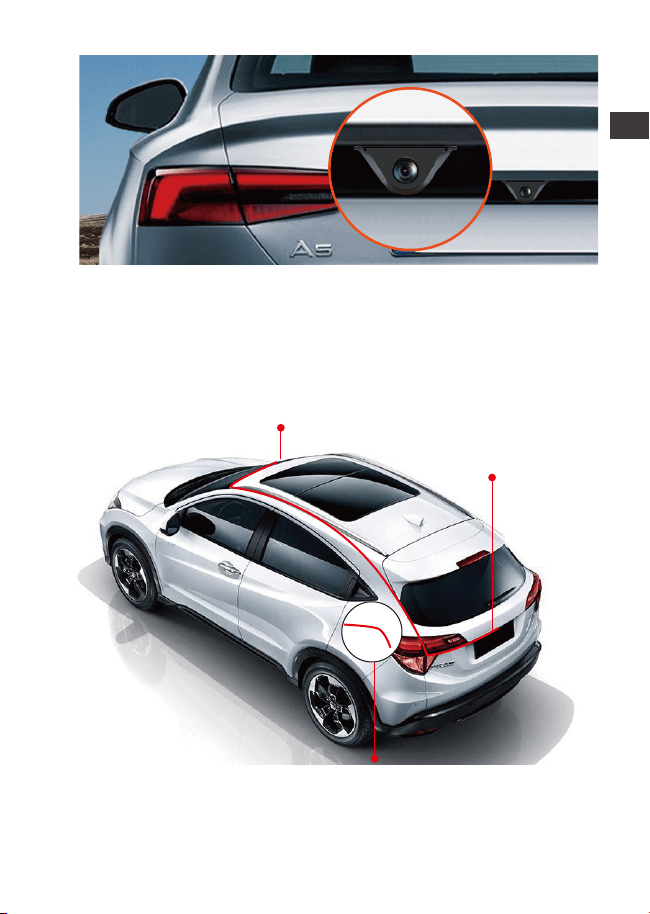
3.6 Rearview Camera Installation
3.5 Interior Camera Installation
Take out the interior camera and plug it into the docking
station headphone jack, then stick it on the front windshield.
There are two ways to install the rear camera, one is installed
inside the car, and the other is installed outside the car.
In-car installation: Select the installation position on the rear
windshield after installing the rear camera mount; then fix
the rear camera in the selected position and adjust the lens.
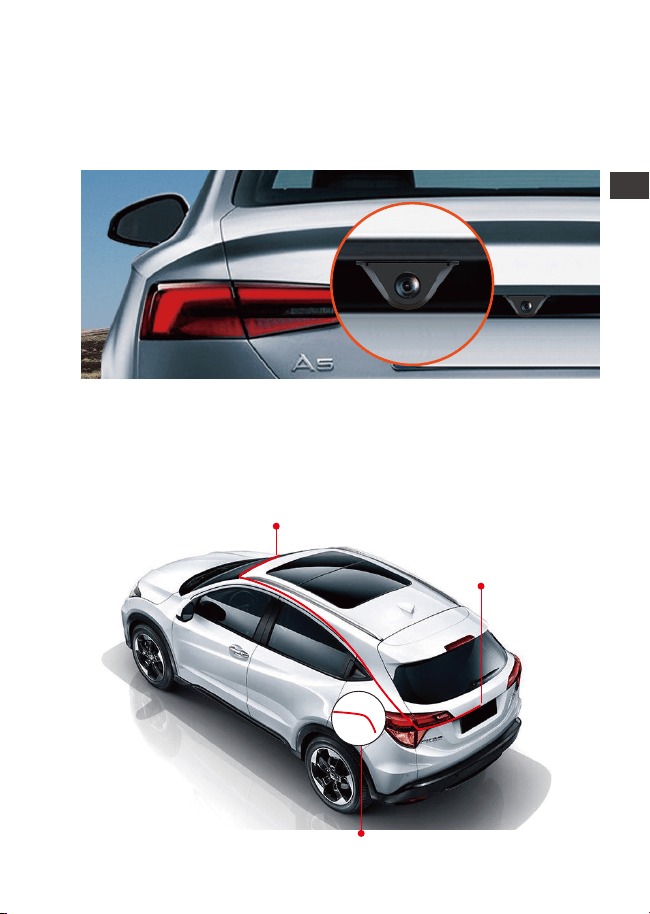
Installation outside the car: Use a trim removal tool to pop
out tailgate trim, then runs the cable from the outside of the
car into the trunk of your car. Then connect the rear
camera’s power cable to the extension cable. Finally, find
the best location, and fix the camera with a sticker or a
screw at the rear end of the car, normally the best place is
above the number plate.
ENEN
- 9 -
3.7 Route your rear camera power cable to the front of the car.
If you’d like, use a trim removal tool to pop out the headlin-
ing panel directly above your windshield. Then, run your
cable through the exposure chamber.
Bind Rearview Mirror
Connect Rearview
Camera
Connect Reversing Light
EN
EN
EN
EN

- 10 -
After power ON the camera, press the button to enter the
setup process.
(If the camera is recording video, press the button to stop
recording before pressing the button.)
Language: Available languages are English/Français/
Español/Deutsch/Italiano/简体中文/русский/日本語/Polski.
Date & Time: Automatically sets the time by GPS, Set the
date and time, the time system (24-hour Format by Default),
and the time zone.
Storage: Display Total Memory/Available Memory/Format SD
Card.
Format Reminder Setup: Select the reminder options: 15
Days, 1 Month, and Off. The default is off.
Resolution: The M3 camera has 2 resolution modes: Front
+Cabin+ Rear recording mode, or Front+Rear recording
mode.
Front +Cabin+ Rear Recording: 1440P+1080P+1080P;
1080P+1080P+1080P;
Front+Rear Recording: 1944P+1080P; 1440P+1080P;
1080P+1080P.
Video frame rate of the front camera: Select the video
frames. 30FPS/28FPS optional.
Loop Recording: The default setting is 3 min. You can choose
the options among 1/3/5 min and OFF. If you select “off”, the
looping recording is 20 minutes per clip.
Cabin Mirror: The default is ON. If you turn it on, the internal
recording screen is displayed in mirror mode.
Internal Rotate Display(180°): The default is Off. If you turn it
on, the Internal recording screen will be flipped 180°.
Rear Mirror: The default is ON. If you turn it on, the rear
recording screen is displayed in mirror mode.
Rear Rotate Display(180°): The default is Off. If you turn it on,
the rear recording screen will be flipped 180°.
Audio Recording: The default is ON. Set recording to on or
off.
3.8 Menu Settings
ENEN

- 11 -
G-Sensor: You can set the g-sensor values of Forward &
Backward, Leftward & Rightward, Upward & Downward of
the car. The G-sensor value in each direction can be
selected 1/2/3/4/5. The highest sensitivity of G-Sensor is 5.
Battery Low Voltage Protection: When connecting the
hardwire kit, the M3 dash cam will automatically identify the
current car battery voltage. There are 3 protection voltage
thresholds for your choice: 11.8V/12V/12.4V. when the car
battery voltage reaches the protection voltage threshold
which you choose, it will automatically shut down to protect
the car battery.
Low Light Night Vision Parking Mode: The default is Off. When
turned on, it can optimize the recording effect of videos in
parking mode.
Parking Mode: You can choose the parking mode you need,
including Collision Detection/Motion Detection/Low Framer-
ate Mode/OFF.
Exposure: Adjust exposure value for the front lens, +2.0,
+1.6,+1.3,+1.0,+0.6,+0.3,+0.0,-0.3,-0.6,-1.0,-1.3,-1.6,-2.0
optional. The default value is +0.0.
Frequency: 50Hz/60Hz available.
Device Sound: Set the volume of the device, such as the
startup sound, prompt sound, button sound, and video
playback sound. You can select off, low, Medium, or high.
The default value is Medium.
Warning Tone: Turn on or off the operation prompts, such as
Format Reminder setup Tone, Video Locked Prompt Tone,
Abnormal Video Recording Stopped Prompt Tone, Touch
Tone, and ON & Off Tone. Default is ON.
Auto LCD Off: 1Min/3Min/5Min/ OFF optional. Default is OFF.
If it is set to Off, it will keep the screen always on.
LCD Brightness: You can select off, low, Medium, or high.
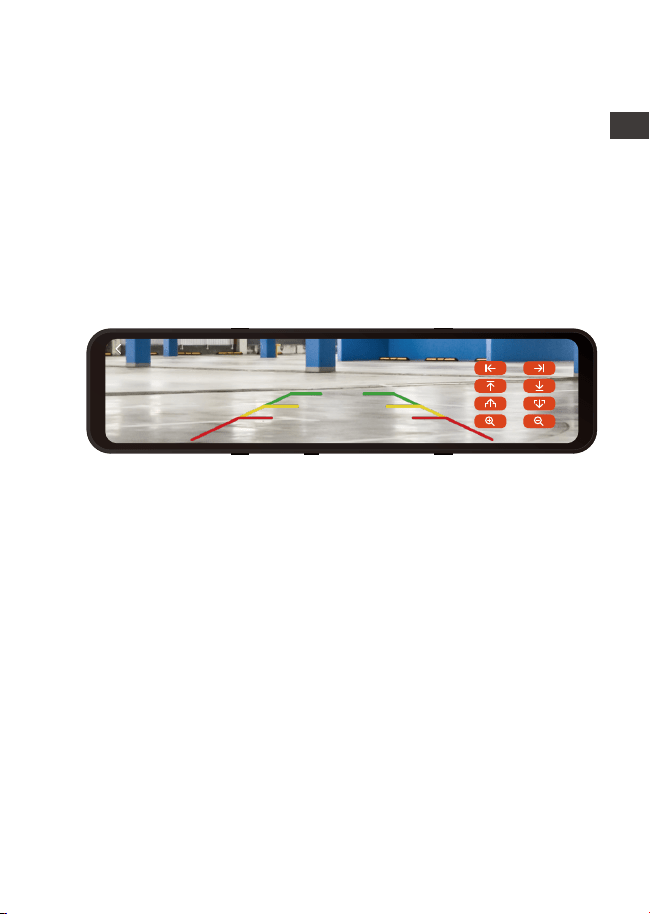
Reversing Setting: Set the Reverse Image, Reverse Assist Lines
and Reverse preview Settings.
Reversing Setting: Set the Reverse Image, Reverse Assist Lines
and Reverse preview Settings.
EN
EN
EN
EN

- 12 -
4. Basic Operation
4.1 Turn ON/OFF the camera
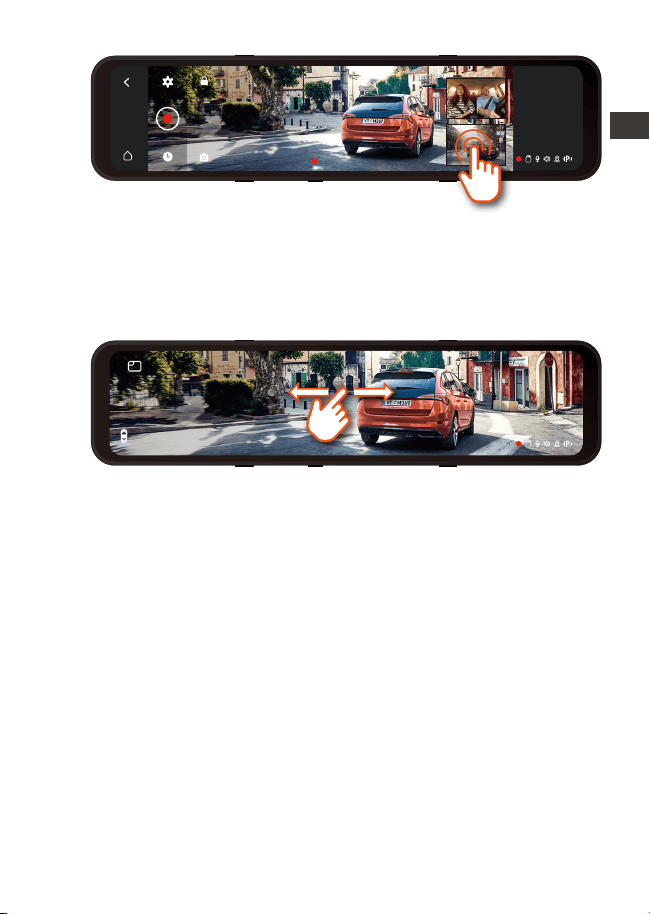
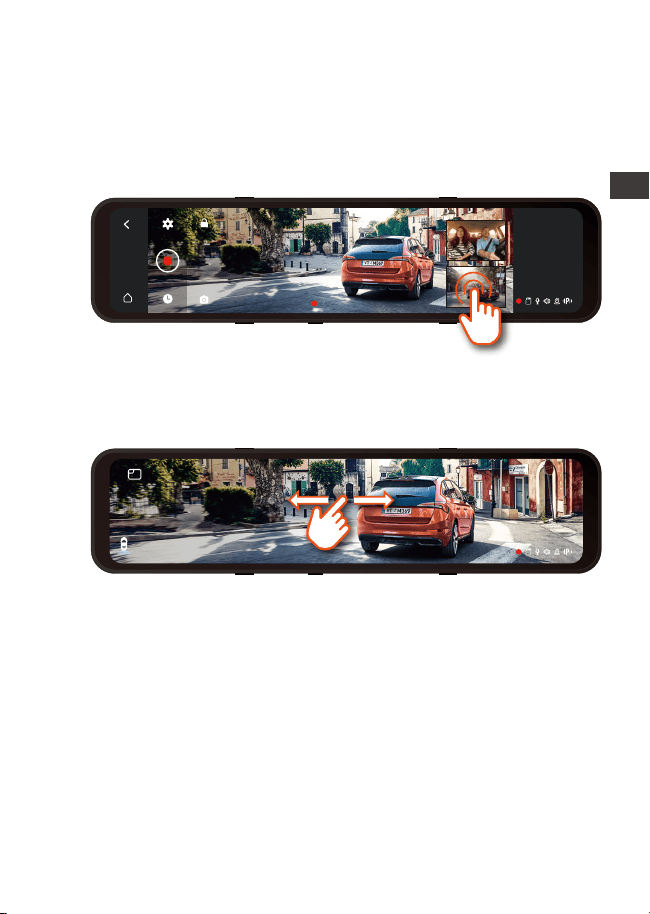
4.2 Switch the Front, Cabin and Rear camera window display
Once connected to the car charger, the camera will auto-
power on after you start your car. It will auto off after you
turn off the car engine even if it is recording. You can also
long-press the Power Button to turn on/off the camera.
Please charge the dash cam with an included car charger
or hardwire kit on your car.
After the car is turned off, if the hardwire kit is connected
and the park mode is turned on, the dash cam will
automatically enter the park mode, otherwise it will
automatically shut down.
Note:
1.
2.
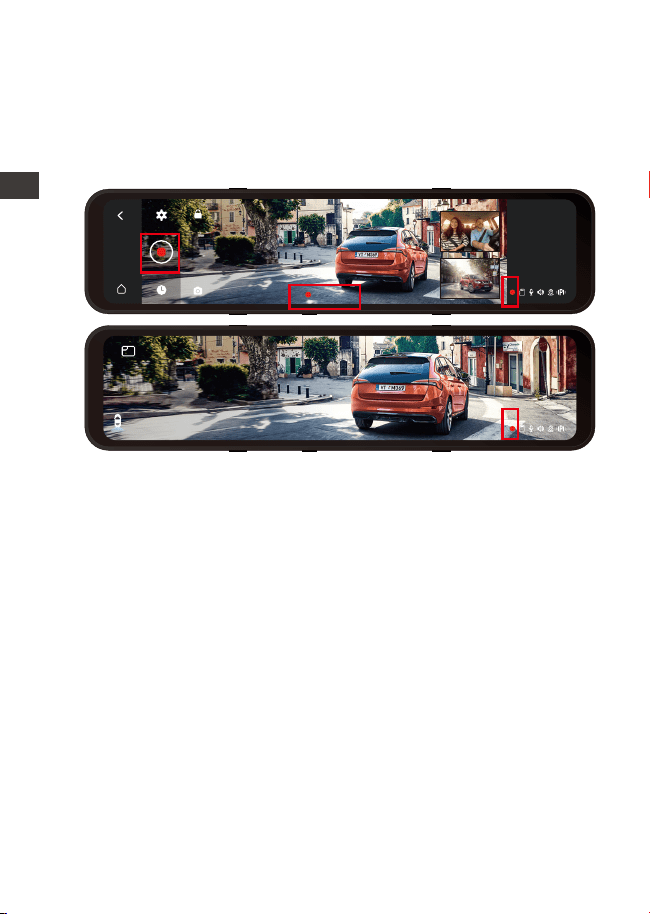
In the recording interface, click the small window to switch
the large screen display of the screen inside or behind the
car.
1.
In 3-way recording mode, there are two ways to switch
between the front, cabin, and rear view.
Time Lapse: Select the video frames of time lapse. 1FPS/3F-
PS/ 5FPS/10FPS/OFF optional.
Number Plate: Select the number or letter to be set. After
setting, your license plate number can be displayed in the
recorded video.
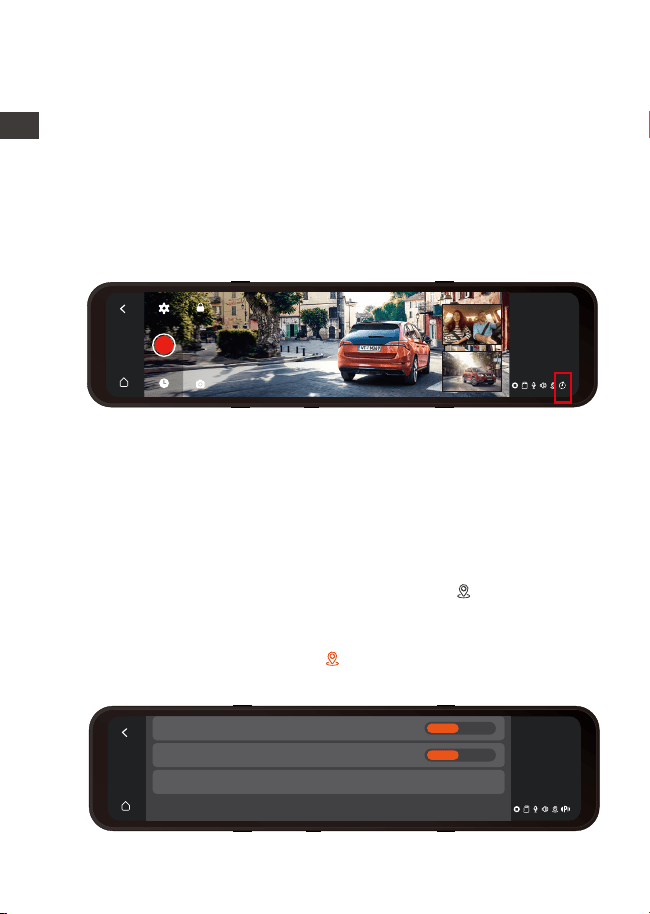
GPS: GPS is enabled by default. GPS ON/OFF settings speed
unit settings, and GPS information are all set here.
Stamp: Enable or disable the watermark stamp of the video
and photos. The watermark stamp includes VANTRUE label,
date and time label, and speed label.
Default Settings: Reset the device back to factory settings.
System Info: Check the Model Number/Firmware Version/
Website/MCU Version.
ENEN
- 13 -
4.3 Low Voltage Protection
In the full-screen interface, there will be 4 modes of display.
Sliding the screen left and right to switch the front camera
preview picture, the cabin camera preview picture, the
rear camera preview, and the front+cabin+rear camera
preview picture displayed on the same screen.
2.
The M3 docking station has a power supply identification
function, with M3 supporting hardwire kit use, which can
identify the car battery voltage. The car mode refers to the
protection voltage setting. The protection voltage has 3
gears, namely 11.8V, 12V, and 12.4V. If the protection
voltage of 11.8V is set, when the car battery reaches 11.8V,
the docking station will automatically cut off the power
supply to protect the Car battery.
Note:
The low voltage protection function does not support 24V
car batteries for the time being.
Please use the hardwire kit for this function.
EN
EN
EN
EN
13:32
9-1
Fri
00:10:15
13:32
9-1
Fri

Please short press button for screen off;
In the parking mode, in order to save power and increase
the protection time of the parking mode, the screen will
turn off within 3 seconds after the dash cam enters the
parking mode.
- 14 -
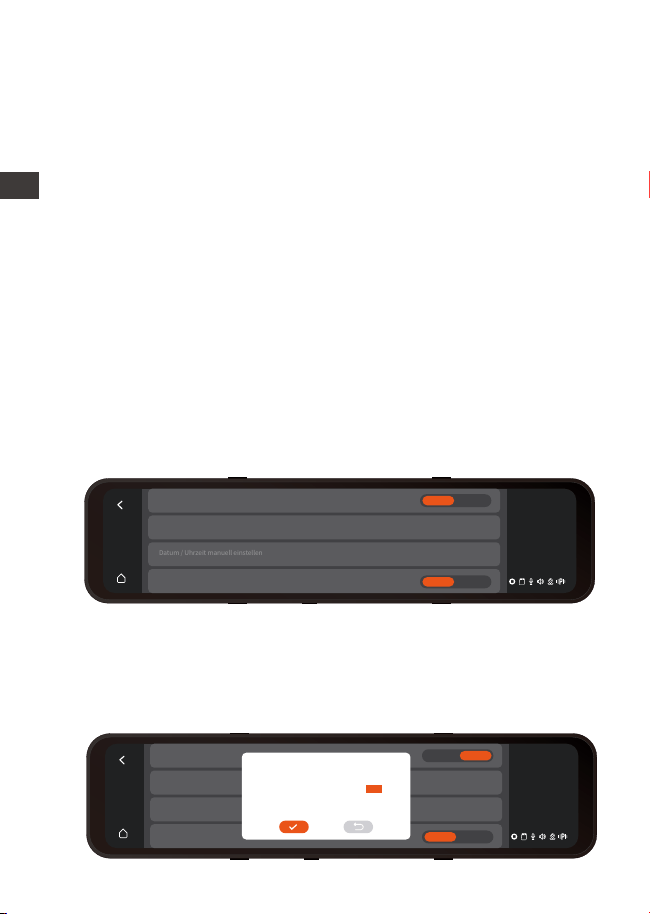
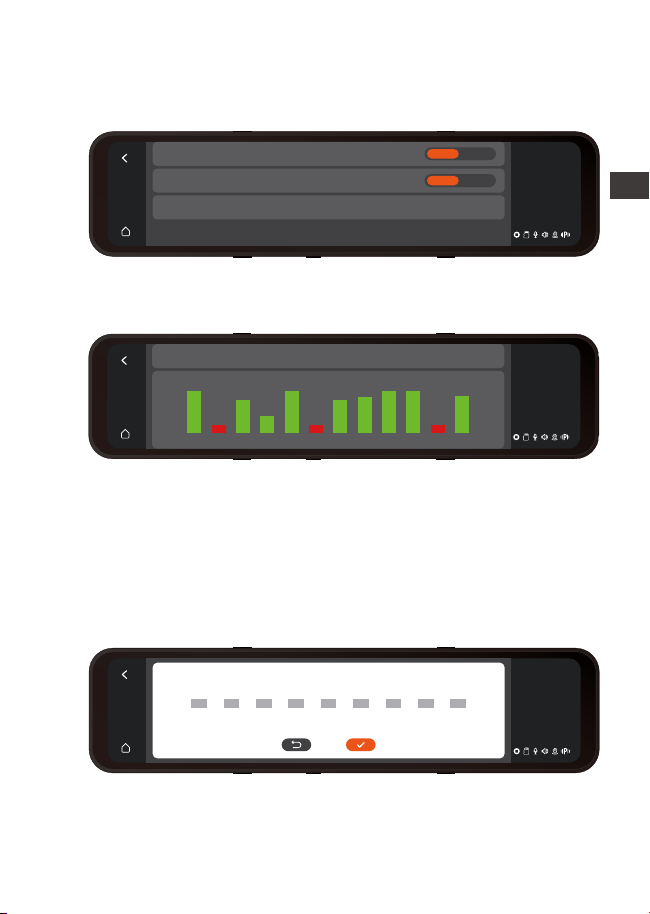
4.4 Set Date & Time
1.
2.
There are two ways to set the time and date: automatically
and manually.
Automatic update: After turning on the GPS, go to the “Time
Setting”, turn on "Automatically sets the time by GPS", and
select your time zone, then the time and date can be
automatically corrected. Automatically sets the time by GPS
is ON by default.
4.5 Auto LCD OFF
There are 3 kinds of display modes: 1 Min/3 Min/5 Min, and
OFF.
Please go to “Menu Setting” > “Auto LCD OFF”, then switch
the screen mode. The default is off. If it is set to Off, it will
keep the screen always on.
Manual update: Go to the “Time Setting”, turn off the
"Automatically sets the time by GPS", and then manually
adjust the time and date.
13:32
9-1
Fri
Automatically Sets The Time By GPS
>
>
Time zone
Manually Set Date /Time
24-Hour
On Off
On Off
24-Hour
On Off
Note:
13:32
9-1
Fri
Automatically Sets The Time By GPS
>
>
Time zone
Manually Set Date /Time
On Off
2049
2050
2022
2023
2024
05
06
07
08
09
06
07
08
09
10
11
12
13
14
15
33
34
35
36
37
ENEN
- 15 -
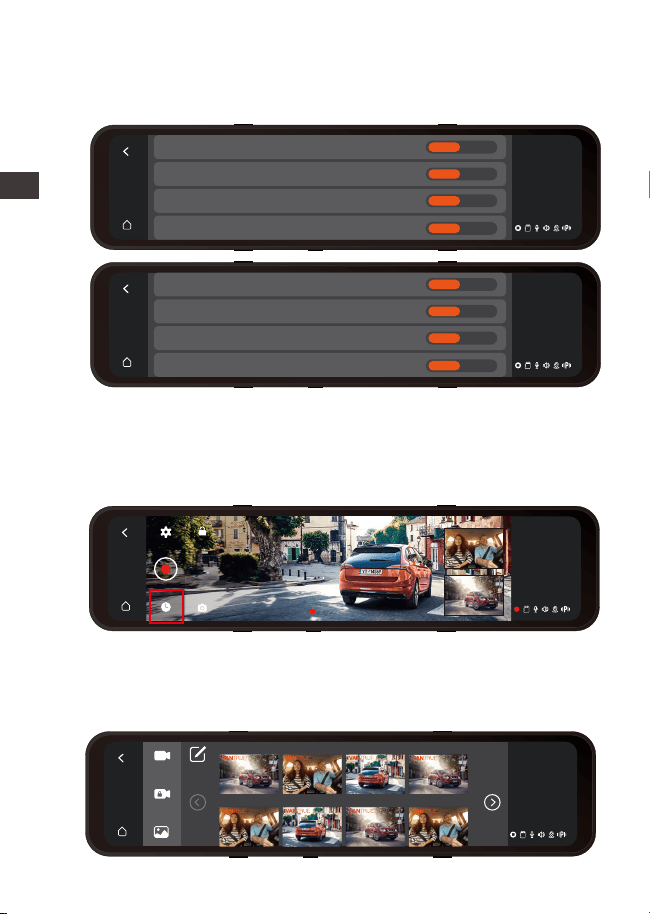
4.6 Resolution
4.7 Loop Recording
After inserting the memory card and connecting the power
supply, the M3 dash cam will auto turn on and enter the
loop recording.
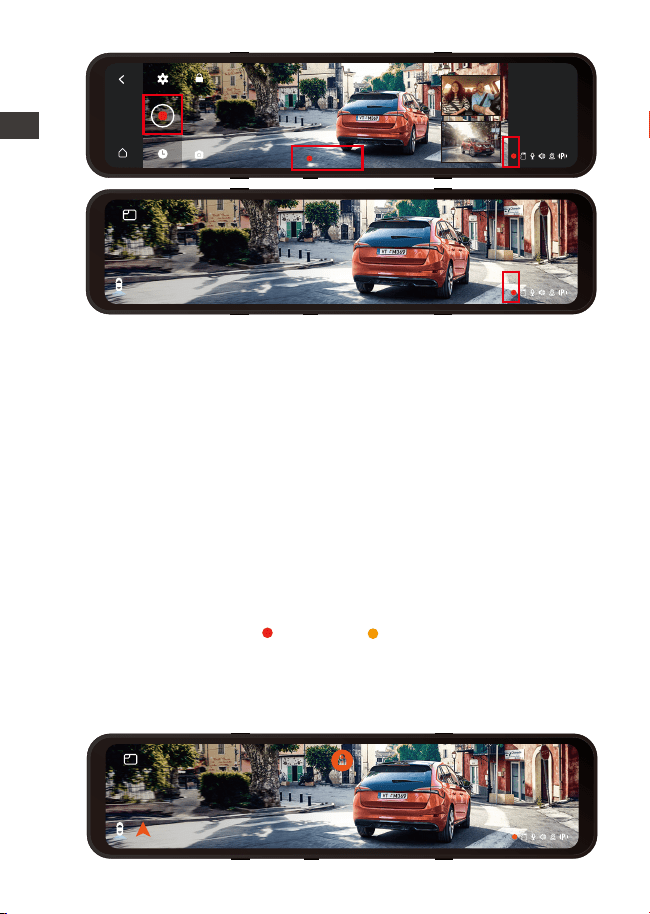
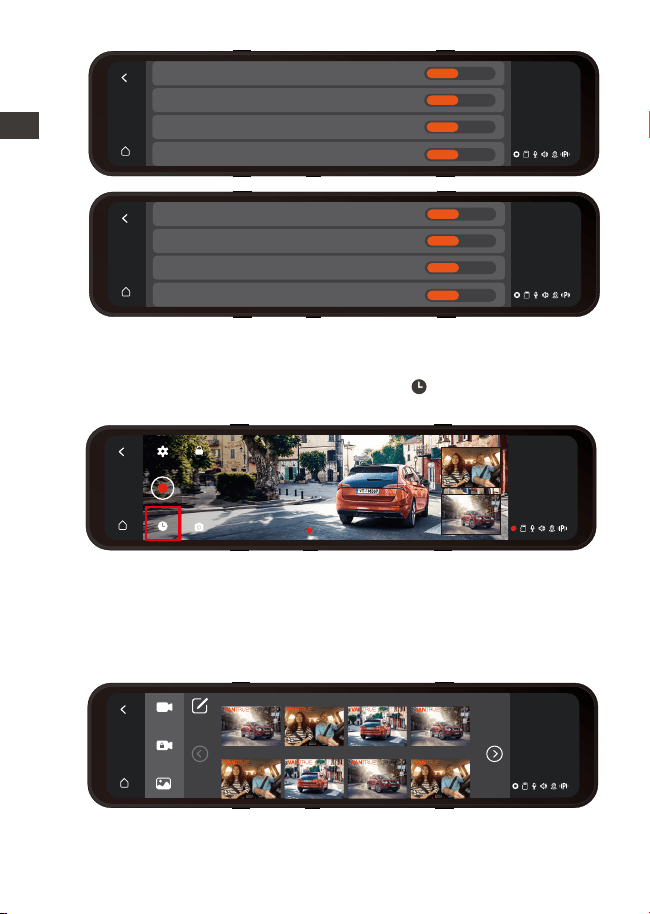
When recording, the icon in the middle of the video
interface flashes, and the recording time will be recorded
according to the loop recording time you set. If you are
back to the screensaver screen, you can view the recording
status icon in the lower right corner of the screen to learn
about the current recording status. (The red icon means
recording is in progress, the orange icon means event
recording, and white the icon means recording has been
paused.).
1.
2.
Note:
The cabin camera will automatically switch to IR infrared
mode at night and in poor light environments.
The frame rate of the interior and rear lens are both 25FPS.
By default (Front+ Cabin+ Rear recording mode), both
cameras will capture road front and rear and cabin at
1440P+1080P+1080P.
It can be switched to Front+Rear mode with the following
steps:
-Go to “Record Setup”> “Resolution” to select Recording
Mode.
Front+Cabin+Rear Mode: 1440P+1080P+1080P;
1080P+1080P+1080P;
Front+Rear Mode: 1944P+1080P; 1440P+1080P; 1080P+1080P.
13:32
9-1
Fri
Front+Cabin+Rear
Front+Rear
1080P+1080P1944P+1080P 1440P+1080P
1440P+1080P+1080P 1080P+1080P+1080P
EN
EN
EN
EN
- 16 -
00:10:15
13:32
9-1
Fri
13:32
9-1
Fri
4.8 Event Recording
Event video is triggered by the G-sensor(Gravity Sensor),
which can be automatically triggered or manually locked.
When the dash cam detects that the current vibration value
of the vehicle has reached the preset G-sensor level, the
video will be automatically locked, and the recording icon
will change from red to orange , the recording time will be
until the end of the recording or manually stop, and the event
video will be saved in the event video folder. Videos and
images in the event video folder will no longer be looping
over.
Note:
After turning off loop recording, emergency recording is
invalid, only snapshots can be taken.
After the loop recording is turned off, the duration of each
video will be 20 mins, and the recording will stop when the
memory card capacity is full.
ENEN
13:32
9-1
Fri
North 60km/h

- 17 -- 17 -
Manually lock the video. In the video recording interface,
click the icon and the video will be locked and saved in
the event video folder.
You can set the G-sensor Sensitivity values of Forward &
Backward, Leftward & Rightward, Upward & Downward of
the car. The G-sensor value in each direction can be
selected 1/2/3/4/5/OFF. The default sensitivity for the three
dimensions is 3. The highest sensitivity of G-Sensor is 5.
Please go to “Menu Setting” > “G-sensor”, then adjust the
G-sensor value.
The interior and rear cameras can be optionally mirrored
on or off. The video files are not affected regardless of
whether it is turned on or off, just the screen display.
If your internal and rear camera is mounted upside down,
the screen will stand upside down. You can turn on this
function to flip the videos. Please go to "Internal Rotate
Display(180°)" or "Rear Rotate Display(180°)" on the “Menu
Settings” and select "On".
By default, this function is disabled.
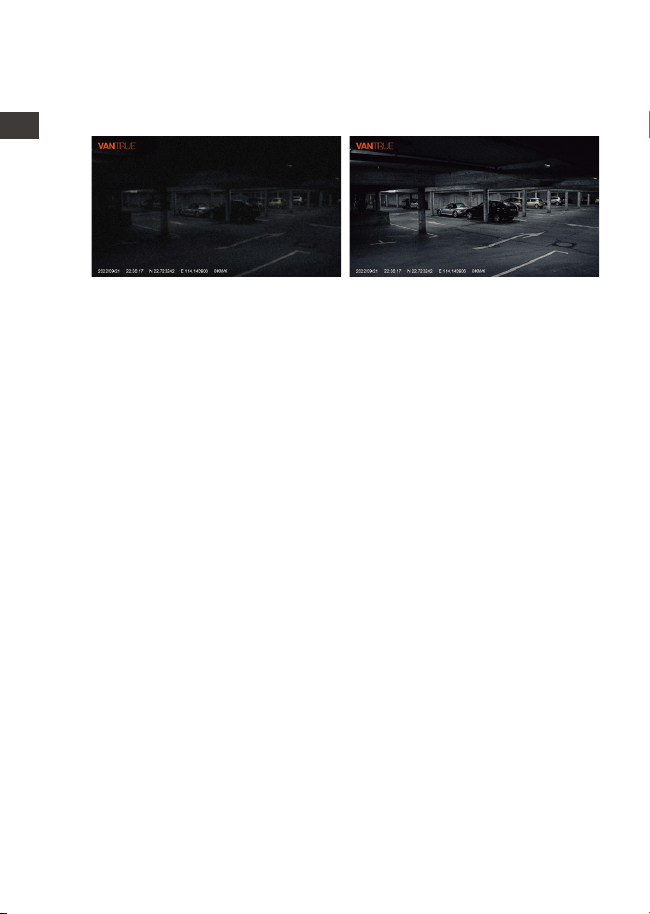
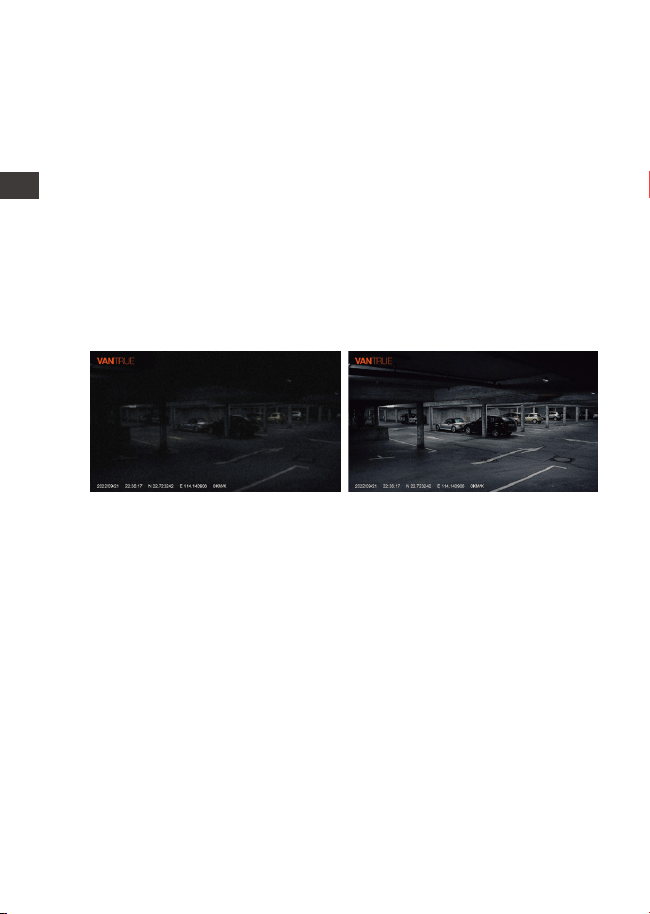
In order to enhance the safety of parking at night, we
make full use of the lens performance combined with
low-light night vision technology to improve the night vision
effect in parking mode. This function is in open mode by
default. It will be triggered only after entering the parking
4.9 Internal & Rear Mirror
4.10 Internal & Rear Camera Flip(180°C)
4.11 Low-light Night Vision in Parking Mode
1.
2.
Note:
The camera will auto-overwrite old Event videos once the
Event folder has accumulated 30% of the card capacity.
Please regularly transfer important videos to your PC or
another storage location (e.g. external hard drive).
EN
EN
EN
EN
- 18 -
There are 3 modes to choose from in the parking mode of
M3: collision detection, low framerate mode, and motion
detection. After the parking mode is enabled, you can
choose to enable one of the parking modes.
4.12 Parking Mode
Note:
To ensure the camera works properly in park mode,
please use the hardwire kits or other stable and continu-
ous power supply to power the dash cam.
The best working environment temperature of M3 is
14-122°F (-10°C to 50°C). We recommend using collision
detection within this temperature range, so once the
temperature exceeds the normal working temperature
range, it will automatically shut down. If the temperature
is high, please turn off the camera when parking.
1.
2.
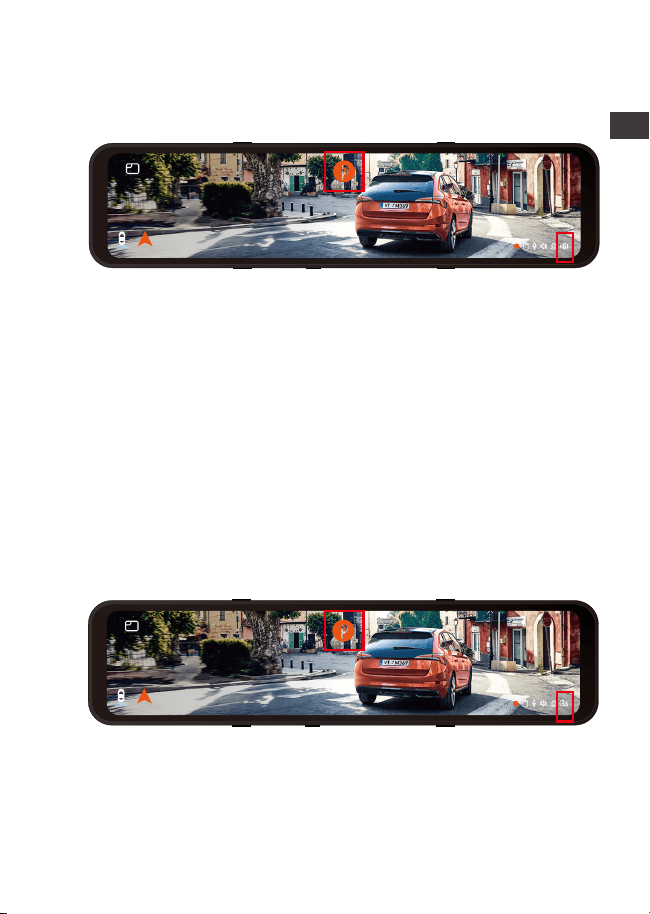
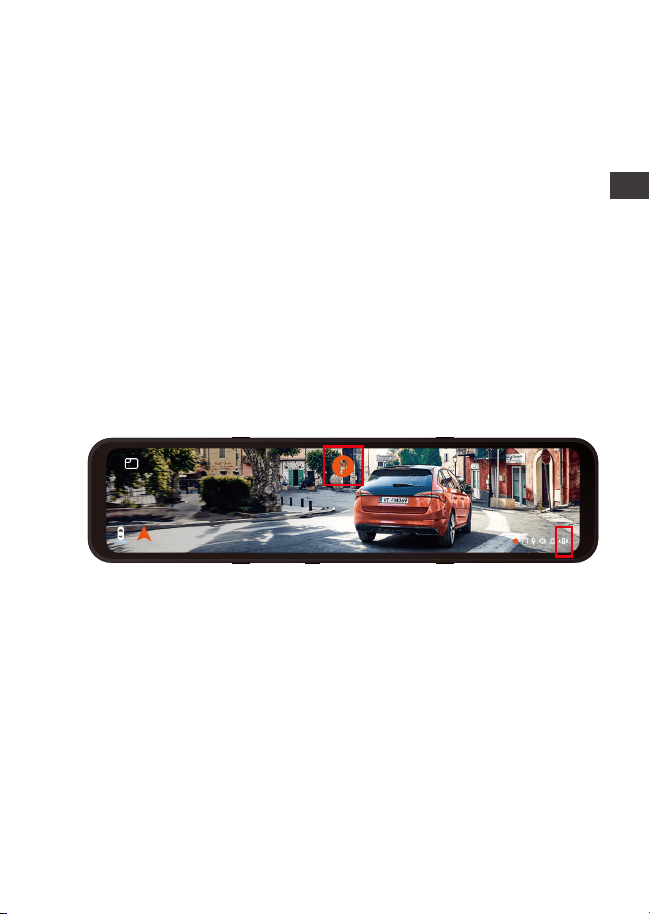
4.12.1 Collision Detection
When the collision detection is turned on, the P icon
appears in the center of the screen, and then the dash
cam is automatically turned off. When the dash cam is
turned off, it will start to record for 1 minute after being
shaken, and then turn off the dash cam again.
Low-light Night Vision Off Low-light Night Vision On
ENEN
mode and will not affect normal recording.
Note: Low-light Night Vision in Parking Mode is only
automatically adjusted for front-lens video footage.
- 19 -
After the parking mode switch is turned on, the collision
detection sensitivity can be selected. There are three levels
of low/medium/high respectively. The default collision
detection is off.
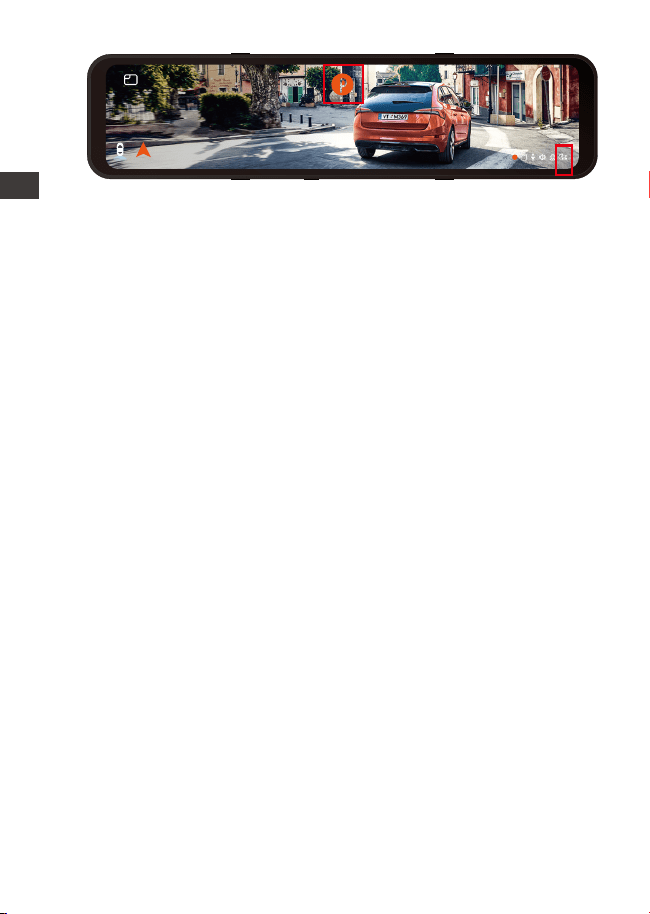
4.12.2 Low Framerate mode
When the low framerate mode is selected, the camera will
record according to your selection among 1FPS/3FPS/5F-
PS/10FPS. When the low framerate mode is selected, the
camera will record according to your selection among
1FPS/3FPS/5FPS/10FPS. Default is OFF. When the low
framerate mode is turned on, the P icon appears in the
center of the screen, and then the dash cam is automati-
cally turned off. After 3 seconds, the screen will be closed
and start the time-lapse recording.
13:32
9-1
Fri
North 60km/h
Note:
The collision detection will be disabled automatically after
the normal time-lapse recording is enabled.
For example, if you select 1FPS and the current video
resolution frame rate is 30FPS, the camera will take one
photo every second, and then stitch the photos together
into a 1 fps video. With a maximum recording frame rate
of 30fps, recording 8 hours of video with Time Lapse 1Sec
13:32
9-1
Fri
North 60km/h
will generate a time-lapse video lasting just 16 minutes
(8x60x60/30/60). This Eco Mode is recommended for
storage cards with a smaller capacity.
[Real Recording Time (Sec) = Time Lapse Recording Time
(Sec) x Video Frame Rate FPS / Time Lapse Option FPS]
EN
EN
EN
EN
- 20 -
1.
Note:
After manually turning off the dash cam, it will not enter
the motion detection mode.
Motion detection will be disabled automatically after the
normal time-lapse recording is enabled.
1.
2.
2.
After manually turning off the dash cam, it will not be able
to enter the low framerate mode.
After turning on time-lapse, the low frame rate mode will
automatically exit.
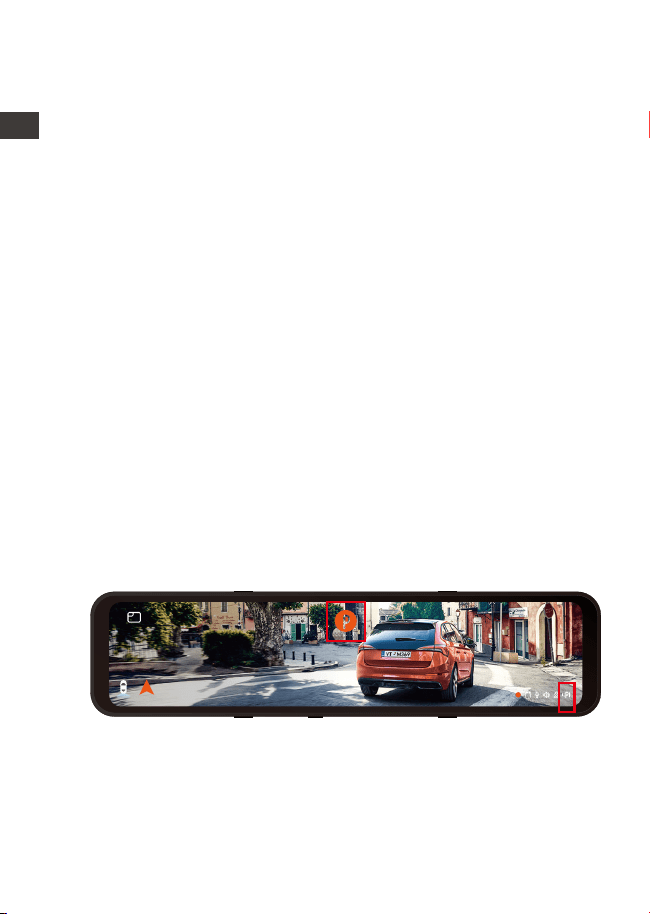
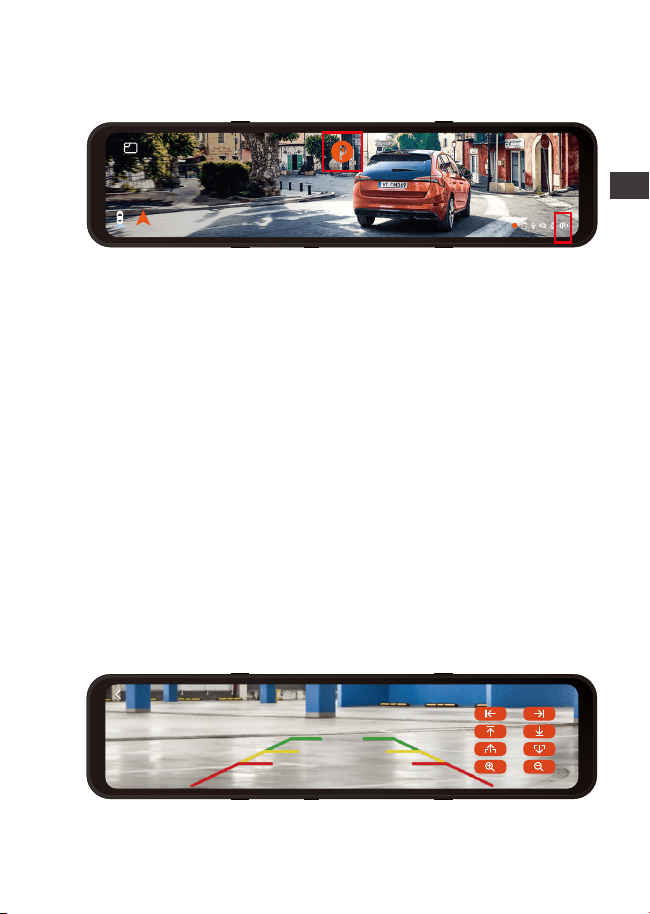
4.12.3 Motion Detection
There are three levels of motion detection sensitivity:
High/Medium /Low and the default is off. Select the record-
ing time of parking, there are 4 hours, 8 hours, 12 hours, 24
hours or unlimited to choose from. Default is unlimited.
When the motion Detection is turned on, then the P icon
appears in the center of the screen, and the screen will turn
off after 3 seconds. M3 comes with a pre-recording function.
When the motion detection motion is over, the camera will
load the first 5 seconds of motion detection into the motion
detection video, and save the motion detection file as 30
seconds.
Note:
13:32
9-1
Fri
North 60km/h
For example, if you select 1FPS and the current video
resolution frame rate is 30FPS, the camera will take one
photo every second, and then stitch the photos together
into a 1 fps video. With a maximum recording frame rate
of 30fps, recording 8 hours of video with Time Lapse 1Sec
will generate a time-lapse video lasting just 16 minutes
(8x60x60/30/60). This Eco Mode is recommended for
storage cards with a smaller capacity.
[Real Recording Time (Sec) = Time Lapse Recording Time
(Sec) x Video Frame Rate FPS / Time Lapse Option FPS]
ENEN
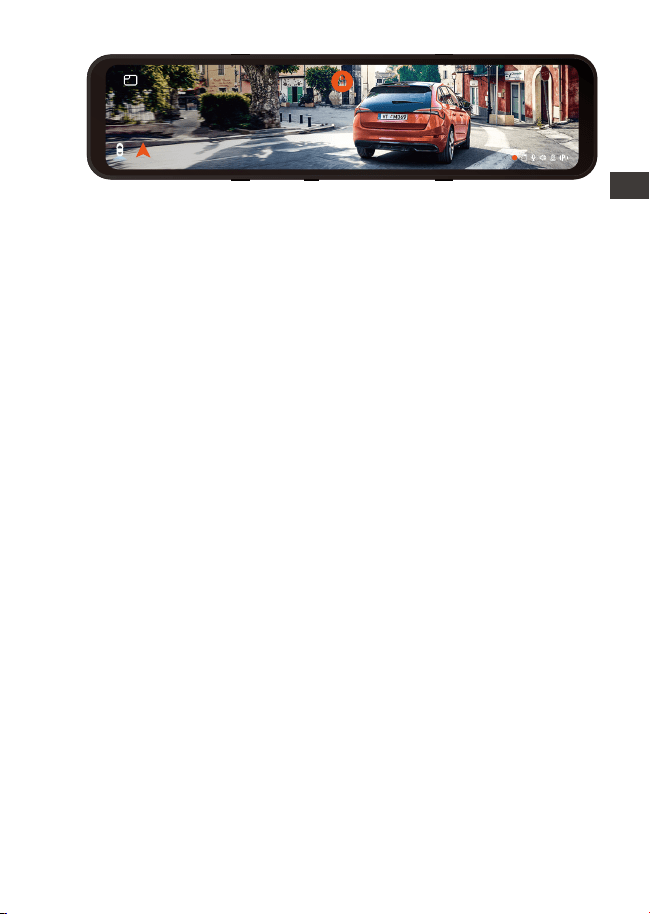
- 21 -
Under the guidance of the installation video (www. vantrue.
net) provided by us, after connecting the rear lens to the
reversing light, the reversing assist function will be automati-
cally activated when reversing.
4.13 Brightness Adjustment
4.14 Reversing settings
Manual/Auto LCD brightness adjustment: Swipe up and
down on the right side of the screen with your finger to
adjust the brightness of the screen. Or enter the Menu
settings and adjust the screen brightness to high/medi-
um/low mode as needed.
Reverse Image: This function is disabled by default. When
your rear camera is installed upside down, the picture will
be inverted by 180° and the picture will be in mirror mode.
After this mode is enabled, the picture will be in the
original image mode.
Reverse Assist Lines: It is on by default. When the rear light is
connected to the rear camera, the reverse guideline will
be displayed automatically when reversing.
Reverse Preview Settings: According to your car model,
adjust up and down the reverse assist line display, click
“back” to confirm and save the settings.
The default setting of the reverse image is on, and the
reversing aid line is turned on by default (the front and rear
direction is to adjust the extension or shortening of the
reversing aid line, the size direction is to adjust its width, left
and right and up and down are to adjust the direction of
the reversing aid line.
EN
EN
EN
EN
After turning on the GPS, a white GPS icon will be
displayed at the bottom right corner of the screen when
GPS is searching for signals. Once the GPS signal has been
received, the GPS red icon will be displayed in the lower
right corner of the screen.
- 22 -
4.15 Time Lapse
4.16 GPS
13:32
9-1
Fri
GPS
>
Speed Unit
GPS Information
On Off
km/h mph
When time-lapse is selected, the camera will record
according to your selection of 1FPS/3FPS/5FPS/10FPS. If
you set up the 1FPS time-lapse, the camera will take one
photo every second, and then stitch the photos together
into a 1 fps video. With a maximum recording frame rate
of 30fps, recording 8 hours of video with Time Lapse 1Sec
will generate a time-lapse video lasting just 16 minutes (=8
x 60 x 60/30/60). This Eco Mode is recommended for
storage cards with smaller capacities.
[Normal Recording Time = Time Lapse Recording Time (Sec)
x Recording Frame Rate FPS/Time Lapse Option]
Note: When Time Lapse is turned on, all parking modes will
be automatically turned off, until it is turned off, the parking
mode function can be turned on again.
13:32
9-1
Fri
ENEN

- 23 -
You can set your license plate number in the number plate
setting, and it is displayed in the watermark of the video.
4.17 Number Plate
The stamp option will help you to select the stamping that
you want to be done on your recorded video. Select the
box against each option to activate the specific parame-
ter to be stamped on your recorded video.
The stamp is enabled by default, so the VANTRUE logo
tamps/time and date/speed information stamp will be
displayed in the video file.
You can also go to "Menu Setting"> "Stamp" to turn on or
off these watermark stamps as needed.
4.18 Stamp
To track the Speed, Status, Direction, and GPS Signal
Strength, please go to GPS info on the Menu Setting.
You can review recorded videos with GPS info on your PC
using the VANTRUE
®
GPS Viewer (available for download
on www.vantrue.net).
13:32
9-1
Fri
Longitude and Latitude Speed GPS State
1 2 3 4 5 6 7 8 9 10 11 12
50
10
40
21
48
39
42 42
49 50
13 13
Positioned22.6671N/114.0306E 00kmh/0.00
13:32
9-1
Fri
-
A
B
C
-
A
B
C
-
A
B
C
-
A
B
C
-
A
B
C
-
A
B
C
-
A
B
C
-
A
B
C
-
A
B
C
EN
EN
EN
EN
- 24 -
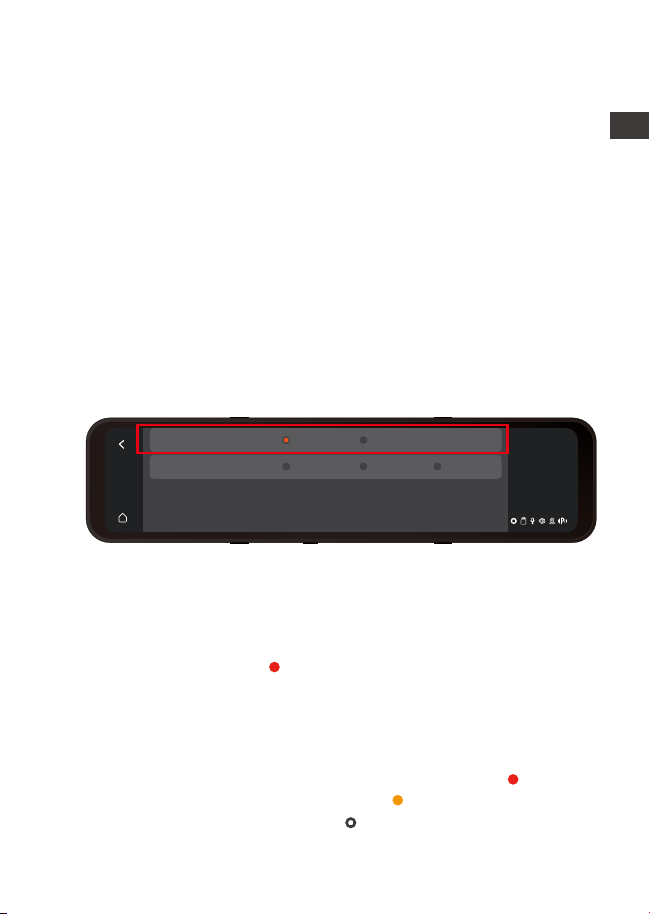
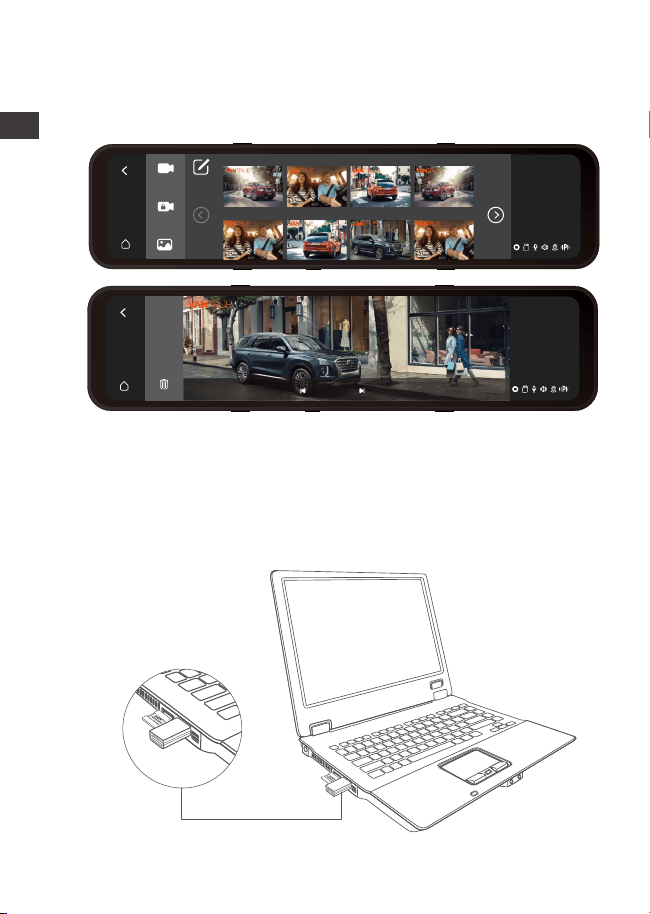
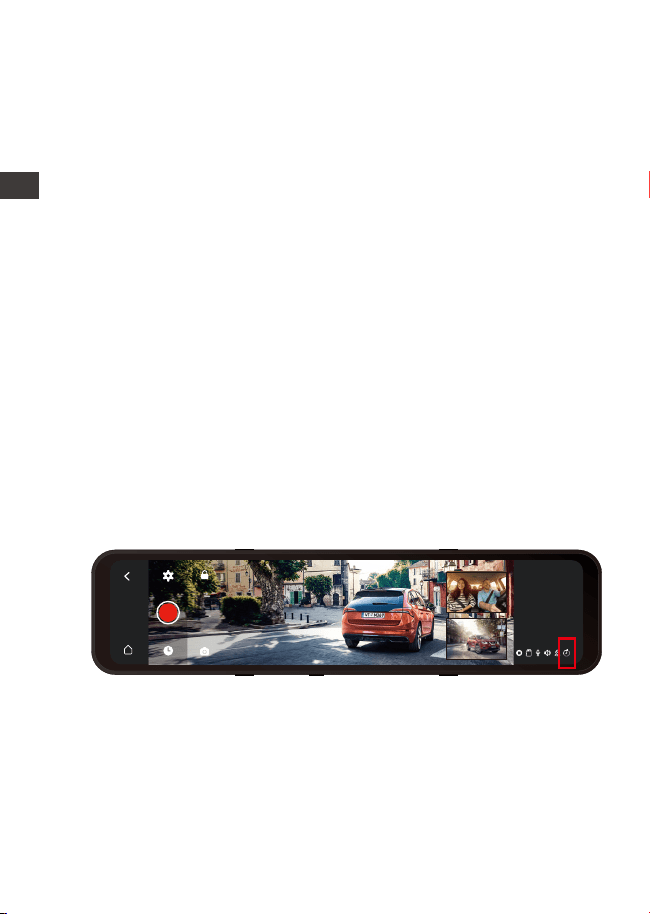
The File Browse List video will be displayed as a thumbnail,
with folders from top to bottom: normal video folders,
emergency video folders, picture folders, and files sorted in
chronological order. You can choose to delete multiple
files in this interface.
After stop recording, press File button and go to View and
Playback videos/Photos on the camera.
4.19 Playback Video/Photos on the Camera
13:32
9-1
Fri
VANTRUE Stamp
Date/Time Stamp
Speed Stamp
GPS Location Stamp
On Off
On Off
On Off
On Off
00:10:15
13:32
9-1
Fri
13:32
9-1
Fri
License Plate Number Stamp
Date/Time Stamp
Speed Stamp
GPS Location Stamp
On Off
On Off
On Off
On Off
13:32
9-1
Fri
20220921221635N-01028C 20220921221635N-01028B 20220921221635N-01028A 20220921221739N-01026C
20220921221739N-01026B 20220921221739N-01026A 20220921221255N-01025C 20220921221255N-01025B
Rear 01:25 Cabin 01:25 Front 01:25 Rear 02:38
Cabin 02:38 Front 02:38 Rear 01:49 Cabin 01:49
ENEN
13:32
9-1
Fri
20220921221635N-01028C 20220921221635N-01028B 20220921221635N-01028A 20220921221739N-01026C
20220921221739N-01026B 20220921221739N-01026A 20220921221255N-01025C 20220921221255N-01025B
Rear 01:25 Cabin 01:25 Front 01:25 Rear 02:38
Cabin 02:38 Front 02:38 Rear 01:49 Cabin 01:49
13:32
9-1
Fri
20220921221635N-01028C 20220921221635N-01028B 20220921221635N-01028A 20220921221739N-01026C
20220921221739N-01026B 20220921221739N-01026A 20220921221255N-01025C 20220921221255N-01025B
Rear 01:25 Cabin 01:25 Front 01:25 Rear 02:38
Cabin 02:38 Front 02:38 Rear 01:49 Cabin 01:49
- 25 -
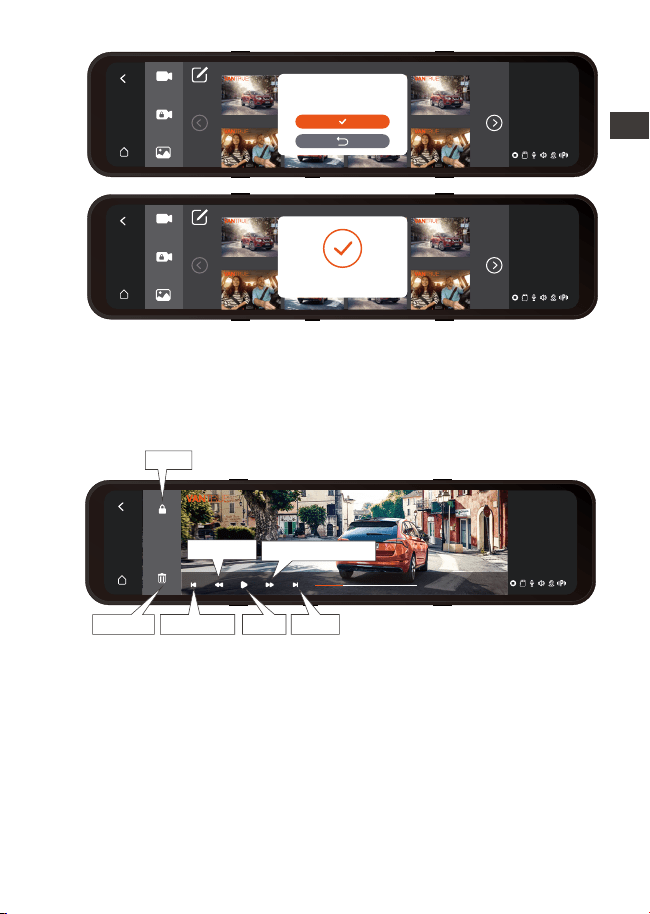
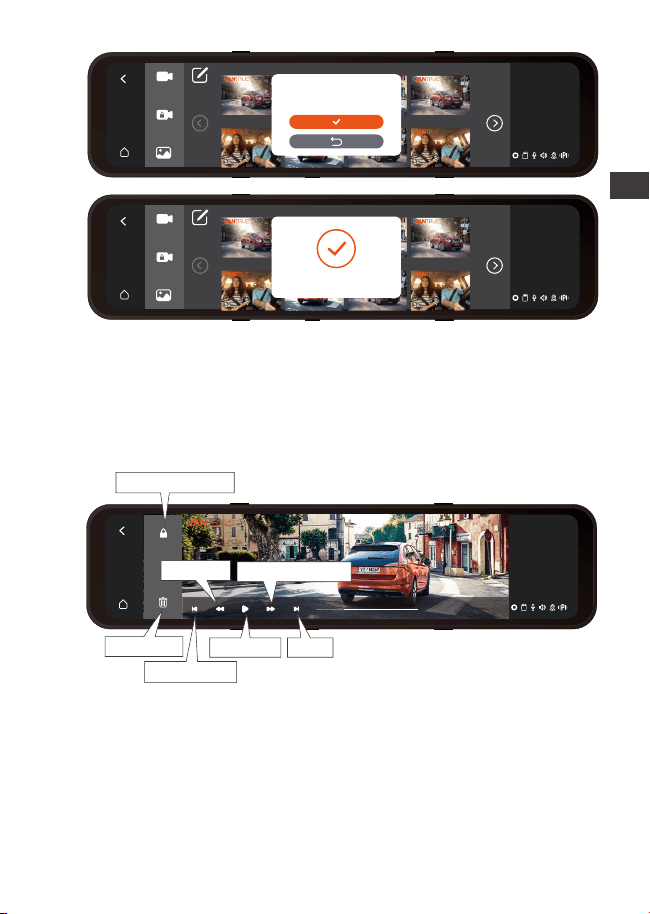
4.19.1 Video Playback
Click on the video file in the list to play it back, and you can
choose to lock/delete/previous/fast forward/play/pause/
rewind/next in the playback interface.
13:32
9-1
Fri
VANTRUE 2022 / 09 / 21 14:25:36 M3
00:15 / 03:35
Note:
Click the fast forward button once to speed up the
playback speed by 2 times; click the rewind button once
to speed up the rewind speed by 2 times.
All the locked videos will be stored in event folder.
Delete the selected files?
Delete Successfully!
NextPrevious
play
Delete
Lock
Rewind
Fast forward
EN
EN
EN
EN
- 26 -
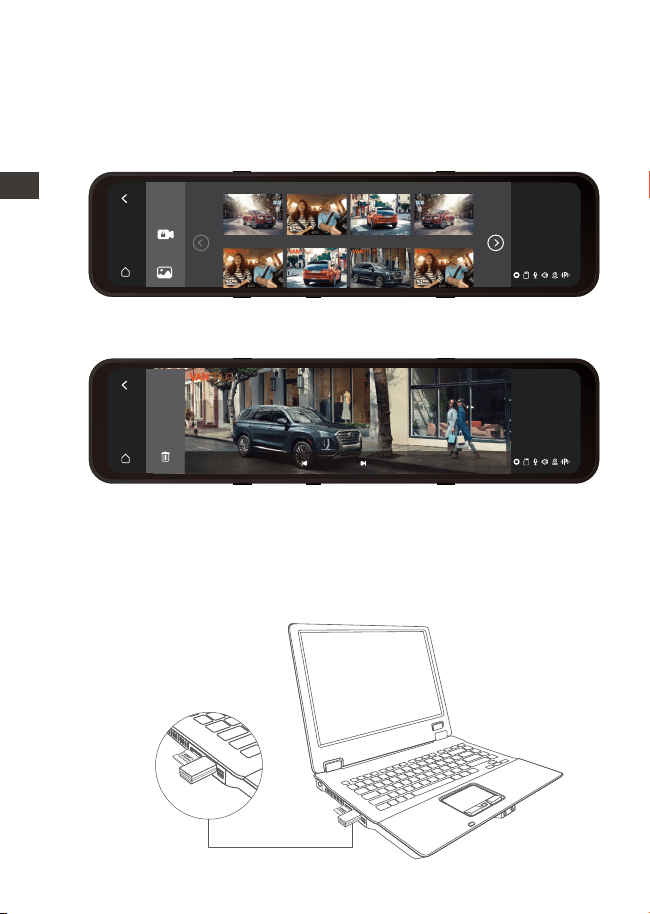
4.19.3 Viewing files on a Computer
The M3 dash cam requires a high power supply current
and does not support connecting to a computer. If you
want to play back files on a computer, you need to use a
card reader.
车内 车前 车后 车内
13:32
9-1
Fri
VANTRUE 2022 / 09 / 21 14:25:36 M3
5 / 47
4.19.2 View Photos
When viewing a photo, you can choose to view the
previous or next picture, lock or delete the picture.
13:32
9-1
Fri
20220921221635N-01028C 20220921221635N-01028B 20220921221635N-01028A 20220921221739N-01026C
20220921221739N-01026B 20220921221739N-01026A 20220921221255N-01025C 20220921221255N-01025B
Rear Cabin Front Rear
Cabin Rear Cabin
Front
ENEN

- 27 -
5. Specifications
The specifications of this product may change without prior
notice due to product improvements.
Model
M3
Chips
Image Sensor
G-sensor
Screen
Camera Angle
Aperture
Languages
Video Resolution
Video File Format
Image Format
Audio
Memory Storage
USB Port
Sony Sensor
Built-in triaxial sensor
12(11.8) inches IPS Touch Screen
Front: 150° wide viewing angle;
Internal: 140° wide viewing angle
Rear:140° wide viewing angle
Front: F/1. 5 wide aperture
Internal: F/2.0 wide aperture
Rear: F/2.0 wide aperture
Engish/Français/Español/Deutsch/
Italiano/简体中文/русский/ 日本語
/Polski
Front+Cabin+Rear mode:
1440P+1080P+1080P;1080P+1080P
+1080P;
Front+ Rear mode:
1944P+1080P;1440P+1080P;1080P+
1080P;
MP4
JPEG
Built-in microphone and speaker
Type C
External: 32GB-512GB Micro SD
Card, U3, Class 10(not included in
the package)
Novatek high-performance
processor
Power Source Built-in super capacitor
EN
EN
EN
EN

- 28 -
6. Warranty & Support
Warranty
The VANTRUE
®
M3 Dash Cam comes with a full 12 months
warranty. If you register your product on our official site
(www.vantrue.net/register), you can extend the warranty
to 18 months.
Support new
If you have any questions regarding your product, please
do not hesitate to contact us at [email protected], or
drop us a message through the live chat box at
www.vantrue.net.
Queries are typically answered within 12-24hours.
Your opinion matters
VANTRUE
®
is firmly committed to always improving our
products, services, and user experience. If you have any
thoughts on how we can do even better, we welcome
your constructive feedback and suggestions. Connect with
us today at [email protected].
MP4
DC 5V 3A
-4°F to 158°F(-20°C to 70°C)
-22°F to 185°F(-30°C to 85°C)
Video File Format
Supply voltage current
Working Temperature
Storage Temperature
ENEN
- 29 -
1. Was ist in der Box?
A. M3 Dashcam
B. Docking Station
C. USB-C kabel
D. Autoladegerät
E. Hardwire-Kit
G. Kabinekamera
I. Gurte * 2
J. Hinterer Objektivanschluss *2
K. 3M Kleber für Rückkamera*1
L. 3M-Kleber für Kabinekamera *1
M. Docking Station 3M Kleber*1
N. Anweisungen
H. Verlängerungskabel für
Rückkamera
F. Rückkamera
A
E F
H
J
I
G
B
C D
User Manual
3-Channel Mirror Dash Cam
Mirror 3
00:10:15
13:32
9-1
Fri
K L M N
EN
EN
EN
DE
- 30 -
2. Beschreibung der Maschinenteile
1. Stromschnittstelle
2. Speicherkartensteckplatz
3. Schaltertaste
4.
5. 11,88 Zoll Bildschirm
Schaltfläche zum schnellen
Abschalten des Bildschirms
ENDE
6. Hupe
7. Frontkamera-Aufnahmen
8. Kabinekamera-Objektiv
9. Rückkamera-Aufnahmen
10. Kabinekamera-Schnittstelle
11. Dockingstation-Schnittstelle
1 2 3
5
6
7
8
9 10 11
4
- 31 -
Bildschirmsymbol
00:10:15
Status des Parkmodus: Bewegungserkennung,
Kollisionserkennung, Low-Frame-Rate-Modus,
Zeitraffer
Lautstärkestatus: Lautstärke An, Lautstärke Aus
GPSstatus: GPS verbunden, GPS nicht verbunden
Speicherkartenstatus: Speicherkarte eingelegt,
Keine Speicherkarte
Mikrofonstatus: Mikrofon An, Mikrofon Aus
Aktueller Aufnahmestatus: Kamera nimmt auf,
Aufnahme pausieren, Video sperren
00:10:15
13:32
1-9
Samstag
Zurück
Zurück zur DVR-Oberfläche
Menüeinstellen
Aufnahme starten
Durchsuchen von Dateien
Sperren
Schnappschuss
Aktuelle Aufnahmezeit
Kabinekamera-Bildschirm
Rückkamera-Bildschirm
Aktuelle Zeit
Aktuelles Datumm
Spezieller Dateistatus, z. B. Sperren von Videos,
Aufrufen des Parkmodus
EN
EN
EN
DE
- 32 -
3. Installations-und Menübeschreibung
3.1 Speicherkarte installieren
Bitte legen Sie eine Speicherkarte ein (Speicherkarten-
kapazität: 32 GB-512 GB, Kartengeschwindigkeit: U3), es
wird empfohlen, eine benutzerdefinierte Hochgeschwind-
igkeits-Speicherkarte von VANTRUE zu verwenden (separat
kaufen).
Die M3-Dockingstation verfügt über eine Energieverwal
tungsfunktion und ist daher mit einem Autoladekabel und
einem Hardwire-Kit ausgestattet. Die Autoladeleitung liefert
keinen Strom, nachdem das Auto ausgeschaltet wurde; die
Notiz:
Für die erste Verwendung muss die Speicherkarte auf dem
M3-Gerät formatiert werden.Nach erfolgreicher Format-
ierung ist das Speicherkartenformat FAT32.
Es wird empfohlen, die Formaterinnerungsfunktion zu
verwenden, um die Speicherkarte regelmäßig zu formatie-
ren. Zu viele Dateien auf der Speicherkarte beeinträchti-
gen die Lese-/Schreibleistung der Speicherkarte.
1.
2.
3.2 Verdrahtung verschiedener Komponenten
Schieben Sie die Speicherkarte in den Kartenschacht, bis ein
„Klick“ im Kartenschacht zu hören ist, was anzeigt, dass die
Speicherkarte eingesetzt ist.
Abwärtsleitung kann an die Autobatterie angeschlossen
werden, um den M3 kontinuierlich mit Strom zu versorgen,
um eine 24-Stunden-Parküberwachung zu erreichen.
①Installation des Autoladekabels:
ENDE
- 33 -
Die M3-Dockingstation verfügt über eine Energieverwal
tungsfunktion und ist daher mit einem Autoladekabel und
einem Hardwire-Kit ausgestattet. Die Autoladeleitung liefert
keinen Strom, nachdem das Auto ausgeschaltet wurde; die
Abwärtsleitung kann an die Autobatterie angeschlossen
werden, um den M3 kontinuierlich mit Strom zu versorgen,
um eine 24-Stunden-Parküberwachung zu erreichen.
①Installation des Autoladekabels:
<Anschließen von Dockingstation und Autoladegerät>
Die Dockingstation ① wird mit dem Autoladegerät ②
verbunden
<Anschließen des Autoladegeräts und des Rückfahrkamer-
akabels>
Verbinden Sie das Autoladegerät ③ mit dem
Rückfahrkamerakabel ④
<Anschließen des Verlängerungskabels der hinteren
Kamera an die hintere Kamera>
Das Rückfahrkamera-Verlängerungskabel ⑥ wird mit der
Rückfahrkamera ⑦ verbunden
<Verbinden der Dockingstation mit dem M3-Host>
Dockingstation ⑨ verwenden Sie ein USB-C-Stromkabel, um
eine Verbindung mit dem M3-Host ⑩ herzustellen
<Anschließen der Dockingstation an die Kabine-Kamera>
Nehmen Sie die Kabine-Kamera heraus und stecken Sie
sie in die Kopfhörerbuchse der Dockingstation.
12
11
EN
EN
EN
DE
10
9
12
11
1 2
5
3
4
6
7
8
- 34 -
Notiz:
⑤ ist das Rückfahrlichtkabel, das mit dem Rückfahrlicht des
Sicherungskastens verbunden ist;
⑧ ist das Rückfahrlichtkabel, das mit dem Rückfahrlicht des
Fahrzeugs verbunden ist; Bitte schließen Sie eines der
Rückfahrlichtkabel gemäß an die aktuelle Situation
②Installation des Hardwire-Kits (um eine 24-Stunden-
Parküberwachung zu erreichen):
<Anschließen der Dockingstation und des Netzkabels>
①Mit ② verbinden
<Anschließen des Netzkabels an das Kabel der
Rückfahrkamera>
③ und ④ sind verbunden
<Anschließen das Kabel der Rückfahrkamera an
Rückfahrkamera>
⑤Mit ⑥ verbinden
<Installation des Netzkabels⑦>
⑦In Übereinstimmung mit der Installationsmethode der
Hardwire Kit
Der schwarze Draht ist der negative Draht, der mit dem
Metall des Autos verbunden ist;
Die rote Leitung ist die ACC-Signalleitung, die mit der
ENDE
10
9
12
11
1 2
3 4
5
6
8
7
ACC-Sicherung des Kfz-Sicherungskastens verbunden ist;
Das gelbe Kabel ist das Pluskabel, das mit der Konstantstrom-
sicherung des Kfz-Sicherungskastens verbunden ist.
<Verbinden der Dockingstation mit dem M3-Host>
⑨Mit dem USB-C-Stromkabel ⑩ verbinden
<Anschließen der Dockingstation an das Autoobjektiv>
Nehmen Sie ihn heraus und richten Sie ihn an der
Kopfhörerbuchse der Dockingstation aus.
Hinweis: Rot ⑧ ist die hintere Rückfahrlichtlinie
- 35 -
11
12
3.3 Installieren Sie den M3-Rückspiegel-Host
Nehmen Sie die Haupteinheit des M3-Rückspiegels heraus
und befestigen Sie sie mit den Gurten am Rückspiegel des
Fahrzeugs.
3.4 Installieren Sie die Dockingstation
Nehmen Sie die Dockingstation heraus, reißen Sie die 3M-Kle-
beschutzfolie ab und kleben Sie sie auf die Frontscheibe. Bitte
beachten Sie, dass die Klebeposition sauber sein muss und
den Aufnahmebereich der Frontlinse vermeiden muss.
EN
EN
EN
DE
- 36 -
Ziehen Sie nach der Installation der Dockingstation das
Netzkabel heraus und verbinden Sie den Host mit der
Dockingstation
3.6 Installation der Rückfahrkamera
3.5 Frontkamera installation
Nehmen Sie die Dashcam heraus, setzen Sie sie in die
Dockingstation ein und wählen Sie dann eine geeignete
Position an der Windschutzscheibe aus, um sie zu installieren.
Empfohlener Installationsort: Blockieren Sie nicht die
Frontlinsenaufnahme und installieren Sie sie nach der
Reinigung.
Es gibt zwei Installationsmethoden für die Rückfahrkamera,
die erste wird im Auto installiert und die zweite wird außerh-
alb des Autos installiert.
Installation im Auto: Nachdem die hintere Linse mit der
Halterung installiert wurde, wählen Sie eine geeignete
Position an der Heckscheibe, um die Linse zu reinigen und zu
trocknen, und kleben Sie sie dann ein.
ENDE
- 37 -
3.7 Kabelverlegung der Rückfahrkamera
Installation außerhalb des Autos: Entfernen Sie den Zierstreif-
en über dem Nummernschild, verlängern Sie das Kabel der
hinteren Linse aus der Lücke des Zierstreifens in das Auto,
verbinden Sie es mit dem Kabel der Rückfahrkamera und
kleben Sie dann die Kamera oben auf das Nummernschild.
Nachdem die Kamera installiert ist, kann das Verbindung-
skabel der Rückfahrkamera in der im Bild angezeigten
Richtung aufbewahrt werden.
Rückspiegel binden
Schließen die
Rückkamera an
Rückfahrscheinwerfer anschlieBen
EN
EN
EN
DE

- 38 -
3.8 Funktion
Nach dem Einschalten beginnt die Dashcam automatisch
mit der Aufnahme. Wenn Sie das Menü aufrufen möchten,
halten Sie zuerst die Aufnahme an und klicken Sie dann auf
das Menüsymbol.
Sprache: Wählen Sie eine Sprache aus.
Uhrzeit und Datum: Automatische GPS-Korrekturzeit,
Datum und Uhrzeit einstellen, Zeitformat einstellen
(standardmäßiges 24-Stunden-Format, 12-Stunden-For-
mat anzeigen, wenn ausgeschaltet), Zeitzone einstellen
Speicherplatz: Zeigt den Gesamtspeicher, den verfügbar-
en Speicher und den Anteil der Dateitypen an, außer-
dem können Sie hier die Speicherkarte formatieren.
Formatierungserinnerung: Standardmäßig ausgeschaltet,
erinnert sie nach dem Einschalten alle 15/30 Tage daran,
die Speicherkarte zu formatieren.
Auflösung: Front+Kabine+Rück1440P+1080P+1080P,
1080P+1080P+1080P
Front+Rück: 1944P+1080P, 1440P+1080P, 1080P+1080P
Videobildrate: Wählen Sie die Videobildrate für die
Aufnahme aus, 30 FPS/28 FPS
h.Loop-Aufnahme: 1 Minute, 3 Minuten, 5 Minuten, aus.
Der Standardwert ist 3 Minuten, und die Aufnahmezeit
beträgt 20 Minuten, wenn sie ausgeschaltet ist.
i.Kabinebild Spiegel: standardmäßig ausgeschaltet. Bei
Aktivierung wird der interne Aufnahmebildschirm im
Spiegelmodus angezeigt.
Kabinebild Flip(180°): Standardmäßig ausgeschaltet.
Nach der Aktivierung dreht sich der interne Aufnahme-
bildschirm um 180°.
Rückbild Spiegel:Standardmäßig deaktiviert Wenn
aktiviert, wird der Bildschirm der Rückkamera im
Spiegelmodus angezeigt.
Rückbild Flip(180°):Standardmäßig ausgeschaltet. Nach
der Aktivierung wird das Bild der Rückfahrkamera um
180° gedreht.
A.
B.
C.
D.
E.
F.
G.
H.
I.
J.
K.
L.
ENDE

- 39 -
Videoton: Standardmäßig geöffnet, kann geschlossen
werden.
G-Sensor: Der Standardwert ist 3 Gänge. Stellen Sie die
induktiven Werte vorne und hinten am Auto, oben und
unten am Auto und links und rechts am Auto ein,
1/2/3/4/5 induktive Werte in jede Richtung.
Batterieunterspannungsschutz: Bei Verwendung des
Hardwire Kits kann M3 automatisch die aktuelle Autobat-
teriespannung erkennen und 3 Schutzspannungsschwel-
lenwerte auswählen, 11,8 V/12 V/12,4 V. Wenn die
Autobatteriespannung die Schutzspannungsschwelle
erreicht, schaltet sich M3 automatisch ab, um die
Autobatterie zu schützen.
Nachtsicht bei schwachem Licht beim Parken: standard-
mäßig deaktiviert. Es löst automatisch nach dem Eintritt
in den Parkmodus aus, wenn es aktiviert ist.
Parküberwachungsmodus: Standardmäßig deaktiviert,
können Sie drei Parküberwachungsmodi einstellen:
Kollisionserkennung, Bewegungserkennung und
Zeitraffer.
Belichtung: Standardmäßig +0,0, Sie können den
Belichtungswert der Frontlinse entsprechend anpassen
+2.0, +1.6, +1.3, +1.0, +0.6, +0.3, +0.0, -0.3, -0.6, -1.0, -1.3,
-1.6, -2.0 und andere Optionen.
Lichtquellenfrequenz: optional 50 Hz, 60 Hz.
Ton: Stellen Sie die Lautstärke aller Töne des Geräts ein (z.
B. Startton, Aufforderungston, Tastenton, Videowieder-
gabeton), wählbar aus, niedrig, mittel, hoch, die
Standardeinstellung ist mittel.
Aufforderungston: Erinnerungston zur Formatzeit,
Erinnerungston zum Sperren des Videos, Erinnerungston
zum anormalen Aufnahmestopp, Erinnerung zum
Tastenton, Erinnerung zum Ein- und Ausschalten.
Bildschirm-Ausschaltzeit: Der Standardwert ist 3 Minuten.
Die automatische Bildschirm-Ausschaltzeit kann auf 1
Minute/3 Minuten/5 Minuten/Aus eingestellt werden.
M.
N.
N.
P.
Q.
R.
S.
T.
U.
V.
EN
EN
EN
DE

- 40 -
4. Funktion
4.1 Einschalten / Ausschalten
Nachdem der M3 an die Stromversorgung angeschlossen ist,
wird er mit dem Automotor ein- und ausgeschaltet, oder Sie
können ihn manuell ein- und ausschalten, indem Sie lange
auf den Schalter drücken.
Bitte verwenden Sie das passende Autoladegerät oder
Hardwire Kit.
Wenn Sie das Hardwire Kit zum Anschließen der Stromver-
sorgung verwenden und der Parkmodus eingeschaltet ist,
wechselt das Auto automatisch in den Parkmodus, andern-
falls schaltet es sich ab.
Notiz:
1.
2.
Bildschirmhelligkeit: Die Bildschirmhelligkeit kann zwischen
niedrig, mittel und hoch ausgewählt werden
Umkehrhilfslinieneinstellung: Standardmäßig geöffnet,
nach dem Öffnen können Sie die Umkehrvorschaueinstel-
lung eingeben
Zeitraffer: standardmäßig deaktiviert. Sie können die
Anzahl der Zeitraffer auf 1 FPS/3 FPS/5 FPS/10 FPS/Aus
einstellen.
Kennzeicheneinstellung: Legen Sie das Kennzeichen fest.
wird im Wasserzeichen der Videodatei angezeigt
GPS: Ein- oder ausschalten, Geschwindigkeit in km/h oder
mph einstellen
Etikettenstempel: Klicken Sie, um das Video-Wasserze-
ichen ein- oder auszuschalten. Die Wasserzeichen-Etiket-
tenstempel sind VANTRUE-Etikett, Datums- und Zeitetikett,
GPS-Informationsetikett, Geschwindigkeitsetikett,
Nummernschildetikett
Reset: Das Gerät kann auf die Werkseinstellungen
zurückgesetzt werden.
Über dieses Gerät: Es kann das Produktmodell, die
Systemversion, die Website und die MCU-Version
anzeigen.
W.
X.
Y.
Z.
AA.
AB.
AC.
AD.
ENDE
- 41 -
4.2 Umschalten des Objektivbildschirms
Wischen Sie auf der Vollbildoberfläche über den Bildschirm
nach links und rechts. Es gibt 4 Modi: Frontvideoaufnahme,
Heckvideoaufnahme, Videoaufnahme im Auto und
Aufnahme mit drei Objektiven.
1.
Im Videoaufnahmemodus mit 3Lens gibt es zwei Situationen
für das Umschalten desDrei-Kamera-Bildschirms:Klicken Sie
in der Videoaufzeichnungsschnittstelle auf das kleine
Fenster, um die Großbildanzeige im Auto oder hinter dem
Auto umzuschalten.
4.3 Batterieunterspannungsschutz
Die Dockingstation des M3 verfügt über eine Stromerken-
nungsfunktion, die mit dem Hardwire Kit des M3 verwendet
werden kann, um die Spannung der Autobatterie zu
ermitteln. Die Schutzspannung hat 3 Gänge, nämlich 11,8
V, 12 V und 12,4 V. Wenn die Schutzspannung von 11,8 V
Beim Aufrufen des Vollbildmodus wird zuerst Rück
Aufnahme angezeigt, und Sie können wählen, ob Sie nach
links oder rechts wischen möchten (wie oben gezeigt). Die
Umschaltreihenfolge ist Rück Aufnahme→3 Objektiv
Aufnahme→Kabine Aufnahme→Front Aufnahme.
2.
13:32
1-9
Samstag
00:10:15
13:32
1-9
Samstag
EN
EN
EN
DE
- 42 -
4.4 Uhrzeit und Datum einstellen
Uhrzeit und Datum können auf zwei Arten eingestellt werden:
automatisch und manuell.
Automatisches Update: Nachdem das GPS-Modul verbund-
en ist, schalten Sie die GPS-Funktion ein, aktivieren Sie
„Automatische GPS-Zeitkorrektur“ in den Zeit- und Datum-
seinstellungen und wählen Sie die Zeitzone entsprechend
Ihrem geografischen Standort aus. Nachdem die
GPS-Verbindung erfolgreich war , Uhrzeit und Uhrzeit können
automatisch korrigiert werden.
eingestellt ist und die Autobatterie 11,8 V erreicht,
unterbricht die Dockingstation automatisch die Stromver-
sorgung, um die Autobatterie zu schützen.
Die Batterieunterspannungsschutzfunktion unterstützt
derzeit nicht die Verwendung von 24-V-Autobatterien.
Bitte mit dem passenden Hardwire Kit verwenden.
Notiz:
1.
2.
Datum und Uhrzeit manuell einstellen: Wählen Sie in den
Uhrzeit- und Datumseinstellungen, um das aktuelle Jahr, den
Monat, das Datum und die Uhrzeit einzustellen. Hinweis: Um
Uhrzeit und Datum manuell einzustellen, müssen Sie die
automatische GPS-Zeiteinstellungsfunktion ausschalten.
13:32
1-9
Samstag
Stellt die Zeit automatisch per GPS ein
>
>
Zeitzone
Datum / Uhrzeit manuell einstellen
24-Stunden-Format
An Aus
An Aus
13:32
1-9
Samstag
Stellt die Zeit automatisch
>
>
Zeitzone
Datum / Uhrzeit manuell
24-Stunden-Format
An Aus
An Aus
2049
2050
2022
2023
2024
05
06
07
08
09
06
07
08
09
10
11
12
13
14
15
33
34
35
36
37
ENDE
- 43 -
1.
2.
4.5 Automatische Bildschirmunterbrechung
Die automatische Bildschirmabschaltung kann so gewählt
werden, dass sie für 1/3/5 Minuten aktiviert/ausgeschaltet
ist (nach dem Ausschalten ist der Bildschirm immer an), und
die Standardeinstellung für die Bildschirmabschaltung
beträgt 3 Minuten.
Notiz:
Der M3 kann den Bildschirm manuell ausschalten, indem
er kurz die Bildschirm-aus-Taste drückt.
Um Strom zu sparen, erhöhen Sie die Schutzzeit des
Parkmodus. Nachdem M3 in den Parkmodus wechselt,
schaltet sich der Bildschirm innerhalb von 3 Sekunden aus.
4.6 Auflösungseinstellungen
4.7 Loop-Aufnahme
Nach dem Einlegen der Speicherkarte startet der M3 und
geht nach dem Anschließen der Stromversorgung in die
Loop-Aufnahme. Während der Videoaufzeichnung können
Sie den aktuellen Videoaufzeichnungsstatus über das
1.
2.
Notiz:
Die Kabinekamera schaltet nachts und bei schlechten
Lichtverhältnissen automatisch in den IR-Infrarotmodus.
Die Bildraten von Kabinekamera und Rückkamera sind
beide 25FPS
Die Standardauflösung von M3 ist 1440P+1080P+1080P, und
1080P+1080P+1080P kann ebenfalls ausgewählt werden.
Es gibt drei Auflösungen von vorne + hinten: 1944P+1080P,
1440P+1080P, 1080P+1080P
13:32
1-9
Samstag
Front+Kabine+Rück
Front+Kabine
1080P+1080P1944P+1080P 1440P+1080P
1440P+1080P+1080P 1080P+1080P+1080P
EN
EN
EN
DE
- 44 -
4.8 Notfallvideo
Videoaufzeichnungsstatus-Anzeigesymbol unten rechts auf
dem Bildschirm überprüfen.
Hinweis: Das rote Symbol bedeutet, dass eine Aufzeichnung
läuft, das gelbe Symbol bedeutet, dass eine Notfallaufzeich-
nung läuft, und das weiße Symbol bedeutet, dass die
Aufzeichnung angehalten wurde.
Die Notfallaufzeichnung erfolgt über den G-Sensor, der in
zwei Arten unterteilt ist: automatisches Auslösen und
manuelles Sperren.
Wenn das Gerät erkennt, dass der aktuelle Vibrationswert
des Fahrzeugs die voreingestellte G-Sensor-Stufe erreicht hat,
wird das Video automatisch gesperrt, das Videosymbol
wechselt von Rot zu Gelb und das Notfallvideo wird im
Notfallvideoordner gespeichert .
00:10:15
13:32
1-9
Samstag
13:32
1-9
Samstag
1.
2.
Notiz:
Nach Abschluss der Loop-Aufnahme beträgt die
Aufnahmezeit 20 Minuten/Segment, bis die Speicherkarte
voll ist
Nachdem die Loop-Aufnahme geschlossen wurde, ist die
Notfallaufnahme ungültig und es können nur Bilder
aufgenommen werden.
ENDE
- 45 -
4.9 Kabinenspiegelung und Rückspiegelung
Kabine- und Rücklinsen können verspiegelt werden.
Unabhängig davon, ob die Spiegelung ein- oder ausges-
chaltet ist, wird nur der Bildschirm angezeigt und die
Videodateien sind nicht betroffen.
1.
2.
3.
Notiz:
Wenn der Notfallvideoordner 30 % des Gesamtspeichers
erreicht, überschreibt M3 automatisch das neue Notfall-
video in einer Schleife.
Bitte übertragen Sie regelmäßig wichtige Notfallvideos auf
andere Speichermedien (z. B.: Computer, mobile
Festplatte, Cloud-Festplatte usw.).
Um eine gute Lese- und Schreibleistung zu erhalten, sollte
die Speicherkarte mindestens einmal im Monat formatiert
werden.
Manuelle Sperre: Nachdem Sie auf das Symbol in der
Aufnahmeschnittstelle geklickt haben, beginnt das Video,
die Aufnahme zu sperren und im Notfallvideoordner zu
speichern.
1.Die Empfindlichkeit des G-Sensors wird in drei Dimensionen
eingestellt: vorne und hinten, oben und unten, links und
rechts und 1/2/3/4/5/schließen 6 Optionen. Die Standar-
dempfindlichkeit für 3 Dimensionen ist 3. Anpassungen
können in der Option „G-Sensor“ im Menü vorgenommen
werden.
13:32
1-9
Samstag
Norden 60km/h
EN
EN
EN
DE
- 46 -
4.10 Kabinen-Flip und Rück-Flip (180°)
4.11 Low-Light-Nachtsichtfunktion
Diese Funktion kann eingeschaltet werden, um den
Bildschirm umzudrehen Diese Funktion ist standardmäßig
deaktiviert.
4.12 Parkmodus
Der Parkmodus des M3 verfügt über drei Modi, nämlich
Kollisionserkennung, Modus mit niedriger Bildrate und
Bewegungserkennung. Wählen Sie , um einen Parkmodus zu
aktivieren, und wählen Sie dann die Aufzeichnungsdauer
des Parkmodus aus.
1.
Notiz:
Bitte beachten Sie, dass Sie bei Verwendung des
Parkmodus das Hardwire Kit verwenden müssen, um die
m die Sicherheit beim Parken bei Nacht zu erhöhen, wird
die Linsenleistung mit Low-Light-Nachtsichttechnologie
kombiniert, um den Nachtsichteffekt im Parkmodus zu
verbessern. Diese Funktion befindet sich standardmäßig im
offenen Modus, sie wird erst nach dem Aufrufen des
Parkmodus ausgelöst und hat keinen Einfluss auf die
normale Aufnahme.
Hinweis: Beim Parken bei schwacher Nachtsicht wird nur
der Aufnahmebildschirm der Frontkamera automatisch
angepasst.
Sternenlicht Nachtsicht
im Parken AUS
Sternenlicht Nachtsicht
im Parken AN
ENDE
13:32
1-9
Samstag
Norden 60km/h
- 47 -
2.
4.12.1 Kollisionserkennung
Nachdem die Kollisionserkennung eingeschaltet wurde,
nachdem das Auto den Motor abgestellt hat, erscheint das
P-Symbol in der Mitte des Bildschirms und die Dashcam wird
automatisch ausgeschaltet. Wenn die Dashcam ausges-
chaltet wird, beginnt sie nach dem Vibrieren 1 Minute lang
mit der Aufnahme und schaltet die Dashcam dann wieder
aus.
Kollisionserkennungsempfindlichkeit, es gibt drei Stufen:
niedrig/mittel/hoch, die Standardkollisionserkennung ist
ausgeschaltet.
Autobatterie anzuschließen.
Die beste Arbeitsumgebungstemperatur für M3 ist 14-122
℉ (-10℃ bis 50℃). Wir empfehlen, die Kollisionserkennung
zu verwenden, nachdem die maximale Arbeitstempera-
tur überschritten wurde.
Notiz:
Nachdem das Zeitraffervideo eingeschaltet wurde, wird die
Kollisionserkennung automatisch ausgeschaltet.
4.12.2 Low-Frame-Rate-Modus
Im Modus können Sie 4 Aufnahmeoptionen auswählen,
darunter 1 FPS/3 FPS/5 FPS/10 FPS, und die Standardeinstel-
lung ist „Aus“. Nach dem Einschalten, nachdem das Auto
den Motor abgestellt hat, zeigt der M3-Bildschirm das
P-Symbol an, der Bildschirm schaltet sich nach 3 Sekunden
aus und das Zeitraffer beginnt.
Wenn Sie die Aufnahme mit einer Bildrate von 1 FPS
wählen, nimmt das Video ein Bild pro Sekunde auf und fügt
die Bilder dann zu einem Video mit 1 FPS zusammen. Wenn
Sie eine Bildrate von 30FPS wählen, wird ein 30S-Video
generiert. Verwenden Sie die Option Zeitraffer 1FPS, um ein
8-Stunden-Video aufzunehmen, und die Videogröße ist nur
ein 16-Minuten-Zeitraffer-Video (Rechenformel:
8*60*60/30/60).Dieser Modus spart das Mikro SD-Karten-
platz, geeignet für Micro-SD-Karten werden mit Speicherk-
arten mit geringerer Kapazität verwendet.
[Tatsächliche Aufnahmezeit (Sekunden) = Zeitver-
zögerungsvideodauer (Sekunden) x Videobildrate (FPS) /
Zeitverzögerungsoption (FPS)]
EN
EN
EN
DE
Nachdem Sie die Dashcam manuell geschlossen haben,
kann sie nicht in den Bewegungserkennungsmodus
wechseln.
Nachdem das Zeitraffervideo eingeschaltet wurde, wird
Low-Frame-Rate-Modus automatisch ausgeschaltet.
Notiz:
1.
- 48 -
Notiz:
Nachdem das Zeitraffervideo eingeschaltet wurde, wird die
Kollisionserkennung automatisch ausgeschaltet.
4.12.2 Low-Frame-Rate-Modus
Im Modus können Sie 4 Aufnahmeoptionen auswählen,
darunter 1 FPS/3 FPS/5 FPS/10 FPS, und die Standardeinstel-
lung ist „Aus“. Nach dem Einschalten, nachdem das Auto
den Motor abgestellt hat, zeigt der M3-Bildschirm das
P-Symbol an, der Bildschirm schaltet sich nach 3 Sekunden
aus und das Zeitraffer beginnt.
Wenn Sie die Aufnahme mit einer Bildrate von 1 FPS
wählen, nimmt das Video ein Bild pro Sekunde auf und fügt
die Bilder dann zu einem Video mit 1 FPS zusammen. Wenn
Sie eine Bildrate von 30FPS wählen, wird ein 30S-Video
generiert. Verwenden Sie die Option Zeitraffer 1FPS, um ein
8-Stunden-Video aufzunehmen, und die Videogröße ist nur
ein 16-Minuten-Zeitraffer-Video (Rechenformel:
8*60*60/30/60).Dieser Modus spart das Mikro SD-Karten-
platz, geeignet für Micro-SD-Karten werden mit Speicherk-
arten mit geringerer Kapazität verwendet.
[Tatsächliche Aufnahmezeit (Sekunden) = Zeitver-
zögerungsvideodauer (Sekunden) x Videobildrate (FPS) /
Zeitverzögerungsoption (FPS)]
13:32
1-9
Samstag
Norden 60km/h
4.12.3 Bewegungserkennung
Nachdem der Motor ausgeschaltet wurde, zeigt der
M3-Bildschirm das P-Symbol an, der Bildschirm schaltet sich
nach 3 Sekunden aus und die Videoaufnahme beginnt
automatisch, wenn erkannt wird, dass sich ein Objekt
bewegt. M3 fügt eine Voraufzeichnungsfunktion hinzu, die
die ersten 5 Sekunden der Bewegungserkennung in das
Bewegungserkennungsvideo einfügt, und die Bewegung-
serkennungsdatei wird 30 Sekunden lang gespeichert.
2.
ENDE
- 49 -
Die Bewegungserkennungsempfindlichkeit ist in drei Stufen
unterteilt: hoch/mittel/niedrig, und die Standardeinstellung
ist aus.
Nachdem Sie den Fahrdatensatz manuell geschlossen
haben, können Sie die Bewegungserkennung nicht
aufrufen.
Nachdem das Zeitraffervideo eingeschaltet wurde, wird
die Bewegungserkennung ausgeschaltet.
1.
2.
Sie können die Bildschirmhelligkeit auf hoch/mittel/niedrig
einstellen; Sie können die Bildschirmhelligkeit auch
anpassen, indem Sie auf der rechten Seite des Bildschirms
in der Aufnahmeoberfläche und der Bildschirmschoner-
oberfläche nach oben und unten wischen.
4.13 Bildschirmhelligkeit
4.14 Einstellungen umkehren
Rückfahrhilfezeile: standardmäßig aktiviert, wenn die
Rücklichter an die Rückkamera angeschlossen sind, wird
•
EN
EN
EN
DE
Notiz:
13:32
1-9
Samstag
Norden 60km/h
Nachdem Sie die hintere Linse mit den Rückfahrscheinwer-
fern gemäß den Anweisungen verbunden haben. Beim
Rückwärtsfahren wird automatisch der Rückfahrassistent
aktiviert.
sie beim Rückwärtsfahren automatisch angezeigt
Rückfahrvorschau-Einstellung: Passen Sie die Anzeige der
Hilfslinie für das Rückwärtsfahren an Ihr eigenes Fahrzeug-
modell an.Klicken Sie, um zurückzukehren, und bestätigen
Sie, um die Einstellungen zu speichern.
Hinweis: Für die Installation der Rückfahrleitung beachten
Sie bitte das offizielle VANTRUE Anleitungsvideo
- 50 -
4.15 Zeitraffer
Rückfahrhilfezeile: standardmäßig aktiviert, wenn die
Rücklichter an die Rückkamera angeschlossen sind, wird
•
ENDE
Sie können 1FPS/3FPS/5FPS/10FPS Bildrate wählen, um ein
Video aufzunehmen und zu bearbeiten, die Standardein-
stellung ist deaktiviert.
Wenn Sie 1 FPS-Videoaufzeichnung wählen, nimmt das
Video ein Bild pro Sekunde auf und fügt die Bilder dann zu
einem 1 FPS-Video zusammen. Wenn die Bildrate der
Videoauflösung 30 FPS beträgt, wird ein 30s-Video generi-
ert. Verwenden Sie die Option Zeitraffer 1FPS, um ein
8-Stunden-Video aufzunehmen, und die Videogröße ist nur
ein 16-Minuten-Zeitraffer-Video (Rechenformel:
8*60*60/30/60).Dieser Modus spart das Mikro SD-Karten-
platz, geeignet für Micro-SD-Karten werden mit Speicherk-
arten mit geringerer Kapazität verwendet.
sie beim Rückwärtsfahren automatisch angezeigt
Rückfahrvorschau-Einstellung: Passen Sie die Anzeige der
Hilfslinie für das Rückwärtsfahren an Ihr eigenes Fahrzeug-
modell an.Klicken Sie, um zurückzukehren, und bestätigen
Sie, um die Einstellungen zu speichern.
Hinweis: Für die Installation der Rückfahrleitung beachten
Sie bitte das offizielle VANTRUE Anleitungsvideo
[Tatsächliche Aufnahmezeit (Sekunden) = Zeitverzögerungs-
videodauer (Sekunden) x Videobildrate (FPS) / Zeitver-
zögerungsoption (FPS)]
Hinweis: Wenn dieser Modus eingeschaltet ist, wird der
Parkmodus automatisch ausgeschaltet, und der Parkmodus
kann erst wieder eingeschaltet werden, nachdem der
Zeitraffer-Videomodus ausgeschaltet wurde.
13:32
1-9
Samstag
- 51 -
4.16 GPS
Sie können Ihr Kennzeichen frei festlegen, und die Kennze-
icheninformationen werden im Wasserzeichen des Videos
angezeigt.
4.17 Kennzeicheninformationen
Standardmäßig aktiviert, . Das VANTRUE-Markenetikett/-
Zeit- und Datumsetikett/GPS-Informationsetikett/Geschwin-
4.18 Etikettenprägung
13:32
1-9
Samstag
GPS
>
Geschwindigkeitseinheit
GPS-Informationen
An Aus
km/h mph
GPS zeigt an: GPS-Stärke\GPS-Positionierungsstatus,
Geschwindigkeit und Richtung, Breiten- und Längengrad
und andere Informationen.
Wenn Sie die Fahrtroute überprüfen möchten, können Sie
sich auf www.vantrue.net anmelden, um den GPS-Player
herunterzuladen und anzusehen.
13:32
1-9
Samstag
Längen-und Breitengrad Geschwindigkeit/Richtung GPS-Status
1 2 3 4 5 6 7 8 9 10 11 12
50
10
40
21
48
39
42 42
49 50
13 13
positioniert22.6671N/114.0306E 00kmh/0.00
13:32
1-9
Samstag
-
A
B
C
-
A
B
C
-
A
B
C
-
A
B
C
-
A
B
C
-
A
B
C
-
A
B
C
-
A
B
C
-
A
B
C
EN
EN
EN
DE
Nachdem das GPS verbunden ist, können Sie das GPS
ein-/ausschalten. Geschwindigkeitseinheit: km/h oder mph.
- 52 -
In der Dateisuchliste werden die Videos als Miniaturansicht-
en angezeigt, und die Ordner sind: normaler Videoordner,
Notfallvideoordner und Bildordner. Die Dateien sind
chronologisch sortiert. Dateien können gelöscht werden.
Klicken Sie nach dem Anhalten der Videoaufnahme auf
das Dateisymbol, um die Videodatei und die Bilder anzuzei-
gen.
4.19 Videowiedergabe/Anzeigen von Bildern auf der Dashcam
13:32
1-9
Samstag
VANTRUE Stempel
Zeit&Datum Stempel
Geschwindigkeit Stempel
GPS Stempel
An Aus
An Aus
An Aus
An Aus
00:10:15
13:32
1-9
Samstag
13:32
1-9
Samstag
Autokennzeichen Stempel
Zeit&Datum Stempel
Geschwindigkeit Stempel
GPS Stempel
An Aus
An Aus
An Aus
An Aus
ENDE
13:32
1-9
Samstag
20220921221635N-01028C 20220921221635N-01028B 20220921221635N-01028A 20220921221739N-01026C
20220921221739N-01026B 20220921221739N-01026A 20220921221255N-01025C 20220921221255N-01025B
Rück 01:25 Kabine 01:25 Front 01:25 Rück 02:38
Kabine 02:38 Front 02:38 Rück 01:49 Kabine 01:49
digkeitsetikett/Nummernschild-Informationsetikett wird in
der Videodatei angezeigt (wenn das Nummernschild nicht
eingestellt ist, wird das Wasserzeichen nicht angezeigt).
13:32
1-9
Samstag
20220921221635N-01028C 20220921221635N-01028B 20220921221635N-01028A 20220921221739N-01026C
20220921221739N-01026B 20220921221739N-01026A 20220921221255N-01025C 20220921221255N-01025B
Rück 01:25 Kabine 01:25 Front 01:25 Rück 02:38
Kabine 02:38 Front 02:38 Rück 01:49 Kabine 01:49
13:32
1-9
Samstag
20220921221635N-01028C 20220921221635N-01028B 20220921221635N-01028A 20220921221739N-01026C
20220921221739N-01026B 20220921221739N-01026A 20220921221255N-01025C 20220921221255N-01025B
Rück 01:25 Kabine 01:25 Front 01:25 Rück 02:38
Kabine 02:38 Front 02:38 Rück 01:49 Kabine 01:49
- 53 -
4.19.1 Lokales Wiedergabevideo
Klicken Sie auf die Videodatei in der Liste, um sie abzuspiel-
en. In der Wiedergabeoberfläche können Sie auswählen,
ob sie sperren/löschen/zurück/vorspulen/abspielen/an-
halten/zurückspulen/nächstes anzeigen soll.
Wiedergabe mit doppelter Geschwindigkeit Einmaliges
Klicken ist 2 Mal, zweimaliges Klicken ist 4 Mal und so
weiter bis zu 8 Mal.
Das gesperrte Video wird in den Notfallordner verscho-
ben.
Notiz:
1.
2.
EN
EN
EN
DE
Ausgewählte Dateien löschen?
Erfolgreich löschen!
13:32
1-9
Samstag
VANTRUE 2022 / 09 / 21 14:25:36 M3
00:15 / 03:35
Vorherige
Spielen Next
Löschen
Zurückspulen
Rewind
Fast forward
- 54 -
4.19.2 Dashcam-Bilder anzeigen
Nachdem Sie auf den Fotoordner geklickt haben, werden
die Fotos in chronologischer Reihenfolge angezeigt, und
Sie können mehrere auswählen, um sie stapelweise zu
löschen.
4.19.3 Dateien auf dem Computer anzeigen
Die M3 benötigt eine große Stromversorgung und unterstützt
nicht die Verwendung der an einen Computer angeschloss-
enen Kamera. Um die Dateien auf einem Computer
wiederzugeben, ist ein Kartenlesegerät erforderlich.
13:32
1-9
Samstag
VANTRUE 2022 / 09 / 21 14:25:36 M3
5 / 47
Nach Aufrufen der Bildwiedergabe können Sie das Bild
löschen.
ENDE
车内 车前 车后 车内
20220921221635N-01028C 20220921221635N-01028B 20220921221635N-01028A 20220921221739N-01026C
13:32
1-9
Samstag
20220921221739N-01026B 20220921221739N-01026A 20220921221255N-01025C 20220921221255N-01025B
Rück Kabine Front Rück
Kabine Rück Kabine
Front

- 55 -
5. Produktspezifikationen
Für Ihr besseres Produkterlebnis werden wir das Produkt
aktualisieren, und die Produktspezifikationen können sich
ohne vorherige Ankündigung ändern.
Modell
M3
Chip-Prozessor
Bildsensor
G-sensor
Bildschirm
Weitwinkel
Blende
Sony Sensor
Eingebauter Triaxialsensor
11,88" IPS-Touchdisplay
Frontkamera150° Weitwinkel
Kabinekamera140° Weitwinkel
Rückkamera140° Weitwinkel
Sprache
Novatek Hochleistungsprozessor
FrontkameraF1.5
KabinekameraF2.0
RückkameraF2.0
MP4
English、简体中文、日本語、Deutsch、
Italiano、Español、Français、
Русский язык、Polski
Micro-SD-Karte (unterstützt 32 GB-512
GB, Speicherkarte mit U3- oder
höherer Kartengeschwindigkeit)
Front+Kabine+ Rück
1440P+1080P+1080P、
1080P+1080P+1080P
Front+ Rück1944P+1080P、
1440P+1080P、1080P+1080P
Auflösung
Videoformat
JPEGBildformat
USB-CUSB-Schnittstelle
MP4Videoformat
Eingebautes Mikrofon und
Lautsprecher
Audio
Speicherkarte
EN
EN
EN
DE

- 56 -
6. Kundendienst
Die Garantiezeit der Marke VANTRUE beträgt 12 Monate.
Wenn Sie Fragen zum Produkt haben, können Sie sich an
die Kundendienstmitarbeiter Ihres Einkaufskanals wenden
oder eine E-Mail an unsere offizielle E-Mail-Adresse
[email protected] senden. Wir werden engagierte
Mitarbeiter haben, die innerhalb von 12-24 Stunden auf
Fragen antworten.
Die Marke VANTRUE
®
hat ein unerschütterliches Engage-
ment für die kontinuierliche Verbesserung von Produkten,
Dienstleistungen und Benutzererfahrung. Wenn Sie Ideen
haben, wie wir es besser machen können, können Sie uns
gerne Ihre wertvollen Kommentare und Vorschläge an
unsere offizielle E-Mail-Adresse [email protected]
hinterlassen.
Vielen Dank, dass Sie sich für VANTRUE
®
entschieden haben
SuperkondensatorBatterietyp
DC 5V 3AVersorgungsstrom
-4℉ bis 158℉(-20℃ bis 70℃)Betriebstemperatur
-22℉ bis 185℉(-30℃ bis 85℃)Lagertemperatur
ENDE
- 57 -
1. Qu'y a-t-il dans la boîte?
A. Dashcam VANTRUE
®
M3
B. Station d'accueil
C. Câble d'alimentation
D. Chargeur de voiture
USB C
E. Câble abaisseur
G. Caméra intérieure
I. Bande en caoutchouc *2 jeux
J. Monture d'objectif arrière * 2 jeux
K. Colle 3M pour caméra arrière *1
L. Colle 3M pour caméra interne *1
M.Colle 3M pour station d'accueil
N. Manuel de l'ulitisateur
H. Câble d'extension de lentille
arrière
F. Caméra arrière
EN
EN
EN
FR
A
E F
H
J
I
G
B
C D
User Manual
3-Channel Mirror Dash Cam
Mirror 3
00:10:15
13:32
9-1
Fri
K L M N
- 58 -
2. Vue d'ensemble de la caméra
1. Interface d'alimentation
2. Slot pour carte SD
3. Bouton d'alimentation
4.
Bouton d'arrêt rapide
de l'écran
ENFR
5. Écran11.88 pouces
6. Haut-parleurs
7. Caméra frontale
8. Caméra interne
11.Interface d'alimentation de
Station d'accueil
10.
Interface de caméra interne
9. Caméra arrière
1 2 3
5
6
7
8
9 10 11
4
00:10:15
Icône Retour
Retournez à l'interface d'aperçu en temps réel
Paramètres des menus
Commencez l'enregistrement
Parcourir les fichiers
Verrouiller
Instantané
Détection de collision activée
Détection de mouvement activée
Enregistrement à faible fréquence d'images
(En Mode Parking)
Vidéo en accéléré
Son activé Son désactivé
Signal GPS verrouillé Connexion du signal GPS
Sans carte mémoire Carte mémoire insérée
MIC activé MIC désactivé
En cours d'enregistrement En pause
En cours d'enregistrement d'urgence
- 59 -
Aperçu de l'écran
EN
EN
EN
FR
00:10:15
13:32
1-9
Samedi
Statut de fichier spécial, tel que le verrouillage de la
vidéo, l'entrée en mode parking
Durée d'enregistrement actuelle
Image de la caméra embarquée
Image de la caméra arrière
Temps
Date
- 60 -
3. Insallation
3.1 1Installer la carte mémoire
Veuillez utiliser une véritable carte mémoire Micro SD de 32
Go à 512 Go avec un indice de vitesse de U3 ou plus. Nous
vous recommandons d'utiliser la carte Micro SD Vantrue
(non incluse). Veuillez insérer la carte SD lorsque la caméra
est éteinte. Insérez avec précaution la carte mémoire dans
le slot pour carte de la dashcam jusqu'à ce qu'il y a un clic.
Remarquer:
Pour la première utilisation, la carte mémoire doit être
formatée sur la machine M3. Après le formatage, le
format de la carte mémoire est FAT32.
Il est recommandé d'utiliser la fonction de rappel de
formatage et de formater régulièrement la carte
mémoire. Trop de fichiers sur la carte mémoire affect-
eront les performances de lecture et d'écriture de la
carte mémoire.
1.
2.
ENFR
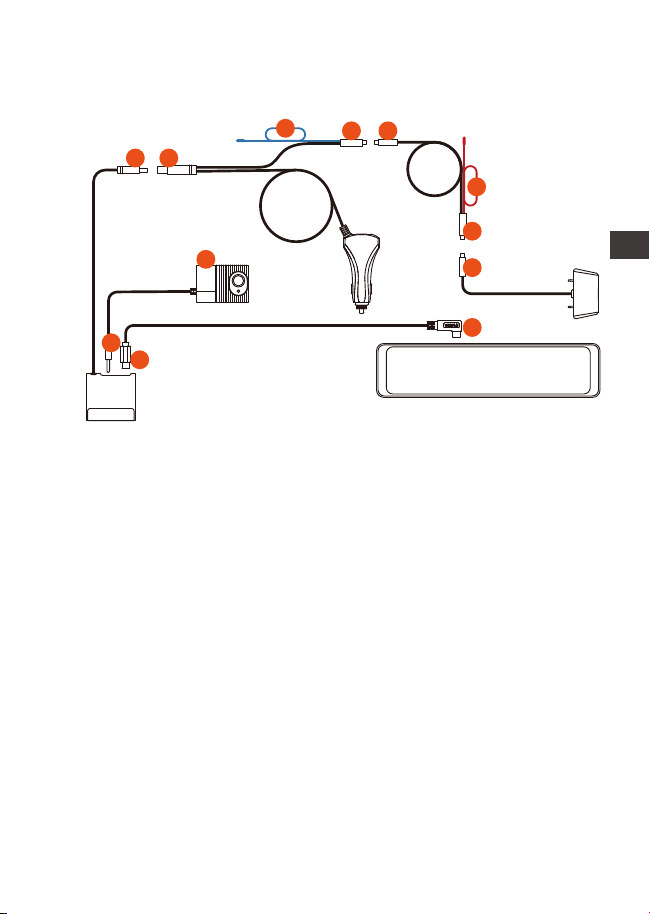
- 61 -
3.2 Assemblage de pièces
①Installation du chargeur de voiture:
Connectez la station d'accueil ① et le chargeur de
voiture ②
Connectez le chargeur de voiture③ et le câble d'exten-
sion de la caméra arrière④
Connectez le câble d'extension de la caméra arrière ⑥
et l'objectif arrière ⑦
Connectez la station d'accueil ⑨ et l'hôte M3 ⑩ via le
câble d'alimentation USB C
Connectez la caméra interne ⑪ et la prise casque ⑫ de
la station d'accueil
② Installation du cordon d'alimentation (surveillance du
stationnement 24h/24):
EN
EN
EN
FR
1.
2.
3.
4.
5.
Remarquer:
⑤ est le fil de feu de recul, qui est connecté au feu de recul
de la boîte à fusibles; ⑧ est le fil de feu de recul arrière, qui
est connecté au feu de recul arrière de la voiture; veuillez
connecter l'un des fils de feu de recul selon le situation
actuelle
10
9
12
11
1 2
5
3
4
6
7
8
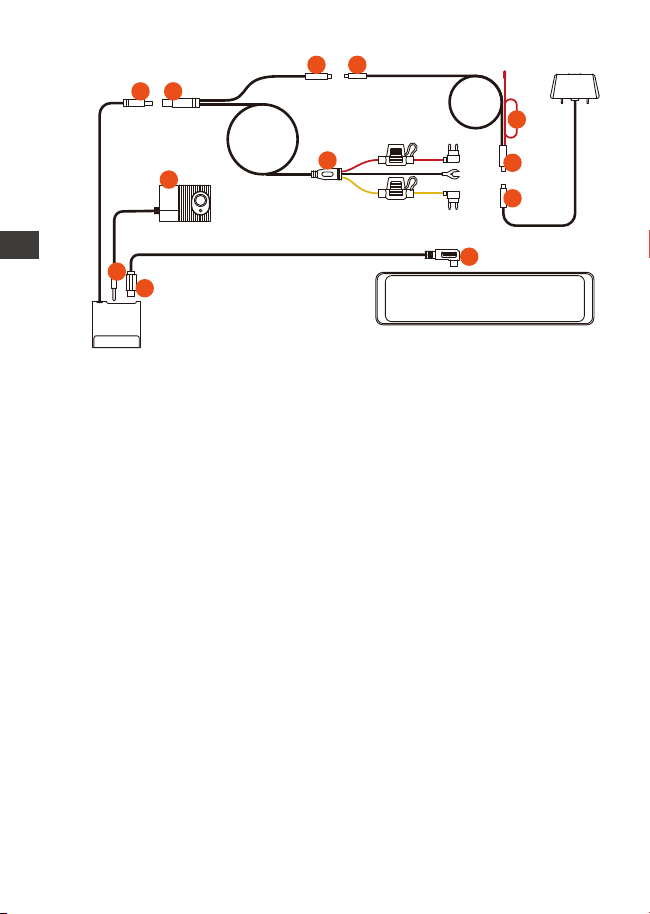
Connectez la station d'accueil ① et le cordon d'alimenta-
tion ②
Connectez le câble d'alimentation ③ et le câble
d'extension de la caméra arrière ④
Connectez le câble d'extension de la caméra arrière ⑤ à
l'objectif arrière ⑥
Installation du cordon d'alimentation⑦
Le câble d'alimentation ⑦ est installé de la même
manière que le câble abaisseur:
Le fil noir est le fil négatif, qui est relié au métal de la
voiture ;
La ligne rouge est la ligne de signal ACC, qui est
connectée au fusible ACC de la boîte à fusibles de la
voiture;
Le fil jaune est le fil positif, qui est connecté au fusible à
courant constant de la boîte à fusibles de la voiture.
Connexion de la station d'accueil à l'hôte M3>
Connectez la station d'accueil ⑨ et l'hôte M3 ⑩ via le
câble d'alimentation USB C
Connectez la caméra interne ⑪ et la prise casque ⑫ de
la station d'accueil
- 62 -
ENFR
1.
2.
3.
4.
5.
6.
Remarque : le rouge ⑧ est la ligne des feux de recul arrière
10
9
12
11
1 2
3 4
5
6
8
7
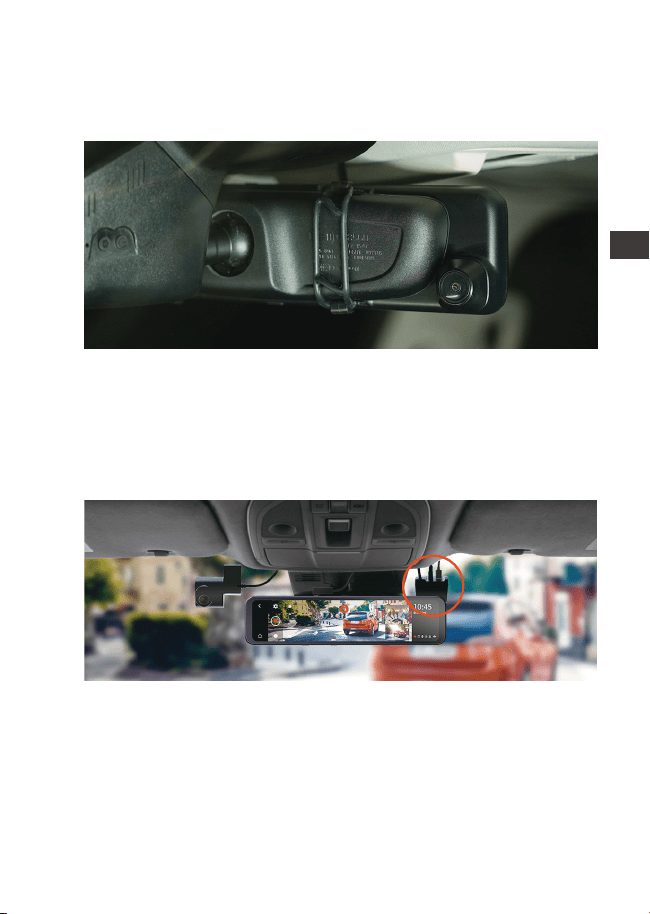
- 63 -
Sortez l'unité principale du rétroviseur M3 et utilisez les sangles
en caoutchouc pour la fixer au rétroviseur de la voiture.
Retirez la station d'accueil, retirez le film protecteur adhésif
3M et collez-le sur le pare-brise avant.Veuillez noter que la
position de collage doit être propre et éviter la zone
d'enregistrement de la lentille frontale.
3.3 Installer l'hôte de rétroviseur M3
3.4 Installer la station d'accueil
Après avoir installé la station d'accueil, débranchez le cordon
d'alimentation et connectez l'hôte à la station d'accueil
EN
EN
EN
FR
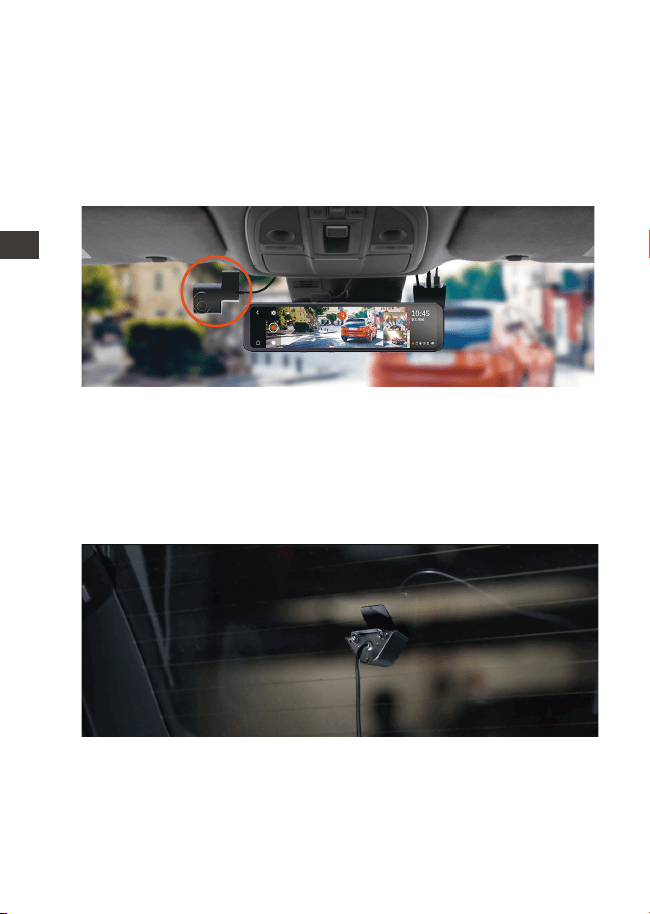
- 64 -
Retirez la caméra interne, insérez-la dans la station d'accueil,
puis installez-la dans une position appropriée sur le pare-brise.
Suggestion: Ne bloquez pas l'enregistrement de l'objectif
avant, après avoir confirmé l'emplacement, veuillez le
nettoyer avant de coller et d'installer.
3.5 Installation de la caméra interne
Vous pouvez choisir de l'installer à l'intérieur ou à l'extérieur de
la voiture
Installation dans la voiture : après avoir installé le support de
la caméra arrière, sélectionnez une position appropriée sur la
lunette arrière pour nettoyer et coller la caméra.
3.6 Installation de la caméra arrière
Installation à l'extérieur de la voiture : retirez la bande
décorative au-dessus de la plaque d'immatriculation,
prolongez le câble de la caméra arrière dans la voiture à
partir de l'espace de la bande décorative, connectez-le
avec le câble d'extension de l'objectif arrière, puis collez la
ENFR
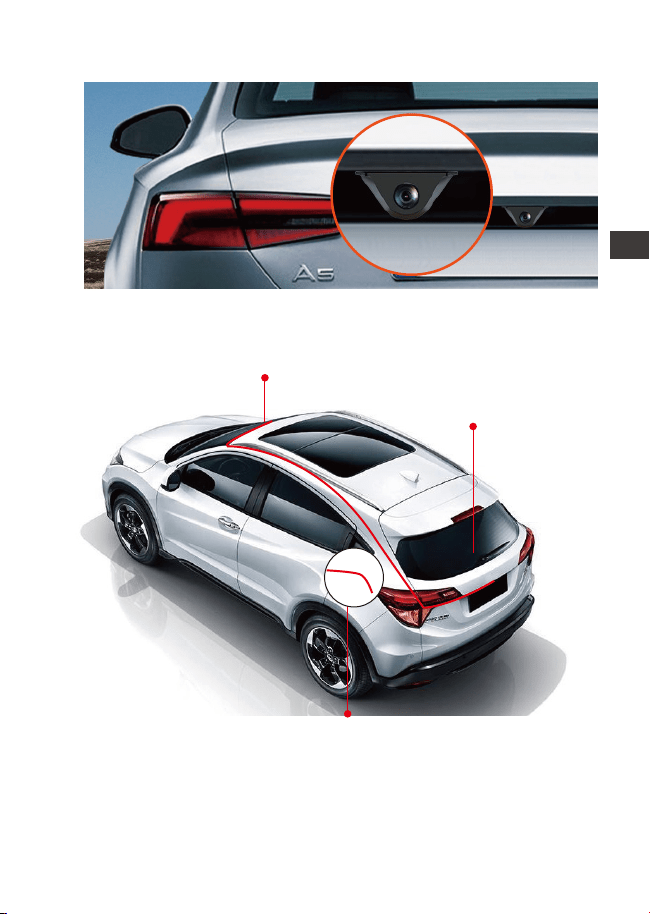
- 65 -
3.7 Disposition du câble de caméra arrière
3.8 Menu
caméra sur le dessus de la licence.
Après la mise sous tension, la dashcam entrera automa-
tiquement dans l'enregistrement.Si vous devez entrer dans
le menu, vous devez d'abord mettre l'enregistrement en
pause, puis cliquer sur l'icône du menu pour entrer.
Connecter la caméra
de recul
Brancher le feu de recul
Lier le rétroviseur
EN
EN
EN
FR

- 66 -
Langue : English / Français / Italiano / Deutsch / Español /
Русский язык / Polskie / 日本語 / 简体中文
Heure et date: heure de correction automatique du
GPS, définir la date et l'heure, définir le format de l'heure
(format 24heures par défaut, afficher le format 12heures
lorsqu'il est éteint), définir le fuseau horaire
Espace de stockage: affichez la mémoire totale, la
mémoire disponible et la proportion de types de fichiers.
Vous pouvez également formater la carte mémoire ici.
Rappel de formatage: il est désactivé par défaut. Une
fois allumé, il vous rappellera de formater la carte
mémoire tous les 15/30jours.
Résolution: résolution avant + intérieure + arrière
1440P+1080P+1080P, 1080P+1080P+1080P
Résolution avant + arrière 1944P+1080P, 1440P+1080P,
1080P+1080P
Fréquence d'images de la caméra frontale: sélectionnez
la fréquence d'images vidéo pour l'enregistrement,
30FPS/28FPS
Enregistrement en boucle : 1 minute, 3 minutes, 5
minutes, désactivé, la valeur par défaut est de 3 minutes,
lorsqu'il est désactivé, l'enregistrement en cycle est de 20
minutes par segment
Miroir de l'image interne:désactivé par défaut. Une fois
activé, l'écran d'enregistrement interne s'affiche en
mode miroir.
Inversion de l'image interne (180°):il est désactivé par
défaut. Une fois activé, l'écran d'enregistrement interne
sera retourné à 180°.
Miroir de l'image arrière:désactivé par défaut. Une fois
activé, l'écran d'enregistrement arrière s'affiche en mode
miroir.
Inversion de l'image arrière (180°):il est désactivé par
défaut. Une fois activé, l'écran d'enregistrement arrière
sera retourné à 180°
Enregistrement du son: activé par défaut, il peut être
désactivé.
A.
B.
C.
D.
E.
F.
G.
H.
I.
J.
K.
L.
ENFR

- 67 -
G-Sensor: Sensibilité 1 / 2 / 3 / 4 / 5 sont disponibles pour
avant et arrière/ haut et bas/ à gauche et à droite de la
voiture. Une sensibilité élevée signifie qu'une légère
collision déclenchera le capteur G
Protection basse tension de la batterie: lors de l'utilisation
du cordon d'alimentation, M3 peut identifier automa-
tiquement la tension actuelle de la batterie de la voiture
et peut choisir parmi 3seuils de tension de protection, 11,8
V/12V/12,4V, lorsque la tension de la batterie de la
voiture atteint le seuil de tension de protection. M3
s'arrêtera automatiquement pour protéger la batterie de
la voiture.
Enregistrement à faible luminosité:désactivée par
défaut, et elle sera automatiquement déclenchée après
être entrée en mode de stationnement.
Mode Parking: désactivé par défaut, trois modes peuvent
être définis: détection de collision, détection de mouve-
ment et vidéo accélérée.
Exposition : +0.0 par défaut, vous pouvez choisir de régler
la valeur d'exposition de la lentille frontale, respective-
ment +2.0, +1.6, +1.3, +1.0, +0.6, +0.3, +0.0, -0.3, -0.6, -1.0,
-1.3, -1.6, -2.0 et autres options.
Fréquence de la source lumineuse: 50Hz, 60Hz en
option.
Volume: réglez le volume de tous les appareils, sélection-
nez désactivé, faible, moyen, élevé, la valeur par défaut
est moyenne.
Le son d’un rappel: Active / Désactive. Le son de rappel
de formatage, de verrouillage vidéo, d'arrête anormale-
ment l’enregistrement
L'écran s'éteint automatiquement:par défaut est de 3
minutes. Il peut être réglée sur 1minute/3minutes/5
minutes/désactivé.
Luminosité de l'écran: Il peut être sélectionnée parmi
faible, moyenne et élevée.
Réglage de la ligne de recul: activée par défaut. Après
M.
N.
O.
P.
Q.
S.
R.
T.
U.
V.
W.
EN
EN
EN
FR

- 68 -
l'ouverture, vous pouvez entrer le paramètre de prévisual-
isation de recul et la régler en fonction de la situation
réelle du véhicule.
Vidéo accélérée: désactivée par défaut, vous pouvez
définir le numéro d'image vidéo accélérée, 1FPS/3FPS/5F-
PS/10FPS/off.
Réglage du numéro de plaque d'immatriculation:Il sera
affiché dans le filigrane du fichier vidéo
GPS: Active / Désactive, réglez l'unité de vitesse KM/H ou
MP/H et vérifiez la force du signal GPS
Tampon: activez ou désactivez le tampon en filigrane de
la vidéo et des photos. Le tampon en filigrane comprend
des étiquettes telles que VANTRUE, la date et l'heure, les
informations GPS et la vitesse.
Paramètres Défaut: Vous pouvez restaurer les paramètres
d'usine
Info Système: Afficher le modèle du produit, la version du
système et le site Web.
X.
Y.
Z.
AA.
AB.
AC.
4. Fonction
4.1 Allumer / éteindre la caméra
Une fois le M3 connecté à l'alimentation, il s'allume/s'éteint
avec le moteur de la voiture, ou vous pouvez l'allumer et
l'éteindre manuellement en appuyant longuement sur le
bouton.
Veuillez utiliser le chargeur de voiture ou le cordon
d'alimentation correspondant.
Lorsque vous utilisez le cordon d'alimentation, la voiture
entrera automatiquement en mode parking lorsque il est
activé; sinon, elle s'éteindra.
Remarquer:
1.
2.
ENFR
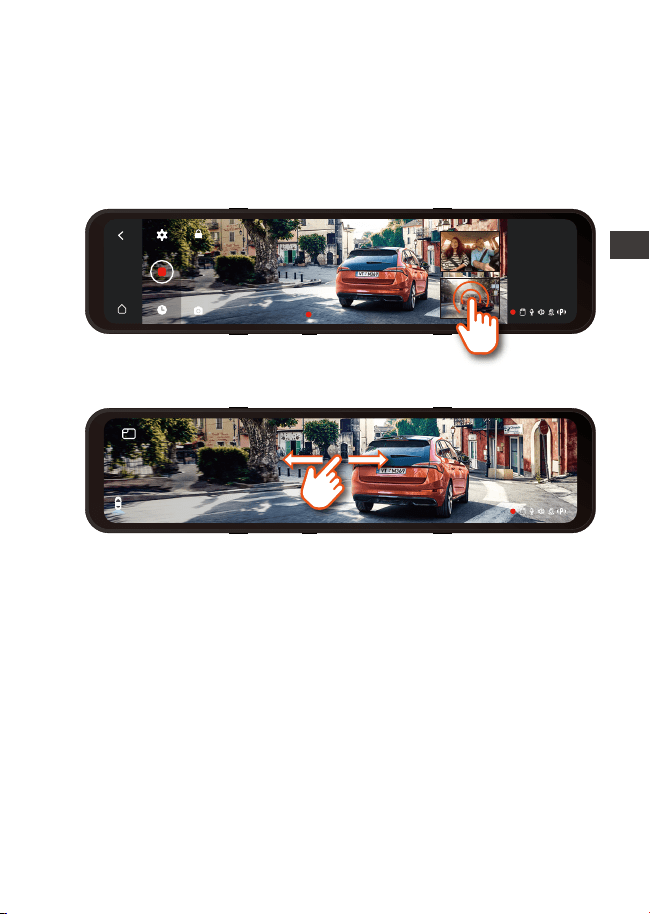
- 69 -
4.2 Commutation de l'affichage de l'image
4.3 Protection batterie basse tension
En mode d'enregistrement vidéo à trois objectifs, il existe
deux situations:
Dans l'interface d'enregistrement vidéo, cliquez sur la
petite fenêtre pour basculer l'affichage grand écran de
l'écran à l'intérieur ou à l'arrière de la voiture.
1.
Dans l'interface plein écran, balayez l'écran vers la
gauche et vers la droite, et il y aura 4 modes d'affichage:
2.
13:32
9-1
Samedi
La station d'accueil du M3 a une fonction d'identification
de l'alimentation et peut être utilisée avec le cordon
d'alimentation du M3 pour identifier la tension de la
batterie de la voiture. Le mode voiture fait référence au
réglage de la tension de protection. La tension de protec-
tion a 3 vitesses, à savoir 11,8 V, 12 V et 12,4 V. Si la tension
de protection de 11,8 V est réglée, lorsque la batterie de la
voiture atteint 11,8 V, la station d'accueil se coupe
automatiquement éteignez l'alimentation pour protéger la
batterie de la voiture.
La fonction de protection contre les basses tensions de la
Remarquer:
1.
EN
EN
EN
FR
00:10:15
13:32
9-1
Samedi
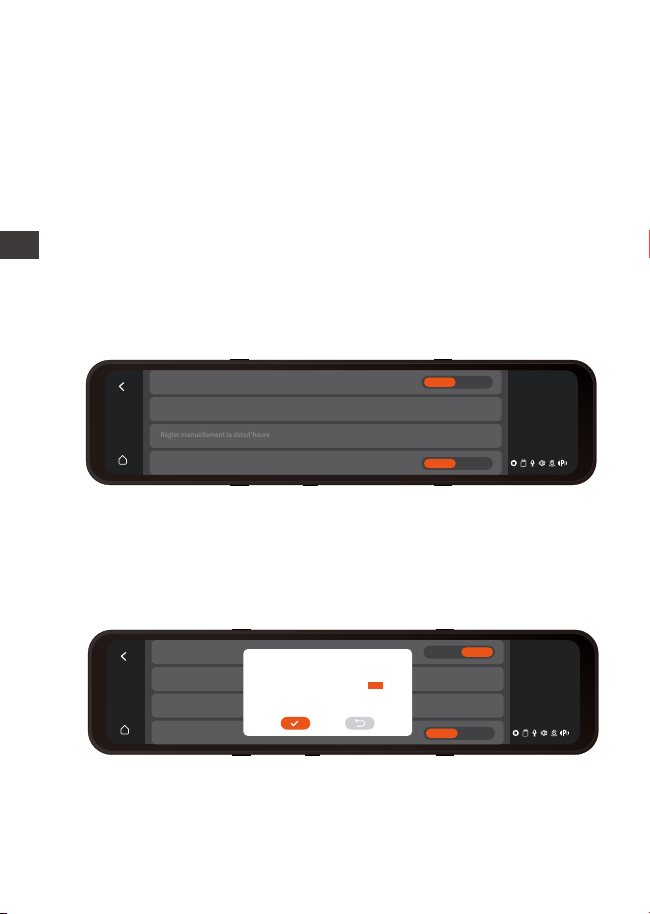
4.4 Régler l'heure et la date
Il existe deux manières de régler l'heure et la date : automa-
tique et manuelle.
Mise à jour automatique: Une fois le module GPS connecté,
activez la fonction GPS, sélectionnez pour activer "l'heure de
correction automatique du GPS" dans les paramètres
d'heure et de date, puis sélectionnez le fuseau horaire en
fonction de votre emplacement géographique. Une fois la
connexion GPS réussie, l'heure et la date peuvent être
corrigées automatiquement.
Mise à jour manuelle : Dans les paramètres d'heure et de
date, choisissez de définir votre année, mois, date et heure
en cours.
Remarque : Pour régler manuellement l'heure et la date,
vous devez désactiver la fonction de réglage automatique
de l'heure du GPS.
2.
batterie ne prend pas actuellement en charge l'utilisation
de batteries de voiture 24 V.
Veuillez l'utiliser avec la ligne de descente correspondante.
13:32
1-9
Samedi
Regle automatiquement l'heure par GPS
>
>
Fuseau horaire
Régler manuellement la date/l'heure
24 heures
Activé Désactivé
Activé Désactivé
13:32
1-9
Samedi
Regle automatiquement I'heure par GPSper GPS ein
>
>
Fuseau horaire
Régler manuellement la
24 heures
Activé Désactivé
Activé Désactivé
2049
2050
2022
2023
2024
05
06
07
08
09
06
07
08
09
10
11
12
13
14
15
33
34
35
36
37
ENFR
- 70 -
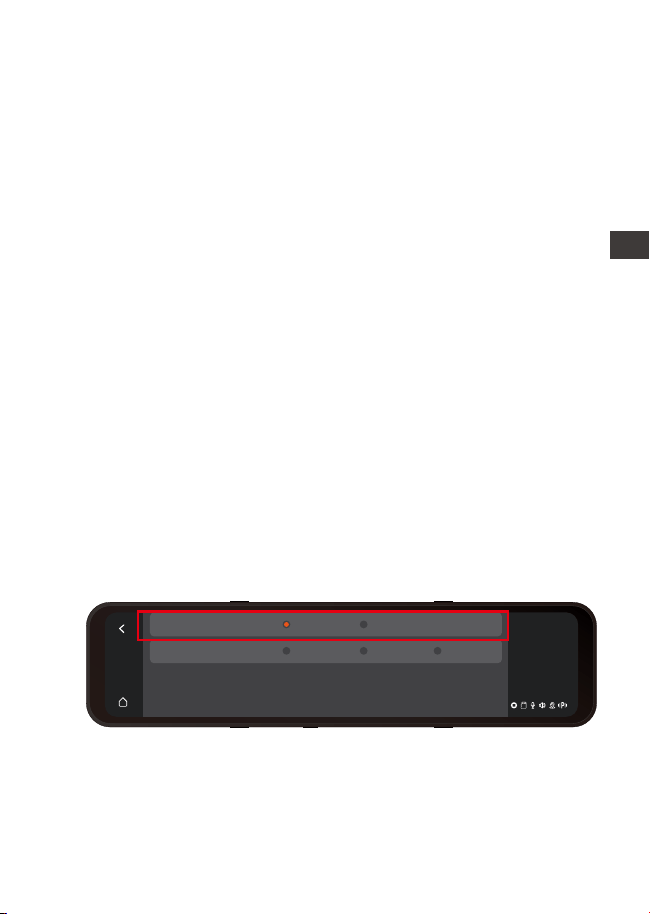
4.6 Résolution
La résolution par défaut de M3 est 1440P+1080P+1080P
devant la voiture + intérieur + arrière de la voiture, et
1080P+1080P+1080P peuvent également être sélectionnés.
Il existe trois résolutions avant + arrière : 1944P+1080P,
1440P+1080P, 1080P+1080P
4.5 LCD s'éteint Auto
L'arrêt automatique de l'écran peut être sélectionné : 1/3/5
minutes/éteint (après qu'il est éteint, l'écran est toujours
allumé), par défaut est de 3 minutes.
Le M3 peut éteindre manuellement l'écran en appuyant
brièvement sur la touche d'arrêt de l'écran.
Afin d'économiser de l'énergie, augmentez le temps de
protection du mode parking. Une fois que le M3 est entré
en mode parking, l'écran s'éteint dans les 3 secondes.
Remarquer:
1.
2.
L'objectif de la voiture passe automatiquement en mode
infrarouge IR la nuit et dans des environnements peu
éclairés.
La fréquence d'images de la lentille arrière et de la lentille
intérieure est de 25FPS
Remarquer:
1.
2.
13:32
9-1
Fri
Avant+Intérieur+Arrière
Avant+Arrière
1080P+1080P1944P+1080P 1440P+1080P
1440P+1080P+1080P 1080P+1080P+1080P
EN
EN
EN
FR
- 71 -
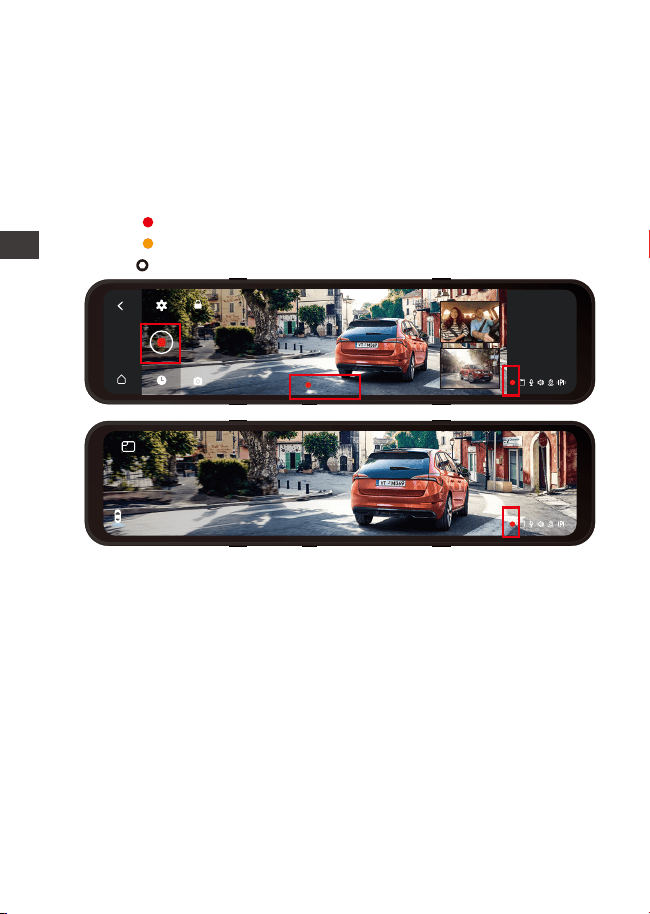
- 72 -
4.7 Enregistrement en boucle
Après avoir fermé l'enregistrement en boucle, la durée
d'enregistrement est de 20 minutes/segment, jusqu'à ce
que la carte mémoire soit pleine
Une fois l'enregistrement en boucle fermé, l'enregis-
trement d'urgence est invalide et seules des photos
peuvent être prises.
Remarquer:
1.
2.
00:10:15
13:32
1-9
Samedi
Avec une carte mémoire insérée, la caméra démarre (par
défaut) immédiatement l'enregistrement vidéo en boucle
lorsqu'elle est connectée à une source d'alimentation et
mise sous tension.
Revenez à l'interface de l'écran de veille pour afficher l'état
actuel de l'enregistrement:
Rouge :En cours d'enregistrement
Jaune :En cours d'enregistrement d'urgence
Blanc :En pause
ENFRENFR
13:32
1-9
Samedi
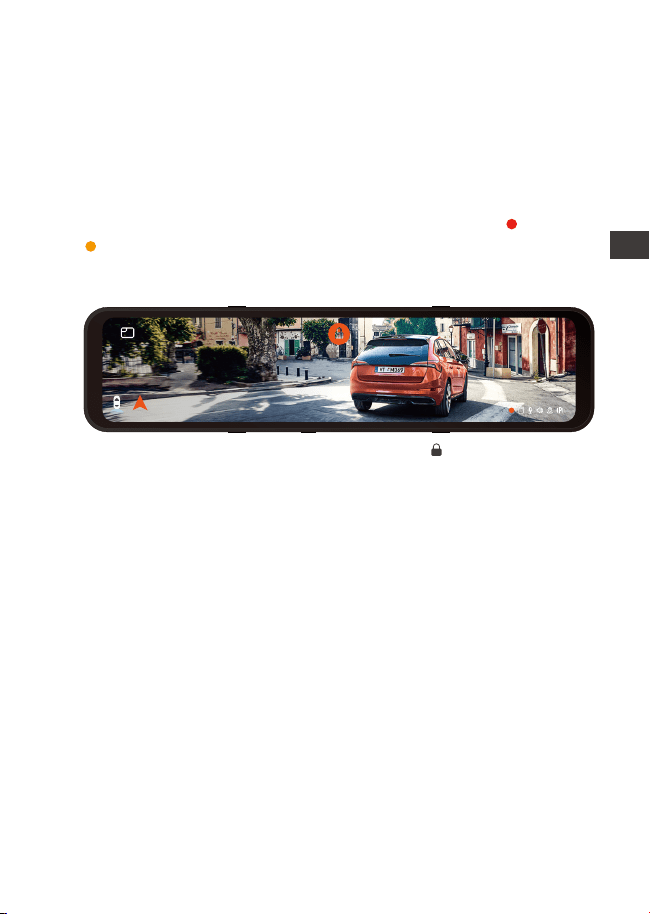
- 73 -
4.8 Vidéo d'urgence
L'enregistrement d'urgence est déclenché par G-Sensor,
qui peut être divisé en déclenchement automatique et
verrouillage manuel.
Lorsque l'appareil détecte que la valeur de vibration
actuelle du véhicule a atteint le niveau prédéfini du
capteur G, la vidéo sera automatiquement verrouillée et
l'icône d'enregistrement vidéo passera du rouge au jaune
jusqu'à ce que la vidéo soit terminée ou arrêtée manuel-
lement. Les vidéo enregistrés dans le dossier des vidéos
d'urgence ne seront pas écrasés par la boucle.
Lorsque le dossier vidéo d'urgence atteint 30% de la
mémoire totale, M3 écrasera automatiquement la
nouvelle vidéo d'urgence en boucle.
Veuillez transférer régulièrement les vidéos d'urgence
importantes vers d'autres périphériques de stockage (par
exemple: ordinateur, disque dur mobile, disque cloud,
etc.).
Afin de maintenir de bonnes performances de lecture et
d'écriture, la carte mémoire doit être formatée au moins
une fois par mois.
Remarquer:
1.
2.
3.
EN
EN
EN
FR
Verrouillage manuel : Cliquez sur l'icône pour commencer
à verrouiller l'enregistrement et la vidéo est enregistrée dans
le dossier vidéo d'urgence.
La sensibilité du G-Sensor: 1 / 2 / 3 / 4 / 5 / désactive
Ajuster en 3 dimensions: Avant et arrière / haut et bas / à
gauche et à droite de la voiture.
La sensibilité par défaut est 3. Il peut être ajusté dans l'option
"G-Sensor" du menu.
13:32
1-9
Samedi
Nord 60km/h
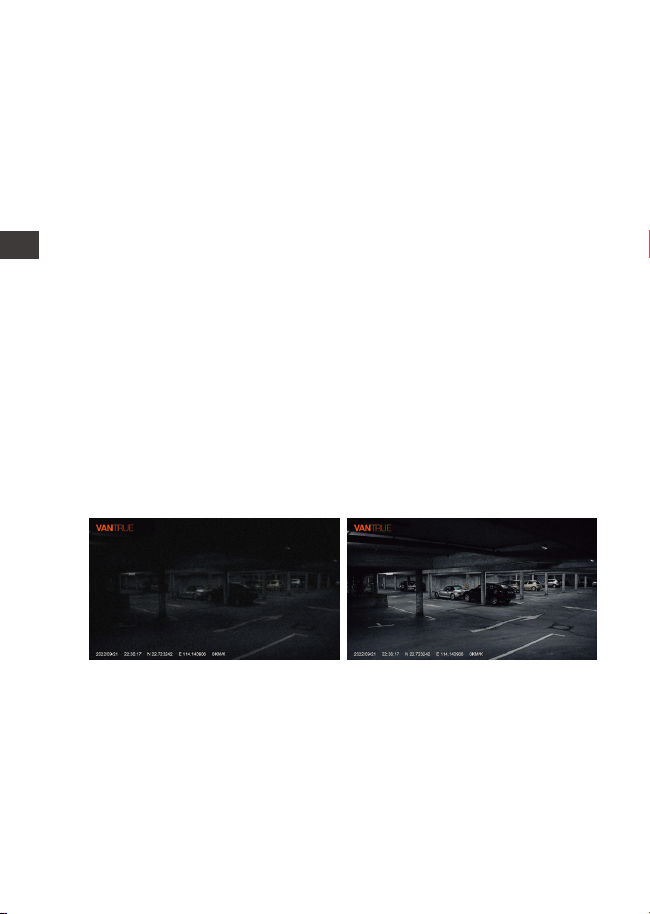
- 74 -
Si votre caméra doit être à l'envers, l'image est inversée. A
ce stade, vous pouvez choisir d'activer cette fonction pour
voir l'image de face.
Cette fonction est désactivée par défaut, vous pouvez
trouver "Flip de la caméra interne/arrière (180 °)" dans le
menu, et choisir de l'activer.
Afin d'améliorer la sécurité du stationnement la nuit, les
performances de l'objectif sont combinées à la technolo-
gie de vision nocturne à faible luminosité pour améliorer
l'effet de vision nocturne en mode stationnement. Cette
fonction est en mode ouvert par défaut, elle ne sera
déclenchée qu'après être entrée en mode parking et
n'affectera pas l'enregistrement normal.
Remarque : seul l'écran d'enregistrement de la caméra
avant sera automatiquement ajusté.
4.9 Miroir d'images de la caméra interne/caméra arrière
4.10 Inversion de l'image interne et de l'image arrière (180°)
4.11 Enregistrement en basse lumière
Vous pouvez choisir d'activer ou de désactiver la mise en
miroir. Cela n'affecte que l'affichage à l'écran, les fichiers
vidéo ne sont pas affectés.
ENFR
Mode Parking à Faible
Luminosité Activé
Mode Parking à Faible
Luminosité Désactivé
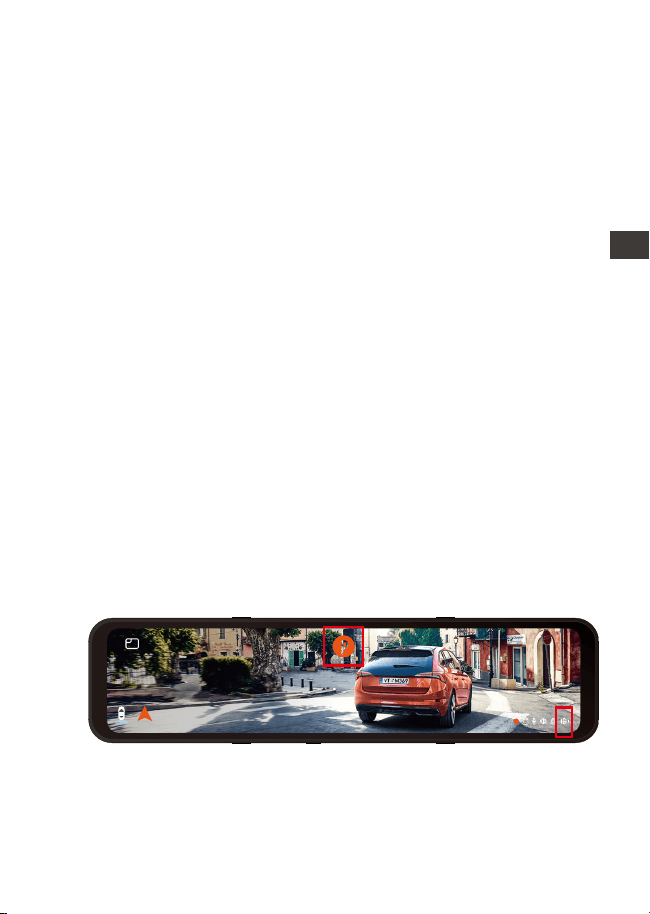
- 75 -
Lorsque vous utilisez le mode parking, vous devez utiliser
le cordon d'alimentation pour connecter la batterie de la
voiture. Veuillez l'utiliser avec la ligne de descente
correspondante.
La meilleure température d'environnement de travail de
M3 est (-10℃ à 50℃), nous recommandons d'utiliser la
détection de collision après avoir dépassé la tempéra-
ture de travail maximale.
Remarque :
1.
2.
Il existe trois modes : détection de collision, vidéo
accélérée et détection de mouvement. Lorsque le mode
parking est activé, vous pouvez en choisir un. Ensuite,
sélectionnez la durée d'enregistrement du mode parking
4.12 Mode parking (Alimentation constante nécessaire)
4.12.1 Détection de collision
Une fois la détection de collision activée, et la voiture a
éteint le moteur, l'icône P apparaît au centre de l'écran, puis
l'enregistreur de conduite s'éteint automatiquement.
Pendant cette période, si la caméra est secouée, elle
commencera à enregistrer pendant 1 minute, puis éteindra
à nouveau.
Pour la sensibilité de détection de collision, il existe trois
niveaux: faible/moyen/élevé
EN
EN
EN
FR
13:32
1-9
Samedi
Nord 60km/h
Remarquer: Une fois la vidéo accélérée activée, la
détection de collision sera automatiquement désactivée.
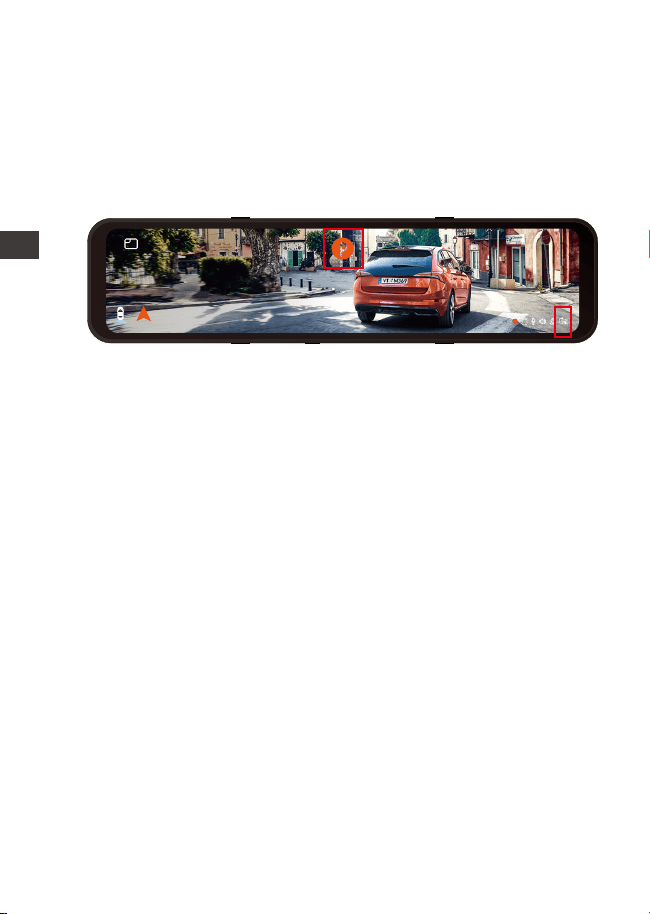
- 76 -
ENFR
4.12.2 Mode fréquence d'images faible
Il existe 4 options d'enregistrement : 1FPS/3FPS/5FPS/10FPS,
la valeur par défaut est désactivée.
Une fois cette fonction activée, après que la voiture ait
éteint le moteur, l'écran M3 affichera l'icône P, l'écran
s'éteindra après 3 secondes et la vidéo accélérée
commencera.
13:32
1-9
Samedi
Nord 60km/h
Si vous choisissez l'enregistrement vidéo à fréquence
d'images 1FPS, la vidéo prendra une image par seconde,
puis assemblera les images dans une vidéo 1FPS, et selon la
résolution vidéo que vous choisissez, la fréquence d'images
est de 30FPS et une vidéo 30S sera générée . Utilisez l'option
time-lapse 1FPS pour enregistrer une vidéo de 8 heures, et
la taille de la vidéo n'est qu'une vidéo time-lapse de 16
minutes (formule de calcul : 8*60*60/30/60). L'espace de la
carte SD, adapté aux cartes Micro SD, est utilisé avec des
cartes mémoire de plus petite capacité.
[Durée d'enregistrement réelle (secondes) = durée de la
vidéo accélérée (secondes) x fréquence d'images vidéo
(FPS)/option de temporisation (FPS)]
4.12.3 Détection de mouvement
Une fois que la voiture a éteint le moteur, l'écran M3 affiche
l'icône P et l'écran s'éteint après 3 secondes.Lorsque le
mouvement de l'objet est détecté, l'enregistrement est
automatiquement déclenché. M3 a une fonction de
pré-enregistrement, regroupe les 5 premières secondes de
détection de mouvement dans la vidéo de détection de
mouvement et enregistre le fichier de détection de
mouvement pendant 30 secondes.
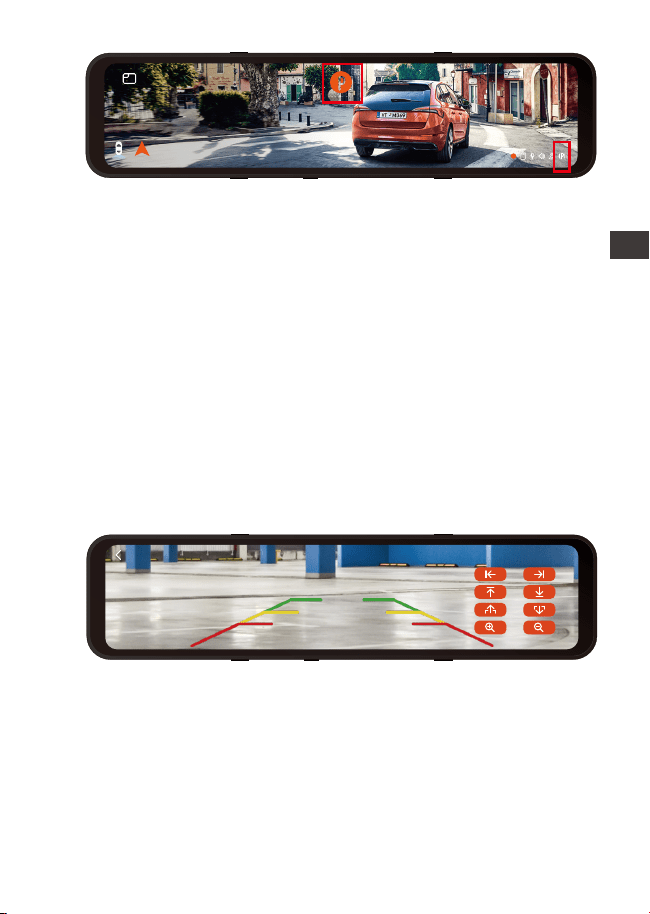
Dans les paramètres du menu, vous pouvez régler la
luminosité de l'écran sur élevée/moyenne/faible; vous
pouvez également balayer vers le haut et vers le bas sur le
côté droit de l'écran dans l'interface d'enregistrement pour
régler librement la luminosité de l'écran.
4.13 Luminosité de l'écran
4.14 Réglage de l'inversion
EN
EN
EN
FR
13:32
1-9
Samedi
Nord 60km/h
La sensibilité de détection de mouvement est divisée en
trois niveaux: élevé/moyen/faible, et la valeur par défaut
est désactivée.
Ligne auxiliaire de recul : allumée par défaut, lorsque le
feu arrière est relié à la caméra arrière, la ligne directrice
inverse est affichée automatiquement en marche arrière.
Réglage de l'aperçu d'inversion : ajustez la ligne auxiliaire
d'inversion appropriée de haut en bas en fonction du
modèle de votre voiture et enregistrez le paramètre après
le retour.
Remarque : pour l'installation du câble d'inversion, veuillez
vous référer à la vidéo d'instructions officielle de VANTRUE
Sous la direction de la vidéo d'installation fournie, après
avoir connecté la lentille arrière au feu de recul, la
fonction auxiliaire sera automatiquement activée lors de la
marche arrière.
- 77 -
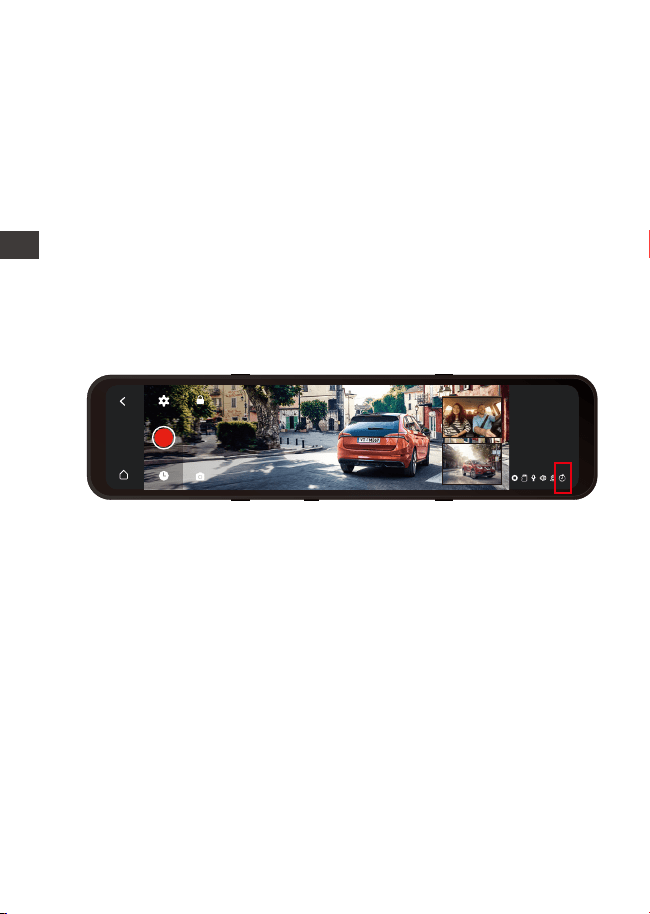
- 75 -
- 78 -
4.15 Vidéo accélérée
ENFR
Une fois ce mode activé, il entrera en mode d'enregis-
trement immédiatement après sa sortie. Vous pouvez
choisir 1FPS/3FPS/5FPS/10FPS, la valeur par défaut est
désactivée.
Si vous choisissez 1FPS, la vidéo prendra une image par
seconde, si vous choisissez la fréquence d'images de la
résolution vidéo de 30FPS, elle produira une vidéo 30S.
Utilisez ensuite la vidéo time-lapse 1FPS pour enregistrer
une vidéo de 8 heures, et la taille de la vidéo n'est qu'une
vidéo time-lapse de 16 minutes (formule de calcul :
8*60*60/30/60). L'espace de la carte Micro SD, adapté aux
cartes Micro SD, est utilisé avec des cartes mémoire de
plus petite capacité.
13:32
1-9
Samedi
[Durée d'enregistrement réelle (secondes) = durée de la
vidéo temporisée (secondes) x fréquence d'images vidéo
(FPS) / option de temporisation (FPS)]
Remarque: lorsque ce mode est activé, tous les modes de
stationnement sont automatiquement désactivés et la
fonction de mode de stationnement ne peut pas être
réactivée tant que le mode vidéo accéléré n'est pas
désactivé.
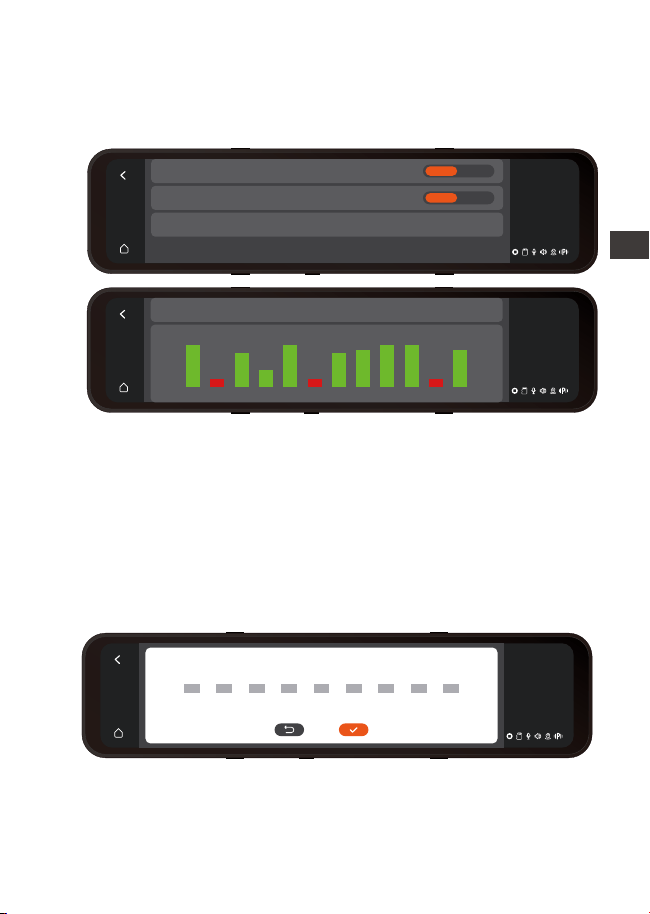
4.16 GPS
Vous pouvez le définir librement et les informations seront
affichées dans le filigrane de la vidéo.
4.17 Informations sur la plaque d'immatriculation
13:32
1-9
Samedi
GPS
>
Unité de vitesse
Informations GPS
Activé Désactivé
km/h mph
Une fois le module GPS connecté, dans ce menu, vous
pouvez choisir d'activer/désactiver la fonction GPS. Vous
pouvez choisir la vitesse en km/h ou mph.
Une fois le positionnement GPS réussi, un itinéraire sera
généré à partir de votre vidéo enregistrée. Si vous souhaitez
afficher votre itinéraire de conduite, vous pouvez vous
connecter au site officiel: www.vantrue.net et télécharger
le lecteur GPS pour le regarder.
13:32
1-9
Samedi
Longitude et latitude La vitesse Etat GPS
1 2 3 4 5 6 7 8 9 10 11 12
50
10
40
21
48
39
42 42
49 50
13 13
positionne22.6671N/114.0306E 00kmh/0.00
13:32
1-9
Samedi
-
A
B
C
-
A
B
C
-
A
B
C
-
A
B
C
-
A
B
C
-
A
B
C
-
A
B
C
-
A
B
C
-
A
B
C
- 79 -
EN
EN
EN
FR
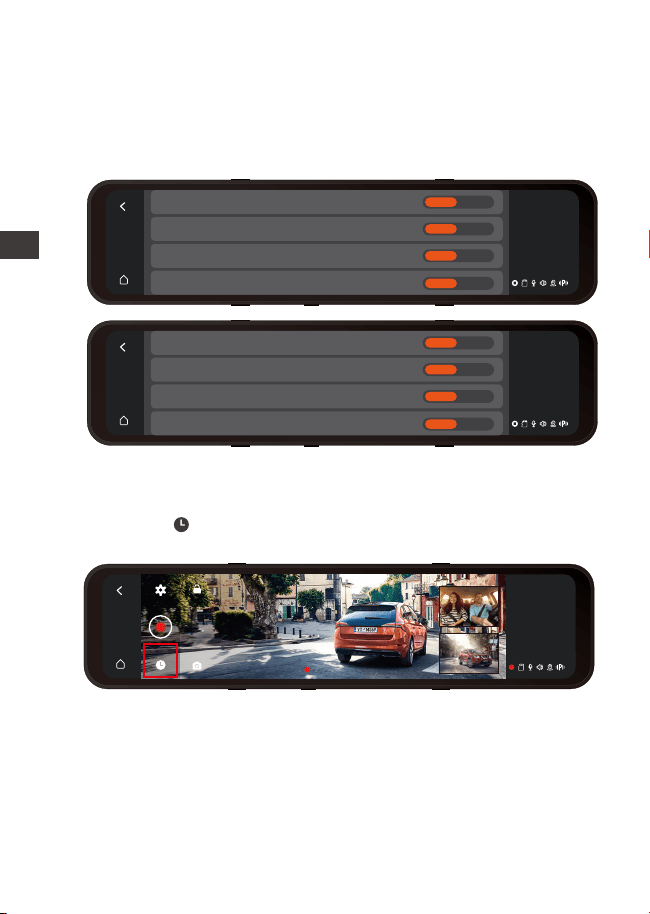
- 80 -
Les balises sont activées par défaut. Ces balises seront
affichées dans le fichier vidéo, telles que la marque
VANTRUE / l'heure et la date / les informations GPS / la
vitesse .
Dans la liste de navigation des fichiers, les vidéos seront
affichées sous forme de vignettes, et les dossiers de haut
en bas sont: dossier vidéo ordinaire, dossier vidéo
d'urgence et dossier photo. Les fichiers seront triés par
ordre chronologique. Dans cette interface, vous pouvez
choisir de supprimer plusieurs fichiers.
4.18 Filigrane
Après avoir interrompu l'enregistrement, cliquez sur l'icône
du fichier pour afficher les fichiers et les images enregis-
trés.
4.19 Regarder la vidéo / afficher des images sur dashcam
13:32
1-9
Samedi
Tampon VANTRUE
Heure & Date Timbre
Vitesse Timbre
Filigrane de localisation GPS
Activé Désactivé
Activé Désactivé
Activé Désactivé
Activé Désactivé
00:10:15
13:32
1-9
Samedi
13:32
1-9
Samedi
Filigrane de Plaque d'immatriculation
Heure & Date Timbre
Vitesse Timbre
Filigrane de localisation GPS
Activé Désactivé
Activé Désactivé
Activé Désactivé
Activé Désactivé
ENFR
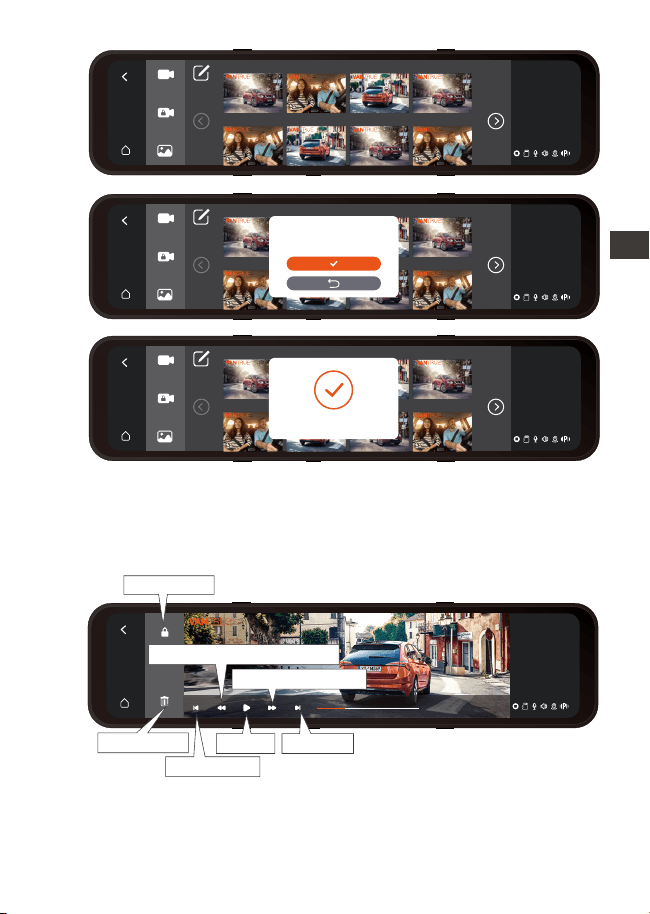
- 81 -
4.19.1 Lecture vidéo
Cliquez sur le fichier vidéo dans la liste, vous pouvez choisir
de verrouiller / supprimer / précédent / avance rapide /
lecture / pause / rembobinage rapide / suivant
13:32
1-9
Samedi
VANTRUE 2022 / 09 / 21 14:25:36 M3
00:15 / 03:35
Cliquez une fois le bouton d’avance rapide pour faire
jouer la vidéo à 2 fois la vitesse.
Remarquer:
1.
车内 02:38 车前 02:38 车后 01:49 车内 01:49
13:32
1-9
Samedi
20220921221635N-01028C 20220921221635N-01028B 20220921221635N-01028A 20220921221739N-01026C
20220921221739N-01026B 20220921221739N-01026A 20220921221255N-01025C 20220921221255N-01025B
Arrière 01:25 Intérieur 01:25 Avant 01:25 Arrière 02:38
Intérieur 02:38 Avant 02:38 Arrière 01:49 Intérieur 01:49
Supprimer avec succès !
Êtes-vous sûr de supprimer le
fichier sélectionné ?
Précédent
Suivant
JouerSupprimer
Verrouiller
Rembobinage rapide
Avance rapide
EN
EN
EN
FR
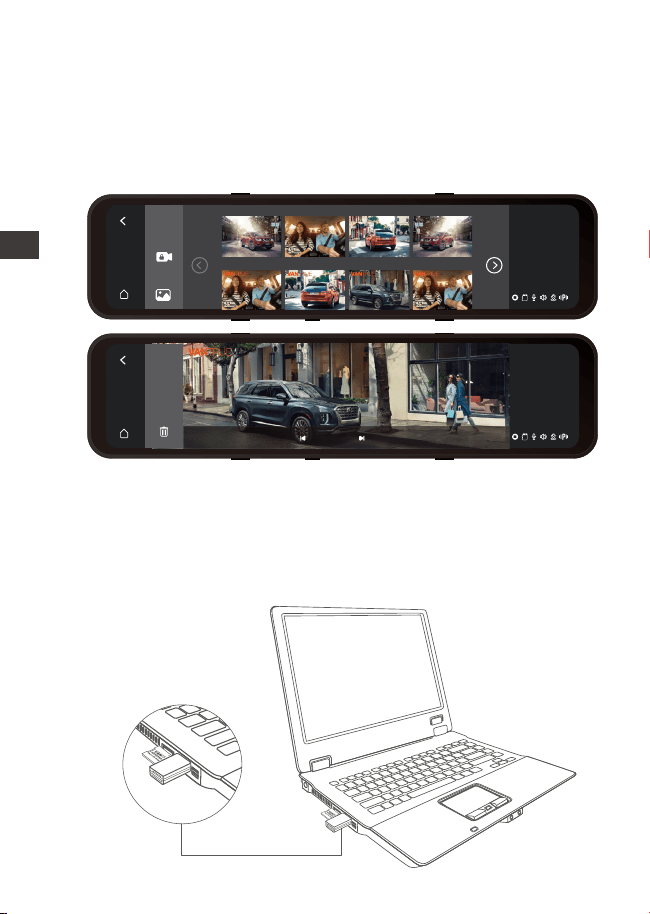
- 82 -
4.19.2 Visualisation de photos
Après avoir cliqué sur l'image, vous pouvez parcourir l'image
précédente ou suivante, verrouiller ou supprimer l'image.
4.19.3 Afficher les fichiers sur l'ordinateur
M3 nécessite un courant d'alimentation important et ne
prend pas en charge l'utilisation de cette machine
connectée à un ordinateur. Si vous souhaitez lire des fichiers
sur un ordinateur, vous devez utiliser un lecteur de carte.
2.
13:32
1-9
Samedi
VANTRUE 2022 / 09 / 21 14:25:36 M3
5 / 47
13:32
1-9
Samedi
20220921221739N-01026B 20220921221739N-01026A 20220921221255N-01025C 20220921221255N-01025B
Arrière Arrière Avan Arrière
Arrière Arrière Arrière
Avan
Cliquez une fois le bouton de rembobinage rapide pour
rembobiner la vidéo deux fois plus vite.
ENFR

- 83 -
5. Spécifications
Les spécifications de ce produit peuvent changer sans
préavis en raison des améliorations du produit.
Modèle
M3
Écran
Lentille
Résolution vidéo
Langues
Avant: angle de 150°, ouverture F/1.5
Interne:angle de 140 °, ouverture F/2.0
Arrière:angle de 140 °, ouverture F/2.0
11,88 pouces
English / Français / Italiano / Deutsch /
Español / Русский язык / Polskie / 日本
語 / 简体中文
Avant+Interne+Arrière:
1440P+1080P+1080P, 1080P+1080P+1080P
Avant+Arrière:
1944P+1080P, 1440P+1080P, 1080P+1080P
Format vidéo
Image
Audio
Source
d'alimentation
Port USB
Stockage de
mémoire externe
JPEG
Microphone et haut-parleur intégrés
MP4
Carte Micro SD de 32Go à 512Go, U3
ou supérieure (non incluse)
USB C
Supercondensateur intégré
DC 5V 3A
-4° à 158°F (-20℃ à 70℃)
-22° à 185°F (-30℃ à 85℃)
Courant
d'alimentation
Température de
fonctionnement
Température de
stockage
EN
EN
EN
FR

- 84 -
6. Garantie & Support
Garantie
La caméra de tableau de bord VANTRUE
®
M3 est livrée avec
une garantie complète de 12 mois.
Si vous enregistrez votre produit sur notre site officiel(www.
vantrue.net/register), vous pouvez
étendre la garantie à 18 mois.
Support
Si vous avez des questions concernant votre produit, n'hésitez
pas à nous contacter via Amazon ou envoyez-nous un e-mail
à [email protected]. Les requêtes reçoivent généralement
une réponse dans les 12 à 24 heures.
Votre opinion compte
VANTRUE
®
s'engage fermement à toujours améliorer notre
produits, services et expérience utilisateur. Si tu as quelque
réflexions sur la façon dont nous pouvons faire encore mieux,
nous apprécions vos commentaires et suggestions construc-
tifs. Connectez-vous avec nous aujourd'hui à support@van-
true.net.
Merci d'avoir choisi VANTRUE!
ENFR
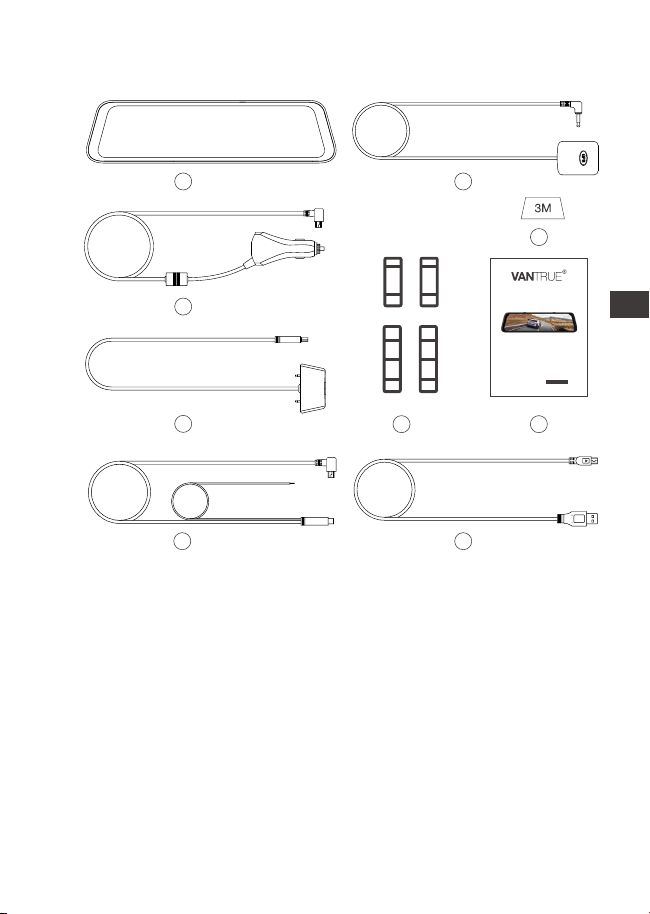
- 85 -
1. Co znajdziemy w pudełku?
A. Vantrue M3
wideorejestrator
B. Stacja dokująca
C. Kabel do transmisji
danych typu C
D. Ładowarka
samochodowa
E. Zestaw przewodowy
G. Kamera wewnętrzna
I. Gumowe paski montażowe * 2
zestaw
J. Wspornik kamery tylnej * 2 zestaw
K. Podkładka samoprzylepna
kamery tylnej 3M * 1
L. Kamera wewnętrzna 3M
podkładka samoprzylepna * 1
M. Stacja dokująca 3M podkładka
samoprzylepna*1
N. Instrukcja obsługi
H. Przedłużacz kamery cofania
B
D
A
E
C
I
F
H
G
User
OnDash M2
Dual Dash Cam
Manual
F. Kamera cofania
EN
EN
EN
PL
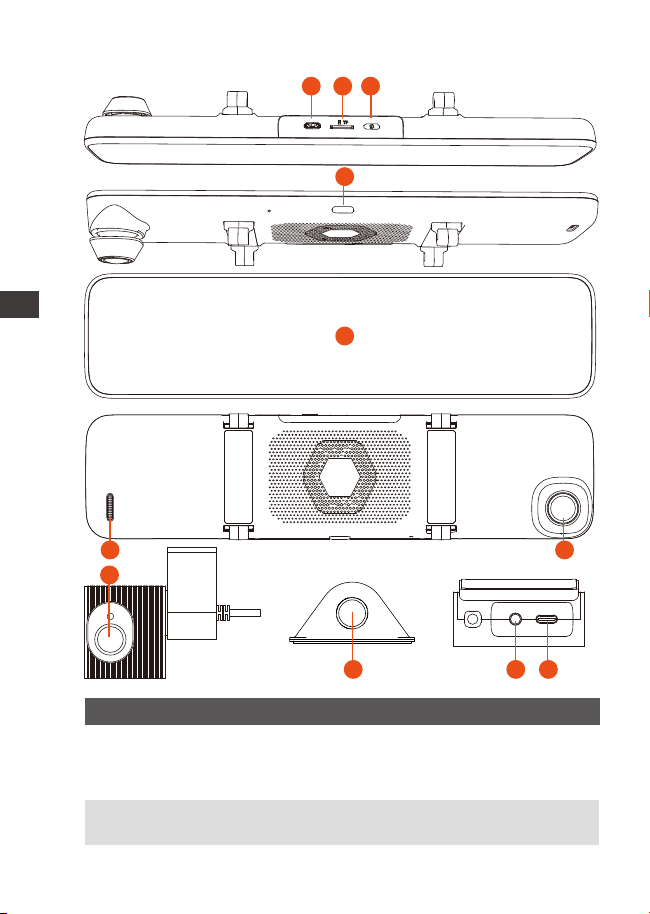
- 86 -
2. Budowa kamery
2 SD Card Slot Obsługiwane Micro SD do 512GB w
FAT32, Class 10;
No.
1 Power Port
Nazwa Opis
Podłącz do kabla typu C lub ładowa-
rki samochodowej, aby uzyskać
zewnętrzne zasilanie;
ENPL
1 2 3
5
6
7
8
9 10 11
4
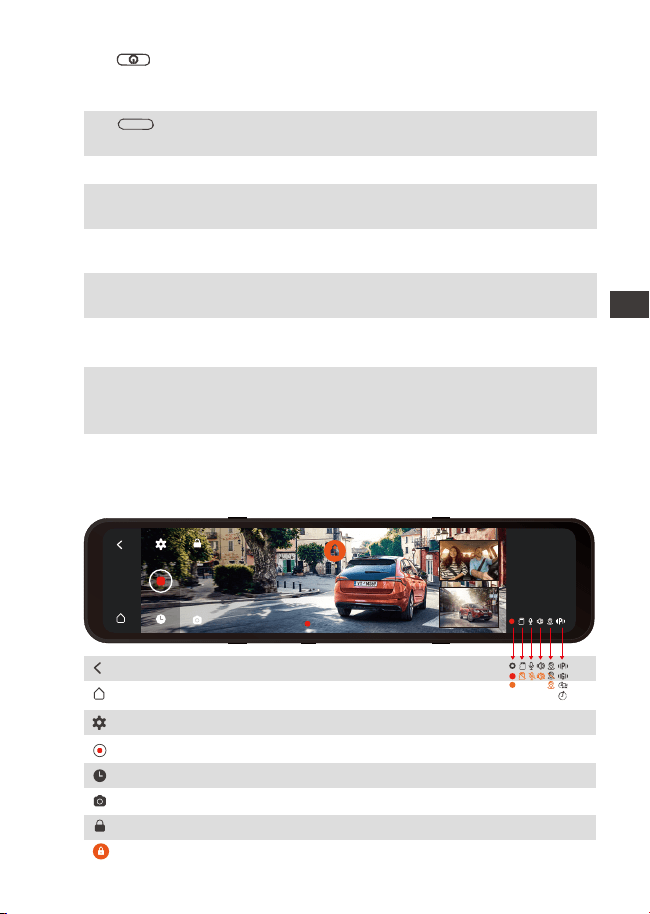
- 87 -
3
przycisk
Zasilanie włącz / wyłącz; długie
naciśnięcie, aby włączyć/wyłączyć
kamera;
4 przycisk krótkie naciśnięcie, aby wyłączyć
ekran;
5 Ekran 12(11.88)” LCD;
6
Przednia kamera7
Głośnik Dostarcza dźwięk podczas
odtwarzania nagrań
8 Wewnętrzna
kamera
Kamera do nagrywania wnętrza
pojazdu
9 Zewnętrzna
kamera
Kamera do nagrywania zdarzeń za
pojazdem
10 Interfejs kamery
wewnętrznej
Port strumienia wideo do
strumieniowego przesyłania nagrań z
kamery wewnętrznej;
11 Interfejs zasilania
stacji dokującej
Port USB typu C do ładowania
przedniej kamery.
Przednia kamera do nagrywania
zdarzeń przed pojazdem
Przegląd ekranu
Wróć do poprzedniego menu;
Wróć interfejsu;
Ustawienia menu;
Rozpocznij/zatrzymaj nagrywanie;
Przeglądanie plików;
Zrób zdjęcie;
Blokada nagrywania;
Zablokowany plik awaryjny;
00:10:15
13:32
1-9
Sobotę
EN
EN
EN
PL
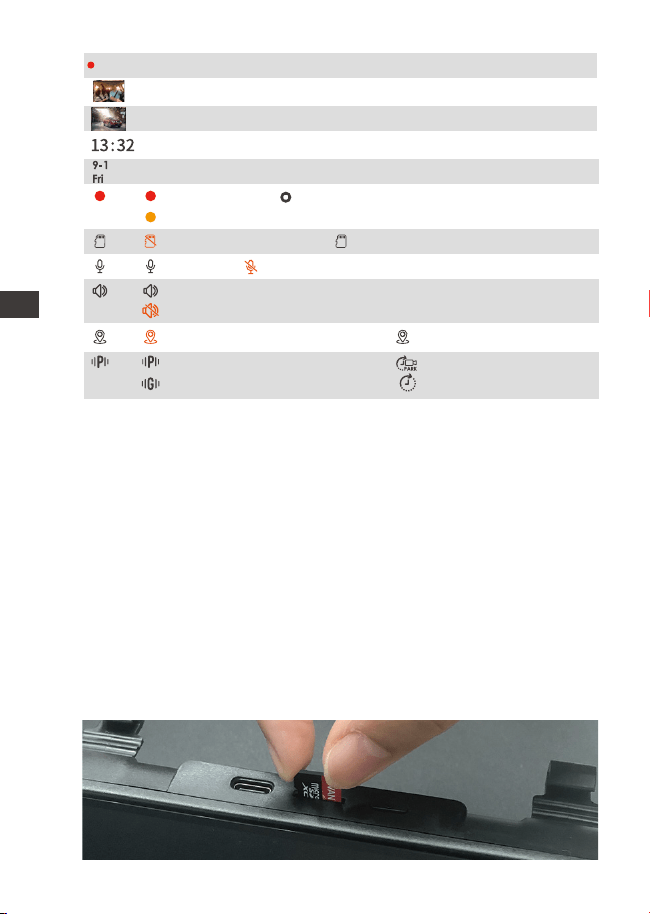
- 88 -
3. Instalacja
3.1 Instalowanie karty pamięci (zalecane: szybka karta microSD
Vantrue U3).
Proszę włożyć kartę pamięci (pojemność karty pamięci: 32
GB-512 GB, szybkość karty: U3/Class10/A2). Kamera M3 ma
pewne wymagania dotyczące szybkości karty pamięci.
Aby zapewnić niezawodne działanie, zalecamy korzystanie
z karty SD VANTRUE (sprzedawanej oddzielnie).
Instalacja karty pamięci: Jest ikona wskazująca kierunek
wkładania karty pamięci. Wsuń kartę pamięci do gniazda
karty zgodnie z kierunkiem wskazanym przez tę ikonę, aż
usłyszysz dźwięk „kliknięcia” w gnieździe karty, co oznacza,
że karta pamięci jest włożona prawidłowo.
ENPL
00:10:15
Czas nagrywania (aktualny klip);
Obraz wnętrza;
Obraz tylny;
Aktualny czas (24H);
Aktualna data (MM/DD/RR);
Detekcja kolizji włączona; Tryb lowbitrate;
Detekcja ruchu włączona; Tryb poklatkowy.
Dźwięki urządzenia włączone;
Dźwięki urządzenia wyłączone;
GPS sygnał zablokowany; GPS sygnał łączenie;
Brak karty pamięci; Karta pamięci włożona;
Mikr. Wł.; Mikr. Wył.;
Nagrywania; Zatrzymywania nagrywania;
Video zablokowane;
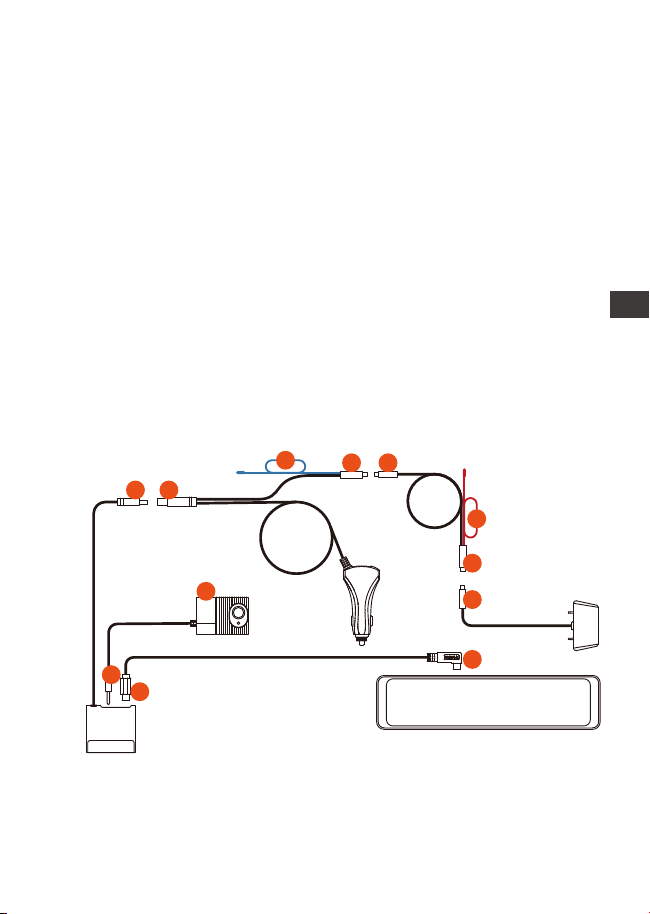
- 89 -
Stacja dokująca doskonale łączyła przednią, wewnętrzną i
tylną kamerę, dzięki czemu instalacja kamery = jest wygod-
niejsza i bardziej elastyczna. Kamera M3 jest dostarczana z
ładowarką samochodową i zestawem przewodów. W
przypadku podłączenia ładowarki samochodowej kamera
wyłączy się po wyłączeniu silnika samochodu; jeśli
podłączysz zestaw przewodów, samochód będzie nadal
zasilał w trybie parkowania.
UWAGA:
Przed użyciem najpierw sformatuj go do FAT32 w kamerze.
Zalecamy włączenie konfiguracji przypomnienia o
formacie i regularne formatowanie karty. Zbyt wiele plików
na karcie pamięci wpłynie na jej wydajność odczytu i
zapisu.
1.
2.
3.2 Instalacja wszystkich akcesoriów
3.2.1 Instalacja ładowarki samochodowej
Podłącz stację dokującą ① do ładowarki samochodowej
②;
Podłącz ładowarkę samochodową ③ do przedłużacza
tylnego obiektywu ④;
EN
EN
EN
PL
1.
2.
10
9
12
11
1 2
5
3
4
6
7
8
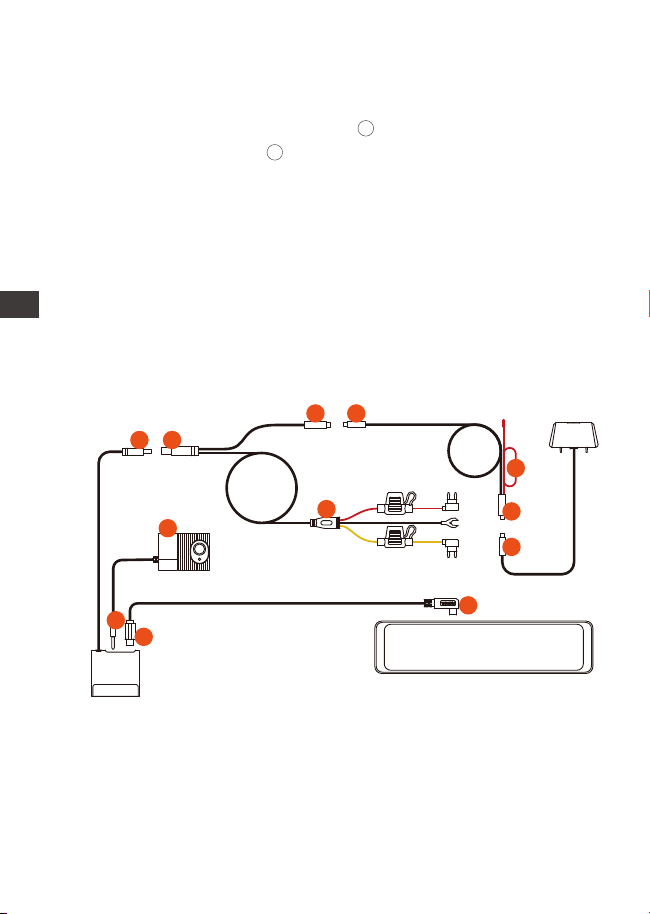
Podłącz przedłużacz tylnej kamery ⑥ do tylnej kamery ⑦;
Połącz stację dokującą ⑨ z główną kamerą M3 ⑩ za
pomocą kabla zasilającego TYPE-C;
Podłącz kamerę wewnętrzną do gniazda słuchawkowe-
go stacji dokującej .
- 90 -
11
12
3.2.2 Instalacja zestawu przewodów (dla 24-godzinnego
trybu parkowania)
3.
1.
2.
3.
4.
4.
5.
UWAGA:
⑤ to przewód światła cofania, który jest podłączony do
światła cofania w skrzynce bezpieczników;
⑧ to przewód tylnego światła cofania, który jest podłąc-
zony do tylnego światła cofania samochodu.
W razie potrzeby podłącz jeden z przewodów do światła
cofania.
Podłącz stację dokującą ① do zestawu Hardwire ②;
Podłącz ładowarkę samochodową ③ do przedłużacza
tylnej kamery④;
Podłącz przedłużacz tylnej kamery ⑤ do tylnej kamery ⑥;
Zestaw sprzętu ⑦ jest taki sam, jak metoda instalacji
normalnego zestawu przewodów ACC:
Czarny przewód to przewód ujemny, który jest połączony
z metalem samochodu(uziemienie); Czerwona linia to
linia sygnału ACC, która jest podłączona do bezpieczni-
ka ACC w skrzynce bezpieczników samochodu; Żółty
przewód to przewód dodatni, który jest podłączony do
bezpiecznika prądu stałego w skrzynce bezpieczników
samochodu.
Połącz stację dokującą ⑨ z główną kamerą M3 ⑩ za
pomocą kabla zasilającego TYPE-C;
Podłącz kamerę wewnętrzną do gniazda słuchawko-
wego stacji dokującej .
ENPL
10
9
12
11
1 2
3 4
5
6
8
7
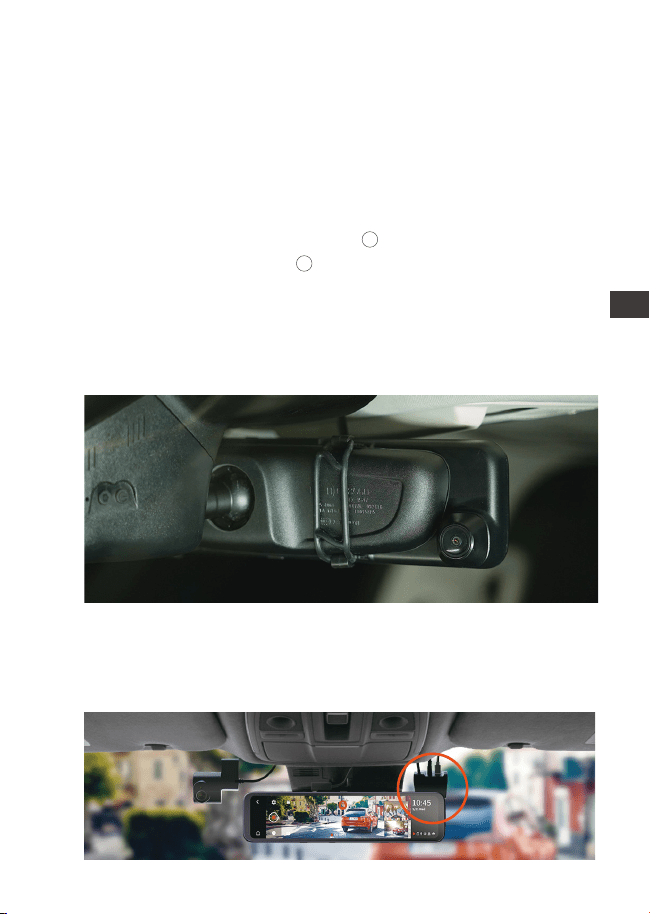
- 91 -
11
12
5.
6.
Podłącz stację dokującą ① do zestawu Hardwire ②;
Podłącz ładowarkę samochodową ③ do przedłużacza
tylnej kamery④;
Podłącz przedłużacz tylnej kamery ⑤ do tylnej kamery ⑥;
Zestaw sprzętu ⑦ jest taki sam, jak metoda instalacji
normalnego zestawu przewodów ACC:
Czarny przewód to przewód ujemny, który jest połączony
z metalem samochodu(uziemienie); Czerwona linia to
linia sygnału ACC, która jest podłączona do bezpieczni-
ka ACC w skrzynce bezpieczników samochodu; Żółty
przewód to przewód dodatni, który jest podłączony do
bezpiecznika prądu stałego w skrzynce bezpieczników
samochodu.
Połącz stację dokującą ⑨ z główną kamerą M3 ⑩ za
pomocą kabla zasilającego TYPE-C;
Podłącz kamerę wewnętrzną do gniazda słuchawko-
wego stacji dokującej .
Uwaga: Czerwony kabel ⑧ słuzy do tylnego światła cofania.
3.3 Instalacja kamery przedniej
Zamontuj krzywkę na M3 na lusterku wstecznym i użyj
dołączonego gumowego pierścienia, aby ją zamocować.
3.4 Instalacja stacji dokującej
Wyjmij stację dokującą, oderwij samoprzylepną folię
ochronną 3M i przyklej ją do przedniej szyby. Po instalacji użyj
kabla TYPE-C, aby podłączyć kamerę do stacji dokującej.
EN
EN
EN
PL

- 92 -
3.6 Instalacja kamery cofania
3.5 Instalacja kamery wewnętrznej
Wyjmij kamerę wewnętrzną i podłącz ją do gniazda
słuchawkowego stacji dokującej, a następnie przyklej ją do
przedniej szyby.
Istnieją dwa sposoby montażu tylnej kamery, jeden jest
montowany wewnątrz samochodu, a drugi na zewnątrz
samochodu.
Instalacja w samochodzie: wybierz pozycję instalacji na
tylnej szybie po zainstalowaniu tylnego uchwytu kamery;
następnie ustaw tylną kamerę w wybranej pozycji i
wyreguluj obiektyw.
Instalacja na zewnątrz samochodu: użyj narzędzia do
usuwania tapicerki, aby wysunąć tapicerkę tylnej klapy, a
następnie poprowadź kabel z zewnątrz samochodu do
bagażnika samochodu. Następnie podłącz kabel zasilający
tylnej kamery do przedłużacza. Na koniec znajdź najlepsze
ENPL
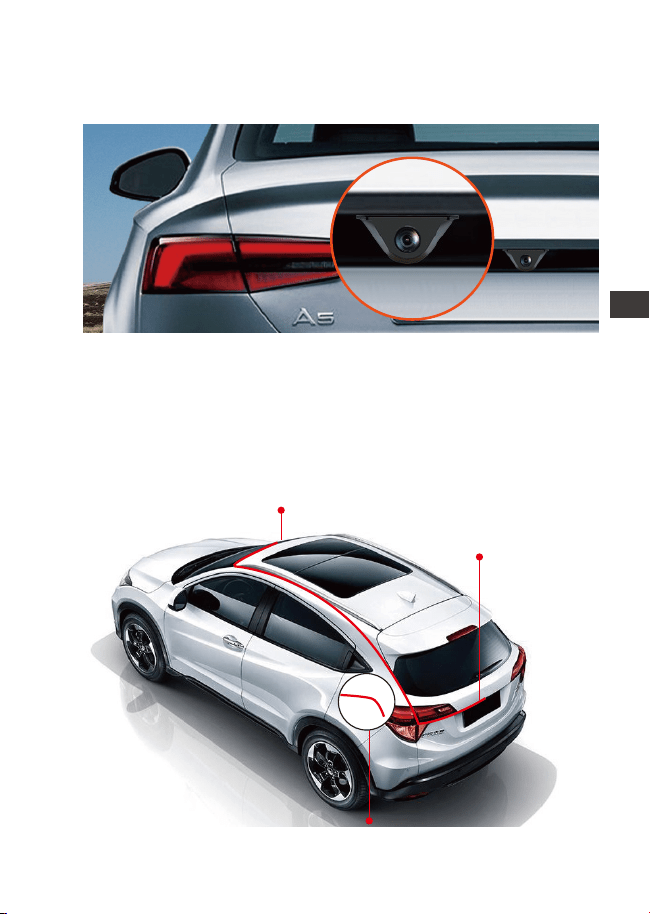
- 93 -
3.7 Poprowadź kabel zasilania tylnej kamery z przodu
samochodu.
Jeśli chcesz, użyj narzędzia do usuwania tapicerki, aby
wysunąć panel podsufitki bezpośrednio nad przednią szybą.
Następnie przeprowadź kabel przez komorę ekspozycji.
miejsce i przymocuj kamerę naklejką lub śrubą z tyłu
samochodu, zwykle najlepsze miejsce jest nad tablicą
rejestracyjną.
Zawiąż lusterko wsteczne
Podłącz kamerę wsteczną
Podłącz światło cofania
EN
EN
EN
PL

- 94 -
3.8 Ustawienia menu
Po włączeniu kamery naciśnij przycisk, aby wejść w
ustawienia.
(Jeśli kamera nagrywa naciśnij aby zatrzymać nagrywan-
ie I dopiero wciśnij aby wejść w menu.)
Języki: Dostępne języki to English/Français/Español/-
Deutsch/Italiano/简体中文/русский/日本語/Polski.
Data i godzina: Automatycznie ustawia godzinę według
GPS, Ustaw datę i godzinę, domyślny 24-godzinny format
systemu czasu) oraz strefę czasową.
Pamięć: Wyświetl całkowitą pamięć/dostępną pamięć/sfor-
matuj kartę SD.
Konfiguracja przypomnienia o formatowaniu: Wybierz opcje
przypomnienia: 15 dni, 1 miesiąc i Wyłączony. Domyślnie jest
wyłączone.
Rozdzielczość: Kamera M3 ma 2 tryby rozdzielczości: tryb
nagrywania przód + kabina + tył lub tryb nagrywania przód
+ tył.
Przód + kabina + tylne nagrywanie: 1440 P + 1080 P + 1080 P;
1080 P + 1080 P + 1080 P;
Nagrywanie z przodu + z tyłu: 1944 P + 1080 P; 1440 P + 1080
P; 1080 P + 1080 P.
Szybkość klatek wideo przedniej kamery: Wybierz klatki
wideo. 30FPS/28FPS opcjonalnie.
Nagrywanie w pętli: Domyślne ustawienie to 3 min. Możesz
wybrać opcje pomiędzy 1/3/5 min i Wył. Jeśli wybierzesz
opcję „wył”, nagrywanie w pętli trwa 20 minut na klip.
Lusterko kabinowe: Domyślnie włączone. Po włączeniu
wewnętrzny ekran nagrywania jest wyświetlany w trybie
lustrzanym.
Obróć wyświetlacz (180°): Ustawienie domyślne to Wyłąc-
zone. Jeśli go włączysz, przedni ekran nagrywania zostanie
obrócony o 180°.
Odbicie lustrzane: domyślnie WŁĄCZONE. Po włączeniu
ekran nagrywania z tyłu jest wyświetlany w trybie lustrzanym.
Obróć tylni wyświetlacz (180°): Ustawienie domyślne to
ENPL

- 95 -
Wyłączone. Jeśli go włączysz, tylny ekran nagrywania
zostanie obrócony o 180°.
Nagrywanie dźwięku: Domyślnie włączone. Włącz lub
wyłącz nagrywanie.
G-Sensor: Możesz ustawić wartości czujnika g do przodu i do
tyłu, w lewo i w prawo, w górę i w dół samochodu. Wartość
G-sensor w każdym kierunku może być
wybrane 1/2/3/4/5. Najwyższa czułość G-Sensora to 5.
Ochrona przed niskim napięciem akumulatora: Po
podłączeniu zestawu przewodów, kamera M3 automaty-
cznie zidentyfikuje aktualne napięcie akumulatora samo-
chodowego. Do wyboru są 3 progi napięcia ochronnego:
11,8 V/12 V/12,4 V. gdy napięcie akumulatora samochodo-
wego osiągnie wybrany próg napięcia ochronnego,
automatycznie wyłączy się, aby chronić akumulator
samochodowy.
Tryb parkowania przy słabym oświetleniu w nocy: domyślnie
jest wyłączony. Po włączeniu może zoptymalizować efekt
nagrywania filmów w trybie parkowania.
Tryb parkowania: Możesz wybrać tryb parkowania, którego
potrzebujesz, w tym wykrywanie kolizji/wykrywanie
ruchu/tryb niskiej liczby klatek na sekundę/WYŁ.
Ekspozycja: Dostosuj wartość ekspozycji dla przedniego
obiektywu, +2,0,
+1,6,+1,3,+1,0,+0,6,+0,3,+0,0,-0,3,-0,6,-1,0,-1,3,-1,6,-2.0
opcjonalnie. Wartość domyślna to +0.0.
Częstotliwość: dostępna 50Hz/60Hz. Dla Polski 50Hz.
Dźwięk urządzenia: Ustaw głośność urządzenia, na przykład
dźwięk uruchamiania, dźwięk monitu, dźwięk przycisków i
dźwięk odtwarzania wideo. Możesz wybrać wyłączone,
niskie, średnie lub wysokie. Wartość domyślna to Średnia.
Sygnał ostrzegawczy: Włącz lub wyłącz monity dotyczące
obsługi, takie jak ton konfiguracji przypomnienia o forma-
towaniu, ton monitu o zablokowanie wideo, ton monitu o
nietypowe zatrzymanie nagrywania wideo, dźwięk dotknię-
cia oraz dźwięk włączania i wyłączania. Domyślnie jest
WŁĄCZONE.
EN
EN
EN
PL

- 96 -
Automatyczne wyłączenie LCD: 1Min/3Min/5Min/WYŁ
opcjonalnie. Domyślnie jest WYŁĄCZONE. Jeśli jest ustawiony
na Wył, ekran będzie zawsze włączony.
Jasność LCD: Możesz wybrać Wył., Niska, Średnia lub
Wysoka.
Ustawienie cofania: Ustaw odwrócony obraz, odwrócone
linie pomocnicze i ustawienia odwróconego podglądu.
Poklatkowy: Wybierz klatki wideo poklatkowe. 1FPS/3FPS/5F-
PS/10FPS/WYŁ opcjonalnie.
Tablica rejestracyjna: Wybierz numer lub literę do ustawie-
nia. Po ustawieniu numer tablicy rejestracyjnej może zostać
wyświetlony w nagranym filmie.
GPS: GPS jest domyślnie włączony. Ustawienia GPS Wł/wył
Ustawienia jednostki prędkości i informacje GPS są tutaj
ustawiane.
Dodaj do nagrania: Włącz lub wyłącz na nagraniach. Do
nagrania można dodać logo VANTRUE, etykietę daty i
godziny oraz etykietę prędkości.
Ustawienia domyślne: Zresetuj urządzenie do ustawień
fabrycznych.
Informacje o systemie: Sprawdź numer modelu / wersję
oprogramowania układowego / witrynę internetową /
wersję MCU.
4. Podstawowe funkcje
Po podłączeniu do ładowarki samochodowej kamera
włączy się automatycznie po uruchomieniu samochodu.
Wyłączy się automatycznie po wyłączeniu silnika samocho-
du, nawet jeśli nagrywa. Możesz także długo nacisnąć
przycisk zasilania, aby włączyć/wyłączyć urządzenie.
4.1 Włącz/wyłącz kamerę
Naładuj kamerę samochodową za pomocą dołączonej
ładowarki samochodowej lub zestawu przewodów w
samochodzie.
UWAGA:
1.
ENPL
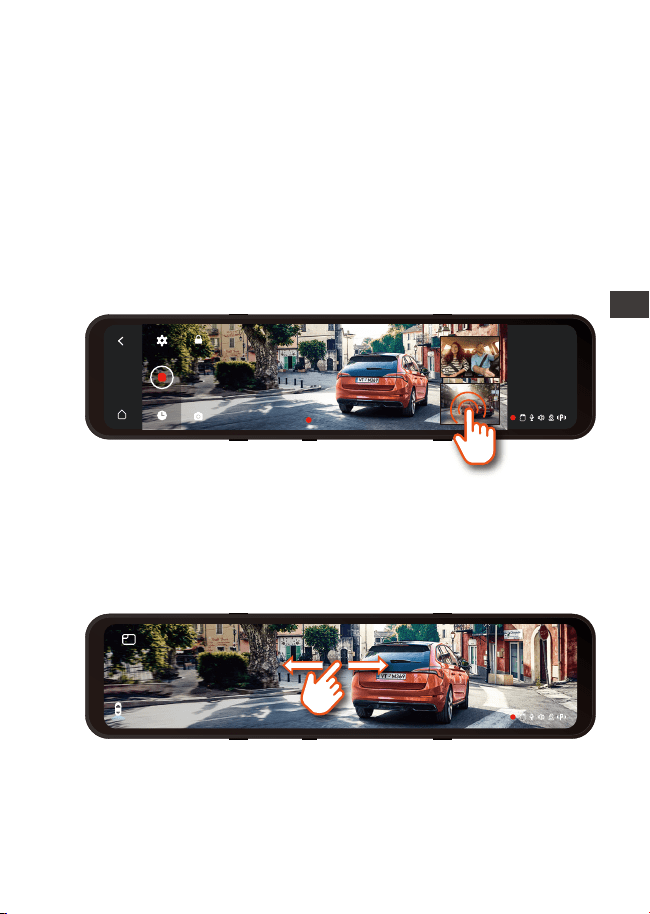
- 97 -
W trybie nagrywania 3-kierunkowego istnieją dwa sposoby
przełączania między widokiem z przodu, z kabiny i z tyłu.
Stacja dokująca M3 ma funkcję identyfikacji zasilacza, z
obsługą zestawu przewodów M3, który może zidentyfikow-
ać napięcie akumulatora samochodowego. Tryb samocho-
4.2 Przełącz wyświetlanie okna kamery przedniej, wewnętrznej
i tylnej
4.3 Ochrona przed niskim napięciem
2.
1.
Po wyłączeniu samochodu, jeśli zestaw przewodów jest
podłączony, a tryb parkowania jest włączony, kamera
automatycznie przejdzie w tryb parkowania, w przeci-
wnym razie automatycznie się wyłączy.
2. W interfejsie pełnoekranowym dostępne będą 4 tryby
wyświetlania. Przesuwanie ekranu w lewo i w prawo, aby
przełączyć obraz podglądu kamery przedniej, obraz
podglądu kamery kabiny, podgląd kamery tylnej oraz
obraz podglądu kamery przód+wnętrze+tylna wyświetla-
ny na tym samym ekranie.
W interfejsie nagrywania kliknij małe okno, aby przełączyć
duży ekran na ekranie wewnątrz lub za samochodem.
00:10:15
13:32
9-1
Sobotę
13:32
9-1
Sobotę
EN
EN
EN
PL

- 98 -
dowy odnosi się do ustawienia napięcia ochronnego.
Napięcie ochronne ma 3 opcje, a mianowicie 11,8 V, 12 V i
12,4 V. Jeśli ustawione jest napięcie ochronne 11,8 V, gdy
akumulator samochodowy osiągnie 11,8 V, stacja dokująca
automatycznie odetnie zasilanie, aby chronić akumulator
samochodowy.
UWAGA:
Funkcja ochrony przed niskim napięciem na razie nie
obsługuje akumulatorów samochodowych 24 V. Do tej
funkcji należy użyć zestawu przewodowego.
Czas i datę można ustawić na dwa sposoby: automatycznie i
ręcznie.
Automatyczna aktualizacja: Po włączeniu GPS przejdź do
„Ustawienie czasu”, włącz „Automatycznie ustawia czas
przez GPS” i wybierz strefę czasową, a następnie godzinę i
datę można automatycznie skorygować. Automatycznie
ustawia czas przez GPS jest domyślnie WŁĄCZONY.
Aktualizacja ręczna: Przejdź do „Ustawienie czasu”, wyłącz
„Automatycznie ustawia czas przez GPS”, a następnie
ręcznie dostosuj godzinę i datę.
4.4 Ustawienia daty & czasu
13:32
1-9
Sobotę
Automatycznie ustawia czas według GPS
>
>
Strefa czasowa
Ręcznie ustaw datę/godzinę
24 godziny
Wł Wył
Wł Wył
13:32
1-9
Sobotę
Automatycznie ustawia czas według GPS
>
>
Strefa czasowa
Ręcznie ustaw datę/godzinę
24 godziny
Wł Wył
Wł Wył
2049
2050
2022
2023
2024
05
06
07
08
09
06
07
08
09
10
11
12
13
14
15
33
34
35
36
37
ENPL

- 99 -
Domyślnie (tryb nagrywania przód + kabina + tył) obie
kamery rejestrują przód i tył drogi oraz kabinę przy 1440P +
1080P + 1080P.
Można go przełączyć w tryb Przód+Tył, wykonując następu-
jące czynności:
- Przejdź do „Ustawienia nagrywania”> „Rozdzielczość”, aby
wybrać tryb nagrywania.
Tryb przód + wnętrze + tył: 1440 P + 1080 P + 1080 P; 1080 P +
1080 P + 1080 P;
Tryb przód + tył: 1944 P + 1080 P; 1440 P + 1080 P; 1080P +
1080P.
Istnieją 3 rodzaje trybów wyświetlania: 1 min/3 min/5 min i
WYŁ.
Przejdź do „Ustawienia menu” > „Automatyczne wyłącza-
nie LCD”, a następnie przełącz tryb ekranu. Domyślnie jest
wyłączone. Jeśli jest ustawiony na Off, ekran będzie
zawsze włączony.
4.5 Wygaszacz ekranu
4.6 Rozdzielczość
2.
W trybie parkowania, w celu oszczędzania energii i
wydłużenia czasu ochrony trybu parkowania, ekran
wyłączy się w ciągu 3 sekund po przejściu kamery w tryb
parkowania.
3.
1.
Kamera kabinowa automatycznie przełączy się na tryb
podczerwieni IR w nocy i przy słabym oświetleniu.
Szybkość klatek obiektywu wewnętrznego i tylnego wynosi
25 klatek na sekundę.
2.
1.
UWAGA: Krótkie wciśnięcie wyłącza ekran;
UWAGA:
EN
EN
EN
PL
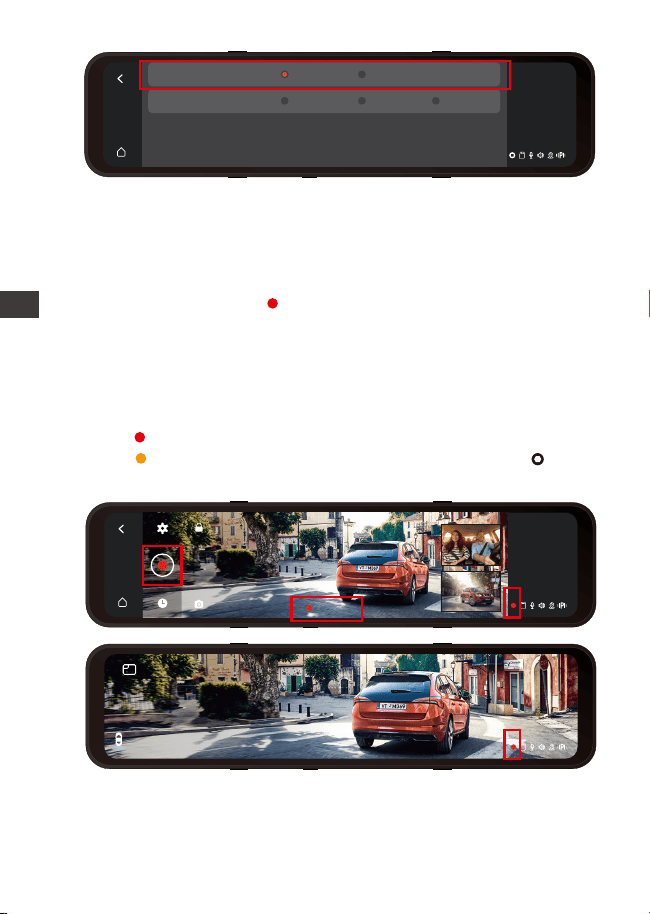
- 100 -
4.7 Nagrywanie w pętli
00:10:15
13:32
1-9
Sobotę
13:32
1-9
Sobotę
13:32
9-1
Sobotę
Przód+wnętrze+tył
Przód+wnętrze
1080P+1080P1944P+1080P 1440P+1080P
1440P+1080P+1080P 1080P+1080P+1080P
Po włożeniu karty pamięci i podłączeniu zasilania kamera
M3 automatycznie się włączy i przejdzie do nagrywania w
pętli.
Podczas nagrywania ikona na środku interfejsu wideo
miga, a czas nagrywania zostanie nagrany zgodnie z
ustawionym czasem nagrywania w pętli. Jeśli wrócisz do
ekranu wygaszacza ekranu, możesz wyświetlić ikonę stanu
nagrywania w prawym dolnym rogu ekranu, aby
dowiedzieć się o bieżącym stanie nagrywania. (Czerwona
ikona oznacza, że trwa nagrywanie, pomarańczowa
ikona oznacza nagrywanie zdarzeń, a biała ikona
oznacza, że nagrywanie zostało wstrzymane.).
Po zamknięciu nagrywania w pętli nagrywanie awaryjne
jest nieważne, można wykonywać tylko migawki.
UWAGA:
1.
ENPL
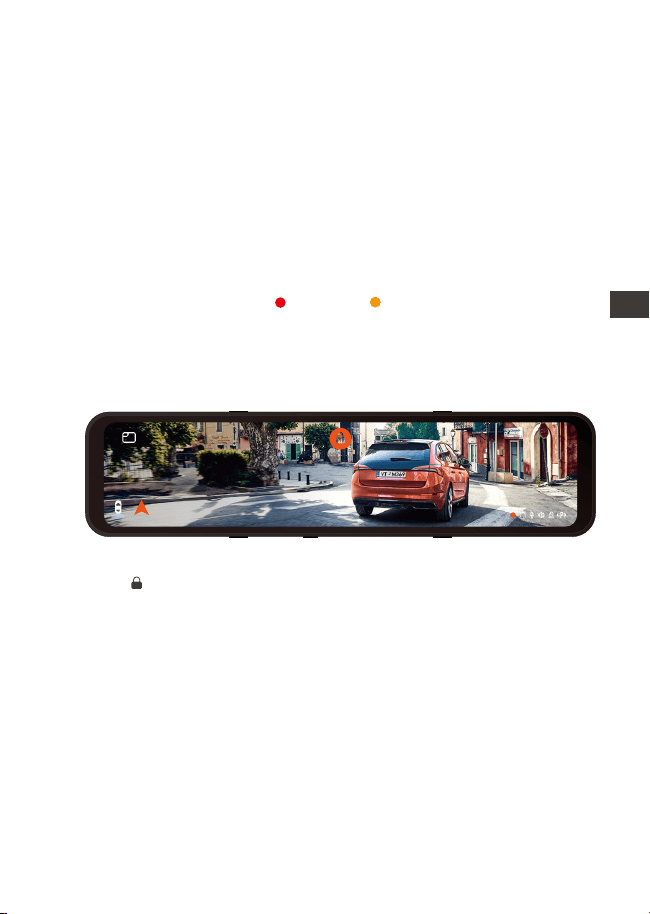
- 101 -
4.8 Nagrywanie zdarzeń
Kamera automatycznie nadpisze stare filmy z wydarzeń,
gdy folder Wydarzeń zgromadzi 30% pojemności karty.
UWAGA:
1.
2.
Po wyłączeniu nagrywania w pętli czas trwania każdego
filmu będzie wynosił 20 minut, a nagrywanie zostanie
zatrzymane po zapełnieniu karty pamięci.
Wideo zdarzenia jest wyzwalane przez czujnik G (czujnik
grawitacyjny), który może być uruchamiany automatycznie
lub ręcznie.
Gdy kamera wykryje, że aktualna wartość wibracji pojazdu
osiągnęła zaprogramowany poziom G-sensor, wideo
zostanie automatycznie zablokowane, a ikona nagrywania
zmieni się z czerwonej do żółtej , czas nagrywania
będzie trwał do końca nagrywania lub ręcznego zatrzyma-
nia, a wideo zdarzenia zostanie zapisane w folderze wideo
zdarzenia. Filmy i obrazy w folderze wideo wydarzenia nie
będą już zapętlone.
13:32
1-9
Sobotę
正北60km/h
Ręcznie blokowanie wideo. W interfejsie nagrywania wideo
kliknij ikonę, a wideo zostanie zablokowane i zapisane w
folderze wideo wydarzenia.
Możesz ustawić wartości czułości czujnika G do przodu i do
tyłu, w lewo i w prawo, w górę i w dół samochodu.
Wartość G-sensor w każdym kierunku można wybrać
1/2/3/4/5/OFF. Domyślna czułość dla trzech wymiarów
wynosi 3. Najwyższa czułość G-Sensor wynosi 5.
Przejdź do „Ustawienia menu” > „G-sensor”, a następnie
dostosuj wartość G-sensor.
EN
EN
EN
PL
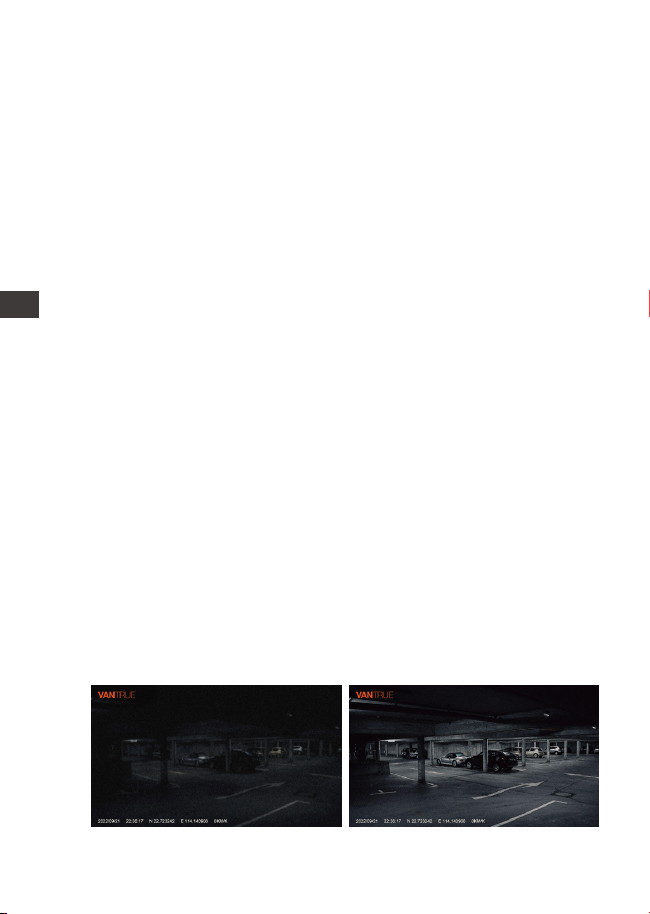
- 102 -
4.9 Lusterko wewnętrzne i tylne
Kamery wewnętrzne i tylne można opcjonalnie włączyć lub
wyłączyć. Nie ma to wpływu na pliki wideo, niezależnie od
tego, czy jest włączony, czy wyłączony, tylko wyświetlanie
na ekranie.
4.10 Odwracanie kamery wewnętrznej i tylnej (180°C)
Jeśli twoja wewnętrzna i tylna kamera jest zamontowana do
góry nogami, ekran stanie do góry nogami. Możesz włączyć
tę funkcję, aby odwrócić filmy. Przejdź do „Wyświetlacz
wewnętrznego obrotu (180°)” lub „Wyświetlacz obrotu
tylnego (180°)” w „Ustawieniach menu” i wybierz „Wł.”.
Domyślnie ta funkcja jest wyłączona.
4.11 Low-light Night Vision w trybie parkingowym
Aby zwiększyć bezpieczeństwo parkowania w nocy, w pełni
wykorzystujemy wydajność obiektywu w połączeniu z
technologią widzenia w nocy przy słabym oświetleniu, aby
poprawić efekt widzenia w nocy w trybie parkowania. Ta
funkcja jest domyślnie w trybie otwartym. Zostanie wyzwolo-
ny dopiero po wejściu w tryb parkowania i nie wpłynie na
normalne nagrywanie.
Uwaga: Widzenie w nocy przy słabym oświetleniu w trybie
parkowania jest automatycznie dostosowywane tylko do
nagrań wideo z przedniego obiektywu.
Encienda la visión nocturna de
estacionamiento con poca luz
Apague la visión nocturna de
estacionamiento con poca luz
2.
Prosimy o regularne przesyłanie ważnych filmów na
komputer lub inne miejsce przechowywania (np.
zewnętrzny dysk twardy).
ENPL
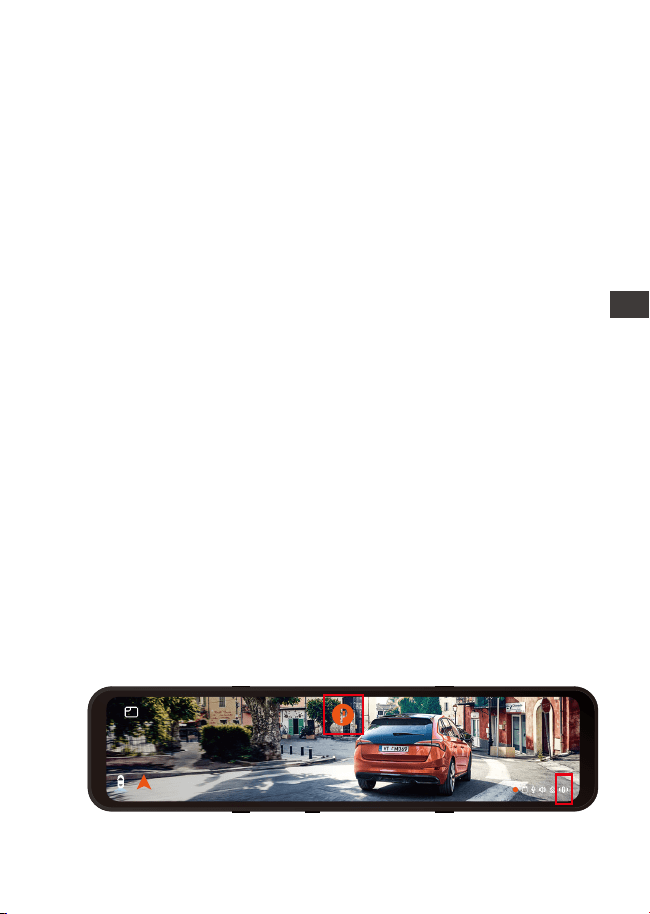
- 103 -
4.12 Tryb parkingowy
W trybie parkowania M3 dostępne są 3 tryby: wykrywanie
kolizji, tryb niskiej liczby klatek na sekundę i wykrywanie
ruchu. Po włączeniu trybu parkowania możesz wybrać
jeden z trybów parkowania.
Aby upewnić się, że kamera działa poprawnie w trybie
parkowania, użyj zestawów przewodowych lub innego
stabilnego i ciągłego źródła zasilania do zasilania
kamery samochodowej.
Najlepsza temperatura środowiska pracy M3 to 14-122°F
(-10°C do 50°C). Zalecamy używanie wykrywania kolizji w
tym zakresie temperatur, więc gdy temperatura
przekroczy normalny zakres temperatury roboczej,
automatycznie się wyłączy. Jeśli temperatura jest
wysoka, wyłącz kamerę podczas parkowania.
UWAGA:
1.
2.
4.12.1 Wykrywanie kolizji
Gdy wykrywanie kolizji jest włączone, ikona P pojawia się
na środku ekranu, a następnie kamera jest automatycznie
wyłączana. Gdy kamera jest wyłączona, rozpocznie
nagrywanie przez 1 minutę po potrząśnięciu, a następnie
ponownie ją wyłączy.
Po włączeniu przełącznika trybu parkowania można
wybrać czułość wykrywania kolizji. Istnieją trzy poziomy
odpowiednio niski/średni/wysoki. Domyślne wykrywanie
kolizji jest wyłączone.
13:32
1-9
Sobotę
Północ 60km/h
EN
EN
EN
PL
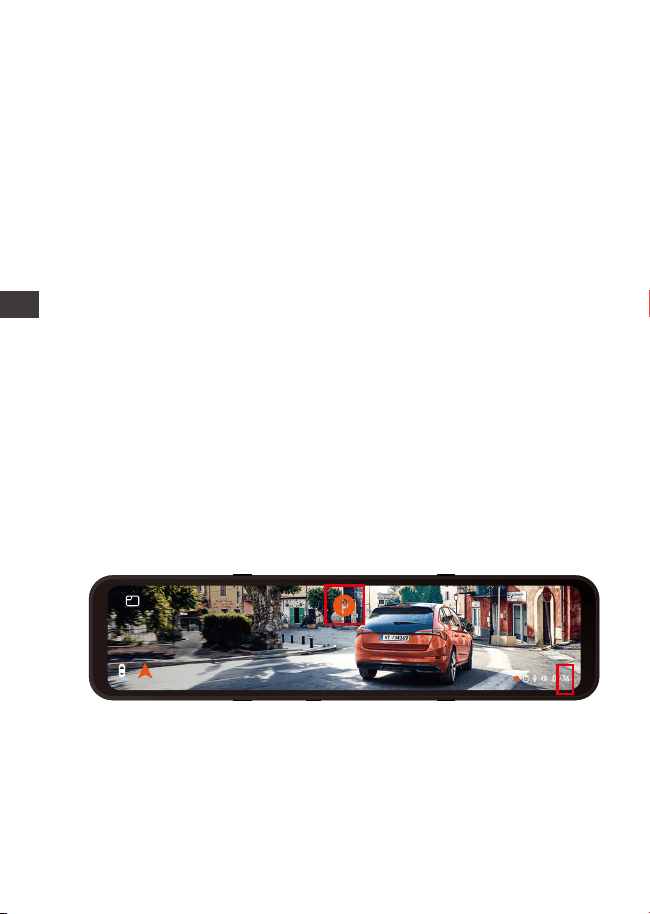
- 104 -
Po ręcznym wyłączeniu kamera nie będzie mogła wejść
do wykrywania ruchu.
UWAGA:
1.
Notatka:
Wykrywanie kolizji zostanie automatycznie wyłączone po
włączeniu normalnego nagrywania poklatkowego.
4.12.2 Tryb poklatkowy
Gdy wybrany jest tryb niskiej liczby klatek na sekundę,
kamera będzie nagrywać zgodnie z wyborem spośród
1FPS/3FPS/5FPS/10FPS. Gdy wybrany jest tryb niskiej liczby
klatek na sekundę, kamera będzie nagrywać zgodnie z
wyborem spośród 1FPS/3FPS/5FPS/10FPS. Domyślnie jest
WYŁĄCZONE. Gdy włączony jest tryb niskiej liczby klatek
na sekundę, ikona P pojawia się na środku ekranu, a
następnie kamera jest automatycznie wyłączana. Po 3
sekundach ekran zostanie zamknięty i rozpocznie się
nagrywanie poklatkowe.
Na przykład, jeśli wybierzesz 1 kl./s, a bieżąca rozdzielczość
wideo wynosi 30 kl./s, M3 zrobi jedno zdjęcie na sekundę,
a następnie połączy je w film o rozdzielczości 1 kl./s. Przy
maksymalnej szybkości nagrywania 30 klatek na sekundę,
nagrywanie 8 godzin wideo w trybie Time Lapse 1Sec
wygeneruje film poklatkowy trwający zaledwie 16 minut
(8x60x60/30/60). Ten tryb Eco jest zalecany dla kart
pamięci o mniejszej pojemności.
[Rzeczywisty czas nagrywania (sek) = Czas nagrywania
poklatkowego (sek) x Szybkość klatek wideo FPS / Opcja
nagrywania poklatkowego FPS]
13:32
1-9
Sobotę
Północ 0km/h
ENPL
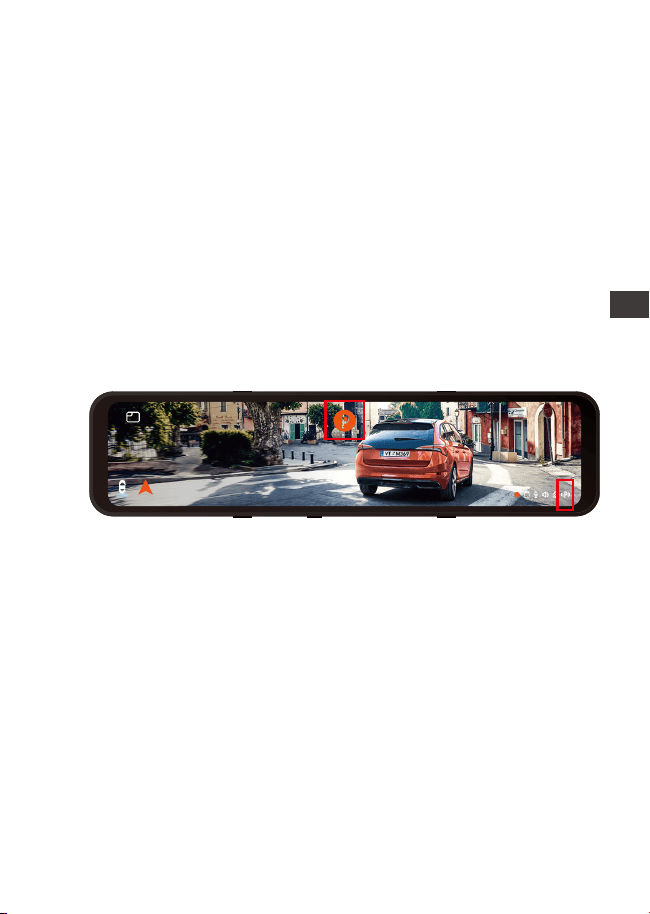
- 105 -
Po ręcznym wyłączeniu nie wejdzie w tryb wykrywania
ruchu.
Wykrywanie ruchu zostanie automatycznie wyłączone
po włączeniu normalnego nagrywania poklatkowego.
UWAGA:
1.
2.
2.
4.12.3 Detekcja ruchu
Istnieją trzy poziomy czułości wykrywania ruchu:
Wysoka/Średnia/Niska i domyślnie wyłączona. Wybierz
czas nagrywania postoju, do wyboru są 4 godziny, 8
godzin, 12 godzin, 24 godziny lub nieograniczony. Wartość
domyślna jest nieograniczona.
Gdy wykrywanie ruchu jest włączone, na środku ekranu
pojawia się ikona P, a ekran wyłącza się po 3 sekundach.
M3 jest wyposażony w funkcję wstępnego nagrywania. Po
zakończeniu ruchu wykrywania ruchu kamera załaduje
pierwsze 5 sekund wykrycia ruchu do wideo wykrywania
ruchu i zapisze plik wykrywania ruchu jako 30 sekund.
4.13 Regulacja jasności
Ręczna/automatyczna regulacja jasności LCD: Przesuń
palcem w górę lub w dół po prawej stronie ekranu, aby
dostosować jasność ekranu. Lub wejdź do ustawień Menu i
dostosuj jasność ekranu do trybu wysokiej/średniej/niskiej,
zgodnie z potrzebami.
Po włączeniu trybu poklatkowego tryb niskiej szybkości
klatek zostanie automatycznie wyłączony.
13:32
1-9
Sobotę
Północ 60km/h
EN
EN
EN
PL
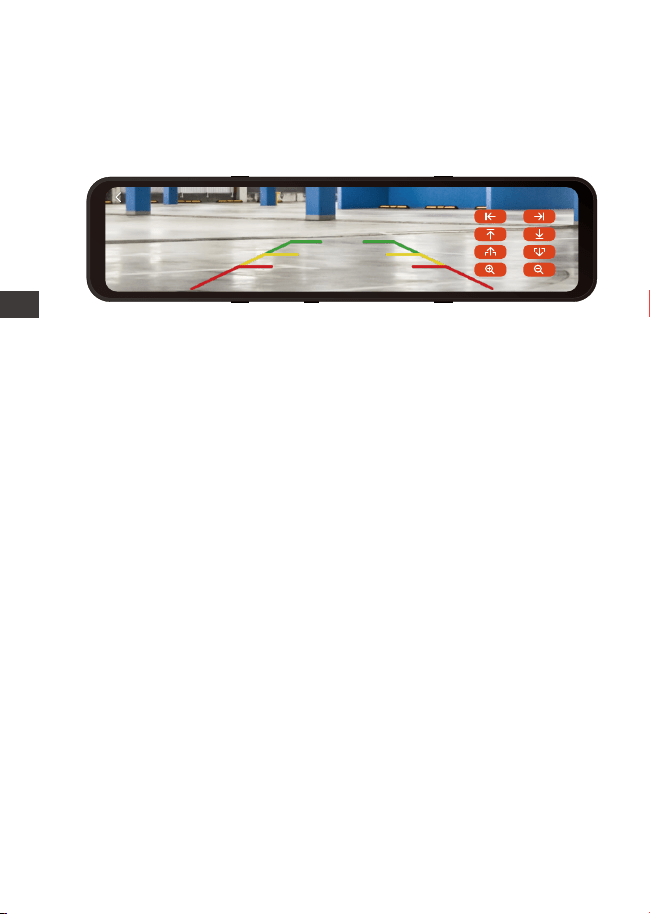
- 106 -
4.14 Ustawienia cofania
Zgodnie z dostarczonym przez nas filmem instalacyjnym
(www.vantrue.net), po podłączeniu tylnej kamery do
światła cofania funkcja wspomagania cofania zostanie
automatycznie aktywowana podczas cofania.
Odwrócony obraz: Ta funkcja jest domyślnie wyłączona.
Gdy kamera tylna jest zamontowana do góry nogami,
obraz zostanie odwrócony o 180°, a obraz będzie w trybie
lustrzanym. Po włączeniu tego trybu obraz będzie w
oryginalnym trybie obrazu.
Odwróć linie wspomagające: jest domyślnie włączone.
Gdy tylne światło jest podłączone do tylnej kamery, linia
cofania zostanie wyświetlona automatycznie podczas
cofania.
Ustawienia podglądu wstecznego: W zależności od modelu
samochodu, dostosuj wyświetlanie linii pomocy cofania w
górę iw dół, kliknij "wstecz", aby potwierdzić i zapisać
ustawienia.
Domyślne ustawienie obrazu odwróconego jest włączone,
a linia pomocy cofania jest domyślnie włączona (kierunek
przód i tył służy do regulacji przedłużenia lub skrócenia linii
pomocy cofania, kierunek rozmiaru to dostosowanie jej
szerokości, lewej i prawo oraz góra i dół służą do regulacji
kierunku linii pomocy cofania.
ENPL
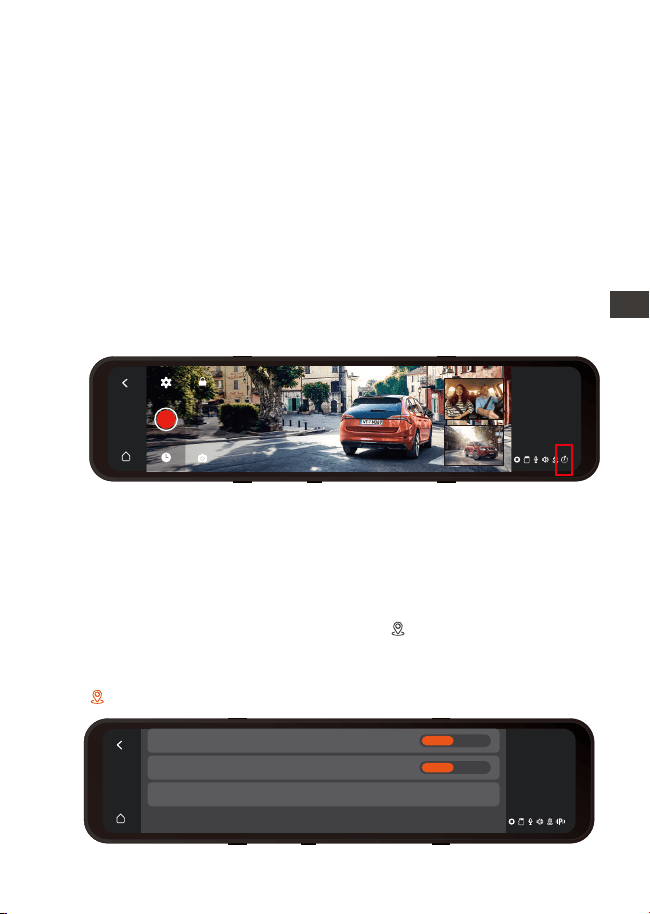
- 107 -
4.15 Tryb poklatkowy
Po wybraniu trybu poklatkowego kamera będzie nagrywać
zgodnie z wybranym przez Ciebie ustawieniem 1FPS/3F-
PS/5FPS/10FPS. Jeśli ustawisz film poklatkowy 1 kl./s, M3
będzie robił jedno zdjęcie na sekundę, a następnie połączy
je w film 1 kl./s. Przy maksymalnej szybkości nagrywania 30
klatek na sekundę, nagrywanie 8 godzin wideo w trybie
Time Lapse 1Sec wygeneruje film poklatkowy trwający
zaledwie 16 minut (=8 x 60 x 60/30/60). Ten tryb Eco jest
zalecany dla kart pamięci o mniejszej pojemności.
[Normalny czas nagrywania = Czas nagrywania poklatkow-
ego (sek) x Szybkość nagrywania FPS x Opcja nagrywania
poklatkowego]
Uwaga: Gdy funkcja Tryb poklatkowy jest włączona,
wszystkie tryby parkowania zostaną automatycznie wyłąc-
zone, dopóki nie zostanie wyłączone, funkcję trybu parkow-
ania można włączyć ponownie.
4.16 GPS
Po włączeniu GPS biała ikona GPS zostanie wyświetlony
w prawym dolnym rogu ekranu, gdy GPS będzie szukał
sygnałów. Po odebraniu sygnału GPS czerwona ikona GPS
zostanie wyświetlona w prawym dolnym rogu ekranu.
13:32
1-9
Sobotę
GPS
>
Jednostka prędkości
Informacje GPS
Wł Wył
km/h mph
13:32
1-9
Sobotę
EN
EN
EN
PL
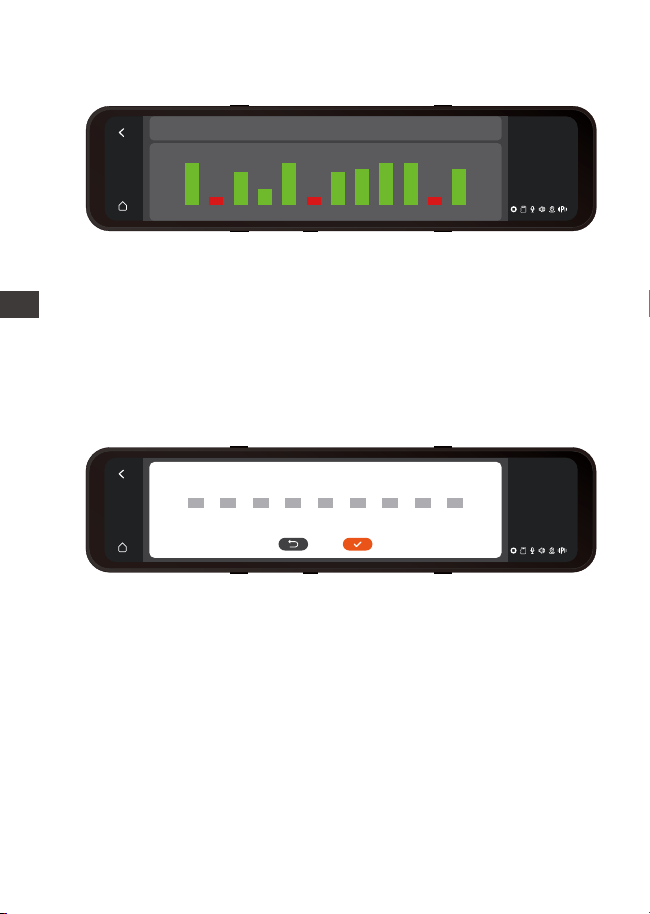
- 108 -
Aby śledzić prędkość, status, kierunek i siłę sygnału GPS,
przejdź do informacji GPS w ustawieniach menu.
4.17 Numer tablic pojazdu
Numer tablicy rejestracyjnej można ustawić w ustawieni-
ach tablicy rejestracyjnej i jest on wyświetlany w znaku
wodnym filmu.
4.18 Dodaj do nagrania
Opcja dodaj do nagrania pomoże Ci wybrać znak, który
chcesz wykonać na nagranym filmie. Zaznacz pole obok
każdej opcji, aby aktywować określony parametr, który ma
zostać nałożony na nagrane wideo.
Parametry dodaj do nagrania są domyślnie włączone,
więc logo VANTRUE/czas i data/prędkość będzie wyświet-
lana w pliku wideo.
Możesz także przejść do "Ustawienia menu"> "Dodaj do
nagrania", aby włączyć lub wyłączyć te parametry w razie
potrzeby.
13:32
1-9
Sobotę
Długość i szerokość geograficzna Prędkość Stan GPS
1 2 3 4 5 6 7 8 9 10 11 12
50
10
40
21
48
39
42 42
49 50
13 13
pozycjonowany22.6671N/114.0306E 00kmh/0.00
13:32
1-9
Sobotę
-
A
B
C
-
A
B
C
-
A
B
C
-
A
B
C
-
A
B
C
-
A
B
C
-
A
B
C
-
A
B
C
-
A
B
C
Możesz przeglądać nagrane filmy z informacjami GPS na
swoim komputerze za pomocą przeglądarki VANTRUE
®
GPS
Viewer (dostępnej do pobrania na www.vantrue.net lub
www.vantrue.pl).
ENPL
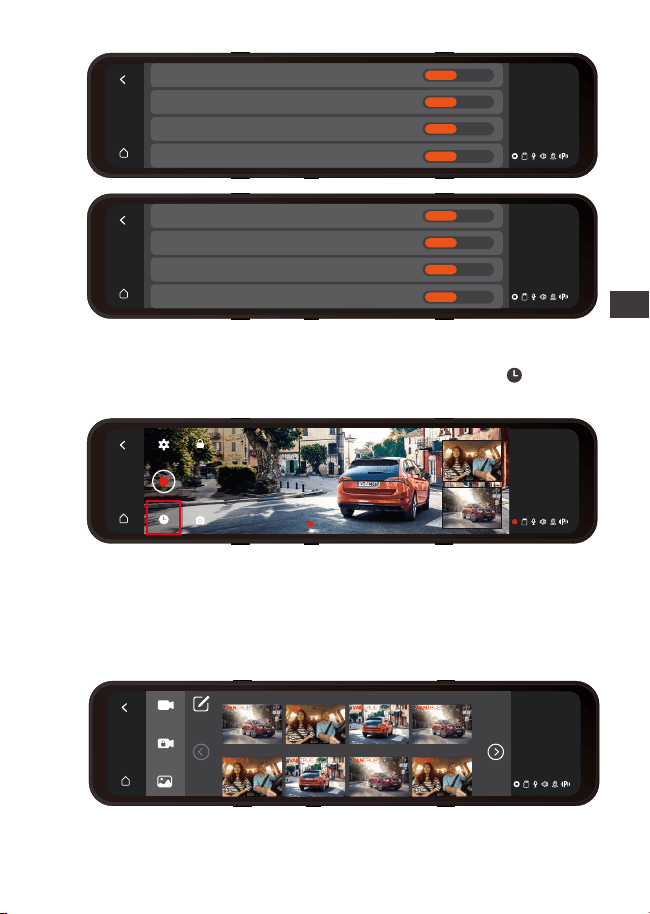
- 109 -
4.19 Odtwarzanie wideo/zdjęć w M3
Po zatrzymaniu nagrywania naciśnij i przejdź do
przeglądania i odtwarzania filmów/zdjęć w kamerze.
13:32
1-9
Sobotę
VANTRUE Logo
Data/czas
Prędkość
Lokalizacja GPS
Wł Wył
Wł Wył
Wł Wył
Wł Wył
13:32
1-9
Sobotę
Numer tablicy rejestracyjnej
Data/czas
Prędkość
Lokalizacja GPS
Wł Wył
Wł Wył
Wł Wył
Wł Wył
00:10:15
13:32
1-9
Sobotę
Lista przeglądania plików wideo zostanie wyświetlona jako
miniatura, z folderami od góry do dołu: normalnymi
folderami wideo, folderami wideo awaryjnych, folderami
obrazów i plikami posortowanymi w kolejności chronolog-
icznej. W tym interfejsie możesz usunąć wiele plików.
车内 02:38 车前 02:38 车后 01:49 车内 01:49
13:32
1-9
Sobotę
20220921221635N-01028C 20220921221635N-01028B 20220921221635N-01028A 20220921221739N-01026C
20220921221739N-01026B 20220921221739N-01026A 20220921221255N-01025C 20220921221255N-01025B
Tył 01:25 Wnętrze 01:25 Przód 01:25 Tył 02:38
Wnętrze 02:38 Przód 02:38 Tył 01:49 Wnętrze 01:49
EN
EN
EN
PL
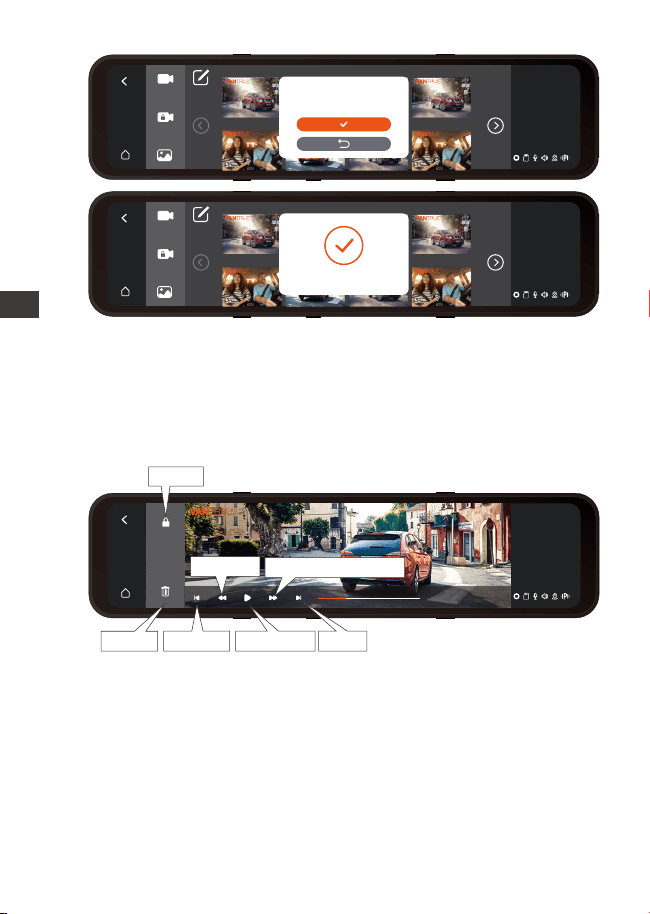
- 110 -
车内 02:38 车前 02:38 车后 01:49 车内 01:49
13:32
1-9
Sobotę
20220921221635N-01028C 20220921221635N-01028B 20220921221635N-01028A 20220921221739N-01026C
20220921221739N-01026B 20220921221739N-01026A 20220921221255N-01025C 20220921221255N-01025B
Tył 01:25 Wnętrze 01:25 Przód 01:25 Tył 02:38
Wnętrze 02:38 Przód 02:38 Tył 01:49 Wnętrze 01:49
4.19.1 Odtwarzanie plików
Kliknij plik wideo na liście, aby go odtworzyć, i możesz go
zablokować/usunąć/przewinąć/szybko
do przodu przewinąć/odtwarzać/pauzować/prze-
winąć/włączyć następny w interfejsie odtwarzania.
Skasowano pomyślnie!
Usunac wybrane pliki?
13:32
1-9
Sobotę
VANTRUE 2022 / 09 / 21 14:25:36 M3
00:15 / 03:35
DalejWstecz
Odtwórz
Skasuj
Blokuj
Przewiń
Szybko przewiń
UWAGA:
Kliknij przycisk szybkiego przewijania do przodu, aby
dwukrotnie przyspieszyć odtwarzanie; kliknij przycisk przewi-
jania do tyłu raz, aby przyspieszyć prędkość przewijania o 2
razy.
Wszystkie zablokowane filmy będą przechowywane w
folderze wydarzeń.
ENPL
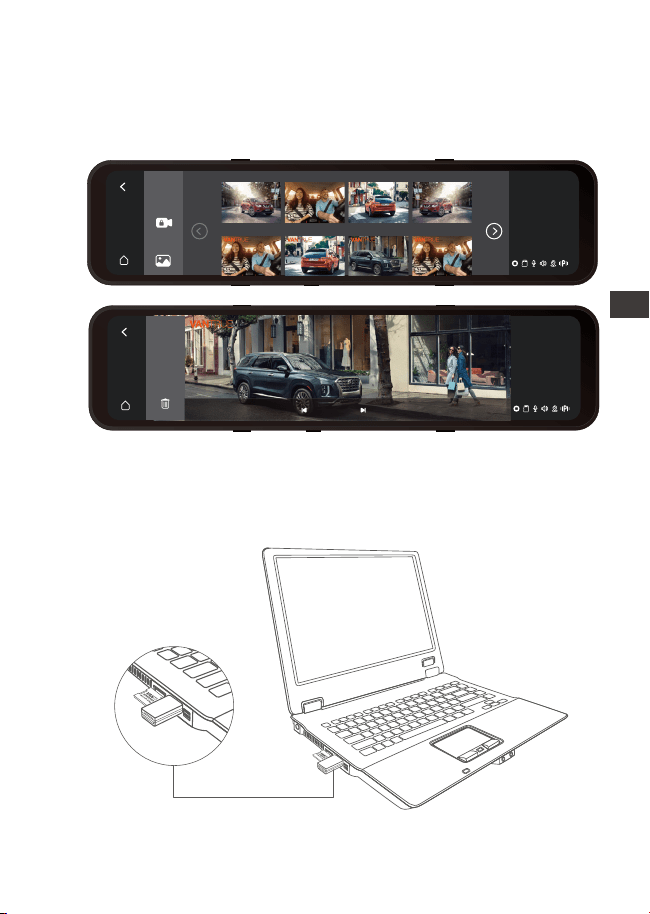
- 111 -
13:32
1-9
Sobotę
VANTRUE 2022 / 09 / 21 14:25:36 M3
5 / 47
4.19.2 Przeglądanie zdjęć
Podczas przeglądania zdjęcia możesz wybrać, czy chcesz
wyświetlić poprzednie lub następne zdjęcie, zablokować
lub usunąć zdjęcie.
4.19.3 Przeglądanie plików na komputerze
Kamera M3 wymaga wysokiego prądu zasilania i nie
obsługuje połączenia z komputerem. Jeśli chcesz odtwar-
zać pliki na komputerze, musisz użyć czytnika kart.
EN
EN
EN
PL
13:32
1-9
Sobotę
20220921221739N-01026B 20220921221739N-01026A 20220921221255N-01025C 20220921221255N-01025B
Tył Wnętrze Przód Tył
Wnętrze Tył Wnętrze
Przód

- 112 -
5. Dane techniczne
Specyfikacje tego produktu mogą ulec zmianie bez
wcześniejszego powiadomienia z powodu ulepszeń produktu.
Model
M3
Procesor
Sensor obrazu
Résolution vidéo
G-sensor
Sony Sensor
Novatek high-performance processor
Wbudowany czujnik trójosiowy
12(11.8)” IPS DOTYKOWY
WiFi
Kąt widzenia
kamery
Dostępne języki
Dostępne
rozdzielczości
USB Port
Pamięć
Przód: 150° obiektyw szerokokątny;
Wnętrze: 140° obiektyw szerokokątny
Tył:140° obiektyw szerokokątny
Jasność
obiektywu
Przód: F/1. 5 Wnętrze: F/2.0 Tył: F/2.0
2.4GHz&5GHz
Zewnętrzna: 32GB-512GB Micro SD Card,
U3, Class 10(brak w zestawie)
Format obrazu
JPEG
Audio
Wbudowany mikrofon oraz głośnik
Typ C
Wbudowany superkondensator
MP4
DC 5V 3A
Zasilanie
Format plików
Video
Prąd napięcia
zasilania
Engish/Français/Español/Deutsch/Italiano
/简体中文/русский/ 日本語/Polski
Przód+wnętrze+tył:
1440P+1080P+1080P;1080P+1080P+1080P;
Przód+tył:
1944P+1080P;1440P+1080P;1080P+1080P;
Temperatura
pracy
-4°F to 158°F(-20°C to 70°C)
ENPL

- 113 -
5. Gwarancja & wsparcie
Gwarancja
VANTRUE
®
M3 posiada 12 miesięcy gwarancji. Aby być na
bieżąco z informacjami o aktualizacjach możesz się
zarejestrować na www.vantrue.net/register lub sprawdź
dostępne wersje oprogramowania także na
vantrue.pl/wsparcie
Wsparcie
Jeśli masz jakiekolwiek pytania dotyczące produktu, nie
wahaj się skontaktować z nami pod adresem
Zapytania są zazwyczaj udzielane w ciągu 24-48 godzin.
Twoja opinia ma znaczenie
Firma VANTRUE
®
jest mocno zaangażowana w ciągłe
ulepszanie naszych produktów, usług i doświadczeń
użytkowników. Jeśli masz jakieś przemyślenia na temat tego,
jak możemy zrobić jeszcze lepiej, czekamy na Twoje
konstruktywne opinie i sugestie. Skontaktuj się z nami już dziś
pod adresem [email protected]
EN
EN
EN
PL
Temperatura
pamięci
-22°F to 185°F(-30°C to 85°C)

- 114 -
ENPL
www.vantrue.pl
facebook.com/vantruePolska
Skontaktuj się z nami: