English/Deutsch/Français/Polski Element 3
User Manual
122mmX130mm
70g
Voice-Controlled 3 Channel Dash Cam
更新内容:
20230531更改微光夜视翻译

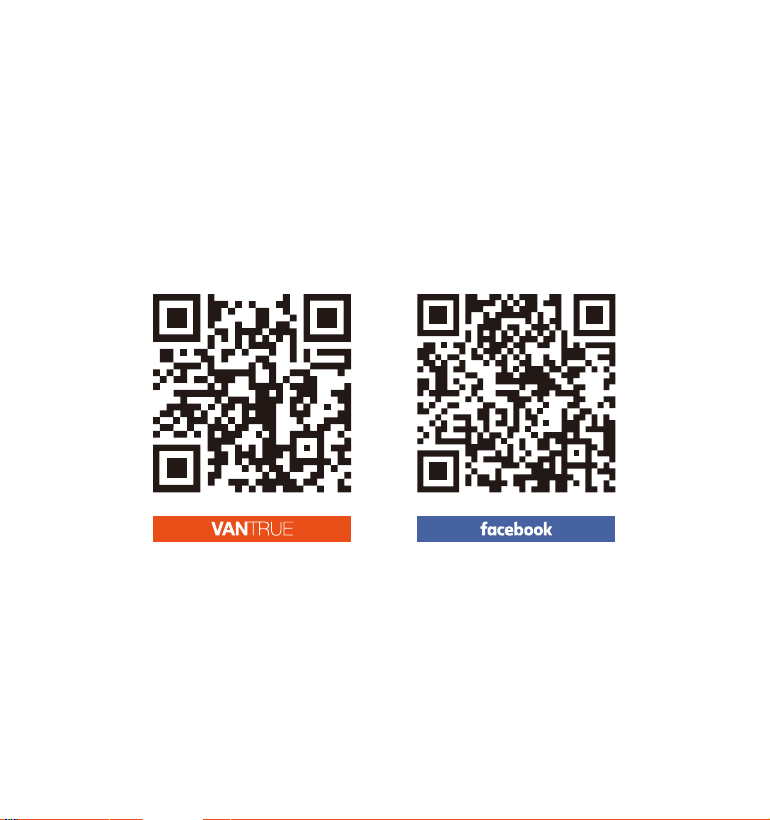
Hey, find us here:
www.vantrue.net/contact
facebook.com/vantrue.live
V4

CONTENTS
VERZEICHNIS
CONTENU
SPIS TREŚCI
5
48
Installation
Installations
Installation
Instalacja
3.
93
139
43
88
134
178
Warranty & Support
Kundendienst
Garantie & Support
Gwarancja & wsparcie
6.
41
86
132
176
Specifications
Produktspezifikationen
Spécification
Dane techniczne
5.
Camera Overview
Teile
Vue d'ensemble de la caméra
Budowa kamery
2
45
90
136
2.
17
61
106
152
Basic Operation
Funktion
Opérationdebase
Podstawowe funkcje
4.
1
44
89
135
What's in the box?
Was ist in der box?
Qu'y a-t-il dans la boîte?
Co znajdziemy w pudełku?
1.
- 1 -
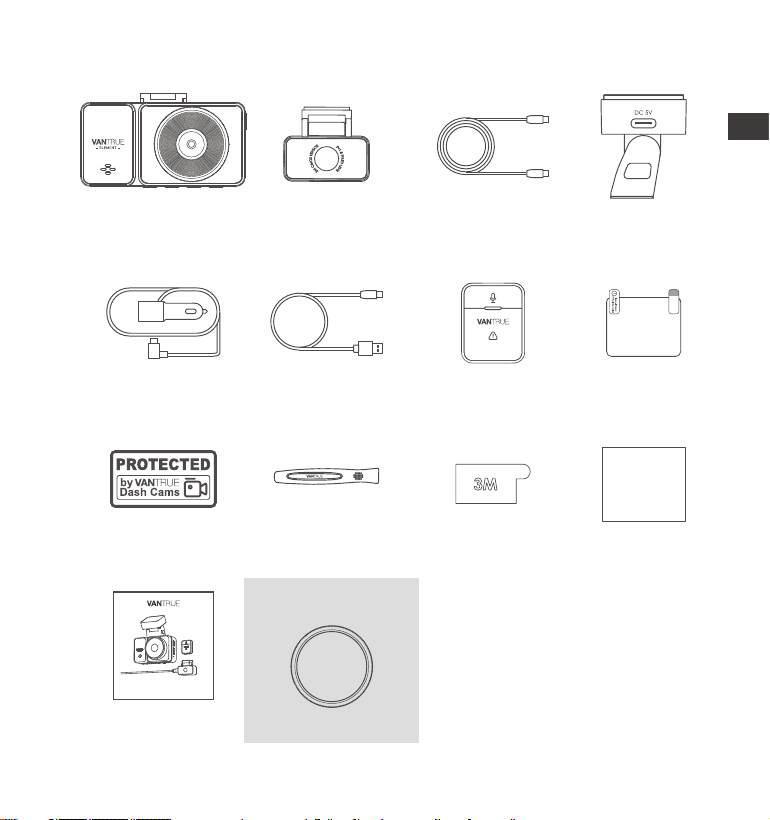
1. What’s in the Box?
H.
dust-free
cloth*1
Warning
Stickers *2
L.
CPL Filter
A.
VANTRUE
®
E3
Dash Cam
E.
Type-C Rear
Camera Cable
(20ft)
I.
User Manual
M. N.
B.
Rear
Camera
G.
Crowbar*1
K.
D.
GPS Adhesive
Mount
C.
VANTRUE
®
Wireless
Remote Controller
F.
Type-C USB Data
Cable (3ft, for
data transfer only)
Car Charger with
Built-in Type-C
Cable (11.4 ft)
3M Adhesive
Stickers
J.
Electrostatic
stickers *2
Optional Accessories
Element 2
User Manual
Voice-Controlled Dual Dash Cam
EN
EN
EN
EN
- 2 -
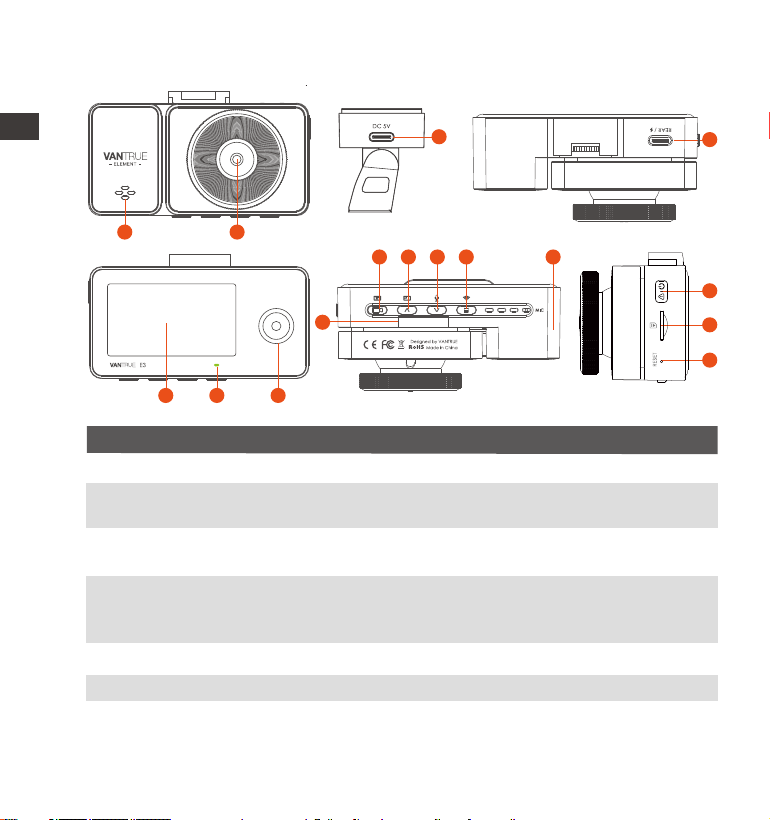
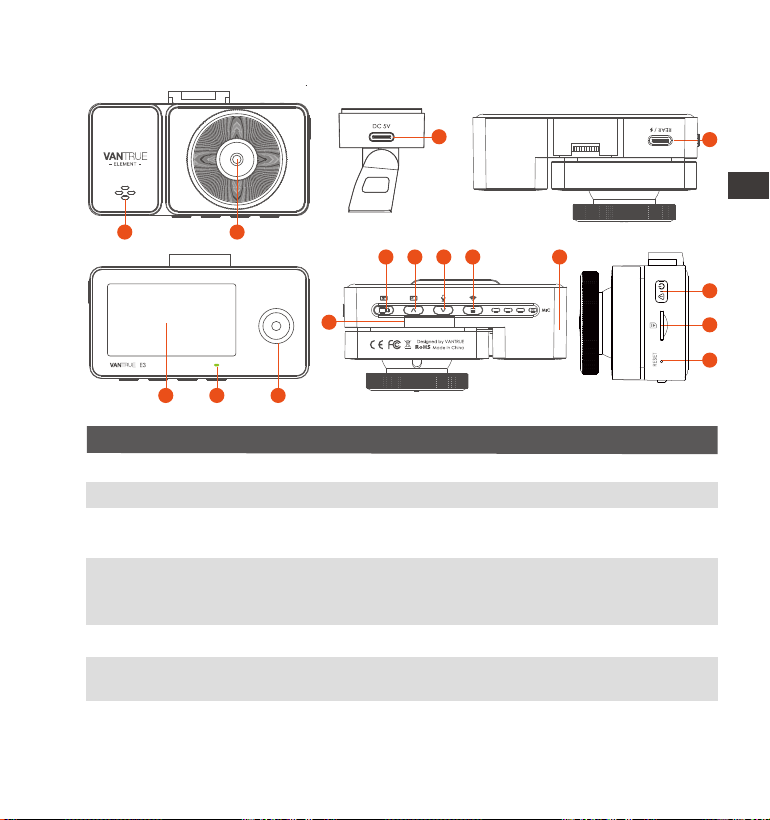
2. Camera Overview
14
15
16
ENEN
3
4
21
5 6 7
8
131211
10
9
VTJE1210130
NO. DescriptionName
1
Front Facing Camera for video recording road
Events;
2 Front Camera
Delivers sound during video playback;
3
Speaker
Connect to Type C cable or car charger for
external power supply;
Power Port
Type-C USB port for charging or transferring data;
Video stream port for streaming rear camera's
recording;
4 Type-C USB /
Rear Cam Port
2.45 inch LCD Display Screen;5 Screen
Camera for in-car video recording; 7 Interior Camera
Steady green light means the camera is connecting;
6 REC

- 3 -
EN
EN
EN
EN
Records clear audio with the video footage;
8
Microphone
Serial Number for warranty registration.
13
Serial Number
9
During video recording, long press to turn off the
screen and short press to stop recording; In standby
state, short press to confirm the action; In playback
mode, short press to stop/Start the video Recording;
12
Button
During video recording, short press will lock the
current file and capture a picture, long press for
power off;In standby status, short press will capture
a picture, long press will shut down;In WiFi state,
short press to exit WiFi, long press to power off;
14
Button
During video recording and standby, short press to
switch the video window; In menu setting and file
browsing, short press to display the previous option,
long press to scroll up to display options; in
playback mode, short press to fast forward; In WiFi
mode, press any key to exit WiFi;
10
Button
During video recording and standby, long press to
quickly enter parking mode, and short press to turn
on/off the microphone; In menu settings, long press
to scroll through menu options, and short press to
display the next menu option; During file browsing,
long press to scroll to display file, short press to
display the next file; In playback mode, short press
to pop up the delete file menu; In WiFi mode, press
any key to exit WiFi;
11
Button
In the recording mode, long press to turn on/off
WiFi; In the standby state, short press to enter/exit
the setup menu, and long press to turn on/off WiFi;
In the WiFi mode, press any key to exit WiFi;
Button
- 4 -
15
MicroSD Card
Slot
16 Reset Button Press to force reset the device;
ENEN
ENEN
Provides expandable storage (up to 512GB in
FAT32, U3 or higher).
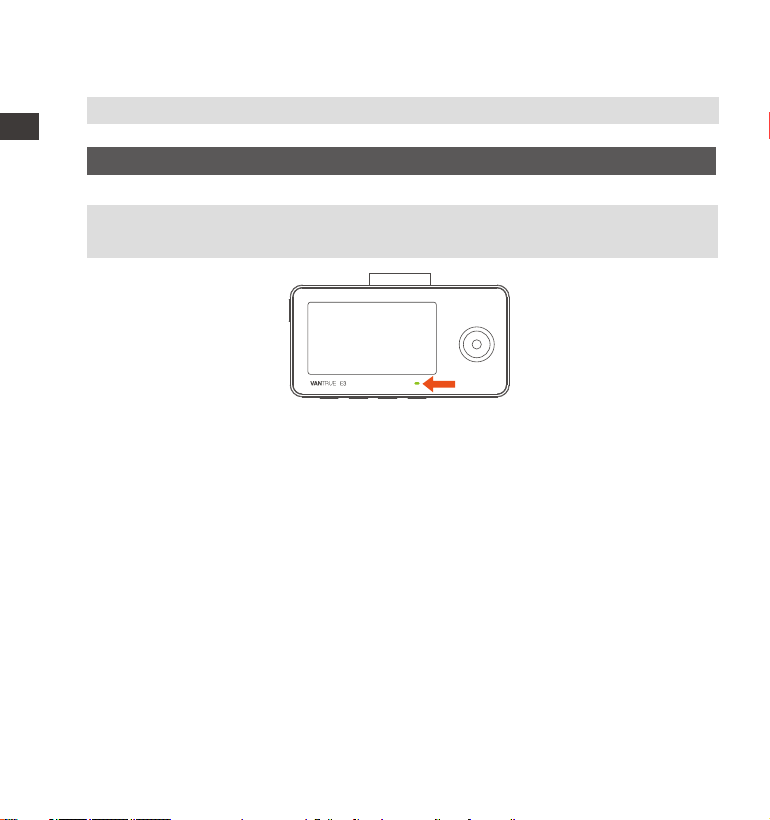
LED Indicator
DescriptionLED
Steady green light Instandbystatus
Camera is recording
LED Status
REC
Blinking green light
14:39:07 02-10-2023
00:00:37
MP/H
35
1440P+1080P+1080P 30FPS
- 5 -
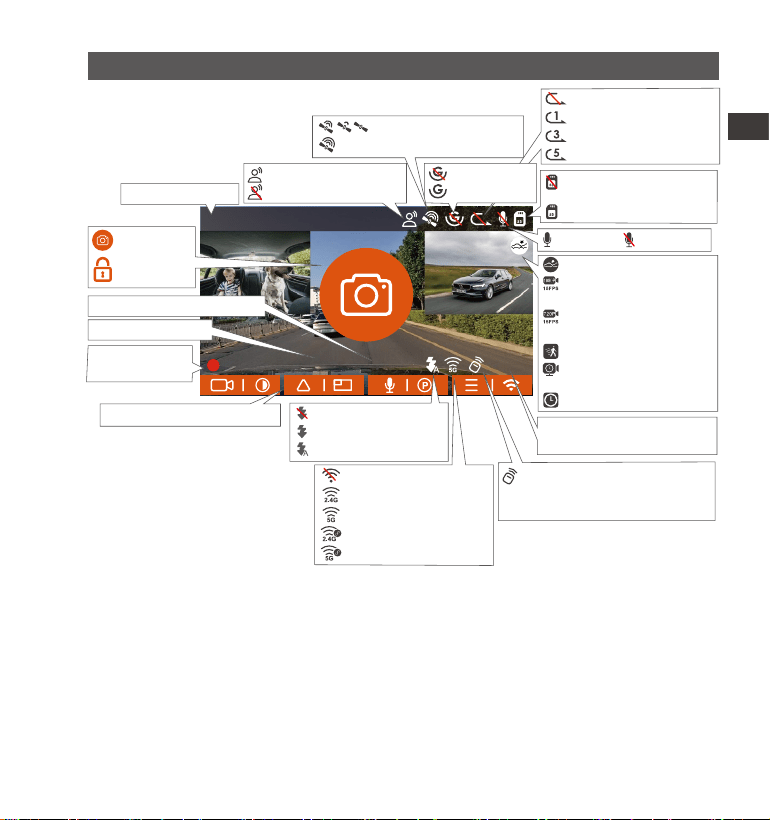
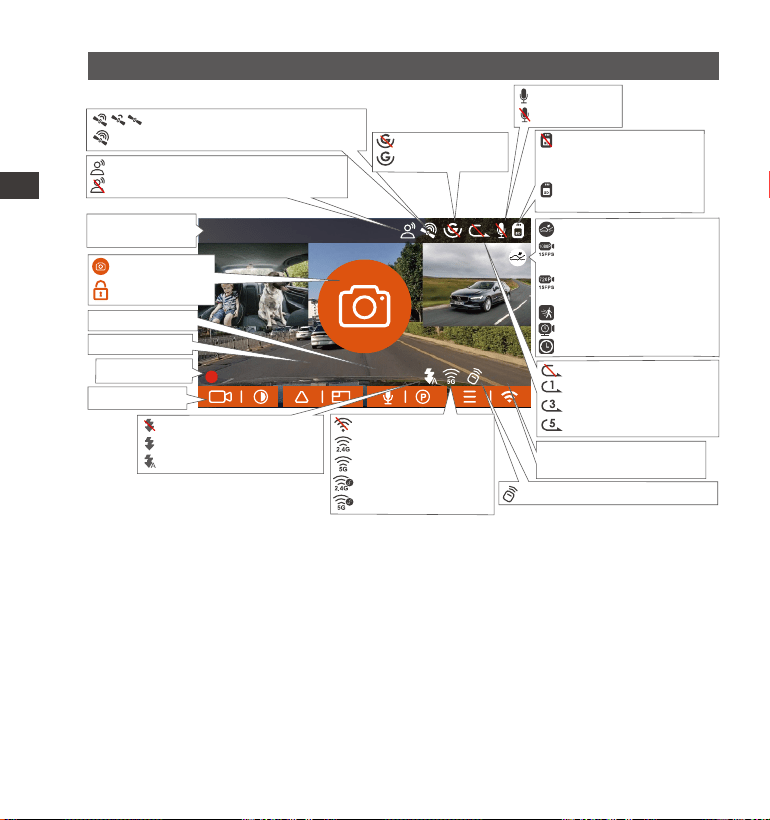
Screen Overview
3. Installation
3.1 Installing a Memory Card (Recommended: Vantrue U3 high-speed
microSD card).
Please insert a memory card (memory card capacity: 32GB-512GB, card
speed: U3/Class10/A2). The dashcam has certain requirements on the
card speed of the memory card. For reliable operation, we recommend
using a VANTRUE SD card(sold separately).
EN
EN
EN
EN
Loop recording OFF
Loop recording for 1 min
Loop recording for 3 min
Loop recording for 5 min
MIC is ON MIC is OFF
NO Memory card
inserted
G-Sensor OF
G-Sensor ON
Recorded driving
speed (KMH or MPH)
Video Resolution
GPS Signal Connecting
GPS Signal Locked
Voice Assistant is ON
Voice Assistant is OFF
MP/H
35
Memory card inserted
Icons for Indicating Buttons
Remote control is connected
Blinking means the remote
control is not connected
IR LED OFF
IR LED ON
IR LED AUTO ON/OFF
Recording Time
(Current Clip
Current Time (24H)
Snapshot
Emergency
File Locked
Current Date (MM/DD/YY)
Collision Detection ON
1080P Low Bitrates
Recording ON
720P Low Bitrates
Recording ON
Motion Detection ON
Low Framerate Parking
Mode
Time Lapse On
Wi-Fi OFF
2.4G Wi-Fi ON
5G Wi-Fi ON
2.4G Wi-Fi Connected
5G Wi-Fi Connected
If the camera is recording, please press the button to pause the
recording, then press the button to enter the menu, then enter
“System Setup,” select the format, and confirm to format the memory
card until it prompts "Formatted successfully''.
After inserting the memory card, if the screen prompts "Card error,
please format" (please note that the recorder does not record at this
time), please directly press the button to enter the menu and start
the formatting process.
- 6 -
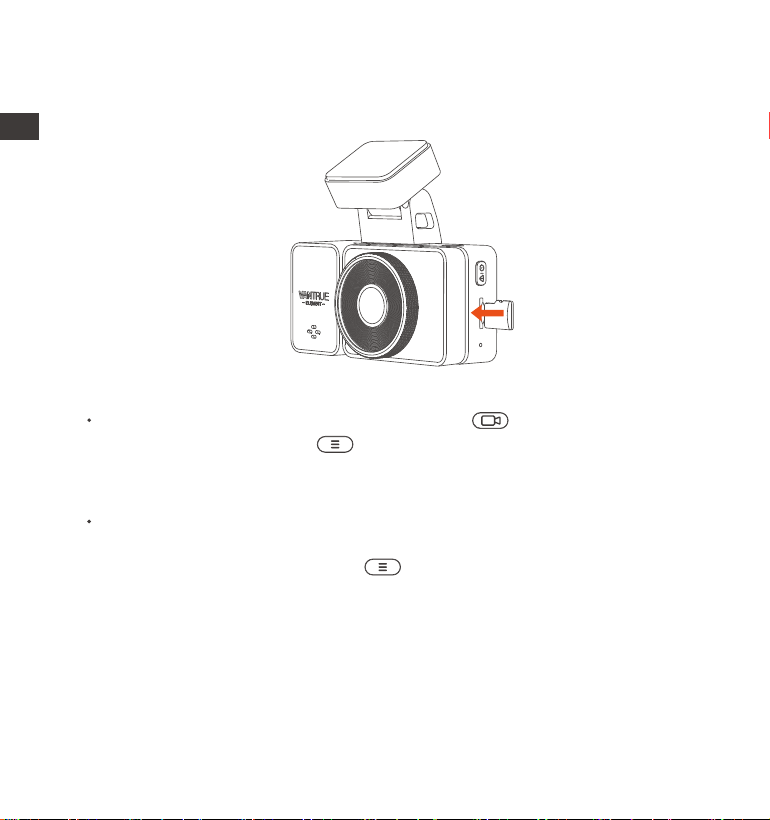
Memory Card Installation: There is an icon indicating the insertion direction
of the memory card. Please push the memory card into the card slot
according to the direction indicated by this icon, until a "click" sound is
heard in the card slot, indicating that the memory card is inserted properly.
The microSD card should be formatted once a month to maximize the
lifetime of the memory card.
Pleasedonottakethecardoutwhenthecameraisrecordingincase
theimportantvideofilesmissing.
REMINDER:
1.
2.
ENEN
Before using this card, please follow the steps below to format it properly:
- 7 -
3.
4.
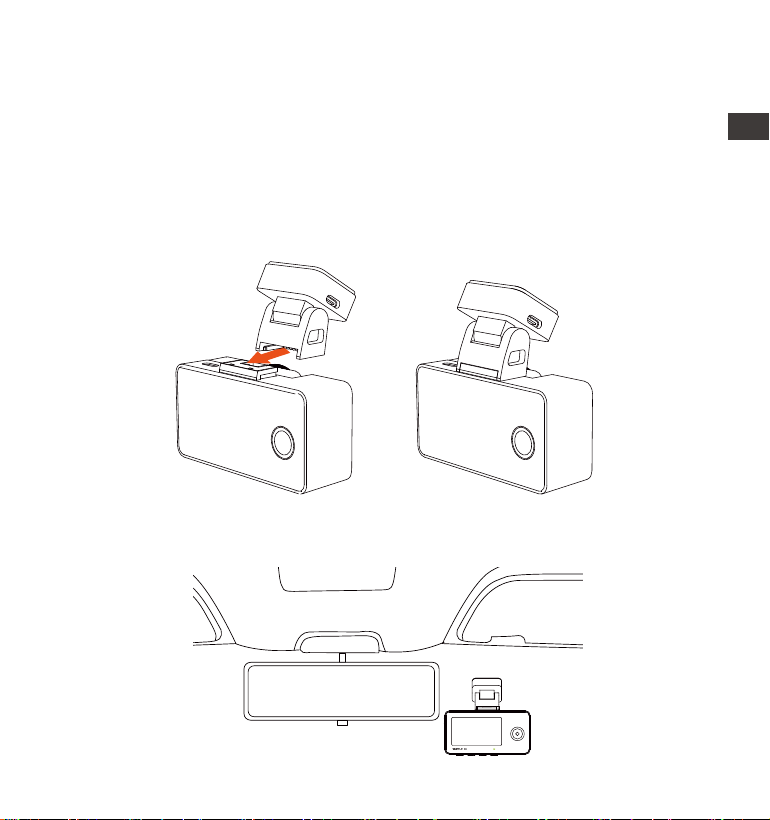
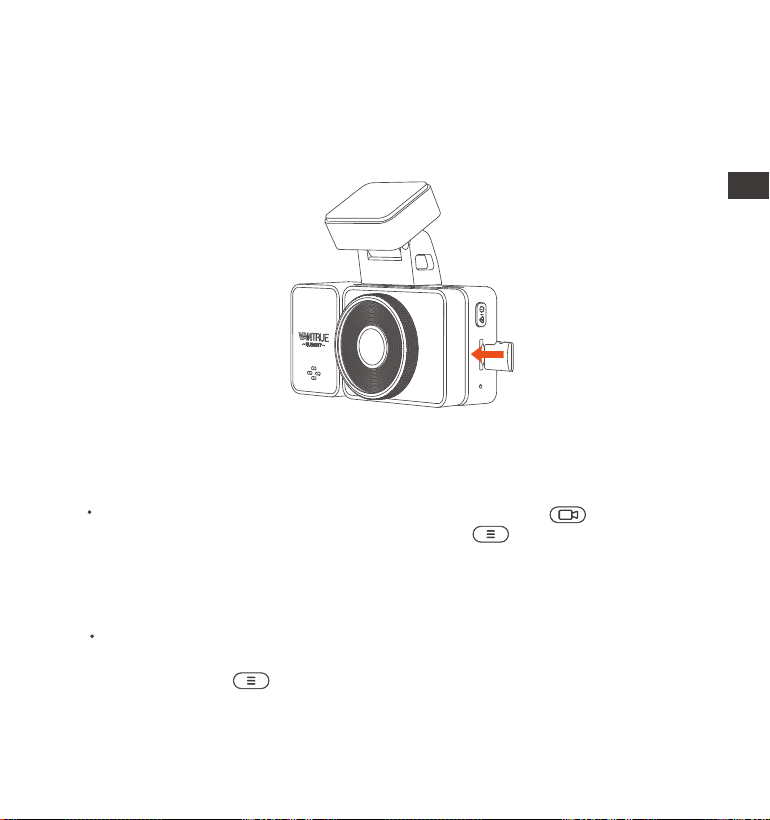
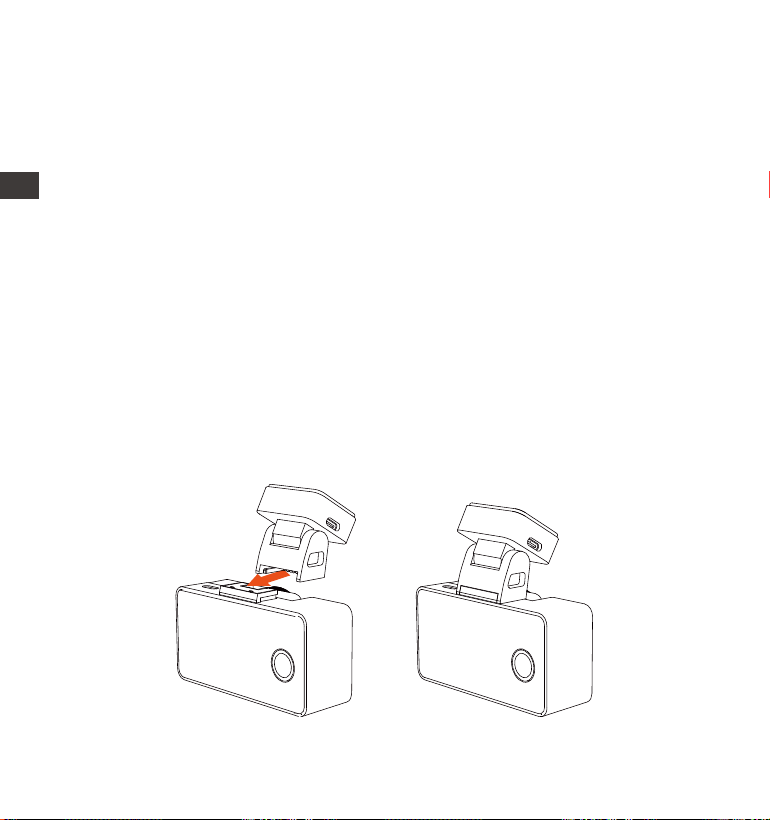
3.2 Installing the camera onto your windshield
Align the mount with the dash cam mount interface then push in until
the mount is installed.
1.
EN
EN
EN
EN
Before installation, please power on the dash cam and check whether
the shooting angle of the front and interior lens are appropriate through
the recording view.
2.
Please do not use bad cards or low-speed cards on the dash cam, as it
is easy to stop or lose the recording due to the failure of a memory card.
Before formatting the memory card, please check the event video
folder in the SD card to see if there are any videos that need to be
saved separately, so as not to delete important videos by mistake.
- 8 -
ENEN
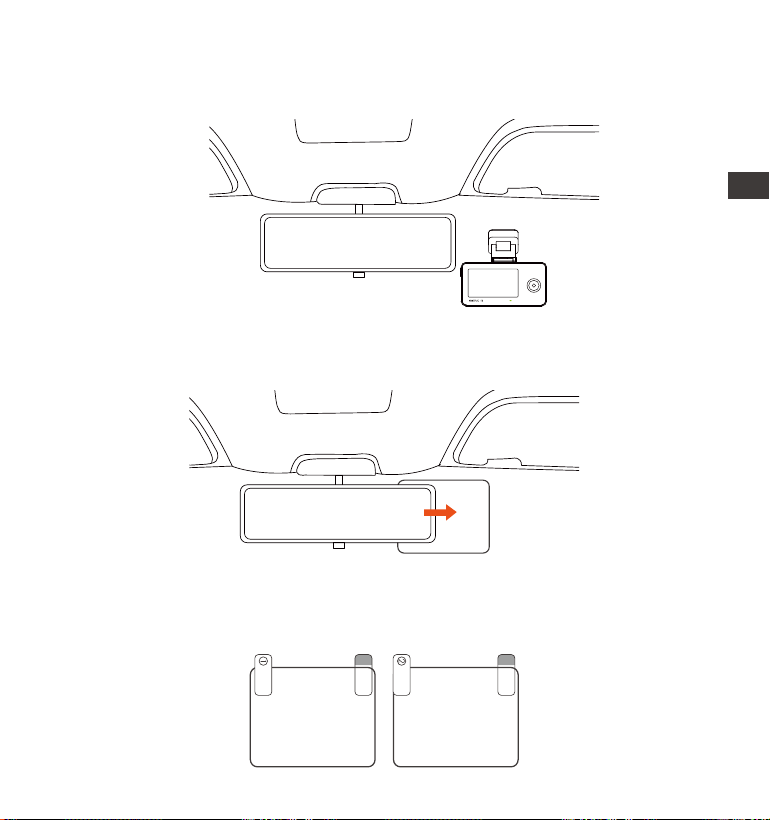
Thoroughly clean the windshield with water or alcohol, then wipe it with
a dry cloth. Stick the electrostatic sticker behind the rear-view mirror,
which is the recommended position to prevent blocking your view while
driving.
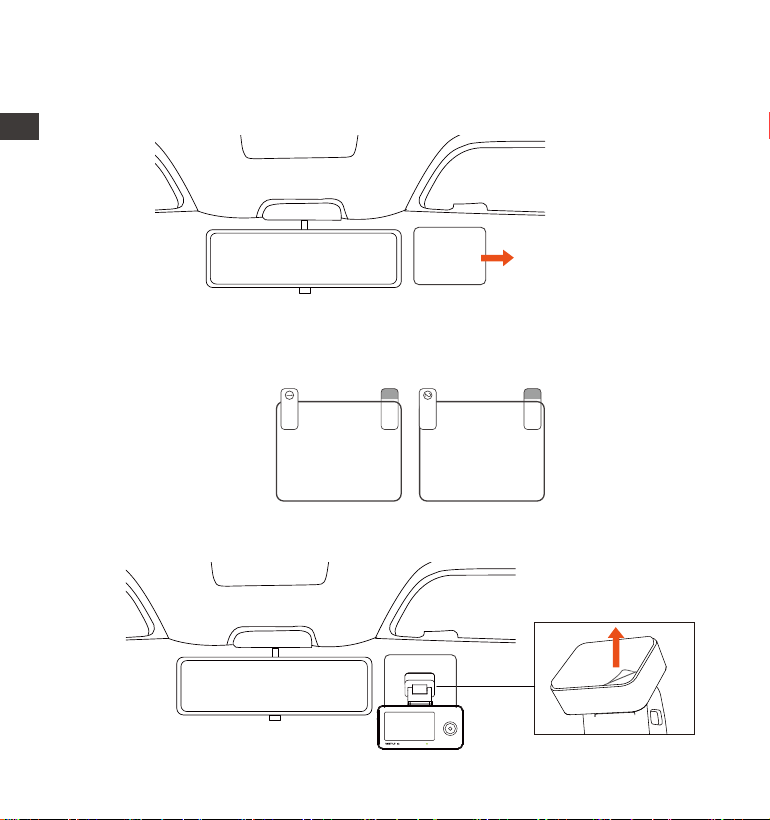
Note: The electrostatic stickers with two-sided protective film. Please
remove the protective film from No. 1, paste the electrostatic sticker
on the windshield, and then remove the protective film from No.2.
3.
Remove the 3M tape from the mount, then fix the mount and camera
on the electrostatics stickers.
4.
Electrostatic sticker
Please peel off this mask
AFTER application completed
Please peel off this
mask BEFORE application

- 9 -
EN
EN
EN
EN
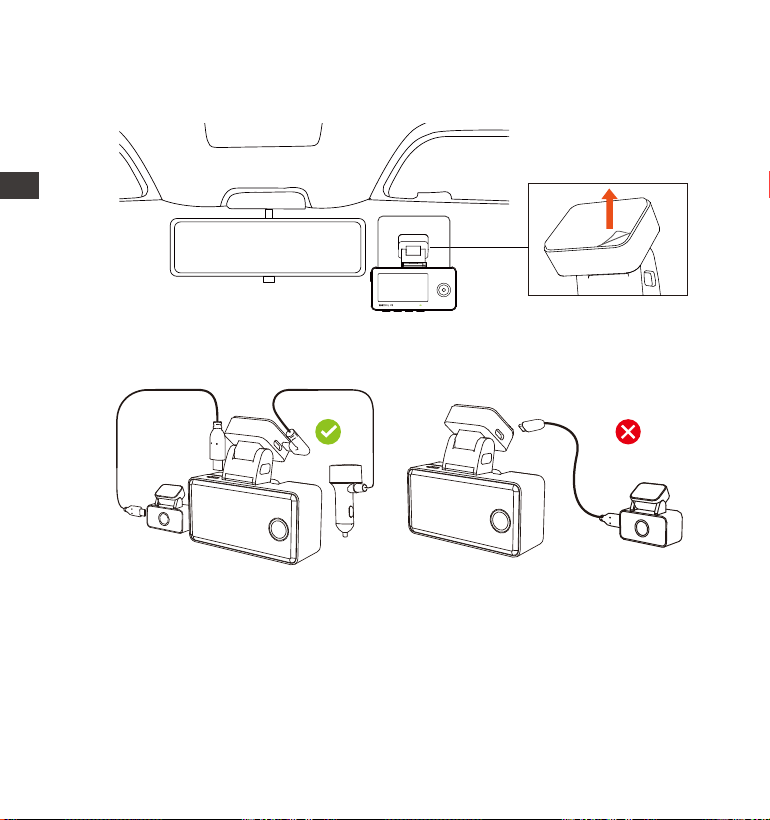
Take out the rear camera cable, connect the main camera and the
rear camera, and take out the car charger to connect it. After the
camera is powered on, choose a suitable location and install it.
5.
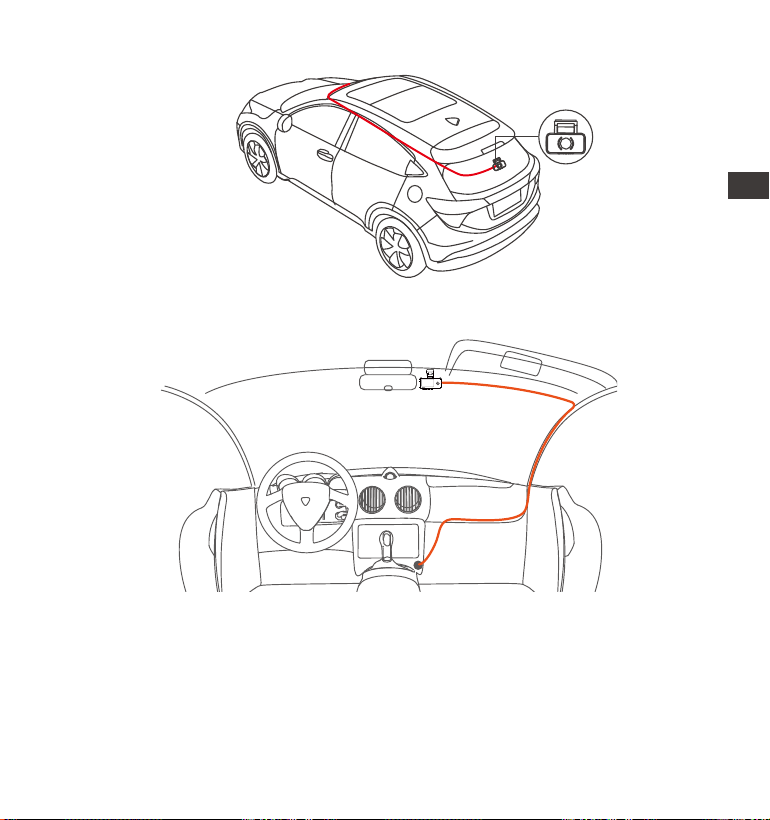
Rear Camera Installation: Please select the installation position on the
rear windshield. We recommend that you select a position close to the
center of the rear windshield, and avoid the defogging line on the rear
windshield, so as not to affect the video effect. Remove the protection
film of the sticky pad and rear camera lens. Fix the rear camera in the
selected position and adjust the angle, then use the rear camera cable
to connect the rear camera with the main front camera.
6.
(Correct wiring method) (Wrong wiring method)
- 10 -
ENEN
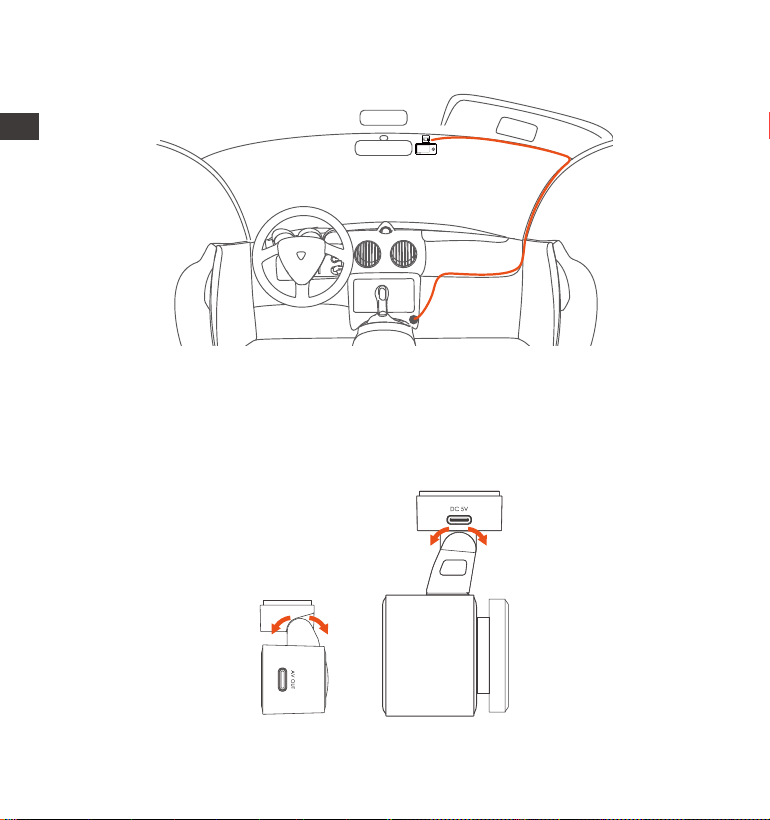
Carefully store the car charger cable in the direction shown in the
picture.
7.
The angle of the window glass of each model is different, please adjust
the recording angle of the main camera and rear camera up and
down according to actual needs.
Note: Only the front camera can be rotated and adjusted, the cabin
camera is fixed.
8.

- 11 -
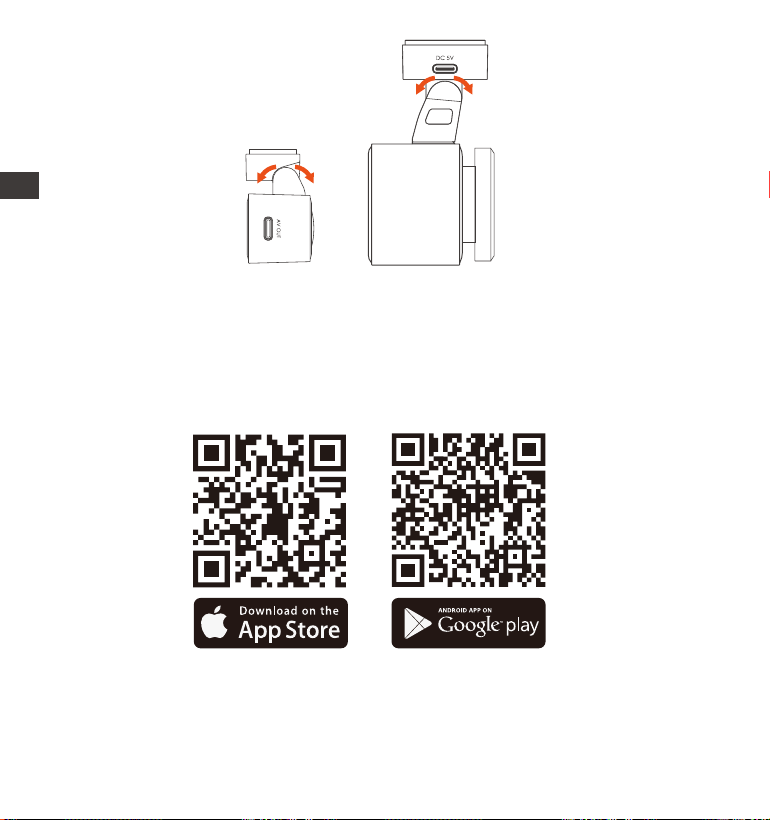
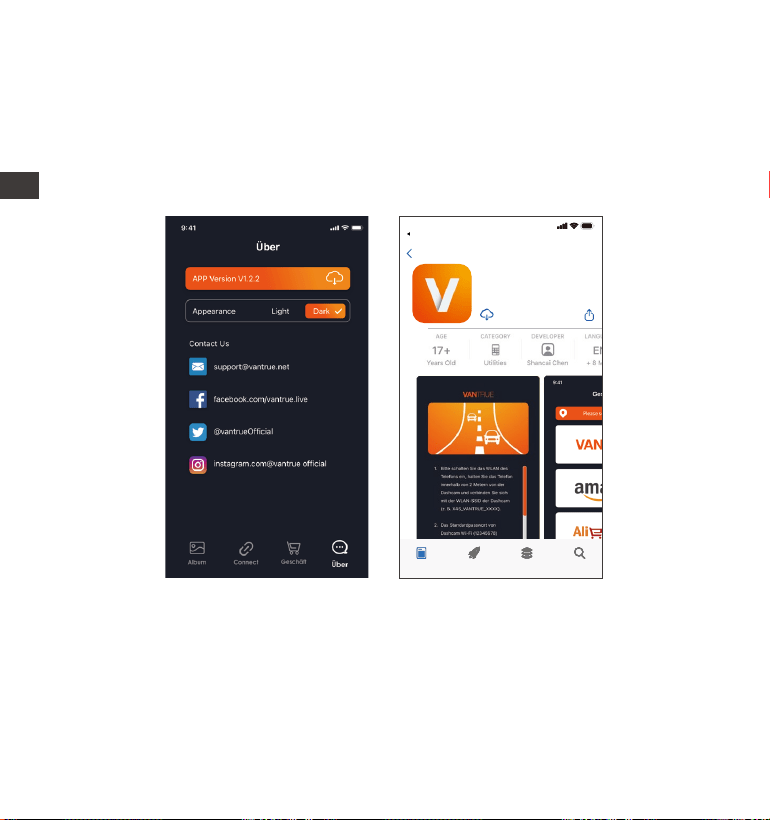
3.3 APP Download
Please scan the QR code for the relevant version below to download the
app and install it. Search for the "Vantrue" app in App Store or Google
Play Store to find the app and then download and install it on your
phone.
Note: After this camera is successfully connected to your mobile phone
through WiFi, it can perform real-time video preview, change camera
settings, download files without internet connection, and play back
videos on the mobile phone. However, the GPS track playback and video
sharing functions will depend on the internet or telecom value-added
services (requires you to turn off/disconnect the camera WiFi).
EN
EN
EN
EN
- 12 -
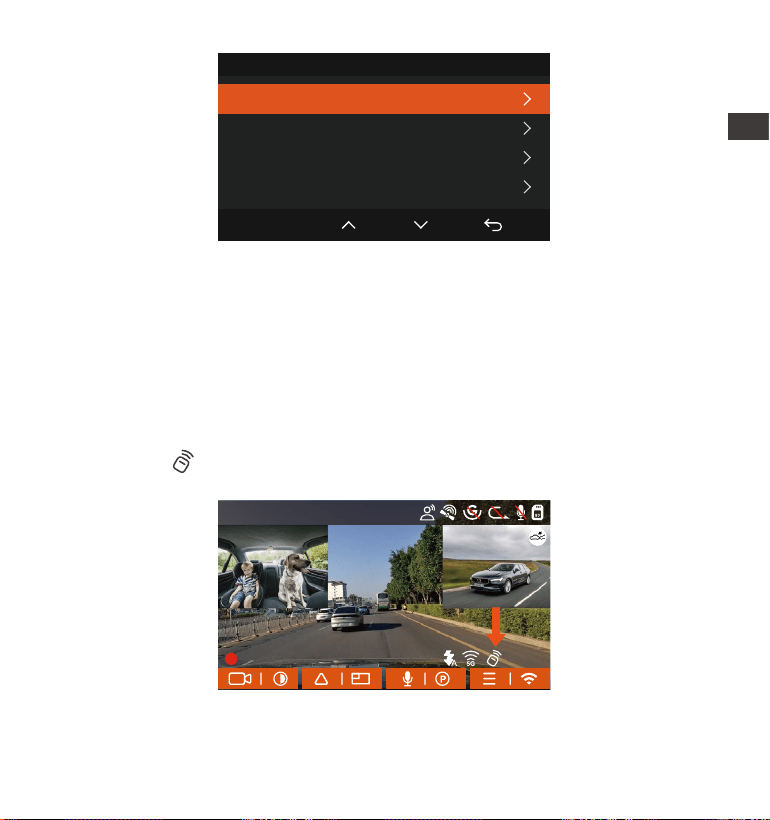
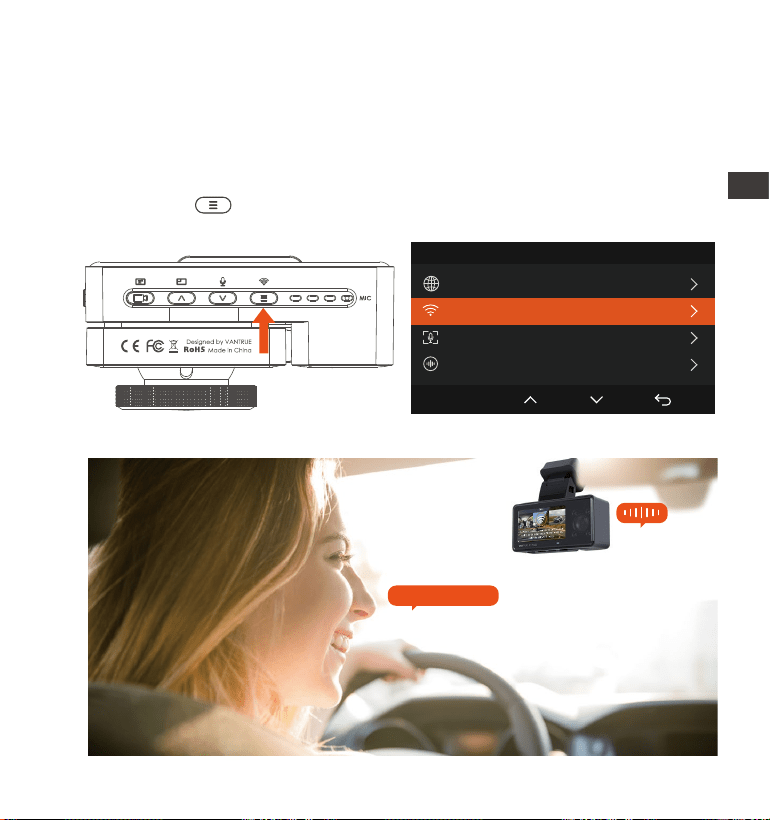
3.4 WiFi Connection
ENEN
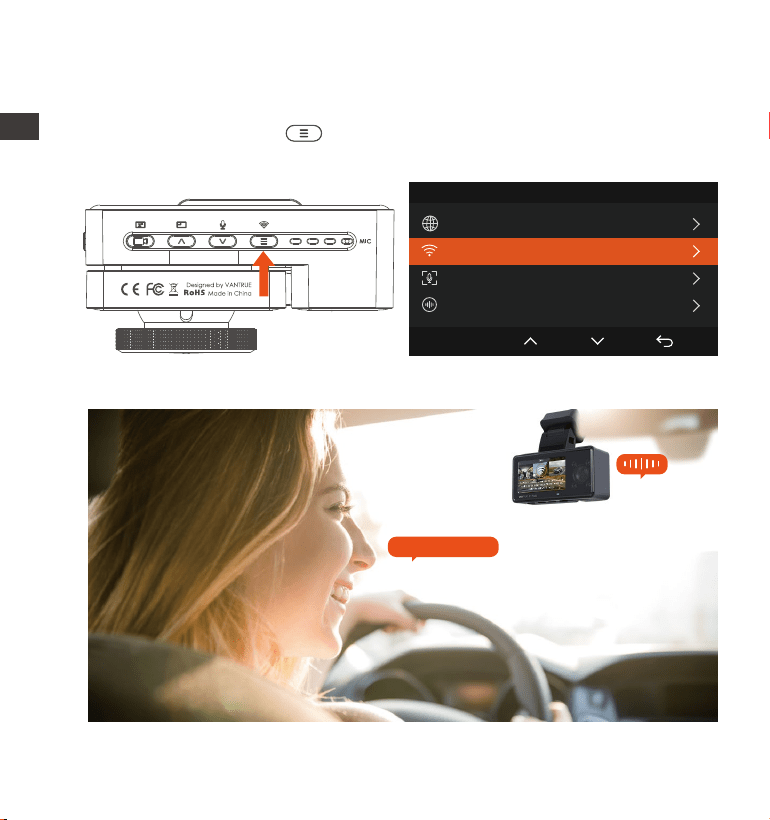
There are 3 ways to turn on the Wi-Fi of the camera.
VTJE1210130
Long press the menu button
for 2 seconds.
Go to dash cam System Settings
then turn on the Wi-Fi.
3. Use the "Turn on Wi-Fi" voice command to turn it on.
1. 2.
Turn on WiFi
System Setup 2/14
Language
Wi-Fi
Voice Control
Voice Content
OK
- 13 -
EN
EN
EN
EN
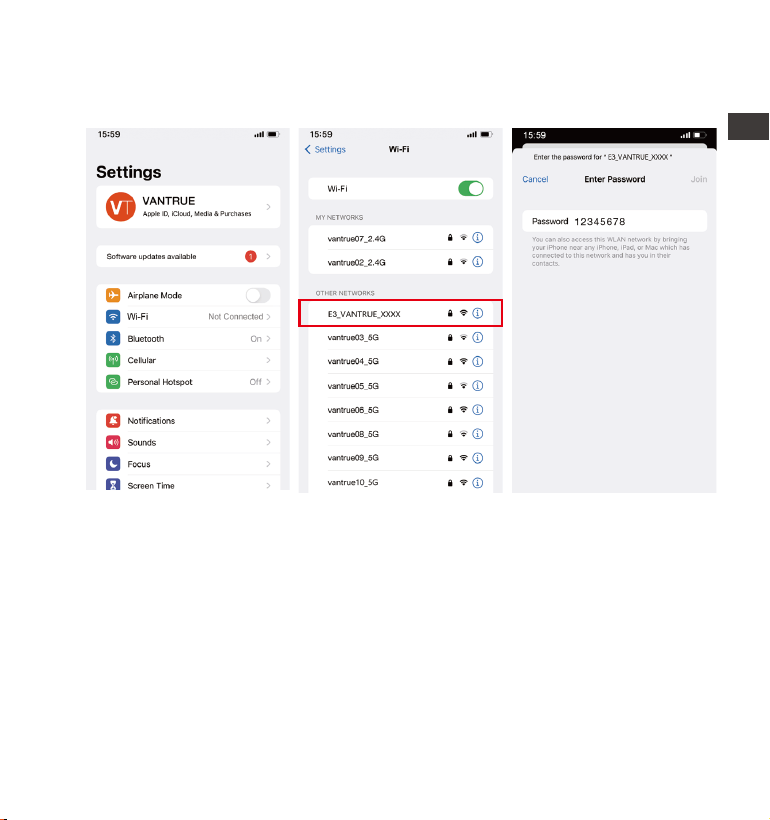
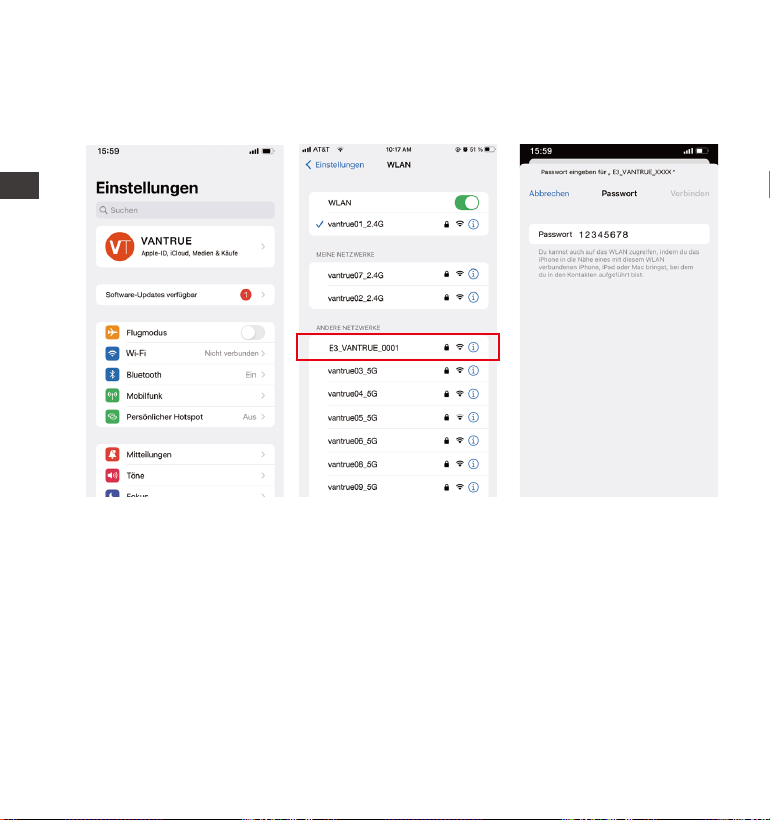
After Turning on the WiFi function of the camera, enter the WiFi settings of
the mobile phone, then find the WiFi name, such as E3_VANTRUE_XXXX,
and enter the WiFi default password: 12345678 to connect to WiFi.
- 14 -
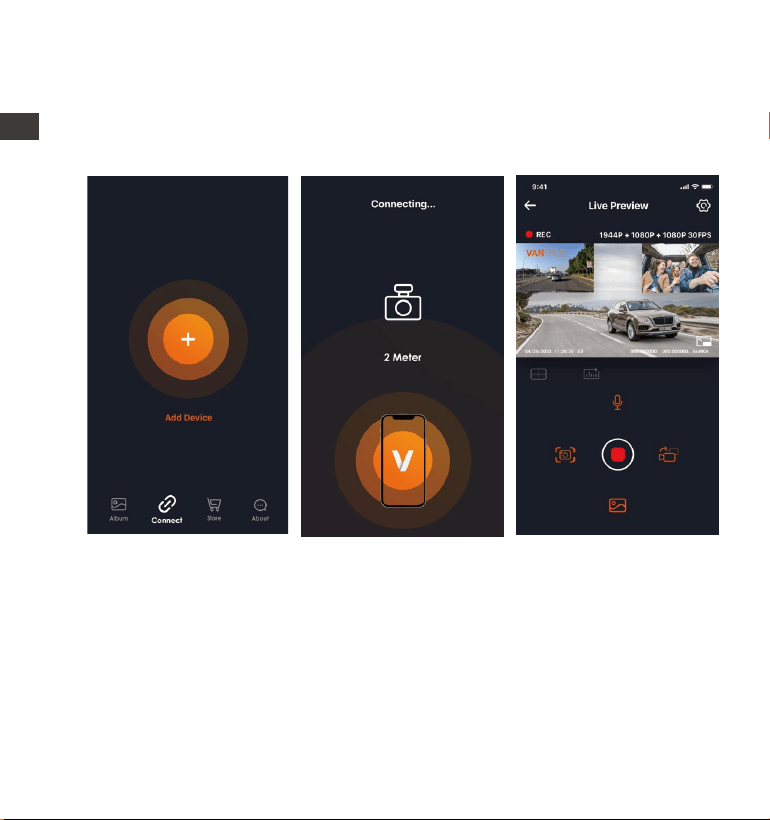
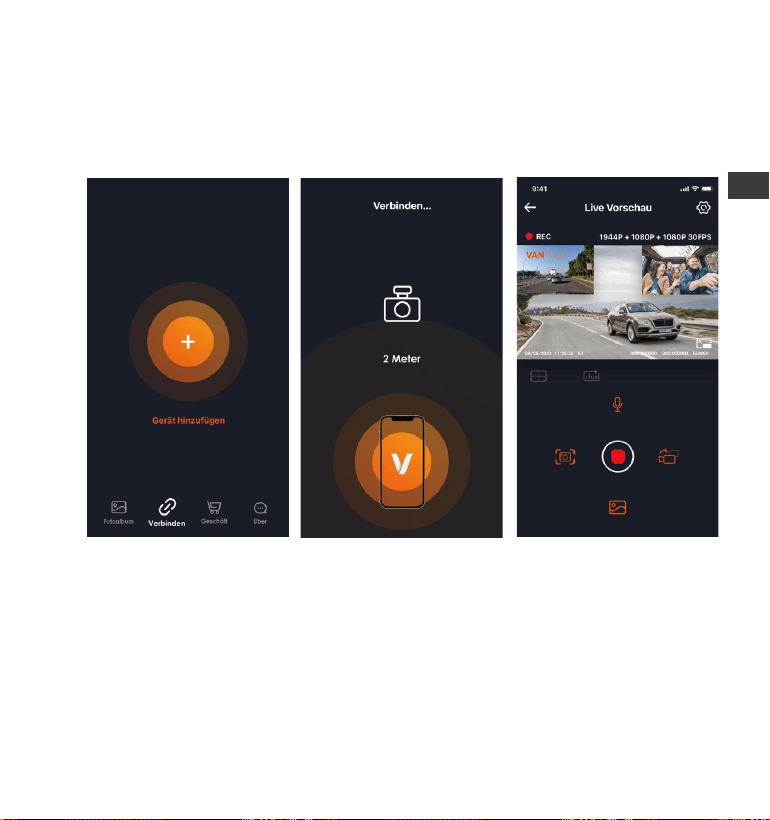
After the WiFi connection is successful, click "+" when opening the app
for the first time, add the camera model, and then the app will automati-
cally connect to the camera and display the current real-time recording
situation of the camera.
3.5 APP Connection
Note:
If you do not connect to WiFi before opening the app, the app will
prompt you by saying "Please connect to WiFi first", and will automati-
cally jump to the WiFi settings. Please complete the steps to connect to
WiFi first.
If the WiFi is already connected, but the app jumps to the application
permissions of the APP after selecting the model, please check whether
the wireless network permission of the app is turned on.
1.
2.
ENEN
- 15 -
3.
4.
5.
6.
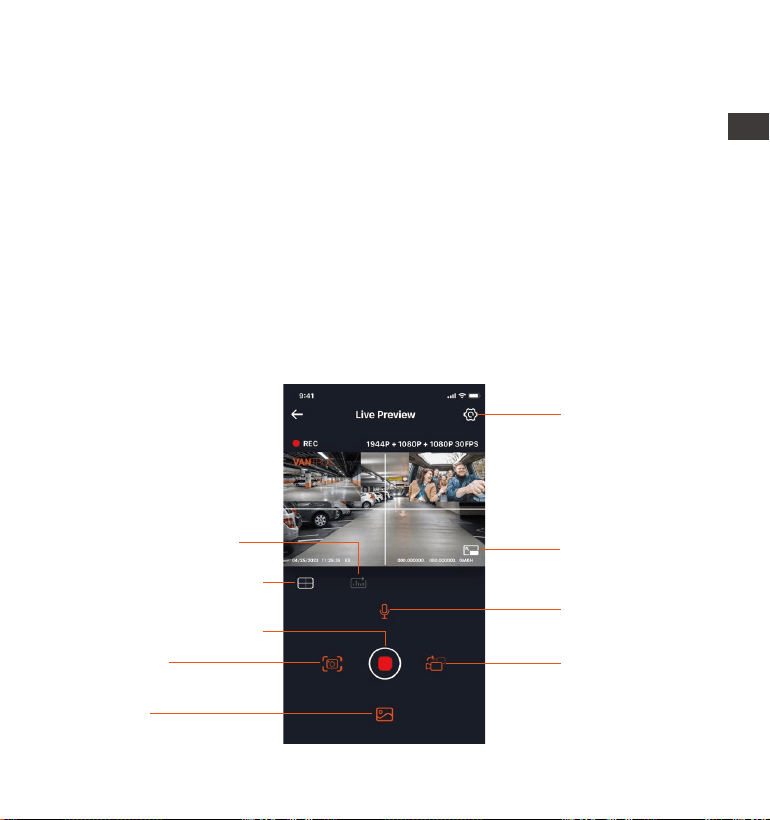
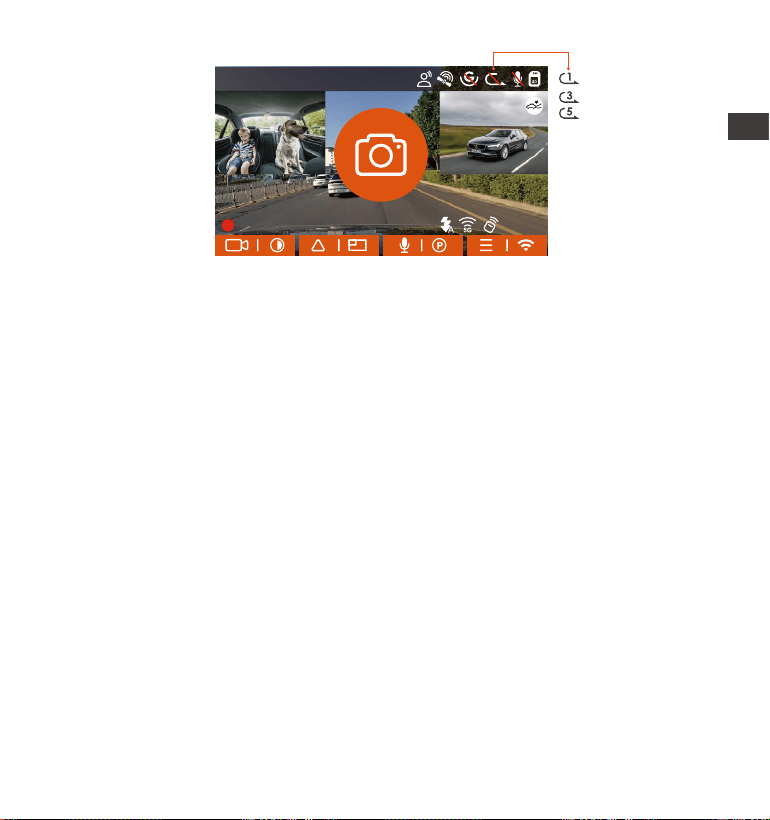
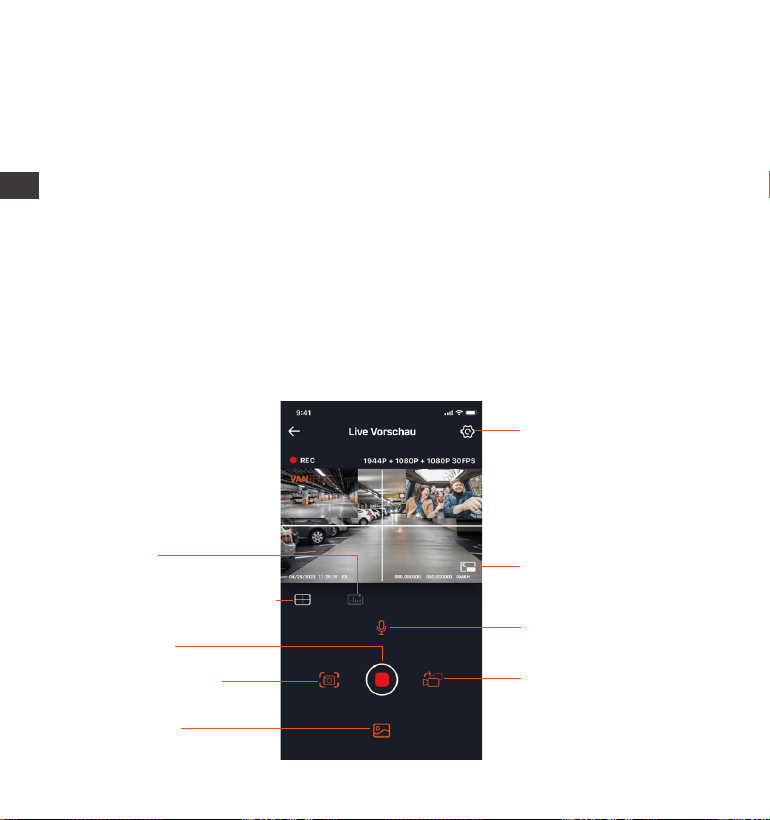
Camera Setting
Full-Screen icon
Front Rear and
Cabin Display
Switch
Snapshot
Album
Stop Recording icon
Microphone on/
off setting
Mileage Statistics
Lens Correction Line
3.6 App Operation
EN
EN
EN
EN
The initial password for this device is only used for initial login. In order
to prevent potential security risks, please be sure to change the initial
password after the initial login to prevent others from logging into your
device without authorization or other adverse consequences.
If you forget the WiFi password, you can restore the default setting of
the device, and the Wi-Fi password of the device will also be restored
to the default password(12345678).
If the connected WiFi name does not match your dash cam model,
the app will prompt you: "Please select the correct model" and
automatically jump back to the model selection interface.
If there is no connection with the mobile phone after the WiFi is turned
on, the camera will automatically turn off the WiFi and return to the
recording interface after 10 minutes.

- 16 -
ENEN
After the app is successfully connected to the camera, you can perform
the following operation:
Video Preview: In the real-time preview interface, you can switch to the
full-screen preview mode by clicking the full-screen icon or placing the
phone horizontally, clicking the window switch icon to switch video
windows only multi-channel recording can use this feature.
Video playback: The video and photo files recorded on the SD card can
be viewed in the app, and the video can be played back after clicking
the file.
Video download: You can select the video or picture you want to
download in the SD card browsing interface or in the video playback
area. After downloading the video, if you play it in the local file of the
app interface, you can view the GPS track of the video.
Video snapshot: You can capture the current screen in the real-time
preview interface of the app.
Mileage Statistics: Users can click to download mileage information as
required, and the mileage information will be saved in the APP as a
picture or PDF file.
Lens correction line: Correct the lens balance via accurate crosshair so
that the video screen will not be skewed.
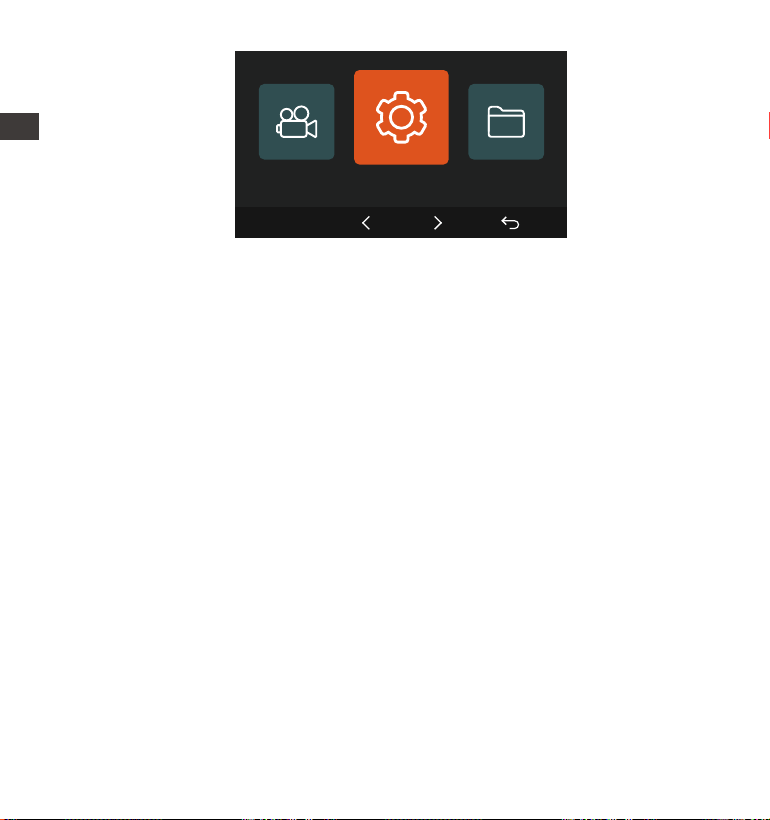
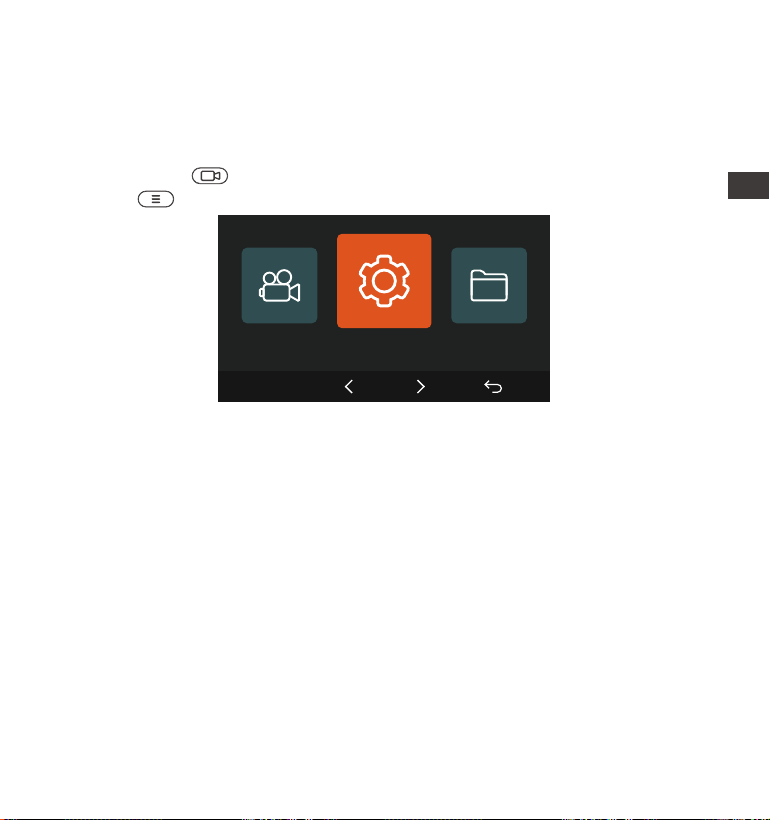
The E3 dash cam has 3 function menus, which are: record settings, system
settings, and file browsing. You can set your dash cam according to your
requirements with these function setting.
Press the button, pause the video first, then press the button to
enter the menu settings.
- 17 -
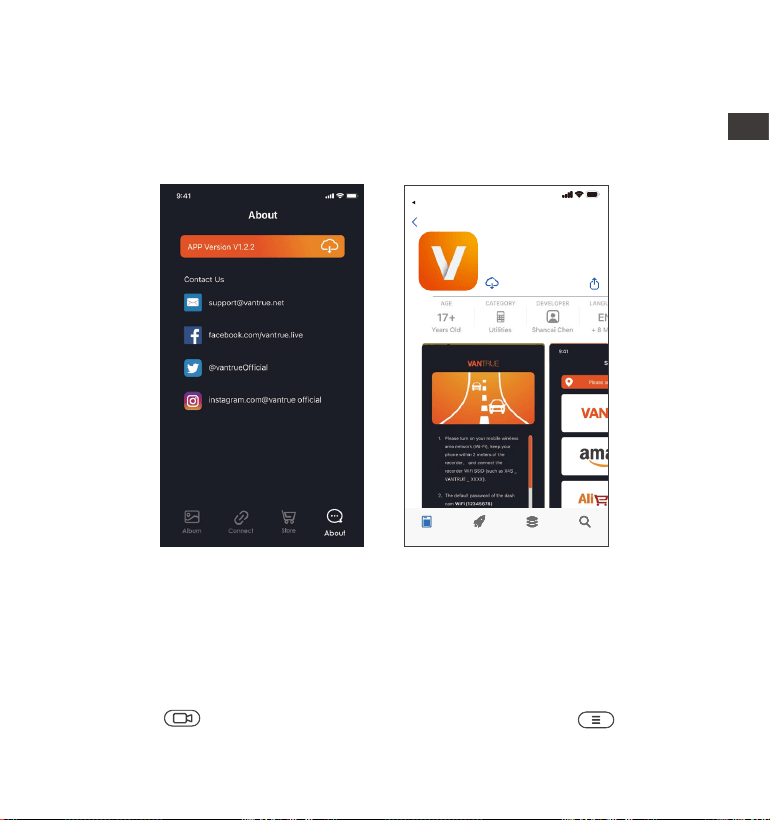
3.7 APP Upgrade
Open the "Vantrue" App, connect to the Wi-Fi, and enter "Settings>
About> Detect New Version". The App will automatically detect whether
its version is the latest version. If there is a new version of the app, follow
the prompts and upgrade the version.
4. Basic Operation
4.1 Menu Settings
EN
EN
EN
EN
Vantrue Ltd.
Vantrue
Vantrue
9:41
Today Games Apps Search
Back
- 18 -
ENEN
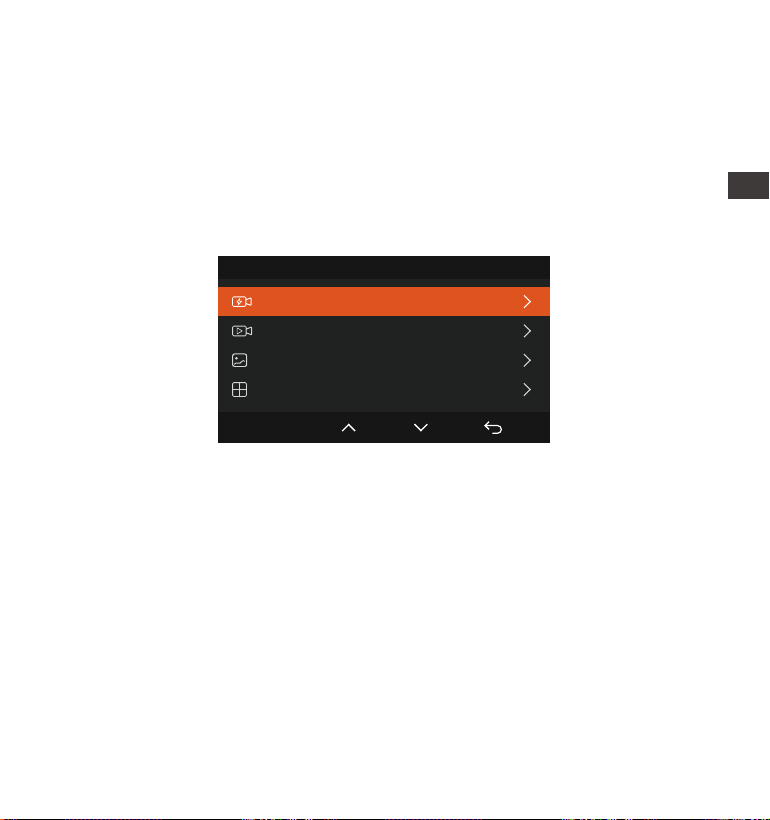
A.Record Setup
-Resolution: The E3 camera has 4 resolution modes: Front+ Cabin+ Rear/
Front+ Cabin/ Front+ Rear/Single Front;
Front+ Cabin+ Rear Recording: 1944P+1080P+1080P 30FPS;
1440P+1080P+1080P 30FPS; 1080P+1080P+1080P 30FPS; 1440P+1080P+720P
30FPS; 1440P+720P+720P 30FPS; 1080P+1080P+720P 30FPS;
1080P+720P+720P 30FPS; 720P+720P+720P 30FPS;
Front+ Cabin Recording: 1944P+1080P 30FPS; 1440P+1080P 30FPS;
1080P+1080P 30FPS; 1080P+720P 30FPS; 720P+1080P 30FPS; 720P+720P
30FPS;
Front + Rear recording: 1944P+1080P 30FPS; 1440P+1080P 30FPS;
1080P+1080P 30FPS; 1080P+720P 30FPS; 720P+1080P 30FPS; 720P+720P
30FPS;
Front recording: 2592x1944P 30FPS; 2560x1440P 30FPS; 1920x1080P 30FPS;
1280x720P 30FPS.
-Loop Recording: Default setting is 3 min. You can choose the options
among 1/3/5 min and OFF.
-IR LEDs: Default setting is Auto. You can select auto, on, or off.
-G-Sensor: Select the level of G-sensor you need, then you can set 3
directions (Front + Rear/Left + Right/Up + Down). The G-sensor value in
each direction can be selected as 1/2/3/4/5/Off. The higher the sensitivity
level, the easier it is to trigger event recording. G-sensor is most sensitive
when set to 5.
System Setup
OK

- 19 -
EN
EN
EN
EN
-Audio Recording: The default is ON. Set recording to on or off.
-Exposure: The default value is +0.0. Adjust the exposure of the lens.
-REC Status Light: Default setting is ON. You can choose to turn on/off the
recording status light.
-WDR: Default is ON. For a better-balanced video effect, you can choose
to turn it off. This function is only for front and interior lenses.
-Rear HDR: The default is ON. Set recording to on or off.
-Rotate Display: Default is off. You can choose to flip the video screen up
and down(180 degrees).
-Cabin Mirror: The default is ON. If you turn it on, the internal recording
screen is displayed in mirror mode.
-Rear Mirror: The default is ON. If you turn it on, the rear recording screen is
displayed in mirror mode
-Number Plate: Select the number or letter to be set. After setting, your
license plate number can be displayed in the recorded video.
-Stamp: Enable or disable the watermark stamp on video and photos. The
watermark stamp includes time and date label, VANTRUE label, license
plate number, GPS location information, and speed label. All enabled by
default.
-Time Lapse: The default value is disabled. You can choose to enable
1FPS/5FPS/10FPS/15FPS.
-Parking Mode: You can choose the parking mode you need, including
Collision Detection/Motion Detection/Low Bitrate Recording/Low Framer-
ate Mode/OFF.
-Low-light Night Vision in Parking Mode: Default is on. When turned on, it
can optimize the recording effect of videos in parking mode.
-Mileage statistics: The default is on, and the GPS mileage information will
be stored in the memory card, and customers can view it on the comput-
er or export the file through the mileage statistics function in the APP.
-GPS Settings: GPS is enabled by default. GPS ON/OFF settings, speed unit
settings, and GPS information are all set here.

- 20 -
ENEN
B. System Setup
-Language: Available languages are Engish/Français/Español/Deutsch/I-
taliano/简体中文/русский/日本語/Polski.
-WiFi: The default is automatically to turn off wifi after 10 minutes without a
connection. Under this function, you can set Wi-Fi to automatically turn on
or off and turn off after 10 minutes, and view Wi-Fi information.
-Voice Control: The default sensitivity is Standard. Voice commands can
be recognized after the option is turned on. You can choose options such
as low sensitivity/high sensitivity/standard/off.
-Voice Content: Voice recognition commands. You can use different
commands to remote control the camera to work.
-Format Memory Card: Format all data on the memory card.
-Format Reminder Setup: Select the reminder options: 15 Days, 1 Month,
and Off. Default is off.
To prevent you from forgetting to format the memory card regularly, we
have added a format reminder time setting. You can choose to be
reminded after 15 days or 1 month, and calculate 15 days or 1 month
from the set date. When the time is up, you can choose "OK" to format, or
choose "Next."
Note: If you changing the format reminder option, the timing will restart as
soon as the option is changed.
-Date&Time: There are two ways to set the time and date: 1. GPS
automatic update, 2 Manual date/time setting. GPS automatic update is
enabled by default.
GPS automatically updates the date and time based on your time zone,
so you need to select the correct time zone first; you can also choose to
turn off GPS automatic update, turn on Manual date/time setting, and
manually correct date and time.
The date format and time zone settings can also be set under this menu.
-Auto LCD Off: Set the time to automatically turn off the LCD display after
no operation.
- 21 -
EN
EN
EN
EN
If you set the Auto LCD Off to 3 min, the camera’s LCD screen will auto
light off after 3 min but recording will continue. If the setup is Off, the
screen will not turn off. You can choose the options among 30s, 1Min,
3Min and OFF.
-Device Sound: Set the volume of the device. The default volume level is
3, the lowest is 0, and the highest is 5.
-Prompt Tone: According to different situations, the dash cam is set with 5
kinds of prompt tones, which are power-on/off sound, keys sound, file
locked sound, format sound, and abnormal stop recording reminder. All
prompt tones are turned on by default.
-Frequency: Different countries have different frequencies. In order to
avoid affecting the video, you can choose 50Hz or 60Hz frequency
according to different regions.
-System Info: Check the current model, firmware version, and the
Vantrue official website.
-Certifications: You can view the certification information of E3 camera.
-Default Settings: Reset the device back to factory settings.
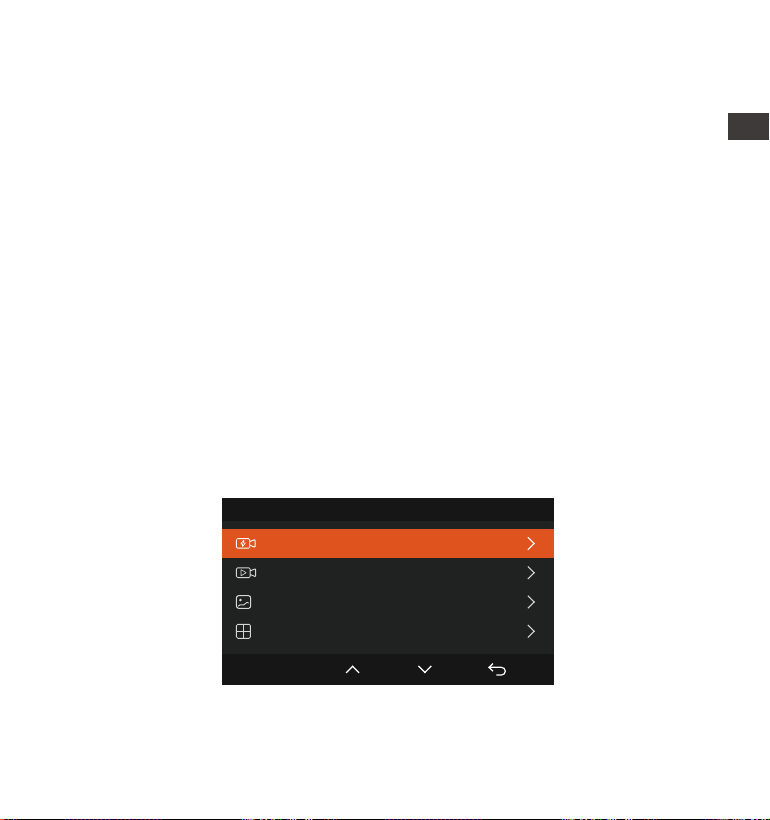
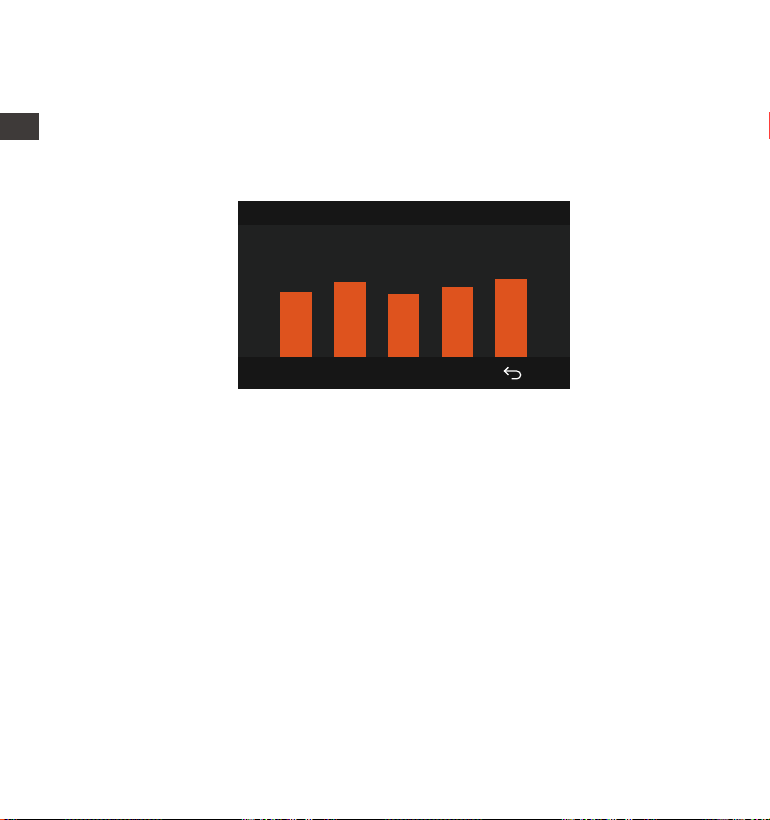
C. Files
Review the video and photo files recorded by the camera.
Files 1/4
Event Video
Normal Video
Photo
All Files
OK
-Event: Critical event videos detected by G-Sensor activity or manually
locked by user.
The file name format is
20300128_140633_0008_E_A.MP4
20300128_140633_0008_E_B.MP4
20300128_140633_0008_E_C.MP4
-Normal: Standard videos recorded. This folder saves loop recording
video, parking mode video, and time-lapse video.
The file name format of Loop Recording video is:
20300128_140633_0008_N_A.MP4;
The file name format of Parking Mode video is:
20300128_140633_0007_P_A.MP4;
The file name format of Time-Lapse video is:
20300128_140633_0006_T_A.MP4.
-Photo: Photos files.
-All: All the standard videos and critical event videos recorded.
Note: The suffix A represents the files recorded by the front camera, the
suffix B represents the files recorded by the cabin camera, and the suffix
C represents the files recorded by the rear camera.

- 22 -
4.2.1 Loop Recording
After inserting the memory card and connecting the power, the E3 dash
cam will automatically turn on and enter loop recording. The duration of
each recorded video will be saved based on the loop recording time
you set, saved in the normal video folder.
When the capacity of the normal video folder reaches 70% of the total
capacity, the new loop recording file will automatically overwrite the
original loop recording files. After this function is enabled, the video file
will automatically overwrite the loop, so as not to stop recording during
the driving process.
ENEN
-Event: Critical event videos detected by G-Sensor activity or manually
locked by user.
4.2 Specifications
The file name format is
20300128_140633_0008_E_A.MP4
20300128_140633_0008_E_B.MP4
20300128_140633_0008_E_C.MP4
-Normal: Standard videos recorded. This folder saves loop recording
video, parking mode video, and time-lapse video.
The file name format of Loop Recording video is:
20300128_140633_0008_N_A.MP4;
The file name format of Parking Mode video is:
20300128_140633_0007_P_A.MP4;
The file name format of Time-Lapse video is:
20300128_140633_0006_T_A.MP4.
-Photo: Photos files.
-All: All the standard videos and critical event videos recorded.
Note: The suffix A represents the files recorded by the front camera, the
suffix B represents the files recorded by the cabin camera, and the suffix
C represents the files recorded by the rear camera.
14:39:07 02-10-2023
00:00:37
MP/H
35
1440P+1080P+1080P 30FPS
- 23 -
EN
EN
EN
EN
Note:
<1> The normal operation of the loop recording function is very depen-
dent on the speed of the memory card, so please format the memory
card regularly to avoid problems such as excessive memory card files
and card aging that affect the normal loop recording.
<2> Please check the loop recording video regularly to avoid the
necessary videos being overwritten by loop.
<3> When Loop Recording is turned off, the video lock function will no
longer work.
<4> After the loop recording is turned off, the duration of each video will
be 20 mins, and the recording will stop when the memory card capacity
is full.
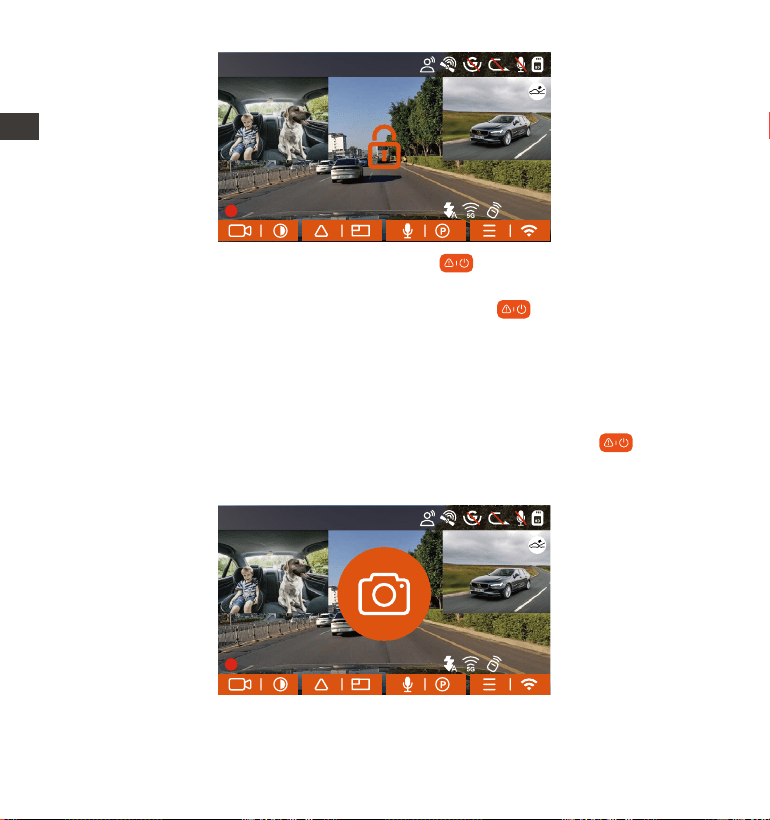
4.2.2 Event Recording
Event video is triggered by the G-sensor(Gravity Sensor), which can be
automatically triggered or manually locked. During driving, in case of
special circumstances, the camera will automatically lock for event
recording or you can manually lock it for event recording.
14:39:07 02-10-2023
00:00:37
MP/H
35
1440P+1080P+1080P 30FPS
- 24 -
ENEN
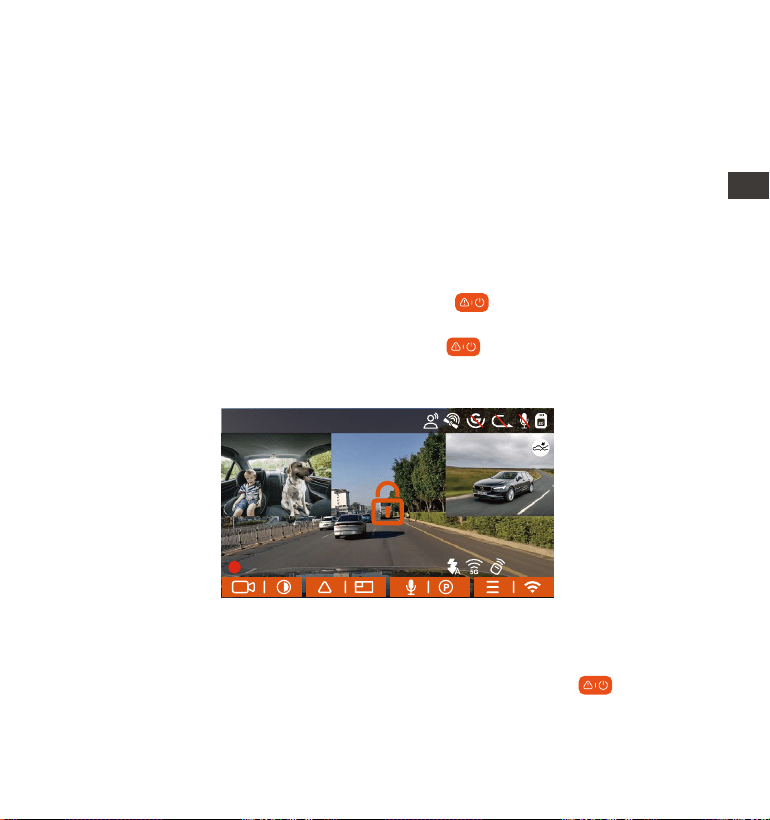
To manually lock the video, just press the button to lock the current
video and capture it.
During the lock video period, you can press the button to capture
multiple times. After recording, the video will be automatically saved in
the event video folder, and the photo will be saved in the photo folder.
Automatic locking event video is triggered when the car is hit/shaken.
The dash cam detects the vibration and automatically locks the current
video, which is saved in the event video folder.
During the locked recording period, you can also press the button to
take a picture. After the event video recording ends, the video will be
saved in the event video folder, and the photo will be saved in the photo
folder.
14:39:07 02-10-2023
00:00:37
MP/H
35
1440P+1080P+1080P 30FPS
Note:
<1> The sensitivity of the automatic locking video trigger is determined by
the sensitivity of the collision. The higher the sensitivity setting, the greater
the probability of being triggered.
<2> The total capacity of the event video file accounts for 30% of the total
capacity of the current memory card. When the event video file reaches
the upper limit, the new event video file will automatically overwrite the
old event video file. It is recommended to periodically check and save
your event video files to avoid loss.
<3 > Lock recording will not trigger in either of the following situations:
Loop recording is off or Time lapse recording is on.
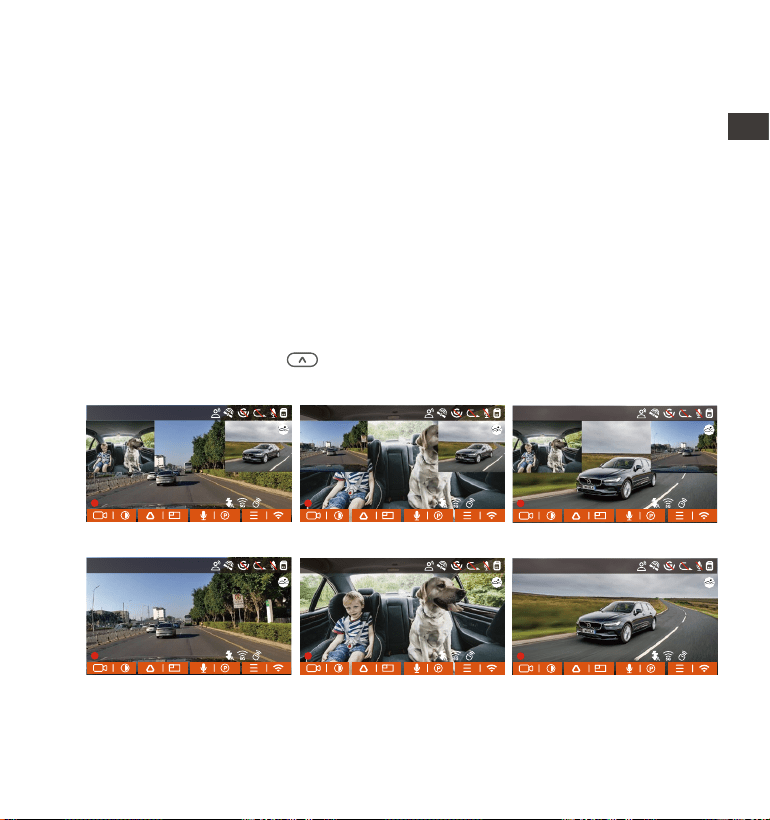
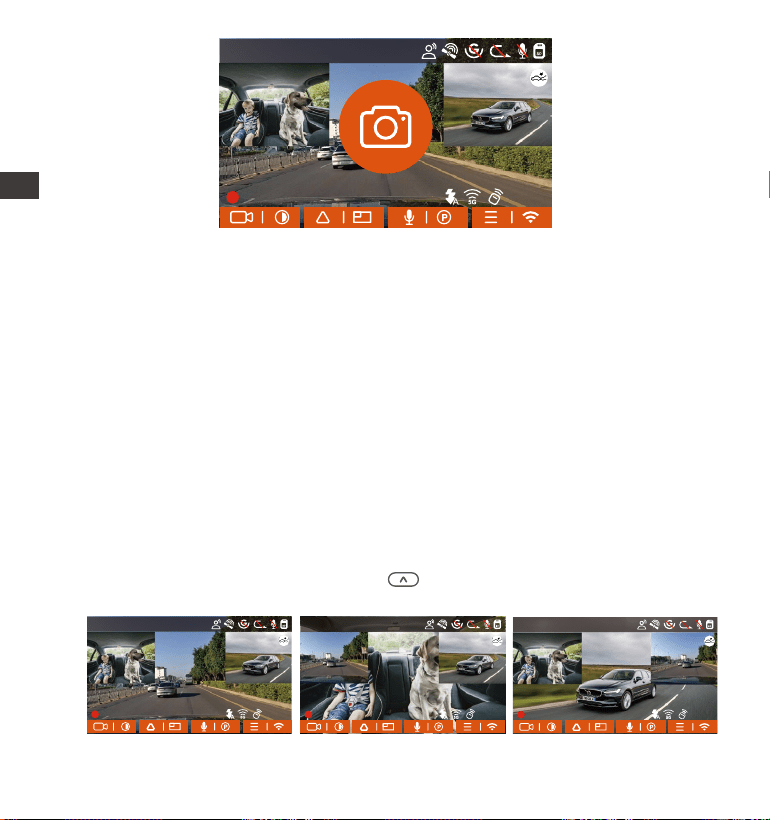
4.2.3 Switch the front and rear camera window display
You can click press the button to switch display to make the front,
inside and rear camera shows bigger on the LCD.
- 25 -
EN
EN
EN
EN
Front Camera Bigger Inside Camera Bigger Rear Camera Bigger
Single Front
Recording Display
Single Inside
Recording Display
Single Rear
Recording Display
14:39:07 02-10-2023
00:00:37
MP/H
35
1440P+1080P+1080P 30FPS
14:39:07 02-10-2023
00:00:37
MP/H
35
1440P+1080P+1080P 30FPS
14:39:07 02-10-2023
00:00:37
MP/H
35
1440P+1080P+1080P 30FPS
14:39:07 02-10-2023
00:00:37
MP/H
35
1440P+1080P+1080P 30FPS
14:39:07 02-10-2023
00:00:37
MP/H
35
1440P+1080P+1080P 30FPS
14:39:07 02-10-2023
00:00:37
MP/H
35
1440P+1080P+1080P 30FPS
- 26 -
ENEN
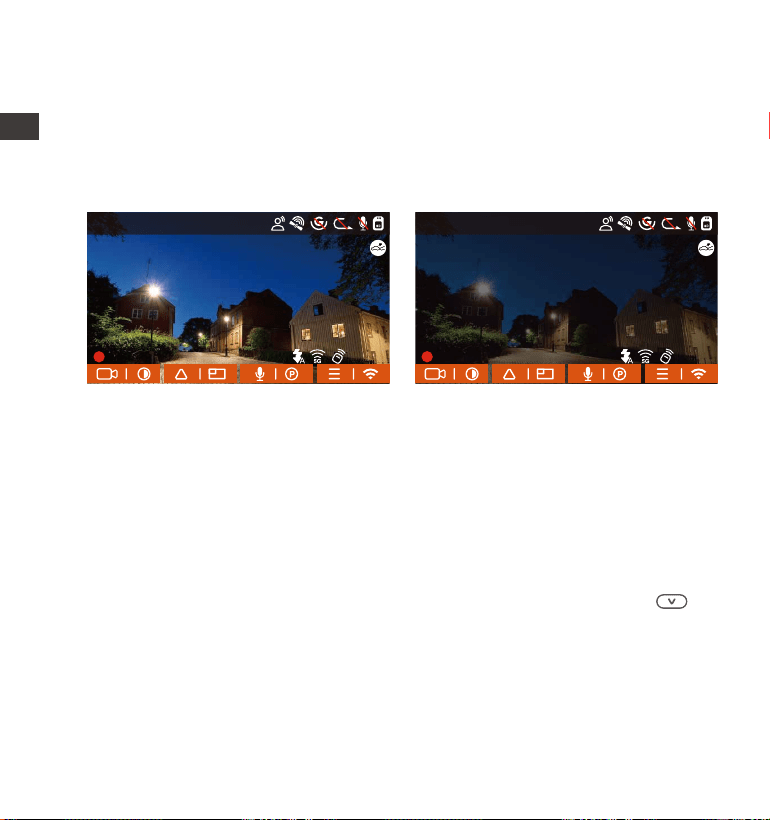
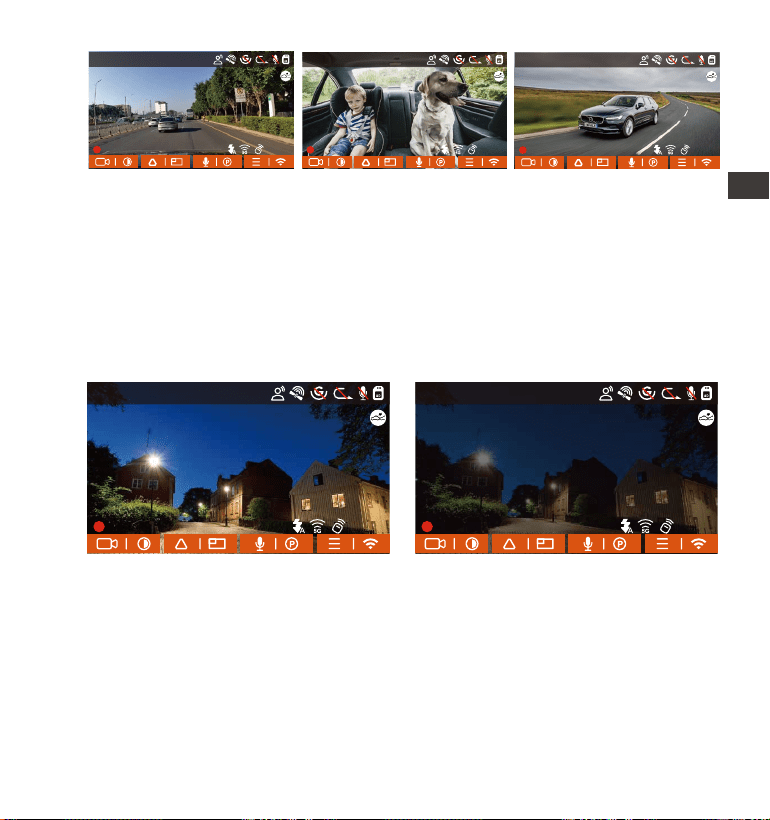
4.2.4 Low-light Night Vision in Parking Mode
In order to enhance the safety of parking at night, we make full use of the
lens performance combined with low-light night vision technology to
improve the night vision effect in parking mode. This function is in the open
mode by default. It will be triggered only after entering the parking mode
and will not affect normal recording.
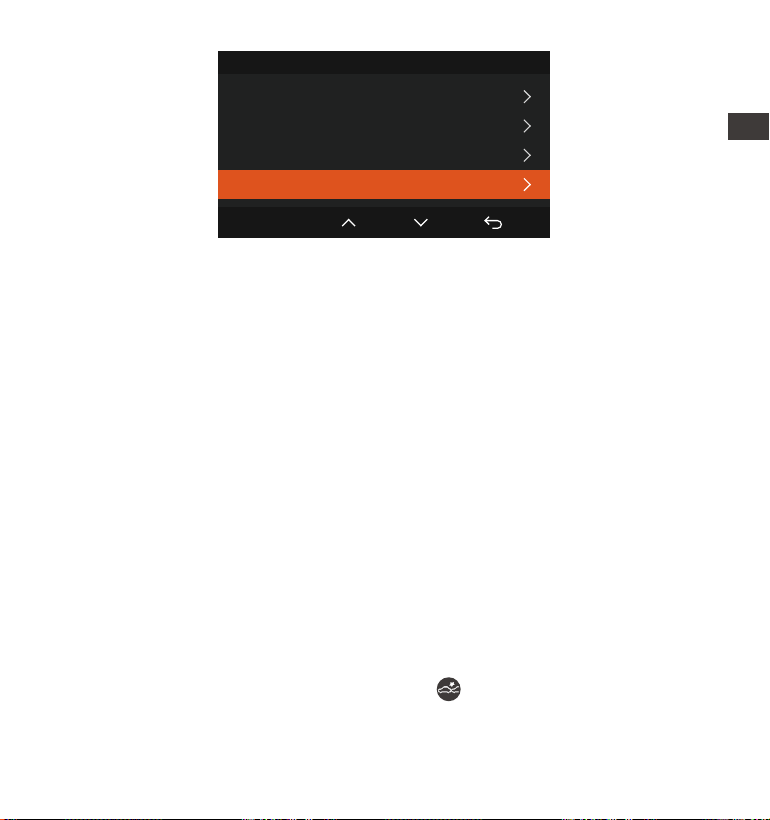
4.2.5 Parking Mode(When the parking mode is turned on, the time-lapse
recording will not work. These two functions cannot run at the same time)
Parking Mode operates as a sentry function under different situations. You
can switch to different parking monitoring modes according to different
parking situations.
After the parking mode is turned on, there are three ways to record: 1.
You can wait for 5 minutes to start automatically. 2. long press the
button to begin manually. 3. Install the ACC hardwire kit and the dash
cam will directly enter after the car is stopped the engine (the ACC
hardwire kit needs to buy separately).
Low-light Night Vision OffLow-light Night Vision On
14:39:07 02-10-2023
00:00:37
MP/H
35
1440P+1080P+1080P 30FPS
14:39:07 02-10-2023
00:00:37
MP/H
35
1440P+1080P+1080P 30FPS
- 27 -
EN
EN
EN
EN
Note:
To ensure the camera works properly in park mode, please use the
hardwire kits or other stable and continuous power supply to power the
dash cam.
The best working environment temperature of E3 is -4-158°F(-20°C to
70°C). We recommend using collision detection within this temperature
range, so once the temperature exceeds the normal working tempera-
ture range, it will automatically shut down. If the temperature is high,
please turn off the camera when parking.
Time-lapse video recording and parking mode (including collision
detection, motion detection, low bitrate recording, and low framerate
mode) can only be enabled one at a time. When one is enabled, the
other will be automatically disabled.
All videos recorded in parking mode(Collision Detection, Motion
Detection, Low Bitrate Recording, Low Framerate mode) will be saved
in the normal video folder. In order to prevent the video in parking
mode from being overwritten in a loop, please check and save the
required files in time to prevent loss.
1.
2.
3.
4.
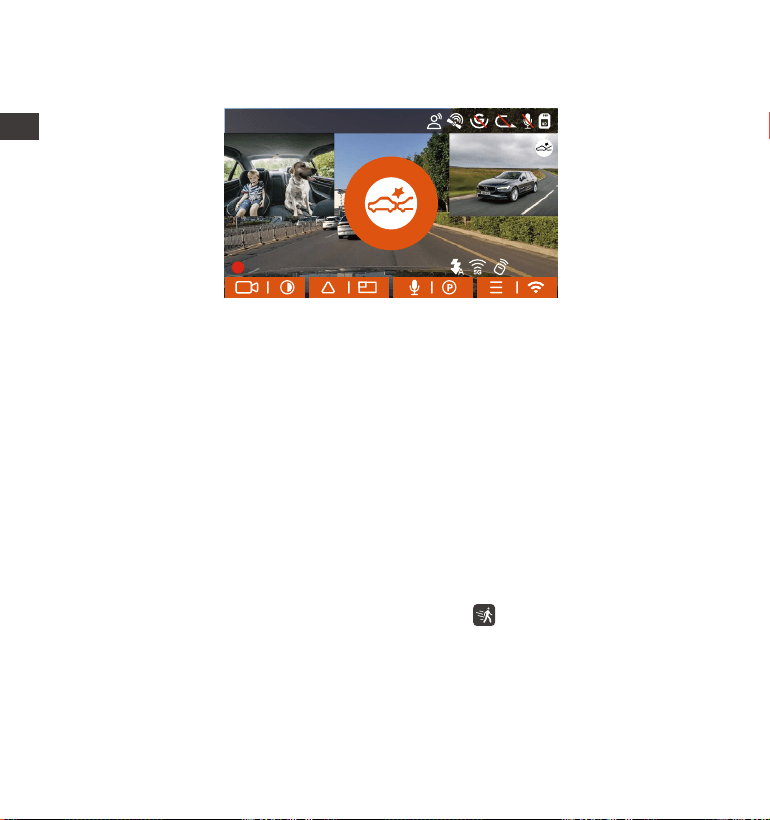
Collision Detection
When collision detection is enabled, the icon will be displayed on the
recording interface, indicating that the recorder is currently using collision
detection mode. Collision detection sensitivity can be adjusted from 1 to
Parking Mode
Collision Detection
Motion Detection
Low Bitrate Mode
OK
Low Framerate Mode
- 28 -
ENEN
When the Collision Detection is turned on, and no movement is detected
after 5 minutes of recording (5-minute entry mechanism for short), then
Collision Detection is activated with a Collision Detection icon at the top
right corner of the screen, and the camera automatically turns off. When
the dash cam is turned off, it will start to record for 1 minute after being
shaken, then turn off the dash cam again.
Note:
If the dash cam continues to be hit during the collision detection record-
ing, it will exit the collision detection mode and enter normal recording,
restarting the 5-minute entry mechanism.
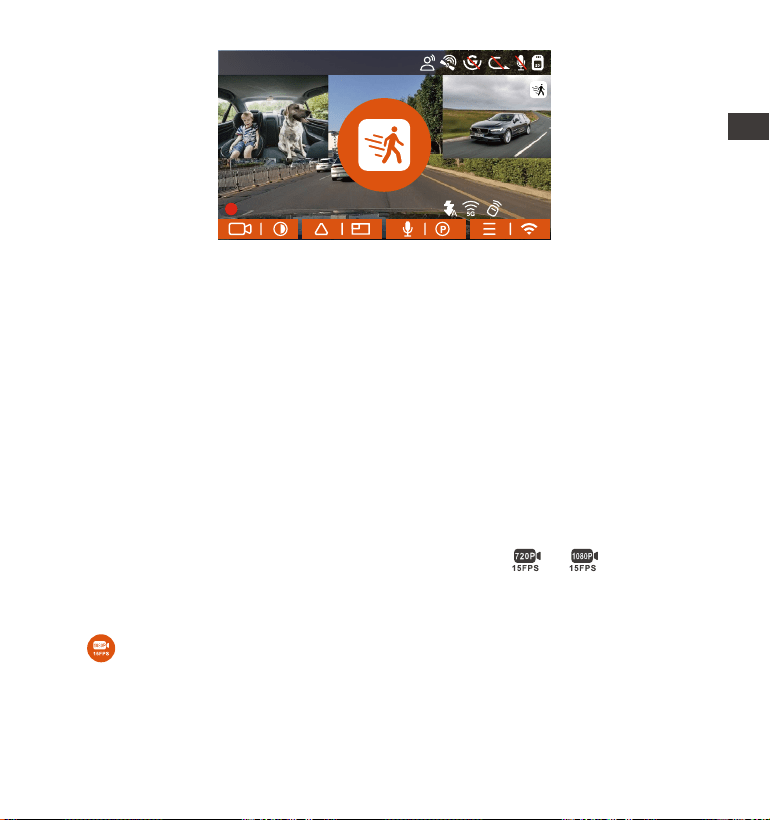
Motion Detection
When the motion detection is turned on, the icon will be displayed on
the recording interface, indicating that the dash cam is currently in motion
detection mode. Motion detection has three levels: low/medium/high
that can be adjusted, and the corresponding detection ranges for motion
detection is 6.6ft/13ft/19.7ft.
14:39:07 02-10-2023
00:00:37
MP/H
35
1440P+1080P+1080P 30FPS
5 levels. You can adjust according to your habits, as well as the
surroundings of the car.
- 29 -
EN
EN
EN
EN
14:39:07 02-10-2023
00:00:37
MP/H
35
1440P+1080P+1080P 30FPS
When the motion Detection is turned on, and no movement is detected
after 5 minutes of recording, then an orange icon will appear in the
center of the screen, and the screen will turn off after 3 minutes.
When the camera detects object movement, it will automatically trigger
video recording for 30 seconds. after the motion detection recording
ends, the camera will load a 15s pre-recorded video into the 30 motion
detection video and save the 45s video to the normal folder.
Note:
Motion detection mode can only be engaged when the camera is
turned on. Once the camera is turned off, the motion detection mode
will not work.
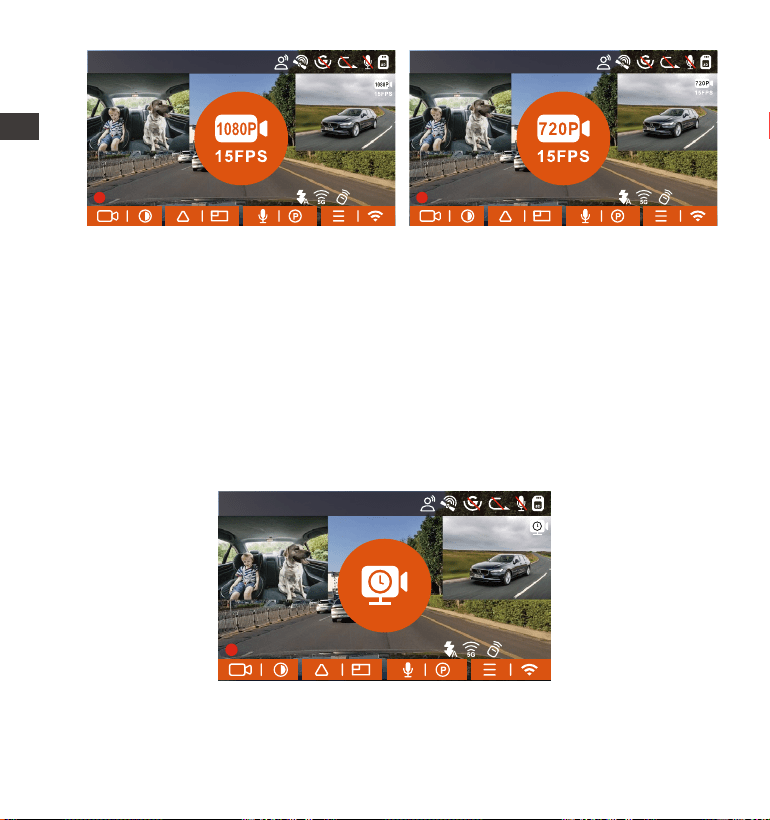
Low Bitrate Recording
When Low Bitrate recording is enabled, the icons or will be
displayed in the lower right corner of the screen, depending on whether
you choose 1080P 15FPS or 720P 15FPS.
If no movement is detected after 5 minutes of recording, there will be a
icon that appears in the center of the screen. The resolution of all
current video will be automatically switched to 1080P 15FPS or 720P 15FPS
for recording, and the recording duration will be determined according
to the currently set loop recording duration. When the camera is vibrates
or is moved, it will automatically exit, wait 5 minutes, and enter again.
- 30 -
ENEN
[Normal Recording Time = Time Lapse Recording Time (Sec) x Recording
Frame Rate FPS/Time Lapse Option]
(Time should be converted into seconds)
Note:
Low Bitrate recording can only be engaged when the camera is turned
on. Once the camera is turned off, the Low Bitrate recording will not work.
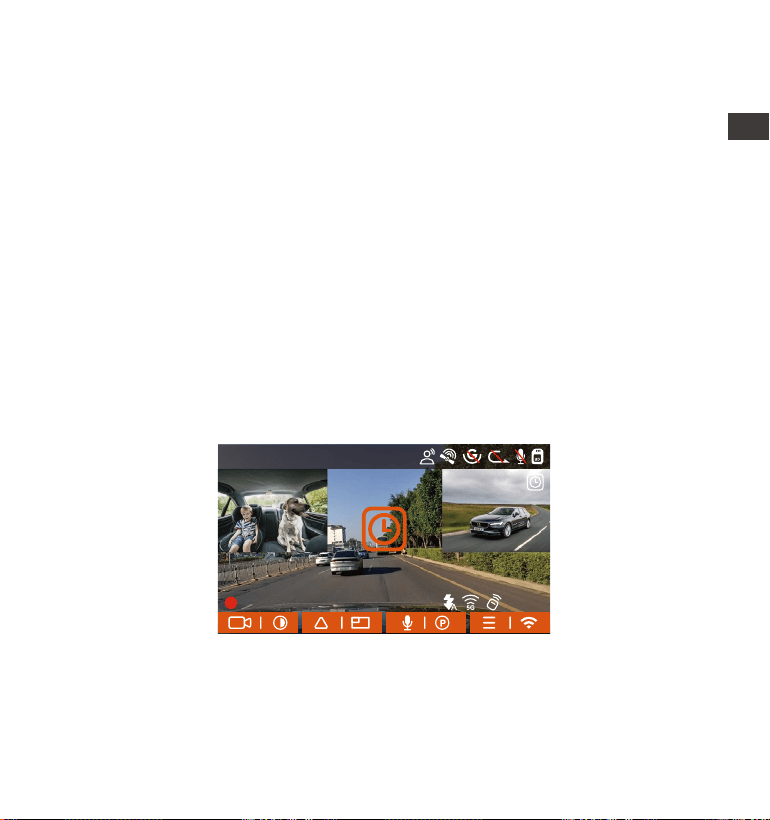
Low Framerate mode
When the low framerate mode is selected, the camera will record
according to your selection among 1FPS/5FPS/10FPS/15FPS.
For example, if you select 1FPS and the current video resolution frame rate
is 30FPS, the camera will generate a 30FPS video per second. Low
framerate mode can greatly preserve the integrity of the video and save
space on the memory card.
14:39:07 02-10-2023
00:00:37
MP/H
35
1440P+1080P+1080P 30FPS
14:39:07 02-10-2023
00:00:37
MP/H
35
1440P+1080P+1080P 30FPS
14:39:07 02-10-2023
00:00:37
MP/H
35
1440P+1080P+1080P 30FPS
- 31 -
EN
EN
EN
EN
4.2.6 Time Lapse
When time lapse is selected, the camera will record according to your
selection of 1FPS/5FPS/10FPS/15FPS.
For example, if you select 1FPS and the current video resolution framerate
is 30FPS, the recorder will generate a 30FPS video per second. Low frame
rate mode can greatly preserve the integrity of the video and save
space on the memory card.
The time unit of the calculation formula is seconds, so the final normal
recording time calculated is also in seconds. If you need to convert it
into other time units, please check the units and convert by yourself.
The low framerate mode is similar to the time-lapse recording function,
but the difference is that there is no 5-minute entry mechanism for
time-lapse recording, which will be directly turned on after setting.
In low framerate mode, the camera also needs a stable power supply.
Once the power is off or exhausted, the camera will shut down.
1.
2.
3.
Note:
The formula for calculating video duration is:
[Normal Recording Time = Time Lapse Recording Time (Sec) x Recording
Frame Rate FPS/Time Lapse Option]
(Time should be converted into seconds)
14:39:07 02-10-2023
00:00:37
MP/H
35
1440P+1080P+1080P 30FPS
- 32 -
ENEN
4.2.7 GPS Function
The GPS function is one of the important functions of the dash cam. GPS
is enabled by default, and the camera receives GPS signals through the
GPS mount. It can automatically calibrate the time and date in your
area, recording the location where the video was taken and the speed
of the car at the time.
40
46
39
43
48
GPS Information
The GPS connection will be completed within 1 minute after you turn
on the device. If the GPS connection is not successful within 1 minute,
please check whether the DEVICE has turned on the GPS function,
whether the GPS bracket is properly connected, and whether your
environment (underground parking lot, densely populated residential
area, subway, tunnel, etc.)is affecting the reception of GPS signal.
GPS information is recorded along with the video. To view it, please
download and install the VANTRUE App and VANTRUE GPS Player
(available for download at www.vantrue.net).
Note:
1.
2.
4.2.8 Automatic Correct the Time via GPS
The GPS automatic correction time setting for the E3 dash cam is turned
on by default. You can select GMT-08:00 by selecting your time zone,
such as Los Angeles. If you do not know the time zone of your location,
you can use WIFI to connect to the Vantrue App, and confirm that the
automatic time adjustment function in the App is turned on.
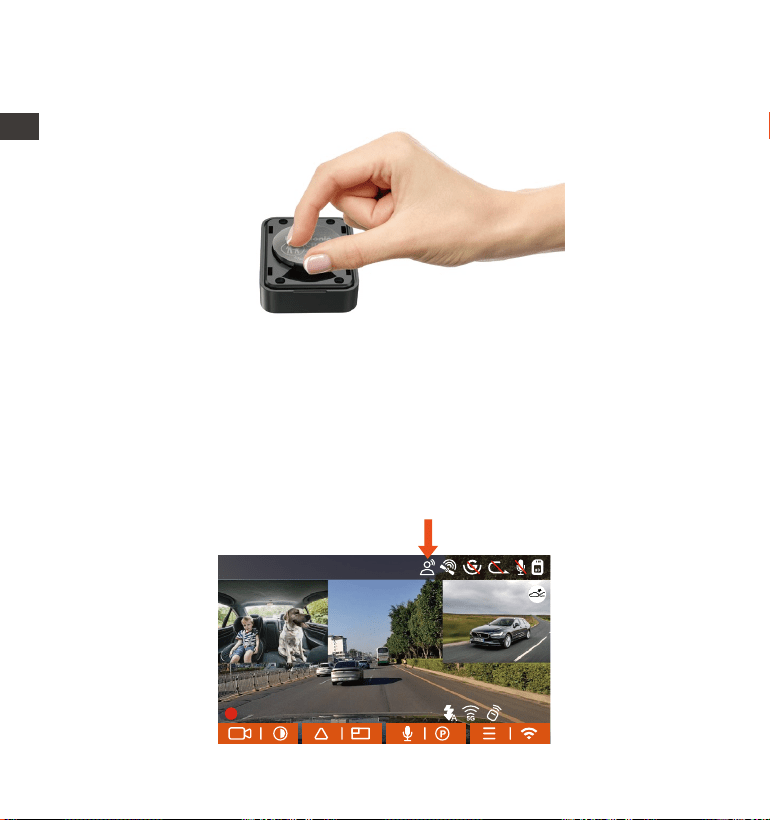
4.2.9 Wireless Remote Control
The camera is equipped with a remote control, which can be used to
quickly control the camera to snapshot, take event video, set audio
on/off and perform other functions.
Remote control connection:
Remove the insulating strip on the remote control, and the camera will
automatically match the remote control. No manual pairing with the
dash cam is required.
When the icon appears on the screen, it means that the remote
control has been successfully matched.
- 33 -
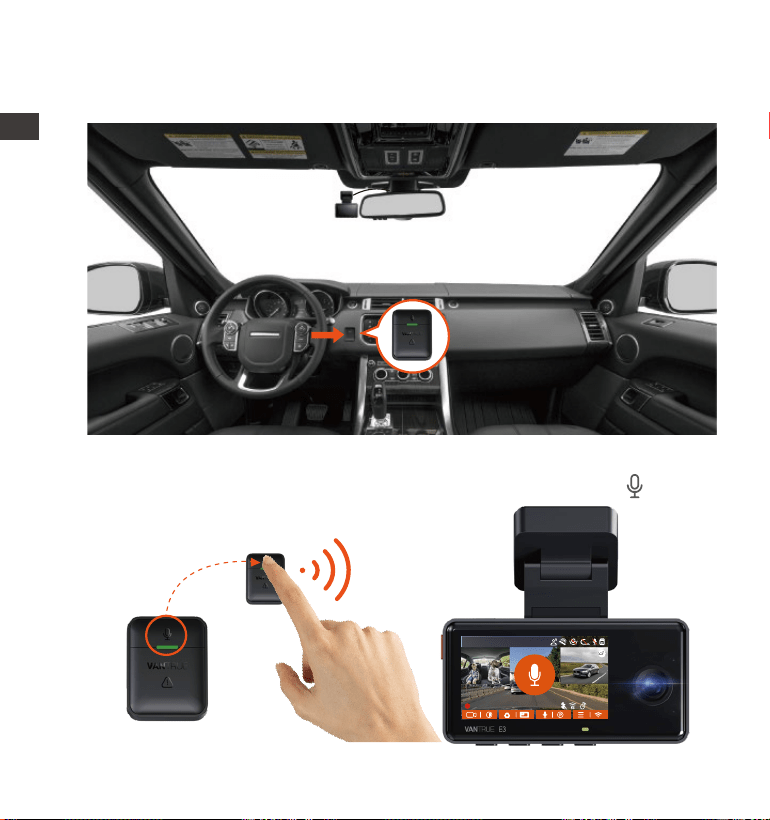
Installation of the remote control:
After the remote control is matched with the camera, please select a
EN
EN
EN
EN
Time & Date
GPS Automatic Update
Manually Set Date / Time
Date Style
Time Zone
OK
14:39:07 02-10-2023
00:00:37
MP/H
35
1440P+1080P+1080P 30FPS
- 34 -
After the remote control is successfully connected, press the button
to enable or disable audio.
1.
Functions of the remote control:
ENEN
suitable location on your car, then tear off the adhesive sticker from the
remote control and stick it to your selected location. (Note: The remote
control needs to be installed in a position that does not affect safe driving)
14:39:07 02-10-2023
00:00:37
MP/H
35
1440P+1080P+1080P 30FPS
- 35 -
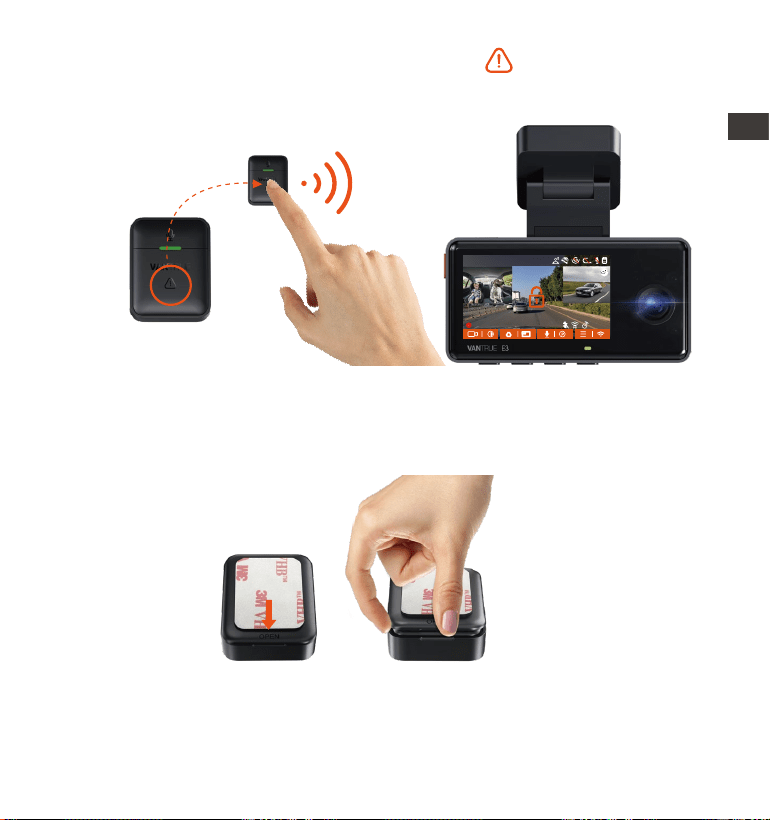
Replacing the remote control battery:
After successful connection, short press the button to lock the
current file and take a snapshot; continue to short press during the
locked video, and continue to capture the photo.
2.
After opening, gently pry the battery open from the groove in the front
of the battery compartment, then take out the old battery, put the new
battery in, and cover the back cover of the remote control.
2.
There is an "OPEN" mark on the bottom of the remote control, please
slowly pry open the surrounding gap along the groove position of this
mark to open.
1.
EN
EN
EN
EN
14:39:07 02-10-2023
00:00:37
MP/H
35
1440P+1080P+1080P 30FPS
- 36 -
4.2.10 Voice Assistant
In addition to controlling the camera with the remote control, you can
also control the camera with voice command. Currently supported
languages are English, Japanese, Russian, and Chinese. For more detailed
voice commands, please check System Settings > Voice Content.
The default setting is standard sensitivity. Voice recognition has options
such as low sensitivity/standard/high sensitivity/off. You can control the
camera with voice commands.
Note:
When the power is low, the battery needs to be replaced(The battery
model of the remote control is a CR2032 battery). It does not support
charging.
ENEN
14:39:07 02-10-2023
00:00:37
MP/H
35
1440P+1080P+1080P 30FPS
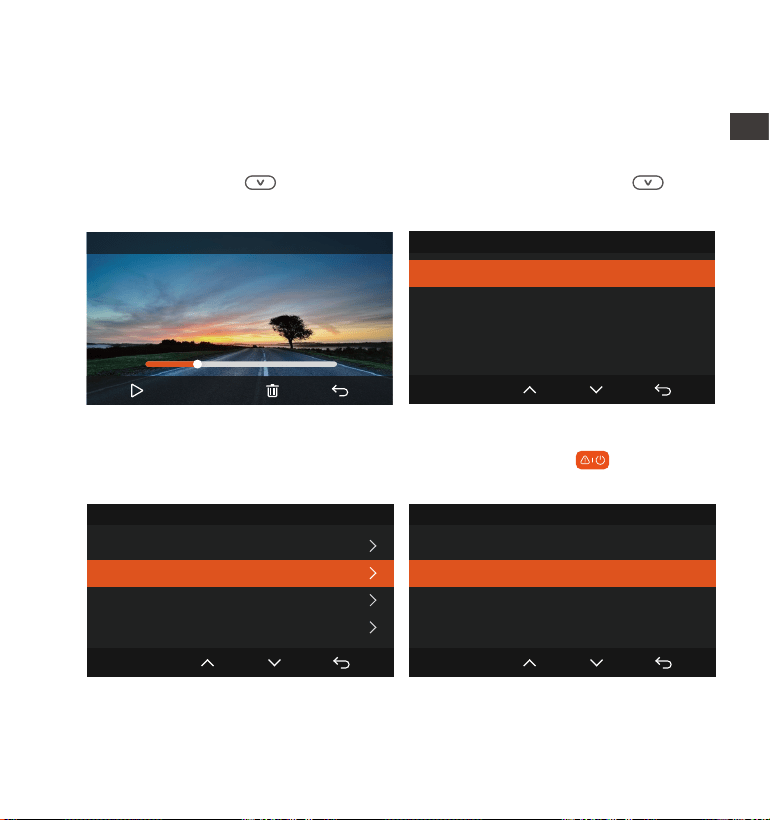
4.2.11 Viewing and Deleting Video/Photos
a.Viewing and Deleting files on the Camera
-Playback Files
After clicking "Files", enter any folder, and after opening the video folder,
you can press the button to select the next file, or press the button
to delete the file during playback.
-Deleting Files
Go to "Files", choose a video on the dash cam, press the button in the
file browsing interface to pop up the delete Menu.
- 37 -
EN
EN
EN
EN
Event Video
Delete This File?
Delete All Files?
OK
00:30
01:07
20230210_140633_0002_E_B.MP4
1X
Event Video
20230210_140633_0001_E_B.MP4
20230210_140633_0002_E_B.MP4
20230210_140633_0003_E_B.MP4
20230210_140633_0004_E_B.MP4
2/5
OK
Event Video
Delete This File?
Delete All Files?
OK
- 38 -
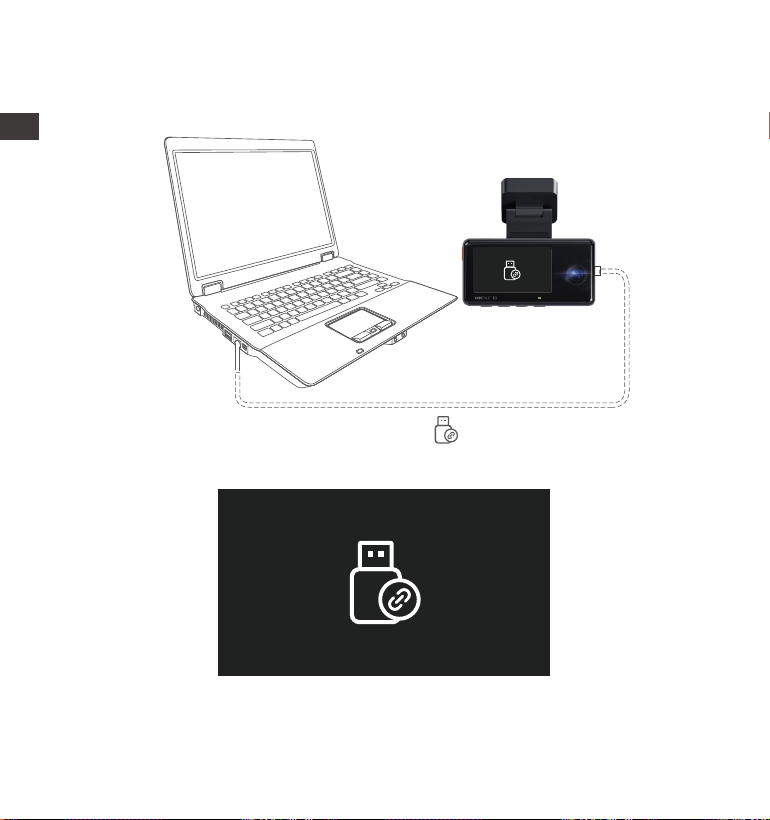
Connect the included TYPE-C USB data cable to the camera and the
computer.
b.Viewing and Deleting files a Computer
1.
After the connection is successful, the icon will appear on the display
of the camera to transfer data, and then you can view the video files in
the computer folder.
2.
Depending on the computer systems of different users, after the camera
is connected to the computer, it will be displayed as a removable drive
or a removable folder.
3.
ENEN
- 39 -
Note:
For video playback in the app, or downloads to SD card, there will be
no network traffic consumption.
1.
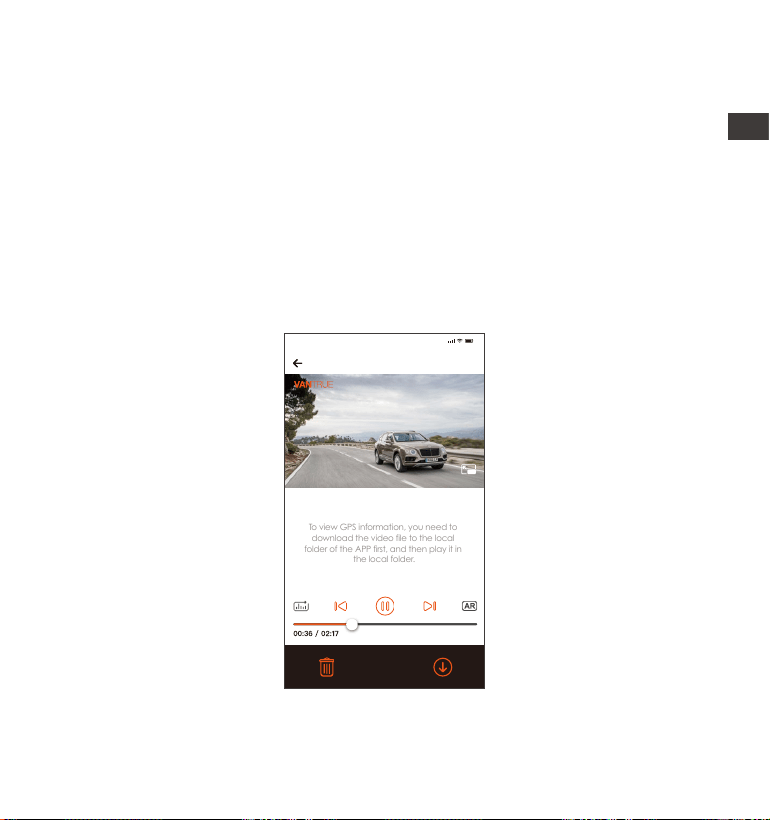
c.Viewing and Deleting on the ”Vantrue” App
After the camera is successfully connected to the mobile phone through
WiFi, it can play back, download and delete files in the mobile app.
20230210_115036_0079_N_A.MP4
02/10/2023 11:5:35 E3 000.000000. 000.000000. 36MK/H
To view GPS information, you need to
download the video file to the local
folder of the APP first, and then play it in
the local folder.
Note:
9:41
EN
EN
EN
EN
4.
5.
6.
To view the files on the computer, you can directly access, right-click
to open the menu and delete them.
You can also use a USB card reader to read the memory card informa-
tion.
To ensure a stable power supply, please check whether the computer
interface is a USB3.0 interface. When connecting to a desktop comput-
er, it is recommended to use the USB port on the back of the host
computer.
- 40 -
2.
ENEN
4.2.12 Upgrading the Firmware
The system will automatically update with the Micro SD card the firmware
upgrade file. The camera will restart once the upgrade has been
completed.
The latest firmware version is always available at the official VANTRUE
website (www.vantrue.net). We strongly recommend registering your
product (www.vantrue.net/register) to receive a notification email when
a new firmware update is available.
You can view GPS track information only after the video file is down-
loaded and played back locally. At the same time, you need to
disconnect the WIFI of the dash cam, otherwise the map information
will be blank.

- 41 -
4.2.13 Working Temperature
The camera is designed to operate in temperatures from -4 to 140°F (-20
to 60°C). Temperatures outside this range risk degrading the camera’s
performance work and causing damage.
To avoid damage
In hot weather, do not expose the camera directly to the sun when the
car is parked.
In extreme winter conditions, i.e. -4°F (-20°C) or lower, detach the
camera from the windshield when not in use, and store in the glove box.
5. Specifications
The specifications of this product may change without prior notice due to
product improvements.
EN
EN
EN
EN
EN
EN
EN
E3Model
Front: F/1. 8 wide aperture;
Inside: F/2.0 wide aperture;
Rear: F/1. 8 wide aperture;
Engish/Français/Español/Deutsch/Italiano/简体
中文/русский/ 日本語/Polski
Novatek high-performance processor
Sony CMOS Sensor
Built-in triaxial sensor
Built-in 2.4GHz&5GHz
2.45’’ IPS Screen
Chips
Image Sensor
Screen
WiFi
Front: 160° wide viewing angle;
Inside: 165° wide viewing angle;
Rear: 160° wide viewing angle;
Aperture
Languages
Camera Angle
Screen

- 42 -
Video Resolution
ENEN
Front + Inside + Rear Mode:
1944P+1080P+1080P 30FPS;
1440P+1080P+1080P 30FPS;
1080P+1080P+1080P 30FPS; 1440P+1080P+720P
30FPS; 1440P+720P+720P 30FPS;
1080P+1080P+720P 30FPS; 1080P+720P+720P
30FPS; 720P+720P+720P 30FPS;
Front + Inside Mode: 1944P+1080P 30FPS;
1440P+1080P 30FPS; 1080P+1080P 30FPS;
1080P+720P 30FPS; 720P+1080P 30FPS;
720P+720P 30FPS;
Front + Rear Mode: 1944P+1080P 30FPS;
1440P+1080P 30FPS; 1080P+1080P 30FPS;
1080P+720P 30FPS; 720P+1080P 30FPS;
720P+720P 30FPS;
Single Front Mode: 2592x1944P 30FPS;
2560x1440P 30FPS; 1920x1080P 30FPS;
1280x720P 30FPS;
MP4
JPEG
Built-in microphone and speaker
Video File Format
Image Format
Audio
Memory Storage
Type C
Built-in super capacitor
DC 5V 2.4A
6W
USB Port
Power Source
Supply voltage current
Power
External: 32GB-512GB Micro SD Card, U3, Class
10(not included in the package)
Working Temperature
Storage Temperature
-4°F to 140°F(-20°C to 60°C)
-4°F to 158°F(-20°C to 70°C)

- 43 -
Warranty
The VANTRUE
®
Element 3 Dash Cam comes with a full 12 months warranty.
If you register your product on our official site (www.vantrue.net/register),
you can extend the warranty to 18 months.
Support
If you have any questions regarding your product, please do not hesitate
to contact us via Amazon or drop us an email at [email protected].
Queries are typically answered within 12-24 hours.
Your opinion matters
VANTRUE
®
is firmly committed to always improving our products, services,
and user experience. If you have any thoughts on how we can do even
better, we welcome your constructive feedback and suggestions.
Connect with us today at [email protected].
THANK YOU for choosing
6. Warranty & Support
EN
EN
EN
EN

- 44 -
ENDE
1. Was ist in der box?
H.
Sauberes Tuch
(1 Stück)
Warnaufkleber
(2 Blätter)
L.
CPL-Filter (optional)
A.
VANTRUE E3
Dashcam
E.
Rückkamera-
kabel(zwei USB-C-
Schnittstellen,
6 Meter)
I.
Anweisungen
M. N.
B.
Rückkamera
G.
Brechstange
(1 Stück)
K.
D.
GPS-
Klebehalterung
C.
VANTRUE
Drahtlose
Fernbedienung
F.
USB-C-Datenkabel
(1 Meter, nur für
Datenübertragung)
USB-C
Autoladekabel
(3,5 Meter)
3M-Ersatzkleber
(einer für Halterung
/Rückkamera/
Fernbedienung)
J.
Statische
Aufkleber
(2 Blätter)
Optionales Zubehör
Element 2
User Manual
Voice-Controlled Dual Dash Cam
- 45 -
EN
EN
EN
DE
2. Teile
Num. FunktionName
1
Die Kamera nimmt die Front des Autos auf2 Frontkamera
Liefert Ton während der Videowiedergabe;
3
Lautsprecher
Stromschnittstelle
Stromschnittstelle
der Halterung
Das Verbindungskabel der Rückkamera und der
Rückkamera; bei Anschluss an den Computer
wird der U-Disk-Modus angezeigt.
4 Rückkamera-
Schnittstelle
2,45 Zoll LCD-Display5 Bildschirm
Kamera zur Videoaufnahme im Auto7 Kabinenkamera
Dauerhaftes grünes Licht: Die Kamera ist an das
Netzteil angeschlossen.
6 REC
14
15
16
3
4
21
5 6 7
8
131211
10
9
VTJE1210130

- 46 -
ENDE
8
9
Bei Aufnahme/Standby kurz drücken, um das
Videofenster zu wechseln; bei Menüeinstellung
und Dateisuche kurz drücken, um die vorherige
Option anzuzeigen, lange drücken, um nach
oben zu den Optionen zu blättern; im Wieder-
gabemodus kurz drücken, um vorzuspulen; im
WLAN-Modus , drücken Sie eine beliebige Taste,
um WLAN zu beenden.
10
11
12
Taste
Taste
Während der Videoaufnahme können Sie lange
drücken, um den Bildschirm auszuschalten, kurz
drücken, um die Videoaufnahme zu stoppen und
in den Standby-Modus zu wechseln; Sie können
die ausgewählte Option im Menü bestätigen;
während der Wiedergabe der Datei können Sie
die Wiedergabedatei abspielen/anhalten.
Taste
Bei Aufnahme/Standby kurz drücken, um das
Mikrofon ein-/auszuschalten, lange drücken, um
die Parküberwachung aufzurufen; in den
Menüeinstellungen kurz auf eine Option
drücken, lange drücken, um nach unten zu den
Optionen zu scrollen; beim Durchsuchen von
Dateien kurz auf eine Datei drücken, lang
Drücken Sie Scrollen Sie nach unten, um Dateien
anzuzeigen; Drücken Sie im Wiedergabemodus
kurz, um Dateien zu löschen; Drücken Sie im
WLAN-Modus eine beliebige Taste, um WLAN zu
beenden.
Taste
Zertifikat zur Rückverfolgbarkeit des Produkts
nach dem Verkauf.
Seriennummer
IWährend der Aufnahme lange drücken, um
WLAN ein- oder auszuschalten; im Standby-Mo-
dus kurz drücken, um das Menü aufzurufen/
zurückzukehren, lange drücken, um WLAN
ein-/auszuschalten; Drücken Sie im WLAN-Modus
eine beliebige Taste drücken, um WLAN zu
beenden.

- 47 -
EN
EN
EN
DE
Aufzeichnung von klarem Ton
Im Videoaufnahmezustand wird durch kurzes
Drücken die aktuelle Datei gesperrt und ein Bild
aufgenommen, langes Drücken zum Herunter-
fahren; im Standby-Modus wird durch kurzes
Drücken das Bild aufgenommen, durch langes
Drücken wird heruntergefahren; Im WLAN-Status
kurz drücken, um WLAN zu verlassen, lange
drücken, um die Dashcam zu schließen.
14
Mikrofon
Taste
LED-Anzeige
BeschreibungLED
Grünes Licht bleibt an: Im Standby-Status
Kamera zeichnet auf
LED Status
REC
Grünes Licht blinkt:
13
16 Reset
Speicherplatz für die Installation der Speicherkarte.
Dashcam neu starten
15 Micro-SD-
Kartensteckplatz
IWährend der Aufnahme lange drücken, um
WLAN ein- oder auszuschalten; im Standby-Mo-
dus kurz drücken, um das Menü aufzurufen/
zurückzukehren, lange drücken, um WLAN
ein-/auszuschalten; Drücken Sie im WLAN-Modus
eine beliebige Taste drücken, um WLAN zu
beenden.
14:39:07 10-02-2023
00:00:37
MP/H
35
1440P+1080P+1080P 30FPS
ENDE
- 48 -
Beschreibung der Bildschirmsymbole
3. Installations-und Gebrauchsanweisung
3.1 Speicherkarte installieren
Bitte legen Sie eine Speicherkarte ein (Speicherkartenkapazität:
32GB-512GB, Kartengeschwindigkeit: U3/Class10/A2), da Dashcam-Vid-
eoaufnahmen bestimmte Anforderungen an die Kartengeschwindigkeit
der Speicherkarte stellen, für Ihre reibungslose Nutzung empfehlen wir
Ihnen VANTRUE Speicherkarte ( separat kaufen ).
Daueraufnahme AUS
Daueraufnahme 1 Minute
Daueraufnahme 3 Minute
Daueraufnahme 5 Minute
Geschwindigkeits-
anzeige
Aktuelle
Videoauflösung
Kollisionserkennung ;
1080P Niedriger Bitrate
Modus;
720P Niedriger Bitrate
Modus;
Bewegungserkennung;
Low-Frame-Rate-Modus;
Zeitraffer;
GPS sucht ein Signal
GPS wurde erfolgreich positioniert
Die Spracherkennung ist aktiviert
Die Spracherkennung ist deaktiviert;
MP/H
35
Aufnahmezeit
Fernbedienung ist verbunden
Infrarotlicht aus
Infrarotlicht immer an
Infrarotlicht automatisch
Aktuelle Uhrzeit
Schnappschuss
Video sperren
Aktuelles Datum
Mikrofon An
Mikrofon Aus
Keine Karte oder
Speicherkarte nicht
erkannt
Die Speicherkarte wird
normal verwendet
Aufnahmezeit
G-Sensor ist Aus;
G-sensor ist An
WiFi AUS
2.4G WiFi AN
5G WiFi AN
2.4G WiFi Verbunden
5G WiFi Verbunden
Wenn die Dashcam aufzeichnet, drücken Sie bitte „ “, um die
Aufnahme anzuhalten, drücken Sie dann „ “, um das Menü
aufzurufen, rufen Sie das Menü „Systemeinstellungen“ auf, wählen Sie „
SD Karte Formatieren“ und bestätigen Sie, um die Speicherkarte zu
formatieren , bis die Aufforderung „Formatieren erfolgreich“ ausreicht.
Wenn Sie die Speicherkarte einlegen, wird „Kartenfehler, SD-Kartenfe-
hler“ angezeigt. Die Dashcam nimmt zu diesem Zeitpunkt nicht auf. Sie
können direkt „ “ drücken, um den Formatierungsprozess aufzurufen
und zu starten.
- 49 -
EN
EN
EN
DE
Speicherkarten-Installationsmethode: An der Position des Kartensteck-
platzes befindet sich ein Symbol für die Richtung des Speicherkartenein-
schubs. Bitte schieben Sie die Speicherkarte entsprechend der durch das
Symbol angezeigten Richtung in den Kartensteckplatz, bis ein
„Klick“-Geräusch in der Karte zu hören ist Steckplatz, was anzeigt, dass
die Speicherkarte eingesetzt ist.
Wenn die Speicherkarte eingelegt ist, wird empfohlen, die Speicherkarte
zu formatieren, um die normale Verwendung der Dashcam zu gewährleis-
ten. Gehen Sie dabei wie folgt vor:
- 50 -
ENDE
Wenn Sie die Speicherkarte verwenden, wird empfohlen, sie einmal im
Monat zu formatieren, um die normale Verwendung der Dashcam
sicherzustellen.
Bitte legen Sie während der Videoaufnahme die Speicherkarte nicht
direkt ein oder entfernen Sie sie, um keine wichtigen Videoaufnahmen
zu verlieren.
Bitte verwenden Sie keine schlechten Karten oder Karten mit niedriger
Geschwindigkeit auf der Dashcam, da dies leicht zu Problemen führen
kann.
Bevor Sie die Karte formatieren, überprüfen Sie bitte den Notfall-
videoordner auf der SD-Karte, um festzustellen, ob noch andere Videos
gespeichert werden müssen, um nicht versehentlich wichtige Videos zu
löschen.
Notiz:
1.
2.
3.
4.
3.2 Dashcam installieren
Richten Sie die Halterung an der Schnittstelle der Dashcam-Halterung
aus und drücken Sie sie hinein, bis die Halterung installiert ist.
1.
- 51 -
EN
EN
EN
DE
Bevor Sie den E3 installieren, schalten Sie ihn bitte ein und überprüfen
Sie auf dem E3-Bildschirm, ob der Aufnahmewinkel der Frontkamera
und des Kabinekamera geeignet ist.
2.
Bitte bringen Sie vor dem Einbau des E3 den Elektrostatik-Aufkleber an,
um nach der zweiten Demontage keine Spuren auf der
Windschutzscheibe zu hinterlassen.
Hinweis: Bitte wählen Sie eine geeignete Position auf der
Windschutzscheibe und reinigen Sie diese.Bitte ziehen Sie zuerst die ①
Gesichtsschutzfolie ab, kleben Sie sie auf die Windschutzscheibe und
reißen Sie dann die ② Gesichtsschutzfolie ab.
3.
Electrostatic sticker
Please peel off this mask
AFTER application completed
Please peel off this
mask BEFORE application
- 52 -
ENDE
Nachdem der elektrostatische Aufkleber angebracht ist, reißen Sie den
Aufkleber der E3-Halterung ab und kleben Sie ihn auf den elektro-
statischen Aufkleber.
4.
Nehmen Sie das Kabel der Rückkamera heraus und schließen Sie das E3
an die Rückkamera. Achten Sie bei der Installation auf die Verdrahtung-
smethode.
5.
Bitte wählen Sie die Einbauposition an der Heckscheibe, es wird
empfohlen, die Position nahe der Mitte der Heckscheibe zu wählen
und die Entnebelungslinie an der Heckscheibe zu vermeiden, um den
Videoeffekt nicht zu beeinträchtigen. Nachdem Rückkamera einge-
fügt wurde, kann der Winkel nach oben und unten angepasst werden,
und bitte fügen Sie die hinter kabel entlang der Dachdekorationslücke
ein.
6.
(Richtige Verdrahtung) (Falsche Verdrahtung)
- 53 -
EN
EN
EN
DE
Verstauen Sie das Autoladekabel in der Abbildung gezeigten Richtung.7.
Da der Winkel des Fensterglases bei jedem Modell unterschiedlich ist,
passen Sie bitte den Aufnahmewinkel des Objektivs an die tatsächli-
chen Bedürfnisse an.
8.
- 54 -
ENDE
3.3 APP Herunterladen
Bitte scannen Sie den unten stehenden QR-Code mit Ihrem Mobiltelefon,
laden Sie die VANTRUE APP herunter und installieren Sie sie und folgen Sie
den Anweisungen, um die Installation abzuschließen.
Hinweis: Nachdem dieses Produkt über WLAN mit einem Mobiltelefon
verbunden wurde, kann es eine Echtzeit-Videovorschau realisieren,
Dashcam-Einstellungen ändern, Dateien mit 0 Verkehr herunterladen und
Videos auf Mobiltelefonen wiedergeben. Aber die GPS-Track-Wieder-
Hinweis: Der Winkel der Kabinenkamera des E3 ist fest, und der Winkel der
Frontkamera kann gedreht und angepasst werden.
①Halten Sie 2 Sekunden lang.
- 55 -
3.4 WiFi Verbindung
Es gibt 3 Möglichkeiten, das WLAN der Dashcam einzuschalten, auf das
zugegriffen werden kann
VTJE1210130
gabe und die Video-Sharing-Funktionen hängen vom Internet ab (das
Dashcam- WLAN muss ausgeschaltet sein).
②Gehen Sie zu System Einstellung >
WLAN ein.
③Der Spracherkennungsbefehl „Turn on WiFi“
EN
EN
EN
DE
Turn on WiFi
System Einstellung 2/14
Sprache
Wi-Fi
Spracherkennung
Sprachinhalt
OK
- 56 -
ENDE
Öffnen Sie dann die WLAN-Einstellungen des Handys, suchen Sie den
WLAN-Namen, z. B.: E3_VANTRUE_XXXX, Geben Sie das
Standard-WLAN-Passwort ein: 12345678, um eine Verbindung zu WLAN
herzustellen.
- 57 -
EN
EN
EN
DE
Nachdem die WLAN-Verbindung erfolgreich ist, öffnen Sie die APP zum
ersten Mal und klicken Sie auf „+“, um das Dashcam-Modell hinzuzufügen,
dann verbindet sich die APP automatisch mit der Dashcam und zeigt die
aktuelle Echtzeit-Aufzeichnung der Dashcam an.
3.5 APP-Verbindung
Notiz:
Wenn Sie sich vor dem Öffnen der APP nicht mit WLAN verbinden,
fordert die APP Sie auf „Bitte zuerst mit WLAN verbinden“ und springt
automatisch zu den WLAN-Einstellungen. Bitte führen Sie zuerst die
Schritte aus, um sich mit WLAN zu verbinden.
Wenn Ihr WLAN bereits verbunden ist, aber die APP nach der Auswahl
des Modells zur Anwendungserlaubnis der APP springt, überprüfen Sie
bitte, ob die drahtlose Netzwerkerlaubnis der APP aktiviert ist.
1.
2.
- 58 -
ENDE
5.
6.
3.
4.
Das Initialpasswort dieses Geräts wird nur für die Erstanmeldung
verwendet. Um potenziellen Sicherheitsrisiken vorzubeugen, ändern Sie
das Initialpasswort bitte rechtzeitig nach der ersten Anmeldung, um zu
verhindern, dass sich andere unbefugt in Ihr Gerät einloggen oder
andere nachteilige Folgen haben.
Wenn Sie das WLAN-Passwort vergessen, können Sie die Werkseinstellun-
gen der Dashcam wiederherstellen, und das WLAN-Passwort des Geräts
wird ebenfalls auf das Standardpasswort 12345678 zurückgesetzt.
Wenn der verbundene WLAN-Name nicht mit dem Kameramodell
übereinstimmt, fordert die APP auf „Bitte wählen Sie das richtige Modell
aus“ und springt zurück zur Modellauswahloberfläche.
Wenn Sie nach dem Einschalten von WLAN keine Verbindung zu Ihrem
Handy herstellen, schaltet die Dashcam WLAN nach 10 Minuten aus
und kehrt zur Aufnahmeschnittstelle zurück.
3.6 APP Verwendung
Fotoalbum
Aufnahme starten/
pausieren
Mikrofonschalter
Einstellungen
Kilometerstand-
Statistik
Linsenkalibrierungslinie
Vollbild-Schalter
Front und rück
wechseln
Schnappschuss

- 59 -
EN
EN
EN
DE
1.
2.
3.
4.
5.
Nach dem Aufrufen der APP-Echtzeitvorschau können Sie die folgenden
Vorgänge ausführen:
Videovorschau: Nachdem die APP erfolgreich mit der Dashcam
verbunden wurde, wechselt die Dashcam zur Echtzeit-Vorschauseite,
klicken Sie auf die Vollbild-Schaltfläche oder das Mobiltelefon wird
horizontal platziert, und der Echtzeit-Bildschirm wechselt automatisch
zum Vollbild. Bildschirmvorschaumodus. Klicken Sie auf die Fenster-
wechsel-Schaltfläche, um das vordere und hintere Videofenster
umzuschalten.
Video abspielen: Sie können die aufgenommene Video- oder
Fotodatei in der APP anzeigen und auf die Datei klicken, um das Video
abzuspielen.
Video Herunterladen: Sie können wählen, ob Sie Videos oder Bilder in
der SD-Karten-Browsing-Oberfläche oder in der Videowiedergabe
herunterladen möchten. Nachdem Sie das Video heruntergeladen
haben, spielen Sie es in der lokalen Datei der App ab, um den
GPS-Track des Videos anzuzeigen.
Schnappschuss: Die Echtzeit-Vorschauoberfläche der App kann den
aktuellen Bildschirm erfassen.
Kilometerstatistik: Kilometerstatistik nach Aktivierung generieren.
- 60 -
ENDE
3.7 APP-Upgrade
Öffnen Sie die „Vantrue“-App, verbinden Sie sich mit dem WLAN der
Dashcam, gehen Sie zu „Einstellungen > Über > Neue Version erkennen“,
die App erkennt automatisch, ob die App-Version die neueste Version ist.
Wenn es eine neue Version der App gibt, befolgen Sie die Anweisungen
in der App, um die Version zu aktualisieren.
Vantrue Ltd.
Zurück
Vantrue
Vantrue
9:41
Heute Spiele Apps Suche
A. Videoauflösung: E3dashcam enthält 4 Kombinationen, nämlich:
Auflösung vorne + innen + hinten:
1944P+1080P+1080P 30FPS
1440P+1080P+1080P 30FPS
1080P+1080P+1080P 30FPS
1440P+1080P+720P 30FPS
1440P+720P+720P 30FPS
1080P+1080P+720P 30FPS
1080P+720P+720P 30FPS
720P+720P+720P 30FPS
- 61 -
EN
EN
EN
DE
E3 dashcam verfügt über 3 Hauptfunktionsmenüs, nämlich Aufnahme-
einstellungen, Systemeinstellungen und Dateisuche.
Drücken Sie , halten Sie die Videoaufnahme an und drücken Sie
dann , um die Menüeinstellungen aufzurufen Aufnahmeeinstellungen:
4. Funktion
4.1 Hauptfunktion
System Einstellung
OK
Auflösung vorne + hinten:
1944P+1080P 30FPS
1440P+1080P 30FPS
1080P+1080P 30FPS
1080P+720P 30FPS
720P+1080P 30FPS
720P+720P 30FPS
Auflösung vorne:
2592x1944P 30FPS
2560x1440P 30FPS
1920x1080P 30FPS
1280x720P 30FPS
Auflösung vorne + innen:
1944P+1080P 30FPS
1440P+1080P 30FPS
1080P+1080P 30FPS
1080P+720P 30FPS
720P+1080P 30FPS
720P+720P 30FPS

- 62 -
ENDE
b. Daueraufnahme: Der Standardwert ist 3 Minuten, diese Funktion enthält
4 Optionen, nämlich Aus, 1 Minute, 3 Minuten und 5 Minuten.
c. Infrarot LED: Die E3-Innenlinse verfügt über einen Infrarotlichtmodus, die
Standardeinstellung ist automatisch und kann auf Autom./ Aus/Ein
eingestellt werden.
d. Kollisionsempfindlichkeit: Wählen Sie die gewünschte Stufe der
Kollisionsempfindlichkeit aus, es gibt 3 Richtungen (vorne+hin-
ten/links+rechts/oben +unten), sechs Stufenoptionen 1/2/3/4/5/aus
Auswahl, Standardstufe 3.
e. Audioaufnahme: Standardmäßig aktiviert, hier können Sie die
Aufnahme ein-/ausschalten.
f. Belichtungskorrektur: Sie können den Belichtungswert jeweils für die
Vorder-/Innen-/Hinterseite des Autos einstellen, der Standardwert ist +0,0.
g. Aufnahmeanzeige: Standardmäßig eingeschaltet, stellen Sie die
Aufnahmeanzeige ein oder aus.
h.WDR: Standardmäßig geöffnet, bessere Balance des Videoeffekts, Sie
können schließen. Die WDR-Funktion des E3 passt nur die Effekte der
vorderen und inneren Linsen an.
i. HDR hinten: Standardmäßig aktiviert, kann ein- oder ausgeschaltet
werden.
j. Bildschirm umdrehen: Sie ist standardmäßig ausgeschaltet und die
Rotationsanzeige vor dem Auto + im Auto oder hinter dem Auto kann
jeweils eingeschaltet werden.
k. Kabinenspiegel: Sie ist standardmäßig aktiviert.Nach der Aktivierung
wird das Bild der Fahrzeugkamera im Spiegelmodus angezeigt.
l. Rückspiegel: Es ist standardmäßig aktiviert.Nach der Aktivierung wird
das Bild der Rückfahrkamera im Spiegelmodus angezeigt.
m. Nummernschild: Es kann ein 9-stelliges Kennzeichen eingestellt werden,
das im Wasserzeichen des Videos zu sehen ist.
n. Stempel: Anzeige von Uhrzeit und Datum, VANTRUE-Markenname,
Kfz-Kennzeichen, GPS-Standortinformationen und Fahrzeuggeschwind-

- 63 -
EN
EN
EN
DE
igkeit im Video, alles standardmäßig aktiviert.
o. Zeitraffe: standardmäßig deaktiviert, Sie können wählen, ob Sie 1 FPS/5
FPS/10 FPS/15 FPS einschalten möchten.
p. Parkmodus: Hier können Sie den benötigten Parkmodus einstelle,
einschließlich Kollisionserkennung/Bewegungserkennung/Niedriger Bitrate
Modus/Niedriger Bildrate Modus/Aus, die Standardeinstellung ist Aus.
q. Sternenlichtnachtsicht beim parken: Standardmäßig aktiviert. Nach
dem Öffnen kann es den Aufnahmeeffekt des Parkmodus optimieren.
r. Kilometerstatistik: Aktivieren Sie standardmäßig und speichern Sie
GPS-Kilometerinformationen auf der Dashcam-Speicherkarte. Kunden
können die Datei auf der SD-Karte einsehen oder die Kilometerstatistik-
funktion in der App exportieren.
s. GPS-Einstellung: GPS ist standardmäßig aktiviert, GPS-Schalter,
einstellung der Geschwindigkeitseinheit, GPS-Informationen sind alle unter
dieser Funktion.
B. Systemeinstellungen :
a. Sprache: Englisch, Französisch, Spanisch, Deutsch, Italienisch, Chine-
sisch, Russisch, Japanisch, Polnisch kann eingestellt werden
b. WiFi: Das Standard-WLAN startet nach dem Booten und schaltet sich
nach 10 Minuten automatisch aus. Sie können WLAN so einstellen, dass es
nach dem Booten immer eingeschaltet ist, oder WLAN deaktivieren, um
beim Booten automatisch zu starten. Nachdem Sie das WLAN ausges-
chaltet und automatisch gestartet haben, müssen Sie manuell die Taste
drücken oder die Stimme aufwecken, um die WLAN-Funktion einzus-
chalten.
c. Spracherkennung: Die standardmäßige Standardempfindlichkeit, wenn
sie eingeschaltet ist, kann sie Sprachbefehle erkennen, es gibt Optionen
für niedrige Empfindlichkeit / hohe Empfindlichkeit / Aus.
d. Sprachinhalt: Spracherkennungsbefehle, Benutzer können verschie-
dene Befehle verwenden, um Dashcam fernzusteuern, damit er funktion-

- 64 -
ENDE
iert.
e. SD Karte Formatieren: Alle Daten auf der Speicherkarte formatieren.
f. Formatierungsmeldung: Standardmäßig deaktiviert, können Sie wählen,
ob Sie nach 15 Tagen oder 1 Monat erinnert werden möchten, und es
wird 15 Tage oder 1 Monat nach dem eingestellten Datum sein. Nach-
dem die Zeit erreicht ist, können Sie „OK“ zum Formatieren auswählen,
oder Wählen Sie „Nächste Einmal“, wenn Sie „Weiter“ wählen, wird die
Zeit neu berechnet.
g. Datum/Uhrzeit: Es gibt 2 Möglichkeiten, Datum und Uhrzeit einzustellen,
① Automatische GPS-Aktualisierung, automatische GPS-Aktualisierung ist
standardmäßig aktiviert, Datum und Uhrzeit der automatischen GPS-Aktu-
alisierung werden entsprechend Ihrer Zeitzone durchgeführt, daher
müssen Sie die richtige Zeitzone auswählen;
② Datum/Uhrzeit manuell einstellen, Sie können die automatische
GPS-Aktualisierung schließen, die manuelle Datums-/Uhrzeiteinstellung
öffnen und Datum und Uhrzeit manuell korrigieren. Darüber hinaus
befinden sich in diesem Menü auch Datumsformat und Zeitzoneneinstel-
lungen.
h. Bildschirmschoner: Die Bildschirmschonereinstellung ist standardmäßig
ausgeschaltet, Sie können 30 Sekunden, 1 Minute oder 3 Minuten für die
Bildschirmschonerzeit wählen.
I. Geräteton: Das Standardvolumen beträgt 3 Dateien, das niedrigste ist 0,
das höchste ist 5.
j. Warnton: Je nach Situation hat Dashcam 5 Arten von
Aufforderungstönen eingestellt, nämlich Ein-/Ausschaltton, Tastendruck-
ton, Sperrton, formatierter Ton und ungewöhnlicher Aufnahmeton. Alle
Signaltöne sind standardmäßig eingeschaltet.
k. Frequenz: Unterschiedliche Länder haben unterschiedliche Lichtquel-
lenfrequenzen. Um eine Beeinträchtigung des Videos zu vermeiden,
wählen Sie je nach Region eine Lichtquellenfrequenz von 50 Hz oder 60
Hz.
- 65 -
EN
EN
EN
DE
l. System Info: Zeigen Sie das Maschinenmodell, die Software-Version-
snummer und die offizielle VANTRUE-Website an.
m. Zertifizierungsinfo: Sie können die Zertifizierungsinformationen von E3
anzeigen.
n. Standardeinstellungen: Systemstandardeinstellungen wiederherstellen.
C. Dateinen:
Sie können Videodateien und Fotodateien anzeigen, die von der
Dashcam aufgenommen wurden.
Datei 1/4
Notfallvideo
Normal Video
Fotos
Alle Dateien
OK
a. Notfallvideo: Die Notfallvideodatei wird in diesem Ordner gespeichert,
und das Dateinamenformat ist
20300128_140633_0008_E_A.MP4
20300128_140633_0008_E_B.MP4
20300128_140633_0008_E_C.MP4
b. Normales Video: Dieser Ordner speichert Loop-Videos, Parkmodus-
Videos und Zeitraffer-Videos.
Der Dateiname des Loop-Videos lautet 20300128_140633_0008_N_A.MP4;
Der Name der Videodatei im Parkmodus lautet
20300128_140633_0007_P_A.MP4;
Der Dateiname des Zeitraffervideos lautet
20300128_140633_0006_T_A.MP4.
c. Fotos: Fotodateien werden in diesem Ordner gespeichert

- 66 -
ENDE
d. Alle Dateien: Alle Dateien können angezeigt werden.
Hinweis: „A“ im Dateinamen bedeutet das von der Frontkamera
aufgenommene Video, „B“ bedeutet das von der Kabinenkamera
aufgenommene Video und „C“ bedeutet das von der Rückfahrkamera
aufgenommene Video.
4.2 Spezifikationen
Der Betrieb der Loop-Aufnahmefunktion hängt stark von der Karten-
geschwindigkeit der Speicherkarte ab. Formatieren Sie die Speicher-
karte daher regelmäßig, um Probleme wie übermäßige Speicherkarten-
dateien und Kartenalterung zu vermeiden, die sich auf die Loop-Auf-
nahme auswirken.
4.2.1 Daueraufnahme
Die Dashcam wechselt nach dem Einschalten automatisch in den
Loop-Aufnahmemodus. Der normale Videoordner belegt 70 % des
Gesamtspeichers. Wenn der Ordner 70 % der Gesamtkapazität erreicht,
überschreibt die neue Datei automatisch die Originaldatei. Nachdem
diese Funktion aktiviert wurde, überschreibt die Videodatei automatisch
die Schleife, um die Aufnahme nicht zu stoppen, wenn Speicherkarte
während der Fahrt voll ist.
Notiz:
1.
14:39:07 10-02-2023
00:00:37
MP/H
35
1440P+1080P+1080P 30FPS
- 67 -
EN
EN
EN
DE
EN
EN
EN
DE
Bitte überprüfen Sie regelmäßig das Loop-Aufzeichnungsvideo, um zu
vermeiden, dass wichtige Videos durch Loops verdeckt werden.
Wenn Sie die Loop-Aufnahme deaktivieren, funktioniert die Videosperr-
funktion nicht mehr.
Nachdem die Loop-Aufnahme ausgeschaltet wurde, beträgt die Dauer
jedes Videos 20 Minuten. Nachdem die Aufnahme voll ist, stoppt die
Dashcam die Aufnahme und meldet „Die Karte ist voll!“.
2.
3.
4.
4.2.2.Notfallvideo
Sperren Sie automatisch den Notfallaufnahmeauslöser. Wenn das Auto
angefahren oder vibriert wird, erkennt die Dashcam die Vibration und löst
automatisch aus, um das aktuelle Video zu sperren.
Während der gesperrten Aufnahmezeit können Sie auch drücken, um
ein Bild aufzunehmen. Nachdem beendet ist, wird das Video im Notfall-
videoordner und das Foto im Fotoordner gespeichert.
Während der Fahrt können Sie unter besonderen Umständen die
Dashcam manuell oder automatisch für die Notfallaufnahme sperren.
Zum manuellen Sperren müssen Sie nur die drücken, um das aktuelle
Video zu sperren und aufzunehmen.
Während der Videosperre können Sie die mehrmals drücken, um zu
Schnappschuss. Nach der Aufnahme wird das Video automatisch im
Notfallvideoordner und das Foto im Fotoordner gespeichert.
14:39:07 10-02-2023
00:00:37
MP/H
35
1440P+1080P+1080P 30FPS
4.2.3 Kamerabildschirm wechseln
E3 kann den Kamerabildschirm mit umschalten, die folgenden sind 3
Arten von Bildschirmen.
- 68 -
ENDE
Notiz:
Die Empfindlichkeit des Auslösers der automatischen Verriegelung wird
durch die Kollisionsempfindlichkeit bestimmt.Je höher die Empfindlich-
keit, desto größer die Wahrscheinlichkeit des Auslösens.
Die Gesamtkapazität der Notfallvideodatei macht 30% der Gesamt-
kapazität der aktuellen Speicherkarte aus. Wenn die Notfallvideodatei
die Obergrenze erreicht, überschreibt die neue Notfallvideodatei
automatisch die ursprüngliche Notfallvideodatei. Es wird empfohlen
Überprüfen und speichern Sie regelmäßig Ihre wichtigen Videodateien,
um sie nicht zu verlieren.
Die Aufnahmesperre wird in den folgenden zwei Fällen nicht ausgelöst:
Schleifenaufnahme ausschalten/Zeitrafferaufnahme einschalten.
Schalten Sie die Loop-Aufnahme aus/schalten Sie das Zeitraffer-Video
ein, die Kamera kann nur Schnappschüsse aufnehmen.
1.
2.
3.
Rückkamera größer Kabinenkamera größer Rückkamera größer
14:39:07 10-02-2023
00:00:37
MP/H
35
1440P+1080P+1080P 30FPS
14:39:07 10-02-2023
00:00:37
MP/H
35
1440P+1080P+1080P 30FPS
14:39:07 10-02-2023
00:00:37
MP/H
35
1440P+1080P+1080P 30FPS
14:39:07 10-02-2023
00:00:37
MP/H
35
1440P+1080P+1080P 30FPS
- 69 -
EN
EN
EN
DE
Einzelnes Front Video Einzelnes Innen Video Einzelnes Rück Video
4.2.4 Sternenlichtnachtsicht beim parken
Um die Sicherheit beim Einparken bei Nacht zu erhöhen, nutzen wir die
Linsenleistung in Kombination mit der Low-Light-Nachtsichttechnologie
voll aus, um den Nachtsichteffekt im Parkmodus zu verbessern. Diese
Funktion befindet sich standardmäßig im offenen Modus, sie wird erst
nach dem Aufrufen des Parkmodus ausgelöst und hat keinen Einfluss auf
die normale Aufnahme.
4.2.5 Parkmodus (Nachdem der Parkmodus eingeschaltet wurde,
funktioniert die Zeitraffer nicht und die beiden Funktionen können nicht
gleichzeitig ausgeführt werden.)
Sie können je nach Parksituation zwischen verschiedenen Parküberwa-
chungsmodi wechseln.
Sternenlicht Nachtsichtim
Parken AUS
Sternenlicht-Nachtsicht AN
14:39:07 10-02-2023
00:00:37
MP/H
35
1440P+1080P+1080P 30FPS
14:39:07 10-02-2023
00:00:37
MP/H
35
1440P+1080P+1080P 30FPS
14:39:07 10-02-2023
00:00:37
MP/H
35
1440P+1080P+1080P 30FPS
14:39:07 10-02-2023
00:00:37
MP/H
35
1440P+1080P+1080P 30FPS
14:39:07 10-02-2023
00:00:37
MP/H
35
1440P+1080P+1080P 30FPS

Nachdem der Parkmodus aktiviert wurde, gibt es 3 Möglichkeiten zum
Betreten: 1. Warten Sie nach dem Parken 5 Minuten, um automatisch
einzutreten 2. Wählen Sie den manuellen Eintritt durch langes Drücken
3. Installieren Sie das ACC-Hardwire Kit und geben Sie ein direkt nach
dem Parken und stellen Sie den Motor ab (ACC Hardwire Kit ist ein
optionales Zubehör, das Sie selbst kaufen müssen).
- 70 -
ENDE
Parkmodus
Kollisionserkennung
Bewegungserkennung
Niedriger Bitrate Modus
OK
Low-Frame-Rate-Modus
Notiz:
Um sicherzustellen, dass die Dashcam den Parkmodus normal verwen-
den kann, verwenden Sie bitte das Hardwire Kit oder eine andere
stabile und kontinuierliche Stromversorgung, um die Dashcam mit Strom
zu versorgen.
In Umgebungen mit hohen Temperaturen im Sommer empfehlen wir die
Verwendung des Kollisionserkennungsmodus. Wenn die Umgebungs-
temperatur im Auto bis zu 60 °C beträgt, wird empfohlen, die Dashcam
auszuschalten, um einen anormalen Betrieb der Dashcam aufgrund der
hohen Temperatur zu vermeiden.
Nur einer der Zeitraffer-Videoaufnahmen und der Parkmodus
(einschließlich Kollisionserkennung, Bewegungserkennung, Niedriger
Bitrate Modus und Low-Frame-Rate-Modus) kann eingeschaltet werden,
und das Einschalten des einen schaltet automatisch den anderen aus.
Alle im Parkmodus aufgezeichneten Dateien (einschließlich Kollision-
serkennung, Bewegungserkennung, Aufzeichnung mit niedriger Bitrate
1.
2.
3.
4.
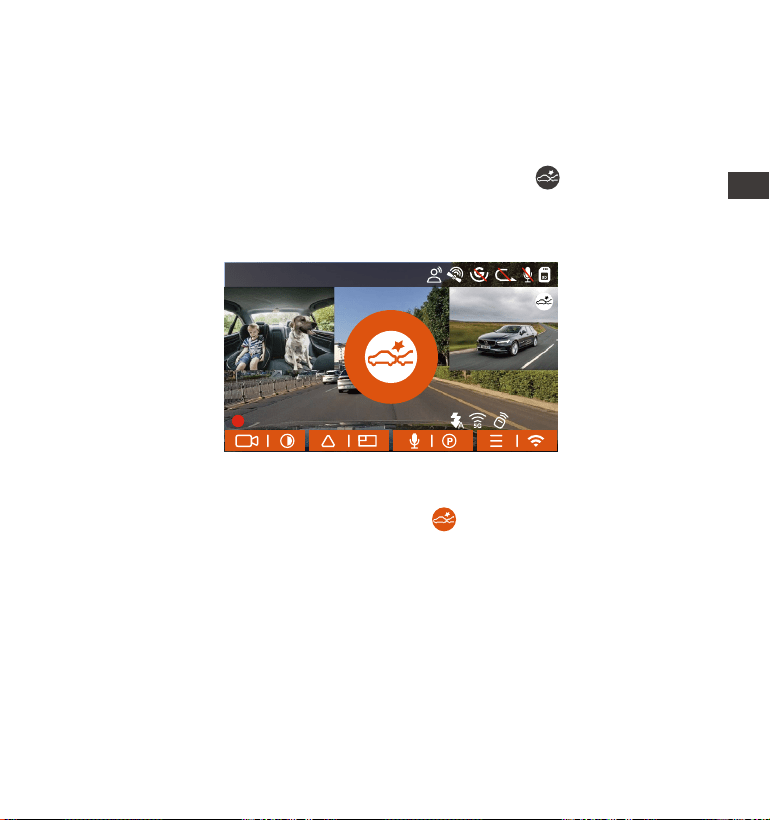
- 71 -
DE
EN
EN
EN
DE
Kollisionserkennung
Wenn die Kollisionserkennung eingeschaltet ist, wird auf der
Aufnahmeoberfläche angezeigt. Die Empfindlichkeit der Kollisionserken-
nung kann von 1 bis 5 Stufen eingestellt werden, und Sie können sie selbst
anpassen. (Je höher die Zahl, desto empfindlicher ist es)
Wenn die Dashcam erkennt, dass sich das Auto nach dem Parken 5
Minuten lang nicht vibriert hat, wird automatisch in den
Kollisionserkennungsmodus gewechselt, wird in der Mitte des
Dashcam-Bildschirms angezeigt und die Dashcam wird automatisch
heruntergefahren . Wenn der G-Sensor nach dem Herunterfahren erkennt,
dass das Auto vibriert, beginnt er automatisch 1 Minute lang mit der
Aufzeichnung und schaltet sich dann aus.
Notiz:
Wenn die Dashcam während der Kollisionserkennungsaufzeichnung
kontinuierlich kollidiert, verlässt sie die Kollisionserkennung und wechselt in
die normale Aufzeichnung.
und Modus mit niedriger Bildrate) werden im normalen Ordner
gespeichert, um zu vermeiden, dass die Dateien im Parkmodus in einer
Schleife überschrieben werden. Bitte überprüfen Sie diese regelmäßig.
14:39:07 10-02-2023
00:00:37
MP/H
35
1440P+1080P+1080P 30FPS
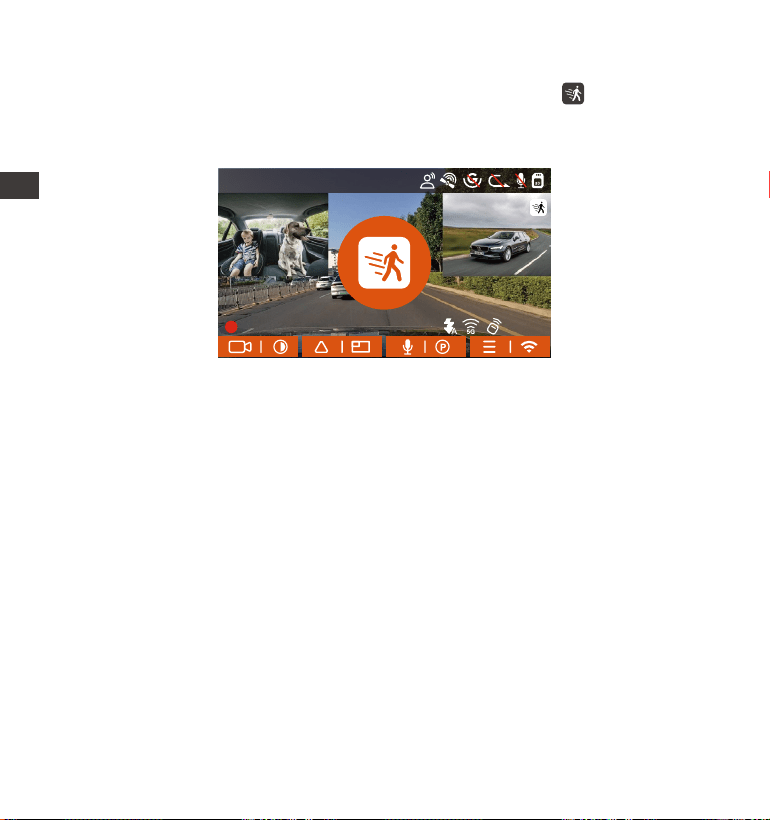
- 72 -
ENDE
Bewegungserkennung
Wenn die Bewegungserkennung eingeschaltet ist, wird auf der
Aufnahmeoberfläche angezeigt. Es gibt 3 Arten der Bewegungserken-
nung: niedrig/mittel/hoch, entsprechend der Erfassungsreichweite von 2
Meter/4 Meter/6 Meter.
14:39:07 10-02-2023
00:00:37
MP/H
35
1440P+1080P+1080P 30FPS
Wenn die Bewegungserkennung eingeschaltet ist und nach 5 Minuten
Aufnahme keine Bewegung erkannt wird, erscheint ein orangefarbenes
Symbol in der Mitte des Bildschirms und der Bildschirm schaltet sich
nach 3 Minuten aus.
Wenn die Kamera eine Objektbewegung erkennt, löst sie automatisch
die Videoaufzeichnung für 30 Sekunden aus. Nachdem die Aufzeich-
nung der Bewegungserkennung beendet ist, lädt die Kamera ein vorab
aufgezeichnetes 15-Sekunden-Video in das 30-Bewegungserkennungs-
video und speichert das 45-Sekunden-Video im normalen Ordner.
Notiz:
Der Bewegungserkennungsmodus kann nur aktiviert werden, wenn die
Kamera eingeschaltet ist. Sobald die Kamera ausgeschaltet ist,
funktioniert der Bewegungserkennungsmodus nicht.
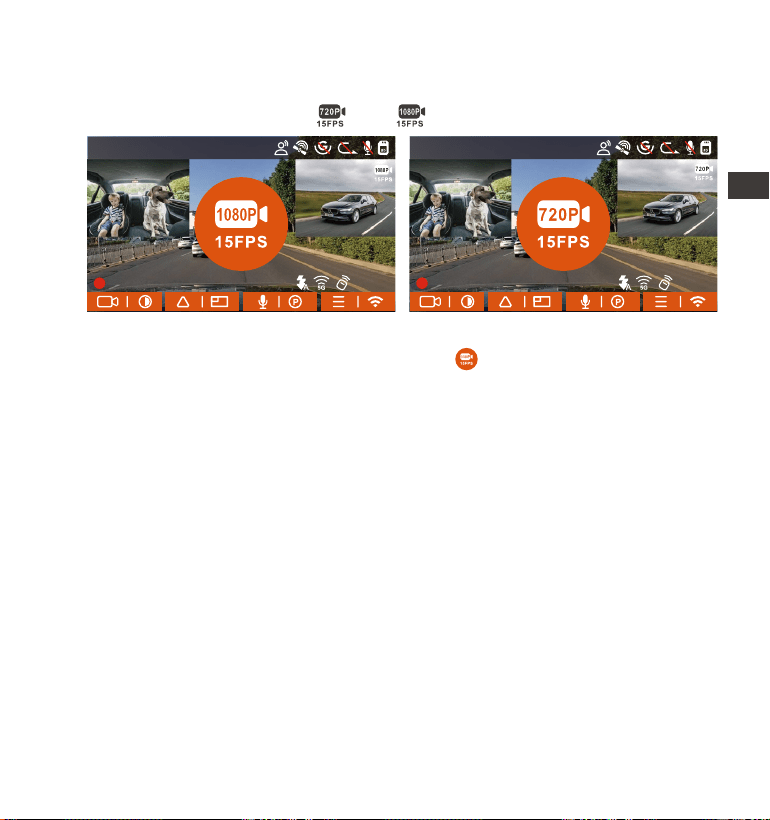
Wenn die Dashcam erkennt, dass sich das Auto nach dem Parken 5
Minuten lang nicht vibriert hat, ein Symbol wird in der Mitte des
Bildschirms angezeigt und die Auflösung aller Objektive wird automatisch
auf 1080P 15FPS oder 720P 15FPS für die Aufnahme umgeschaltet
Aufnahmedauer anhand der aktuell eingestellten Loop-Aufnahmedauer
Entscheiden. Wenn die Maschine vibriert, verlässt sie den Raum, wartet
fünf Minuten und tritt wieder ein.
Hinweis: Niedriger Bitrate Modus muss aktiviert werden. Sobald die
Dashcam ausgeschaltet ist, funktioniert Niedriger Bitrate Modus nicht.
Low-Frame-Rate-Modus
Wenn Sie den Low-Frame-Rate-Modus aktivieren, nimmt die Dashcam
gemäß den ausgewählten 1FPS/5FPS/10FPS/15FPS auf. Wenn Sie beispiels-
weise 1 FPS auswählen und die Bildrate der aktuellen Videoauflösung 30
FPS beträgt, generiert Dashcam ein Video mit 30 FPS pro Sekunde. Wenn
die Dashcam erkennt, dass sich das Auto nach dem Parken 5 Minuten
lang nicht vibriert hat, wird automatisch in den Low-Frame-Rate-Modus
gewechselt. Zeitraffer können die Integrität des Videos erheblich
bewahren und Speicherplatz auf der Speicherkarte sparen.
- 73 -
EN
EN
EN
DE
14:39:07 10-02-2023
00:00:37
MP/H
35
1440P+1080P+1080P 30FPS
14:39:07 02-10-2023
00:00:37
MP/H
35
1440P+1080P+1080P 30FPS
Niedriger Bitrate Modus
Nachdem der Niedriger Bitrate Modus eingeschaltet wurde, zeigt der
Bildschirm das Symbol von oder an.
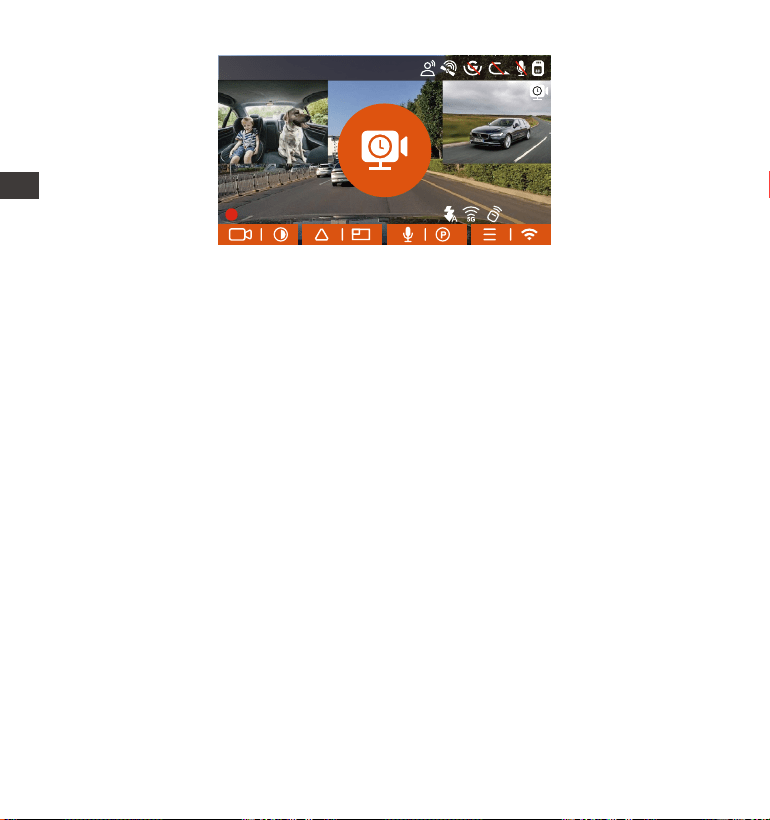
- 74 -
ENDE
[Normale Aufnahmezeit = Zeitrafferaufnahmezeit (Sek.) x Aufnahmebil-
drate FPS x Zeitrafferoption]
(Die Zeit sollte in Sekunden umgerechnet werden)
Notiz:
Die Zeiteinheit der Berechnungsformel ist Sekunden, und die berech-
nete normale Aufnahmezeit beträgt ebenfalls Sekunden.
Niedriger Bildrate Modus ähnelt der Zeitraffer.Der Unterschied zwischen
den beiden besteht darin, ob Sie 5 Minuten warten müssen, um
einzutreten. Nachdem das Zeitraffervideo eingestellt wurde, wird es
direkt eingeschaltet.
Im Modus mit niedriger Bildrate benötigt die Dashcam auch eine
stabile Stromversorgung. Sobald die Stromversorgung erschöpft ist, wird
die Dashcam heruntergefahren.
1.
2.
3.
4.2.6.Zeitraffer
Wenn Sie Zeitraffervideos aktivieren, zeichnet die Dashcam Schleifen
entsprechend der Auswahl von 1FPS/5FPS/10FPS/15FPS auf. Wenn Sie
beispielsweise ein Zeitraffervideo mit 1 FPS auswählen (die aktuelle Videoau-
flösung beträgt 30 FPS und die Dauer der Schleifenaufnahme 1 Minute),
generiert die Dashcam jede Sekunde ein Video mit 30 FPS.
14:39:07 10-02-2023
00:00:37
MP/H
35
1440P+1080P+1080P 30FPS
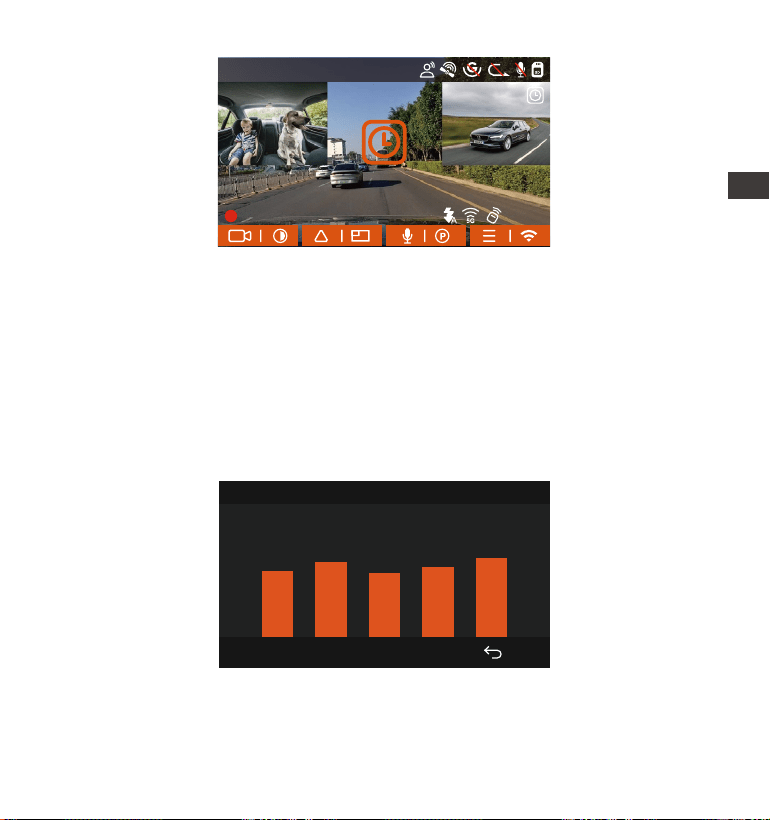
- 75 -
EN
EN
EN
DE
Die Formel zur Berechnung der Videodauer lautet:
[Normale Aufnahmezeit = Zeitrafferaufnahmezeit (Sek.) x Aufnahmebil-
drate FPS x Zeitrafferoption]
(Die Zeit sollte in Sekunden umgerechnet werden)
4.2.7.GPS
GPS ist standardmäßig eingeschaltet und GPS-Signale werden über die
GPS-Station empfangen. Es kann die Uhrzeit und das Datum in Ihrer
Nähe, den Standort des Dashcam-Videos und die Geschwindigkeits-in-
formationen automatisch korrigieren.
40
46
39
43
48
GPS Information
14:39:07 10-02-2023
00:00:37
MP/H
35
1440P+1080P+1080P 30FPS
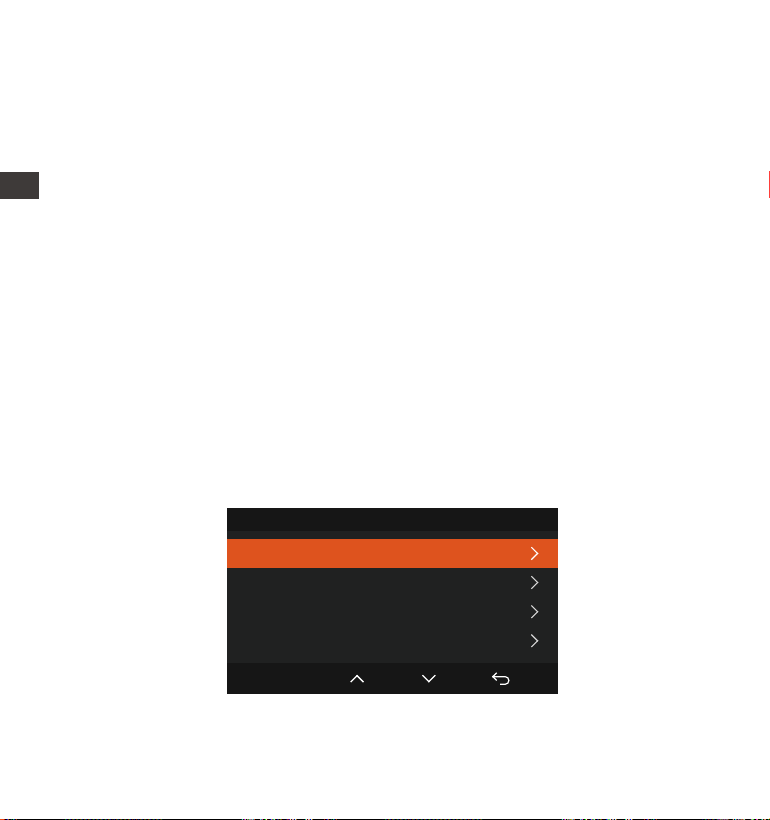
- 76 -
ENDE
Notiz:
Das GPS stellt die Verbindung innerhalb von 1 Minute nach dem
Einschalten her. Wenn Sie die Verbindung nicht innerhalb von 1 Minute
erfolgreich hergestellt haben, überprüfen Sie bitte, ob das Gerät die
GPS-Funktion eingeschaltet hat, ob es mit der GPS-Halterung verbund-
en ist, und Ihr Umgebung (Tiefgarage, dichte Wohngebiete, U-Bahnen,
Tunnel und andere Bereiche beeinträchtigen den Empfang von
GPS-Signalen).
Die GPS-Informationen werden in dem von Ihnen aufgenommenen
Video aufgezeichnet. Um sie anzuzeigen, laden Sie bitte die VANTRUE-
APP und den VANTRUE GPS Player herunter und installieren Sie.
1.
2.
4.2.8.GPS automatische Zeitkorrektur
E3 dashcam öffnet standardmäßig die automatische GPS-Zeitkorrektur,
Sie können Ihre Zeitzone auswählen, z. B. Los Angeles, Sie können
GMT-08:00 auswählen. Wenn Sie die Zeitzone Ihres Standorts nicht kennen,
können Sie sich über WLAN mit der Vantrue APP verbinden und bestäti-
gen, dass die automatische Zeitanpassungsfunktion in der APP aktiviert ist.
Nach erfolgreicher Verbindung wird die Zeitzone des Rekorders zwangs-
weise entsprechend der Zeitzone Ihres Mobiltelefons korrigiert.
Hinweis: Die automatische GPS-Zeitkorrektur muss die richtige Zeitzone
einstellen, Sie können sich nach jeder Zeitzone auf die repräsentativen
Städte beziehen.
Urzeit & Datum
Automatisches GPS-Update
Datum / Uhrzeit manuell einstellen
Datumsformat
Zeitzone
OK
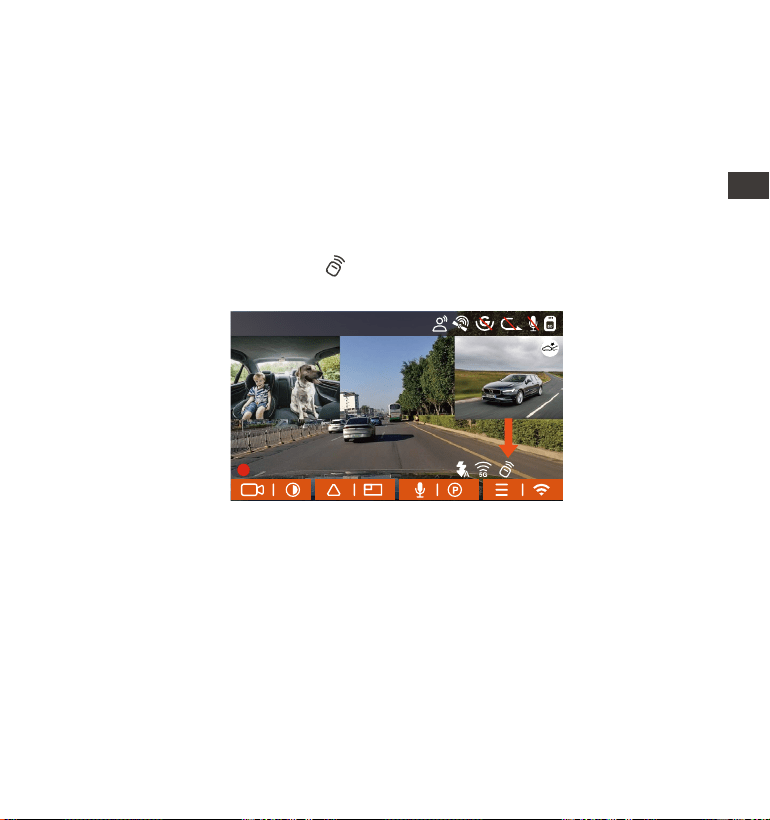
- 77 -
DE
EN
EN
EN
DE
4.2.9.Fernbedienung
Die dshcam ist mit einer Fernbedienung ausgestattet, mit der Funktionen
wie Schnappschuss, Notfallaufnahme und Aufnahme ein/aus über die
Fernbedienung schnell bedient werden können.
Fernbedienungsanschluss:
Nehmen Sie die Fernbedienung heraus, entfernen Sie die Batterieisolierfo-
lie auf der Fernbedienung, die Dashcam passt sich automatisch an die
Fernbedienung an, Sie müssen sie nicht manuell mit der Dashcam
koppeln. Wenn das Symbol auf dem Bildschirm erscheint, bedeutet
dies, dass die Fernbedienung erfolgreich angepasst wurde.
Installation der Fernbedienung:
Nachdem die Fernbedienung mit der Dashcam abgeglichen wurde,
wählen Sie bitte eine geeignete Position an Ihrem Auto aus, ziehen Sie
dann den Aufkleber der Fernbedienung ab und kleben Sie ihn auf die
ausgewählte Position. (Hinweis: Die Fernbedienung muss in einer Position
installiert werden, die das sichere Fahren nicht beeinträchtigt.)
14:39:07 10-02-2023
00:00:37
MP/H
35
1440P+1080P+1080P 30FPS
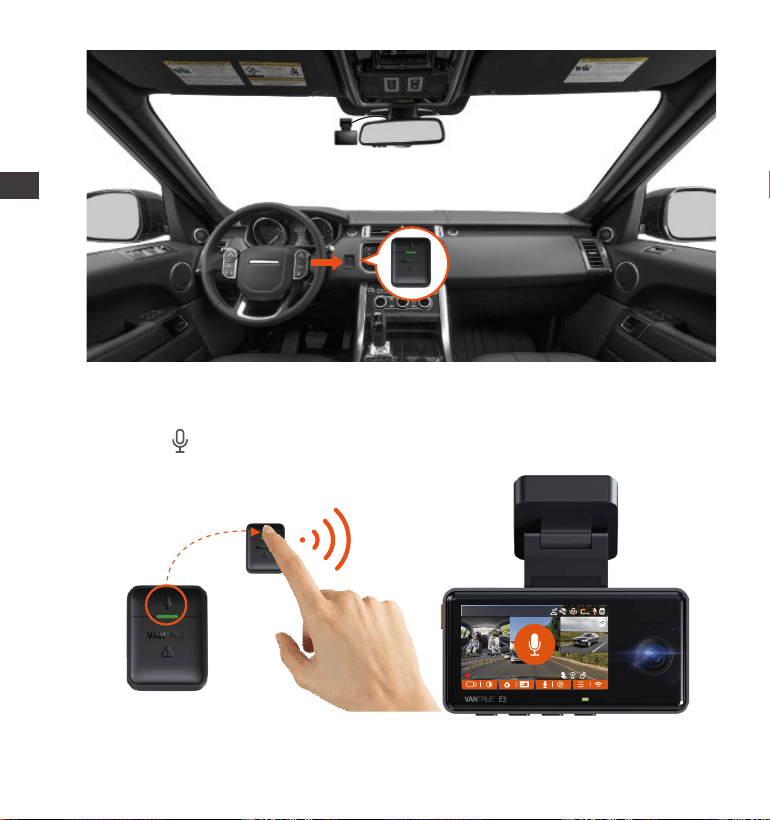
- 78 -
ENDE
ENDE
Nachdem die Fernbedienung erfolgreich verbunden wurde, verwen-
den Sie , um das Mikrofon ein- oder auszuschalten.
1.
Fernbedienungsfunktion:
14:39:07 10-02-2023
00:00:37
MP/H
35
1440P+1080P+1080P 30FPS
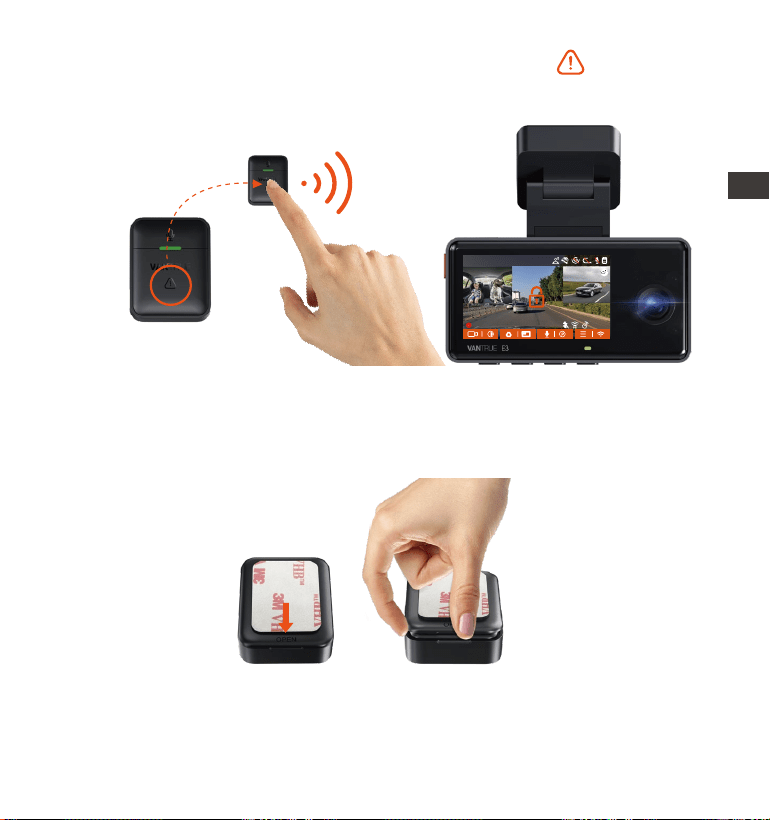
- 79 -
EN
EN
EN
DE
EN
EN
EN
DE
Batteriewechsel der Fernbedienung:
Drücken Sie nach erfolgreicher Verbindung kurz die , um die aktuelle
Datei und den Snappschus zu sperren; drücken Sie sie während des
gesperrten Videos weiter, wird der Schnappschuss fortgesetzt.
2.
An der Unterseite der Fernbedienung befindet sich eine „OPEN“-
Markierung, bitte hebeln Sie sie von der umgebenden Lücke entlang
der Rillenposition dieser Markierung auf.
1.
2.
Hebeln Sie die Batterie nach dem Öffnen vorsichtig aus der Nut an der
Vorderseite des Batteriefachs heraus, nehmen Sie dann die alte
Batterie heraus, legen Sie die neue Batterie ein und decken Sie die
hintere Abdeckung der Fernbedienung ab.
14:39:07 10-02-2023
00:00:37
MP/H
35
1440P+1080P+1080P 30FPS
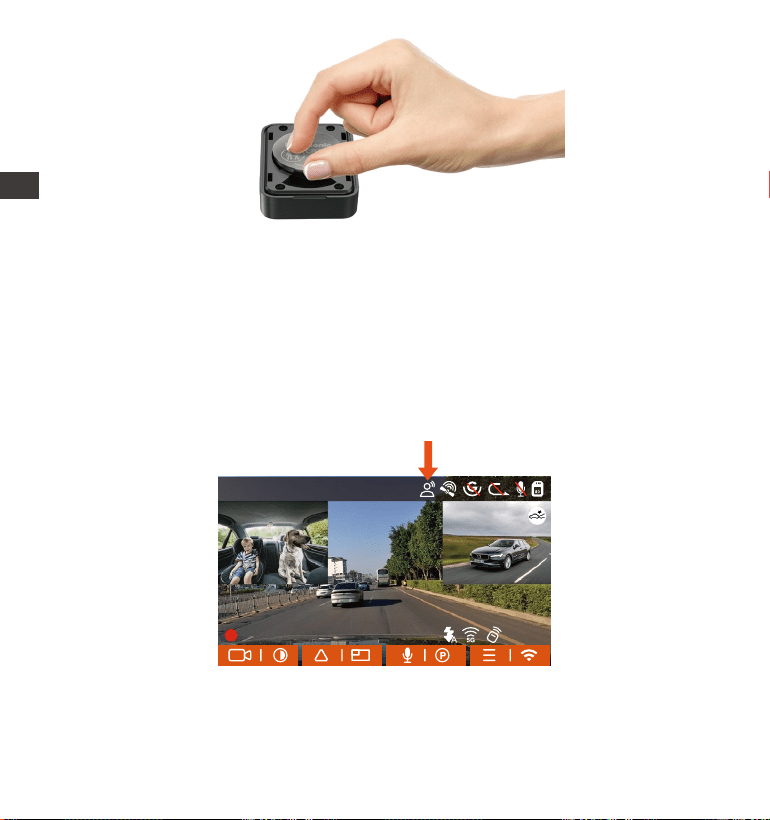
- 80 -
ENDE
Hinweis: Bitte ersetzen Sie die Batterie, wenn die Leistung der Fernbedi-
enung niedrig ist, die Fernbedienung unterstützt das Aufladen nicht. Das
Modell der Fernbedienungsbatterie ist eine CR2032-Knopfbatterie.
4.2.10 Spracherkennung
Neben der Steuerung der Dashcam mit der Fernbedienung können Sie der
Dashcam auch Sprachbefehle über den Sprachassistenten erteilen, wie z.
B. Bilder aufnehmen, Videoaufzeichnung starten, WLAN ein-/ausschalten,
Video sperren usw. Derzeit unterstützte Sprachen sind Englisch, Japanisch,
Russisch, Chinesisch. Detailliertere Sprachbefehle finden Sie unter
Systemeinstellungen > Sprachinhalt
Schalten Sie die Spracherkennung ein
Die Spracherkennung verfügt über Optionen wie niedrige Empfindlichkeit/-
Standard/hohe Empfindlichkeit/Aus, die Standardeinstellung ist Standard,
Sie können die Dashcam über Sprachbefehle fernsteuern.
14:39:07 10-02-2023
00:00:37
MP/H
35
1440P+1080P+1080P 30FPS
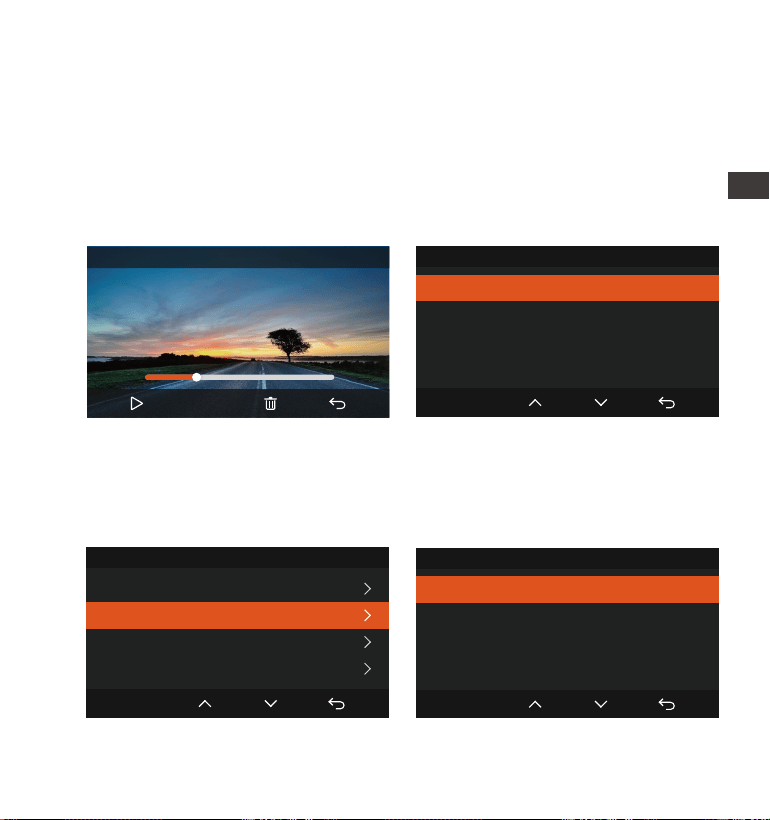
--- Video löschen
Um ein Video auf der Dashcam zu löschen, drücken Sie in der Benutzer-
oberfläche zum Durchsuchen von Dateien die Notfall-Videotaste, um das
Löschmenü aufzurufen.
- 81 -
EN
EN
EN
DE
EN
EN
EN
DE
4.2.11 Dateien wiedergeben und löschen
a.Dashcam-Betrieb
---Video abspielen
Wählen Sie nach dem Aufrufen der Dateisuche einen beliebigen Ordner
aus, um darauf zuzugreifen, nachdem Sie die Videodatei geöffnet haben,
können Sie die Taste drücken, um die nächste Datei auszuwählen, und Sie
können die Datei während der Wiedergabe löschen.
Notfallvideo
Diese Datei Löschen?
Alle Dateien löschen?
OK
Notfallvideo
Diese Datei Löschen?
Alle Dateien löschen?
OK
00:30
01:07
20230210_140633_0002_E_B.MP4
1X
Notfallvideo
20230210_140633_0001_E_B.MP4
20230210_140633_0002_E_B.MP4
20230210_140633_0003_E_B.MP4
20230210_140633_0004_E_B.MP4
2/5
OK
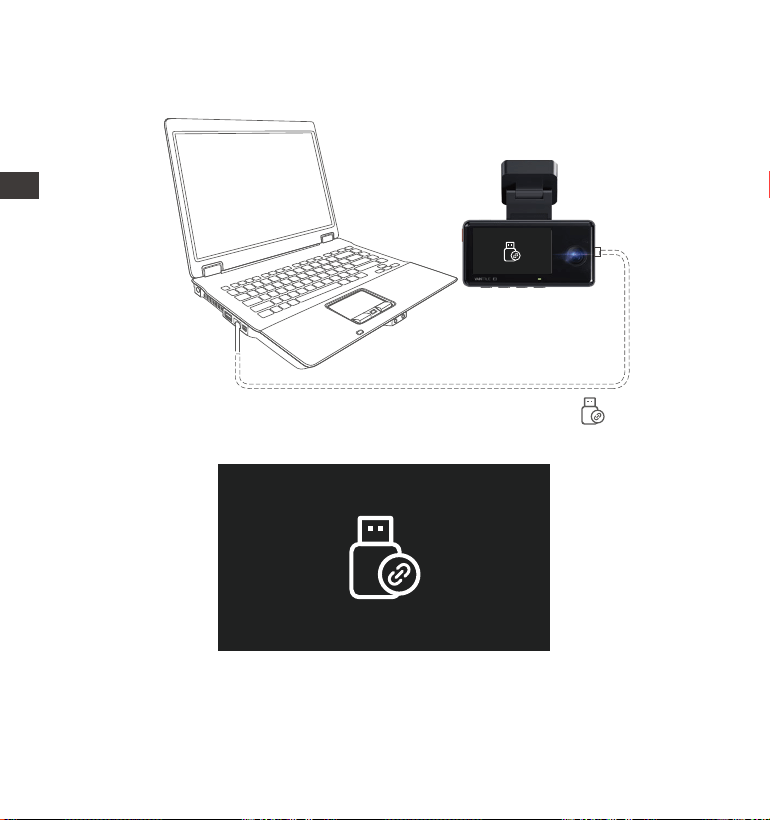
- 82 -
ENDE
Schließen Sie die Dashcam über ein USB-C-Kabel an den Computer an.
b. Wiedergabe und Löschen von Dateien auf dem Computer
1.
Nach erfolgreicher Verbindung erscheint das Symbol „ “ auf dem
Dashcam-Display und Sie können die Videodateien im Computerordner
sehen.
2.
Je nach Computersystem des Benutzers wird die Dashcam nach dem
Anschließen an den Computer als Wechseldatenträger oder Wechsel-
ordner auf dem Computer angezeigt.
3.
(Dashcam zeigt diesen Bildschirm)
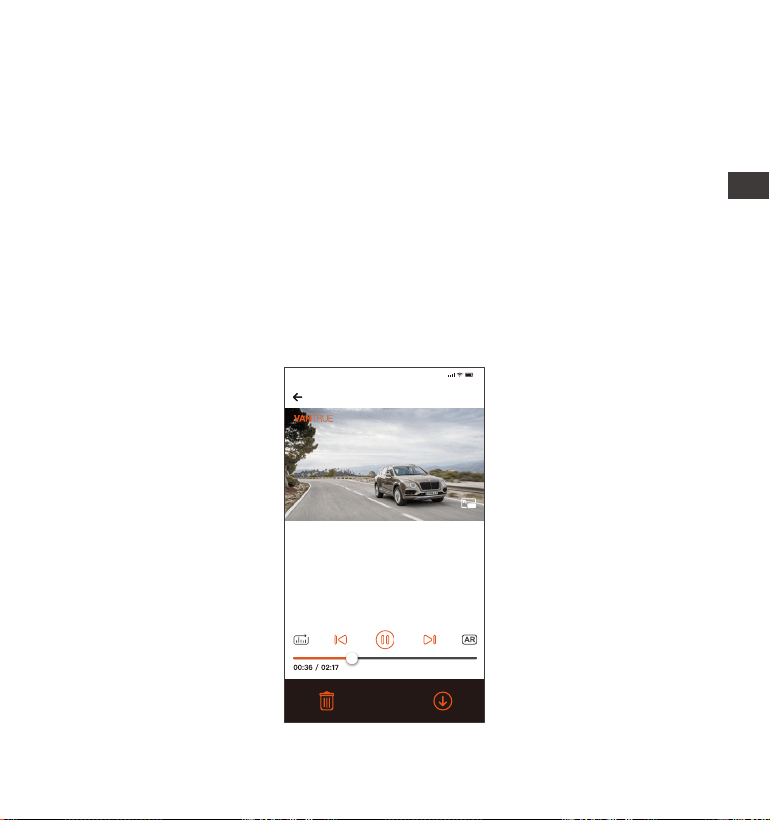
- 83 -
EN
EN
EN
DE
c. Dateien in der mobilen APP wiedergeben und löschen
Nachdem die Dashcam über WLAN mit dem Mobiltelefon verbunden ist,
können Dateien im Kameraordner in der Handy-APP wiedergegeben,
heruntergeladen und gelöscht werden.
4.
5.
6.
Um die Datei auf dem Computer anzuzeigen, können Sie direkt mit der
rechten Maustaste klicken, um das Menü zu öffnen und sie zu löschen.
Sie können auch einen USB-Kartenleser verwenden, um die Speicherk-
arteninformationen zu lesen.
Um eine stabile Stromversorgung beim Anschluss an einen Computer zu
gewährleisten, können Sie überprüfen, ob es sich bei der Computer-
schnittstelle um eine USB3.0-Schnittstelle handelt.Bei Verwendung eines
Desktop-Computers zum Anschluss wird empfohlen, die USB-Schnitt-
stelle auf der Rückseite des Desktops zu verwenden Computer-Host.
20230210_115036_0079_N_A.MP4
10/02/2023 11:5:35 E3 000.000000. 000.000000. 36MK/H
Hinweis:
9:41
Um GPS-Informationen anzuzeigen,
müssen Sie zuerst die Videodatei in
den lokalen Ordner der APP
herunterladen und dann im lokalen
Ordner abspielen.
- 84 -
ENDE
4.2.12 Aktualisieren Sie die Dashcam-Software
Um ein besseres Benutzererlebnis zu erreichen, aktualisieren wir die
Dashcam-Software von Zeit zu Zeit. Sie können die neueste Softwarever-
sion herunterladen, indem Sie sich an unsere Kundendienstmitarbeiter
wenden oder sich auf unserer offiziellen Website anmelden. Folgen Sie
nach dem Herunterladen der Software den Anweisungen auf der
offiziellen Website zum Upgrade.
Die Wiedergabe und das Herunterladen von SD-Kartendateien in der
APP verbraucht keinen Datenverkehr.
Die Videodatei wird auf das lokale Gerät heruntergeladen und
wiedergegeben, Sie können die GPS-Track-Informationen anzeigen,
aber Sie müssen die DashcamWIFI trennen, da sonst die Karteninforma-
tionen leer sind.
Notiz:
1.
2.

- 85 -
EN
EN
EN
DE
Hinweis: Schalten Sie die Dashcam während des Aktualisierungsvorgangs
nicht aus, da dies sonst dazu führt, dass die Dashcam nicht erfolgreich
aktualisiert wird oder die Dashcam beschädigt wird. Wenn das Upgrade
aufgrund eines plötzlichen Stromausfalls fehlschlägt, können Sie sich an
unsere Kundendienstmitarbeiter wenden, und es wird jemand da sein,
der das Problem für Sie löst.
4.2.13.Dashcam-Arbeitsumgebung
Die normale Arbeitsumgebung der Dashcam liegt bei -20℃ bis 60℃. Das
Arbeiten außerhalb dieses Temperaturbereichs beeinträchtigt die
Leistung, was auf lange Sicht die Lebensdauer der Dashcam beein-
trächtigt.
Daher empfehlen wir Ihnen:
Wenn Sie längere Zeit in einer heißen Umgebung mit hohen Tempera-
turen parken, verwenden Sie bitte den Kollisionserkennungsmodus oder
unterbrechen Sie die Verwendung des Rekorders.
In extrem kalten Umgebungen nimmt die Aktivität der Dashcam-Bat-
terie ab.Wenn die Dashcam längere Zeit nicht verwendet wird,
entfernen Sie bitte die Dashcam und legen Sie sie in die Armlehnenbox,
um die normale Verwendung der Dashcam sicherzustellen.
1.
2.

- 86 -
ENDE
5. Produktspezifikationen
E3Modell
Frontkamera F1.8
Kabinenkamera F2.0
Rückfahrkamera F1.8
English、简体中文、日本語、Deutsch、Italiano、
Español、Français、Русский язык、Polski
Novatek Hochleistungsprozessor
Sony Sensor
Eingebauter Triaxialsensor
2.4GHz&5GHz
2,45" LCD-Display
Für Ihr besseres Produkterlebnis werden wir das Produkt aktualisieren, und
die Produktspezifikationen können sich ohne vorherige Ankündigung
ändern.
Chip-Prozessor
Bildsensor
G-sensor
WIFI
Bildschirm
Frontkamera 160°
Kabinenkamera 165°
Rückfahrkamera 160°
Video Resolution
Blende
Sprache
Weitwinkel
Front+Kabine+Rück:
1944P+1080P+1080P 30FPS
1440P+1080P+1080P 30FPS
1080P+1080P+1080P 30FPS
1440P+1080P+720P 30FPS
1440P+720P+720P 30FPS
1080P+1080P+720P 30FPS
1080P+720P+720P 30FPS
720P+720P+720P 30FPS
Front+Kabine:
1944P+1080P 30FPS

- 87 -
EN
EN
EN
DE
EN
EN
EN
DE
MP4
JPEG
Eingebautes Mikrofon und Lautsprecher
Videoformat
Bildformat
Audio
Speichermethode
USB-C
Superkondensator
DC 5V 2.4A
6W
-4℉-140℉(-20℃bis60℃)
-22℉-158℉(-20℃bis70℃)
USB-Schnittstelle
Batterietyp
Strom
Energie
Betriebstemperatur
Lagertemperatur
Micro-SD-Karte (unterstützt 32 GB-512 GB,
Speicherkarte mit U3- oder höherer
Kartengeschwindigkeit)
1440P+1080P 30FPS
1080P+1080P 30FPS
1080P+720P 30FPS
720P+1080P 30FPS
720P+720P 30FPS
Front+Rück:
1944P+1080P 30FPS
1440P+1080P 30FPS
1080P+1080P 30FPS
1080P+720P 30FPS
720P+1080P 30FPS
720P+720P 30FPS
Front:
2592x1944P 30FPS
2560x1440P 30FPS
1920x1080P 30FPS
1280x720P 30FPS

- 88 -
ENDE
Die Garantiezeit der Marke VANTRUE beträgt 12 Monate. Wenn Sie Fragen
zum Produkt haben, können Sie diese auf drei Arten lösen:
①Öffnen Sie die VANTRUE APP und finden Sie die Antwort unter Info >
Häufig gestellte Fragen;
②Kontaktieren Sie den Kunden Servicemitarbeiter Ihres Einkaufskanals ;
③Senden Sie eine E-Mail an unsere offizielle Mailbox [email protected],
wir werden eine engagierte Person haben, die die Frage innerhalb von
12-24 Stunden beantwortet.
Die Marke VANTRUE
®
hat ein unerschütterliches Engagement für die
kontinuierliche Verbesserung von Produkten, Dienstleistungen und
Benutzererfahrung. Wenn Sie Ideen haben, wie wir es besser machen
können, können Sie uns gerne Ihre wertvollen Kommentare und
Vorschläge an unsere offizielle E-Mail-Adresse [email protected]
hinterlassen.
Vielen Dank, dass Sie sich für VANTRUE
®
entschieden haben
6. Kundendienst
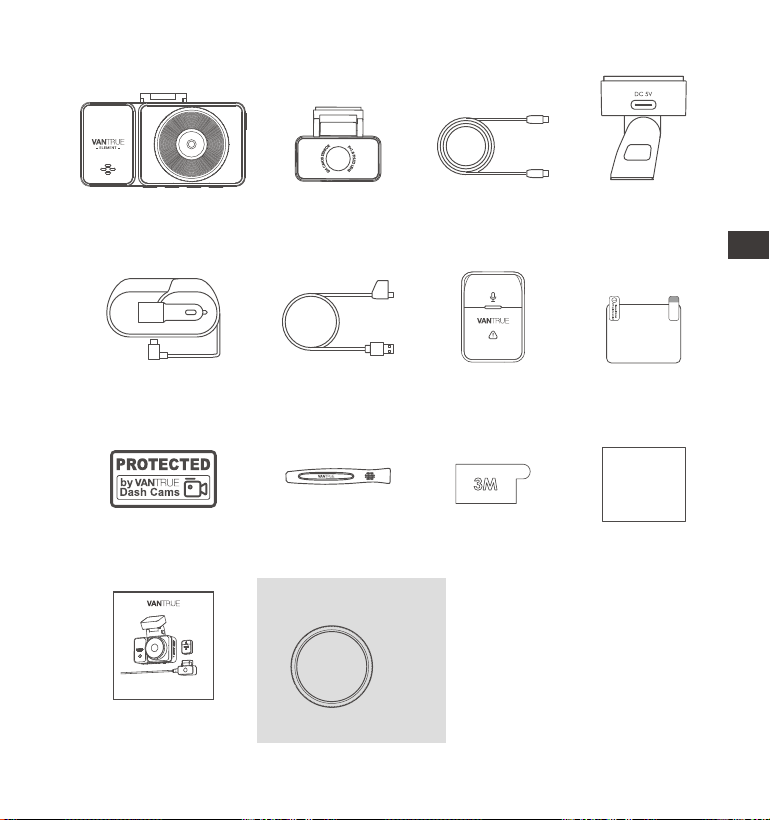
- 89 -
EN
EN
EN
FR
1. Qu'y a-t-il dans la boîte?
H.
Tissu sans
poussière
Autocollants
d'avertissement*2
L.
A.
Dashcam
VANTRUE
®
E3
E.
Câble pour
caméra arrière
(6m)
I.
Manuel de
l’utilisateur
M.
Filtre CPL
N.
G.
K.
D.
Support adhésif
GPS
C.
Télécommande
sans Fil
Chargeur de
voiture avec
câble USB C (3.5 m)
Autocollants
adhésifs 3M
B.
Caméra arrière
Pied-de-biche
F.
Câble de
données USB C
(1m)
J.
Autocollants
électrostatiques*2
Accessoires Optionnels
Element 2
User Manual
Voice-Controlled Dual Dash Cam
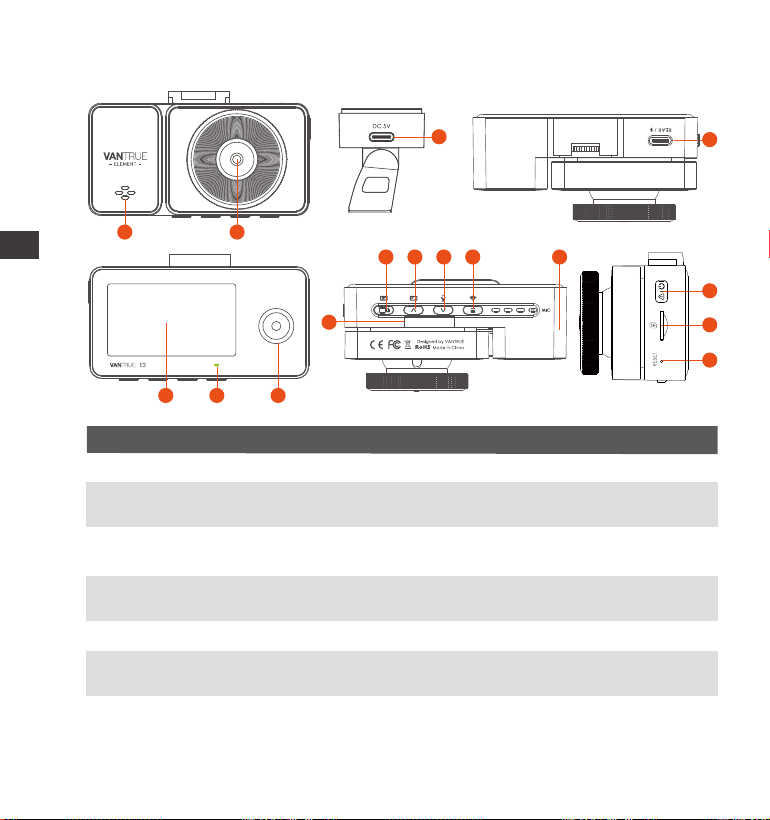
- 90 -
ENFR
2. Vue d'ensemble de la caméra
Numéro DescriptionNom
1
Enregistrer une vidéo de la route devant la
voiture.
2 Caméra frontale
Délivre le son pendant la lecture vidéo.
3
Haut-parleur
Interface d'alimentationConnecteur
d'alimentation
Port de connexion pour le câble de la
caméra arrière
4 Connecteur de
caméra arrière
Écran LCD de 2,45 pouces5 Écrans
Peut être configuré pour basculer automa-
tiquement en mode vision nocturne infrarouge
7 Caméra
intérieure
Le voyant vert allumé signifie qu'il est sous
tension
6 Indicateur vidéo
14
15
16
3
4
21
5 6 7
8
131211
10
9
VTJE1210130

- 91 -
EN
EN
EN
FR
8
Pendant l'enregistrement vidéo et le mode
veille, appuyez longuement pour activer/
désactiver le WiFi.
9
Pendant l'enregistrement vidéo et la veille,
Appui court pour changer de fenêtre vidéo;
dans le réglage du menu et la navigation
dans les fichiers, Appui court pour afficher
l'option précédente, Appui long pour faire
défiler vers le haut pour afficher les options;
en mode lecture, Appui court pour avancer
rapidement; En mode Wi-Fi, appuyez sur
n'importe quelle touche pour quitter le Wi-Fi
10
Pendant l'enregistrement vidéo et la veille,
Appui long pour entrer rapidement en mode
parking et appui court pour allumer/éteindre
le microphone; Dans le menu et la naviga-
tion des fichiers, Appui long pour faire défiler
les options, Appui court pour afficher l'option
suivante; Appui court pour le supprimer lors
de la lecture de fichiers. En mode Wi-Fi,
appuyez sur n'importe quelle touche pour
quitter le Wi-Fi
11
12
Bouton
Bouton
Bouton
Bouton
Numéro de série pour l'enregistrement de la
garantie.
Numéro de Série
Pendant l'enregistrement , Appui long pour
éteindre l'écran, appui court pour arrêter
l'enregistrement vidéo et passer en mode
veille;Vous pouvez confirmer l'option
sélectionnée dans le menuet lire/mettre en
pause des fichiers.
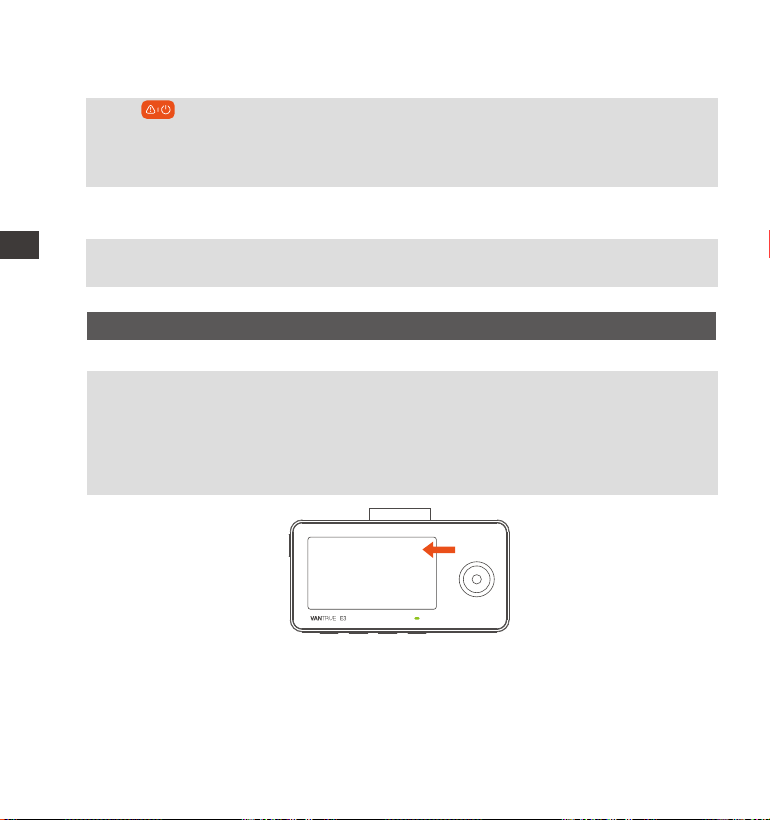
- 92 -
ENFR
Enregistre un son clair avec les séquences
vidéo.
Mise sous/hors tension. Appui long pour allumer
et éteindre, appui court pour verrouiller la
vidéo et prendre des photos pendant l'enregis-
trement d'un événement.
14 Bouton
Microphone
Indicateur LED
DescriptionLED
Lumière verte fixe Enétat de veille ou le
voyant d'enregistrement
est désactivé
La caméra est en train
d'enregistrer.
État des voyants
Enregistrement
lumière verte clignotante
13
16 Bouton de
réinitialisation
Prise en charge de la carte Micro SD jusqu'à 512
Go en FAT32, classe 10
Appuyez brièvement pour redémarrer la caméra.
15 Slot pour carte
MicroSD
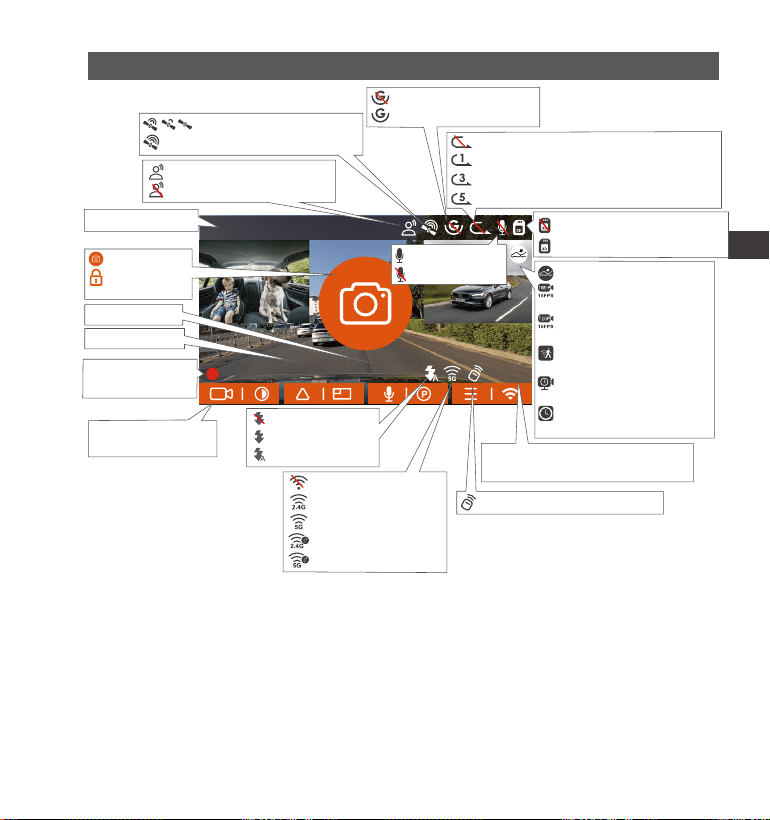
- 93 -
EN
EN
EN
FR
Vue d'ensemble de la caméra
3. Installation
3.1 Installation d'une carte mémoire (Carte microSD VANTRUE recommandée)
Veuillez insérer une carte mémoire (capacité de la carte mémoire :
32Go-512 Go, vitesse de la carte : U3/Class10/A2), car la dashcam a
certaines exigences sur la vitesse de la carte mémoire. Pour un
fonctionnement fiable, nous vous recommandons d'utiliser la carte SD
VANTRUE (vendue séparément).
14:39:07 10-02-2023
00:00:37
MP/H
35
1440P+1080P+1080P 30FPS
Enregistrement en boucle désactivé
Enregistrement en boucle (1 minute)
Enregistrement en boucle (3 minutes)
Enregistrement en boucle (5 minutes)
Capteur G désactivé
Capteur G activé
Vitesse de conduite
enregistrée (KMH ou MPH)
Résolution vidéo
Détection de collision;
Enregistrement à bas
débit1080P
Enregistrement à bas
débit 720P
Détection de
mouvement;
Mode Parking à faible
fréquence d'images
Enregistrement en
accéléré activé
Connexion du signal GPS
Signal GPS verrouillé
Assistant vocal activé
Assistant vocal désactivé
MP/H
35
Icônes d'indication
des boutons
Télécommande connectée
IR LED désactivé
IR LED activé
IR LED auto
Heure actuelle
Instantané
Verrouiller la
vidéo
Date actuelle
MIC activé
MIC désactivé
Sans carte mémoire
Carte mémoire insérée
Durée
d'enregistrement
Wi-Fi désactivé
2.4G Wi-Fi activé
5G Wi-Fi activé
2.4G Wi-Fi connecté
5G Wi-Fi connecté
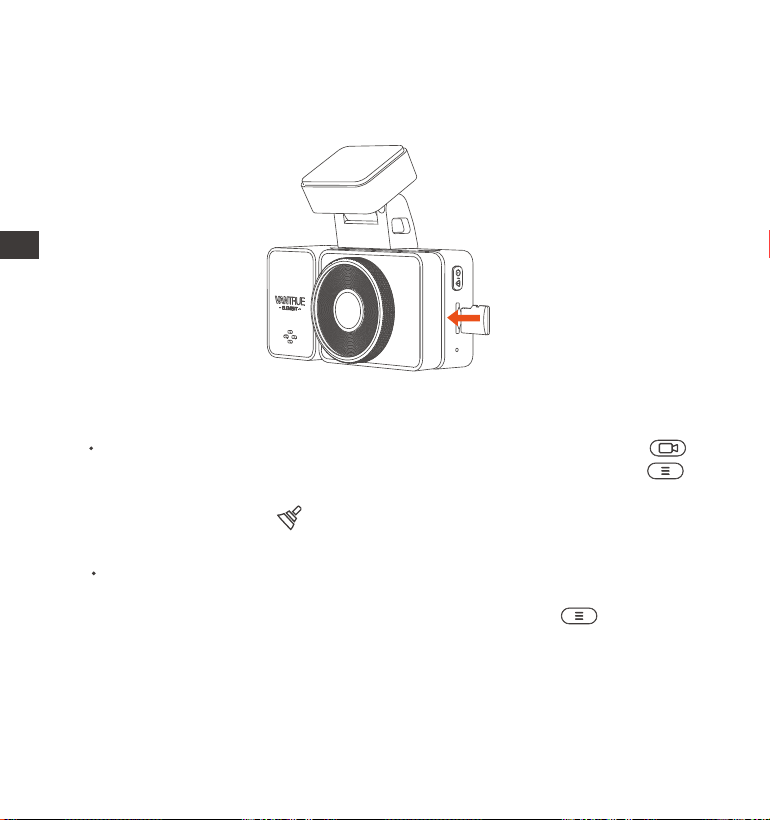
- 94 -
ENFR
Si l'appareil est en train d'enregistrer, veuillez appuyer sur l'icône
pour mettre en pause l'enregistrement, puis appuyez sur l'icône
pour entrer dans le menu, puis entrez dans le "Système", sélectionnez la
carte de formatage et confirmez pour formater la carte mémoire
jusqu'à ce qu'il vous demande "Formaté avec succès" .
Après avoir inséré la carte mémoire, si l'écran affiche "Erreur de carte,
veuillez formater" (veuillez noter que l'enregistreur n'enregistre pas à ce
moment), veuillez appuyer directement sur le bouton pour accéder
au menu et démarrer le processus de formatage.
Avant d'utiliser cette carte, veuillez suivre les étapes ci-dessous pour la
formater correctement:
Installation de la carte mémoire : Une icône indique le sens d'insertion de
la carte mémoire. Veuillez pousser la carte mémoire dans la fente pour
carte selon la direction indiquée par l'icône, jusqu'à ce qu'un "clic" se
fasse entendre dans la fente pour carte, indiquant que la carte mémoire
est correctement insérée
Nous vous recommandons de formater la carte une fois par mois pour
garantir l'utilisation normale de la caméra de tableau de bord;
1.
RAPPEL:
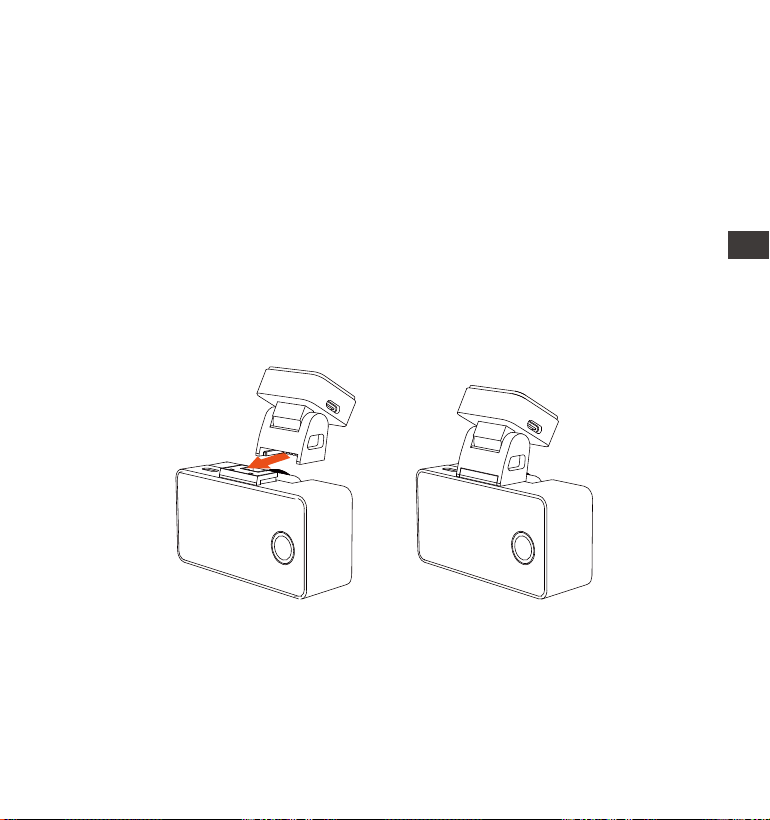
- 95 -
EN
EN
EN
FR
EN
EN
EN
FR
Ne retirez pas ou n'insérez pas la carte mémoire pendant l'enregis-
trement pour éviter de perdre des vidéos importantes.
Veuillez ne pas utiliser de mauvaises cartes ou de cartes à faible vitesse
sur la caméra de tableau de bord, car il est facile d'arrêter ou de perdre
l'enregistrement en raison d'une défaillance de la carte mémoire.
Avant de formater la carte mémoire, veuillez vérifier le dossier vidéo
d'urgence sur la carte SD pour voir s'il y a des vidéos qui doivent être
enregistrées séparément, afin de ne pas supprimer des vidéos impor-
tantes par erreur.
2.
3.
4.
3.2 Installation de la caméra sur votre pare-brise
Installation du support caméra : Alignez le support avec l'interface de
montage de la caméra, puis poussez jusqu'à ce que le support soit
installé
1.
Démarrez et observez l'emplacement d'installation:
Avant d'installer l'E3, veuillez mettre sous tension et vérifier si l'angle de
prise de vue de l'objectif avant et de l'objectif intérieur est approprié à
travers l'écran.
2.
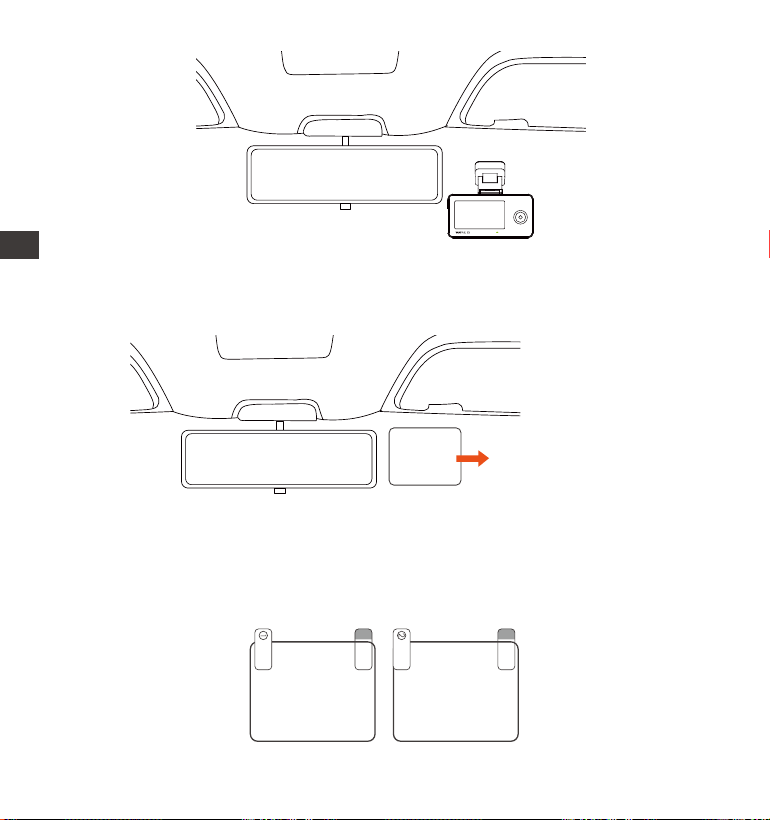
- 96 -
ENFR
Avant d'installer le E3, veuillez installer l'autocollant électrostatique pour
éviter de laisser des traces sur le pare-brise après le deuxième démon-
tage.
Remarque: veuillez choisir une position appropriée sur le pare-brise et
nettoyez-le. Veuillez d'abord retirer le film protecteur ①, le coller sur le
pare-brise, puis déchirer le film protecteur ②.
3.
Électrostatique autocollant
Please peel off this mask
AFTER application completed
Please peel off this
mask BEFORE application
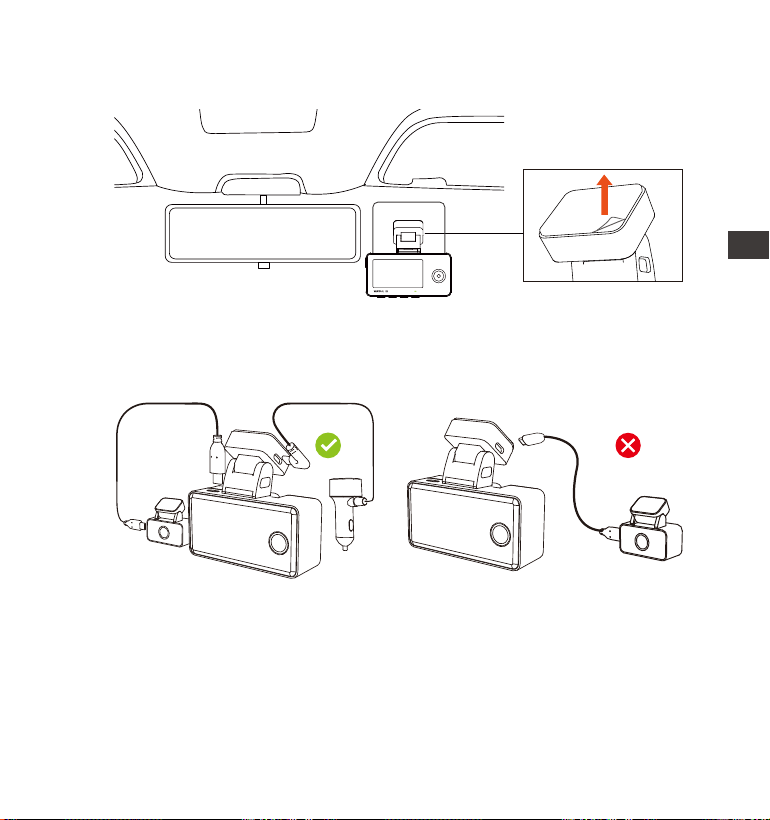
- 97 -
EN
EN
EN
FR
Installez E3: une fois l'autocollant électrostatique installé, retirez
l'autocollant adhésif du support E3 et collez-le sur l'autocollant électro-
statique.
4.
Connectez les caméras avant et arrière et allumez-les via le câble de
charge de la voiture, sélectionnez d'abord un emplacement approprié
pour installer la caméra avant à l'emplacement où l'autocollant
électrostatique est installé.
5.
Installation de la caméra arrière: Nous vous recommandons de
sélectionner une position proche du centre du pare-brise arrière.
Veuillez éviter la position où la lunette arrière a des lignes de grille pour
éviter que l'écran ne soit bloqué, et nettoyez la position avant
l'installation. Fixez la caméra arrière à l'emplacement sélectionné et
réglez l'objectif selon vos besions.
6.
(Câblage Correct) (Câblage Incorrect)
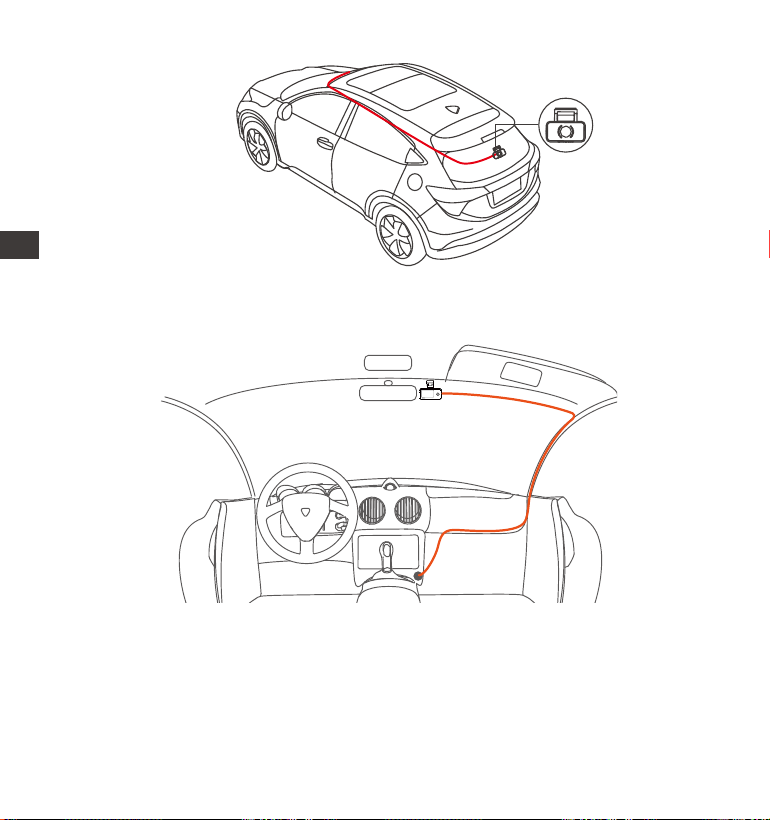
- 98 -
ENFR
Après avoir débranché le chargeur de voiture, rangez-le dans le sens
indiqué sur la figure, puis allumez la dashcam.
7.
Veuillez ajuster l'angle d'enregistrement de la caméra frontale en
fonction des besoins réels.
8.

- 99 -
EN
EN
EN
FR
3.3 Téléchargement de l'APP
Veuillez scanner le code QR de la version appropriée ci-dessous pour
télécharger l'APP et l'installer.Recherchez l'application "Vantrue" dans
l'App Store ou Google Play Store pour trouver l'application, puis
téléchargez -la et installez-la sur votre téléphone.
Remarque : Une fois la caméra connectée au téléphone mobile via WiFi,
vous pouvez prévisualiser la vidéo en temps réel, modifier les paramètres
de l'enregistreur, télécharger le fichier avec 0 trafic et lire la vidéo sur le
téléphone mobile. Cependant, les fonctions de lecture de piste GPS et
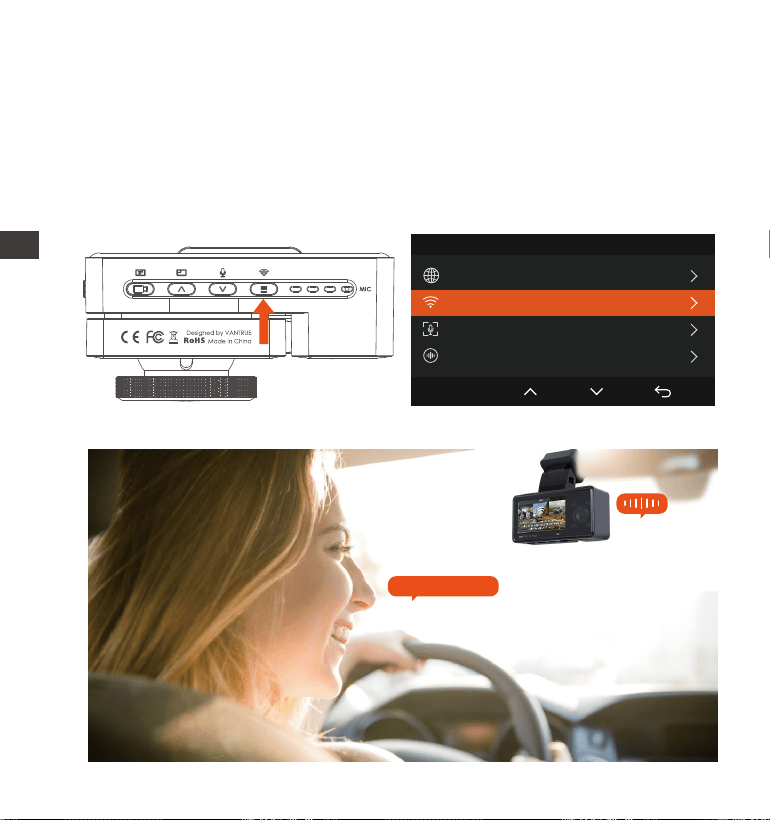
Turn on WiFi
Paramètres du Système 2/14
Langue
Wi-Fi
Commande Vocale
Contenu Vocal
OK
- 100 -
ENFR
3.4 Connexion Wi-Fi
Il existe 3 façons d'activer le Wi-Fi de l'enregistreur :
de partage vidéo dépendront des services à valeur ajoutée Internet ou
télécom (nécessite d'éteindre/déconnecter l'enregistreur WiFi).
VTJE1210130
Appuyez longuement sur le
bouton de menu pendant 2
secondes pour l'ouvrir rapidement
Allez dans Paramètres système >
Wi-Fi activé
Commande de reconnaissance vocale "Turn on Wi-Fi" pour allumer.
1.
3.
2.
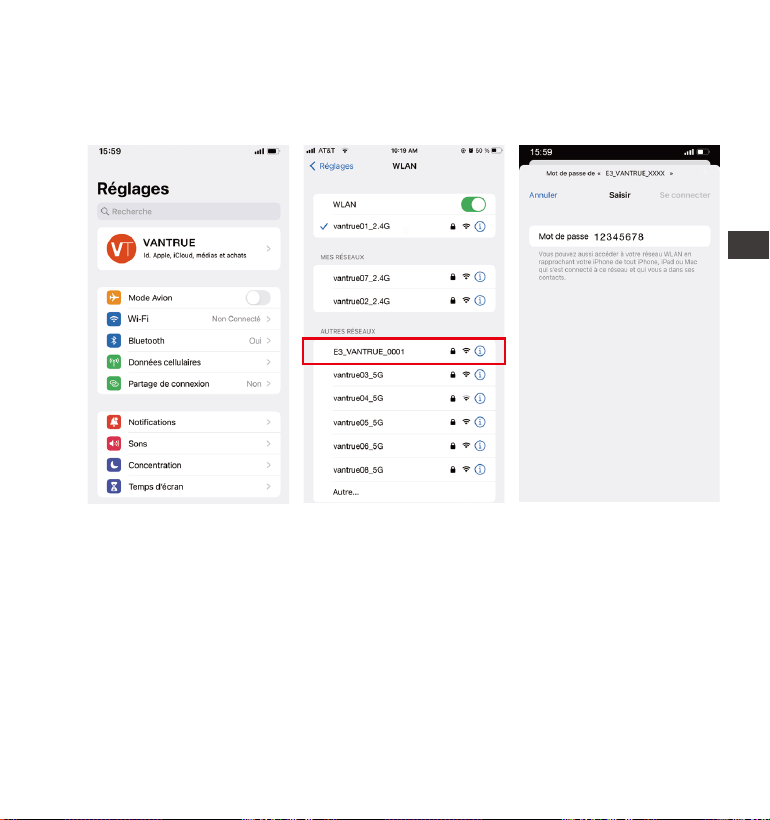
- 101 -
EN
EN
EN
FR
puis ouvrez les paramètres WiFi du téléphone mobile, recherchez le nom
WiFi tel que:E3_VANTRUE_XXXX, entrez le mot de passe par défaut du
WiFi: 12345678, et le téléphone mobile peut se connecter avec succès
au WiFi.
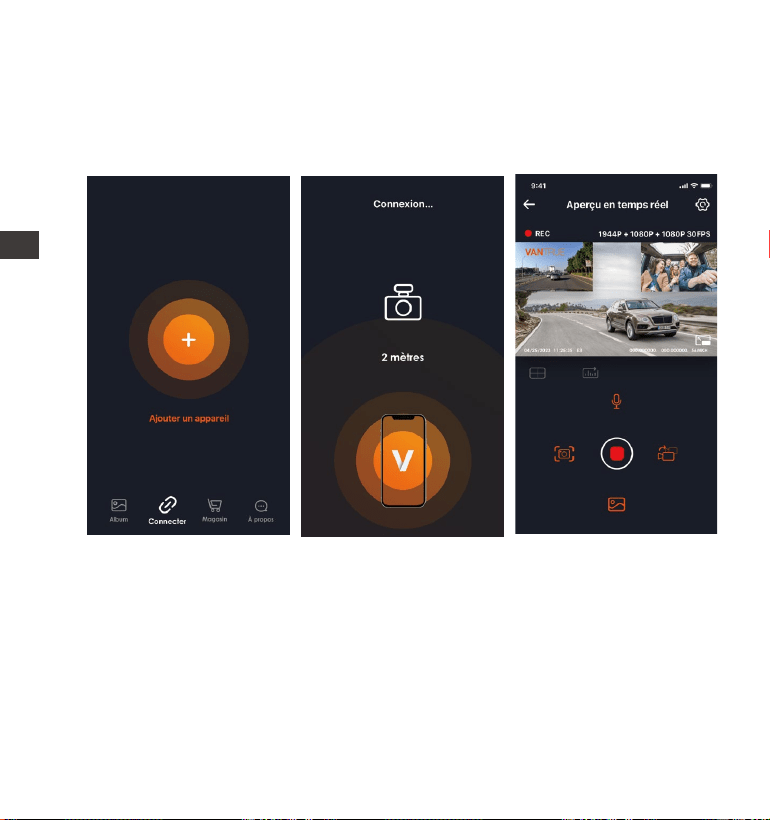
- 102 -
ENFR
3.5 Connexion APP
Une fois la connexion WiFi établie, cliquez sur "+" lors de la première
ouverture de l'APP, ajoutez le modèle de caméra, puis l'APP se connect-
era automatiquement à la caméra et affichera la situation d'enregis-
trement en temps réel actuelle de la caméra.
Noter:
Si vous ne vous êtes pas connecté au WiFi avant d'ouvrir l'APP, l'APP
vous demandera "Veuillez d'abord vous connecter au WiFi", et passera
automatiquement aux paramètres WiFi, veuillez d'abord suivre les
étapes pour vous connecter au WiFi.
Si vous vous êtes connecté au Wi-Fi, mais passez à l'autorisation
d'application de l'APP après avoir sélectionné le modèle dans l'APP,
veuillez vérifier si l'autorisation de réseau sans fil de l'APP est activée.
1.
2.
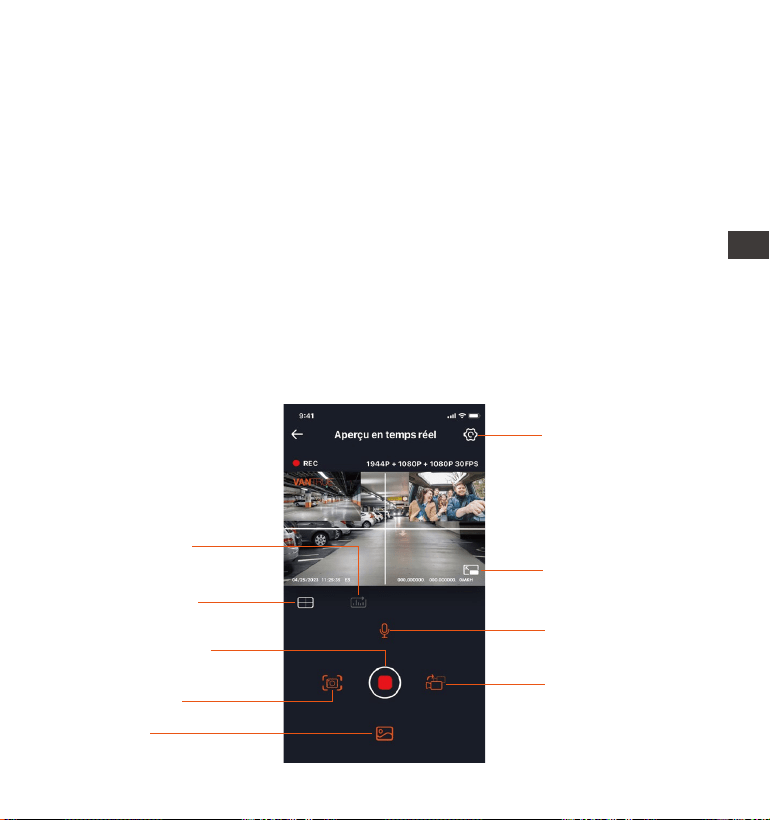
- 103 -
EN
EN
EN
FR
Le mot de passe initial de cet appareil est uniquement pour la connex-
ion initiale. Afin d'éviter les risques de sécurité potentiels, assurez-vous
de le changer initial à temps après la connexion initiale pour empêcher
d'autres personnes de se connecter à votre appareil sans autorisation
ou d'autres conséquences néfastes.
Si vous oubliez le mot de passe Wi-Fi, vous pouvez restaurer les
paramètres d'usine et le mot de passe sera également restauré par
défaut.
Si le nom Wi-Fi connecté ne correspond pas au modèle, l'application
demandera "Veuillez sélectionner le bon modèle" et reviendra automa-
tiquement à l'interface de sélection du modèle.
Si vous ne le connectez pas à votre téléphone après avoir activé le wifi,
la caméra éteindra le wifi après 10 minutes et reviendra à l'interface
d'enregistrement
3.
4.
5.
6.
3.6 Fonctionnement de l'application
Album
Bouton arrêter
l'enregistrement
Microphone
Réglage
Bouton plein écran
Ligne de correction
de l’objectif
Statistiques de
kilométrage
Commutateur de
vitre avant et arrière
Instantané

- 104 -
ENFR
Après être entré dans l'aperçu en temps réel de l'APP, vous pouvez
effectuer les opérations suivantes:
Aperçu vidéo : Une fois l'appareil connecté avec succès à l'APP,
l'enregistreur accède à la page d'aperçu en temps réel, cliquez sur le
bouton plein écran ou placez le téléphone horizontalement, l'image en
temps réel passera automatiquement mode aperçu plein écran.
Cliquez sur le bouton commutation pour basculer les fenêtres vidéo
avant et arrière.
Lecture vidéo : Vous pouvez visualiser le fichier vidéo ou photo enregistré
sur la carte SD dans l'APP, et cliquer sur le fichier pour lire la vidéo.
Téléchargement vidéo : Vous pouvez choisir de télécharger des vidéos
ou des images dans l'interface de navigation des fichiers de la carte SD
ou dans la lecture vidéo. Après avoir téléchargé la vidéo, elle peut être
lue dans le fichier local de l'application et la trace GPS de la vidéo peut
être visualisée.
Capture vidéo : Vous pouvez capturer l'image actuelle dans l'interface
de prévisualisation en temps réel de l'application. Veuillez cliquer sur le
bouton d'instantané pour le prendre.
Statistiques de kilométrage: Les utilisateurs cliquent pour télécharger les
informations de kilométrage au besoin, et elles seront enregistrées dans
l’application sous forme d’images ou de fichiers PDF.
Ligne de correction de l’objectif : Corrigez l’équilibre de l’objectif avec
des réticules précis afin que l’image vidéo ne soit pas biaisée
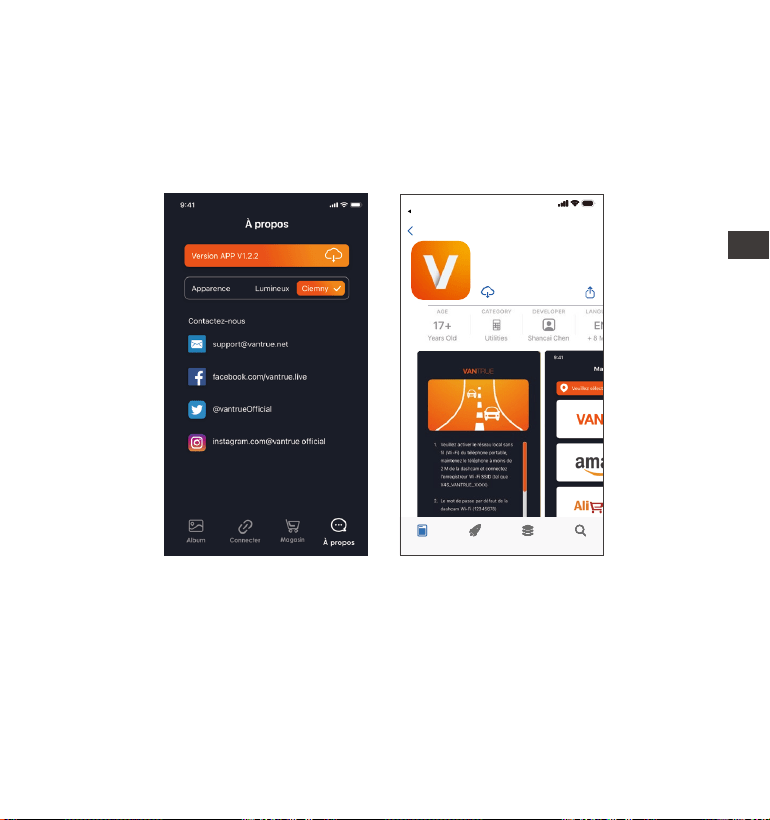
- 105 -
EN
EN
EN
FR
3.7 Mise à niveau de l'application
Ouvrez l'application "Vantrue", entrez "Paramètres> À propos> Détecter
nouveau Version", l'App détectera automatiquement si la version de l'App
est la dernière version. S'il existe une nouvelle version de l'application,
suivez les invites de l'application et mettez-la à niveau.
Vantrue Ltd.
Vantrue
Vantrue
9:41
Derrière
Connard Le jeu Apps Recherche
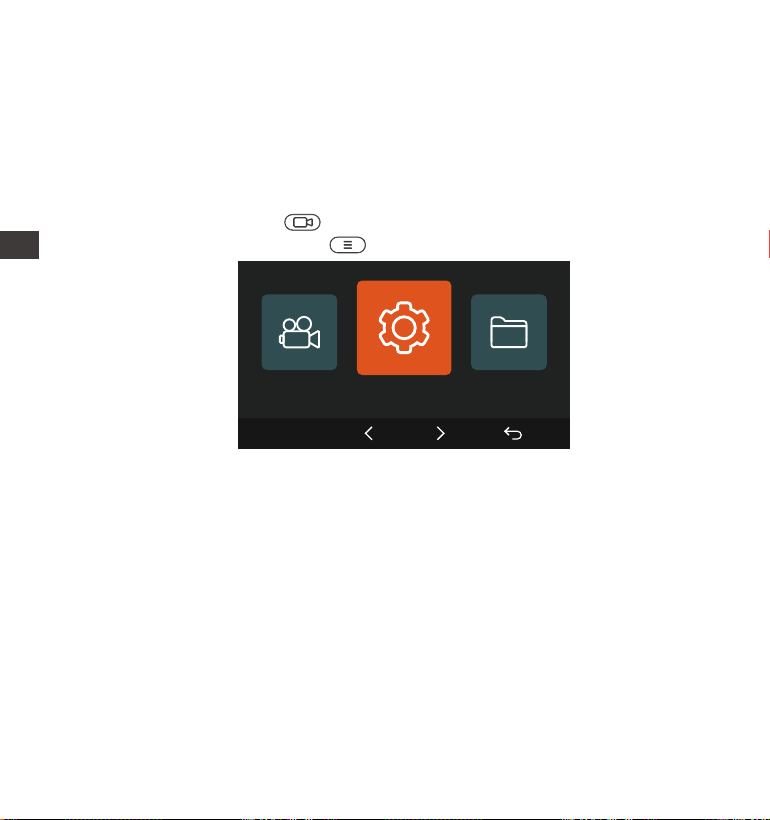
- 106 -
ENFR
A. Paramètres d’enregistrement
Mode d'enregistrement Avant +
Interne+ Arrière:
Dashcam E3 dispose de 3 menus de fonctions, qui sont les paramètres
d'enregistrement, les paramètres système et la navigation dans les
fichiers. Vous pouvez régler votre caméra de tableau de bord selon vos
besoins dans ce paramètre de fonction.
Appuyez sur le bouton , mettez d'abord la vidéo en pause, puis
appuyez sur le bouton pour accéder aux paramètres du menu.
4. Opération de base
4.1 Paramètres de Menu
Paramètres du Système
OK
Mode d'enregistrement Avant
+Interne:
1944P+1080P 30FPS
1440P+1080P 30FPS
1080P+1080P 30FPS
1080P+720P 30FPS
720P+1080P 30FPS
720P+720P 30FPS
1944P+1080P+1080P 30FPS
1440P+1080P+1080P 30FPS
1080P+1080P+1080P 30FPS
1440P+1080P+720P 30FPS
1440P+720P+720P 30FPS
1080P+1080P+720P 30FPS
1080P+720P+720P 30FPS
720P+720P+720P 30FPS

- 107 -
EN
EN
EN
FR
Mode d'enregistrement Avant
+ Arrière:
Mode d'enregistrement Avant
2592x1944P 3OFP
S2560x1440P 3OFPS
1920x1080P 3OFPS
1280x720P 3OFPS
1944P+1080P 3OFPS
1440P+1080P 3OFPS
1080P+1080P 3OFPS
1080P+720P 3OFPS
720P+1080P 3OFPS
720P+720P 3OFPS
Enregistrement en Boucle: Par défaut 3 minutes. Sélectionner les options
de la durée: 1,2,3,4,5, Désactive.
Lumière infrarouge: Seule pour la caméra intérieure, la valeur par défaut
est automatique, peut être réglée sur auto/off/Activé
Capteur G: La sensibilité aux collisions a 3 dimensions d'une voiture:
En avant & En arrière ; Vers la gauche & la droite ; Vers le haut & Vers le
bas Le niveau par défaut est 3, sélectionner les options de sensibilité:
1,2,3,4,5, Désactive. Une sensibilité élevée signifie qu'une légère collision
déclenchera la détection.
Enregistrement Audio: Activé par défaut. Vous pouvez choisir de le
désactiver si vous ne voulez pas enregistrer le son environnant.
Exposition: Par défaut est +0,0 valeur d'exposition. Réglez l'exposition de
l'objectif.
Indicateur d'enregistrement : Le réglage par défaut est Actif, vous pouvez
choisir de activer/ désactiver le voyant d'état de l'enregistrement.
WDR : Activé par défaut, pour mieux équilibrer l'effet vidéo, vous pouvez
choisir de désactiver. Seule pour la caméra avnat et intérieure.
Caméra arrière HDR: activée par défaut, ajustez si nécessaire.
Rotation de l'écran: Désactive par défaut. Vous pouvez choisir de faire
pivoter la caméra, l'écran vidéo sera inversé de 180°
Plaque d'immatriculation: Après le réglage, votre numéro de plaque
d'immatriculation peut être affiché dans la vidéo enregistrée
Filigrane: Tout sont activés par défaut. Vous pouvez choisir de activer :

- 108 -
ENFR
Date et heure, modèle et logo, numéro de plaque d'immatriculation,
étiquette de vitesse, localisation GPS.
Enregistrement en accéléré: Désactivé par défaut. Il existe actuellement
4 options: 1FPS/5FPS/10FPS/15FPS. Selon votre choix, la vidéo est enregis-
trée à 1 image/5 images/10 images/ 15 images par seconde.
Mode Parking: Désactive par défaut. Vous pouvez modifier les options:
Détection de collision, Détection de mouvement, Enregistrement à faible
débit,Mode à faible fréquence d'images.
Mode Parking à Faible Luminosité: Par défaut est activée. Il peut optimiser
l'effet d'enregistrement des vidéos en mode parking.
GPS: Activé par défaut. Les paramètres de commutation GPS, les
paramètres d'unité de vitesse, les informations GPS sont tous définis ici.
B.Paramètres Système
Langue: English / Français / Italiano / Deutsch / Español / Русский язык /
Polskie / 日本語 / 简体中文
Wi-Fi: Automatiquement activé par défaut et éteint après 10 minutes.
Si vous annulez cette fonction, vous devez activer le WiFi manuellement
ou par la voix.
Commande Vocale:Uniquement en anglais.La sensibilité par défaut est
Standard. Les commandes vocales peuvent être reconnues une fois
l'option activée. Vous pouvez choisir des options telles que faible/haute/-
standard/désactivé.
Contenu vocal: Commandes de reconnaissance vocale. Vous pouvez
utiliser différentes commandes pour contrôler à distance la caméra pour
qu'elle fonctionne.
Formater la carte mémoire: Choisir de formater la carte micro SD.
Rappel de format: Désactivé par défaut. Sélectionner les options de
rappel: 15 jours, 1 mois et désactivé.
Rappel de format: Désactivé par défaut. Sélectionner les options de
rappel: 15 jours, 1 mois et désactivé.

- 109 -
EN
EN
EN
FR
EN
EN
EN
FR
Heure & Date: Il existe deux méthodes de réglage
①Mise à jour automatique du GPS, ② Réglage manuel de la
date/heure.
Mise à jour automatique par défaut. La première méthode est basée sur
votre fuseau horaire, vous devez donc choisir le bon ; vous pouvez
également choisir de le désactiver et de corriger manuellement l'heure
de la date vous-même.
LCD s'éteint Auto: 30 seconds /1minute/3minute/désactivé sont
disponibles. Par défaut est désactivé. En mode auto, l'écran réduira
automatiquement la luminosité, mais ne s'éteindra pas. Sinon, l'écran
s'éteindra après le temps défini. Mais l'enregistrement ne s'arrêtera pas.
Volume de Son: Réglez le volume de l'appareil. Le niveau de volume par
défaut est 3, le plus bas est 0 et le plus élevé est 5.
Volume de Son: Réglez le volume de l'appareil. Le niveau de volume par
défaut est 3, le plus bas est 0 et le plus élevé est
Rappel Sonore: Selon différentes situations, la caméra est réglée avec 5
types de rappel sonore, qui sont: Son de mise en marche, Son des
touches, Son du fichier verrouillé, Son du Format, Rappel d'arrêt d'enreg-
istrement anormal. Tous sont activées par défaut.
Fréquence de la source lumineuse: 50Hz / 60Hz sont disponibles. Choisis-
sez la bonne fréquence selon les différentes régions.
Informations système: Vérifiez le modèle de la machine, la version du
logiciel, l'URL du site officiel
Certification: Vous pouvez afficher les informations de certification de la
caméra E3.
Paramètres Défaut: Vous pouvez restaurer les paramètres d'usine.
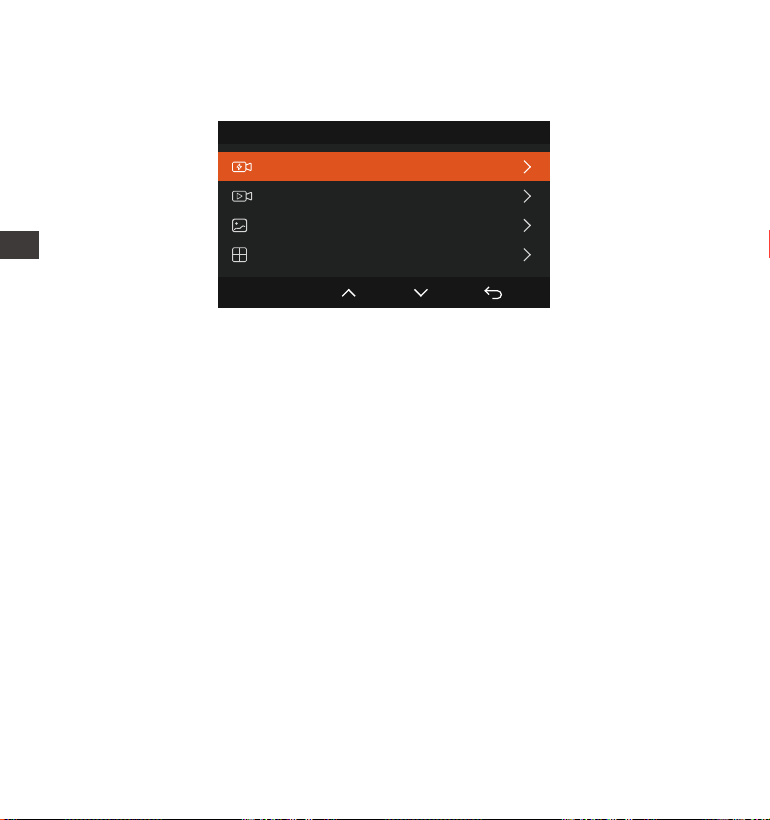
- 110 -
ENFR
Fichier 1/4
Vidéo Événement
Vidéo Normale
Photo
Tous les fichiers
OK
Vidéo d’urgence: Les fichiers vidéo d'urgence sont enregistrés dans ce
dossier. Le nom du fichier:
20300128_140633_0008_E_A.MP4
20300128_140633_0008_E_B.MP4
20300128_140633_0008_E_C.MP4
Vidéo Normal: Ce dossier enregistre la vidéo en boucle courants, la
vidéo en mode parking, la vidéo en accéléré. Les noms de fichiers sont
respectivement:
20300128_140633_0008_N_A.MP4 Vidéo d'enregistrement en boucle
20300128_140633_0007_P_A.MP4 Vidéo du mode parking
20300128_140633_0006_T_A.MP4 Vidéo enregistrée en accéléré
Photo: Le fichier capturé est enregistré ici.
TOUS: Vous pouvez afficher tous les fichiers sur la dashcam.
Remarque: Le suffixe A représente les fichiers enregistrés par la caméra
avant, B représente la caméra interne et C représente la caméra arrière
C.Parcourir les Documents
Passez en revue et supprimez les vidéos stockées dans des dossiers de
fichiers.
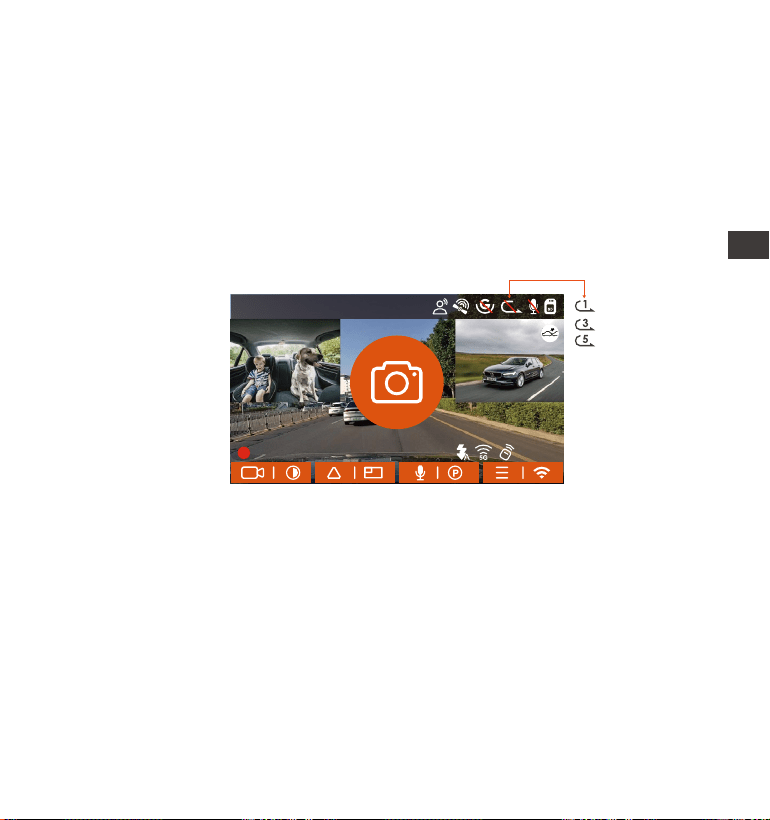
- 111 -
EN
EN
EN
FR
4.2 Présentation des fonctions
Le fonctionnement normal de cette fonction dépend en grande partie
de la vitesse de la carte mémoire. Veuillez donc formater la carte
mémoire régulièrement pour éviter des problèmes tels qu'un trop grand
nombre de fichiers sur la carte mémoire et le vieillissement de la carte
qui affectent le cycle d'enregistrement normal.
Veuillez vérifier régulièrement la vidéo d'enregistrement en boucle pour
éviter de boucler sur la vidéo nécessaire.
Lorsque l'enregistrement en boucle est désactivé, la caméra enregistre-
ra la vidéo en 20 minutes chaque clip, mais n'écrasera pas les
anciennes vidéos lorsque la carte de stockage est pleine.
Si l'enregistrement en boucle est désactivé, la fonction de verrouiller les
vidéos ne fonctionnera plus.
4.2.1 Enregistrement en Boucle
Avec une carte mémoire insérée, la caméra démarre (par défaut)
immédiatement l'enregistrement vidéo en boucle lorsqu'elle est
connectée à une source d'alimentation.
Selon la taille de la carte mémoire actuelle, une fois que l'enregistrement
atteint le réglage (70 % de la capacité totale), le nouvel enregistrement
écrasera automatiquement le plus ancien. L'activation de cette fonction
peut éviter d'arrêter l'enregistrement lorsque le fichier est plein pendant
la conduite.
Remarquer:
1.
2.
3.
4.
14:39:07 10-02-2023
00:00:37
MP/H
35
1440P+1080P+1080P 30FPS
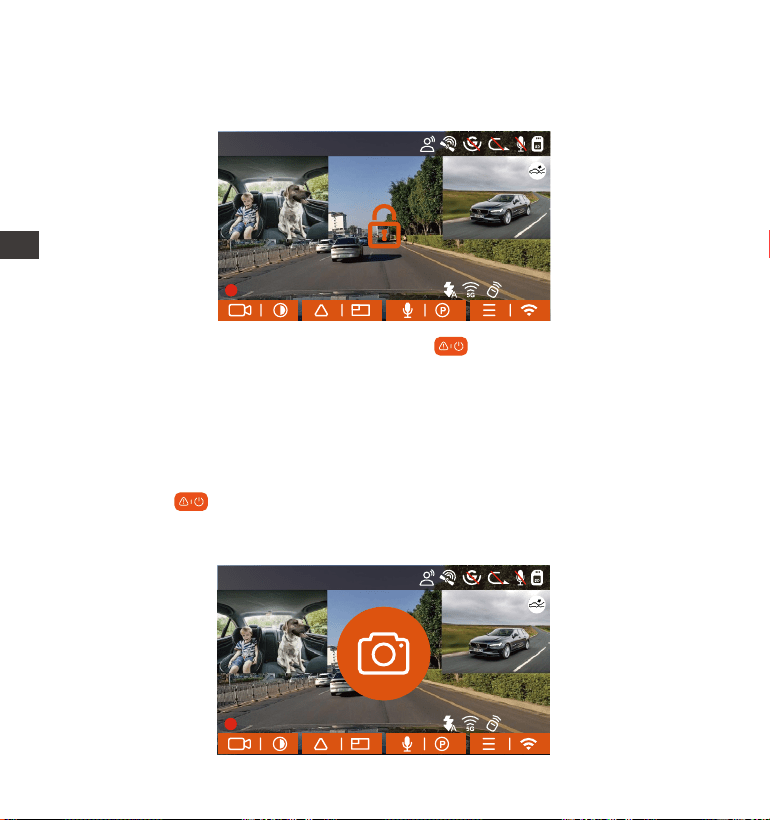
- 112 -
ENFR
4.2.2 Vidéo d'urgence
L'enregistrement d'urgence est déclenché par G-Sensor, qui peut être
divisé en déclenchement automatique et verrouillage manuel.
Verrouillage manuel : Cliquez sur l'icône pour commencer à verrouiller
l'enregistrement et la vidéo est enregistrée dans le dossier vidéo
d'urgence.
Verrouillage automatiquement: Lorsque la voiture est heurtée par une
collision, le capteur G détecte la vibration et verrouille automatiquement
la vidéo actuelle et l'enregistre dans le dossier vidéo d'urgence.
Pendant la période de verrouillage de la vidéo, vous pouvez appuyer sur
le bouton pour capturer plusieurs fois. Après l'enregistrement, la vidéo
sera automatiquement enregistrée dans le dossier vidéo de l'événement
et la photo sera enregistrée dans le dossier photo.
14:39:07 10-02-2023
00:00:37
MP/H
35
1440P+1080P+1080P 30FPS
14:39:07 10-02-2023
00:00:37
MP/H
35
1440P+1080P+1080P 30FPS
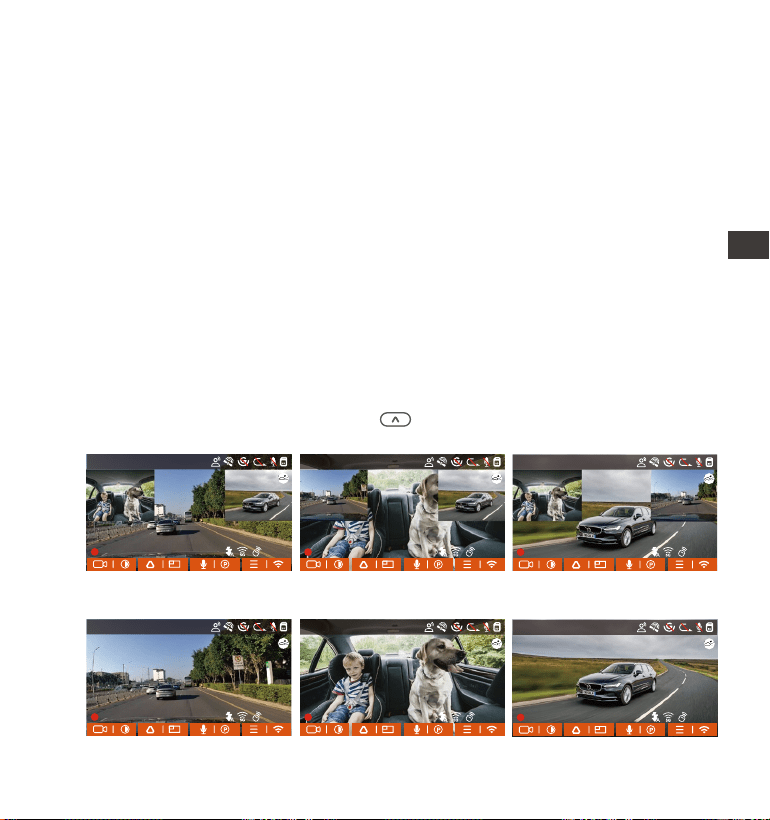
- 113 -
EN
EN
EN
FR
4.2.3 Basculer l'affichage de l'écran/window de la caméra
Vous pouvez cliquer sur le bouton pour changer d'affichage afin
d'agrandir l'affichage de la caméra avant ou arrière sur l'écran LCD.
Remarquer:
La sensibilité du déclencheur vidéo à verrouillage automatique est
déterminée par la sensibilité de la collision. Plus le réglage de sensibilité
est élevé, plus la probabilité d'être déclenché est grande.
La capacité totale du fichier vidéo d'événement représente 30% de la
capacité totale de la carte mémoire actuelle. Lorsque le fichier vidéo
d'événement atteint la limite supérieure, le nouveau fichier vidéo
d'événement écrasera automatiquement le fichier vidéo d'événement
d'origine. Il est recommandé de vérifier et d'enregistrer périodiquement
vos fichiers vidéo d'événement pour éviter toute perte.
La situation qui ne déclenchera pas l'enregistrement verrouillé :
désactivez le mode d'enregistrement en boucle ou activez le mode
d'enregistrement en accéléré. Dans les deux cas, vous ne pouvez
prendre que des photos
1.
2.
3.
Caméra Frontale
Plus Grand
Caméra Interne
Plus Grand
Caméra Arrière
Plus Grand
Caméra Frontale Caméra Interne Caméra Arrière
14:39:07 10-02-2023
00:00:37
MP/H
35
1440P+1080P+1080P 30FPS
14:39:07 10-02-2023
00:00:37
MP/H
35
1440P+1080P+1080P 30FPS
14:39:07 10-02-2023
00:00:37
MP/H
35
1440P+1080P+1080P 30FPS
14:39:07 10-02-2023
00:00:37
MP/H
35
1440P+1080P+1080P 30FPS
14:39:07 10-02-2023
00:00:37
MP/H
35
1440P+1080P+1080P 30FPS
14:39:07 10-02-2023
00:00:37
MP/H
35
1440P+1080P+1080P 30FPS
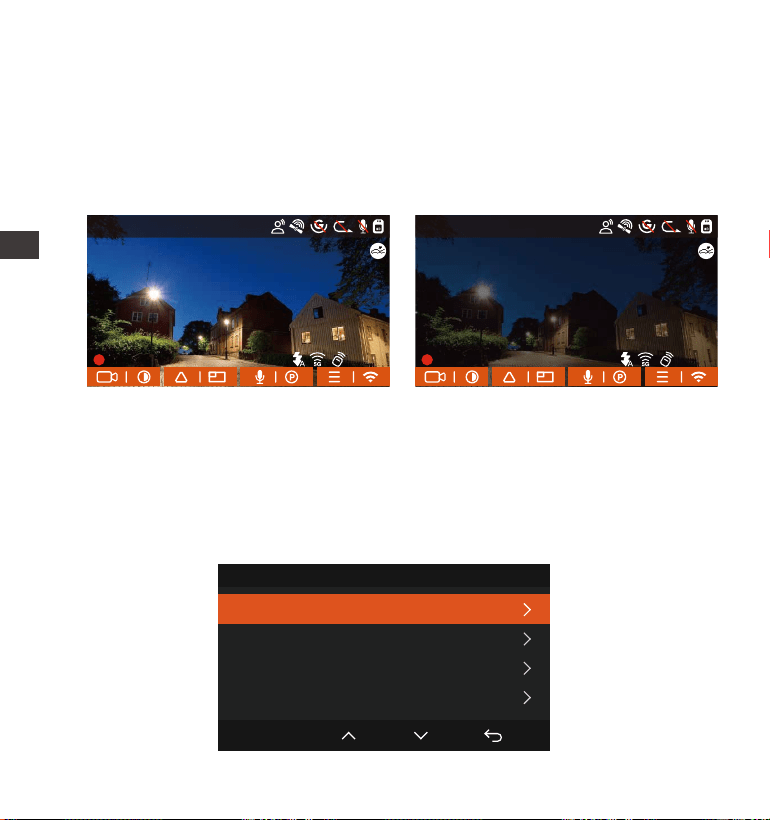
- 114 -
ENFR
4.2.4 Mode Parking à Faible Luminosité
Afin d'améliorer la sécurité du stationnement la nuit, nous utilisons
pleinement les performances de l'objectif combinées à la technologie
de vision nocturne à faible luminosité pour améliorer l'effet de vision
nocturne en mode stationnement.
Cette fonction est activée par défaut, elle ne sera déclenchée qu'après
être entrée en mode parking et n'affectera pas l'enregistrement normal.
4.2.5 Mode Parking (Ne peut pas être utilisé avec la fonction "Enregis-
trement en Accéléré" en même temps)
Le mode parking fonctionne comme une sentinelle dans différentes
situations. Veuillez choisir le mode de stationnement en fonction de vos
besoins.
Mode Parking à Faible
Luminosité Activé
Mode Parking à Faible
Luminosité Désactivé
Mode Parking
Détection de Collision
Détection de Mouvement
Enregistrement à faible débit
OK
Mode faible fréquence d'images
14:39:07 10-02-2023
00:00:37
MP/H
35
1440P+1080P+1080P 30FPS
14:39:07 10-02-2023
00:00:37
MP/H
35
1440P+1080P+1080P 30FPS

- 115 -
EN
EN
EN
FR
Une fois le mode de stationnement activé, il existe 3 façons d'entrer:
Vous pouvez attendre 5 minutes pour entrer automatiquement
Appuyer longuement sur le bouton pour entrer manuellement.
Installez la ligne abaisseur ACC et entrez directement après l'arrêt du
moteur (la ligne abaisseur ACC est un accessoire en option, vous
pouvez choisir de l'acheter).
1.
1.
2.
3.
4.
2.
3.
Pour vous assurer que la caméra fonctionne correctement en mode
parc, veuillez utiliser les kits de câblage ou une autre alimentation
stable et continue pour alimenter la caméra de tableau de bord.
Dans un environnement chaud et ensoleillé en été, nous vous recom-
mandons de sélectionner la détection de collision. Lorsque la
température ambiante dans la voiture atteint 60 ℃, il est recom-
mandé de l’éteindre pour éviter un fonctionnement anormal de la
dashcam causé par la température élevée.
L'enregistrement en accéléré et le mode de stationnement (y compris
la détection de collision, la détection de mouvement, l'enregistrement
à faible débit binaire et le mode à faible fréquence d'images) ne
peuvent être activés que pour l'un d'entre eux. Lorsque l'un est activé,
l'autre sera automatiquement désactivé.
Les fichiers enregistrés en mode parking seront enregistrés dans le
dossier normal, afin d'éviter que les fichiers ne soient écrasés, veuillez
les vérifier régulièrement pour éviter toute perte.
Remarque:
A. Détection de Collision
Lorsque la détection de collision est activée, son icône s'affiche à
l'écran, indiquant que la caméra utilise actuellement le mode de détec-
tion de collision. La sensibilité de détection de collision peut être ajustée
de 1 à 5 niveaux, Une sensibilité élevée signifie qu'une légère collision peut
facilement déclencher l'enregistrement.

- 116 -
ENFR
1.
2.
15 secondes de contenu vidéo avant le déclenchement de la
détection de mouvement
30 secondes de contenu lors du déclenchement de la détection de
mouvement
Processus d'enregistrement vidéo: lorsque l'enregistreur détecte le
mouvement de l'objet ou ressent la vibration de la voiture, il déclenche
automatiquement l'enregistrement vidéo. E3 a une fonction de pré-
enregistrer 15secondes, de sorte que la vidéo de détection de mouve-
ment de stationnement sera de 45secondes qui se compose de deux
parties:
B. Détection de Mouvement
Lorsque la détection de mouvement est activée, son icône s'affiche
à l'écran, indiquant que la caméra utilise actuellement le mode de
détection de mouvement. La détection de mouvement est réglable
avec 3 réglages: faible, Moyen et élevé et la plage de détection de
mouvement correspondante est de 2 m/4 m/6 m.
14:39:07 10-02-2023
00:00:37
MP/H
35
1440P+1080P+1080P 30FPS
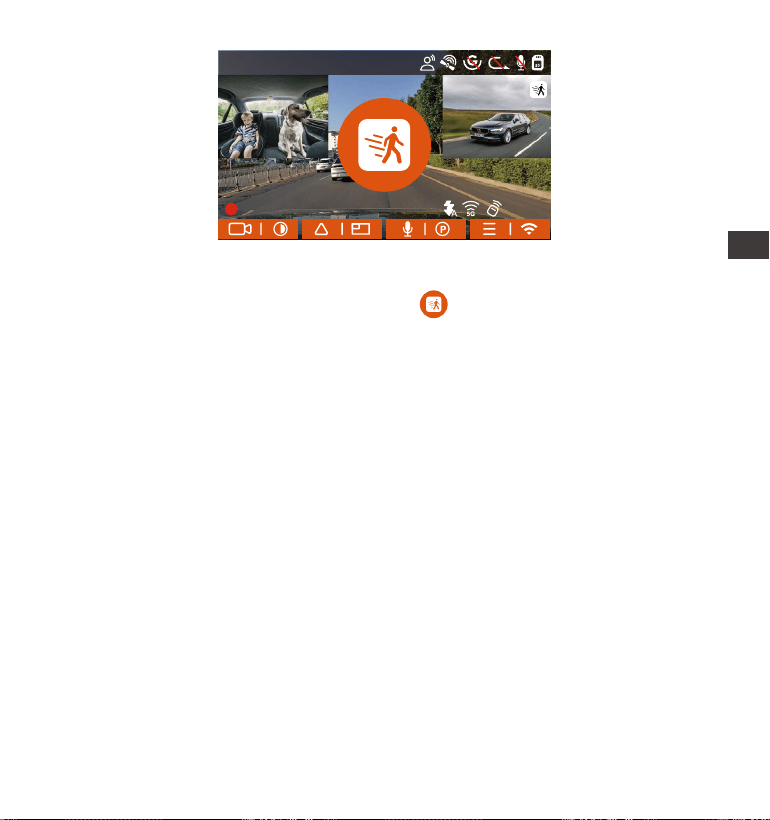
- 117 -
EN
EN
EN
FR
Si l'enregistreur de conduite ne détecte pas le mouvement ou la vibration
de l'objet dans les 5 minutes, le mode de détection de mouvement se
déclenche automatiquement. L'icône apparaît au centre de l'écran,
et l'écran s'éteindra après 3 minutes.
Processus d'enregistrement vidéo: lorsque l'enregistreur détecte le
mouvement de l'objet ou ressent la vibration de la voiture, il déclenche
automatiquement l'enregistrement vidéo. E3 a une fonction de pré-enreg-
istrer 15secondes, de sorte que la vidéo de détection de mouvement de
stationnement sera de 45secondes qui se compose de deux parties:
① 15 secondes de contenu vidéo avant le déclenchement de la détec-
tion de mouvement
② 30 secondes de contenu lors du déclenchement de la détection de
mouvement
Remarque:
Le mode de détection de mouvement doit être exécuté lorsque la
caméra est allumée. Une fois la caméra éteinte, le mode de détection de
mouvement ne fonctionnera pas.
14:39:07 10-02-2023
00:00:37
MP/H
35
1440P+1080P+1080P 30FPS
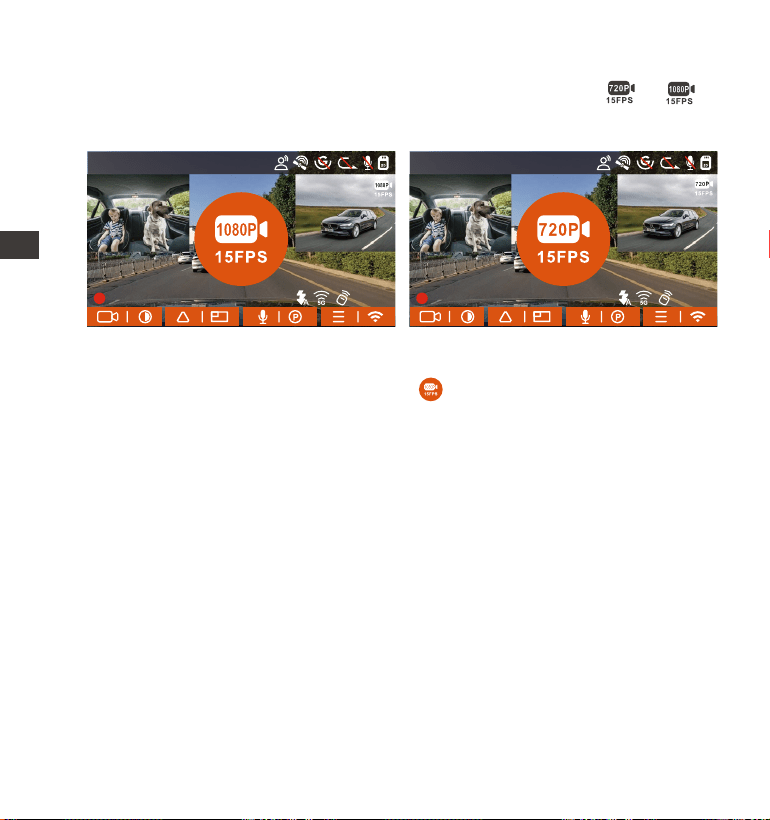
Si l'enregistreur de conduite ne détecte pas le mouvement ou la vibration
de l'objet dans les 5 minutes, le mode de enregistrement à faible débit se
déclenche automatiquement. L'icône apparaît au centre de l'écran.
La résolution de tous les objectifs actuels sera automatiquement
commutée sur 1080P 15FPS ou 720P 15FPS, et la durée d'enregistrement
est déterminée en fonction de la durée d'enregistrement en boucle
définie. Lorsque la dashcam détecte des vibrations ou des mouvements,
il quitte ce mode et passe à l'enregistrement normal. Après 5 minutes
d'absence de mouvement ou de vibration, il passe à nouveau en mode
faible débit.
Remarque:Le mode de enregistrement à faible débit doit être exécuté
lorsque l'appareil est allumé. Une fois la dashcam éteint, ce mode ne
fonctionnera pas.
D. Mode à faible fréquence d'images
Lorsque Mode à faible fréquence d'images est avtivé, la dashcam
enregistrera selon la sélection de 1FPS/5FPS/10FPS/15FPS. Par exemple, si
vous sélectionnez 1FPS et que la résolution vidéo actuelle est de 30FPS,
l'enregistreur générera une vidéo de 30FPS toutes les secondes.
- 118 -
ENFR
C.Enregistrement à faible débit
Lorsque Enregistrement à faible débit est activée, son icône ou
s'affiche à l'écran, selon l'option que vous choisissez d'être 1080P 15FPS
ou 720P 15FPS.
14:39:07 10-02-2023
00:00:37
MP/H
35
1440P+1080P+1080P 30FPS
14:39:07 10-02-2023
00:00:37
MP/H
35
1440P+1080P+1080P 30FPS
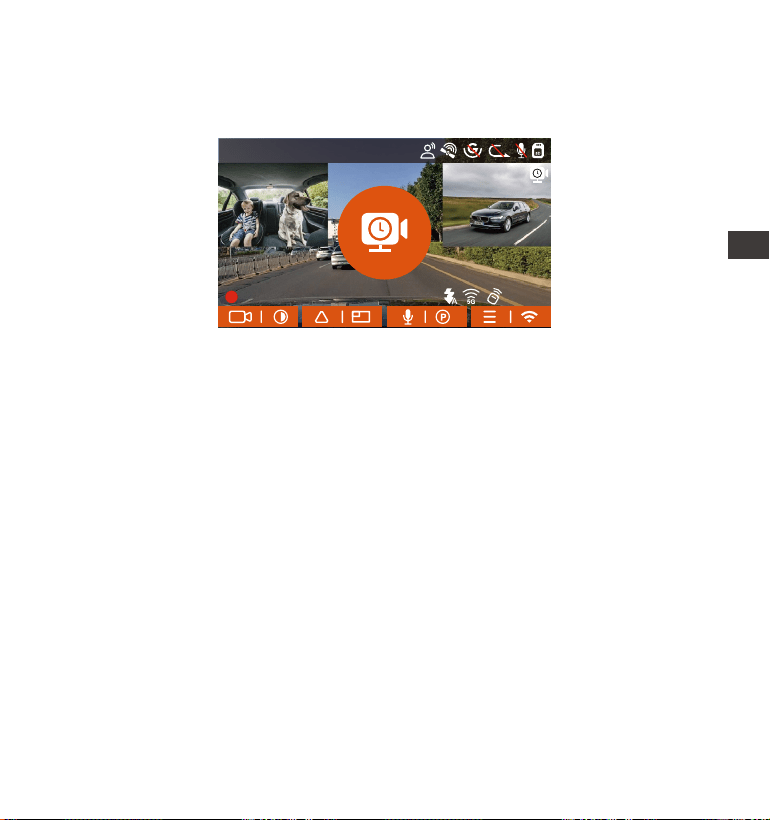
- 119 -
FR
EN
EN
EN
FR
Après le stationnement, l'enregistreur activera le mécanisme d'entrée
pendant 5 minutes, puis entrera automatiquement en mode de fréquence
d'images faible. La vidéo accélérée peut grandement préserver l'intégrité
de la vidéo et économiser de l'espace sur la carte mémoire.
La formule d'enregistrement:
Durée du fichier à faible fréquence d'images * fréquence d'images /
Frame de résolution = Durée réelle du fichier d'enregistrement (Le temps
doit être converti en secondes)
L'unité de temps de la formule de calcul est la seconde, donc la durée
d'enregistrement normale finale calculée est également la seconde. Si
vous avez besoin de le convertir dans d'autres unités de temps, veuillez
vérifier et convertir par vous-même.
Le mode de faible fréquence d'images est similaire à la fonction vidéo
accélérée. La différence entre les deux est le mécanisme d'entrée de 5
minutes. Le mode de fréquence d'images faible attendra cinq minutes
après le réglage, puis entrera dans ce mode. Le mode vidéo accélérée
sera activé directement après le réglage.
Le mode à faible fréquence d'images doit être exécuté lorsque l'appar-
eil est allumé. Une fois la dashcam éteint, ce mode ne fonctionnera pas.
Remarque:
1.
2.
3.
14:39:07 10-02-2023
00:00:37
MP/H
35
1440P+1080P+1080P 30FPS
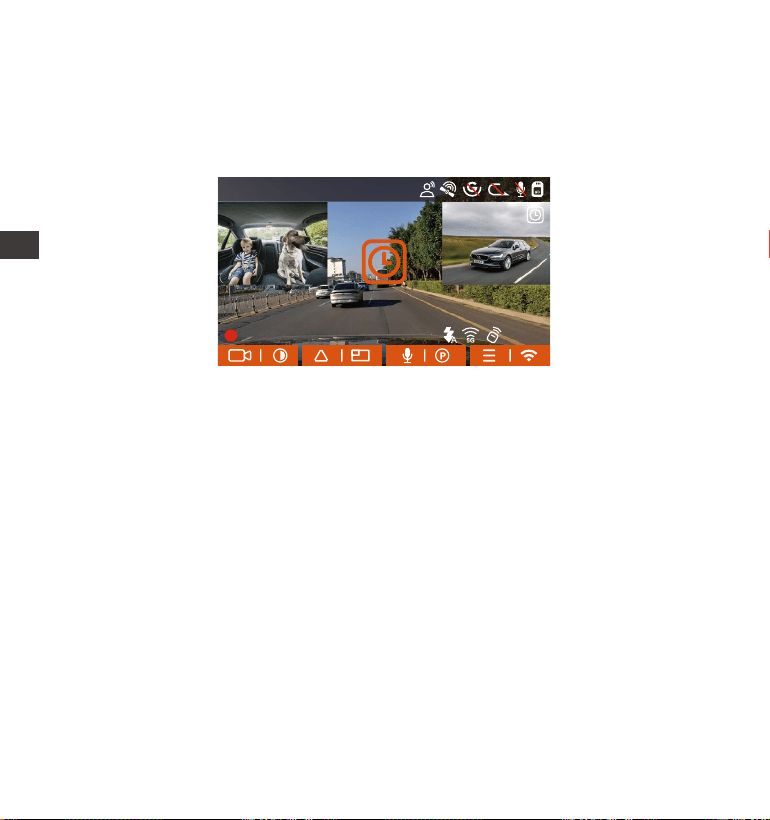
- 120 -
ENFR
4.2.6. Enregistrement en Accélérée
Lorsque Mode à faible fréquence d'images est avtivé, la dashcam enregis-
trera selon la sélection de 1FPS/5FPS/10FPS/15FPS. Par exemple, si vous
sélectionnez 1FPS et que la résolution vidéo actuelle est de 30FPS, l'enreg-
istreur générera une vidéo de 30FPS toutes les secondes.
La formule d'enregistrement:
Durée du fichier d'enregistrement en accéléré * Frame d'enregistrement
en Accéléré/ Frame de résolution = Durée réelle du fichier d'enregis-
trement (Le temps doit être converti en secondes)
4.2.7 Fonction GPS
La fonction GPS est également l'une des fonctions importantes de la
caméra de tableau de bord. Le GPS est activé par défaut et la caméra
reçoit des signaux GPS via le support GPS. Il peut corriger automatique-
ment l'heure et la date de votre région, en enregistrant l'endroit où la
vidéo a été enregistrée et la vitesse de la voiture à ce moment-là.
14:39:07 10-02-2023
00:00:37
MP/H
35
1440P+1080P+1080P 30FPS

- 121 -
EN
EN
EN
FR
40
46
39
43
48
Informations GPS
La connexion GPS sera établie dans la minute qui suit la mise sous
tension de l'appareil. Si la connexion GPS échoue dans la minute qui
suit, veuillez vérifier si l'appareil a activé la fonction GPS, si le support
GPS est correctement connecté et votre environnement (parking
souterrain, zone résidentielle densément peuplée, métro, tunnel, etc. )
affectera également la réception du signal GPS.
Les informations GPS sont enregistrées dans la vidéo que vous avez
enregistrée. Pour le voir, veuillez télécharger et installer VANTRUE APP et
VANTRUE GPS Player (disponibles en téléchargement sur www.vantrue.
net.
Remarque:
1.
2.
4.2.8 Correction Automatique de l'heure par GPS
Par défaut, l'enregistreur E3 active la correction automatique de l'heure
GPS, veuillez sélectionner votre fuseau horaire, comme Paris, vous pouvez
choisir GMT+2. Si vous ne connaissez pas le fuseau horaire de votre
emplacement, vous pouvez utiliser le Wi-Fi pour vous connecter à l'applica-
tion Vantrue et confirmer que la fonction de réglage automatique de
l'heure dans l'application est activée. Une fois la connexion établie, le
fuseau horaire du l'enregistreur sera corrigé de force en fonction du fuseau
horaire de votre téléphone mobile.
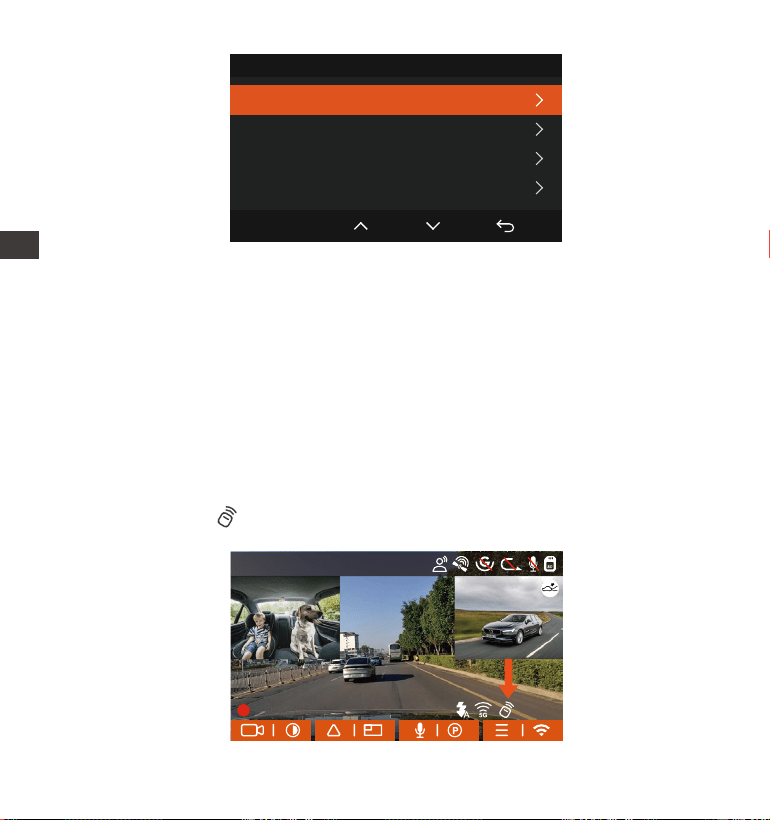
Remarque: la correction automatique de l'heure par le GPS doit définir
le bon fuseau horaire.
4.2.9 Télécommande sans Fil
La caméra est équipée d'une télécommande, qui peut être utilisée pour
contrôler rapidement la caméra pour un instantané, une vidéo
d'urgence, l'enregistrement marche/arrêt et d'autres fonctions.
Connexion de la télécommande:
Retirer la feuille isolante de la télécommande, la caméra s'adaptera
automatiquement à la télécommande. Aucun couplage manuel avec
la caméra de tableau de bord n'est requis.
Lorsque l'icône apparaît à l'écran, cela signifie que la télécommande
a été associée avec succès.
- 122 -
ENFR
Heure & Date
Mise à jour automatique du GPS
Régler manuellement la date/l'heure
Style de date
Fuseau Horaire
OK
14:39:07 10-02-2023
00:00:37
MP/H
35
1440P+1080P+1080P 30FPS
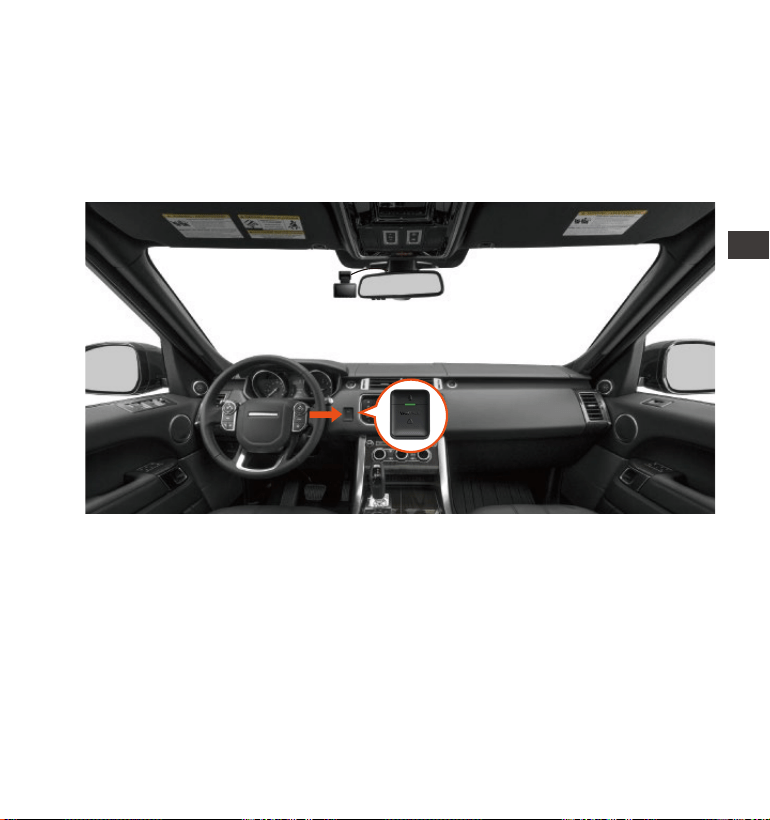
- 123 -
EN
EN
EN
FR
EN
EN
EN
FR
Installation de la télécommande :
Une fois la télécommande associée à l'appareil, veuillez sélectionner un
emplacement approprié sur votre voiture, puis retirez l'autocollant adhésif
de la télécommande et collez-le à l'emplacement sélectionné.
(Remarque: la télécommande doit être installée dans une position qui
n'affecte pas la sécurité de la conduite)
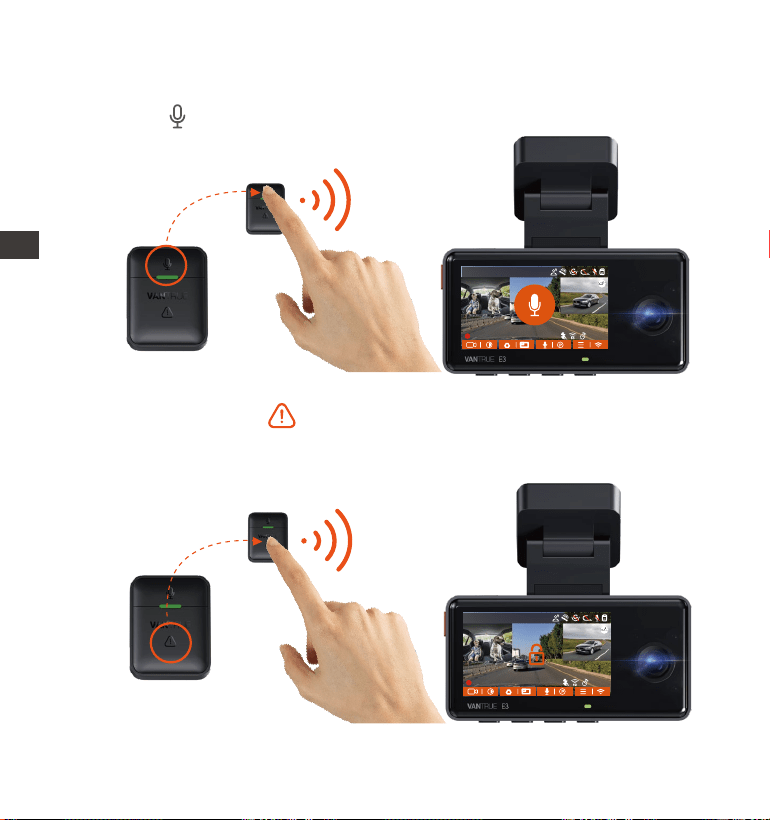
- 124 -
ENFR
Une fois la télécommande connectée avec succès, appuyez sur le
bouton pour activer ou désactiver l'enregistrement.
1.
Fonctions de la télécommande :
Une fois la connexion établie, lorsque vous appuyez brièvement sur le
bouton d'urgence , la caméra verrouille le fichier actuel et prend
un instantané vidéo; continuez à appuyer brièvement pendant la
vidéo verrouillée et continuez à capturer la photo.
2.
14:39:07 10-02-2023
00:00:37
MP/H
35
1440P+1080P+1080P 30FPS
14:39:07 10-02-2023
00:00:37
MP/H
35
1440P+1080P+1080P 30FPS
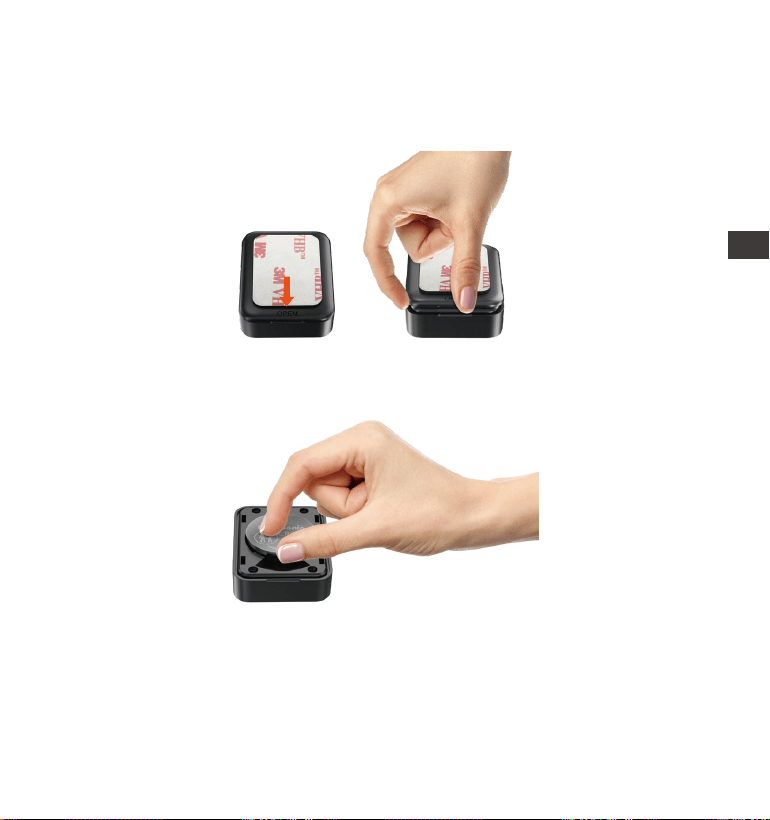
- 125 -
EN
EN
EN
FR
Remplacement de la pile de la télécommande:
Il y a une marque "OPEN" au bas de la télécommande, veuillez ouvrir
lentement l'espace environnant le long de la position de la rainure de
cette marque pour l'ouvrir.
1.
2.
Après l'ouverture, soulevez délicatement la pile de la rainure située à
l'avant du compartiment de la pile, puis retirez l'ancienne pile, insérez
la nouvelle pile et couvrez le couvercle arrière de la télécommande.
Remarque:
Lorsque la puissance est faible, la batterie doit être remplacée (le modèle
de batterie de la télécommande est une batterie CR2032). Il ne prend pas
en charge la charge.
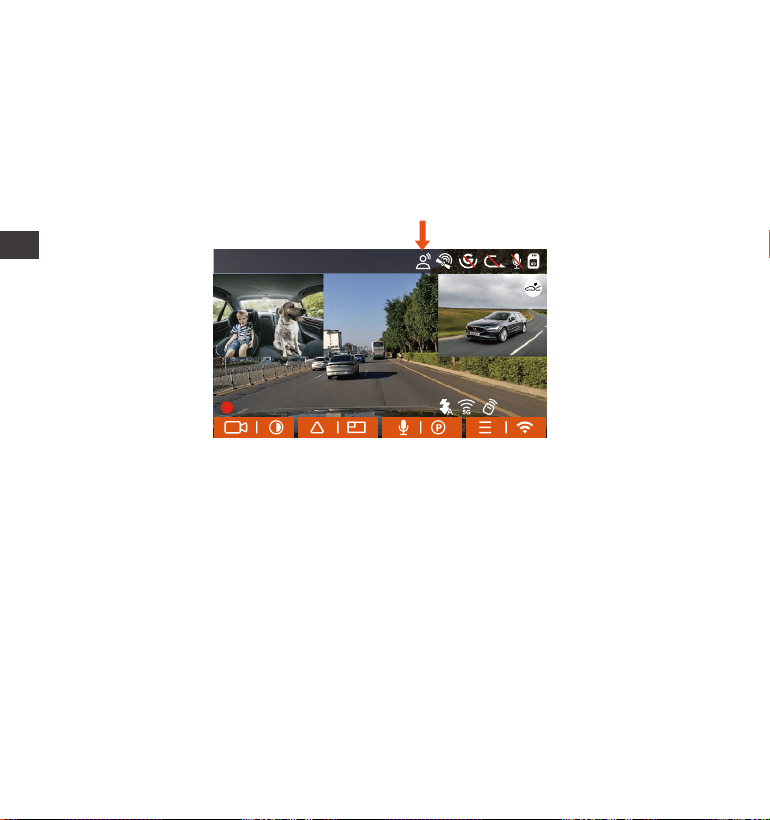
- 126 -
ENFR
Le réglage par défaut est la sensibilité standard. La reconnaissance
vocale propose des options telles que faible sensibilité/standard/haute
sensibilité/désactivé. Vous pouvez contrôler la caméra avec des
commandes vocales.
4.2.10 Assistant Vocal
En plus de contrôler la caméra avec la télécommande, vous pouvez
également contrôler la caméra avec la commande vocale. Comme
capturer des images, démarrer l'enregistrement vidéo, activer/désactiver
le WiFi, verrouiller la vidéo, etc. Les langues actuellement prises en charge
sont l'anglais, le japonais, le russe et le chinois. Pour des commandes
vocales plus détaillées, veuillez vérifier Paramètres système > Contenu
vocal.
14:39:07 10-02-2023
00:00:37
MP/H
35
1440P+1080P+1080P 30FPS
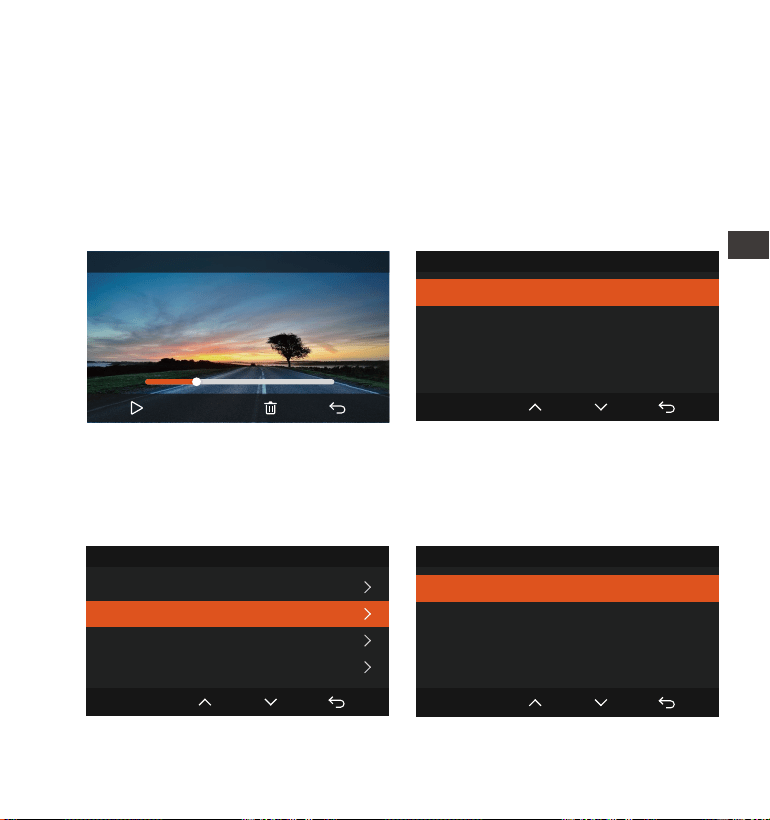
- 127 -
EN
EN
EN
FR
Supprimer les vidéos
Supprimez la vidéo sur la caméra. Appuyez sur le bouton d'enregis-
trement d'urgence dans l'interface de navigation des fichiers pour faire
apparaître le menu de suppression
Vidéo Événement
Supprimer ce fichier ?
Supprimer tous les fichiers ?
OK
Vidéo Événement
Supprimer ce fichier ?
Supprimer tous les fichiers ?
OK
00:30
01:07
20230210_140633_0002_E_B.MP4
1X
Vidéo Événement
20230210_140633_0001_E_B.MP4
20230210_140633_0002_E_B.MP4
20230210_140633_0003_E_B.MP4
20230210_140633_0004_E_B.MP4
2/5
OK
4.2.11. Lecture et Suppression de Fichiers
a. Regarder sur la caméra
Lire les vidéos
Après avoir cliqué sur "Fichiers", entrez dans n'importe quel dossier, après
avoir ouvert le dossier vidéo, vous pouvez appuyer sur le bouton Bas pour
sélectionner le fichier suivant, et appuyez sur le bouton Bas pour supprim-
er le fichier pendant la lecture.
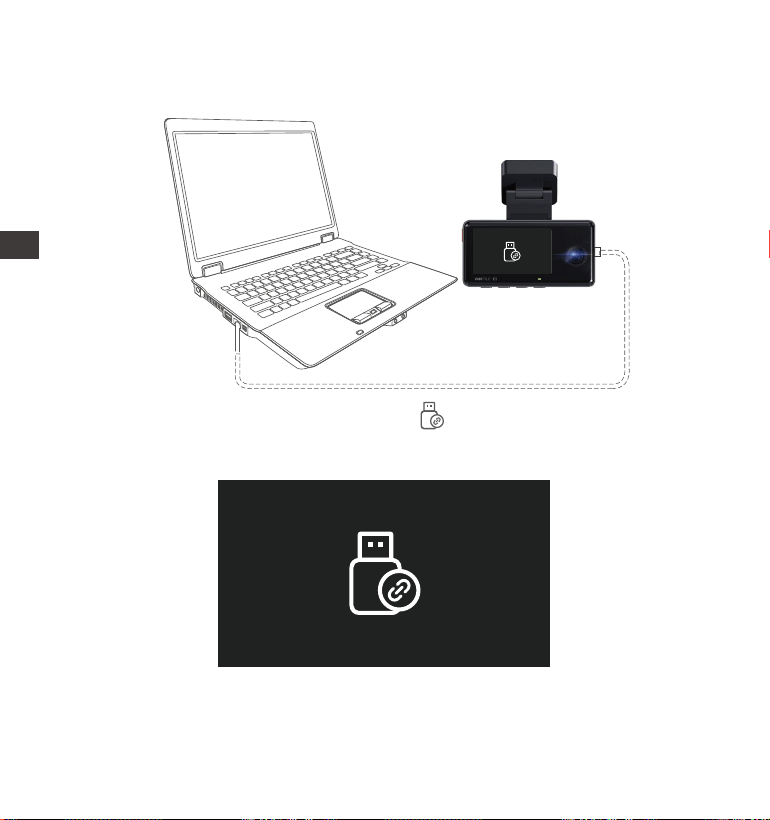
- 128 -
ENFR
Connectez le câble de données USB C fourni à l'appareil et à l'ordinateur.
b. Regarder sur l'ordinateur
1.
Une fois la connexion réussie, l'icône apparaîtra sur l'écran de
l'appareil pour transférer les données, puis vous pourrez visualiser les
fichiers vidéo dans le dossier de l'ordinateur.
2.
Selon le système informatique des différents utilisateurs, une fois l'appareil
connecté à l'ordinateur, il s'affichera en tant que lecteur amovible ou
dossier amovible sur l'ordinateur.
3.
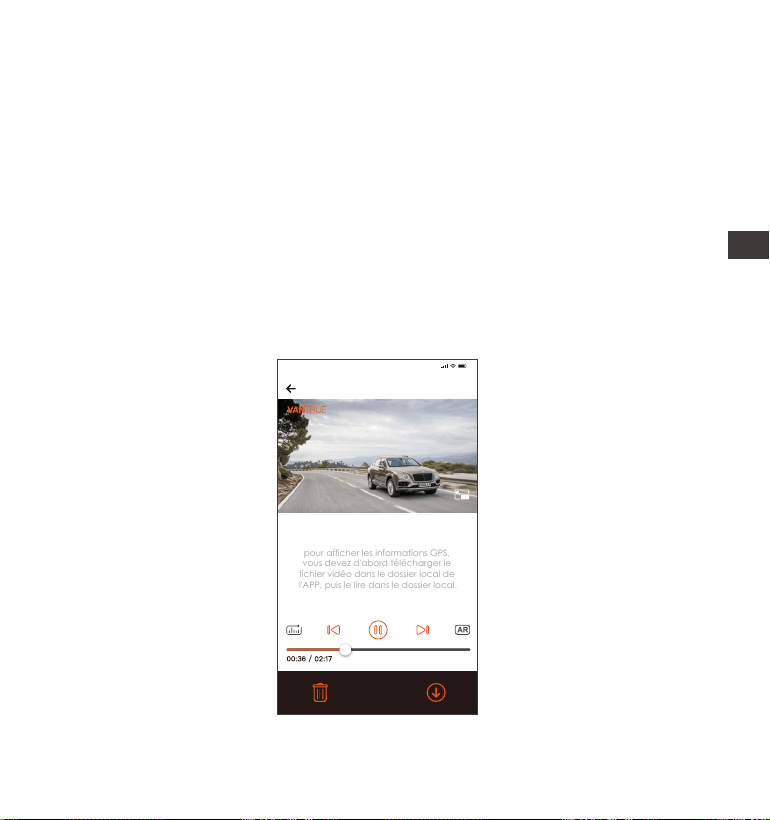
- 129 -
EN
EN
EN
FR
c. Regarder/ suprrimer dans l'application
Une fois que l'appareil est connecté avec succès au téléphone mobile
via WiFi, il peut lire, télécharger et supprimer des fichiers dans l'applica-
tion mobile.
4.
5.
6.
Pour afficher le fichier sur l'ordinateur, vous pouvez directement cliquer
avec le bouton droit pour ouvrir le menu et le supprimer.
Vous pouvez également utiliser un lecteur de carte USB pour lire les
informations de la carte mémoire.
Afin d'assurer une alimentation stable lors de la connexion à un ordina-
teur, veuillez vérifier si l'interface de l'ordinateur est USB 3.0. Lorsque vous
utilisez un ordinateur de bureau pour vous connecter, il est recom-
mandé d'utiliser l'interface USB à l'arrière de l'hôte de l'ordinateur de
bureau.
20230210_115036_0079_N_A.MP4
10/02/2023 11:5:35 E3 000.000000. 000.000000. 36MK/H
pour afficher les informations GPS,
vous devez d'abord télécharger le
fichier vidéo dans le dossier local de
l'APP, puis le lire dans le dossier local.
Remarque :
9:41
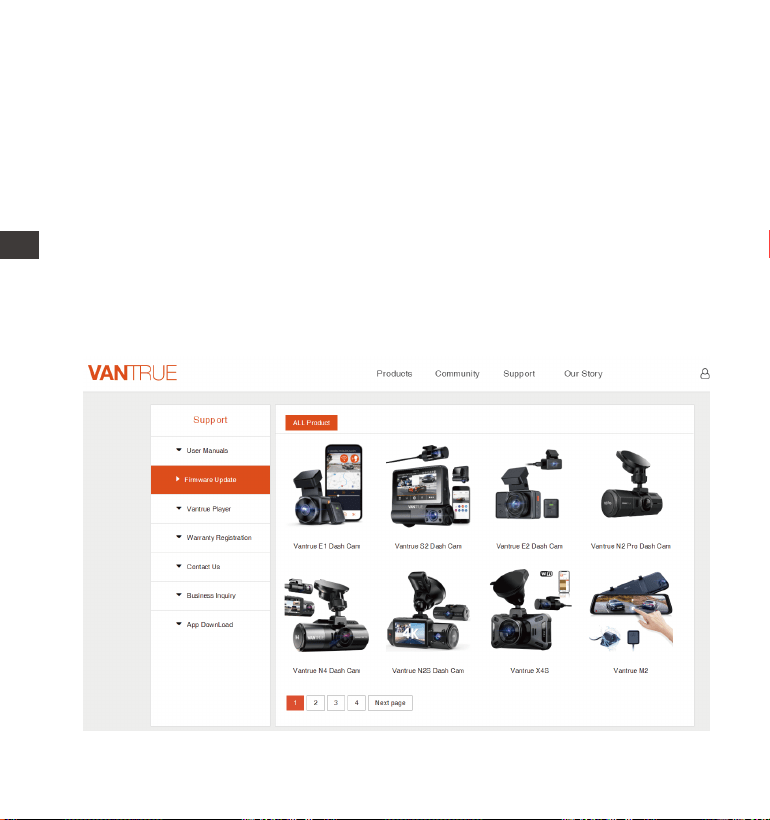
- 130 -
ENFR
4.2.12 Mise à niveau du logiciel
La version du logiciel de la dashcam sera annoncée sur le site officiel de
VANTRUE. Vous pouvez contacter le service client ou télécharger la
dernière version du logiciel à partir du site officiel, et mettre à niveau
selon les invites du site officiel.(www.vantrue.net)
La lecture de vidéos dans l'APP ou le téléchargement de fichiers sur la
carte SD ne consommera pas de données.
Une fois le fichier vidéo téléchargé et lu localement, vous pouvez
afficher les informations de suivi GPS.Vous devez déconnecter le WIFI
de l'enregistreur de conduite, sinon les informations cartographiques
seront vides.
Remarque:
2.
1.

- 131 -
EN
EN
EN
FR
Remarque : pendant le processus de mise à niveau, ne mettez pas hors
tension, sinon la mise à niveau échouera ou la dashcam sera endom-
magé. Si vous rencontrez une panne de courant soudaine qui entraîne
l'échec de la mise à niveau, n'hésitez pas à contacter le service clientèle
pour résoudre le problème pour vous.
4.2.13 Température de fonctionnement
La caméra est conçue pour fonctionner à des températures comprises
entre de -20°C à 60°C, les températures en dehors de cette plage
risquent de dégrader les performances de la caméra et de causer des
dommages.
Pour éviter les dommages
Par temps chaud, n'exposez pas l'appareil directement au soleil lorsque la
voiture est garée.
Dans des conditions hivernales extrêmes, c'est-à-dire -20°C ou moins,
détachez la caméra du pare-brise lorsqu'elle n'est pas utilisée et rangez-la
dans la boîte à gants

- 132 -
ENFR
5. Spécification
E3Modèle
Résolution avant+Interne+arrière :
1944P+1080P+1080P 30FPS;
1440P+1080P+1080P 30FPS;1080P+1080P+1080P
30FPS; 1440P+1080P+720P 30FPS;
1440P+720P+720P 30FPS; 1080P+1080P+720P
30FPS; 1080P+720P+720P 30FPS;
720P+720P+720P 30FPS
Résolution avant+Interne:
1944P+1080P 30FPS; 1440P+1080P 30FPS;
1080P+1080P 30FPS; 1080P+720P 30FPS;
720P+1080P 30FPS; 720P+720P 30FPS
Résolution avant+arrière:
1944P+1080P 30FPS; 1440P+1080P 30FPS;
1080P+1080P 30FPS; 1080P+720P 30FPS;
720P+1080P 30FPS; 720P+720P 30FPS
Résolution avant:
2592x1944P 30FPS; 2560x1440P 30FPS;
1920x1080P 30FPS; 1280x720P 30FPS
Processeur Novatek haute performance
Capteur CMOS Sony
Écran tactile IPS 2.45 pouces
WiFi intégré 2.4GHz & 5GHz
Processeur de puce
Capteur d'image
Écran
WiFi
Lentille
English、简体中文、日本語、Deutsch、Italiano、
Español、Français、Русский язык、Polski
Résolution vidéo
Langues
Avant: Objectif grand angle F1.8, 160 degrés
Interne:Objectif grand angle F2.0, 165 degrés
Arrière: Objectif grand angle F1.8, 160 degrés

- 133 -
MP4
JPEG
Microphone et haut-parleur intégrés
Carte micro SD (U3 ou supérieur, jusqu'à 512 Go)
USB-C (Type-C)
Super condensateur
DC 5V 2.4A
6W
-4°F à 140℉ (-20℃ à 60℃)
-4°F à 158°F (-20°C à 70°C)
Format de vidéo
Format d’image
Audio
Mode de stockage
Interface USB
Type de batterie
Puissance
Température de travail
Tension et courant de
l'alimentation
Température de
stockage
EN
EN
EN
FR

- 134 -
Garantie
VANTRUE offre une période de service de garantie de 12 mois, pendant
laquelle vous pouvez profiter de services tels que des réparations rapides,
le retour et l'échange de marchandises endommagées, etc.
Si vous vous inscrivez en tant que membre sur le site officiel de VANTRUE,
votre période de service de garantie peut être étendue à 18 mois.
Support
Si vous avez des questions sur le produit, vous pouvez les résoudre des 3
manières suivantes :
①Ouvrez l'application VANTRUE et trouvez la réponse dans À propos >
Foire aux questions
② Contactez le service client de votre canal d'achat
③ Envoyez un envoyez un e-mail à notre e-mail officiel support@vantrue.
net, nous aurons un personnel dédié pour répondre aux questions dans 24
heures.
Votre opinion compte
VANTRUE
®
s'engage fermement à toujours améliorer notre produits,
services et expérience utilisateur. Si tu as quelque réflexions sur la façon
dont nous pouvons faire encore mieux, nous apprécions vos commen-
taires et suggestions constructifs. Connectez-vous avec nous aujourd'hui à
6. Garantie & Support
ENFR
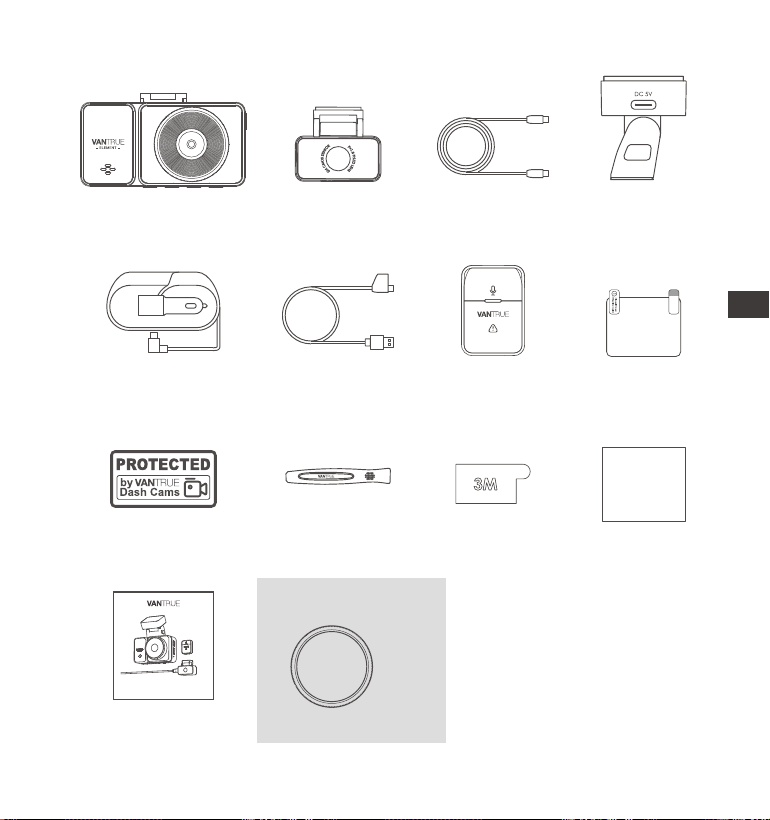
- 135 -
EN
EN
EN
PL
1. Co znajdziemy w pudełku?
H.
Ściereczka
bezpyłowa*1
Naklejki
ostrzegawcze *2
L.
A.
Wideorejestrator
VANTRUE
®
E3
E.
Kabel do tylnej
kamery
I.
Instrukcja obsługi
M.
Filtr CPL
N.
G.
K.
D.
Uchwyt GPS
C.
VANTRUE
®
pilot
bezprzewodowy
Ładowarka
samochodowa pod
gniazdo zapalniczki
3M naklejki
B.
Tylna kamera
Szpatułka*1
F.
Kabel USBC
do transmisji
danych
J.
Naklejki
elektrostatyczne
*2
Opcjonalne akcesoria
Element 2
User Manual
Voice-Controlled Dual Dash Cam
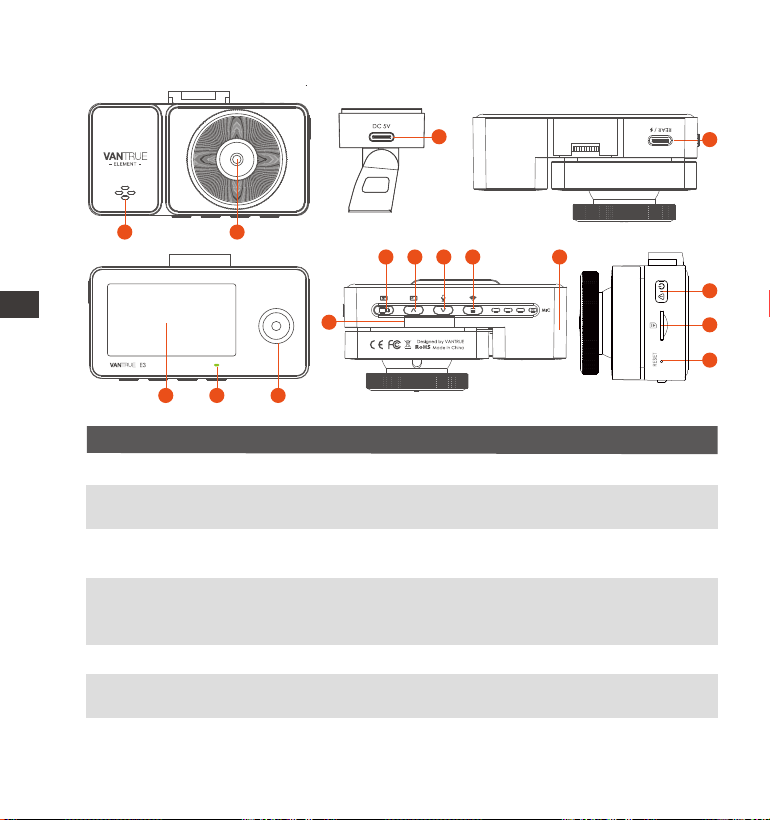
- 136 -
ENPL
2. Budowa kamery
NO. OpisNazwa
1
Nagrywa wszsystko przed pojazdem2 Przednia
kamera
Dostarcza dźwięk podczas odtwarzania nagrań
3
Głośnik
Podłącz do kabla typu C lub ładowarki samocho-
dowej, aby uzyskać zewnętrzne zasilanie;
Port zasilania
Port USB typu C do ładowania lub przesyłania
danych; Port strumienia wideo do strumieniowego
przesyłania nagrań z tylnej kamery;
4 Typ-C USB /
Podłączenie
tylnej kamery
2.45”5
Ekran
Ciągłe zielone światło oznacza, że kamera się
łączy;
6 REC
14
15
16
3
4
21
5 6 7
8
131211
10
9
VTJE1210130

- 137 -
EN
EN
EN
PL
7
Nagrywa wnętrze pojazdu Wewnętrzna
kamera
8
Numery seryjny kamery samochodowejNumer seryjny
9
Podczas nagrywania wideo i czuwania krótkie
naciśnięcie powoduje przełączenie okna wideo;
W ustawieniach menu i przeglądaniu plików
krótkie naciśnięcie powoduje wyświetlenie
poprzedniej opcji, długie naciśnięcie powoduje
przewinięcie w górę do wyświetlenia opcji; w
trybie odtwarzania naciśnij krótko, aby przewinąć
do przodu; W trybie Wi-Fi naciśnij dowolny klawisz,
aby wyjść z Wi-Fi;
10
Podczas nagrywania wideo i czuwania, długie
naciśnięcie, aby szybko przejść do trybu parkowa-
nia, i krótkie naciśnięcie, aby włączyć/ wyłączyć
mikrofon; W ustawieniach menu długie naciśnię-
cie powoduje przewijanie opcji menu, a krótkie
naciśnięcie powoduje wyświetlenie następnej
opcji menu; Podczas przeglądania plików, długie
naciśnięcie powoduje przewinięcie do pliku,
krótkie naciśnięcie powoduje wyświetlenie
następnego pliku; W trybie odtwarzania krótkie
naciśnięcie powoduje wyświetlenie menu
usuwania plików; W trybie Wi-Fi naciśnij dowolny
klawisz, aby wyjść z Wi-Fi;
11
Podczas nagrywania wideo długie naciśnięcie
wyłącza ekran i krótkie naciśnięcie zatrzymuje
nagrywanie; W stanie gotowości naciśnij krótko,
aby potwierdzić akcję; W trybie odtwarzania
krótkie naciśnięcie powoduje zatrzymanie/
rozpoczęcie nagrywania wideo;
Przycisk
Przycisk
Przycisk
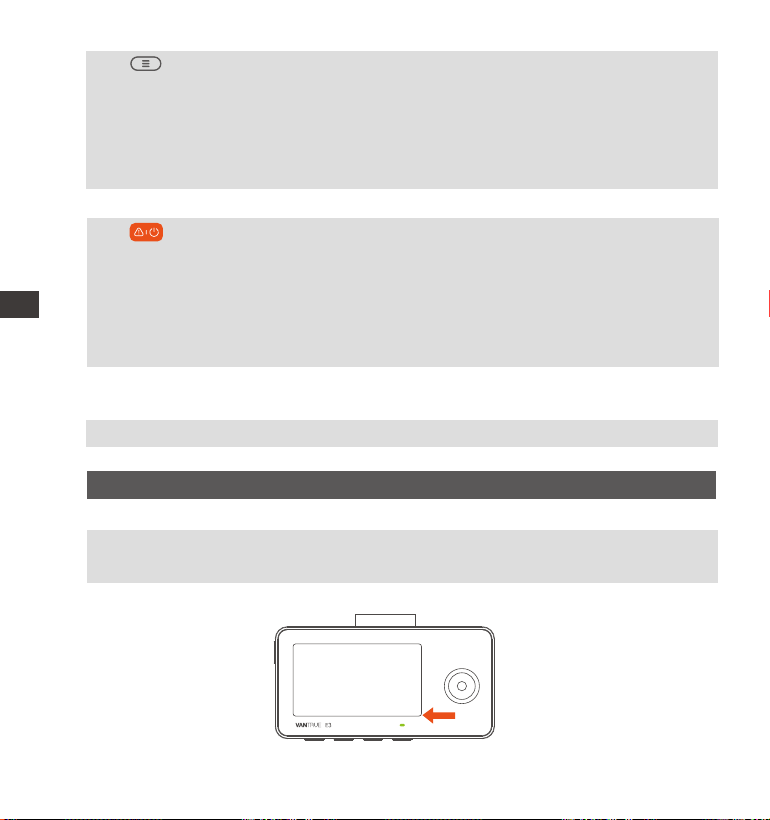
- 138 -
ENPL
Nagrywa dźwiękMikrofon
Naciśnij, aby wymusić resetowanie urządzenia;15 Reset przycisk
13
Zapewnia rozszerzalną pamięć masową (do 512
GB w systemie FAT32, U3 lub wyższym).
14 MicroSD Card
Slot
Podczas nagrywania wideo krótkie naciśnięcie
zablokuje bieżący plik i zrobi zdjęcie, długie
naciśnięcie spowoduje wyłączenie zasilania; W
stanie gotowości krótkie naciśnięcie zrobi zdjęcie,
długie naciśnięcie wyłączy; W stanie Wi-Fi naciśnij
krótko, aby wyjść z Wi-Fi, naciśnij długo, aby
wyłączyć;
14
12
Przycisk
LED wskaźnik
OpisLED
Stałe zielone światło
Migające zielone światło
W stanie czuwania
Kamera nagrywa
LED Status
REC
W trybie nagrywania naciśnij i przytrzymaj, aby
włączyć/wyłączyć WiFi; W stanie gotowości
krótkie naciśnięcie powoduje wejście/wyjście z
menu ustawień, a długie naciśnięcie włącza/
wyłącza WiFi; W trybie WiFi naciśnij dowolny
klawisz, aby wyjść z WiFi;
Przycisk
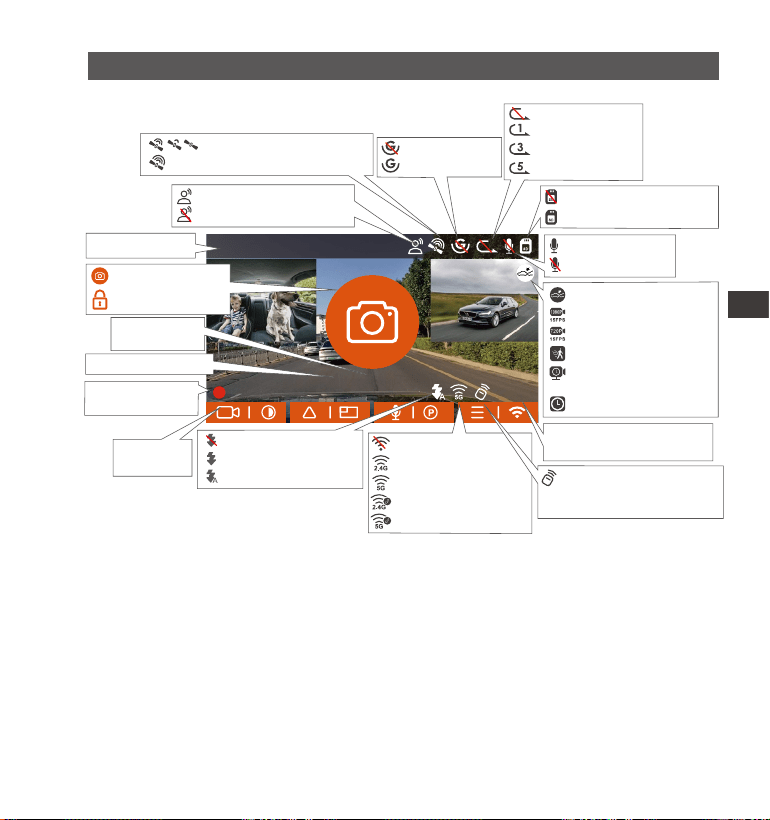
14:39:07 10-02-2023
00:00:37
MP/H
35
1440P+1080P+1080P 30FPS
- 139 -
EN
EN
EN
PL
Przegląd ekranu
3. Instalacja
3.1 Instalowanie karty pamięci (zalecane: szybka karta microSD Vantrue U3).
Proszę włożyć kartę pamięci (pojemność karty pamięci: 32 GB-512 GB,
szybkość karty: U3/Class10/A2). Kamera ma pewne wymagania
dotyczące szybkości karty pamięci. Aby zapewnić niezawodne działanie,
zalecamy korzystanie z karty SD VANTRUE (sprzedawanej oddzielnie).
Pętla wyłączona;
Czas pętli 1 min;
Czas pętli 3 min;
Czas pętli 5 min;
G-Sensor WŁ;
G-Sensor WYŁ;
Aktualna prędkość
(KMH lub MPH);
Rozdzielczość
Detekcja kolizji WŁ;
1080P Low Bitrates WŁ;
720P Low Bitrates WŁ
Detekcja ruchu WŁ;
GPS Łączenie;
GPS sygnał zablokowany;
Asystent głosowy WŁ;
Asystent głosowy WYŁ;
MP/H
35
Wskazanie
przycisku
IR LED WYŁ;
IR LED WŁ.
IR LED AUTO WŁ/WYŁ;
Bieżący czas (24H);
Zdjęcie;
Plik zablokowany;
Bieżąca data
(MM/DD/YY);
MIKROFON WŁ;
MIKROFON WYŁ;
Brak karty pamięci;
Karta pamięci włożona;
Czas nagrywania
(Bieżący klip);
WiFi WYŁ
2.4G WiFi WŁ
5G WiFi WŁ
2.4G WiFi Połączono
5G WiFi Połączono
Parkingowy tryb
poklatkowy;
Tryb poklatkowy;
Pilot jest połączony;
Miganie oznacza, że
pilot nie jest podłączony;
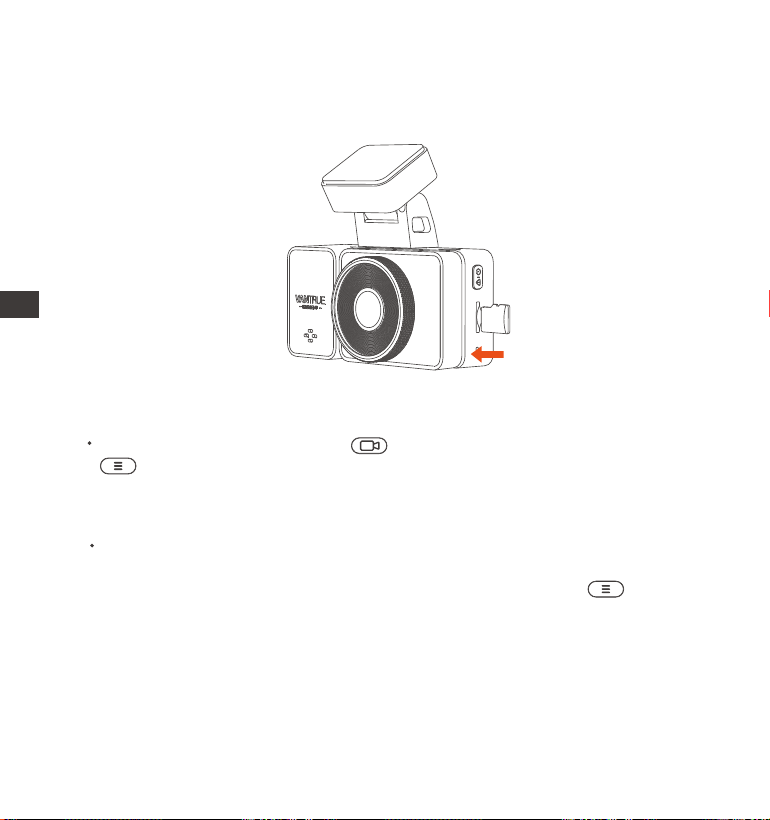
Jeśli kamera nagrywa wciśnij aby zatrzymać nagrywanie a potem
aby wejść w menu “System,” wybierz formatowanie karty i potwi-
erdzaj, aby sformatować kartę pamięci, aż pojawi się komunikat
„Sformatowano pomyślnie”.
Po włożeniu karty pamięci, jeśli na ekranie pojawi się komunikat „Błąd
karty, proszę sformatować” (należy pamiętać, że rejestrator w tym
momencie nie nagrywa), należy bezpośrednio nacisnąć przycisk,
aby wejść do menu i rozpocząć proces formatowania;.
- 140 -
ENPL
Kartę microSD należy formatować raz w miesiącu, aby zmaksymal-
izować żywotność karty pamięci.
Nie wyjmuj karty, gdy kamera nagrywa- grozi utratą danych.
Proszę nie używać złych kart lub kart o niskiej prędkości, ponieważ łatwo
Uwaga:
1.
2.
3.
Przed użyciem tej karty wykonaj poniższe czynności, aby ją prawidłowo
sformatować:
Instalacja karty pamięci: Jest ikona wskazująca kierunek wkładania karty
pamięci. Wsuń kartę pamięci do gniazda zgodnie z kierunkiem wskaza-
nym przez tę ikonę, aż usłyszysz dźwięk „kliknięcia” w gnieździe karty, co
oznacza, że karta pamięci jest włożona prawidłowo.
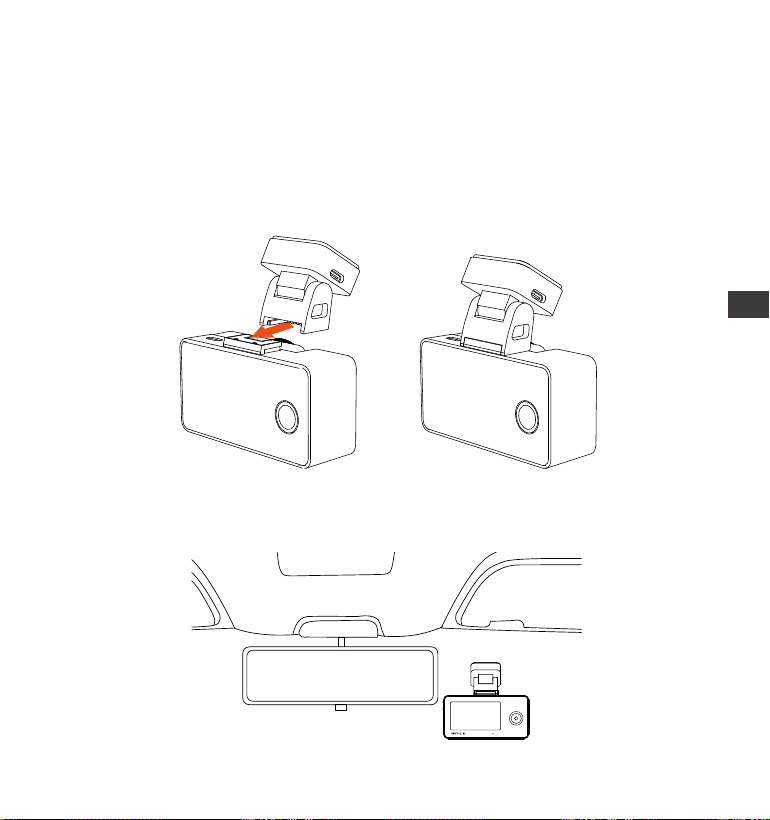
- 141 -
EN
EN
EN
PL
4.
3.2 Instalowanie kamery na przedniej szybie
Wyrównaj uchwyt z interfejsem uchwytu, a następnie wciśnij, aż uchwyt
zostanie zainstalowany.
1.
jest zatrzymać lub utracić nagranie z powodu awarii karty pamięci.
Przed sformatowaniem karty pamięci sprawdź folder wideo wydarzenia
na karcie SD, aby sprawdzić, czy nie ma filmów, które należy zapisać
osobno, aby nie usunąć przez pomyłkę ważnych filmów.
Przed instalacją włącz kamerę i sprawdź, czy kąt fotografowania
przedniego i wewnętrznego obiektywu jest odpowiedni w widoku
nagrywania.
2.
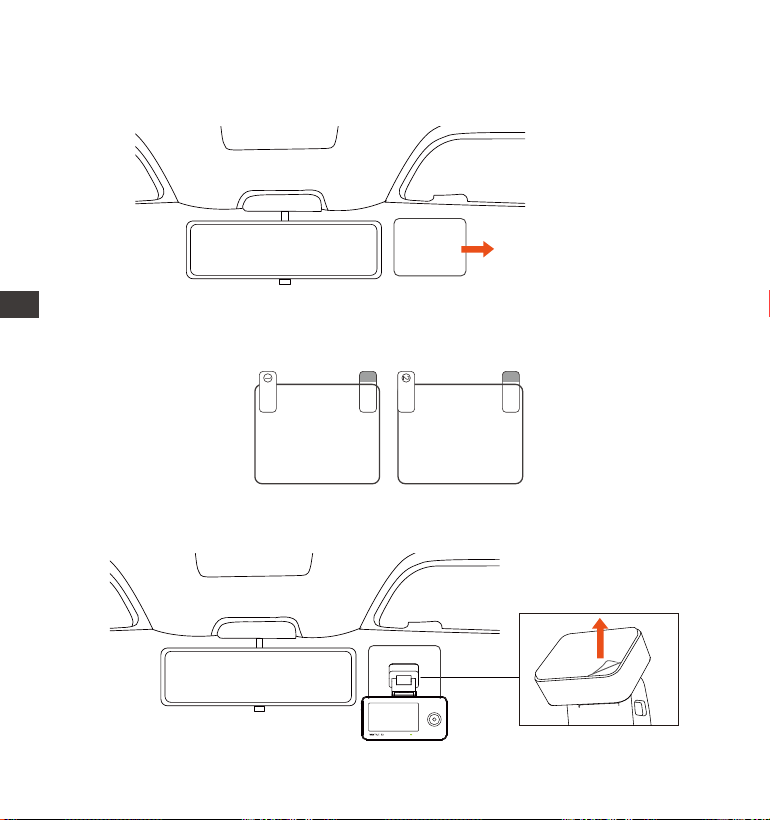
- 142 -
ENPL
Dokładnie wyczyść przednią szybę wodą lub alkoholem, a następnie
wytrzyj suchą szmatką. Przyklej naklejkę elektrostatyczną za lusterkiem
wstecznym, co jest zalecanym miejscem.
Uwaga: Naklejki elektrostatyczne z dwustronną folią ochronną. Usuń
folię ochronną z nr 1, wklej naklejkę elektrostatyczną na przednią
szybę, a następnie usuń folię ochronną z nr 2.
3.
Usuń taśmę 3M z uchwytu, a następnie przymocuj uchwyt i kamerę do
naklejek elektrostatycznych.
4.
Naklejka elektrostatyczna
Please peel off this mask
AFTER application completed
Please peel off this
mask BEFORE application
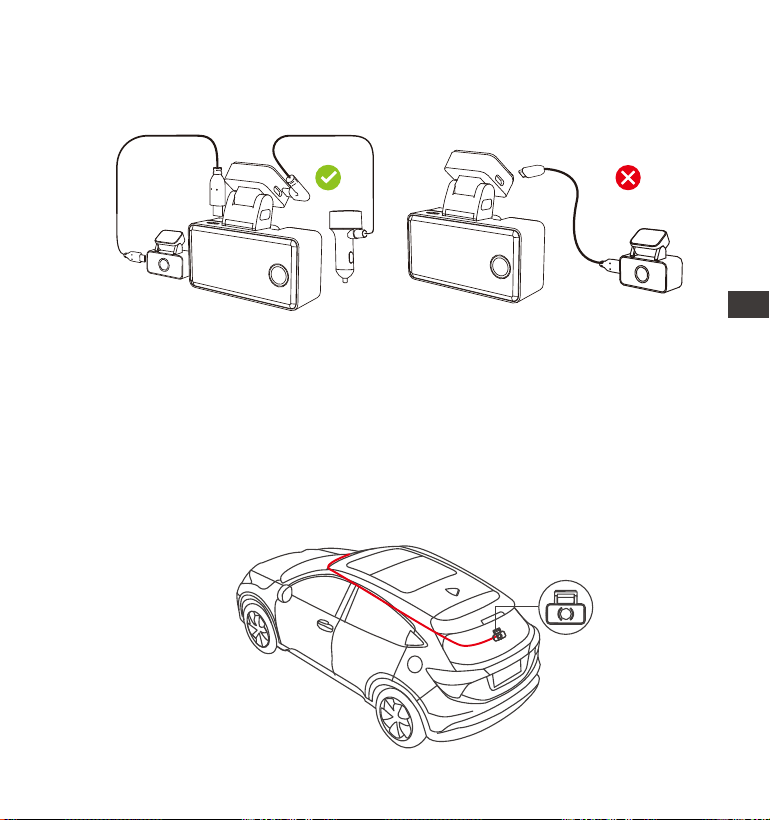
- 143 -
PL
EN
EN
EN
PL
Wyjmij kabel kamery tylnej, podłącz kamerę główną i kamerę tylną i
wyjmij ładowarkę samochodową, aby ją podłączyć. Po włączeniu
kamery wybierz odpowiednią lokalizację i zainstaluj ją.
5.
Instalacja kamery tylnej: Wybierz pozycję instalacji na tylnej szybie.
Zalecamy wybranie pozycji blisko środka tylnej szyby i unikanie linii
odparowywania na tylnej szybie, aby nie wpływać na efekt wideo.
Usuń folię ochronną z podkładki samoprzylepnej i tylnego obiektywu
aparatu. Ustaw tylną kamerę w wybranej pozycji i wyreguluj kąt, a
następnie użyj kabla tylnej kamery, aby połączyć tylną kamerę z
główną przednią kamerą.
6.
(Prawidłowa metoda
okablowania)
(Niewłaściwa metoda
okablowania)
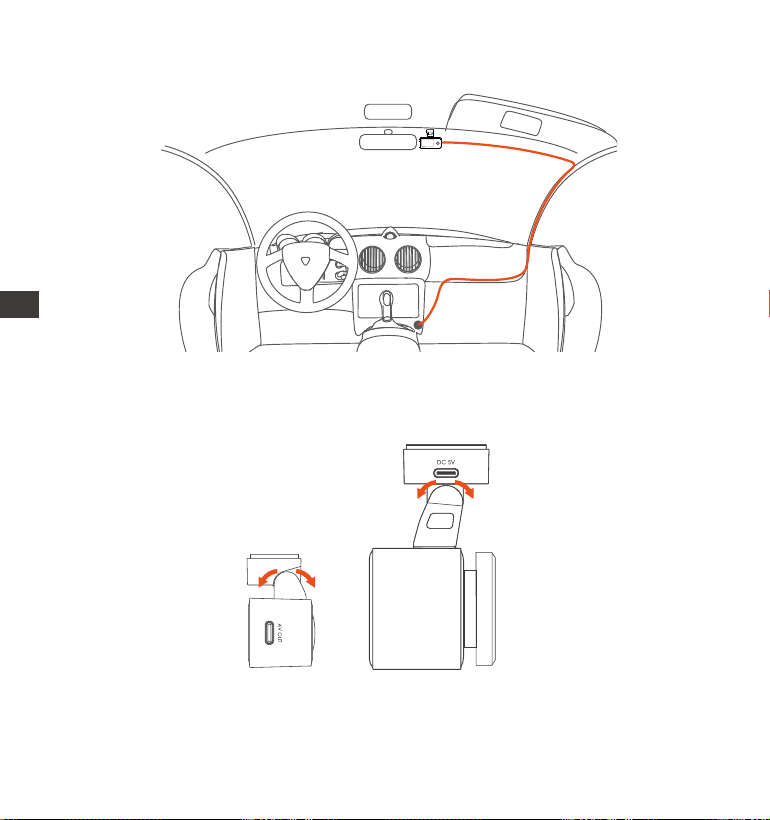
- 144 -
ENPL
Ostrożnie przeprowadź kabel ładowarki samochodowej w kierunku
pokazanym na rysunku.
7.
Kąt szyby okiennej każdego modelu jest inny, należy dostosować kąt
nagrywania kamery głównej i tylnej kamery w górę I w dół zgodnie z
rzeczywistymi potrzebami.
8.
Uwaga: Tylko przednią kamerę można obracać i regulować, kamera
kabinowa jest stała.
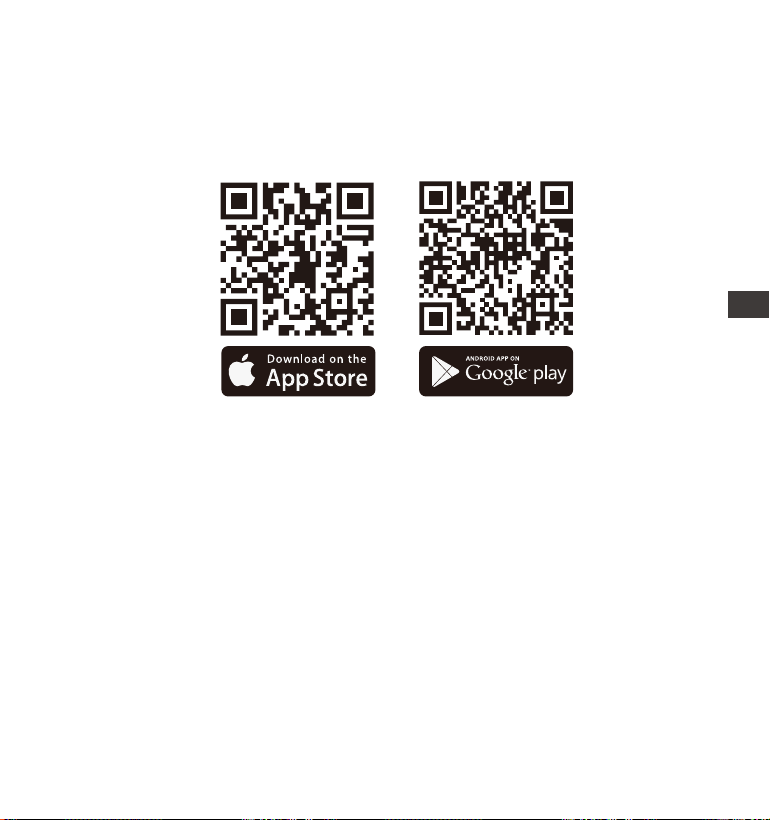
- 145 -
EN
EN
EN
PL
3.3 Pobieranie aplikacji
Aby pobrać i zainstalować aplikację, zeskanuj poniższy kod QR odpow-
iedniej wersji. Wyszukaj aplikację „Vantrue” w App Store lub Google Play
Store, aby znaleźć aplikację, a następnie pobierz ją i zainstaluj na swoim
telefonie.
Uwaga: Po pomyślnym podłączeniu E3 do telefonu komórkowego przez
Wi-Fi, może on wykonywać podgląd wideo w czasie rzeczywistym,
zmieniać ustawienia E3, pobierać pliki bez połączenia z Internetem i
odtwarzać filmy na telefonie komórkowym. Jednak funkcje odtwarzania
śladów GPS i udostępniania wideo będą zależeć od usług dodanych
internetowych lub telekomunikacyjnych (wymaga wyłączenia/odłącze-
nia WiFi kamery).
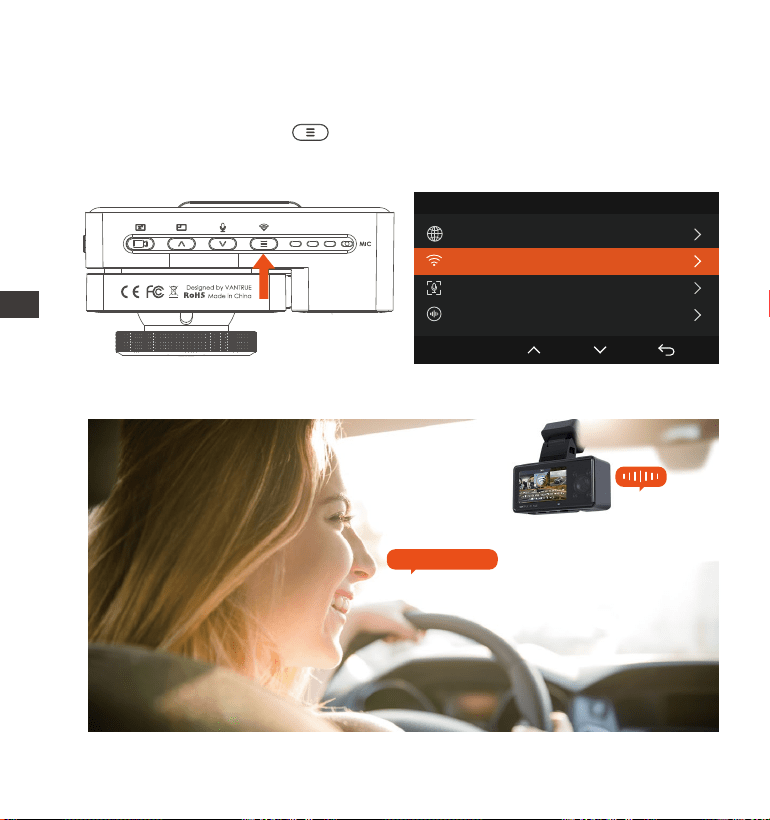
Turn on WiFi
- 146 -
ENPL
3.4 WiFi Łączenie
Istnieją 3 sposoby włączenia Wi-Fi kamery.
Przejdź do ustawień systemowych
kamery samochodowej, a następ-
nie włącz Wi-Fi.
Użyj polecenia głosowego „Turn on Wi-Fi”, aby je włączyć.
VTJE1210130
Długo naciśnij menu! przez
2 sekundy.
3.
1. 2.
Ustawnienia Systemu 2/14
Język
Wi-Fi
Rozpoznawanie mowy
Treść głosowa
OK
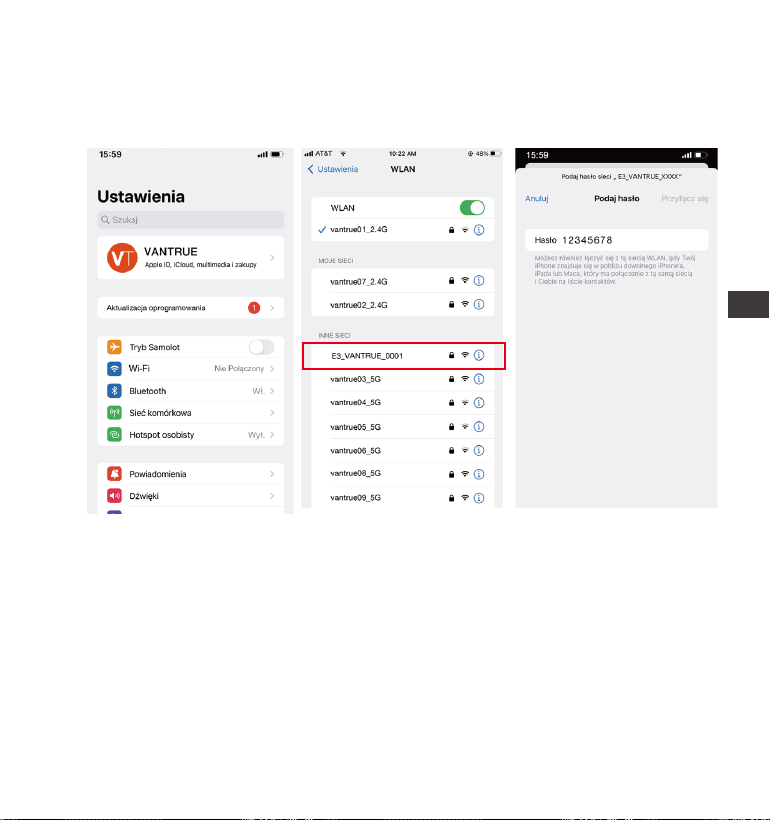
- 147 -
EN
EN
EN
PL
Po włączeniu funkcji Wi-Fi kamery wprowadź ustawienia Wi-Fi telefonu
komórkowego, a następnie znajdź nazwę Wi-Fi, na przykład E3_VANTRUE
_XXXX, i wprowadź domyślne hasło Wi-Fi: 12345678, aby połączyć się z
Wi-Fi.
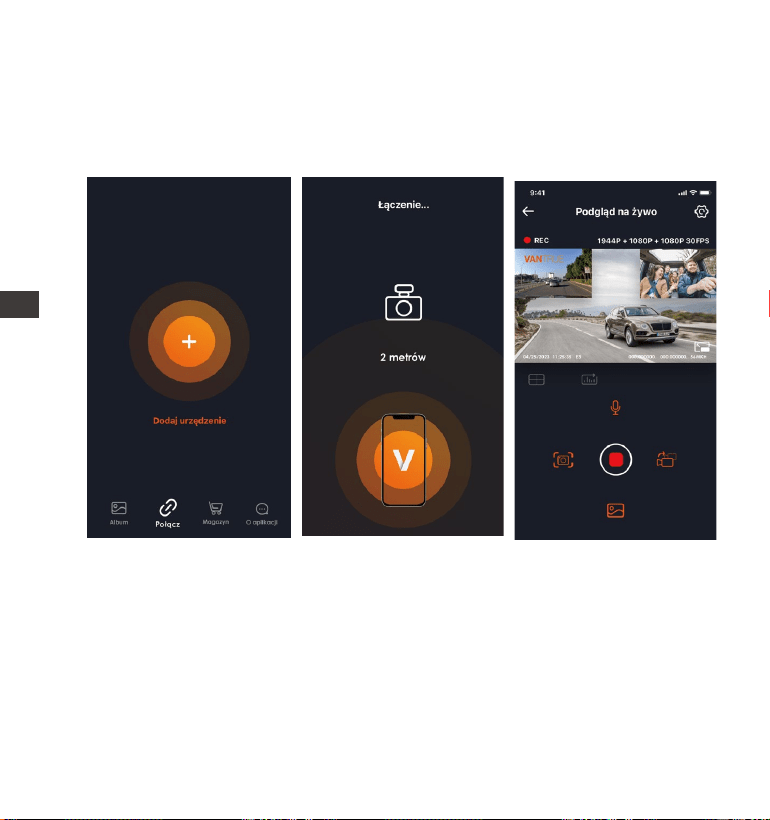
- 148 -
ENPL
3.5 APP Łączenie
Po pomyślnym nawiązaniu połączenia Wi-Fi kliknij „+” podczas otwiera-
nia aplikacji po raz pierwszy, dodaj model kamery, a następnie aplikacja
automatycznie połączy się z kamerą i wyświetli aktualną sytuację
nagrywania kamery w czasie rzeczywistym.
Noter:
Jeśli nie połączysz się z Wi-Fi przed otwarciem aplikacji, aplikacja
wyświetli monit „Najpierw połącz się z Wi-Fi” i automatycznie przejdzie
do ustawień Wi-Fi. Najpierw wykonaj czynności, aby połączyć się z
Wi-Fi.
Jeśli Wi-Fi jest już podłączone, ale aplikacja przeskakuje do uprawnień
aplikacji APP po wybraniu modelu, sprawdź, czy zezwolenie na sieć
bezprzewodową aplikacji jest włączone.
1.
2.
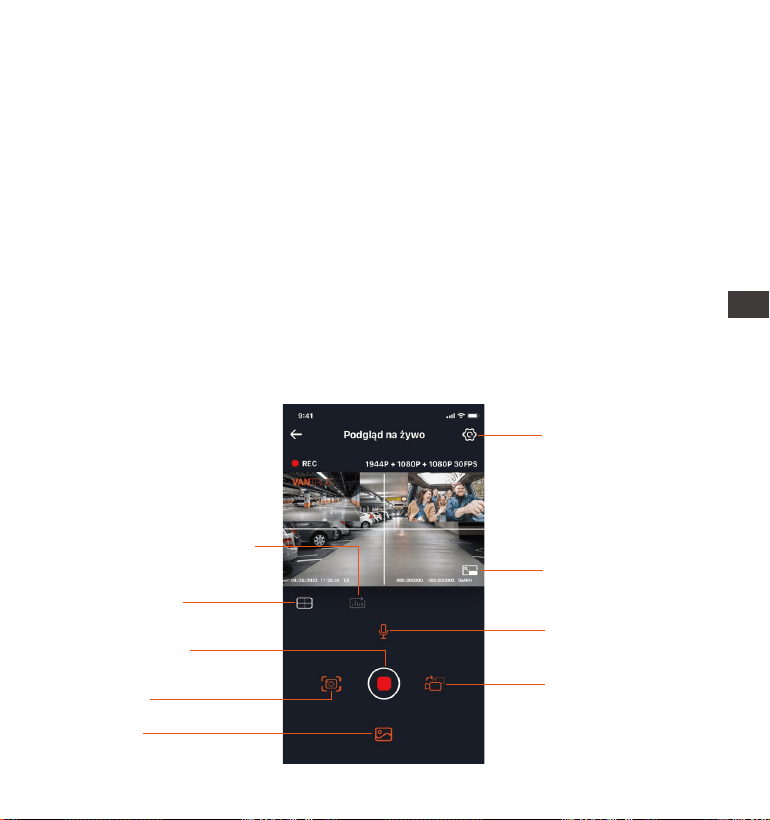
- 149 -
EN
EN
EN
PL
3.
4.
5.
6.
3.6 App funkcje
Ustawienia
Statystyki przebiegu
Linia korekcji
obiektywu
Pełny ekran
Przełączanie
ekranów
Zdjęcie
Album
Zatrzymuje
nagrywanie
Wł/wył mikrofon
Początkowe hasło dla tego urządzenia jest używane tylko do pierwsze-
go logowania. Aby zapobiec potencjalnym zagrożeniom bezpieczeńst-
wa, pamiętaj o zmianie początkowego hasła po pierwszym zalogowa-
niu, aby uniemożliwić innym zalogowanie się do Twojego urządzenia
bez autoryzacji lub innych negatywnych konsekwencji.
Jeśli zapomnisz hasła Wi-Fi, możesz przywrócić domyślne ustawienia
urządzenia, a hasło Wi-Fi urządzenia również zostanie przywrócone do
hasła domyślnego (12345678).
Jeśli nazwa podłączonego Wi-Fi nie pasuje do modelu kamery samo-
chodowej, aplikacja wyświetli monit: „Wybierz właściwy model” i
automatycznie wróci do interfejsu wyboru modelu.
W przypadku braku połączenia z telefonem komórkowym po włącze-
niu WiFi kamera automatycznie wyłączy WiFi i powróci do interfejsu
nagrywania po 10 minutach.

- 150 -
ENPL
Po wejściu do podglądu aplikacji w czasie rzeczywistym możesz wykonać
następujące operacje:
Podgląd wideo: Po pomyślnym podłączeniu aplikacji do E3 wejdź na
stronę podglądu w czasie rzeczywistym, kliknij ikonę pełnego ekranu lub
umieść telefon poziomo, a ekran czasu rzeczywistego automatycznie
przełączy się w tryb podglądu pełnoekranowego. Kliknij ikonę przełączni-
ka okien, aby przełączyć przednie i tylne okna wideo, ale tylko wielo-
kanałowe kamery samochodowe mogą korzystać z tej funkcji.
Odtwarzanie wideo: Pliki wideo i zdjęcia nagrane na karcie SD można
oglądać w aplikacji, a wideo można odtworzyć po kliknięciu pliku.
Pobieranie wideo: Możesz wybrać wideo lub zdjęcie, które chcesz
pobrać w interfejsie przeglądania karty SD lub w obszarze odtwarzania
wideo. Po pobraniu filmu, jeśli odtworzysz go w lokalnym pliku interfejsu
aplikacji, możesz wyświetlić ścieżkę GPS filmu.
Migawka wideo: możesz przechwycić bieżący ekran w interfejsie podglą-
du aplikacji w czasie rzeczywistym.
Statystyki przebiegu: Użytkownicy mogą kliknąć, aby pobrać informacje
o przebiegu w razie potrzeby, a informacje o przebiegu zostaną zapisane
w aplikacji jako obraz lub plik PDF.
Linia korekcji obiektywu: Popraw balans obiektywu za pomocą precyzyj-
nego celownika, aby obraz wideo nie był przekrzywiony.
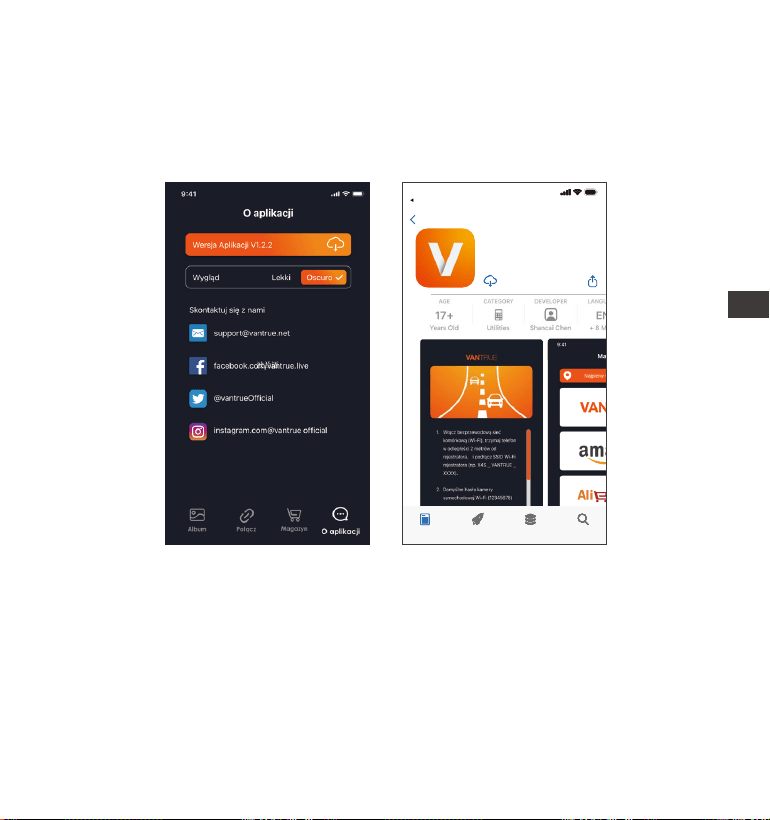
- 151 -
EN
EN
EN
PL
3.7 APP Aktualizacja
Otwórz aplikację „Vantrue”, połącz się z Wi-Fi i wejdź w „Ustawienia >
Informacje> Wykryj nową wersję”. Aplikacja automatycznie wykryje, czy
jej wersja jest najnowszą wersją. Jeśli dostępna jest nowa wersja aplikacji,
postępuj zgodnie z instrukcjami i uaktualnij wersję.
Vantrue Ltd.
Vantrue
Vantrue
9:41
Powrót
Dzisiaj Gry Apps Wyszukiwanie
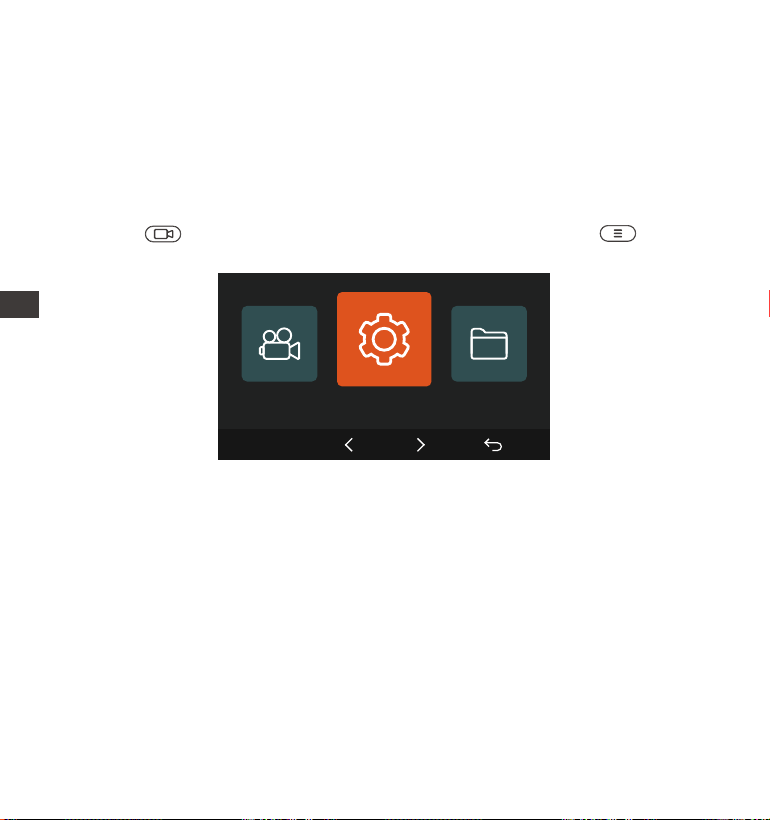
- 152 -
ENPL
Kamera E3 posiada 3 menu funkcyjne, którymi są: ustawienia nagrywania,
ustawienia systemowe i przeglądanie plików. Dzięki tym ustawieniom
funkcji możesz ustawić kamerę samochodową zgodnie z własnymi
wymaganiami.
wciśnij , najpierw wstrzymaj wideo, a następnie naciśnij aby wejść
w ustawienia menu.
A. Ustawienia nagrywania
-Rozdzielczość:
Kamera E3 ma 4 tryby rozdzielczości: przód+kabina+tył/przód+kabina/
przód+tył/pojedynczy przód;
Przód + kabina + tylne nagrywanie: 1944 P + 1080 P + 1080 P 30 FPS; 1440 P
+ 1080 P + 1080 P 30 FPS; 1080 P + 1080 P + 1080 P 30 FPS; 1440 P + 1080 P +
720 P 30 FPS; 1440 P + 720 P + 720 P 30 FPS; 1080 P + 1080 P + 720 P 30 FPS;
1080 P + 720 P + 720 P 30 FPS; 720 P + 720 P + 720 P 30 FPS;
Przód + nagrywanie w kabinie: 1944 P + 1080 P 30 FPS; 1440 P + 1080 P 30
FPS; 1080 P + 1080 P 30 FPS; 1080 P + 720 P 30 FPS; 720 P + 1080 P 30 FPS;
720P + 720P 30FPS;
Nagrywanie z przodu + z tyłu: 1944 P + 1080 P 30 FPS; 1440 P + 1080 P 30
4. Podstawowe funkcje
4.1 Menu ustawienia
Ustawnienia Systemu
OK

- 153 -
EN
EN
EN
PL
EN
EN
EN
PL
FPS; 1080 P + 1080 P 30 FPS; 1080 P + 720 P 30 FPS; 720 P + 1080 P 30 FPS;
720P + 720P 30FPS;
Nagrywanie z przodu: 2592x1944P 30FPS; 2560x1440P 30FPS; 1920x1080P
30FPS; 1280x720P 30FPS.
-Nagrywanie w pętli: Ustawienie domyślne to 3 min. Możesz wybrać
opcje pomiędzy 1/3/5 min i WYŁ.
-Diody podczerwieni: ustawienie domyślne to Auto. Możesz wybrać auto,
włączone lub wyłączone.
-G-Sensor: Wybierz poziom G-sensora, którego potrzebujesz, a następnie
możesz ustawić 3 kierunki (Przód + Tył/Lewo + Prawo/Góra + Dół).
Wartość G-sensor w każdym kierunku można wybrać jako 1/2/3/4/5/Wył.
Im wyższy poziom czułości, tym łatwiej wyzwolić nagrywanie zdarzeń.
G-sensor jest najbardziej czuły, gdy jest ustawiony na 5.
-Nagrywanie dźwięku: Domyślnie włączone. Włącz lub wyłącz nagry-
wanie.
-Ekspozycja: Domyślna wartość to +0.0. Dostosuj ekspozycję obiektywu.
-Kontrolka statusu REC: Ustawienie domyślne to WŁ. Możesz
włączyć/wyłączyć lampkę stanu nagrywania.
-WDR: Domyślnie włączone. Aby uzyskać lepiej zrównoważony efekt
wideo, możesz go wyłączyć. Ta funkcja dotyczy tylko soczewek przed-
nich i wewnętrznych.
-Tylny HDR: Domyślnie włączony. Włącz lub wyłącz nagrywanie HDR.
-Obróć wyświetlacz: Domyślnie wyłączone. Możesz wybrać obracanie
ekranu wideo w górę iw dół (180 stopni).
-Odbicie lustrzane kamera wewnętrzna: domyślnie włączone. Po
włączeniu wewnętrzny ekran nagrywania jest wyświetlany w trybie
lustrzanym.
-Tylna kamera odbicie lustrzane: Domyślnie włączone. Jeśli go włączysz,
tylny ekran nagrywania jest wyświetlany w trybie lustrzanym
-Numer tablicy rejestracyjnej: Wybierz numer lub literę do ustawienia. Po
ustawieniu numer tablicy rejestracyjnej może zostać wyświetlony w

- 154 -
ENPL
nagranym filmie.
-Dodaj do nagrania: Włącz lub wyłącz pieczęć znaku wodnego na wideo
i zdjęciach. Znaczek znaku wodnego zawiera etykietę godziny i daty,
etykietę VANTRUE, numer tablicy rejestracyjnej, informacje o lokalizacji
GPS i etykietę prędkości. Wszystkie włączone domyślnie.
-Tryb poklatkowy: Domyślna wartość jest wyłączona. Możesz włączyć
1FPS/5FPS/10FPS/15FPS.
-Tryb parkowania: Możesz wybrać tryb parkowania, którego potrzebujesz,
w tym wykrywanie kolizji/wykrywanie ruchu/nagrywanie lowbitrate/tryb
poklatkowy/wyłączone.
-Widzenie w nocy przy słabym oświetleniu w trybie parkowania: Domyśl-
nie włączone. Po włączeniu może zoptymalizować efekt nagrywania
filmów w trybie parkowania.
-Statystyki przebiegu: Ustawienie domyślne jest włączone, a informacje o
przebiegu GPS będą przechowywane na karcie pamięci, a klienci mogą
je wyświetlić na komputerze lub wyeksportować plik za pomocą funkcji
statystyki przebiegu w aplikacji.
-Ustawienia GPS: GPS jest domyślnie włączony. Tutaj ustawia się ustawie-
nia GPS WŁ/WYŁ, ustawienia jednostek prędkości i informacje GPS.
B. Konfiguracja systemu
-Język: Dostępne języki to Engish/Français/Español/Deutsch/Italiano/简体
中文/русский/日本語/Polski.
-WiFi: Domyślnie Wi-Fi jest automatycznie wyłączane po 10 minutach bez
połączenia. W ramach tej funkcji możesz ustawić Wi-Fi tak, aby automaty-
cznie włączało się lub wyłączało oraz wyłączało się po 10 minutach, a
także podejrzeć informacje o Wi-Fi.
-Sterowanie głosem: Domyślna czułość to Standard. Polecenia głosowe
można rozpoznać po włączeniu opcji. Możesz wybrać takie opcje, jak
niska czułość/wysoka czułość/standardowa/wyłączona.
-Treść głosowa: Polecenia rozpoznawania głosu. Możesz użyć różnych

- 155 -
EN
EN
EN
PL
poleceń, aby zdalnie sterować kamerą do pracy.
-Formatuj kartę pamięci: Formatuj wszystkie dane na karcie pamięci.
-Konfiguracja przypomnienia formatu: Wybierz opcje przypomnienia: 15
dni, 1 miesiąc i Wył. Domyślnie jest wyłączone.
Aby zapobiec regularnemu zapominaniu o formatowaniu karty pamięci,
dodaliśmy ustawienie czasu przypomnienia o formatowaniu. Możesz
wybrać przypomnienie po 15 dniach lub 1 miesiącu i obliczyć 15 dni lub 1
miesiąc od ustawionej daty. Gdy czas się skończy, możesz wybrać „OK”,
aby sformatować, lub wybrać „Dalej”.
Uwaga: Jeśli zmienisz opcję przypomnienia formatu, odliczanie czasu
zostanie wznowione natychmiast po zmianie opcji.
-Data i godzina: Istnieją dwa sposoby ustawienia godziny i daty: 1.
Automatyczna aktualizacja GPS, 2 Ręczne ustawienie daty/czasu.
Automatyczna aktualizacja GPS jest domyślnie włączona.
GPS automatycznie aktualizuje datę i godzinę w oparciu o strefę czasową,
więc najpierw musisz wybrać prawidłową strefę czasową; możesz także
wyłączyć automatyczną aktualizację GPS, włączyć Ręczne ustawianie
daty/godziny oraz ręcznie korygować datę i godzinę.
W tym menu można również ustawić format daty i ustawienia strefy
czasowej.
-Wygaszacz ekranu: Ustaw czas automatycznego wyłączania wyświetlac-
za LCD po braku operacji.
Jeśli ustawisz Wygaszacz na 3 min, ekran LCD E3 wyłączy się automaty-
cznie po 3 min, ale nagrywanie będzie kontynuowane. Jeśli konfiguracja
jest wyłączona, ekran się nie wyłączy. Możesz wybrać opcje spośród 30s,
1Min, 3Min i Wył.
-Dźwięk urządzenia: Ustaw głośność urządzenia. Domyślny poziom
głośności to 3, najniższy to 0, a najwyższy to 5.
-Ton podpowiedzi: w zależności od różnych sytuacji kamera jest ustawiona
na 5 rodzajów dźwięków podpowiedzi, które są dźwiękiem włącza-
nia/wyłączania, klawiszami.
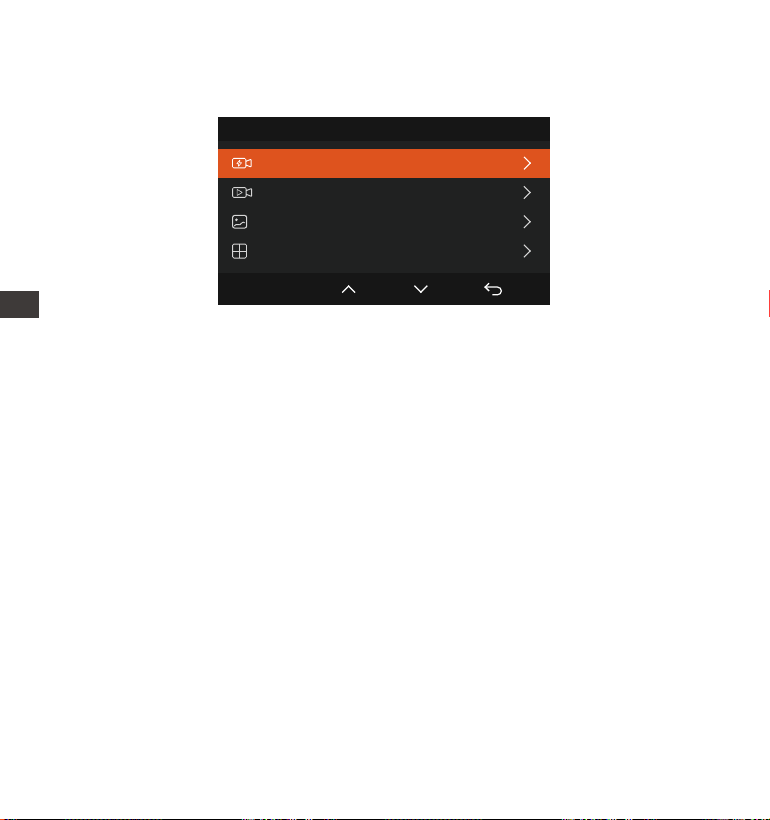
- 156 -
PL
ENPL
Pliki 1/4
Zdarzenia
Normalne
Zdjęcia
Wszystkie pliki
OK
-Zdarzenia: Filmy o zdarzeniach krytycznych wykryte przez aktywność
G-Sensor lub ręcznie zablokowane przez użytkownika.
Format nazwy pliku to 20300128_140633_0008_E_A.MP4
20300128_140633_0008_E_B.MP4
20300128_140633_0008_E_C.MP4
-Normalny: Nagrane standardowe filmy. Ten folder zapisuje wideo
nagrywania w pętli, wideo trybu parkowania i wideo poklatkowe.
Nazwa pliku standardowego: 20300128_140633_0008_N_A.MP4;
Nazwa pliku parkingowego: 20300128_140633_0007_P_A.MP4;
Nazwa pliku z trybu poklatkowego: 20300128_140633_0006_T_A.MP4.
-Zdjęcia: Pliki zdjęć.
-Wszystko: Nagrane wszystkie standardowe nagrania wideo i nagrania o
krytycznych zdarzeniach.
Uwaga: Przyrostek A reprezentuje pliki nagrane przez przednią kamerę,
przyrostek B reprezentuje pliki nagrane przez kamerę w kabinie, a
przyrostek C reprezentuje pliki nagrane przez tylną kamerę.
C. Pliki
Przejrzyj pliki wideo i zdjęcia nagrane przez kamerę.
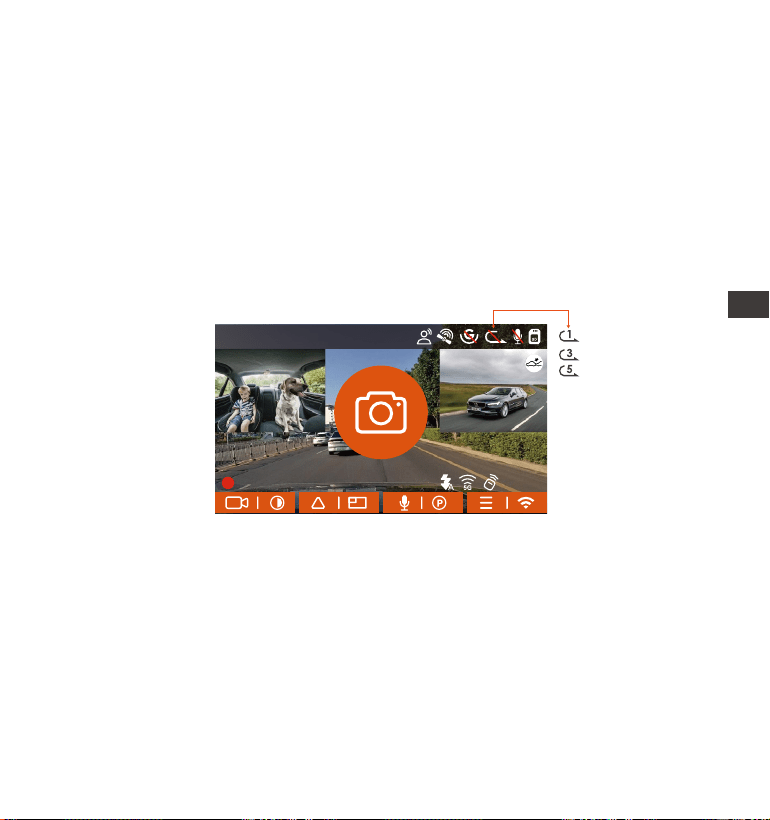
- 157 -
PL
EN
EN
EN
PL
4.2 Dane techniczne
Normalne działanie funkcji nagrywania w pętli jest bardzo zależne od
szybkości karty pamięci, dlatego należy regularnie formatować kartę
pamięci, aby uniknąć problemów, takich jak nadmierne pliki na karcie
pamięci i starzenie się karty, które wpływają na normalne nagrywanie w
pętli.
Należy regularnie sprawdzać nagrywanie w pętli, aby uniknąć nadpisy-
wania niezbędnych filmów przez pętlę.
Gdy nagrywanie w pętli jest wyłączone, kamera będzie nagrywać
wideo po 5 minutach każdego klipu, ale nie nadpisze starych filmów,
gdy karta pamięci jest pełna.
4.2.1 Nagrywanie w pętli
Po włożeniu karty pamięci i podłączeniu zasilania kamera E3 automaty-
cznie włączy się i przejdzie do nagrywania w pętli. Czas trwania każdego
nagranego wideo zostanie zapisany na podstawie ustawionego czasu
nagrywania w pętli, zapisanego w normalnym folderze wideo.
Gdy pojemność normalnego folderu wideo osiągnie 70% całkowitej
pojemności, nowy plik nagrywania w pętli automatycznie nadpisze
oryginalne pliki nagrywania w pętli. Po włączeniu tej funkcji plik wideo
automatycznie nadpisze pętlę, aby nie zatrzymywać nagrywania
podczas procesu jazdy.
Uwaga:
1.
2.
3.
14:39:07 10-02-2023
00:00:37
MP/H
35
1440P+1080P+1080P 30FPS
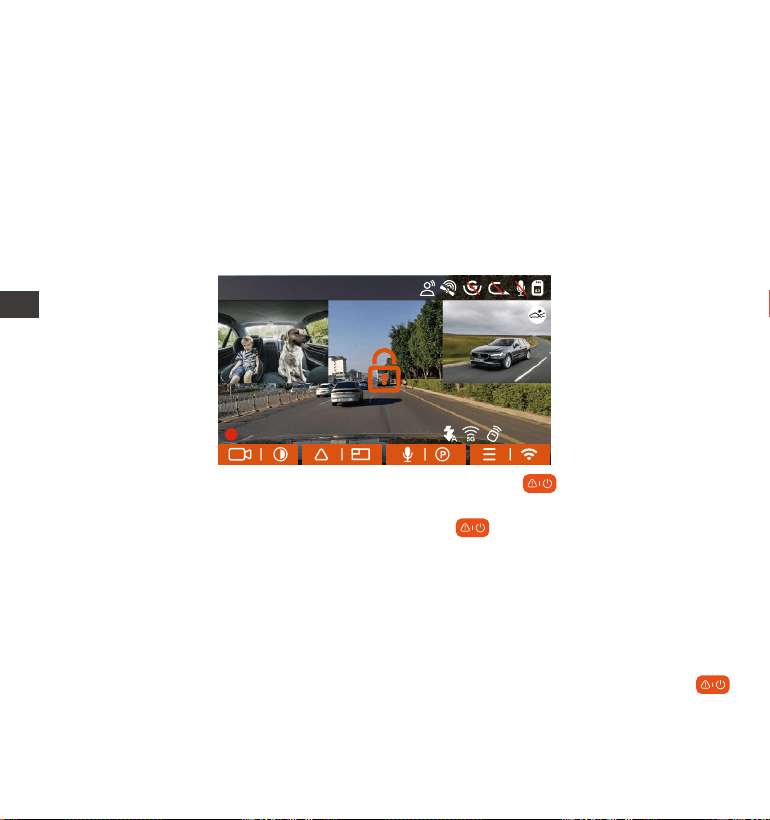
- 158 -
ENPL
4.2.2 Nagrywanie zdarzeń
Wideo zdarzenia jest wyzwalane przez czujnik G (czujnik grawitacyjny),
który może być uruchamiany automatycznie lub ręcznie blokowany.
Podczas jazdy, w szczególnych okolicznościach, kamera zostanie
automatycznie zablokowana w celu nagrywania zdarzenia lub można ją
ręcznie zablokować w celu nagrywania zdarzenia.
4.
Aby ręcznie zablokować wideo, po prostu naciśnij przycisk, aby
zablokować bieżący film i przechwycić go.
W okresie blokady wideo możesz nacisnąć przycisk, aby przechwycić
wiele razy. Po nagraniu wideo zostanie automatycznie zapisane w
folderze wideo wydarzenia, a zdjęcie zostanie zapisane w folderze zdjęć.
Wideo zdarzenia automatycznego blokowania jest wyzwalane, gdy
samochód zostanie uderzony/wstrząśnięty. Kamera wykrywa wibracje i
automatycznie blokuje bieżące wideo, które jest zapisywane w folderze
wideo zdarzeń.
Podczas zablokowanego okresu nagrywania można również nacisnąć
aby zrobić zdjęcie. Po zakończeniu nagrywania wideo wydarzenia, wideo
zostanie zapisane w folderze wideo wydarzenia, a zdjęcie zostanie
zapisane w folderze zdjęć.
Po wyłączeniu nagrywania w pętli czas trwania każdego filmu będzie
wynosił 20 minut, a nagrywanie zostanie zatrzymane po zapełnieniu
karty pamięci.
14:39:07 10-02-2023
00:00:37
MP/H
35
1440P+1080P+1080P 30FPS
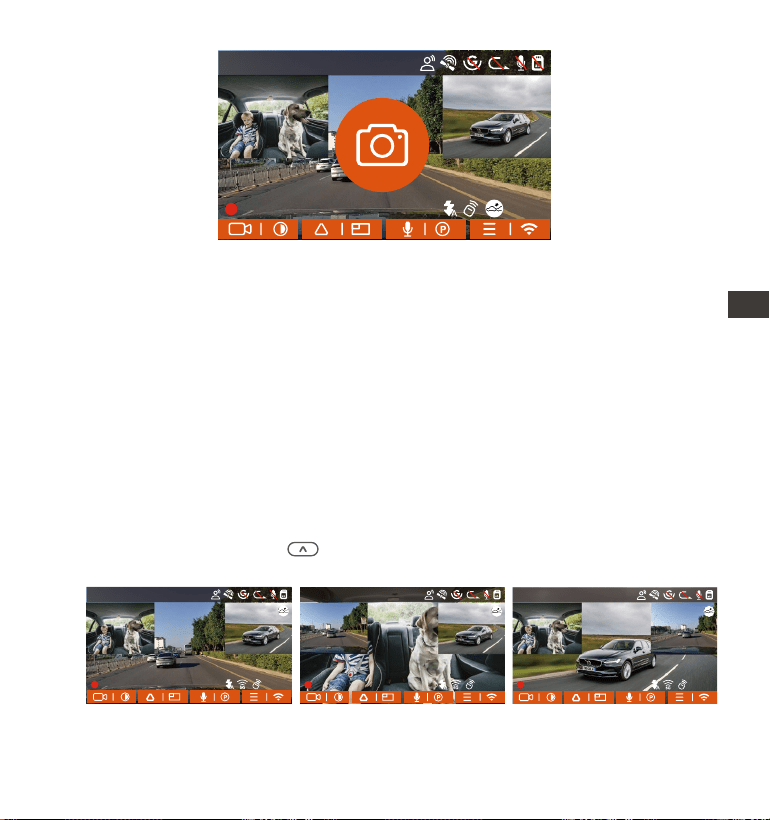
- 159 -
EN
EN
EN
PL
Czułość wyzwalacza automatycznego blokowania wideo jest określo-
na przez czułość kolizji. Im wyższe ustawienie czułości, tym większe
prawdopodobieństwo wyzwolenia.
Całkowita pojemność pliku wideo zdarzenia stanowi 30% całkowitej
pojemności bieżącej karty pamięci. Gdy plik wideo wydarzenia
osiągnie górny limit, nowy plik wideo wydarzenia automatycznie
zastąpi stary plik wideo wydarzenia. Zaleca się okresowe sprawdzanie i
zapisywanie plików wideo z wydarzenia, aby uniknąć ich utraty.
Nagrywanie z blokadą nie zostanie uruchomione w żadnej z następują-
cych sytuacji: Nagrywanie w pętli jest wyłączone lub Nagrywanie
poklatkowe jest włączone.
Notatka:
1.
2.
3.
4.2.3 Przełącz wyświetlanie przedniej i tylnej kamery w oknie
Możesz kliknąć, naciśnij przycisk, aby przełączyć wyświetlacz, aby
kamera przednia, wewnętrzna i tylna były większe na wyświetlaczu LCD.
Większy obraz z
przedniej kamery
Większy obraz z
wewnętrznej kamery
Większy obraz z
tylnej kamery
1440P+1080P+1080P 30FPS
14:39:07 10-02-2023
00:00:37
MP/H
35
14:39:07 10-02-2023
00:00:37
MP/H
35
1440P+1080P+1080P 30FPS
14:39:07 10-02-2023
00:00:37
MP/H
35
1440P+1080P+1080P 30FPS
14:39:07 10-02-2023
00:00:37
MP/H
35
1440P+1080P+1080P 30FPS
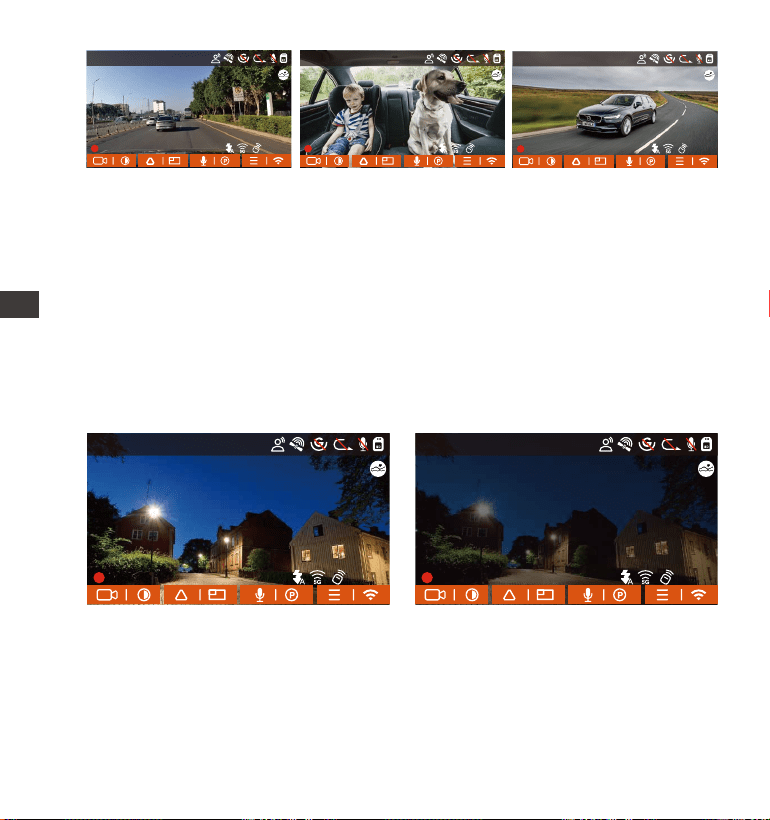
- 160 -
ENPL
Obraz tylko z
przedniej kamery
Obraz tylko z
wewnętrznej kamery
Obraz tylko z
Tylnej kamery
4.2.4 Low-light Night Vision - widzenie w nocy przy słabym oświetleniu w
trybie parkowania
Aby zwiększyć bezpieczeństwo parkowania w nocy, w pełni wykorzystu-
jemy wydajność obiektywu w połączeniu z technologią noktowizyjną
przy słabym oświetleniu, aby poprawić efekt widzenia w nocy w trybie
parkowania. Ta funkcja jest domyślnie w trybie otwartym. Zostanie
wyzwolony dopiero po wejściu w tryb parkowania i nie wpłynie na
normalne nagrywanie.
Tryb nocnego parkowania Wł Tryb nocnego parkowania Wył
14:39:07 10-02-2023
00:00:37
MP/H
35
1440P+1080P+1080P 30FPS
14:39:07 10-02-2023
00:00:37
MP/H
35
1440P+1080P+1080P 30FPS
14:39:07 10-02-2023
00:00:37
MP/H
35
1440P+1080P+1080P 30FPS
14:39:07 10-02-2023
00:00:37
MP/H
35
1440P+1080P+1080P 30FPS
14:39:07 10-02-2023
00:00:37
MP/H
35
1440P+1080P+1080P 30FPS
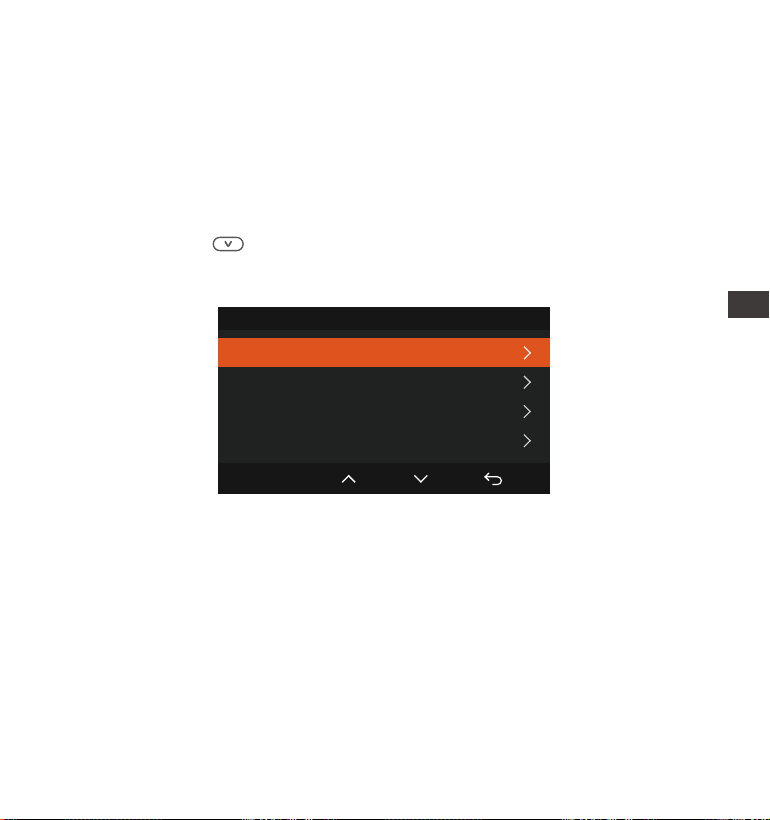
4.2.5 Tryb parkowania (gdy tryb parkowania jest włączony, nagrywanie
poklatkowe nie będzie działać. Te dwie funkcje nie mogą działać
jednocześnie)
Tryb parkingowy działa jako funkcja strażnicza w różnych sytuacjach.
Możesz przełączać się na różne tryby monitorowania parkowania w
zależności od różnych sytuacji parkowania.
Po włączeniu trybu parkowania dostępne są trzy sposoby nagrywania: 1.
Możesz odczekać 5 minut, aby rozpocząć automatyczne nagrywanie. 2.
długo naciśnij przycisk, aby rozpocząć ręcznie. 3. Zainstaluj zestaw
przewodów ACC, a kamera wejdzie bezpośrednio po zatrzymaniu silnika
samochodu (zestaw przewodów ACC należy kupićosobno).
- 161 -
EN
EN
EN
PL
Aby upewnić się, że kamera działa poprawnie w trybie parkowania,
użyj zestawów przewodowych lub innego stabilnego i ciągłego źródła
zasilania do zasilania kamery samochodowej.
Najlepsza temperatura środowiska pracy E3 wynosi -4-158°F (-20 °C do
60 °C). Zalecamy używanie wykrywania kolizji w tym zakresie tempera-
tur, więc gdy temperatura przekroczy normalny zakres temperatury
roboczej, zostanie automatycznie wyłączony. Jeśli temperatura jest
wysoka, wyłącz kamerę podczas parkowania.
Nagrywanie filmów poklatkowych i tryb parkowania (w tym wykrywanie
kolizji, wykrywanie ruchu, nagrywanie z niską szybkością transmisji i tryb z
Uwaga:
1.
2.
3.
MP/H
Tryb parkingowy
Detekcja kolizji
Detekcja ruchu
Lowbitrate
OK
Tryb poklatkowy
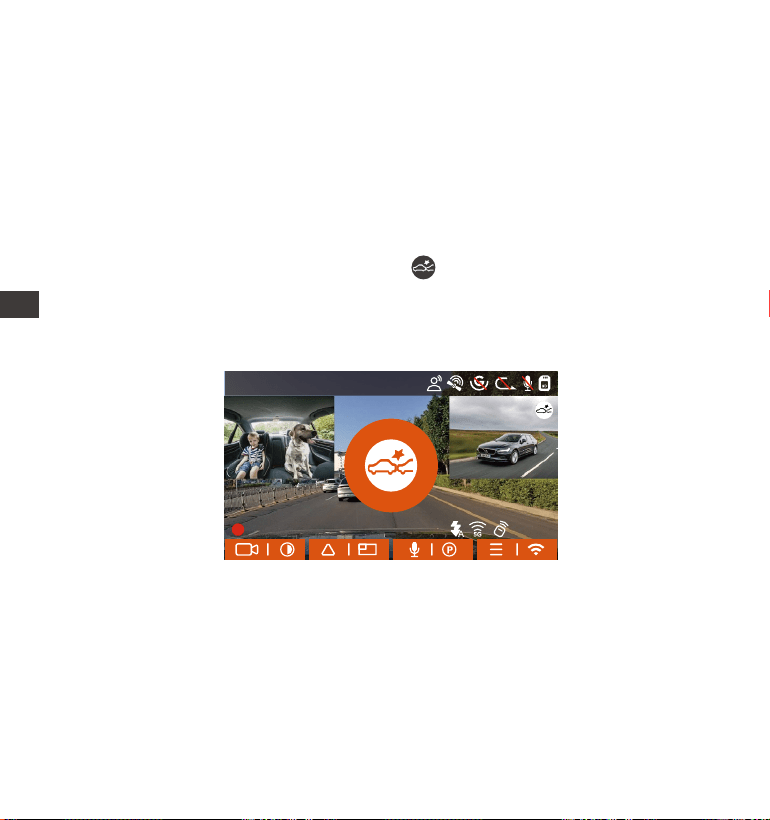
- 162 -
PL
ENPL
4.
niską liczbą klatek na sekundę) można włączyć tylko pojedynczo. Gdy
jeden jest włączony, drugi zostanie automatycznie wyłączony.
Wszystkie filmy nagrane w trybie parkowania (wykrywanie kolizji,
wykrywanie ruchu, nagrywanie z niską szybkością transmisji, tryb z niską
szybkością klatek) zostaną zapisane w normalnym folderze wideo. Aby
zapobiec zapętleniu nadpisywania wideo w trybie parkowania,
sprawdź i zapisz wymagane pliki na czas, aby zapobiec utracie.
A. Detekcja kolizji
Gdy wykrywanie kolizji jest włączone, Na interfejsie nagrywania zostanie
wyświetlona ikona wskazująca, że rejestrator aktualnie korzysta z trybu
wykrywania kolizji. Czułość wykrywania kolizji można regulować w zakresie
od 1 do 5 poziomów. Możesz dostosować się do swoich przyzwyczajeń, a
także otoczenia samochodu.
Gdy funkcja Detekcja kolizji jest włączona i po 5 minutach nagrywania
nie zostanie wykryty żaden ruch (w skrócie 5-minutowy mechanizm
wprowadzania), wówczas Detekcja kolizji jest aktywowana ikoną w
prawym dolnym rogu ekranu, a kamera wyłącza się automatycznie.
Gdy kamera jest wyłączona, rozpocznie nagrywanie przez 1 minutę po
wykryciu wstrząsu, a następnie ponownie ją wyłączy.
14:39:07 10-02-2023
00:00:37
MP/H
35
1440P+1080P+1080P 30FPS
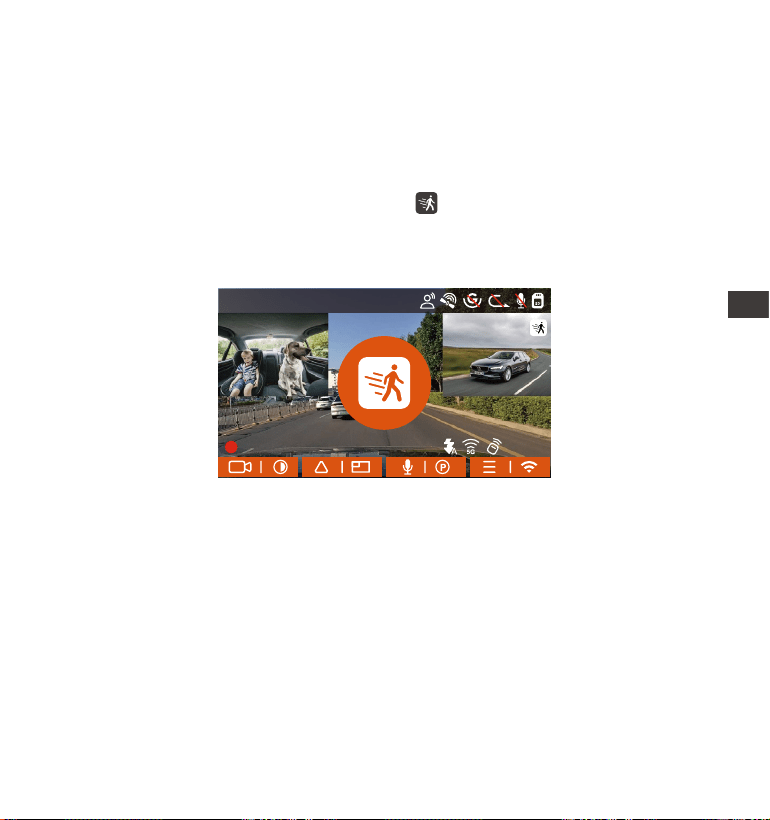
Notatka:
Eśli kamera nadal będzie uderzać podczas nagrywania wykrywania kolizji,
wyjdzie z trybu wykrywania kolizji i przejdzie do normalnego nagrywania,
uruchamiając ponownie 5-minutowy mechanizm wprowadzania.
B. Detekcja ruchu
Gdy wykrywanie ruchu jest włączone, Ikona zostanie wyświetlona w
interfejsie nagrywania, wskazując, że kamera jest aktualnie w trybie
wykrywania ruchu. Wykrywanie ruchu ma trzy poziomy: niski/średni/wysoki,
które można regulować, a odpowiednie zakresy wykrywania ruchu to 2m
/ 4m / 6m.
- 163 -
Ruch, na środku ekranu pojawi się pomarańczowa ikona, a ekran wyłączy
się po 3 minutach.
Gdy przednia kamera wykryje ruch obiektu, automatycznie rozpocznie
nagrywanie przez 45 sekund i zapisze nagranie w zwykłym folderze wideo.
Uwaga:
Tryb wykrywania ruchu można włączyć tylko wtedy, gdy E3 jest włączony.
Po wyłączeniu kamery tryb wykrywania ruchu nie będzie działał.
EN
EN
EN
PL
14:39:07 10-02-2023
00:00:37
MP/H
35
1440P+1080P+1080P 30FPS
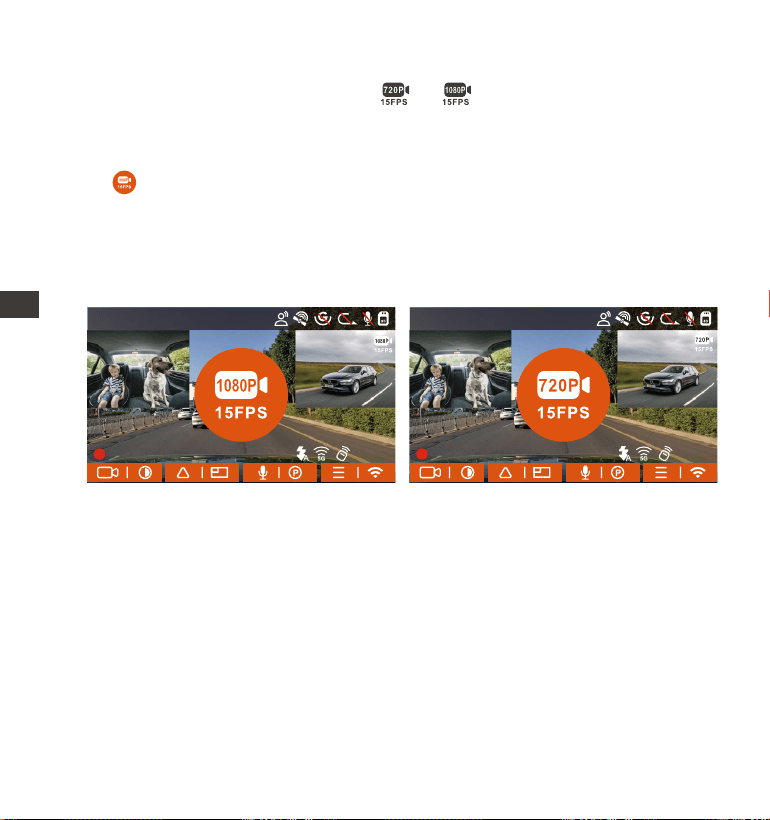
- 164 -
C. Low Bitrate
Kiedy Low Bitrate jest włączony to lub zostanie wyświetlony w
prawym dolnym rogu ekranu, w zależności od tego, czy wybierzesz 1080P
15FPS czy 720P 15FPS.
Jeśli po 5 minutach nagrywania nie zostanie wykryty żaden ruch, pojawi
się ikona, która pojawia się na środku ekranu. Rozdzielczość wszystkich
bieżących filmów zostanie automatycznie zmieniona na 1080P 15FPS lub
720P 15FPS do nagrywania, a czas nagrywania zostanie określony zgodnie
z aktualnie ustawionym czasem nagrywania w pętli. Gdy kamera wibruje
lub zostanie przesunięta, automatycznie wyjdzie, odczeka 5 minut i
wejdzie ponownie.
Uwaga:
Nagrywanie z niską szybkością transmisji można włączyć tylko wtedy, gdy
E3 jest włączony. Po wyłączeniu E3 nagrywanie z niską szybkością
transmisji nie będzie działać.
D. Tryb poklatkowy
Gdy wybrany jest tryb niskiej liczby klatek na sekundę, kamera będzie
nagrywać zgodnie z wyborem spośród 1FPS/5FPS/10FPS/15FPS.
Na przykład, jeśli wybierzesz 1 kl./s, a bieżąca rozdzielczość wideo wynosi
30 kl./s, kamera wygeneruje wideo 30 kl./s na sekundę. Tryb niskiej liczby
klatek na sekundę może znacznie zachować integralność wideo i
zaoszczędzić miejsce na karcie pamięci.
ENPL
14:39:07 10-02-2023
00:00:37
MP/H
35
1440P+1080P+1080P 30FPS
14:39:07 10-02-2023
00:00:37
MP/H
35
1440P+1080P+1080P 30FPS
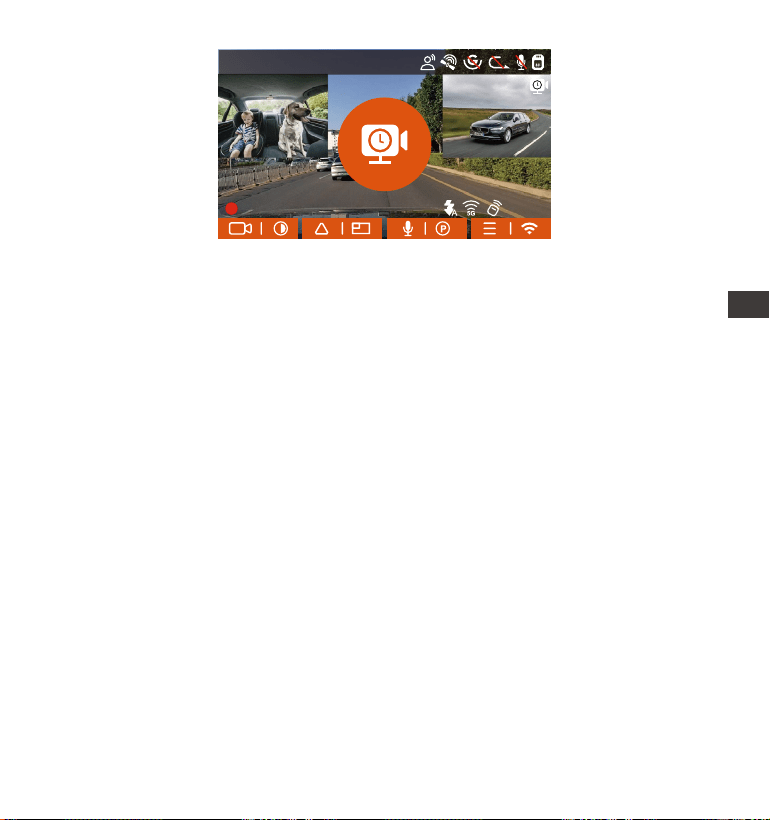
- 165 -
EN
EN
EN
PL
4.2.6 Tryb poklatkowy
Po wybraniu trybu poklatkowego kamera będzie nagrywać zgodnie z
wybranym ustawieniem 1FPS/5FPS/10FPS/15FPS.
Na przykład, jeśli wybierzesz 1 kl./s, a bieżąca rozdzielczość wideo wynosi
30 kl./s, rejestrator będzie generował wideo 30 kl./s na sekundę. Tryb niskiej
liczby klatek na sekundę może znacznie zachować integralność wideo i
zaoszczędzić miejsce na karcie pamięci.
[Normalny czas nagrywania = Czas nagrywania poklatkowego (sek) x
Szybkość nagrywania FPS x Opcja nagrywania poklatkowego]
(Czas należy przeliczyć na sekundy)
Jednostką czasu we wzorze obliczeniowym są sekundy, więc ostatec-
zny obliczony normalny czas nagrywania jest również wyrażony w
sekundach. Jeśli chcesz przeliczyć je na inne jednostki czasu, sprawdź
jednostki i przelicz je samodzielnie.
Tryb niskiej liczby klatek na sekundę jest podobny do funkcji nagrywania
poklatkowego, ale różnica polega na tym, że nie ma 5-minutowego
mechanizmu wejścia do nagrywania poklatkowego, który zostanie
włączony bezpośrednio po ustawieniu.
W trybie niskiej liczby klatek na sekundę kamera potrzebuje również
stabilnego zasilania. Gdy zasilanie zostanie wyłączone lub wyczerpane,
kamera wyłączy się.
Uwaga:
1.
2.
3.
14:39:07 10-02-2023
00:00:37
MP/H
35
1440P+1080P+1080P 30FPS
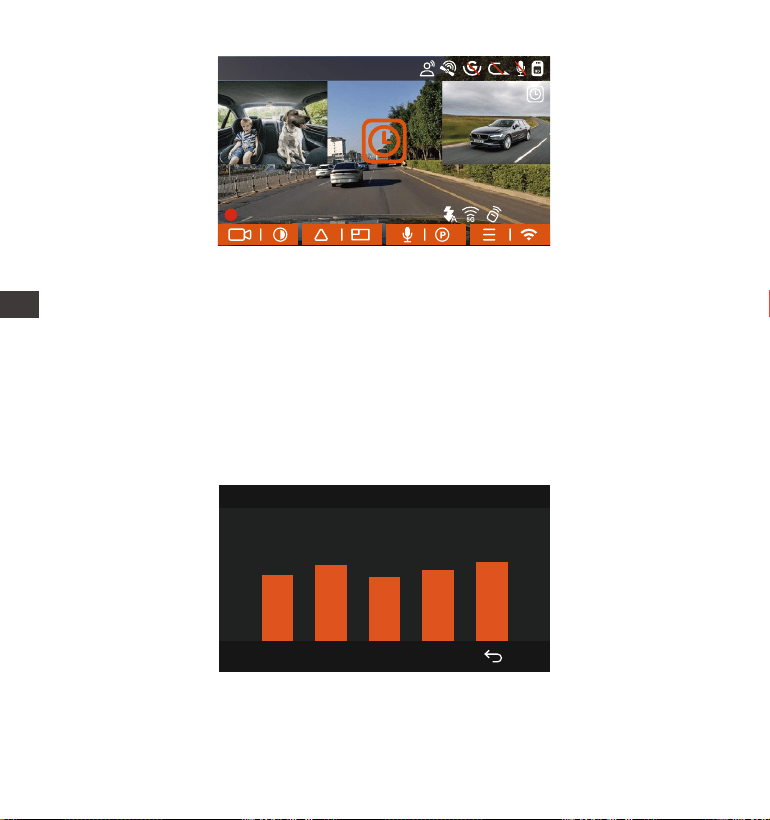
Wzór na obliczanie czasu trwania wideo to:
[Normalny czas nagrywania = Czas nagrywania poklatkowego (sek) x
Szybkość nagrywania FPS x Opcja nagrywania poklatkowego]
(Czas należy przeliczyć na sekundy)
4.2.7 Funkcja GPS
Funkcja GPS jest jedną z ważnych funkcji kamery samochodowej. GPS jest
domyślnie włączony, a E3 odbiera sygnały GPS przez uchwyt GPS. Może
automatycznie korygować godzinę i datę w Twojej okolicy, rejestrując
lokalizację, w której nagranie zostało nagrane, oraz prędkość samochodu
w tym czasie.
- 166 -
ENPL
40
46
39
43
48
Informacje GPS
Połączenie GPS zostanie zakończone w ciągu 1 minuty od włączenia
urządzenia. Jeśli połączenie GPS nie powiedzie się w ciągu 1 minuty,
sprawdź, czy URZĄDZENIE włączyło funkcję GPS, czy uchwyt GPS jest
Uwaga:
1.
14:39:07 10-02-2023
00:00:37
MP/H
35
1440P+1080P+1080P 30FPS
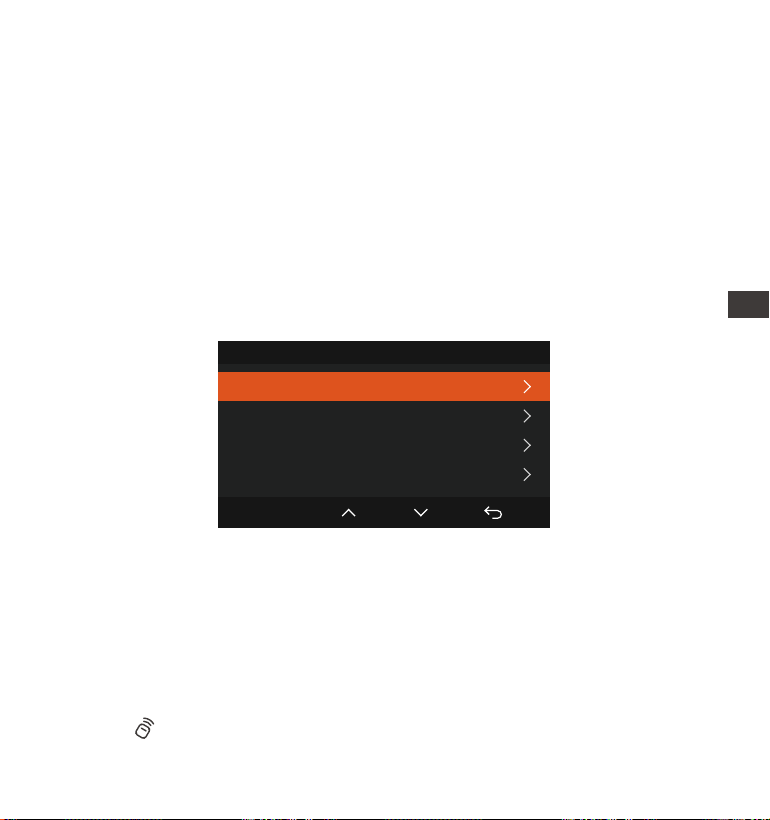
- 167 -
EN
EN
EN
PL
EN
EN
EN
PL
2.
4.2.8 Automatycznie czas przez GPS
Ustawienie czasu automatycznej korekcji GPS dla kamery E3 jest domyśl-
nie włączone. Możesz wybrać GMT-08:00, wybierając swoją strefę
czasową, na przykład Los Angeles. Jeśli nie znasz strefy czasowej swojej
lokalizacji, możesz użyć WIFI, aby połączyć się z aplikacją Vantrue i
potwierdzić, że funkcja automatycznej regulacji czasu w aplikacji jest
włączona.
Data & czas
Automatyczna aktualizacja GPS
Ręcznie ustaw datę i czas
Format daty
Strefa czasowa
OK
4.2.9 Pilot zdalnego sterowania
Kamera jest wyposażona w pilota, za pomocą którego można szybko
sterować kamerą, robić zdjęcia, nagrywać wideo zdarzenia,
włączać/wyłączać nagrywanie oraz wykonywać inne funkcje.
Połączenie zdalnego sterowania:
Usuń pasek izolacyjny na pilocie, a kamera automatycznie dopasuje się
do pilota. Nie jest wymagane ręczne parowanie z kamerą samochodową.
Kiedy na ekranie pojawi się ikona, oznacza to, że pilot został pomyślnie
dopasowany.
prawidłowo podłączony i czy Twoje otoczenie (parking podziemny,
gęsto zaludniony obszar mieszkalny, metro, tunel itp.) .) wpływa na
odbiór sygnału GPS.
Informacje GPS są rejestrowane wraz z wideo. Aby go wyświetlić, pobierz
i zainstaluj aplikację VANTRUE i VANTRUE GPS Player (dostępne do
pobrania ze strony www.vantrue.pl/wsparcie).

- 168 -
ENPL
Instalacja pilota zdalnego sterowania
Po dopasowaniu pilota do kamery wybierz odpowiednie miejsce w
samochodzie, a następnie oderwij naklejkę z pilota i przyklej ją w wybra-
nym miejscu. (Uwaga: pilot musi być zainstalowany w pozycji, która nie
wpływa na bezpieczną jazdę)
- 168 -
14:39:07 10-02-2023
00:00:37
MP/H
35
1440P+1080P+1080P 30FPS
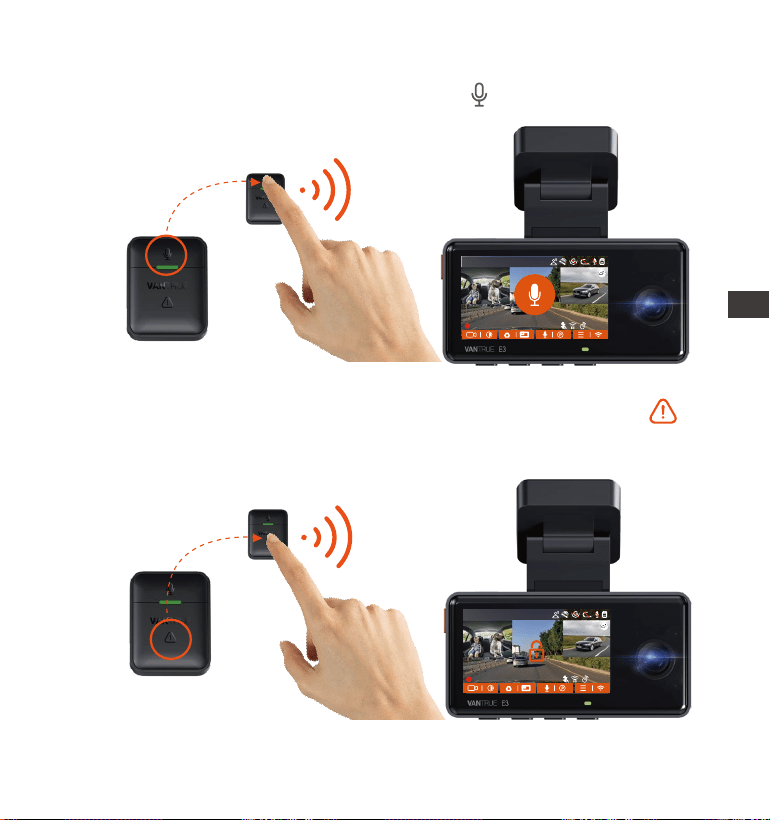
- 169 -
EN
EN
EN
PL
Po pomyślnym podłączeniu pilota naciśnij przycisk, aby włączyć lub
wyłączyć dźwięk.
1.
Funkcje pilota zdalnego sterowania:
Po pomyślnym nawiązaniu połączenia, po krótkim naciśnięciu
przycisk, kamera zablokuje bieżący plik i zrobi migawkę wideo; kontyn-
uuj krótkie naciśnięcie podczas zablokowanego wideo i kontynuuj
robienie zdjęcia.
2.
14:39:07 10-02-2023
00:00:37
MP/H
35
1440P+1080P+1080P 30FPS
14:39:07 10-02-2023
00:00:37
MP/H
35
1440P+1080P+1080P 30FPS
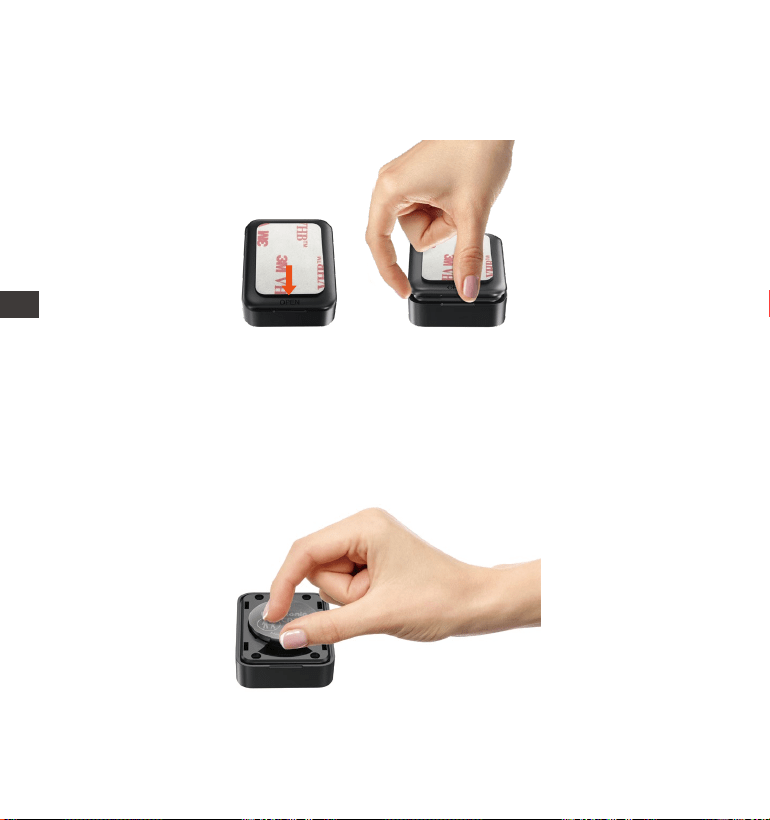
- 170 -
PL
ENPL
Wymiana baterii pilota:
Na spodzie pilota znajduje się znak "OPEN", proszę powoli podważyć
otaczającą szczelinę wzdłuż pozycji rowka tego znaku, aby otworzyć.
1.
2. Po otwarciu delikatnie podważ baterię z rowka z przodu komory baterii,
a następnie wyjmij starą baterię, włóż nową baterię i zakryj tylną
pokrywę pilota.
Uwaga:
Gdy moc jest niska, należy wymienić baterię (model baterii pilota to
bateria CR2032). Nie obsługuje ładowania.
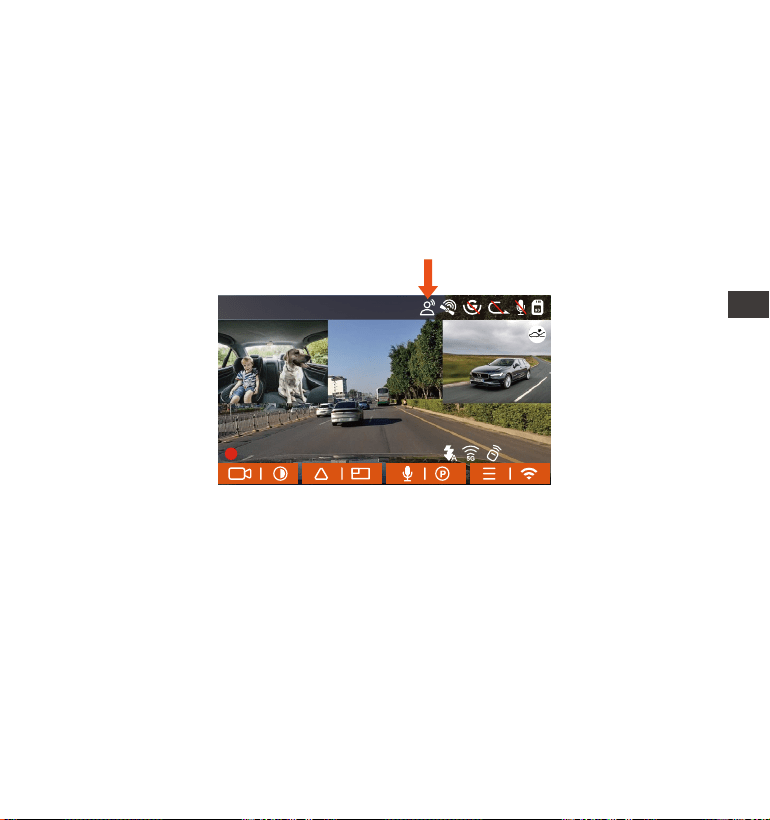
- 171 -
PL
EN
EN
EN
PL
4.2.10 Asystent głosowy
Oprócz sterowania kamerą za pomocą pilota, możesz również sterować
kamerą za pomocą poleceń głosowych. Obecnie obsługiwane języki to
angielski, japoński, rosyjski i chiński. Aby uzyskać bardziej szczegółowe
polecenia głosowe, sprawdź Ustawienia systemu > Treść głosowa.
Domyślnym ustawieniem jest standardowa czułość. Rozpoznawanie głosu
ma opcje takie jak niska czułość/standardowa/wysoka czułość/wyłąc-
zone. Możesz sterować kamerą za pomocą poleceń głosowych.
14:39:07 10-02-2023
00:00:37
MP/H
35
1440P+1080P+1080P 30FPS
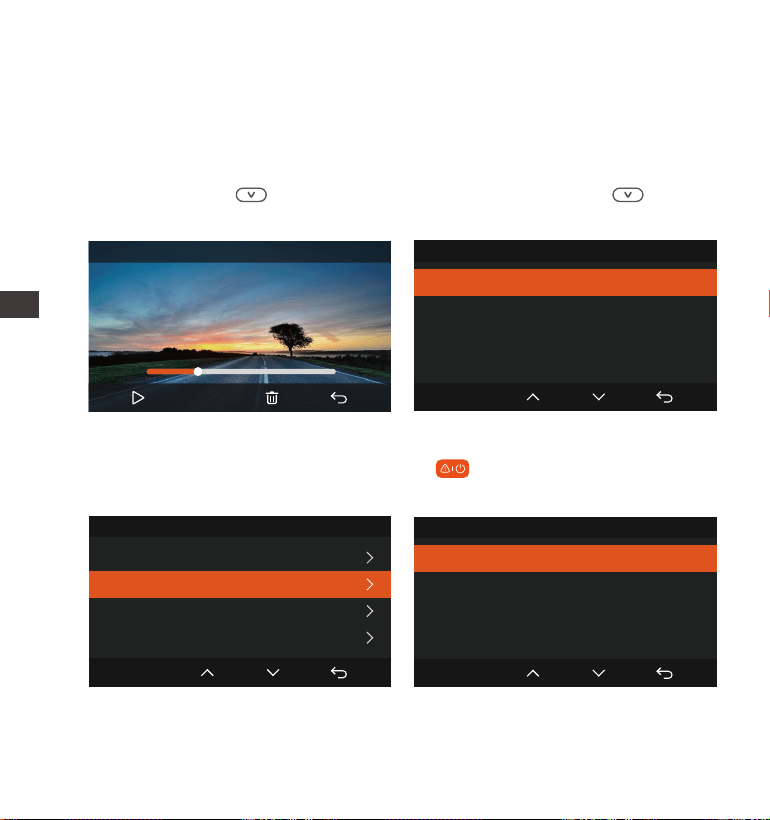
- 172 -
ENPL
4.2.11 Przeglądanie I kasowanie plików oraz nagrań
a. Przeglądanie i usuwanie plików w aparacie
-Odtwarzanie plików
Po kliknięciu „Pliki” wprowadź dowolny folder, a po otwarciu folderu wideo
możesz nacisnąć , aby wybrać następny plik, lub naciśnij przycisk,
aby usunąć plik podczas odtwarzania.
-Kasowanie plików
Przejdź do „Pliki”, wybierz wideo, naciśnij w interfejsie przeglądania
plików, aby wyświetlić menu usuwania.
Zdarzenia
Skasować ten plik?
Skasować wszystkie pliki?
OK
Zdarzenia
Skasować ten plik?
Skasować wszystkie pliki?
OK
00:30
01:07
20230210_140633_0002_E_B.MP4
1X
Zdarzenia
20230210_140633_0001_E_B.MP4
20230210_140633_0002_E_B.MP4
20230210_140633_0003_E_B.MP4
20230210_140633_0004_E_B.MP4
2/5
OK
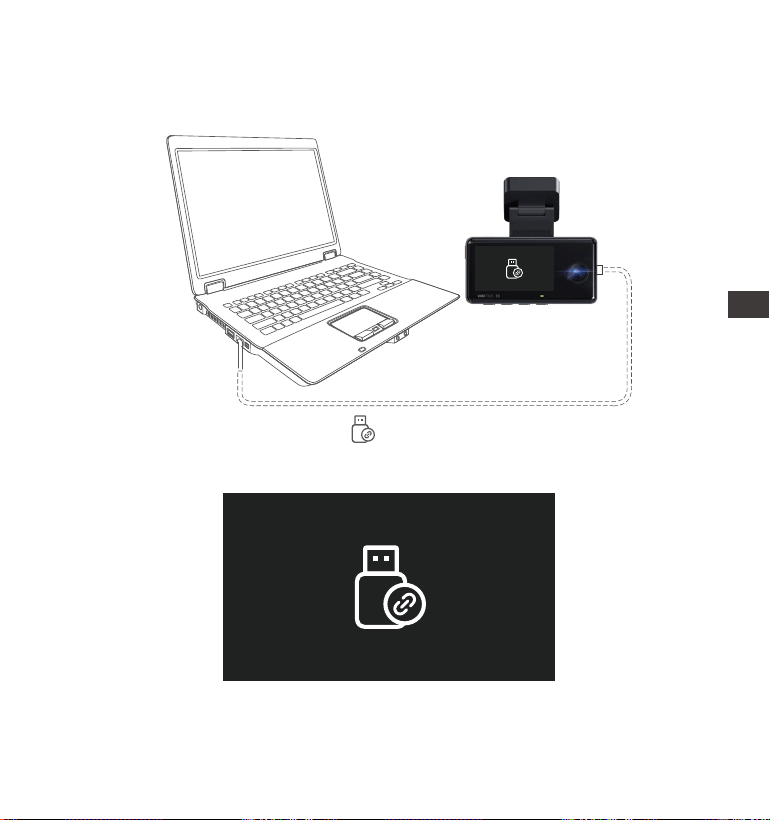
- 173 -
EN
EN
EN
PL
Podłącz dołączony kabel USB TYPE-C do transmisji danych z E3 i
komputerem.
b. Przeglądanie i usuwanie plików na komputerze
1.
Po pomyślnym podłączeniu Ikona pojawi się na wyświetlaczu E3 w
celu przesłania danych, a następnie będzie można przeglądać pliki
wideo w folderze komputera.
2.
W zależności od systemów komputerowych różnych użytkowników, po
podłączeniu E3 do komputera będzie on wyświetlany jako dysk
wymienny lub folder wymienny.
3.
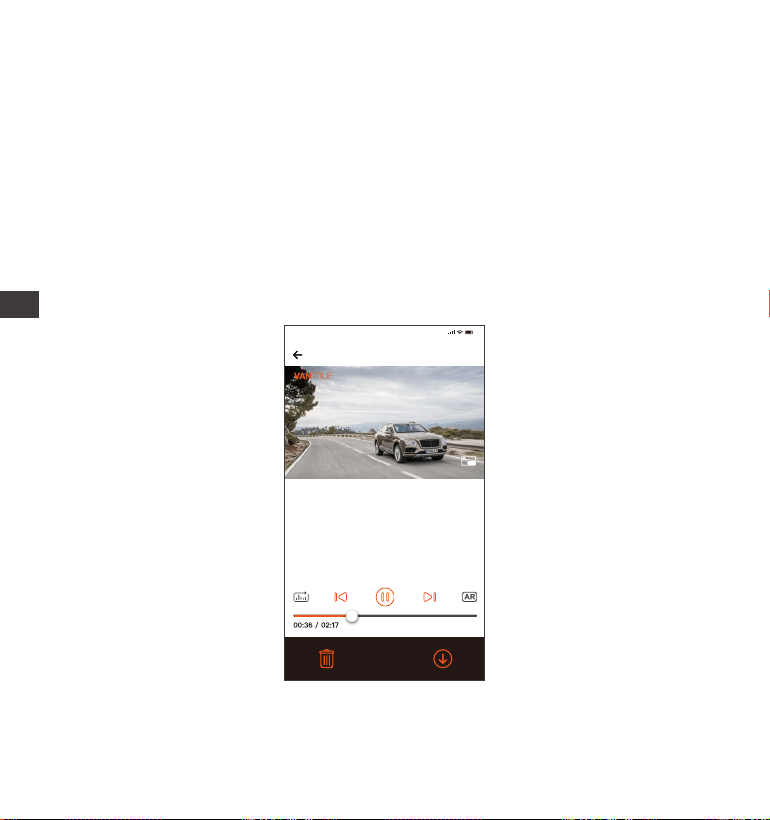
- 174 -
ENPL
c. Przeglądanie i usuwanie w aplikacji „Vantrue”
Po pomyślnym połączeniu E3 z telefonem komórkowym przez Wi-Fi, może
odtwarzać, pobierać i usuwać pliki w aplikacji mobilnej.
4.
5.
6.
W przypadku odtwarzania wideo w aplikacji lub pobierania na kartę
SD nie będzie zużycia ruchu sieciowego.
Uwaga:
1.
Aby wyświetlić pliki na komputerze, możesz uzyskać bezpośredni
dostęp, kliknij prawym przyciskiem myszy, aby otworzyć menu i je
usunąć.
Możesz także użyć czytnika kart USB do odczytania informacji o karcie
pamięci.
Aby zapewnić stabilne zasilanie, sprawdź, czy interfejs komputera jest
interfejsem USB3.0. Podczas podłączania do komputera stacjonarne-
go zaleca się użycie portu USB z tyłu komputera hosta.
20230210_115036_0079_N_A.MP4
10/02/2023 11:5:35 E3 000.000000. 000.000000. 36MK/H
Uwaga:
9:41
Aby wyświetlić informacje GPS, musisz
najpierw pobrać plik wideo do
lokalnego folderu aplikacji, a następnie
odtworzyć go w folderze lokalnym.
- 175 -
EN
EN
EN
PL
4.2.12 Aktualizacja oprogramowania
System automatycznie zaktualizuje plik aktualizacji oprogramowania
układowego za pomocą karty Micro SD. Kamera uruchomi się ponownie
po zakończeniu aktualizacji.
Najnowsza wersja oprogramowania jest zawsze dostępna na oficjalnej
stronie internetowej VANTRUE (www.vantrue.pl/wsparcie).
2.
Informacje o ścieżce GPS można wyświetlić dopiero po pobraniu pliku
wideo i odtworzeniu go lokalnie. W tym samym czasie musisz odłączyć
WIFI kamery samochodowej, w przeciwnym razie informacje o mapie
będą puste.

- 176 -
PL
ENPL
4.2.13 Temperatura pracy urządzenia
Kamera została zaprojektowana do pracy w temperaturach od -4 do
140°F (od -20 do 60°C). Temperatury poza tym zakresem mogą obniżyć
wydajność E3 i spowodować uszkodzenia.
Aby uniknąć uszkodzeń
W czasie upałów nie wystawiaj E3 bezpośrednio na słońce, gdy samo-
chód jest zaparkowany.
W ekstremalnych warunkach zimowych, tj. -4°F (-20°C) lub niższych,
odłącz kamerę od przedniej szyby, gdy nie jest używana, i przechowuj ją
w schowku.
5. Dane techniczne
E3Model
Novatek high-performance processor
Sony CMOS Sensor
Wbudowany czujnik trójosiowy
2.4GHz&5GHz
2.45’’ IPS
Procesor
Sensor
G-sensor
WiFi
Ekran
Przód: F/1. 8 ;
Wnętrze: F/2.0 ;
Tylny: F/1. 8 ;
Engish/Français/Español/Deutsch/Italiano/
简体中文/русский/ 日本語/Polski
Jasność obiektywu
Języki
Specyfikacje tego produktu mogą ulec zmianie bez wcześniejszego
powiadomienia z powodu ulepszeń produktu.
Przód: 160° ;
Wnętrze: 165° ;
Tył: 160° ;
Kąt widzenia
obiektywu

Rozdzielczość
Video Format
Format obrazu
Audio
Pamięć zewnętrzna
Przód + wnętrze + tył: 1944P+1080P+1080P
30FPS; 1440P+1080P+1080P 30FPS;
1080P+1080P+1080P 30FPS; 1440P+1080P+720P
30FPS; 1440P+720P+720P 30FPS;
1080P+1080P+720P 30FPS; 1080P+720P+720P
30FPS; 720P+720P+720P 30FPS;
Przód + wnętrze: 1944P+1080P 30FPS;
1440P+1080P 30FPS; 1080P+1080P 30FPS;
1080P+720P 30FPS; 720P+1080P 30FPS;
720P+720P 30FPS;
Przód + tył: 1944P+1080P 30FPS; 1440P+1080P
30FPS; 1080P+1080P 30FPS; 1080P+720P 30FPS;
720P+1080P 30FPS; 720P+720P 30FPS;
Przód: 2592x1944P 30FPS; 2560x1440P 30FPS;
1920x1080P 30FPS; 1280x720P 30FPS;
MP4
JPEG
Wbudowany mikrofon oraz głośnik
Obsługuje 32GB-512GB Micro SD Card, U3,
Class 10 (brak w zestsawie)
USB Port
Zasilanie
Prąd napięcia zasilania
Zasilanie
Temp. pracy urządzenia
Temp. pracy pamięci
Typ C
Kondensator
DC 5V 2.4A
6W
-4°F to 140°F(-20°C to 60°C)
-4°F to 158°F(-20°C to 70°C)
- 177 -
EN
EN
EN
PL
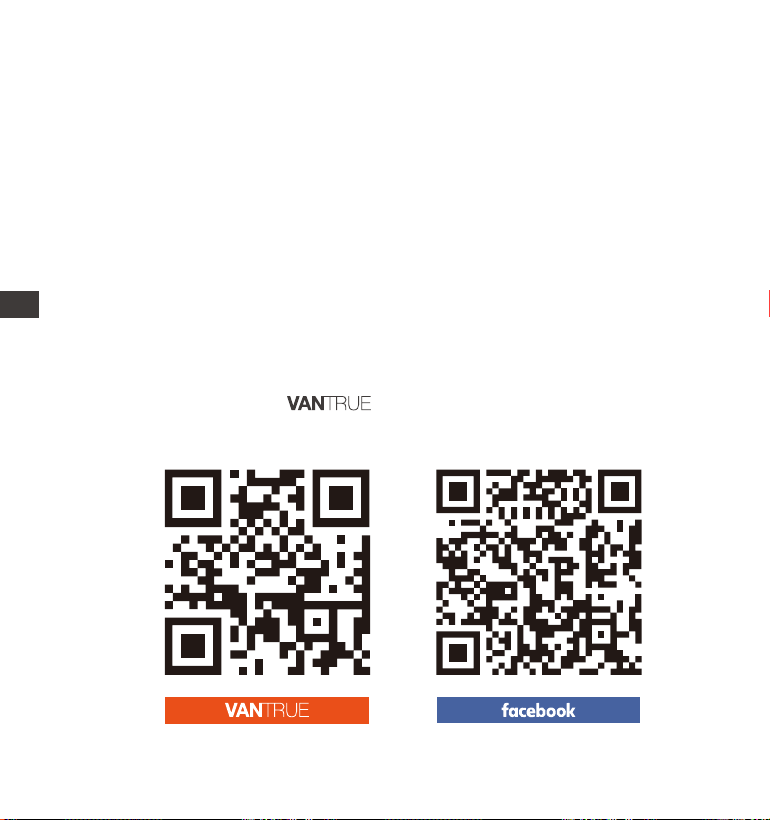
6. Gwarancja & wsparcie
Gwarancja
VANTRUE
®
E3 jest objęta pełną 12-miesięczną gwarancją.
Wsparcie
Jeśli masz jakiekolwiek pytania dotyczące produktu, nie wahaj się
skontaktować z nami pod adresem [email protected] Odpowiedzi na
zapytania są zazwyczaj udzielane w ciągu 12-24 godzin.
Twoja opinia ma znaczenie
VANTRUE
®
jest mocno zaangażowany w ciągłe ulepszanie swoich
produktów, usług i doświadczeń użytkowników. Jeśli masz jakieś przemyśle-
nia na temat tego, jak możemy robić to jeszcze lepiej, czekamy na Twoje
konstruktywne opinie i sugestie. Skontaktuj się z nami [email protected]
DZIĘKUJEMY ZA WYBÓR
www.vantrue.pl
facebook.com/vantruePolska
Skontaktuj się z nami:
- 178 -
ENPL