4-channel Voice Controlled
User Manual

Hey, Find Us Here:
Www.vantrue.net/contact
Facebook.com/vantrue.live

Contents
01
02
03
04
05
06
07
1
2
4
12
31
33
34

Warm Tips:
Please read the User Manual carefully before use;
The dash cam must be plugged in to operate;
Please do not debug the product or use your mobile
phone to watch driving videos during driving, and pay
attention to driving safety;
This product requires the inseion of an SD card for
use. Please use a functional SD card;
Do not disassemble or repair the dash cam casing by
yourself. If the product malfunctions, please contact
the ocial VANTRUE.
Do not install the dash cam in a location that may
obstruct the driving view;
Please use this product away from high temperature
and humid environments;
In order to improve the product experience, the
rmware of the product will be updated periodically. If
necessa, you can update the rmware to experience
it;
Do not install the dash cam directly in front of
passengers to prevent accidental detachment and
potential safety hazards;
Please note that it may not be possible to connect to
the app when using CarPlay or Android Auto;
Please use this product within the scope permitted by
law.
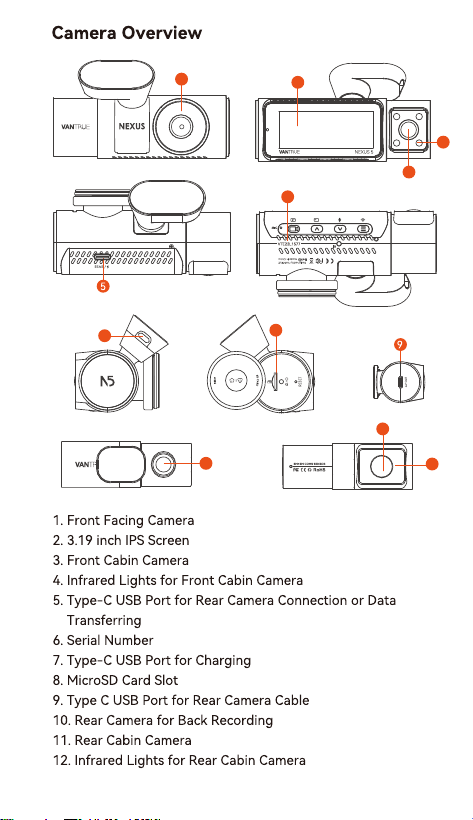
1.
2.
3.
4.
5.
6.
7.
8.
9.
10.
11.
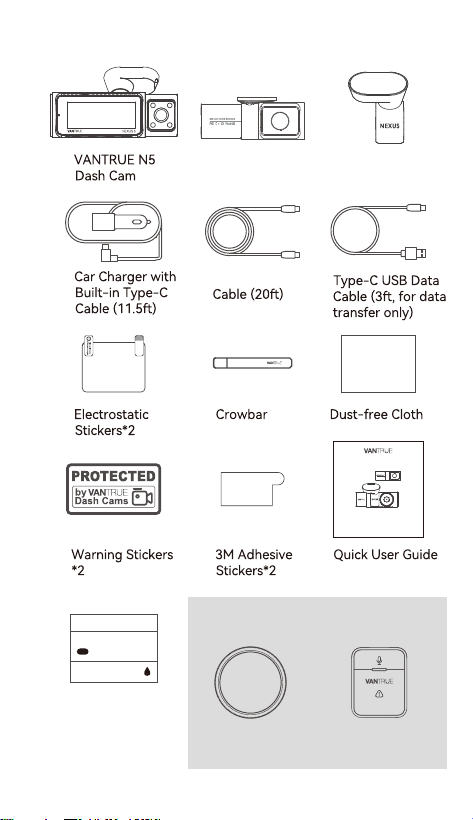
1. What’s In The Box?
A. B. Rear Camera C. Gps Mount
D.
E. Rear Camera
F.
H. G.
J. K.
I.
L.
3m
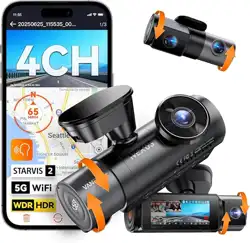
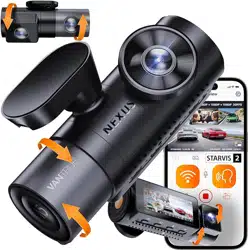
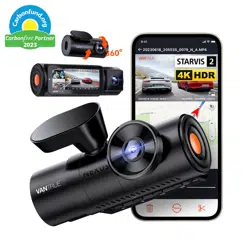
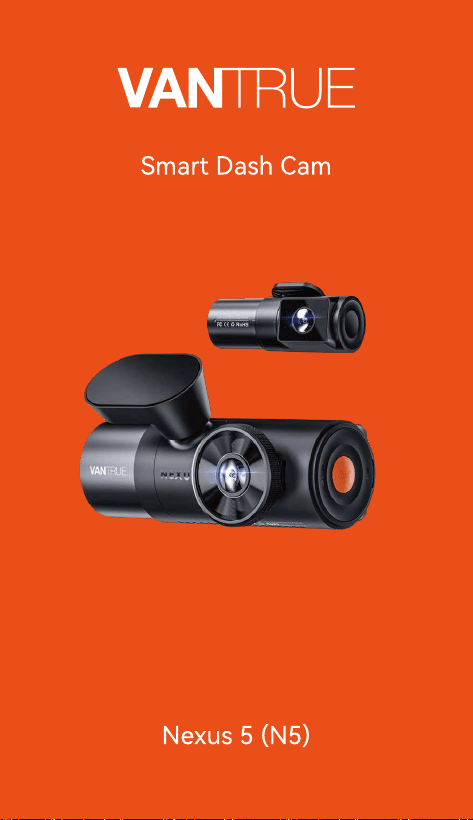
4-channel Voice Controlled
Smart Dash Cam
Quick User Guide
Nexus 5(N5)
- 1 -
CPL Filter Wireless Remote
Control
Optional Accesso
M. Bracket Adhesion
Promoter
CONNECTS THE WORLD
Primer
Adhesion promoter
EN
Non-woven wipes
2.0ml
- 2 -
2.
10
12
11
6
1
7
8
2
4
3
- 3 -
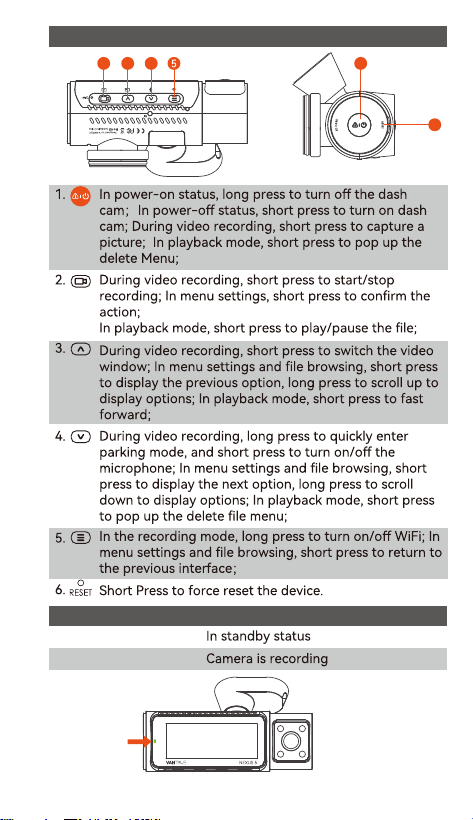
Button Instruction
6
2 13 4
Led Indicator
Steady Green Light
Blinking Green Light
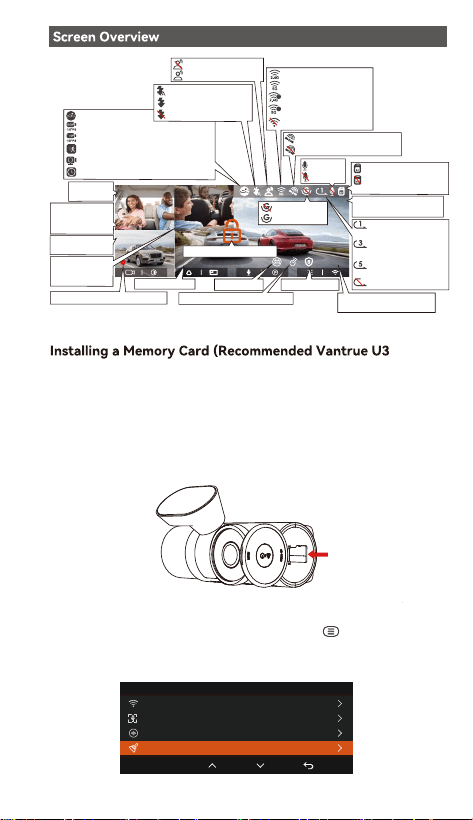
Please inse a memo card (memo card capacity: 32GB-1TB,
card speed: U3/Class10/A2) into the card slot according to the
direction indicated in below picture, until a "click" sound is heard
in the card slot, indicating that the memo card is inseed
properly.
After inseing the memo card, if the screen prompts "Card
error, please format" (please note that the recorder does not
record at this time), please directly press the button to enter
the menu, then go to "system setup" and choose "format" to sta
the formatting process.
- 4 -
3. Installation
3.1
High-speed Microsd Card).
Ok
System Setup
5/14
Format Sd Card
Wi-fi
Voice Control
Voice Content
FC
R
RC
F
MP/H
14:25:35 06-01-202300:00:37
35
1944P+1080P+1080P+1080P 30FPS
2.4G WiFi ON
5G WiFi ON
2.4G WiFi is connected
5G WiFi is connected
WiFi OFF
GPS is located successfully
GPS OFF
Memo card inseed
Loop Recording for
1 min;
Loop Recording for
3 min;
Loop Recording for
5 min;
Loop Recording OFF
Video
Resolution
R means Rear
Camera Display
Time and Date
F means Front Camera
Display
Voice Assistant OFF
Voice Assistant ON
Recording Time (Current Clip)
Collision Detection
1080P Low Bitrates Recording ON
720P Low Bitrates Recording ON
Motion Detection
Low Framerate Recording ON
Time Lapse On
IR LED AUTO ON/OFF
IR LED ON
IR LED OFF
MIC ON
MIC OFF
FC means Front
Cabin Camera
Display
RC means Rear
Cabin Camera
Display
Emergency File Locked
G-sensor OFF
G-sensor ON
NO Memo card/SD
card error
Privacy Mode
Recorded driving speed
(KMH or MPH)
Remote control is connected
ACC normal
- 5 -
Format SD Card
OK
All data will be deleted!
Format SD Card
OK
Format SD Card
Format SD Card
OK
Format successful
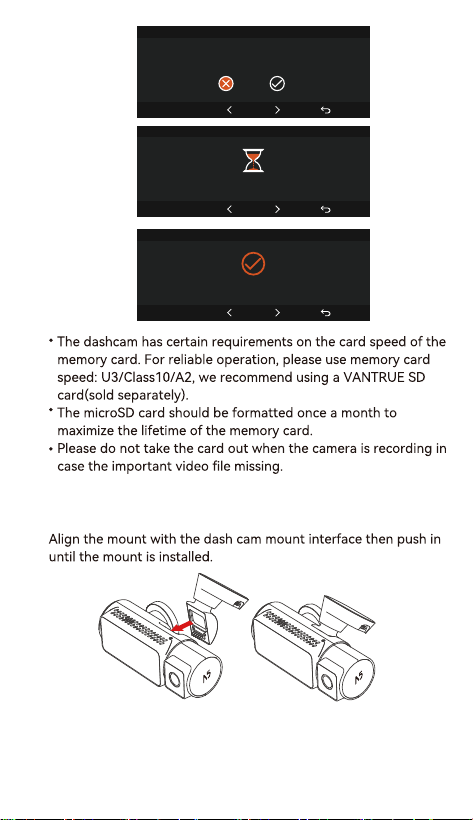
Note:
3.2 Installation
3.2.1 lnstallation of Camera Mount
- 6 -
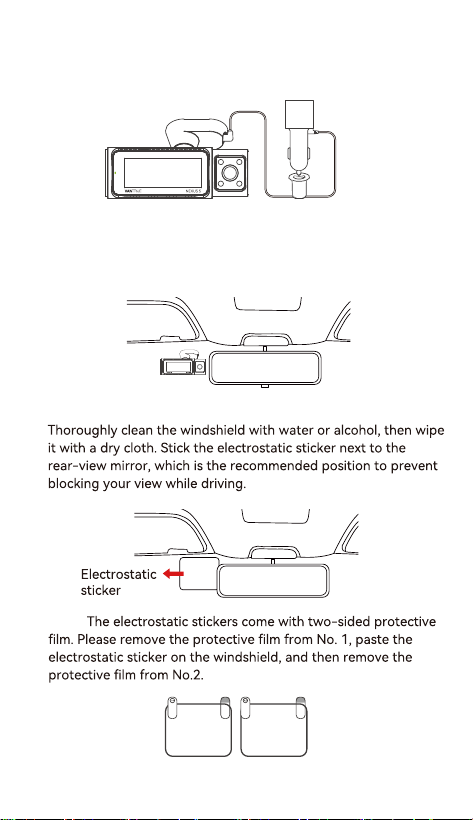
3.2.4 Installing the Electrostatic Stickers
Note:
Please peel off this mask
AFTER application completed
Please peel off this
mask BEFORE application
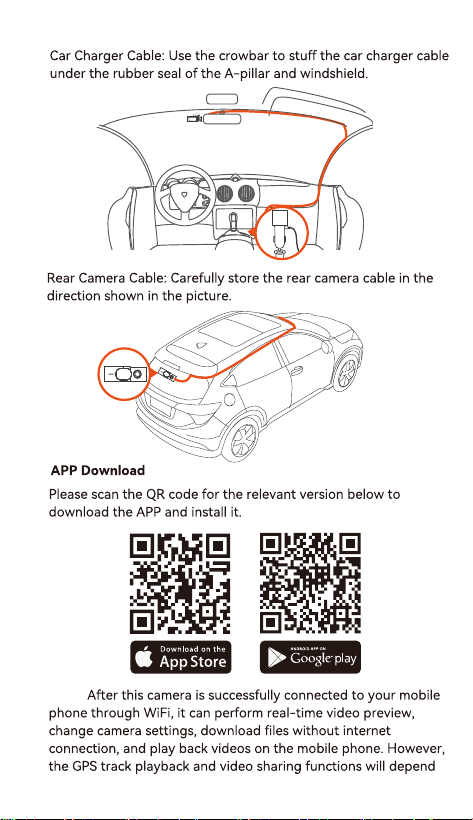
3.2.2 Car Charger Installation
Connect one end of the car charger to the car cigarette lighter
and the other end to the Type C po on the front camera mount.
Sta the ignition, waiting for the dash cam to sta.
3.2.3 Power On Dash Cam, Select the Installation Position
Before installation, please power on the dash cam and check
whether the shooting angle of the front and interior lens are
appropriate through the recording view.
- 7 -
3.2.5 Installing The Front Camera
Note:
Note: In order to install the bracket more rmly, we recommend
applying bracket adhesion promoter on the ② side of the
electrostatic sticker before installing the bracket.
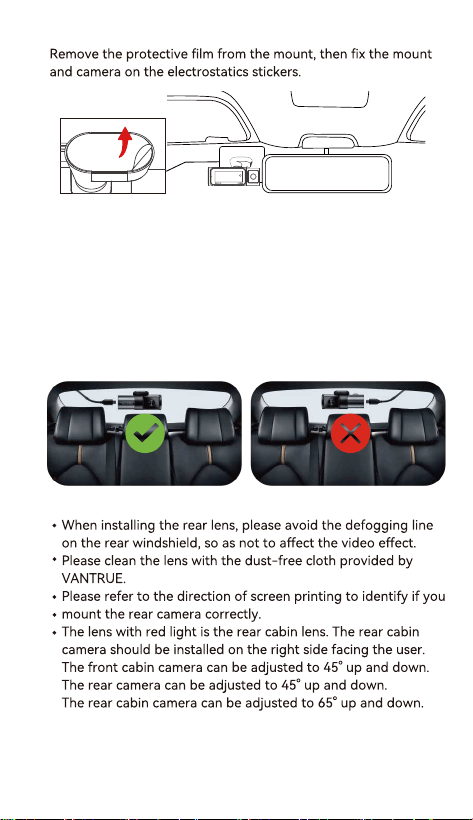
3.2.6 Rear Camera Installation
Please select the installation position on the rear windshield.
Remove the protection lm of the sticky pad and rear camera
lens. Fix the rear camera in the selected position and adjust the
angle, then use the rear camera cable to connect the rear camera
with the main front camera.
- 8 -
3.2.7 Wire Storage
3.3
Note:
- 9 -
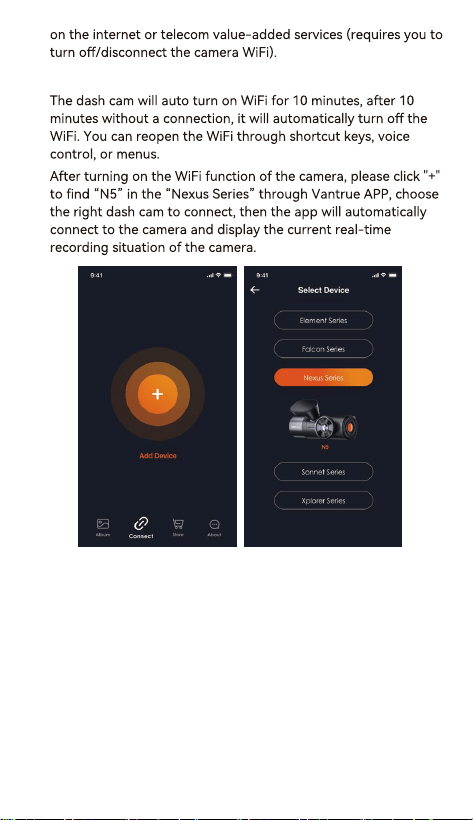
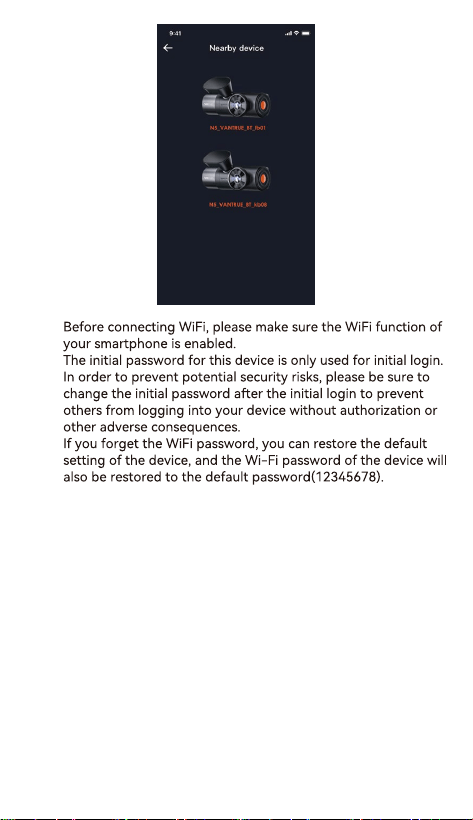
3.4 Wi Connection
- 10 -
Note:
•
•
•
- 11 -
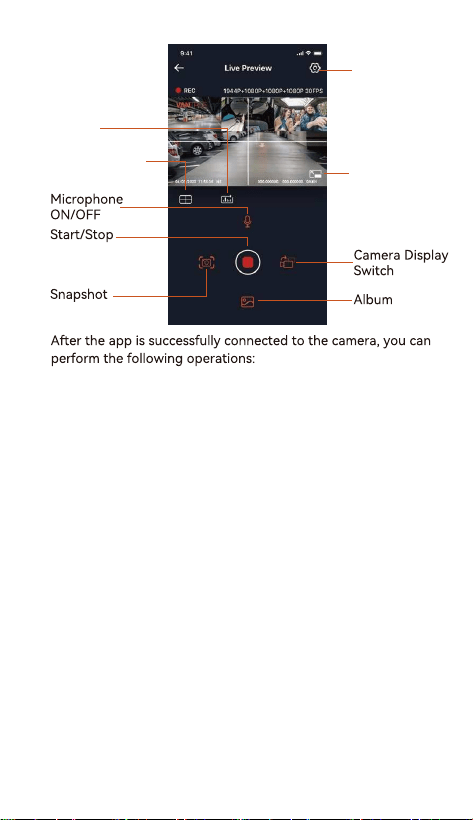
3.5 APP Operation
Lens Correction
Line
Mileage
Statistics
Full Screen
Recording
Camera Setting
Video preview: In the real-time preview inteace, you can
switch to the full-screen preview mode by clicking the
full-screen icon or placing the phone horizontally, click the
window switch icon to switch video windows, only multi
channel recording can use this feature.
Video playback: The video and photo les recorded on the SD
card can be viewed in the app, and the video can be played
backafter clicking the le.
Video download: You can select the video or picture you want
todownload in the SD card browsing inteace or in the video
playback area. After downloading the video, if you play it in
the local le of the app inteace, you can view the GPS track
of the video.
Video snapshot: You can capture the current screen in the
real-time preview inteace of the app.
Mileage statistics: You can click to download mileage
information as required, and the mileage information will be
saved in the APP as a picture or PDF le.
Lens correction line: Correct the lens balance via accurate
crosshair so that the video screen will not be skewed.
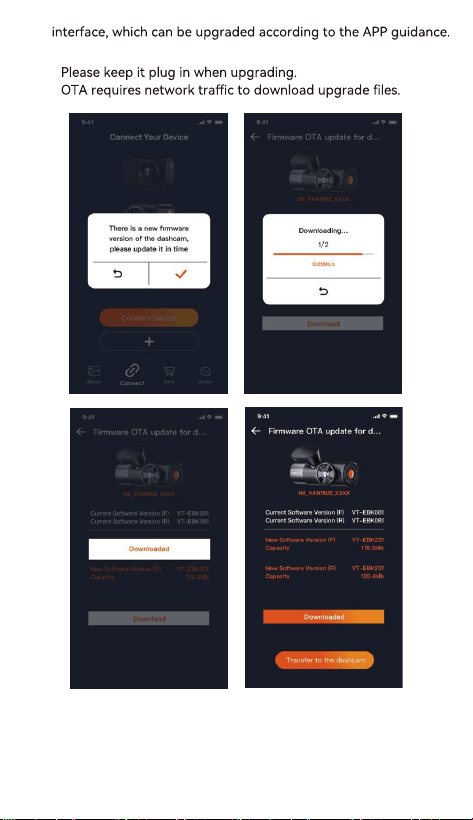
OTA upgrade: You can upgrade the N5 dash cam via APP,
please refer to 4.2.12 for more details.
1.
2.
3.
4.
5.
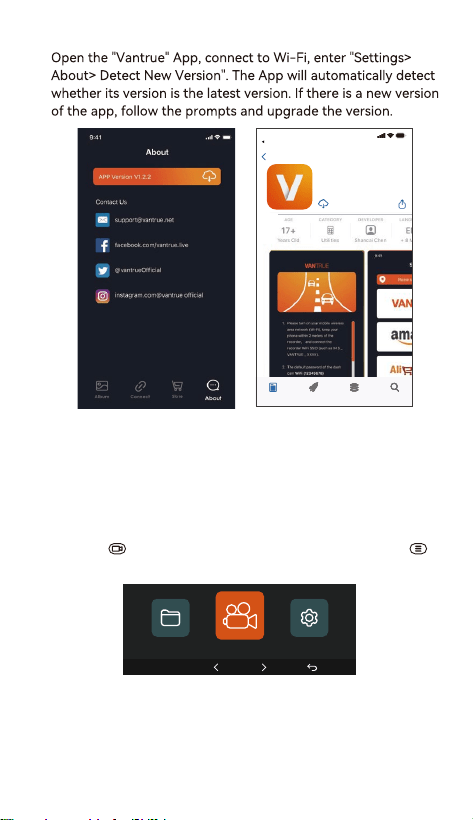
The N5 dash cam has 3 function menus, which are: record
settings, system settings, and le browsing. You can set your
dash cam according to your requirements with these function
setting.
Press the button to pause the video rst, then press the
button to enter the menu settings.
- 12 -
3.6 APP Upgrade
Vantrue Ltd.
Vantrue
Vantrue
9:41
Today Games Apps Search
Back
4. Basic Operation
4.1 Menu Settings
Record Setup
OK
Record Setup:
A. Resolution: The N5 camera has 5 recording modes:
Front+Front Cabin+Rear Cabin+Rear Recording:
1944P+1080P+1080P+1080P 30FPS
1440P+1080P+1080P+1080P 30FPS

1280x720P 30FPS
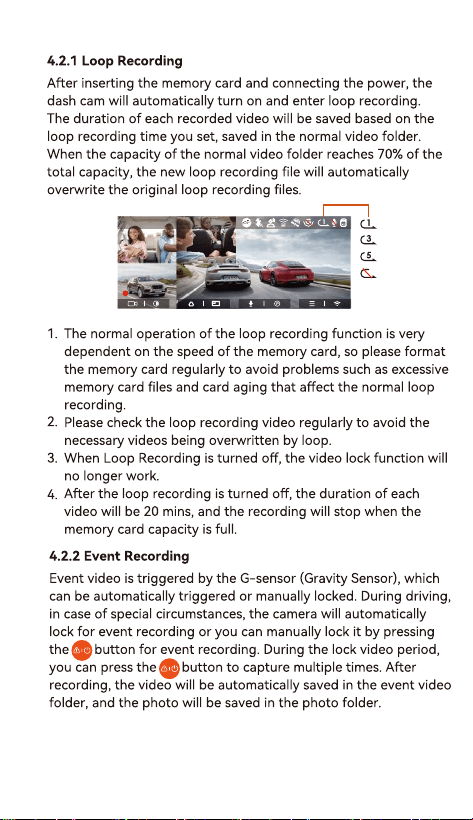
B. Loop Recording: Default setting is 1 min. You can choose the
options among 1/3/5 min and OFF.
C. IR LEDs: The front cabin camera and rear cabin camera are
equipped with IR LED lights. Default setting is Auto. You
canselect auto, on or o.
- 13 -
1440P+720P+720P+1080P 30FPS
1080P+1080P+1080P+1080P 30FPS
1080P+720P+720P+1080P 30FPS
720P+720P+720P+720P 30FPS
Front+Front Cabin+Rear Recording:
1944P+1080P+1080P 30FPS
1440P+1080P+1080P 30FPS
1440P+720P+720P 30FPS
1080P+1080P+1080P 30FPS
1080P+720P+720P 30FPS
720P+720P+720P 30FPS
Front+Rear Cabin+Rear Recording:
1944P+1080P+1080P 30FPS
1440P+1080P+1080P 30FPS
1440P+720P+720P 30FPS
1080P+1080P+1080P 30FPS
1080P+720P+720P 30FPS
720P+720P+720P 30FPS
Front+Front Cabin Recording:
1944P+1080P 30FPS
1440P+1080P 30FPS
1440P+720P 30FPS
1080P+1080P 30FPS
1080P+720P 30FPS
720P+720P 30FPS
Front+Rear Recording:
1944P+1080P 30FPS
1440P+1080P 30FPS
1440P+720P 30FPS
1080P+1080P 30FPS
1080P+720P 30FPS
720P+720P 30FPS
Front Recording:
2592x1944P 30FPS
2560x1440P 30FPS
1920x1080P 30FPS
1280x720p 30FPS

D. G-Sensor: Select the level of G-sensor you need, then you can
set 3 directions (Front + Rear/Left + Right/Up + Down). The
G-sensor value in each direction can be selected as 1/2/3
(default) /4/5/O. The higher the sensitivity level, the easier it is
to trigger event recording. G-sensor is the most sensitive when
set to 5.
E. Privacy Mode: Default is OFF, you can also select on. After
turning it on, the video will be recorded in privacy mode.
F. Audio Recording: The default is ON. Set recording to on or o.
G. Audio Denoise: The default is ON. It optimizes the audio
recording eect by dynamic noise reduction. You can choose to
turn it o.
H. Exposure: The default value is +0.0. Adjust the exposure of the
lens.
I. REC Status Light: Default setting is ON. You can choose to
turn on/o the recording status light.
J. WDR: The default is ON. You can choose to turn it o.
K. Rear HDR: The default is ON. Set to on or o.
L. Rotate Display: The default is o. You can choose to ip the
front and front cabin video, rear and rear cabin screen up and
down (180 degrees).
M. Mirror: The default is ON. If you turn it on, the front cabin,
rear cabin, rear recording screen will be displayed in mirror mode.
N. Number Plate: Select the number or letter to be set. After
setting, your license plate number can be displayed in the
recorded video.
O. Stamp: Enable or disable the watermark stamp on video and
photos. The watermark stamp includes time and date label,
VANTRUE label, license plate number, GPS location information,
and speed label. All enabled by default.
P. Time Lapse: The default value is disabled. You can choose to
enable 1FPS/5FPS/10FPS/15FPS.
Q. Parking Mode: You can choose the parking mode you need,
including Collision Detection/Motion Detection/Low Bitrate
Recording/Low Framerate Mode/OFF, The default is OFF.
R. Low-light Night Vision in Parking Mode: The default is ON.
When turned ON, it can optimize the recording eect of videos in
parking mode.
S. Collision Detection in Parking Mode: Energy-saving Mode:
The default is ON. In Collision Detection, the N5 dash cam will be
automatically turned o when no collision is detected.
Rapid Sta-up Mode: In Collision Detection, the N5 dash cam will
- 14 -

- 15 -
•
•
•
Automatic GPS update: GPS automatic update is enabled by
default. The date and time will be automatically updated based
on your time zone, please select the correct time zone.
Manual date/time setting. You can choose to turn o automatic
GPS update, turn on manual date/time setting, and manually
correct date and time.
Summer/Winter time automatic switching. The default is OFF.
After this function is enabled, the system automatically switches
between summer time and winter time.
Time Format: The default settings in recording inteace is
24-hour time display, you can switch to 12-hour time display as
rapidly sta recording when any collision is detected.
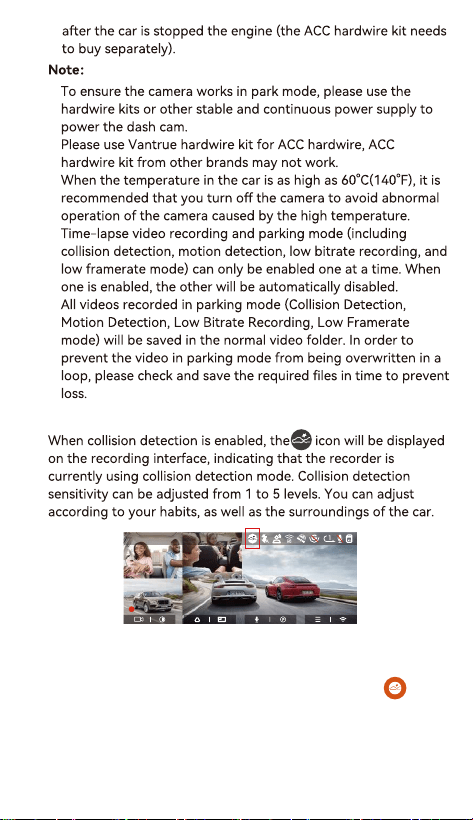
T. Motion Detection Area: The motion detection range of the
front and rear areas can be adjusted respectively.
U. Mileage statistics: The default is ON, and the GPS mileage
information will be stored in the memo card, you can view it on
the computer or expo the le through the mileage statistics
function in the APP.
V. GPS Settings: GPS is enabled by default. GPS ON/OFF settings,
speed unit settings, and GPS information are all set here.
System Setup:
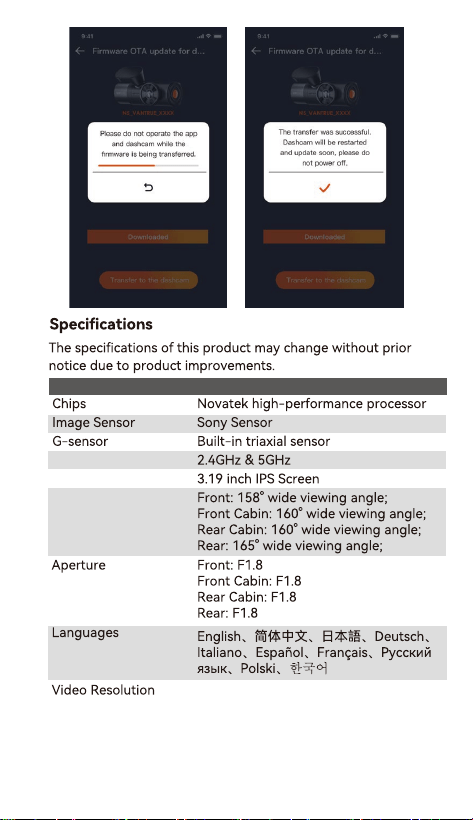
A. Language: Available languages are English/Français/Español
/Deutsch/ Italiano/简体中文/русский/日本語/Polski/한국어.
B. Wi-Fi: You can set the WiFi function, switch WiFi mode, and
view WiFi information here. The default is automatically turn o
WiFi after 10 minutes without connection. WiFi will stay on in the
background if you turn on the Auto ON option. The default WiFi
mode is 5G. After turning on, you can connect the WiFi and
operate the N5 dash cam through the mobile phone. WiFi
Information Displays the WiFi name and password.
C. Voice Control: The default sensitivity is Standard. Voice
commands can be recognized after the option is turned on. You
can choose options such as low sensitivity/high sensitivity/stan
dard/OFF.
D. Voice Content: Voice recognition commands. You can use
dierent commands to remote control the camera to work.
E. Format Memo Card: Format all data on the memo card.
F. Format Reminder Setup: You can select the reminder options:
15 Days, 1 Month, and OFF. Default is o. When the time is up,
you can choose "OK" to format, or choose "Next" to recalculate.
G. Date & Time: There are two ways to set the time and date:

- 16 -
Ok
Files
1/4
Event Video
Normal Video
Photo
All Files
A. Event: Critical event videos detected by G-Sensor activity or
manually locked by user.
The le name format is:
20300128_140633_0008_E_A.MP4
20300128_140633_0008_E_B.MP4
20300128_140633_0008_E_C MP4
H. Auto LCD O: The default is OFF. Set the time to automatically
turn o the LCD display after no operation.
I. Screen Brightness: The default is Auto. The screen brightness
will be automatically set to 50% after 10 minutes of no operation.
You can choose dierent screen brightness by selecting options
such as high/medium/low.
J. Device Sound: Set the volume of the device. The default
volume level is 2, the lowest is 0, and the highest is 5.
K. Prompt Tone: According to dierent situations, the dash cam
is set with 5 kinds of prompt tones, which are power-on/o
sound, keys sound, le locked sound, format sound, and abnormal
stop recording reminder. All prompt tones are turned on by
default.
L. Frequency: Dierent countries have dierent frequencies. In
order to avoid aecting the video, you can choose 50Hz or 60Hz
frequency according to dierent regions.
M. System Info: Check the current model, rmware version, and
the Vantrue ocial website.
N. Ceications: You can view the ceication information of N5
camera.
O. Default Settings: Reset the device back to facto settings.
Files:
Review the video and photo les recorded by the camera.
needed. This settings only reect in recording inteace and
watermark stamp of time label.
* This feature is available in Noh America only. Time error may
occur in other regions.
The date format and time zone settings can also be set under
this menu.
20300128_140633_0008_E_D.MP4
Standard videos recorded. This folder saves loop
The le name format of Loop Recording video is:
20300128_140933_0008_N_A.MP4;
The le name format of Parking Mode video is:
20300128_140833_0007_P_A.MP4;
The le name format of Time-Lapse video is:
20300128_140733_0006_T_A.MP4;
The le name format of Privacy Mode video is:
20300128_140633_0005_S_A.MP4.
Photos les. The le name format is:
20210128_140633_0001A.JPG
All the standard videos and critical event videos recorded.
The sux A represents the les recorded by the front
camera, the sux B represents the les recorded by the front
cabin camera, and the sux C represents the les recorded by the
rear cabin camera, and the sux D represents the les recorded

- 17 -
Critical event videos detected by G-Sensor activity or
The le name format is:
20300128_140633_0008_E_A.MP4
20300128_140633_0008_E_B.MP4
20300128_140633_0008_E_C MP4
20300128_140633_0008_E_D.MP4
B. Normal: Standard videos recorded. This folder saves loop
recording video, parking mode video, time-lapse video, privacy
mode video.
The le name format of Loop Recording video is:
20300128_140933_0008_N_A.MP4;
The le name format of Parking Mode video is:
20300128_140833_0007_P_A.MP4;
The le name format of Time-Lapse video is:
20300128_140733_0006_T_A.MP4;
The le name format of Privacy Mode video is:
20300128_140633_0005_S_A.MP4.
C. Photo: Photos les. The le name format is:
20210128_140633_0001A.JPG
D. All: All the standard videos and critical event videos recorded.
Note: The sux A represents the les recorded by the front
camera, the sux B represents the les recorded by the front
cabin camera, and the sux C represents the les recorded by the
rear cabin camera, and the sux D represents the les recorded
by the rear camera.
- 18 -
4.2 Key Features
Note:
Fc
R
Rc
F
Mp/h
14:25:35 06-01-202300:00:37
35
1944p+1080p+1080p+1080p 30fps
- 19 -
Fc
R
Rc
F
Mp/h
14:25:35 06-01-202300:00:37
35
1944p+1080p+1080p+1080p 30fps
Fc
R
Rc
F
Mp/h
14:25:35 06-01-202300:00:37
35
1944p+1080p+1080p+1080p 30fps
Note:
•
•
•
Mp/h
14:25:35 06-01-202300:00:37
35
1944p+1080p+1080p+1080 P 30fps
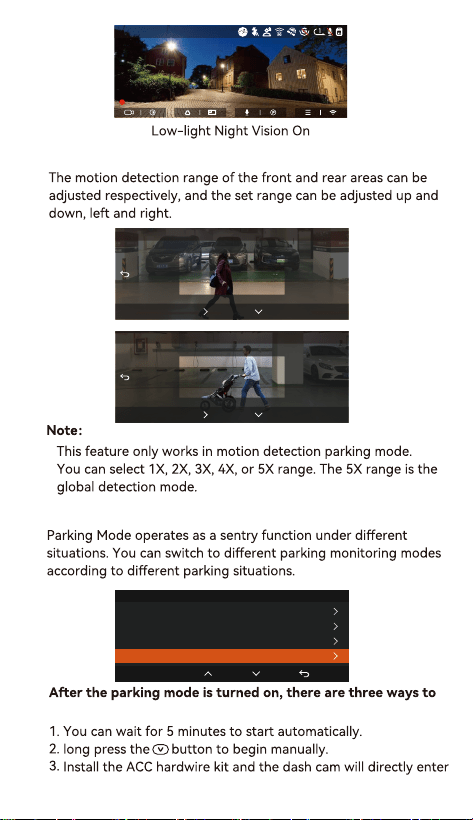
4.2.3 Low-light Night Vision in Parking Mode
In order to enhance the safety of parking at night, we make full
use of the lens peormance combined with low-light night vision
technology to improve the night vision eect in parking mode.
The default is ON. It will be triggered only after entering the
parking mode and will not aect normal recording.
- 20 -
4.2.5 Parking Mode
4.2.4 Motion Detection Area
Ok
2x
Rear Area Detection
Ok
2x
Front Area Detection
Record:
Ok
Parking Mode
Collision Detection
Motion Detection
Low Bitrate Mode
Low Framerate Mode
•
•
Mp/h
14:25:35 06-01-202300:00:37
35
1944p+1080p+1080p+1080 P 30fps
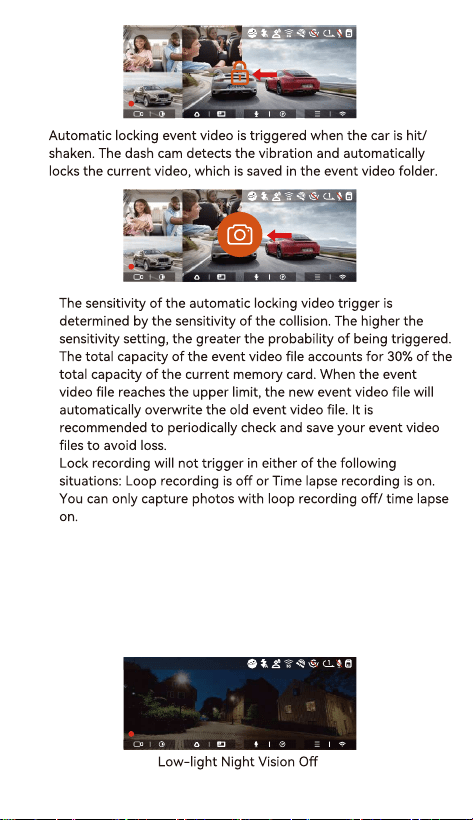
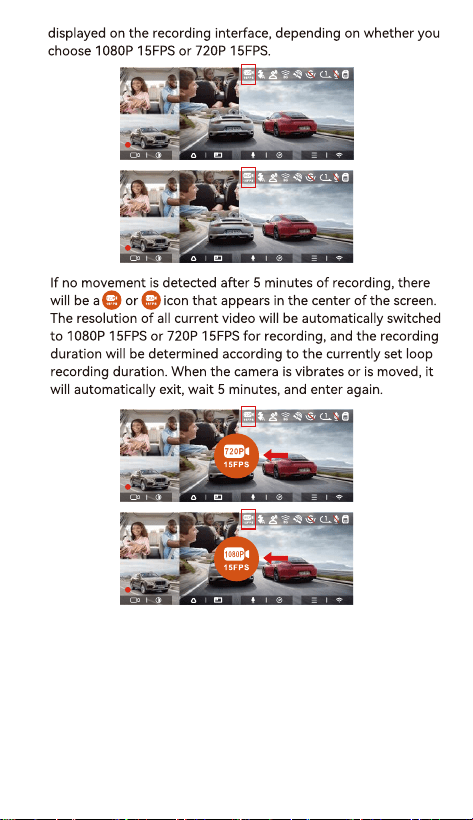
When the collision detection is turned on, and no movement is
detected after 5 minutes of recording (5-minute ent mechanism
for sho), then collision detection is activated with the icon in
the center of the screen, and the camera automatically turns o.
When the dash cam is turned o, it will sta to record for 1
minute after being shaken, then turn o the dash cam again.
- 21 -
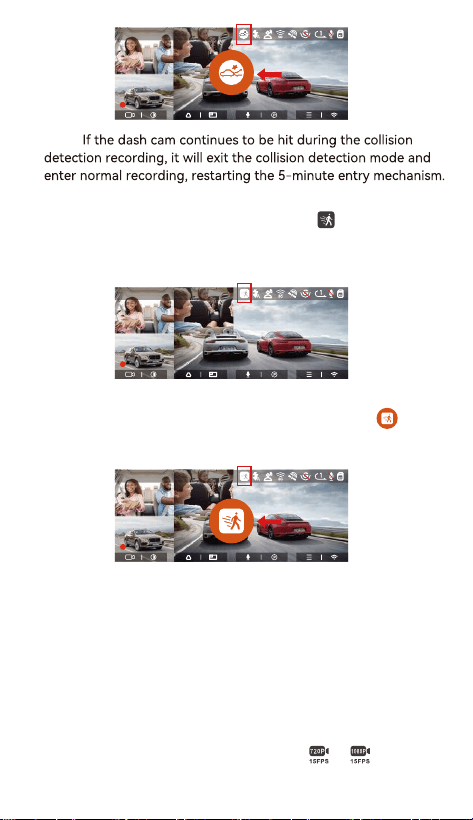
Collision Detection
•
•
•
•
•
Fc
R
Rc
F
Mp/h
14:25:35 06-01-202300:00:37
35
1944p+1080p+1080p+1080 P 30fps
- 22 -
Note:
Motion Detection
Fc
R
Rc
F
Mp/h
14:25:35 06-01-202300:00:37
35
1944p+1080p+1080p+1080 P 30fps
Fc
R
Rc
F
Mp/h
14:25:35 06-01-202300:00:37
35
1944p+1080p+1080p+1080 P 30fps
Fc
R
Rc
F
Mp/h
14:25:35 06-01-202300:00:37
35
1944p+1080p+1080p+1080 P 30fps
When the motion detection is turned on, the icon will be
displayed on the recording inteace, indicating that motion
detection has been turned on. Please go to “Motion Detection
Area” to set the area range.
When the motion detection is turned on, and no movement is
detected after 5 minutes of recording, then an orange icon
will appear in the center of the screen, and the screen will turn
o after 3 minutes.
Video recording process: When the camera detects object
movement, it will automatically trigger video recording for 30
seconds. After the motion detection recording ends, the camera
will load a 10s pre-recorded video into the 30s motion detection
video and save the 40s video to the normal folder.
Note: Motion detection mode can only be engaged when the
camera is turned on. Once the camera is turned o, the motion
detection mode will not work.
Low Bitrate Recording
When low bitrate recording is enabled, the or icon will be
- 23 -
Fc
R
Rc
F
Mp/h
14:25:35 06-01-202300:00:37
35
1944p+1080p+1080p+1080 P 30fps
Fc
R
Rc
F
Mp/h
14:25:35 06-01-202300:00:37
35
1944p+1080p+1080p+1080 P 30fps
Fc
R
Rc
F
Mp/h
14:25:35 06-01-202300:00:37
35
1944p+1080p+1080p+1080 P 30fps
Fc
R
Rc
F
Mp/h
14:25:35 06-01-202300:00:37
35
1944p+1080p+1080p+1080p 30fps
Note: Low bitrate recording can only be engaged when the
camera is turned on. Once the camera is turned o, the low
bitrate recording will not work.
Low Framerate mode
When the low framerate mode is selected, the camera will record
according to your selection among 1FPS/5FPS/10FPS/ 15FPS.
For example, if you select 1FPS and the current video resolution
frame rate is 30FPS, the camera will generate a 30FPS video per
E
Contains Character “S”. For Example: 20210128_140633_0006_s
- 24 -
Note:
FC
R
RC
F
MP/H
14:25:35 06-01-202300:00:37
35
1944P+1080P+1080P+1080P 30FPS
•
•
•
Note:
4.2.6 Privacy Mode
FC
R
RC
F
MP/H
14:25:35 06-01-202300:00:37
35
1944P+1080P+1080P+1080P 30FPS
•
•
•
second. Low framerate mode can greatly presee the integrity
of the video and save space on the memo card.
[Normal Recording Time = Low Framerate Recording Time (Sec)
x Recording Frame Rate FPS/Low Framerate Option] (Time
should be conveed into seconds)
The time unit of the calculation formula is seconds, so the nal
normal recording time calculated is also in seconds. If you need
to conve it into other time units, please check the units and
conve by yourself.
The low framerate mode is similar to the time-lapse recording
function, there is a dierence between the le name sux.
In low framerate mode, the camera also needs a stable power
supply. Once the power is o or exhausted, the camera will
shut down.
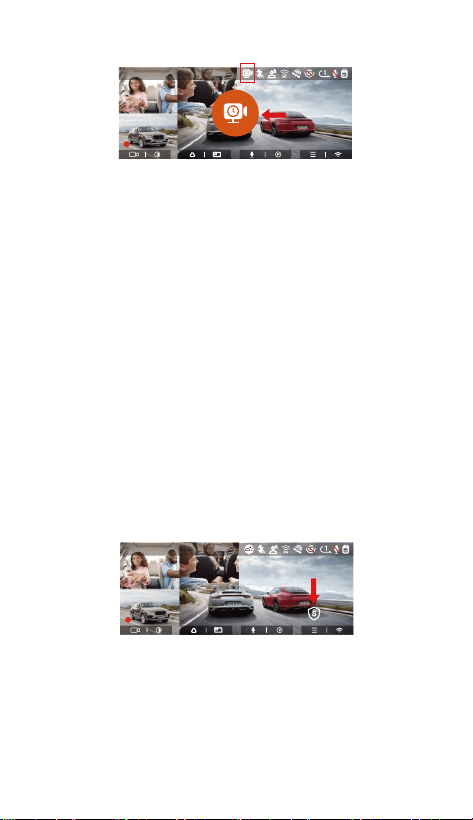
After enabling the privacy mode, only the latest 3 recording
les will be saved.
For example: If you set the loop recording to 1 minutes, after
enabling the privacy mode, when the third 1 minute recording
ends, the new loop recording le will automatically overwrite
the oldest le.
Privacy le will be saved to the normal folder, and the le
name contains character “S”. For example:
20210128_140633_0006_S _A.MP4
Privacy mode can’t be enabled when loop recording is o.
Before enabling the private mode, please format the
memo card.
- 25 -
•
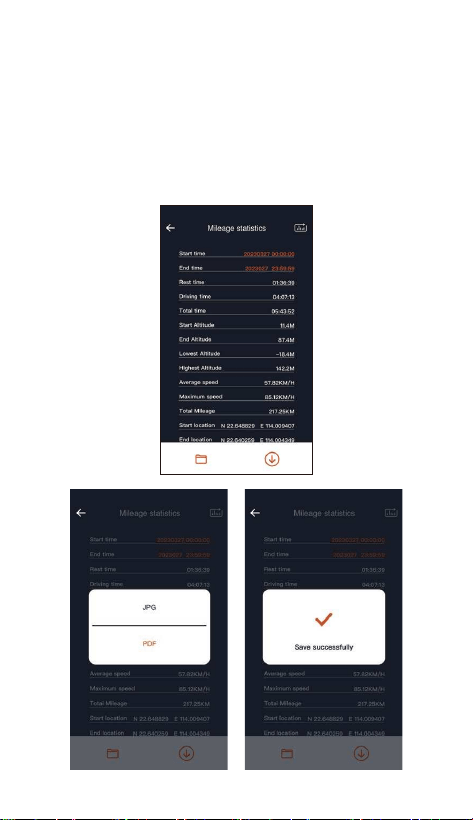
4.2.7 Mileage Statistics
In privacy mode, manually locked video les will be saved in the
Event folder, and the le name is the same as the emergency
video le.
The N5 dash cam can record, analysis and statistics your driving
time, driving distance, altitude, driving speed and other
information according to the GPS information.
You can click to download mileage information in the APP, and
the mileage information will be saved in the APP as a picture or
PDF le.
- 26 -
Fc
R
Rc
F
Mp/h
14:25:35 06-01-202300:00:37
35
1944p+1080p+1080p+1080p 30fps
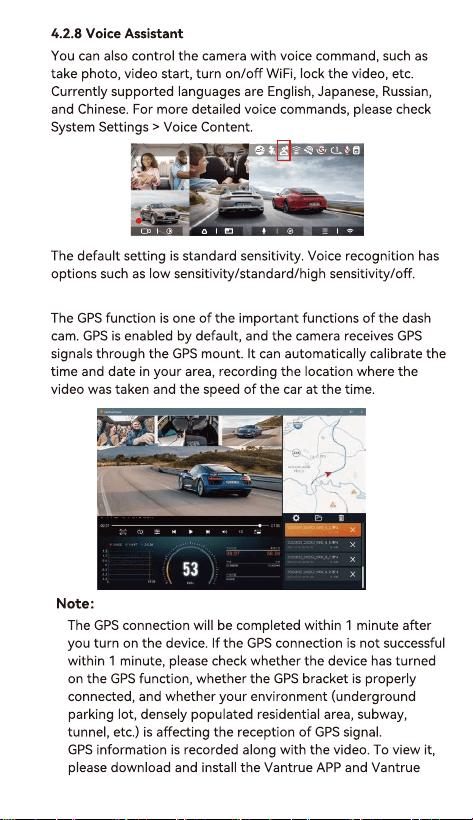
4.2.9 Gps Function
•
•

4.2.10 Gps Automatic Update Time& Date
- 27 -
Ok
Time & Date
Gps Automatic Update
Set Date/time Manually
St/wt Auto Switch
Date Format
20230601_140633_0006_t_c.mp4
00:30 01:07
1x
Ok
Event Video
Delete This File?
Delete All Files?
Ok
20230601_140633_0005_t_c.mp4
20230601_140633_0006_t_c.mp4
20230601_140633_0007_t_c.mp4
20230601_140633_0008_t_c.mp4
Event Video
2/5
a.Viewing and Deleting Files on the Camera

- 28 -
Ok
Event Video
Delete This File?
Delete All Files?
b. Viewing and Deleting Files on Computer
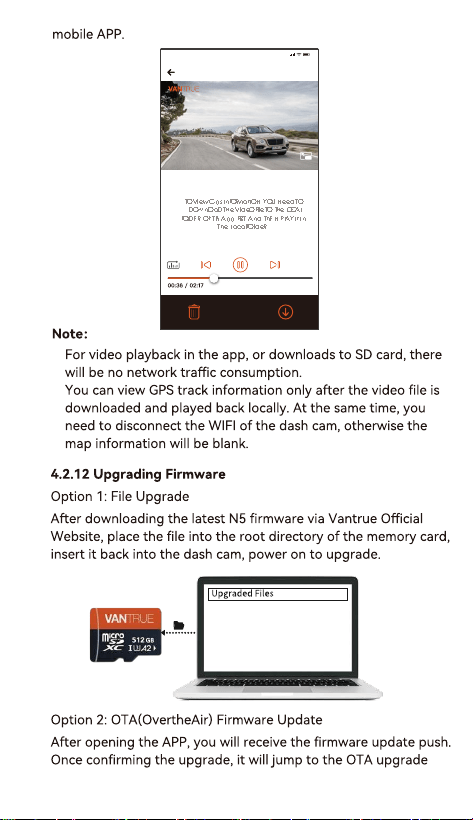
c. Viewing and Deleting on the "Vantrue" APP
- 29 -
20230601115036_0079_N_A.MP4
06/01/2023 11:05:35 N5 000.000000. 000.000000. 36mk/h
TO View Gps InFORMatION, YOU Need TO
DOWnlOaD THe VideO File TO THe LOCAL
FOLDER Of ThE App FiRST, And ThEN PLAY It In
The Local FOldeR.
NoTE :
9:41
•
•
- 30 -
Note:
•
•
- 31 -
5.
N5Model
Wi
Screen
Camera Angle
Front+Front Cabin+Rear Cabin+Rear:
1944P+1080P+1080P+1080P 30FPS
1440P+1080P+1080P+1080P 30FPS
1440P+720P+720P+1080P 30FPS
1080P+1080P+1080P+1080P 30FPS
1080P+720P+720P+1080P 30FPS
720P+720P+720P+720P 30FPS
Front+Front Cabin+Rear:
1944P+1080P+1080P 30FPS
1440P+1080P+1080P 30FPS
1440P+720P+720P 30FPS
1080P+1080P+1080P 30FPS
1080P+720P+720P 30FPS
720P+720P+720P 30FPS
Front+Rear Cabin+Rear:
1944P+1080P+1080P 30FPS
1440P+1080P+1080P 30FPS
1440P+720P+720P 30FPS
1080P+1080P+1080P 30FPS
1080P+720P+720P 30FPS
720P+720P+720P 30FPS
Front+Front Cabin:
1944P+1080P 30FPS
1440P+1080P 30FPS
1440P+720P 30FPS
1080P+1080P 30FPS
1080P+720P 30FPS
720P+720P 30FPS
Front+Rear:
1944P+1080P 30FPS
1440P+1080P 30FPS
1440P+720P 30FPS
1080P+1080P 30FPS
1080P+720P 30FPS
720P+720P 30FPS
Front:
2592x1944P 30FPS
2560x1440P 30FPS
1920x1080P 30FPS
1280x720p 30FPS

- 32 -
Mp4Video Format
Image Format
Audio
Front+Front Cabin+Rear Cabin+Rear:
1944P+1080P+1080P+1080P 30FPS
1440P+1080P+1080P+1080P 30FPS
1440P+720P+720P+1080P 30FPS
1080P+1080P+1080P+1080P 30FPS
1080P+720P+720P+1080P 30FPS
720P+720P+720P+720P 30FPS
Front+Front Cabin+Rear:
1944P+1080P+1080P 30FPS
1440P+1080P+1080P 30FPS
1440P+720P+720P 30FPS
1080P+1080P+1080P 30FPS
1080P+720P+720P 30FPS
720P+720P+720P 30FPS
Front+Rear Cabin+Rear:
1944P+1080P+1080P 30FPS
1440P+1080P+1080P 30FPS
1440P+720P+720P 30FPS
1080P+1080P+1080P 30FPS
1080P+720P+720P 30FPS
720P+720P+720P 30FPS
Front+Front Cabin:
1944P+1080P 30FPS
1440P+1080P 30FPS
1440P+720P 30FPS
1080P+1080P 30FPS
1080P+720P 30FPS
720P+720P 30FPS
Front+Rear:
1944P+1080P 30FPS
1440P+1080P 30FPS
1440P+720P 30FPS
1080P+1080P 30FPS
1080P+720P 30FPS
720P+720P 30FPS
Front:
2592x1944P 30FPS
2560x1440P 30FPS
1920x1080P 30FPS
1280x720p 30FPS
External: 32GB-1TB Micro SD Card

6w
- 33 -
6. Safety Warnings
•
•
•
•
•
•
•
•
•
•
•
This product is an auxilia device for the purpose of recording
exterior images of vehicles, and some functions may not be
suppoed due to dierent driving and vehicle environments.
Firmware upgrade will be carried out from time to time to
fuher improve the product, please pay attention to the
ocial notice of VANTRUE according to the specic upgrade.
This product can record and save images of vehicle accidents,
but it does not guarantee that all accident images can be
recorded. The image may not be recorded in a special folder
because the crash sensor cannot be activated for minor
crashes.
Be sure to turn o the power when inseing or removing the
memo card.
For stable use of the product, please format the memo card
at least once a month.
Generally, memo cards have a life span, and long-term use
memo cards may result in data not being saved. In this case,
of it is recommended to purchase a new memo card for use.
If the data is destroyed due to the long-term use of the
memo card, the company will not be held responsible
Do not install or operate this product while the vehicle is
running.
Do not subject the product to strong shocks or vibrations,
which may damage the product and cause malfunction or
inoperability.
Do not use chemical solvents or cleaning agents to clean the
product.
The ambient temperature range for normal use of this device
is -20 degrees Celsius to 60 degrees Celsius. Exceeding this
ambient temperature range may cause the product to
malfunction.
Do not place the product in an open ame. Do not use the
product in high temperature and high humidity areas, as this
may cause electric shock, sho circuit, and other hazards and
•
•
•
- 34 -
7.
Warranty
Your Opinion Matters
damage the product.
It is forbidden to disassemble or modify the car charger by
yourself, or use a sho-circuit car charger, otherwise it will
cause personal inju, electric shock, re and other dangers or
damage the product.
Please do not disassemble or modify the product without
permission to avoid damaging the recorder, generating heat
and causing re.
Please use this product within the scope of the law.