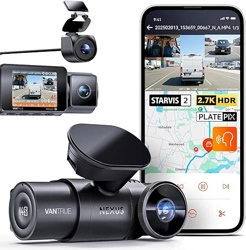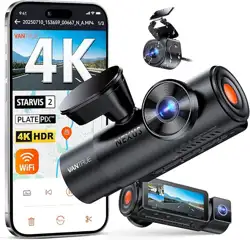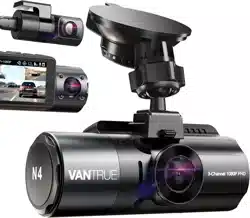
OnDash N4
3-Channel Dash Cam
User Manual
122mmX130mm
80g
OnDash N4
3-Channel Dash Cam
User Manual
122mmX130mm
80g
Always a surprise in Vantrue
Hey, find us here:
www.vantrue.net/contact
facebook.com/vantrue.live

CONTENTS
VERZEICHNIS
日本語作業マニュアル
CONTENU
SPIS TREŚCI
1
32
64
94
126
What’s in the box?
Was ist in der Box?
付属品を確認する
Qu'y a-t-il dans la boîte?
Co znajdziemy w pudełku?
1.
9
40
71
102
134
Basic Operation
Grundlegende Operation
基本的な使い方
Opération de base
Podstawowe funkcje
4.
29
61
91
123
151
Specifications
Spezifikationen
製品仕様
Spécification
Specyfikacja techniczna
5.2
33
65
95
127
Camera Overview
Die Übersicht über Kamera
各部の名称とはたらき
Vue d'ensemble de la caméra
Opis kamery
2.
31
63
92
125
153
Warranty & Support
Garantie und Unterstützung
保証とサポート
Garantie et support
Gwarancja & wsparcie
6.Getting Started
入門
Pierwsze uruchomienie
3.
Préparation avant la mise
en marche
Vorbereitung vor dem
Einschalten
5
67
98
130
36
- 1 -
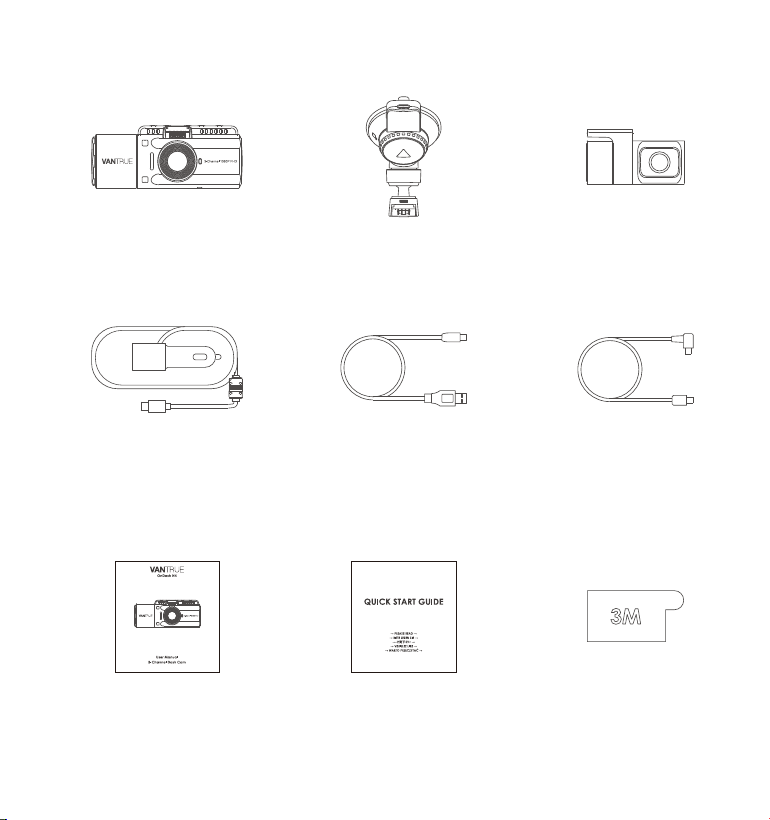
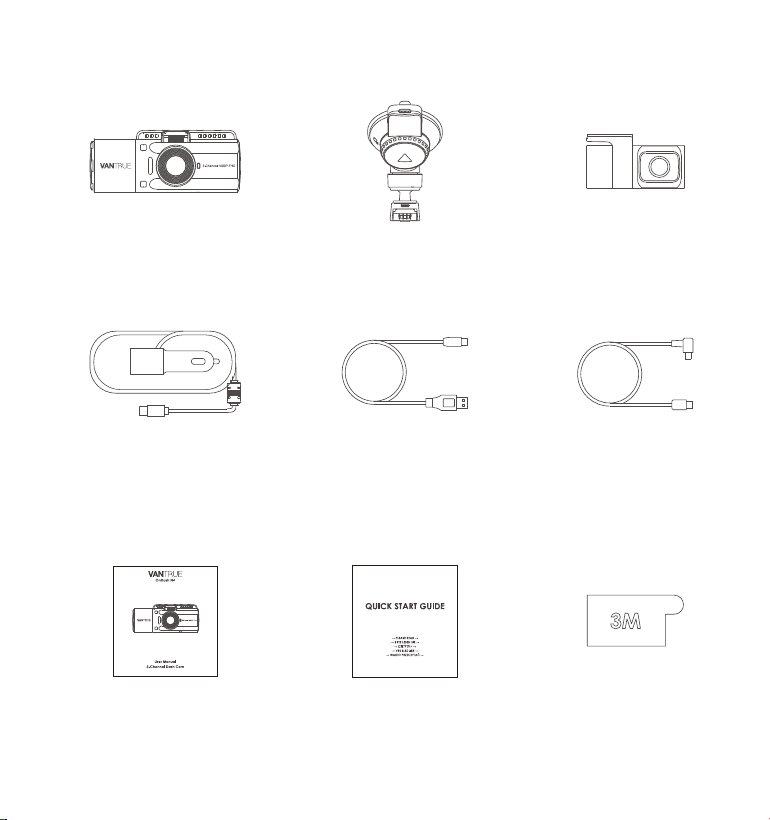
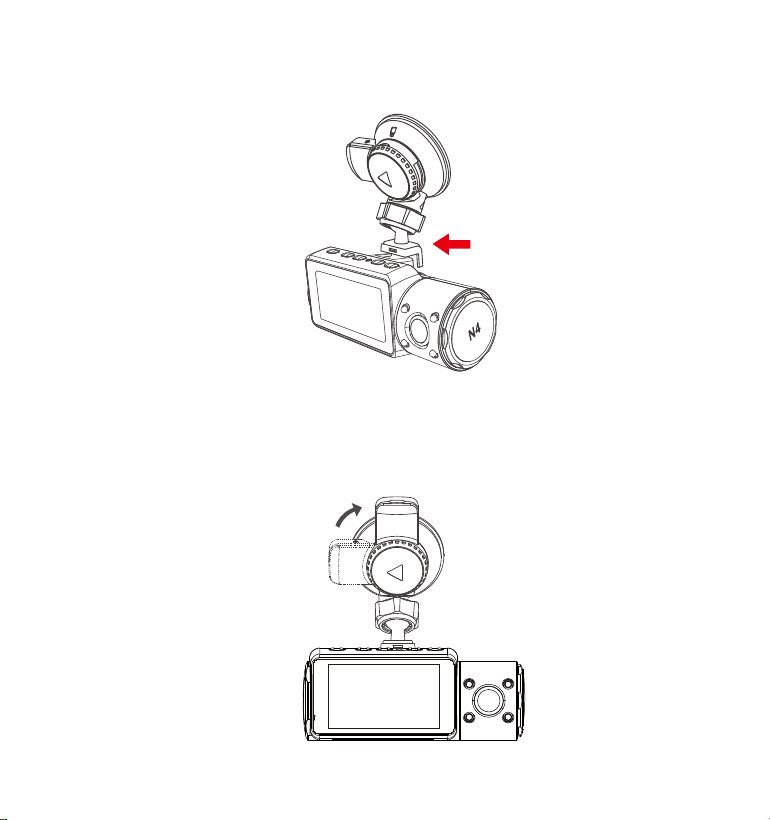
1.Whatʼsinthebox?
C. Rear Camera
(0.98 ft)
F. Rear Camera
Cable (20 ft)
I. Adhesive Sticker
D. Car Charger with
Built-in Type-C
Cable (11.4 ft)
A. VANTRUE
®
N4 Dash Cam
G. User Manual
B. Suction Cup Mount
E. Type-C USB Data
Cable (3ft)
H. Quick Start Guide

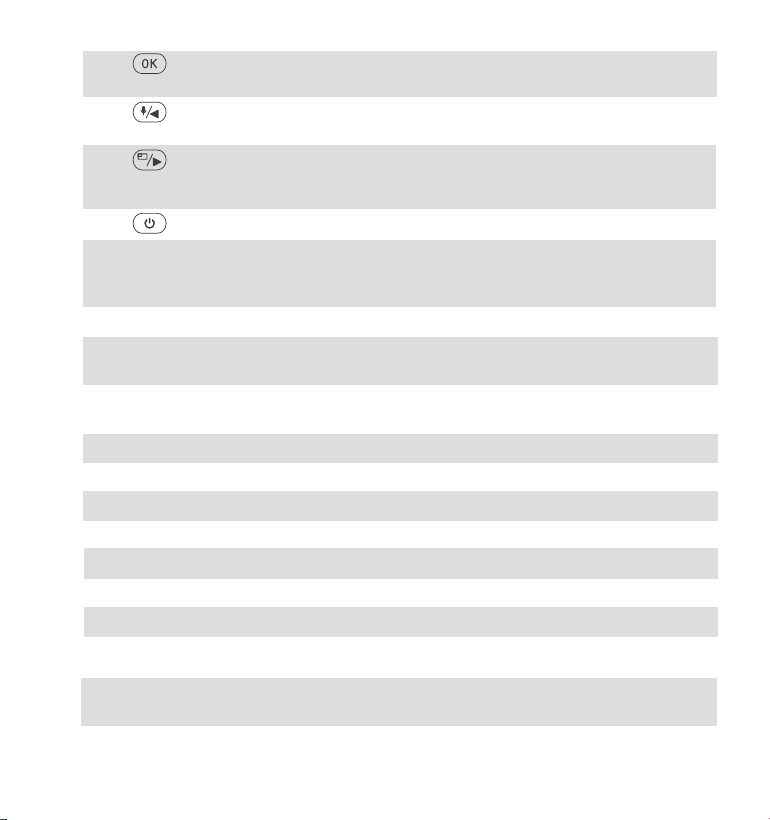
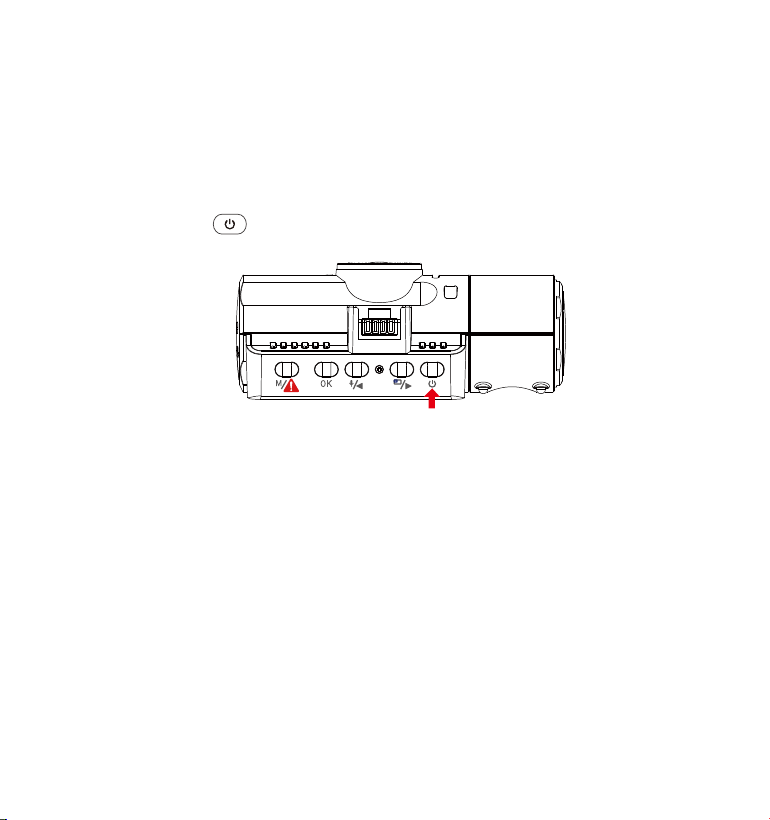
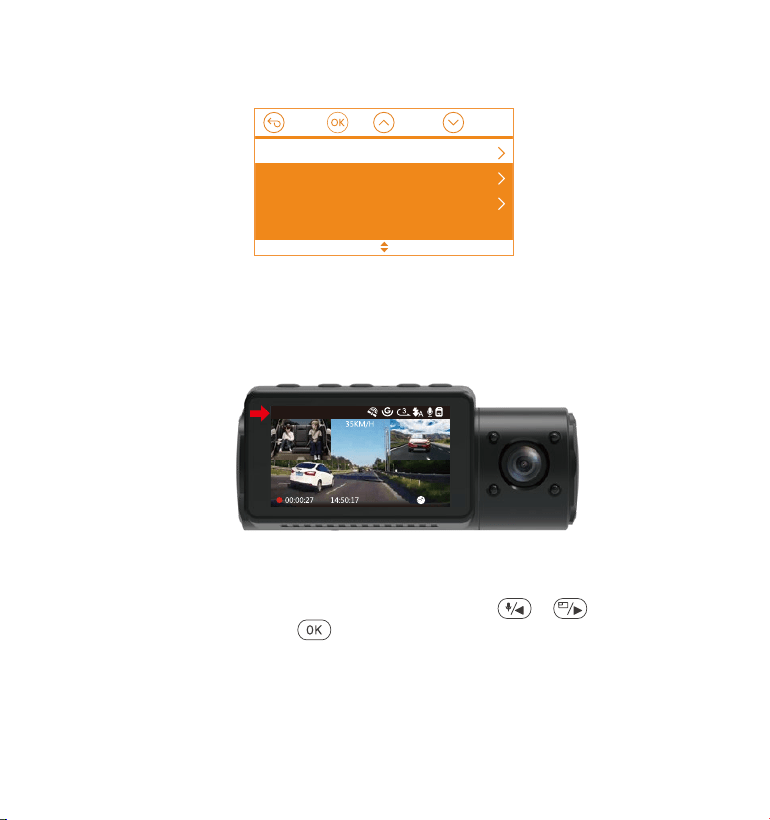
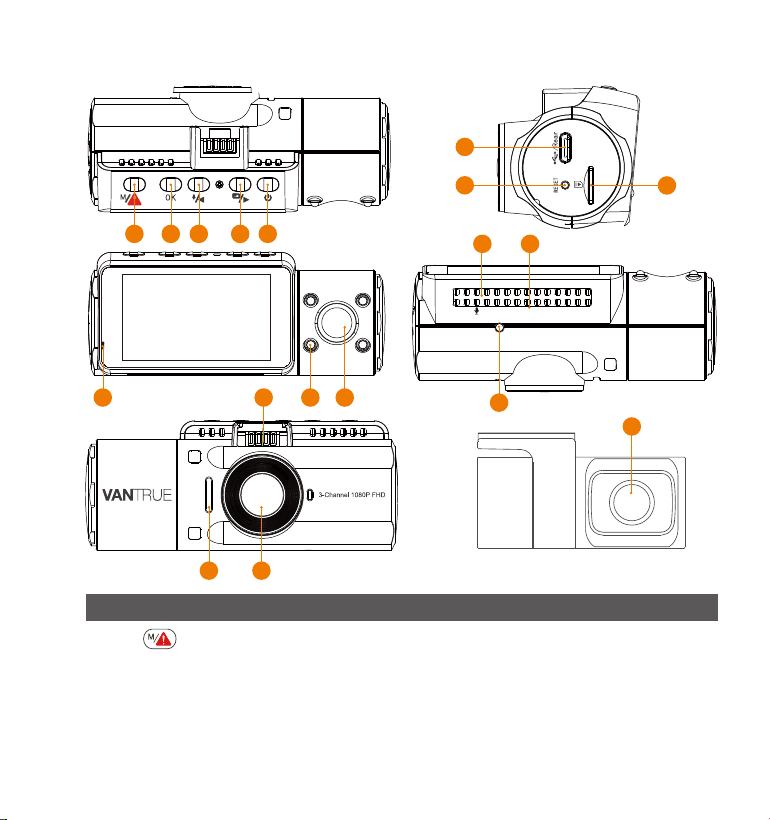
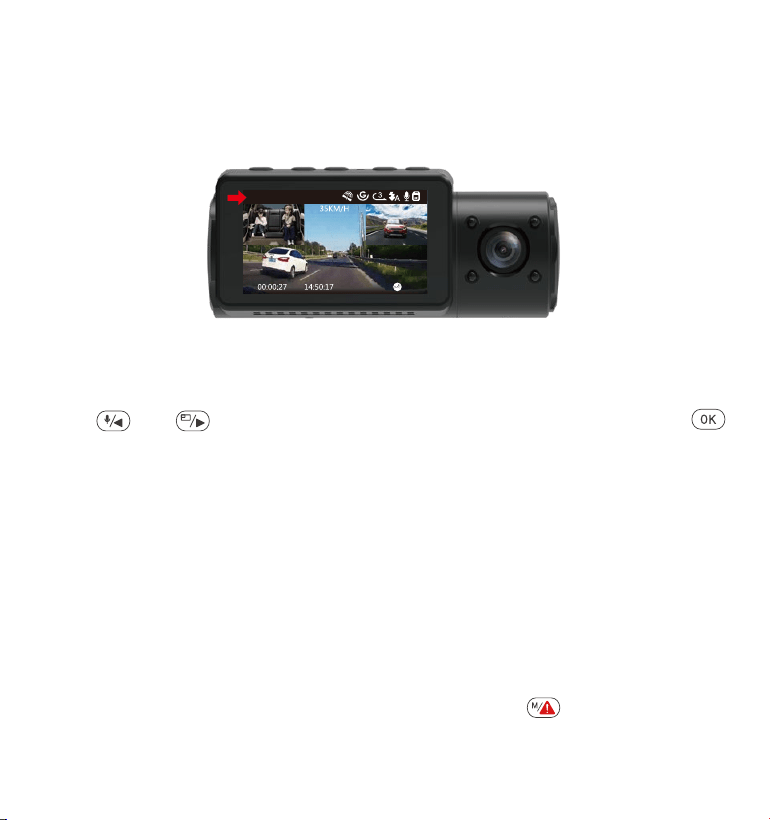
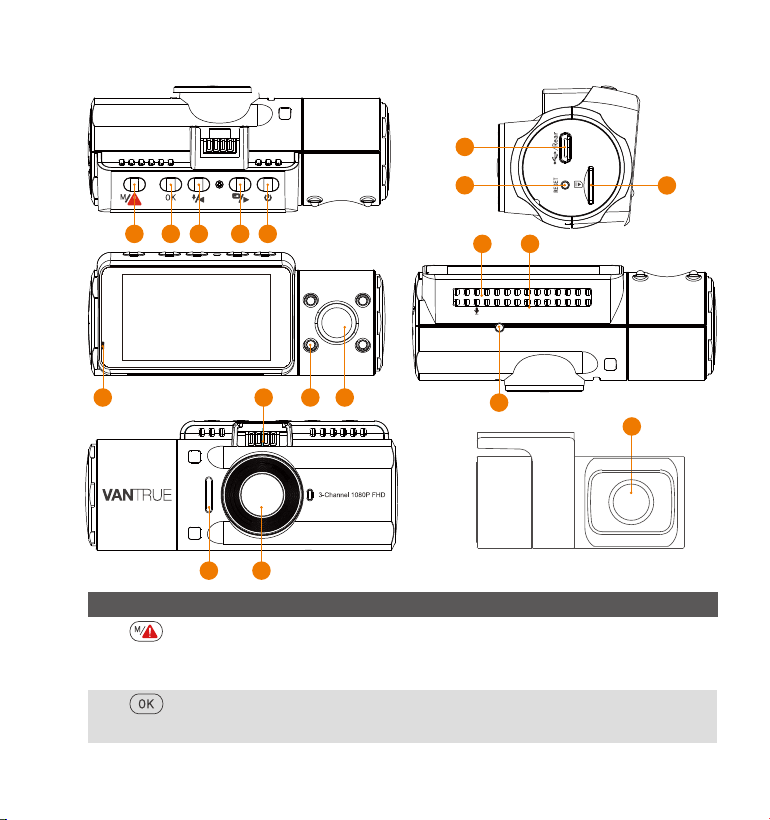
2. Camera Overview
NO. DescriptionName
- 2 -
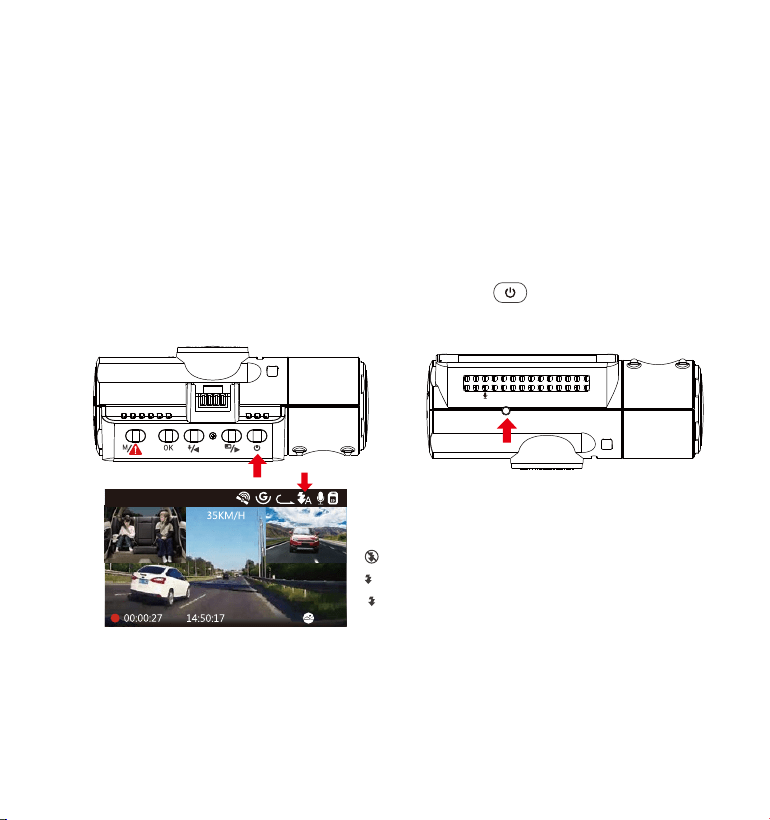
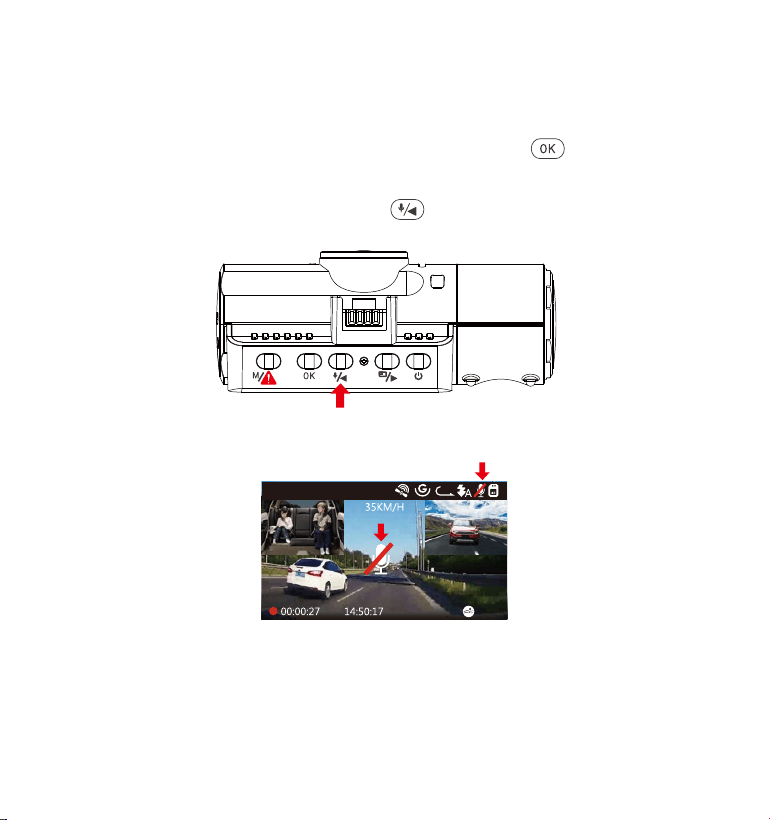
1 Enter/exit setup menu; Long press to enter Parking
Mode;
Manually locks the currently recording video clip
following emergency or to preserve important
videos.
Button
16 17
15
18
321 4 5
6
7
8
9
10 11
14
12 13
VTN40AXXXX
5
4
Button
Button
Power ON/OFF; IR LED Light Switch.
Move selector down; Switch the Front, cabin
and rear camera window display;Fast forward
when playing back videos.
3
Move selector up; Microphone on/off; Slow
forward when playing back videos.
2
Confirms the action; Stop/Start the video
recording.
6 Type-C USB /
Rear Cam Port
Type-C USB port for charging or transferring
data; Video stream port for streaming rear
camera’s recording.
7
MicroSD Card
Slot
Provides expandable storage (up to 512GB in
FAT32, U3 or higher).
10 IR LED Light
4 IR LED lights enhances the night vision in car.
9 Indicatorlight Blue light blinking when recording; Light on
when charging.
12 Microphone
Records clear audio with the video footage.
18
Front Camera Front Facing Camera for video recording road
events.
15
Mount Connector
Connects to the Suction Cup Mount.
13
Serial Number
Serial Number for Warranty Registration.
16
Speaker
Delivers sound during video playback.
14
IR Light Sensor
Sense the light changing.
17
External Camera
External Camera for video recording rear road
events.
11 Cabin Camera
Camera for in-car video recording.
8
Reset Button Press to force reset the device.
Button
Button
- 3 -
- 4 -
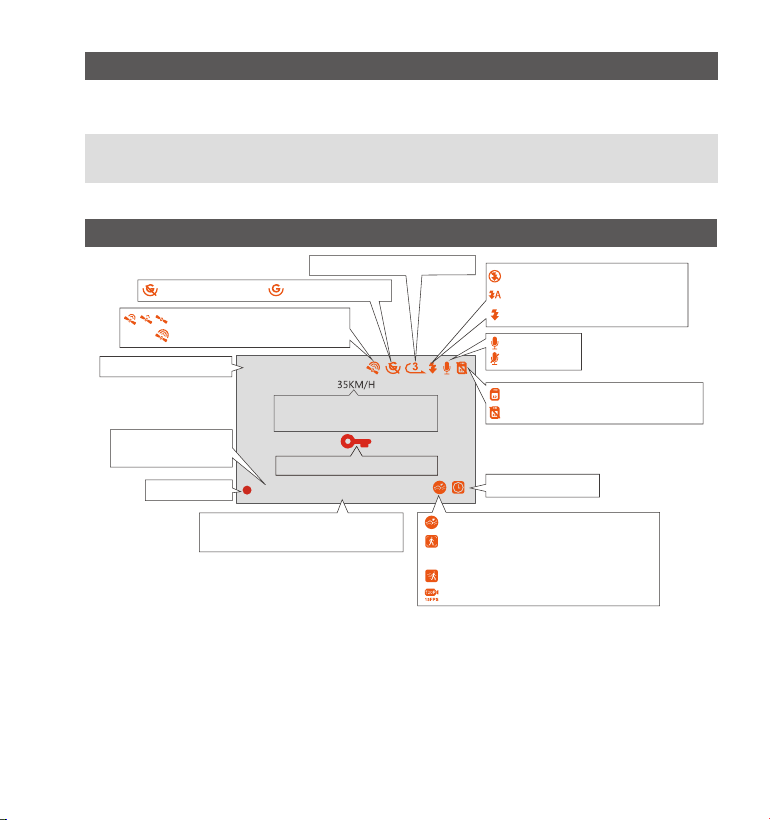
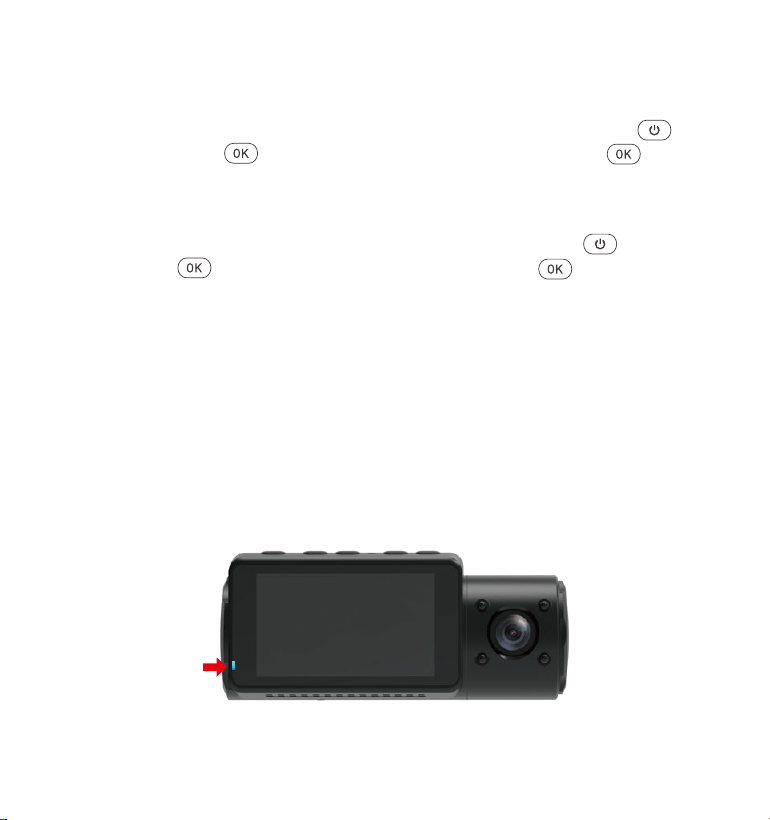
LED Indicator
Camera is plugged into supply.Blue light is visible on the
Indicatorlight [11]
Camera is recording.
Blue light blinks on the
Indicatorlight [11]
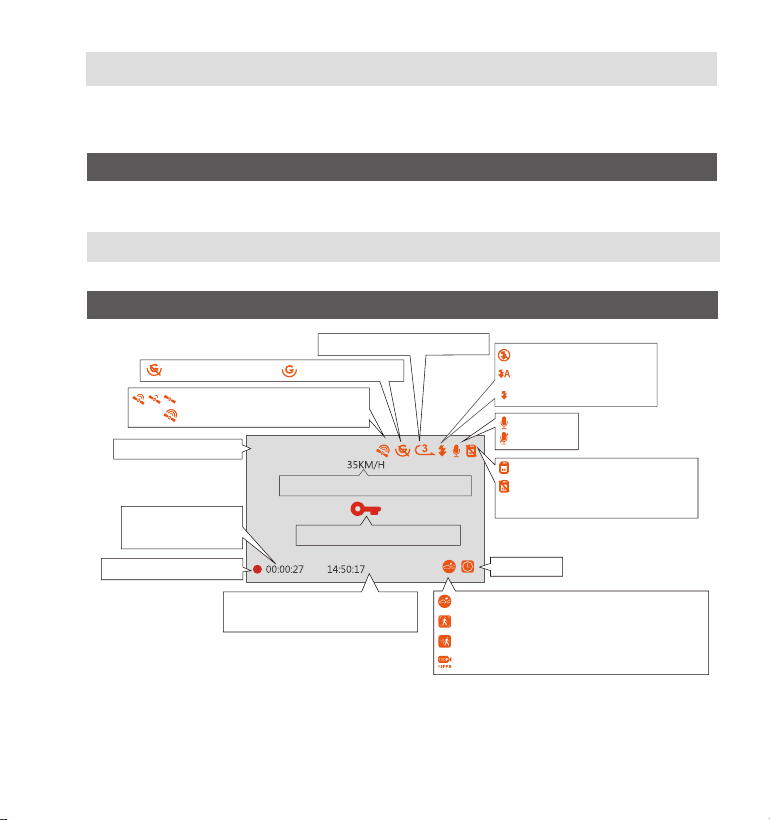
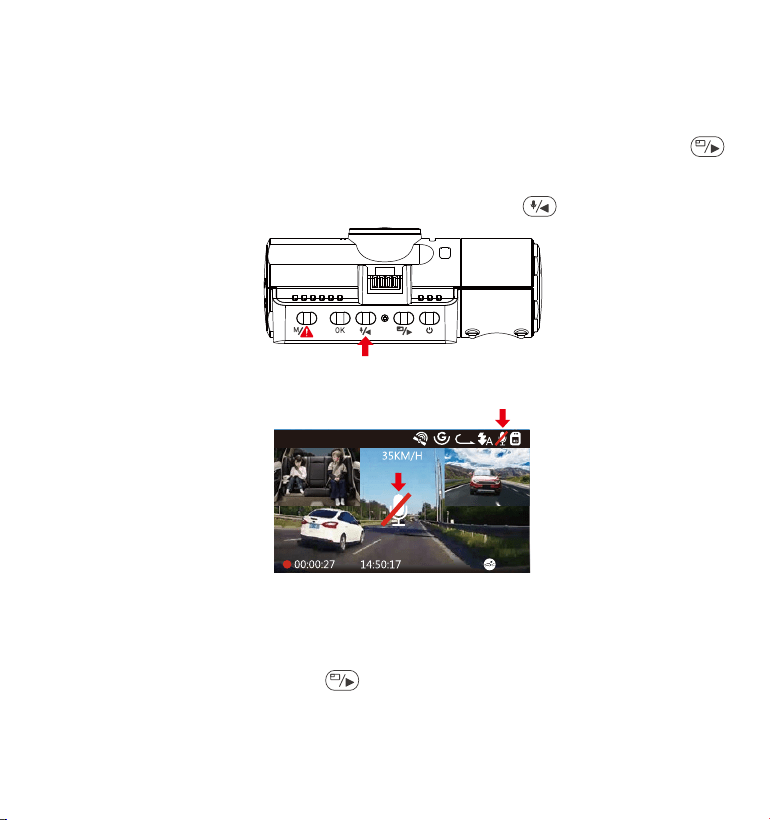
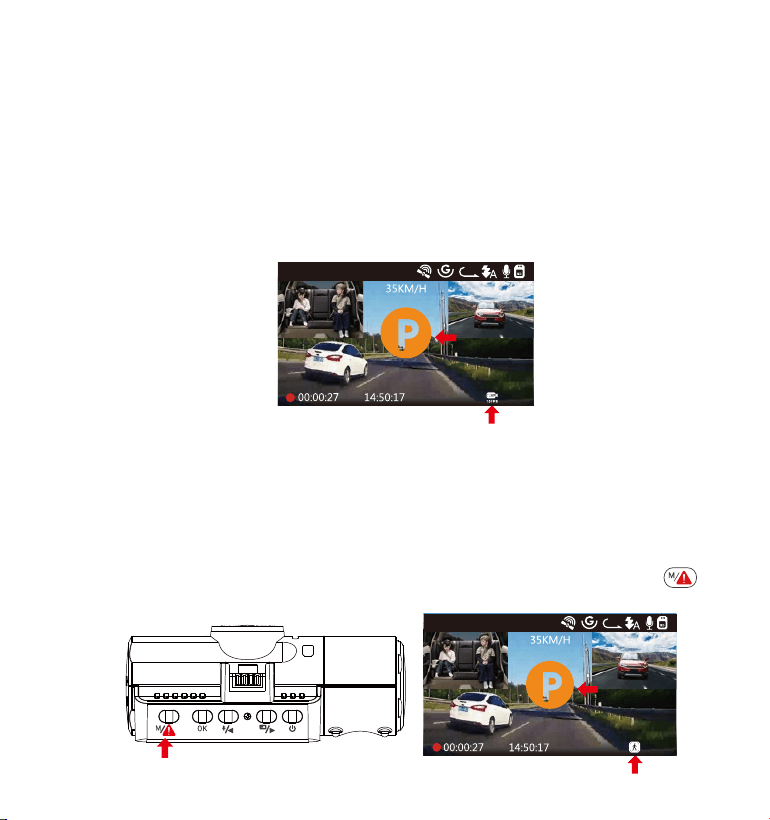
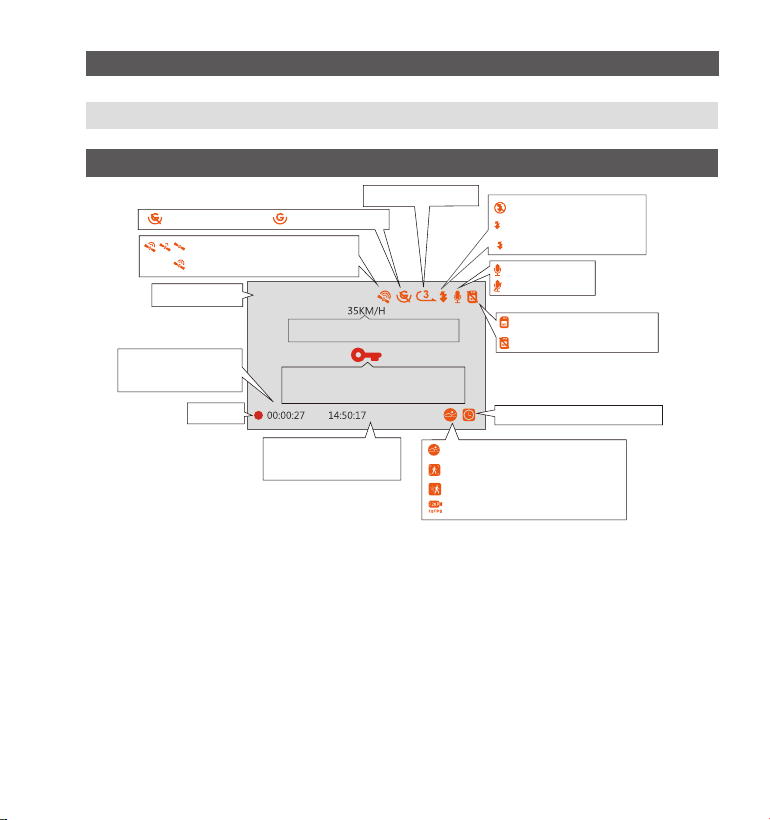
Screenoverview
G-Sensor OFF
Loop Recording Time
MIC is ON
MIC is OFF
Recording
Emergency File Lock
Time lapse On
Collision Detection + Motion
Detection ON
Current Date (MM/DD/YY)
and Time (24H)
Night mode off
Night mode auto on/off
Night mode on
Video Resolution
G-Sensor ON
Memory card inserted
NO Memory card inserted
Recording Time
(current clip)
GPS Signal Locked
GPS Signal Connecting
Recorded Driving
Speed (KMH or MPH)
Collision Detection ON
1440P+1080P+1080P
Motion Dection ON
Low Bitrates Recording ON
01-01-202100:00:27 14:50:17
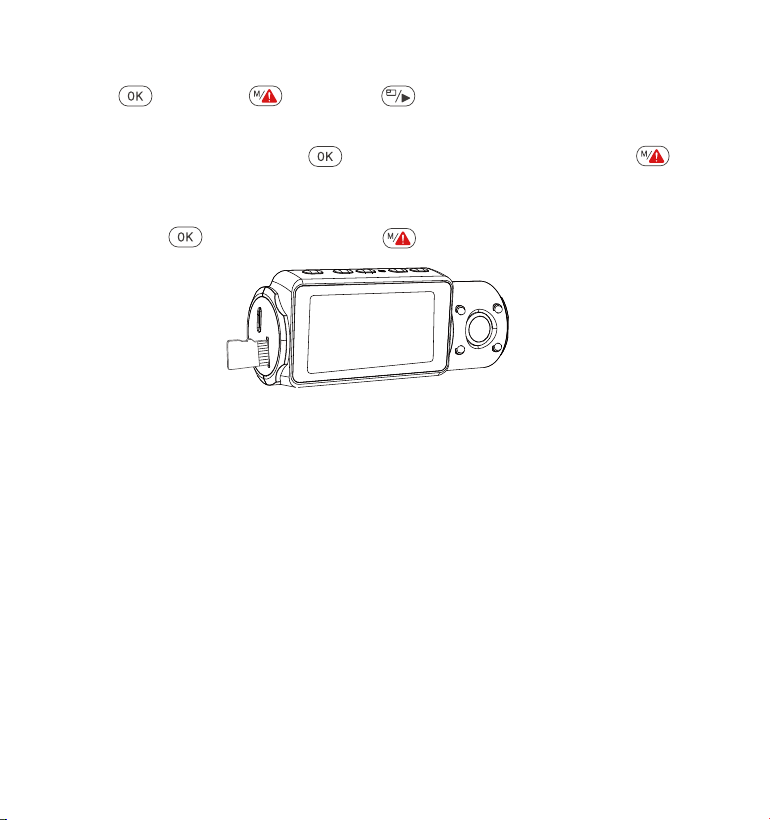
Press button to enter setup; if the camera is recording video, press
button to stop the recording; if it says ‘SD card error, please format
SD card’ here, please press the button and press button to
access into the menu.
Press the button to highlight the System Setup option, press the
button to confirm.
PressthebuttontohighlighttheFormatoption,pressthebuttonto
confirmbythebuttontoselectformat.
Please use a genuine Micro SD memory card from 32GB to 512GB with a
speed rating of U3 or higher. We recommend use Vantrue Micro SD Card
(not include). Please insert the SD card when dash cam is off. Carefully
insert the memory card into the camera’s card slot until it clicks. To
remove the card, power off the camera first, then push the card into the
slot until it clicks again.
If you are using SD card from other brand, before using the card, press
button to stop the recording.
- 5 -
3. Getting Started
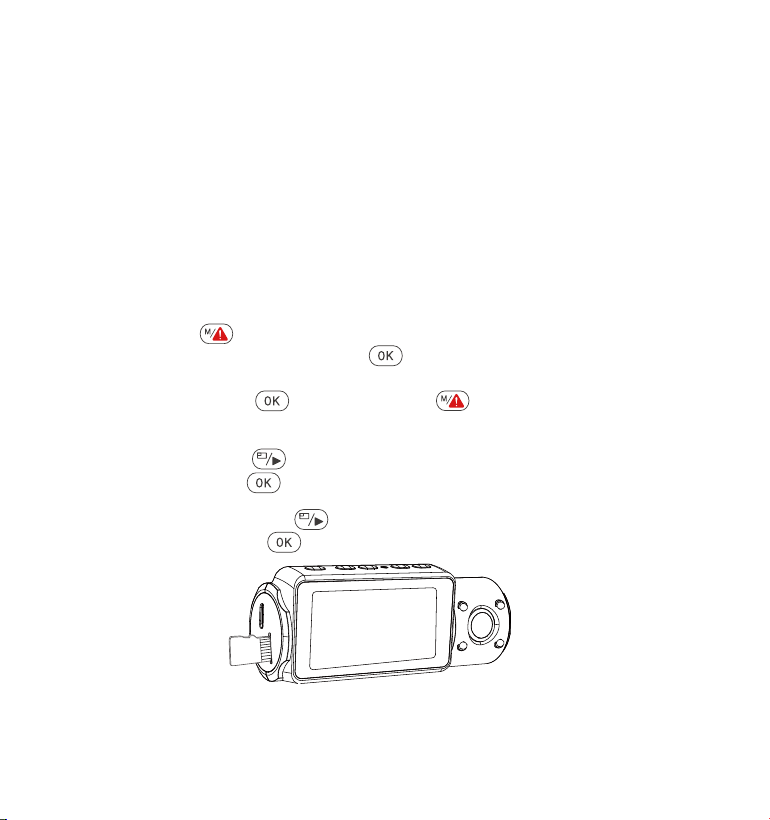
3.1 Installing a Memory Card (Recommend VANTRUE microSD Card)
•
•
•
- 6 -
REMINDER:
The microSD card should be formatted once a month to maximize the
lifetime of the memory card.
Pleasedonottakethecardoutwhenthecameraisrecordingincase
thattheimportantvideofilesmissing.
Please don't use Sandisk or Transcend SD card on this dash cam.
1.
2.
3.
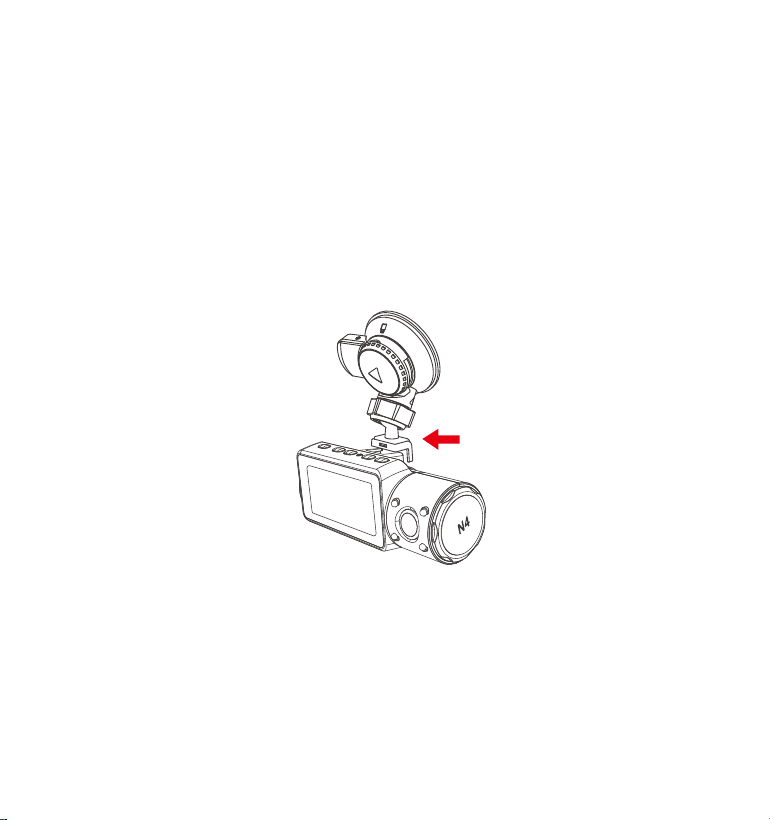
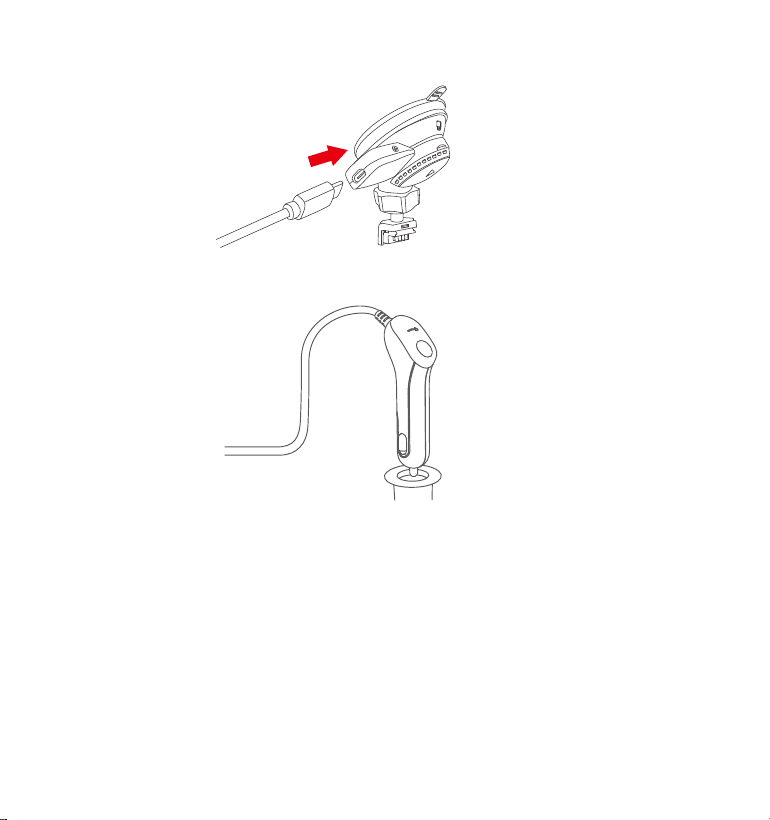
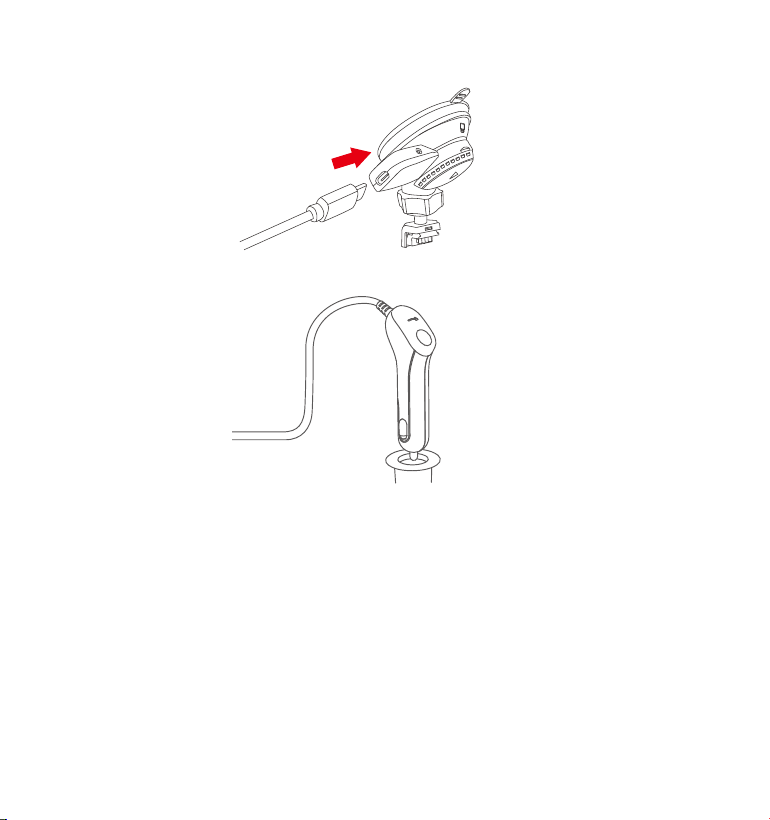
3.2 Installing the camera onto your windshield
Attach the Suction Mount to the camera’s Mount Connector, pushing it
in until it clicks.
1.
2.
3.
4.
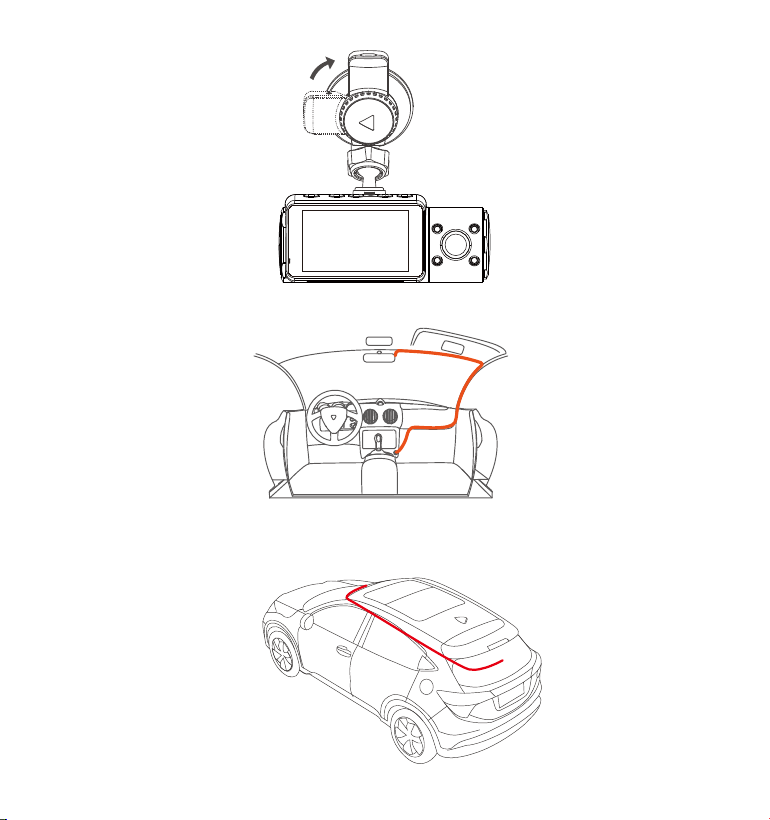
Thoroughly clean the windshield using water or alcohol, and wipe clean
with a dry cloth.
Wipe the Suction Mounting Pad clean on the Suction Mount.
Securely attach the Suction Mount to the windshield, and rotate the
locking clamp on the mount 90° upward until it clicks.
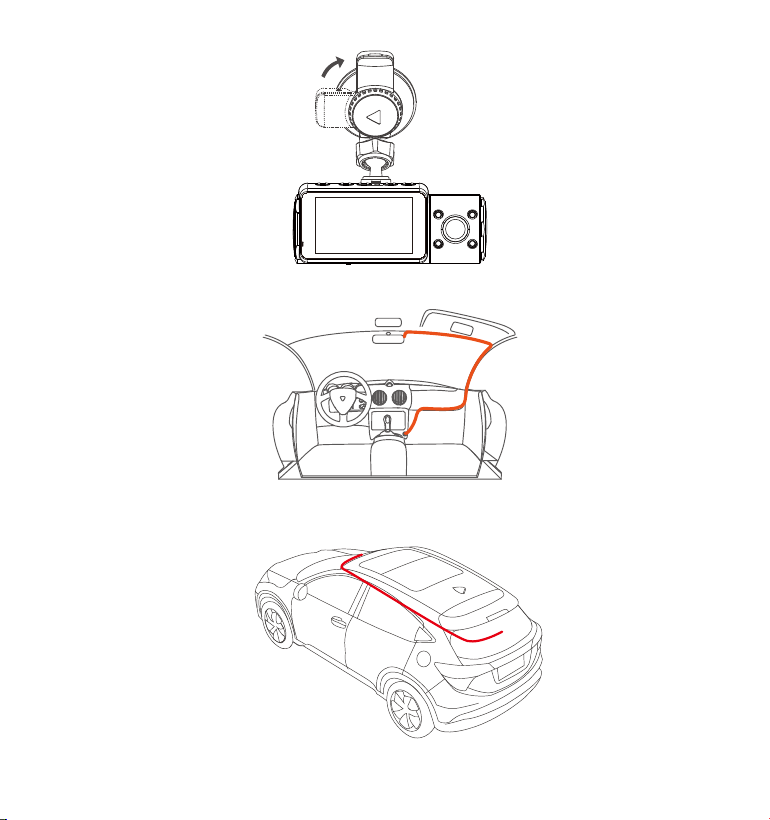
- 7 -
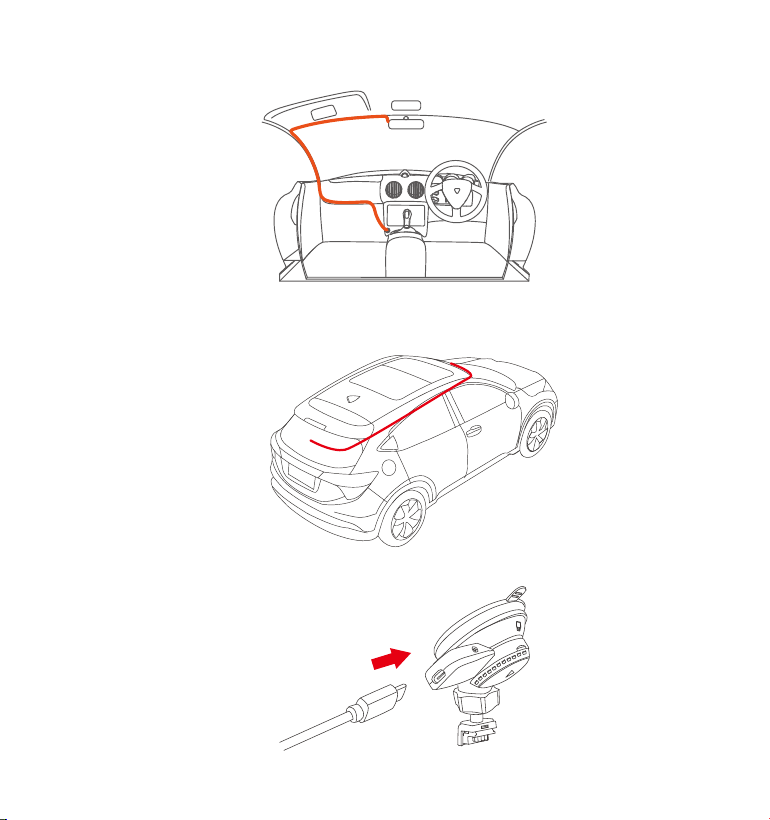
Carefully route the power cable around the windscreen and tuck it
under the trim.
5.
Connect the External Camera to the Rear Cam Port on the device
through the rear camera cable, carefully route the cable and tuck it
under the trim.
6.
- 8 -
With the Type-C USB Cable, connect the supplied Car Charger to the
Front Camera Mount Base.
7.
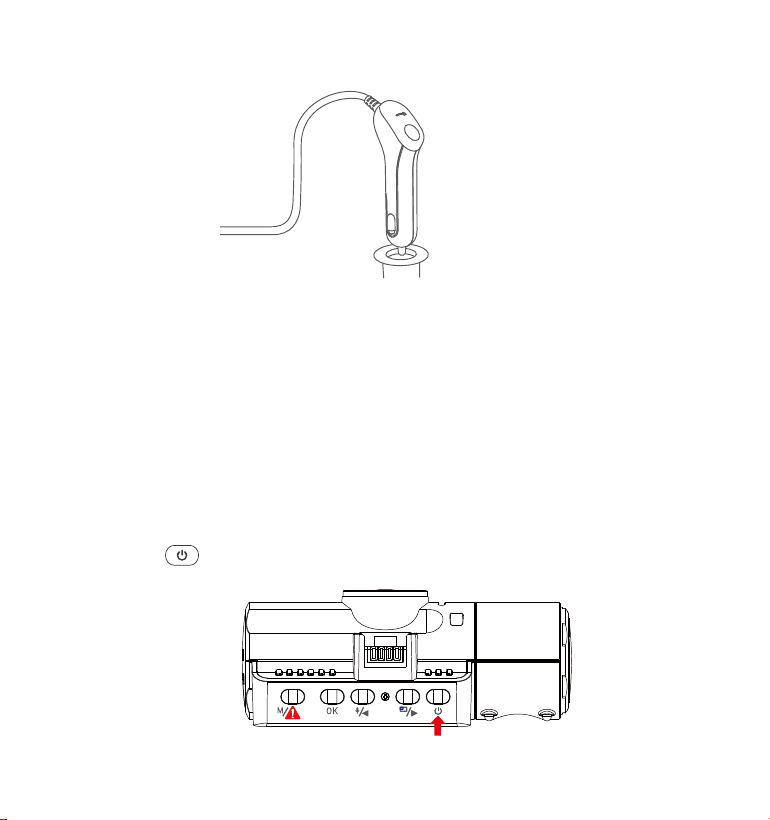
8. Insert the Car Charger into your vehicle’s cigarette lighter port.
Vehicle’s Cigarette
Lighter Port
9. Start the car.
10. The camera will auto power on and start recording.
- 9 -
4. Basic Operation
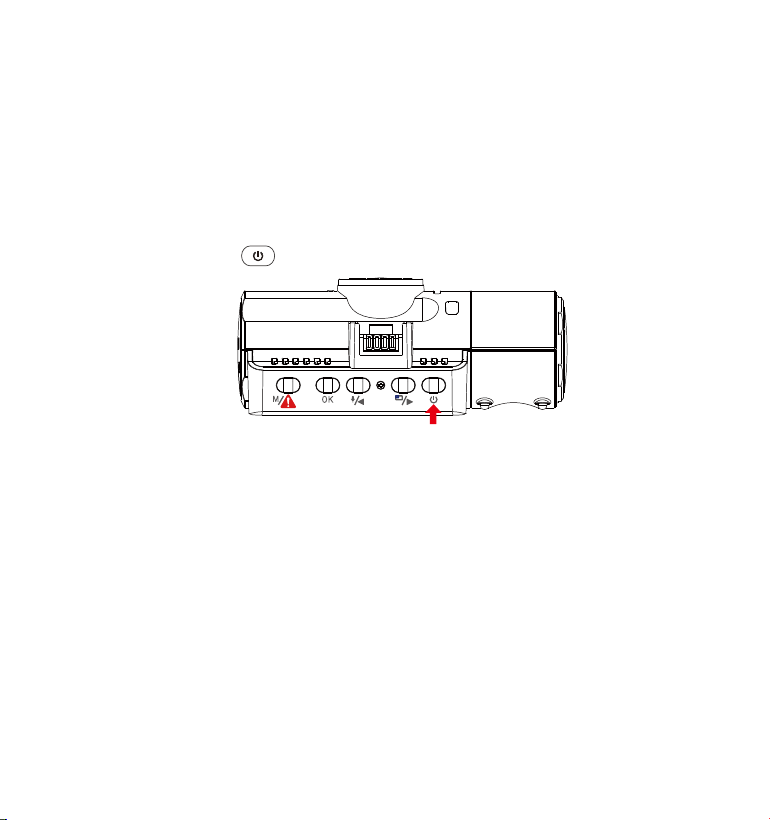
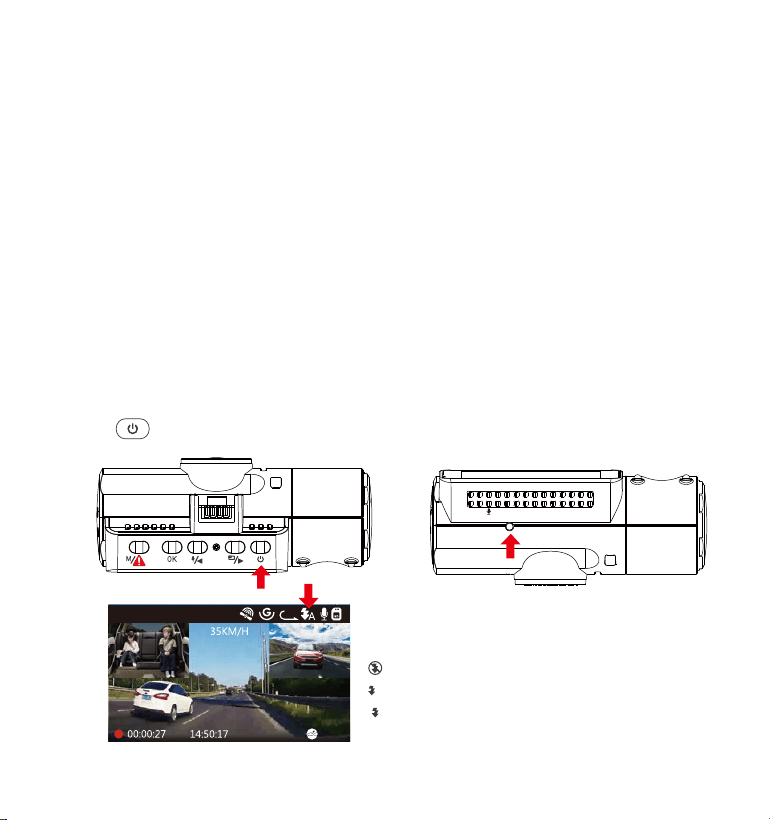
4.1 Power ON/OFF
Once the car starts on, the camera will automatically turn on and start
recording.
A. Manually
Long press the button to power it OFF.
B. Automatically
The camera will power off if the charger cable is disconnected or if the
vehicle is turned off.
The device has two USB ports available for power supply– on the
camera or via the suction cup mount.
When charging via computer, please use the USB port located on the
mount. If you use the USB port on the camera, “USB Connecting ” and
“Power On” will be displayed on the camera screen, please select
“Power on" to charge the dash cam.
NOTE:
1.
2.
- 10 -
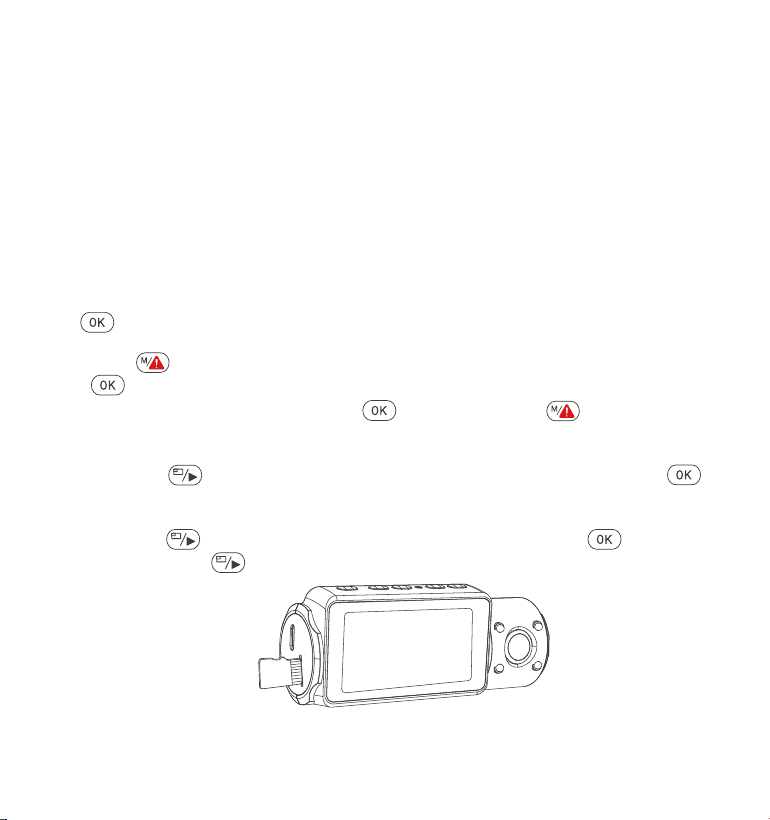
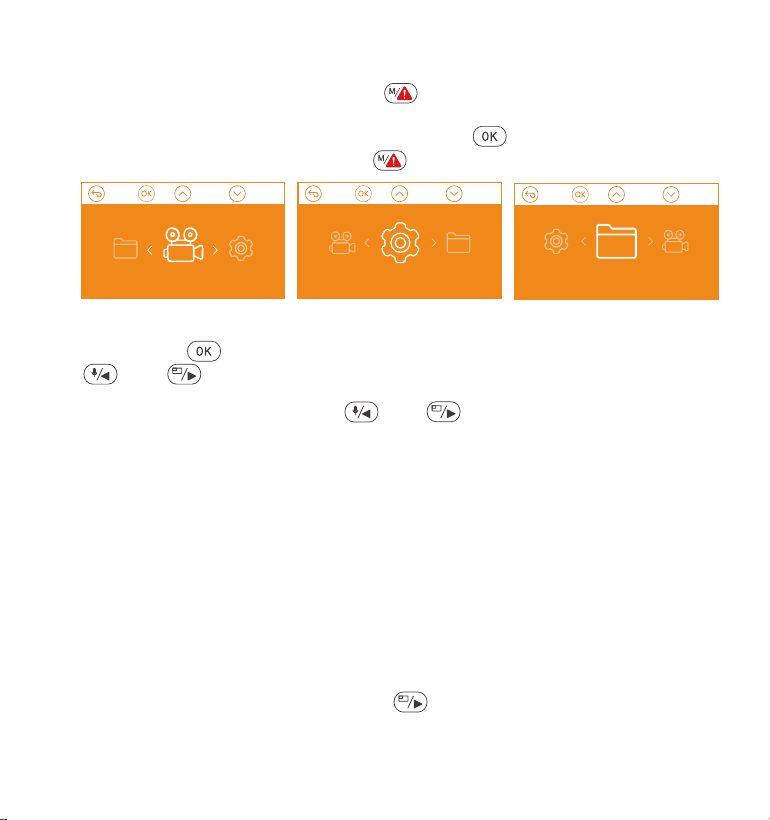
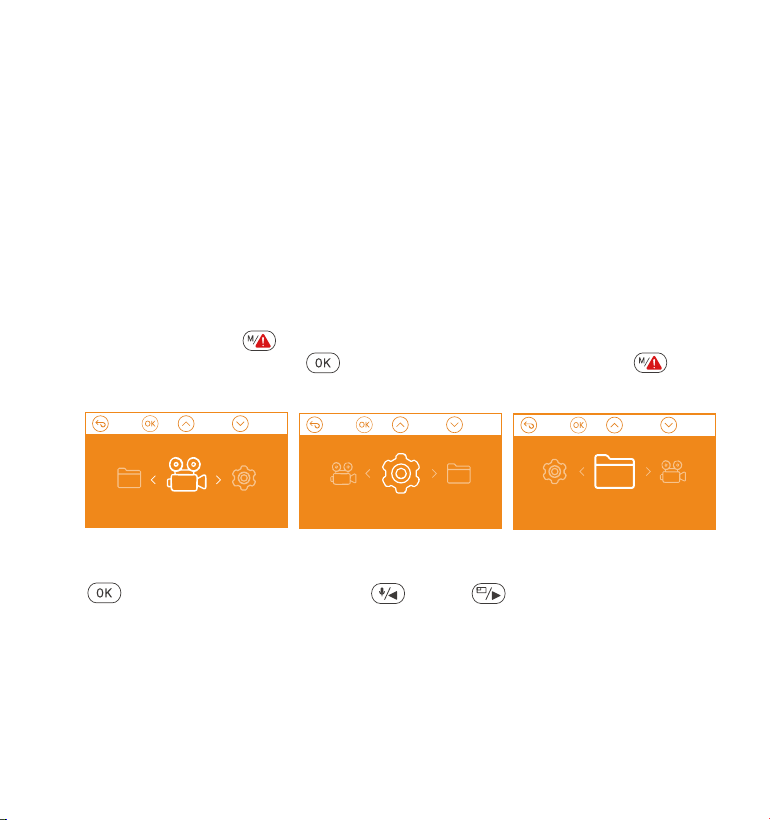
After powering ON the camera, press the button to enter the setup
process.
(If the camera is recording video, press the button to stop recording
before pressing the button.)
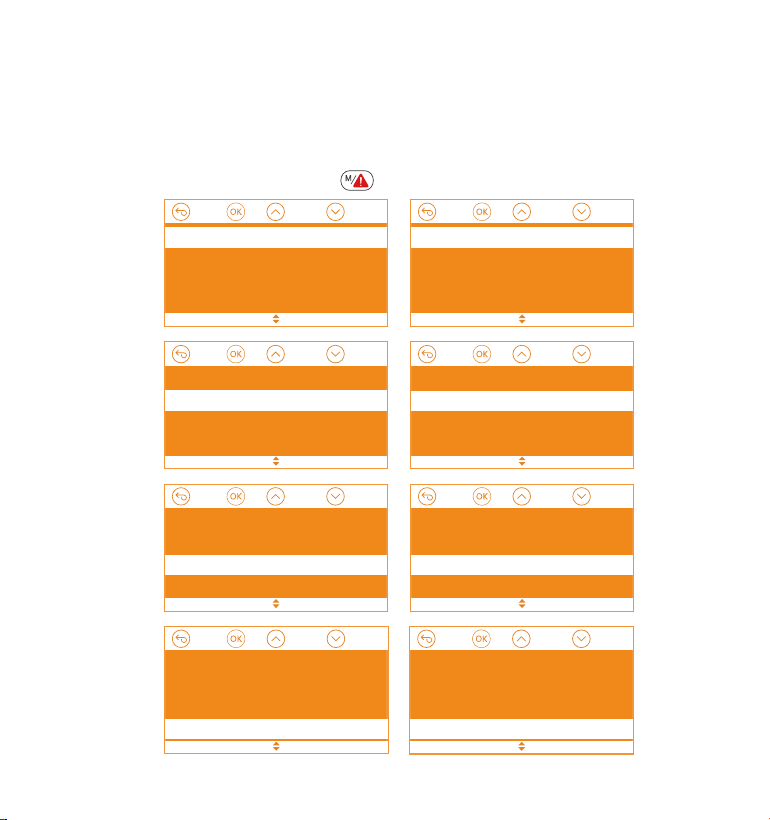
4.2 Menu Settings
Resolution: Press the or button to toggle the recording mode
and resolution.
Front+Cabin+Rear Mode: 1440P+1080P+1080P 30FPS; 1080P+1080P+1080P
30FPS; 1080P+1080P+720P 30FPS; 1440P+1440P+1080P 30FPS;
720P+720P+720P 30FPS.
Front+Cabin Mode: 1440P+1440P 30FPS; 1440P+1080P 30FPS; 1080P+1080P
30FPS; 1080P+720P 30FPS; 720P+1080P 30FPS; 720P+720P 30FPS.
Front+Rear Mode: 2160P+1080P 30FPS; 1440P+1080P 30FPS; 1080P+1080P
30FPS; 1080P+720P 30FPS; 720P+1080P 30FPS; 720P+720P 30FPS.
Single Front Cam Mode: 3840x2160P 30FPS; 2592x1520P 30FPS;
2560x1440P 30FPS; 1920x1080P 30FPS; 1280x720P 30FPS.
Loop Recording: Press button to change the duration: 1Min, 3Min,
5Min, and OFF.
IR lEDs: Press the and or button to select the section: Auto,
A. Record Setup
Press the button to enter the settings, and use the or buttons
to navigate the different options.
•
•
•

On and Off.
G-Sensor Set: Press and or button to select the sensitivity
options: 1,2,3,4,5,OFF.
Audio Recording: Press button and button to toggle it OFF/ON.
Parking Mode: Press and button to change the options: Collision
Detection, Collision + Motion Detection, Motion Detection, Low Bitrates
Recording, OFF.
Collision Detection: Press the and or button to select the
section: Low, Medium and High.
Collision +Motion Detection: Press the button or button to
select the section : Low, Medium and High.
Motion Detection: Press the button or button to select the
section : Low, Medium and High.
Exposure: Press and or button to select between Front,
Cabin and Rear exposure.
Front: +2.0, +1.6, +1.3, +1.0, +0.6, +0.3, +0.0, -0.3, -0.6, -1.0, -1.3, -1.6, -2.0
Cabin: +2.0, +1.6, +1.3, +1.0, +0.6, +0.3, +0.0, -0.3, -0.6, -1.0, -1.3, -1.6, -2.0
Rear: +2.0, +1.6, +1.3, +1.0, +0.6, +0.3, +0.0, -0.3, -0.6, -1.0, -1.3, -1.6, -2.0
WDR: Press and button to toggle it OFF/ON.
Number Plate: Press or and button to set your car license
number.
Stamp: Press button to toggle it OFF/ON. Stamp shows the date/-
time, logo, car number, Speed and GPS Location information.
Rotate Display: Press and or button to select the options:
Front+Cabin, Rear.
Time Lapse: Press and or button to select the options: 1FPS,
5FPS and OFF.
Recording Light: Press and button to toggle it OFF/ON. The
indicator light will stop blinking on recording if turns off.
- 11 -
•
•
•
•
•
•
•
•
•
•

Language: Press and or button to select between English,
Simplified Chinese, Japanese, Deutsch, Italian, Spanish, French and
Russian.
Format memory Card: Press , navigate button and select format
to format the micro SD card.
Format Reminder Setup: Press the and or button to select the
reminder options: 15 Days, 1 Month and Off.
Note: If changing the format reminder option, formatting the sd card in
advance or reseting manually, the dash cam will recalculate the time.
Time & Date: There are two ways to set the time and date: 1. GPS
automatic update; 2 Manual date/time setting. GPS automatic update
is enabled by default.
GPS automatically updates the date and time based on your time zone,
so you need to select the correct time zone first; you can also choose to
turn off GPS automatic update, turn on Manual date/time setting, and
manually correct date and time
Auto LCD Off: If the setup is 3 min, the dash cam screen would auto turn
off after 3 min it start recording. If the setup is Auto, the screen brightness
will decreases to 50% after 3 minutes of normal video recording, but its
brightness will be restored by manual operation.
Press the button to select the options: Auto, 30 Sec, 1 Min, 3 Min.
Device Sound: Press the or button to adjust the device sound.
Frequency: Press button to toggle between 50Hz/60Hz.
System Info: Press button to check the current firmware version and
Website. (System Info)
Default Setting: Press and button to select to reset the device
back to stock factory settings.
GPS: Press the button to toggle it ON/OFF.
- 12 -
B.SystemSetup
•
•
•
•
•
•
•
•
•
•
- 13 -
•
Event: Critical event videos detected by G-Sensor activity or manually
locked by user.
Normal: Standard videos recorded.
All: All the standard videos and critical event videos recorded.
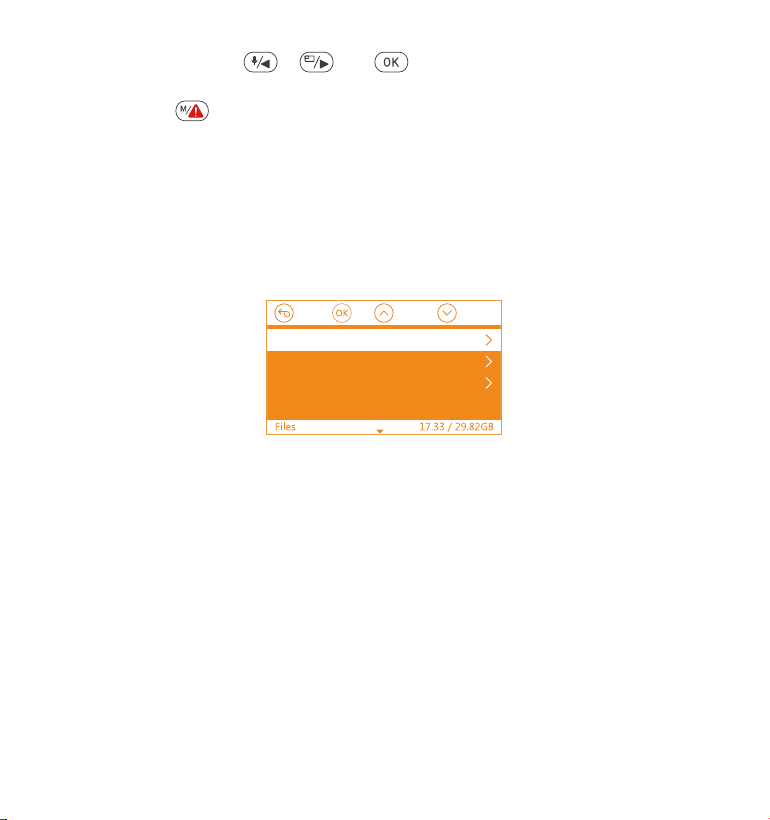
C. Files
Event
Normal
All
•
•
•
Review and delete videos stored in the file folders.
4.3 Set Date/Time
Open the menu interface, and navigate to “System Setup” > “Time &
Date” to enter the time setting menu. There are two ways to set the time
and date: Manual date/time setting and GPS automatic update(en-
abled by default).
--After the GPS automatic correction is turned on, the time and date will
be automatically changed according to the time zone you selected
after the GPS positioning is successful.
--Manually set date/time, you can manually adjust different times.
To manually set the date/time, you need to turn off the GPS automatic
time correction to set.
1.
Note:
Speed Unit: Press or and button to select either KM/H or
MP/H.
Press the button to exit and complete the setup.
30FPS; 1080P+720P 30FPS; 720P+1080P 30FPS; 720P+720P 30FPS.
Front+Rear Mode: 2160P+1080P 30FPS; 1440P+1080P 30FPS; 1080P+1080P
30FPS; 1080P+720P 30FPS; 720P+1080P 30FPS; 720P+720P 30FPS.
Single Front Cam Mode: 3840x2160P 30FPS; 2592x1520P 30FPS;
2560x1440P 30FPS; 1920x1080P 30FPS; 1280x720P 30FPS.
To finish setup, just press the button to exit.
- 14 -
4.4 Switch Recording Mode/Resolution
By default (Front+ Cabin+ Rear RECORDING mode), 1440P+1080P+1080P
resolution will show on the screen, the 3 cameras will simultaneously
capture road front, inside cabin, and rear at 1440P+1080P+1080P (30fps).
01-01-2021
1440P+1080P+1080P
Go to “Record Setup”>“Resolution”, Navigate or to select
Recording Mode. Press button to confirm and proceed.
Front+Cabin+Rear Mode: 1440P+1080P+1080P 30FPS; 1080P+1080P+1080P
30FPS; 1080P+1080P+720P 30FPS; 1440P+1440P+1080P 30FPS;
720P+720P+720P 30FPS.
Front+Cabin Mode: 1440P+1440P 30FPS; 1440P+1080P 30FPS; 1080P+1080P
•
It can be switched to Front+Cabin , Front+Rear or Front mode with following
steps:
GPSAutomaticUpdate
ManuallySetDate/Time
DateStyle
2. GPS automatic time correction must select the correct time zone,
otherwise, the time will be inaccurate after GPS positioning.
30FPS; 1080P+720P 30FPS; 720P+1080P 30FPS; 720P+720P 30FPS.
Front+Rear Mode: 2160P+1080P 30FPS; 1440P+1080P 30FPS; 1080P+1080P
30FPS; 1080P+720P 30FPS; 720P+1080P 30FPS; 720P+720P 30FPS.
Single Front Cam Mode: 3840x2160P 30FPS; 2592x1520P 30FPS;
2560x1440P 30FPS; 1920x1080P 30FPS; 1280x720P 30FPS.
To finish setup, just press the button to exit.
- 15 -
Go to “Record Setup”>“Resolution”, Navigate or to select
Recording Mode. Press button to confirm and proceed.
Front+Cabin+Rear Mode: 1440P+1080P+1080P 30FPS; 1080P+1080P+1080P
30FPS; 1080P+1080P+720P 30FPS; 1440P+1440P+1080P 30FPS;
720P+720P+720P 30FPS.
Front+Cabin Mode: 1440P+1440P 30FPS; 1440P+1080P 30FPS; 1080P+1080P
Front+Cabin+Rear
Front+Cabin
Front+Rear
Front
1440P+1080P+1080P 30FPS
1080P+1080P+1080P 30FPS
1080P+1080P+720P 30FPS
720P+720P+720P 30FPS
Front+Cabin+Rear
Front+Cabin
Front+Rear
Front
1080P+1080P 30FPS
1080P+720P 30FPS
1440P+1440P 30FPS
1440P+1080P 30FPS
Front+Cabin+Rear
Front+Cabin
Front+Rear
Front
2160P+1080P 30FPS
1440P+1080P 30FPS
1080P+1080P 30FPS
1080P+720P 30FPS
Front+Cabin+Rear
Front+Cabin
Front+Rear
Front
3840x2160P 30FPS
2592x1520P 30FPS
2560x1440P 30FPS
1920x1080P 30FPS

With a memory card inserted, the camera will (by default) immediately
start loop recording video when connected to a power source and
powered ON. If the device is not connected to a power source, it will not
immediately start on and record.
While recording, the Record indicator will blink and a red dot will flash on
the lower corner left of the screen. You can stop/start the recording at
any time by pressing the button.
- 16 -
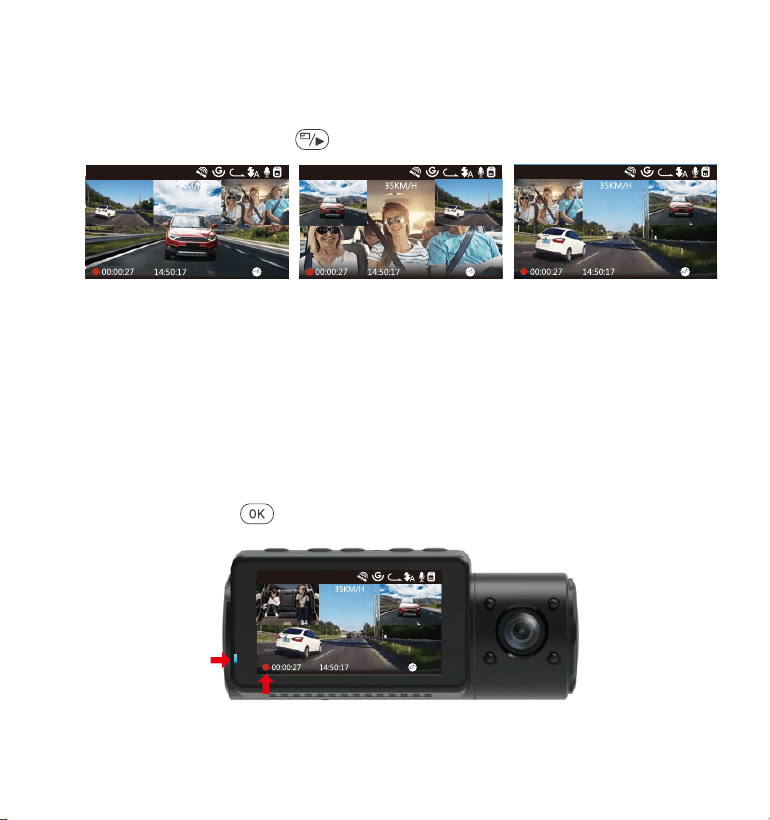
In three way or two-way recording mode, you can press the button to
switch display so the rear/inside camera shows bigger on the lcd.
4.5 Switch the Front, cabin and rear camera window display
FrontCameraBiggerInsideCameraBiggerRearCameraBigger
3
1440P+1080P+1080P
01-01-2021
3
1440P+1080P+1080P
01-01-2021
3
1440P+1080P+1080P
01-01-2021
4.6 Loop Recording
01-01-2021
3
1440P+1080P+1080P
By default, the Loop Recording Time is 3 minutes. Please go to “Record
Setup” > “Loop Recording” to change it to 1 min, 3 mins, or 5 mins for
your need.
- 17 -
4.7 IR LED Light
By default, the IR LED light is auto on. Short Press button to toggle the
night vision mode ON, Auto ON/OFF, OFF.
Please note: If IR lights on, the video footage of the cabin will turn into black
and white.
IR Light Sensor
VTN40AXXXX
Night mode off
Night mode auto on/off
Night mode on
A
01-01-2021
3
1440P+1080P+1080P
The loop recording video file name format is “Year_Date_Time_A.MP4”.
For example: “2021-01-01-060101-A.MP4”. The suffix A indicates front cam
recorded files, while the suffix B refers to cabin cam recorded files and the
suffix C indicates the External cam recorded files. Standard files are stored
in the “Video/Normal” folder. When the Micro SD card is full, the camera
will write over older files.
When Loop Recording is turned off, the camera will record video in 20
minute clips, but will not overwrite old videos when the storage card is full.
- 18 -
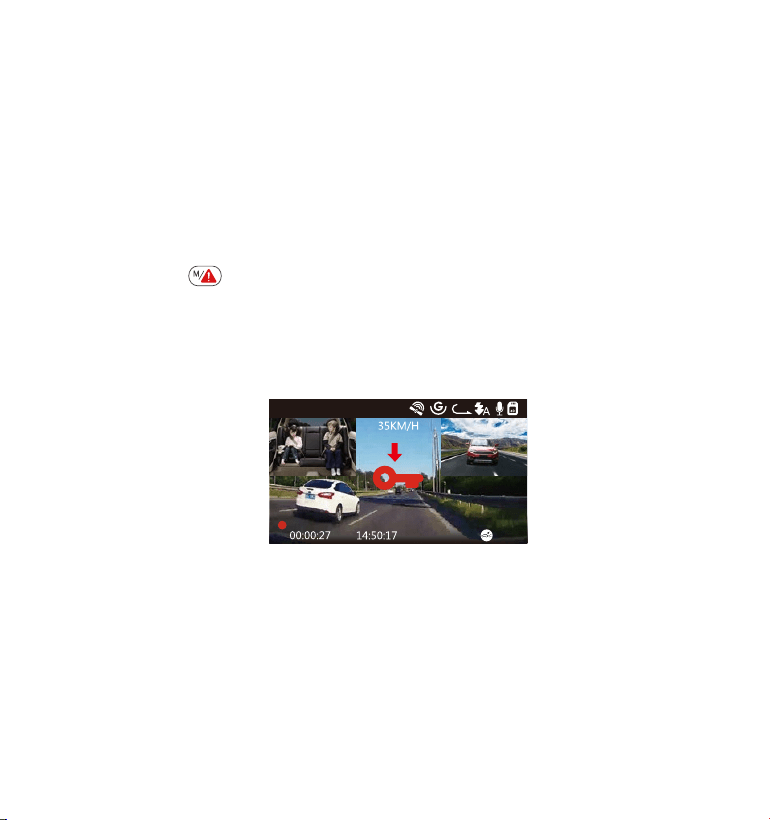
Critical event detection is triggered by the G-Sensor (Gravity Sensor) and
will auto-detect vehicle impacts and collisions. This will cause the camera
to protect the current video clip from being overwritten by locking it and
saving the footage in the “Video/Event” folder.
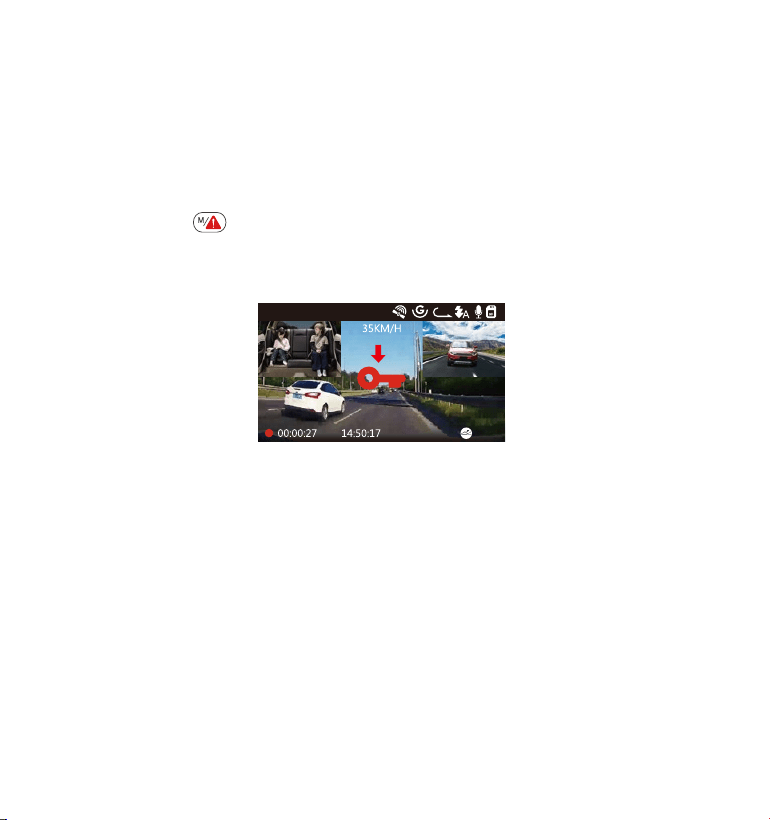
The user can also manually lock the current video recording session by
pressing the Button. A key icon will appear at the center of the screen.
The G-Sensor sensitivity is adjustable with 6 settings: 1,2,3,4,5 and OFF-it is set
to 3 by default. The G-Sensor can also be deactivated in “Record Setup” >
“G-Sensor”.
4.8 Event Recording
3
1440P+1080P+1080P
01-01-2021
Event videos are stored in the “Video/Event” folder, and cannot be
automatically overwritten.
NOTE: The camera will auto overwrite old Event videos once the Event
folder has accumulated 30% of the card capacity. Please regularly
transfer important videos to your PC or another storage location (e.g.
external hard drive). To maintain good read/write performance, the
microSD card should be formatted at least once a month.
- 19 -
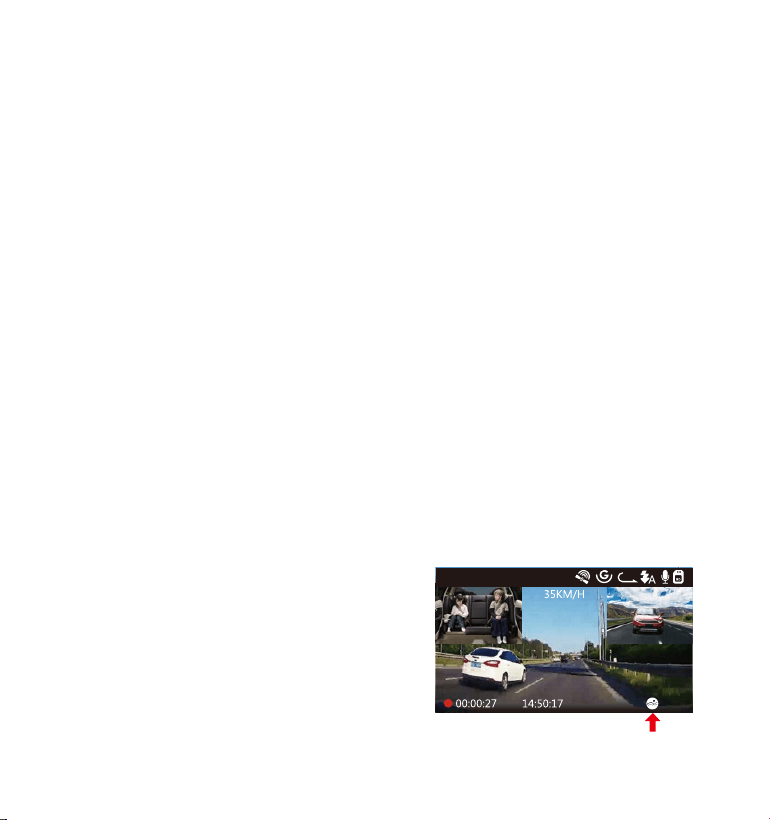
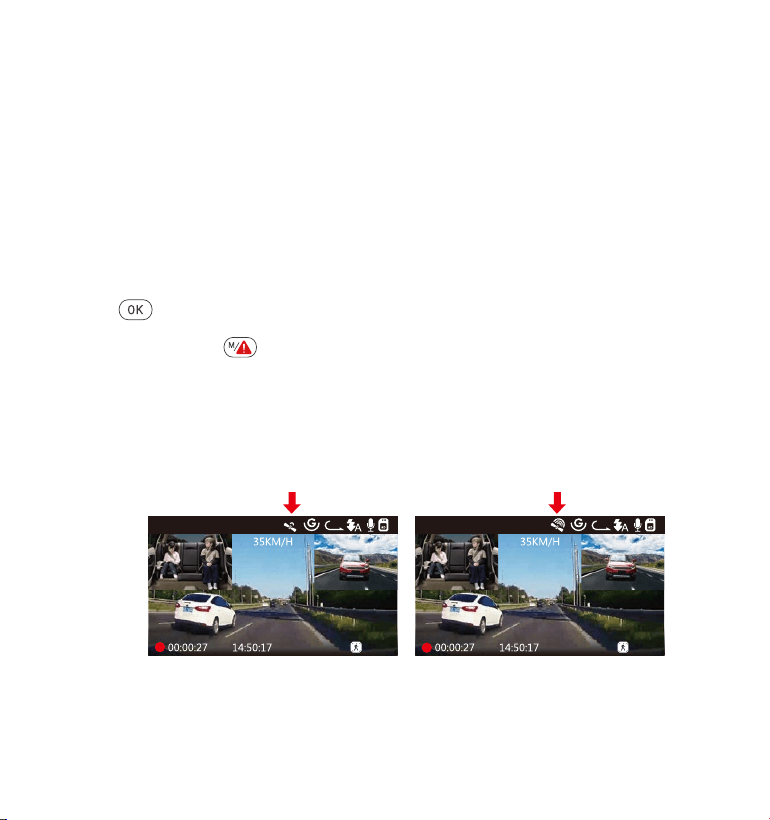
4.9 Voice Recording
Go to “Record Setup” > “Audio Recording”, press button and select
OFF;
While recording video, press the button to toggle voice recording
OFF/ON.
By default, the voice recording is ON. It can be turned OFF using either of
the following methods:
•
•
When the voice recording has been turned OFF, the MIC icon at the top
of the screen will turn white with a red line across it.
01-01-2021
3
1440P+1080P+1080P

- 20 -
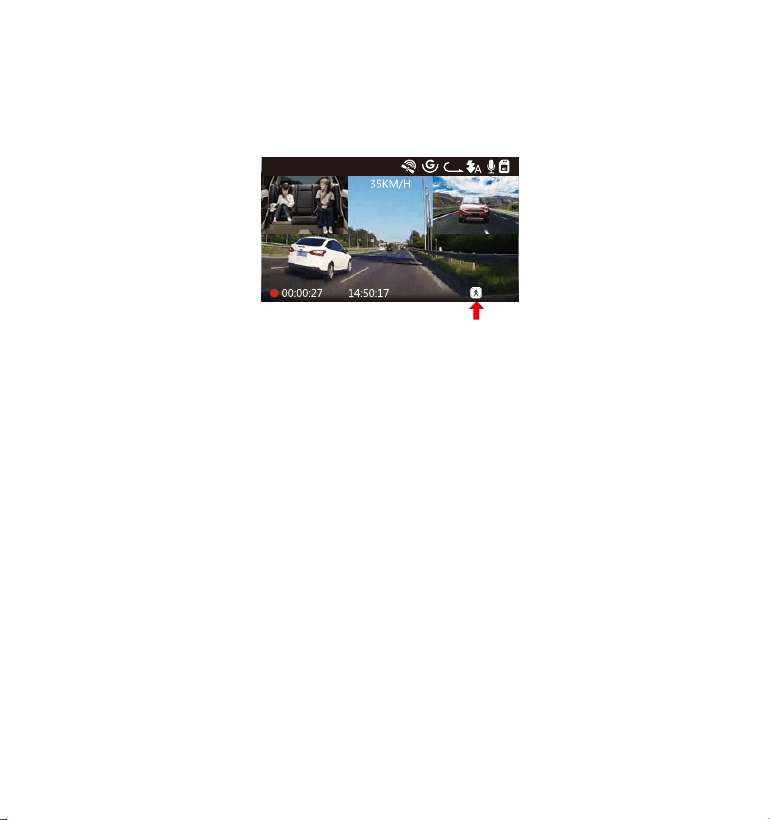
4.10 Parking Mode (Constant Power Supply Needed)
Parking Mode operates as a sentry function under different situations. To
activate Parking Mode, go to “Record Setup” > “Parking Mode” , press
button and select
the following options: Collision Detection,
Collision Detection + Motion Detection, Motion Detection
, Low Bitrates
Recording,
OFF.
NOTE:
To ensure the camera is able to function in Parking Mode, please keep
it powered with a mobile power bank or hardwire it directly to the car
battery. We do not recommend running the camera continuously for
too long time.
The N4 working environment temperature is 14-122°F (-10°C to 50°C),
we recommend using Collision Detection within this temperature
range, so once the temp is beyond the normal working temp range, it
will auto shut off. If the temperature is high, please take camera off
when you parked your car.
1.
2.
4.10.1 Collision Detection Triggered
When the Collision Detection has been turned on, and no movement
is detected after 5 minutes of recording, then Collision Detection is
activated with a Collision Detection icon at the bottom right corner
of the screen, and the camera automatically to turn off. Full frame
recording will be triggered by the Collision Detection sensor. Once
dash camera detects vehicle impacts or collision, it will auto turn on
and start auto recording; it will stop recording and auto off again
after 5 minutes of inactivity.
The Collision Detection sensitivity is adjustable with 3 settings: Low,
Medium and High. Please go to “Record Setup” > “Parking Mode”>
“Collision Detection” to change it for your need.
- 21 -
When the Collision Detection has been turned on, and no movement
is detected after 5 minutes of recording, then Collision Detection is
activated with a Collision Detection icon at the bottom right corner
of the screen, and the camera automatically to turn off. Full frame
recording will be triggered by the Collision Detection sensor. Once
dash camera detects vehicle impacts or collision, it will auto turn on
and start auto recording; it will stop recording and auto off again
after 5 minutes of inactivity.
The Collision Detection sensitivity is adjustable with 3 settings: Low,
Medium and High. Please go to “Record Setup” > “Parking Mode”>
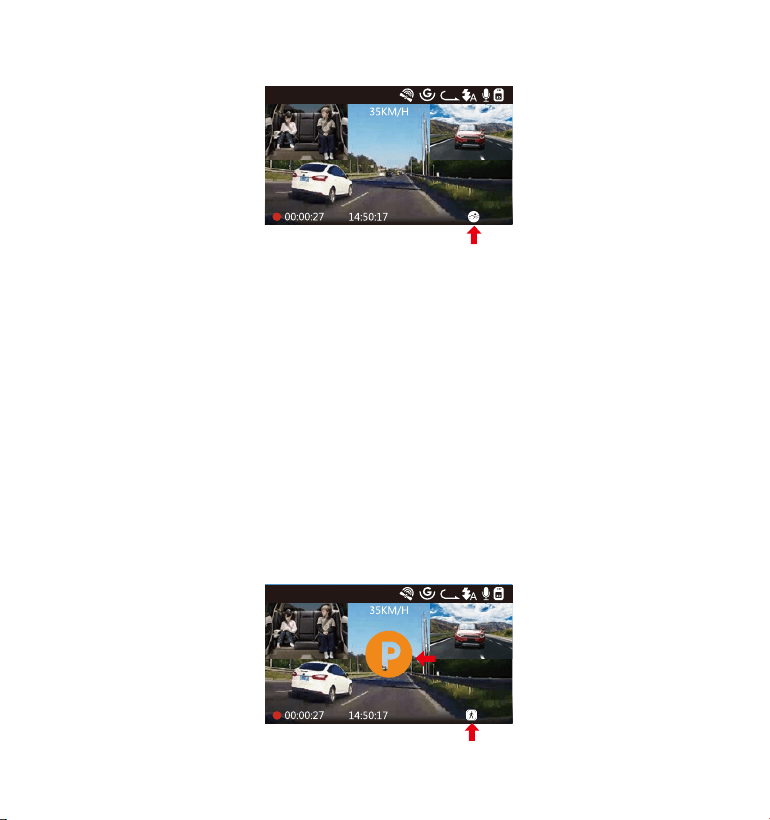
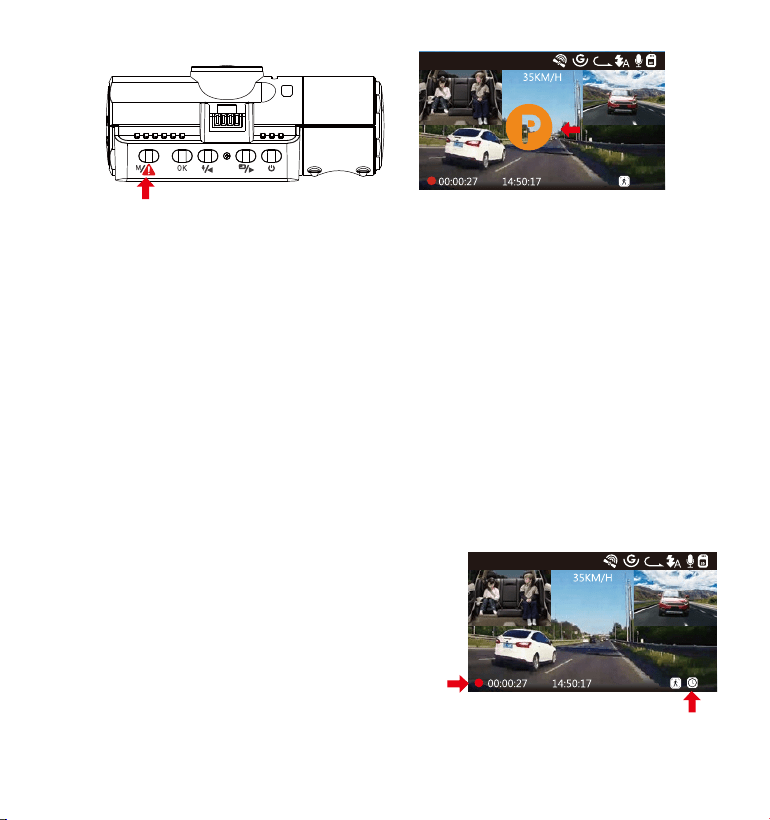
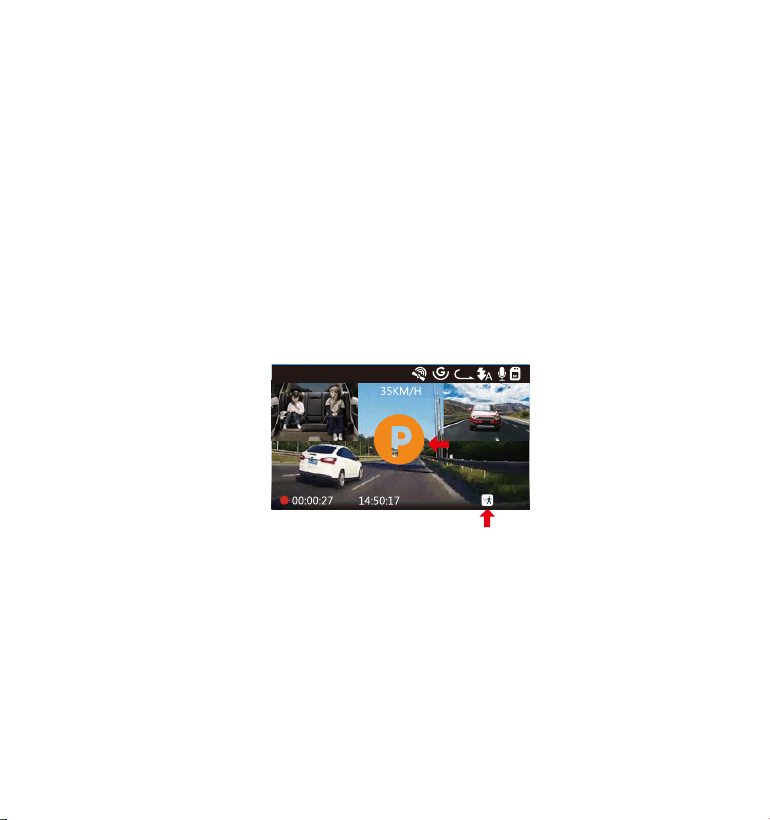
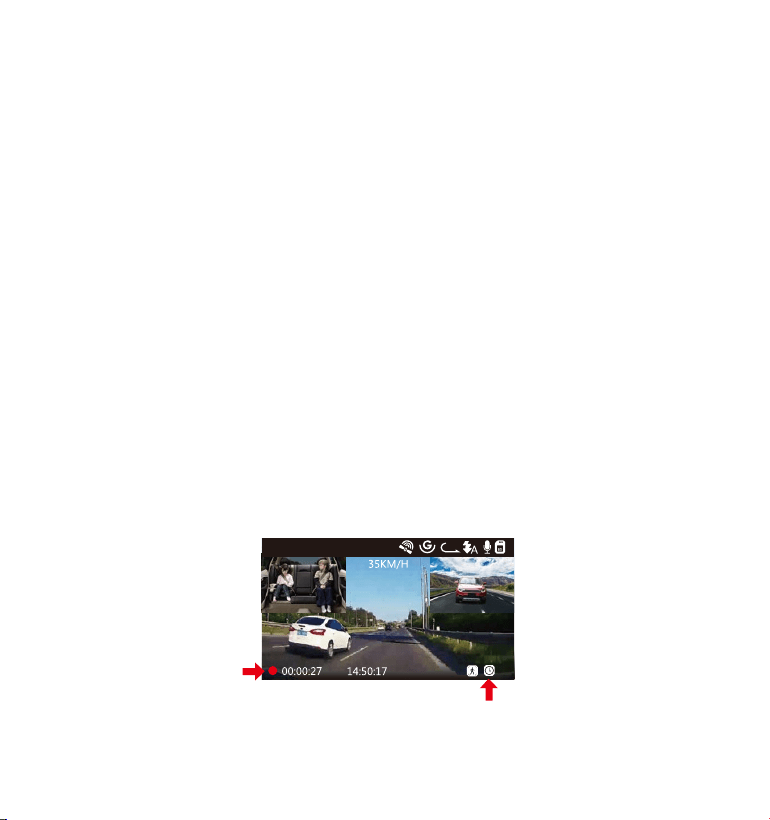
4.10.2 Collision Detection + Motion Detection Triggered
When the Collision Detection + Motion Detection has been turned on, this is
represented by an Collision Detection + Motion Detection icon at the bottom
right corner of the screen.
If no movement is detected after 5 minutes of recording, there will be an
orange P icon appears in the center of the screen which means Parking
Mode is activated. Once the Front or inside camera detects movement, 3
cameras will simultaneously start auto recording;they will stop recording
after 30 seconds of inactivity.
The Collision Detection + Motion Detection is adjustable with 3 settings: Low,
Medium and High. Please go to “Record Setup” > “Parking Mode”> “Collision
Detection + Motion Detection” to change it for your need.
01-01-2021
3
1440P+1080P+1080P
“Collision Detection” to change it for your need.
01-01-2021
3
1440P+1080P+1080P

- 22 -
NOTE: In Collision Detection + Motion Detection mode, if the dash cam is turned
off manully, it will turn on and record once it detects any vibration.
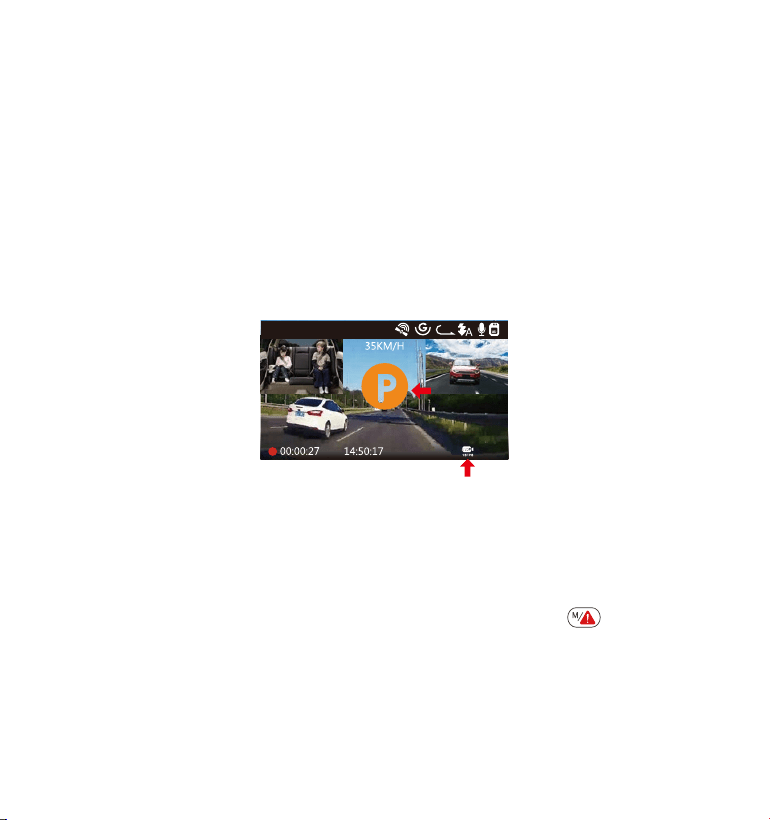
4.10.3 Motion Detection Triggered
When the Motion Detection has been turned on, this is represented by an
Motion Detection icon at the bottom right corner of the screen. If no
movement is detected after 5 minutes of recording, there will be an
orange P icon appears in the center of the screen which means Parking
Mode is activated. Once the front camera or inside camera detects
motion, 3 cameras will simultaneously start auto recording; they will stop
recording after 30 seconds of inactivity.
The Motion Detection is adjustable with 3 settings: Low, Medium and High.
Please go to “Record Setup” > “Parking Mode”> “ Motion Detection” to
change it for your need.
01-01-2021
3
1440P+1080P+1080P
In Motion Detection mode, if the dash cam is turned off manually, it will
not turn on and record even it detects any vibration.
In time lapse, the dash cam cannot enter the Motion Detection mode.
NOTE:
1.
2.
- 23 -
To manually activate Parking Mode, press and hold the button until
the P icon appears on the screen.
When the Low Bitrates Recording has been turned on, this is represented
by an Low Bitrates Recording icon at the bottom right corner of the screen.
If no movement is detected after 5 minutes of recording, there will be an
orange P icon appears in the center of the screen which means Parking
Mode is activated. Once the camera enter Low Bitrates Recording, the
dash cam will auto switch to 720P @15fps resolution and keep recording.
For example: the single front mode will record video at 720P@15fps, and
the dual recording mode will record video at 720+720P @15fps, 3 way
recording will record video at 720P+720P+720P@ 15FPS. The camera will
exit Low Bitrates Recording if it detects any vibration, and record at the
selected resolution.
4.10.4 Low Bitrates Recording
01-01-2021
3
720P+720P+720P 15FPS
1.
2.
In Low Bitrates Recording, if the dash cam is turned off manually, it will
not turn on and record even it detects any vibration.
In Time Lapase, the dash cam cannot enter the Low Bitrates Recording
mode.
NOTE:
- 24 -
In Parking Mode, the camera will exit Parking Mode if it detects any
vibration, and enter the Normal Video Mode.
In Parking Mode, if you set the Auto LCD OFF to Auto, the camera's LCD
will light off after 1 minutes but recording will continue with blue light blinks
on the Indicatorlight.
01-01-2021
3
1440P+ 80P+1080P
If Time Lapse is selected, the camera will take static photos at the set
recording frame rate– either 1FPS,5FPS,OFF – to create a video montage.
For example, if you set Time Lapse 1FPS, the camera will take one photo
every second, and then stitch the photos together into a 1 fps video.With
a maximum recording frame rate of 30fps, recording 8 hours of video
with Time Lapse 1Sec will generate a time lapse video lasting just 16
minutes (8x60x60/30/60). This Eco Mode is recommended for storage
cards with smaller capacities.
4.11 TIME LAPSE
01-01-2021
3
1440P+1080P+1080P
[Real Recording Time(Sec) = Time Lapse
Video Time Length (Sec) x Video Frame
Rate (FPS ) / Time Lapse Option( FPS)]

- 25 -
4.12ConnectingExternalGPSReceiver(OptionalAccessory)
To use the camera’s GPS function, please purchase an external GPS
receiver mount. This can be purchased from Amazon.
Install the External GPS Mount onto the camera instead of the original
mount.
Plug the Type C USB Connector into the GPS Mount to power it.
Once charged, the camera will power on. Recording will commence
if a microSD card has been inserted, just press the Button to stop
recording.
Press the button button to enter setup, go to “System Setup” >
“GPS ” to activate the camera’s GPS function.
The GPS receiver will start to search for a GPS signal, the GPS icon will
keep flashing on the screen. Once the GPS signal has been received
and locked, the icon will stop flashing.
1.
3.
2.
4.
5.
01-01-2021
3
1440P+1080P+1080P
01-01-2021
3
1440P+1080P+1080P
6.
You can include GPS tracking and vehicle speed on the video footage,
go to “Record Setup” > “Stamp” > “GPS Location Stamp” and “Speed
Stamp” to set.
You can review recorded video using the VANTRUE
®
GPS Viewer
(available for download on www.vantrue.net).
7.
- 26 -
4.13ViewingVideoontheCamera
View on a computer
Connect the camera to your computer using the supplied Type-C USB
cable.
“USB Connecting” and “Power on” will be displayed on the camera
screen, please navigate to “USB Connecting” and press .......button to
transfer data.
Depending on your computer OS, the device will appear either as a
removable drive or a removable volume.
1.
2.
3.
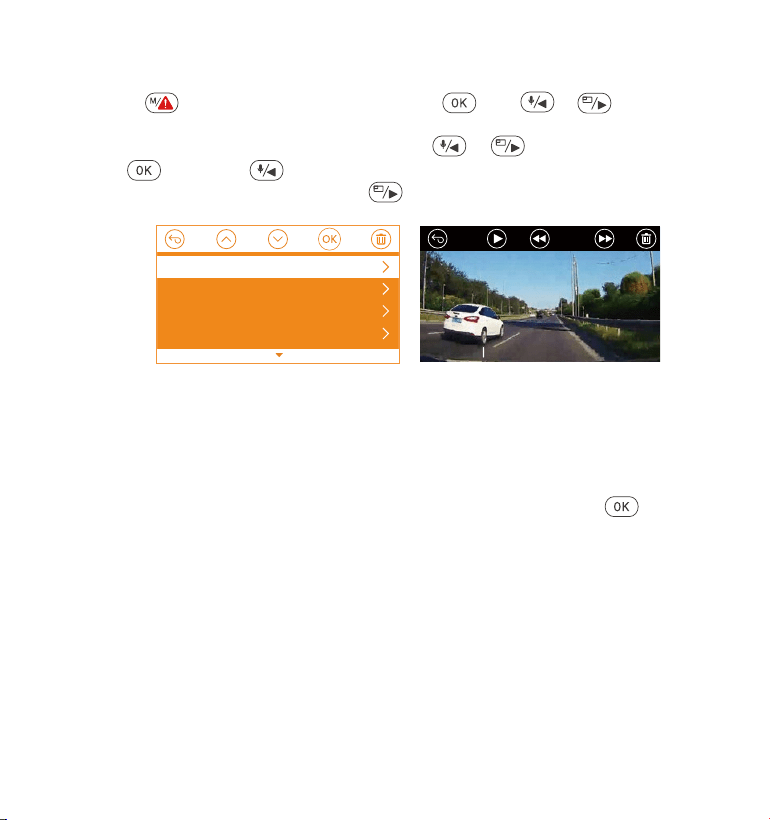
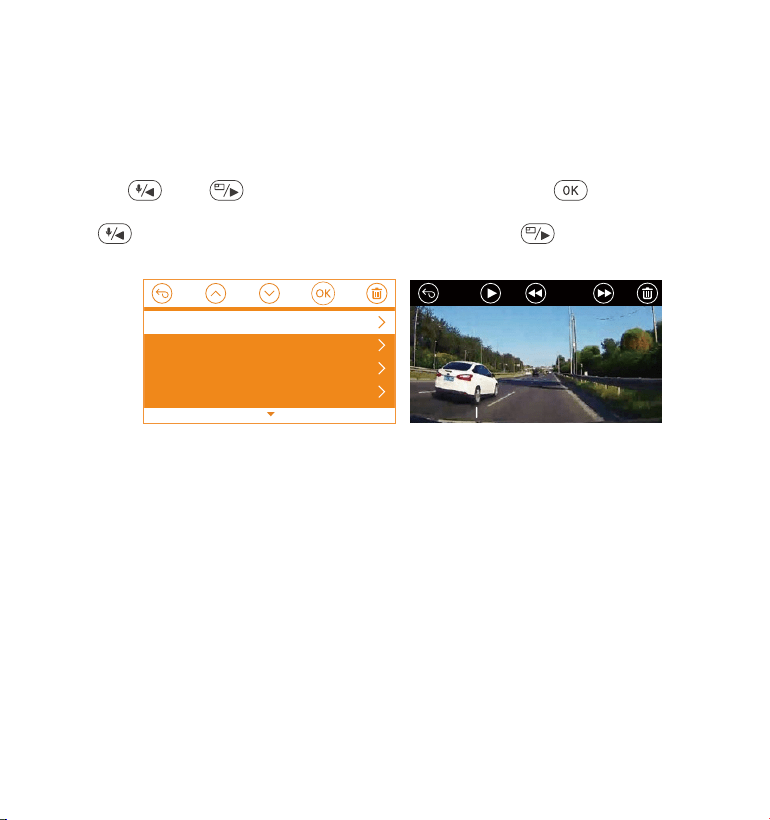
Press button and go to “Files”, press and or button to
navigate to > “Normal” or > “Event” file folders to view and playback
videos on the camera display. Use the or buttons to select the
file and press button to playback/pause. During playing back,
press to slow forward and press to fast forward.
0:00/00:02
1/5
2021_01_01_151629_B.MP4
2021_01_01_151629_A.MP4
2021_01_01_113647_B.MP4
2021_01_01_113647_A.MP4
Normal
- 27 -
4.15 Auto LCD Off
This feature avoids any chance of the screen being a distraction in the
vehicle, especially at night when the illumination from the LED screen can
be a nuisance or even a hazard to the driver. If you set the Auto LCD Off
to 3 minutes, the camera’s LCD will light off after 3 minutes but recording
will continue with blue light blinks on the Indicatorlight. If you turn off the
recording light, the indicator light will stop flashing. You can press any
button to light on the screen. If the setup is Auto, the screen brightness will
decreases to 50% after 3 minutes of normal video recording, but its bright-
ness will be restored by manual operation.
Please go to System Setup to adjust this time to 30 sec, 1Min, 3Min, or Auto
to using that.
Delete Normal Files
Go to Normal file, choose a video on the dash cam, press the button,
then press the button to select “Delete ” section, press button to
select Delete.
DeleteEventFiles
GotoEventfile,chooseavideoonthedashcam,pressthebutton,then
pressthebuttontoselect“Delete”section,pressbuttontoselect
Delete.
4.14DeleteVideosontheDashCam

4.16 Upgrading the Firmware
The system will automatically update if the microSD card contains the
firmware upgrade file. The camera will restart once the upgrade has
been completed.
Always stay up-to-date
The latest firmware version is always available at the official VANTRUE
website (www.vantrue.net). We strongly recommend registering your
product (www.vantrue.net/register) to receive a notification email when
a new firmware update is available.
- 28 -
4.17 Working Temperature
The camera is designed to operate in temperatures from 14-158°F (-10°C
to 70°C) , temperatures outside this range risk degrading the camera’s
performance work and causing damage.
To avoid damage
In hot weather, do not expose the camera directly to the sun when the
car is parked.
In extreme winter conditions, i.e. -4°F (-20°C) or lower, detach the
camera from the windshield when not in use, and store in the glove box.
•
•

- 29 -
5.Specifications
Thespecificationsofthisproductmaychangewithoutpriornoticedueto
productimprovements.
Model
Front: F1.4, 155 degree wide angle lens
Cabin: F2.0, 165 degree wide angle lens
External Camera: F1.8, 160 degree wide angle lens
Channels 3 Channel
LCD
2.45" IPS LCD, 480x272
Lens
Languages
N4
English/Japanese/Spanish/French/Italian/
简体中文(Simplified Chinese)/ Deutsch /Russian
Audio
Video
resolution
Front+Cabin+Rear Mode: 1440P+1080P+1080P
30FPS; 1080P+1080P+1080P 30FPS;
1080P+1080P+720P 30FPS; 1440P+1440P+1080P
30FPS; 720P+720P+720P 30FPS.
Front+Cabin Mode: 1440P+1440P 30FPS;
1440P+1080P 30FPS; 1080P+1080P 30FPS;
1080P+720P 30FPS; 720P+1080P 30FPS; 720P+720P
30FPS.
Front+Rear Mode: 2160P+1080P 30FPS;
1440P+1080P 30FPS; 1080P+1080P 30FPS;
1080P+720P 30FPS; 720P+1080P 30FPS; 720P+720P
30FPS.
Front mode: 3840x2160P 30FPS ; 2592x1520P
30FPS; 2560x1440P 30FPS; 1920x1080P 30FPS;
1280x720P 30FPS
Video File Format MP4
Built-in microphone and speaker

- 30 -
External memory
Shutter Type
USB Port
Battery type
Working voltage
Working currency
Working Temperature
Micro SD card (U3 or higher, up to 512GB)
Electronic
Type-C
super-capacitor
5V 1.5A
800mA(Typical value) / DC 5V
14 -158°F (-10°C to 70°C)
Storage Temperature
Compatible OS
-4 to 176°F (-20°C to 80°C)
Windows XP/Vista/7/8/10 &Mac OS
14-122°F (-10°C to 50°C)Working Environment
Temperature

- 31 -
6.Warranty & Support
Warranty
The VANTRUE
®
OnDash N4 Dash Cam comes with a full 12 months
warranty.
If you register your product on our official site (www.vantrue.net/register),
you can extend the warranty to 18 months.
Support
Ifyouhaveanyquestionsregardingyourproduct,pleasedonothesitateto
contactusviaAmazonordropusanemailat[email protected].Queriesare
typicallyansweredwithin12-24hours.
Your opinion matters
VANTRUE
®
is firmly committed to always improving our products, services,
and user experience. If you have any thoughts on how we can do even
better, we welcome your constructive feedback and suggestions.
Connect with us today at [email protected].
THANKYOUforchoosing
- 32 -
1.WasistinderBox?
C.
Rückkamera
(0.5Meter)
F. RückkameraKabel
(6Meter)
I.
Aufkleberder
Rückkamera
D. Auto-Ladegerätmit
USB-CKabel
(3.5Meter)
A.
VANTRUE®
N4Dashcam
G.
Benutzerhandbuch
B.
Saugnapfhalterung
E. USB-CDatenKabel
(1Meter)
H.
Kurzanleitung
- 33 -
2.DieÜbersichtüberKamera
Num. Beschreibung
Einstellung-Menü aufrufen / beenden; Lange
drücken, um den Parkmodus aufzurufen,
während die Kamera aufzeichnet; Manuell
sperrt den aktuell Videoclip nach Ereignis
Ordner, um wichtige Videos zu speichern;
1 Taste
16 17
15
18
321 4 5
6
7
8
9
10 11
14
12 13
VTN40AXXXX
Name
- 34 -
5
4
Taste
3
Taste
Power An/ Aus wenn lange drücken; Infrarot Licht
An / Aus wenn kurz drücken
Abwärtsauswahl; um zwischen Frontkamera-,
Kabinen- und Rückkamera-Blickwinkel zu
wechseln; Schneller Vorlauf bei der Wiedergabe
von Videos
Aufwärtsauswahl; Mikrofon AN/AUS; Langsamer
Vorlauf bei der Wiedergabe von Videos
Taste
USB-C/
Rückkamera
Anschluss
USB-C-Anschluss zum Laden oder Übertragen
von Daten; Dient zum Anschließen der
Rückkamera
11
KabineKamera Kamera für die Videoaufnahme im Auto.
12 Mikrofon Zeichnet den Ton mit dem Videomaterial auf.
9 LED Leuchte
Blaues Licht blinkt während der Aufnahme;
Während des Ladevorgangs immer an
Stoppt / startet die Videoaufnahme; Bestätigt
die Einstellung.
MicroSD-Karten-
steckplatz
Bietet erweiterbaren Speicher (bis zu 512GB in
FAT 32, U3 oder höher)
Reset
Die Kamera neuzustarten
InfrarotLED
Leuchte
10 4 IR-LED-Leuchten verbessern die Nachtsicht im
Auto.
15 Halterung-
Anschluss
Verbindet sich mit der Saugnapfhalterung
6
8
7
2 Taste
16 Lautsprecher Liefert Ton bei der Wiedergabe von Videos.
14 Infrarot Licht
Sensor
13 Seriennummer
Seriennummer für die Garantieregistrierung.
Fühlen wie sich das Licht ändert und beeinträch-
tigen den Nachtsichtmodus
- 35 -
17 Frontkamera
Frontkamera für Überwachung der Fahrspuren.
18 Rückkamera
Zur Videoaufnahme von hinteren
Straßenereignissen.
LEDAnzeige
AndieStromversorgung
angeschlossen
BlauesLichtistaufderLEDLeuchteimmer
sichtbar[10]
InderAufnahme
BlauesLichtblinktaufderLEDLeuchte[10]
Bildschirmübersicht
G-Sensor AUS
Daueraufnahme Zeit
MIk AN
MIk AUS
Aufnahme-Modus
Aktuelle Datei sperre
Zeitraffer
Kollisionserkennung
Kollisions +Bewegungserkennung
Bewegungserkennung
Niedrige-Bitrate Modus
Urzeit(24Std.) und Datum
(MM/DD/YY)
Infrarot LED Aus
Infrarot LED Autom
Infrarot LED An
Video Auflösung
G-Sensor AN
Speicherkarte eingelegt
Keine Speicherkarte
eingelegt
Aufnahmenzeit
(aktuelle Clips)
GPS Signal sperren
GPS-Signal durchsuchen
Geschwindigkeitseinheit
1440P+1080P+1080P
01-01-2021
- 36 -
Drücken Sie , um das Menüsystem aufzurufen. (Wenn die Kamera ein
Video aufzeichnet, drücken Sie Taste, um die Aufzeichnung zu
beenden. Oder wenn ,,Bitte legen Sie eine Speicherkarte ein” steht,
drücken Sie zuerst Taste, und dann Taste, um in das Menüsystem
zu gelangen.)
Dann drücken Sie Taste, um die System Einstellung zu markieren,
danach drücken Taste.
Schließlich drücken Sie Taste, um das Formatierung Option zu
markieren, drücken Taste und anschließend das Format Option
auszuwählen.
3. Vorbereitung vor dem Einschalten
3.1 Speicherkarte installieren(VANTRUE Micro SD-Karte empfehlen)
Bitte verwenden Sie eine echte microSD-Speicherkarte von 32GB bis
512GB mit einer Geschwindigkeitsklasse von U3 oder höher. Wir empfehlen
Vantrue Micro SD-Karte (nicht im Lieferumfang enthalten). Setzen Sie die
Speicherkarte in der Kamera ein, wenn die Kamera aus ist, bis sie einrastet.
Um die Karte herauszunehmen, schalten Sie zuerst die Kamera aus und
drücken Sie dann die Karte in den Steckplatz, bis sie ausrastet.
Wenn Sie eine SD-Karte anderer Marke verwenden, formatieren Sie diese
vor der Verwendung wie folgt:
•
•
•
HINWEIS:
Die MicroSD-Karte sollte einmal im Monat formatiert werden, um die
Lebensdauer der Speicherkarte zu maximieren.
1.
Nehmen Sie die Karte nicht heraus, wenn die Kamera aufzeichnet,
ansonsten wichtige Videodateien fehlen.
Bitte verwenden Sie keine Sandisk- oder Transcend-SD-Karte für diese
Dashcam.

- 37 -
Die MicroSD-Karte sollte einmal im Monat formatiert werden, um die
Lebensdauer der Speicherkarte zu maximieren.
2.
3.
3.2 Installieren Sie die Kamera auf Ihrer Windschutzscheibe
Verbinden Sie die Saughalterung mit der Montagesockel der Kamera
und drücken Sie sie hinein, bis sie einrastet.
1.
2.
3.
4.
Reinigen Sie die Windschutzscheibe mit Wasser oder Alkohol und
wischen Sie sie mit einem fusselfreien Tuch ab.
Reinigen Sie den Saugnapf an der Saugnapfhalterung.
Installieren Sie die Saughalterung an der Windschutzbe und drehen Sie
die Verriegelungsstange an der Halterung um 90 Grad nach oben, bis
sie einrastet.
Nehmen Sie die Karte nicht heraus, wenn die Kamera aufzeichnet,
ansonsten wichtige Videodateien fehlen.
Bitte verwenden Sie keine Sandisk- oder Transcend-SD-Karte für diese
Dashcam.
- 38 -
5.
6.
Verlegen Sie das Stromkabel um die Verkleidung Ihres Fahrzeugs und
stecken Sie es unter die Blende.
Schließen Sie die Rückkamera über das Rückkamera-Kabel an den
Anschluss der Frontkamera an, verlegen Sie das Kabel sorgfältig und
stecken Sie es unter die Blende.
- 39 -
7.
Schließen Sie das mitgelieferte Auto-Ladegerät an die Frontkamera-
Halterung an.
8. Stecken Sie das Auto-Ladegerät in den Zigarettenanzünder Ihres
Fahrzeugs.
Zigarettenanzünder
9.
10.
Starten Sie das Auto
Die Kamera schaltet sich automatisch ein und beginnt mit der
Aufnahme.
- 40 -
4. Grundlegende Operation
4.1 Power Ein/Ausschalten
Sobald das Fahrzeug startet, schaltet sich die Kamera automatisch ein und
beginnt mit der Aufnahme.
Es gibt zwei Möglichkeiten, die Kamera auszuschalten:
A. Manuell
Drücken Sie lange Taste, um die Kamera auszuschalten.
B. Automatisch
Die Kamera wird ausgeschaltet, wenn das Ladekabel abgezogen oder
das Fahrzeug ausgeschaltet wird.
Das Gerät verfügt über zwei USB-Anschlüsse für die Stromversorgung - an
der Kamera oder über die Saugnapfhalterung.
Beim Aufladen über einen Computer verwenden Sie bitte den USB-An-
schluss an der Halterung. Wenn Sie den USB-Anschluss an der Kamera
verwenden, werden auf dem Kamerabildschirm „ USB Kontakt" und „
Einschalten" angezeigt. Wählen Sie „ Einschalten", um die Dashcam
aufzuladen.
Hinweis:
1.
2.
Infrarot LED: Drücken Sie die Taste und oder , um sie auszu-
wählen: Autom, An und Aus.
G-Sensor: Drücken Sie und Taste, um 1,2,3,4,5 und Aus zu
wählen. Je höher die Zahl, desto höher die Empfindlichkeit.
Audio Rekord: Drücken Sie und Taste, um AUS/AN umzuschalten.
Parkmodus: Drücken Sie Taste und Taste, um Bewegungserken-
nung, Kollisionserkennung, Kollision + Bewegungserkennung, Niedrige-Bi-
trate Modus, AUS umzuschalten.
Kollisionserkennung: Drücken Sie und Taste, um Hoch, Mittler
oder Niedrig zu wählen.
Bewegungserkennung: Drücken Sie und Taste, um Hoch, Mittler
oder Niedrig zu wählen.
Kollision+ Bewegunserkennung: Drücken Sie und Taste, um Hoch,
Mittler oder Niedrig zu wählen.
Niedrige-Bitrate Modus: Drücken Sie und Taste, um Hoch, Mittler
oder Niedrig zu wählen.
Belichtungszahl: Drücken Sie und oder Taste, um zwischen
Front-, Kabinen- und Rückbelichtung zu wählen.
Front: +2.0, +1.6, +1.3, +1.0, +0.6, +0.3, +0.0, -0.3, -0.6, -1.0, -1.3, -1.6, -2.0
Kabine: +2.0, +1.6, +1.3, +1.0, +0.6, +0.3, +0.0, -0.3, -0.6, -1.0, -1.3, -1.6, -2.0
Rück: +2.0, +1.6, +1.3, +1.0, +0.6, +0.3, +0.0, -0.3, -0.6, -1.0, -1.3, -1.6, -2.0
WDR: Drücken Sie und Taste, um zwischen AUS und AN umzus-
chalten.
Autokennzeichen Einstellung: Drücken Sie oder und Taste,
um Ihre Fahrzeugnummer einzustellen.
Stempel: Es liefert die Informationen über Datum/ Zeit, Marke, Autokenn-
zeichen, Geschwindigkeit und GPS. Drücken Sie Taste und Taste, um
die Stempel ein- /auszuschalten.
Drehdarstellung: Drücken Sie Taste und Taste, um Front+Kabine
Modus, Rück Modus ein-/auszuschalten.
Zeitraffer: Drücken Sie und Taste, um 1FPS, 5FPS oder Aus zu
wählen.
Videoauflösung: Verwenden oder Taste, die verschiedenen
Optionen zu navigieren.
Front+Kabine+Rück Modus: 1440P+1080P+1080P 30FPS;
1080P+1080P+1080P 30FPS; 1080P+1080P+720P 30FPS;
1440P+1440P+1080P 30FPS; 720P+720P+720P 30FPS.
Front+Kabine Modus: 1440P+1440P 30FPS; 1440P+1080P 30FPS;
1080P+1080P 30FPS; 1080P+720P 30FPS; 720P+1080P 30FPS; 720P+720P
30FPS.
Front+Rück Modus: 2160P+1080P 30FPS; 1440P+1080P 30FPS;
1080P+1080P 30FPS; 1080P+720P 30FPS; 720P+1080P 30FPS;
720P+720P 30FPS.
Front Modus: 3840x2160P 30FPS; 2592x1520P 30FPS; 2560x1440P 30FPS;
1920x1080P 30FPS; 1280x720P 30FPS.
Zirkulationsaufnahme: Drücken Sie Taste, um 1 Min, 3 Min, 5 Min
oder Aus zu wählen.
- 41 -
Nach dem Einschalten drücken Sie Taste, um in die Menü-Einstellung
zu gelangen.
(Wenn die Kamera Video aufnimmt, drücken Taste, um die Aufnahme
zu stoppen und drücken Sie dann Taste.)
4.2 Einstellungen im Menü
A.Video Einstellung
Drücken Sie Taste, um die Einstellung zu bestätigen, und drücken Sie
oder Taste, um Einstellungsoptionen Auszuwählen.
Video Einstellung System Einstellung
Dateiverwaltung
•
•
Infrarot LED: Drücken Sie die Taste und oder , um sie auszu-
wählen: Autom, An und Aus.
G-Sensor: Drücken Sie und Taste, um 1,2,3,4,5 und Aus zu
wählen. Je höher die Zahl, desto höher die Empfindlichkeit.
Audio Rekord: Drücken Sie und Taste, um AUS/AN umzuschalten.
Parkmodus: Drücken Sie Taste und Taste, um Bewegungserken-
nung, Kollisionserkennung, Kollision + Bewegungserkennung, Niedrige-Bi-
trate Modus, AUS umzuschalten.
Kollisionserkennung: Drücken Sie und Taste, um Hoch, Mittler
oder Niedrig zu wählen.
Bewegungserkennung: Drücken Sie und Taste, um Hoch, Mittler
oder Niedrig zu wählen.
Kollision+ Bewegunserkennung: Drücken Sie und Taste, um Hoch,
Mittler oder Niedrig zu wählen.
Niedrige-Bitrate Modus: Drücken Sie und Taste, um Hoch, Mittler
oder Niedrig zu wählen.
Belichtungszahl: Drücken Sie und oder Taste, um zwischen
Front-, Kabinen- und Rückbelichtung zu wählen.
Front: +2.0, +1.6, +1.3, +1.0, +0.6, +0.3, +0.0, -0.3, -0.6, -1.0, -1.3, -1.6, -2.0
Kabine: +2.0, +1.6, +1.3, +1.0, +0.6, +0.3, +0.0, -0.3, -0.6, -1.0, -1.3, -1.6, -2.0
Rück: +2.0, +1.6, +1.3, +1.0, +0.6, +0.3, +0.0, -0.3, -0.6, -1.0, -1.3, -1.6, -2.0
WDR: Drücken Sie und Taste, um zwischen AUS und AN umzus-
chalten.
Autokennzeichen Einstellung: Drücken Sie oder und Taste,
um Ihre Fahrzeugnummer einzustellen.
Stempel: Es liefert die Informationen über Datum/ Zeit, Marke, Autokenn-
zeichen, Geschwindigkeit und GPS. Drücken Sie Taste und Taste, um
die Stempel ein- /auszuschalten.
Drehdarstellung: Drücken Sie Taste und Taste, um Front+Kabine
Modus, Rück Modus ein-/auszuschalten.
Zeitraffer: Drücken Sie und Taste, um 1FPS, 5FPS oder Aus zu
wählen.
Videoauflösung: Verwenden oder Taste, die verschiedenen
Optionen zu navigieren.
Front+Kabine+Rück Modus: 1440P+1080P+1080P 30FPS;
1080P+1080P+1080P 30FPS; 1080P+1080P+720P 30FPS;
1440P+1440P+1080P 30FPS; 720P+720P+720P 30FPS.
Front+Kabine Modus: 1440P+1440P 30FPS; 1440P+1080P 30FPS;
1080P+1080P 30FPS; 1080P+720P 30FPS; 720P+1080P 30FPS; 720P+720P
30FPS.
Front+Rück Modus: 2160P+1080P 30FPS; 1440P+1080P 30FPS;
1080P+1080P 30FPS; 1080P+720P 30FPS; 720P+1080P 30FPS;
720P+720P 30FPS.
Front Modus: 3840x2160P 30FPS; 2592x1520P 30FPS; 2560x1440P 30FPS;
1920x1080P 30FPS; 1280x720P 30FPS.
Zirkulationsaufnahme: Drücken Sie Taste, um 1 Min, 3 Min, 5 Min
oder Aus zu wählen.
- 42 -
•
•
•
•
•
•
•
•
•

Sprache: Drücken Sie und Taste, um zwischen Englisch, Chine-
sisch, Deutsch, Japanisch, Spanisch, Französisch, Italienisch und Russisch
zu wählen.
Formatierung: Drücken Sie anschließend Format, um die microSD-
Karte zu formatieren.
Formaterinnerung:Drücken Sie Tasten und , um die Erinnerung-
soptionen auszuwählen: 15 Tage, 1 Monat und Aus.
Hinweis: Wenn Sie die Option für die Formatierungszeit ändern oder die
Werkseinstellungen manuell wiederherstellen, wird das Gerät neu
gestartet, um die Zeit zu berechnen.
Zeit & Datum: Es gibt zwei Möglichkeiten, Uhrzeit und Datum einzustellen:
1. Automatische GPS-Aktualisierung; 2 Manuelle Einstellung.
Bildschirmschoner: Wenn Sie 3 Minuten wählen, wird der Bildschirm der
Dash-Cam nach 3 Minuten automatisch ausgeschaltet und die
Aufnahme fortgesetzt. Wenn die Einstellung auf Autom eingestellt ist,
verringert sich die Bildschirmhelligkeit nach 3 Minuten normaler Videoauf-
nahme auf 50%, die Helligkeit wird jedoch durch manuellen Betrieb
wiederhergestellt.
Drücken Sie Taste, um zwischen 30 Sek,1Min, 3 Min oder Autom
umzuschalten.
Ton: Drücken Sie oder und dann , um es 1-5 Stufe oder Aus
umzuschalten.
Frequenz: Drücken Sie Taste und , um 50Hz oder 60Hz umzus-
chalten
System Info: Drücken Sie , um die aktuelle Firmware-Version und die
Website zu überprüfen.
Restaurierung Eintstellung: Drücken Sie auf Taste und wählen Sie ,
um das Gerät auf die Werkseinstellungen zurückzusetzen.
GPS: Drücken Sie die Taste, um es AN/AUS umzuschalten.
- 43 -
•
•
•
•
•
•
•
•
•
•
B. System Einstellung

- 44 -
•
Geschwindigkeitseinheit: Drücken Sie Taste, um KM / H oder MPH zu
wählen.
C. Dateiverwaltung
Ereignis
Normal
Alle
Dateiverwaltung
•
•
•
Überprüfen und löschen Sie Videos im Ordner.
Ereignis: Notfallvideos (vom G-Sensor erkannt und manuell
gesperrt) werden gespeichert.
Normal: Normale Aufnahme von Videos werden gespeichert.
Alle: Alle Standardvideos, kritischen Ereignisvideoswerden aufgezeichnet.

Öffnen Sie „System Einstellung“ > „Zeit/Datum“, um das Zeiteinstellungs-
menü aufzurufen. Zeit &Datum: Es gibt zwei Möglichkeiten, Uhrzeit und
Datum einzustellen: 1. Automatische GPS-Aktualisierung; 2 Manuelle
Einstellung von Datum/Uhrzeit. Die automatische GPS-Aktualisierung ist
standardmäßig aktiviert.
-GPS aktualisiert automatisch das Datum und die Uhrzeit basierend auf
Ihrer Zeitzone, daher müssen Sie zuerst die richtige Zeitzone auswählen;
-Sie können auch die automatische GPS-Aktualisierung deaktivieren, die
manuelle Datums-/Uhrzeiteinstellung aktivieren und Datum und Uhrzeit
manuell korrigieren.
- 45 -
4.3Zeit&DatumEinstellung
AutomatischesGPS-Update
Datum/Uhrzeitmanuelleinstellen
Datumsformat
1.
2.
Um Datum/Uhrzeit manuell einzustellen, müssen Sie vor der Einstellung
die automatische GPS-Zeitkorrektur ausschalten.
Die automatische GPS-Zeitkorrektur muss die richtige Zeitzone
auswählen, da sonst die Zeit nach der GPS-Positionierung ungenau ist.
Notiz:
Gehen Sie zur „Video Einstellung“> „Videoauflösung“ und navigieren Sie
+ oder , den Aufnahmemodus auszuwählen. Bestätigen Sie mit
und fahren Sie fort.
Front+Kabine+Rück Modus: 1440P+1080P+1080P 30FPS;
1080P+1080P+1080P 30FPS; 1080P+1080P+720P 30FPS; 1440P+1440P+1080P
30FPS; 720P+720P+720P 30FPS.
Front+Kabine Modus: 1440P+1440P 30FPS; 1440P+1080P 30FPS;
1080P+1080P 30FPS; 1080P+720P 30FPS; 720P+1080P 30FPS; 720P+720P
30FPS.
Front+Rück Modus: 2160P+1080P 30FPS; 1440P+1080P 30FPS;
1080P+1080P 30FPS; 1080P+720P 30FPS; 720P+1080P 30FPS;
720P+720P 30FPS.
Front Modus: 3840x2160P 30FPS; 2592x1520P 30FPS; 2560x1440P 30FPS;
1920x1080P 30FPS; 1280x720P 30FPS.
Zum Beenden der Einstellung drücken Sie einfach Taste, um das Menü
zu verlassen.
- 46 -
4.4 Wechseln Sie den Aufnahme-Modus und Videoauflösung
Standardmäßig (Front + Kabine + Rück). Die Auflösung von 1440P + 1080P +
1080P wird auf dem Bildschirm angezeigt. Die Kameras erfassen die Vorder-
und Hinterstraße sowie die Kabine mit 1440P + 1080P + 1080P (30 fps).
Es kann mit folgenden Schritten in den Front + Kabine, Front + Rück oder
Front-Aufnahme-Modus geschaltet werden:
•
01-01-2021
1440P+1080P+1080P

- 47 -
Front+Kabine+Rück
Front+Kabine
Front+Rück
Front
1440P+1080P+1080P 30FPS
1080P+1080P+1080P 30FPS
1080P+1080P+720P 30FPS
720P+720P+720P 30FPS
Front+Kabine+Rück
Front+Kabine
Front+Rück
Front
1440P+1440P 30FPS
1440P+1080P 30FPS
1080P+1080P 30FPS
1080P+720P 30FPS
Front+Kabine+Rück
Front+Kabine
Front+Rück
Front
3840x2160P 30FPS
2592x1520P 30FPS
2560x1440P 30FPS
1920x1080P 30FPS
Front+Kabine+Rück
Front+Kabine
Front+Rück
Front
2160P+1080P 30FPS
1440P+1080P 30FPS
1080P+1080P 30FPS
1080P+720P 30FPS
- 48 -
4.5 Wechseln Sie den Blickwinkel der Front-, Rückkamera und interne Kamera
Im Drei- oder Zwei-Kanal-Aufnahmemodus können Sie die Anzeige der
Frontkamera, Kabinekamera und Rückkamera umschalten, indem Sie
während der Aufnahme Taste drücken.
Frontkamera(größer)Kabinekamera(größer)Rückkamera(größer)
3
1440P+1080P+1080P
01-01-2021
3
1440P+1080P+1080P
01-01-2021
3
1440P+1080P+1080P
01-01-2021
Nach der Installation der Speicherkarte beginnt die Kamera standard-
mäßig mit der Zirkulationsaufnahme, wenn sie an eine Stromquelle
angeschlossen und eingeschaltet wird. Wenn es nicht an eine Stromquelle
angeschlossen ist, will die Aufnahme nicht automatisch gestartet werden.
Während der Aufnahme blinkt die LED-Leuchte und ein roter Punkt blinkt
unten links auf dem Bildschirm. Sie können die Aufnahme stoppen /
starten, indem Sie Taste drücken.
4.6Zirkulationsaufnahme
01-01-2021
3
1440P+1080P+1080P
4.7 Infrarot LED
Standardmäßig ist das IR-LED-Licht automatisch eingeschaltet. Drücken Sie
kurz Taste, um Nachtsichtmodus An, Autom Aus / An, Aus umzuschalten.
Infrarot Licht Sensor
VTN40AXXXX
Infrarot LED Aus
Infrarot LED Autom
Infrarot LED An
A
01-01-2021
3
1440P+1080P+1080P
- 49 -
Standardmäßig ist die Zirkulation-Aufnahmezeit 3 Minuten. Bitte gehen Sie
zu „Video Einstellung" > „Zirkulationsaufnahme", um auf 1 Minute, 3 Minuten
oder 5 Minuten für Ihren Bedarf zu wechseln.
Das Zirkulationsaufnahme wird nach dem Format „Jahr_ Datum_ Zeit_
A.MP4" .(zum Beispiel 2021-01-01-060101-A.MP4". Das Suffix A steht für die
Dateien von der Vorderen Kamera. Das SuffixB steht für die Dateien von
der Kabine-Kamera , das Suffix c steht für die Dateien von der Rückkamera.
Das normale Video will im Ordner„Dateiverwaltung" >„Normal" gespe-
ichert. Wenn die Micro SD-Karte voll ist, überschreibt die Kamera ältere
Dateien mit neuen Videos.
Wenn diese Funktion ausgeschaltet wird, nimmt die Kamera Videos in 20
Minuten pro Clip auf, aber würden die alten Videos nicht überschrieben,
wenn die Karte voll ist.
- 50 -
Bitte beachten Sie: Wenn IR leuchtet, werden die Videoaufnahmen der
Kabine in schwarz und weiß gedreht.
4.8 NotfallRekord
Erkennung kritischer Ereignisse wird durch den G-Sensor (Schwerkraftsensor)
ausgelöst, erkennt mögliche Unfallkollisionen automatisch, sperrt die
aktuelle Aufzeichnung und speichert das Material im Ereignis-Ordner, so
dass es nicht überschrieben wird, wenn die Karte voll ist .
Sie können ein Video auch manuell sperren, wenn die Kamera aufnimmt,
drücken Sie Taste. In der Mitte des Bildschirms wird ein Schlüsselsymbol
angezeigt.
Die Empfindlichkeit des G-Sensors ist einstellbar mit 6 Optionen: 1,2,3,4,5
und Aus , standardmäßig ist 3, aber Sie können unter „Video Einstellung">
„G-Sensor" die anderen Optionen wählen.
01-01-2021
3
1440P+1080P+1080P
Das Notfallvideo wird im Ordner "Ereignis" gespeichert und nicht automa-
tisch überschrieben.
Hinweis: Sobald der Ereignis-Ordner 30% der Kartenkapazität erreicht hat,
wollen die Notfallvideos überschrieben werden. Bitte übertragen Sie
wichtige Videos regelmäßig auf Ihren PC oder einen anderen Speicherort
(z. B. externe Festplatte). Um eine gute Lese- / Schreibleistung
beizubehalten, die microSD-Karte sollte mindestens einmal im Monat
formatiert werden.
- 51 -
Gehen Sie zur „Video Einstellung" > „Audio Rekord" und drücken Sie
Taste, wählen Sie Aus;
Wenn die Kamera Videos aufnimmt, drücken Sie Taste, um Audio
ein- / auszuschalten.
Standardmäßig ist die Audioaufnahme AN. Sie können es auf zwei Arten
ausschalten:
4.9 Audio Rekord
•
•
Wenn Audio deaktiviert wurde, wird das Mikrofon-Symbol auf dem
Bildschirm weiß und mit einer roten Linie angezeigt.
01-01-2021
3
1440P+1080P+1080P
4.10 Parkmodus
Parkmodus arbeitet als eine Sentry-Funktion in verschiedenen Situationen
Um den Parkmodus zu aktivieren, gehen Sie zu „Video Einstellung“ >
„Parkmodus”. Drücken Sie und wählen Sie die folgenden Optionen
aus: Bewegungserkennung, Kollisionserkennung, Kollision + Bewegung-
serkennung, Niedrige-Bitrate Modus,AUS.
- 52 -
Um sicherzustellen, dass die Kamera im Parkmodus funktioniert, lassen
Sie sie über ein Powerbank mit Strom versorgen oder verbinden Sie sie
direkt mit der Autobatteriemithilfe des Hardwire Kits . Wir empfehlen,
die Kamera nicht zu lange ununterbrochen laufen zu lassen.
Die N4-Arbeitsumgebungstemperatur beträgt -10°C bis 50°C. Wir
empfehlen die Verwendung der Kollisionserkennung innerhalb dieses
Temperaturbereichs. Sobald die Temperatur außerhalb des normalen
Arbeitstemperaturbereichs liegt, wird sich die Kamera automatisch
abschalten. Wenn die Temperatur hoch ist, nehmen Sie bitte die
Kamera ab, wenn Sie Ihr Auto geparkt haben.
1.
2.
Beachten Sie:
4.10.1 Kollisionserkennung
Wenn die Kollisionserkennung eingeschaltet wurde,will ein Kollision-
serkennungssymbol in der unteren rechten Ecke des Bildschirms
erscheinen. Nach 5 Minuten Aufnahme keine Bewegung erkannt wird,
will die Kamera zu den Parkmodus gelangen und sich automatisch
ausschalten. Die Einzelbildaufzeichnung wird vom Kollisionserkennungs-
sensor ausgelöst. Sobald ein Aufprall oder eine Kollision erkannt wird,
schaltet sich das Gerät automatisch ein und startet die automatische
Aufzeichnung. Nach 5 Minuten Inaktivität stoppt die Aufnahme und
schaltet sich automatisch wieder aus.
01-01-2021
3
1440P+1080P+1080P
Die Kollisionserkennung ist
einstellbar mit 3 Optionen: Hoch,
Mittler und Niedrig. Gehen Sie zur
Video Einstellung--Parkmo-
dus--Kollisionserkennung.
- 53 -
4.10.2 Kollisionserkennung + Bewegungserkennung
Wenn die Kollisionserkennung + Bewegungserkennung eingeschaltet
wurde, wird dies durch ein Symbol für Kollisionserkennung + Bewegung-
serkennung in der unteren rechten Ecke des Bildschirms dargestellt.
Wenn nach 5 Minuten keine Bewegung festgestellt wird, wird in der
Mitte des Bildschirms ein orangefarbenes P angezeigt, was bedeutet,
dass die Kamera in den Parkmodus gelangt. Sobald die Front- oder
Rückkamera eine Bewegung erkennt, startet die Kamera die automa-
tische Aufnahme. Nach der Bewegung wird die Aufnahme nach 30
Sekunden Inaktivität beendet.
Die Kollision und Bewegungserkennung ist einstellbar mit 3 Optionen:
Hoch, Mittler und Niedrig. Gehen Sie zur Video Einstellung--Parkmodus--
Kollision und Bewegungserkennung.
01-01-2021
3
1440P+1080P+1080P
Im Kollision + Bewegungserkennung Modus schaltet sich die Kamera
automatisch ein und zeichnet auf, wenn sie Vibrationen erkennt, auch
wenn sie zuvor manuell ausgeschaltet wurde.
Tipps:
- 54 -
4.10.3 Bewegungserkennung ausgelöst
01-01-2021
3
1440P+1080P+1080P
Wenn die Bewegungserkennung aktiviert wurde, wird dies durch ein
Bewegungserkennungssymbol in der unteren rechten Ecke des
Bildschirms dargestellt. Wenn nach 5 Minuten Aufnahme keine Bewe-
gung festgestellt wird, wird in der Mitte des Bildschirms ein orangefarben-
es P-Symbol
angezeigt, was bedeutet, dass der Parkmodus aktiviert ist. Sobald die
Kamera eine Bewegung vor sich erkennt, starten 3 Kameras gleichzeitig
die automatische Aufnahme. Nach 30 Sekunden Inaktivität wird die
Aufzeichnung beendet.
Die Bewegungserkennung ist einstellbar mit 3 Optionen: Hoch, Mittler
und Niedrig. Gehen Sie zur Video Einstellung--Parkmodus--Bewegung-
serkennung.
1.
2.
Wenn die Dashcam im Bewegungserkennungsmodus manuell ausges-
chaltet wird, wird sie sich nicht einschalten und aufzeichnen, selbst
wenn Vibrationen erkannt werden.
Wenn Zeitraffer eingeschaltet ist, kann die Dash-Cam nicht in die
Bewegungserkennung wechseln.
Tipps:
- 55 -
01-01-2021
3
1440P+1080P+1080P
01-01-2021
3
720P+720P+720P 15FPS
Wenn Niedrige-Bitrate Modus aktiviert wurde, wird dies durch ein Symbol
in der unteren rechten Ecke des Bildschirms dargestellt. Wenn nach 5
Minuten Aufnahme keine Bewegung festgestellt wird, wird in der Mitte
des Bildschirms ein orangefarbenes P-Symbol angezeigt, was bedeutet,
dass der Parkmodus aktiviert ist. Bei diesem Modus zeichnet der
Front-Modus Videos mit 720P bei 15FPS auf, und der Dual-Aufnahmemo-
dus zeichnet Videos mit 720 + 720P bei 15FPS auf. Bei der 3-Wege-Auf-
nahme werden Videos mit 720P + 720P + 720P bei 15FPS aufgenommen.
4.10.4 Niedrige-Bitrate Modus
Um den Parkmodus manuell zu aktivieren, drücken und halten Sie
Taste, bis das Symbol P auf dem Bildschirm erscheint.
Bei diesem Modus wenn die Kamera manuell ausgeschaltet wird, wird
sie nicht automatisch eingeschaltet und aufgezeichnet, selbst wenn
Vibrationen erkannt werden.
Wenn Zeitraffer eingeschaltet ist, kann die Dash-Cam nicht in den
Niedrige-Bitrate Modus wechseln.
Tipps:
1.
2.
- 56 -
Im Parkmodus verlässt die Kamera den Parkmodus, wenn sie Vibrationen
erkennt (z. B. das Öffnen und Schließen der Tür oder das Bewegen des
Fahrzeugs aus dem Stand oder andere Aufprallvibrationen können
ausgelöst werden), und wechselt in den normalen Videomodus.
Wenn Sie die Bildschirmschoner Einstellung auf Autom einstellen, im
Parkmodus erlischt die LCD-Anzeige der Kamera nach 1 Minuten.
Die Aufnahme wird jedoch fortgesetzt, während die blaue LED auf der
Anzeigeleuchte blinkt.
4.11 Zeitraffer
Wenn Sie die Zeitrafferfunktion aktivieren, nimmt die Kamera bei dem
eingestellten Zeitraffer Option - entweder 1FPS, 5FPS, Aus auf. Z.B wenn
Sie 1FPS wählen, nimmt die Kamera jede Sekunde ein Foto auf und setzt
die Fotos dann zu einem 1-fps-Video zusammen. Bei einer maximalen
Bildrate von 30 fps erzeugt 8-stundenlange Video mit einem Zeitintervall
von 1 Sekunde ein Zeitraffervideo mit einer Dauer von nur 16 Minuten
(8 x 60 x 60 /30/60). Dieser Umgebungsmodus ist Empfohlen für Speicher-
karten mit geringerer Kapazität.
[Tatsächliche Aufnahmedauer (Sek.)= Zeitraffer-Aufnahmedauer (Sek.) X
Aufnahmebildrate FPS / Zeitraffer Option FPS ]
01-01-2021
3
1440P+1080P+1080P
- 57 -
4.12 Anschluss eines externen GPS-Empfängers (optionales Zubehör)
Installieren Sie die externe GPS-Halterung anstelle der Originalhalter-
ung an der Kamera.
Stecken Sie den USB-C-Stecker in der GPS-Halterung und laden für sie
auf.
Sobald es aufgeladen ist, schaltet sich die Kamera ein; Wenn eine
microSD-Karte eingelegt ist, wird die Aufnahme gestartet. Drücken Sie
Taste, um die Aufnahme zu beenden.
Drücken Sie Taste, um zur Menü Einstellung zu gelangen, gehen
Sie zu „ System Einstellung"> „ GPS ", um die GPS-Funktion der Kamera
einzuschalten.
Der GPS-Empfänger beginnt mit der Suche des GPS-Signals und das
GPS-Symbol ist grau auf dem Bildschirm. Sobald das GPS-Signal
erfolgreich empfangen wurde, wird das Symbol auf dem Bildschirm
angezeigt.
Um die GPS-Funktion der Kamera zu verwenden, kaufen Sie bitte eine
externe GPS-halterung. Sie kann auf Amazon gekauft werden.
1.
2.
3.
4.
5.
01-01-2021
3
1440P+1080P+1080P
01-01-2021
3
1440P+1080P+1080P
6. Sie können das GPS und die Geschwindigkeit auf das Videomaterial
stempeln, gehen Sie zu „ Video Einstellung"> „ Stempel"> „ Geschwind-
igkeit Stempel", „ GPS Stempel" zu setzen.
- 58 -
7.
SiekönnendasVideoaufVANTRUEGPSViewer(zumDownloadaufwww.
vantrue.net.)Ansehen.
Drücken Sie MENÜ und gehen Sie zu „Dateiverwaltung" > „Normal" oder
„Ereignis", um Videos auf dem Kameradisplay abzuspielen. Wählen Sie
mit oder Taste die Datei aus und drücken Sie , um die
Wiedergabe / Pause zu starten. Drücken Sie während der Wiedergabe
Taste, um den Vorlauf zu verlangsamen, und Taste, um den
Vorlauf zu beschleunigen.
4.13 Video auf der Kamera ansehen
Am PC Anzeigen
Verbinden Sie die Kamera mit dem Computer über dem mitgelieferte
USB Kabel (nicht über den USB Anschluss der Halterung).
Auf dem Bildschirm der Kamera erscheint „USB Kontakt" oder
„Einschalten“;
Je nach Betriebssystem Ihres Computers erscheint das Gerät als
Wechseldatenträger oder entfernbares Laufwerk.
1.
2.
3.
0:00/00:02
1/5
2021_08_01_151629_B.MP4
2021_08_01_151629_A.MP4
2021_08_01_113647_B.MP4
2021_08_01_113647_A.MP4
Normal

Videos in Normal Ordner:
Gehen zum Normal Ordner, wählen Sie das zu löschende Video aus und
drücken Sie Taste Markieren Sie ,, Löschen
Sie diese Datei”, anschließend drücken Sie und ,,Löschen''.
Videos im Ereignis Ordner:
Gehen zum Ereignis Ordner, wählen Sie das zu löschende Video aus und
drücken Sie Taste. Markieren Sie ,, Löschen Sie diese Datei”,
anschließend drücken Sie und ,,Löschen''.
- 59 -
4.14 Videos löschen
4.15 Bildschirmschoner
Diese Funktion verhindert, dass der Bildschirm ablenkt das Fahrzeug,
besonders in der Nacht, wenn die Beleuchtung von der LCD Bildschirm
kann ein Ärgernis oder sogar eine Gefahr für den Fahrer sein. Wenn Sie
die Funktion auf 3 Minuten eingestellt ist, schaltet der Bildschirm der
Kamera sich nach 3 Minuten aus, aber die Aufnahme wird fortgesetzt,
während das blaue Licht auf der LED Leuchte blinkt. Sie können eine
beliebige Taste drücken, um den Bildschirm zu beleuchten.
Wenn die Einstellung auf Autom eingestellt ist, verringert sich die
Bildschirmhelligkeit nach 3 Minuten normaler Videoaufnahme auf 50%,
die Helligkeit wird jedoch durch manuellen Betrieb wiederhergestellt.

- 60 -
Gehen Sie zur System Einstellung, um diese Zeit auf 30 Sek, 1 Min, 3 Min
oder Autom einzustellen.
4.16 Aktualisieren der Firmware
Das System wird automatisch aktualisiert, wenn die microSD-Karte
Firmware-Aktualisierungsdateien enthält. Nach dem Upgrade wird die
Kamera automatisch neu gestartet.
Immer auf dem Neusten bleiben
Die neueste Firmware-Version ist immer auf der offiziellen VANTRUE-Web-
site (www.vantrue.net) verfügbar. Wir empfehlen dringend, Ihr Produkt
zu registrieren (www.vantrue.net/register), um eine Benachrichtigungs-
Email zu erhalten, wenn ein neues Firmware-Update verfügbar ist.
4.17Arbeitstemperatur
Die Betriebstemperatur der Kamera liegt zwischen 14 - 158°F (-10°C bis
70°C). Eine Temperatur außerhalb dieses Bereichs kann die Arbeit der
Kamera beeinträchtigen und dem Gerät schaden.
Um Schaden zu vermeiden
Bei extrem heißem Wetter sollten Sie die Kamera nicht in der Sonne
liegen lassen, wenn das Auto draußen steht.
Bei extrem kaltem Wetter, bei oder unter 14˚F (-20℃) liegt, entfernen
Sie sie bitte von der Windschutzscheibe und lagern Sie sie in einer
Aufbewahrungsbox.
•
•

- 61 -
5.Spezifikationen
Die Spezifikationen dieses Produkts können sich ohne vorherige Ankündi-
gung aufgrund von Produktverbesserungen ändern.
Model
Front: 5M CMOS Sensor
Kabine: 2M CMOS Sensor
Rück: 2M CMOS Sensor
Prozessor
Kanal 3 Kanale
Bildschirm
Linse
2.45" IPS LCD, 480x272
N4
Front: F1.4, 155 Grad Weitwinkelobjektiv
Kabine: F2.0, 165 Grad Weitwinkelobjektiv
Rück: F1.8, 160 Grad Weitwinkelobjektiv
Videoauflösung
English/日本語/Español /Français/Italiano /简体中文
/Deutsch/Русский язык
Sprache
Front+Kabine+Rück Modus: 1440P+1080P+1080P
30FPS; 1080P+1080P+1080P 30FPS;
1080P+1080P+720P 30FPS; 1440P+1440P+1080P
30FPS; 720P+720P+720P 30FPS.
Front+Kabine Modus: 1440P+1440P 30FPS;
1440P+1080P 30FPS; 1080P+1080P 30FPS;
1080P+720P 30FPS; 720P+1080P 30FPS;
720P+720P 30FPS.
Front+Rück Modus: 2160P+1080P 30FPS;
1440P+1080P 30FPS; 1080P+1080P 30FPS;
1080P+720P 30FPS; 720P+1080P 30FPS;
720P+720P 30FPS.
Front Modus: 3840x2160P 30FPS; 2592x1520P 30FPS;
2560x1440P 30FPS; 1920x1080P 30FPS; 1280x720P
30FPS

- 62 -
Audio Eingebautes Mikrofon und Lautsprecher
Verschluss Elektronik
Batterie Typ Super-Kondensator
Videodateiformat MP4
Memorizer Micro SD Karte (U3 oder höher, max. 512GB)
USB Anschluss
USB-C
Arbeitsstrom 800mA(Typischer Wert)/ DC 5V
Lager Temperature -4 zu 176°F (-20°C zu 80°C)
Arbeitsumgebung-
stemperatur
14-122°F (-10°C to 50°C)
Arbeitstemperatur 14 zu 158°F (-10°C zu 70°C)
Betriebsspannung 5V 2A
Windows XP/Vista/7/8/10&Mac OSKompatibel OS

- 63 -
6.GarantieundUnterstützung
Garantie
Die VANTRUE
®
OnDash N4 Dashcam wird mit 12 Monaten Garantie
geliefert.
Wenn Sie Ihr Produkt auf unserer offiziellen Website (www.vantrue.net/
register) registrieren, können Sie die Garantie auf 18 Monate verlängern.
Unterstützung
Wenn Sie Fragen zu Ihrem Produkt haben, zögern Sie nicht, uns über
Amazon zu kontaktieren oder senden uns eine E-Mail an
[email protected]. Jeder Kontakt wird innerhalb von 12-24 Stunden
beantwortet.
Irgendwelche Gedanken?
Wir arbeiten immer an unserem Besten, um unsere Produkt- und Service-
qualität und Benutzerfreundlichkeit zu verbessern. Wenn Sie irgendwelche
Gedanken zur Verbesserung des Produkts haben, können Sie bitte uns
gerne eine Nachricht an [email protected]. senden.
Danke, dass Sie sich für entschieden haben!

- 64 -
1.付属品を確認する
C.
リアカメラ(0.3m)
F. リアカメラケーブル
(6m)
I.
両面テープ
D. デュアルUSBポート付
きのType-Cシガーソ
ケットケーブル(3.5m)
A.
N4ドライブレコ
ーダー本体
G.
取扱説明書
B.
吸盤マウント
E. Type-CUSBデータ
ーケーブル(1m)
H.
クイックスタート
ガイド
- 65 -
16 17
15
18
321 4 5
6
7
8
9
10 11
14
12 13
VTN40AXXXX
2.各部の名称とはたらき
NO. 名称 働き
ボタン 録画停止中に押してメニューモードへ;
長押して駐車モードに入ります;
手動で記録している映像をロックします。
ボタン アクションを確認します;
押して録画停止/開始します。
1
2
- 66 -
3
ボタン メニュー設定−上向き;
マイクのオン/オフをします;
再生中−再生速度を再開します。
4 ボタン メニュー設定−下向き;
画面表示(フロントカメラ、車内カメラ、リアカメラ)
を切り替えます;再生中−早送り。
5 ボタン 長押して、電源をオン/オフします;
短く押して、IRLEDライトをオン、オフ、自動にします。
6
Type-CUSB/
リアカメラポート
充電やデータ転送に使用します;
リアカメラケーブルの差込口。
8 MicroSDカード挿入口 microSDカードを挿入します。(512GBまで、書き込み
速度はU3またはU3以上のカードをサポートします。)
10
IRLEDライト 四つのIRLEDライト付き、車内のナイトビ
ジョンを高めます。
9
インジケーターライト 録画中、点滅しています;
通電中、点灯しています。
15
マウントコネクタ 付属のマウントを取り付けます。
18
リアカメラ 車の後方のビデオを録画します。
13
シリアル番号 保証登録用のシリアル番号。
12
マイク 映像とともに音声も記録します。
17
フロントカメラ 車の前方のビデオを録画します。
16
スピーカー
本体で動画を再生する際に音声を出力します。
11
車内カメラ 車内のビデオを録画します。
7
リセットボタン
押して本体を再起動します。
14
赤外線感知センサー
光の変化を感知します。
- 67 -
LEDインジケータ
青色のLEDが点灯しています[12] 通電中
青色のLEDが点滅しています[12] 録画中
スクリーンの概要
G-Sensorオフ
ループ録画時間
マイクオン
マイクオフ
車速(KMHまたはMPH)
録画中
上書禁止動画撮影時
に鍵マークが出てきます
タイムラプス撮影オン
衝撃録画オン
衝撃+動体検知オン
動体検知オン
低ビットレート録画オン
日付(MM/DD/YY)
と時刻表示(24H)
赤外線ライトオフ
赤外線ライト自動
赤外線ライトオン
A
撮影解像度
GPS信号を受信しました
GPS信号を受信中
G-Sensorオン
メモリーカードあり
メモリーカードなし
撮影時間
(現在のファイル)
1440P+1080P+1080P
01-01-2021
3.入門
3.1メモリーカードをセットする(VANTRUEMicroSDカードをお勧めです。)
書き込み速度はU3またはU3以上の32GB〜512GBmicroSDカードを使ってください。
VANTRUEMicroSDカードをお勧めです(別売)。
挿入:電源オフの状態で、microSDカードの端子面を本機の背面側にし、カチッと音がす
るまで記録メディア挿入口へ差し込みます。
取出し:電源オフしてから、microSDカードを1回押すと取り出すことができます。
- 68 -
【ボタン】>【ボタン】>【ボタン】を押して、【システム設定】>
【フォーマット】>【確認】を選択して、フォーマットできます。
録画中の状態でしたら、まず
ボタンを押して、録画を停止させてから、ボタン
を押してメニュー画面に入ります;
「SDカードエラー、メモリーカードをフォーマットしてください」の表示が出てきました
ら、まず
ボタンを押して、そしてボタンを押してメニュー画面に入ります。
•
microSDカードを使用する前に必ず本機でフォーマットしてください。
a.
b.
a.
2.
1.
3.
4.
5.
ご注意:
microSDカードは消耗品です。microSDカードの寿命を伸ばすため、1ヶ月ごとにフォー
マットしてください。
VANTRUEMicroSDカードをおすすめです。安定性が弱いメモリカードがドライブレ
コーダーの運行に悪い影響があるので、ご了承ください。(例えば:Sandisk、
Transcend、シリコン、TEAM)
microSDカードには書き込み可能回数などの製品寿命があります。使用状況に応じて定
期的に新品に交換することをおすすめします。
事故発生時は記録された録画ファイルが上書きされないように、必ず電源をOFFにして
からmicroSDカードを取り出し保管してください。
電源がONの状態でmicroSDカードの抜き差しをしないでください。microSDカード
本体やデータ破損の原因となります。必ず電源OFF後、ランプが3秒以上消灯したこ
とを確認しmiciroSDカードの抜き差しを行ってください。
- 69 -
3.2ドライブレコーダーの取り付け
ブラケットを本機ブラケットホルダーに、カチッと音がするまで差し込んで取り付けて
ください。
1.
【フロントガラス上部より1/5以内、ルームミラー裏側の視界を妨げない場所へ設置し
て下さい】。ワイパーの可動範囲にカメラを取り付けてください。
フロントガラスを綺麗に拭いて事前に決めた位置に軽く押し当て、マウントをロック方
向に90度まわしてください。
2.
3.
- 70 -
4. 電源ケーブルをフロントガラスの周りに慎重に配線して隠してください。
5. リアカメラケーブルをリアカメラポートに挿入して、リアケーブルを慎重に配線して隠
してください。
6. シガーソケットケーブルのType-CUSB端子をフロントカメラのマウントのUSBポートと
接続してください。
- 71 -
7. 車のシガーライターポートに付属のシガーソケットケーブルをしっかりと挿入してくだ
さい。
8.
9.
エンジンを起動します。
ドライブレコーダーは自動にオンをし、自動的に録画を開始します。
4.基本的な使い方
4.1電源のオン/オフ
シガーソケットケーブルや外部電源に接続して給電するとカメラは自動的にオンになります。
電源オン/オフするために二つ方式がございます。
A.手動で
給電中、【
ボタン】を長押して、ドラレコの電源はオン/オフになります。
車のシガーライ
ターポート
- 72 -
1.
2.
4.2メニューの設定
電源オンしてから、【ボタン】を押して、メニュー設定画面に入ります。
(録画中の状態でしたら、まず
ボタンを押して、録画を停止させてから、ボタン
を押してメニュー画面に入ります)
B.自動で
シガーソケットケーブルや外部電源に接続するとカメラは自動的にオンになります。
電源が切れたら、ドラレコは自動的にオフになります。
ご注意:
本体USBポートとマウントUSBポート二つ電源用のUSBポートがございます。
パソコンから付属のUSBデータケーブルでカメラ本体のUSBポートと接続すると、画面
に【電源オン】と【マスストレージ】が表示されます。【マスストレージ】モード時は
本体での操作は受け付けずコンピューター側でのみデータを読み取ることができます。
録画設定
ファイル管理
システム設定
解像度設定:初期設定(フロント+車内+リア録画モード)では、3カメラは1440p
+1080p+1080p30FPSで録画します。
録画モードにより、解像度はぞれぞれが選択できます。
フロント+車内+リア録画モード:1440P+1080P+1080P30FPS;1080P+1080P+1080P
30FPS;1080P+1080P+720P30FPS;1440P+1440P+1080P30FPS;720P+720P+720P30FPS。
A.録画設定
ボタンを押して録画設定を入力し、ボタン/ボタンで設定項目を選択して
ください。
•
フロント+車内録画モード:1440P+1440P30FPS;1440P+1080P30FPS;1080P+1080P
30FPS;1080P+720P30FPS;720P+1080P30FPS;720P+720P30FPS。
フロント+リア録画モード:2160P+1080P30FPS;1440P+1080P30FPS;1080P+1080P
30FPS;1080P+720P30FPS;720P+1080P30FPS;720P+720P30FPS。
フロントカメラ録画モード:3840x2160P30FPS;2592x1520P30FPS;2560x1440P30FPS;
1920x1080P30FPS;1280x720P30FPS。
ループ録画設定:1回ごとの録画時間を設定します。選択可能な設定:1分、3分、5分、
オフです。
赤外線ライト:自動、オン、オフが選択できます。
G-センサー設定:録画中、揺れや衝撃を設定した感度で検知すると自動的に録画ファイ
ルをロックします。その際画面の中央にキーのアイコンが表示されます。ロックされた
映像は上書きされません。初期設定はレベル3です。状況により適切なレベル(1、2、
3、4、5、オフ)を選択してください。
録画音声:オン/オフが選択できます。
駐車モード:衝撃録画、動体検知、衝撃+動体検知、低ビットレート録画、タイムラプ
ス撮影、オフが選択できます。
衝撃録画の感度は高感度、標準感度、低感度を選択できます。
衝撃+動体検知に高感度、標準感度、低感度が選択できます。
動体検知にも高感度、標準感度、低感度が選択できます。
露光指数:三つのカメラの露出指数は個別に調整できます。
フロント:+2.0,+1.6,+1.3,+1.0,+0.6,+0.3,+0.0,-0.3,-0.6,-1.0,-1.3,-1.6,-2.0
車内:+2.0,+1.6,+1.3,+1.0,+0.6,+0.3,+0.0,-0.3,-0.6,-1.0,-1.3,-1.6,-2.0
リア:+2.0,+1.6,+1.3,+1.0,+0.6,+0.3,+0.0,-0.3,-0.6,-1.0,-1.3,-1.6,-2.0
WDR:オン/オフが選択できます。
車両登録番号:車両番号を設定します。
/ボタンを押し、正確な番号を選択
してボタンを押してください。
スタンプ設定:全てのスタンプ(日付/時間、VANTRUEロゴ、車両登録番号、速度、
GPSの情報)を録画ファイルに表示します。スタンプを表示させたくない場合、スタンプ
をオフに選択してください。
液晶反転設定:フロント+車内、リアが選択できます。
タイムラプス撮影:タイムラプス撮影:1FPS、5FPS、オフが選択できます。
タイムラプス撮影はオンを選択する場合、たとえば、タイムラプス1FPSを設定すると、
毎秒1つの写真を撮ります、記録された静止画を1FPSの動画に圧縮します。

- 73 -
解像度設定:初期設定(フロント+車内+リア録画モード)では、3カメラは1440p
+1080p+1080p30FPSで録画します。
録画モードにより、解像度はぞれぞれが選択できます。
フロント+車内+リア録画モード:1440P+1080P+1080P30FPS;1080P+1080P+1080P
30FPS;1080P+1080P+720P30FPS;1440P+1440P+1080P30FPS;720P+720P+720P30FPS。
•
•
•
•
•
•
•
•
•
•
•
フロント+車内録画モード:1440P+1440P30FPS;1440P+1080P30FPS;1080P+1080P
30FPS;1080P+720P30FPS;720P+1080P30FPS;720P+720P30FPS。
フロント+リア録画モード:2160P+1080P30FPS;1440P+1080P30FPS;1080P+1080P
30FPS;1080P+720P30FPS;720P+1080P30FPS;720P+720P30FPS。
フロントカメラ録画モード:3840x2160P30FPS;2592x1520P30FPS;2560x1440P30FPS;
1920x1080P30FPS;1280x720P30FPS。
ループ録画設定:1回ごとの録画時間を設定します。選択可能な設定:1分、3分、5分、
オフです。
赤外線ライト:自動、オン、オフが選択できます。
G-センサー設定:録画中、揺れや衝撃を設定した感度で検知すると自動的に録画ファイ
ルをロックします。その際画面の中央にキーのアイコンが表示されます。ロックされた
映像は上書きされません。初期設定はレベル3です。状況により適切なレベル(1、2、
3、4、5、オフ)を選択してください。
録画音声:オン/オフが選択できます。
駐車モード:衝撃録画、動体検知、衝撃+動体検知、低ビットレート録画、タイムラプ
ス撮影、オフが選択できます。
衝撃録画の感度は高感度、標準感度、低感度を選択できます。
衝撃+動体検知に高感度、標準感度、低感度が選択できます。
動体検知にも高感度、標準感度、低感度が選択できます。
露光指数:三つのカメラの露出指数は個別に調整できます。
フロント:+2.0,+1.6,+1.3,+1.0,+0.6,+0.3,+0.0,-0.3,-0.6,-1.0,-1.3,-1.6,-2.0
車内:+2.0,+1.6,+1.3,+1.0,+0.6,+0.3,+0.0,-0.3,-0.6,-1.0,-1.3,-1.6,-2.0
リア:+2.0,+1.6,+1.3,+1.0,+0.6,+0.3,+0.0,-0.3,-0.6,-1.0,-1.3,-1.6,-2.0
WDR:オン/オフが選択できます。
車両登録番号:車両番号を設定します。
/ボタンを押し、正確な番号を選択
してボタンを押してください。
スタンプ設定:全てのスタンプ(日付/時間、VANTRUEロゴ、車両登録番号、速度、
GPSの情報)を録画ファイルに表示します。スタンプを表示させたくない場合、スタンプ
をオフに選択してください。
液晶反転設定:フロント+車内、リアが選択できます。
タイムラプス撮影:タイムラプス撮影:1FPS、5FPS、オフが選択できます。
タイムラプス撮影はオンを選択する場合、たとえば、タイムラプス1FPSを設定すると、
毎秒1つの写真を撮ります、記録された静止画を1FPSの動画に圧縮します。

- 74 -
解像度設定:初期設定(フロント+車内+リア録画モード)では、3カメラは1440p
+1080p+1080p30FPSで録画します。
録画モードにより、解像度はぞれぞれが選択できます。
フロント+車内+リア録画モード:1440P+1080P+1080P30FPS;1080P+1080P+1080P
30FPS;1080P+1080P+720P30FPS;1440P+1440P+1080P30FPS;720P+720P+720P30FPS。
フロント+車内録画モード:1440P+1440P30FPS;1440P+1080P30FPS;1080P+1080P
30FPS;1080P+720P30FPS;720P+1080P30FPS;720P+720P30FPS。
フロント+リア録画モード:2160P+1080P30FPS;1440P+1080P30FPS;1080P+1080P
30FPS;1080P+720P30FPS;720P+1080P30FPS;720P+720P30FPS。
フロントカメラ録画モード:3840x2160P30FPS;2592x1520P30FPS;2560x1440P30FPS;
1920x1080P30FPS;1280x720P30FPS。
ループ録画設定:1回ごとの録画時間を設定します。選択可能な設定:1分、3分、5分、
オフです。
赤外線ライト:自動、オン、オフが選択できます。
G-センサー設定:録画中、揺れや衝撃を設定した感度で検知すると自動的に録画ファイ
ルをロックします。その際画面の中央にキーのアイコンが表示されます。ロックされた
映像は上書きされません。初期設定はレベル3です。状況により適切なレベル(1、2、
3、4、5、オフ)を選択してください。
録画音声:オン/オフが選択できます。
駐車モード:衝撃録画、動体検知、衝撃+動体検知、低ビットレート録画、タイムラプ
ス撮影、オフが選択できます。
衝撃録画の感度は高感度、標準感度、低感度を選択できます。
衝撃+動体検知に高感度、標準感度、低感度が選択できます。
動体検知にも高感度、標準感度、低感度が選択できます。
露光指数:三つのカメラの露出指数は個別に調整できます。
フロント:+2.0,+1.6,+1.3,+1.0,+0.6,+0.3,+0.0,-0.3,-0.6,-1.0,-1.3,-1.6,-2.0
車内:+2.0,+1.6,+1.3,+1.0,+0.6,+0.3,+0.0,-0.3,-0.6,-1.0,-1.3,-1.6,-2.0
リア:+2.0,+1.6,+1.3,+1.0,+0.6,+0.3,+0.0,-0.3,-0.6,-1.0,-1.3,-1.6,-2.0
WDR:オン/オフが選択できます。
車両登録番号:車両番号を設定します。
/ボタンを押し、正確な番号を選択
してボタンを押してください。
スタンプ設定:全てのスタンプ(日付/時間、VANTRUEロゴ、車両登録番号、速度、
GPSの情報)を録画ファイルに表示します。スタンプを表示させたくない場合、スタンプ
をオフに選択してください。
液晶反転設定:フロント+車内、リアが選択できます。
タイムラプス撮影:タイムラプス撮影:1FPS、5FPS、オフが選択できます。
タイムラプス撮影はオンを選択する場合、たとえば、タイムラプス1FPSを設定すると、
毎秒1つの写真を撮ります、記録された静止画を1FPSの動画に圧縮します。
言語:日本語、英語、中国語、ドイツ語、フランス語、イタリア語、スペイン語、ロシ
ア語の8種の言語が選択できます。
フォーマット:microSDカードのフォーマットを行います。この操作を行うと全ての
ファイルが消去されます。
フォーマットリマインダー:15日、1ヶ月、オフが選択できます。
ご注意:ファーマットリマインダーの選択項目を変更する時、または、手動で初期設定を
行う時、本体がリマインダーの時間を計算し直します。
時間設定:時間の設定/調整は二つの方法があります。①手動で時刻を設定する。②GPS
自動時刻補正。GPSが受信すると日付・時刻がタイムゾーンで設定された時刻に補正さ
れます。GPS自動時刻補正機能はオン/オフに設定できます。
なお、日付/時刻設定にGMT設定を行います。日本のタイムゾーンは「+9」となってお
ります。
モニター点灯時間:録画中、設定時間経過後カメラのモニターは自動的にオフになり、
30秒、1分、3分、自動が選択できます。
自動を選択すれば、無操作で3分後、画面の明るさが50%まで下がり、手動で本体を操作
すると、明るさが自動に回復します。
デバイス音声:音量を調整します。オフ、1、2、3、4、5段階が選択できます。
周波数:光源周波数は50Hz/60Hzが選択できます。
システム情報:商品の型番とファームウェアのバージョンが確認できます。
初期設定:選択してから、全ての設定をお買い上げ時の状態に戻します。
GPS:オン/オフが選択できます。
速度の単位:KMH、MPHが選択できます。設定後
ボタンを押して退出します。
B.システム設定
•
•
•
•
•
•
•
•
•
•
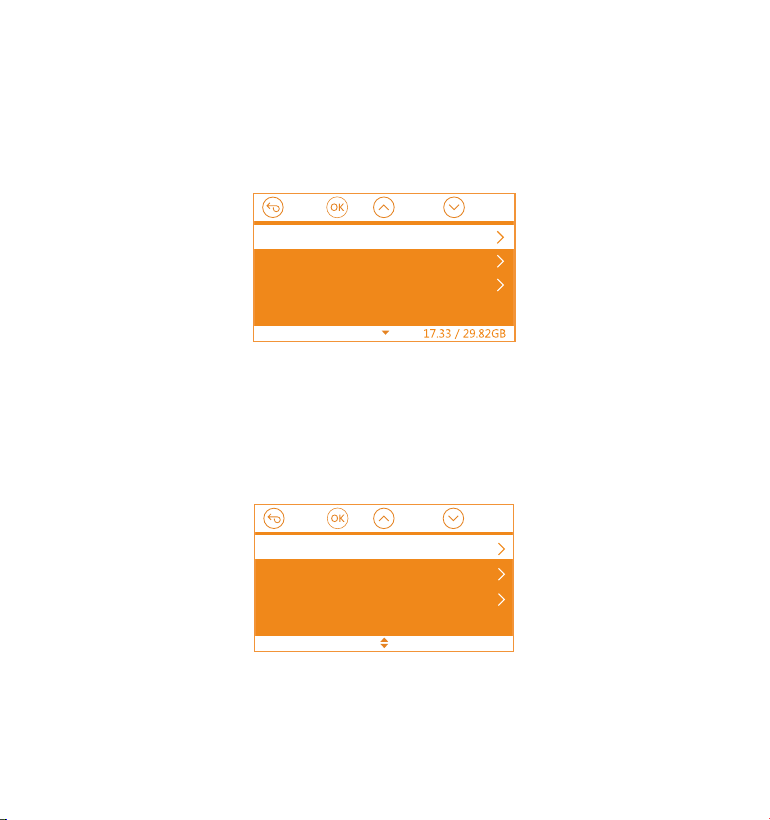
- 75 -
•
•
•
C.ファイル管理
撮影したビデオを確認し、削除します。
イベント:イベントビデオ(自動で/手動でロックされたビデオ)が保存されます。
ノーマル:通常の録画ビデオが保存されます。
全て:全ての通常の録画ビデオ、イベントビデオが保存されます。
イベント
ノーマル
全て
ファイル管理
4.3時間の設定
【システム設定】>【時間設定】を選択し、OKボタンを押してください。時間の設定/調整は
二つの方法があります。初期設定はGPS自動時刻補正です。
①GPS自動時刻補正。GPSが受信すると日付・時刻がタイムゾーンで設定された時刻に補正さ
れます。GPS自動時刻補正機能はオン/オフに設定できます。
②手動で時刻を設定します。
GPS自動時刻補正
手動で時刻設定
日付形式
ご注意:
1.
2.
手動で時刻を設定する前に、GPS自動時刻補正をオフにしてください。
GPS自動時刻補正を設定すれば、必ずGMT設定を行います。日本のタイムゾーンは「+9」
となっております
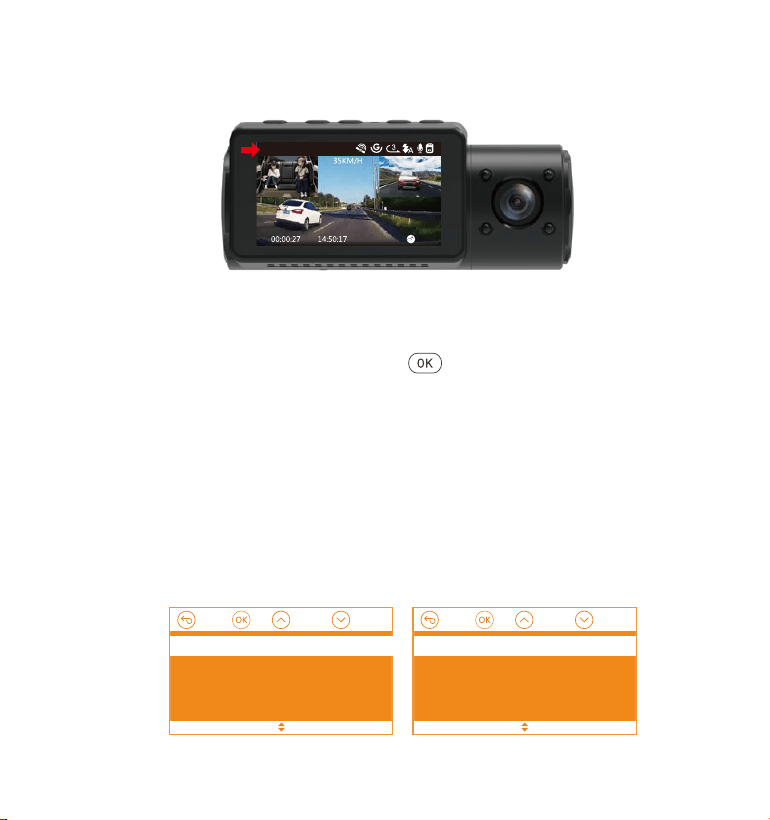
- 76 -
「録画設定」>「解像度設定」を選択し、「
」ボタンを押して、録画モードが選択
できます。
フロント+車内+リア録画モード:1440P+1080P+1080P30FPS;1080P+1080P+1080P
30FPS;1080P+1080P+720P30FPS;1440P+1440P+1080P30FPS;720P+720P+720P
30FPS。
フロント+車内録画モード:1440P+1440P30FPS;1440P+1080P30FPS;1080P+1080P
30FPS;1080P+720P30FPS;720P+1080P30FPS;720P+720P30FPS。
フロント+リア録画モード:2160P+1080P30FPS;1440P+1080P30FPS;1080P+1080P
30FPS;1080P+720P30FPS;720P+1080P30FPS;720P+720P30FPS。
フロントカメラ録画モード:3840x2160P30FPS;2592x1520P30FPS;2560x1440P30FPS;
1920x1080P30FPS;1280x720P30FPS。
4.4録画モード/解像度の切り替え
初期設定(フロント+車内+リア録画モード)では、3カメラは1440p+1080p+1080p30FPS
で録画します。
次の手順で録画モード(フロント+車内、フロント+リア、フロント)を切り替えることが
できます。
•
01-01-2021
1440P+1080P+1080P
フロント+ 車内+ リア
フロント+ 車内
フロント+ リア
フロント
1440P+1080P+1080P 30FPS
1080P+1080P+1080P 30FPS
1080P+1080P+720P 30FPS
720P+720P+720P 30FPS
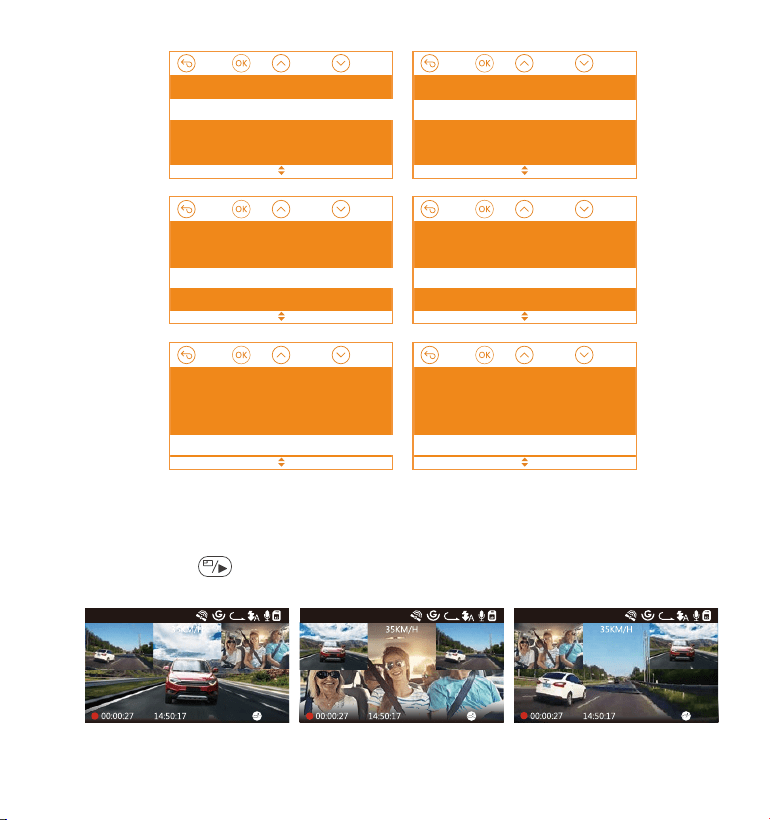
- 77 -
フロント+ 車内+ リア
フロント+ 車内
フロント+ リア
フロント
3840x2160P 30FPS
2592x1520P 30FPS
2560x1440P 30FPS
1920x1080P 30FPS
フロント+ 車内+ リア
フロント+車内
フロント+ リア
フロント
1440P+1080P 30FPS
1080P+1080P 30FPS
1440P+1440P 30FPS
1080P+720P 30FPS
フロント+ 車内+ リア
フロント+ 車内
フロント+リア
フロント
1440P+1080P 30FPS
2160P+1080P 30FPS
1080P+1080P 30FPS
1080P+720P 30FPS
4.5画面表示の切り替え
3カメラ録画モード(フロント+車内+リア)と2カメラ録画モード(フロント+車内、フロ
ント+リア)で、
ボタンを押すと、画面表示(フロントカメラ、車内カメラ、リアカメ
ラ)を切り替えることができます。
リアカメラが真ん中に表示 車内カメラが真ん中に表示 フロントカメラが真ん中に表示
3
1440P+1080P+1080P
01-01-2021
3
1440P+1080P+1080P
01-01-2021
3
1440P+1080P+1080P
01-01-2021
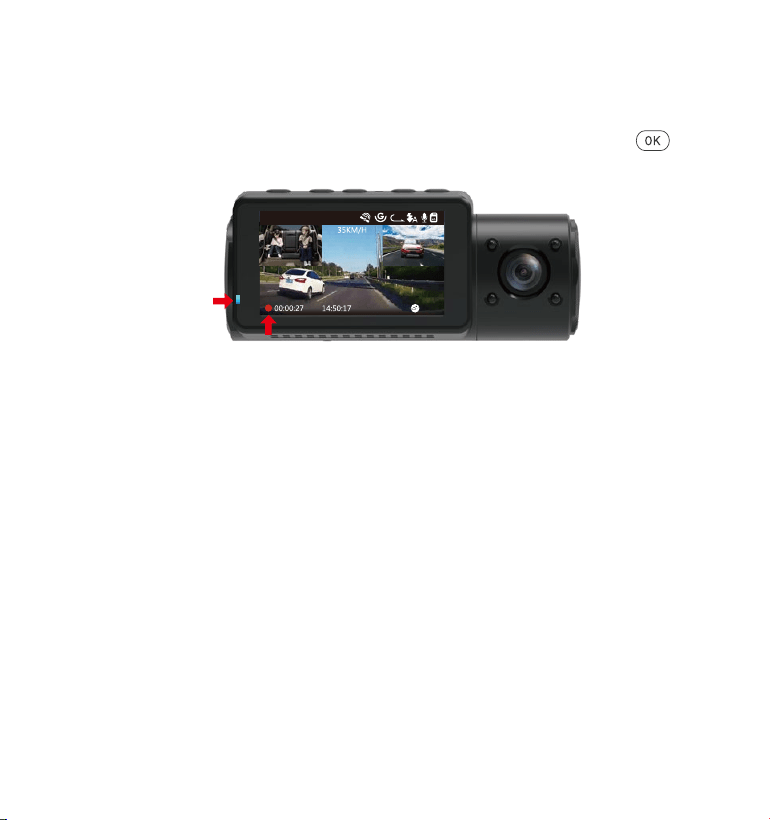
- 78 -
4.6ループ録画
microSDカードが挿入されている状態で電源を入れると、本機が自動的にオンになり、設定
した間隔でループ録画を行います。電源が入っていない場合は本体は起動しません。
録画中、インジケーターライトが青く点滅し、左下角の赤丸も点滅しています。
ボタン
を押し録画の開始/停止を行います。
初期設定は3分です。1回ごとの録画時間を設定します。選択可能な設定:1分、3分、5分か
ら選択できます。
録画されたファイル名のフォーマットは「年月日時間A/B/C.MP4」です。
例えば:「2021-01-01-060101-A.MP4」です。
ファイルAはフロントカメラの映像を示し、ファイルBは車内カメラの映像を示し、ファイ
ルCはリアカメラの映像を示します。
録画された映像は【ファイル管理】>【ノーマル】に保存しています。microSDカードの容
量がなくなると自動的に古い記録ファイルから順に上書きします。
オフを選択すると1回ごとの録画時間は20分となり、microSDカードの容量がなくなると自
動的に古い記録ファイルから順に上書きされません。
01-01-2021
3
1440P+1080P+1080P
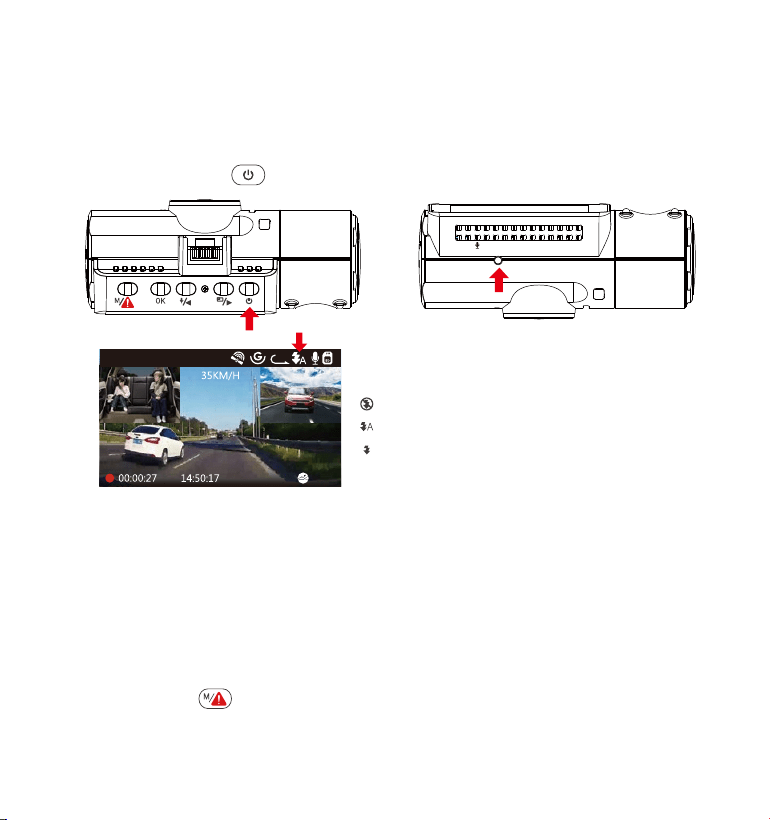
- 79 -
【録画設定】>【赤外線ライト】を選択し、自動、オン、オフが選択できます。
録画画面で、直接
ボタンを短く押して、自動、オン、オフが変更できます。
4.7赤外線ライト
初期設定は自動です、自動、オン、オフが選択できます。
設定は以下のように変更できます。
赤外線ライトオフ
赤外線ライト自動
赤外線ライトオン
•
•
赤外線感知センサー
VTN40AXXXX
01-01-2021
3
1440P+1080P+1080P
ご注意:赤外線ライトはオンをすると、赤外線に反応したものを白黒で写っています。
4.8イベント録画
Gセンサーにより、緊急時にロックされた映像と衝撃を検知した映像は自動的にイベント
フォルダに保存されます。G-Sensor感度の設定によって、検知できる衝撃の感度には違い
があります。その際画面の中央にキーのアイコンが現れます。ロックされた映像は上書き
されません。(衝撃を停止した20秒ぐらい、イベント録画は停止になり、ループ録画になり
ます。)
録画中、手動で緊急ボタンを押すと、録画もロックできます。録画された映像は
【ファイル管理】>【イベント】に保存しています。G-Sensor感度は1、2、3、4、5、オフ
が選択できます。
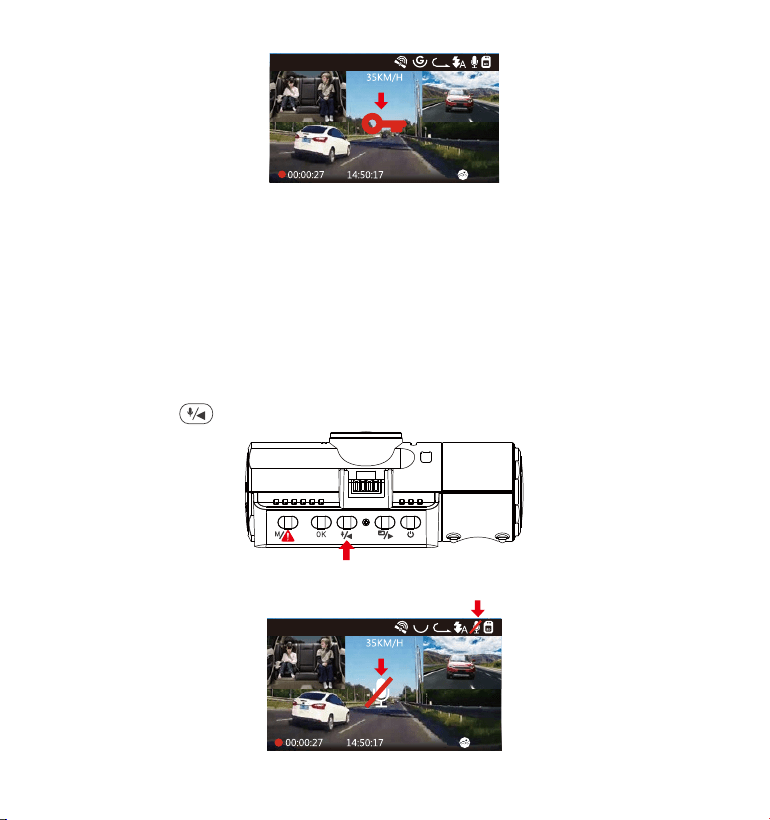
録画画面で、ボタンを押し、マイクのオン/オフをします。
ご注意:イベントファイルの容量は総容量の30%以上に達すると以前のイベントファイル
は新たなビデオに上書きされます。定期的にコンピューターへ重要なファイルを保存して
ください。また書き込み速度を維持するため、1ヶ月ごとにmicroSDカードをフォーマット
してください。
01-01-2021
3
1440P+1080P+1080P
4.9録画音声
オン/オフにするには以下のように設定します。
•
【録画設定】>【録画音声】を選択し、オン/オフを選択してください。
•
- 80 -
マイクがオフの場合、右上部のマイクアイコンは赤い斜線が表示されます。
01-01-2021
3
1440P+1080P+1080P
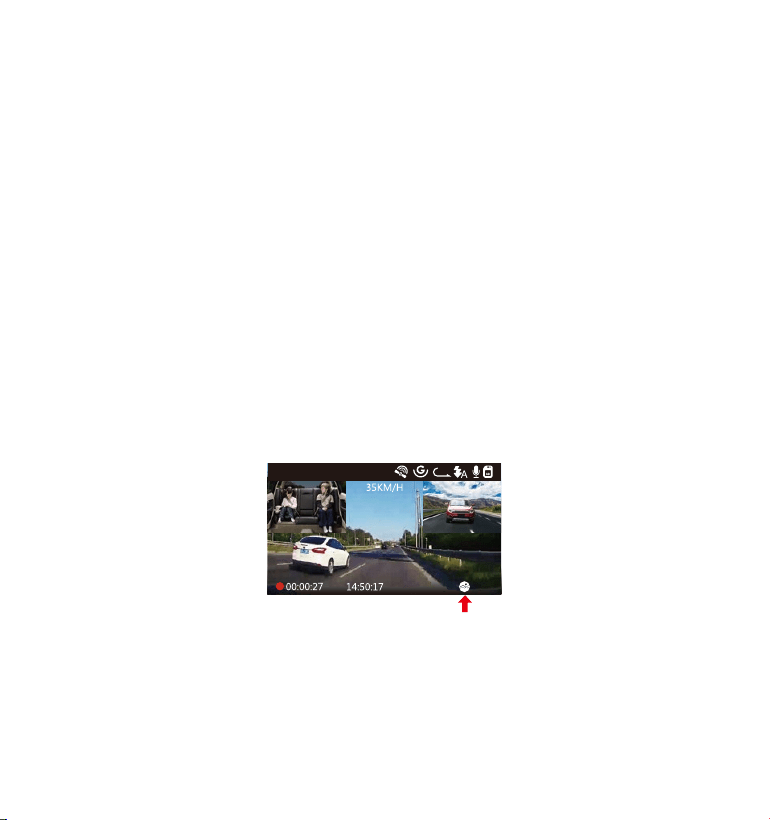
- 81 -
4.10駐車監視モード(給電が必要です)
駐車モードを使用する前に、駐車監視を開いてください。
【録画設定】>【駐車モード】を押し、選択可能な設定:衝撃録画、動体検知、衝撃+動
体検知、低ビットレート録画、タイムラプス撮影、オフから選択できます。
オフを選択すると、常時録画モードに入ります。
ご注意:N4の作業環境温度は14〜122℉(-10℃〜50℃)です。この温度範囲内で衝撃録画
機能をご使用ください。作業温度範囲が50℃以上になると、本体が自動的に停止になりま
す。本体の寿命を延長するため、駐車時、車内に非常に高温になる場合に、本体を外して
ください。
4.10.1衝撃録画(通電中)
駐車モードに衝撃録画を選択すれば、画面の右下角に衝撃検知のマークが表示されます。
録画中、約5分間車両への振動を検知せず衝撃検知録画と判断すると、本体も自動にオフ
になります。揺れや衝撃を発生した場合、本体がオンにして、録画を開始します。動きを
停止した5分ぐらい、録画は停止になり、本体が自動にオフになります。
衝撃録画の感度は(高感度、標準感度、低感度)を選択できます。
01-01-2021
3
1440P+1080P+1080P
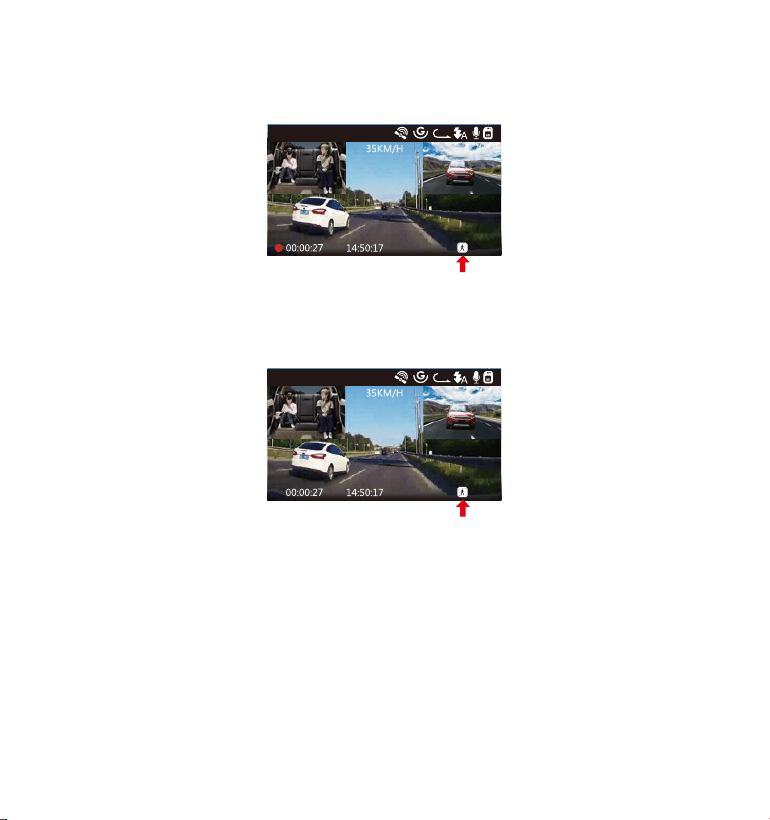
- 82 -
駐車モードに衝撃+動体検知を選択すれば、画面の右下角に衝撃+動体検知のマークが表
示されます。
4.10.2衝撃+動体検知(通電中)
録画中、約5分間車両への振動を検知せず衝撃+動体検知中と判断すると、画面の中部に
オレンジの【P】のマークが表示されます。動きを検知してから、自動に録画を開始しま
す、30秒後、録画は停止になります。
01-01-2021
3
1440P+1080P+1080P
01-01-2021
3
1440P+1080P+1080P
ご注意:衝撃+動き検知モード中、手動で本体をオフすると、揺れや衝撃を発生した場
合、本体がオンにして、録画を開始します。
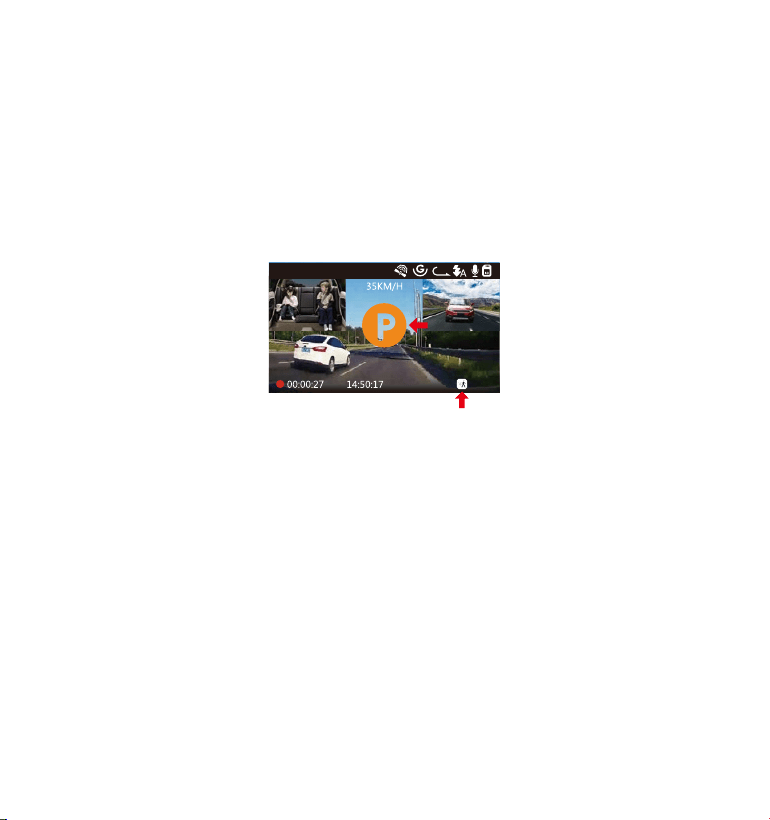
- 83 -
4.10.3動体検知(通電中)
駐車モードに動体検知を選択すれば、画面の右下角に動体検知のマークが表示されます。
録画中、約5分間車両への動きを検知せずなら、動体検知モードに入ります。
駐車中、フロントカメラと車内カメラが動体を検知しましたら、3カメラとも録画を開始
します。30秒後、録画は停止になり、動体検知待機状態になります。
本体が振動を検知すると動体検知モードは自動的に終了し、駐車モードを退出します。
動体検知の感度は(高感度、標準感度、低感度)を選択できます。
ご注意:
1.
2.
動体検知モードでは、ドラレコを手動でオフにすると、振動を検出しても、オンになら
ず記録されません。
タイムラプス撮影をオンすると、動体検知モードを使用できなくなりました。
駐車モードに低ビットレート録画を選択すれば、画面の右下角に低ビットレート録画の
マークが表示されます。録画中、約5分間車両への動きを検知せずなら、低ビットレート
録画モードに入り、その際画面の中部にオレンジの「P」のアイコンが表示され、低解像
度で録画を開始します。
フロントカメラのみ録画すれば、720P@15FPSの解像度で録画します。フロント+車内
カメラ同時録画すれば、720P+720P@15FPSの解像度で録画します。3カメラ同時録画
すれば、720P+720P+720P@15FPSの解像度で録画します。
4.10.4低ビットレート録画(通電中)
01-01-2021
3
1440P+1080P+1080P
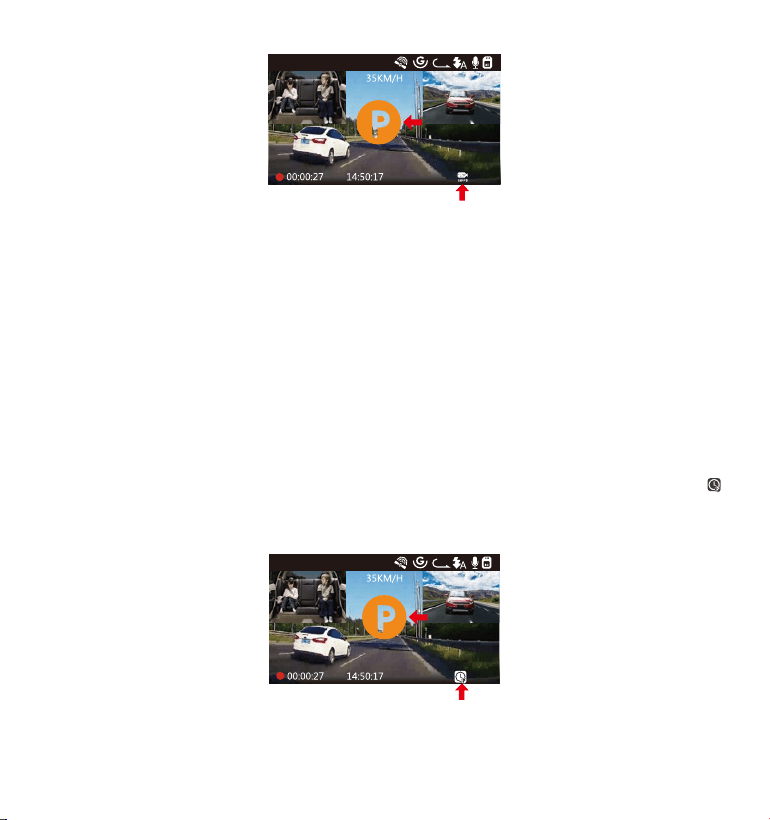
駐車モード設定にタイムラプス撮影を選択してください。タイムラプス撮影モード:一
定の間隔を空けて画像を撮影し、連続して再生させることで長時間の映像を短時間で確
認できる微速度撮影です。
※タイムラプス撮影はオンを選択する場合、画面の右下角にタイムラプス撮影のマーク
が表示されます。約 5 分間車両への振動を検知せず、画面の中部にオレンジの【P】のマー
クが表示されます。タイムラプス撮影を開始します。
- 84 -
ご注意:
1.
2.
低ビットレート録画モードでは、ドラレコを手動でオフにすると、振動を検出しても、
オンにならず記録されません。
タイムラプス撮影をオンすると、低ビットレート録画モードを使用できなくなりまし
た。
01-01-2021
3
720P+720P+720P 15FPS
4.10.5タイムラプス撮影
01-01-2021
3
1440P+1080P+1080P
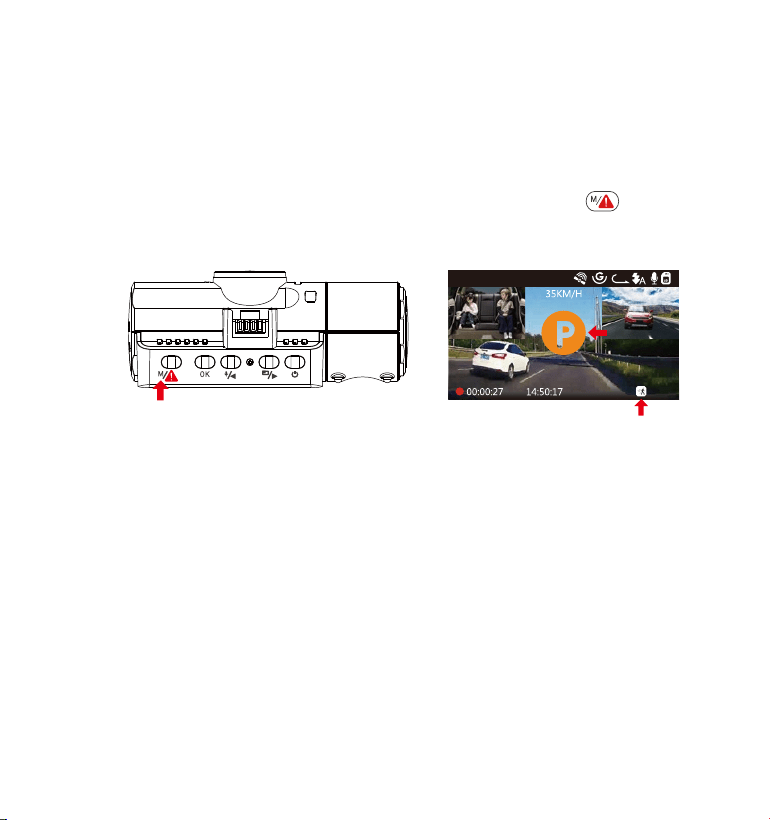
※タイムラプス録画は 1FPS、5FPS が選択できます。たとえば、タイムラプス 1FPS を設
定すると、毎秒 1 つの写真を撮ります、記録された静止画を 1FPS の動画に圧縮します。
モニター点灯時間に自動を選択した場合に、駐車モードに入って1分後、モニターが自
動的にオフになります。動きなどを検知する時、モニターが点灯しなくても録画し続き
ます。
手動で駐車監視モードに移行するため、録画中または録画待機時に【ボタン】を3
秒間長押しで駐車モードを開始します。その際画面の中部にオレンジの「P」のアイコン
が表示されます。
01-01-2021
3
1440P+1080P+1080P
本体が振動を検知すると駐車モードは自動的に終了し、駐車モードを退出します。
ご注意:VANTRUEN4ドライブレコーダーはスーパーコンデンサを内蔵していますので、
24 時間駐車監視機能を使用する場合、外部電源または電源直結ケーブルをご利用くださ
い。またバッテリー消費を少なくする為モニター点灯時間にて選択時間をなるべく短く
することをお勧めします。
- 85 -
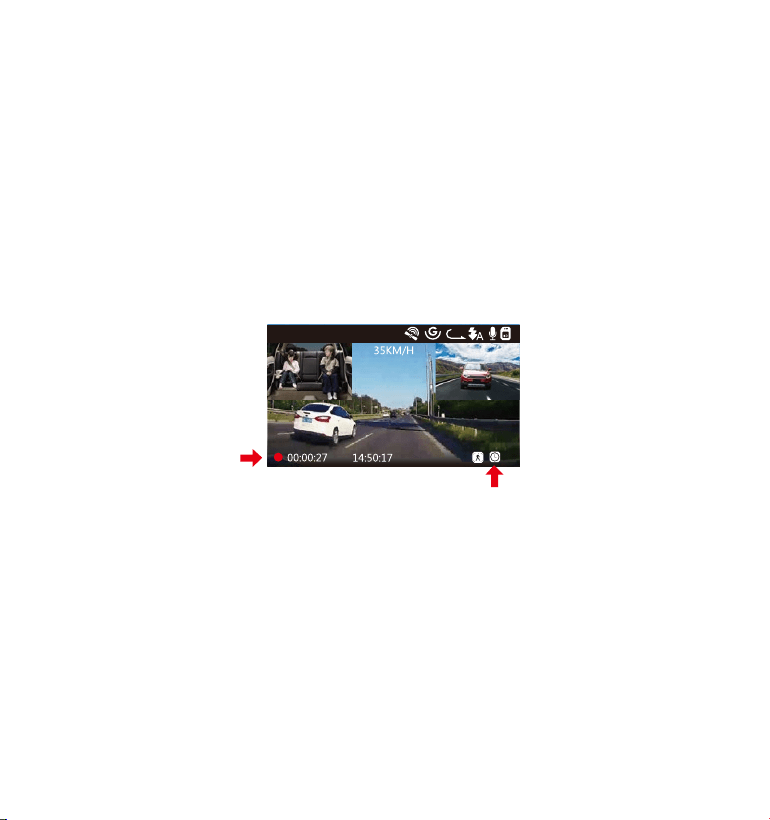
4.11タイムラプス撮影
タイムラプス撮影を選択してください。タイムラプス撮影モード:一定の間隔を空けて
画像を撮影し、連続して再生させることで長時間の映像を短時間で確認できる微速度撮
影です。
※タイムラプス録画は1FPS、5FPS、オフが選択できます。
タイムラプス撮影はオンを選択する場合、たとえば、タイムラプス1FPSを設定すると、
毎秒1つの写真を撮ります、記録された静止画を1FPSの動画に圧縮します。
本体の録画速度は30fpsです、タイムラプス撮影に5FPSを設定する場合に、8時間連続録
画をすると、80分(=8*60*60*5/30/60)の動画を作成します。
タイムラプス総撮影時間 (Sec) = 通常録画時間 (Sec)* 選択されたタイムラプス撮影のフ
レームレート(FPS)/録画フレームレート(FPS)
01-01-2021
3
1440P+1080P+1080P
- 86 -
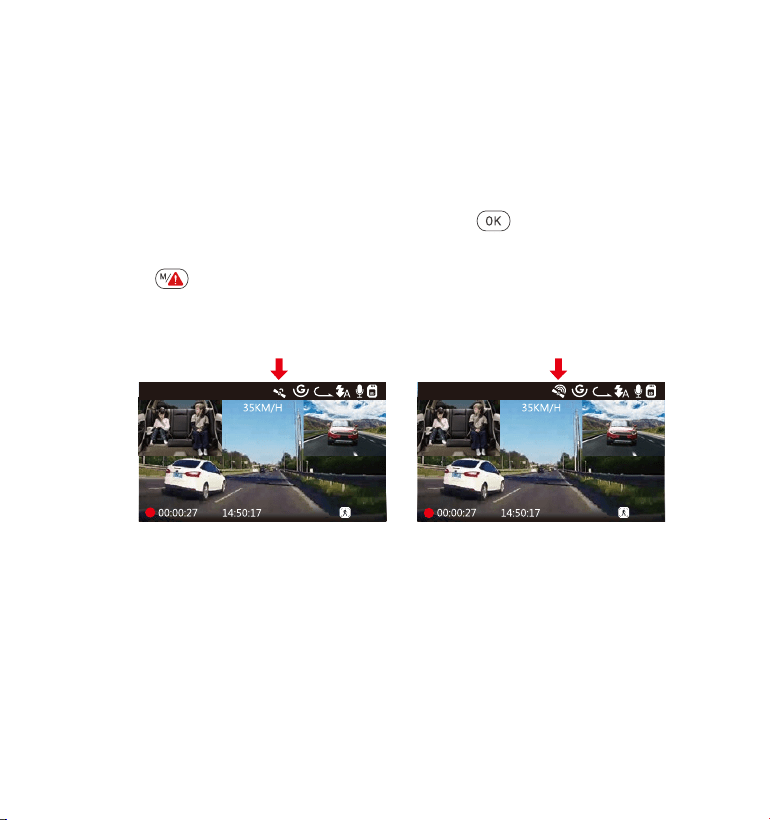
- 87 -
4.12専用GPS受信機の取り付け(別売品)
N4ドライブレコーダーにはGPS受信機は含まれておりません、GPS機能をお使いいただく
場合はVANTRUEGPS受信機(Amazon.co.jpにて販売中)を別途ご用意ください。
付属のマウントの代わりに、GPSマウントを取り付けてください。
GPSマウントのUSBポートで給電してください。
電源を入れると本機は自動的に録画を開始します。
ボタンを押して録画をいったん
停止します。
次に
ボタンを押し【システム設定】>【GPS】を押し、オンを選択してください。
GPS信号の捕捉を開始し、GPSアイコンが点滅します。GPS受信を確認するとGPSアイコ
ンの点滅が停止になります。
1.
2.
3.
4.
5.
01-01-2021
3
1440P+1080P+1080P
01-01-2021
3
1440P+1080P+1080P
画面にGPSと速度のスタンプを表示させたい場合、【録画設定】>【スタンプ設定】>
【GPS】、【速度】を設定してください。
VANTRUEGPSViewerでGPS情報を含んだビデオを再生できます。
VANTRUEGPSViewerのダウンロードアドレス:(www.vantrue.net)
6.
7.
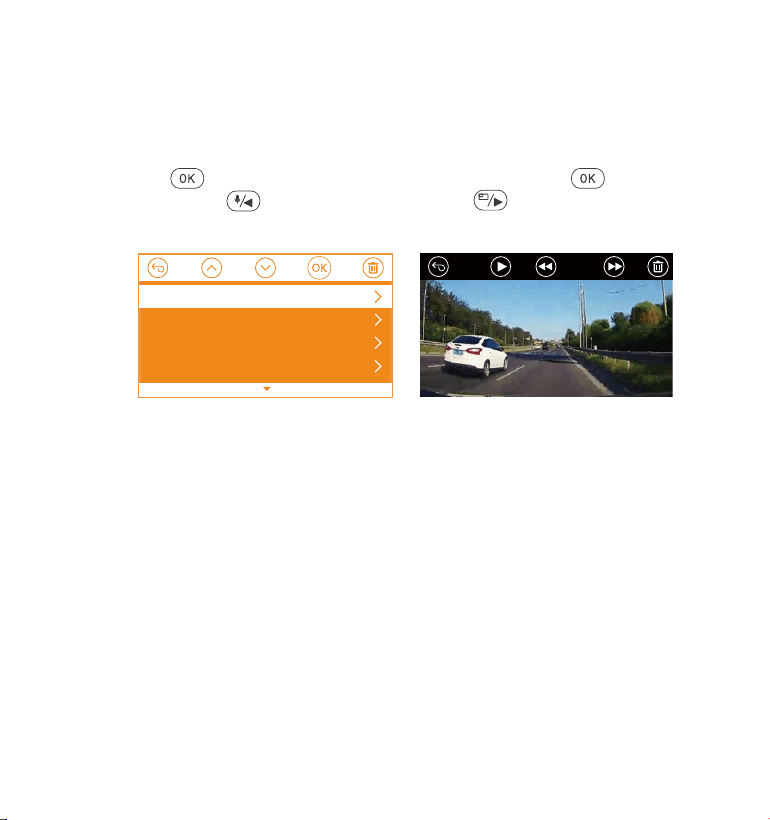
- 88 -
4.13動画の再生
本体で表示
ドライブレコーダーで表示本機モニターで再生できます。
メニュー画面で、【ファイル管理】>【ノーマル】/【イベント】/【全て】を押して動画
を選択し、
ボタンを押して再生します。ビデオの再生中に、【ボタン】を押す
と停止します。【
ボタン】を押すと早送り、【ボタン】を押すと再生速度を
再開します。
1.
2.
PCで表示
ご注意:コンピューターから直接本体のデータを読み込む時、本体のUSBポートと接続し
てください。
カードリーダーなどを使用してコンピューターで再生します。MP4形式に対応した動
画プレーヤーを使用するとビデオとオーディオファイルを再生できます。
付属のUSBケーブルでカメラ本体のUSBポートと接続すると、画面に「電源オン」と
「マスストレージ」が表示されます。「マスストレージ」モード時は本体での操作は
受け付けずコンピューター側でのみデータを読み取ることができます。正常に接続さ
れるとコンピューターでビデオを再生できます。
1/5
2021-01-01_151629_B.MP4
2021-01-01_151629_A.MP4
2021-01-01_113647_B.MP4
2021-01-01_113647_A.MP4
ノーマル
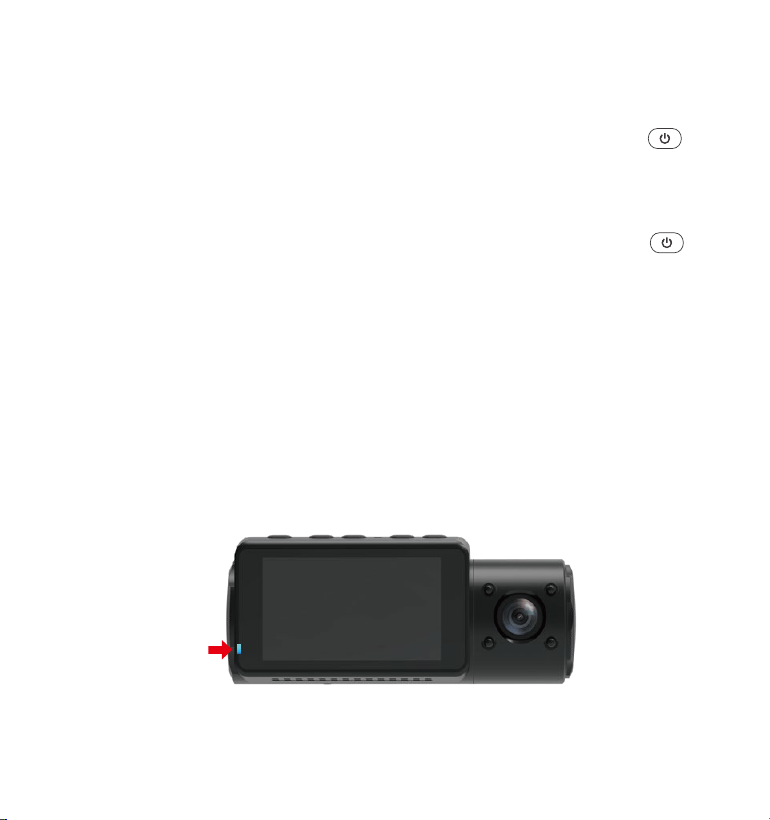
- 89 -
4.14動画の削除
ノーマルファイルの削除
【ファイル管理】>【ノーマル】を押して、削除したいファイルを選択して、【
ボタ
ン】を押して、選択中のみ削除する場合「現在のファイルの削除します」を選択してくださ
い。
イベントファイルの削除
【ファイル管理】>【イベント】を押して、削除したいファイルを選択して、【
ボタ
ン】を押して、選択中のみ削除する場合「現在のファイルの削除します」を選択してくださ
い。
4.15モニター点灯時間
運転中、ドライバーの視線に影響しないため、モニター点灯時間を設定してください。録画
中、設定時間経過後カメラのモニターは自動的にオフになり、同時にLEDインジケータは青
くて点滅しています。任意のボタンを押して、画面が点灯になります。
選択項目は30秒、1分、3分、自動があります。
自動を選択すれば、無操作で3分後、画面の明るさが50%まで下がり、手動で本体を操作
すると、明るさが自動に回復します。

- 90 -
4.16ファームウェアのバージョン
microSDカードにはファームウェアのファイルがある場合、システムは自動的にファーム
ウェアを更新します。正常に更新されると本機は自動的に再起動します。
定期にお手元のファームウェアのバージョンをご確認ください。弊社のウェブサイトで
(www.vantrue.net)最新のファームウェアがダウンロードできます。弊社のウエブサイト
で(www.vantrue.net/register)商品を登録していただきますと、新しいファームウェアをメ
ールでお知らせていただきます。
4.17動作温度
本機の動作温度範囲は-10〜70℃です、動作温度範囲を超える場合、動作や本体の寿命に
影響を及ぼす可能性があります。
夏場など車内が非常に高温になることが見込まれる際は長時間放置しないでください。
温度が上がりすぎると保護機能により、温度が下がるまで本製品は動作を停止します。
気温が-20℃以下になるような冬期に本機を使用しない場合、駐車中はフロントガラスか
ら取り外しグローブボックス等に保管してください。

- 91 -
シャッター
USBポート
電子シャッター
Type-CUSBポート
5.製品仕様
本製品の仕様及び外観は、改良のため予告なく変更することがあります。予めご了承くだ
さい。
型番
フロント:5MCMOSセンサー
車内:2MCMOSセンサー
リア:2MCMOSセンサー
N4
プロセッサー
チャンネル 3カメラチャンネル
オーディオ マイクロホン/スピーカー内蔵
レンズ フロント:F1.4、155度広角レンズ
車内:F2.0、165度広角レンズ
リア:F1.8、160度広角レンズ
2.45インチIPSLCD,480x272LCD
日本語、英語、中国語、ドイツ語、フランス語、イタリア語、スペイ
ン語、ロシア語
言語
ビデオ
フロント+車内+リア録画モード:1440P+1080P+1080P30FPS;
1080P+1080P+1080P30FPS;1080P+1080P+720P30FPS;
1440P+1440P+1080P30FPS;720P+720P+720P30FPS.
フロント+車内録画モード:1440P+1440P30FPS;1440P+1080P30FPS;
1080P+1080P30FPS;1080P+720P30FPS;720P+1080P30FPS;
720P+720P30FPS.
フロント+リア録画モード:2160P+1080P30FPS;1440P+1080P30FPS;
1080P+1080P30FPS;1080P+720P30FPS;720P+1080P30FPS;
720P+720P30FPS.
フロントカメラ録画モード:3840x2160P30FPS;2592x1520P30FPS;
2560x1440P30FPS;1920x1080P30FPS;1280x720P30FPS。
解像度
MP4

6.保証とサポート
保証について
VANTRUE
OnDashN4ドライブレコーダーは12ヶ月の保証期間があります。
18ヶ月の延長保証をご希望の際は、購入日から6ヶ月以内弊社の公式ウェブサイト
で(www.vantrue.net/register)ご購入いただいた商品のご登録をお願い致します。
サポートについて
製品に何のご質問・問題がございましたら、いつでもお気軽にLINE経由(LINE
ID:vantruecam)でお問い合わせいただくかあるいは[email protected]までお問
い合わせください。営業日の場合、弊社はなるべく24時間以内にご返信を差し上
げます。
ご意見
当社は製品とサービスの品質、ユーザーエクスペリエンスを向上させるため日夜
全力で取り組んでいます。製品を改善するうえでの貴重な御意見やアドバイスが
ございましたらご遠慮なく弊社までご連絡をお願いいたします。お客様からのお
声を期待しております。
スーパーコンデンサ
5V1.5A
800mA(標準値)/DC5V
14〜158°F (-10℃〜70℃)
14〜122°F (-10℃〜50℃)
-4〜176°F (-20℃〜80℃)
WindowsXP/Vista/7/8/10&MacOS
電源タイプ
動作電圧
動作電流
動作温度
動作環境温度
保存温度
対応OS
- 92 -
お問合せ先:
LINEID:vantruecam
VANTRUEをご選択いただき、誠にありがとうございます。
- 93 -
製品をご購入頂き、誠にありがとうございます。
お問い合わせ:
www.vantrue.net/contact
facebook.com/vantrue.live
LINE ID:vantruecam

- 94 -
1.Qu'ya-t-ildanslaboîte?
C.
Caméra arrière
(0,98 pi)
F. Câble de la caméra
arrière (20 pieds)
I.
Autocollant adhésif
D. Chargeur de voiture
avec câble de type
Cintégré (11,4 pi)
A.
Caméra Dashcam
VANTRUE
®
N4
G.
Notice de l'utilisateur
B.
Suction Cup Mount
E. Câble de données
USB de type C
(3 pieds)
H.
Guide de
démarrage rapide
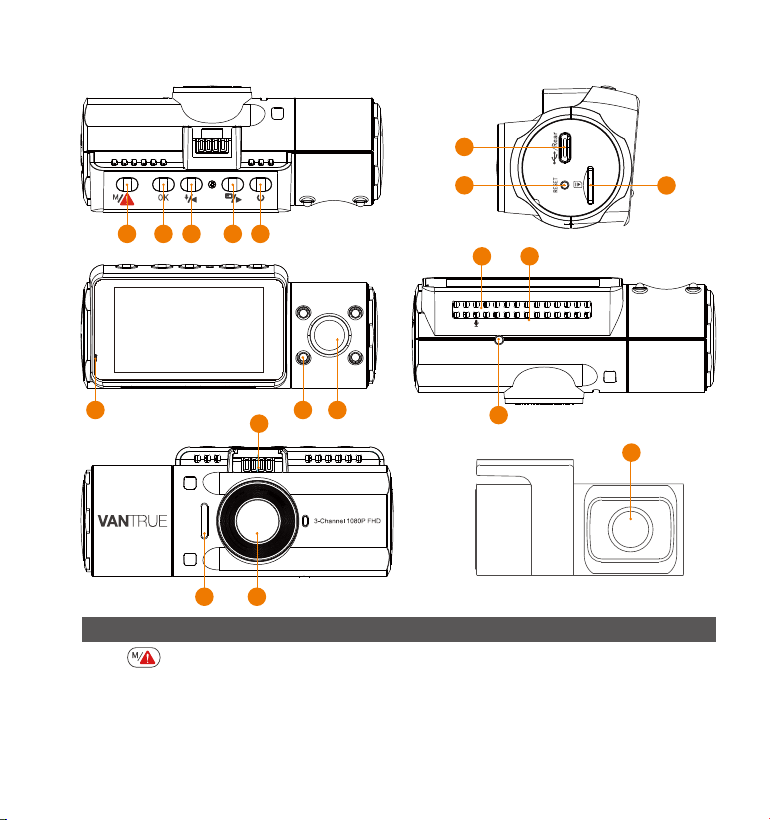
- 95 -
2. Vue d'ensemble de la caméra
NO DescriptionNom
1 Entrer / quitter le menu de Paramètres; Appuyez
longuement pour entrer en mode parking;
Verrouille manuellement le clip vidéo en cours
d'enregistrement après une urgence ou pour
conserver les vidéos importantes.
Bouton
16 17
15
18
321 4 5
6
7
8
9 10 11
14
12 13
VTN40AXXXX
- 96 -
5
4
Bouton
Bouton
Puissance ON/OFF ; Interrupteur d'éclairage
LED IR.
Déplacer le sélecteur vers le bas; Commu-tation
de l'affichage de window/écran de la caméra
avant, cabine et arrière ;
Avance rapide lors de la lecture de vidéos.
3
Déplacer le sélecteur vers le haut; Microphone
activé / désactivé; Avance lente lors de la
lecture de vidéos.
2
Confirme l'action; Arrêtez / démarrez l'enregis-
trement vidéo.
6 Port USB de
type C / caméra
arrière
Port USB de type C pour charger ou transférer
des données; Port de flux vidéo pour diffuser
l'enregistrement de la caméra arrière.
8
Bouton de
réinitialisation
Appuyez pour forcer la réinitialisation de
l'appareil.
10 Lumière LED IR
4 lumières LED IR renforcent la vision nocturne
dans la voiture.
9 Voyant La lumière bleue clignote lors de l'enregistrement;
Allumé lors du chargement.
12 Microphone Records clear audio with the video footage.
Caméra pour l'enregistrement vidéo embarqué.
13
Numéro de série
Numéro de série pour l'enregistrement de la
garantie.
11 Caméra de
cabine
7
Slot pour carte
MicroSD
Fournit un stockage extensible (jusqu'à 512 Go
en FAT 32, U3 ou supérieur).
Bouton
Bouton
14
Capteur de lumière
infrarouge
Sentez la lumière changer.
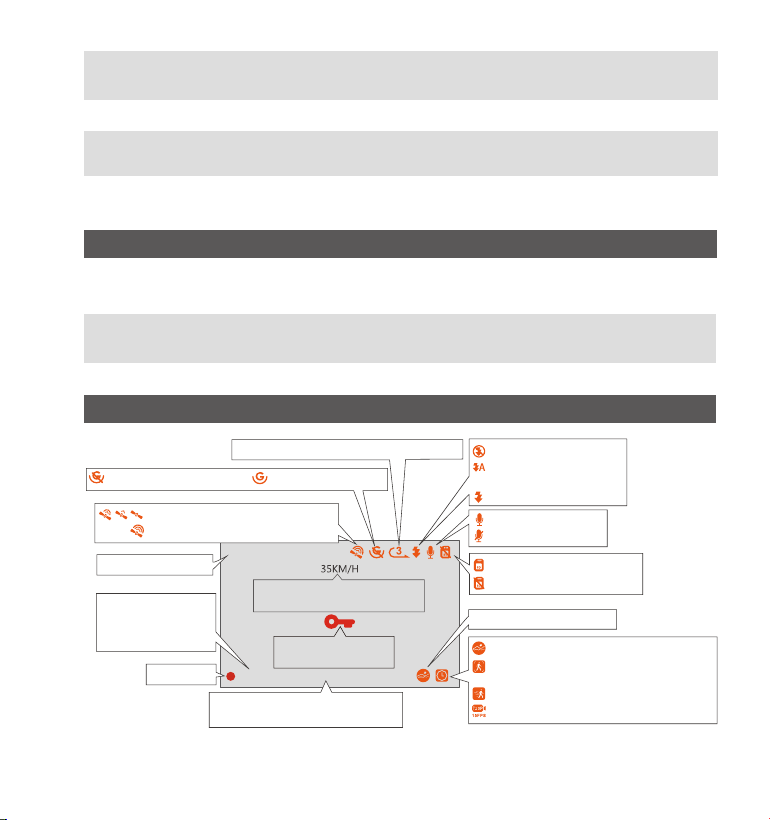
- 97 -
15
Connecteur de
montage
Se connecte au support à ventouse.
16
Haut-parleur
17
Caméra frontale
Caméra frontale pour l'enregistrement vidéo
d'événements sur route.
18
Caméra externe
Caméra externe pour l'enregistrement vidéo
d'événements sur la route arrière.
Indicateur LED
La caméra est branchée sur l'alimentation.La lumière bleue est visible
sur le voyant lumineux [10]
La caméra est en cours d'enregistrement.
Le voyant bleu clignote sur
l'ndicateur de voyant [10]
Aperçudel'écran
Capteur G désactivé
Durée d'enregistrement en boucle
MIC est allumé
MIC est OFF
Enregistre
Verrouillage de
fichier d'urgence
Laps de temps activé
Date actuelle (MM / JJ / AA)
et heure (24H)
Mode nuit désactivé
Marche / arrêt auto
du mode nuit
Mode nuit activé
Résolution vidéo
Capteur G activé
Carte mémoire insérée
Sans carte mémoire
Durée
d'enregistrement
(clip actuel)
Signal GPS verrouillé
Connexion du signal GPS
Vitesse de conduite
enregistrée (KMH ou MPH)
Détection de collision activé
Détection de collision +
détection de mouvement activé
Détection de mouvement activée
Enregistrement à bas débit activé
1440P+1080P+1080P
01-01-202100:00:27 14:50:17
Fournit du son pendant la lecture vidéo.
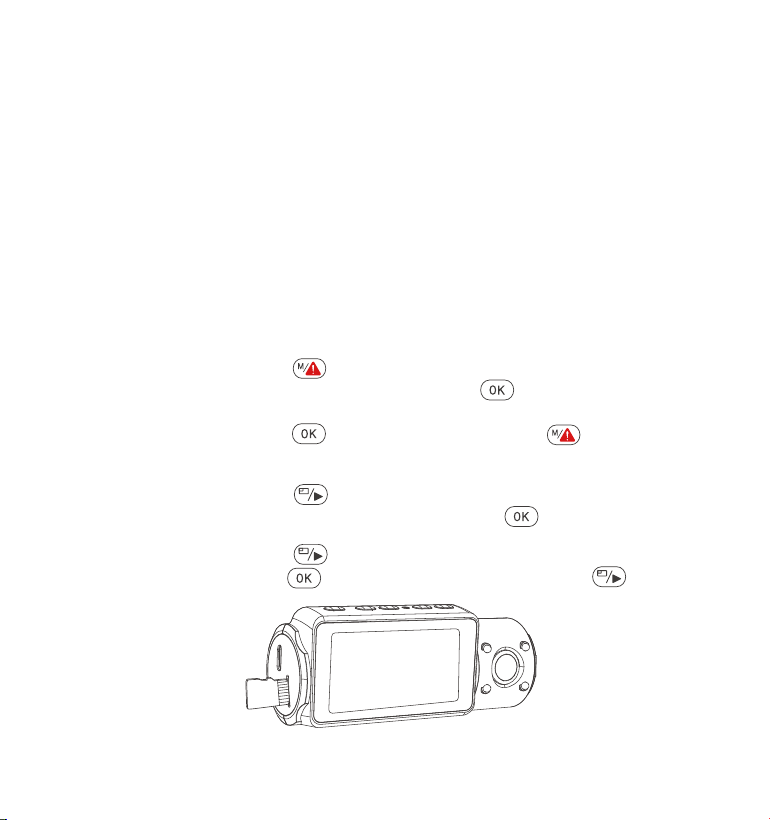
Appuyez sur le bouton pour entrer dans les paramètres; si la caméra
enregistre une vidéo, appuyez sur le bouton pour arrêter l'enregis-
trement; s'il indique "Erreur de carte SD, veuillez formater la carte SD" ici,
appuyez sur le bouton et appuyez sur le bouton pour accéder
au menu.
Appuyez sur le bouton pour mettre en surbrillance l'option de
paramètres du système, appuyez sur le bouton pour confirmer.
Appuyez sur le bouton pour mettre en surbrillance l'option Format,
appuyez sur le bouton pour confirmer avec le bouton pour
sélectionner le format.
- 98 -
Veuillez utiliser une véritable carte mémoire Micro SD de 32 Go à 512 Go
avec un indice de vitesse de U3 ou plus. Nous vous recommandons
d'utiliser la carte Micro SD Vantrue (non incluse). Veuillez insérer la carte
SD lorsque la caméra de Dashcam est éteinte. Insérez avec précaution la
carte mémoire dans le slot pour carte de la dashcam jusqu'à ce qu'il y a
un clic. Pour retirer la carte, mettez d'abord la dashcam hors tension, puis
poussez la carte dans le slot jusqu'à ce qu'elle s'enclenche à nouveau.
Si vous utilisez une carte SD d'une autre marque, avant d'utiliser la carte,
appuyez sur le bouton pour arrêter l'enregistrement.
3. Préparation avant la mise en marche
3.1 Installation d'une carte mémoire (carte microSD VANTRUE recommandée)
•
•
•
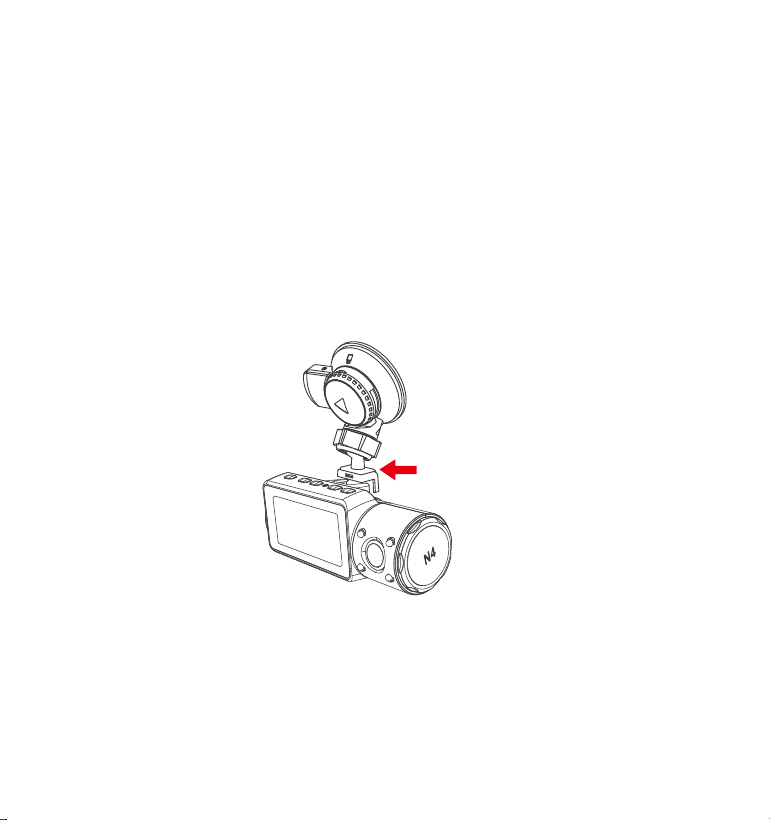
- 99 -
RAPPEL:
La carte microSD doit être formatée une fois par mois pour maximiser la
durée de vie de la carte mémoire.
Veuillez ne pas retirer la carte lorsque la caméra est en train d'enregistrer
au cas où les fichiers vidéo importants manqueraient.
Veuillez ne pas utiliser la carte SD Sandisk ou Transcend sur cette caméra
dashcam.
1.
2.
3.
3.2 Installation de la caméra sur votre pare-brise
Fixez le support d'aspiration au connecteur de montage de la caméra,
en le poussant jusqu'à ce qu'il y un clic.
1.
2.
3.
4.
Nettoyez soigneusement le pare-brise avec de l'eau ou de l'alcool et
essuyez-le avec un chiffon sec.
Essuyez le timbre de montage d'aspiration sur le support d'aspiration.
Fixez solidement le support d'aspiration au pare-brise et faites pivoter le
collier de verrouillage sur le support de 90° vers le haut jusqu'à ce qu'il y
un clic.
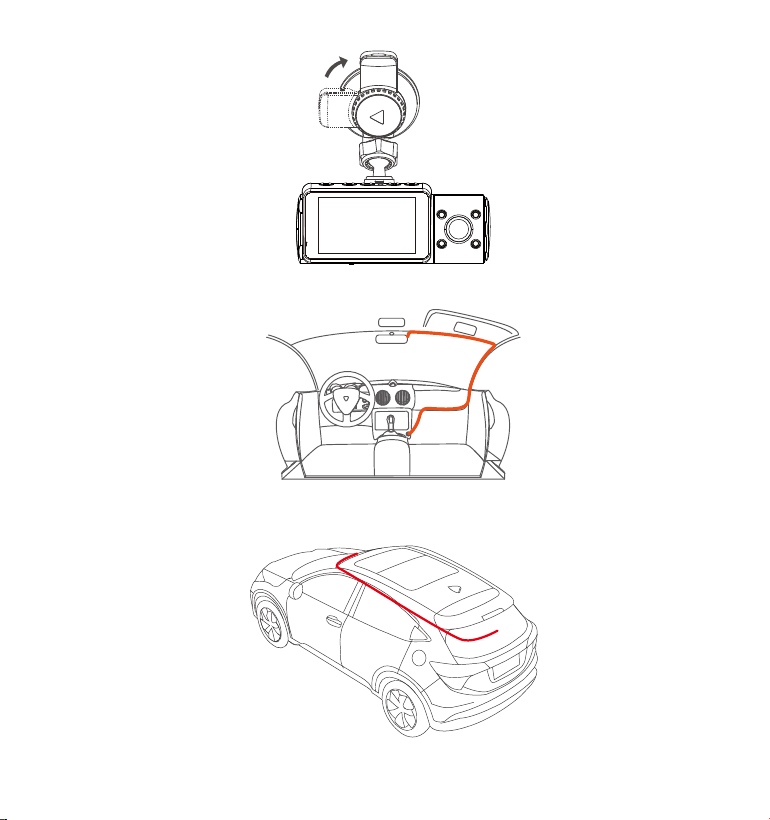
- 100 -
Faites passer soigneusement le câble d'alimentation autour du pare- brise
et placez-le sous la garniture
5.
Connectez la caméra externe au port de came arrière via le câble de
la caméra arrière, acheminez soigneusement le câble et placez-le sous
la garniture.
6.
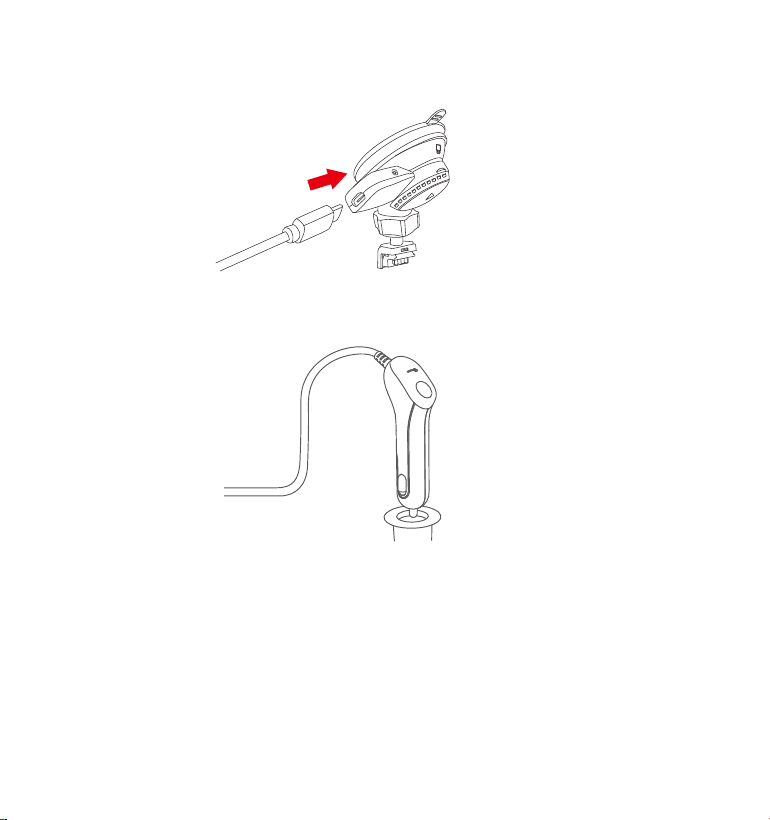
- 101 -
Avec le câble USB de type C, connectez le chargeur de voiture fourni
à la base de montage de la caméra avant.
7.
8. Insérez le chargeur de voiture dans le port allume-cigare de votre
véhicule.
port allume-cigare
du véhicule
9. Démarrez la voiture.
10. La caméra se met automatiquement sous tension et démarre
l'enregistrement.
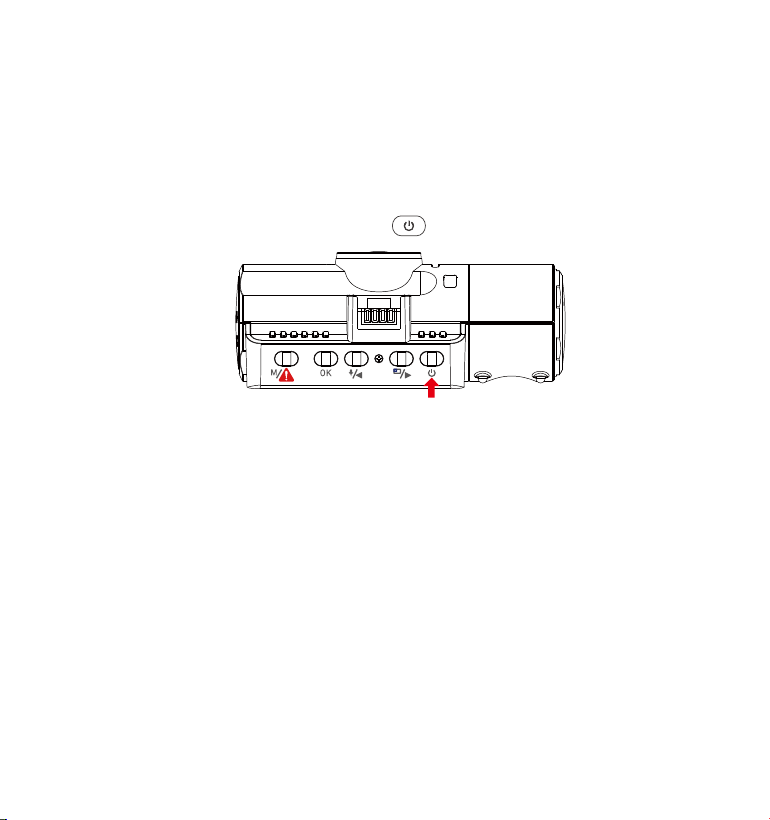
A. Manuellement
Appuyez longuement sur le bouton pour l'éteindre.
- 102 -
4. Opération de base
4.1 Mise sous / hors tension
Une fois que la voiture démarre, la caméra s'allume automatiquement et
commence l'enregistrement.
B. Automatiquement
La Dash cam s'éteint si le câble du chargeur est débranché ou si le
véhicule est éteint.
L'appareil dispose de deux ports USB disponibles pour l'alimentation
électrique de la caméra ou via le support à ventouse.
Lors du chargement via un ordinateur, veuillez utiliser le port USB situé
sur le support. Si vous utilisez le port USB de la caméra, «Connexion USB»
et « démarre » s'afficheront sur l'écran de l'appareil photo, veuillez
sélectionner «Power on/Allumer» pour charger la dash cam.
NOTEZ:
1.
2.
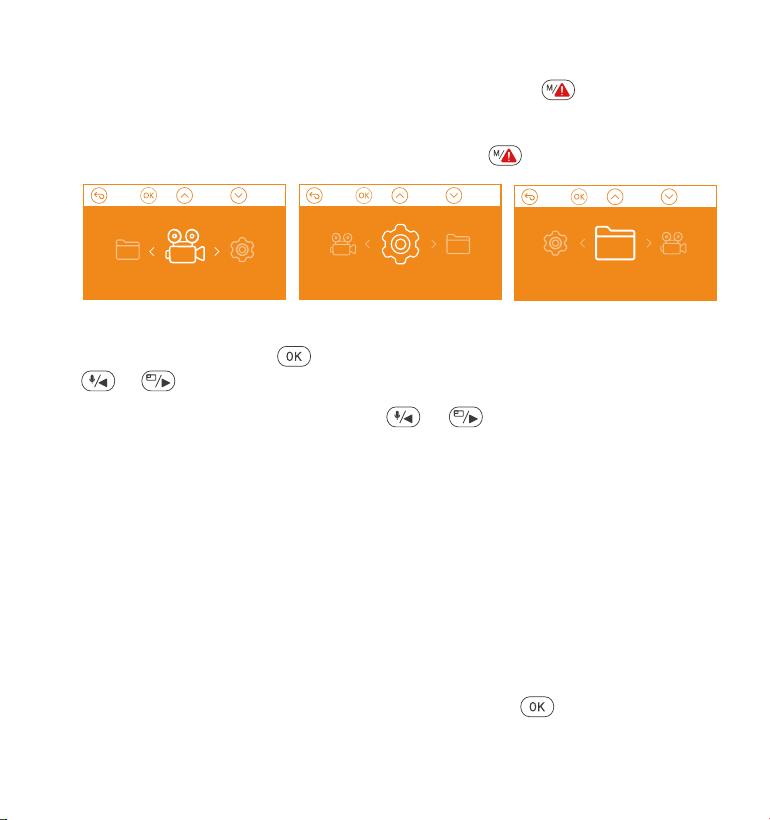
Résolution: Appuyez sur le bouton ou pour basculer entre le mode
d'enregistrement et la résolution.
Mode avant + cabine + arrière: 1440P+1080P+1080P 30FPS;
1080P+1080P+1080P 30FPS; 1080P+1080P+720P 30FPS; 1440P+1440P+1080P
30FPS; 720P+720P+720P 30FPS.
Mode avant + cabine: 1440P+1440P 30FPS; 1440P+1080P 30FPS;
1080P+1080P 30FPS; 1080P+720P 30FPS; 720P+1080P 30FPS; 720P+720P
30FPS.
Mode avant + arrière: 2160P+1080P 30FPS; 1440P+1080P 30FPS;
1080P+1080P 30FPS; 1080P+720P 30FPS; 720P+1080P 30FPS; 720P+720P
30FPS.
Mode de came avant simple: 3840x2160P 30FPS; 2592x1520P 30FPS;
2560x1440P 30FPS; 1920x1080P 30FPS; 1280x720P 30FPS.
Enregistrement en boucle: Appuyez sur le bouton pour changer la
durée: 1 min, 3 min, 5 min et OFF.
- 103 -
Après avoir allumé la caméra, appuyez sur le bouton pour entrer dans
le processus de paramètres.
(Si la caméra enregistre une vidéo, appuyez sur le bouton pour arrêter
l'enregistrement avant d'appuyer sur le bouton .)
4.2 Paramètres de Menu
A. Paramètres de l'enregistrement
Appuyez sur le bouton pour entrer les paramètres et utilisez les boutons
ou pour parcourir les différentes options.
•
•
Paramètres de
l'enregistrement
Paramètres
du système
Fichiers

LED IR: Appuyez sur le bouton et ou pour sélectionner la
section: Auto, Active et Désactive.
Set de capteurs G: Appuyez sur le bouton et ou pour
sélectionner les options de sensibilité: 1,2,3,4,5, OFF/ Désactive.
Enregistrement audio: Appuyez sur le bouton et sur le bouton
pour l'activer / désactiver.
Mode de stationnement/parking: Appuyez sur et sur le bouton
pour modifier les options: Détection de collision, Détection de collision +
mouvement, Détection de mouvement, Enregistrement à faible débit,
OFF/ Désactive.
Détection de collision: Appuyez sur le bouton et ou pour
sélectionner la section: Faible, Moyen et Élevé.
Détection de collision + mouvemen: Appuyez sur le bouton ou
sur le bouton pour sélectionner la section: Faible, Moyen et Élevé.
Détection de mouvement: Appuyez sur le bouton et sur le bouton
ou pour sélectionner la section: Faible, Moyen et Élevé.
Enregistrement à faible débit : Appuyez sur le bouton pour le sélec-
tionner
Exposition: Appuyez sur et sur le bouton ou pour sélectionner
entre l'exposition avant, cabine et arrière.
Avant: +2.0, +1.6, +1.3, +1.0, +0.6, +0.3, +0.0, -0.3, -0.6, -1.0, -1.3, -1.6, -2.0
Cabine: +2.0, +1.6, +1.3, +1.0, +0.6, +0.3, +0.0, -0.3, -0.6, -1.0, -1.3, -1.6, -2.0
Arrière: +2.0, +1.6, +1.3, +1.0, +0.6, +0.3, +0.0, -0.3, -0.6, -1.0, -1.3, -1.6, -2.0
WDR: Appuyez sur et sur le bouton pour l'activer / désactiver.
Plaque d'immatriculation: Appuyez sur ou et sur le bouton
pour définir votre numéro de licence de voiture.
Timbre: Appuyez sur le bouton et sur ou pour le désactiver /
activer Le timbre indique la date / heure, le logo, le numéro de voiture, la
vitesse et les informations de localisation GPS.
Rotation de l'affichage: Appuyez sur le bouton et ou pour
sélectionner les options: Avant + Cabine, Arrière.
•
•
•
•
•
- 104 -
•
•
•
•
•
•
•
•

Langue: Appuyez sur le bouton et ou pour choisir entre
l'anglais, le chinois simplifié, le japonais, l'allemand, l'italien, l'espagnol, le
français et le russe.
Formater la carte mémoire: appuyez sur et sélectionnez le format
pour formater la carte micro SD.
Paramètres du rappel de format: appuyez sur le bouton et ou
pour sélectionner les options de rappel: 15 jours, 1 mois et désactivé.
Remarque: si vous modifiez l'option de rappel de format, formatez la
carte SD à l'avance ou réinitialisez manuellement, la caméra de tableau
de bord calculera l'heure.
Heure & Date: Vous pouvez mettre à jour automatiquement via GPS ou
définir manuellement
Arrêt automatique de l'écran LCD:
Si le paramètre est de 3 minutes, l'écran de dashcam s'éteint automa-
tiquement après 3 minutes de démarrage de l'enregis trement. Si le
paramètre est Auto, la luminosité de l'écran diminuera à 50% après 3
minutes d'enregistrement vidéo normal, mais sa luminosité sera restaurée
par une opération manuelle.
Appuyez sur le bouton pour sélectionner les options: Auto, 30 Sec, 1
Min, 3 Min.
Son de l'appareil: Appuyez sur le bouton ou pour régler le son de
l'appareil.
Fréquence: appuyez sur le bouton pour basculer entre 50 Hz / 60 Hz
Informations système: appuyez sur le bouton pour vérifier la version
actuelle du micrologiciel/firmware et le site Web. (Information système)
Réglage par défaut: appuyez sur et sur le bouton pour sélection-
ner pour réinitialiser l'appareil aux paramètres d'usine.
GPS: appuyez sur le bouton pour l'activer / le désactiver.
•
- 105 -
B.Paramètresdusystème
•
•
•
•
•
•
•
•
•
•
Laps de temps: Appuyez sur le bouton et ou pour sélec-
tionner les options: 1FPS, 5FPS et OFF
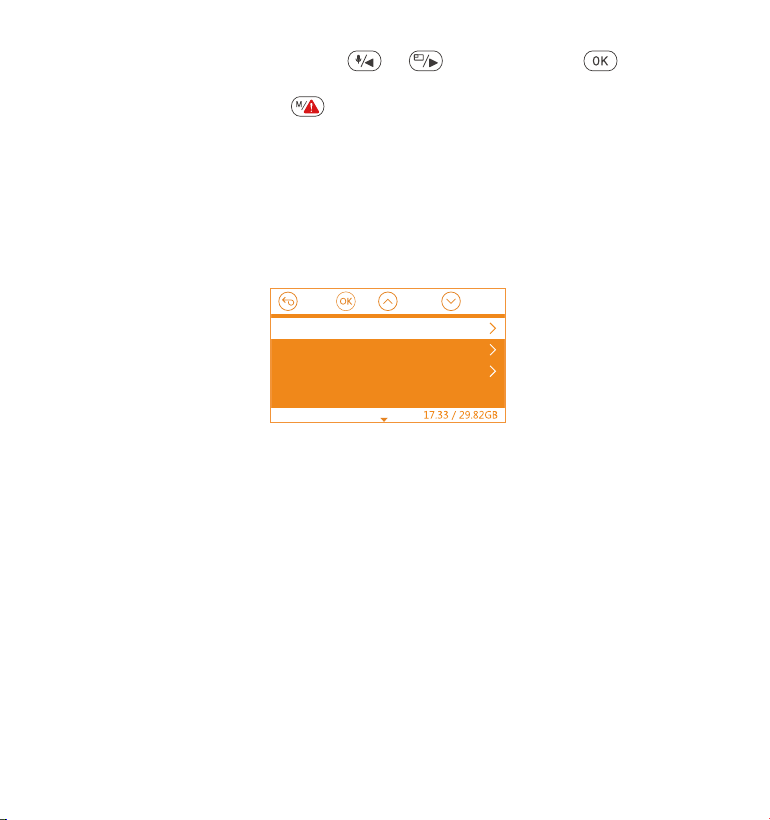
Unité de vitesse: Appuyez sur ou et sur le bouton poursélec-
tionner soit KM / H ou MP / H.
Appuyez sur le bouton pour quitter et terminer le paramètre.
•
C.Fichiers
•
•
•
4.3 Régler la date / l'heure
Il existe deux méthodes de réglage①Mise à jour automatique du GPS, ②
Réglage manuel de la date/heure. Mise à jour automatique par défaut.
--Lorsque la correction automatique de l'heure GPS est activée, l'heure et
la date changent automatiquement en fonction du fuseau horaire que
vous avez sélectionné une fois le positionnement GPS réussi.
--Vous pouvez régler manuellement la date/heure
Examiner et supprimer les vidéos stockées dans les dossiers de fichiers.
Événement: vidéos d'événements critiques détectées par l'activité du
capteur G ou verrouillées manuellement par l'utilisateur.
Normal: vidéos standard enregistrées.
Tous: Toutes les vidéos standard et les vidéos d'événements critiques
enregistrées.
Evénement
Normal
Tous
Fichiers
- 106 -
Pour régler manuellement la date/l'heure, vous devez désactiver la
correction automatique de l'heure du GPS avant le réglage.
La correction automatique de l'heure par GPS doit sélectionner le bon
fuseau horaire, sinon l'heure sera inexacte.
1.
2.
Avis:
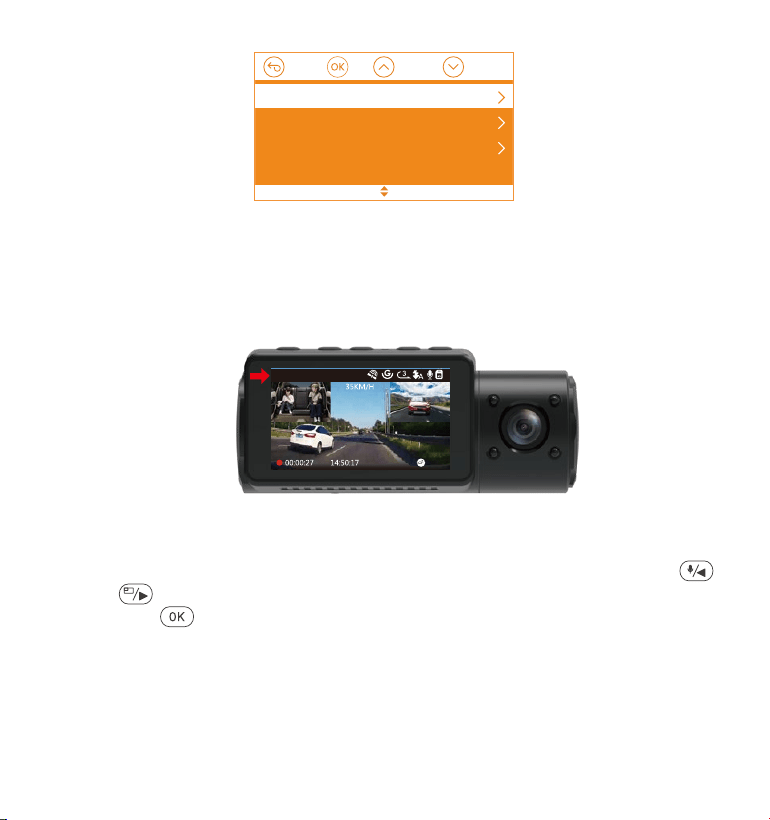
Mode avant + arrière: 2160P+1080P 30FPS; 1440P+1080P 30FPS;
1080P+1080P 30FPS; 1080P+720P 30FPS; 720P+1080P 30FPS; 720P+720P
30FPS.
Mode de came avant simple: 3840x2160P 30FPS; 2592x1520P 30FPS;
2560x1440P 30FPS; 1920x1080P 30FPS; 1280x720P 30FPS.
Pour terminer les paramètres, appuyez simplement sur le bouton
pour quitter.
- 107 -
4.4 Changer de mode / résolution d'enregistrement
Par défaut (mode d'enregistrement avant + cabine + arrière), la résolu-
tion 1440P + 1080P + 1080P s'affiche à l'écran, les 3 caméras captureront
simultanément l'avant de la route, l'intérieur de la cabine et l'arrière à
1440P + 1080P + 1080P (30fps).
01-01-2021
1440P+1080P+1080P
Il peut être commuté en mode Avant + Cabine, Avant + Arrière ou Avant
avec les étapes suivantes:
•
Allez dans «Paramètres de l'enregistrement»> «Résolution», naviguez
ou pour sélectionner le mode d'enregistrement. Appuyez sur le
bouton pour confirmer et continuer.
Mode avant + cabine + arrière: 1440P+1080P+1080P 30FPS;
1080P+1080P+1080P 30FPS; 1080P+1080P+720P 30FPS; 1440P+1440P+1080P
30FPS; 720P+720P+720P 30FPS.
Mode avant + cabine: 1440P+1440P 30FPS; 1440P+1080P 30FPS;
1080P+1080P 30FPS; 1080P+720P 30FPS; 720P+1080P 30FPS; 720P+720P
30FPS.
MiseàjourautomatiqueduGPS
Réglermanuellementladate/l'heure
Stylededate
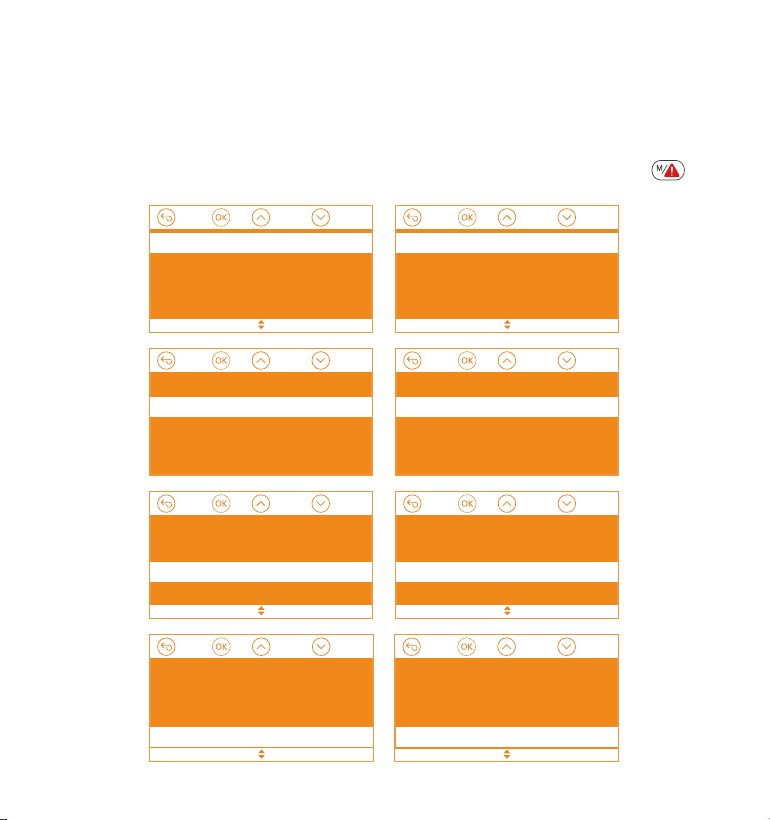
Mode avant + arrière: 2160P+1080P 30FPS; 1440P+1080P 30FPS;
1080P+1080P 30FPS; 1080P+720P 30FPS; 720P+1080P 30FPS; 720P+720P
30FPS.
Mode de came avant simple: 3840x2160P 30FPS; 2592x1520P 30FPS;
2560x1440P 30FPS; 1920x1080P 30FPS; 1280x720P 30FPS.
Pour terminer les paramètres, appuyez simplement sur le bouton
pour quitter.
- 108 -
Avant+Cabine+ Arrière
Avant+Cabine
Avant+ Arrière
Avant
1440P+1080P+1080P 30FPS
1080P+1080P+1080P 30FPS
1080P+1080P+720P 30FPS
720P+720P+720P 30FPS
Avant+Cabine+ Arrière
Avant+Cabine
Avant+ Arrière
Avant
1080P+1080P 30FPS
1080P+720P 30FPS
1440P+1440P 30FPS
1440P+1080P 30FPS
Avant+Cabine+ Arrière
Avant+Cabine
Avant+ Arrière
Avant
2160P+1080P 30FPS
1440P+1080P 30FPS
1080P+1080P 30FPS
1080P+720P 30FPS
Avant+Cabine+ Arrière
Avant+Cabine
Avant+ Arrière
Avant
3840x2160P 30FPS
2592x1520P 30FPS
2560x1440P 30FPS
1920x1080P 30FPS
Allez dans «Paramètres de l'enregistrement»> «Résolution», naviguez
ou pour sélectionner le mode d'enregistrement. Appuyez sur le
bouton pour confirmer et continuer.
Mode avant + cabine + arrière: 1440P+1080P+1080P 30FPS;
1080P+1080P+1080P 30FPS; 1080P+1080P+720P 30FPS; 1440P+1440P+1080P
30FPS; 720P+720P+720P 30FPS.
Mode avant + cabine: 1440P+1440P 30FPS; 1440P+1080P 30FPS;
1080P+1080P 30FPS; 1080P+720P 30FPS; 720P+1080P 30FPS; 720P+720P
30FPS.
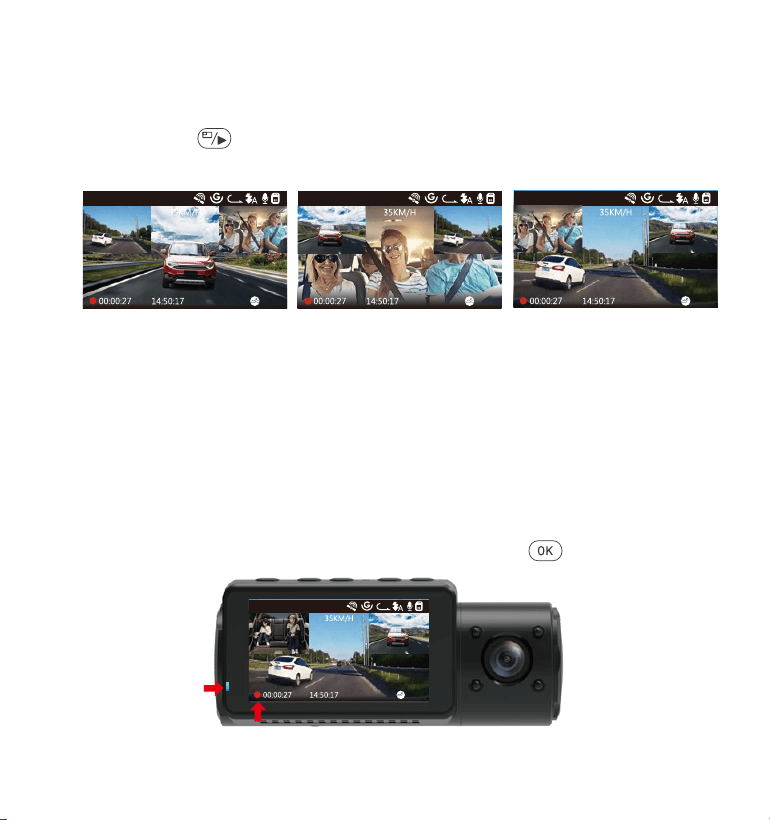
- 109 -
CamérafrontaleplusgrandeCaméraintérieureplusgrandeCaméraarrièreplusgrande
3
1440P+1080P+1080P
01-08-2021
3
1440P+1080P+1080P
01-08-2021
3
1440P+1080P+1080P
01-08-2021
4.6 Enregistrement en boucle
Avec une carte mémoire insérée, la caméra démarre (par défaut)
immédiatement l'enregistrement vidéo en boucle lorsqu'elle est
connectée à une source d'alimentation et mise sous tension. Si l'appareil
n'est pas connecté à une source d'alimentation, il ne démarrera pas et
n'enregistrera pas immédiatement. Pendant l'enregistrement, l'indicateur
d'enregistrement clignotera et un point rouge clignotera dans le coin
inférieur gauche de l'écran. Vous pouvez arrêter / démarrer l'enregis-
trement à tout moment en appuyant sur le bouton .
01-01-2021
3
1440P+1080P+1080P
En mode d'enregistrement à trois ou à deux voies, vous pouvez appuyer
sur le bouton pour changer d'affichage afin que la caméra arrière /
intérieure soit plus grande sur l'écran LCD.
4.5 Basculer l'affichage de l'écran/window de la caméra avant, cabine et
arrière
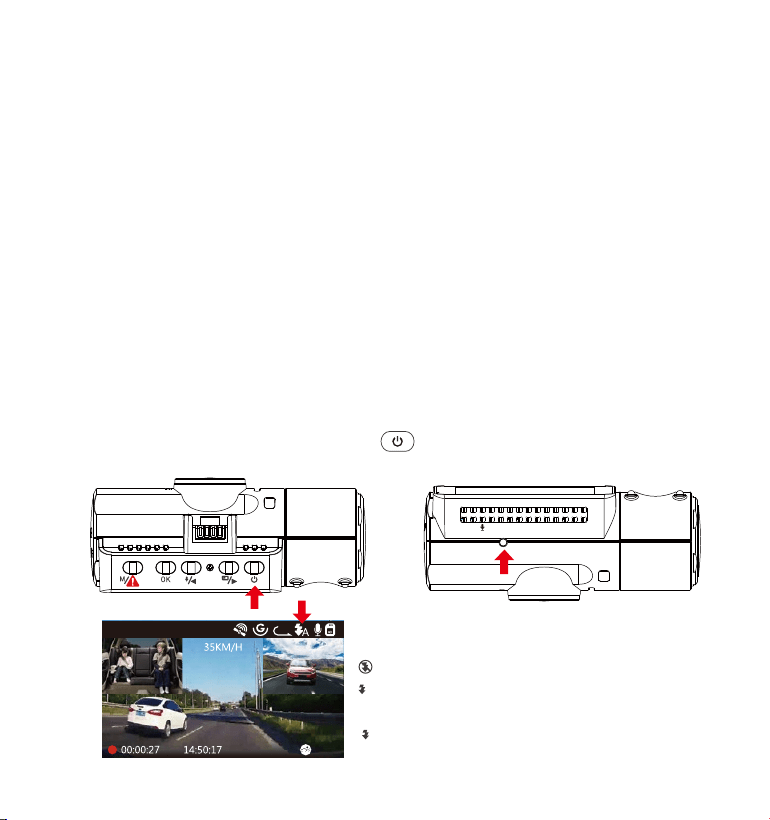
- 110 -
4.7 Lumière LED IR
Par défaut, la lumière LED IR est allumée automatiquement.
Appuyez brièvement sur le bouton pour basculer le mode de vision
nocturne sur ON, Auto ON / OFF, OFF.
Capteur de lumière infrarouge
VTN40AXXXX
Mode nuit désactivé
Marche / arrêt automatique
du mode nuit
Mode nuit activé
A
01-01-2021
3
1440P+1080P+1080P
Par défaut, la durée d'enregistrement en boucle est de 3 minutes. Veuillez
aller à «Paramètres de l'enregistrement»> «Enregistrement en boucle» pour
le changer en 1 min, 3 min ou 5 min selon vos besoins.
Le format du nom du fichier vidéo d'enregistrement en boucle est «Anné_-
Date_- heur_A.MP4». Par exemple: «2021-08-01-060101-A.MP4». Le suffixe A
indique les fichiers enregistrés par la caméra avant, tandis que le suffixe B
fait référence aux fichiers enregistrés par la caméra de cabine et le suffixe
C indique les fichiers enregistrés par la caméra externe. Les fichiers
standard sont stockés dans le dossier «Vidéo / Normal». Lorsque la carte
Micro SD est pleine, la caméra écrasera les fichiers plus anciens.
Lorsque l'enregistrement en boucle est désactivé, la caméra enregistre la
vidéo en clips de 20 minutes, mais n'écrase pas les anciennes vidéos
lorsque la carte de stockage est pleine.
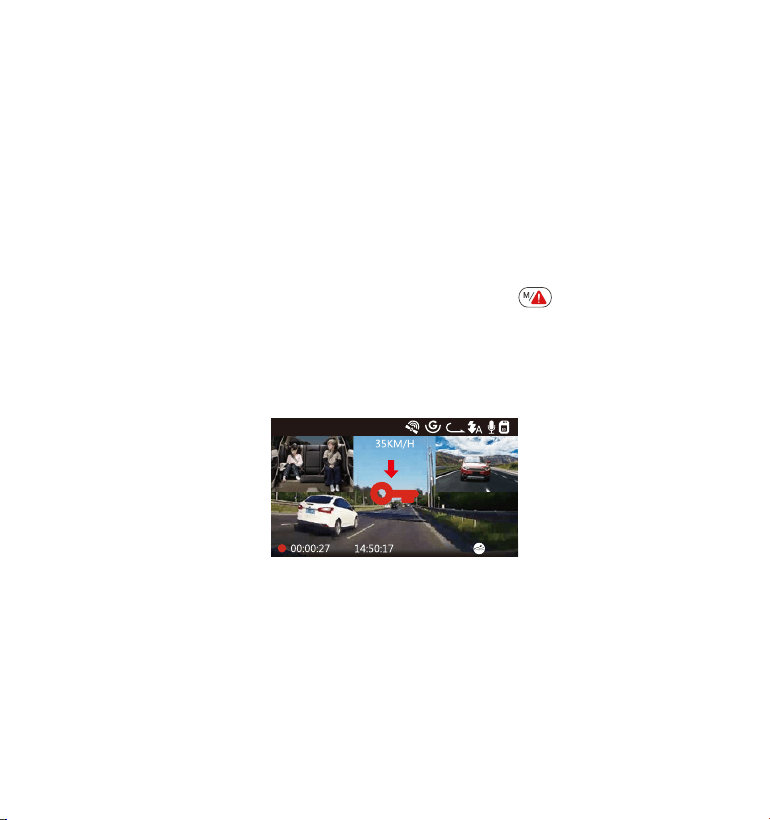
- 111 -
3
1440P+1080P+1080P
01-01-2021
La détection d'événement critique est déclenchée par le capteur G
(capteur de gravité) et détecte automatiquement les impacts et les
collisions du véhicule. La caméra protégera ainsi le clip vidéo actuel
contre l'écrasement en le verrouillant et en enregistrant le métrage dans le
dossier «Vidéo / Événement».
L'utilisateur peut également verrouiller manuellement la session L'enregis-
trement vidéo en cours en appuyant sur le bouton . Une icône de clé
apparaît au centre de l'écran.
La sensibilité du capteur G est réglable avec 6 réglages: 1, 2, 3,4, 5 et OFF
elle est réglée sur 3 par défaut. Le capteur G peut également être
désactivé dans «Paramètres de l'enregistrement»> «Capteur G».
4.8 Enregistrement d'événements
Les vidéos d'événements sont stockées dans le dossier «Vidéo / Événe-
ment» et ne peuvent pas être écrasées automatiquement.
Remarque: la caméra écrasera automatiquement les anciennes vidéos
d'événements une fois que le dossier d'événements aura accumulé 30%
de la capacité de la carte. Veuillez transférer régulièrement des vidéos
importantes sur votre PC ou un autre emplacement de stockage (par
exemple, un disque dur externe). Pour maintenir de bonnes performances
Remarque: si les lumières infrarouges sont allumées, les séquences vidéo
de la cabine se transforment en noir et blanc.
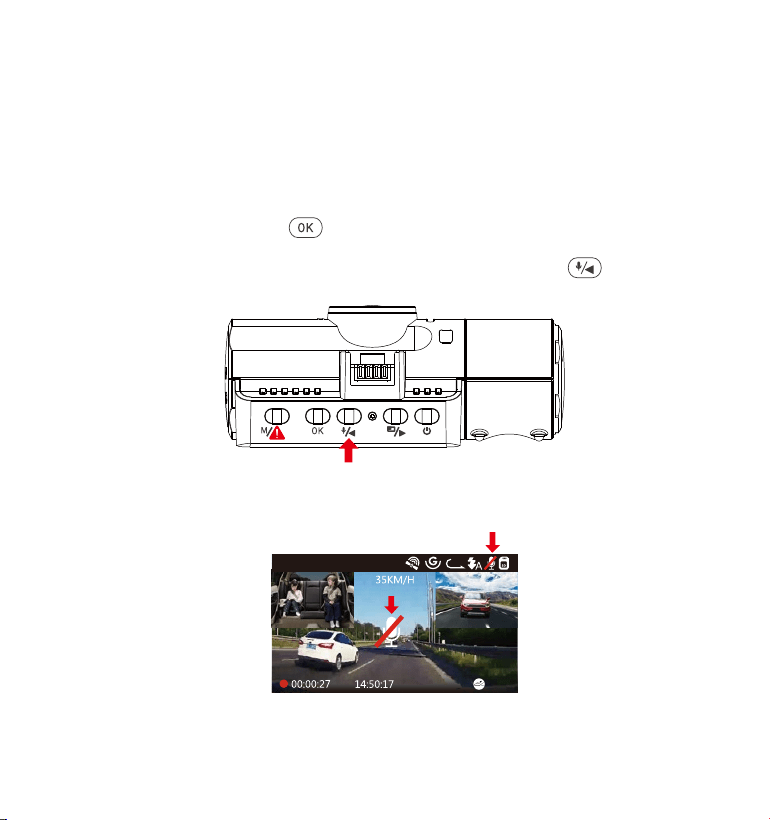
- 112 -
4.9 Enregistrement vocal
Par défaut, l'enregistrement vocal est activé. Il peut être désactivé en
utilisant l'une des méthodes suivantes:
Allez dans «Paramètres de l'enregistrement»> «Enregistrement audio»,
appuyez sur le bouton et sélectionnez OFF;
Pendant l'enregistrement vidéo, appuyez sur le bouton pour activer
/ désactiver l'enregistrement vocal.
•
•
Lorsque l'enregistrement vocal a été désactivé, l'icône MIC en haut de
l'écran deviendra blanche avec une ligne rouge à travers elle.
01-01-2021
3
1440P+1080P+1080P
de lecture / écriture, la carte microSD doit être formatée au moins une fois
par mois.

- 113 -
4.10.1 Détection de collision déclenchée
Lorsque la détection de collision a été activée et que aucun mouve-
ment n'est détecté après 5 minutes d'enregistrement, puis la Détection
de Collision est activée avec une détection de collision dans le coin
inférieur droit de l'écran et la caméra s'éteint automatiquement.
L'enregistrement plein frame sera déclenché par le capteur de
détection de collision. Une fois que la caméra détecte les chocs ou les
collisions du véhicule, elle s'allume automatiquement et démarre
l'enregistrement automatique; il arrêtera l'enregistrement et s'éteindra
automatiquement après 5 minutes d'inactivité.
Pour vous assurer que la caméra peut fonctionner en mode parking,
Veuillez le maintenir alimenté avec une banque d'alimentation mobile
ou la connecter directement à la batterie de la voiture. Nous vous
déconseillons de faire fonctionner la caméra photo en continu
pendant trop longtemps.
La température de l'environnement de travail N4 est de 14 à 122°F
(-10°C à 50°C), nous vous recommandons d'utiliser la détection de
collision dans cette plage de température, donc une fois que la
température est au-delà de la plage de température de travail
normale, elle s'éteint automatiquement. Si la température est élevée,
veuillez retirer la dashcam lorsque vous avez garé votre voiture.
REMARQUE:
1.
2.
4.10 Mode de stationnement (alimentation constante nécessaire)
Le mode parking fonctionne comme une fonction de sentinelle dans
différentes situations. Pour activer le mode parking, allez dans
«Paramètres de l'enregistrement»> «Mode Parking», appuyez sur le
bouton et sélectionnez es options suivantes: détection de collision,
détection de collision + mouvement, détection de mouvement,
enregistrement à faible débit, désactive/OFF.
La sensibilité de détection de collision est réglable avec 3 réglages:
faible, moyen et élevé. Veuillez aller à «Paramètres de l'enregis-
trement»> «Mode Parking»> «Collision Detection» pour le modifier selon
vos besoins.

Lorsque la détection de collision a été activée et que aucun mouve-
ment n'est détecté après 5 minutes d'enregistrement, puis la Détection
de Collision est activée avec une détection de collision dans le coin
inférieur droit de l'écran et la caméra s'éteint automatiquement.
L'enregistrement plein frame sera déclenché par le capteur de
détection de collision. Une fois que la caméra détecte les chocs ou les
collisions du véhicule, elle s'allume automatiquement et démarre
l'enregistrement automatique; il arrêtera l'enregistrement et s'éteindra
automatiquement après 5 minutes d'inactivité.
- 114 -
01-01-2021
3
1440P+1080P+1080P
Lorsque la détection de collision + détection de mouvement a été activé,
cela est représenté par une icône Détection de collision + Détection de
mouvement dans le coin inférieur droit de l'écran.
Si aucun mouvement n'est détecté après 5 minutes d'enregistrement, une
icône P orange apparaît au centre de l'écran, ce qui signifie que le mode
parking est activé. Une fois que la caméra détecte un mouvement devant, 3
caméras démarrent simultanément l'enregistrement automatique ; elles
arrêteront l'enregistrement après 30 secondes d'inactivité.
La détection de collision + détection de mouvement est réglable avec 3
réglages: faible, moyen et élevé. Veuillez aller à «Paramètres de l'enregis-
trement»> «Mode Parking »> «Détection de Collision + Détection de mouve-
ment» pour le modifier selon vos besoins.
4.10.2 Détection de collision + mouvement déclenchée
La sensibilité de détection de collision est réglable avec 3 réglages:
faible, moyen et élevé. Veuillez aller à «Paramètres de l'enregis-
trement»> «Mode Parking»> «Collision Detection» pour le modifier selon
vos besoins.
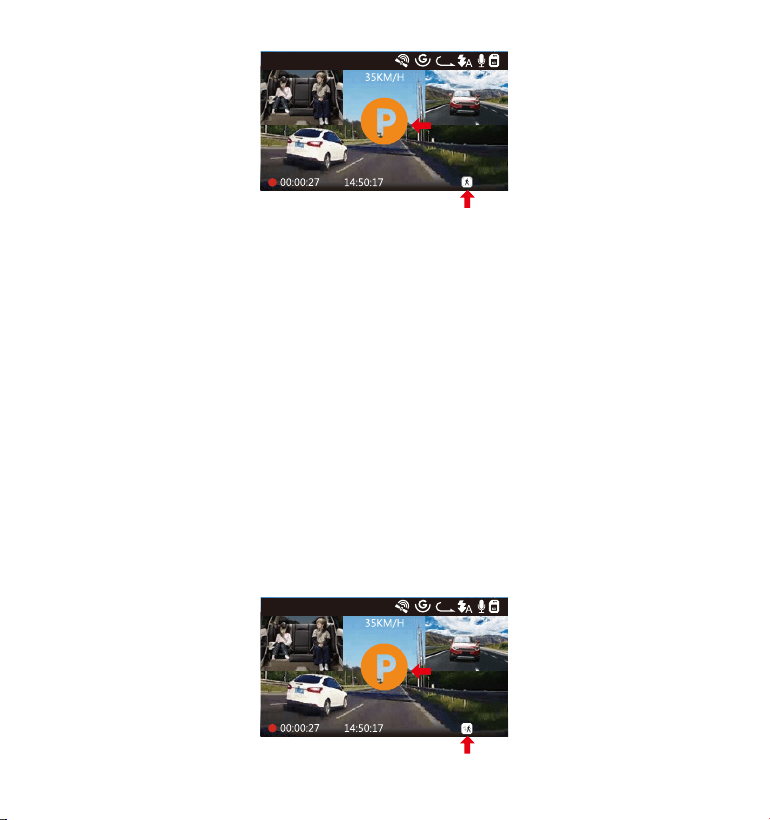
01-01-2021
3
1440P+1080P+1080P
- 115 -
REMARQUE: en mode Détection de collision + Détection de mouvement, si la
caméra dash cam est désactivée manuellement, elle s'allumera et enregistre-
ra une fois qu'elle détectera une vibration.
4.10.3 Détection de mouvement
Lorsque la détection de mouvement a été activée, cela est représenté
par une icône de détection de mouvement dans le coin inférieur droit
de l'écran. Si aucun mouvement n'est détecté après 5 minutes d'enregis-
trement, une icône P orange apparaît au centre de l'écran, ce qui
signifie que le mode parking est activé. Une fois que la caméra détecte
un mouvement devant, 3 caméras démarrent simultanément l'enregis-
trement automatique; ils arrêteront l'enregistrement après 30 secondes
d'inactivité.
La détection de mouvement est réglable avec 3 réglages: faible, Moyen
et haut. Veuillez aller à «Paramètres de l'enregistrement»> «Mode Parking
» > « Détection de mouvement »pour le modifier selon vos besoins.
01-01-2021
3
1440P+1080P+1080P
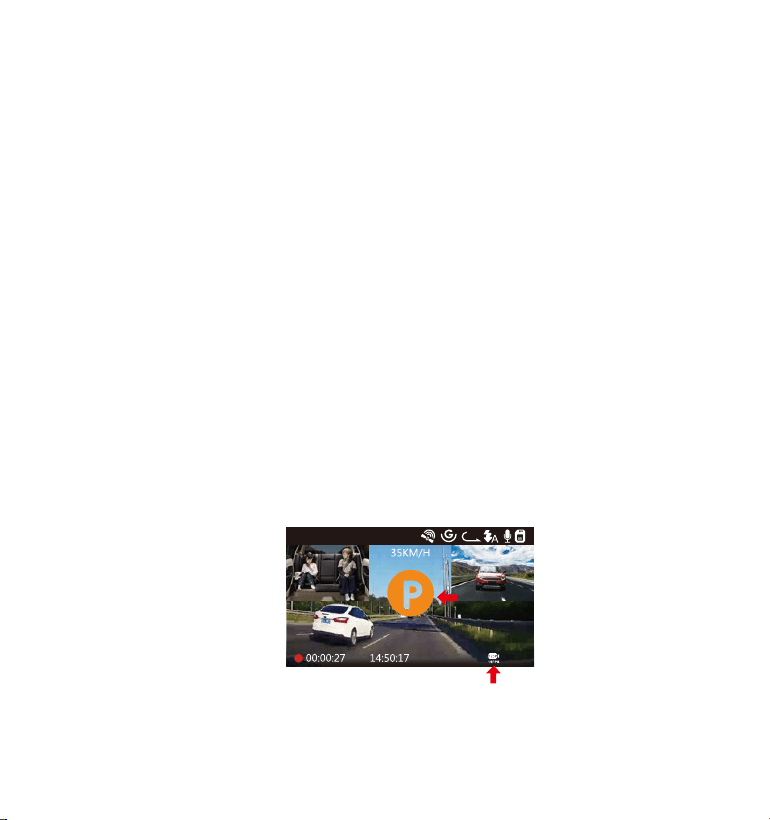
En mode de détection de mouvement, si la caméra est désactivée
manuellement, elle ne s'allumera pas et n'enregistrera pas même si elle
détecte des vibrations.
Dans le laps de temps, la caméra dashcam ne peut pas entrer en
mode de détection de mouvement.
REMARQUE:
1.
2.
- 116 -
Lorsque l'enregistrement à bas débit binaire a été activé, cela est
représenté par une icône d'enregistrement à bas débit binaire dans le
coin inférieur droit de l'écran. Si aucun mouvement n'est détecté après 5
minutes d'enregistrement, une icône P orange apparaît au centre de
l'écran, ce qui signifie que le mode parking est activé. Une fois que la
caméra entre en enregistrement à bas débit, la caméra passe automa-
tiquement à la résolution 720P @ 15fps et continue l'enregistrement. Par
exemple: le mode avant simple enregistrera la vidéo à 720P @ 15fps, et le
mode d'enregistrement double enregistrera la vidéo à 720+ 720P @ 15fps,
l'enregistrement 3 voies enregistrera la vidéo à 720P + 720P + 720P @ 15FPS.
La caméra quittera l'enregistrement à bas débit si elle détecte des
vibrations et enregistrera à la résolution sélectionnée.
4.10.4 Enregistrement à faible débit
01-01-2021
3
720P+720P+720P 15FPS
1.
En enregistrement à bas débit, si la caméra est désactivée manuelle-
ment, elle ne s'allumera pas et n'enregistrera pas même si elle détecte
des vibrations.
REMARQUE :
En Laps de temps, la caméra ne peut pas entrer en mode d'enregis-
trement à bas débit.
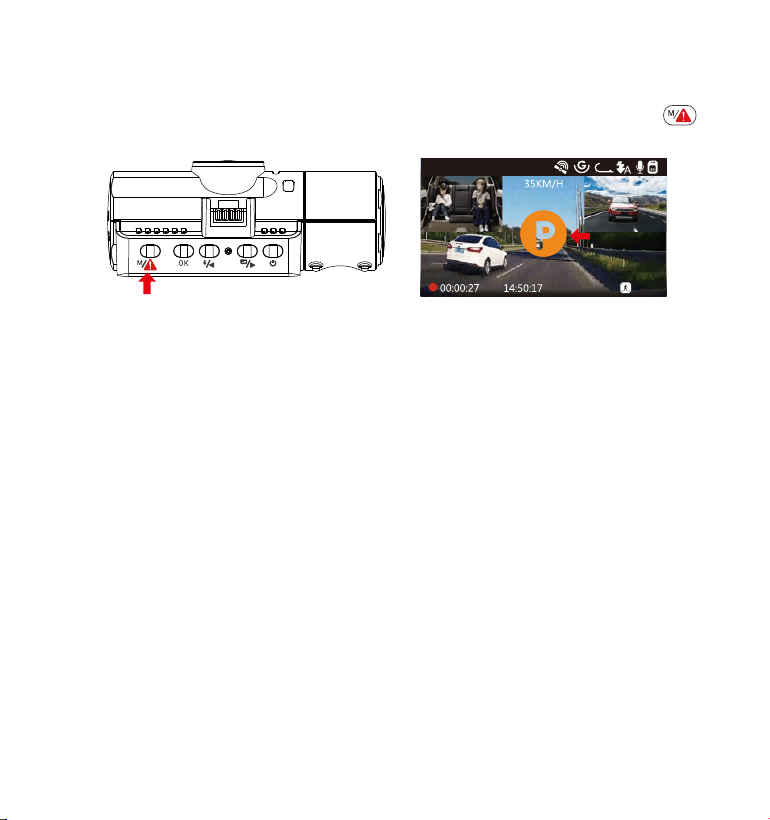
2.
En enregistrement à bas débit, si la caméra est désactivée manuelle-
ment, elle ne s'allumera pas et n'enregistrera pas même si elle détecte
des vibrations.
Pour activer manuellement le mode parking, maintenez le bouton
enfoncé jusqu'à ce que l'icône P apparaisse à l'écran.
En mode parking, la caméra sortira du mode parking si elle détecte des
vibrations et entrera en mode vidéo normal.
En mode Parking, si vous réglez Auto LCD OFF sur Auto, l'écran LCD de la
dashcam s'éteint après 1 minute mais l'enregistrement se poursuit avec
une lumière bleue qui clignote sur le témoin lumineux.
01-01-2021
3
1440P+1080P+1080P
Si Laps de temps est sélectionné, la dashcam prendra des photos
statiques à la fréquence d'images d'enregistrement définie 1FPS,5FPS,
OFF - pour créer un montage vidéo. Par exemple, si vous définissez Laps
de temps 1FPS, la dashcam prendra une photo toutes les secondes, puis
assemblera les photos en une vidéo de 1 fps. générer une vidéo
accélérée d'une durée de seulement 16 minutes (8x60x60 / 30/60). Ce
mode Eco est recommandé pour les cartes de stockage de plus petite
capacité.
[Temps d'enregistrement réel (s) = Durée de la vidéo en accéléré (s) x
Fréquence d'images vidéo (FPS) / Option en accéléré (FPS)]
4.11 Laps de temps
- 117 -
En Laps de temps, la caméra ne peut pas entrer en mode d'enregis-
trement à bas débit.
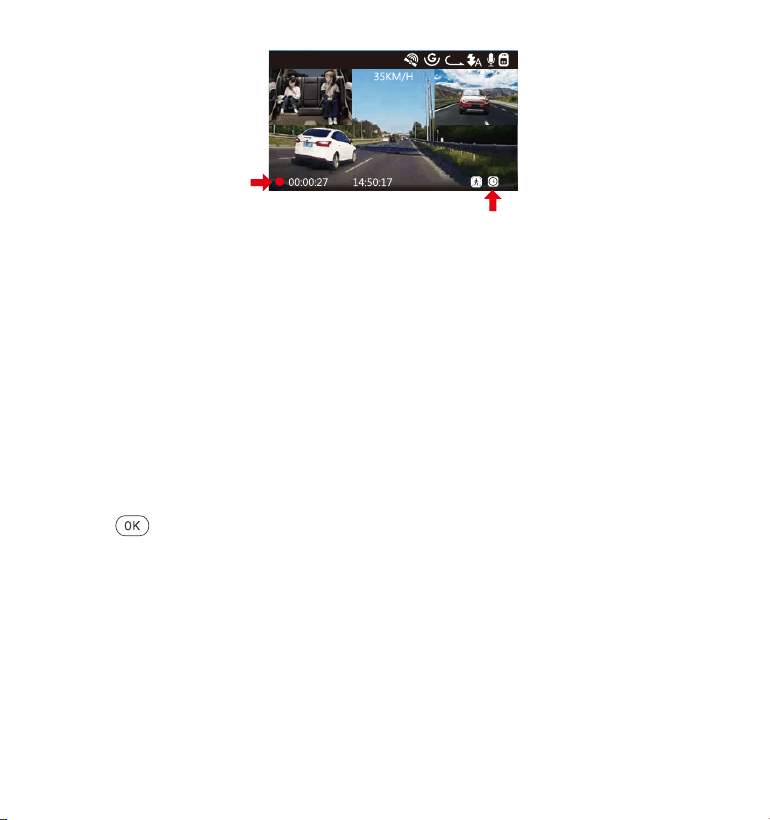
01-01-2021
3
1440P+1080P+1080P
- 118 -
4.12Connexiond'unrécepteurGPSexterne(accessoireenoption)
Si Laps de temps est sélectionné, la dashcam prendra des photos
statiques à la fréquence d'images d'enregistrement définie 1FPS,5FPS,
OFF pour créer un montage vidéo. Par exemple, si vous définissez Laps
de temps 1FPS, la dashcam prendra une photo
Installez le support GPS externe sur la caméra au lieu du support
d'origine.
Branchez le connecteur USB de type C sur le support GPS pour
l'alimenter.
Une fois chargée, la caméra s'allume. L'enregistrement commencera
si une carte microSD a été insérée, appuyez simplement sur le bouton
pour arrêter l'enregistrement.
Appuyez sur le bouton pour entrer dans les paramètre, allez dans
«Paramètre du système»> «GPS» pour activer la fonction GPS de la
caméra.
Le récepteur GPS commencera à rechercher un signal GPS, l'icône
GPS continuera à clignoter à l'écran. Une fois le signal GPS reçu et
verrouillé, l'icône cessera de clignoter.
1.
3.
2.
4.
5.
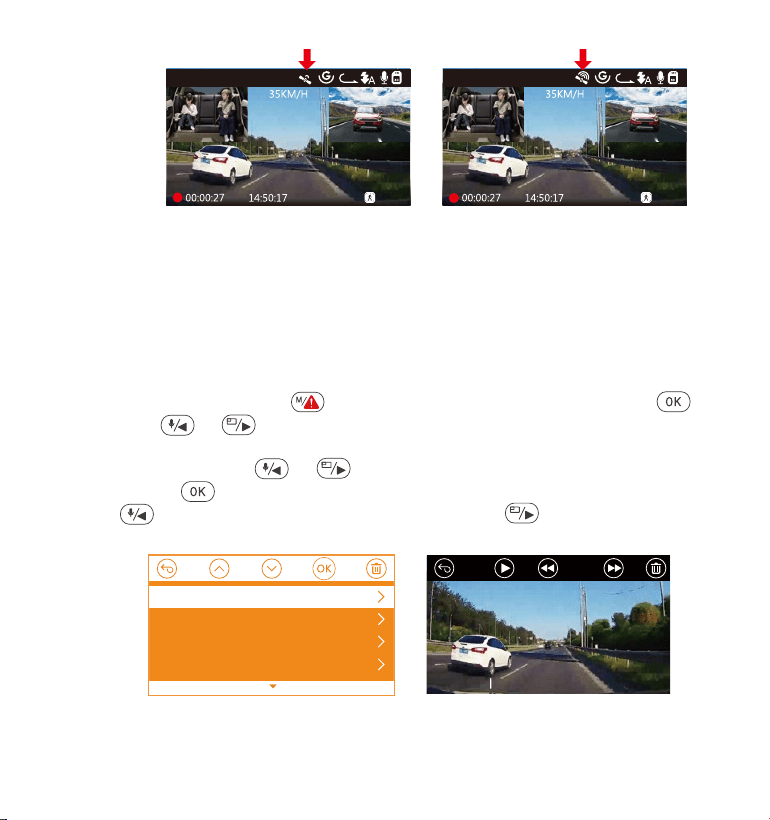
01-01-2021
3
1440P+1080P+1080P
01-01-2021
3
1440P+1080P+1080P
- 119 -
6.
7.
Vous pouvez inclure le suivi GPS et la vitesse du véhicule sur la
séquence vidéo, allez à «Paramètre de l'enregistrement»> «Timbre»>
«Timbre de localisation GPS» et «Timbre de vitesse» pour régler.
Vous pouvez consulter la vidéo enregistrée à l'aide de la visionneuse
GPS VANTRUE
®
(disponible en téléchargement sur www.vantrue.net ).
4.13Visionnerlavidéosurlacaméra
Appuyez sur le bouton et allez à «Fichiers», appuyez sur et sur le
bouton ou pour naviguer vers les dossiers de fichiers> «Normal»
ou> «Événement» pour afficher et lire des vidéos sur l'écran de la caméra.
Utilisez les boutons ou pour sélectionner le fichier et appuyez sur
le bouton pour lire / mettre en pause. Pendant la lecture, appuyez
sur pour avancer lentement et appuyez sur pour avancer
rapidement.
0:00/00:02
1/5
2021_08_01_151629_B.MP4
2021_08_01_151629_A.MP4
2021_08_01_113647_B.MP4
2021_08_01_113647_A.MP4
Normal

Afficher sur un ordinateur
Connectez la caméra à votre ordinateur à l'aide du câble USB Type-C
fourni.
«Connexion USB» et «démarre» s'afficheront sur l'écran de la caméra,
veuillez naviguer vers «Connexion USB» et appuyez sur le bouton
pour transférer les données.
En fonction du système d'exploitation de votre ordinateur(OS), l'appar-
eil apparaîtra sous la forme d'un lecteur amovible ou d'un volume
amovible.
1.
2.
3.
- 120 -
Supprimer les fichiers normaux
Allez au fichier Normal, choisissez une vidéo sur la caméra, appuyez sur
le bouton , puis appuyez sur le bouton pour sélectionner la section
«Supprimer», appuyez sur le bouton pour sélectionner Supprimer.
Supprimerlesfichiersd'événements
Accédezaufichierévénement,choisissezunevidéosurlacaméra,appuyez
surlebouton,puisappuyezsurleboutonpoursélectionnerla
section«Supprimer»,appuyezsurleboutonpoursélectionnerSupprimer.
4.14SupprimerdesvidéossurlaDashCam
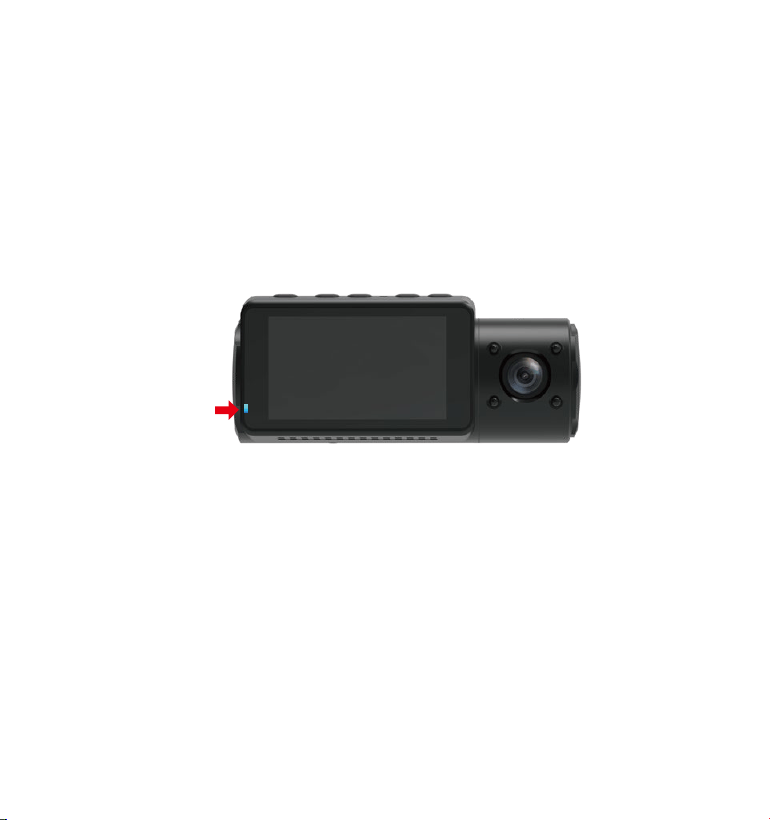
- 121 -
4.15 Arrêt automatique de l'écran LCD
Cette fonctionnalité évite tout risque que l'écran soit une distrac�tion
dans le véhicule, en particulier la nuit lorsque l'éclairage de l'écran LED
peut être une nuisance voire un danger pour le conducteur. Si vous
réglez la fonction Auto LCD Off sur 3 minutes, l'écran LCD de la dashcam
s'éteindra au bout de 3 minutes, mais l'enregistrement se poursuivra avec
un voyant bleu clignotant sur le voyant. Vous pouvez appuyer sur
n'importe quel bouton pour allumer l'écran. Si les paramètres est Auto, la
luminosité de l'écran diminuera à 50% après 3 minutes d'enregistrement
vidéo normal, mais sa luminosité sera restaurée par une opération
manuelle.
Veuillez accéder aux paramètres du système pour régler cette durée sur
30 secondes, 1 minute, 3 minutes ou automatique pour l'utiliser.

- 122 -
4.16 Mise à jour du micrologiciel/Firmware
Le système se mettra à jour automatiquement si la carte microSD
contient le fichier de mise à niveau du micrologiciel. La caméra
redémarrera une fois la mise à niveau terminée.
Restez toujours à jour
La dernière version du firmware est toujours disponible sur le site officiel
de VANTRUE (www.vantrue.net). Nous vous recommandons vivement
d'enregistrer votre produit (www.vantrue.net/register) pour recevoir un
e-mail de notification lorsqu'une nouvelle mise à jour du micrologiciel
est disponible.
4.17 Température de travail
La caméra est conçue pour fonctionner à des températures comprises
entre 14-158℉ (-10℃ et 70℃), les températures en dehors de cette
plage risquent de dégrader les performances de la caméra et de
provoquer des dommages.
Pour éviter les dommages
Par temps chaud, n'exposez pas la dashcam directement au soleil
lorsque la voiture est garée.
Dans des conditions hivernales extrêmes, c'est-à-dire -4℉ (-20℃) ou
moins, détachez la caméra du pare-brise lorsqu'elle n'est pas utilisée et
rangez-la dans la boîte à gants.
•
•

- 123 -
5.Spécifications
Les spécifications de ce produit peuvent changer sans préavis en raison
des améliorations apportées au produit.
Model
Avant: Capteur CMOS 5M
Cabine: Capteur CMOS 2M
Arrière: Capteur CMOS 2M
Avant: objectif grand angle F1.4, 155 degrés
Cabine: F2.0, objectif grand angle de 165 degrés
Caméra externe: F1.8, objectif grand angle de 160
degrés
Capteur
d'image
Canaux/ Voie 3 canaux
LCD
2,45 pouces IPS LCD, 480 x 272
Lentille
Langues
N4
English/日本語/Español /Français/Italiano /简体中文
/Deutsch/Русский язык
Mode avant + cabine + arrière:
1440P+1080P+1080P 30FPS; 1080P+1080P+1080P
30FPS; 1080P+1080P+720P 30FPS;
1440P+1440P+1080P 30FPS; 720P+720P+720P 30FPS.
Mode avant + cabine:
1440P+1440P 30FPS; 1440P+1080P 30FPS;
1080P+1080P 30FPS; 1080P+720P 30FPS;
720P+1080P 30FPS; 720P+720P 30FPS.
Mode avant + arrière:
2160P+1080P 30FPS; 1440P+1080P 30FPS;
1080P+1080P 30FPS; 1080P+720P 30FPS;
720P+1080P 30FPS; 720P+720P 30FPS.
Vidéo
résolution

- 124 -
L'audio
Format de
fichier vidéo
MP4
Mémoire
externe
Type
d'obturateur
Port USB
Type de batterie
Tension de travail
Monnaie de
travail
Température
de travail
Microphone et haut-parleur intégrés
Carte Micro SD (U3 ou supérieur, jusqu'à 512 Go)
Électronique
Type-C
Super-condensateur
5V 2A
800mA (valeur typique) / DC 5V
14-158℉ (-10℃ à 70℃)
Température
de stockage
-4 à 176℉ (-20 ℃ à 80℃)
14-122℉ (-10℃ à 50℃))Température de
l'environnement
de travail
Compatible
avec le système
d'exploitation/OS
Windows XP/Vista/7/8/10 &Mac OS
Mode avant:
3840x2160P 30FPS ; 2592x1520P 30FPS; 2560x1440P
30FPS; 1920x1080P 30FPS; 1280x720P 30FPS

- 125 -
6.Garantie & Support
Garantie
La caméra de tableau de bord VANTRUE
®
OnDash N4 est livrée avec
une garantie complète de 12 mois.
Si vous enregistrez votre produit sur notre site officiel(www. vantrue.net/
register), vous pouvez étendre la garantie à 18 mois.
Support
Sivousavezdesquestionsconcernantvotreproduit,n'hésitezpasànous
contacterviaAmazonouenvoyez-nousune-mailà[email protected].Les
requêtesreçoiventgénéralementuneréponsedansles12à24heures.
Votre opinion compte
VANTRUE
®
s'engage fermement à toujours améliorer notrepro�duits,
services et expérience utilisateur. Si tu as quelque réflexions sur la façon
dont nous pouvons faire encore mieux, nous apprécions vos commen-
taires et suggestions constructifs. Connectez-vous avec nous aujourd'hui
Mercid'avoirchoisi

- 126 -
1. Co znajduje się w pudełku?
C. Tylna kamera
(30cm)
F. Kabel do tylnej
kamery (6m)
I.
Naklejka 3M
D. Ładowarka
samochodowa
Typ-C z kablem
(347,5cm)
A. VANTRUE
®
N4
Dash Cam
G.
Instrukcja obsługi
B. Uchwyt mocujący
E. Kabel typ-C USB
(90cm)
H.
Przewodnik
użytkowania
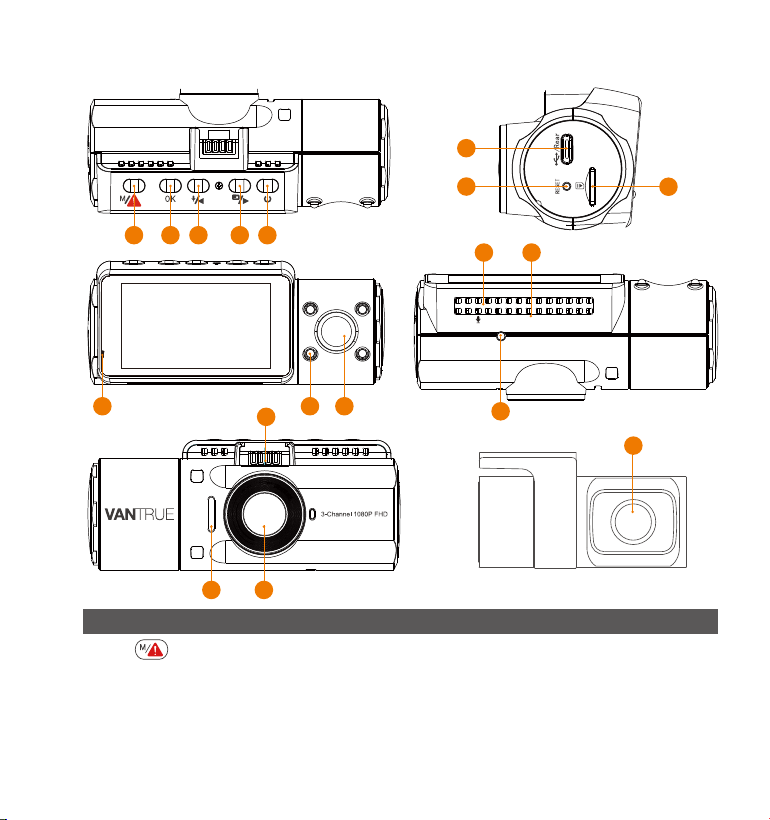
- 127 -
18
6
7
8
16 17
15
321 4 5
9 10 11
14
12 13
VTN40AXXXX
2. Opis kamery
Lp
Przycisk
Wejście/wyjście z menu ustawień;
Dłuższe przytrzymanie tryb parkingowy;
Ręcznie blokuje aktualnie nagrywany klip wideo
po nagłym wypadku lub w celu zachowania
ważnych filmów.
1
OpisNazwa

- 128 -
5
4
3
Zasilanie Wł./Wył.; IR LED Przełącznik.
Przesuń w dół; Przełącz wyświetlanie okna
kamery przedniej, kabiny i tylnej ; Przewijanie do
przodu podczas odtwarzania filmów.
Przesuń w górę; Mikrofon wł / wył; Powoli
przewijaj do przodu podczas odtwarzania.
2
Potwierdź akcję; Stop/Start nagrywanie video
Przycisk
Przycisk
Przycisk
Przycisk
Naciśnij, aby wymusić reset urządzenia.
7 Reset
Type-C USB /
Port tylnej kamery
Typ-C USB port do ład. lub transferu danych;
Port wideo do przesyłania strumieniowego
nagrań z kamery tylnej.
6
MicroSD Card
Slot
Zewnętrzna pamięć (do 512GB w FAT32, U3 lub
wyższej).
8
9 Lampka kontrolna
Niebieskie światło miga podczas nagrywania;
Świeci podczas ładowania.
IR LED Light 4 IR LED światła poprawiają widzenie w nocy w
samochodzie.
Kabina wew11
Kamera do nagrywania wewnątrz auta.
10
12 Mikrofon
Nagrywa czysty dźwięk z materiałem wideo.
14 IR Sensor
Czujnik zmierzchu.
13 Nr seryjny
Nr do celów gwarancyjnych.
15 Uchwyt
mocujący
Łączy się z uchwytem przyssawki.
16 Głośnik
Zapewnia dźwięk podczas odtwarzania.
17 Przednia kamera
Przednia kamera do nagrywania zdarzeń
drogowych.
18 Tylna kamera
Tylna kamera do nagrywania wideo wydarzeń
na drodze z tyłu pojazdu.
- 129 -
LEDIndicator
Ładowaniekamery.
Niebieskieświatłojestwidocznena
lampcekontrolnej[10]
Kameranagrywa.
Niebieskieświatłomigana
wskaźniku[10]
Opisekranu
G-SensorWył
Czasnagrywaniapętli
MICwł
MICwył
Nagrywanie
blokadaplików
TimelapseWł
Bieżącadata(MM/DD/YY)
iczas(24H)
ITrybnocnywył
Trybnocnywł/wył
Trybnocnywł
Rozdz.Video
G-SensorWł
Włożonakartapamięci
Brakkartypamięci
Czasnagrywania
bieżącyklip
GPSzablokowany
GPSSzukanieSygnału
Nagrywaniejazdy
Prędkość(KMH/MPH)
Detekcjakolizjiwł
Detekcjakolizji
Detekcjaruchuwłączona
1440P+1080P+1080P
LowBitratesRecordingON
NagrywanielowbitrateWŁ.
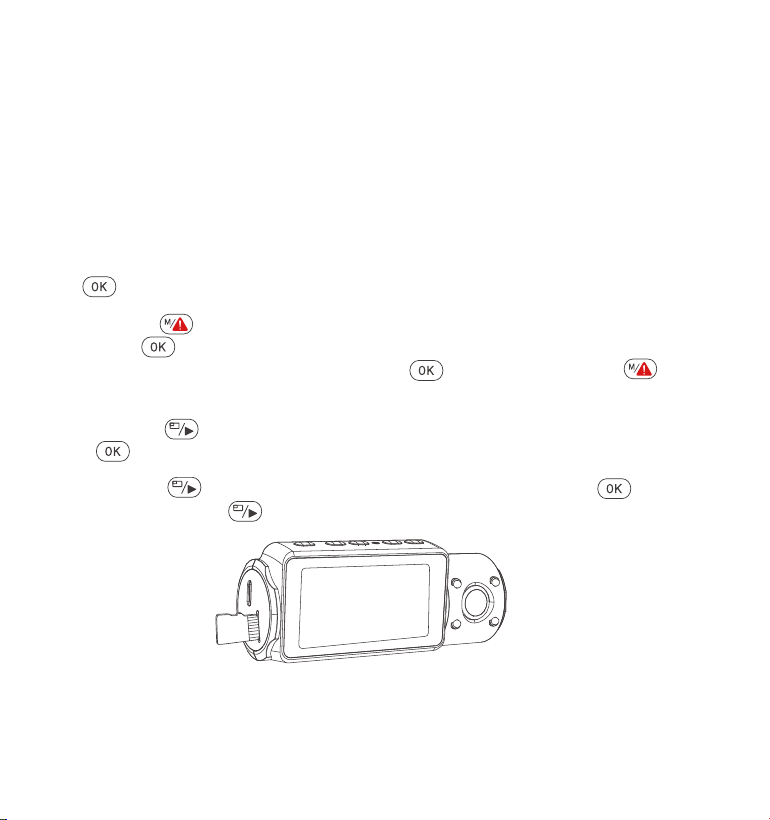
Należy używać oryginalnej karty pamięci Micro SD o pojemności od 32GB
do 512GB o prędkości U3 lub wyższej. Zalecamy stosowanie karty Vantrue
Micro SD Card (brak w zestawie). Włóż kartę SD, gdy kamera samocho-
dowa się wyłączy. Ostrożnie włóż kartę pamięci do gniazda karty
kamery, aż usłyszysz kliknięcie. Aby wyjąć kartę, najpierw włącz kamery,
a następnie wepchnij kartę do gniazda, aż kliknie ponownie.
Jeśli używasz karty SD innej marki, przed użyciem karty naciśnij przycisk +
aby zatrzymać nagrywanie.
Wciśnij aby wejść w ustawienia; jeśli kamera nagrywa video, naciśnij
guzik aby zatrzymać nagrywanie; jeśli wyświetli się komunikat „Błąd
karty SD, sformatuj kartę SD” naciśnij przycisk oraz naciśnij aby
wejść do menu.
Naciśnij przycisk, aby wybrać opcję Ustawienia systemu, a potem
aby potwierdzić.
Naciśnij i przejdź do opcji formatowania karty, potem żeby
wybrać format i zatwierdzić.
- 130 -
3. Pierwsze uruchomienie
3.1 Instalacja karty pamięci (zalecamy VANTRUE microSD)
•
•
•
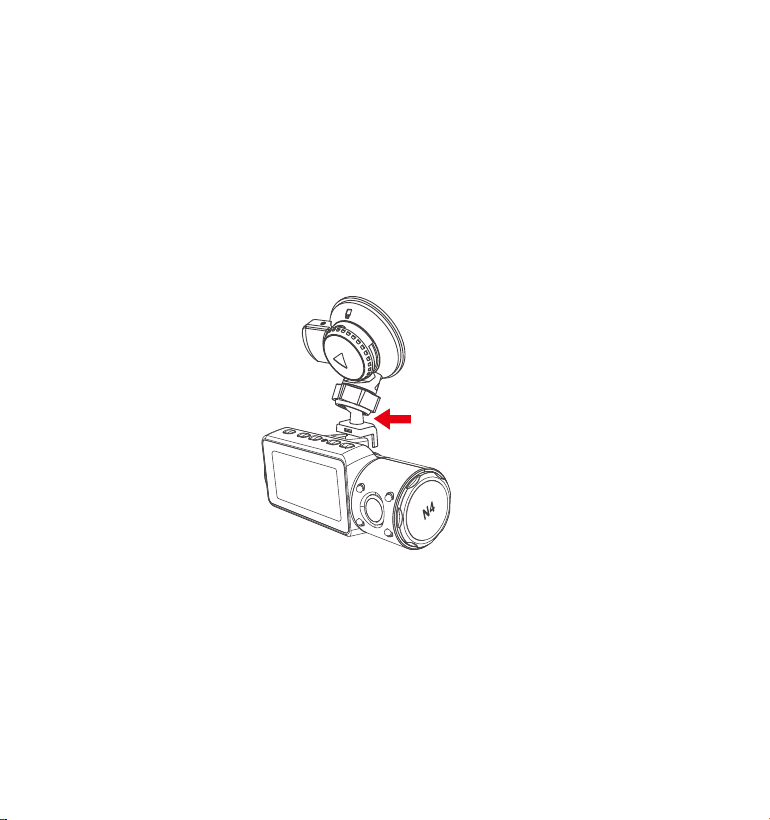
- 131 -
UWAGA:
Karta microSD powinna być sformatowana raz w miesiącu, aby zmaksy-
malizować żywotność karty pamięci.
Nie wyjmuj karty, gdy kamera nagrywa.
Nie używaj karty Sandisk ani Transcend SD w tej kamerze samochodowej.
1.
2.
3.
3.2 Instalowanie kamery na przedniej szybie
Przymocuj uchwyt ssący do złącza mocowania kamery, wciskając go,
aż usłyszysz kliknięcie.
1.
2.
3.
4.
Dokładnie wyczyść szybę przednią wodą lub alkoholem i wytrzyj do
sucha suchą szmatką.
Wytrzyj przyssawkę na uchwycie.
Mocno zamocuj przyssawkę do przedniej szyby i obróć zacisk blokujący
na uchwycie o 90° w górę, aż usłyszysz kliknięcie.
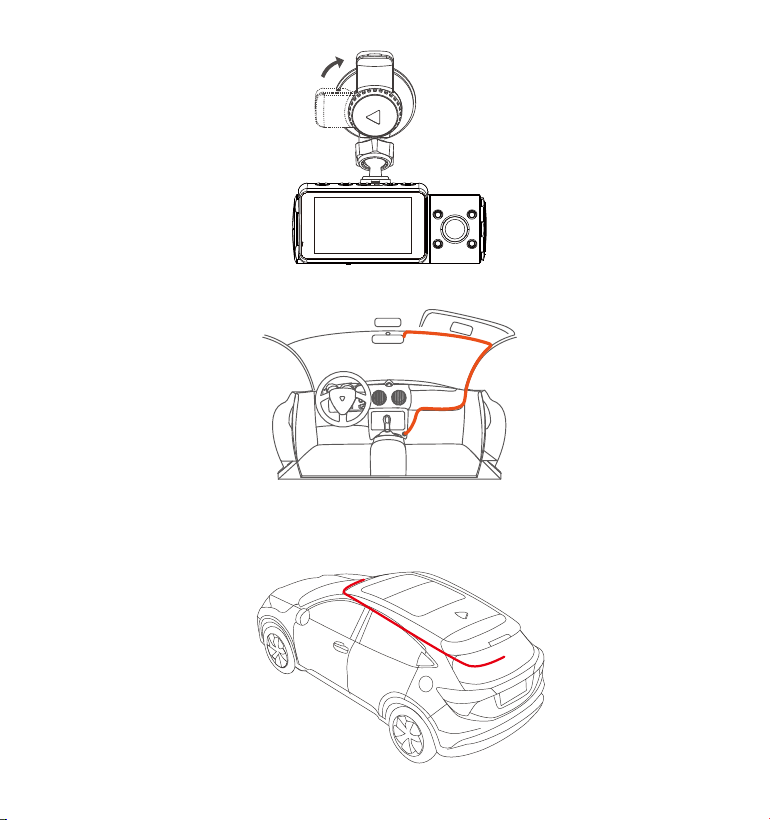
- 132 -
Ostrożnie poprowadź kabel zasilający wokół przedniej szyby i wsuń go
pod poszyciem.
5.
Podłącz kamerę tylną do portu tylnej kamery w urządzeniu za pomocą
kabla kamery tylnej. Ostrożnie poprowadź kabel i wsuń go pod listwę.
UWAGA: Kamera tylna ani moduł przedni nie nadaje się do mocowania
na zewnątrz pojazdu.
6.
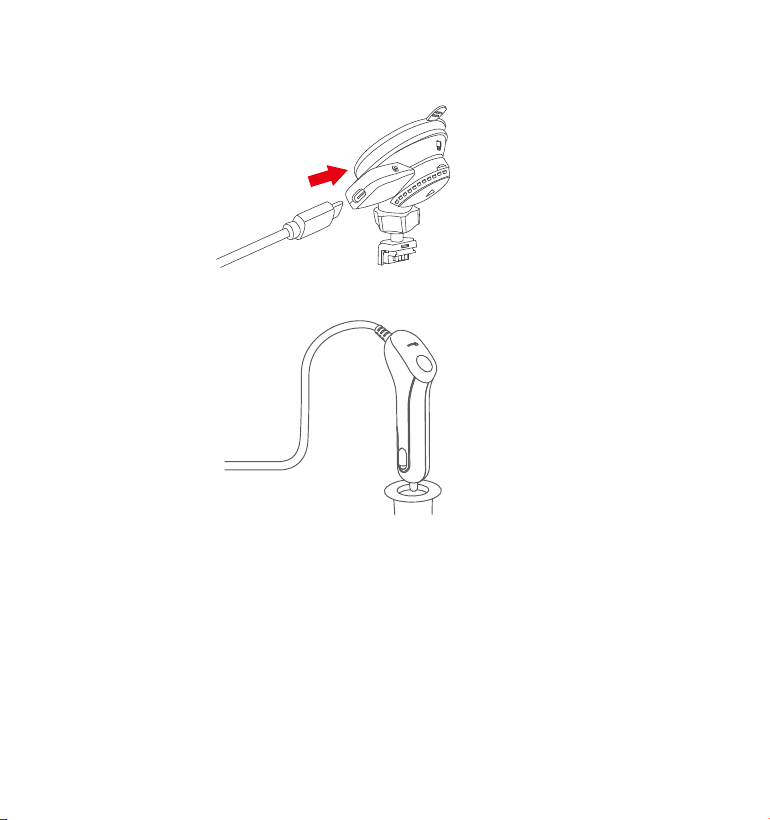
- 133 -
Za pomocą kabla USB typu C podłącz dostarczoną ładowarkę
samochodową do podstawy montażowej przedniej kamery
7.
8. Włóż ładowarkę samochodową do gniazda zapalniczki w samochodzie.
Gniazdo zapalniczki
samochodowej
9. Uruchom samochód.
10. Kamera włączy się automatycznie i rozpocznie nagrywanie.
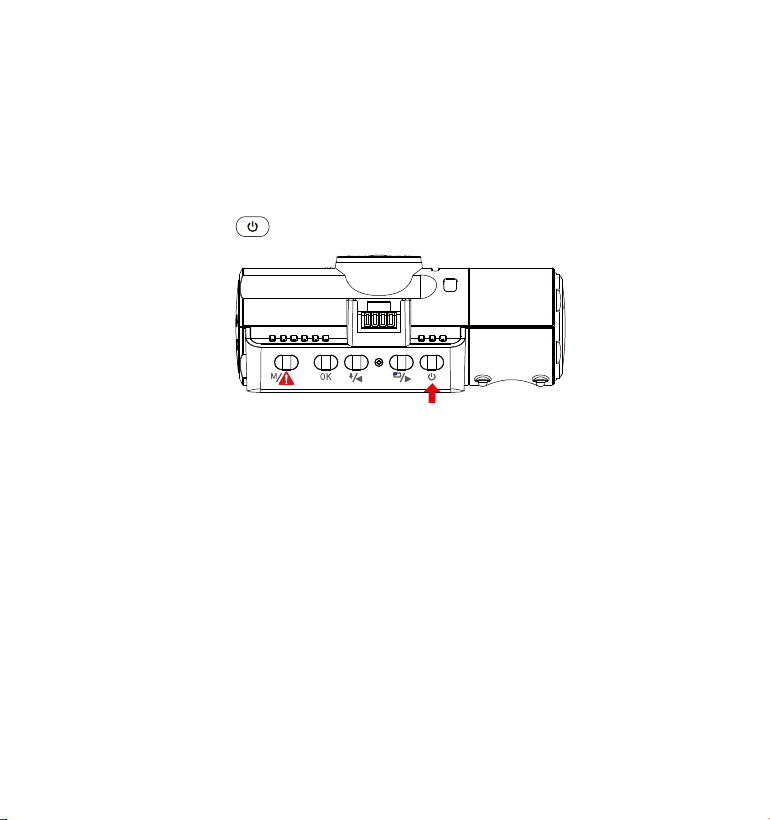
- 134 -
4. Podstawowe funkcje
4.1 Zasialanie WŁ/WYŁ.
Po uruchomieniu samochodu kamera włączy się automatycznie i
rozpocznie nagrywanie.
A. Manualnie
Długie wciśnięcie wyłączy kamerę.
B. Automatycznie
Kamera wyłączy się, jeśli kabel ładowarki zostanie odłączony lub pojazd
zostanie wyłączony.
Urządzenie ma dwa porty USB dostępne do zasilania - w kamerze lub za
pomocą przyssawki.
Podczas ładowania za pomocą komputera użyj portu USB znajdujące-
go się na uchwycie. Jeśli korzystasz z portu USB kamery, na ekranie
kamery wyświetli się „USB Łączenie” i „Włącz zasilanie”, wybierz „Włącz
zasilanie”, aby naładować kamerę samochodową
UWAGA:
1.
2.
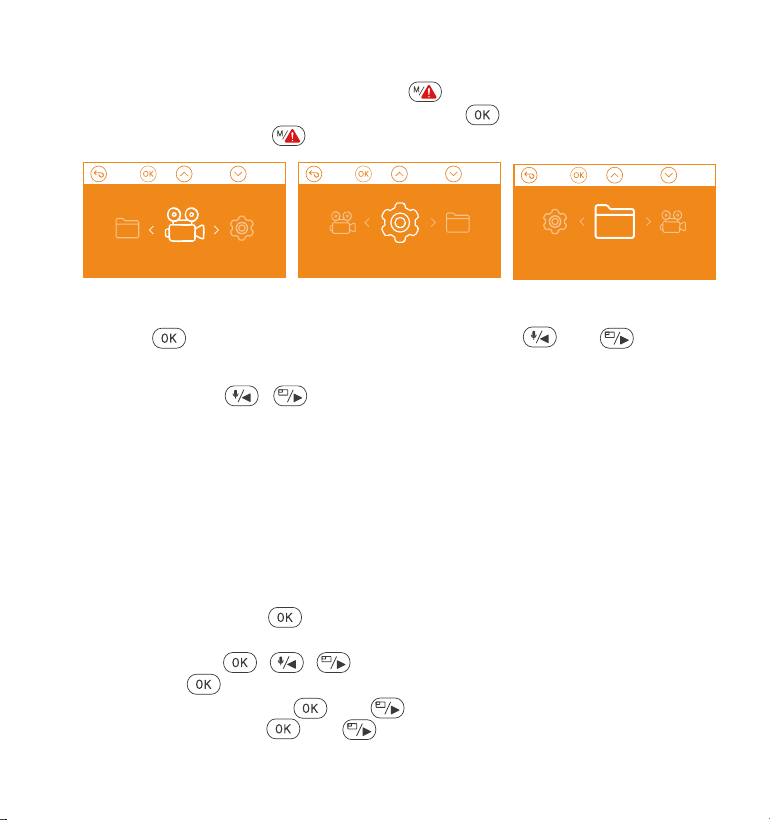
Wciśnij przycisk / aby przełączyć tryb nagrywania i rozdzielczości
Przód+Wnętrze+Tył:1440P+1080P+1080P 30FPS; 1080P+1080P+1080P 30FPS;
1080P+1080P+720P 30FPS; 1440P+1440P+1080P 30FPS; 720P+720P+720P
30FPS.
Przód+Wnętrze: 1440P+1440P 30FPS; 1440P+1080P 30FPS; 1080P+1080P
30FPS; 1080P+720P 30FPS; 720P+1080P 30FPS; 720P+720P 30FPS.
Przód+Tył: 2160P+1080P 30FPS; 1440P+1080P 30FPS; 1080P+1080P 30FPS;
1080P+720P 30FPS; 720P+1080P 30FPS; 720P+720P 30FPS.
Tylko przód: 3840x2160P 30FPS; 2592x1520P 30FPS; 2560x1440P 30FPS;
1920x1080P 30FPS; 1280x720P 30FPS.
Nagrywanie w pętli: kliknij aby zmienić czas trwania: 1min, 3min, 5min
lub WYŁ.
IR LED: Naciśnij i / aby wybrać :Auto, Wł lub Wył.
G-Sensor : Wciśnij aby ustawić czułość- niska, średnia, wysoka.
Audio: Naciśnij przycisk oraz aby Wył / WŁ
Tryb parking:Wciśnij oraz aby zmienić opcje Detekcja kolizji, Kolizja
+ detekcja ruchy, wył.
- 135 -
Po włączeniu zasilanie wciśnij przycisk aby wejść do ustawień.
Jeśli kamera jest w trybie nagrywania wciśnij aby zatrzymać
nagrywanie, a potem aby wejść w opcje.
4.2 Ustawenia menu
A. Opcje nagrywania
Nacisńij żeby wejść w ustawienia i wciśnij guzik lub, żeby
wybrać odpowiednią opcję.
•
•
•
•
•
•
Nagrywanie Ustawieniasystemu Pliki

Język: Wciśnij i / aby wybrać odpowiedni język: Angielski,
Chiński, Japoński, Niemiecki, Włoski, Hiszpański, Francuski, Rosyjski, Polski.
Formatowanie karty: Kliknij nawiguj używając przycisku aby
wybrać opcję.
Data,czas: Czas i datę można ustawić na dwa sposoby: 1. GPS
automatyczna aktualizacja; 2 Ręczne ustawienie daty/godziny.
Auto LCD wył: Jeśli ustawiono 3min, ekran kamery wyłączy się
po 3 minutach od startu nagrywania. Jeśli tryb jest wyłączony,
lcd nie zgaśnie nigdy. Wciśnij i wybierz czas wygaszania lcd: 30s 1min
lub tryb wył. - ekran świeci ciągle.
Dźwięki urządzenia: lub aby dostosować dźwięk urządzenia.
Częstotliwość: i wybierz między 50Hz/60Hz.
Wersja systemu: aby sprawdzić bieżącą wersję.
Podstawowe ust: aby przywrócić ust. fabryczne kamery.
Ekspozycja: oraz / aby wybrać pomiędzy ustawieniem
ekspozycji Przód, Wnętrze lub Tył.
Przód: +2.0, +1.6, +1.3, +1.0, +0.6, +0.3, +0.0, -0.3, -0.6, -1.0, -1.3, -1.6, -2.0
Wnętrze: +2.0, +1.6, +1.3, +1.0, +0.6, +0.3, +0.0, -0.3, -0.6, -1.0, -1.3, -1.6,
-2.0
Tył: +2.0, +1.6, +1.3, +1.0, +0.6, +0.3, +0.0, -0.3, -0.6, -1.0, -1.3, -1.6, -2.0
WDR:Kliknij i aby włączyć lub wyłączyć.
Numery tablicy:/ i aby wprowadzić.
Logo: Ustaw się na wł/wył. Na ekranie po wcisnięciu przycisku będzie
można zobaczyć logotyp, czas, datę, numery tablic oraz pozycję gps
(opcjonalnie).
Obróć ekran: Wcisnij i / aby wybrać opcję:
Przód+wnętrze+tył
Time Lapse: i aby włączyć / wyłączyć.
•
•
•
•
•
•
•
•
•
•
•
•
•
•
B.Ustawieniasystemowe
- 136 -
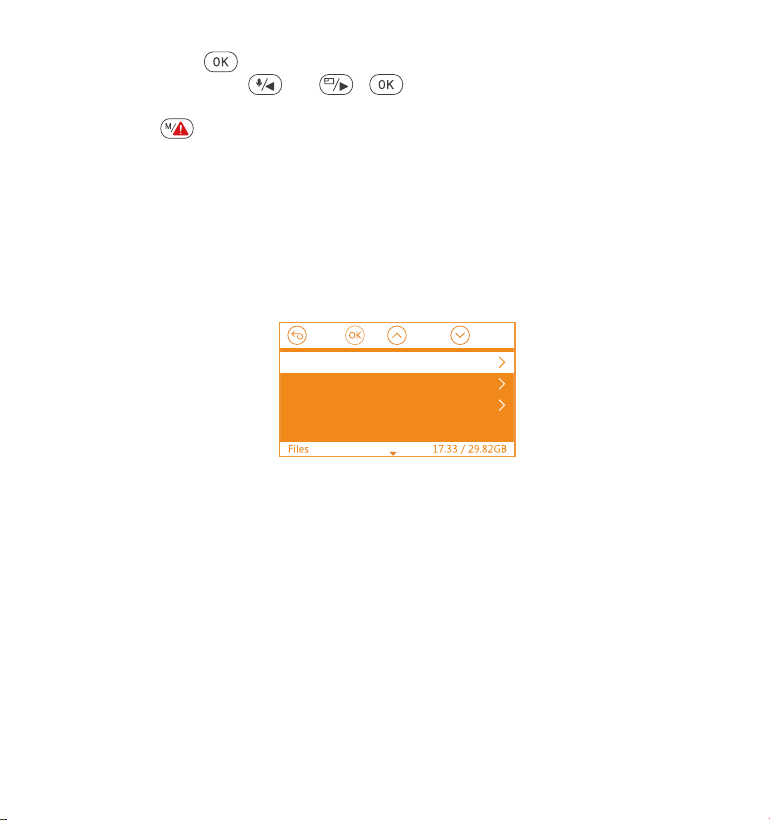
GPS: Wciśnij aby włączyć / wyłączyć.
Prędkość: Wciśnij lub i aby wybrać pomiędzy KM/H oraz
MP/H.
Wciśnij aby wyjść i zapisać ustawienia
Otwórz interfejs menu i przejdź do „Ustawienia systemu” > „Czas i data”,
aby wejść do menu ustawień czasu. Istnieją dwa sposoby ustawienia
godziny i daty: Ręczne ustawienie daty/godziny i automatyczna aktual-
izacja GPS (domyślnie włączone).
-- Po włączeniu automatycznej korekcji GPS, czas i data zostaną
automatycznie zmienione zgodnie ze strefą czasową wybraną po pomyśl-
nym pozycjonowaniu GPS.
-- Ręcznie ustaw datę/godzinę, możesz ręcznie dostosować różne czasy.
- 137 -
•
•
C.Nagrania
•
•
•
Chronione:KrytycznezdarzeniawykryteprzezaktywnośćG-Sensorlubręcznie
zablokowaneprzezużytkownika.
Normalne:Standardowenagrania.
Wszystkie:Wszystkienagraniajakiezostałyzarejestrowane.
Przejrzyjiusuńfilmyzapisanewfolderach.
- 14 -
Chronione
Normalne
Wszystkie
4.3 Ustaw datę/godzinę
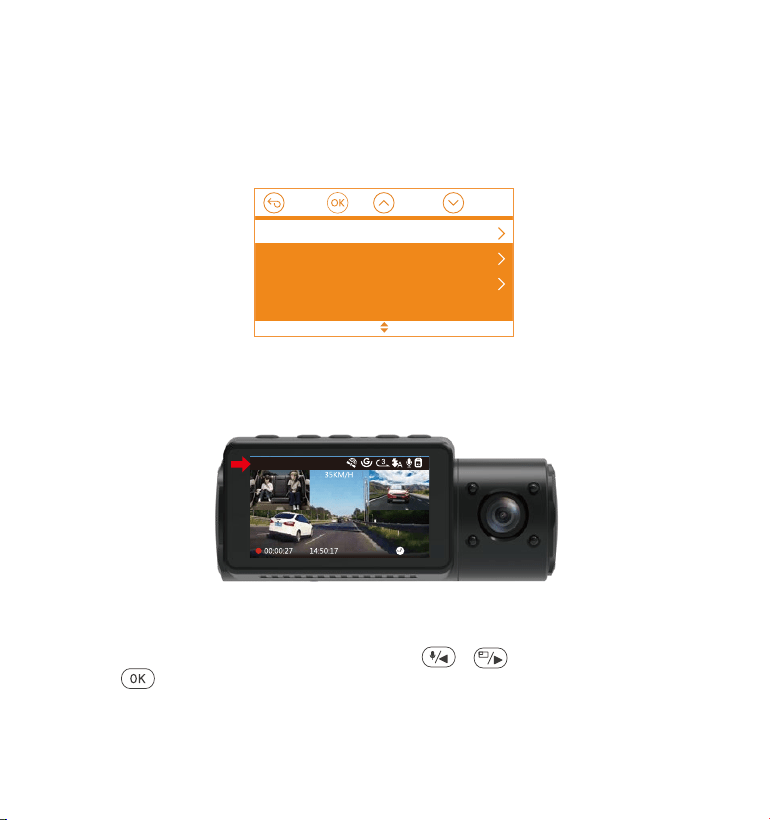
01-01-2021
1440P+1080P+1080P
- 138 -
Idźdo“Ust.nagrywania>“Rozdzielczość”/wybierzopcjęnagrywan-
iaiabyzatwierdzić.
Przód+Wnętrze+Tył:1440P+1080P+1080P 30FPS; 1080P+1080P+1080P
30FPS; 1080P+1080P+720P 30FPS; 1440P+1440P+1080P 30FPS;
720P+720P+720P 30FPS.
•
4.4Przełącztrybnagrywania/rozdzielczość
Domyślnetryb(Przód+Wnętrze+Tył),1440P+1080P+1080Prozdzielczość
pokazananaekranie,3kameryrejestrująobrazw1440P+1080P+1080P(30fps).
Możnaprzełączyćtrybpomiędzyprzód+kabina,przód+tyłlubprzód,wykonując
następująceczynności:
Aby ręcznie ustawić datę/godzinę, należy wyłączyć automatyczną
korektę czasu GPS, aby ustawić.
Automatyczna korekta czasu GPS musi wybrać prawidłową strefę
czasową, w przeciwnym razie czas będzie niedokładny po pozycjonowa-
niu GPS.
Notatka:
1.
2.
AutomatycznaaktualizacjaGPS
Ręcznieustawdatęiczas
Formatdaty
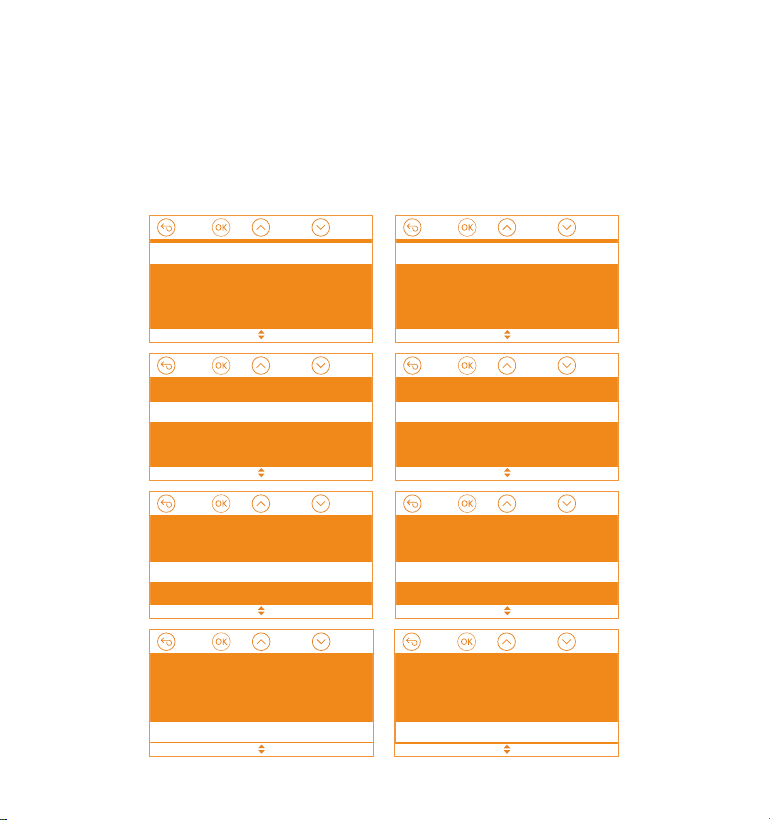
Przód+Wnętrze+Tył
Przód+Wnętrze
Przód+Tył
Przód
1440P+1080P+1080P 30FPS
1080P+1080P+1080P 30FPS
1080P+1080P+720P 30FPS
720P+720P+720P 30FPS
- 139 -
Front+Cabin+Rear
Front+Cabin
Front+Rear
Front
1080P+1080P 30FPS
1080P+720P 30FPS
1440P+1440P 30FPS
1440P+1080P 30FPS
Front+Cabin+Rear
Front+Cabin
Front+Rear
Front
2160P+1080P 30FPS
1440P+1080P 30FPS
1080P+1080P 30FPS
1080P+720P 30FPS
Front+Cabin+Rear
Front+Cabin
Front+Rear
Front
3840x2160P 30FPS
2592x1520P 30FPS
2560x1440P 30FPS
1920x1080P 30FPS
Przód+Wnętrze: 1440P+1440P 30FPS; 1440P+1080P 30FPS; 1080P+1080P 30FPS;
1080P+720P 30FPS; 720P+1080P 30FPS; 720P+720P 30FPS.
Przód+Tył: 2160P+1080P 30FPS; 1440P+1080P 30FPS; 1080P+1080P 30FPS;
1080P+720P 30FPS; 720P+1080P 30FPS; 720P+720P 30FPS.
Tylko przód: 3840x2160P 30FPS; 2592x1520P 30FPS; 2560x1440P 30FPS;
1920x1080P 30FPS; 1280x720P 30FPS.
Abyzapisaćzmianywciśnij
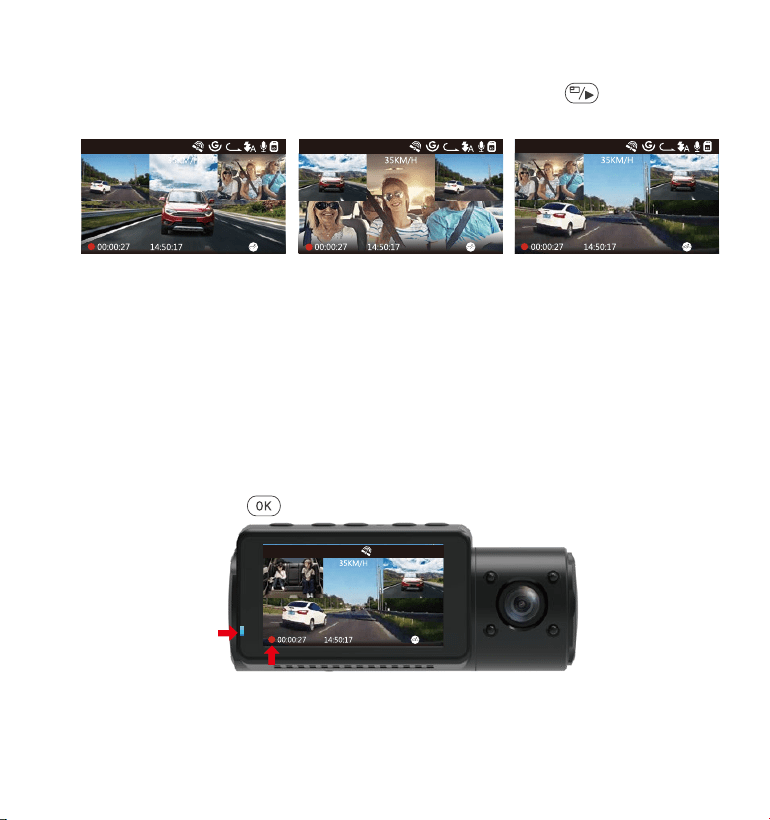
4.5 Przełączania pomiędzy przód, wnętrze, tył
W trybie nagrywania trzy- lub dwukierunkowego naciśnij aby kamera
tylna / wewnętrzna wyświetlała się na ekranie LCD w większym rozmiarze.
Przednia kamera
większy obraz
Wewnętrzna kamera
większy obraz
Tylna kamera większy obraz
3
1440P+1080P+1080P
01-01-2021
3
1440P+1080P+1080P
01-01-2021
3
1440P+1080P+1080P
01-01-2021
- 140 -
4.6 Nagrywanie w pętli
Po włożeniu karty pamięci kamera natychmiast rozpocznie nagrywanie w
pętli po podłączeniu do źródła zasilania i włączeniu zasilania. Jeśli
urządzenie nie zostanie podłączone do źródła zasilania, nie rozpocznie
się od razu i będzie nagrywać. Podczas nagrywania wskaźnik nagrywania
będzie migać, a czerwona kropka będzie migać w dolnym lewym rogu
ekranu.
Możesz zatrzymać / rozpocząć nagrywanie w dowolnym momencie,
naciskając przycisk .
3
01-01-2021
1440P+1080P+1080P
Domyślnie czas nagrywania w pętli wynosi 3 minuty. Przejdź do "Ustawień
nagrywania"> "Nagrywanie w pętli”, aby zmienić na 1 minutę, 3 minuty lub
5 minut, zależnie od potrzeb.
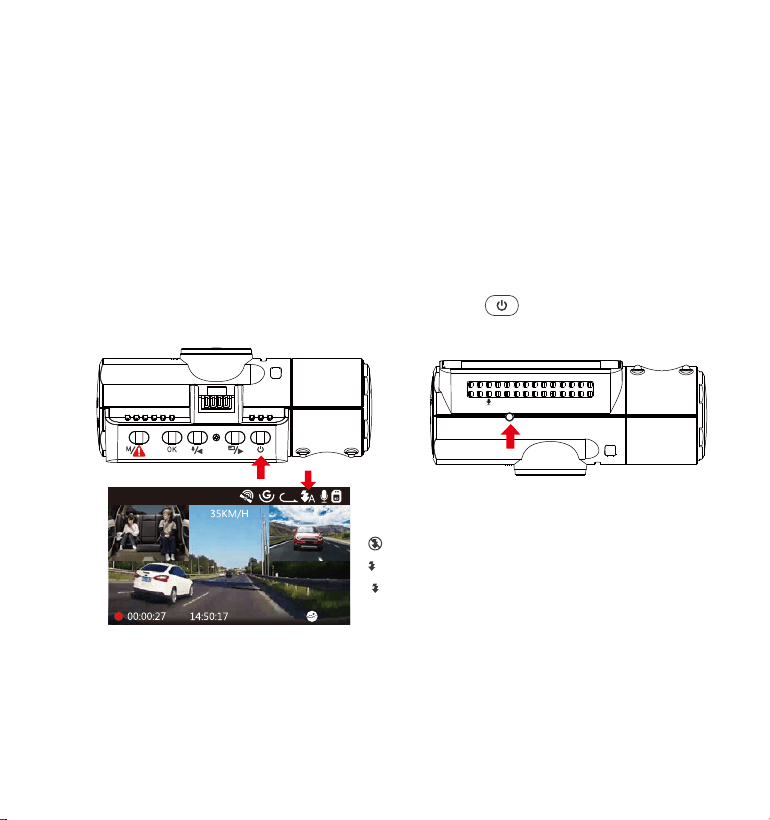
Domyślnie dioda IR jest włączona. Krótko kliknij aby włączyć tryb nocny
lub go wyłączyć.
- 141 -
4.7 IR LED
IR Sensor
VTN40AXXXX
Tryb nocny wyłączony
Tryb nocny auto wł/wył
Tryb nocny włączony
A
01-01-2021
3
1440P+1080P+1080P
Uwaga: Jeśli świeci się podczerwień, materiał wideo z kabiny zmieni się w
czarno-biały.
Format nazwy pliku wideo nagrania w pętli to ,, Rok_data-czas�A.mp4".-
Na przykład: 2021_08_01_060101_A.MP4. Liczba xA oznacza pliki nagrane
kamerą przednią, podczas gdy x B x B odnosi się do plików nagranych
kamerą wewnętrzną, a x C oznacza pliki nagrane kamerą tylną. Standar-
dowe pliki są przechowywane w folderze Wideo / Normalne. Gdy karta
Micro SD jest pełna, aparat nadpisuje najstarsze pliki.
Gdy nagrywanie w pętli jest wyłączone, kamera będzie nagrywać wideo
w 20-minutowych klipach, ale nie zastąpi starych filmów, gdy karta pamię-
ci jest pełna.
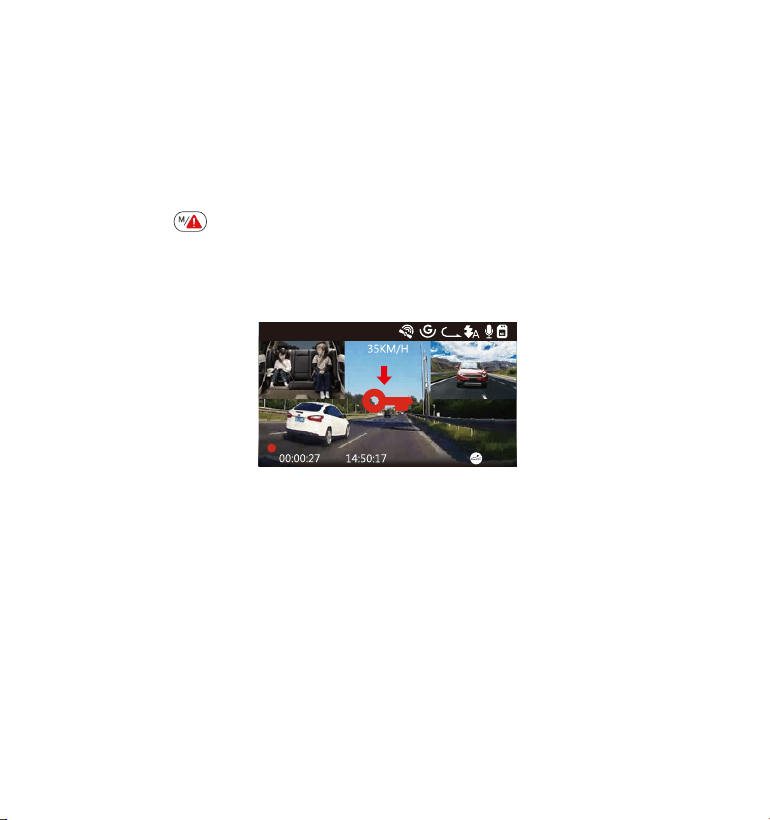
- 142 -
01-01-2021
3
1440P+1080P+1080P
Chronione - krytyczne nagranie przechowywane są w folderze Nagra-
nia/chronione. Takie nagrania zablokowane są przed automatycznym
nadpisaniem.
Uwaga: kamera automatycznie nadpisze stare filmy z wydarzenia, gdy
folder zdarzeń zgromadzi 30% pojemności karty. Regularnie przesyłaj
ważne filmy na komputer lub inne miejsce przechowywania (np. zewnętrz-
ny dysk twardy). Aby zachować dobrą wydajność odczytu / zapisu, kartę
microSD należy sformatować przynajmniej raz w miesiącu.
4.8 Nagrywanie zdarzeń krytycznych - tryb chronione
Wykrywanie zdarzeń krytycznych jest uruchamiane przez czujnik G (czujnik
grawitacji) i automatycznie wykrywa uderzenia i zderzenia pojazdu.
Spowoduje to, że kamera zabezpieczy bieżący klip wideo przed nadpisani-
em, blokując go i zapisując materiał w folderze Wideo / Chronione.
Użytkownik może także manualnie zabezpieczyć nagranie poprzez
wciśnięcie Po zablokowaniu wyświetli się kluczyk na środku ekranu.
G-Sensor możemy ustawić w 4 czułoś ciach: niska, średnia, wysoka i
wyłączona. Czujnik G-Sensor można także dezaktywować 4 w ,,Ustawienia
nagrywania" ,,G-Sensor".
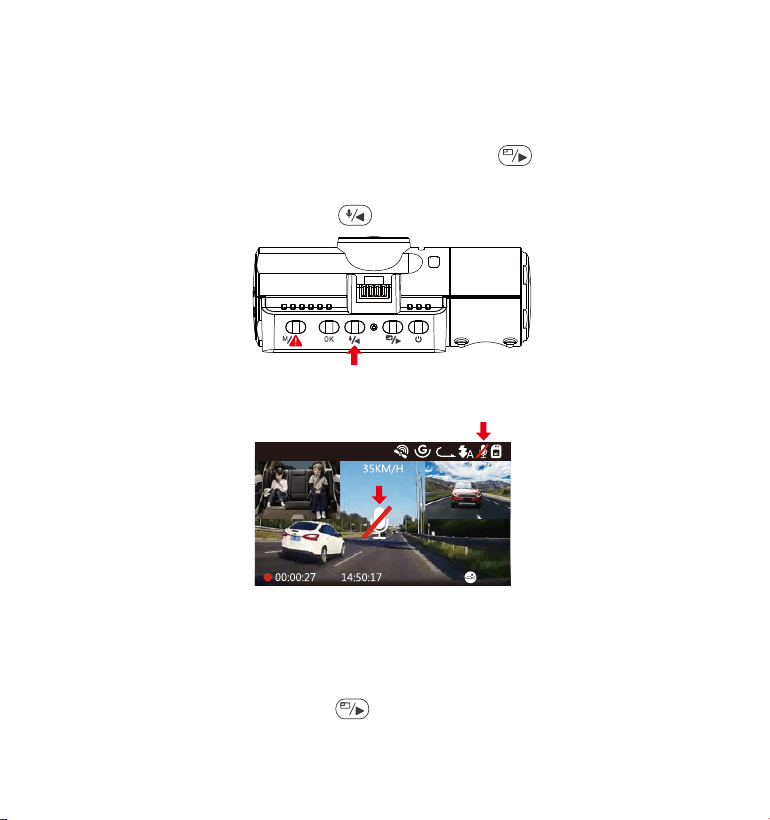
Idź do “Ustawienia nagrywania > “Nagrywanie audio/dźwięku”,
wciśnij OK i wybierz wyłącz.
Podczas nagrywania wciśnij i ustaw nagrywanie audio wył/ wł.
Domyślnie nagrywanie głosu jest WŁĄCZONE. Można go WYŁĄCZYĆ za
pomocą jednej z następujących metod:
4.9 Nagrywanie dźwięku
•
•
Po wyłączeniu nagrywania głosu ikona MIC u góry ekranu zmieni kolor na
biały z czerwoną linią w poprzek.
01-01-2021
3
1440P+1080P+1080P
4.10 Tryb parkingowy (wymagane stałe zasilanie)
Tryb parkingowy działa jako funkcja ochronna w różnych sytuacjach.
Aby włączyć tryb parkowania, przejdź do „Ustawienia nagrywania”>
„Tryb parkowania”, naciśnij i wybierz następującą opcję: Detekcja
kolizji, Detekcja kolizji + detekcja ruchu, wyłącz tryb parkingowy.
- 143 -
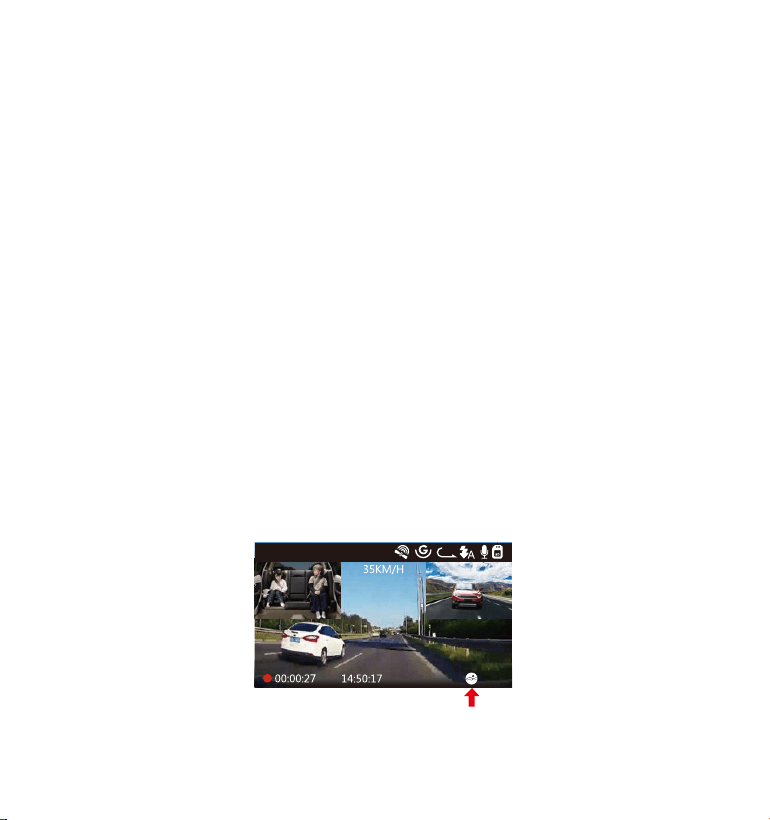
- 144 -
4.10.1 Wykryto kolizję
Jeśli funkcja wykrywania kolizji została włączona, a po 5 minutach
nagrywania nie zostanie wykryty ruch, funkcja wykrywania kolizji jest
aktywowana ikoną wykrywania kolizji w prawym dolnym rogu ekranu, a
kamera automatycznie się wyłącza. Nagrywanie pełnoklatkowe
zostanie uruchomione przez czujnik wykrywania kolizji. Gdy kamera
samochodowa wykryje uderzenie lub kolizję pojazdu, automatycznie się
włączy i rozpocznie automatyczne nagrywanie; zatrzyma nagrywanie i
ponownie wyłączy się automatycznie po 5 minutach braku aktywności.
01-01-2021
3
1440P+1080P+1080P
Aby kamera mogła działać w trybie parkowania, należy ją zasilać za
pomocą mobilnego banku energii lub podłączyć ją za pomocą
przewodów do akumulatora. Nie zalecamy używanie trybu parkingo-
wego przez zbyt długi okres czasu.
Temperatura środowiska pracy N4 wynosi 14-122°F (-10°C do 50°C).
Zalecamy korzystanie z trybu wykrywania kolizji w tym zakresie
temperatur. Gdy temperatura przekroczy Normalny zakres temperatu-
ry roboczej, kamera wyłączy się automatycznie. Jeśli temperatura jest
bardzo wysoka, zalecamy schować kamerę po zaparkowaniu.
1.
2.
UWAGA:
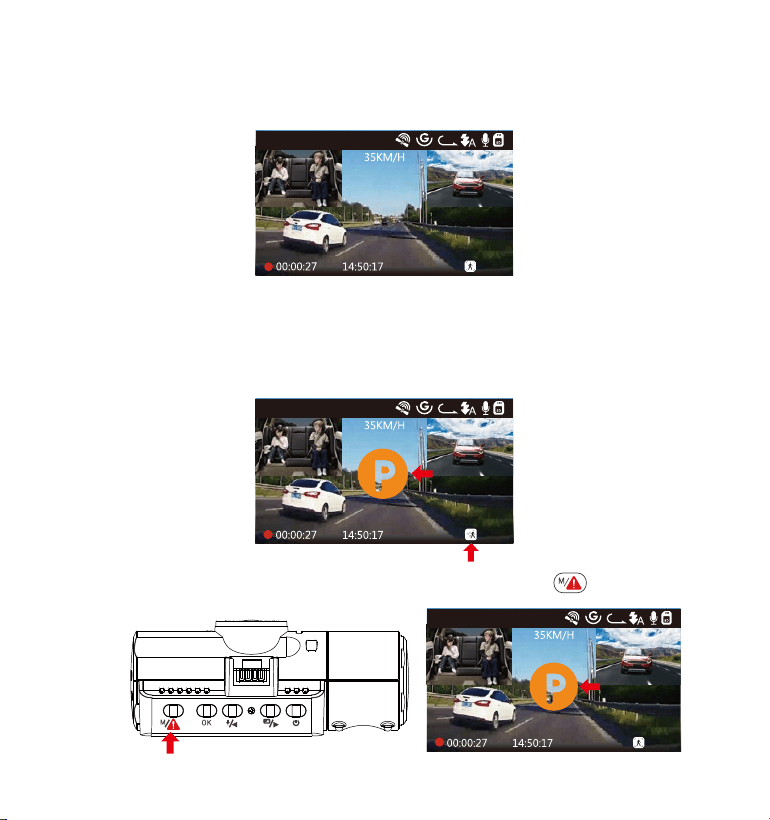
4.10.2 Wykrywanie kolizji + Detekcja ruchu uruchomiona
Po włączeniu Wykrywania kolizji + Wykrywania ruchu jest to pokazane
przez ikonę Wykrywanie kolizji + Wykrywanie ruchu w prawym dolnym
rogu ekranu.
01-01-2021
3
1440P+1080P+1080P
- 145 -
Aby manualnie włączyć tryb parkingowy przytrzymaj aż na ekranie
pojawi się pomarańczowa litera P.
Jeśli po 5 minutach nagrywania nie zostanie wykryty żaden ruch, na
środku ekranu pojawi się pomarańczowa ikona P, co oznacza, że tryb
parkowania jest włączony. Gdy kamera wykryje ruch z przodu, 3 kamery
rozpoczną jednocześnie automatyczne nagrywanie;zatrzymają
nagrywanie po 30 sekundach braku aktywności.
01-01-2021
3
1440P+1080P+1080P
01-01-2021
3
1440P+1080P+1080P
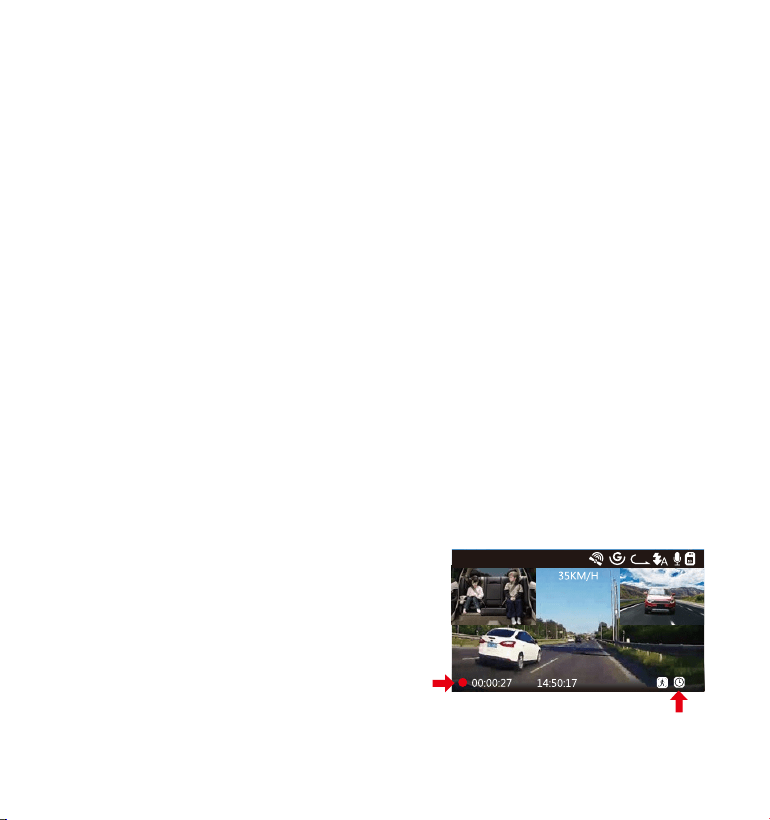
W trybie parkowania kamera wyjdzie z trybu parkowania, jeśli wykryjejak-
iekolwiek wibracje (takie jak otwarcie i zamknięcie drzwi, odsuwanie
samochodu od spoczynku lub inne wibracje uderzeniowe) i przejdzie do
normalnego trybu wideo. Jeśli w trybie parkowania ustawisz opcję Auto
LCD WYŁ na 3 minuty, ekran LCD kamery zaświeci się po 3 minutach, ale
nagrywanie będzie kontynuowane, a kontrolka będzie migać na
niebieski kolor.
UWAGA: Aby kamera mogła działać w trybie parkowania, należy ją
zasilać za pomocą mobilnego banku energii lub podłączyć ją za
pomocą przewodów do akumulatora. Nie zalecamy używanie trybu
parkingowego przez zbyt długi okres czasu.
- 146 -
4.11 TIME LAPSE - TRYB POKLATKOWY
W przypadku wybrania opcji TIME LAPSE aparat będzie robił zdjęcia
statyczne w ustalonych odstępach czasu co 1 sekundę, aby utworzyć
montaż wideo. Jeśli ustawisz upływ czasu, aparat wykona jedno zdjęcie
co sekundę, a następnie połączy je w film o szybkoś ci 30 klatek na
sekundę. Przy maksymalnej liczbie klatek na sekundę 30 klatek na
sekundę, nagrywanie 8 godzin wideo za pomocą Time Lapse 1Sec
wygeneruje wideo poklatkowe trwające zaledwie 16 minut (= 8 x 60 x
60/30/60). Ten tryb Eco jest zalecany do kart pamięci o mniejszej
pojemnoś ci.
01-01-2021
3
1440P+1080P+1080P
[Normalny czas nagrywania = czas
nagrywania poklatkowego (s) x
Liczba klatek na sekundę FPS x opcja
poklatkowa]
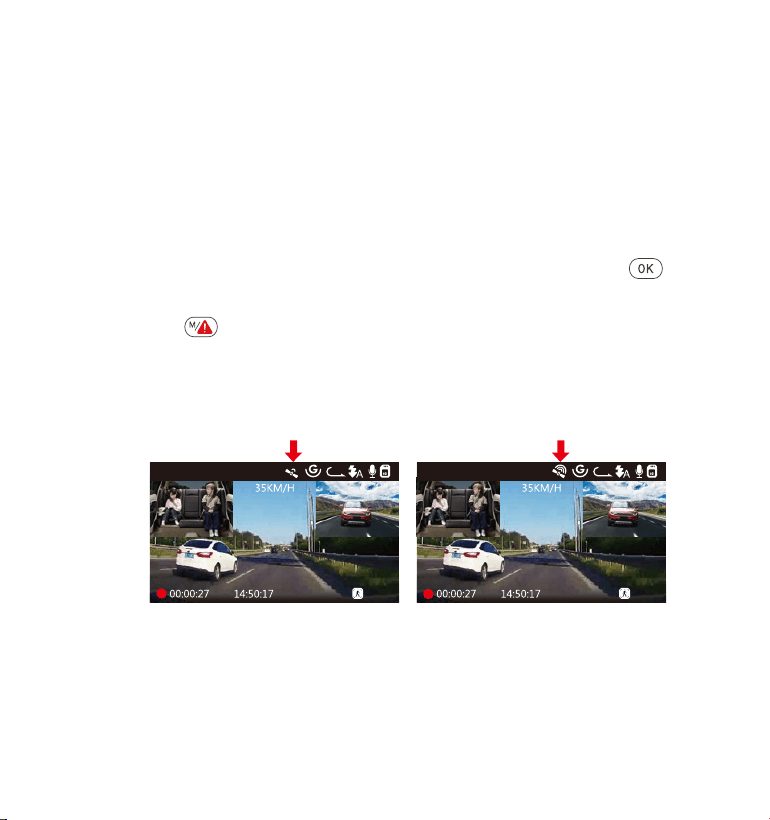
Zainstaluj zewnętrzny uchwyt GPS w aucie zamieniając go z
podstawowym.
Podłącz złącze USB typu C do uchwytu GPS, aby je zasilić.
Po naładowaniu kamera włączy się. Nagrywanie rozpocznie się po
włożeniu karty microSD. Wystarczy jednak nacisnąć przycisk aby
zatrzymać nagrywanie.
Naciśnij aby wejść w ,,Ustawienia systemu"> “GPS” aby aktywować
funkcję GPS.
Odbiornik GPS rozpocznie wyszukiwanie sygnału GPS, ikona GPS będzie
migać na ekranie. Po odebraniu i zablokowaniu sygnału GPS ikona
przestanie migać.
- 147 -
4.12 Podłączenie zewnętrznego odbiornika GPS (wyposażenie opcjonalne)
Aby korzystać z funkcji GPS kamery, kup zewnętrzny uchwyt odbiornika
GPS.
1.
2.
3.
4.
5.
Możesz dołączyć śledzenie GPS i prędkoś ć pojazdu do materiału
wideo, przejdź do Ustawienia zapisu> Stempel> Stempel lokalizacji GPS
i Stempel prędkoś ci aby ustawić.
Możesz przeglądać nagrane filmy za pomocą przeglądarki GPS
VANTRUE
®
- dostępnej do pobrania na www.vantrue.net.
6.
7.
01-01-2021
3
1440P+1080P+1080P
01-01-2021
3
1440P+1080P+1080P
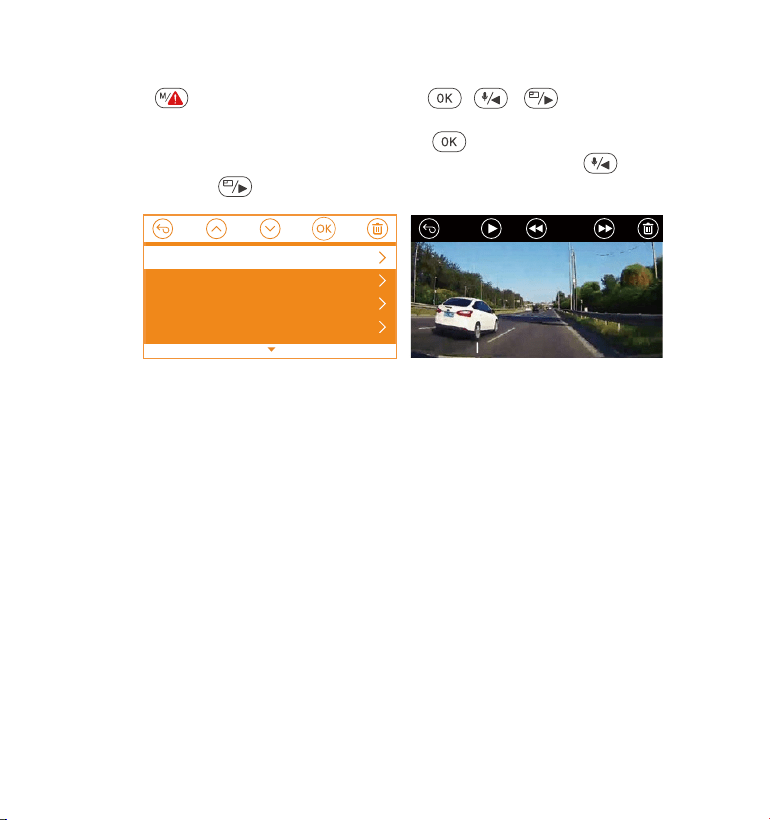
Wcisnij potem “Nagrania ”, wcisnij i / przejdź do>
“Normalne” lub > “Chronione” - przeglądaj nagrania które
zarejestrowała kamera. Potem przycisk lub aby wybrac plik i wciśnij
przycisk żeby odtwarzać zatrzymać . Podczas ogladania aby zwolnić
oglądanie lub aby przyspieszyć.
- 148 -
4.13 Przeglądanie video na kamerze
Przeglądaj na komputerze
Podłącz kamerę do komputera za pomocą dostarczonego kabla USB
typu C.
Połączenie USB oraz ,,Włączenie zasilania" zostanie wyświetlone na
ekranie, nawiguj do ,,Połączenie USB" i wciśnij aby przesyłać pliki.
W zależnoś ci od systemu operacyjnego komputera urządzenie pojawi
się jako dysk wymienny lub wolumin wymienny
1.
2.
3.
0:00/00:02
1/5
2021_08_01_151629_B.MP4
2021_08_01_151629_A.MP4
2021_08_01_113647_B.MP4
2021_08_01_113647_A.MP4
Normal
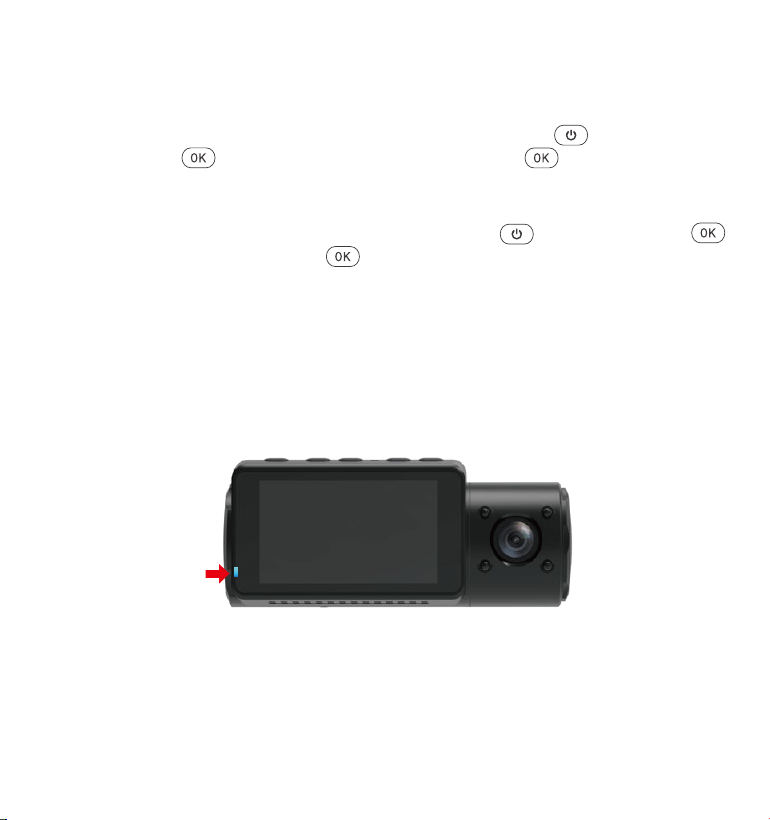
- 149 -
Delete Normal Files Kasowanie normalnych plików
Przejdz do danego pliku ktory chcesz usunac i wcisnij potem
potwierdz i wybierz ,,Skasuj", potem potwierdz aby usunac plik.
Kasowanie plików chronionych
Przejdź do pliku który chcesz skasować i wcisnij potem potwierdź
klikajac “Skasuj” potwierdź aby usunąć plik
4.14 Kasowanie plików
4.15 Auto LCD Wył - tryb uśpienia ekranu
Ta funkcja pozwala uniknąć rozproszenia kierowcy podczas jazdy,
szczególnie w nocy, gdy podświetlenie ekranu LED może być uciążliwe,
a nawet stanowić zagrożenie dla kierowcy. Jeśli ustawisz Auto LCD Wył
na 3 minuty, wyświetlacz LCD wyłączy się po 3 minutach, ale nagrywanie
będzie kontynuowane, a niebieskie światło będzie migać na wskaźniku.
Możesz nacisnąć dowolny przycisk, aby włączyć ekran ponownie.
Przejdź do konfiguracji systemu, aby ustawić ten czas na 30 sekund, 1Min,
3Min lub WYL, aby go wyłączyć - wowczas wyświetlacz LCD bedzie cały
czas włączony.

- 150 -
4.16 Aktualizacja oprogramowania
System zaktualizuje się automatycznie, jeśli karta microSD zawiera plik
aktualizacji oprogramowania. Kamera uruchomi się ponownie po
zakończeniu aktualizacji.
Zawsze bądź na bieżąco!
Najnowsze oprogramowanie zawsze jest dostępne na stronie
www.vantrue.net. Zalecamy rejestrację produktu na www.vantrue.net/
register aby otrzymywać infomarcje o nowych aktualizacjach.
Instrukcję aktualizacji oprogramowania znajdziesz także na
www.vantrue.pl
4.17Temperaturapracyurządzenia
Kamera została zaprojektowana do pracy w temperaturach od -10°C do
70°C, a temperatury poza tym zakresem mogą spowodować obniżenie
wydajnoś ci kamery lub jej uszkodzenie.
W czasie upałów nie wystawiaj kamery bezpoś rednio na słońce, gdy
samochód jest zaparkowany. Staraj się tego unikać.
W ekstremalnych warunkach zimowych, tj. -4℉(-20°C) lub niżej, odłącz
kamerę od przedniej szyby, gdy nie jest używana, i schowaj ją w
schowku.
•
•
Aby uniknąć uszkodzeń

- 151 -
5.Specyfikacjatechniczna
Specyfikacje tego produktu mogą ulec zmianie bez uprzedzenia z
powodu ulepszeń produktu.
Model
Przód: 5M CMOS Sensor
Wnętrze: 2M CMOS Sensor
Tył : 2M CMOS Sensor
Sensor
Liczba kanałów 3 kanały
LCD
Obiektyw
2.45" IPS LCD, 480x272
N4
Przód: F1.4, 155 st. obiektyw szerokokątny
Wnętrze: F2.0, 165 st. obiektyw szerokokątny
Tylna kamera: F1.8, 160 st. obiektyw. szer.
Język
Rozdzielczość
video
Przód+wnętrze+tył:
1440P+1080P+1080P 30FPS; 1080P+1080P+1080P
30FPS; 1080P+1080P+720P 30FPS;
1440P+1440P+1080P 30FPS; 720P+720P+720P 30FPS
Przód+wnętrze: 1440P+1440P 30FPS; 1440P+1080P
30FPS; 1080P+1080P 30FPS; 1080P+720P 30FPS;
720P+1080P 30FPS; 720P+720P 30FPS
Przód+tył: 2160P+1080P 30FPS; 1440P+1080P 30FPS;
1080P+1080P 30FPS; 1080P+720P 30FPS; 720P+1080P
30FPS; 720P+720P 30FPS
Przód: 3840x2160P 30FPS; 2592x1520P 30FPS;
2560x1440P 30FPS; 1920x1080P 30FPS; 1280x720P
30FPS.
English/Japanese/Spanish/French/Italian/简体中文
(Simplified Chinese)/Deutsch/Russian/Polski
MP4Format Plików wideo

- 152 -
Audio Wbudowany mikrofon oraz głośnik
Typ migawki Elektroniczna
Rodzaj baterii superkondensator
Pamięć
zewnętrzna
Micro SD card (U3 lub wyższa do 512GB)
USB Port
Typ-C
Napięciezasilania 800mA(Typischer Wert)/ DC 5V
Kompatybilny z Windows XP/Vista/7/8/10 &Mac OS
Temperatura
pamięci
-4 to 176° (-20°C to 80°C)
Temperatura
pracy urządzenia
14 -158°F (-10°C to 70°C)
Napięcierobocze 5V 1.5A

Gwarancja
Każda kamera VANTRUE
®
OnDash N4 posiada 12 miesiecy gwarancji.
Wsparcie
Jeśli masz jakiekolwiek pytania dotyczące produktu skontaktuj się z nami
Twoja opinia ma znaczenie
VANTRUE
®
jest niezmiennie zaangażowany w ciągłe doskonalenie swoich
produktów.
Jeśli masz jakiekolwiek uwagi śmiało pisz opinie i sugestie na
Dziękujęmy za wybór
6.Gwarancja&wsparcie
- 153 -