Trackball Mouse
User Manual
Compliant model: MMT1MRS, E02C
This manual describes the important precautions you should take for safe operation of this product.
Observe these precautions carefully to avoid personal injury, damage, fire, and other problems.
Precautions
Meaning of symbols
CR70604
* Screenshots will be replaced with the target language version's when they are all ready.
* XXX will be determined when they are all fixed.
WARNING
Failure to observe precautions carries the possibility of serious personal injury or death due to fire,
electric shock, or other causes.
CAUTION
Failure to observe precautions may result in personal injury due to electric shock or other causes, and
may damage other equipment.
Prohibited action
Mandatory action
Situation that needs attention
Notes and reference information
WARNING
If a foreign object (water, metal chips) enters this product, stop using immediately and remove
the batteries.
Continuing to use the product as it is may cause a fire or an electric shock.
If abnormalities such as overheating, emitting smoke, or strange odors occur, stop using the
product immediately and disconnect it from the connected device. Also, after confirming that
there is no heat generation, please remove the battery from this product while being careful to
avoid burns. Afterwards, please contact your dealer.
Continuing to use the product as it is may cause a fire or an electric shock.
Please do not drop or hit this product.
In the event that the product is damaged, cease usage immediately. Turn OFF the power and
remove the batteries. Afterwards, please contact your dealer.
Fires or electric shocks may occur if this product is used when damaged.
Do not attempt to disassemble, modify, or repair this product or the receiver.
Doing so may cause a fire, electric shock, or product damage.
Such malfunctions are not covered under warranty.
Do not put this product in fire.
Breakage may cause fire or injury.
Please do not insert or pull out the receiver unit with wet hands.
It can cause a fire or electric shock.
The receiver unit presents a swallowing hazard for children, so be sure to store it in a place out of
the reach of children.
CAUTION
Do not place this product in any of the following environments:
This product does not have a waterproof structure. Use or store in a place not exposed to liquids
such as water.
Any liquid such as rain, water spray, juice, coffee, steam, and sweat, can cause this product to
breakdown.
CAUTION
Please use either AAA alkaline batteries, AAA manganese batteries, or AAA nickel-metal hydride
batteries.
When not using this product for long periods of time, remove the batteries.
Not removing them may cause leakage or malfunction.
If this product becomes dirty, wipe it with a soft, dry cloth.
In a car exposed to sunlight or a place exposed to direct sunlight.
In a place that becomes hot, such as around a heater.
In a moist place or a place where condensation may occur.
In an uneven place or a place exposed to vibration.
In a place where a magnetic field is generated (such as near a magnet.)
In a dusty place.
Only use this trackball with PCs, smartphones, tablets, and video game systems.
Do not use this product with any device that may be significantly affected in the case of this
product malfunctioning.
When you no longer need to use this product and the batteries, be sure to dispose of them in
accordance with the local ordinances and laws of your area.
Batteries
Cleaning the Product
Use of a volatile liquid (paint thinner, benzene, alcohol, etc.) may a ect the material quality and
colour of this product.
Please take caution regarding the following for disinfection.
Gently soak a cleaning cloth, such as a microfiber cloth, in the disinfectant solution. Ensure there are
no loose droplets and gently wipe the product using the cloth.
After wiping, dry thoroughly and wipe off any residual liquid.
*Do not spray any liquid onto the product directly. Doing so can cause electric malfunctions.
IMPORTANT
Do not spray any liquid onto the product directly.
Doing so can cause electric malfunctions.
Do not use organic solvents or expose the product to ultraviolet light.
Using these can cause damage to the exterior such as the deterioration of the housing components or
paints.
We recommend using disposable gloves.
When using any alcohol-based products, please check its associated precautions and that it is
appropriate for the specific purpose.
Please turn off any connected devices.
*When in sleep or hibernation mode, turn off connected devices.
*Please unplug the AC adapter and power cable from the outlet.
Cautions for Wireless Equipment
This product is a wireless device that can use the entire 2.4 GHz band, and is able to avoid the mobile
entity identification device range. The GFSK method is adopted as the radio wave method, and the
interference distance is 10 m. The 2.4 GHz band is also used in medical devices, Bluetooth, and wireless
LAN devices of the IEEE 802.11b/11g/11n standards.
Please note that the customer is fully responsible for repair costs in the event that the product is
damaged or operates abnormally due to the disinfection process.
It is recommended that you sanitize your hands before and after using PCs and peripherals that are
used by multiple people to prevent the spread of infection through the equipment.
*Other "radio stations" refer to industrial, scientific and medical devices using the 2.4 GHz band, the
same as this product, other radio stations of this type, licensed radio station premises for a mobile
object identification system that is used in factory production lines, certain non-licensed low power
radio stations, and amateur radio stations.
WARNING
*ELECOM is not liable for any accidents or any indirect or consequential damage incurred due to the
failure of this product.
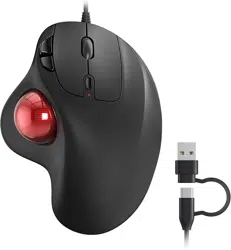
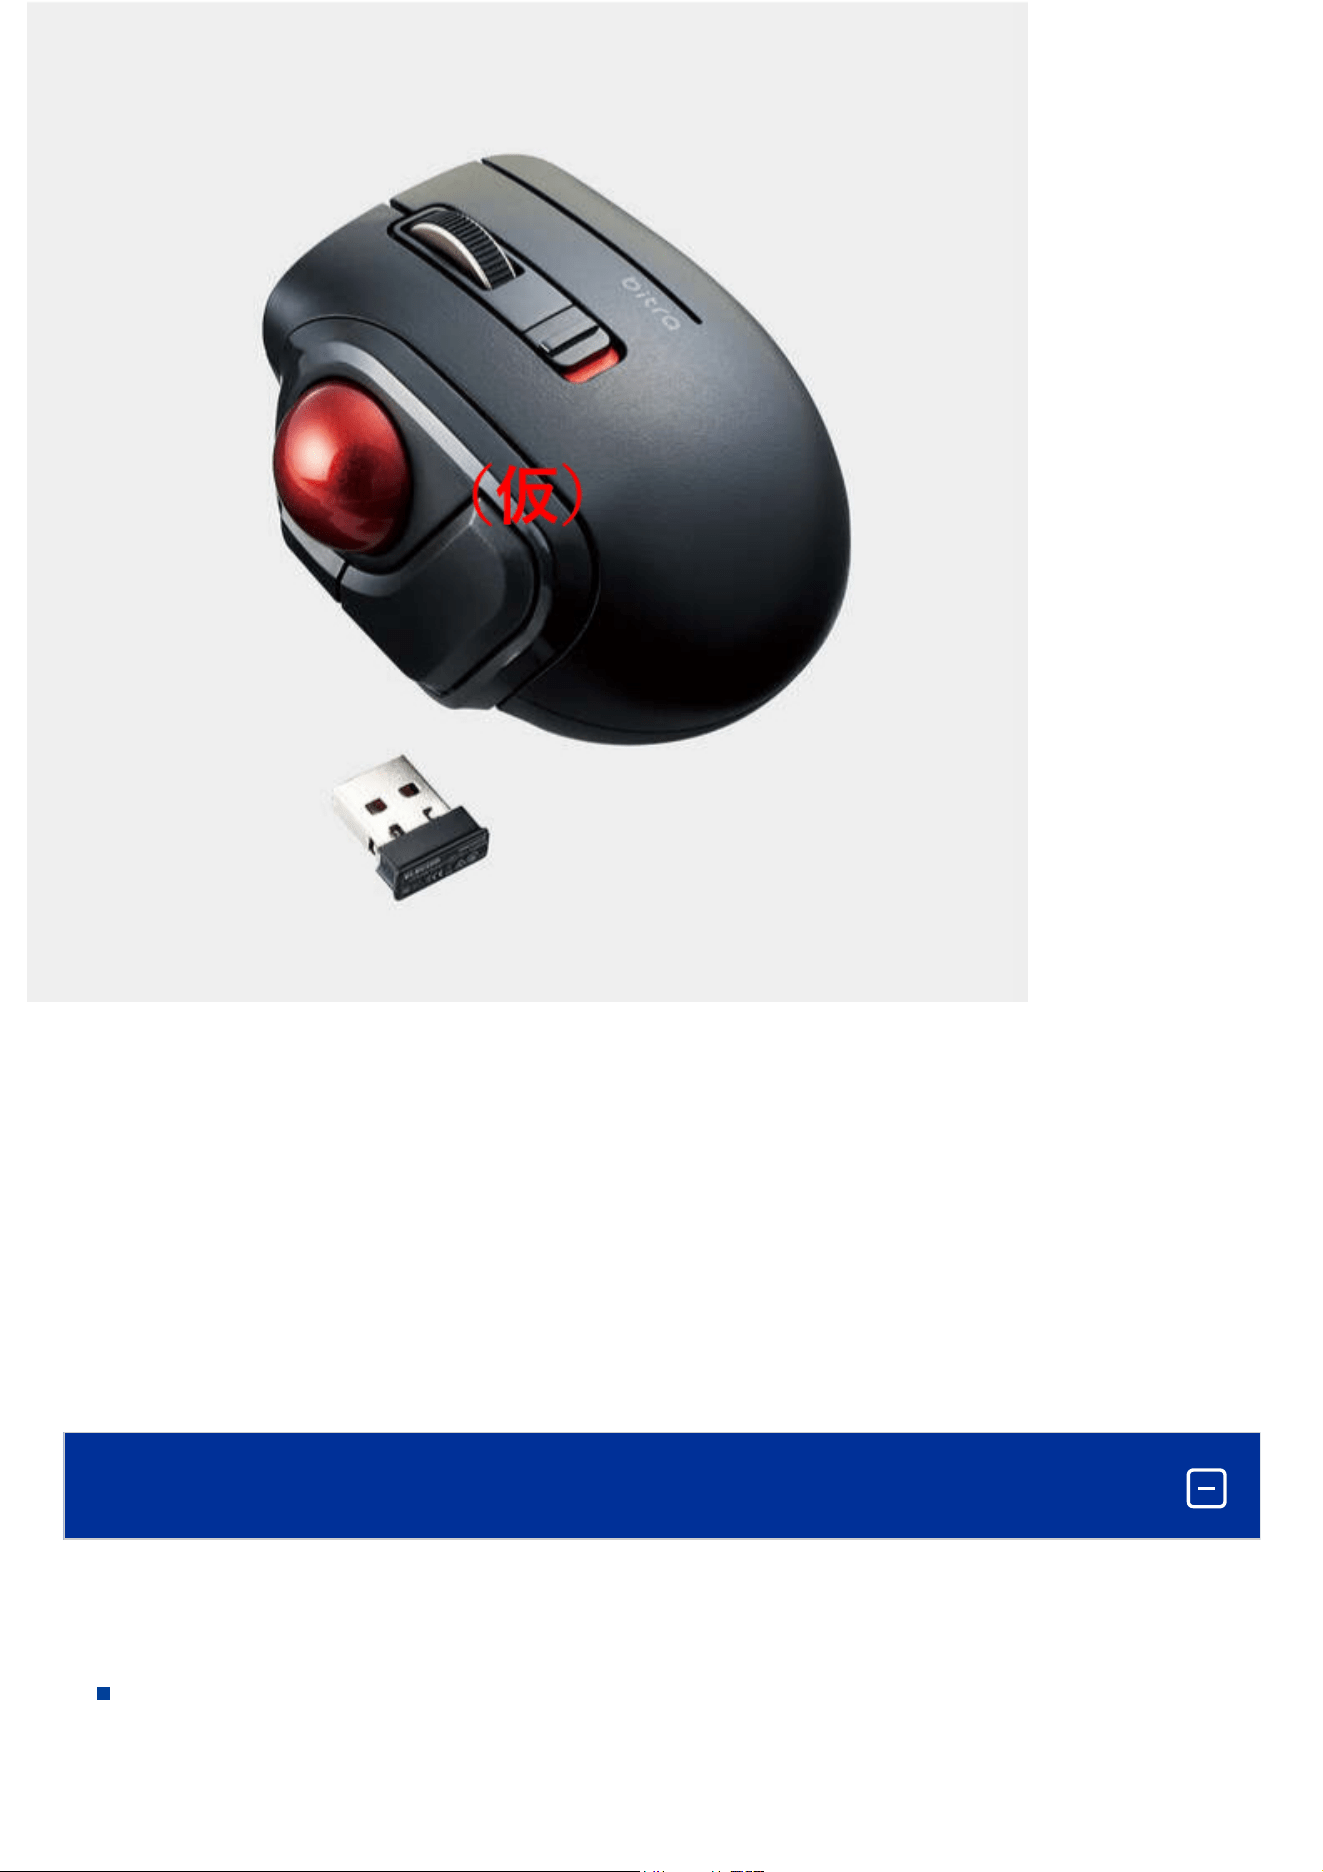
The following items are included in this package. Verify the package to ensure all items are accounted
for prior to using this product. While every effort has been made to ensure proper packaging, in the
event that any shortage or damage is discovered, please contact the retailer where the product was
purchased.
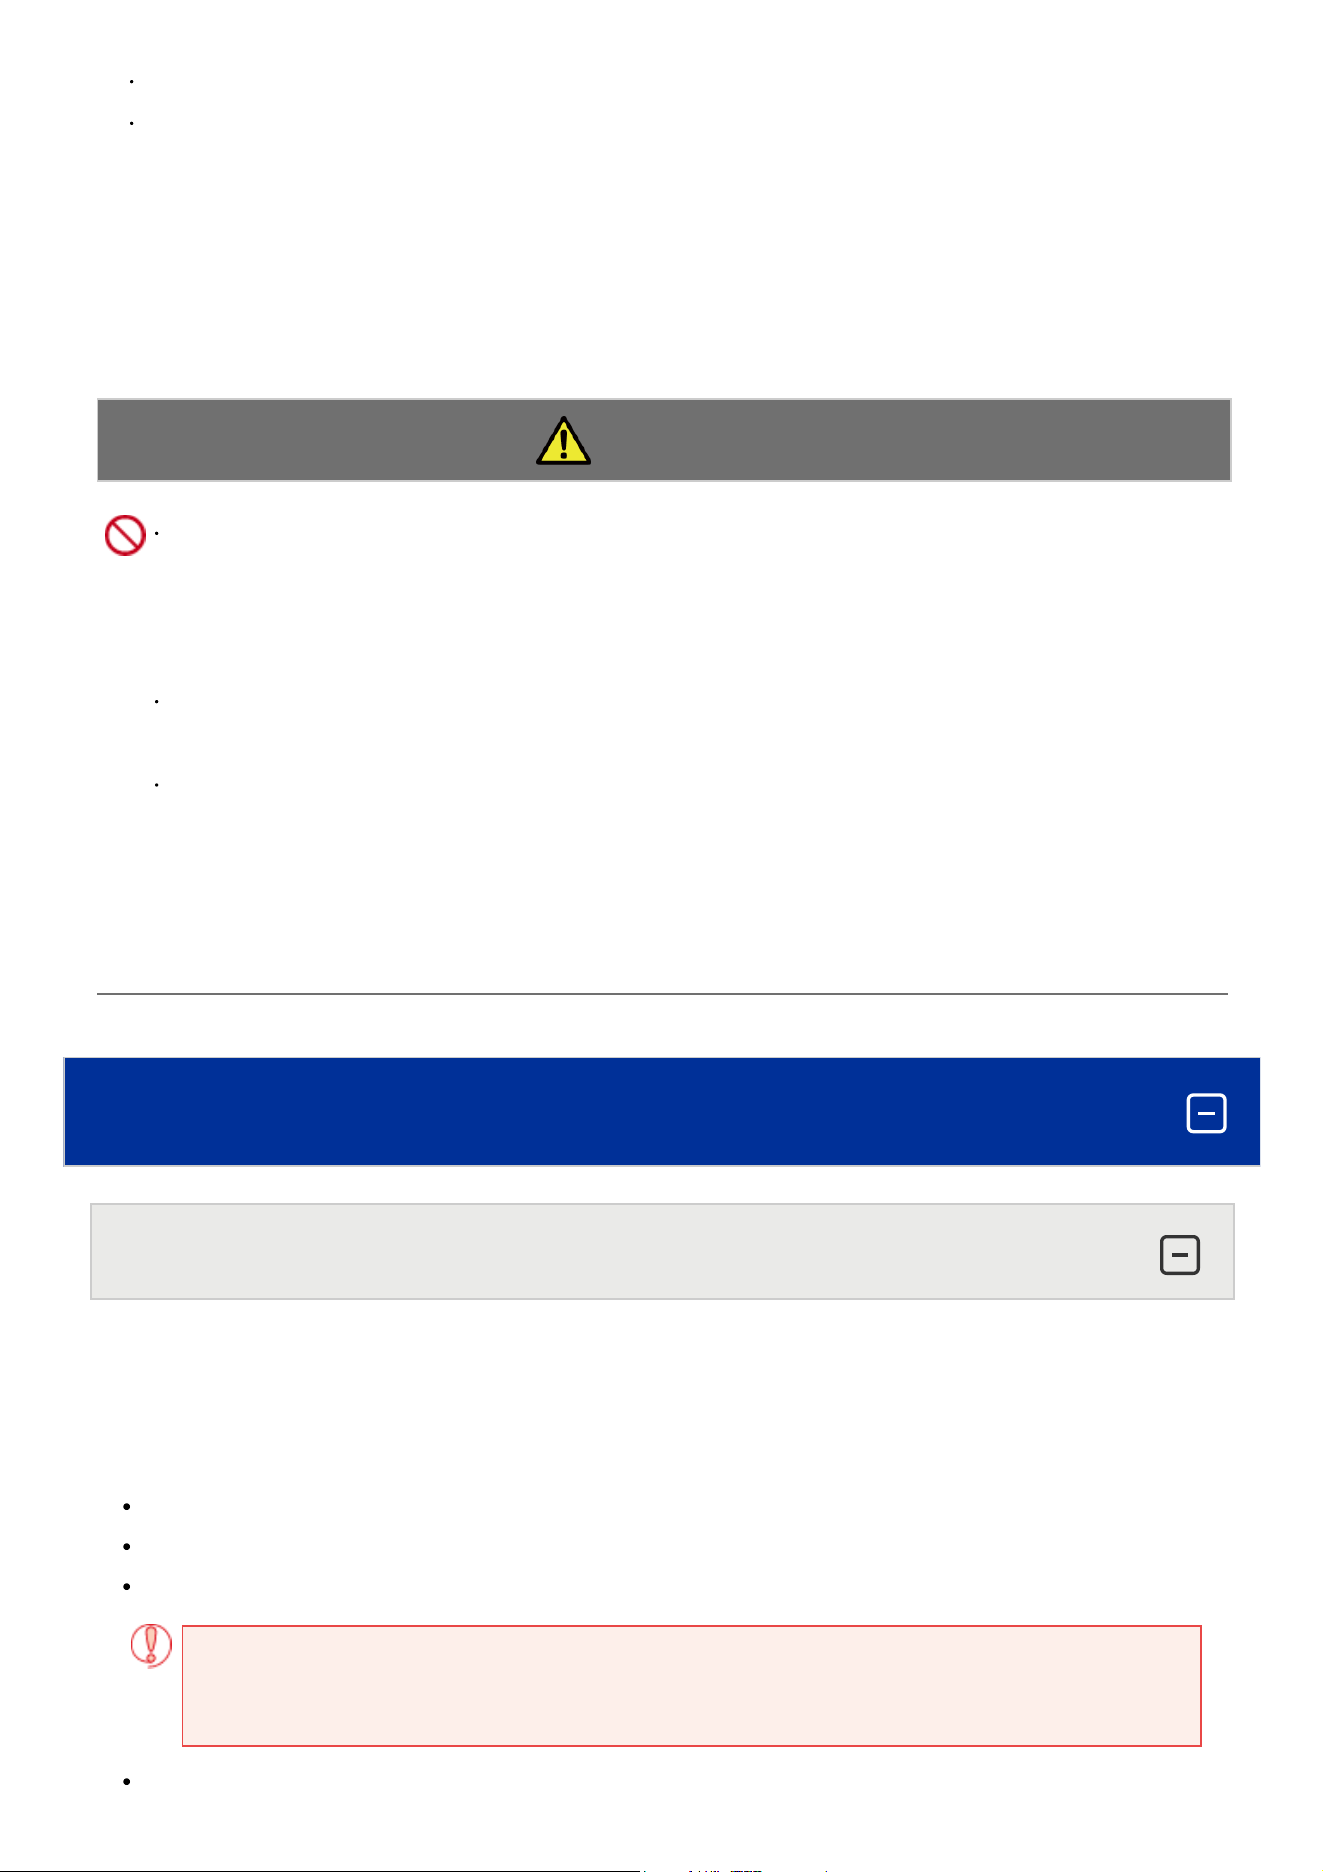
The batteries and receiver unit are already installed into the mouse. Please remove the battery
insulating pull tab before use. Also, take out the receiver unit as needed.
Before using this product, check that there are no other “radio stations”* operating nearby.
If electromagnetic interference occurs between this product and other “radio stations”*, use this
product in another location or stop using this product.
Do not use with any equipment that may be significantly affected in the case of this product
malfunctioning. There are rare cases in which an external radio wave at the same frequency, or the
radio wave emitted from a mobile phone, causes this product to malfunction, slow down, or fail to
operate.
Do not use this product in places where radio wave usage is prohibited, such as hospitals. Radio waves
of this product may affect electronic devices and medical devices (for example pacemakers).
Due to the possibility of hindering safe navigation of aircraft, use of wireless trackball in aircraft is
prohibited by the Civil Aeronautics Act. Turn off the power of the wireless trackball before boarding
and do not use after boarding.
How to use
Items included in this package
Trackball main body × 1
Receiver unit × 1
AAA alkaline dry cell battery for confirming operability × 1
One dedicated semi-hard case is included
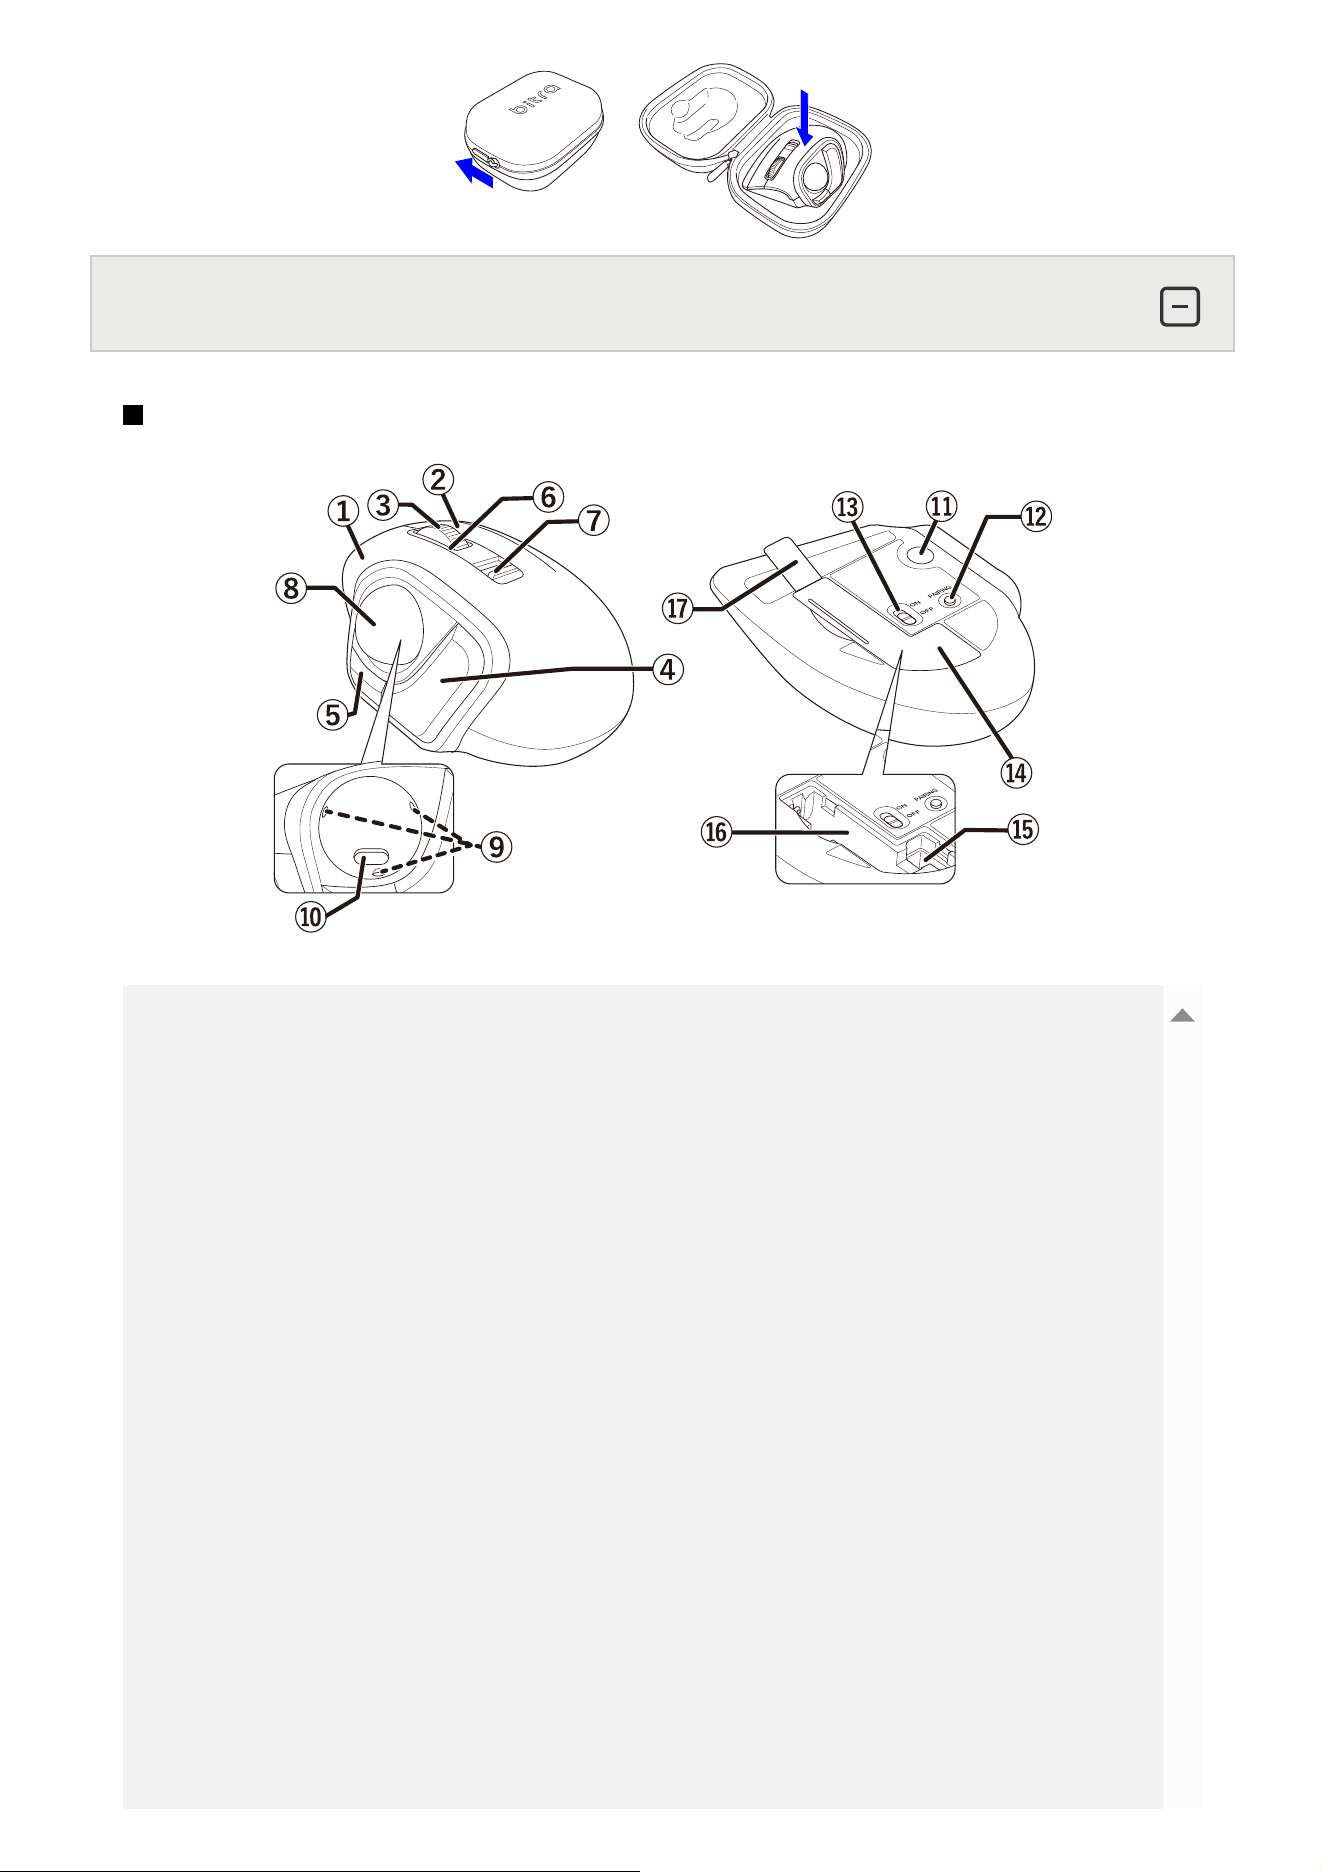
① Left button
To left click on your PC.
② Right button
To right click on your PC.
③ Wheel
Rotate forward and backward or click like a button to operate your PC.
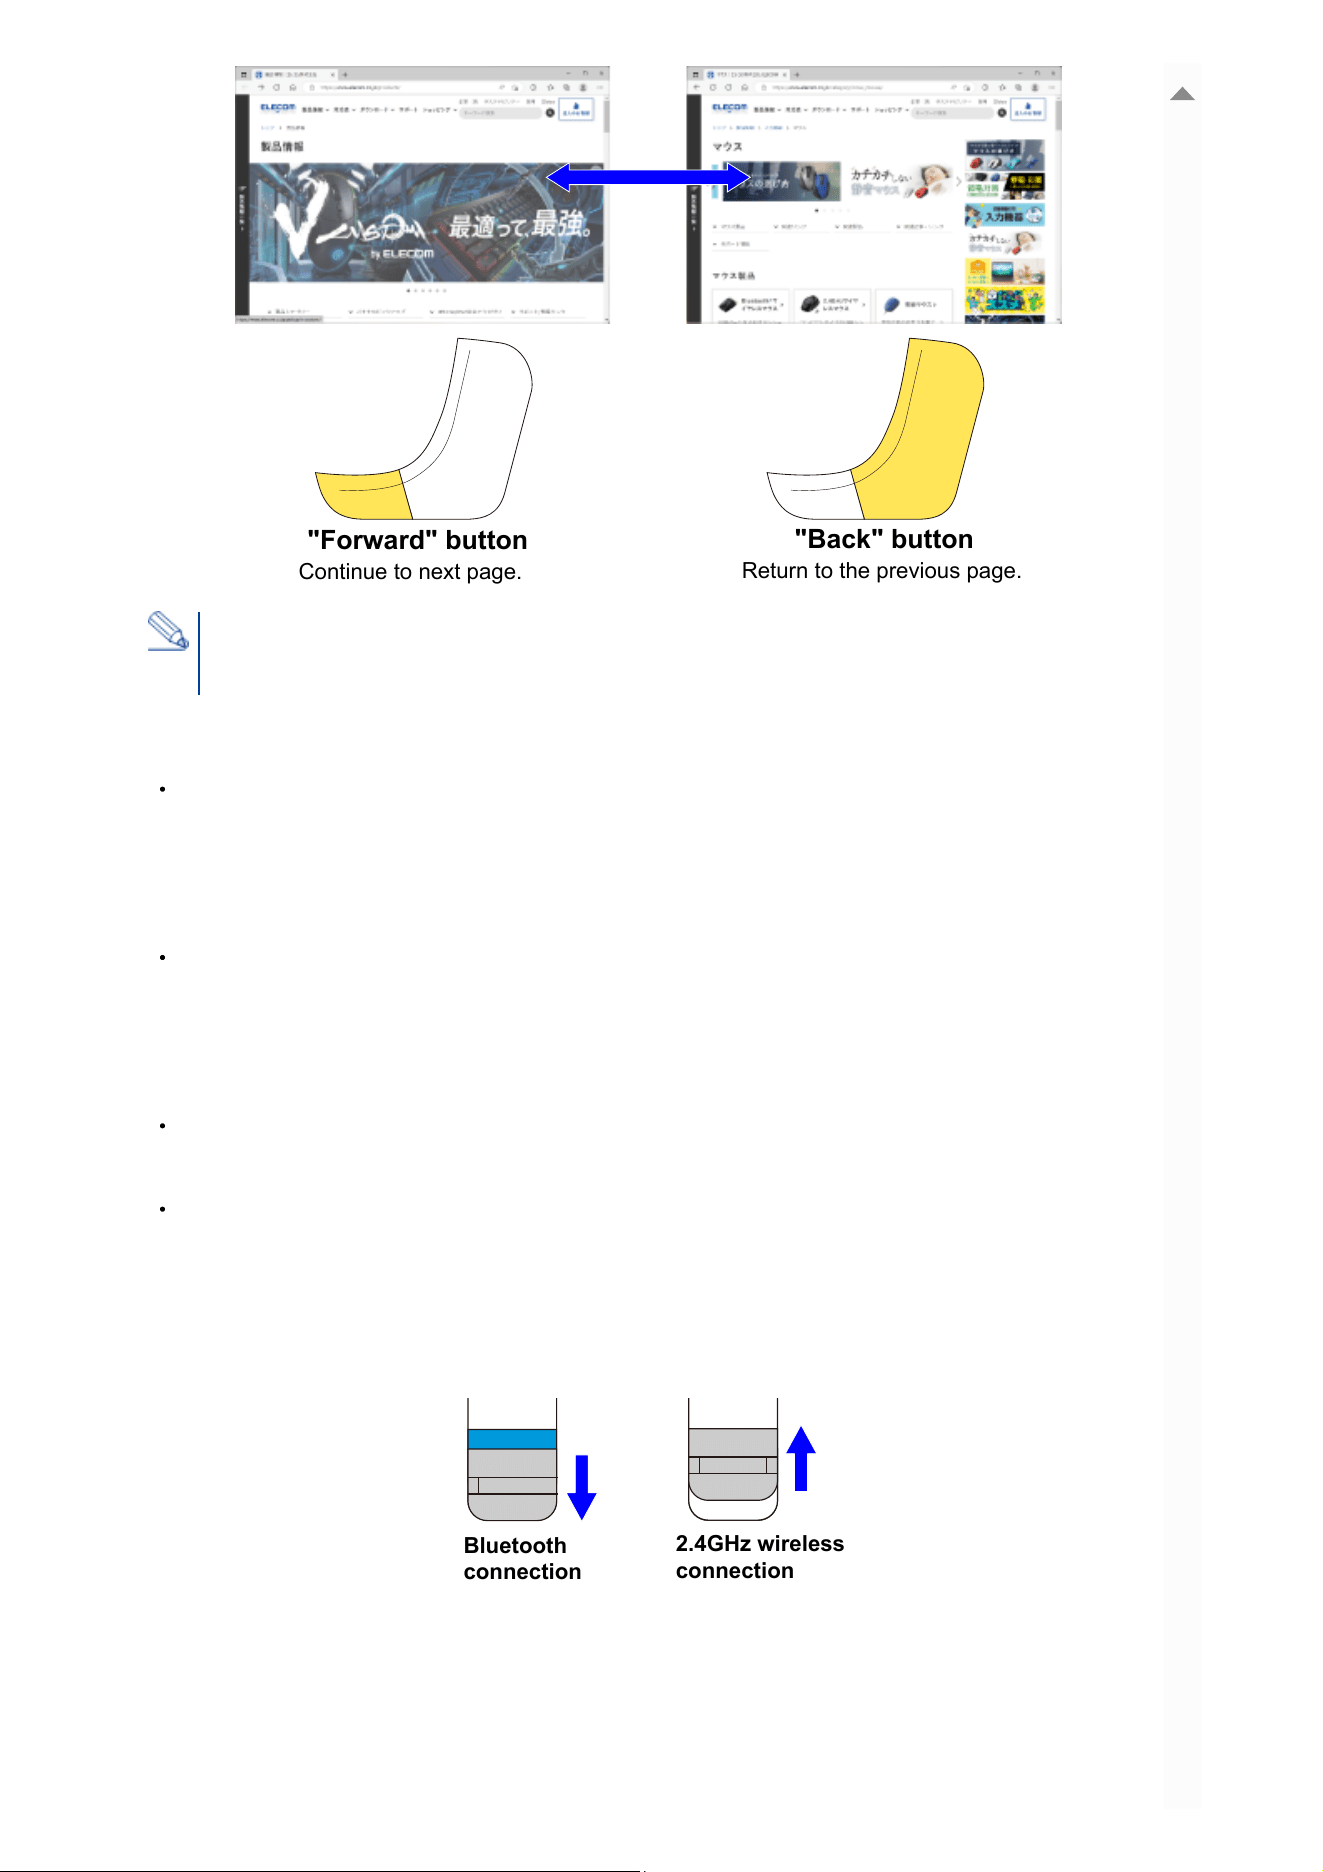
④ “Back” button
Performs the “Back” function on the Web browser.
⑤ “Forward” button
Performs the “Forward” function on the Web browser.
Name and function of each part
Trackball
⑥ LED light
⑦ Connection selection switch
Sliding it downward connects via Bluetooth, and sliding it upward connects via 2.4GHz wireless.
*At the time of purchase, it is set to the Bluetooth connection side.
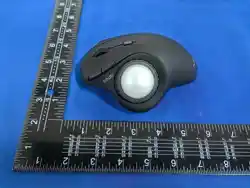
⑧ Ball (diameter: 25 mm)
Rotate using your fingertips to move the cursor.
You need to install the “ELECOM Mouse Assistant 6” from our website to use the
“Back” and “Forward” button on Mac. Refer to “Install ELECOM Mouse Assistant 6”.
When the power is turned ON, the area around the wheel lights up in the following color for 5
seconds.
Bluetooth connection: ●blue
2.4GHz Wireless Connection: ●White
When you change the connection target using the connection switch, it lights up in the
following color for 5 second.
Bluetooth connection: ●blue
USB 2.4GHz Wireless Connection: ●White
When in Bluetooth pairing standby mode, the area around the wheel rapidly flashes ●blue.
When pairing is successful, the area around the wheel lights up ●blue for 3 seconds.
When the battery level becomes low during use, the area around the wheel flashes●white 10
times at 1-second intervals.
"Forward" button
Continue to next page.
"Back" button
Return to the previous page.
Bluetooth
connection
2.4GHz wireless
connection
⑨ Ball Socket
Support the ball.
⑩ Optical sensor (under the ball)
This sensor detects the trackball’s movements when you move the trackball.
⑪ Ball Release Button
To clean the internal ball socket and optical sensor, press this button to remove the ball.
⑫ Pairing button
Pair this product with your PC’s Bluetooth module, Bluetooth adapter, or a receiver unit.
⑬ Power switch
Turn the trackball power ON and OFF.
⑭ Battery cover
Remove this cover and insert a battery.
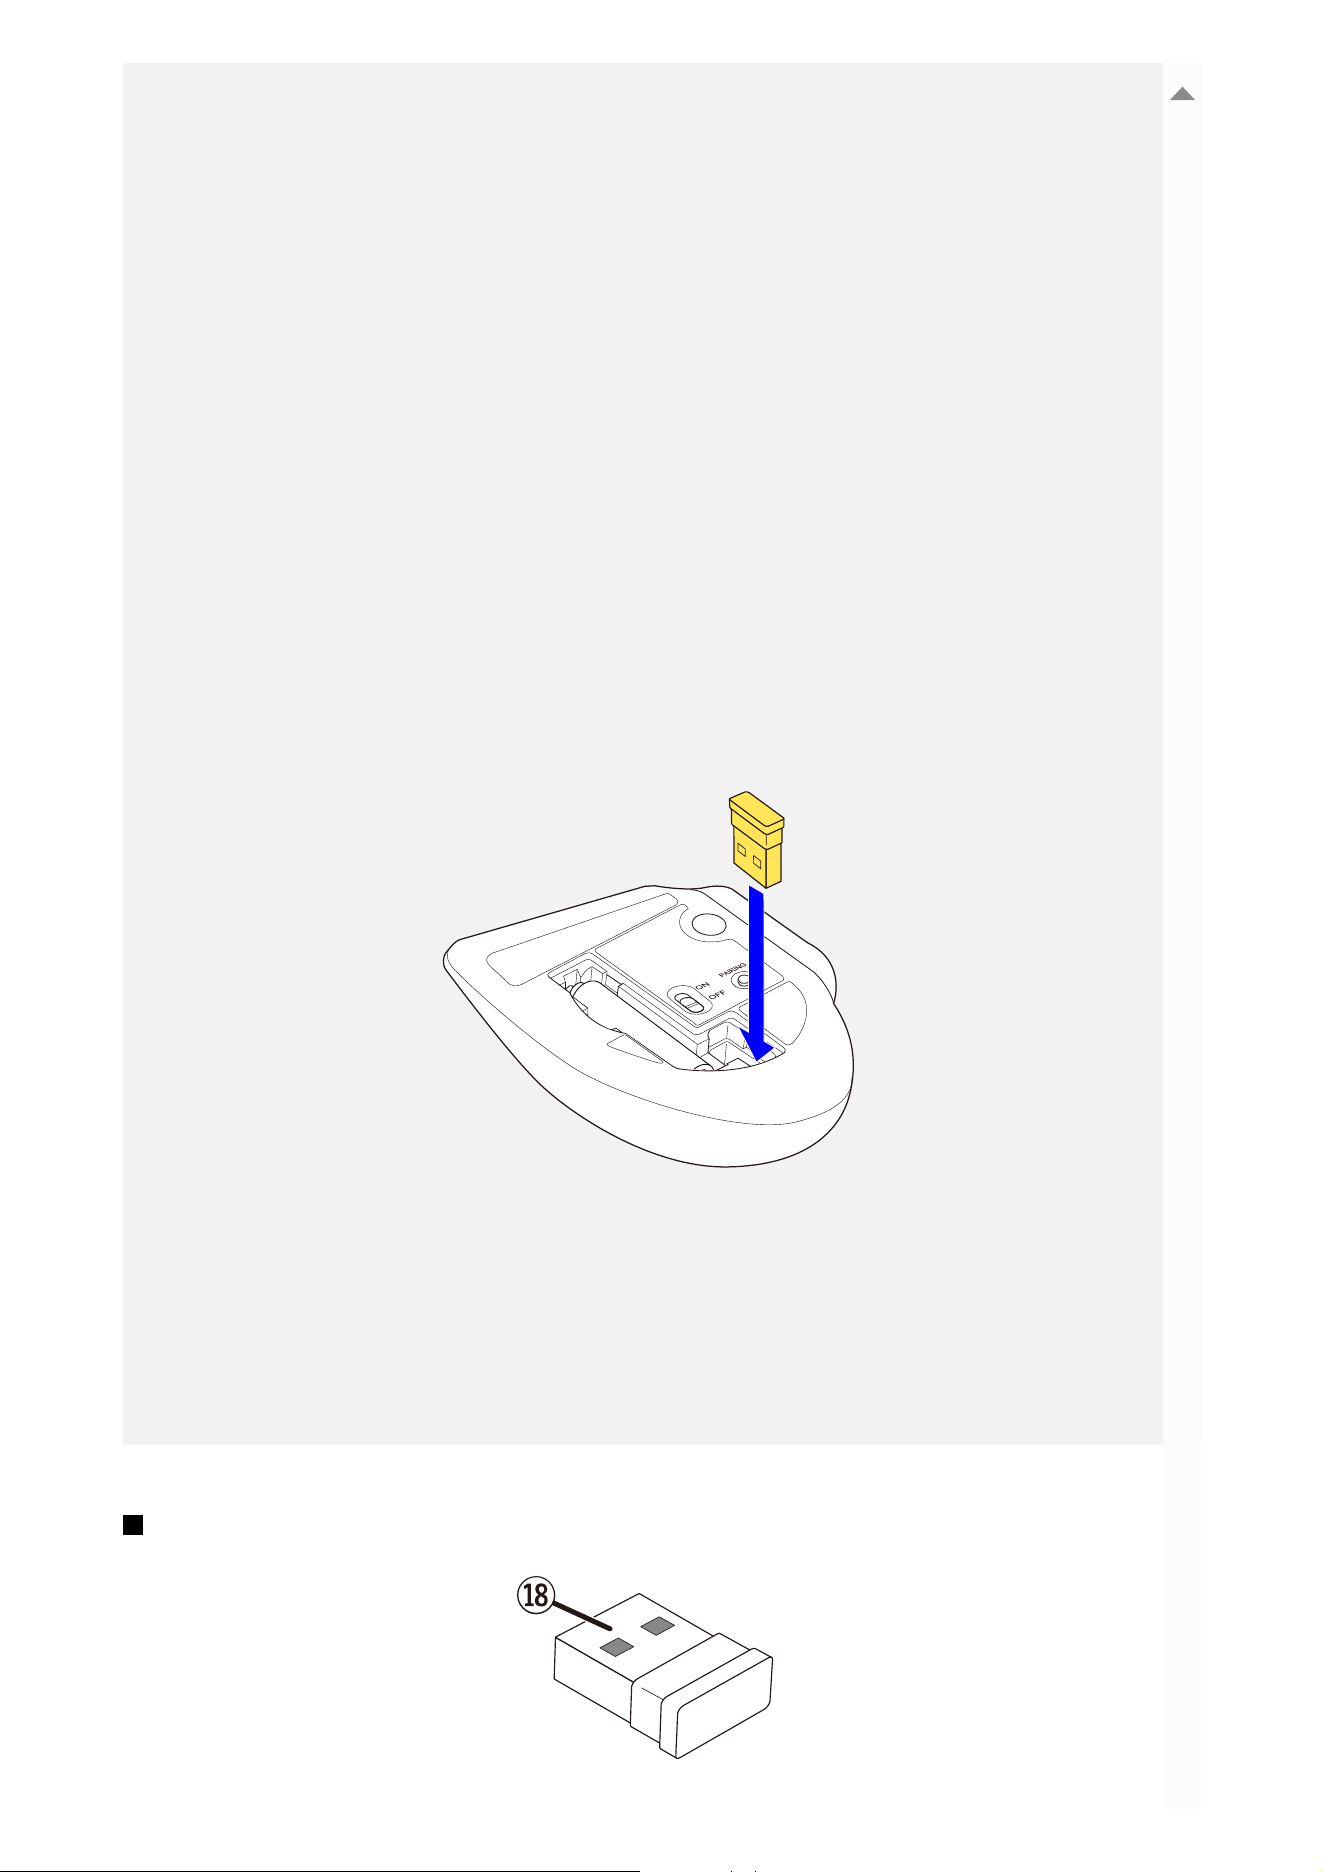
⑮ Receiver unit storage compartment
The receiver unit can be stored here when the mouse is not connected wirelessly.
⑯ Battery storage compartment
Holds the battery.
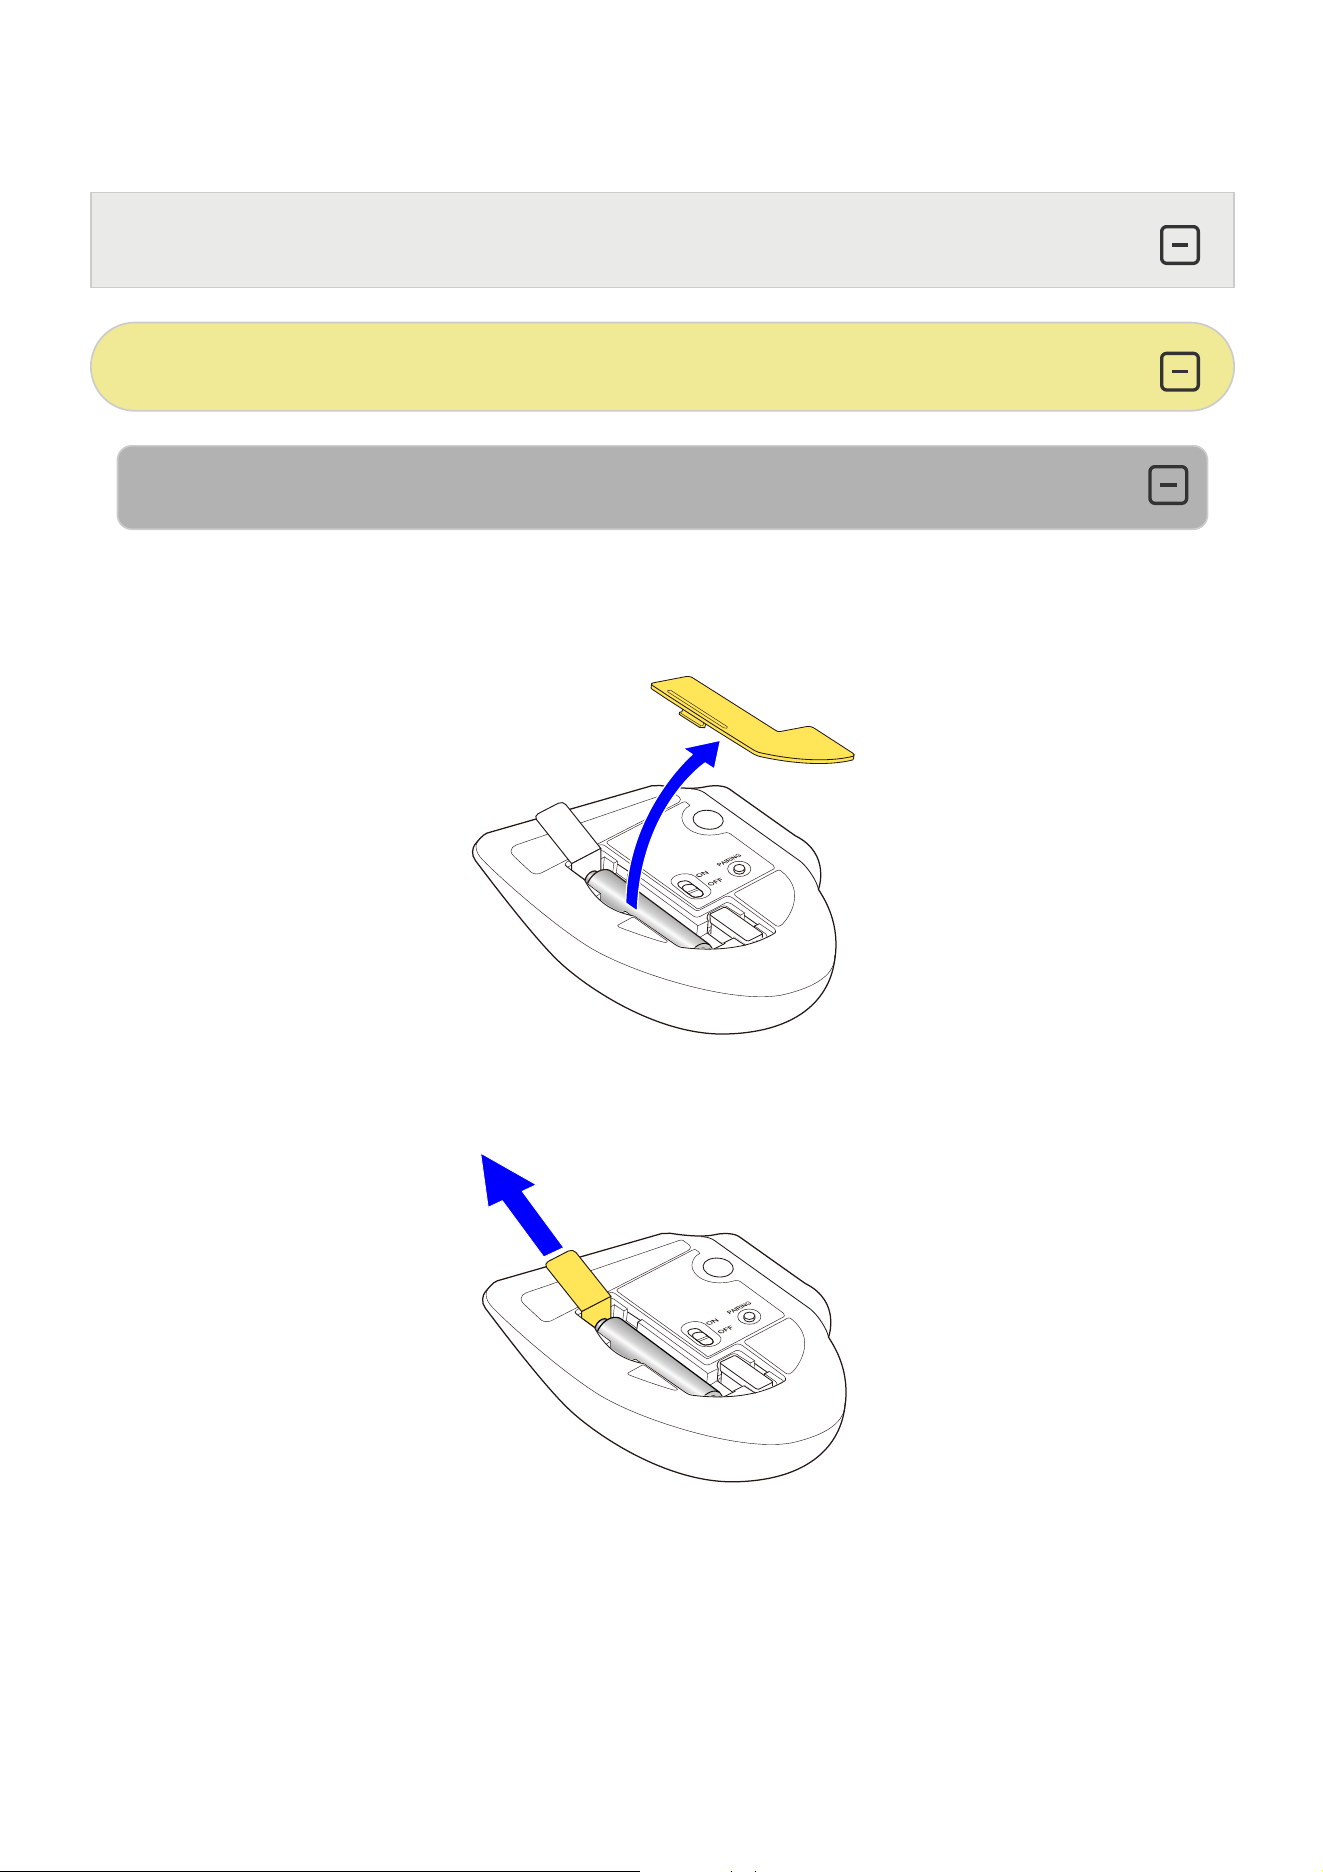
⑰ Battery insulating tab
Remove this tab before using.
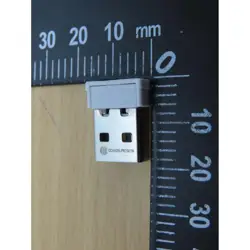
Receiver unit
⑱ USB-A plug
Connects to the PC USB-A port.
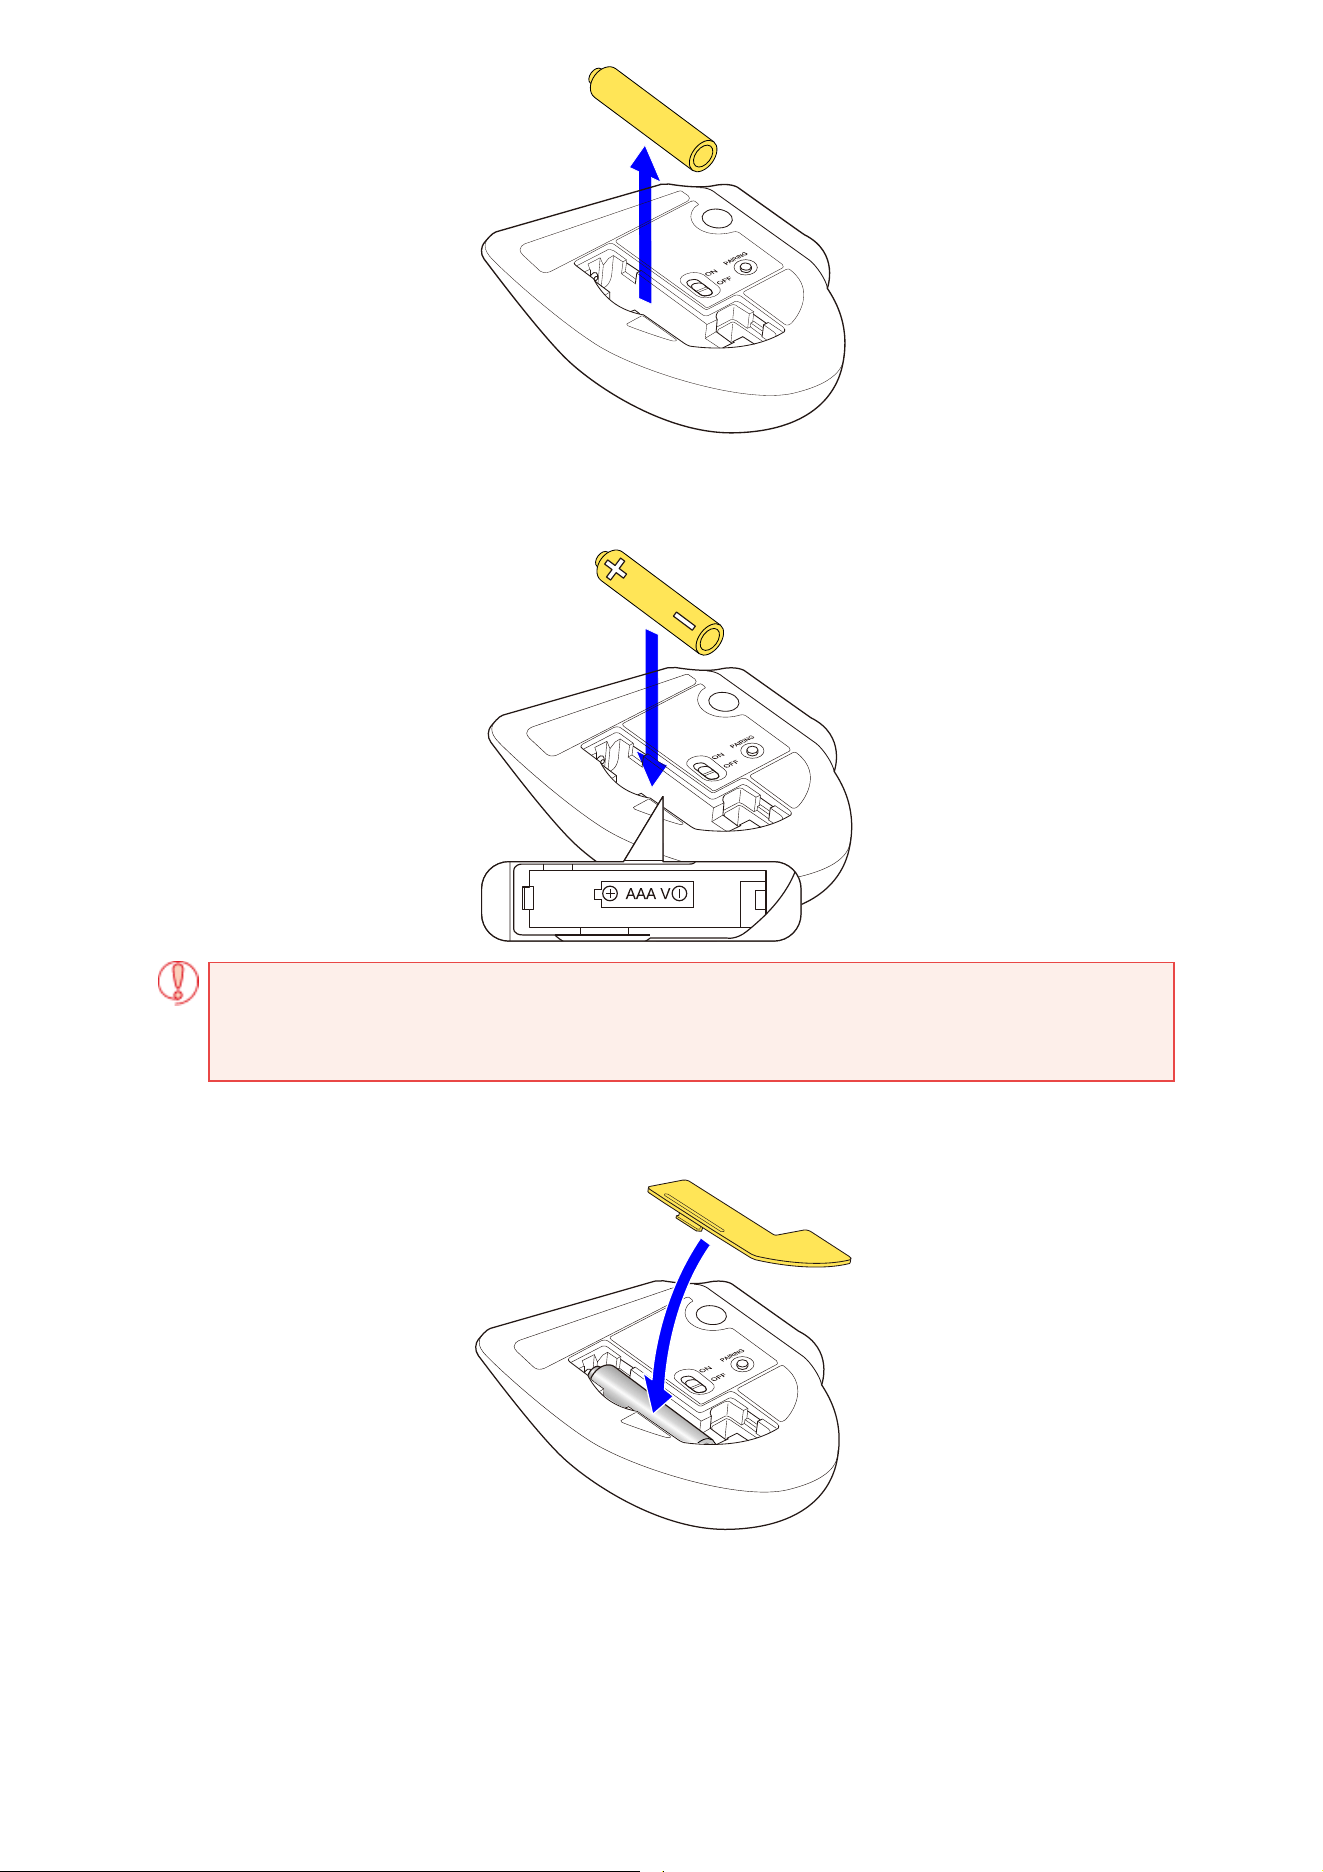
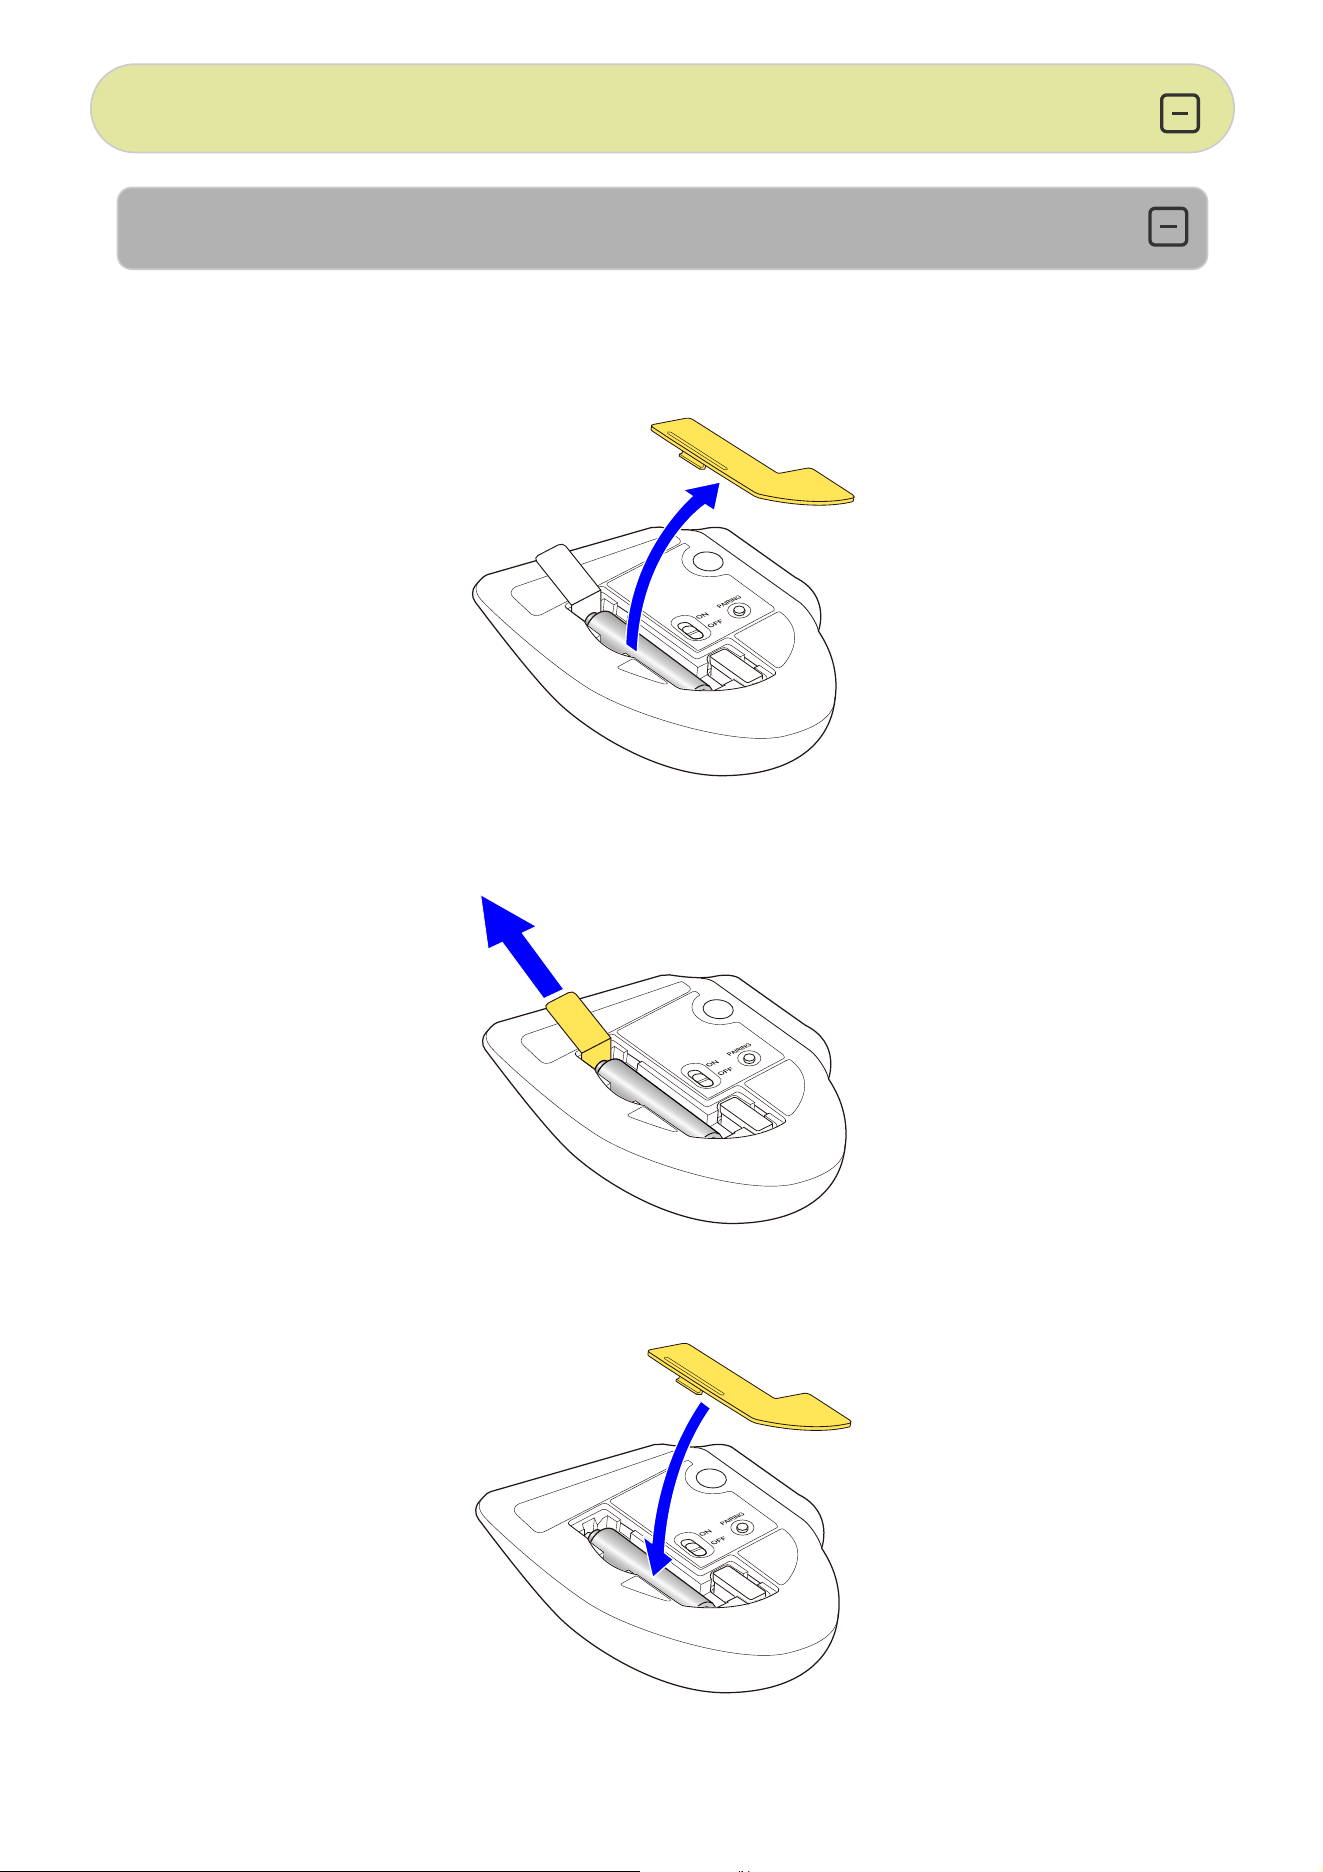
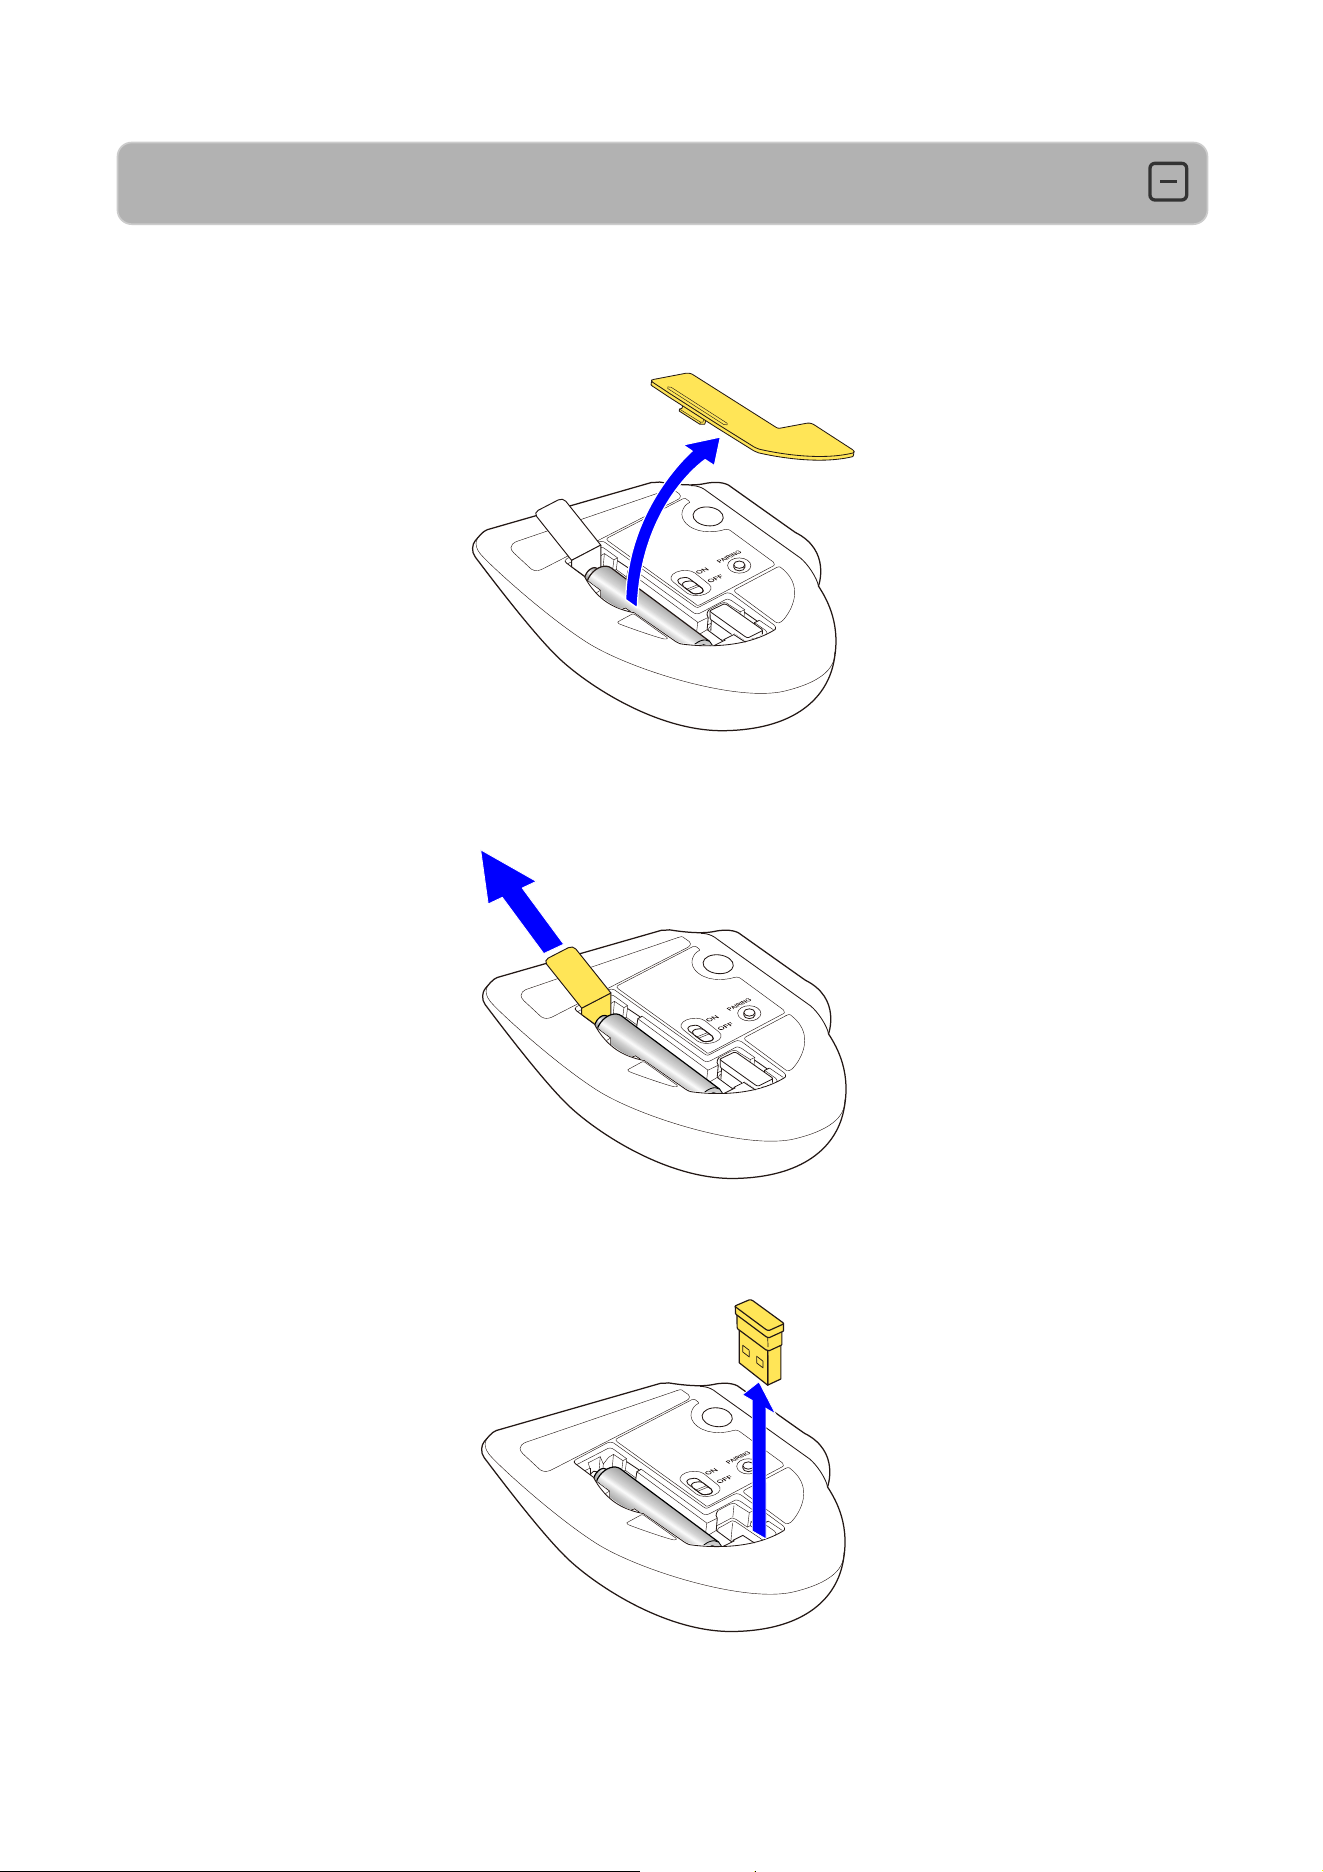
1. Remove the battery insulating tab.
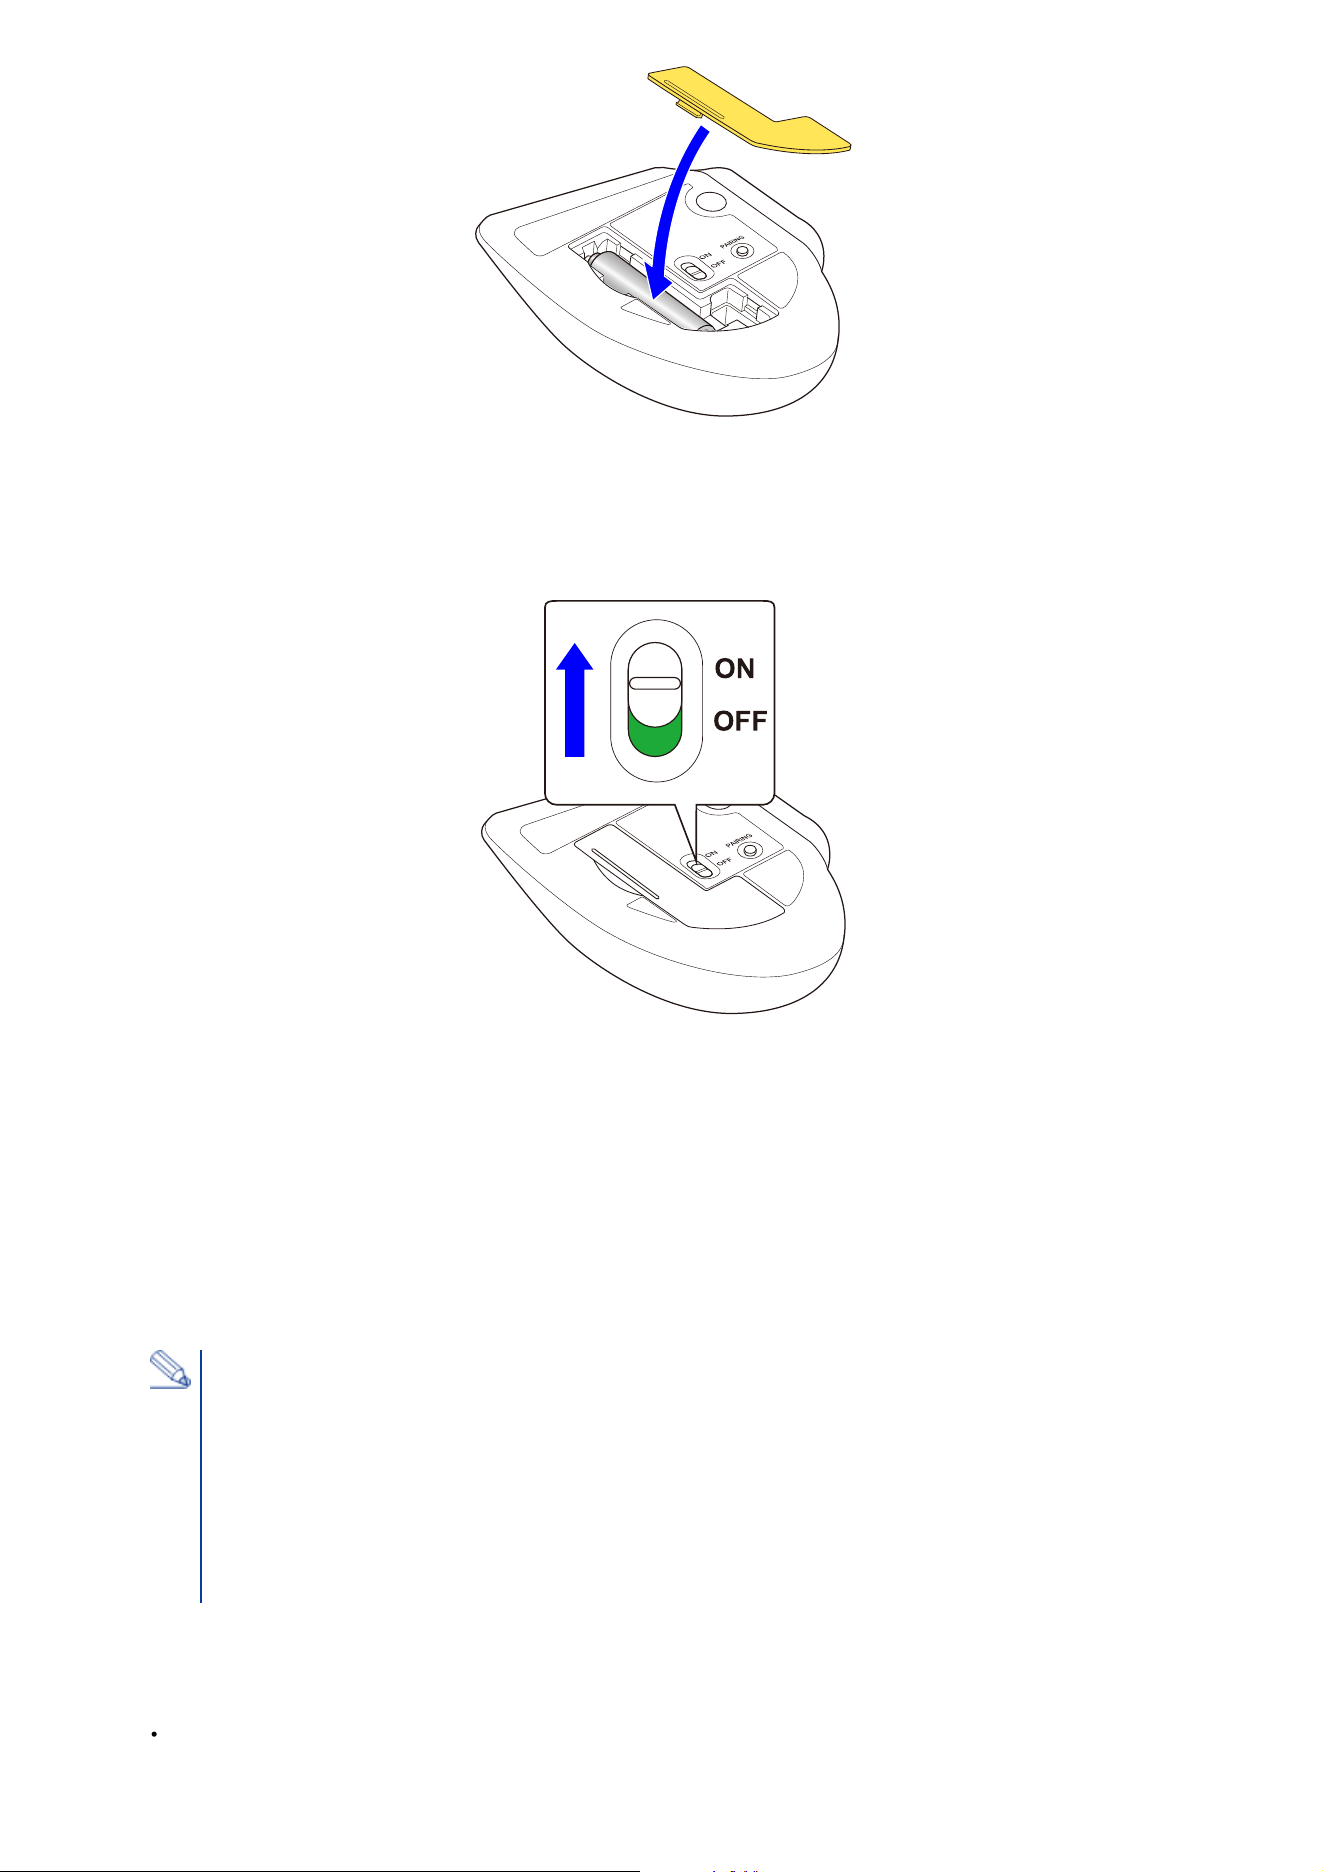
1) Remove the battery cover.
2) Remove the battery insulating tab.
3) Put the battery cover back on.
Connecting and Configuring the Trackball
Windows®
Using Bluetooth connection

Replacing the battery...
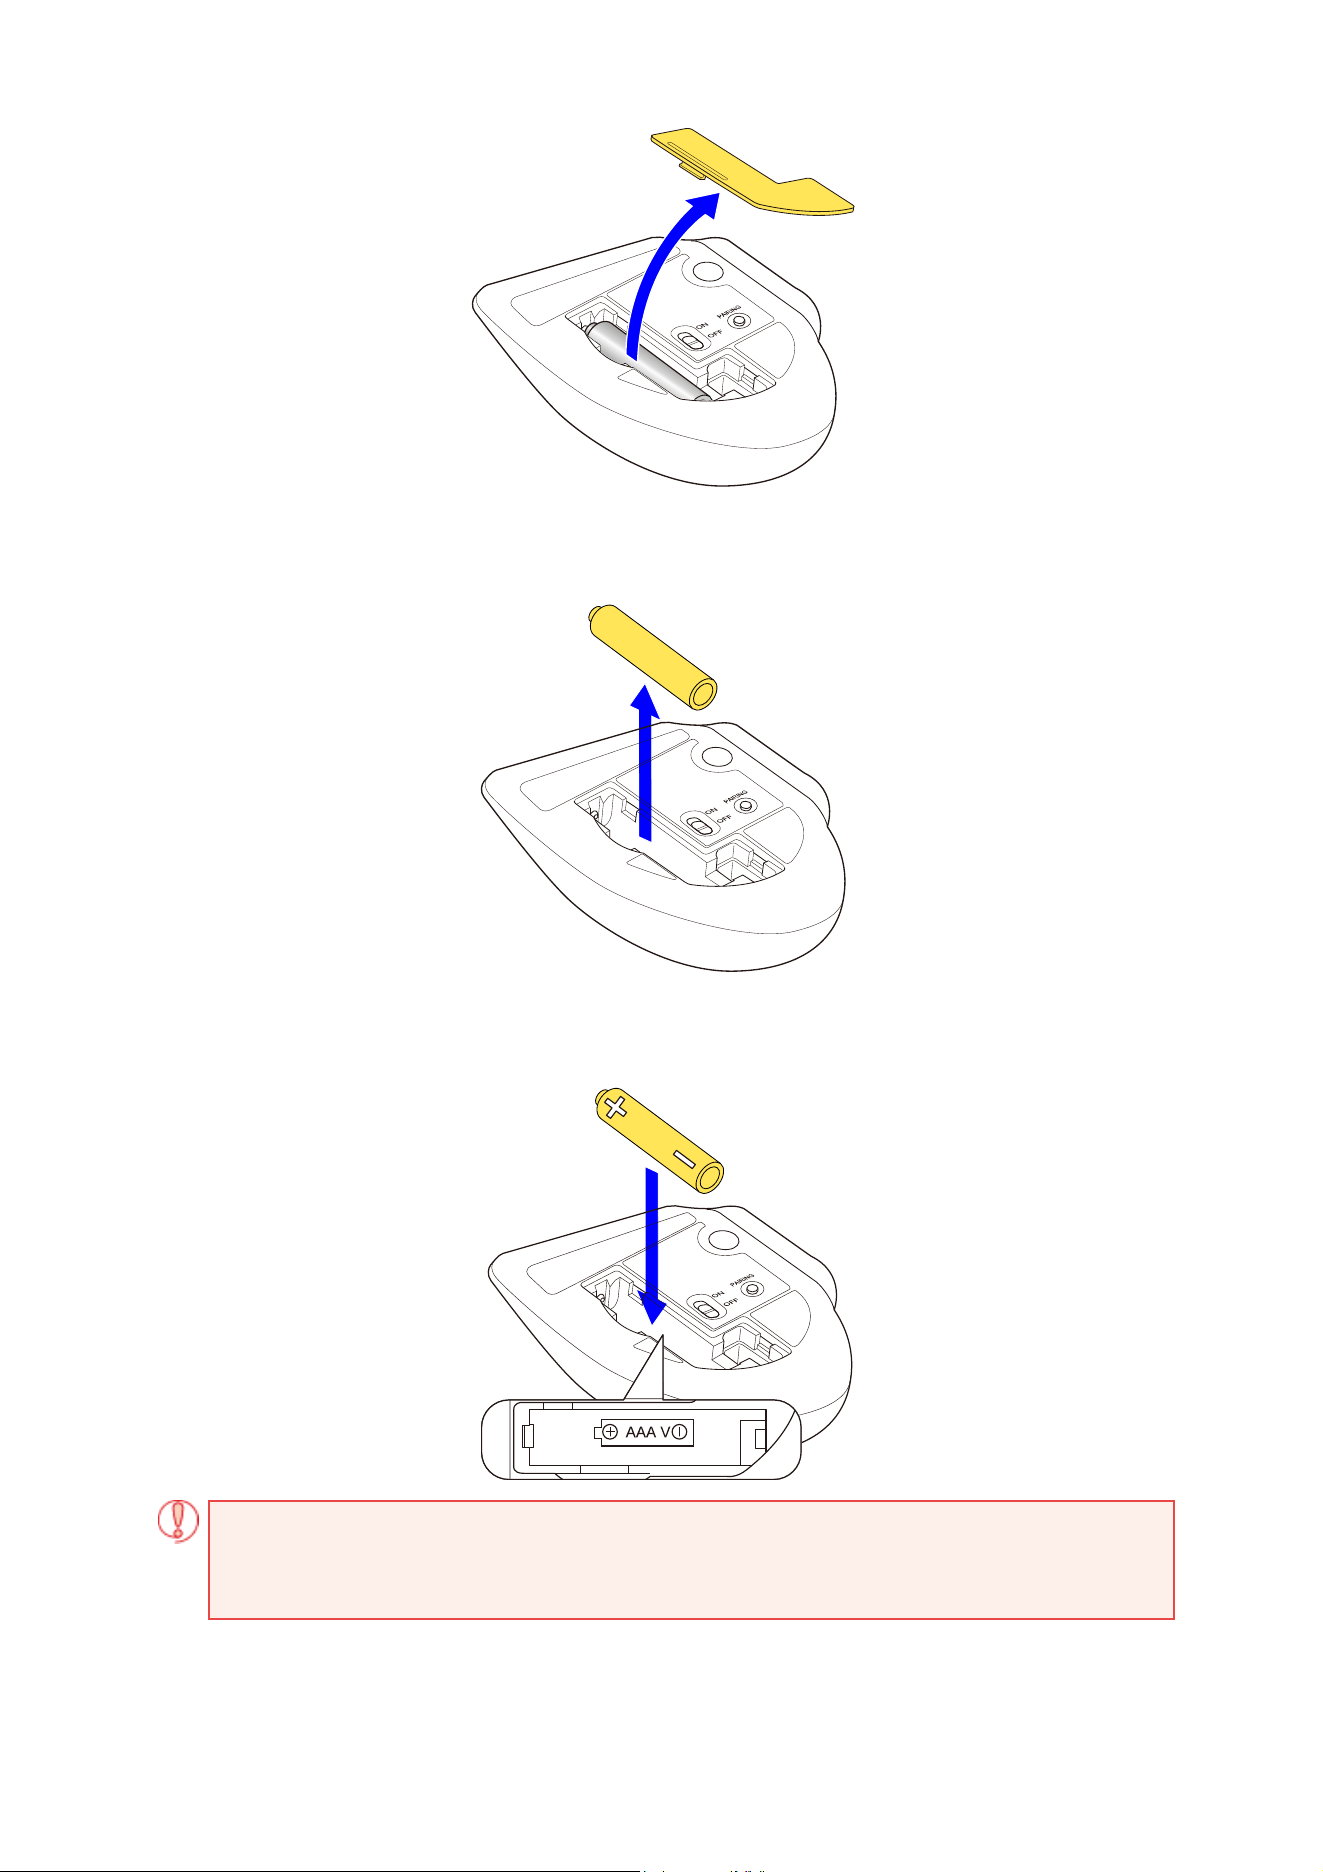
1) Remove the battery cover.
2) Remove the old battery.
3) Insert a new battery according to the instructions on the battery compartment.

Ensure that the battery is inserted with the positive (+) and negative (-) terminals oriented
correctly.
4) Put the battery cover back on.
2. Turn the power ON.
1) Slide the power switch on the underside of the product to the ON position.
The area around the wheel lights up blue for 5 seconds.
*When the battery is running low, the LED blinks white ten times every second.
・When turning on the power for the first time
The device enters pairing mode, and the area around the wheel rapidly flashes blue. You can now
pair it with your computer.
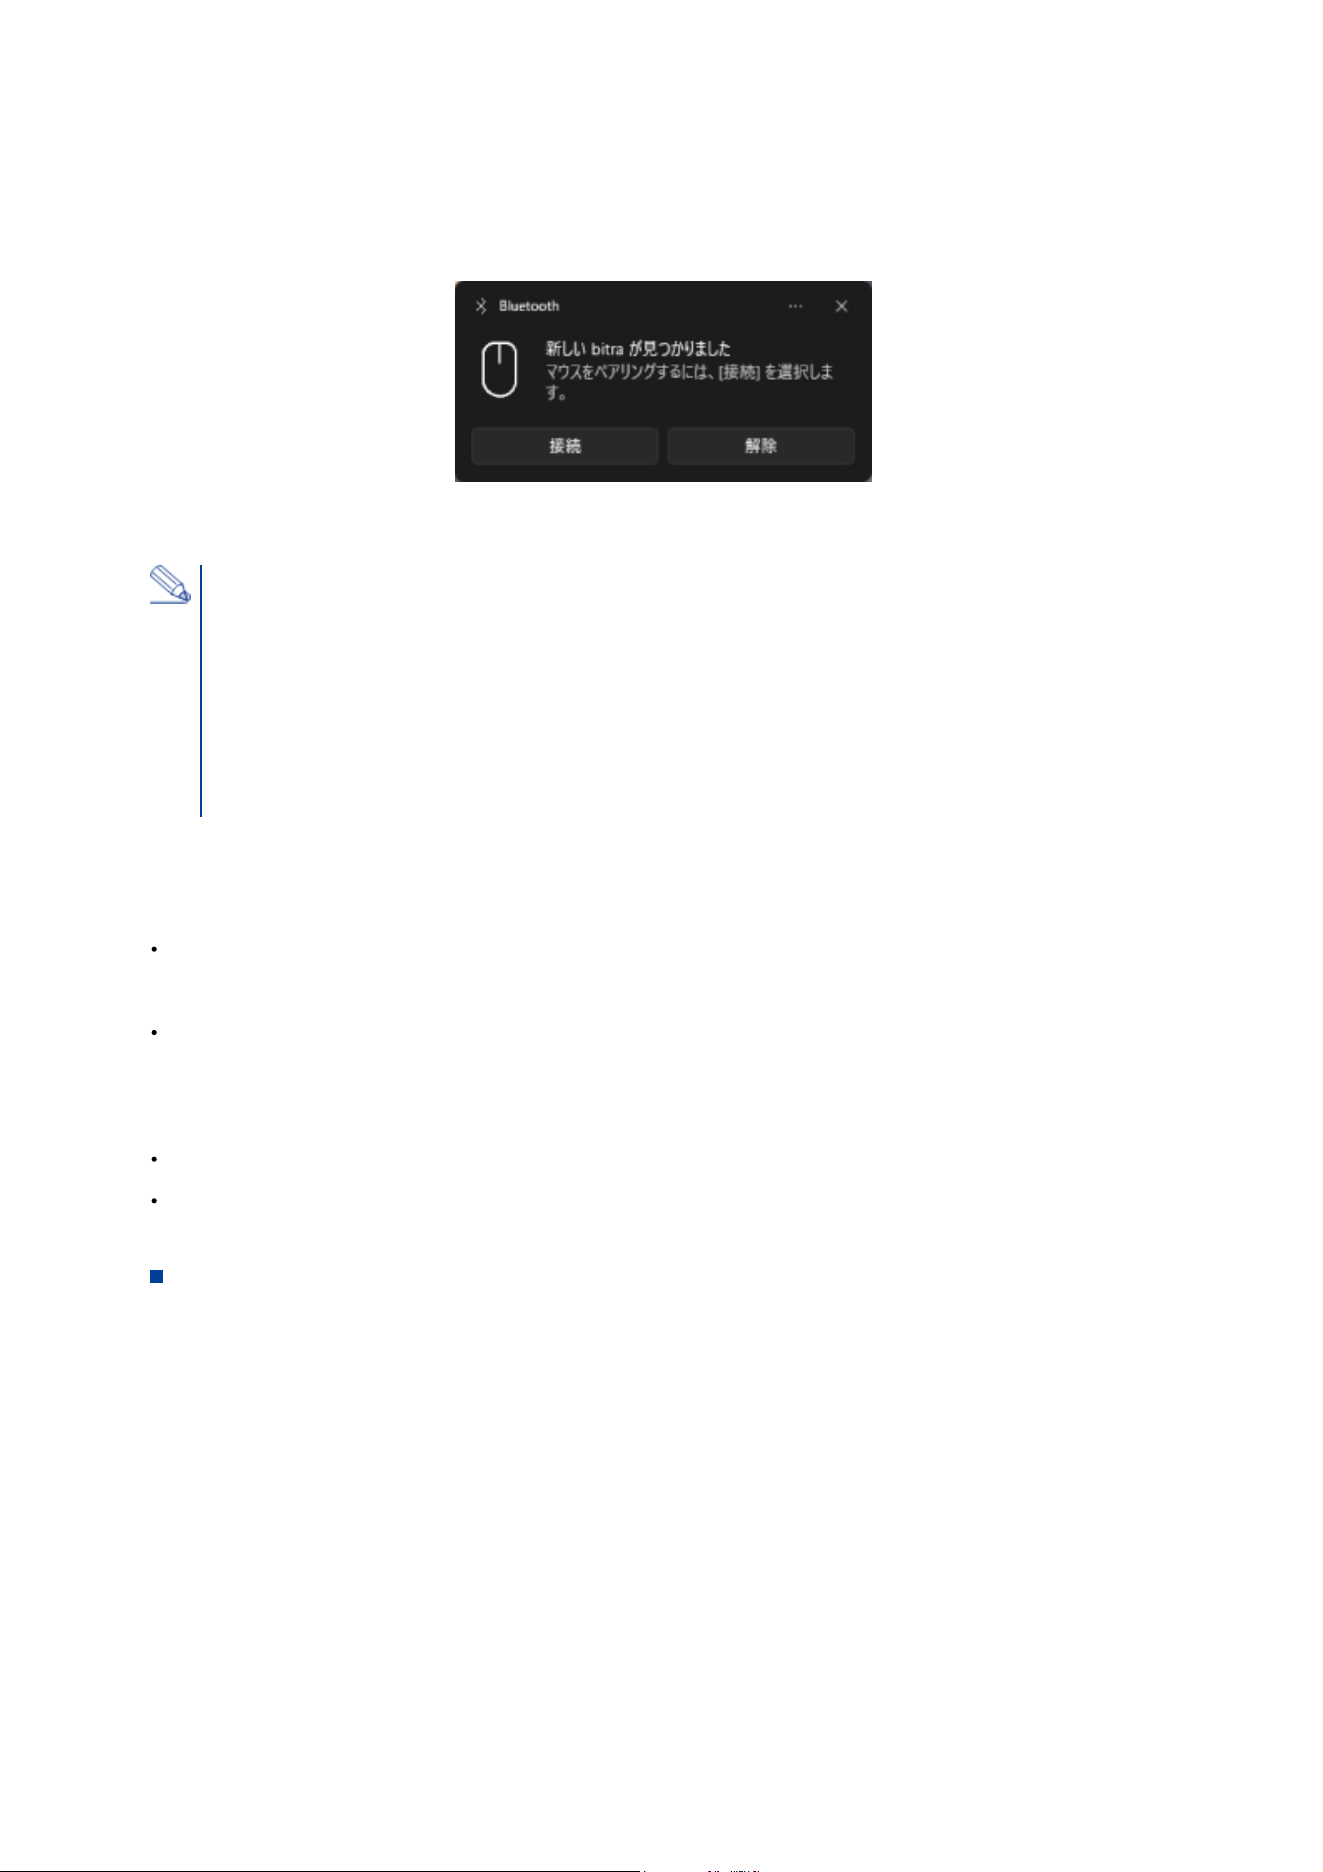
If the following screen appears, refer to Step 3 in "▪ When Using Quick Pairing".
If the above screen does not appear, refer to Step 3 in "▪ When Pairing from the Settings Screen".
3. Pairing with a PC
This product supports Quick Pairing. If you are using a PC or Bluetooth dongle that supports Quick
Pairing, setting the mouse to pairing mode allows it to quickly pair with the PC.
1) Slide the connection switch downward to select the Bluetooth connection.
The area around the wheel lights up blue for 5 seconds.
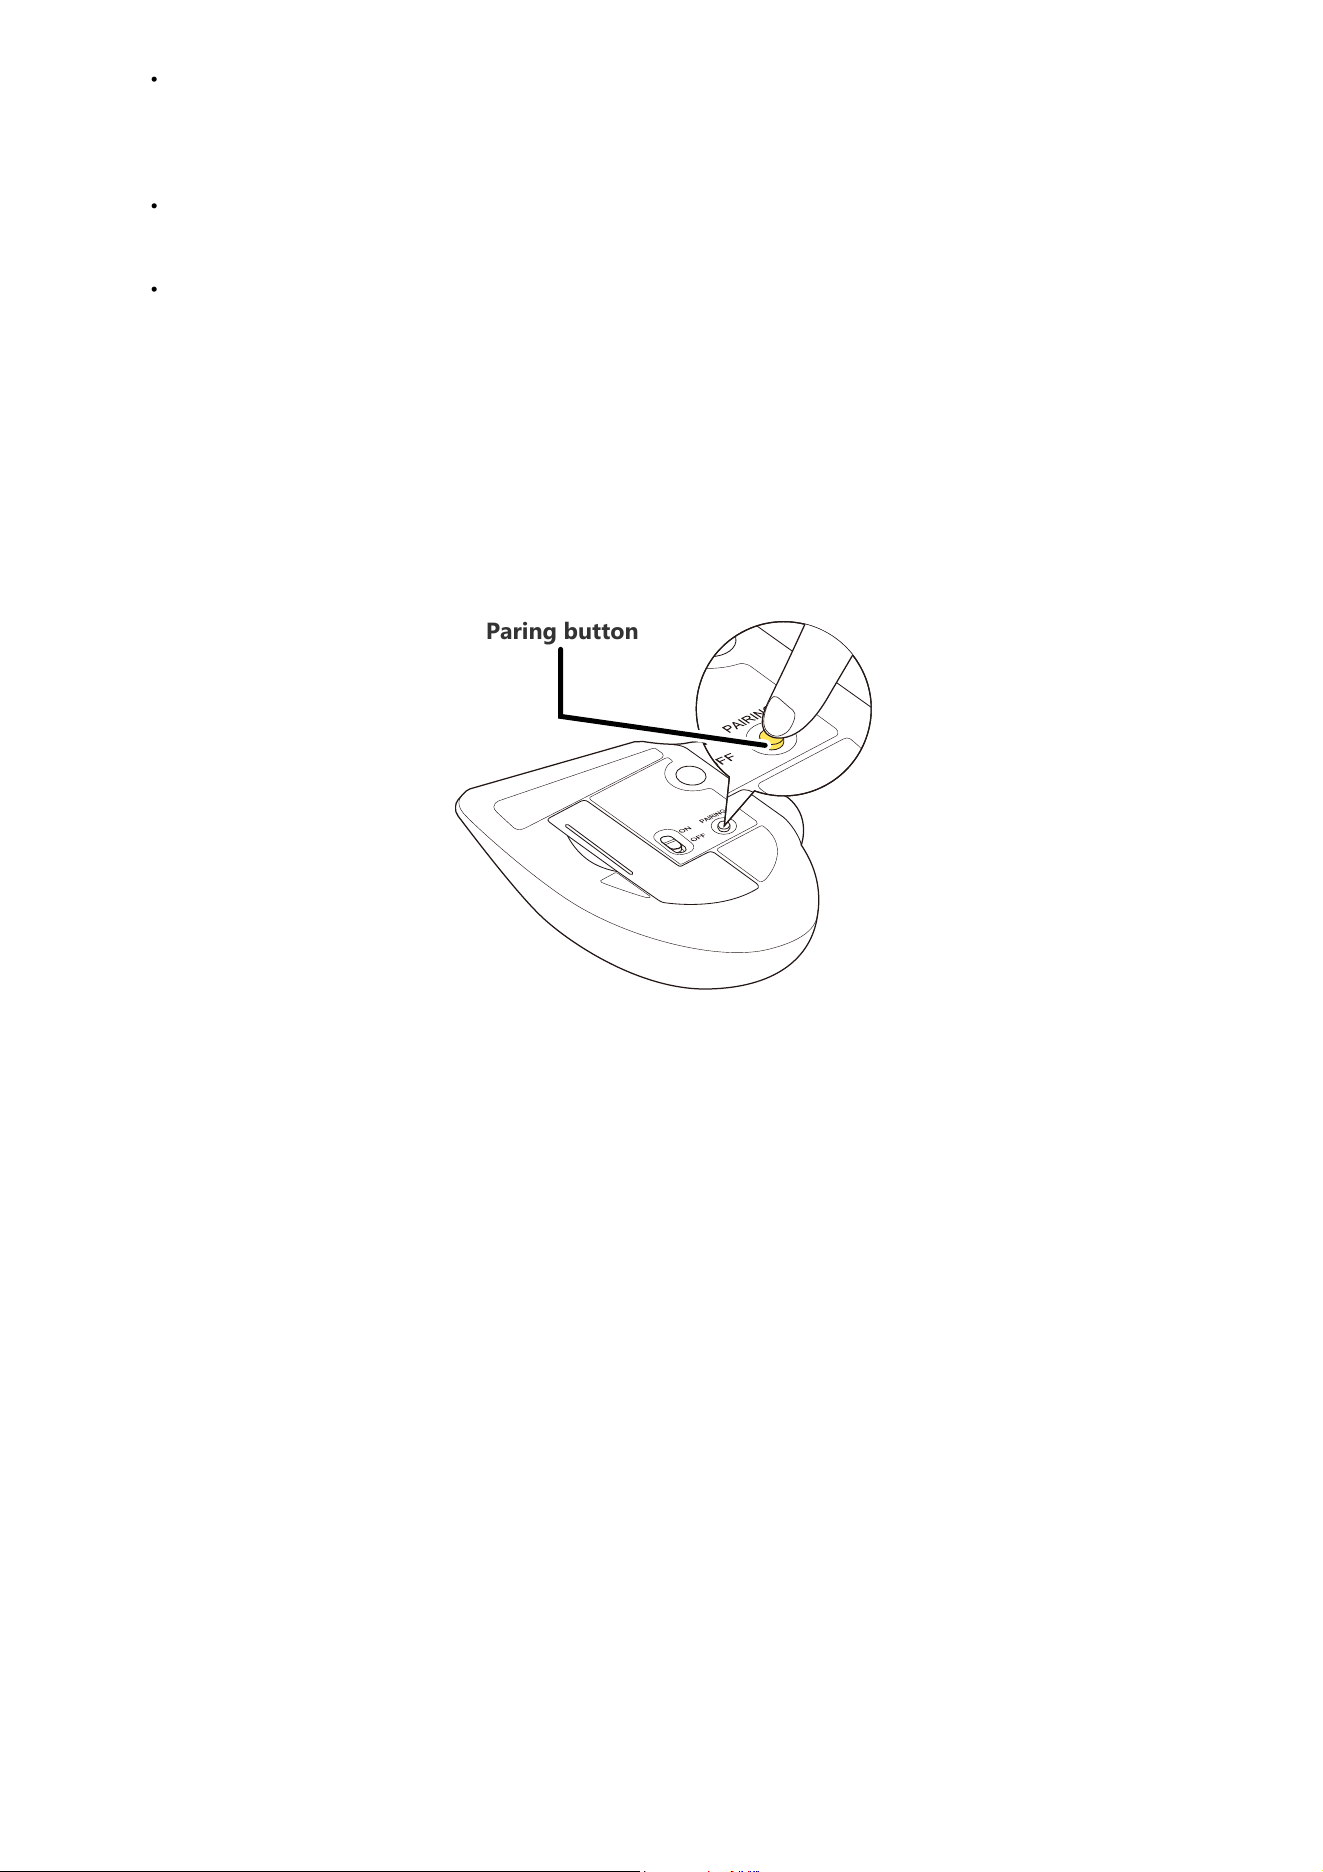
2) Press and hold the pairing button on the underside of the product for 3 seconds,
then release it.
The device enters pairing mode, and the area around the wheel rapidly flashes blue.
Power-saving mode
When the trackball is left untouched for a fixed period of time while the power is ON,
it automatically shifts to power-saving mode.
The trackball returns from power-saving mode when it is moved.
*Trackball operation may be unstable for 2-3 seconds after returning from the power-saving
mode.
Pairing involves registering Bluetooth devices (in this case, this product and your device) with
each other, and authorizing a connection between them.
This section covers Windows standard Bluetooth functions. Depending on your device or
Bluetooth adaptor, unique Bluetooth functions may be used. Please read the respective manuals
for each function.
Please carry out the pairing operation using your current mouse or touchpad on your device.
The following instructions are for Windows 11 (24H2).
When Using Quick Pairing
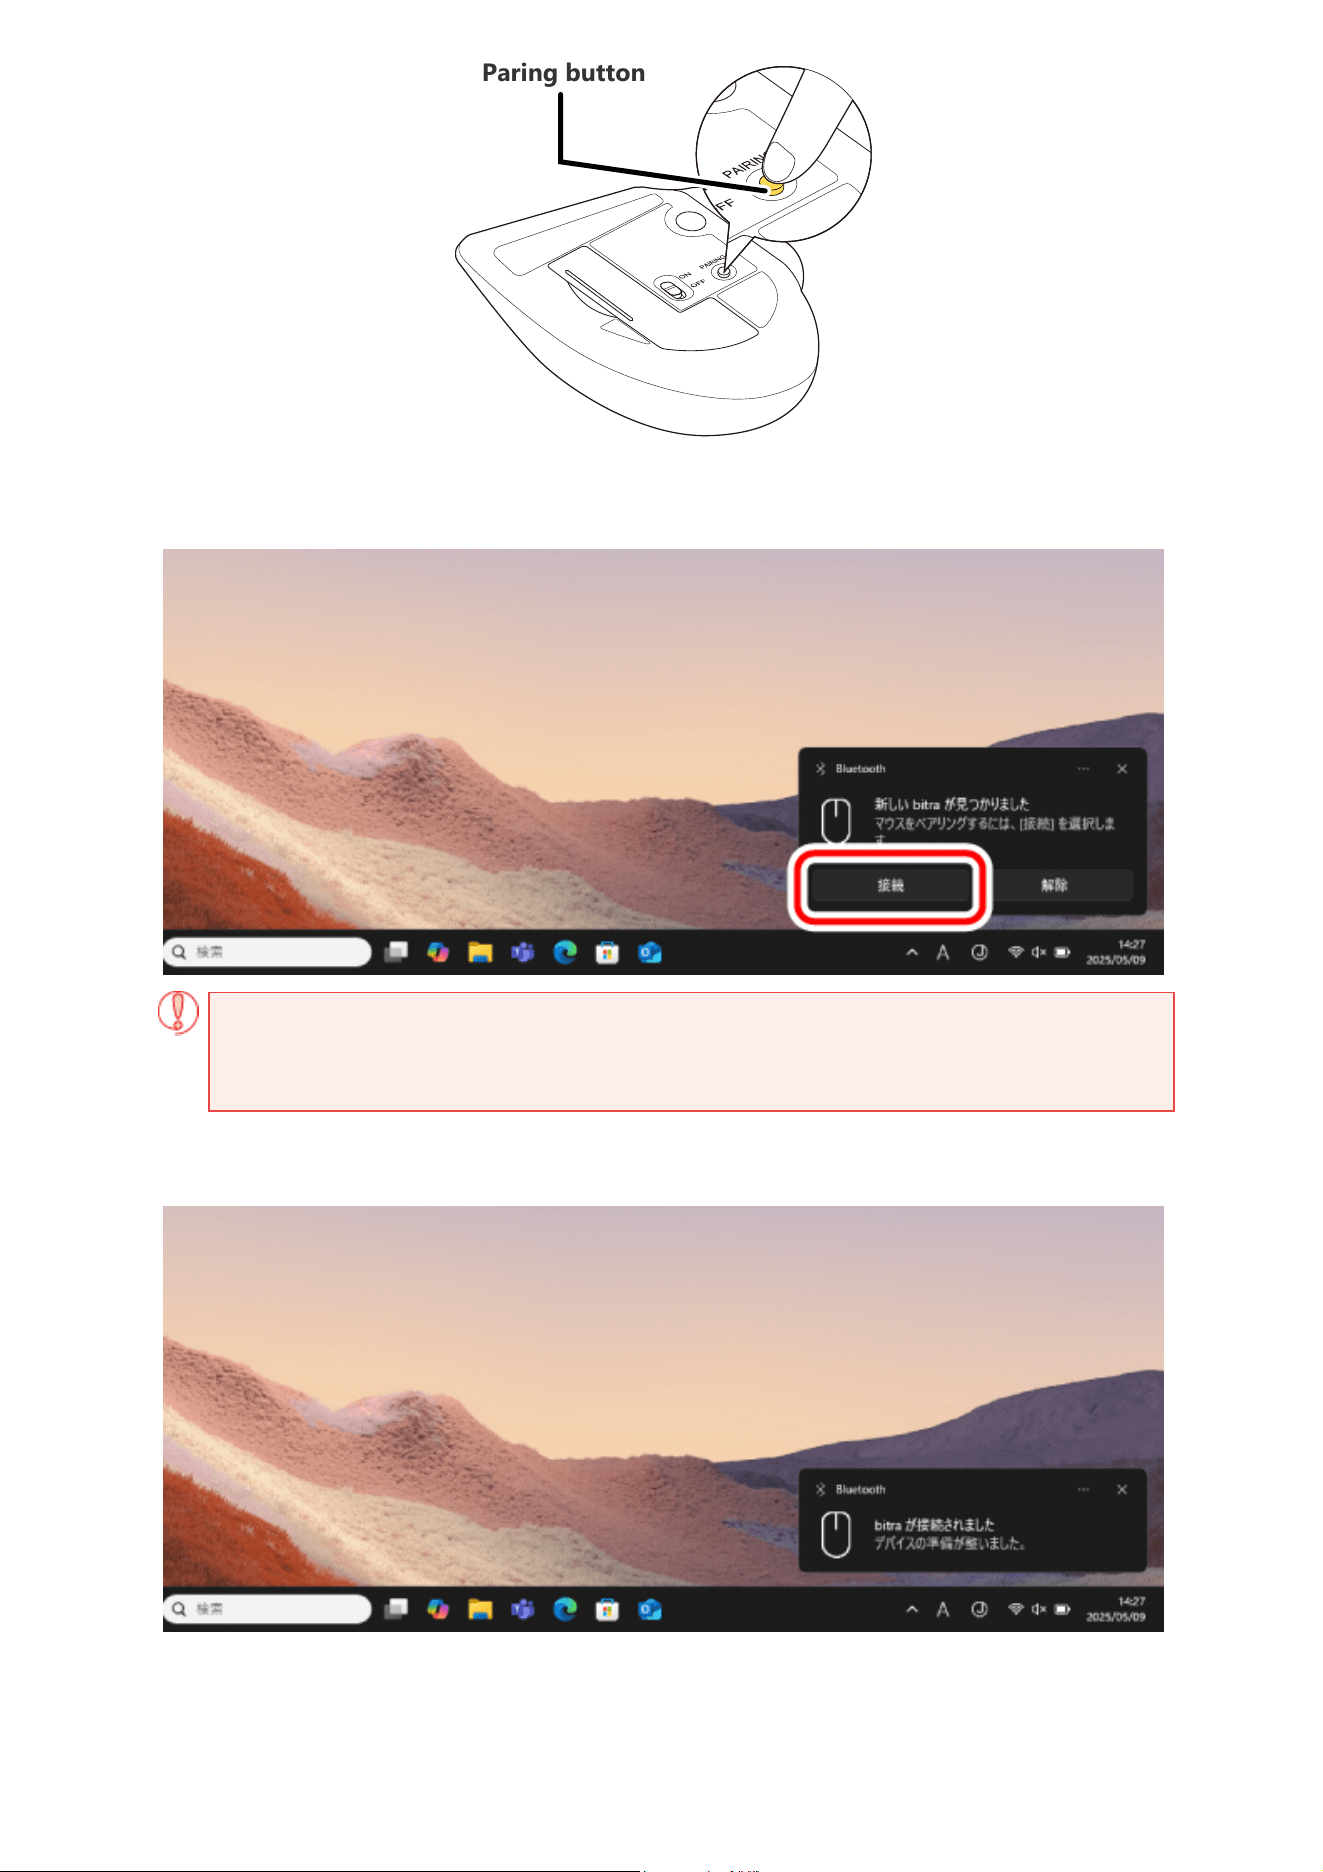
3) When the screen below appears in the lower-right corner, click "Connect".
If the above screen does not appear, please check whether Quick Pairing notifications are
enabled. For more details, refer to"Turning On Quick Pairing Notifications".
4) When "bitra has been connected" is displayed, pairing is complete.
The area around the wheel lights up blue for 5 seconds.
Paring button
You can now use the trackball.
● Turning On Quick Pairing Notifications
If Quick Pairing does not work even after entering pairing mode, enable the Quick Pairing
notification by following the steps below.
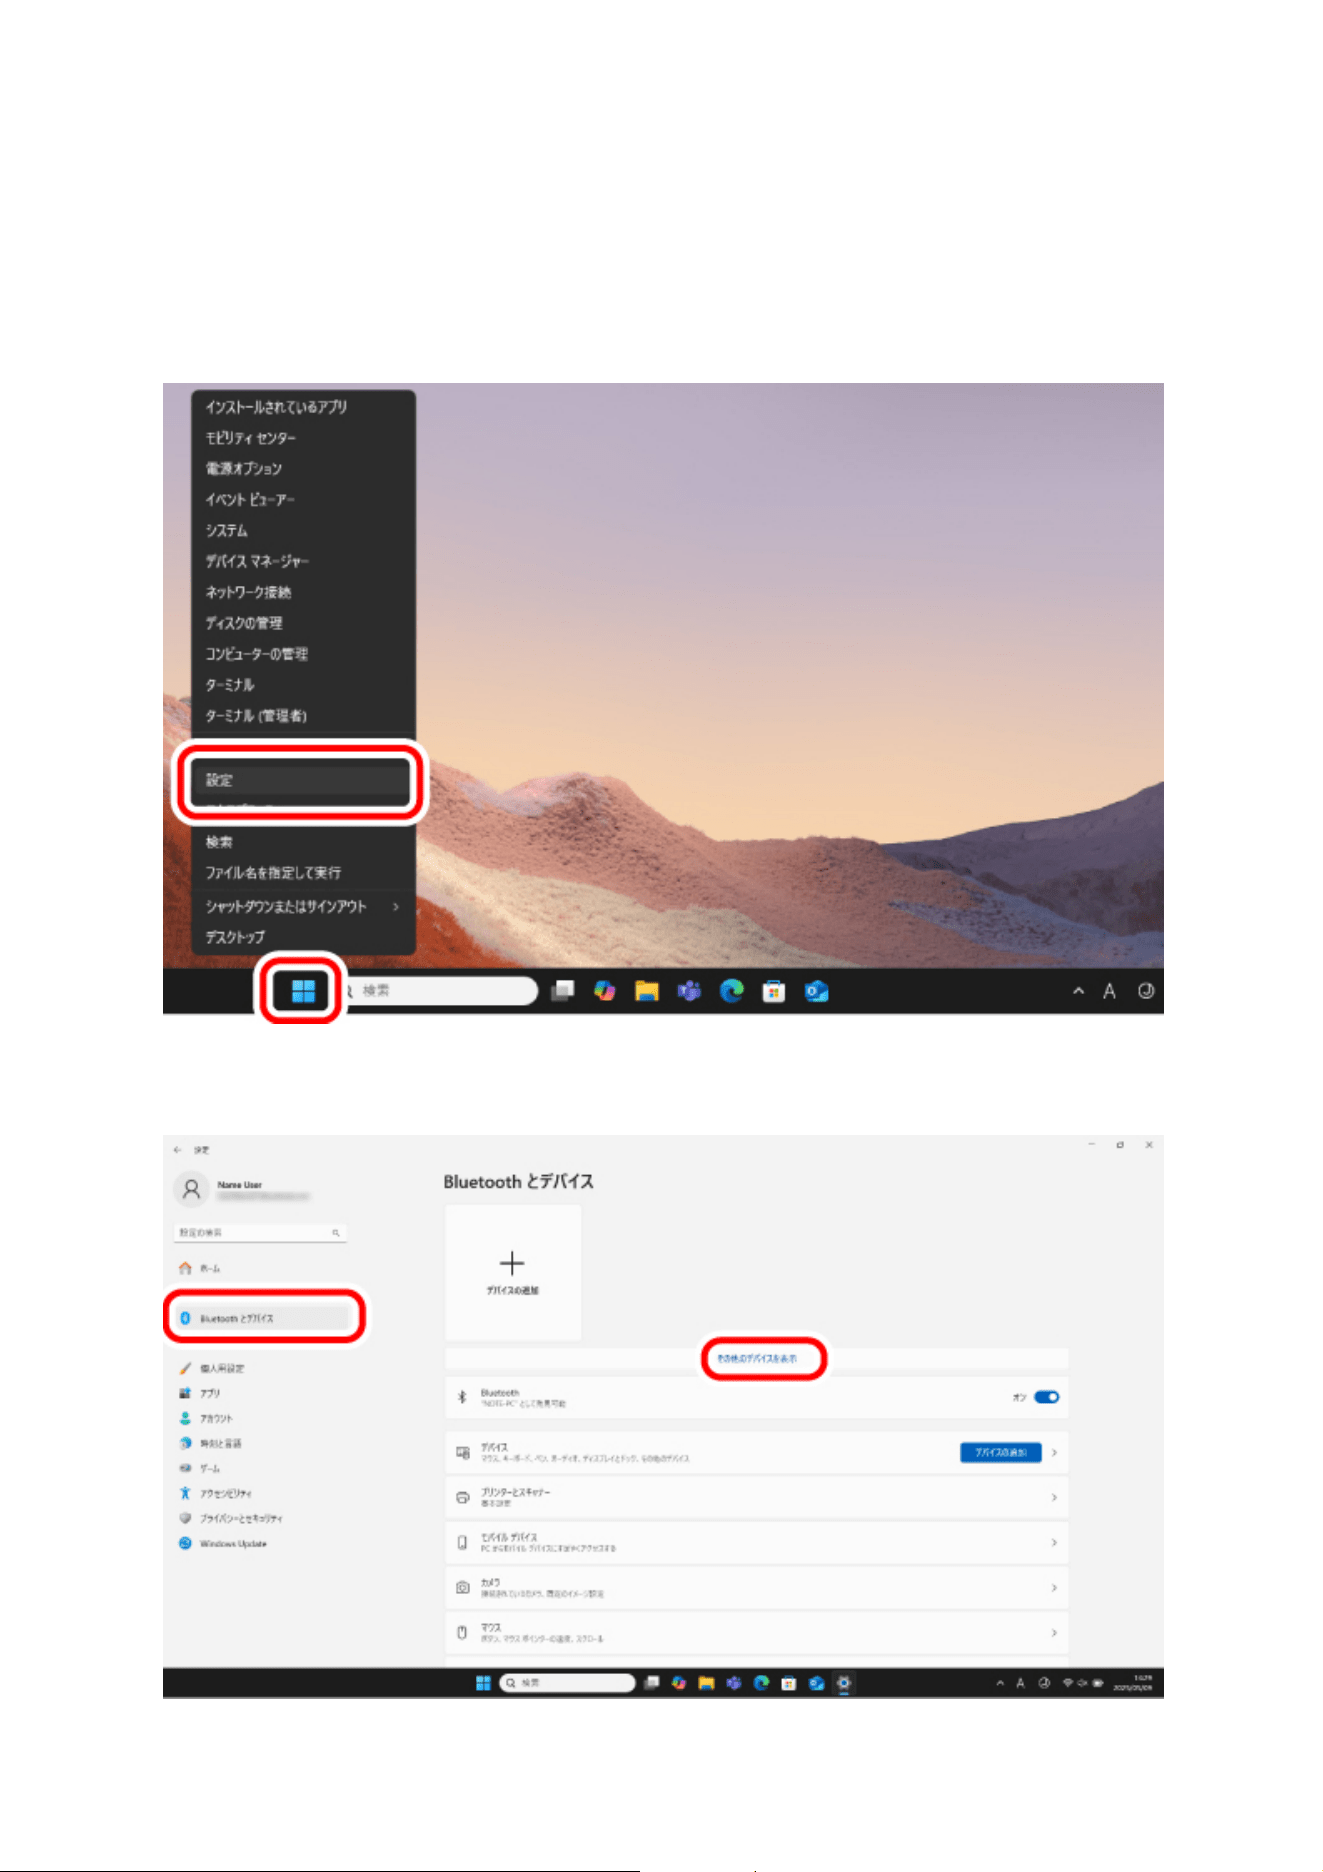
1) Right click on “Start” on the bottom of the screen and then, select “Settings”.
The “Settings” page appears.
2) Click "Bluetooth & devices," then click "View more devices".
3) Click "Show notifications to connect using Quick Pairing", and turn it on.
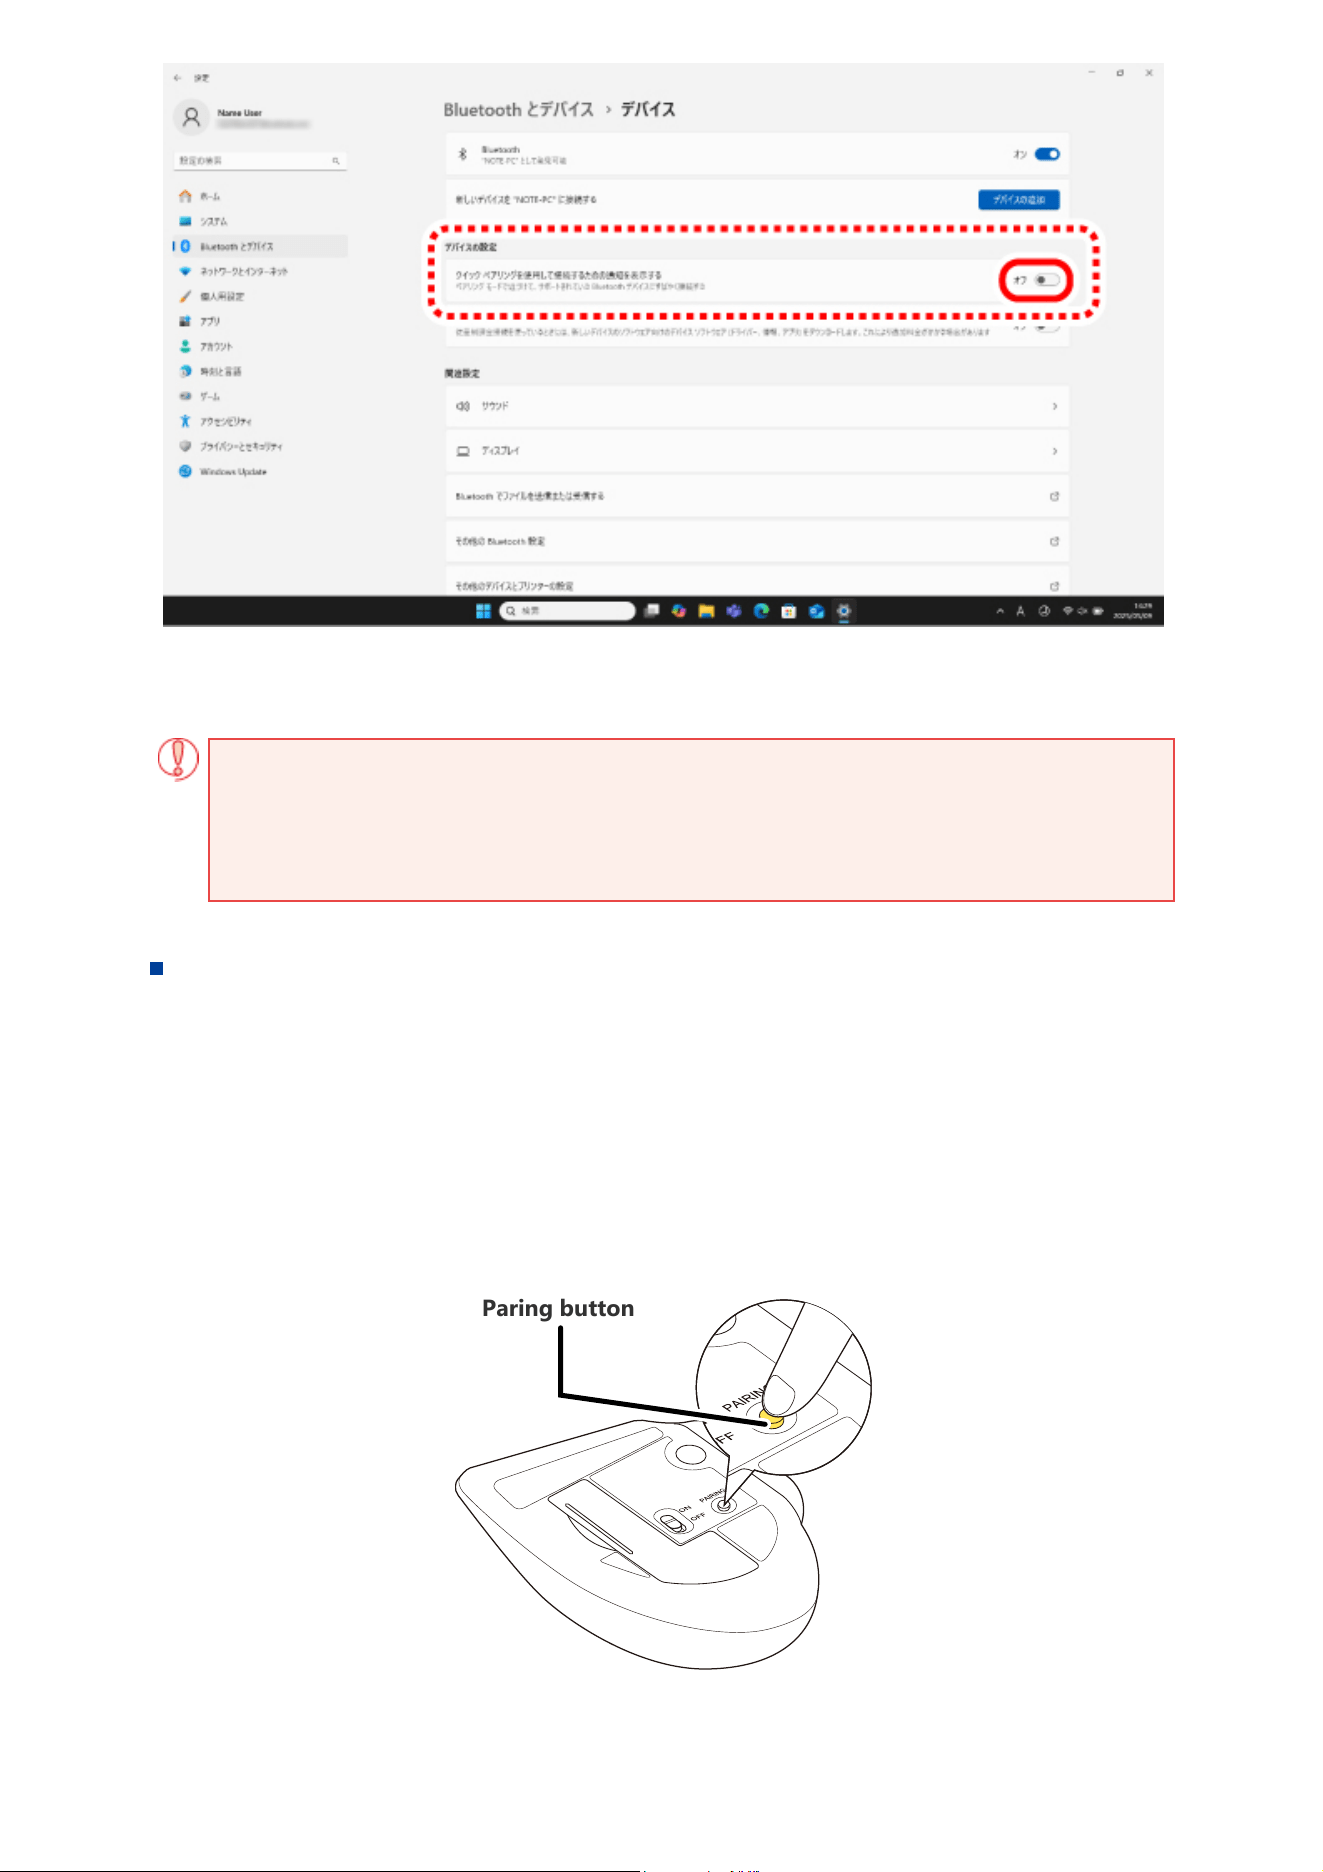
You are now able to use Quick Pairing.
If "Show notifications to connect using Quick Pairing" does not appear, your PC or
Bluetooth dongle does not support Quick Pairing. In that case, please pair the device from
the settings screen. For details, refer to"▪ When Pairing from the Settings Screen".
1) Slide the connection switch downward to select the Bluetooth connection.
The area around the wheel lights up blue for 5 seconds.
2) Press and hold the pairing button on the underside of the product for 3 seconds,
then release it.
The device enters pairing mode, and the area around the wheel rapidly flashes blue.
3) Right click on “Start” on the bottom of the screen and then, select “Settings”.
The “Settings” page appears.
When Pairing from the Settings Screen
Paring button
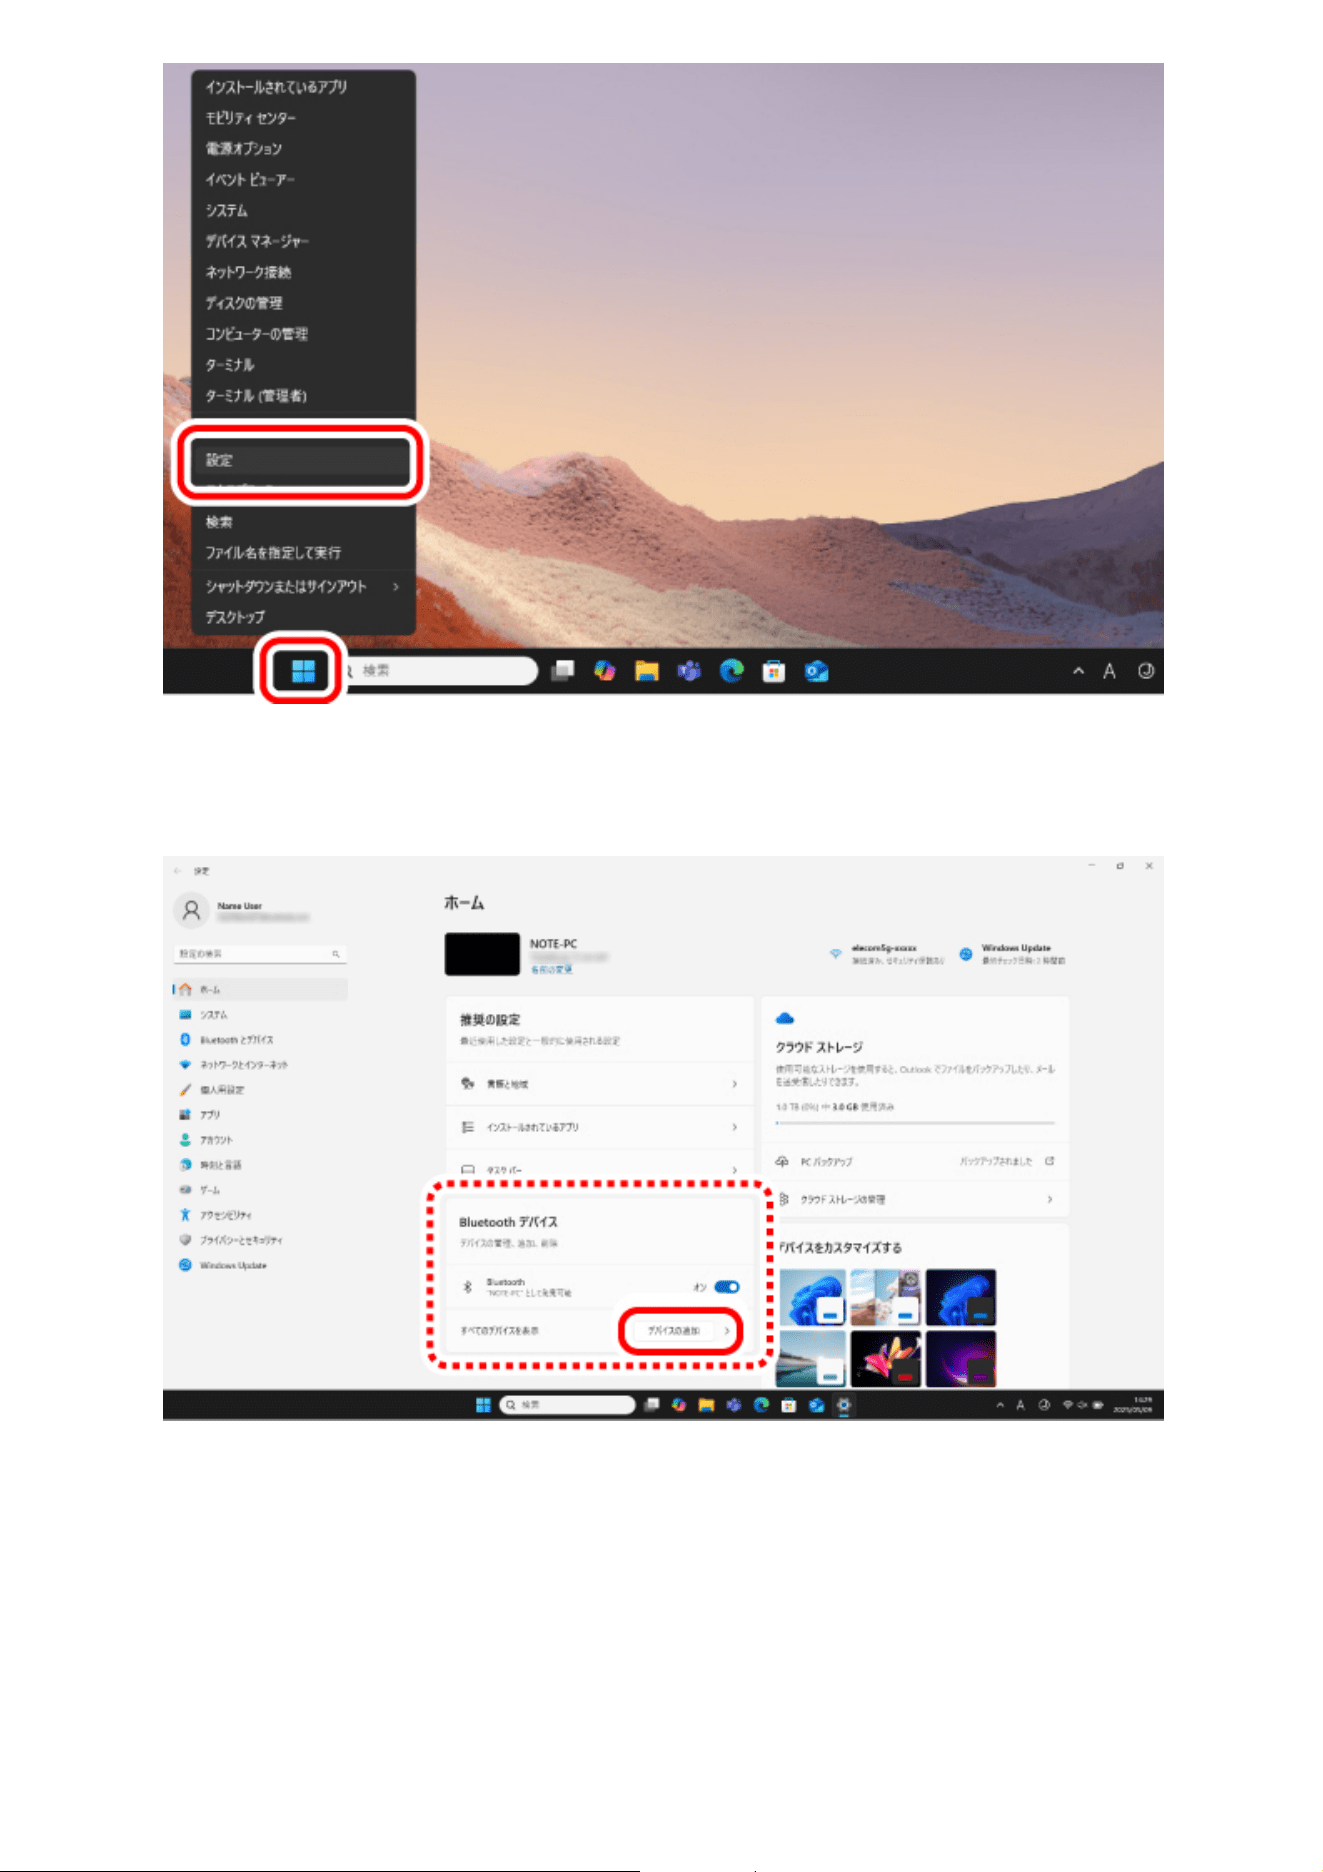
2) Under "Home", select "Add device" under "Bluetooth devices".
The “Add a device” page appears.
If “Bluetooth” is off, turn it on.
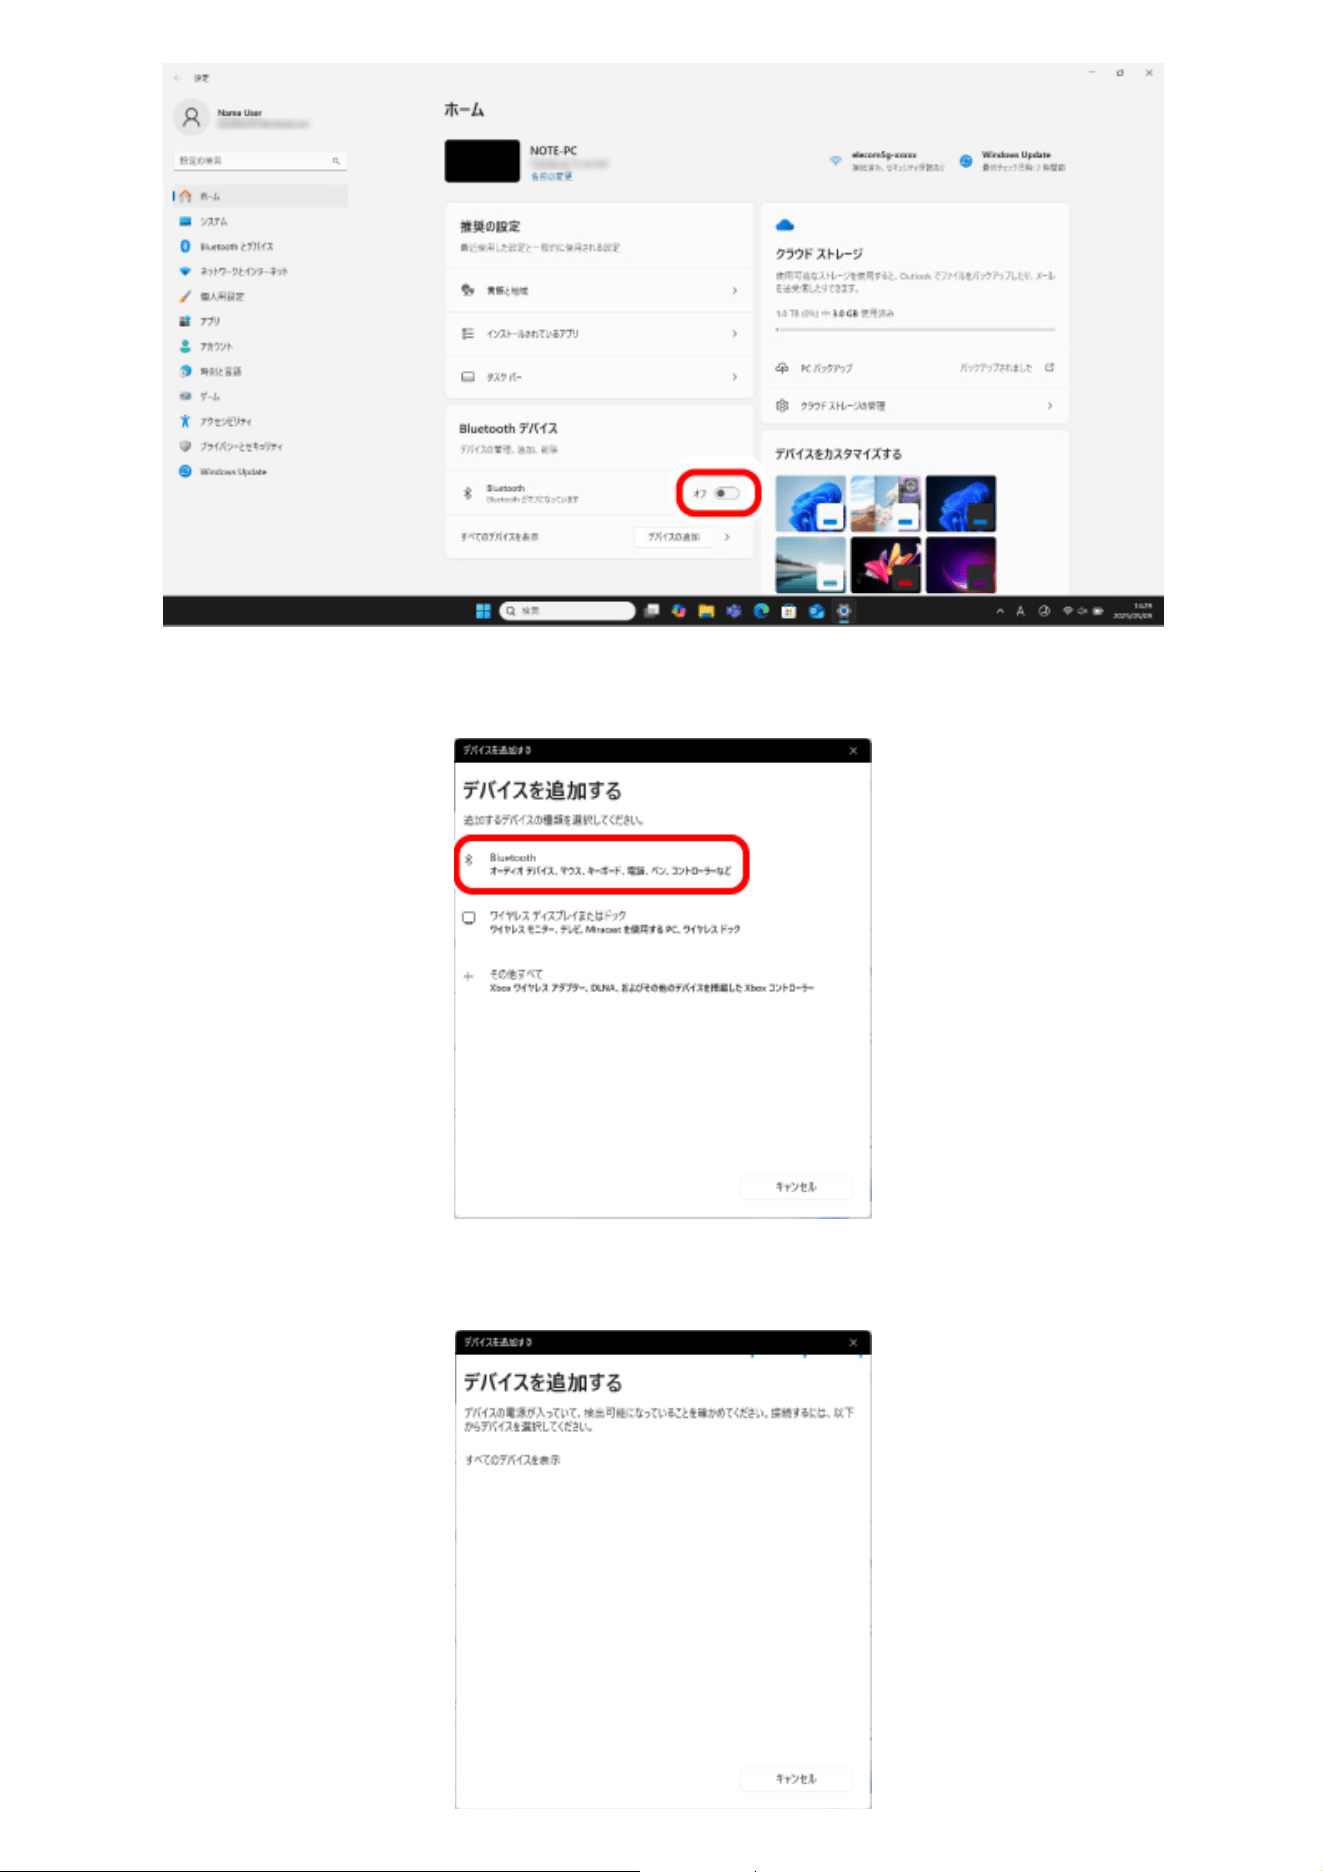
4) Click “Bluetooth”.
5) The “Add a device” page appears.
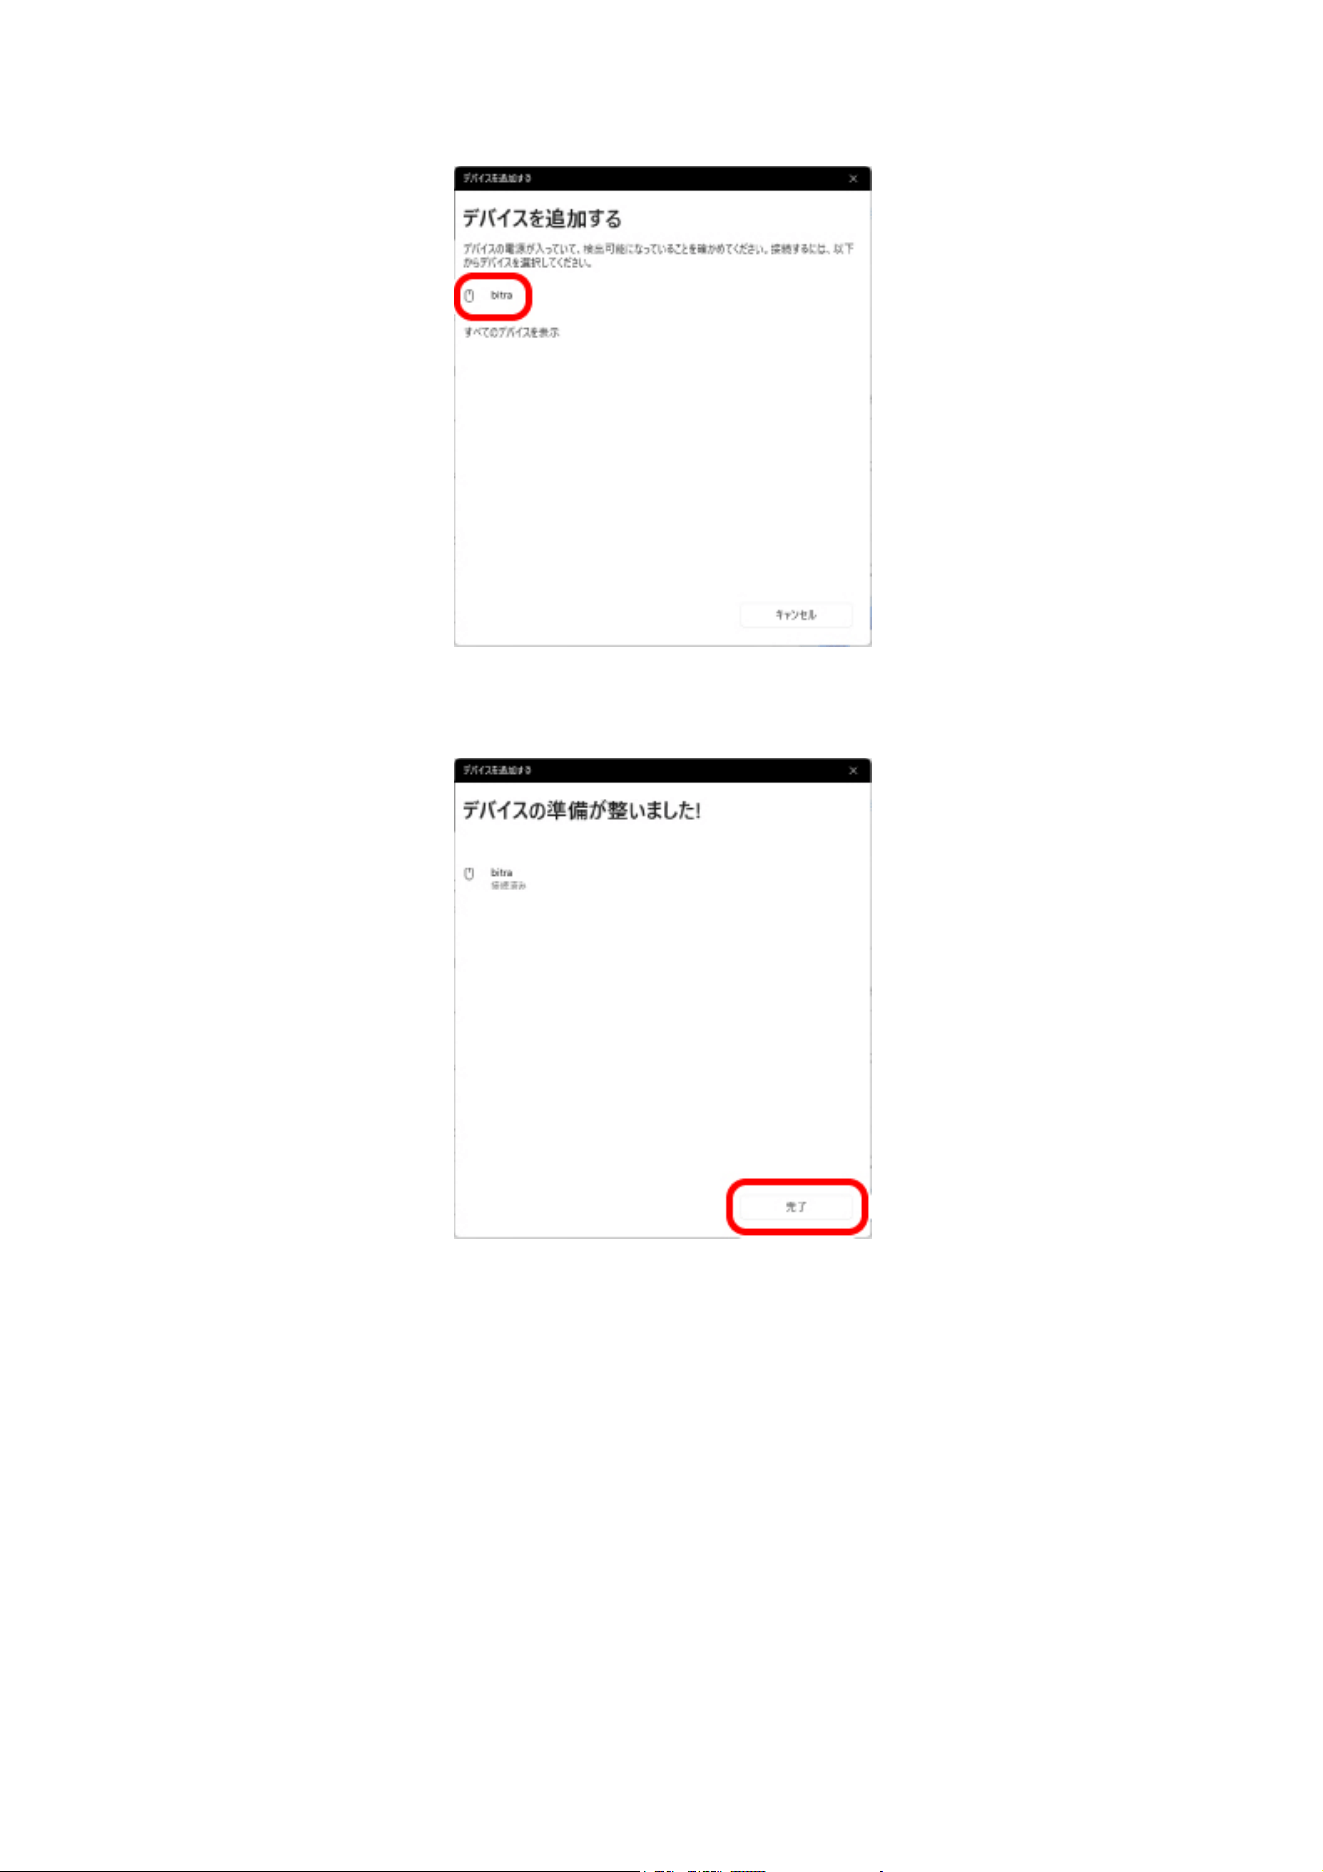
6) Click on “bitra”.
Pairing begins.
7) When the message changes to “Your device is ready to go!”, select “Done”.
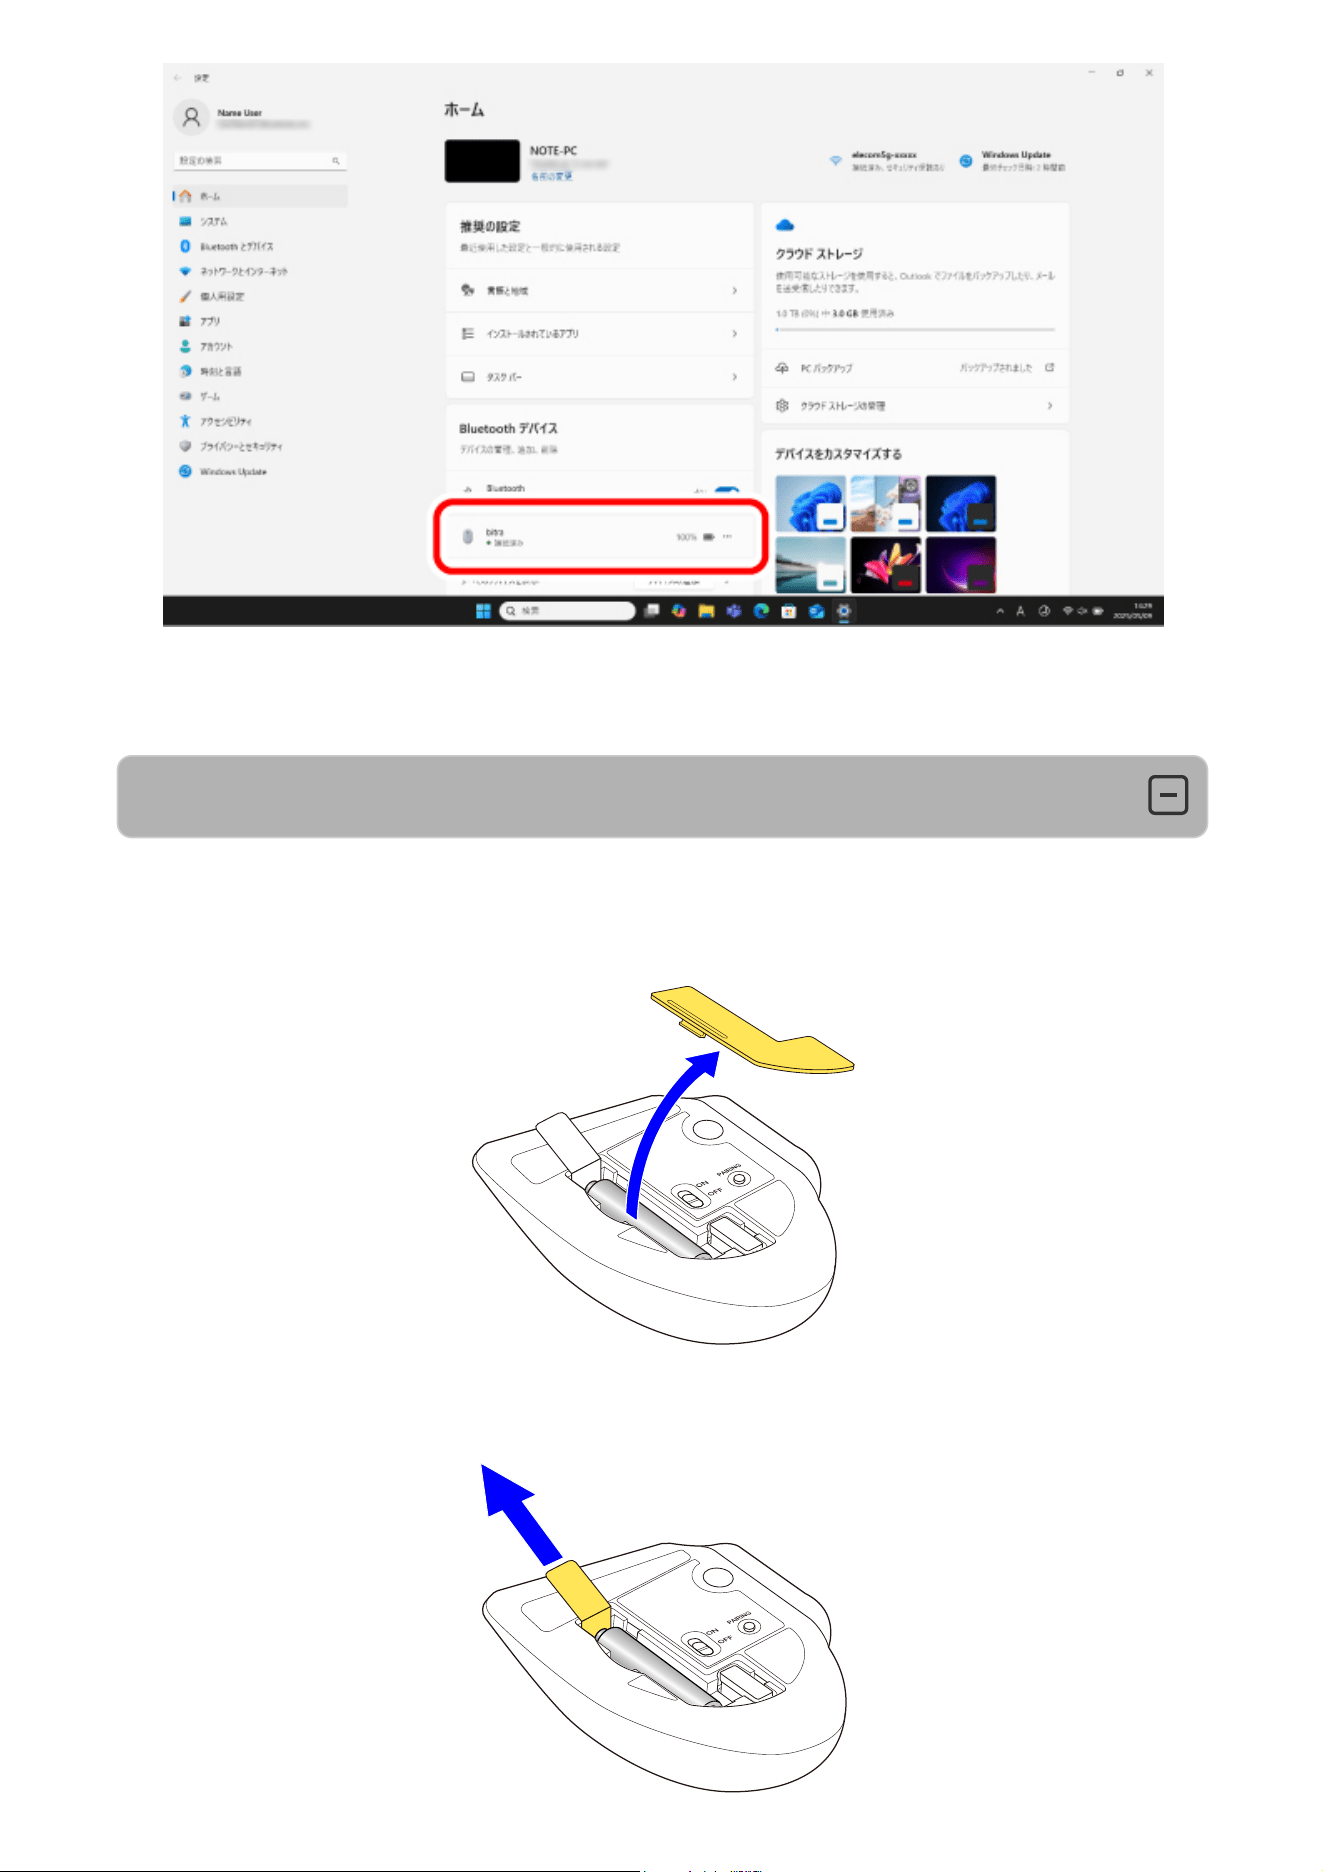
8) Pairing is complete when this product is added to “Bluetooth devices” and the
status is “Connected”.
After the area around the wheel lights up blue for 5 seconds, it turns off.
You can now use the trackball.
1. Remove the battery insulating tab.
1) Remove the battery cover.
2) Remove the battery insulating tab.
Using wireless connection
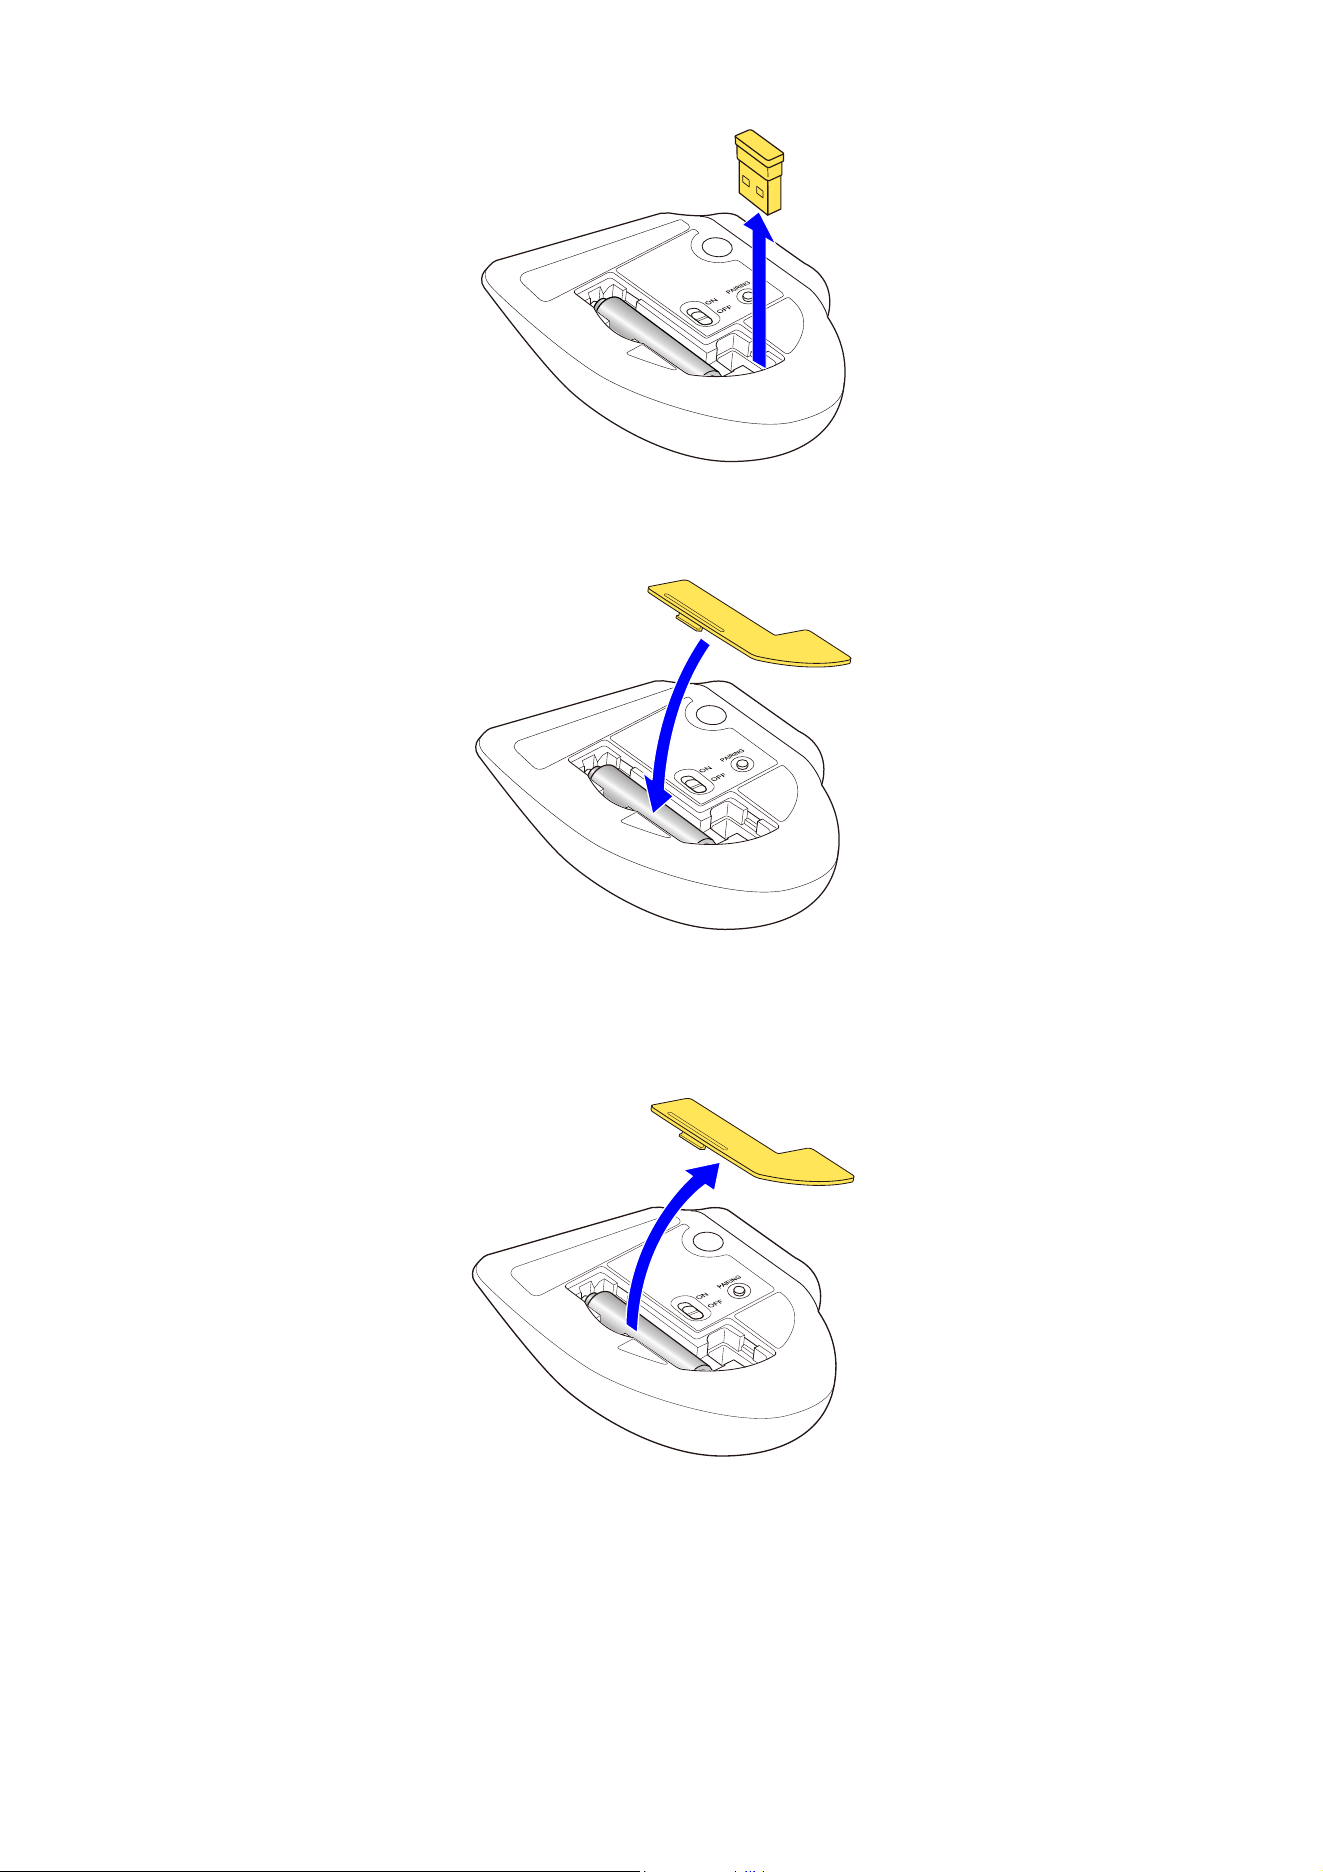
3) Remove the receiver unit.
4) Put the battery cover back on.
Replacing the battery...
1) Remove the battery cover.
2) Remove the old battery.
3) Insert a new battery according to the instructions on the battery compartment.
Ensure that the battery is inserted with the positive (+) and negative (-) terminals oriented
correctly.
4) Put the battery cover back on.
2. Turn the power ON.
1) Slide the power switch on the underside of the product to the ON position.

The area around the wheel lights up white for 5 seconds.
*When the battery is running low, the LED blinks white 10 times every second.
3. Connect to a PC
1) Start up your PC.
Please wait until the PC has started up and can be operated.
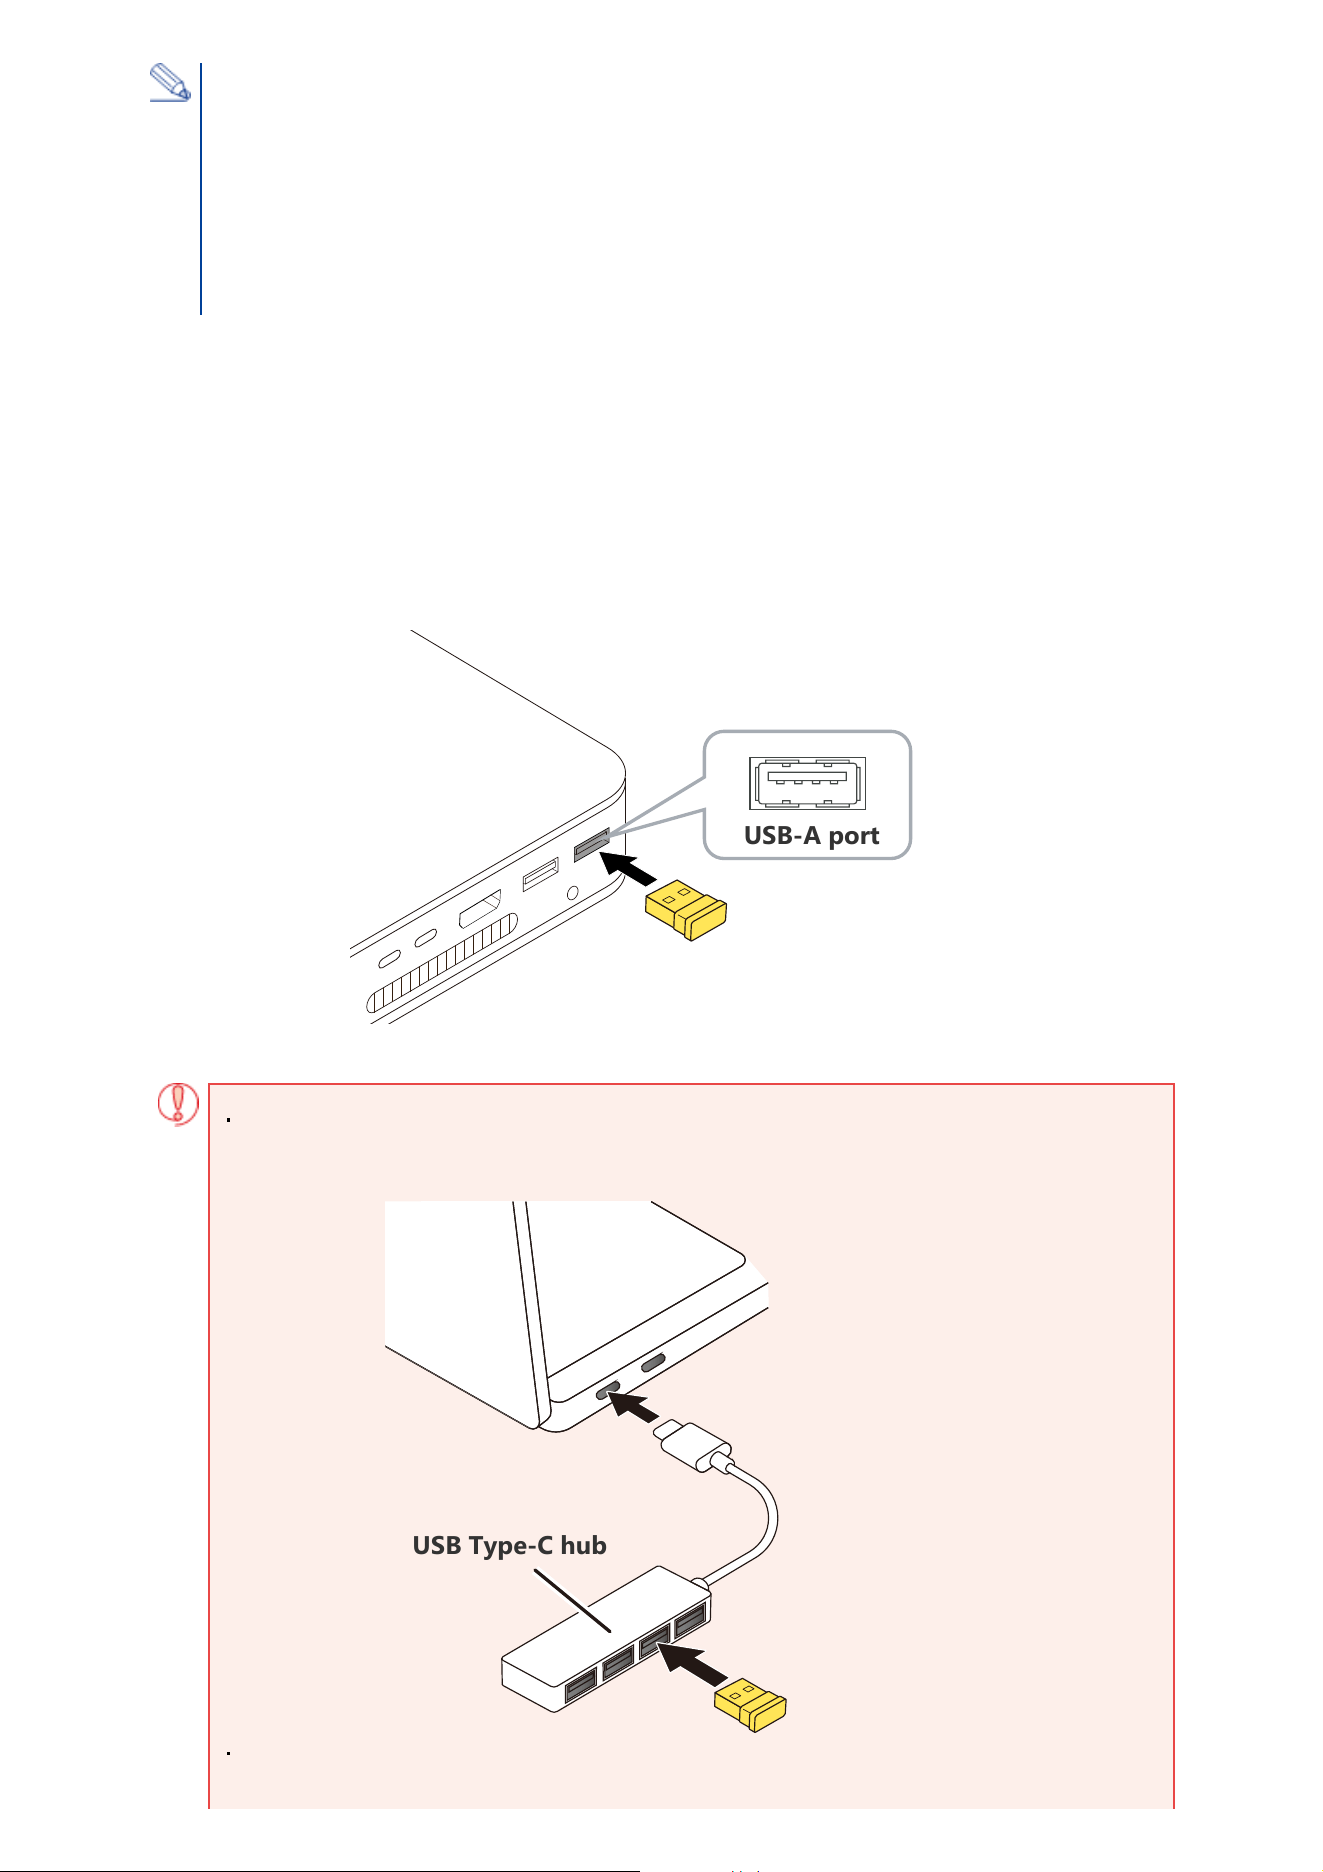
2) Insert the receiver unit into the PC's USB-A port.
You may use any USB-A port.
Power-saving mode
When the trackball is left untouched for a fixed period of time while the power is ON,
it automatically shifts to power-saving mode.
The trackball returns from power-saving mode when it is moved.
*Trackball operation may be unstable for 2-3 seconds after returning from the power-saving
mode.
Ensure that the connector is correctly oriented to the port.
If there is strong resistance when inserting, check the shape and orientation of the
connector. Forcibly inserting the connector may damage the connector, and there is a
risk of injury.
USB-A port
3) Slide the connection switch upward to select the 2.4GHz wireless connection.
The area around the wheel lights up white for 5 seconds.
4) The driver is automatically installed, and then you are able to use the mouse.
You can now use the trackball.
By downloading and installing the "ELECOM Mouse Assistant V6" from our company website, settings
such function assignment, keyboard shortcuts, gesture functions, and changes to profiles can be
performed. Please proceed to “Install ELECOM Mouse Assistant 6
”.
Change the mouse pointer speed
Adjust the mouse pointer movement speed on your PC if the mouse pointer moves too fast or too slow.
■ For Windows 11
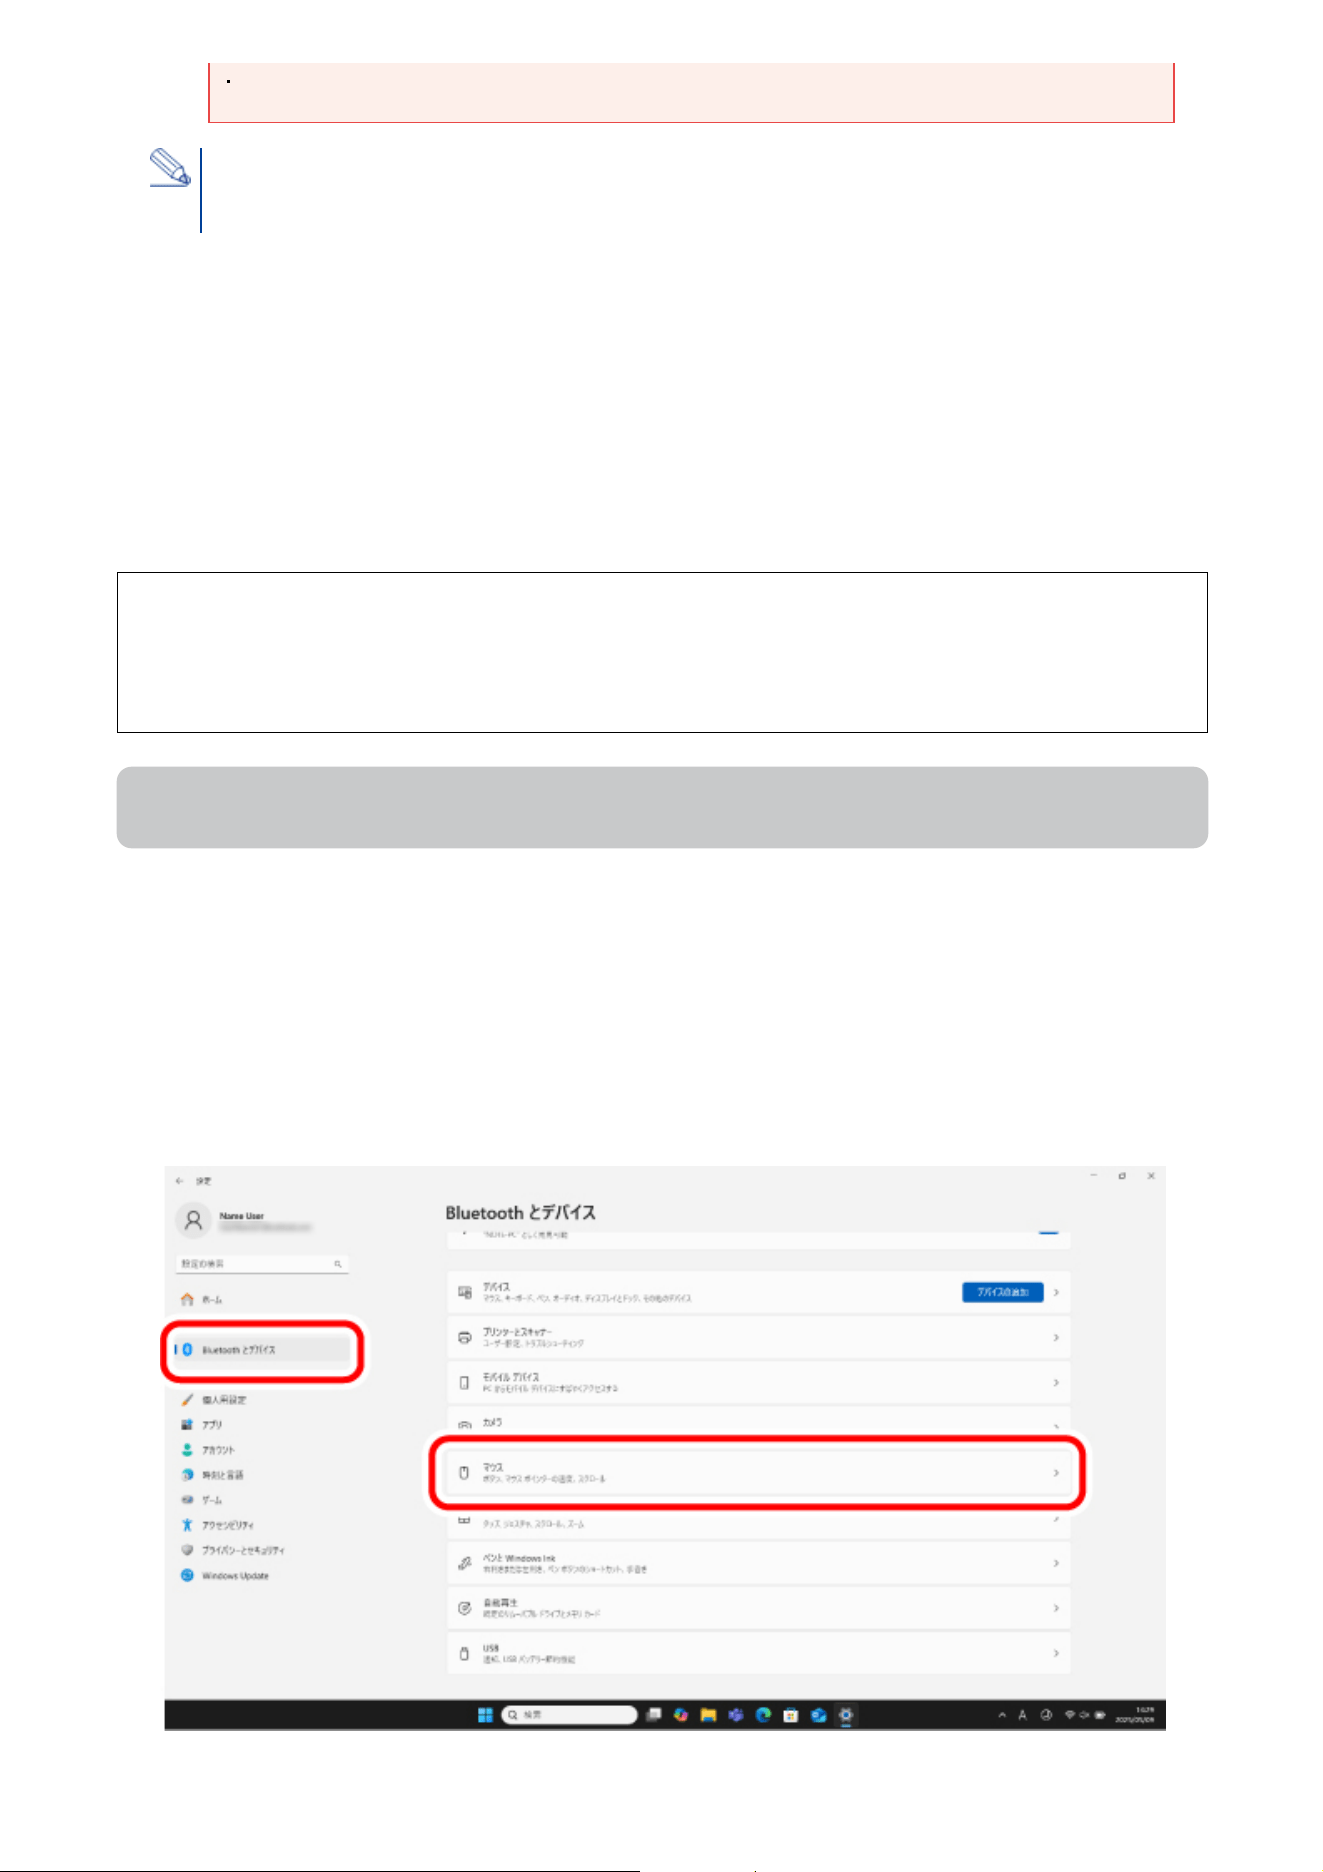
1) Click on “Start” on the bottom of the screen and select “Settings”.
The “Settings” page appears.
2) Select “Bluetooth & devices” and then “Mouse”.
Do not touch the terminal portion of the USB connector.
When removing the receiver unit
This product supports hot plugging. The receiver unit can be removed while the PC is on.
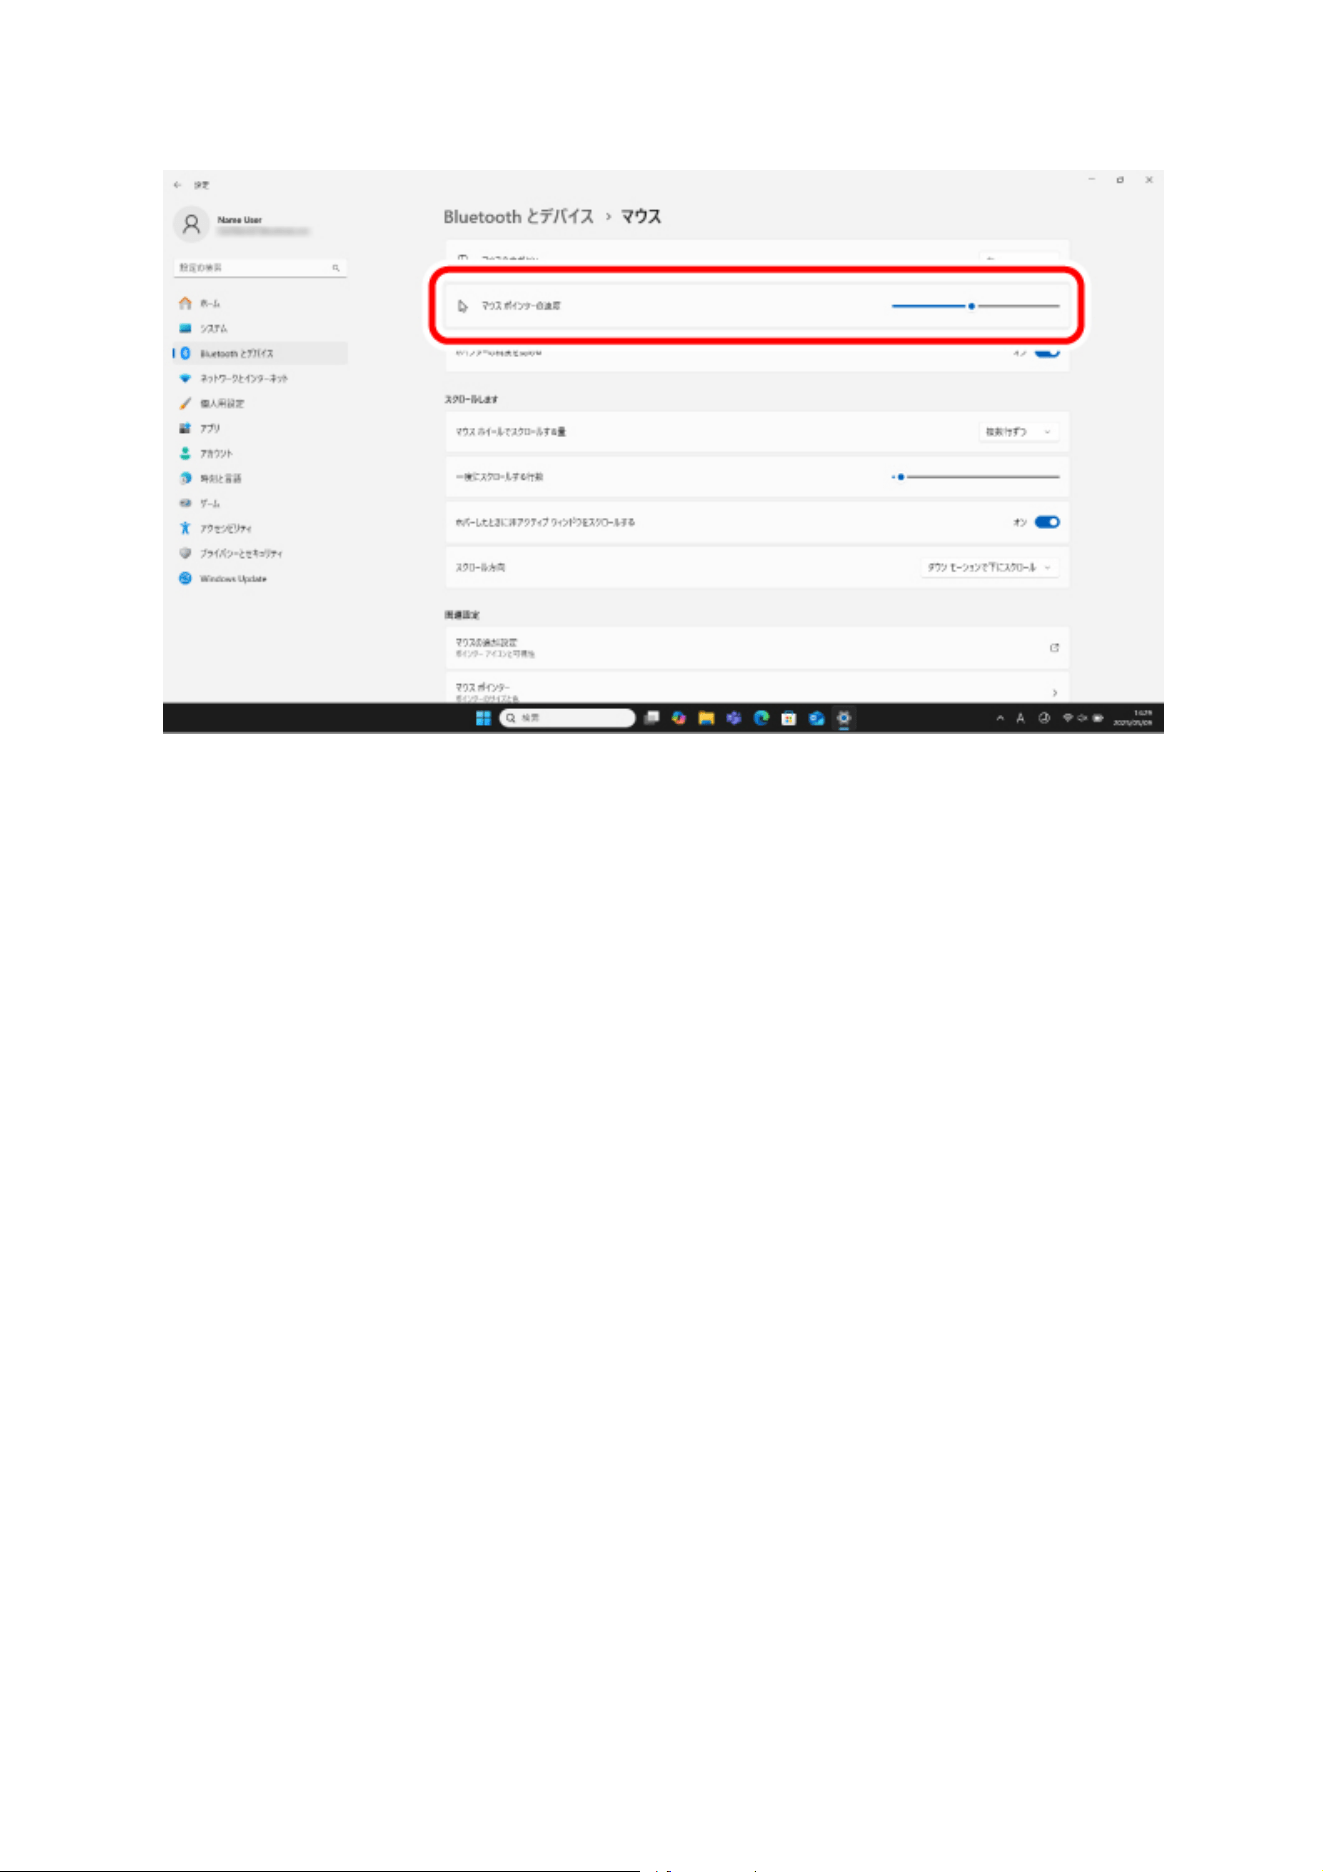
3) Adjust the “Mouse pointer speed” slider bar to adjust the mouse pointer movement
speed.
■ For Windows 10
1) Open “Mouse” properties.
From the start menu, select the Settings icon, select “Devices” → “Mouse”, then select “Additional mouse
options” under “Related Settings”.
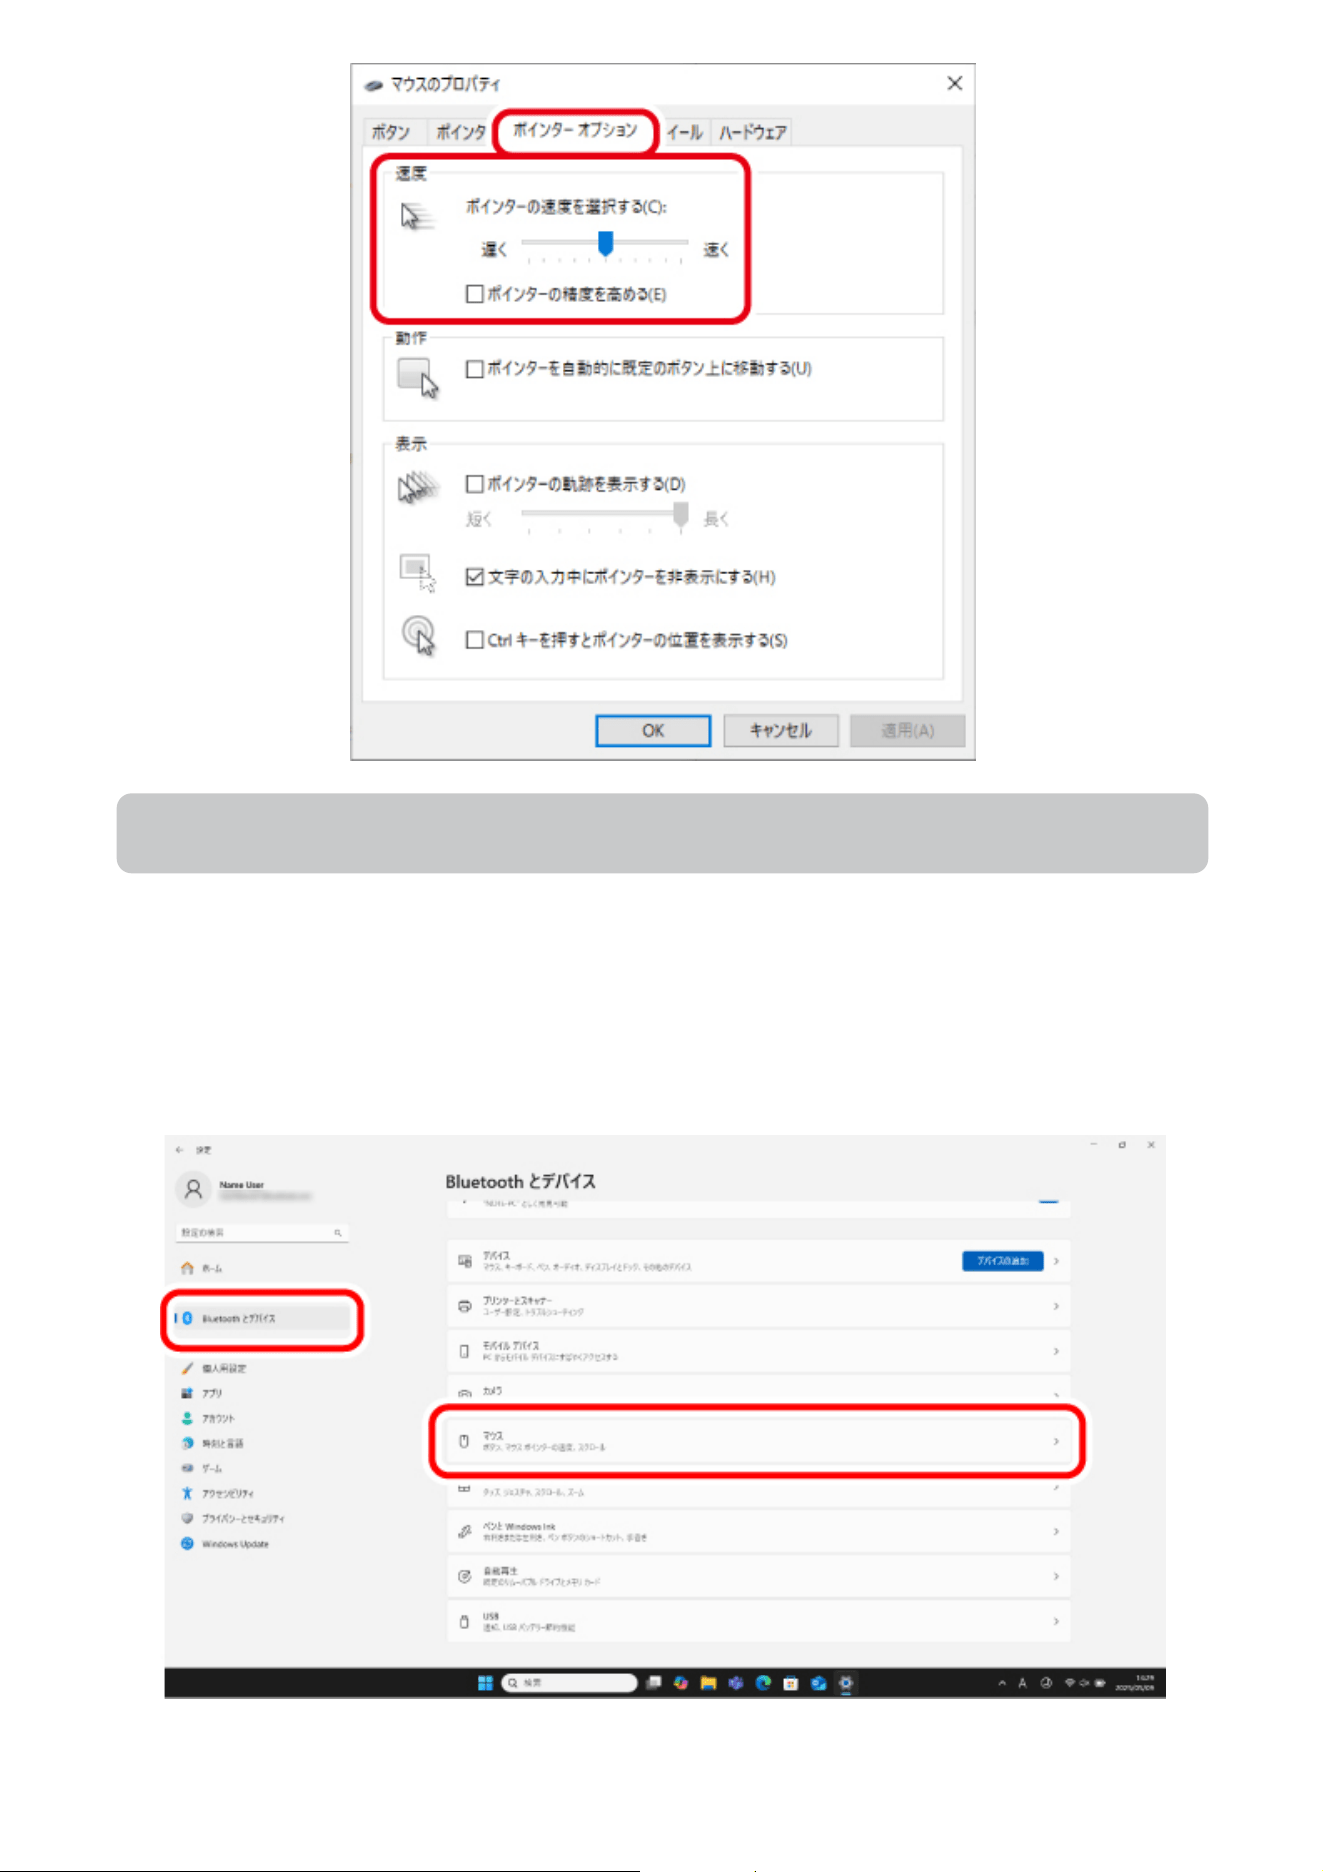
2) Select the “Pointer Options” tab.
3) Adjust the “Select a pointer speed” slider bar to adjust the mouse pointer movement
speed.
Change the number of lines scrolled in one wheel turn
■ For Windows 11
1) Click on “Start” on the bottom of the screen and select “Settings”.
The “Settings” page appears.
2) Select “Bluetooth & devices” and then “Mouse”.
3) Adjust the “Lines to scroll at a time” slider bar to adjust the number of lines per scroll.
■ For Windows 10
1) Open “Mouse” properties.
From the start menu, select the Settings icon, select “Devices” → “Mouse”, then select “Additional mouse
options” under “Related Settings”.
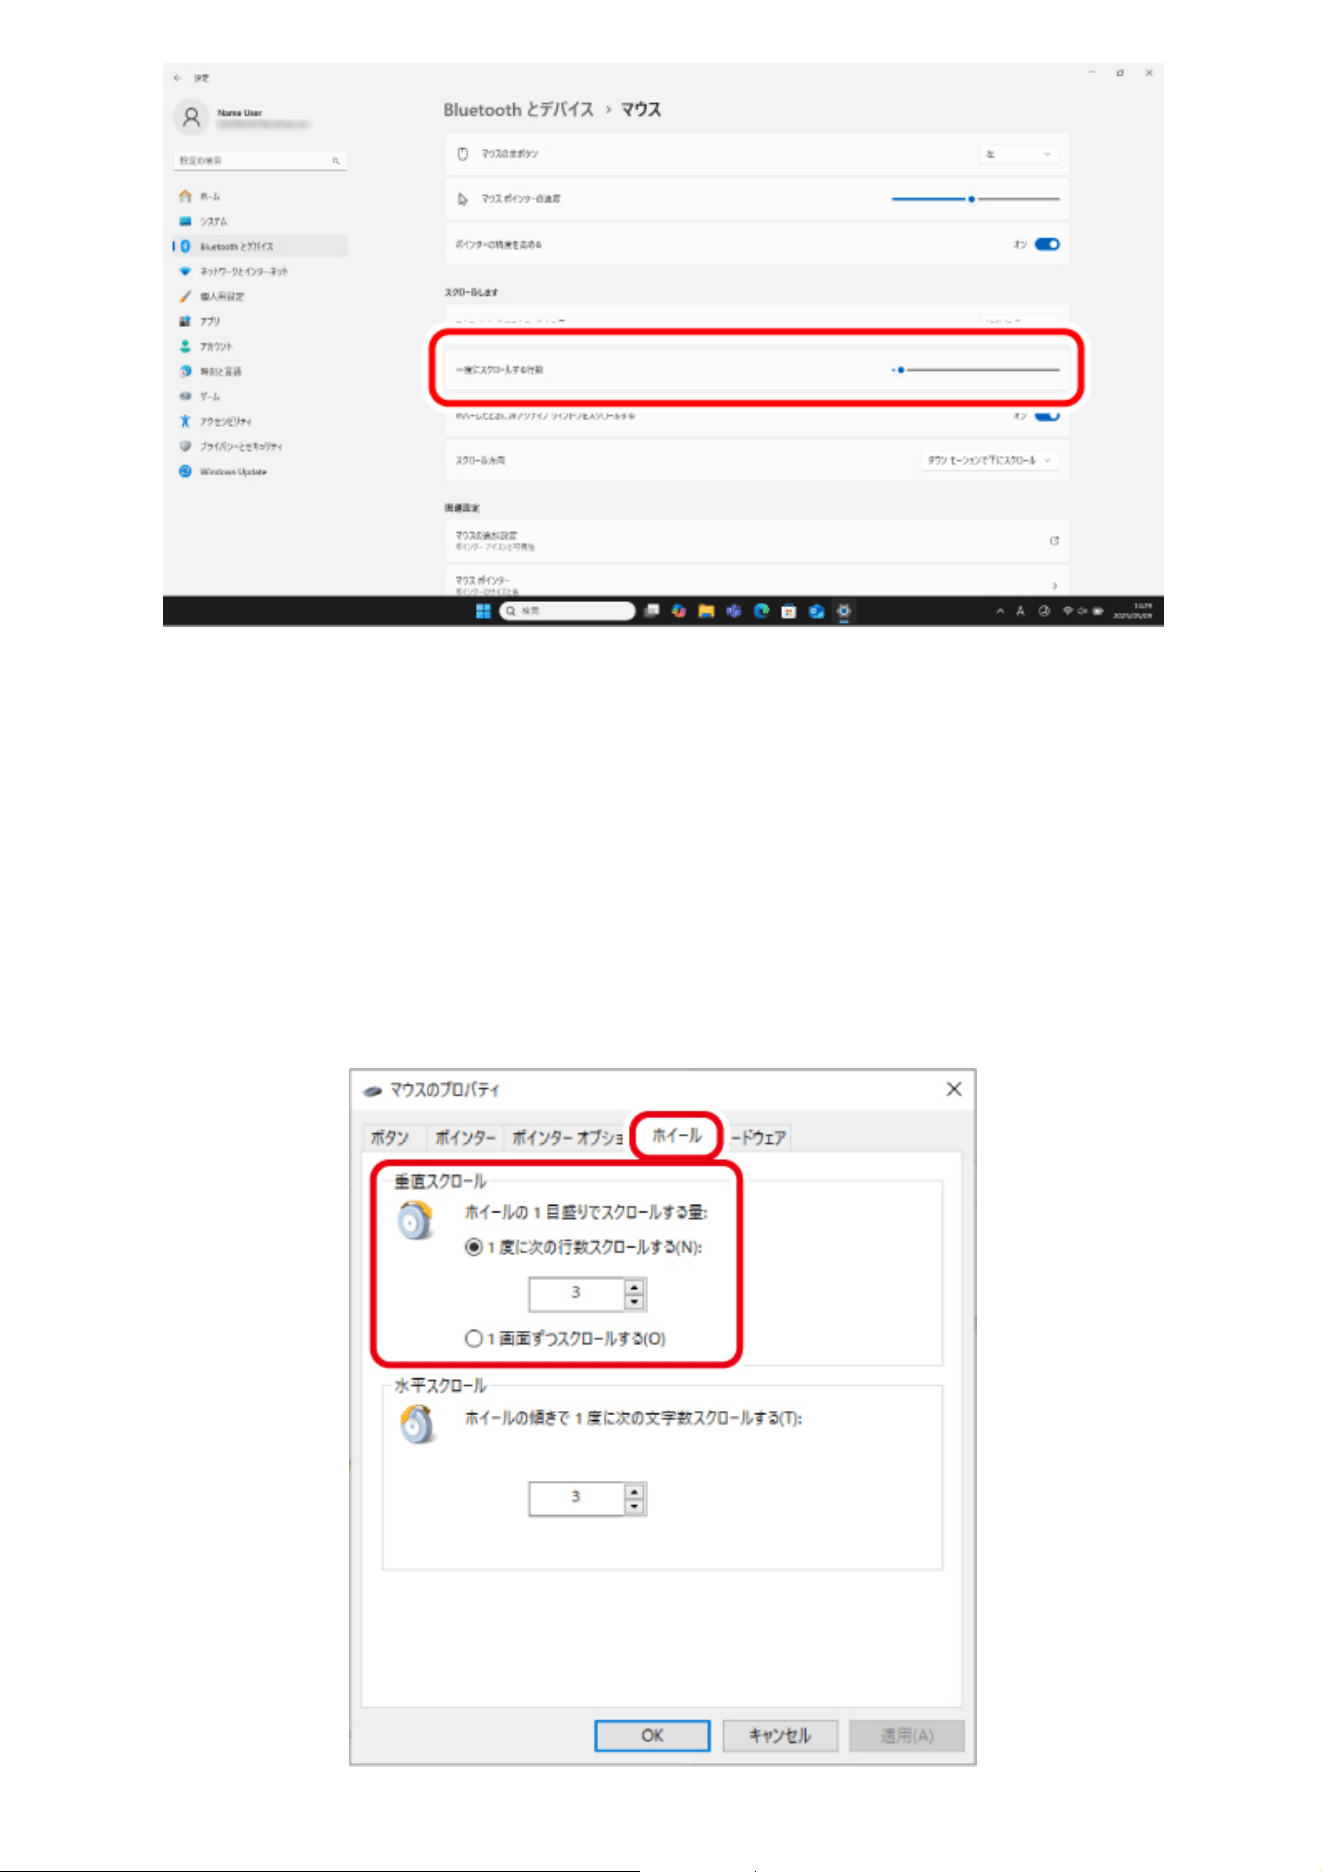
2) Select the “Wheel” tab.
3) Change the value of “The following number of lines at a time” under “Roll the wheel one
notch to scroll”
Change scroll direction
Change the scroll direction for when the scroll wheel on the mouse is moved.
■ For Windows 11
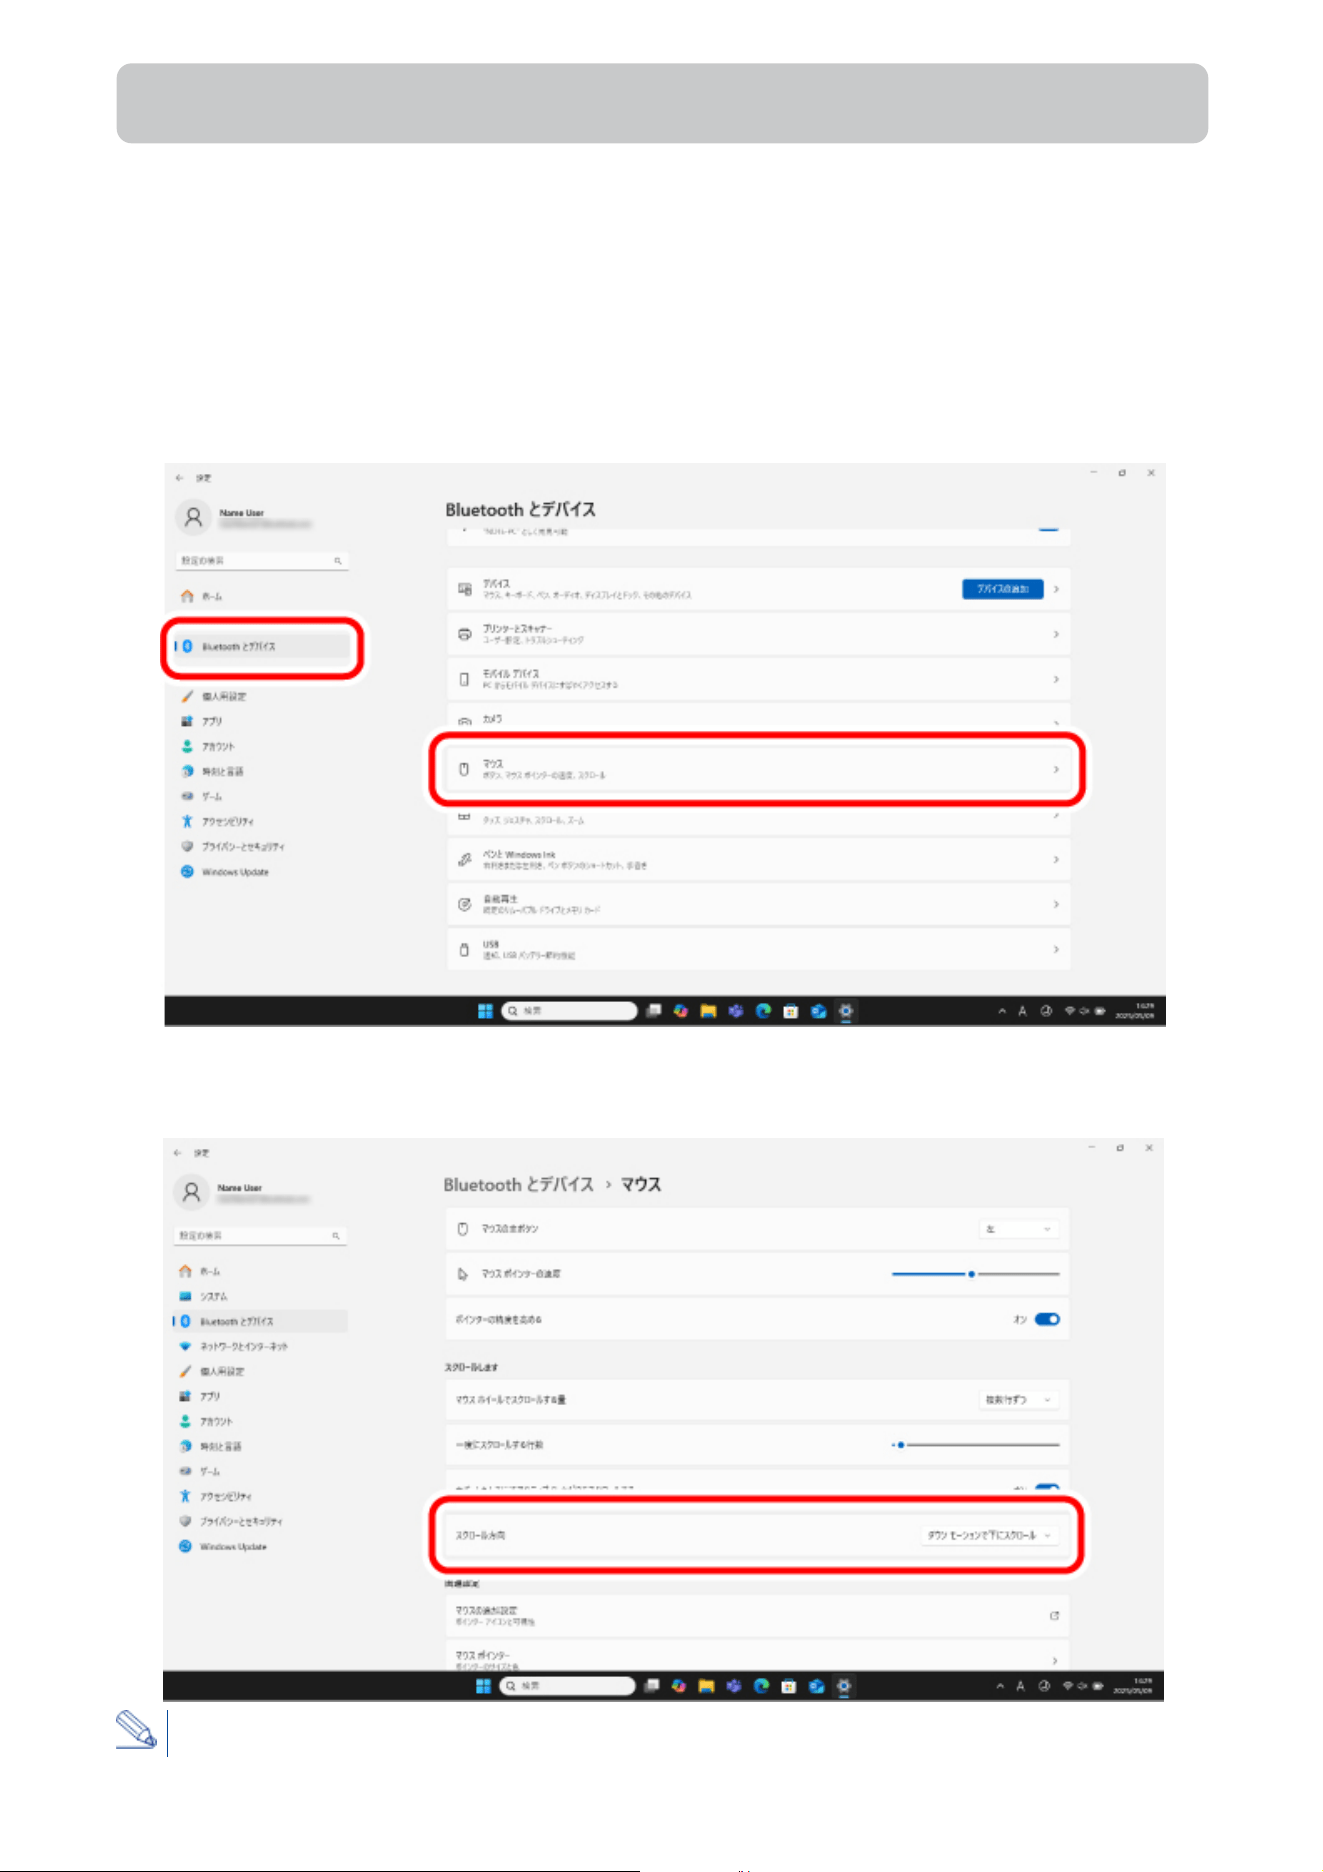
1) Click on “Start” on the bottom of the screen and select “Settings”.
The “Settings” page appears.
2) Select “Bluetooth & devices” and then “Mouse”.
3) Click “Scrolling direction” to change the scroll direction.
Select “Down motion scrolls up” to reverse the scroll direction when the scroll wheel is moved.
1. Remove the battery insulating tab.
1) Remove the battery cover.
2) Remove the battery insulating tab.
3) Put the battery cover back on.
Replacing the battery...
Mac
Using Bluetooth connection
1) Remove the battery cover.
2) Remove the old battery.
3) Insert a new battery according to the instructions on the battery compartment.
Ensure that the battery is inserted with the positive (+) and negative (-) terminals oriented
correctly.
4) Put the battery cover back on.
2. Turn the power ON
1) Slide the power switch on the underside of the product to the ON position.
The area around the wheel lights up blue for 5 seconds.
*When the battery is running low, the LED blinks white 10 times every second.
・When turning on the power for the first time
The device enters pairing mode, and the area around the wheel rapidly flashes blue. You can now
pair it with your computer.
If you wish to pair, refer to Step 3 in "3. Pairing with a PC".
3. Pairing with a PC
Power-saving mode
When the trackball is left untouched for a fixed period of time while the power is ON,
it automatically shifts to power-saving mode.
The trackball returns from power-saving mode when it is moved.
*Trackball operation may be unstable for 2-3 seconds after returning from the power-saving
mode.
Pairing involves registering Bluetooth devices (in this case, this product and your device) with
each other, and authorizing a connection between them.
1) Slide the connection switch downward to select the Bluetooth connection.
The area around the wheel lights up blue for 5 seconds.
2) Press and hold the pairing button on the bottom of the product for 3 seconds, then
release it.
The device enters pairing mode, and the area around the wheel rapidly flashes blue.
3) From the Apple menu, click on “System Settings...”
The “System Settings” page appears.
This section covers macOS standard Bluetooth functions. Depending on your device or Bluetooth
adaptor, unique Bluetooth functions may be used. Please read the respective manuals for each
function.
Use your current mouse or the touchpad on your device to operate your device until pairing is
complete.
The following instructions are for macOS Sequoia (15).
Paring button
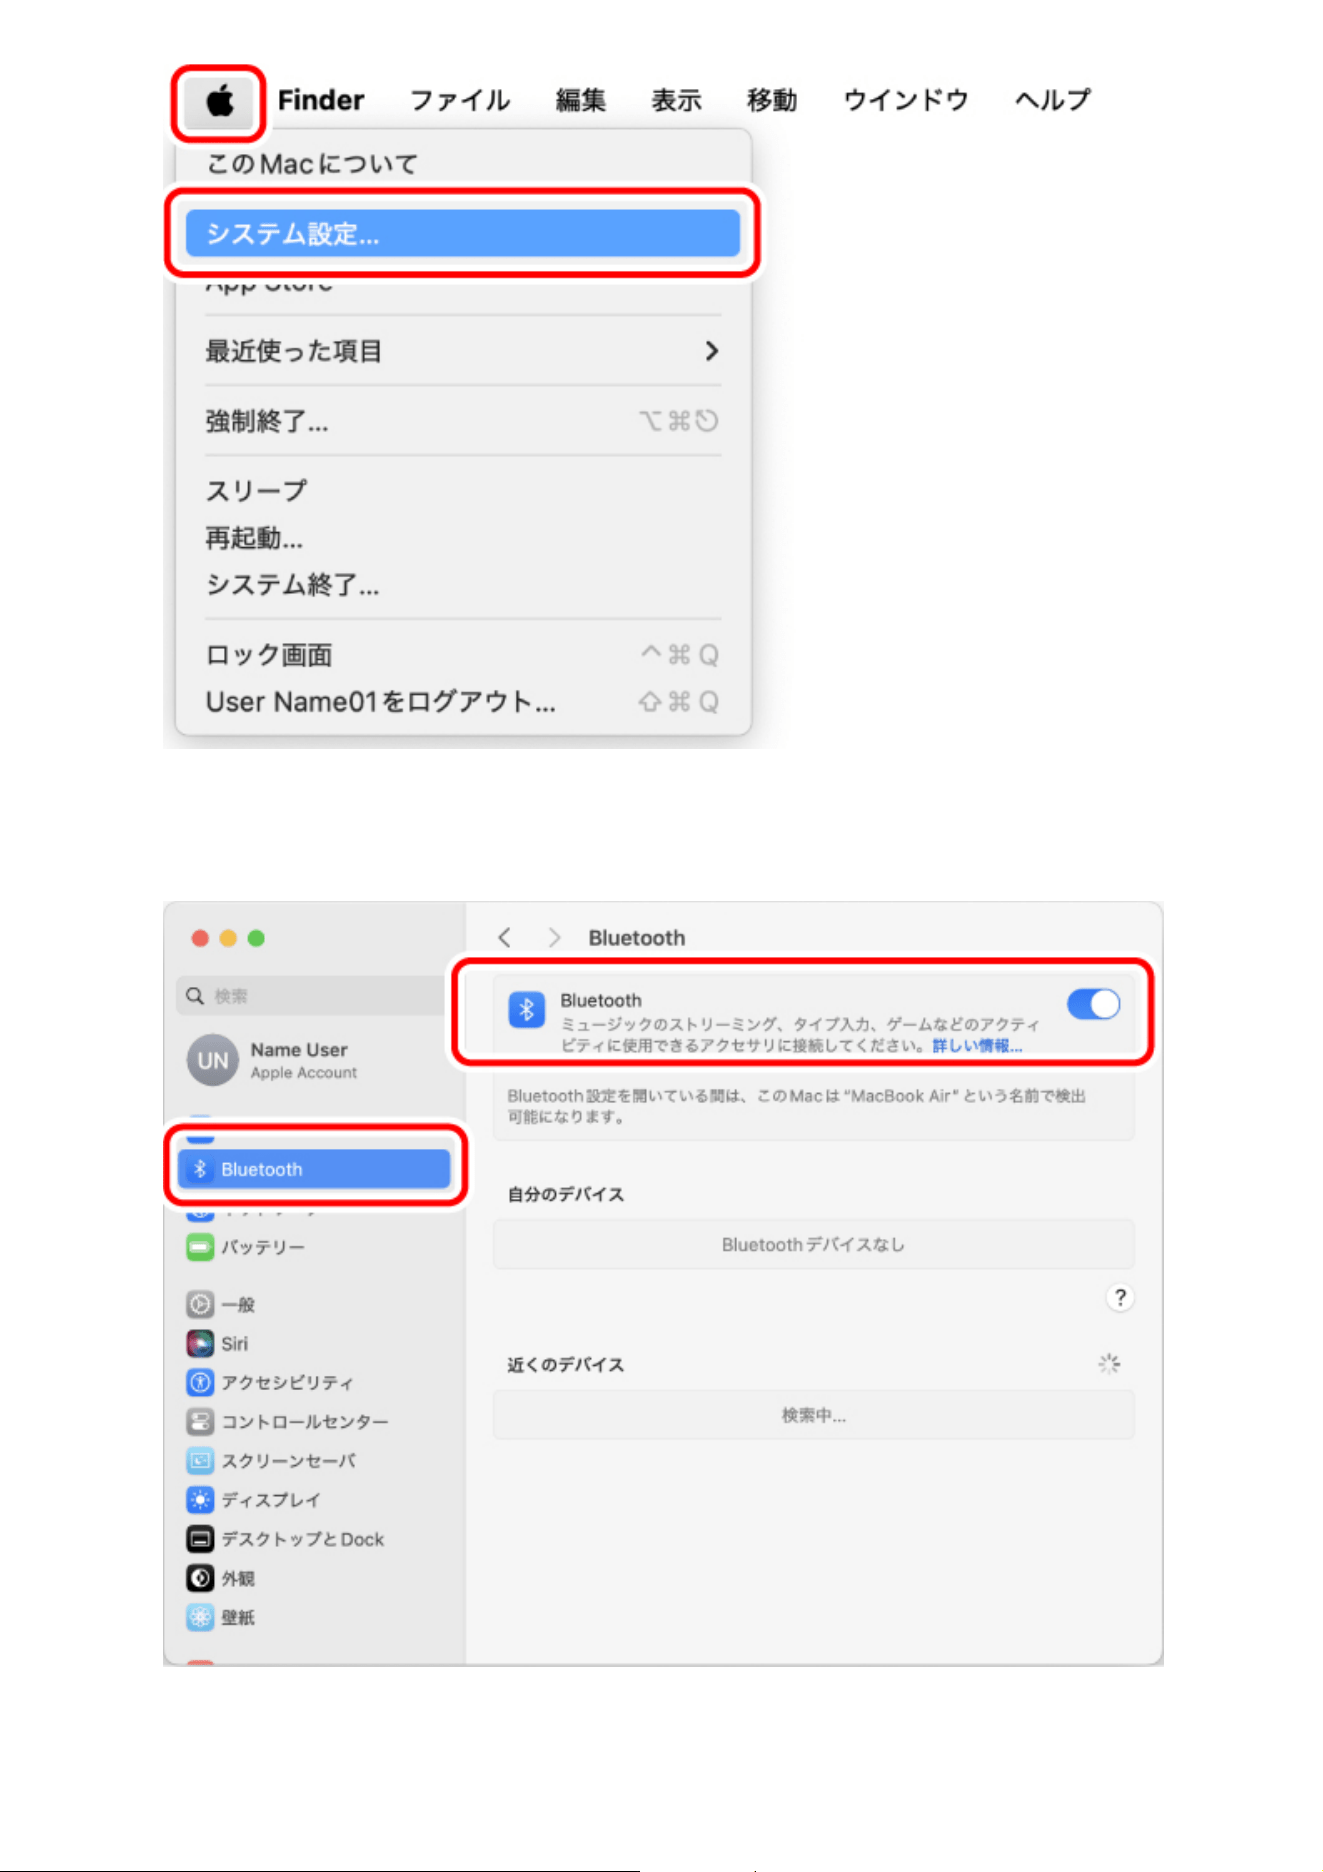
4) Select “Bluetooth” to turn on “Bluetooth”.
The “Bluetooth” system settings page appears.
5) When "bitra" is detected under "Nearby Devices", click “Connect”.
Pairing begins.
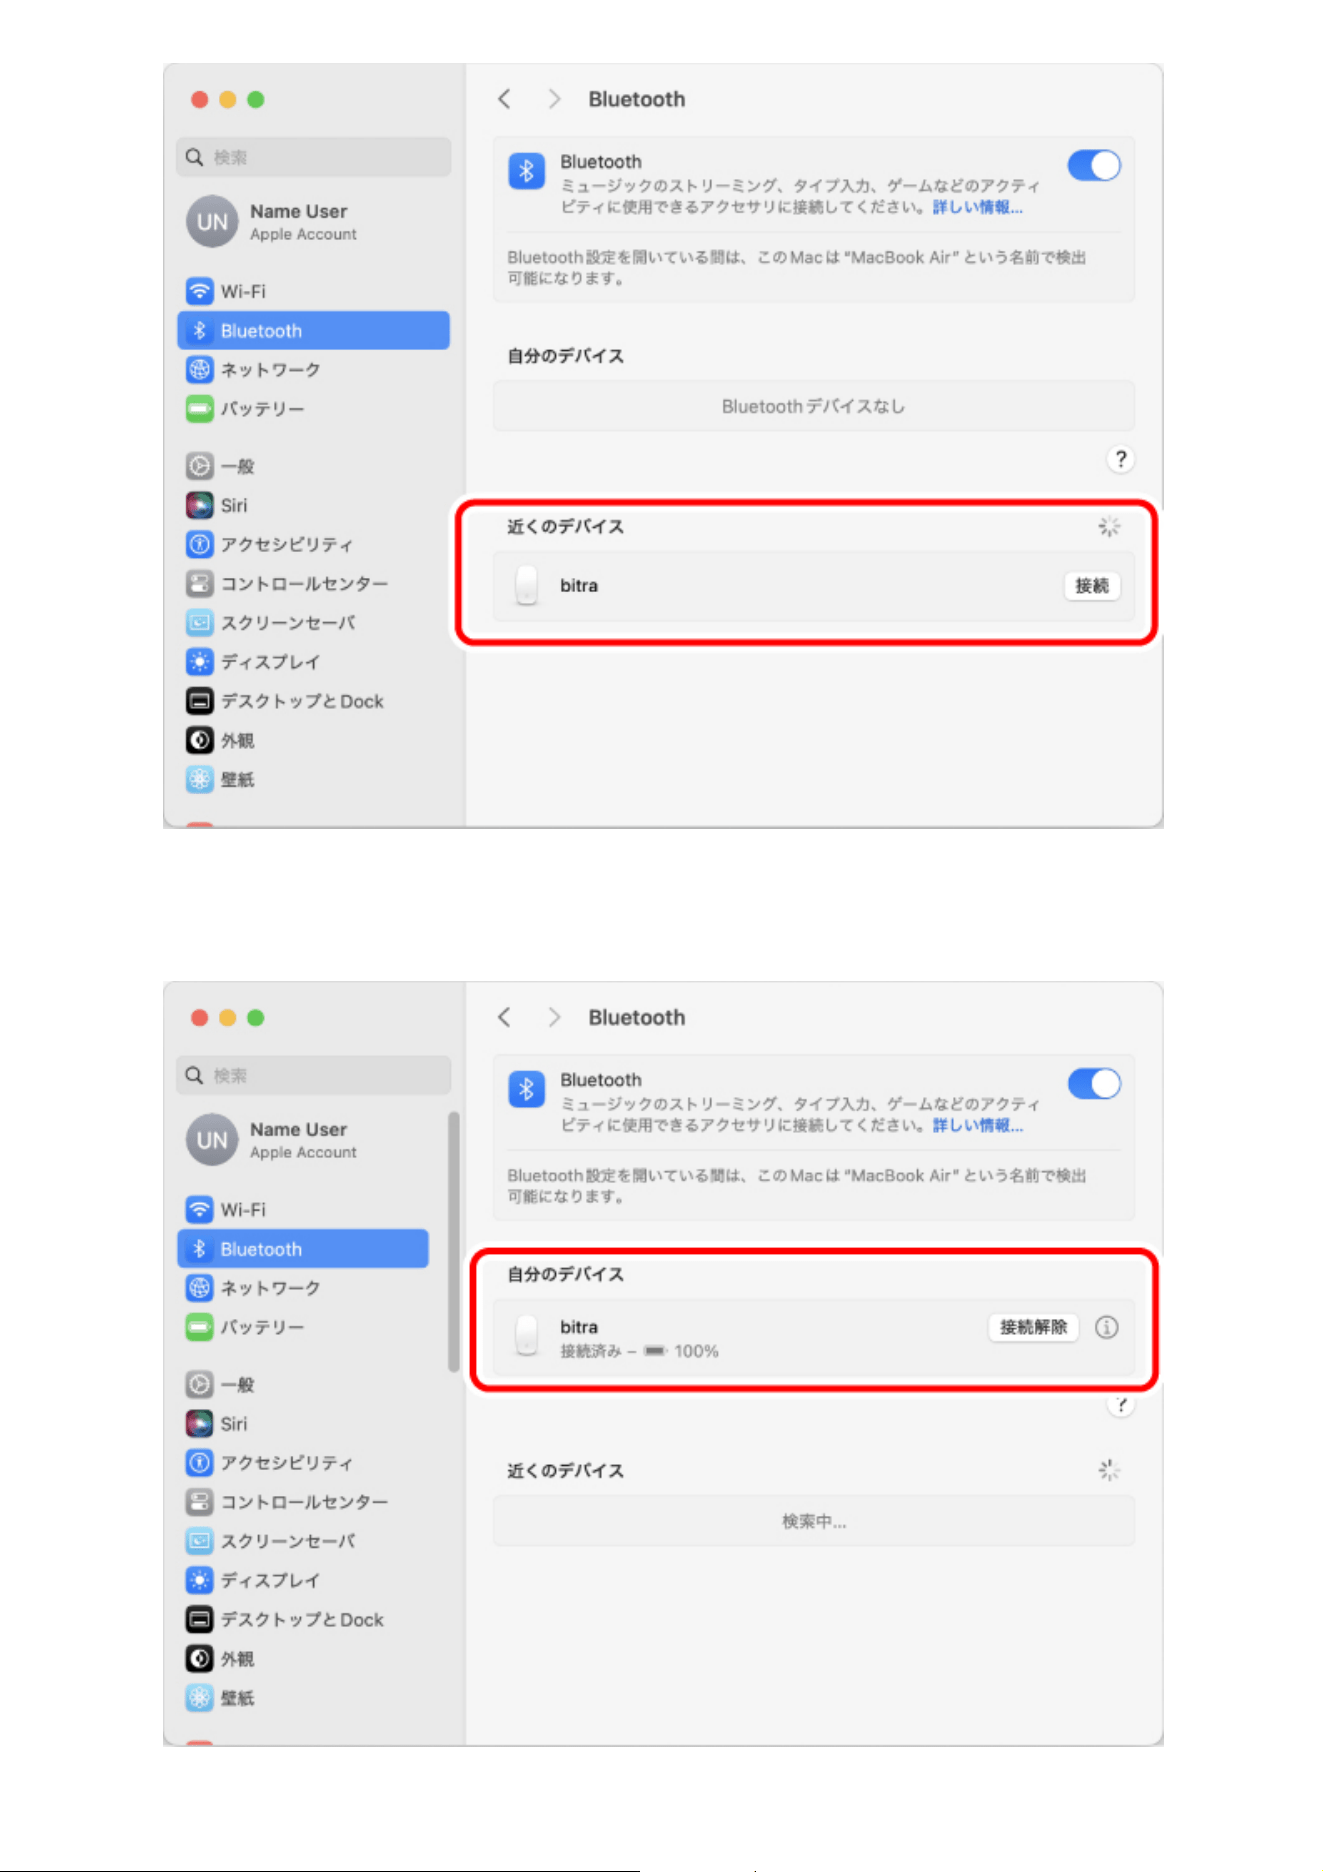
6) When "bitra" changes to “Connected”, pairing is completed.
After the area around the wheel lights up for 5 seconds, it turns off.
You can now use the trackball.
1. Remove the battery insulating tab.
1) Remove the battery cover.
2) Remove the battery insulating tab.
3) Remove the receiver unit.
4) Put the battery cover back on.
Using wireless connection

Replacing the battery...
1) Remove the battery cover.
2) Remove the old battery.
3) Insert a new battery according to the instructions on the battery compartment.

Ensure that the battery is inserted with the positive (+) and negative (-) terminals oriented
correctly.
4) Put the battery cover back on.
2. Turn the power ON
1) Slide the power switch on the underside of the product to the ON position.
The area around the wheel lights up white for 5 seconds.
*When the battery is running low, the LED blinks white 10 times every second.
3. Connect to a PC
1) Start up your PC.
Please wait until the PC has started up and can be operated.
2) Insert the receiver unit into the PC's USB-A port.
You may use any USB-A port.
Power-saving mode
When the trackball is left untouched for a fixed period of time while the power is ON,
it automatically shifts to power-saving mode.
The trackball returns from power-saving mode when it is moved.
*Trackball operation may be unstable for 2-3 seconds after returning from the power-saving
mode.
For terminals that do not have a USB-A port, such as a MacBook, use the USB Type-C
®
hub.
Ensure that the connector is correctly oriented to the port.
USB-A port
USB Type-C hub

3) The driver is automatically installed, and then you are able to use the mouse
You can now use the trackball.
By downloading and installing the "ELECOM Mouse Assistant V6" from our company website, settings
such function assignment, keyboard shortcuts, gesture functions, and changes to profiles can be
performed. Please proceed to “Install ELECOM Mouse Assistant 6”.
Change the mouse pointer speed
Adjust the mouse pointer movement speed on your PC if the mouse pointer moves too fast or too slow.
1) Select “Mouse” under “System Settings”.
The “Mouse” settings page loads up.
If there is strong resistance when inserting, check the shape and orientation of the
connector. Forcibly inserting the connector may damage the connector, and there is a
risk of injury.
Do not touch the terminal portion of the USB connector.
When removing the receiver unit
This product supports hot plugging. The receiver unit can be removed while the PC is on.
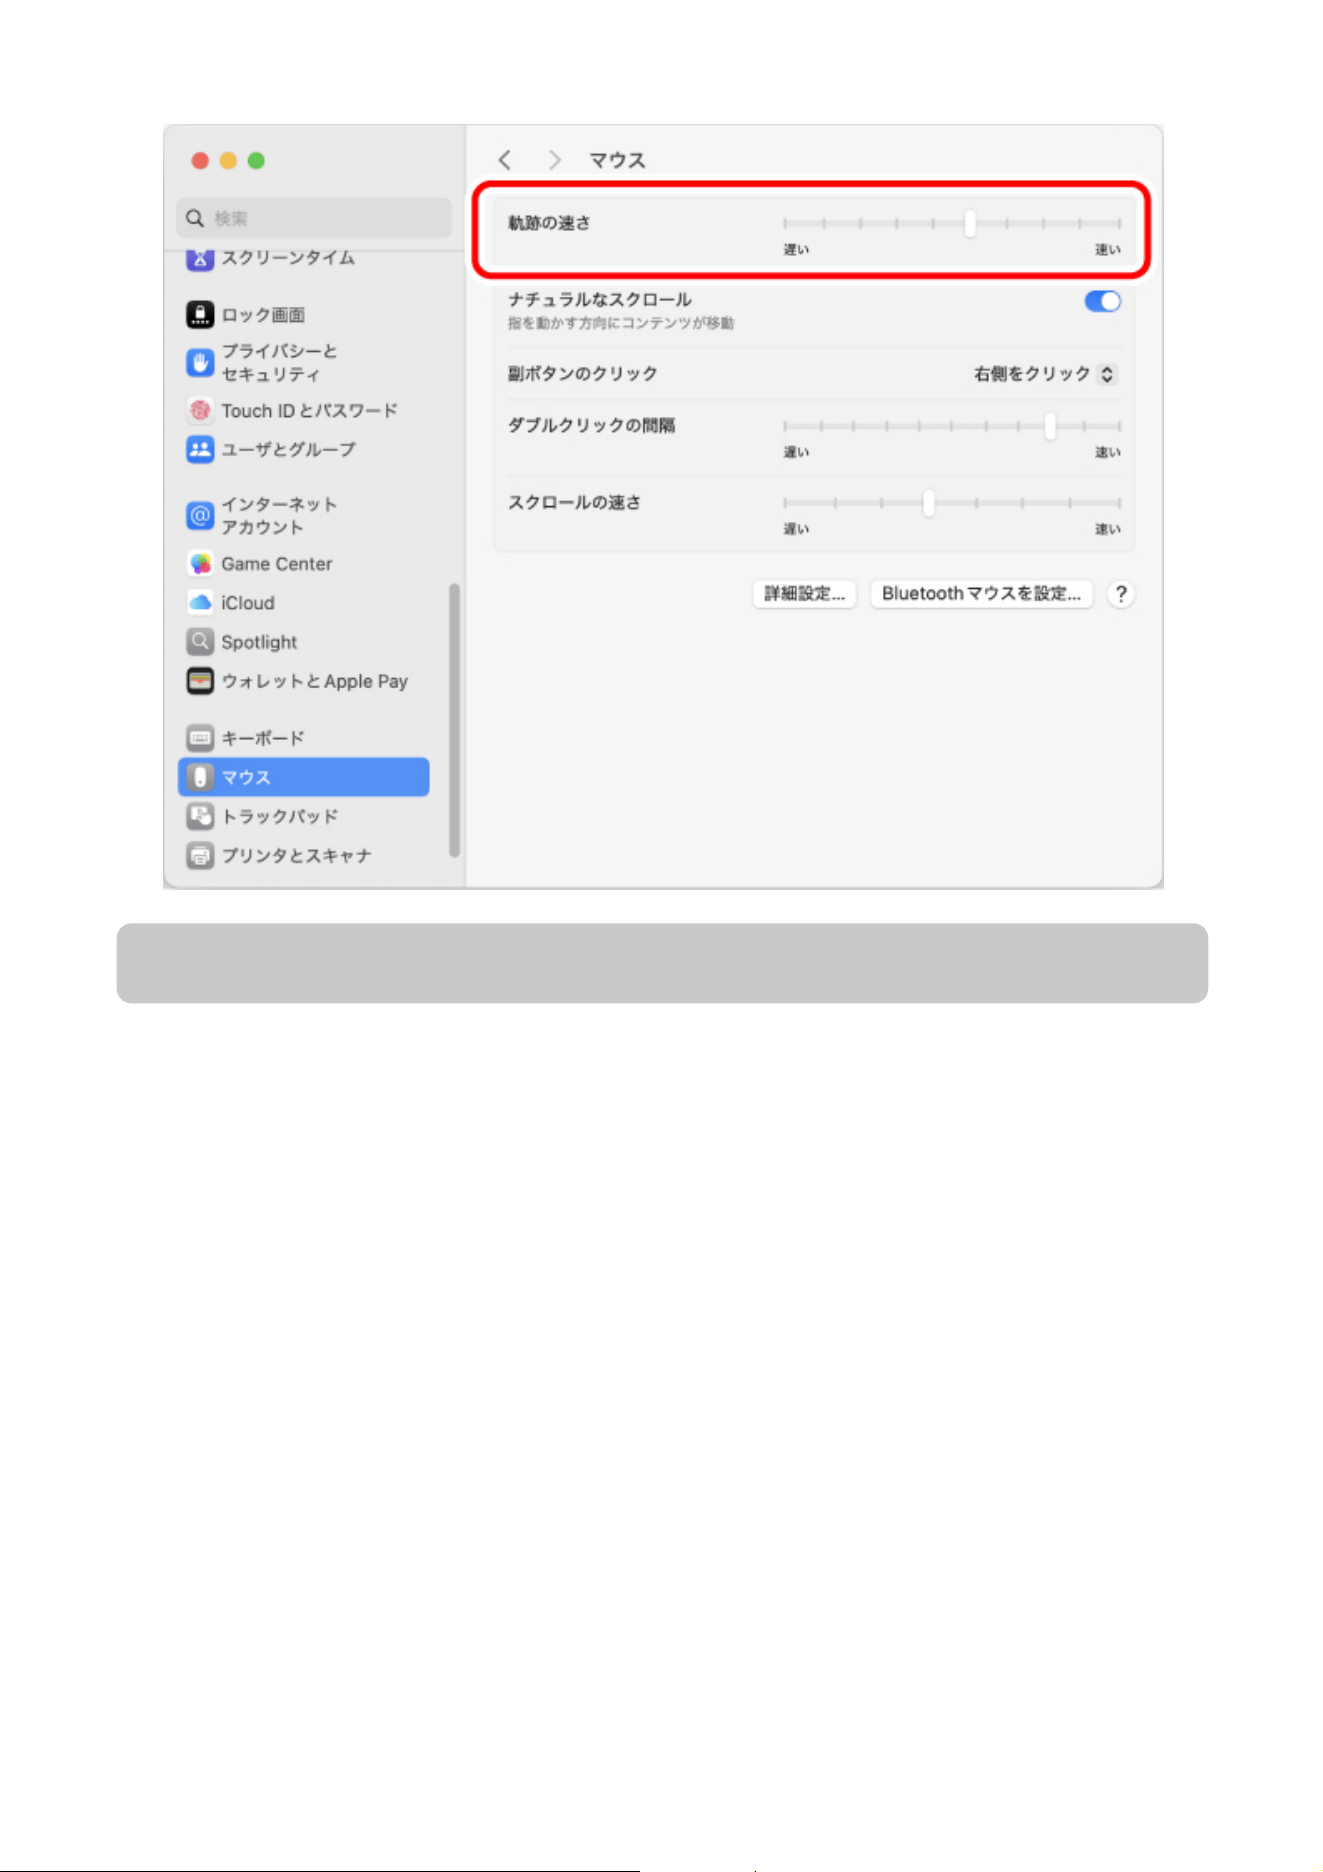
2) Adjust the “Tracking speed” slider to adjust the speed of the mouse pointer.
Change scroll direction
Change the scroll direction for when the scroll wheel on the mouse is moved.
1) Select “Mouse” under “System Settings”.
The “Mouse” settings page loads up.
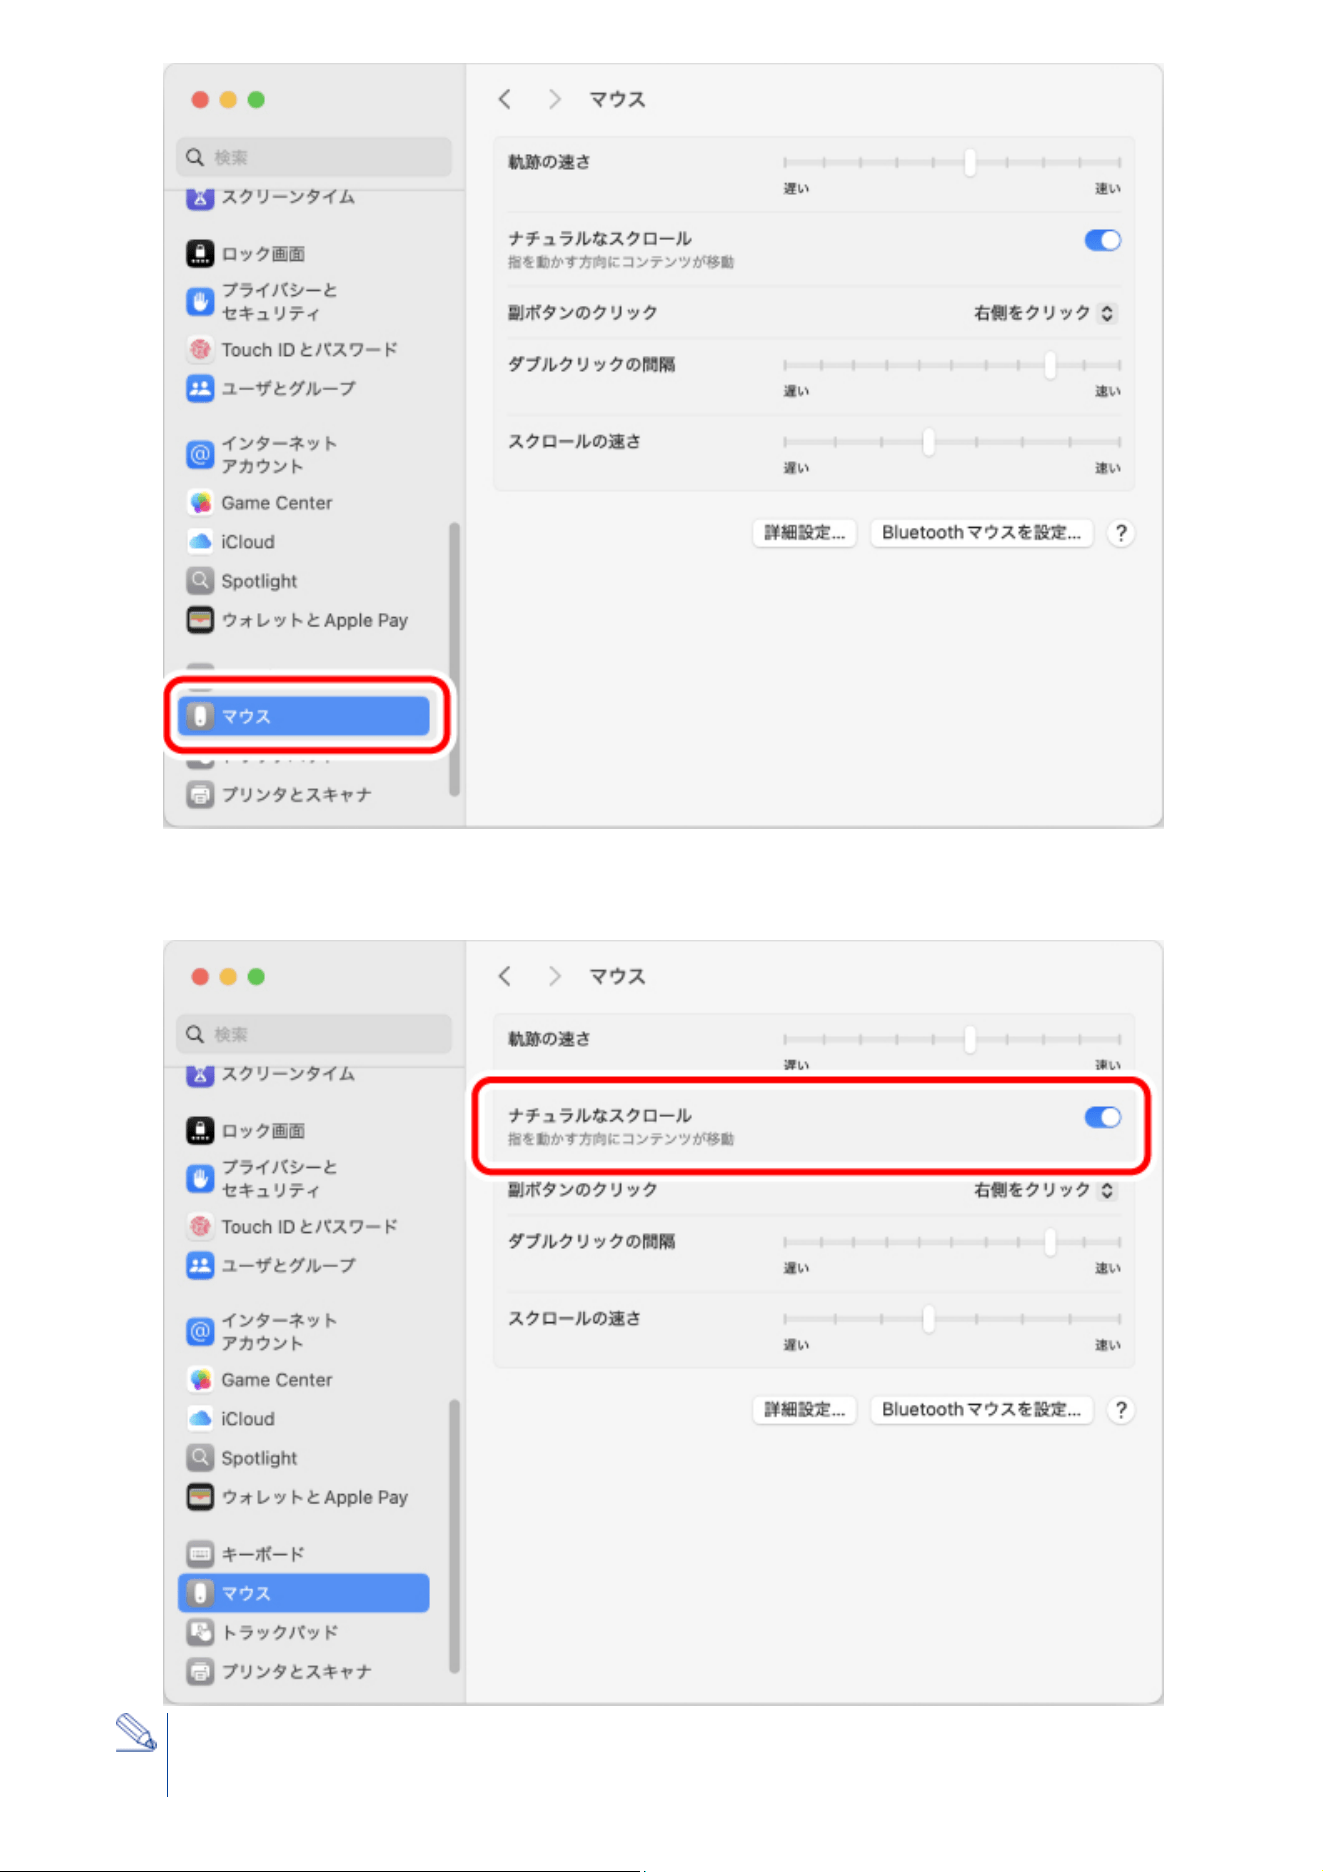
2) Clicking “Natural scrolling” to turn it on or off changes the scroll direction.
When “Natural scrolling” is turned off, the scroll direction is the same as the direction of the
scroll wheel movement.

1. Remove the battery insulating tab.
1) Remove the battery cover.
2) Remove the battery insulating tab.
3) Put the battery cover back on.
Replacing the battery...
iPhone, iPad
Using Bluetooth connection

1) Remove the battery cover.
2) Remove the old battery.
3) Insert a new battery according to the instructions on the battery compartment.
Ensure that the battery is inserted with the positive (+) and negative (-) terminals oriented
correctly.
4) Put the battery cover back on.

2. Turn the power ON
1) Slide the power switch on the underside of the product to the ON position.
The area around the wheel lights up blue for 5 seconds.
*When the battery is running low, the LED blinks white 10 times every second.
・When turning on the power for the first time
The device enters pairing mode, and the area around the wheel rapidly flashes blue. You can now
pair it with your computer.
If you wish to pair, refer to Step 3 in "3. Pairing with an iPad or an iPhone".
3. Pairing with an iPad or an iPhone
Power-saving mode
When the trackball is left untouched for a fixed period of time while the power is ON,
it automatically shifts to power-saving mode.
The trackball returns from power-saving mode when it is moved.
*Trackball operation may be unstable for 2-3 seconds after returning from the power-saving
mode.
Pairing involves registering Bluetooth devices (in this case, this product and an iPad or an iPhone)
with each other, and authorizing a connection between them.
1) Slide the connection switch downward to select the Bluetooth connection.
The area around the wheel lights up blue for 5 seconds.
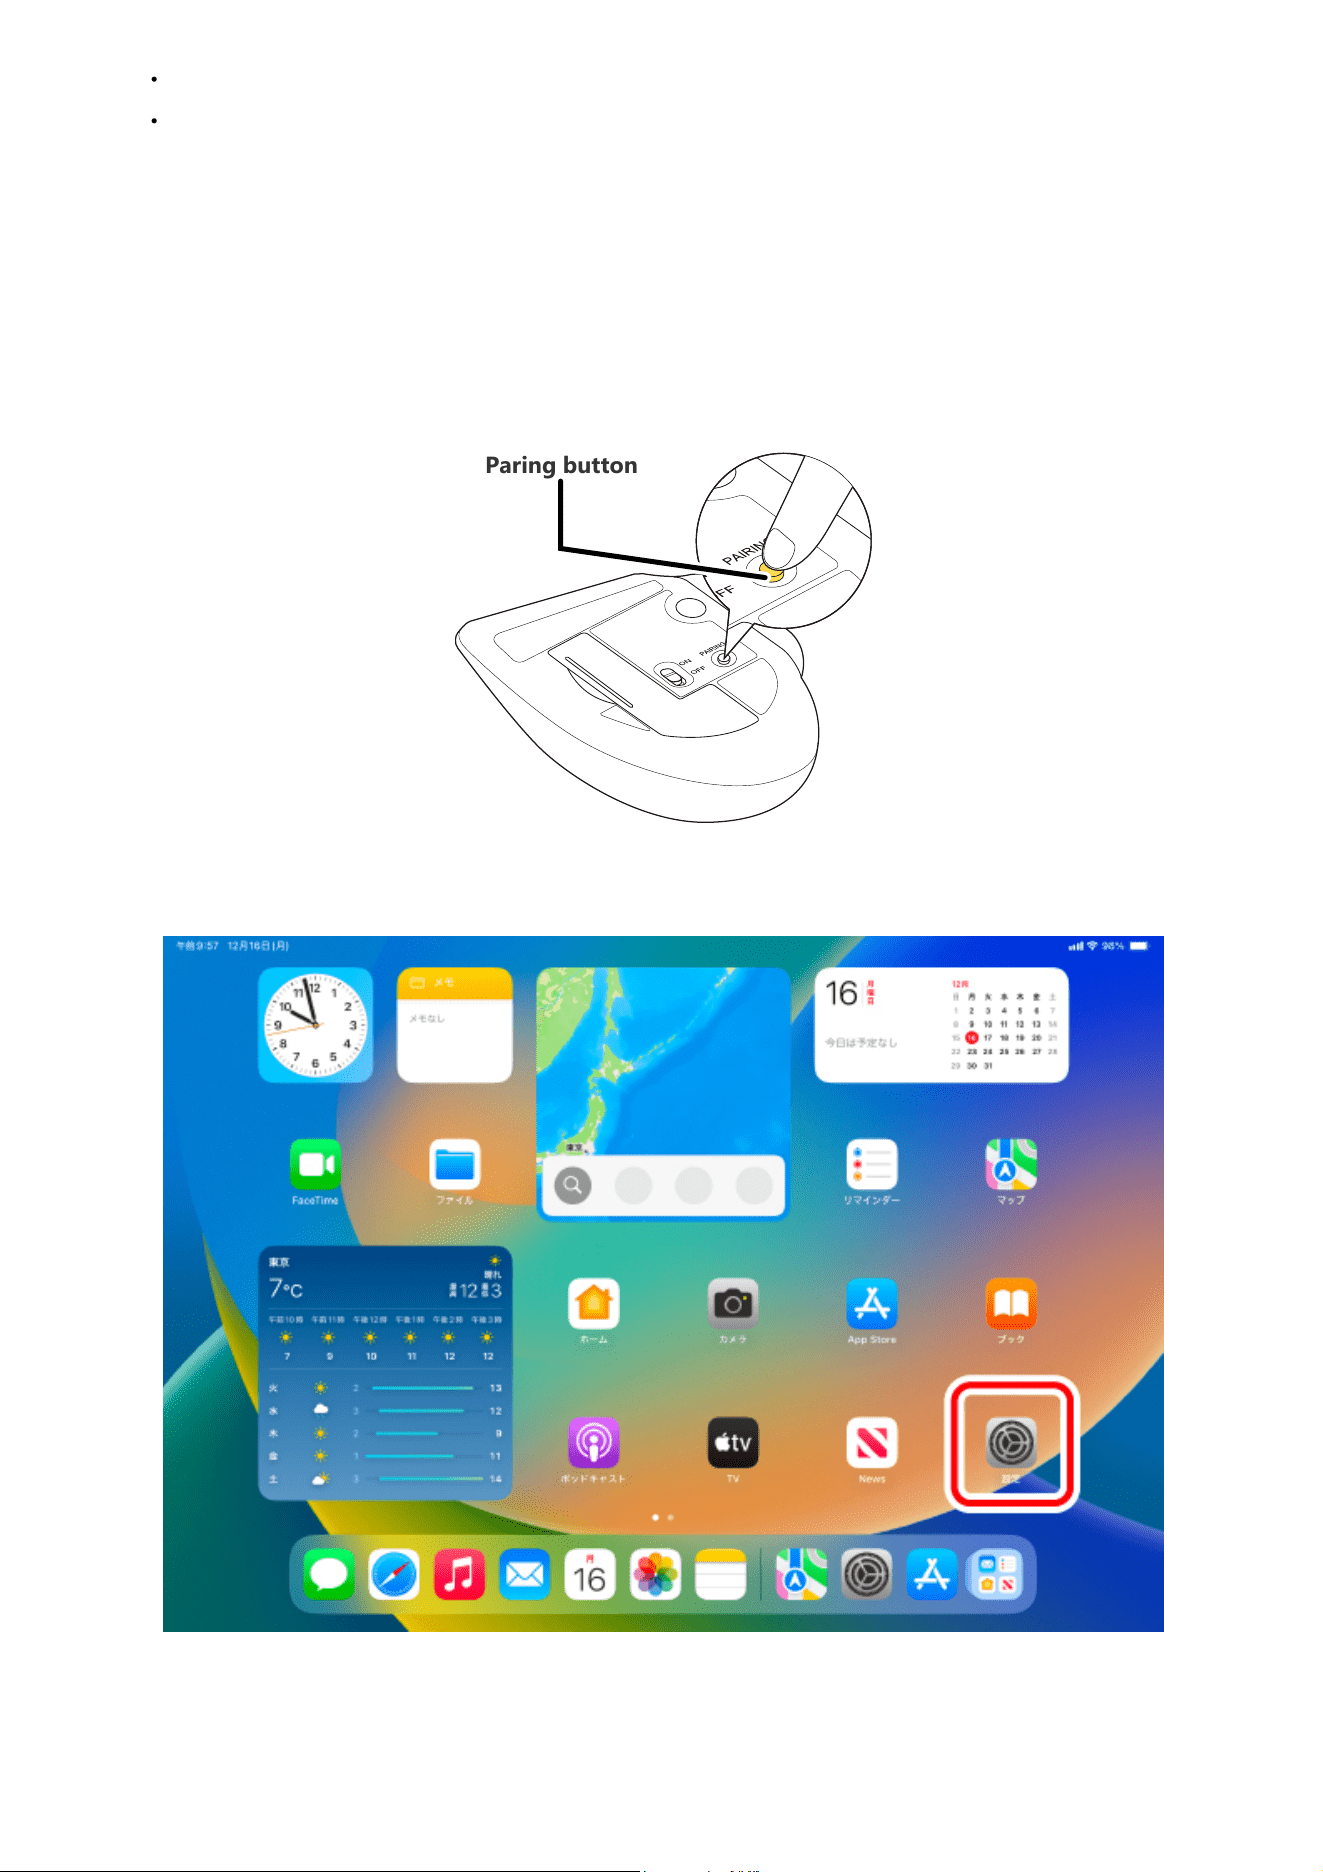
2) Press and hold the pairing button on the bottom of the product for 3 seconds, then
release it.
The device enters pairing mode, and the area around the wheel rapidly flashes blue.
3) Select “Settings” from the home page.
4) Select “Bluetooth” to turn on the “Bluetooth”.
Tap to operate the iPad or iPhone device until pairing is complete.
The following instructions are for iPadOS Ver.18.
Paring button
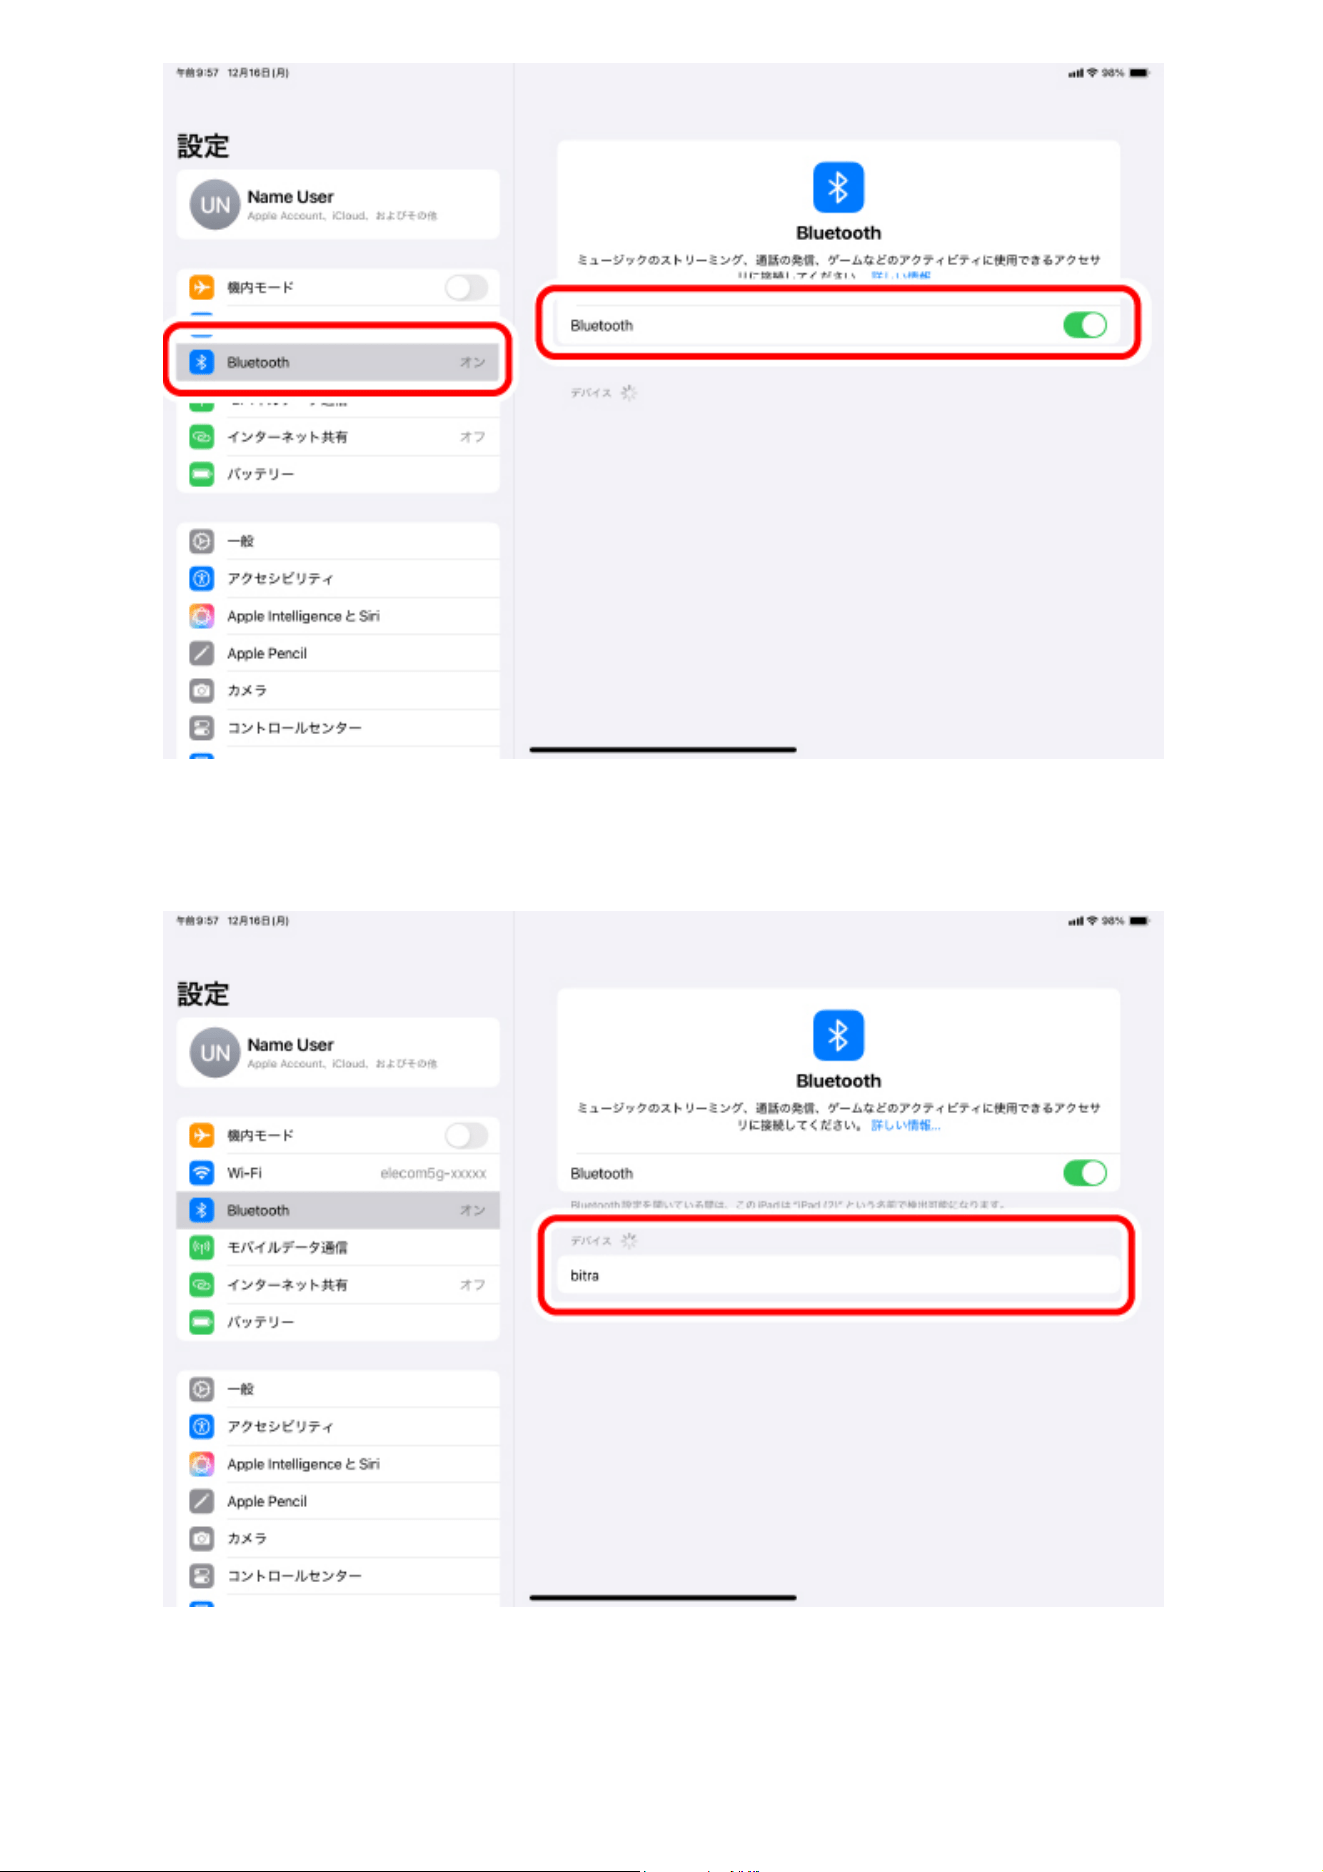
5) Tap on “bitra” when it is detected under “DEVICES”.
Pairing begins.
6) When the “Bluetooth Pairing Request” page loads, tap on “Pair”.
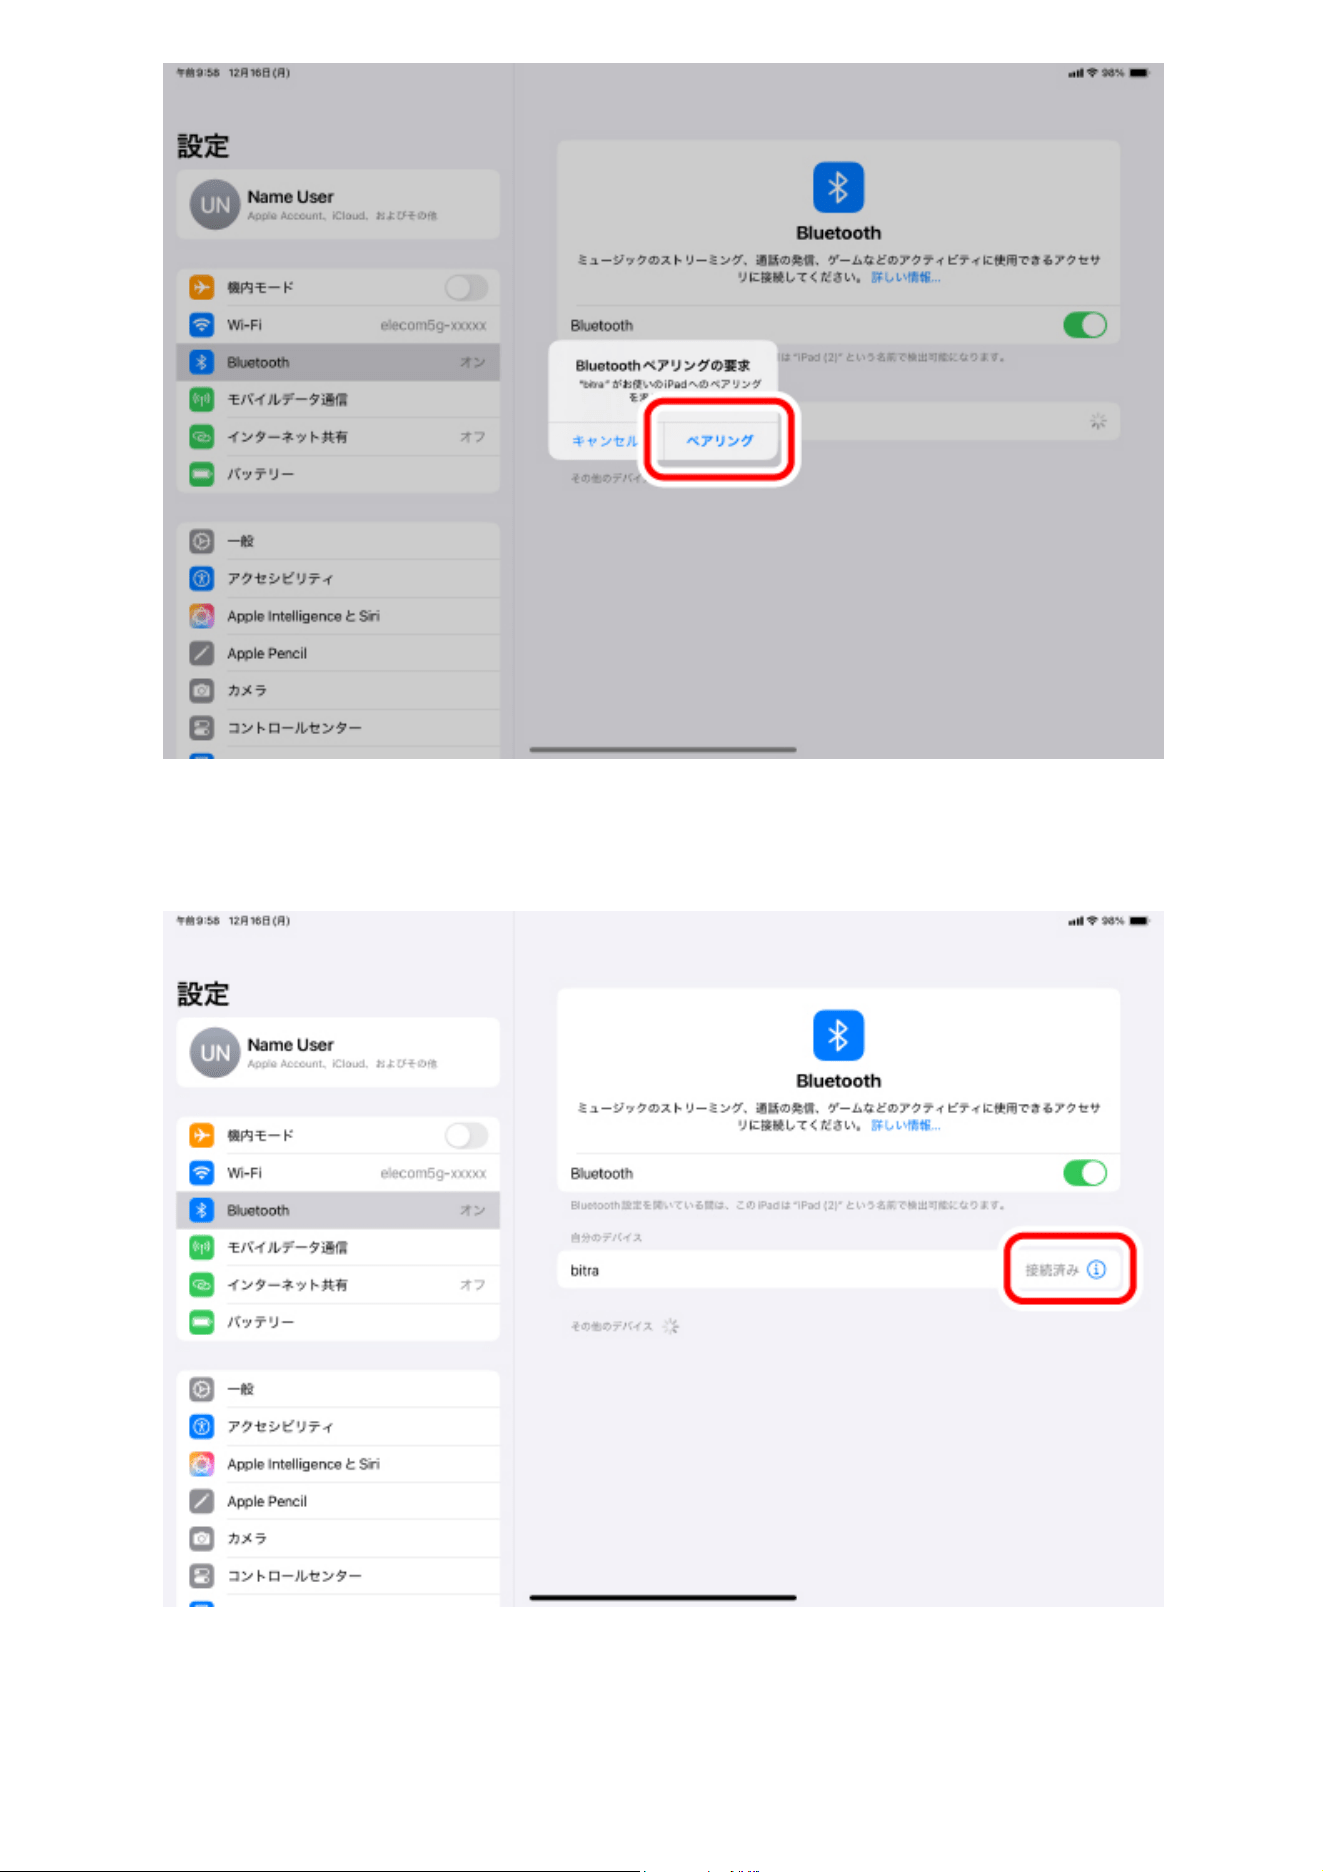
7) You can use the mouse when the status shows "Connected"
After the area around the wheel lights up for 5 seconds, it turns off.
You can now use the trackball.