Email:
seice@rainpointonline.com
Free Hotline
UStoll free: +1 833-381-5659
DEtollfree: +49800-182-0576
UKtollfree: +44 800-808-5337
WhatsApp:
+1 626-780-5952
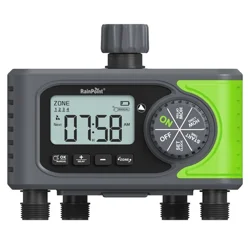
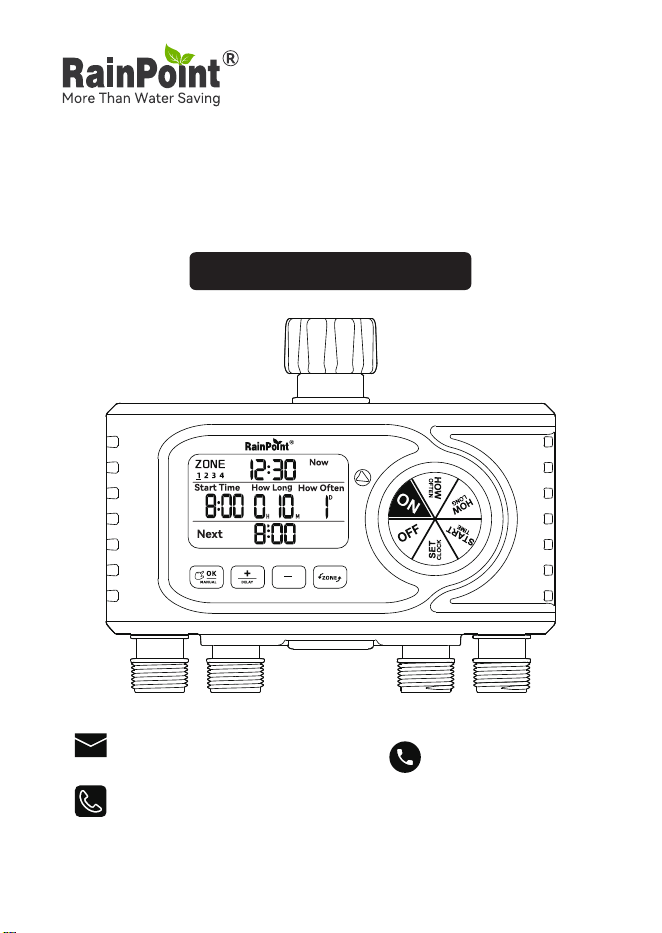
RainPoint 4-Zone Digital Water Timer
ModeI No.ITV405
USER MANUAL

Web: www.rainpointonline.com
Email: seice@rainpointonline.com
WhatsApp: +1 626-780-5952
US toll free(English): +1 833-381-5659
(Mon-Fri: 9:30 AM-5:30 PM PST)
DE toll free(Deutsch): +49 800-182-0576
(Mon-Fri: 9:00 AM-5:00 PM CET)
UK toll free(English): +44 800-808-5337
(Mon-Fri: 9:00 AM-5:00 PM CET)
WARM TIPS
PLEASE READ BEFORE USING
FOR ANY PROBLEMS DURING USE, PLEASE GET SUPPORT
FROM US:
Don't use the water timer when the temperature is below
37.4°F (3℃), and please store the timer indoors to avoid
potential freezing damage.
The lter traps di paicles, preventing them from
entering the timer and causing clogging. Please clean the
lter regularly and replace it if worn.
To ensure a longer lifespan, please use 4 new AA alkaline
batteries (not included). Don't mix new and old alkaline,
standard (carbon-zinc), or rechargeable batteries.
Please activate the water timer before rst use or after a
period of inactivity (Refer to page 9: ACTIVATE THE TIMER
BEFORE USE).
Only use with clean cold water.
EN

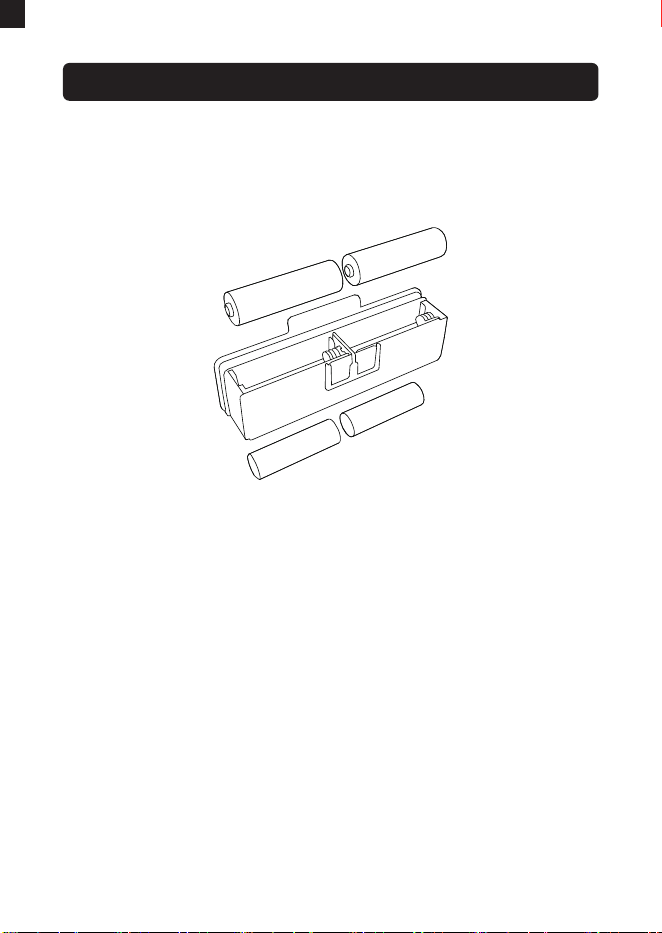
WHAT IN THE BOX
1 4
2
3
RainPoint 4-Zone
Water Timer x 1
User Manual x 1
Nut x 1
Brace x 1
Thin shim x 2
Bracket accesso x 1
Small Screw x 2
Thick shim x 1
Big Screw x 1
Middle Screw x 1
Tap connector x 4
( 3/4" Faucet End Connector
BSP Thread/ EU-type Only
for EU Market)
1
2
3
4
5
6
7
8
9
10
11
5
9
6 7 8
10
11
-01-
(Only for EU market)
EN
-02-
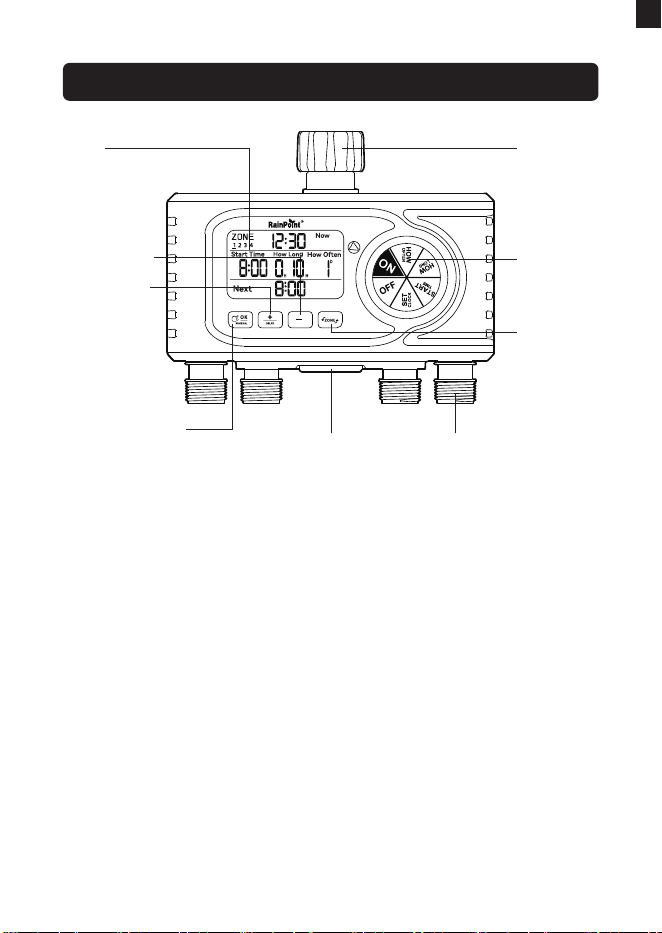
OVERVIEW
LCD
SCREEN
+ / DELAY
BUTTON
OK / MANUAL
BUTTON
- BUTTON
WATER OUTLETS
BATTERY BOX
WATER
INLET
SETTING
DIAL
ZONE
BUTTON
EN
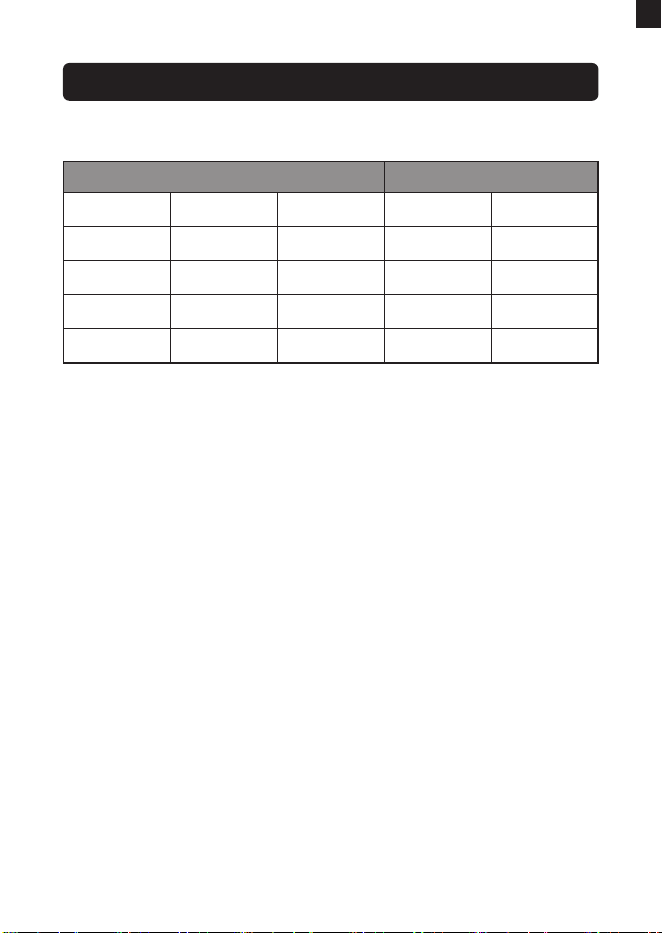
ITEM SPECIFICATION
Inlet Thread
NH(US) for 3/4’’ faucet
BSP(EU) for 3/4’’ or 1’’ faucet
Working Temperature
37.4℉-122℉(3℃-50℃)
Working Water Pressure
0.5bar-8bar(7.25PSI-116PSI)
Time Format
12H/24H
Rain Delay
24/48/72H
Water Frequency
1H-12H, 1Day-7Day
Water Duration
1min-4H
Manual Watering Time
1min-8H
Powered By
Waterproof Level
4*AA Alkaline batteries
(not included)
IP54
SPECIFICATION
-03-
EN
-04-
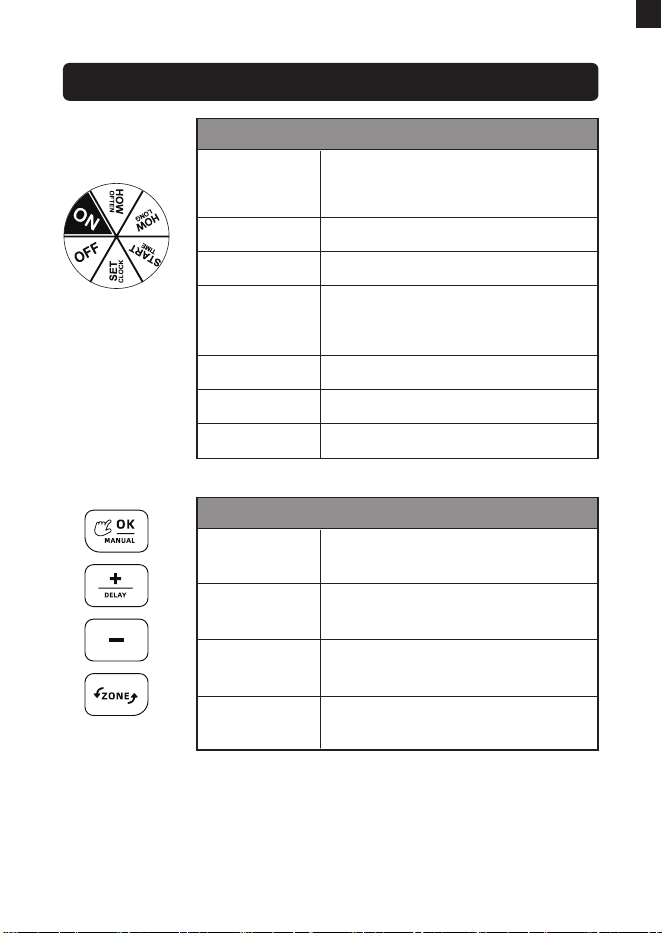
BUTTON FUNCTION INTRODUCTION
Dial Functions
ON
Dial
OFF
SET CLOCK
START TIME
HOW LONG
HOW OFTEN
Run the timer as scheduled
Turn the dial to set the watering
plans and save the settings
Turn o the timer
Choose 12H/24H time format
and set current time
Set the time to sta watering
Set the duration of watering plan
Set the frequency of watering plan
Button Functions
OK/MANUAL
BUTTON
Conrm settings or water
manually
Adjust settings,choose rain
delay time or select zone
Switch watering zone when
setup
Adjust settings,choose rain
delay time or deselect zone
+/DEALY
BUTTON
ZONE
BUTTON
- BUTTON
EN
-05-
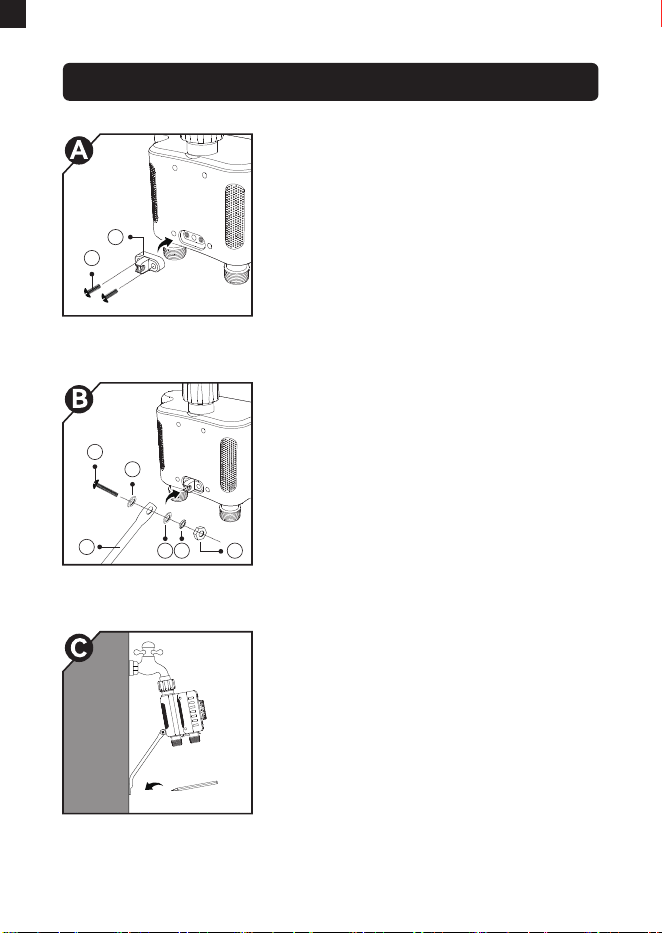
Firstly, before installing timer to
faucet, please screw the "bracket
accesso" onto the back of the water
timer with 2 screws.
Pas used in this step:
⑥Bracket accesso x 1, ⑦Small
screw x 2.
Secondly, use a screw to x the
"brace" onto the "bracket accesso"
through the hole.
Pas used in this step:
④Brace x 1, ⑤Thin shim x 2,
⑧Thick shim x 1, ③Nut x 1,
⑩Middle screw x 1.
INSTALL THE TIMER BRACKET
Then installing the timer to the faucet
properly. Please turn to page 6 for
instruction. After that, please mark a
proper position with a pencil before
installing the brace onto the wall.
Pas used in this step:
Pencil x 1 (not included).
6
10
5
5 8 3
4
7
EN
-06-
At the marked place, drilling a hole on
the wall for screwing.
At last, x the other end of the brace
to the wall.
Pas used in this step:
⑨Big screw x 1.
9
EN
Remove the batte compament at the bottom of the timer.
Inse 4 new AA (1.5V) alkaline batteries(not included).
Put the batte compament back to the timer and press
rmly to make sure it is completely sealed.
Install the batte compament securely after installing the
batte to ensure waterproong.
When the timer is not used for a long time, please remove the
batteries and dispose of them properly.
Replace batteries when the low batte indicator displays.
Don't dispose of batteries in re. Batteries may explode or leak.
To ensure a longer lifespan, please use 4 new AA alkaline
batteries (not included). Don't mix new and old alkaline,
standard (carbon-zinc), or rechargeable batteries.
1)
2)
3)
4)
5)
1)
2)
3)
BATTERY INSTALLATION
NOTE:
-07-
EN
-08-
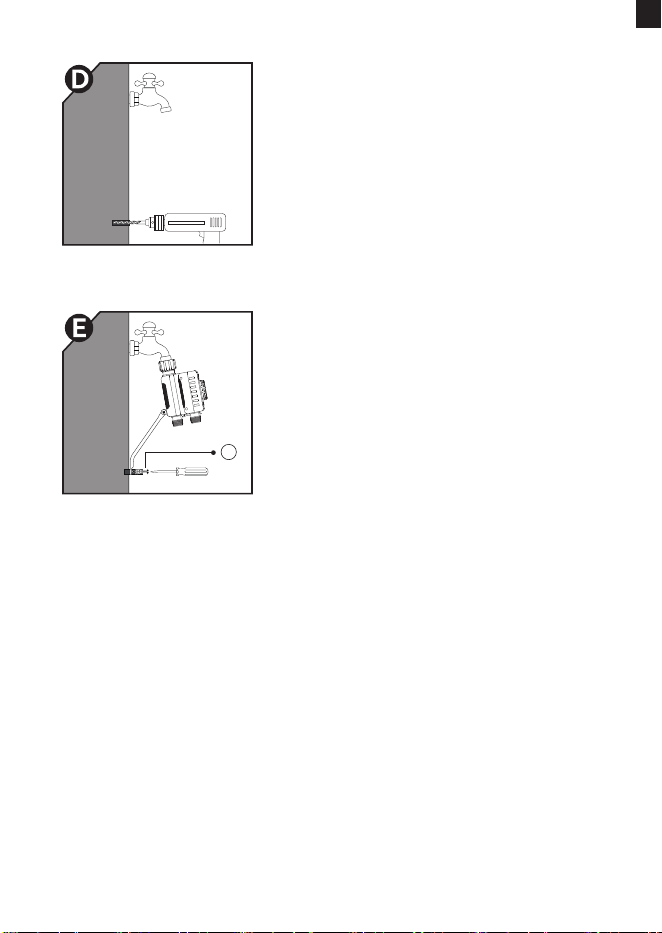
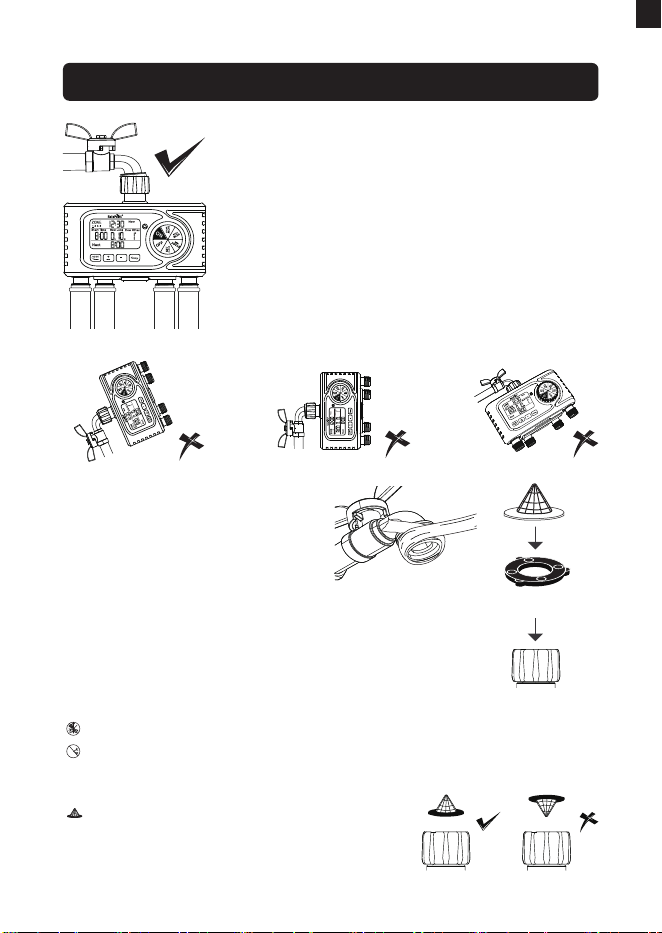
INSTALL THE TIMER ON THE FAUCET
1) Turn o the garden faucet.
2) Wrap Teon Tape around the faucet threads.
3) Screw the timer to the garden faucet and
make the display as veical as possible to
the ground to prevent rainwater from
accumulating and leaking into the interior.
4) Wrap Teon Tape around the threads of the
timer outlets.
5) Screw the garden hoses to the timer outlets.
6) Turn on the faucet after programming the
timer.
Tips: If the timer connection to
the faucet or hose is loose or
leaking, wrap more Teon tape
around the threads and align
the threads. If the faucet
threads won't tighten to the
bottom of the timer inlet, add a
rubber washer to make it
tighter.
Rubber Washer
Please do not use tools, only install the timer by hand.
When freezing temperatures are expected, timers should be
removed from the hose faucet and stored indoors to prevent
potential freeze damage.
Please install the lter properly and
keep it clean as follows.
Note:
EN
-09-
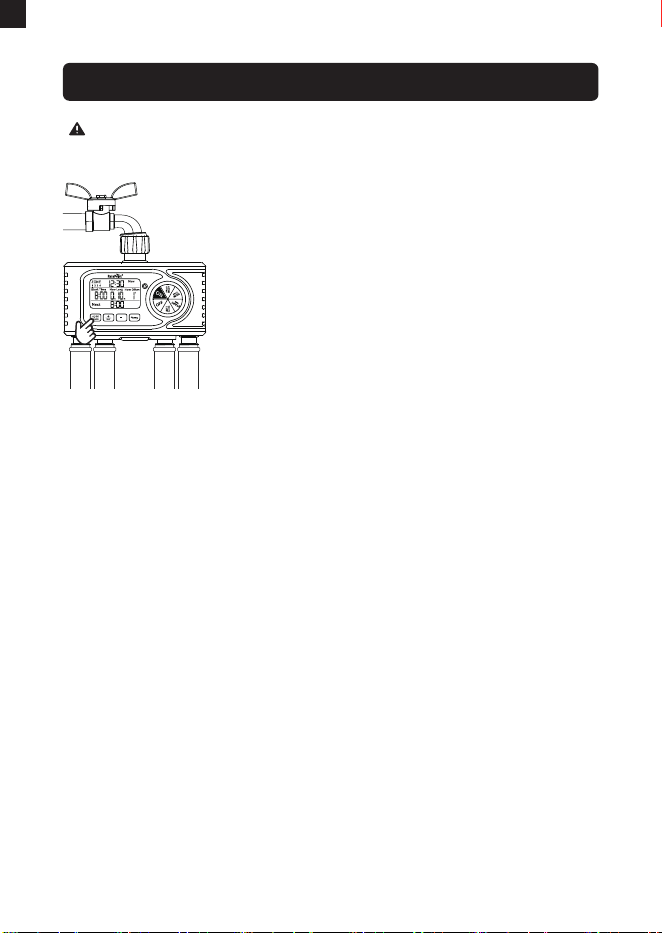
1) Pulling out the batte box and install 4*AA
batteries.
2) Keep the faucet closed and turn the dial to
"ON".
3) Press and hold "OK/Manual" button and at
the same time inse the batteries to enter
the self-inspection mode.
4) Release "OK/Manual" button 3 sec later
and four valves will be opened and closed
in turn to nish self-inspection, each valve
costs 5 sec.
5) After zone 4 nishing its rst self-inspection, turn on the faucet
a little bit to sta test with water.
6) During test of each valve, please check whether the water ow
out or shut o as expected.
If yes, the timer valves are activated successfully, please use
the timer with condence.
If not, please repeat the step 1~6 for several times, or contact
us immediately for suppo.
7) After test, take out the batteries to avoid testing circly. Then
re-inse batteries to sta normal operaion.
Note:
When testing, please keep away from the water timer outlet to
avoid being splashed and wet.
Please active the valves when getting the timer for the rst
time, or it's been a long time since your last time to use it.
ACTIVATE THE TIMER BEFORE USE
EN

-10--10-
This four-zone timer allows you to water four dierent areas using
a single faucet, with each zone customizable for independent sta
times, irrigation durations, and frequencies.
Single Zone Operation:
The device can only run one zone's program at a time;
running multiple zones simultaneously will split and reduce
water pressure. If there are conicting programs, only one
zone will execute while others wait for completion. More
information please refer to P22.
Setup Instructions:
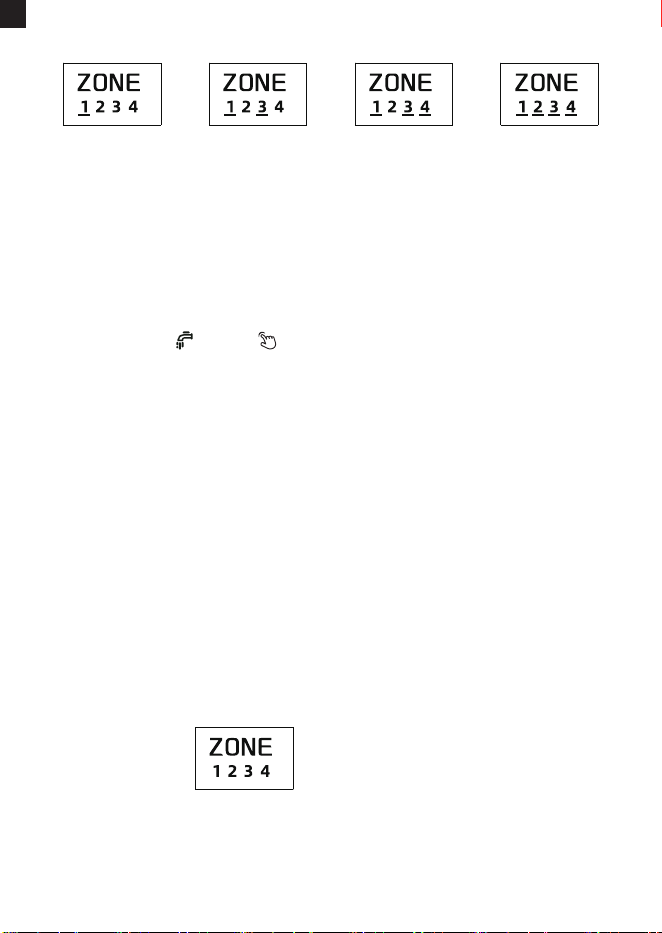
Setting Watering Plans for Each Zone: Press the "ZONE"
button to select ZONE 1. Set the sta time, duration, and
frequency of ZONE 1, then turn the dial to "ON" to save the
changes. And the watering plan for ZONE 1 has been set
successfully. Use the "ZONE" button to select ZONE 2, ZONE 3,
or ZONE 4, and use the same method to set the watering plans
for each zone.
Watering Plans:
Each zone can set only one watering plan.
1)
2)
NOTE:
EN
PROGRAMMING THE TIMER
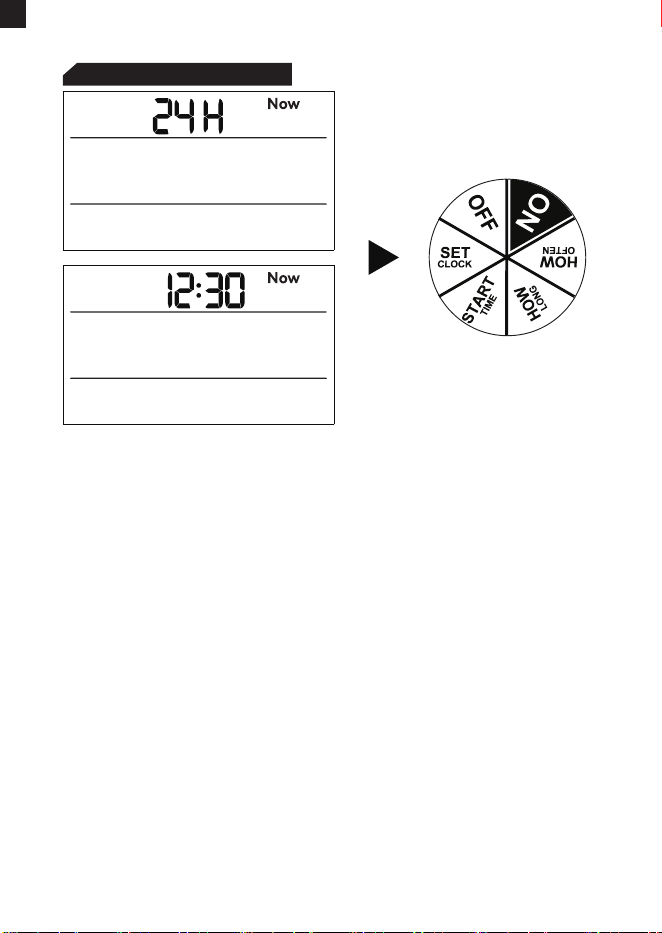
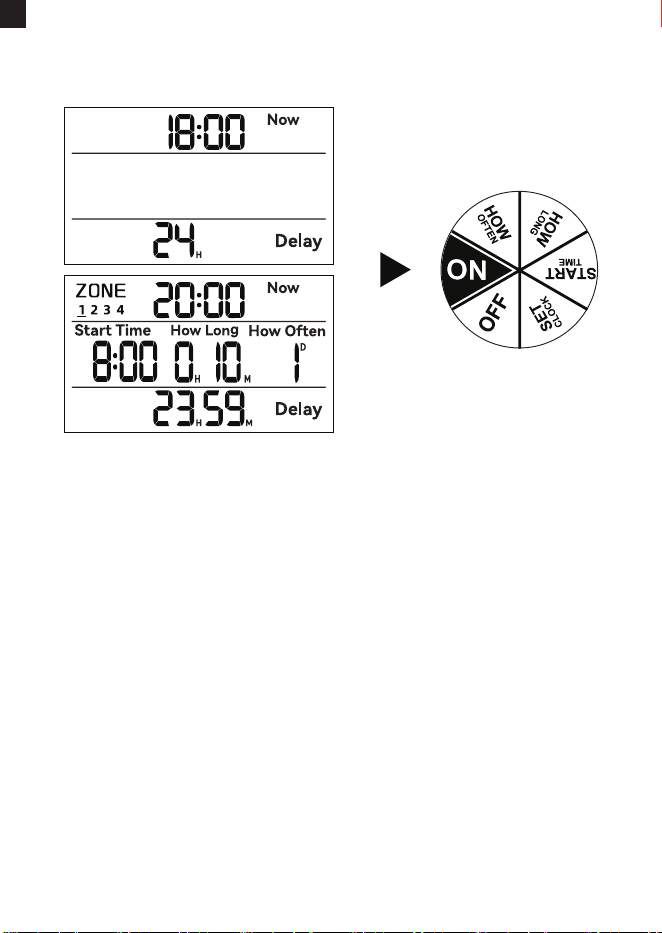
STEP 1: SET CLOCK
Turn the dial to "SET CLOCK". Use the "+" or "-" buttons to
select either the 24H or 12H format, then press the "OK"
button to conrm and enter the time setting.
The hour number ashes. Use the "+" or "-" buttons to adjust
the number to your local time. If you choose the 12H format,
please be aware of the distinction between AM and PM.
Use the "OK" button to conrm and switch between hours,
minutes, or 12H/24H formats.
Rotate the dial clockwise to save the changes, then proceed
to the next step.
1)
2)
3)
4)
When completing this step, please turn the dial to save
changes instead of pressing the "OK" button. If you press
"OK" after setting, it will return to previous settings instead of
saving them.
Press and hold "+" or "-" buttons for 3 secs can adjust number
quickly.
1)
2)
NOTE:
-11-
EN

-12-
STEP 2: START TIME
Turn the dial to "START TIME".
The hour ashes; use the "+" and "-" buttons to set your sta
time.
Use the "OK" button to switch between hours or minutes.
Rotate the dial clockwise to save the changes and proceed to
the next step.
1)
2)
3)
4)
More information please turn to Page 22 to learn the running
logic of the valves in each zone of the timer.
To learn how to close one or several zones, please refer to Page
20 in this manual.
NOTE:
Press and hold "+" or "-" buttons for 3 secs can adjust number
quickly.
EN
-13-
Turn the dial to "HOW LONG".
The hour ashes. Use the "+" and "-" buttons to select the
watering duration, ranging from 1 minute to 4 hours.
Use the "OK" button to conrm and switch between hours or
minutes.
Rotate the dial clockwise to save the changes and proceed to
the next step.
1)
2)
3)
4)
STEP 3: HOW LONG
Press and hold "+" or "-" buttons for 3 secs can adjust number
quickly.
As the setting range for "HOW LONG" is from 1 minute to 4
hours, and the setting range for "HOW OFTEN" is from 1 hour
to 12 hours or 1 day to 7 days, it’s impoant to ensure that
the "HOW OFTEN" setting is equal to or longer than the
"HOW LONG" setting. This ensures that the plan functions
correctly; otherwise, it may not operate as intended.
1)
2)
NOTE:
EN
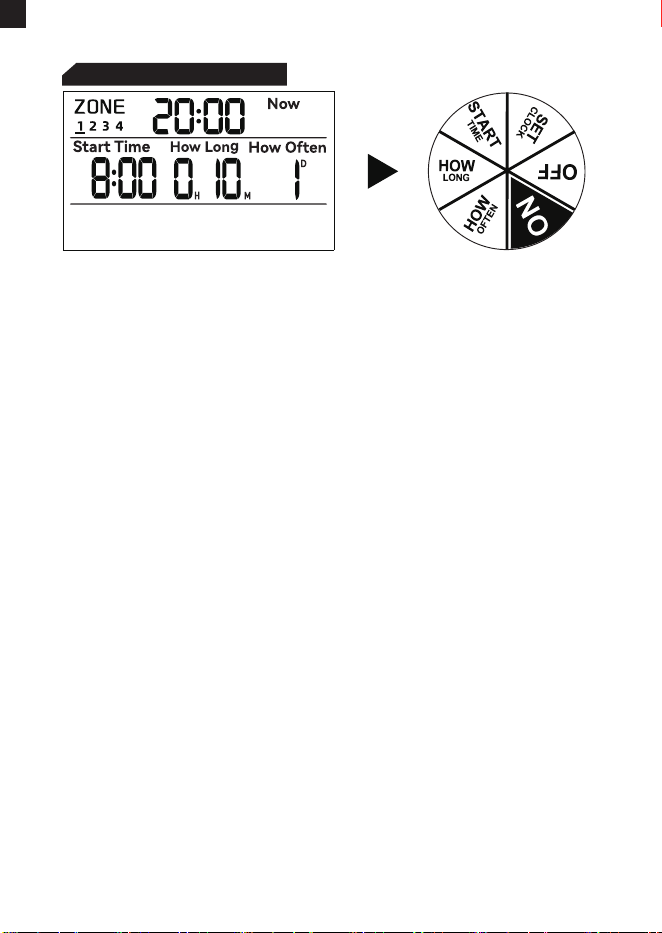
STEP 4: HOW OFTEN
-14-
Turn the dial to "HOW OFTEN".
Use the "+" and "-" buttons to set your watering frequency.
You can choose eve 1 to 12 hours or eve 1 to 7 days.
Rotate the dial clockwise to save the changes and proceed to
the next step.
1)
2)
3)
Press and hold "+" or "-" buttons for 3 secs can adjust number
quickly.
NOTE:
More information please turn to Page 23 to learn the logic of
the watering frequency.
EN
-15-
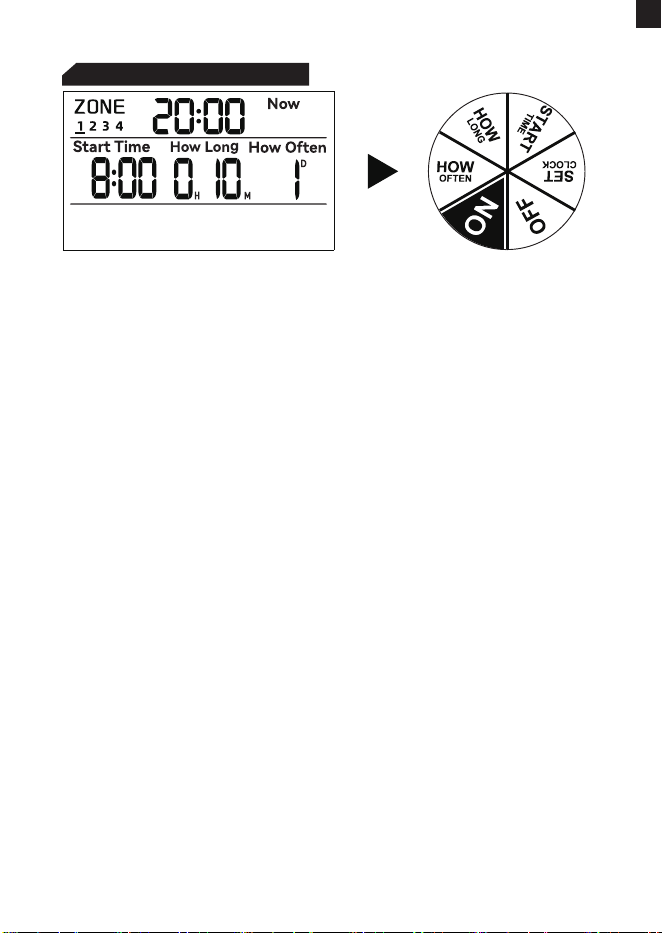
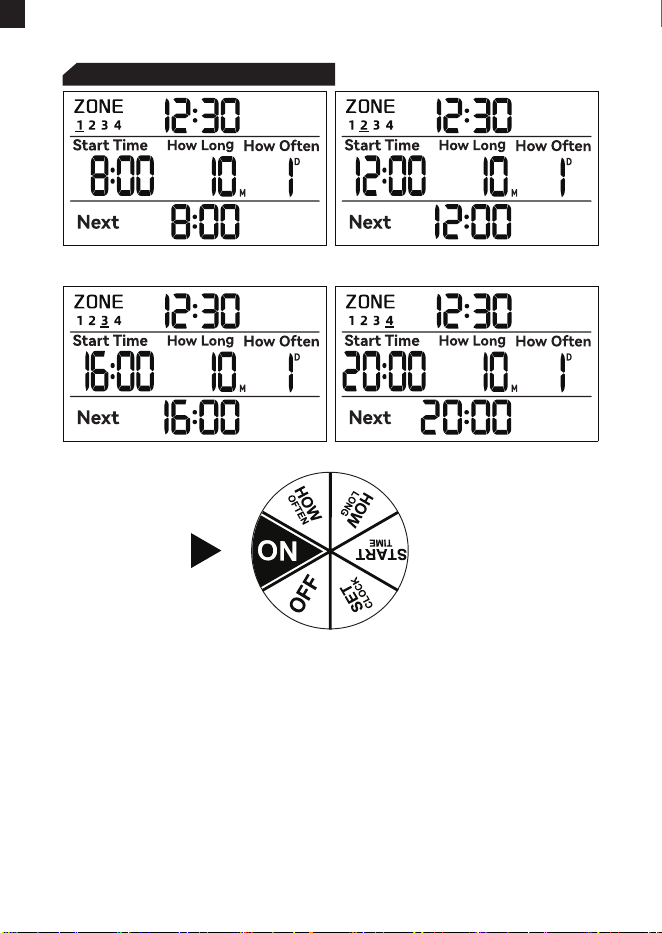
STEP 5: AUTOMATIC WATERING
CONGRATULATIONS!
Your timer has now been programmed successfully. It will sta
watering automatically based on the programmed sta time,
duration and frequency.
Now you can keep the faucet turned on and trust the timer to do
the watering!
Turn the dial to "ON".
The LCD will display the current time and automatically switch
to show program details for each of the four zones.
1)
2)
Next Plan For Zone 1 Next Plan For Zone 2
Next Plan For Zone 3 Next Plan For Zone 4
EN
ADDITIONAL FUNCTIONS
-16-
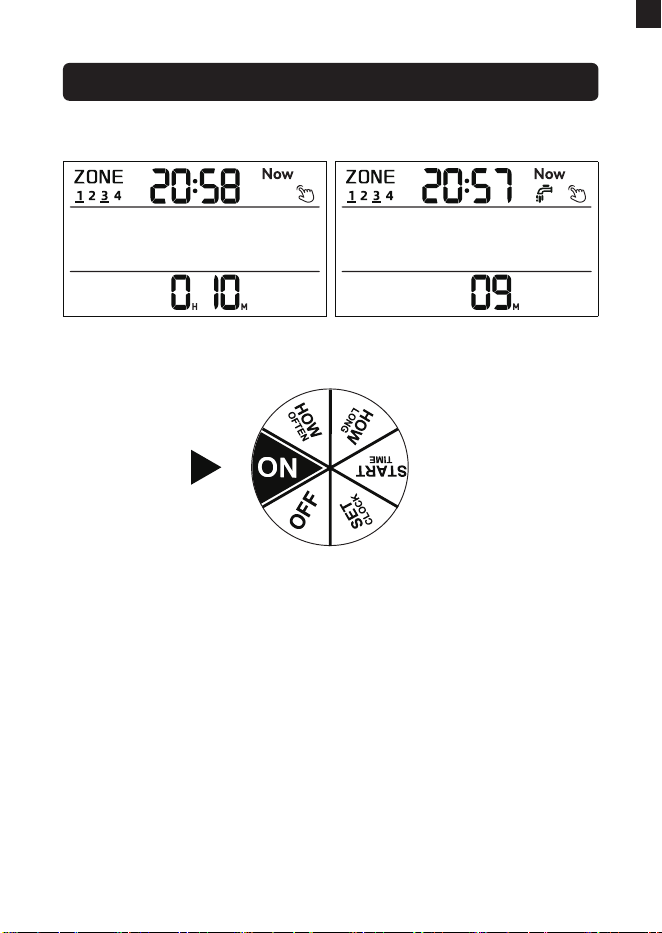
Manual Watering
Turn the dial to "ON".
Press and hold the "MANUAL" button for 3-5 seconds to
enter manual watering mode.
Press the "ZONE" button to switch zones, use the "+" button
to select a zone, and the "-" button to deselect a zone. After
making your selections, press the "OK" button to enter time
setting.
1)
2)
3)
Setting Process Setting Finished
EN
-17-
4)
5)
6)
Remember to press the "OK" button after setting the manual
watering duration in order to sta manual watering; otherwise,
the manual watering settings will automatically exit after
approximately 3-5 seconds of ashing on-screen.
If you do not select a zone and press "OK" to enter the manual
watering time setting, then press "OK" again to sta manual
watering, no zone will be activated for watering since you
haven't selected any specic zone.
1)
2)
If multiple zones are selected for simultaneous manual
watering, the device will sequentially open valves for irrigation.
3)
NOTE:
One Zone
Only
Three Of The
Four Zones
Two Of The
Four Zones
All Of The
Four Zones
Manual Water Will Not Run
Use the "+" or "-" buttons to adjust the manual watering
duration from 1 minute to 8 hours. The default watering
duration is 10 minutes. Press and hold the "+" or "-" buttons
will quickly increase or decrease the value.
When the numbers are ashing, immediately press the "OK"
button to conrm and sta manual watering. The screen will
display ( and ) along with the remaining time for
manual watering.
To stop manual watering, press and hold the "MANUAL"
button for 3-5 seconds and it will stop manual watering and
restore the original watering program. (Alternatively, you can
turn the dial to "OFF" to stop manual watering, then turn it
back to "ON" to resume the original watering program.)
EN

-18-
EN
Note:
Manual watering mode always takes priority over automatic
watering mode.
For a zone, when it's running an automatic watering, a manual
watering with later sta time conicts with it, no matter comes
from the same or a dierent zone, then automatic watering
would be interruptted and lose its left watering time.
For a zone, when it's running a manual watering mode, an
automatic watering with later sta time conicts with it,
automatic watering mode would be skipped no matter it's from
the same zone or from another zone.
Please turn to pages 24 and 25 to learn the running logic of
the valves in each zone under the Manual Watering Mode.
After selecting the rain delay duration, you need to press the
"OK" button to activate the rain delay program. Otherwise, the
rain delay settings will automatically exit after ashing on the
screen for 3-5 seconds.
Rain delay mode cannot be paused once staed. To stop the
rain delay program, press and hold the "DELAY" button to stop
the rain delay program and restore the original watering
program.( Alternatively, you can turn the dial to "OFF" and then
turn it back to "ON" to resume the original watering program.)
The rain delay setting is applied to all of the four zones at the
same time. If you set the rain delay program for one zone, the
plans for the other three zones will be delayed as well.
1)
2)
3)
NOTE:
1) When dial at "ON", press and hold "+/DELAY" button for 3 sec
to enter into rain delay mode inteace.
2) When default time "24H" is ashing, press "+" and "-" buttons
to adjust time between 0H, 24H, 48H and 72H. Select 0H
means cancel delay mode.
3) Press "OK/Manual" button, and it will sta rain delay program
immediately.
RAIN DELAY
-19-
EN
If you want to use one, two or three of the four zones for watering
and close the other zone(s), please refer to the following steps to
close ZONE 1 and you can close the other zones using the same
method.
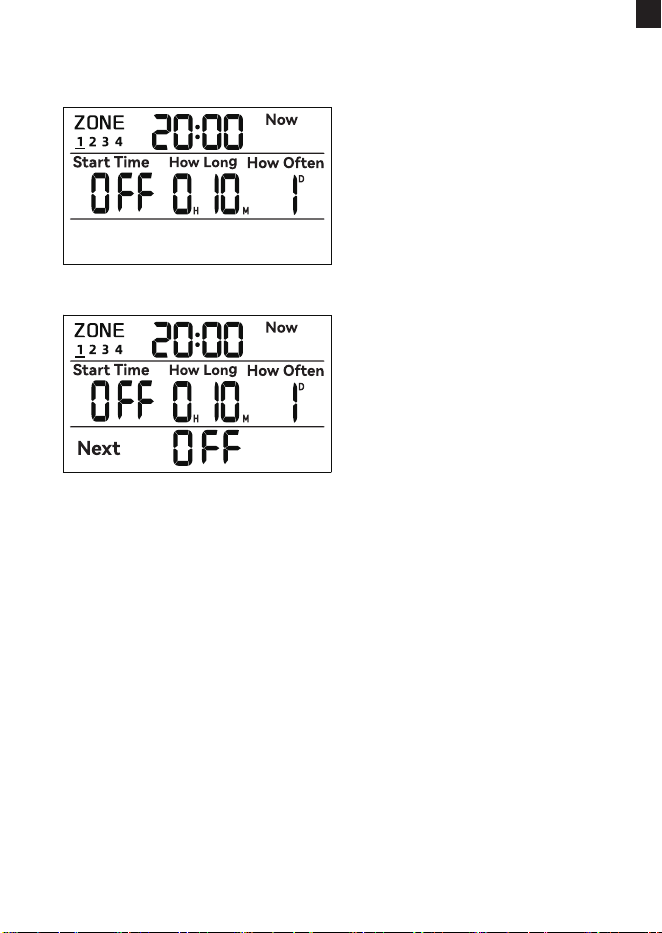
Turn the dial to "START TIME" and press "ZONE" to select
ZONE 1.
The hour ashes. Press the "+" or "-" button to adjust the
hour until it displays "OFF".
Turn the dial to "ON" to save the changes and you will see the
screen display the sta time as "OFF" of ZONE 1 on the main
page.
1)
2)
3)
CLOSE ONE/TWO/THREE OF THE ZONES
Setting Process
Setting Finished
-20-
EN
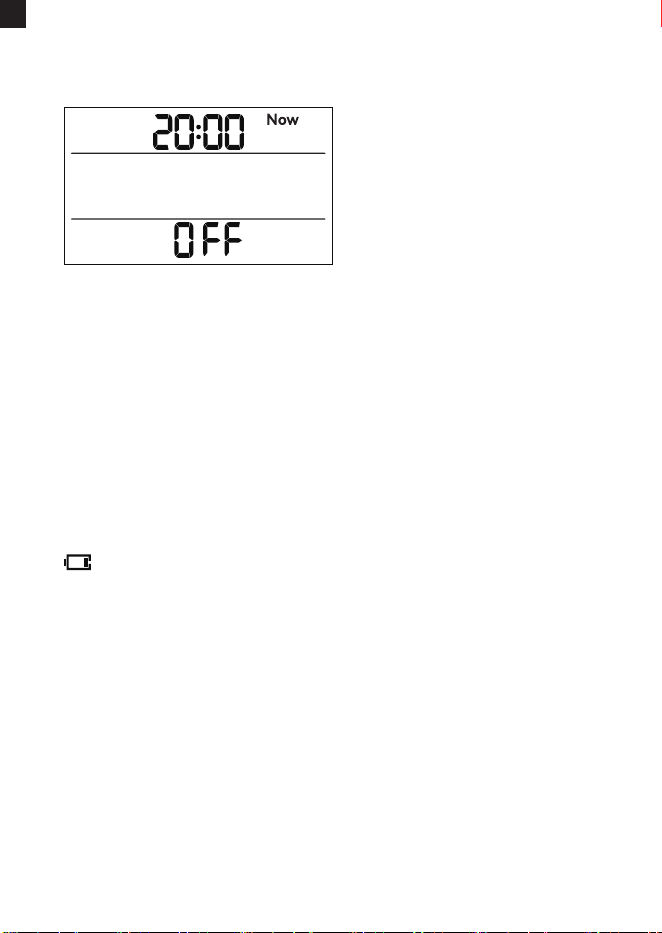
OFF MODE
BATTERY STATUS
1) If you wish to stop all watering plans for an extended period,
turn the dial to "OFF".
2) The timer will not water automatically while in OFF mode, but
timer still saves your setted programs. Once you turn the dial to
"ON", the setted programs will work again.
Note:
Your automatic watering schedule will only run if the dial is at ON.
Note: When the batteries don't have enough power, the low
batte icon will shown on the screen, please change batteries as
soon as possible.
low power icon
-21-
EN
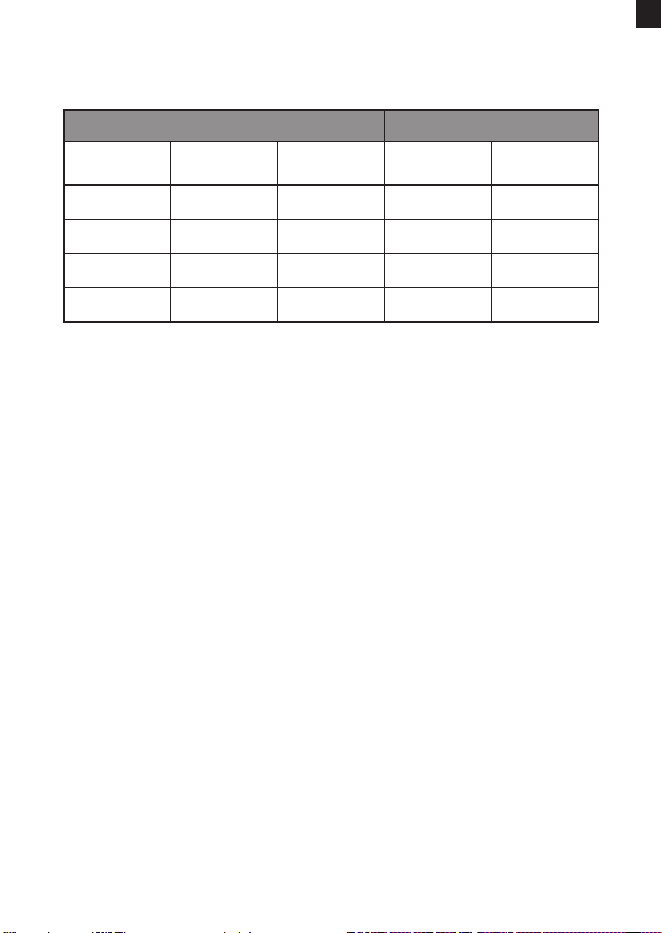
Automatic Watering for 4 Zones
To ensure output water volume and water pressure from faucet
don't reduce, timer will always only open one valve at a time
when multi-zones are running at the same time. In this case, a
valve with the earliest sta time would run rstly. When zones
have same sta time, then timer would open valve one by one
according to the zone number 1-2-3-4.
For example as above:
1) Zone 3 has the earliest sta time in all 4 zones, so zone 3
would run rstly.
2) Both zone 1 and 2 have secondly earliest sta time, and they
would run next. Zone 1 secondly and zone 2 thirdly.
3) Zone 4 has the latest sta time, so timer would open zone 4 at
last. Because zone 2 nish watering at 7�40, then real sta time
of zone 4 is at 7�40 instead of its original sta time at 7�30.
Your Timed Watering Plan Real Working
Valve
Zone 1
Zone 2
Zone 3
Zone 4
Sta Time
7�00
7�00
6�00
7�30
How Long
20 minutes
20 minutes
20 minutes
20 minutes
7�20
7�40
6�20
8�00
7�00
7�20
6�00
7�40
Finish
Watering Time
Real Sta
Time
-22-
WORKING IN DIFFERENT PROGRAMS
EN
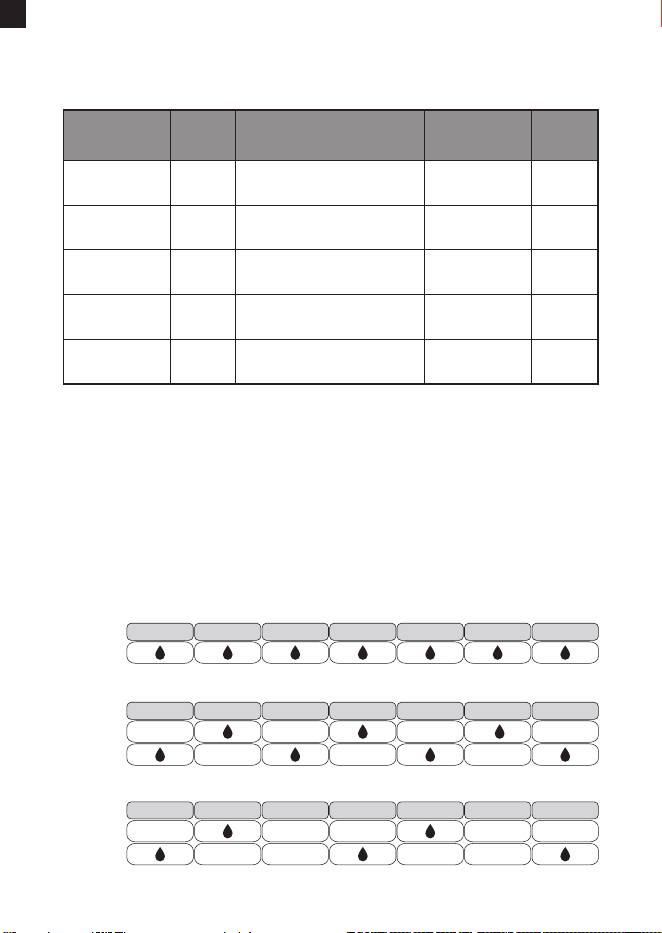
Dierent Watering Frequency
Sta
time
How timer works in
dierent frequency
How
often
Next Sta
time
-
8�00 AM 8H 16�00 PM
...
Next sta time
= sta time + 8H
8�00 AM 12H 20�00 PM
...
Next sta time
= sta time + 12H
8�00 AM 1 Day
8�00 AM
eve day
...
Next sta time
= sta time + 1 Day
8�00 AM 2 Day
8�00 AM
2 days later
...
Next sta time
= sta time + 2 Day
8�00 AM 3 Day
8�00 AM
3 days later
...
Next sta time =
sta time + 3 Day
In automatic mode, what will timer work in dierent watering
frequency ?
For example as above:
It shows the sta time and next sta time when you choose
dierent "How often", namely watering frequency.
Examples of watering frequency of eve 1 day, eve 2 days
and eve 3 days:
EVERY
WEEK
SUNDAY MONDAY TUESDAY WEDNESDAY THURSDAY FRIDAY SATURDAY
EVERY 1 DAY
WEEK
ONE
WEEK
TWO
SUNDAY MONDAY TUESDAY WEDNESDAY THURSDAY FRIDAY SATURDAY
EVERY 2 DAY
WEEK
ONE
WEEK
TWO
SUNDAY MONDAY TUESDAY WEDNESDAY THURSDAY FRIDAY SATURDAY
EVERY 3 DAY
-23-
EN
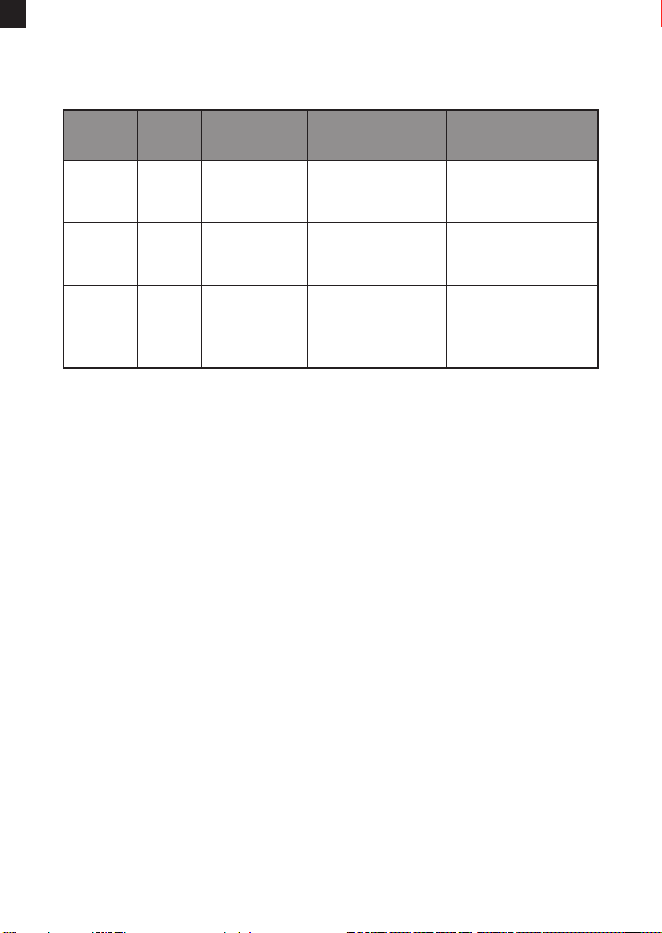
Manual Watering for 4 Zones
If you set manual watering mode for 4 zones as above, how will
the timer work ?
Working together ? No.
To ensure output water volume and water pressure from faucet
don't reduce, timer would always only open one valve at a time,
even if multi zones have the same sta time.
For example as above:
1) 4 zones have the same sta time, but they won't work
together.
2) They would work one by one according to zone number
1-2-3-4, namely zone 1, then zone 2, zone 3 and zone 4.
Your Manual Watering Plan Real Working
Valve
Zone 1
Zone 2
Zone 3
Zone 4
Sta Time
9�00
9�00
9�00
9�00
How Long
20 minutes
20 minutes
20 minutes
20 minutes
9�20
9�40
10�00
10�20
9�00
9�20
9�40
10�00
Finish
Watering Time
Real Sta
Time
-24-
EN
Timed Watering meets Manual Watering
Valve
How
Long
Sta
Time
Mode Really Run
Zone 1 7�00
Timed watering
mode eve day
Run automatic
watering program
from 7�00~7�20
20 minutes
Zone 2 7�10
Manual watering
mode only today
Run manual
watering program
from 7�10~7�40
30 minutes
Zone 3 7�30
Timed watering
mode eve day
Run automatic
watering program
from 7�30~7�50
the next day
20 minutes
Manual watering mode always has the priority over timed
watering mode.
For example as above:
1) Zone 1 sta automatic watering program at 7�00, and its'
original end time is at 7: 20. However, zone 2 sta manual
watering mode at 7�10, which is earlier than 7�20, then timer
would open zone 2 to run manual watering program from
7�10~7�40, and zone 1 would be closed from 7�10~7�20, which
means zone 1 would lose 10 minutes' watering time.
2) After zone 2 nish manual watering at 7�40, zone 3 will skip the
timed watering for today as the sta time for the automatic
watering has passed and it will sta the automatic watering
the next day at 7�30 after zone 1 and zone 2 nish the
watering.
-25-
EN
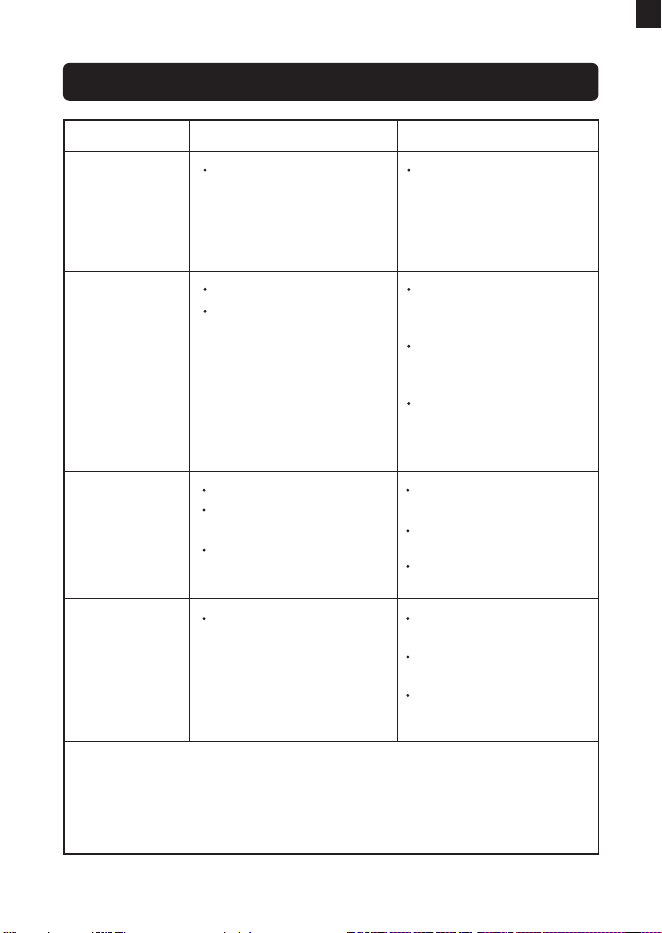
TROUBLESHOOTING
Problem Possible Factors Solution may help
Condensation
on the screen
Low water
pressure
Timer does not
water or has
low water ow
Batteries are low.
The dial does not turn to
ON.
The faucet is not turned
on.
Replace brand new
alkaline batteries.
Turn the knob of the
dial to the ON position.
Turn on the faucet.
Timer is
leaking
If you need help in using the timer, please feel free to contact us.
Email: seice@rainpointonline.com WhatsApp: +1 626-780-5952
US toll free: +1 833-381-5659 (Mon-Fri: 9�30 AM-5�30 PM PST)
DE toll free: +49 800-182-0576(Mon-Fri: 9�00 AM-5�00 PM CET)
UK toll free: +44 800-808-5337 (Mon-Fri: 9�00 AM-5�00 PM CET)
Filter washer lost or
damaged.
Check if lter washer is
in place.
Check if lter washer is
clean and undamage.
Faucet connection is
hand tight.
Filter blockage.
Inlet pressure is not
sucient to suppo
watering needs.
Check if the lter is
clogged, if so, clean or
replace the lter.
Make sure the timer is
installed properly and
not cross-threaded.
Install a booster pump
or other booster
pressurizing equipment.
Air condenses inside the
screen due to the
dierence in temperature
between inside and
outside.
The fog will disappear
as the temperature
rises, or leave it stand
for a period of time.
-26-
EN

WARNINGS
1) Intended for outdoor use only, put in the sheltered outdoor will
prolong the product lifetime.
2) Using tools to secure the timer can lead to over-tightening and
damage to the timer. Please do not use tools to install the
timer; it is recommended to secure it by hand.
3) Please ensure that the lter is placed horizontally in the top
connector before installation to prevent leakage, add a lter
and thread seal tape if necessa.
4) The mesh lter can prevent di paicles. To extend the lifespan
of the hose timer, please clean the lter regularly and replace it
when worn.
5) When the power is low, please replace the batteries in time to
avoid the interruption of the normal operation; when replacing
the batteries, please make sure that the batte compament
is d.
6) When not in use, please remove the batteries, drain the water
from the timer and store it indoors to avoid freezing.
7) Do not use the timer when the temperature is above 50°C
(122°F)or below 3°C (37.4°F).
8) Do not subject the product to extreme force and shock.
9) Severe electrical shock could result if water is sprayed into
outlets or sources of electrical current. Never immerse the
product in water.
-27-
EN

WARRANTY
CUSTOMER SERVICE
RainPoint provides a 1-year wor-free warranty against
manufacturing defects in materials and workmanship from the
date of purchase. During the warranty period, we'll replace free of
charge the product found to be defective under reasonable use
and seice as determined solely by RainPoint.
To place a warranty request, please email your order lD to
seice@rainpointonline.com and we'll respond within 24 hours.
Still have trouble with setup, please search for "RainPoint" on
YouTube for installation videos !
lf the user manual doesn't have what you're looking for or you
need some help, please prepare the LOT NO. of your device and
contact us before returning the product to the store.
LOT NO.: XXXXX (on the back of the timer)
US toll free: +1833-381-5659 (Mon-Fri: 09�30 AM-5�30 PM PST)
DE toll free: +49 800-182-0576(Mon-Fri: 09�00 AM-5�00 PM CET)
UK toll free: +44 800-808-5337 (Mon-Fri: 09�00 AM-5�00 PM CET)
Email: seice@rainpointonline.com
WhatsApp:+1626-780-5952
-28-
EN

EC REP
NAME: VIAJE ELECTRONIC COMPANY LIMITED
ADDRESS: E588, 13 ADELAIDE ROAD, DUBLIN, D02 P950, IRELAND
Email: VIAJEELE@outlook.com
UK REP
NAME: SUJE ELECTRONIC COMPANY LIMITED
ADDRESS: S211 92a Bu Old Road, Manchester, England, M45 6TQ
EMAIL: SU[email protected]
MANUFACTURER/HERSTELLER/FABRICANT/PRODUTTORE/FABRI-
CANTE:
FUJIAN BALDR TECHNOLOGY CO.,LTD
ADDRESS/ADRESSE/ADRESSE/INDIRIZZO/DIRECCIÓN: Floor 3,
Building 2, No.71 Yangqi Road, Fuwan Industrial Area Cangshan
District, Fuzhou, China. 350008
Email: seice@rainpointonline.com

Need Help?
Scan the QR code to get fast suppo
Please contact us
US toll free: +1 833-381-5659
(Mon-Fri: 9:30 AM-5:30 PM PST)
DE toll free: +49 800-182-0576
(Mon-Fri: 9:00 AM-5:00 PM CET)
UK toll free: +44 800-808-5337
(Mon-Fri: 9:00 AM-5:00 PM CET)
Email: seice@rainpointonline.com
WhatsApp: +1 626-780-5952
