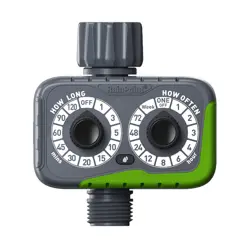
USER MANUAL
Quickdial Automatic Hose Timer
Save the user manual for future reference. If you have any
questions, please contact us to get suppo.
Model No. ITV152
Don’t use the water timer when the temperature is
below 37.4℉ (3°C), and please store the timer indoors
to avoid potential freezing damage.
The lter traps di paicles, preventing them from
entering the timer and causing clogging. Please clean
the lter regularly and replace it if worn.
Please read before use:
Warm Tips
If you encounter any problems during use,
please contact our suppo:
To ensure a longer lifespan, please use 2 new AAA
alkaline batteries (not included). Don’t mix new and old
alkaline, standard (carbon-zinc), or rechargeable
batteries.
Please activate the water timer before rst use or after a
period of inactivity (Refer to page 7: ACTIVATE THE
TIMER BEFORE USE).
Web: www.rainpointonline.com
Email: suppo@rainpointonline.com
Only use with clean cold water.
EN

Contents
1. Contents in the box
2. Introduction
2.1 Product Oveiew
2.2 Specication
3. Timer Programming
3.1 Programming Your Timer
3.2 Product Installation
3.3 Cleaning Your Timer
4. Troubleshooting
5. Precautions
6. Warranty Policy
7. Customer Suppo
01
02
02
03
04
04
09
13
14
16
17
17
EN

1. Contents in the box
4
ITV152 Quickdial Automatic Hose Timer
User Manual
Sealing Tape
Spare rubber washer
Warranty Card
1.
2.
3.
4.
5.
2
5
-01-
1
3
EN
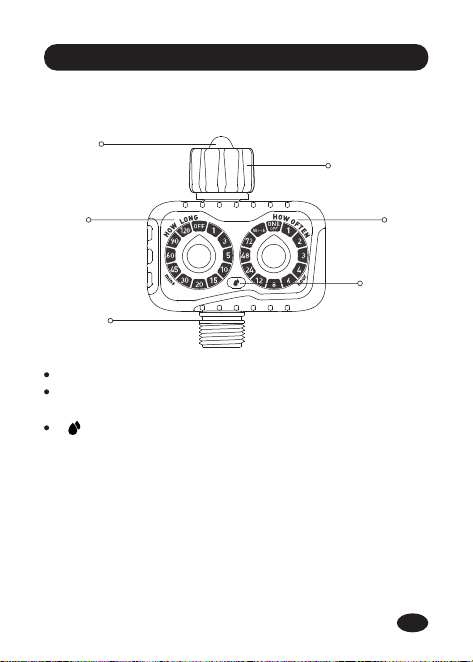
2. Introduction
LEFT KNOB: Rotate the knob to set the watering duration
RIGHT KNOB: Rotate the knob to set the watering
frequency
MANUAL: Manual watering button
2.1 Product Oveiew
WATER INLET
HOW OFTEN
DIAL
HOW LONG
DIAL
FILTER
WATER
OUTLET
MANUAL
BUTTON
-02-
EN
2.2 Specication
Water Inlet
NH (US)for 3/4" faucet
BSP (EU) for 3/4" or 1" faucets
Irrigation frequency
ONE/OFF-1h-2h-3h-4h-6h-8h-
12h-24h-48h-72h-week
Powered by
2*AAA alkaline batteries
(not included)
Irrigation duration
OFF-1min-3min-5min-10min-
15min-20min-30min-45min-
60min-90min-120min
Water Outlet For 3/4'' standard garden hose
Operating temperature 37.4°F-122°F (3℃-50°C)
Waterproof level IP 55
Operating water
pressure
0.5-8 bar (7.25-116PSI)
-03-
EN

-04-
3.1 Programming Your Timer
Rotate the knob to select the desired Irrigation Frequency.
The light on the manual watering button will ash green for 5
times and then be on for 2 seconds to conrm the setting.
Rotating to other positions during the ashing process will
resta the count for the light.
Setting Irrigation Frequency
3. Timer Programming
EN
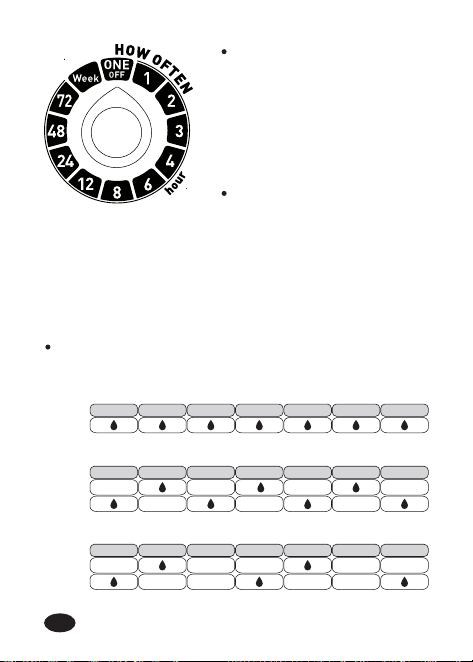
Examples of watering frequencies of eve 24 hours, eve
48 hours, and eve 72 hours:
When the frequency knob is
turned to ONE/OFF, the
single function is entered. At
this time, the valve will be
opened once no matter how
long the duration knob is
turned to, and no cycle plan
will be generated.
When the frequency knob is
at ONE/OFF and you need to
water once more, you need
to turn the duration knob to
any other position and then
turn it back to the desired
duration to resta the single
watering.
EVERY
WEEK
SUNDAY MONDAY TUESDAY WEDNESDAY THURSDAY FRIDAY SATURDAY
WEEK
ONE
WEEK
TWO
SUNDAY MONDAY TUESDAY WEDNESDAY THURSDAY FRIDAY SATURDAY
WEEK
ONE
WEEK
TWO
SUNDAY MONDAY TUESDAY WEDNESDAY THURSDAY FRIDAY SATURDAY
-05-
EN
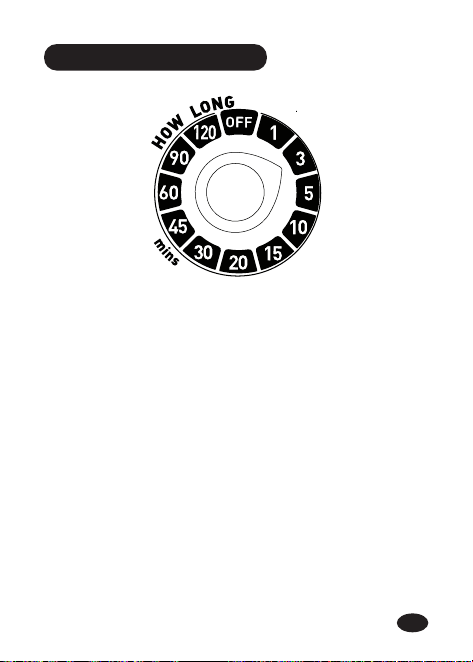
Setting Irrigation Duration
Turn the duration knob to set the Irrigation Duration. The
green light ashes 5 times, and then stays on for 2 seconds to
conrm the setting.
If the light is rotated to another position during the ashing
process, the count will be restaed. After conrmation, the
irrigation plan will be staed immediately. During the irrigation
process, the green light will ash intermittently, once eve 5
seconds, until the irrigation is nished.
-06-
EN
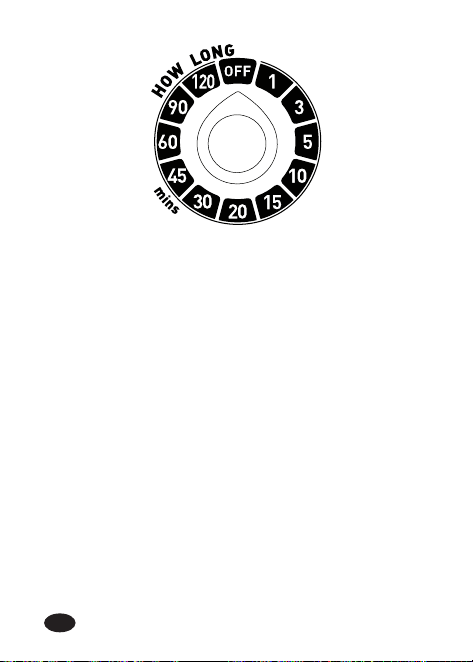
When the duration knob is turned to OFF, the red light ashes
and then stays on for 2 seconds to turn o the valve. After the
valve is turned o, the red light will no longer be on. At this
time, if you rotate the frequency knob to any position, the light
will ash red twice, indicating that it is now in the o state, the
valve is not opened, and the plan will not be set successfully.
-07-
EN

Batte Status Indicator
When the batte is low, no matter where the two knobs are
turned, the red light will stay on for 1 second, the valve will not
respond, and the plan will not be set successfully. If the batte
is low during watering, the device will immediately close the
valve, if the above situation occurs, please replace the
batteries in time.
-08-
Manual Irrigation
When the device is watering, sho press the manual
button to close the valve and stop irrigation.
When the device is in any state except watering, sho
press the manual button to open the valve, and sho
press the manual button again to close the valve.
During manual irrigation, the green light ashes
intermittently, once eve 5 seconds, until the irrigation is
nished.
EN

3.2 Product Installation
3.2.1 Installing The Batteries
Note:
Open the batte
compament cover on
the back of the timer.
Inse 2 new AAA (1.5V)
alkaline batteries (not
included).
Replace the batte
compament cover and
press rmly to ensure it is
fully sealed.
After installing the batteries, please install the batte
cover securely to ensure waterproong.
When the timer is not used for a long time, please remove
the batteries and dispose of them properly.
Don't dispose of batteries in re. Batteries may explode or
leak.
To ensure a longer seice life, please use 2 new AAA
alkaline batteries (not included). Do not mix old and new
alkaline batteries, standard batteries (carbon-zinc
batteries), or rechargeable batteries.
1.
2.
3.
-09-
EN
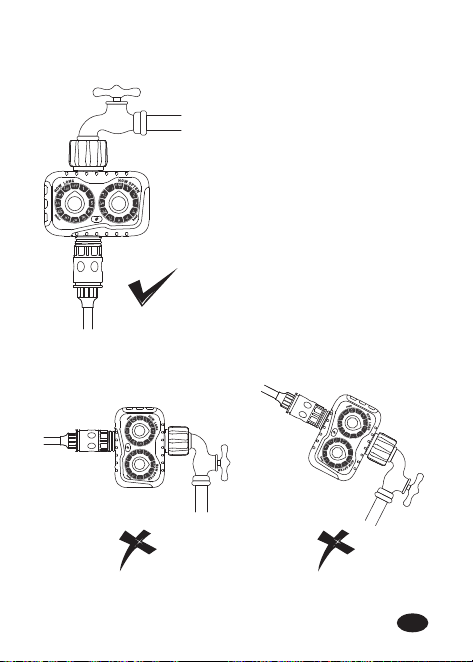
3.2.2 Installing The Timer
Turn o the garden faucet.
Wrap Teon Tape around the
faucet threads.
Screw the timer to the garden
faucet and make the timer dial
as veical as possible to the
ground to prevent rainwater
from accumulating and leaking
into the interior.
Wrap Teon Tape around the
threads of the timer outlet.
Screw the garden hose to the
timer outlet.
Turn on the faucet after
programming the timer.
1.
2.
3.
4.
5.
6.
-10-
EN
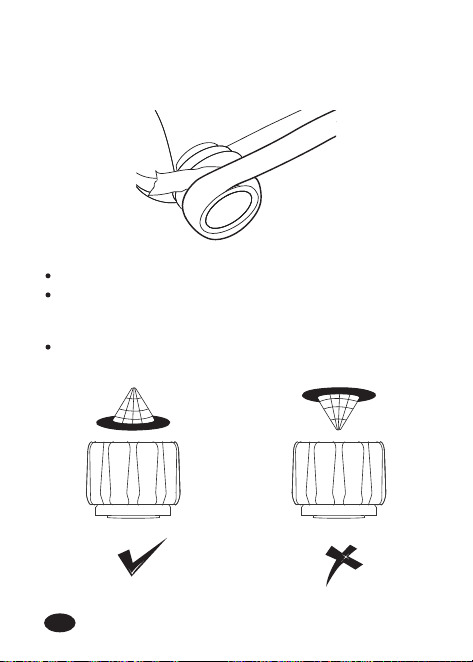
Note:
Tips: If the connection between the timer and the faucet or
hose is not tight or leaking, wrap more Sealing Tap (thread
seal tape) to make them tight.
Please do not use tools, only install the timer by hand.
When expecting freezing temperatures, timers should be
removed from the hose faucet and stored indoors to avoid
potential freeze damage.
Please install the lter properly and keep it clean as
follows.
-11-
EN
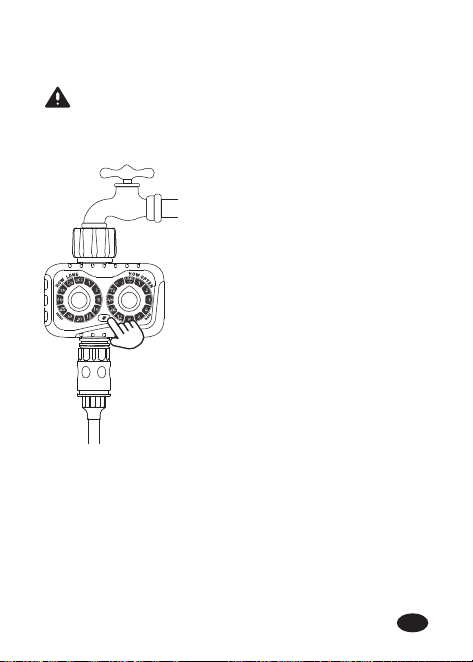
3.2.3 Activate The Timer Before Use
Keep the garden faucet turned
o.
Sho press the manual
watering button to enter
manual watering mode.
After hearing a "click" sound,
the valve in the timer opens,
then click manual watering
button again to close the
valve.
Test: Open the faucet slightly,
then repeat steps 2-3 to check
if the water ows out as
expected or is turned o.
1.
2.
3.
4.
lf yes, the timer valve is activated successfully, please use it
with condence!
lf not, please repeat the step 2-3 several times or contact us
immediately for suppo.
Note: When testing, please stay away from the water timer
outlet to avoid splashing and wet.
Please activate the device before using it for the rst
time or after a period of inactivity.
Activation steps:
-12-
EN

3.3 Cleaning Your Timer
After a period of use, impurities or di in the water may
accumulate in the timer. Therefore, the timer should be
cleaned regularly to ensure its proper operation.
Please follow these steps to clean the timer.
Turn o the garden faucet and remove the timer. Check
whether the lter at the timer water inlet has accumulated
impurities.
If the lter is diy, please take it out of the timer and rinse
it with running water.
Turn on the Manual
Watering Mode of the
timer to open the valve
and check whether the
water pipe of the timer is
blocked. If it is blocked,
please clean it gently
with a small cleaning
brush.
FILTER
1.
2.
3.
-13-
EN
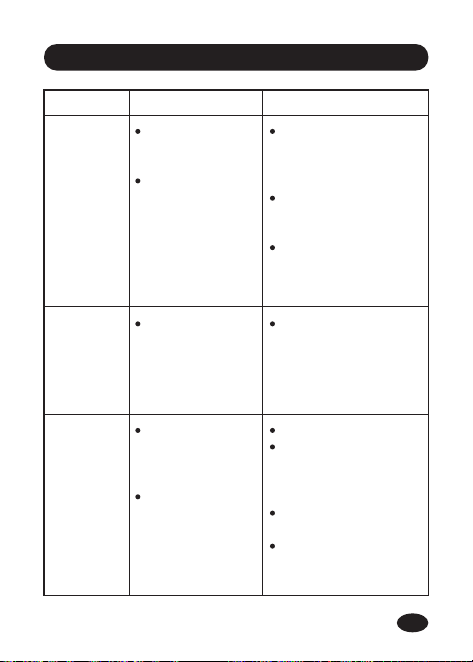
4. Troubleshooting
Problem Possible Cause Possible Solution
The water
inlet
leakage.
No lter or lter
not be placed
horizontally.
The faucet is
not the
standard 3/4".
Add a lter and
make sure it's placed
horizontally in the
inlet.
Make sure the
faucet is a standard
3/4" faucet.
Wrap Teon tape on
the faucet to make it
tight.
The valve
opens for
too long,
more than
5 seconds.
Low batte. Use new alkaline
batteries.
Unable to
open or
close the
valve.
The valve does
not work due to
long storage
time.
Valve blockage.
Keep the faucet on.
Run manual
watering for 5-7
seconds, then stop
watering.
Repeat manual
watering 5 times.
T using the timer
normally.
-14-
EN
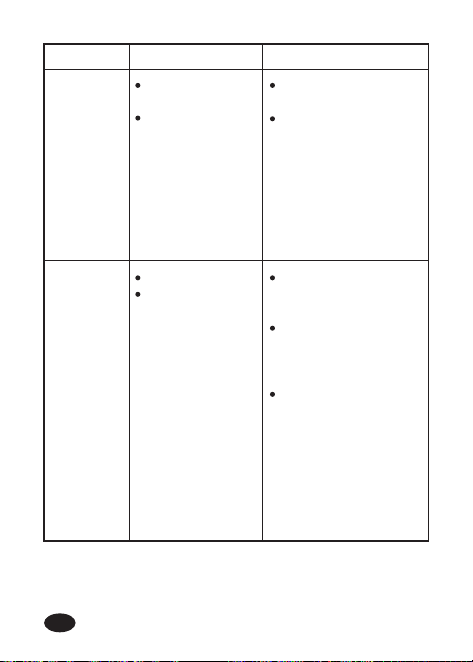
Problem Possible Cause Possible Solution
Sho
batte life.
Mixing old and
new batteries.
Use carbon
batteries or
rechargeable
batteries.
Use new alkaline
batteries.
Rechargeable
batteries or carbon
batteries have a
sho life, please use
alkaline batteries.
Low water
pressure.
Filter blockage.
Inlet pressure
not sucient to
suppo
watering needs.
Check if the lter is
clogged, if so, clean
or replace the lter.
Make sure the timer
is installed properly
and not
cross-threaded.
Installation of a
booster pump or
other auxilia
equipment of
increasing pressure.
-15-
EN
5. Precautions
For outdoor use only. Placing the timer in the sheltered
outdoors will prolong its lifetime.
To avoid damage, please tighten it without using tools.
The lter should be placed horizontally in the water inlet
to prevent leakage.
When low power, please replace the batteries to avoid the
interruption of normal operation, when replacing the
batteries, please make sure that the batte tray is d.
When the timer is not in use, please remove the batteries
and store it indoors.
Don’t use the timer under the temperature more than
122℉ (50℃), or less than 37.4℉ (3℃).
Don’t subject the product to extreme force and shock.
Severe electrical shock could result if water is sprayed into
outlets or sources of electrical current. Never immerse the
product in water.
1.
2.
3.
4.
5.
6.
7.
8.
-16-
EN

6. Warranty Policy
RainPoint provides a 1-year warranty against manufacturing
defects in materials and workmanship from the date of
purchase.
During the warranty period, we’ll replace free of charge the
product found to be defective under reasonable use and
seice as determined solely by RainPoint.
To place a warranty request, please email us with your order
ID at suppo@rainpointonline.com and we’ll respond within
24 hours.
7. Customer Suppo
Still have trouble with setup, please search for "RainPoint" on
Youtube for installation videos!
If the user manual doesn’t have what you're looking for or you
need other help, please contact us before returning the
product to the store and let us know the LOT NO. of your
device. LOT NO.: XXXXXX (on the back of the timer)
V1
-17-
Need Help ?
suppo@rainpointonline.com
Scan the QR code for more help.
or Email:
EN
