取扱説明書
Owner’s Manual
Benutzerhandbuch
Mode d’emploi
Manuale di istruzioni
Manual de instrucciones
Manual do Proprietário
Руководство пользователя
使用说明书
使用說明書
사용설명서
SVC300F
日本語
EnglishEspañol
简体中文
EnglishFrançais
Português
繁體中文
DeutschItalianoРycский
한국어
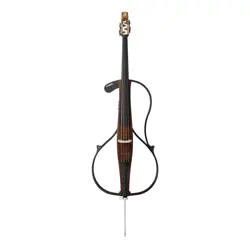
Electric Cello
Violoncelle électrique
Электрическая виолончель
电大提琴
電大提琴
JA ITDE PTEN ESFR RU KO
ZH-CN ZH-TW
IMPORTANT
Plese record the serial number of this unit in the
space below.
Model
Serial No.
This serial number is located on the bottom or rear
of the unit.
Retain this Owner’s Manual in a safe place for
future reference.
(Ser.No)
This applies only to products distributed by
YAMAHA CORPORATION OF AMERICA.
FCC INFORMATION (U.S.A.)
1. IMPORTANT NOTICE: DO NOT MODIFY
THIS UNIT!
This product, when installed as indicated in the
instructions contained in this manual, meets
FCC requirements. Modifications not expressly
approved by Yamaha may void your authority,
granted by the FCC, to use the product.
2. IMPORTANT:
When connecting this product to
accessories and/or another product use only high
quality shielded cables. Cable/s supplied with
this product MUST be used. Follow all installation
instructions. Failure to follow instructions could
void your FCC authorization to use this product in
the USA.
3. NOTE:
This product has been tested and found
to comply with the requirements listed in FCC
Regulations, Part 15 for Class “B” digital devices.
Compliance with these requirements provides a
reasonable level of assurance that your use of
this product in a residential environment will not
result in harmful interference with other electronic
devices. This equipment generates/uses radio
frequencies and, if not installed and used
according to the instructions found in the users
manual, may cause interference harmful to the
operation of other electronic devices. Compliance
with FCC regulations does not guarantee that
interference will not occur in all installations. If this
product is found to be the source of interference,
which can be determined by turning the unit “OFF”
and “ON”, please try to eliminate the problem by
using one of the following measures:
- Relocate either this product or the device that is
being affected by the interference.
- Utilize power outlets that are on different branch
(circuit breaker or fuse) circuits or install AC line
filter/s.
- In the case of radio or TV interference, relocate/
reorient the antenna. If the antenna lead-in is 300
ohm ribbon lead, change the lead-in to co-axial
type cable.
If these corrective measures do not produce
satisfactory results, please contact the local retailer
authorized to distribute this type of product. If
you cannot locate the appropriate retailer, please
contact Yamaha Corporation of America, 6600
Orangethorpe Avenue, Buena Park, CA 90620,
U.S.A.
The above statements apply ONLY to those
products distributed by Yamaha Corporation of
America or its subsidiaries.
(529-M04 FCC class B YCA 02)
COMPLIANCE INFORMATION STATEMENT
(Supplier’s declaration of conformity procedure)
Responsible Party: Yamaha Corporation of America
Address: 6600 Orangethorpe Avenue,
Buena Park, CA. 90620, U.S.A.
Telephone: 714-522-9011
Type of Equipment: Electric Cello
Model Name: SVC300F
This device complies with Part 15 of the FCC Rules.
Operation is subject to the following two conditions:
1) this device may not cause harmful interference, and
2) this device must accept any interference received,
including interference that may cause undesired
operation.
(529-M02 FCC sdoc YCA 02)
SVC300F
Owner’s Manual
• 3
Introduction
Thank you for purchasing the Yamaha SILENT Cello™ SVC300F.
This product is a completely new type of cello, with a simple body structure consisting of
only a frame, providing both silent play and portability—allowing you to practice anywhere,
even at night, by using headphones.
Although its simple structure does not have the resonating body of a conventional
instrument, the newly installed SRT POWERED system* reproduces the natural sound and
timbre of an acoustic instrument.
In order to obtain maximum performance and enjoyment from this product, we urge you to
read this Owner’s Manual thoroughly before using the instrument. After reading the Owner’s
Manual, keep it together with the warranty card in a safe place for later reference.
* “SILENT cello™” and the
™
logo are registered trademarks of Yamaha
Corporation.
* SRT POWERED system: Technology that simulates and adds in real time the sound of the
cello’s inherent body resonance, recorded in a studio with a high-quality microphone.
Contents
PRECAUTIONS .......................................4
Included Items
........................................7
Part Names
.............................................8
Setup
..................................................... 11
Tuning/Changing Strings ........................... 11
Attaching the Chest Support
..................... 14
Attaching/Adjusting the End Pin
................ 14
Power Supply .......................................15
Powering with Batteries ............................. 15
Supplying AC Power
.................................. 15
Basic Operations .................................16
Playing with Headphones .......................... 16
Creating a Natural Cello Sound
................. 16
Using Reverb Effects
................................. 17
Using the Tone Controls
............................. 17
Using the Tuner
.......................................... 18
Enabling/Disabling
the Auto Power Off Function
................. 19
Ending Play
................................................ 19
Advanced Operations ..........................20
Outputting Sound to an External Device ... 20
Playing Along with Music
from a Smart Device, etc.
..................... 21
Specifications ......................................22
4 • SVC300F
Owner’s Manual
PRECAUTIONS
PLEASE READ CAREFULLY BEFORE PROCEEDING
Please keep this manual in a safe and handy place for future reference.
WARNING
Always follow the basic precautions listed below to avoid the possibility of serious injury or even
death from electrical shock, short-circuiting, damages, fire or other hazards. These precautions
include, but are not limited to, the following:
Do not disassemble
• This product contains no user-serviceable parts. Do not
attempt to disassemble the internal parts or modify them in
any way.
Water warning
• Do not expose the product to rain, use it near water or in
damp or wet conditions, or place on it any containers (such
as vases, bottles or glasses) containing liquids which might
spill into any openings or places where water may drop. A
liquid such as water getting into the product may cause fire,
electric shock, or malfunctions.
• Use the AC adaptor indoors only. Do not use it in any wet
environments.
If you notice any abnormality
• If any of the following problems occur, immediately turn off
the power switch and disconnect the power plug from the
outlet. (If you are using batteries, remove all batteries from
the product.) Finally have the device inspected by Yamaha
service personnel.
- The power cord or plug becomes frayed or damaged.
- Unusual smells or smoke are emitted.
- Some object, or liquid has been dropped into the
instrument.
- There is a sudden loss of sound during use of the product.
- Cracks or other visible damage appear on the product.
Power supply
• Use only the correct voltage specified for the product. The
required voltage is printed on the name plate of the product.
• Use only the specified AC adaptor (page 22).
• Never insert or remove an electric plug with wet hands.
• Check the power plug periodically and remove any dirt or
dust which may have accumulated on it.
• Do not place the power cord near heat sources such as
heaters or radiators. Also, do not excessively bend or
otherwise damage the cord, or place heavy objects on it.
• Do not connect the product to an electrical outlet using a
multi-plug outlet extender. Doing so can result in lower sound
quality, or possibly cause fire at or around the outlet.
• Do not touch the product or the electric plug during an
electrical storm.

SVC300F
Owner’s Manual
• 5
CAUTION
Always follow the basic precautions listed below to avoid the possibility of physical injury to you
or others, or damage to the product or other property. These precautions include, but are not
limited to, the following:
Power supply
• If not using the product for long periods of time, be sure to
pull the power plug from the AC outlet.
• Insert the power plug firmly all the way into the AC outlet.
Using the product when it is not plugged in sufficiently can
cause dust to accumulate on the plug, possibly resulting in
fire or skin burns.
• When setting up the product, make sure that the AC outlet
you are using is easily accessible. If some trouble or
malfunction occurs, immediately turn off the power switch
and disconnect the plug from the outlet.
• When disconnecting the power plug, always hold the plug
itself and not the cord. Pulling by the cord can damage it and
cause electric shock or fire.
Battery
• Follow the precautions below. Failure to do so could result
in fire, overheating, leakage, or malfunction causing burns
or injury.
- Use the specified battery type (page 22) only.
- Do not use new batteries together with old ones.
- Do not mix battery types.
- Always make sure all batteries are inserted in conformity
with the +/- polarity markings.
- When the batteries run out, or if the product is not to
be used for a long time, remove the batteries from the
product.
• Do not attempt to recharge batteries that are not designed
to be charged. Doing so could result in rupture or leakage
causing injury, etc.
• If the batteries do leak, avoid contact with the leaked fluid.
If the battery fluid should come in contact with your eyes,
mouth, or skin, wash immediately with water and consult a
doctor. Battery fluid is corrosive and may possibly cause loss
of sight or chemical burns.
• Keep batteries away from children. A child could accidentally
swallow a battery. Failure to observe this may also cause
inflammation due to battery fluid leakage.
• Do not disassemble batteries. Doing so could result in fire,
overheating, rupture, explosion, or leakage, causing burns
or injury.
• Do not dispose of a battery in a fire.
• Do not expose the battery to conditions of extreme low air
pressure, cold or heat (such as in direct sunlight or a fire).
Doing so may result in the battery rupturing or exploding,
and cause fire or injury.
• When using rechargeable batteries, follow the instructions
that came with the batteries. Use only the specified charger
device and within the specified charging temperature range
when charging. Charging with an unspecified charger or
at a temperature outside the range may cause leakage,
overheating, rupture, or malfunction.
• Do not put batteries in a pocket or bag, or carry or store them
together with pieces of metal. Batteries kept in such condition
could short, rupture, or leak, causing fire or injury.
• When storing or discarding batteries, insulate the terminal
area by applying tape, or some other protection. Mixing them
with other batteries or metal objects can cause fire, burns, or
inflammation due to fluid.
Connections/Location
• Before connecting the product to other electronic
components, turn off the power for all components. Also,
before turning the power on or off for all components, set all
volume levels to minimum.
• Do not place the product in an unstable position or a location
with excessive vibration, where it might accidentally fall over
and cause injury.
• Handle the neck and the body when moving the instrument.
Handling the instrument by only the side plate unit could
result in malfunction to the side plate unit.
• Before moving the product, remove all connected cables, to
prevent damage to the cables or injury to anyone who might
trip over them.
• Be sure to set the volumes of all components at their
minimum levels and gradually raise the volume controls while
playing the product to set the desired listening level.
6 • SVC300F
Owner’s Manual
Notice
■
Maintenance
• When cleaning the product, use a soft and dry (or slightly
damp) cloth. Do not use paint thinners, solvents, alcohol,
cleaning fluids, or chemical-impregnated wiping cloths.
■
About the supplied soft case
• Do not use the supplied soft case to store any other
instrument not intended for use with the supplied case.
• Do not drop or subject the supplied soft case to strong shock
with the instrument stored inside. Doing so may damage the
instrument.
• Do not expose the supplied soft case to direct sunlight (such
as in a car during the day), or extremely high temperatures
(such as close to a heater).
Doing so may result in discoloration or deterioration.
• Do not place near oils or chemicals. They may deteriorate
the cover.
Yamaha cannot be held responsible for damage caused
by improper use or modications to the product.
■
Information
•
The illustrations and screens as shown in this document are for
instructional purposes only.
■
Handling this product
• Do not expose to direct sunlight (in a car during the day),
high temperatures such as near a stove, or extremely low
temperatures, and do not expose to vibrations or dust, in
order to prevent damage to the internal components or panel
disfiguration.
• Use/store the instrument in environments with a constant
moderate humidity and temperature. Wooden instruments
are very delicate. Using/storing the instrument in an
excessively dry environment may cause the frame and other
parts to crack.
• Never return the signal sent from Silent Cello’s outputs
directly, or via an external device to the AUX IN jack. Doing so
can result in a feedback loop that may result in damaging the
instrument’s electronics.
• Do not use close to electronics such as speakers, TV, and
radio. The instrument’s electronic circuits may cause noise in
the TV or radio.
• Do not place any vinyl or plastic objects on the product.
• Always turn the power off when the product is not in use.
Even when the [
] (power key) switch is in standby status
(power LED is off/ status is off), electricity is still flowing to
the product at the minimum level.
• When disposing of this product, please contact the
appropriate local authorities.
• Make sure to discard used batteries according to local
regulations.
Handling
• When moving any movable parts, be careful not to pinch your
fingers or hands, to avoid possible injury.
• Do not use the product or headphones for a long period of
time at a high or uncomfortable volume level, since this can
cause permanent hearing loss. If you experience any hearing
loss or ringing in the ears, consult a physician.
• Keep small parts out of the reach of children, since they may
accidentally swallow them.
• Do not insert your finger or hand in any gaps on the
product. Also take care that the arm support and the optional
accessories do not pinch your fingers. Failure to do so might
result in injury.
• Do not rest your weight on, or place heavy objects on the
product, and do not use excessive force on the buttons,
switches or connectors.
• When changing or adjusting strings, do not put your face
close to the instrument. The string may suddenly break
resulting in unexpected injury to your eyes, face, etc.
• Use caution when changing strings. The ends of the strings
are sharp and can pierce your skin.
About the Supplied Soft Case.
• Do not swing the supplied soft case or the strap. Doing so
could cause an accident.
SVC300F
Owner’s Manual
• 7
* Power Adaptor (sold separately): Yamaha PA-130
* Two AA batteries (alkaline or nickel-metal hydride) are required to play the
SVC300F.
Included Items
● Cello × 1 ● Soft case × 1
● Bridge × 1 ● Chest support × 1
Make sure that the following items are included in the package.
● End pin × 1
The SILENT Cello™ is shipped from the factory without the bridge set up
and the end pin installed. Follow the procedure in “Setup” on page 11
to properly set up the instrument.
8 • SVC300F
Owner’s Manual
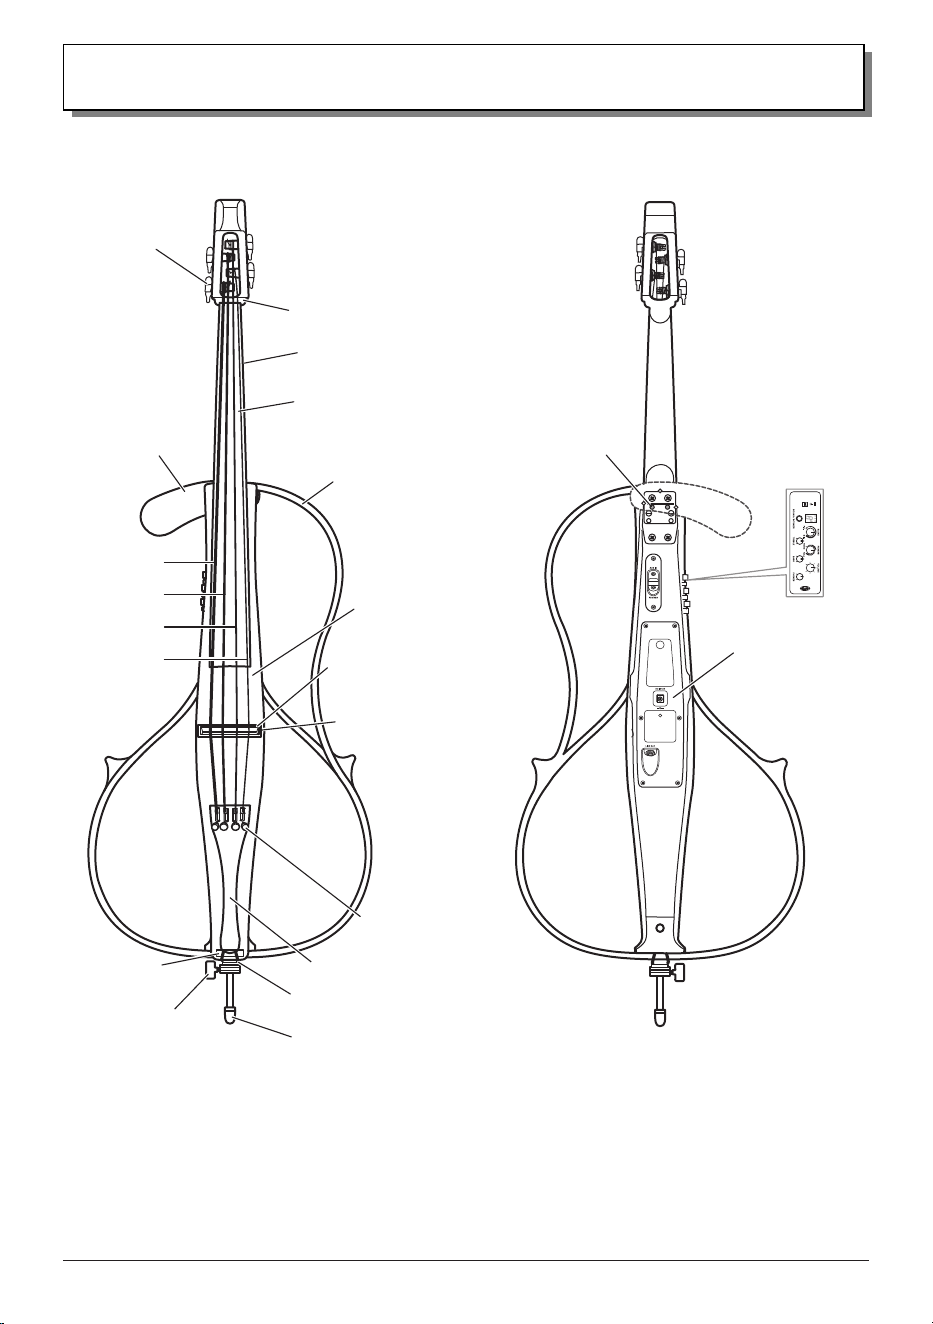
Part Names
● Front ● Rear
Chest support
attachment
holes
Control panel
(page 10)
Rear panel
(page 9)
Fingerboard
Neck
Saddle
Tuning peg
Nut
4th string (C)
3rd string (G)
2nd string (D)
1st string (A)
Adjuster
Tailpiece
Body
Bridge seat
Tail nylon
End pin
End pin stopper
Bridge
Chest support
Frame
SVC300F
Owner’s Manual
• 9
Part Names
● Rear Panel
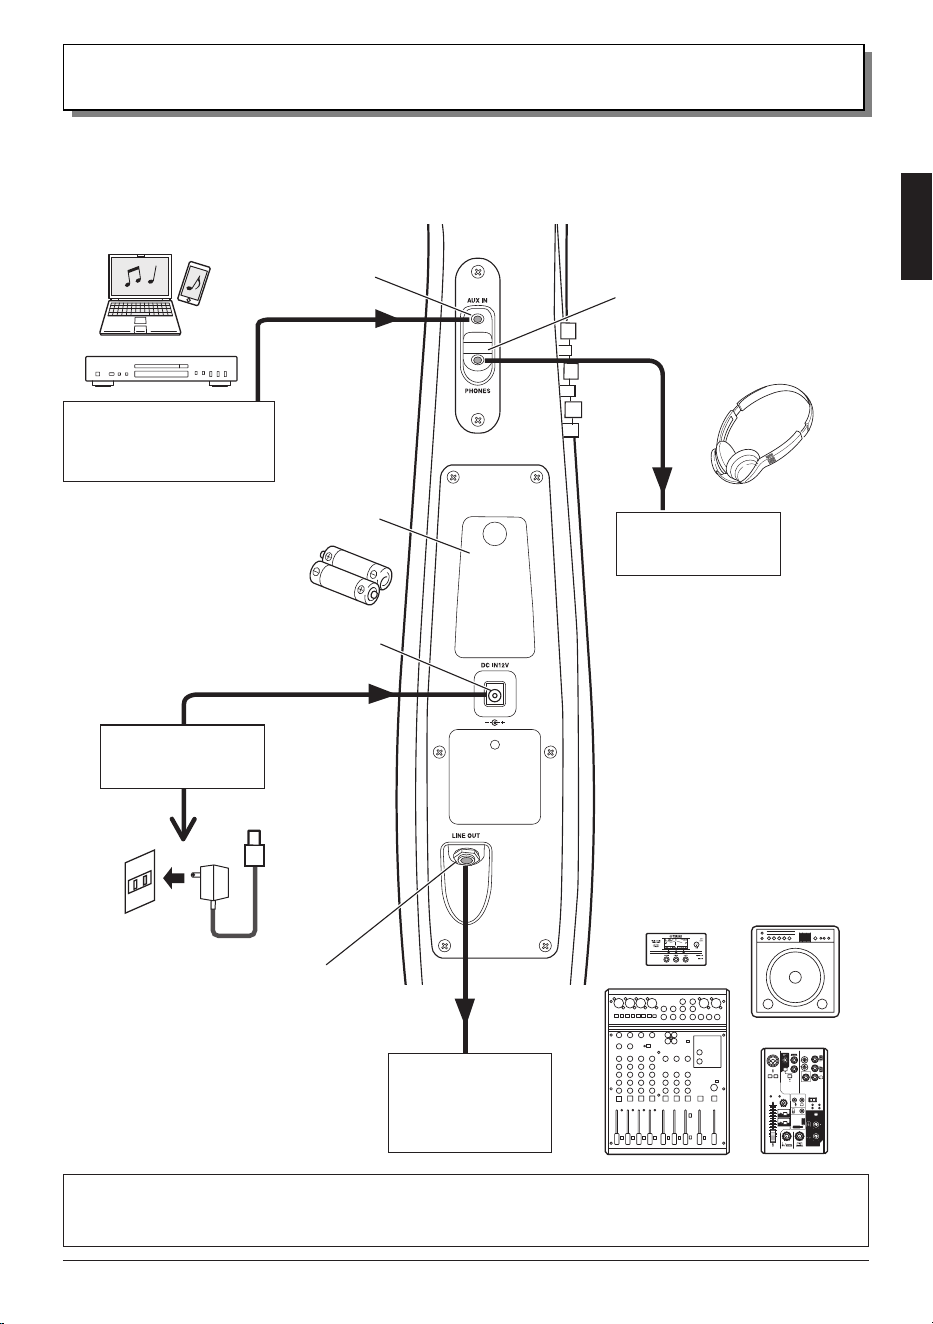
A power supply and external devices can be connected here.
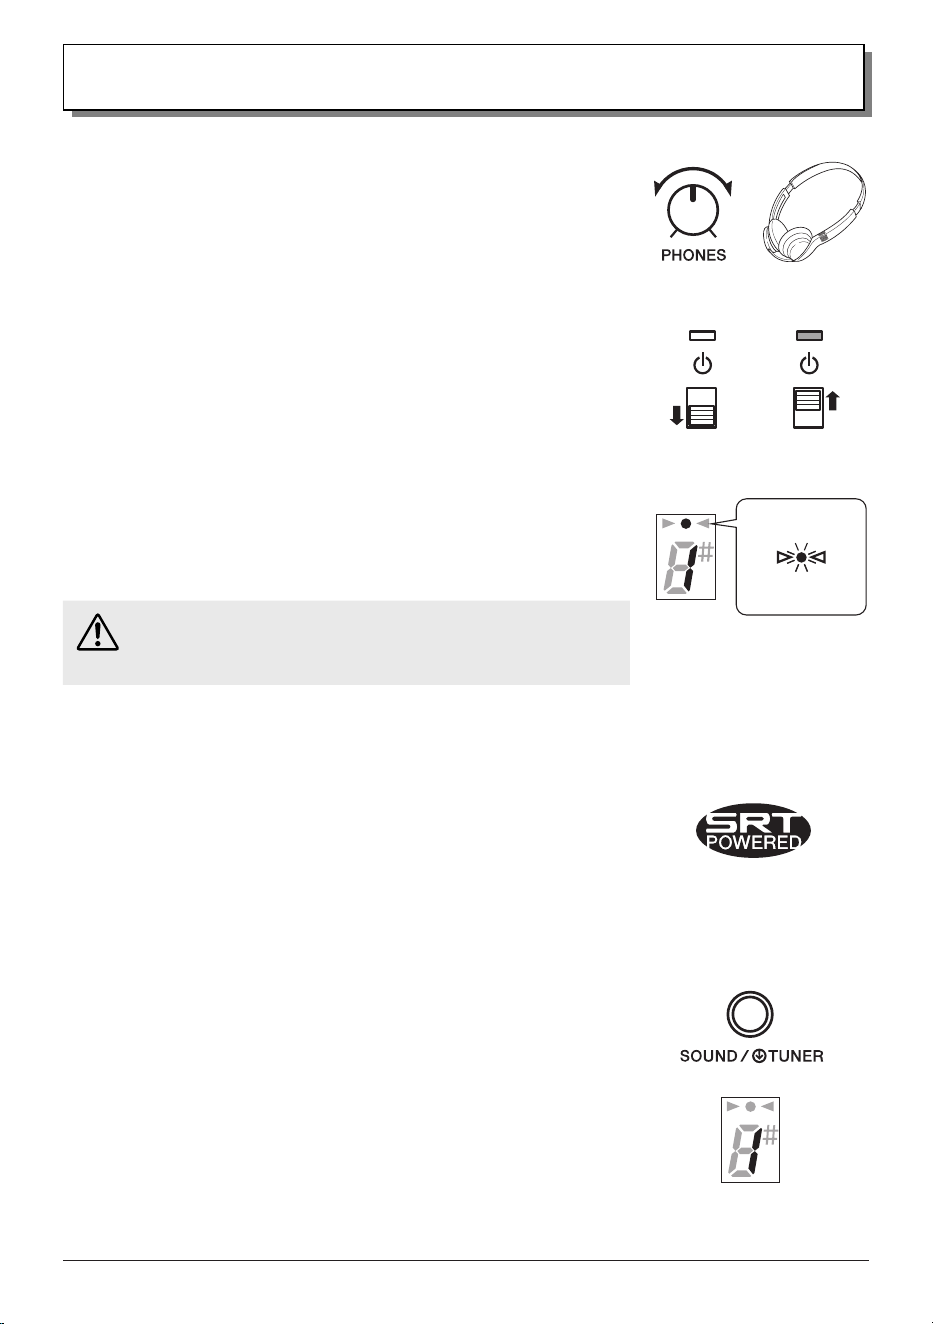
[PHONES] jack
(stereo mini)
Stereo earphones,
stereo headphones
Notice
• Do not connect any device other than
earphones or headphones to the
[PHONES] jack. Otherwise, damage
may result.
NOTE
• The [PHONES] jack on this instrument
is a 3-pole stereo mini type. Earphones/
headphones of the 4-pole type (for
microphone use) are not compatible
and cannot be used.
[LINE OUT] jack
(standard mono)
To electric outlet
Power adaptor
(option)
[DC IN 12V] jack
Battery cover
Smart device,
CD player or audio device,
metronome, etc.
[AUX IN] jack
(stereo mini)
When connecting the instrument to external audio equipment, check the jack size and use a cable with a
corresponding plug size, and then properly insert the plug into the jack.
Powered speaker,
mixer, recorder,
audio interface,
electronic tuner, etc.
10 • SVC300F
Owner’s Manual
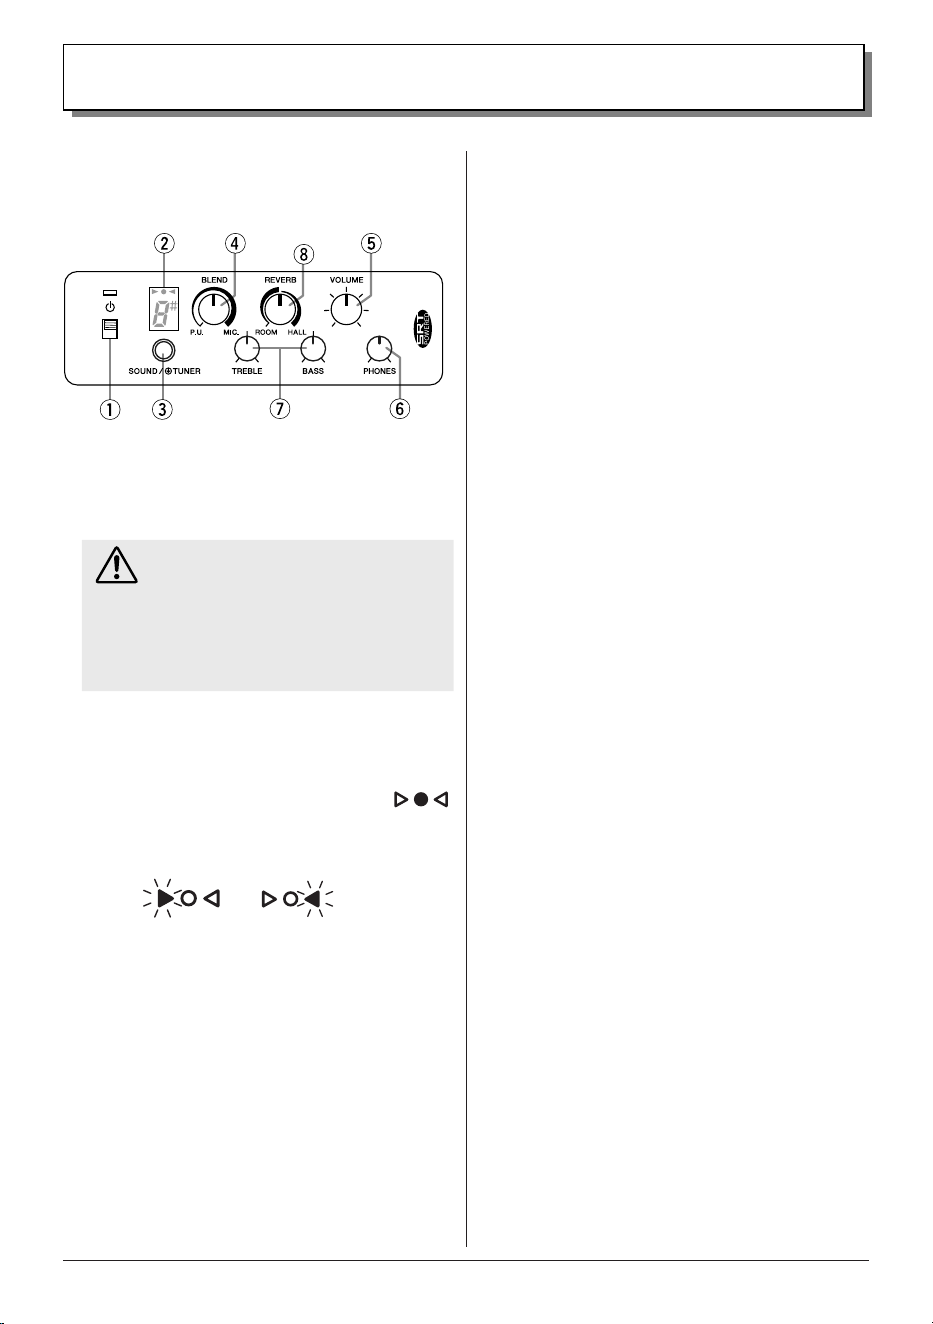
● Control Panel
This section conveniently provides all controls for the
instrument’s functions.
Part Names
1
Power switch
For switching the SILENT Cello™ between on
and standby. When the instrument is turned on, it
automatically enters play mode.
Caution
• Before switching between on and standby, be
sure to lower the output volume of connected
ampliers, powered speakers, etc., or set them
to standby.
• Before switching between on and standby, be
sure to remove earphones or headphones from
your ears.
2
Display
Displays the on/standby status, tuning status, battery level
warnings, etc.
On: Center green round indicator lights up
Low battery warning: Triangular indicators flash
alternately.
n
3
[SOUND/TUNER] button
For selecting sounds, switching from Play mode to Tuner
mode, and enabling/disabling the Auto Power Off function.
n
Selecting a Sound
The built-in SRT POWERED system featured on this
instrument simulates the sound of the cello’s body
resonance recorded in a studio with a high-quality
microphone, recreating the natural body resonance of a
cello.
Each press of the button switches between the two sound
types (page 16).
n
Switching to Tuner Mode
With the instrument turned on, hold down this button to
enter the Tuner mode, allowing you to tune the instrument
(page 18) without the need for a separate device. Press
this button again to return to Play mode.
4
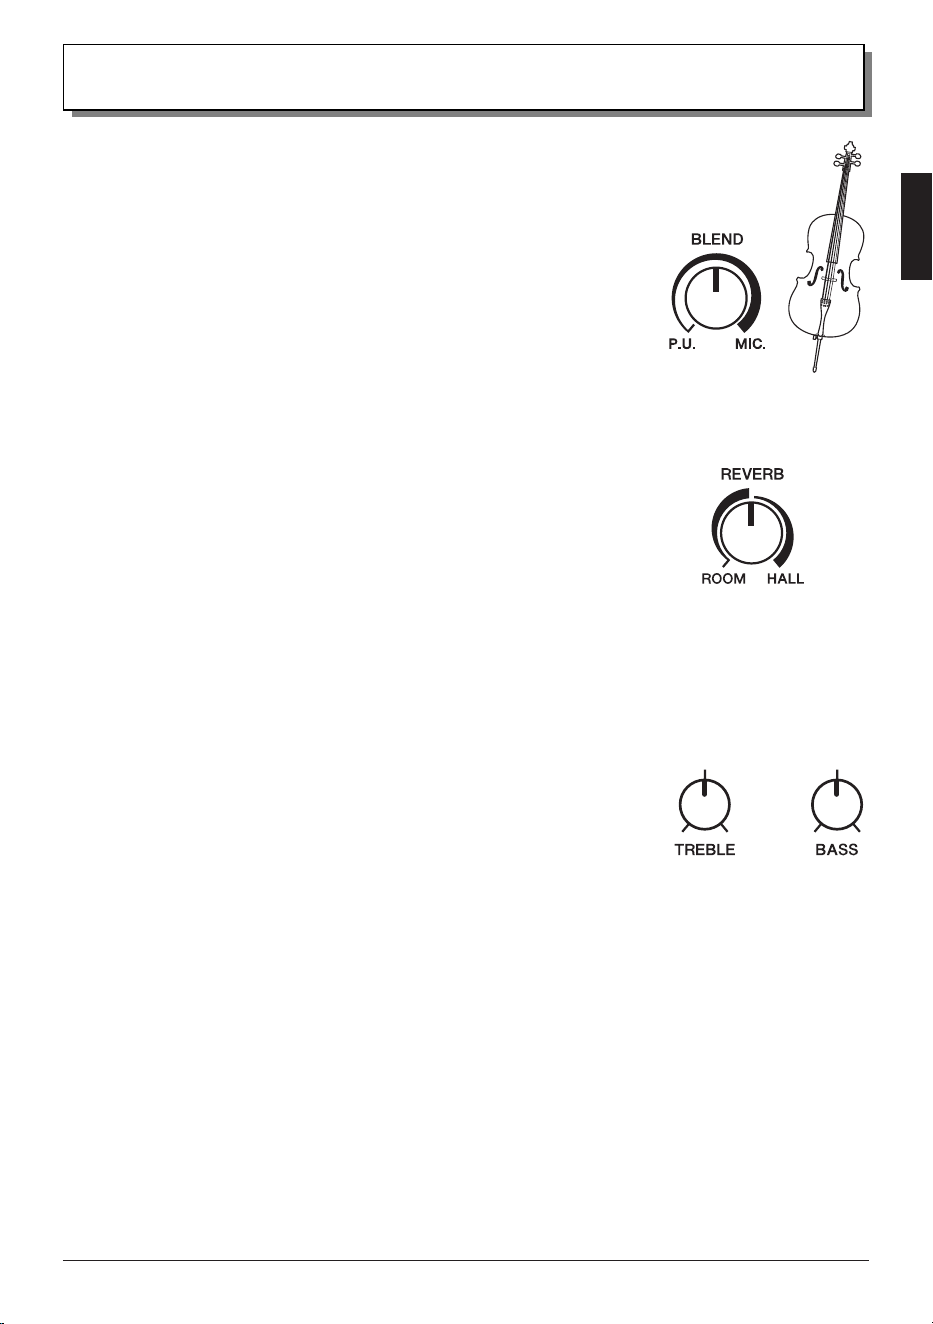
[BLEND] knob
For adjusting the level balance of the performance sound
(original sound) captured by the built-in pickup and the
sound (simulated body resonance sound) selected with the
[SOUND/TUNER] button
3
(page 16).
5
[VOLUME] knob
For adjusting the volume of the LINE OUT output.
NOTE
• Audio from the [AUX IN] jack is not output through the [LINE
OUT] jack.
6
[PHONES] knob
For adjusting the volume of earphones/headphones
connected to the [PHONES] jack.
NOTE
• If while playing strongly the sound is distorted, rotate the
[VOLUME] and [PHONES] knobs to the left to lower the volume.
7
Tone controls
These control the overall tone of the SILENT Cello™ by
letting you adjust the frequency responses in the high and
low ranges (page 17).
[TREBLE] knob: For adjusting the level of the high range.
[BASS] knob: For adjusting the level of the low range.
8
[REVERB] knob
For switching between the two types of reverb effects as
well as adjusting the intensity of the effect (page 17).
l
ROOM: This reverb effect simulates the natural
reverberation of a room.
l
HALL: This reverb effect simulates the natural
reverberation of a concert hall.
SVC300F
Owner’s Manual
• 11
■ Tuning/Changing Strings
The SILENT Cello™ is shipped from the factory without the bridge set up. After setting up the bridge, proceed with tuning.
Caution
• The ends of the strings are sharp and can pierce your skin. Use caution when changing strings.
• When changing or adjusting a string, do not put your face close to the instrument. The string may suddenly break resulting
in unexpected injury to your eyes, face, etc.
NOTE
• As strings get older, their sound quality deteriorates, and the instrument can no longer be tuned correctly. Change the strings as soon as
you think that they are getting old.
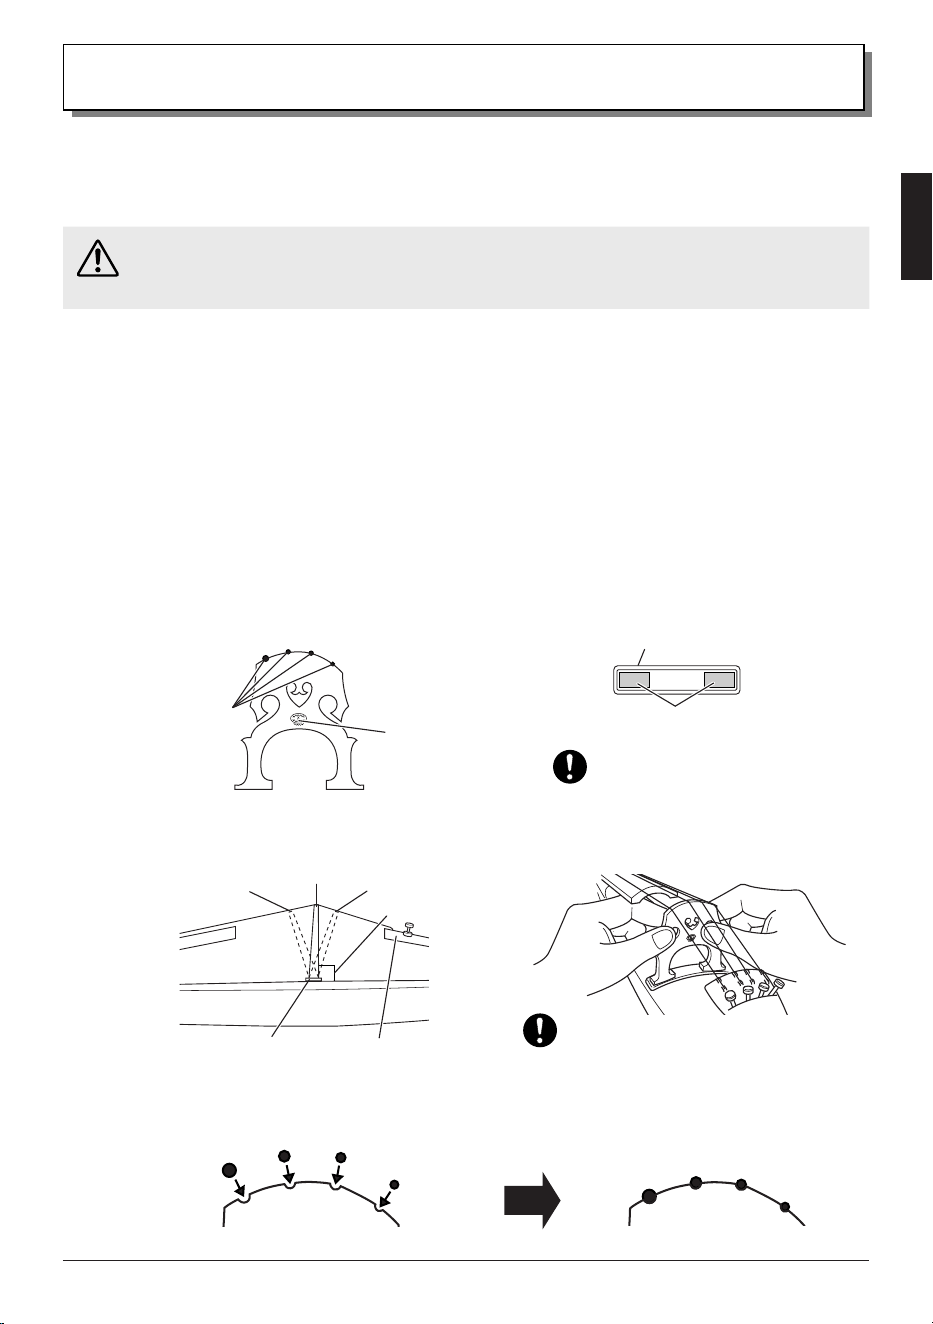
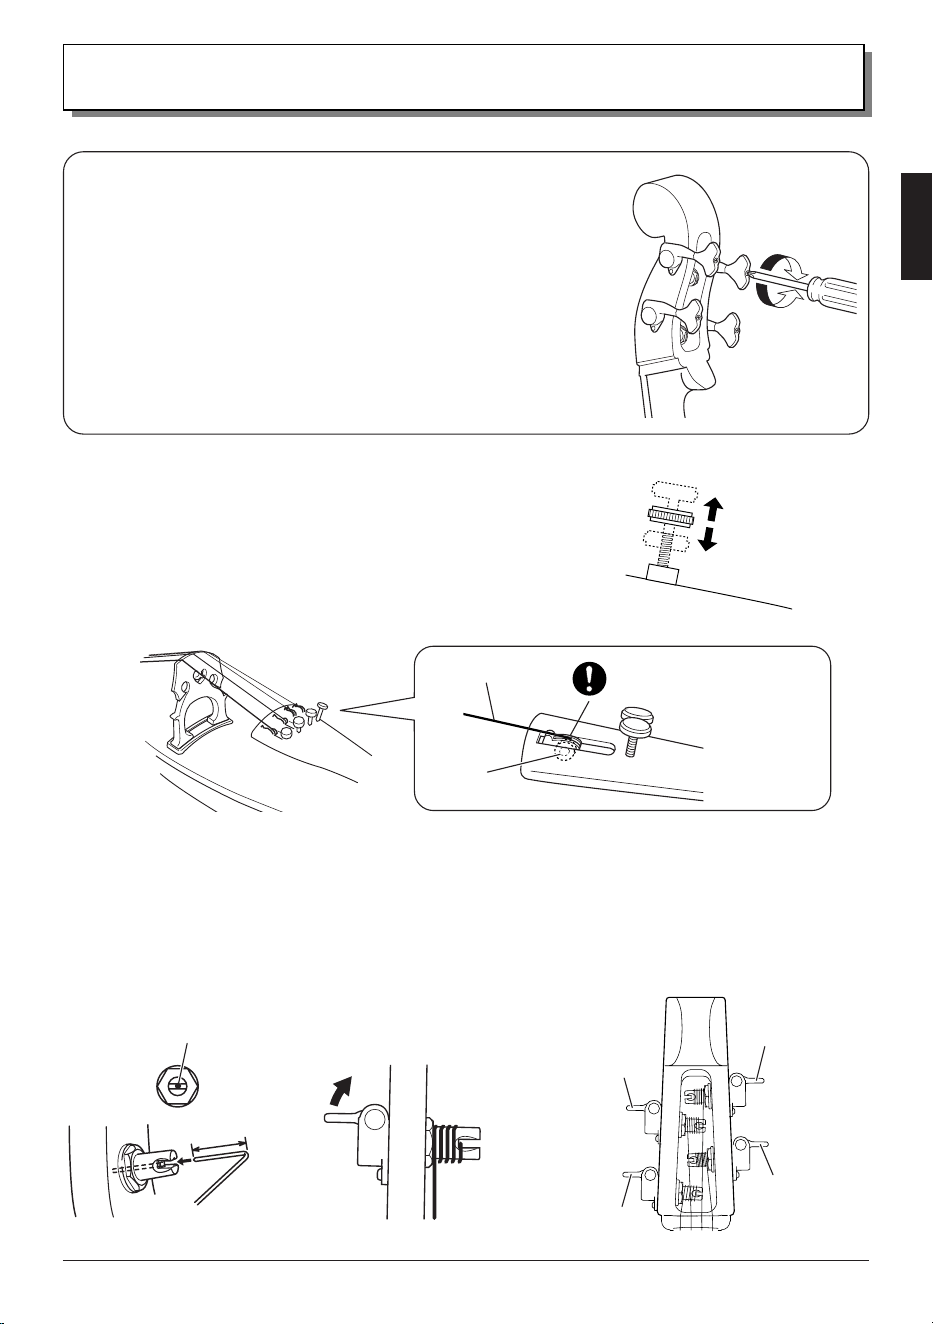
● Setting Up the Bridge
The lower side of the bridge supports the 1st string (A), the higher side supports the 4th string (C).
The side of the bridge with the logo imprint should face the tailpiece.
1.
While making sure that the bridge is oriented correctly, set up the bridge so that its feet do not touch the
sides of the bridge seat.
Setup
2nd string (D)3rd string (G)
4th string (C)
1st string (A)
3.
Make sure that each string sits rmly in the corresponding groove in the bridge.
2.
Make sure that the bridge stands vertically. If it leans to one side, use both hands to adjust it.
Do not allow the bridge feet to touch
the sides of the bridge seat.
Make sure that the bridge stands vertically.
Bridge viewed from the tailpiece:
A
D
G
C
1st string side
4th string side
Groove
Logo imprint
Bridge placement location:
Bridge seat
Bridge feet
Correct
Bridge seat
Tailpiece
Body
Incorrect
Incorrect
Perpendicular
12 • SVC300F
Owner’s Manual
• Before playing the instrument, make sure that the strings are seated in their corresponding grooves in the bridge. Strings may
come out of their grooves when the bridge is adjusted or strings are changed. Since the 1st (A) and 4th (C) strings tend to
come out of their grooves more easily than the others, lightly press them against the bridge with your ngers while tuning.
• Always keep the bridge perpendicular to the body, whether the instrument is being played or stored. Even if the bridge
is standing vertically before tuning, it may tilt during the tuning process. It may also become tilted during storage. If so,
readjust the bridge so it stands vertically.
Important
Setup
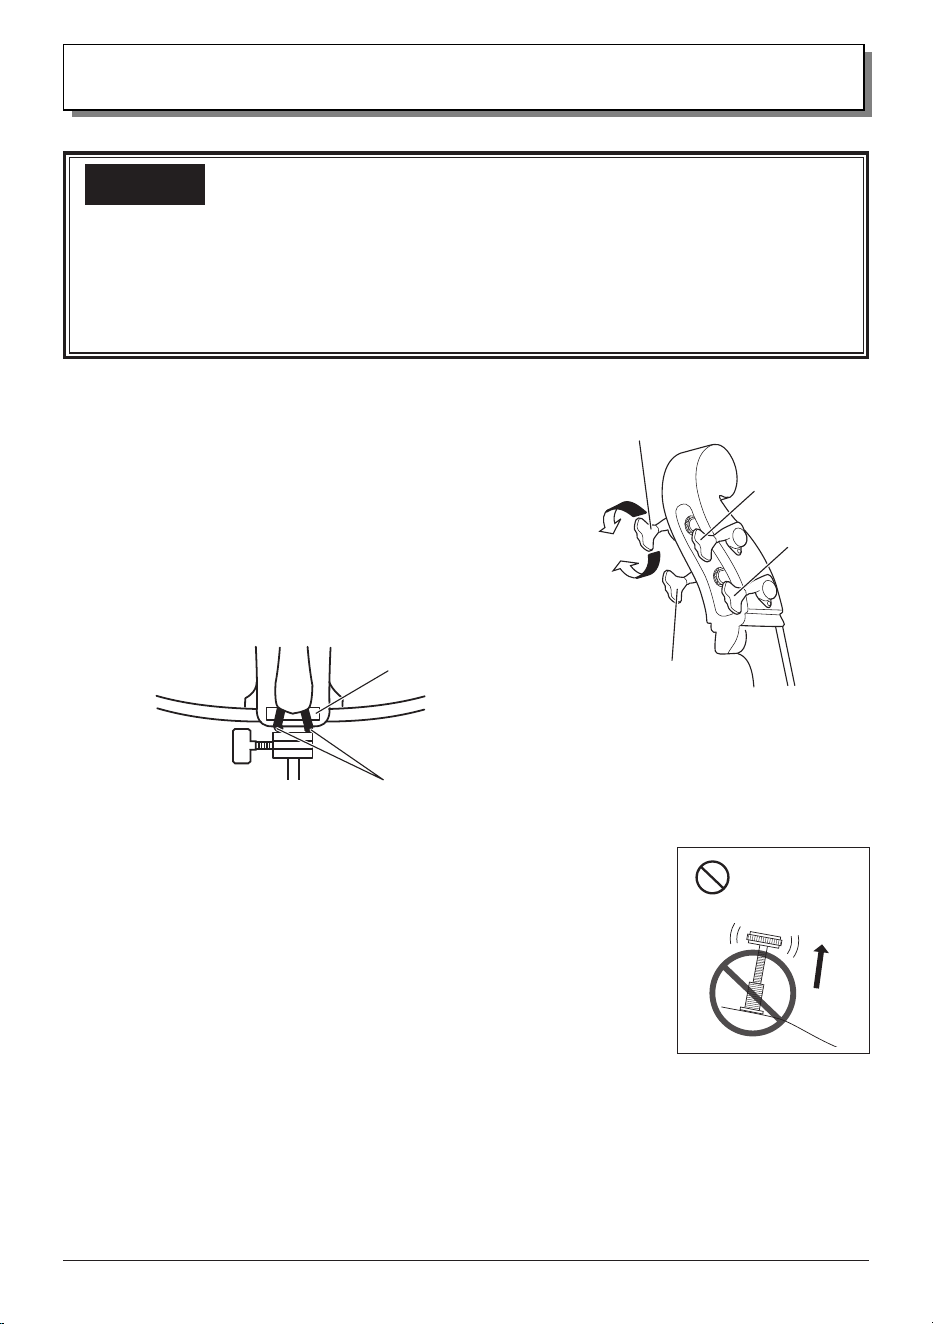
● Tuning
The 1st string is A, the 2nd string D, the 3rd string G, and the 4th
string C.
1.
Using a piano, tuning fork, tuner, etc., adjust the pitch
of each string with its tuning peg. Make sure that the tail
nylon is correctly positioned on top of the saddle.
2.
If necessary, ne-tune the string by turning the tailpiece
adjuster by hand.
Notice
• Do not loosen the adjuster too much. If you do so, noise may be produced while the instrument is
being played.
• Before using the instrument, make sure that the bridge stands vertically. Damage to the bridge
and poor sound quality may result if the bridge is not properly positioned.
NOTE
• When the instrument is not being used, loosen the strings until the pitch drops a whole tone. If the
instrument is not going to be used for an extended period of time, loosen the strings even more to
prevent bending of the neck.
Do not loosen
the adjuster too
much.
1st string (A)
4th string (C)
2nd string (D)
3rd string (G)
Raises
the pitch
Lowers
the pitch
Tail nylon
Saddle
SVC300F
Owner’s Manual
• 13
● Winding the Strings (Refer to this when changing
strings.)
1.
Before threading the string, set the corresponding adjuster to the
middle of its adjustment range (for all strings).
2.
Slot the ball (on the end of the string) into the adjuster. Make sure
that ball properly ts into the adjuster.
Set to the
middle of
its adjustment
range.
Setup
● Adjusting the Tuning Peg Torque
The force (torque) required to turn the tuning peg can be adjusted by using
a Phillips screwdriver to turn the tension adjustment screw on the end of the
tuning peg.
• If the torque is low and the tuning peg turns with very little force:
g
Turn the adjustment screw to the right (clockwise: A).
• If the torque is high and the tuning peg is hard to turn:
g
Turn the adjustment screw to the left (counterclockwise: B).
A
B
3.
At a point about 2 cm from the string’s end, bend the string at a right angle, and then insert the end into
the hole in the tuning peg.
4.
While pulling the string toward the bridge to maintain string tension, turn the tuning peg to wind the string
around the tuning post. Make sure that the string is wound toward the base of the post as shown in the
illustration below.
About 2 cm
String
Winding
direction
Viewed from the front
String
Ball
Insert string end
into this hole.
Properly fit the ball into the
adjuster.
1st string (A)
4th string (C)
2nd string (D)
3rd string (G)
14 • SVC300F
Owner’s Manual
Setup
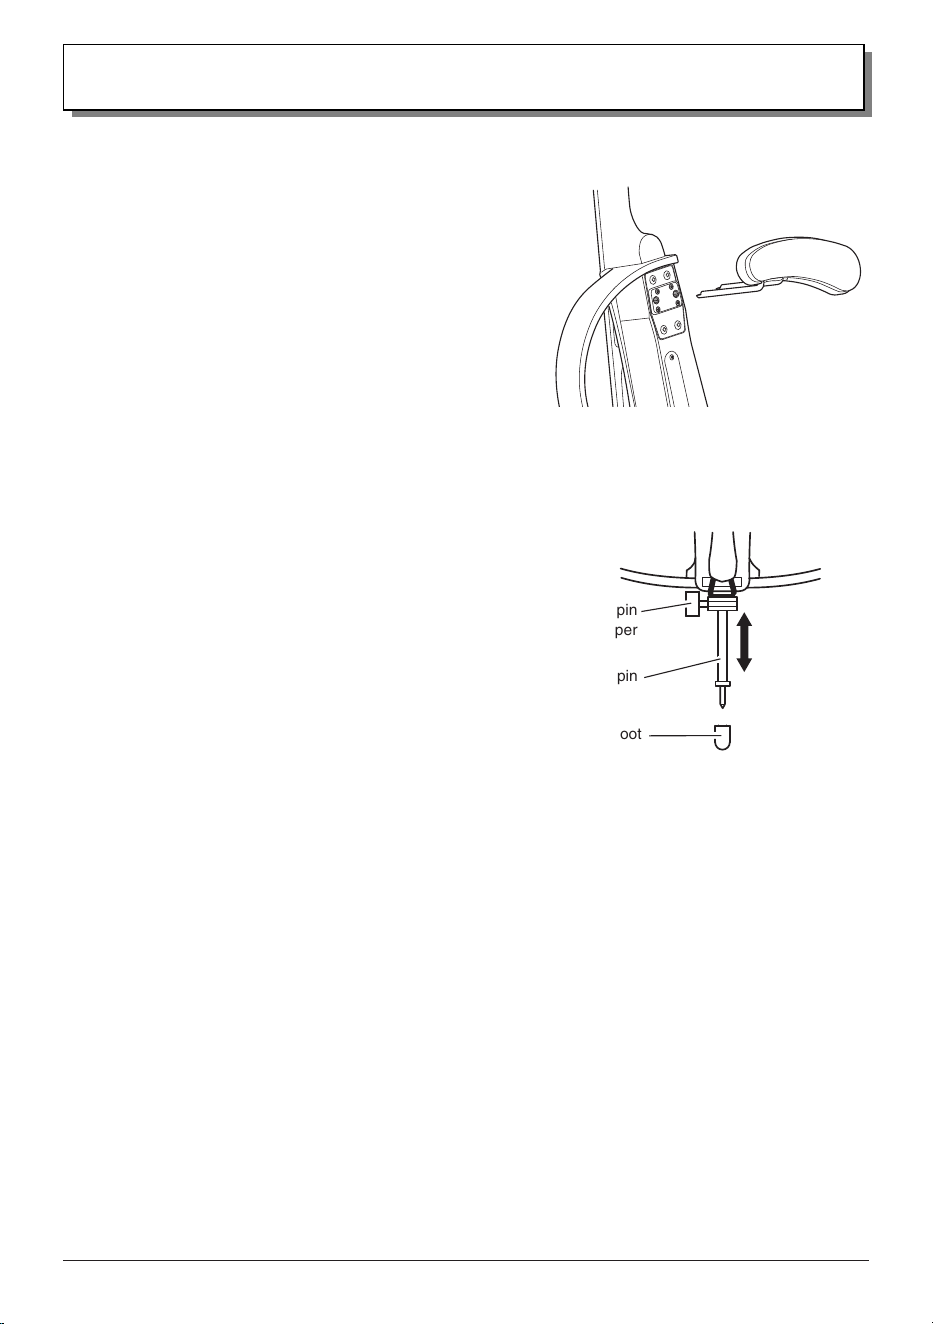
■ Attaching the Chest Support
The supplied chest support is used to rest the cello against your
body.
As shown in the illustration, insert the pins on the chest support
into the attaching holes in the rear of the instrument.
Make sure that the chest support is installed in the correct
orientation.
■ Attaching/Adjusting the End Pin
1.
Turn the end pin stopper to loosen it, and then insert the
end pin into the hole at the bottom of the instrument.
(Only when setting up for the rst time)
2.
Firmly tighten the end pin stopper when the end pin is at
a comfortable length for playing.
NOTE
• When nished playing, slide the end pin all the way into the
instrument, and then tighten the end pin stopper to secure the pin.
The next time you play, loosen the end pin stopper, extend the end
pin, and then adjust it as described in step 2.
• A rubber foot is attached to the tip of the end pin. Removing the
rubber foot exposes the pointed end pin, which can be used on
appropriate surfaces.
Notice
• The end pin is pointed and sharp. Be extremely careful using and
standing up the instrument when the end pin is exposed.
• Make sure that the end pin stopper is rmly tightened in order to prevent
the instrument from slipping while it is being played.
Rubber foot
End pin
End pin
stopper
Rear of SILENT Cello™
Chest support

SVC300F
Owner’s Manual
• 15
Power Supply
The SILENT Cello™ can be operated with either batteries or AC power. Before installing batteries, use the
power switch on the control panel to set the instrument to standby.
■ Powering with Batteries
1.
Remove the battery cover on the rear panel by slightly
loosening the bolt.
2.
Insert two AA alkaline or nickel-metal hydride batteries,
correctly oriented according to the markings inside the
battery compartment. (Refer to the illustration.)
3.
Fit the battery cover in place, and then rmly tighten the bolt.
● When to Replace the Batteries
When the battery level is low and the triangular indicators in
the display flash alternately (
⇔
), replace the
batteries as soon as possible. With nickel-metal hydride batteries,
this feature may not function properly due to the discharge
characteristics of the batteries.
Caution
• Replace both batteries at the same time. Do not mix new and old batteries or batteries of different types (different
manufacturers or different types from the same manufacturer). Otherwise, overheating, uid leakage or rupture may result.
• Do not disassemble batteries or throw them into a re.
• When repeatedly reusing nickel-metal hydride batteries, be careful when inserting and removing them from the battery
compartment so as not to damage the battery casing or terminals.
• Do not touch leaking battery uid. If battery uid gets into your eyes or mouth or on your skin, immediately rinse it off with
water and seek medical attention.
• Dispose of batteries in accordance with local laws and regulations.
■ Supplying AC Power
1.
Purchase a power adaptor (sold separately).
• Specied power adaptor: PA-130
2.
Connect the power adaptor (sold separately) with the [DC
IN 12V] jack on the rear panel in the order shown in the
illustration.
NOTE
• When removing the power adaptor, rst turn off the instrument, and
then remove the adaptor in the reverse order.
Warning
• Be sure to use only the specied power adaptor (i.e., PA-130). The use of an incompatible adaptor may result in damage
to the instrument or cause re, etc. Be aware that in such cases, we may not be able to service the product under warranty,
even within the warranty period.
Caution
• Battery power is automatically disconnected when the AC adaptor is connected. When the AC adaptor is used, the batteries
may leak. To prevent leakage, we recommend removing the batteries from the instrument when the AC adaptor is used.
2
1
Power adaptor
(option)
Electric
outlet
[DC IN 12V] jack
(
)
Battery cover
AA battery
× 2
Tighten
Loosen
Bolt
Battery
compartment
16 • SVC300F
Owner’s Manual
Basic Operations
■ Playing with Headphones
1.
Rotate the [VOLUME] knob to the left to set the volume to its minimum.
2.
Connect headphones/earphones to the [PHONES] jack on the rear panel.
3.
Turn on the instrument by setting the power switch on the control panel to
the on position (the small window above the switch changes to green).
The instrument enters Play mode, and the indicator in the display lights
up in green.
4.
Put the headphones/earphones on both ears.
5.
While playing, rotate the [PHONES] knob to adjust the volume to a
comfortable level.
NOTE
• Rotating the [VOLUME] knob does not change the headphone volume. Adjust the
headphone volume with the [PHONES] knob and the volume from the [LINE OUT] jack with
the [VOLUME] knob.
• The [PHONES] jack on this instrument is a 3-pole stereo mini type. Earphones/headphones
of the 4-pole type (for microphone use) are not compatible and cannot be used.
Caution
• Do not use headphones at high volume levels for long periods of time. Otherwise,
irreparable damage to your hearing may result.
■ Creating a Natural Cello Sound
The SRT POWERED system that this instrument is equipped with simulates the sound
of the cello’s body resonance recorded in a studio with a high-quality microphone,
recreating the natural body resonance of a cello.
Select your favorite sound from the two types available in order to create a natural
timbre.
• Sound 1: This is based on the sound that the player hears when playing
an acoustic cello. It is ideal when using this instrument for practicing.
• Sound 2: This is based on the sound of an acoustic cello recorded with
a microphone. It is ideal when using this instrument for recording and
streaming.
1.
Selecting a Sound
With the instrument turned on, press the [SOUND/TUNER] button on the control panel
to select the sound. Each press of the button toggles between the two types of sounds
and switches the number that appears in the display (1
g
2
g
1 ...).
On
Standby
Play mode
Lit green
SVC300F
Owner’s Manual
• 17
Basic Operations
2.
Creating a Natural Timbre Balance
Adjust the level balance of the performance sound (original sound) captured by the
built-in pickup and the sound (simulated body resonance sound) selected in step 1.
While playing, adjust the balance with the [BLEND] knob on the control panel in order
to create the desired natural timbre.
When the [BLEND] knob is rotated all the way to the left, 100% of the sound is from
the pickup (original sound); when rotated all the way to the right, 100% of the sound is
the simulated body resonance.
■ Using Reverb Effects
Try applying a reverb effect to make the SILENT Cello™ sound resonate as if you were playing in a large space such as a
concert hall.
■ Using the Tone Controls
Use the two tone controls on the control panel to adjust the tone of the SILENT
Cello™.
Normally, each knob would be set in the center, then rotated as needed to increase or
decrease the level to the desired setting within the range.
Rotate the [REVERB] knob on the control panel to switch between the two types of
reverb effects as well as adjust the intensity.
When the knob is rotated all the way to the left, the effect is turned off.
As the knob is rotated to the right, the effect becomes stronger, and as soon as it
switches to the next effect, the effect starts at its weakest. Further rotating the knob to
the right gradually increases the effect.
• ROOM: This reverb effect simulates the natural reverberation of a room.
• HALL: This reverb effect simulates the natural reverberation of a concert hall.
[TREBLE] knob
For adjusting the level of the high range. Peaking can be used to amplify or attenuate the characteristic sound range
optimized for this instrument.
• Rotating the knob to the right gives the sound an edge, creating a brighter tone that allows you to stand
out more in band or ensemble situations.
• Rotating the knob to the left produces a softer tone while still retaining the cello’s characteristic sound.
[BASS] knob
For adjusting the level of the low range. Peaking can be used to amplify or attenuate the sound range affected by the
resonance of the 4th string (C).
• Rotating the knob to the right increases the resonance of the 4th string (C), producing a tone with greater
cabinet resonance.
• Rotating the knob to the left reduces the resonance of the 4th string (C), producing a tighter tone that does
not compete with other bass instruments.
18 • SVC300F
Owner’s Manual
Basic Operations
■ Using the Tuner
By switching from Play mode to Tuner mode, you can tune the instrument without the need of a separate tuner.
● Tuning
1.
With the instrument turned on, hold down the [SOUND/TUNER] button for about one second, and then
release it, to enter Tuner mode.
When the instrument enters Tuner mode, the display indicators
light up (Tuner standby).
NOTE
• Holding down the [SOUND/TUNER] button for ve seconds or more will turn on and off the Auto Power Off function (page 19)
instead of switching the instrument to Tuner mode.
2.
Tune the SILENT Cello™ until the name of the note that you want to tune to appears in the display.
NOTE
• In Tuner mode, sound from the SILENT Cello™ is not output.
3.
The string is in tune when only the center indicator lights.
Pitch is low. In tune Pitch is high.
4.
Briey press the [SOUND/TUNER] button to return to Play mode.
NOTE
• After pressing the [SOUND/TUNER] button, it may take a few seconds for the recognized note name to be displayed.
• If the tuning is continuously adjusted, the note name and indicators may not be able to keep up with the changes in pitch. When
tuning, adjust and pause to check the sound in increments.
• It may not be possible to measure sounds that contain many harmonics or sounds that decay quickly.
● Calibration (Changing the Reference Pitch)
The tuner’s reference pitch of A can be set within the range of 438 Hz to 445 Hz (default setting: 442 Hz).
1.
In Tuner mode, hold down the [SOUND/TUNER] button for one second or more to display the last digit of
the current reference pitch for three seconds.
2.
Each press of the [SOUND/TUNER] button while the last digit is displayed switches the reference pitch (in
1 Hz steps) as follows:
442 Hz (default setting)
g
443 Hz
g
444 Hz
g
445 Hz
g
438 Hz
g
439 Hz
g
440 Hz
g
441 Hz
g
442 Hz
g
...
3.
After selecting the desired reference pitch and waiting for about three seconds, the pitch is conrmed, the
display goes off, and the tuner returns to normal Tuner mode.
NOTE
• The calibration setting is retained even when the instrument is turned off.
• If the button is not pressed for more than three seconds during the calibration procedure, the pitch will be conrmed, and the instrument
will automatically return to normal Tuner mode. To continue specifying the setting, start the procedure again from step 1.
SVC300F
Owner’s Manual
• 19
Basic Operations
■ Enabling/Disabling the Auto Power Off Function
In order to prevent unnecessary power consumption, this instrument has a built-in Auto Power Off function that
automatically turns off the instrument if no sound is produced for 20 minutes or longer. Even if the instrument is turned off
by the Auto Power Off function, it can be turned on again with the power switch.
NOTE
• The SILENT Cello™ is shipped from the factory with the Auto Power Off function turned on (enabled).
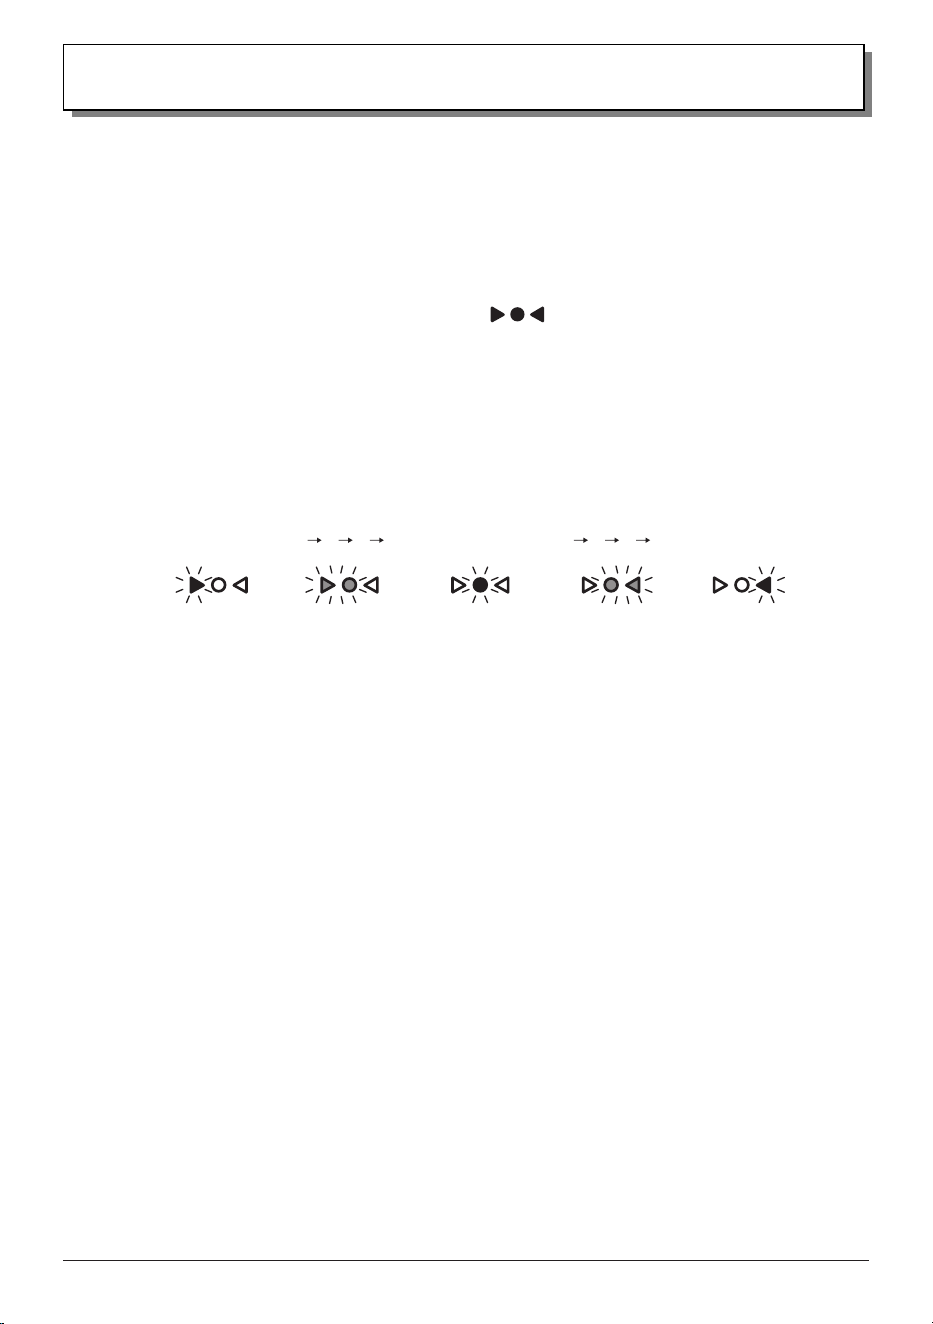
● Switching Between Turning On (Enabling)/Off (Disabling) the Auto Power Off Function
With the instrument turned on (Play mode), hold down the [SOUND/TUNER] button for five seconds or more to switch
between turning the function on (enabled) and off (disabled).
• If the above operation is performed while the function is turned on (enabled), all display indicators light
up in red, then go off one by one, and the function is turned off (disabled).
Auto power off
function
turned off
(disabled)
Play mode
• If the above operation is performed while the function is turned off (disabled), each display indicator
lights up in red one by one, and the function is turned on (enabled).
Auto power off
function
turned on
(enabled)
Play mode
NOTE
• The last setting specied is retained by the instrument. If the instrument is turned on after this function has been turned off (disabled),
the display indicators show that this function is turned off (disabled), then switch to normal Play mode (lit in green).
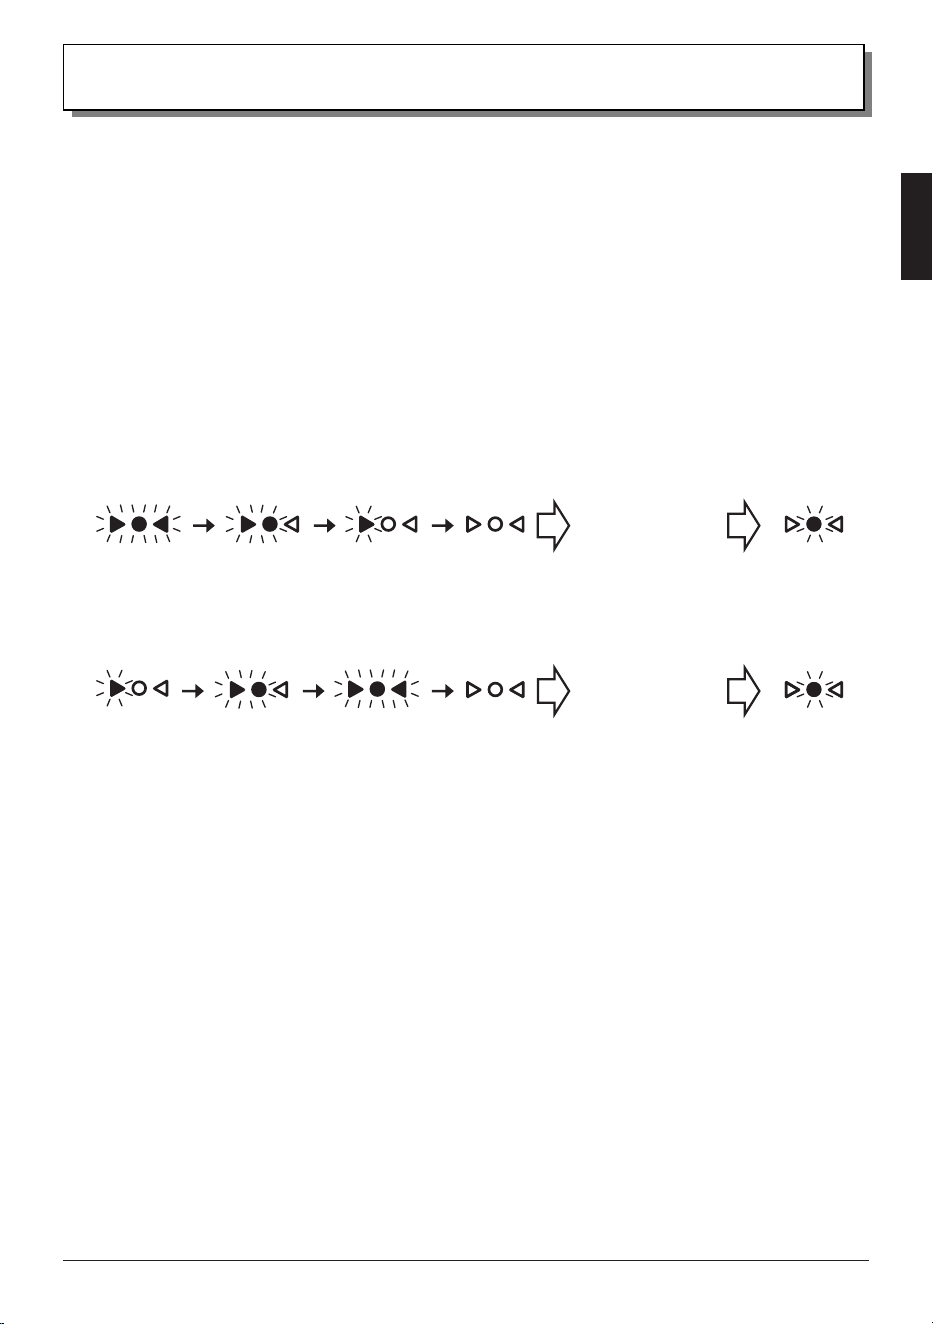
■ Ending Play
After use, turn off the instrument by sliding the power switch to the standby position.
The process is complete when the display indicators flash, and then turn off.
NOTE
• Before turning the instrument on again, wait until the display indicators have nished ashing, and then turn off (as described above)
before sliding the power switch.

20 • SVC300F
Owner’s Manual
Advanced Operations
■ Outputting Sound to an External Device
The [LINE OUT] jack (on the rear panel) is for outputting a mono audio signal to an external device. By connecting the
instrument to an external device (using an audio cable), you can use it in some of these convenient and powerful ways:
• Playing at home or on stage with the sound output to your amp/speakers
• Connecting to a mixer/recorder/audio equipment to record your performance or amplify the sound on
stage
• Connecting to a smart device/computer via an audio interface to record or livestream your performances
1.
Turn off all devices to be connected.
2.
Refer to the sample setup below and use a cable to connect this instrument with an external device.
At this time, keep the volume of all devices low.
3.
After connections are complete, turn on the devices in the following order: this instrument, then the
external device.
4.
Adjust the volume by raising the volume of devices in the following order: this instrument, then the
external device.
Caution
• Before connecting the SILENT Cello™ to any external device, make sure that all related devices are turned off. Set the
volume of any external audio sources to the minimum level before connecting any device. High volume settings could
cause damage to the equipment and your hearing.
• Be sure not to disconnect a cable while the device is turned on. Otherwise, the device may be damaged, or your ears may
suffer a substantial shock.
• Be careful not to step on cables. Otherwise, the cables may break, devices may be damaged, and this may cause a
substantial shock to your ears.
Rear
Standard
mono plug
Powered speaker/
amplifier
Preamplifier
Mixer/
Recorder
Audio
interface
Smart device/
computer
* An audio interface is a device that
connects instruments, microphones,
etc., to a smart device/computer
via a USB port. This enables higher
quality audio transmission with
less degradation as compared to
connecting directly to the existing
analog input/output jacks of a smart
device/computer.
SVC300F
Owner’s Manual
• 21
Advanced Operations
Notice
• The signal from the SILENT Cello™ output jacks must NEVER be returned to the [AUX IN] jack, either directly or through external
equipment. Otherwise, feedback may occur and cause damage to the internal electronics.
• When connecting the instrument to external audio equipment, check the jack size and use a cable with a corresponding plug size, and
then properly insert the plug into the jack.
• When a powered speaker is connected to the [LINE OUT] jack, speakers with inadequate power ratings may distort due to the low
frequencies produced by the instrument. For sufcient headroom, use powered speakers with a power rating of 50 watts or more.
• If the sound becomes distorted, rotate the [VOLUME] knob to the left to lower the volume.
NOTE
• Audio from the [AUX IN] jack is not output at the [LINE OUT] jack.
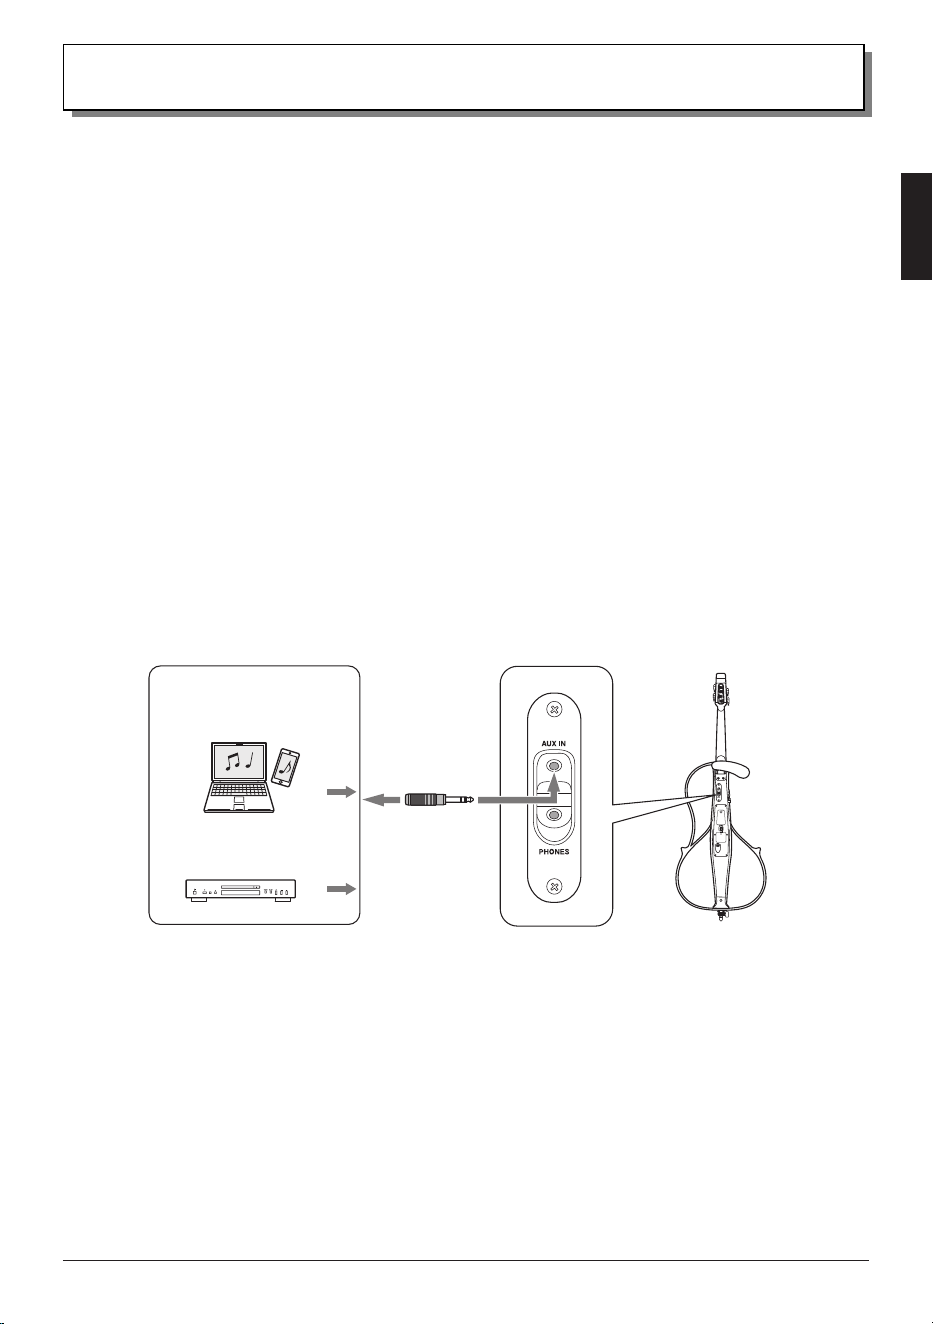
■ Playing Along with Music from a Smart Device, etc.
The [AUX IN] jack (on the rear of the instrument) can be used to connect an external stereo signal source.
By using an audio cable to connect the instrument to an audio device, such as a music player, or the output jack of a smart
device, you can practice with background music from that device.
1.
Use the [PHONES] knob to lower the headphone volume to its minimum.
2.
Refer to the sample setup below and use a cable to connect this instrument with an external device.
3.
Turn on the external device.
4.
While playing music on the external device, raise its volume as needed.
5.
Rotate the [PHONES] knob to adjust the volume to a comfortable level.
NOTE
• Audio from the [AUX IN] jack is not output at the [LINE OUT] jack.
Smart device/
computer
Audio device
Stereo mini
plug
Rear

22 • SVC300F
Owner’s Manual
Specications
* This document is based on the latest specifications at the time of publication. The latest version can be down-
loaded from the Yamaha website.
Neck: Maple
Body: Spruce/Maple
Fingerboard: Ebony
Bridge: Maple (Aubert)
Tuning Pegs: Worm Gear Type
Frame: Molded plywood
Tailpiece: Four adjusters (Wittner)
Strings: Ball-end type (Helicore)
Sensor: Piezo pickup
Controls:
• POWER (ON/Standby)
• VOLUME
• PHONES
• SOUND/TUNER
• BLEND
• REVERB (ROOM/HALL)
• TREBLE
• BASS
Input/Output Connectors:
• LINE OUT (6.3 mm mono standard)
• PHONES (3.5 mm stereo mini)
• AUX IN (3.5 mm stereo mini)
• DC-IN
Power Supply:
• Batteries: Two AA alkaline batteries (LR6) or
nickel-metal hydride batteries
• Power adaptor (sold separately):
Yamaha PA-130 (Output: DC12V/700mA)
Power Consumption: 1.3 W
Standby Power Consumption: 0.1 W
Battery Life (Continuous Use):
• Using alkaline batteries: 7 hours 30 minutes
•
Using nickel-metal hydride batteries (2,500 mAh):
9 hours 30 minutes
* Differs depending on the conditions of use.
String Length: 690 mm
Dimensions (without chest support):
1,266 mm (L) × 430 mm (W) × 243 mm (H)
Weight (with batteries and chest support):
3.4 kg

Deutsch
Français
Nederlands
Español
Italiano
Português
Ελληνικά
Svenska
Norsk
Dansk
Suomi
Polski
Čeština
Magyar
Eesti
Latviešu
Lietuvių
Slovenčina
Slovenščina
Български
Română
English
Hrvatski
Türkçe
Important Notice: Power management information for customers in European Economic Area (EEA),
Switzerland and Turkey
Remarque importante : Informations sur la gestion de l'alimentation pour les clients de l'Espace
économique européen (EEE), de Suisse et de Turquie
Yamaha-Produkte sind mit einer Power-Management-Funktion ausgestattet. Bei einigen Produkten können Sie diese Funktion ausschalten oder
die Zeitdauer, die verstreicht, bis das Instrument ausgeschaltet oder in Bereitschaft versetzt wird, verlängern. In diesen Fällen erhöht sich der
Energieverbrauch.
Les produits Yamaha sont équipés d’une fonction de gestion de l’alimentation. Certains produits vous permettent de désactiver cette fonction ou
d'allonger le délai avant la mise hors tension ou la mise en veille. Dans ces cas, la consommation d’énergie augmente.
Yamaha-producten zijn uitgerust met een energiebeheerfunctie. Bij sommige producten kunt u die functie uitschakelen of de tijd verlengen die
verstrijkt voordat de stroom wordt uitgeschakeld of in stand-by wordt gezet. In deze gevallen zal het energieverbruik toenemen.
Los productos Yamaha están equipados con una función de administración de energía. Algunos productos permiten desactivar esa función o
ampliar el tiempo que transcurre antes de apagar la alimentación o poner el producto en modo de espera. En estos casos, el consumo de energía
aumentará.
I prodotti Yamaha sono dotati di una funzione di gestione dell'alimentazione. Alcuni prodotti consentono di disattivare tale funzione o di
estendere il periodo di tempo che trascorre prima che l'alimentazione venga spenta o impostata in standby. In questi casi, il consumo energetico
aumenterà.
Yamaha products are equipped with a power management function. Some products allow you to disable that function, or to extend the amount of
time that elapses before the power is turned off or set to standby. In these cases, energy consumption will increase.
Os produtos Yamaha são equipados com uma função de gerenciamento de energia. Alguns produtos permitem desativar essa função ou
estender o tempo decorrido antes de se desligar ou entrar em standby. Nesses casos, o consumo de energia aumentará.
Τα προϊόντα της Yamaha είναι εξοπλισμένα με μια λειτουργία διαχείρισης ισχύος. Ορισμένα προϊόντα σάς δίνουν τη δυνατότητα να
απενεργοποιείτε αυτή τη λειτουργία ή να επεκτείνετε το χρονικό διάστημα μέχρι την απενεργοποίηση ή τη θέση σε κατάσταση αναμονής. Σε
αυτές τις περιπτώσεις, η κατανάλωση ενέργειας θα αυξηθεί.
Yamaha-produkterna är utrustade med en energihanteringsfunktion. För vissa produkter kan du inaktivera den funktionen eller för att förlänga
tiden som förflutit innan strömmen stängs av eller ställs i vänteläge. I dessa fall ökar energiförbrukningen.
Yamahas produkter har en strømstyringsfunktion. På nogle produkter er det muligt at deaktivere denne funktion eller at forlænge den tid, der går,
før der slukkes for strømmen, eller sættes på standby. I disse tilfælde vil strømforbruget stige.
Yamaha-tuotteet on varustettu virranhallintatoiminnolla. Joissakin tuotteissa voit poistaa toiminnon käytöstä tai pidentää aikaa, joka kuluu ennen
virran katkaisemista tai valmiustilaan asettamista. Näissä tapauksissa energiankulutus kasvaa.
Produkty Yamaha są wyposażone w funkcję zarządzania energią. Niektóre produkty umożliwiają wyłączenie tej funkcji lub wydłużenie czasu,
jaki upływa do wyłączenia zasilania lub przejścia w tryb gotowości. W takich przypadkach zużycie energii wzrośnie.
Produkty Yamaha jsou vybaveny funkcí správy napájení. Některé produkty umožňují tuto funkci zakázat nebo prodloužit dobu, která má
uběhnout před vypnutím napájení nebo pohotovostním režimem. V těchto případech se zvýší spotřeba elektřiny.
A Yamaha termékek energiamenedzsment funkcióval vannak ellátva. Egyes termékek lehetővé teszik, hogy letiltsa ezt a funkciót, vagy
meghosszabbítsa a kikapcsolás vagy készenléti állapotba helyezés előtt eltelt időt. Ezekben az esetekben az energiafogyasztás növekedni fog.
Yamaha tooted on varustatud toitehalduse funktsiooniga. Mõned tooted võimaldavad teil selle funktsiooni keelata või pikendada aega, mis
möödub enne toite väljalülitamist või ooterežiimi seadmist. Sellistel juhtudel suureneb energiattarbimine.
Yamaha izstrādājumi ir aprīkoti ar barošanas pārvaldības funkciju. Dažiem izstrādājumiem šo funkciju var atspējot vai paildzināt laiku, kam
jāpaiet pirms barošanas atslēgšanas vai pāriešanas gaidstāves režīmā. Šādā gadījumā palielināsies enerģijas patēriņš.
„Yamaha“ gaminiuose yra energijos sąnaudų valdymo funkcija. Kai kurie gaminiai leidžia išjungti šią funkciją arba pratęsti laiką, praėjusį prieš
išjungiant maitinimą arba įjungiant budėjimo režimą. Tokiais atvejais energijos suvartojimas padidės.
Produkty spoločnosti Yamaha sú vybavené funkciou správy napájania. Niektoré produkty vám umožňujú túto funkciu vypnúť alebo predĺžiť čas,
po uplynutí ktorých sa napájanie vypne alebo nastaví do pohotovostného režimu. V takýchto prípadoch sa zvýši spotreba energie.
Yamahini izdelki imajo funkcijo upravljanja z napajanjem. Nekateri izdelki vam omogočajo, da onemogočite to funkcijo ali podaljšate čas, ki mora
preteči, preden se napajanje izklopi ali nastavi v stanje pripravljenosti. V teh primerih se bo poraba energije povečala.
Продуктите на Yamaha са снабдени с функция за управление на захранването. Някои продукти ви позволяват да забраните тази
функция или да удължите времето, което ще изтече, преди захранването да се изключи или да се настрои в режим на готовност.
В тези случаи консумацията на енергия ще се увеличи.
Produsele Yamaha sunt echipate cu o funcție de gestionare a energiei. Unele produse vă permit să dezactivați această funcție sau să prelungiți
perioada de timp care trece înainte ca alimentarea să fie oprită sau setată în standby. În aceste cazuri, consumul de energie va crește.
Yamaha proizvodi opremljeni su funkcijom upravljanja potrošnjom energije. Neki vam proizvodi omogućuju onemogućavanje te funkcije ili
produljenje vremena koje protekne prije isključivanja napajanja ili postavljanja u stanje pripravnosti. U tim će se slučajevima povećati potrošnja
energije.
Yamaha ürünlerinde güç yönetimi işlevi vardır. Bazı ürünler, bu işlevi devre dışı bırakmanıza veya güç kapatılmadan ya da bekleme moduna
alınmadan önce geçen süreyi uzatmanıza olanak tanır. Bu gibi durumlarda, enerji tüketimi artacaktır.
(574-M06 EU erp 01)
制造商 :雅马哈株式会社
制造商地址 :日本静冈县滨松市中央区中泽町 10-1
进口商 :雅马哈乐器音响(中国)投资有限公司
进口商地址 :上海市静安区新闸路 1818 号云和大厦
2楼
原产地 :日本
VHM1400
Yamaha Global Site
https://www.yamaha.com/
Yamaha Downloads
https://download.yamaha.com/
〒430-8650 静岡県浜松市中央区中沢町 10-1
10-1 Nakazawa-cho, Chuo-ku,
Hamamatsu, 430-8650 Japan
© 2025 Yamaha Corporation
Published 07/2025
2025 年 7 月 发行
IPID-A0
