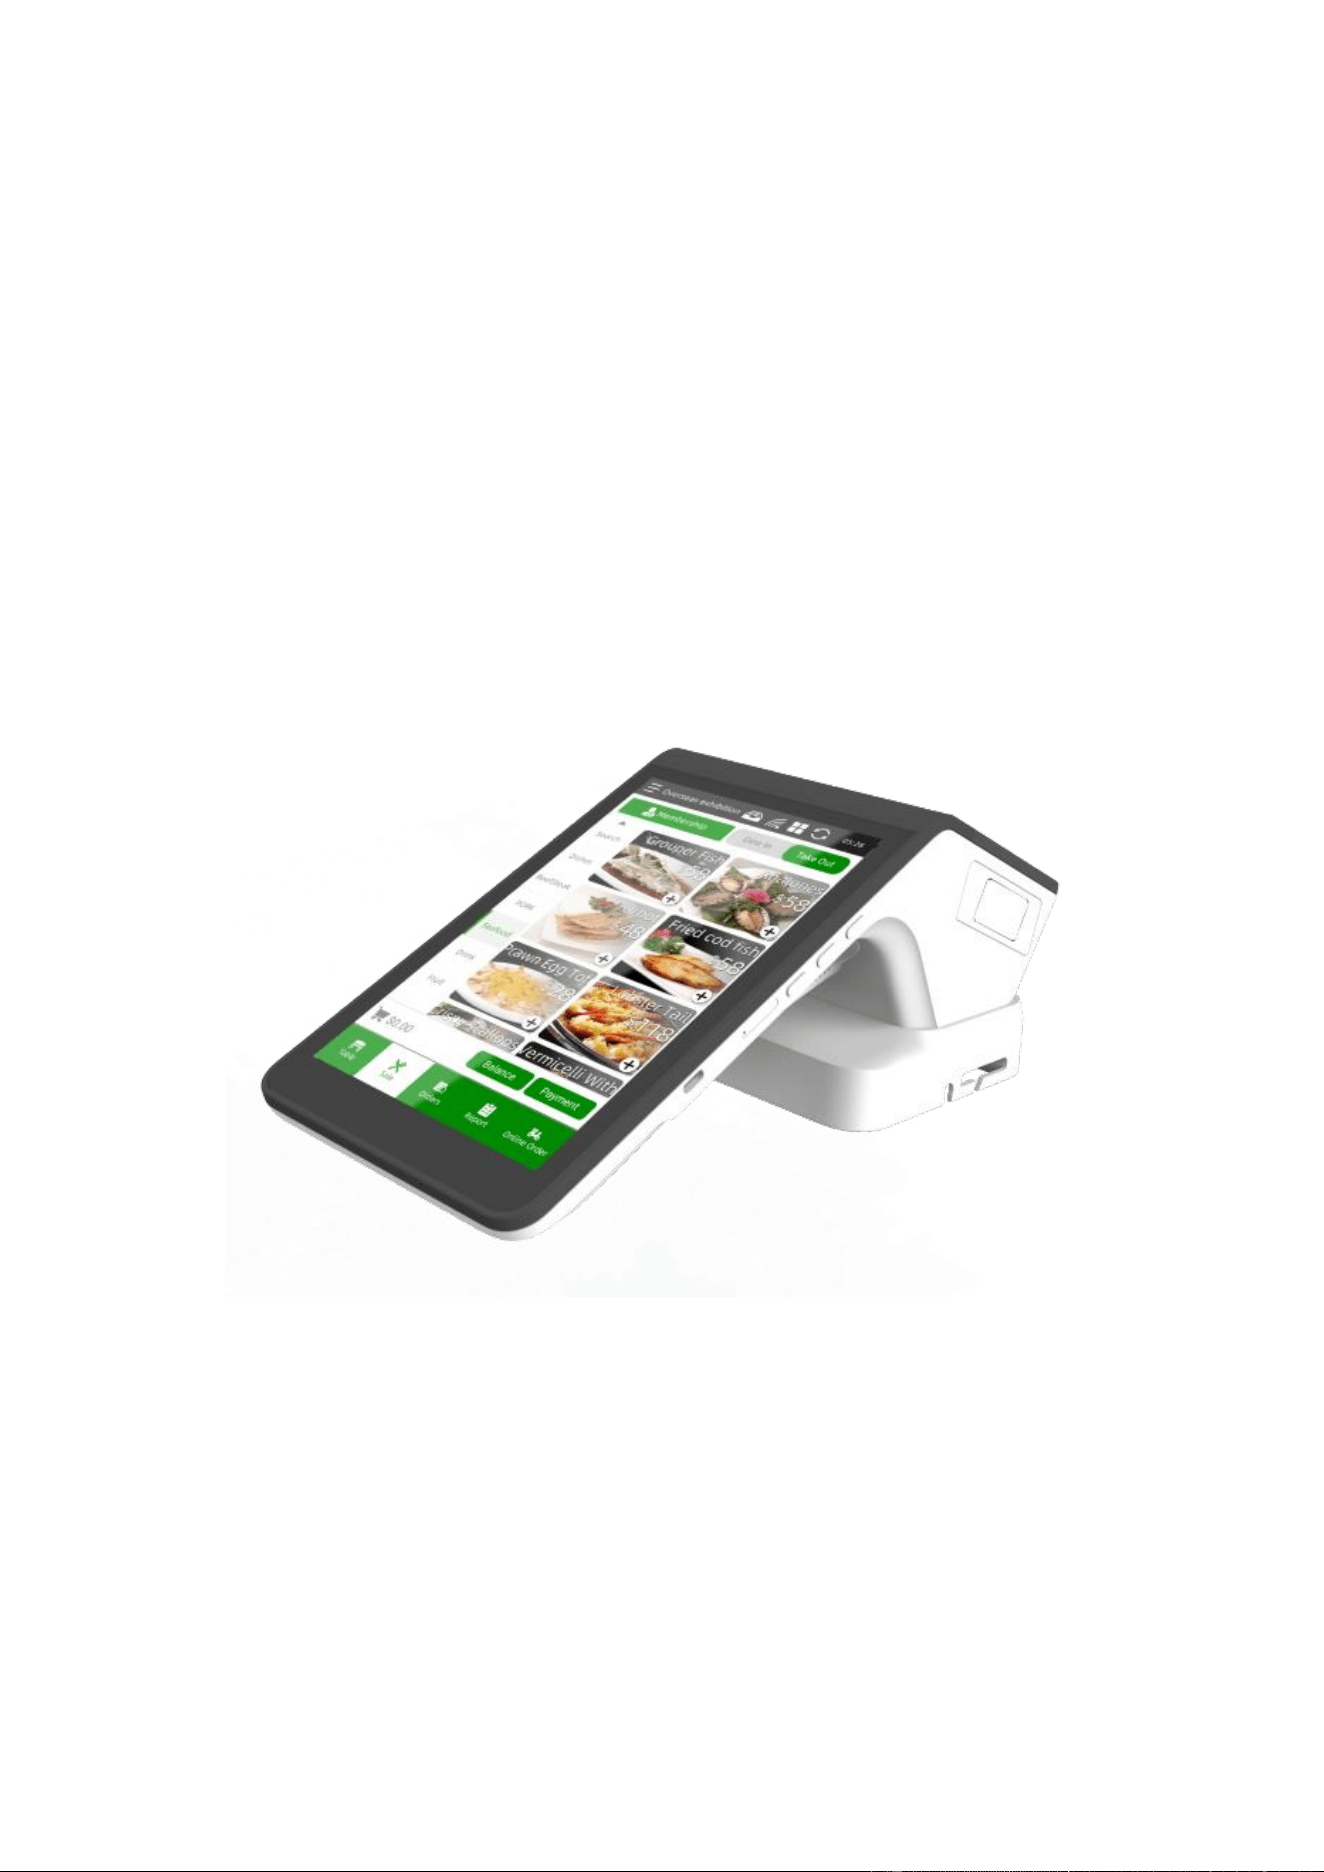
AOCX SERIES ALL-IN-ONE TOUCH POS
USER MANUAL
Pinnacle Technology Corp.


Important Safety Information
⚫ Please read these safety instructions carefully.
⚫ Keep this user manual for later reference.
⚫ This product meets the relative requirements of the national standard IEC 60950:2001
“Information technical equipment Security”.
⚫ Before turning on the machine, please make sure that the electric power meets the
requirements, (such as the electrical pressure and frequency), and that your electrical
outlet is really connected to the ground.
⚫ Thunder can hurt this product, even your personal security, so please pull out the
network cable, electrical cable and others connecting external on the thunder days.
⚫ The non-experts or non-authorized persons please don’t open the machine shell.
⚫ In the circumstance that the power system hasn’t been cut off, please do not plug in and
out any components and connections (except for USB device).
⚫ Please don’t spatter any sundries or liquor into the machine; please don’t slip the heat
releasing holes, or it may cause short circuit and therefore may cause fire or get an
electric shock.
⚫ Incorrectly changing the lithium battery on the mainboard and the UPS lithium battery
in the machine may cause a blast, so please make sure installing and changing the
lithium batteries under the instruction of the expert service personnel.
⚫ Please lay this product packed in the 10-35℃ environment for at least 2 hours before
turning on if it was stored in less than 10℃ temperature environment, thus avoiding the
hurt on PC due to a big change of environmental temperature.
⚫ For PLUGGABLE EQUIPMENT, the socket-outlet shall be installed near the
equipment and shall be easily accessible.
⚫ All external devices’ power consumption should be less than 1.5A.
⚫ Don’t replace the battery with wrong type, or maybe it will explode. Please dispose
those used battery by rule.
Cautions
⚫ Please use the system shutdown method to power off the machine, and please don’t pull
the plug or shut off the power directly, or it will affect the normal use of the machine.
⚫ To avoid the damage from high and low voltage to the machine, please pull the plug or
shut off the power of the plug after shutdown.
⚫ Please do not use damaged power cord, damaged power plug or loose power socket, or
it may cause fire or an electric shock.
⚫ Please do not plug in and out the power plug with wet hand, or it may cause an electric
shock.
⚫ Please do not connect more than one power plug of the electronic equipment to a wall
socket, or it may cause fire because of overheating of the wall socket, meanwhile, it
may cause power interference, thus leading to the equipment working abnormal.
⚫ Please make sure the power plug is plugged in tightly, or it may cause fire.
⚫ Please do not excessively bend or twist the power cord and please avoid placing heavy
objects on the power cord, or it may cause damage to the power cord, thus causing fire
or an electric shock.
⚫ Please make the machine and the power cord be away from the heater, or it may cause

fire or an electric shock.
⚫ If the pins of the power cord or the wall socket are with dust, please use the dry cloth
to wipe off.
⚫ Please do not disconnect the power cord when the machine is running, or the machine
may be damaged.
⚫ Please be sure to only use the power cord supplied by our company.
⚫ Please be sure to unplug the power plug from the wall socket by seizing the power plug
instead of grasping the power cord.
⚫ Please do not disassembly, repair or modify the machine by yourself. If it needs
repairing, please contact us.
⚫ Please do not place any goods on the machine or strike it.
⚫ When carrying the machine, please do not let it fall, otherwise it may lead to its
malfunction or personal injury.
⚫ Please do not place the machine on the floor with the display facing down, or the display
may be damaged.
⚫ Please take and put the machine gently, otherwise it may lead to its malfunction or
personal injury.
⚫ If the machine makes abnormal noise, sends out burnt flavor or discharges smoke,
please shut off the power immediately, unplug the power plug and contact the service
center. Otherwise it may cause fire or an electric shock.
⚫ Please do not allow children to climb this product, otherwise the product might fall and
cause personal injury.
⚫ Please don’t use or place flammable spray or goods around the machine, otherwise it
may lead to explosion or fire.
Note: Please plug in electric supply if it is only 10% remaining capacity, otherwise the
printer will not be able to work. And the machine will be forced to power off if it is 5%
remaining capacity.
Maintenance of the Surface and Screen
⚫ Please use soft dry cloth to clean it.
1. Please clean the machine when it’s in the shutdown state.
2. Please do not use flammable substances (e.g., benzene, diluent) to clean this
product, otherwise it may cause product malfunctions.
3. Please do not use nails or sharp objects to scrape the screen, otherwise it may
scratch or damage the product.
4. In the process of cleaning the product, please do not spray water onto its surface.
If water enters the product, it may cause electric shock or product malfunctions.
⚫ Please use soft brush to sweep the dust on the corner of the screen.
Note: In order to ensure the normal use of products, please do the maintenance and
cleaning of the touch screen every day. Please keep the display of the products no
dust, no water and no oil as far as possible.
CONTENTS
1. General Description .............................................................................................................................. 1
1.1. Innovative Functions .................................................................................................................... 1
1.2. Excellent Functions ...................................................................................................................... 1
1.3. Packing List .................................................................................................................................. 1
1.4. Appearance ................................................................................................................................... 2
1.5. Dimension .................................................................................................................................... 3
1.6. Power On/Off ............................................................................................................................... 3
1.7. Specification ................................................................................................................................. 4
2. Connector Panels .................................................................................................................................. 5
3. Pin Definition of the Cash Drawer ...................................................................................................... 5
4. Installation Method .............................................................................................................................. 6
4.1. Thermal Paper Replacement ........................................................................................................ 6
4.2. Battery Replacement .................................................................................................................... 7
5. Test Instruction ..................................................................................................................................... 8
6. Setting Instruction ................................................................................................................................ 8
6.1. Network Settings .......................................................................................................................... 8
6.1.1. Wi-Fi .................................................................................................................................. 8
6.1.2. Ethernet .............................................................................................................................. 8
6.2. Storage Settings ............................................................................................................................ 9
6.3. Application Program Management .............................................................................................. 9
7. Analysis & Troubleshooting of Common Failures ............................................................................. 9
Important Note
For program, user manual and other information, please visit the website:
http://download.aclas.com/en/index1.html to download or consult.
WARNING: Operation of this equipment in a residential environment
could cause radio interference.

1
1. General Description
1.1. Innovative Functions
※ It features an all-in-one Arm POS design, integrating touch screen, printer, touch
customer display, WiFi, BT, NFC, camera, etc. into a device. Its performance is
sufficient to meet the complex business needs.
※ 4.3” touch customer display enables dual-screen linkage. As a result, the operations of
customers and merchants do not interfere with each other. The checkout information is
clearly visible at a glance, and convenient interaction is just a touch away.
※ Patent for Clearing Paper Jams by Pulling Three Times: Quickly clear paper jams
caused by misaligned paper loading or curled paper ends. Simply pull the cover lever
3 times to clear jams, which can prevent business suspension due to paper jams.
※ Equipped with a pogopin expansion base, it can easily expand various interfaces, such
as Ethernet, cash drawer, USB, etc., thus breaking through the limitations of interfaces,
meeting diverse external connection needs, and building a super-strong expansion
platform for various commercial applications.
※ With a frameless capacitive touchscreen, it offers a perfect touch experience,
comparable to that of high-end mobile phones, making effortless and rapid sales
possible.
※ Featuring a buyer protection function, it prevents competitive software from running
unauthorized applications via firmware flashing, thus safeguarding the interests of
device purchasers.
1.2. Excellent Functions
※ It supports applications in retail, service, gas stations and prepaid industries. It can
directly access remote databases via Webservice, establish a chain network, and enable
online upgrades.
※ Adopting 8” full-touch LCD screen with a unique vertical capacitive LCD display
(resolution: 800*1280), it can display more product items, making it more convenient
to view.
※ It is embedded with a 3.2Ah lithium battery UPS, which can continuously print 300
receipts or standby for 10 hours, preventing problems such as data loss and sales
interruption caused by sudden power outages.
※ With modular hardware design, it facilitates product upgrades and maintenance.
1.3. Packing List
Name
Quantity
AOC
1
Power Adapter
1
Power Cord
1
User Manual
1
2
1.4. Appearance
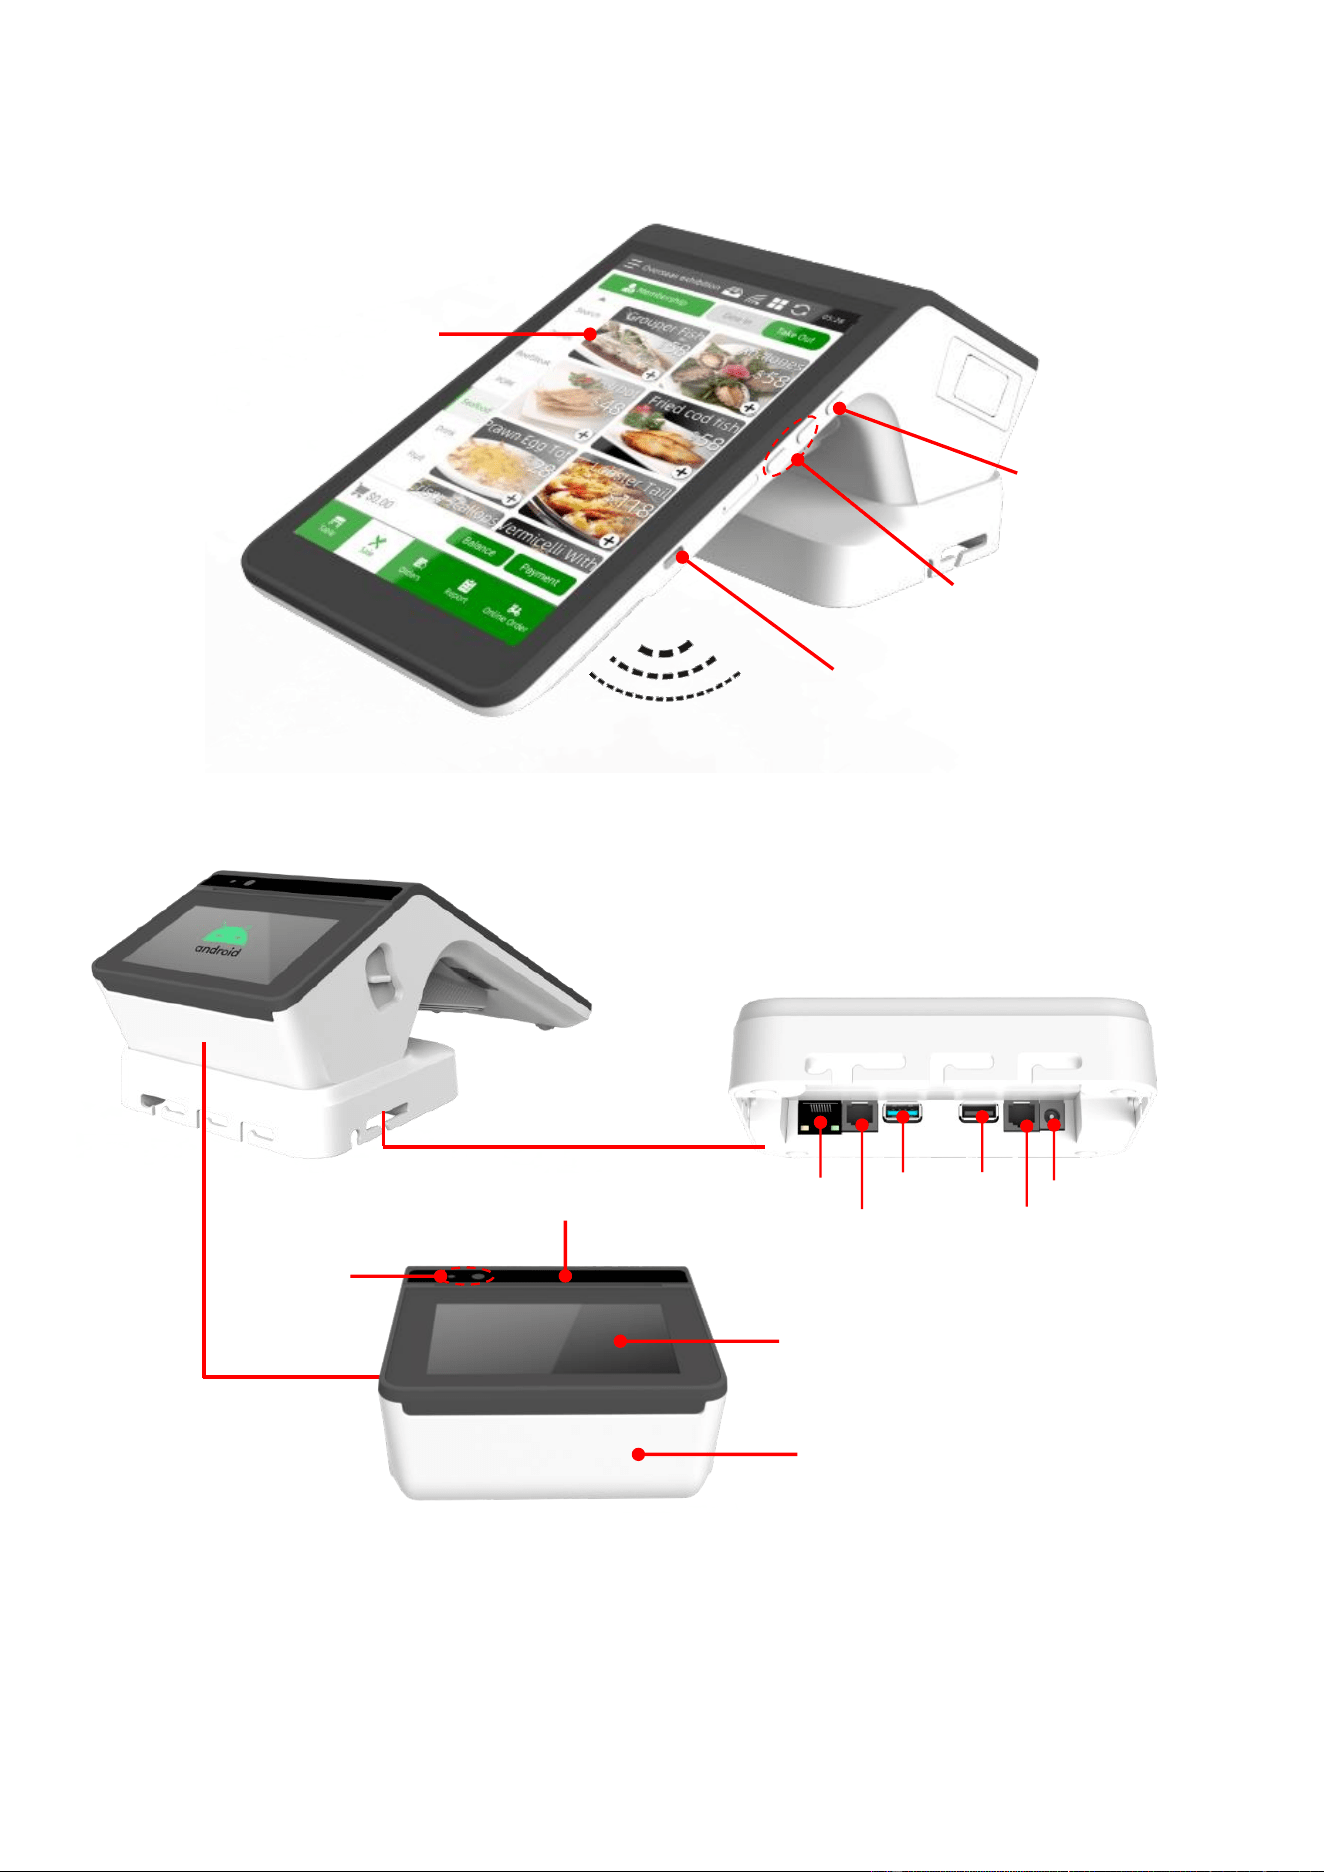
Note: pictures are for reference only.
Touch panel and TFT-LCD
Inbuilt WiFi/BT
Power button
Volume key
Type C
Ethernet
RS232
USB
USB
Drawer
DC13.8V
Camera
NFC
4.3” touch customer display
Printer
3
1.5. Dimension
1.6. Power On/Off
⚫ Power On
Press and hold the device’s side power button for 1.5 seconds to power on.
Note: Charge the device before powering on if it has been unused for a long time or
the battery is low.
⚫ Power Off
Press and hold the power button until a menu with the “Power off” option appears on the
screen, then tap “Power off” to shut down the device.
⚫ Sleep
Press the power button briefly (do not hold) to turn off the screen and put the device into
sleep mode.
To wake it, press the power button briefly— the screen will light up as the device
activates.
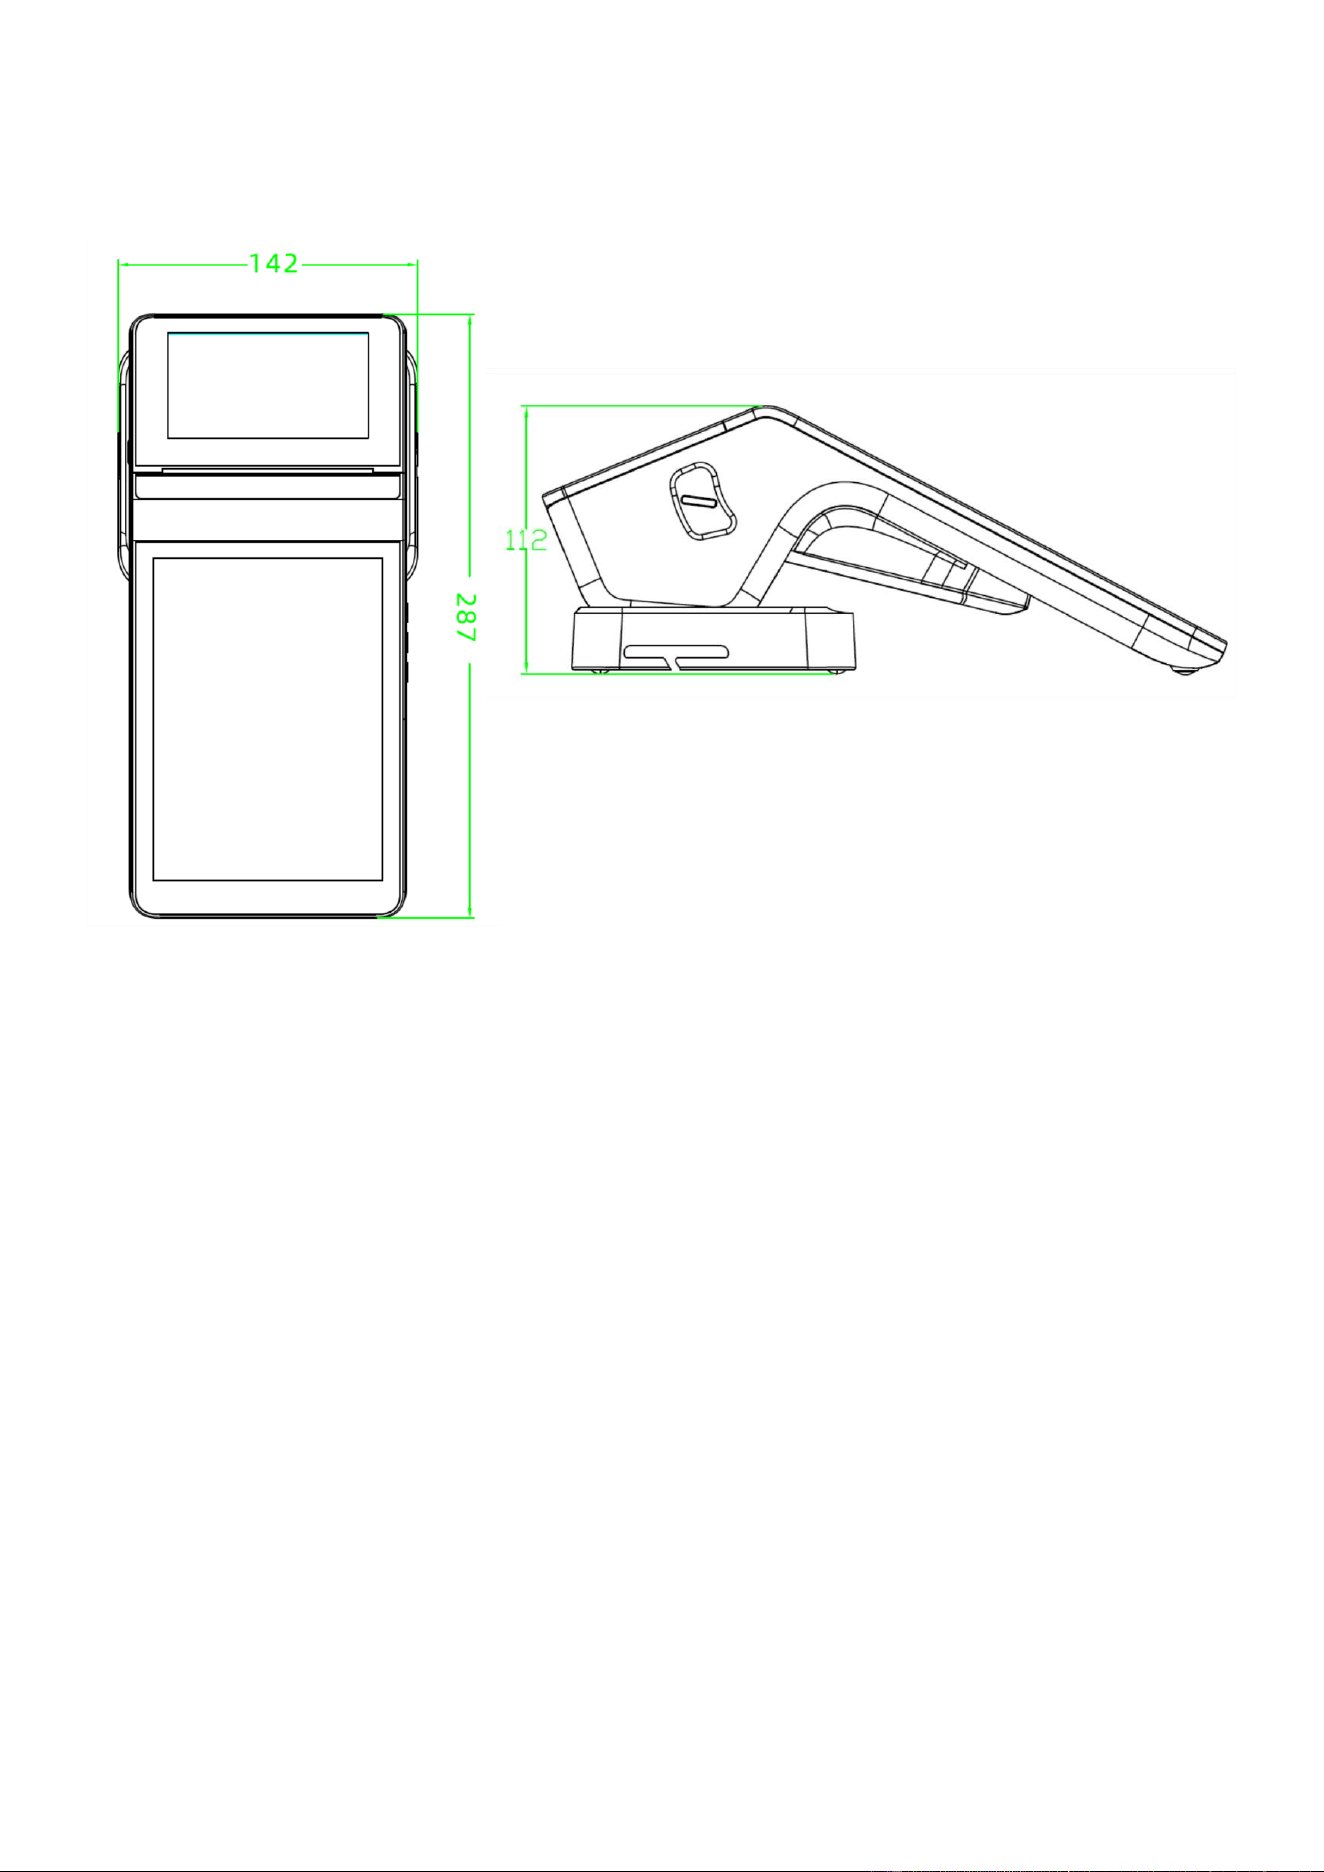
Unit: mm
4
1.7. Specification
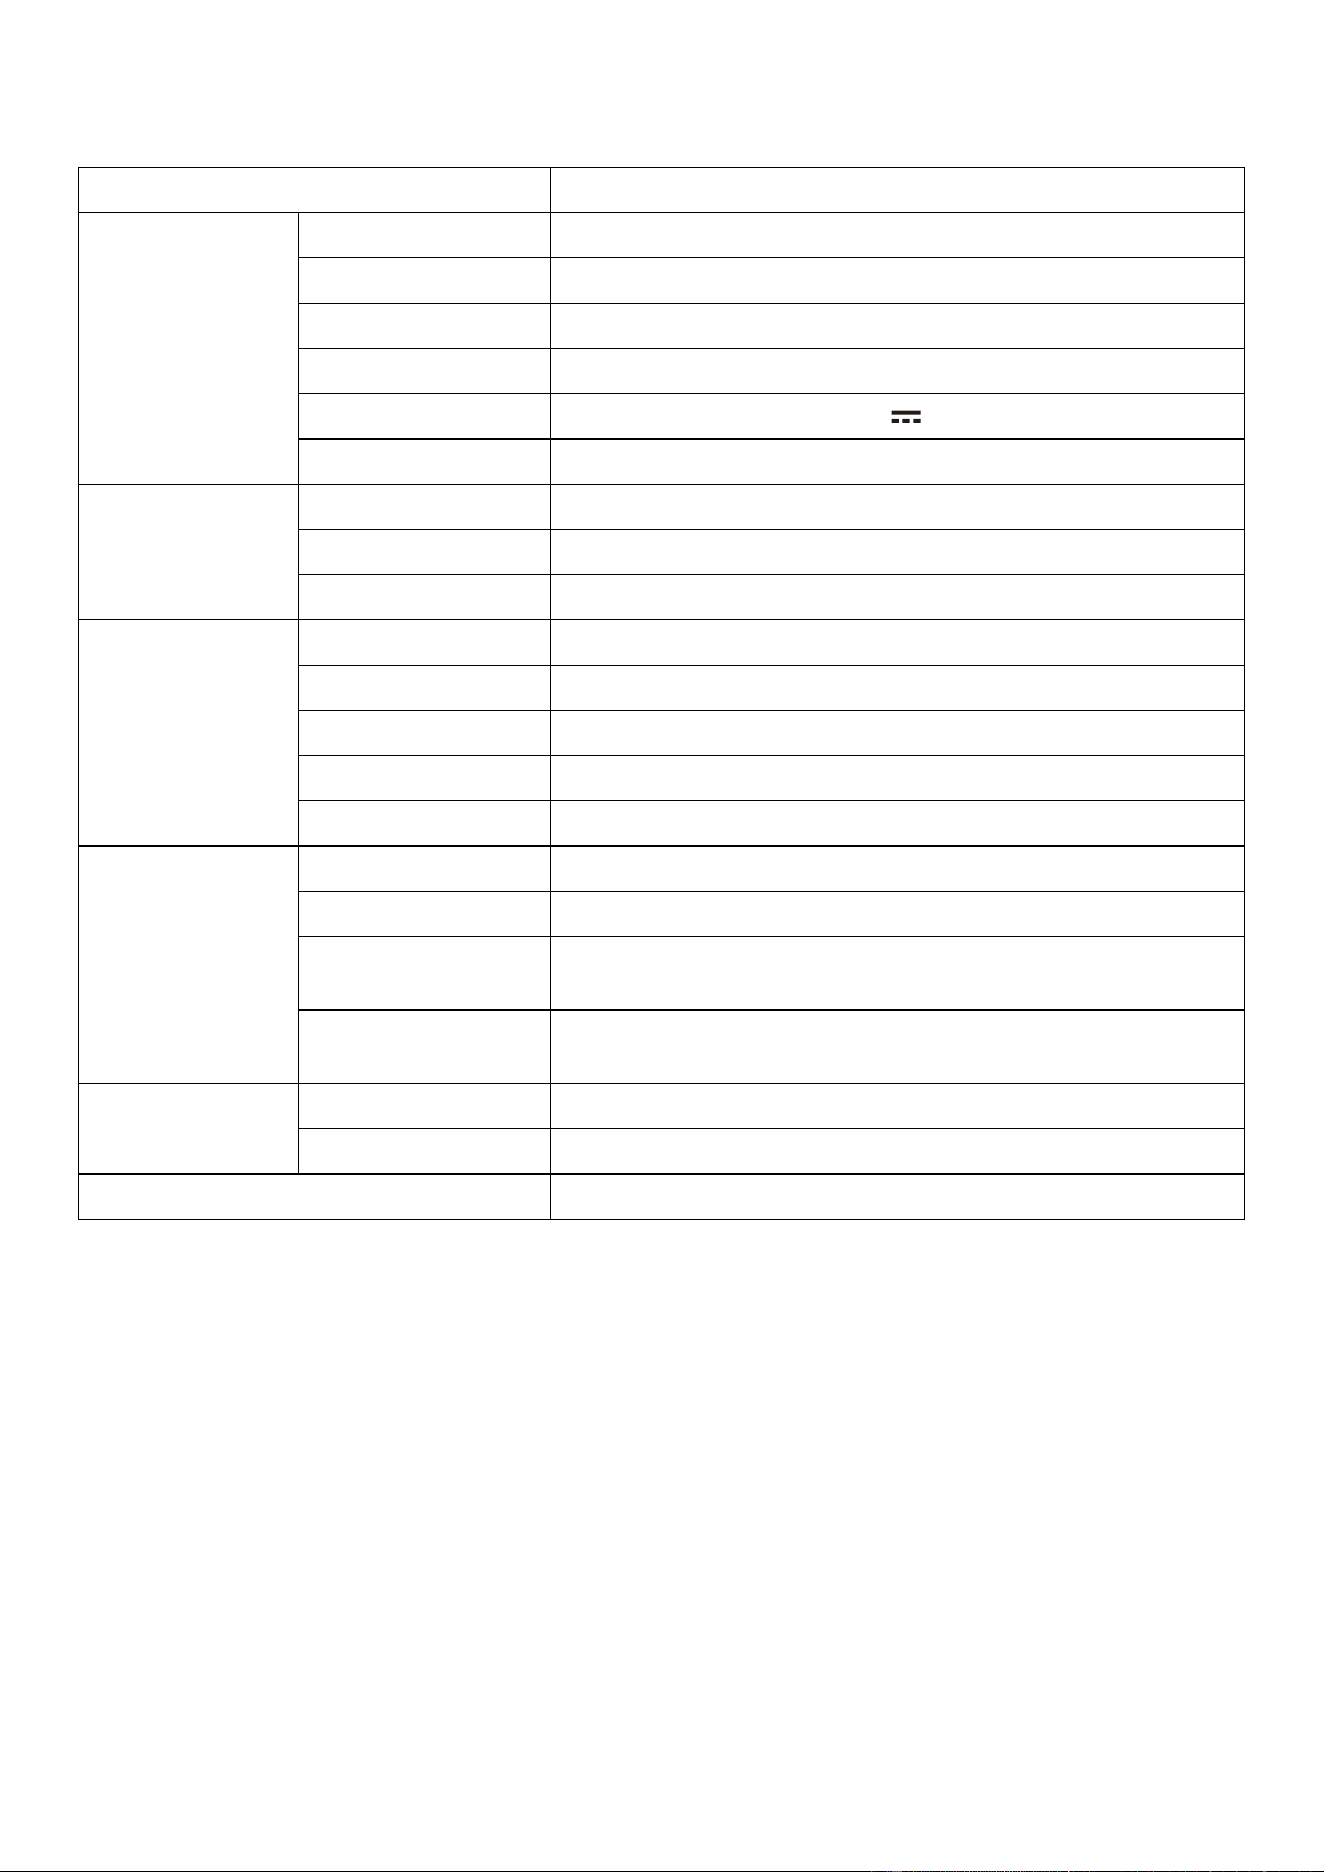
Model
AOCX
Host
Configuration
Processor
RK3568 Quad-core Cortex-A55 up to 2.0GHz
Memory
4GB
Storage
32GB
Operating system
Android 14.0
Power supply
13.8V 3.2A
Battery
7.4V, 3200mAh
Display
Operator display
8" TFT (800*1280)
Touch screen
Capacitive
Customer display
4.3” color screen (480*272; touch-enabled)
I/O Port
(On the base)
USB
USB2.0*2
Serial port
RJ12*1
Cash drawer
RJ12 *1
Ethernet port
RJ45 *1
SD card socket
Micro SD card socket *1
Peripherals
BT
Bluetooth 5.4
WiFi
IEEE 802.11a/b/g/n/ac/ax
NFC
ISO/IEC 14443 A&B, ISO/IEC 15693,
MIFARE 1K/4K, Sony FeliCa
Camera
5 mega-pixel, auto-focusing,
support 1D/2D code scanning
Printer
Thermal printer
3” with cutter (80mm*Φ50mm)
Printing speed
150mm/s
Dimensions
287mm*142mm*112mm
5
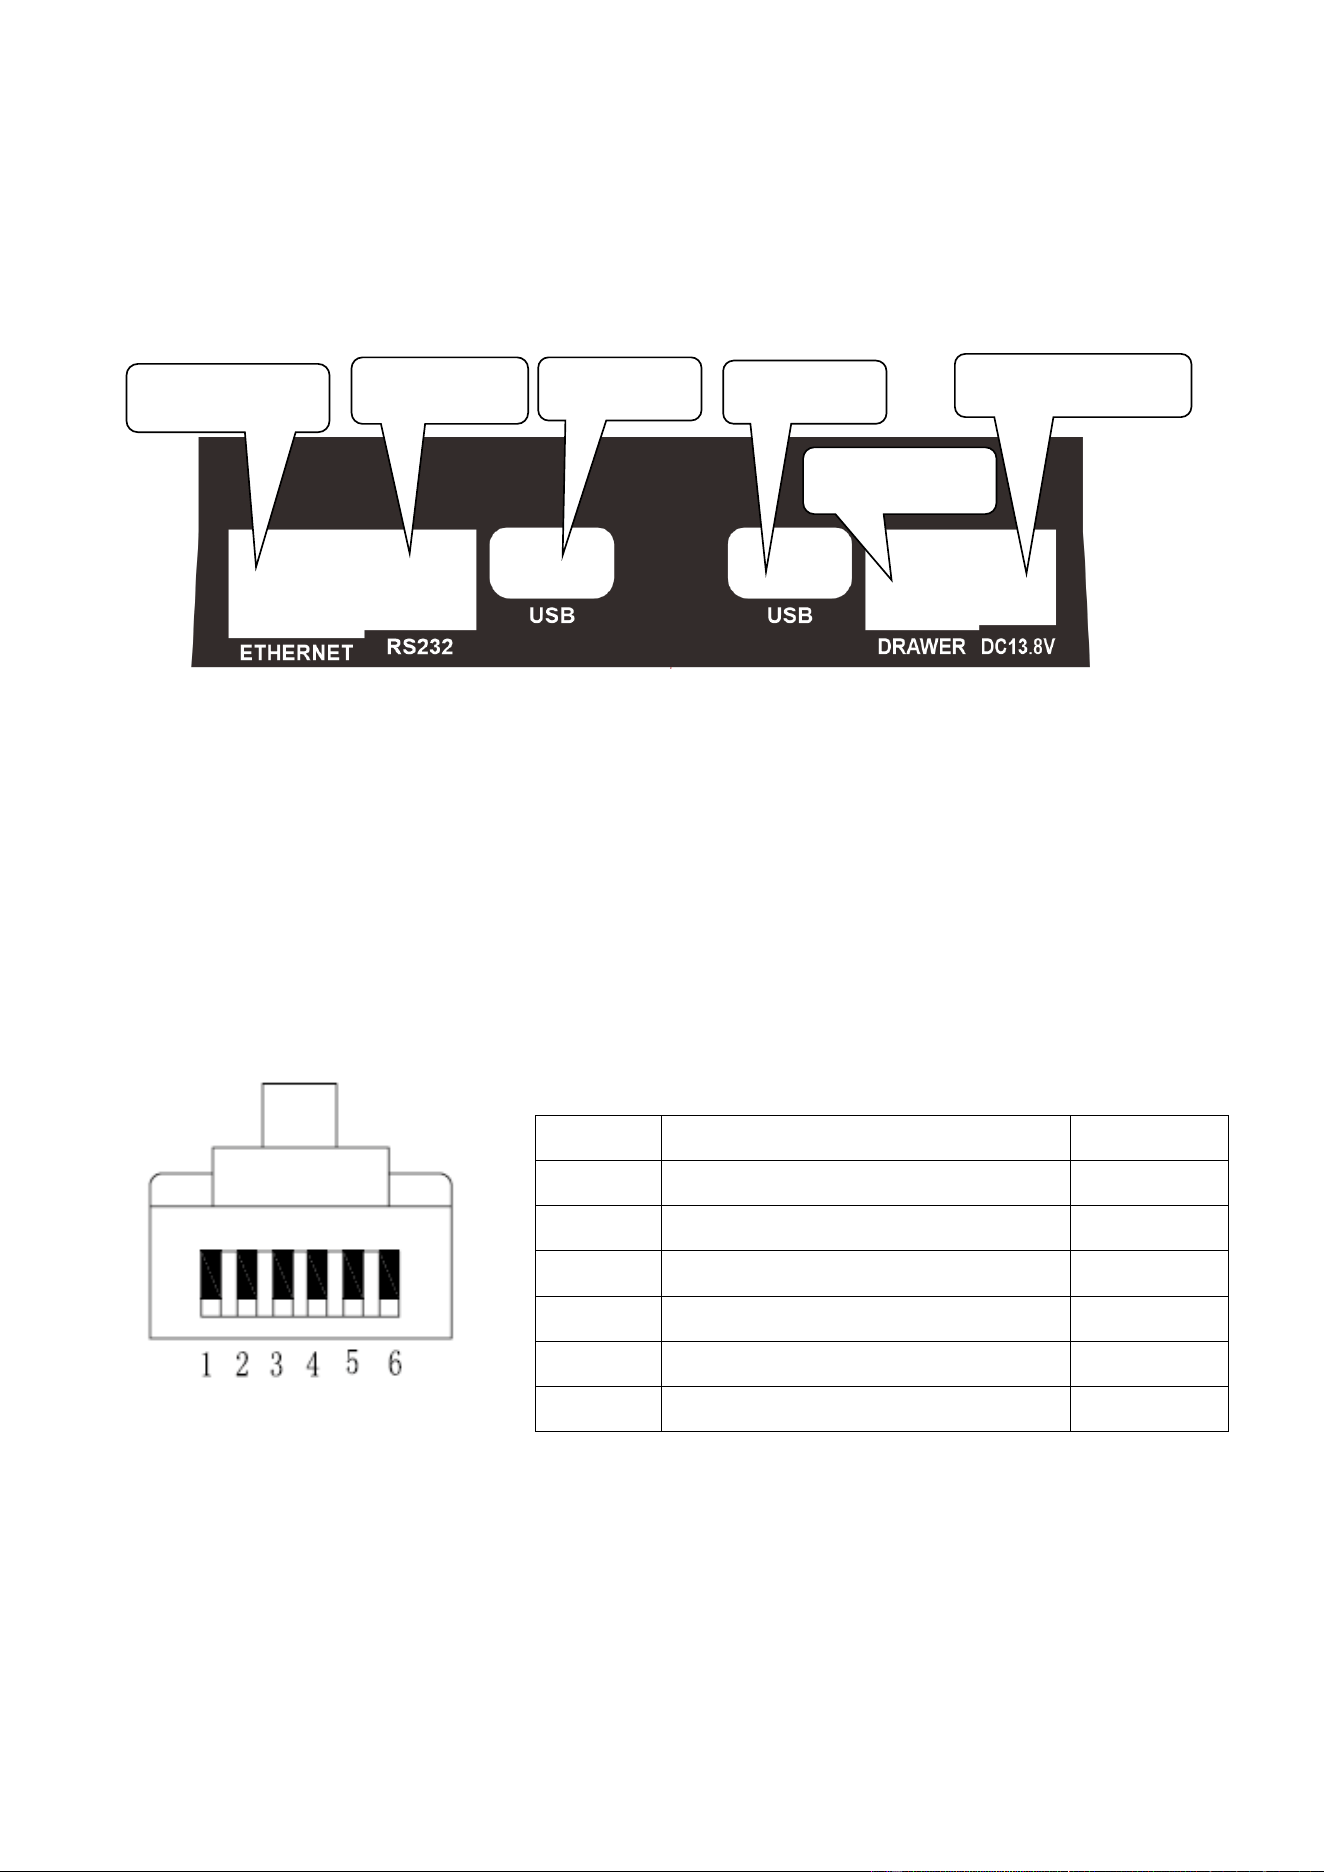
2. Connector Panels
Note: Drawer panel can only use to connect drawer. Please do not connect the
telephone line or other connecting lines; otherwise it may make telephone or its
terminal error.
Definition of Connector Panel 1:
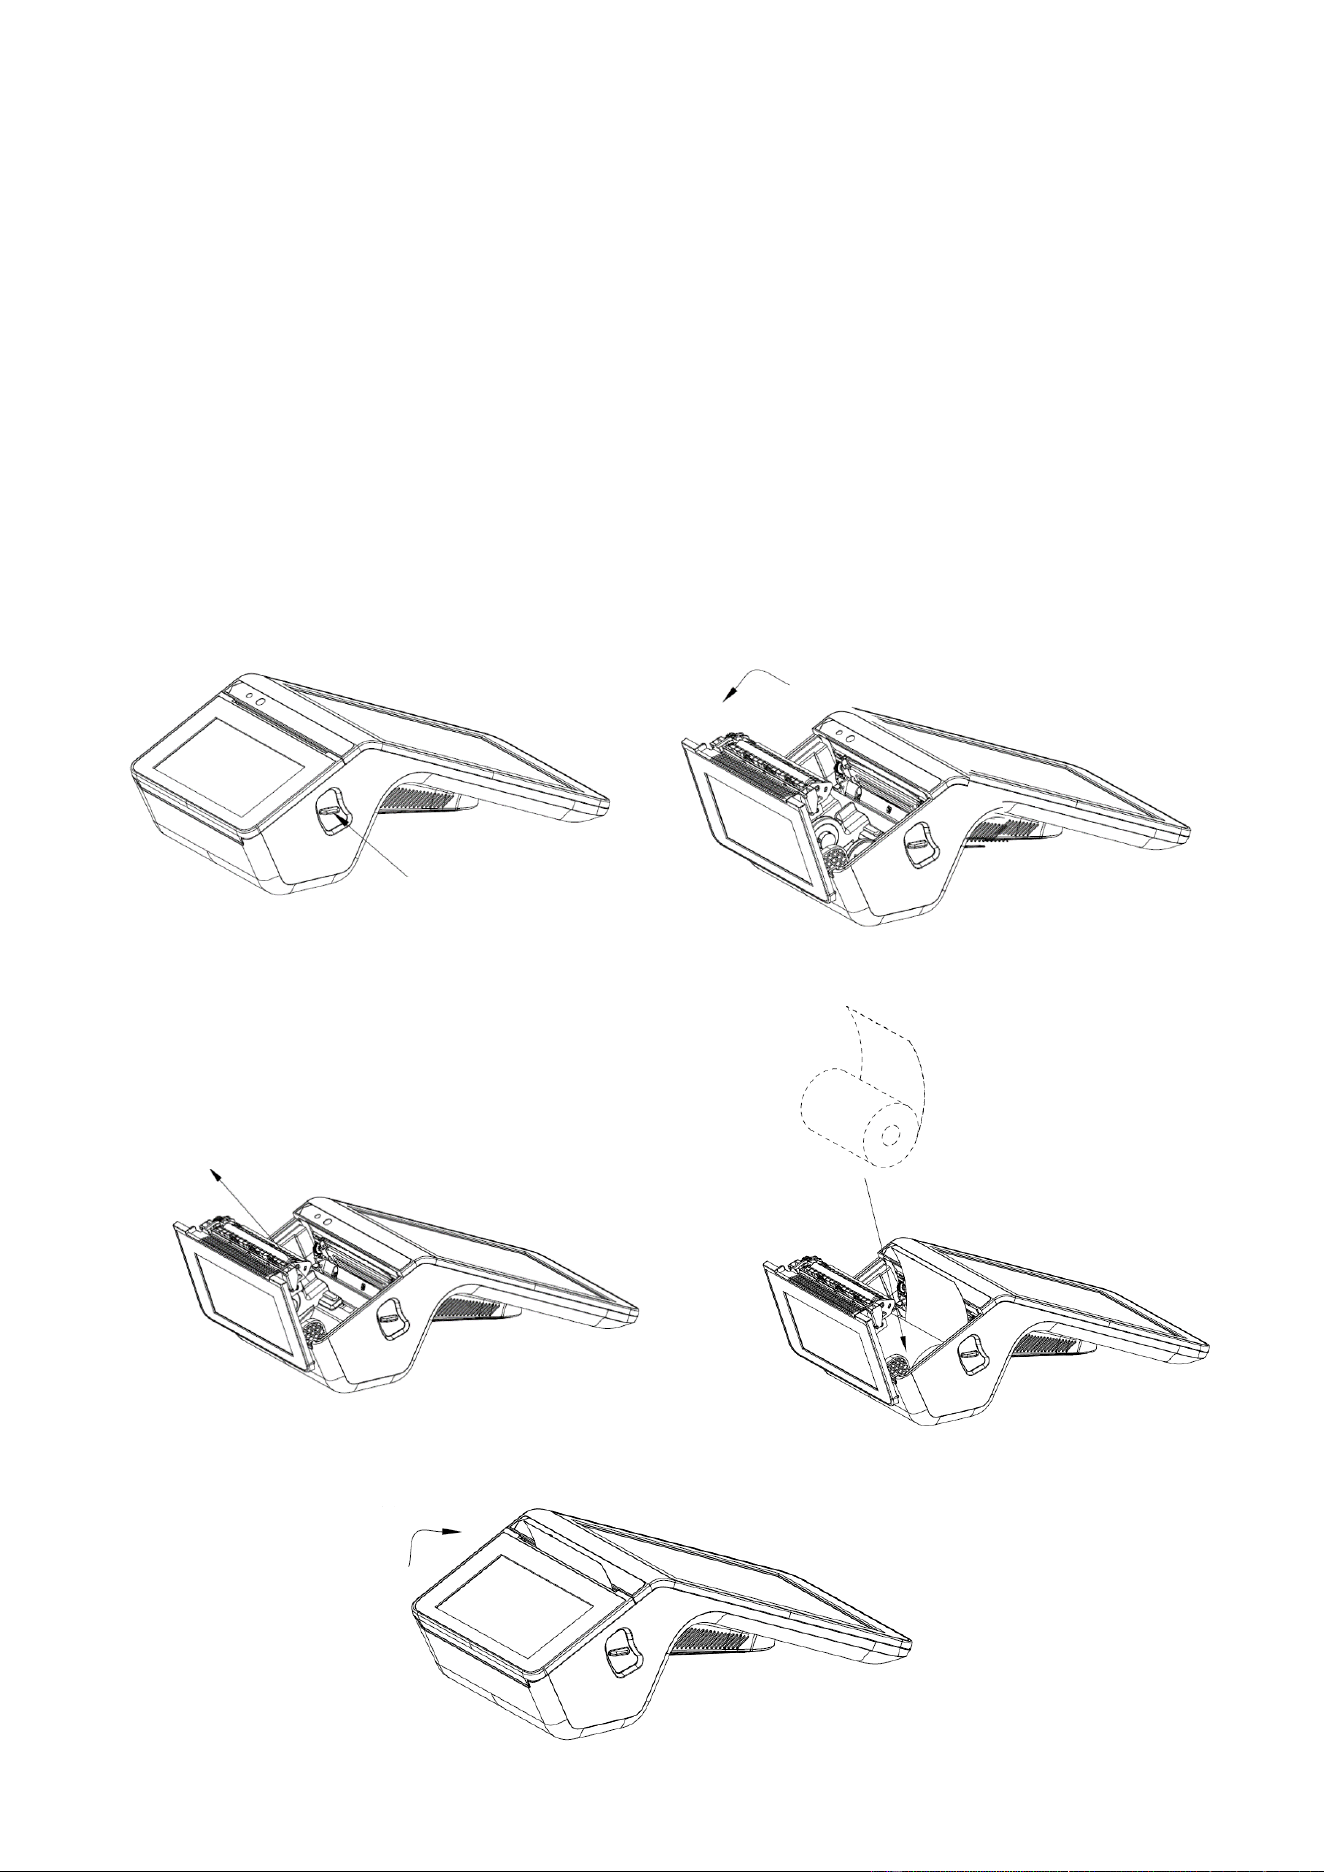
3. Pin Definition of the Cash Drawer
The cash drawer port is suitable for RJ-12 (6Pin) connector. Please verify the pin
assignment before installation.
The following schematics are showing you Pin Definition of AOC Cash drawer and Pin
Assignment
Pin Definition of AOC Cash Drawer
Pin No.
Signal name
Direction
1
Frame ground
-
2
Drawer kick-out drive signal 1
Output
3
Drawer open/close signal
Input
4
+24V
-
5
Drawer kick-out drive signal 2
Output
6
Signal ground
-
Cash drawer Pin Assignment
DC power port
Drawer port
USB port
Ethernet port
Serial port
USB port
6
4. Installation Method
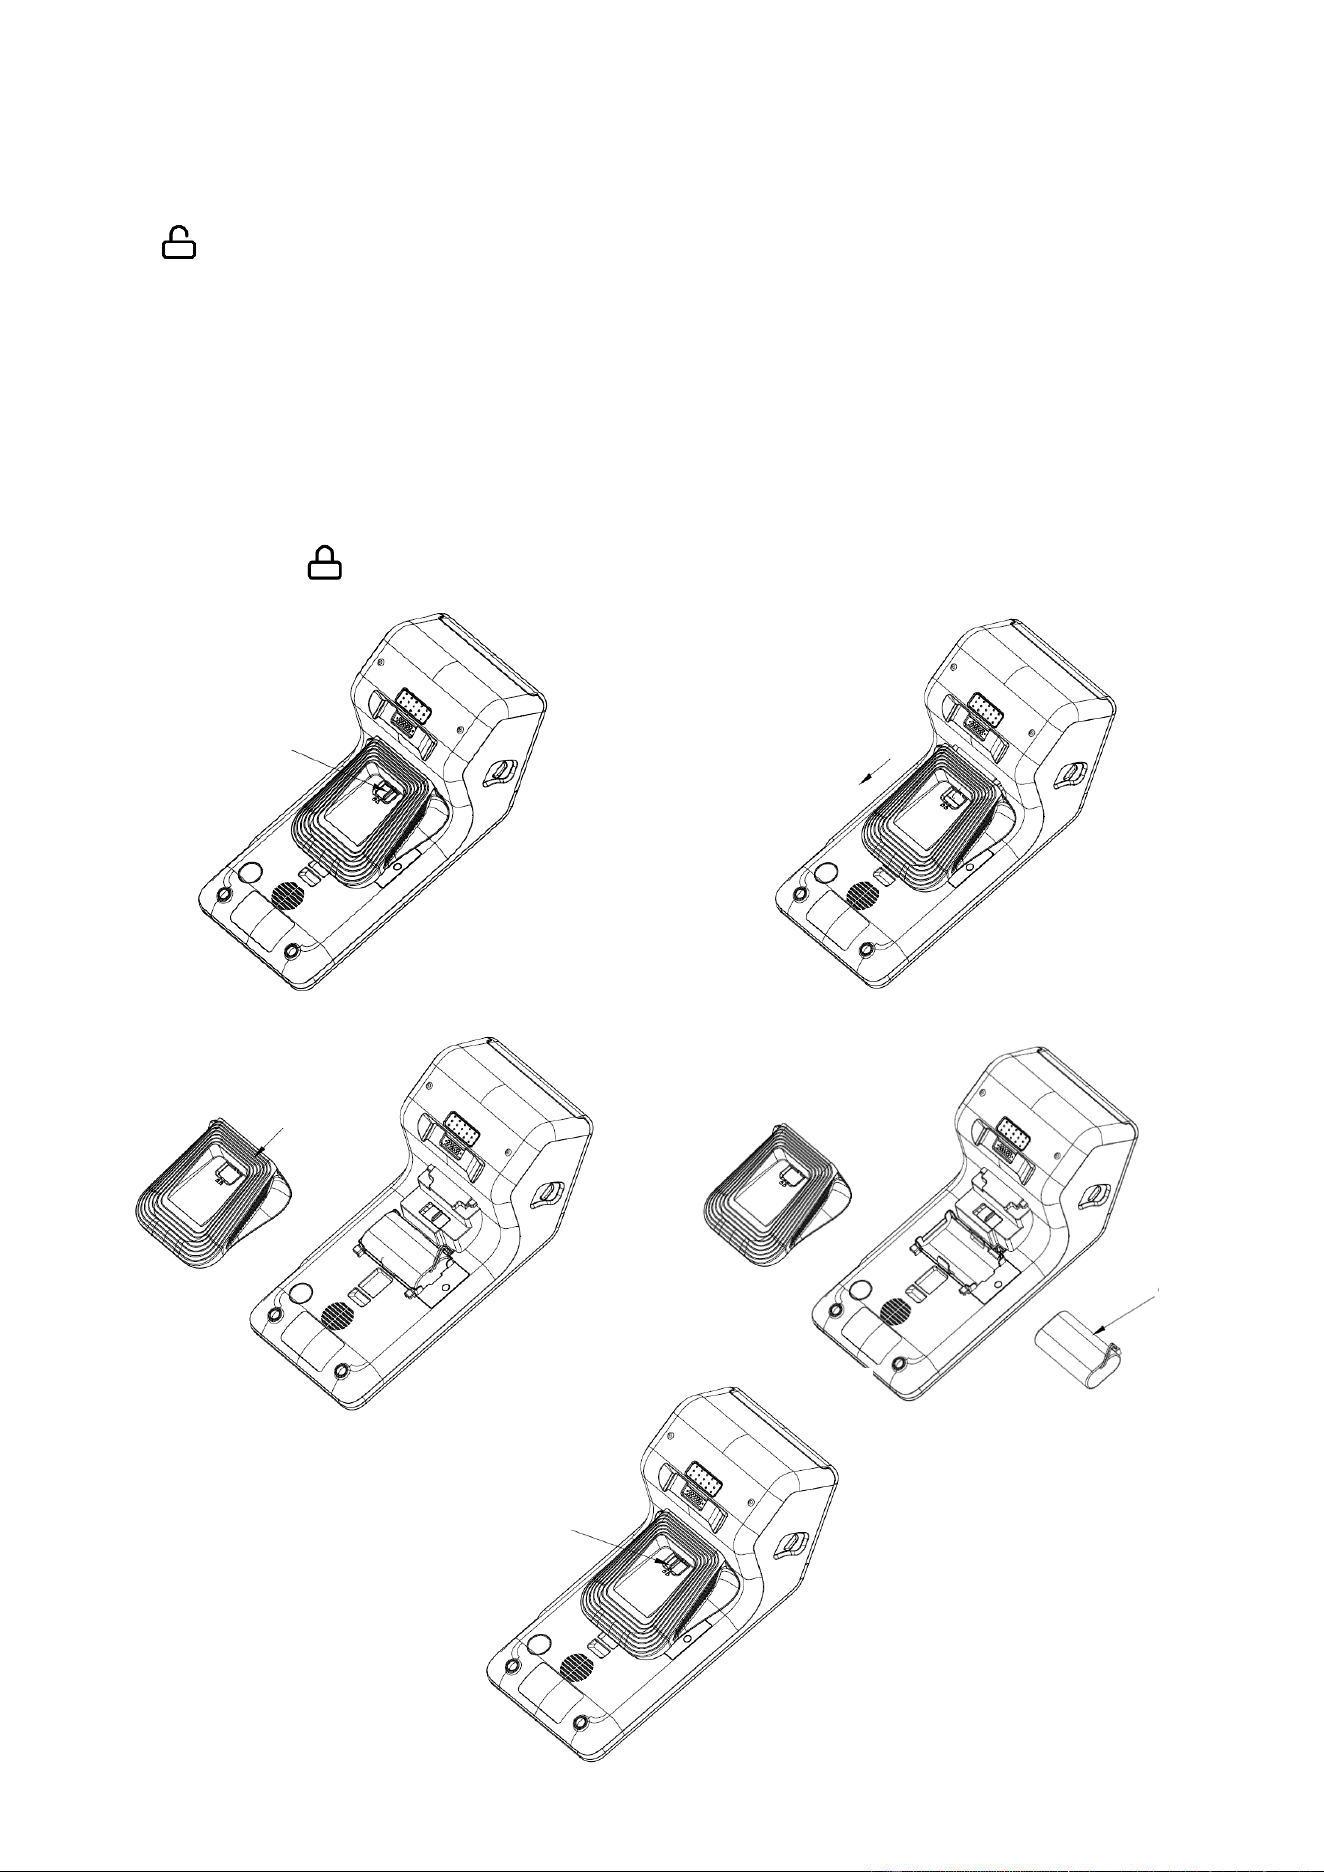
4.1. Thermal Paper Replacement
Note: Bad quality thermal paper with rough surface and low sensitivity may reduce
the life time of the printer head, please use high quality thermal paper.
1) Locate the cover switch on the exterior of the printer. Press the cover switch downward
with your thumb until the printer cover unlocks.
2) Open the printer cover as shown in the figure 2.
3) Inside the opened printer, you will notice a paper holder, which is designed to guide and
position the paper roll correctly. Use your fingers to slide the paper holder to both sides.
4) Take the new paper roll and put it into the paper slot as shown in the figure 4.
Note: Make sure the paper roll is inserted straight and centered, with the paper
end protruding slightly from the front of the printer.
5) Once the paper roll is properly placed in the paper slot, close the printer cover.
Cover switch
(1)
(2)
(3)
Paper holder
(4)
(5)
7
4.2. Battery Replacement
1) Use your finger to slide the cover switch to the “Unlock” position indicated by the icon
“ ”on the device.
2) Hold the device firmly with one hand to stabilize it. And grip the edge of the cover with
the other hand. Pull the cover in the direction shown by the arrow in Figure 2 with steady
force until it releases from the device.
3) Gently remove the released cover off the device and set it aside in a clean, safe place.
4) Carefully remove the old battery and insert the new battery.
5) Align the cover with the device’s edges, then gently press it into place until it clicks
securely. Use your finger to slide the cover switch back to the “Lock” position indicated
by the icon “ ”on the device to secure the cover.
(4)
(5)
Cover switch
(1)
(2)
(3)

8
5. Test Instruction
The “Hardware Assistant” program is used to test the status of all device hardware,
including the display, printer, cash drawer, and other peripherals.
Operation steps:
1) Launch the “Hardware Assistant” program from the desktop.
2) Once the program is running, perform the required hardware tests as prompted.
⚫ Device Information: View device details including model, serial number, printer type,
etc.
⚫ Receipt Printer: Test the printer’s printing function.
⚫ Peripherals: Test the functionality of peripheral devices (e.g. camera, NFC).
⚫ Display: Test the device’s display function.
⚫ Touch: Test the device’s touch functionality.
⚫ Cash Drawer: Test the cash drawer’s operation.
⚫ Speaker: Test the device’s audio output.
⚫ UART: Connect the serial port. The Serial Test message will be displayed on the test
page.
⚫ Bluetooth Test: Test Bluetooth connectivity. Access this menu and click “Search” to
scan for and connect to Bluetooth devices.
⚫ Net Test: Test network connection status.
6. Setting Instruction
6.1. Network Settings
6.1.1. Wi-Fi
This device supports network access via WLAN, with the specific configuration method
outlined below:
1) Swipe up on the screen to bring up the menu, and tap “Settings”;
2) Select “Network & Internet”, and tap “Internet”.
3) Enable the Wi-Fi function. The device will automatically search for available nearby
wireless networks and display information such as network name, signal strength, and
encryption status.
4) Select the target Wi-Fi network to connect.
⚫ For an open network, the device will connect automatically.
⚫ For an encrypted network, you need to enter the correct password to connect.
⚫ For Wi-Fi networks that have been connected before, the device will connect
automatically without requiring you to re-enter the password.
6.1.2. Ethernet
The device can also access the network via an Ethernet network. The specific setup
method is as follows:
1) Connect the Ethernet interface of the device to the corresponding port of the PC using
an Ethernet cable.
2) Swipe up on the screen to bring up the menu, then tap “Settings”.
3) Select “Network & Internet”, and tap “Ethernet”.

9
4) Tap “Ethernet IP mode” to set:
⚫ If DHCP is selected, the IP address will be obtained automatically;
⚫ If Static is selected, you need to configure static IP parameters (such as IP address,
gateway, subnet mask, DNS address, etc.) to obtain the IP address manually.
6.2. Storage Settings
1) Insert the SD card into the device’s SD card slot.
2) Swipe up on the screen to bring up the menu, then tap “Settings”.
3) Select “Storage” to view the capacity usage of both the internal storage and the SD card.
If you need to remove the SD card, go to the “Storage” option, tap “Eject”, and then you
can safely remove the SD card.
6.3. Application Program Management
This menu is mainly used to manage applications on the device (such as viewing,
uninstalling, permission settings, etc.) and configure display notifications.
1) Swipe up on the screen to bring up the menu, then tap “Settings”;
2) Select “Apps” to manage the applications on the device and configure display
notifications.
7. Analysis & Troubleshooting of Common Failures
➢ Device Fails to Power On
If the device cannot be turned on after connecting with the power supply, the possible
reason may be that there are some problems with the power supply.
Solutions:
1) Firstly, please check if the power adapter is electrified.
2) Please check if the terminal is connected with the power adapter well, and then repress
the power button.
3) Bad working conditions (such as high temperature or long-time operation) may cause
the terminal to automatically turn off. Please wait for a moment before turning it on
again to improve the working conditions.
4) If this problem is caused by sudden power outage or improper shutdown, please unplug
the power adapter from the terminal, and then press power button several times, after
that, plug the power adapter back into the terminal and turn it on.
5) If the indicator light of power adapter is off or twinkling when connecting with the
power, please pull out it immediately, and check if its indicator light is normal; if it is
abnormal, please don’t connect with the power again; please contact our service center
immediately.
➢ Device Restarts Automatically (or Turn off)
The occasion of AOCX auto turn off or restart occurs very often in working status (or
just after startup).
Solutions:
1) Please check if the power is well connected.
2) Please check if AC 220V is steady.
3) If this problem is caused by abrupt power off or illegal turning off, please wait for a

10
while to restart the terminal.
4) If it is caused by hardware addition or replacement, please return or remove the
hardware.
➢ The AOCX cannot surf the Internet (or low efficiency)
This issue manifests as the terminal being unable to browse web pages normally.
Solutions:
1) First, verify that the external router is functioning properly.
2) After powering on the terminal and connecting the Ethernet cable, check whether the
green light on the terminal’s Ethernet port is on and the orange light is blinking. If the
above phenomena do not occur, there may be an issue with the external Ethernet cable;
please recheck that the Ethernet cable connection is secure.
➢ Cursor Jumps at Fixed Position or Touch Misalignment on Touchscreen
Solutions:
1) Check if the touchscreen is clean. Remove any foreign objects to ensure the device
remains clean.
2) Check if the outer casing is deformed. If deformation is present, the device must be
returned to the factory for repair.
➢ The Display Screen shows unclear content or presents water ripples.
Solutions:
If the display is interfered with by power supplies or other high-frequency devices
(such as walkie-talkies, mobile phones, etc.), the above issue may occur. It is
recommended to place the AOCX terminal away from high-voltage devices and high-
frequency devices to eliminate interference.
➢ USB External Devices Cannot Be Used
Solutions:
1) Check if the external USB device is working properly.
2) It is recommended that the length of the USB cable should be ≤1 meter. If the cable is
too long, the USB device may not be recognized due to insufficient power supply.
➢ Fail to Connect with The External Printer
Solutions:
1) First, check if the printer is working properly.
2) Check if the connection between the printer and the AOCX terminal is normal.

DAOC601ENV0-01
FCC Statement:
This device complies with part 15 of the FCC Rules. Operation is subject to the following
two conditions: (1) This device may not cause harmful interference, and (2) this device
must accept any interference received, including interference that may cause undesired
operation.
This equipment has been tested and found to comply with the limits for a Class B digital
device, pursuant to part 15 of the FCC Rules. These limits are designed to provide
reasonable protection against harmful interference in a residential installation. This
Equipment generates,uses and can radiate radio frequency energy and,if not installed and
used in accordance with the instructions,may cause harmful interference to radio
communications.However,there is no guarantee that interference will not occur in a
Particular installation.If thise quipment does cause harmful interference to radio or
television reception, which can be determined by turning the equipment off and on, the
user is encouraged to try to correct the interference by one or more of the following
measures:
—Reorient or relocate the receiving antenna.
—Increase the separation between the equipment and receiver.
—Connect the equipment into an outlet on a circuit different from that to which the
receiver is connected.
—Consult the dealer or an experienced radio/TV technician for help.
Caution: Any changes or modifications not expressly approved by the party responsible
for compliance could void the user's authority to operate the equipment.
This equipment complies with FCC radiation exposure limits set forth for an uncontrolled
environment. This transmitter must not be co-located or operating in conjunction with any
other antenna or transmitter.
This equipment should be installed and operated with minimum distance 20cm between
the radiator&your body.
11