
Two-wheeler intelligent taillights
instructions
product presentation
warn
For product risks and important information, please refer to Safety and Product Information
Notice.
This equipment can enhance the detection of the environment, but it cannot replace the attention
and judgment . Please always keep a good judgment on the road conditions and ride safely. If you
do not pay attention to follow the relevant content, it may lead to fatal accidents or serious
injuries.
Always consult your doctor before starting or changing your exercise program.
Start using it
You can use the ZP-2406 with compatible Bluetooth/ANT+ devices or mobile phones. This list
outlines the installation and setup of the product.
Charge the device (Charge the device, page 8).
Install the tail light bracket (Install the tail light bracket, page 2).
If you use a mobile phone, please download the Jingyun Smart application to your mobile
phone and then pair the device (pair the device with the mobile phone, page 5).
Tips for installing equipment
The ZP-2406 equipment includes a taillight that can detect approaching vehicles within 140
meters (when the speed is above 10KM/h).
Choose the right position to install, avoid affecting the safety of cycling.
Install the equipment at the appropriate height of the seat rod to achieve the best detection.
Note: The fixed seat should be installed vertically, and the unique design can adapt to most
seat rod angles.
Install the equipment on a seat pole 250 mm to 1200 mm above the road.
Install the equipment correctly. The equipment should be oriented backward and
perpendicular to the road surface.
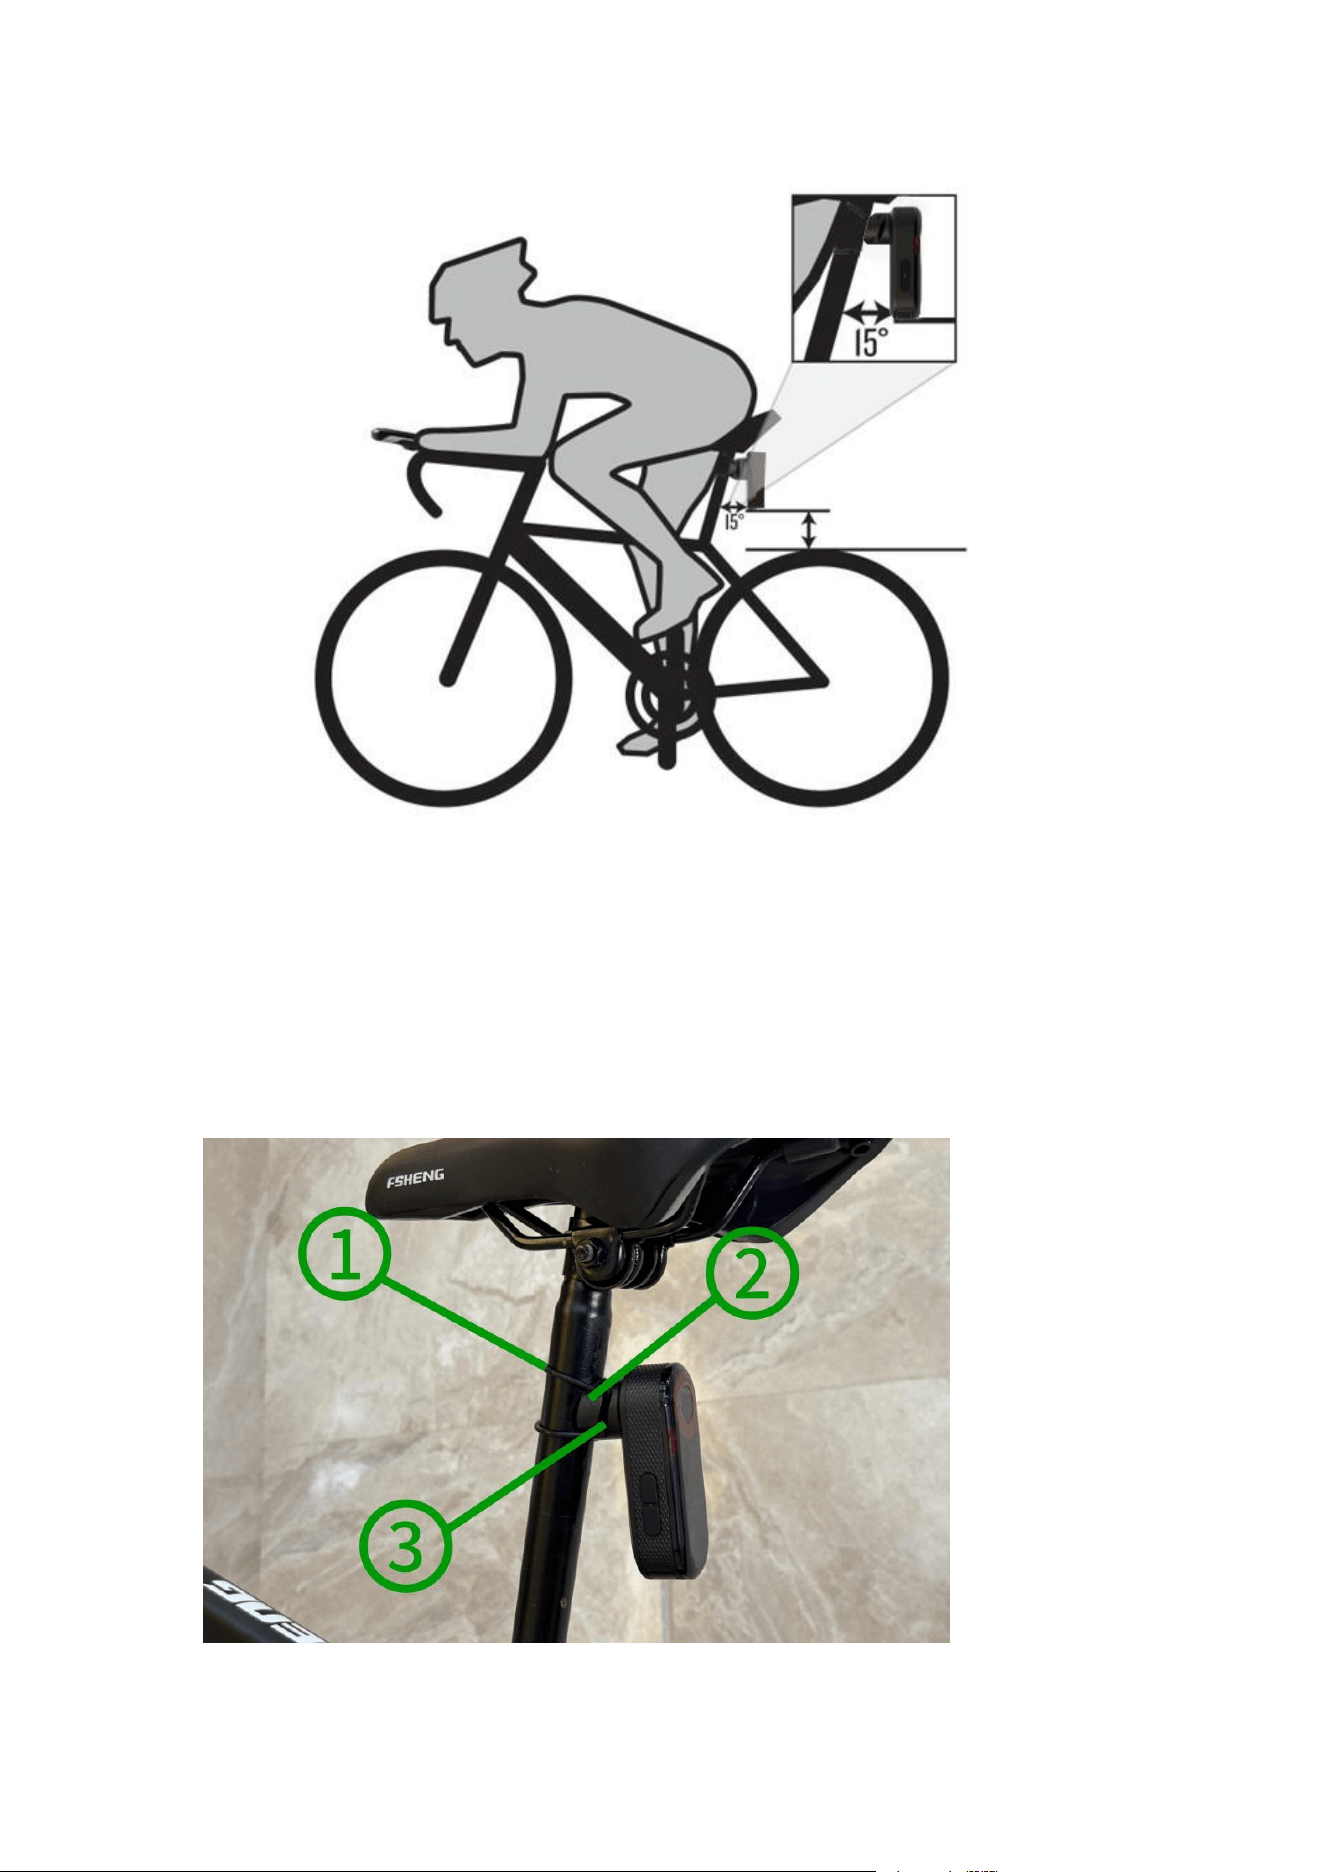
Make sure there is no obstruction in front of the equipment.
Test in a safe environment during the day.
Install the taillight bracket
1 Select the appropriate rubber gasket
②
according to the shape of your seat rod, and place the
gasket on the back of the fixed seat.
2. Place the tail light fixing seat on the seat rod.
3. Align the back of the device with the plastic and the slot of the fixing seat.
4. Use a tether
①
Fix the tail light holder.
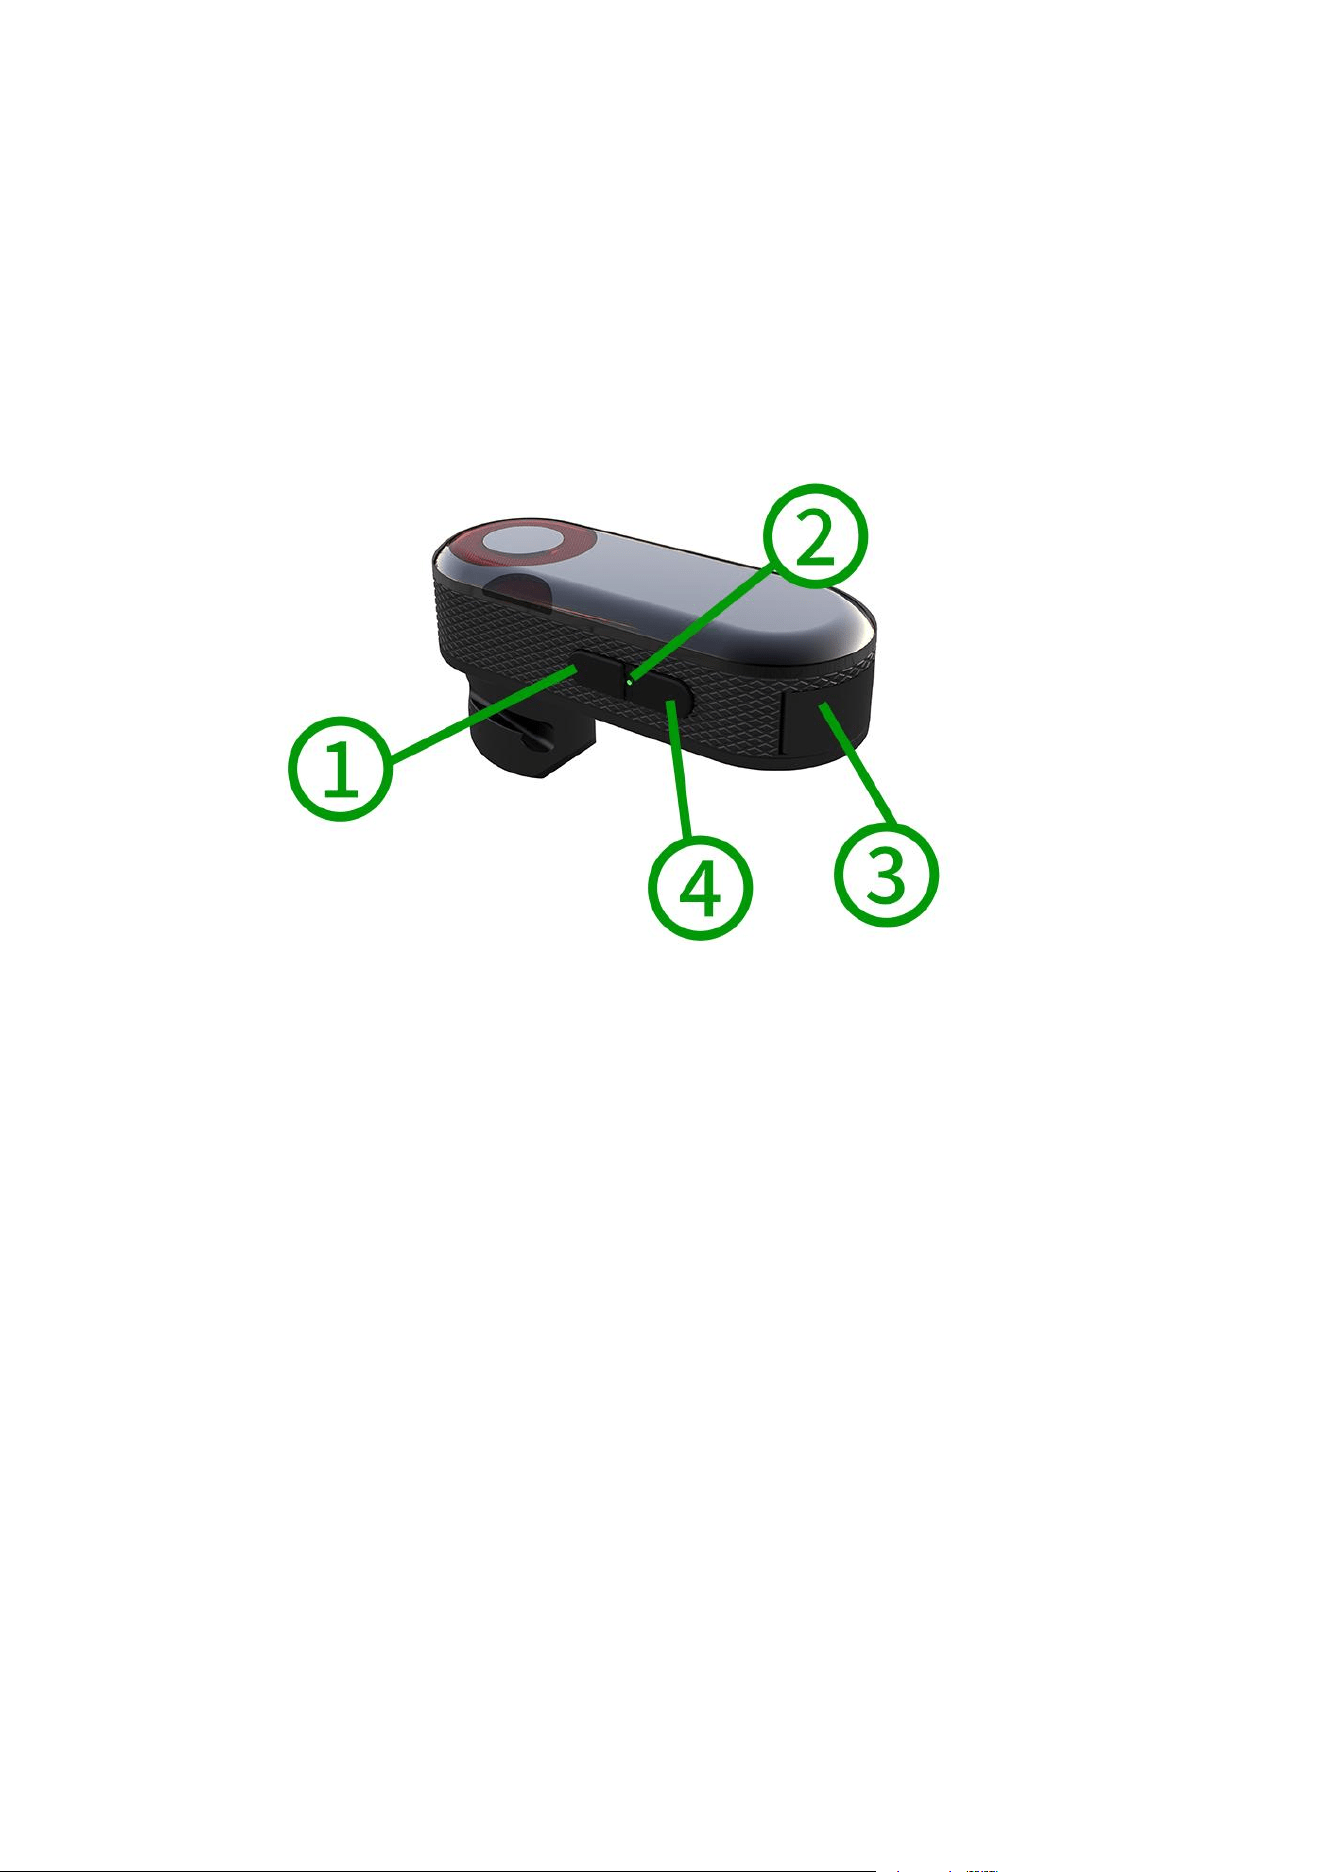
Overview of equipment
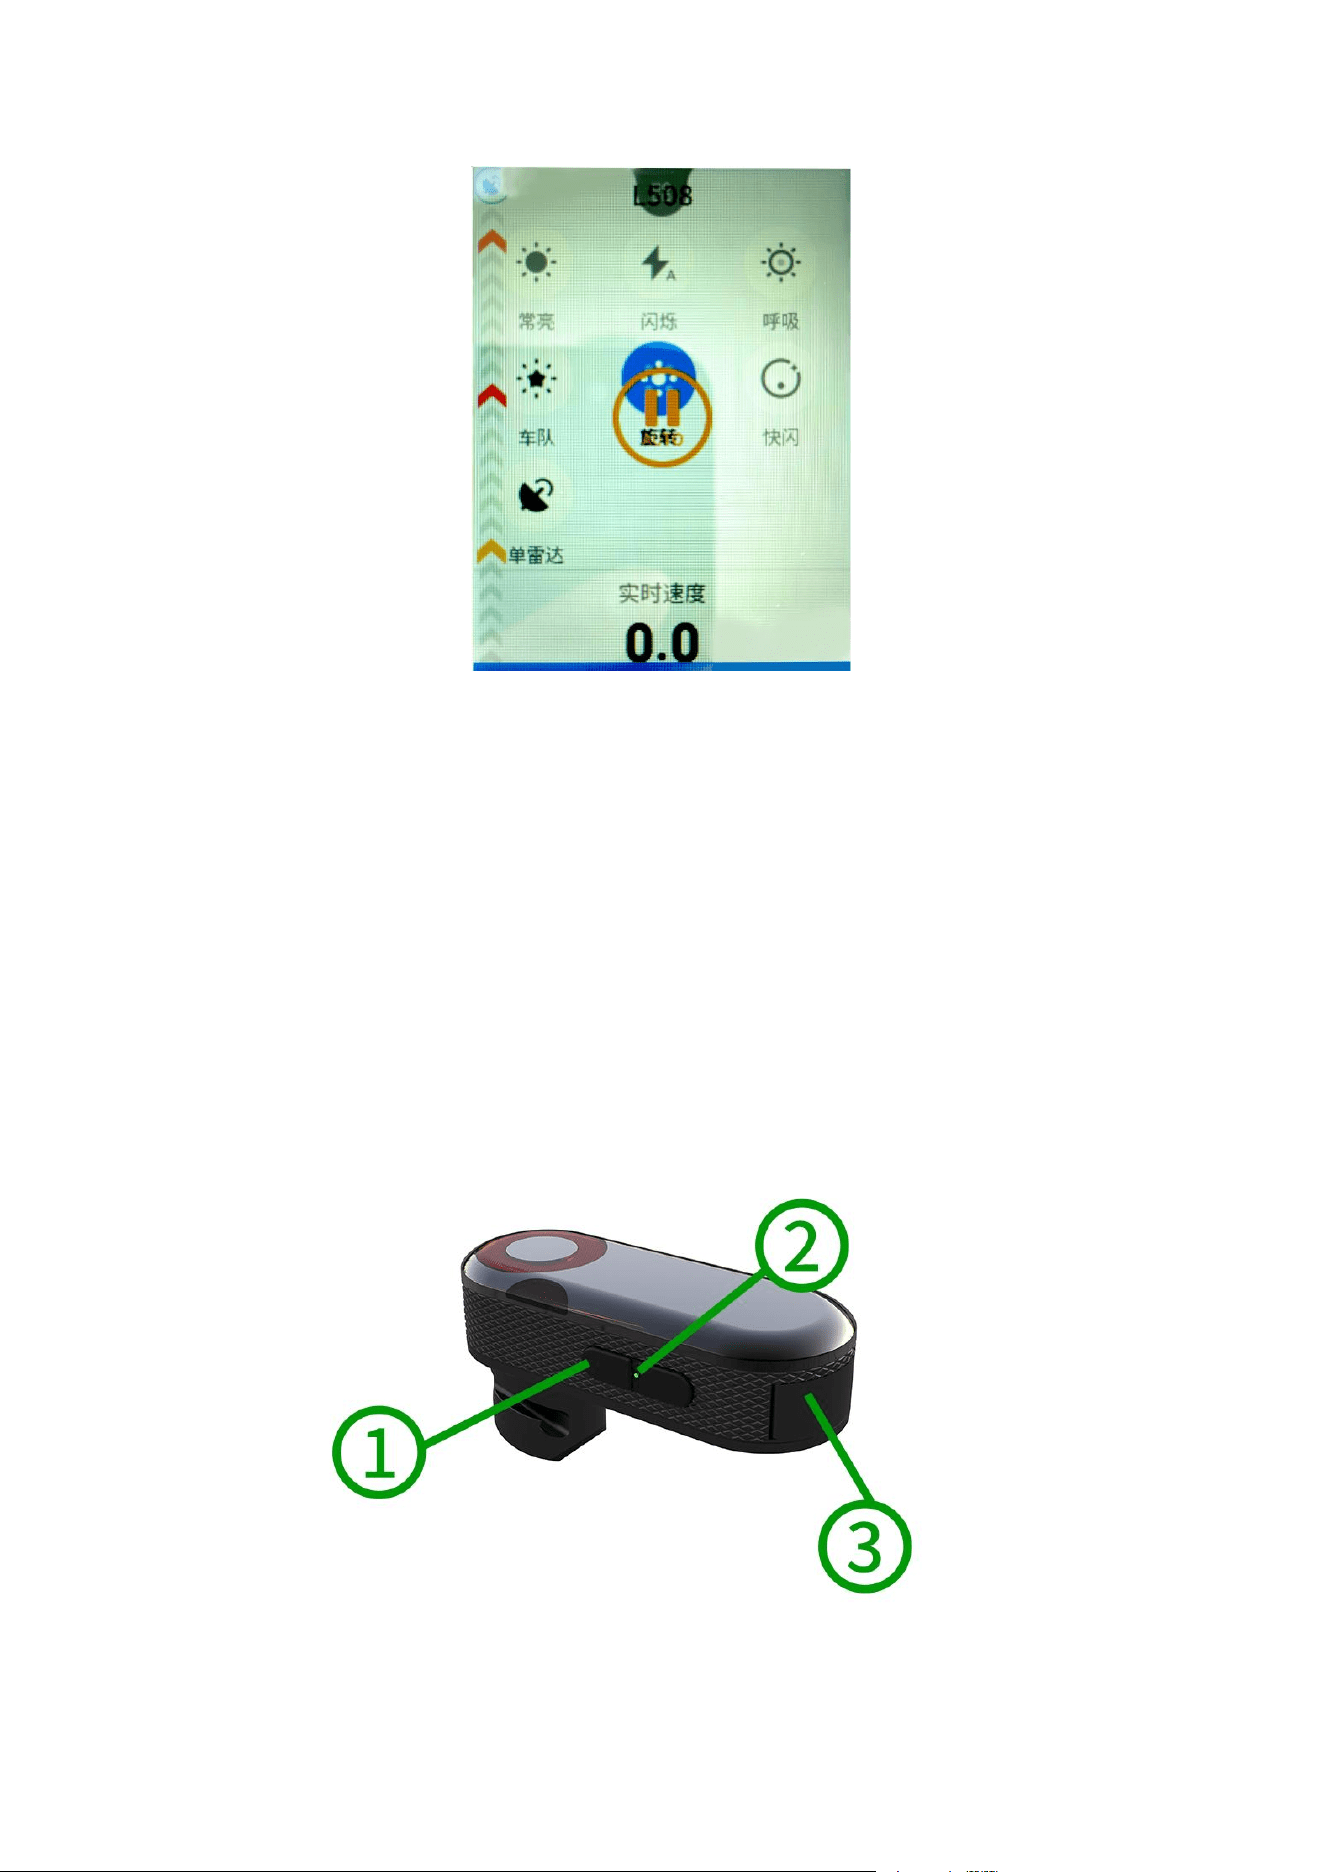
1. Power button
Long press for 2 seconds to turn on the device.
Long press for 2 seconds to turn off the device.
2. Device status indicator (power on indicator, charging indicator)
The device status indicator will be blue after the device is working (ZP-2406 device status
indicator, page 2).
Change the color of the indicator light based on the charging status of the device (ZP-2406 device
charging status indicator light, page 2)
3.USB charging port
Plug in the standard TYPE-C USB port to charge the device.
4.LED light mode button
Press and switch the LED working mode, which is divided into constant light, convoy, breathing,
flashing, flash, rotation, single detection.
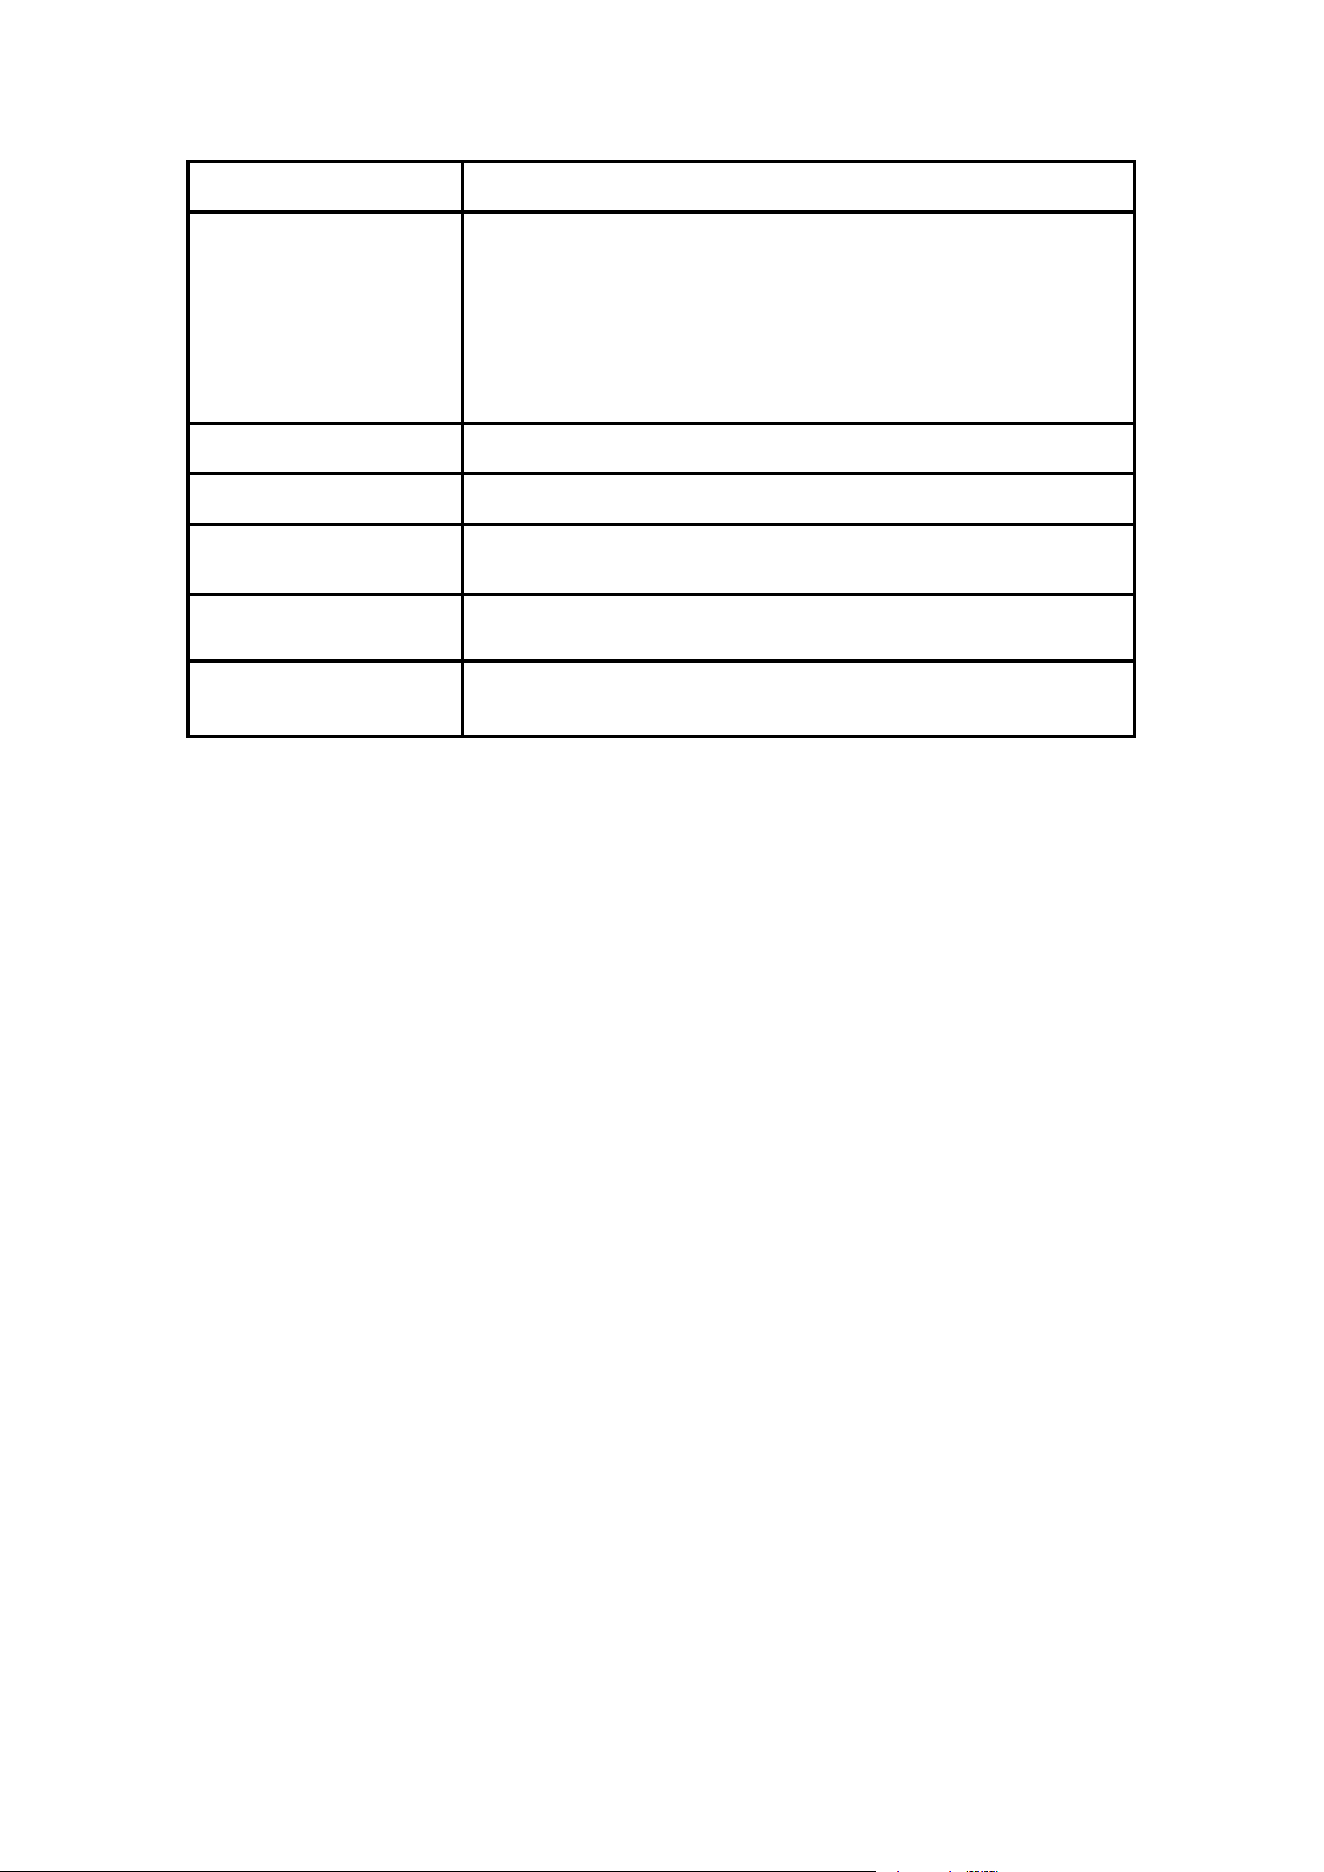
ZP-2406, equipment status indicator light
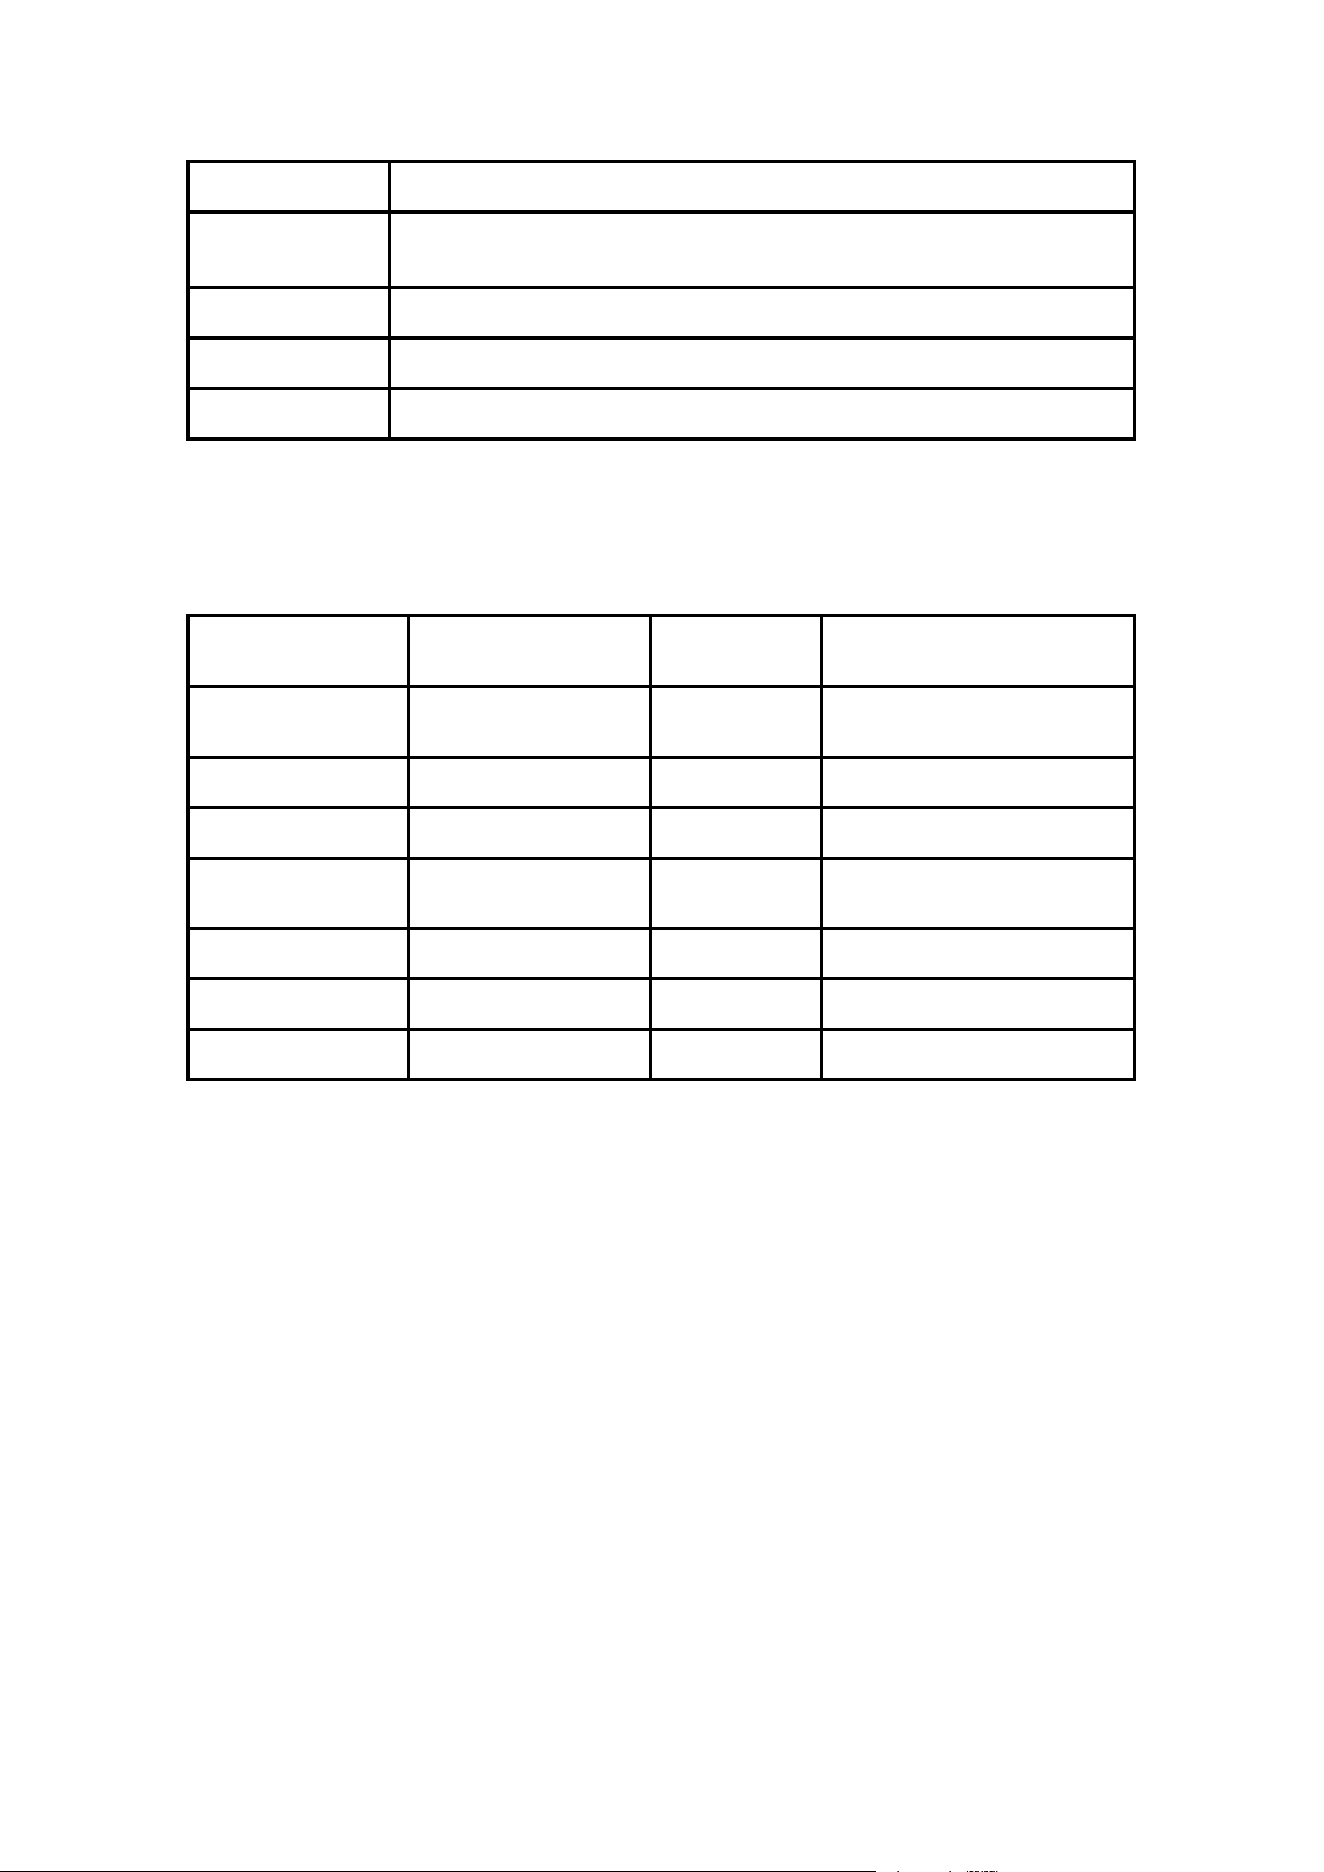
Status indicator
device status
Blue stays on
The device is in paired mode and can be controlled by the paired APP
device.
Blue stays on
The App is connected to the device successfully.
Red stays bright
The device is in charging mode.
Green is always
on
The device is in charging complete mode.
Tail light mode and intensity
You can switch the ZP-2406 tail light mode by pressing the LED lamp mode button on the device
(device Overview, page 1).
Tail light mode
Light intensity of the
car
Default
flashing
Flash when a vehicle
approaches
Chang Liang
(default)
tall
not have
The taillights are flashing
Team cycling
centre
centre
The taillights are flashing
breathe
tall
slow
The taillights are flashing
twinkle
Brightest
once in a
while
The taillights are flashing
quick flashing
tall
fast
The taillights are flashing
revolve
centre
slow
The taillights are flashing
Single detection
close
not have
The taillights are flashing
closing device
Press the device power button for 2 seconds (device Overview, page 3).
ZP-2046 and Suiyun Intelligence, applications
The Rhinocloud Smart App connects to your ZP-2406 device via Bluetooth. The app displays
information, sets up the device, and views real-time road conditions.
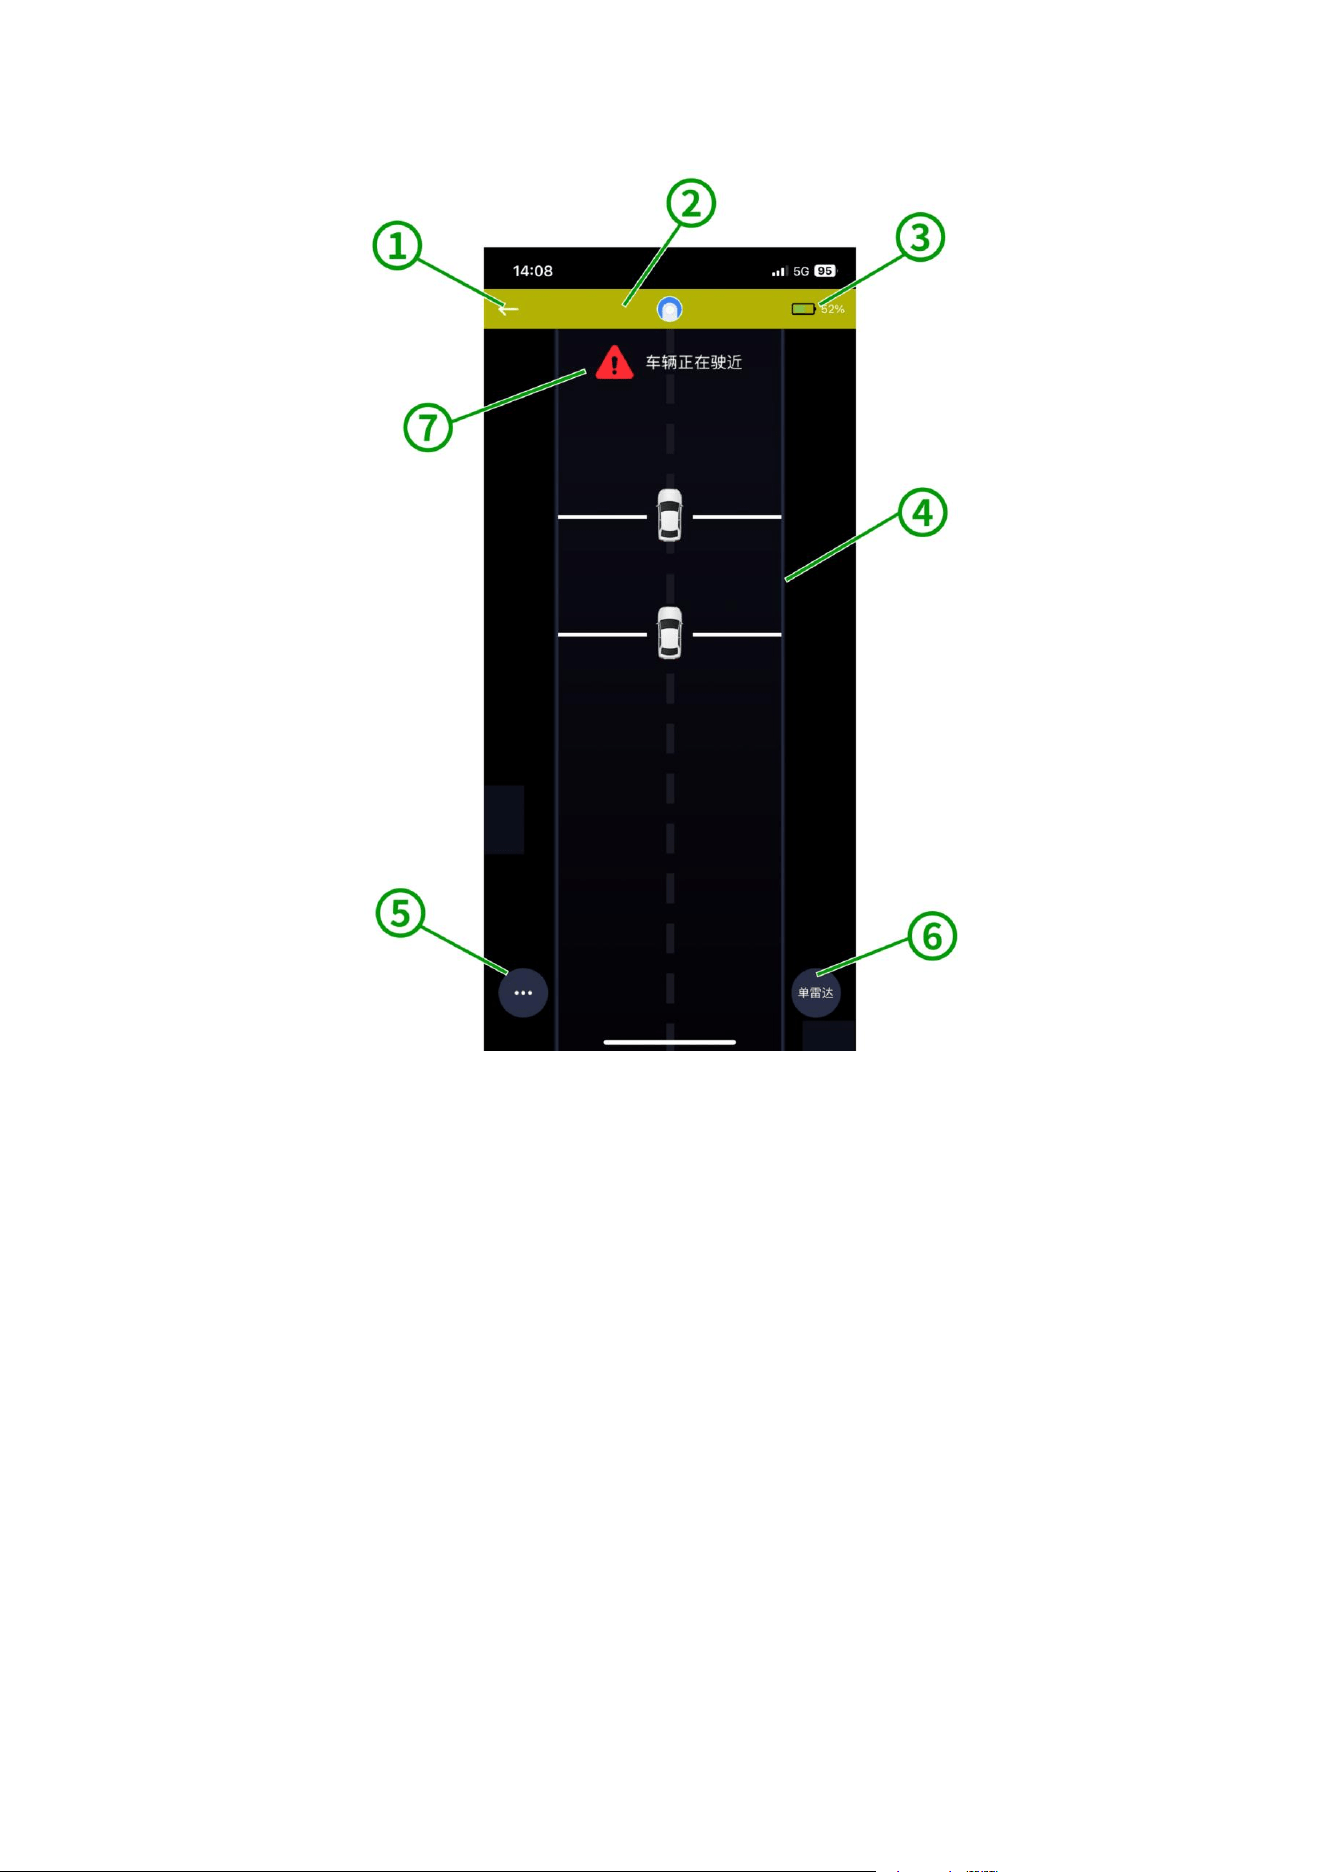
1) Exit real-time monitoring interface.
2) Display the color status bar indicating the level of danger caused by approaching vehicles.
3) Display the power status of the paired ZP-2406 device.
4) Display detection target information (view detection information on the Guiyun Intelligent
application, page 6).
5) Select to change the device Settings (Xiyun Smart App Settings Device, page 4).
6) Select the working mode of the LED alarm light on the device (set up as prompted by the
Guiyun Intelligent application, page 3).
You can download the app (Xiyun Intelligence) from the app store on your smartphone.
Pair the ZP-2406 device with the phone
When connecting the ZP-2406 device to the Xiyun Smart app for the first time, you must pair
these two devices. After initial pairing, when the device is turned on and within range, the Xiyun
Smart app will automatically recognize the ZP-2406 when you open the app.
1. Keep your smartphone within 3 meters of the equipment.
Note: When pairing, please keep at least 10 meters away from other Bluetooth sensors.
2. Turn on Bluetooth on compatible smartphones.
3. Install and open the Jiyun Smart application from the mobile app store or official website.
4. When the ZP-2406 device is in the off state, press the power button for 2 seconds to turn on the
device and enter the pairing mode.
The device status indicator light is blue and on, and the tail light flashes three times. The device is
in pairing mode.
5 Select Add Device ZP-2406 Device name: "Bike Tail Light".
When the ZP-2406 device is paired with a smartphone, the application will display the current
equipment status and battery level.
View detection information on the Suiyun intelligent application
Start cycling.
The information will be displayed on the activity data page.
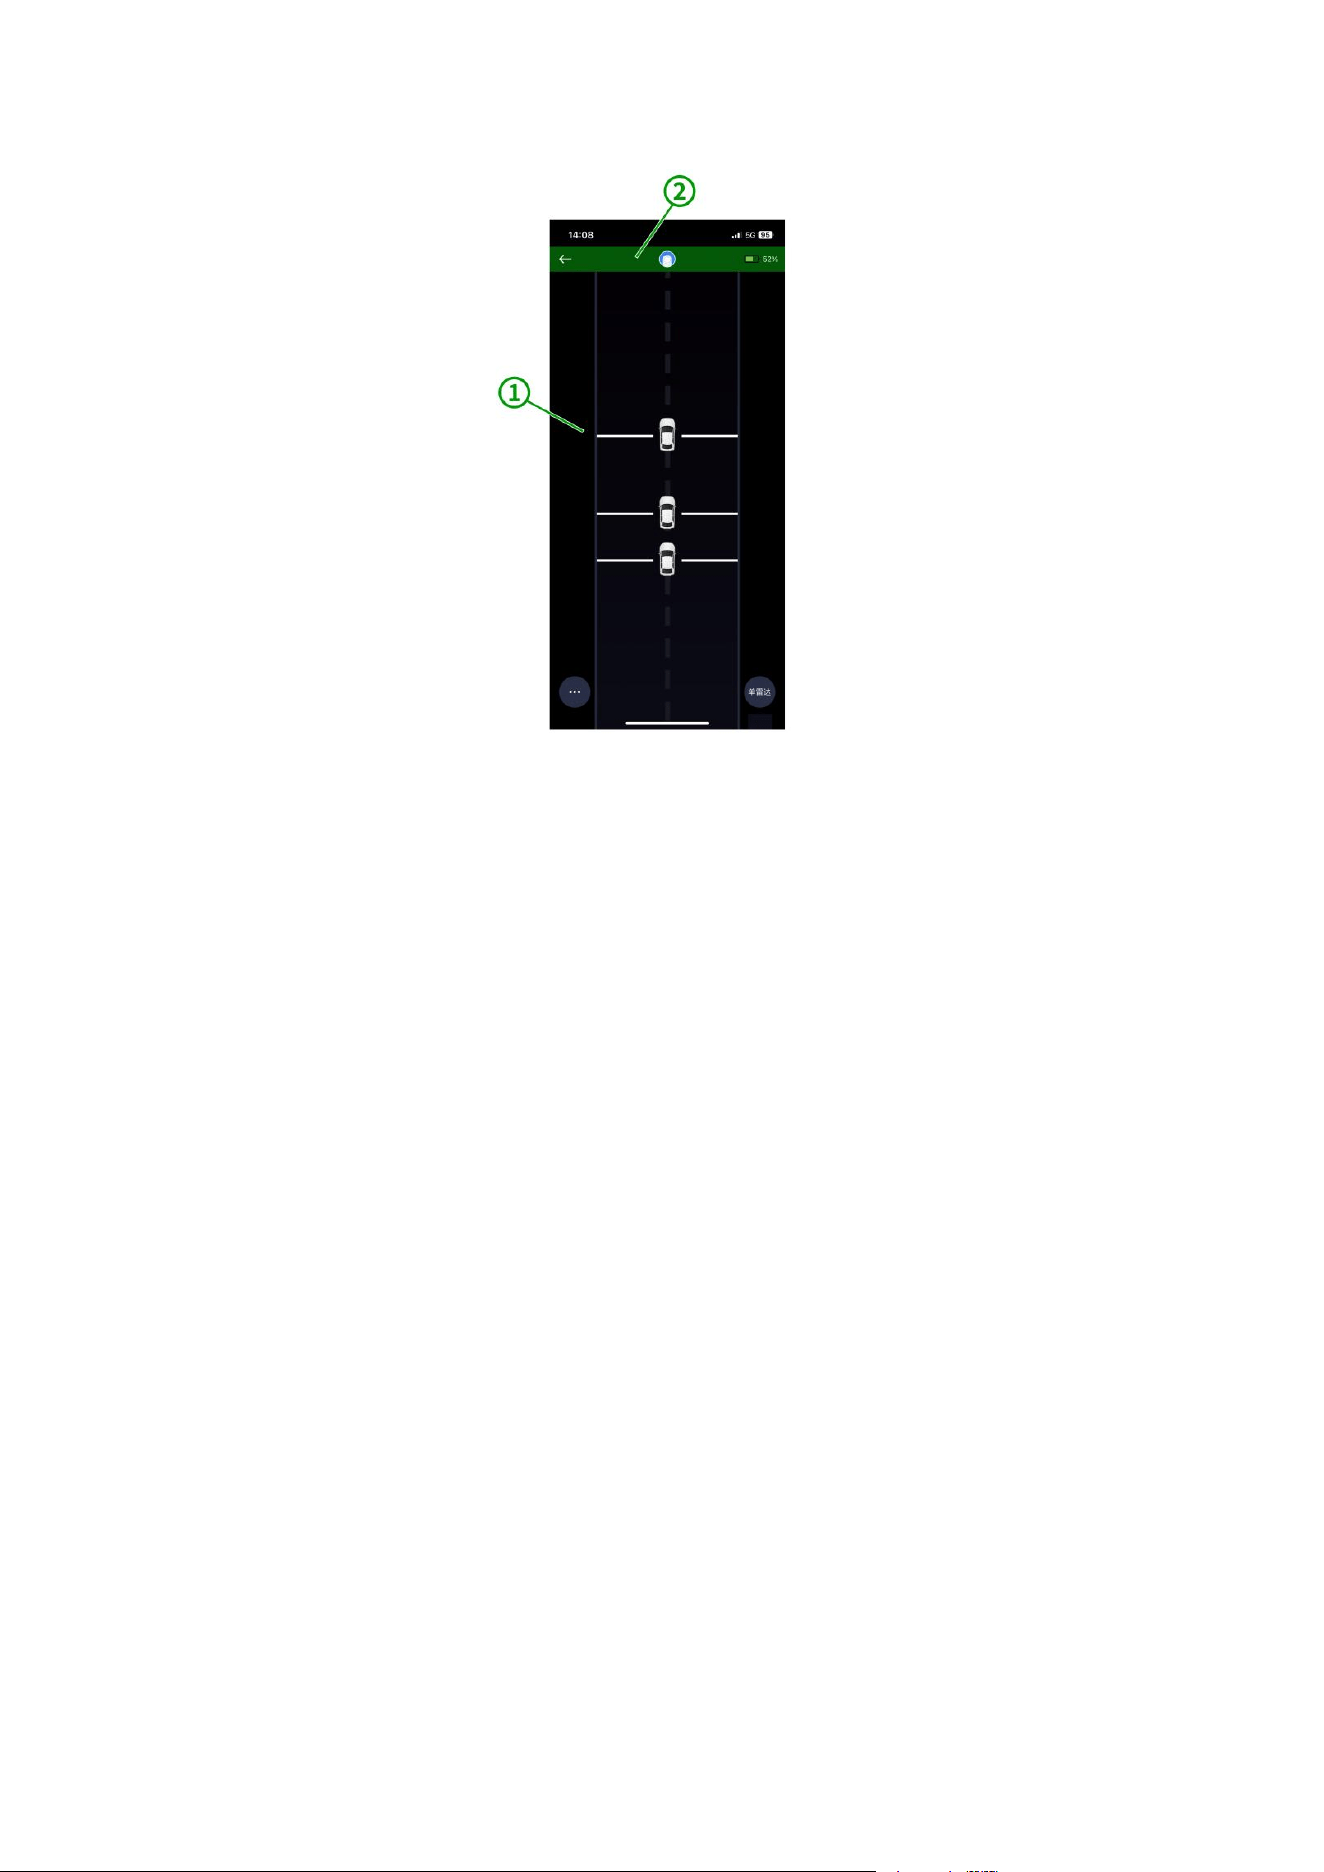
Note: When the power button of the device is pressed for 2 seconds, the device will be turned
on and enter pairing mode. If the Xiyun APP cannot scan the "Bike Tail Light", press the mode
button for 2-3 seconds (device pairing reset), and add the device again through the Xiyun APP. At
this time, the device can be scanned and click to add the device;
When a vehicle approaches you, the vehicle position
①
moves upward. The danger level
column
②
changes color according to the threat level. Green indicates no approaching vehicles
behind. Orange indicates approaching vehicles. Red indicates caution: a vehicle is approaching at
high speed.
Note: The line on the side of the vehicle will also indicate the level of danger.
The ZP-2406 and your ANT+ Device series
You can use compatible ANT+ devices to remotely control the device and customize the Settings.
Pair the ZP-2406 device with your ANT+ device
When connecting the ZP-2406 device to an ANT+ device for the first time, you must pair the two
devices. After the initial pairing, when the device is on and within range, the ANT+ device will
automatically connect to the device when you are active.
Note: The equipment is compatible with other ANT+ devices.
1 Keep ANT+ devices and sensors within 3 meters.
Note: When pairing, keep a distance of 10 meters from other ANT+ sensors.
2 Turn on ANT+ devices.
3 Select ()> Sensor> Add sensor> Search all Name is "XXXXX-5"
4. When the ZP-2406 device is in the off state, press the power button for 2 seconds to enter the
startup state. The blue status indicator light and the tail light will be on. The device is in the startup
and pairing mode.
5 Select your sensor and select Add.
When the sensor is paired with an ANT+ device, the sensor status is connected. () (equipment) and
() (Headlight) status icons are displayed on the status bar at the top of the home page.
View the equipment on the ANT+ device
Start cycling.
The information will be displayed on the activity data page.
When a vehicle approaches you, the vehicle position
①
moves upward. The danger level
indicator light
②
changes according to the threat level. Green indicates no approaching vehicles
behind. Orange indicates approaching vehicles. Red indicates caution as a vehicle is approaching
at high speed.
The ANT+ device emits a distinctive beeping sound when vehicles approach, activated in the
settings. Your device features multiple functional alerts. The approaching vehicle alert produces a
unique tone. Upon detecting the first vehicle, the device will emit a single beep. After the threat is
cleared, another beep will sound when another vehicle is detected.
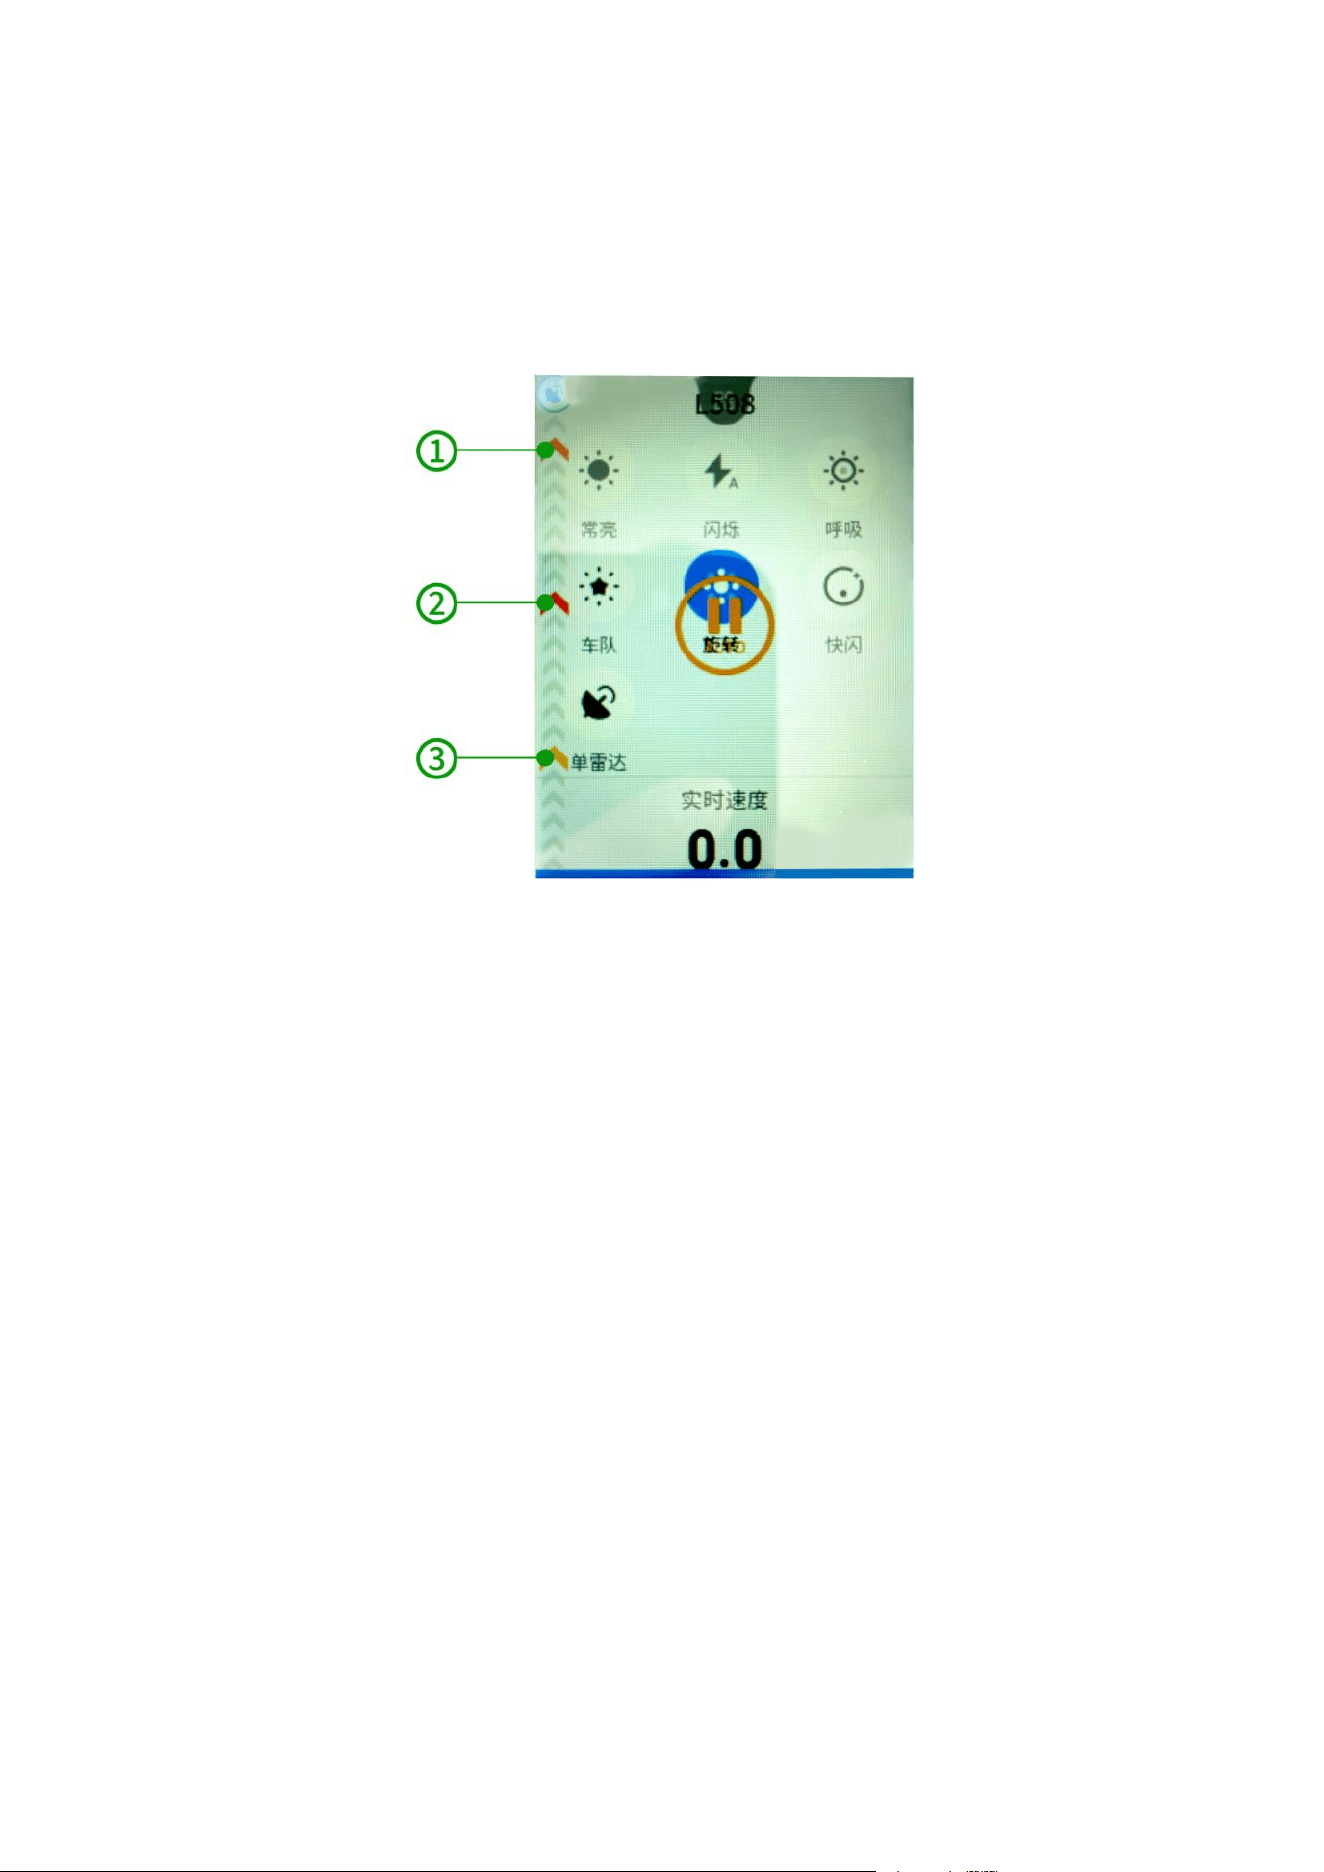
Car light mode setting
In the ANT+ device's riding interface, you can select various lighting modes: -Constant Light
Mode (default): All LED lights remain on. -Blinking Mode: All LED lights flash intermittently.
-Breathing Mode: LED lights enter a breathing pattern. -Team Mode: LED lights increase
brightness to mimic a convoy's formation. -Rotation Mode: LED lights rotate in a circular pattern.
-Flashing Mode: LED lights flash at shorter intervals. -Single Detection Mode: LED lights remain
off while detects nearby objects.
facility information
Charge the device
pay attention to
To prevent corrosion, thoroughly dry the USB port, dust cover and surrounding area before
charging or connecting to a computer.
The device is powered by a lithium battery and can be charged using a standard wall outlet or the
computer's USB port.
Note: The device cannot be charged when it exceeds the specified temperature range.
1 Open the dust cover on the device
③
The USB port is inside.
2. Insert the smaller end of the USB cable into the USB port of the device.

3. Connect the larger end of the USB cable to the power adapter or USB port of the computer.
4. Insert the power adapter into the standard wall-mounted power outlet.
5. Charge the device fully.
When charging, the LED status indicator is red and always on. After charging, the status indicator
is green and always on.
6 Remove the USB cable and close the dust cover.
Tips for charging your device
Connect the charging device safely to the device.
The device can be charged by connecting a USB cable to the approved power adapter for ZP-2406,
either through a standard wall outlet or a USB port on your computer. When charging a
completely drained device using the computer, it takes approximately 5 hours to fully charge,
while AC power charging requires about 3 hours.
Remove the charger when the status indicator is green and on.
pay attention to
Do not store the equipment for a long time in extreme temperature environment, which may cause
permanent damage to the equipment.
Avoid using chemical cleaners, solvents, sunscreen and repellents to avoid damaging plastic parts
and finishes.
Make sure the dust cover is securely fastened to prevent damage to the USB port.
Try to avoid violent collisions or rough use, because this may shorten the service life of the
equipment.
The equipment is clean
pay attention to
Do not use any cloth or other material that may scratch the mirror. Scratches may reduce detection
performance.
·
Clean mud and dirt on the dust cover.
·
When the dust cover is closed, place the equipment under running water for flushing. After
cleaning, please wait for the equipment to be completely dry.
Detection
warn
This equipment can enhance the detection of the environment, but it cannot replace the attention
and judgment of the rider. Please always keep a good judgment on the road conditions and ride
safely. If you do not pay attention to follow the relevant content, it may lead to fatal accidents or
serious injuries.
This equipment can detect approaching vehicles within a range of 140 meters.
This equipment detects approaching vehicles at speeds of 10 to 160 km/h (6 to 99 mph).
Note: This equipment does not detect vehicles traveling at the same speed as you.
This equipment beam width is 40 degrees, which provides coverage for typical bends in the road.
This equipment can detect up to eight approaching vehicles.
ZP-2406 specification
Battery type
Rechargeable built-in polymer lithium battery
Battery life
It lasts up to 10 hours in normal mode
It can reach 10 hours in convoy mode
It lasts up to 11 hours in flashing mode
Up to 11 hours in flash mode
It can last up to 10 hours in breath mode
Up to 15 hours in single detection mode
Operating temperature
range
-15
°
C to 45
°
C
Charging temperature
range
0
°
C~45
°
C
Wireless transmission
protocol
PDA 、ANT+
Classification of
waterproof
IEC60529 IPX71
Light quantity
20Im (always on mode) 8lm (vehicle mode) 21lm (night flashing
mode) 65lm (daytime flashing mode)
FCC Statement
This device complies with part 15 of the FCC rules.
Operation is subject to the following two conditions:
(1) This device may not cause harmful interference.
(2) This device must accept any interference received, including
interference that may cause undesired operation.
Changes or modifications not expressly approved by the party
responsible for compliance could void the user's authority to
operate
the equipment.
NOTE
This equipment has been tested and found to comply with the limits
for a Class B digital device, pursuant to part 15 of the FCC Rules.
These limits are designed to provide reasonable protection against

harmful interference in a residential installation.
This equipment generates, uses and can radiate radio frequency
energy
and, if not installed and used in accordance with the instructions,
may cause harmful interference to radio communications.
However, there is no guarantee that interference will not occur in
a
particular installation.
If this equipment does cause harmful interference to radio or
television reception (which can be determined by turning the
equipment off and on), the user is encouraged to try to correct the
interference by one or more of the following measures:
●Reorient or relocate the receiving antenna.
●Increase the separation between the equipment and receiver.
●Connect the equipment into an outlet on a circuit different from
that to which the receiver is connected.
●Consult the dealer or an experienced radio/TV technician for help.
This equipment complies with FCC radiation exposure limits set forth
for an uncontrolled environment.
This equipment should be installed and operated with minimum
distance
20cm between the radiator & your body.