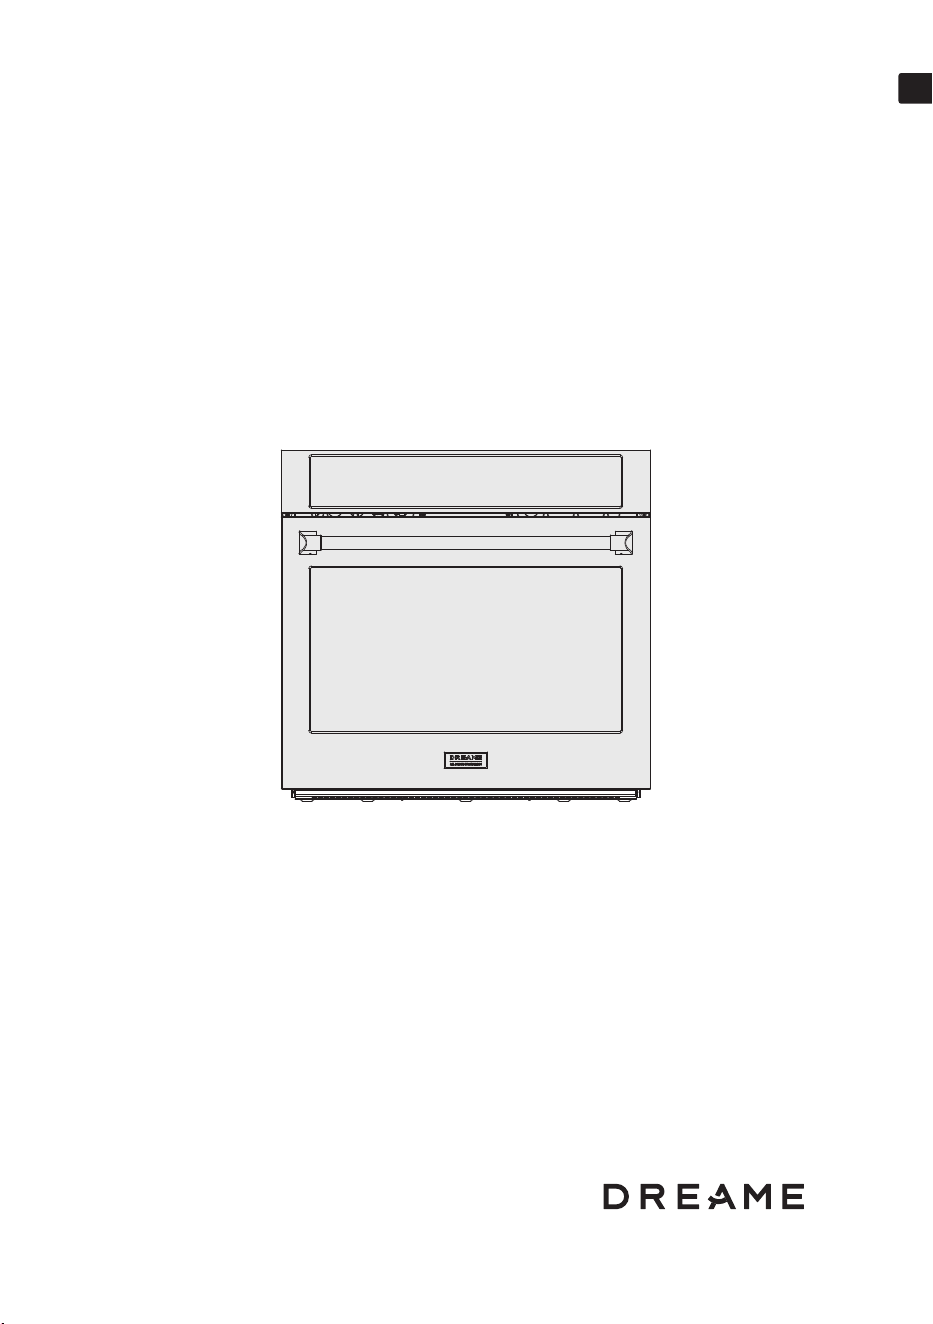
Single Wall Ovens
User Manual
Model: OL141-OZ601POSNA
Dreame OZ601 Pro Single Wall Ovens
Please read this manual carefully before installing the
product and keep it for future reference.
EN

EN

3
3
IMPORTANTSAFETY TIPS. . . . . . . . . . . . . . . . . . . . . . . . . . . . . . . . . . . . . . . . . . . . . . . . . . . . . . . . . . . . . . . . . . . . . . . . . . . . . . . . . .4
SafetyPrecaution. . . . . . . . . . . . . . . . . . . . . . . . . . . . . . . . . . . . . . . . . . . . . . . . . . . . . . . . . . . . . . . . . . . . .4
WARNING. . . . . . . . . . . . . . . . . . . . . . . . . . . . . . . . . . . . . . . . . . . . . . . . . . . . . . . . . . . . . . . . . . . . . . . . . . . . . . 5
Electrical Safety . . . . . . . . . . . . . . . . . . . . . . . . . . . . . . . . . . . . . . . . . . . . . . . . . . . . . . . . . . . . . . . . . . . . . . . . . 5
SafetyDuringUse. . . . . . . . . . . . . . . . . . . . . . . .
. . . . . . . . . . . . . . . . . . . . . . . . . . . . . . . . . . . . . . . . . . . . . . . . . . . . .6
Child Safety . . . . . . . . . . . . . . . . . . . . . . . . . . . . . . . . . . . . . . . . . . . . . . . . . . . . . . . . . . . . . . . . . . . . . 6
SafetyWhenCleaning . . . . . . . . . . . . . . . . . . . . . . . . . . . . . . . . . . . . . . . . . . . . . . . . . . . . . . . . . . . . . . . . . . . . . 6
INTRODUCINGYOURNEW OVEN. . . . . . . . . . . . . . . . . . . . . . . . . . . . . . . . . . . . . . . . . . . . . . . . . . . . . . . . . . . . . . . . . . . 7
Overview. .. . . . . . . . . . . . . . . . . . . . . . . . . . . . . . . . . . . . . . . . . . . . . . . . . . . . . . . . . . . . . . . . . . . 7
What's inc
ludedwithyour oven. . . . . . . . . . . . . . . . . . . . . . . . . . . . . . . . . . . . . . . . . . . . . . . . . . . . . . . . . . . . . . . . . . . . . . . . 7
BEFORE YOU BEGIN . . . . . . . . . . . . . . . . . . . . . . . . . . . . . . . . . . . . . . . . . . . . . . . . . . . . . . . . . 8
OPERATING THE OVEN. . . . . . . . . . . . . . . . . . . . . . . . . . . . . . . . . . . . . . . . . . . . . . . . . . . . . . . . . 9
Operating Control Panel . . . . . . . . . . . . . . . . . . . . . . . . . . . . . . . . . . . . . . . . . . . . . . . . . . . . . . . . . . . . . . . . . . . 9
Cooling Fan. . . . . . . . . . . . . . . . . . . . . . . . . . . . . . . . . . . . . . . . . . . . . . . . . . . . . . . . . . . . . . . . .
. 10
Energy Saving Tips . . . . . . . . . . . . . . . . . . . . . . . . . . . . . . . . . . . . . . . . . . . . . . . . . . . . . . . . . . . . . . . . . . 10
Setting The Clock . . . . . . . . . . .. . . . . . . . . . . . . . . . . . . . . . . . . . . . . . . . . . . 10
Setting The Oven. . . . . . . . . . . . . . . . . . . . . . . . . . . . . . . . . . . . . . . . . . . . . . . . . . . . . . . . . . . . . . . . 10
General OperationLogic(Appliesto Most Functions). . . . . . . . . . . . . . . . . . . . . . . . . . . . . . . . . . . . . . . . . . 12
Specific Functions (Key Details Only) . . . . . . . . . . . . . . . . . . . . . . . . . . . . . . . . . . . . . . . . . . . . . . . . . . . . . . . . . 12
Bake. . . . .
. . . . . . . . . . . . . . . . . .. . . . . . . . . . . . . . . . . . . . . . . . . . . 12
Conv Bake . . . . . . . . . . . . . . . . . . . . . . . . . . . . . . . . . . . . . . . . . . . . . . . . . . . . . . . . . . . . . . . 12
Conv Roast. . . . . . . . . . . . . . . . . . . . . . . . . . . . . . . . . . . . . . . . . . . . . . . . . . . . . . . . . . . . . . . . 13
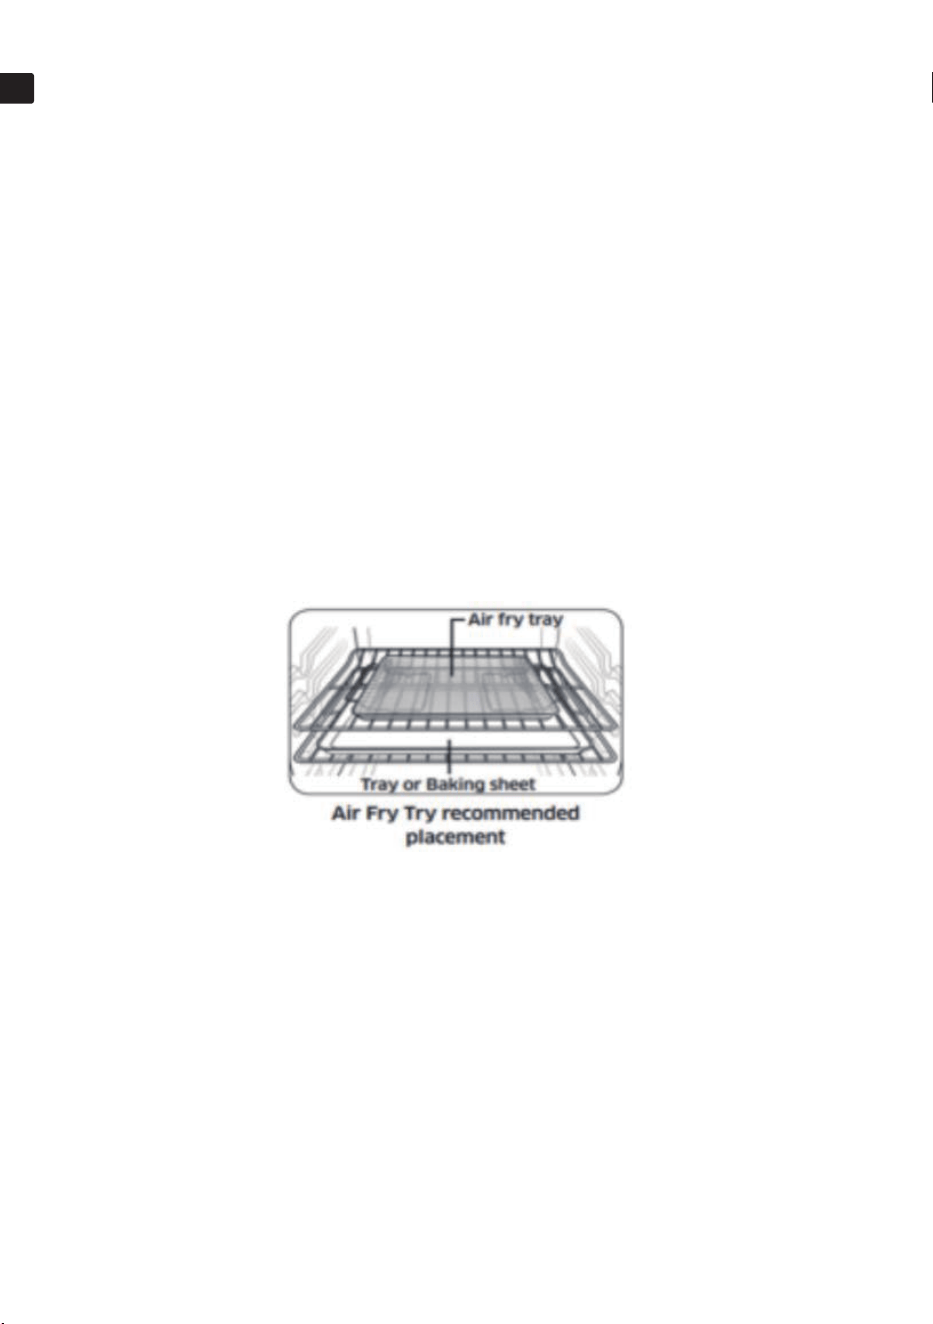
Air Fry. . . . . . . . . . . . . . . . . . . . . . . . . . . . . . . . . . . . . . . . . . . . . . . . . . . . . . . . . . . . . . . . 13
Broil. . . . . . . . . .. . . . . . . . . . . . . . . . . . . . . . . . . . . . . . . . . . . . . . . . . . . . . . . . . . . 14
Keep warm. . . . . . . . . . . . . . . . . . . . . . . . . . . . . . . . . . . . . . . . . . . . . . . . . . . . . . . . . . . . . .
. . 14
Pizza. . . . . . . . . . . . . . . . . . . . . . . . . . . . . . . . . . . . . . . . . . . . . . . . . . . . . . . . . . . . . . . . 15
Proof (DoughFermentation). . . . . . . . . . . . . . . . . . . . . . . . . . . . . . . . . . . . . . . . . . . . . . . . . . . . . . . . . . . . . . . . 15
Delay Start(ScheduledCooking). . . . . . . . . . . . . . . . . . . . . . . . . . . . . . . . . . . . . . . . . . . . . . . . . . . . . . . . . . . . . . . . 15
Oven Food Probe (Only for Bake/Conv Bake/Conv Roast). . . . . . . . . . . . . . . . . . . . . . . . . . . . . . . . 15
Self Clean. . . . . . . . . . . . . . . . . . . . . . . . . . . . . . . . . . . . . . . . . . . . . . . . . . . . . . . . 17
Minimum and maximum settings . . . . . . . . .
. . . . . . . . . . . . . . . . . . . . . . . 19
Oven Rack Positions . . . . . . . . . . . . . . . . . . . . . . . . . . . . . . . . . . . . . . . . . 20
Rack and Pan Placement . . . . . . . . . . . . . . . . . . . . . . . . . . . . . . . . . . . . . . . . . . 20
Before using the rack . . . . . . . . . . . . . . . . . . . . . . . . . . . . . . . . . . . 21
MAINTAINING THE OVEN. . . . . . . . . . . . . . . . . . . . . . . . . . . . . . . . . . . . . . . . . . . . . . . . . . . . . . . . . . . . . . . . 22
TROUBLESHOOTING. . . . . . . . . . . . . . . . . . . . . . . . . . . . . . . . . . . . . . . . . . . . . . . . . . . . . . . . . . . . . . . . 23
Warranty Terms. . . . . . . . . . . . . . . . . . . . . . . . . . . . . . . . . . . . . . . . . . . . . . . . . . . . . . . . . . . . . 27
...
Warranty Card . . . . . . .
. . . . . . . . . . . . . . . . . . . . . . . . . . . . . . . . . . .
. . . . . . . . . . . . . . . . . . . 28.
. ..
.
.
EN
3
TABLE OF CONTENTS
3
3
3
3
3
3
3
3
3
3
3
3
3
3
3
3
3
3
3
3
3
3 3
3
3
3
4
4
4
SAFETY PRECAUTIONS
•
•
•
•
DO NOT TOUCH HEATING ELEMENTS OR INTERIOR SURFACES OF OVEN WHEN IN USE
USE CARE WHEN OPENING DOOR.
Let hot air or steam escape before youremove or place food in theoven.
DONOTHEAT UNOPENEDFOODCONTAINERS.
There will be a build up of pressure in sealed food containers when heated. This can lead to
containers bursting and resulting in injury.
Note:
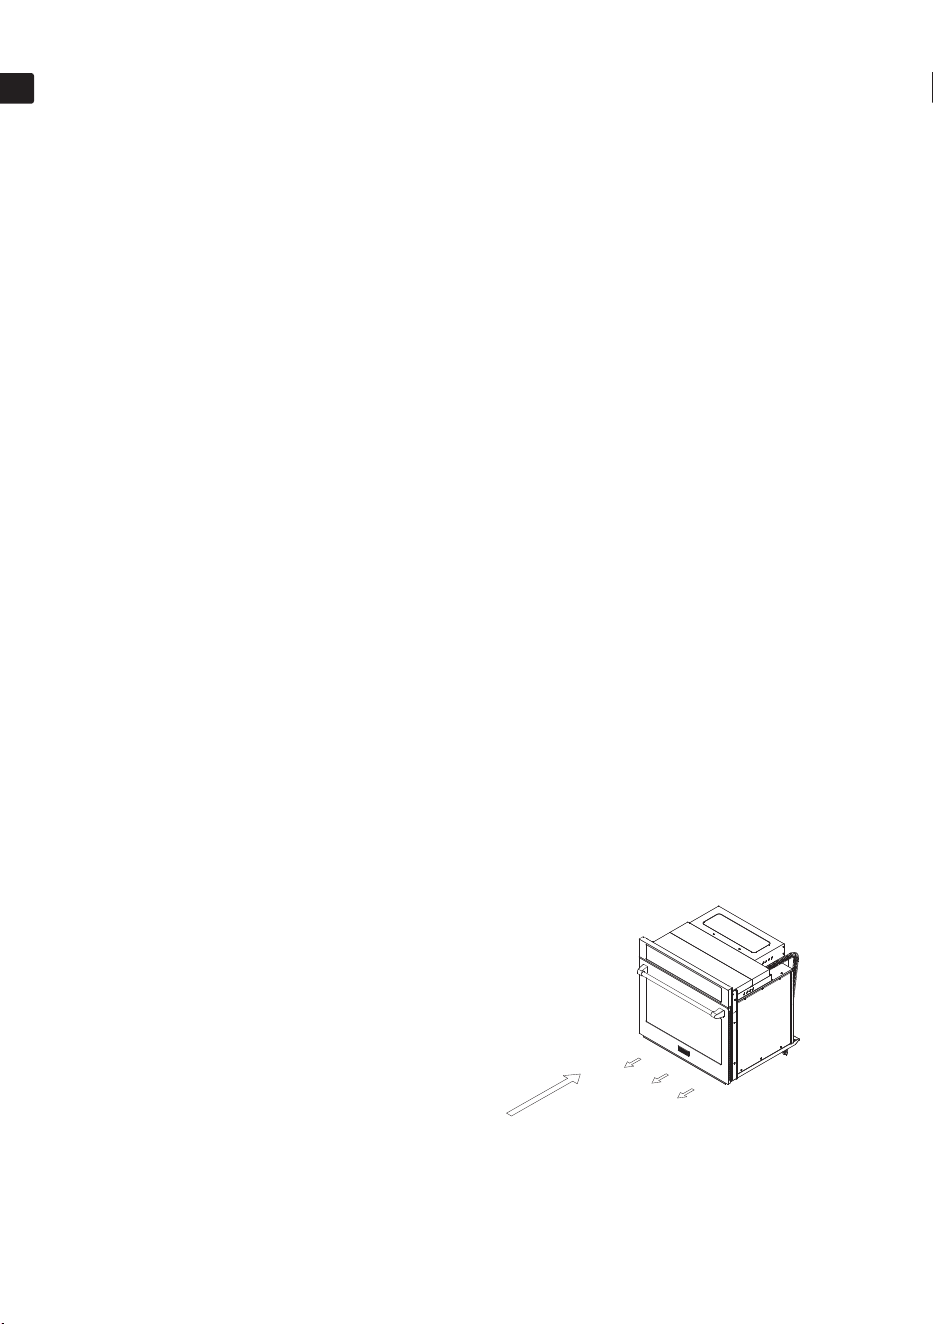
For proper operation,vent trim must be installed below the oven door to correctly channel
cooling air flow for oven.
SAFETY PRECAUTONS (Cont.)
•Keep oven vent /ducts unobstructed.
The oven vent becomes hot during oven use. Never block
this vent and never place plastic or heat sens
itive items
on or near theoven vent.
Oven vent opening
Read and follow all instructions before using your oven to prevent the risk of fire, electrical
shock, personal injury or damage when using the oven. This guide does not cover all possible
conditions that may occur. Always contact your service agent or manufacturer about problems
you do not understand.
Be sure your appliances are properly installed and grounded by a qualified technician.
Do not repair or replace any part of this appliance unless specifically recommended in this
Use & Care Manual.
All servicing of this appliance should be carried out by a qualified technician.
Always disconnect the power to the appliance before servicing by unplugging the power
cord,removing the fuse or switching off the circuit breaker.
Heating elements may be hot to the touch even though they are dark in color and not glowing.
The interior surface of the oven can become hot enough to cause burns.During and after use,
do not touch or let clothing or other flammable material contact heating elements or interior
surfaces of oven until they have had sufficient time
to cool. Other surfaces of the appliance
may become hot enough to cause burns. Use caution around oven vent openings and surfaces
near vent opening, oven doors, and window of oven door.
EN
4
IMPORTANT SAFETY TIPS
4
4
4
4
4
4
4
4
4
4
4
4
4
4
4
4
4
4
4
4
4 4
4
4
4
5
5
5
5
• DO NOT place aluminum foil directly on the oven bottom.
• DO NOT line the oven walls, racks, bottom, or any other part of the oven with aluminum
foil or any other material. Doing so will result in poor cooking results. The foil will disrupt
the heat distribution and result in permanent damage to the oven.
•Use dry pot holders only.
Moist or damp pot holder on a hot surface may result in steam burns. Do not allow pot
holders or clothingto contactheatingelements. Do use towels or other bulky cloths topick
up hot items. Usea dry pot holder or equivalent.
• Wear appropri
ate apparel when operating appliance.
Loose fitting or hanginggarments shouldnever be worn while using theappliance.
• Be certain all packing materials are removed from the appliance before operating.
Keep all plastics, clothing, paper and other flammableproductsaway from parts of theoven
that becomehot.
• DONOTForce theoven door open. This can damage the automaticdoor locking system.
Wait for the oven to fullycool beforetryingto opent
he door. Whenopening the door after Self-
Clean, standto the sideof the door and allow hot air and steam to escape, the oven may still
be veryhot.
•DO NOTuse steel wool pads. Steel wool will scratch the stainless steel surfaces as well as
rack and oven interior.
•DO NOT use harsh etching tools, abrasive, cleaners, or sharp metal scrapers to clean the oven
surfaces or glass, as this may cause damage to the product.
•Use caution when remo
ving the ovendoor. Oven door is HEAVY. DO NOTlift the oven door by
the handle or carry thedoor by the handle.
WARNING
•NEVER use this appliance for warming or heating the room.
•DONOTuse wateron grease fires.
Should an ovenfire occur, DONOTopen the oven door. Turnoff the oven. Once the fire has
consumedall oxygenin theoven the fire will go out on it own.If it does not,use an ABC type
Fire extinguisher.
ELECTRICAL SAFETY
• Protective Liners. DO NOT use aluminum foil or any other material to line the oven bottom.
This include silicone liners. Doing so will cause permanent damage to the oven interior.
EN
5
IMPORTANT SAFETY TIPS
5
5
5
5
5
5
5
5
5
5
5
5
5
5
5
5
5
5
5
5 5
5
5
5

6
6
6
6
6
• Before replacing the oven light bulb switch off the electrical power to the oven at the
circuit breaker panel. Failure to do so can result in severe personal injury , death or electrical
shock.
SAFETY DURING USE
• Always place the oven rack in the desired position while the oven is cool.
• Always use pot holders or oven mitts when removing food from the oven or adjusting the oven
rack.Hot cookware and racks can cause burns.
• Use caution with TIMED COOKING or DELAY TIME COOKING features.Always use pot holders or
oven mitts when removing food from the oven or adjusting the oven rack.
• Should an oven fire occur, leave the oven door closed, and turn off the oven. If the fire
continues, use an ABC fire extinguisher.
• DO NOT use water to put out a fire.
• DO NOT use the broiler pan with out the grid in place.DO NOT cover the Grid with aluminum
foil.
CHILD SAFETY
• Children should be kept away from the oven.
Children should not be left alone or unattended in the area where the oven is in use.
DO NOT leave small children unattended near the appliance. During the self-cleaning cycle ,
the outside of the oven can become very hot to the touch.
•
•
SAFETY WHEN CLEANING
•
•
•
•
•
•
•
Do not clean the door gasket. The door gasket is essential for a good seal between the
oven body and the door. Do not use cleaners or push or rub on the door gasket.
Do not use oven cleaners. No commercial oven cleaner or oven liner protective coatings
of any kind should be used in or around any part of the oven.
Before self cleaning the oven,remove the broiler pan, all oven racks, meat probe and any
other utensils from the oven cavity.
Never keep pets birds in the kitchen. The health of birds is extremely sensitive to the
fumes released during and oven self clean cycle. Fumes may be harmful or fatal to birds.
Move birds to a well ventilated room.
Important instructions. In the event of a failure during the self-clean cycle, an "F" and a
number error code will be displayed.Record this number for the service technician. Shut
down the power to the oven. Contact a qualified service technician.
Ensure the oven light lens and all interior surfaces have cooled before cleaning or wiping
them down to avoid thermal shock.
Do not block the oven vent during operation. Blocking the oven vents can cause the oven
to overheat and trip safety thermal protectors on the oven. The airflow from the bottom
of the wall oven should never be obstructed.
EN
6
IMPORTANT SAFETY TIPS
6
6
6
6
6
6
6
6
6
6
6
6
6
6
6
6
6
6
6 6
6
6
6
7
7
7
7
7
7
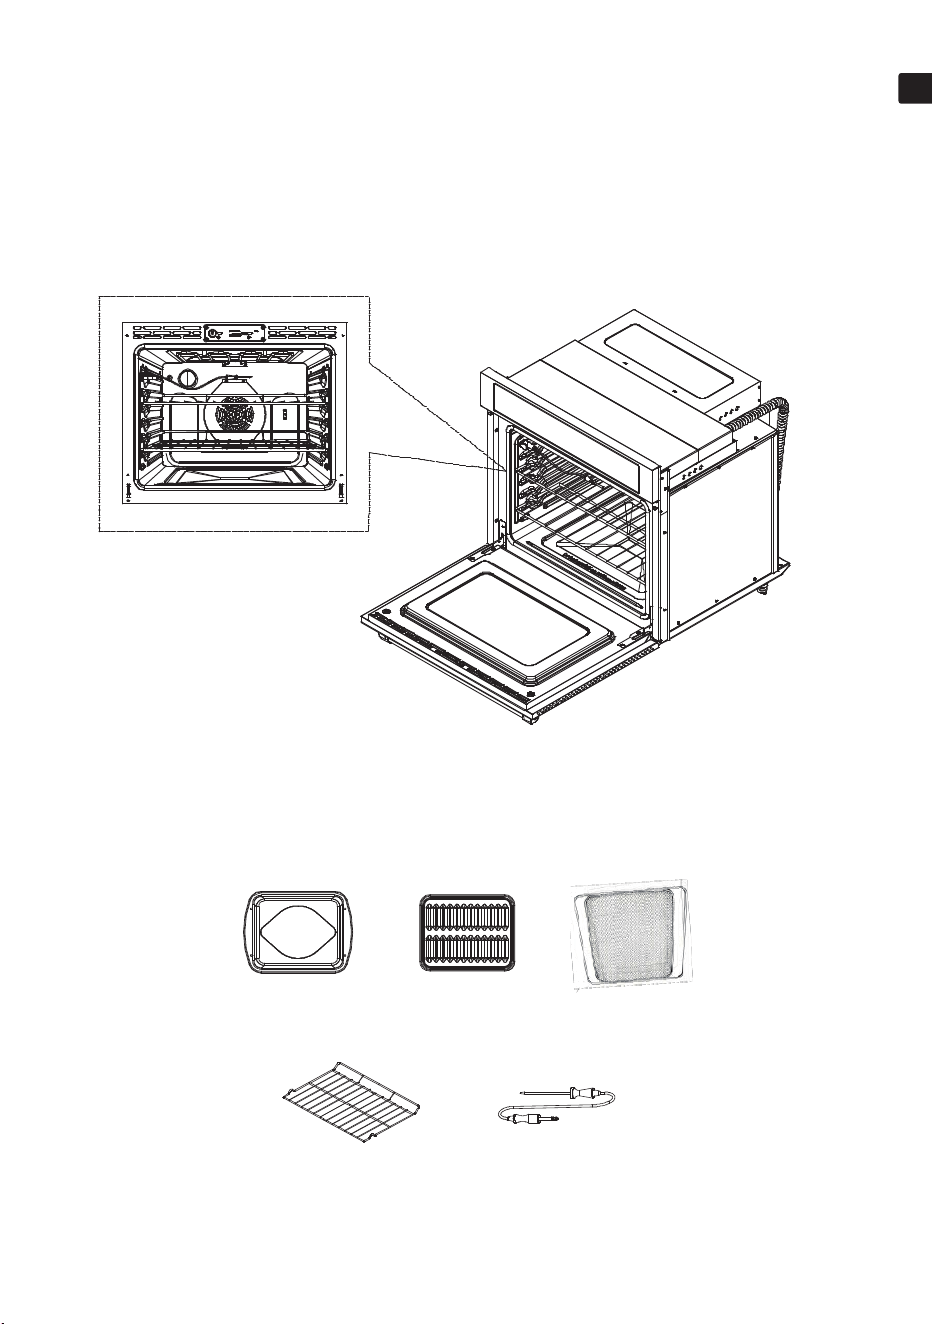
2*OvenRacks 1*Temp prob
What's included with your oven
Overview
1*Broil Pan Cover 1*Broil Pan 1*Air Fry Tray
EN
7
INTRODUCING YOURNEW OVEN
7
7
7
7
7
7
7
7
7
7
7
7
7
7
7
7
7
7 7
7
7
7

8
8
8
8
8
8
8
Energy Saving Tips
•
•
•
•
Remove all rack accessories. Make sure there is no packing material remaining in the oven.
Clean the oven thoroughly before using it for the first time. Then set the oven to Bake, set
temperature for 400 °F and run for 1 hour. Then set unit to Broil and run for an additional
30 min on Broil. There will be a distinctive odor. This is normal. You may see a light smoke
from the oven vent area and inside the oven as the manufacturing and protective coating
oils are burned off. Ensure your kitchen is well ventilated during this conditioning period.
During cooking, the oven door should remain closed except when you turn food over.
Do not open the door frequently during cooking to maintain the oven temperature and
to save energy.
If cooking time is more than 30 minutes, you can switch the oven off 5-10 minutes
before the end of the cooking time to save energy. The residual heat will complete the
cooking process.
To save
energy and reduce the time needed for reheating the oven, plan oven use to
avoid turning the oven off between cooking one item and the next.
Whenever possible, cook more than one item at a time.
EN
8
BEFORE YOUBEGIN
8
8
8
8
8
8
8
8
8
8
8
8
8
8
8
8
8 8
8
8
8
9
9
9
9
9
9
9
9
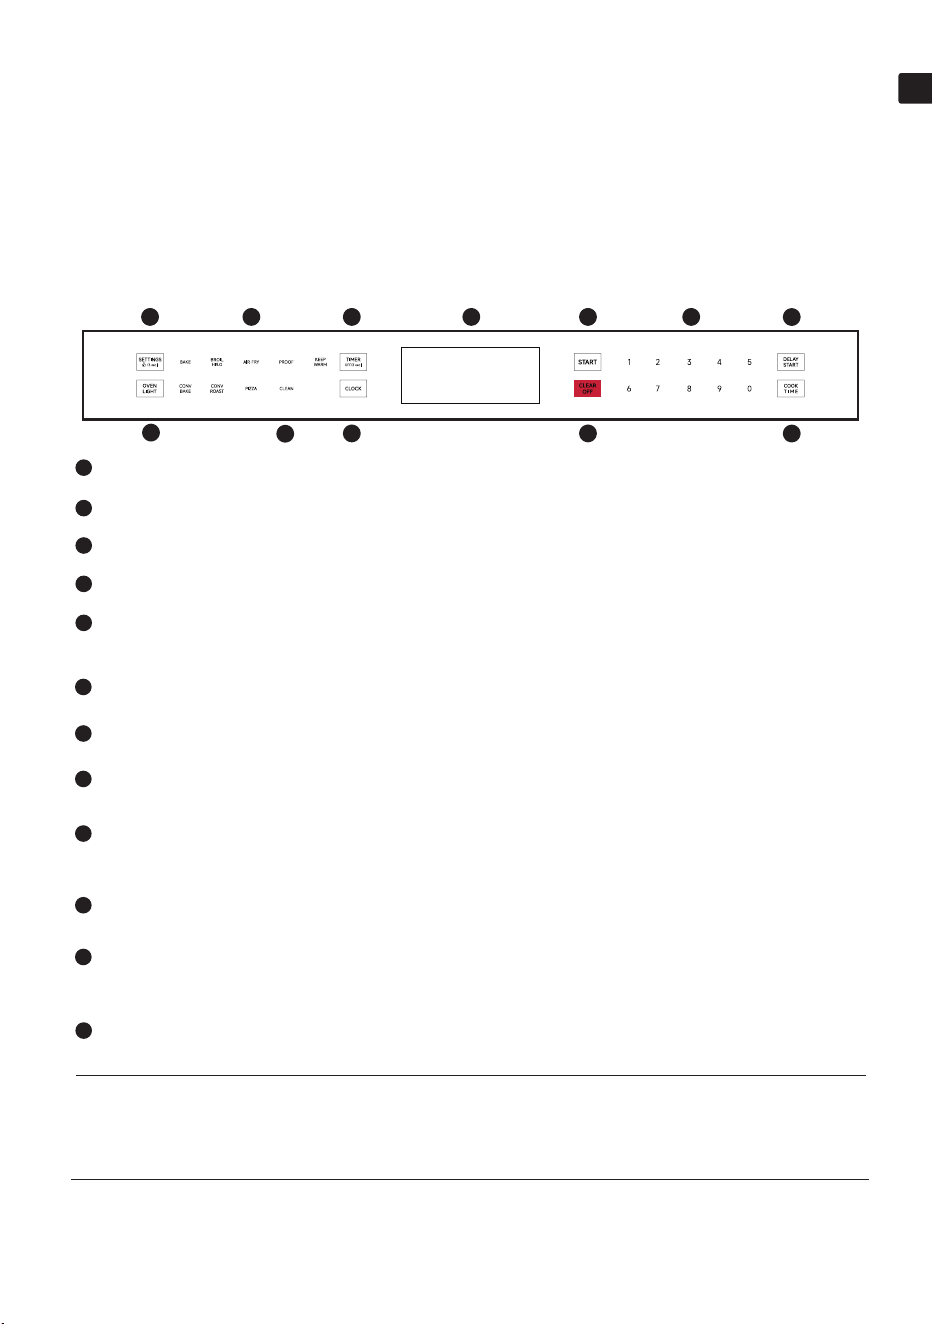
Operating Control Panel
Control Panel Features
Oven Functions
Select various functions of the oven.
Display
Oven operation and settings appear in the display.
START
Use to start all functions.
Oven Light
Use to turn the oven on and off.
Settings
Press to select and adjust oven settings.
Press and hold the Settings button for three seconds to activate/deactivate. .
Timer Off
Use to set or cancel the timer of the oven.
Clock
Use to set the time of day.
CLEAR OFF
Use to stop cooking or cancel settings of the oven.
Number Pads
Use to set any function requiring numbers such as the time of day on the clock, the timer, the oven
temperature, the start time, and the length of operation for timed baking, etc.
Delay Start
Press the button to set the delayed time cook. The oven starts at the set time.
Cook Time
Press the button to set the desired amount of time for food to cook. The oven shuts off when the set
cook
ing time runs out.
• Setting the Time, Timer and Temperature
If you enter one digit of a number incorrectly, enter the entire number again to correct it. For example, if you
press 1, 0, 3 and 1 to set the clock for 10:30, press 1, 0, 3 and 0 to enter the correct time.
2 3
3
4
4
5
6
6
7
7
8
8
9
NOTE
1
1
2
1
2
2
1
3
2
1
4
2
1
5
2
1
6
2
1
7
2
1
8
2
1
9
2
1
10
2
1
11
Clean
2
1
12
Use to set self clean or steam clean of the oven.
5
4
1 6
7
2 3
8
9
10
11
12
EN
9
OPERATING THE OVEN
9
9
9
9
9
9
9
9
9
9
9
9
9
9
9
9 9
9
9
9

10
10
10
10
10
10
10
10
10
Cooling Fan
Your appliance has a cooling fan. The cooling fan switches on during operation. The hot air escapes above
the door. The cooling fan continues to run for a certain time after operation.
CAUTION
Do not cover the ventilation slots. Otherwise, the appliance will overheat.
Energy Saving Tips
• Multiple-rack cooking saves time and energy. Whenever possible, cook foods requiring the same cooking
temperature together in one oven.
• For optimal performan
ce and energy savings, follow the guides for proper rack and pan placement.
• Reduce energy use by cleaning light oven soil.
• Avoid opening the oven door more than necessary during use.
Setting The Clock
When power is first supplied to the oven, the timer display will flash "12:00" and "Clock setting" will appear on
the display . Enter the time by touching "1" in the number keypads or "START".
The operation proceed as follow:
1.
2.
3.
4.
Press CLEAR OFF to cancel the clock and enter the standby status page.
12-hour system : If the hour is less than 10
, the leading zero is not displayed; for example: 8:56 AM (8:56 in the
morning)
24-hour system : If the hour is less than 10, the leading zero is displayed; for example: 8:56 (08:56)
Setting The Oven
Settings
The oven has additional settings which can be accessed and adjusted using the settings button. They remain
in the control's memory until changed.
How to use:
1. Touch Settings. The oven display will scroll through the various options.
2. Touch the
number keypad for the specific option to toggle the function setup. Use a following chart as a guide.
NOTE
Touch START to set clock or touch Clock.
Choose 12 or 24 hours system according to the prompts: 1:12hr, 2: 24hr
Enter the correct time using the number keys.
1) 12-hour system: choose AM or PM: 1:AM, 2:PM, then touch START, then press the number
keys to set the correct time.
2) 24-hour system: press the number keys to set the correct time.
Touch START to confirm is complete setting.
EN
10
OPERATING THE OVEN
10
10
10
10
10
10
10
10
10
10
10
10
10
10
10 10
10
10
10

1 1
1 1
1 1
1 1
1 1
1 1
1 1
1 1
1 1
1 1
The Timer does not start or stop the oven.
NOTE
3
Option Code Function Description
Temp Units 1 Set temperature unit
Sound 2 Key sound switch
Error Code 3 Query for error codes that have occurred
Version 4 Version information query
DEMO Mode 5 Set oven demo mode
Compensation 6 ±35°F(±19°C) (retained after power loss)
Sabbath 7
Set sabbath mode. (The cooking time can be set within 74hours)
Sabbath mode disables the oven lights (the oven light will not turn
on
when the door is opened), all sounds (the control will not beep
screen is pressed), Convection modes, Broil modes,
all time
functions. Sabbath mode can only
This feature conforms to Jewish
Factory Reset 8 Restore factory setting
Sabbath Mode
How to set Sabbath Mode:
1 Touch Settings.
Touch 7.
Set the desired temperature.
Press START.
To cancel Sabbath Mode, press CLEAR OFF.
2
3
4
Timer
In the standby or working state (except for the Sabbath mode), how to set timer:
1
2
Touch Timer/off(3 sec), the oven display will scroll through the various options.
Touch number keypad to set the time.(hours and minutes).
Touch Timer.
The maximum allowed setting for the alarm operation time is 24 hours. Note that the alarm operation
time needs to be set to be more than 1 minute for it to be effective.
Press and hold Timer/off(3 sec) to turn off Timer.When the Timer count down ends, a prompt sound
lasts for one minute, displaying "End and flashes for 1 minute". Then it switches to "Cooking" display (for
example, if there is no "Cook time" display, it shows this).
EN
1 1
OPERATING THE OVEN
when the
Warm, Proof, and
be used with traditional Bake.
Sabbath requirements.
1 1
1 1
1 1
1 1
1 1
1 1
1 1
1 1
1 1
1 1
1 1
1 1
1 1
1 1 1 1
1 1
1 1
1 1

12
12
12
12
12
12
12
12
12
12
12
The Control Lock shuts down the control panel keypads to avoid unintended use of the oven. The Control Lock
will remain set after a power failure, if set before the power failure occurs.
When the control is locked, only the keypads will function.
To Lock Control:
Touch The oven control is lock, when a lock icon appears in the display.
To Unlock Control:
Hold for 3 seconds, and then the oven is unlock and the lock icon is remove.
General 0peration Logic(Applies to Most Functions)
1.Activate Function: Press the function button (e.g., [Bake]) when the oven is in standby.
2.Set Temperature/Time:
• Temperature: Use number keys (default temp varies by function, see below).
• Time (Optional): Press [Cook Time] -> use number keys (default: 10hrs if not set; no time display if using default).
3.Start:Press [START]
4.Adjust During Cooking:
• Temperature: Use number keys -> Press [START] to confirm (oven keeps old temp until confirmed).
• Time: Press [Cook Time] -> numb
er keys -> [START].
5.Confirmation Rules:
• "Press START” to Confirm “pops up if no [START] within 5 seconds of settings”.
• Returns to standby if no action for 30 seconds (unless temperature is already set/confirmed).
6.End of Cooking:
When cooking is complete, the unit exits the operating mode.
The display shows “Cooking complete”, and “End” will flash on the screen. The buzzer beeps every 3 seconds for 1
minute.
Opening the door or pressing the CLEAR OFF will return the oven to Standby Mode.
Place food in the oven after preheating if the recipe calls for it. Preheating is very important for good results
when bakin
g cakes, cookies, pastry and breads. After the oven has reached desired temperature, it will
automatically switch to Cooking Mode.
Specific Functions (Key Details Only)
Bake
• Default Settings: Temp=350°F(177°C) (flashes); Time=10hrs.
• How to use Bake:
1 TouchBake.
2
Touch number keypads to enter the temperature.
3 Touch Cook Time.Touch number keypads to set the baking time.
4 Touch START to start cooking.
Conv Bake (Convection Bake)
• Default Settings: Temp=325°F(163°C) (flashes);Time=10hrs.
• How to use Conv Bake:
1 Touch Conv Bake.
NOTE
NOTE
2 Touch number keypads to enter the temperature.
3 Touch Cook Time. Touch number keypads to set the Convection Bake time.
4 Touch START to start cooking.
EN
12
OPERATING THE OVEN
12
12
12
12
12
12
12
12
12
12
12
12
12 12
12
12
12
13
13
13
13
13
13
13
13
13
13
13
13
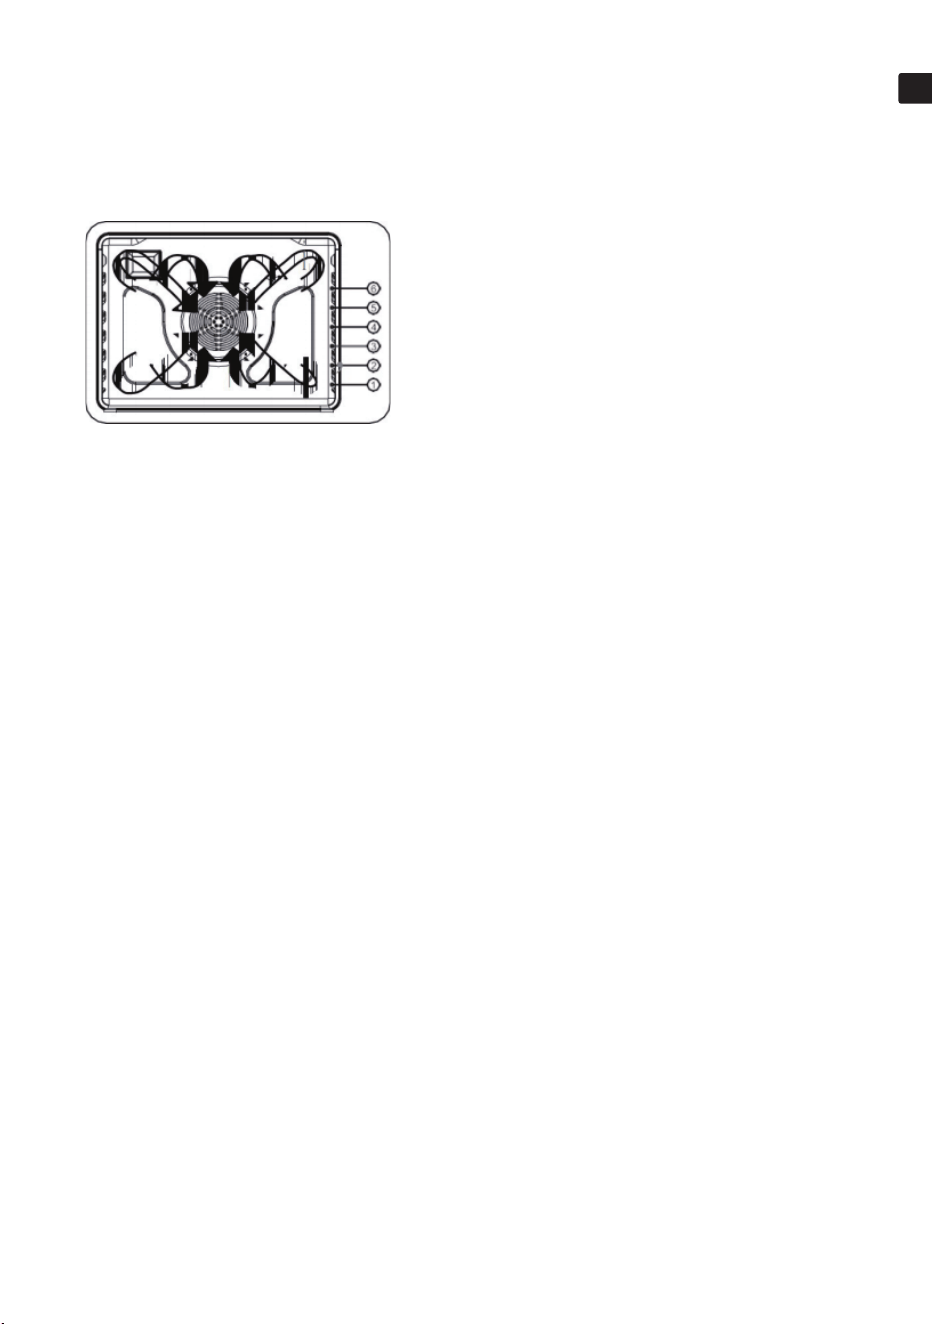
Tips for convection baking
Conv Roast
• Default Settings: Temp=325℉(163℃) (flashes); Time= 10hrs (no time display initially).
• How to use Conv Roast:
1 Touch Conv Roast.
Touch number keypads to enter the temperature.
Touch Cook Time. Touch number keypads to set the Convection Roast time.
Touch START to start cooking.
2
3
4
• Adjust During Cooking:
·Temperature: Enter a new temperature directly using the numeric keypad, then press START to confirm; or
press the Conv Roast key once -> enter the new temperature using the numeric keypad -> press START to
confirm.
Time: Press [Cook Time ,enter new time, press [START] to confirm (reverts to old time after 30s of no action).
·
Air Fry
The Air Fry feature uses hot air for crispier and healthier frozen or fresh foods without any (or less than normal)
oil compared to conve
ction modes.
ConvectionBaking
By using the Convection Bake, you will be able
to cook faster. Convection baking uses a fan to
circulate the oven's heat evenly and continuously
within the oven. This improved heat distribution
allows for even cooking and excellent results
while using multiple racks at the same time.
Foods cooked on a single oven rack will generally
cook faster and more evenly with convection
baking. Multiple oven rack cooking may hav
e
slightly increased cooking times for some foods,
but the overall result is time saved. Breads and
pastries brown more evenly. You can program
the oven for convection baking at any
temperature between 175 °F and 550 °F.
The amount of time you save will vary depending on the amount and type of food you are cooking.
When baking cookies or biscuits, you should use pans with no sides or very low sides to allow the
heated air to circulate around the food.
Using a pan with a dark finish will produce faster cooking times.
When using convection
baking with a single rack, place the oven rack in position 3 or 4. If cooking on
multiple racks, place the oven racks in position 3 and 5. When baking a cake, using the bake mode
(not the convection bake mode) will produce better results.
Convection roasting is good for cooking large tender cuts of meat uncovered. Heat comes from the
top heating element. The convection fan circulates the heated air evenly over and around the food.
Meat and poultry are browned on all sides as if they were cooked on a rotisserie. The heated air seals
in j
uices quickly for moist and tender results while, at the same time, creating a rich golden-brown
The Air Fry feature works best for single-rack baking with packaged and convenience foods. Make sure
that you remove the packaging from food before cooking it. You can program for temperatures
between 350° F - 550° F. Leave the oven light off when baking.
EN
13
OPERATING THE OVEN
13
13
13
13
13
13
13
13
13
13
13
13 13
13
13
13
14
14
14
14
14
14
14
14
14
14
14
14
14
•
•
•
1
2
3
4
Note:
• This will help to reduce splatter and smoke.
• Before using a baking sheet, check the maximum temperature.
• Air Fry is designed for a single oven rack. Place food on rack position 3 for best results.
• For cooking fresh or foods, spread the oil over a larger area more evenly, for better crisping.
Broil
• Default Settings: Heat level = Hi (flashes); Time = 3hrs (no time display).
• How to use Broil:
1. Touch Broil.
2.Select Hi or Low mode: 1: Hi, 2: Lo
3.Touch START to start cooking.
Keep Warm
• Default Settings: Temp=175°F(79°C)(NOT adjustable); Time = 3hrs (if [START] pressed without setting time).
• How to use Keep Warm:
1. Touch Keep Warm.
Touch Cook Time. Touch number keypads to set the Keep Warm time.
Touch START to start cooking.
2.
3.
Default Settings: Temp=425°F(219°C)(flashes); Time = 10hrs (e.g., 15 mins for French fries)
Critical Note: NO preheating -> press [START] to directly enter "Cooking" mode.
How to use Air Fry:
Touch Air Fry.
Touch number keypads to enter temperature.
Touch Cook Time. Touch number keypads to set the Air fry time. Time can be set up to 1 minutes
and 10hours.
Touch START to start cooking.
The oven display will count down the Air Fry time.
When cooking is complete, the unit exits the operating mode.
The display shows "Cooking complete", and "End" will flash on the screen. The buzzer beeps every
3 seconds for 1 minute.
Opening the door or pressing the CLEAR OFF will return the oven to Standby Mode.
Broiling is a method of cooking tender cuts of meat by direct heat under the broil element of the
oven. The high heat coo
ks quickly and gives a rich, brown outer appearance. Broil mode is best for
meats, fish, and poultry up to 1" thick.
EN
14
OPERATING THE OVEN
14
14
14
14
14
14
14
14
14
14
14 14
14
14
14

15
15
15
15
15
15
15
15
15
15
15
15
15
15
Pizza
• Check pizza before minimum time, pizza may cook faster compared to a traditional oven.
• For fresh pizza use a pizza paddle for sliding the pizza on and from the metal turntable.
• If using a pizza paddle, sprinkle the paddle liberally with cornmeal for ease in transferring the dough to
the metal turntable.
• Maximum size is 12 inches for fresh and frozen pizzas.
• Avoid using a pizza stone as it can damage the oven.
• The metal turntable can be used for
cutting pizza into slices. Remo
ve the turntable from the oven after the
pizza is baked.
• Default Settings: Temp=425°F(219°C)(flashes);Time=10hrs(suggest 10-15 mins for pizza).
• How to use Pizza:
1 Touch Pizza.
Touch number keypads to enter temperature. The temperature can be set between 175 °F and 550°F.
Touch Cook Time. Touch number keypads to set the pizza time. Time can be set up to 1 minutes and 10hours.
Touch START to start cooking.
2
3
4
Proof (Dough Fermentation)
• Default Time: 10hrs (set time via [Cook Time]+ number keys if needed).
• How to use Proof:
1. Touch Proof.
Set the temperature.
2.
·F mode: Press "1"for 85°F, "2" for 95°F(default =85°F).
·C mode: Press "1"for 30°C, "2" for 35 °C(default=30°C)
3.Touch Cook Time. Touch number keypads to set the Proof time.
4. Touch START to start cooking.
Delay start (Scheduled Cooking)
• Prerequisite: First set temperature + Cook Time for your function if you need (e.g., Bake) -> DO NOT press
[START] yet.
• How to use Delay Start:
1. Press Delay Start.
Use number keys to set delay time
Select function
2.
3.
Oven Food Probe (Only for Bake/Conv Bake/Conv Roast)
• How to use Oven Food Probe:
1. Insert Probe: Plug into oven port (probe icon lights up) -> do this in standby or after preheating.
2.
-> press [START].
The oven starts to preheat until preheat complete, a beep will sound and the oven display will count-
down the Pizza time if you set.
Tips: You can touch START directly without entering the time of cooking, after setting the cooking
temperature. The oven will work for the maximum safe time, at which time the cooking time will not
be displayed.
EN
15
OPERATING THE OVEN
Set Oven Temp:
• Display switches to function name (e.g., "BAKE") -> default temp: 350°F(177°C) for Bake;325
°F(163°C) for
Conv Bake/Conv Roast.
• Use number keys to adjust (max temp=482°F/250°C)
15
15
15
15
15
15
15
15
15
15 15
15
15
15
When cooking is complete, the unit exits the operating mode.
The display shows "Cooking complete", and "End" will flash on the screen. The buzzer beeps every
3 seconds for 1 minute.
Opening the door or pressing the CLEAR OFF will return the oven to Standby Mode.
Touch START to start cooking.
4.
16
16
16
16
16
16
16
16
16
16
16
16
16
16
Set Probe Temp:
-Default probe temp=150°F(65°C) -> use number keys to adjust
16
3
4
Touch START to start cooking.
Time (Optional): Press [Cook Time] -> number keys [START] (default =10hrs).
• End Condition: Auto-stops when countdown ends OR food reaches probe temp.
• Note: Remove probe during cooking -> oven continues in original function.
CAUTION
•
•
•
•
•
•
•
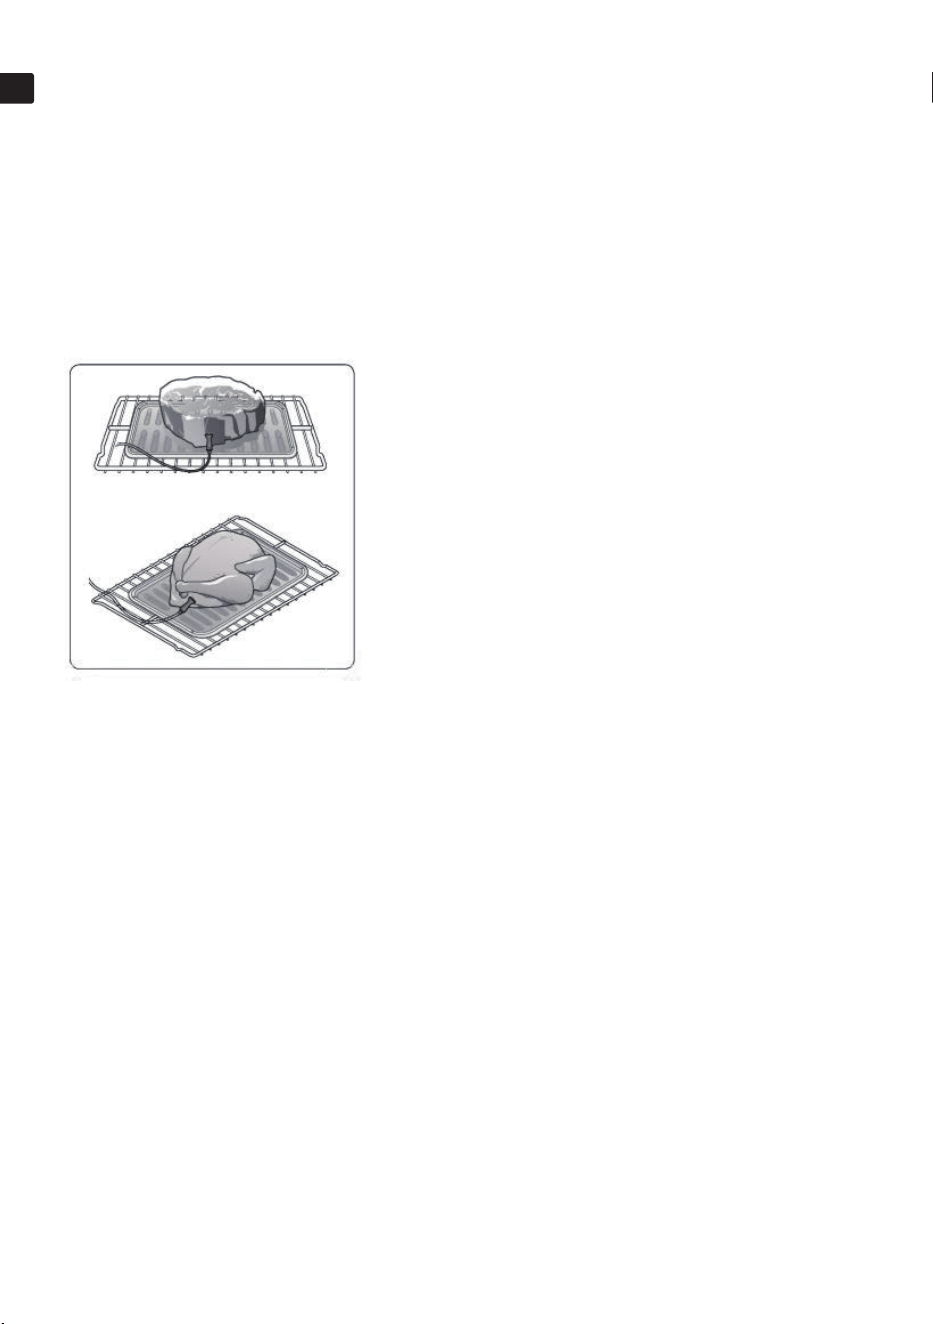
How to use the temp probe into the meat:
Insert the probe completely into the meat as shown in
the illustrations. It should not touch bone, fat, or
gristle.
If you do not fully insert the probe into the meat, the
Temp Probe function will not work correctly because
the probe will sense the oven temperature, not the
temperature of the meat.
For bone-in meats, insert the probe into the center of
the lowest and thickest portion of the piece.
For whole poultry (turkey, large chickens, etc.),
inser
t the probe into the thickest part of the inner
thigh, parallel to the leg.
To protect the Temp Probe's tip, be careful not to insert the probe so that the tip protrudes through
the surface of the meat. Make sure that the tip is in or near the center of the meat.
Do not store the probe in the oven.
Do not leave the probe inside the oven during a self-clean or broiting cycte, as you can permanent-
ty damage the probe and it will no longer work.
To avoid breaking the probe's tip, defrost your food completely.
Do not use tongs when inserting or removing the probe. Tongs can damage the probe.
Use the Temp
Probe for Temp. Probe function cooking only. Do not use the Temp Probe for any
other purpose:
If you remove the Temp Probe while the Temp. The probe function is operating or insert the Temp
Probe while baking or cooking normally, cooking will stop after 1 minute.
EN
16
OPERATING THE OVEN
16
16
16
16
16
16
16
16
16 16
16
16
16
.
1 7
1 7
1 7
1 7
1 7
1 7
1 7
1 7
1 7
1 7
1 7
1 7
1 7
1 7
1 7
1 7
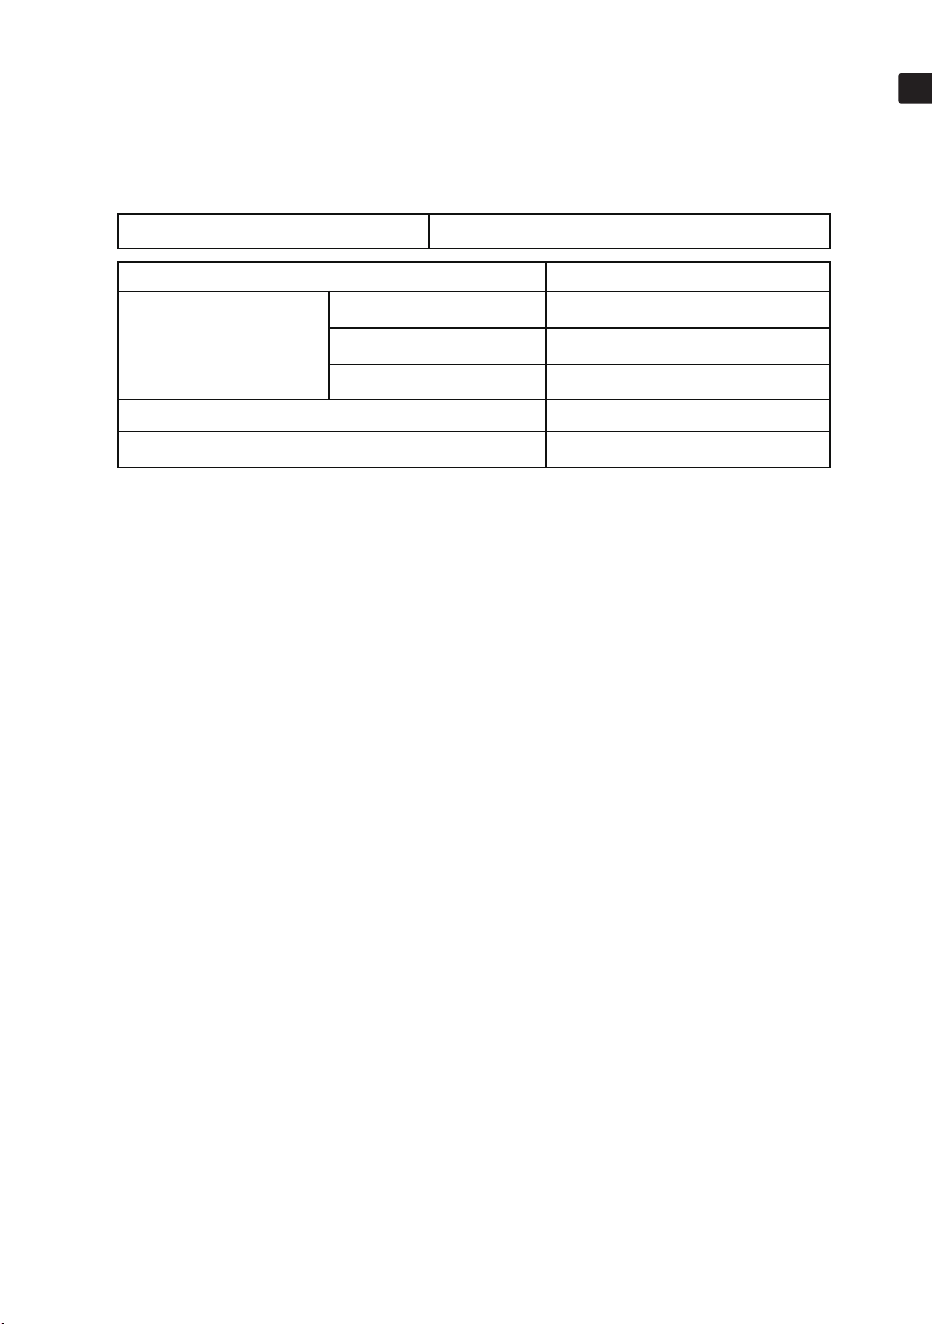
Temp Probe table
Note:
• If you cover meat with foil and allow to rest for 10 minutes after cooking , the internal temperature will
rise anadditional 5°Fto 10°F.
Removing the Temp Probe.
Remove the temp probe plug from the socket.
•
•
CAUTION
After cooking, the Temp Probe will be hot enough to cause burns.
Self Clean
This self-cleaning oven uses high temperatures to burn off left over grease and cooking residue and completely
reduce them to a fine powdered ash that can be wiped away with a damp cloth after cycle has completed and
oven has cooled.The Steam Clean feature is designed to use water and a low oven temperature to generate
steam to warm the oven interior surfaces and loosen light soils before hand-cleaning.
How to use Self Clean:
1. Touch Clean.
Touch 1 : self clean
Select Self Clean time: 1: 3hr, 2: 5hr
Touch START to start Self Clean.
2.
3.
NOTE:
•
•
•
•
Typeof Food Internal Temperature
Beef /Lamb
Rare
120℉
Medium
130℉
Well Done
140℉
Pork 160℉
Poultry 165℉
Available Temperatures 100 to 210°F
After the self-clean cycle is complete, the oven door remains locked until the internal temperature
cools to below 572°F (300°C).
During operation, only TIMER and CLEAR OFF are operable; other keys are invalid.
If one oven is used in any mode, the other oven can not enter self-clean mode.
All racks and broil pan and any cookware must be removed from the oven prior to running the self
clean cycle.
4.
How to use steam Clean:
1. Remove all accessories from the oven.
Pour 10 oz.(300 ml)of water onto the bottom of the empty oven and close the oven door.Use normal water only,
not distilled water.
When steam-cleaning,use exactly 10 oz.of water since this produces the best results.
2.
EN
1 7
OPERATING THE OVEN
1 7
1 7
1 7
1 7
1 7
1 7
1 7
1 7 1 7
1 7
1 7
1 7
18
18
18
18
18
18
18
18
18
18
18
18
18
18
18
18
18
•
When the cooking time ends, the oven will stop operating, a buzzer will sound, and a pop-up notification will
indicate that cooking is complete. (Cooking time does not include preheating time.)
•
•
•
•
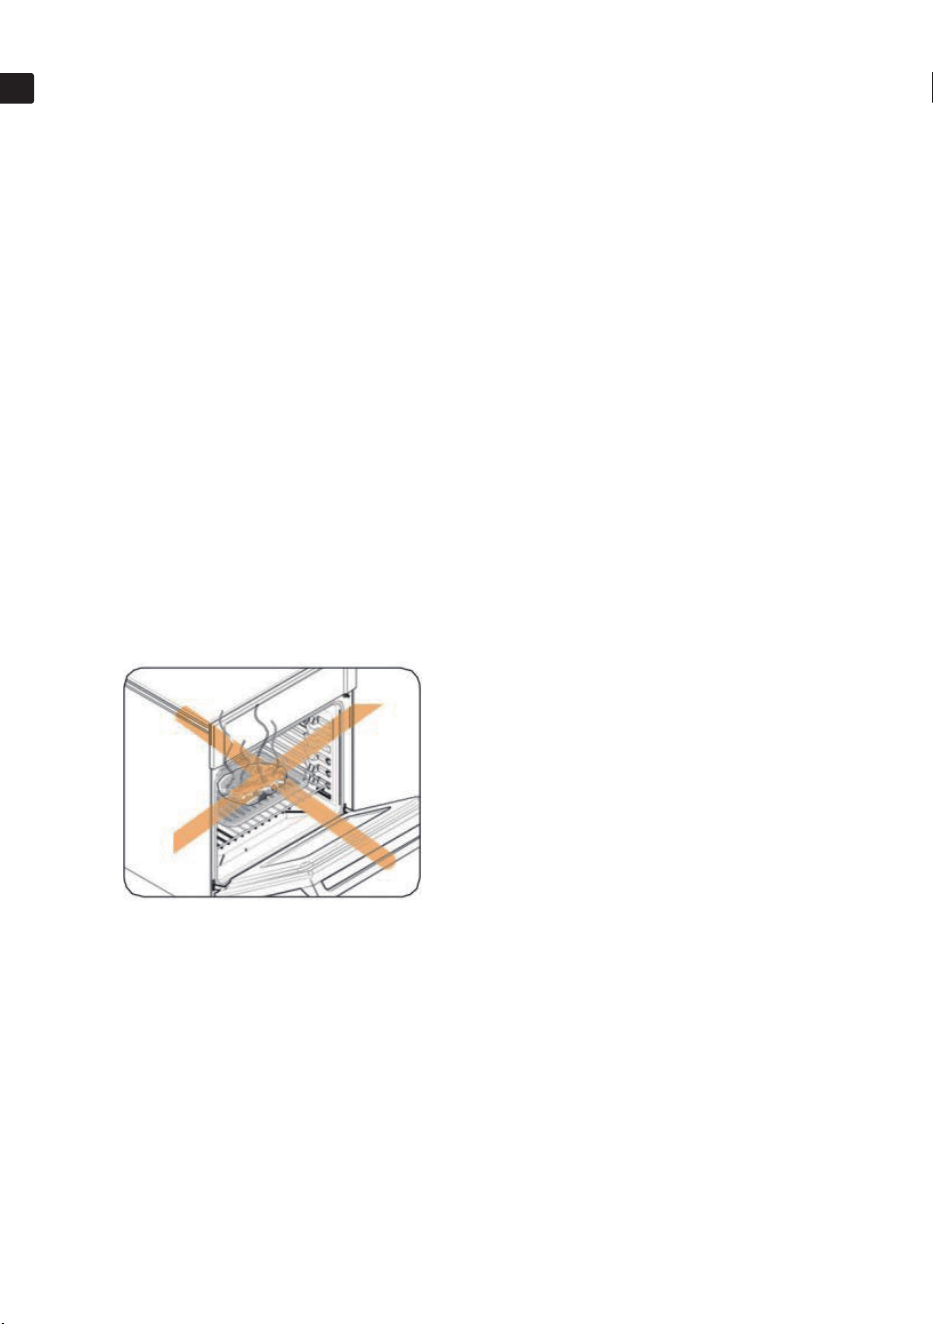
CAUTION!
Always broil with the oven door closed. Use care
when opening the door. Let hot air from steam
escape before you remove food.
•
•
•
Wipe up debris from the oven floor and remove any large spills.
Self clean cycle will only clean areas where the heat can reach. Areas along the door frame,
gasket area and inner door will have to be cleaned by hand after cleaning cycle has finished.
During self-clean, exterior surfaces may get hotter than usual, so children should be kept away. If
canceled, the door stays locked until the unit cools to a safe temperature level.
Turning a unit off during self-clean is discouraged. Damage ca
n occur if self-clean does not
complete.
EN
18
OPERATING THE OVEN
18
18
18
18
18
18
18 18
18
18
18
To change the cooking temperature, tap the temperature value in the numeric keypad to adjust
it, then press START. The oven will operate with the updated settings.
If you want to change the cooking time, you need to touch COOK TIME on the right side of the
keypad to update, then touch START. The oven will operate with the updated settings.
Convention Fan turns off when the oven door is opened to prevent unwanted heat escape. If the
oven door is left open for more than one minute, the heating elements will turn off.
If you Want to change the cooking temperature, you need to touch the temperature value in the
numeric keypad to update, then touch START. The oven will operate with the updated settings.
If you want to change the cooking time, you need to touch COOK TIME on the right side of the
keypad to update, then touch START. The oven will operate with the updated settings.
•
19
19
19
19
19
19
19
19
19
19
19
19
19
19
19
19
19
19
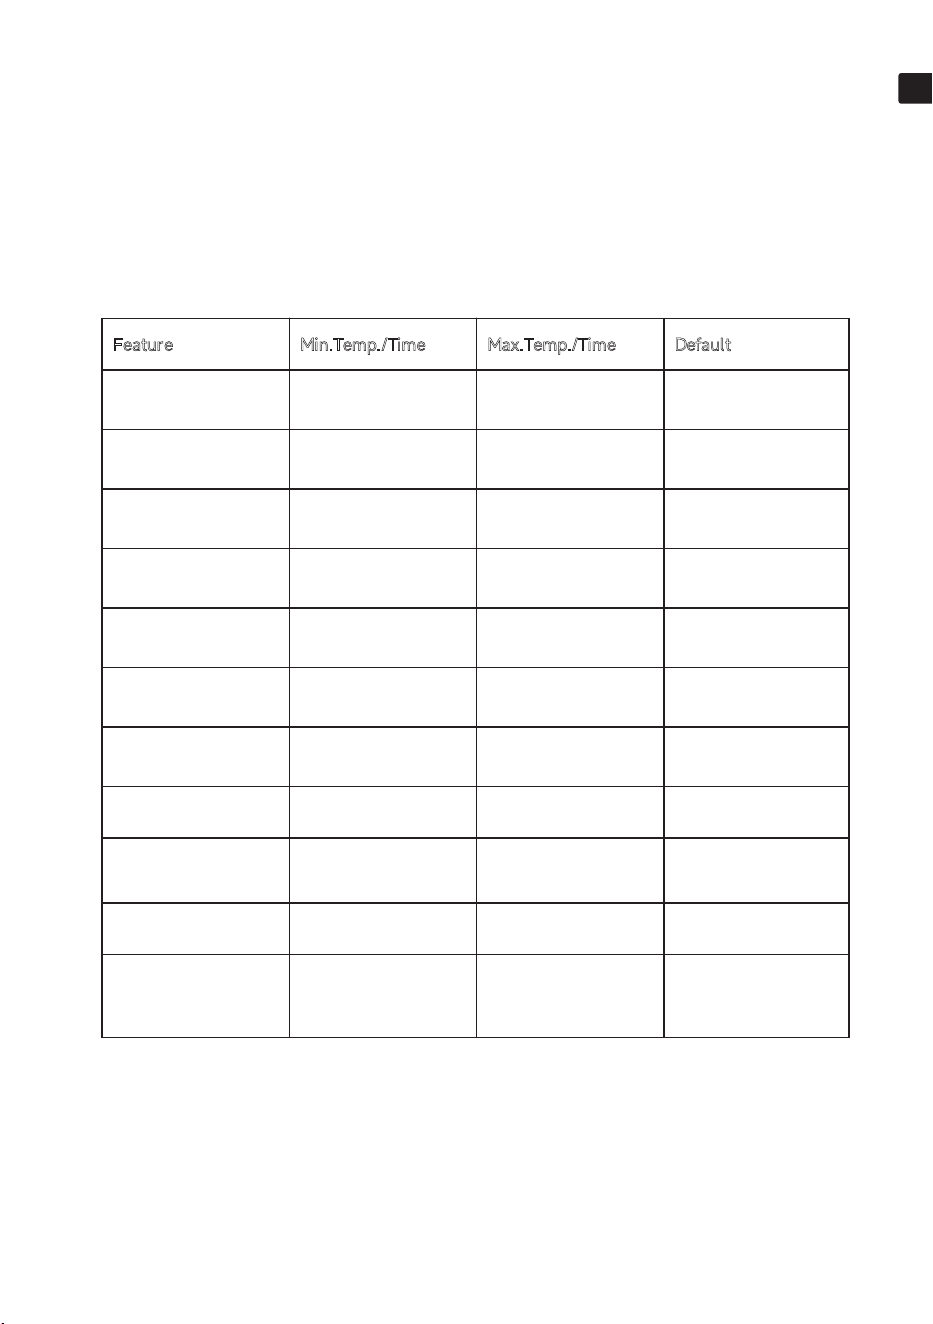
Feature Min.Temp./Time Max.Temp./Time Default
Bake
175°F(79℃) 0:01
hr/min
550°F(287℃) 10:00
hr/min
350°F(177℃)
Convection Bake
175°F(79℃) 0:01
hr/min
550°F(287℃) 10:00
hr/min
325
°F(163℃)
Broil Hi/Lo
Lo 400°F(204℃) Hi 550°F(287℃)
Hi 550°F(287℃)
3:00 hr/min
Convection Roast
175°F(79℃) 0:01
hr/min
550°F(287℃) 10:00
hr/min
325°F(163℃)
Pizza
175°F(79℃) 0:01
hr/min
550°F(287℃) 10:00
hr/min
425°F(219℃)
Proof
85°F(30℃) 0:01 hr/min
95°F(35℃) 10:00
hr/min
85°F(30℃)
Air Fry
350°F(79℃
) 0:01
hr/min
550°F(287℃) 10:00
hr/min
425°F(219℃)
Keep Warm 0:01 hr/min 3:00 hr/m
in
175°F(79℃)
Self Clean 3:00 hr/min 5:00 hr/min 3:00 hr/min
Probe
100°F(38℃) 210°F(99℃) 150°F(66℃)
Sabbath
175°F(79℃) 0:01
hr/min
550°F(287℃)
74:00 hr/min
350°F(177℃)
Minimum and maximum settings
All the features listed in the table below have minimum and maximum time or temperature
settings. A beep will sound each time a pad on the control panel is pressed and the entry is ac-
cepted. An error tone will sound in the f
orm of a long beep if the entered temperature or time is
below the minimum or above the maximum setting for the feature.
EN
19
OPERATING THE OVEN
19
19
19
19
19
19 19
19
19
19
20
20
20
20
20
20
20
20
20
20
20
20
20
20
20
20
20
20
20
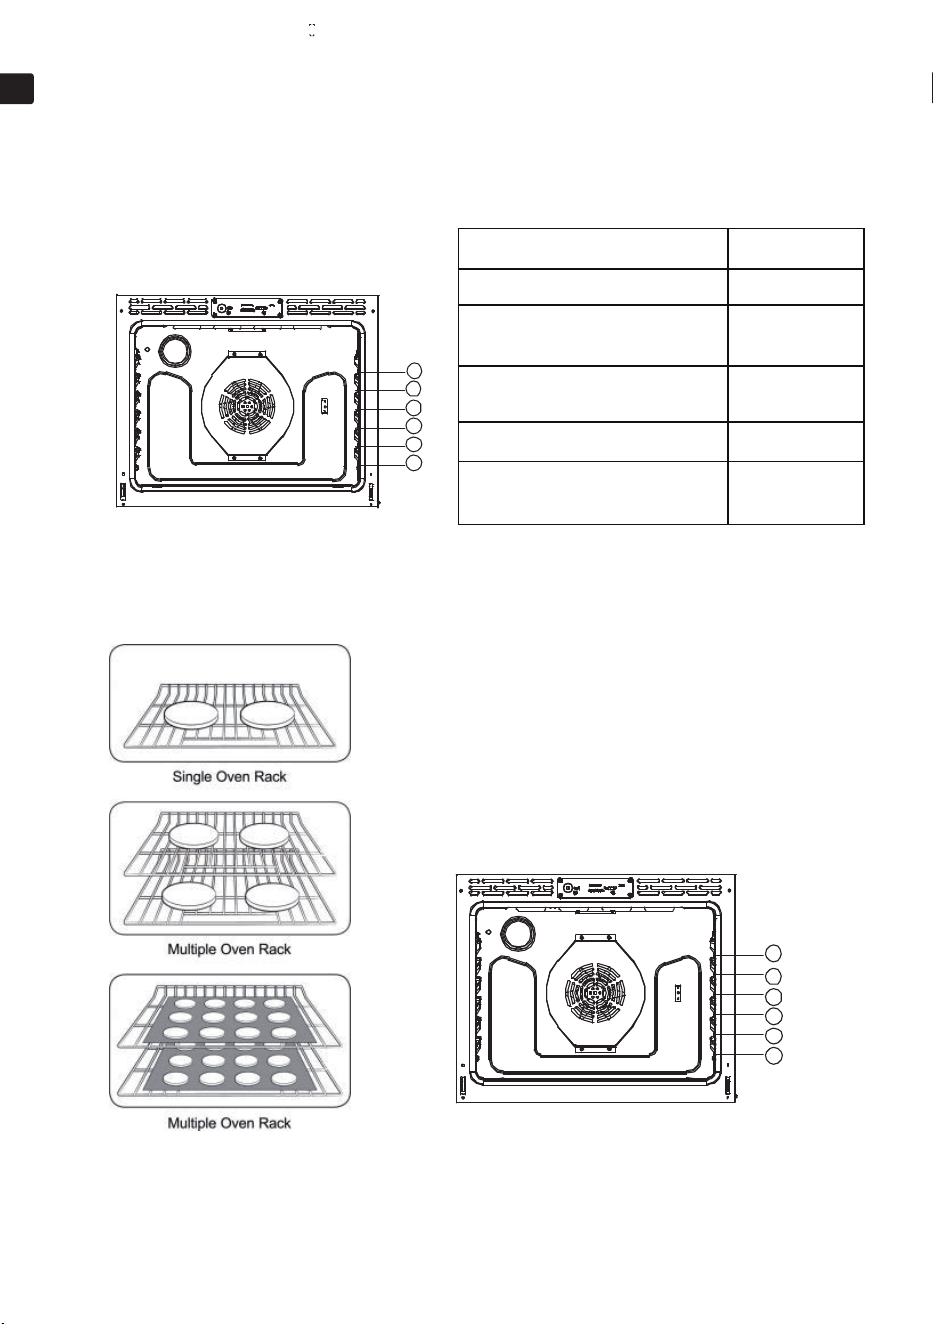
Type of Food
Rack Position
Broiling of Hamburgers.
6
Broiling meats or small cuts of
poultry and fish.
3 to 5
Bundt Cakes, Pound Cakes,
Frozen Pies, and Casseroles.
4 or 3
Angel Food Cakes, Small Roast 2
Turkey, large Roast, Hams,
Fresh Pizza
1
Centeringbaking pans in theovenas much as possible
will producebetter results. If baking with more than
one pan, place the pans so each has at least 1" to 2” of
air spacearound it. When baking on a single oven rack,
place the oven rack in position 3 or 4.
Whenbaking cakes and cookies on multiple racks,
place theoven racks in position 3and 5. Using the
convection fan will providebest air movement with
multi-level rack cooking.
Rack and Pan Placement
Oven Rack Positions
6
5
4
3
2
1
6
5
4
3
2
1
EN
20
OPERATING THE OVEN
20
20
20
20
20 20
20
20
20
21
21
21
21
21
21
21
21
21
21
21
21
21
21
21
21
21
21
21
21
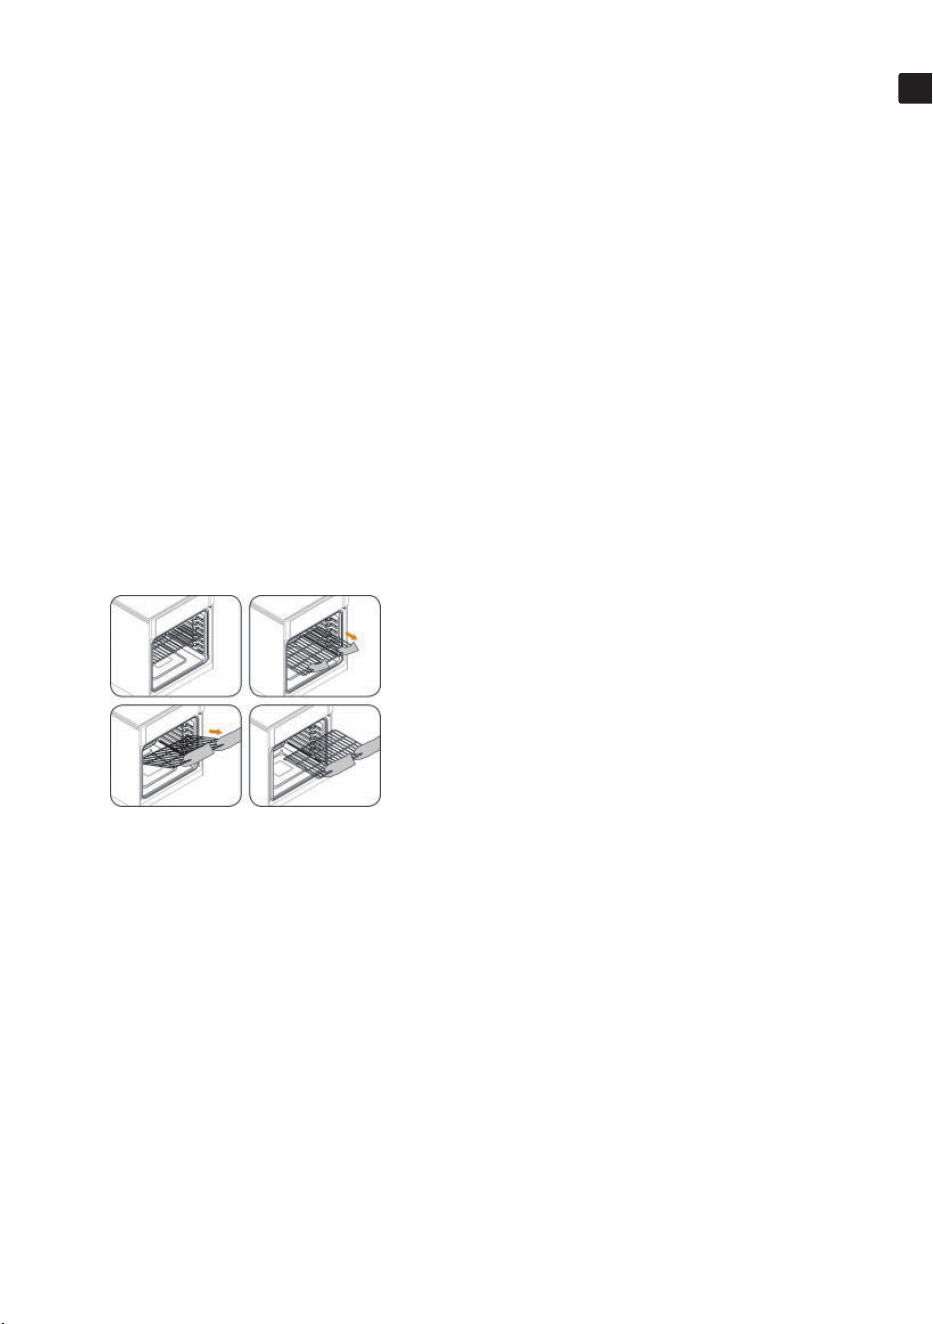
Before using the racks
Each rack has stops that need to be placed correctly on the supports. These stops will keep the
rack from coming completely out.
REMOVING THE RACKS
1. Pull the rack straight out until it stops.
2. Lift up the front of the rack, and then pull it out.
REPLACING THE RACKS
1. Place the end of the rack on the support.
2. Place the front end up and push the rack in.
CAUTION
•Do not cover a rack with aluminum foil
or place aluminum foil on the oven
bottom. This will hamper heat circulation,
resulting in poor baking, and may damage
the oven bottom.
• Arrange the oven racks only when the
oven is cool.
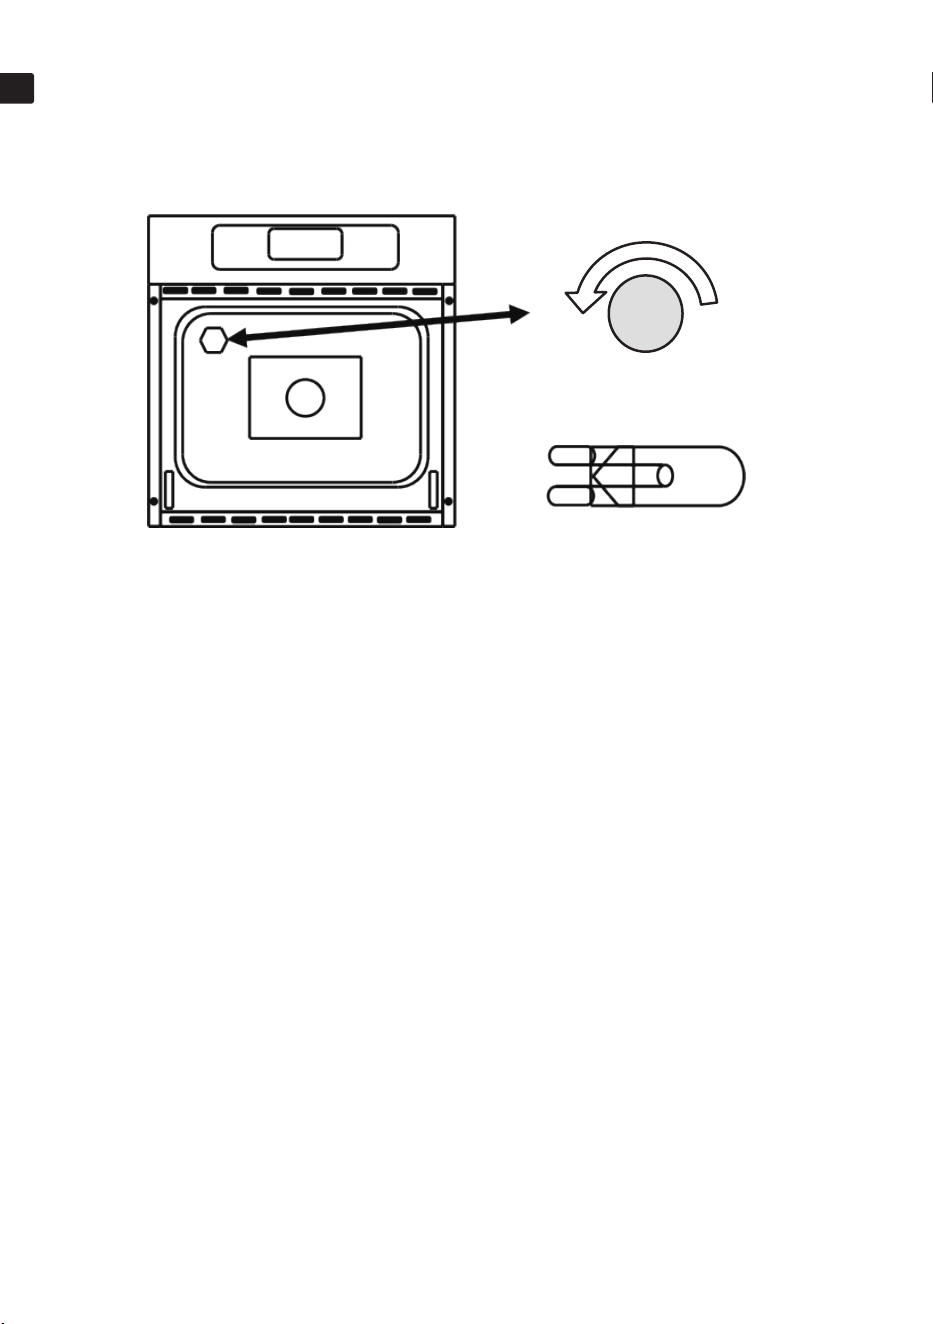
REPLACINGOVENCAVITYLIGHT BULB
•
•
•
•
•
•
Turn off power to the oven at the circuit breaker.
Make sure the oven cavity is cool to the touch.Do not attempt to change light bulb when
the oven is hot.
Grasp oven light lens cover and unscrew the light lens by turning it counter-clockwise
direction.
Remove the light lens and set it aside.
Remove light bulb from the socket by pulling the light bulb towards front of the oven.
Replace the oven light bulb with a 120Vac 40watt G9 base Halogen light bulb. Do not handle
the halogen bulb with hare hands. Use a cloth or glove when removing and insert
ing the
bulb.
EN
21
OPERATING THE OVEN
21
21
21
21 21
21
21
21
22
22
22
22
22
22
22
22
22
22
22
22
22
22
22
22
22
22
22
22
22
CLEANING THE OVEN EXTERIOR
Replace light bulb with120Vac
40 watt G9 base halogen bulb.
Turn oven light lens counter
clockwise tounscrew.
For general cleaning, use a soft cloth with hot soapy water. For more dificult soils and built up
grease apply liquid detergent directly onto the soil. Let detergent sit for 30 to 60 min and then
rinse with a damp cloth. Do not use abrasive cleaners as they can scratch oven surfaces.
CLEANING STAINLESS STEEL SURFACES
•
•
•
•
CLEANING THE BROILER PAN AND GRID
•Broil pan and grid can be cleaned by washing in hot soapy water. For burnt on material allow
pan and grid to soak in hot water to soften material.
CLEANING THE OVEN DOOR
• Use soap and water with a dish cloth to thoroughly clean.
• Glass cleaner can be used on the exterior glass only.
•Do not spray or allow water near the oven vents at the top and bottom of the door. Doing so
will allow liquid to seep between the layers of glass inside the door, resulting in streaks and
spots on the interior glass surface.
•Do not clean theoven door gasket.Doing so will cause damageto the gasket.
DO NOT use steel wool or any other abrasive type material to clean the stainless steel
surfaces.
Use a stainless steel cleaner or stainless steel polish cleaner with a soft cloth.
Clean the stainless steel by moving the cloth in the direction of the grain of the stainless
steel panel being cleaned.Note: Do no
t clean using swirling motions or going across the
grain.
Once the cleaner has dried, buff the surface with a soft, dry microfiber towel, moving
along the grain of the stainless steel.
EN
22
MAINTAINING THE OVEN
22
22
22 22
22
22
22

23
23
23
23
23
23
23
23
23
23
23
23
23
23
23
23
23
23
23
23
23
23
Problem Possible solution
Oven control beeps
and displays F and
number
•The electronic control has detected a fault .
Press the Cancel key to clear display.
Reprogram cycle and try again. If error continues,
turn off power to the oven for 5 min via the circuit breaker.
After 5 min, turn on power and retry.
If error continues,contact a qualified service technician.
•
•
•
No power /No display
• Power outage.Check other items in the house such as lights.
Check house circuit breaker.
•
Oven cavity light
doesn't turn on
• Replace oven cavity light bulb.
Food is notbaking or
roasting properly
• Oven control was not set correctly - go to the Operating the
Oven section of the user manual.
Rack posit
ion being used is not correct - Go to the Operation
the Oven section of the user manual .
Incorrect cookware or cookware of improper size being used
Go to the operating the Oven section of user manual.
Temperature adjustment needed.See the temp adjustment
subsection of the "Operating the Oven" section of the manual.
•
•
•
Food is not Broiling
correctly
•Oven controls improperly set.- Make sure Broil function is
selected.
Improper rack position being used.See the broiling subsection
of the "Operating the Oven" section of the manual.
You may be using cookware that is not suited for broiling.
Use the broil pan that came with the oven.
•
•
Troubleshooting
Kitchen works hard to ensure that you don’t have problems with your new eclectic wall
oven.If you run into unexpected trouble, look first for a solution in the
tables below. If you’re
still having trouble after trying the suggested solution, call Dreame +1 (866) 977-5177 .
EN
23
TROUBLESHOGING
23
23 23
23
23
23

24
24
24
24
24
24
24
24
24
24
24
24
24
24
24
24
24
24
24
24
24
24
24
Problem Possible solution
Oven smokes during
broiling
•Food product is placed to close to broil element.
Rack position is incorrect.
Food product not properly prepared, Remove excess fat from
cuts of meats, Trim fatty edges to prevent curling.
Incorrect cookware used.use the supplied broiler pan to allow
the grease to drip below the slots.
Grease has built up on oven cavity surfaces. Regular
cleaning is required when doing heavy amounts of broiling
due to grease splatter.
•
•
•
•
Oven tempis to hot or
too cold
• Oventemp sensor off set needs to be adjusted.
• See manual temp adjust. Oven Temp can be increased or
decreased by 35℉.
Cracking /popping
sounds
• These sounds are normal. As metal heats and cools, there will
be expansion and contractions sounds during the heating
.
Oven is not clean after
a self clean
• The oven control may not be set correctly or for a sufficient
cleaning cycle. Use a 5-hour cycle for heavy soil and a 3-hour
cycle for normal soil.
The soil level in the oven may be too high. Self clean more
frequently.
Clean up heavy spills over before starting the clean cycle.
Oven may need a second self clean cycle if there was heavy
soiling present during the previous self clean cycle.
•
•
•
Excessivesmoking
duringself clean
cycle
• Excessive soil in oven cavity.
• Cancel the cleanin
g cycle, open windows, and turn on the
exhaust hood to ventilate and remove smoke. Allow the oven to
cool and the door to unlock. Remove excess soil from the cavity,
then restart the self-clean cycle.
Burning oroily odor
emitting from the
oven
and vents
•This is normal for a new oven and will dissipate with use.
Run the oven priorto first use following the seasoning process
outlined in the BEFORE YOU BEGIN section of owners manual.
•
EN
24
TROUBLESHOGING
process
24 24
24
24
24
25
25
25
25
25
25
25
25
25
25
25
25
25
25
25
25
25
25
25
25
25
25
25
25
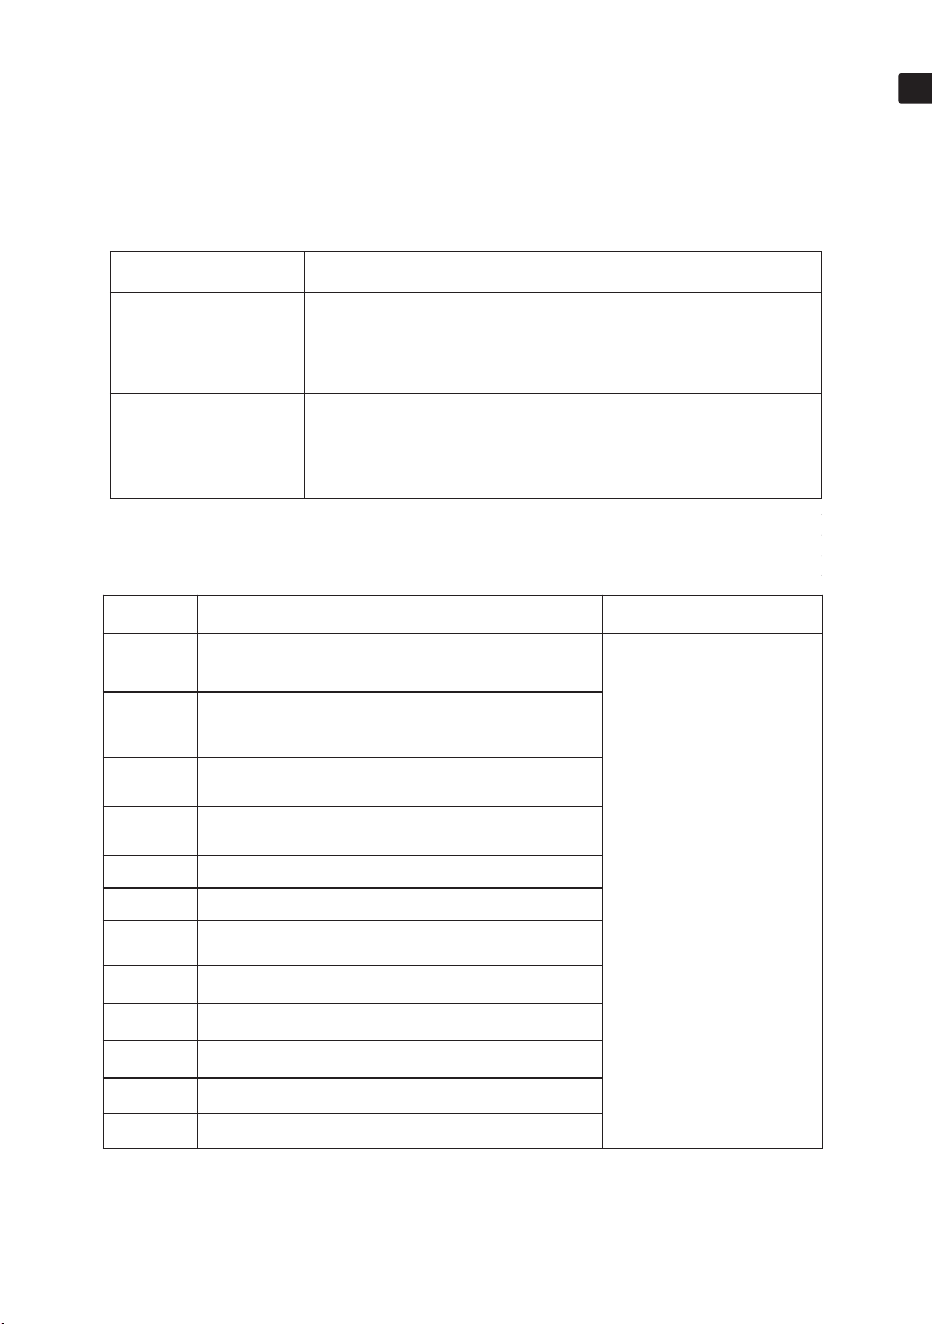
Error Code
Error Description Solutions
F1E1
Communication failure
Restart the oven. If the
problem persists,
disconnect all power to
your oven for at least 30
seconds. Then, reconnect
the power. If this does not
solve the problem, call
for service.
F1E3
The control board does not match the main control
board model
F1E4
Communication failure between the control board
and the left touch panel
F1E5
Communication failure between the control board
and the right touch panel
F3E1
The oven temperature is overheated
F3E2
Open/closed circuit of the oven temperature sensor
F3E3
Oven temperature rise failure
F3E4
PCB board overheating
F3E5
PCB temperature sensor failure
F3E6
Overheating of the temperature controller
F3E7
Food probe failure
F4E1
MCU self-check failure
Problem Possible solution
Cooling fan runs after
the oven is turned off
•This is normal, the cooling fan will continue to run until the
oven has cooled below 165°F. Once it has cooled below this
temperature it will automatily turn off.
Warm air is venting
out from below the
door
•This is normal, the oven cooling fan will draw cool air in through
the oven door and this air will be cycled over the top and back of
the oven. The warm air will be vented out the bottom vent of the
oven into the kitchen.
Error Code
EN
25
TROUBLESHOGING
25
25
25
25

26
26
26
26
26
26
26
26
26
26
26
26
26
26
26
26
26
26
26
26
26
26
26
26
26
Error Code
Error Description Solutions
F5E1
Door lock failure
Restart the oven. If the
problem persists,
disconnect all power to
your oven for at least 30
seconds. Then, reconnect
the power. If this does not
solve the problem, call
for service.
F5E2
Door switch failure
F6E1
Cooling/hall/low/high gear failure
F6E5
Clock chip communication failure
EN
26
TROUBLESHOGING
26
26
26
Model number(s):
Voltage & frequency:
Product dimensions (mm):
Rated input in watts:
Top Heater Power:
Lower Heater Power:
Back Heater Power:
Oven Light:
PRODUCT INFORMATION
OL141-OZ601POSNA
240V,60Hz
762(W)x724(H)x640(D)
4900W
3500W
3000W
1300W
120V,40W

27
27
27
27
27
27
27
27
27
27
27
27
27
27
27
27
27
27
27
27
27
27
27
27
2727
Warranty Terms
Dear Customer,
Thank you for choosing Dreame products. In accordance with the provisions of the
Consumer Protection Law and our sincere commitment to users, we will provide the
following services based on this warranty card and valid proof of purchase:
Warranty Policy
This product provides a warranty period in accordance with the legal and
regulatoryrequirements of the place of sale. Defects that occur within this warranty period
undernormal use and care can get related warranty service. lf your product is faulty or you
areexperiencing difficulties to use this product and require assistance, please also contact
withyour local dealers or authorized after service center for help.
Warranty Does Not Cover the Following Parts
• Dishwasher water supply and drainage hoses;
• Built-in steam oven trays, steam plates, grill racks, and baking racks;
• Gas stove pot supports and inner/outer burner caps;
• Range hood decorative covers.
Warranty service does not apply under the following conditions
• Use of the machine outside a household environment or in public places;
• Product defects caused by the consumer’s violation of product operation, storage, or
transportation conditions;
• Consumable wear and tear of the product, such as battery capacity loss;
• Damage and defects caused by the following reasons:
- Use, storage, or maintenance inconsistent with the operating instructions, as well as
installation not in accordance with installation guidelines;
- Consumable materials used during operation, such as detergents, cleaning agents,
regeneration salts, rinse aids, maintenance agents, or other consumables not suitable for
the product;
- Repairs, modifications, alterations, or structural changes performed by the user or
unauthorized personnel that cause product defects;
- Damage caused by external factors unrelated to the manufacturer, including
force
majeure events (natural disasters, fire, lightning, etc.);
- Intentional or negligent acts by consumers or third parties, including those causing
mechanical damage to the product;
- Consumable and wear parts.
• Installation and connection of electrical wiring, water supply, drainage, or gas must be
performed by qualified professionals; otherwise, the warranty will be void.
If the equipment is transported and used in other EU/European Free Trade
Association countries, its technical specifications (such as voltage,
frequency, gas type, etc.) must be the same as in the original country of
purchase. Provided that Dreame has a service network in the area,
warranty terms can be consulted with the local representative in the
country of use; otherwise, the warranty will be invalid.
EN
27
27
27
28
28
28
28
28
28
28
28
28
28
28
28
28
28
28
28
28
28
28
28
28
28
28
28
28 28
28
Warranty Card
Warranty Card
To access Dreame’s after-sales services, please fill out this warranty card carefully
before purchase. We will establish a user profile based on your information to
provide better service.
Repair Records
Product Name:
Product Model:
Manufacturing Serial No.:
Purchase Date:
Contract No.:
Customer Name:
Customer Phone No.:
Customer Address:
Purchase Store:
Store Phone No.:
Repair Date:
Fault Description:
Handling Details:
Technician Signature:
After-sales Contact:
Please complete this warranty card immediately upon purchasing Dreame products.
Keep the warranty card safe; consumers do not need to mail it back to the company.
Please bring the warranty card and the original valid invoice for any repairs.
Zhiyue Youchuang Technology (Suzhou) Co., Ltd.
EN
28
28
Scan the QR Code
Please contact:
Contact us
• To view the Digital User Manual
• If you encounter any problems
during use, you can scan the QR
code on the right to obtain the
service hotline number and call for
consultation.
Manufacturer: Zhiyue Youchuang Technology (Suzhou) Co., Ltd.
Address: Room 552, Unit 5010, No.282 Dongping Street, Suzhou Industrial Park, Suzhou Area,
China (Jiangsu) Pilot Free Trade Zone
Website: global.dreametech.com
Version No.: 251113A1
EN

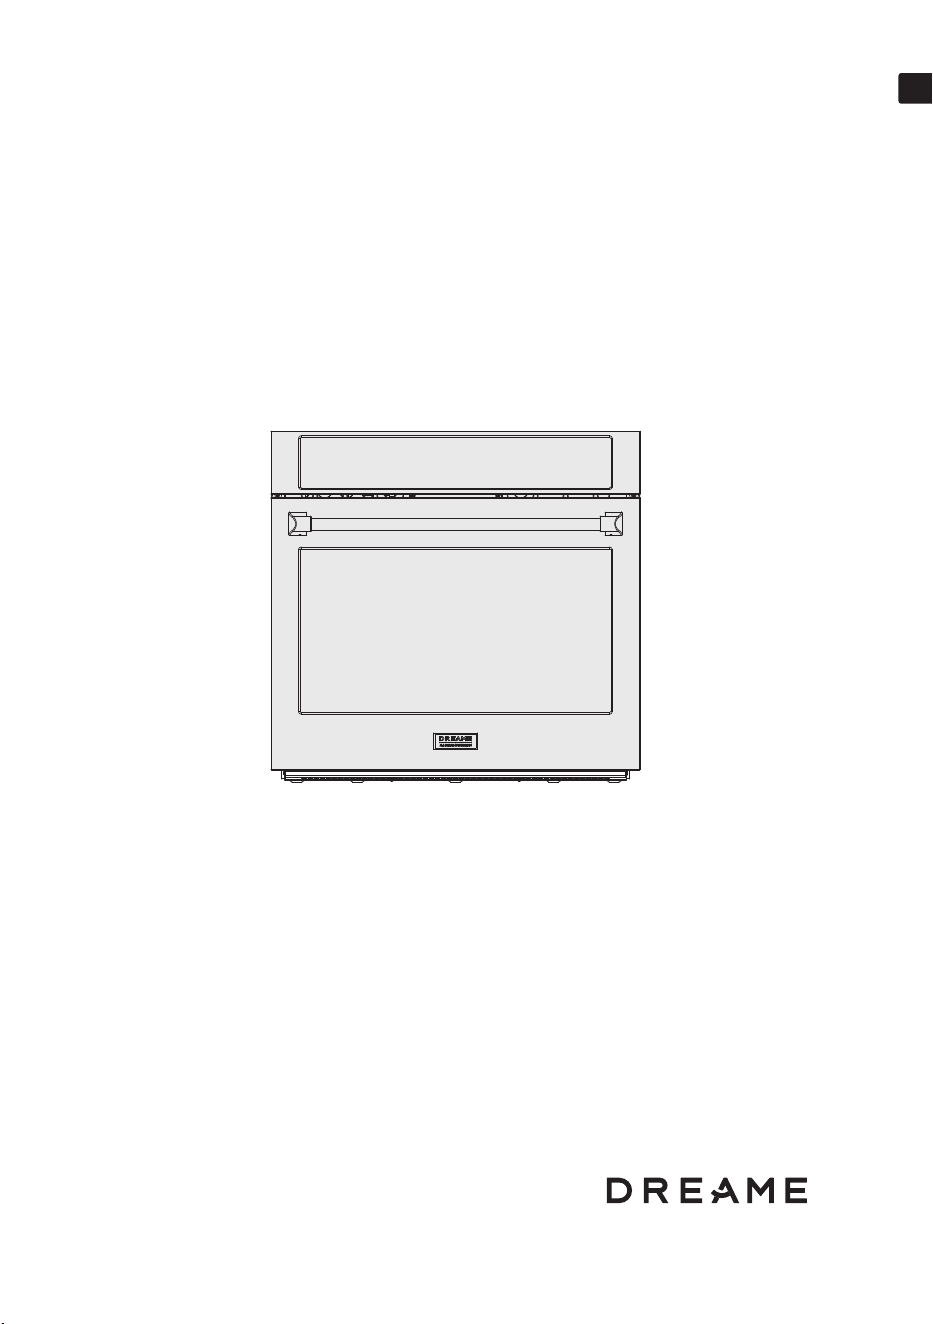
Sing Wall Ovens
Installation Instructions Manual
Model: OL141-OZ601POSNA
Dreame OZ601 Pro Single Wall Ovens
Please read this manual carefully before installing the
product and keep it for future reference.
3 4 5 6 7 8 9 1 0
11 12 1 3 14
EN

3 4 5 6 7 8 9 1 0
11 12 1 3 14
EN

IMPORTANTINSTRUCTION. . . . . . . . . . . . . . . . . . . . . . . . . . . . . . . . . . . . . . . . . . . . . . . . . . . . . . . . . . . . . . . . . . . . . . . . 4
1.1 Critical safety information . . . . . . . . . . . . . . . . . . . . . . . . . . . . . . . . . . . . . . . . . . . . . . . . . . . . . . . . . . . . . . 4
1.2 Signal words explanation. . . . . . . . . . . . . . . . . . . . . . . . . . . . . . . . . . . . . . . . . . . . . . . . . . . . . . . . . . . . . . . . . . . . . 5
1.3 Intendeduse . . . . . . . . . . . . . . . . . . . . . . . . . . . . . . . . . . . . . . . . . . . . . . . . . . . . . . . . . . . . . . . . . . . . . . . . . . . . . . . . 5
1.4 IMPORTANTINSTRUCTION. . . . . . . . . . . . . . . . . . . . . . . . . . . . . . . . . . . . . . . . . . . . . . . . . . . . . . . . . . . . . . . . . . . 6
INSTALLATION . . . . . . . . . . . . . . . . . . . . . . . . . . . . . . . . . . . . . . . . . . . . . . . . . . . . . . . . . . . . . . . . . . . . . . . . . . . . . . . . . . 8
2.1
2.2
2.3
2.4
2.5
2.6
Important note to the installer
. . . . . . . . . . . . . . . . . . . . . . . . . . . . . . . . . . . . . . . . . . . . . . . . . . . . . . . . . . . . . . . 8
Clearances and dimensions . . . . . . . . . . . . . . . . . . . . . . . . . . . . . . . . . . . . . . . . . . . . . . . . . . . . . . . . . . . . . . . . . 8
Install the handle . . . . . . . . . . . . . . . . . . . . . . . . . . . . . . . . . . . . . . . . . . . . . . . . . . . . . . . . . . . . . . . . . . . . . . . . . . . 10
Attach/detachthe oven door . . . . . . . . . . . . . . . . . . . . . . . . . . . . . . . . . . . . . . . . . . . . . . . . . . . . . . . . . . . . . . . . . 11
Electrical connectionfor electric range. . . . . . . . . . . . . . . . . . . . . . . . . . . . . . . . . . . . . . . .. . . . . . . . . . . . . . . . . 11
Conditioningprior to first time use. . . .. . . . . . . . . . . . . . . . . . . . . . . . . . . . . . . . . . . . . . . . . . . . . . . . . . . . .. 12
3 4 5 6 7 8 9 1 0
11 12 1 3 14
TABLE OF CONTENTS
EN
1.1 Critical safety information
WARNING: If the information in these instructions is not followed exactly,
a fire or explosion can result causing property damage, personal injury,
or death.
- Do not store or use gasoline or other flammable vapors and liquids in
the vicinity of this or any other appliance.
WHAT TO DO IF YOU SMELL GAS:
-
•Do not try to light any appliance.
Do not touch any electrical switch.
Do not use any phone in your building.
Immediately call your gas supplier from a neighbor's phone. Follow
the gas supplier's instructions.
If you cannot reach your gas supplier, call the fire department.
•
•
•
•
- Installation and service must be performed by a qualified installer,
service agency, or the gas supplier.
WARNING
Never Operate the Top Surface Cooking Section of this Appliance
Unattendedl.
•Failure to follow this warning statement could result in fire,
explosion, or burn hazard that could cause property damage,
personal injury, or death.
If a fire should occur, keep away from the appliance and
immediately call your fire department.
•
DO NOT ATTEMPT TO EXTINGUISH AN OIL/GREASE FIRE WITH WATER.
WARNING
NEVER use this appliance as a space heater to heat or warm the room. Doing
so can result in carbon monoxide poisoning and overheating of the oven.
3 4 5 6 7 8 9 1 0
11 12 1 3 14
IMPORTANT INSTRUCTION
EN
WARNING
•
•
•
•
•
•
To check the installation of the anti-tip device:
1. Remove any items on the cooktop.
Grasp the top rear edge of the appliance and carefully attempt to tilt it forward.
Verify that the anti-tip device is engaged.
2.
3.
1.2 Signal words explanation
The following signal words are used in this manual
DANGER
This signal word indicates a hazardous situation which, if not avoided, will
result in death or serious injury.
WARNING
This signal word indicates a hazardous situation which, if not avoided, could
result in death or serious injury.
CAUTION
This signal word indicates a hazardous situation which, if not avoided, could
result in minor or moderate injury.
CAUTION
This signal word indicates a hazardous situation which, if not avoided, could
result in property damage.
NOTICE
This signal word is a preferred signal word to address tips and practices not
related to personal injury.
1.3 Intended use
•
•
•
•
•
•
A child or adult can tip the appliance and be killed.
Install the anti-tip device to the wall/floor. Verify the anti-tip device has been properly
installed and engaged with the back of the appliance.
Engage the appliance to the anti-tip device by pushing that appliance all the way into the
installation location. Ensure the anti-tip device is re-engaged when the appliance is moved.
Re-engage the anti-tip device if the appliance is moved. Do not operate the appliance
without the anti-tip device in place and engaged.
See installation instructions for details.
Failure to do so can result in death or serious burns to children or adults.
This appliance is intended for cooking and preparing food.
This appliance is intended for household use only.
This appliance is intended to be used in dry indoor areas only.
Only use the appliance as mentioned in this manual. Any other use is considered improper
and may result in damage to property or injury to persons.
Potential injury from improper use.
The manufacturer or vendor cannot be held liable for damages or injury incurred through
improper or incorrect use.
3 4 5 6 7 8 9 1 0
11 12 1 3 14
IMPORTANT INSTRUCTION
EN

1.4 IMPORTANT INSTRUCTION
For all models
•
•
•
•
•
•
•
•
•
•
•
•
•
•
•
•
•
This installation instructions is part of this appliance, and contains important informa-
tion on setup and use. Read this manual carefully, especially the IMPORTANT
INSTRUCTION chapter, before using the appliance. Failure to do so may result in
personal injury and/or damage to the appliance.
Keep this manual for future use and reference. Make sure to include this manual
when passing the appliance on to third parties. If you require a digital copy of
this manual, please contact customer service.
The appliance must be installed in accordance with local codes. In the absence
of Local codes, follow ANSI Z223.1/NFPA 54 standards in the U.S. or CSA B149.1
in Canada.
It is recommended to electrically ground the appliance during installation in
accordance with local codes. If Local codes are not available, follow NFPA 70 or
CSA C22.1 standards in Canada.
The ventilation area is located at the back of the appliance. The back of the
appliance should not be in direct contact with a wall/surface. Install the back
spacers to the back of the appliance to maintain a proper area for ventilation.
In the event of a power failure, do not attempt to use the appliance. If the power
fails, always turn the oven off. If the oven is not turned off and the power
returns, the oven my begin to operate again. Food left unattended could catch
fire or spoil.
The maximum depth of cabinets installed above the cooktop is 13" (33 cm).
Seal any openings in the wall behind the appliance and in the floor under the
appliance.
If there is a cabinet above the appliance, install a noncombustible material on the
bottom if that cabinet in accordance with local codes. If local codes are not
available, follow ANSI Z223.1/NFPA 54 or, CSA B149.1. in Canada.
Proper Installation - Be sure your appliance is properly installed and grounded by
a qualified technician.
Never Use Your Appliance for Warming or Heating the Room.
Do Not Leave Children Alone - Children should not be left alone or unattended in
area where apptiance is in use. They shoutd never be allowed to sit or stand on
any part of the appiance.
Wear Proper Apparel - Loose-ftting or hanging garments should never be worn
while using the appliance.
User Servicing- Do not repair or replace any part of the appliance unless
specifically recommended in the manual. All other servicing should be referred to
a qualified technician.
Storage in or on Appliance - Flammable materials should not be stored in an
oven or near surface units.
Do Not Use Water on Grease Fires - Smother fire or flame or use dry chemical or
foam-type extinguisher.
Use Only Dry Potholders - Moist or damp potholders on hot surfaces may result
in burns from steam. Do not let potholder touch hot heating elements. Do not
use a towel or other bulk cloth.
Use Proper Pan Size - The appliance is equipped with one or more surface units
of different size. Se lect utensils having flat bottoms large enough to cover the
surface unit heating element. The use of undersized utensils will expose a portion
of the heating element to direct contact and my result in ignition of clothing.
Proper relationship of utensil to burner will also improve efficiency.
3 4 5 6 7 8 9 1 0
11 12 1 3 14
IMPORTANT INSTRUCTION
EN

•
•
•
•
•
•
•
•
•
•
•
•
•
CAUTION
CAUTION
Never Leave Surface Units Unattended at High Heat Settings - Boilover can
cause smoke and greasy spillovers that may ignite.
Protective Liners - Do not use aluminum foil to line the surface of cooktop drip
pan or oven bottoms. Improper installation of these liners may result in a risk of
electric shock, fire or damage to the porcelain surface.
Glazed Cooking Utensils - Only specific types of glass, glass-ceramic, ceramic,
earthenware, or other glazed utensils are suitable for use on the cooktop, as they
may break from sudden temperature changes.
Utensil Handles Should Be Turned Inward and Not Extend Over Adjacent Surface
units - To reduce the risk of burns, ignition of flammable materials, and spillage
due to unintentional contact with the utensil, the handle of a utensil should be
positioned so that it is turned inward, and does not extend over adjacent surface
units.
Use Caution When Opening Door - Let hot air or steam escape before removing
or replacing food.
Do Not Heat Unopened Food Containers - Build-up of pressure may cause
container to burst and result in injury.
Keep Oven Exhaust Vent Unobstructed.
Placement of Oven Racks - Always place oven racks in the desired position while
the oven is cool. If moving a rack while the oven is hot, ensure potholders do not
touch the heating elements.
Do Not Clean Door Gasket - The door gasket is essentials for a good seal. Care
should be taken not to rub, damage, or move the gasket.
Do not use a protective coating to line the oven and do not use commercial oven
cleaner unless Certified for use in a self cleaning oven.
Clean only the parts as sugge sted in the manual.
DO NOT TOUCH SURFACE UNITS OR AREAS NEAR SURFACES UNITS - Surface
units may be hot even though they are dark in color. Areas near surface units
may become hot enough to cause burns. During and after use, do not touch, or
let clothing or other flammable materials contact surface units or areas near units
until they have had sufficient time to cool. Among these areas are the surround-
ing areas of cook-top, drip-pan, burners and cooking grates.
DO NOT TOUCH INTERIOR SURFACES OF OVEN - Interior surfaces of an oven
become hot enough to cause burns. During and after use, do not touch, or let
clothing or other flammable materials contact the interior surfaces of oven until
they have had sufficient time to cool. Other surface of the appliance may
become hot enough to cause burns - among these surface are oven vent
openings and surfaces near these openings, oven doors, and windows of oven
doors.
Risk of fire and damage! Do not leave food or cooking utensils, etc., in
oven during the pyrolytic self cleaning mode of operation. Remove all
items from the oven prior to initiating the cieaning cycle. Before
initiating the cleaning cycle, wipe off all excessive spillage, food residue
or debris that could potentially ignite. Maintain a safe distance from the
appliance during the cleaning cycle and avoid placing any flammable
items or materials near the appliance.
Risk of injury!.Do not store items of interest to children in cabinets
above a appliance or on the backguard of a appliance children climbing
on the appliance to reach items could be seriously injured.
3 4 5 6 7 8 9 1 0
11 12 1 3 14
IMPORTANT INSTRUCTION
EN

WARNING
COMMONWEALTH OF MASSACHUSETTS
•
•
•
For electrical appliancesonly
•
•
This appliance contains chemicals known to the State of California to cause
cancer and/or reproductive harm, and birth defects or other reproductive harm.
For more information go to www.P65Warnings.ca.goV.
Installations and repairs must be performed by a qualified or licensed contractor,
plumber, or gas fitter, qualified or licensed by the state, province, or region
where this appliance is being installed.
Use only gas shut-off valves approved for use within the state, province, or
region where this appliance is being installed.
A flexible gas connector, when used, must not exceed 3' (0.9 m).
Do Not Cook on a Broken Cooktop - If the cooktop is broken, cleaning solutions
and spillovers may seep through the cracks, posing a risk of electric shock.
Contact a qualified technician immediately.
Clean Cook-Top With Caution. Do Not clean cooktop when it's hot. - If a wet
sponge or cloth is used to wipe spills on a hot cooking area, be careful to avoid
steam burn. Some cleaners can produce noxious fumes if applied to a hot
surface.
2.1 Importantnoteto the installer
•
•
•
•
•
•
2.2 Clearances and dimensions
•
•
•
•
•
Read all installation instructions included in this manual before installing the
appliance.
Remove all packing materials from the appliance before connecting it to the
electric and/or gas supply.
Adhere to all governing codes and ordinances during installation.
Install the anti-tip device to the wall/floor. Verify the anti-tip device has been
properly installed and engaged with the back of the appliance.
Leave these instructions with the consumer for future reference.
Important - Save for local electrical inspector's use.
Provide proper clearance between the appliance and adjacent combustible
surfaces. These dimensions must be met for safe use of the appliance.
The location of the electrical outlet and gas pipe opening may be adjusted to
meet specific requirements.
Seal any openings in the wall behind the appliance and in the floor under the
appliance.
If there is a cabinet above the appliance, install a noncombustible material on the
bottom if that cabinet in accordance with local codes or, in the absence of local
codes, with ANSI Z223.1/NFPA 54 or, in Canada, CSA B149.1.
With the spacers installed, the appliance may be placed against the back wall.
3 4 5 6 7 8 9 1 0
11 12 1 3 14
IMPORTANT INSTRUCTION
INSTALLATION
EN
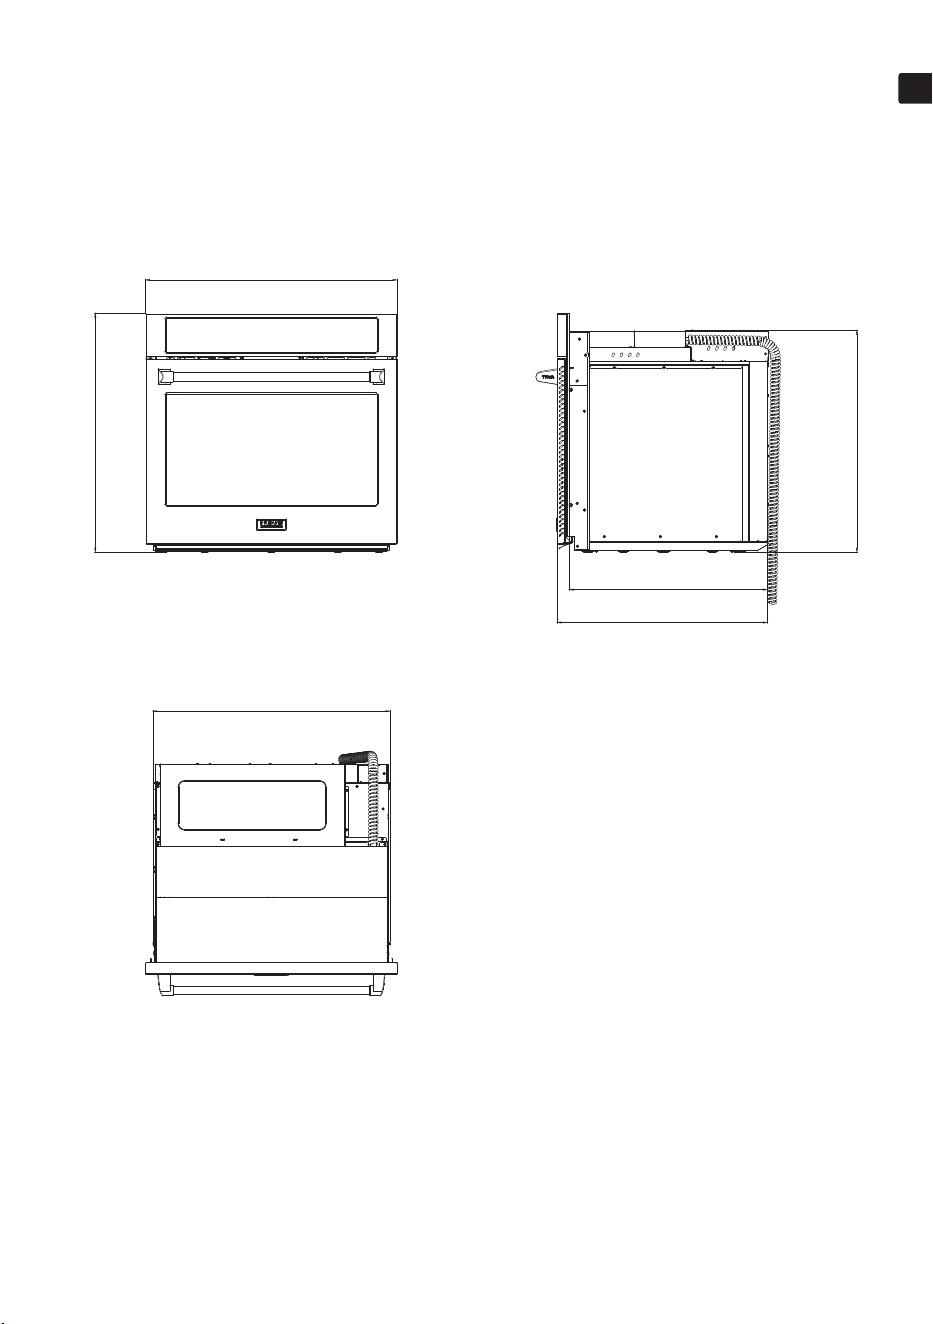
Single Wall Oven Clearances(OL141-OZ601POSNA)
30"( 762mm)
28 1/2"( 724mm
)
23 7/10"(601mm)
25"( 637mm)
26 1/2"( 673mm)
28 1/3"( 719mm)
3 4 5 6 7 8 9 1 0
11 12 1 3 14
INSTALLATION
EN
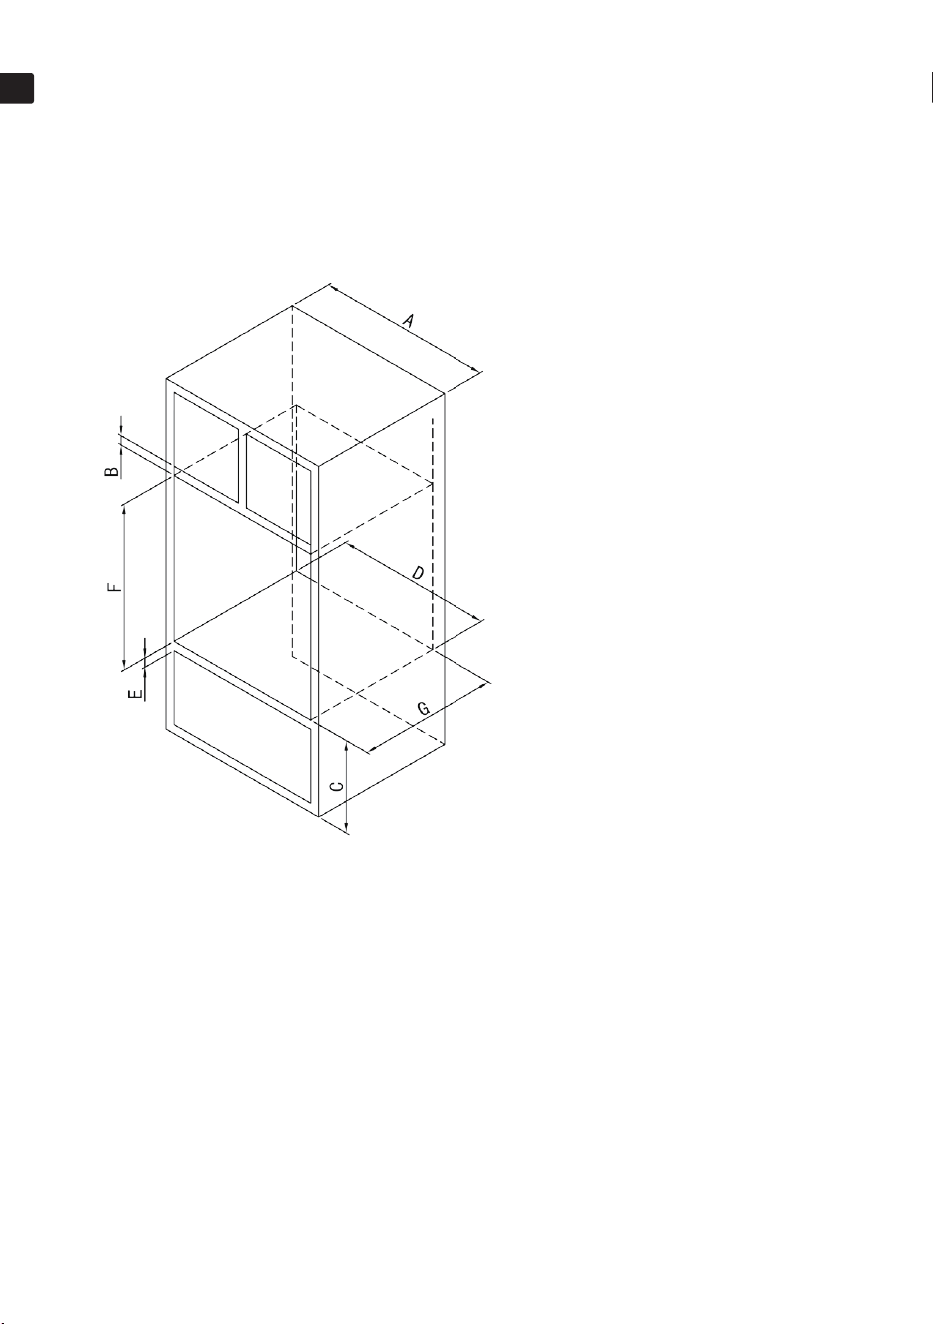
Single Wall Oven Cut -out Dimension:
A:30"(762mm)
B:1"(25mm)
C:15 3/4"(401mm)
D:28 1/2"(724mm)
E:1 1/2"(38mm)
F:27 5/8"(702mm)
G:24"(610mm)
Single Wall Oven Clearances(OL141-OZ601POSNA)
3 4 5 6 7 8 9 1 0
11 12 1 3 14
INSTALLATION
EN
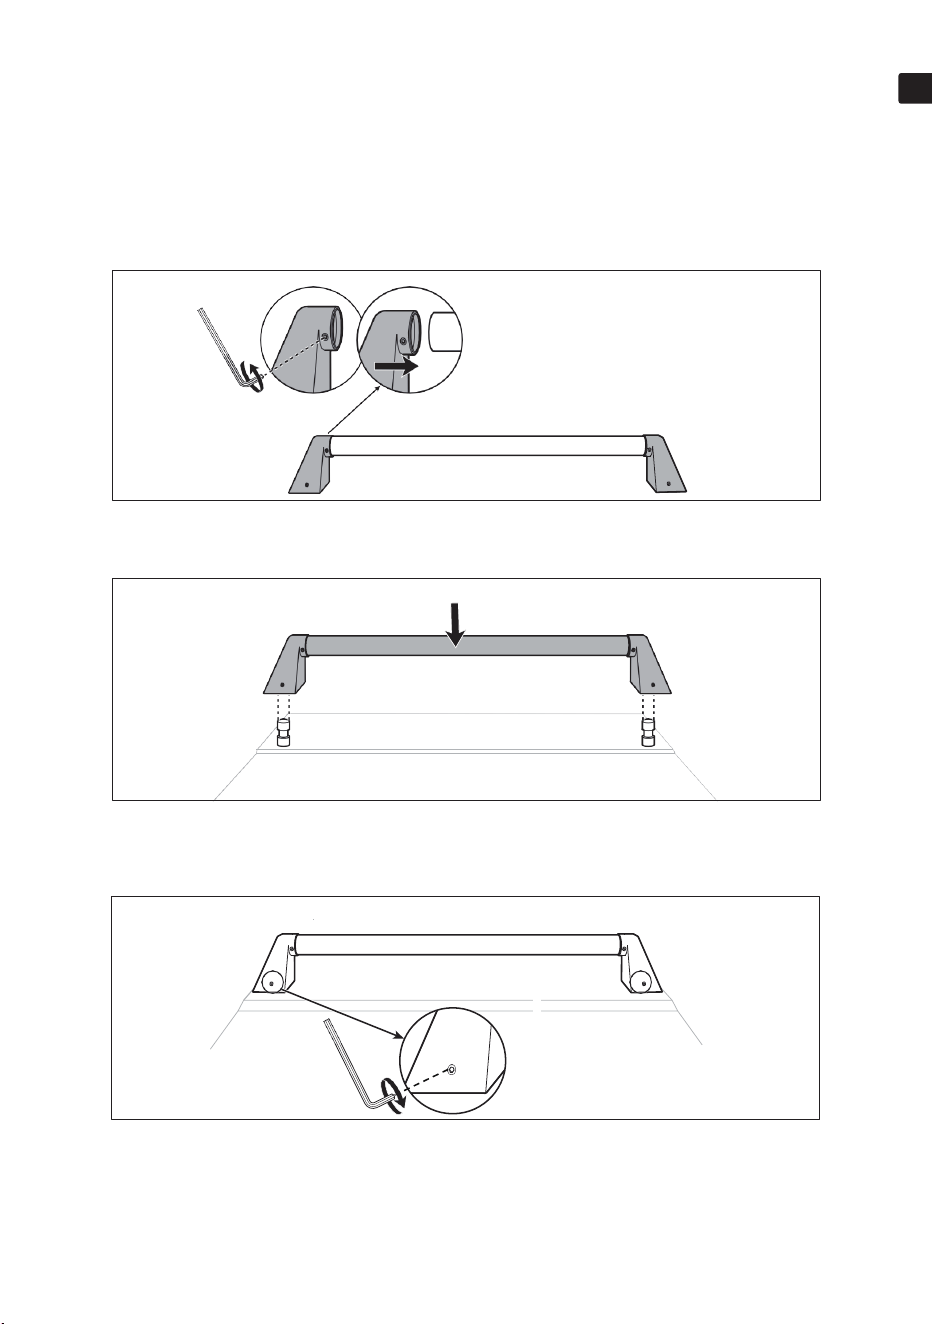
2.3 Install the handle
1. Attach door side brackets to both ends of the door handle.
2. Place the assembled door handle onto the door pins on the oven door.
3. Tighten the pre-installed screws on the door side brackets with the hex key .
Do not overtighten the screws.
3 4 5 6 7 8 9 1 0
11 12 1 3 14
INSTALLATION
EN

2.4 Attach/detach the oven door
NOTICE
•
•
Detach
The oven door may be too big or heavy. It is recommended to have 2 people work
together for attaching/detaching the oven door.
Do not carry or hold the removed oven door by the door handle. It cannot support
the weight of the oven door .
Detach
1. Fully open the oven door.
2. Unlock the hinge lock on both sides by rotating them fully towards the oven door.
3. Firmly grasp both sides on the oven door.
4. Close the oven door until it is approximately at a 20° angle. When the oven door
is at the correct angle position, the hinges arms release from the appliance.
5. Take out the oven door by lifting it upwards and outwards.
Attach
1. Firmly grasp both sides on the oven door .
2. With the door at the same 20° angle as the detach position, slide the hinge arms
into the bottom edge of the hinge slots on the appliance .
3. The notch in the hinge arms must be fully inserted into the bottom edge of the
slots.
4. Open the door fully. If the door does not open fully, the hinge arms are not
inserted correctly in the bottom edge of the hinge slots.
5. Re-engage the hinge locks, rotating them back toward the slots in the oven.
6. Close the oven door .
2.5 Electrical connection for electric range
•
•
•
•
•
•
•
•
This appliance must be supplied with the proper voltage and frequency, and
connected to an individual properly grounded branch circuit, protected by a
circuit breaker or fuse having amperage as specified on the rating label. The
rating label is located on the right of the oven door.
This appliance is manufactured ready to be installed with a single phase
4-wire power supply cord rated at 240 Volt, 50 Amps, rated at 194 °F (90
°C).
This appliance can only be plugged into a standard 14-50R wall receptacle.
Be sure the wall receptacle is within reach of range's final location.
It is recommended to electrically ground the appliance during installation in
accordance with local codes or,in the absence of local codes, with NFPA 70
or CSA C22.1.
If the electrical service provided does not meet the above specifications,
have a licensed electrician install an approved outlet.
It is recommended to have the electrical wiring and hookup of the appliance
connected by a qualified electrician. After installation, have the electrician
explain where and how to locate and disconnect the appliance from power.
Effective January 1,1996, the National Electrical Code requires that new
constructions (not pre-existing) utilize a 4-conductor connection with an
electric appliance. When installing an electric appliance in new construction,
follow the 4-wire connection section of this chapter.
The outlet for the appliance should be located within the range of the
appliance's power cord. Do not use an extension cord with this appliance.
3 4 5 6 7 8 9 1 0
11
12 1 3 14
INSTALLATION
EN
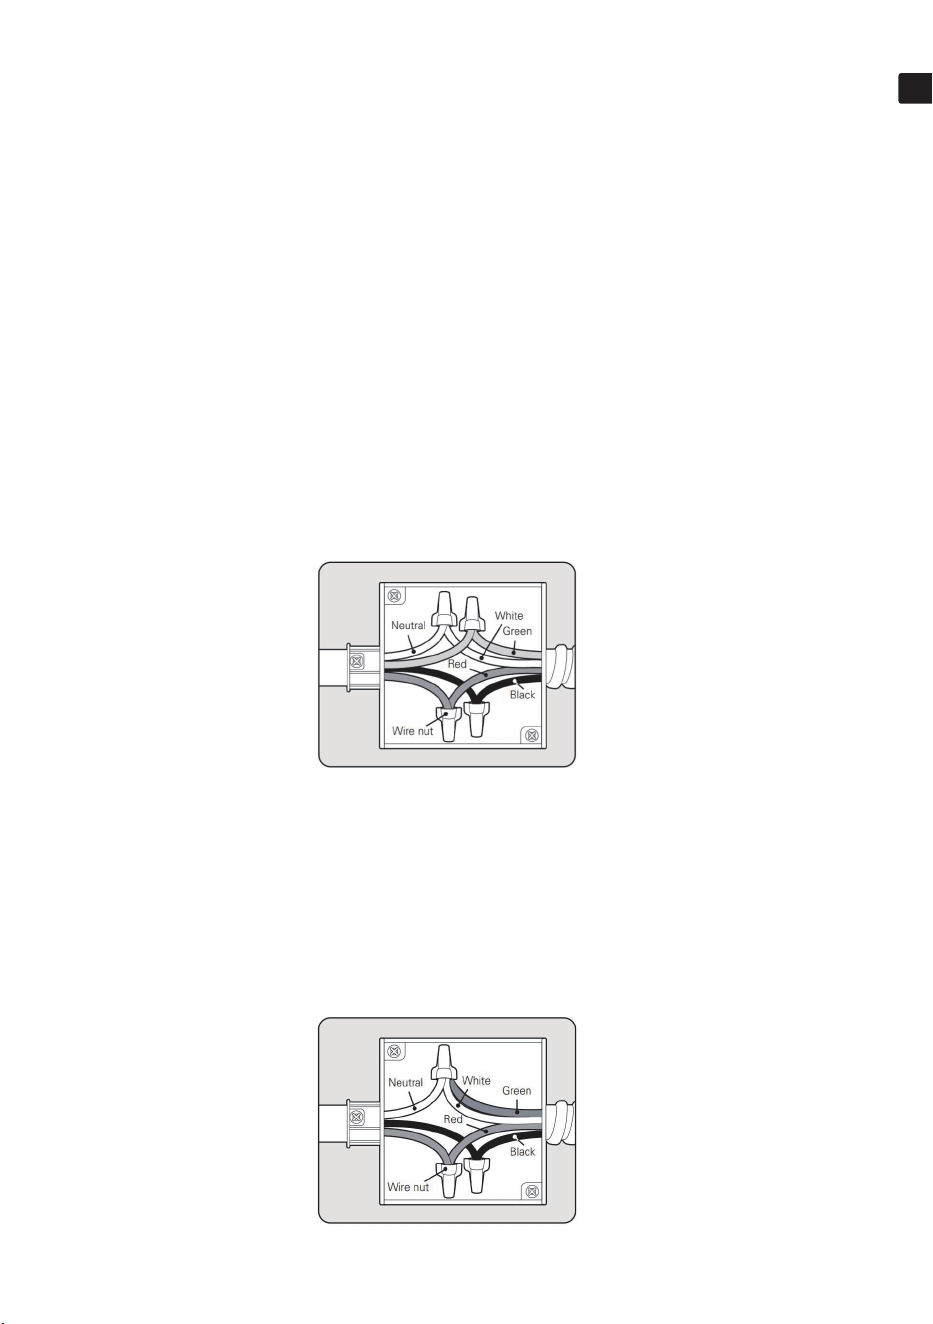
Equipment required
•
Cross-head screwdriver
3 or 4 prong UL or CSA International Certified power cord (rated at 240 Volt, 50 Amps)
•
4-Wire Connection from Home Power Supply
To connect to a Four wire circuit follow below steps.
1. Separate the oven (Green) Ground wire and (white) Neutral wire.
2. Connect the oven ground (Green or bare copper wire) wire to the home branch circuit
Ground (Green or bare copper) wire, using a UL approved wire nut appropriate for wire
gauge.
3. Connect the oven (White) wire to the branch circuit White (Neutral) wire using an
approved UL wire nut.
4. Connect the oven Black wire to the branch circuit Black (L1) using a UL approved wire
nut.
5. Connect the oven Red wire to the branch circuit Red (L2) wire using a UL approved Wire
nut.
6. Install junction box cover.
3-Wire Connection from Home Power Supply
To connect to a Three wire circuit follow below steps.
1. Connect the oven ground [Green or bare copper wire) wire and Neutral (white wire to
the home branch circuit neutral (white wire, using a UL approved wire nut appropriate for
wire gauge.
2. Connect the oven Red wire to the branch circuit Red [L2] wire using an approved UL
wire nut appropriate for wire gauge.
3. Connect the oven Black wire to the branch circuit Black (L1) using a UL approved wire
nut appropriate for the wire gauge.
4. Install junction box cover.
3 4 5 6 7 8 9 1 0
11 12
1 3 14
INSTALLATION
EN

2.6 Conditioning prior to first time use
Conditioning burns off any manufacturing residues.
Problem Possible cause Solution
The applianceis not
level.
The appliancehas been installed
improperly.
Place the ovenrack in the center of the
oven.Place a level on the ovenrack .
Adjustthe feet until the ovenrack is level.
Ensure the floor is level and strong
and stable enoughto adequately support the
appliance.
The floor is saggingor sloping. Contacta carpenterto correct the situation.
Thekitchen cabinetsare not
properly aligned and make the
applianceappearto be not level.
Ensure the cabinetsare square and provide
sufficientroom for installation.
Th
e appliancemust
beaccessedfor
servicing and cannot
be movedeasily.
Thekitchen cabinetsare not
square and tooclose to the
appliance.
Contact a builder or installer to make the
appliance accessible.
Carpetis interfering with
movement of the appliance.
Providesufficient space so the appliancecan
be lifted over the carpet.
TROUBLESHOOTING
1. Place all the oven racks inside the oven cavity .
2. If a hood is installed, set it on high.
3. Set the oven to the BAKE function and preheat the empty oven to 350 °F (176 °C) and
allow it to heat for 30 minutes, then increase the temperature to 500 °F (260 °C) then
allow oven to heat for another 30 minutes.
4. Let the oven cavity cool down.
5. Once cooled, wipe the oven cavity with a damp cloth and mild detergent, then dry
thoroughly.
3 4 5 6 7 8 9 1 0
11 12 1 3
14
INSTALLATION
EN
Scan the QR Code
Please contact:
Contact us
• To view the Digital User Manual
• If you encounter any problems
during use, you can scan the QR
code on the right to obtain the
service hotline number and call for
consultation.
Manufacturer: Zhiyue Youchuang Technology (Suzhou) Co., Ltd.
Address: Room 552, Unit 5010, No.282 Dongping Street, Suzhou Industrial Park, Suzhou Area,
China (Jiangsu) Pilot Free Trade Zone
Website: global.dreametech.com
Version No.: 251113A1
EN