Product Manual
English
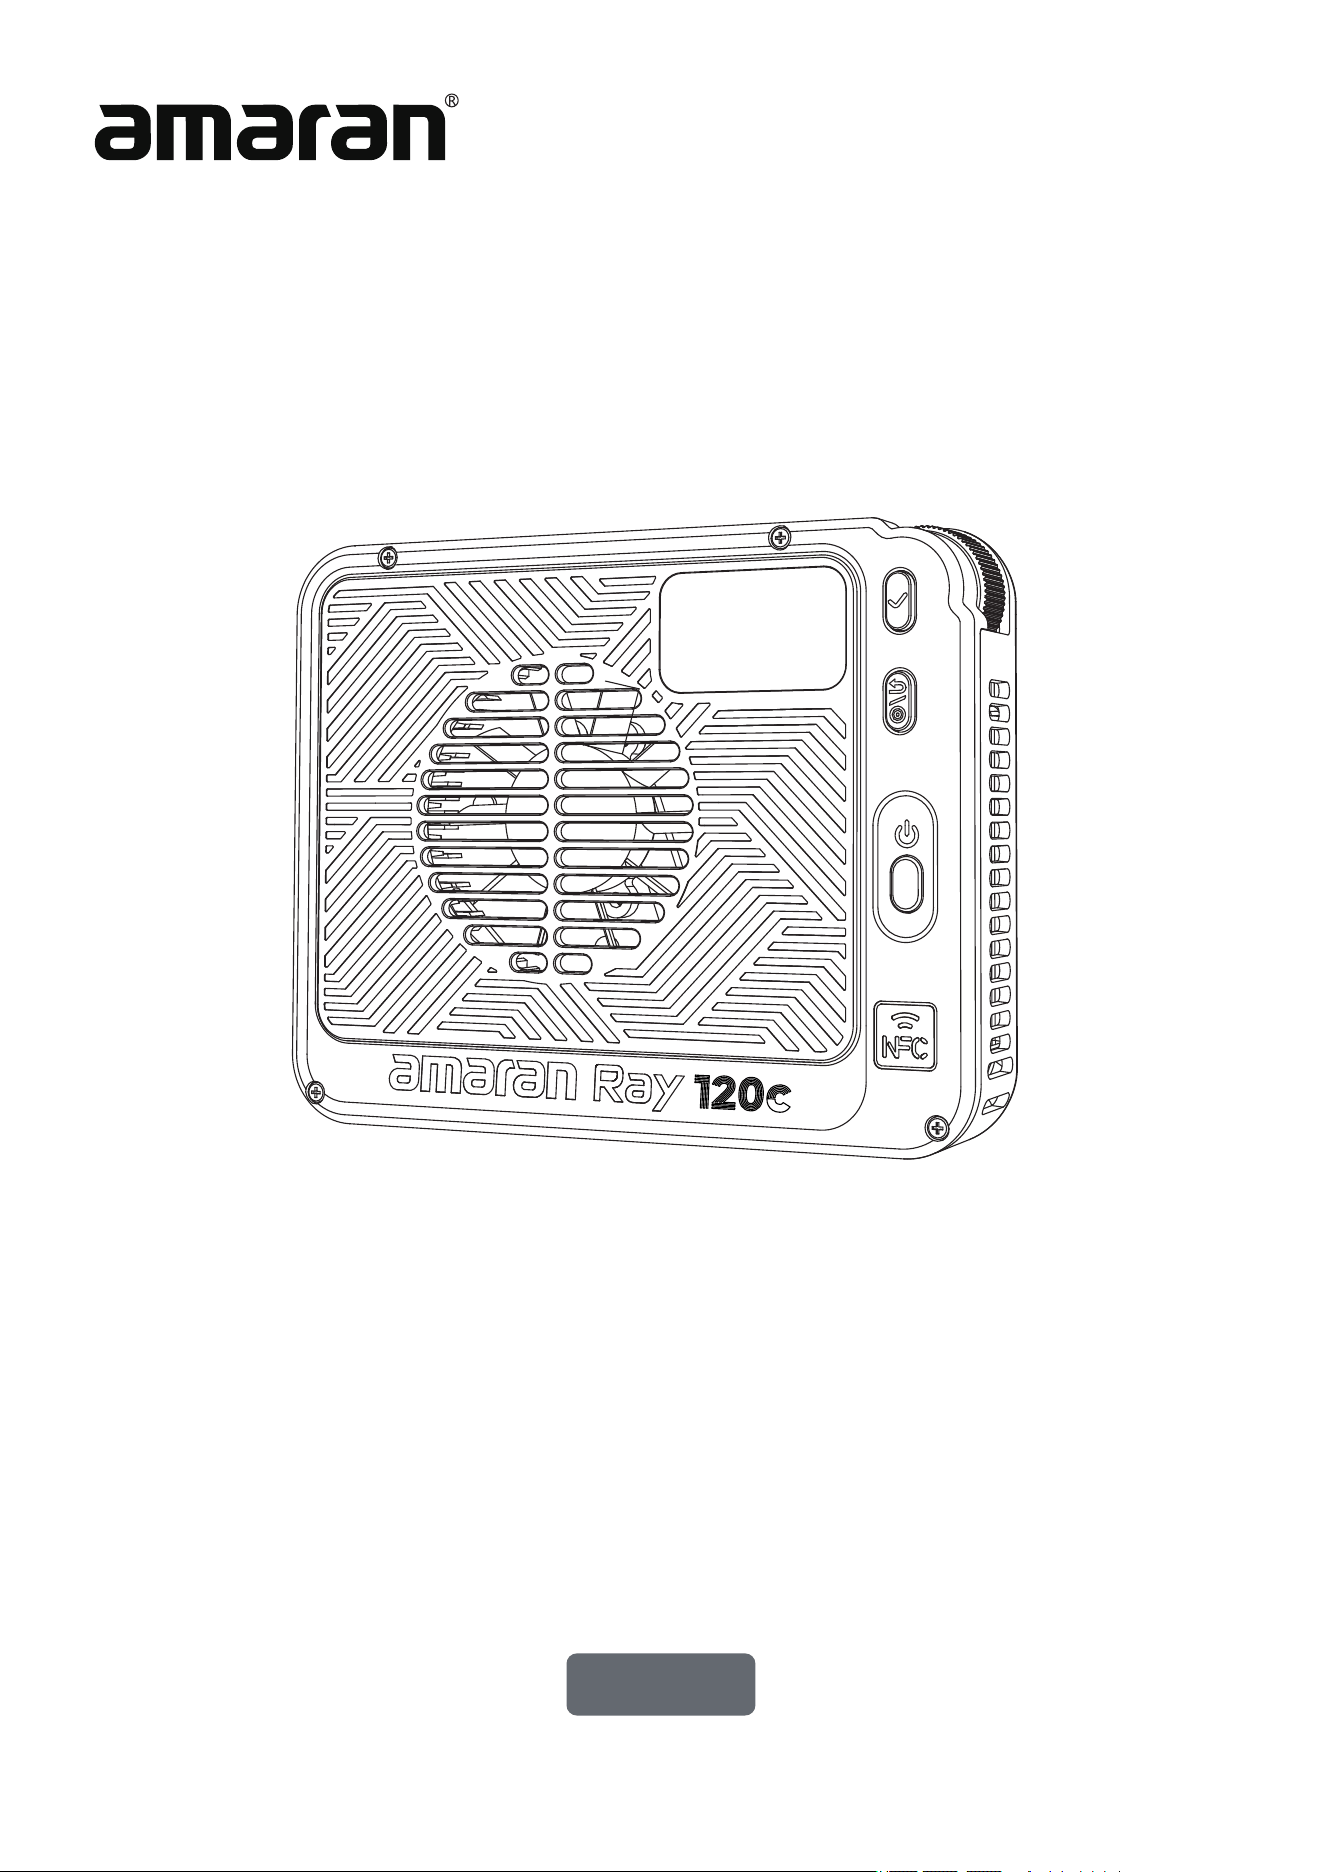
amaran Ray 120c

Introduction
Components List
Product Overview
Operations
1.Power Supply
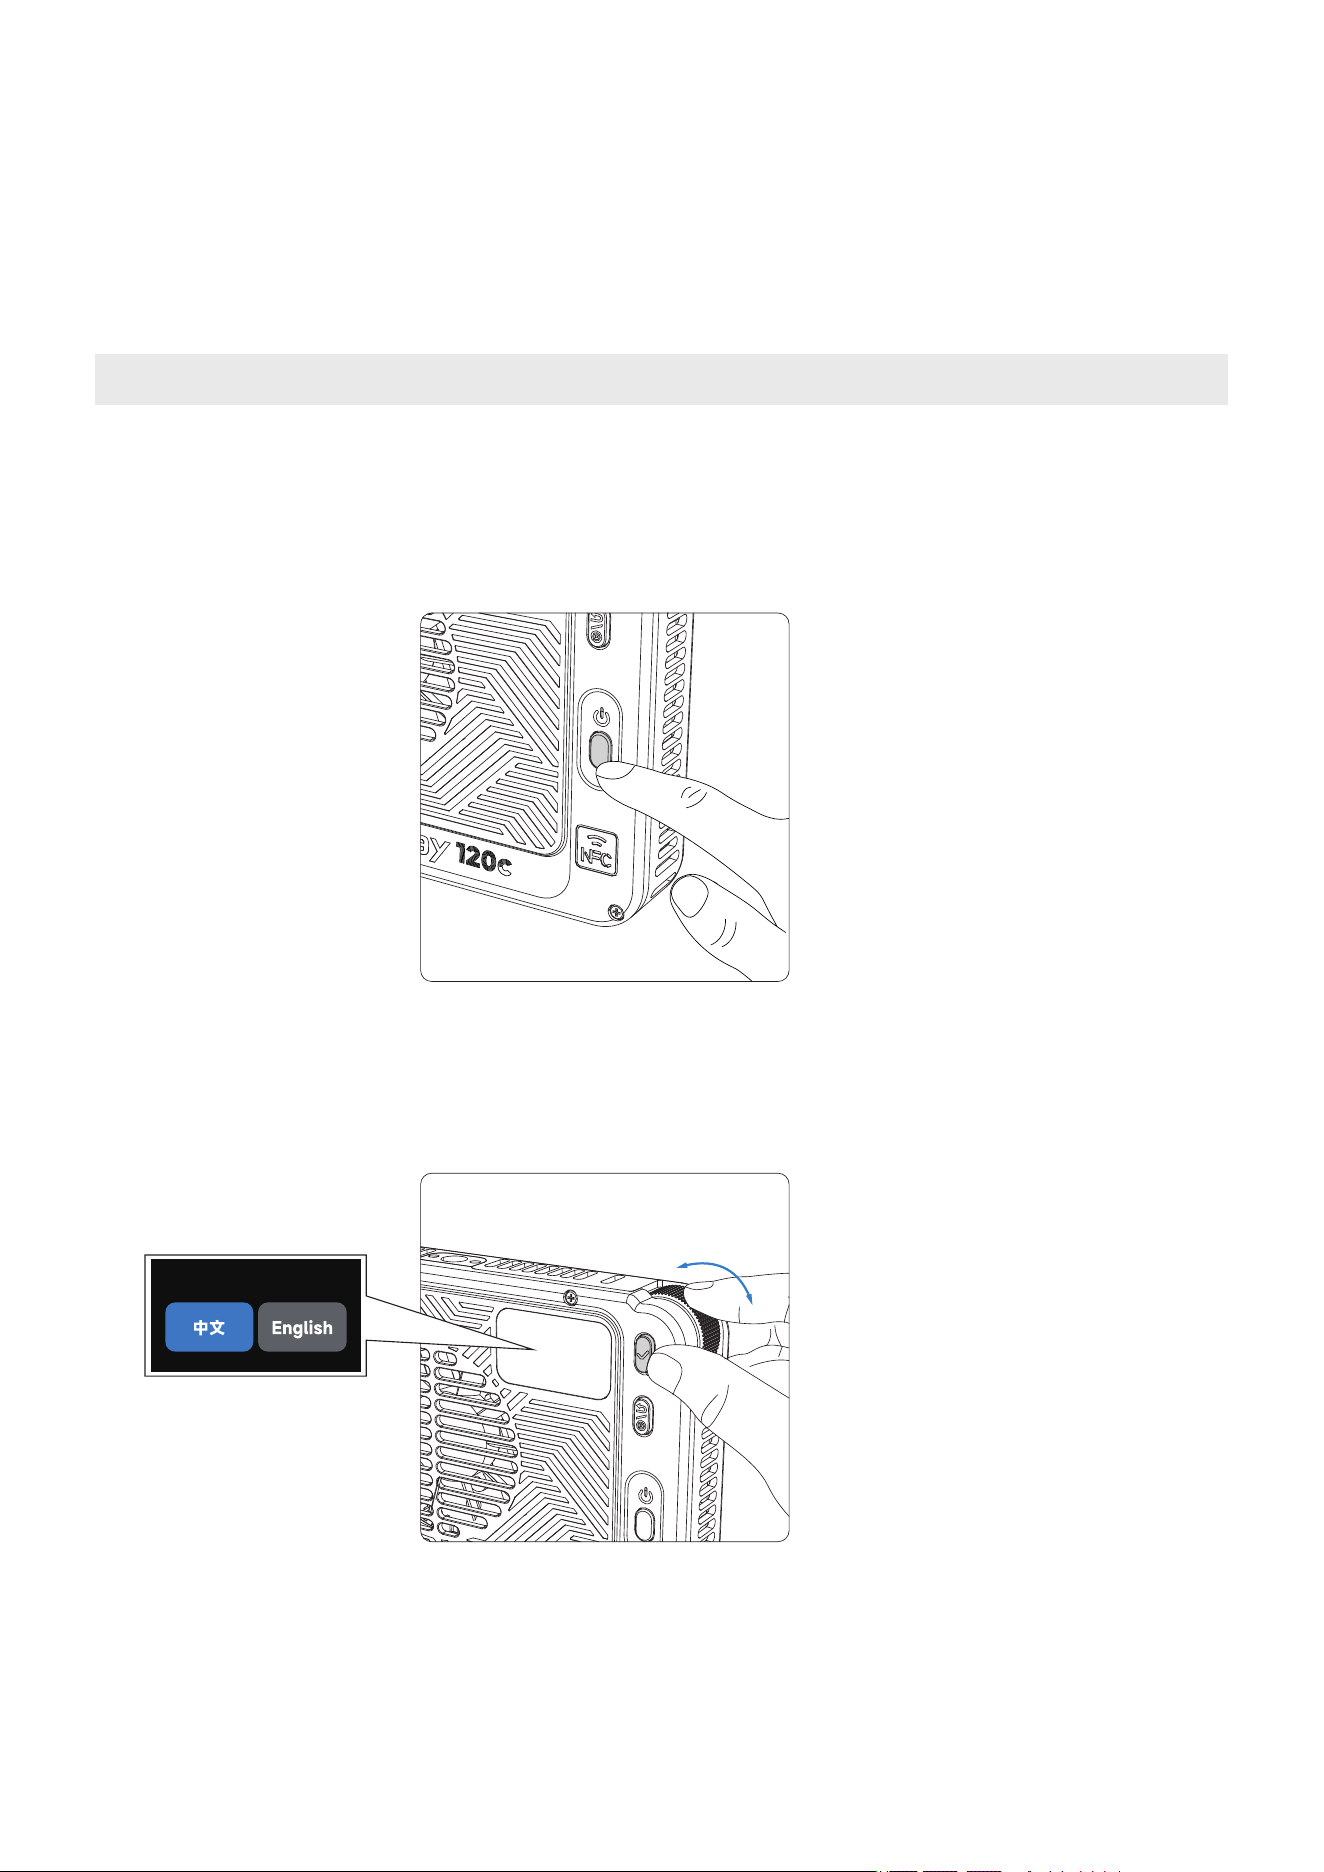
2.Power On/Off
3.Light Installation
4.Bowens Mount Accessory Installation
5.Main Menu
5.1.CCT Mode
5.2.HSI Mode
5.3.RGB Mode
5.4.FX Mode
5.5.BT Bluetooth Reset
5.6.Custom Mode
5.7.LANG (Language)
5.8.Studio Mode
5.9.HFR Mode (High Frame Rate)
5.10.Fan Mode
5.11.Firmware Update
5.12.Pairing via NFC
Using the amaran App
Specifications
Photometrics
Declaration of Toxic and Hazardous Substances in Electronic Information
IC
CertificationInformation
FCC
UL
CSA
Important Safety Instructions
Disclaimer
Table of Content
....................................................................................................................
03
04
05
07
07
08
09
10
11
12
12
12
13
13
14
14
15
15
16
16
17
18
19
20
22
23
24
25
26
27
28
30
...........................................................................................................
..........................................................................................................
......................................................................................................
............................................................................................................
............................................................................................................
......................................................................................................................
........................................................................................
.................................................................................................................................
...................................................................
................................................................................................................
...........................................................................................................
............................................................................................................
............................................................................................................
..........................................................................................................
...........................................................................................
....................................................................................................
.............................................................................................
.......................................................................................................
......................................................................................................
...................................................................................................................
...................................................................................................................
....................
......................................................................................................................................
.................................................................................................
..........................................................................
.........................................................................................................
..............................................................................................
..................................................................................................
......................................................................................................................................
.....................................................................................................................................
.........................................................................................................................
Introduction
Components List
Product Overview
Operations
1.Power Supply
2.Power On/Off
3.Light Installation
4.Bowens Mount Accessory Installation
5.Main Menu
5.1.CCT Mode
5.2.HSI Mode
5.3.RGB Mode
5.4.FX Mode
5.5.BT Bluetooth Reset
5.6.Custom Mode
5.7.LANG (Language)
5.8.Studio Mode
5.9.HFR Mode (High Frame Rate)
5.10.Fan Mode
5.11.Firmware Update
5.12.Pairing via NFC
02

Introduction
1
Thank you for purchasing the amaran Ray 120c.
Designed for creators on the move who need more punch, the amaran Ray 120c is an
ultra-compact, 120W full-color point-source LED light powered by the OmniColor light
engine – delivering class leading output and true-to-life color in a slim, travel-ready body.
With an IP54-rated build for real-world shoots, amaran Ace E-Lock compatibility for
mounting or pairing with the amaran Peak 75 or amaran Peak in one second , and
simplified USB-C PD power, the amaran Ray 120c moves efortlessly from outdoors
to the studio.
amaran Peak 75 and amaran Peak battery system sold seprately.
1
1
03
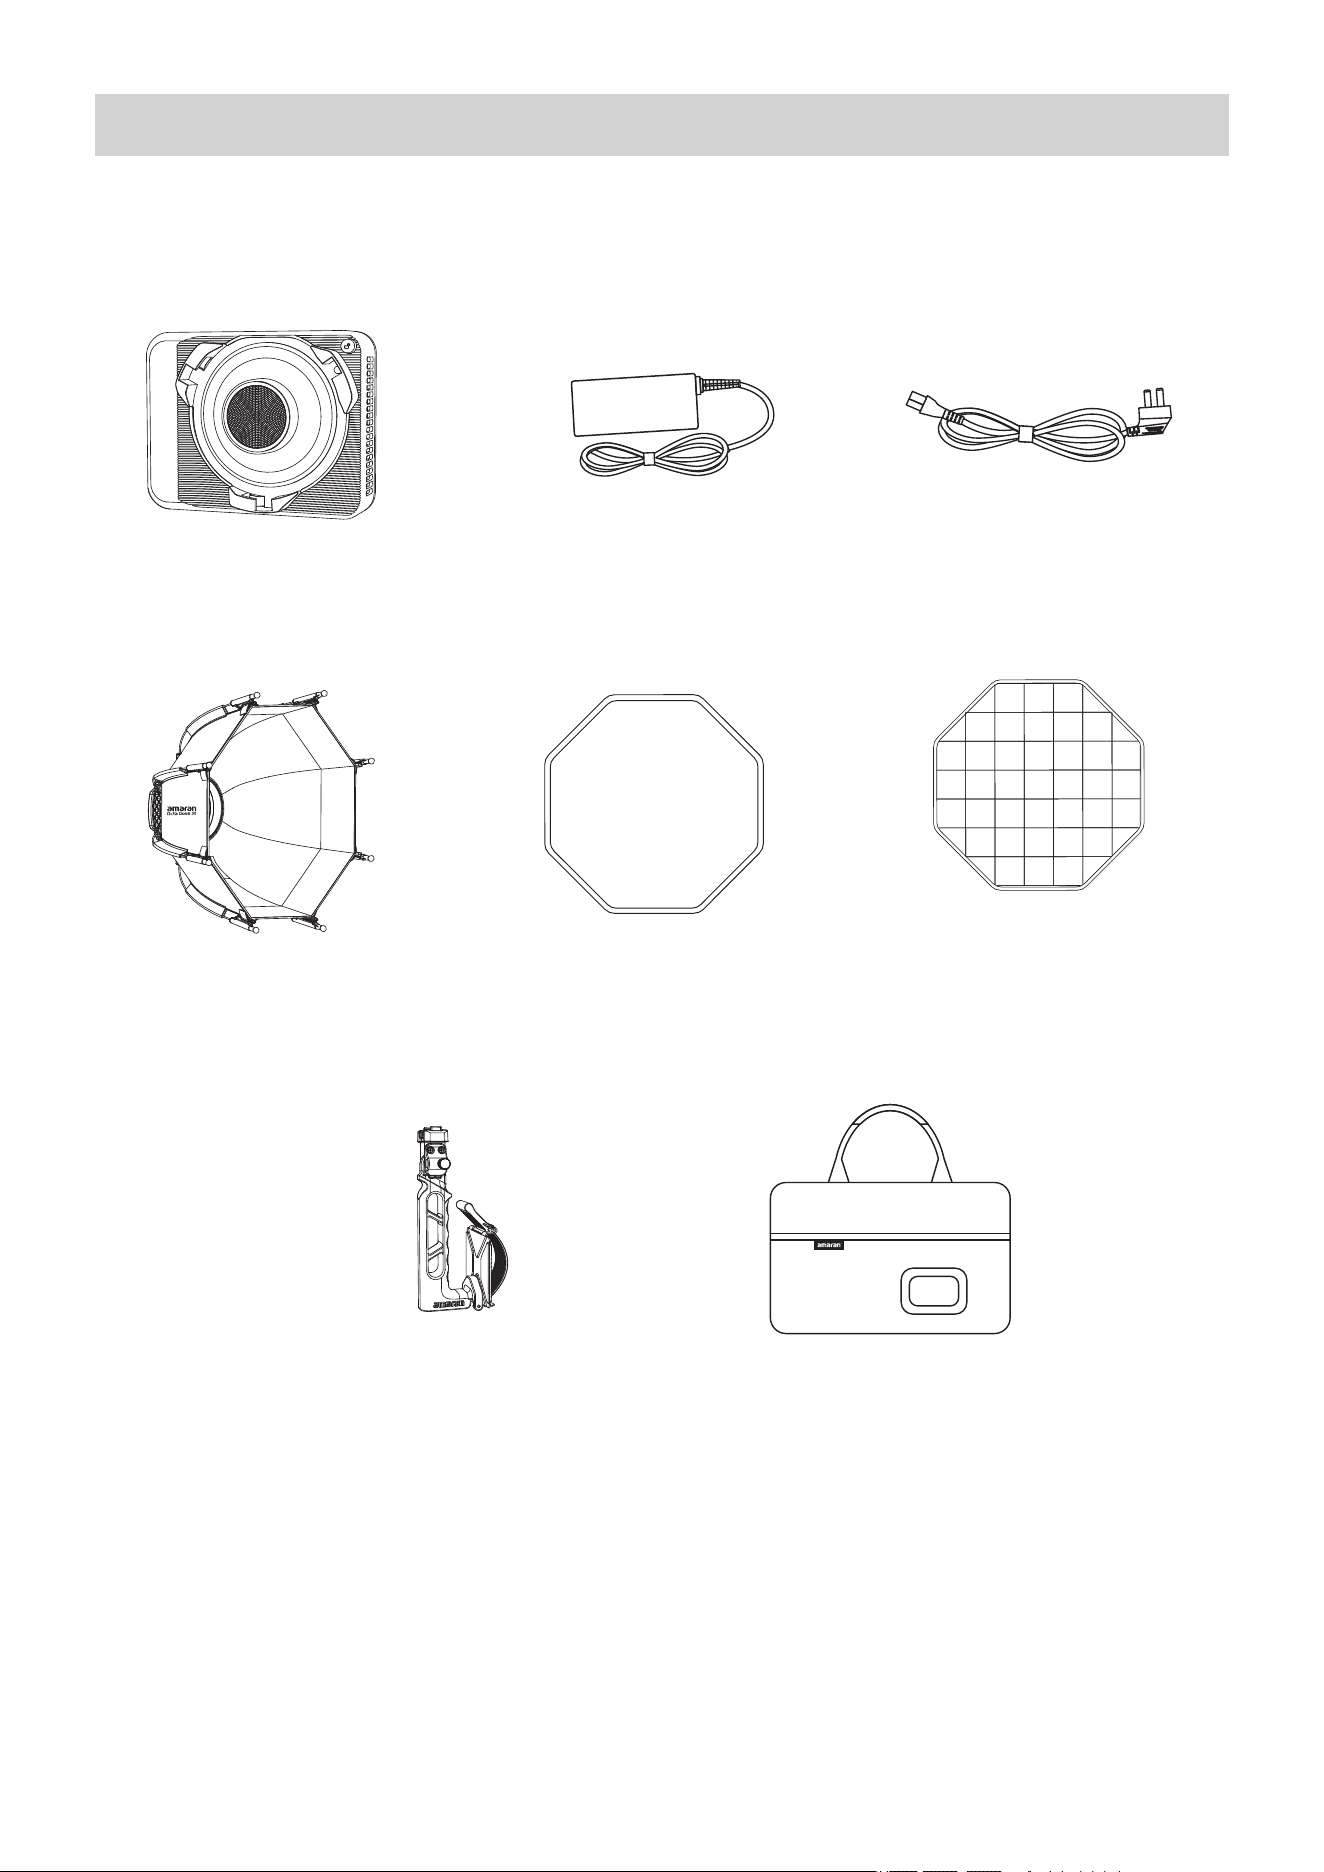
Components List
Please make sure all accessories listed below are complete before using. If not, please
contact your sellers immediately.
Tip: The illustrations in the manual are diagrams for reference only. Due to the continuous
development of new versions of the product, if there are any differences between the product
and the user manual diagrams, please refer to the product itself.
amaran Ray 120c x 1
amaran AC Power
Cable (4 m) x 1
amaran Ray
Carrying Bag x 1
amaran Octa Dome 30 x 1
amaran Octa Dome 30
Light Control Grid x 1
amaran Octa Dome 30
Diffusion Cloth x 1
04
amaran AC to DC 150W
Power Adapter (0.5m) x 1
amaran
Ace Lock to Baby Pin Adapter Grip x 1
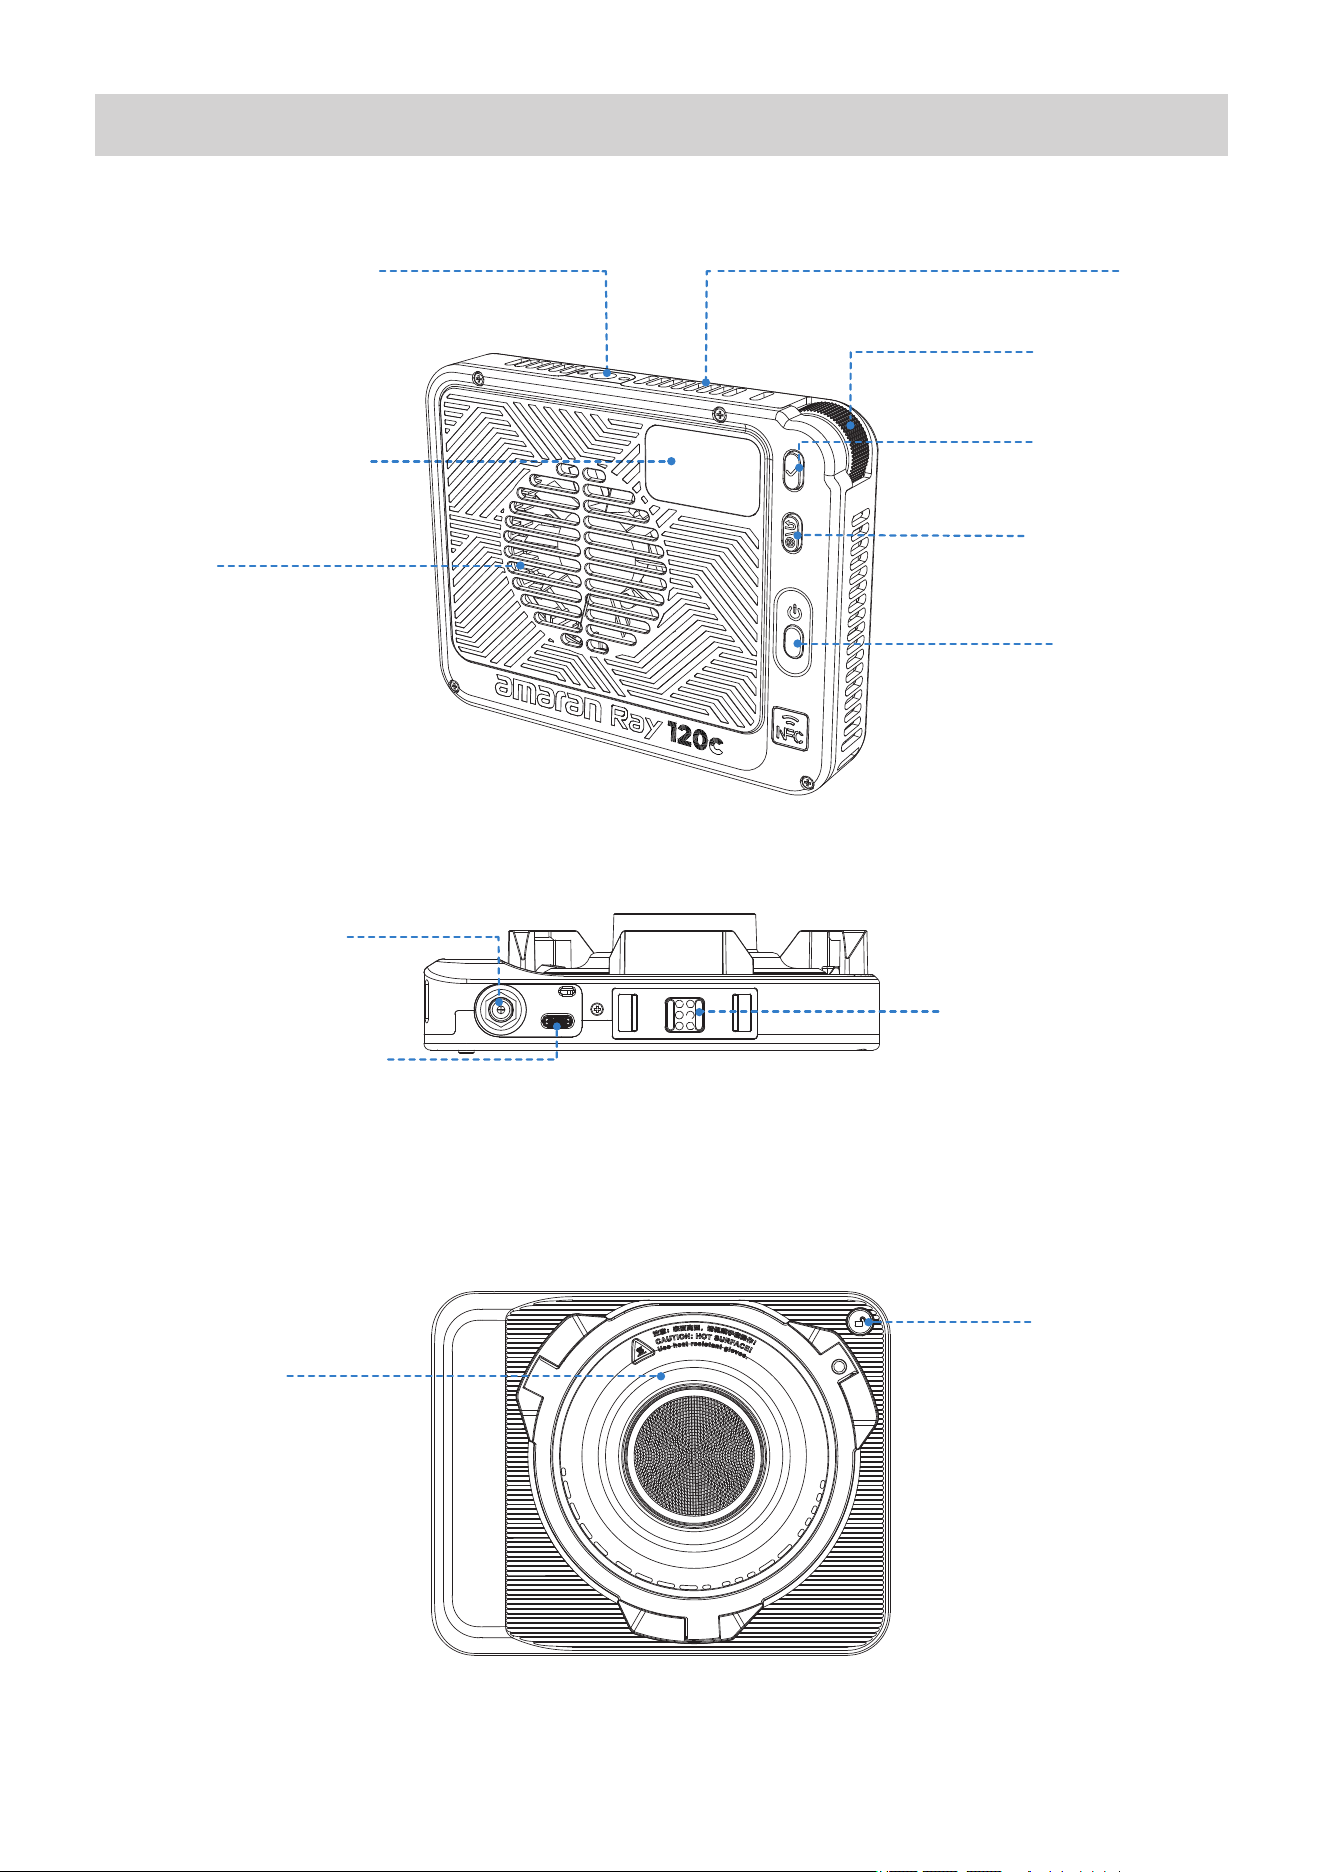
Product Overview
Display Menu Screen
FlowTurn Knob
Fan Vent
Air Vent
1/4-20in Screw Mount
Confirm Button
Return Button /
Custom Button
Power Button
DC Power Input Port
USB-C Power Input Port
amaran Ace E-Lock
Quick-Release Mount
Full-Size
Bowens Mount
Bowens Mount
Release Button
05
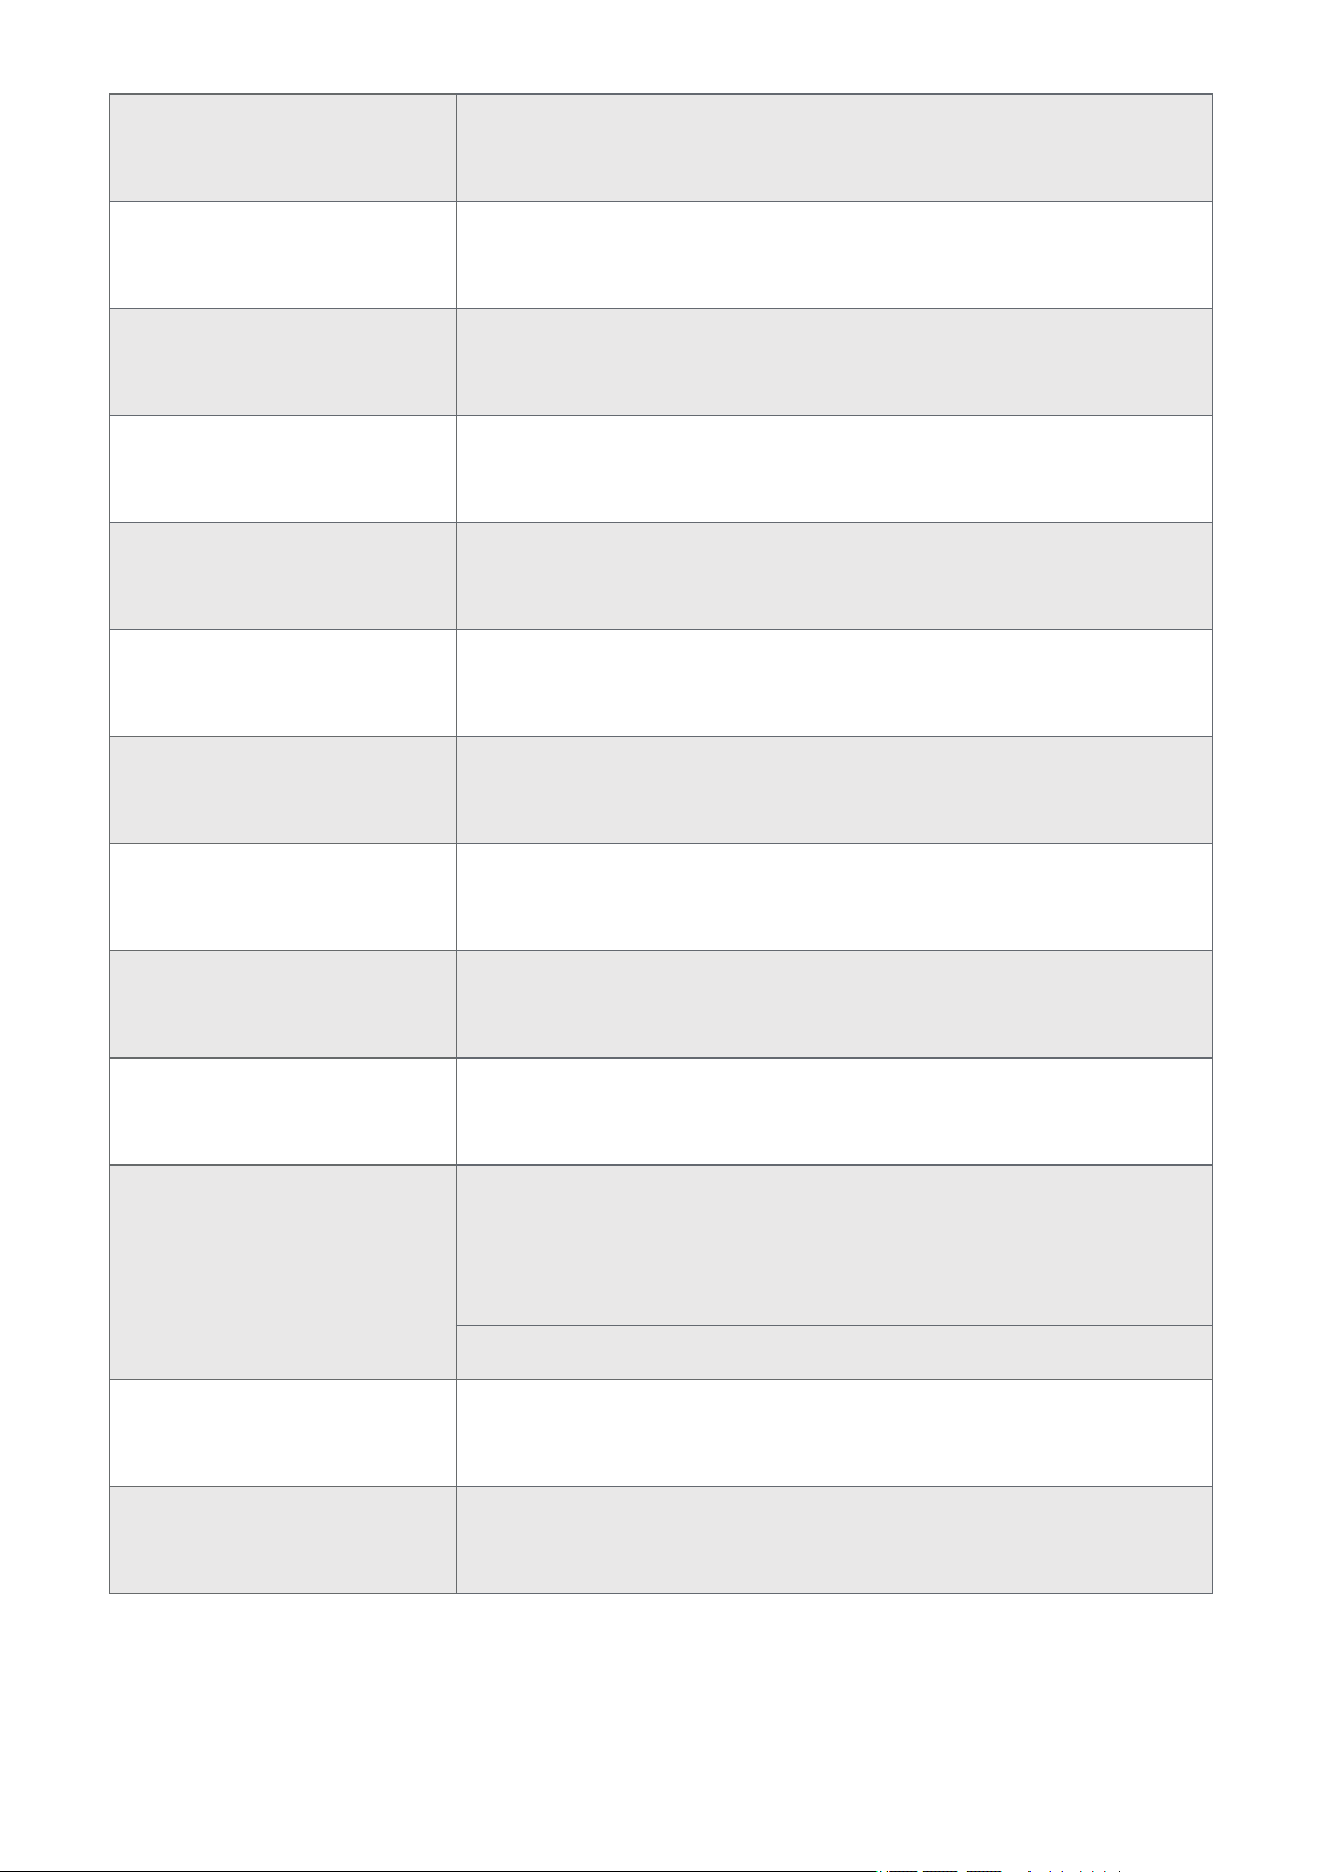
*The amaran Peak 75 and amaran Peak are sold separately.
Power Button
Fan Vent
Air Vent
1/4-20in Screw Mount
USB-C Power Input Port
DC Power Input Port
Displays settings and status of your light.
amaran Ace E-Lock
Quick-Release Mount
Rotate to toggle the menu or adjust values and lighting
settings, such as brightness, color temperature, and
color mode.
Display Menu Screen
FlowTurn Knob
Confirm Button
Return Button
Custom Button
Confirms selected settings or enters the highlighted menu.
Click to return to the previous menu screen. Hold or double
click on the return button to execute customizable shortcuts
set in Custom Mode.
Double click to turn the light on or off.
Helps the light dissipate heat. Please do not block the fan
vent when using the light.
The temperature of the air vent may be higher after long
usage. Please do not block the air when using the light as
it helps the light dissipate heat.
Mount the light onto 1/4-20in tripods or other equipment.
Used to power the fixture via a PD-supported power supply.
Used to power the fixture via a 12V-24V DC barrel input.
Supports a wide range of external power sources.
Install and disassemble the light in less than a second
with the amaran Ace Lock system. The light can also be
powered by the amaran Peak 75 or amaran Peak power
bank accessory.
Full-Size Bowens Mount
Bowens Mount
Release Button
Compatible with a variety of full-size, standard Bowens
Mount accessories.
Press to release the Bowens Mount accessory.
06
*The amaran Peak 75 and amaran Peak are sold separately.
Power Button
Fan Vent
Air Vent
1/4-20in Screw Mount
USB-C Power Input Port
DC Power Input Port
Displays settings and status of your light.
amaran Ace E-Lock
Quick-Release Mount
Full-Size Bowens Mount
Rotate to toggle the menu or adjust values and lighting
settings, such as brightness, color temperature, and
color mode.
Display Menu Screen
FlowTurn Knob
Confirm Button
Return Button
Custom Button
Bowens Mount
Release Button
Confirms selected settings or enters the highlighted menu.
Click to return to the previous menu screen. Hold or double
click on the return button to execute customizable shortcuts
set in Custom Mode.
Double click to turn the light on or off.
Helps the light dissipate heat. Please do not block the fan
vent when using the light.
The temperature of the air vent may be higher after long
usage. Please do not block the air when using the light as
it helps the light dissipate heat.
Mount the light onto 1/4-20in tripods or other equipment.
Used to power the fixture via a PD-supported power supply.
Used to power the fixture via a 12V-24V DC barrel input.
Supports a wide range of external power sources.
Install and disassemble the light in less than a second
with the amaran Ace Lock system. The light can also be
powered by the amaran Peak 75 or amaran Peak power
bank accessory.
Compatible with a variety of full-size, standard Bowens
Mount accessories.
Press to release the Bowens Mount accessory.
Operations
1.Power Supply
07
Please use a power adapter or supply that meets the rated power specifications to ensure
proper performance and safety.
* The amaran Ray 60c supports power supply standards of USB PD3.0 and above, but is not
compatible with some third-party private charging protocols. Please ensure to select the
appropriate power supply device. If the selected power supply device cannot power the light
at full power, a pop-up window will appear on the display menu screen and limit the maximum
brightness.
Notice:
*The amaran Peak 75 and amaran Peak battery system is sold separately.
*Using a power source that does not meet the rated power requirements may result in the
following issues:
(1) The light output may be limited and unable to reach maximum brightness.
(2) The fixture may fail to power on or operate unstably.
Please use a power adapter or supply that meets the rated power specifications to ensure
proper performance and safety.
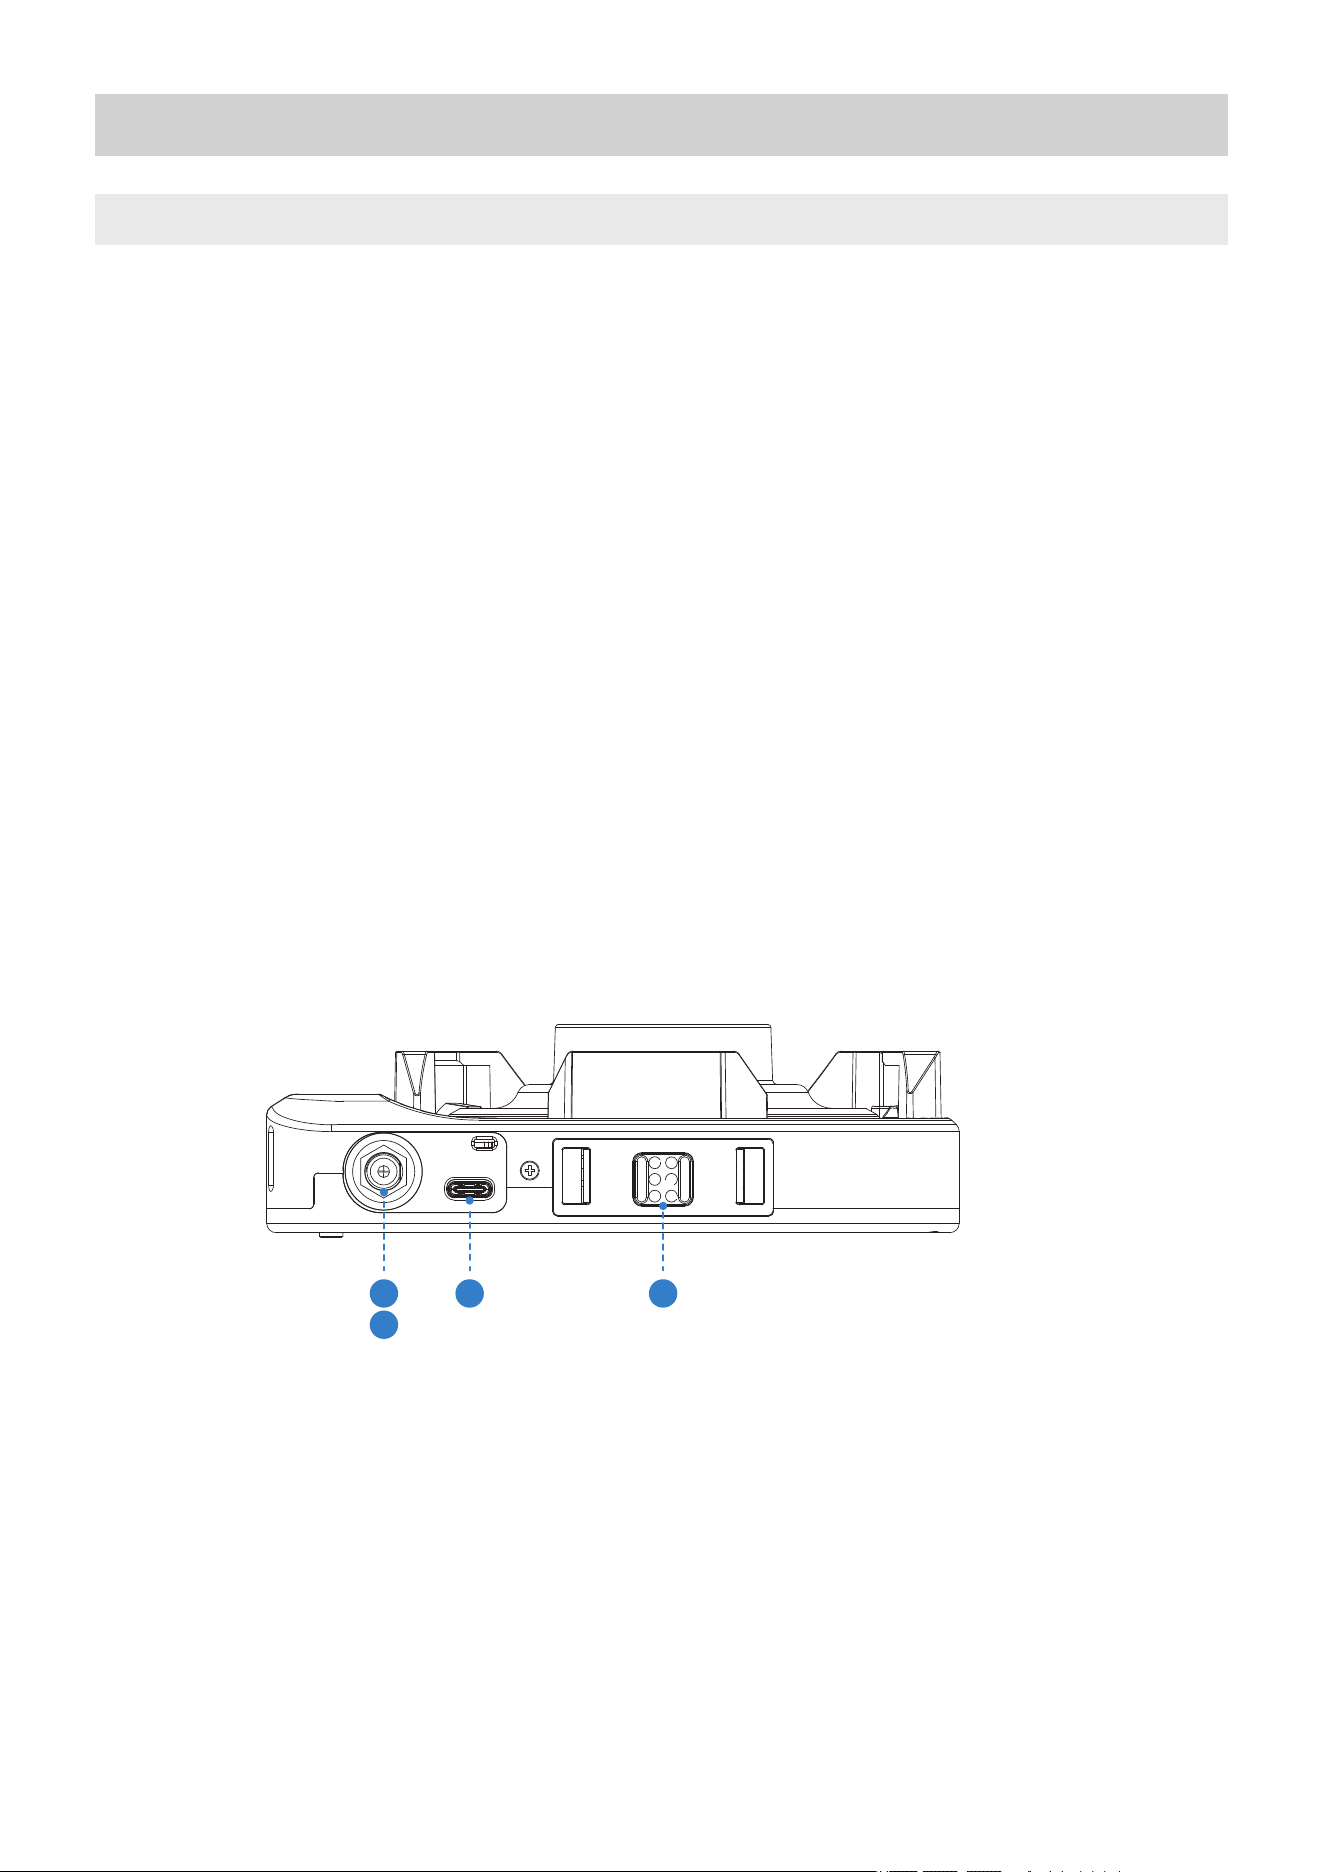
1 3 4
2
4.amaran Ace E-Lock IN: Max Power 140W
Supports wireless, cable-free operation with the amaran Peak 75 or amaran Peak battery
system via the amaran Ace E-Lock.
When using the amaran Peak 75, the light’s output is limited to 50% power; when using the
amaran Peak, the light can operate at full power.
The fixture supports three power input methods: Supplying power with the included DC
Adapter, with a USB-C PD power supply, and the amaran Ace E-Lock. Power specifications
for each input are as follows:
1.DC IN : 12–20V, Max Power 84W
2.DC IN : 21-24V, Max Power 140W
3.USB-C IN : 9V/3A (Max 27W), 12V/5A (Max 60W), 20V/3.75A (Max 75W), 20V/5A(Max 100
W), 28V/5A(Max 140W). Supports PD fast charging protocol and is compatible with a variety
of USB-C power sources.
4.amaran Ace E-Lock IN: Max Power 140W
Supports wireless, cable-free operation with the amaran Peak 75 or amaran Peak battery
system via the amaran Ace E-Lock.
When using the amaran Peak 75, the light’s output is limited to 50% power; when using the
amaran Peak, the light can operate at full power.
Please use a power adapter or supply that meets the rated power specifications to ensure
proper performance and safety.
* The amaran Ray 120c supports power supply standards of USB PD3.1, but is not compatible
with some third-party private charging protocols. Please ensure to select the appropriate
power supply device. If the selected power supply device cannot power the light at full power,
a pop-up window will appear on the display menu screen and limit the maximum brightness.
2.Power On/Off
Power On : After connecting to the power supply, double-press the power button to turn on
the device.
Power Off : While the light is on, double-press the power switch to turn it off.
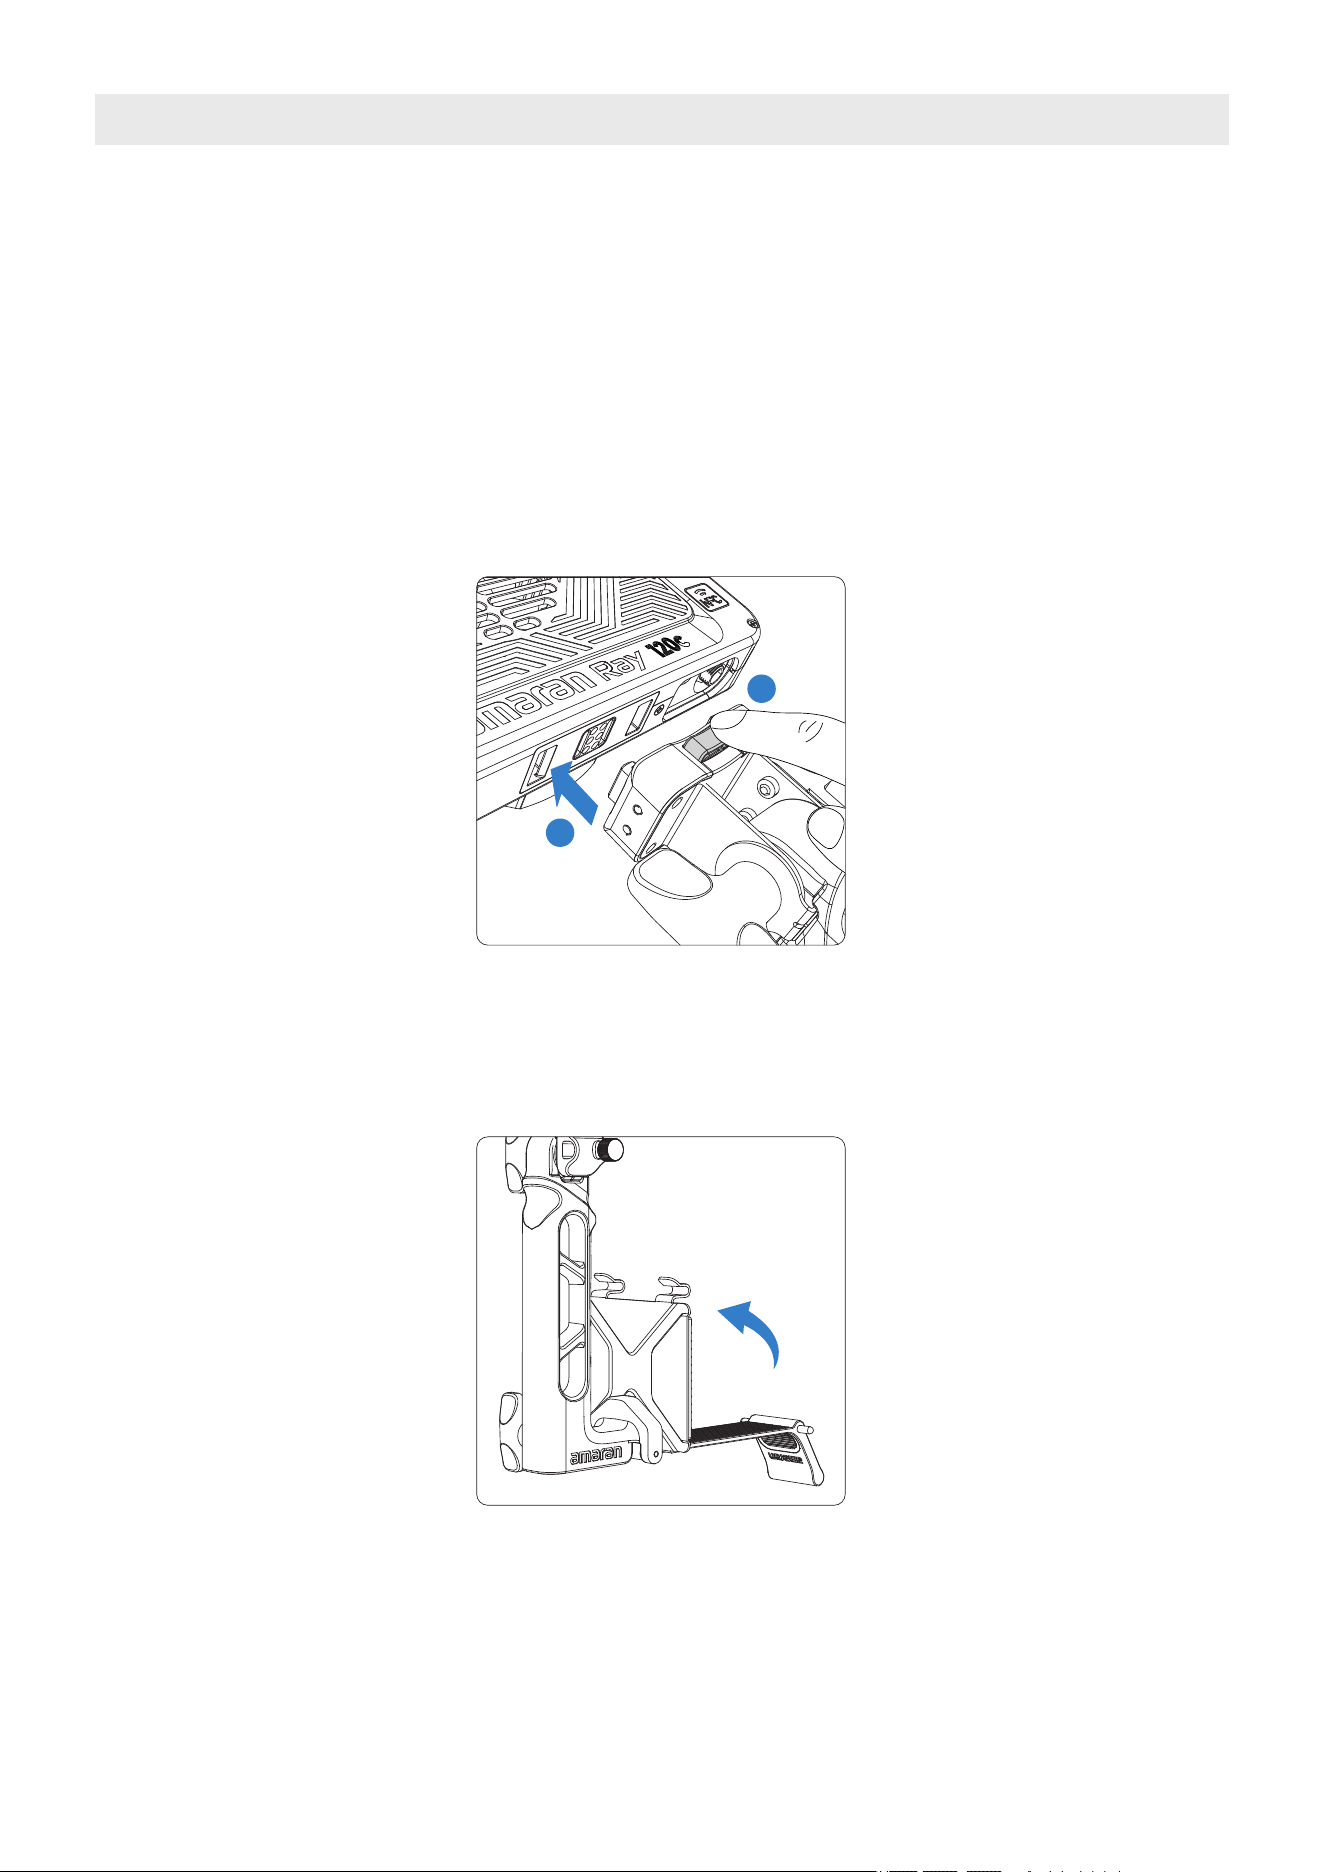
You can select your preferred language when you turn the light on for the first time. Rotate
the knob to select your language. Click confirm button to confirm.
欢迎使用 amaran 产品
08
3.Light Installation
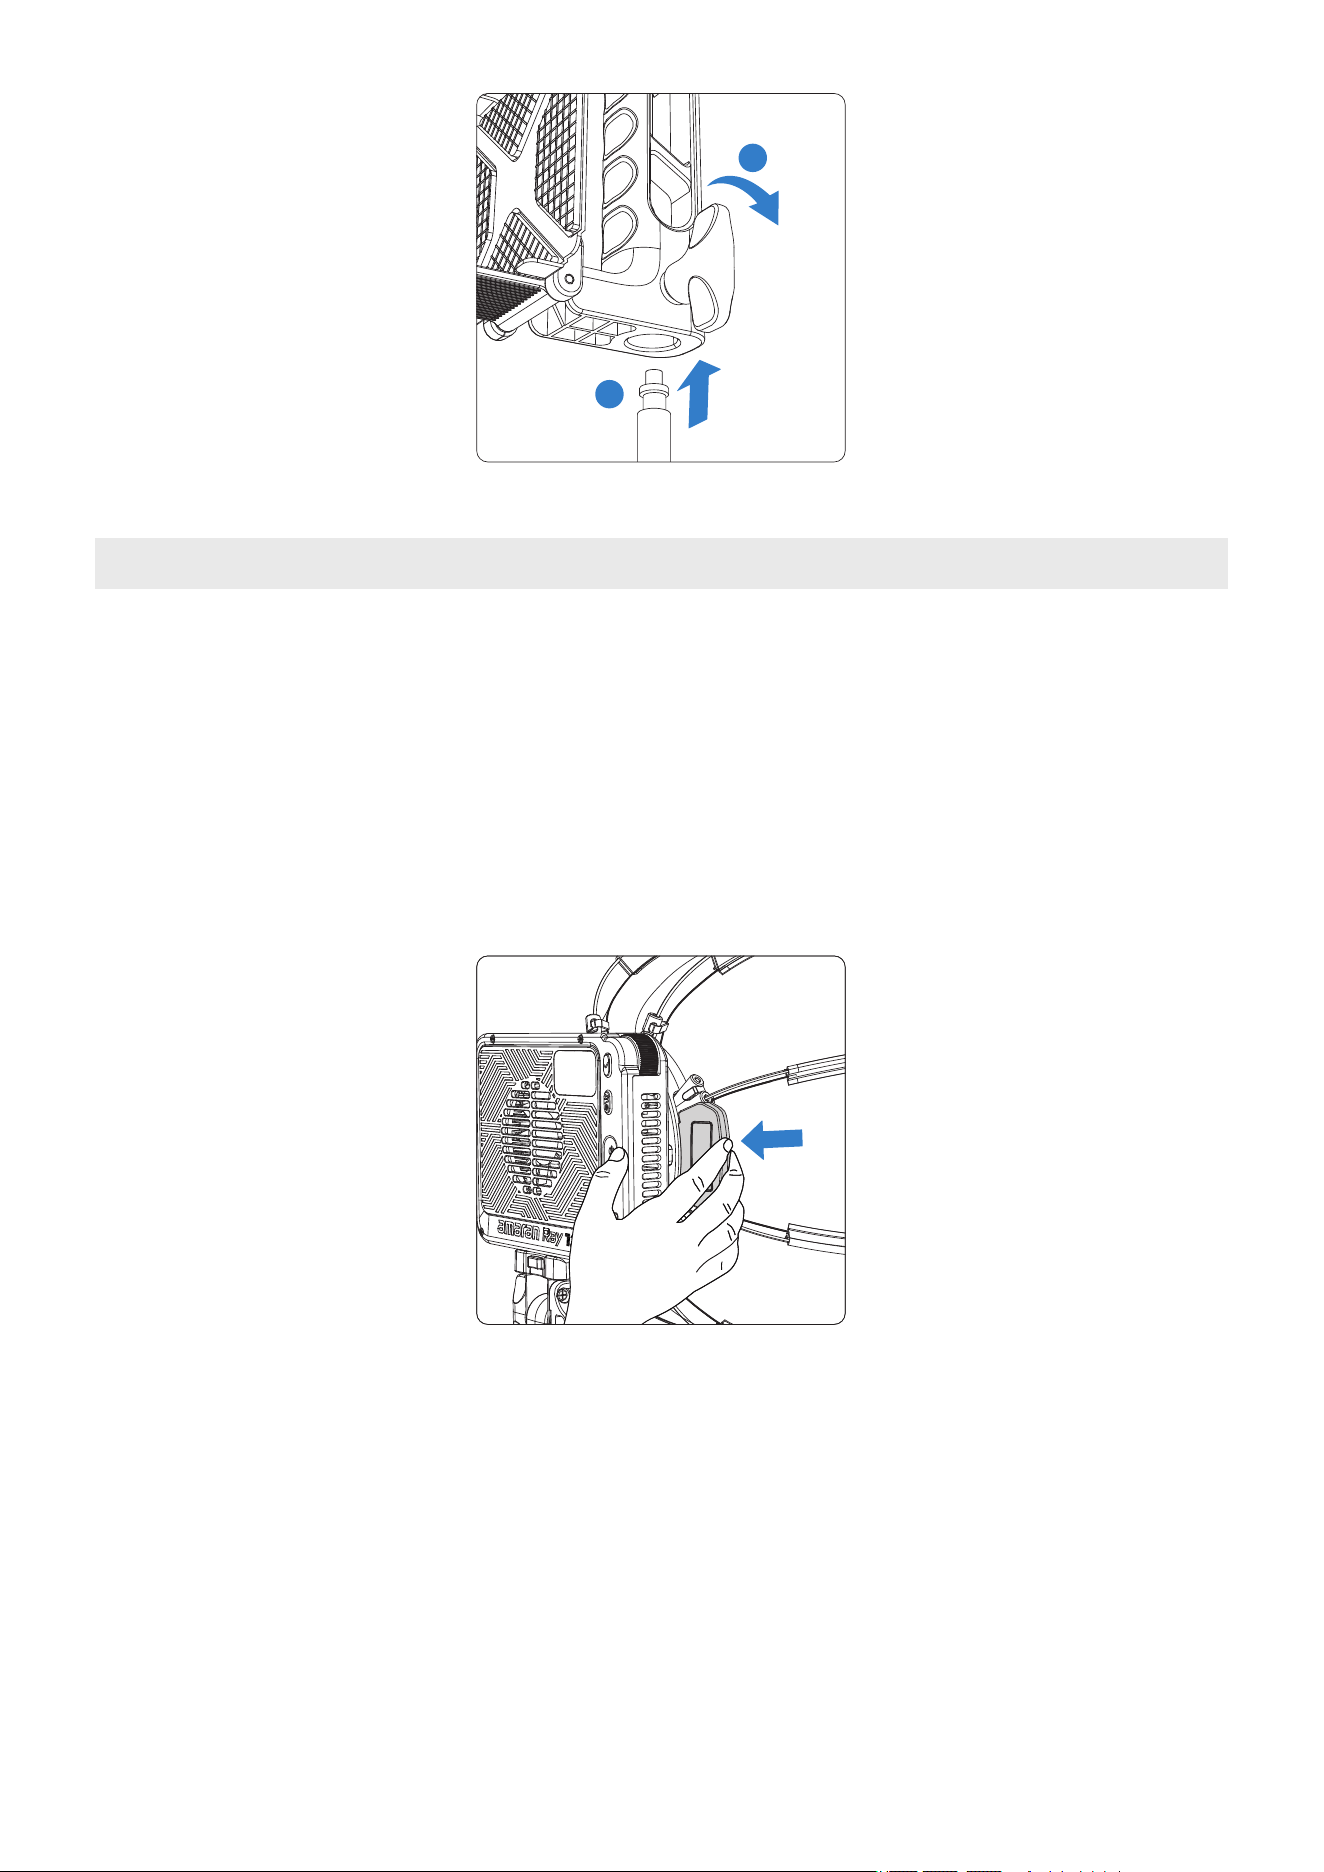
Align the contact pins on the amaran Ace Lock to Baby Pin Adapter Grip to the light's
amaran Ace Lock quick release mount. Press the blue release key and push towards the
bottom of the light. The Baby Pin Adapter Grip is securely attached to the light when the
pins are embedded into the amaran Ace lock mount and when you hear a clicking noise.
amaran Ace Lock to Baby Pin Adapter Grip
Please ensure that the blue release key is facing the back of the light to avoid reverse
installation.
3.1 Top 1/4”-20 Mounting
The top of the light is equipped with a 1/4-20in screw mount,allowing you to install the fixture
onto various accessories such as handles, mounting arms, or support rigs—offering flexibility
for diverse shooting needs.
1
2
The front of the grip features a silicone strap for securing external power sources, such as
power adapters, V-mount batteries, or power banks.
The bottom of the grip includes a Baby Pin mount, which can be directly mounted to
compatible light stands and secured using the locking screw.
09
1
2
4.Bowens Mount Accessory Installation
Th fixture comes with the amaran Octa Dome 30 pre-installed. The softbox features a
one-snap setup design – simply unfold it for immediate use, with no additional assembly
required.
To unfold the softbox : Pull up the expansion handle in the indicated direction to fully open
the softbox and ensure it is securely lo cked. Adjust te diffusion cloth and grid as needed
to achieve the desired lighting effect.
10
To collapse the softbox : When removing, press the release latch on the softbox mount with
your fingers. This will unlock the mechanism and allow the softbox to fold down automatically.
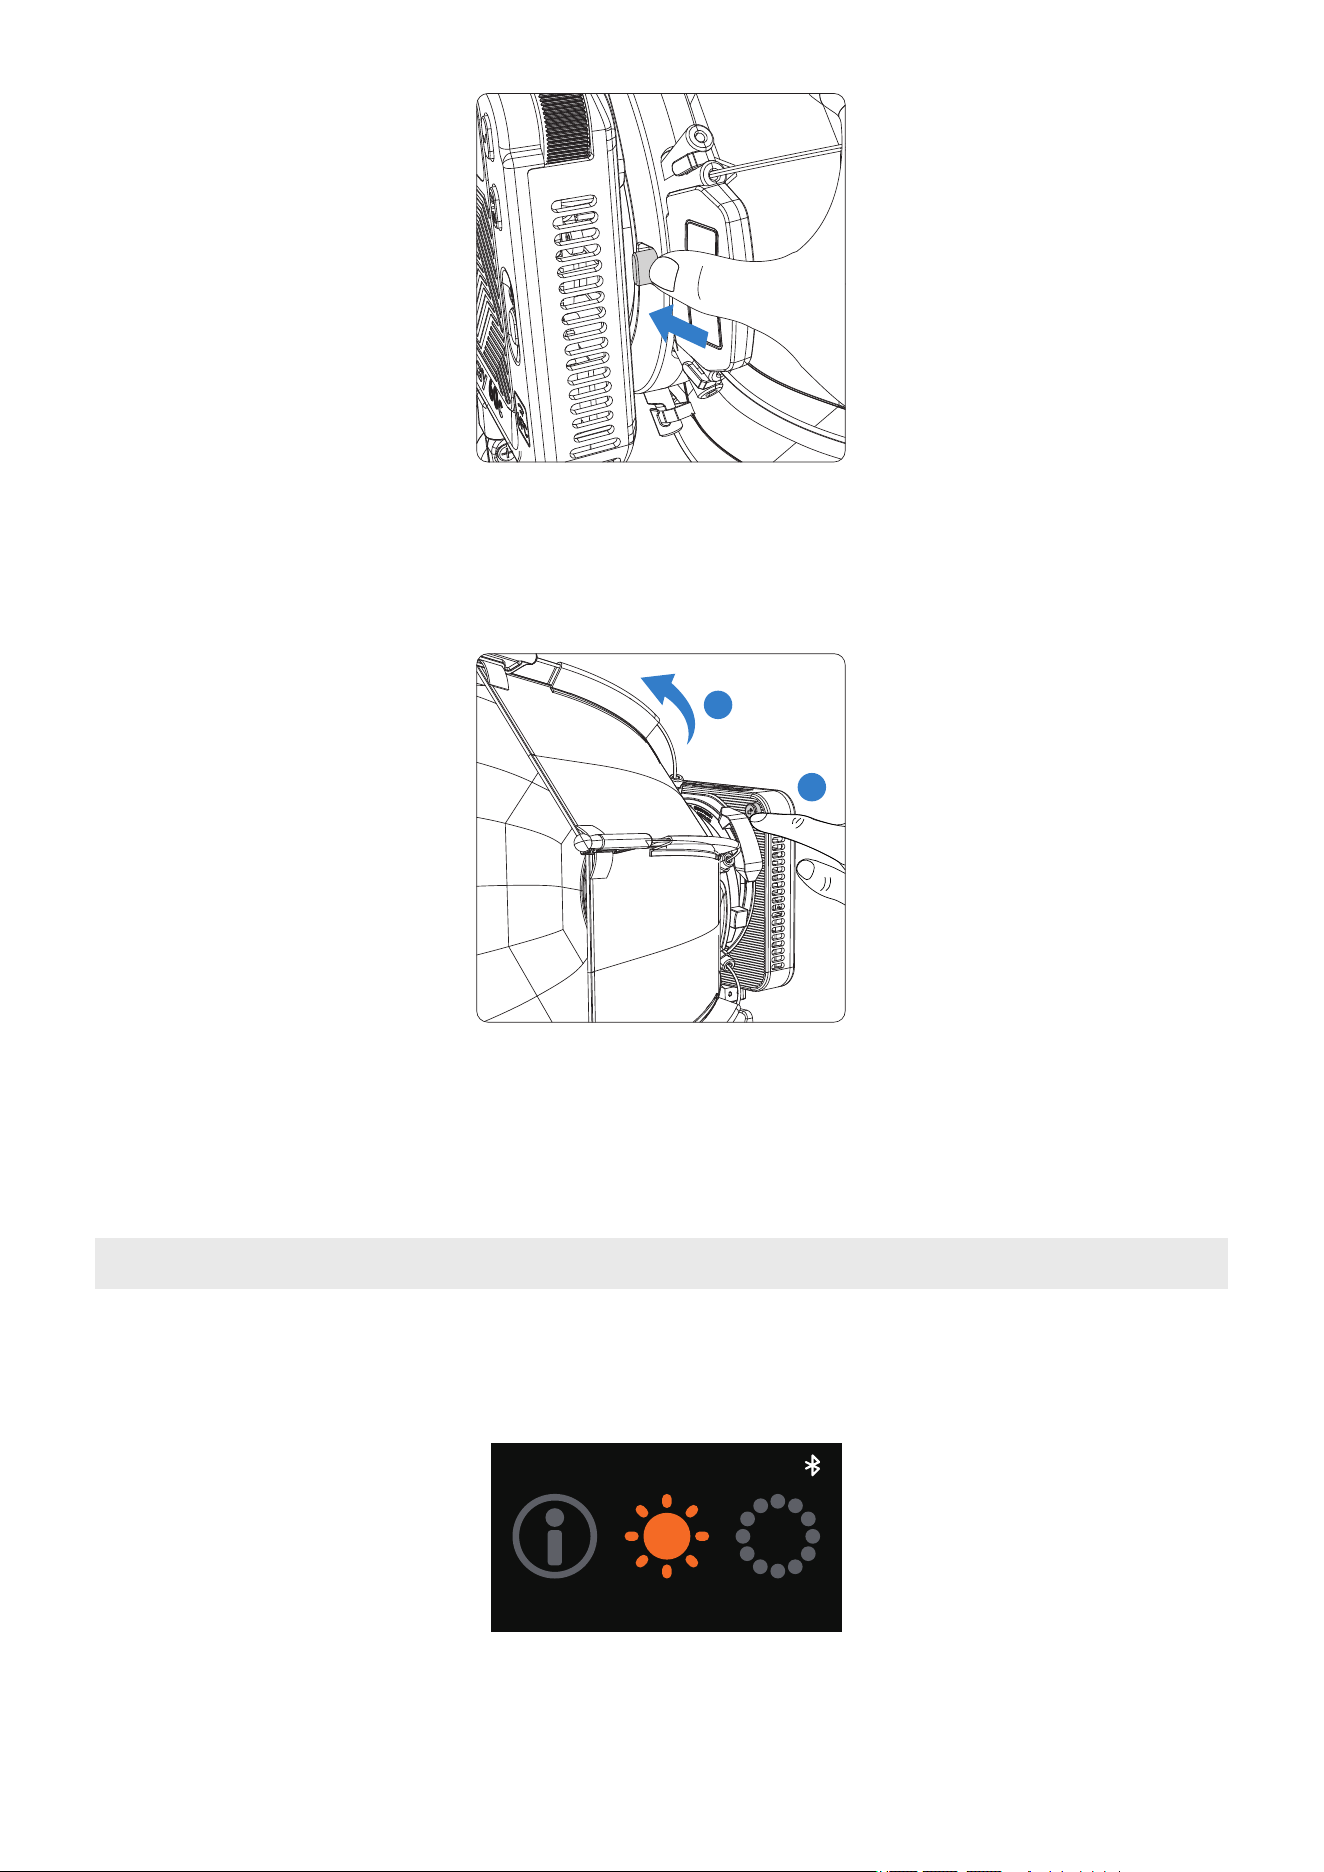
If you need to remove the softbox or replace it with another accessory, press the Bowens
Mount Release Button while rotating either the accessory or the fixture to unlock and detach.
*When replacing with other accessories, please ensure compatibility with the fixture. For
detailed compatibility information, refer to the official website.
2
1
11
5.Main Menu
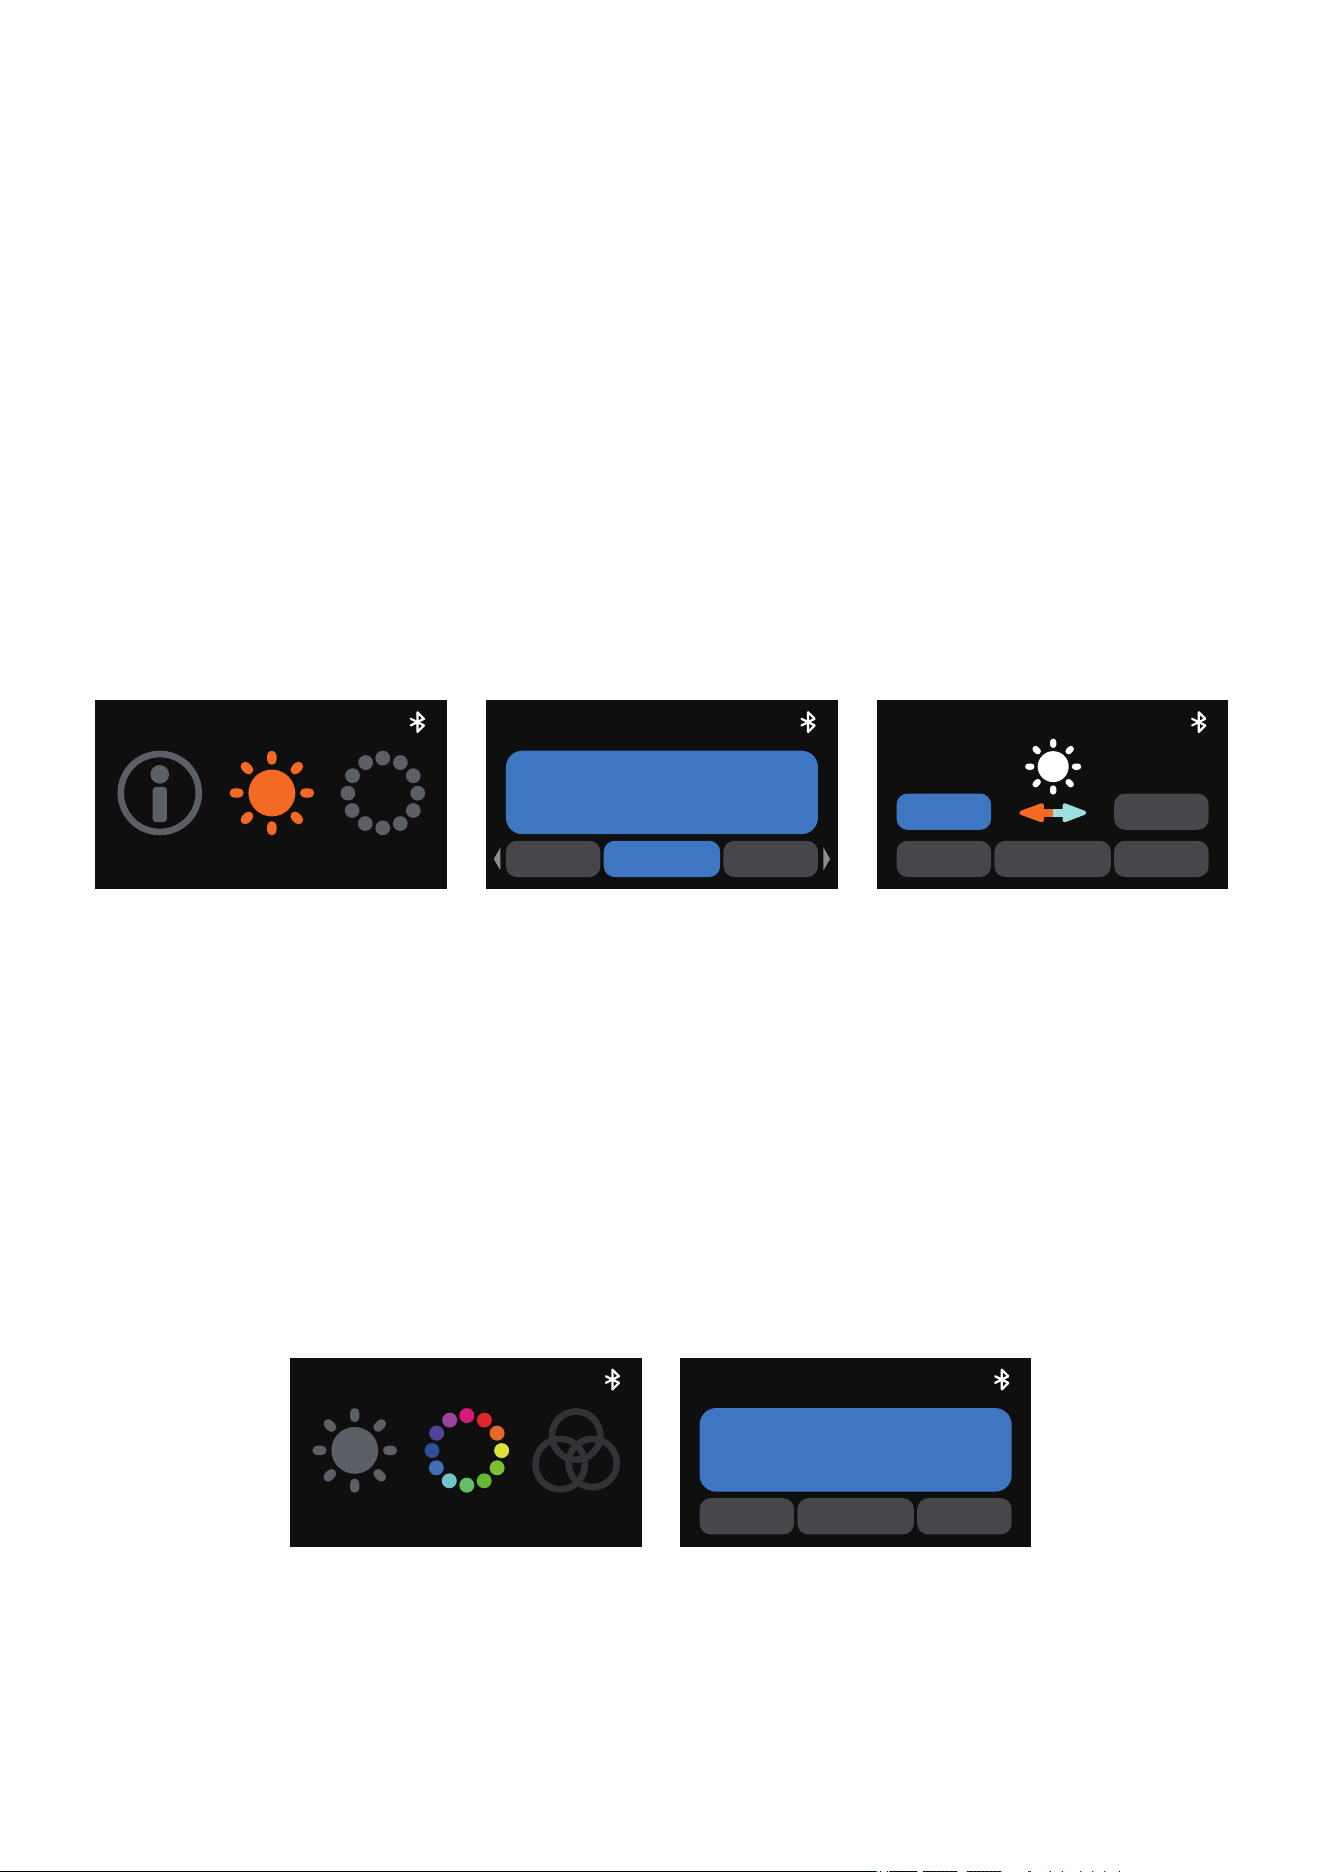
Rotate the control knob to browse through options, then press the confirm button to select
a lighting mode or adjust function settings.
CCT
About HSI
5.1.CCT Mode
Rotate the knob and press the confirm button to enter CCT Mode from the main menu. In
this mode, press the confirm button to toggle between parameters, and rotate the knob to
adjust the corresponding values.
INT (Intensity) : Adjust your light's brightness from 0%-100%.
CCT (Correlated Color Temperature) : Adjust your light's color temperature from warm
white (2,300K CCT) to cool white (10,000K CCT)
G/M (Green-Magenta) : Adjust the green-megenta shift in ±10 increments.
CCT+ (Expanded CCT) : Enables or disables extended CCT range. When enabled, the
adjustable color temperature in CCT mode is expanded to 1,800K to 20,000K CCT.
Please note that the color rendering when in the expanded CCT range is lower.
5.2.HSI Mode
Rotate the knob and press the confirm button to enter HSI Mode from the main menu. In
HSI, press the confirm button to select INT, HUE, or SAT and rotate the knob to adjust the
corresponding value.
INT (Intensity) : Adjust your light's brightness from 0%-100%.
HUE : Adjust your light's hue value from 1° to 360°.
SAT (Saturation) : Adjust the saturation of the color from 0%-100%.
CCT+
CCT
CCT
50%
INT
G/M
ON OFF
INT
CCT+
CCT
12
HSI
CCT RGB
SAT HUE
50%
INT
HSI
5.3.RGB Mode
CCT
About HSI
RGB
HSI FX
INT
Green
50%
Red
RGB
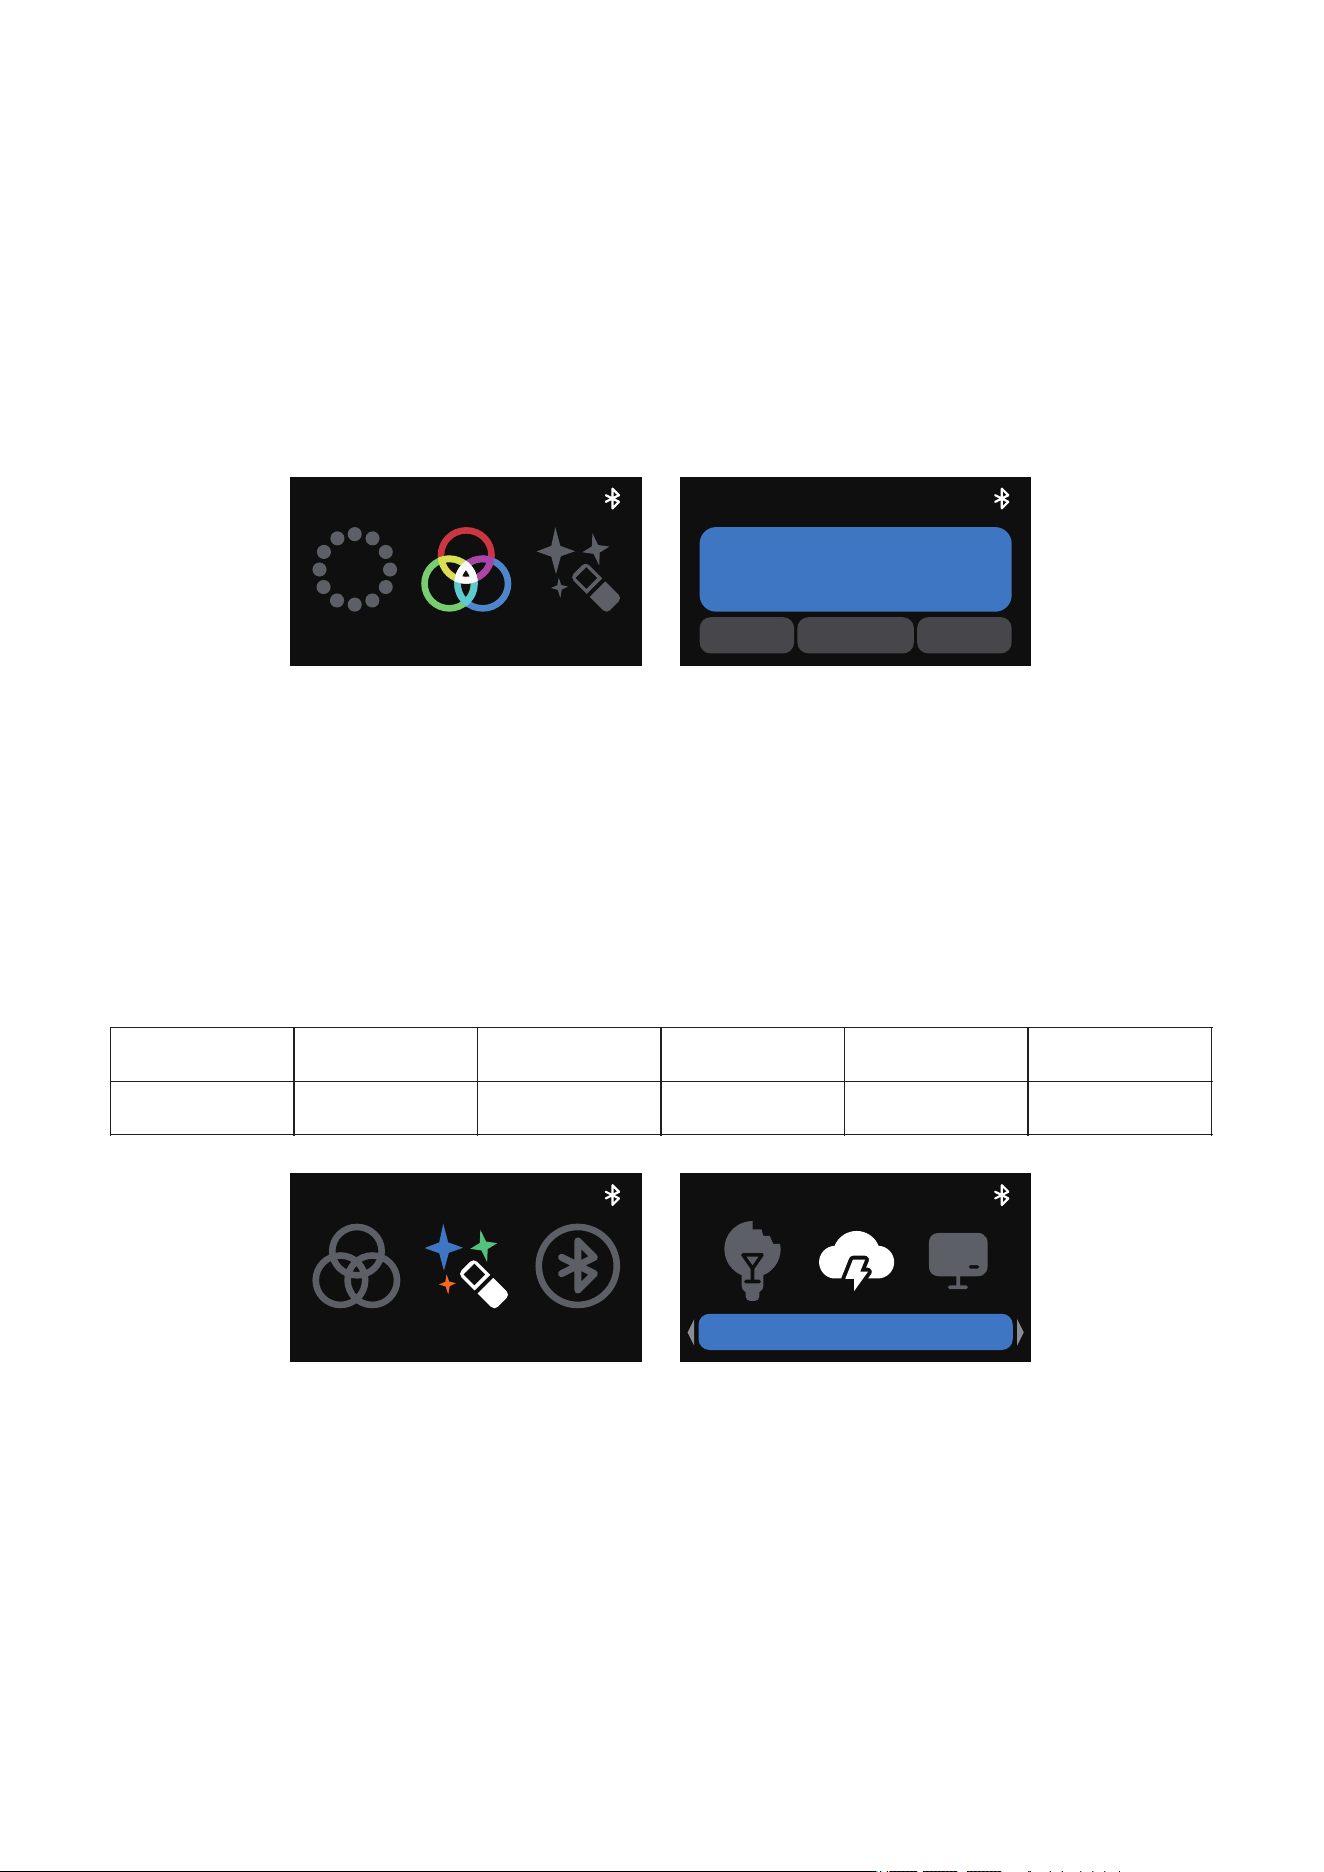
Rotate the knob and press the confirm button to enter RGB Mode from the main menu. In
this mode, press the confirm button to select INT, Red, Green, or Blue and rotate the knob
to adjust the corresponding value.
INT (Intensity) : Adjust your light's brightness from 0%-100%.
Red : Adjust your light's Red value from 0%-100%.
Green : Adjust your light's Green value from 0%-100%.
Blue : Adjust your light's Blue value from 0%-100%.
5.4.FX Mode
Rotate the knob and press the confirm button to enter FX Mode from the main menu. In FX
mode, rotate the knob to switch between different lighting effects. After entering an effect’s
settings, you can rotate the knob to adjust the corresponding value.
Supported lighting effects:
Fireworks
Faulty Bulb
Lightning
TV
Pulsing
Strobe
Explosion
Fire
Paparazzi
Welding
Cop Car
Party Lights
5.5.BT Bluetooth Reset
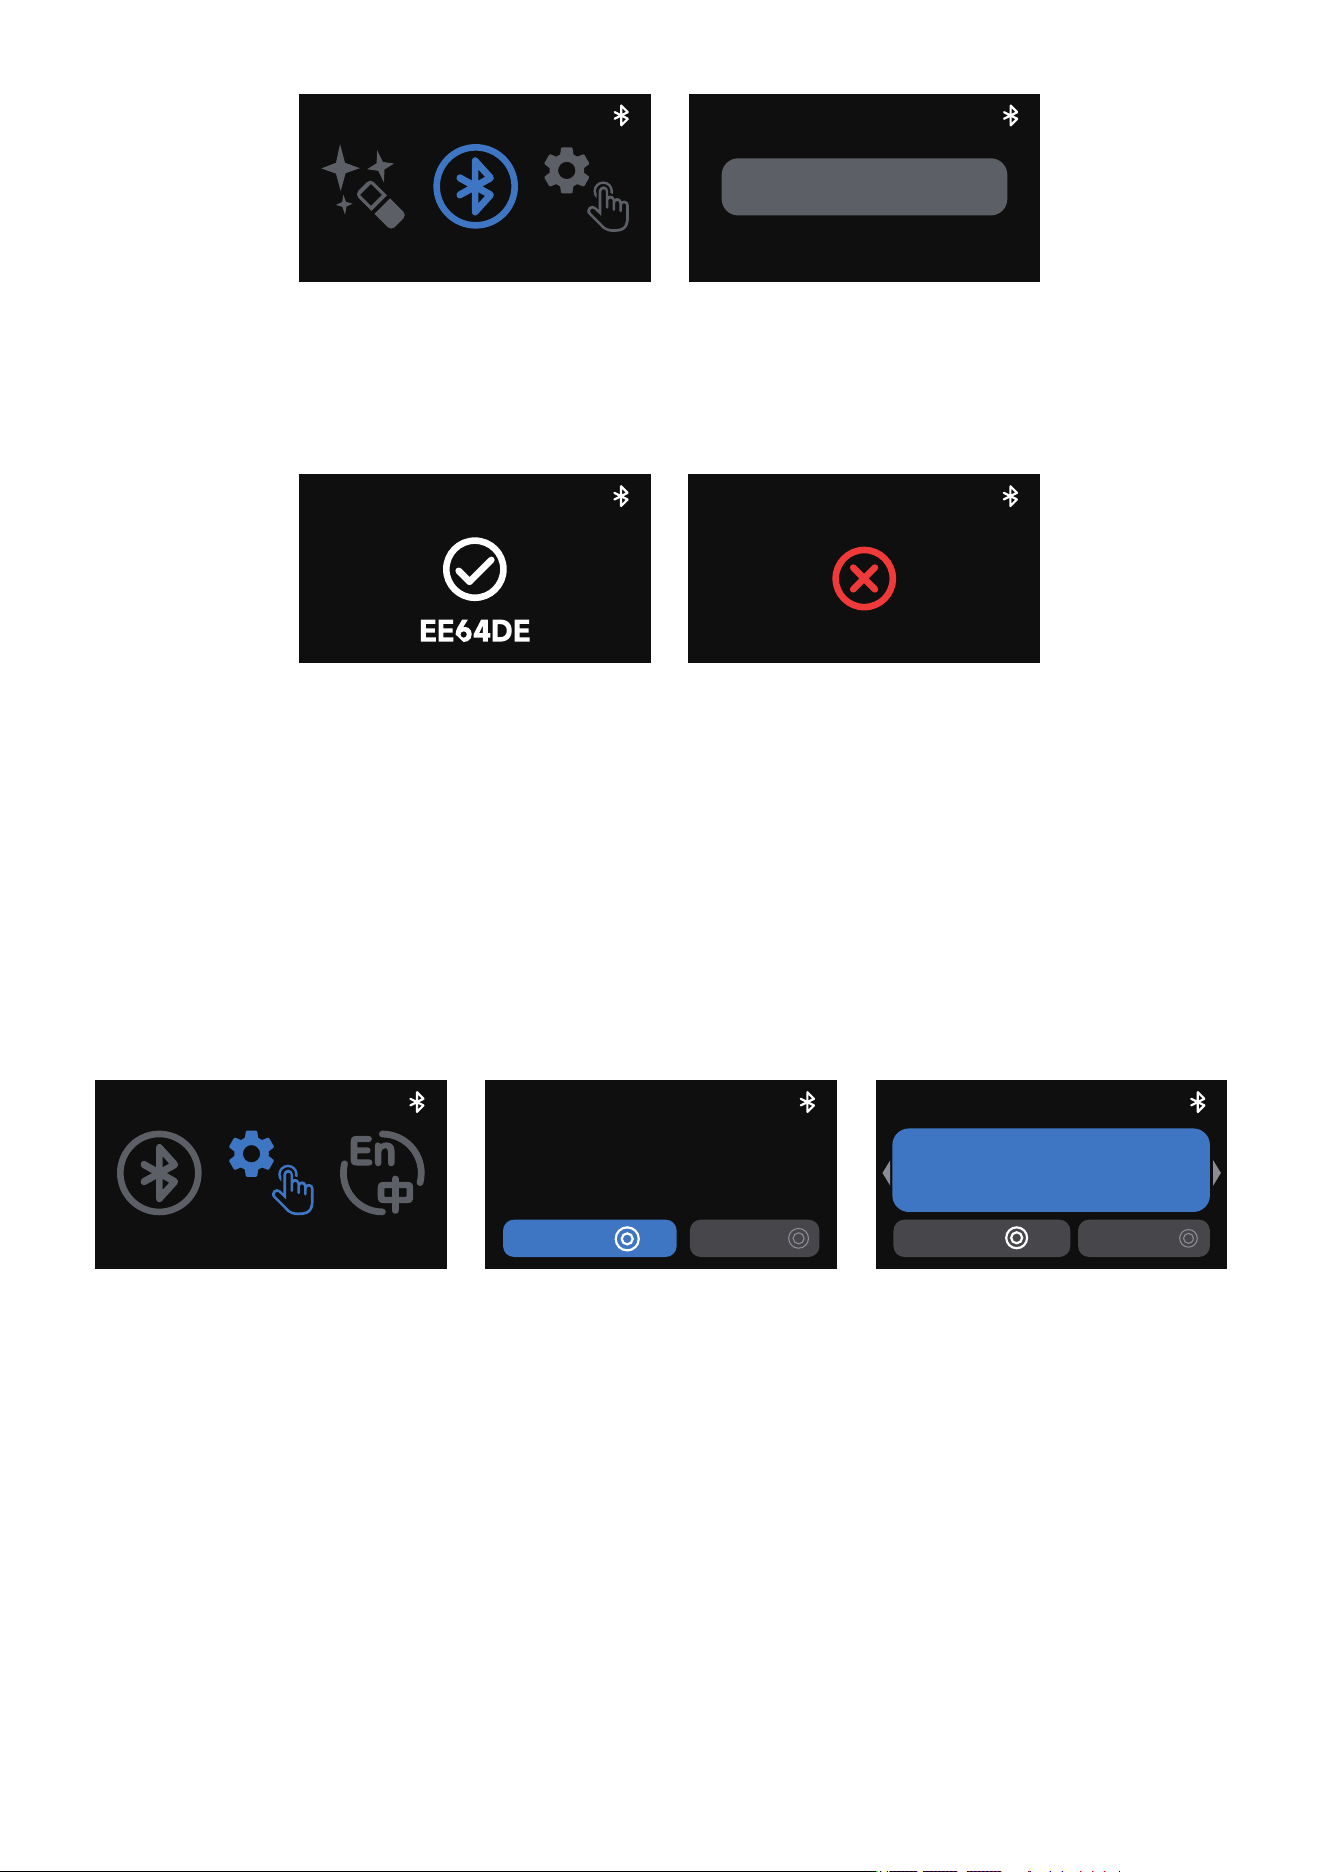
Rotate the knob and press the confirm button to enter BT mode from the main menu. Press
and hold the confirm button until the end of the progress bar. Release the knob to cancel.
13
FX
RGB BT
Lightning
FX
BT
EE64DE
BT
5.6.CustomMode
Rotate the knob and press the confirm button to enter Custom Mode from the main menu.
In Custom mode, press the knob to select customizable shortcuts for long press (Hold) or
double click (Double) of the Return button. Rotate the dial to select between None/SOS/
Bluetooth Reset/CCT Mode/HSI Mode/RGB Mode/FX Mode/Rotation/CCT+/Fan Mode
shorcut functions. Press the confirm button again to confirm your selection.
Custom
BT LANG
Double
Hold
Custom
ResetBT
Double
Hold
Custom
ResetBT
5.7.LANG(Language)
14
BT
FX Custom
EE64DE
Press to reset
BT
1.Bluetooth reset is successful.
2.Bluetooth reset is unsuccessful. Please reset Bluetooth again.
Rotate the knob and press the confirm button to enter Custom Mode from the main menu.
In Custom mode, press the knob to select customizable shortcuts for long press (Hold) or
double click (Double) of the Return button. Rotate the dial to select between None/SOS/
Bluetooth Reset/CCT Mode/HSI Mode/RGB Mode/FX Mode/Rotation/CCT+/Fan Mode
shorcut functions. Press the confirm button again to confirm your selection.
In Custom mode, you can assign a custom shortcut function to either a long-press or double
-press of the back button.Press the confirm button to enter the settings. Rotate the knob to
choose from the following functions : No / SOS / Bluetooth Reset / CCT Mode / HSI Mode/
RGB Mode / FX Mode / Rotation / CCT+ / Fan Mode. Press the confirm button again to
confirm your selection.
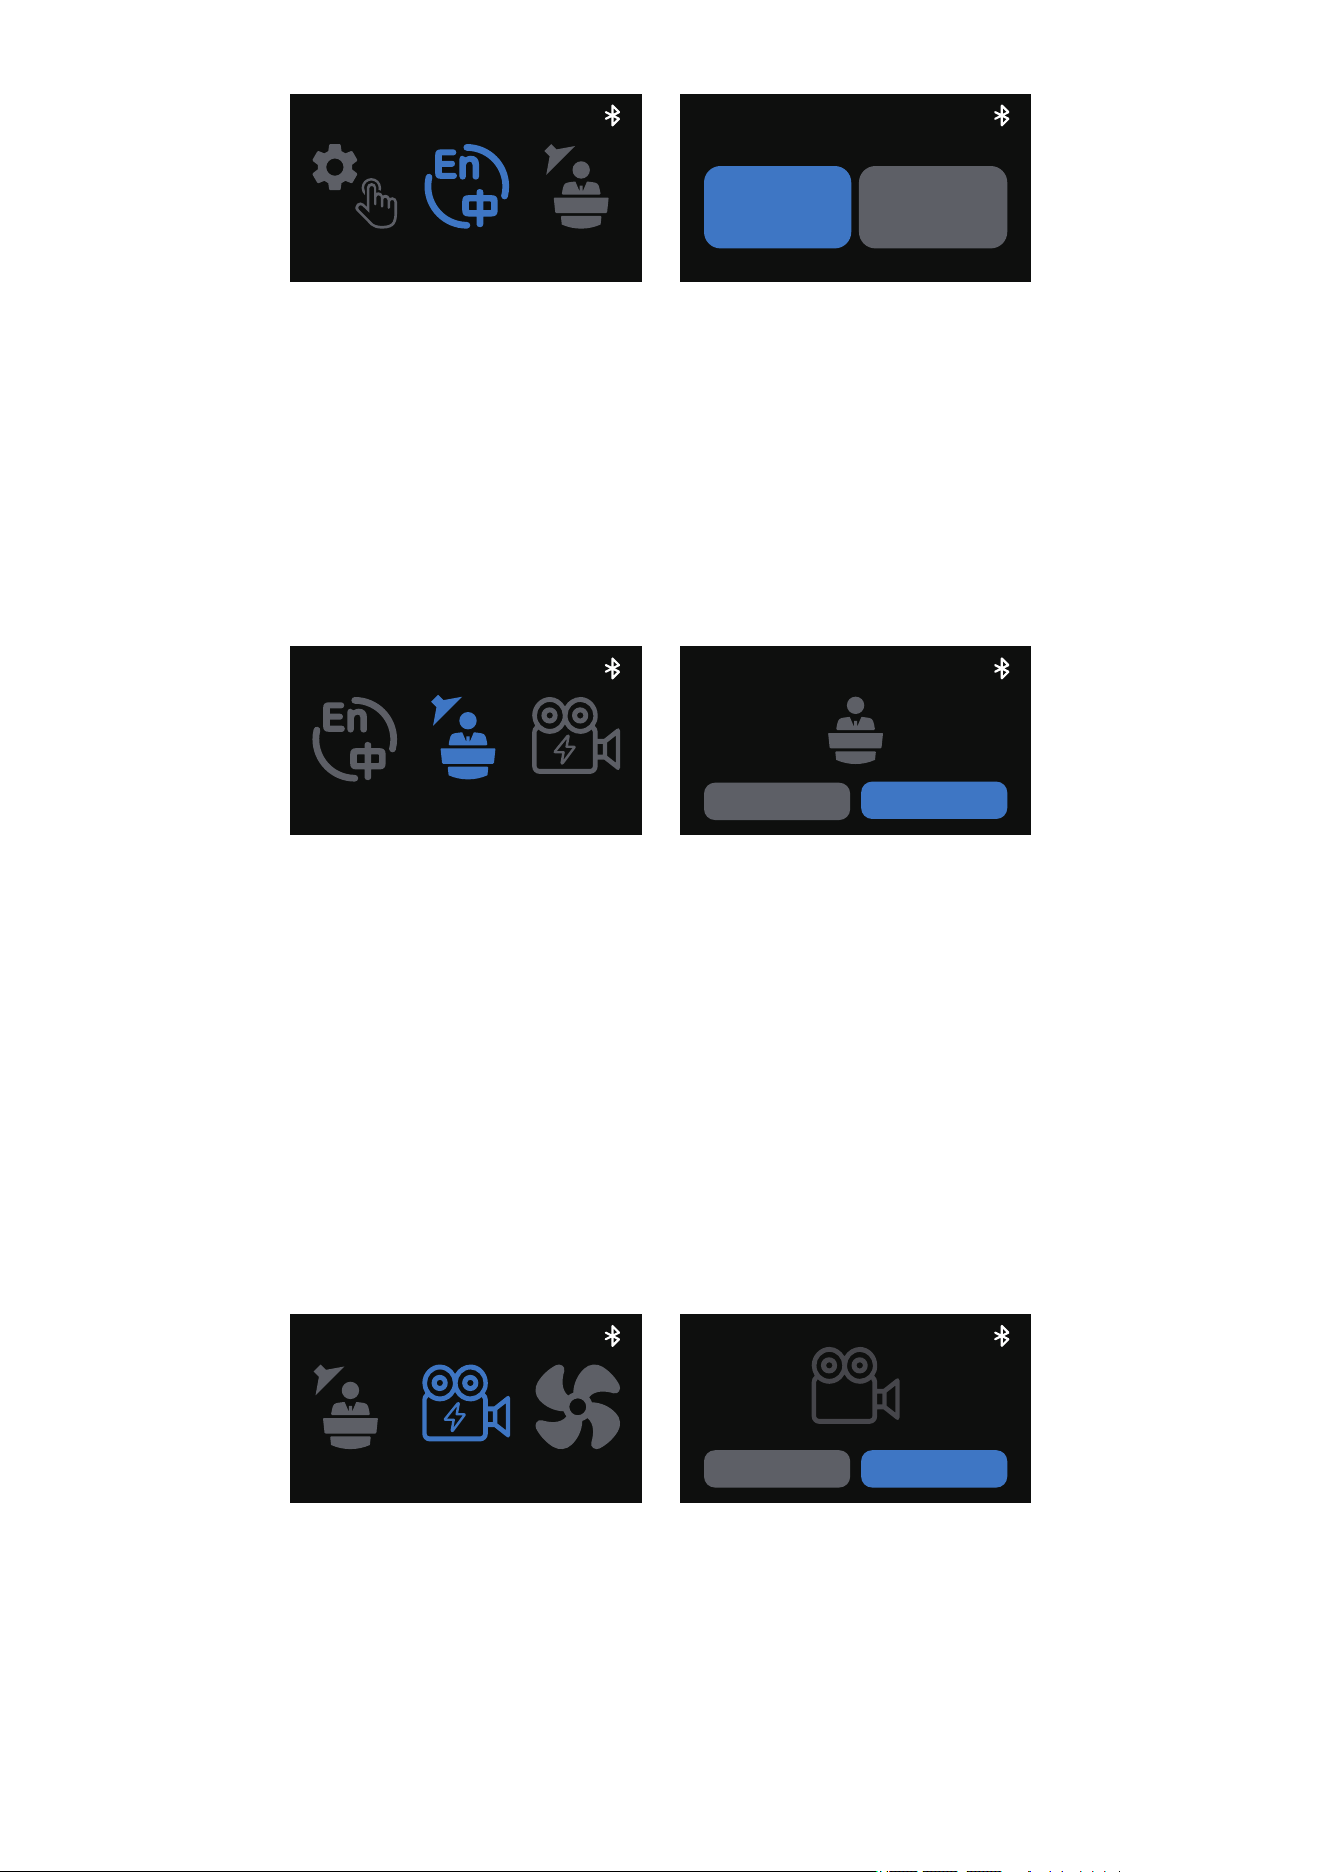
Rotate the knob and press the confirm button to enter Language settings from the main
menu.In this menu, rotate the knob to switch between English and Chinese. Press the
confirm button to confirm your selection.
5.8.StudioMode
LANG HFR
Studio
Studio
ON
OFF
Rotate the knob and press the confirm button to enter Studio Mode from the main menu.
Rotate the knob to toggle between On and Off, then press the confirm button to confirm
your selection. When Studio mode is turned on, the light will automatically turn on after
connecting to a power supply, reducing the need to manually press the power button.
5.9.HFRMode(HighFrameRate)
Rotate the knob and press the confirm button to enter High Frame Rate Mode from the main
menu. In High Frame Rate mode , rotate the knob to toggle between On and Off, then press
the confirm button to confirm your selection.
HFR Mode On : Optimized for high-speed shooting at up to 240fps, ensuring minimal flicker
for smooth and stable image capture.
HFR Mode Off : The fixture operates in standard mode.
HFR
FanStudio
HFR
ON OFF
15
Custom
LANG
Studio
English 中文
Language/语言
*When High Frame Rate Mode is enabled, the minimum brightness will be limited to 50%.To
adjust the brightness below 50%, please disable High Frame Rate Mode first.
16
HFR
Fan
About
Fan
Silent Smart
5.11.FirmwareUpdate
Firmware updates can be updated online via the amaran app.
About
CCTFan
About
HW:V1.0SW:V1.0
Nov 19 2025 09:00:00
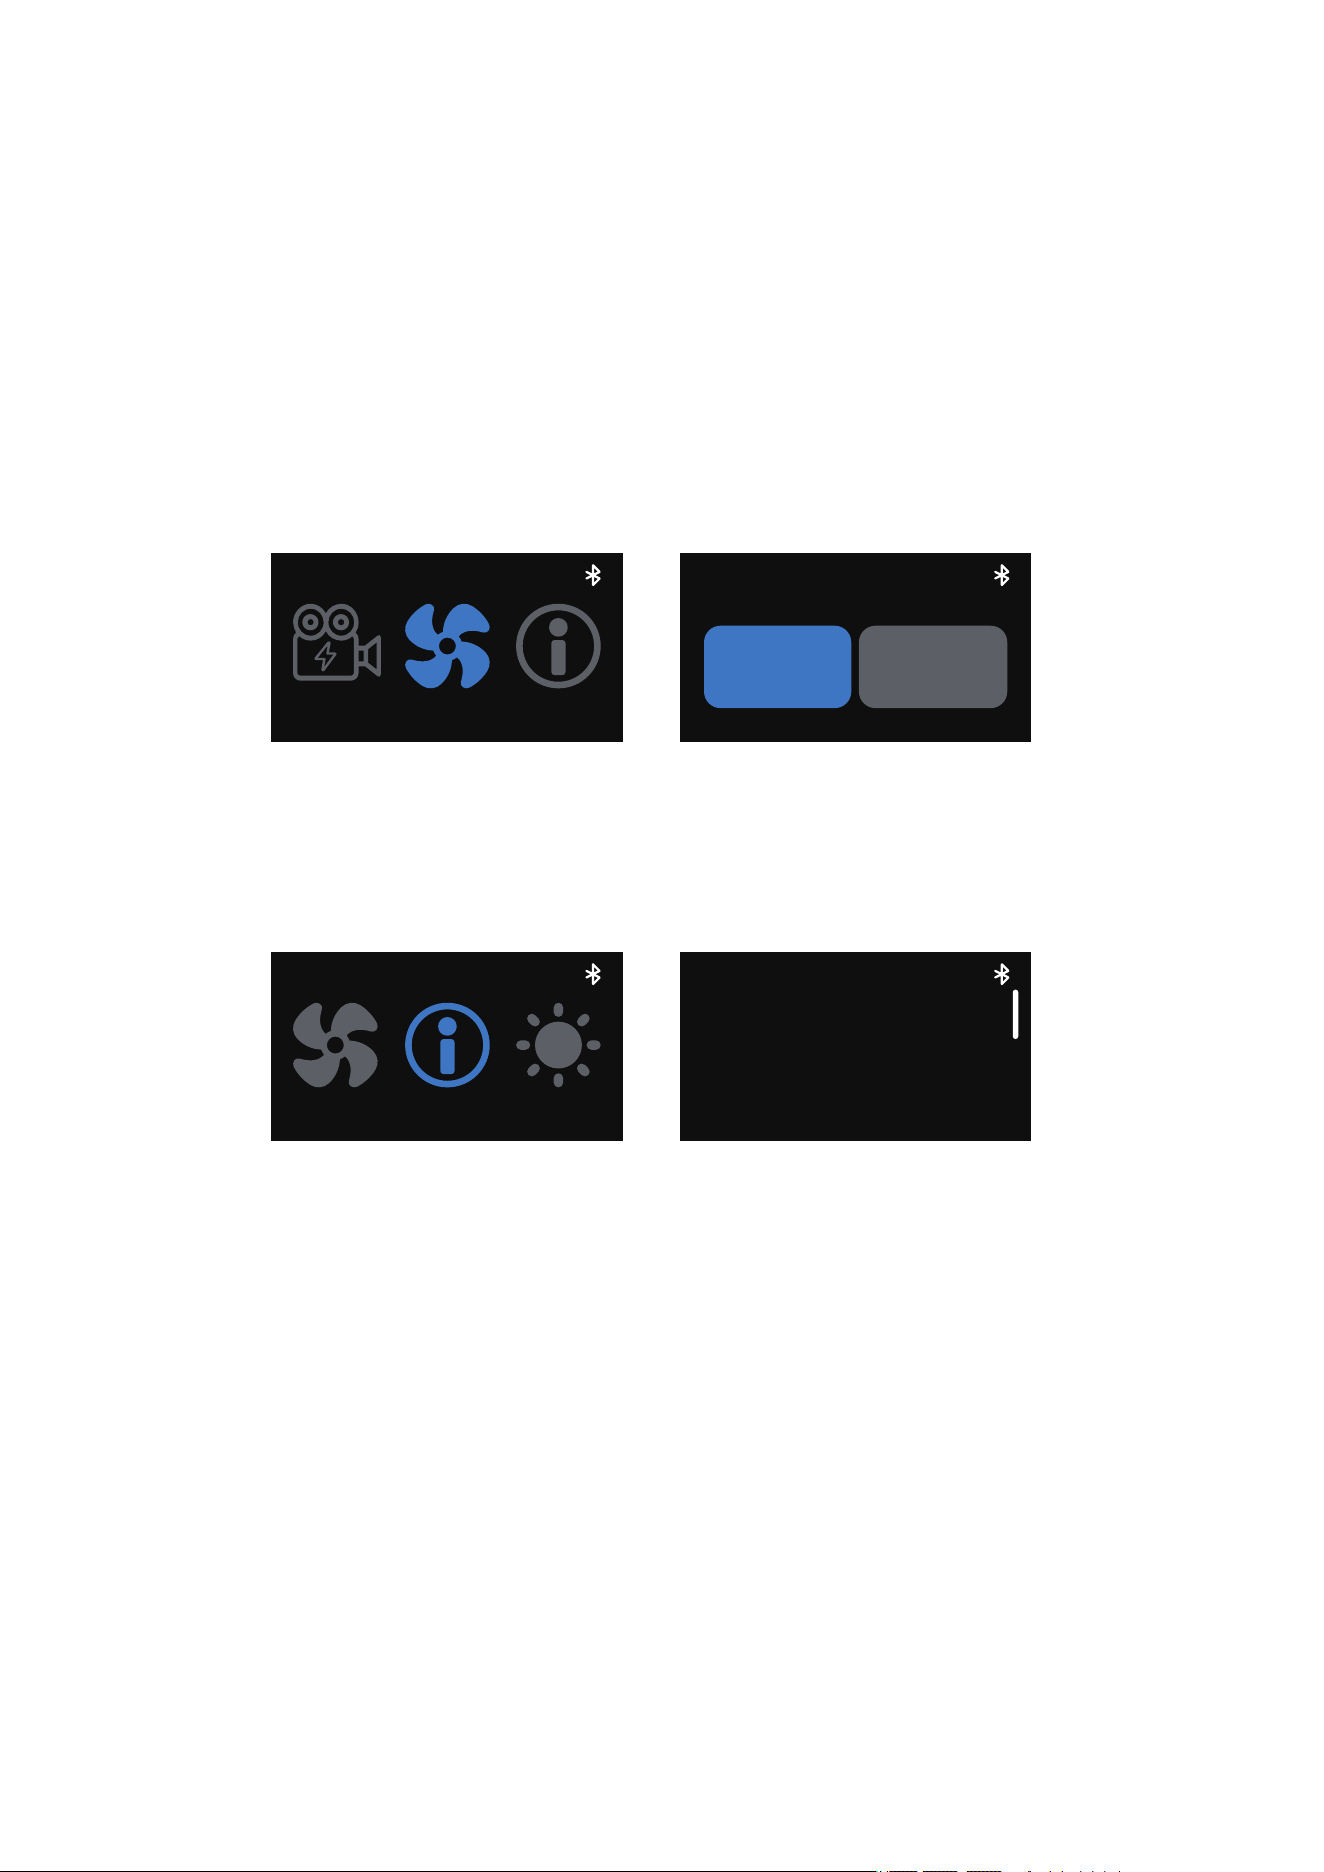
Rotate the knob and and press the confirm button to enter Fan mode from the main menu.
In Fan mode, rotate the dial to toggle between Silent and Smart fan mode. Press the knob
to confirm your settings.
Silent Mode : The fan will be completely turned off, and the light will not produce any noise.
To ensure safe operation, the maximum power output will be limited to 18W.
Smart Mode : The fan speed will automatically adjust according to the temperature of the
light.
5.10.FanMode
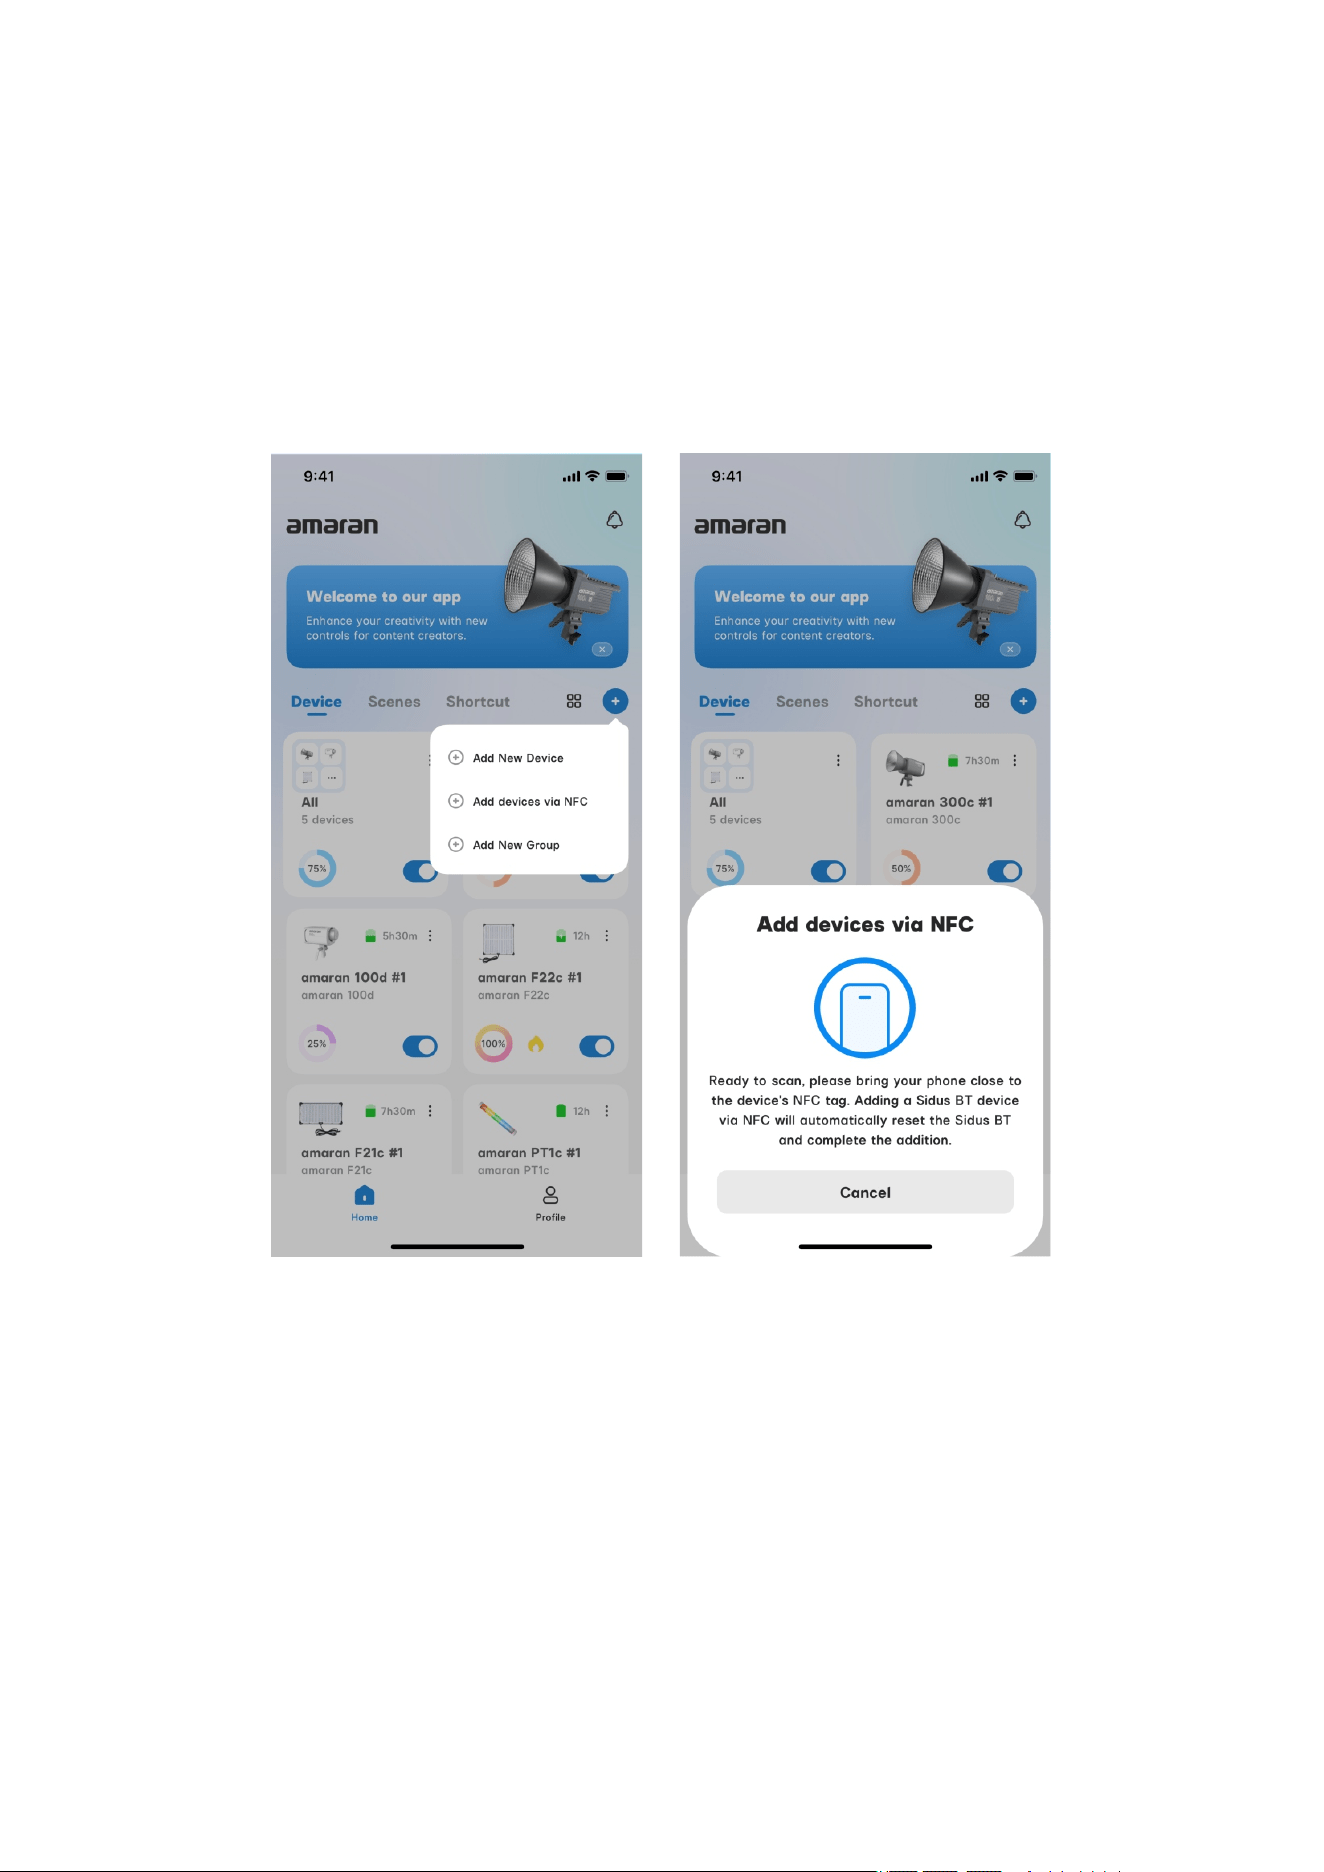
5.12.Pairing via NFC
To pair your light to the amaran app via NFC, open the amaran mobile app, tap the + sign,
and select NFC Add Device. Place the NFC sensor area of your phone to the fixture's NFC
tag. Hold your phone still until the fixture has been detected and successfully paired before
removing your phone.Even if the light is powered off, pairing via NFC is still supported. The
light will automatically connect to the app once it is turned on.
17
Using the amaran App
You can download the amaran mobile app from the iOS App Store, Google Play Store, and
oher platforms for enhancing the functionallty of the light. You can download the amaran
desketop app for Mac and Windows from the amaran website. Please visit amarancreators.
com for more detalls on how to use the app to contrdl your amaran Iights.
18
You can download the amaran mobile app from the iOS App Store, Google Play Store, and
oher platforms for enhancing the functionallty of the light. You can download the amaran
desketop app for Mac and Windows from the amaran website. Please visit amarancreators.
com for more detalls on how to use the app to contrdl your amaran Iights.
You can download the amaran mobile app from the iOS App Store, Google Play Store, and
other platforms to enhance your lighting experience. The amaran desktop app is also available
for download on the amaran website. For more detailed information on how to use the app
to control amaran products, please visit amarancreators.com.
Specifications
*The above technical specifications are from the Aputure laboratory, and there may be some
variation betwveen individual units
19
Power
Consumption
95+
100
87
AC 100V-240V
TFT
-10℃-40℃
14.5×11.5×5.1cm/
5.7×4.5×2.0in
18x6.5x34.6cm/
7.09x2.56x13.62in
40.8x26.4x11cm/
16.06x10.39x4.33in
8,719 lumens
95+
94
80
PD 3.0
DC 12-24V
amaran Ace E-Lock
amaran App
≤80m / ≤262.5ft
≤28 dBA @ 30°C
-20℃-80℃
0.59kg/1.32lb
0.34kg/0.75lb
0.49kg/1.08lb
CCT
CRI
TM-30 Rg
(Average)
SSI(D32)
Operating
Voltage
Control
Methods
Screen Type
Cooling
Method
Fixture
Dimensions
Operating
Temperature
Octa Dome 30
Dimensions
Carrying Bag
Dimensions
140 W(Max)
Standard:2,300-10,000K
Expanded(CCT+):
1,800-20,000K
On-board,amaran App
Active Cooling
Power Output
Luminous Flux
TLCI
TM-30 Rf
(Average)
SSI (D56)
Power Supply
Methods
Firmware
Upgradeable
Wireless
Operating
Rang
Max Noise
Level
Storage
Temperature
Fixture Weight
Octa Dome 30
Weight
Carrying Bag
Weight
120 W(Max)
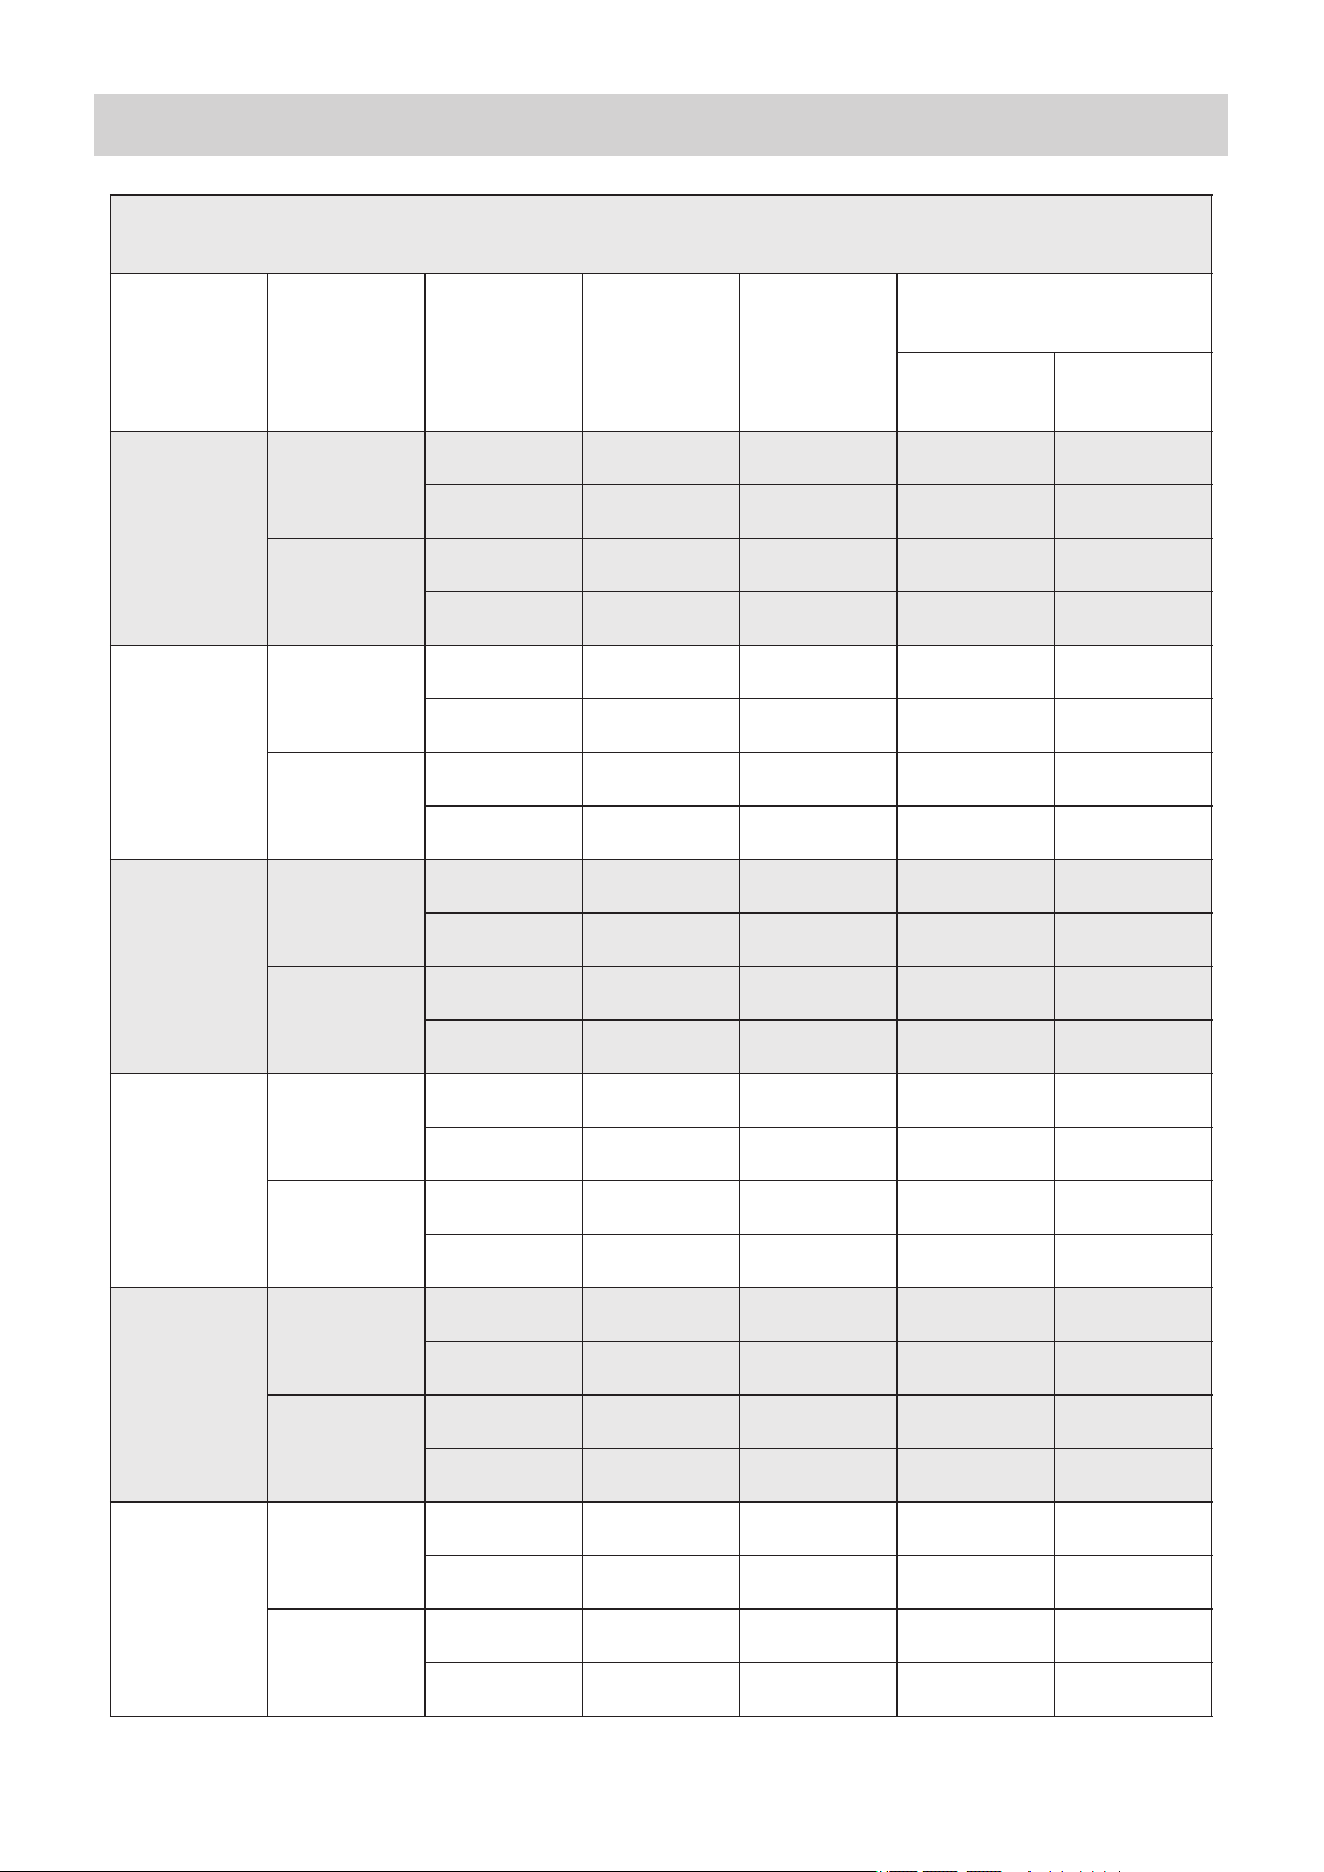
Photometrics
20
4300K
5600K
6500K
10000K
1m
3m
1m
3m
1m
3m
1m
3m
1m
3m
1m
3m
2300K
3200K
4,770Lux
443fc
1,968Lux
183fc
24,500Lux
2,276fc
29,900Lux
2,778fc
11,540Lux
1,072fc
530Lux
49fc
219Lux
20fc
2,722Lux
253fc
3,322 Lux
309fc
1,282Lux
119fc
6,850Lux
636fc
2,497Lux
232fc
35,600Lux
3,307fc
43,100Lux
4,004fc
16,620Lux
1,544fc
761Lux
71fc
277Lux
26fc
3,956Lux
368fc
4,789Lux
445fc
1,847Lux
172fc
6,770Lux
629fc
2,470Lux
229fc
35,400Lux
3,289fc
42,600Lux
3,958fc
16,480Lux
1,531fc
752Lux
70fc
274Lux
25fc
3,933Lux
365fc
4,733Lux
440fc
1,831Lux
170fc
6,520Lux
606fc
2,378Lux
221fc
34,000Lux
3,159fc
41,100Lux
3,818fc
15,840Lux
1,472fc
724Lux
67fc
264Lux
25fc
3,778Lux
351fc
4,567Lux
424fc
1,760Lux
164fc
6,370Lux
592fc
2,326Lux
216fc
33,300Lux
3,094fc
40,200Lux
3,735fc
15,520Lux
1,442fc
708Lux
66fc
258Lux
24fc
3,700Lux
344fc
4,467Lux
415fc
1,724Lux
160fc
5,830Lux
542fc
2,128Lux
198fc
30,500Lux
2,834fc
36,800Lux
3,419fc
14,190Lux
1,318fc
648Lux
60fc
236Lux
22fc
4,089Lux
380fc
1,577Lux
147fc
3,389Lux
315fc
amaran Ray 120c
RGB
Dis.
No
Accessories
Octa
Dome 30
Mini
Reflector
Mini Fresnel
Spot 15°
Flood 30°
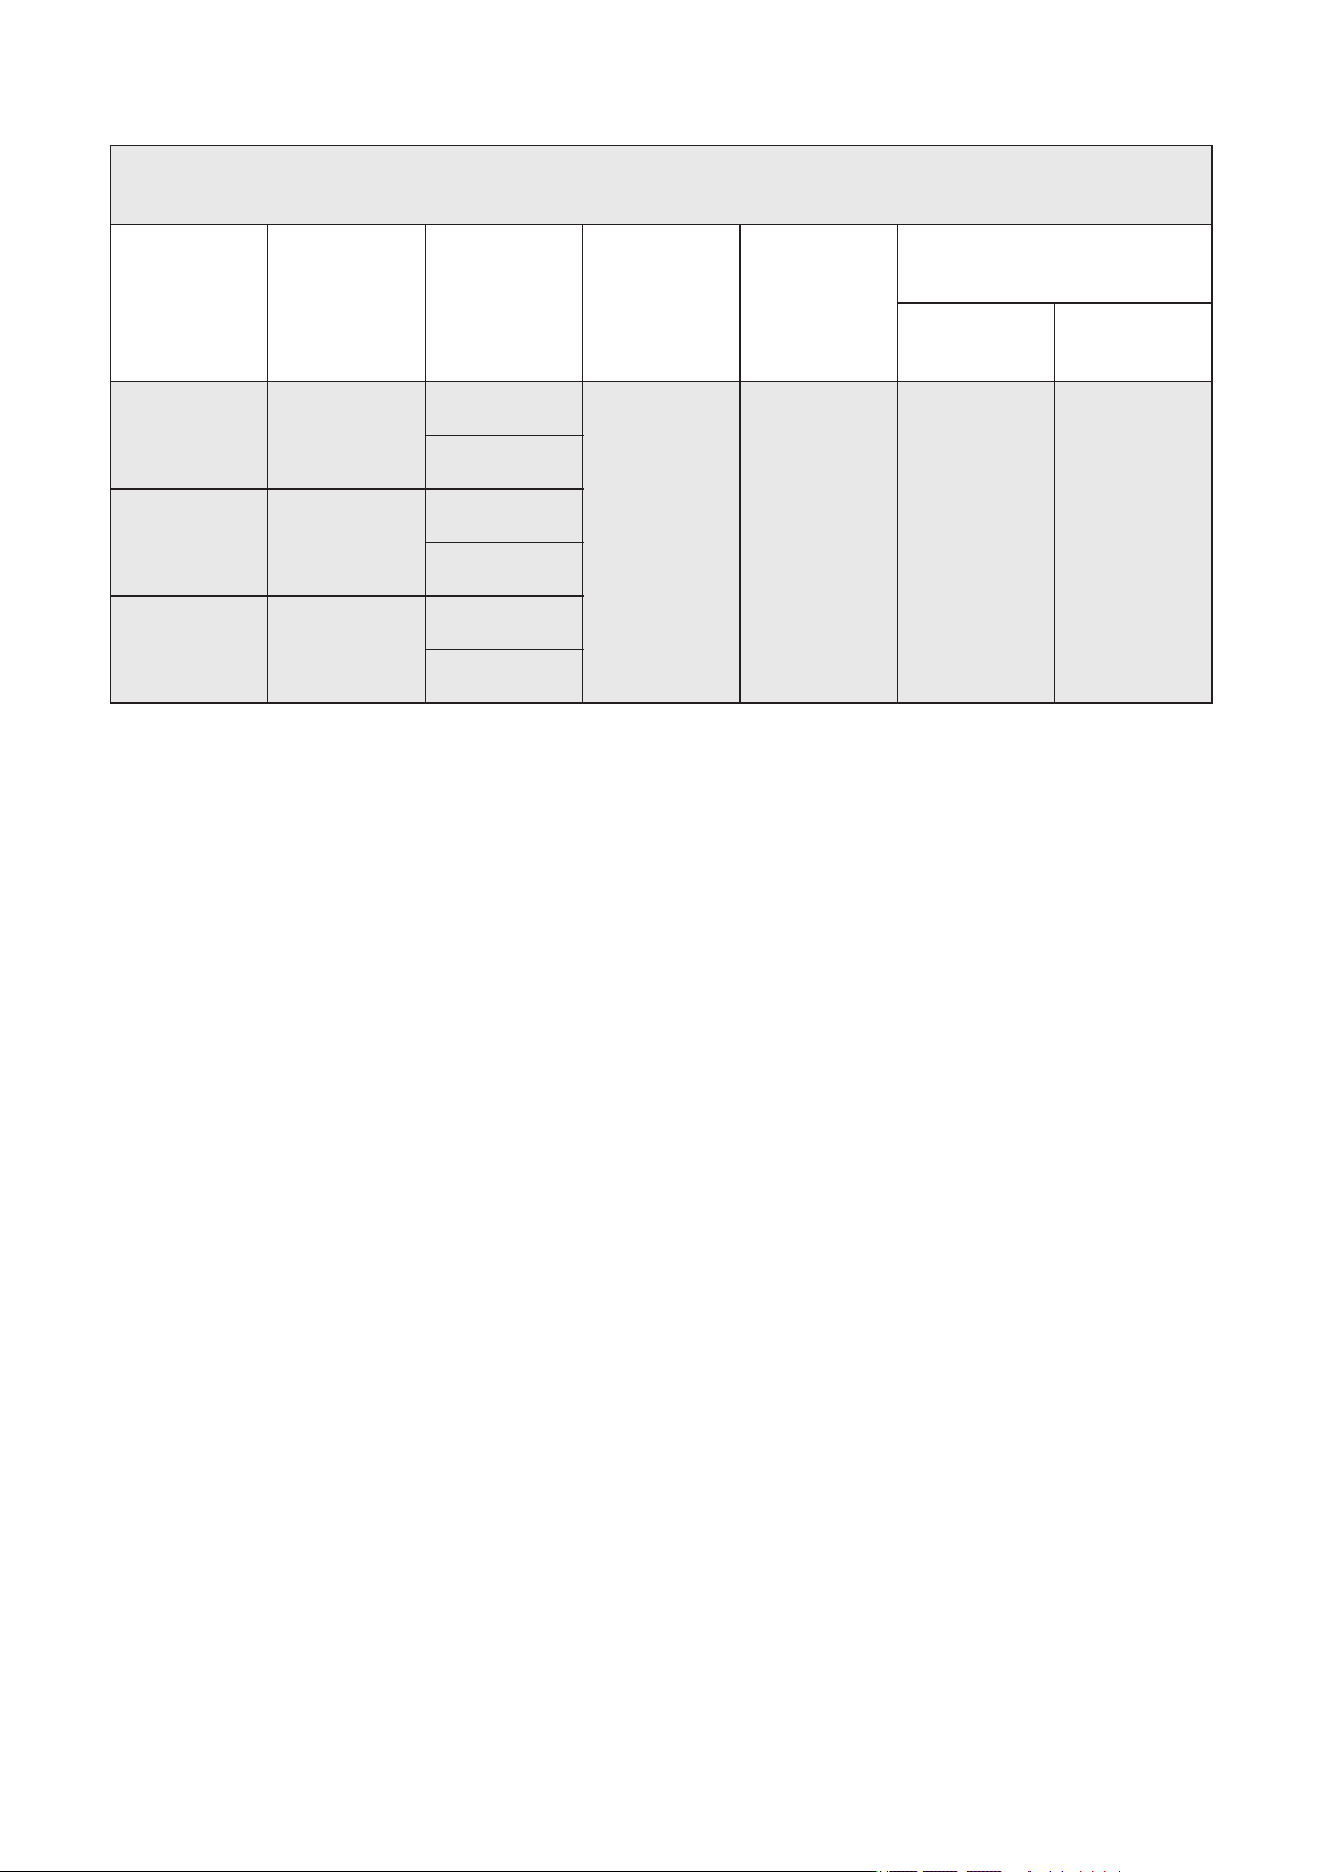
Red
Green
Blue
1,045Lux
97fc
3,070Lux
285fc
846Lux
79fc
/ / / /
1m
1m
1m
amaran Ray 120c
RGB
Dis.
No
Accessories
Octa
Dome 30
Mini
Reflector
Mini Fresnel
Spot 15°
Flood 30°
Continued Table:
21
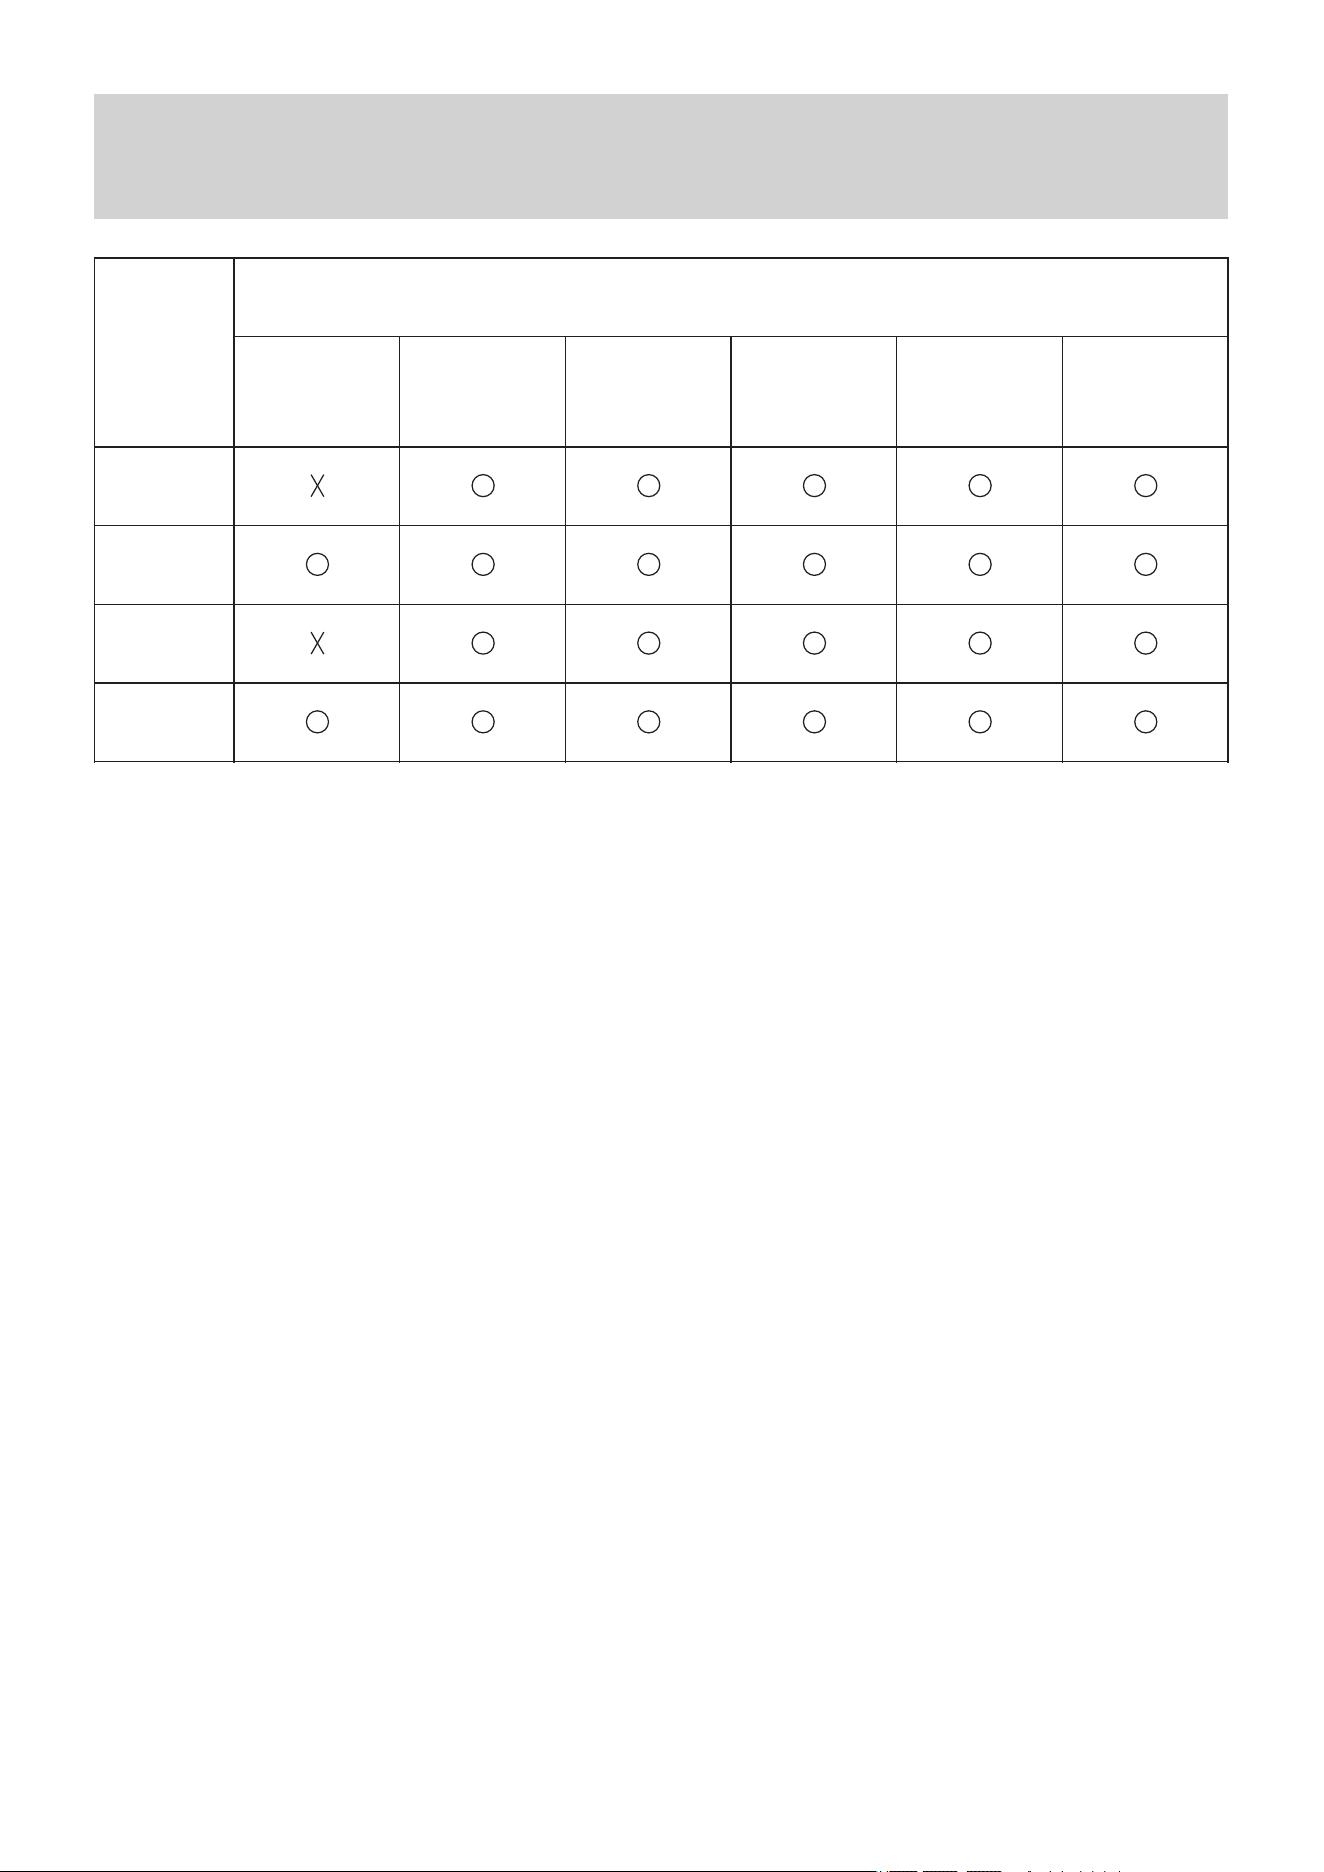
Declaration of Toxic and Hazardous Substances in
Electronic Information
Metal
Accessories
Toxic and Hazardous Substances or Elements
Component
PCB
Plastic
Lead
(Pb)
Mercury
(Hg)
Cadmium
(Cd)
Hexavalent
chromium
(Cr VI)
Polybrominated
biphenyls
(PBB)
Polybrominated
diphenyl ethers
(PBDE)
22
Toxic and Hazardous Substances or Elements
Component
PCB
Plastic
Metal
Accessories
Lead
(Pb)
Mercury
(Hg)
Cadmium
(Cd)
Hexavalent
chromium
(Cr VI)
Polybrominated
biphenyls
(PBB)
Polybrominated
diphenyl ethers
(PBDE)
This table is prepared in accordance with the provisions of SJ/T 11364.
O: Indicates that the content of the toxic and hazardous substance in all homogeneous
materials of the component is below the limit specified by GB/T 26572.
X: Indicates that the content of the toxic and hazardous substance exceeds the limit
specified by GB/T 26572 in at least one homogeneous material of the component.
The information in this table is provided to suppliers in the form of data and testing results
that comply with RoHS environmental requirements.


IC regulatory conformance
This device complies with CAN ICES-003 (B)/NMB-003(B) and CAN RSS-216 / CNR-216.
This device contains licence-exempt transmitter( s) /receiver( s) that comply with Innovation,
Science and Economic Development Canada's licence-exempt RSS(s). Operation is subject
to the following two conditions:
(1) This device may not cause interference.
(2) This device must accept any interference, including interference that may cause
undesired operation of the device.
Cet appareil est conforme à la norme CAN ICES-003 (B)/NMB-003 (B) et CAN RSS-216 /
CNR-216.
Cet appareil contient des émetteurs / récepteurs exempt (s) de licence qui sont conformes
aux RSS exemptes de licence d'Innovation, Sciences et Développement économique Canada.
Son fonctionnement est soumis aux deux conditions suivantes:
(1) Cet appareil ne doit pas provoquer d'interférences.
(2) Cet appareil doit accepter toute interférence, y compris les interférences susceptibles
de provoquer un fonctionnement indésirable de l'appareil.
This equipment complies with IC radiation exposure limits set forth for an uncontrolled
environment.
Cet équipement est conforme aux limites d'exposition aux radiations de la IC définies pour
un environnement non contrôlé.
23
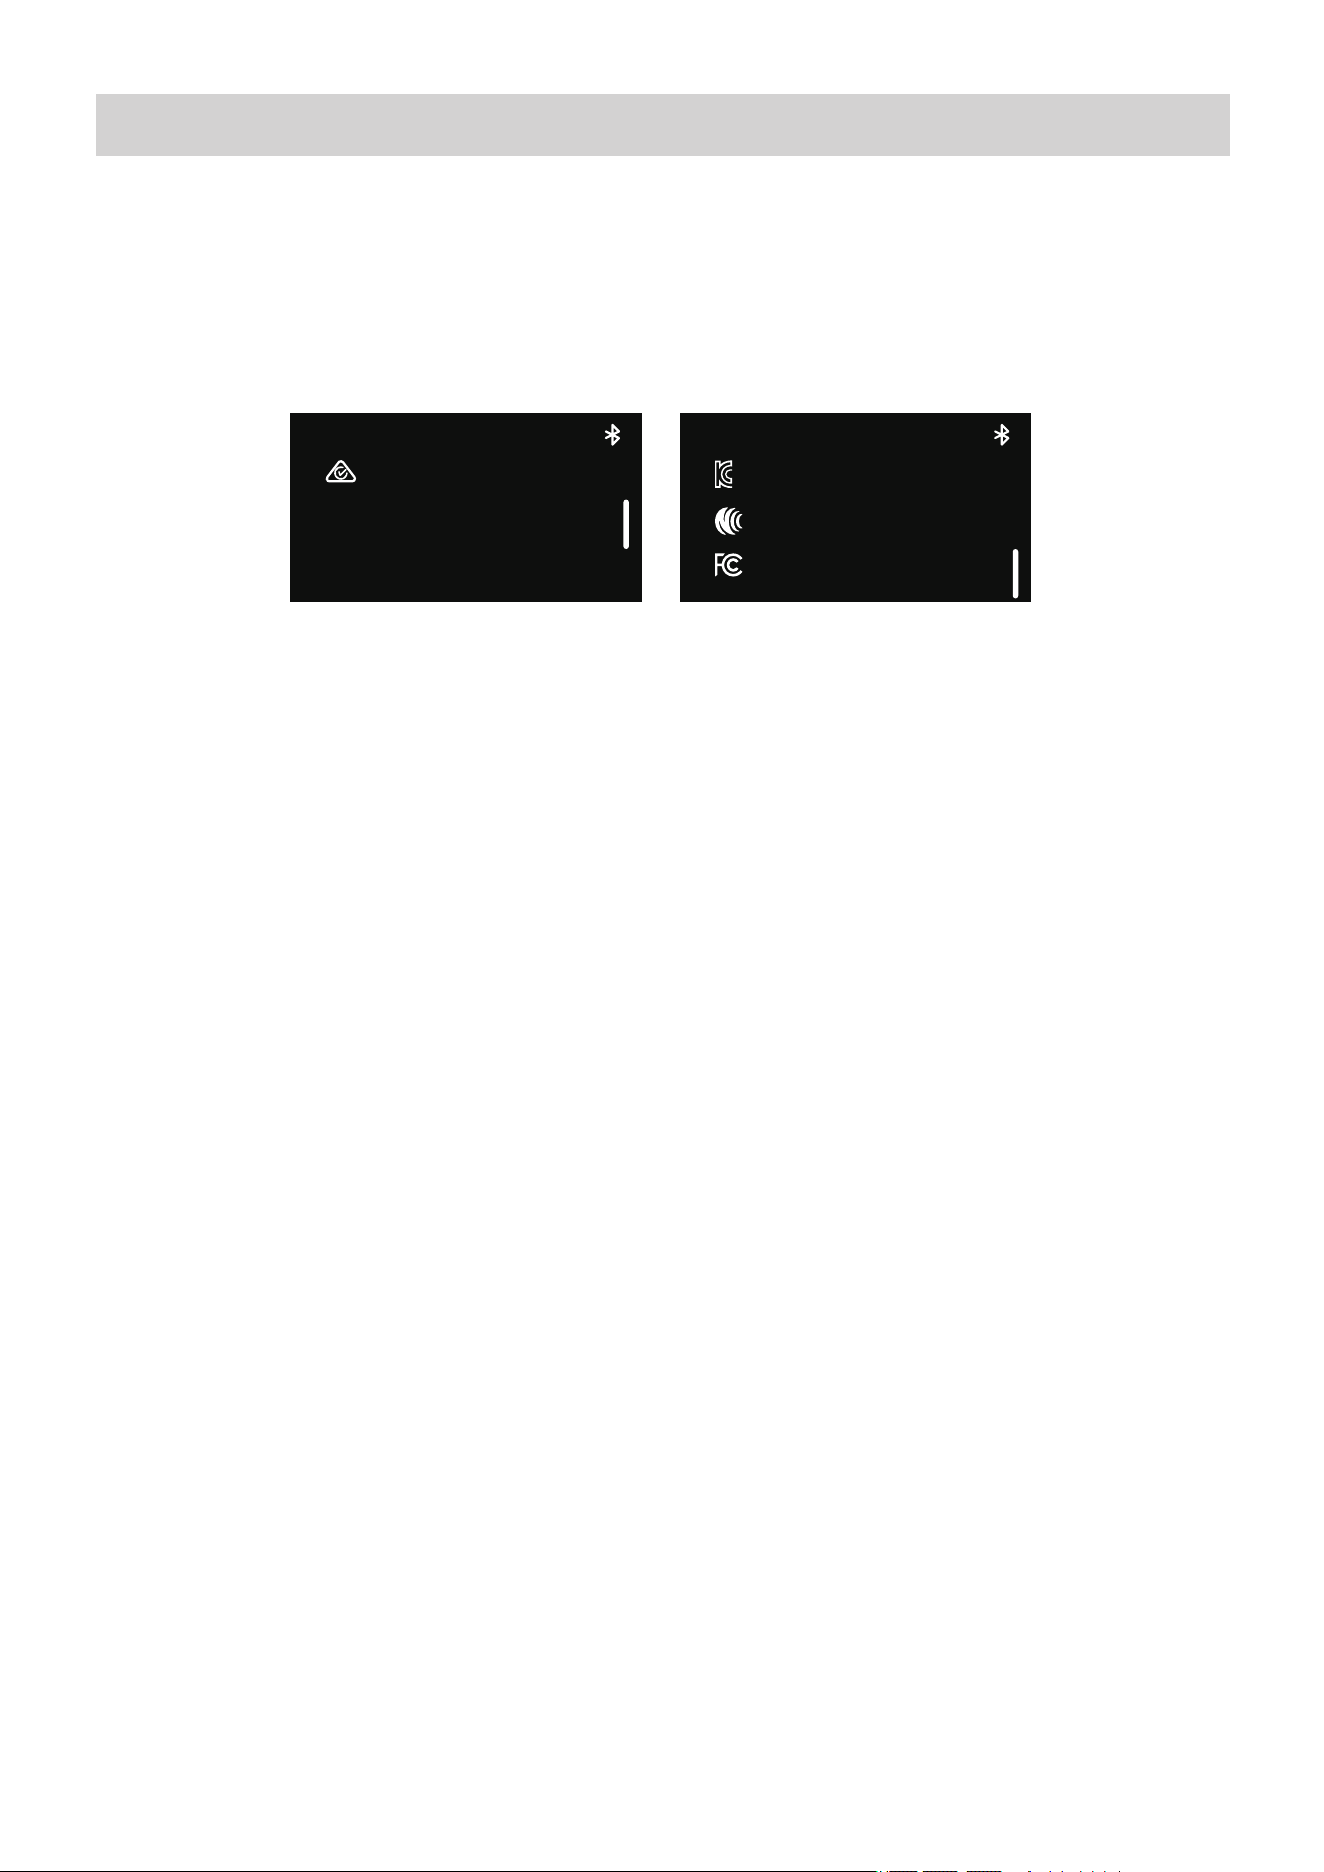
Certification Information
Rotate the knob and press the confirm button to enter the “About” menu from the main
screen. In this menu, rotate the knob to view the electronic label and certification numbers.
This product has been certified by the following regulatory bodies: FCC, IC, KCC, RCM, NCC,
and SRRC.
IC: 28850-RAY120C
CMIIT ID: 25J447VSC120
About
FCC ID: 2AABZ-RAY120C
About
CCAJ25LPAMY0T4
R-R-A9w-RAY120C
24
FCC
FCC regulatory conformance:
This device complies with Part 15 of the FCC Rules. Operation is subject to the following two
conditions:
(1) This device may not cause harmful interference.
(2) This device must accept any interference received, including interference that may cause
undesired operation.
This equipment complies with FCC radiation exposure limits set forth for an uncontrolled
environment.
The manufacturer is not responsible for any radio or TV interference caused by
unauthorized modifications to this equipment. Such modifications could void the
user’s authority to operate the equipment.
This equipment has been tested and found to comply with the limits for a Class B
digital device, pursuant to part 15 of the FCC Rules. These limits are designed to
provide reasonable protection against harmful interference in a residential installation.
This equipment generates uses and can radiate radio frequency energy and, if not
installed and used in accordance with the instructions, may cause harmful interference
to radio communications. However, there is no guarantee that interference will not occur
in a particular installation. If this equipment does cause harmful interference to radio or
television reception, which can be determined by turning the equipment off and on, the
user is encouraged to try to correct the interference by one or more of the following
measures:
- Reorient or relocate the receiving antenna.
- Increase the separation between the equipment and receiver.
- Connect the equipment into an outlet on a circuit different from that to which the
receiver is connected.
- Consult the dealer or an experienced radio/TV technician for help.
25

UL
NOT FOR RESIDENTIAL USE
NON DESTINÉ À UN USAGE DOMESTIQUE
Notice: This control circuit is not isolated – see installation instructions.
Note: ce circuit de commande n’est pas isolé - voir les instructions d’installation.
26

CSA
NOT FOR HOUSEHOLD USE
NON DESTINÉ À UN USAGE DOMESTIQUE
DISCONNECT POWER BEFORE SERVICING
COUPER L'ALIMENTATION AVANT L'ENTRETIEN
27

Important Safety Instructions
When using the amaran Ray 120c, basic safety precautions should always be followed,
including the following:
1.Read and understand all instructions before using.
2.Close supervision is necessary when any fixture is used by or near children. Do not leave
the fixture unattended while in use.
3.Care must be taken as burns can occur from touching hot surfaces.
4.Do not operate the fixture if any power cable is damaged, or if the fixture has been dropped
or damaged, until it has been examined by qualified service personnel.
5.Position any power cables such that they will not be tripped over, pulled, or come into
contact with hot surfaces.
6.Always unplug the fixture from the power outlet before cleaning, servicing, or when not in
use. Never pull on the power cord to unplug from the outlet.
7.Allow the fixture to cool down completely before storing. Unplug all cables and store them
properly. If a carrying case is used, place cables in their designated compartments.
8.Do not immerse the fixture in water or any other liquid to avoid electric shock.
9.Do not disassemble the fixture to avoid the risk of fire or electric shock. For service, contact
cs@aputure.com or consult qualified service personnel. Improper reassembly may result in
electric shock when the fixture is in use.
10.Using any accessory not recommended by the manufacturer may increase the risk of fire,
electric shock, or personal injury.
11.Power this fixture only by connecting it to a properly grounded outlet.
12.Do not block the ventilation openings. Do not look directly at the LED light source when it
is powered on, and never touch the LED emitters under any condition.
13.Do not place the fixture near flammable materials or volatile solvents, as this may cause
damage.
14.Use a soft, dry cloth to clean the device.
15.When operating in humid or wet environments, ensure that all ports and plugs are
completely dry to avoid short circuits or electric shock.
When using the amaran Ray 60c, basic safety precautions should always be followed,
including the following:
1.Read and understand all instructions before using.
2.Please have the product checked by an authorized service personnel agent if the product
has a problem. Any malfunctions caused by unauthorized disassembly are not covered by
the warranty. The user may pay for maintenance.
3.Care must be taken as burns can occur from touching hot surfaces.
4.Do not operate the fixture if any power cable is damaged, or if the fixture has been dropped
or damaged, until it has been examined by qualified service personnel.
5.Position any power cables such that they will not be tripped over, pulled, or come into
contact with hot surfaces.
6.Always unplug the fixture from the power outlet before cleaning, servicing, or when not in
use. Never pull on the power cord to unplug from the outlet.
7.Allow the fixture to cool down completely before storing. Unplug all cables and store them
properly. If a carrying case is used, place cables in their designated compartments.
8.Do not immerse the fixture in water or any other liquid to avoid electric shock.
9.Do not disassemble the fixture to avoid the risk of fire or electric shock. For service, contact
cs@aputure.com or consult qualified service personnel. Improper reassembly may result in
electric shock when the fixture is in use.
10.Using any accessory not recommended by the manufacturer may increase the risk of fire,
electric shock, or personal injury.
11.Power this fixture only by connecting it to a properly grounded outlet.
12.Do not block the ventilation openings. Do not look directly at the LED light source when it
is powered on, and never touch the LED emitters under any condition.
13.Do not place the fixture near flammable materials or volatile solvents, as this may cause
damage.
14.Use a soft, dry cloth to clean the device.
15.When operating in humid or wet environments, ensure that all ports and plugs are
completely dry to avoid short circuits or electric shock.
16.All service and maintenance should be performed by authorized personnel only. Any
malfunctions caused by unauthorized disassembly are not covered under warranty and may
result in repair costs borne by the user.
17.This product is certified by RoHS, CE, KC, PSE, and FCC. Please operate the product in full
compliance with the regulations of your country or region. Malfunctions caused by improper
use are not covered under warranty and may result in repair costs borne by the user.
18.This User Manual is based on extensive testing conducted by the company. Design and
specifications are subject to change without prior notice.
28

16.All service and maintenance should be performed by authorized personnel only. Any
malfunctions caused by unauthorized disassembly are not covered under warranty and may
result in repair costs borne by the user.
17.This product is certified by RoHS, CE, KC, PSE, and FCC. Please operate the product in full
compliance with the regulations of your country or region. Malfunctions caused by improper
use are not covered under warranty and may result in repair costs borne by the user.
18.This User Manual is based on extensive testing conducted by the company. Design and
specifications are subject to change without prior notice.
29

Disclaimer
Before using this product, please read the product manual to ensure correct use under the
complete understanding. After reading, please keep the product manual properly for future
reference. In case of not operating this product correctly, it may seriously harm yourself or
others, or result in product damage and property loss. When using this product, it shall be
deemed that you have understood, recognized and accepted all clauses and contents of this
document. The user commits to be responsible for their own behaviors and all consequences
thereof, amaran shall not be liable for any loss due to the user who does not use this product
in accordance with the product manual.
Under the laws and regulations, our company holds the final explanation right of this document
and all related documents of this product. No prior notice will be given for any update, revision
or termination. Please visit the official amaran website for the latest product information.
30