Product Manual
English
amaran Halo 60x/100x

02
Introduction............................................................................................................................................................03
Components List.................................................................................................................................................04
Product Overview-amaran Halo 60x ........................................................................................................05
Product Overview-amaran Halo 100x ......................................................................................................07
Operations .............................................................................................................................................................09
1. Power Supply.............................................................................................................................................09
2. Power On/Off .............................................................................................................................................11
3. Light Installation .......................................................................................................................................12
4. Bowens Mount Modifier Installation...............................................................................................12
5. Main Menu...................................................................................................................................................13
5.1. CCT ........................................................................................................................................................13
5.2. FX ...........................................................................................................................................................13
5.3. Bluetooth Reset...............................................................................................................................13
5.4. Studio Mode......................................................................................................................................14
5.5. Language.............................................................................................................................................14
5.6. DMX Control Settings...................................................................................................................15
5.7. Fan Mode ............................................................................................................................................15
5.8. Firmware Upgrade .........................................................................................................................16
5.9. Pairing via NFC ................................................................................................................................16
Using the amaran App ...................................................................................................................................... 17
Specifications .......................................................................................................................................................18
Photometrics .......................................................................................................................................................20
Declaration of Toxic and Hazardous Substances in Electronic Information .......................22
IC ...............................................................................................................................................................................23
FCC ..........................................................................................................................................................................24
UL ..............................................................................................................................................................................25
CSA ..........................................................................................................................................................................26
Important Safety Instructions ...................................................................................................................... 27
Disclaimer ..............................................................................................................................................................29
Table of Content

Introduction
03
Thank you for purchasing the amaran Halo 60x and amaran Halo 100x.
Designed for home studio creators and everyday setups, The amaran Halo 60x / 100x are
bi-color COB lights that deliver bright, reliable output in a compact and portable design.
With ultra-bright, accurate light and USB-C PD power, it’ s the ideal entry point for lighting
small spaces with precision. Built with a standard Bowens Mount, it pairs perfectly with vari-
ous modifiers to diffuse or intensify your output. And with its lightweight build and compact
footprint, the amaran Halo 60x and amaran Halo 100x are easy to carry, quick to setup, and
convenient to power from anywhere – simplifying your workflow whether you're creating
content on the go or in a studio.�
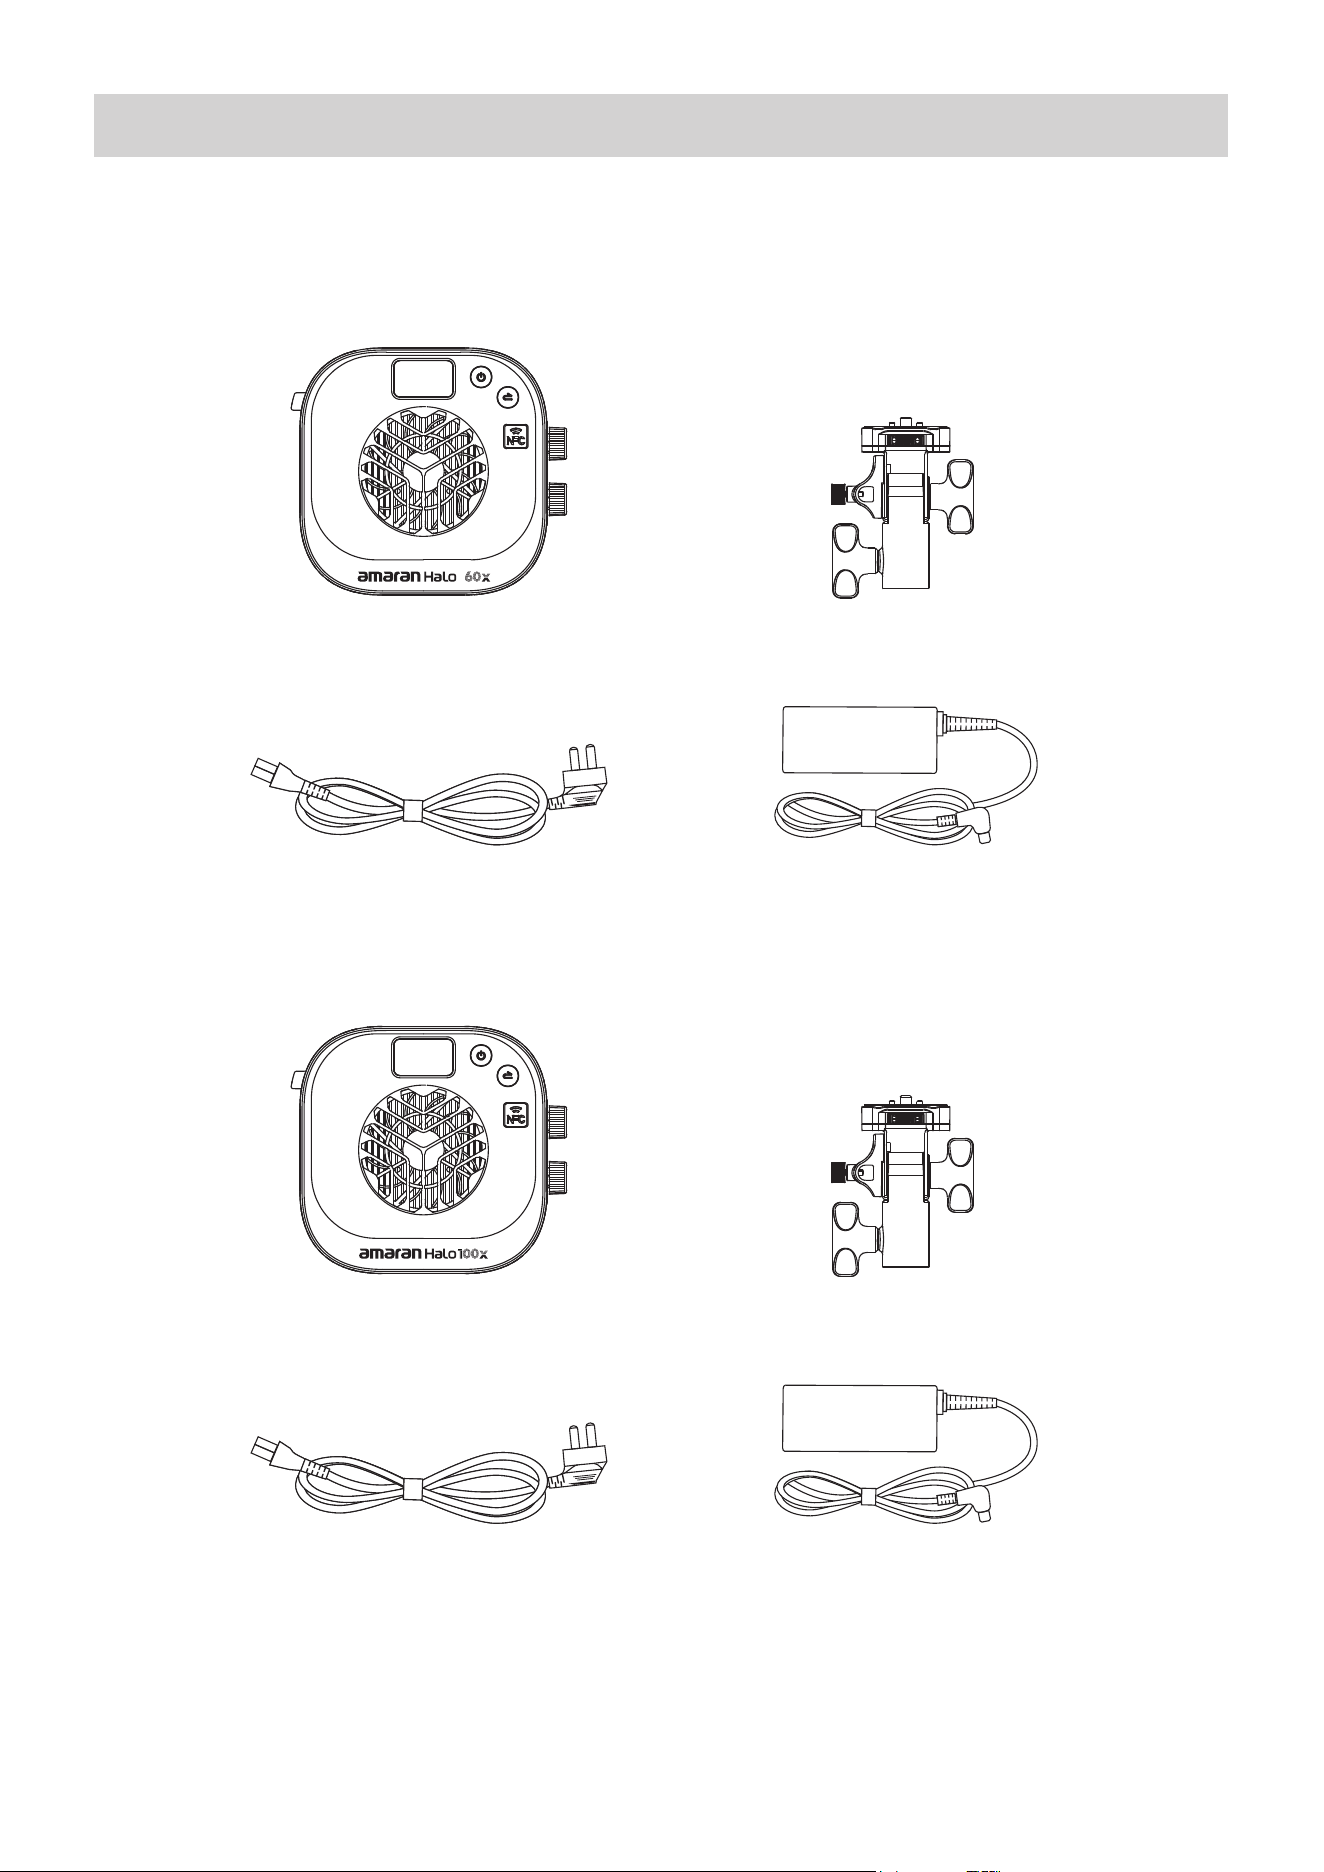
Please make sure all accessories listed below are complete before using. If not, please con-
tact your sellers immediately.
04
Components List
amaran 1/4-20in to Baby Pin
Tilt-Adjustable Adapter� x1
amaran Halo 60x x1
amaran IEC C5
AC Power Cable (2m) x1
amaran AC to USB-C
65W Power Adapter (2.5m) x1
amaran 1/4-20in to Baby Pin
Tilt-Adjustable Adapter� x1
amaran Halo 100x x1
amaran IEC C13
AC Power Cable (2m) x1
amaran AC to DC
100W Power Adapter (2.5m cable) x1
amaran Halo 60x
amaran Halo 100x
Tip: The illustrations in the manual are diagrams for reference only. Due to the continuous development of new versions
of the product, if there are any differences between the product and the user manual diagrams, please refer to the
product itself.
05
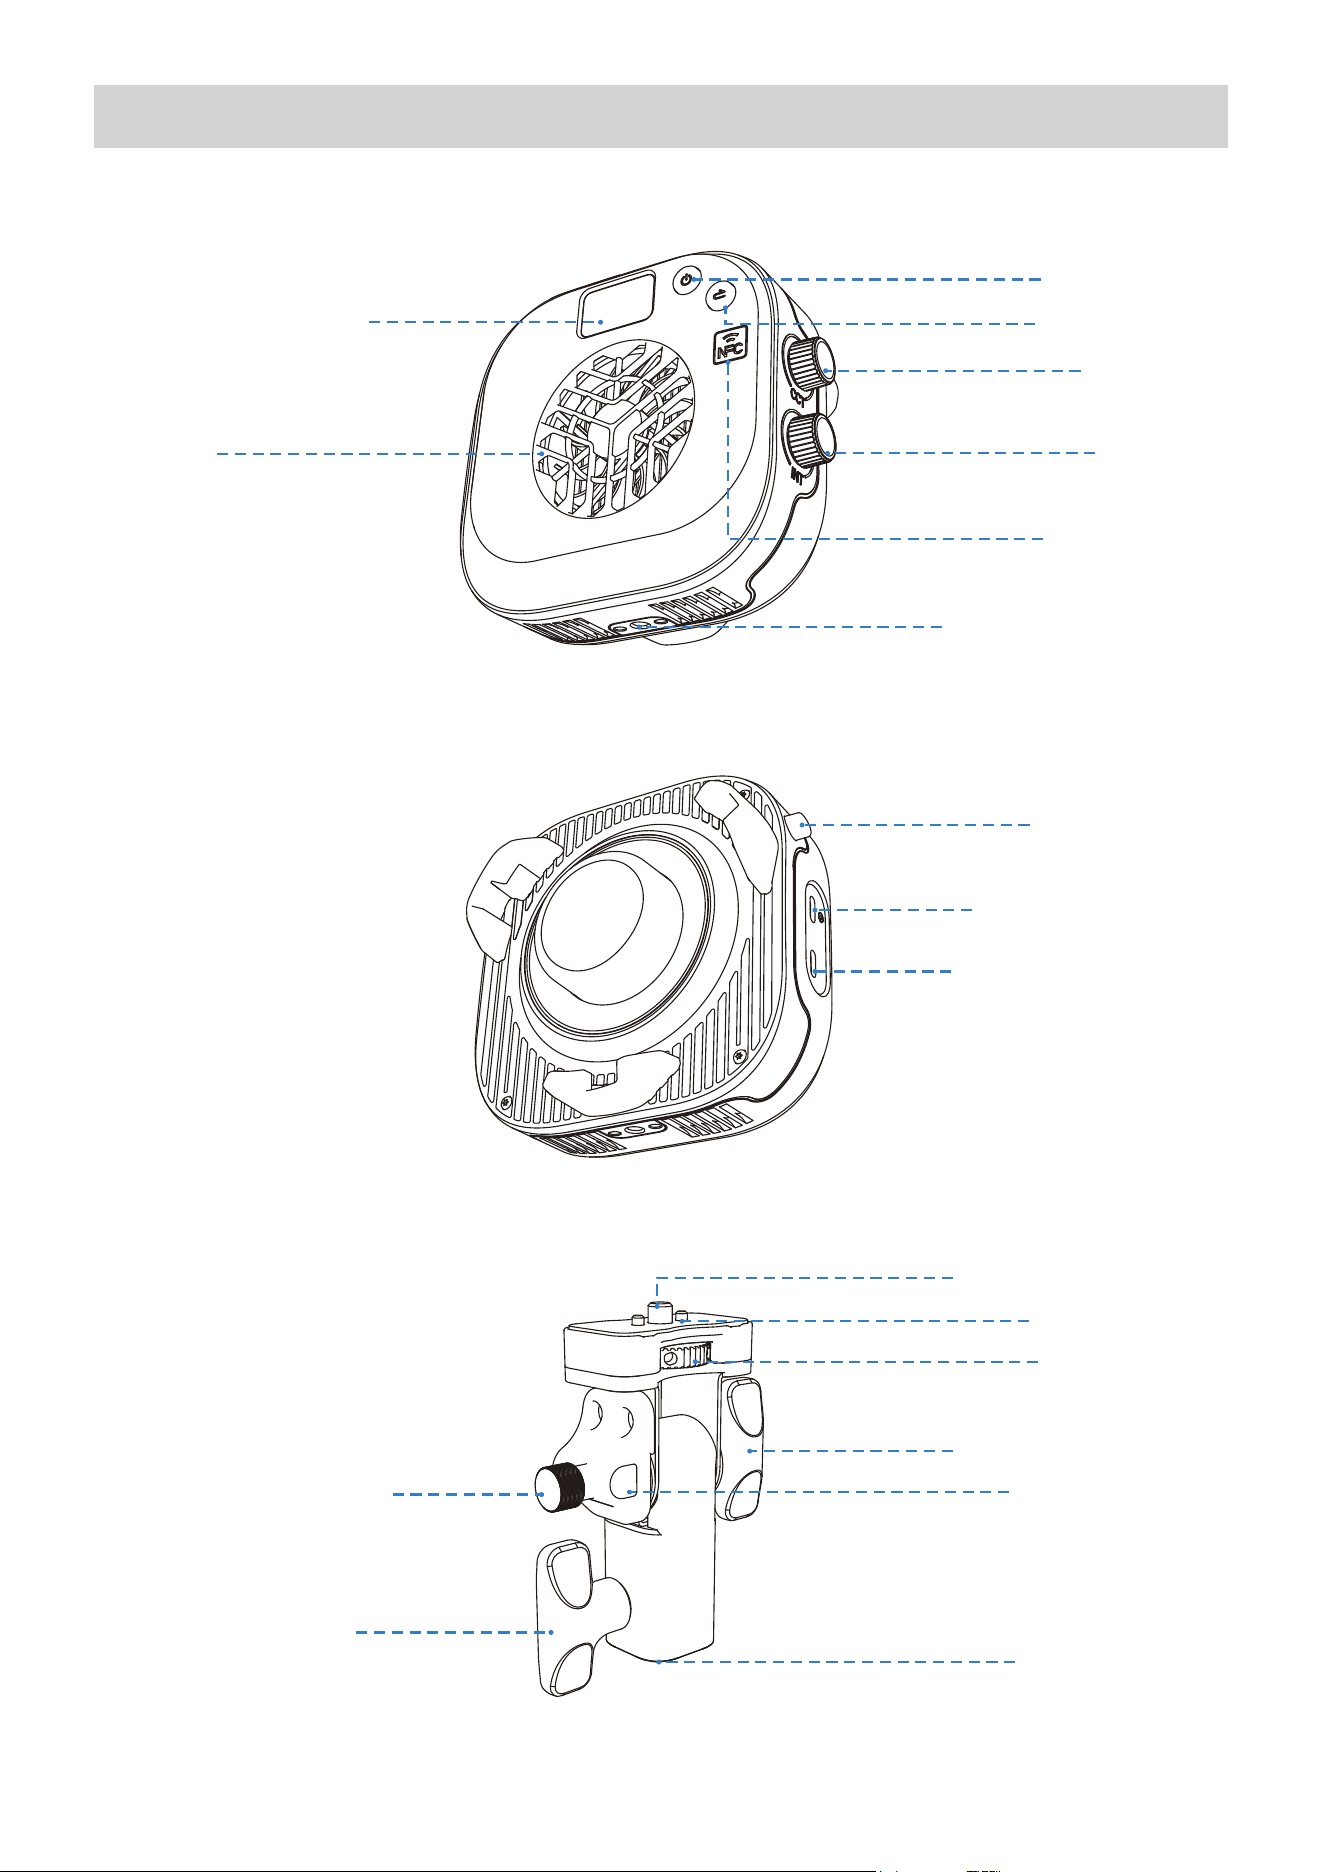
Product Overview-amaran Halo 60x
Bowens Mount
Release Button
USB-C to DMX Port
USB-C Charging Port
Power Button
Return Button
CCT Knob
INT Knob
NFC Antenna
Display Menu Screen
Fan Vent
1/4-20in Screw Mount
1/4”-20 Screw Mount
Positioning Pin
Locking Knob
Baby Pin Mount
Umbrella Holder
Tilt Adjustment Knob
Umbrella Locking Knob
Stand Locking Knob
06
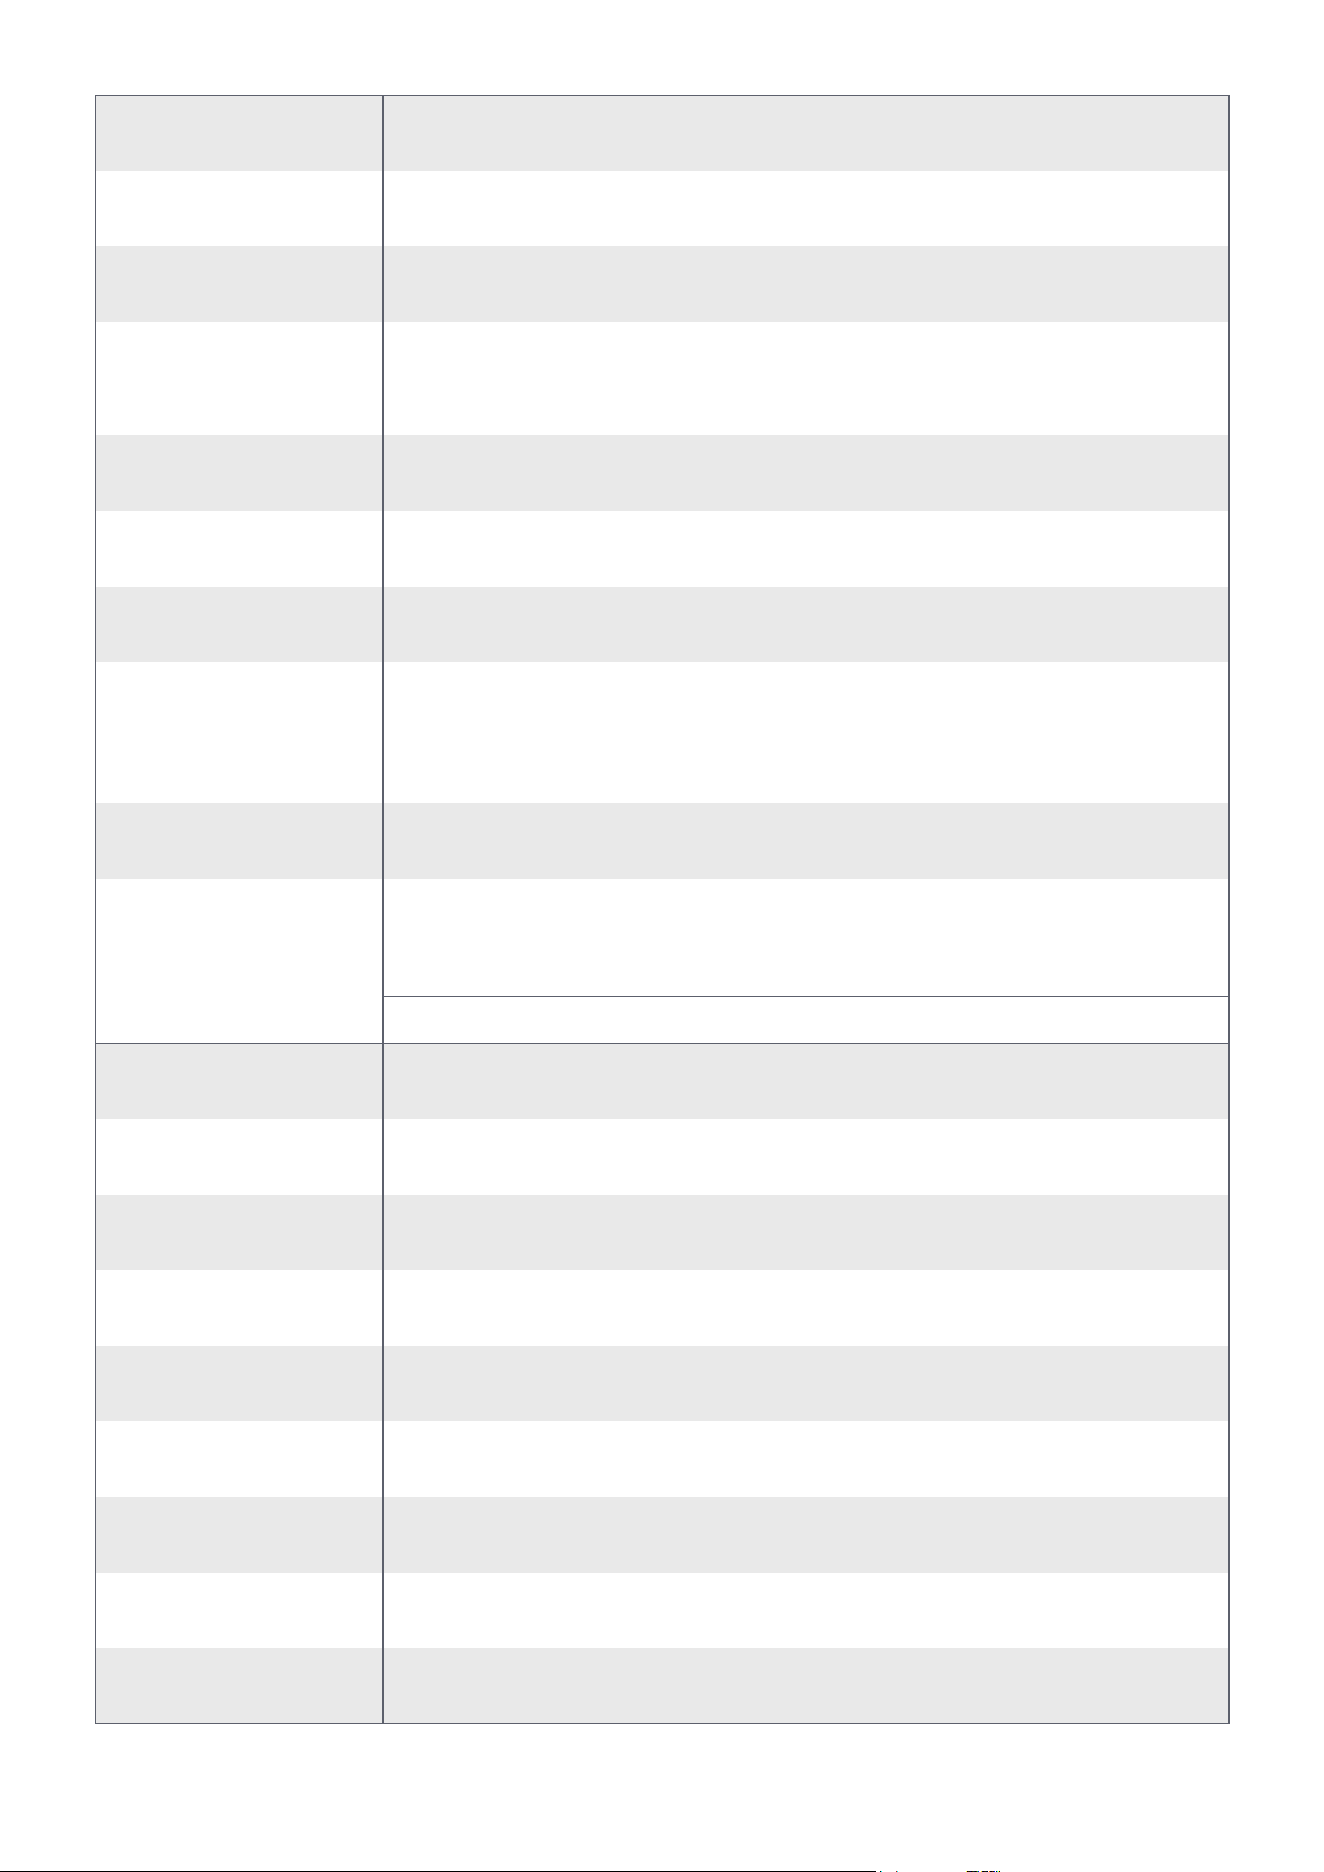
Power Button
Return Button
Display Menu
Screen
CCT Knob
INT Knob
1/4-20in Screw
Mount
Fan Vent
NFC Antenna
Bowens Mount
Release Button
USB-C to DMX Port
USB-C Charging
Port
1/4”-20 Screw
Mount
Positioning Pin
Locking Knob
Tilt Adjustment
Knob
Baby Pin Mount
Umbrella Holder
Umbrella Locking
Knob
Stand Locking Knob
Press to turn the light on, press again to turn the light off.
Click to return to the previous menu screen.
Displays settings and status of your light.
In any interface, rotate to adjust brightness. Press to switch to
CCT mode.�
Mount the light onto 1/4-20in tripods or other equipment.
Helps the light dissipate heat. Please do not block the fan vent
when using the light.
Press to release the Bowens Mount accessory.
Used to charge the fixture via a PD-supported power supply.
*The amaran USB-C to 5-Pin DMX In&Out Adapter is sold separately.
Connects to the 1/4”-20 threaded hole on the bottom of the fixture.
Helps align the fixture and prevents unwanted rotation.
Tighten clockwise to securely fasten the fixture to the adapter.
Loosen to adjust the tilt angle of the fixture; tighten to lock in place.
Fits standard Baby Pin light stands for easy mounting.
Compatible with umbrella accessories such as soft umbrellas
or reflectors with a shaft diameter of up to 9mm.
Tightens to secure the umbrella shaft and prevent slippage.
Secures the adapter to the light stand and prevents wobbling
or detachment.
In CCT Mode, rotate to adjust CCT. In other menu interfaces,
rotate to toggle the menu or adjust values and lighting settings.
Press the knob to confirm parameters.
Used for NFC pairing.When a smartphone is brought close to
the light's NFC area, it can quickly trigger a Bluetooth connec-
tion, enabling seamless pairing and control via the amaran app
without the need to manually search for the device.
Connect the USB-C to 5-Pin DMX In&Out Adapter* to achieve
wired DMX control. This fixture’s USB-C port does not support
power delivery or firmware updates.
07
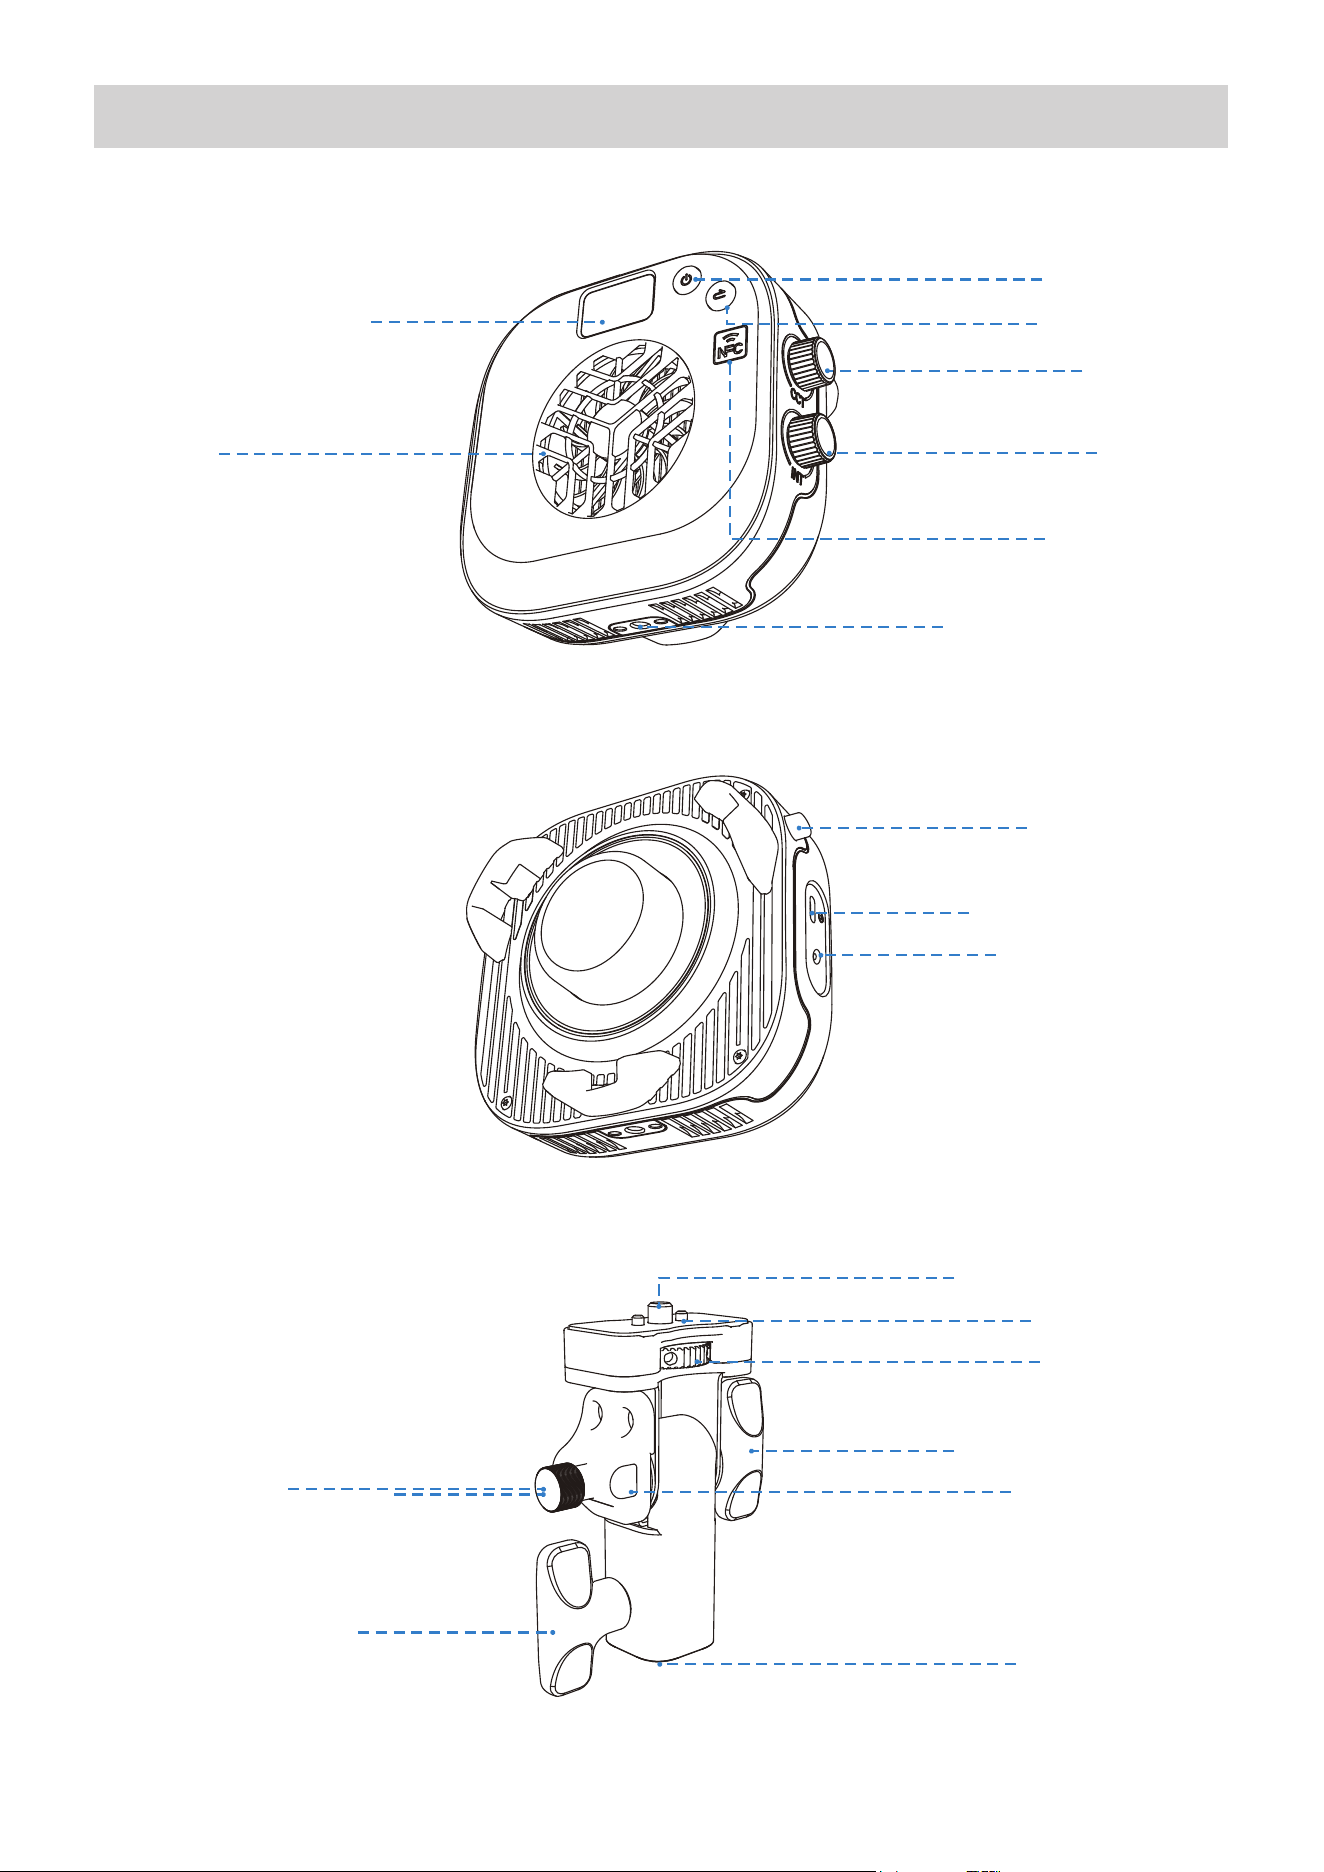
Product Overview-amaran Halo 100x
Bowens Mount
Release Button
USB-C to DMX Port
DC Charging Port
Power Button
Return Button
CCT Knob
INT Knob
NFC Antenna
Display Menu Screen
Fan Vent
1/4-20in Screw Mount
1/4”-20 Screw Mount
Positioning Pin
Locking Knob
Baby Pin Mount
Umbrella Holder
Tilt Adjustment Knob
Umbrella Locking Knob
Stand Locking Knob
08
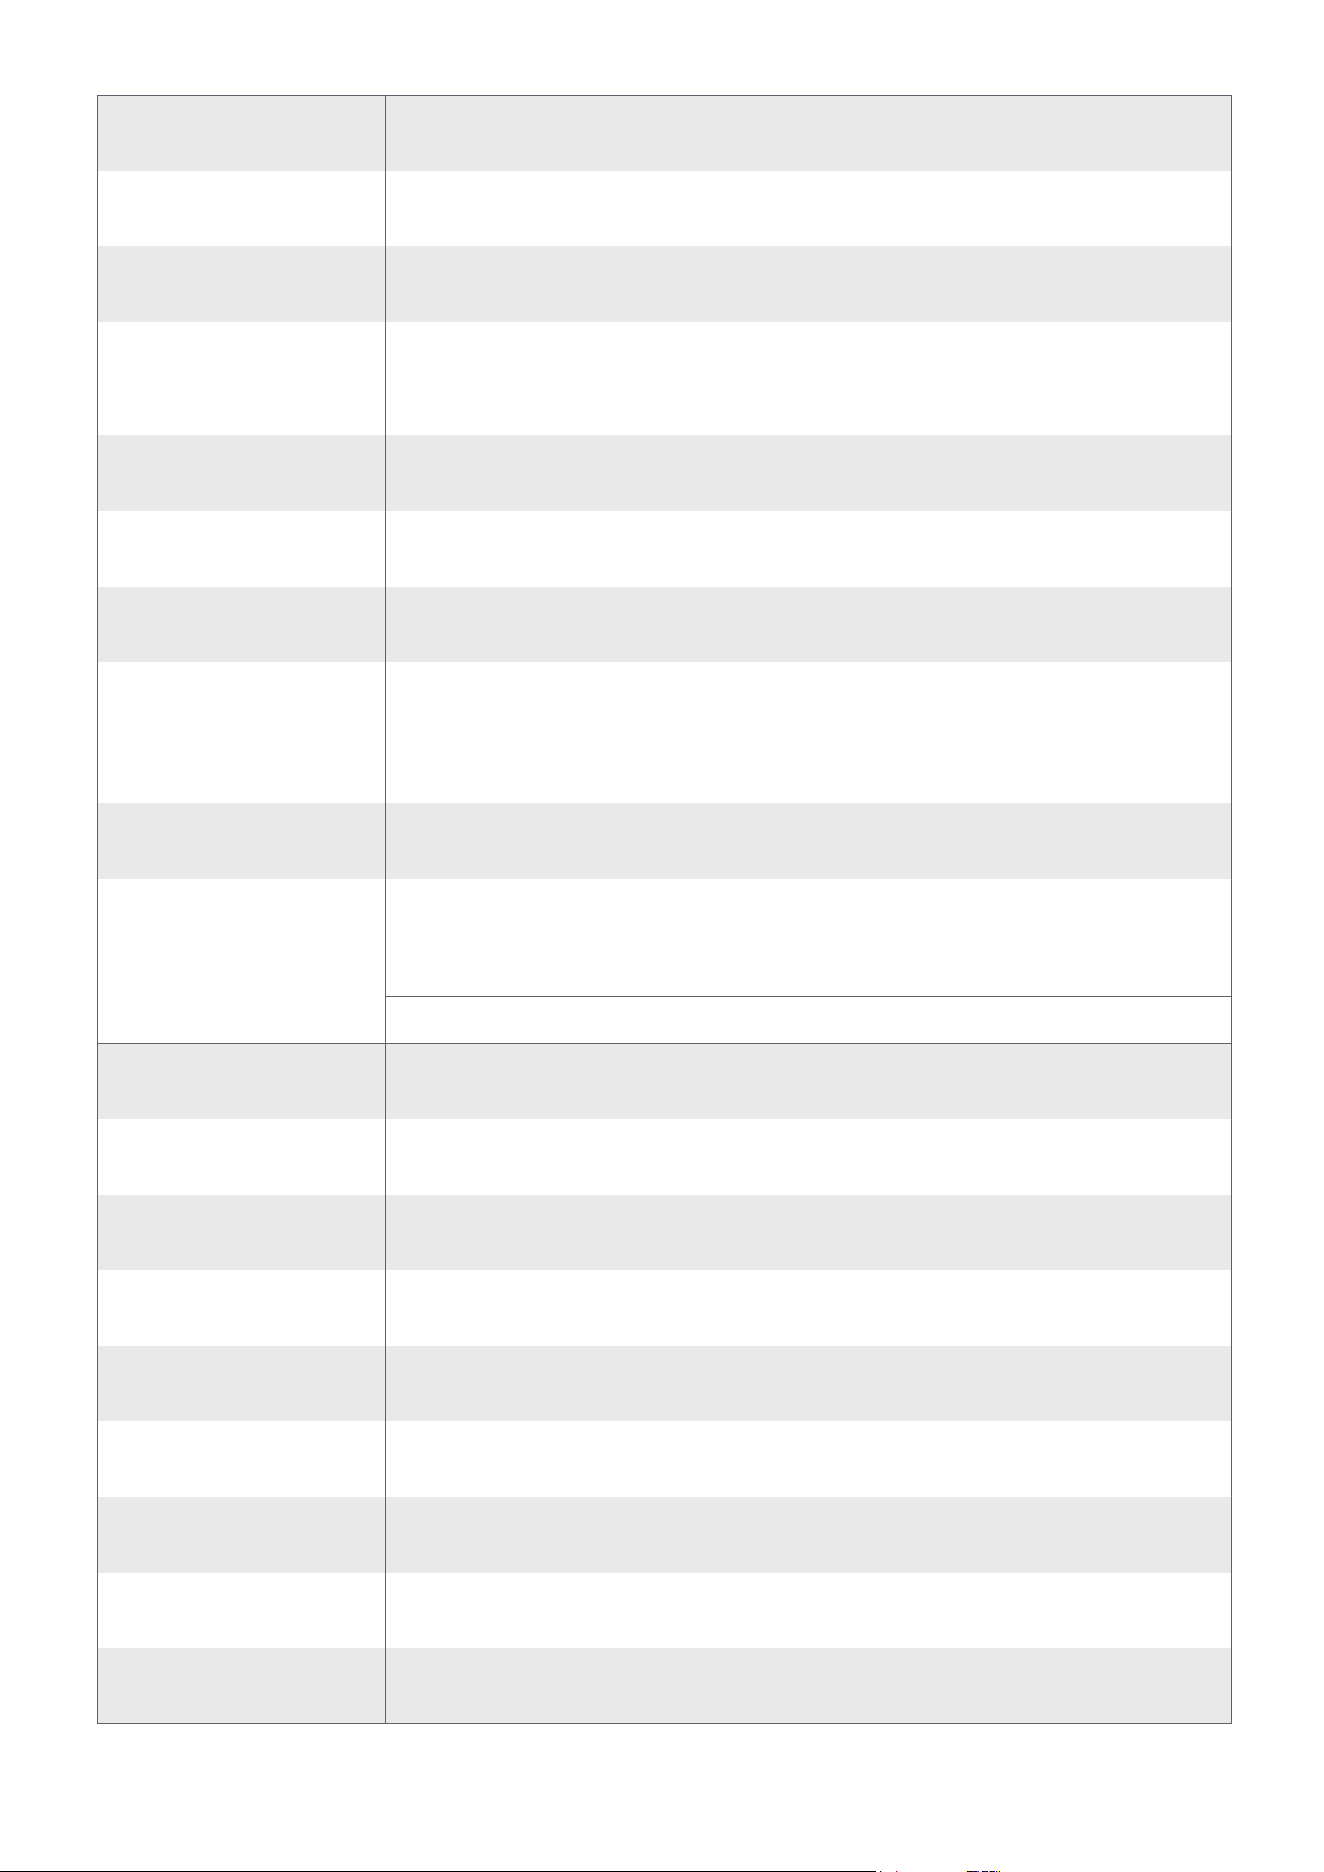
Power Button
Return Button
Display Menu
Screen
CCT Knob
INT Knob
1/4-20in Screw
Mount
Fan Vent
NFC Antenna
Bowens Mount
Release Button
USB-C to DMX Port
DC Charging Port
1/4”-20 Screw
Mount
Positioning Pin
Locking Knob
Tilt Adjustment
Knob
Baby Pin Mount
Umbrella Holder
Umbrella Locking
Knob
Stand Locking Knob
Press to turn the light on, press again to turn the light off.
Click to return to the previous menu screen.
Displays settings and status of your light.
In any interface, rotate to adjust brightness. Press to switch to
CCT mode.�
Mount the light onto 1/4-20in tripods or other equipment.
Helps the light dissipate heat. Please do not block the fan vent
when using the light.
Press to release the Bowens Mount accessory.
Used to charge the fixture via a PD-supported power supply.
*The amaran USB-C to 5-Pin DMX In&Out Adapter is sold separately.
Connects to the 1/4”-20 threaded hole on the bottom of the fixture.
Helps align the fixture and prevents unwanted rotation.
Tighten clockwise to securely fasten the fixture to the adapter.
Loosen to adjust the tilt angle of the fixture; tighten to lock in place.
Fits standard Baby Pin light stands for easy mounting.
Compatible with umbrella accessories such as soft umbrellas
or reflectors with a shaft diameter of up to 9mm.
Tightens to secure the umbrella shaft and prevent slippage.
Secures the adapter to the light stand and prevents wobbling
or detachment.
In CCT Mode, rotate to adjust CCT. In other menu interfaces,
rotate to toggle the menu or adjust values and lighting settings.
Press the knob to confirm parameters.
Used for NFC pairing.When a smartphone is brought close to
the light's NFC area, it can quickly trigger a Bluetooth connec-
tion, enabling seamless pairing and control via the amaran app
without the need to manually search for the device.
Connect the USB-C to 5-Pin DMX In&Out Adapter* to achieve
wired DMX control. The USB-C port of the amaran Halo 100x sup-
ports PD power input only and does not support firmware updates.
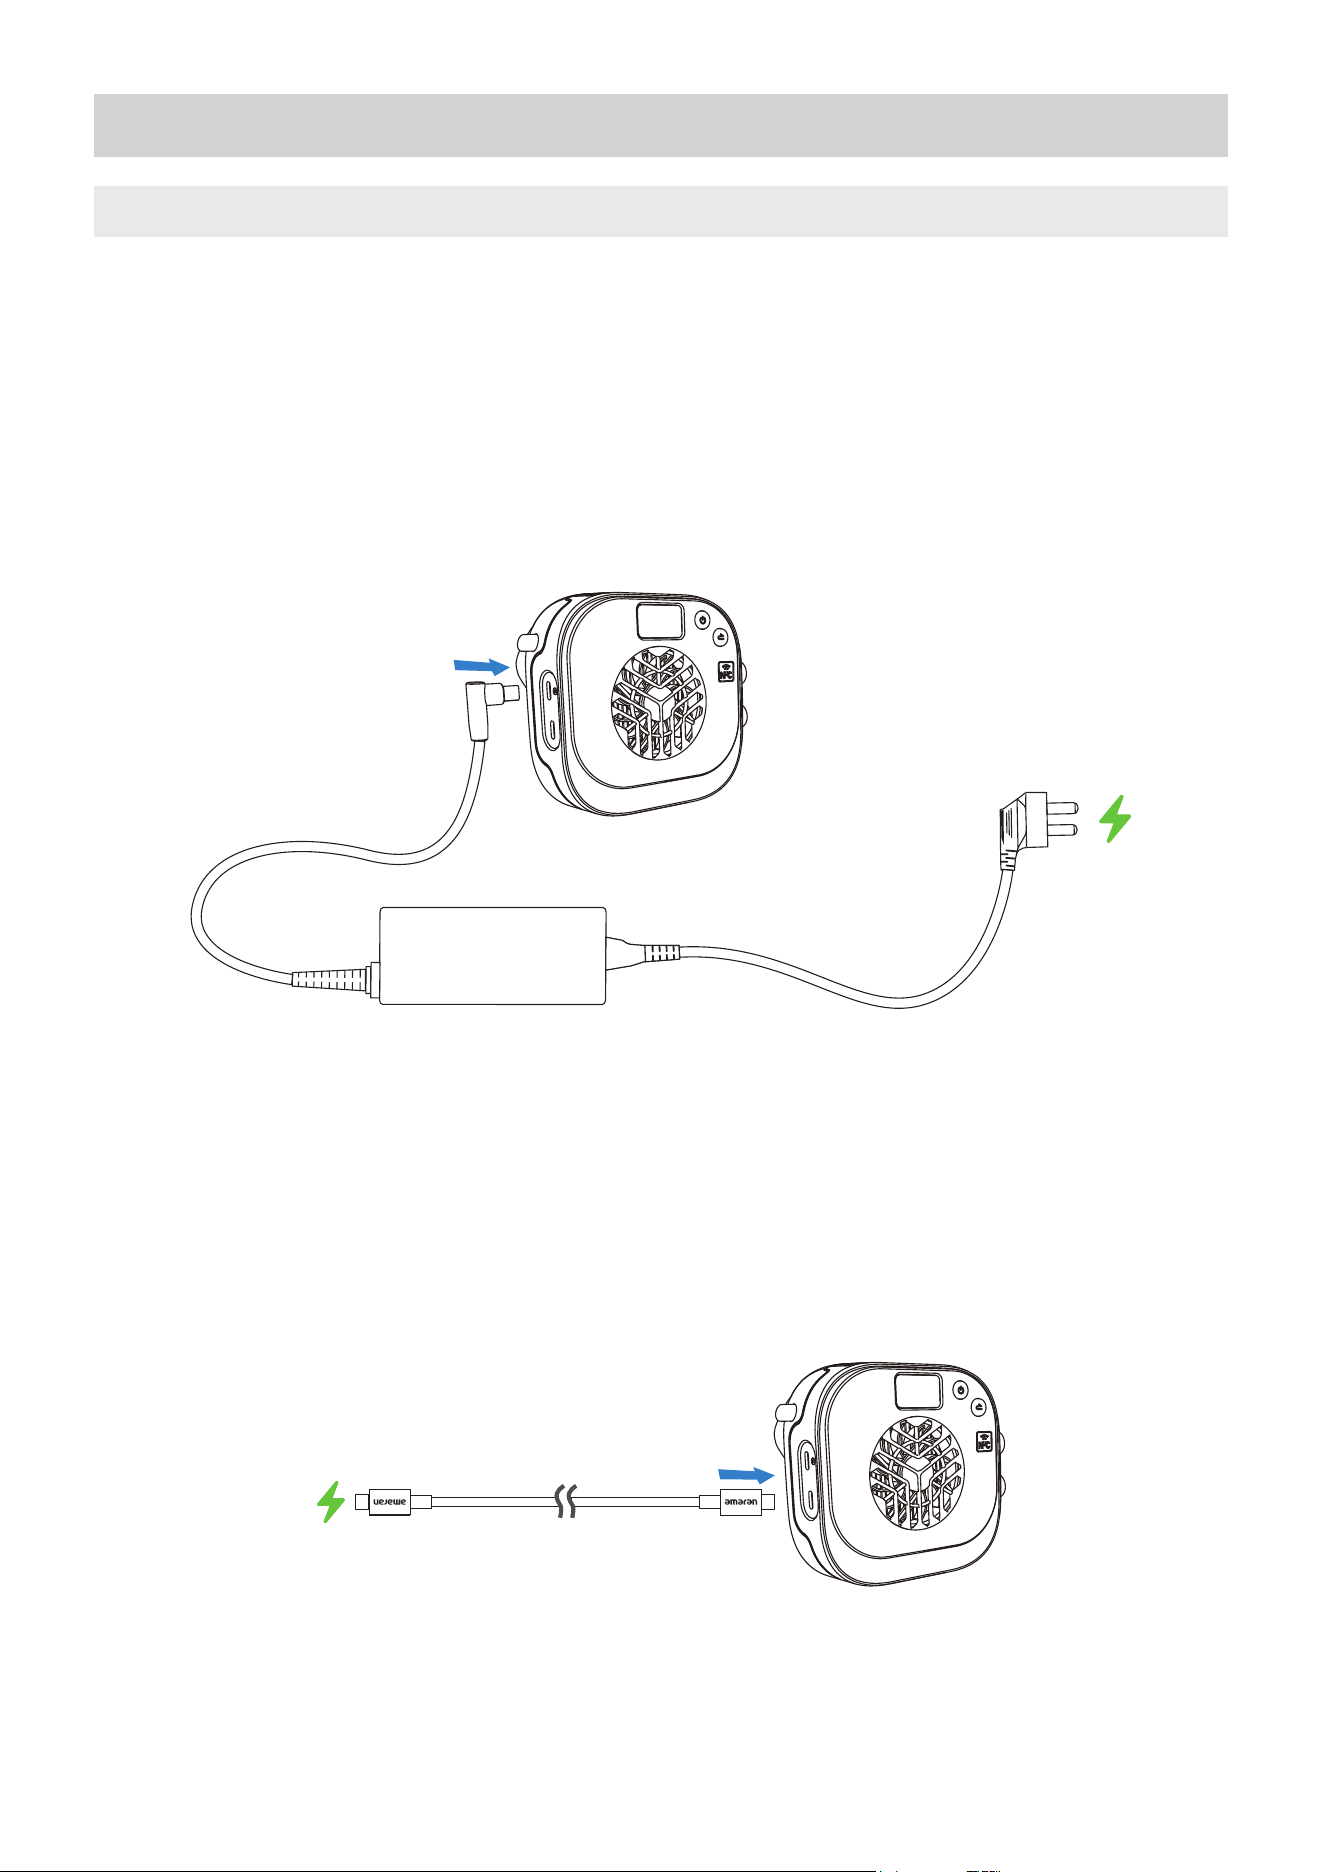
1. Power Supply
09
Operations
The fixture supports two power supply methods: power input via included adapter, USB-C
power input via external power supply.
The power specifications for each input are as follows:
Power Supply Method 1: The amaran Halo 60x is powered using the included amaran AC to
USB-C power adapter. The amaran Halo 100x is powered using the included amaran AC to
DC power adapter.
Power Supply Method 2: Supply power to the light via other PD power supply devices or
power banks. Plug the output port of the PD power supply device into the USB-C Charging
Port of the light. If you use a power supply lower than the rated power of the product, the
brightness of the lamp will be limited or it will not light up.
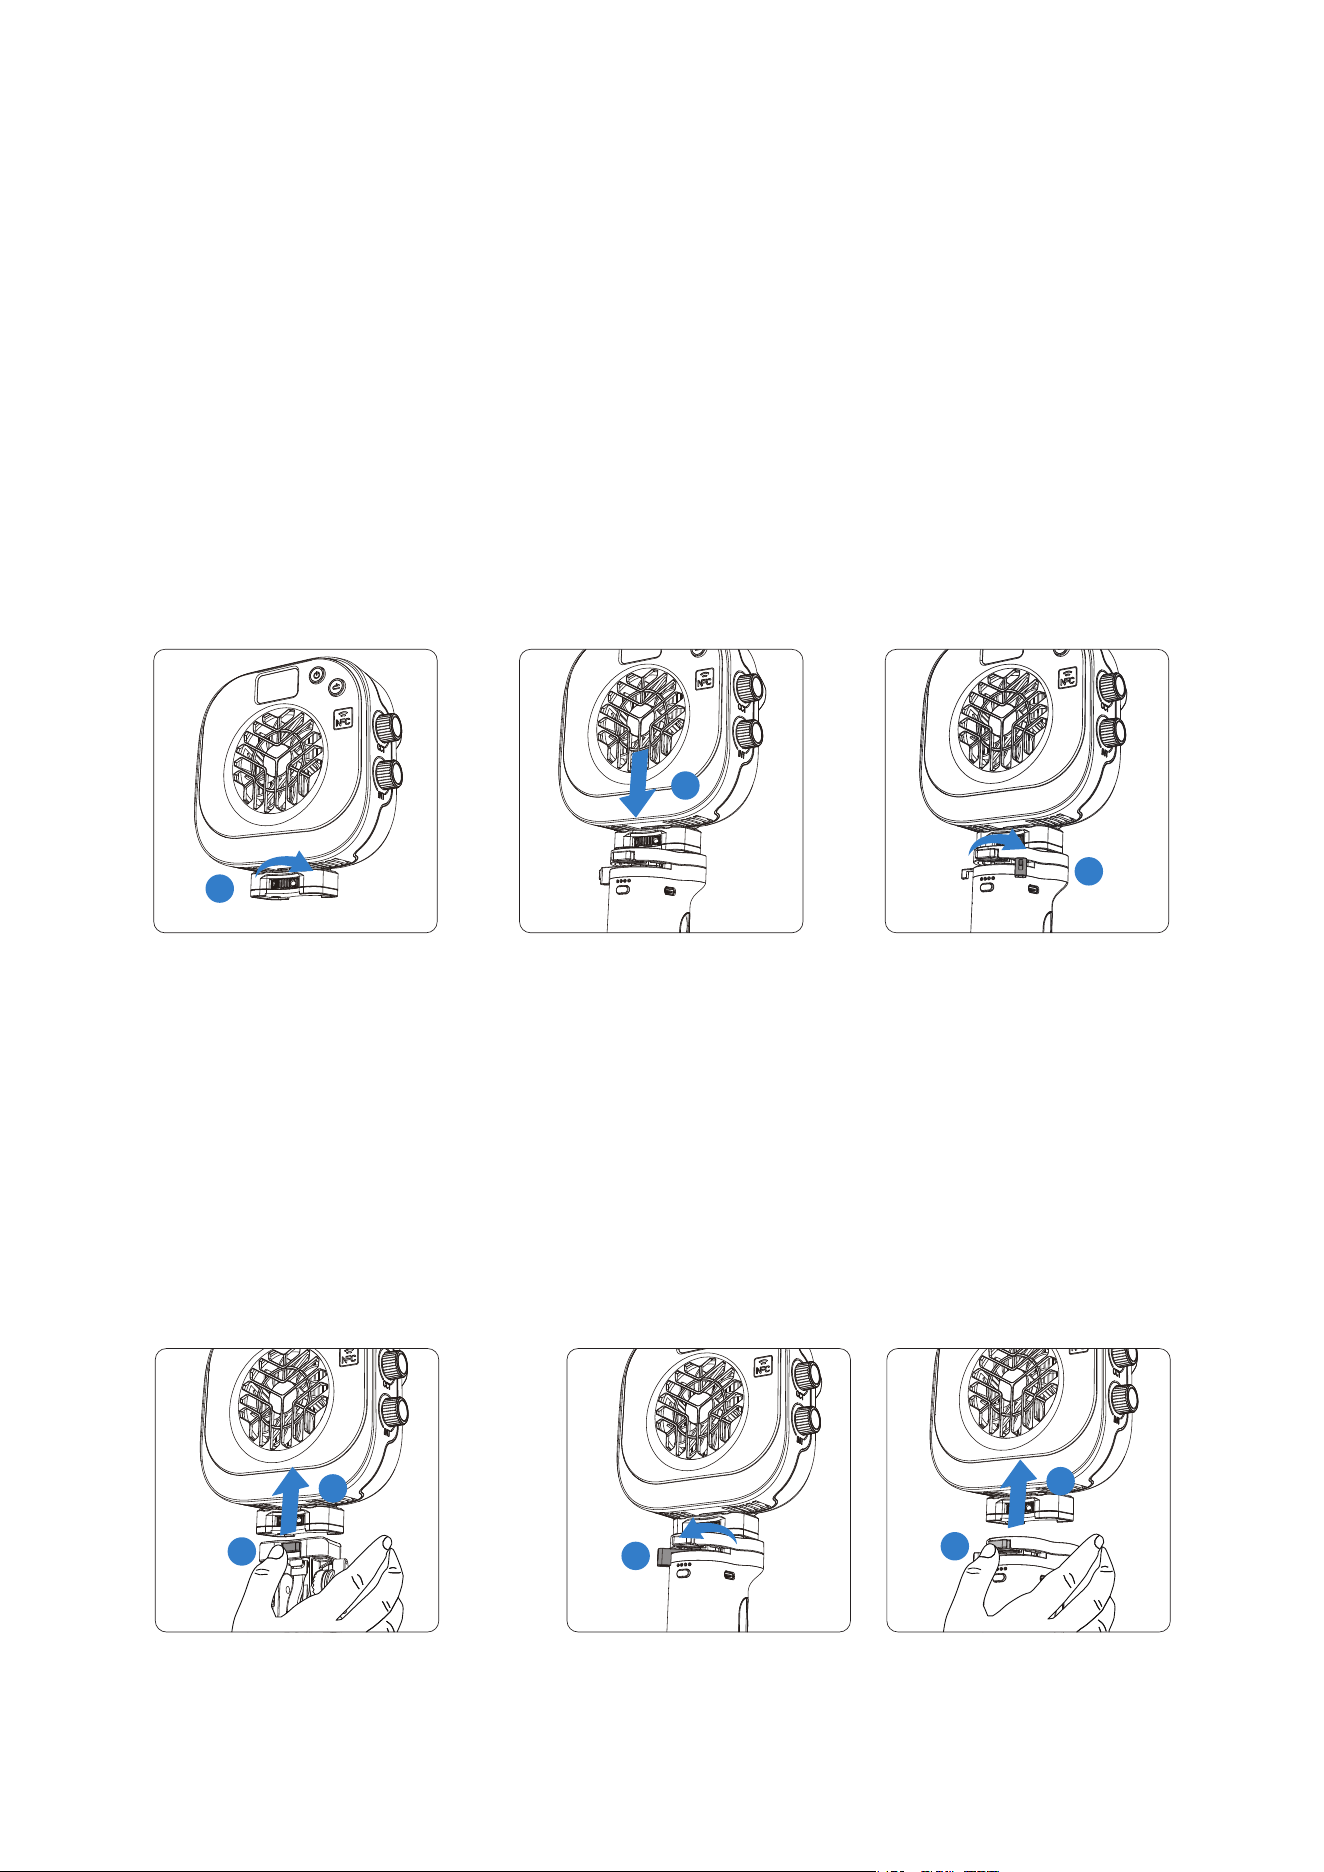
You can use the USB-C port of the amaran Peak or amaran Peak 75 to supply power to the
fixture.
10
Use the amaran Ace E-Lock Adapter (supports 1/4” and 3/8” threaded mounts) to connect
the fixture to the battery grip.
Installation steps:
1.Rotate the knurled adjustment dial on the adapter to align the 1/4” screw, then thread it
into the mounting hole on the bottom of the fixture.
2.Align the Ace E-Lock interface on the adapter with the Ace Lock latches on the amaran
Peak or amaran Peak 75.
3.Press straight downward until you hear a “click,” indicating a secure connection.
4.For amaran Peak 75, move the locking lever to the right to the locked position to complete
the secure attachment.
Removal Instructions:
amaran Peak: Press the blue release button, then pull the amaran Peak downward to
detach it.
amaran Peak 75: First, press the blue button on the locking lever and slide the lever fully to
the left. Then press the blue release button and pull the amaran Peak 75 downward to dis-
connect it.
1
2
3
amaran Peak amaran Peak 75
2
3
1
2
1
11
*amaran Ace E-Lock Adapter (1/4" & 3/8" Screw Compatible) (Sold Separately)
* The product supports power supply standards of USB PD 3.0 and above, but is not compatible with some
third-party private charging protocols. Please ensure to select the appropriate power supply device. If the select-
ed power supply device cannot power the light at full power, a pop-up window will appear on the display menu
screen and limit the maximum brightness.
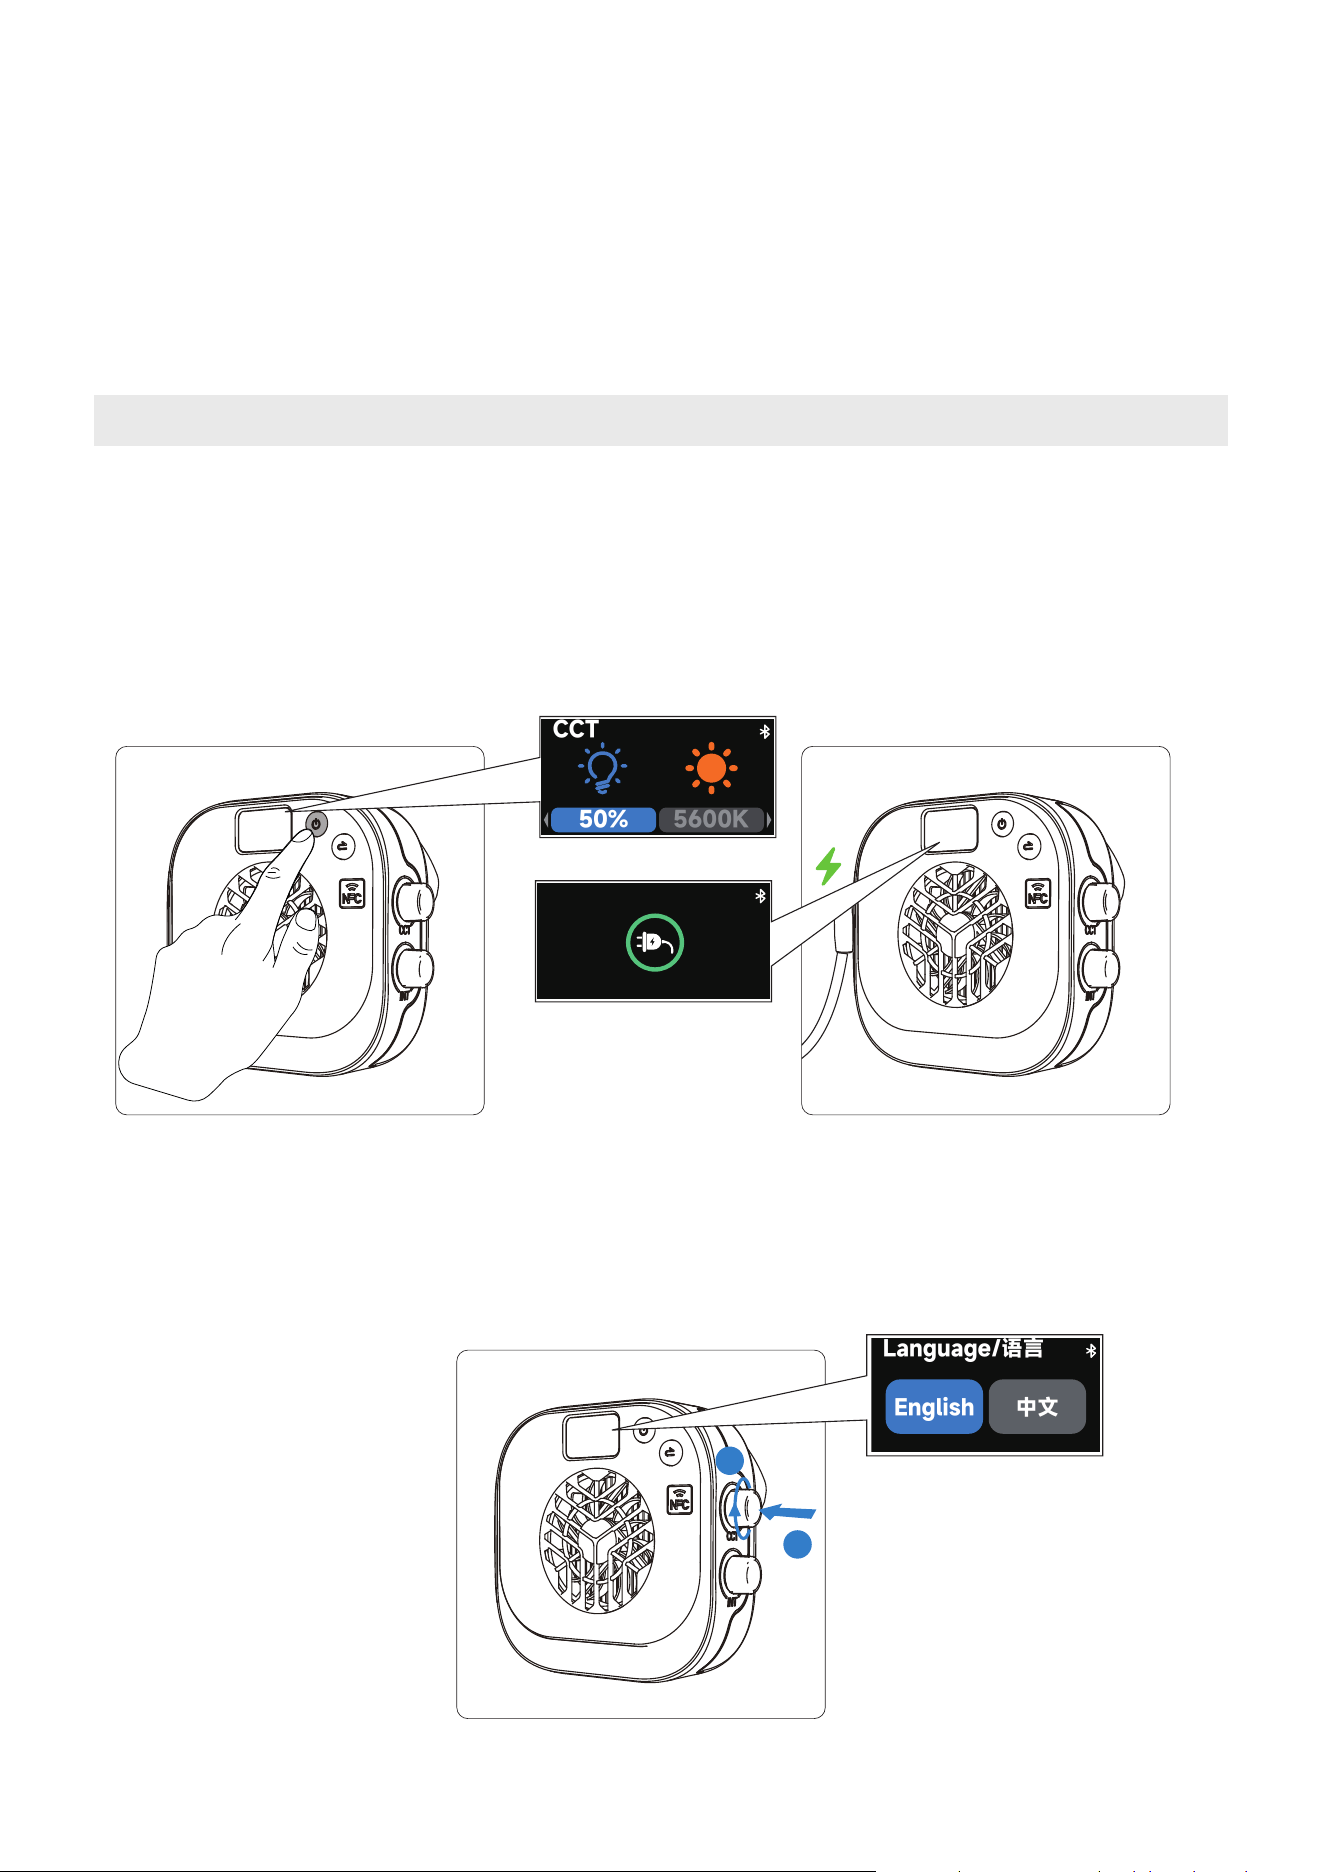
1.After connecting to the power supply, short press the power button to turn on the device,
and short press it again to turn off the device. The default mode is CCT mode.
The Power On icon will appear on the menu screen after connecting to power, and will dis-
appear after 30 minutes or when the fixture is turned on.
2.You can select your preferred language when you turn the light on for the first time.
Rotate the CCT knob to select your language. Click CCT Knob to confirm.
2. Power On/Off
CCT
50%
5600K
1
2
Language/语言
English
中文
12
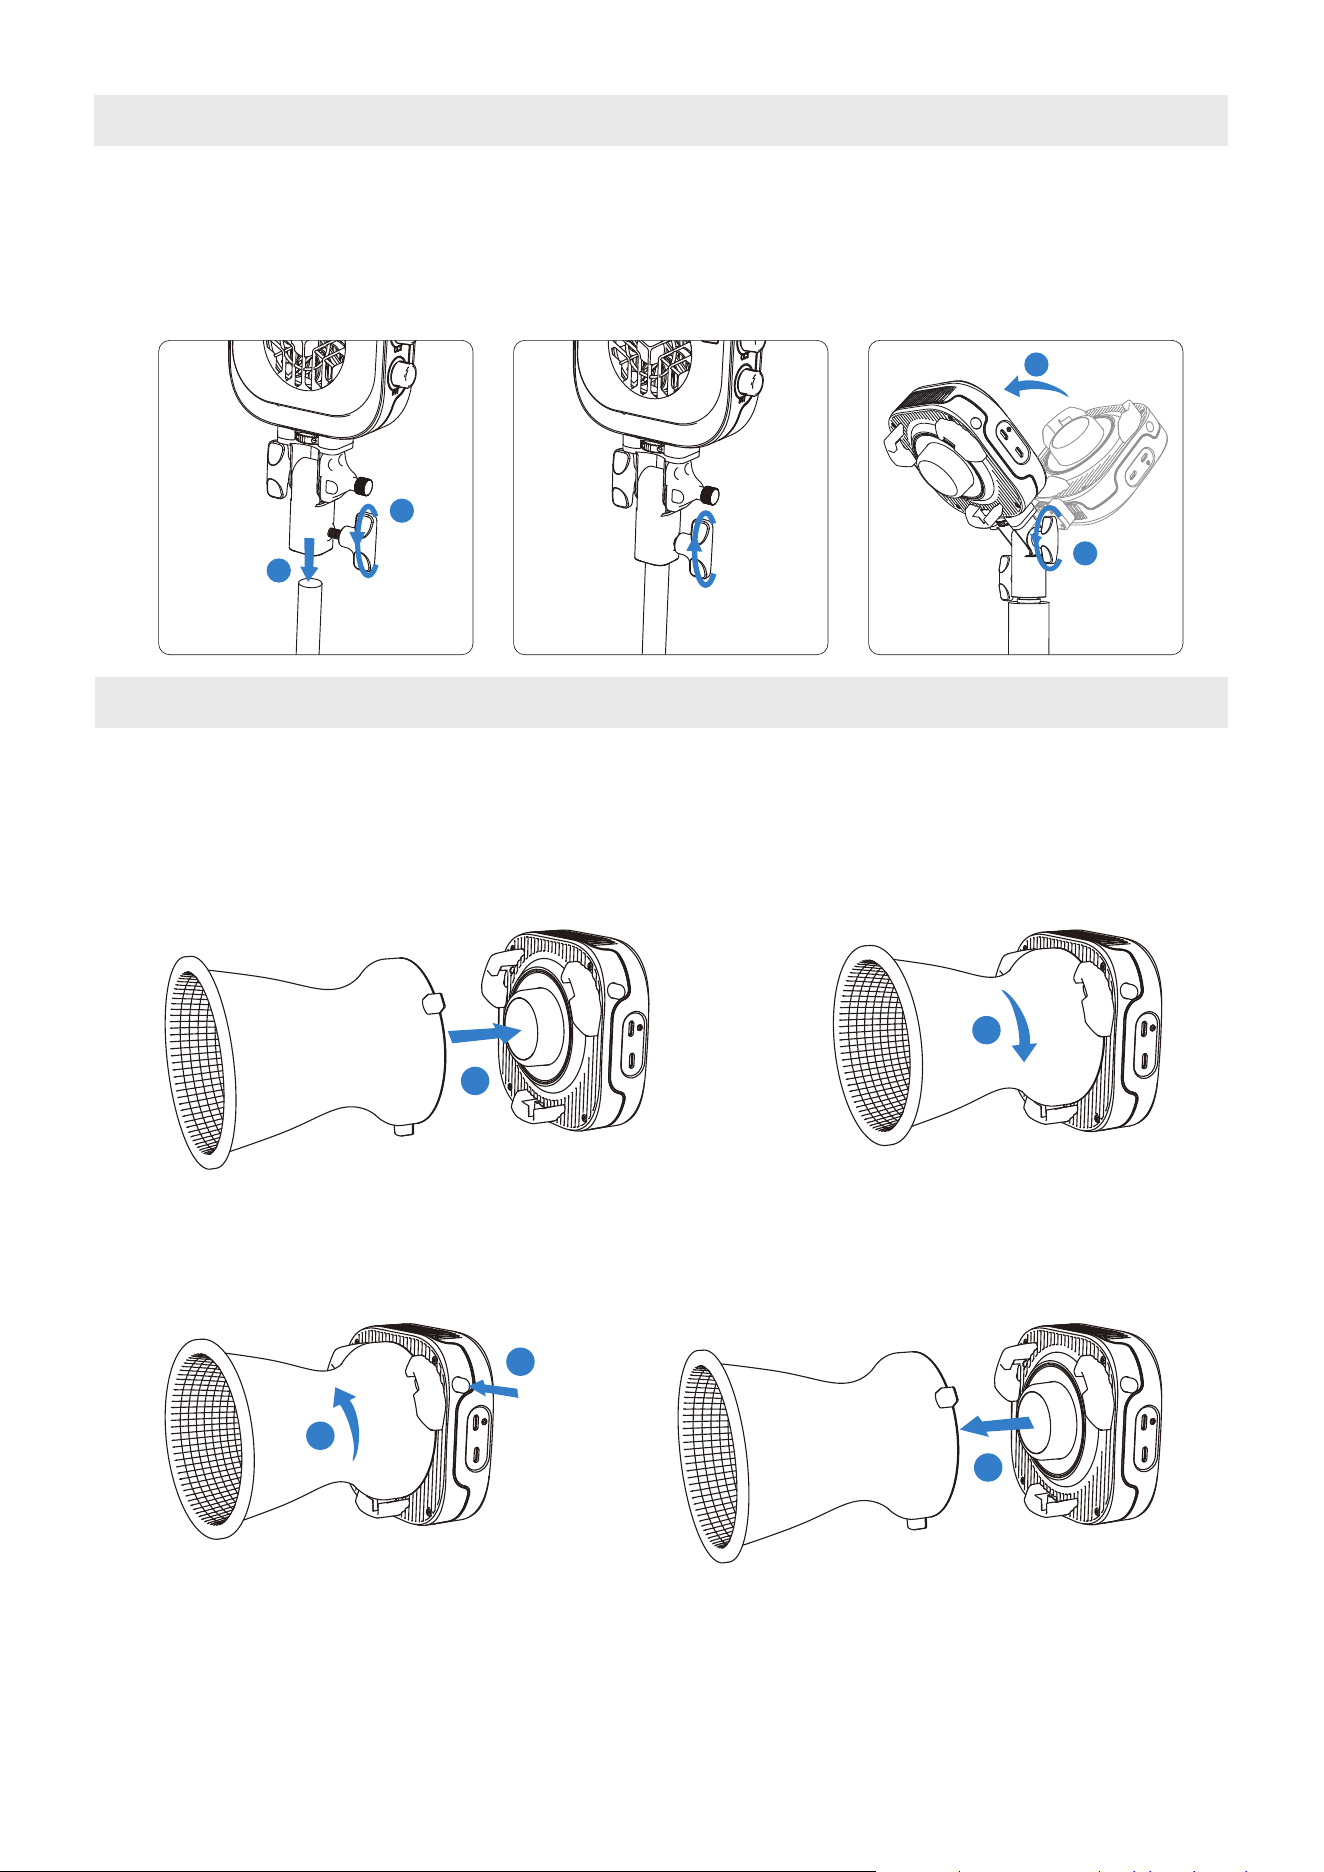
*When replacing with other accessories, please ensure compatibility with the fixture. For detailed compatibility infor-
mation, refer to the official website.
*The amaran Mini Reflector shown in the illustration is sold separately and is not included in the standard package.
With the mounting bracket installed onto the light, place the end of the mounting bracket
onto the light stand and turn the locking knob to secure into place. Adjust the angle of the
light and turn the tilting bracket knob to secure into place.
3. Light Installation
2.Modifier Removal: Press and hold the Bowens Mount Release Button on the corner of the
light. Rotate the modifier counterclockwise to remove.
1.Modifier Installation: Align the Bowens Mount pins with the Bowens Mount of the fixture.
Insert the modifier and rotate clockwise. Installation is complete when the Bowens Mount
Release Button pops out.
4. Bowens Mount Modifier Installation
1
2
1
2
1
2
3
1
2
13
5. Main Menu
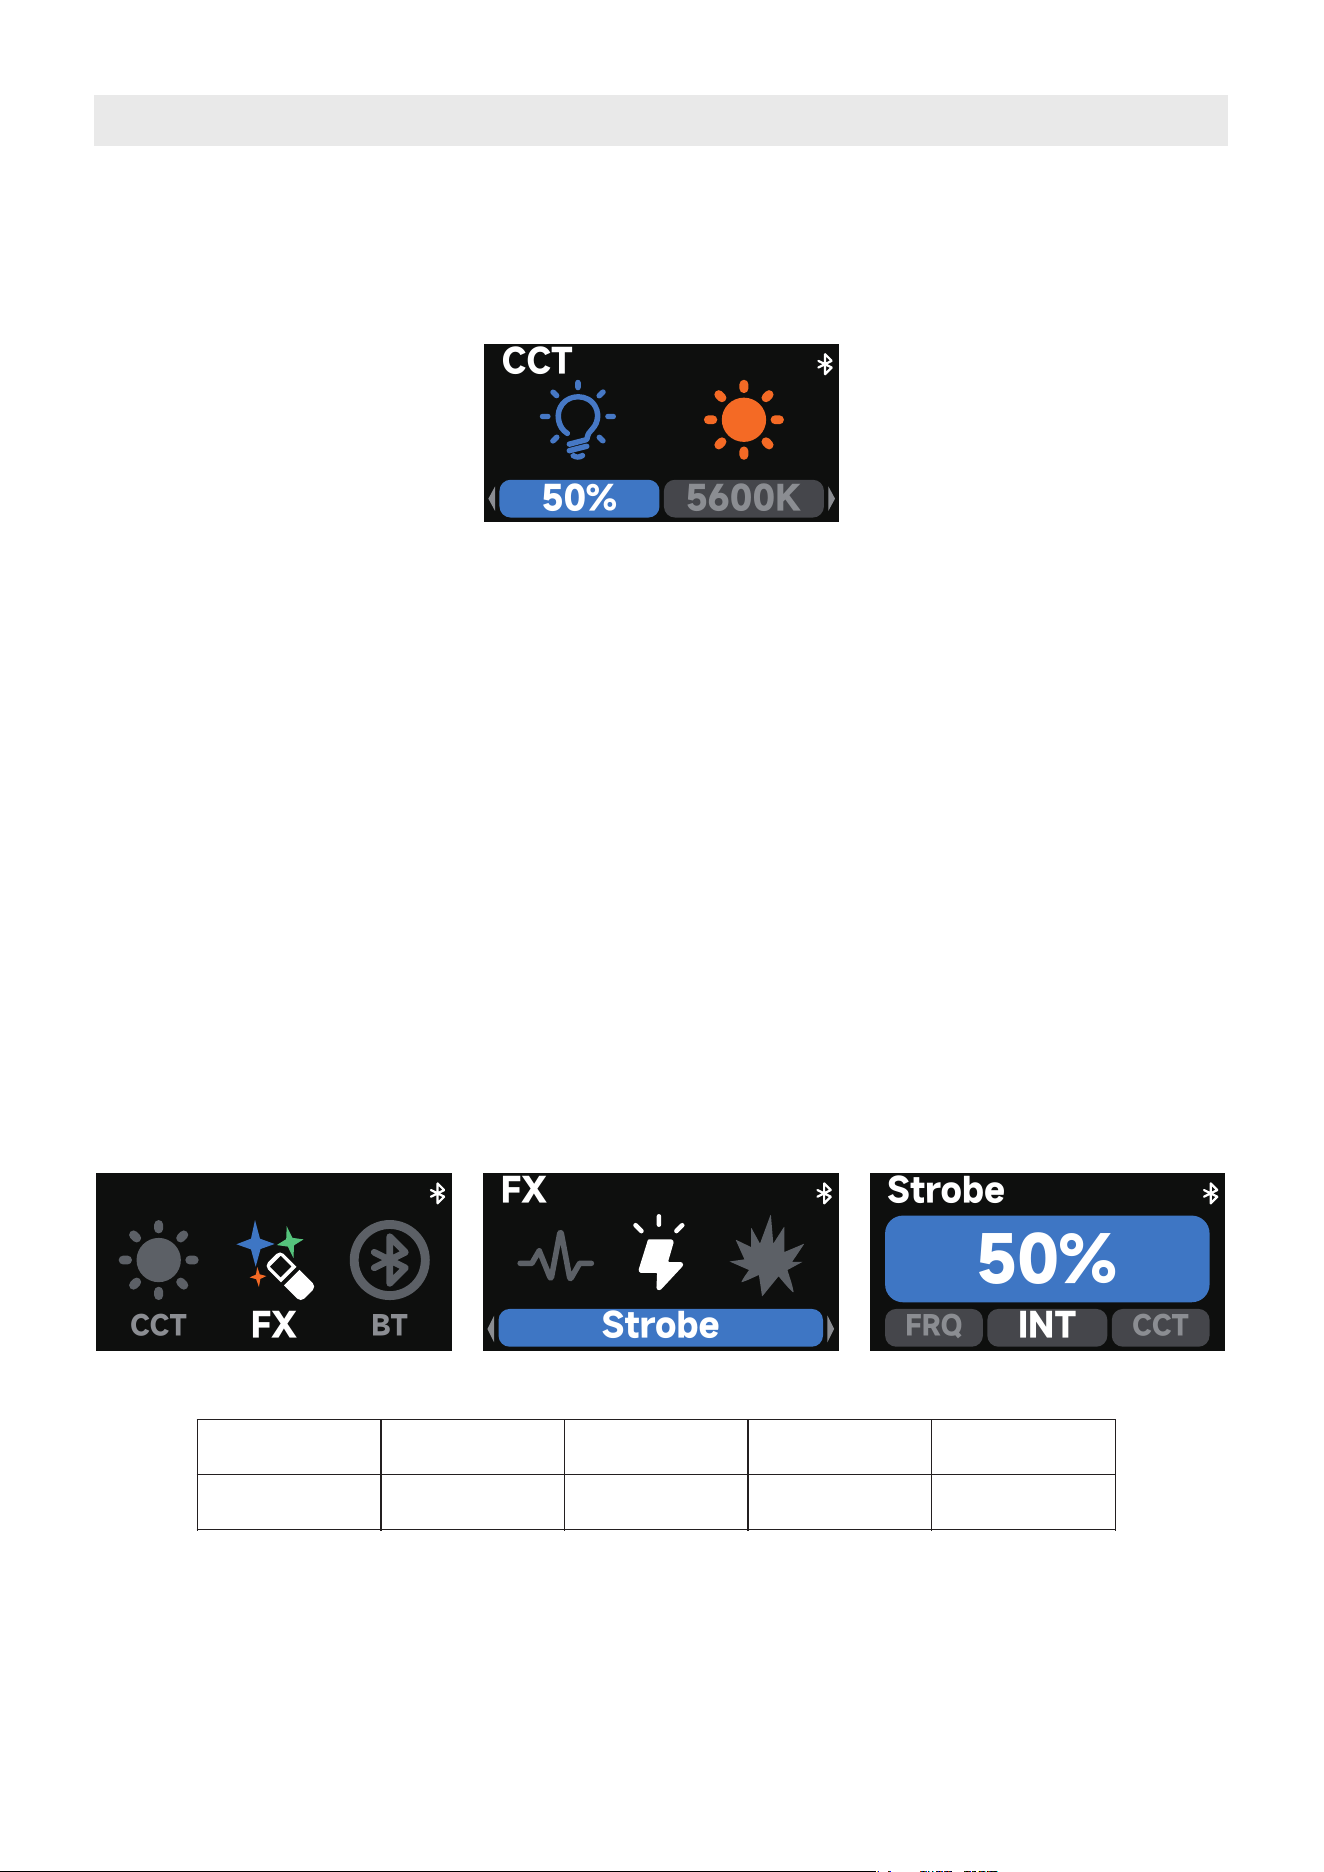
5.1. CCT
After powering on, the fixture is in CCT mode by default. Rotate the CCT knob on top to
adjust the color temperature. Rotate the INT knob on the bottom to adjust the brightness.
5.2. FX
In CCT Mode, press the Back button to return to the main menu.
Rotate the CCT knob and press it to select and enter Effects Mode from the main menu.
Once in Effects Mode, rotate the CCT knob to browse the available effects, and press the knob to
enter the selected effect settings.
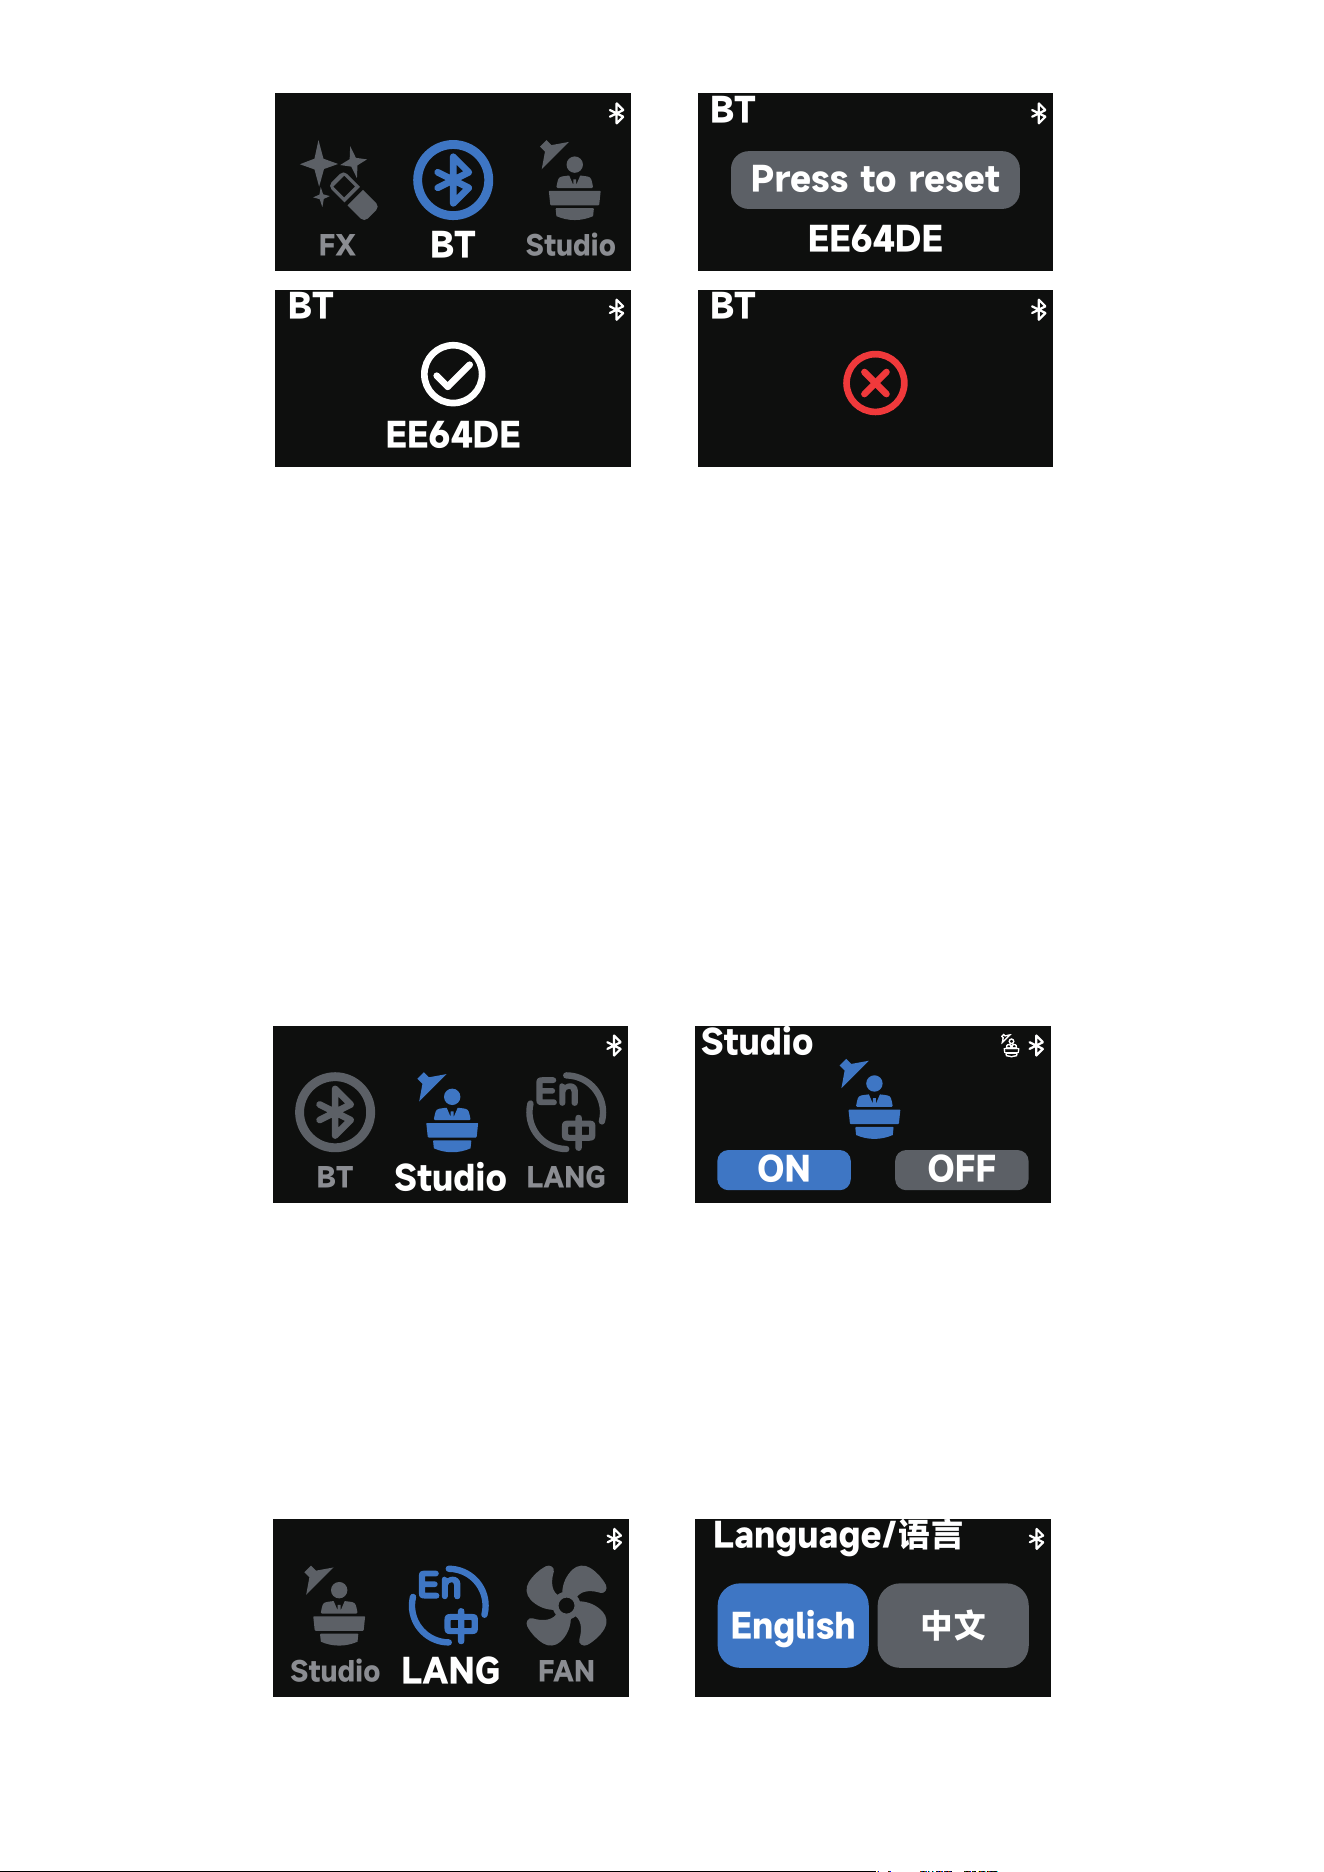
5.3. Bluetooth Reset
Rotate and press the CCT knob to enter BT mode from the main menu. Hold down on the
CCT knob until the end of the progress bar. Release the knob to cancel.
1. INT (Intensity): Adjust your light's brightness from 0%-100%.
2. CCT (Correlated Color Temperature): Adjust your light's color temperature from warm
white (2,700K CCT) to cool white (6,500K CCT).
3.Short press the INT knob to quickly switch to CCT Mode, allowing fast adjustment of color
temperature and brightness.
4.In any interface, rotating the INT knob directly adjusts the brightness of the fixture.
Supported Lighting Effects:
Fireworks Faulty Bulb
Lightning
TV Pulsing
Strobe
Explosion
Fire
Paparazzi /
CCT
FX
BT
Strobe
FX
Strobe
50%
FRQ
INT
CCT
CCT
50%
5600K
14
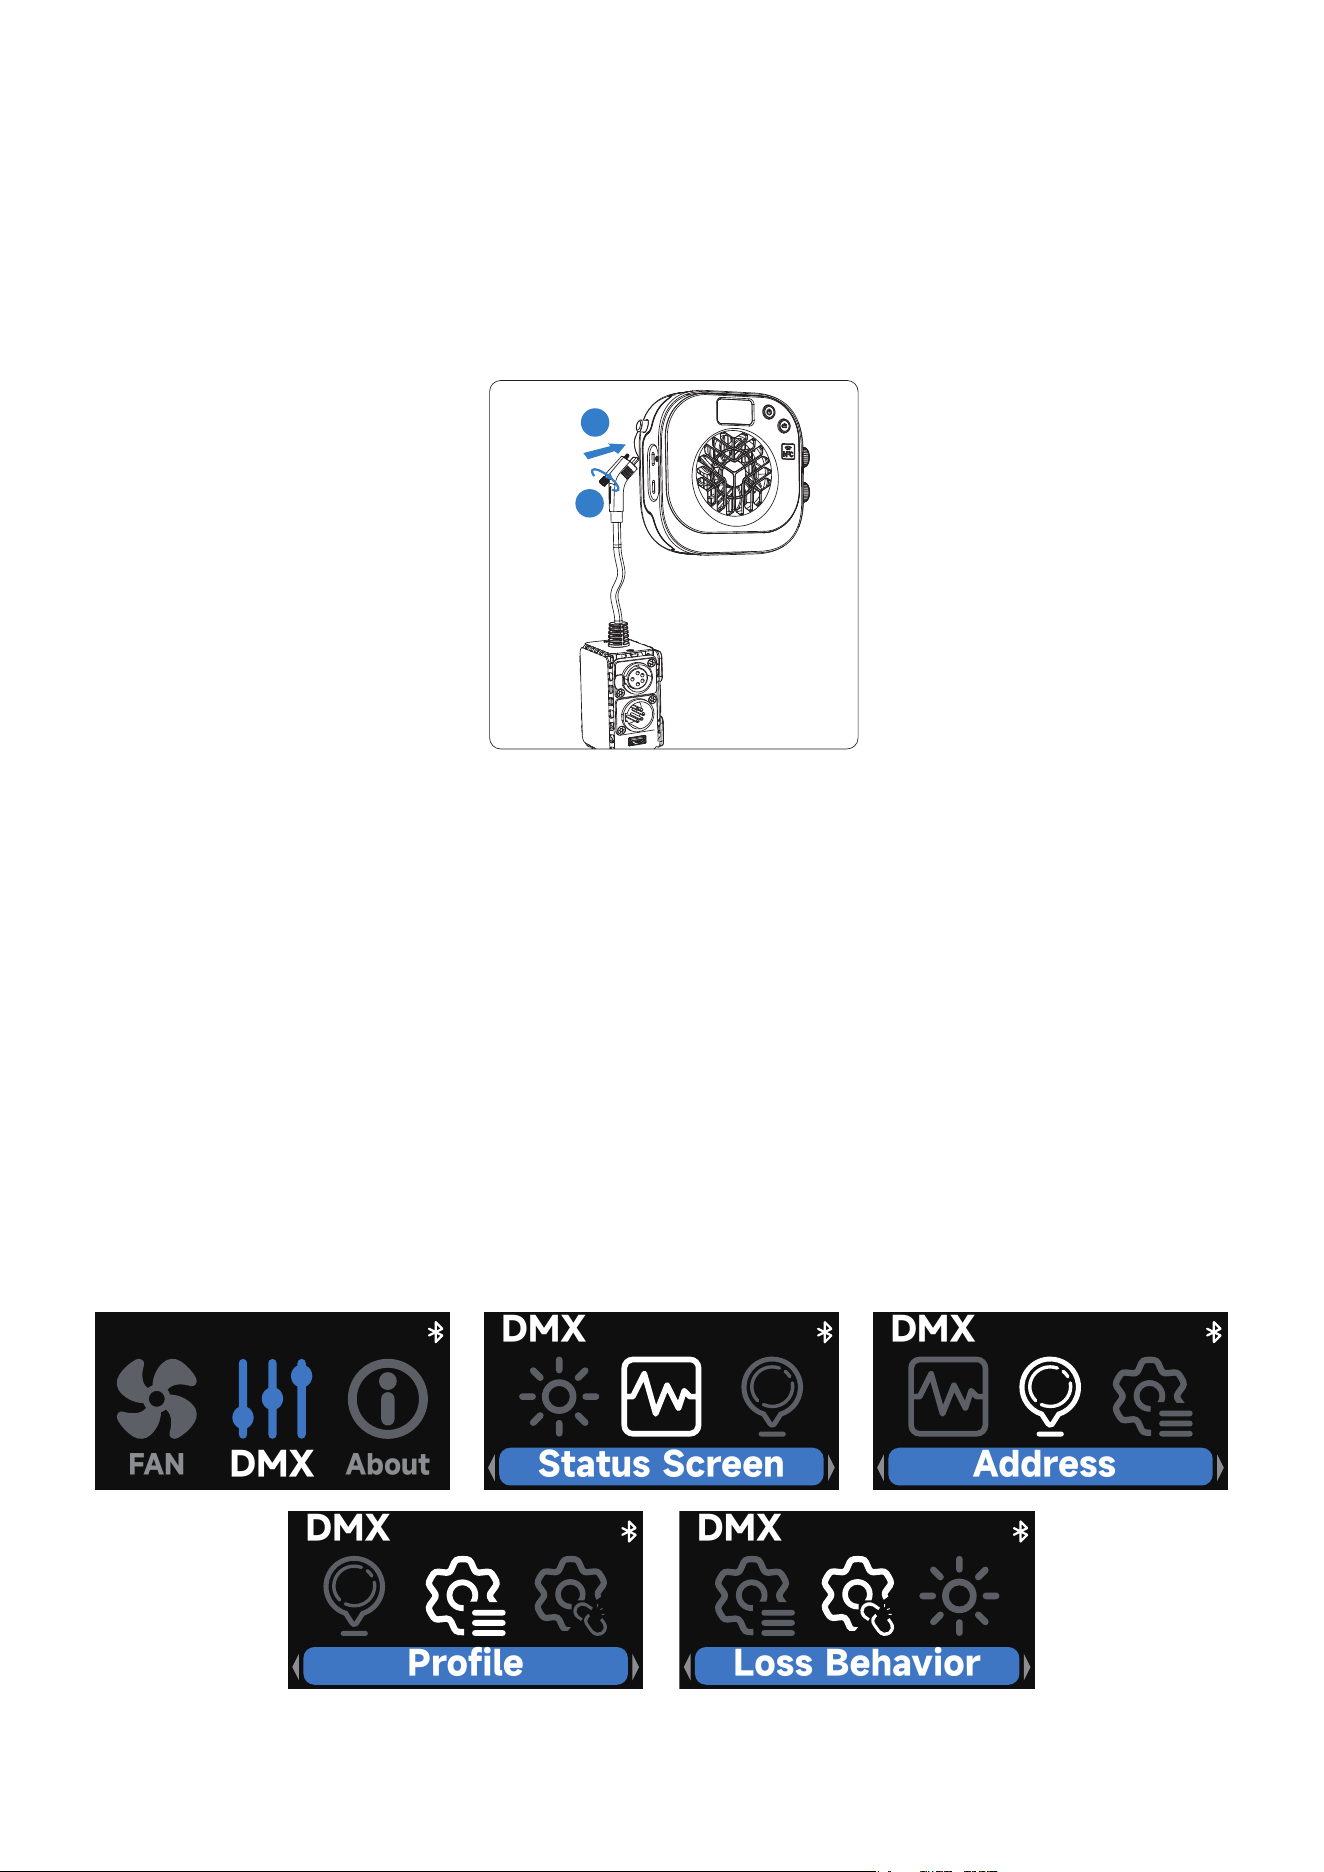
5.5. LANG (Language)
In the main menu, rotate the CCT control knob to select Language, then press the knob to
enter the settings interface.
In this menu, rotate the CCT knob to switch between English and Chinese. Press the confirm
button to confirm your selection.
1. Bluetooth reset is successful.
2. Bluetooth reset is unsuccessful. Please reset Bluetooth again.
5.4. Studio Mode
In the main menu, rotate the CCT knob to select Studio Mode, then press the knob to enter
the settings interface.
In this mode, rotate the CCT knob to toggle between On and Off, and press the knob to con-
firm the selection.
When Studio Mode is enabled, the light will automatically turn on upon connecting to power,
without the need to manually press the power button.
LANG
FAN
Studio
Language/语言
English
中文
BT
Studio
LANG
Studio
ON
OFF
BT
FX
Studio
BT
EE64DE
Press to reset
BT
EE64DE
BT
15
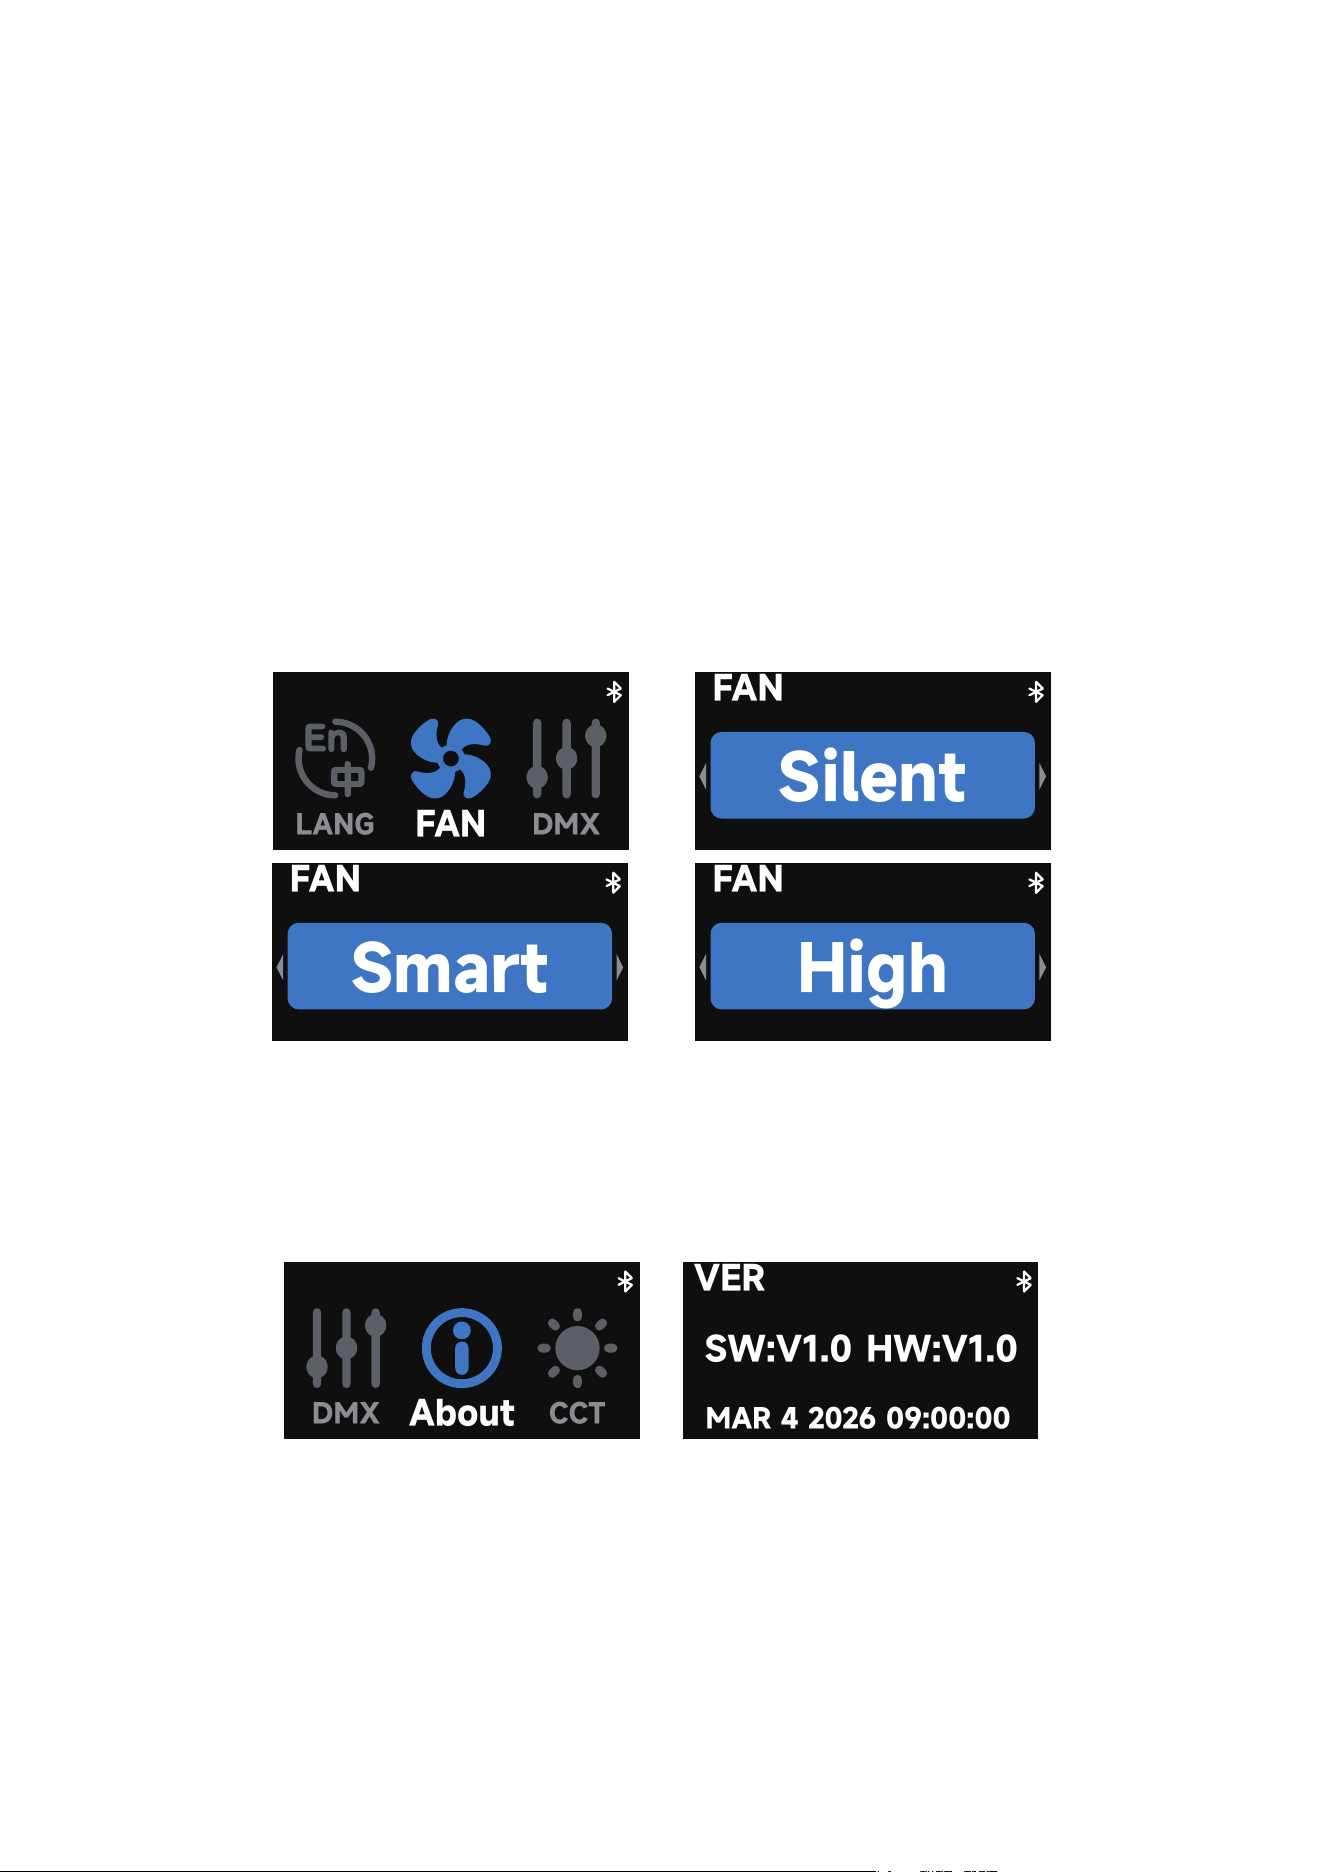
*The amaran USB-C to 5-Pin DMX In&Out Adapter is sold separately.
5.6. DMX Control Settings
Insert the USB-C connector of *the amaran USB-C to 5-Pin DMX In&Out Adapter into the
USB-C port of the fixture, and tighten the locking screw to secure the connection. Velcro
straps can be used to secure the adapter in an appropriate position, ensuring stability during
use.The USB-A port on the adapter provides a 5V/1A power output.
To enter DMX Mode, follow these steps:
1.Rotate the control knob and press it to select “DMX Mode” from the main menu.
2.Once inside, rotate the knob to toggle between the following options:
-DMX Status Display: View the current DMX address and selected DMX configuration.
-DMX Address: Set the DMX start address of the fixture, ranging from 1 to 512.
-DMX Signal Loss Behavior: Choose how the fixture responds to DMX signal loss. Options
include: Hold Last State, Instant Off, Fade Out, or Hold for 2 Minutes then Fade Out.
-DMX Profile: Select the desired DMX channel profile. For detailed configuration files,
please refer to the official documentation.
1
2
DMX
Profile
DMX
Loss Behavior
About
FAN
DMX
DMX
Status Screen
DMX
Address
5.7. Fan Mode
Rotate the knob and and press the knob to enter Fan mode from the main menu. In Fan mode,
rotate the dial to toggle between Silent and Smart fan mode. Press the knob to confirm your
settings.
Silent Mode: The fan will be completely turned off, and the light will not produce any noise. To
ensure safe operation, the amaran Halo 60x maximum power will be limited to 11W, the
amaran Halo 100x maximum power will be limited to 20W.
Smart Mode: The fan speed will automatically adjust according to the temperature of the
light.
High Mode: The fan runs at maximum speed to provide enhanced cooling performance, ideal
for high-load scenarios.
5.8. Firmware Update
Firmware updates can be performed online via the amaran app, ensuring your device stays
up to date with the latest features and performance improvements.
About
CCT
DMX
VER
HW:V1.0
SW:V1.0
MAR 4 2026 09:00:00
16
To enter DMX Mode, follow these steps:
1.Rotate the control knob and press it to select “DMX Mode” from the main menu.
2.Once inside, rotate the knob to toggle between the following options:
-DMX Status Display: View the current DMX address and selected DMX configuration.
-DMX Address: Set the DMX start address of the fixture, ranging from 1 to 512.
-DMX Signal Loss Behavior: Choose how the fixture responds to DMX signal loss. Options
include: Hold Last State, Instant Off, Fade Out, or Hold for 2 Minutes then Fade Out.
-DMX Profile: Select the desired DMX channel profile. For detailed configuration files,
please refer to the official documentation.
FAN
LANG
DMX
FAN
Silent
FAN
Smart
FAN
High
17
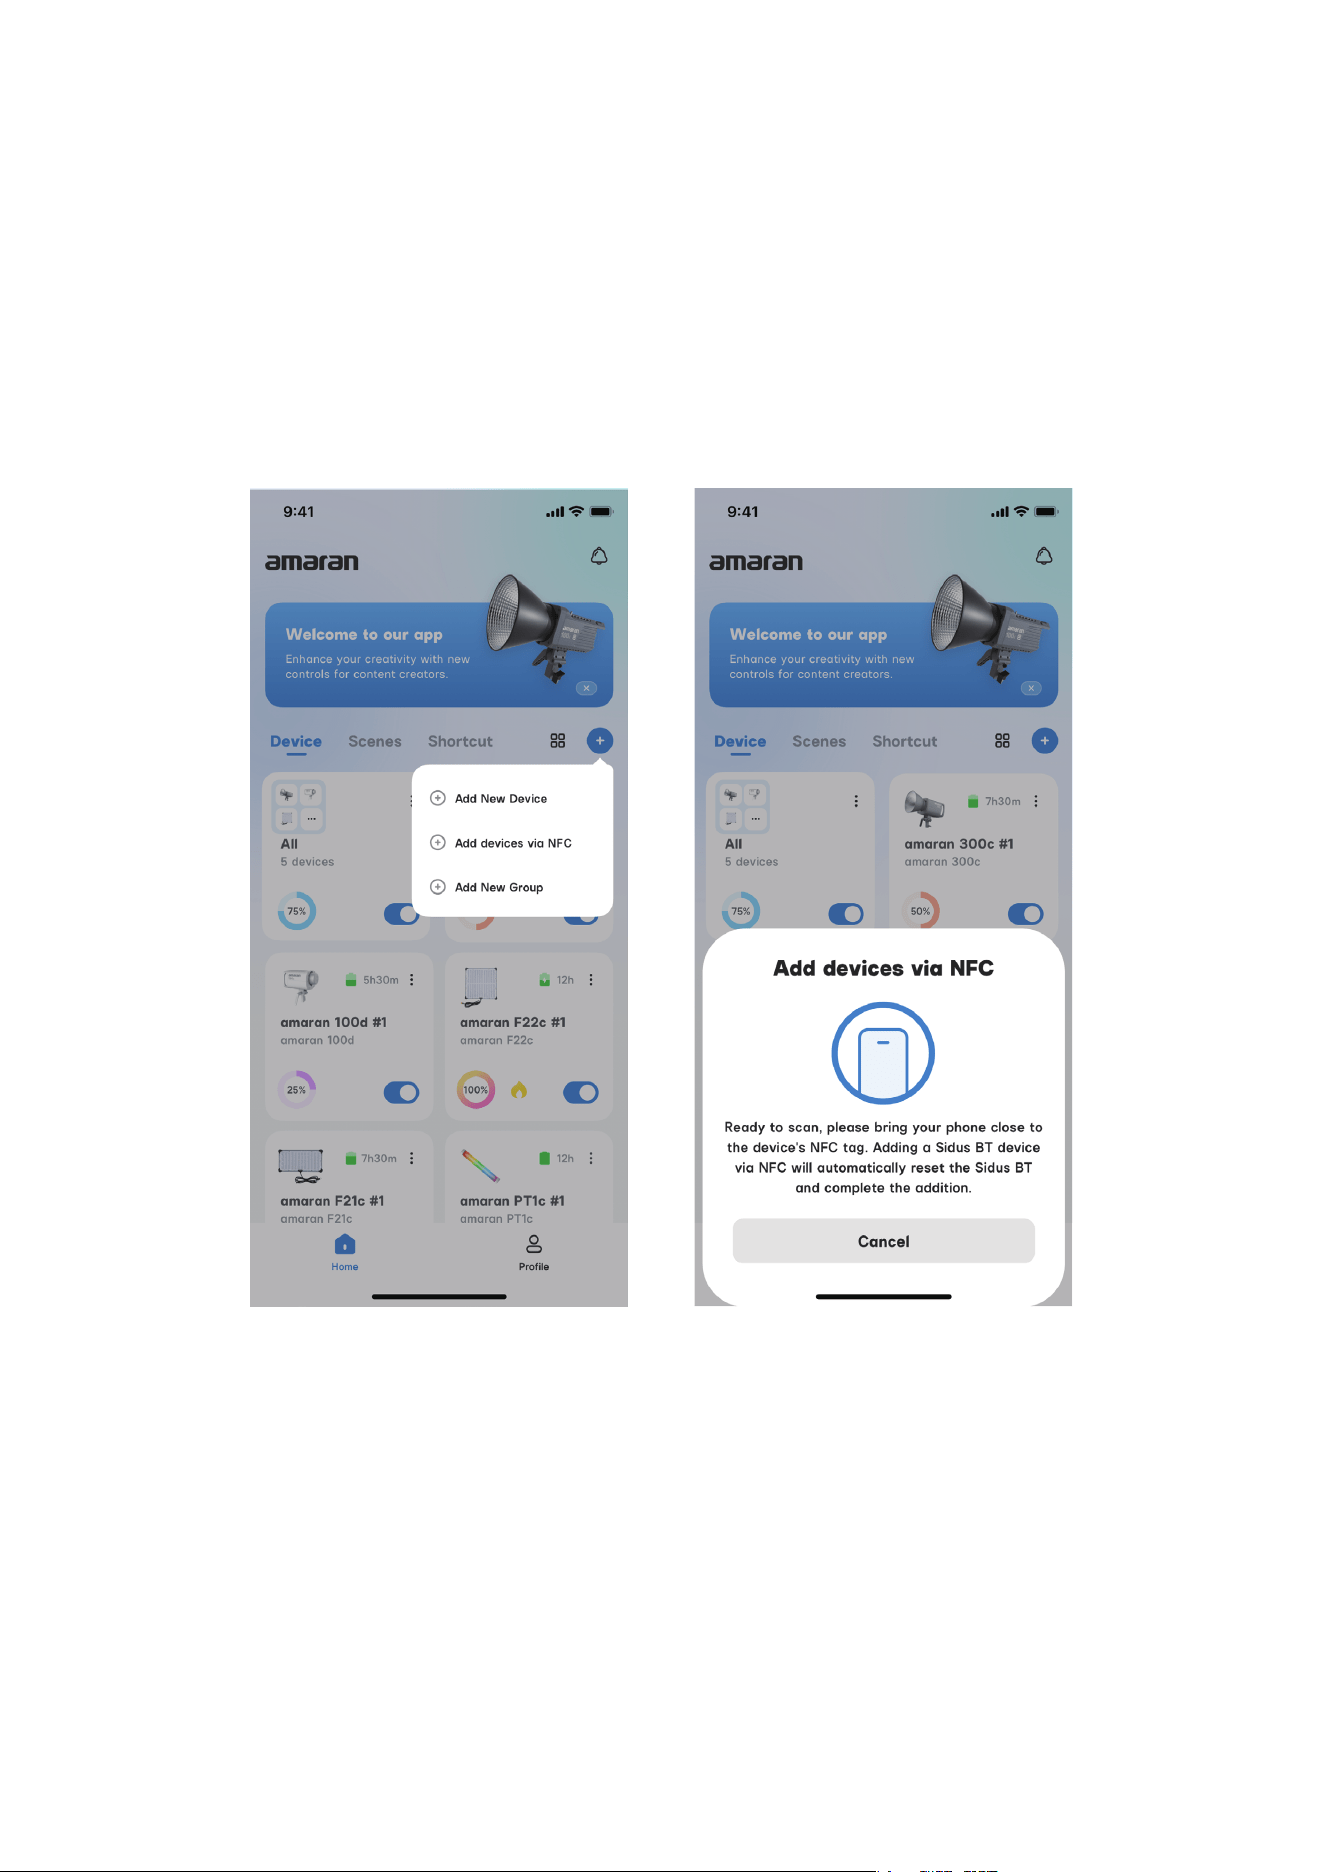
5.9. Pairing via NFC
To pair your light to the amaran app via NFC, open the amaran mobile app, tap the + sign,
and select NFC Add Device. Place the NFC sensor area of your phone to the fixture's NFC tag.
Hold your phone still until the fixture has been detected and successfully paired before
removing your phone.
Even if the light is powered off, pairing via NFC is still supported. The light will automatically
connect to the app once it is turned on.
18
You can download the amaran mobile app from the iOS App Store, Google Play Store, and
oher platforms for enhancing the functionallty of the light.You can download the amaran
desketop app for Mac and Windows from the amaran website. Please visit amarancre-
ators.com for more detalls on how to use the app to contrdl your amaran Iights.
Using the amaran App
amaran APP amarancreators.com
19
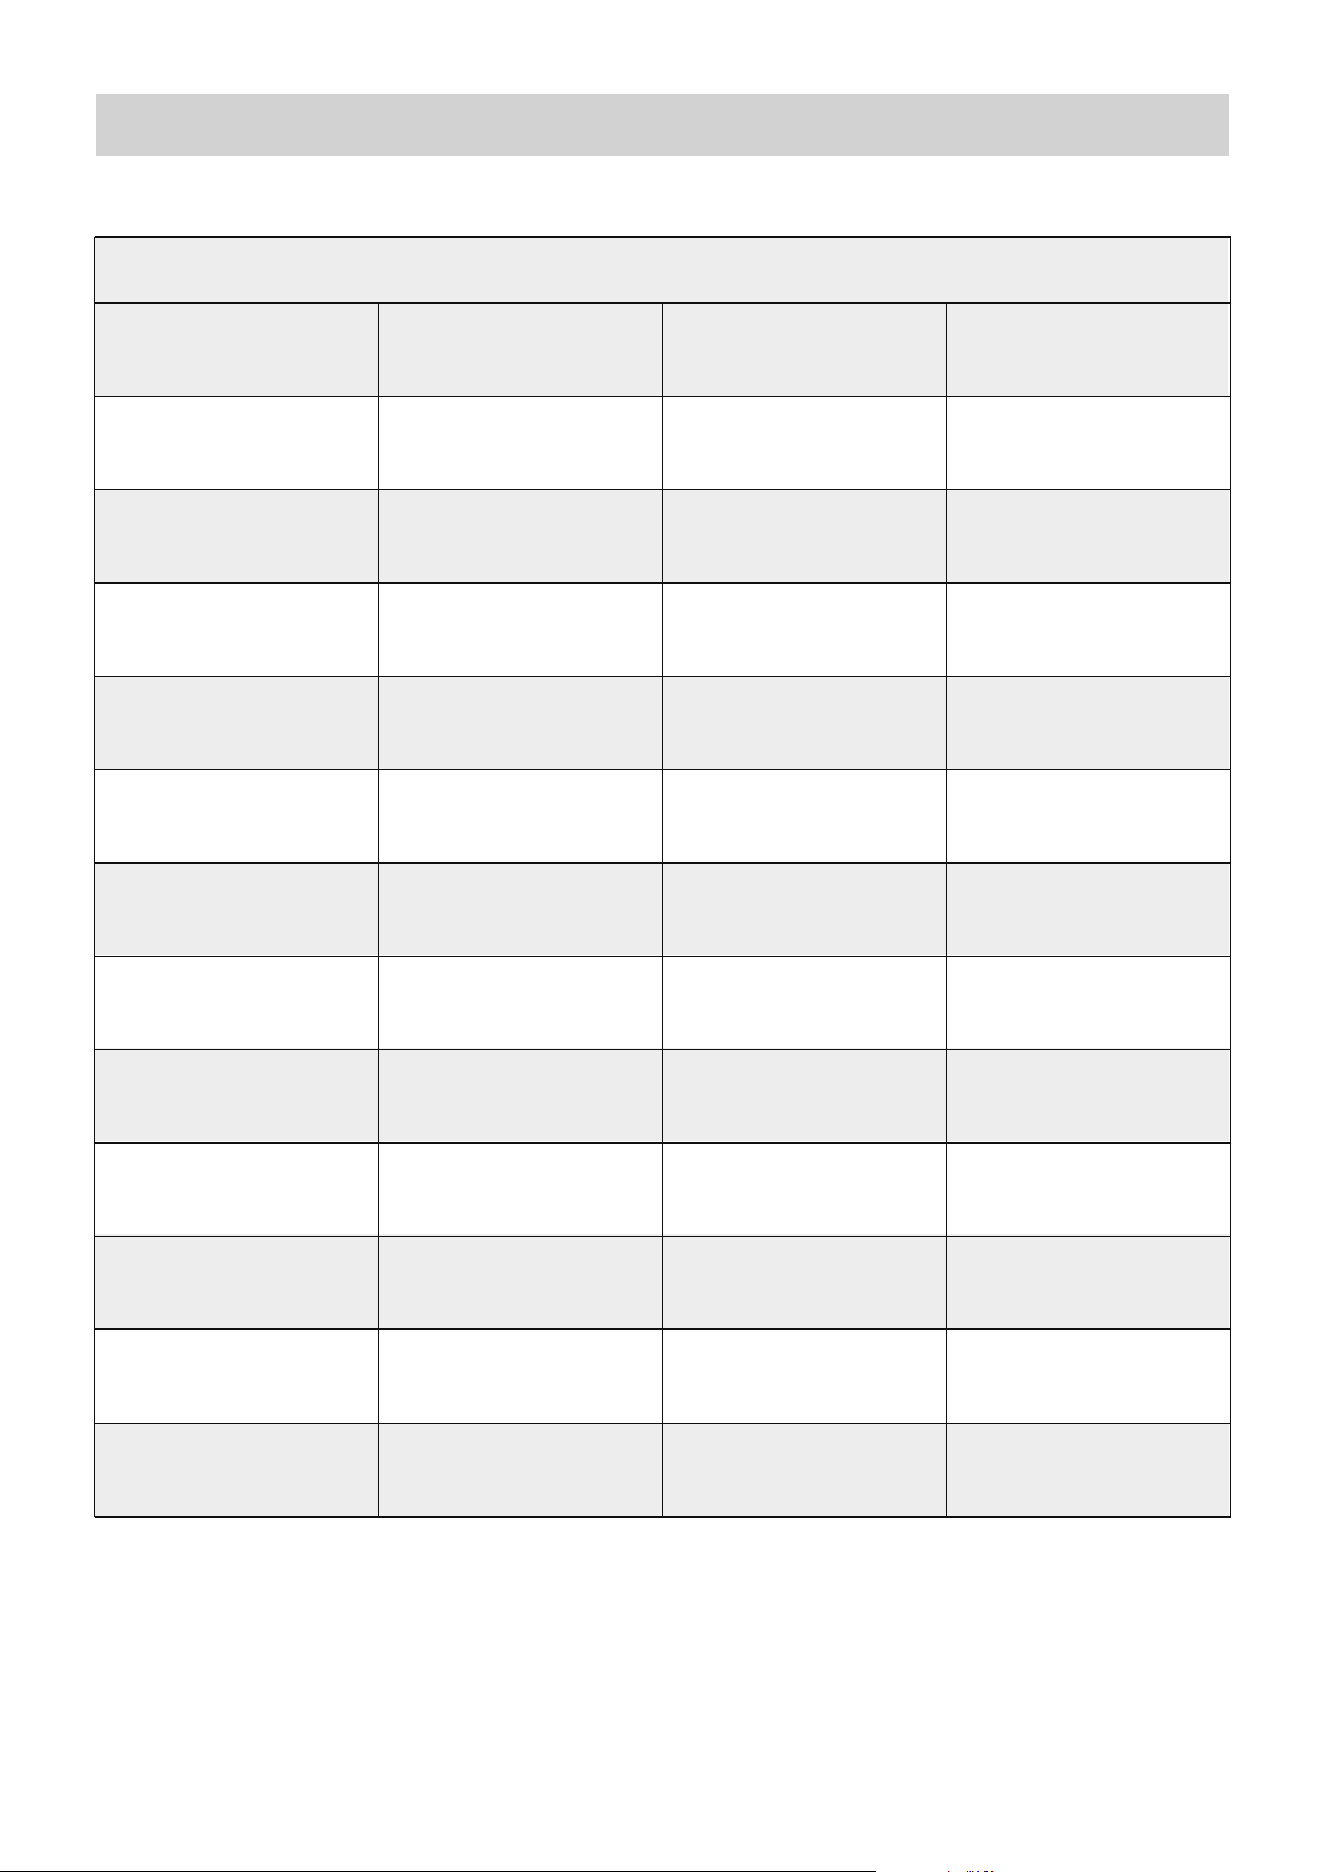
Specifications
Power Consumption Power Output
CCT Luminous Flux
CRI TLCI
Operating Voltage
Power Supply
Methods
Beam Angle IP Rating
Control Methods
Firmware
Upgradeable
Screen Type
Wireless Operating
Rang (Bluetooth)
Cooling Method
Operating
Temperature
63W(Max) 56W(Max)
2,700K - 6,500K 6,041 lumens@5600K
96+
94
97+
102
84
AC 100V - 240V/
50-60Hz
74
USB-C PD 3.0
On-board,amaran
App, *DMX Control
TFT ≤80m / ≤262.5ft
Active Cooling
Max Noise Level
@ Smart Mode
≤28dBA @25℃
Storage Temperature
-20ºC - 80ºC /
-4ºF - 176ºF
-10°C - 40°C /
14°F - 104°F
Fixture Dimensions Fixture Weight
0.42 kg / 0.93 lb
13.4 × 12.0 × 5.8 cm
5.28 × 4.72 × 2.28 in
Power Adapter
Cable Length
AC Power
Cable Length
2 m / 6.56 ft2.5 m / 8.2 ft
TM-30 Rf(Average) TM-30 Rg(Average)
SSI(P3200) SSI (D56)
85° IP20
amaran App
amaran Halo 60x
20
*The amaran USB-C to 5-Pin DMX In& Out Adapter is sold separately.
*The above technical specifications are from the Aputure laboratory, and there may be
some variation between individual units.
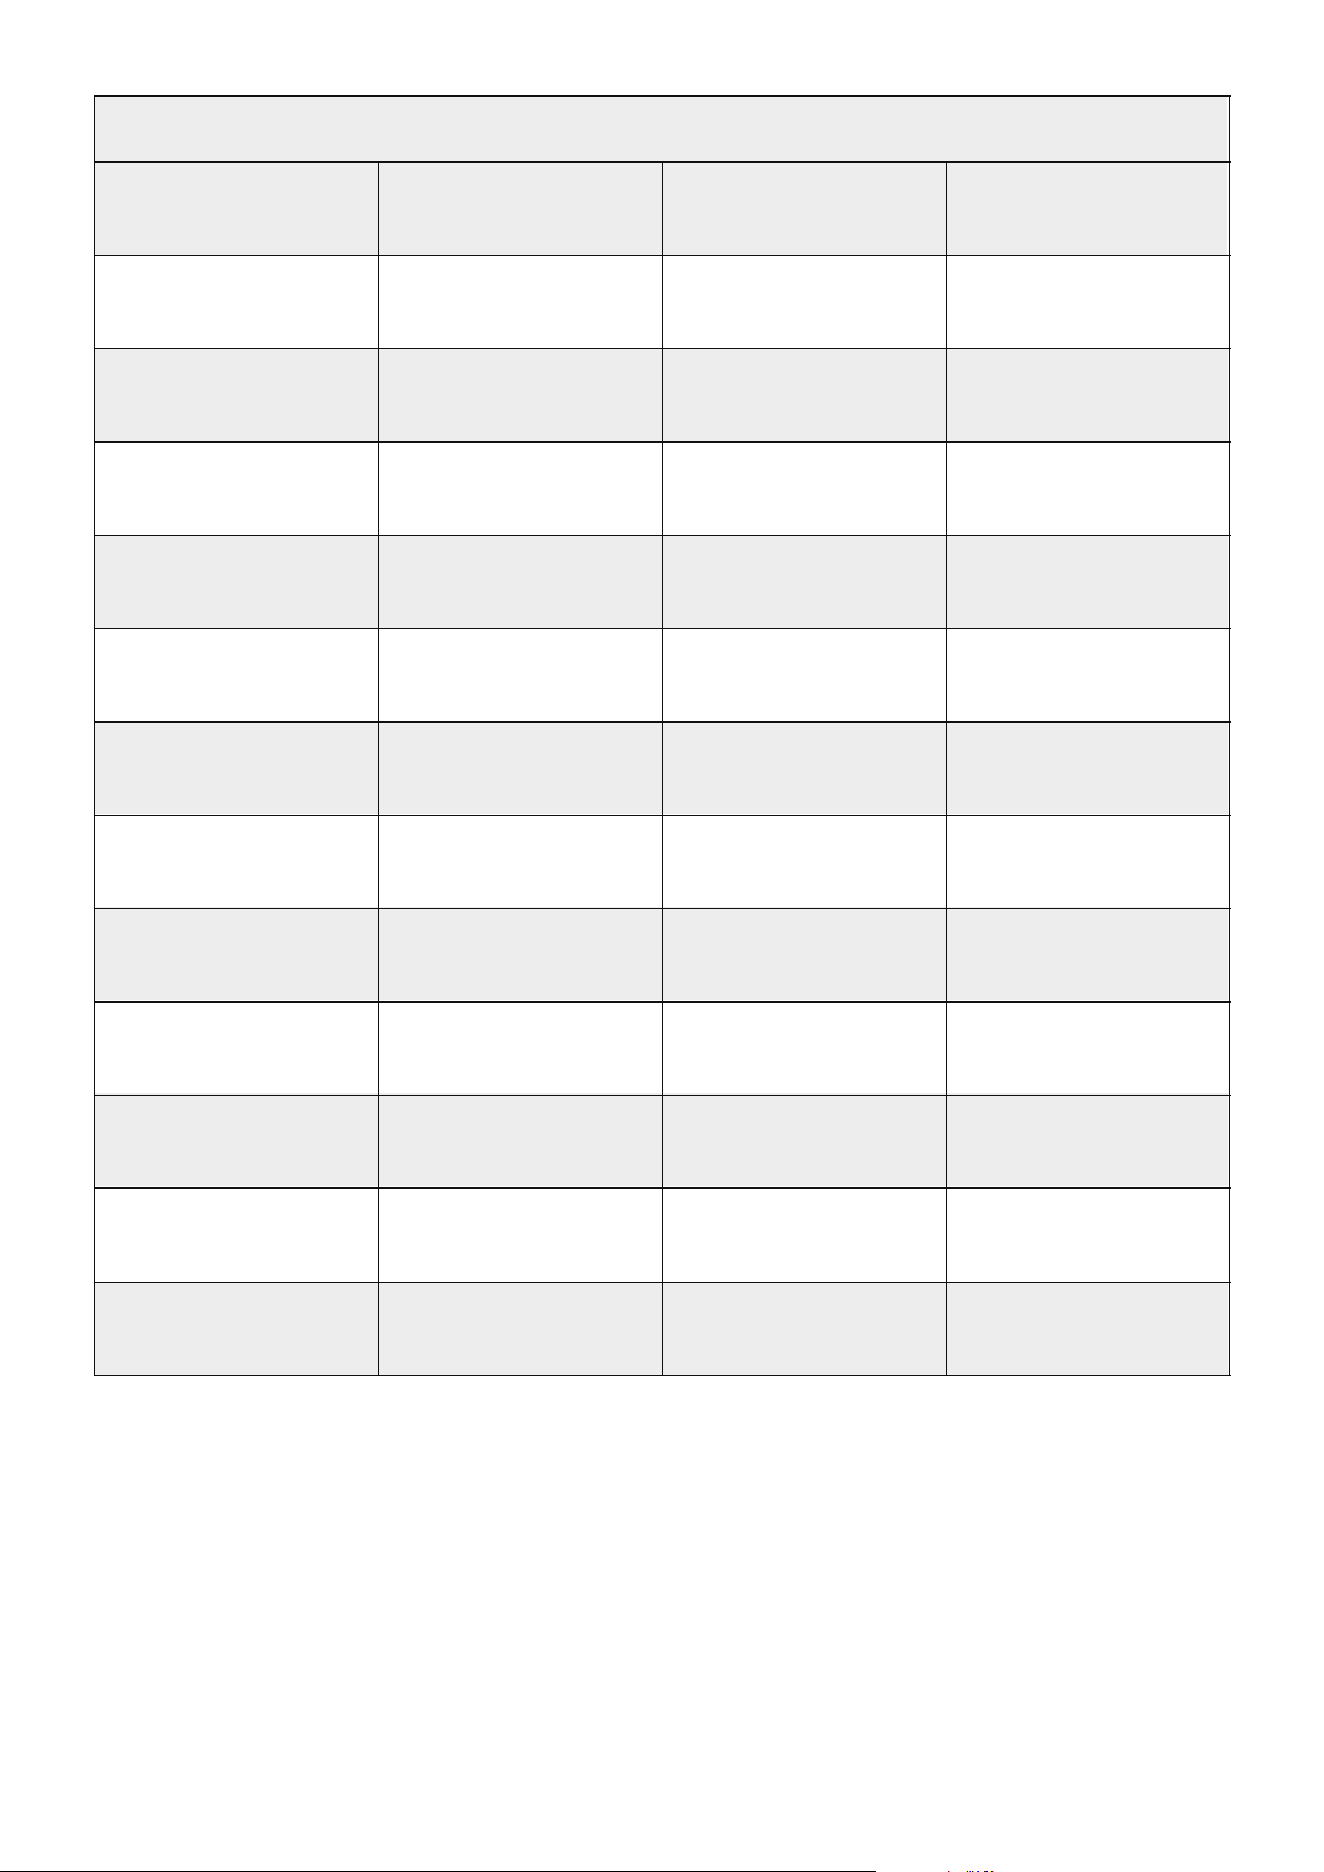
Power Consumption Power Output
CCT Luminous Flux
CRI TLCI
Operating Voltage
Power Supply
Methods
Beam Angle IP Rating
Control Methods
Firmware
Upgradeable
Screen Type
Wireless Operating
Rang (Bluetooth)
Cooling Method
Operating
Temperature
100W(Max) 84W(Max)
2,700K - 6,500K 8,722 lumens@5600K
96+
94
97+
102
84
AC 100V - 240V/
50-60Hz
74
USB-C PD 3.0
DC 12V-24V
On-board,amaran
App, *DMX Control
TFT ≤80m / ≤262.5ft
Active Cooling
Max Noise Level
@ Smart Mode
≤28dBA @25℃
Storage Temperature
-20ºC - 80ºC /
-4ºF - 176ºF
-10°C - 40°C /
14°F - 104°F
Fixture Dimensions Fixture Weight
0.42 kg / 0.93 lb
13.4 × 12.0 × 5.8 cm
5.28 × 4.72 × 2.28 in
Power Adapter
Cable Length
AC Power
Cable Length
2 m / 6.56 ft2.5 m / 8.2 ft
TM-30 Rf(Average) TM-30 Rg(Average)
SSI(P3200) SSI (D56)
85° IP20
amaran App
amaran Halo 100x
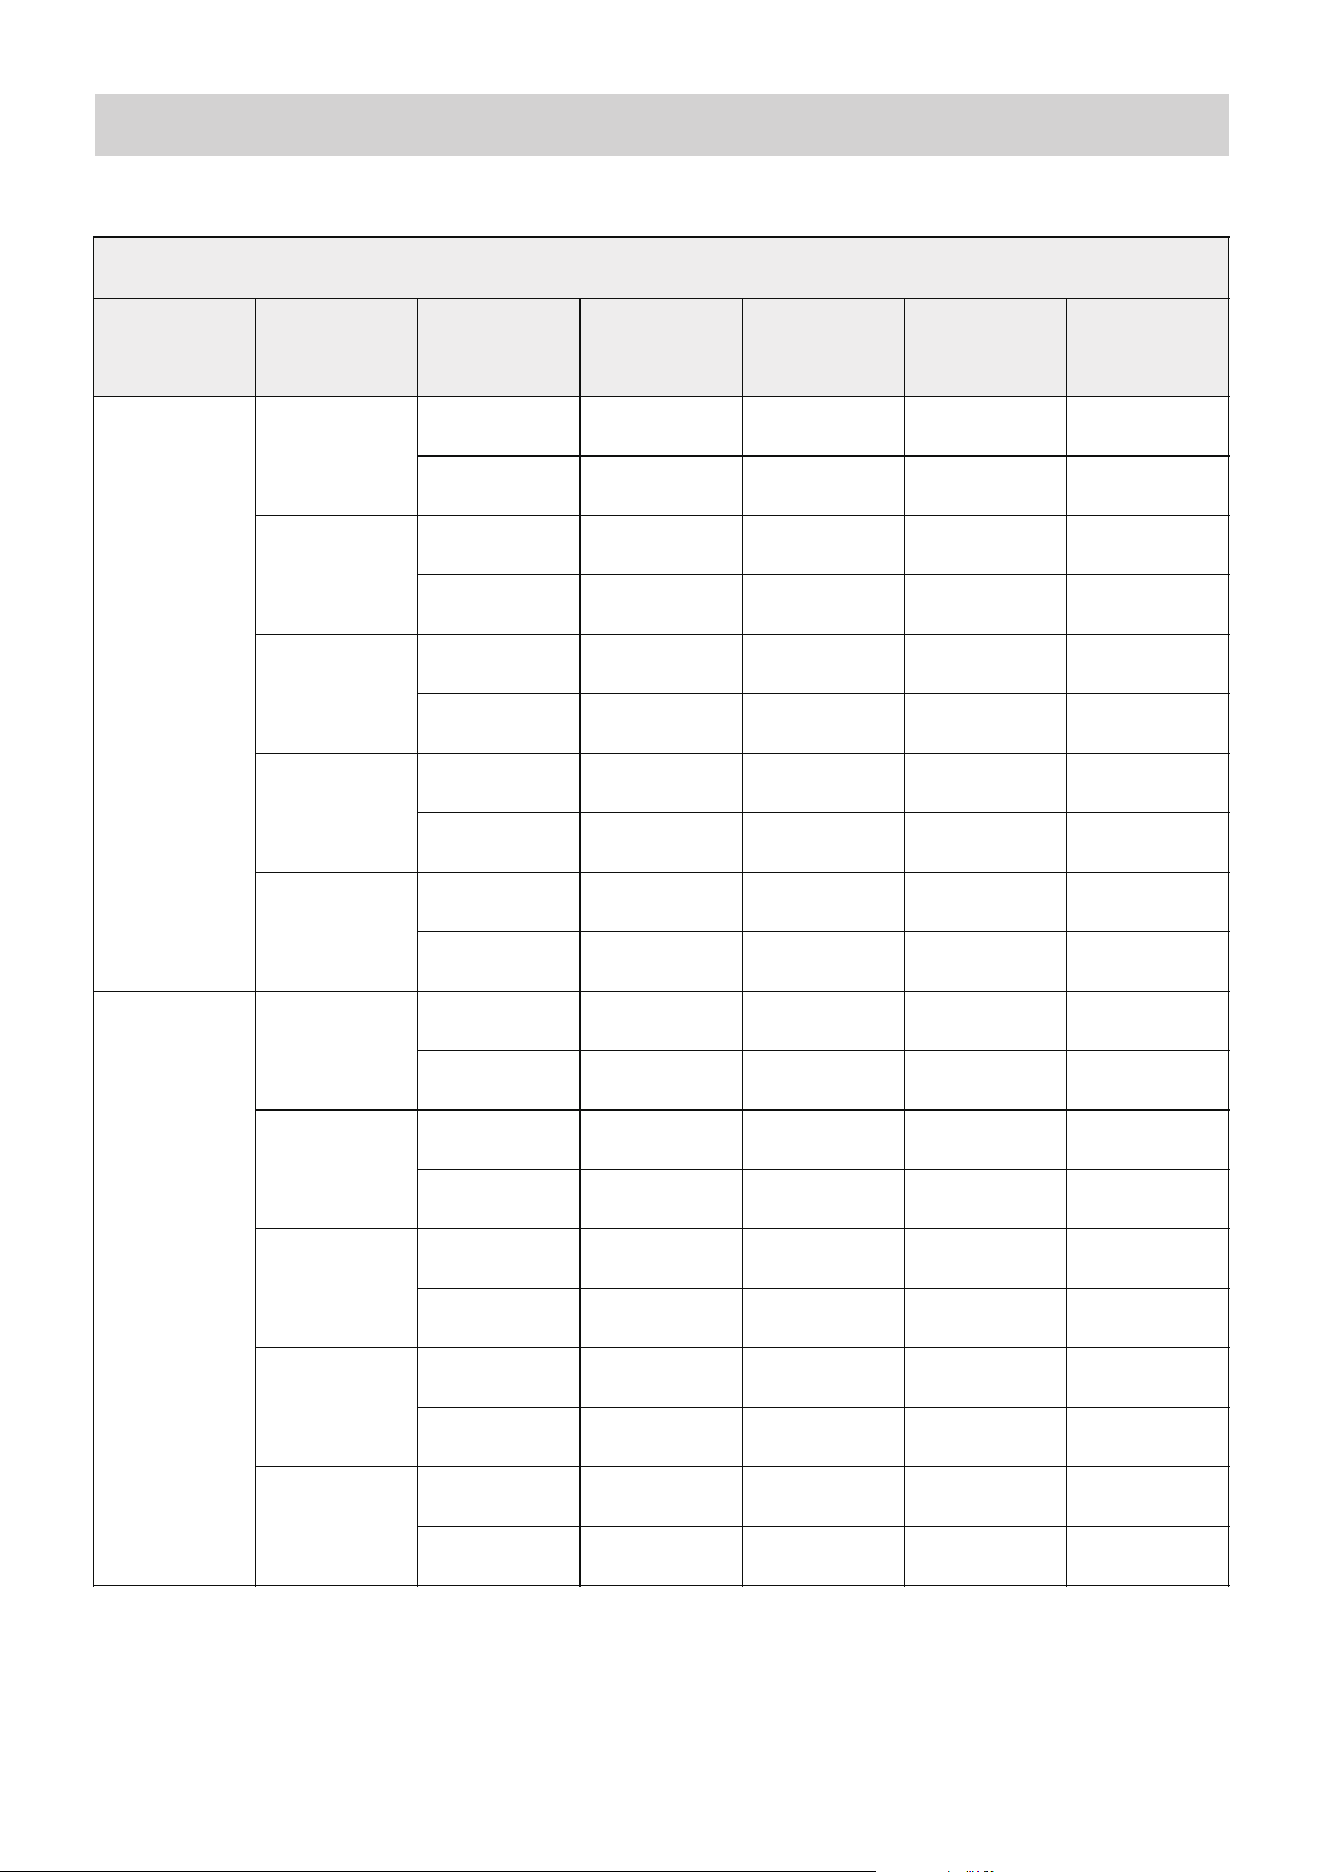
21
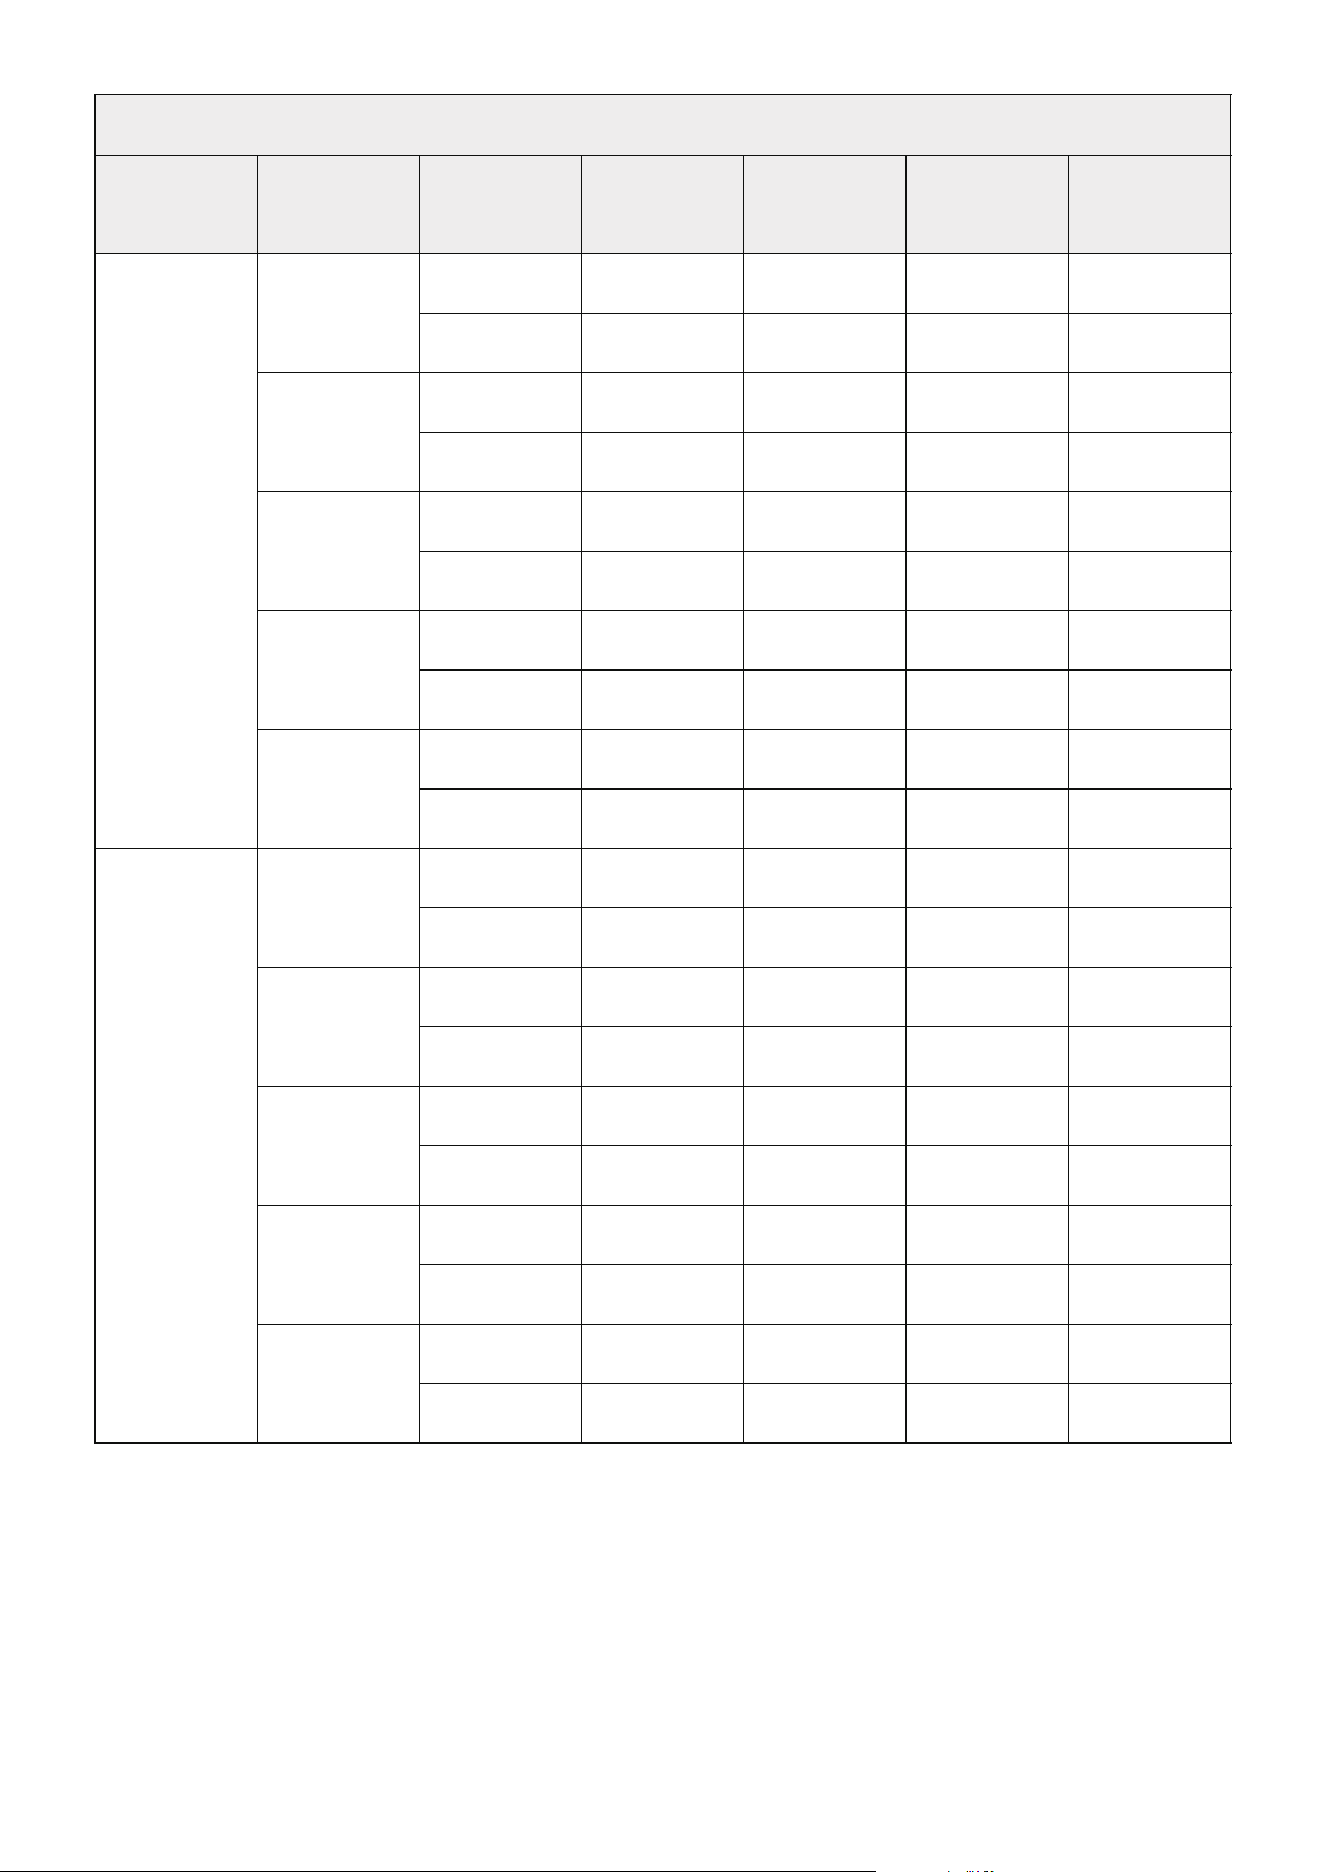
Photometrics
Dis. CCT
No Access-
ories
Light Dome
60
amaran Halo 60x
Mini Fresnel
Spot 15°
Mini Fresnel
Flood 30°
Mini
Reflector
2,700K
2,570 lux 1,760 lux 21,440 lux 22,500 lux 7,270 lux
239 fc 164 fc 1,992 fc 2,090 fc 675 fc
2,800 lux 1,927 lux 23,530 lux 24,510 lux 7,930 lux
260 fc 179 fc 2,186 fc 2,277 fc 737 fc
3,070 lux 2,129 lux 26,000 lux 26,980 lux 8,690 lux
285 fc 198 fc 2,415 fc 2,507 fc 807 fc
3,240 lux 2,255 lux 27,520 lux 28,470 lux 9,140 lux
301 fc 209 fc 2,557 fc 2,645 fc 849 fc
3,270 lux 2,285 lux 27,890 lux 28,770 lux 6,220 lux
304 fc 212 fc 2,591 fc 2,673 fc 578 fc
295 lux 133 lux 2,164 lux 2,514 lux 885 lux
27 fc 12 fc 201 fc 234 fc 82 fc
321 lux 145 lux 2,372 lux 2,720 lux 965 lux
30 fc 13 fc 220 fc 253 fc 90 fc
353 lux 160 lux 2,622 lux 2,991 lux 1,058 lux
33 fc 15 fc 244 fc 278 fc 98 fc
372 lux 169 lux 2,777 lux 3,150 lux 1,113 lux
35 fc 16 fc 258 fc 293 fc 103 fc
375 lux 171 lux 2,812 lux 3,190 lux 1,123 lux
35 fc 16 fc 261 fc 296 fc 104 fc
3,200K
4,300K
5,600K
6,500K
2,700K
3,200K
4,300K
5,600K
6,500K
1m
3m
22
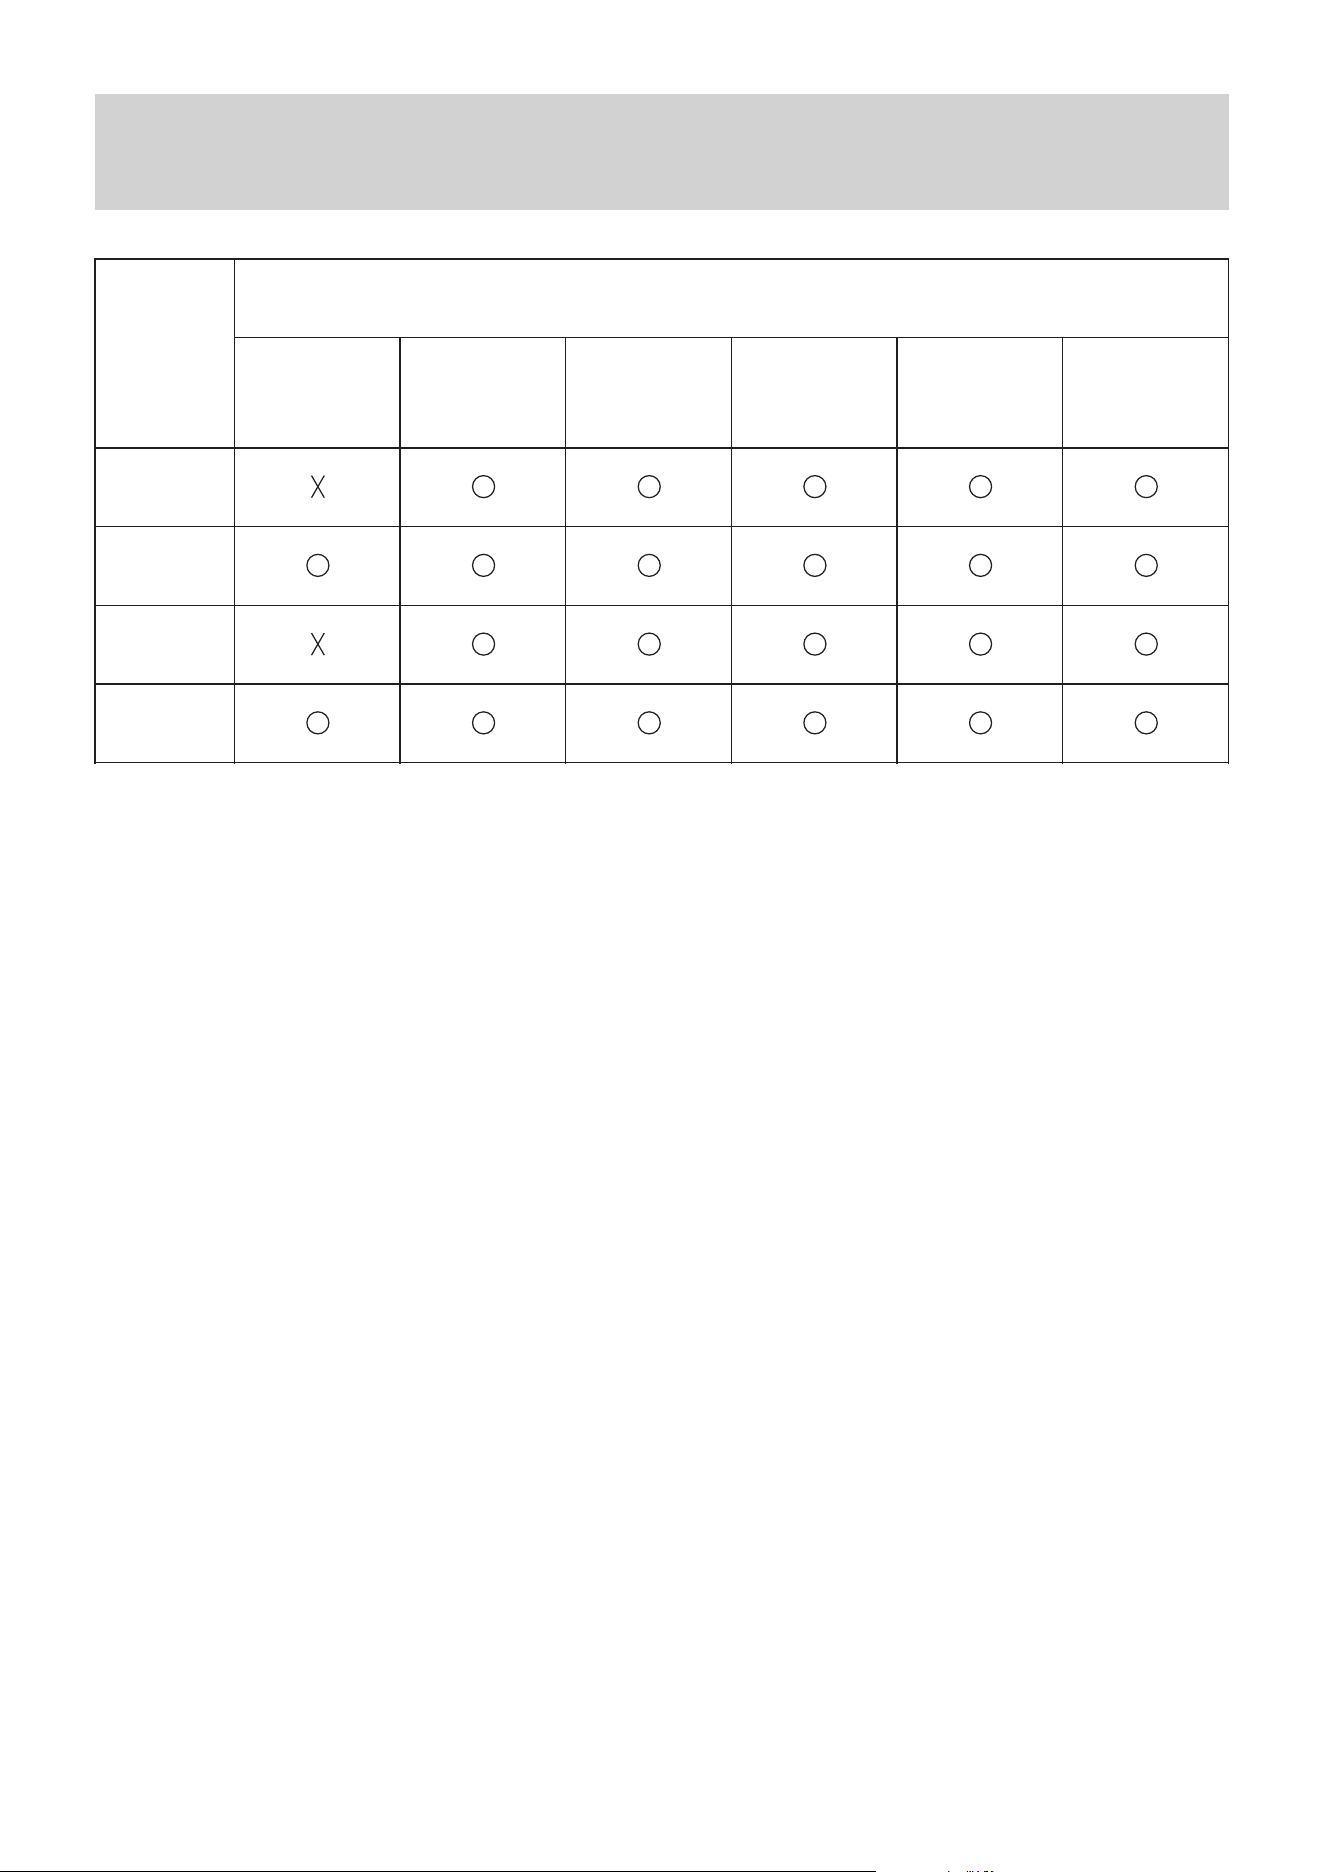
*The above illuminance data is from the Aputure laboratory, and there may be some varia-
tion between individual units.
amaran Halo 100x
2,700K
3,670 lux 2,417 lux 27,910 lux 28,600 lux 10,010 lux
341 fc 225 fc 2,593 fc 2,657 fc 930 fc
4,360 lux 2,892 lux 33,500 lux 34,300 lux 12,020 lux
405 fc 269 fc 3,112 fc 3,187 fc 1,117 fc
4,890 lux 3,280 lux 38,100 lux 39,000 lux 13,690 lux
454 fc 305 fc 3,540 fc 3,623 fc 1,272 fc
4,860 lux 3,290 lux 38,400 lux 39,200 lux 13,790 lux
452 fc 306 fc 3,567 fc 3,642 fc 1,281 fc
4,630 lux 3,140 lux 36,700 lux 37,500 lux 13,210 lux
430 fc 292 fc 3,410 fc 3,484 fc 1,227 fc
414 lux 182 lux 2,690 lux 2,830 lux 1,173 lux
38 fc 17 fc 250 fc 263 fc 109 fc
492 lux 218 lux 3,230 lux 3,400 lux 1,406 lux
46 fc 20 fc 300 fc 316 fc 131 fc
551 lux 247 lux 3,670 lux 3,870 lux 1,601 lux
51 fc 23 fc 341 fc 360 fc 149 fc
547 lux 248 lux 3,700 lux 3,890 lux 1,610 lux
51 fc 23 fc 344 fc 361 fc 150 fc
521 lux 237 lux 3,540 lux 3,720 lux 1,538 lux
48 fc 22 fc 329 fc 346 fc 143 fc
3,200K
4,300K
5,600K
6,500K
2,700K
3,200K
4,300K
5,600K
6,500K
1m
3m
Dis. CCT
No Access-
ories
Light Dome
60
Mini Fresnel
Spot 15°
Mini Fresnel
Flood 30°
Mini
Reflector
23
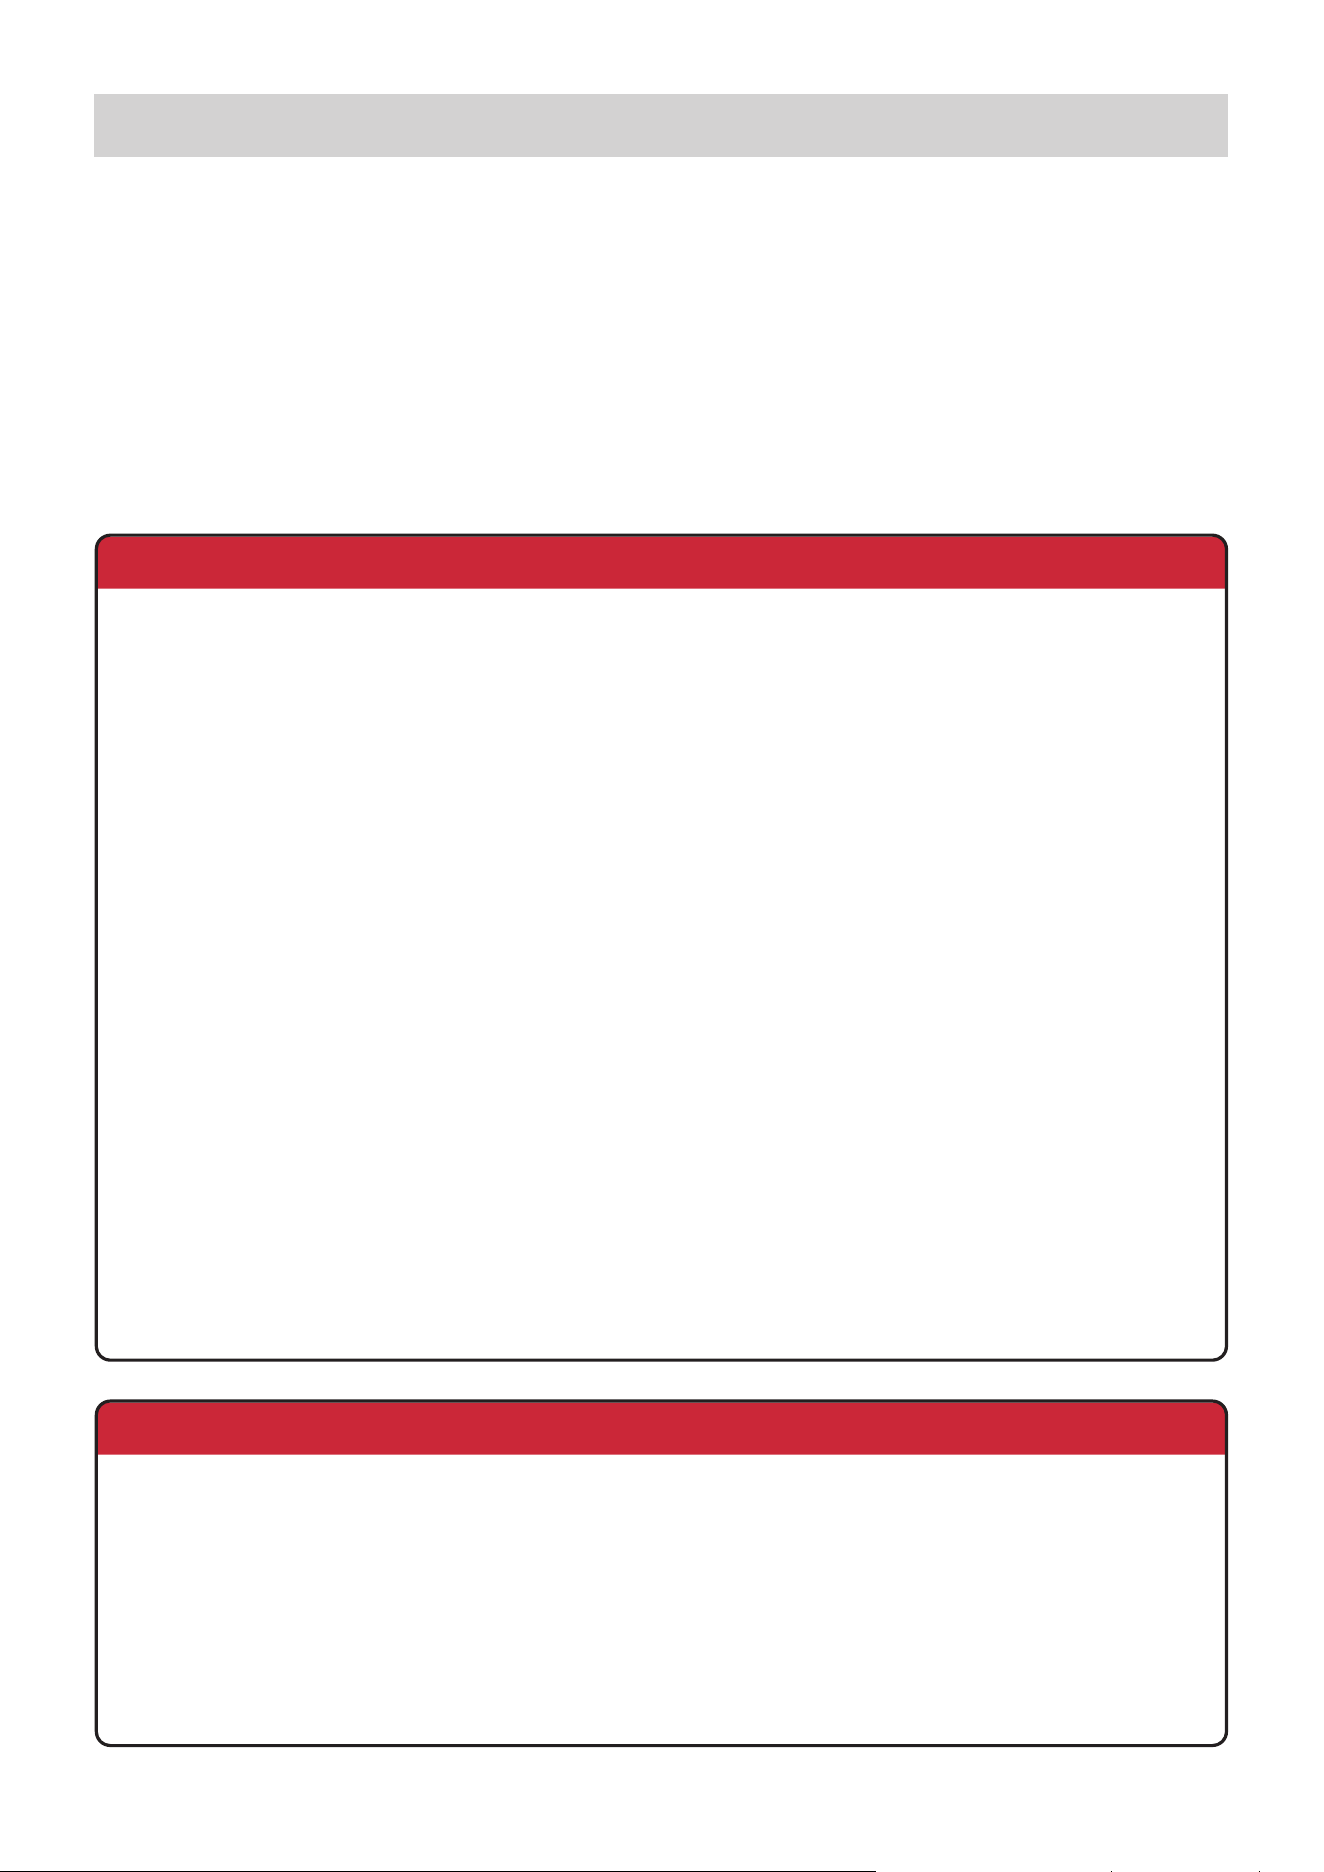
Metal
Accessories
Toxic and Hazardous Substances or Elements
Component
PCB
Plastic
Lead
(Pb)
Mercury
(Hg)
Cadmium
(Cd)
Hexavalent
chromium
(Cr VI)
Polybrominated
biphenyls
(PBB)
Polybrominated
diphenyl ethers
(PBDE)
Declaration of Toxic and Hazardous Substances in
Electronic Information
This table is prepared in accordance with the provisions of SJ/T 11364.
O: Indicates that the content of the toxic and hazardous substance in all homogeneous ma-
terials of the component is below the limit specified by GB/T 26572.
X: Indicates that the content of the toxic and hazardous substance exceeds the limit speci-
fied by GB/T 26572 in at least one homogeneous material of the component.
The information in this table is provided to suppliers in the form of data and testing results
that comply with RoHS environmental requirements.

24
IC
IC regulatory conformance
This device complies with CAN ICES-003 (B)/NMB-003(B) and CAN RSS-216 / CNR-216.
This device contains licence-exempt transmitter(s)/receiver(s) that comply with Innovation,
Science and Economic Development Canada's licence-exempt RSS(s). Operation is subject
to the following two conditions:
(1) This device may not cause interference.
(2) This device must accept any interference, including interference that may cause unde-
sired operation of the device.
Cet appareil est conforme à la norme CAN ICES-003 (B)/NMB-003 (B) et CAN RSS-216 /
CNR-216.
Cet appareil contient des émetteurs / récepteurs exempt (s) de licence qui sont conformes
aux RSS exemptes de licence d'Innovation, Sciences et Développement économique
Canada. Son fonctionnement est soumis aux deux conditions suivantes:
(1) Cet appareil ne doit pas provoquer d'interférences.
(2) Cet appareil doit accepter toute interférence, y compris les interférences susceptibles
de provoquer un fonctionnement indésirable de l'appareil.
This equipment complies with IC radiation exposure limits set forth for an uncontrolled envi-
ronment.
Cet équipement est conforme aux limites d'exposition aux radiations de la IC définies pour
un environnement non contrôlé.
This equipment has been tested and found to comply with the limits for a Class B digital
device, pursuant to part 15 of the FCC Rules. These limits are designed to provide reason-
able protection against harmful interference in a residential installation.
This equipment generates uses and can radiate radio frequency energy and, if not installed
and used in accordance with the instructions, may cause harmful interference to radio com-
munications. However, there is no guarantee that interference will not occur in a particular
installation. If this equipment does cause harmful interference to radio or television recep-
tion, which can be determined by turning the equipment off and on, the user is encouraged
to try to correct the interference by one or more of the following measures:
● Reorient or relocate the receiving antenna.
● Increase the separation between the equipment and receiver.
●Connect the equipment into an outlet on a circuit different from that to which the receiver
is connected.
●Consult the dealer or an experienced radio/TV technician for help
NOTE
25
FCC
FCC regulatory conformance:
This device complies with Part 15 of the FCC Rules. Operation is subject to the following
two conditions:
(1) This device may not cause harmful interference.
(2) This device must accept any interference received, including interference that may
cause undesired operation.
The manufacturer is not responsible for any radio or TV interference caused by unautho-
rized modifications to this equipment. Such modifications could void the user’ s authority to
operate the equipment.
This equipment complies with FCC radiation exposure limits set forth for an uncontrolled en-
vironment.
NOTE

26
UL
NOT FOR RESIDENTIAL USE
NON DESTINÉ À UN USAGE DOMESTIQUE
Notice: This control circuit is not isolated – see installation instructions
Note: ce circuit de commande n’est pas isolé - voir les instructions d’installation

27
CSA
NOT FOR HOUSEHOLD USE
NON DESTINÉ À UN USAGE DOMESTIQUE
DISCONNECT POWER BEFORE SERVICING
COUPER L’ALIMENTATION AVANT L’ENTRETIEN

28
Important Safety Instructions
When using the amaran Halo 60x and amaran Halo 100x, basic safety precautions should
always be followed, including the following:
1.Read and understand all instructions before using the fixture.
2.Close supervision is necessary when any fixture is used by or near children. Do not leave
the fixture unattended while in use.
3.Care must be taken as burns can occur from touching hot surfaces.
4.Do not operate the fixture if any power cable is damaged, or if the fixture has been
dropped or damaged, until it has been examined by qualified service personnel.
5.Position any power cables such that they will not be tripped over, pulled, or come into
contact with hot surfaces.
6.Always unplug the fixture from the power outlet before cleaning, servicing, or when not in
use. Never pull on the power cord to unplug from the outlet.
7.Allow the fixture to cool down completely before storing. Unplug all cables and store them
properly. If a carrying case is used, place cables in their designated compartments.
8.Do not immerse the fixture in water or any other liquid to avoid electric shock.
9.Do not disassemble the fixture to avoid the risk of fire or electric shock. For service, con-
tact [email protected] or consult qualified service personnel. Improper reassembly may
result in electric shock when the fixture is in use.
10.Using any accessory not recommended by the manufacturer may increase the risk of
fire, electric shock, or personal injury.
11.Power this fixture only by connecting it to a properly grounded outlet.
12.Do not block the ventilation openings. Do not look directly at the LED light source when it
is powered on, and never touch the LED emitters under any condition.
13.Do not place the fixture near flammable materials or volatile solvents, as this may cause
damage.
14.Use a soft, dry cloth to clean the device.
15.When operating in humid or wet environments, ensure that all ports and plugs are com-
pletely dry to avoid short circuits or electric shock.

29
16.If the external flexible cable or cord of this fixture is damaged, it must be replaced by a
special cable or cord provided by the manufacturer or its service agent.
17.The light source contained in this fixture shall only be replaced by the manufacturer, its
service agent, or similarly qualified personnel.
18.All repair and maintenance must be performed by authorized service personnel only. Any
damage caused by unauthorized disassembly is not covered under warranty, and the user
shall bear the related repair costs.
19.The low-voltage power supply and DMX circuits are designed with reinforced insulation.
20.This fixture is intended for professional use only. It is certified by RoHS, CE, KC, PSE,
and FCC. Please operate the product in accordance with the applicable standards and reg-
ulations of your country or region.
21.Malfunctions caused by improper operation are not covered under warranty, and repair
costs shall be borne by the user. This user manual is based on thorough in-house testing.
Product design and specifications are subject to change without prior notice.

30
Before using this product, please read the product manual to ensure correct use under the
complete understanding. After reading, please keep the product manual properly for future
reference. In case of not operating this product correctly, it may seriously harm yourself or
others, or result in product damage and property loss. When using this product, it shall be
deemed that you have understood, recognized and accepted all clauses and contents of
this document. The user commits to be responsible for their own behaviors and all conse-
quences thereof, amaran shall not be liable for any loss due to the user who does not use
this product in accordance with the product manual.
Under the laws and regulations, our company holds the final explanation right of this docu-
ment and all related documents of this product. No prior notice will be given for any update,
revision or termination. Please visit the official amaran website for the latest product infor-
mation.
Disclaimer