Read This Manual
Read all instruction and explanation for the
instrallation before use. Follow the instructions
carefully. Keep the operation instructions handy
for later use. If the appliance is sold or passed
on, ensure that the new owner always receives
this operation instructions.
16138100A37557
6358034001
FRONT LOADING
WASHING MACHINE
OWNER’S MANUAL
MODEL :
TW-T21BU115UWM
TW-T21BU105UWM
TW-T21BU115UWS
TW-T21BU105UWS
OPERATIONS
Programmes
1
CONTENTS
SAFETY INSTRUCTIONS
INSTALLATION
MAINTENANCES
Safety Instructions……………………………………
Product Description ………………………………….
…………………………………. . . . . . . . . .Installation
Quick Start
Before Each Washing
……………………………………………
…………………………………
Detergent Dispenser
…………………………………
…………………………………
Cotrol Panel …………………………………………
Option
………………………………………………
…………………………………………
Cleaning And Care …………………………………
Trouble Shooting ……………………………………
Customer Service
…………………………… . . . . . . .
2
11
12
16
17
18
19
20
27
29
34
34
Other Functions
22
………………………… Washing Programmes Table 28
……………………………
33
SAFETY INSTRUCTIONS
ELECTRIC SHOCKHAZARD
Safety Instructions
This combination of symbol and signal word indicates a potentially
dangerous situation which may result in death or serious injuries
unless it's avoided.
This combination of symbol and signal word indicates a potentially
dangerous situation which may result in slight or minor injuries.
If the supply cord is damaged, it must be replaced by the manufacturer,
If the machine is damaged, it must not be operated unless repaired by
Risk of electric shock!
Note!
This combination of symbol and signal word indicates a potentially
dangerous situation which may result in slight or minor injuries
or damage to property and the environment.
2
Warning!
Caution!
Warning!
For your safety,the information in this manual must be followed
prevent property damage, personal injury or loss of life.
Explanation of the symbols:
SAFETY INSTRUCTIONST
3
Before maintenance, unplug the appliance.
This appliance must be grounded. In the event of Malfunction
or breakdown, grounding will reduce the risk of electric shock by
providing a path of least resistance for electric current.
This appliance is equipped with a cord having an equipment -grounding
conductor and grounding plug.The plug must be plugged into an
appropriate outlet that is properly installed and grounded in accordance
with all local codes and ordinances.
Improper connection for the appliance when using not grounded outlet
or when GND terminal of outlet is not suitable with GND terminal of
power plug, can result in risk of electric shock. Check with a qualied
electrician or service person if you are in doubt as to whether the
appliance is properly grounded.
Do not modify the plug provided with the appliance. lf it does not
t the outlet, have a proper outlet installed by a qualied electrician.
Make sure that the water and electrical devices must be connected by
a qualied technician in accordance with the manufacturer's instructions
and local safety regulations.
Pull out its plug from the power socket before cleaning or maintenance.
Do not use any socket with rated current less than that of appliance.
Never pull out power plug with wet hand.
Please remember to disconnect water and power supply immediately
after the clothes are washed.
SAFETY INSTRUCTIONS T
4
RISK TO CHILDREN
The appliance can be used by children aged from 8 years and above
and persons with reduced physical, sensory or mental capabilities or lack
of experience and knowledge if they have been given supervision or
instruction concerning use of the appliance in a safe way and understand
the hazards involved.
Children of less than 3 years should be kept away unless continuously
supervised.
This appliance is not intended for use by persons (including children)
with reduced physical, sensory or mental capabilities or lack of
experience and knowledge unless they have been given supervision
or instruction concerning use of the appliance by a person responsible
for their safety.
Children should be supervised to ensure that they do not play with
the appliance.
Cleaning and user maintenance shall not be made by children without
supervision.
Animals and children may climb into the machine. Check the machine
before every operation.
Glass door may be very hot during the operation. Keep children and pets
far away from the machine during the operation.
For use in EU contries:
SAFETY INSTRUCTIONS
INSTALLATION LOCATION AND SURROUNDING
All washing and additional substances are to be kept in a safe place
out of the reach of children.
Do not install the machine on a carpet oor. The obstruction of the
openings by a carpet can damage the machine.
Keep the appliance clear from heating sources and direct sunlight to
avoid plastic and rubber parts to corrode.
Do not use the appliance in humid environments or rooms containing
explosive or caustic gas. In case of water leakage or water splashes let
the appliance dry in the open air.
The appliance must not be installed behind a lockable door, a sliding
door or a door with a hinge on the opposite side to that of the machine.
Do not operate the machine in rooms with a temperature of below 5°C.
This can cause damages to parts of it. If it is unavoidable, make sure to
drain the water completely from the appliance after every use
(see "Maintenance - Cleaning of drain pump lter") to avoid damages
caused by frost.
Never use ammable sprays or substances in the immediate proximity
of the appliance.
RISK OF EXPLOSION
• Do not wash articles that have been cleaned in, washed in, soaked in ,
or spotted with combustible or explosive substances (such as wax, oil,
paint, gasoline, degreasers, dry-cleaning solvents, kerosene, etc.)
This may result in re or explosion.
The washer is not to be used if industrial chemicals have been used
for cleaning.
•
5
SAFETY INSTRUCTIONS
INSTALLATIONS
Remove all packaging material and transport bolts before using
the appliance. Otherwise, serious damage may result.
This appliance is equipped with a single inlet valve and can be
connected to the cold water supply only.
Mains plug must be accessible after installation.
Do not put any excessively heavy objects on the appliance, like water
containers or heating devices.
The new hose-sets supplied with the appliance are to be used and that
old hose-sets should not be reused.
Max. Inlet water pressure 1 Mpa.
Min. inlet water pressure 0.05 MPa.
Before washing clothes for the rst time, the product shall be Before
washing clothes for the rst time, the product shall be operated once
throughout all the procedures without any clothes inside.
ELECTRICAL CONNECTION
6
Make sure the supply cable is not trapped by the machine, it can get
damaged.
Connect the product to a grounded outlet protected by a fuse
complying with the values in the "Technical specications table.
The grounding installation has to be made by a qualied electrician.
Ensure that the machine is installed in accordance with the local
regulations.
Water and electrical connections must be carried out by a qualied
technician in accordance with the manufacturer's instructions and
local safety regulations.
Don't use multiple plugs or extension cords.
The appliance must not have an external switching device such as a
timer or connected to a circuit that is regularly switched on and o.
Do not pull the plug out of the mains outlet if there is ammable
Chas around.
Never pull out power plug with wet hands.
Always pull at the plug, not at the cable.
Always unplug the appliance if it is not being used.
SAFETY INSTRUCTIONS
WATER CONNECTIONS
Check the connections of the water inlet hose, the water tap and the
outlet hose for possible problems due to changes of water pressure.
If the connections loosen or leak close the water tap and get it repaired.
Do not use the appliance before the pipes and hoses are installed properly
by qualied persons.
The water inlet and outlet hoses have to be safely installed and remain
undamaged. Otherwise, water leakage can occur.
Do not remove the drain pump lter while there is still water in the
appliance. Big quantities of water can leak out, and there is a risk of
scalding due to hot water.
7
RISK OF DAMAGING APPLIANCE
Your product is only for home use and is only designed for the textiles
suitable for machine washing.
Do not climb up and sit on top cover of the machine.
Do not lean against machine door.
Please do not close the door with excessive forces. If it is found dicult
to close the door, please check if clothes are put in or distributed well.
It is forbidden to wash carpets.
SAFETY INSTRUCTIONS
8
OPERATION AND MAINTENANCE
The washing machine is not to be used if industrial chemicals have been
used for cleaning. Risk of explosion.
Hands shall not be inserted into running drums.
one round of the whole procedures without the clothes inside.
The suggested program is "DRUM CLEAN".
gasoline and alcohol etc. as detergents. Only select detergents that are
suitable for washing machine.
Make sure that all pockets are emptied. Sharp and rigid items such as
coins, brooches, nails, screws, stones etc. may cause serious damages
to this machine.
Remove all objects from pockets such as lighters and matches before
use the appliance.
Items that have been soiled with substances such as cooking oil,
acetone, alcohol, petrol, kerosene, spot removers, turpentine, wax
and wax removers should be washed in hot with an extra amount
of detergent before being dried in the appliance.
Items containing foam rubber (latex foam), shower caps, water
foam rubber pads should not be dried in the machine
Fabric softeners or similar products should be used as recommended
in their instructions.
Never try to open the door forcefully. The door will unlock shortly after
the end of a cycle.
to close the door, please check if the clothes are properly inserted
and distributed.
Please check whether the water inside the drum has been drained before
opening its door.Please do not open the door if there is any water visible.
Be careful of burning when the product drains hot washing water.
After program is completed, Please wait for two minutes to open the door.
SAFETY INSTRUCTIONS
•
cleaning and maintenance and after each use.
• Never pour water over the appliance for cleaning purpose. Risk of
electric shock!
• Repairs shall only be carried out by the manufacturer, its service
agent or similarly qualified persons in order to avoid a hazard. The
producer will not be responsible for damages caused by the
intervention of not authorized persons.
Always unplug the appliance and close the water tap before
TRANSPORT
•
-.Bolts shall be reinstalled to the machine by a specialized person
-.Accumulated water shall be drained out of the machine
• This appliance is heavy. Transport with care. Never hold any
protruding part of the machine when lifting. The machine door
cannot be used as a handle.
Before Transport:
INTENDED USE
•
household amounts suitable for machine washing and drying. This
appliance is for indoor use only and not intended for built in use.
Only use according to these instructions. The appliance is not
intended for commercial use.
• Any other use is considered as improper use. The producer is not
responsible for any damage or injuries that may result of it.
The product is intended only for home use and for textiles in
9
• This appliance is intended to be used in household and similar
applications such as:
-.Staff kitchen areas in shops, offices and other working environments;
-.Farm houses;
-.By clients in hotels, motels and other residential type environments;
-.Bed and breakfast type environments;
-.Areas for communal use in blocks of flats or in launderettes.
SAFETY INSTRUCTIONS
ENVIRONMENT
For use in EU contries
This appliance is labelled in accordance with the European Directive 2012/19/EU on
waste electrical and electronic equipment (WEEE). The directive provides the framework
for the EU-wide take-back and recycling of waste equipment.
Disposal of old appliances
The devices marked with this symbol
must not be disposed of in household waste !
For use in other contries
This appliance doesn’t have symbol above. If you want to dispose your appliance,
please contact your local authority or retailer for futher information on collection
and disposal.
10
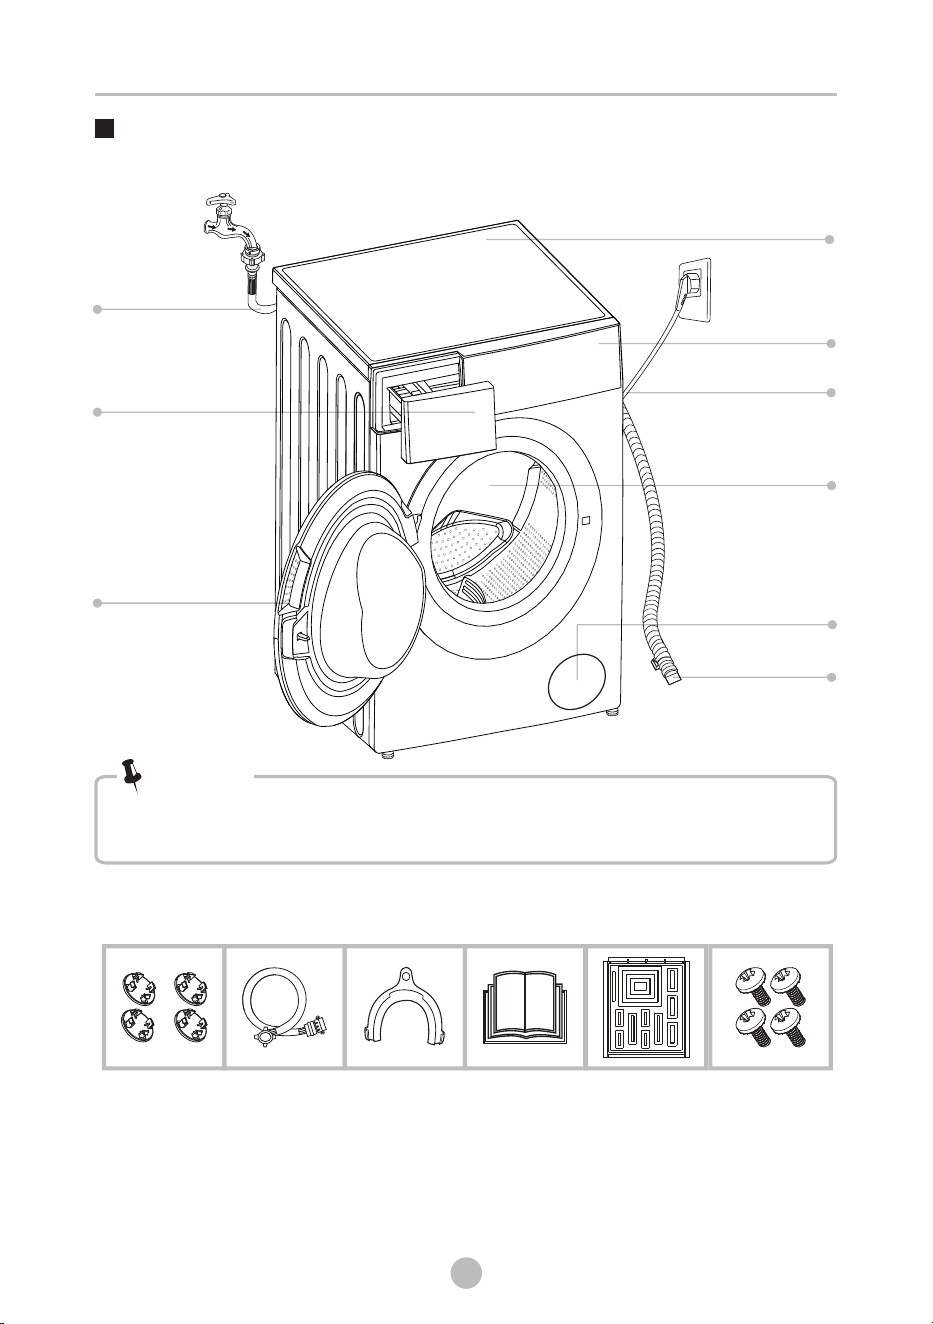
Accessories
Screw (optional)
Rat resistance
panel (optional)
Water inlet hose
cold water
Transport
hole plug
Detergent dispenser
Water inlet hose
Product Description
• The product line chart is for reference only, please refer to real product
as standard.
Note!
11
Drum
Power supply cord
Control panel
Drain Pump Filter
Door
Top cover
Drain hose
INSTALLATION
Drain hose
support
(optional)
Owner’s manual
INSTALLATION
Installation
Before installing the machine, the location characterized
as follows shall be selected:
1.Rigid, dry, and level surface.
2.Avoid direct sunlight.
3.Room temperature is above 0°C.
4.Keep far away from the heat resources such as coal or gas.
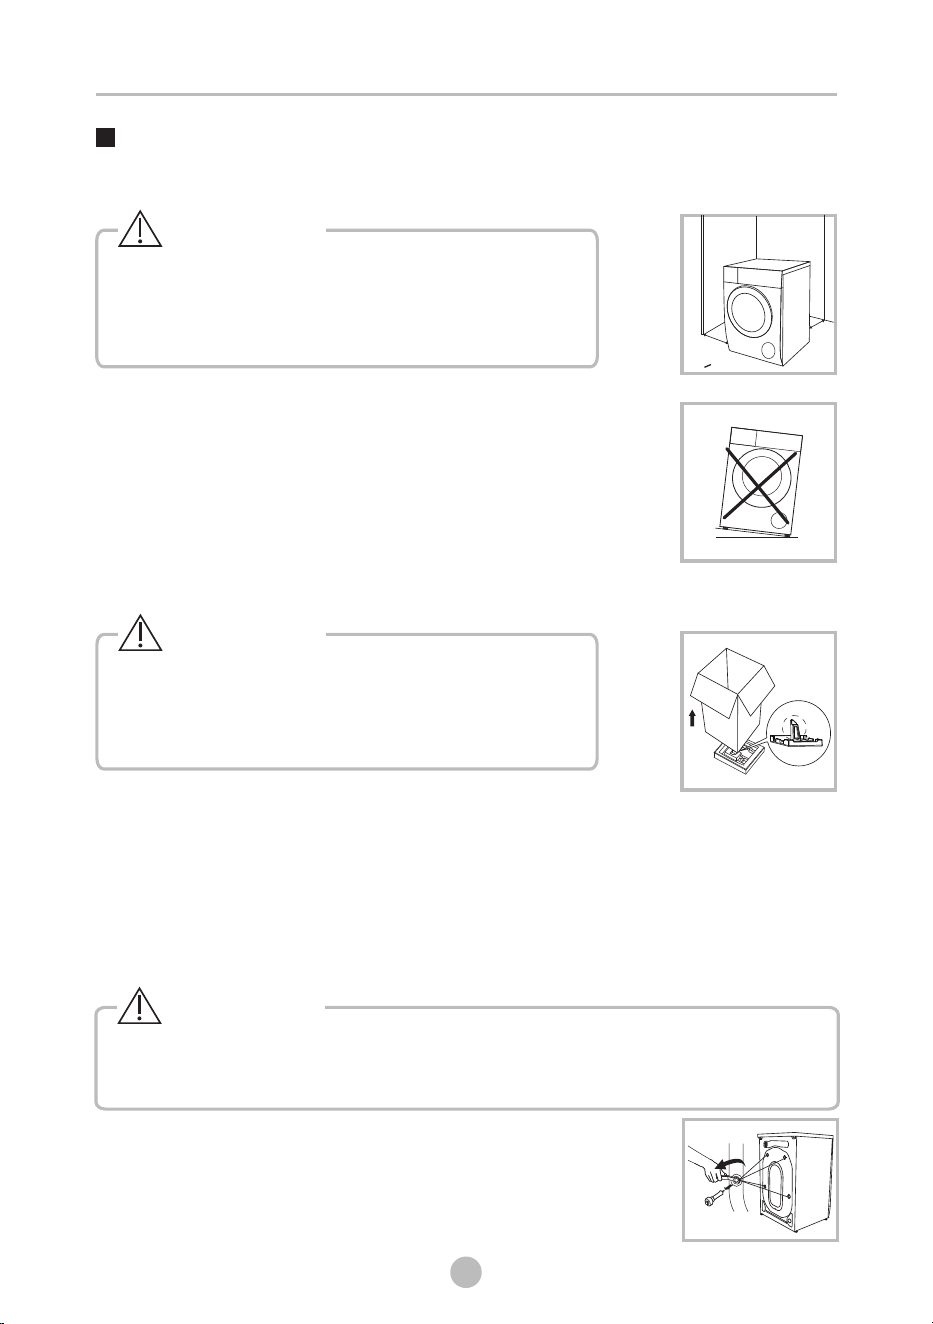
Unpacking the washing machine
1. Remove the cardboard box and styrofoam packing.
2. Lift the washing machine and remove the base packing.Make sure the small triangle
foam is removed with the bottom one together. If not, lay the unit down with side
surface, then remove the small foam from the unit bottom manually.
3. Remove the tape securing the power supply cord and drain hose.
4. Remove the water inlet hose from the drum.
Please take the following steps to remove the bolts:
1.Loosen 4 bolts with spanner and then remove them.
2.Cover the hole with transport hole plugs.
3.Keep the transport bolts properly for future use.
Remove transport bolts
• Stability is important to prevent the product from
wandering!
• Make sure that the product should not stand on
the power cord.
Warning!
• Packaging material (e.g. Films, Styrofoam) can be
dangerous for children.
• There is a risk of suffocation ! Keep all packaging
well away from children.
Warning!
• You must remove the transport bolts from the backside before using the product.
• You’ll need the transport bolts again if you move the product , so make sure
you keep them in a safe place.
Warning!
w
w
W 20mm>
Installation area
12
13
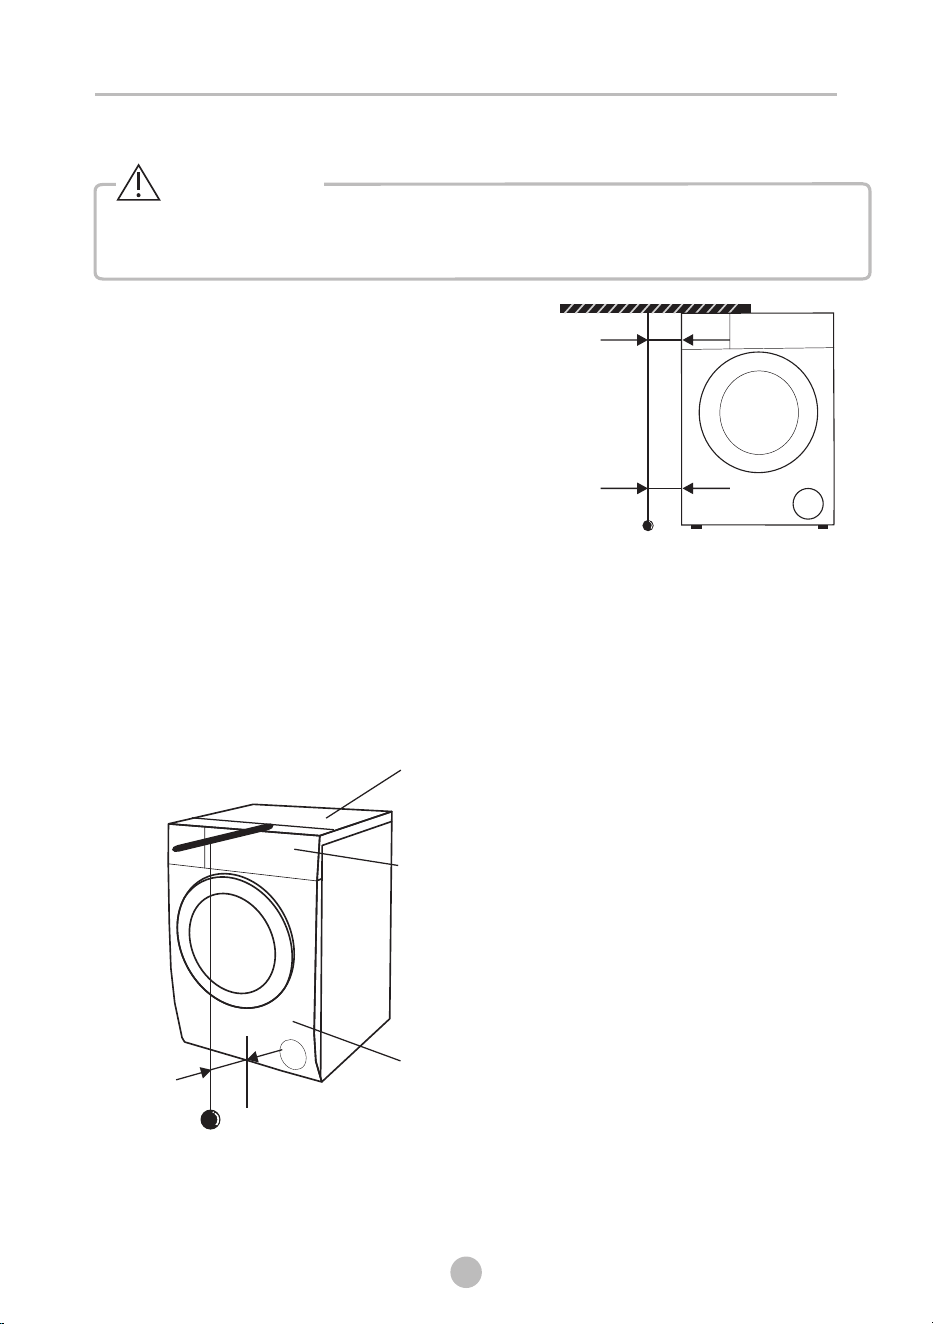
Levelling the washing machine
• Check with the gradienter if the machine placement is balanced and steady.
• If there is no gradienter, check the balance as per the following method.
Wa rning!
b
a
c
Front Cover
Control Panel
Top Cover
1.If it’s balanced from left to right.
• Take a long stick, and tie a rope at the end of it.
Bind a heavy object at the end of the rope.
• Hang the rope from the top cover of the
machine. Adjust the legs till the difference
between ‘a’ and ‘b’ is less than 1cm.
2.If it’s balanced from front to back
• Put the stick at the middle of the control panel, and hang the rope in front of the
machine.
• Keep 10cm away from the rope end to the control panel edge. Adjust the legs till
‘
c’ is 3.5~4.5cm (‘c’ is the distance from rope to bottom of front cover ).
INSTALLATION
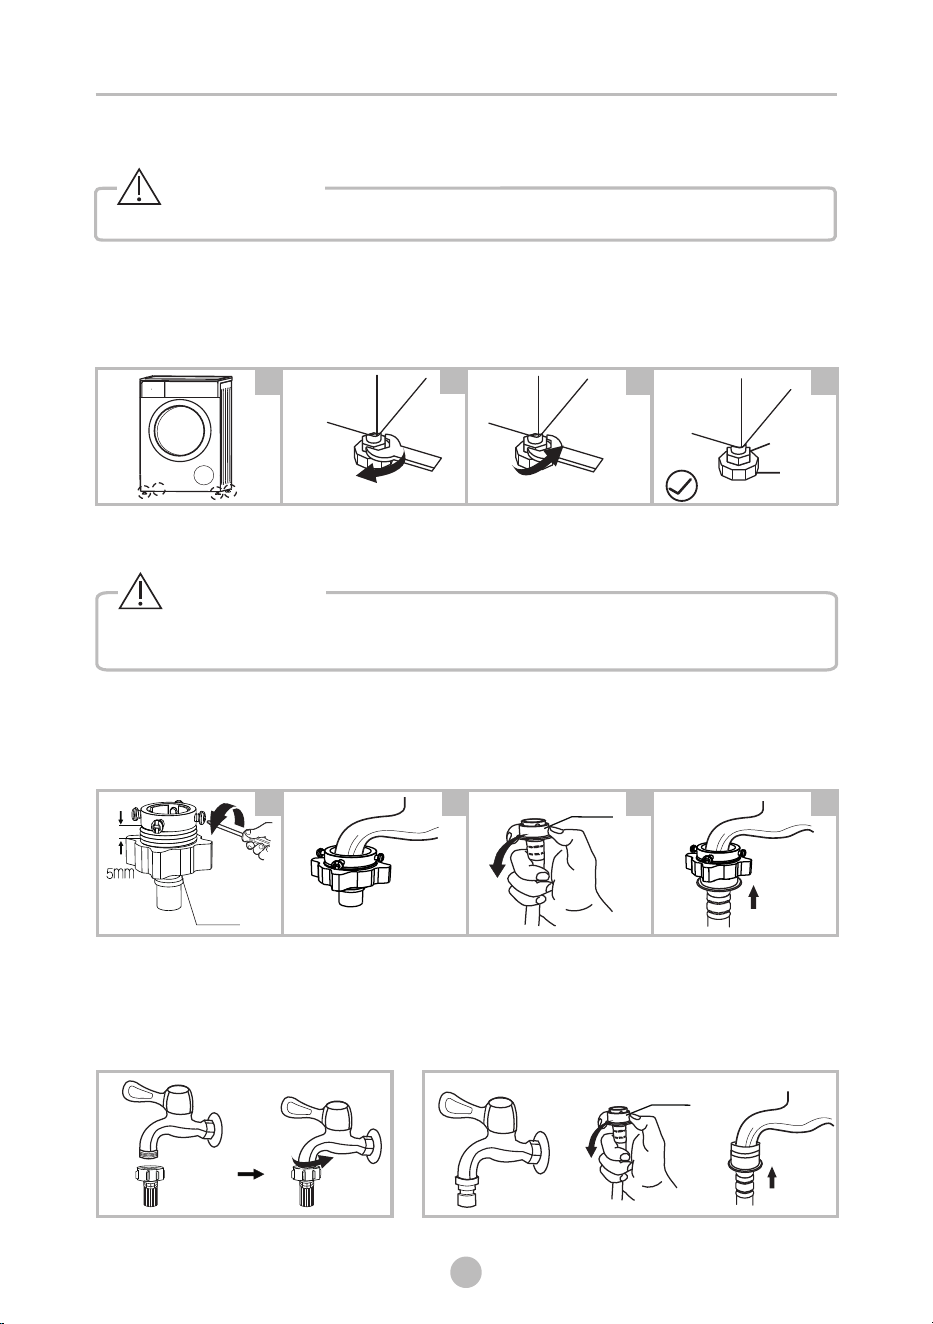
INSTALLATION
1.Check if the legs are closely attached to the cabinet. If not, please turn them to
their original positions and tighten the nuts.
2.Loosen the lock nut and turn the feet until it closely contacts with the floor.
3.Adjust the legs and lock them with a spanner, make sure the machine is steady.
Levelling the washing machine
• The lock nuts on all four feet must be screwed tightly against the housing.
Connect Water Inlet Hose
Connect the water inlet hose as indicated, There are two ways to connect the
inlet hose.
water
1.Connection between ordinary tap and water inlet hose.
• To prevent leakage or water damage, follow the instructions in this chapter
• Do not kink, crush, modify water inlet hose.or
!
2
3
4
1
Raise
Lower
Lock nut
foot
Warning!
Warning!
Loosen clamp nut and
four bolts
Press the tap end
tightly to the rubber
ring inside the clamp,
and then, tighten the
4 bolts
Press slide bushing,
insert water inlet
hose into
base
connecting
slide bushing
2
3
41
Connection finished
clamp nut
Tap with threads and water inlet hose
Special tap for washing machine
2.Connection between screw tap and water inlet hose.
slide bushing
14
INSTALLATION
Warning!
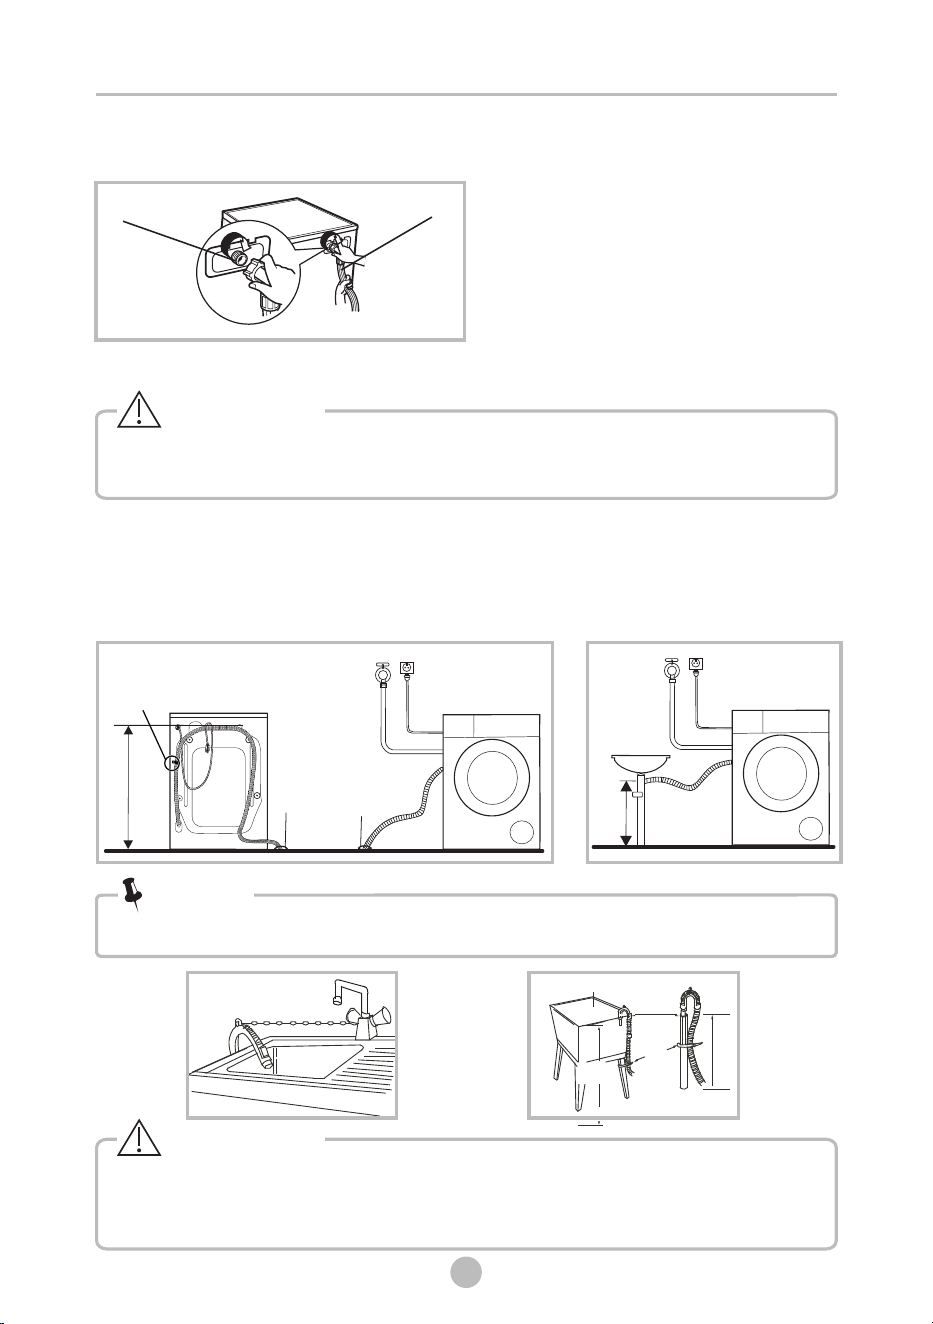
Drain Hose
•
• If drain hose is too long, do not force it into washing machine as it will cause
abnormal noises.
When installing drain hose, fix it properly with a rope.
•
• Position drain hose properly ,otherwise damage might result of water leakage.
Do not kink or protract the drain hose.
Trough
Hose Retainer
Bin
d
Max.100cm
Min.60cm
Min.60cm
Max.100cm
If the machine has drain hose support, please install it like the following .
•
Warning!
Note!
water inlet hose
water Inlet valve
Connect the other end of water inlet hose to the inlet valve at the backside of
product and fasten the hose tightly clockwise.
15
There are two ways to place the end of drain hose:
1.Put it into the drain port. If the drain hose is put
into the drain hole on the floor, fix the drain hose
on the back of the appliance to prevent water
overflow from the drum.
2.Connect it to the branch
the trough.drain hose of
Min. 60cm
Max
. 100cm
Drain port
Do not
the screw
unscrew
Drain port
Min. 60cm
Max
. 100cm
Quick Start
OPERATIONS
10
16
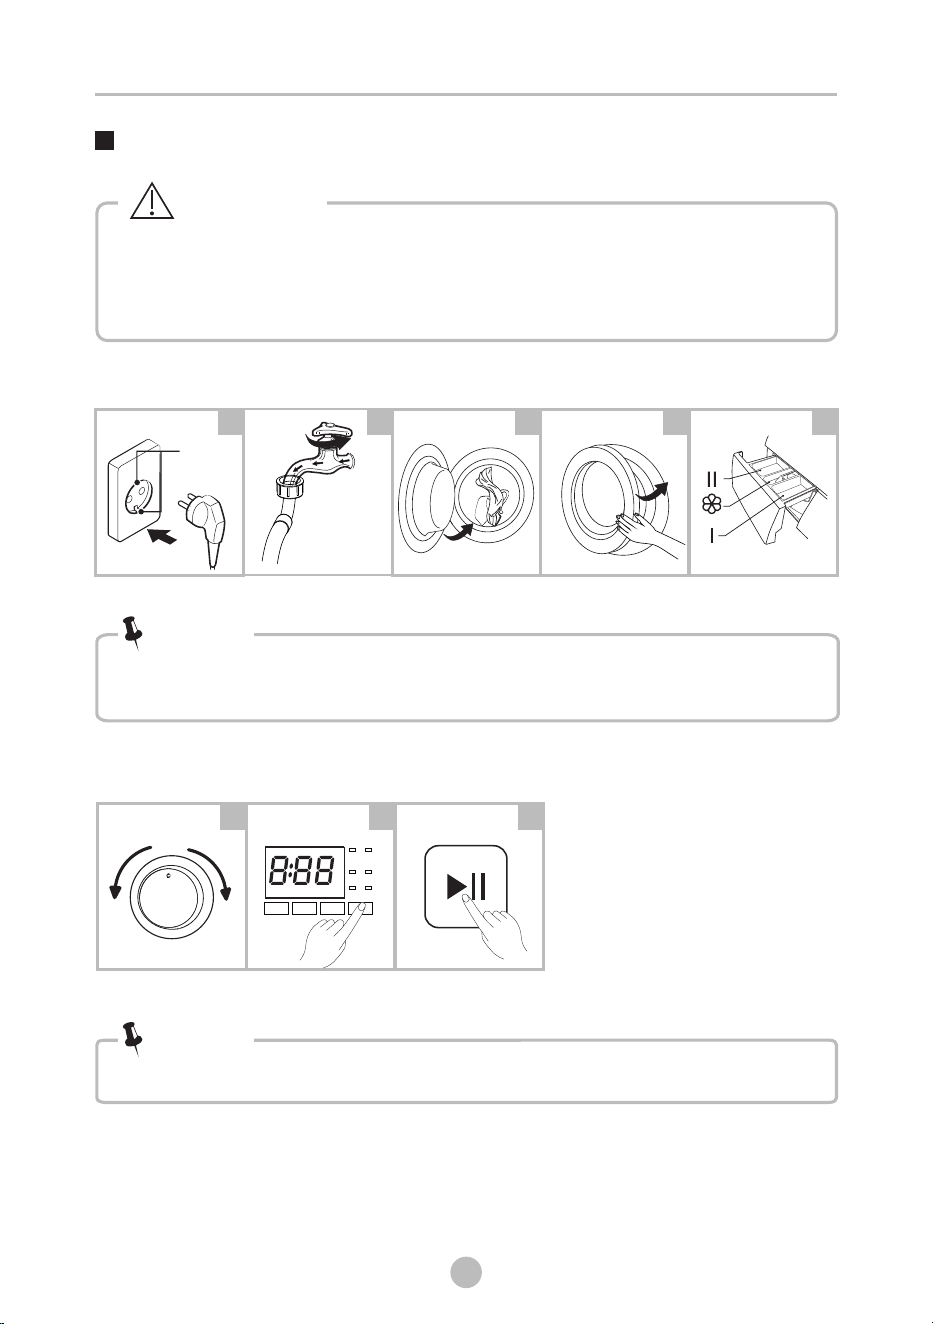
• Before washing, please make sure it’s installed properly.
• Before washing at first time, the washing machine shall be operated in
one round of the whole procedures without clothes in as follows.
The suggested program is “DRUM CLEAN”.
Caution!
1. Before Washing
Buzzer beep or “End” on display.
Open tap
Load
Close door
Plug in
Add detergent
3. After Washing
• Detergent only need to be added in "case I “after selecting pre-washing
for machines with this function.
1 2 3 4 5
2. Washing
Select Programme
Select function
or default
Start up
1 2 3
• If default is selected, step 2 can be skipped.
Note!
Note!
Main
wash
Prewash
Softener
earth
terminal
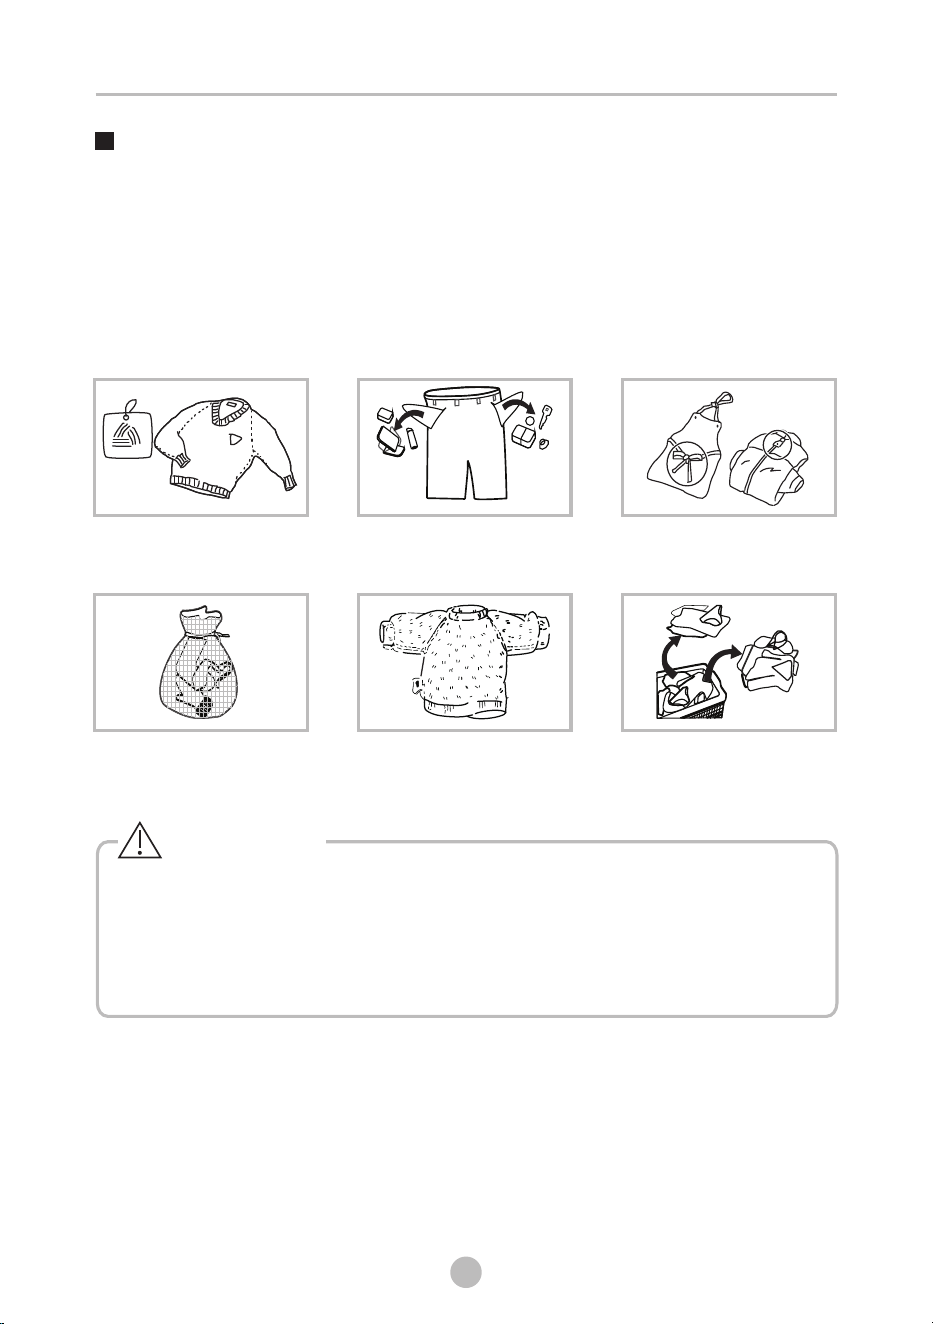
Knot the long strips,zip or
button
• When washing a single clothes, it may easily cause great imbalance and give
alarm. Therefore it is suggested to add one or two more clothes to be washed
together so that washing process can be done smoothly.
• Don't wash the clothes soaked in kerosene, gasoline, alcohol and other
flammable materials.
• The working condition of the washer should be(0 -40 ).If used under 0°C,the °C °C
inlet valve and draining system may be damaged. If the machine is placed under
condition of 0°C or less, then it should be transferred to normal ambient
temperature to ensure the water inlet hose and drain hose are not frozen
before use.
• Please check the labels and the explanation of using detergent before wash. Use
non-foaming or less-foaming detergent suitable for machine properly. washing
Take out the items out of
the pockets
Put small clothes into the
pillow slip
Check the label
Before Each Washing
Turn easy-pilling and
long-pile fabric inside out
Separate clothes with
different textures
Warning!
17
OPERATIONS
Programme
COTTON
QUICK 15’
MIX 45’
ECO WASH
DELICATE
WOOL
SPORTS
DRUM CLEAN
DOWNLOAD CYCLES
Programme
RINSE&SPIN
SPIN ONLY
BEDDING
STEAM HYGIENE
COLOR ALIVE
WHITE
JEANS
BABY CARE
SYNTHETIC
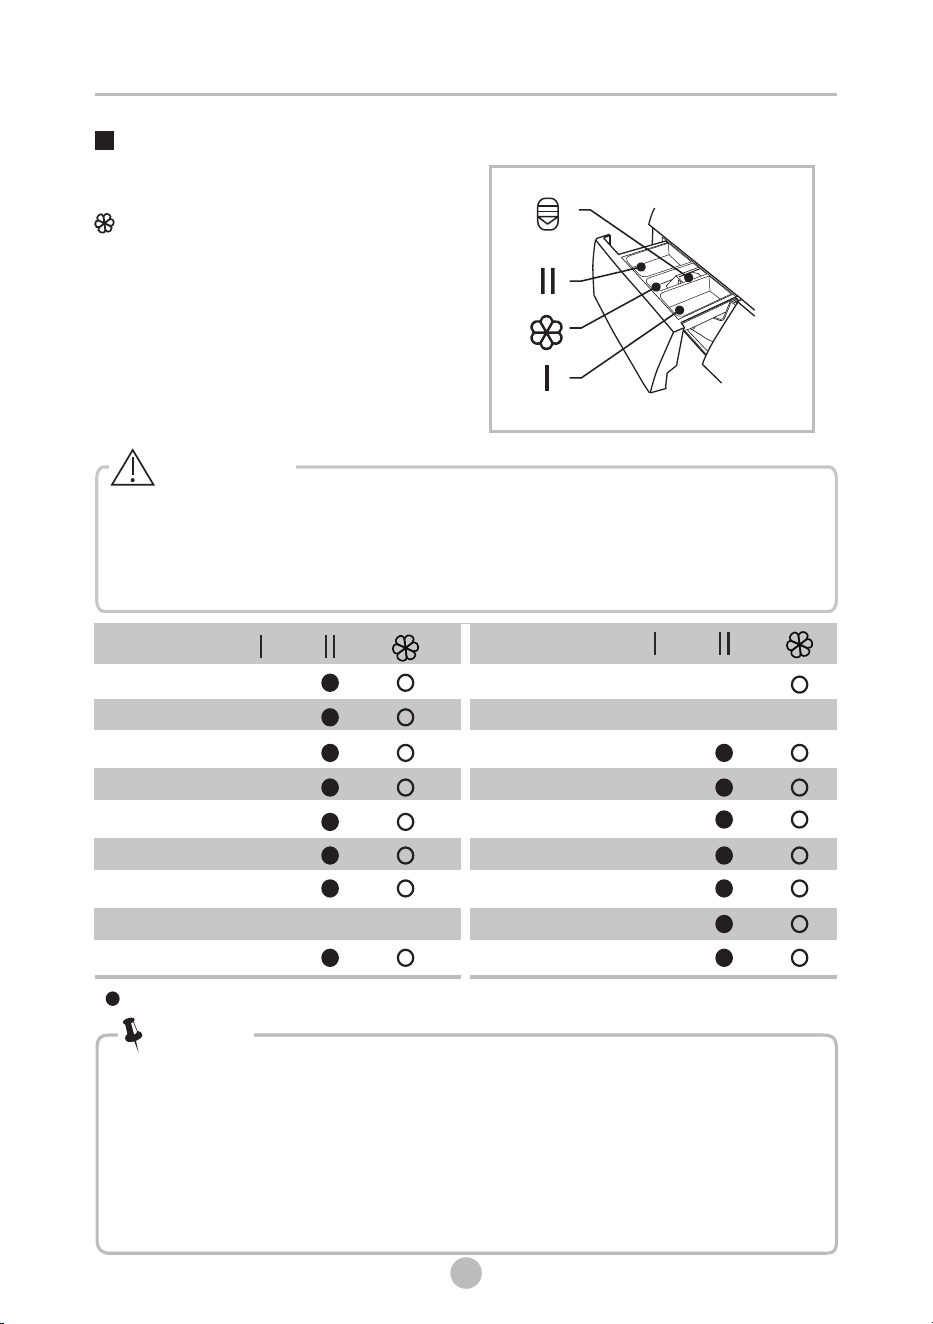
Detergent Dispenser
Pre wash detergent
Main wash detergent
Softener
II
I
Pull out the dispenser
Caution!
• Detergent only need to be added in "case I “after selecting pre-washing
for machines with this function.
18
OPERATIONS
• To prevent powder detergent from remaining in the dispenser under low water
pressure, add the poder detergent into the Container, then put it into the drum.
Means must Means optional ○
• As for the agglomerated or ropy detergent or additive, before they are
poured into the detergent box, it is suggested to use some water for
dilution to prevent the inlet of detergent box from being blocked and
overflowing while filling water.
• Please choose suitable type of detergent for the various washing
temperature to get the best washing performance with less water and
energy consumption.
Note!
Remote control
UFB
Wireless Network
Delay End Time Error
Press the button to start or pause the
washing cycle.
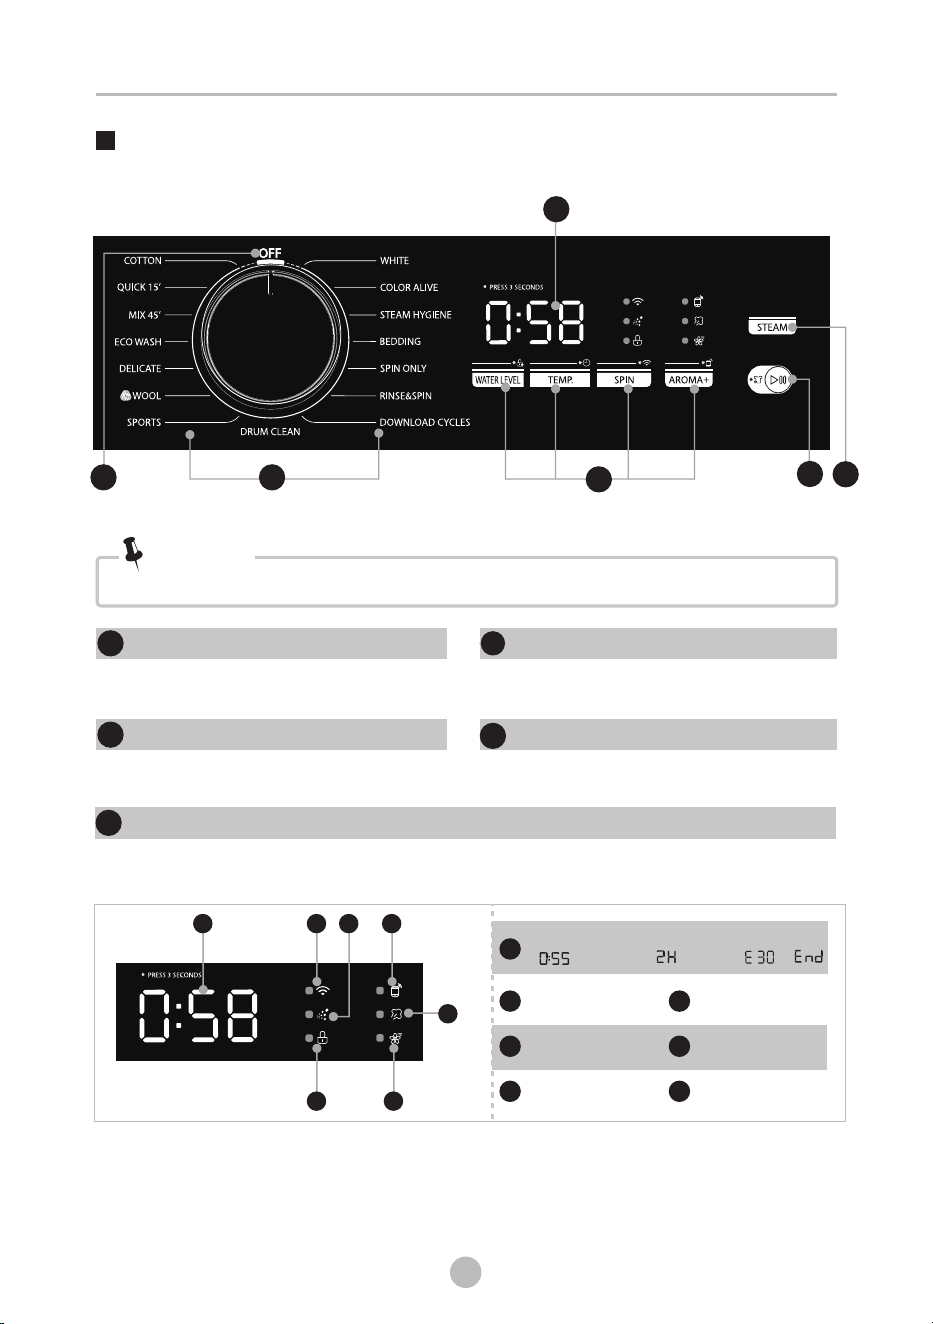
Control Panel
OPERATIONS
OFF
Product is switched o..
Start/Pause
Programmes
Available according to the laundry type.
Option
This allows you to select an additional
function.
Note!
• The chart is for reference only, Please refer to real product as standard.
1
3
2
4
Display
The display shows the settings, estimated time remaining, options, and status
messages for your washer. The display will remain on through the cycle.
5
A
B
D
F
19
Wash Time
End
Model:TW-T21BU115UWM / TW-T21BU105UWM / TW-T21BU115UWS / TW-T21BU105UWS
Door lock
Steam
A B C
D
E
G
F
C
E
G
Aroma+
I
3
2
3
5
41
Option
10
20
OPERATIONS
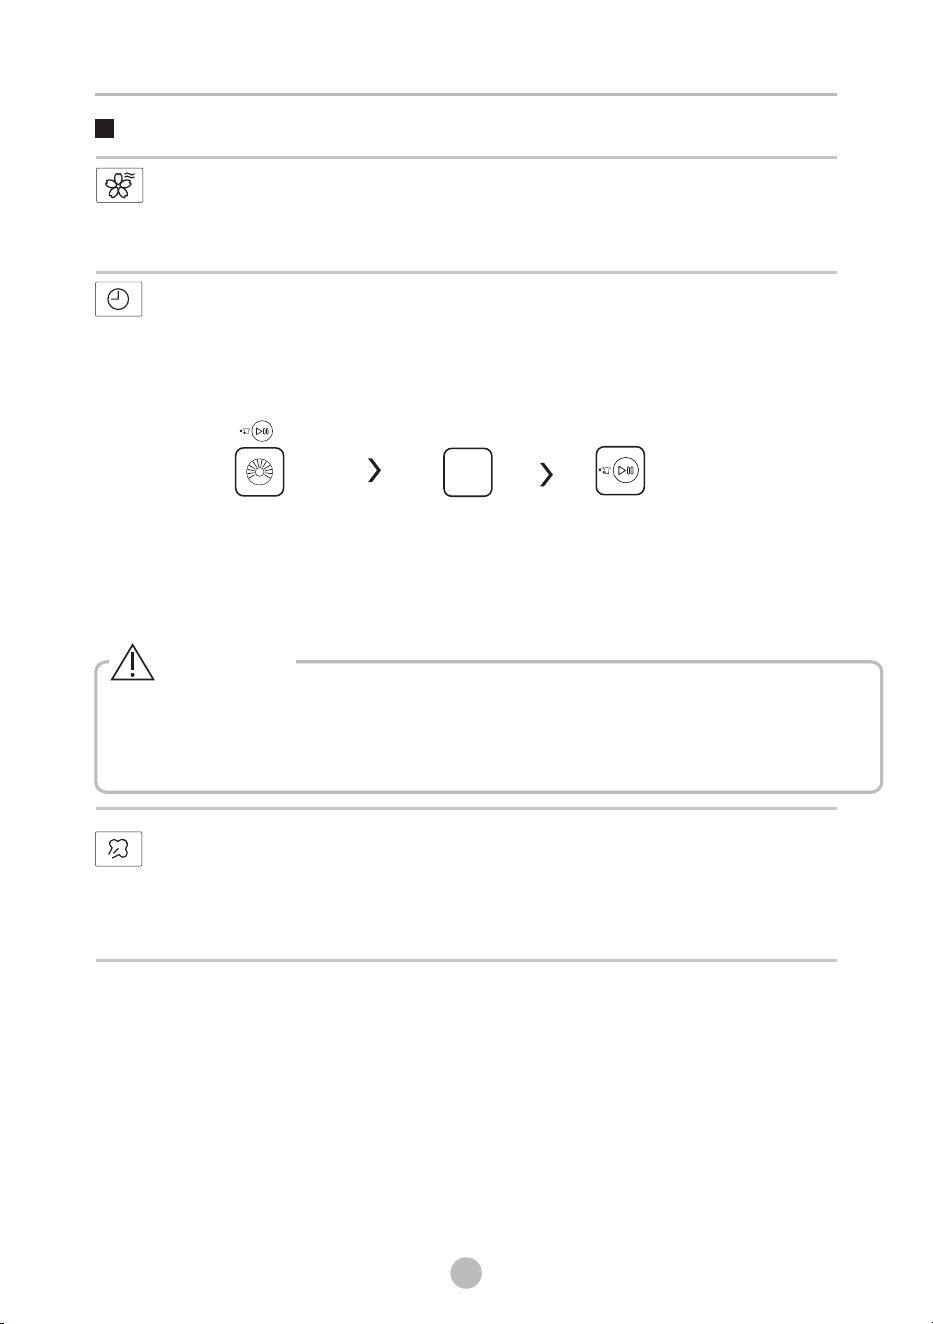
DELAY END
Set the Delay end function:
1. Select a programme
2.Press the [ TEMP.] button for 3 seconds to choose the time(the delaying end
time is 1-24 H.)
3.Press [ ] to commence the delay operation
Choose the Programme
StartSetting time
TEMP.
[ ]
Cancel the Delay function:
Press the TEMP. button until the display be 0H.It should be pressed before
starting the programme. If the programme already started, should turn off the
machine.
AROMA+
fibers to absorb softener more efficiently. As a result, with dosing the same
amount of softener, we can achieve better fragrance left on the clohtes.
The function helps to modify the water flow mode and time. Then help the
Caution!
• If there is any break in the power supply while the machine is operating, a special
memory stores the selected programme and when the power is restarted, the
selected programme will continue running.
STEAM function can penetrate the fiber,which effectively eliminate bacterias and
germs,preventing odors .
STEAM function can be selected with “COTTON”, “ “, “ ”,
.
BEDDING STEAM HYGIENE
“JEANS” , “MIX45 ‘ ” , “BABY CARE ” , “DOWNLOAD CYCLES ” and “SYNTHETIC”
STEAM
OPERATIONS
10
21
Programme Option
Option
COTTON
QUICK 15’
MIX 45’
ECO WASH
DELICATE
WOOL
SPORTS
DRUM CLEAN
DOWNLOAD CYCLES
RINSE&SPIN
SPIN ONLY
BEDDING
STEAM HYGIENE
COLOR ALIVE
WHITE
JEANS
BABY CARE
SYNTHETIC
○ Means optional
AROMA+
STEAM
DELAY END
○
○
○
○
○
○
○
○
○
○
○
○
○
○
○
○
○
○
○
○
○
○
○
○
○
○
○
○
○
○
*DOWNLOAD CYCLES default program is BABY CARE .
○ ○
○
○
OPERATIONS
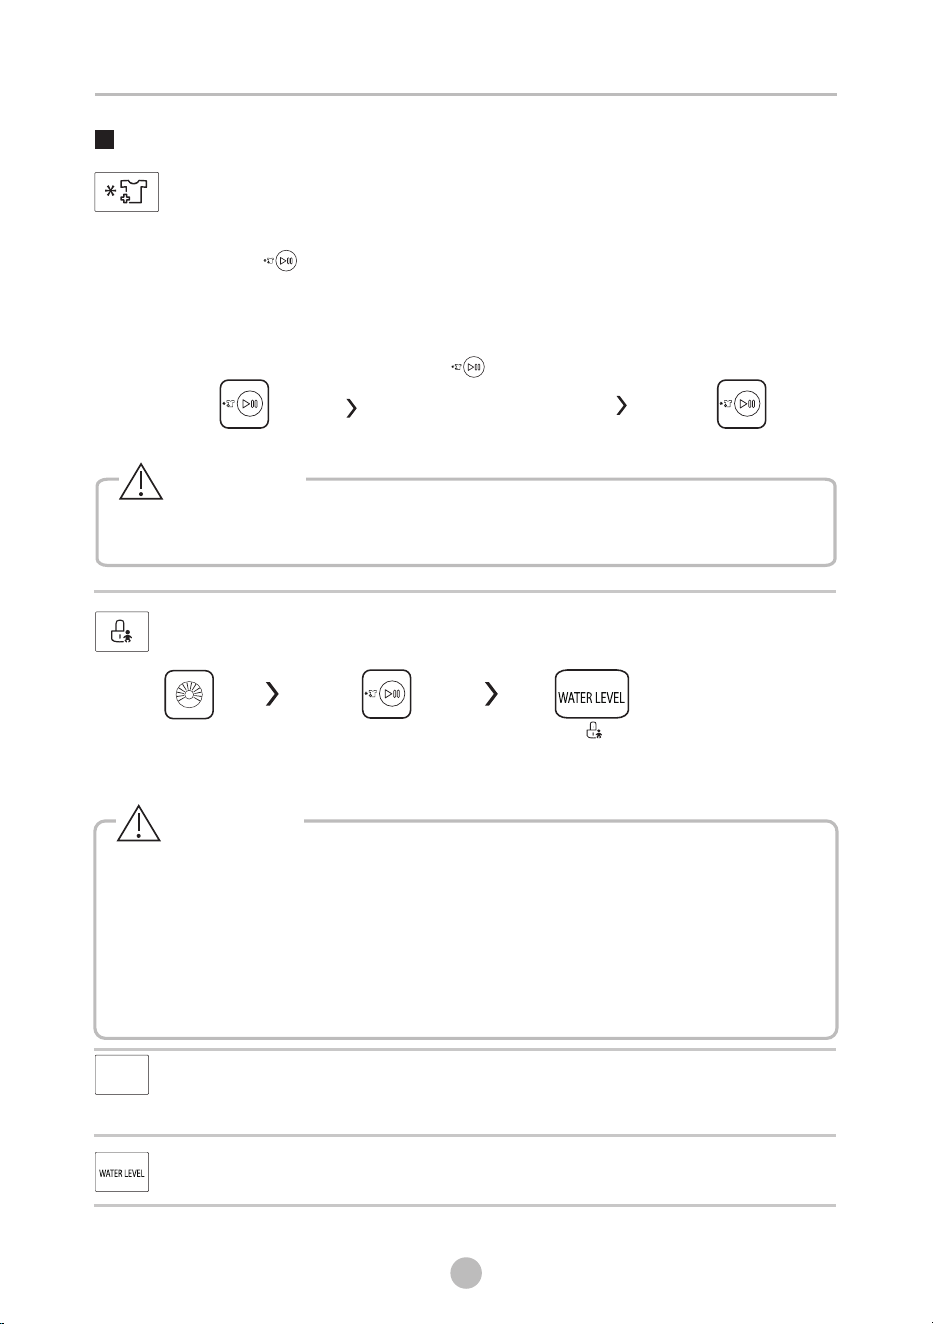
RELOAD
Cloths can be added after strating washing process.
Please follow the steps as bellow:
1. Press [ ] for 3 seconds.
2. Wait until the drum stops rotation.
3. The door is unlocked.
4. Add cloths into drum.
5. Close the door and Press [ ] .
Start/Pause
P 3sress[Start/Pause] ec.
Reload the clothes
• Don't use the Reload function when the water level is over the lower edge of the door
or the water temparature is high.
Caution!
10
22
CHILD LOCK
To avoid mis operation by children.
Caution!
Start/Pause
Other Functions
Press [WATER LEVEL] button
for 3 seconds till buzzer beep.
When the Child Lock is activated, the display will alternately show “CL” and the remaining time.
Pressing any other button will cause the Child Lock indicator to flash.
When the program ends, “CL” and “End” will alternate on the display.
The Child Lock deactivates the function of all buttons except the On/Off button and the Child
lock button!
Only can deactivate the Child Lock!
Please deactivate the Child Lock before selecting a new program!
press [WATER LEVEL]
WATER LEVEL
Adjust the water level of the main wash.
TEMP.
Press the button to regulate the temperature.
The display show "--" means the temperature is cold.
TEMP.
Choose the Programme
10
23
OPERATIONS
UFB Function
- Ultra Fine Bubble (UFB) is an invisibly small Nano size air bubble that is smaller
than a fiber gap of cotton.
- UFB deliver surfactants to stains deep inside the cloth. Thus UFB promotes the
easy removing stains.
- All washing program with the UFB function.
Wireless Network
Remote Control
This is the switch of remote control, if you want to use your smartphone to
control the washing machine remotely, you need to hold [AROMA+] 3seconds.
Considering the safe operation of washing machine, the smartphone remote
control should meet the following conditions:
1. The appliance should connect to the internet;
2. The door of drum should be closed.
Remark:
-. If the door is open in anytime, the remote control function will be failure.
-. The remote control function is turned off at the end of each cycle automatically,
if you want to use remote control function again, you need turn on it again.
Methods to turn on the Wireless Network function
1. Press SPIN to turn on the Wireless Network function,
it can also configure the network or reset the network.
[ ] button for 3 seconds
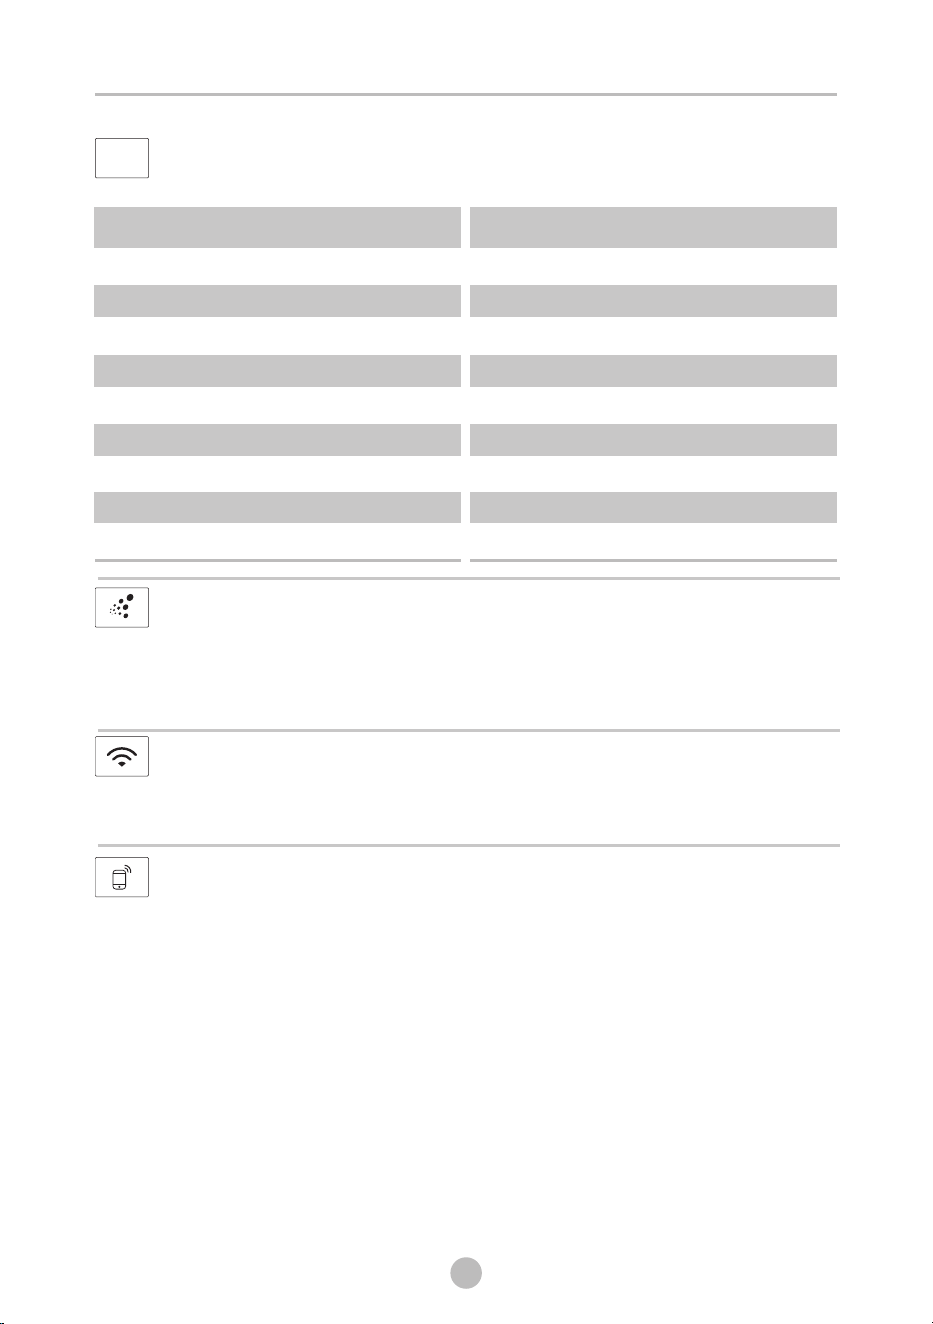
Programme Default Spin Speed(rpm)
COTTON
QUICK 15’
MIX 45’
ECO WASH
DELICATE
WOOL
SPORTS
DRUM CLEAN
DOWNLOAD CYCLES
Programme Default Spin Speed(rpm)
RINSE&SPIN
SPIN ONLY
BEDDING
STEAM HYGIENE
COLOR ALIVE
WHITE
JEANS
BABY CARE
SYNTHETIC
1000
800
800
800
600
600
800
-
1000
800
1000
800
800
1000
800
800
1000
1000
SPIN
Press the [SPIN] button to change the spin speed.
SPIN
24
1. Your smartphone is connected to home Wireless Network,and you know the
network password.
2. Make sure you are near the home appliance.
3. The 2.4GHz band wireless signal is enabled on your wireless router.
Follow the below steps to enter the remote control state
Before you start, make sure that:
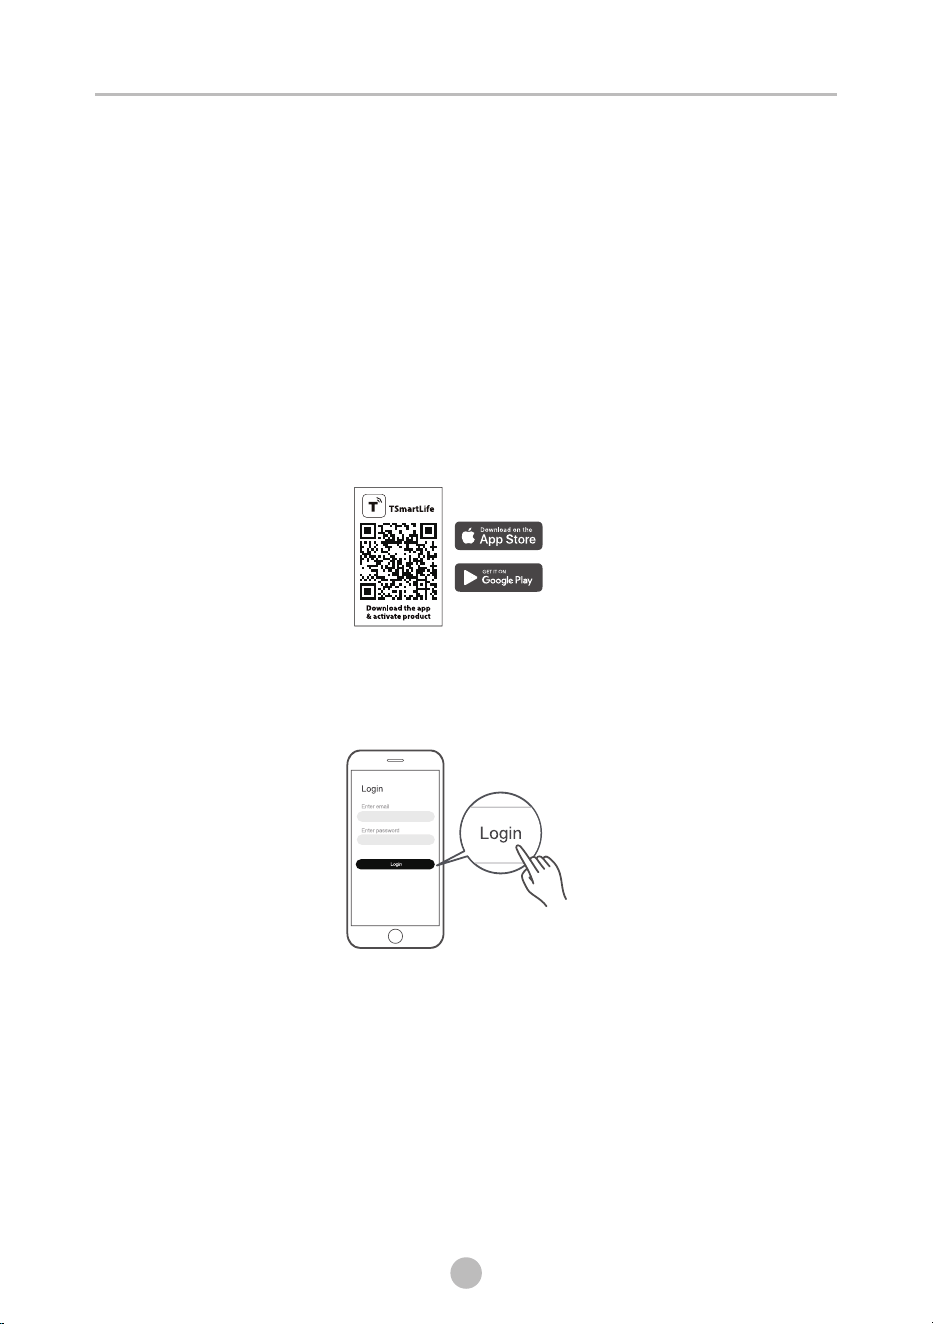
Instructions to Connection with the TSmartLife App
Download the TSmartLife App
On an app market (Google Play Store, Apple App Store), search for
"TSmartLife" and find the TSmartLife app. Download and install it on
your phone. You can also download the app by scanning the QR code
below.
Register and log in
Open the TSmartLife app, and create a new account to start (you can
also register through a third-party account). If you already had an
existing account, use the account to log in.
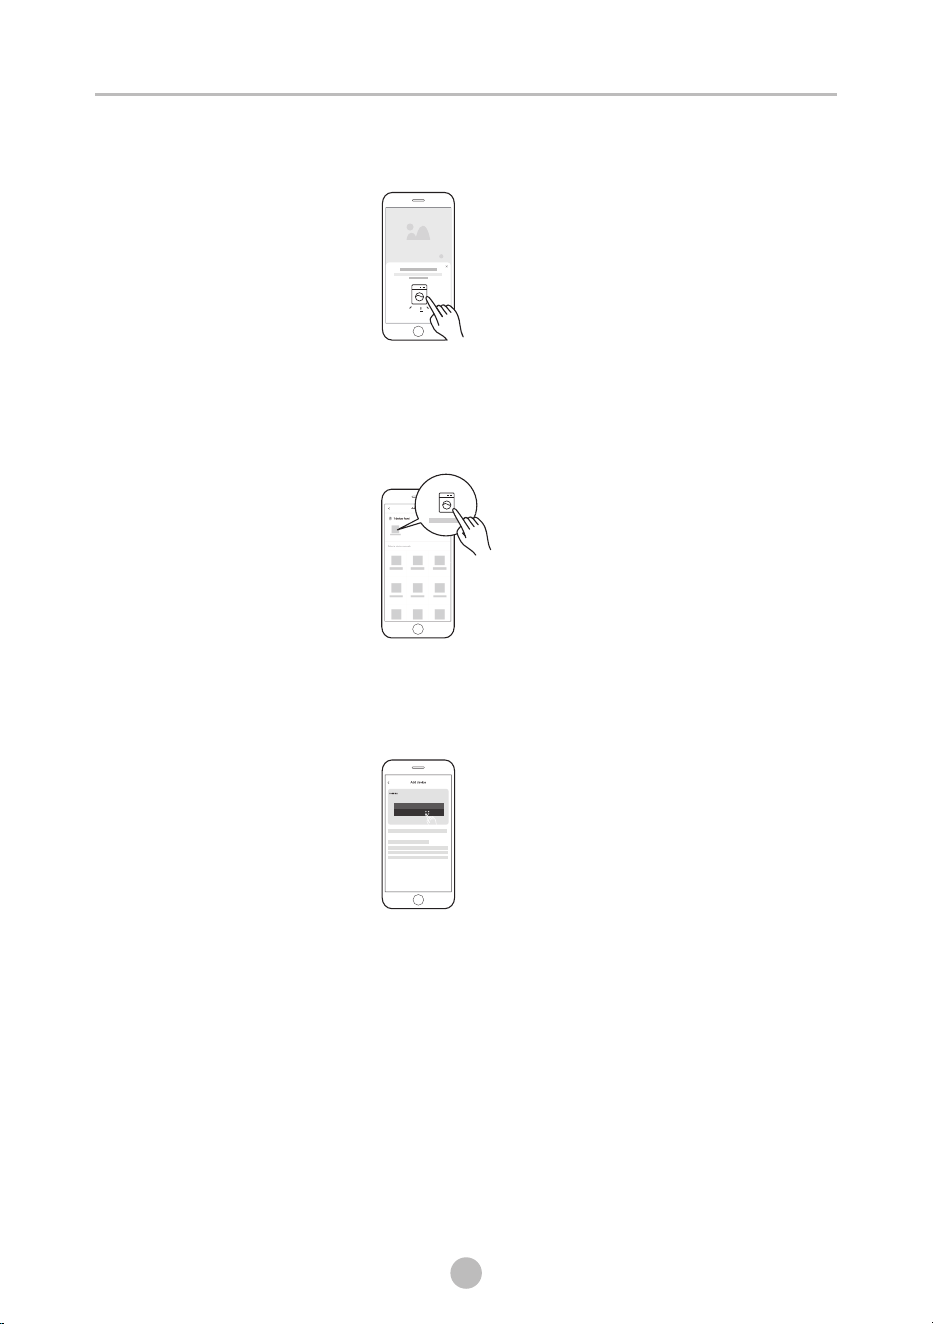
Connect your devices to TSmartLife
1:Please make sure your mobile phone is connected to Wireless Network.
If not, go to Settings and turn on the wireless connection, select and
connect to a Wireless Network. Also please turn on the Bluetooth on
your phone. If not, go to Settings and turn it on.
2:Please power on your devices.
3:Open TSmartLife app on your phone.
OPERATIONS
25
4:If a message of "Smart devices discovered nearby" appears, click to
add.
5:If no message appears, select " + " on the page and select your device
in the list of nearby devices available. If your device is not listed,
please add your device manually by the device category and device
model.
8: 88
6:Connect your device to Wireless Network according to the instructions
on app. If the connection fails, please follow the instructions provided
by the app to continue with the operation.
OPERATIONS
OPERATIONS
26
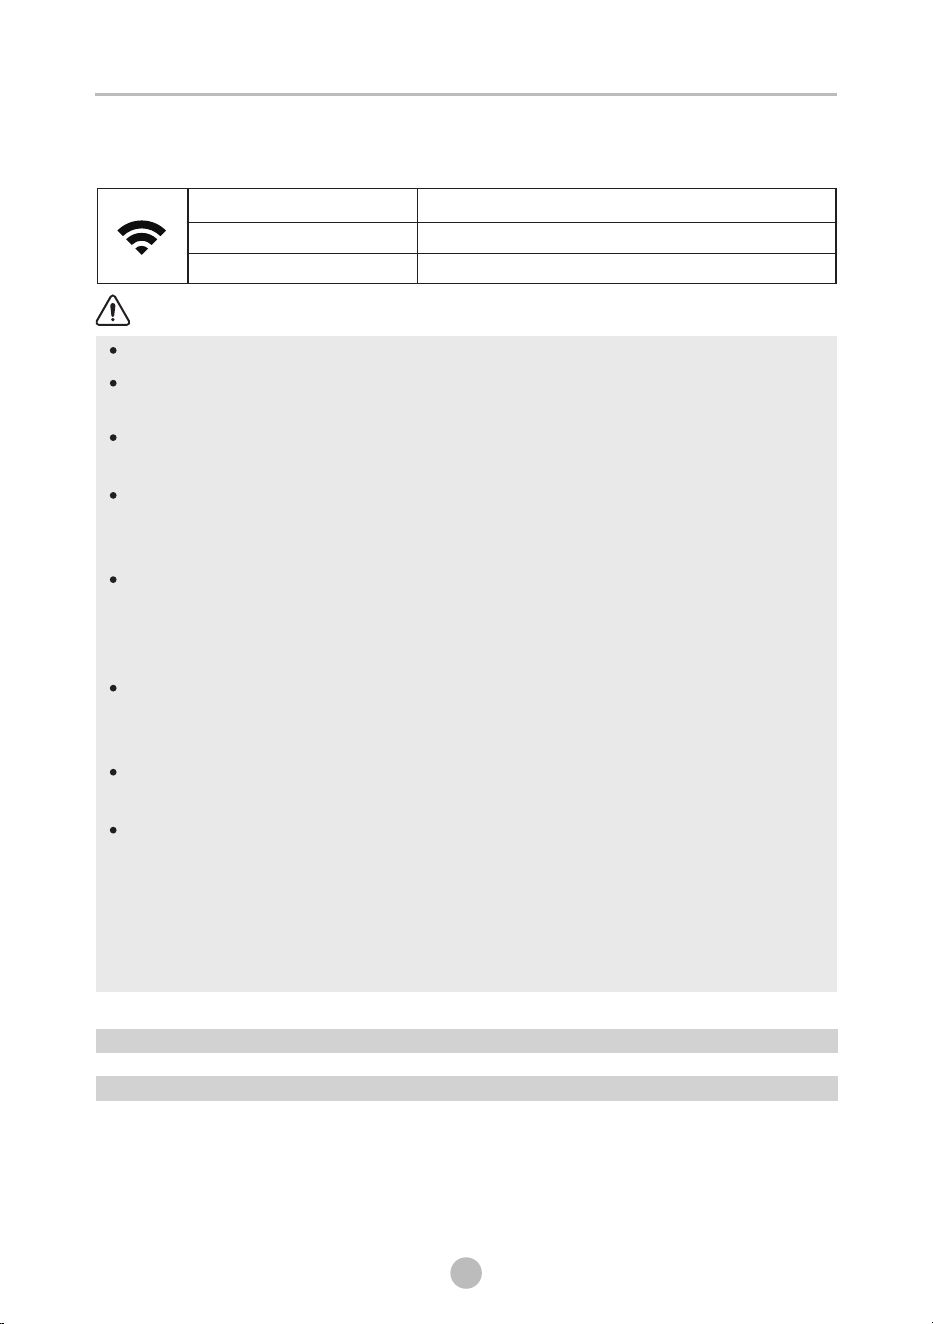
Wireless Network Status Light
Slowly ashing
Waiting for connection
Quickly ashing
Connecting
Quickly ashing solid
Connected to your wireless router
Notes
Make sure your devices are powered on.
Keep your mobile phone close enough to your device when you
are connecting network to your device.
Connect your mobile phone to the wireless network at home, and
make sure you know the password of the Wireless Network.
Check if your router supports 2.4 GHz Wireless Network band and
turn it on. If you are not sure whether the router supports 2.4 GHz
band, please contact the router manufacturer.
The device cannot connect to the Wireless Network that requires
authentication, and it usually appears in public area such as hotels,
restaurants, etc. Please connect to a Wireless Network that does not
require authentication.
It is recommended to use a Wireless Network name that only contains
letters and numbers. If your Wireless Network name contains special
characters, please modify it in the router
Turn o the WLAN + (Android) or WLAN Assistant (iOS) function of
your mobile phone when connecting network to your devices.
In the case that your device connected to Wireless Network before
but it needs to reconnect, please click "+" on app Home page, and
add your device again by the device category and model according to
the instructions on app.
Wireless Network INFORMATION
Working Frequency
Extreme Temperature Range
Max RF Power Output
2.4G
-20°C~85°C
WiFi: E.I.R.P 18dBm BT: 8dBm
QUICK 15’
WOOL
Hand or machine washable wool or richwool textiles Especially
gentle wash programme to prevent shrinkage longer programme
pauses
- .
,
.
SPORTS
Washing the activewear.
COTTON
Hard-wearing textiles, heat-resistant textiles made of cotton or linen.
SPIN ONLY
Spins and drains the water.
BEDDING
10
27
OPERATIONS
MIX 45'
This procedure is suitable for washing few and not very dirty clothes
quickly.
Mixed load consisting of textiles made of cotton and synthetics.
ECO WASH
This programme is suitable for energy saving wash.
DELICATE
For delicate washable textiles e.g. made of silk,satin synthetic
fibres or blended fabrics.
, , , ,
DRUM CLEAN
This program is specially set in this machine to clean the drum
and It applies high temperature water to make the drum
and tub. When this procedure is performed, the clothes can not be
added. When proper amount of chlorine bleaching agent is put in,
the drum cleaning effect will be better. The customer can use this
procedure regularly according to the need.
tub.
RINSE&SPIN
Rinses and then spins the laundry, and then drains the water.
Programmes are available according to the laundry type.
Programmes
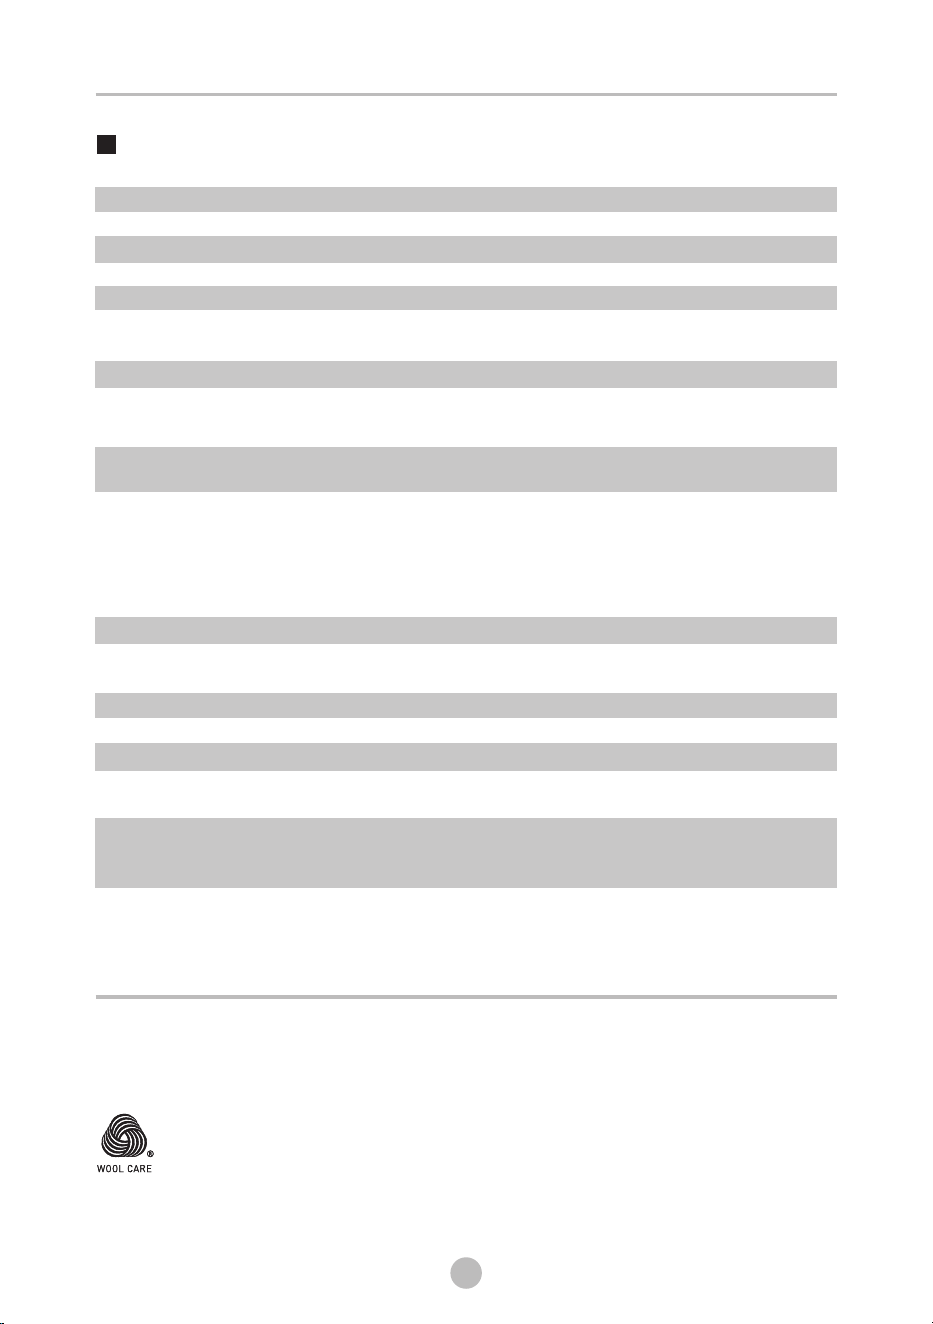
The wool wash cycle of this machine has been approved by The Woolmark
Company for the washing of machine washable wool products provided that the
products are washed according to the instructions on the garment label and those
issued by the manufacturer of this washing machine.
M2203:TW-T21BU115UWM / TW-T21BU105UWM / TW-T21BU115UWS / TW-T21BU105UWS
This program is specially designed for washing Bedding.
STEAM HYGIENE
Washing machine can kill some bacterium, and achieve hygiene
effect.
COLOR ALIVE
Washing brightly colored clothes, it can protect the colors better.
WHITE
Specially for white clothes.
JEANS
Specially for jeans.
BABY CARE
Washing the baby’s clothes, it can make the baby's wear cleaner and
make the rinse performance better to protect the baby skin.
SYNTHETIC
Wash synthetic articles, for example: shirts, coats,blending. While
washing the knitting textiles, detergent quantity shall be reduced
due to its loose string construction and easily forming bubbles.
DOWNLOAD CYCLES
By using , you can download addtional cycles to your
washing machine, we have limited cycle numbers on the panel, but
we have more cycles in the app, and we can choose one via the app,
and the by controlling the knob, we can apply the app cycle to the
machine.
TSmartLife App
The program (BABY CARE/JEANS/SYNTHETIC) can only be selected by App on mobile phones.TSmartLife
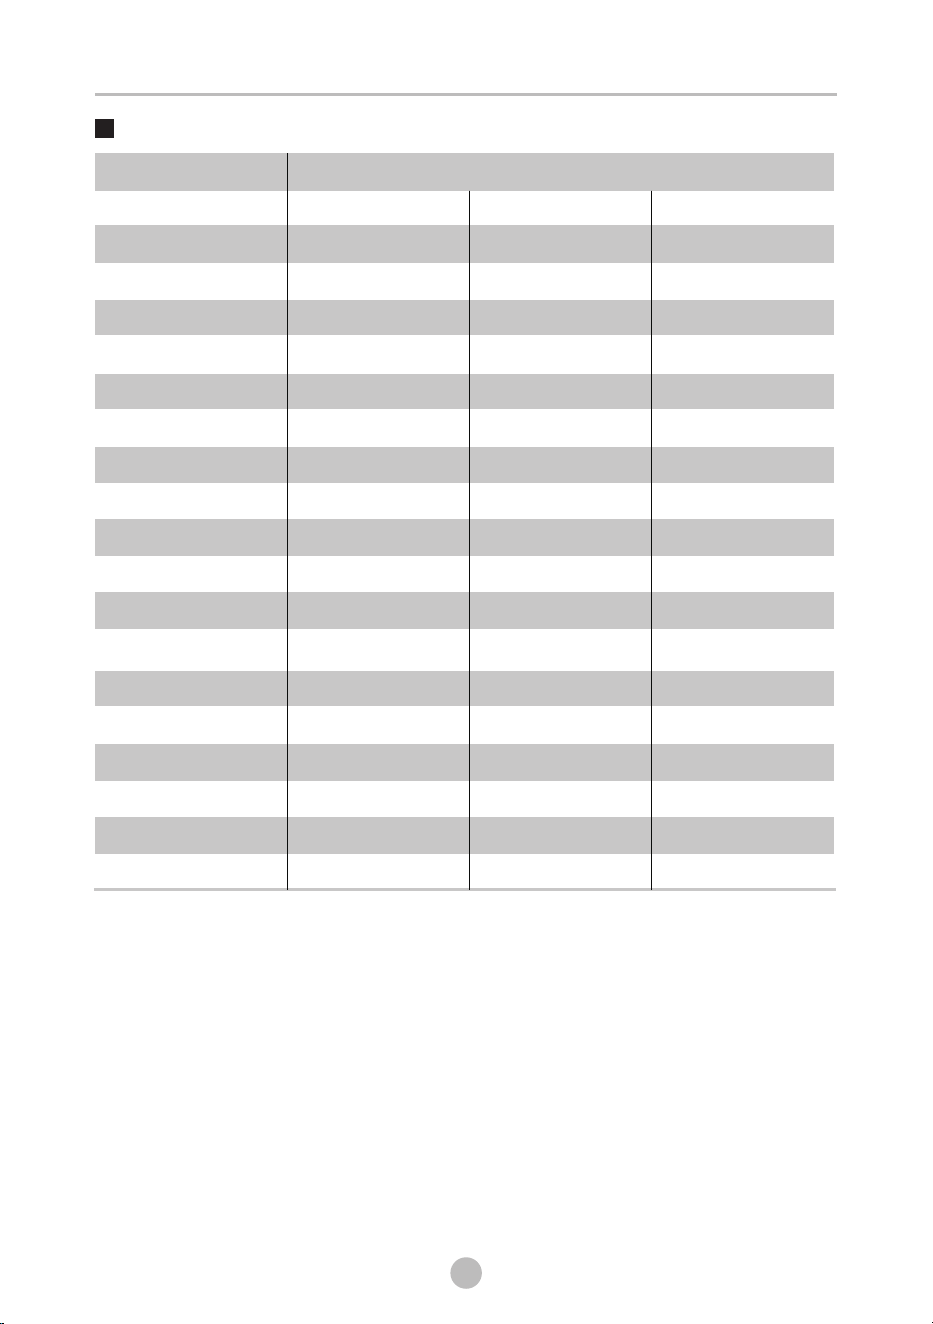
Washing Programmes Table
28
OPERATIONS
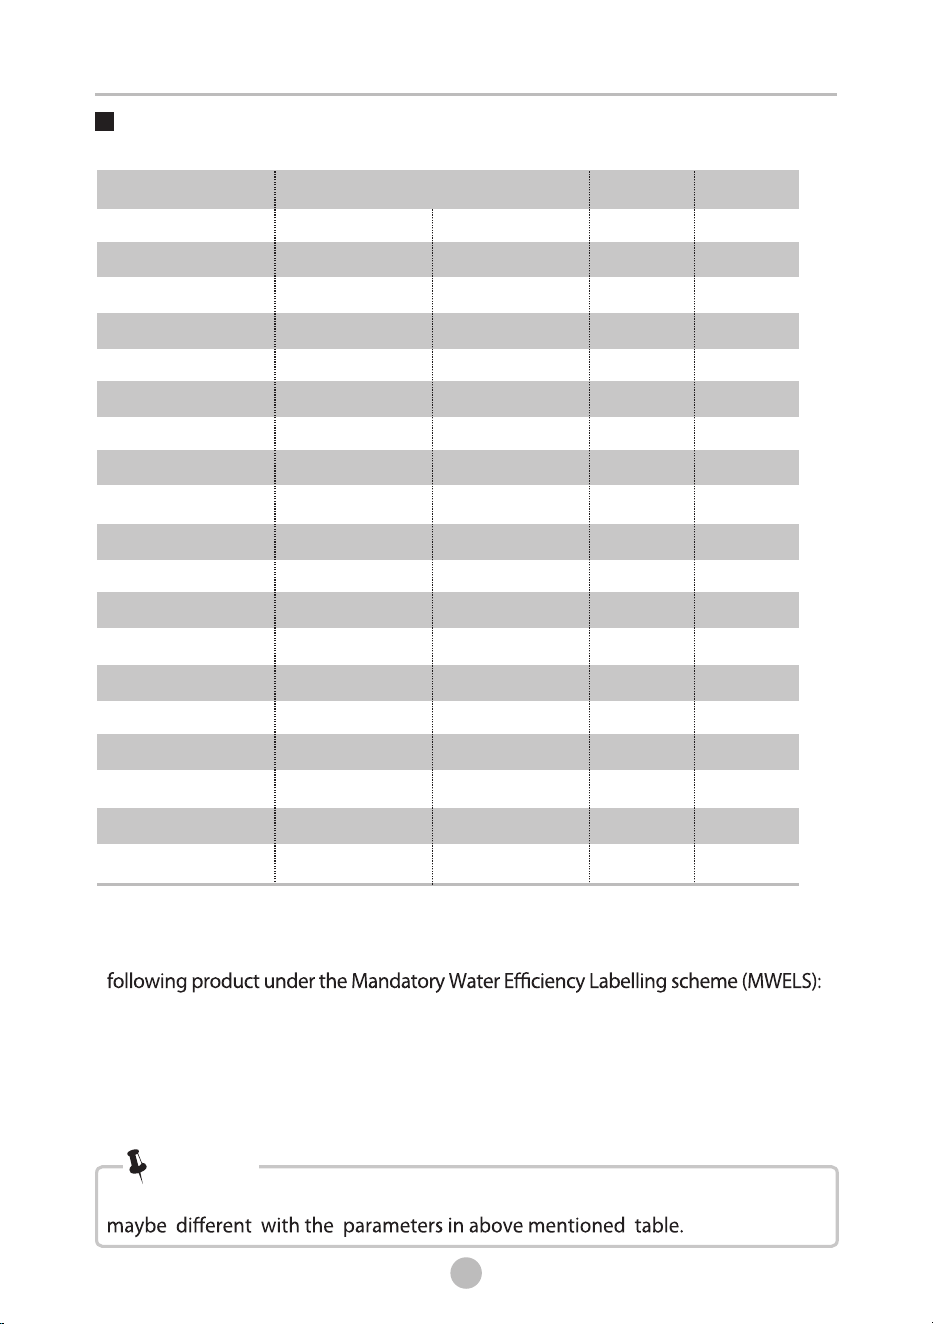
• The parameters in this table are only for user’s reference. The actual parameters
Note!
*DOWNLOAD CYCLES default program is BABY CARE.
- Recommended wash mode for normally soiled clothes was used for the evaluation of the
Programme
Default Time
Default
Temp.(°C)
Load(kg)
9.5
9.5
2.0
4.5
4.5
2.5
2.5
4.5
-
9.5
9.5
9.5
9.5
4.5
4.5
4.5
9.5
9.5
4.5
COTTON
QUICK 15’
MIX 45’
ECO WASH
DELICATE
WOOL
SPORTS
DRUM CLEAN
DOWNLOAD CYCLES
RINSE&SPIN
SPIN ONLY
BEDDING
STEAM HYGIENE
COLOR ALIVE
WHITE
JEANS
BABY CARE
SYNTHETIC
1:18
0:15
0:45
0:57
0:50
1:07
0:45
1:18
2:05
0:20
0:12
1:48
2:39
1:03
1:09
1:35
2:05
1:03
40
Cold
30
30
30
40
20
90
60
-
-
40
-
Cold
30
30
60
40
10.5
10.5
2.0
5.0
5.0
2.5
2.0
5.0
-
10.5
10.5
10.5
10.5
5.0
5.0
5.0
10.5
10.5
5.0
Model : TW-T21BU115UWM, TW-T21BU105UWM, TW-T21BU115UWS, TW-T21BU105UWS
Model : TW-T21BU115UWM, TW-T21BU105UWM, TW-T21BU115UWS, TW-T21BU105UWS
Malaysaia and Singapore models
Recommended programme : Cotton + Wash temp 60°C + Spin speed 1200 rpm.
• Before your maintenance starts, please unplug the machine and close the tap.
Cleaning The Cabinet
Cleaning The Drum
• Formic acid and its diluted solvents or equivalent are forbidden, such as
alcohol, solvents or chemical products,etc.
• Don’t put laundry in the washing machine during the drum cleaning.
Cleaning The Gasket And Glass
Warning!
Note!
Note!
Cleaning And Care
The rusts left inside the drum by the metal articles shall be removed immediately
with chlorine-free detergents.
Never use steel wool.
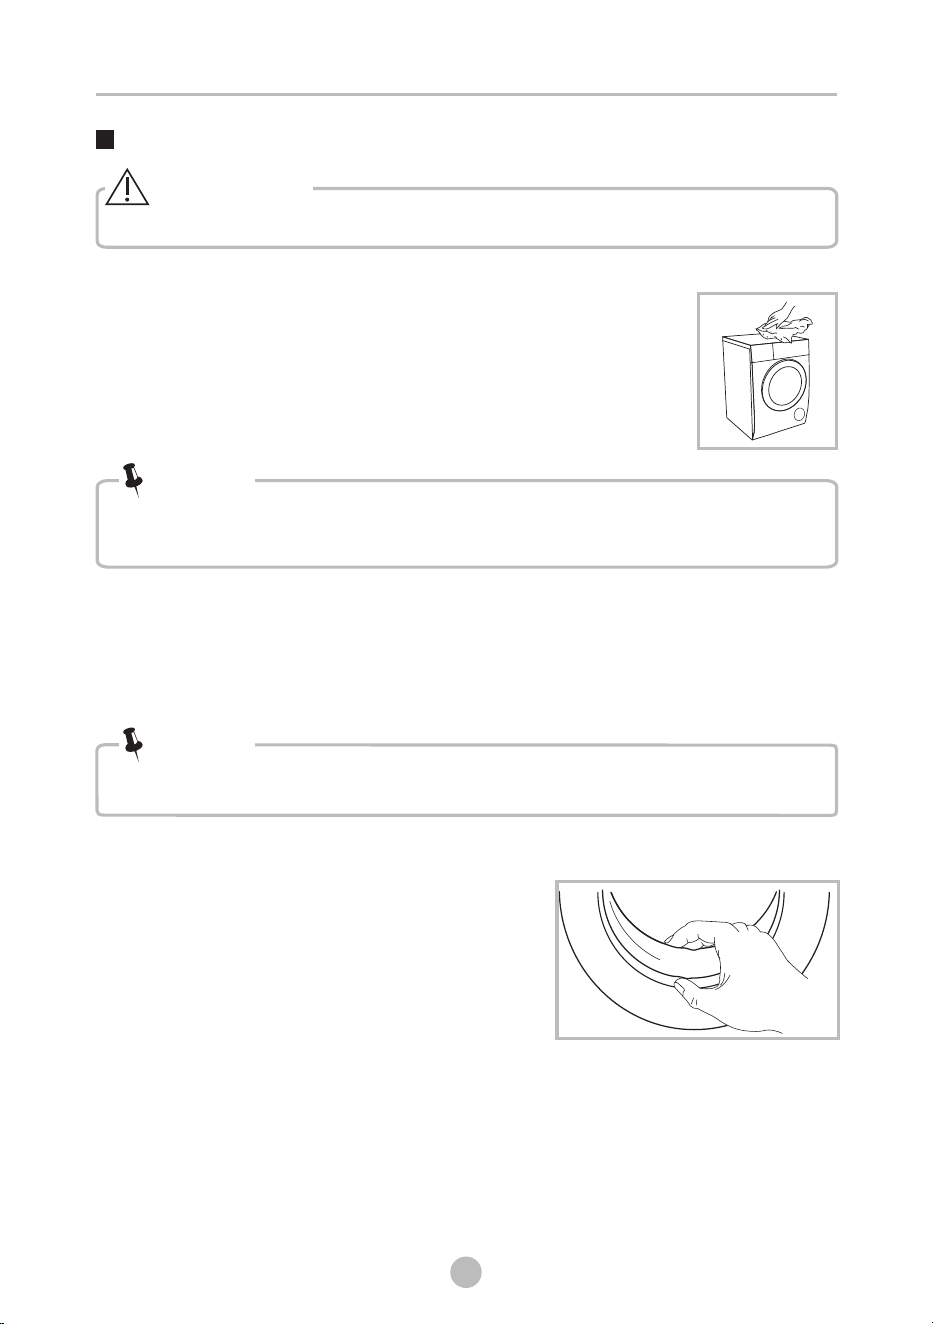
Proper maintenance on the washing machine can extend its
working life. The surface can be cleaned with diluted
non-abrasive neutral detergents when necessary. If there is
any water overflow, use the dry cloth to wipe it off immediately.
No sharp items are allowed.
Wipe the glass and gasket after each wash
to remove lint and stains. If lint builds up it
can cause leaks.
Remove any coins, buttons and other objects
from the gasket after each wash.
MAINTENANCES
29
Clean the Door Seal and Glass every month
to ensure the normal operation of the
appliance.
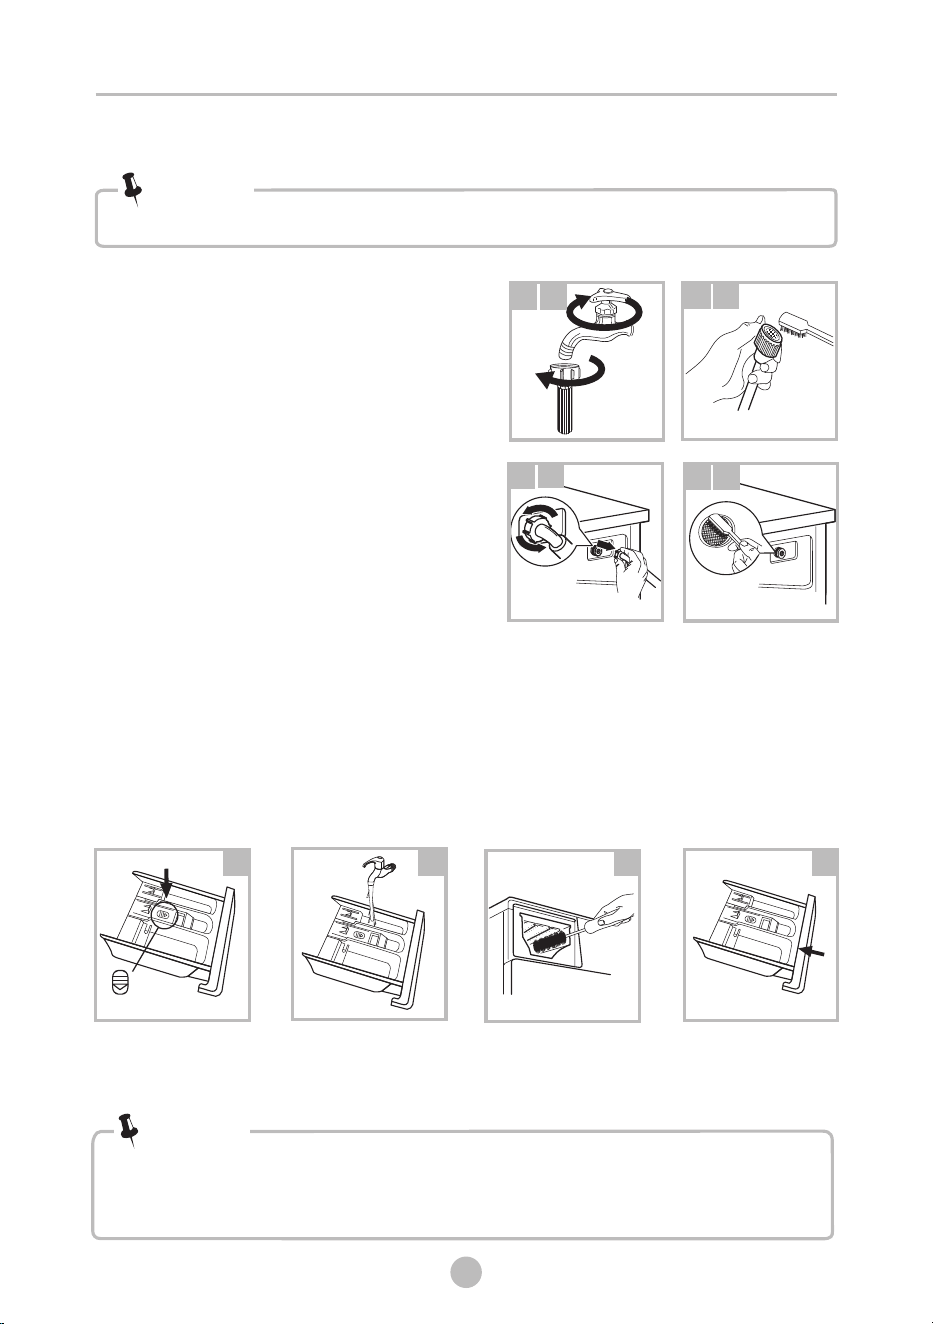
Washing the filter in the water inlet hose
1.Close the tap.
2.Remove water inlet hose from the tap.
3.clean the filter.
4.Reconnect the water inlet hose.
Cleaning The Inlet Filter
• Inlet filter must be cleaned if water reduces than before.
Washing the filter in washing machine:
1.
2 .Pull out the filter with long nose pliers
and reinstall it back after being washed.
3.Use the brush to clean the filter.
4.Reconnect the water inlet hose.
Screw off the water inlet hose from the
of the machine.backside
Note!
MAINTENANCES
1
1
2
2
3
3
4
4
30
Clean The Detergent Dispenser
• Do not use alcohol,solvents or chemical products to clean the machine.
Note!
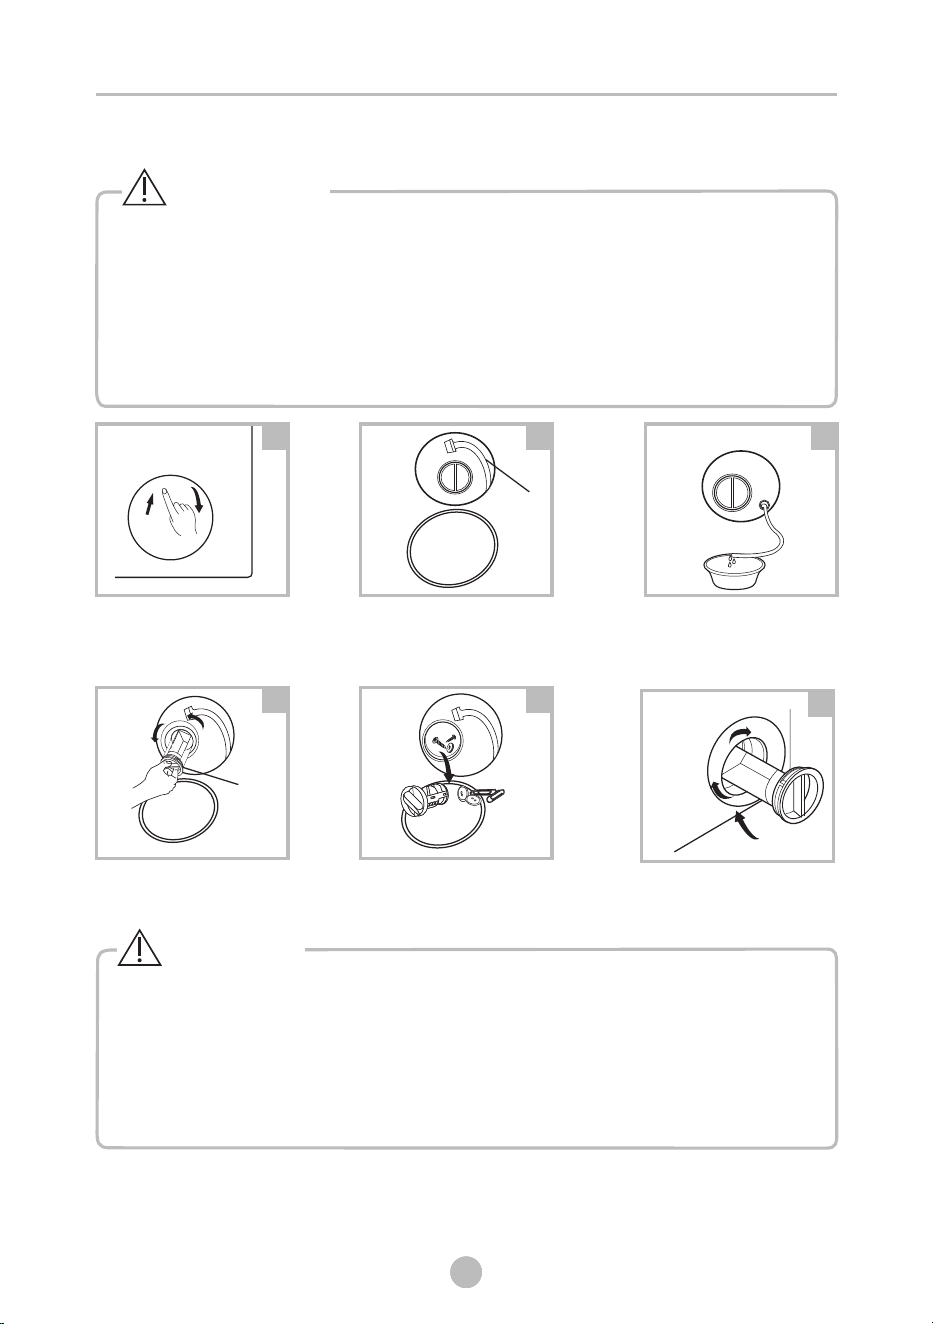
1.Press down the arrow location on softener cover inside the dispenser drawer.
2.Lift the clip up and take out softener cover and wash all grooves with water.
3.Restore the softener cover and push the drawer into position.
5.Clean the Door Seal and Glass every month to ensure the
normal operation of the appliance.
• Clean the detergent dispenser every 3 months to ensure the normal
operation of the appliance.
Press the release and
remove the dispenser
drawer
Clean the dispenser
drawer and the softener
cover under water
Clean the recess with
an soft brush
Insert the dispenser
drawer
1
3
4
2
MAINTENANCES
31
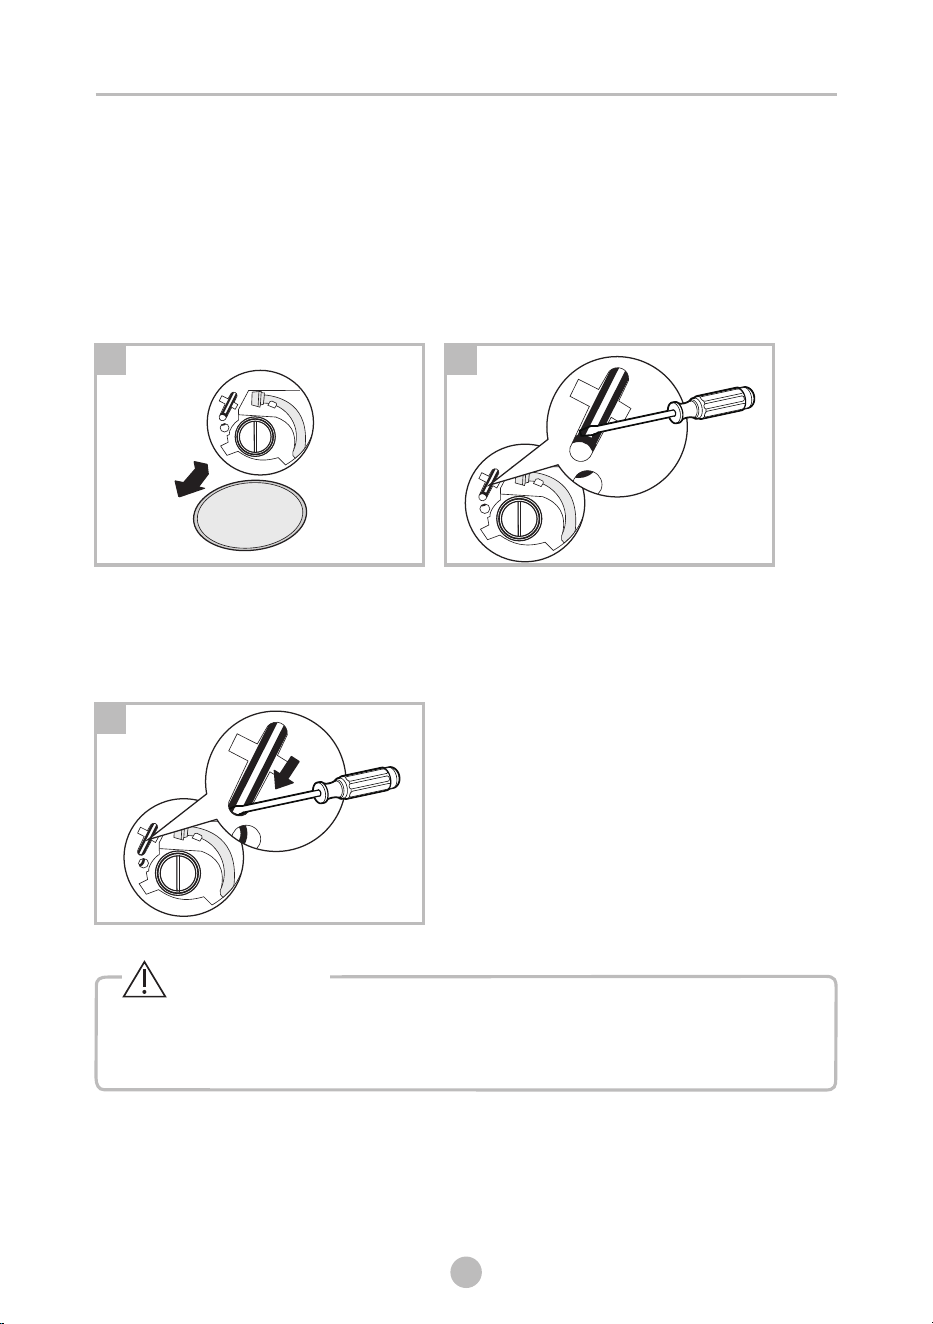
Cleaning The Drain Pump Filter
• Wait until the water cools down.
• Unplug the machine to avoid electrical shock before maintenance.
• Drain pump filter can filter the lints and small foreign matters from the
washing.
• Clean the filter periodically to ensure the normal every 3 months
machine.operation of washing
Be careful of the hot water!
Open the lower cover cap
Pull out the emergency drain
hose, and take off the hose cap
Open the filter cap by turning
to the counter clockwise
Remove extraneous matter
1
2
3
Close the filter cap and the
lower cover cap
6
Emergency
drain hose
After water runs out,
reset the drain hose
5
4
Filter cap
•
Warning!
Caution!
• Make sure that filter cap and emergency drain hose are reinstalled properly, filter cap
should be inserted aligning to hole plates otherwise water may leak.
• When the appliance is in use and depending on the programme selected there can
be hot water in the pump. Never remove the pump cover during a wash cycle, always
wait until the appliance has finished the cycle, and is empty. When replacing the filter
cap, ensure it is securely re-tightened.
MAINTENANCES
31
MAINTENANCES
31
MAINTENANCES
31
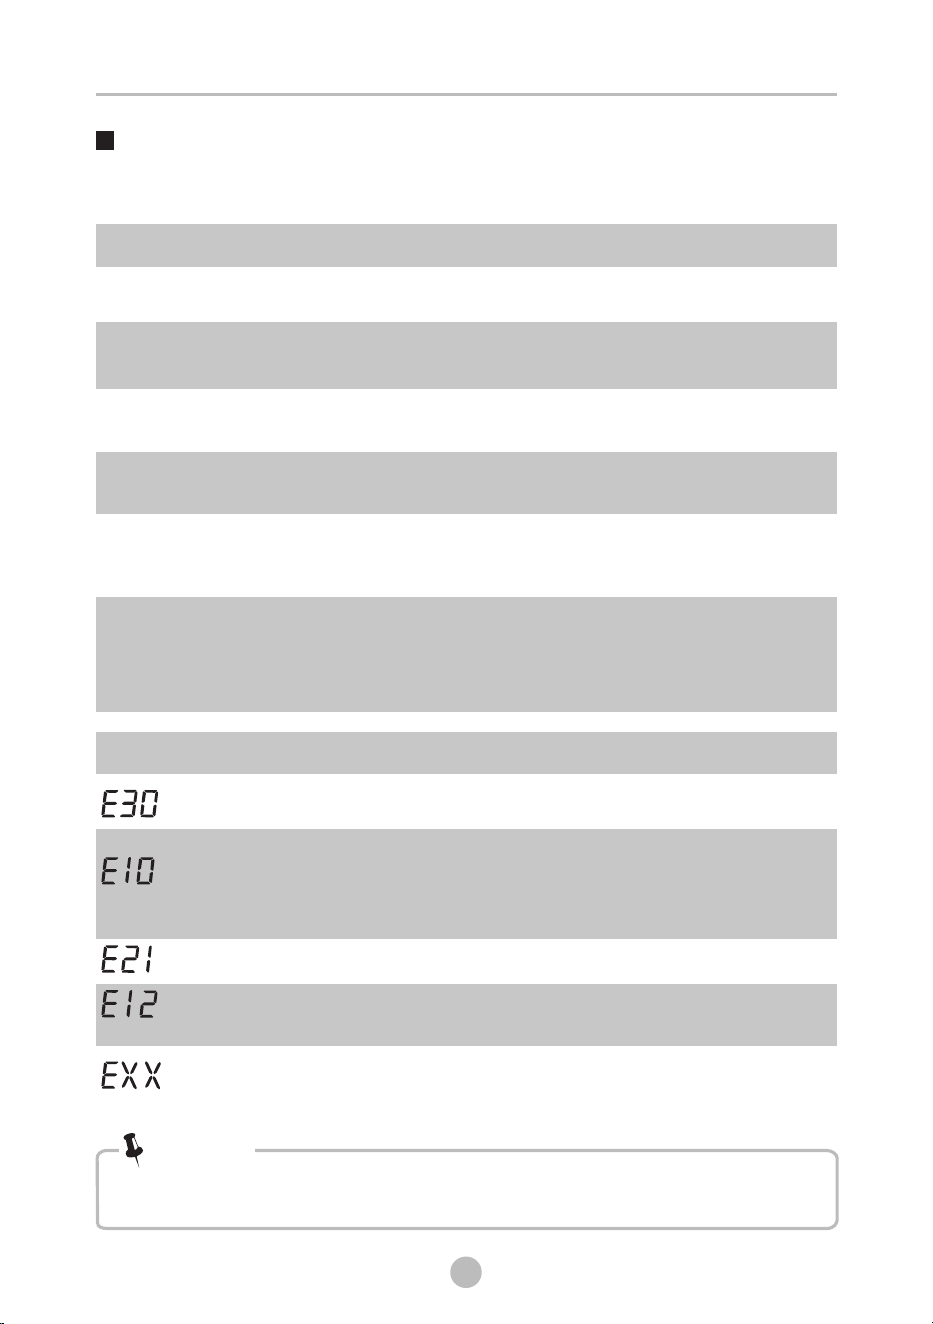
Open filter door.
Emergency door pull cord
Using a straight screwdriver
(or other non-sharp tool),
insert into the emergency door
pull cord.
Emergency Door Release
In case of power failure or other circumstances and door cannot be opened.
If it is necessary to open the door under this circumstances, please pull
down the pull cord inside emergency door and restore the pull cord after
opening the door.
The machine is not allowed to use the emergency switch pull cord during washing. If need to
run machine urgently, it is recommended to open door after water is cooled, to avoid getting
burn caused by high temperature residual water outflow from the machine tub.
Pull down the emergency door
pull cord (refer to direction of the
arrow in the picture).
If unlocked successfully, you will
find the door lock icon will go out.
1
2
3
MAINTENANCES
32
Warning!
Trouble Shooting
The start of the appliance does not work or it stops during operation.
First try to find a solution to the problem, If not, contact the service centre.
Description
Reason
Solution
Restart after the door is closed
Check if the clothes is stuck
Door is not closed properly
Door can’t be
opened
Safety protection design
is working
Disconnect the power, restart
the product
Water leakage
Connection of water inlet
hose or drain hose is not
proper.
Check connection of water inlet
hose and drain hose.
Clean and wipe the detergent
box
Abnormal noise
Check if the fixing (bolts) have
been removed
Check it’s installed on a solid
and level floor
Indicator or display
does not light
Electrical power cord may
not be plugged in or
connection may be loose.
Make sure plug fits tightly in
wall outlet.Check the power
plug is connected correctly.
Washing machine
can not start up
Detergent residues
in the box
Detergent is dampened
or agglomerated
MAINTENANCES
shows other alarm codes again, contact the service.
After the check, activate the appliance. If the problem occurs or the display
Note!
Description
Reason
Solution
Check if the water pressure is
too low
Straighten the water inlet hose
Check if the inlet valve filter is blocked
Check if the drain hose is blocked
Water supply duration is
too long
Water drain duration is too
long
Try operation again. If the same
trouble continues, call for service.
Others
Water overflow
Stop using the washing machine
and call the service center for repair
Restart after the door is closed
Check if the clothes is stuck
Door is not closed properly
33
Risk of electric shock
1
34
MAX.Current
Standard Water Pressure
Power Supply
10A
0.05MPa~1MPa
0.01 MPa
220-240V~,50Hz
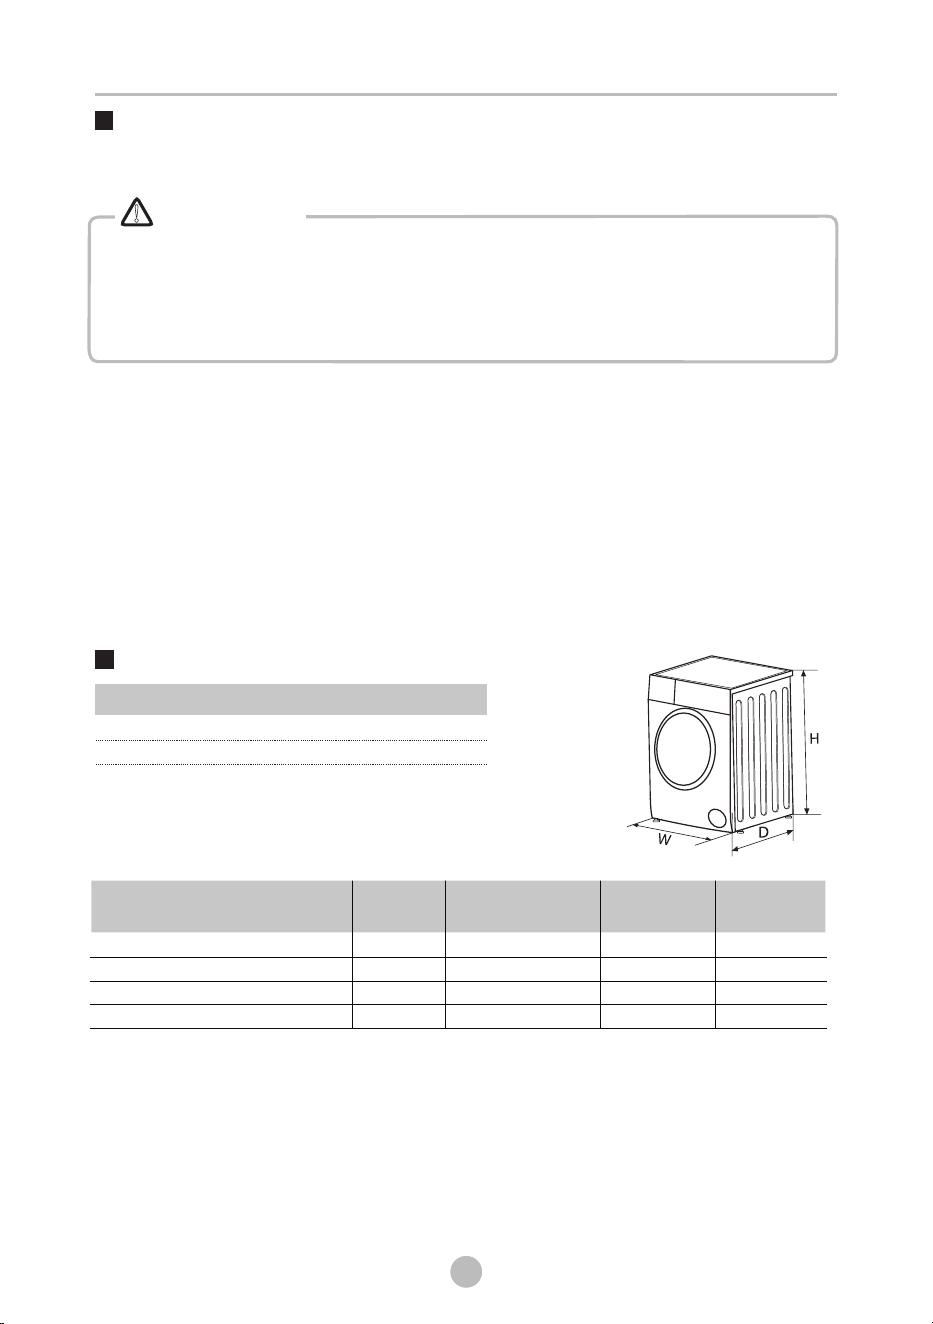
Technical Specication
Model
Washing
Capacity
Dimension
(W*D*H mm)
Net
Weight
Rated
Power
9.5 kg
595*615*850
595*615*850
595*615*850
595*615*850
64 kg
64 kg
64 kg
64 kg
1950W
1950W
1950W
1950W
TW-T21BU105UWM
TW-T21BU115UWM
TW-T21BU105UWS
TW-T21BU115UWS
Customer Service
•
Never try repair an appliance which is defective of presumed to be defective.
You may put your own and future user’s lives in danger. Only authorised specialists
are allowed to carry out this repair work.
• Improper repair will void the warranty and subsequent damages can’t recognized!
Warning!
!
Spare part for your appliance are avaiable for a minimum of 6 years.
In case of questions please contactour local service.
Transport
IMPORTANT STEPS WHEN MOVING THE APPLIANCE
• Unplug the appliance and close the water inlet tap.
• Check, if the door and the detergent dispenser are closed properly.
• Remove the water inlet pipe and the outlet hose from the house installations.
• Let the water drain completely from the appliance (see "Maintenance Cleaning the
drain pump lter")
• Important : Re-install the 4 transport bolts in the back of the appliance.
•
This appliance is heavy. Transport with care. Never hold any protruding part of the
machine when lifting. The machine door cannot be used as a handle.
MAINTENANCES
10.5 kg
9.5 kg
10.5 kg
Lower Water Pressure*
* Underultra-low water pressure and using powder detergent,
there may be a small amount of residue in the detergent box.