1
【The contents of this document may not fully reflect all latest product changes. Please refer to the
actual product.】
Contents
1.Conference Main Interface
2.Writing Whiteboard Introduction
3.Multi-screen Interaction Setup Introduction
4.Wireless Screen Sharing Introduction
5.PC Hardware Screen Sharing Introduction
6.File Management Function Introduction
7.Side Slide Menu Introduction
8.Settings Menu Introduction
9.VIP Reception Function Introduction
10.Other System APPs Introduction
2
3
12
15
17
19
20
24
34
35
75-inch Conference Panel
(with display monitor function)
Software
Operation
Manual
2
【The contents of this document may not fully reflect all latest product changes. Please refer to the actual product.】
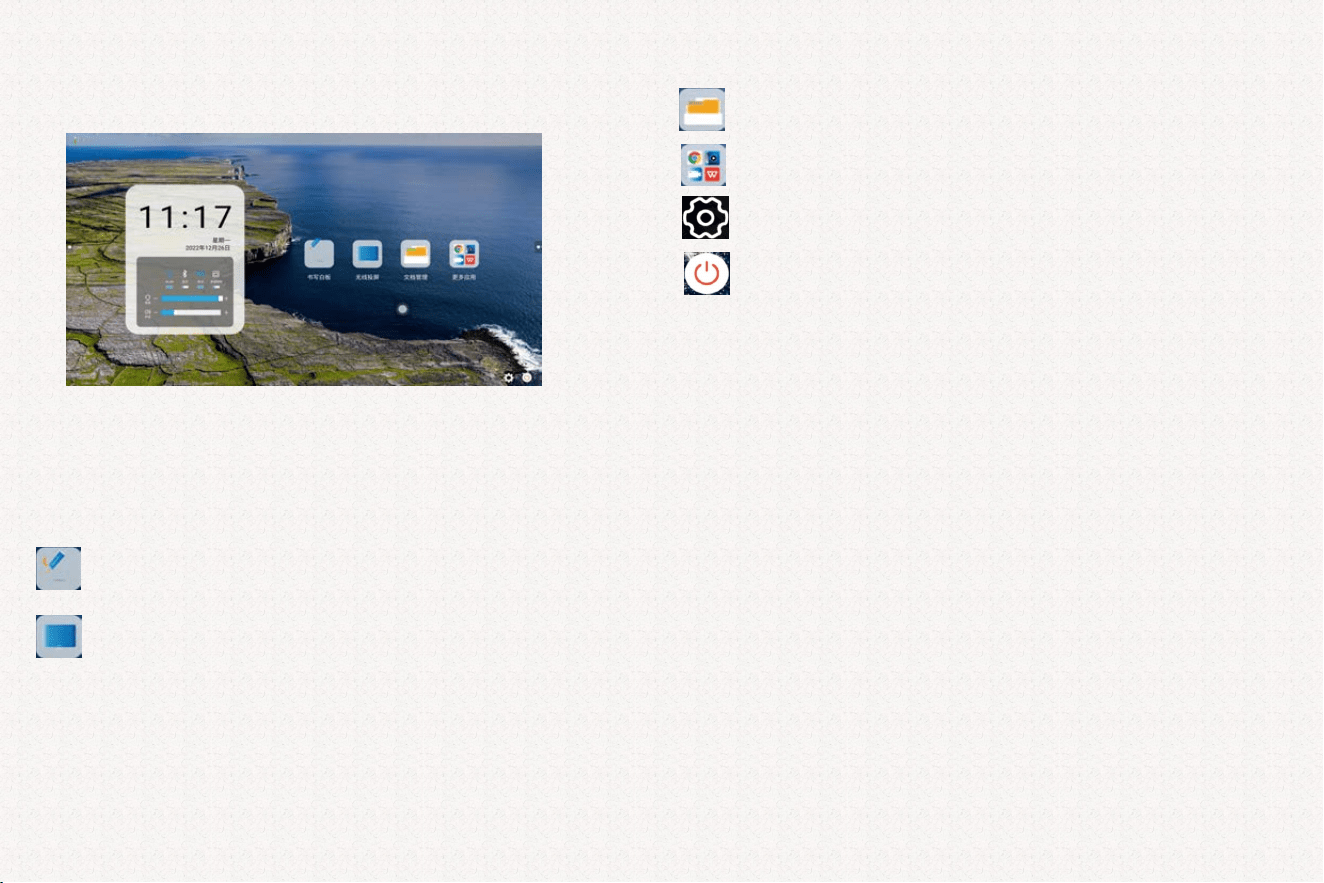
1. Conference Main Interface (Launcher)
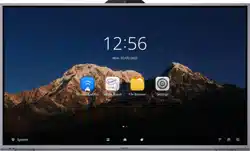
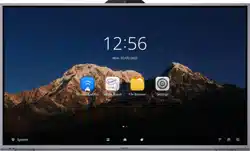
Power on to enter the system main interface. The public default boot theme is
shown as below.
Interface Shortcuts:
:Tap to open and start conference writing.
:Tap to enter Android internal file manager by default; external
memory devices can be selected after entering.
:Tap to perform mobile phone screen projection.
:Tap to enter Android application interface and menu settings.
:Tap to open the settings menu
:Tap to open shutdown options.
3
【The contents of this document may not fully reflect all latest product changes. Please refer to the
actual product.】
2. Writing Whiteboard Introduction
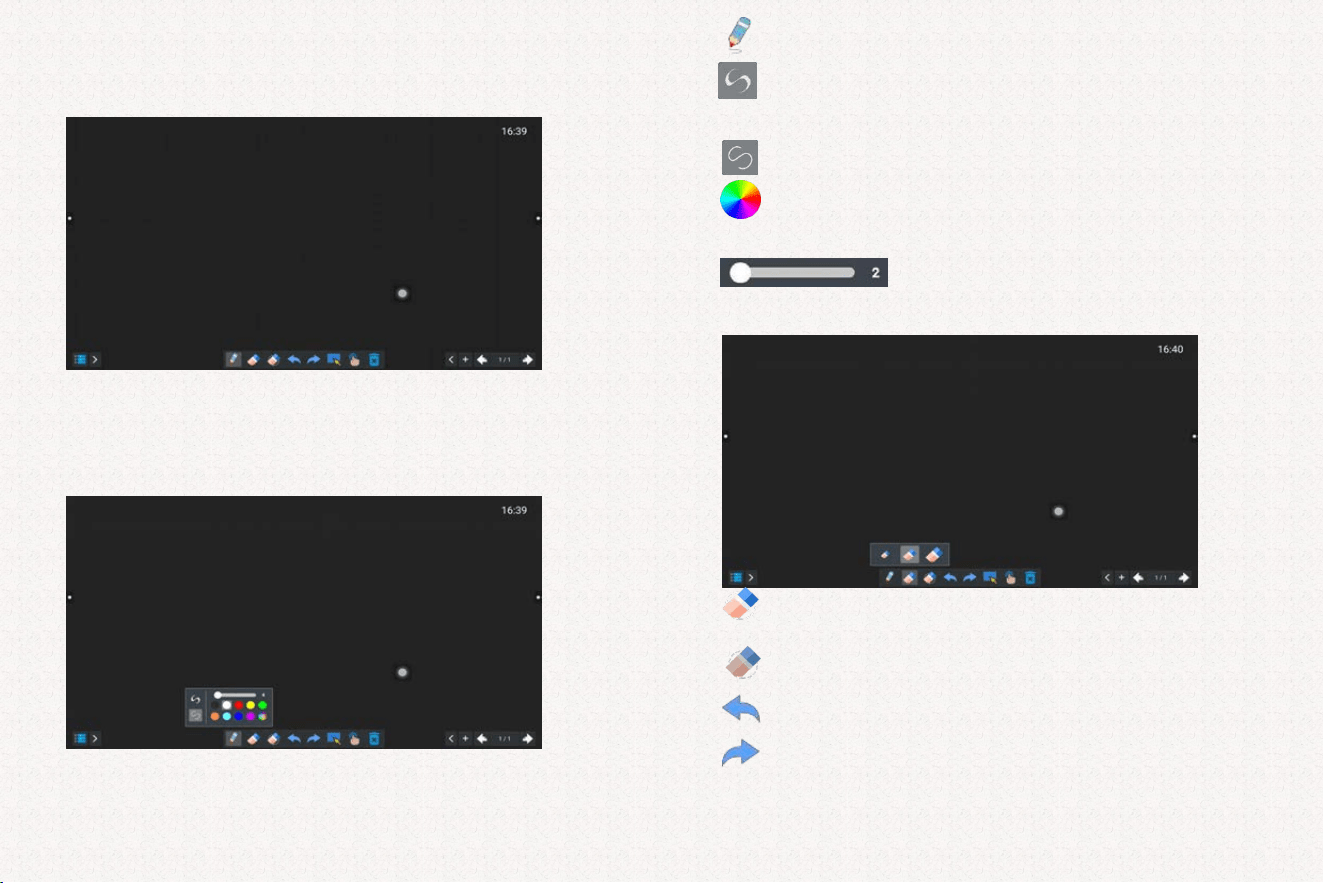
Tap the writing whiteboard icon on the home page to enter the following interface:
The whiteboard uses a gray grid background by default, with
white single-point non-stroke handwriting. You can write
directly after opening.
2.1.Drawing Board Writing Settings
:Tap the icon to open the panel as shown.
:Stroke selection: Tap to write with strokes; stroke
change rate can be adjusted.
:Normal writing.
:Brush color selection: 9 fixed colors available;
custom color adjustment supported.
:Brush thickness adjustment.
2.2. Eraser Function Settings(Multiple fingers together are recognized
as eraser function.)
:Tap the eraser icon to enable eraser via touch. If not
tapped, fingers together will also be recognized as eraser.
:
Area eraser: Select the area to erase; content will be
cleared automatically.
:Undo: Undo the previous operation.
:Redo: Restore the undone operation.
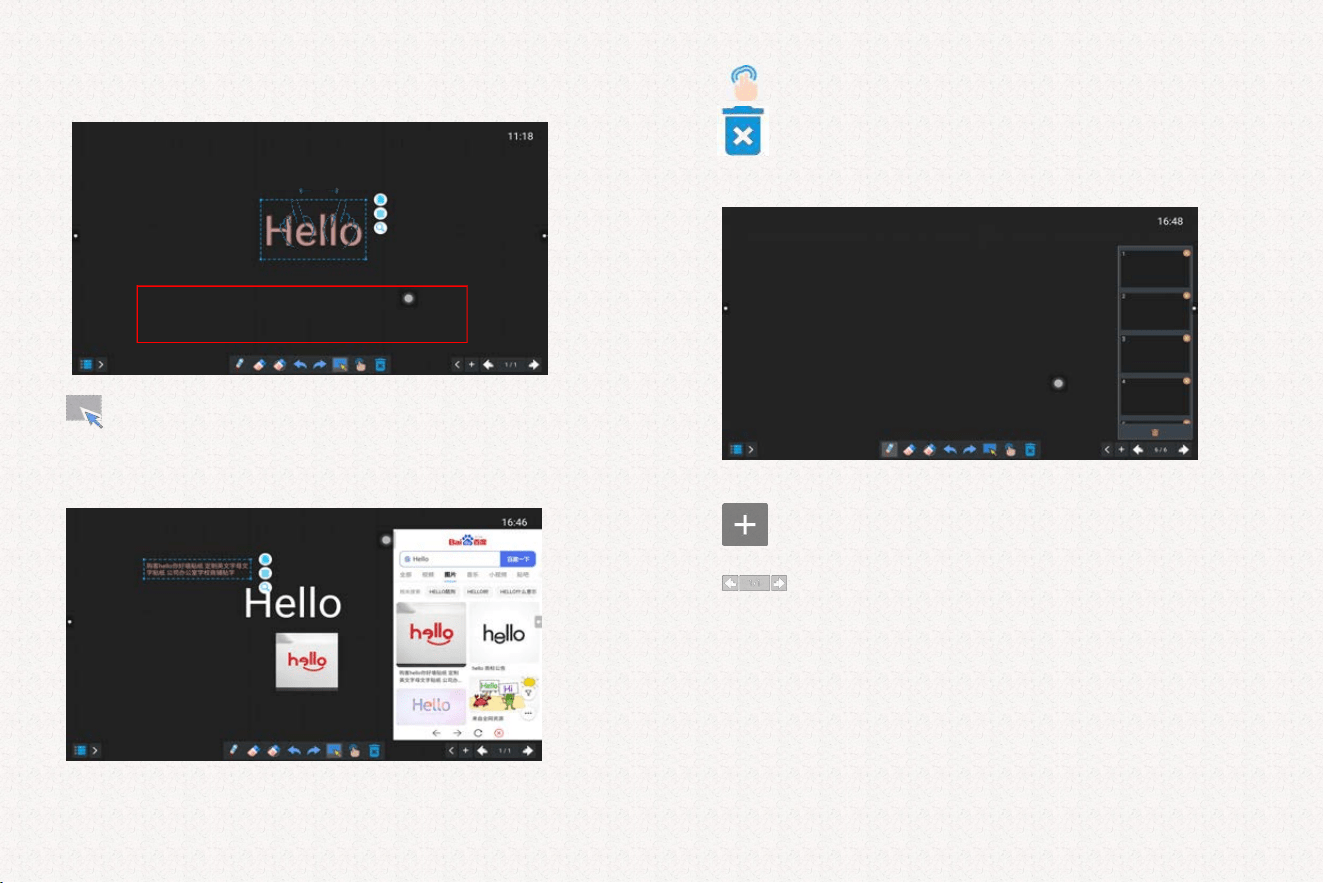
2.3. Drawing Board Content Selection,After selection, you can delete, copy, drag and
perform other operations.
:Tap the icon to select content for delete, copy, search, etc.
Tap Search to open a webpage with the selected text as the keyword. Long-
press images or text on the webpage to paste into the whiteboard.
:Switch between single-point and multi-point writing.
:Tap to clear all writing content with one click.
2.4.Drawing Board Page Adding:
:Tap the icon in the lower right corner of the drawing board to add pages.
:Tap the icon to open page preview (shown on the right).
Single-point writing; use two/three fingers on
specified content to drag, zoom in or zoom out.
4
【The contents of this document may not fully reflect all latest product changes. Please refer to the actual product.】
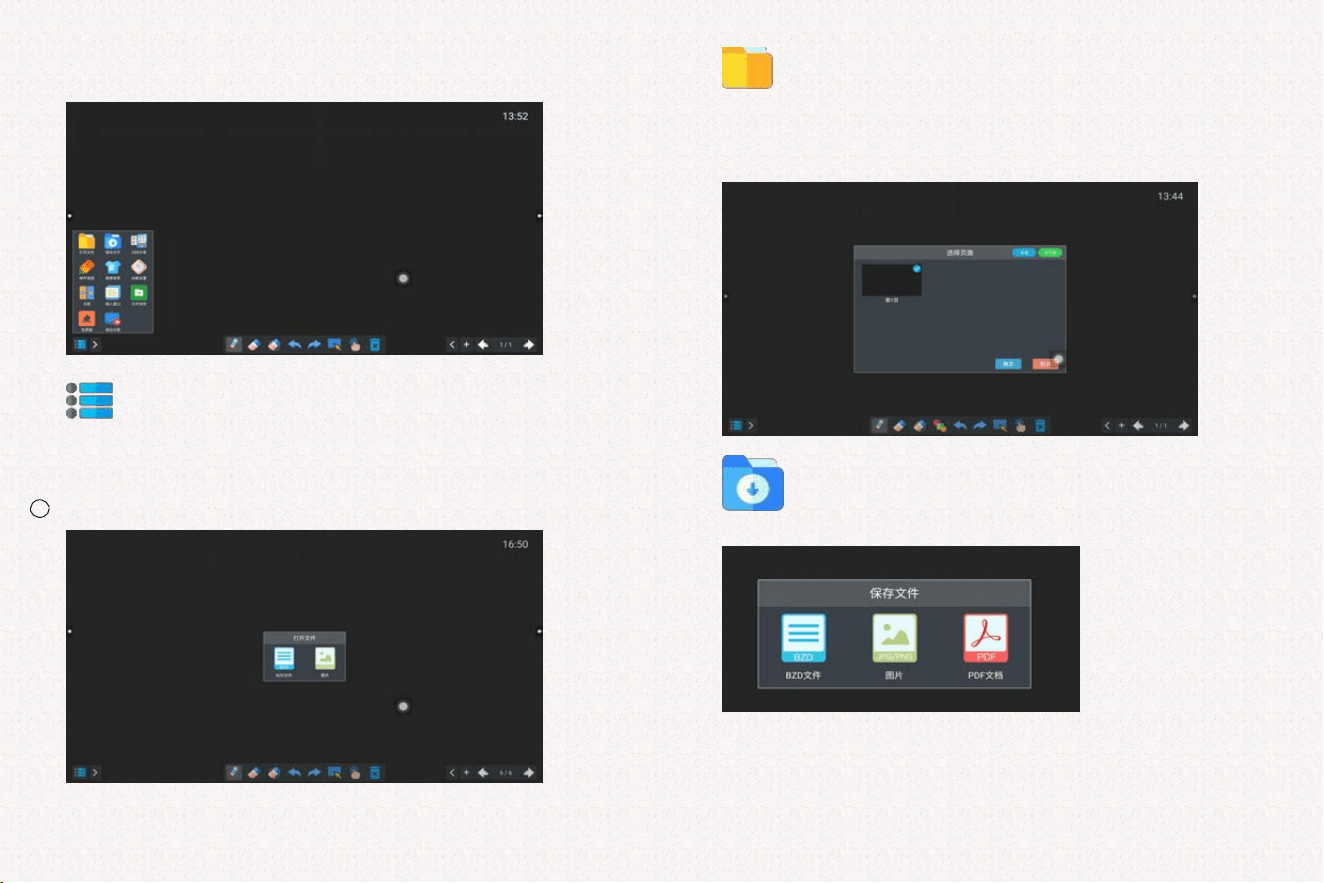
2.5.Drawing Board Writing Memory Processing:
:
Tap the icon in the lower left corner to open the menu. You can load files
to the whiteboard、save writing content、Share content via QR code、send content via
email、change whiteboard background、configure whiteboard function switches, etc.
1 Load file to whiteboard:
:Tap the lower-left icon to load images (JPG/PNG) and files (BZD format).
②.Save writing content:
:
Tap the lower-left icon to save content in formats:
Image (JPG/PNG)、Document (PDF)、File (BZD)
5
【The contents of this document may not fully reflect all latest product changes. Please refer to the
actual product.】
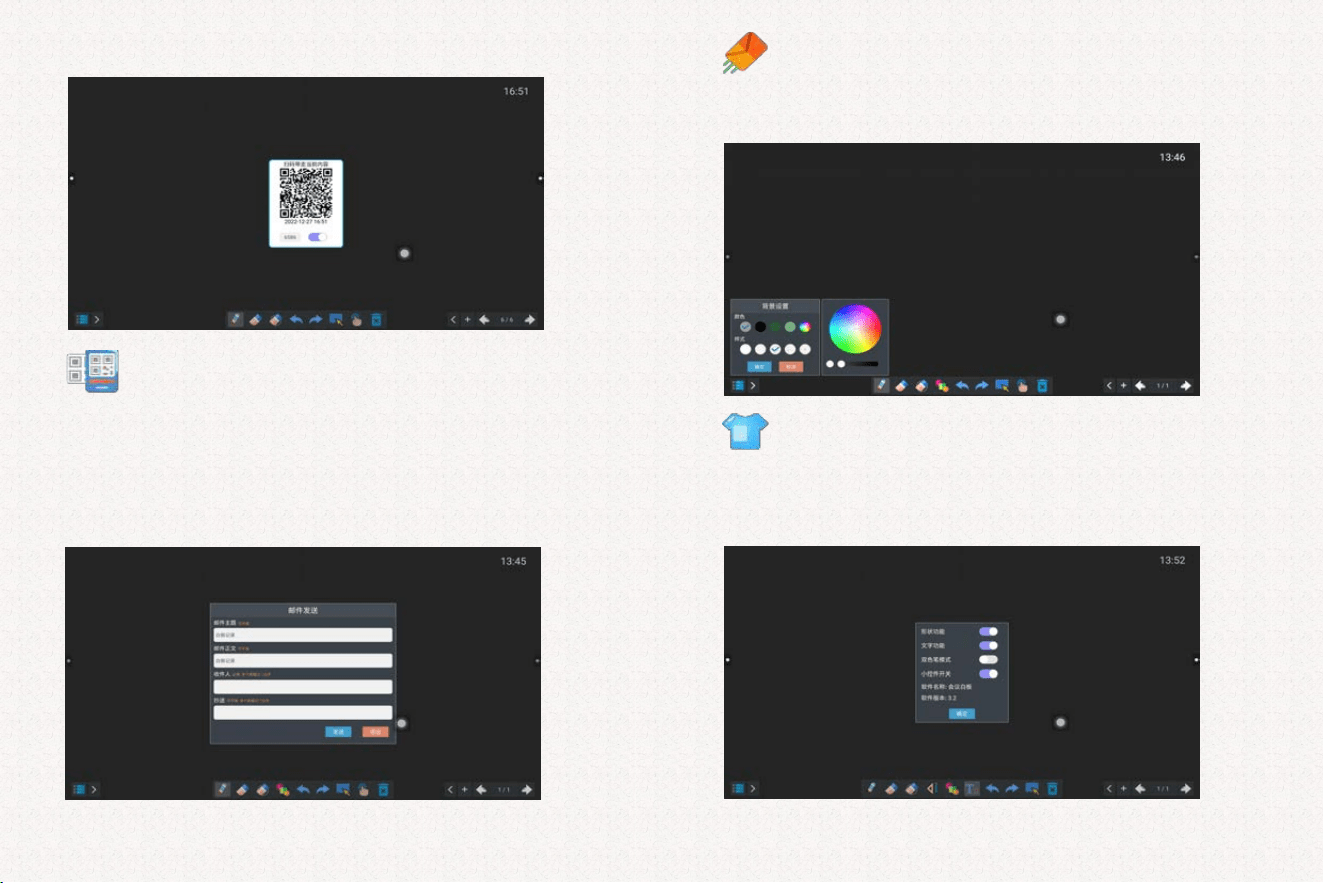
③.QR code sharing of writing content:
:Tap the lower-left icon to generate a QR code. Enable password
to require access code; disable for direct access. (Requires network
connection.)
④.Email sending of writing content
:After connecting to the network, tap the lower-left icon to send emails.
You can edit subject, body, and set multiple recipients/CC separated by ";".
⑤.Change whiteboard background:
:Tap the lower-left icon to select background color and style.
⑥.Whiteboard function switches(Text function and dual-color pen mode
cannot be enabled at the same time.):
6
【The contents of this document may not fully reflect all latest product changes. Please refer to the
actual product.】
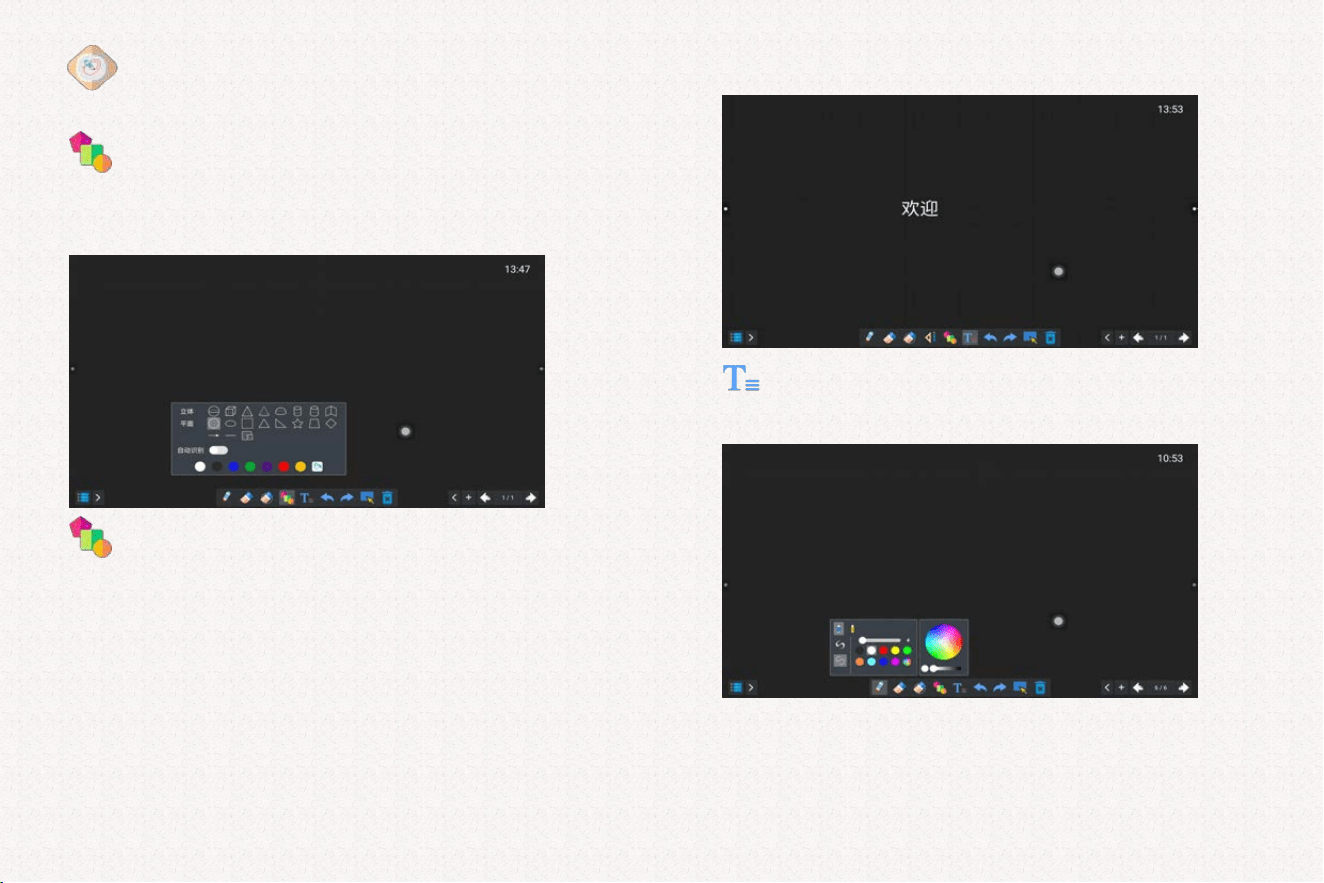
:Click this icon in the bottom-left corner of the canvas to pop up the
image shown above.
1)Shape function:When enabled, the canvas provides preset shapes,
and this icon will appear in the toolbar. Click it to access the shape drawing function.
The interface after enabling the shape function is shown below:
:After clicking this icon, you can choose to draw various shapes (2D, 3D,
and even add tables). When automatic recognition is turned on, it can
automatically recognize the shapes you draw and generate standard shapes.
2)Text function:
:Converts handwritten content into recognized text, numbers or letters.
3)Dual-color pen mode:
7
【The contents of this document may not fully reflect all latest product changes. Please refer to the
actual product.】
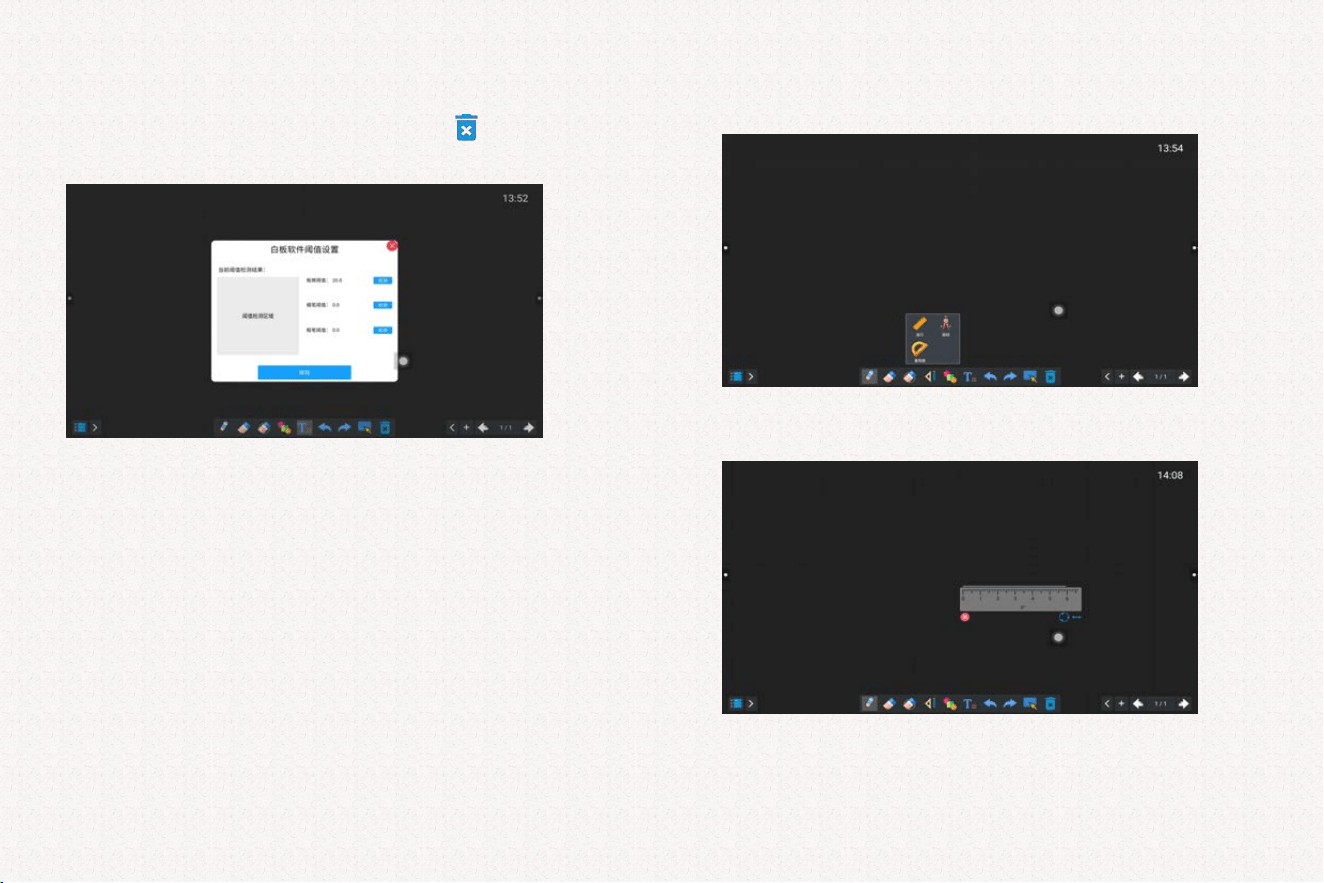
When dual-color pen mode is enabled, it is fixed to multi-point writing mode and
zooming is not available. Click the brush to set the color, nib style, and line thickness
for the thick and thin pens separately. When using the thick-thin pen function, you
need to set thresholds for the thick and thin pens. Long-press the icon to bring up
the following interface:
You can set the eraser threshold, thin pen threshold, and thick pen threshold. First,
click Detect on the right; it will show "Detecting...". Then touch the threshold detection
area on the left to record the threshold value. Click Save when done.
Note: The thresholds for the thick and thin pens should preferably have a large
difference for easier recognition.
4)Widget switches:
Enable ruler, compass, protractor.
Ruler: Draw straight lines; drag, rotate, resize.
8
【The contents of this document may not fully reflect all latest product changes. Please refer to the
actual product.】
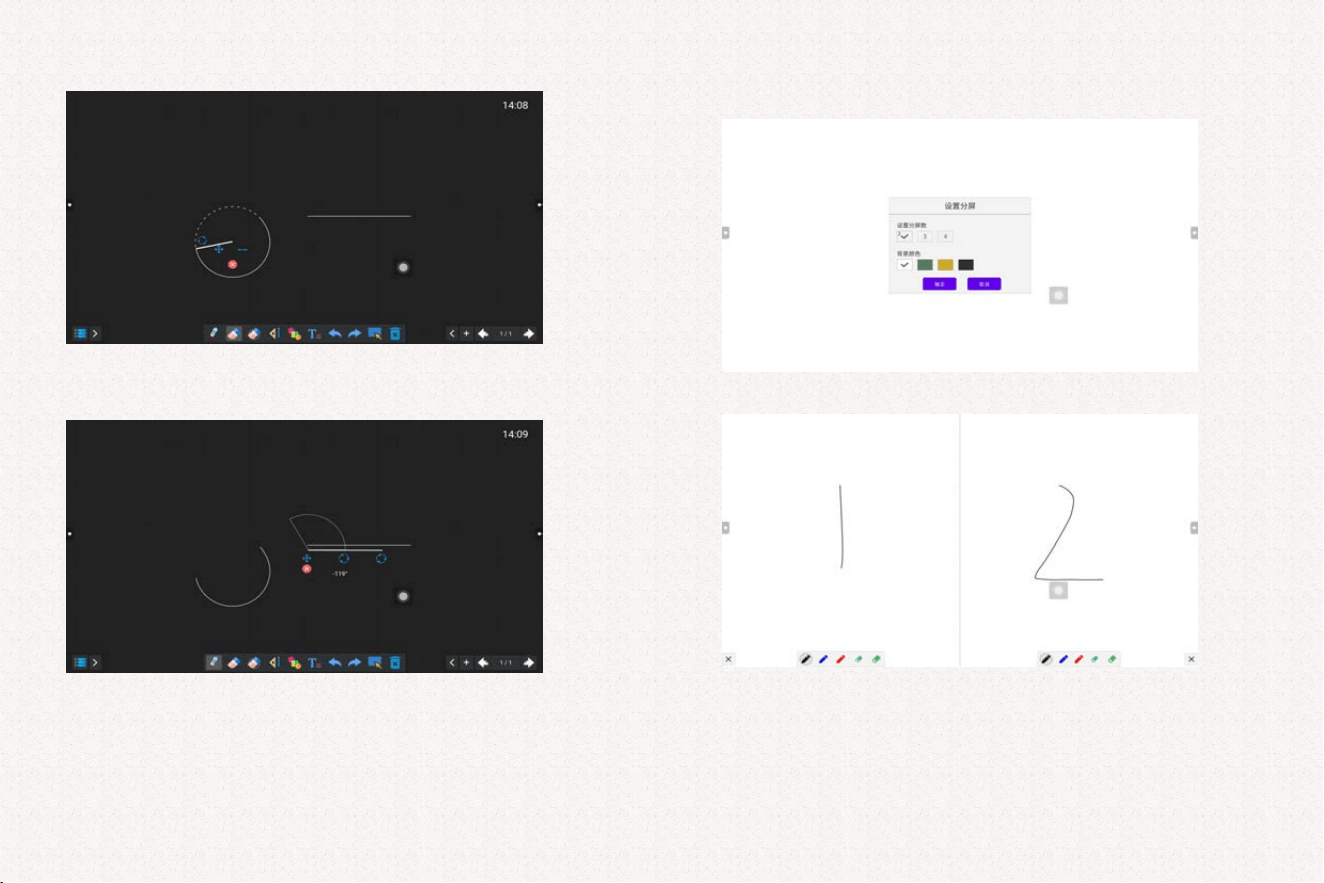
Compass: Draw circles or arcs; drag, adjust radius.
Protractor: Measure angles.
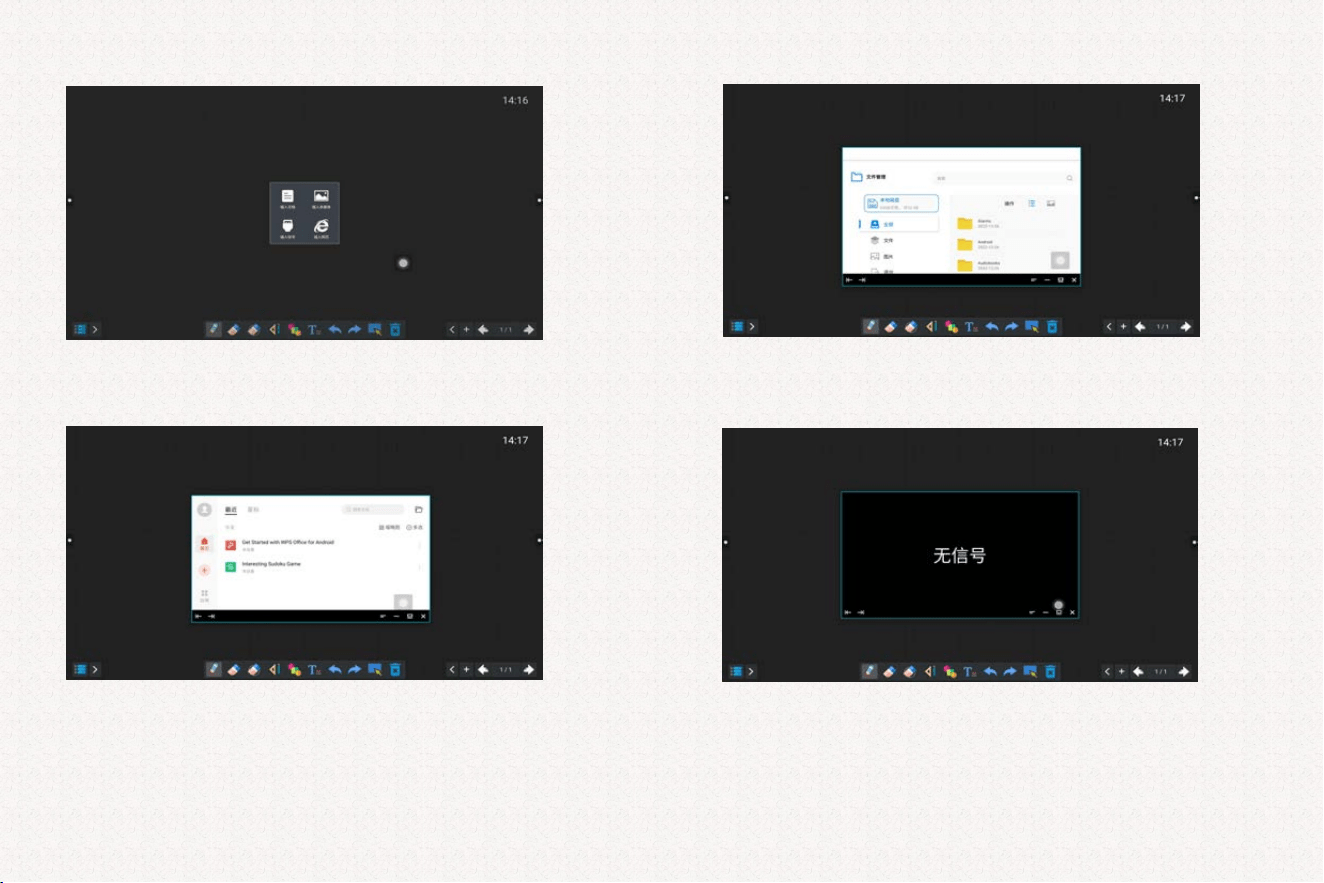
⑦ Split-screen writing:Set the number of split screens and background color;
confirm to enable split-screen writing (single-finger only).
9
【The contents of this document may not fully reflect all latest product changes. Please refer to the
actual product.】
⑧Insert window function:Insert documents, multimedia, signal sources and webpages.
Insert document: Open WPS mini window.
Insert multimedia: Open file manager to play videos, audios or images.
Insert signal source: Open signal source window (view only, no touch control).
10
【The contents of this document may not fully reflect all latest product changes. Please refer to the
actual product.】
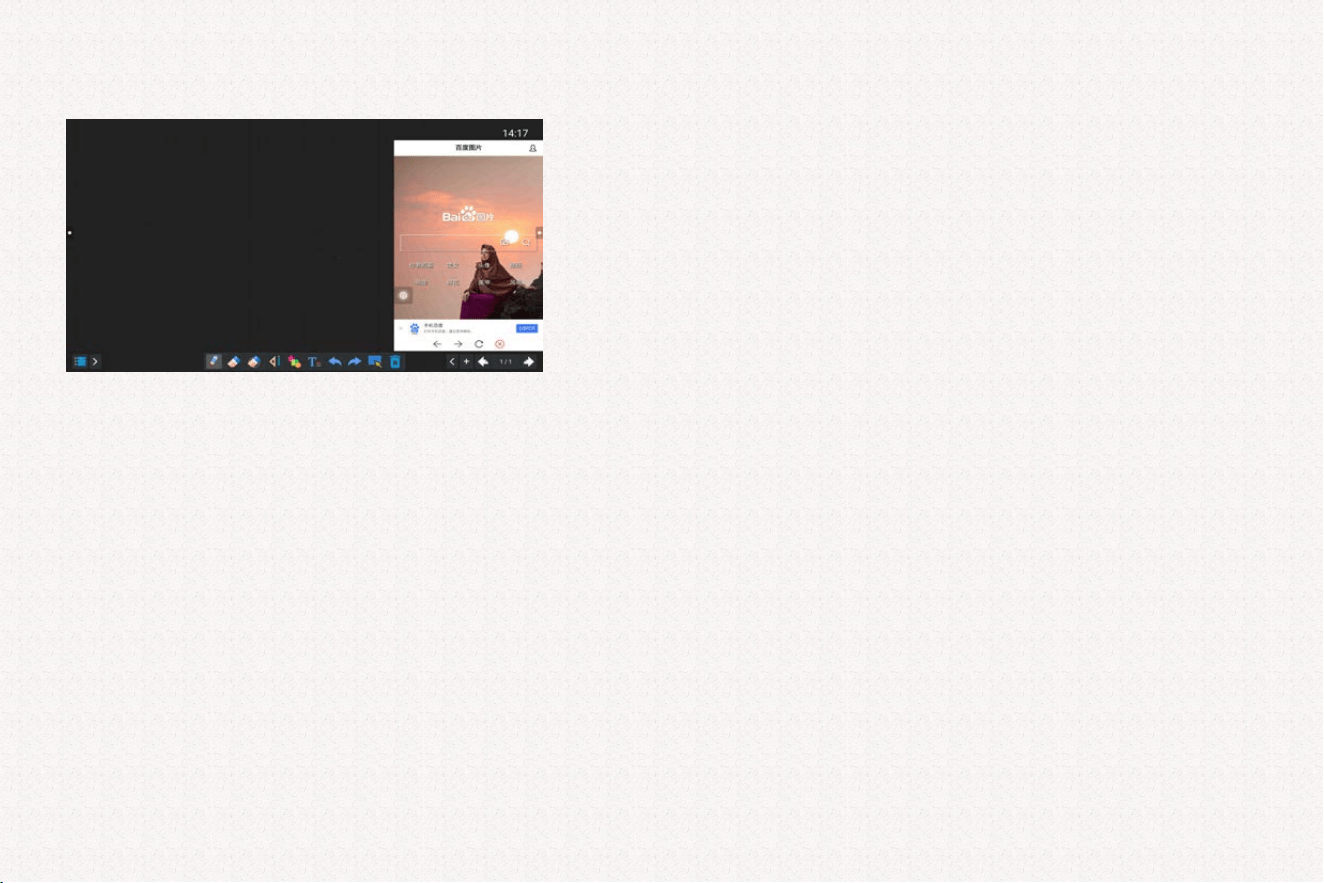
Insert webpage: Open browser mini window; long-press to paste images or text into whiteboard.
For detailed operation of File Fast Transfer and Voting Device, see Section 10: Other System APPs Introduction.
11
【The contents of this document may not fully reflect all latest product changes. Please refer to the
actual product.】
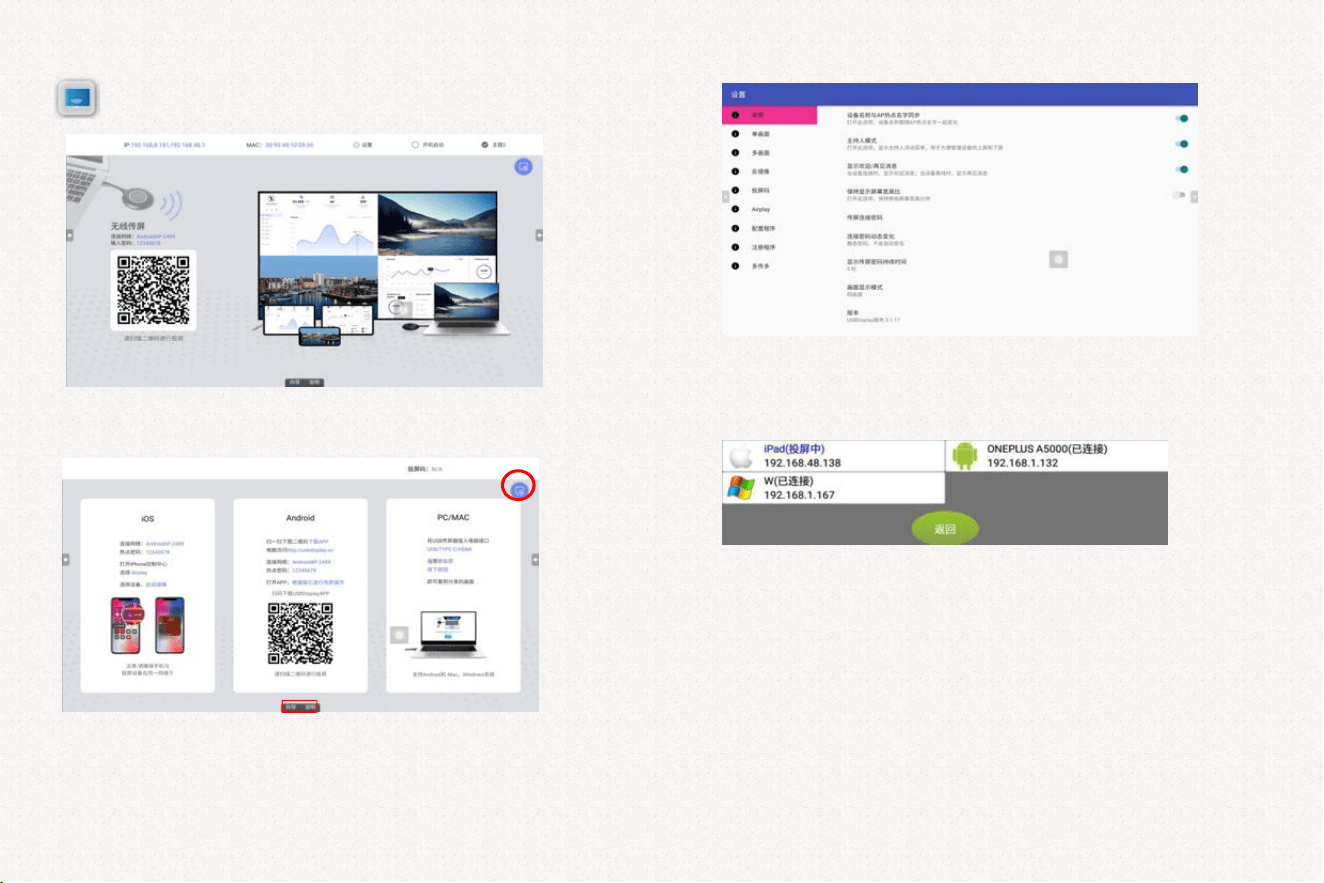
3. Multi-screen Interaction Setup Introduction
3.1.
Tap the corresponding icon on the main interface to open the panel.
(Hotspot must be enabled first.)
Android phones scan the QR code in the lower left corner to download the
projection app for screen sharing.
3.2. Switch to the Instructions tab.
iOS, Android, PC/MAC can project following on-screen steps. Tap the settings icon
in the upper right corner to configure projection functions.
3.3. Projection function settings
Host mode: Enable to add a floating menu for host management of connected devices.
Projection welcome message: Show welcome on connect, goodbye on
disconnect.
12
【The contents of this document may not fully reflect all latest product changes. Please refer to the
actual product.】
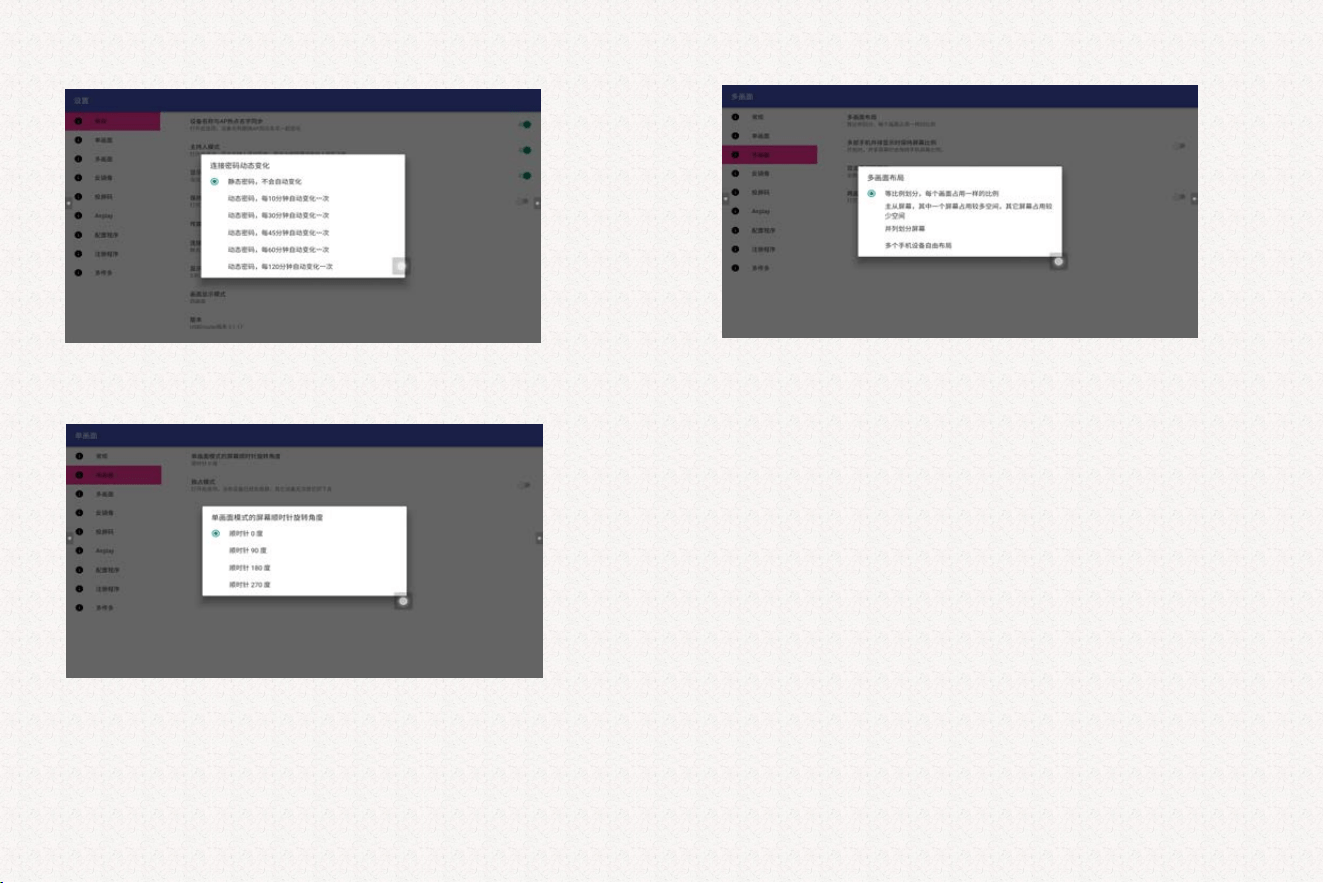
Screen sharing connection password: Default 12345678; customizable. Dynamic
password: Set auto-change interval (10/30/45/60/120 minutes).
3.4. Single-screen projection:
Exclusive mode: Prevent other devices from interrupting the current projection.
3.5. Multi-screen projection layout
Equal proportion, master-slave (main screen larger), side-by-side, free layout.
Two-screen projection stretch: Enable full-screen display for dual mobile phones.
13
【The contents of this document may not fully reflect all latest product changes. Please refer to the actual product.】
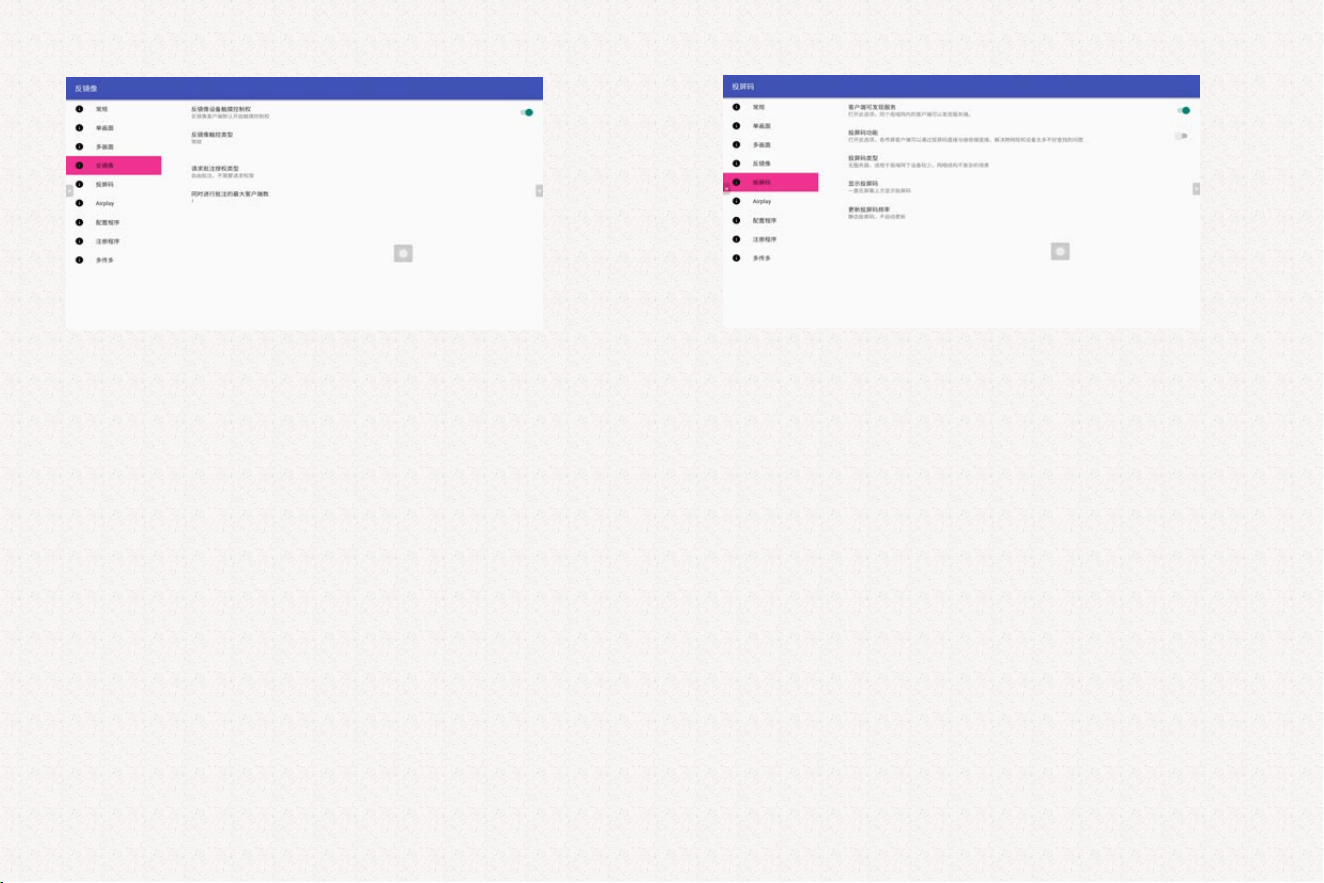
3.6. Reverse mirroring:
After enabling, the Android phone displays the large screen and can control it. Disable to
revoke touch control.
Set annotation authorization type and maximum concurrent annotators (only one user can
write at a time).
For Windows: Click Reverse Mirroring directly after connection.
3.7. Projection code:
Enable to show a 6-digit projection code in the upper right corner.
3.8. Registration program
(
requires network)
Auto-register after network connection; prompt appears on success.
14
【The contents of this document may not fully reflect all latest product changes. Please refer to the
actual product.】
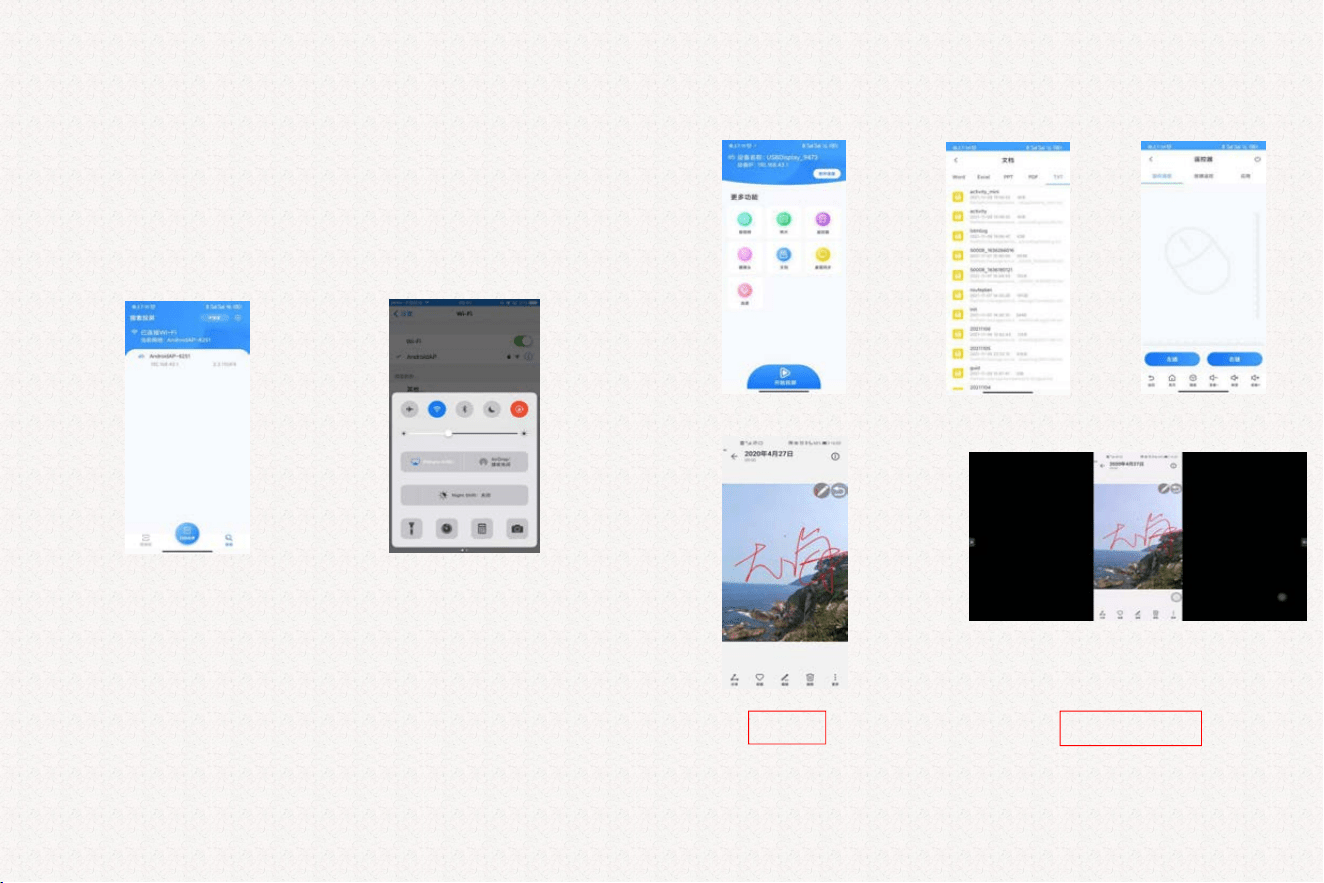
4.Wireless Screen Sharing Introduction
4.1. Apple device sharing:
Connect to the conference unit’s hotspot AndroidAP-xxxx, then enable AirPlay Mirroring.
4.2. Android device sharing:
Scan the on-screen QR code or visit http://120.26.86.122/res to download the
client.Connect to AndroidAP-xxxx, open the client, search and connect.
Android
IOS
After connection, you can use projection, virtual mouse, screenshot, reverse mirroring,
video, music, image and document push (PPT/Word/Excel/PDF).
Click Documents to push PPT, Word, Excel and PDF files to the all-in-one device for playback. After pushing
the document, the phone will jump to the virtual mouse page. Tap the blank area of the virtual mouse to
control the large screen; swipe on the right side or bottom to scroll through the document.
4.3. Wireless screen sharing annotation:
Phone
Large screen
15
【The contents of this document may not fully reflect all latest product changes. Please refer to the
actual product.】
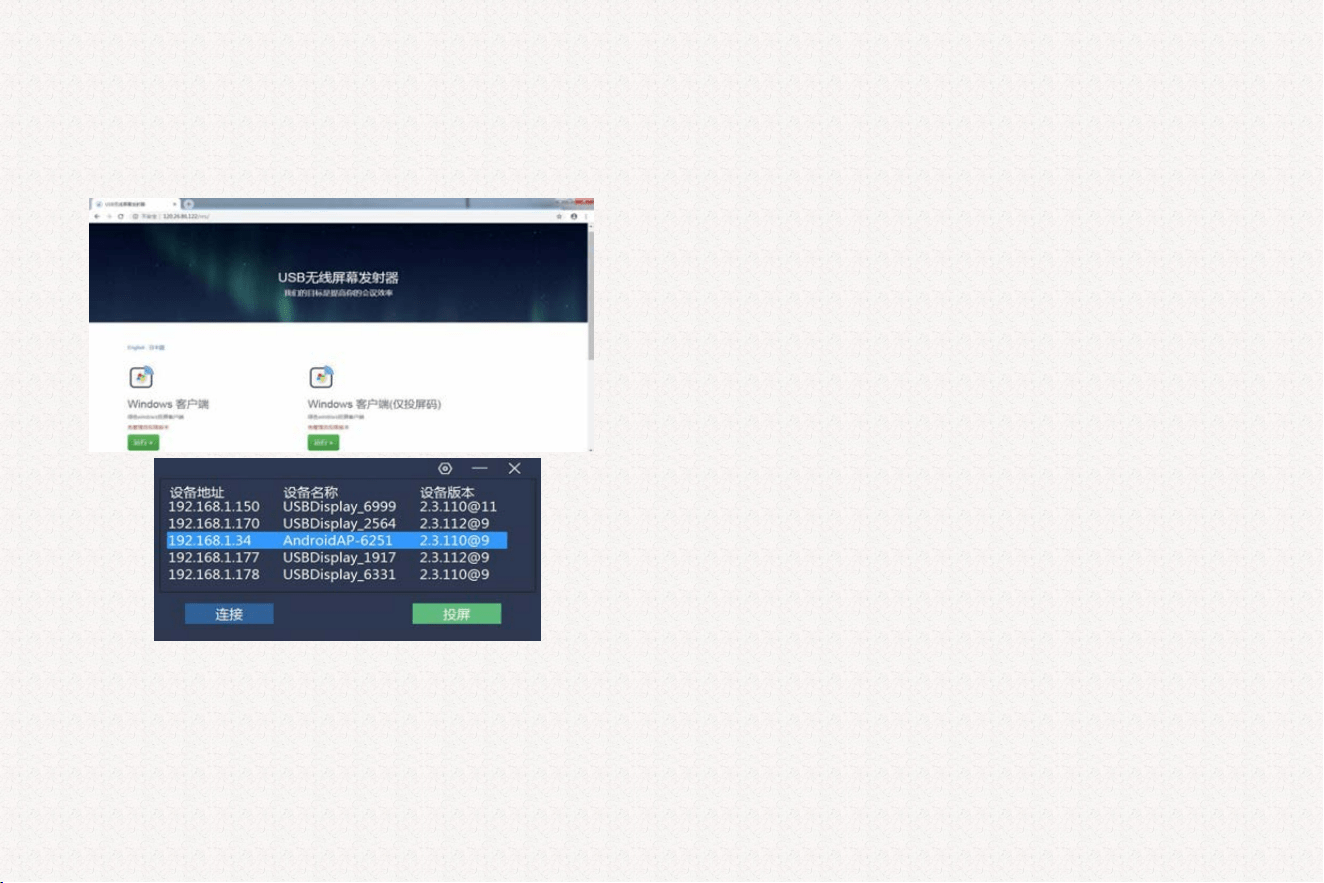
4.4. PC software projection (no dongle):
When no physical transmitter is available, you can use a portable green software to achieve PC
mirror casting, with similar functionality to a dedicated transmitter.
For screen casting: Connect your laptop to the internet, open a web browser, and enter the
address http://www.usbdisplay.cn/ to access the download page, as shown below:
Click to download the Windows client, then double-click to run it as shown. The machine
list will display all discoverable smart conference devices on the same local network as the
laptop. Double-click the target device or its IP address to automatically connect to it. The
operation after casting is the same as with the USB transmitter.
16
【The contents of this document may not fully reflect all latest product changes. Please refer to the
actual product.】
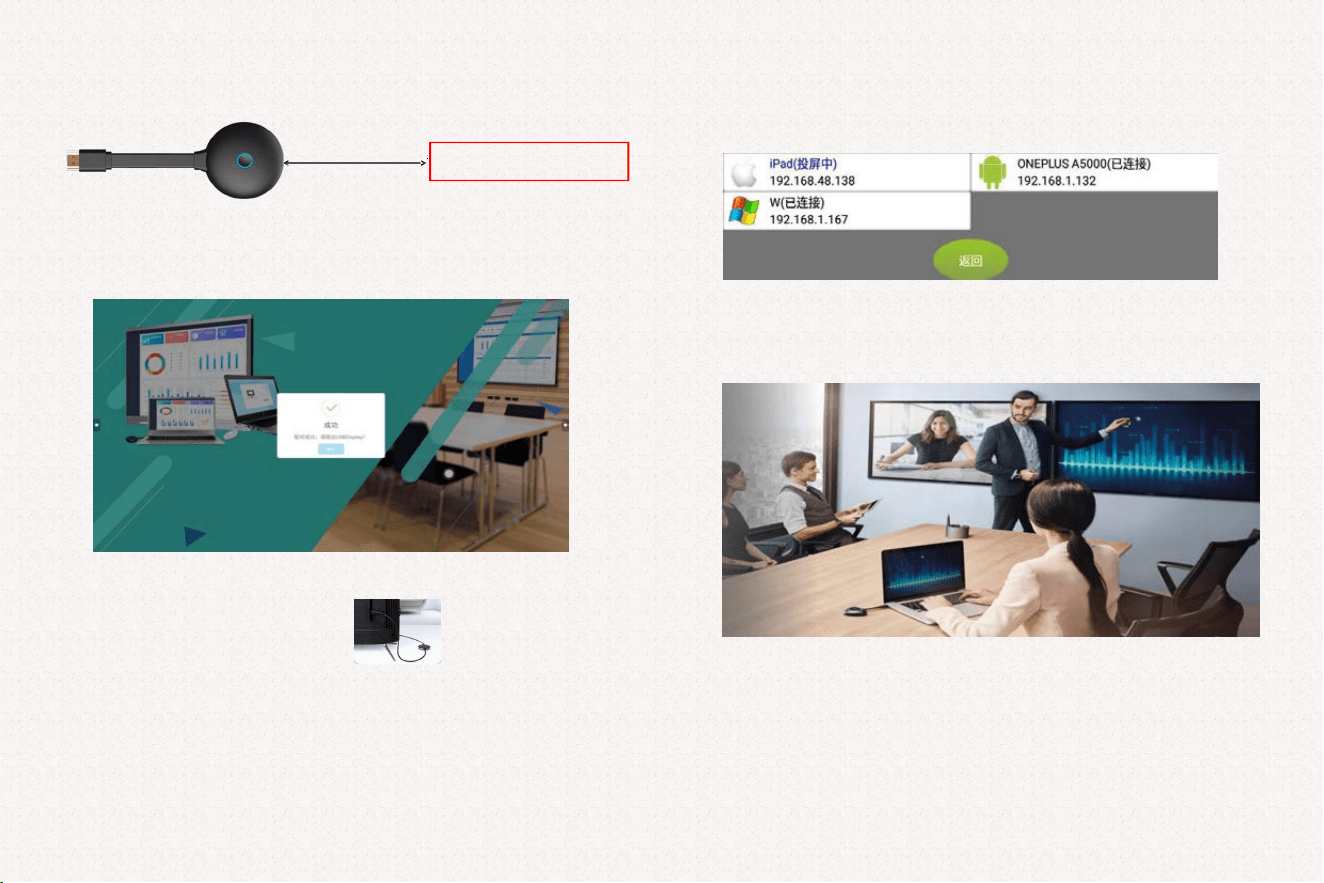
5. PC Hardware Screen Sharing Introduction
5.1.First, turn on the Wi-Fi hotspot of the Android board, then plug the screen
sharing dongle into the USB interface of the Android board for pairing and
registration.
After successful registration, the following interface will pop up:
Note: Turn on the hotspot first before plugging in the dongle for pairing.
5.2.Plug the paired dongle into the PC USB port. When "Ready to Share"
appears,press the dongle button to project.
5.3.After successful connection, a green circular button in the upper left shows the number
of connected dongles. Tap to expand host mode; lock to prevent screen preemption.
During screen sharing, check the "Lock" option, and the computer screens of other users will not
be able to preempt the screen of the user who is currently sharing.
5.4.Touch Return: Control Dual Screens with One Hand
Two-way control between large screen and PC. Auto-update when connected to the
Internet. Re-pair if firmware version mismatch.
Screen Sharing Dongle
17
【The contents of this document may not fully reflect all latest product changes. Please refer to the
actual product.】

5.5. Dongle usage notes:
When a user uses the dongle on a computer for the first time, some computers will
automatically install the driver, and the dongle will run automatically. If the computer
cannot install the driver automatically, click Computer → Removable Storage Devices, and
double-click the drive letter CD Drive (USBDisplay).
The drive letter is as follows:
Note: For Windows 10 systems, you need to turn off the firewall before installing the driver.
After the driver is installed, a prompt "Press to cast screen" will be displayed in the lower
right corner of the computer.
Note: On some computer systems, due to the interception of antivirus software, the dongle
may not run automatically even if it is not the first time to use it. In this case, run the main
program in USBDisplay.
18
【The contents of this document may not fully reflect all latest product changes. Please refer to the
actual product.】
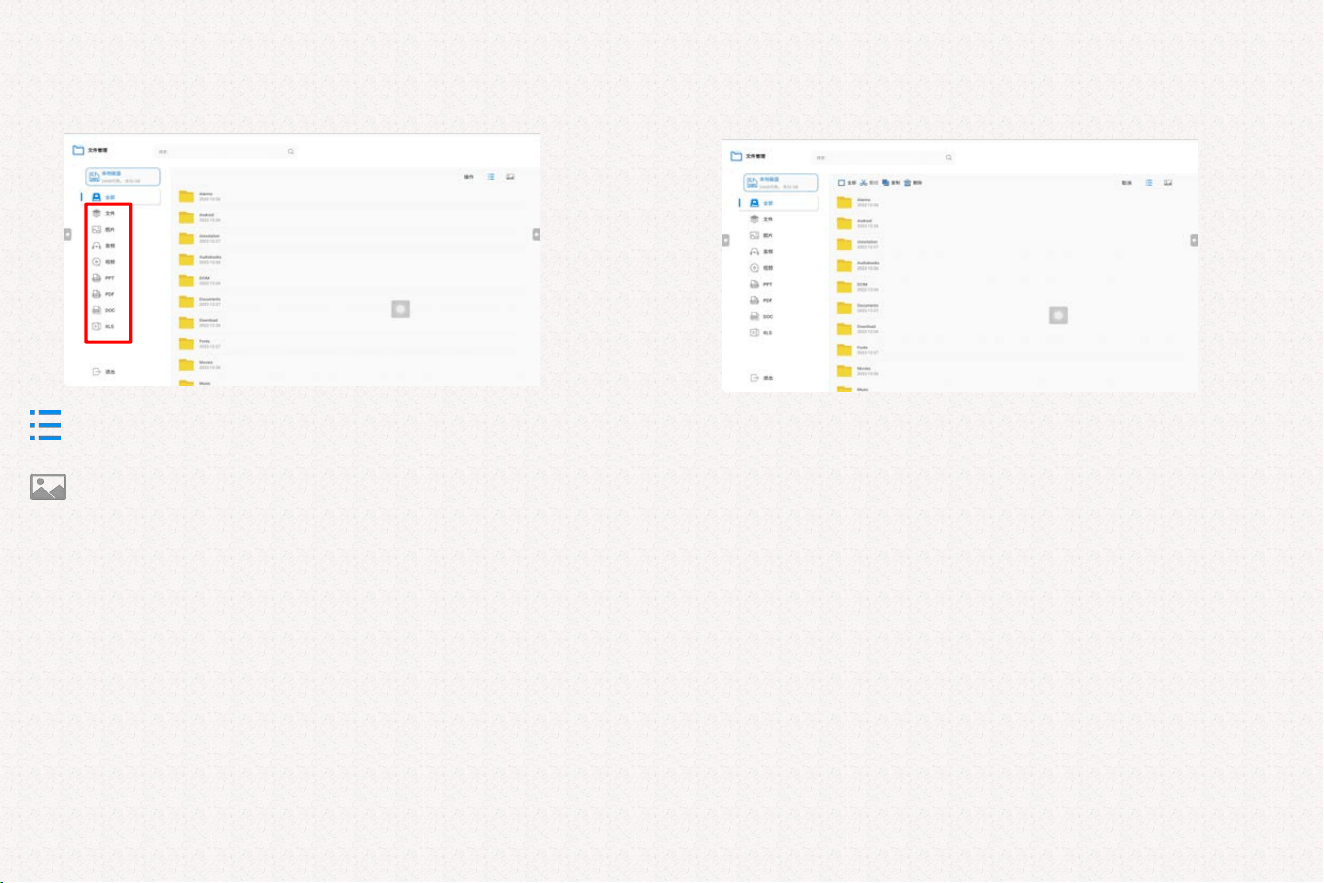
6. File Management Function Introduction
:Files are displayed in list form (at the upper right corner)
:Files are displayed in tile form (at the upper right corner)
The red box on the left can filter file types
Click "Operation" in the upper right corner to pop up the following options:
You can perform file cut, copy and delete functions.
19
【The contents of this document may not fully reflect all latest product changes. Please refer to the actual product.】
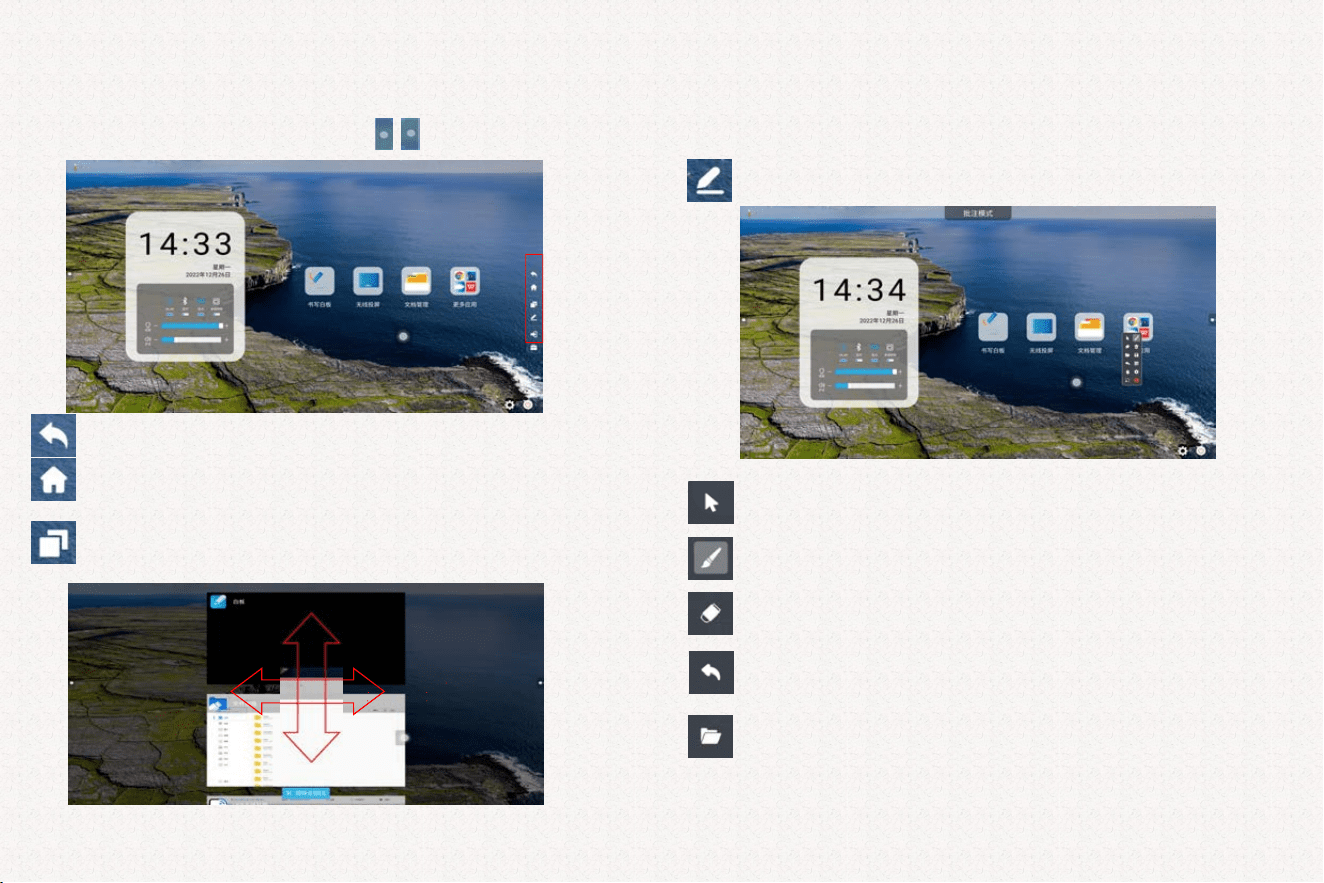
7. Side Pull Menu Introduction
7.1.Click the arrow icons on the left and right sides to pop up the following
interface:
:Return Touch Key: Available in any Android menu.
:Home Touch Key: Press this key to return directly to the Android home
interface in any interface.
:Task Key: Click to open and preview the background running applications.
Drag up and down to browse all applications, click the application window to open it
directly, drag left and right to stop running the application, or click the "Clear All" button
below to clear all applications with one click.
:Annotation Shortcut Key: Click to enter annotation mode.
:
Exit annotation mode to perform other operations on the machine.
:Brush color and thickness selection.
:Annotation eraser size selection.
:Annotation undo key.
:Insert material shortcut key.
20
【The contents of this document may not fully reflect all latest product changes. Please refer to the
actual product.】
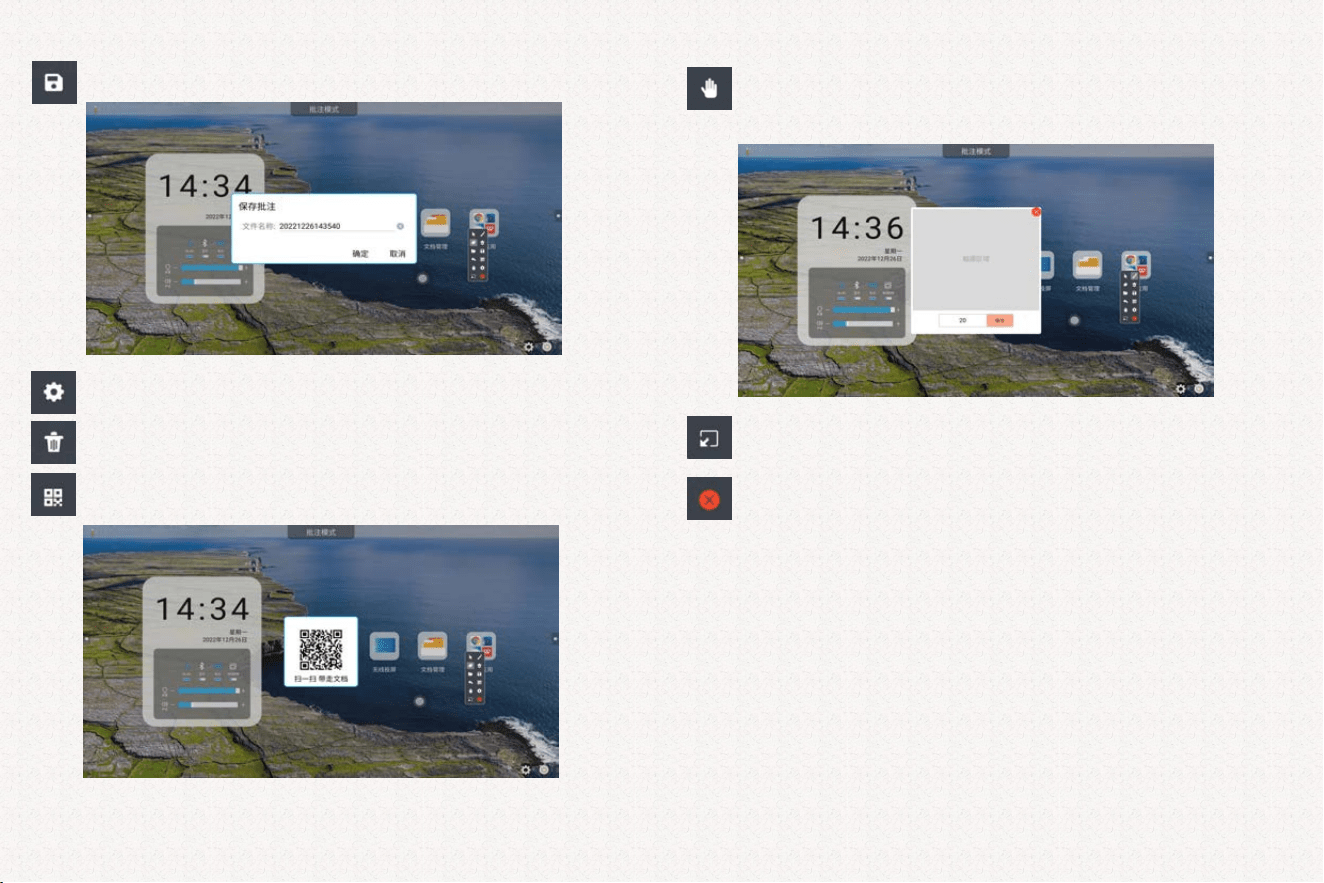
:Annotation content save key: Can save locally.
:annotation setup switch.
:One-click clear all writing content.
:Generate QR code: Scan the code with a mobile phone to view the
annotation content (requires Internet connection).
:Long press to open eraser threshold adaptation: Cover the palm on the touch
area to identify the threshold value, then click Save
(the threshold under the channel needs to be re-adapted).
:Shrink the annotation operation window.
:Annotation exit key.
21
【The contents of this document may not fully reflect all latest product changes. Please refer to the actual product.】
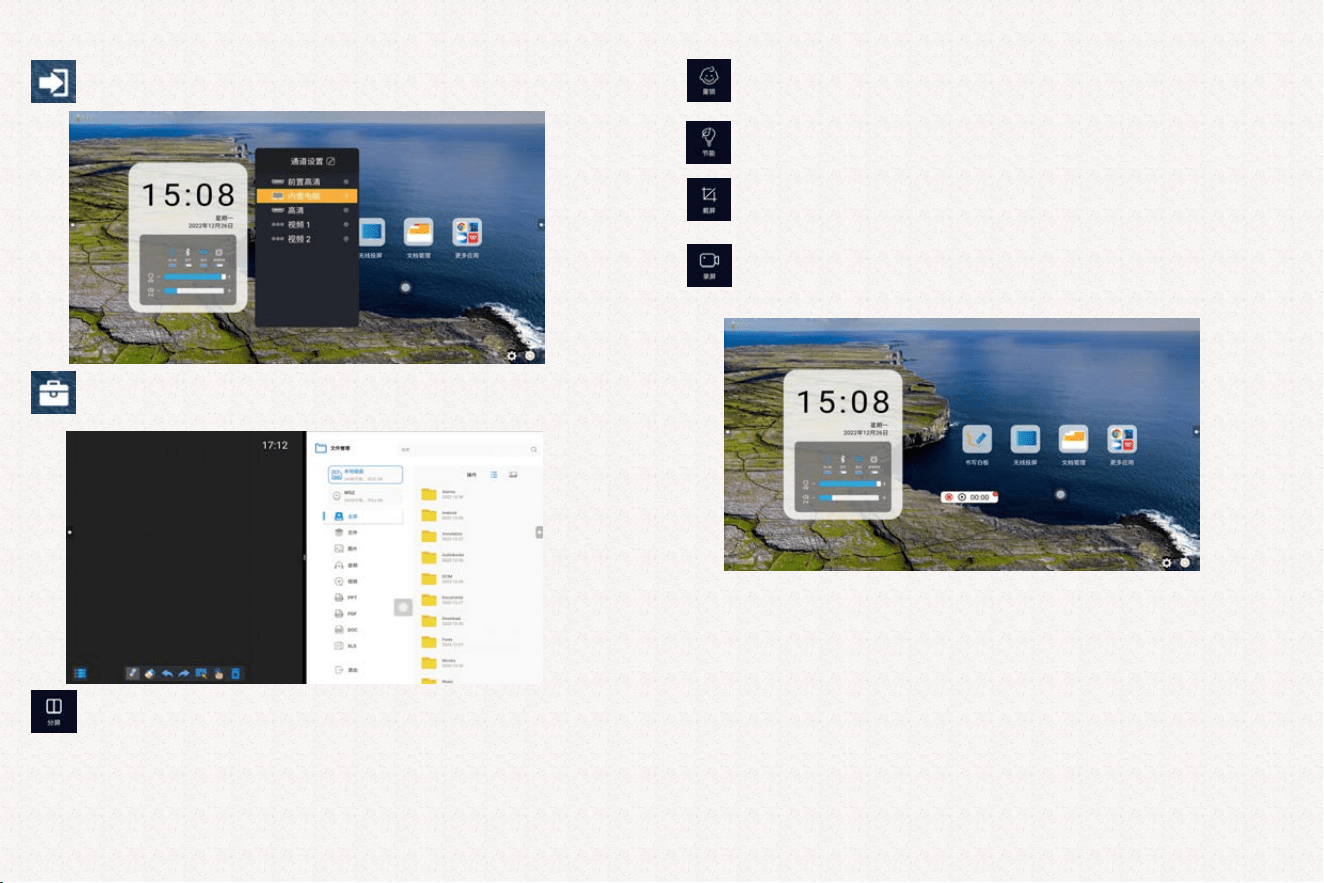
:Switch input channels (Front HDMI, HDMI, Video 1, Video 2).
:Toolbar call(Swipe inward from left/right edge to open).
:Split Screen: The screen can start two APPs at the same time; for example, open
the whiteboard first, then click the split screen function, and then open another application.
:Child lock: Lock screen; default password 2580.
:Energy saving: Turn off backlight; touch to wake.
:Screenshot: Auto-save screen content locally.
:Screen Recording: Click to start screen recording.
After clicking "Start", some operations under Android will be recorded in MP4
format and saved to the local BSDScreen folder.
22
【The contents of this document may not fully reflect all latest product changes. Please refer to the actual product.】
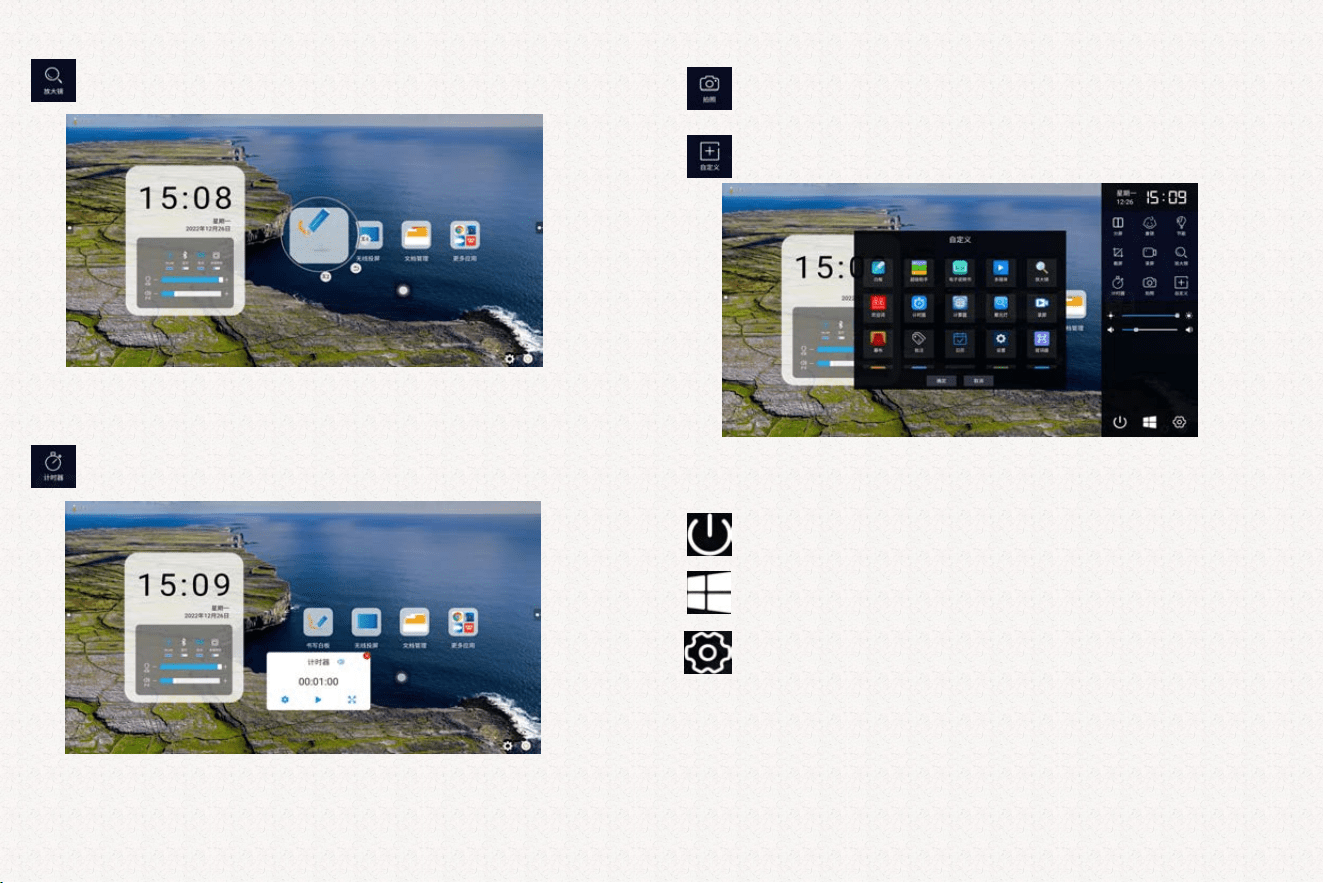
:Magnifier: Enlarge fonts and pictures under Android,.
with 2x/4x magnification options
:Timer: Set a countdown for meetings.
:Camera: Available with external camera.
:Custom shortcut: Set quick app launch;
Long-press to cancel.
: Shutdown button: Open shutdown options.
:Switch to built-in PC: One-key jump to PC channel.
:Menu settings: Open settings menu.
23
【The contents of this document may not fully reflect all latest product changes. Please refer to the actual product.】
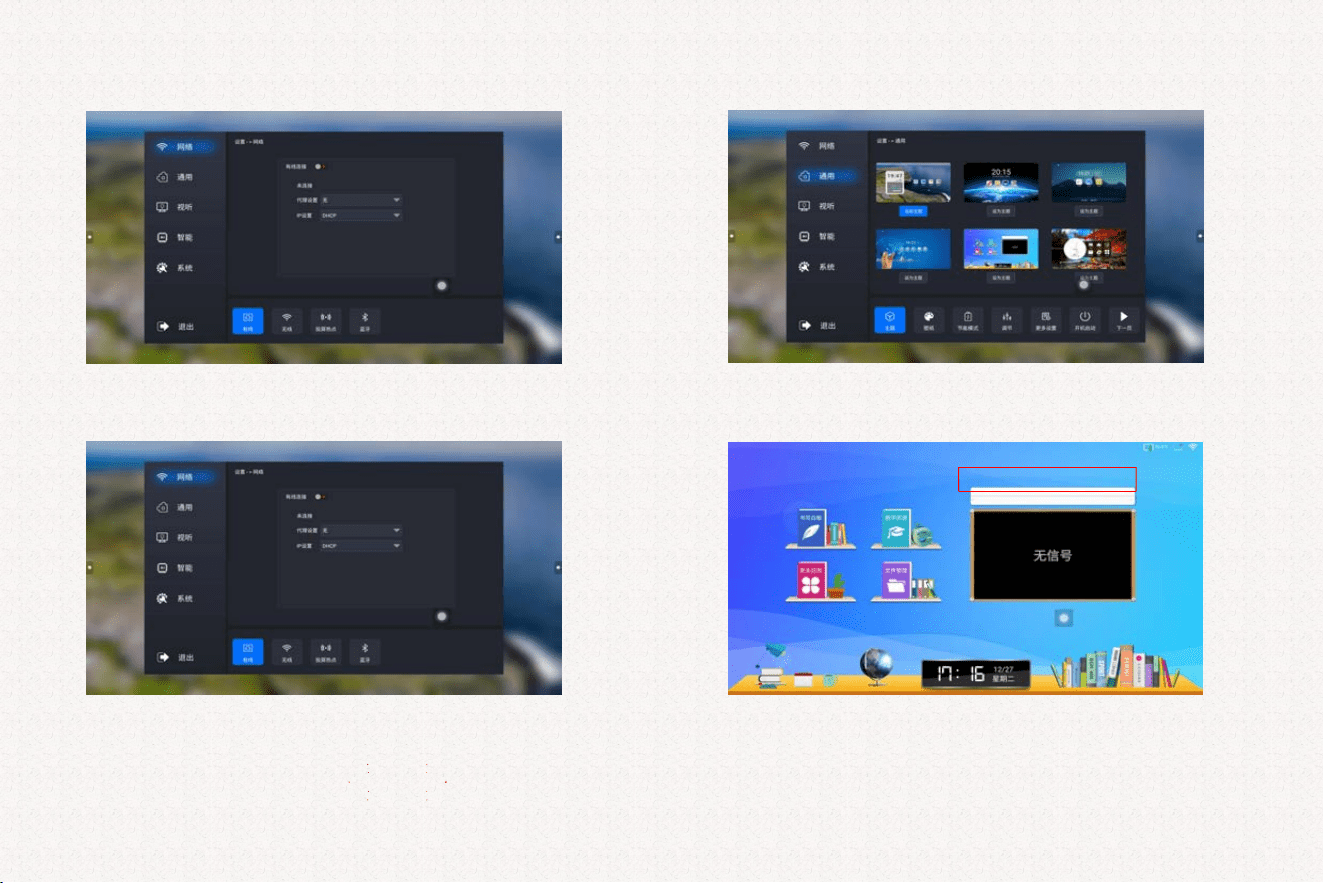
8. Settings Menu Introduction
8.1.Network:Wi-Fi, projection hotspot, wired Ethernet, Bluetooth.(Wired and wireless
cannot be used simultaneously.)
Projection hotspot: Required for wireless projection; default password 12345678. Disable
first to rename/change password.
8.2.General:
①Conference Theme Settings①:
There are 5 conference theme slots. You can define text in the red box
on the right. Long press the font with five fingers to pop up a
replacement box.
24
【The contents of this document may not fully reflect all latest product changes. Please refer to the actual product.】
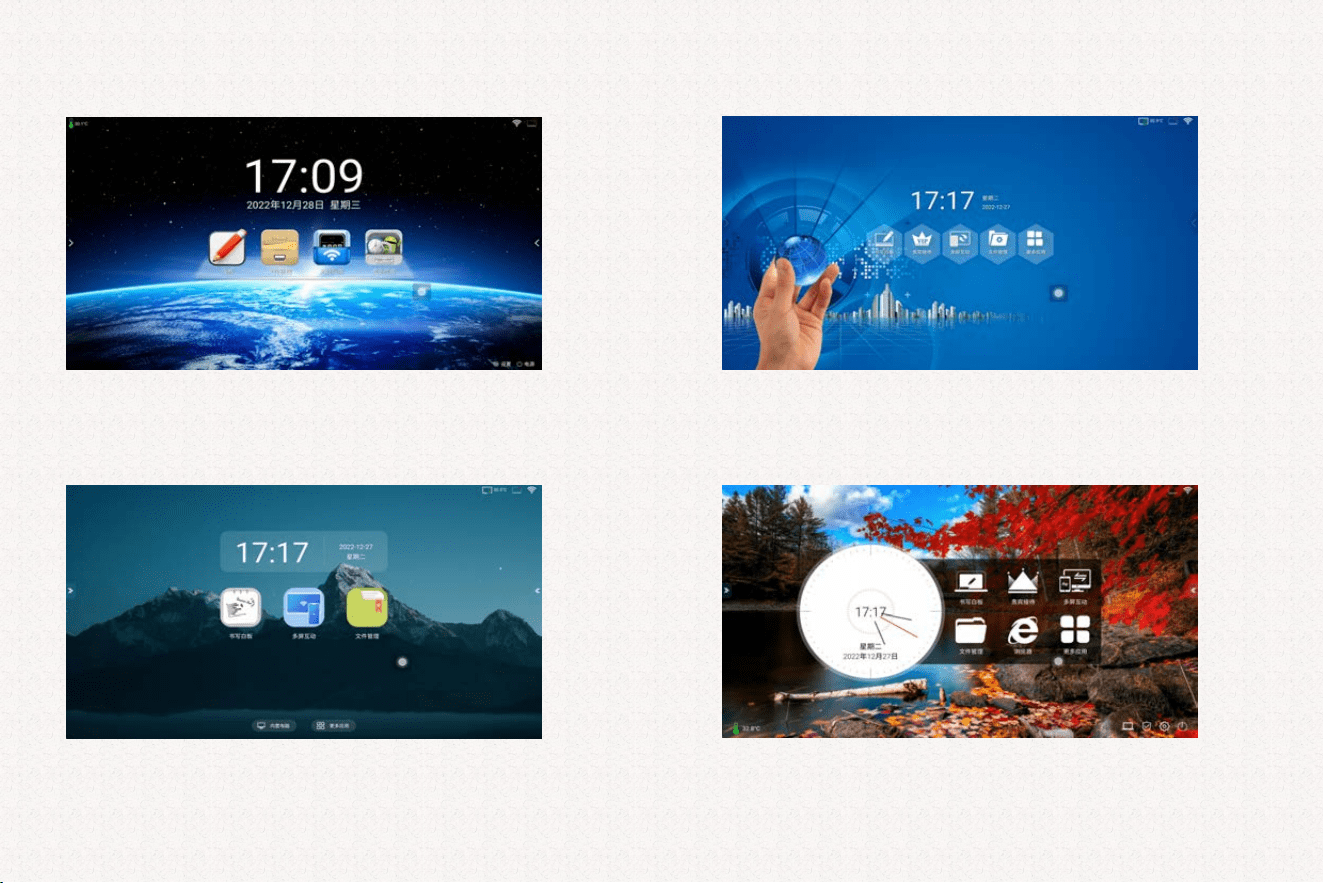
Conference Theme Settings②:
Conference Theme Settings③:
Conference Theme Settings④:
Conference Theme Settings⑤:
25
【The contents of this document may not fully reflect all latest product changes. Please refer to the actual product.】
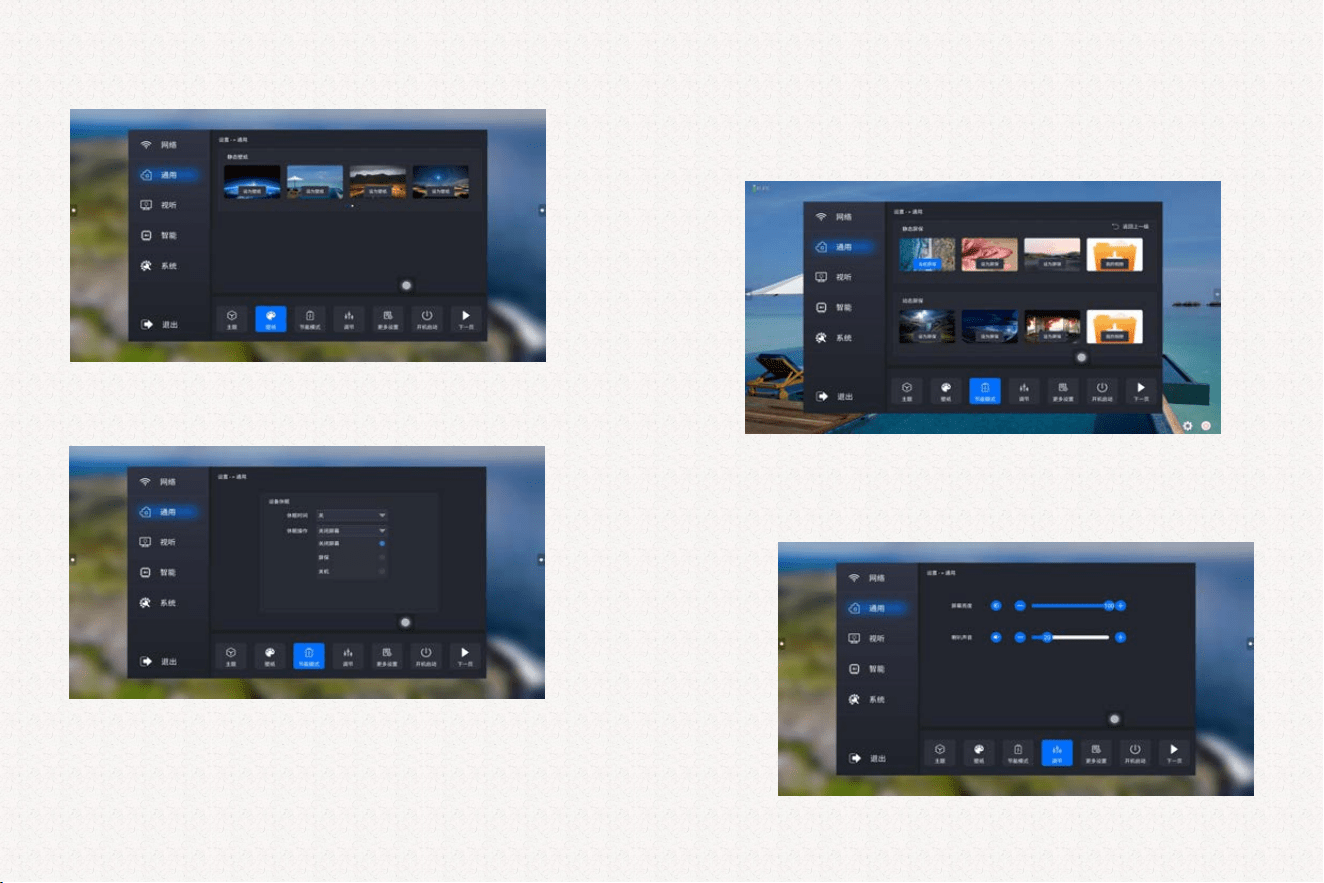
②.Wallpaper Replacement Function: Click the wallpaper function to replace.
Static wallpapers can be customized, and 1920*1080 resolution pictures are supported.
③.Energy Saving Mode:
Sleep Mode is the no-operation standby function, which is off by default. After turning it on,
you can set the sleep time: how long the whole machine will automatically enter sleep
standby mode without operation.
Sleep Operation: Can be divided into Turn Off Screen, Turn On Screensaver and Shutdown.
If you select Turn Off Screen, the screen will be black during sleep standby; if you select
Shutdown, the machine will automatically shut down after no operation for a period of time;
if you select Turn On Screensaver, you can replace the screensaver.
Screensavers include static and dynamic ones, and you can also customize pictures and
videos. JPG, PNG and other format pictures, as well as MP4 and other short videos are
supported.
④.Brightness and Sound Adjustment:
26
【The contents of this document may not fully reflect all latest product changes. Please refer to the actual product.】
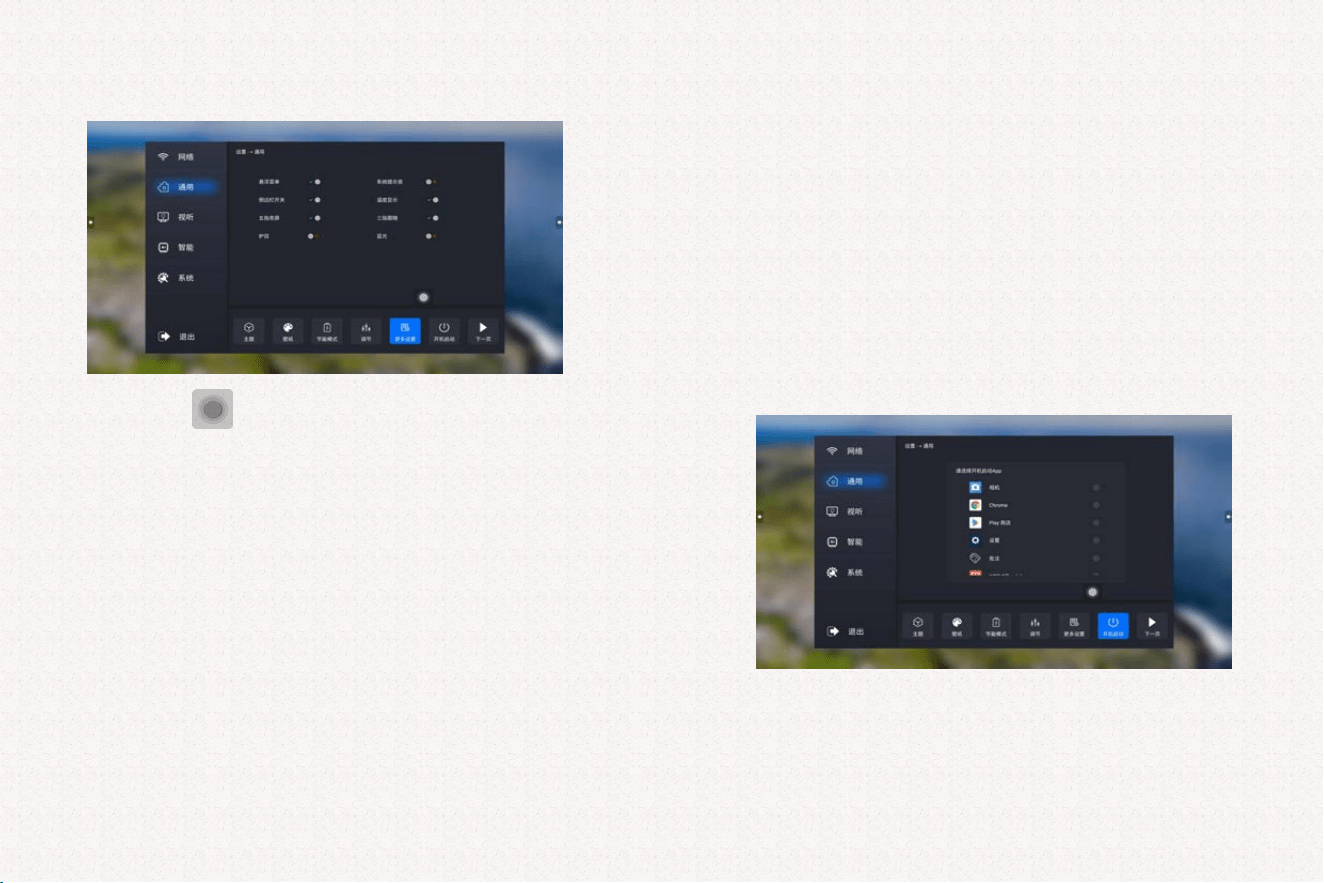
⑤.More Settings:
Floating Menu Switch: Switch for the home page floating menu.
System Prompt Sound Switch: Turn off to disable the prompt sound when touching and
opening applications; turn on to enable it.
Sidebar Switch: When turned on, there are triangular arrows on both sides of the machine;
when turned off, there are no touch arrows on both sides. To call out the sidebar, you can
touch and pull from the side to the inside.
Temperature Display: Display the temperature of the whole machine on the home interface.
Five-Finger Screen Off: When turned on, long press the screen with five fingers for about 3
seconds to automatically turn off the backlight; press again with five fingers to turn it on.
Three-Finger Follow: When turned on, long press the screen with three fingers for about 3
seconds, and the floating menu will automatically move to the touch position.
Eye Protection Function: When turned on, the screen brightness will be automatically
reduced when it is detected that someone is operating the machine.
Blue Light Function: When turned on, the screen will have a blue light effect
(this function is
invalid in the whiteboard, and will be automatically turned off when switching themes).
Light Sensing Function: When turned on, the screen brightness will change with the
brightness of the ambient light (only displayed when the light sensing module is connected).
Light Sensing Energy Saving Function: When turned on, the screen will automatically turn
off and enter energy saving mode when the surrounding environment is completely dark,
and turn on automatically when it becomes bright
(only displayed when the light sensing
module is connected).
⑥.Startup Item Settings:
Select applications to open by default after startup (it is not recommended to use this
function without special circumstances, as it will affect the startup speed, and the settings in
the startup channel will be automatically canceled after setting).
27
【The contents of this document may not fully reflect all latest product changes. Please refer to the
actual product.】
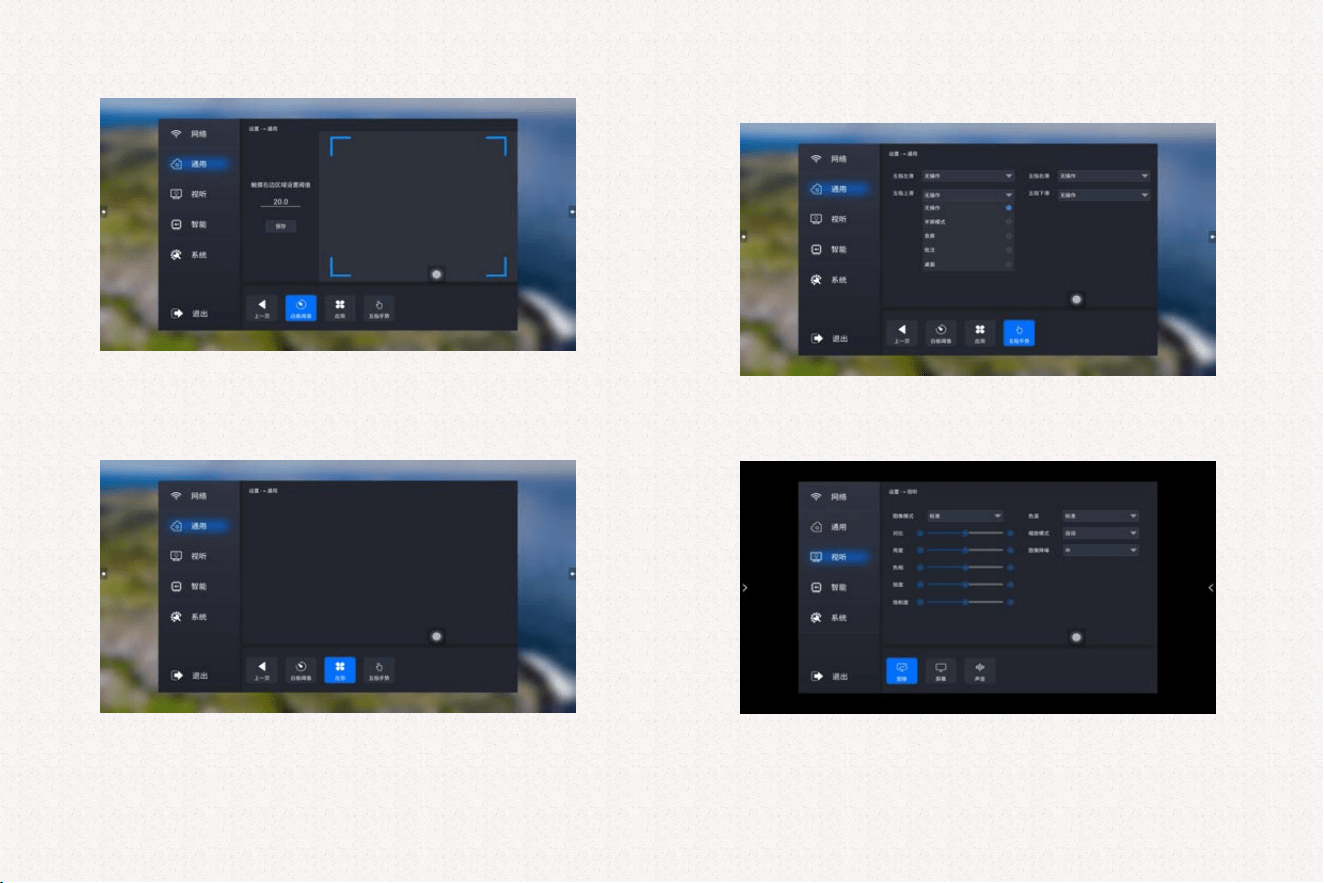
⑦. Whiteboard Threshold Setting:
The whiteboard threshold is the touch contact area recognized as the eraser function in the
whiteboard. The threshold value can be adjusted manually by entering numbers, or you can
put your hand in the blank area above for automatic recognition.
⑧. Application Management:
On this interface, you can uninstall and authorize downloaded software. The software and
APKs that come with the machine cannot be uninstalled. Long press the application to pop
up the authorization interface.
⑨.Five-Finger Gestures: You can set the functions corresponding to five-finger left swipe,
right swipe, up swipe and down swipe respectively.
8.3. Audio-Visual Settings (Image and Screen options are only displayed in the
channel)
① Image Settings
Image Mode: You can switch different image modes, or switch to user mode to
manually adjust the desired effect.
28
【The contents of this document may not fully reflect all latest product changes. Please refer to the actual product.】
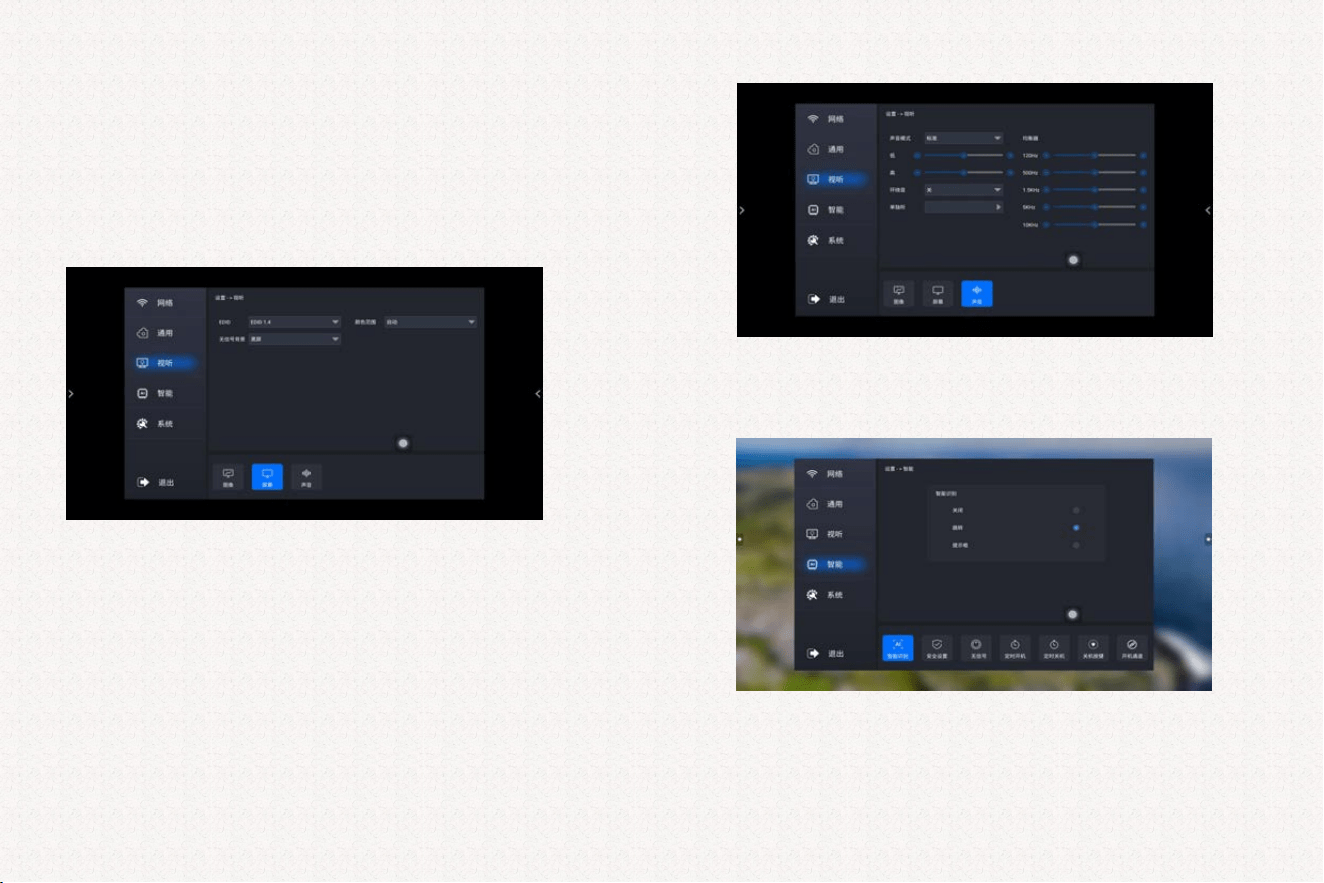
Color Temperature: You can switch different color temperature modes.
Scaling Mode: The default is full screen display, and you can manually switch to the desired
mode.
Image Noise Reduction: Perform noise reduction processing on the picture to make it clearer.
MEMC: When turned on, the picture will be clearer, but the delay will increase.
②Screen Settings
EDID (Extended Display Identification Data): When EDID is set to 1.4, the maximum
resolution supported by this channel is 4K30Hz; when EDID is set to 2.0, the maximum
resolution supported by this channel is 4K60Hz (EDID can only be set in HDMI or OPS
channels, and cannot be adjusted in other channels).
Color Range: Can be adjusted to 0-255 or 16-235.
No Signal Background: Can set the background to black or blue when there is no signal in
the channel.
③Sound Settings
Audio Only: Click to turn off the backlight and only hear the sound; click the screen to
wake up the backlight.
8.4. Smart Settings
①.Smart Recognition:
Select "Off": No action will be taken.
Select "Jump": If the machine is connected to a signal, it will automatically jump to the
corresponding signal channel; if the current channel signal is unplugged, it will automatically
jump back to the built-in computer channel (when the built-in computer is turned on).
29
【The contents of this document may not fully reflect all latest product changes. Please refer to the
actual product.】
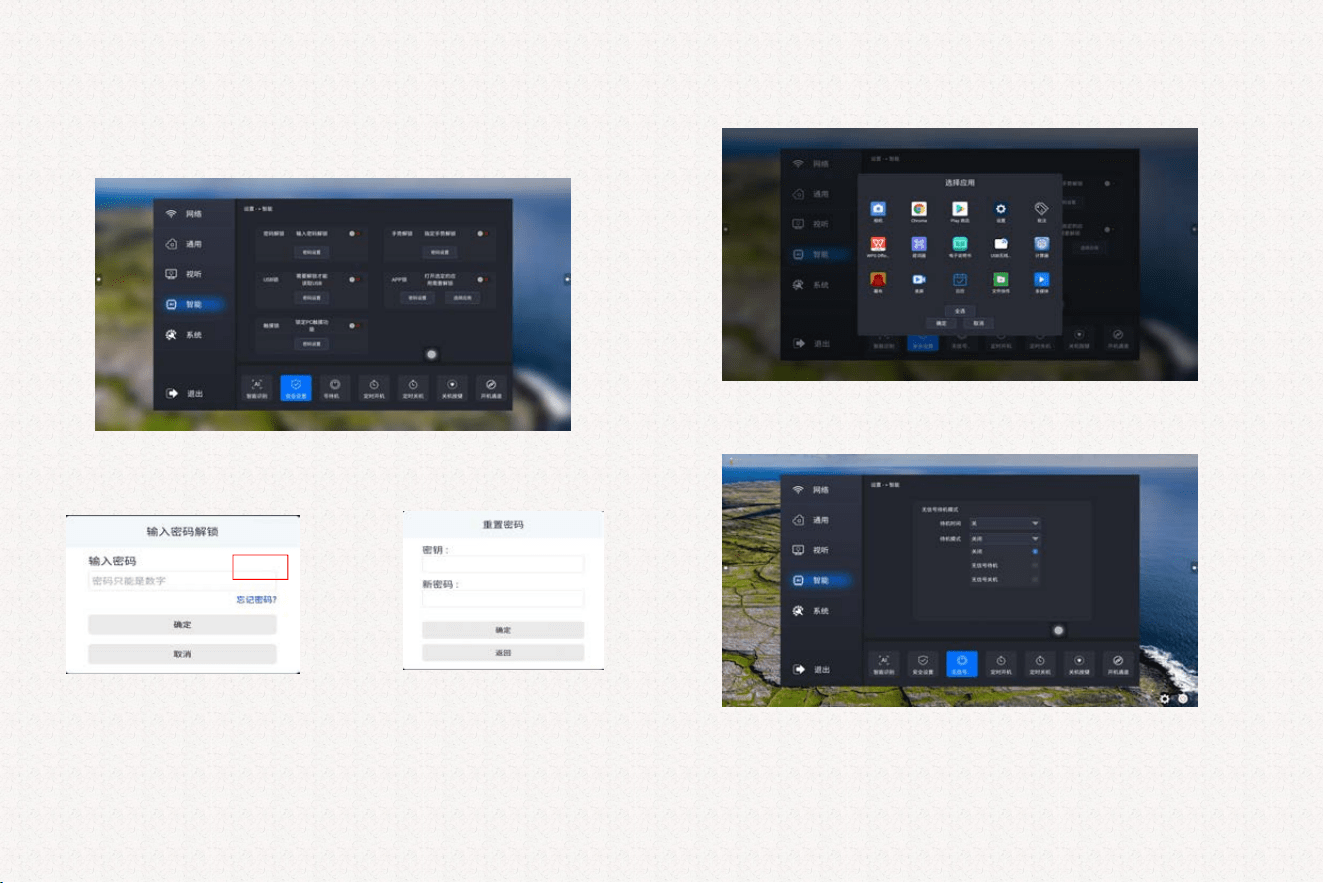
Select "Prompt Box": A selection box will pop up before jumping to the signal channel to
ask whether to switch to the channel; when the current channel signal is unplugged, a
selection box will pop up to ask whether to switch to the built-in computer (when the
built-in computer is turned on).
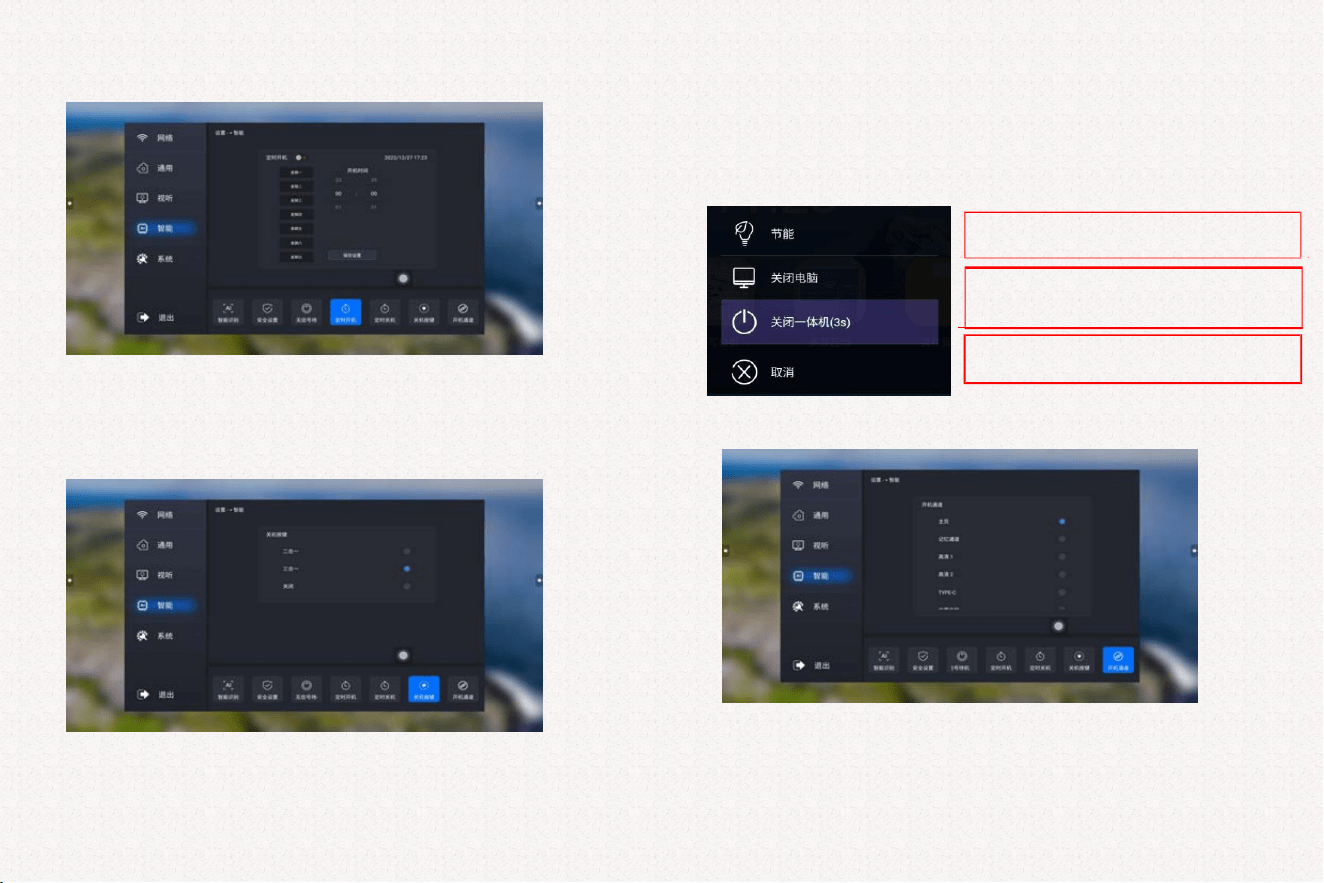
②.Security Settings:
You need to set an unlock password before turning on any lock. If you forget the password
when unlocking, you can click "Forgot Password", enter the key 0000, then enter a new
password, and click Confirm to unlock with the new password.
·Password Unlock: When turned on, the screen will be locked, and you need to enter the
password to unlock and use it.
·Gesture Unlock: When turned on, the screen will be locked, and you need to enter the
gesture to unlock and use it.
·USB Password Lock: When the USB lock is turned on, the USB flash drive will not be
recognized when plugged into the USB interface and clicking File Management.
·APP Lock: Click to select the applications that need to be locked, and you need to enter
the password to open the locked applications.
· PC Touch Lock: When this function is turned on, there is no touch function in all channels.
③.No Signal Standby Settings:
After setting the standby time, you can select the standby mode: No Signal Standby or No
Signal Shutdown, that is, the machine will enter standby mode or shut down after a certain
period of time in the no-signal channel.
30
【The contents of this document may not fully reflect all latest product changes. Please refer to the actual product.】
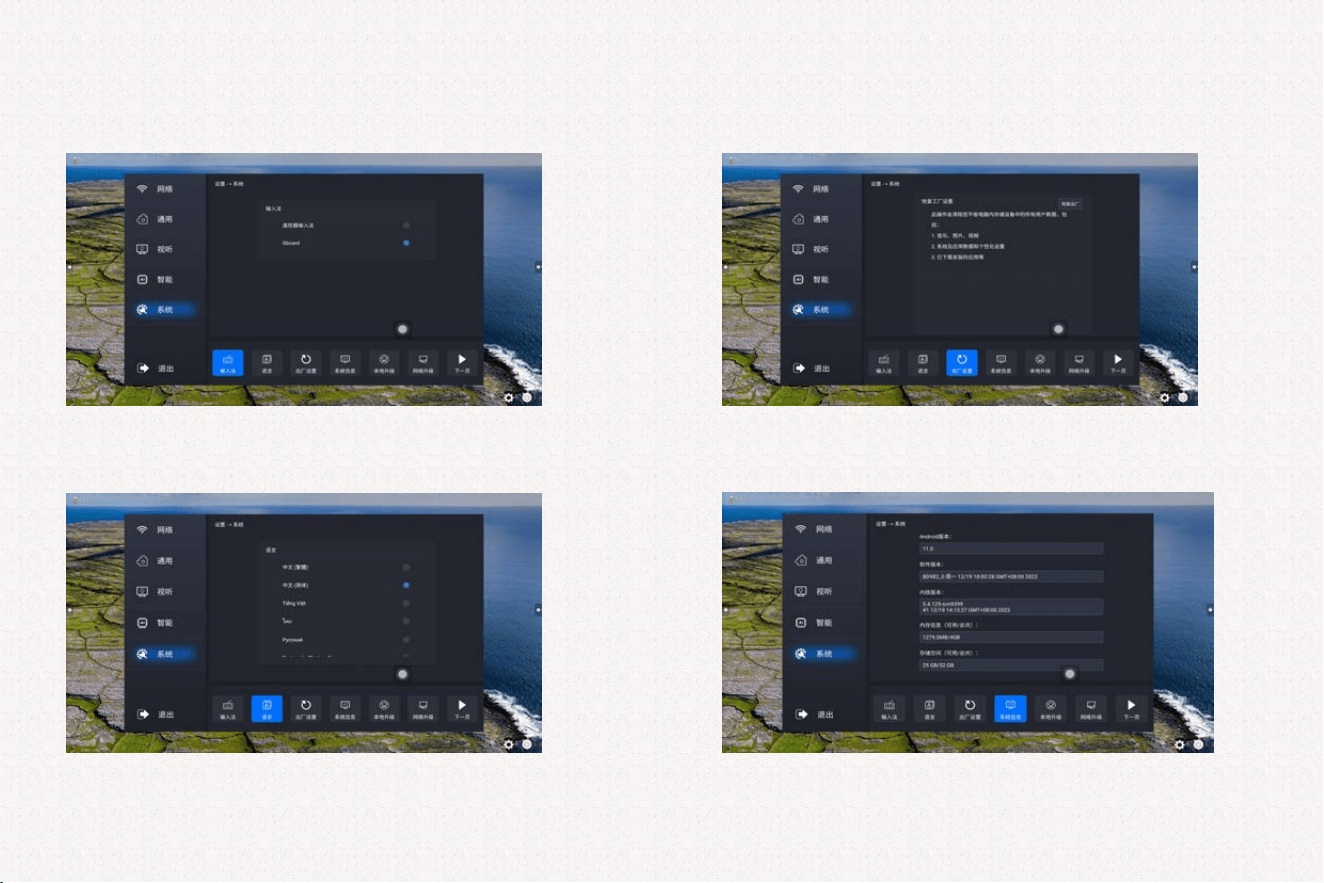
④.Scheduled Power On/Off:
After setting the power on/off time and selecting the effective date, click "Save Settings" (you
need to turn on the switch first to make settings).
⑤.Power On Button:
Select "Two-in-One Button": When shutting down, two options will pop up: Turn Off Computer and
Turn Off All-in-One Machine.
Select "Three-in-One Button": When shutting down, three options will pop up: Energy Saving, Turn
Off Computer and Turn Off All-in-One Machine. Select "Turn Off" to shut down directly.
Energy Saving: Only turn off the backlight, the OPS
and Android motherboard are still running.
Turn Off Computer: Only turn off the built-in OPS
computer, and the whole machine stays in the
Android interface.
Turn Off All-in-One Machine: Shut down the
entire machine.
⑥.Startup Channel Selection:
After selection, the machine will enter the selected channel by default when starting up.
Before selection, it will enter the Android home page by default (setting the startup channel
will cancel the settings in the startup items).
31
【The contents of this document may not fully reflect all latest product changes. Please refer to the actual product.】
8.5. System Settings
①.Input Method Settings:
②.Language Selection:
③.Factory Reset:
④.System Information View:
32
【The contents of this document may not fully reflect all latest product changes. Please refer to the actual product.】
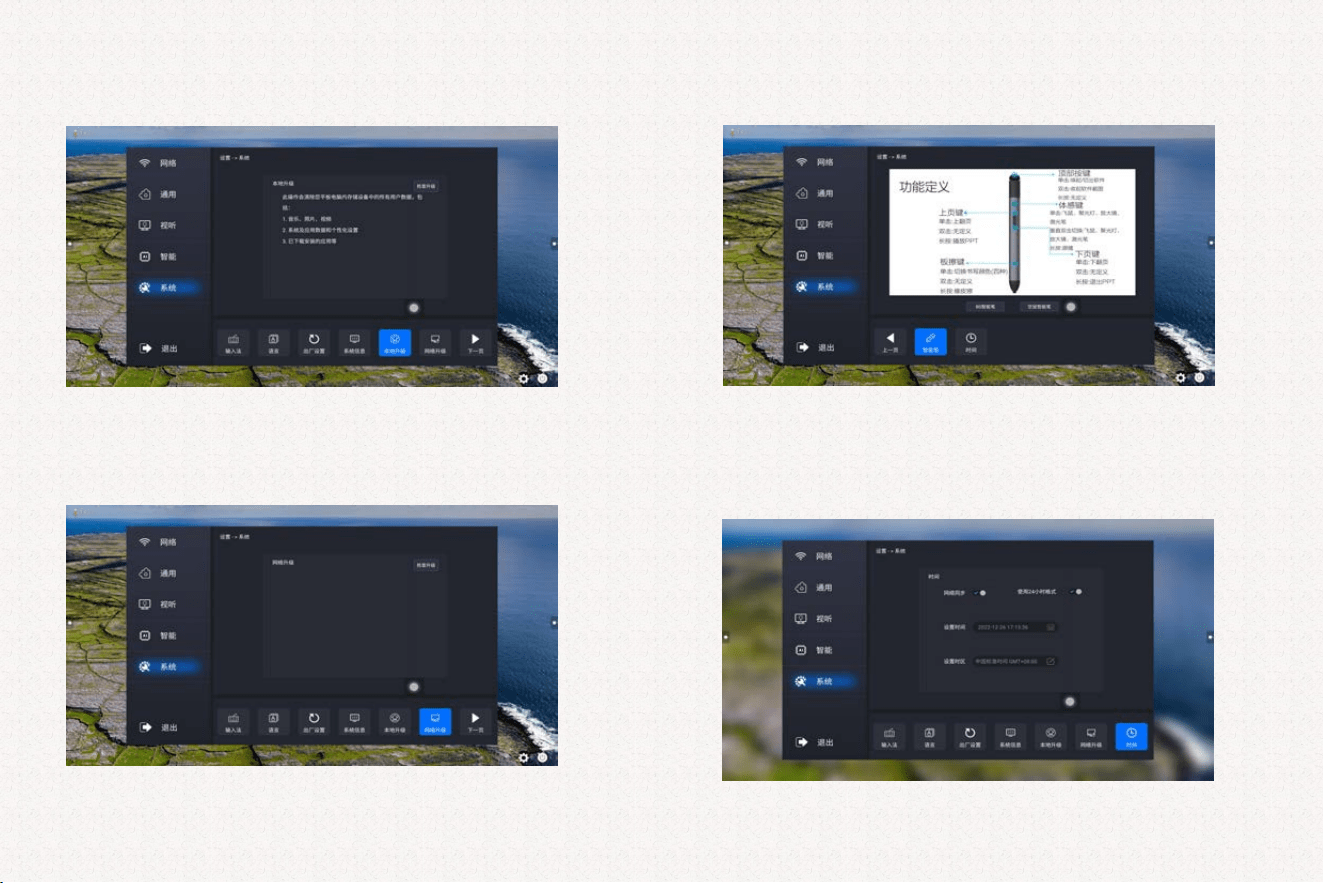
⑤.Local Upgrade:
⑥.Network Online Upgrade:
⑦
.
Smart Pen Instructions:
⑧.Time Settings:
33
【The contents of this document may not fully reflect all latest product changes. Please refer to the actual product.】
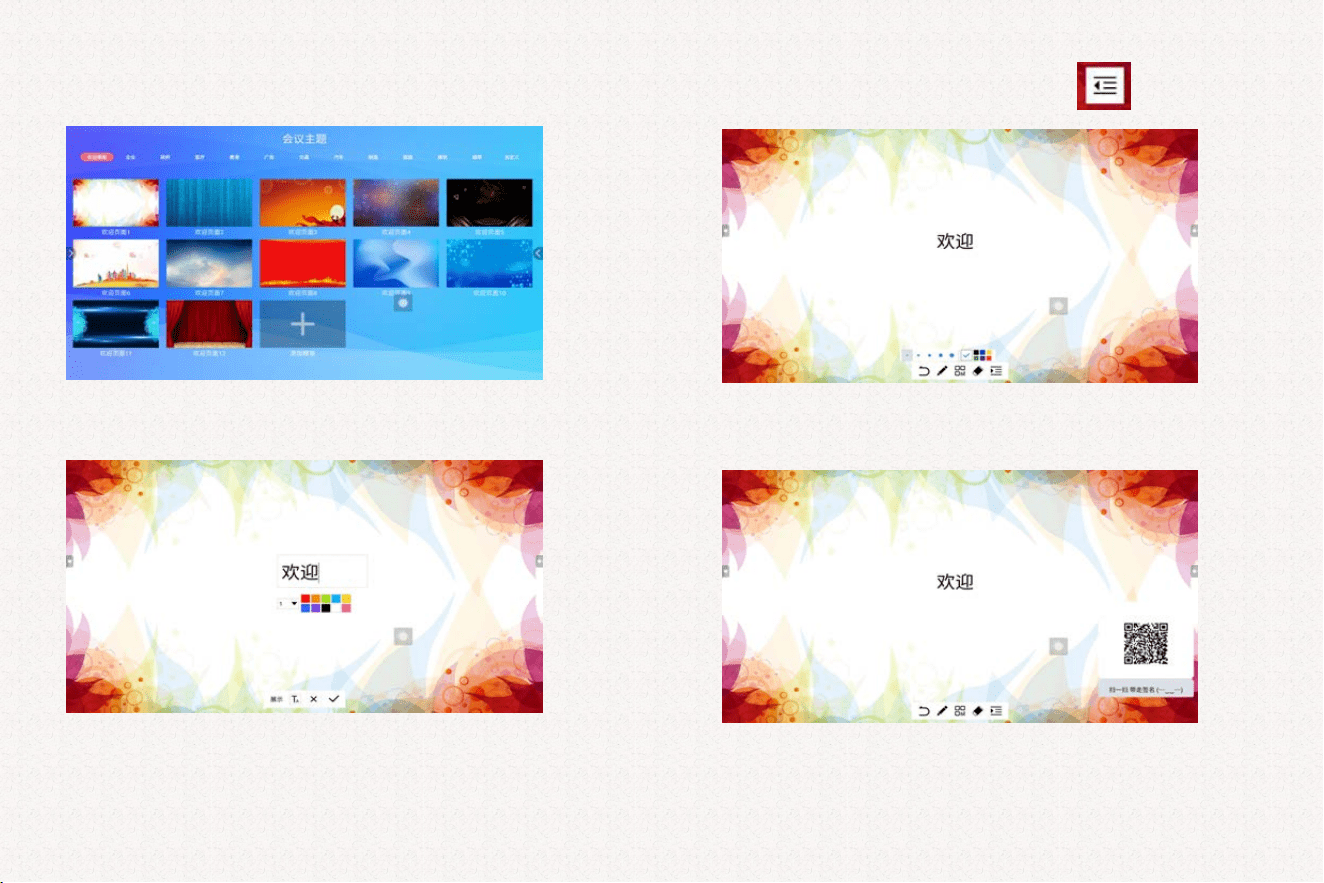
9.VIP Reception Function Introduction
Select the corresponding style page, double-click to zoom in, and then click the
page to enter the welcome word.
to pop up the Click "Display", then click the icon in the lower right corner
operation interface.
Click the brush to sign, or click the QR code to scan and take away the content (this
function requires Internet connection).
34
【The contents of this document may not fully reflect all latest product changes. Please refer to the actual product.】
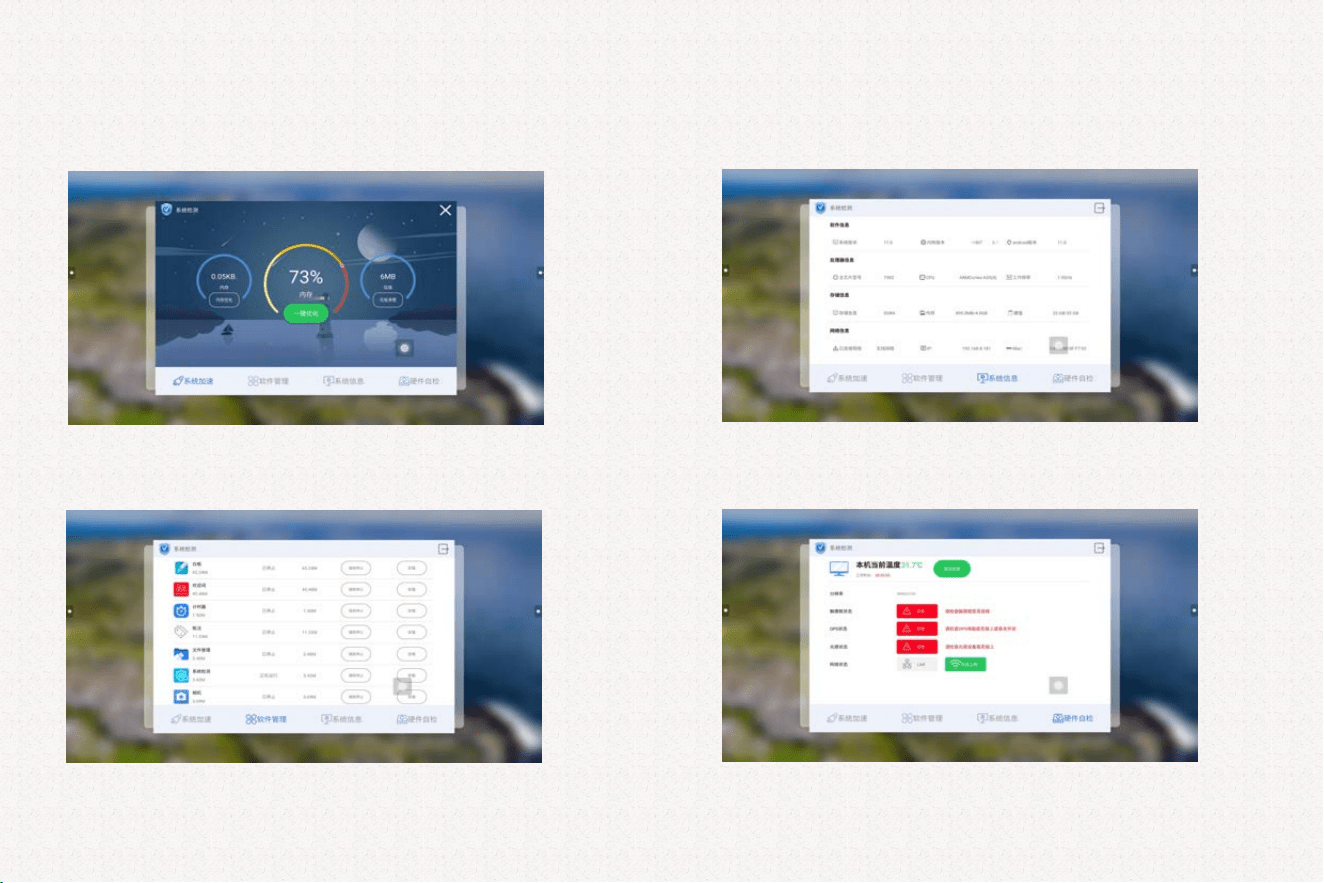
10.Introduction to Other System APPs
10.1.System Detection:
①System Acceleration:
Used to clean up system junk and optimize running speed.
Used to stop running applications and uninstall non-system applications.
③System Information:
View various system information.
④Hardware Self-Test:
Detect whether various functions are normal.
②Software Management:
35
【The contents of this document may not fully reflect all latest product changes. Please refer to the
actual product.】
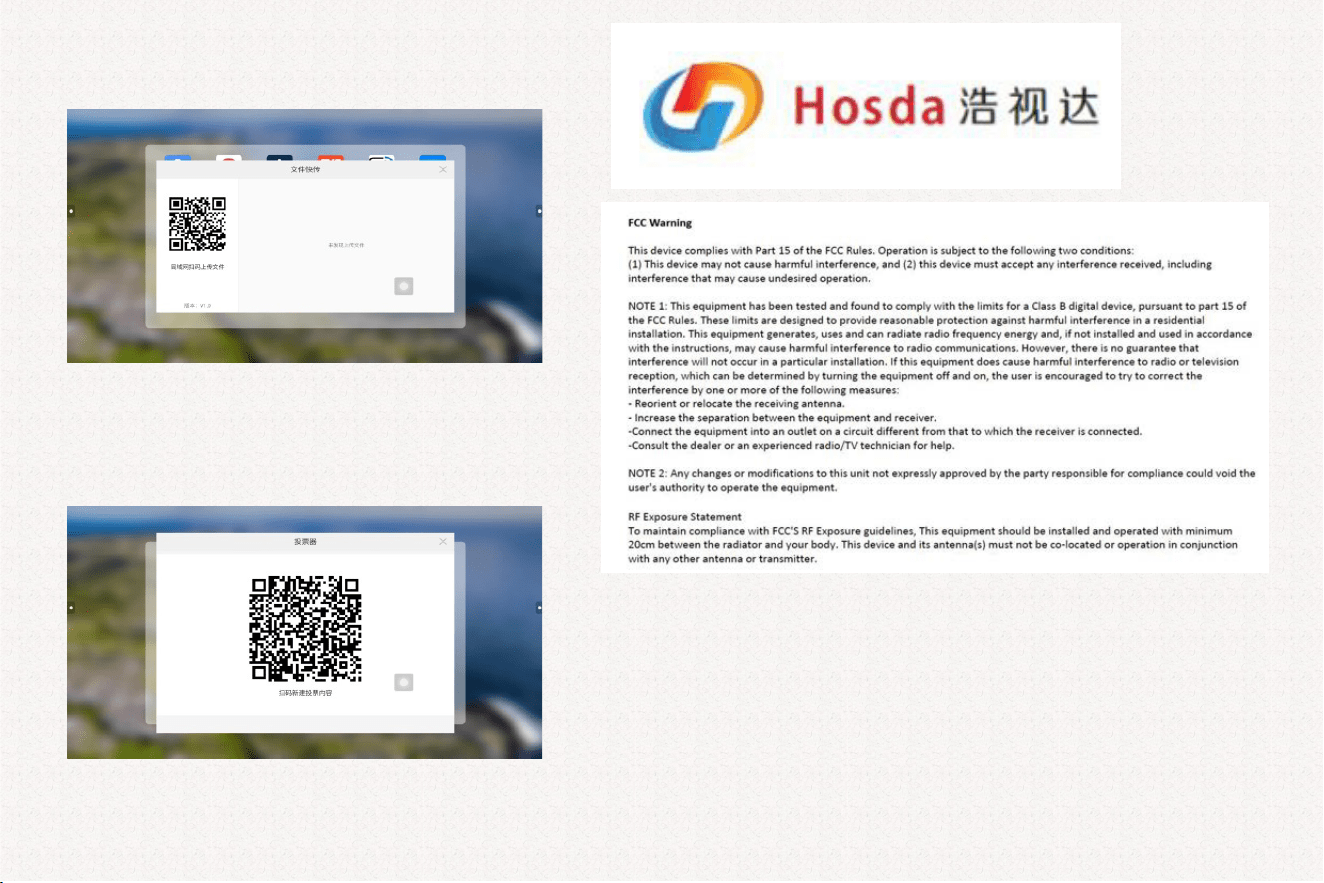
10.2.File Fast Transfer (Only available on the same local area network):
10.3.Voting Device (Requires network connection):
Jiangsu Jinye Optoelectronic
Technology Co., Ltd.
Address: No. 9, Zijing Avenue, Gaochun Economic Development Zone,
Nanjing City, Jiangsu Province, P.R.China
36
【The contents of this document may not fully reflect all latest product changes. Please refer to the actual product.】