03 Tap [ ] at the top right corner for
connection.
Print Master
M250
04 Wait for the printer to be connected.
For better user experience, we
need to connect to your printer.
Searching for printer...
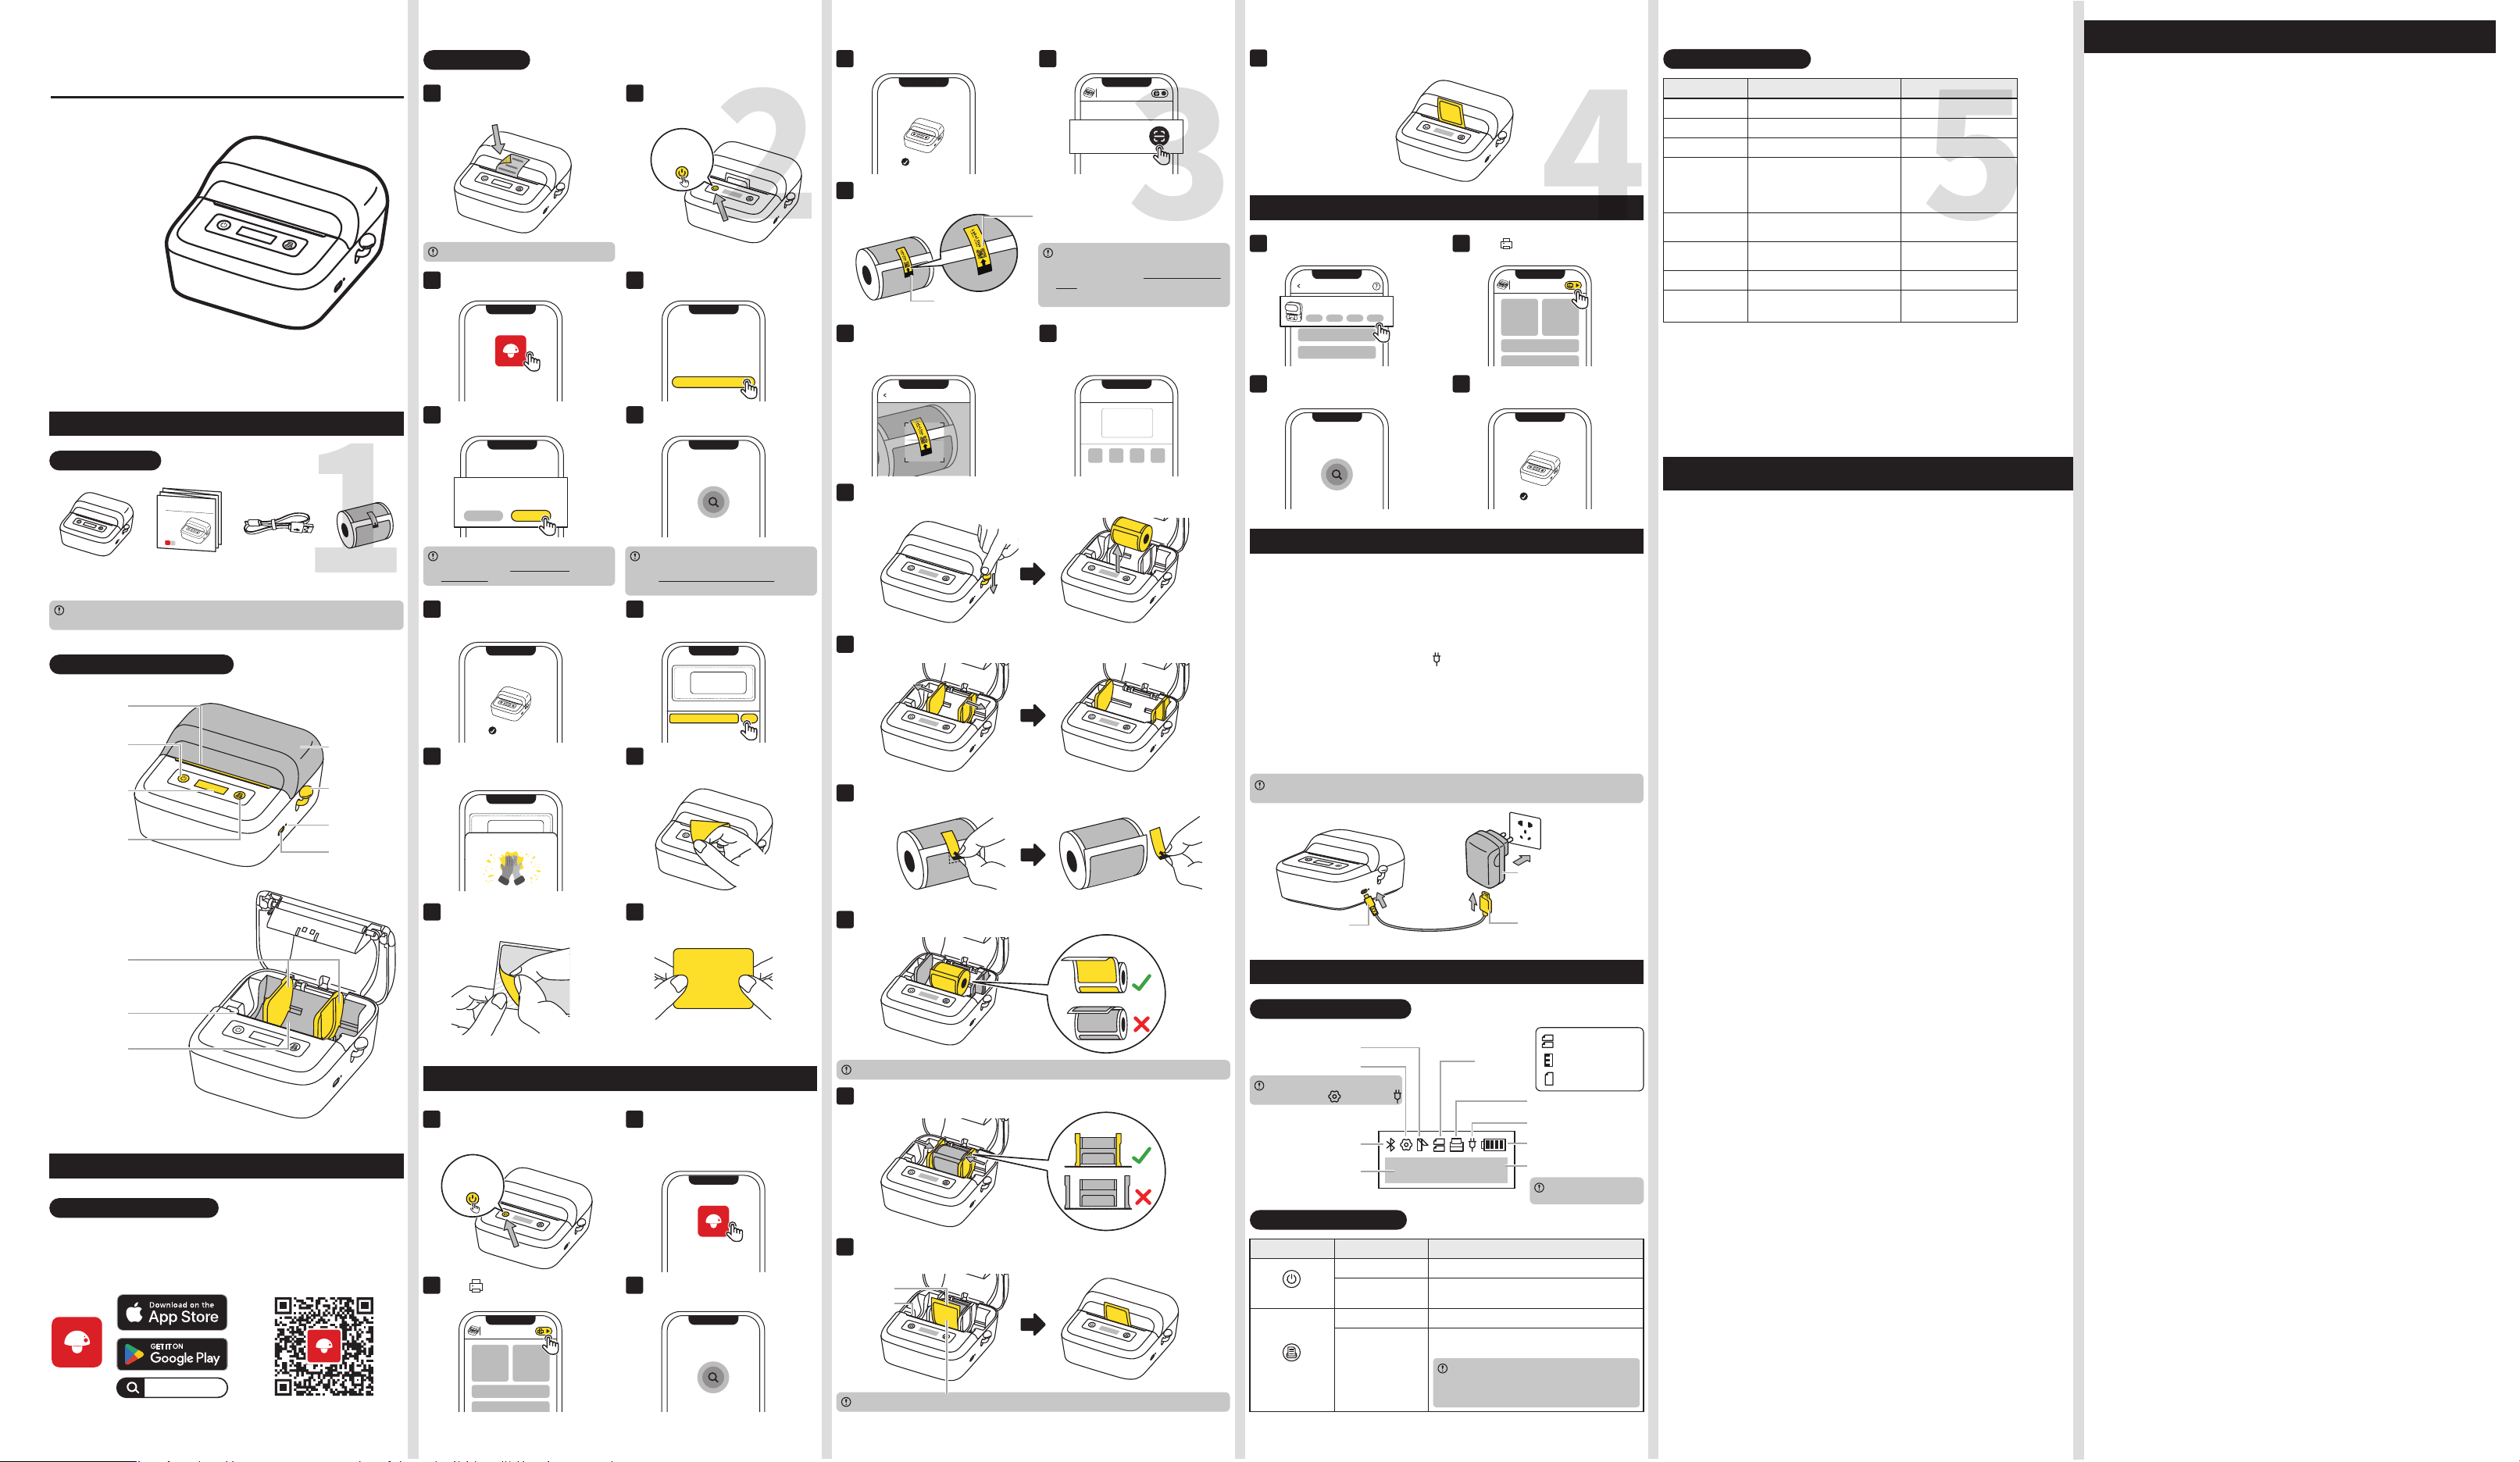
01 Long press the Power Button for 3
seconds until the Display lights up.
3S
Long press for
3s to turn on
printer
02 Open the "Print Master" app.
Print Master
3. Replacing the Paper Roll
08 Aim the scanning frame at the QR
code on the paper roll's
Anti-loosening Sticker.
09 The label size is identified.
AlbumScan
05 Connected.
Connected
The following printers are
found
06 Go to "Home" and tap [Scan].
Scan
Print Master
M250
07 Take out the unused paper roll from the printer.
If you have purchased boxed paper rolls
separately, or if there is no QR code on the
paper roll, please see 4. Identifying Label
Sizes in the Online Guide for instructions
on how to quickly access the editing page.
Anti-loosening Sticker
This QR code is for demonstration only. Please
scan the actual QR code on your paper roll.
10 Press down the Cover Open Lever and remove the paper roll to be replaced
from the Paper Compartment.
11 Slide the Guides outwards as far as they can go.
12 Remove the Anti-loosening Sticker from the paper roll.
13 Place the paper roll in the Paper Compartment.
Place the paper roll in the Paper Compartment.
14 Slide the Guides inwards to the edges of the paper roll.
15 Extend the label paper out above the Paper Outlet and then close the Top
Cover.
Label Paper
Paper Exit
The Label Paper faces the Power Button and is higher than the Paper Exit.
1.2 Printer Parts Instruction
Paper Exit
Display
Feed/Select
Button
Power/Menu
Button
Cover Open
Lever
Top Cover
Reset Hole
Type-C
Charger Port
Paper Guides
Manual Cutter
Paper
Compartment
The Paper Roll has been installed in the printer. However, if you have purchased a
bundled printer package, it does not include a 40*30mm-100pc Paper Roll.
M322
Quick Start Guide
EN JA
1.1 Packing List
1. Product Introduction
Printer
×1
Quick Start Guide
×1
Type-C Cable
×1
100-Pc 40*30 mm
Paper Roll×1
2.2 User Guide
01 Remove the protective film.
This step is required for first use.
02 Long press the Power Button for 3
seconds until the Display lights up.
Long press for
3s to turn on
printer
09 Printing is completed. 10 Tear off the label along the Paper
Exit.
Hi
your nickname
PrintPlease enter your nickname
Print successfully
03 Open the "Print Master" app. 04 Tap [Auto Connect].
Print Master
Auto Connect
Let's print the first label!
Welcome to
Print Master
For more information about app
permissions, see 6.2 Permission
Description in the Online Guide.
You can also find manual connection
options on [Home]. For more details,
see 4. More Connection Methods in this
guide.
05 Grant permissions. 06 Wait for the printer to be connected.
For a better user experience, we
require access to your printer.
"Print Master" would like to use
Bluetooth to connect to the printer
Permission Request
Cancel OK
For better user experience, we
need to connect to your printer.
Searching for printer...
08 Edit your first label, and tap [Print]
after you finish editing.
Hi
your nickname
PrintPlease enter your nickname
07 Connected.
Connected
The following printers are
found
11 Remove the liner. 12 Attach the label to a dry, flat
surface.
Hi
M250
Quick Start Guide
6.3 Menu Instructions
Main Menu
Language
Darkness
Pager type
Power OFF
Restore
Settings
Firmware
Address
Test print
Sub-menu
English
Explanation
Choose language
Show firmware version /
Show device address
/
Test print
Print device
information
/
Reset the device to
factory settings
4(Weak),6(Normal),10(Dark) Choose print density
Continuous,Gap,Black Choose label type
5 Minutes, 15 Minutes, 30
Minutes, 1Hour, 2Hour, 4Hour,
8Hour, 24Hour, NO Close
(default option)
Schedule automatic
shut down
2. Getting Started
2.1 Downloading the App
Method 1: Search for the "Print
Master" app on App Store® or
Google Play™ to download and
install it.
Method 2: Scan the QR code to
download the app.
Print Master
Print Master
01 Select your printer. 02 Tap [ ] at the top right corner
for connection.
03 Wait for the printer to be
connected.
04 Connected.
4. More Connection Methods
Print Master
M250
Select your printer
M220 Series
M120 M110 M200 M220
The following printers are
found
Connected
For better user experience, we
need to connect to your printer.
Searching for printer...
16 The Paper Exit will automatically feed out a blank piece of label paper, which
indicates that calibration is completed.
5. Charging Instructions
1. Please prepare your own power adapter (DC 5V/2A) with a Type-A port.
2. Insert the Type-C end (flat end) of the USB cable into M250's Type-C Charger
Port and plug the Type-A end (narrow end) into the Type-A port of the power
adapter.
3. After connecting the printer to an outlet via the power adapter, check the
Display for the following indications: When the printer is off, "Charging..." will be
displayed. When the printer is on, a " " icon will appear in the top right corner
of the Display.
4. To ensure quick usage, please charge the printer for at least 20 minutes. For a
complete charge, wait for 2-3 hours or until the Display indicates "Charge
Finished".
5. As the printer may heat up during charging, avoid placing it on materials such
as cotton or linen while charging.
6. Once the battery is fully charged, please unplug it promptly.
•
Using the printer while charging will slow down the charging speed.
•
To preserve battery life, it is not advisable to print while charging.
USB Type-A End
Power Adapter with
Type-A Port (not included)
DC 5V/2A
USB Type-C Port
6. Additional Instructions
6.1 Display Instructions
Q155C-21X78921
Information Display Area
Charging status
Bluetooth connected
Label Type
Batte Level
Feeding/Printing
Settings
Top Cover opened
Printer Serial Number
(SN Code)
When your printer is connected
to a computer, will turn into
This is the standby
interface
Gap Label
Continuous Label
Black Mark Label
6.2 Button Instructions
Button Type
Power Button
Feed Button
Operation
Long press for 3s
Press once
Press once
Press once
Function
Power on/off
When in standby mode, feed out paper
When in main menu, access sub-menu for
selection
When in standby mode, access main menu
for selection
After selecting an option in a sub-menu, the
system will automatically revert to the
standby interface if there is no further activity
for 10 seconds.
FCC Caution :
FCC WARNING:
7.
FCC INFORMATION (U.S.A.)
This equipment has been tested and found to comply with
the limits for a Class B digital device, pursuant to Part 15 of
the FCC Rules. These limits are designed to provide reason-
able protection against harmful interference in a residential
installation. This equipment generates, uses and can
radiate radio frequency energy and, if not installed and used
in accordance with the instructions, may cause harmful
interference to radio communications. However, there is no
guarantee that interference will not occur in a particular
installation. If this equipment does cause harmful interfer-
ence to radio or television reception, which can be
determined by turning the equipment off and on, the user is
encouraged to try to correct the interference by one of the
following measures:
• Reorienting or relocating the receiving antenna.
• Increasing the separation between the equipment and
receiver.
• Connecting the equipment to an outlet that is on a
different circuit than the radio or TV.
• Consulting the dealer or an experienced radio/TV techni-
cian for help.
• Any changes or modifications not expressly approved by the party
responsible for compliance could void the user’s authority to operate
this equipment.
• This product satisfies FCC regulations when shielded cables and
connectors are used to connect the unit to other equipment. To
prevent electromagnetic interference with electric appliances, such as
radios and televisions, use shielded cables and connectors for connec-
tions.
FCC Compliance Statement :
The device has been evaluated to meet general RF exposure
requirement. The device can be used in portable exposure
condition without restriction.
This device complies with Part 15 of the FCC Rules. Operation
is subject to the following two conditions: (1) This device may
not cause harmful interference, and (2) this device must
accept any interference received, including interference that
may cause undesired operation.
FCC Radiation Exposure Statement :
Special Notes
The company takes full responsibility for the revision and explanation of this manual, with
utmost care taken to ensure its accuracy. However, please note that any technical
improvements to the product may not be separately notified, and that the images of the
product, accessories, software interfaces, etc. in this manual are for illustrative purposes
and reference only. Due to product updates and upgrades, the actual product may be
slightly different from the images. Please rely on the actual product for all details.
CAN ICES-003(B)/NMB-003(B)
This device contains licence-exempt transmitter(s)/receiv-
er(s) that comply with lnnovation, Science and Economic
Development Canada's licence-exempt RSS(s). Operation is
subject to the following two conditions: 1.This device may
not cause interference. 2. This device must accept any
interference, including interference that may cause
undesired operation of the device.
This equipment complies with ISED radiation exposure limits
set forth for an uncontrolled environment and meets
RSS-102 of the ISED radio frequency (RF) Exposure rules. This
equipment should be installed and operated keeping the
radiator at least 20cm or more away from person's body.
Cet appareil contient un émetteur (S)/ récepteur (S) exempté
(S) de licence qui est conforme aux RSS(S) exemptés (S) de
licence d’innovation, Science et développement
économique Canada. Le fonctionnement est soumis aux
deux conditions suivantes: 1. Cet appareil ne peut pas causer
d’interférences. 2. Cet appareil doit accepter toute
interférence, y compris les interférences qui peuvent causer
un fonctionnement indésirable de l’appareil.
Cet équipement est conforme aux limites d’exposition aux
rayonnements ionisants fixées pour un environnement non
contrôlé et répond à RSS-102 des règles d’exposition aux
rayonnements ionisants (RF). Cet équipement devrait être
installé et utilisé en gardant le radiateur au moins 20cm ou
plus loin du corps de la personne.
8.
ISED NOTICE (Canada)
1
2
4
5
3