
Intelligent Safe and Clean
www.biodeconta.com
1
User Manual
Biodeconta_Glove Integrity Tester
BIODECONTA (HANGZHOU) DECONTAMINATION TECHNOLOGY CO., LTD
All Rights Reserved 2026
File Number: Biodeconta_GIT_UM_2603_03_DRF_EN
Applicable to: Glove Integrity Tester

Intelligent Safe and Clean
www.biodeconta.com
2
Disclaimer:
Biodeconta reserves the right to modify the contents of this manual without prior
notice to customers.
All copyrights are owned by biodeconta.
For any questions, please contact us at sales@biodeconta.com
Biodeconta assumes no liability for any errors or omissions in this manual, nor for any
damages arising from the use of the information herein.
This manual is intended for authorized users.
Intelligent Safe and Clean
www.biodeconta.com
3
Revision History:
Document Number
Date
Author
Description
Status
Signature
Biodeconta_GIT_UM
_2501_01_DRF_EN
January
5th, 2026
YanTing H
Initial
release
-
Biodeconta_GIT_UM
_2603_01_DRF_EN
March 3rd,
2026
YanTing H
Delete
watermark;
Uniform
font
throughout
the text; Fix
the spacing
error;
Uniform
font
variations in
font size
and
thickness
D; M
Biodeconta_GIT_UM
_2603_02_DRF_EN
March 9th,
2026
YanTing H
Correct
spelling
mistake;
Delete
language;
Replace the
picture;
Delete the
highlighted
M; D

Intelligent Safe and Clean
www.biodeconta.com
4
text
Biodeconta_GIT_UM
_2603_03_DRF_EN
March 11th,
2026
YanTing H
Add the
CFF
warning
message
content
A
*Changing state: A-add, M-update, D-delete

Intelligent Safe and Clean
www.biodeconta.com
5
Contents
User Manual ......................................................................................................................................1
Disclaimer: .........................................................................................................................................2
Revision History:
.............................................................................................................................. 3
Contents .............................................................................................................................................5
Chapter 1 Instrument appearance and installation .................................................................... 9
1. Instrument appearance and installation
...........................................................................9
1.1 Instrument appearance: ........................................................................................... 9
1.2 Instrument installation: ........................................................................................... 10
Chapter 2 Test interface (Remote Mode)
...................................................................................12
2. Test interface (Remote Mode) ......................................................................................... 12
2.1 Test interface (Remote Mode): ..............................................................................12
Chapter 3 Network Connection
................................................................................................... 13
3. Network Connection ..........................................................................................................13
3.1 Network Connection: .............................................................................................. 13
Chapter 4 Switch mode
.................................................................................................................15
4. Switch mode ....................................................................................................................... 15
4.1 Date ........................................................................................................................... 15
4.2 Sync:
..........................................................................................................................17
4.3 Self-Check ................................................................................................................ 18
4.4 Start: .......................................................................................................................... 21
4.5 Stop:
.......................................................................................................................... 23
4.6 Sensor ....................................................................................................................... 25
4.7 Zero: .......................................................................................................................... 28

Intelligent Safe and Clean
www.biodeconta.com
6
4.8 Calibrate:
.................................................................................................................. 29
4.9 Reset: ........................................................................................................................ 30
4.10 Mode ....................................................................................................................... 31
4.11 Local Mode:
............................................................................................................33
Chapter 5 System information ..................................................................................................... 35
5. System information ............................................................................................................35
5.1 System information-Alarm Configuration:
........................................................... 37
5.2 System information-Storage Management ......................................................... 40
5.3 Export: ....................................................................................................................... 43
Chapter 6 Login (Local Mode)
..................................................................................................... 45
6. Login (Local Mode) ............................................................................................................45
Chapter 7 Test parameter ............................................................................................................. 46
7. Test parameter
................................................................................................................... 46
7.1 Delete: ....................................................................................................................... 48
7.2 Edit: ............................................................................................................................49
7.3 Add:
............................................................................................................................50
Chapter 8 Historical data .............................................................................................................. 52
8. Historical data .....................................................................................................................52
8.1 Export:
....................................................................................................................... 53
8.2 Search: ......................................................................................................................55
8.3 Data Details: .............................................................................................................56
8.4 Data curve:
............................................................................................................... 57
Chapter 9 Logs ............................................................................................................................... 58
9. Logs ..................................................................................................................................... 58

Intelligent Safe and Clean
www.biodeconta.com
7
9.1 Operation Log
.......................................................................................................... 58
9.2 Export: ....................................................................................................................... 60
9.3 Search: ......................................................................................................................62
9.4 View:
.......................................................................................................................... 63
9.5 Alarm Log ..................................................................................................................64
9.6 Export: ....................................................................................................................... 65
9.7 Search:
......................................................................................................................67
9.8 View: .......................................................................................................................... 68
Chapter 10 User ............................................................................................................................. 69
10. User
................................................................................................................................... 69
10.1 Local User .............................................................................................................. 69
10.2 Add User Group: ................................................................................................... 71
10.3 Modify User Group:
...............................................................................................73
10.4 User Group Disable: ............................................................................................. 75
10.5 User Group Enable: ..............................................................................................76
10.6 Add User:
................................................................................................................77
10.7 Modify User: ...........................................................................................................79
10.8 User Disable: ......................................................................................................... 81
10.9 User Enable:
.......................................................................................................... 82
Chapter 11 Switch mode ...............................................................................................................83
11. Switch mode ..................................................................................................................... 83
11.1 Date
......................................................................................................................... 83
11.2 Manual: ................................................................................................................... 85
11.3 Sync: ........................................................................................................................87

Intelligent Safe and Clean
www.biodeconta.com
8
11.4 Self-Check
.............................................................................................................. 88
11.5 Start: ........................................................................................................................ 91
11.6 Stop: ........................................................................................................................ 93
11.7 Sensor
..................................................................................................................... 95
11.8 Zero: ........................................................................................................................ 98
11.9 Calibrate: .................................................................................................................99
11.10 Reset:
..................................................................................................................100
11.11 Mode ....................................................................................................................101
11.12 Remote Mode: ................................................................................................... 103
Chapter 12 System information
................................................................................................. 105
12. System information ....................................................................................................... 105
12.1 System information-Alarm Configuration: .......................................................107
12.2 System information-Storage Management
.....................................................110
12.3 Export: ...................................................................................................................113
12.4 System information-Backup and Recovery: ...................................................115
12.5 Export:
...................................................................................................................117
Chapter 13 FCC Warning Message ..........................................................................................120
13. FCC Warning Message ................................................................................................ 120
13.1 Labeling requirements
........................................................................................120
13.2 Information to user. ............................................................................................. 120
13.3 Information to the user. ...................................................................................... 120
Chapter 14 Technical Support and Contact Information
....................................................... 122
Intelligent Safe and Clean
www.biodeconta.com
9
Chapter 1 Instrument appearance and installation
1. Instrument appearance and installation
1.1 Instrument appearance:
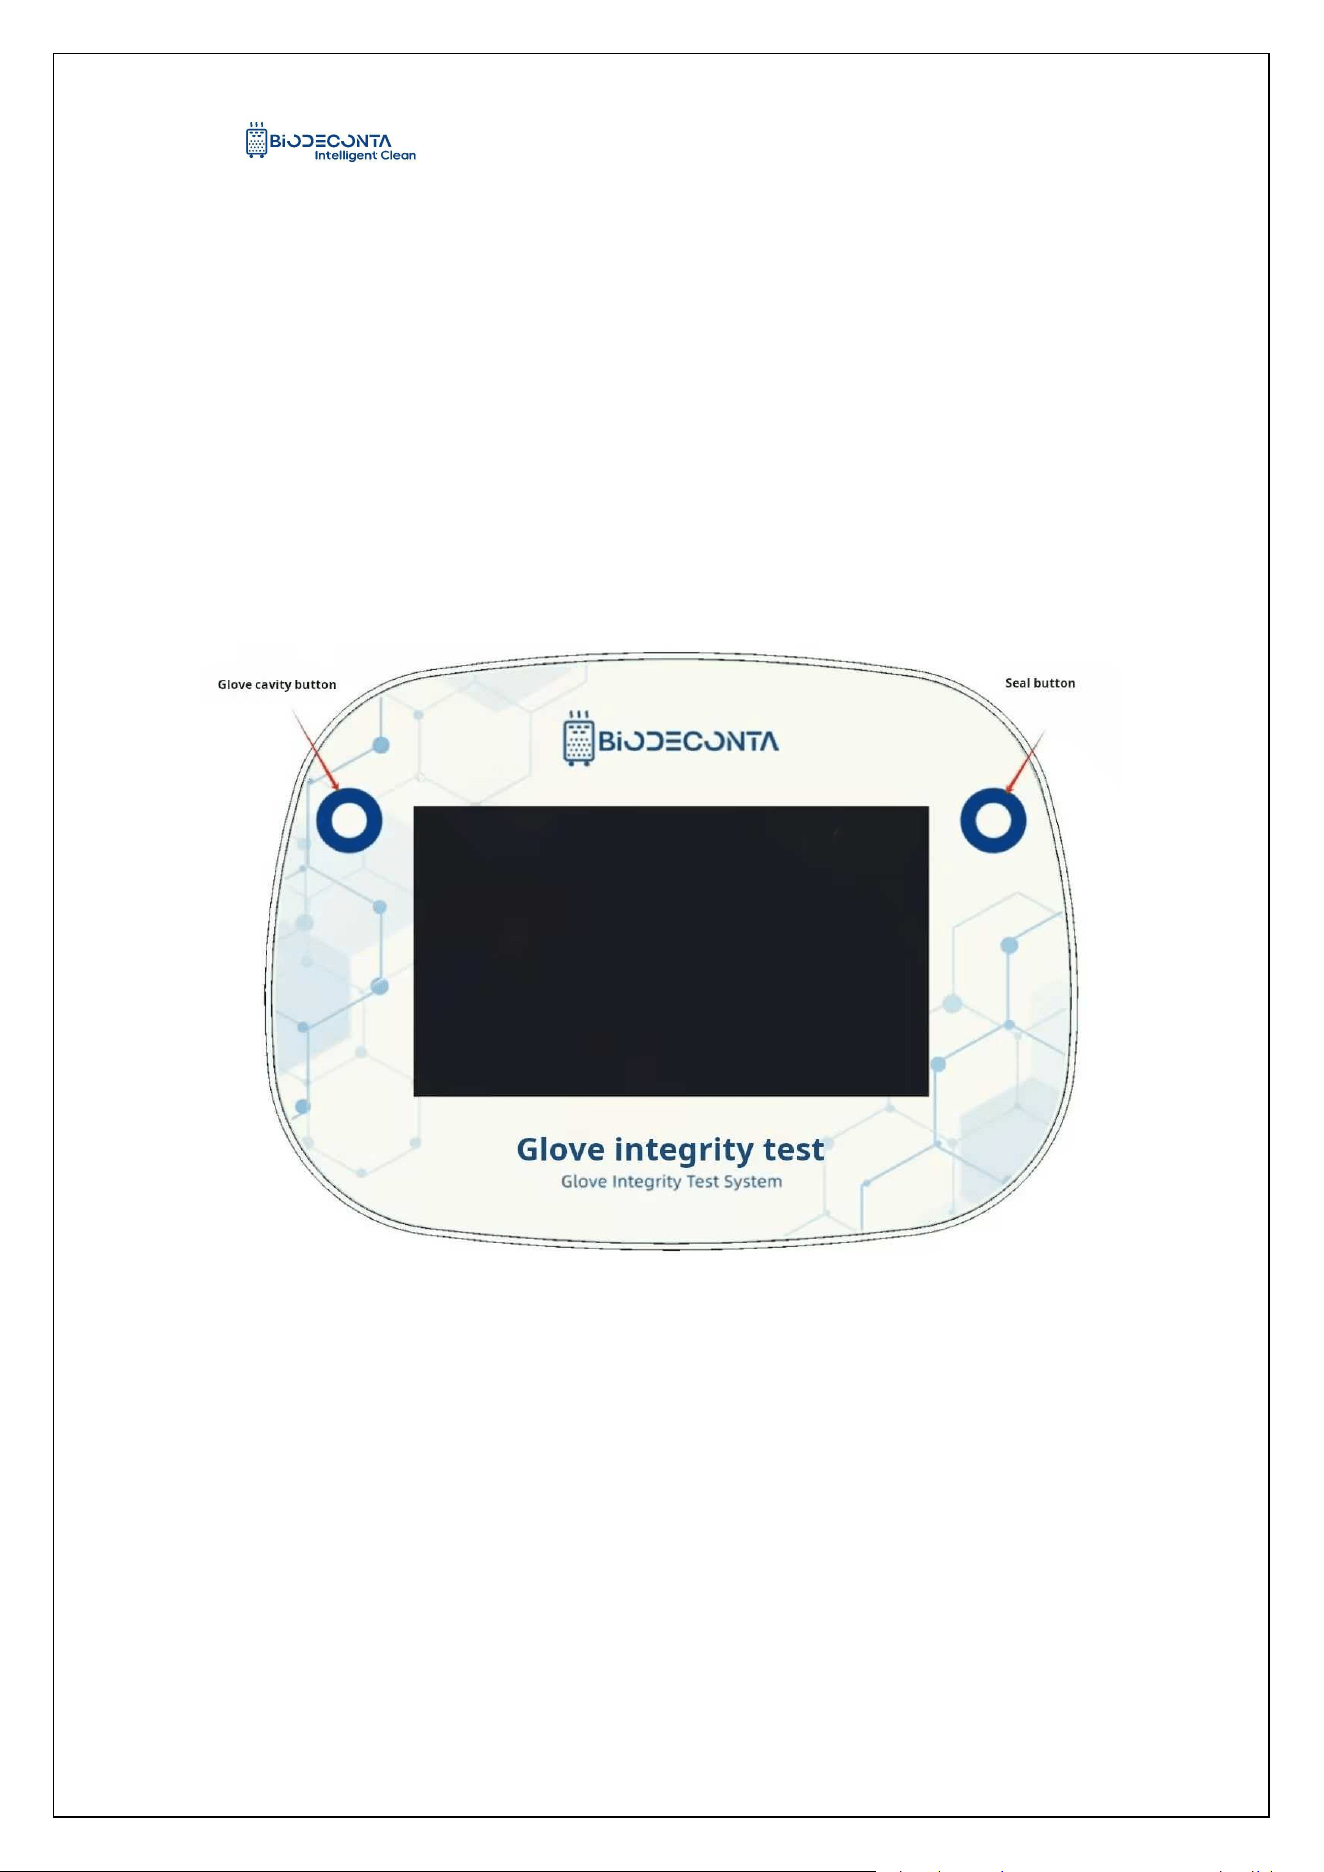
On the front screen of the instrument, there are two buttons respectively, as
shown in Figure 1-1, the left upper corner of the left button is the glove cavity button,
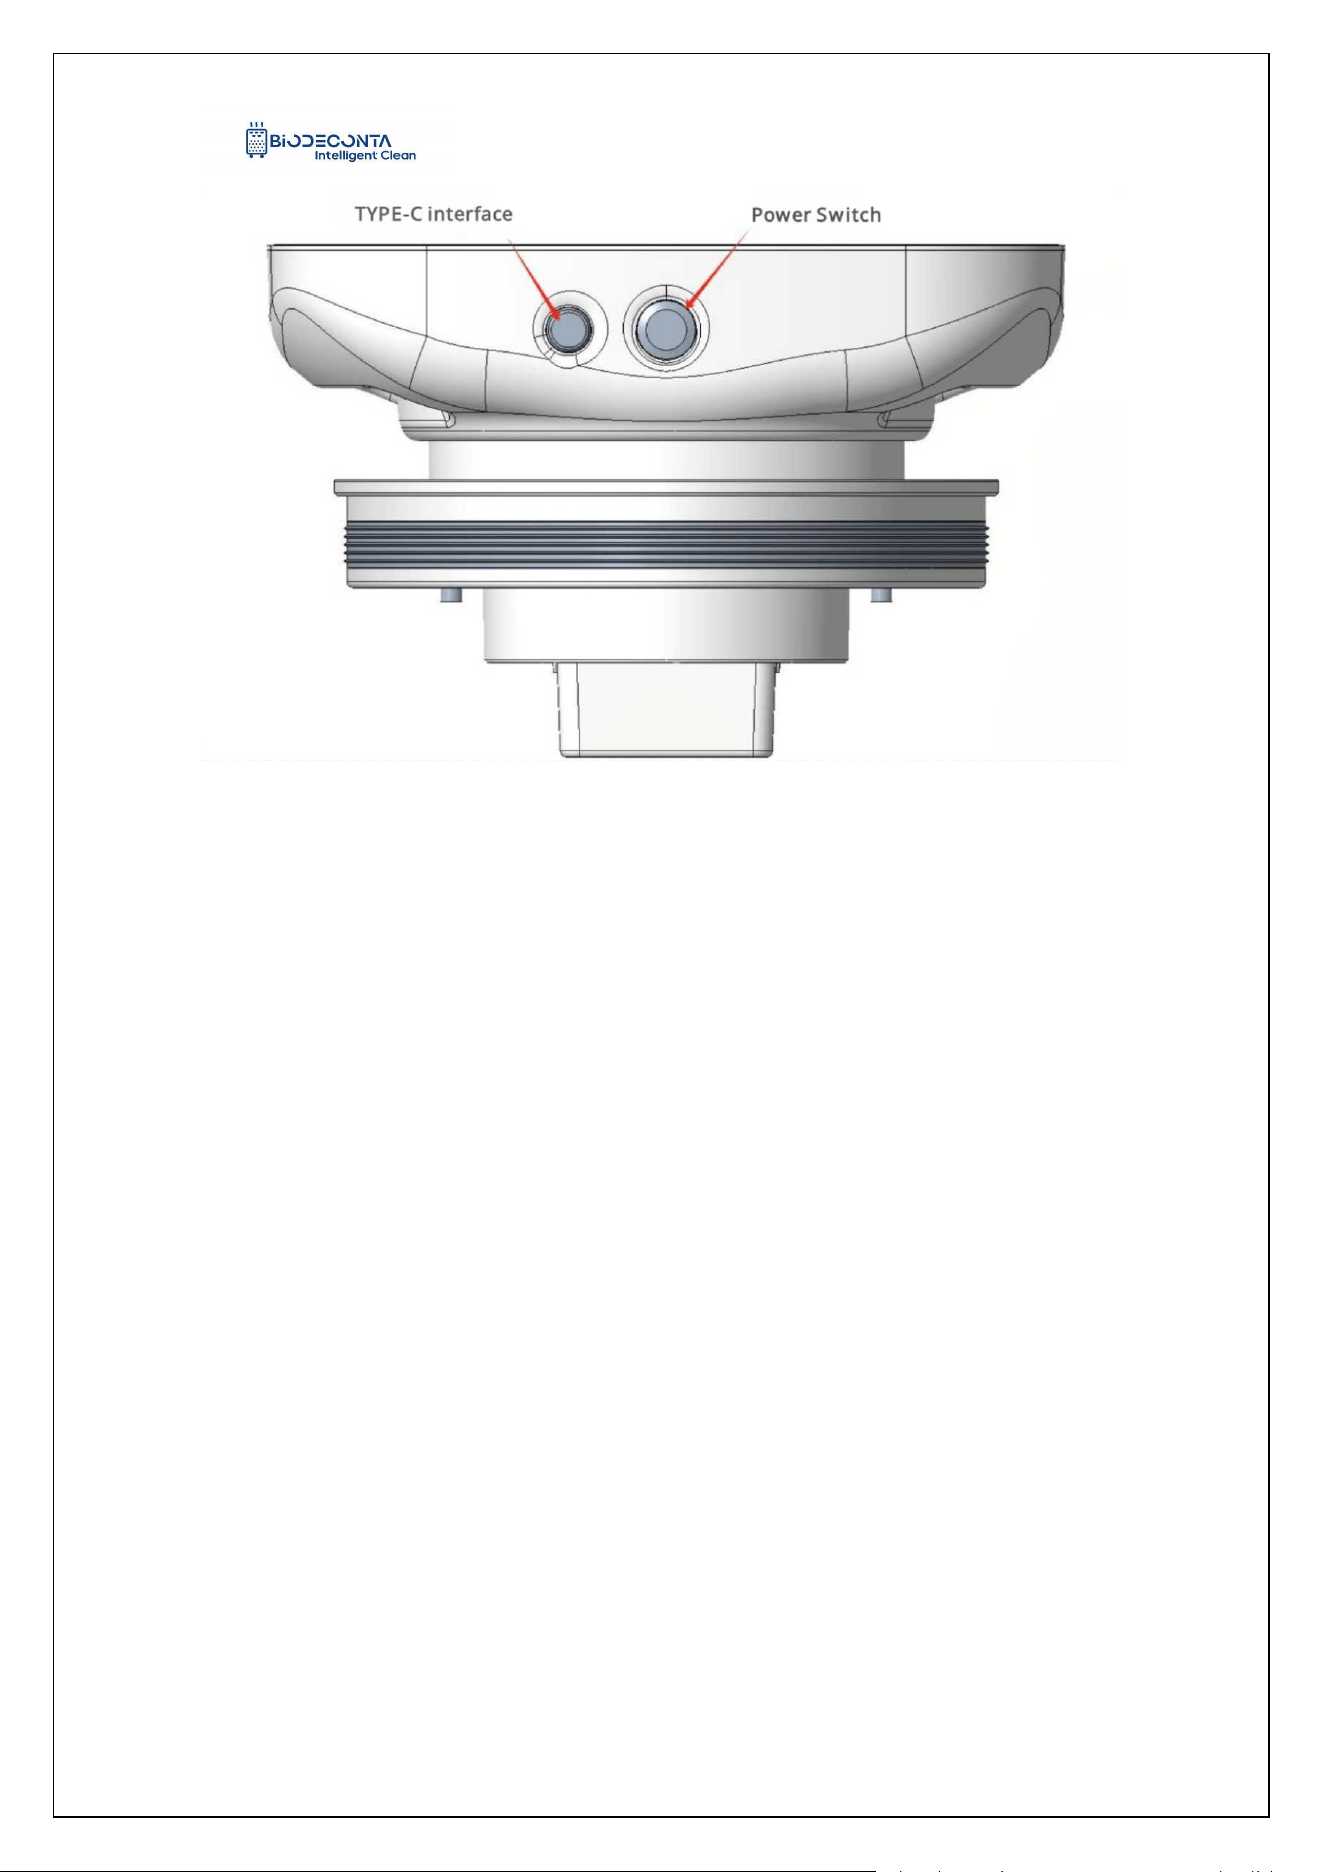
and the right upper corner of the right button is the seal button; There are two buttons
on the front and top side of the instrument, as shown in Figure 1-2. The left side of the
front and top side is the TYPE-C interface, and the middle part is the power button.
Figure 1-1 "Glove Cavity Button, Seal Button"
Intelligent Safe and Clean
www.biodeconta.com
10
Figure 1-2 "TYPE-C Interface, Power Switch"
1.2 Instrument installation:
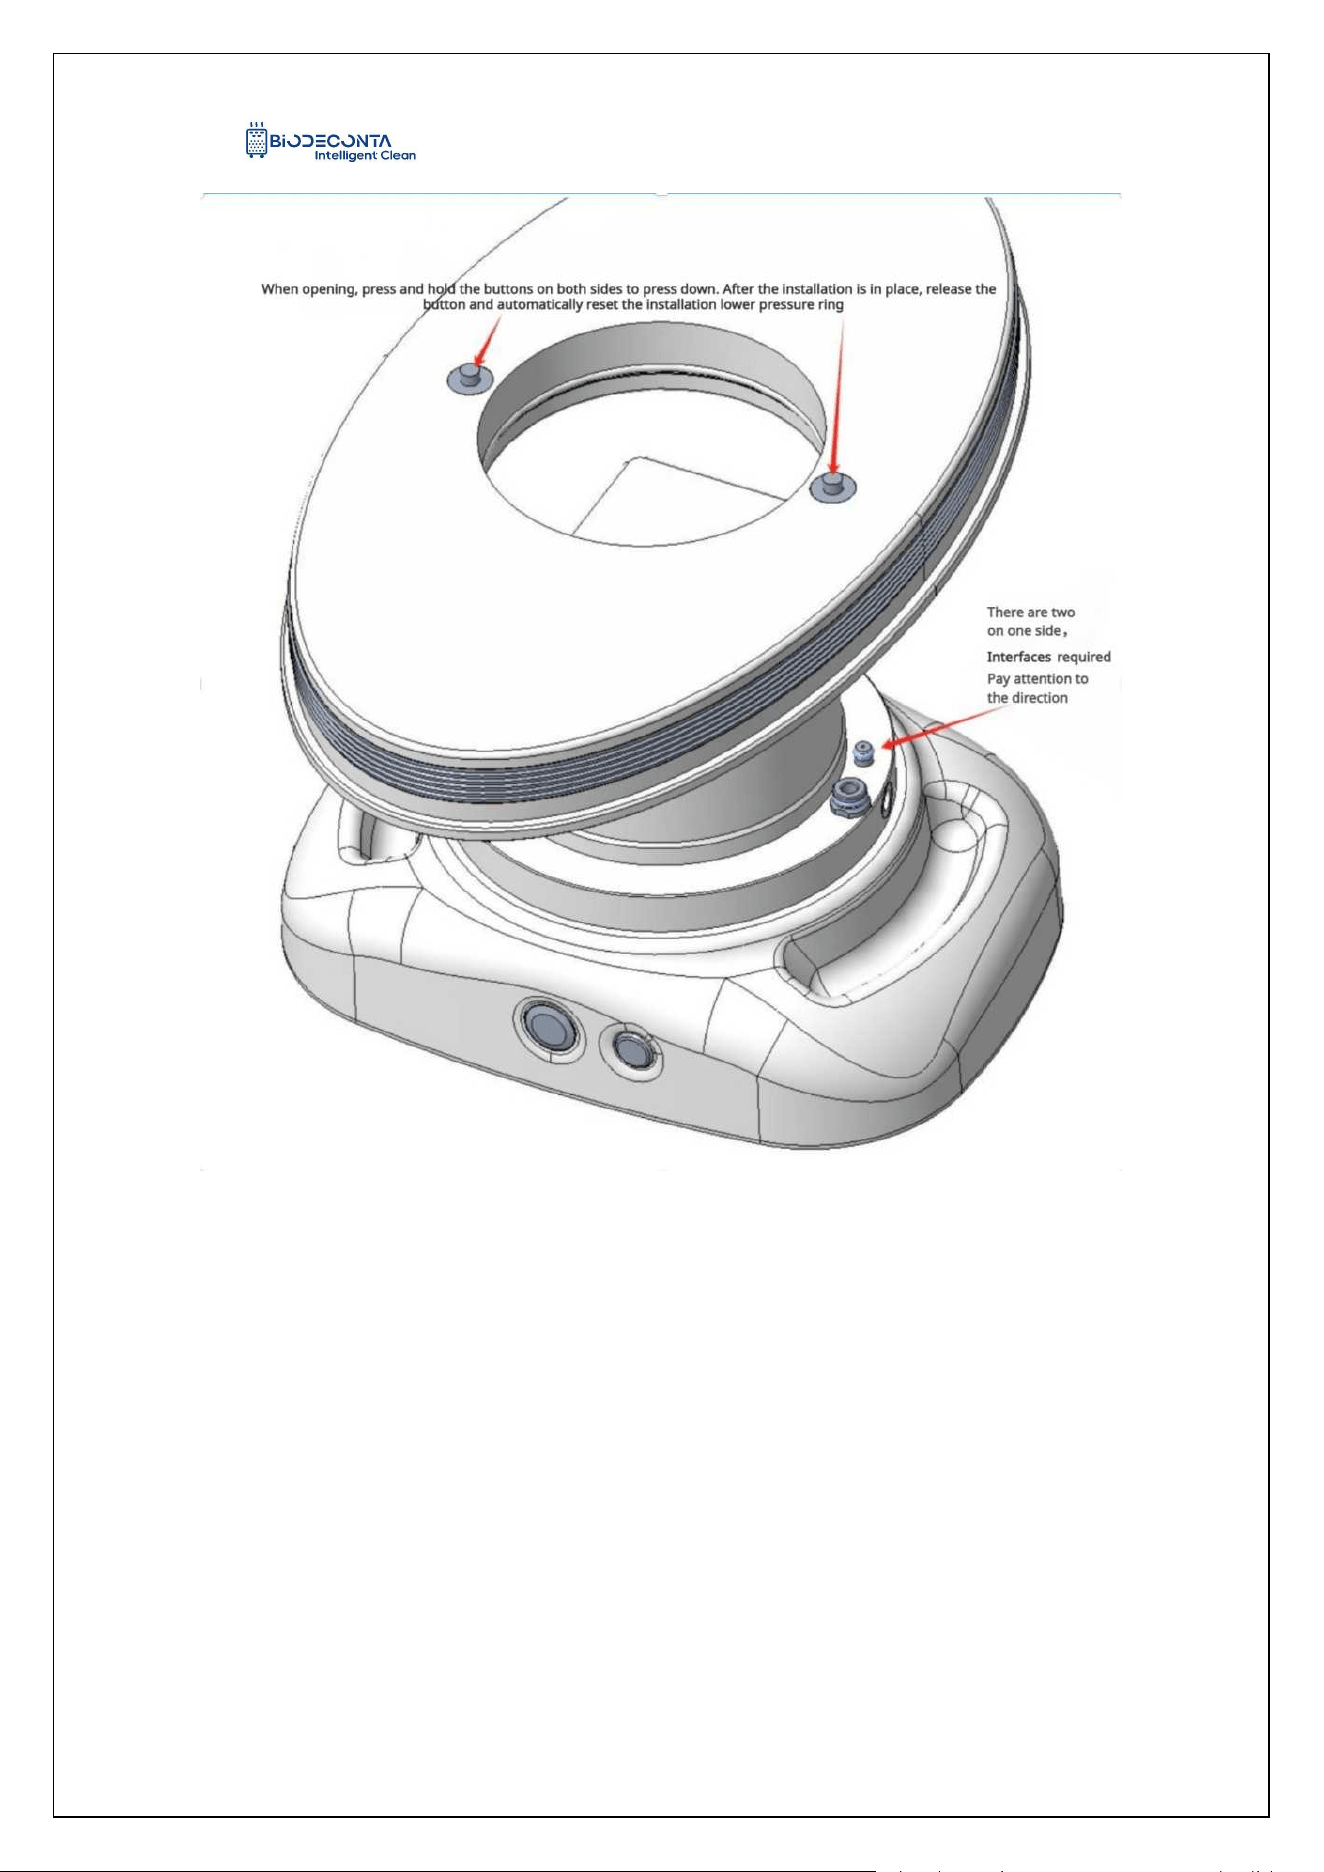
Prepare an instrument and a ring opening, as shown in Figures 1-3, on the front
side of the ring opening, there is an air intake at the left end, on the left and right sides
of the ring opening's back, there are two locking buttons respectively. First, place the
front of the instrument screen upside down on the table, Insert a ring onto the
instrument, align the side with the air inlet on the front of the ring with the left side of
the instrument's back. Press down simultaneously on the two lock buttons on the back
of the ring from both sides until they are flush with the instrument. Then, release the
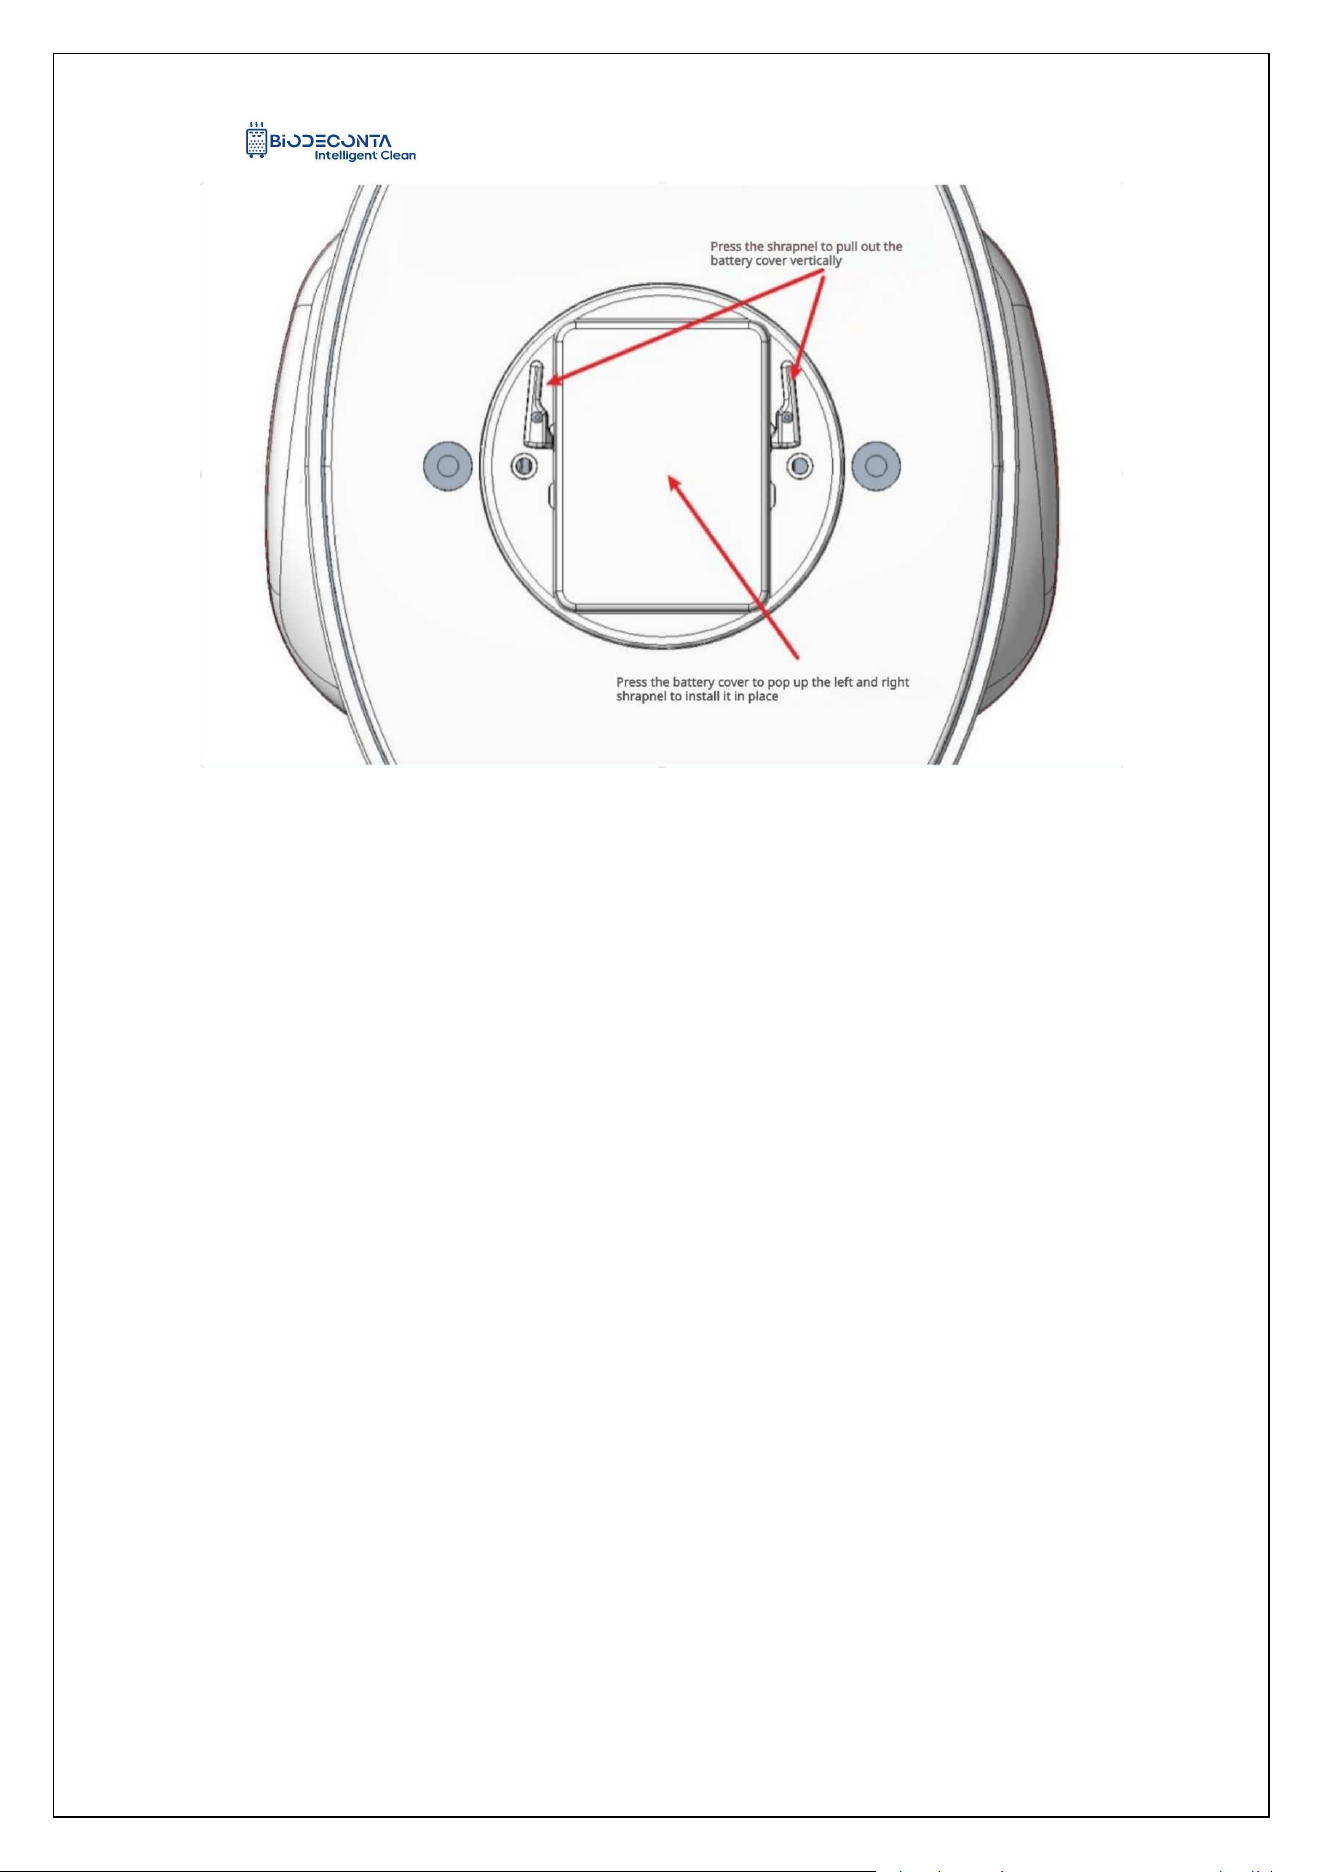
lock buttons with both hands, and the ring installation is complete; Prepare a pair of
batteries, as shown in Figure 1-4, on the back of the instrument, there are two snap
buttons on the left and right sides, press the snap buttons on both sides
simultaneously, install the prepared pair of batteries onto it, and then close the battery
cover, this will complete the battery installation.
Intelligent Safe and Clean
www.biodeconta.com
11
Figure 1-3 "Ring Opening Installation"
Intelligent Safe and Clean
www.biodeconta.com
12
Figure 1-4 "Battery Installation"
Chapter 2 Test interface (Remote Mode)
2. Test interface (Remote Mode)
2.1 Test interface (Remote Mode):
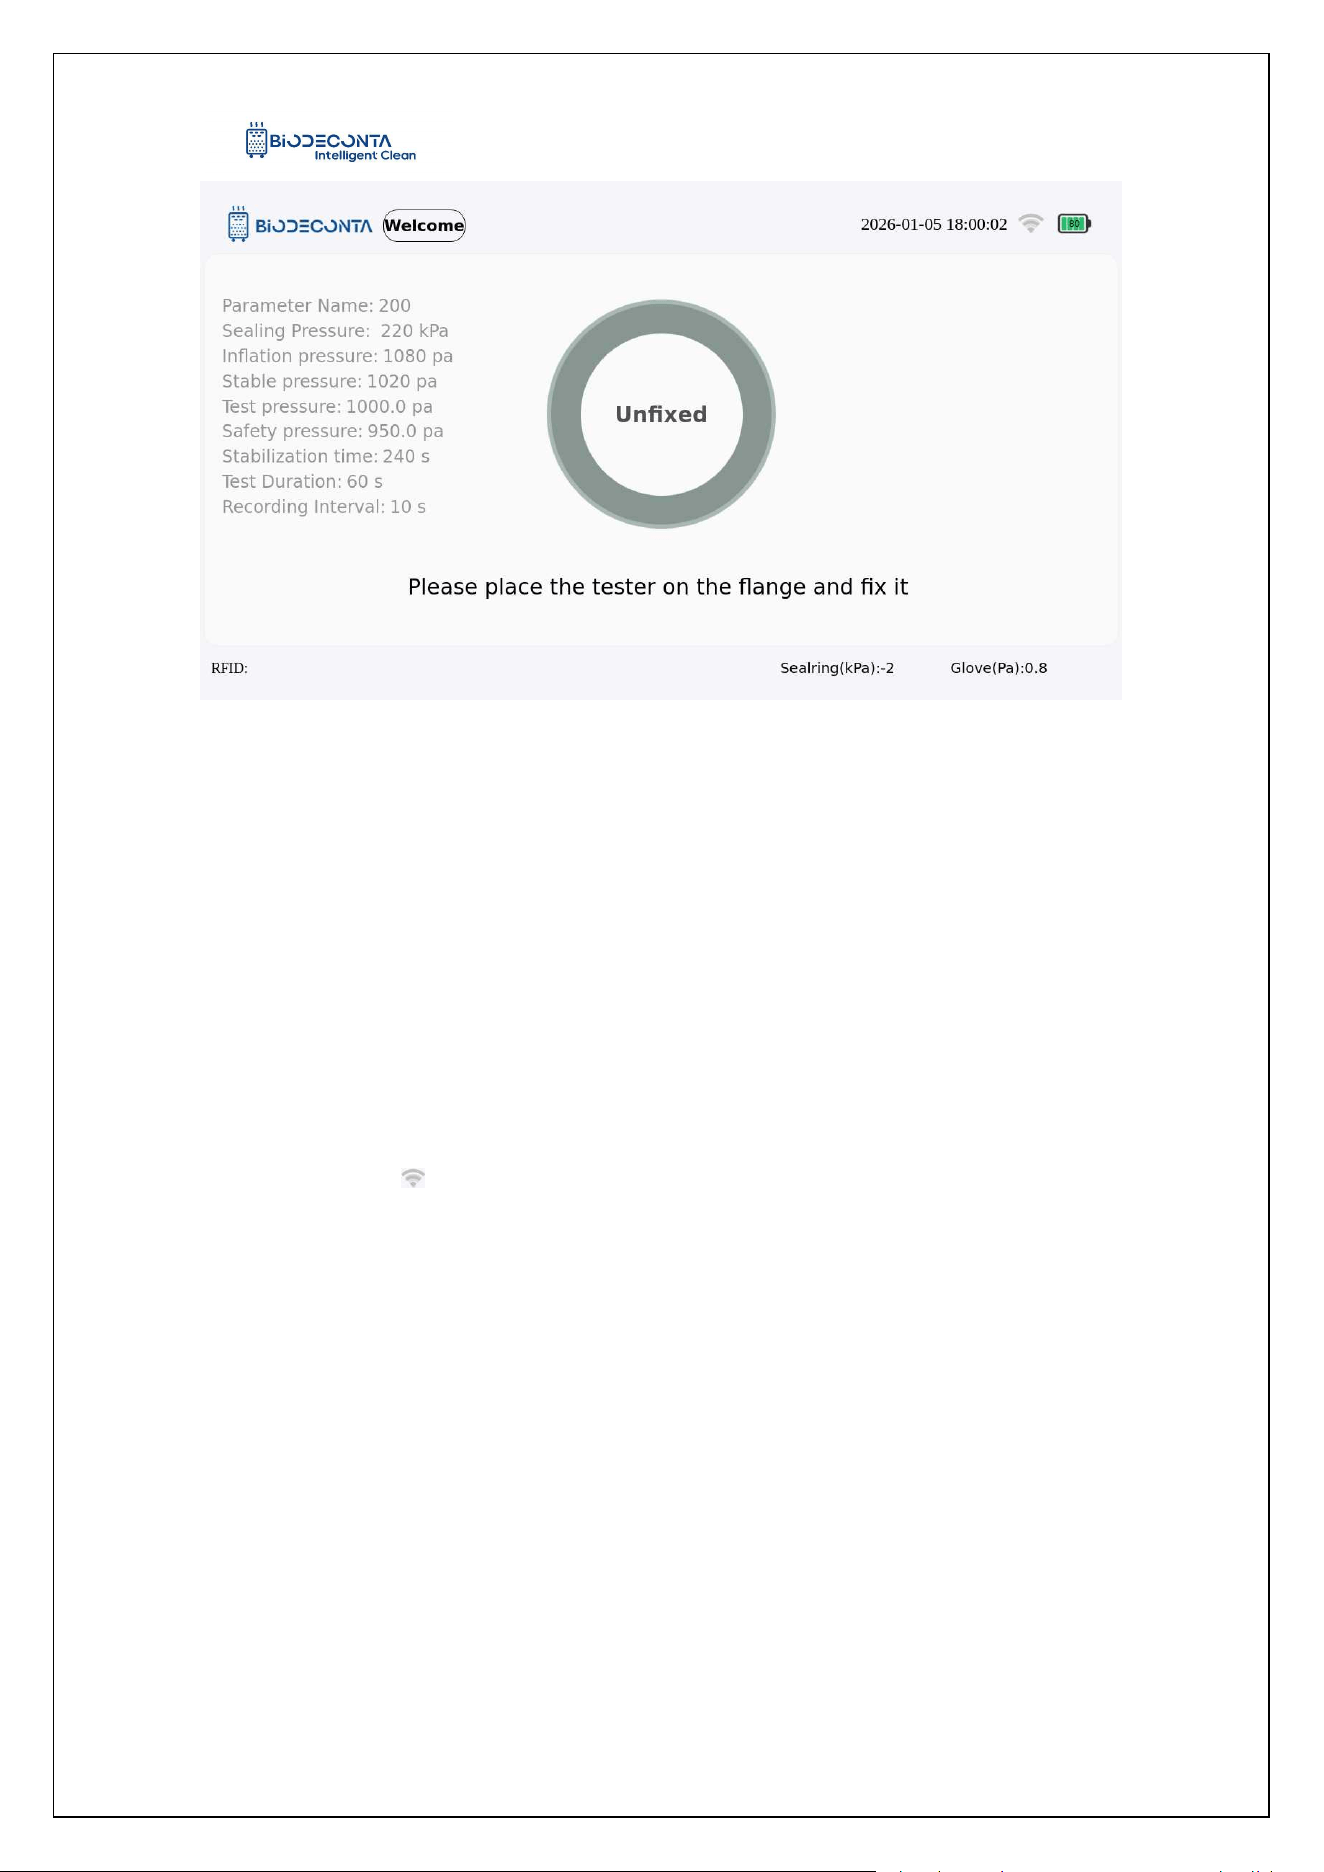
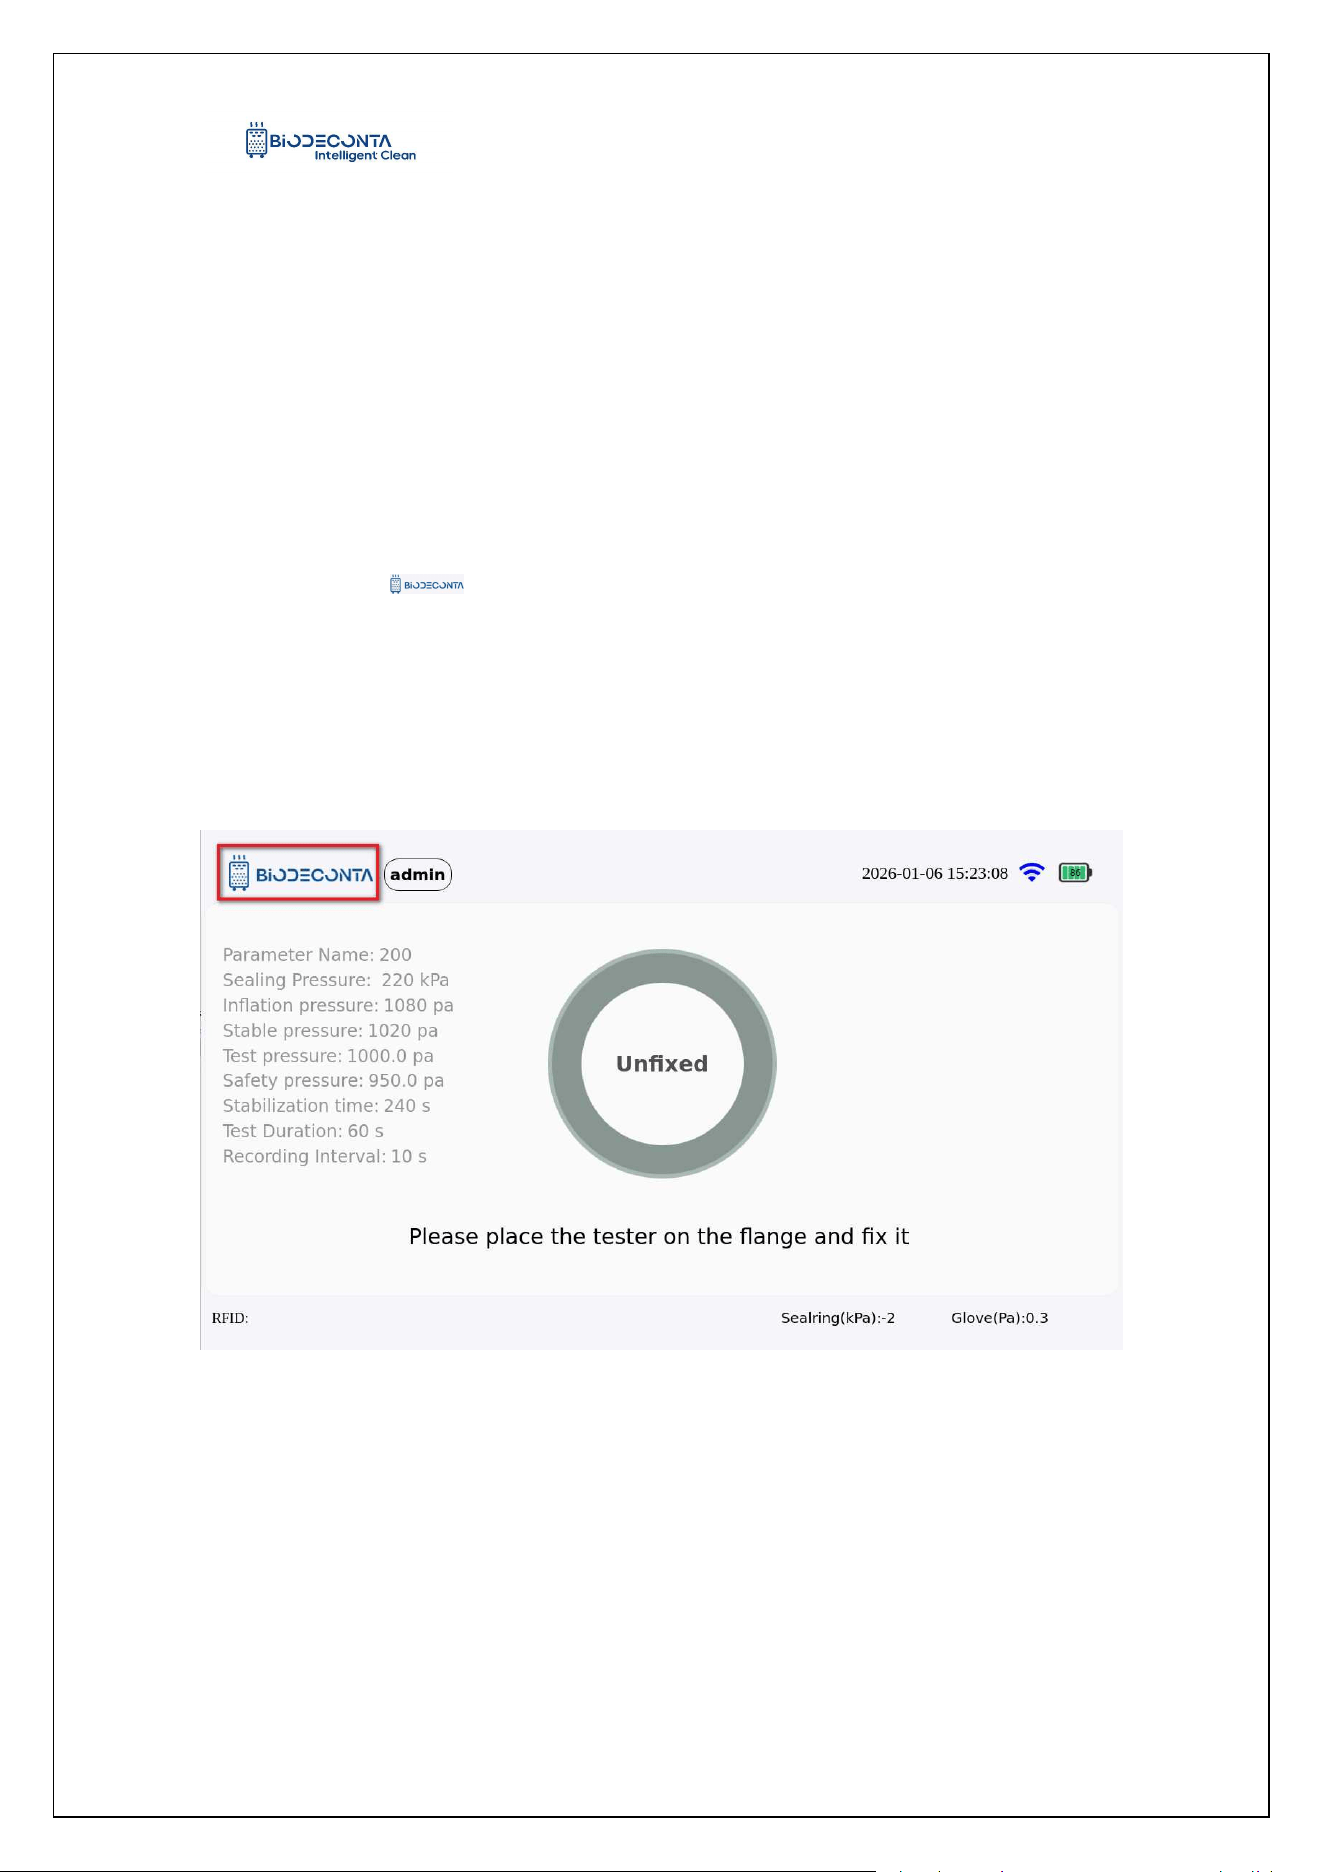
Press the power button of the instrument as shown in Figure 2-1, and you will
enter the test interface.
Intelligent Safe and Clean
www.biodeconta.com
13
Figure 2-1 "Test Interface" (Remote Mode)
Chapter 3 Network Connection
3. Network Connection
3.1 Network Connection:
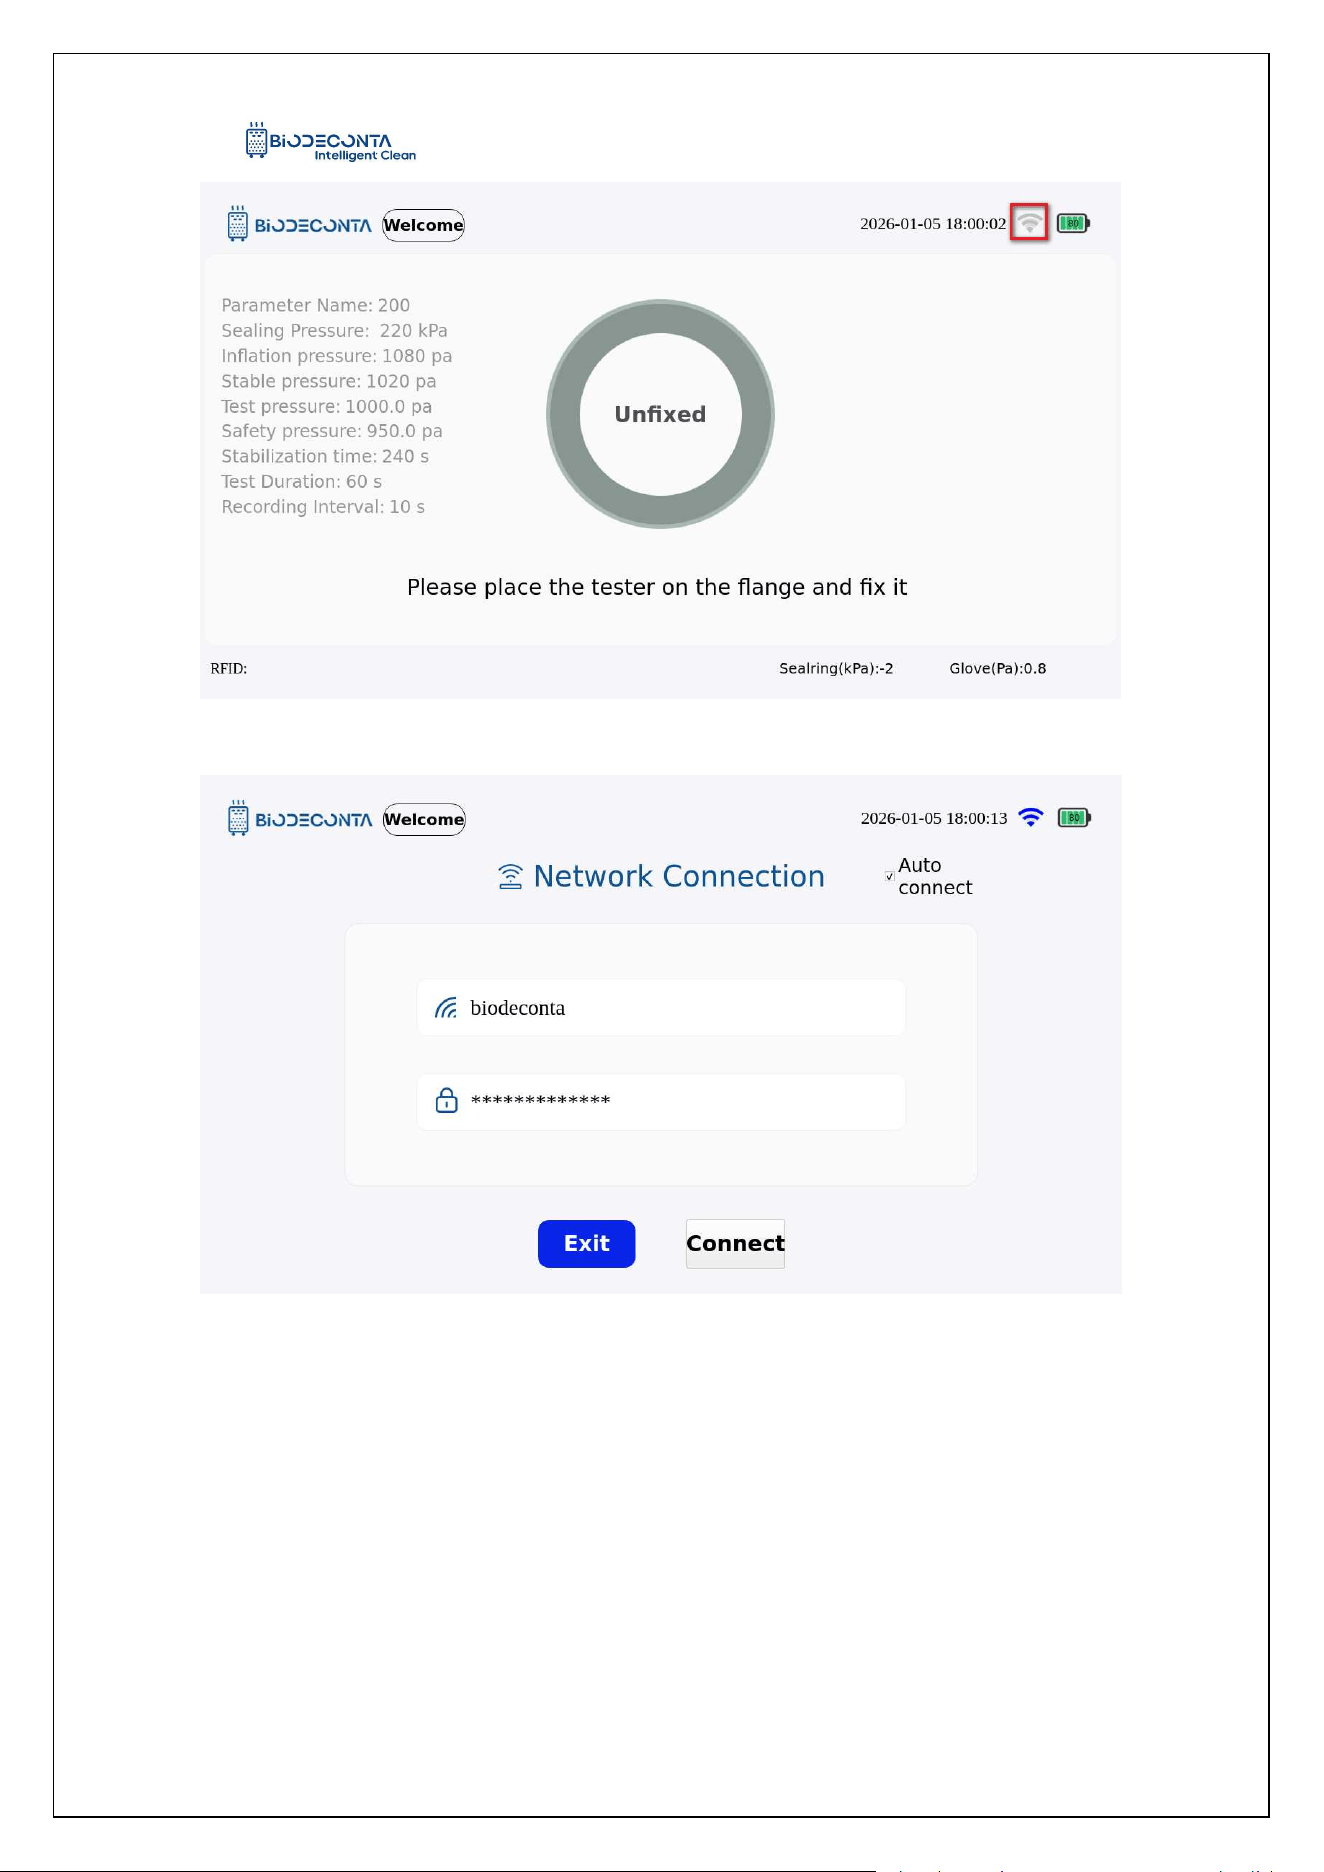
Click on the [ ] icon on the test interface, as shown in Figure 3-1, enter the
account and password, as shown in Figure 3-2, click the "Connect" button, check the
small box on the left of the auto connection option. The next time the instrument is
powered on, the network will automatically connect, after successful connection, click
the "Exit" button, to complete the network connection operation.
Intelligent Safe and Clean
www.biodeconta.com
14
Figure 3-1 "Network Connection 1"
Figure 3-2 "Network Connection 2"
Intelligent Safe and Clean
www.biodeconta.com
15
Chapter 4 Switch mode
4. Switch mode
4.1 Date
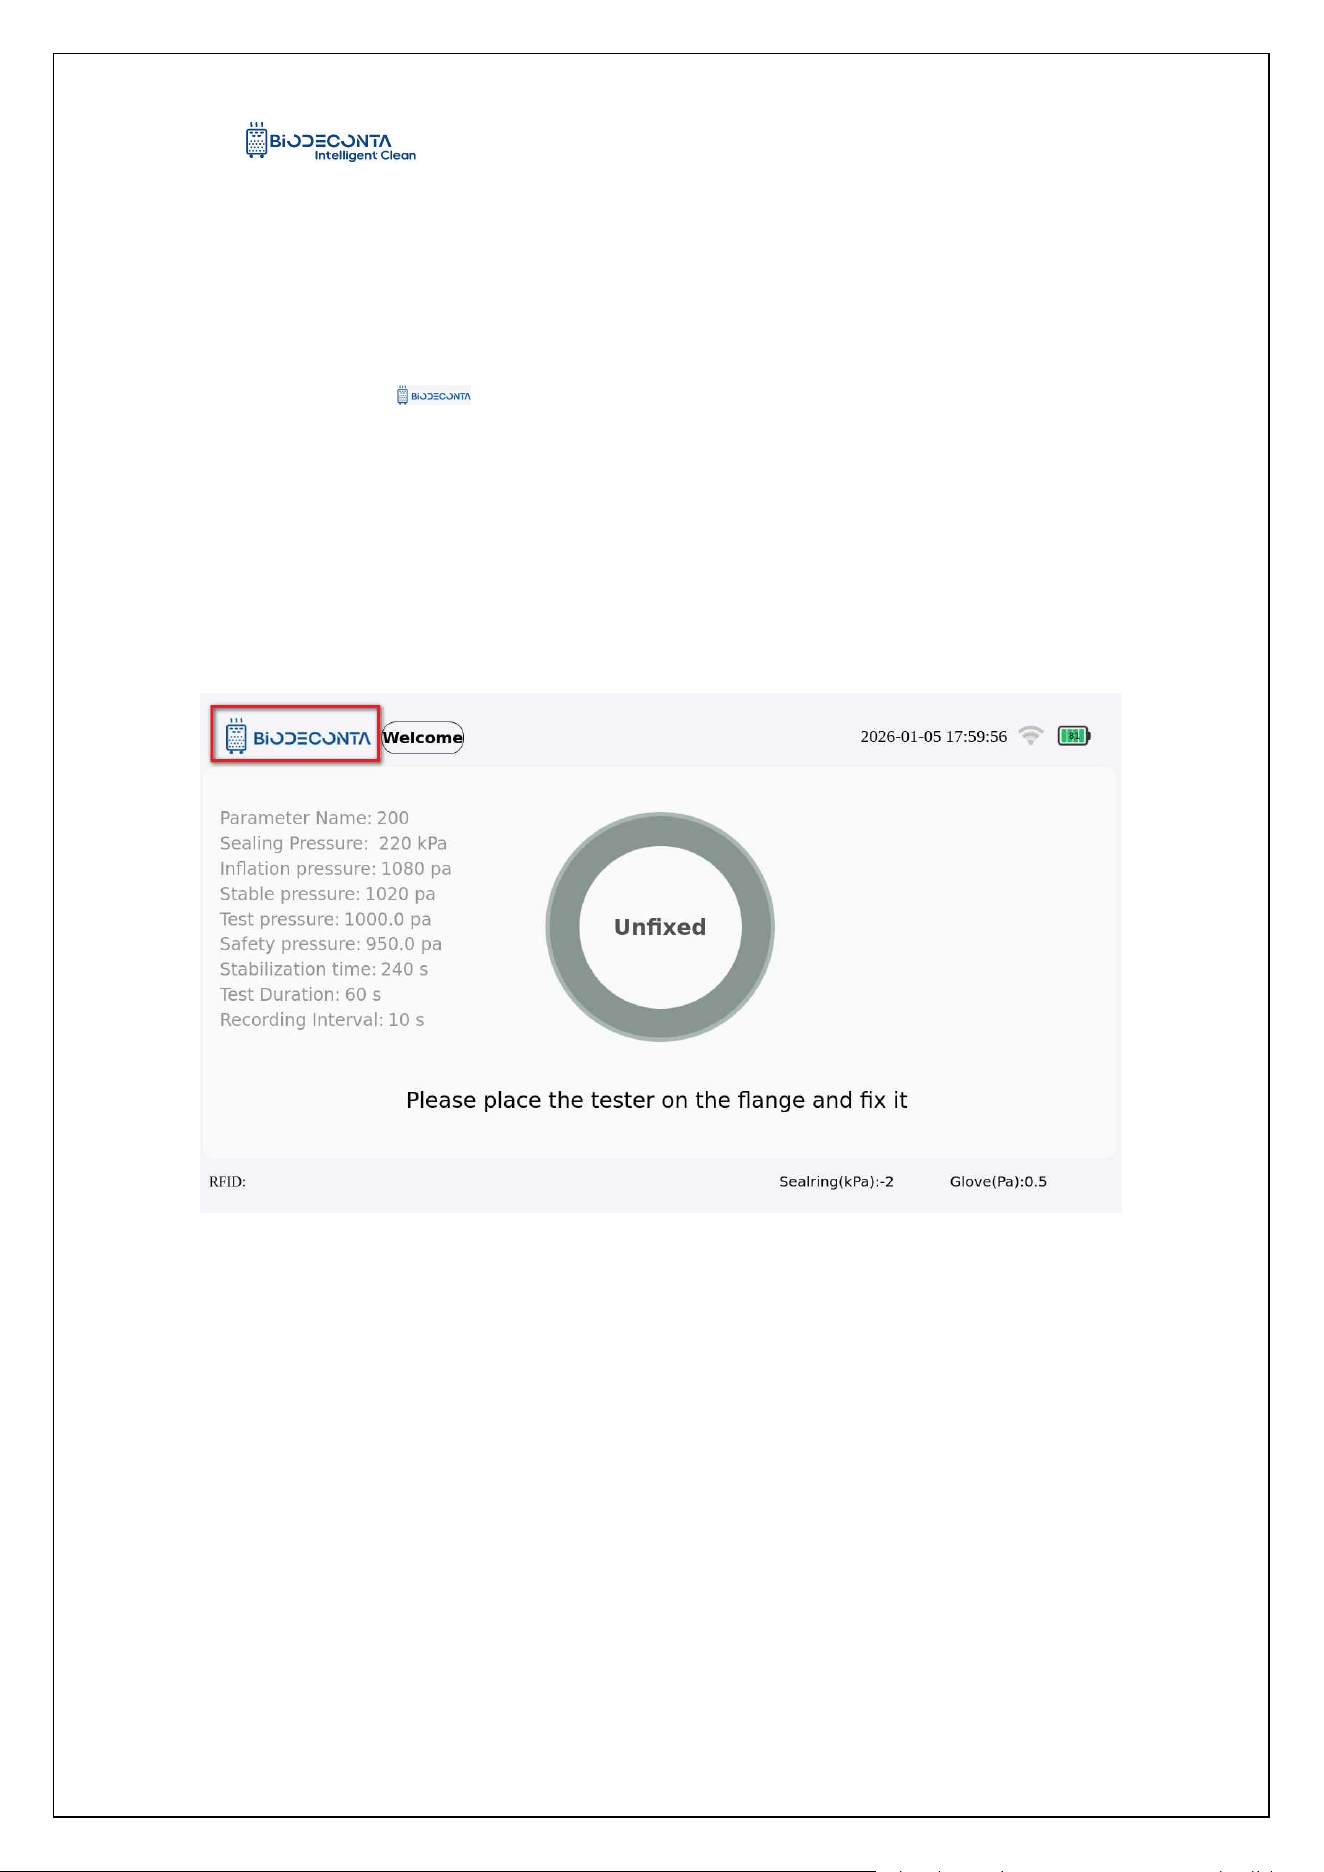
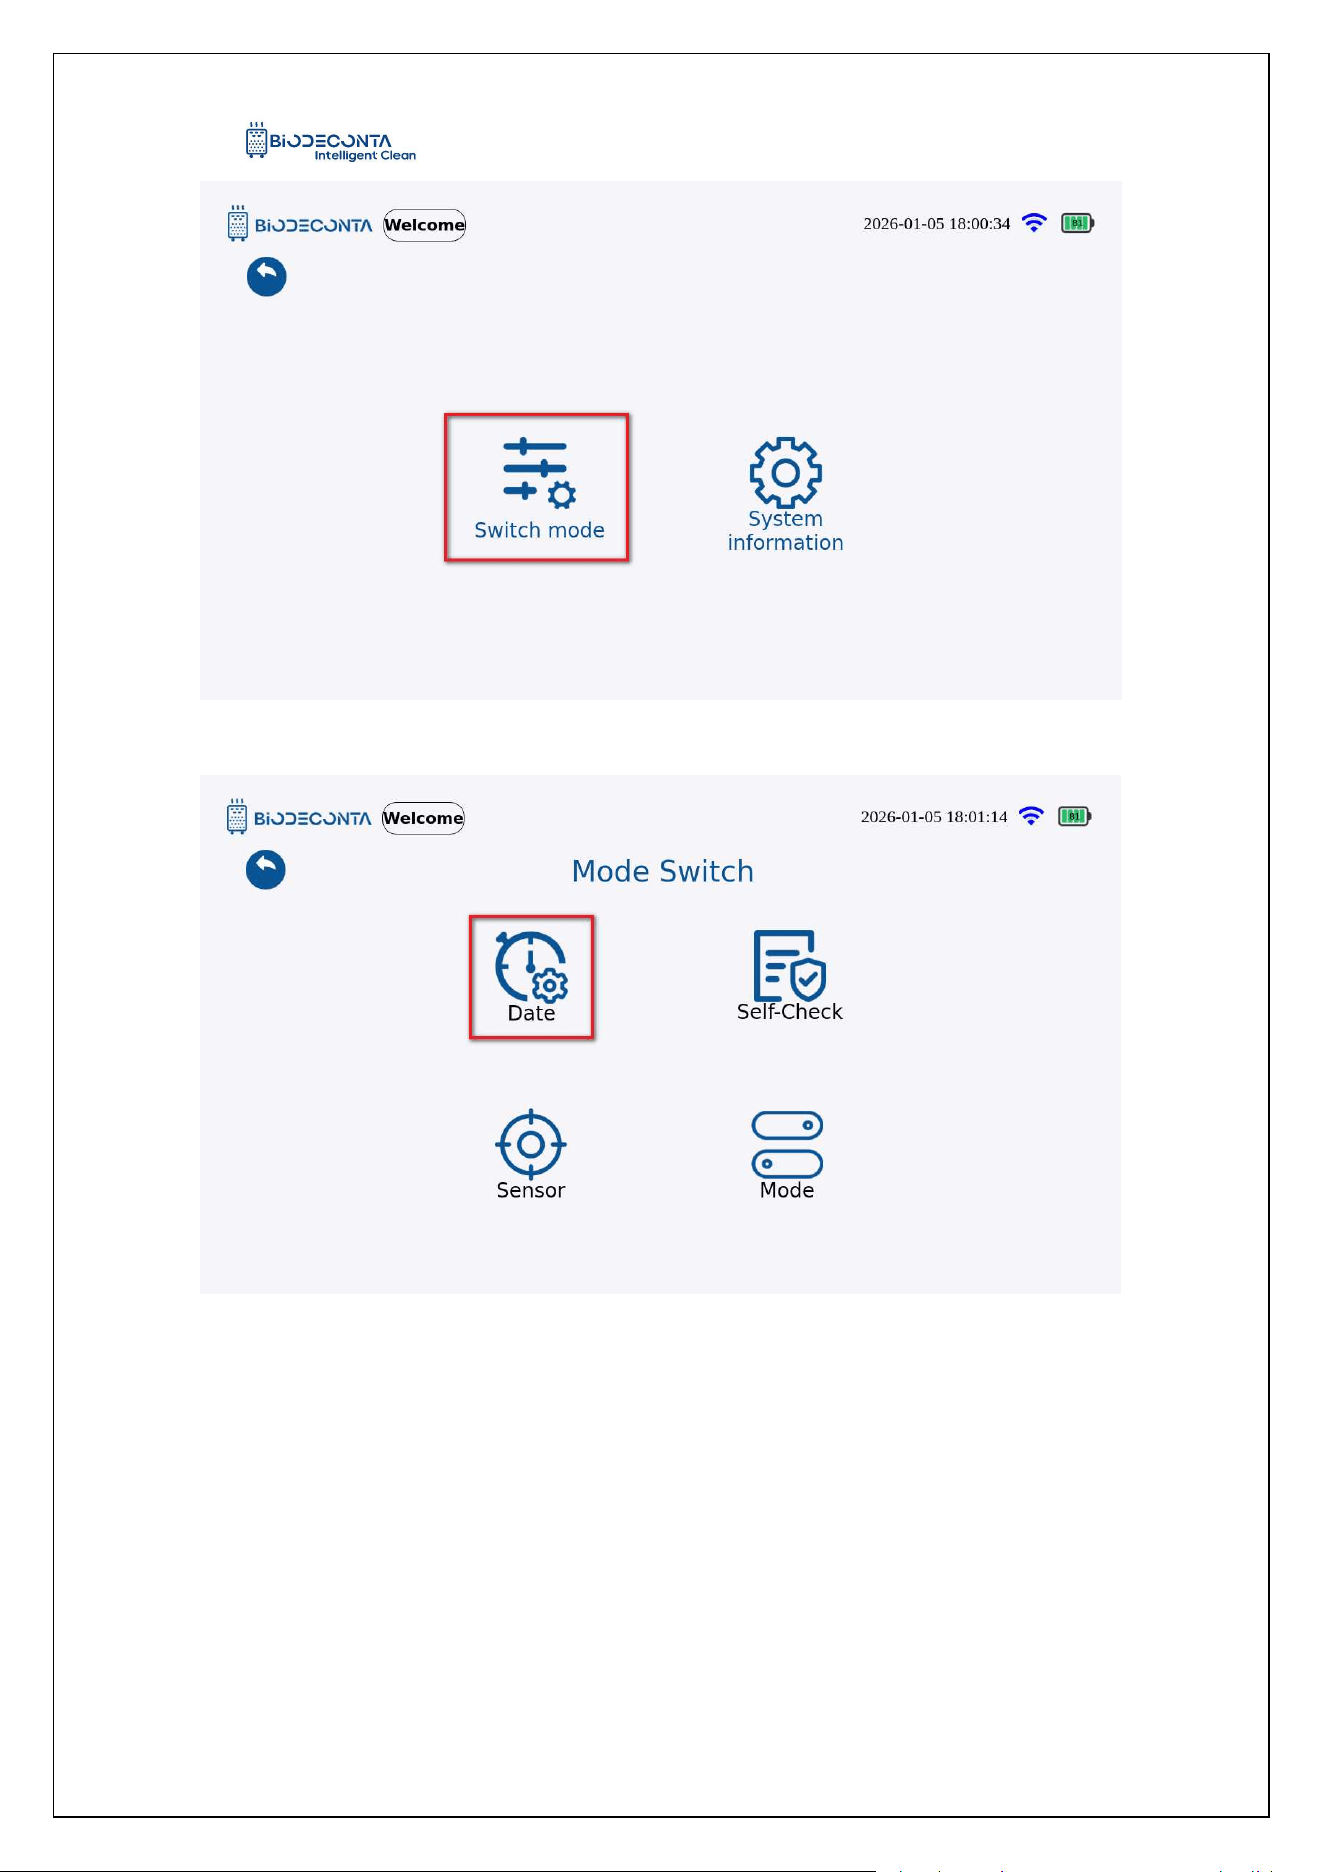
Click on the [ ] icon on the test interface, as shown in Figures 4-1.1 and
4-1.2, the page will then jump to the [Switch mode] and [System information] pages.
Click on [Switch mode] , as shown in Figure 4-1.3, and the page will jump to the [Date],
[Language ], [Self-Check], [Sensor], [Mode] pages. Click on [Date], as shown in
Figure 4-1.4, and the page will jump to the [Sync] page, this sub-module mainly
involves the Sync operation.
Figure 4.1-1 "Date 1"
Intelligent Safe and Clean
www.biodeconta.com
16
Figure 4.1-2 "Date 2"
Figure 4.1-3 "Date 3"
Intelligent Safe and Clean
www.biodeconta.com
17
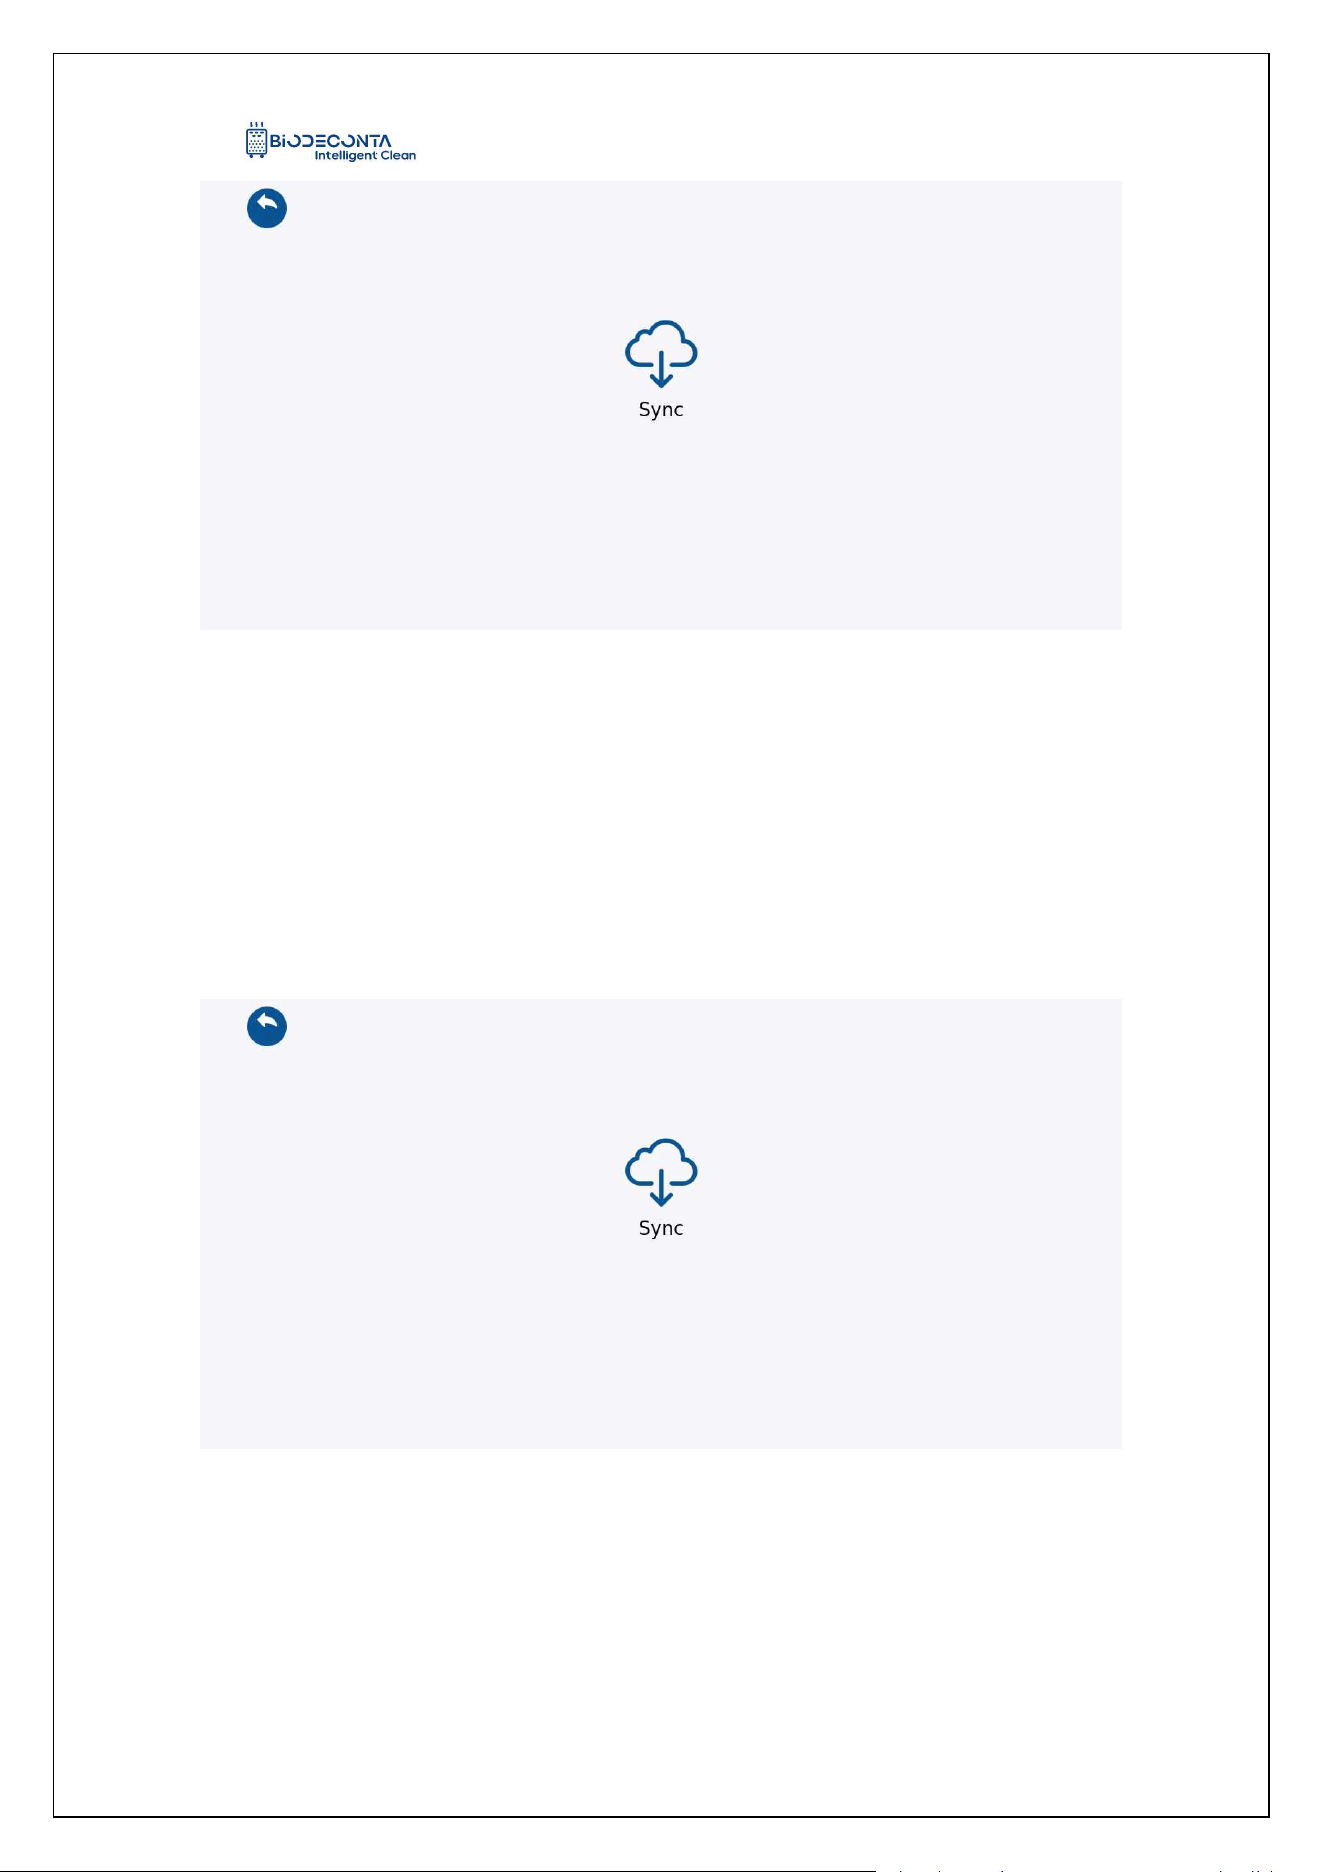
Figure 4.1-4 "Date 4"
4.2 Sync:
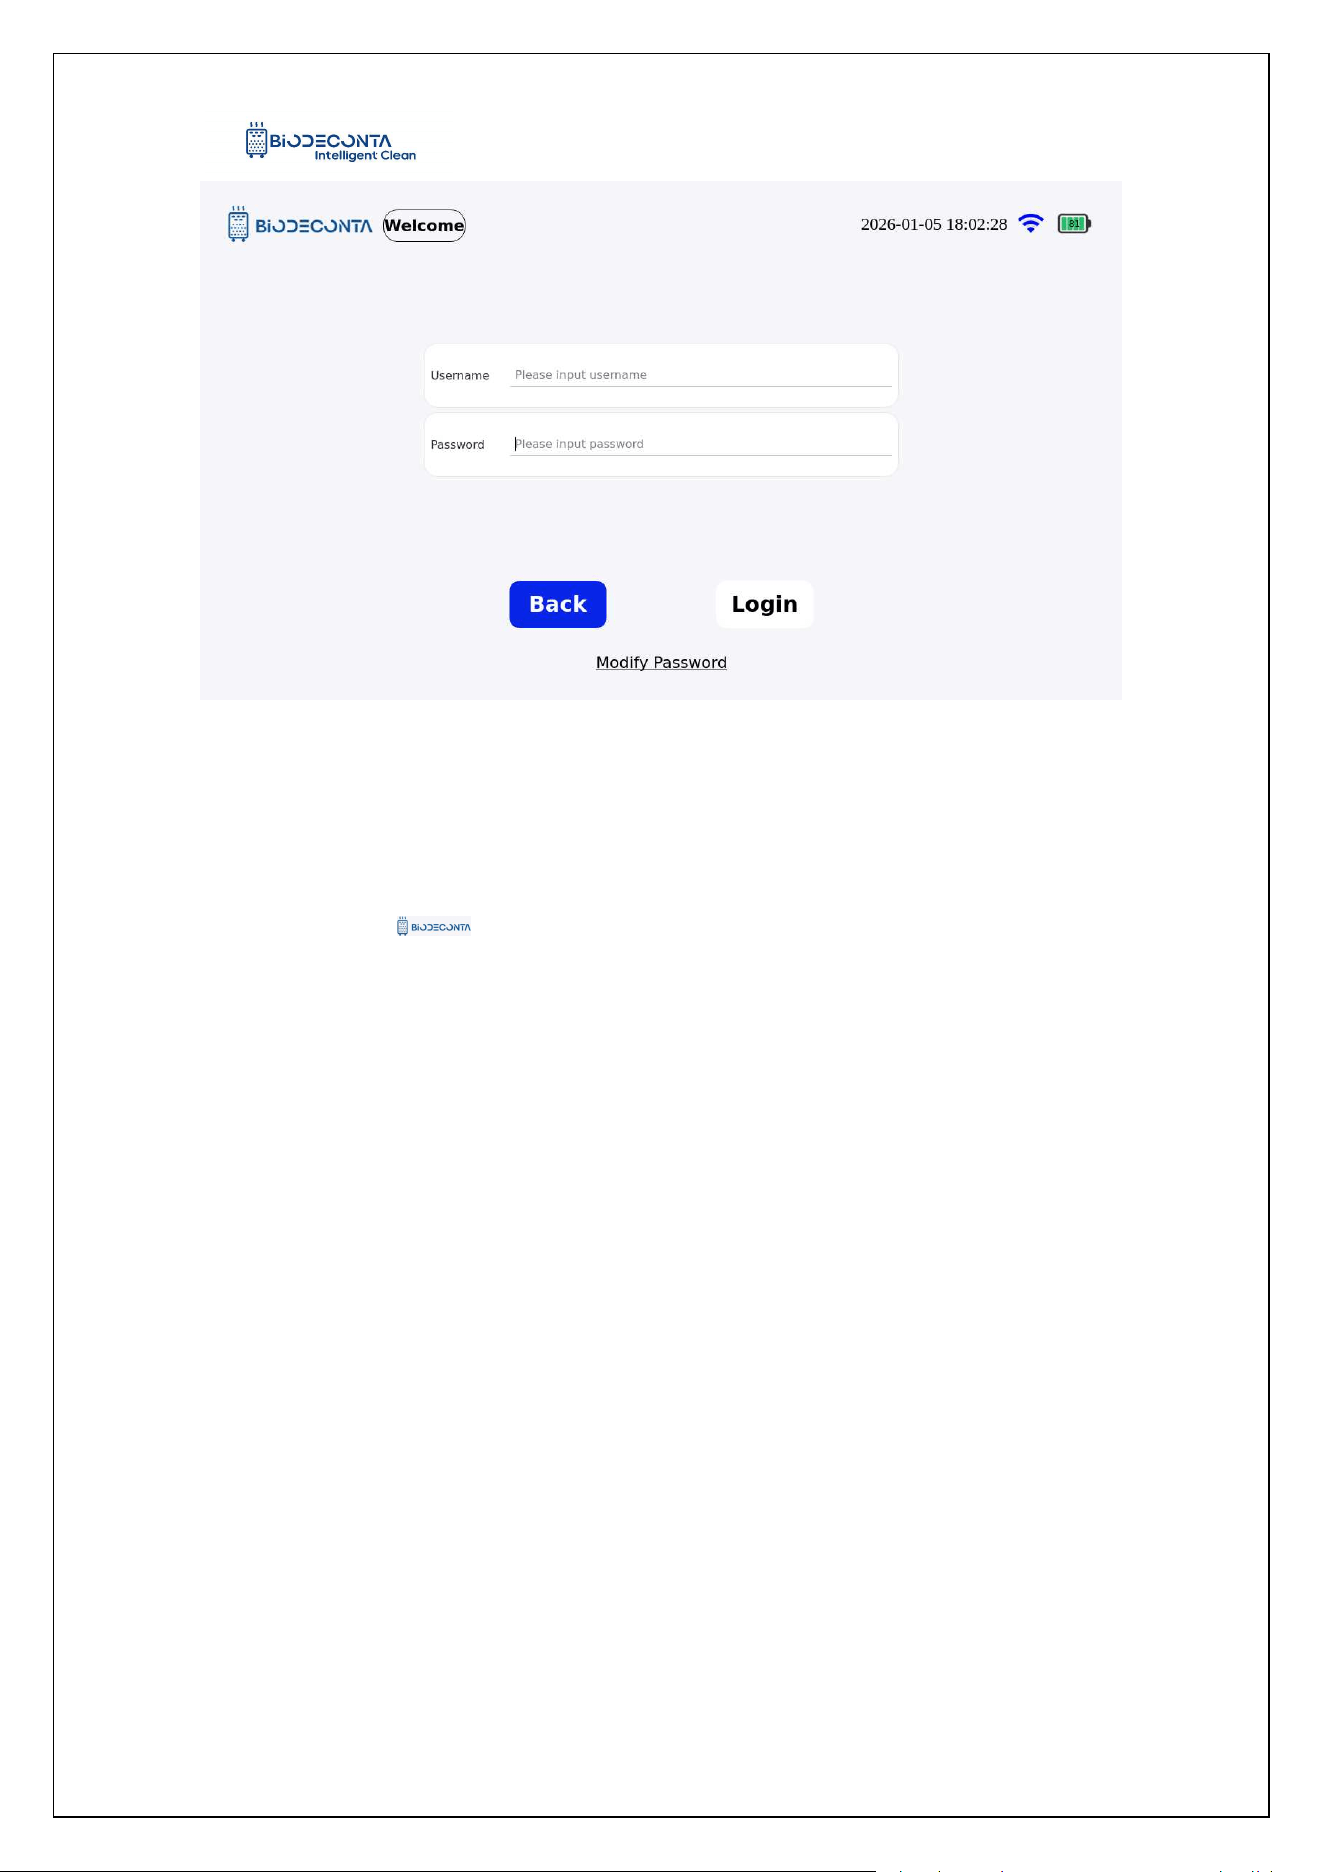
Click on "Sync", as shown in Figures 4.1-5 and 4.1-6. The page will then jump to
the login interface. Enter your account and password information, and click the
"Login" button, to complete the Sync operation.
Figure 4.1-5 "Sync 1"
Intelligent Safe and Clean
www.biodeconta.com
18
Figure 4.1-6 "Sync 2"
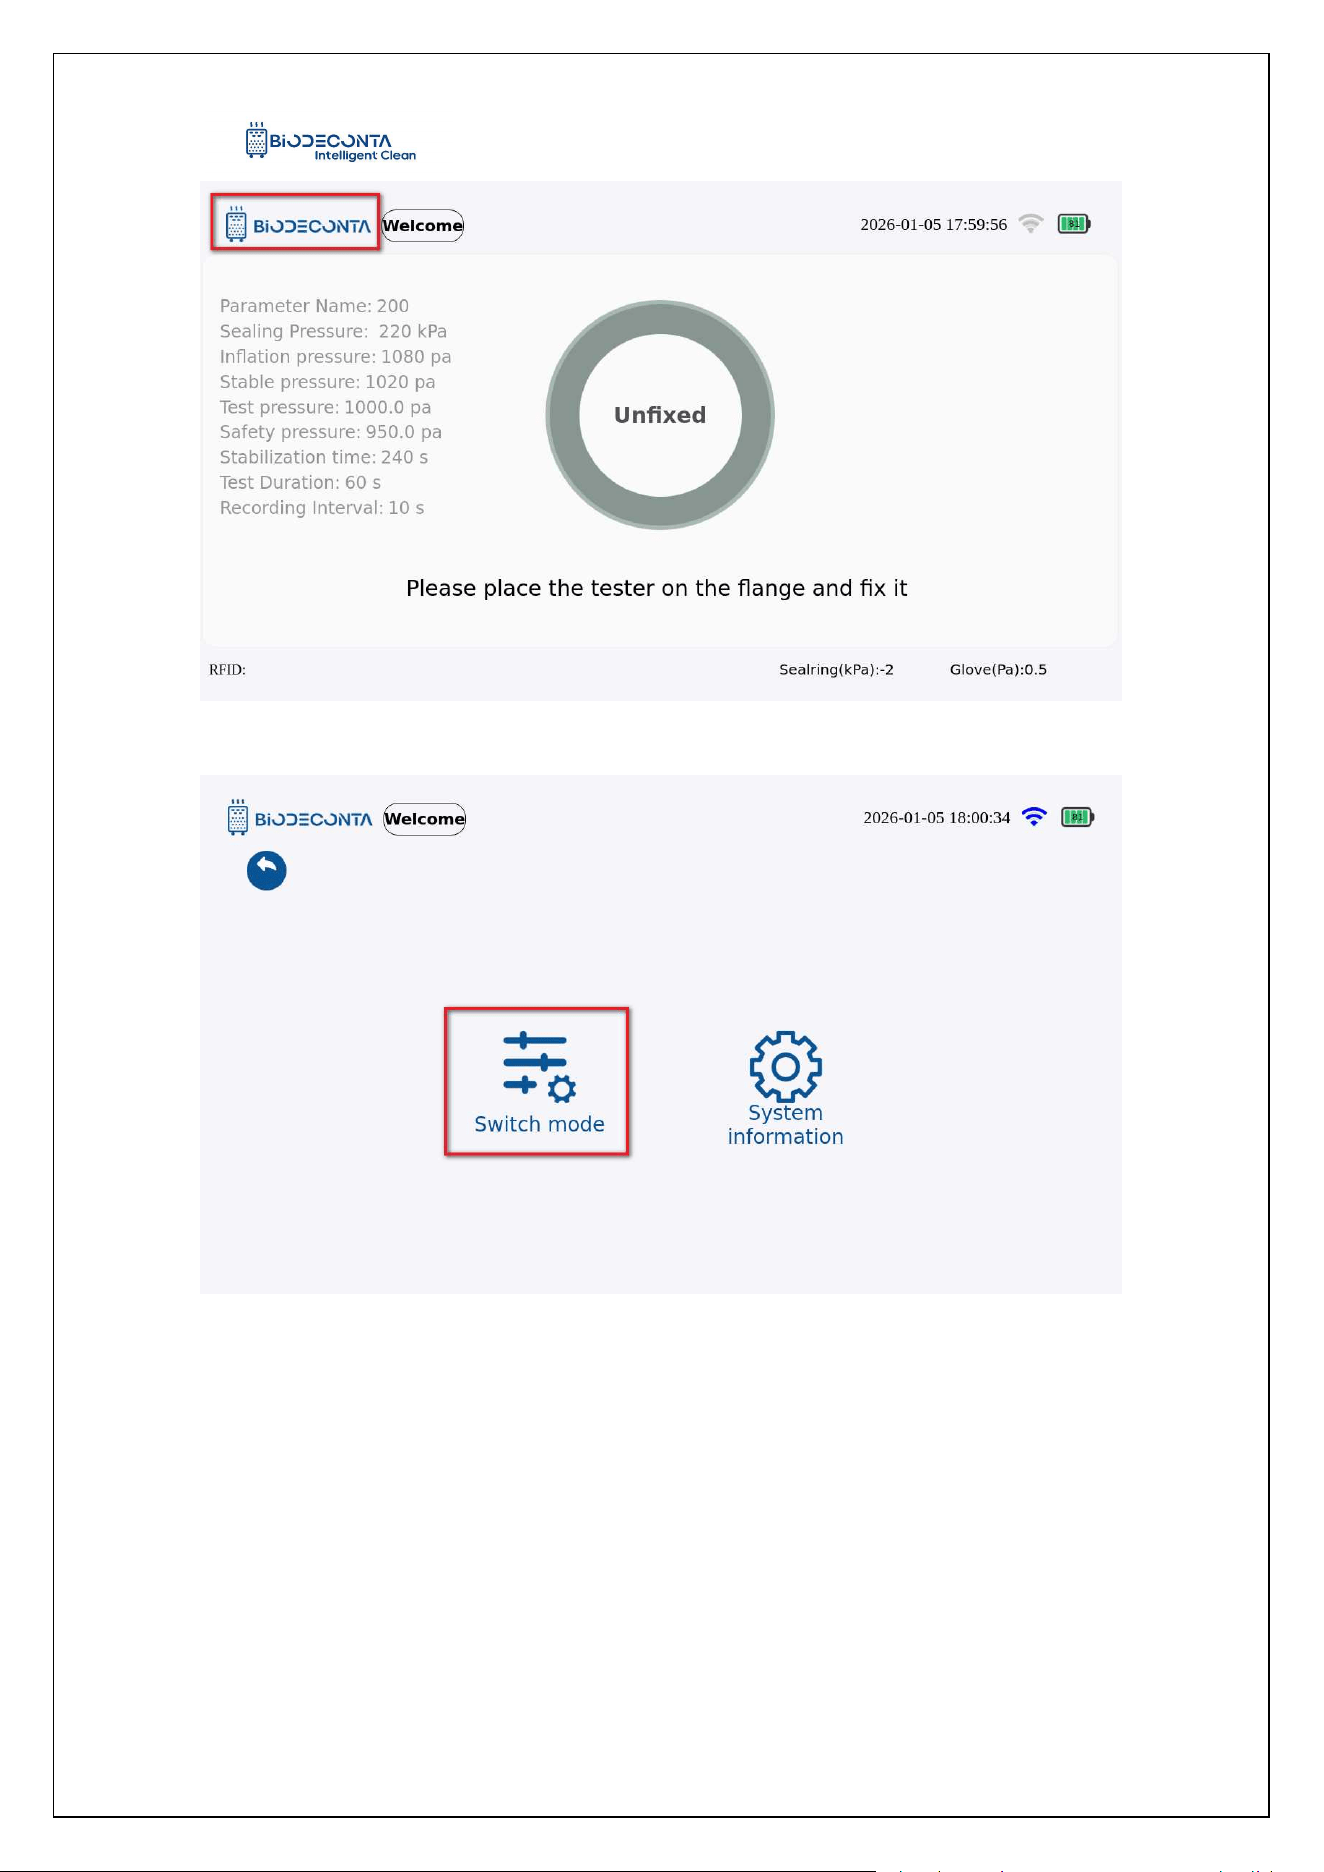
4.3 Self-Check
Click on the [ ] icon on the test interface, as shown in Figures 4-1.7 and
4-1.8, the page will then jump to the [Switch mode] and [System information] pages.
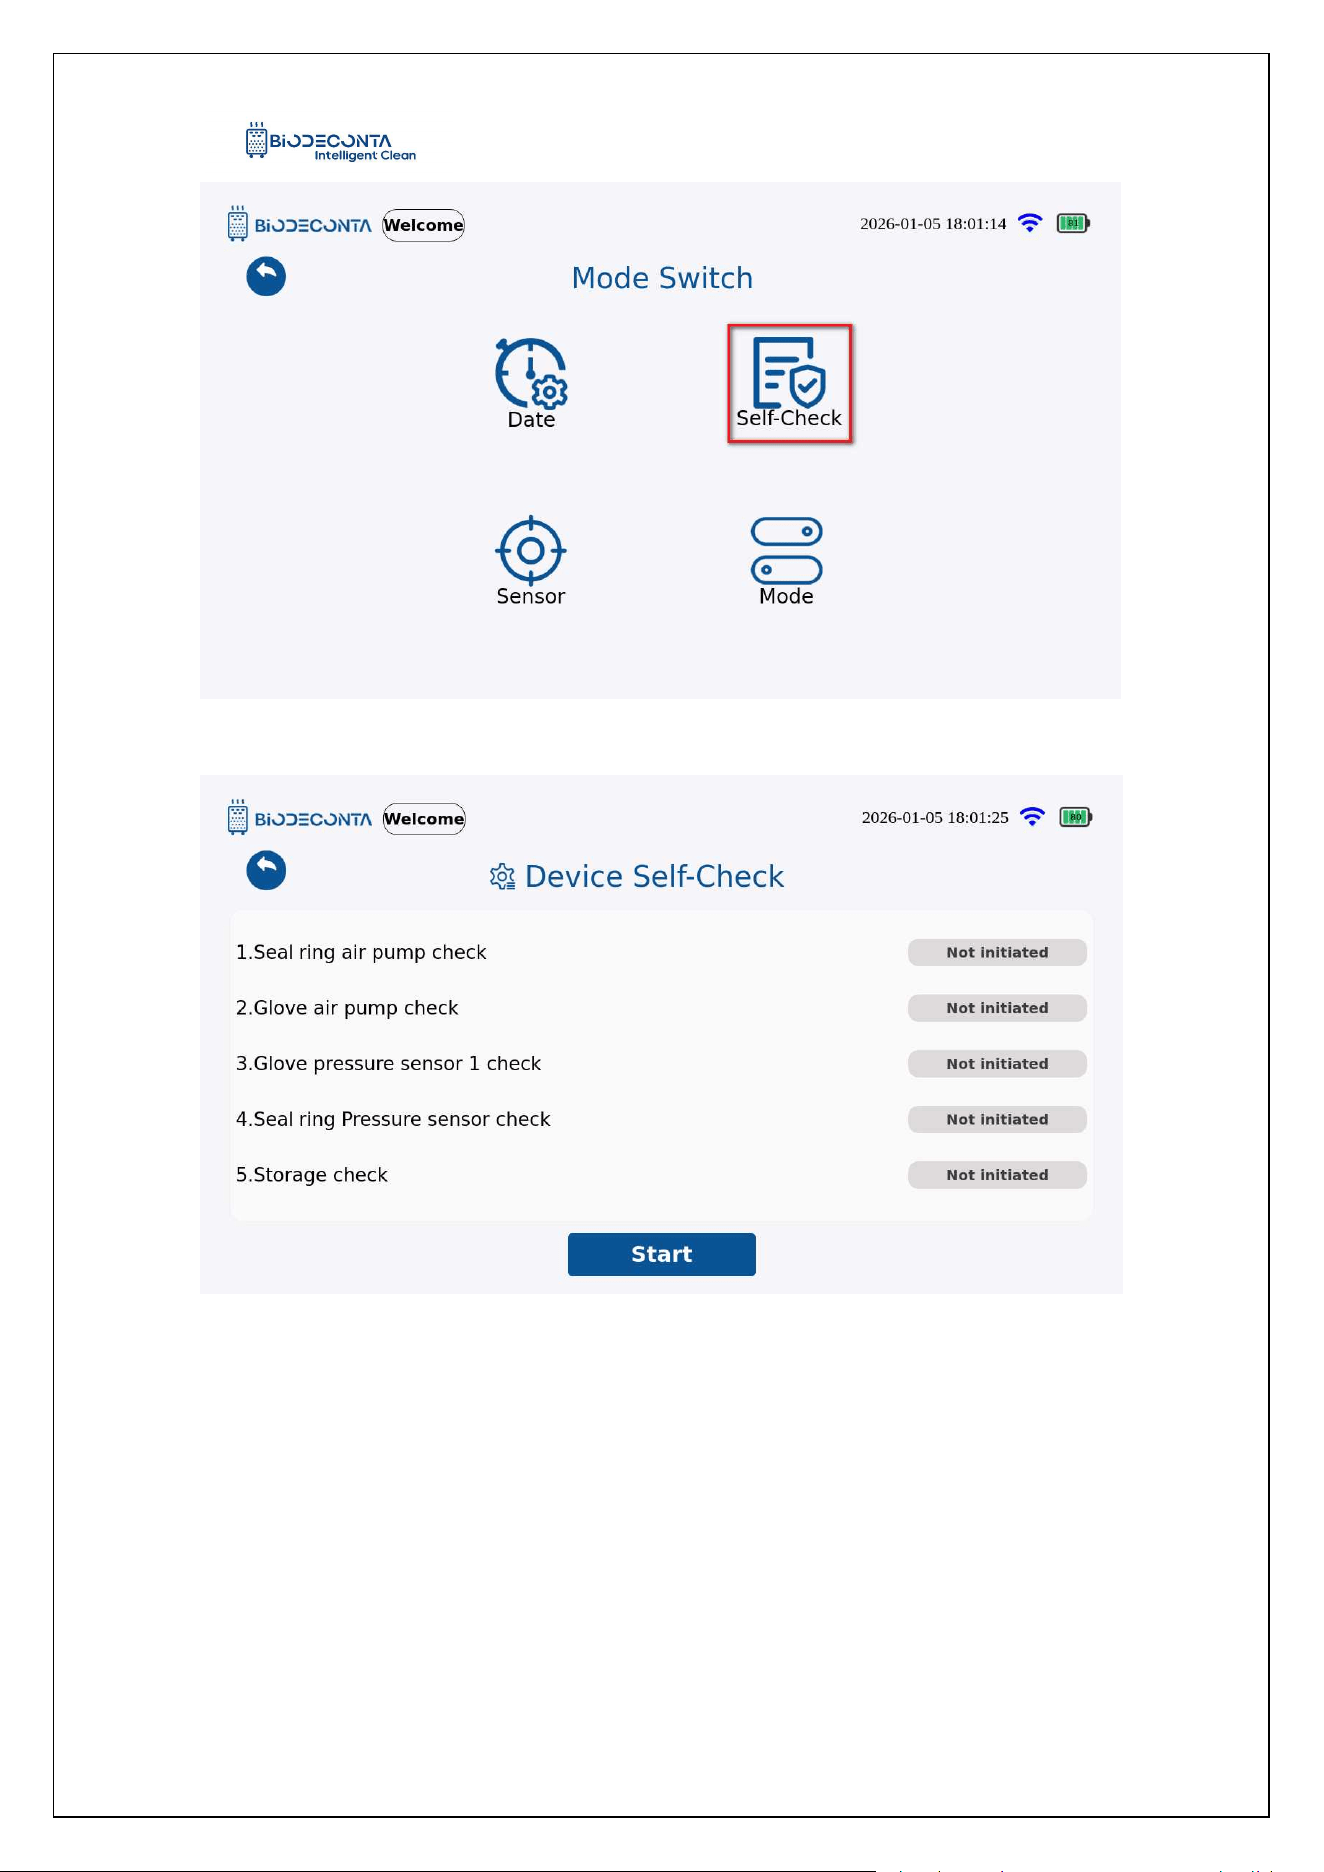
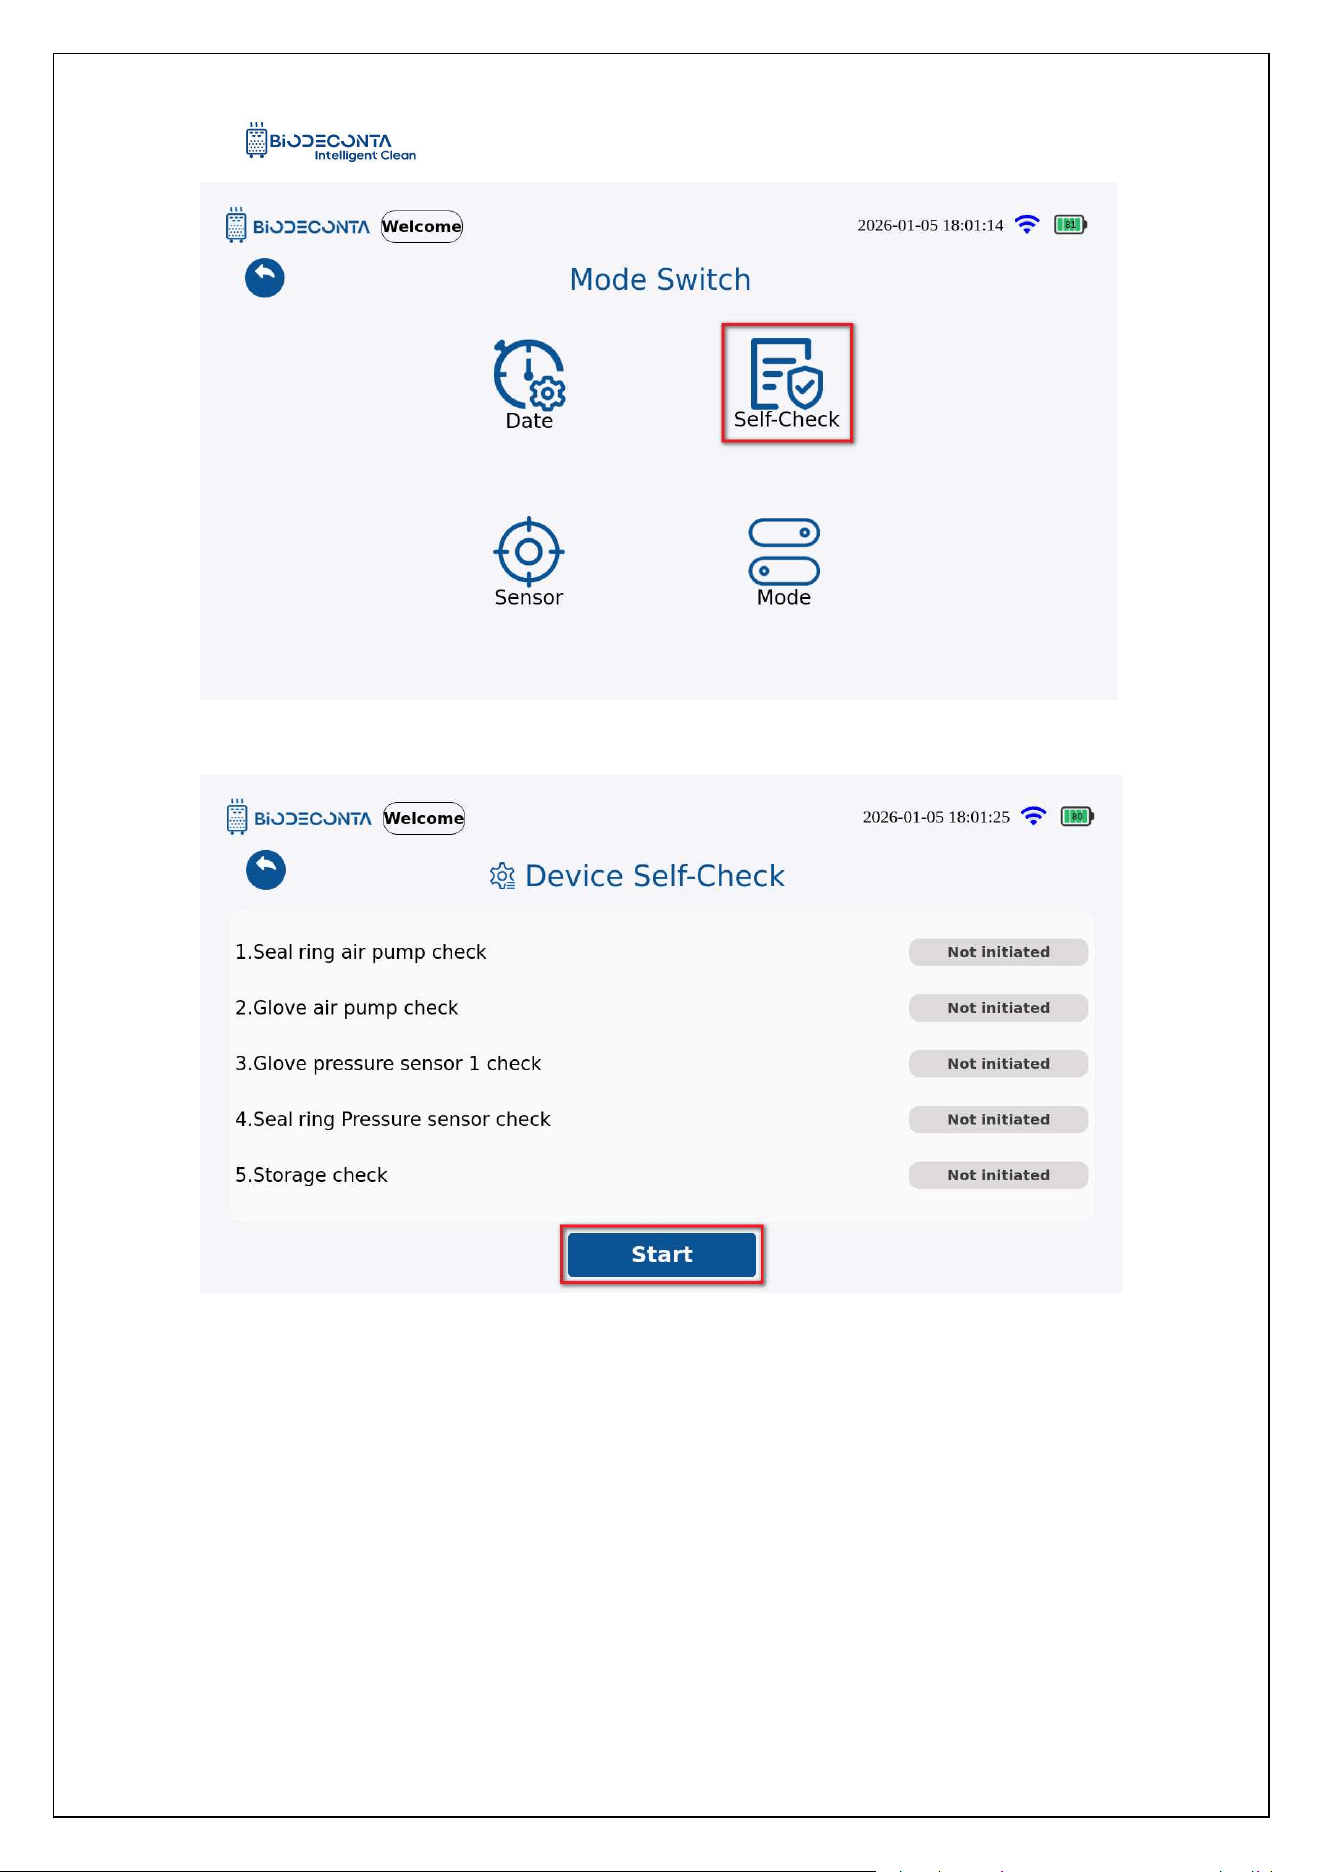
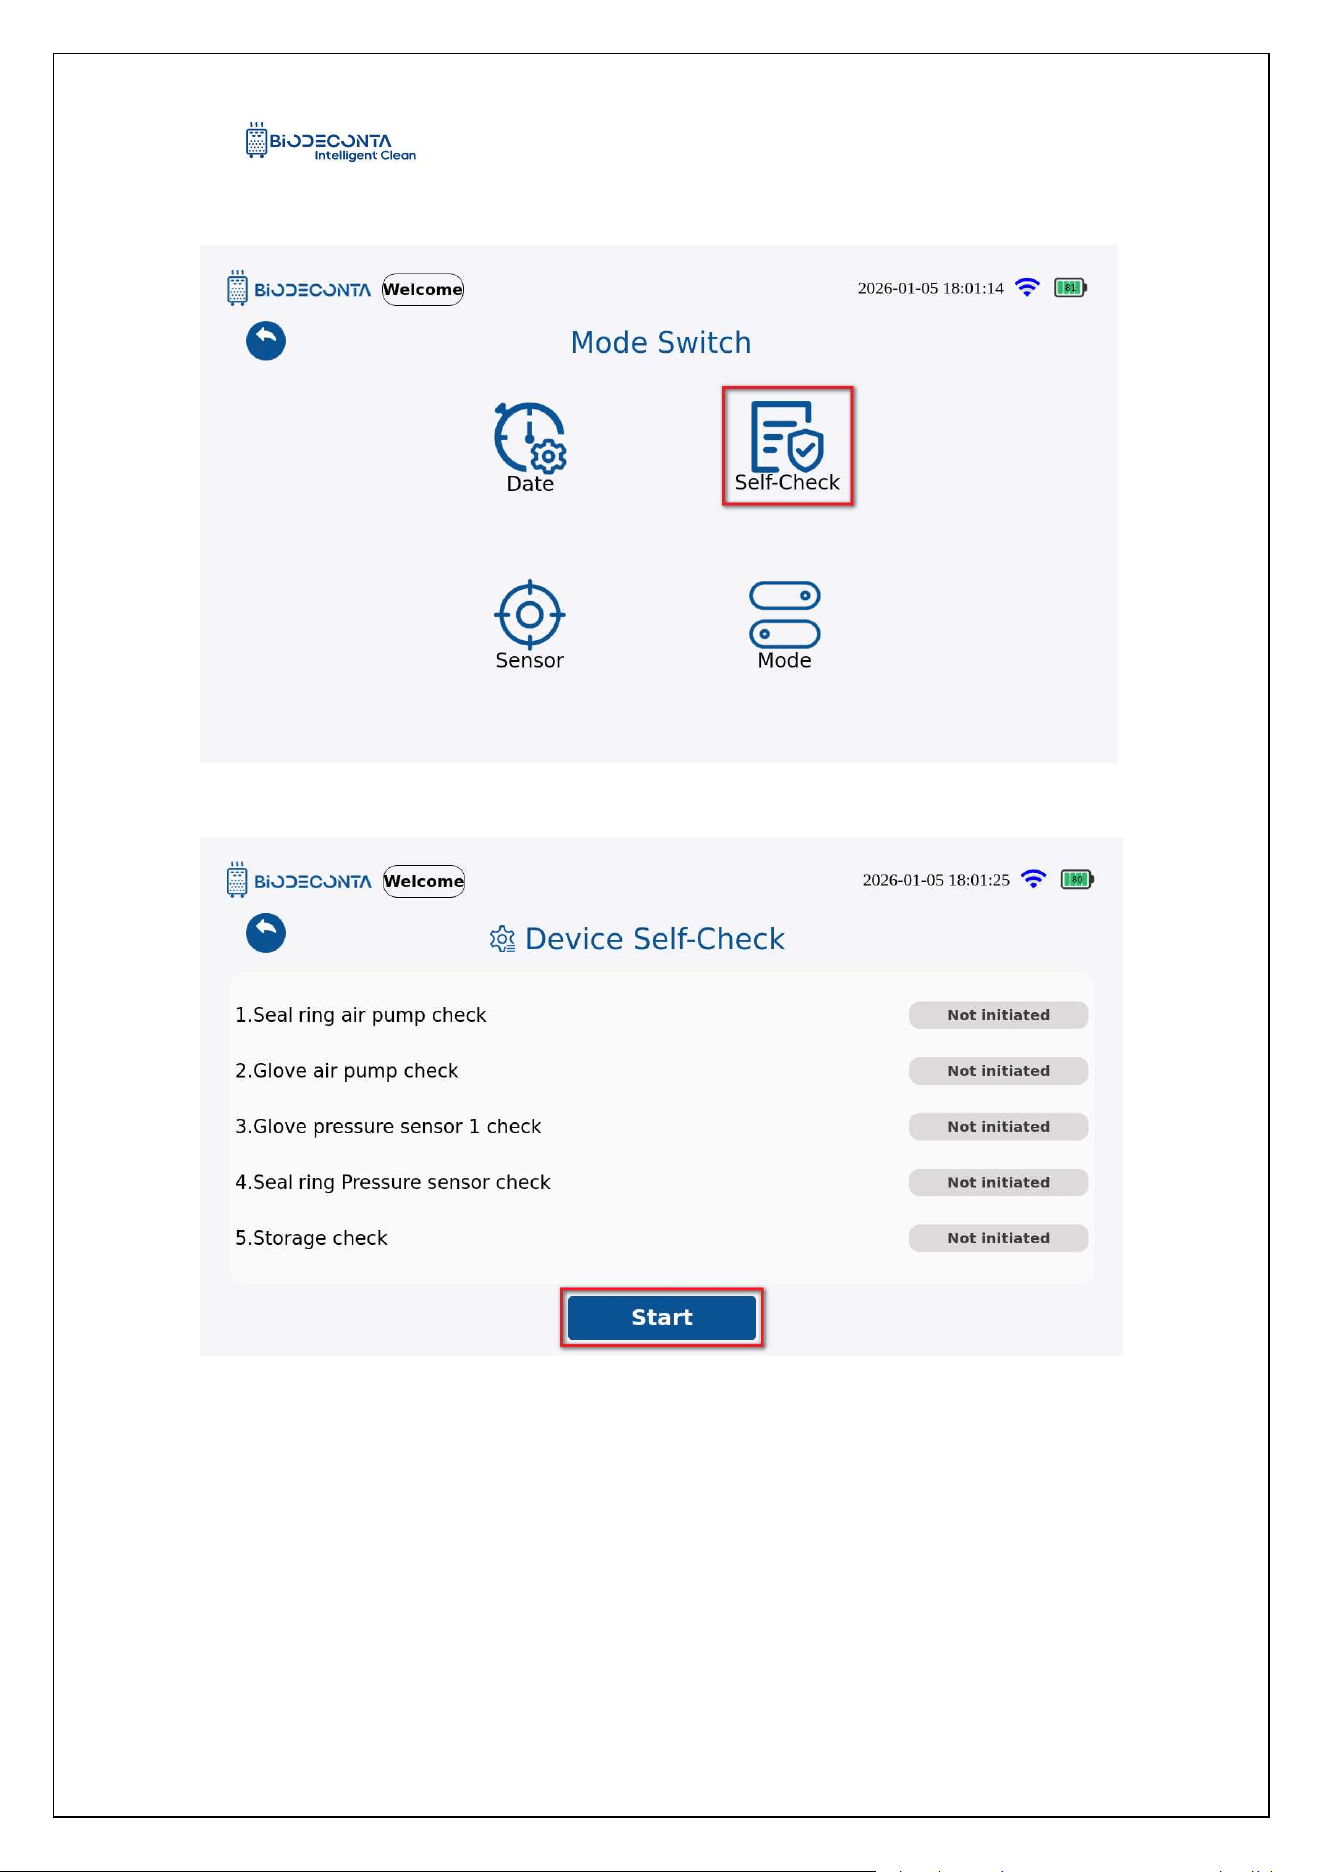
Click on [Switch mode] , as shown in Figure 4-1.9, and the page will jump to the [Date],
[Language], [Self-Check], [Sensor], [Mode] pages. Click on [Self-Check], as shown in
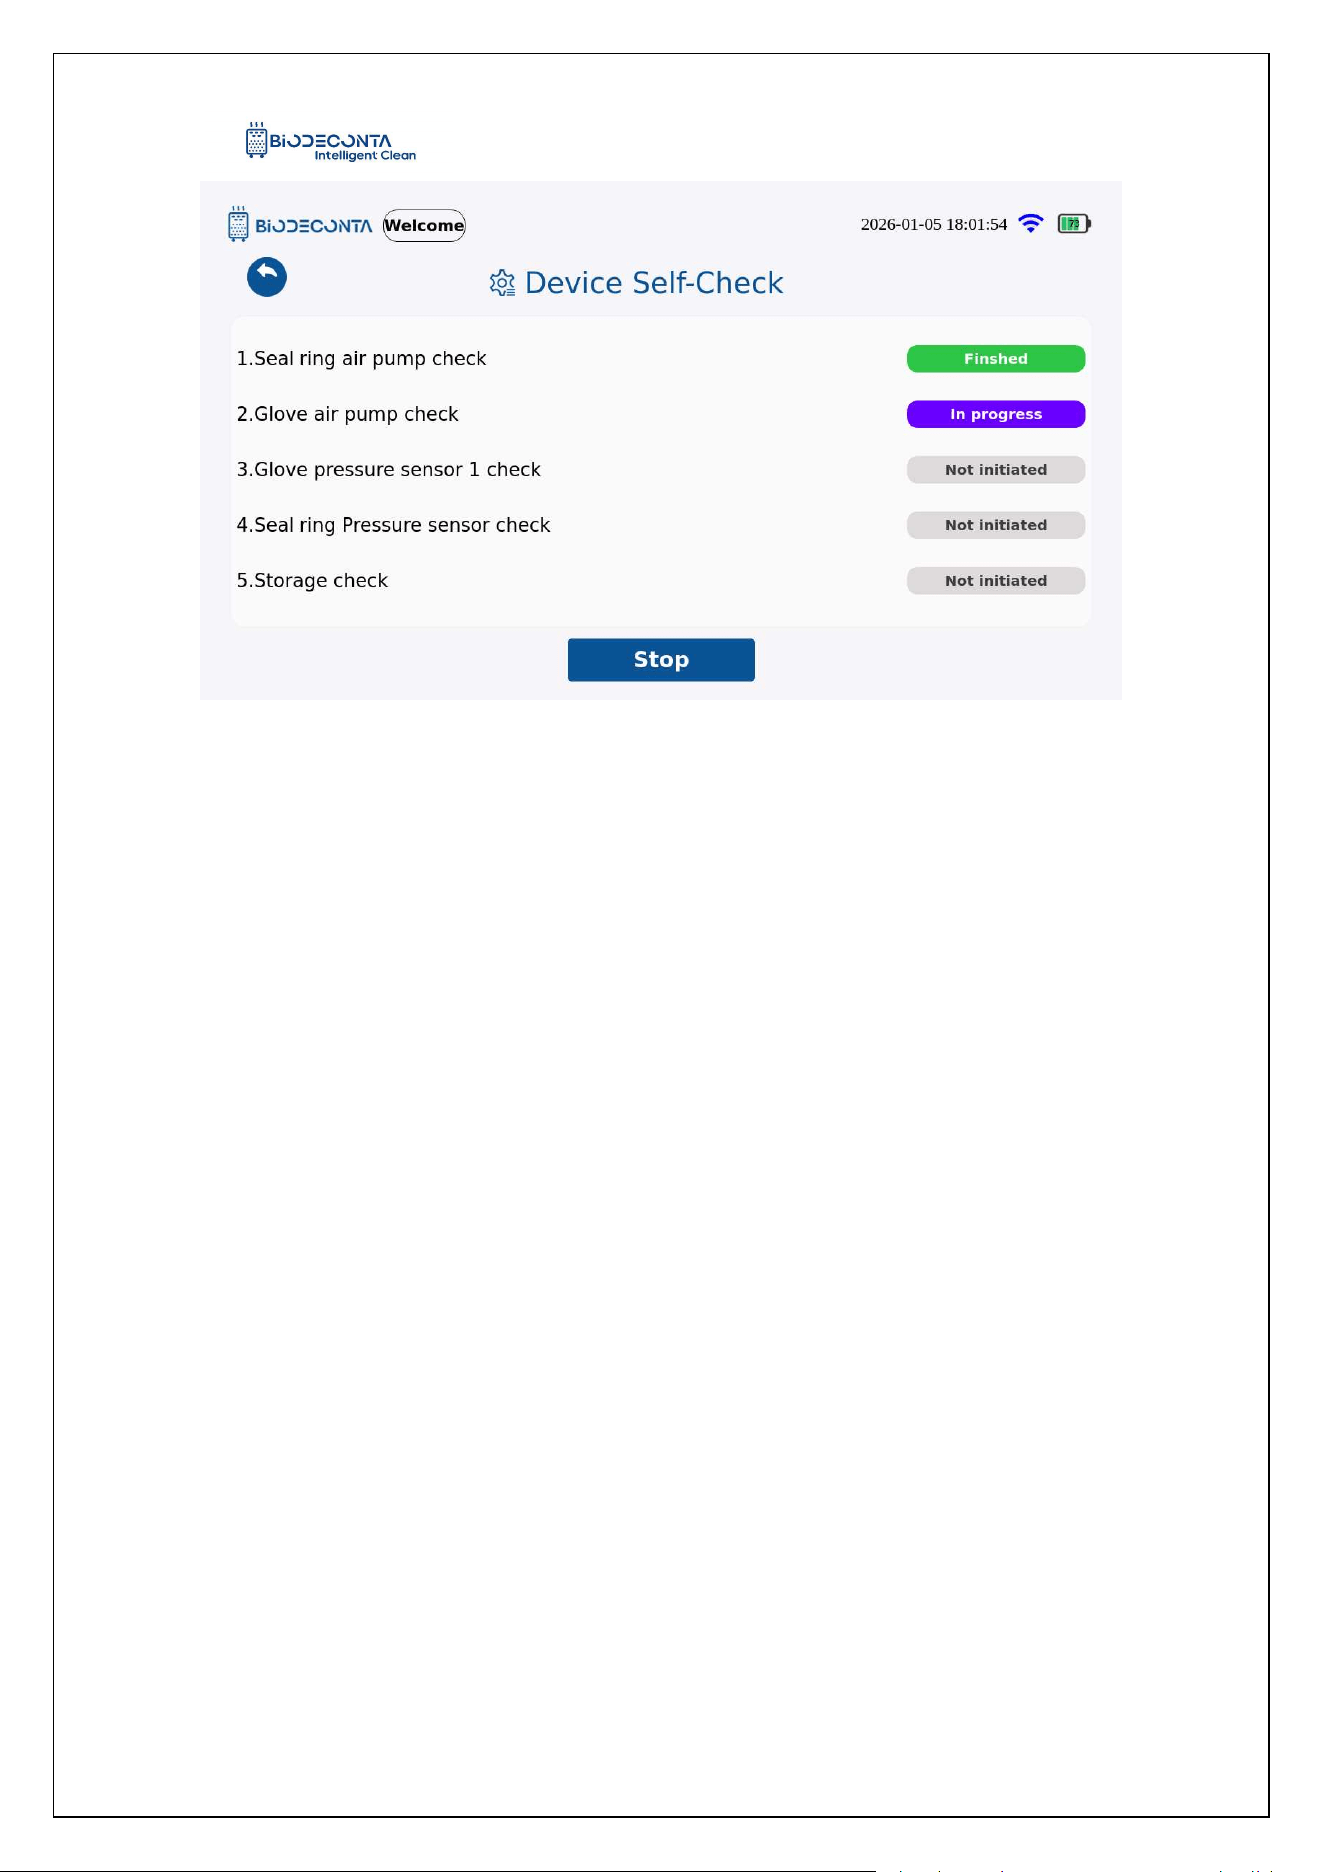
Figure 4-1.10, and the page will jump to the "Device Self-Check" page, this module
mainly involves the Start and Stop operation.
Intelligent Safe and Clean
www.biodeconta.com
19
Figure 4.1-7 "Self-Check 1"
Figure 4.1-8 "Self-Check 2"
Intelligent Safe and Clean
www.biodeconta.com
20
Figure 4.1-9 "Self-Check 3"
Intelligent Safe and Clean
www.biodeconta.com
21
Figure 4.1-10 "Self-Check 4"
4.4 Start:
Click the [Self-Check], as shown in Figures 4.1-11 and 4.1-12, and the page will
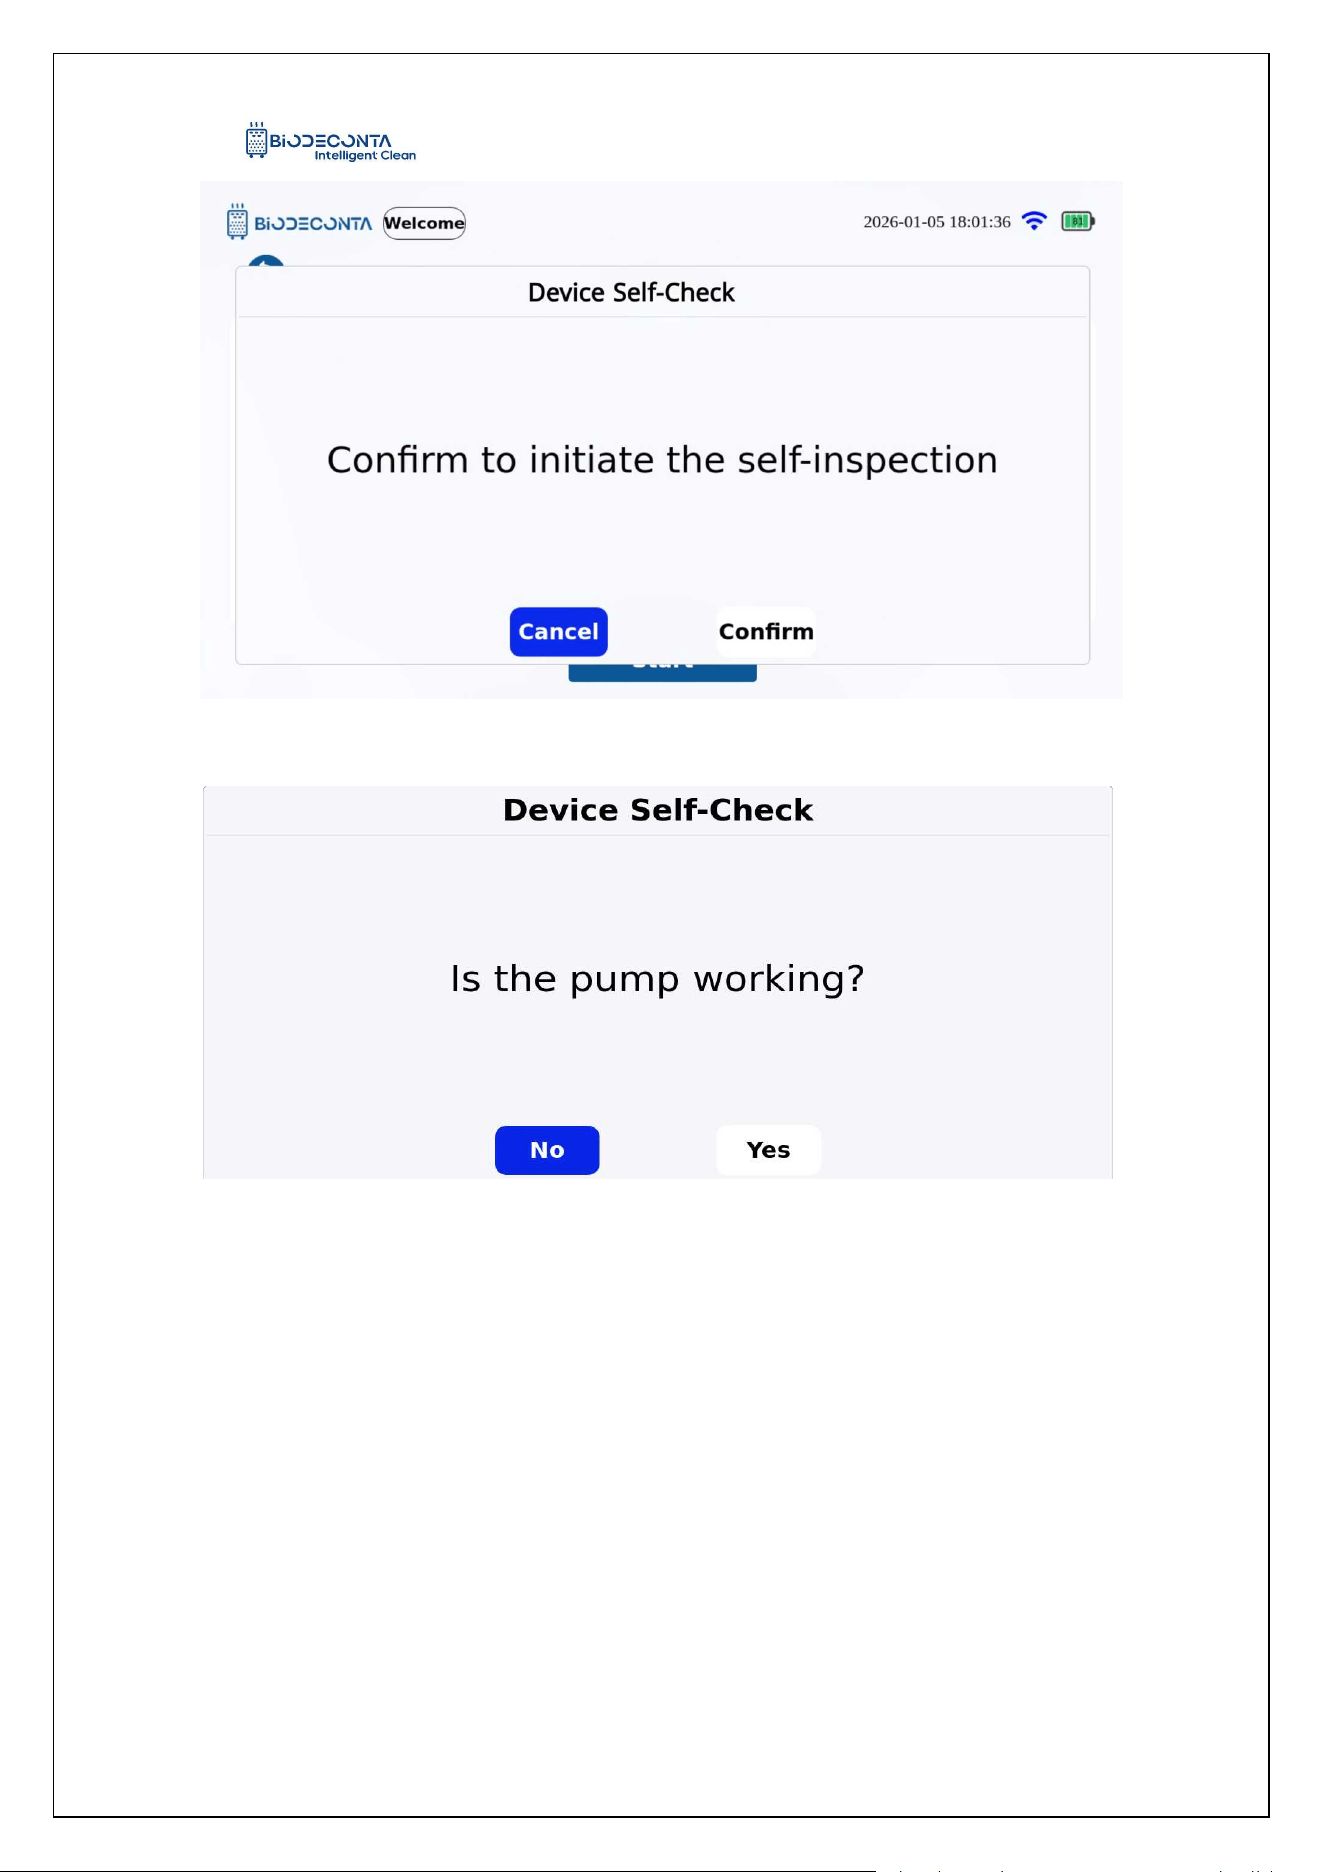
jump to the "Device Self-Check" page. Click the "Start" button, as shown in Figure
4.1-13, and a "Confirm to initiate the self-inspection" dialog box will pop up, click the
"Confirm" button, and the first self-check will begin. After the first self-check is
completed, as shown in Figure 4.1-14, a "Is the pump working?" dialog box will pop up,
click the "Yes" button, and you can then proceed with the start operation of the
self-check one by one (The sealing air pump check started, the glove air pump check
has started, pay attention to whether the instrument has any reaction).
Intelligent Safe and Clean
www.biodeconta.com
22
Figure 4.1-11 "Start 1"
Figure 4.1-12 "Start 2"
Intelligent Safe and Clean
www.biodeconta.com
23
Figure 4.1-13 "Start 3"
Figure 4.1-14 "Start 4"
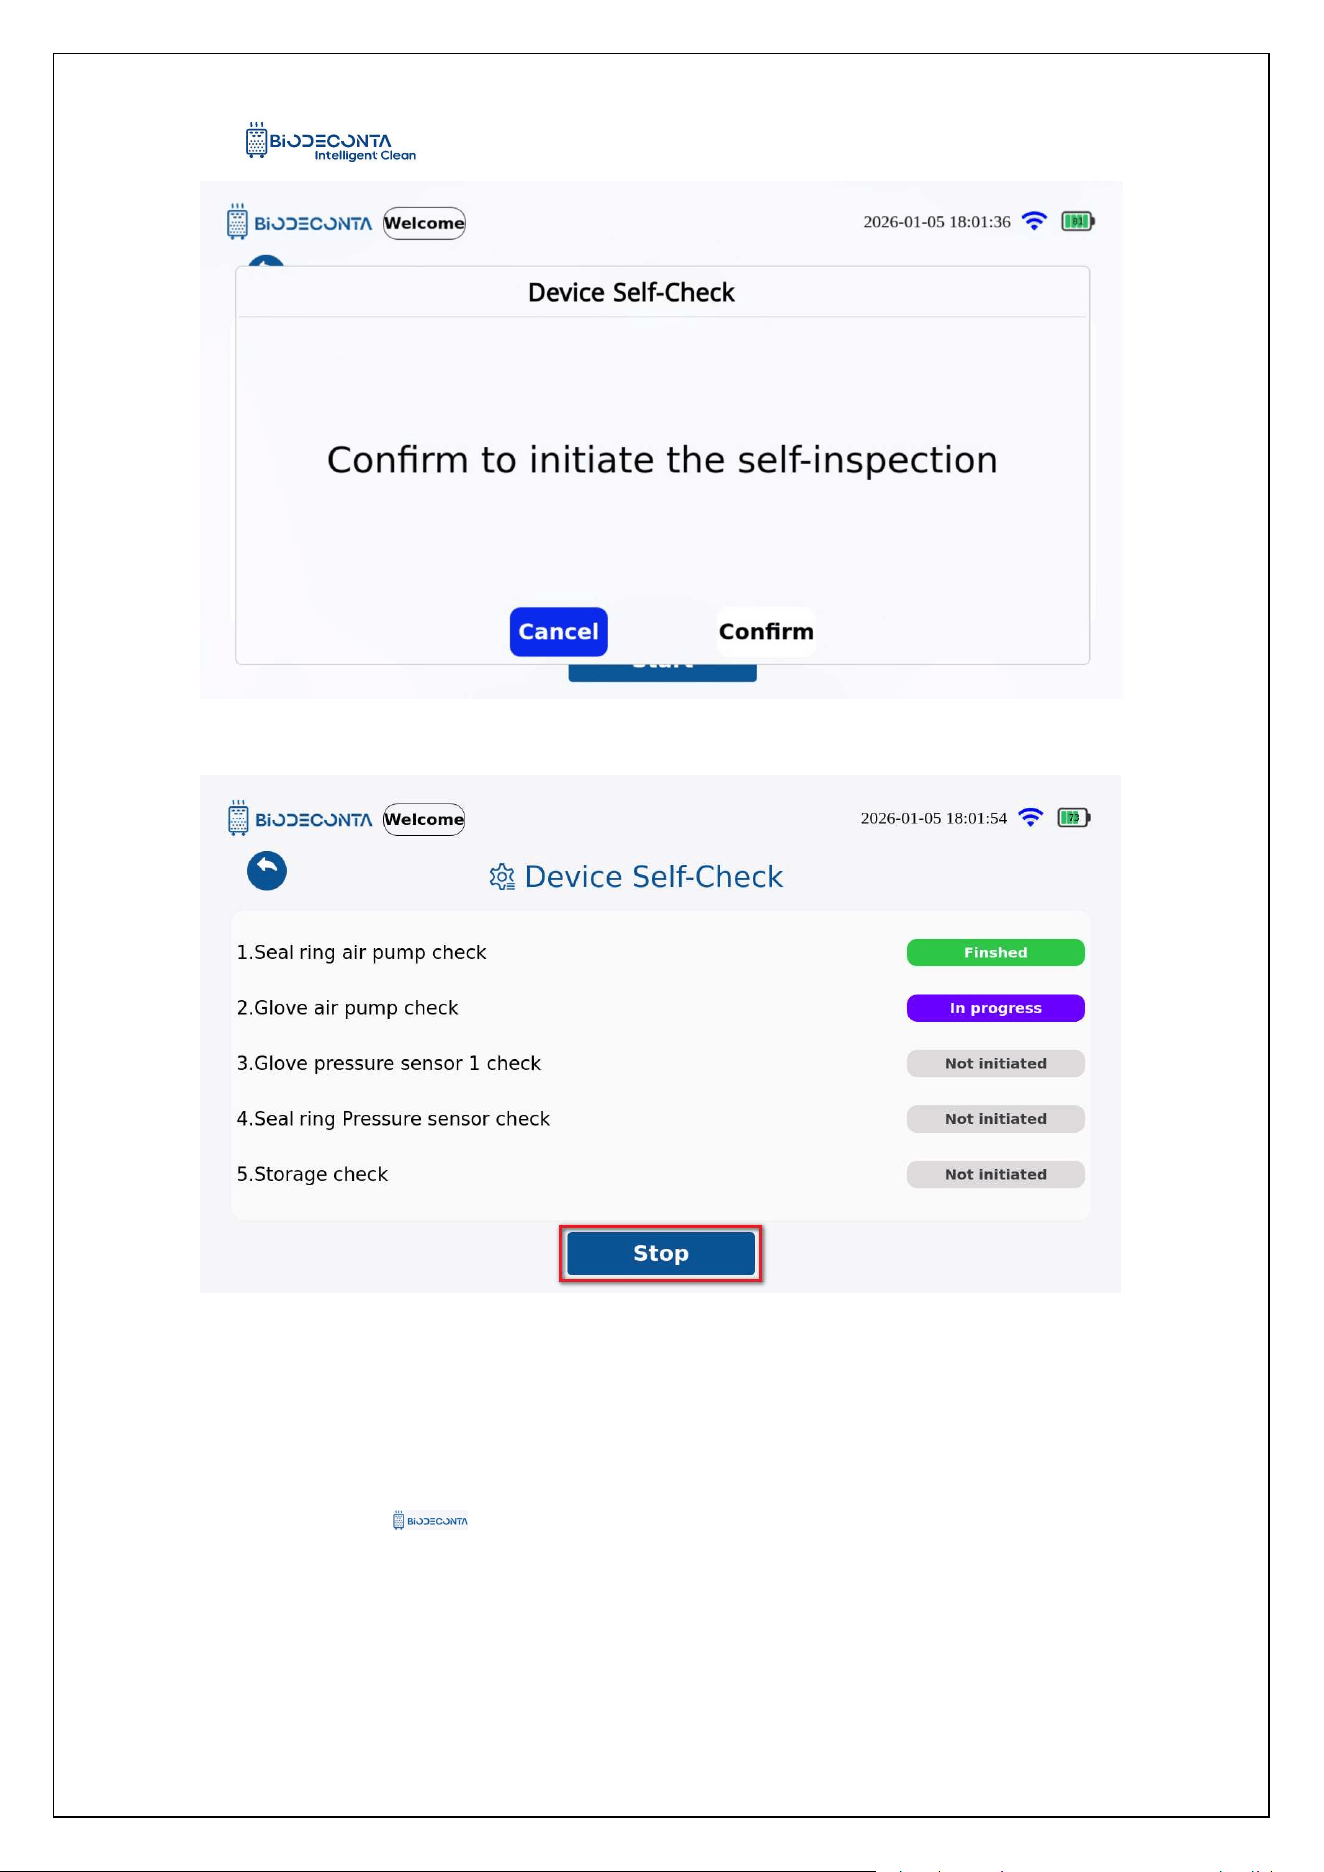
4.5 Stop:
Click the [Self-Check], as shown in Figures 4.1-15 and 4.1-16, and the page will
jump to the "Device Self-Check" page. Click the "Stop" button, as shown in Figure
4.1-17 and a "Confirm to initiate the self-inspection" dialog box will pop up, click the
"Confirm" button, and the first self-check will begin. During the first self-check process,
as shown in Figure 4.1-18, simply click the "Stop" button, to complete the stop
operation of the self-check (The sealing air pump check stopped, the glove air pump
Intelligent Safe and Clean
www.biodeconta.com
24
check has stopped, pay attention to whether the instrument has any reaction).
Figure 4.1-15 "Stop 1"
Figure 4.1-16 "Stop 2"
Intelligent Safe and Clean
www.biodeconta.com
25
Figure 4.1-17 "Stop 3"
Figure 4.1-18 "Stop 4"
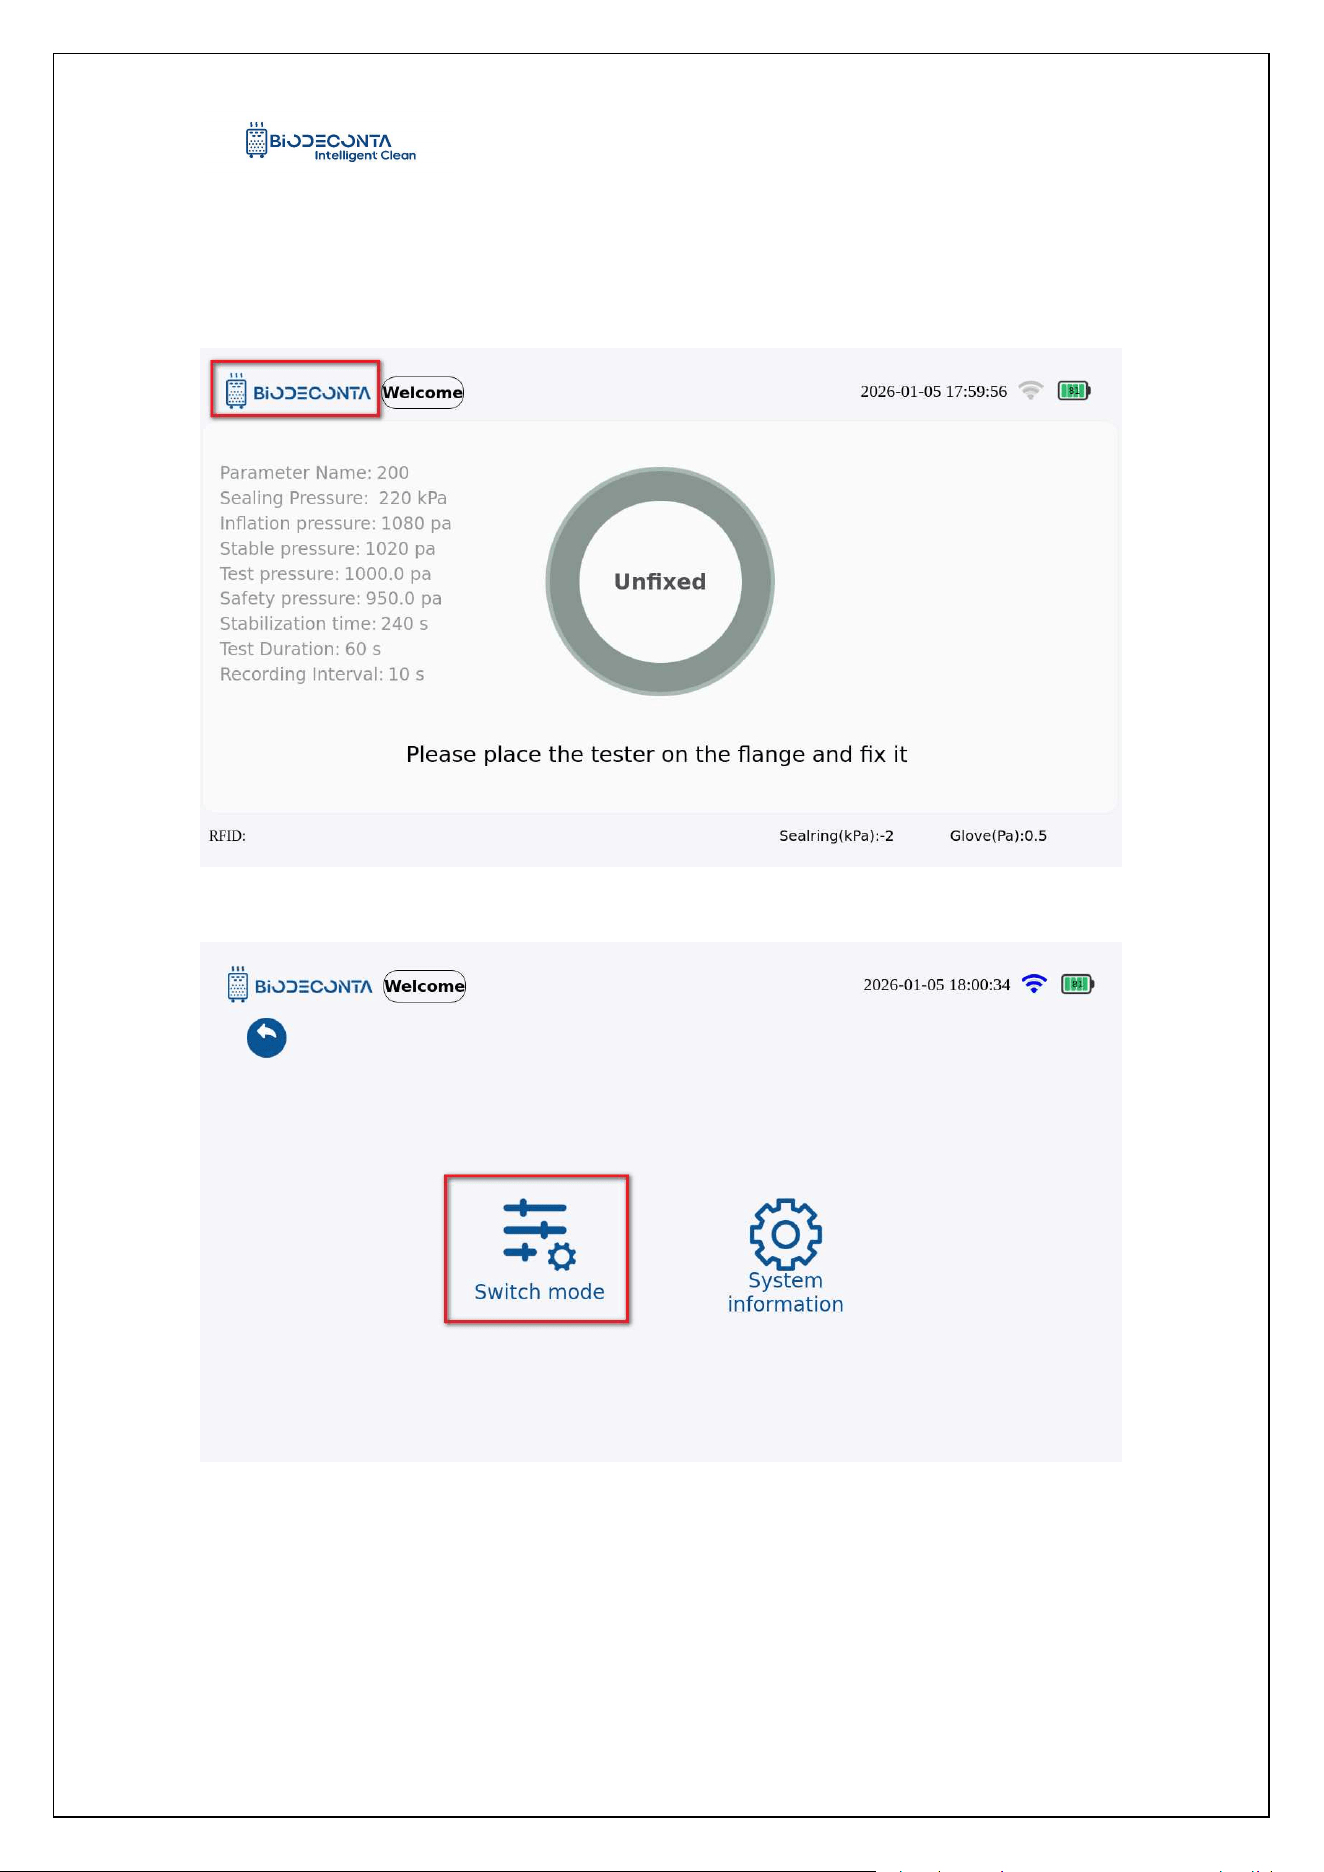
4.6 Sensor
Click on the [ ] icon on the test interface, as shown in Figures 4-1.19 and
4-1.20, the page will then jump to the [Switch mode] and [System information] pages.
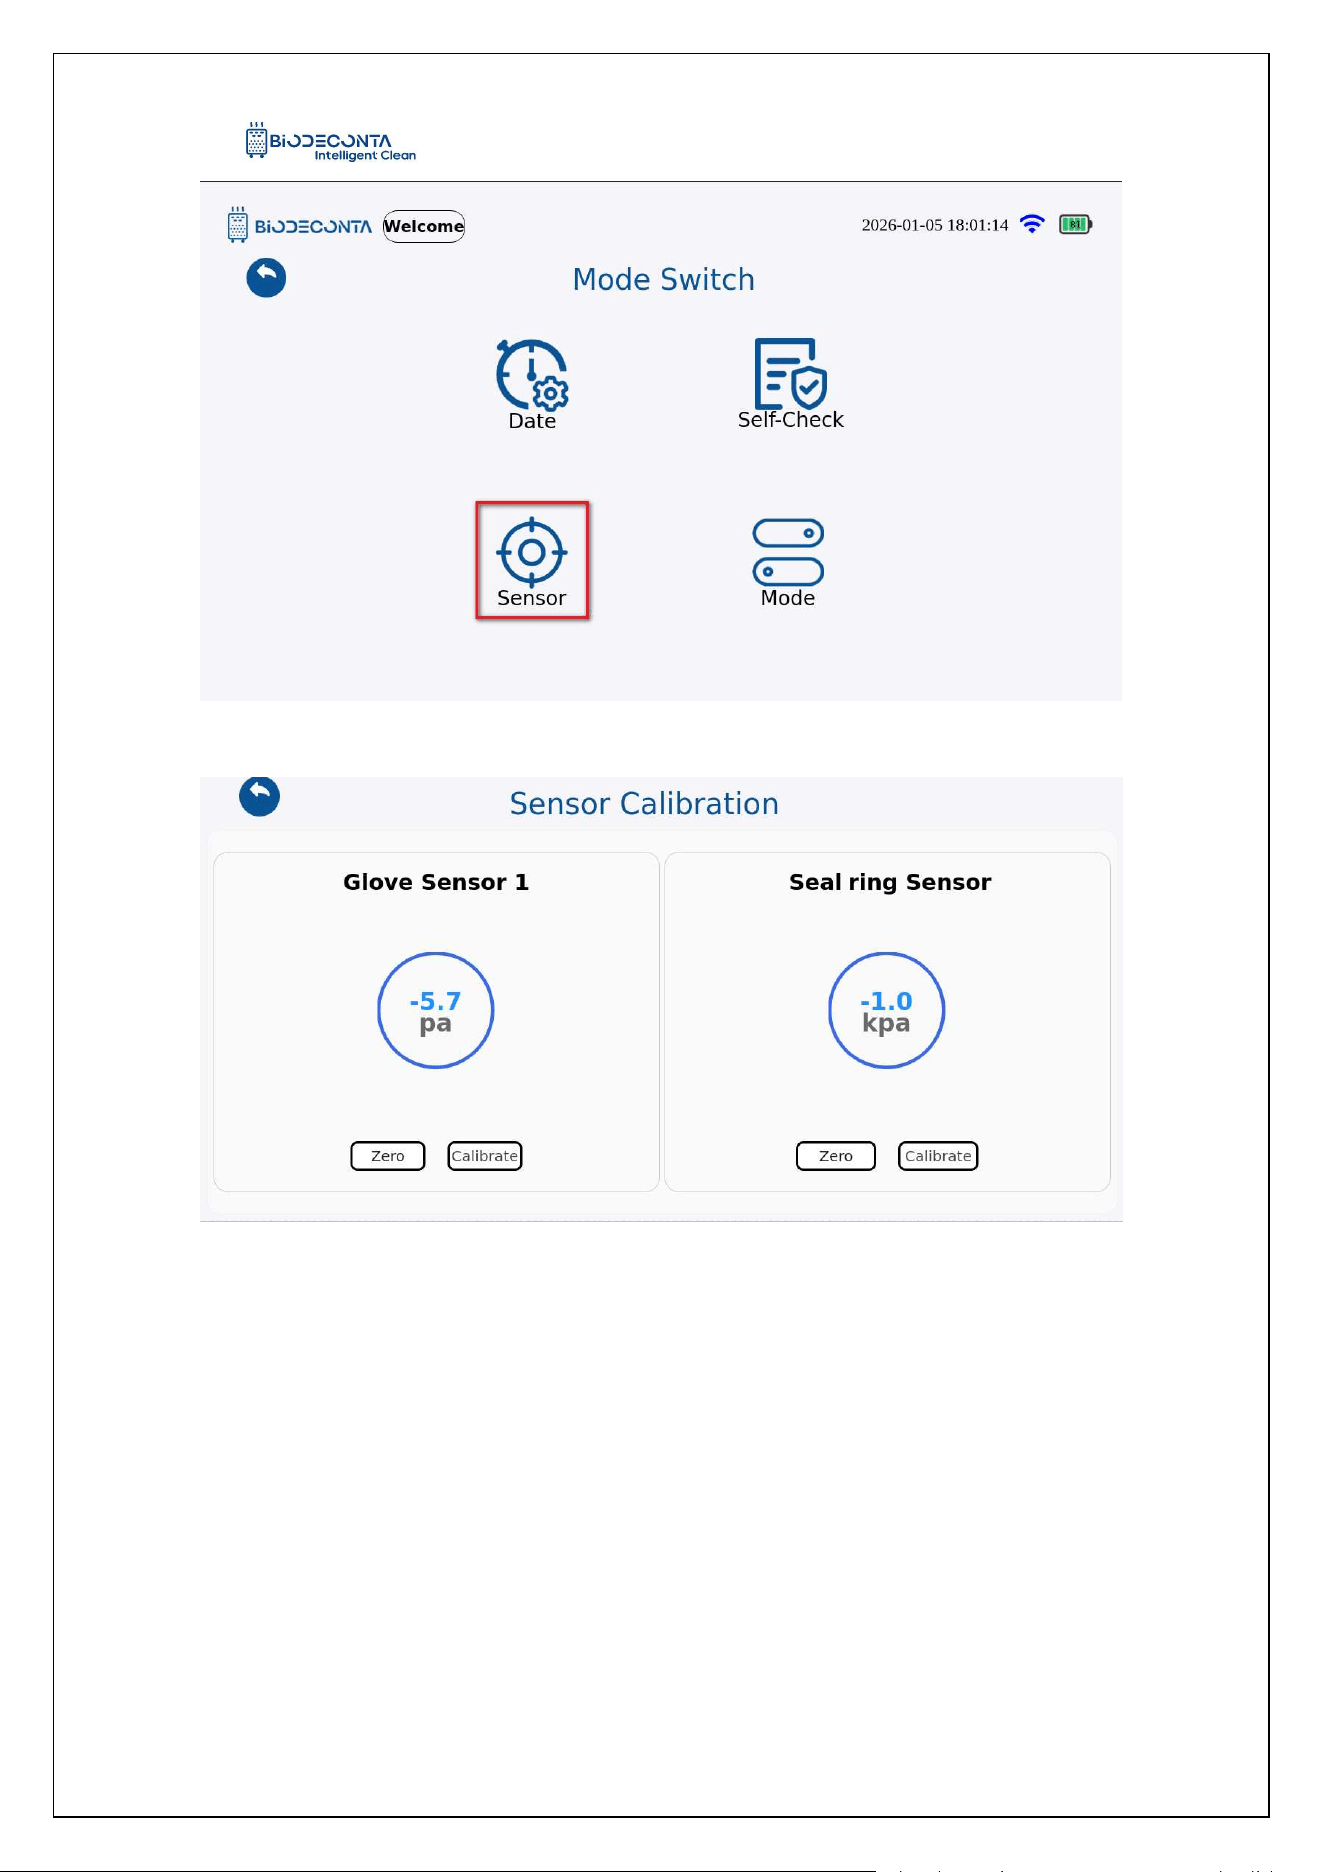
Click on [Switch mode] , as shown in Figure 4-1.21, and the page will jump to the
[Date], [Language], [Self-Check], [Sensor], [Mode] pages. Click on [Sensor], as shown
Intelligent Safe and Clean
www.biodeconta.com
26
in Figure 4-1.22, and the page will jump to the "Sensor Calibration" page, this module
mainly involves the Zero, Calibrate, Reset operation (If there are no professional
measuring equipment, do not use the sensor function).
Figure 4.1-19 "Sensor 1"
Figure 4.1-20 "Sensor 2"
Intelligent Safe and Clean
www.biodeconta.com
27
Figure 4.1-21 "Sensor 3"
Intelligent Safe and Clean
www.biodeconta.com
28
Figure 4.1-22 "Sensor 4"
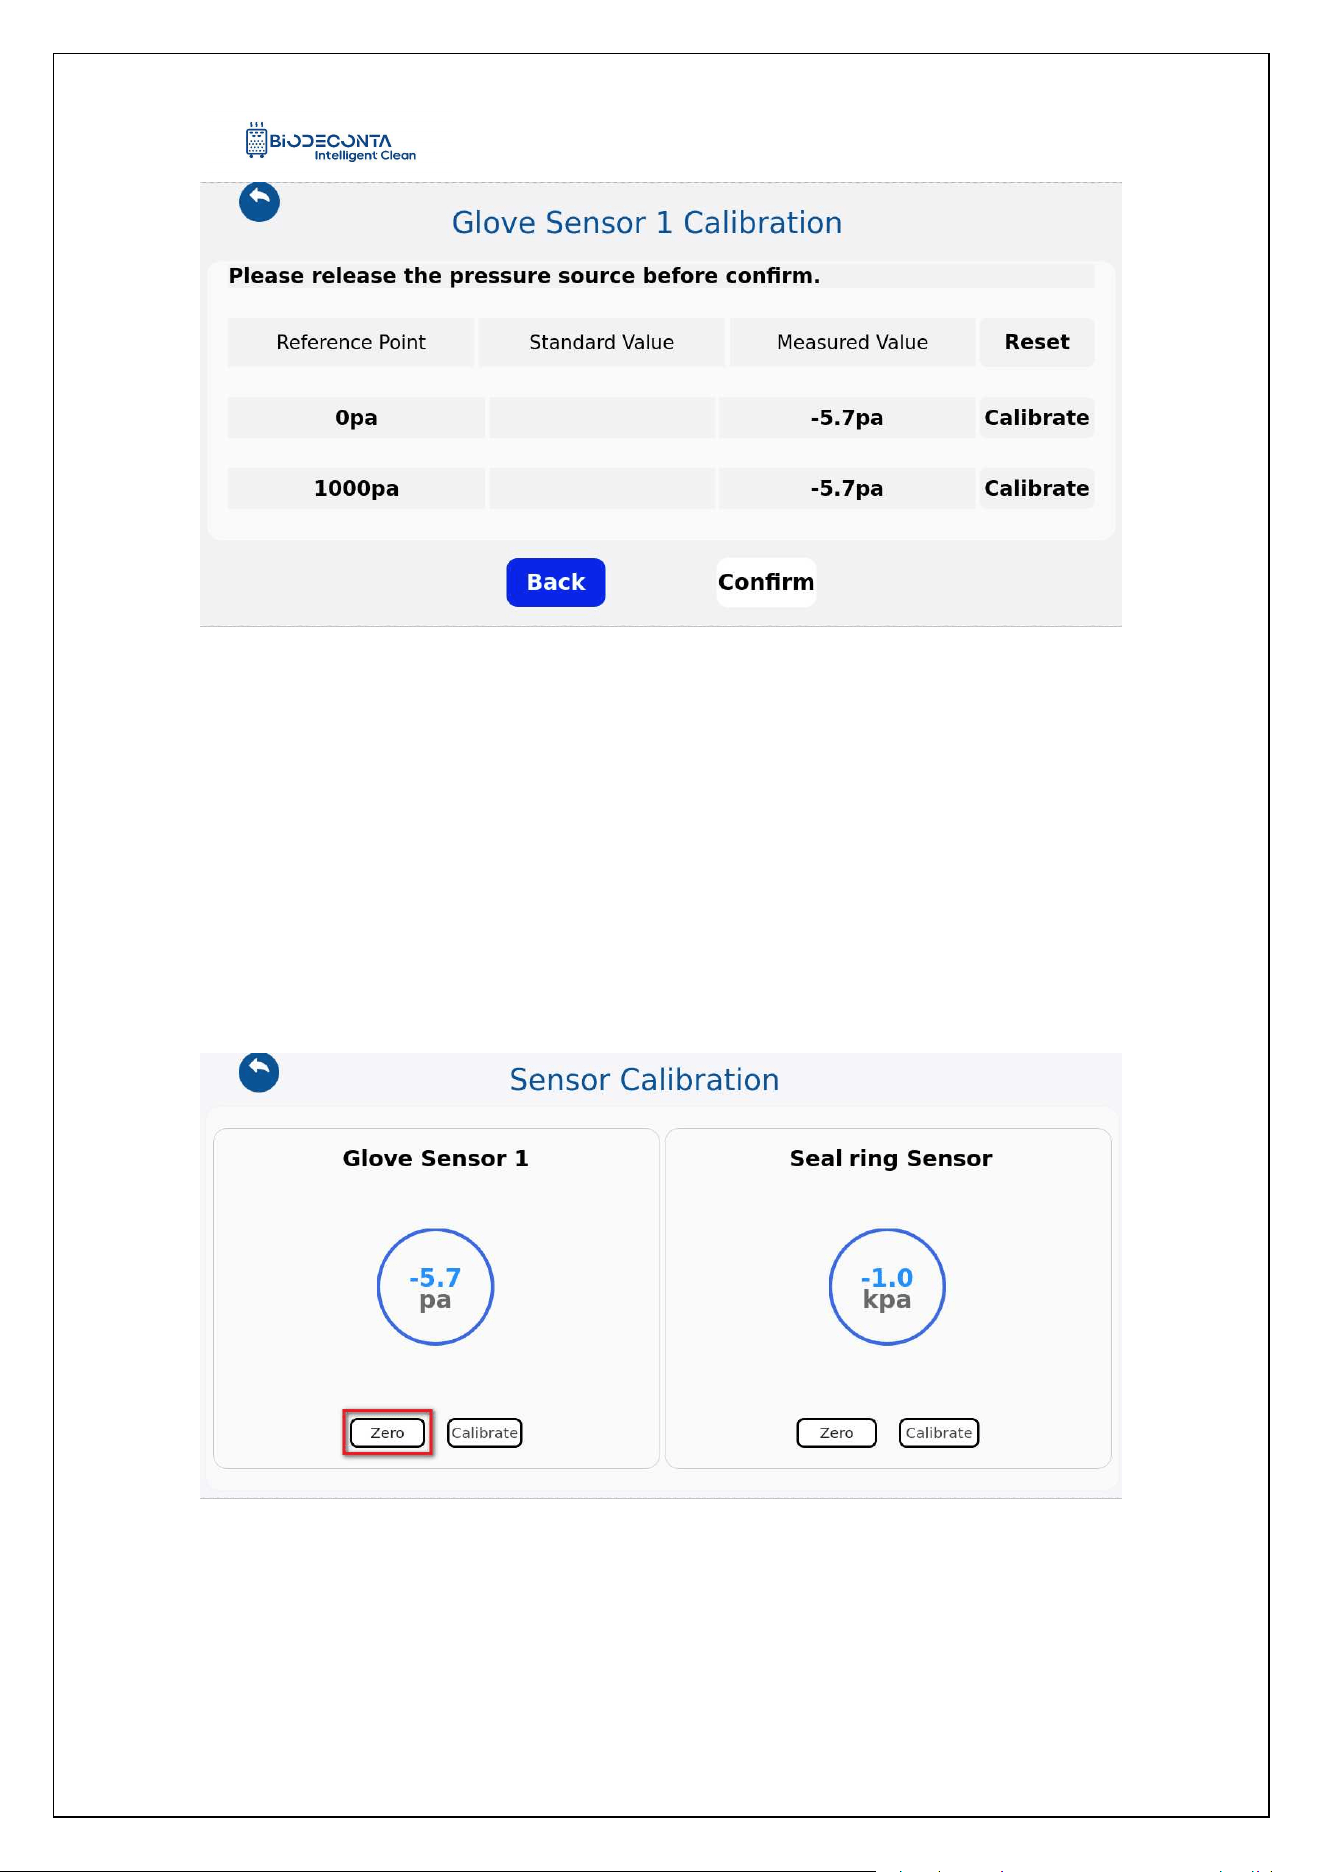
4.7 Zero:
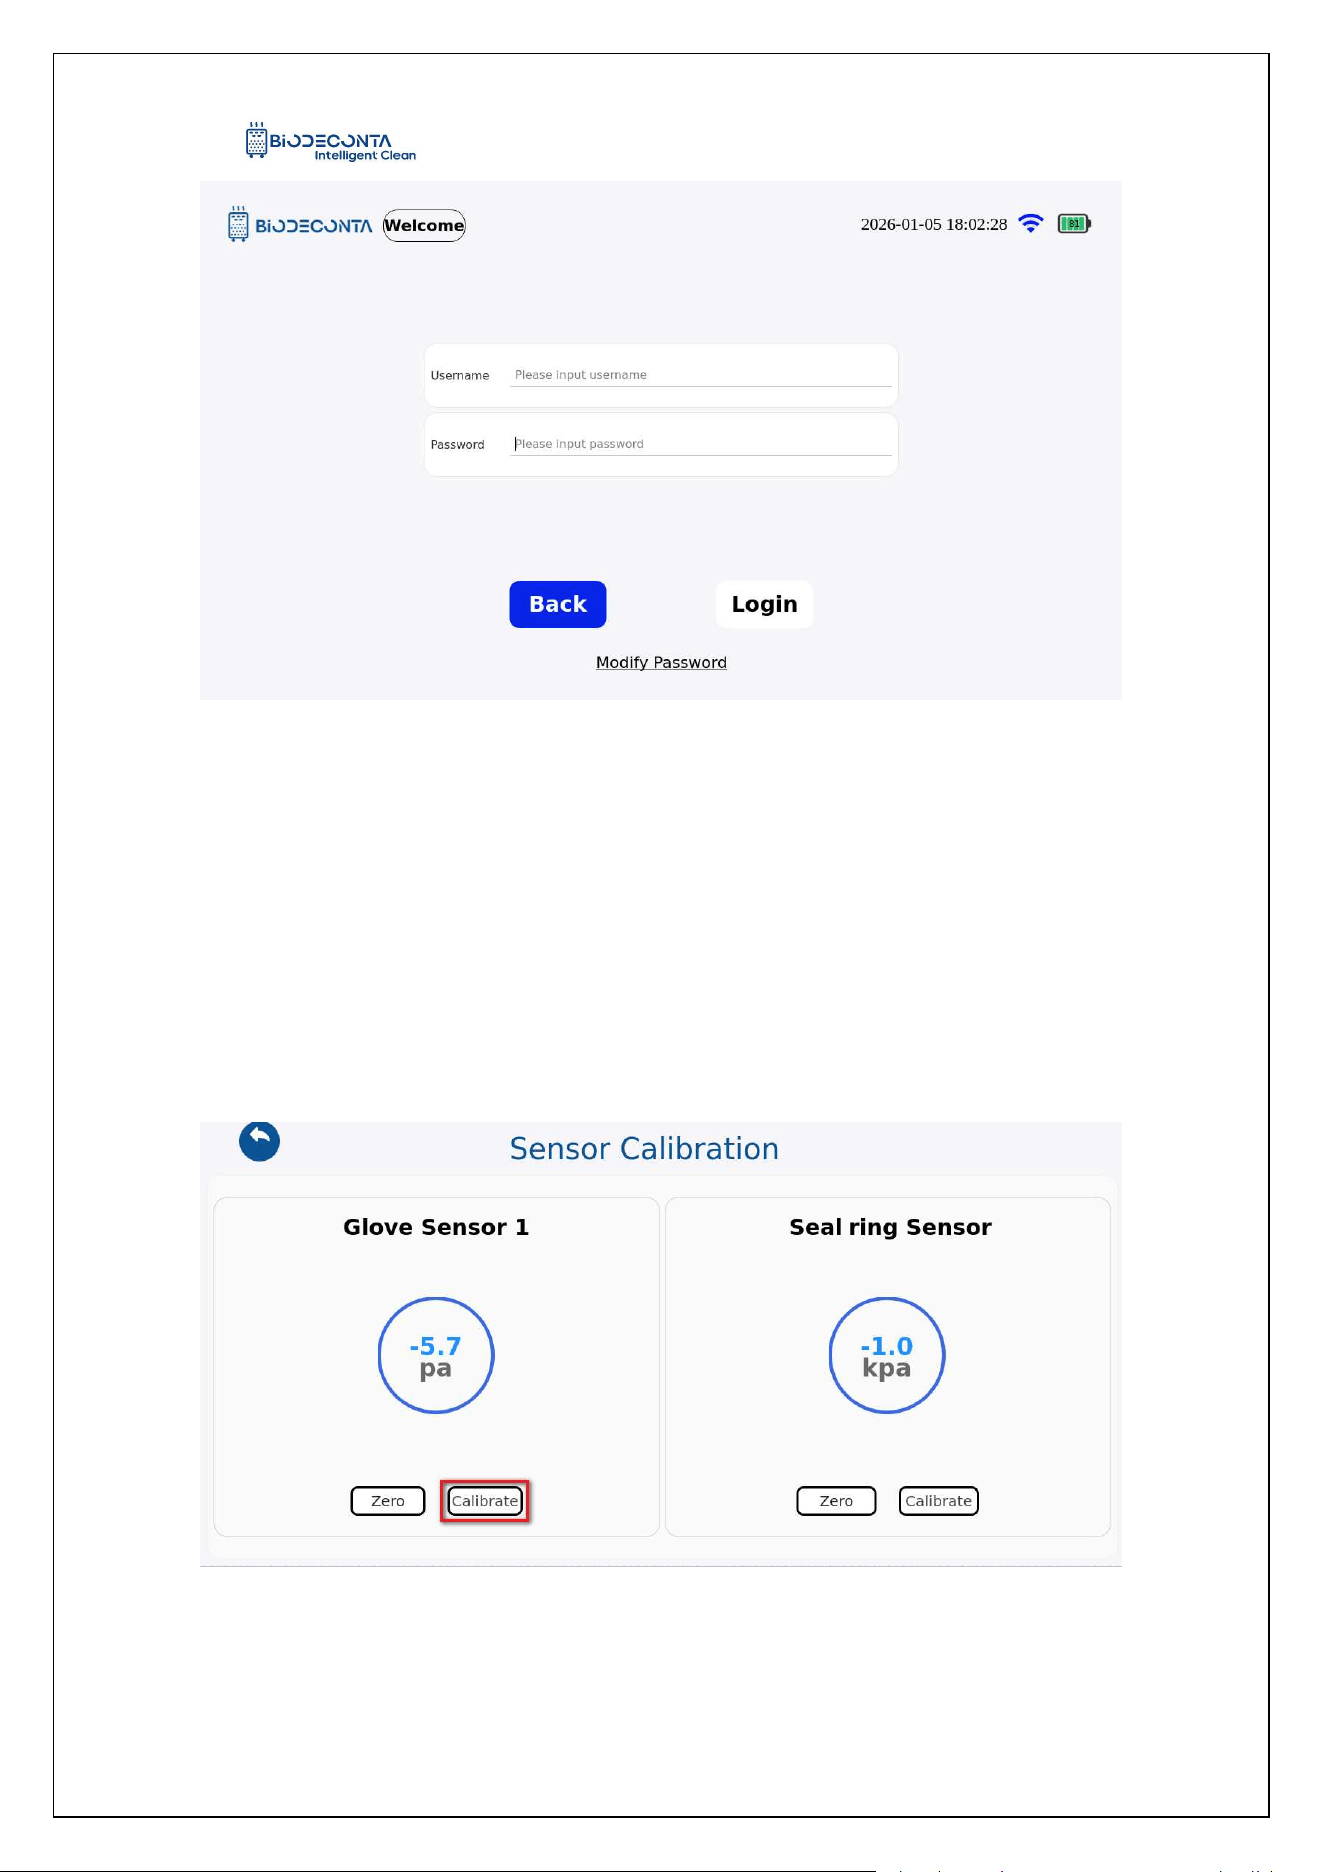
Click on [Sensor], as shown in Figure 4.1-23, and the page will jump to the
"Sensor Calibration" page, click the "Zero" button. As shown in Figure 4.1-24, and the
page will jump to the login interface, enter the account and password information, and
then click the "Login" button, to complete the zero operation.
Figure 4.1-23 "Sensor 1"
Intelligent Safe and Clean
www.biodeconta.com
29
Figure 4.1-24 "Sensor 2"
4.8 Calibrate:
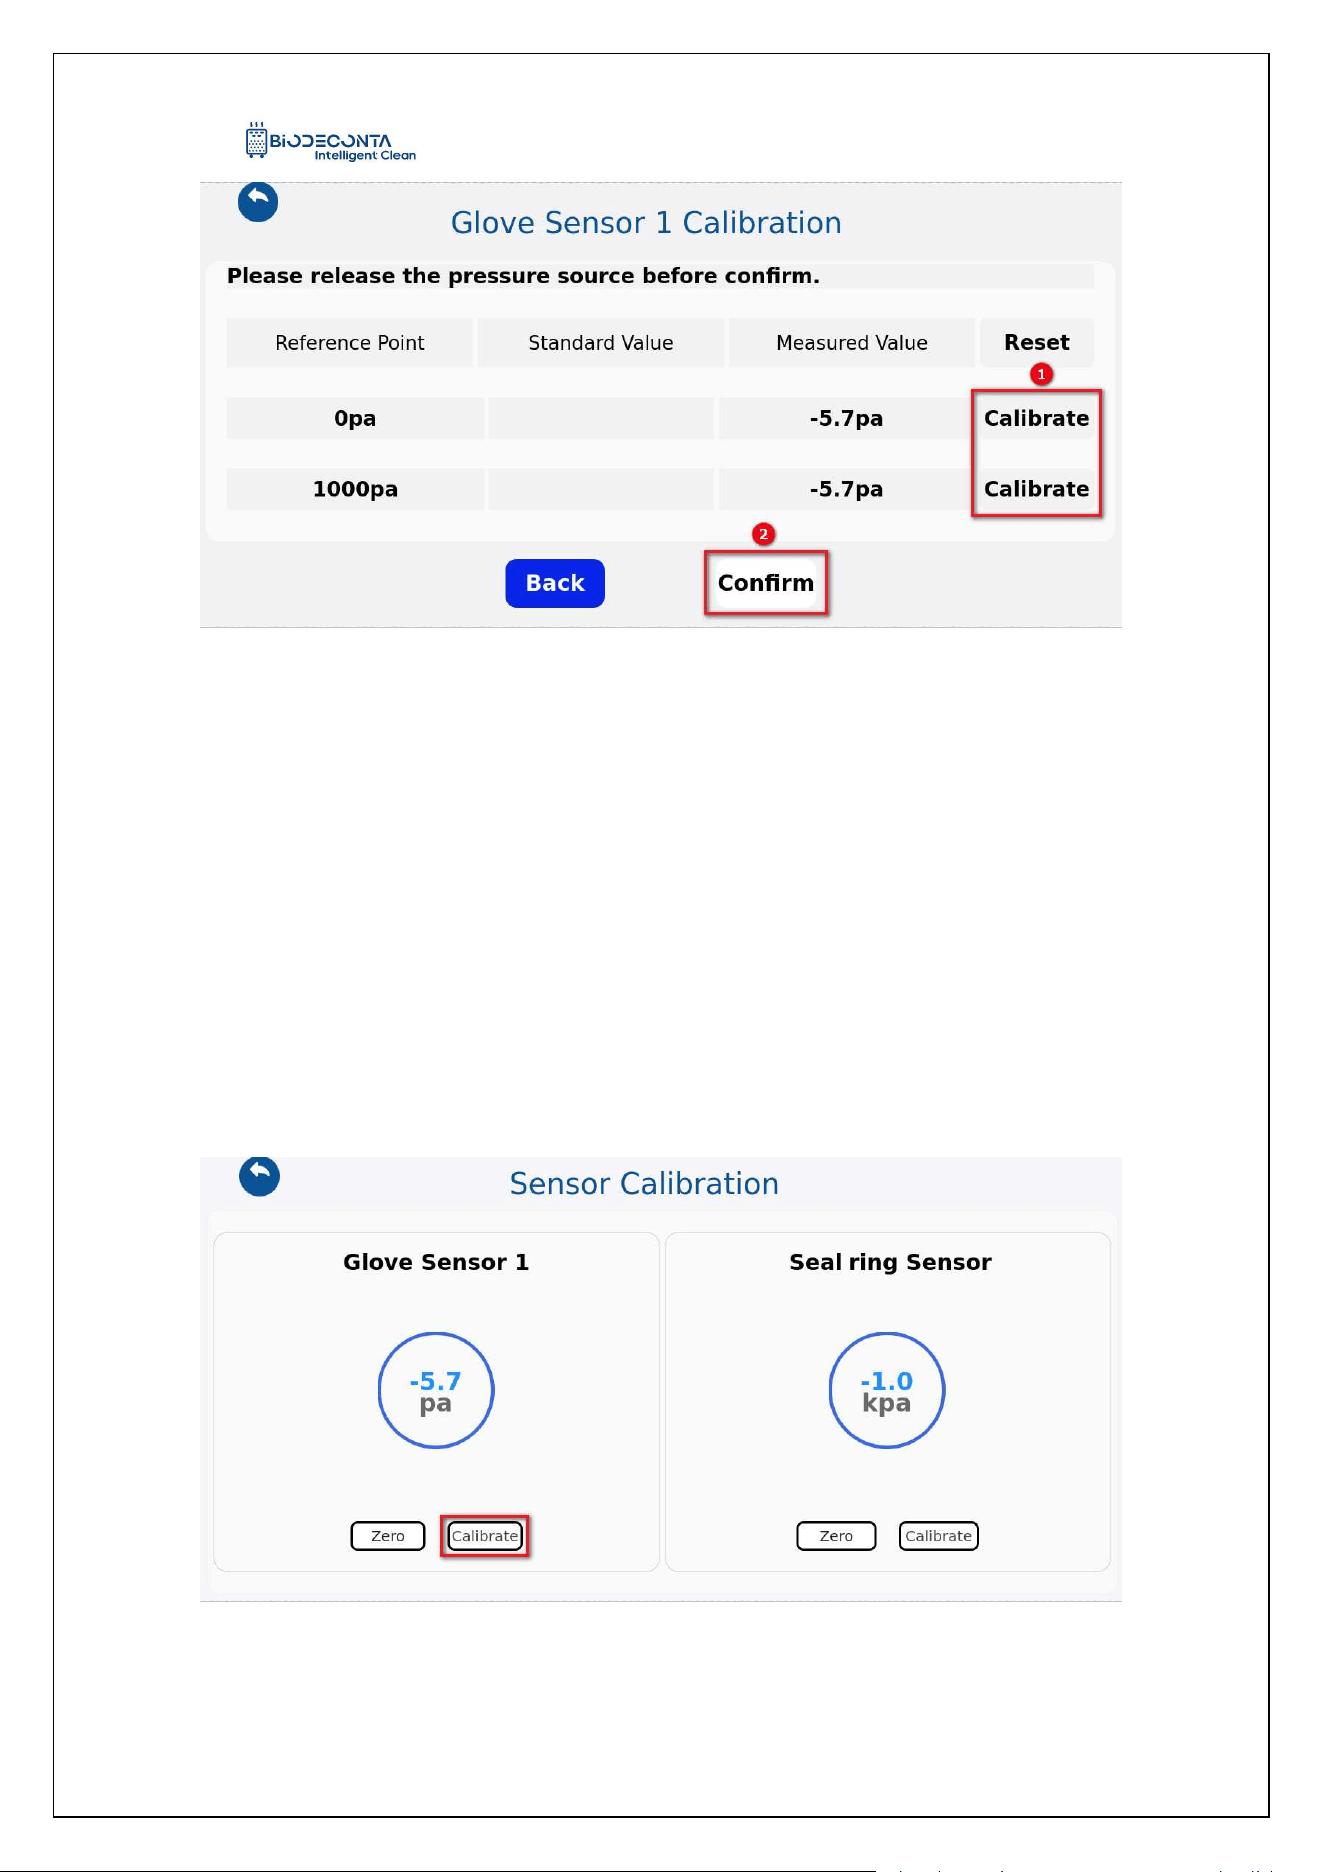
Click on [Sensor], as shown in Figure 4-1.25, and the page will jump to the
"Sensor Calibration" page, click the "Calibrate" button. As shown in Figure 4.1-26, the
page jumps to the "Glove Sensor 1 Calibration" page, click the "Calibrate" button, and
then click the "Confirm" button, to complete the calibration operation.
Figure 4.1-25 "Calibrate 1"
Intelligent Safe and Clean
www.biodeconta.com
30
Figure 4.1-26 "Calibrate 2"
4.9 Reset:
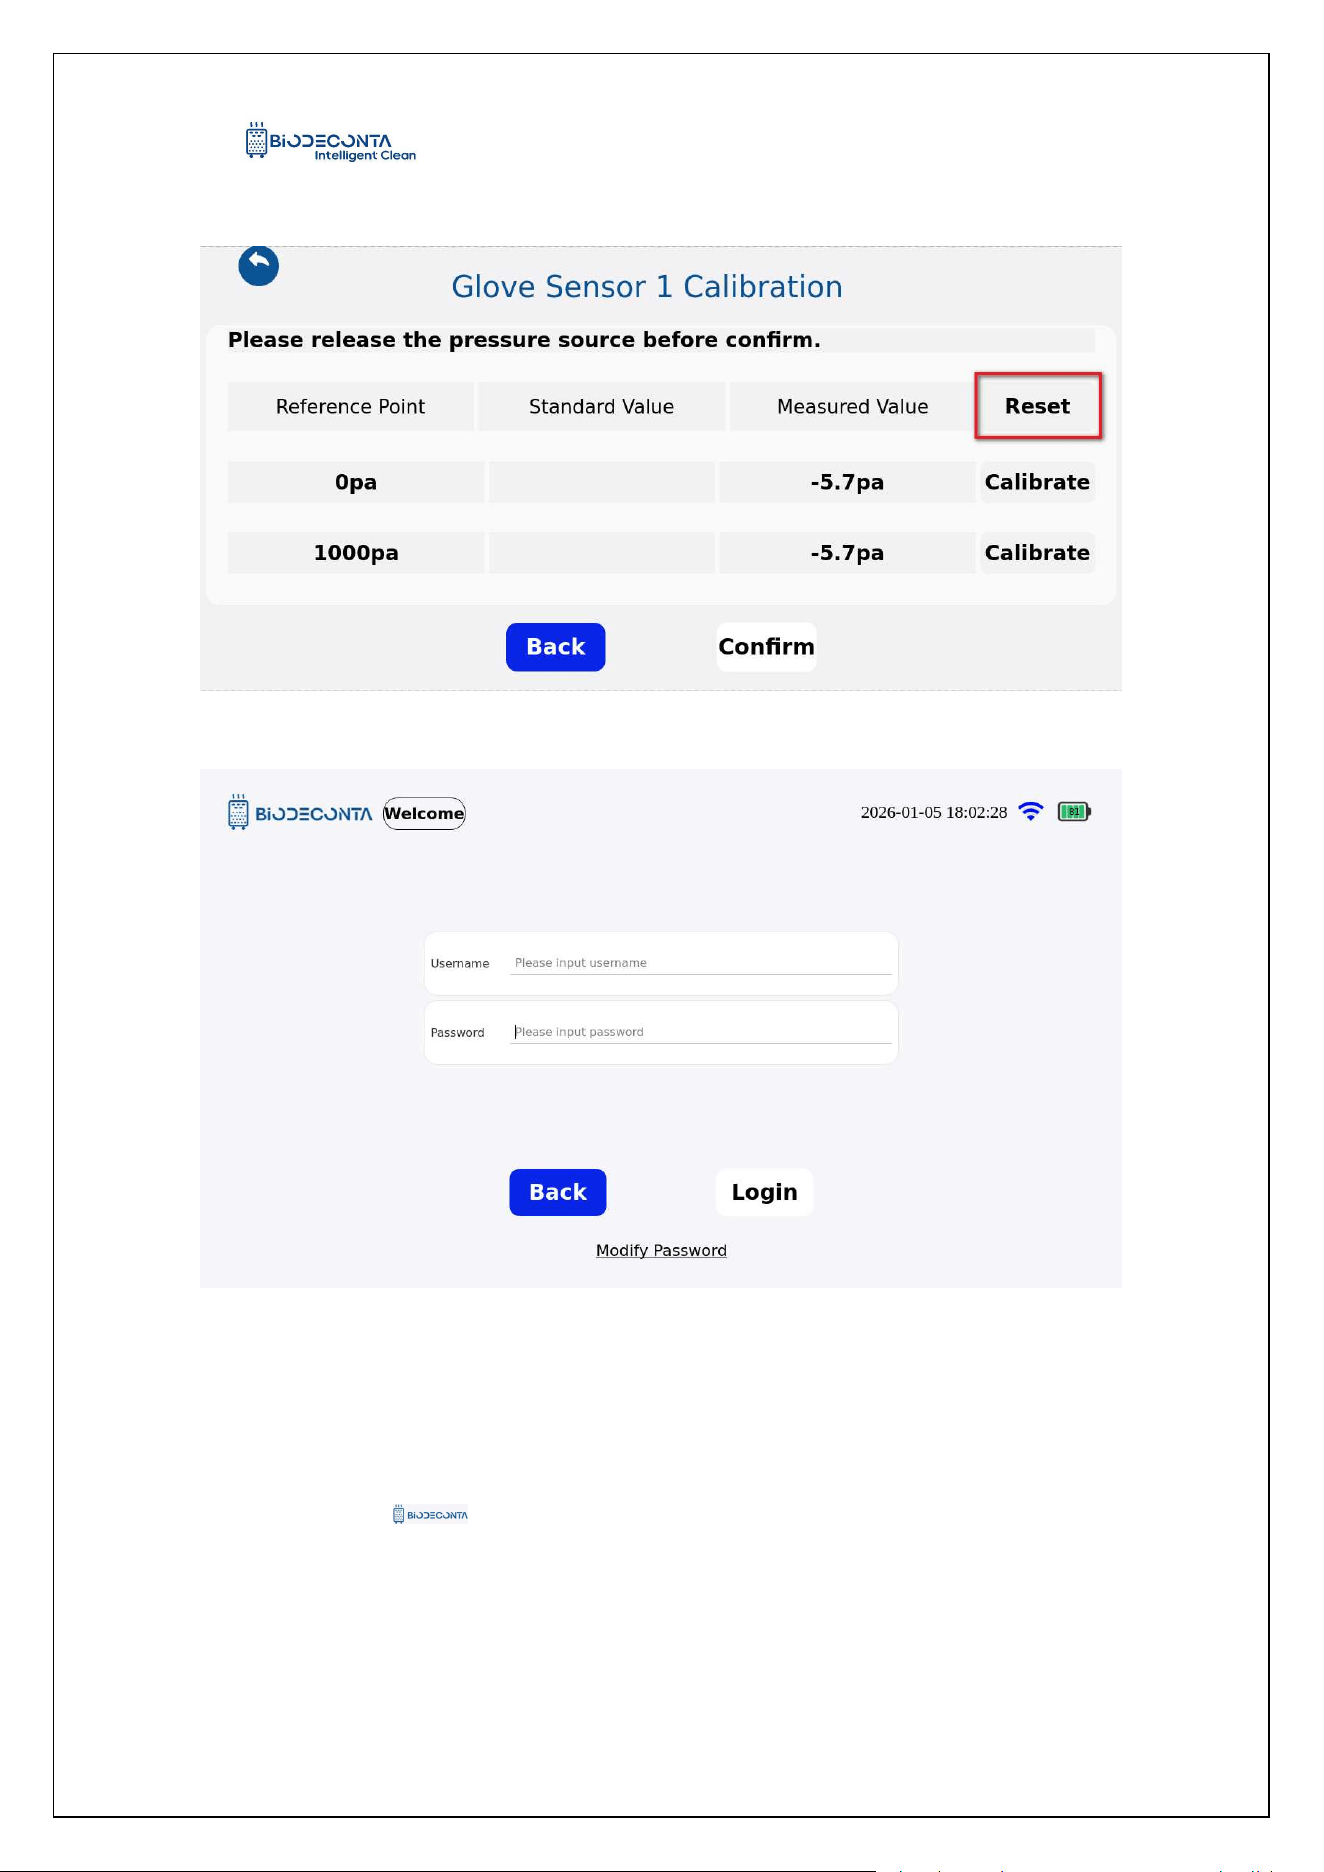
Click on [Sensor], as shown in Figure 4-1.27, and the page will jump to the
"Sensor Calibration" page, click the "Calibrate" button. As shown in Figure 4.1-28, the
page jumps to the "Glove Sensor 1 Calibration" page, click the "Reset" button. As
shown in Figure 4.1-29, and the page will jump to the login interface, enter the
account and password information, and then click the "Login" button, to complete the
reset operation.
Figure 4.1-27 "Reset 1"
Intelligent Safe and Clean
www.biodeconta.com
31
Figure 4.1-28 "Reset 2"
Figure 4.1-29 "Reset 3"
4.10 Mode
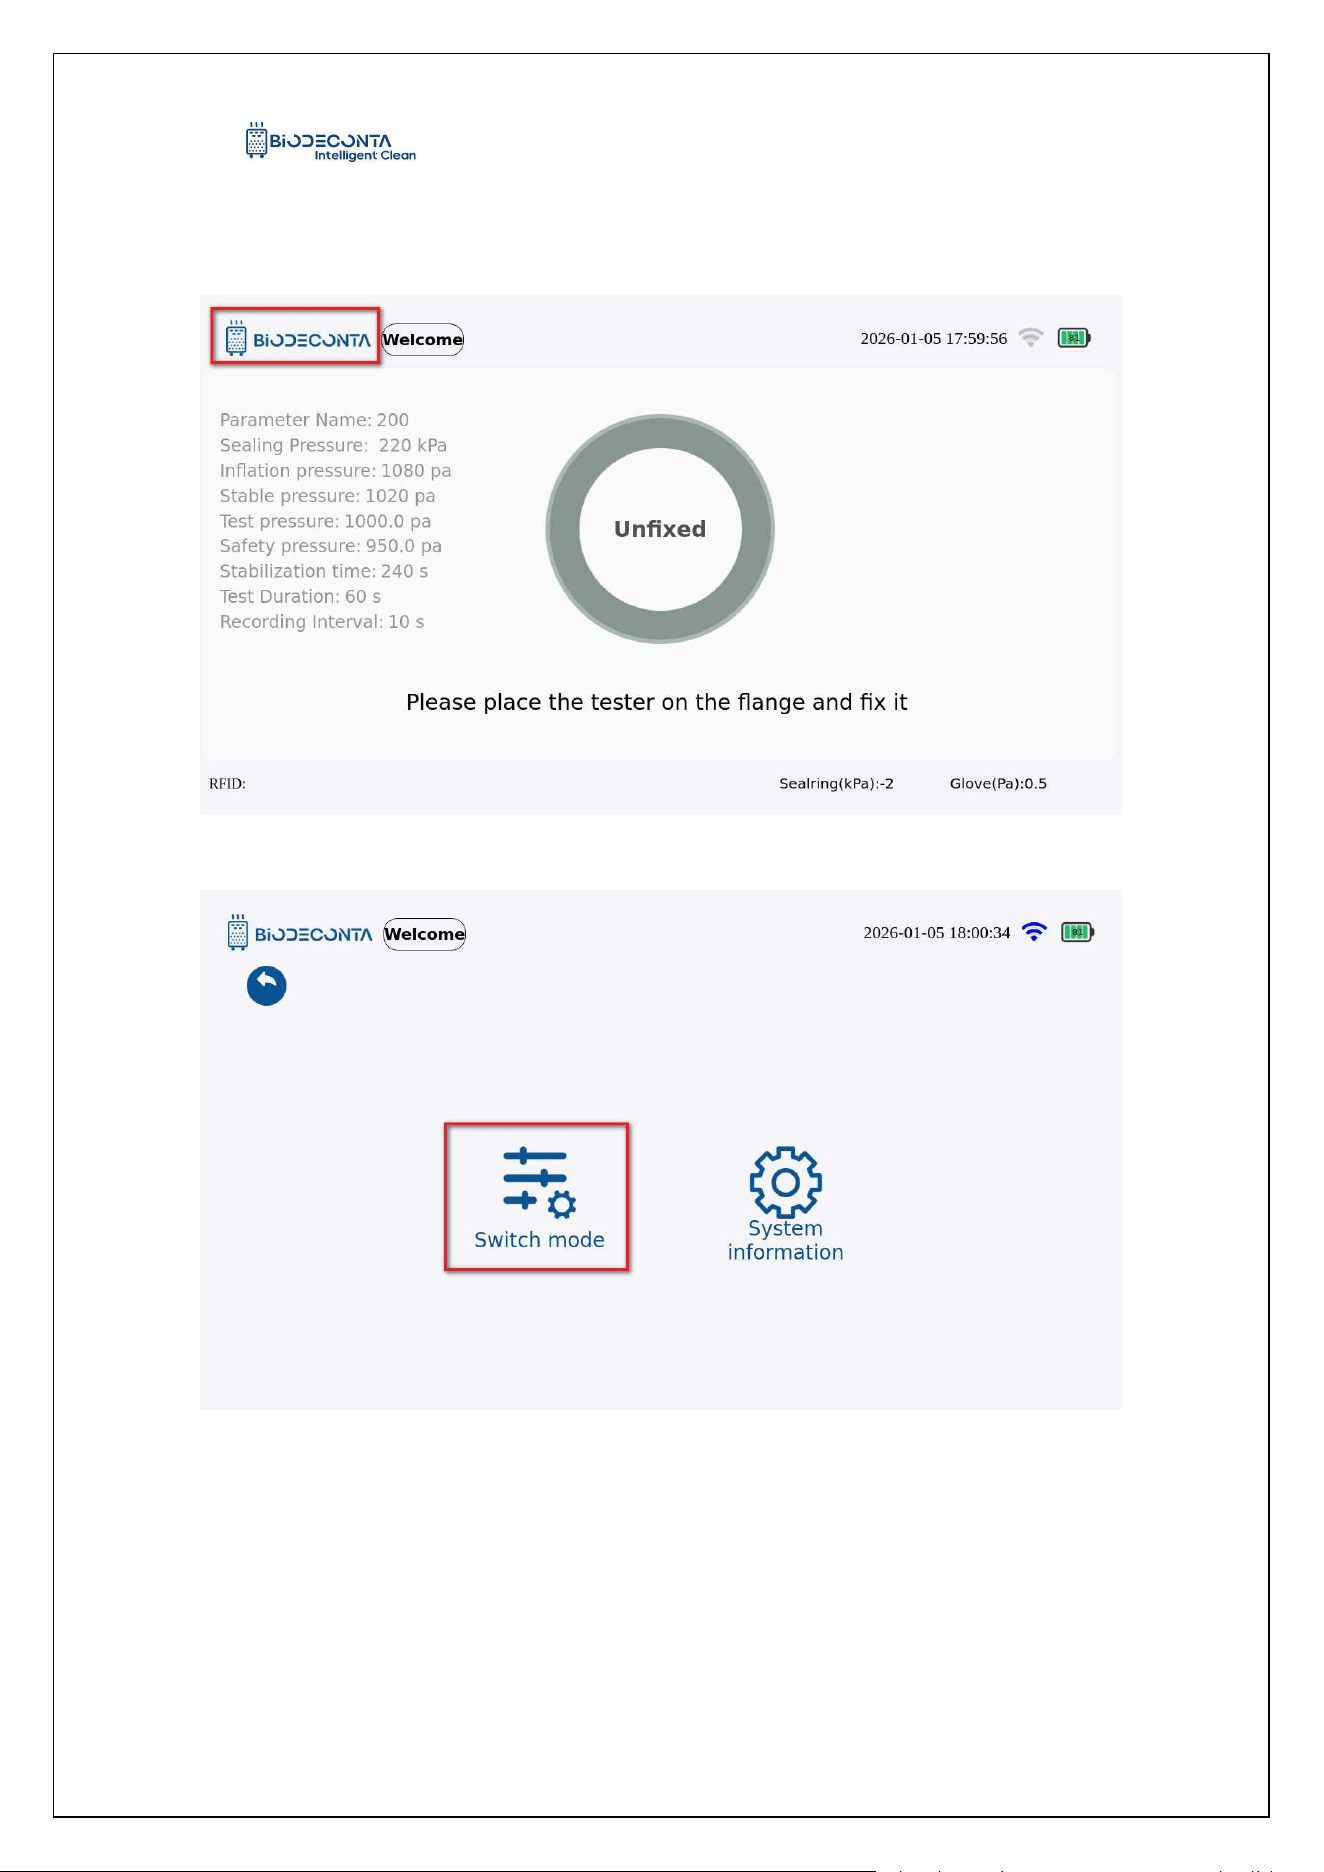
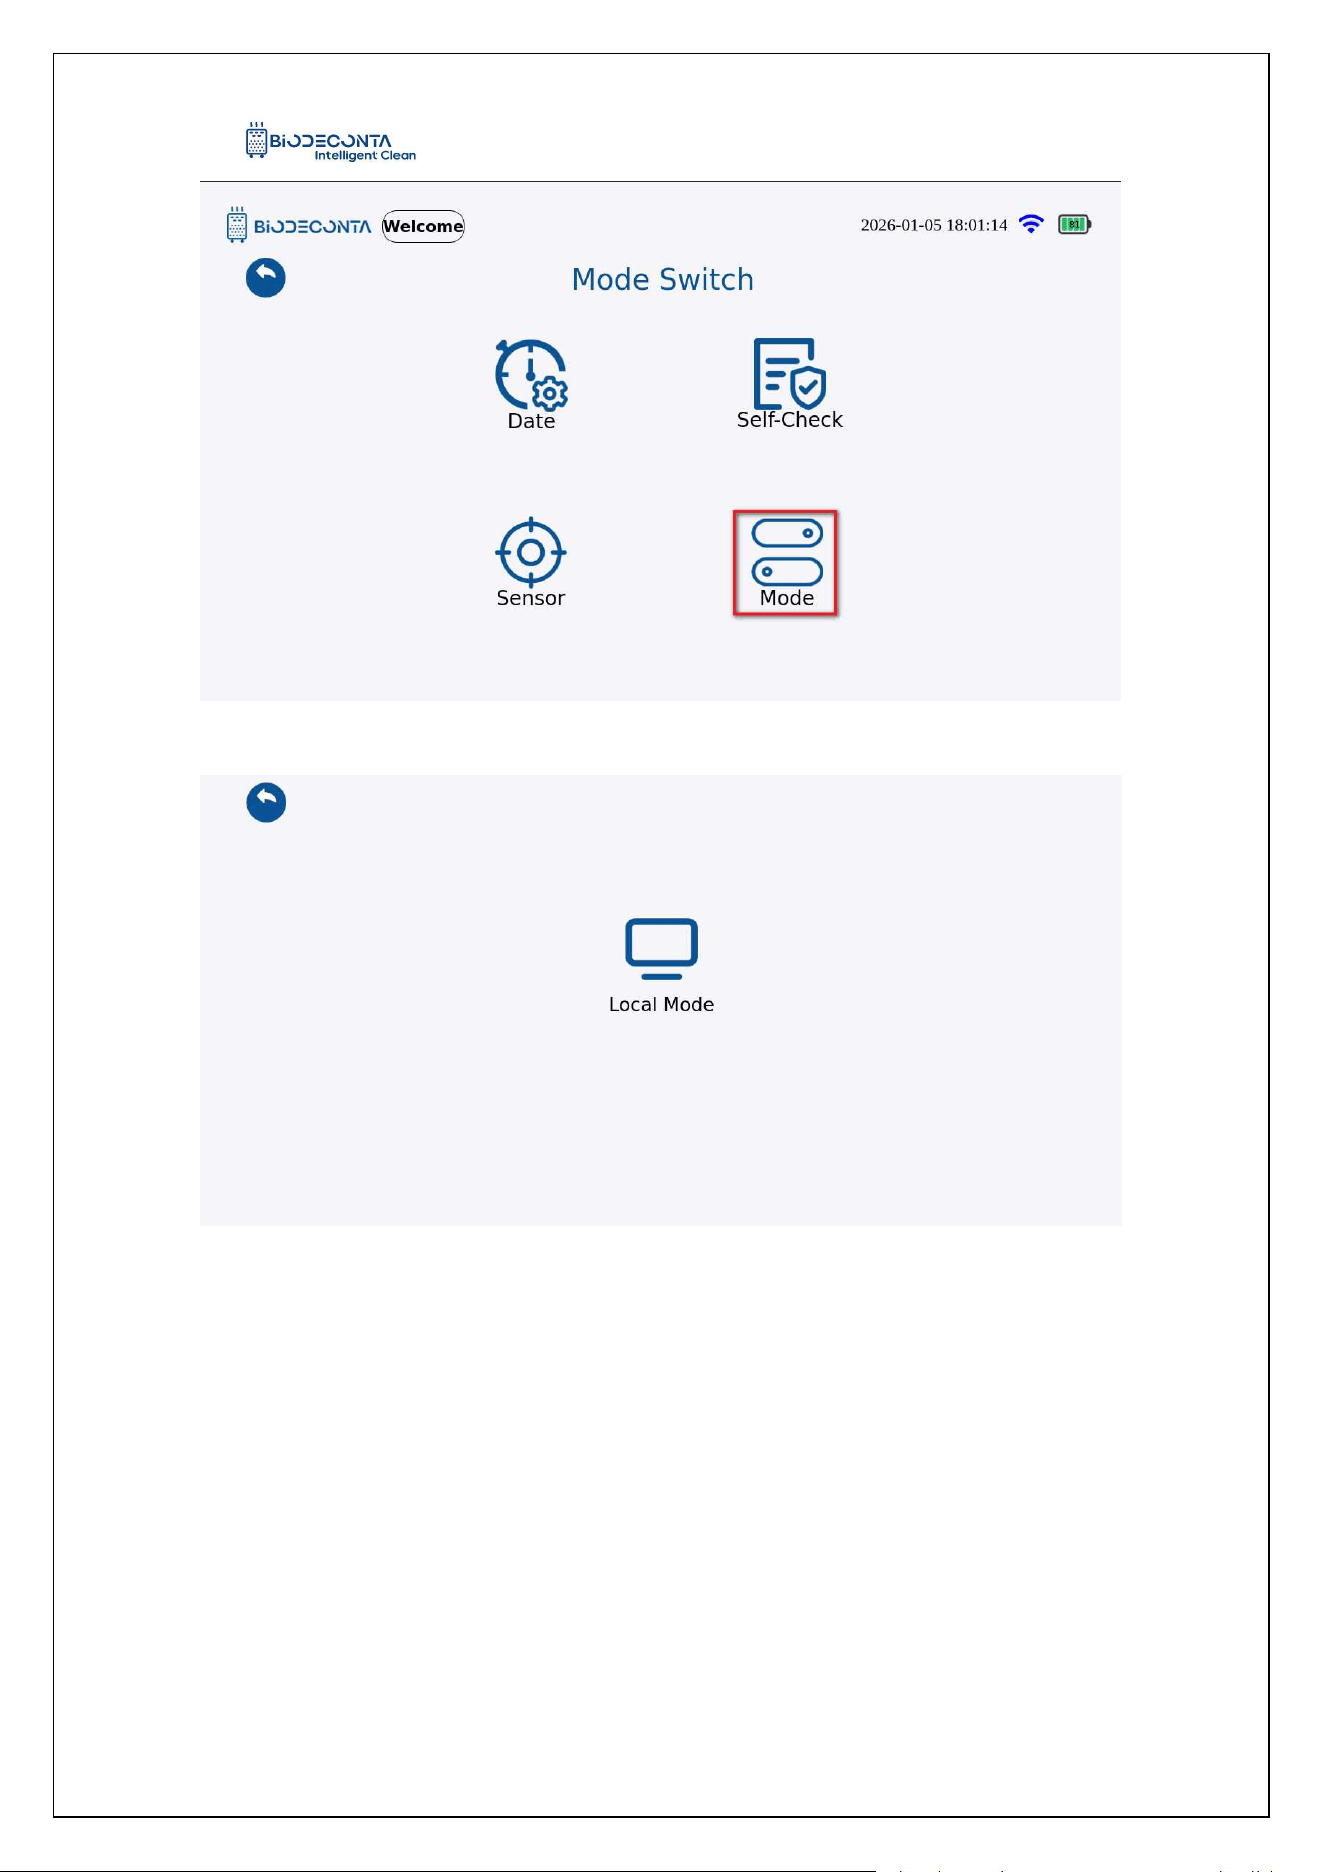
Click on the [ ] icon on the test interface, as shown in Figures 4-1.30 and
4-1.31 the page will then jump to the [Switch mode] and [System information] pages.
Click on [Switch mode] , as shown in Figure 4-1.32, and the page will jump to the
[Date], [Language ], [Self-Check], [Sensor], [Mode] pages. Click on [Mode], as shown
Intelligent Safe and Clean
www.biodeconta.com
32
in Figure 4-1.33, and the page will jump to the [Local Mode] page, this sub-module
mainly involves the Mode operation.
Figure 4.1-30 "Mode 1"
Figure 4.1-31 "Mode 2"
Intelligent Safe and Clean
www.biodeconta.com
33
Figure 4.1-32 "Mode 3"
Figure 4.1-33 "Mode 4"
4.11 Local Mode:
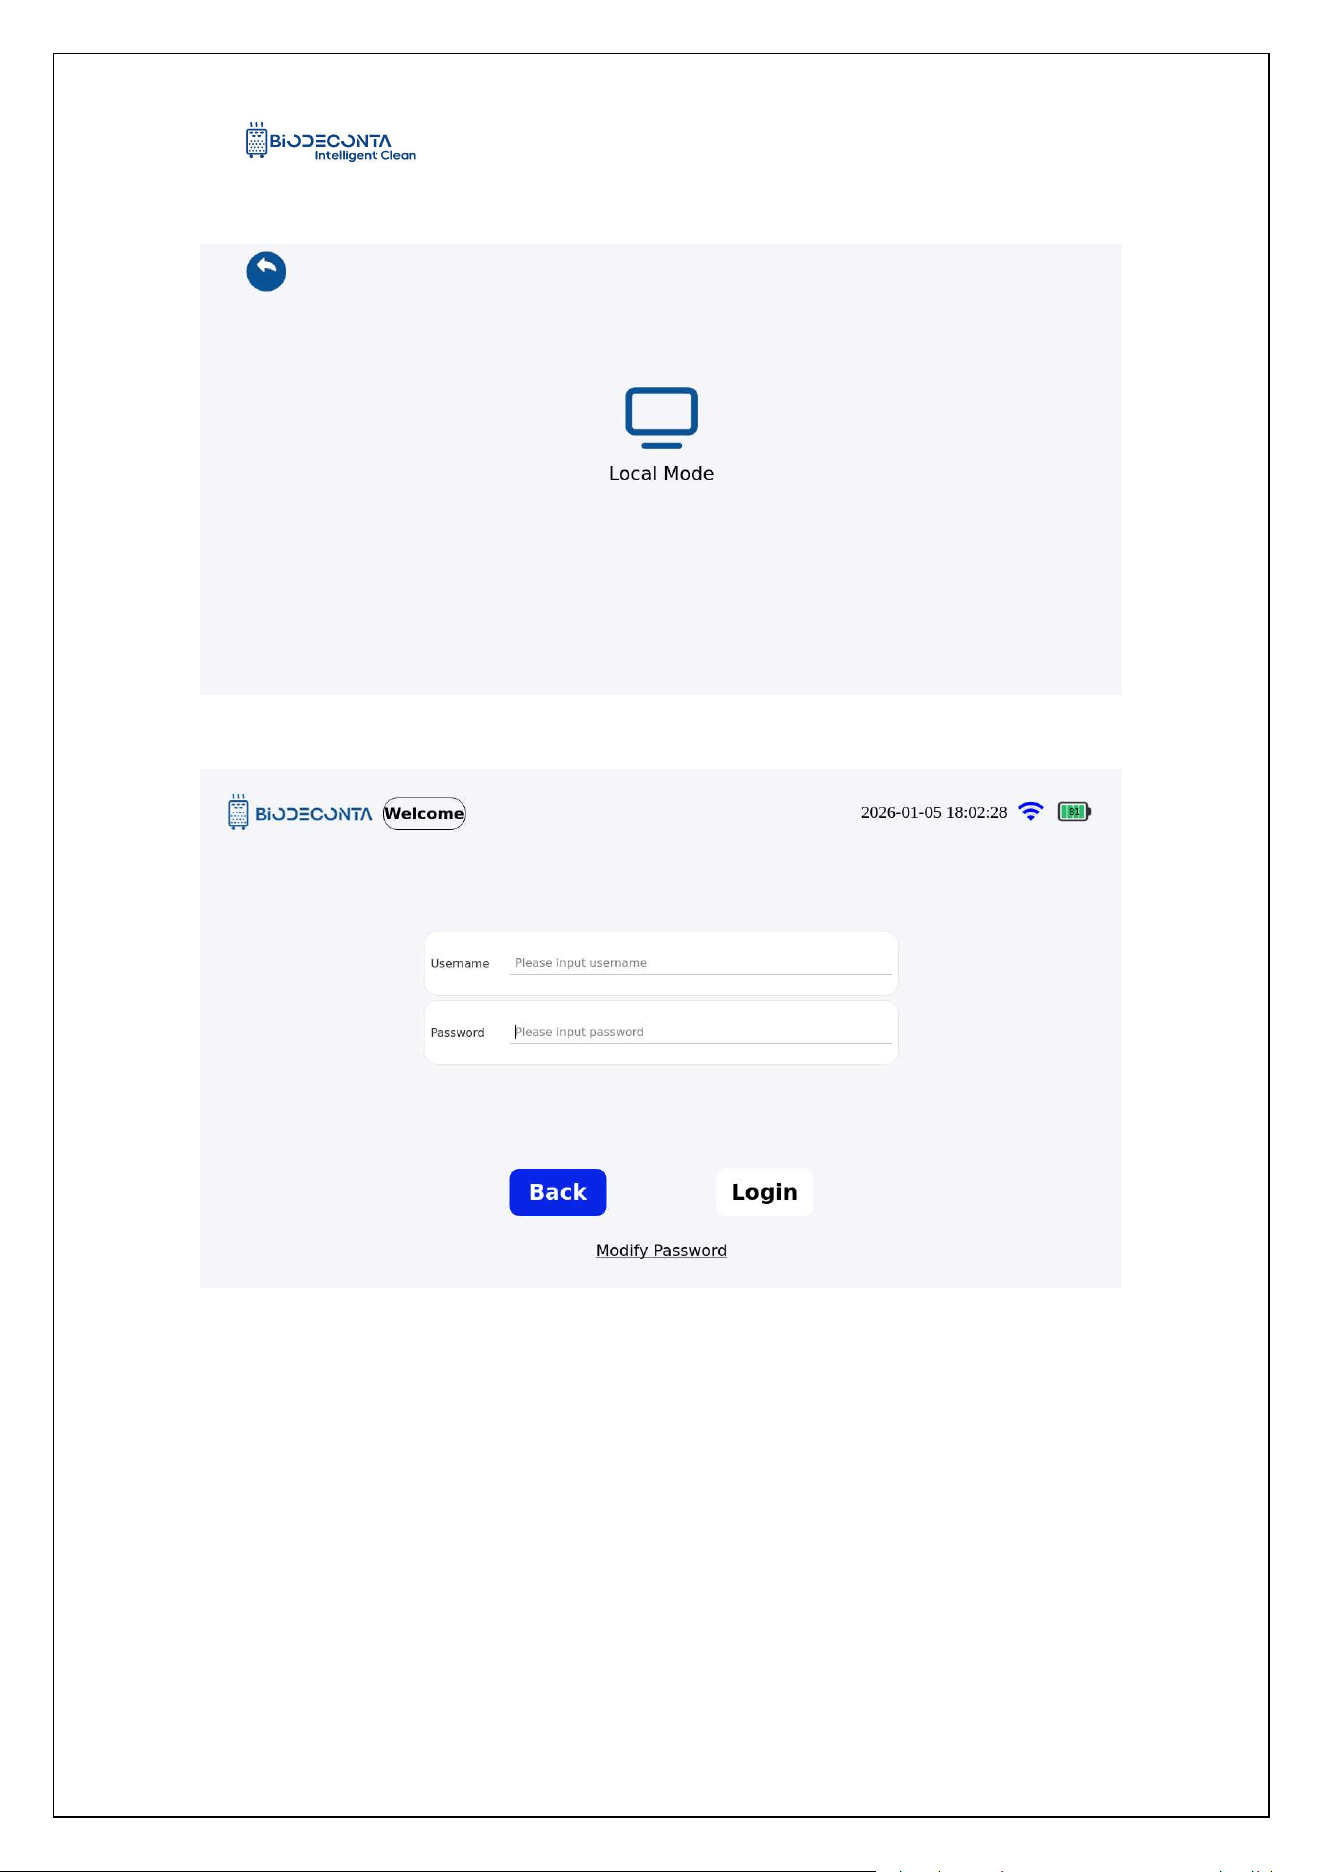
In the remote mode, click on [Mode] as shown in Figure 4-1.34, the page will then
jump to [Local Mode]. Click on "Local Mode", as shown in Figure 4-1.35, and the page
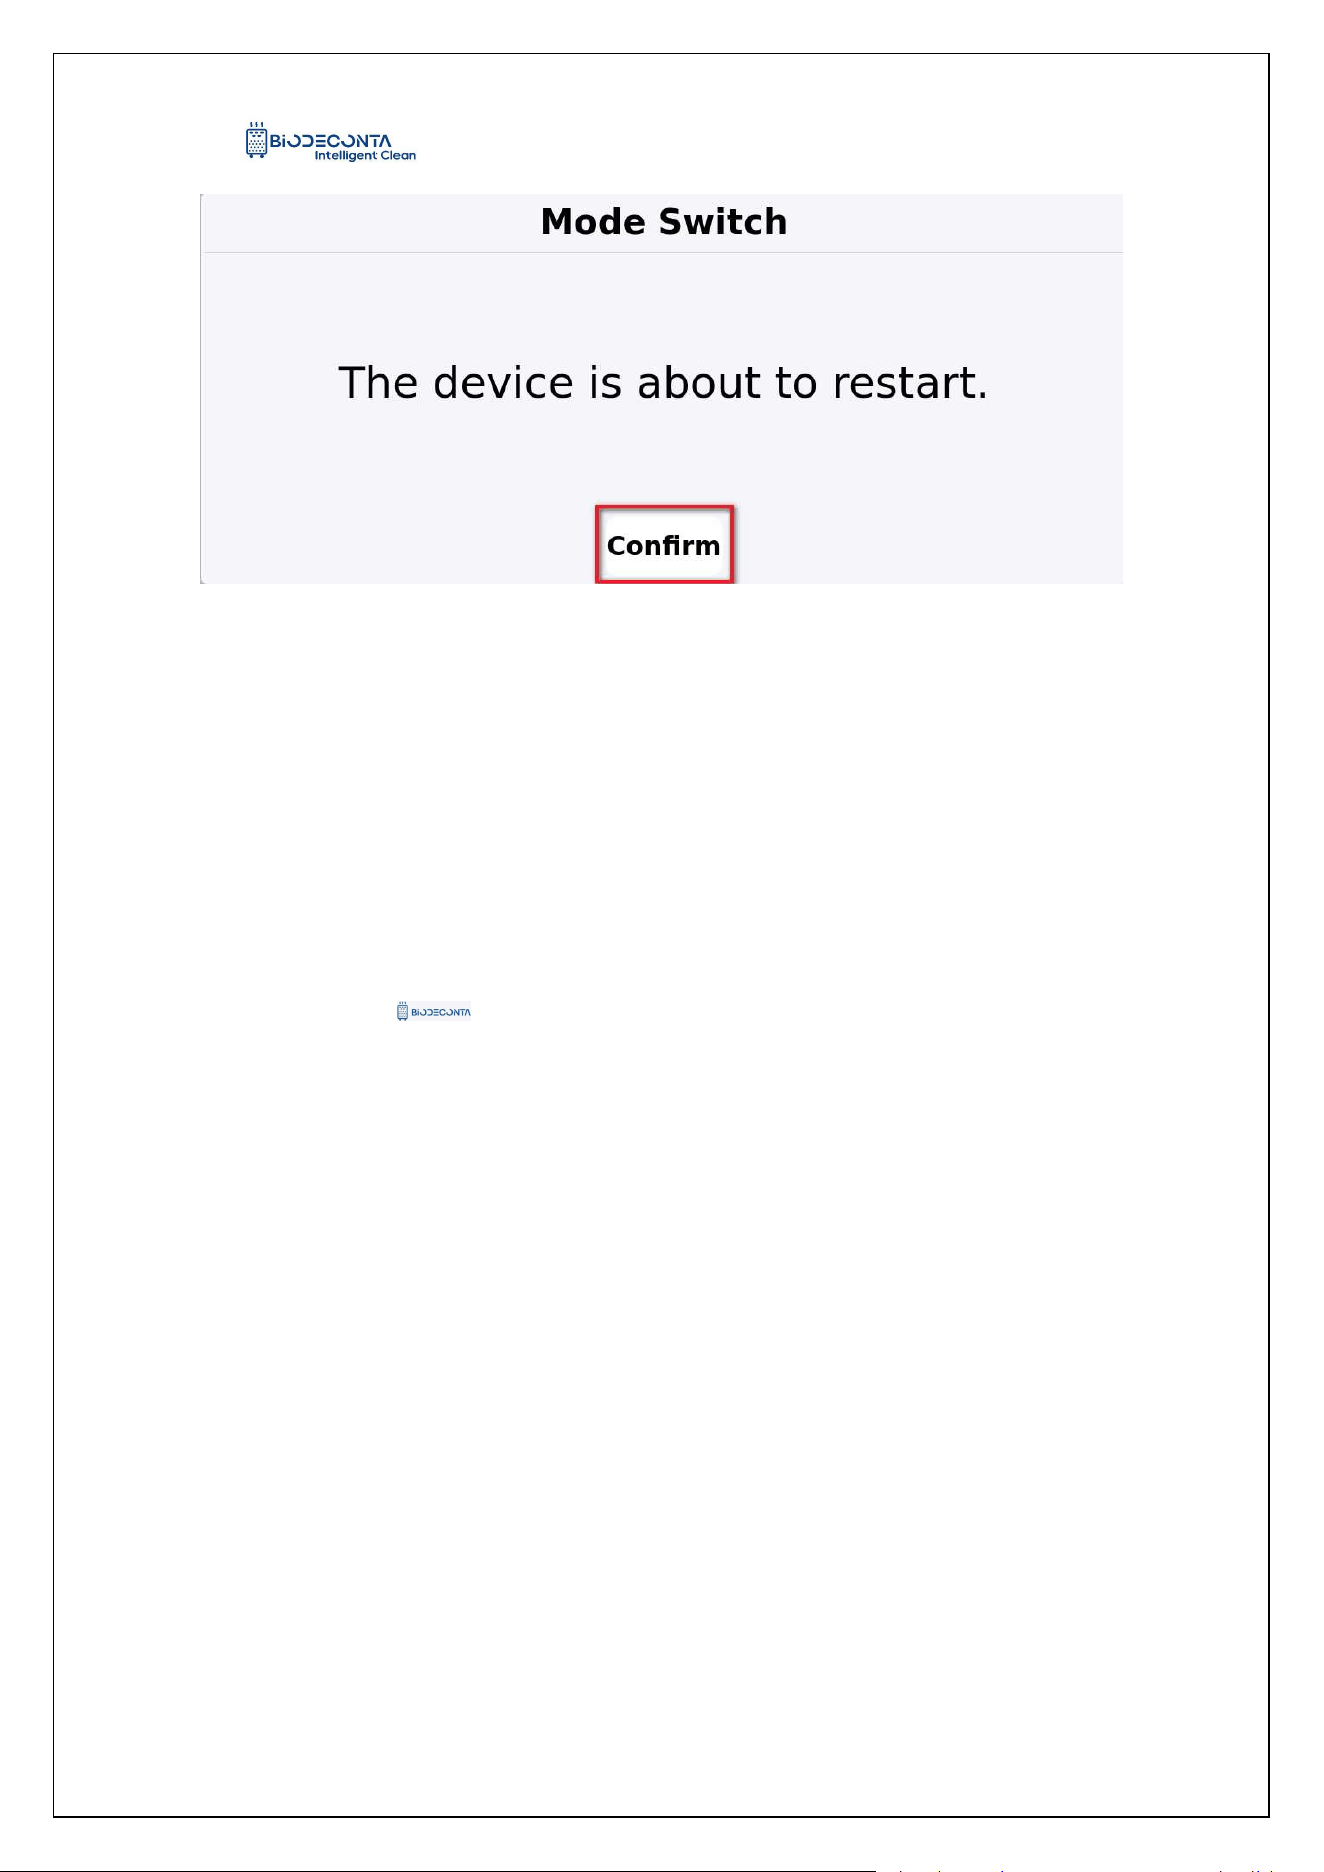
will jump to the login interface, fill in the account and password data, and click the
"Login" button. As shown in Figure 4-1.36, a message" The device is about to restart
"will pop up. Click the "Confirm" button, after the device restarts, you can switch to the
Intelligent Safe and Clean
www.biodeconta.com
34
local mode interface.
Figure 4.1-34 "Mode 1"
Figure 4.1-35 "Mode 2"
Intelligent Safe and Clean
www.biodeconta.com
35
Figure 4.1-36 "Mode 3"
Chapter 5 System information
5. System information
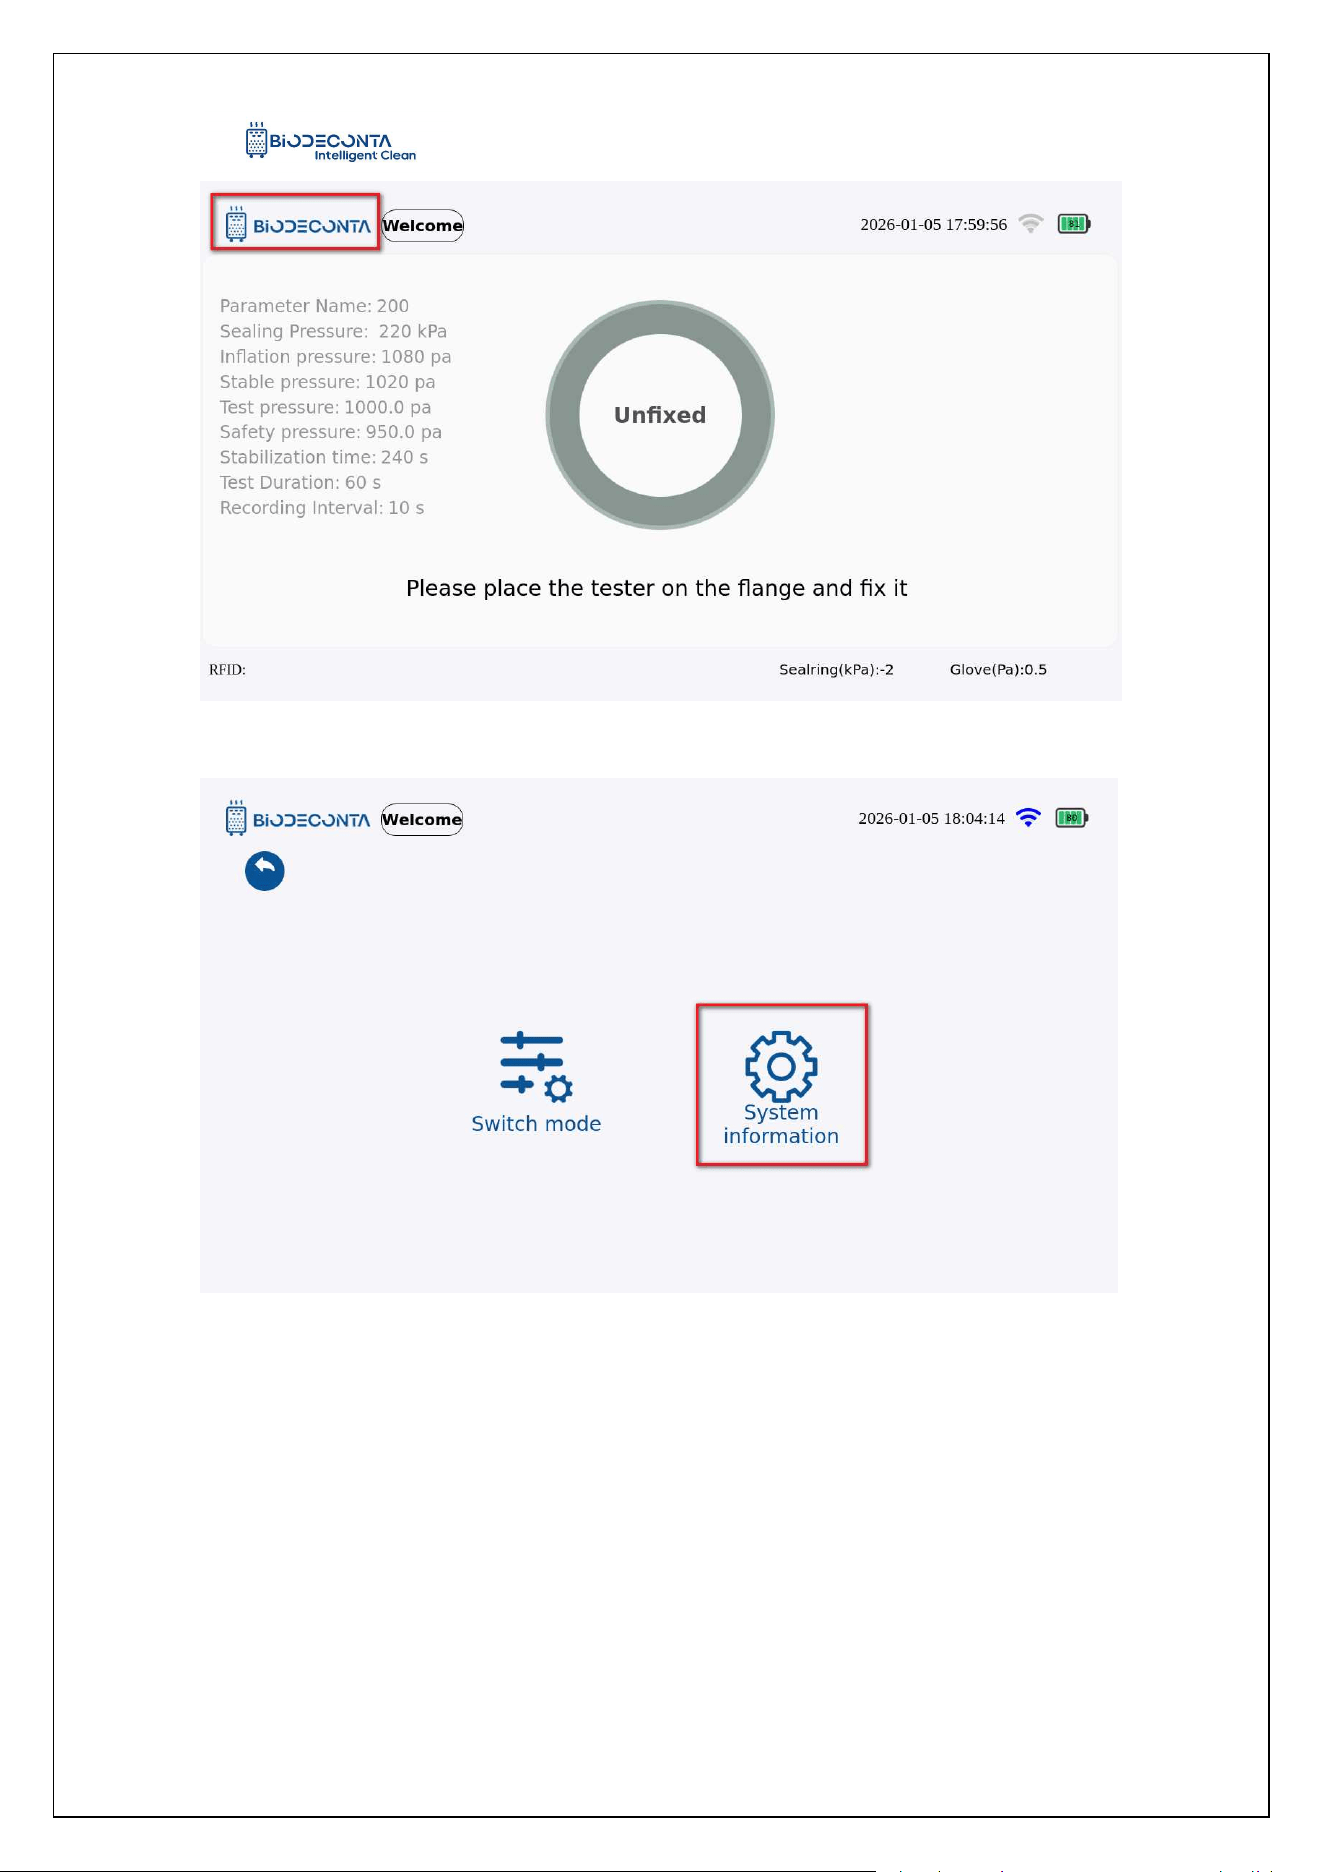
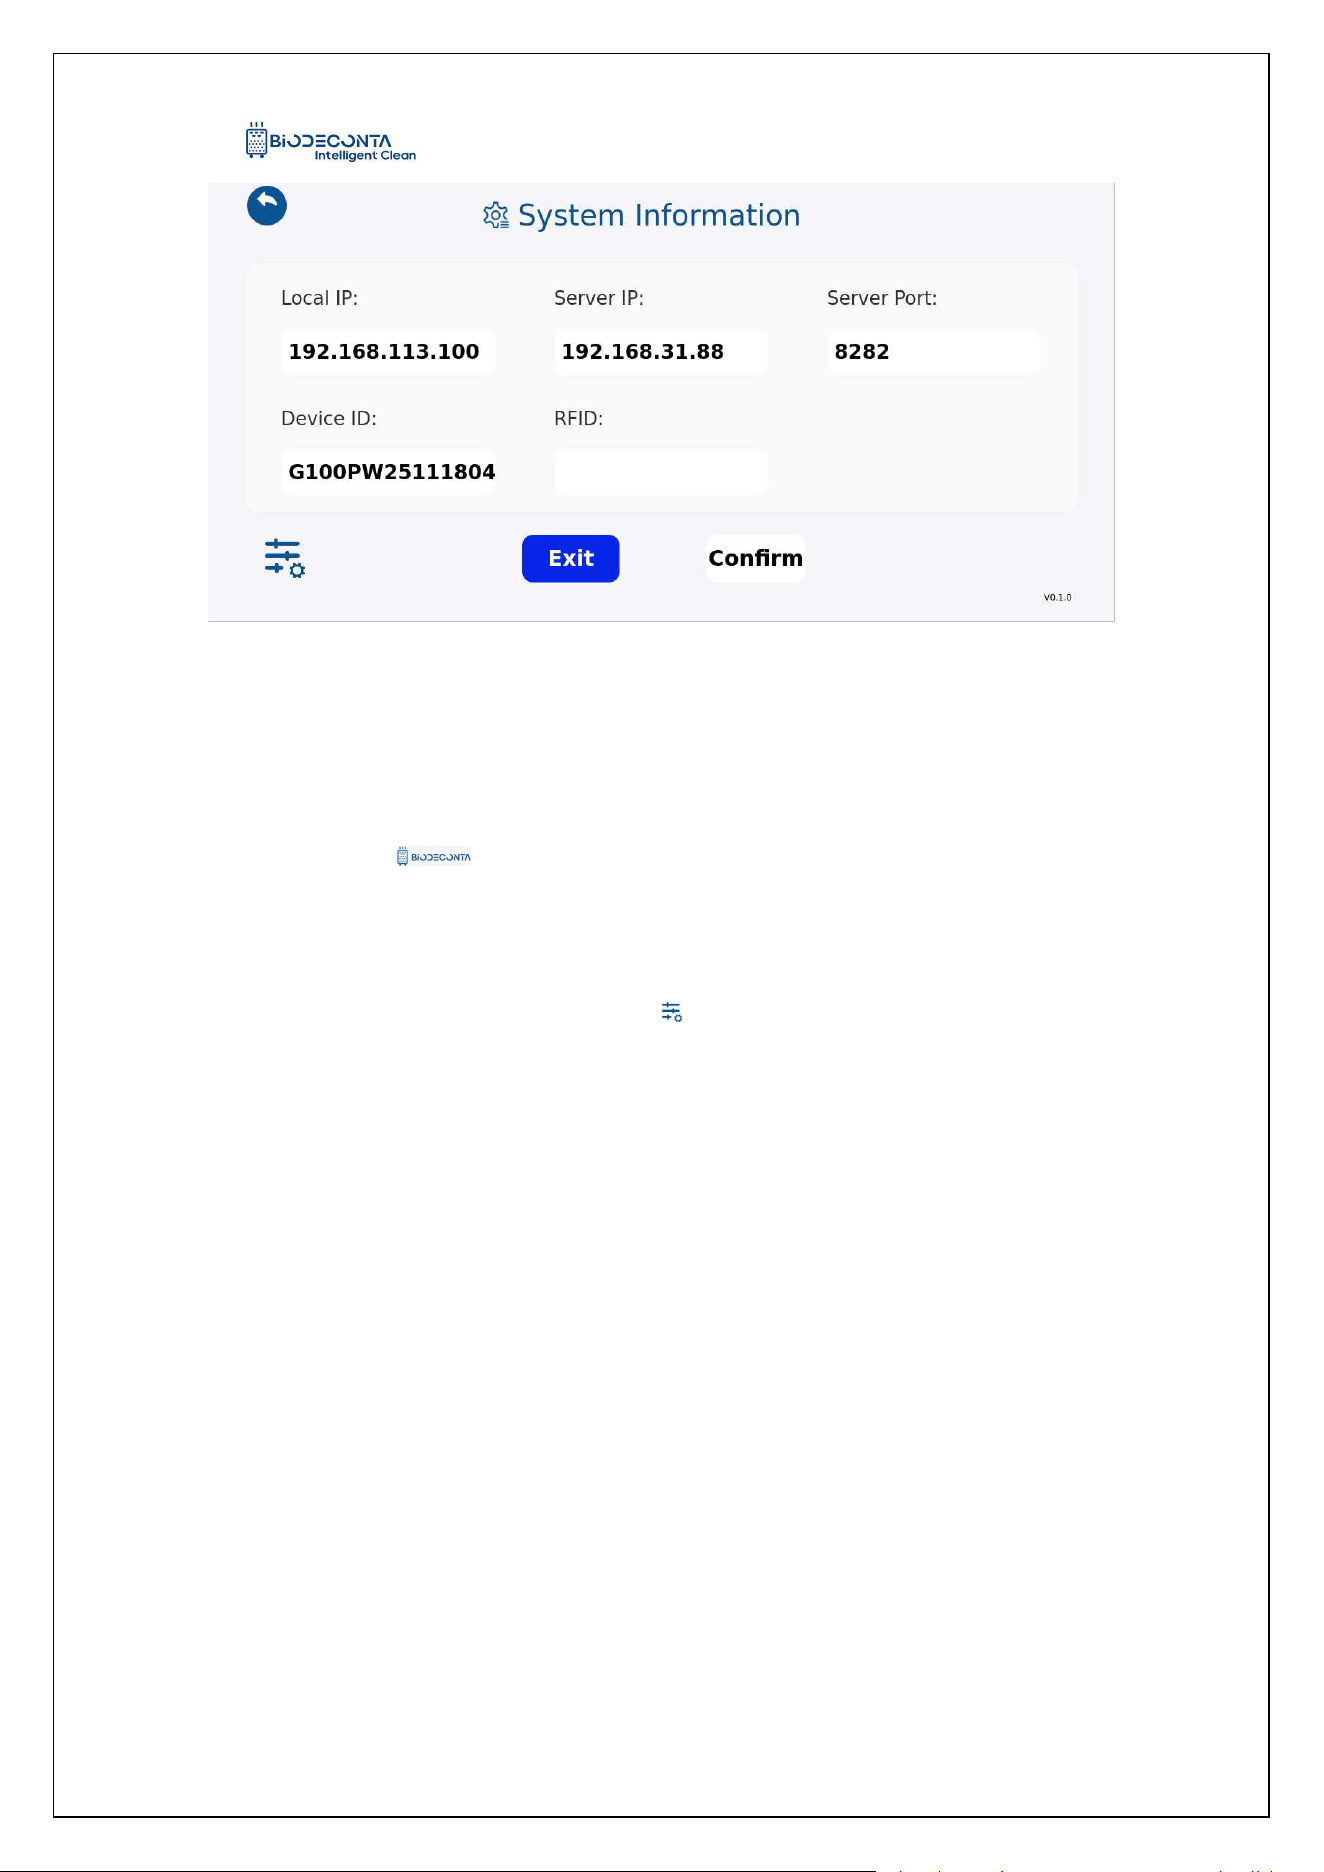
Click on the [ ] icon on the test interface, as shown in Figures 5-1.1 and
5-1.2, the page will then jump to the [Switch mode] and [System information] pages.
Click on[System information], as shown in Figure 5.1-3, and the page will jump to the
"System Information" page. This module mainly involves the operation for determining
system information.
Intelligent Safe and Clean
www.biodeconta.com
36
Figure 5.1-1 "System Information 1"
Figure 5.1-2 "System Information 2"
Intelligent Safe and Clean
www.biodeconta.com
37
Figure 5.1-3 "System Information 3"
5.1 System information-Alarm Configuration:
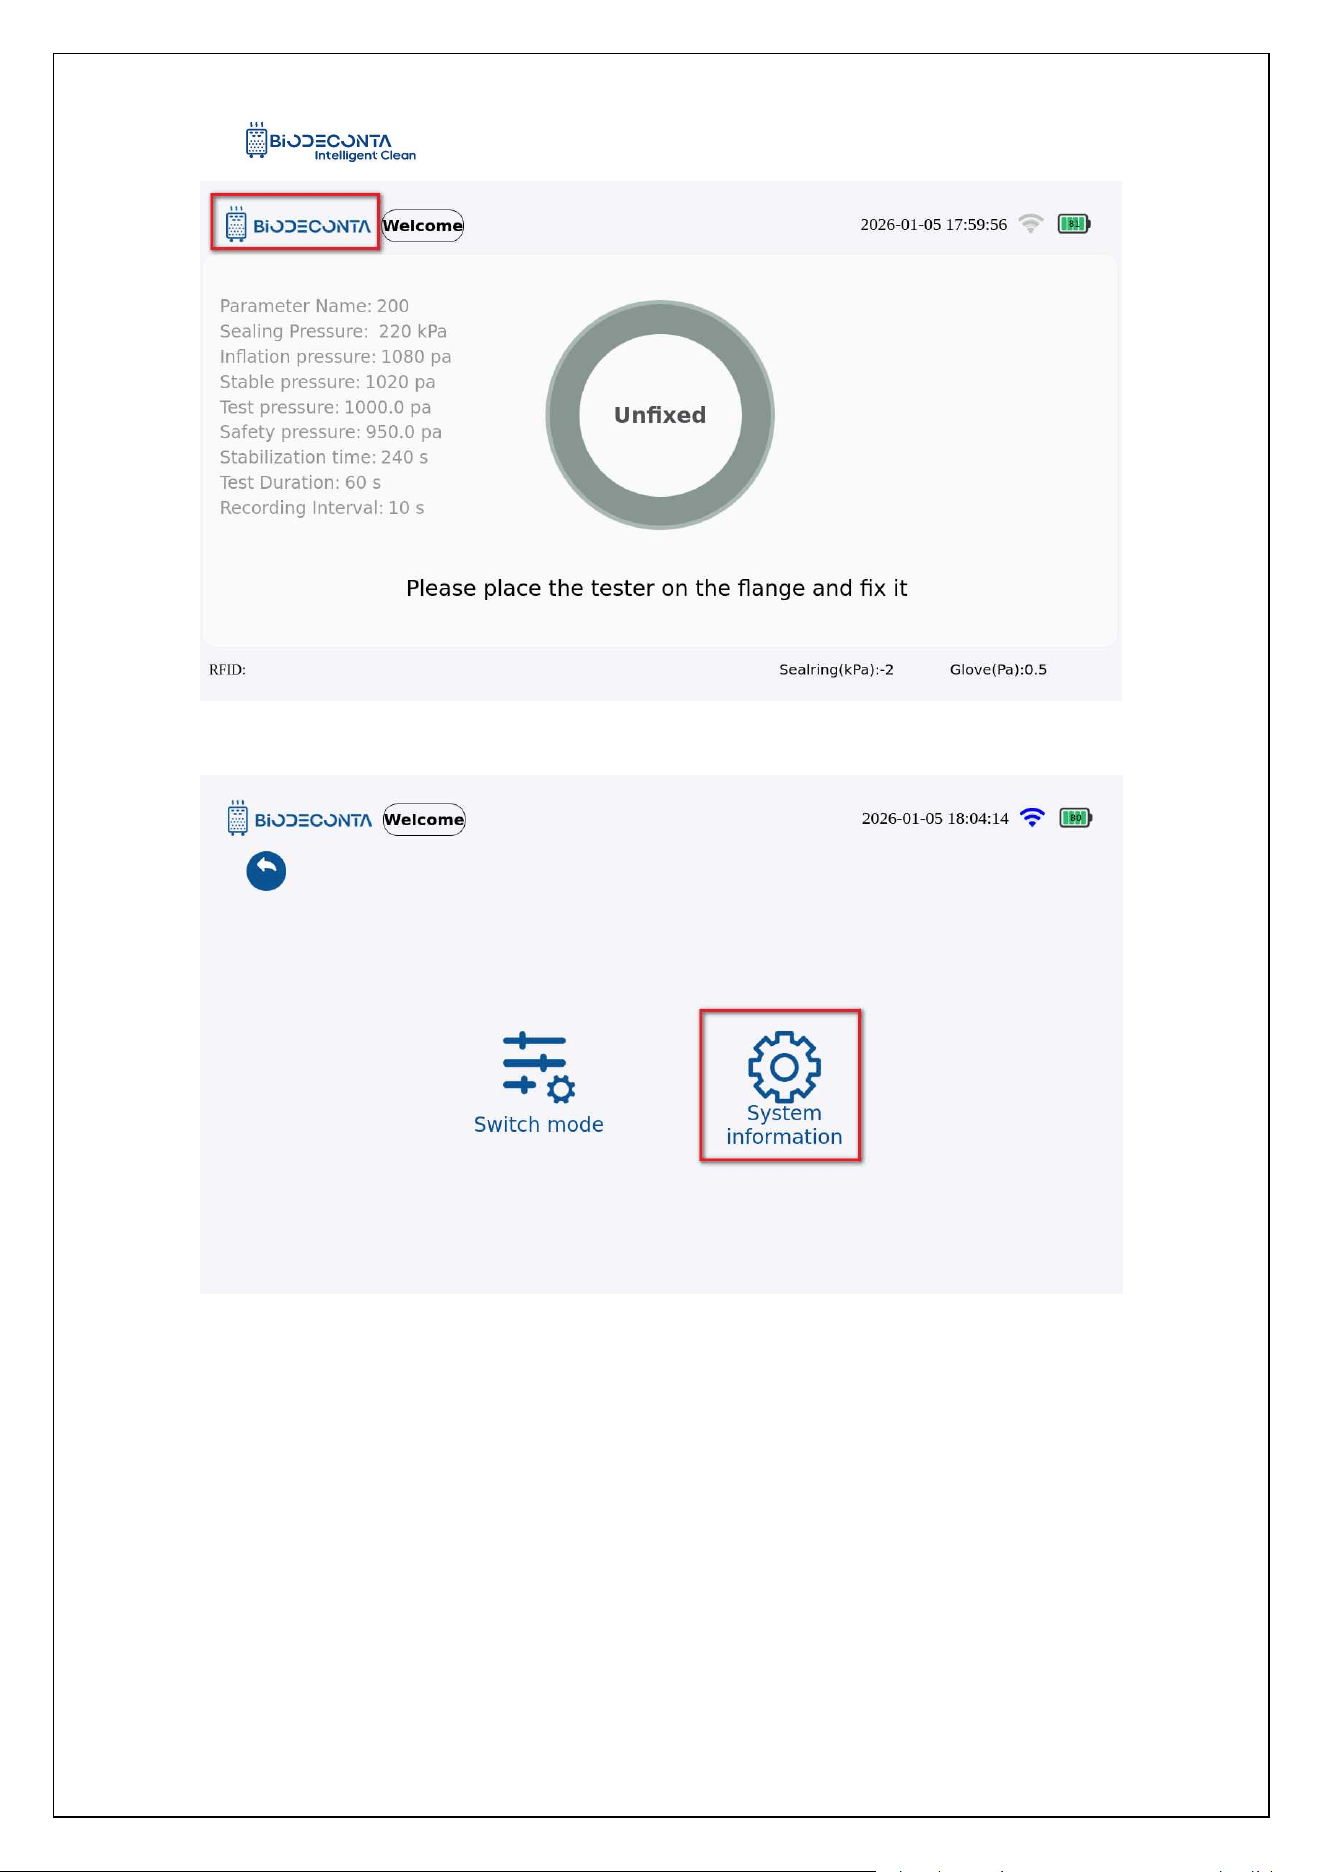
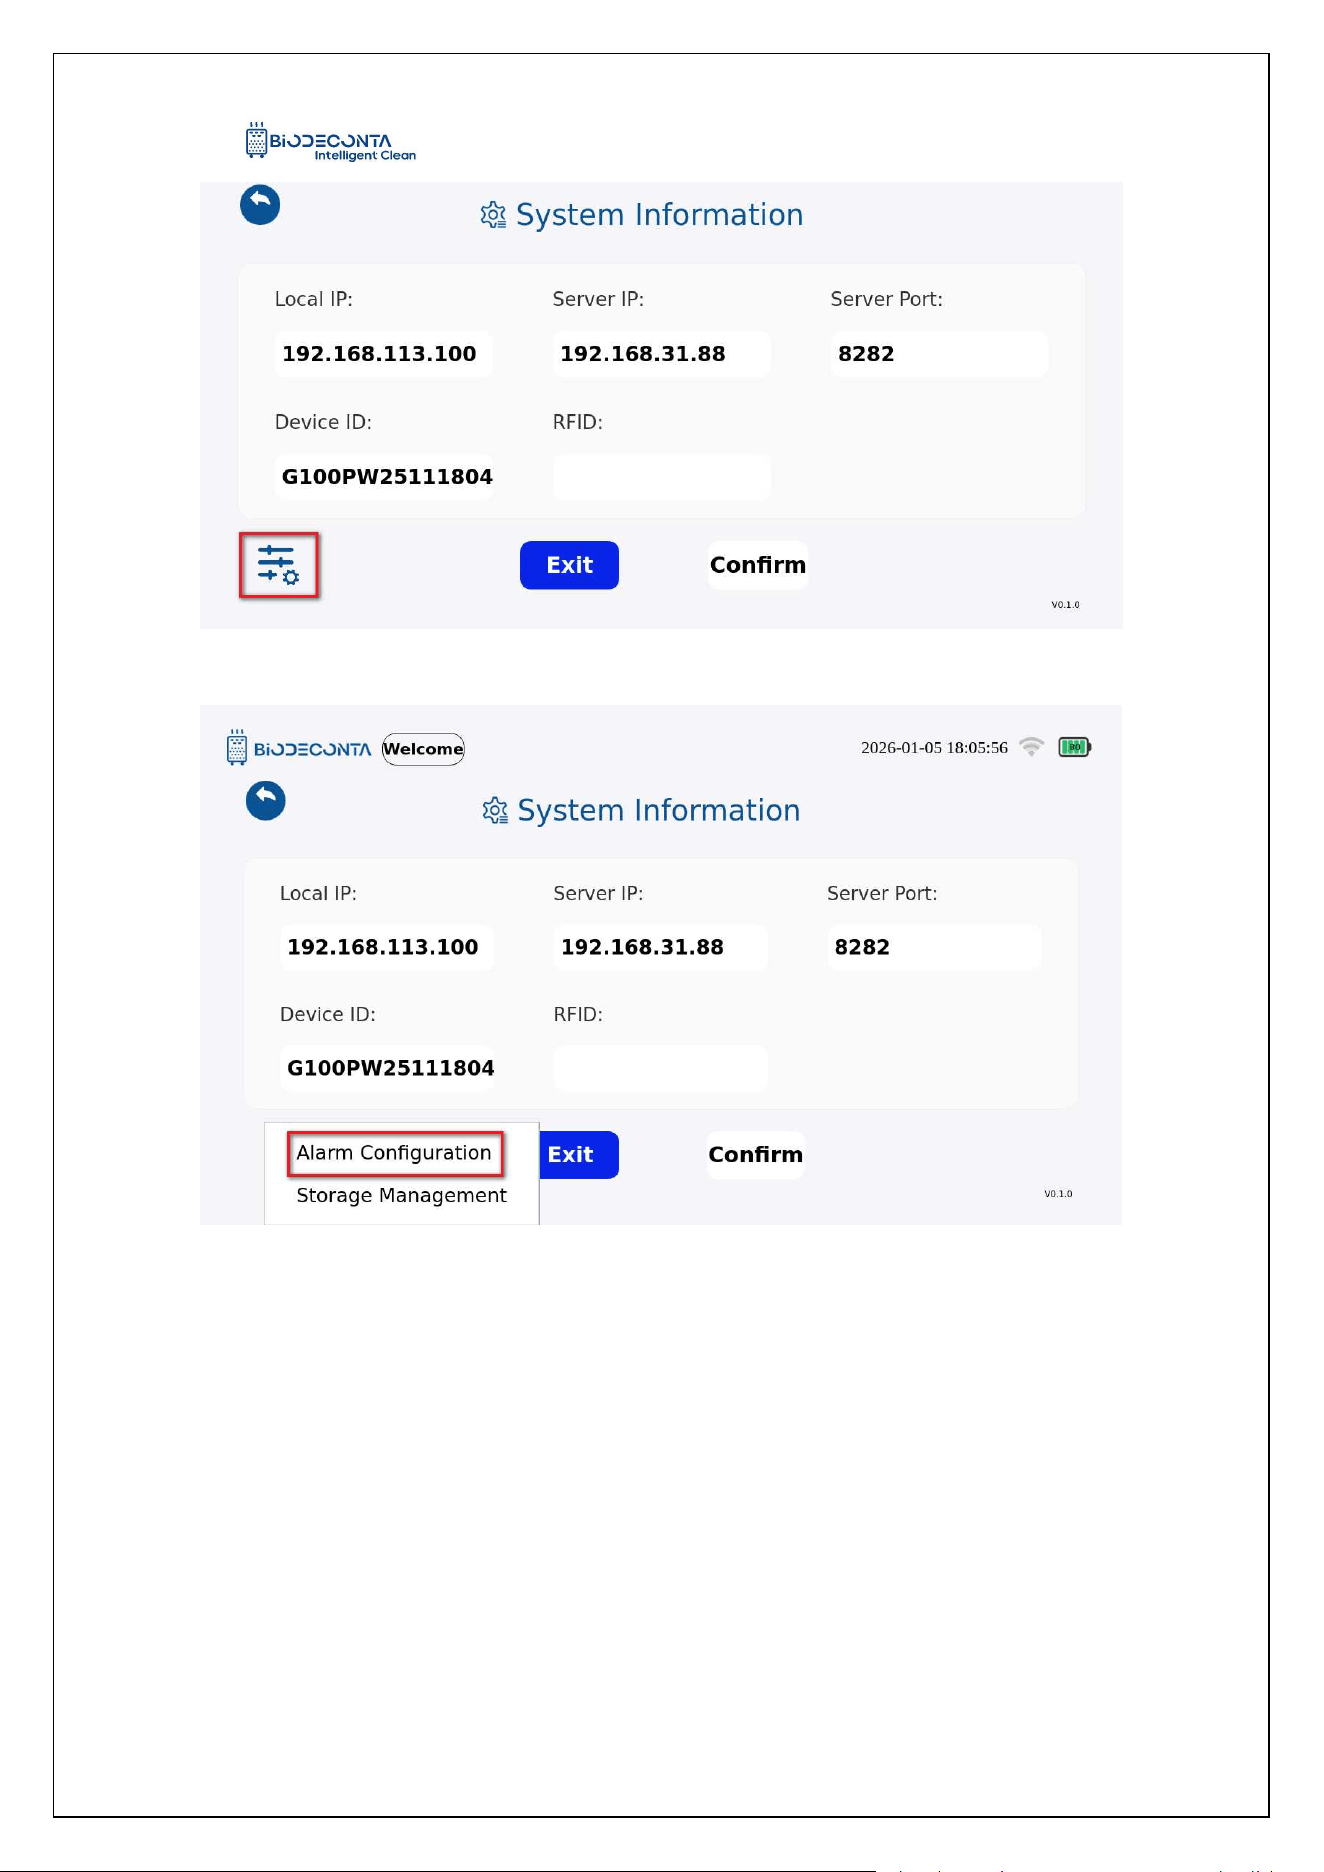
Click on the [ ] icon on the test interface, as shown in Figures 5-1.4 and
5-1.5, the page will then jump to the [Switch mode] and [System information] pages.
Click on[System information]. As shown in Figures 5-1.6, and the page will jump to the
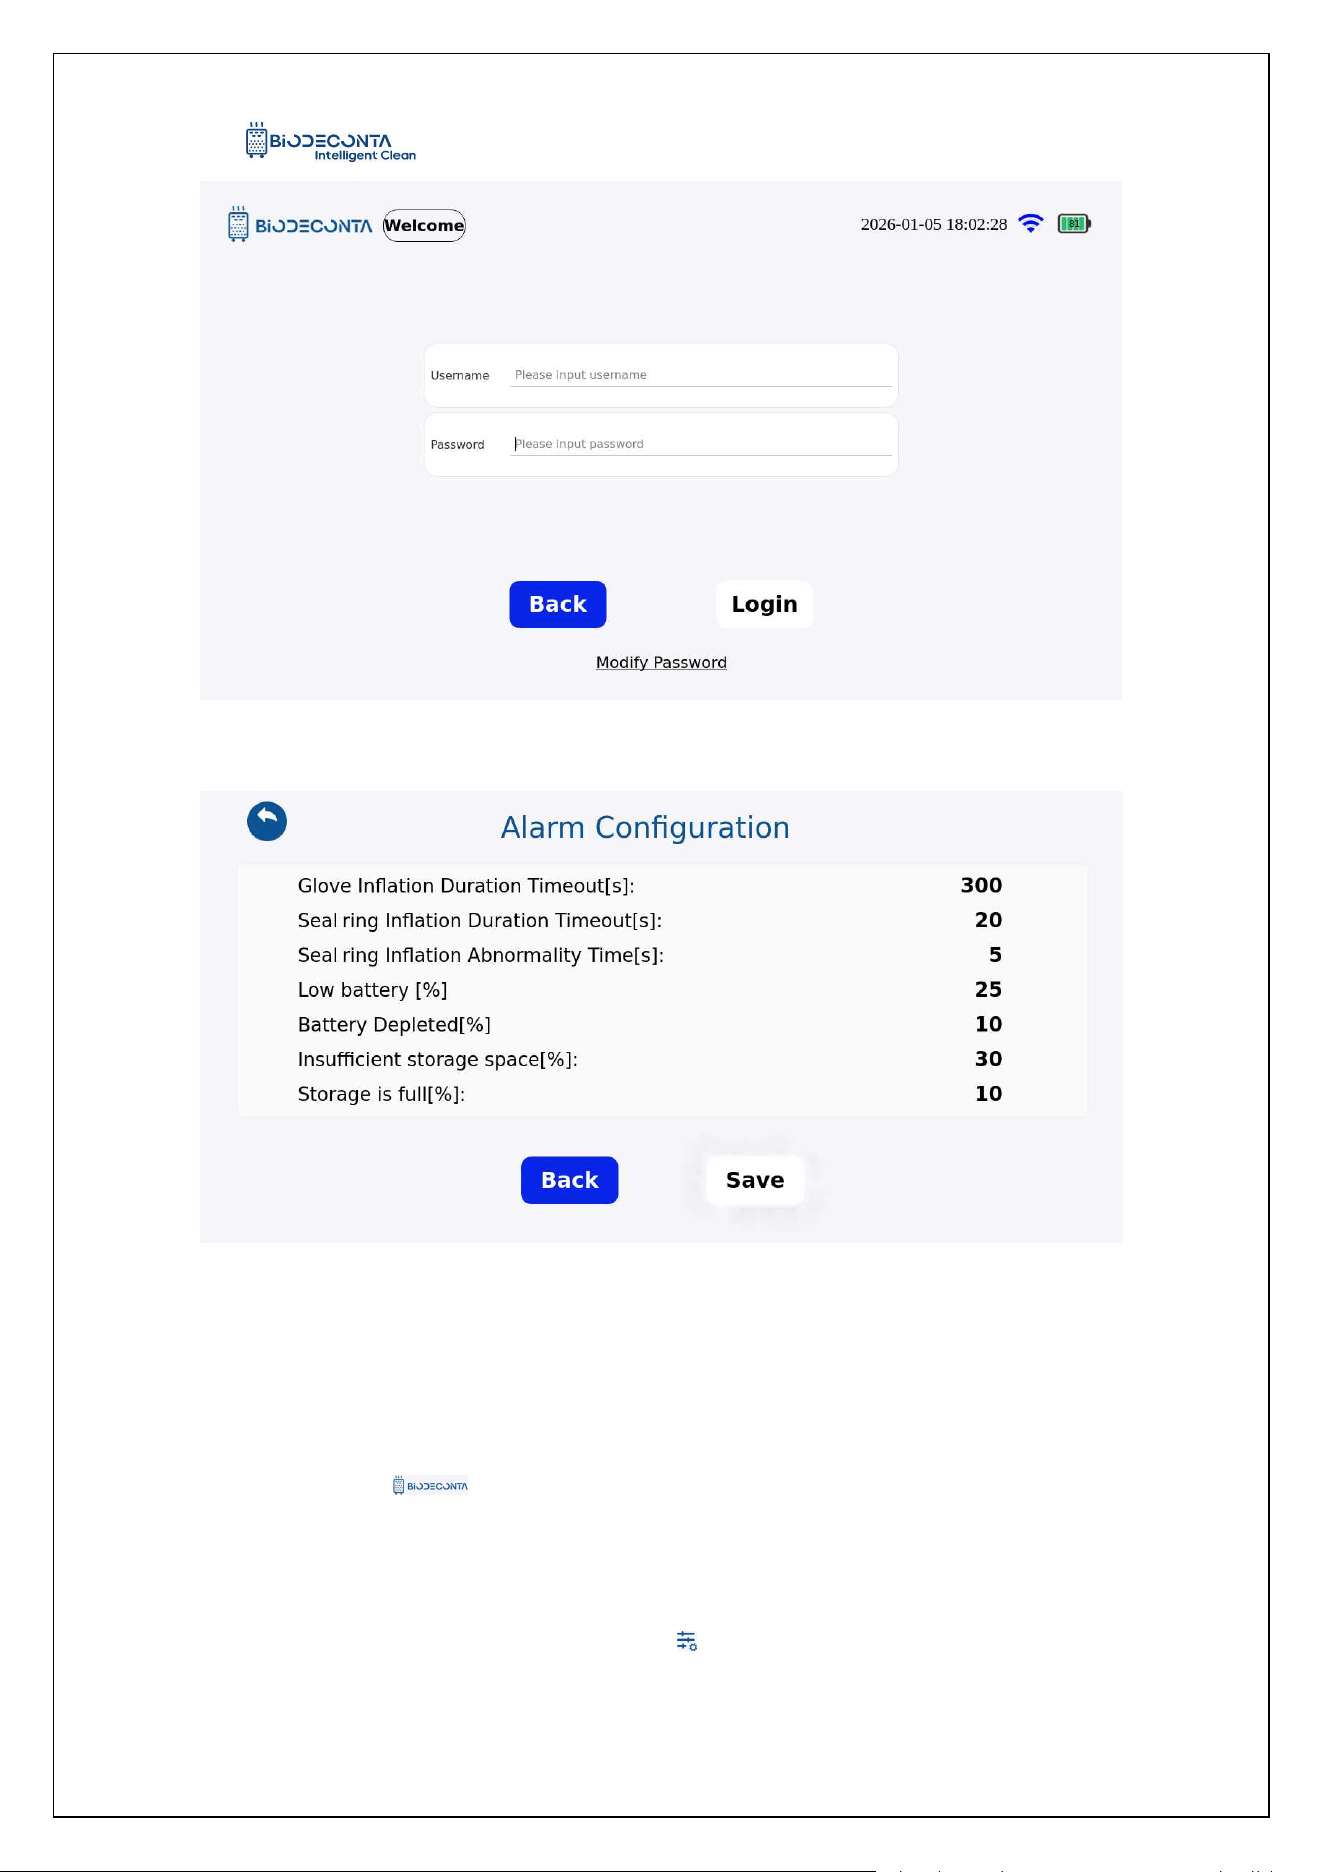
"System Information" page, click on the [ ] icon, as shown in Figures 5-1.7, click
on[Alarm Configuration], as shown in Figures 5-1.8, and the page will jump to the
login interface, fill in the account and password data, and click the "Login" button, as
shown in Figures 5-1.9, the page is redirected to the "Alarm Configuration" page, after
the system issues the test task, the data will be automatically synchronized to the
alarm settings page.
Intelligent Safe and Clean
www.biodeconta.com
38
Figure 5.1-4 "Alarm Configuration 1"
Figure 5.1-5 "Alarm Configuration 2"
Intelligent Safe and Clean
www.biodeconta.com
39
Figure 5.1-6 "Alarm Configuration 3"
Figure 5.1-7 "Alarm Configuration 4"
Intelligent Safe and Clean
www.biodeconta.com
40
Figure 5.1-8 "Alarm Configuration 5"
Figure 5.1-9 "Alarm Configuration 6"
5.2 System information-Storage Management
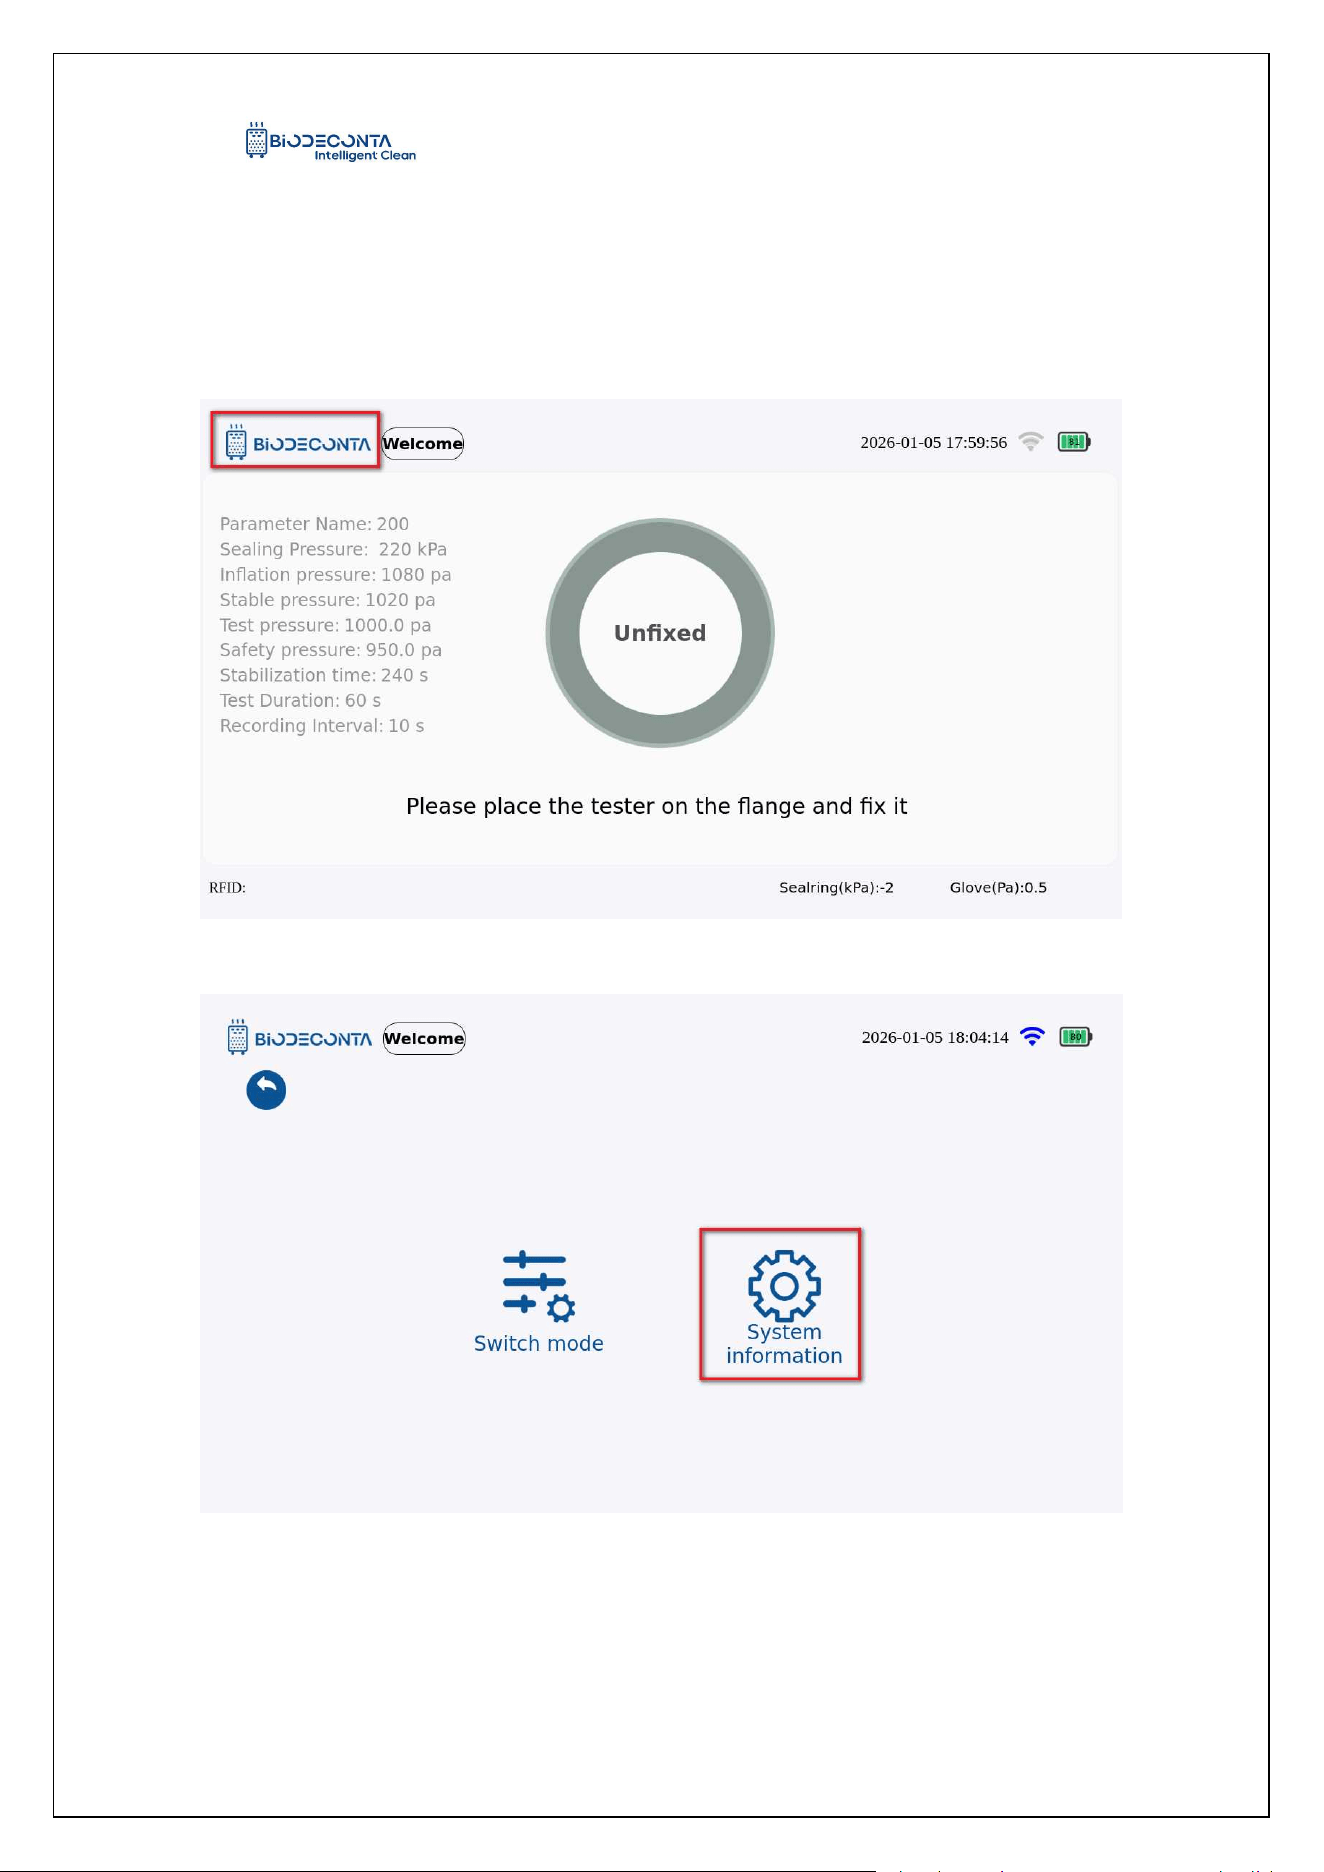
Click on the [ ] icon on the test interface, as shown in Figures 5-1.10 and
5-1.11, the page will then jump to the [Switch mode] and [System information] pages,
click on [System information]. As shown in Figures 5-1.12, and the page will jump to
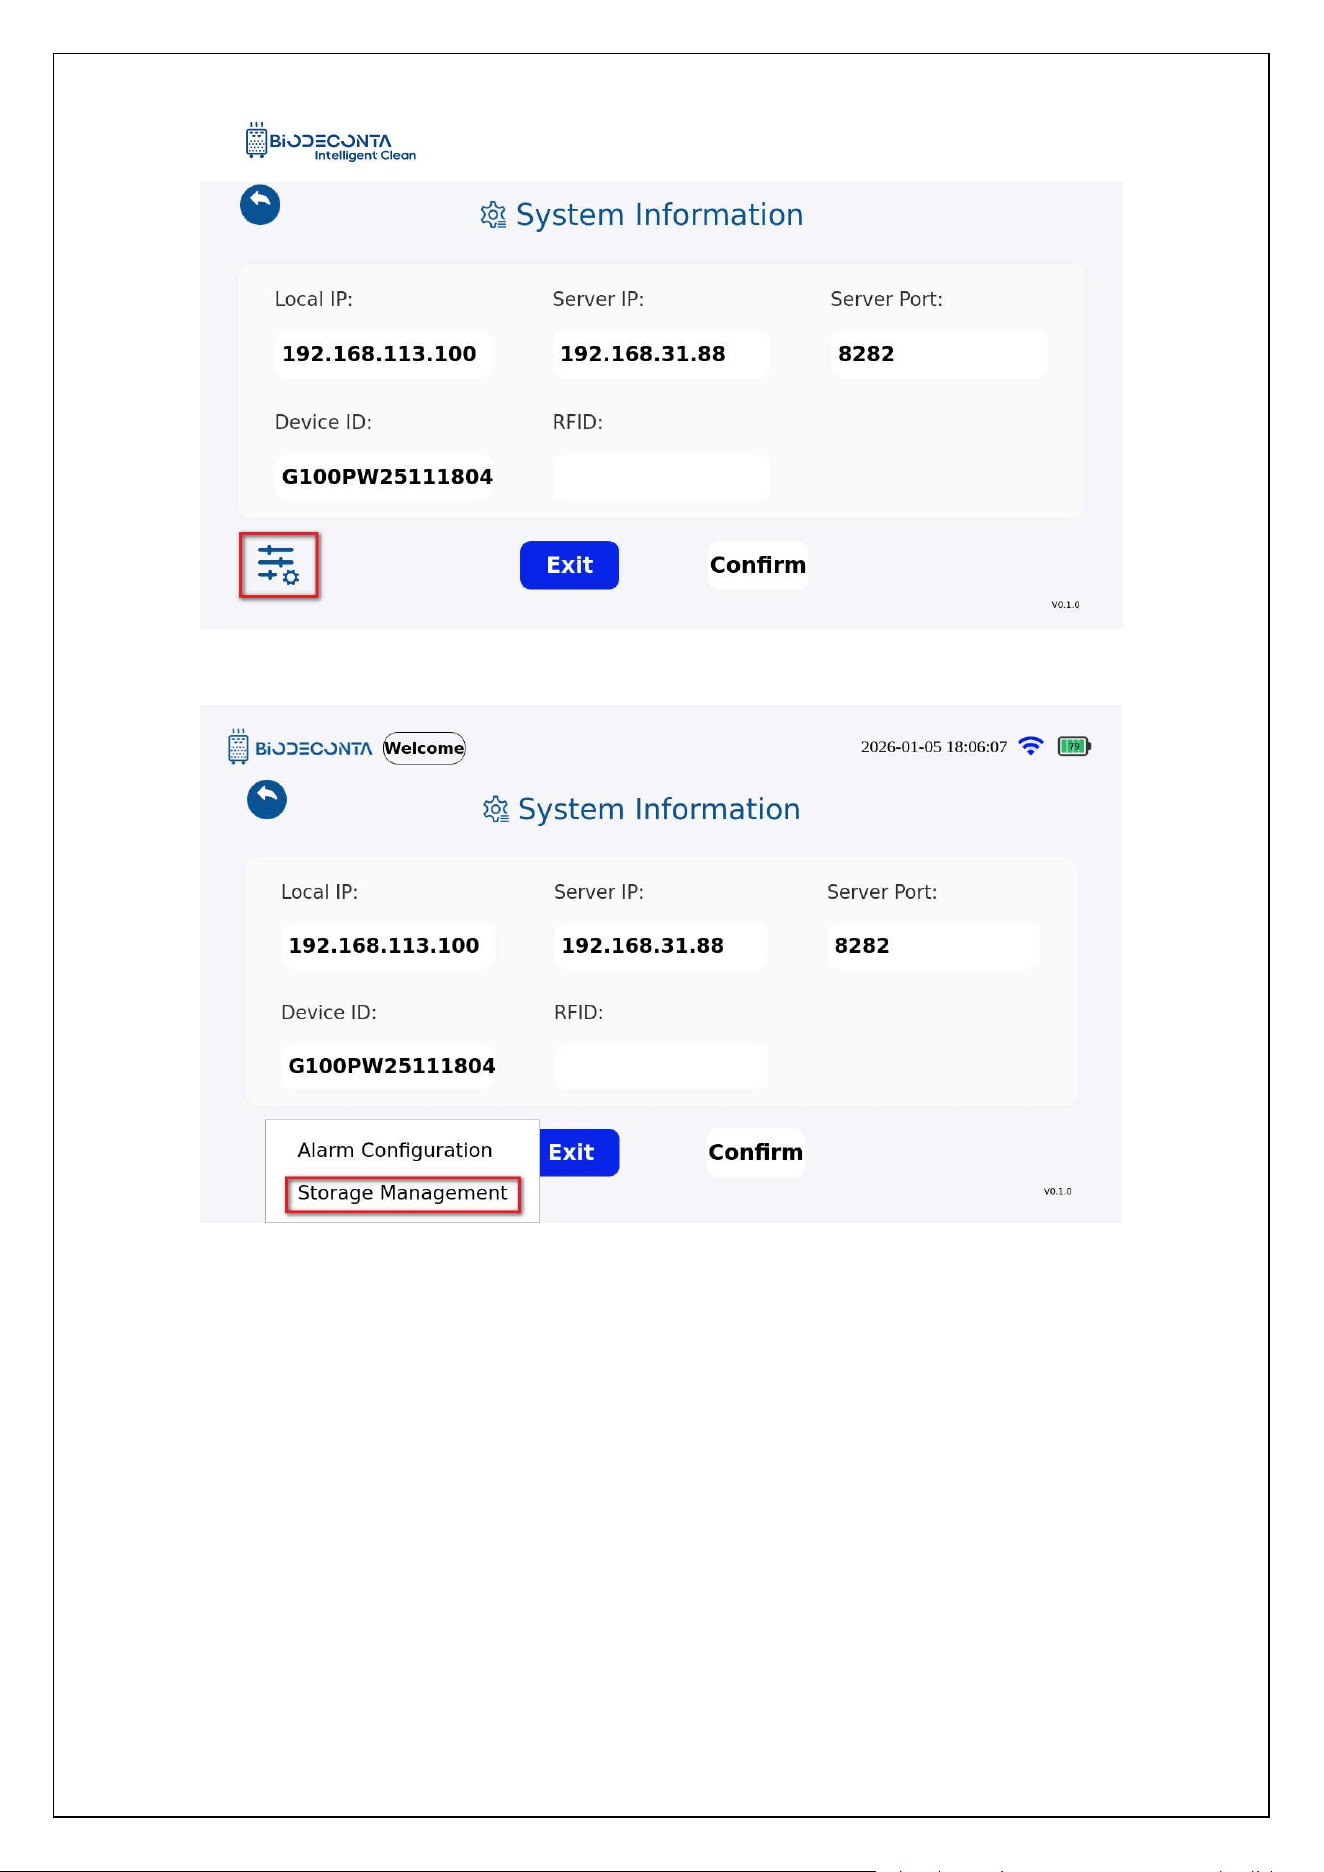
the "System Information" page, click on the [ ] icon, as shown in Figures 5-1.13, click
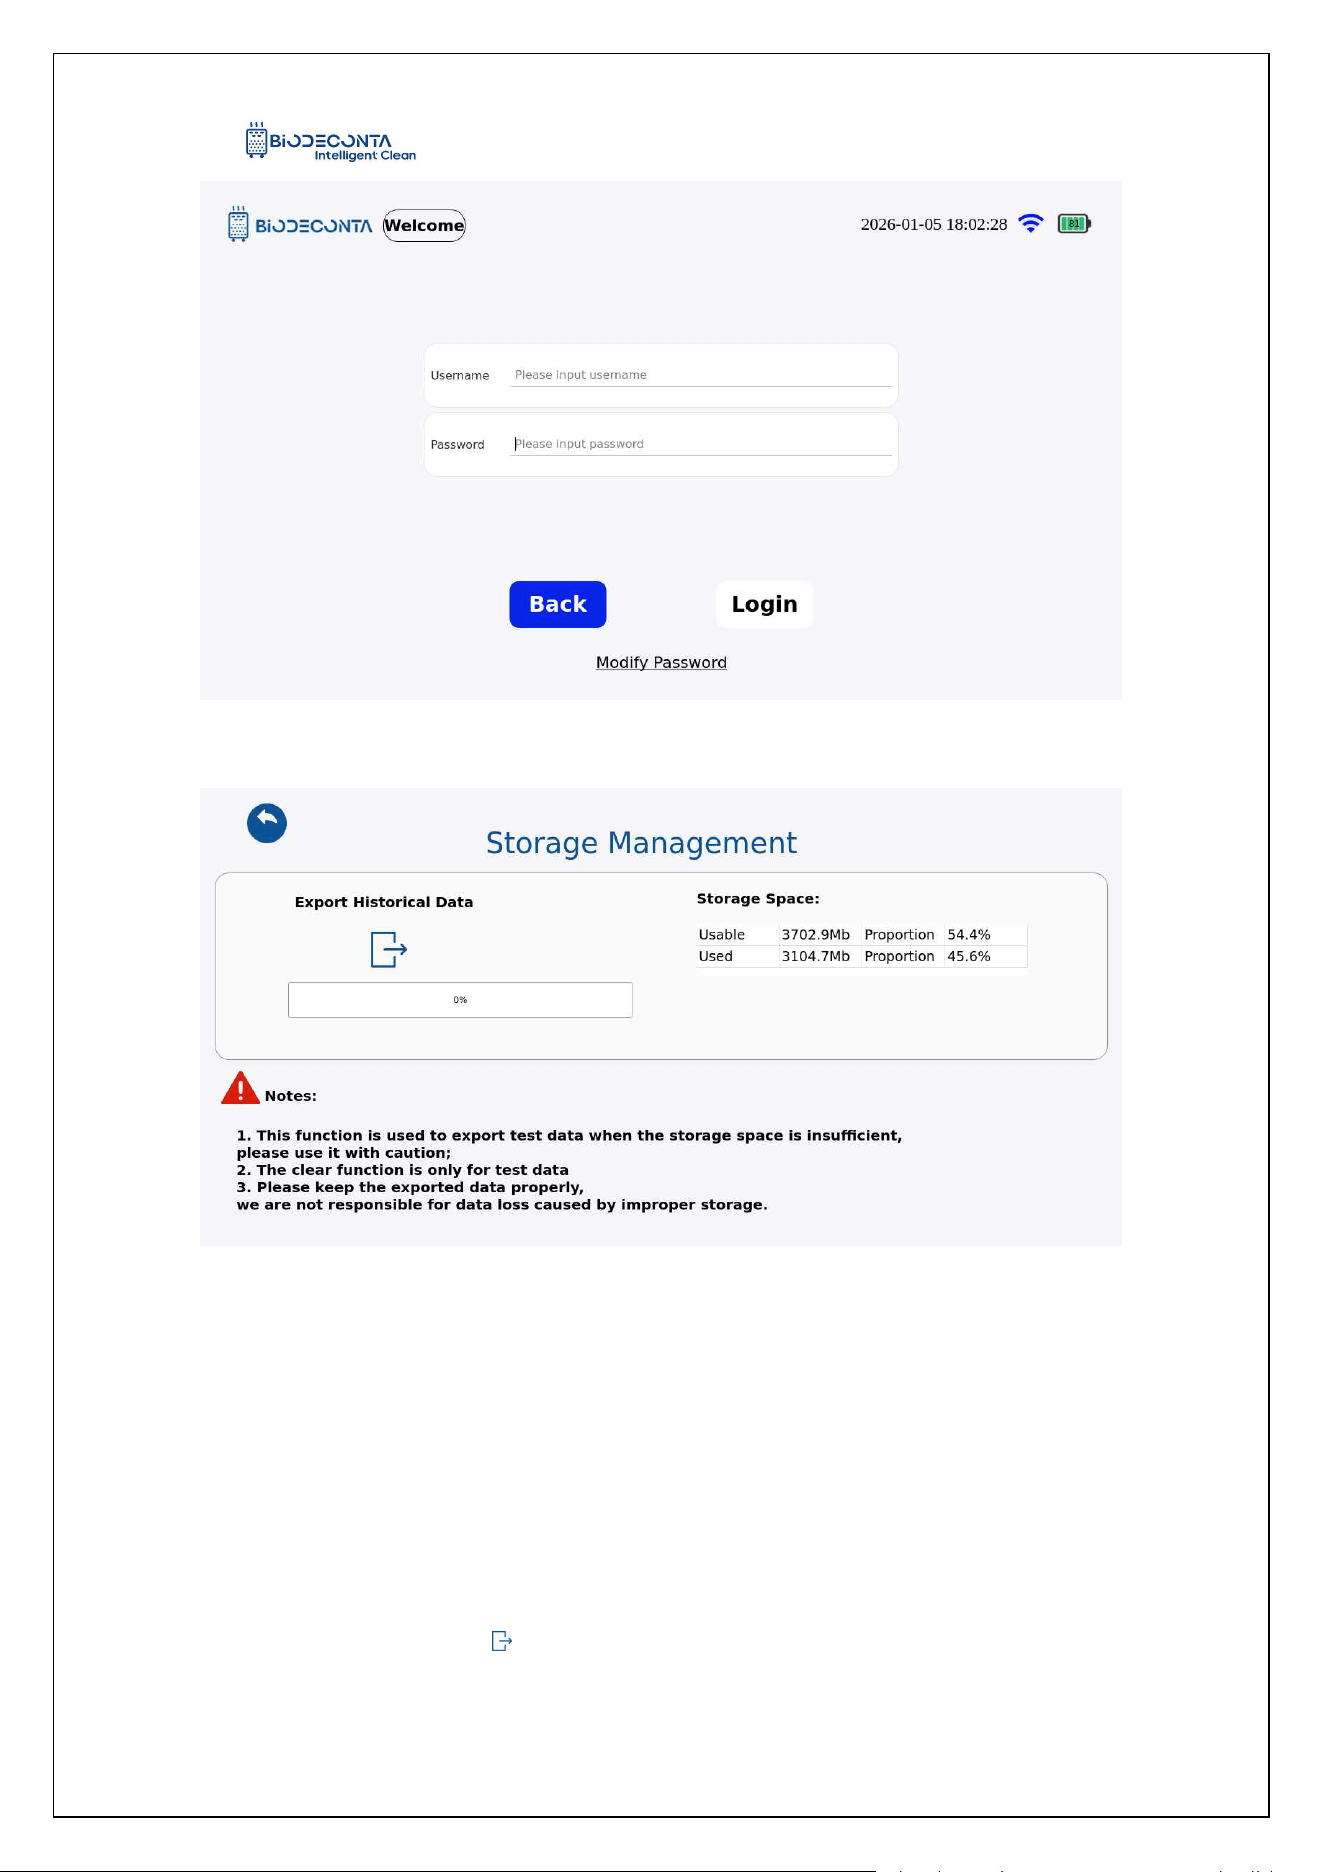
on[Storage Management]. As shown in Figures 5-1.14, and the page will jump to the
Intelligent Safe and Clean
www.biodeconta.com
41
login interface, fill in the account and password data, and click the "Login" button.As
shown in Figures 5-1.15, the page is redirected to the "Storage Management"
page,This module mainly handles the export and deletion operations of storage
management.
Figure 5.1-10 "Storage Management 1"
Figure 5.1-11 "Storage Management 2"
Intelligent Safe and Clean
www.biodeconta.com
42
Figure 5.1-12 "Storage Management 3"
Figure 5.1-13 "Storage Management 4"
Intelligent Safe and Clean
www.biodeconta.com
43
Figure 5.1-14 "Storage Management 5"
Figure 5.1-15 "Storage Management 6"
5.3 Export:
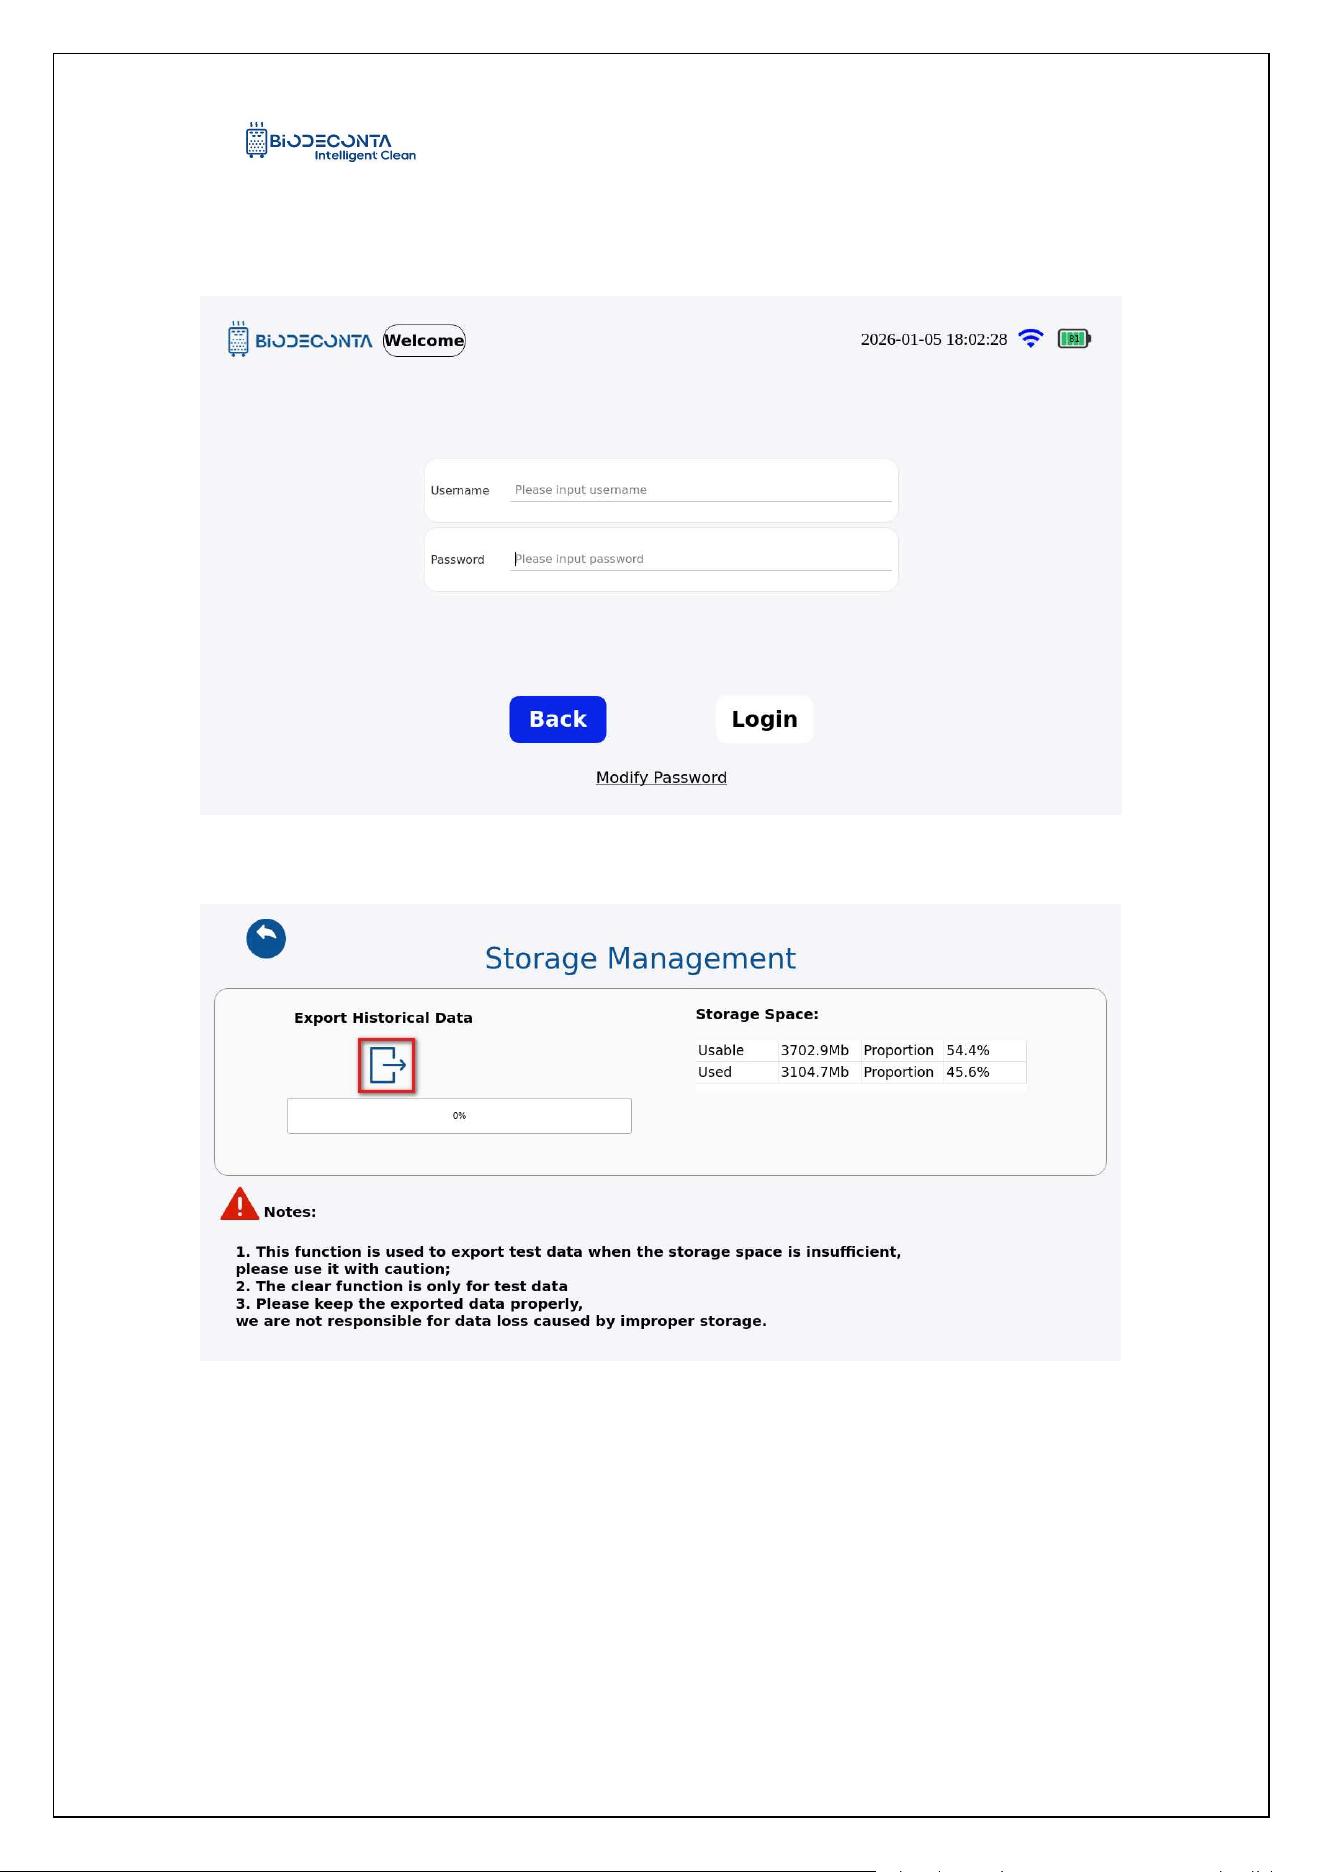
Click the "Storage Management" button, as shown in Figure 5.1-16, and the page
will jump to the login interface. Fill in the account and password data, and click the
"Login" button. The page will then jump to the "Storage Management" page, as shown
in Figure 5.1-17, click the [ ] icon, the page will jump to the login interface, fill in the
account and password data, and click the "Login" button, as shown in Figure 5.1-18,
Intelligent Safe and Clean
www.biodeconta.com
44
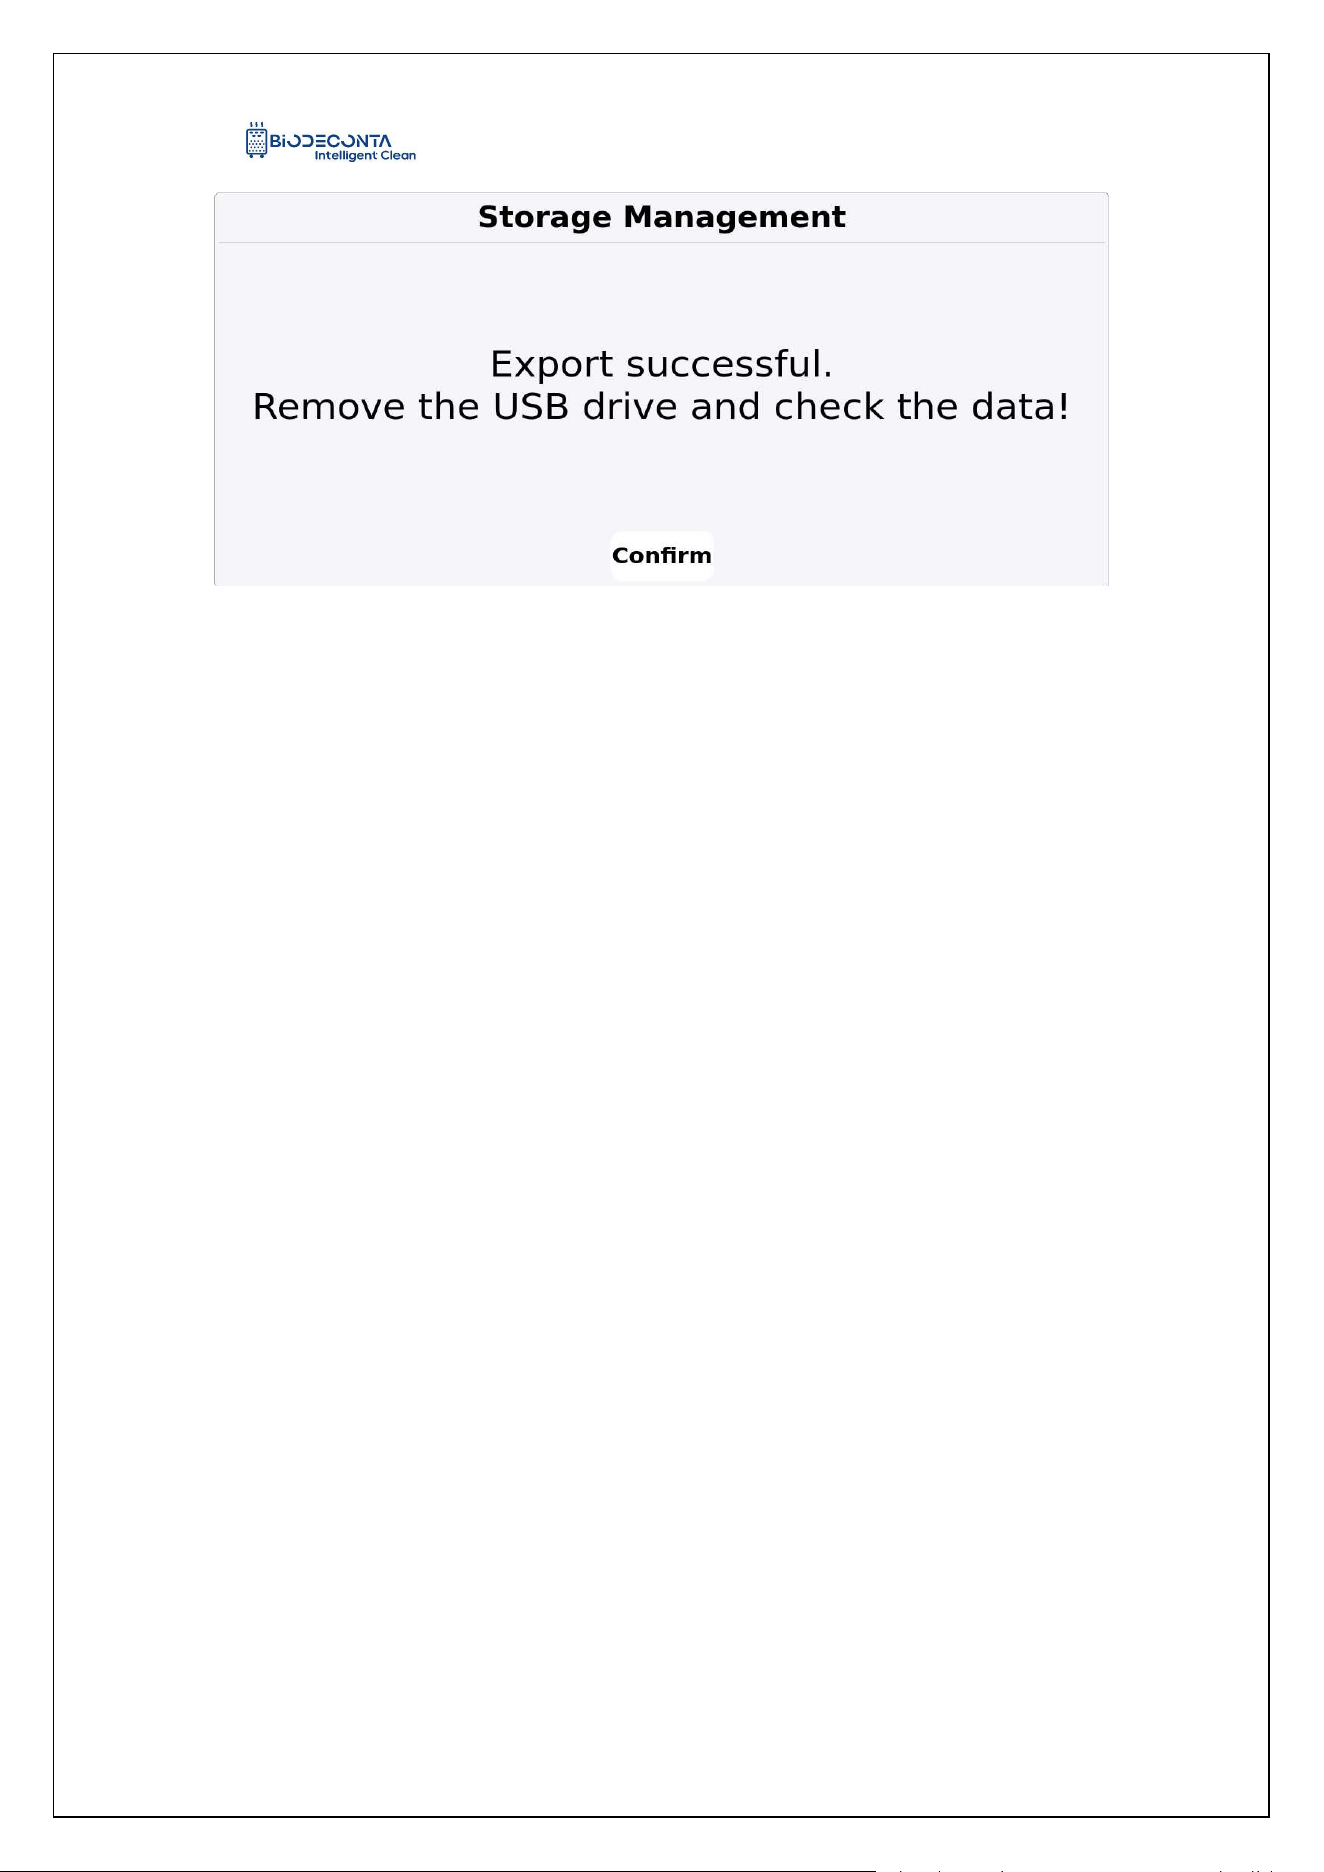
the page will pop up an "Export successful. Remove the USB drive and check the
data!" dialog box, click the "Confirm" button, to complete the export operation.
Figure 5.1-16 "Export 1"
Figure 5.1-17 "Export 2"
Intelligent Safe and Clean
www.biodeconta.com
45
Figure 5.1-18 "Export 3"
Chapter 6 Login (Local Mode)
6. Login (Local Mode)
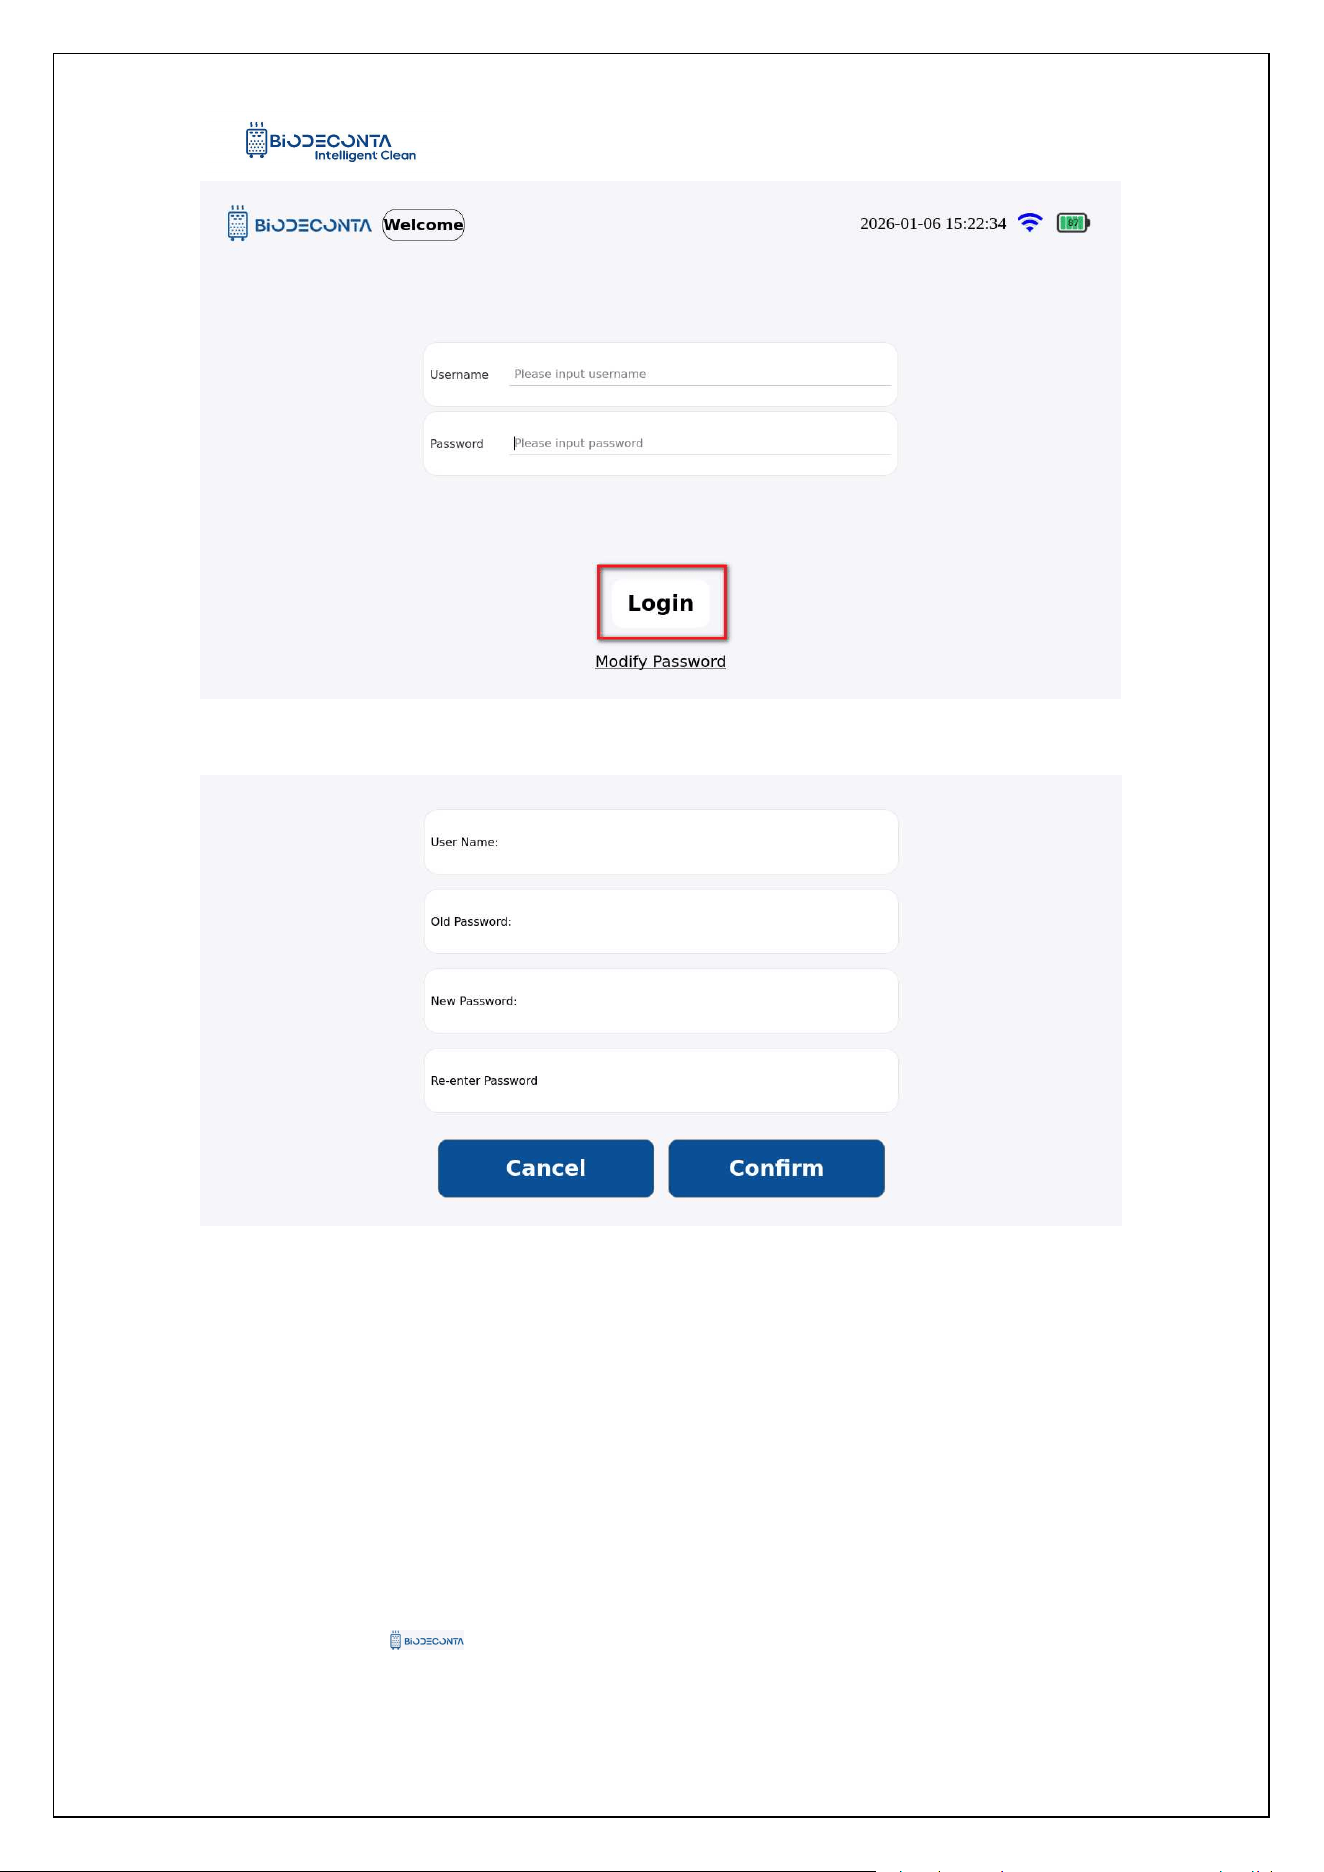
Press the power button of the instrument as shown in Figure 6-1, and you will
enter the login interface. Enter your account and password. Click the "Login" button,
and the login operation will be completed. As shown in Figure 6-2, click the "Modify
Password" button, and a page for modifying the password will pop up. enter the
modified password information and click the "Confirm" button, and the password will
be successfully modified.
Intelligent Safe and Clean
www.biodeconta.com
46
Figure 6-1 "Login (Local Mode)"
Figure 6-2 "Login (Local Mode)-Modify Password"
Chapter 7 Test parameter
7. Test parameter
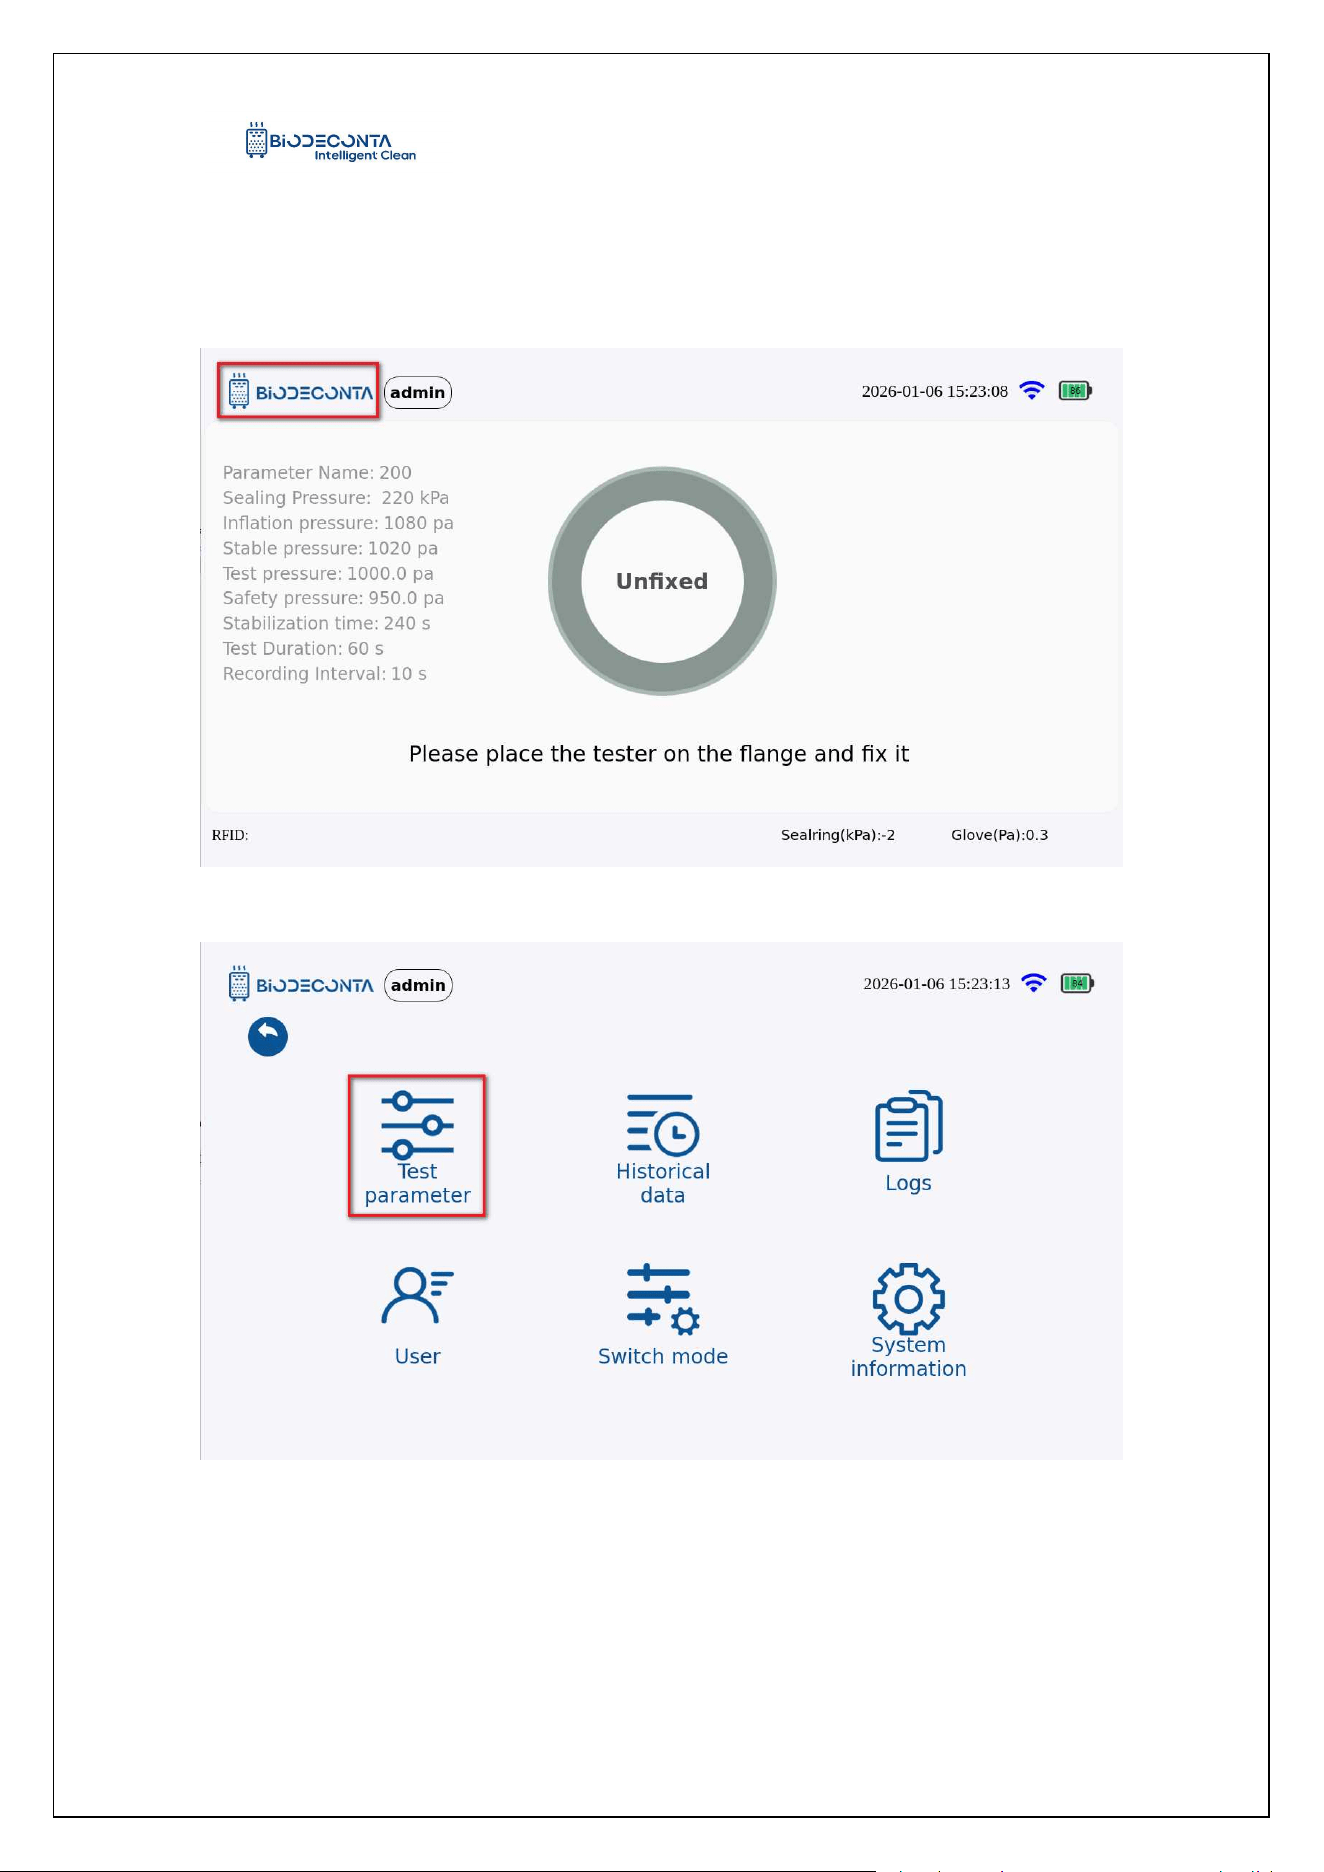
Click on the [ ] icon on the test interface, as shown in Figures 7-1 and 7-2,
and the page will jump to the pages of [Test Parameter], [Historical data], [Logs],
Intelligent Safe and Clean
www.biodeconta.com
47
[Users], [Switch mode], [System information]. Click on [Test Parameter], as shown in
Figure 7-3, and the page will jump to the "Parameter Configuration" page. This
module mainly manages the deletion, editing, and addition operations of parameters.
Figure 7-1 "Test Parameter 1"
Figure 7-2 "Test Parameter 2"
Intelligent Safe and Clean
www.biodeconta.com
48
Figure 7-3 "Test Parameter 3"
7.1 Delete:
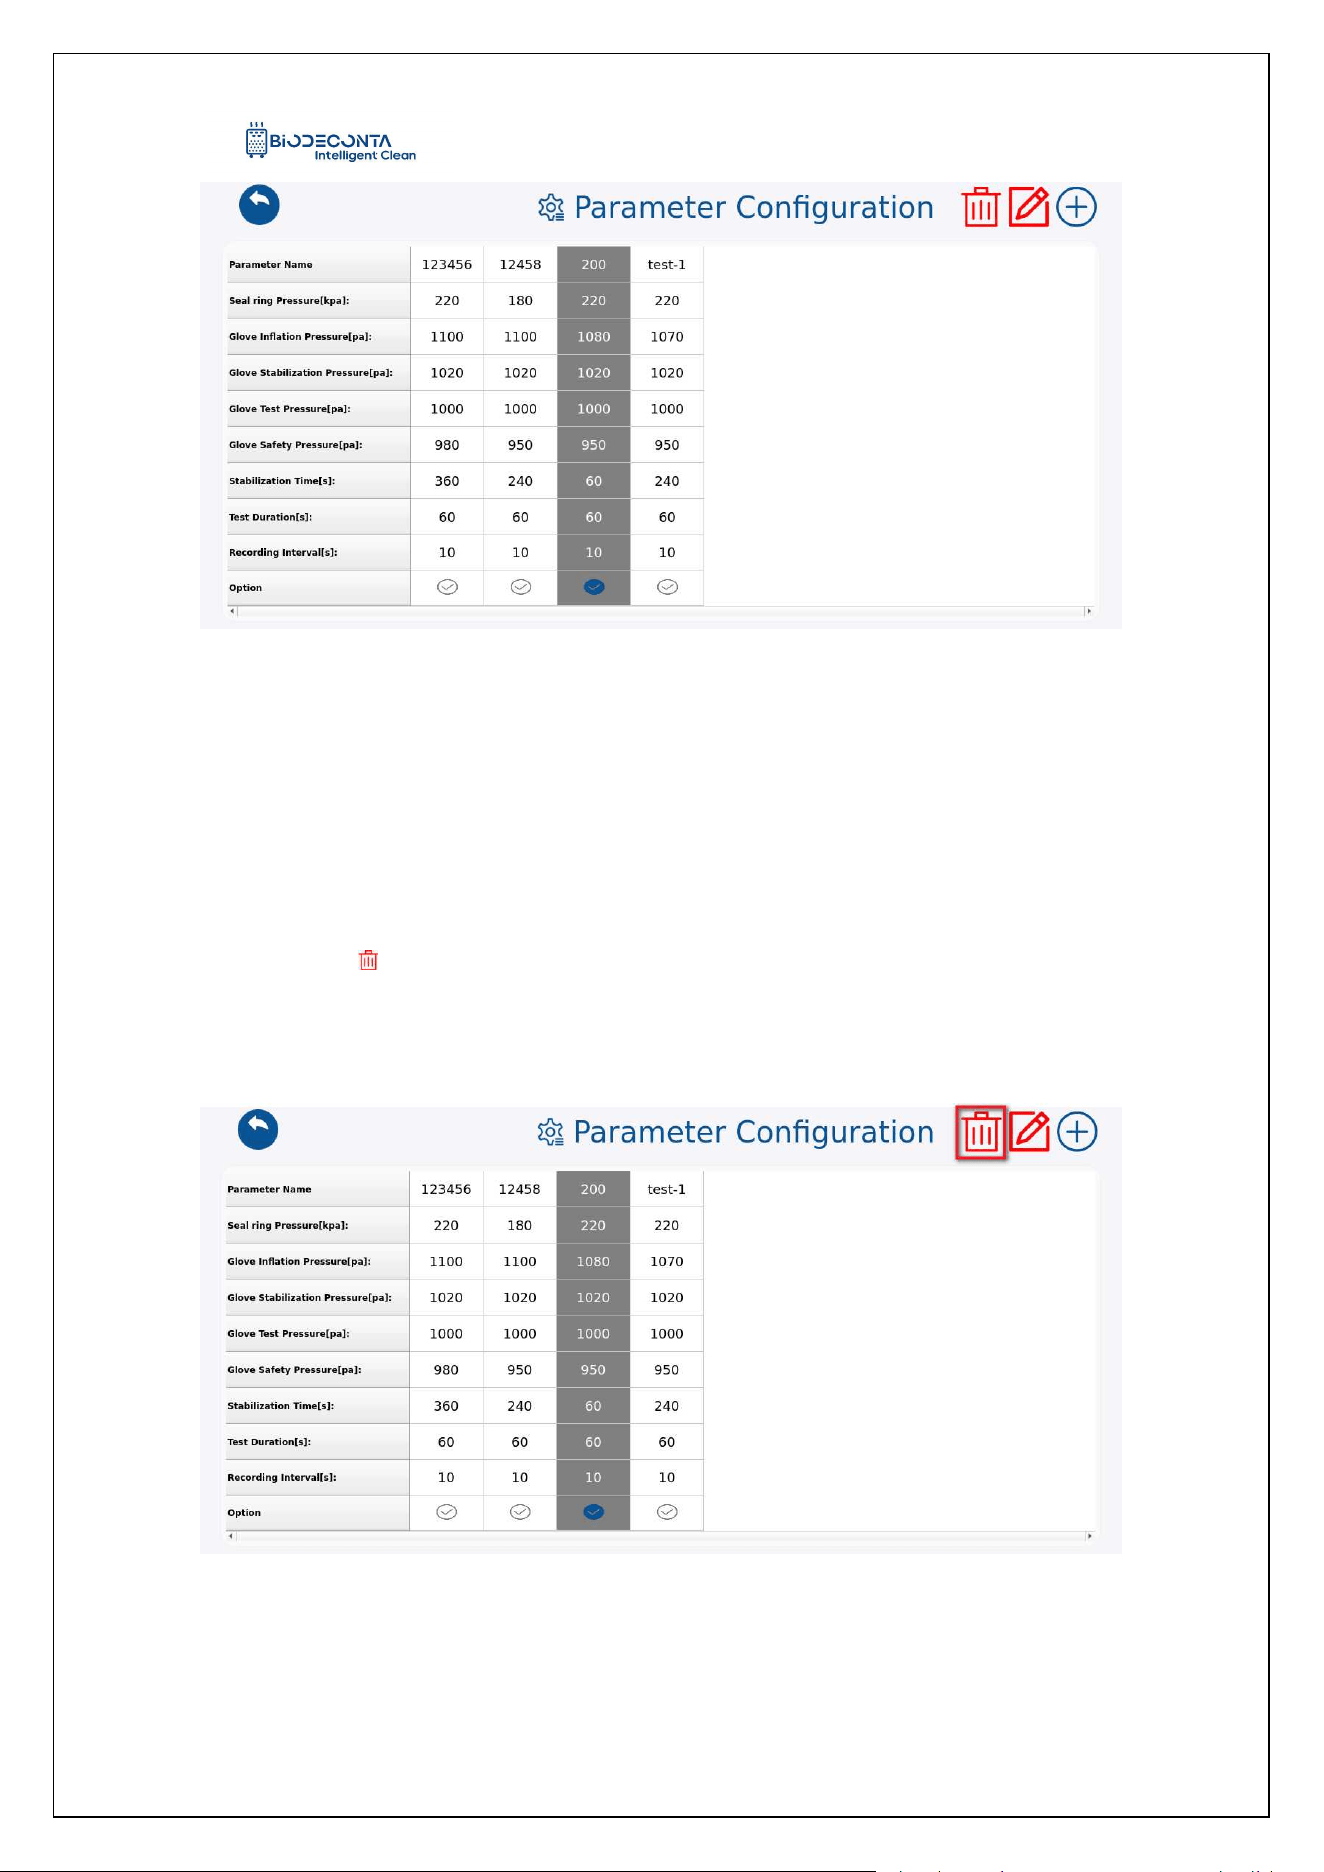
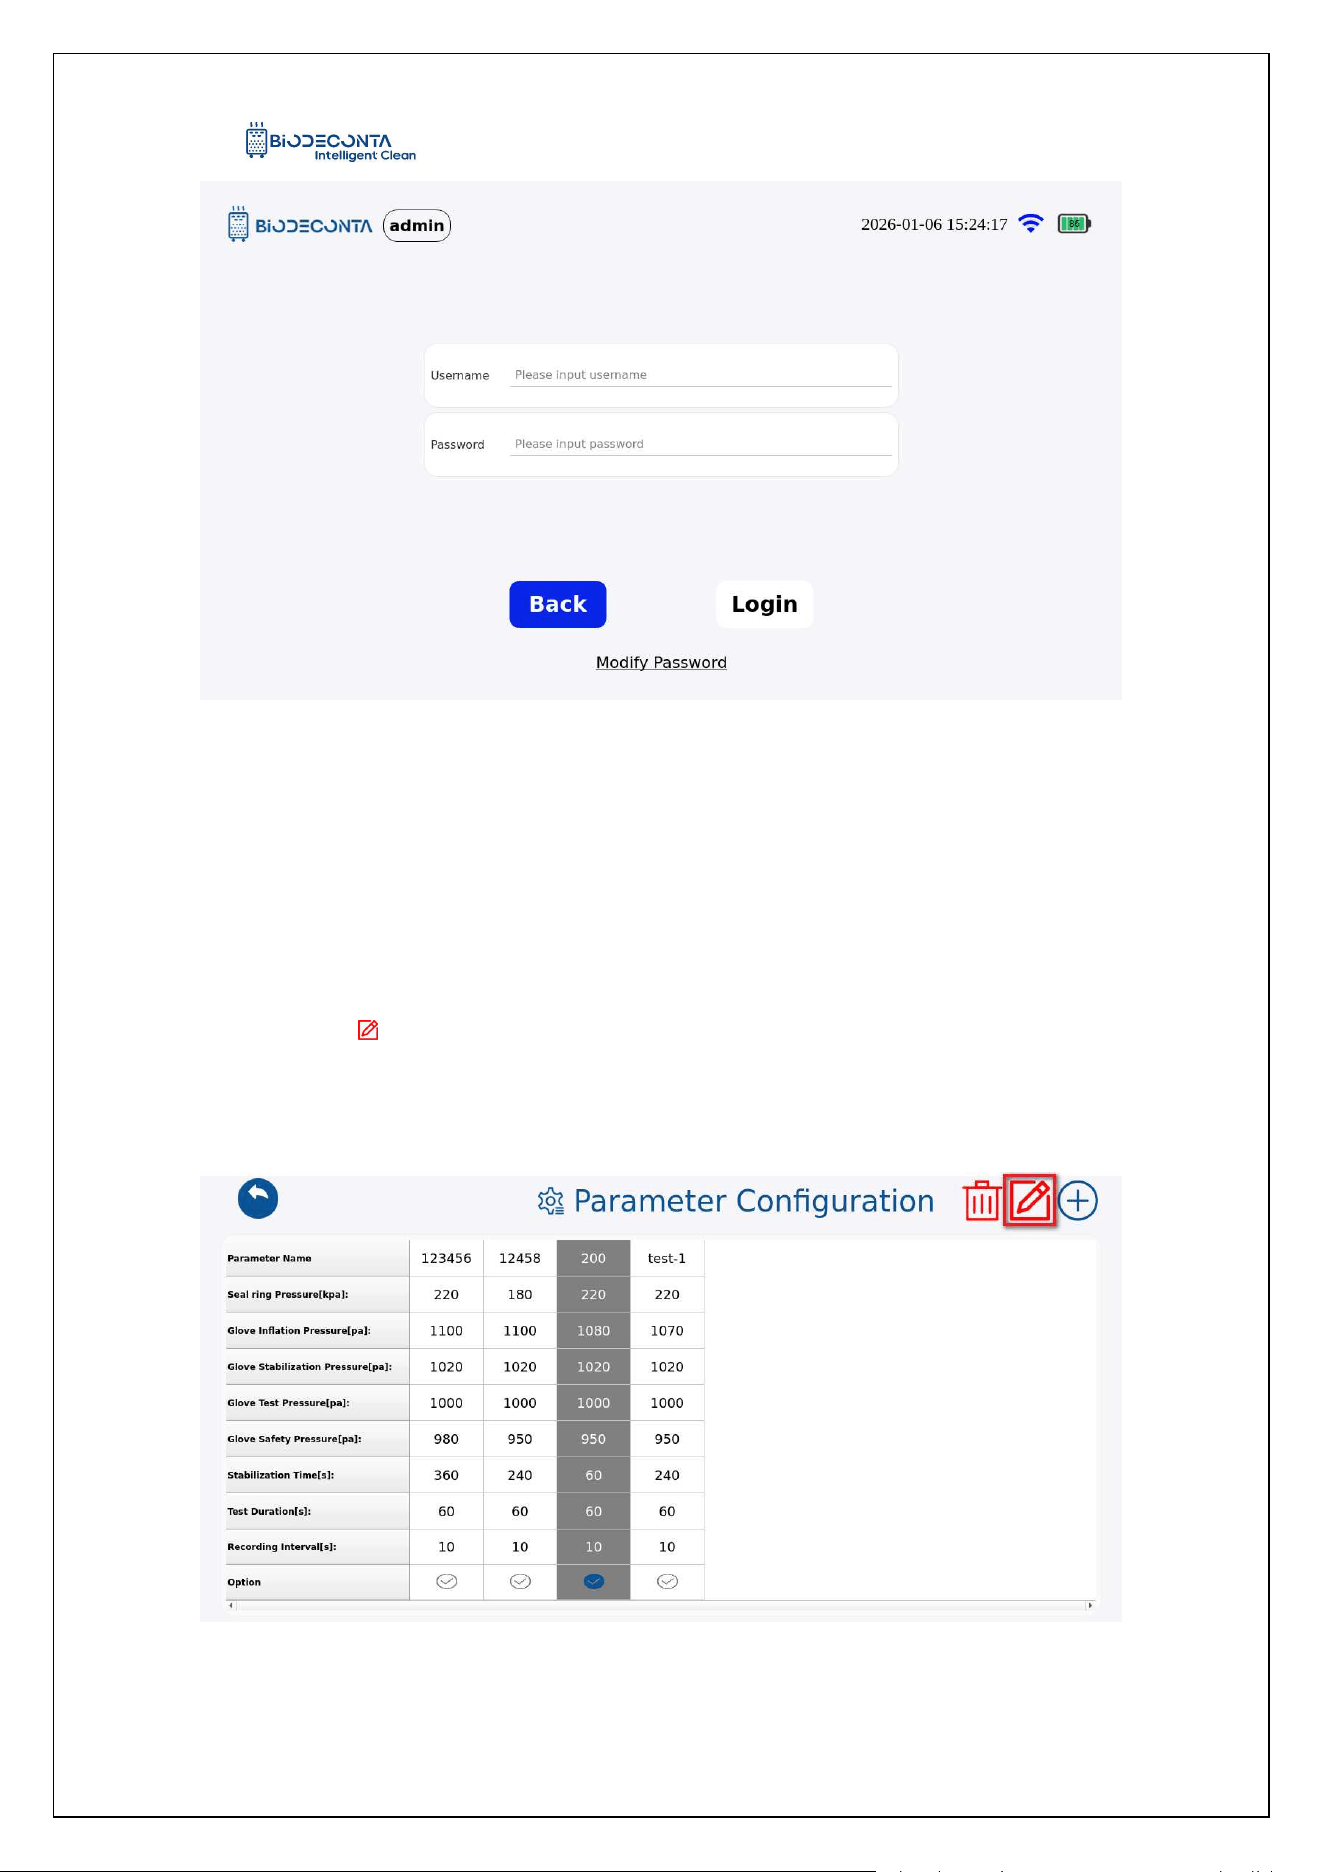
Click the [Manage Parameters], as shown in Figure 7-4, and the page will jump to
the "Parameter Configuration" page. Select the group of data that needs to be deleted,
and click the [ ] icon, as shown in Figure 7-5, then the page will jump to the login
interface, fill in the account and password data, and click the "Login" button, to
complete the deletion operation.
Figure 7-4 "Delete 1"
Intelligent Safe and Clean
www.biodeconta.com
49
Figure 7-5 "Delete 2"
7.2 Edit:
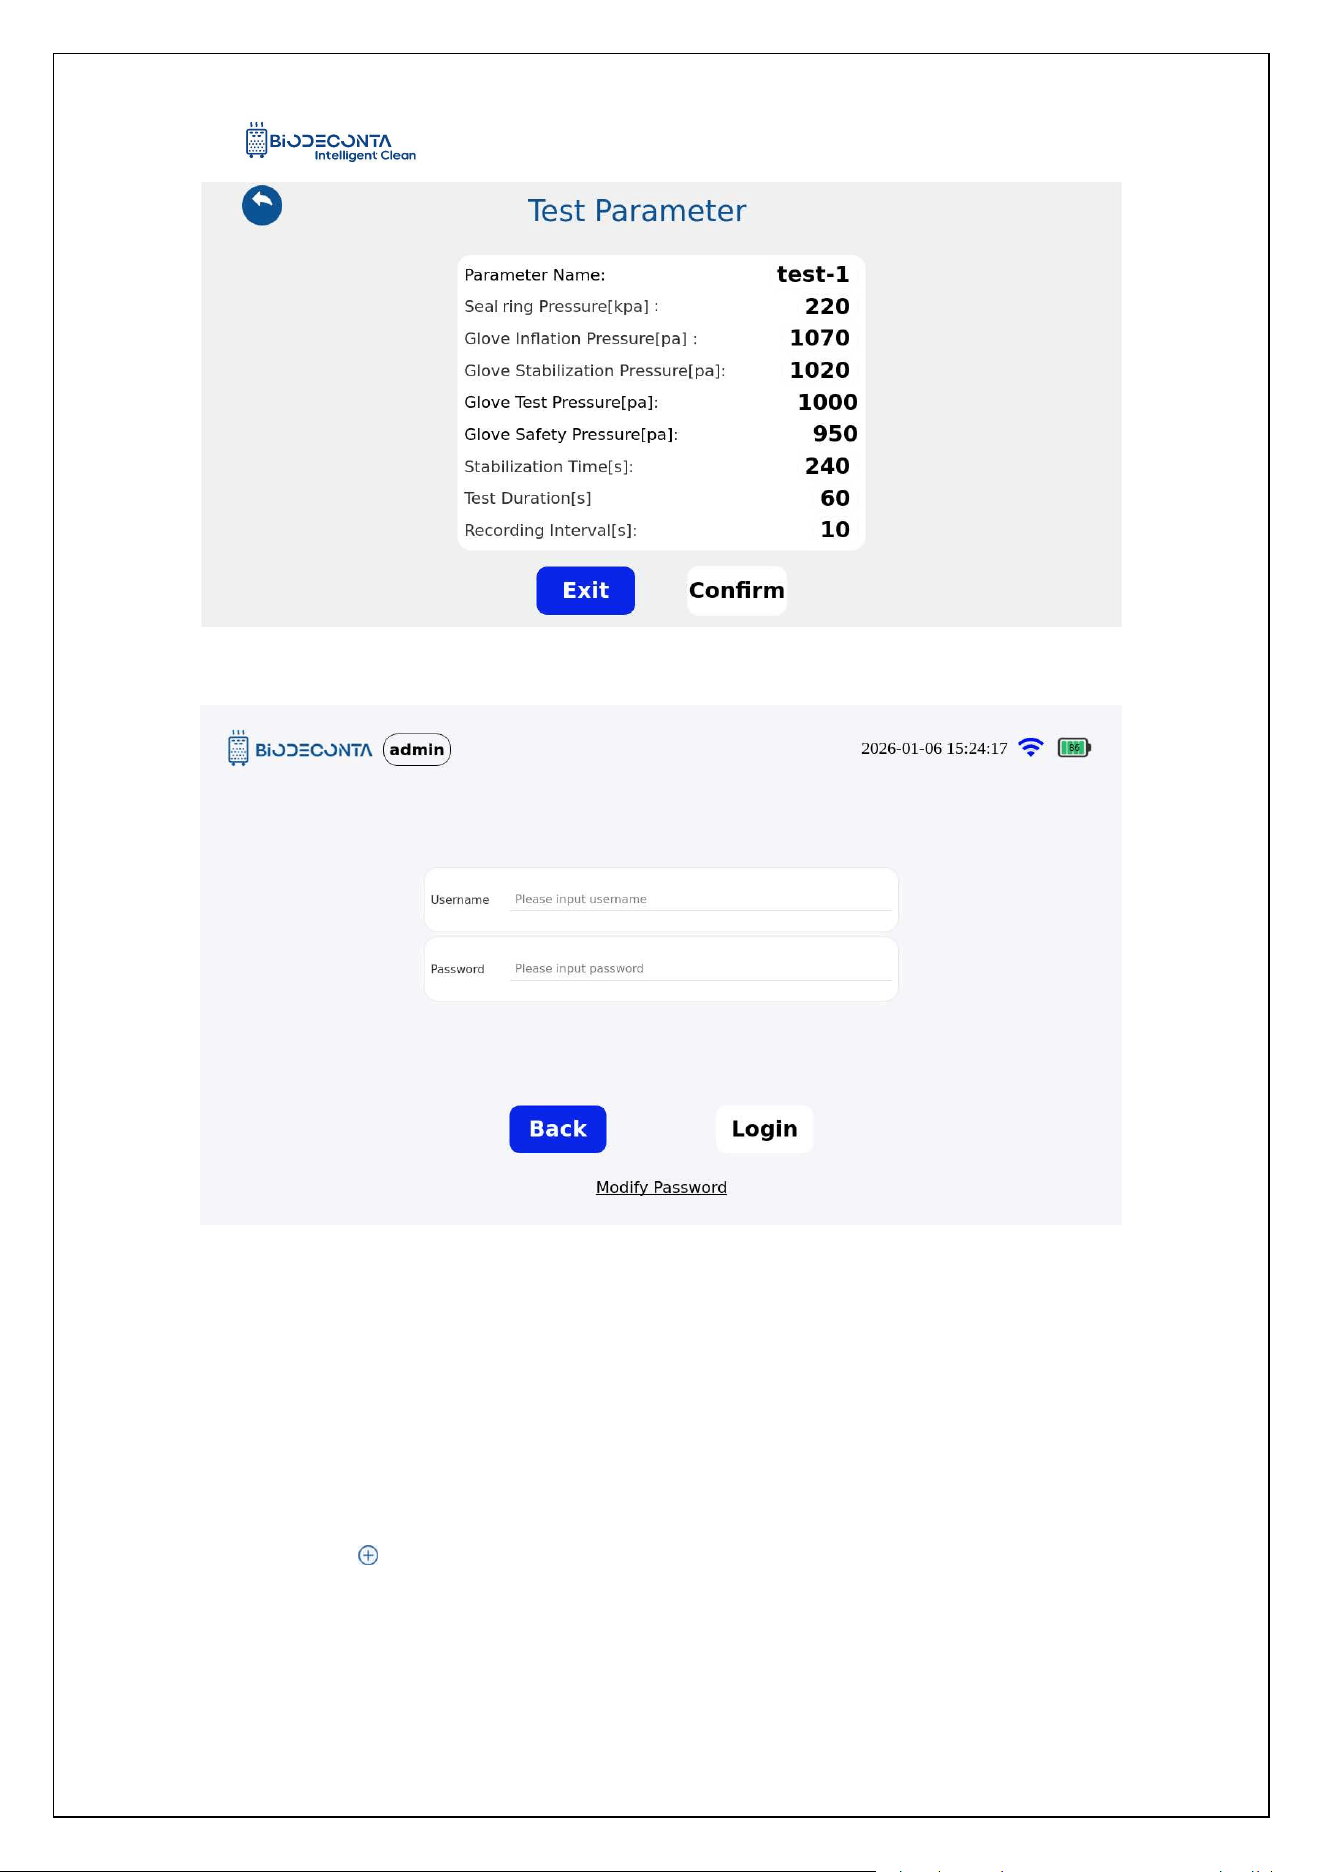
Click the [Manage Parameters], as shown in Figure 7-6, and the page will jump to
the "Parameter Configuration" page. Select the group of data that needs to be edited,
and click the [ ] icon, as shown in Figure 7-7, then the page will jump to the login
interface, fill in the account and password data, and click the "Login" button, to
complete the editing operation.
Intelligent Safe and Clean
www.biodeconta.com
50
Figure 7-6 "Edit 1"
Figure 7-7 "Edit 2"
7.3 Add:
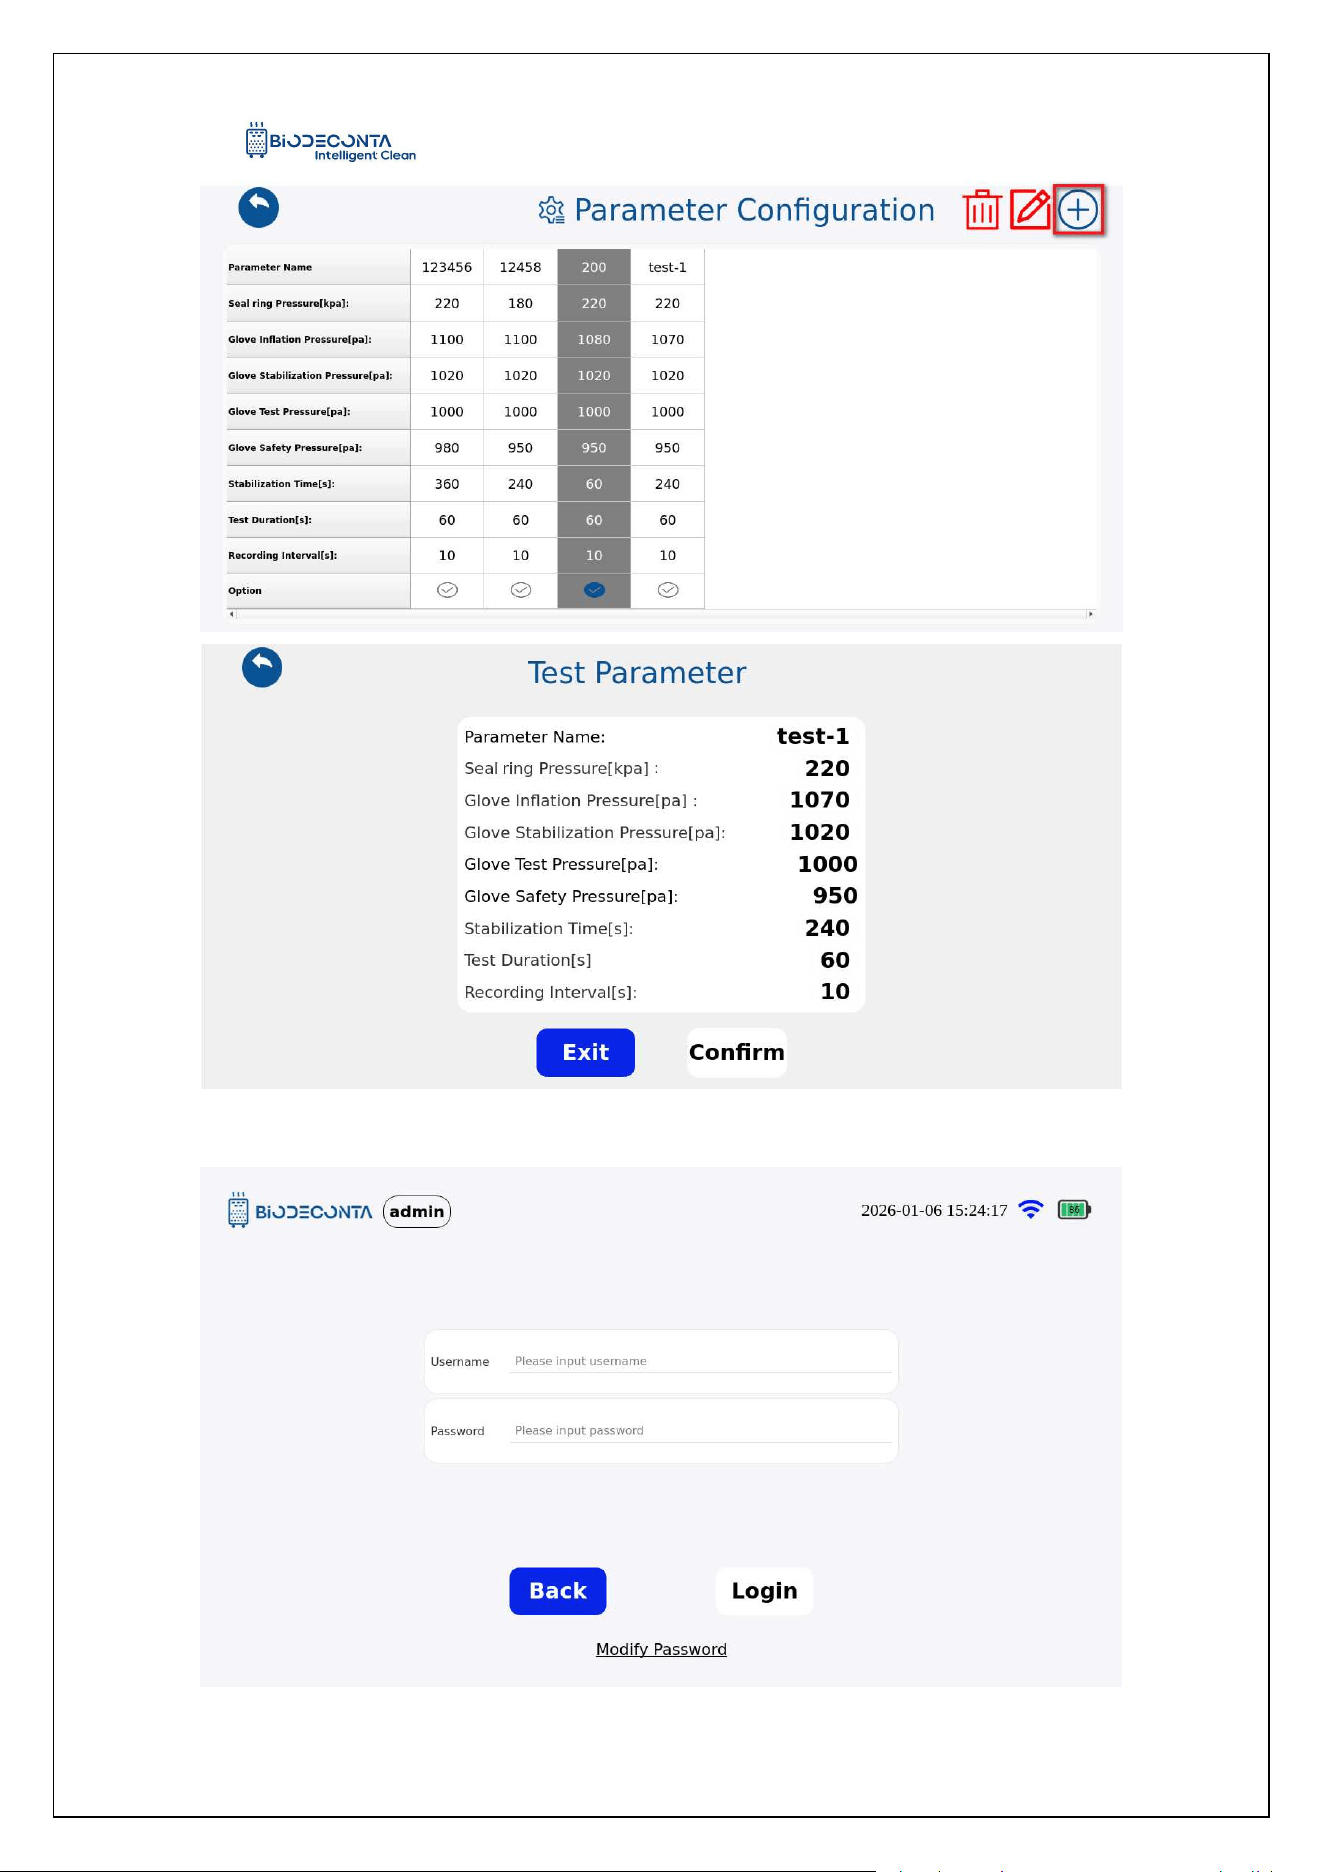
Click the [Manage Parameters], as shown in Figure 7-8, and the page will jump to
the "Parameter Configuration" page. Select the group of data that needs to be edited,
and click the [ ] icon, as shown in Figure 7-9, then the page will jump to the login
interface, fill in the account and password data, and click the "Login" button, to
complete the addition operation.
Intelligent Safe and Clean
www.biodeconta.com
51
Figure 7-8 "Add 1"
Intelligent Safe and Clean
www.biodeconta.com
52
Figure 7-9 "Add 2"
Chapter 8 Historical data
8. Historical data
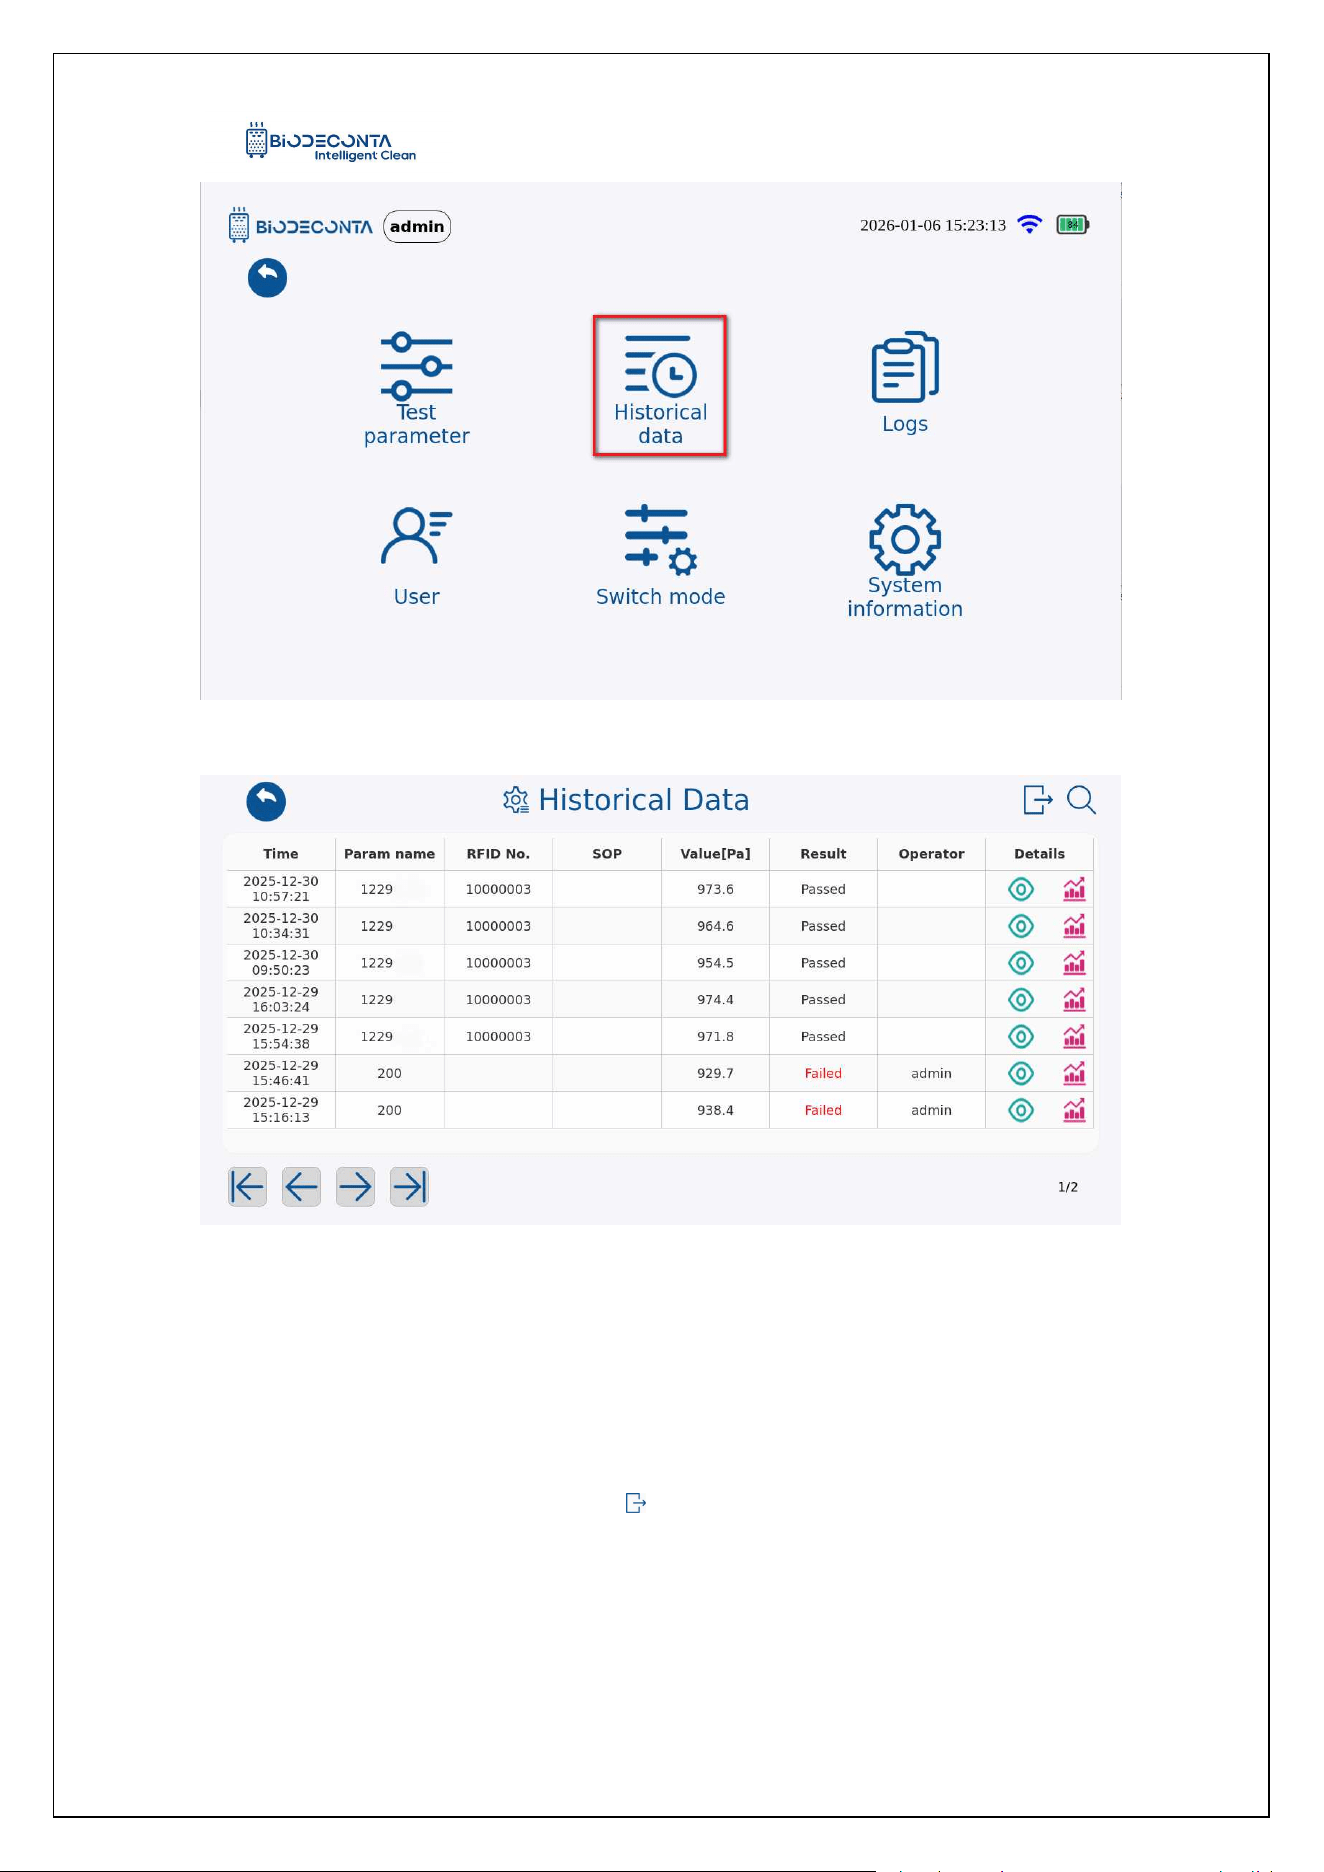
Click on the [ ] icon on the test interface, as shown in Figures 8-1 and 8-2,
and the page will jump to the pages of [Test Parameter], [Historical data], [Logs],
[Users], [Switch mode], [System information]. Click on [Historical data], as shown in
Figure 8-3, and the page will jump to the" [Historical Data" page. This module mainly
handles the export, search, data details, and data curve operations of parameters.
Figure 8-1 "Historical Data 1"
Intelligent Safe and Clean
www.biodeconta.com
53
Figure 8-2 "Historical Data 2"
Figure 8-3 "Historical Data 3"
8.1 Export:
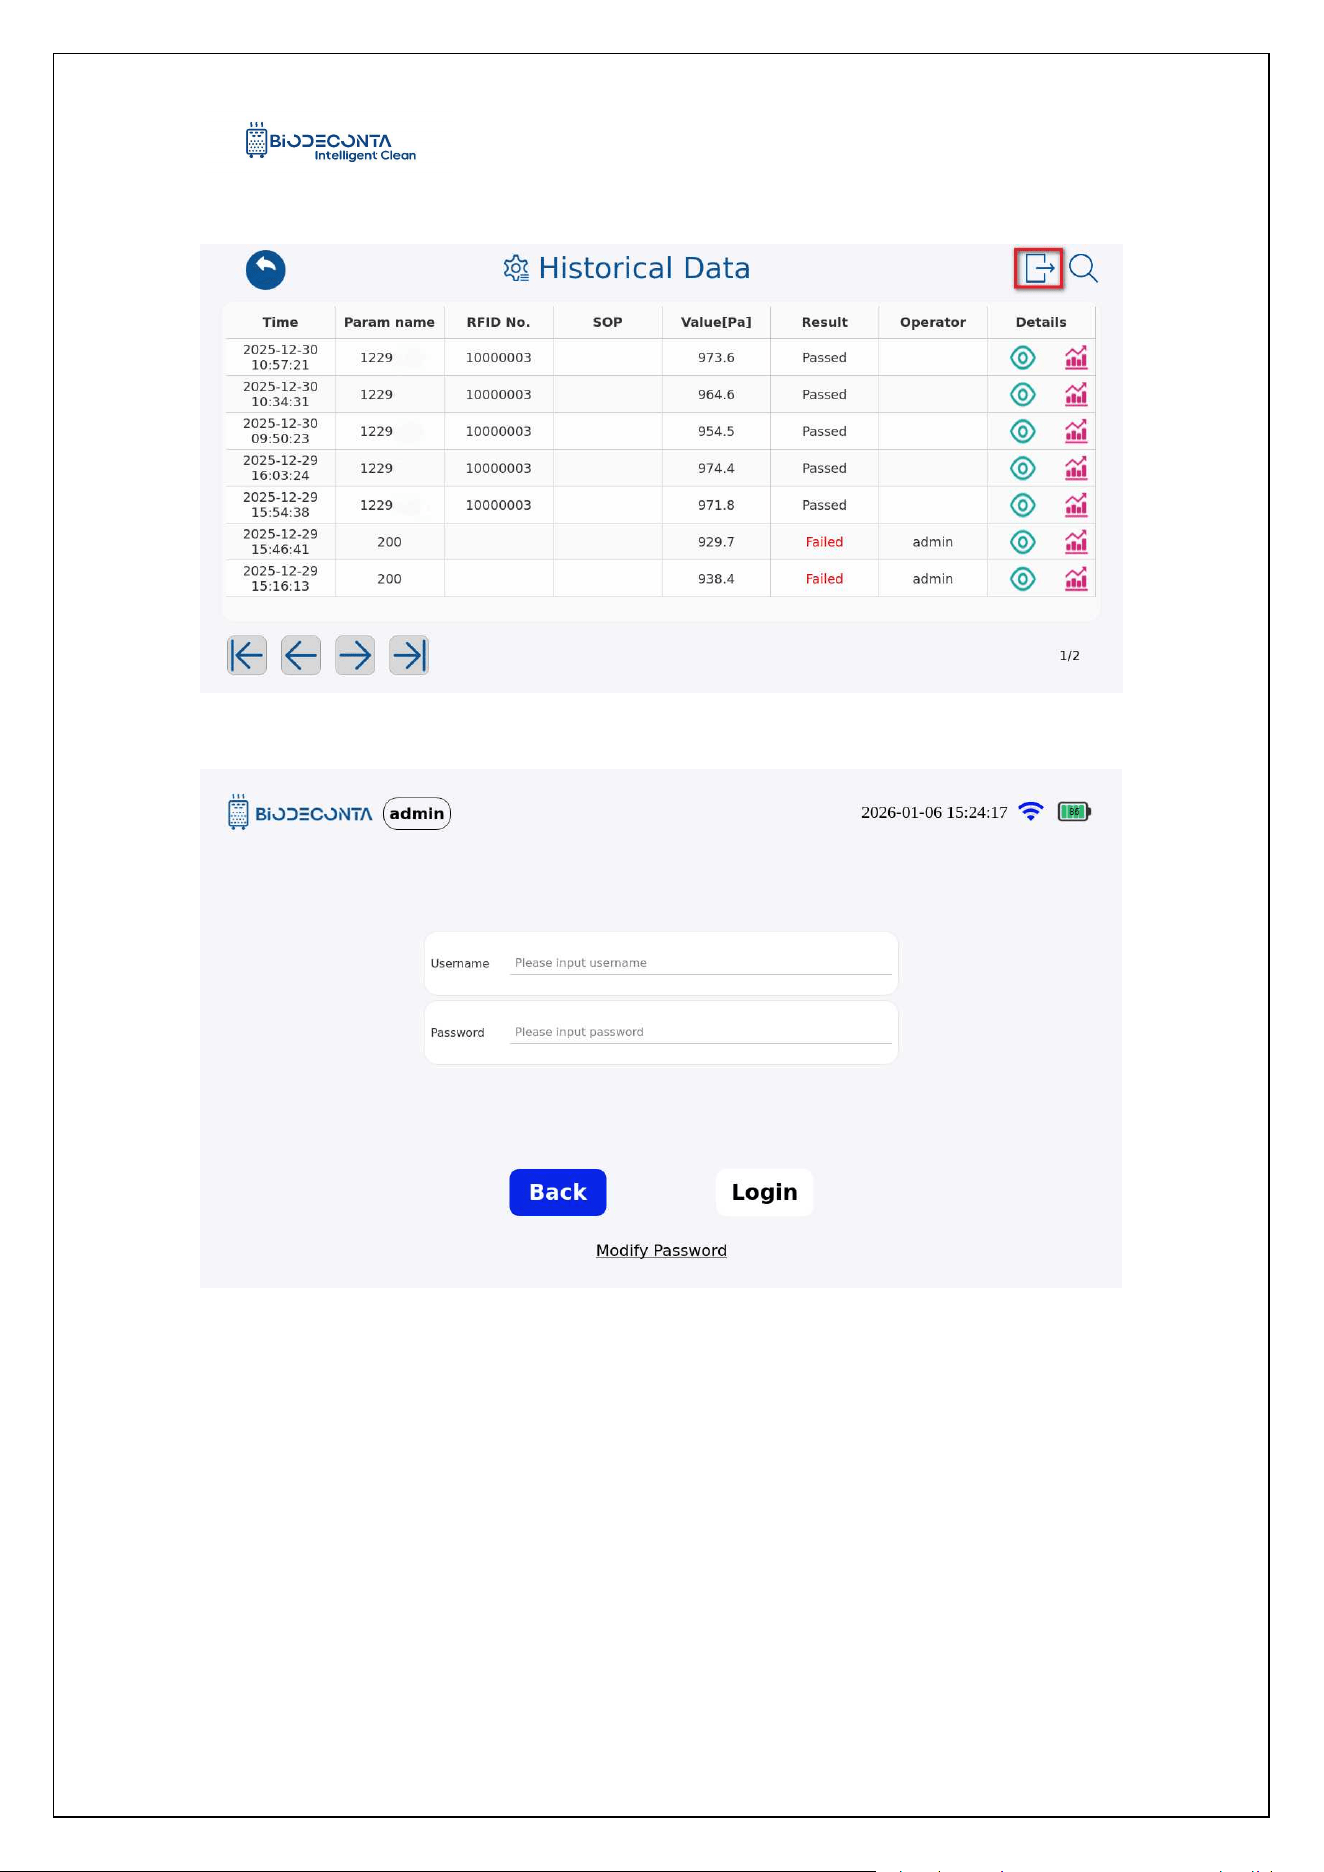
Click the [Historical data], as shown in Figure 8-4, and the page will be redirected
to the "Historical Data" page, click the [ ] icon. As shown in Figure 8-5, the page will
jump to the login interface, fill in the account and password data, and click the "Login"
button. As shown in Figure 8-6, the page will pop up an "Export successful. Remove
the USB drive and check the data!" dialog box, click the "Confirm" button, to complete
Intelligent Safe and Clean
www.biodeconta.com
54
the export operation.
Figure 8-4 "Export 1"
Figure 8-5 "Export 2"
Intelligent Safe and Clean
www.biodeconta.com
55
Figure 8-6 "Export 3"
8.2 Search:
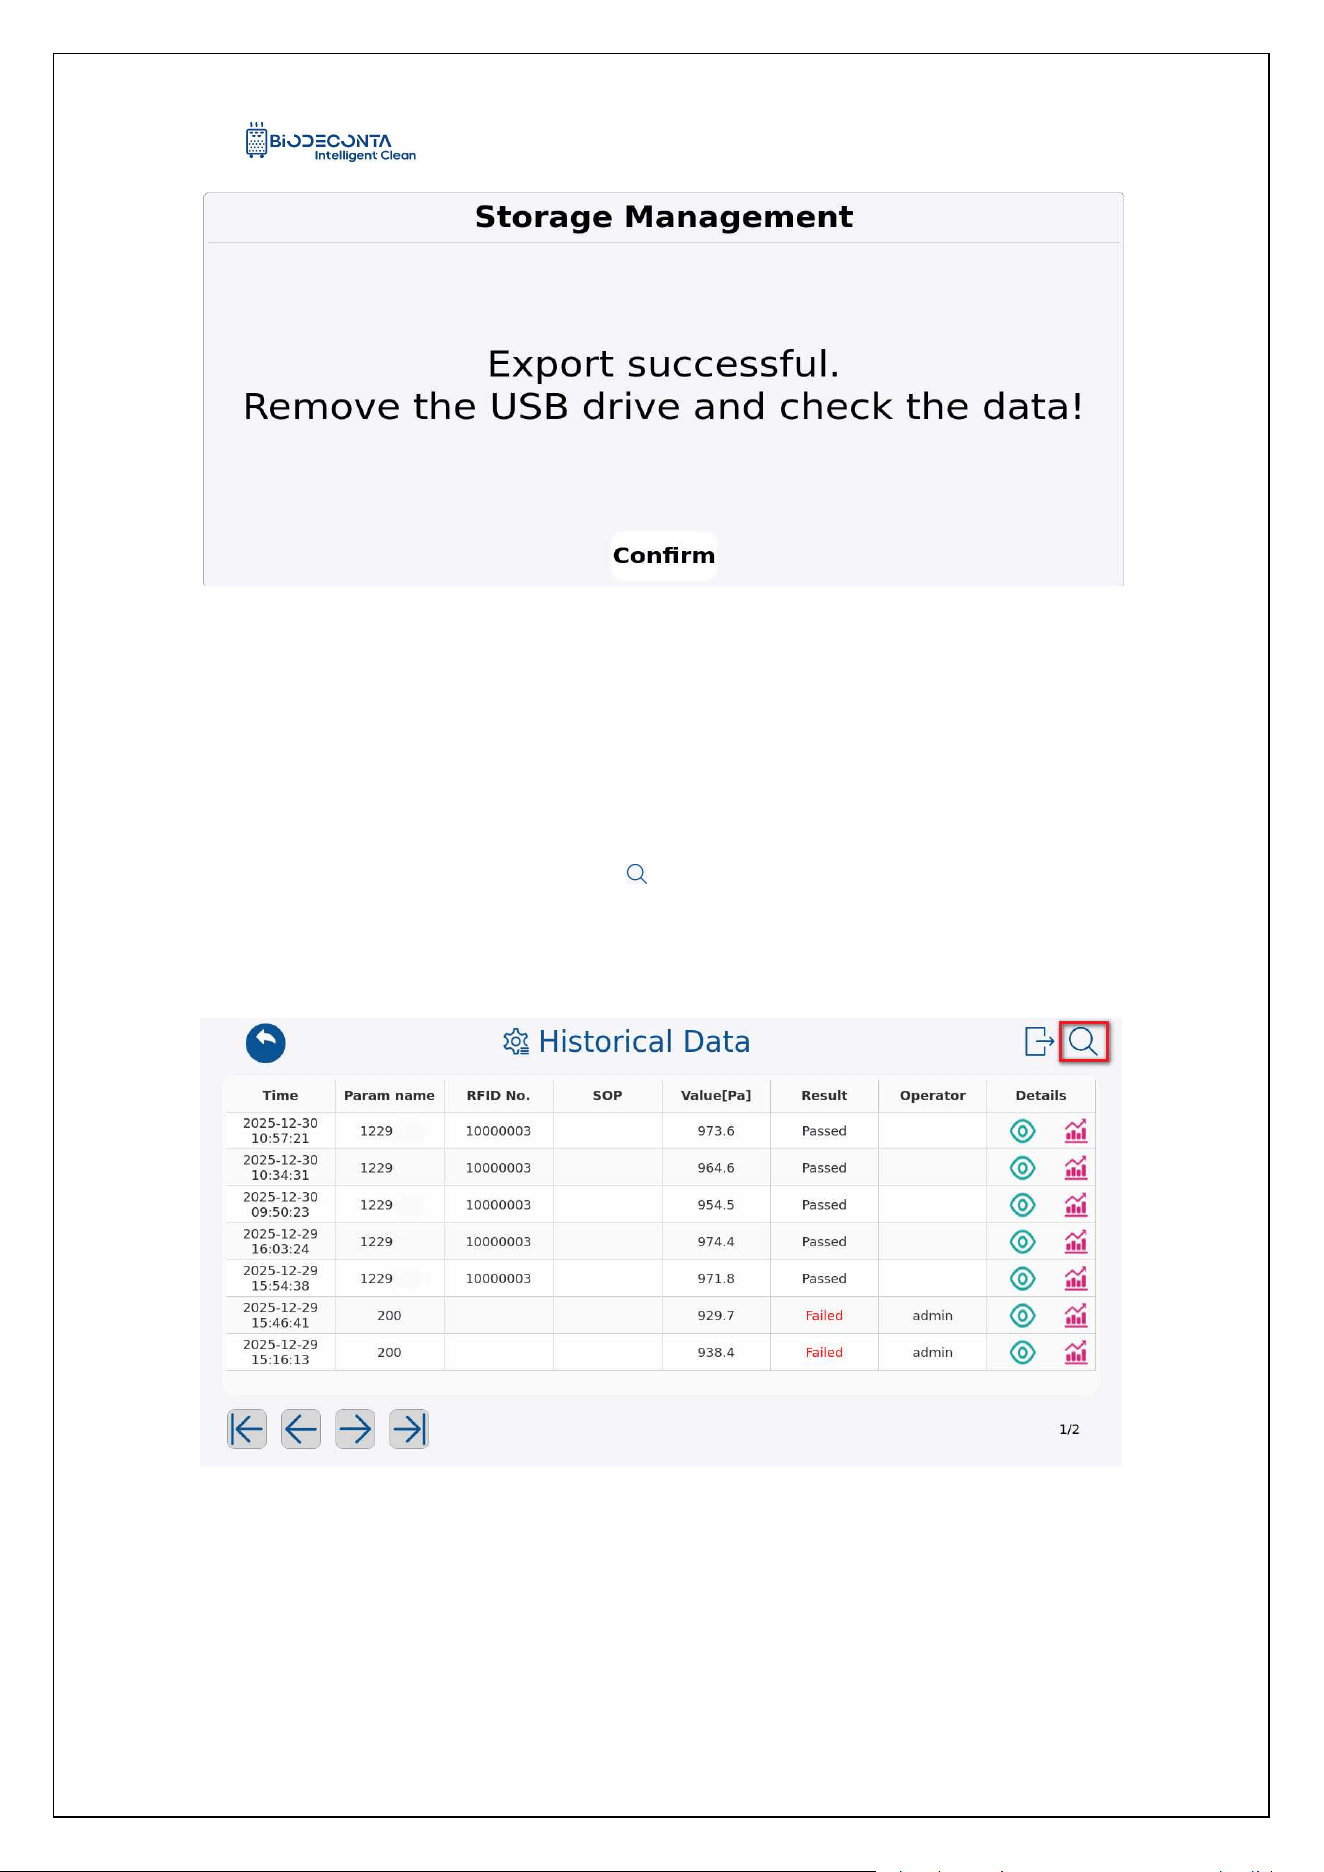
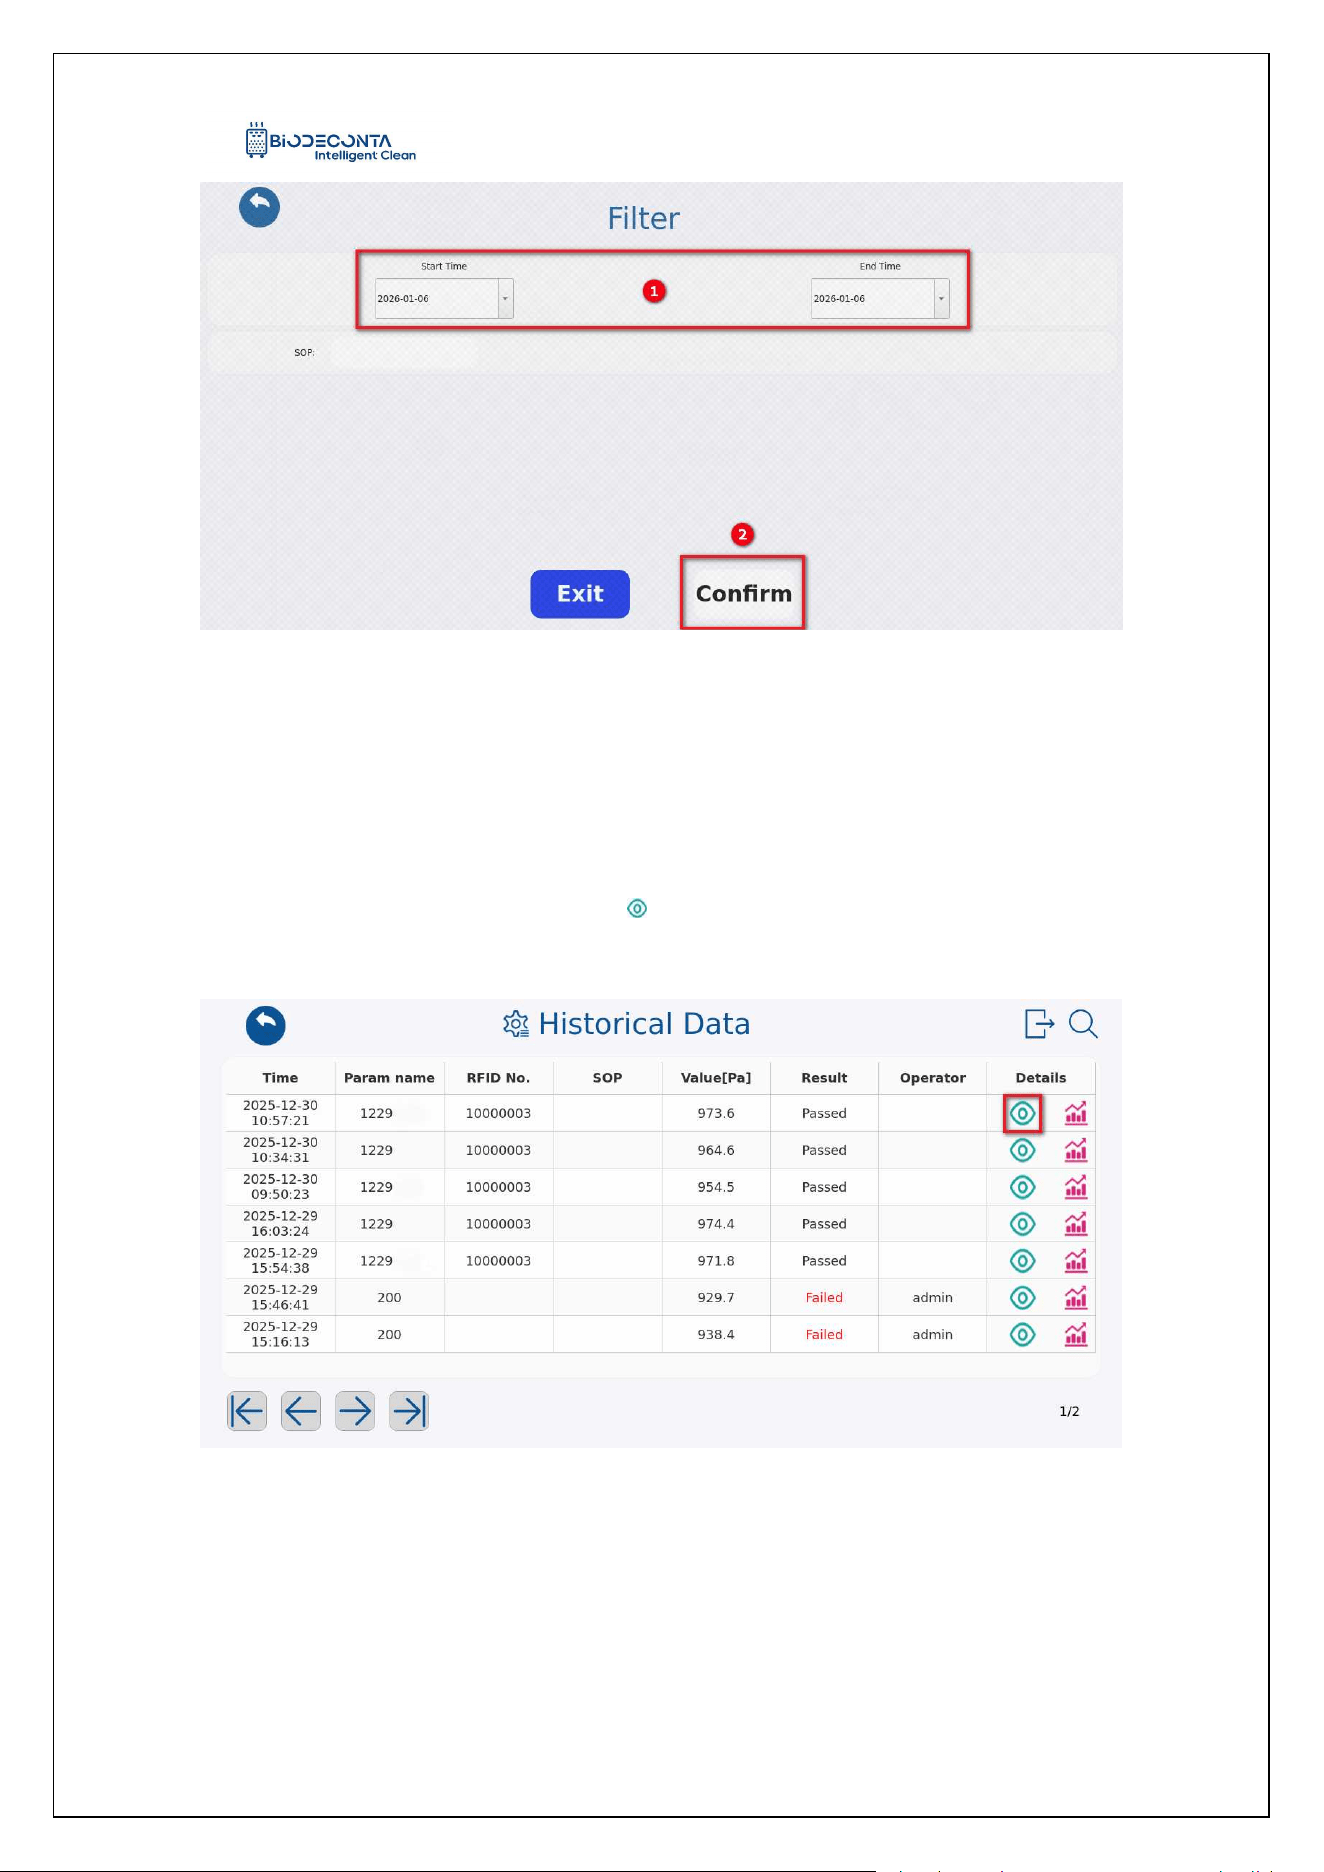
Click the "Historical data "button, as shown in Figure 8-7, and the page will jump
to the "Historical Data" page. Click the [ ] icon, as shown in Figure 8-8, and the page
will jump to the filter page. Select the date data you need to search for, and then click
the "Confirm" button, to complete the search operation.
Figure 8-7 "Search 1"
Intelligent Safe and Clean
www.biodeconta.com
56
Figure 8-8 "Search 2"
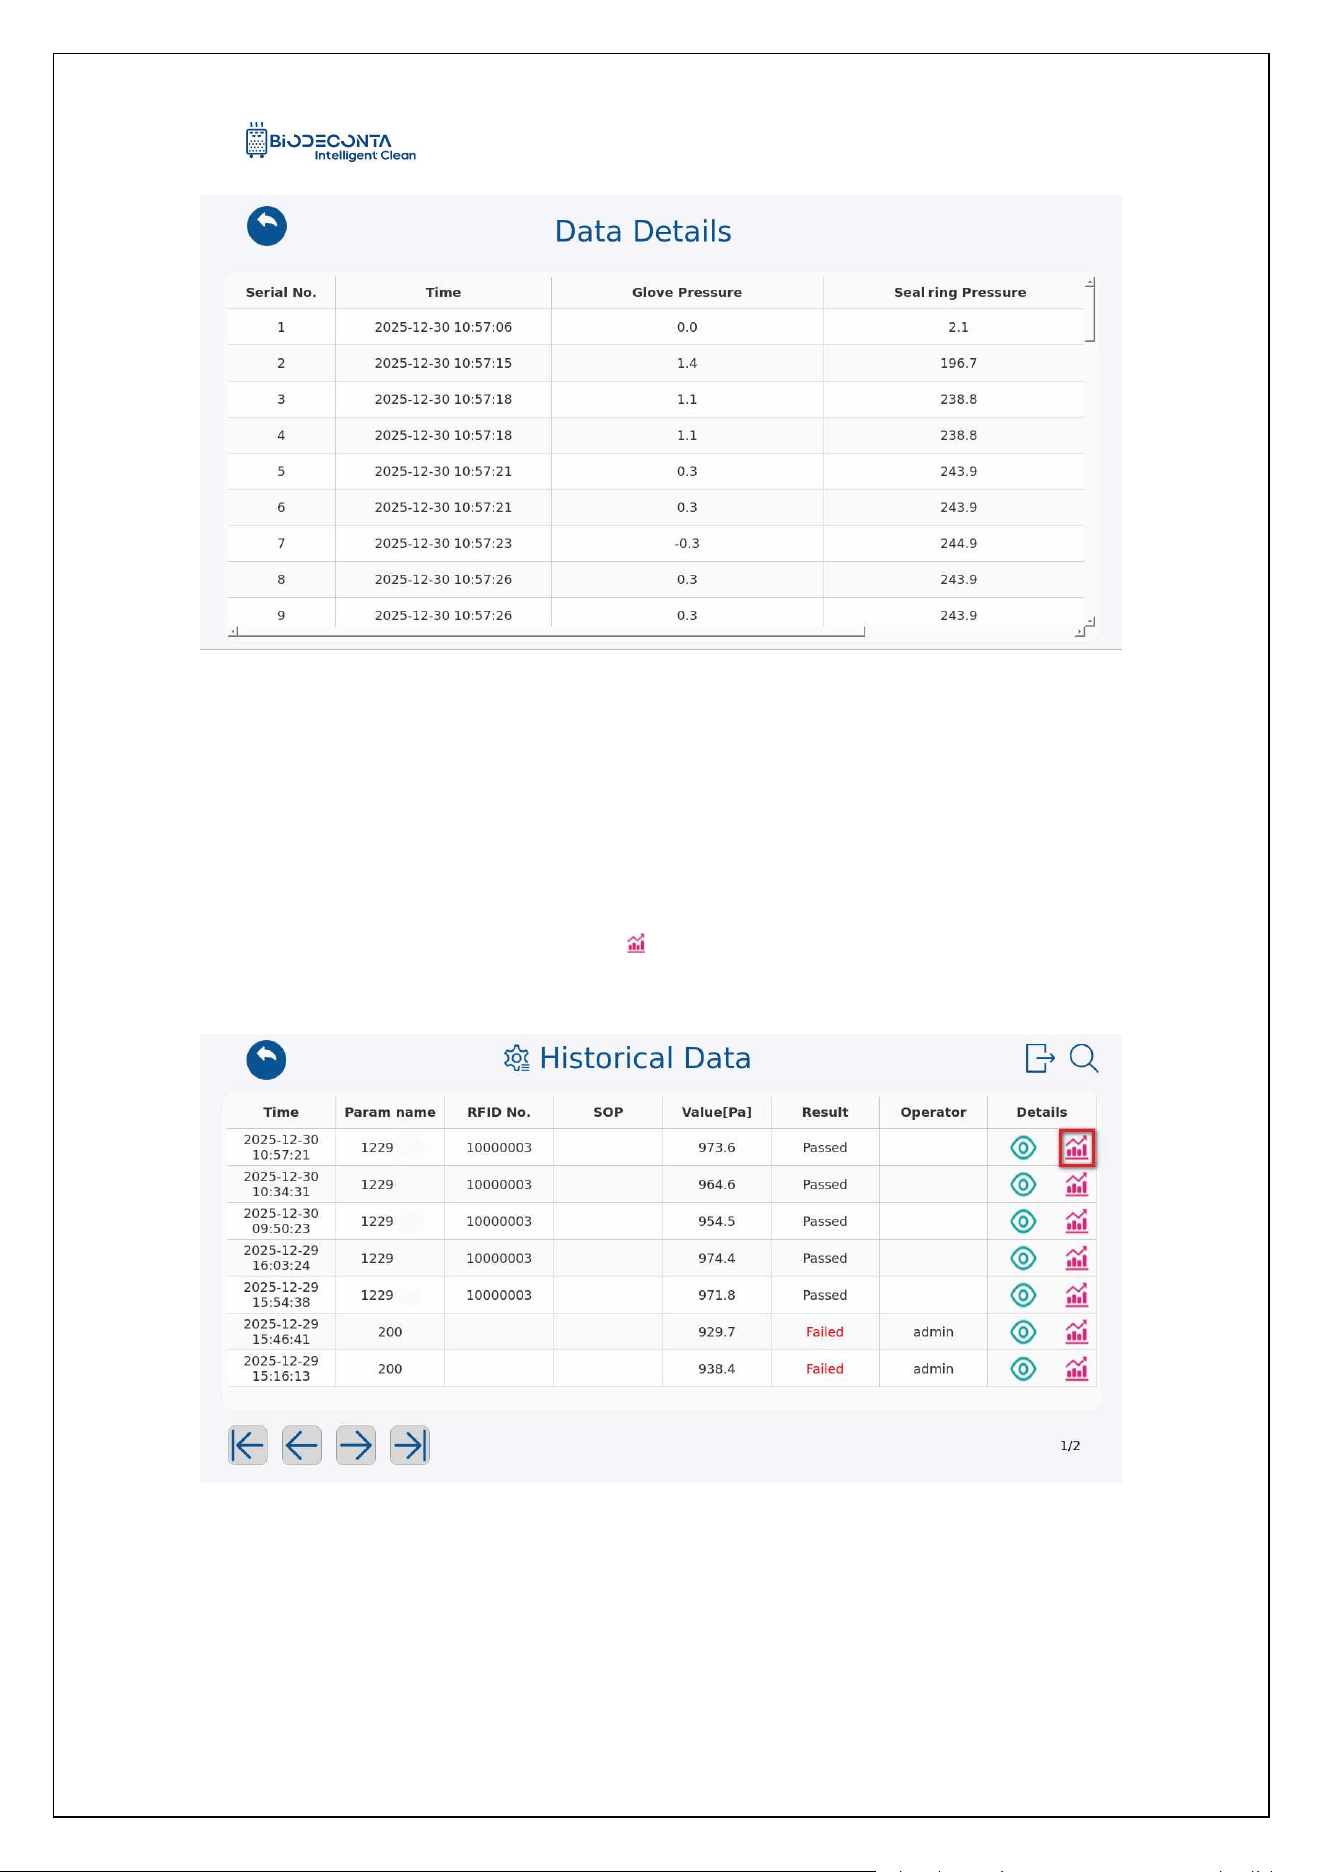
8.3 Data Details:
Click the "Historical data" button, as shown in Figure 8-9, and the page will jump
to the "Historical Data" page. Click the [ ] icon, as shown in Figure 8-10, and a "Data
Details" pop-up box will appear, allowing you, to complete the data details operation.
Figure 8-9 "Data Details 1"
Intelligent Safe and Clean
www.biodeconta.com
57
Figure 8-10 "Data Details 2"
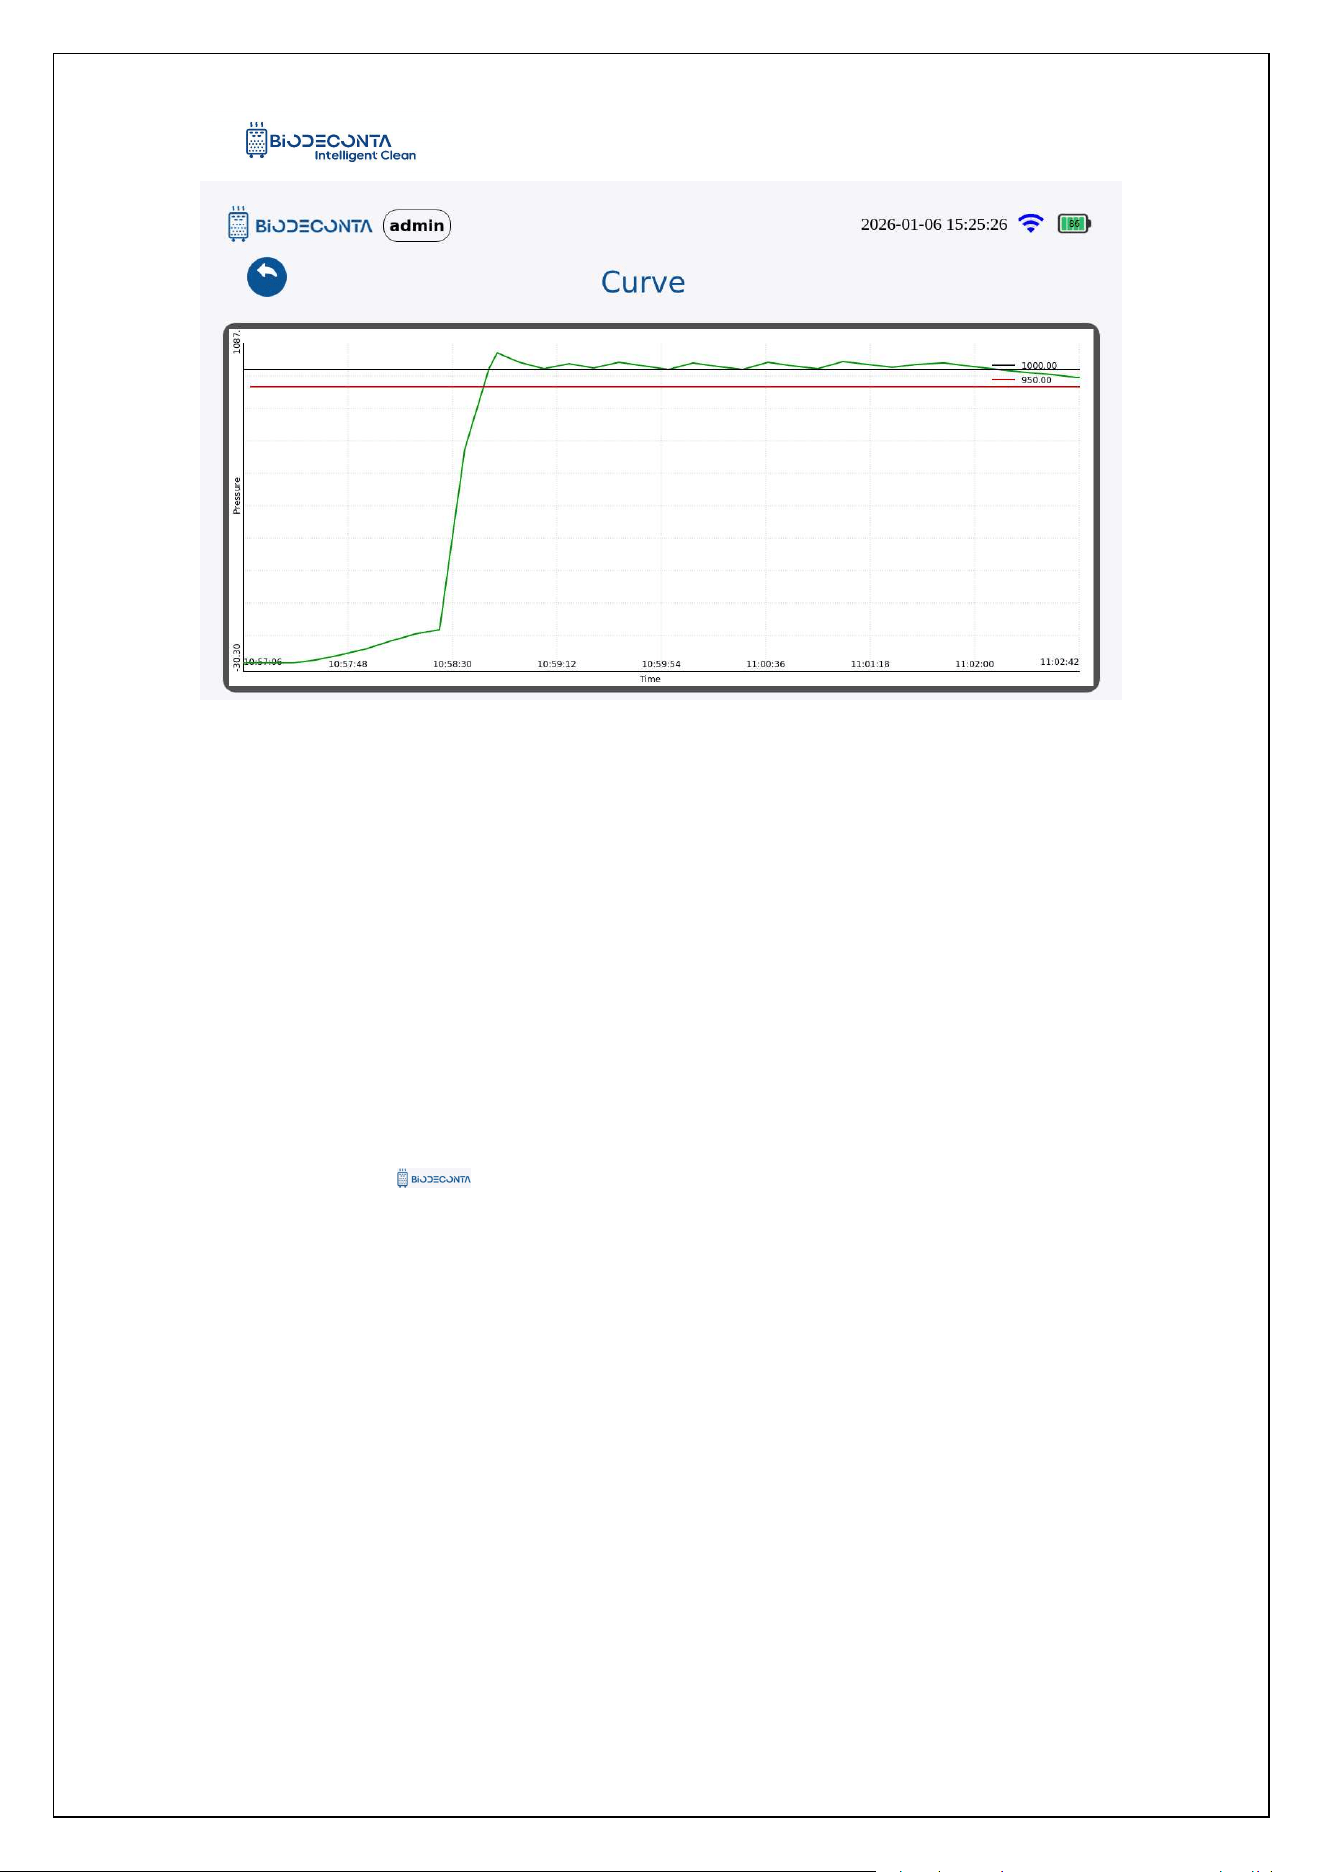
8.4 Data curve:
Click the "Historical data" button, as shown in Figure 8-11, and the page will jump
to the "Historical Data" page. Click the [ ] icon, as shown in Figure 8-12, and a "Data
curve" pop-up box will appear, allowing you, to complete the data curve operation.
Figure 8-11 "Data Curve"
Intelligent Safe and Clean
www.biodeconta.com
58
Figure 8-12 "Data Curve 2"
Chapter 9 Logs
9. Logs
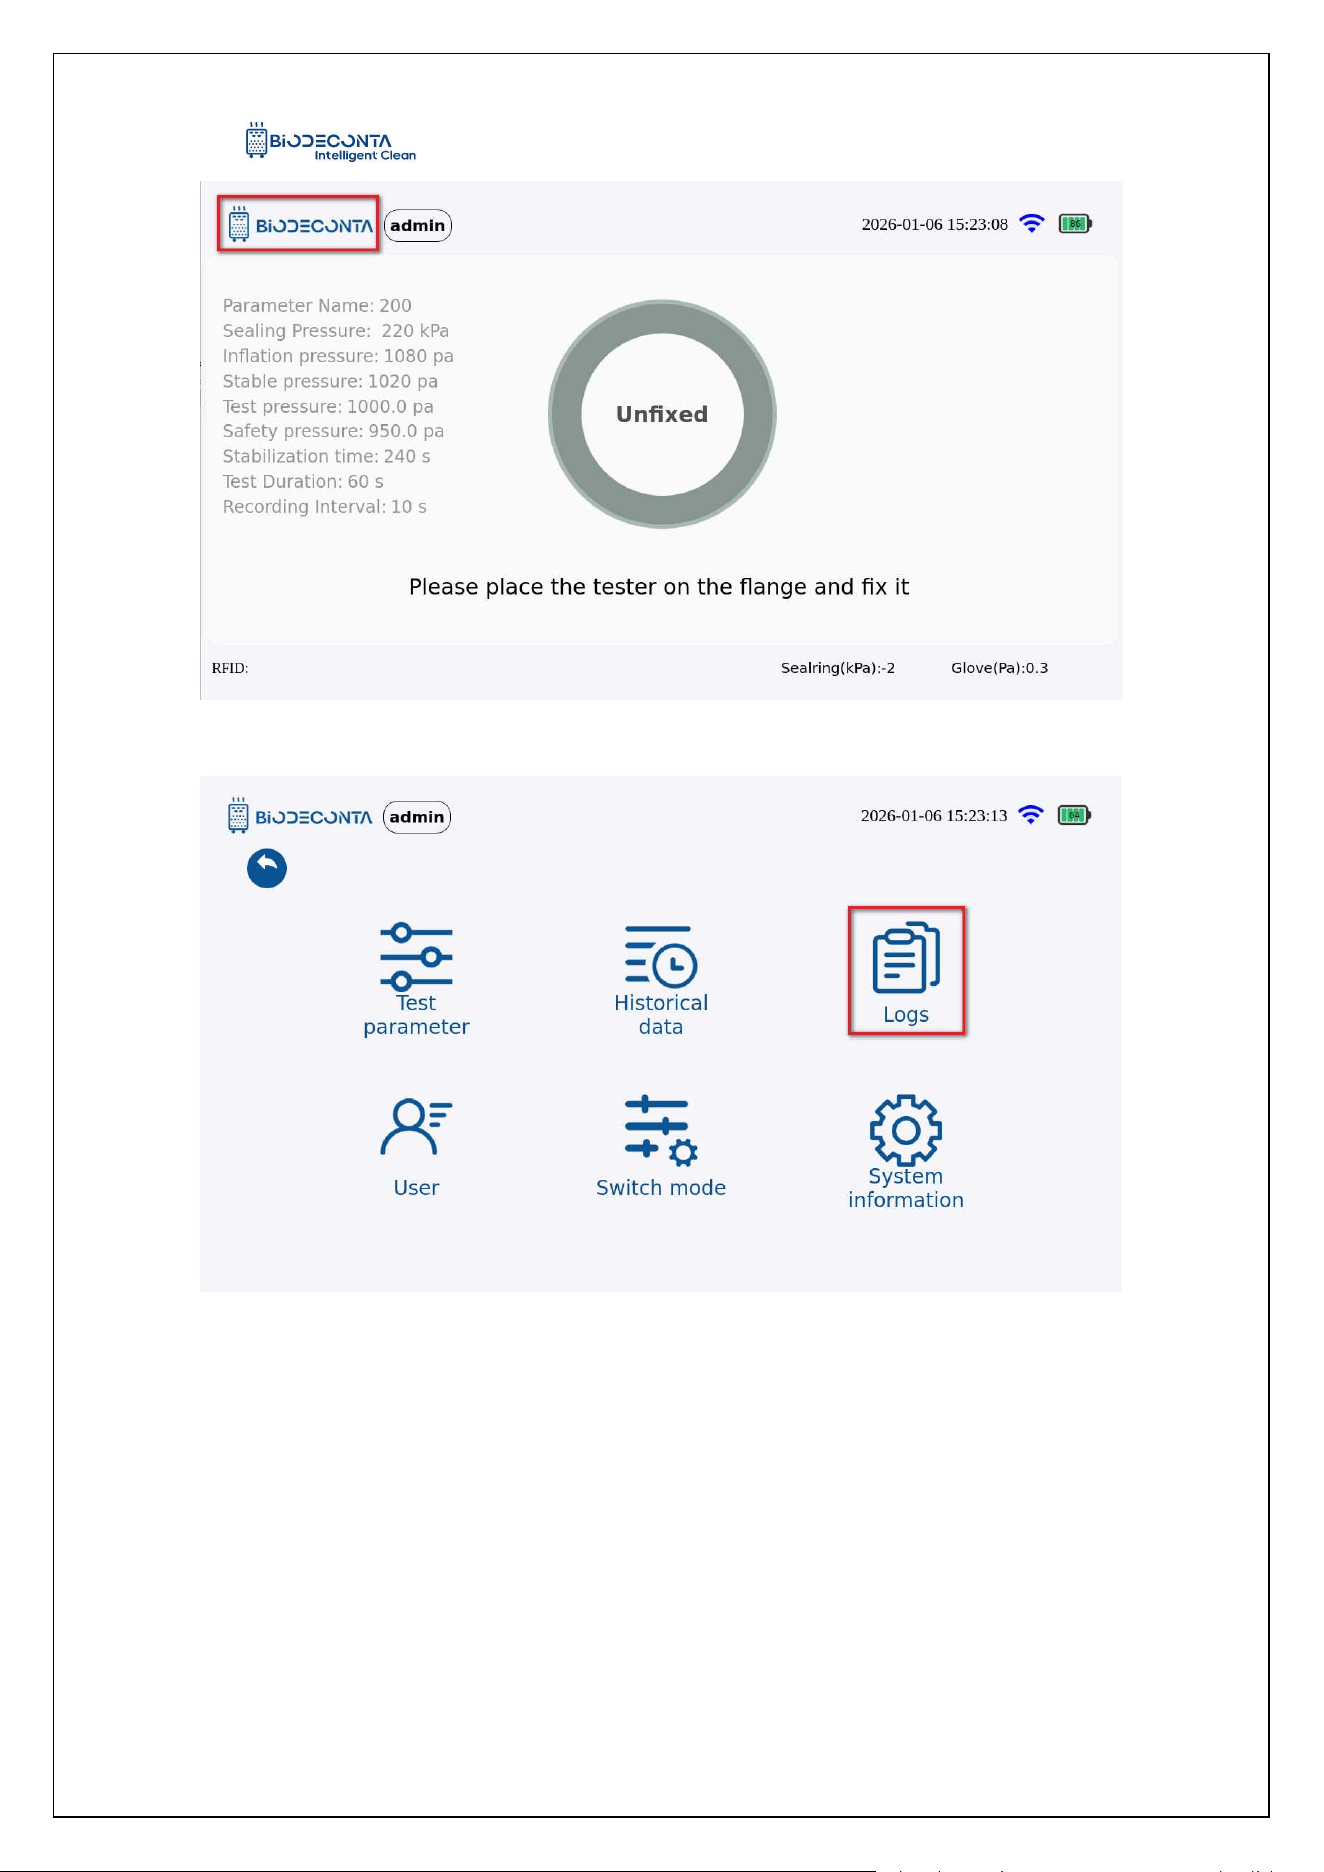
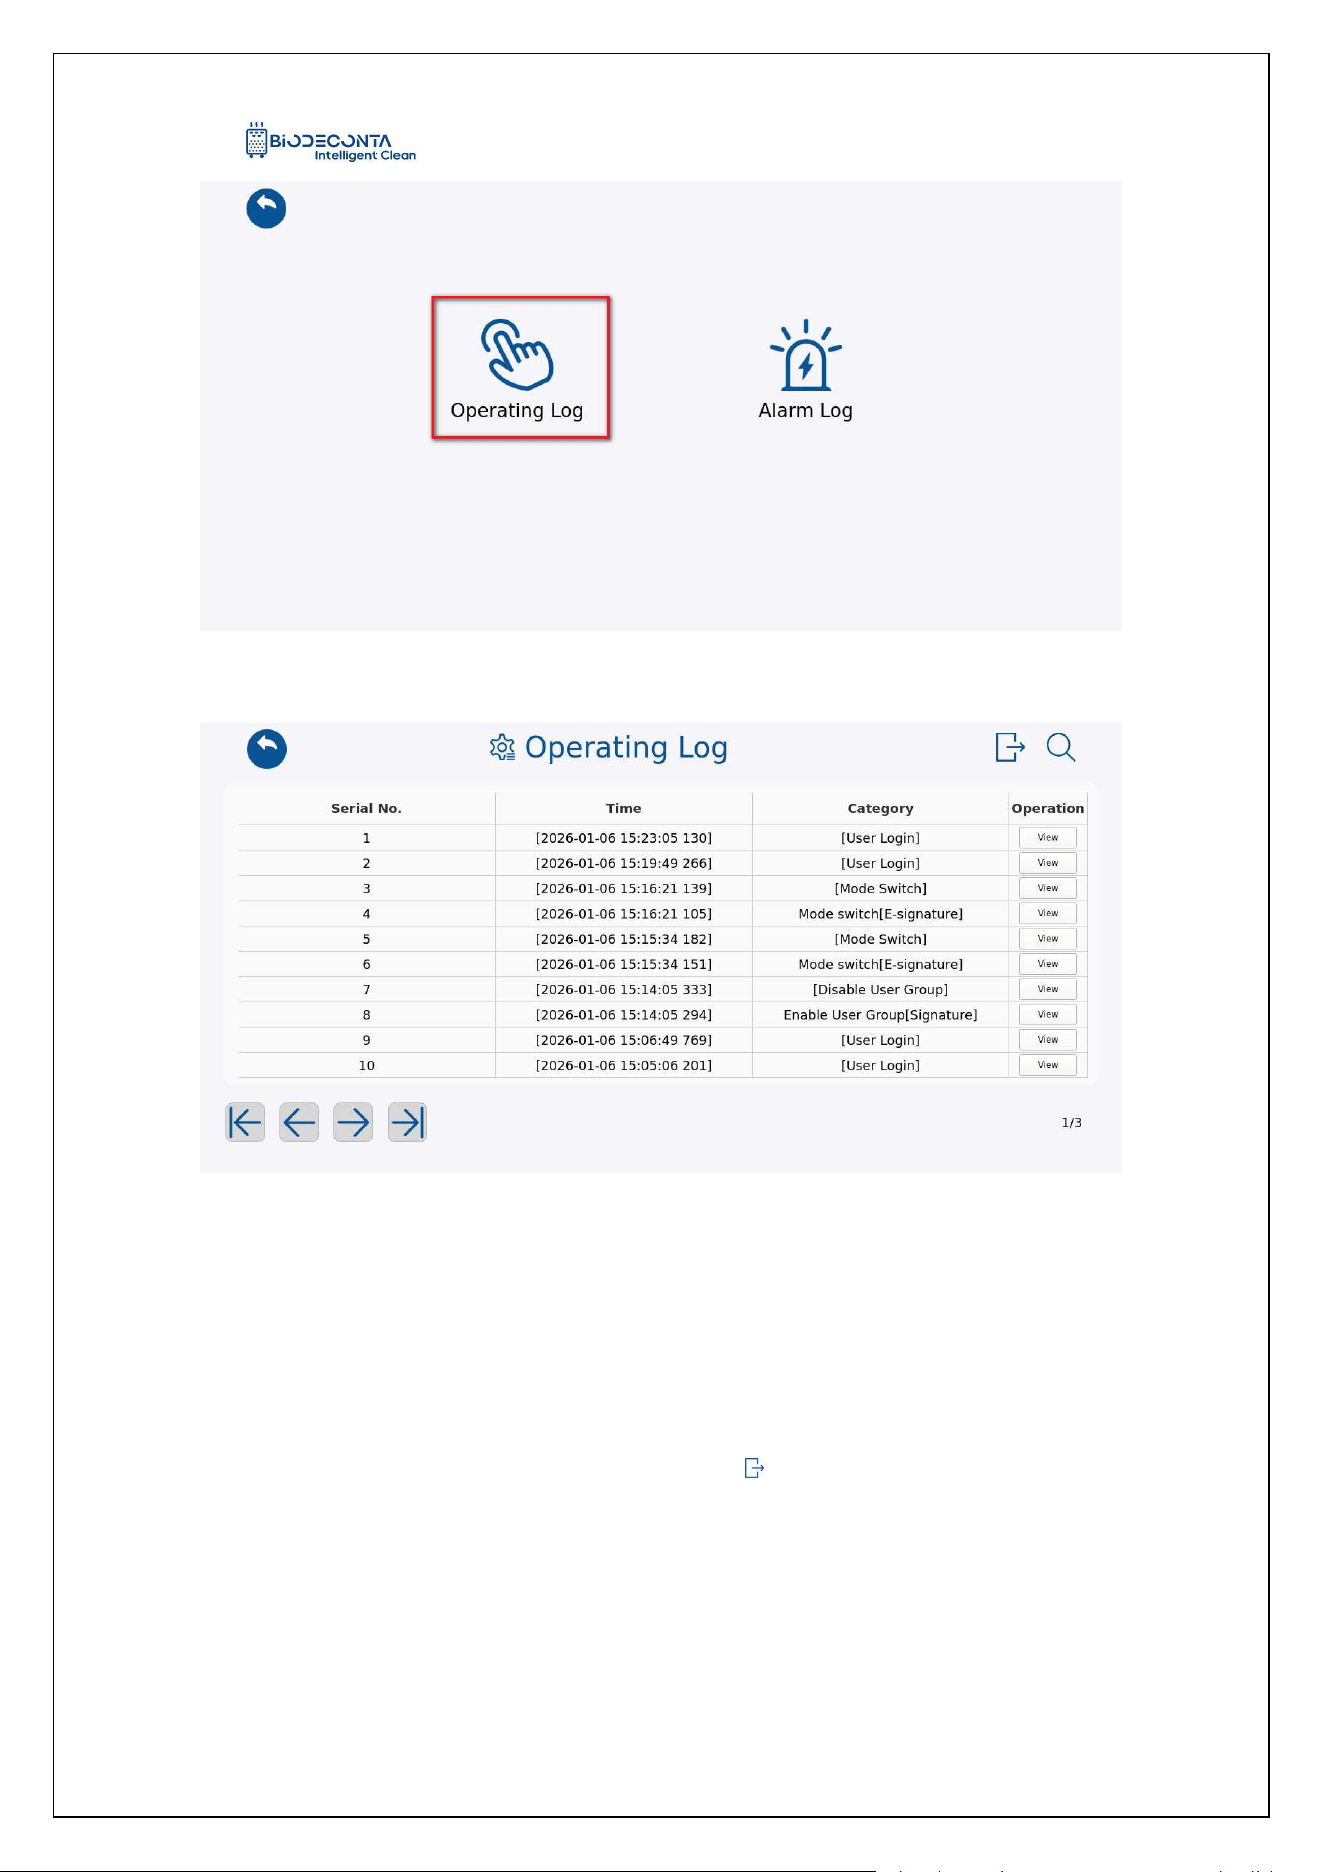
9.1 Operation Log
Click on the [ ] icon on the test interface, as shown in Figures 9.1-1 and
9.1-2, and the page will jump to the pages of [Test Parameter], [Historical data], [Logs],
[Users], [Switch mode], [System information], click on [Logs]. As shown in Figure
9.1-3, and the page will jump to the [Operating Log] page. As shown in Figure 9.1-4,
This module mainly includes the export, search and viewing operations for log
management.
Intelligent Safe and Clean
www.biodeconta.com
59
Figure 9.1-1 "Logs 1"
Figure 9.1-2 "Logs 2"
Intelligent Safe and Clean
www.biodeconta.com
60
Figure 9.1-3 "Logs 3"
Figure 9.1-4 "Logs 4"
9.2 Export:
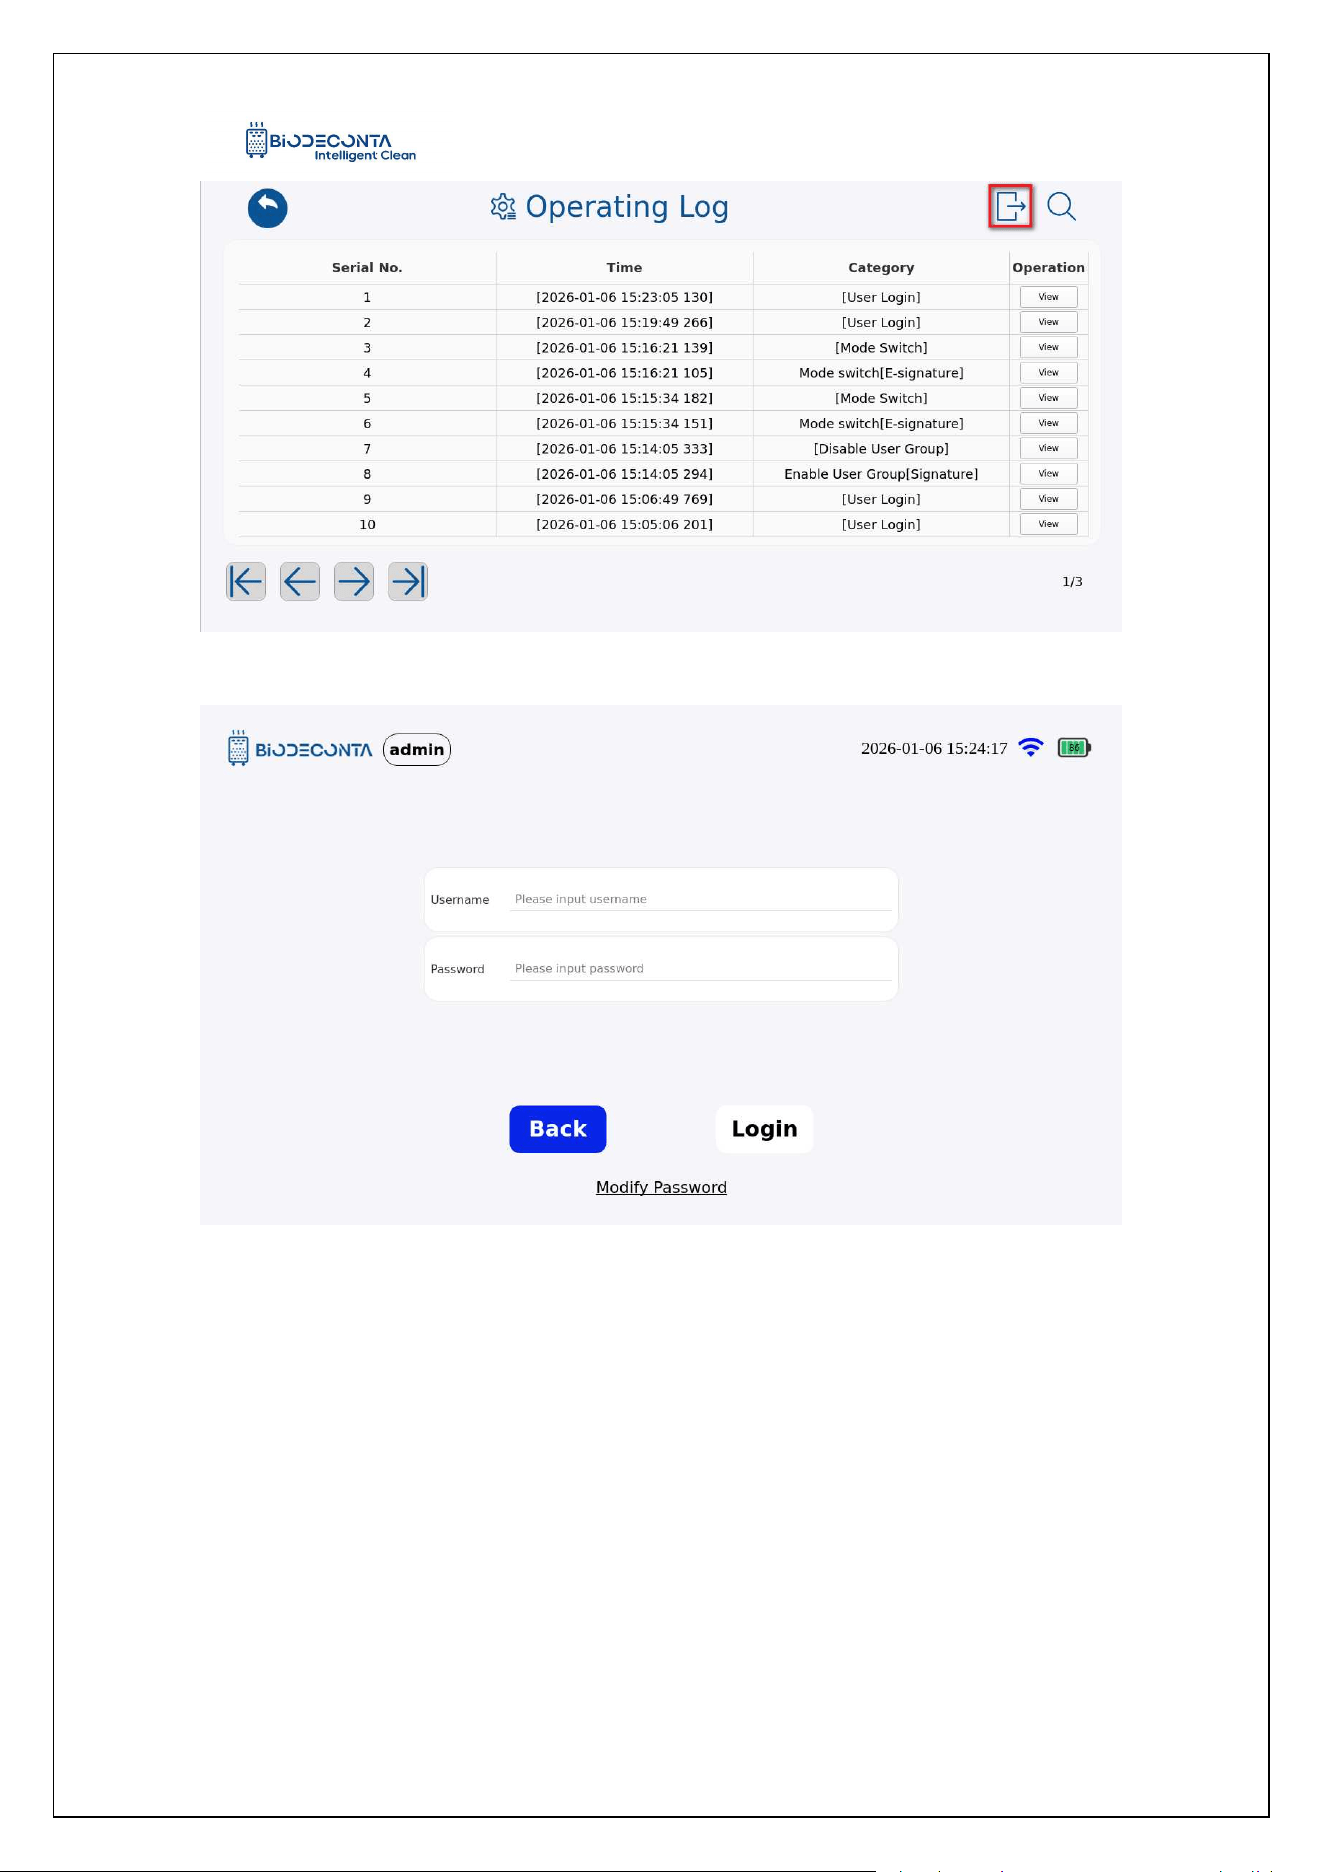
Click the [Operation Log], as shown in Figure 9.1-5, and the page will be
redirected to the "Operation Log" page, click the [ ] icon. As shown in Figure 9.1-6,
the page will jump to the login interface, fill in the account and password data, and
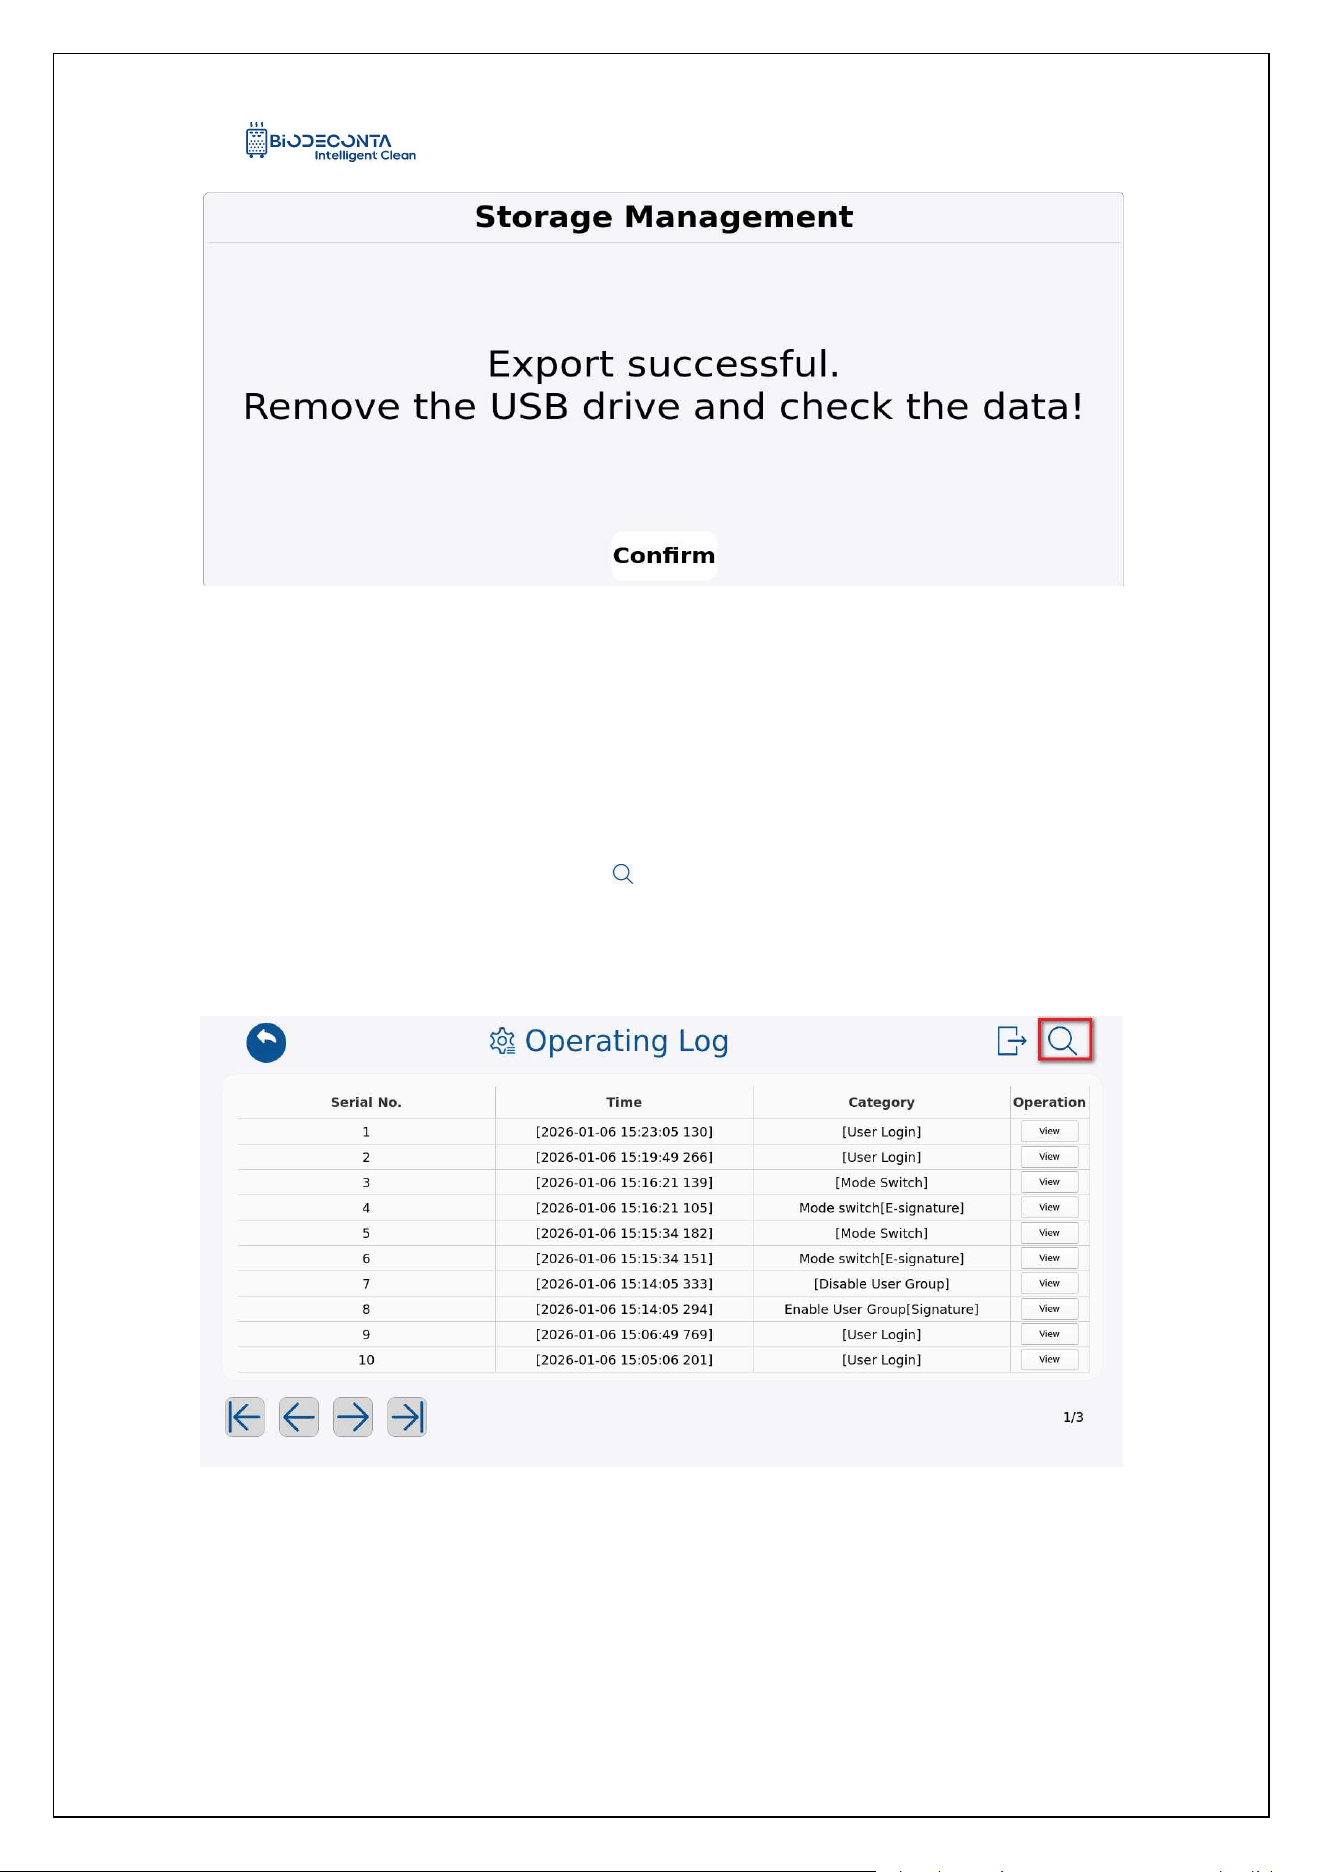
click the "Login" button. As shown in Figure 9.1-7, the page will pop up an "Export
successful. Remove the USB drive and check the data!" dialog box, click the
"Confirm" button, to complete the export operation.
Intelligent Safe and Clean
www.biodeconta.com
61
Figure 9.1-5 "Export 1"
Figure 9.1-6 "Export 2"
Intelligent Safe and Clean
www.biodeconta.com
62
Figure 9.1-7 "Export 3"
9.3 Search:
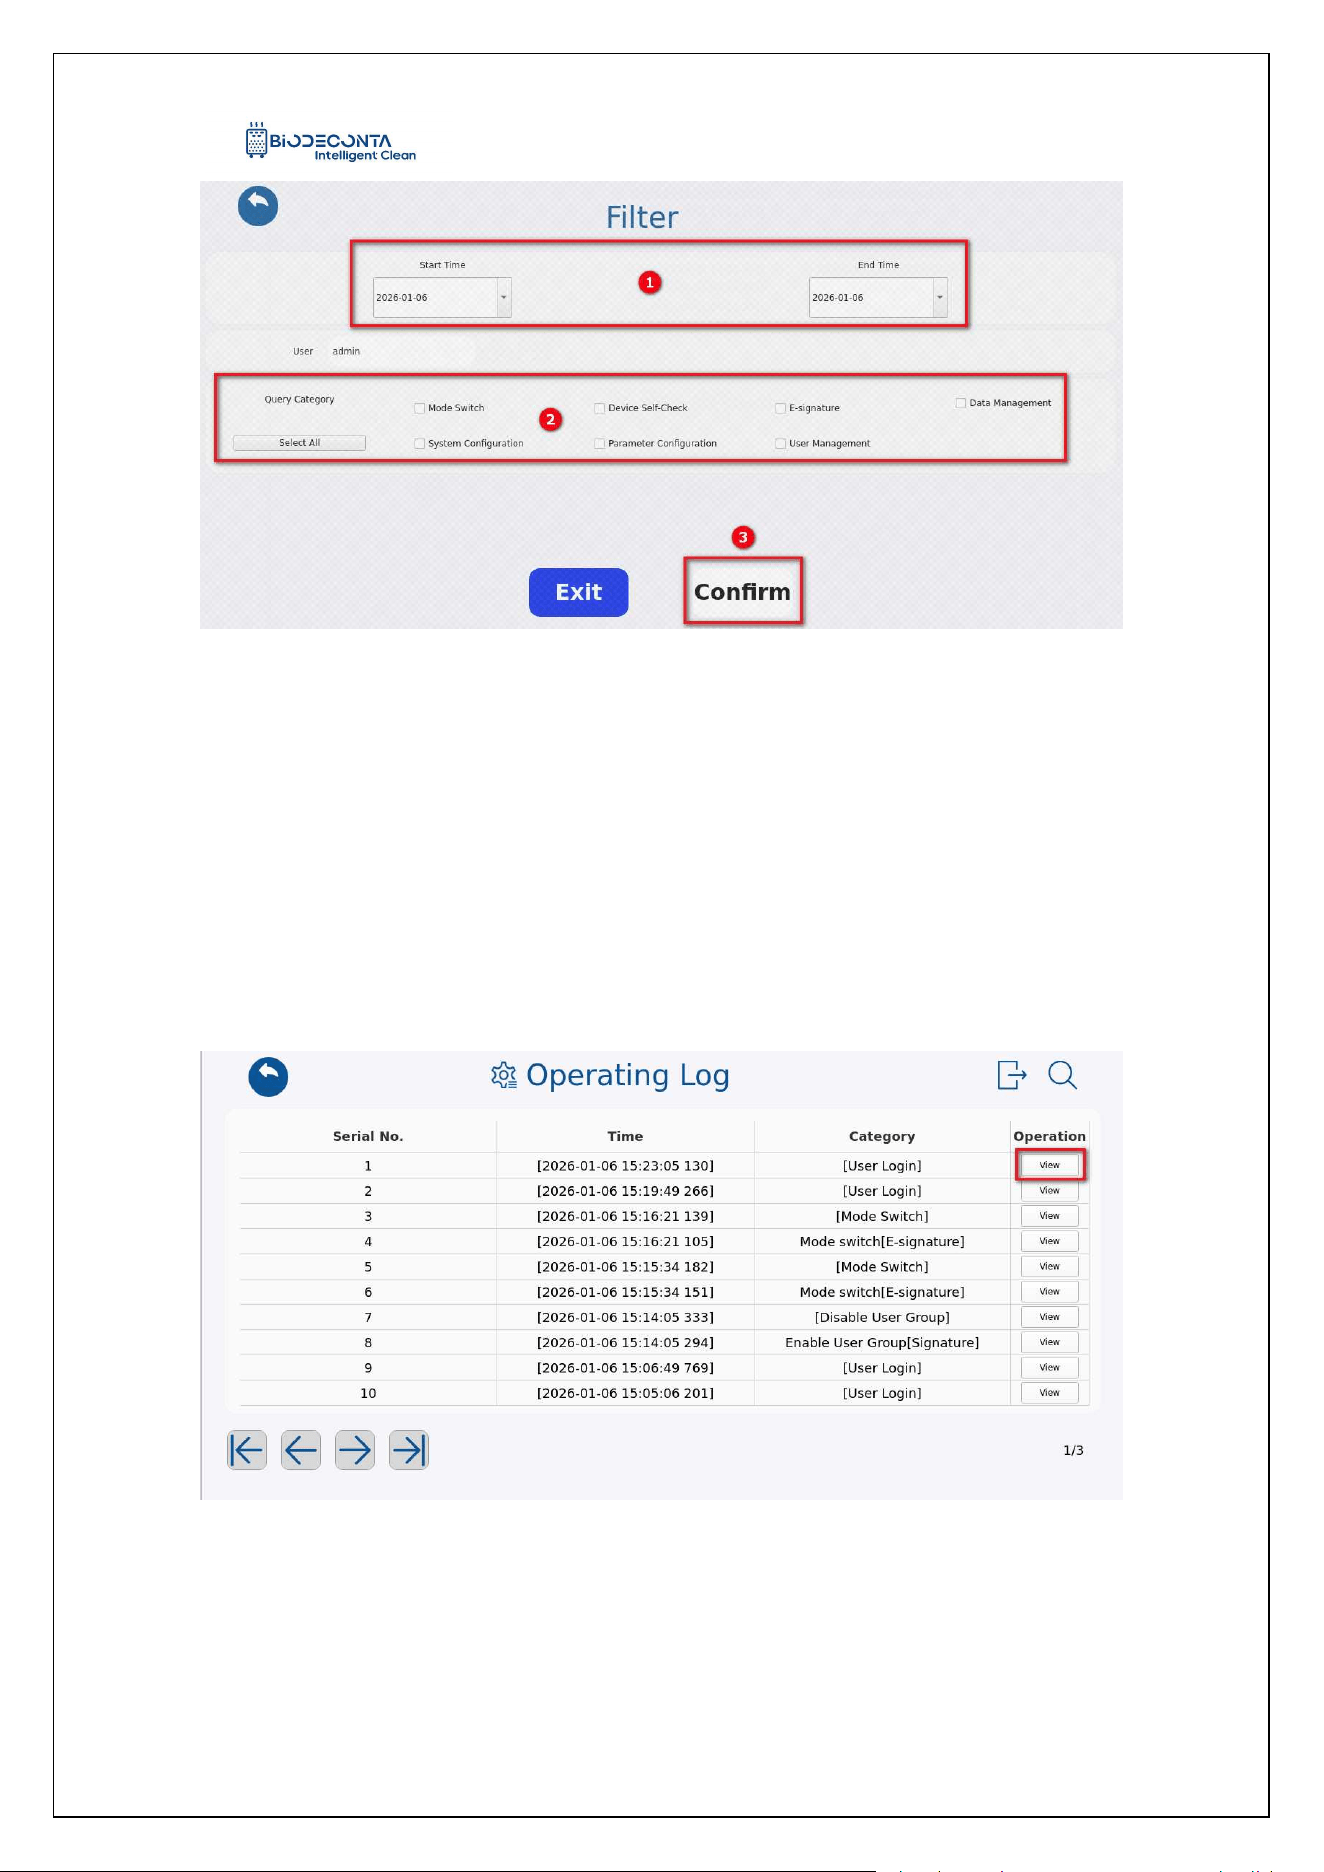
Click the "Operation Log" button, as shown in Figure 9.1-8, and the page will jump
to the "Operation Log" page, click the [ ] icon, as shown in Figure 9.1-9, and the page
will jump to the filter page, select the date data you need to search for, and then click
the "Confirm" button, to complete the search operation.
Figure 9.1-8 "Search 1"
Intelligent Safe and Clean
www.biodeconta.com
63
Figure 9.1-9 "Search 2"
9.4 View:
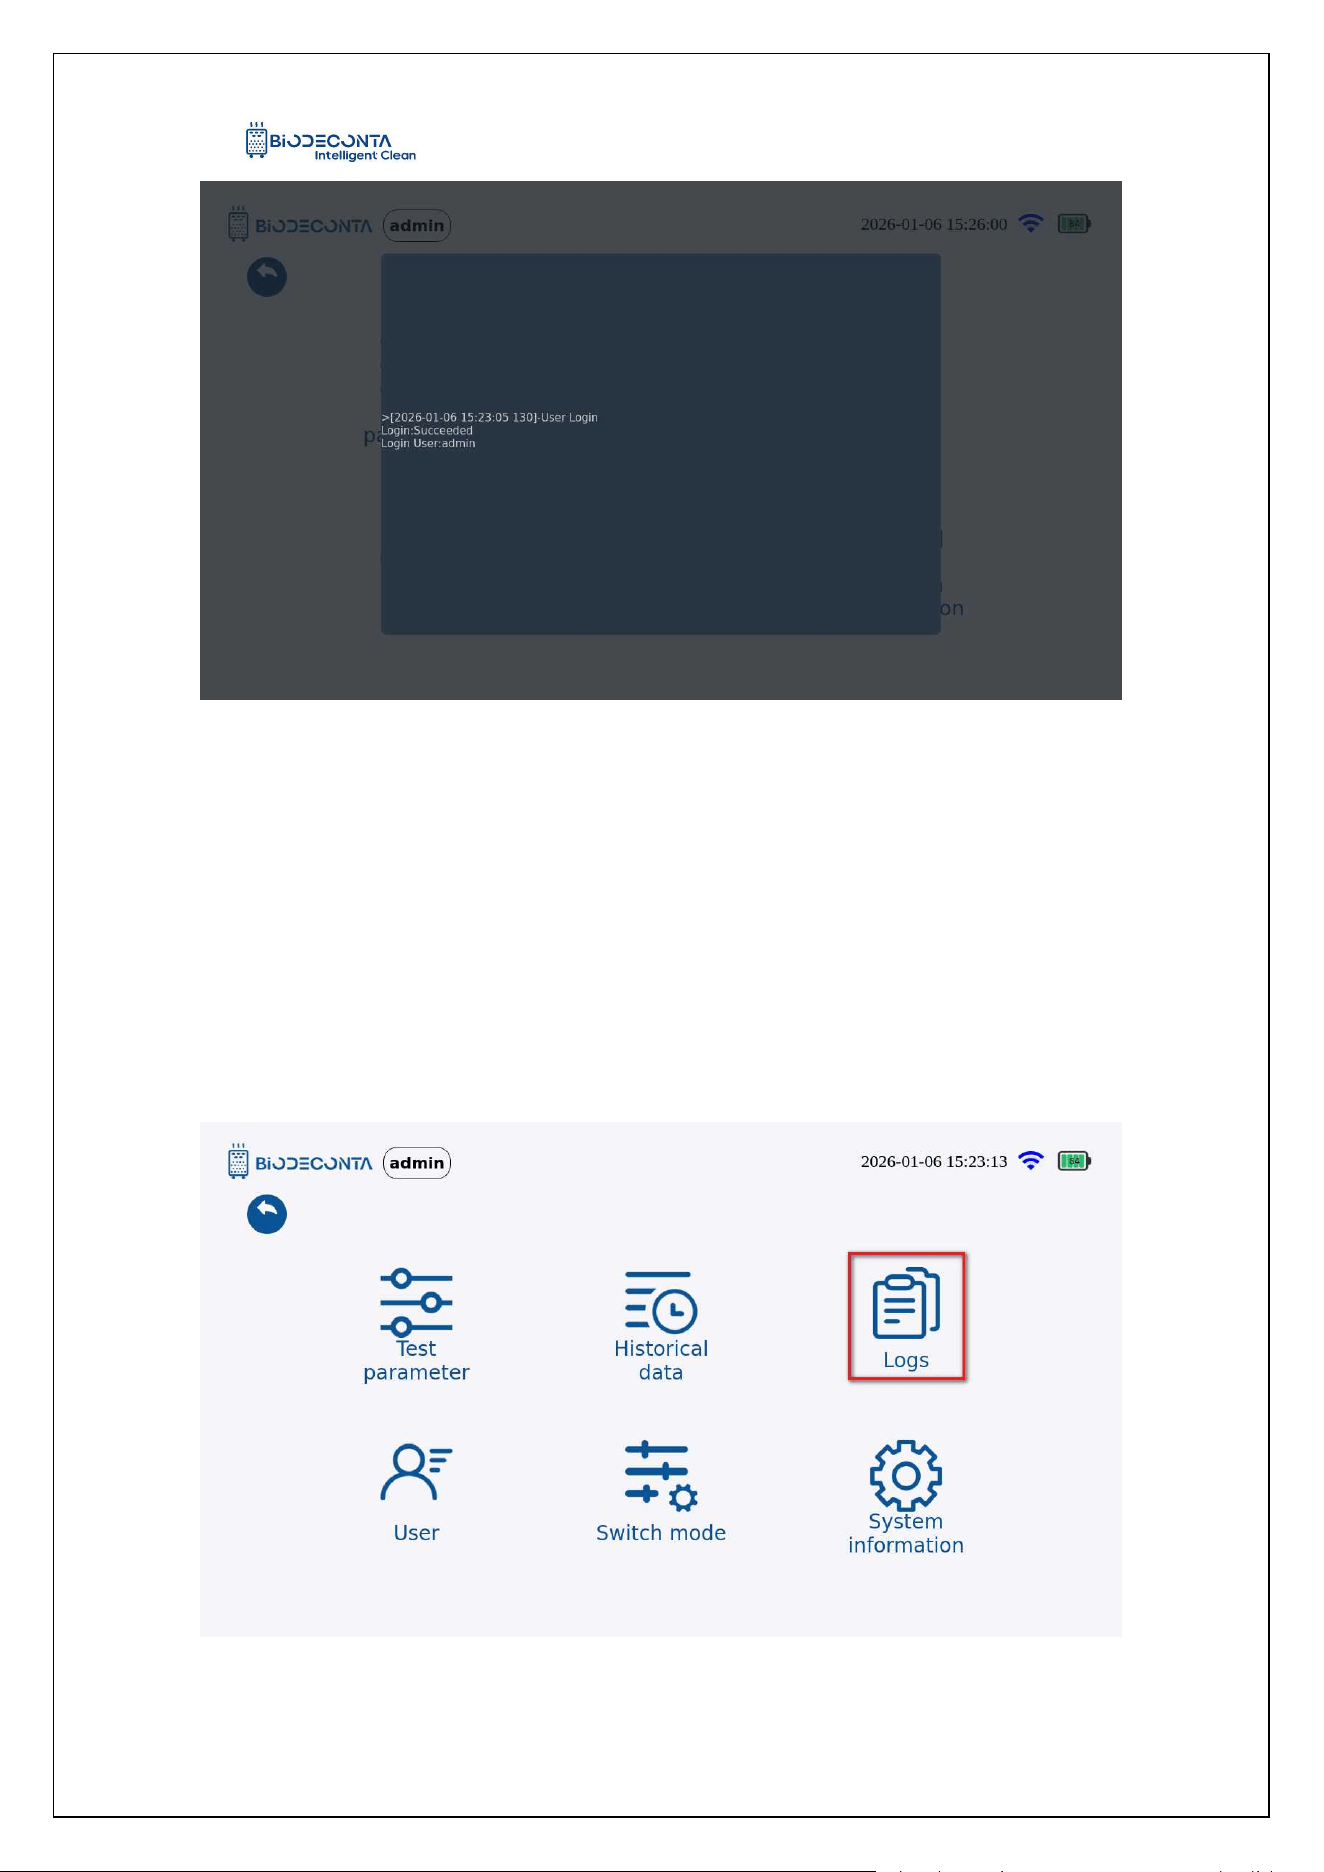
Click on "Operation Log", as shown in Figure 9.1-10, and the page will jump to the
"Operation Log" page. Click the "View" button, as shown in Figure 9.1-11, and the
page will pop up with the recorded operations, and then the viewing operation can be
completed.
Figure 9.1-10 "View 1"
Intelligent Safe and Clean
www.biodeconta.com
64
Figure 9.1-11 "View 2"
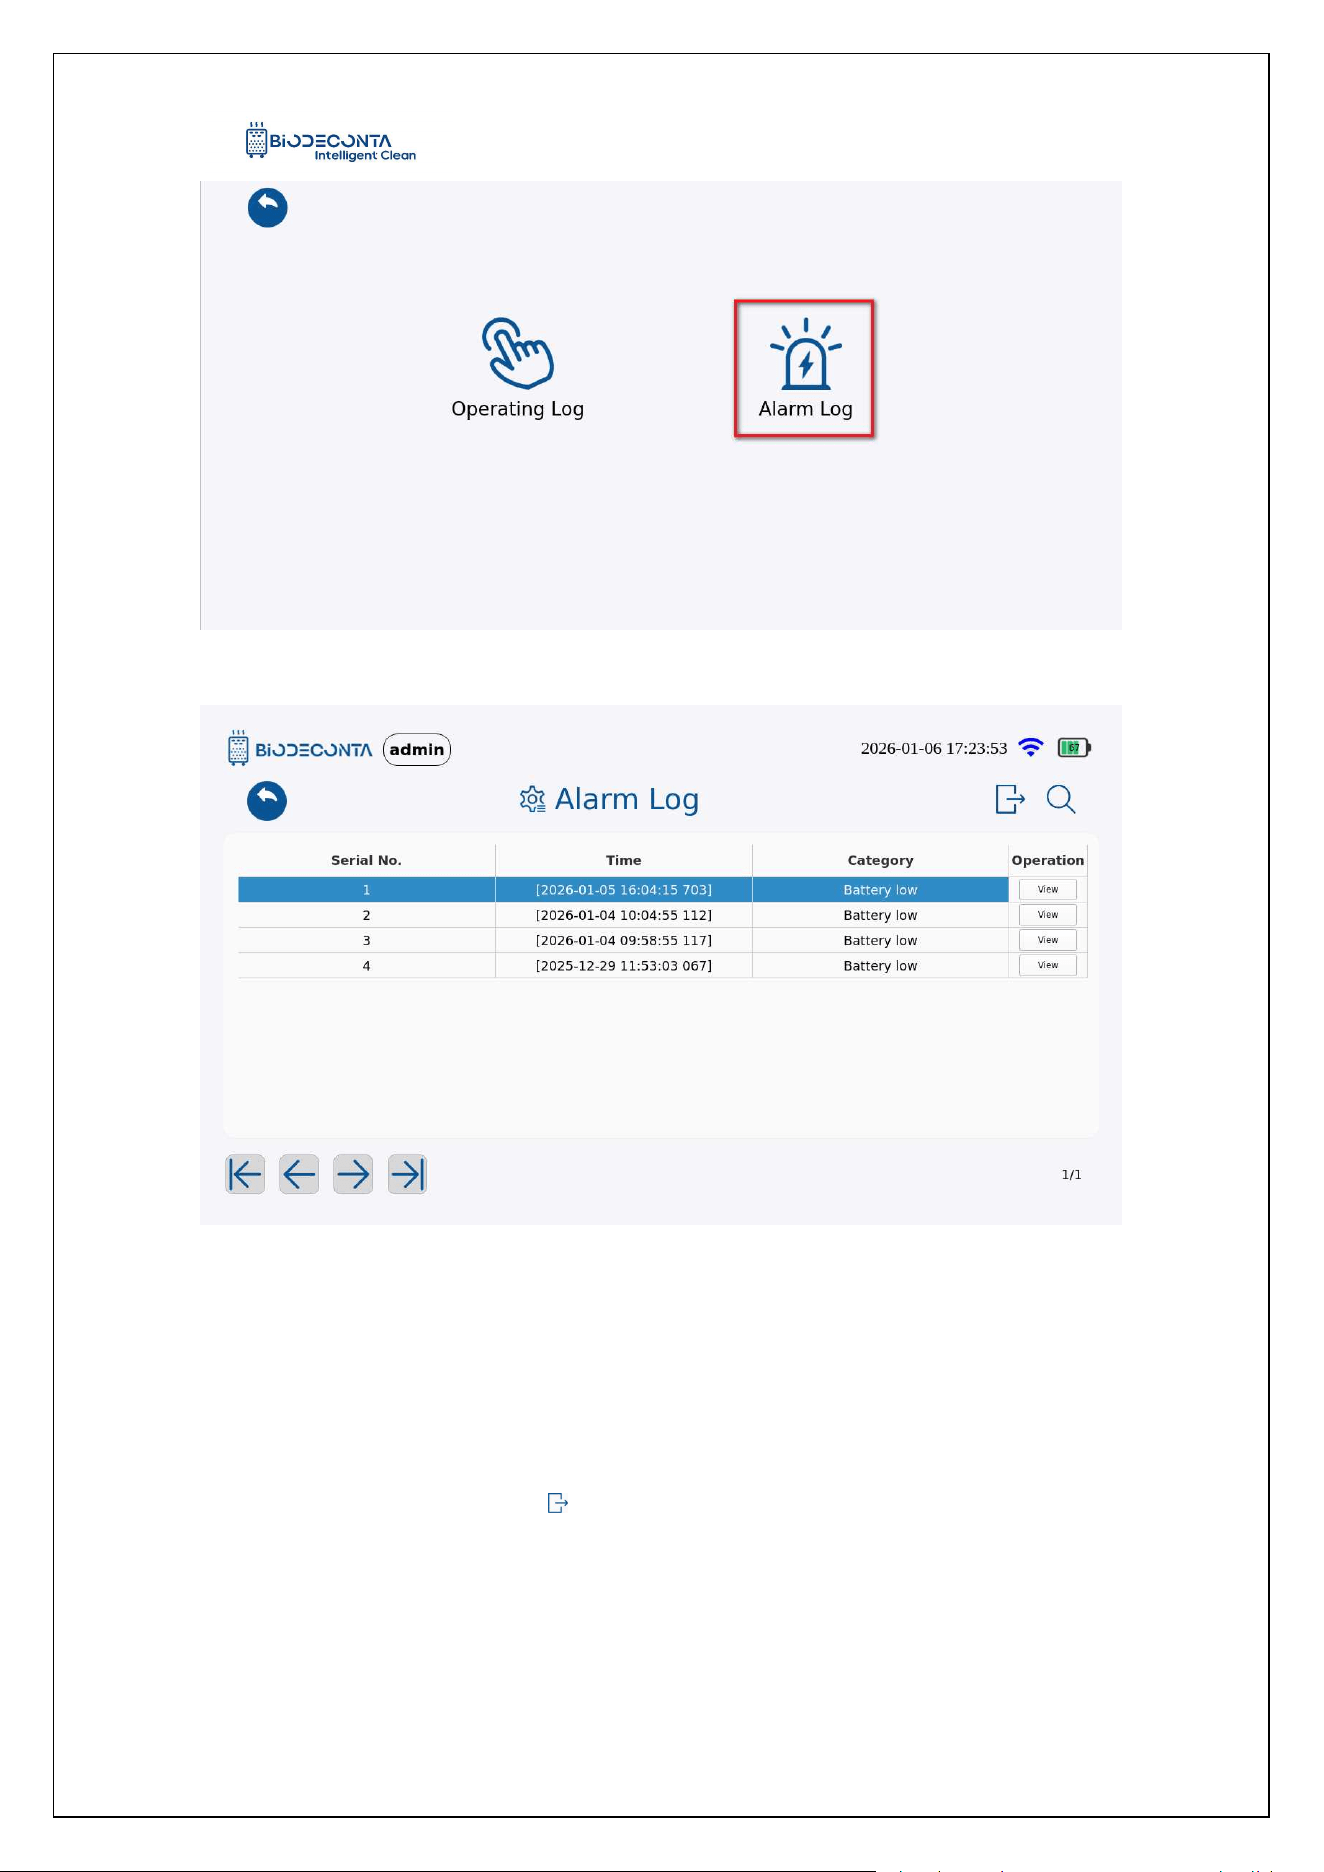
9.5 Alarm Log
Click on "Logs", as shown in Figure 9.2-1, and the page will jump to the
"Operation Log" and "Alarm Log" pages, as shown in Figure 9.2-2, click on "Alarm
Log". As shown in Figure 9.2-3, and this module mainly includes the export, search,
and viewing operations of the alarm logs.
Figure 9.2-1 "Alarm Log 1"
Intelligent Safe and Clean
www.biodeconta.com
65
Figure 9.2-2 "Alarm Log 2"
Figure 9.2-3 "Alarm Log 3"
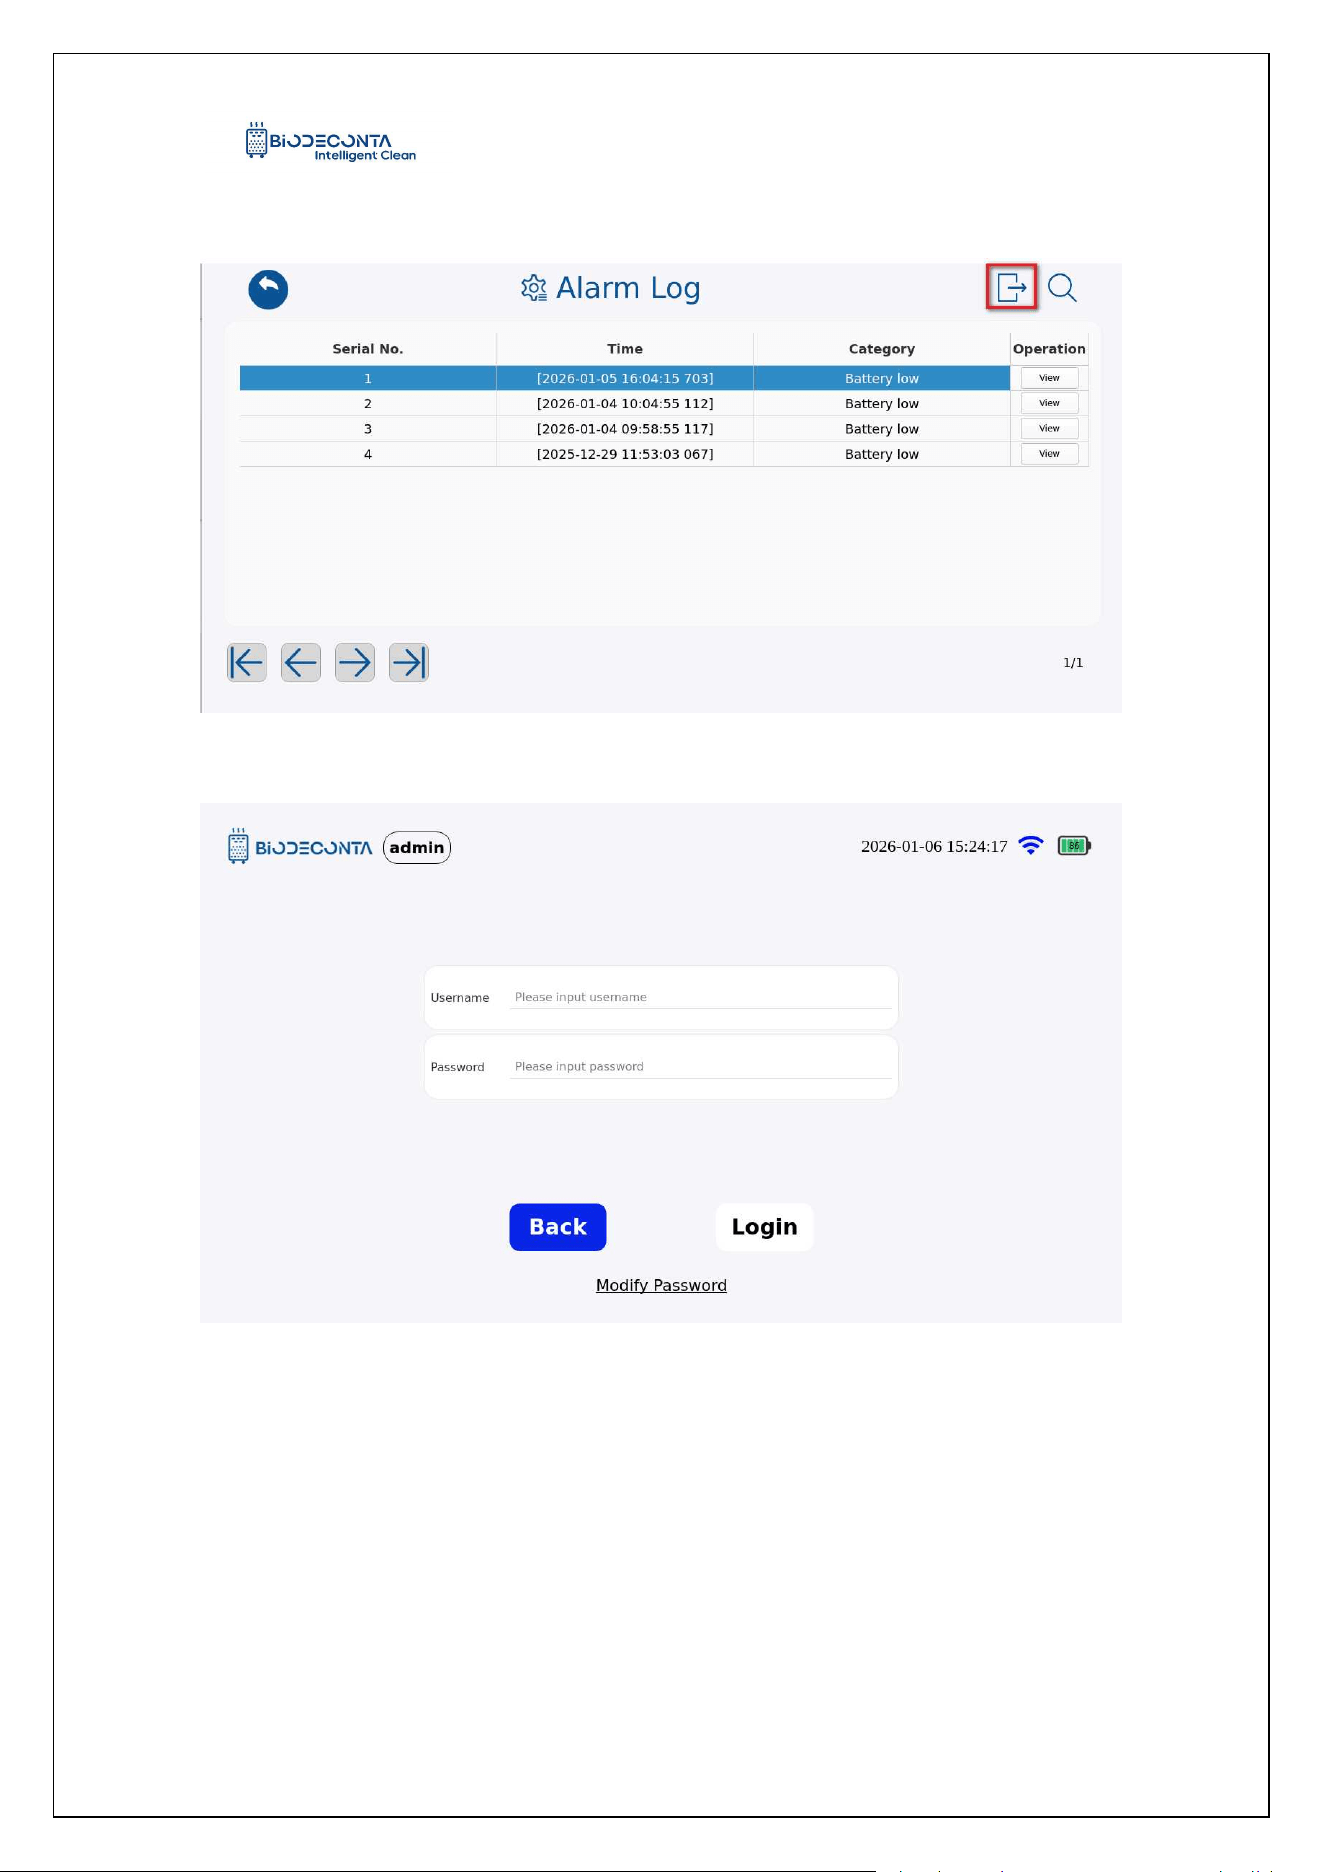
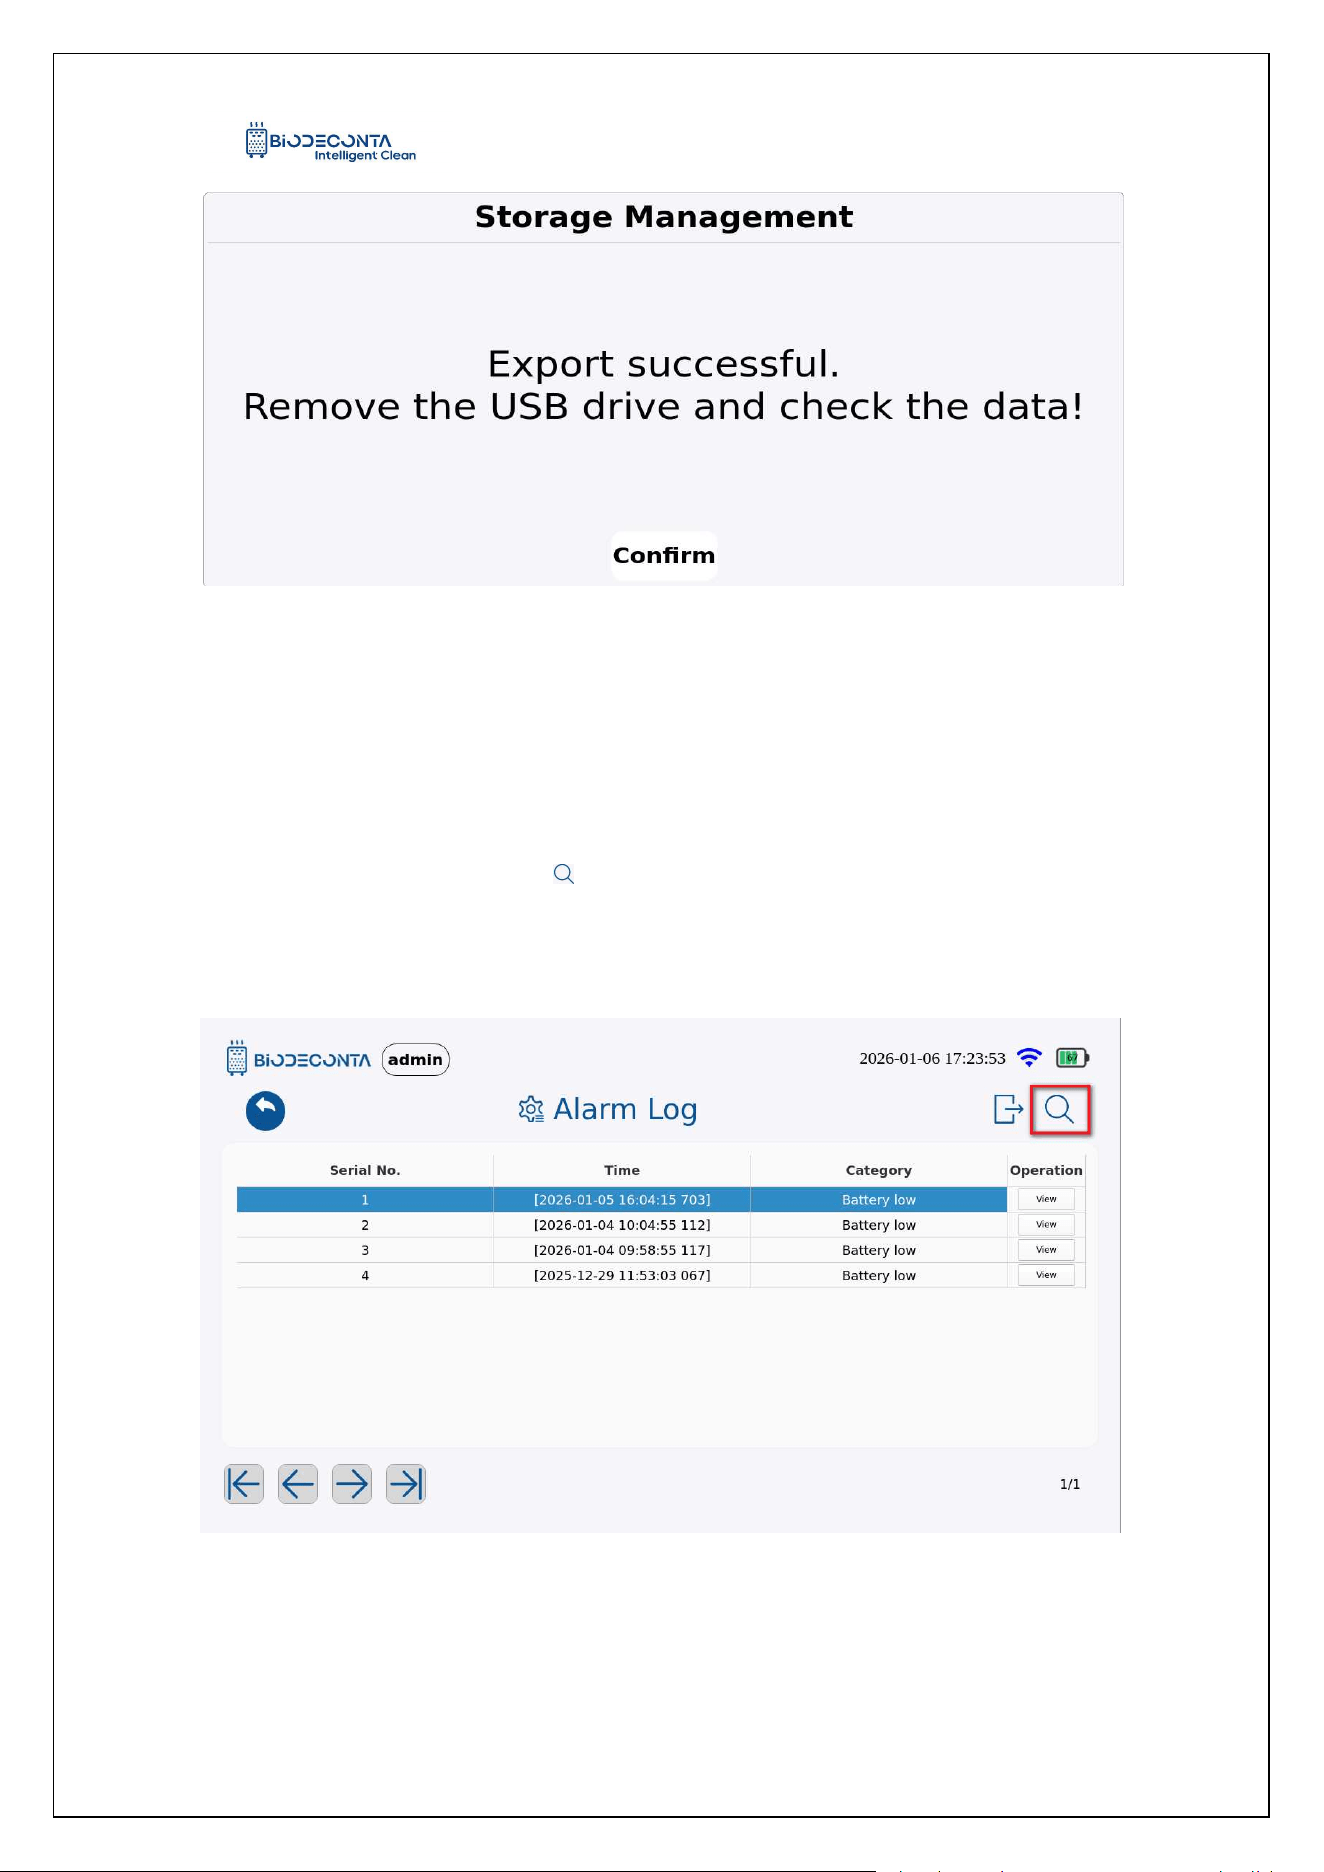
9.6 Export:
Click the [Alarm Log], as shown in Figure 9.2-4, and the page will be redirected to
the "Alarm Log" page, click the [ ] icon. As shown in Figure 9.2-5, the page will jump
to the login interface, fill in the account and password data, and click the "Login"
button. As shown in Figure 9.2-6, the page will pop up an "Export successful. Remove
the USB drive and check the data!" dialog box, click the "Confirm" button, to complete
Intelligent Safe and Clean
www.biodeconta.com
66
the export operation.
Figure 9.2-4 "Export 1"
Figure 9.2-5 "Export 2"
Intelligent Safe and Clean
www.biodeconta.com
67
Figure 9.2-6 "Export 3"
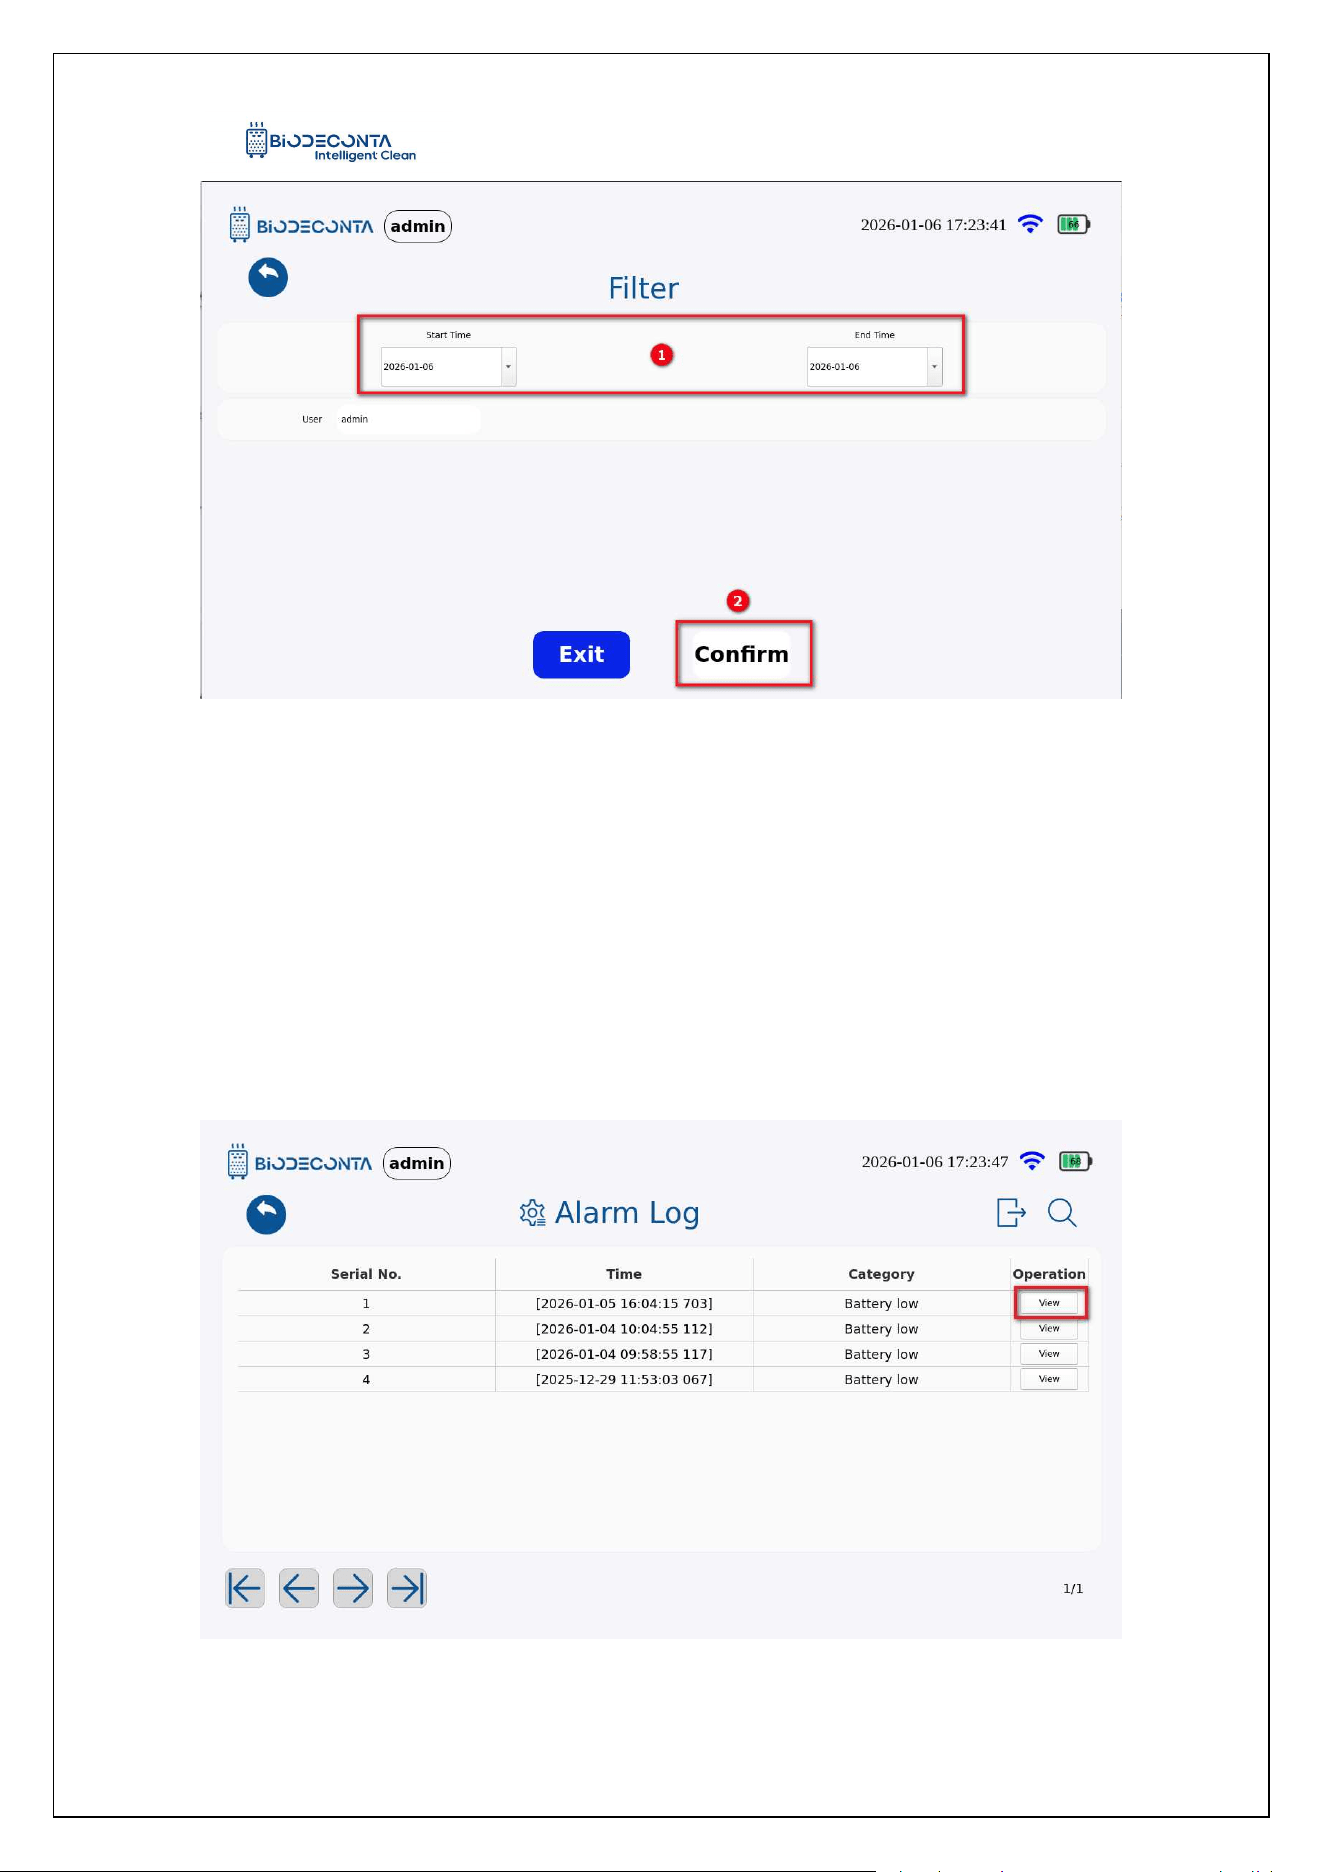
9.7 Search:
Click the "Alarm Log" button, as shown in Figure 9.2-7, and the page will jump to
the "Alarm Log" page, click the [ ] icon, as shown in Figure 9.2-8, and the page will
jump to the filter page, select the date data you need to search for, and then click the
"Confirm" button, to complete the search operation.
Figure 9.2-7 "Search 1"
Intelligent Safe and Clean
www.biodeconta.com
68
Figure 9.2-8 "Search 2"
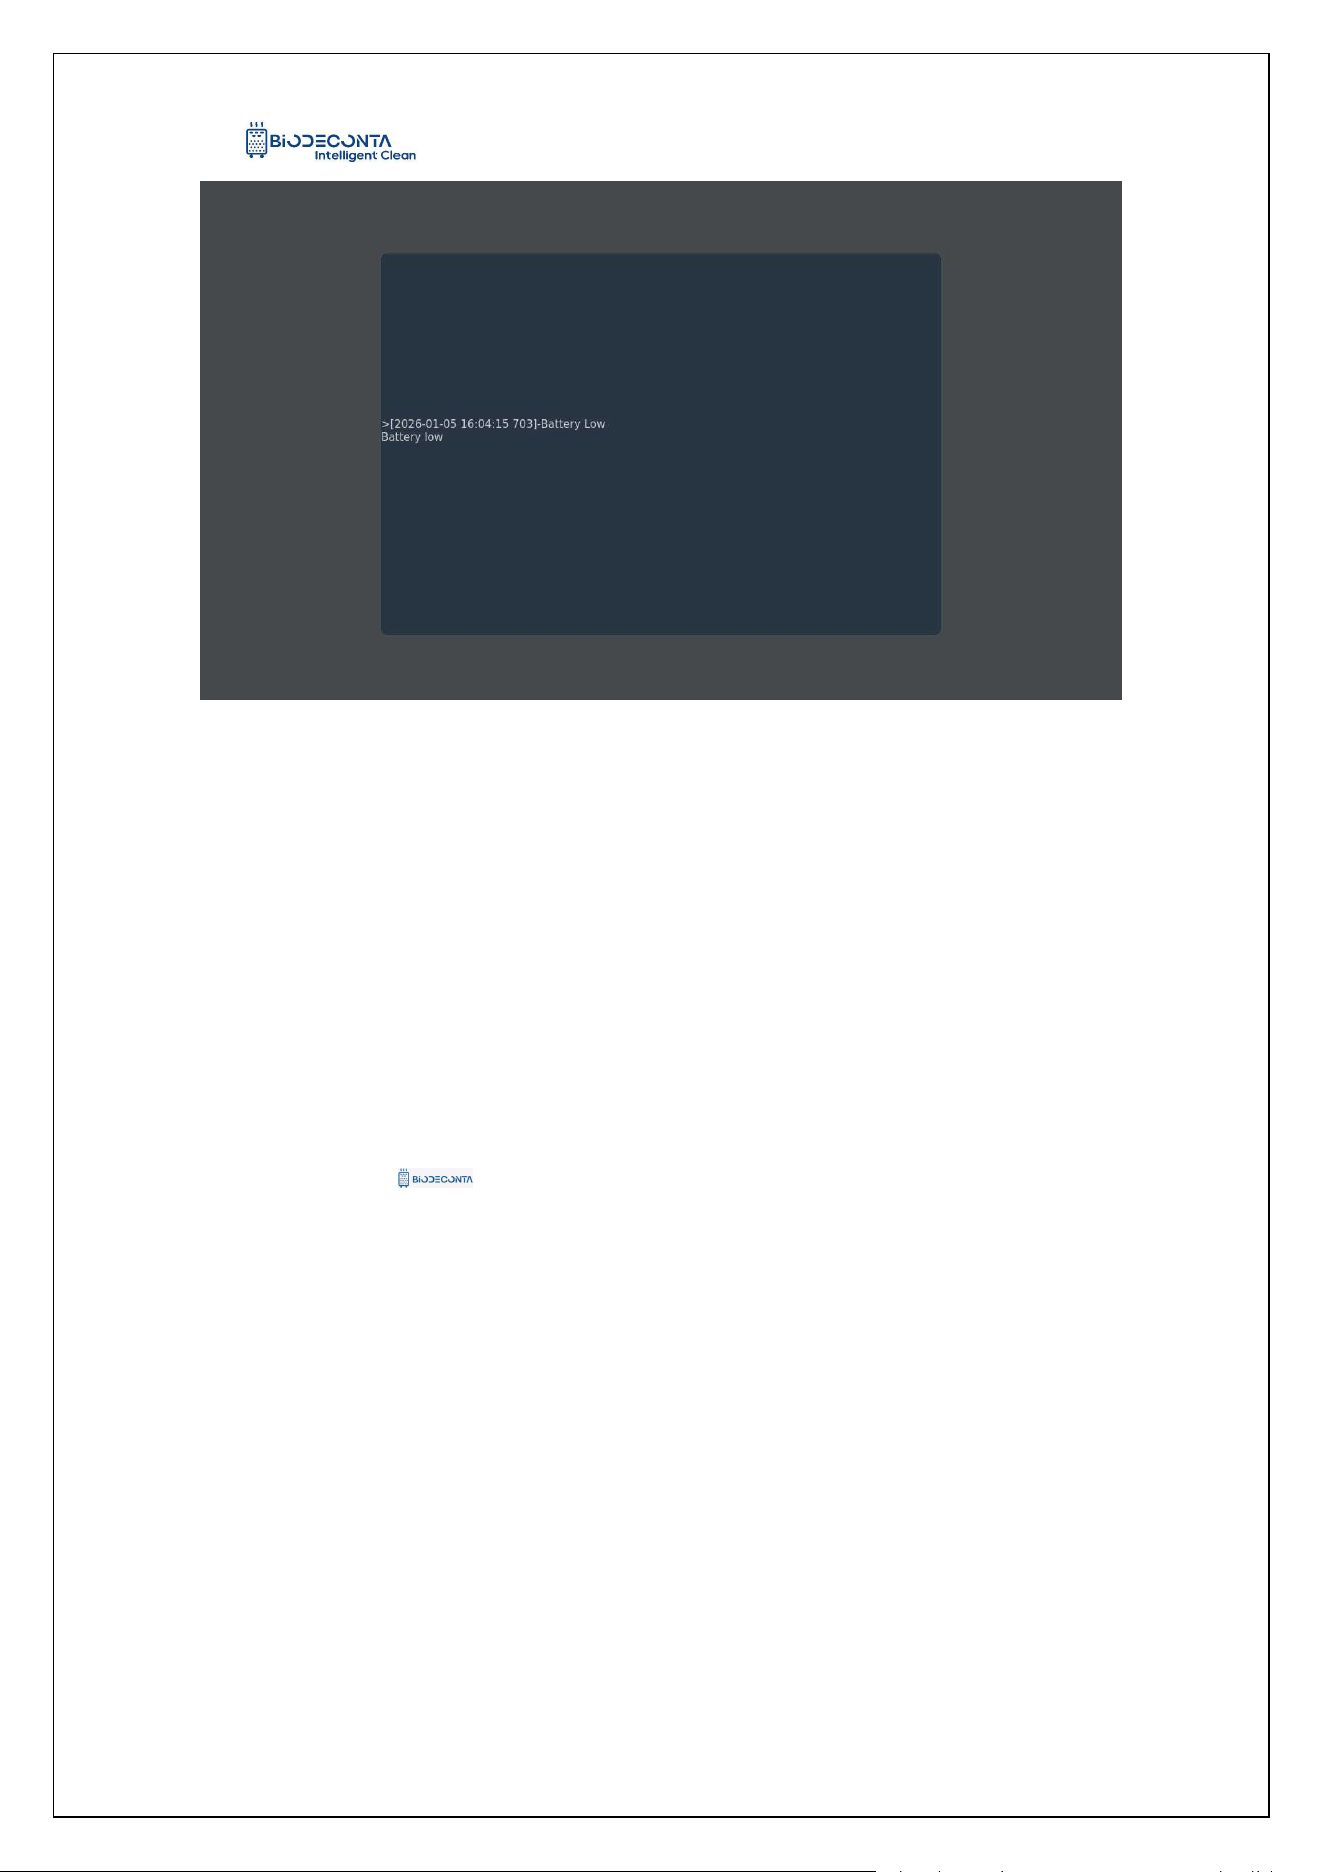
9.8 View:
Click on "Alarm Log", as shown in Figure 9.2-9, and the page will jump to the
"Alarm Log" page. Click the "View" button, as shown in Figure 9.2-10, and the page
will pop up with the recorded operations, and then the viewing operation can be
completed.
Figure 9.2-9 "View 1"
Intelligent Safe and Clean
www.biodeconta.com
69
Figure 9.2-10 "View 2"
Chapter 10 User
10. User
10.1 Local User
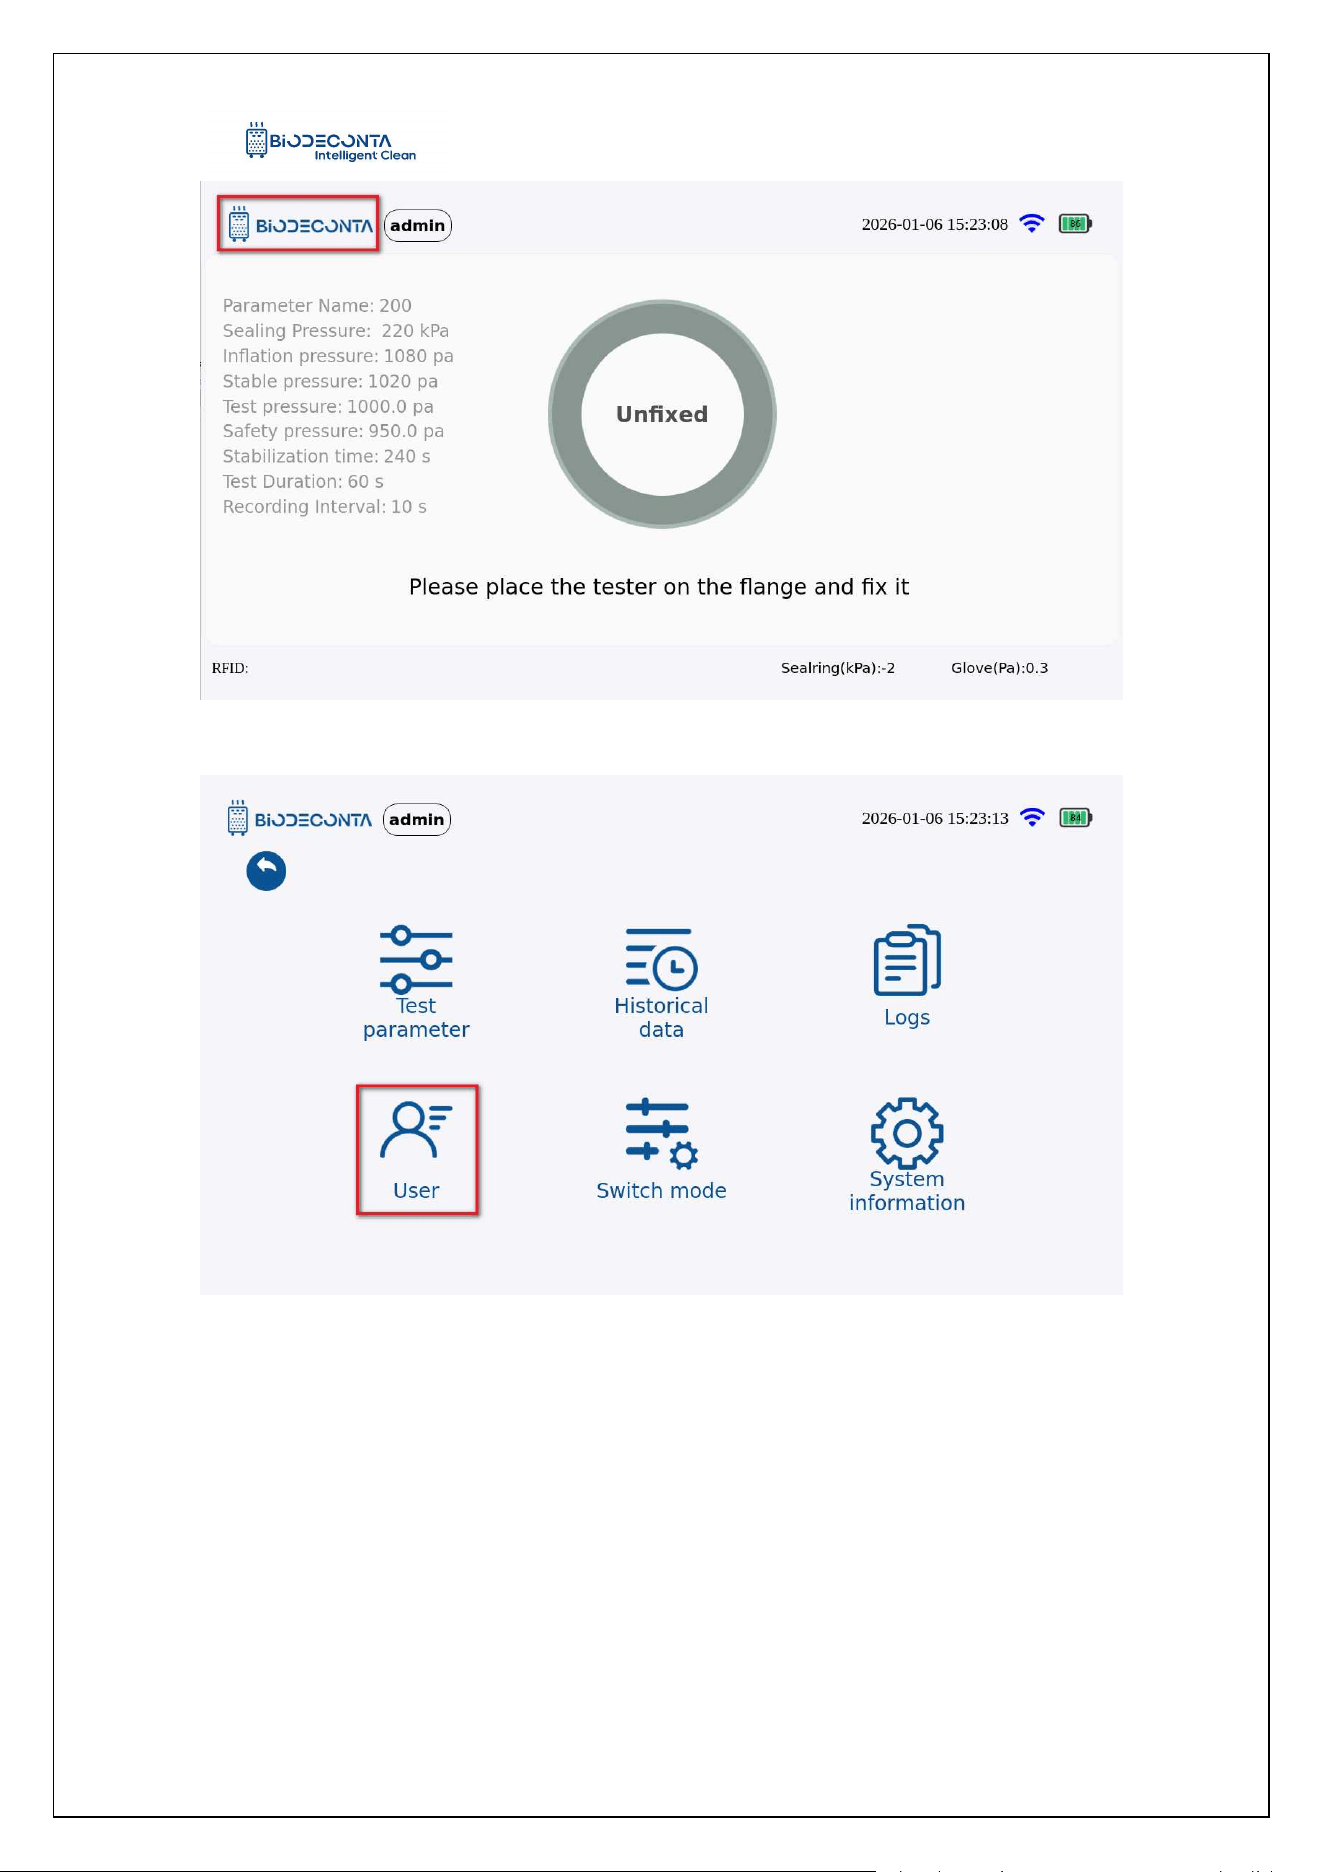
Click on the [ ] icon on the test interface, as shown in Figures 10-1 and
10-2, and the page will jump to the pages of [Test Parameter], [Historical data], [Logs],
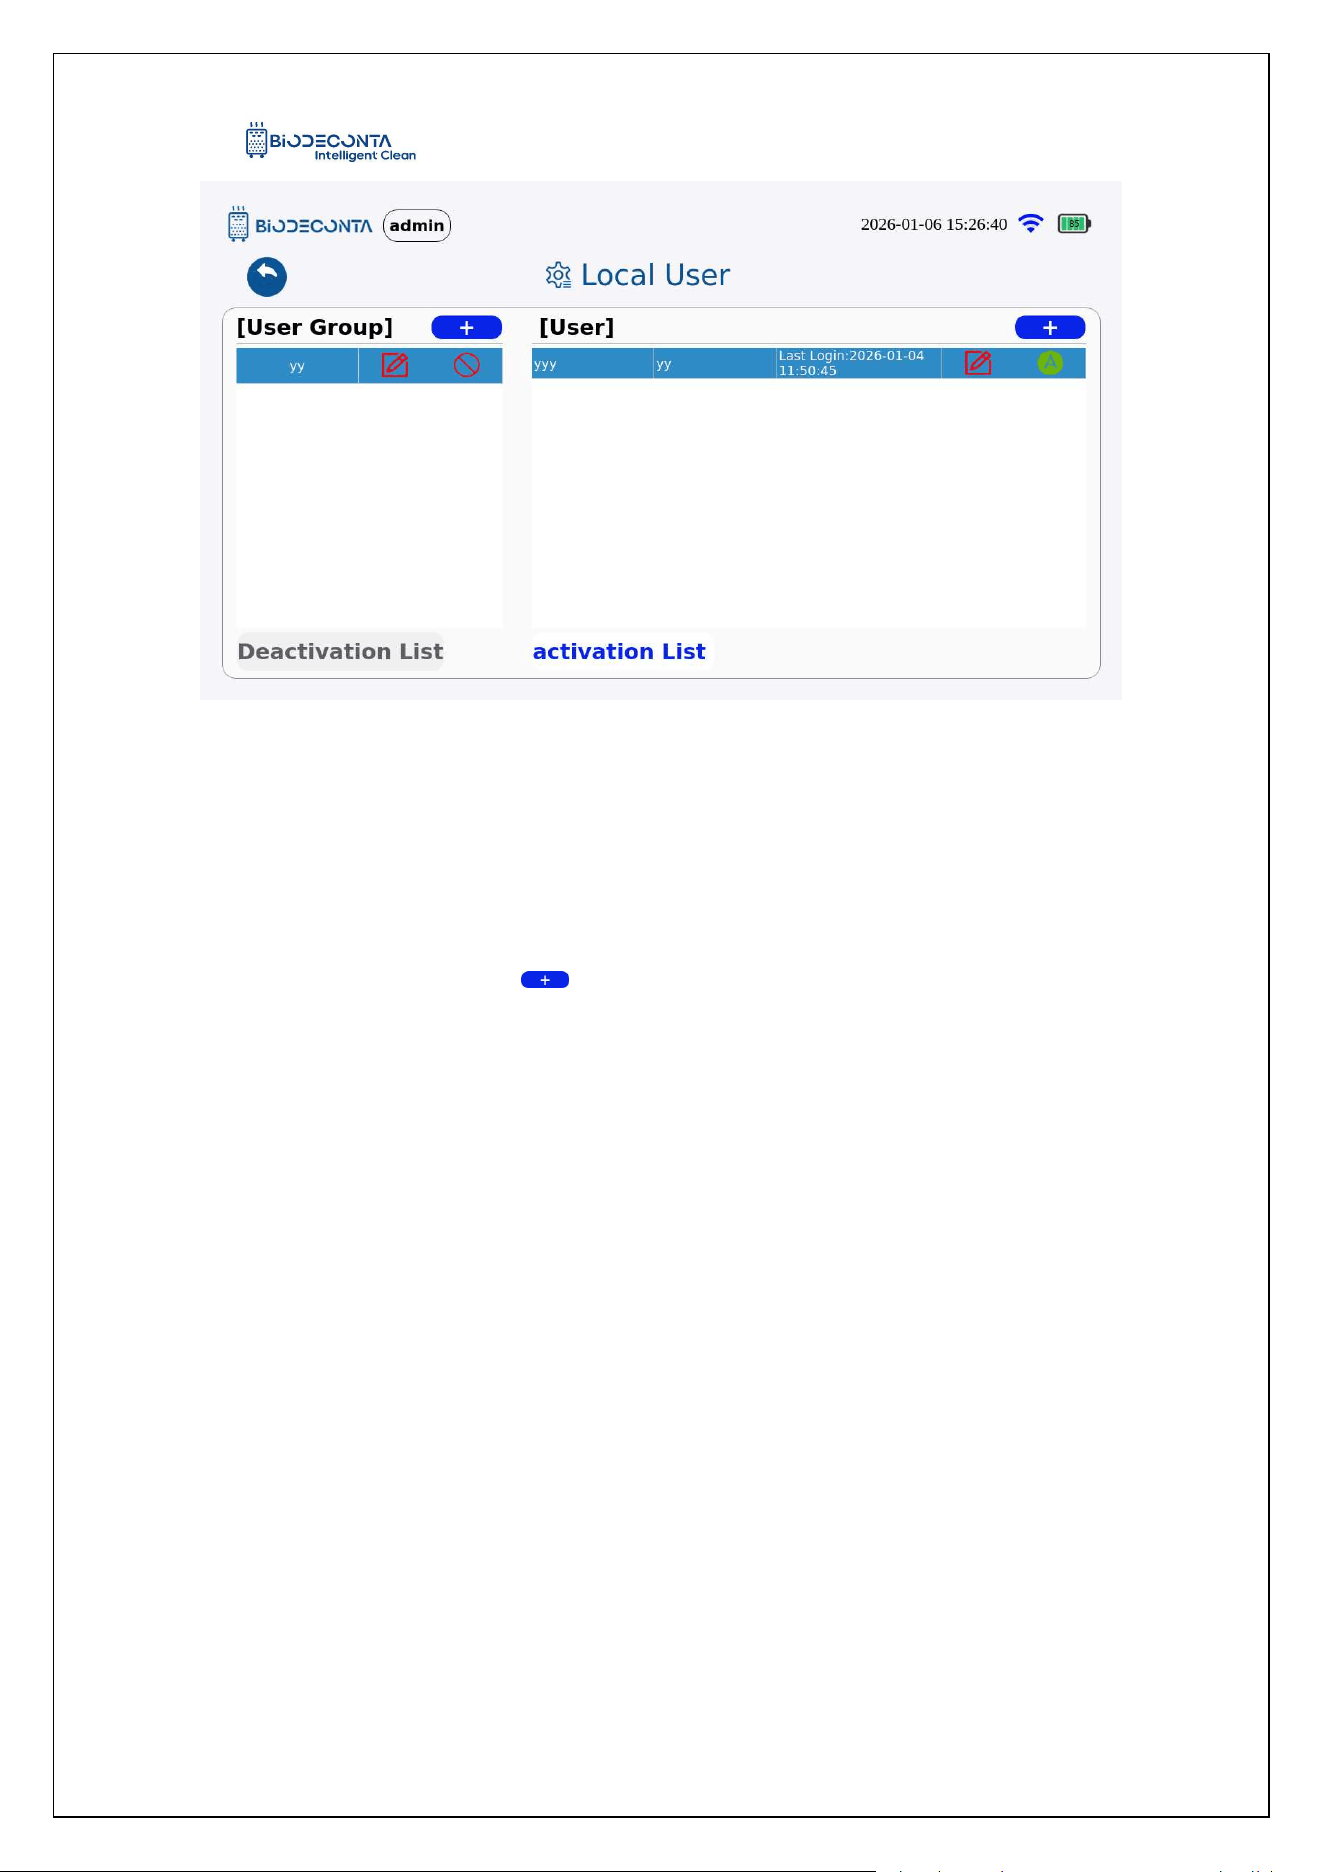
[Users], [Switch mode], [System information], click on [Users]. As shown in Figure
10-3, and the page will jump to the [Local User] page. This module mainly includes the
operations of adding, modifying, disabling and enabling user management.
Intelligent Safe and Clean
www.biodeconta.com
70
Figure 10-1 "Users 1"
Figure 10-2 "Users 2"
Intelligent Safe and Clean
www.biodeconta.com
71
Figure 10-3 "Users 3"
10.2 Add User Group:
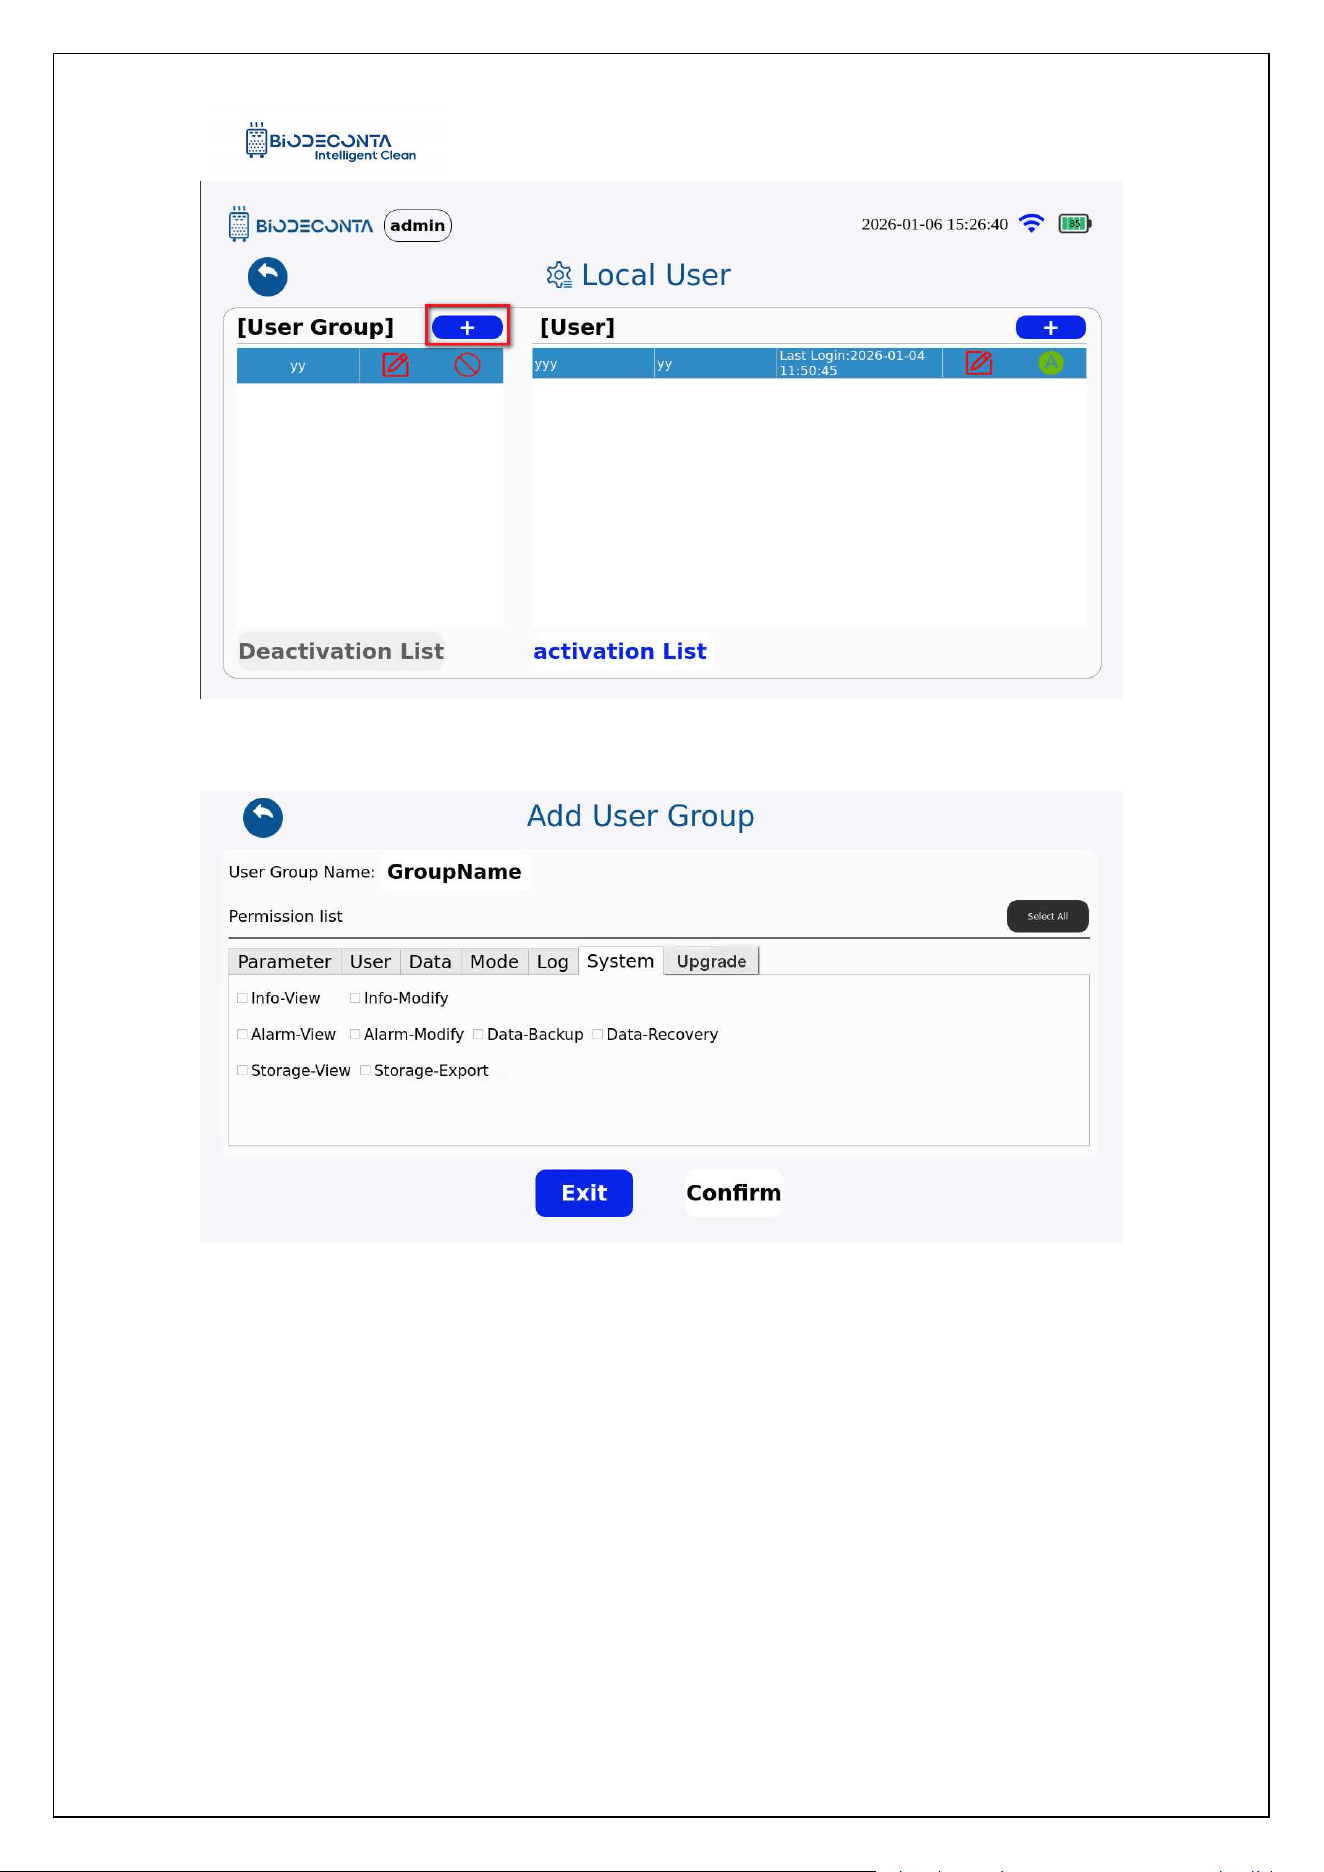
Click the "User" button, as shown in Figure 10-4, and the page will jump to the
"Local User" page, click the [ ] icon. As shown in Figure 10-5, and the page will
jump to the" Add User Group" page, fill in the group name, select the permission list
data, and click the "Confirm" button. As shown in Figure 10-6, the page will jump to
the login interface, fill in the account and password data, and click the "Login" button,
and the new operation can be completed.
Intelligent Safe and Clean
www.biodeconta.com
72
Figure 10-4 "Add 1"
Figure 10-5 "Add 2"
Intelligent Safe and Clean
www.biodeconta.com
73
Figure 10-6 "Add 3"
10.3 Modify User Group:
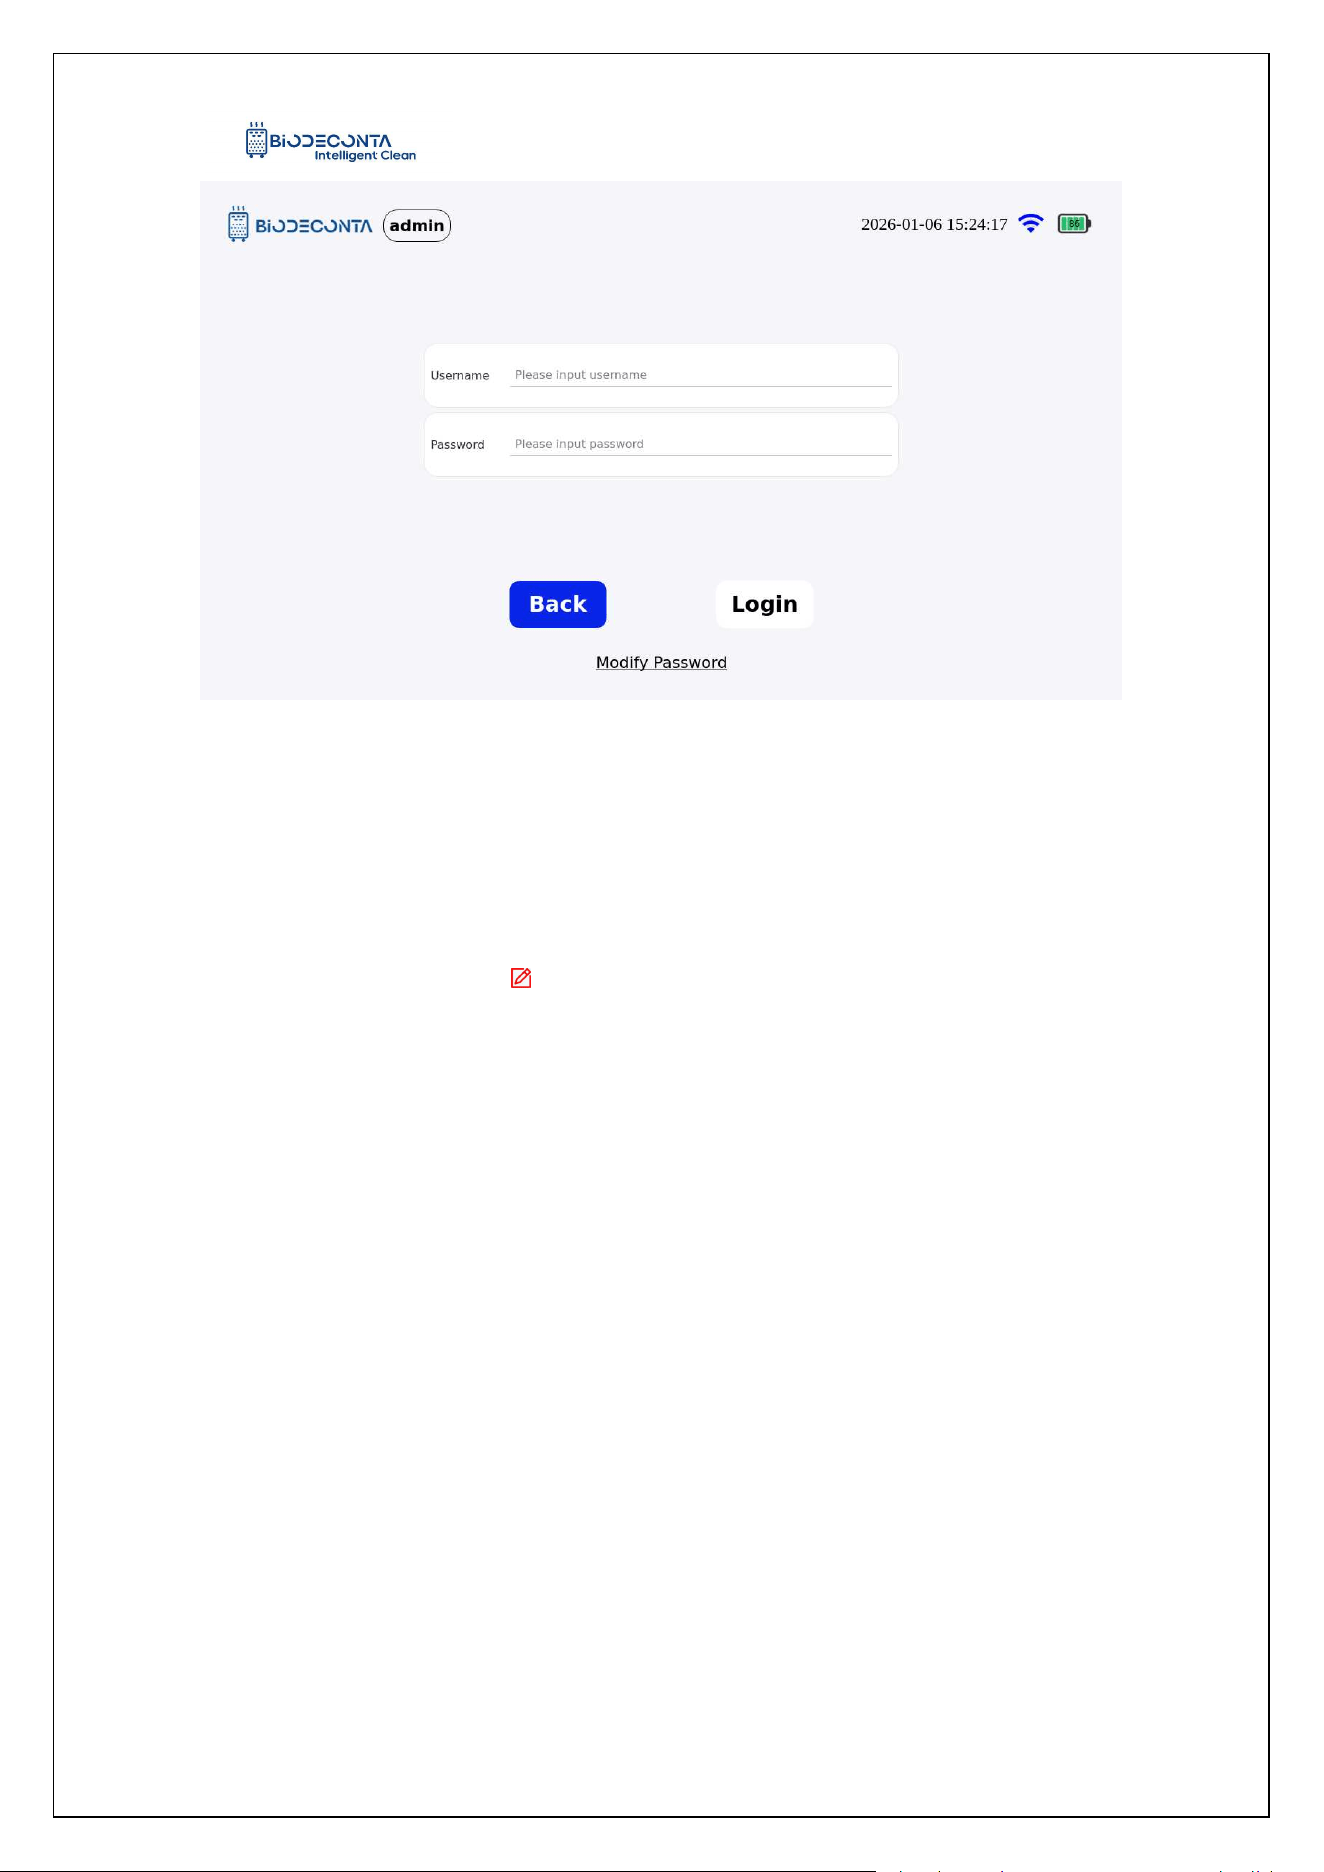
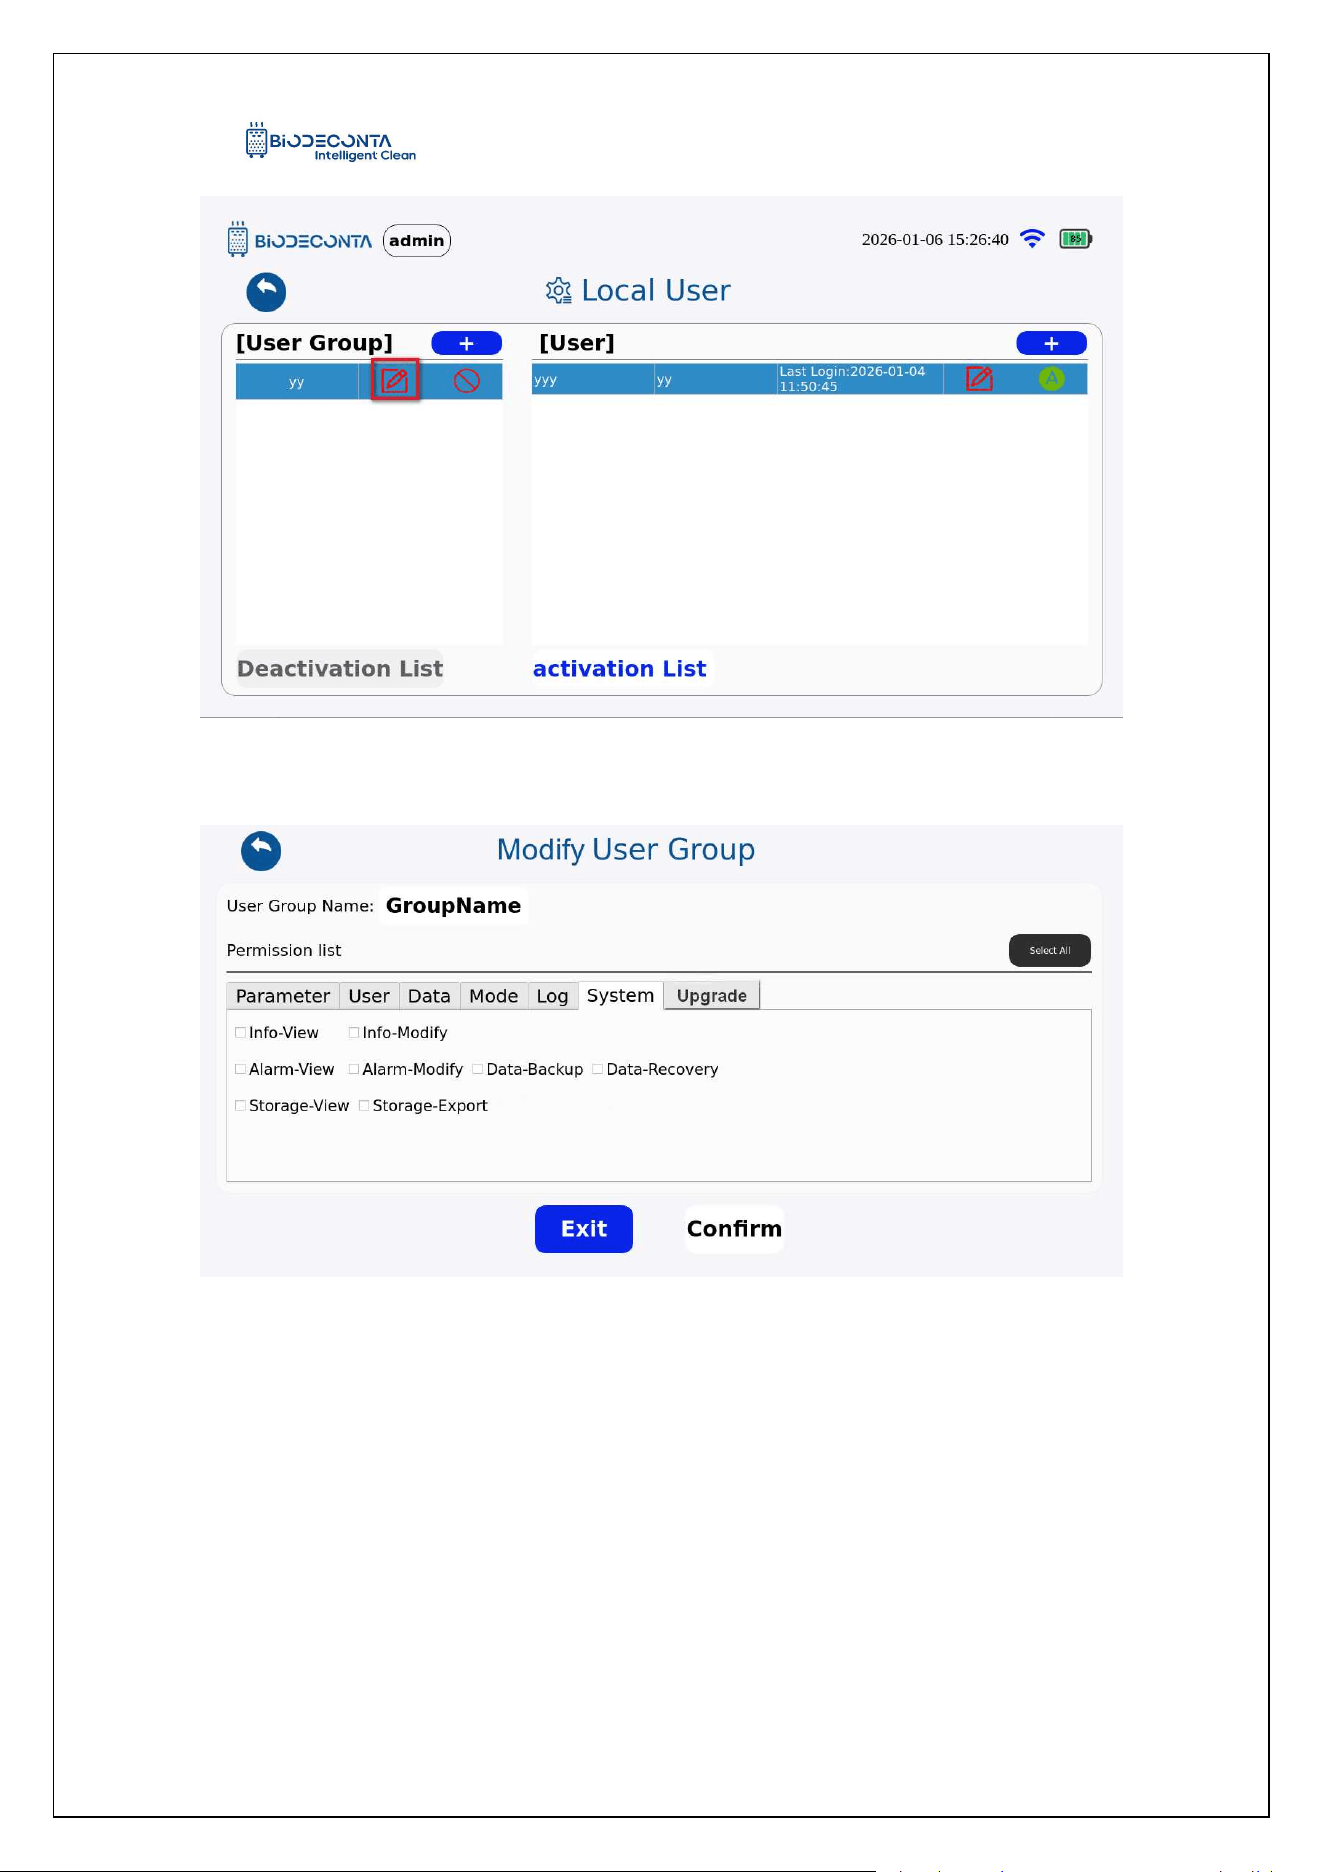
Click the "User" button, as shown in Figure 10-7, and the page will jump to the
"Local User" page, click the [ ] icon. As shown in Figure 10-8, and the page will jump
to the "Modify User Group" page, fill in the group name, select the permission list data,
and click the "Confirm" button. As shown in Figure 10-9, the page will jump to the login
interface, fill in the account and password data, and click the "Login" button, and the
modification operation can be completed.
Intelligent Safe and Clean
www.biodeconta.com
74
Figure 10-7 "Modify 1"
Figure 10-8 "Modify 2"
Intelligent Safe and Clean
www.biodeconta.com
75
Figure 10-9 "Modify 3"
10.4 User Group Disable:
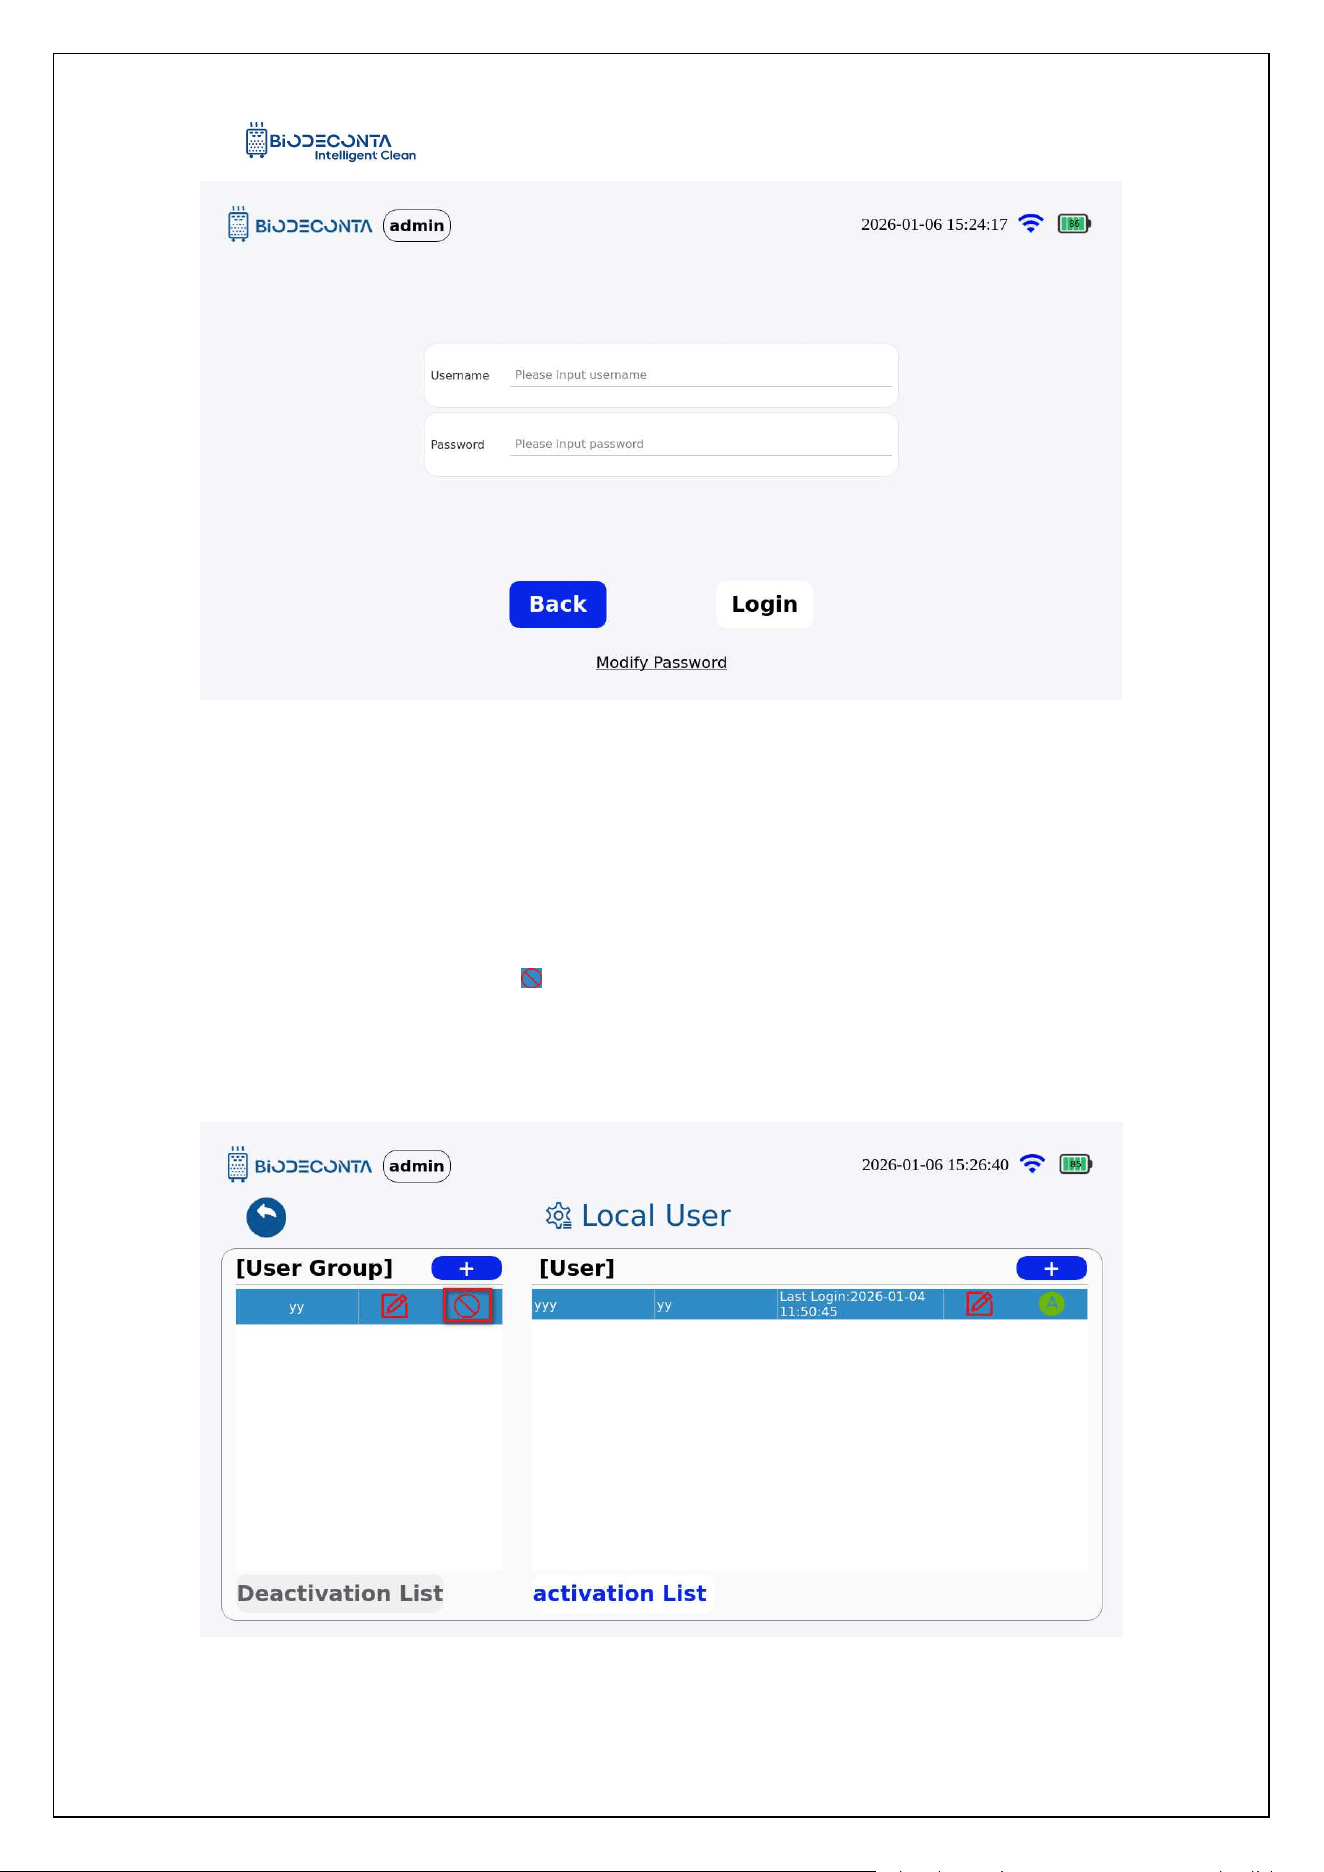
Click the "User" button, as shown in Figure 10-10, and the page will jump to the
"Local Users" page, click the [ ] icon. As shown in Figure 10-11, the page will jump to
the login interface, fill in the account and password data, and click the "Login" button,
to complete the disable operation.
Figure 10-10 "Disable 1"
Intelligent Safe and Clean
www.biodeconta.com
76
Figure 10-11 "Disable 2"
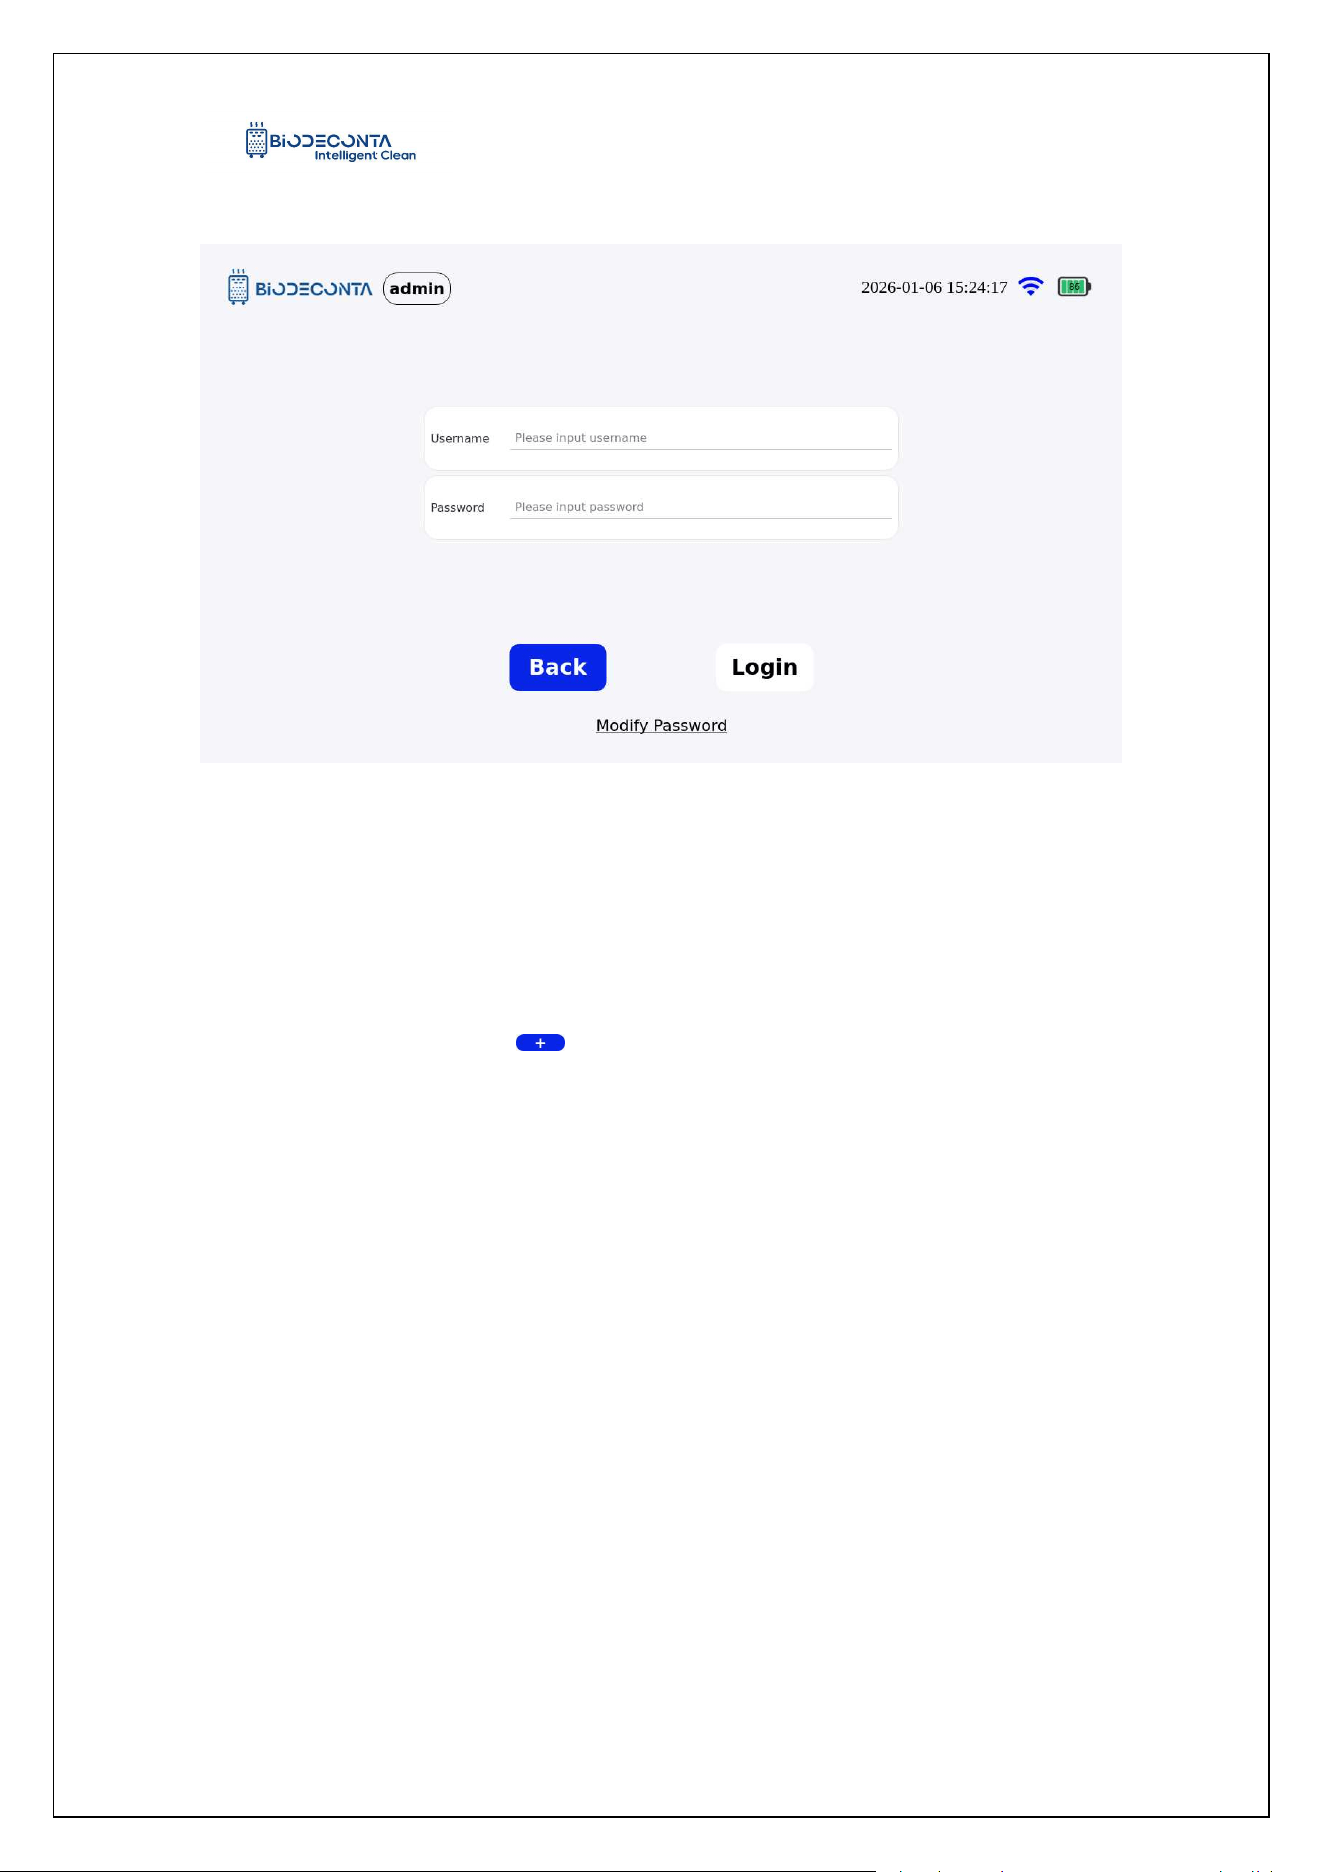
10.5 User Group Enable:
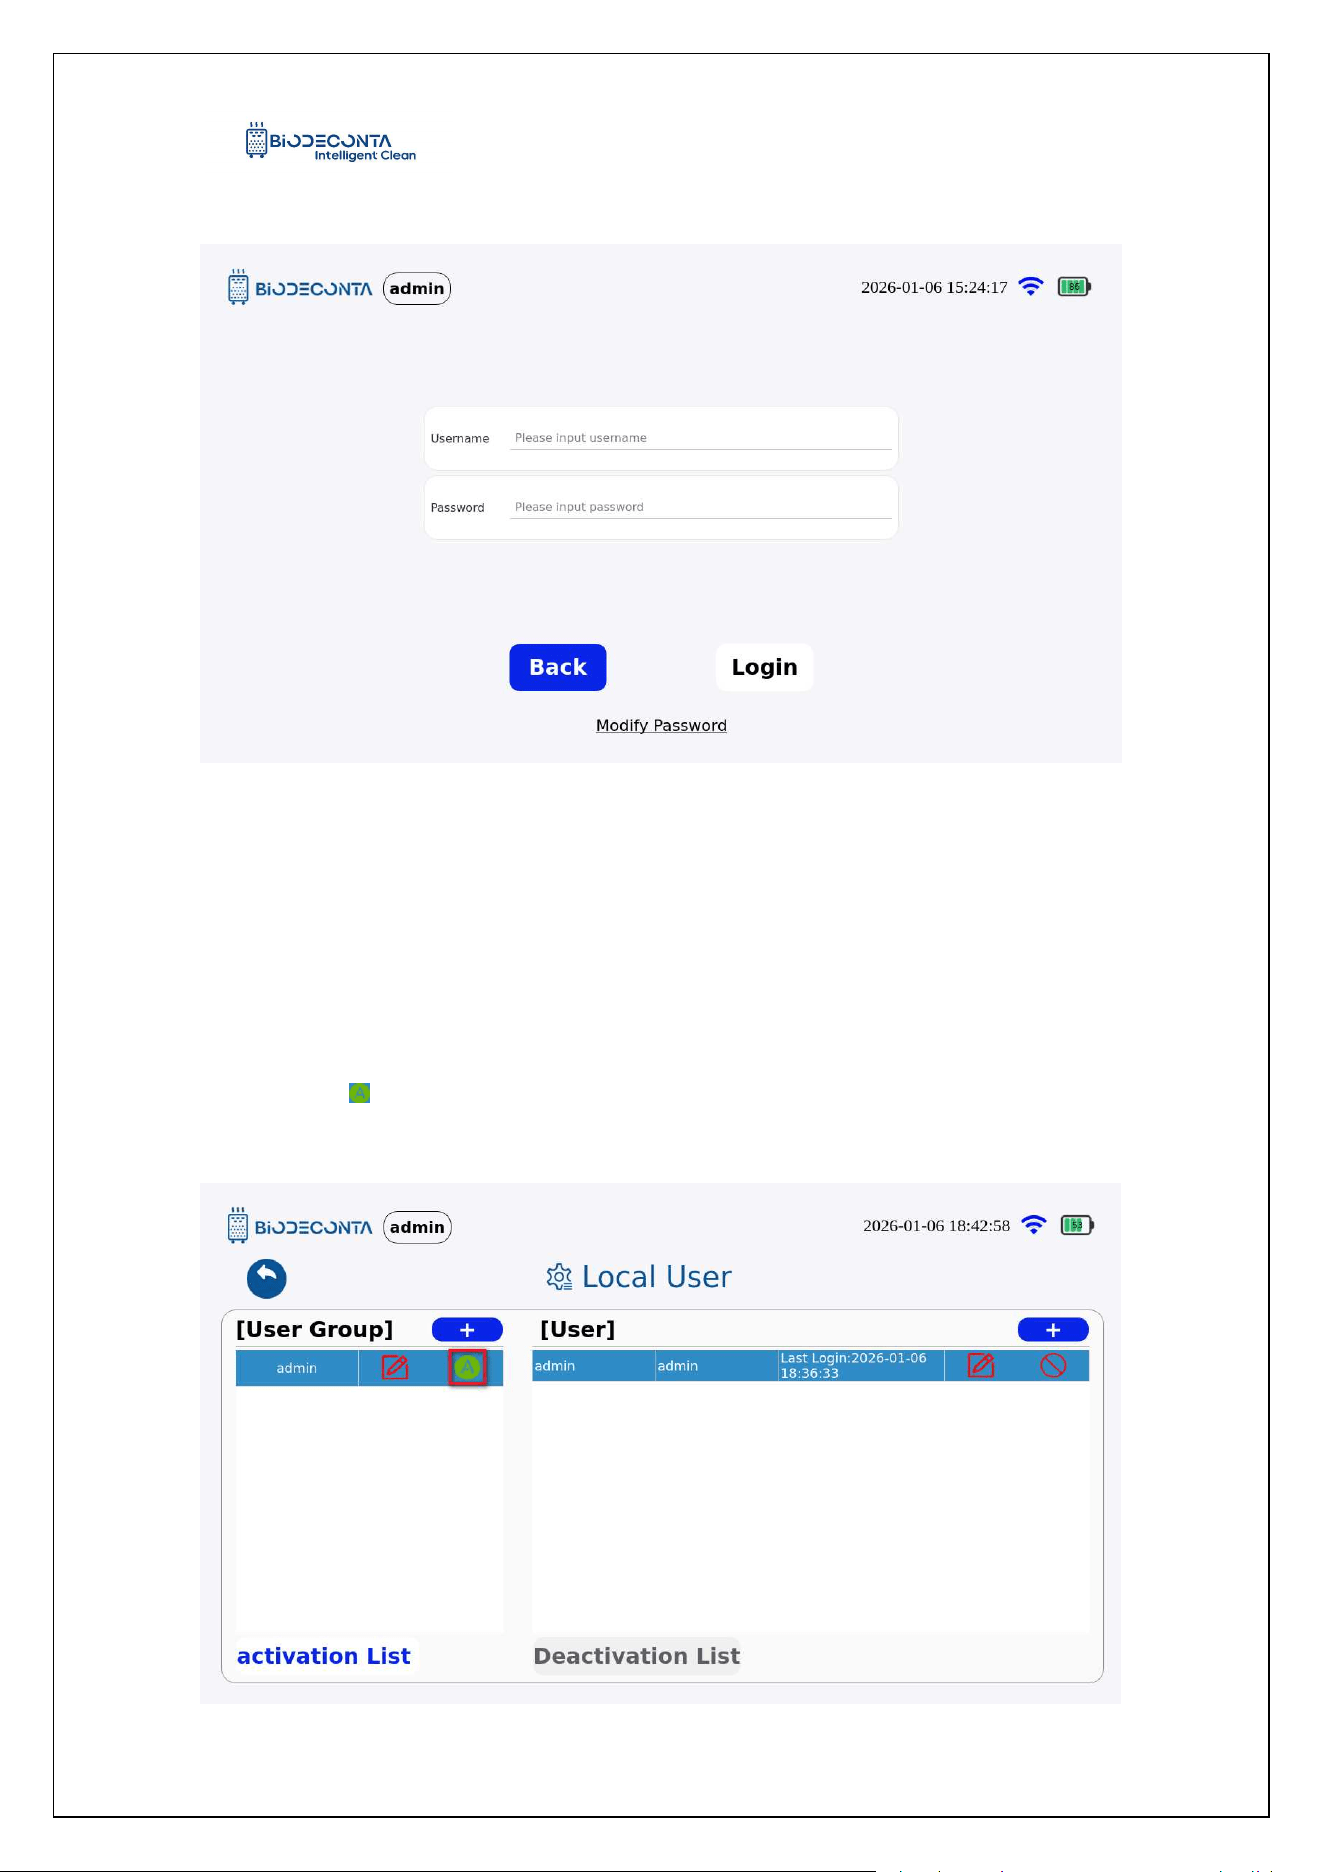
Click the "User" button, as shown in Figure 10-12, and the page will jump to the
"Local Users" page. Click the "Deactivation List" option, as shown in Figure 10-13,
and click the [ ] icon. The page will then jump to the login interface, fill in the account
and password data, and click the "Login" button, to complete the enabling operation.
Intelligent Safe and Clean
www.biodeconta.com
77
Figure 10-12 "Enable 1"
Figure 10-13 "Enable 2"
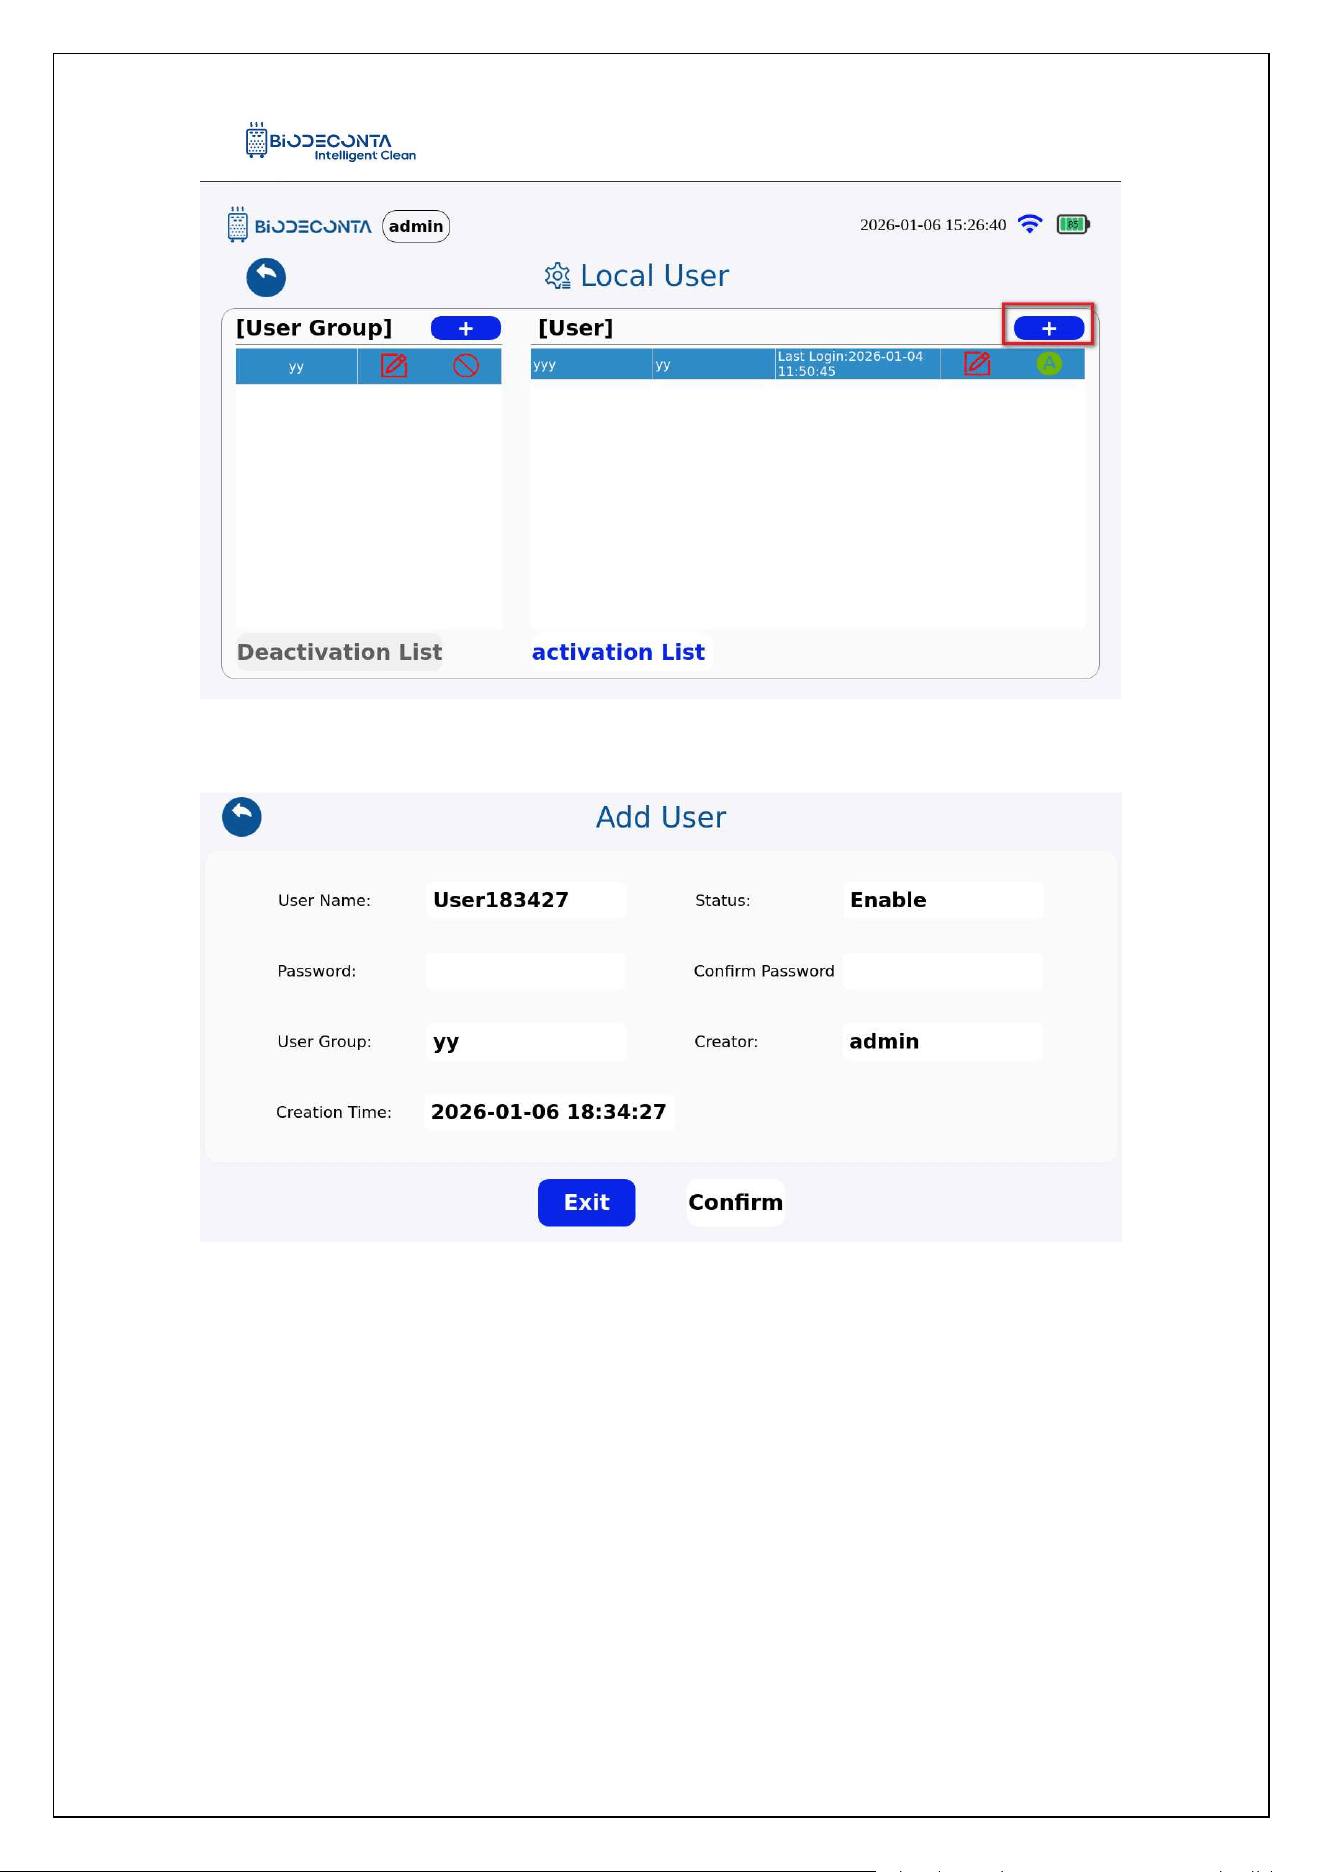
10.6 Add User:
Click the "User" button, as shown in Figure 10-14, and the page will jump to the
"Local User" page, click the [ ] icon. As shown in Figure 10-15, and the page will
jump to the "Add User" page, fill in the group name, select the permission list data,
and click the "Confirm" button. As shown in Figure 10-16, the page will jump to the
login interface, fill in the account and password data, and click the "Login" button, and
the new operation can be completed.
Intelligent Safe and Clean
www.biodeconta.com
78
Figure 10-14 "Add 1"
Figure 10-15 "Add 2"
Intelligent Safe and Clean
www.biodeconta.com
79
Figure 10-16 "Add 3"
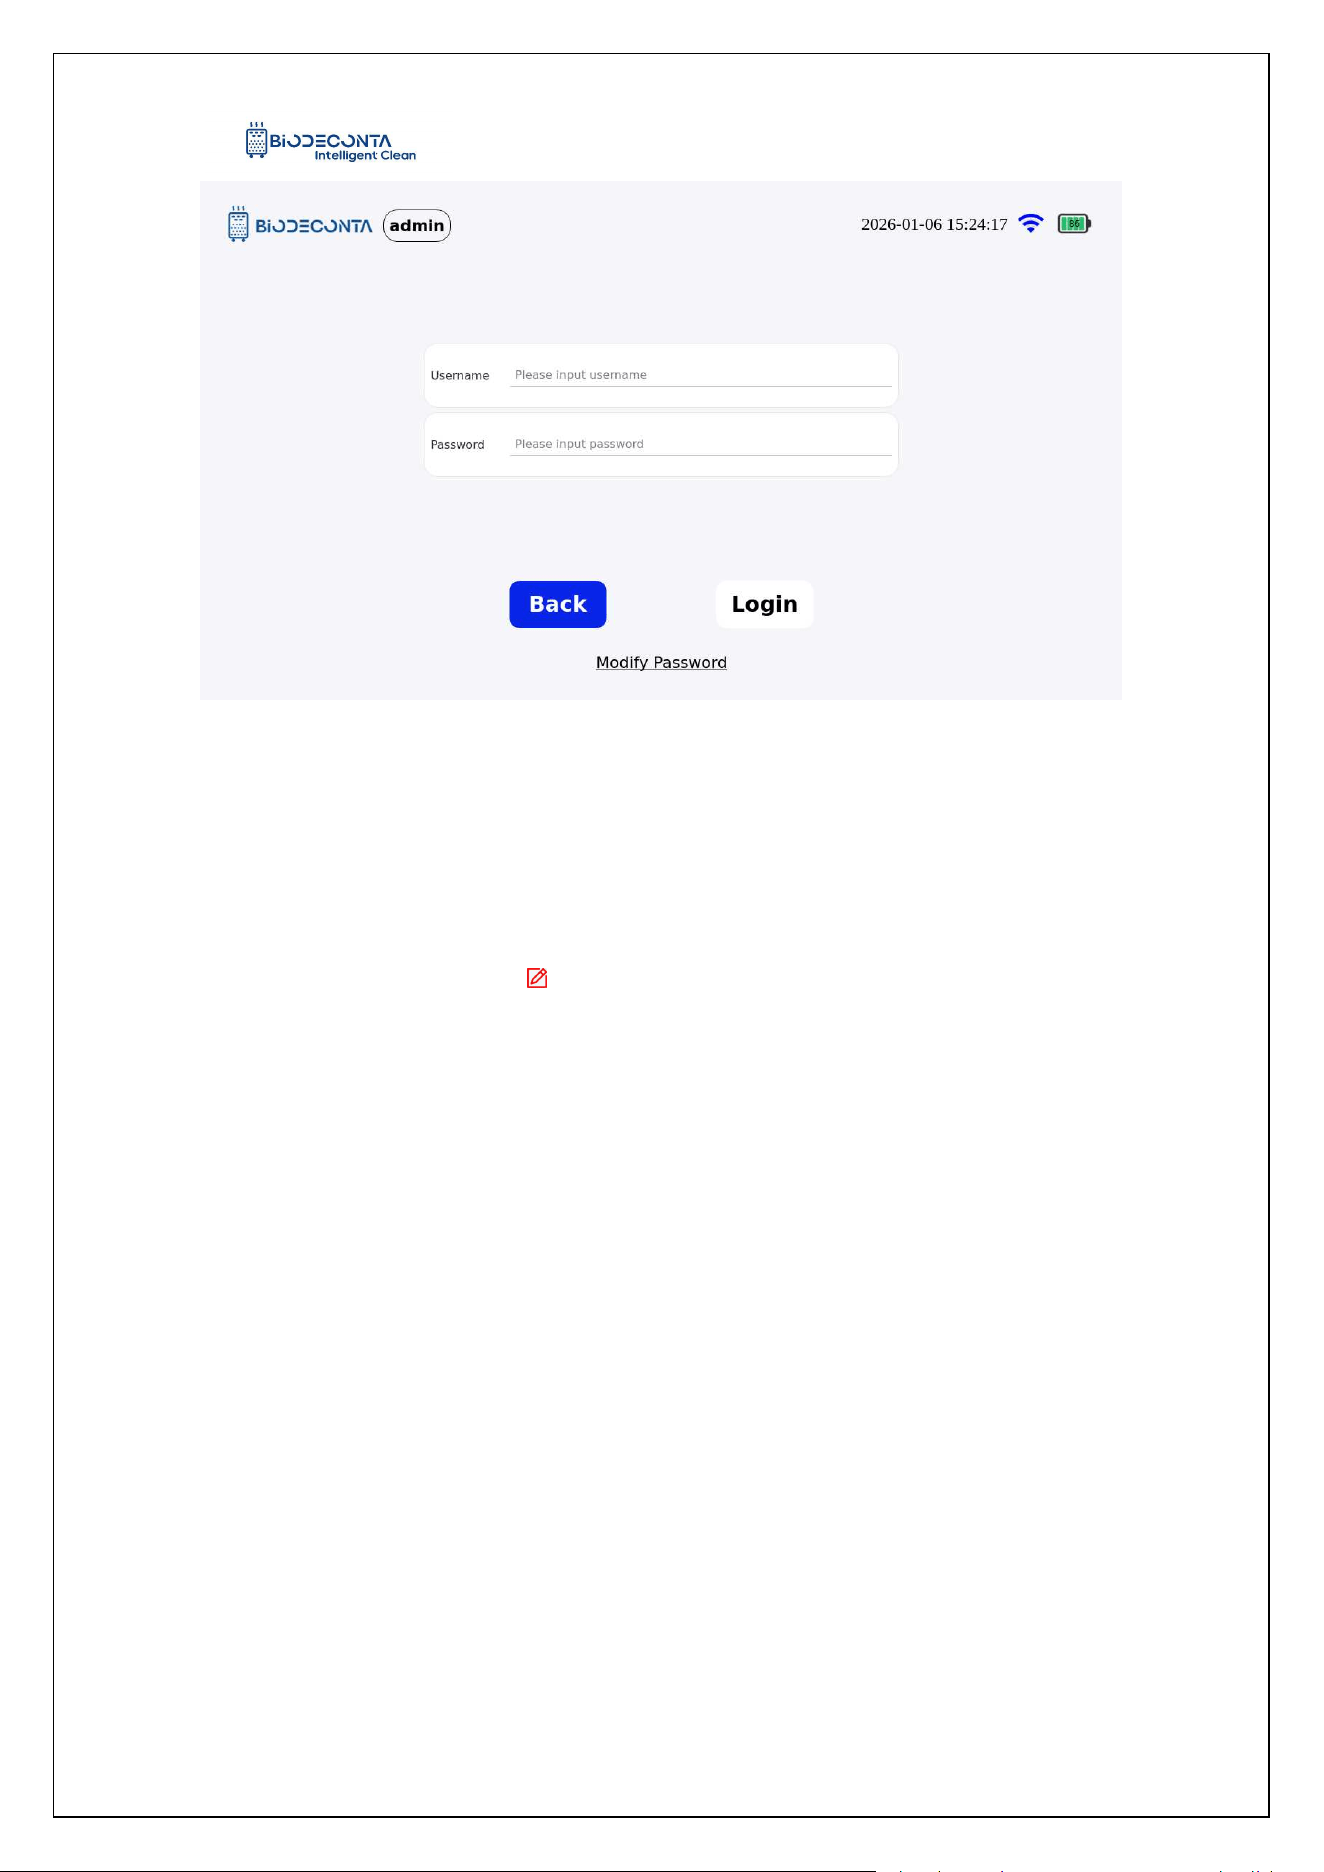
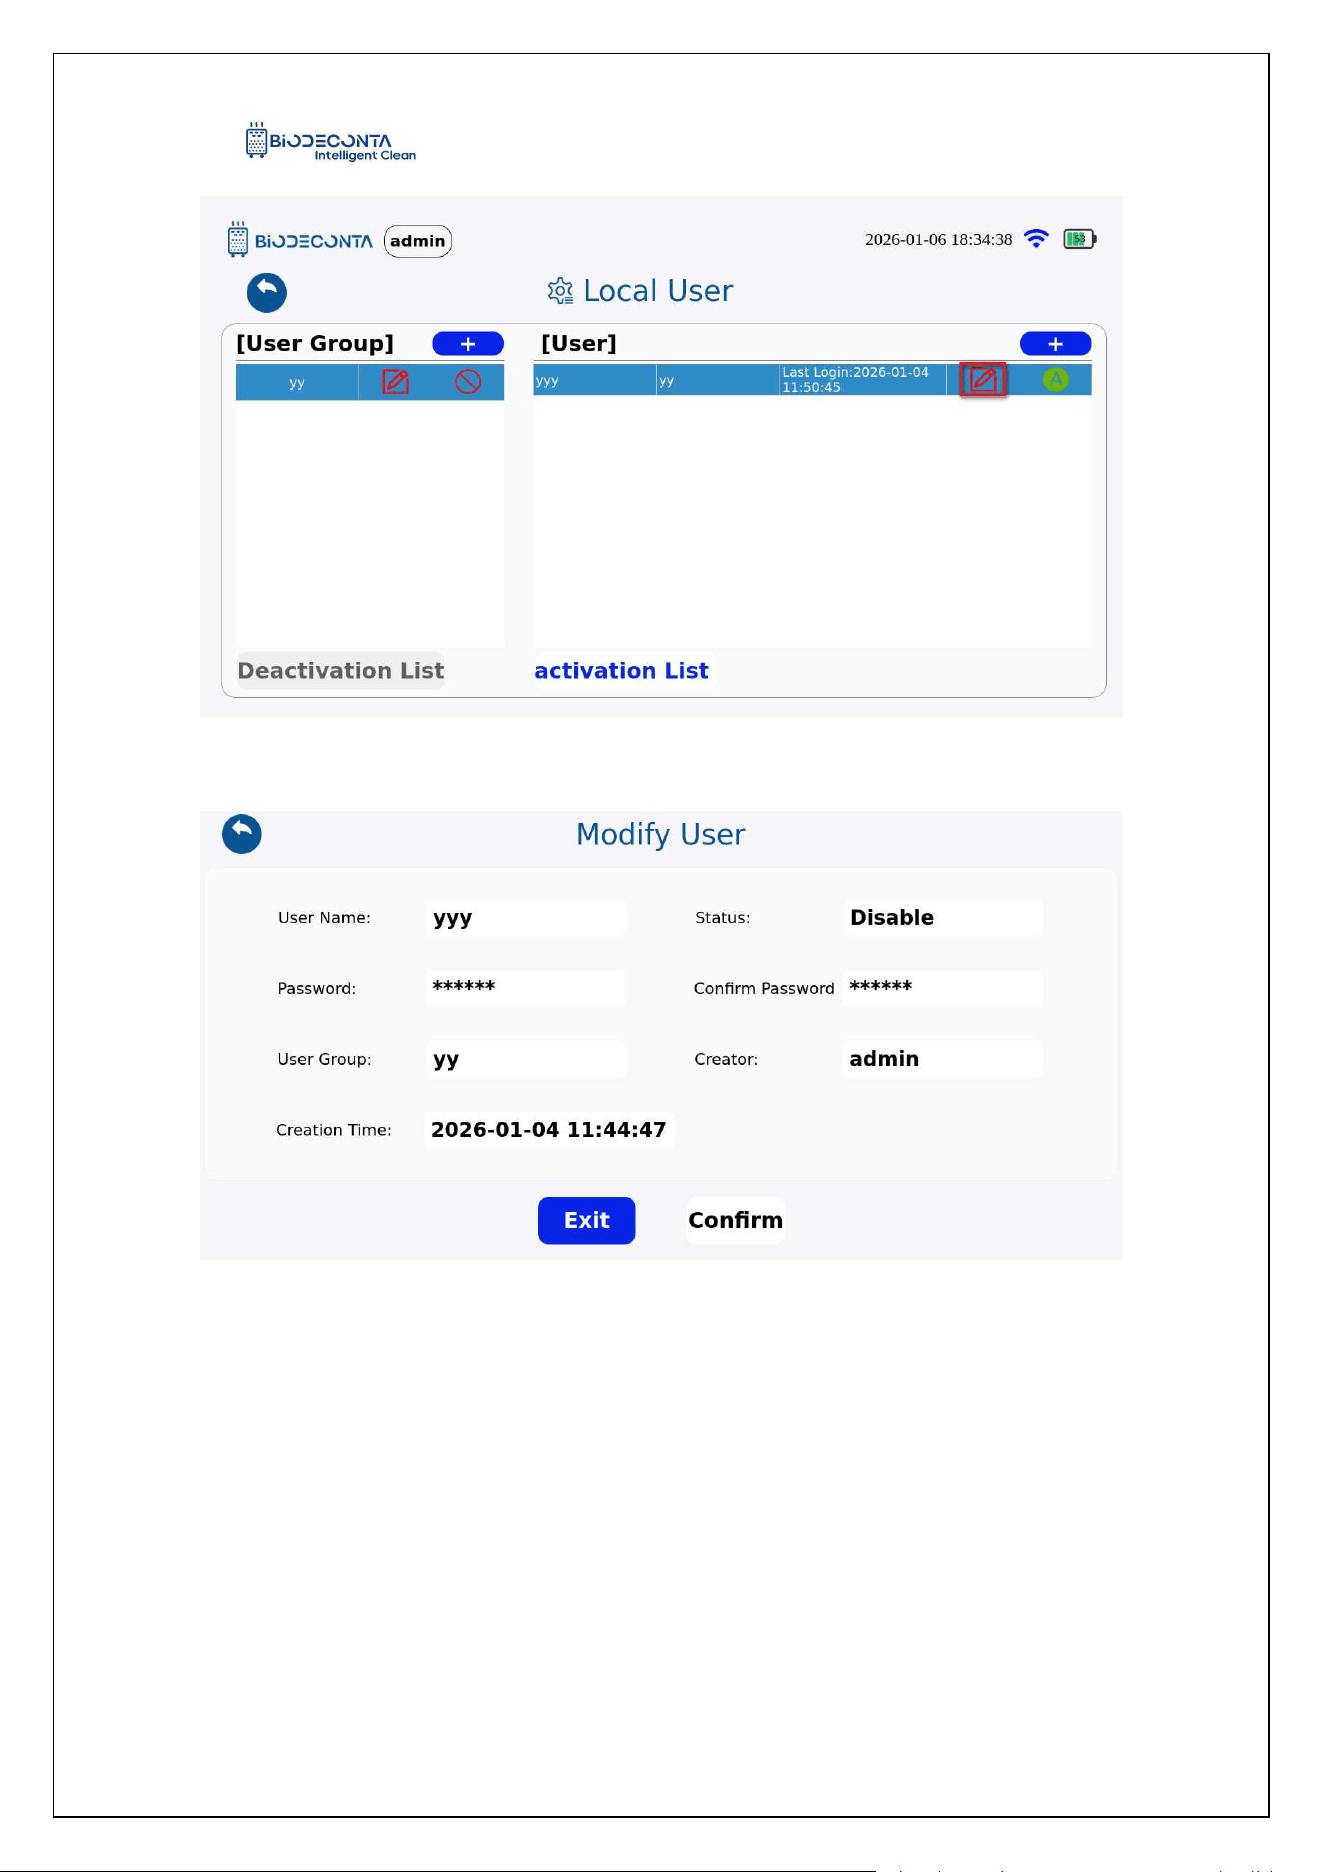
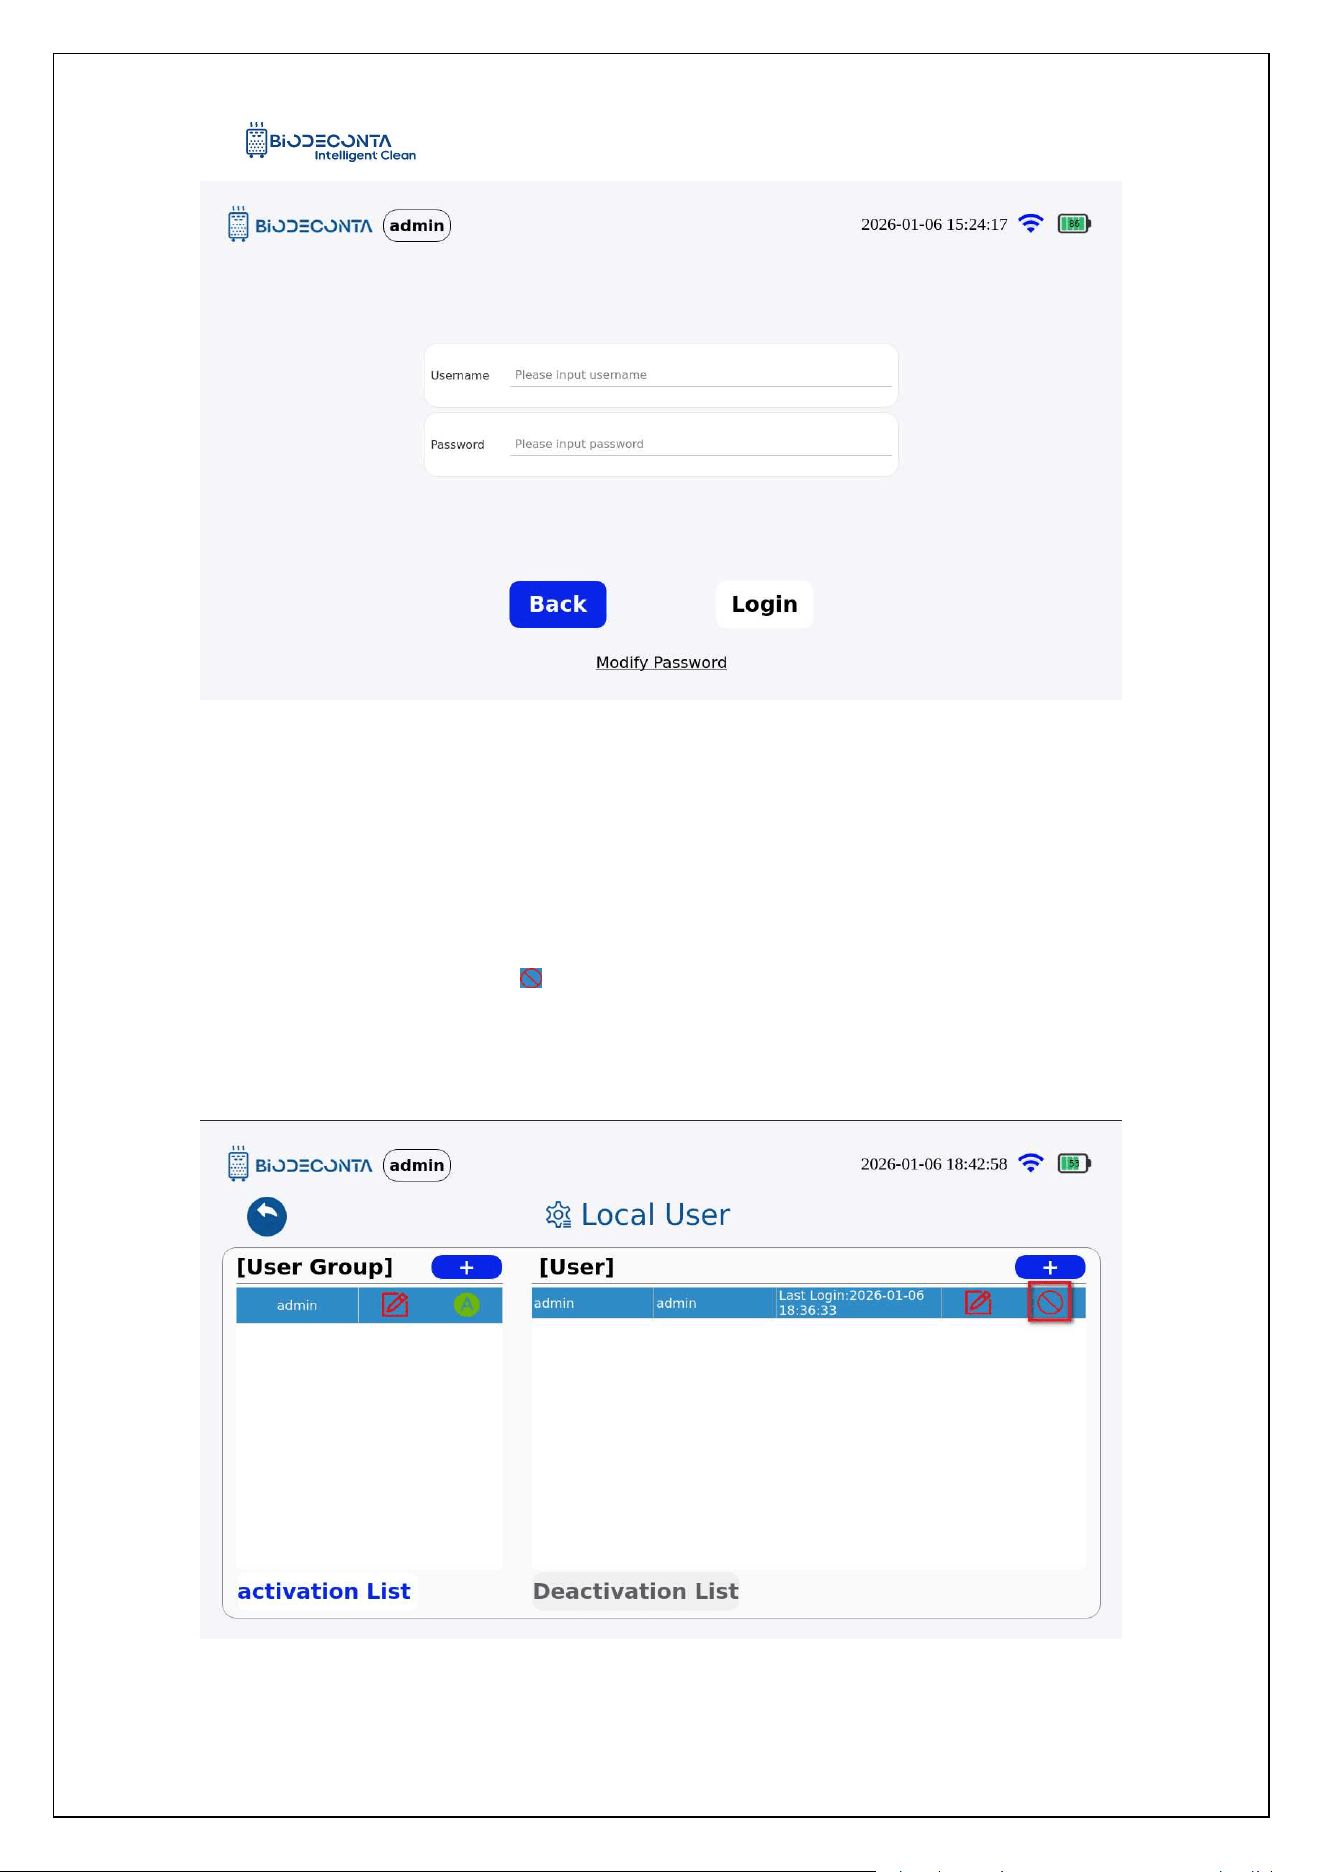
10.7 Modify User:
Click the "User" button, as shown in Figure 10-17, and the page will jump to the
"Local User" page, click the [ ] icon. As shown in Figure 10-18, and the page will
jump to the "Modify User" page, fill in the group name, select the permission list data,
and click the "Confirm" button. As shown in Figure 10-19, the page will jump to the
login interface, fill in the account and password data, and click the "Login" button, and
the modification operation can be completed.
Intelligent Safe and Clean
www.biodeconta.com
80
Figure 10-17 "Modify 1"
Figure 10-18 "Modify 2"
Intelligent Safe and Clean
www.biodeconta.com
81
Figure 10-19 "Modify 3"
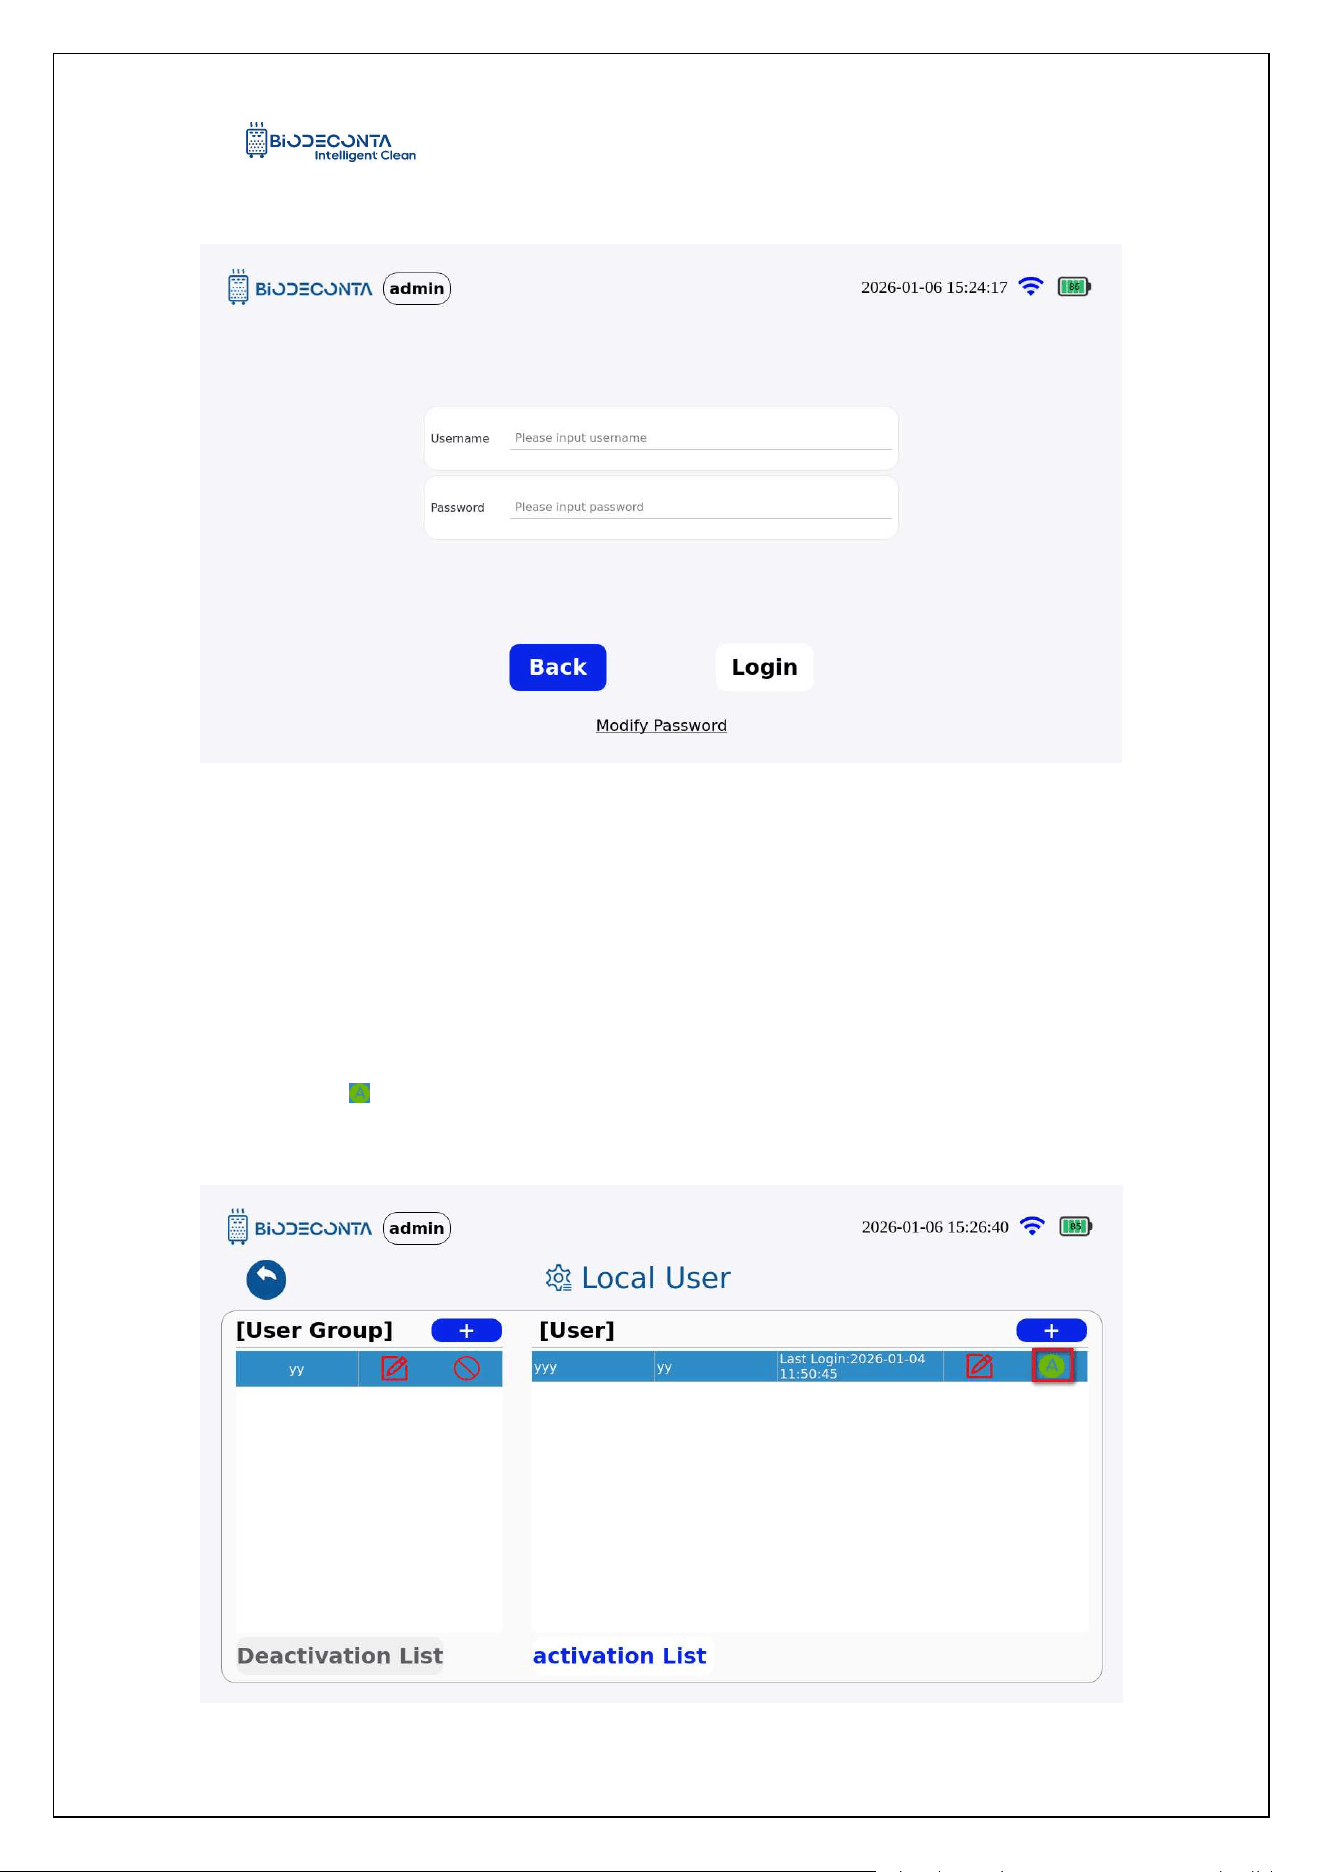
10.8 User Disable:
Click the "User" button, as shown in Figure 10-20, and the page will jump to the
"Local Users" page, click the [ ] icon. As shown in Figure 10-21, the page will jump to
the login interface, fill in the account and password data, and click the "Login" button,
to complete the disable operation.
Figure 10-20 "Disable 1"
Intelligent Safe and Clean
www.biodeconta.com
82
Figure 10-21 "Disable 2"
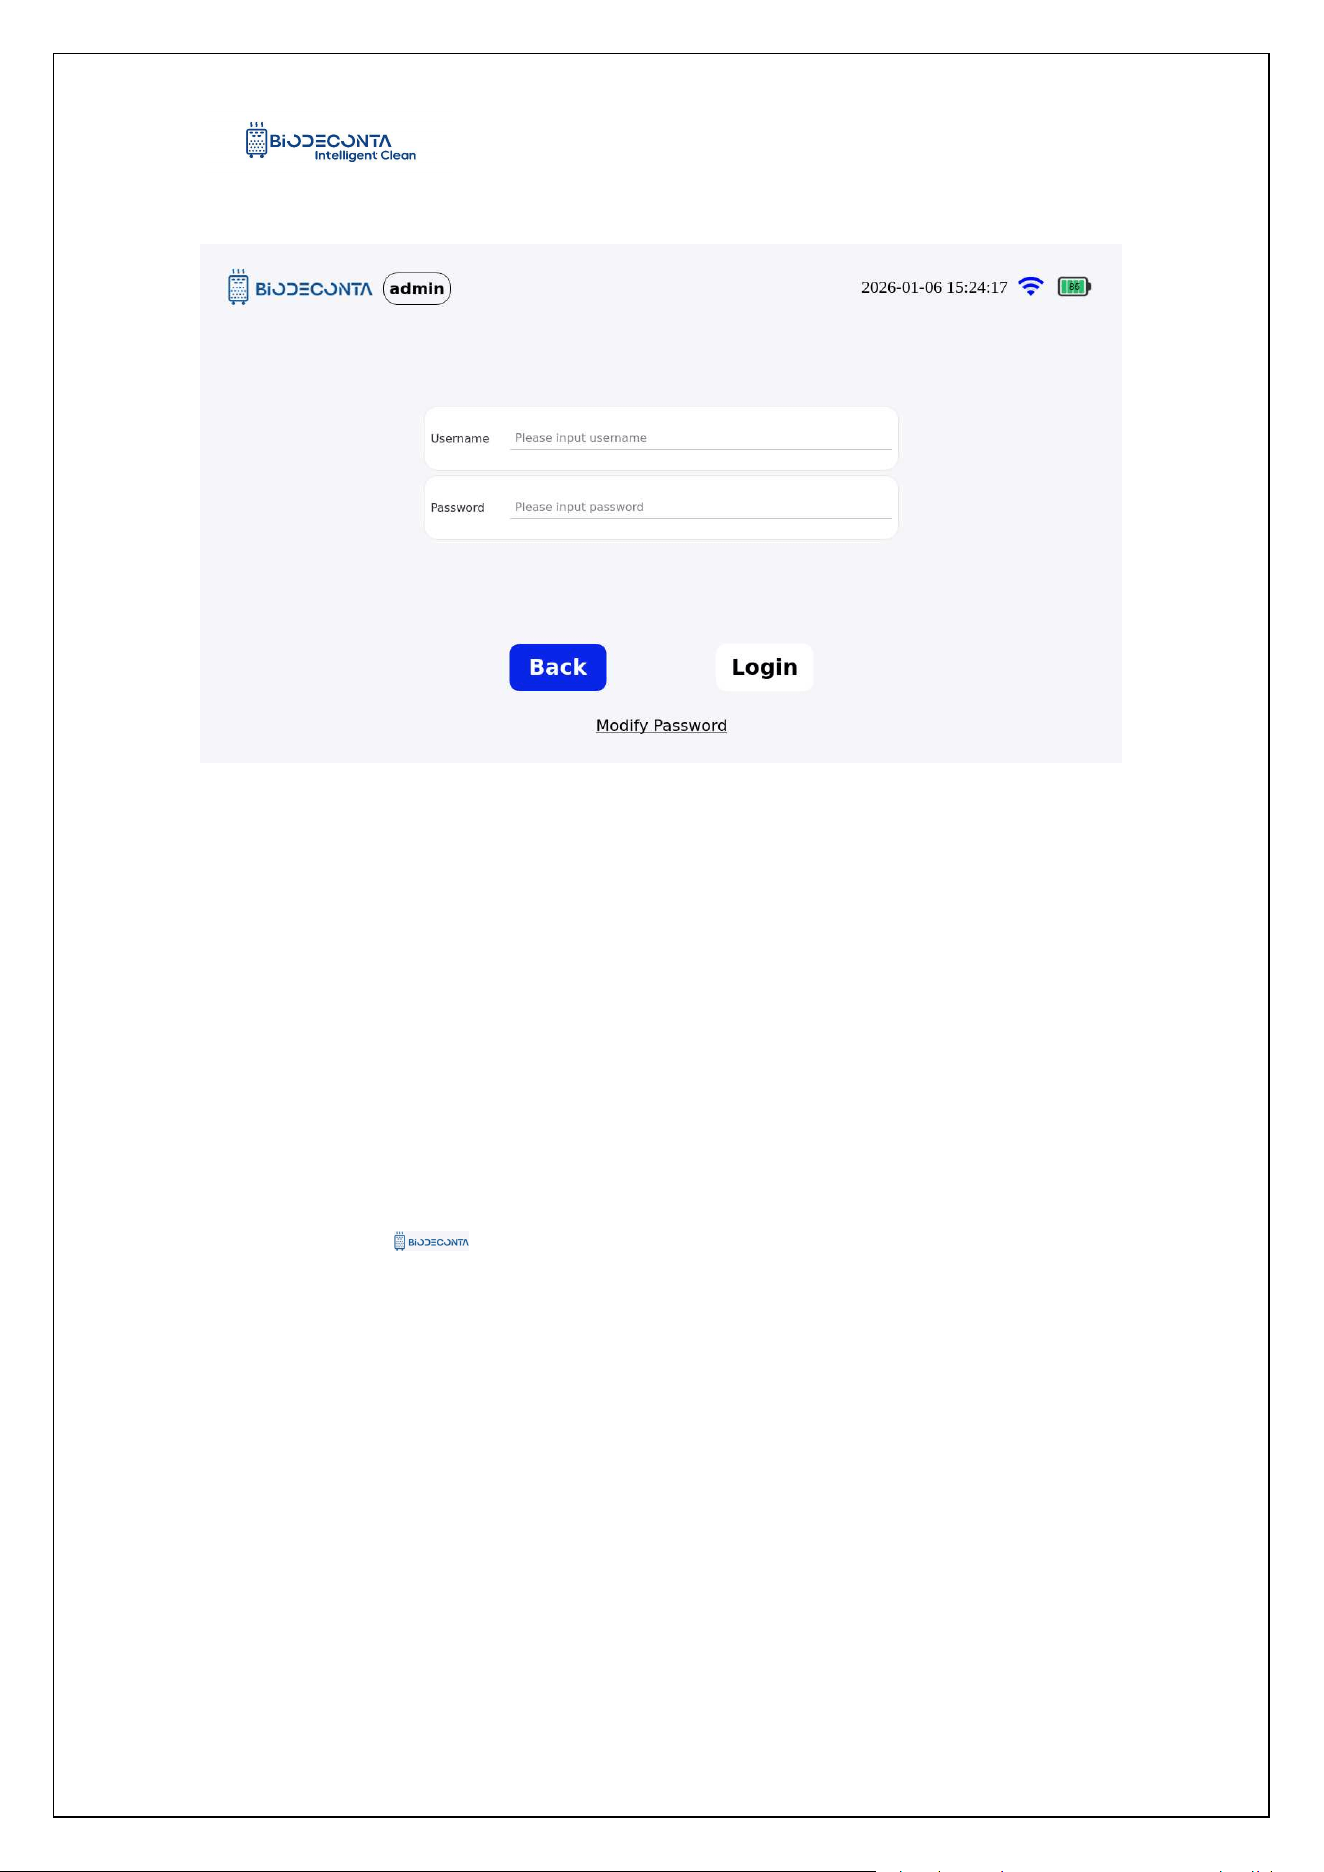
10.9 User Enable:
Click the "User" button, as shown in Figure 10-22, and the page will jump to the
"Local Users" page. Click the "Deactivation List" option, as shown in Figure 10-23,
and click the [ ] icon. The page will then jump to the login interface, fill in the account
and password data, and click the "Login" button, to complete the enabling operation.
Intelligent Safe and Clean
www.biodeconta.com
83
Figure 10-22 "Enable 1"
Figure 10-23 "Enable 2"
Chapter 11 Switch mode
11. Switch mode
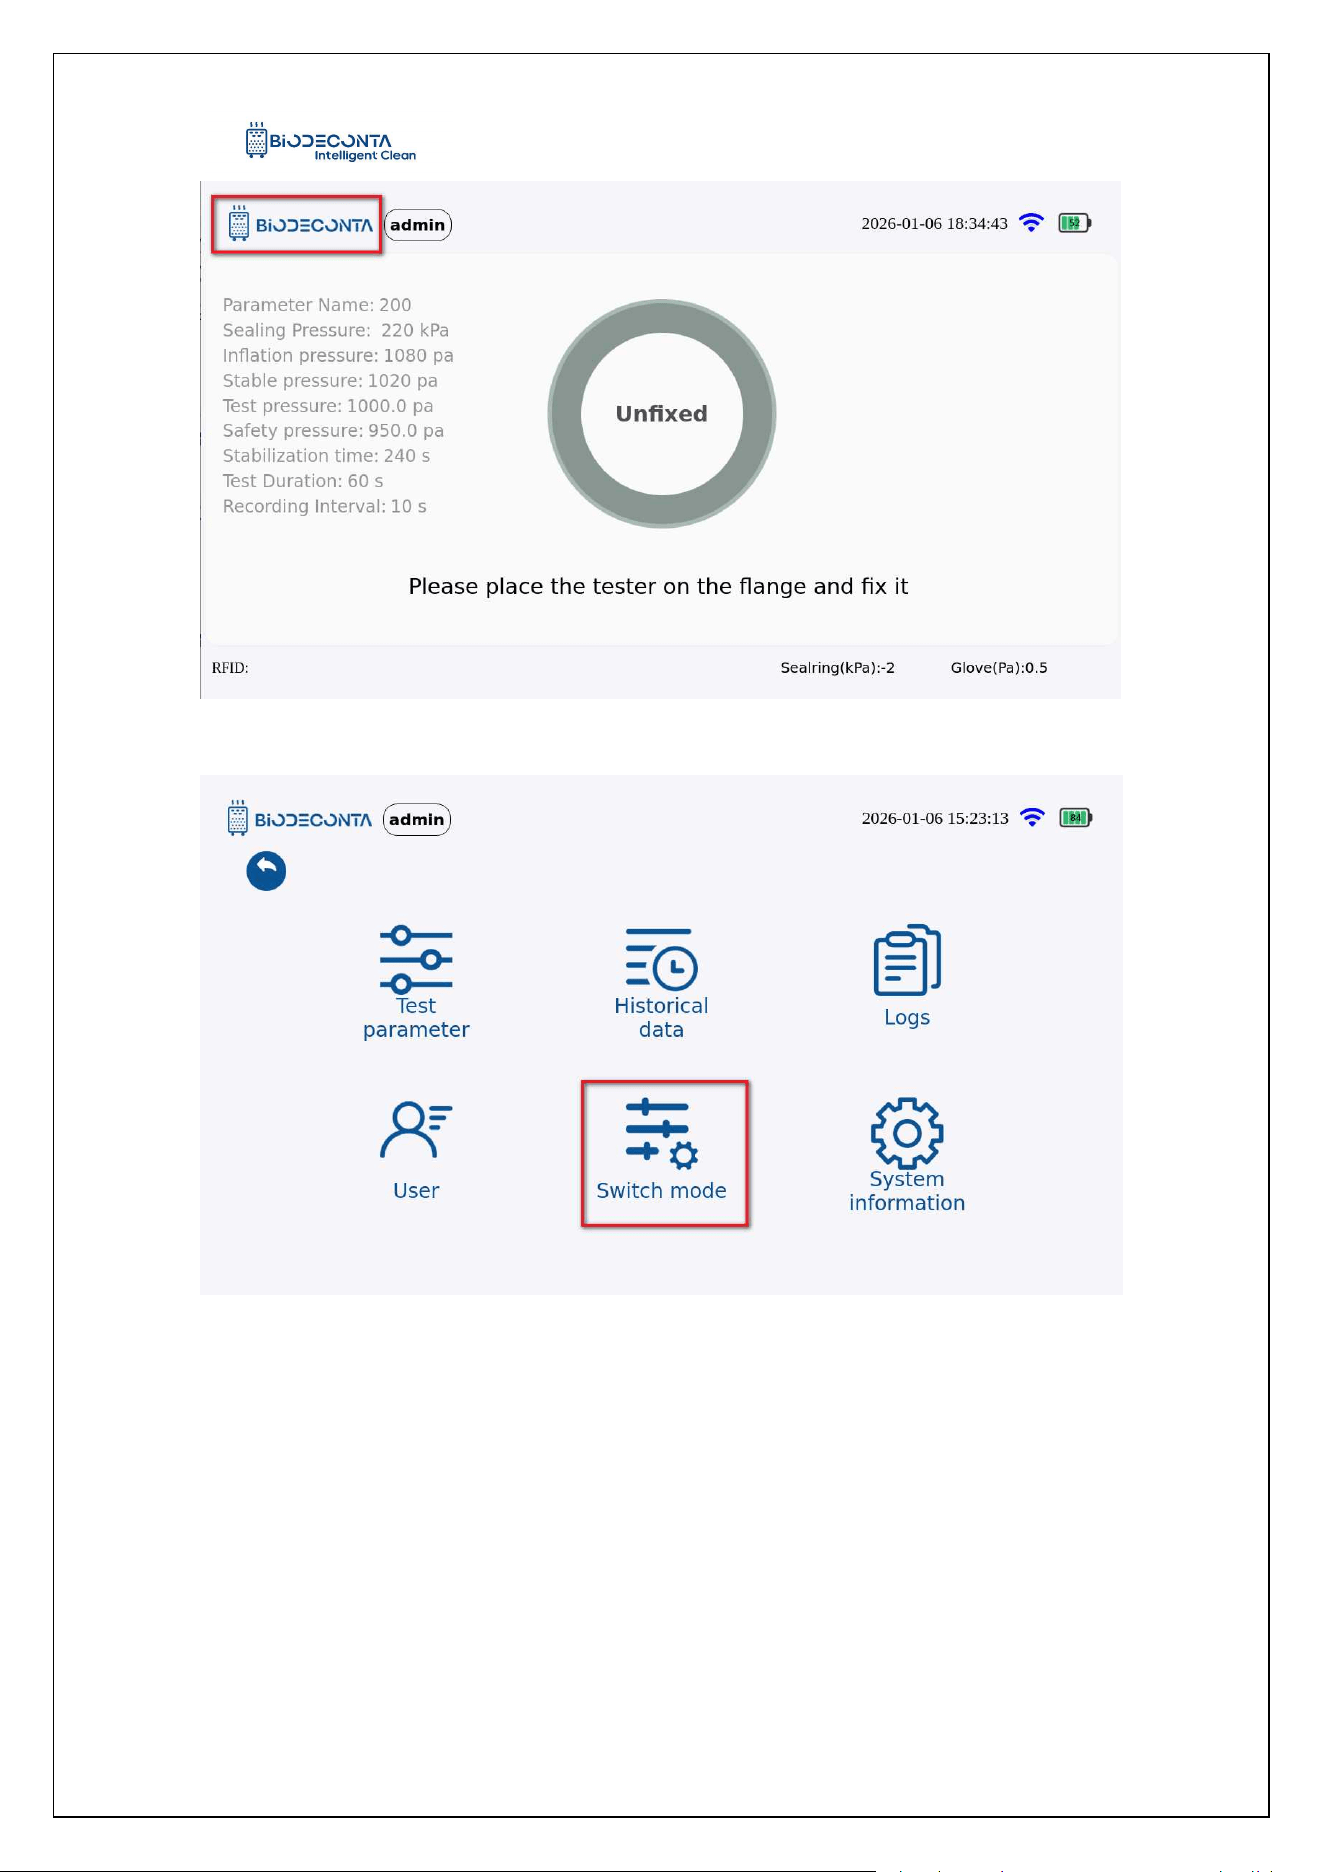
11.1 Date
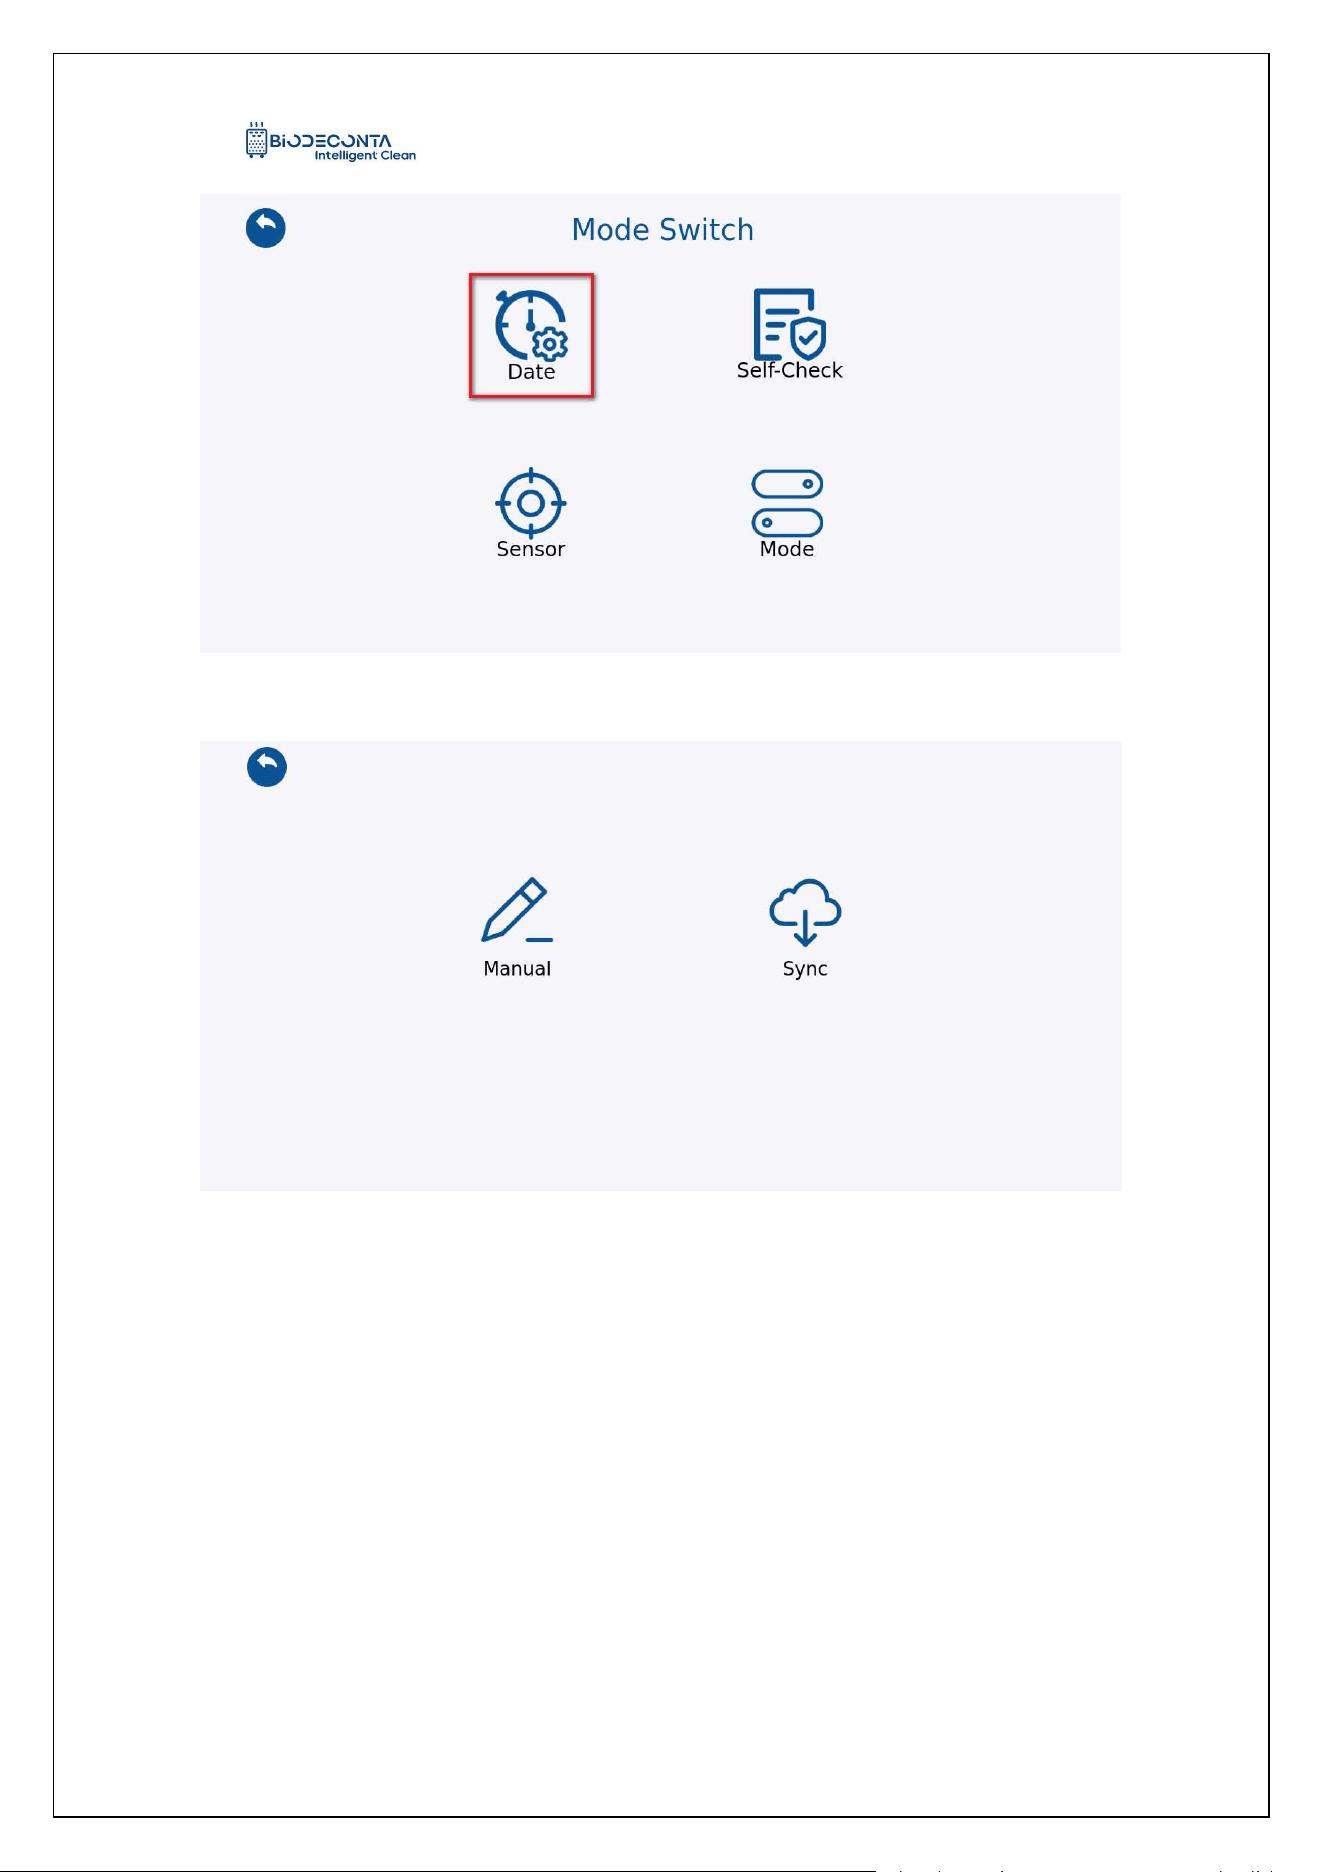
Click on the [ ] icon on the test interface, as shown in Figures 11-1.1 and
11-1.2, the page will then jump to the page will jump to the pages of [Test Parameter],
[Historical data], [Logs], [Users], [Switch mode], [System information] pages. Click on
[Switch mode] , as shown in Figure 11-1.3, and the page will jump to the [Date],
[Language ], [Self-Check], [Sensor], [Mode] pages. Click on [Date], as shown in
Figure 11-1.4, and the page will jump to the [Manual] and [Sync] page, this
sub-module mainly involves the Sync operation.
Intelligent Safe and Clean
www.biodeconta.com
84
Figure 11.1-1 "Date 1"
Figure11.1-2 "Date 2"
Intelligent Safe and Clean
www.biodeconta.com
85
Figure 11.1-3 "Date 3"
Figure 11.1-4 "Date 4"
11.2 Manual:
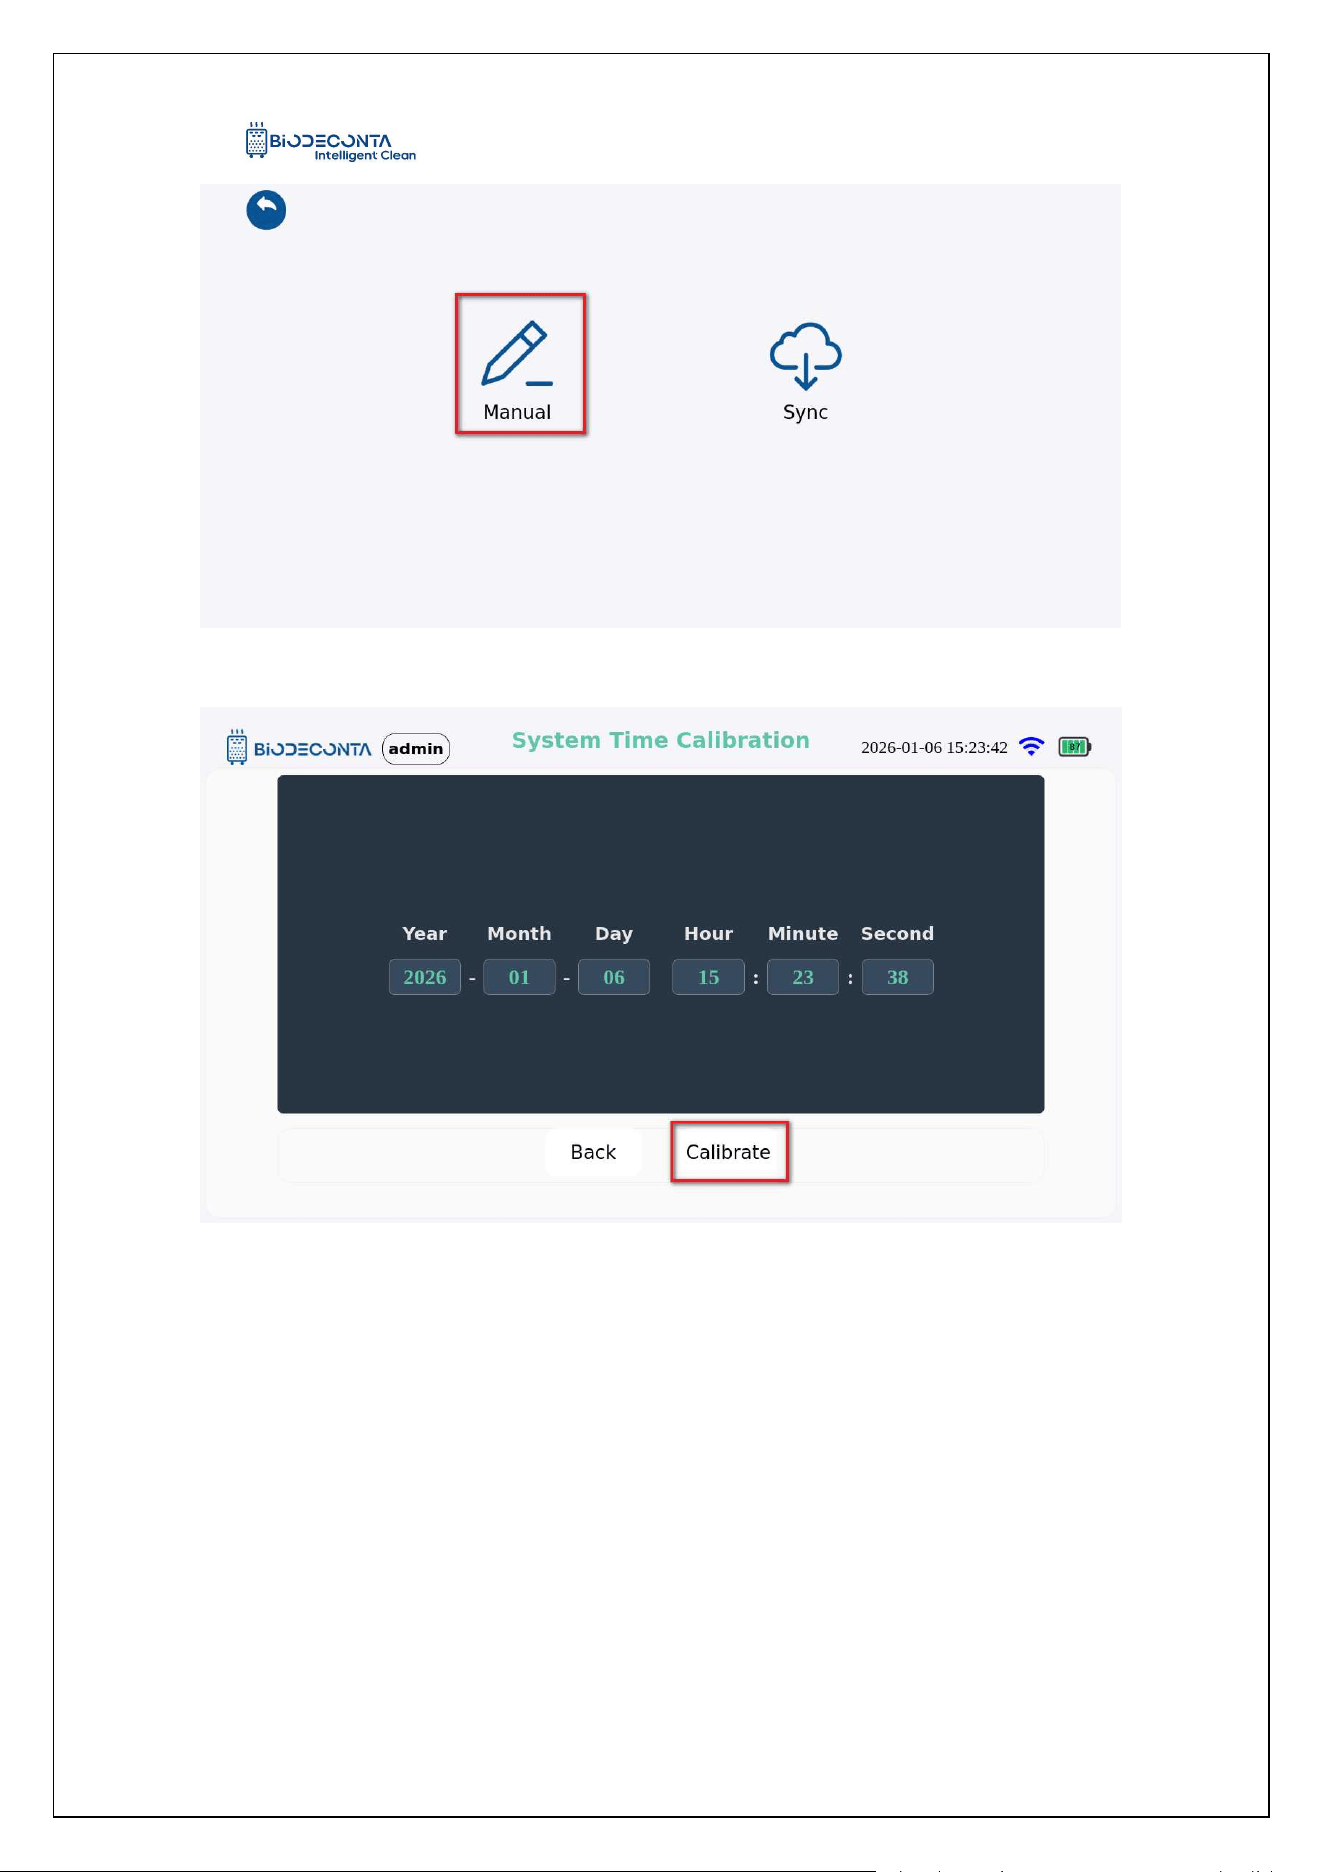
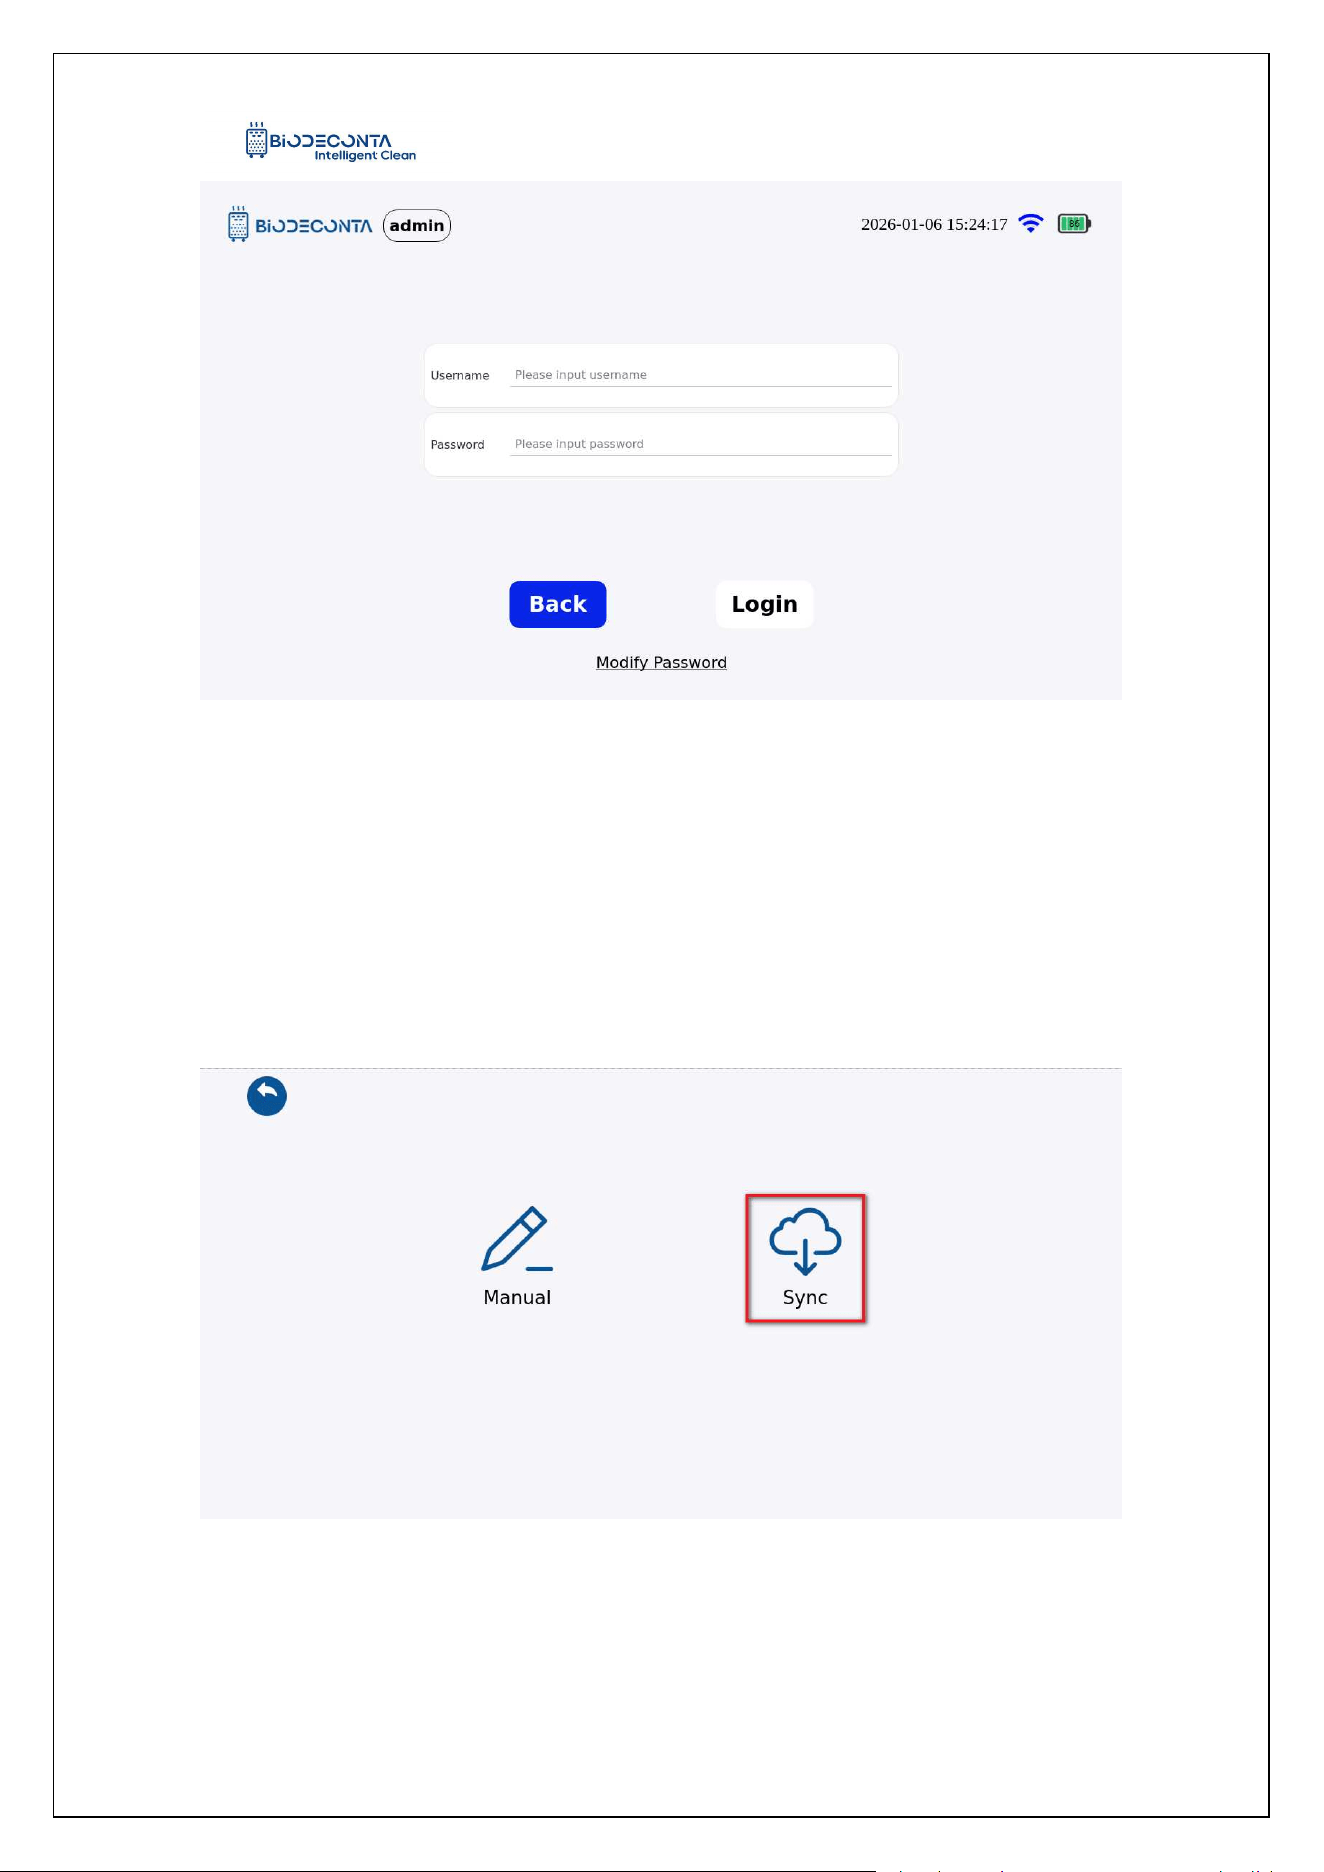
Click on the [Manual], as shown in Figure 11.1-5. The page will then jump to the
"System Time Calibration" page, as shown in Figure 11.1-6, click the "Calibrate"
button. As shown in Figure 11.1-7, the page will then jump to the login interface. Enter
your account and password information, and click the "Login" button, to complete the
Calibration operation.
Intelligent Safe and Clean
www.biodeconta.com
86
Figure 11.1-5 "Calibration 1"
Figure 11.1-6 "Calibration 2"
Intelligent Safe and Clean
www.biodeconta.com
87
Figure 11.1-7 "Calibration 3"
11.3 Sync:
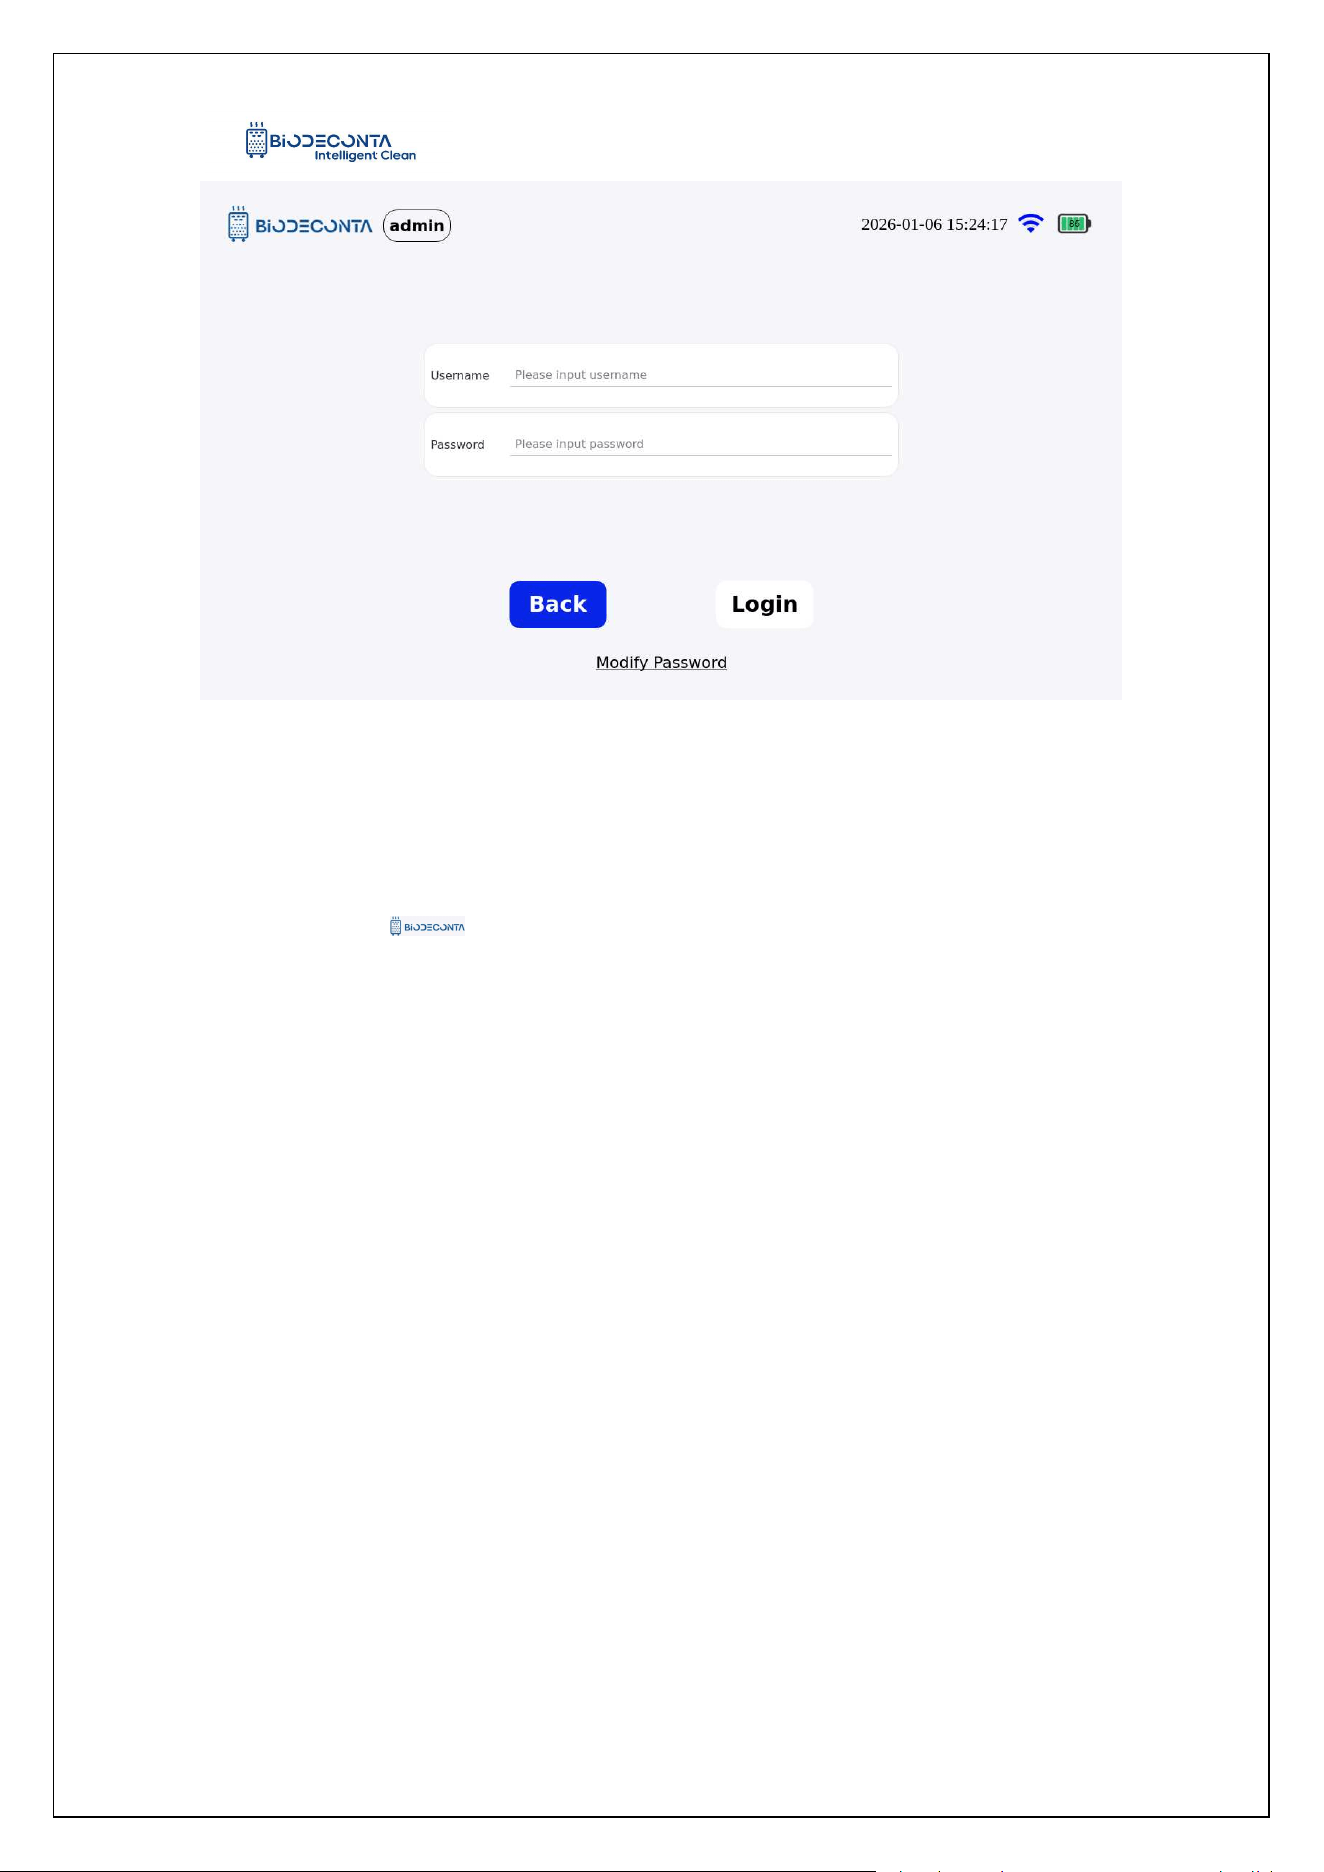
Click on "Sync", as shown in Figures 11.1-8 and 11.1-9. The page will then jump
to the login interface. Enter your account and password information, and click the
"Login" button, to complete the Sync operation.
Figure 11.1-8 "Sync 1"
Intelligent Safe and Clean
www.biodeconta.com
88
Figure 11.1-9 "Sync 2"
11.4 Self-Check
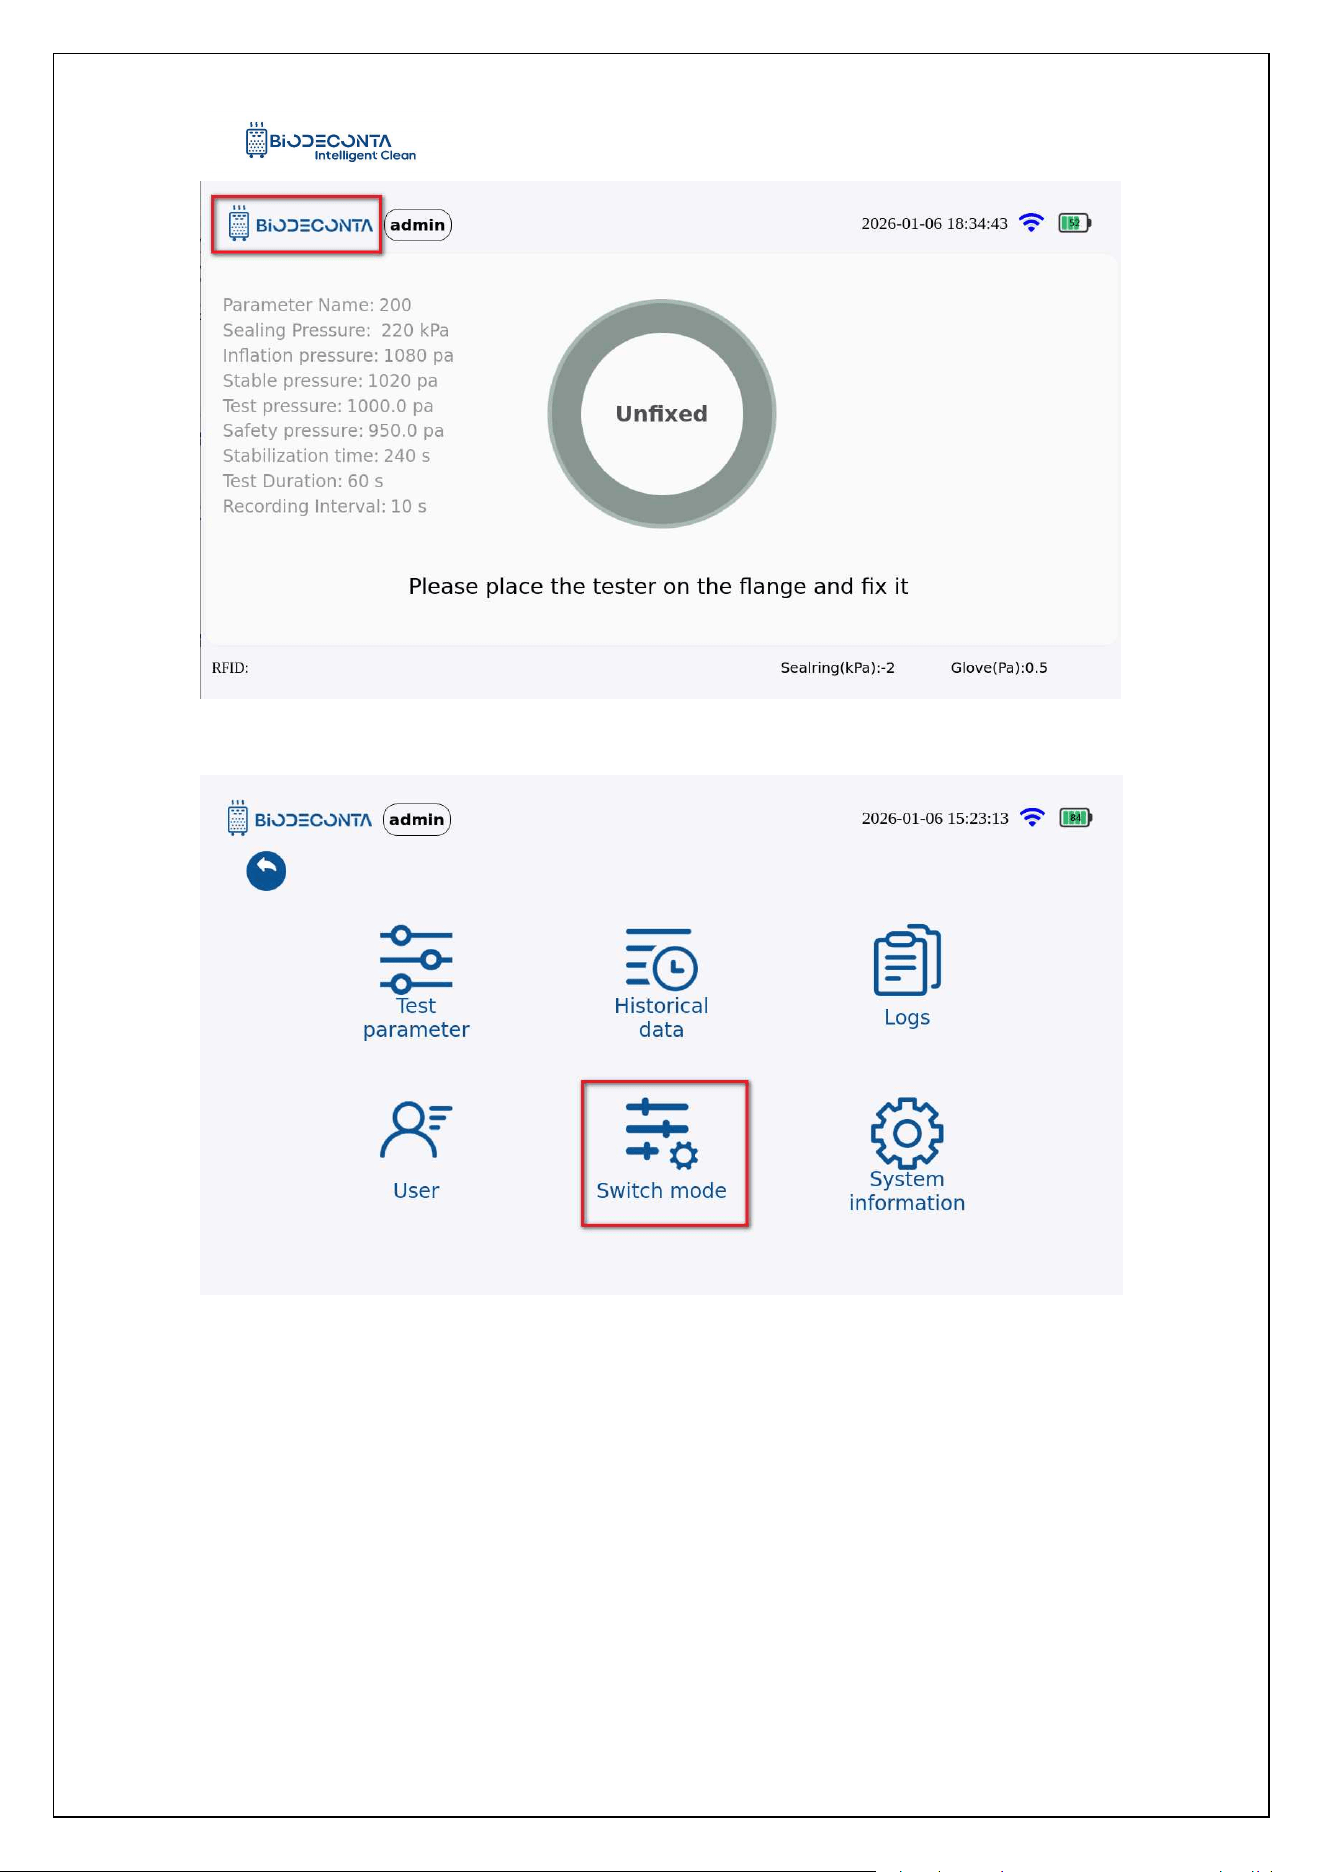
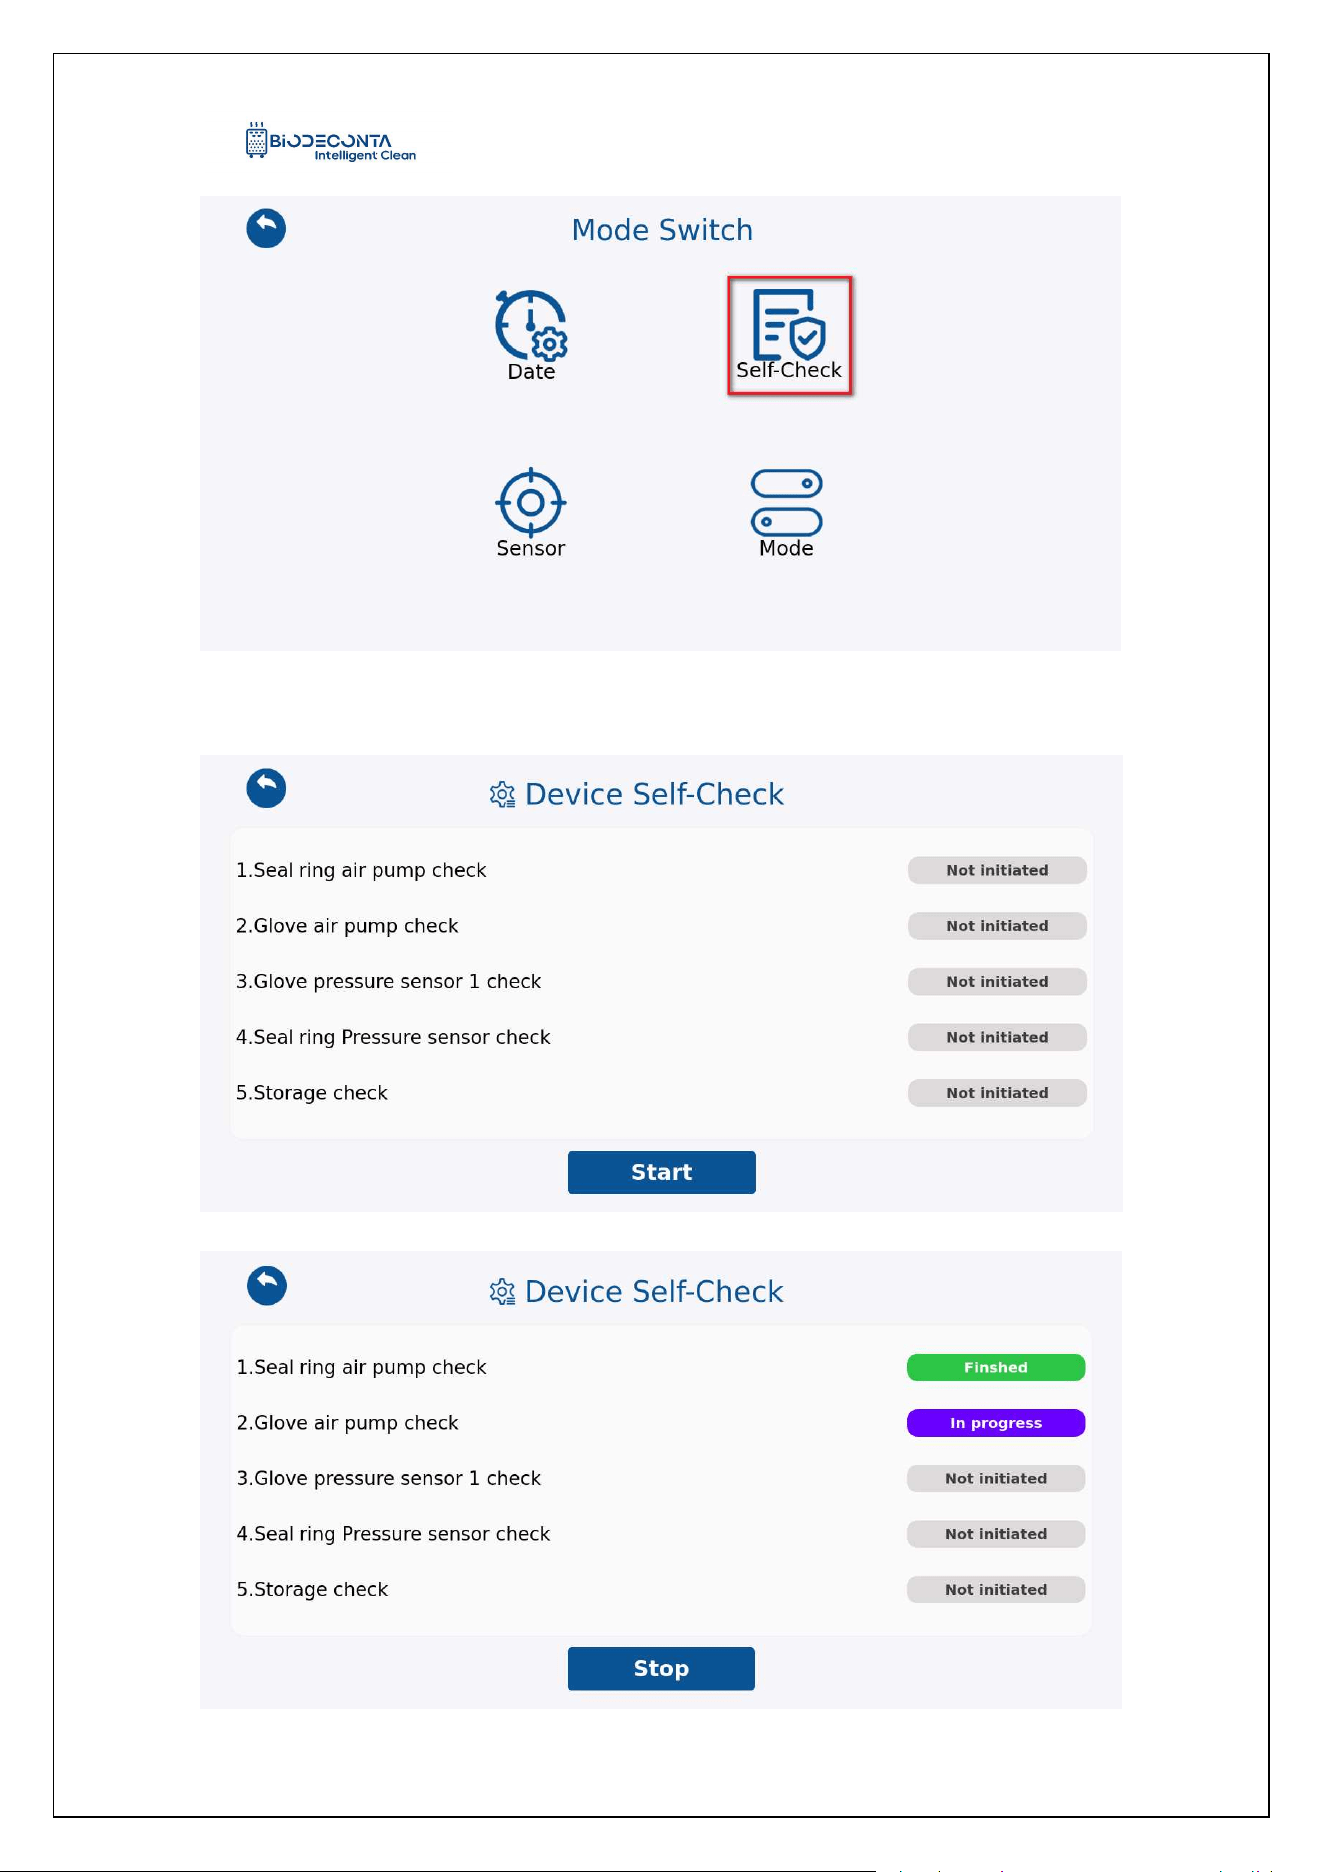
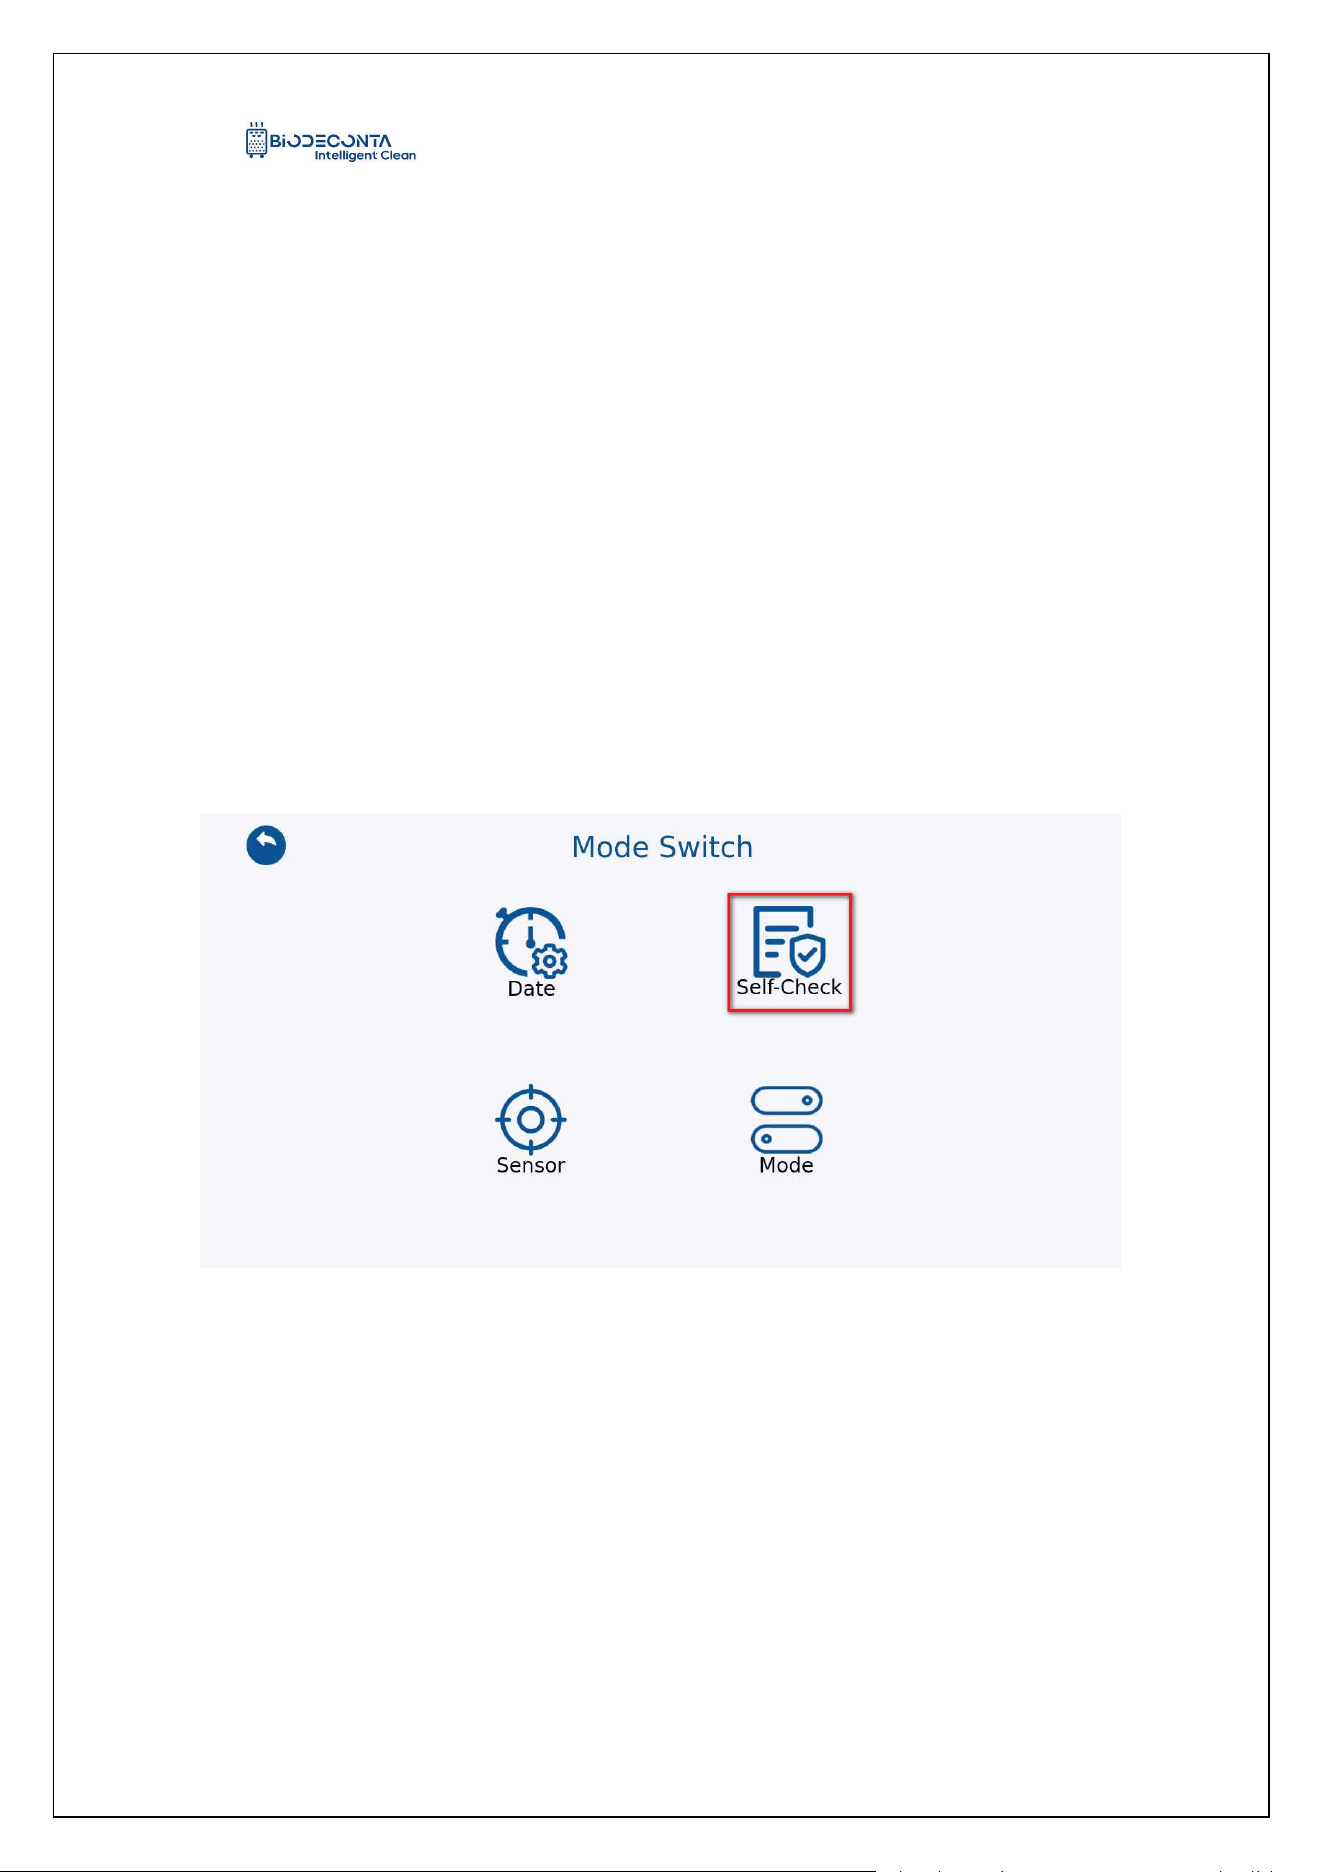
Click on the [ ] icon on the test interface, as shown in Figures 11-1.10 and
11-1.11, the page will then jump to the page will jump to the pages of [Test Parameter],
[Historical data], [Logs], [Users], [Switch mode], [System information] pages. Click on
[Switch mode] , as shown in Figure 11-1.12, and the page will jump to the [Date],
[Language], [Self-Check], [Sensor], [Mode] pages. Click on [Self-Check], as shown in
Figure 11-1.13, and the page will jump to the "Device Self-Check" page, this module
mainly involves the Start and Stop operation.
Intelligent Safe and Clean
www.biodeconta.com
89
Figure 11.1-10 "Self-Check 1"
Figure 11.1-11 "Self-Check 2"
Intelligent Safe and Clean
www.biodeconta.com
90
Figure 11.1-12 "Self-Check 3"
Intelligent Safe and Clean
www.biodeconta.com
91
Figure 11.1-13 "Self-Check 4"
11.5 Start:
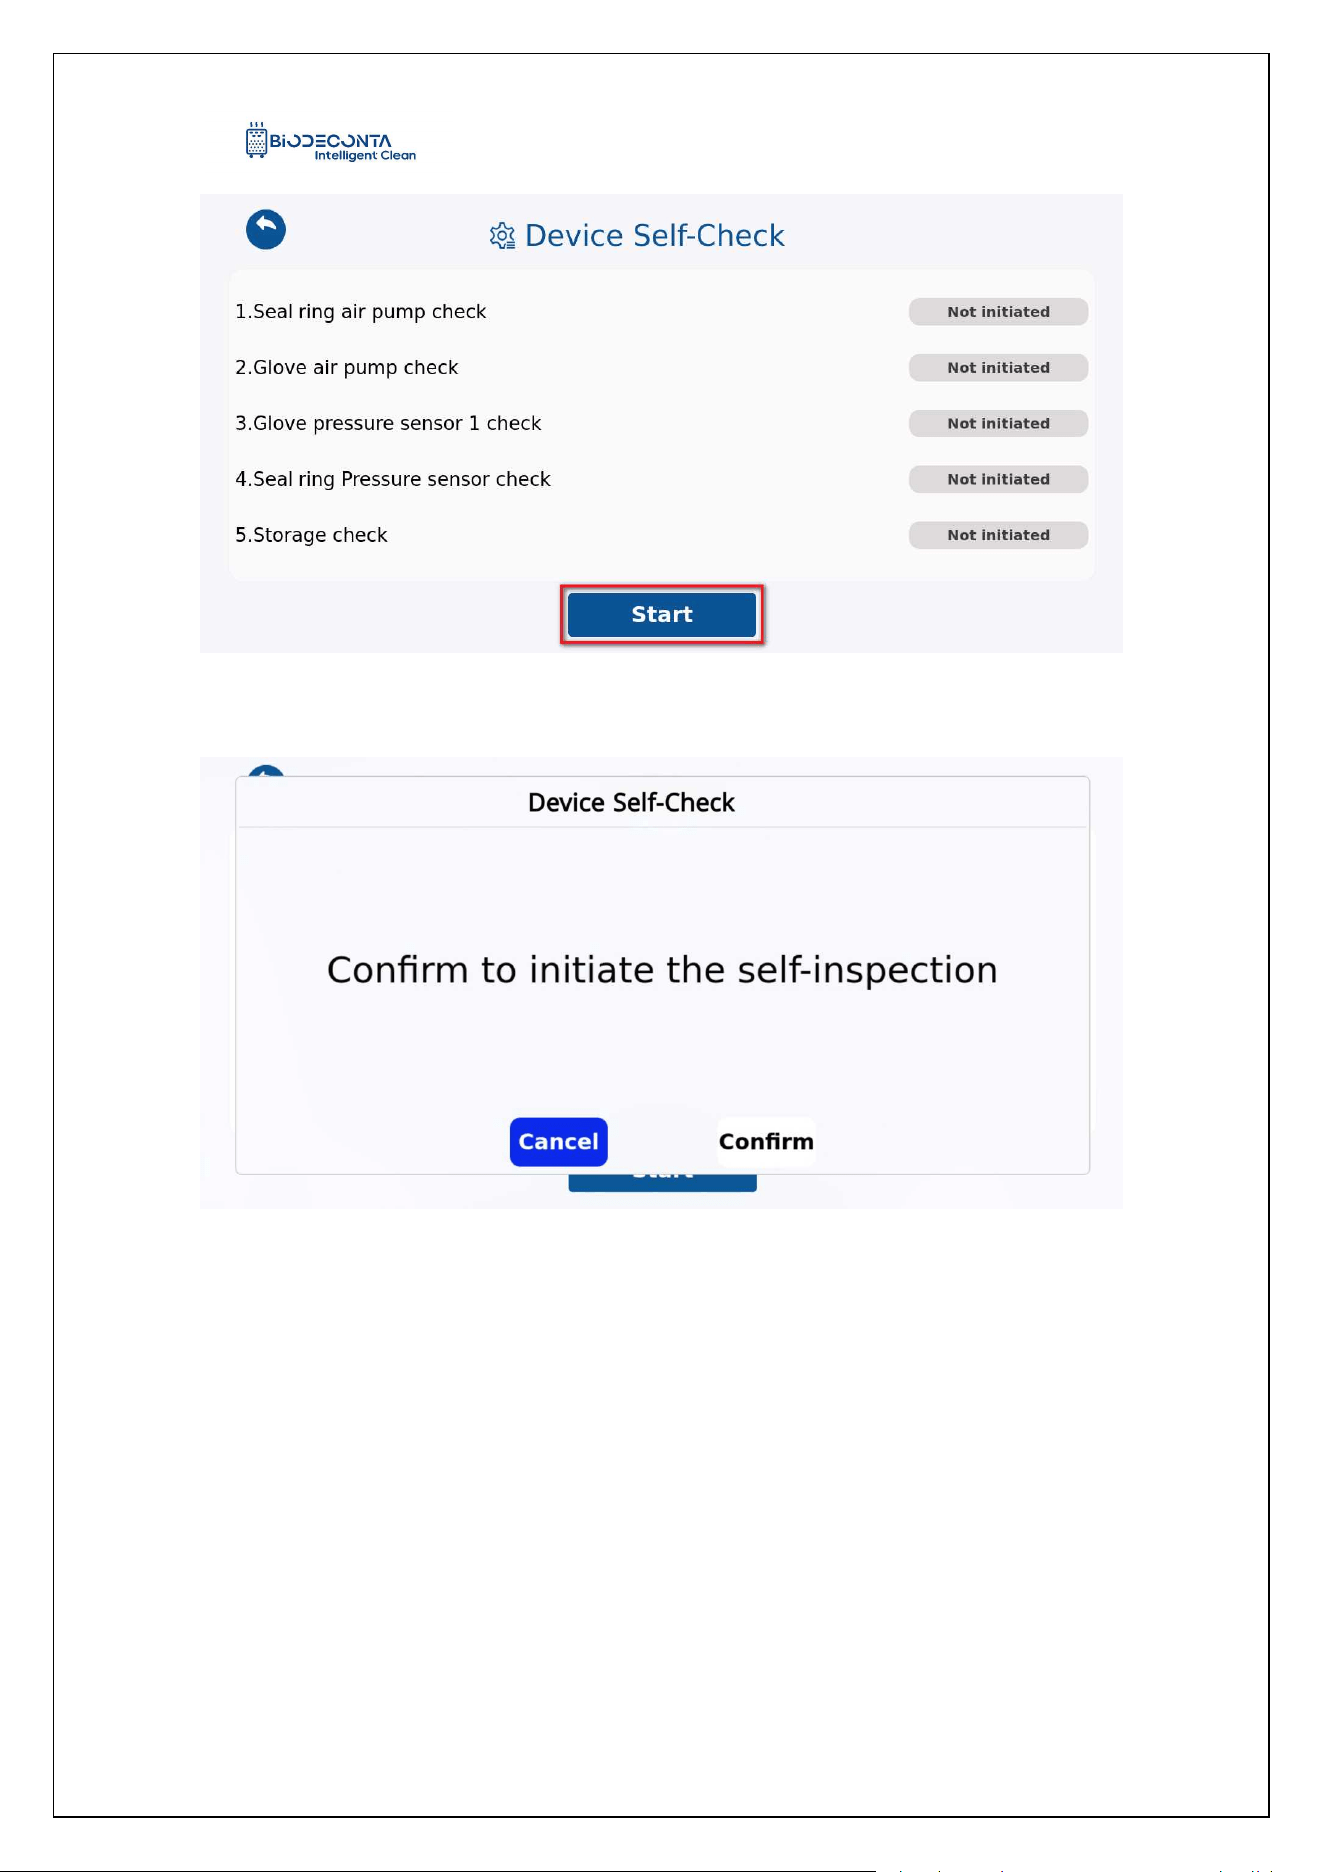
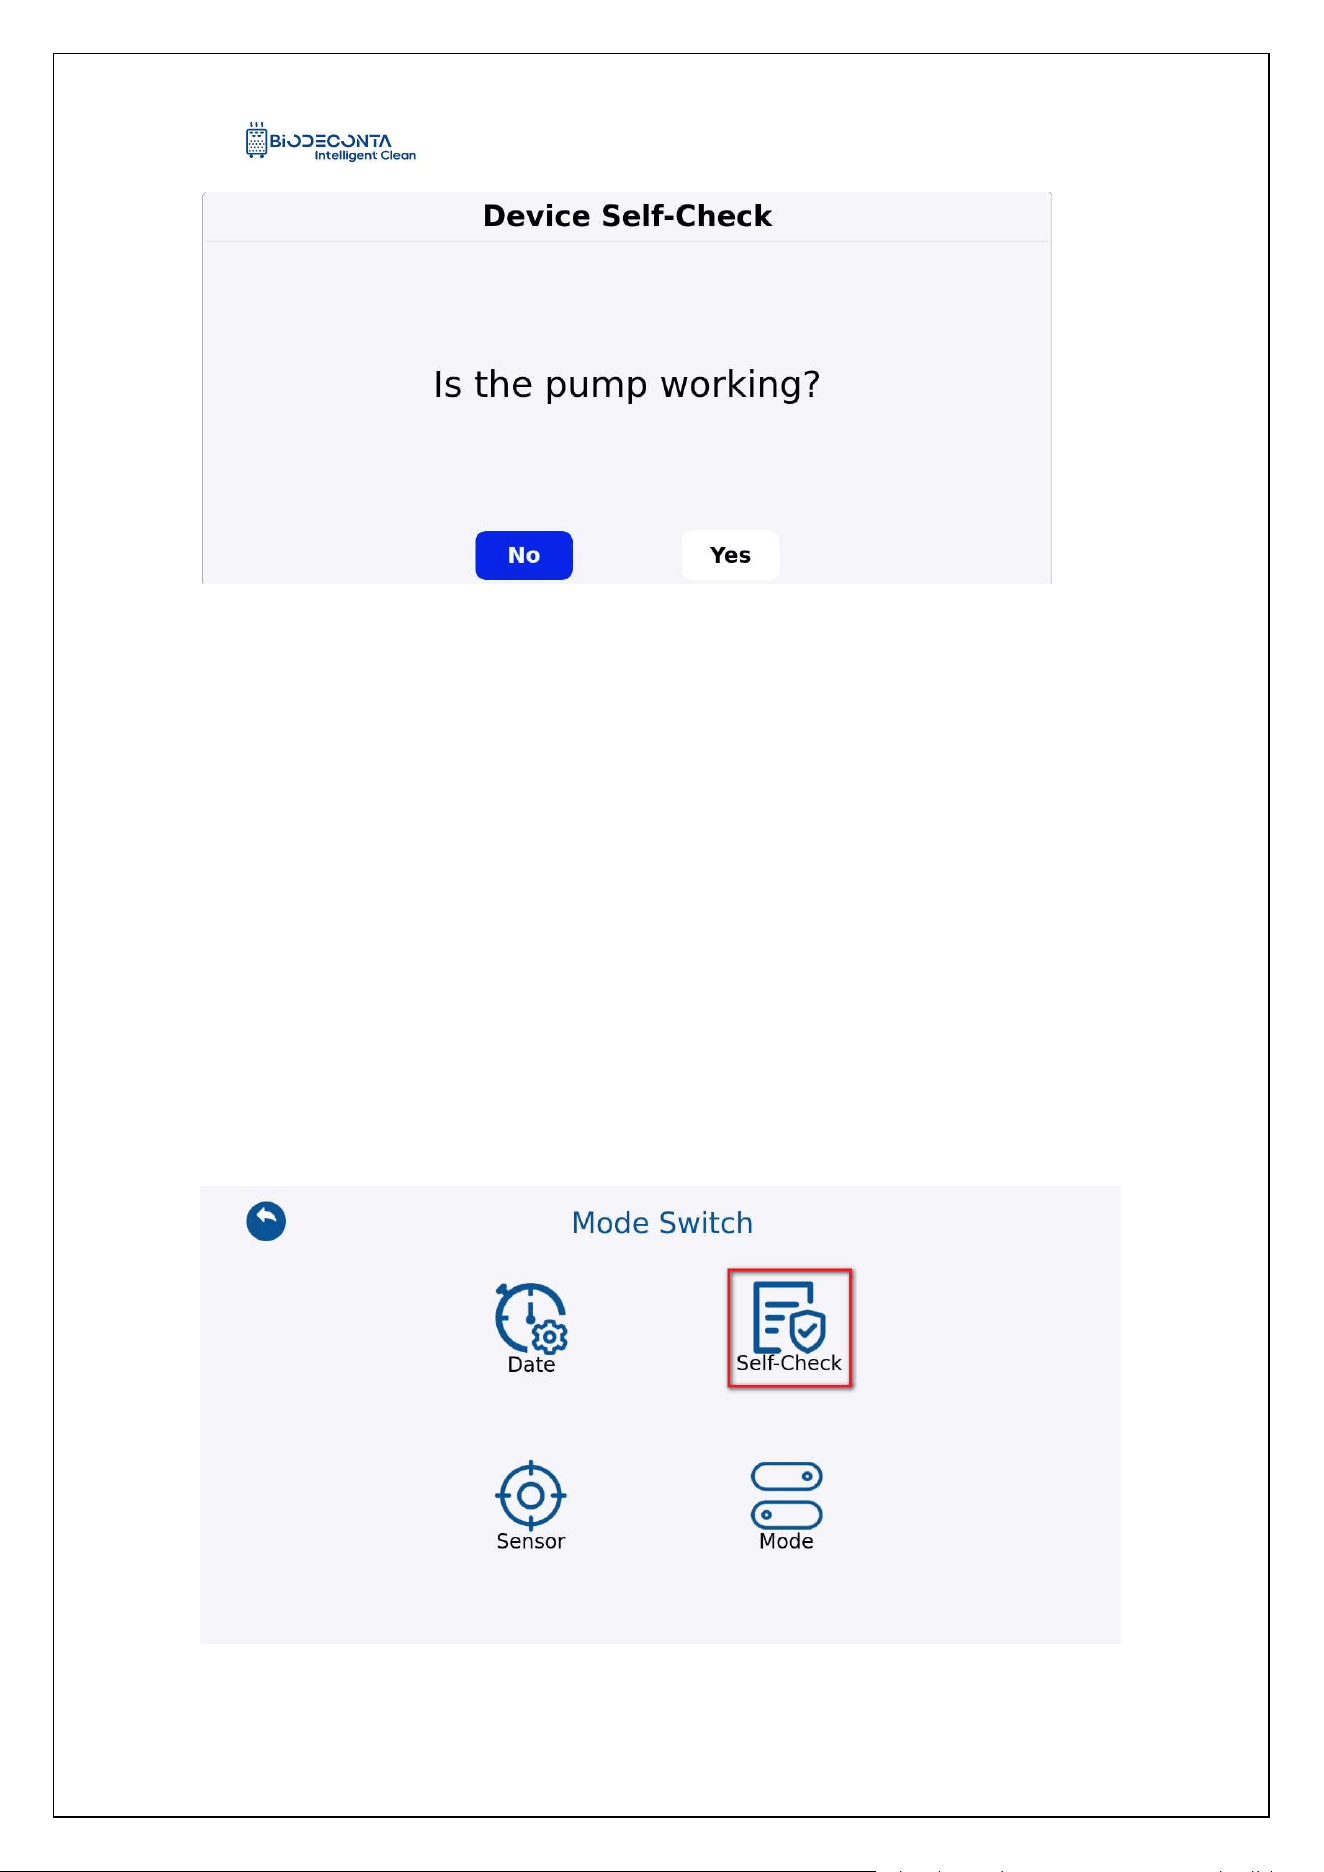
Click the [Self-Check], as shown in Figures 11.1-14 and 11.1-15, and the page will
jump to the "Device Self-Check" page. Click the "Start" button, as shown in Figure
11.1-16, and a "Confirm to initiate the self-inspection" dialog box will pop up, click the
"Confirm" button, and the first self-check will begin. After the first self-check is
completed, as shown in Figure 11.1-17, a "Is the pump working?" dialog box will pop
up, click the "Yes" button, and you can then proceed with the start operation of the
self-check one by one (The sealing air pump check started, the glove air pump check
has started, pay attention to whether the instrument has any reaction).
Figure 11.1-14 "Start 1"
Intelligent Safe and Clean
www.biodeconta.com
92
Figure 11.1-15 "Start 2"
Figure 11.1-16 "Start 3"
Intelligent Safe and Clean
www.biodeconta.com
93
Figure 11.1-17 "Start 4"
11.6 Stop:
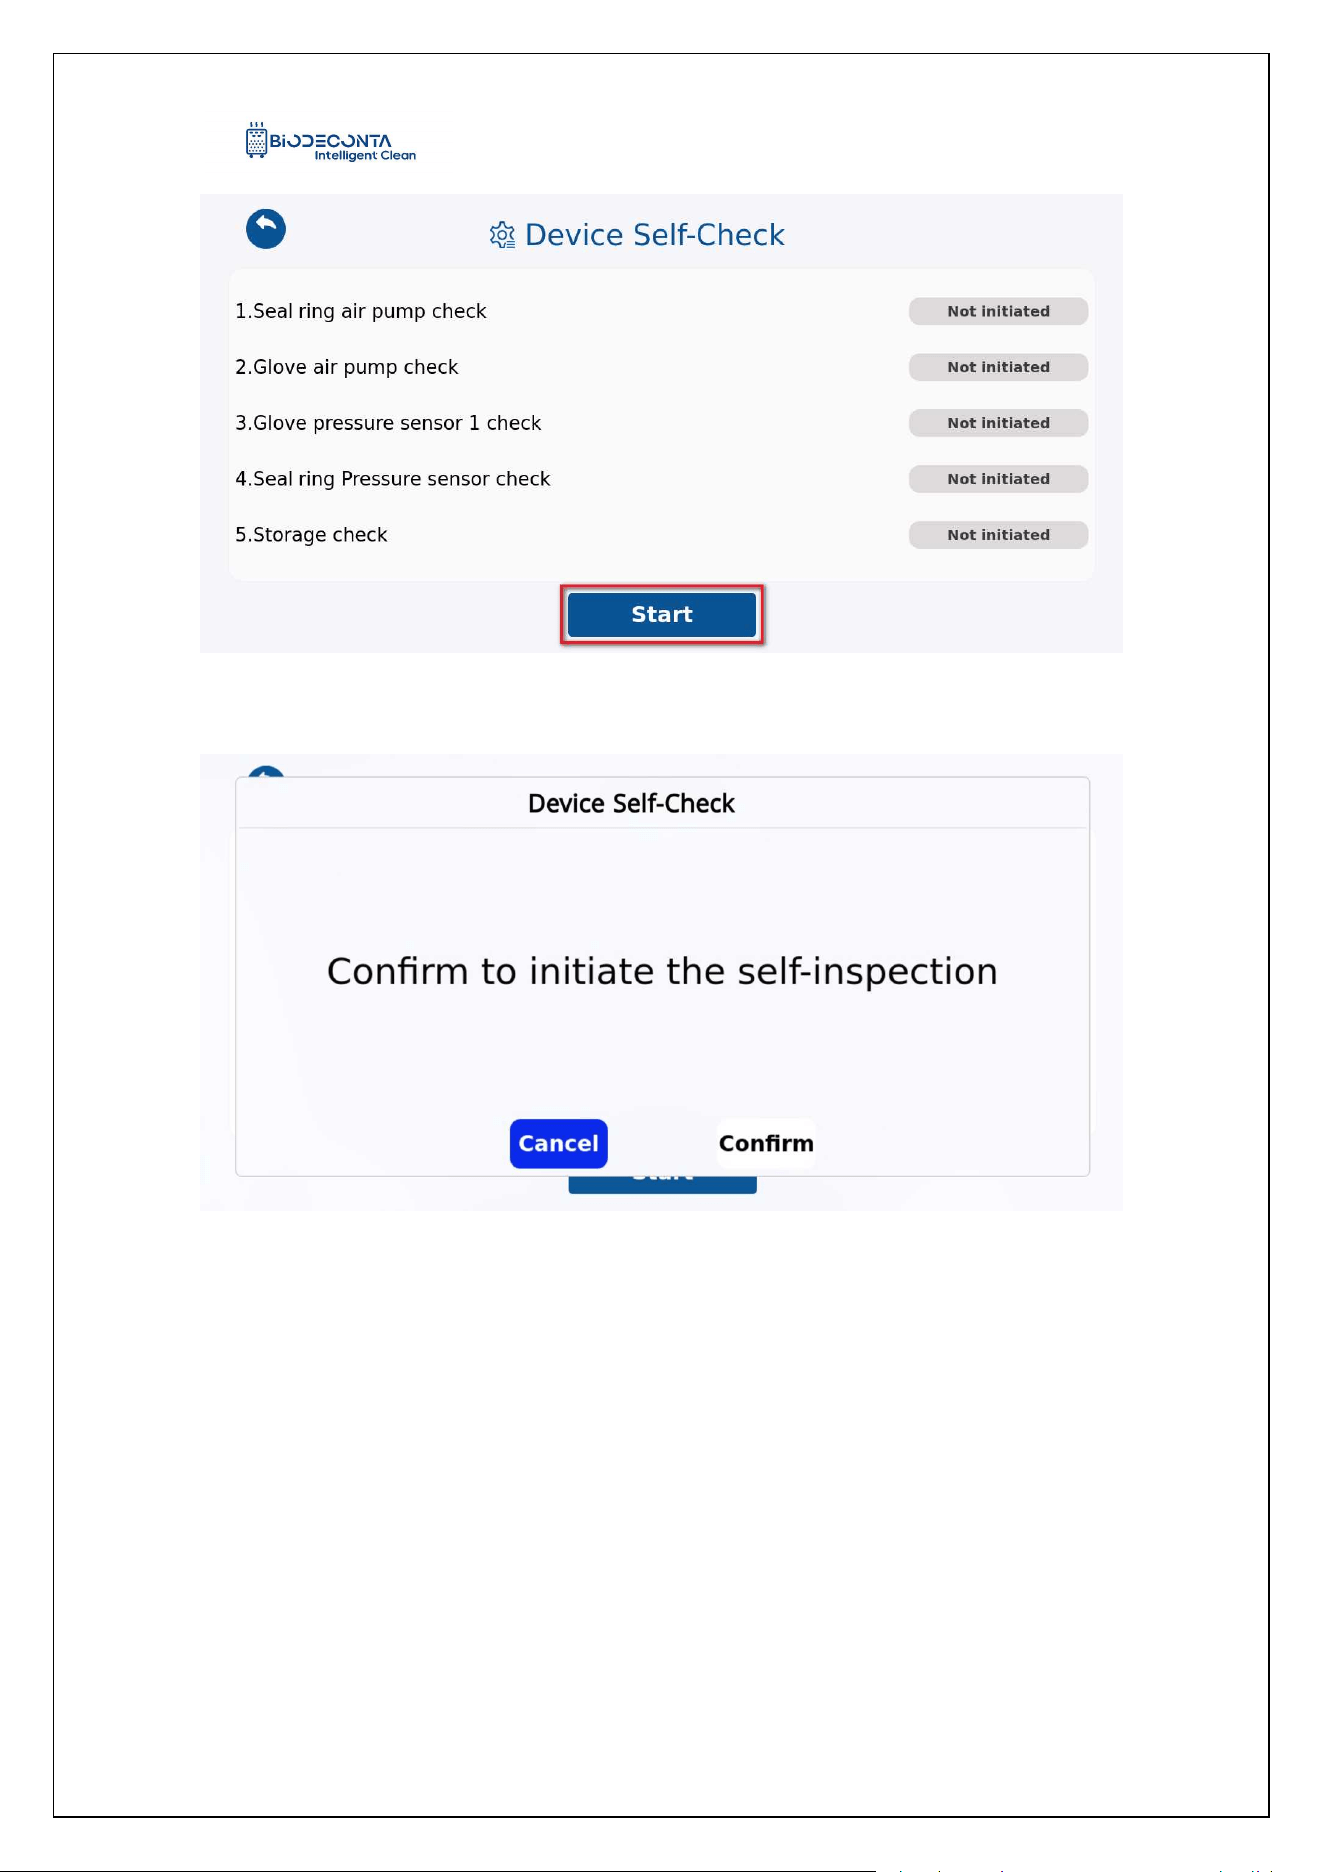
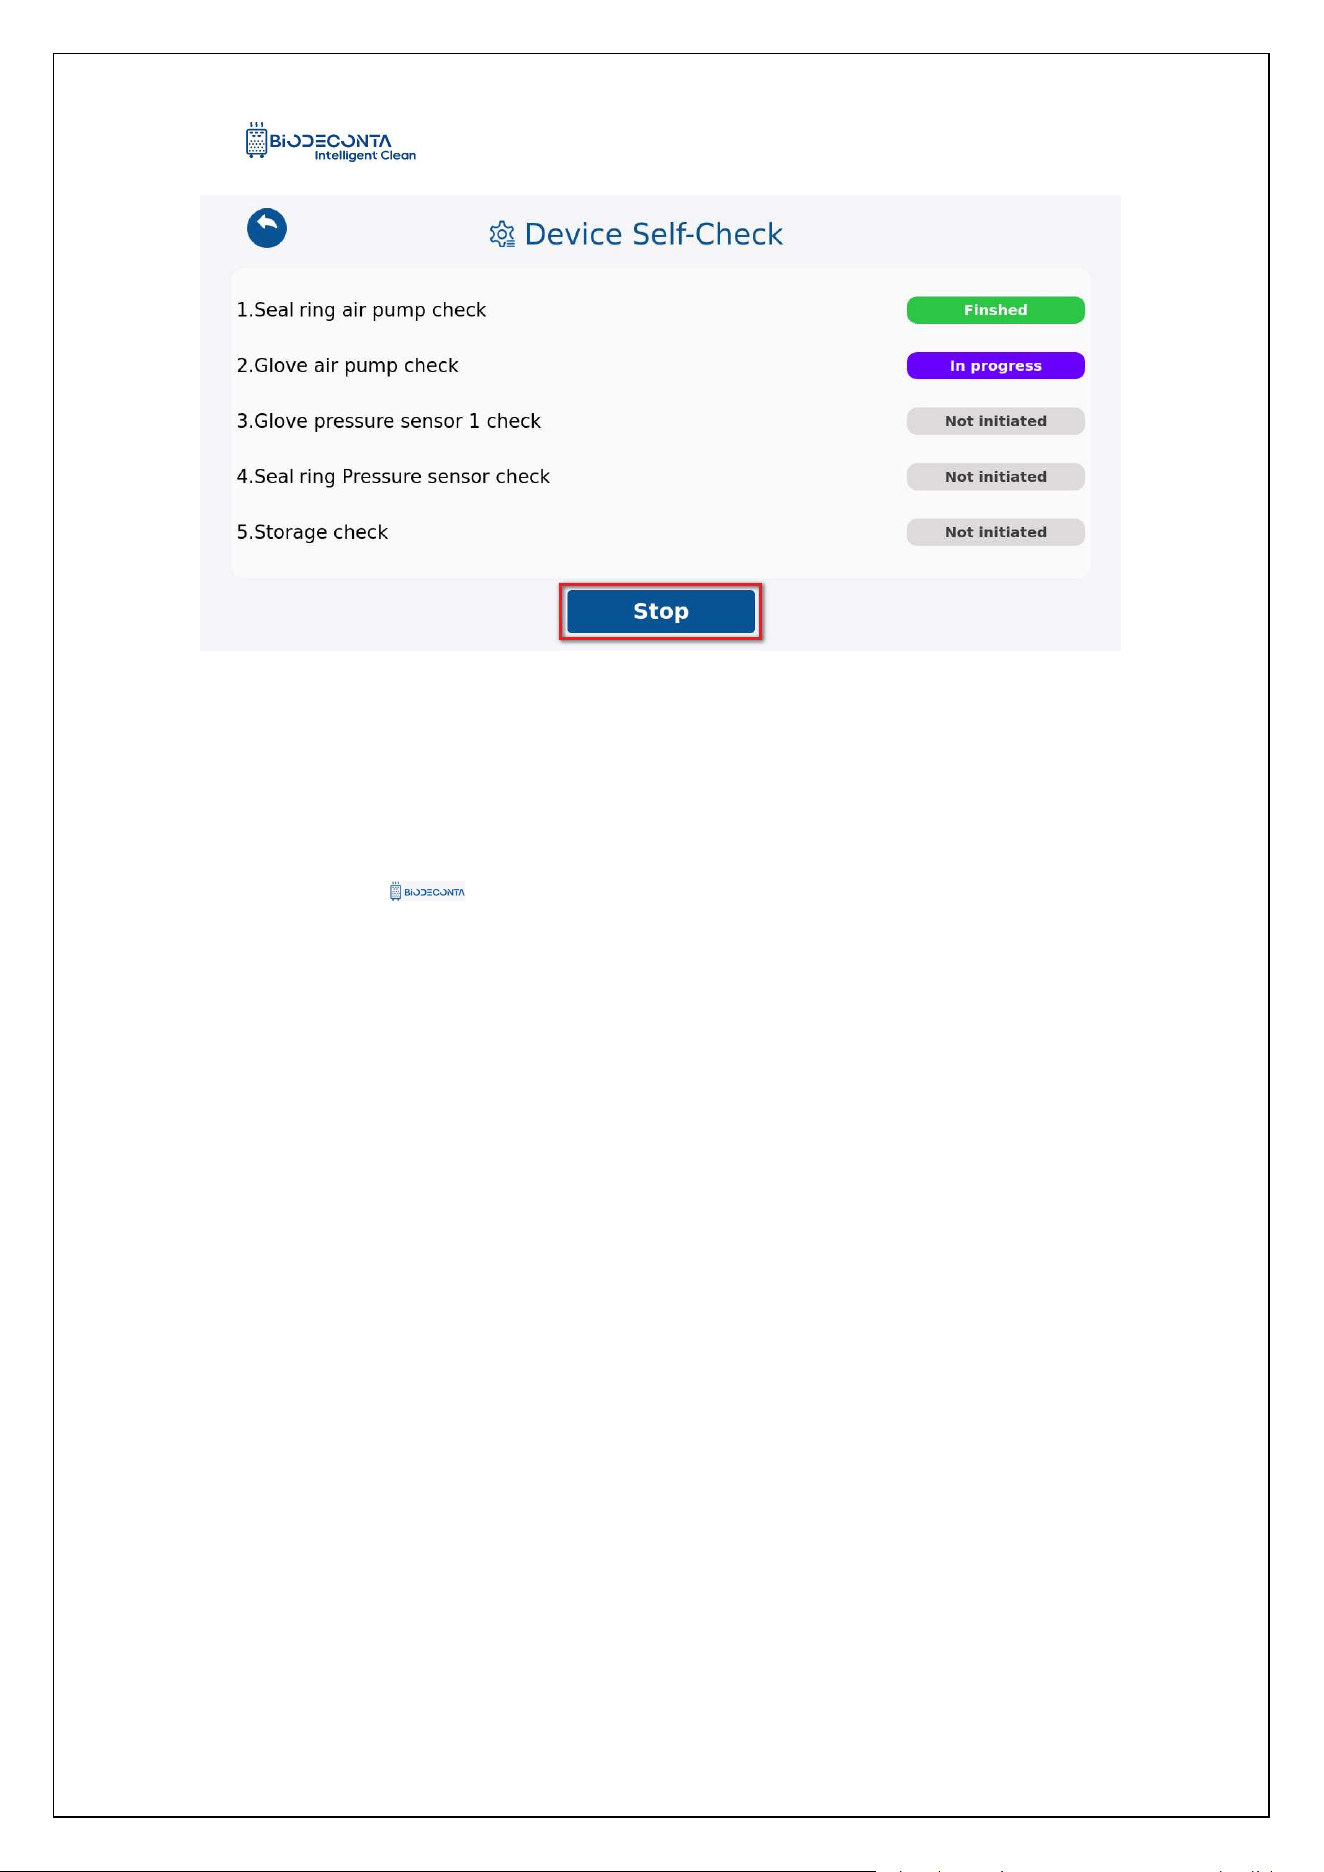
Click the [Self-Check], as shown in Figures 11.1-18 and 11.1-19, and the page will
jump to the" Device Self-Check" page. Click the "Start" button, as shown in Figure
11.1-20, and a "Confirm to initiate the self-inspection" dialog box will pop up, click the
"Confirm" button, and the first self-check will begin. During the first self-check process,
as shown in Figure 11.1-21, simply click the "Stop "button, to complete the stop
operation of the self-check (The sealing air pump check stopped, the glove air pump
check has stopped, pay attention to whether the instrument has any reaction).
Figure 11.1-18 "Stop 1"
Intelligent Safe and Clean
www.biodeconta.com
94
Figure 11.1-19 "Stop 2"
Figure 11.1-20 "Stop 3"
Intelligent Safe and Clean
www.biodeconta.com
95
Figure 11.1-21 "Stop 4"
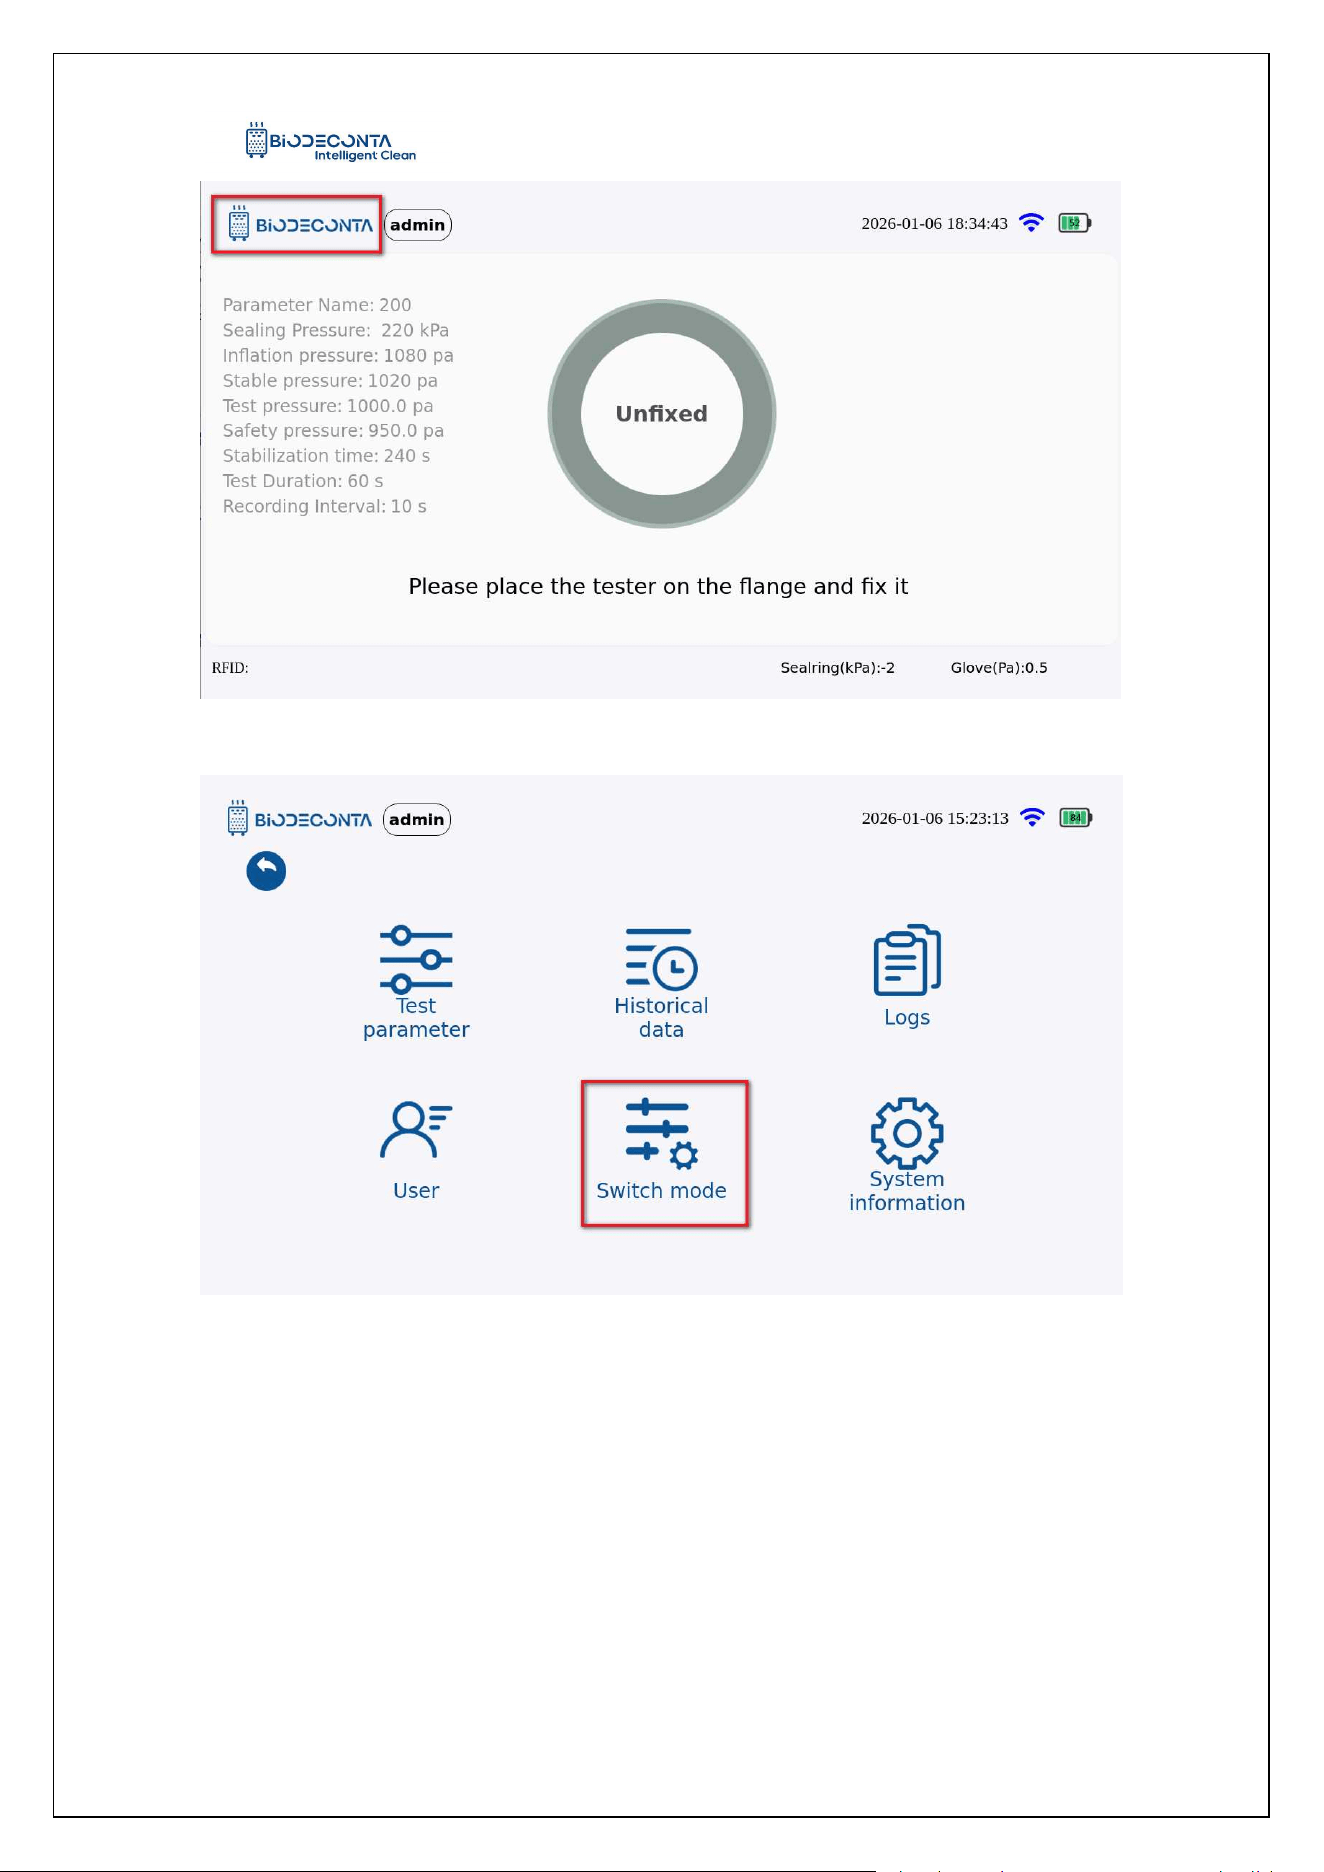
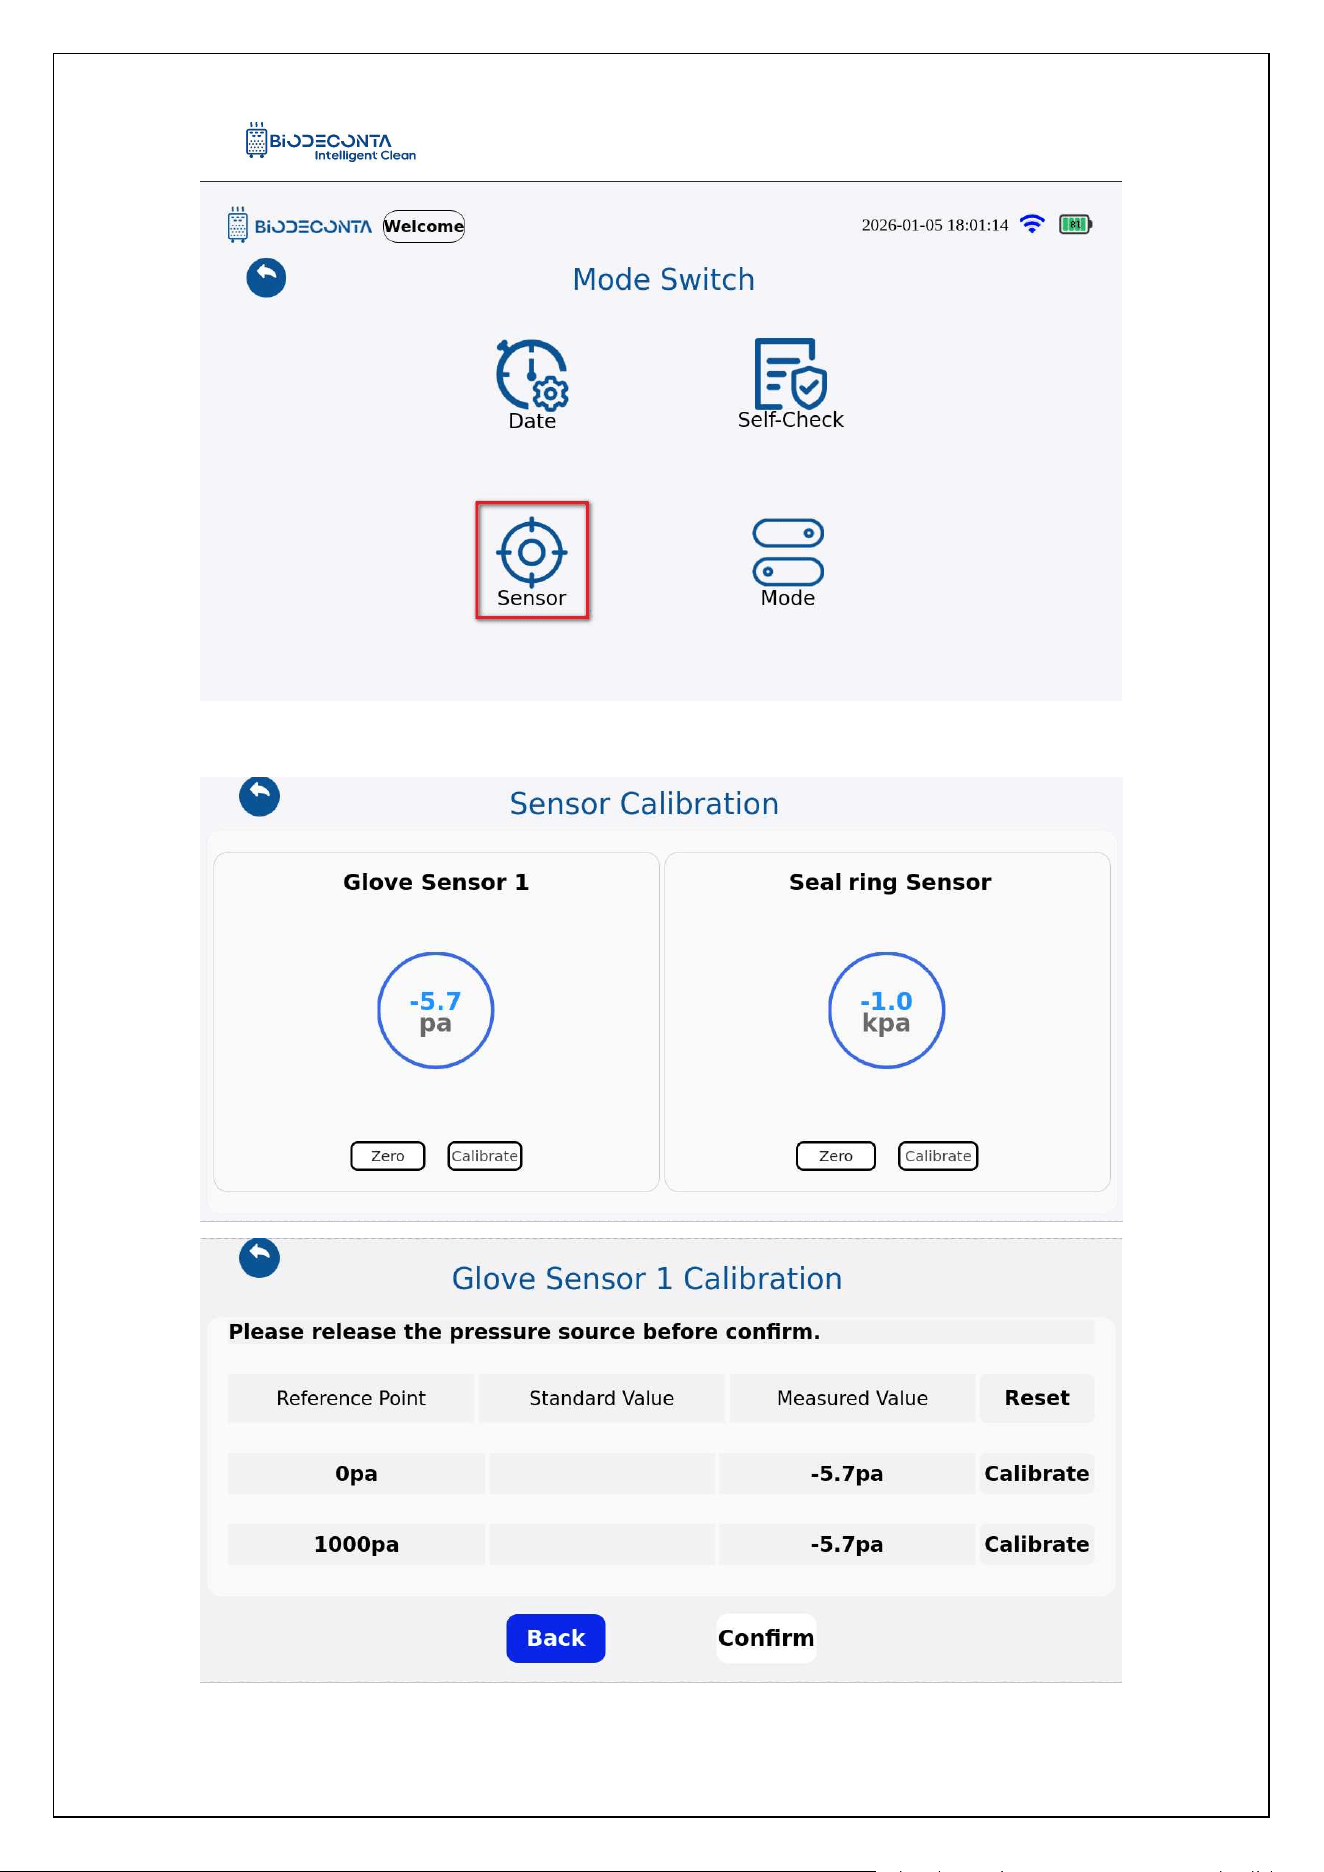
11.7 Sensor
Click on the [ ] icon on the test interface, as shown in Figures 11-1.22 and
11-1.23, the page will then jump to the page will jump to the pages of [Test Parameter],
[Historical data], [Logs], [Users], [Switch mode], [System information] pages. Click on
[Switch mode] , as shown in Figure 11-1.24, and the page will jump to the [Date],
[Language], [Self-Check], [Sensor], [Mode] pages. Click on [Sensor], as shown in
Figure 11-1.25, and the page will jump to the "Sensor Calibration" page, this module
mainly involves the Zero, Calibrate, Reset operation.
Intelligent Safe and Clean
www.biodeconta.com
96
Figure 11.1-22 "Sensor 1"
Figure 11.1-23 "Sensor 2"
Intelligent Safe and Clean
www.biodeconta.com
97
Figure 11.1-24 "Sensor 3"
Intelligent Safe and Clean
www.biodeconta.com
98
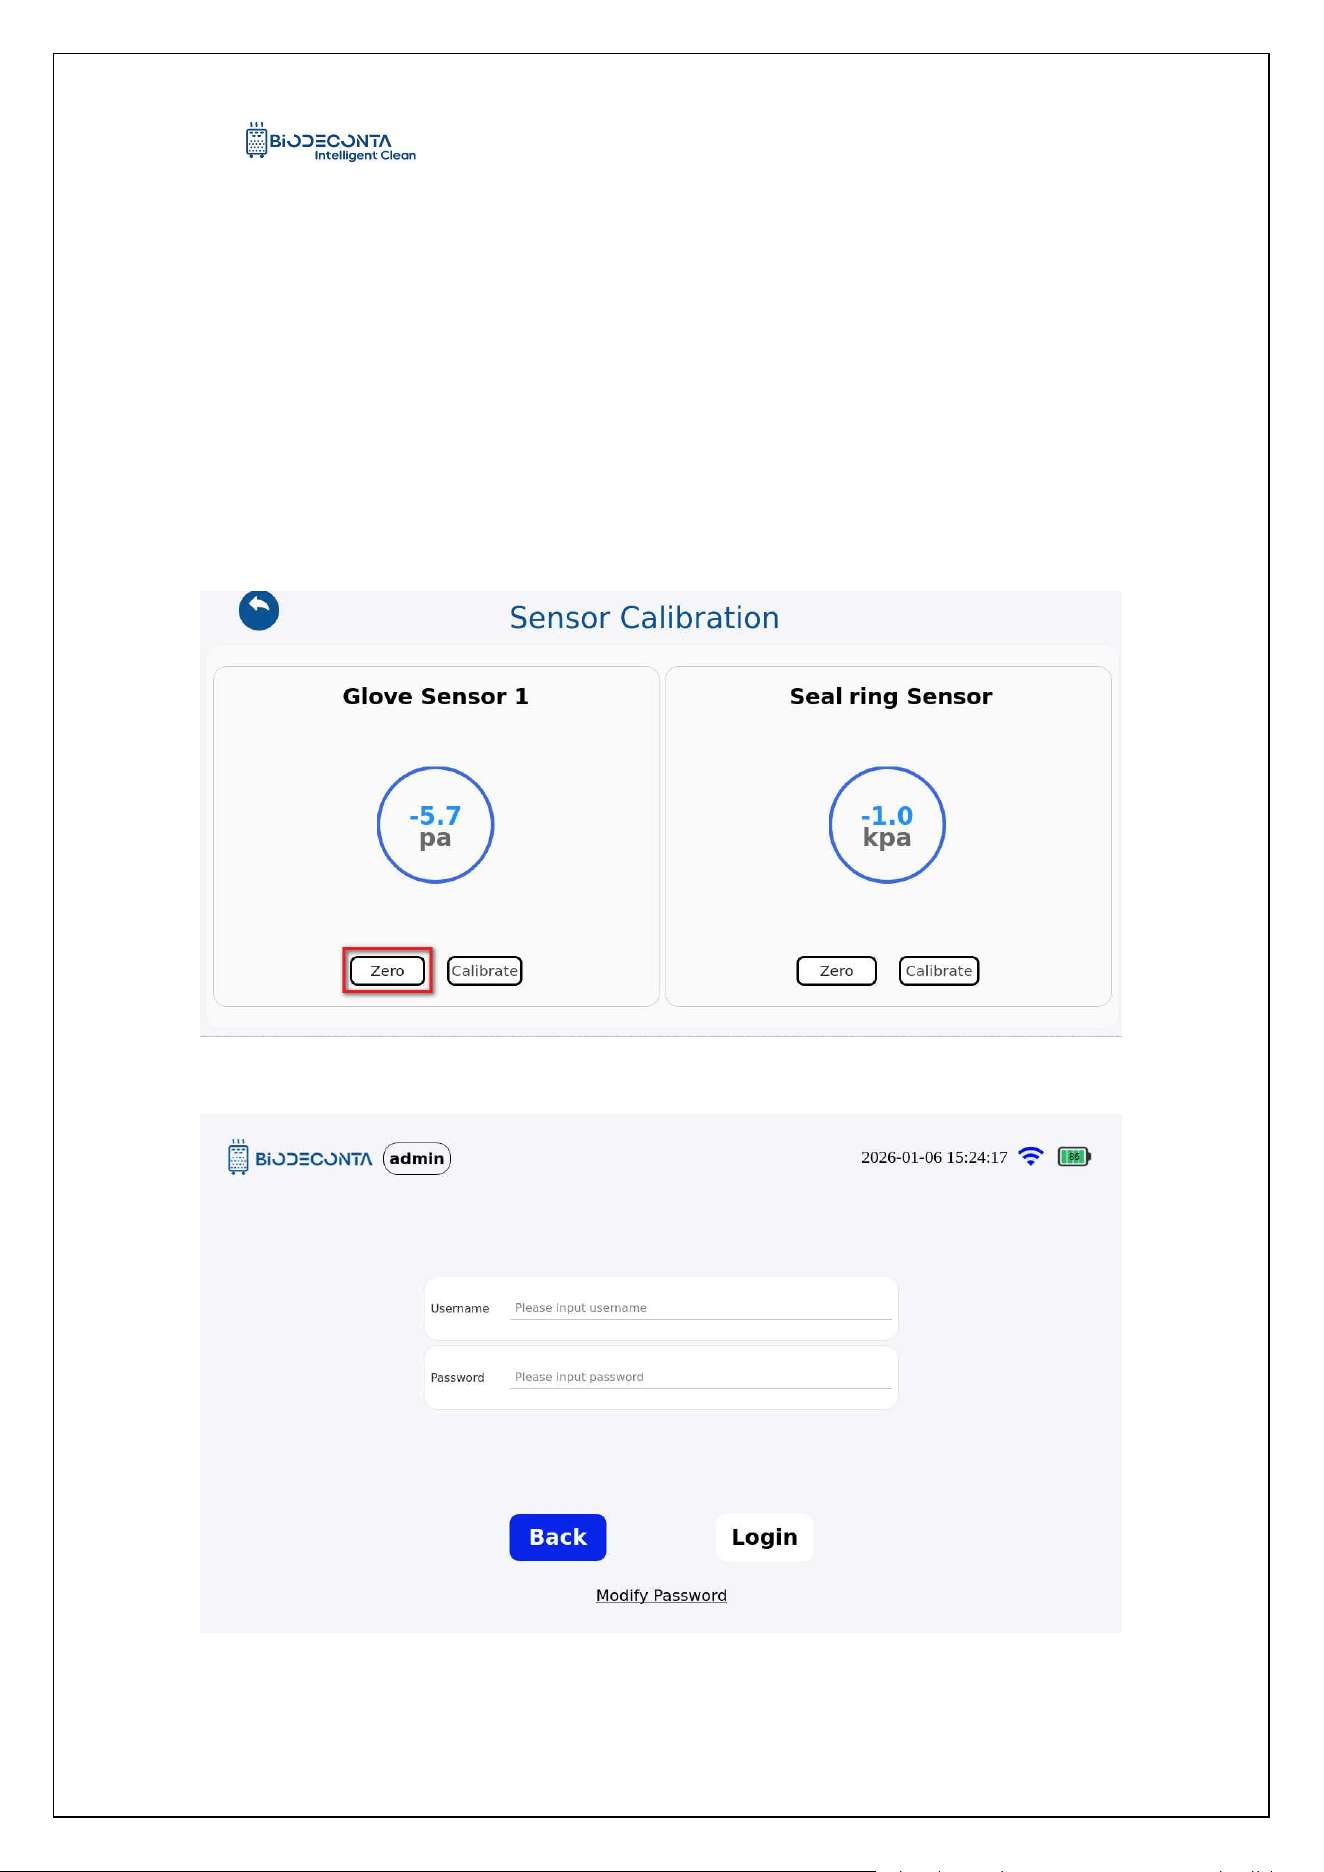
Figure 11.1-25 "Sensor 4"
11.8 Zero:
Click on [Sensor], as shown in Figure 11-1.26, and the page will jump to the
"Sensor Calibration" page, click the "Zero" button. As shown in Figure 11.1-27, and
the page will jump to the login interface, enter the account and password information,
and then click the "Login" button, to complete the zero operation(Used for calibration).
Figure 11.1-26 "Sensor 1"
Figure 11.1-27 "Sensor 2"
Intelligent Safe and Clean
www.biodeconta.com
99
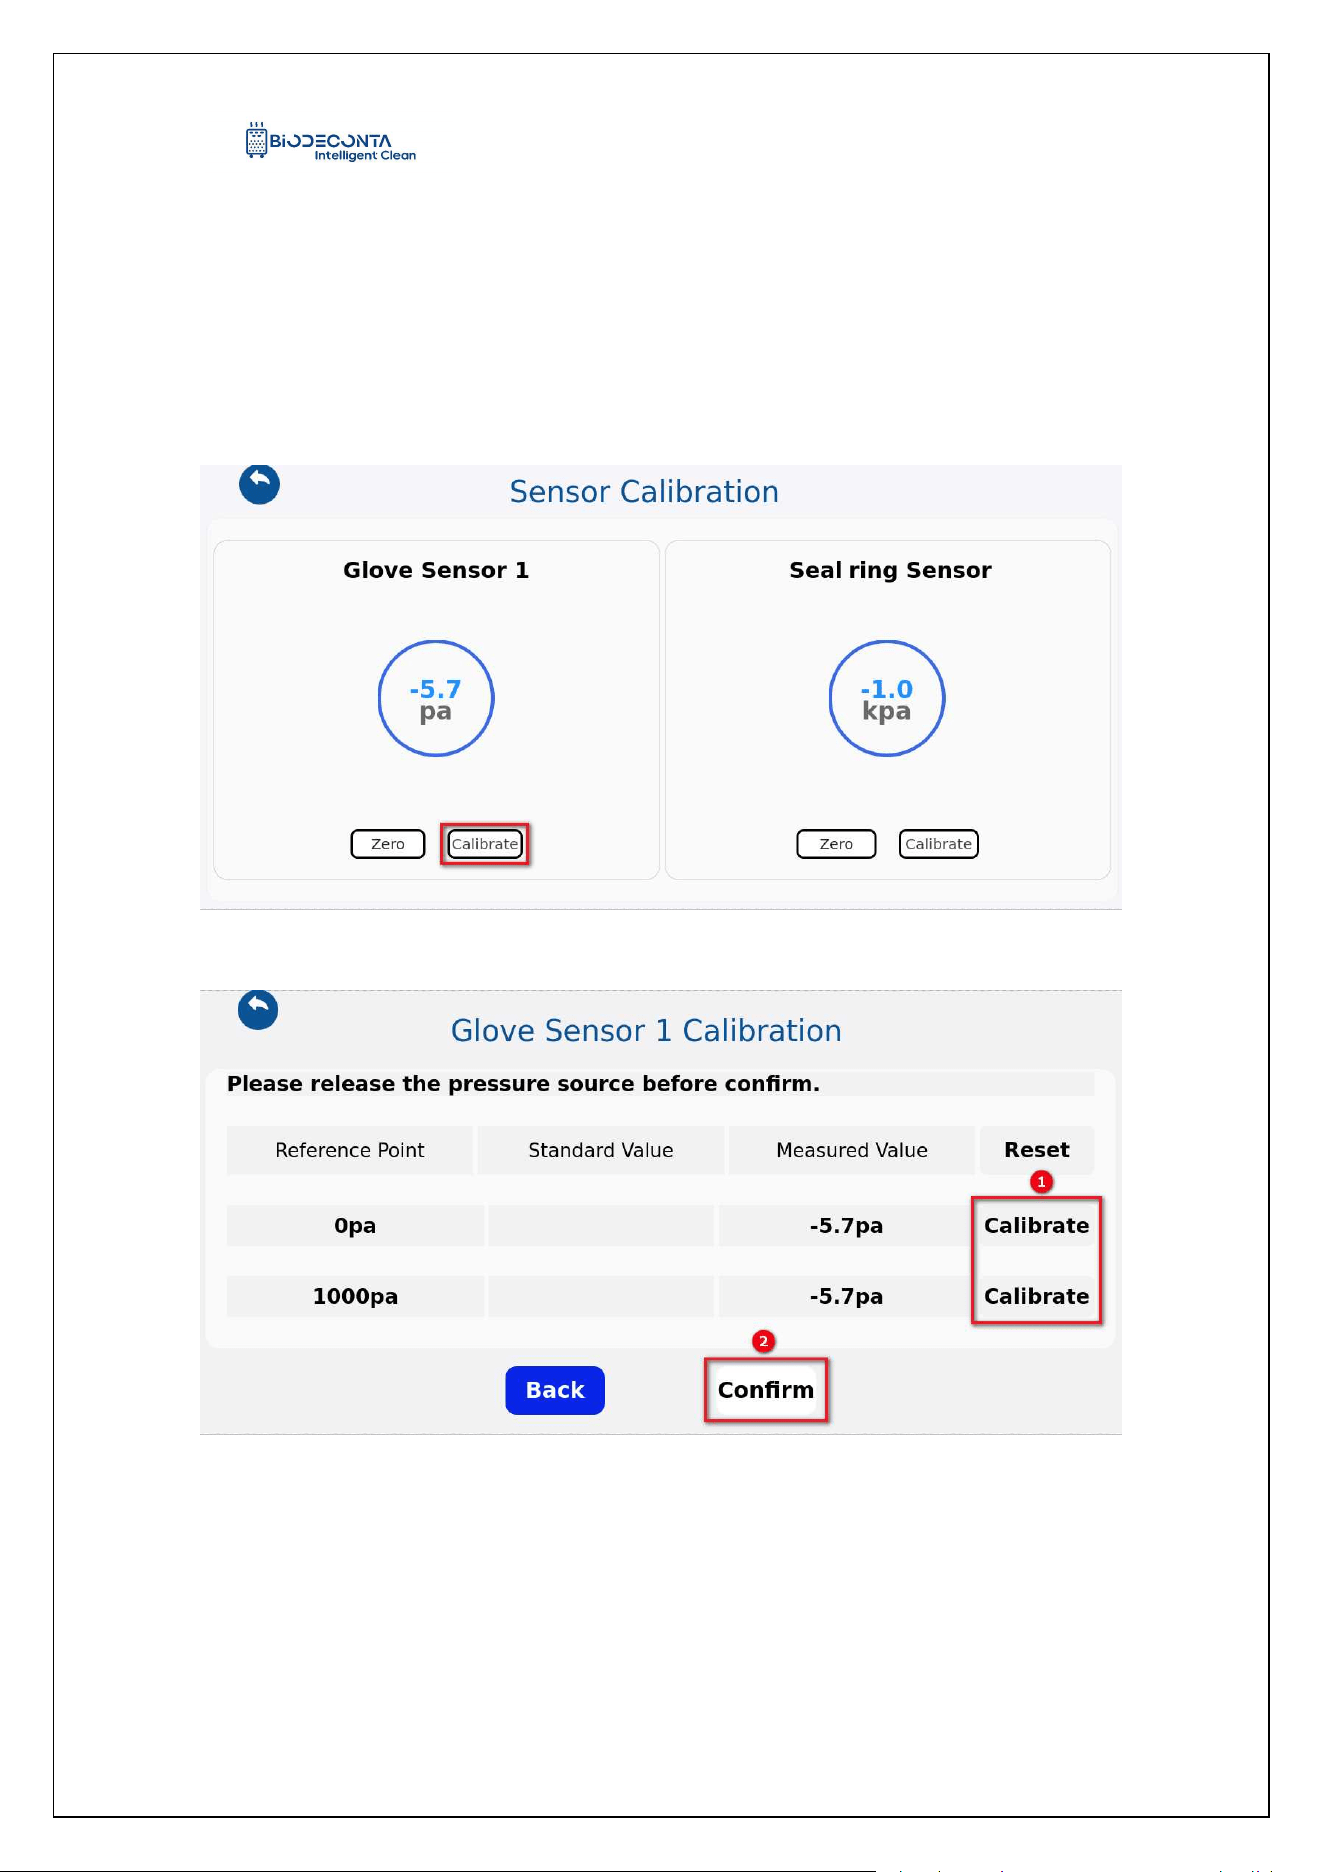
11.9 Calibrate:
Click on [Sensor], as shown in Figure 11-1.28, and the page will jump to the
"Sensor Calibration" page, click the "Calibrate" button. As shown in Figure 11.1-29,
the page jumps to the "Glove Sensor 1 Calibration" page, click the "Calibrate" button,
and then click the "Confirm" button, to complete the calibration operation.
Figure 11.1-28 "Calibrate 1"
Figure 11.1-29 "Calibrate 2"
Intelligent Safe and Clean
www.biodeconta.com
100
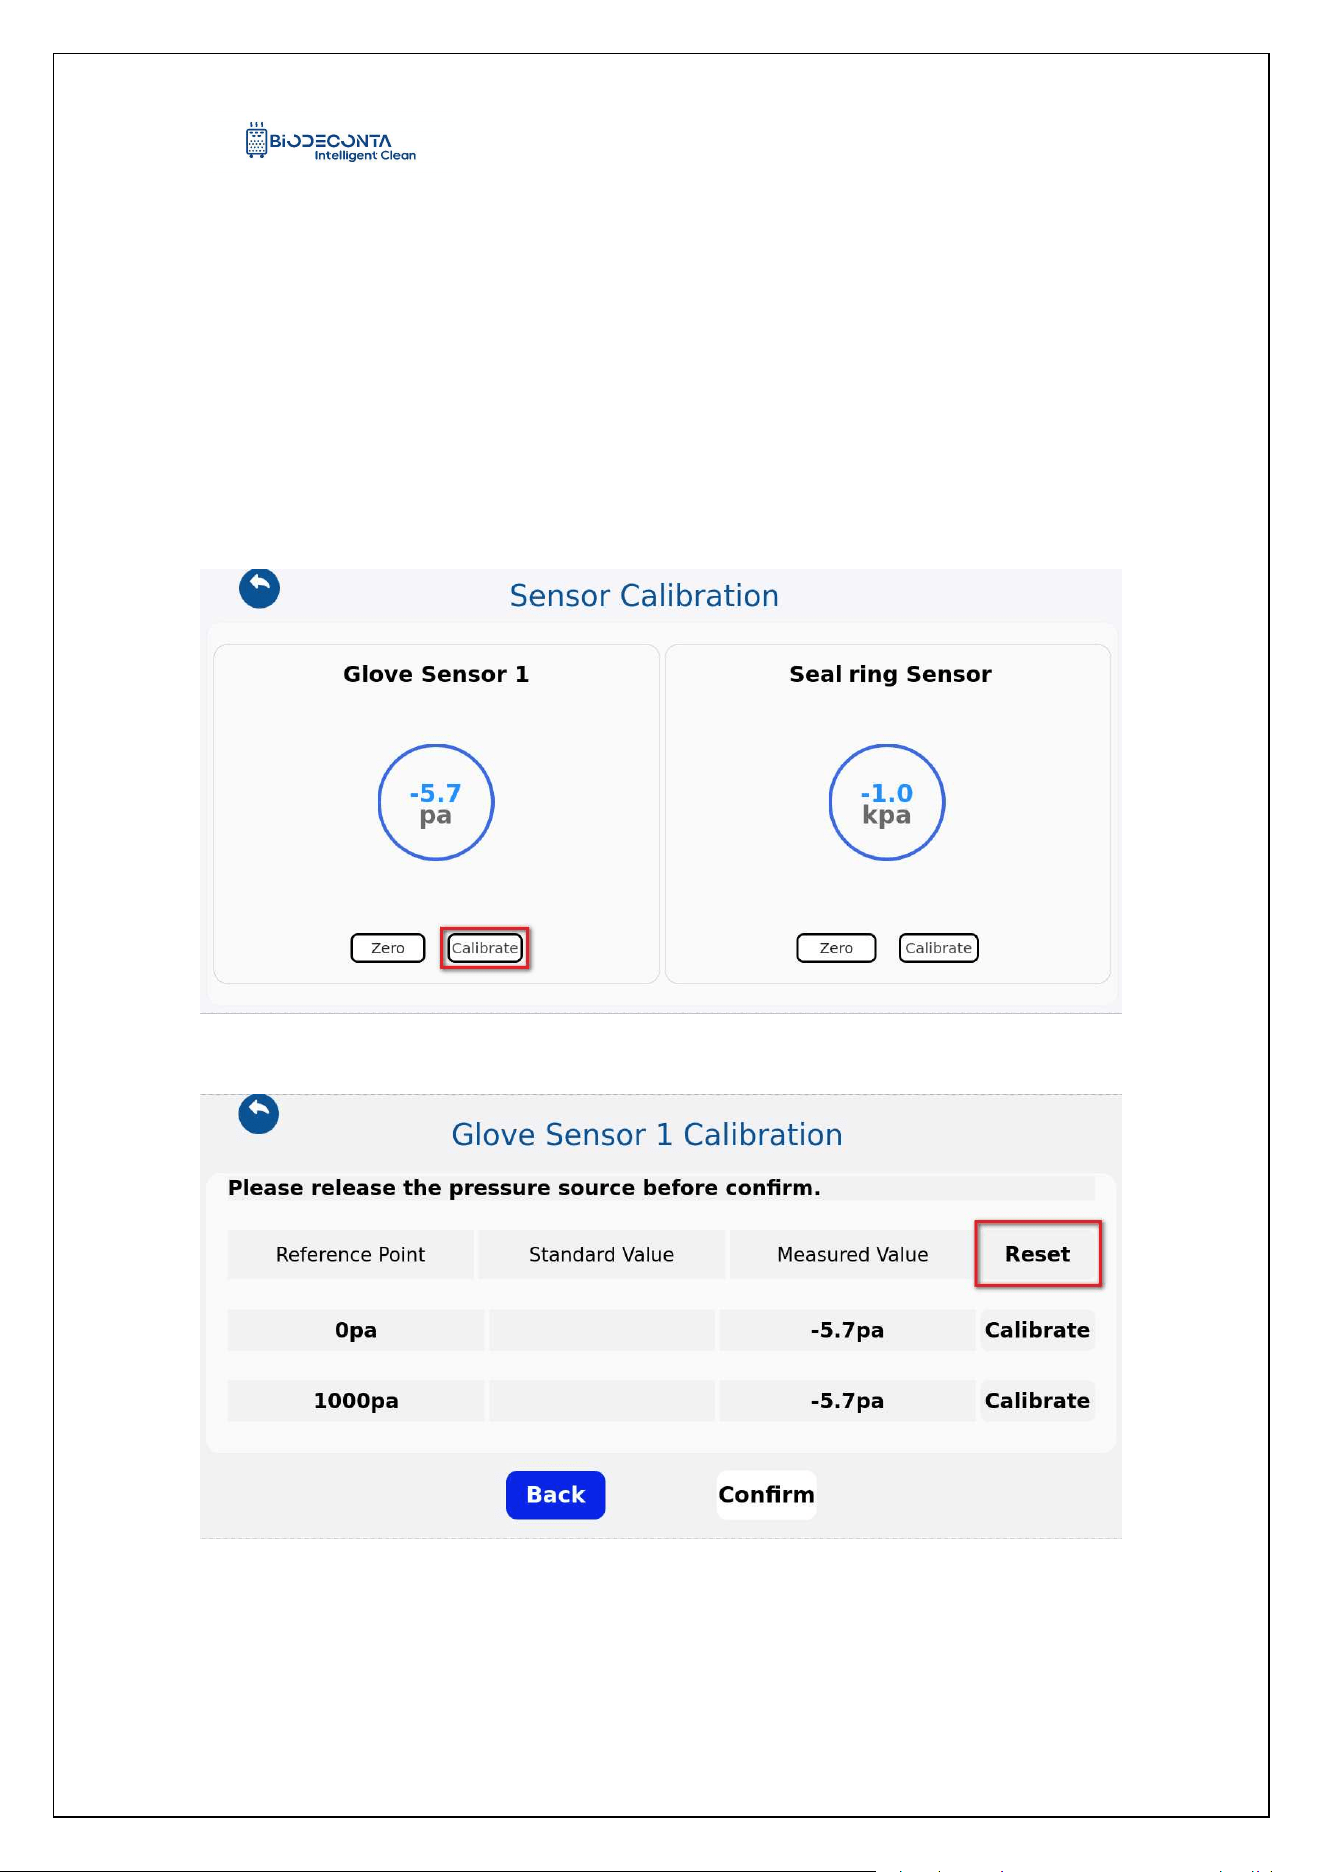
11.10 Reset:
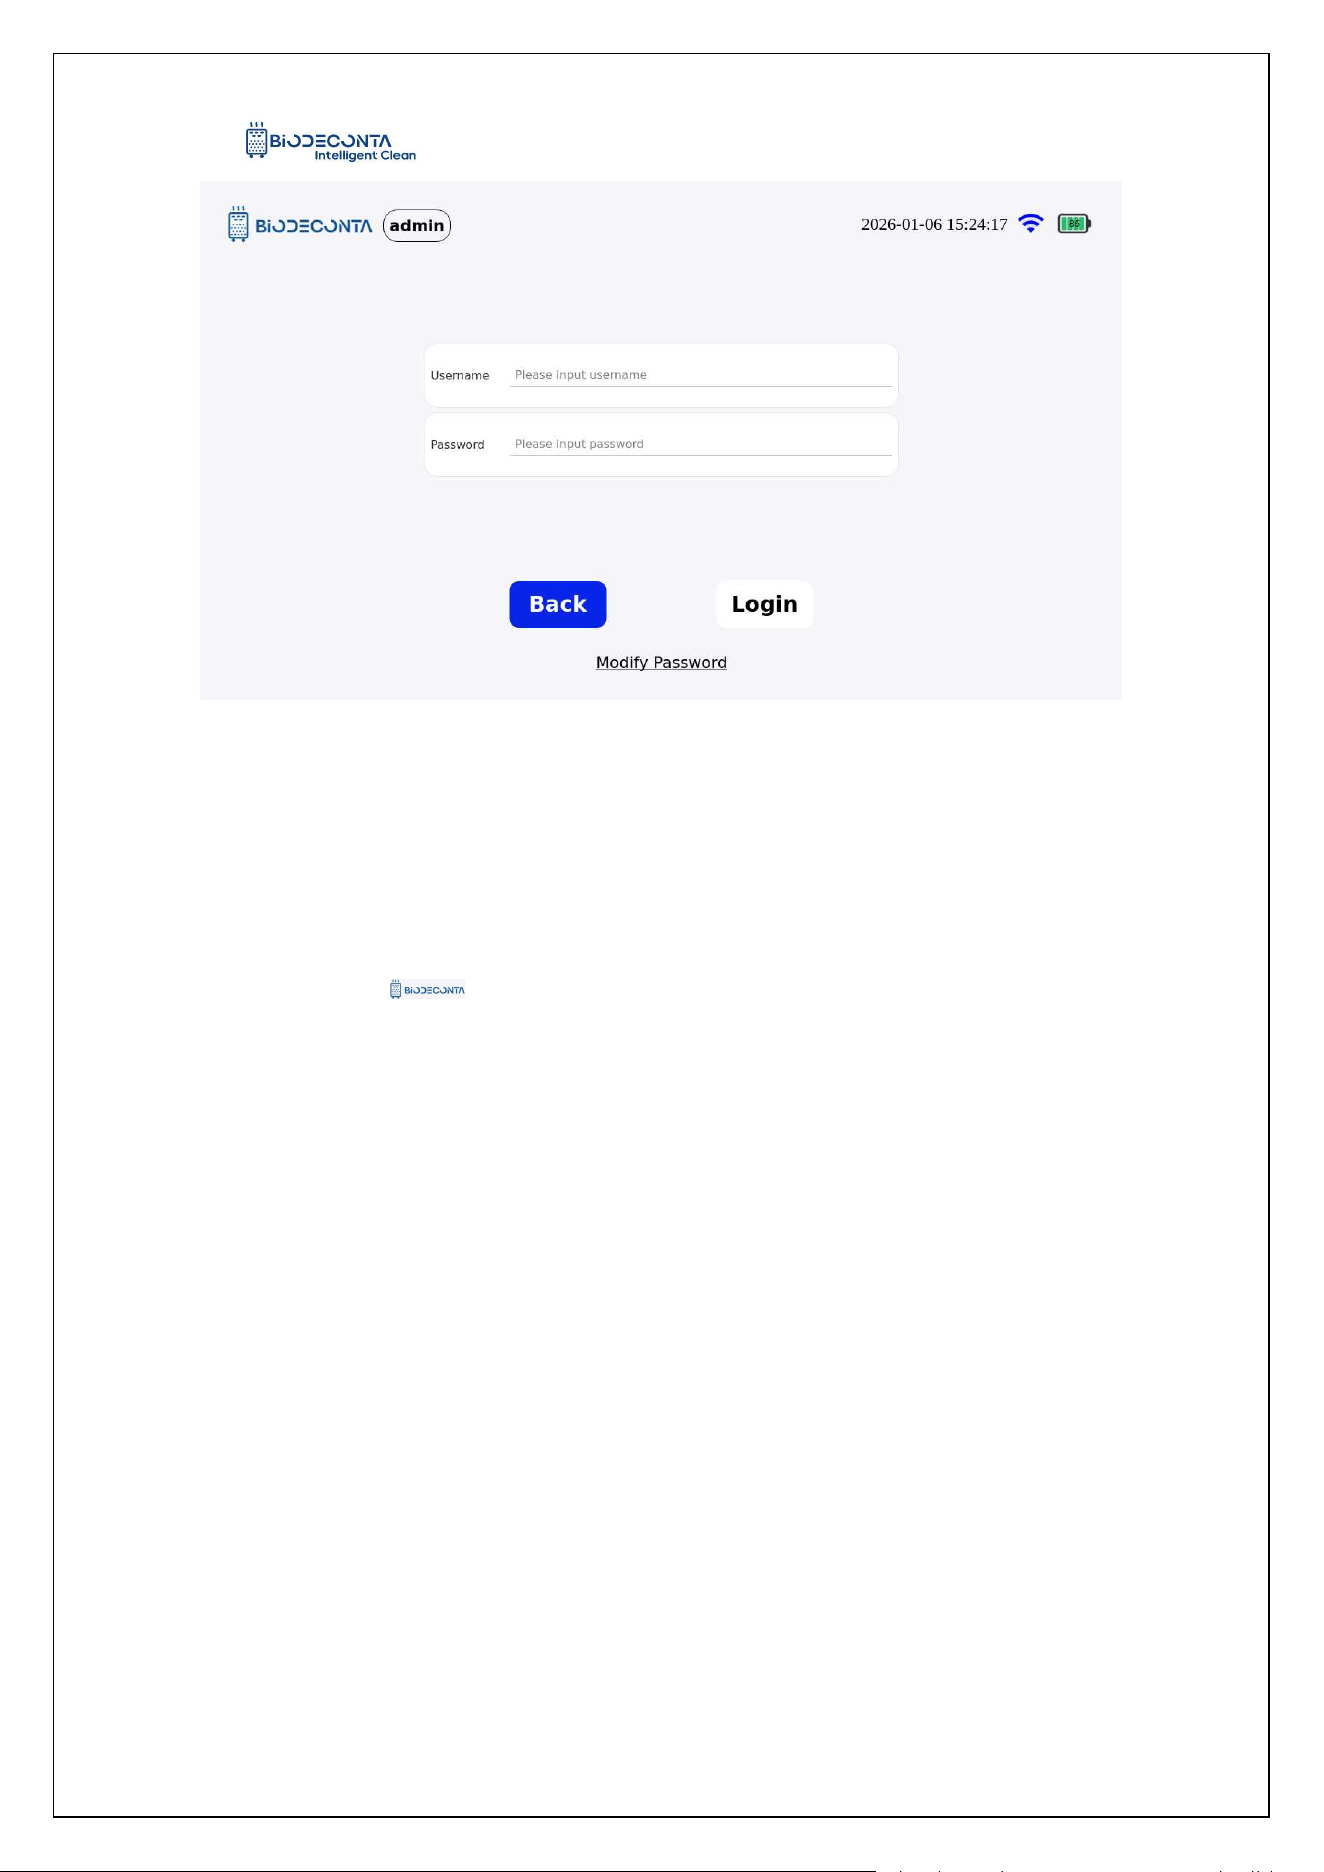
Click on [Sensor], as shown in Figure 11-1.30, and the page will jump to the
"Sensor Calibration" page, click the "Calibrate" button. As shown in Figure 11.1-31,
the page jumps to the "Glove Sensor 1 Calibration" page, click the "Reset" button. As
shown in Figure 11.1-32, and the page will jump to the login interface, enter the
account and password information, and then click the "Login" button, to complete the
reset operation.
Figure 11.1-30 "Reset 1"
Figure 11.1-31 "Reset 2"
Intelligent Safe and Clean
www.biodeconta.com
101
Figure 11.1-32 "Reset 3"
11.11 Mode
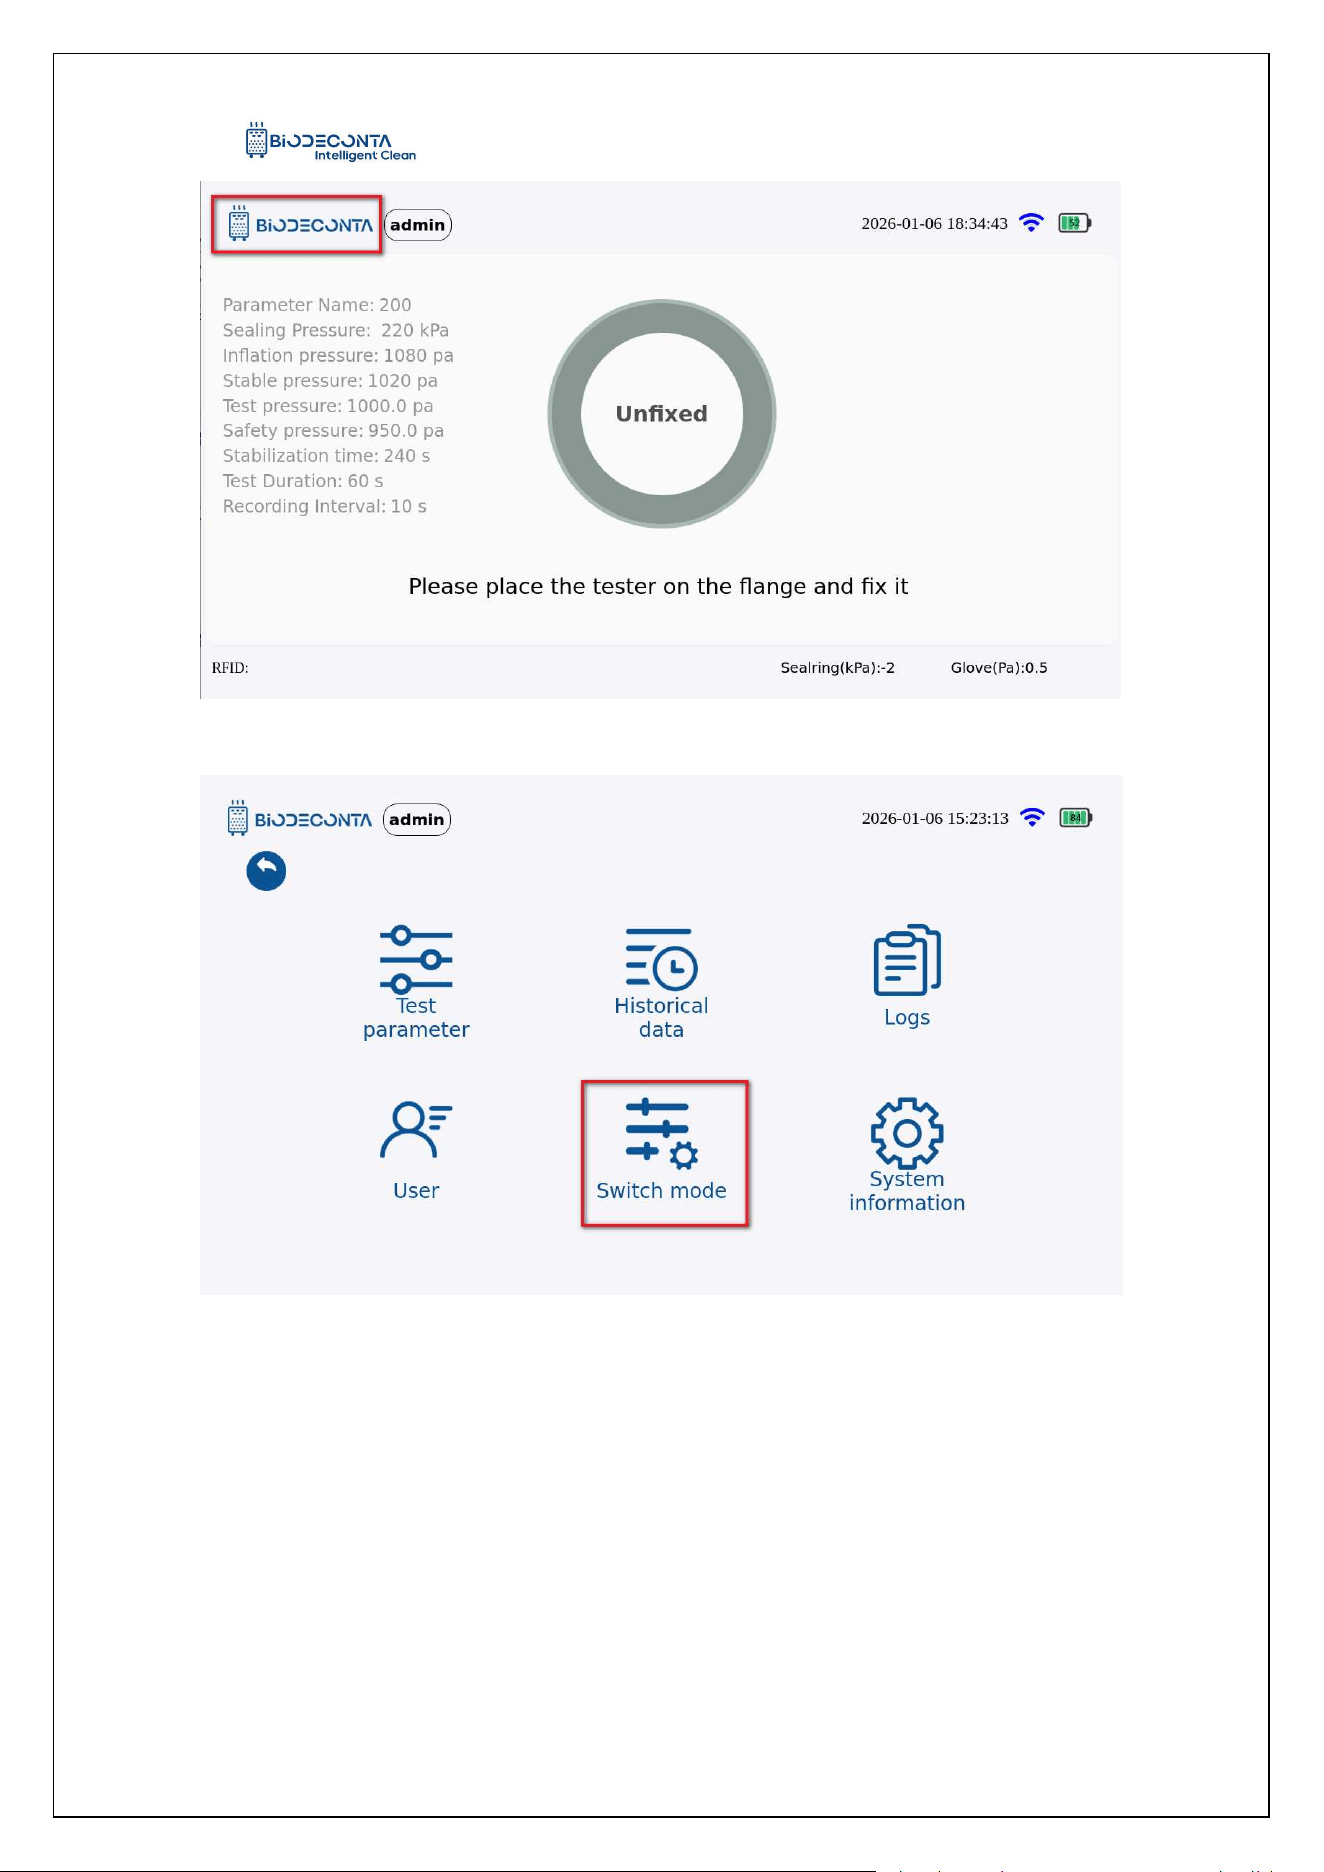
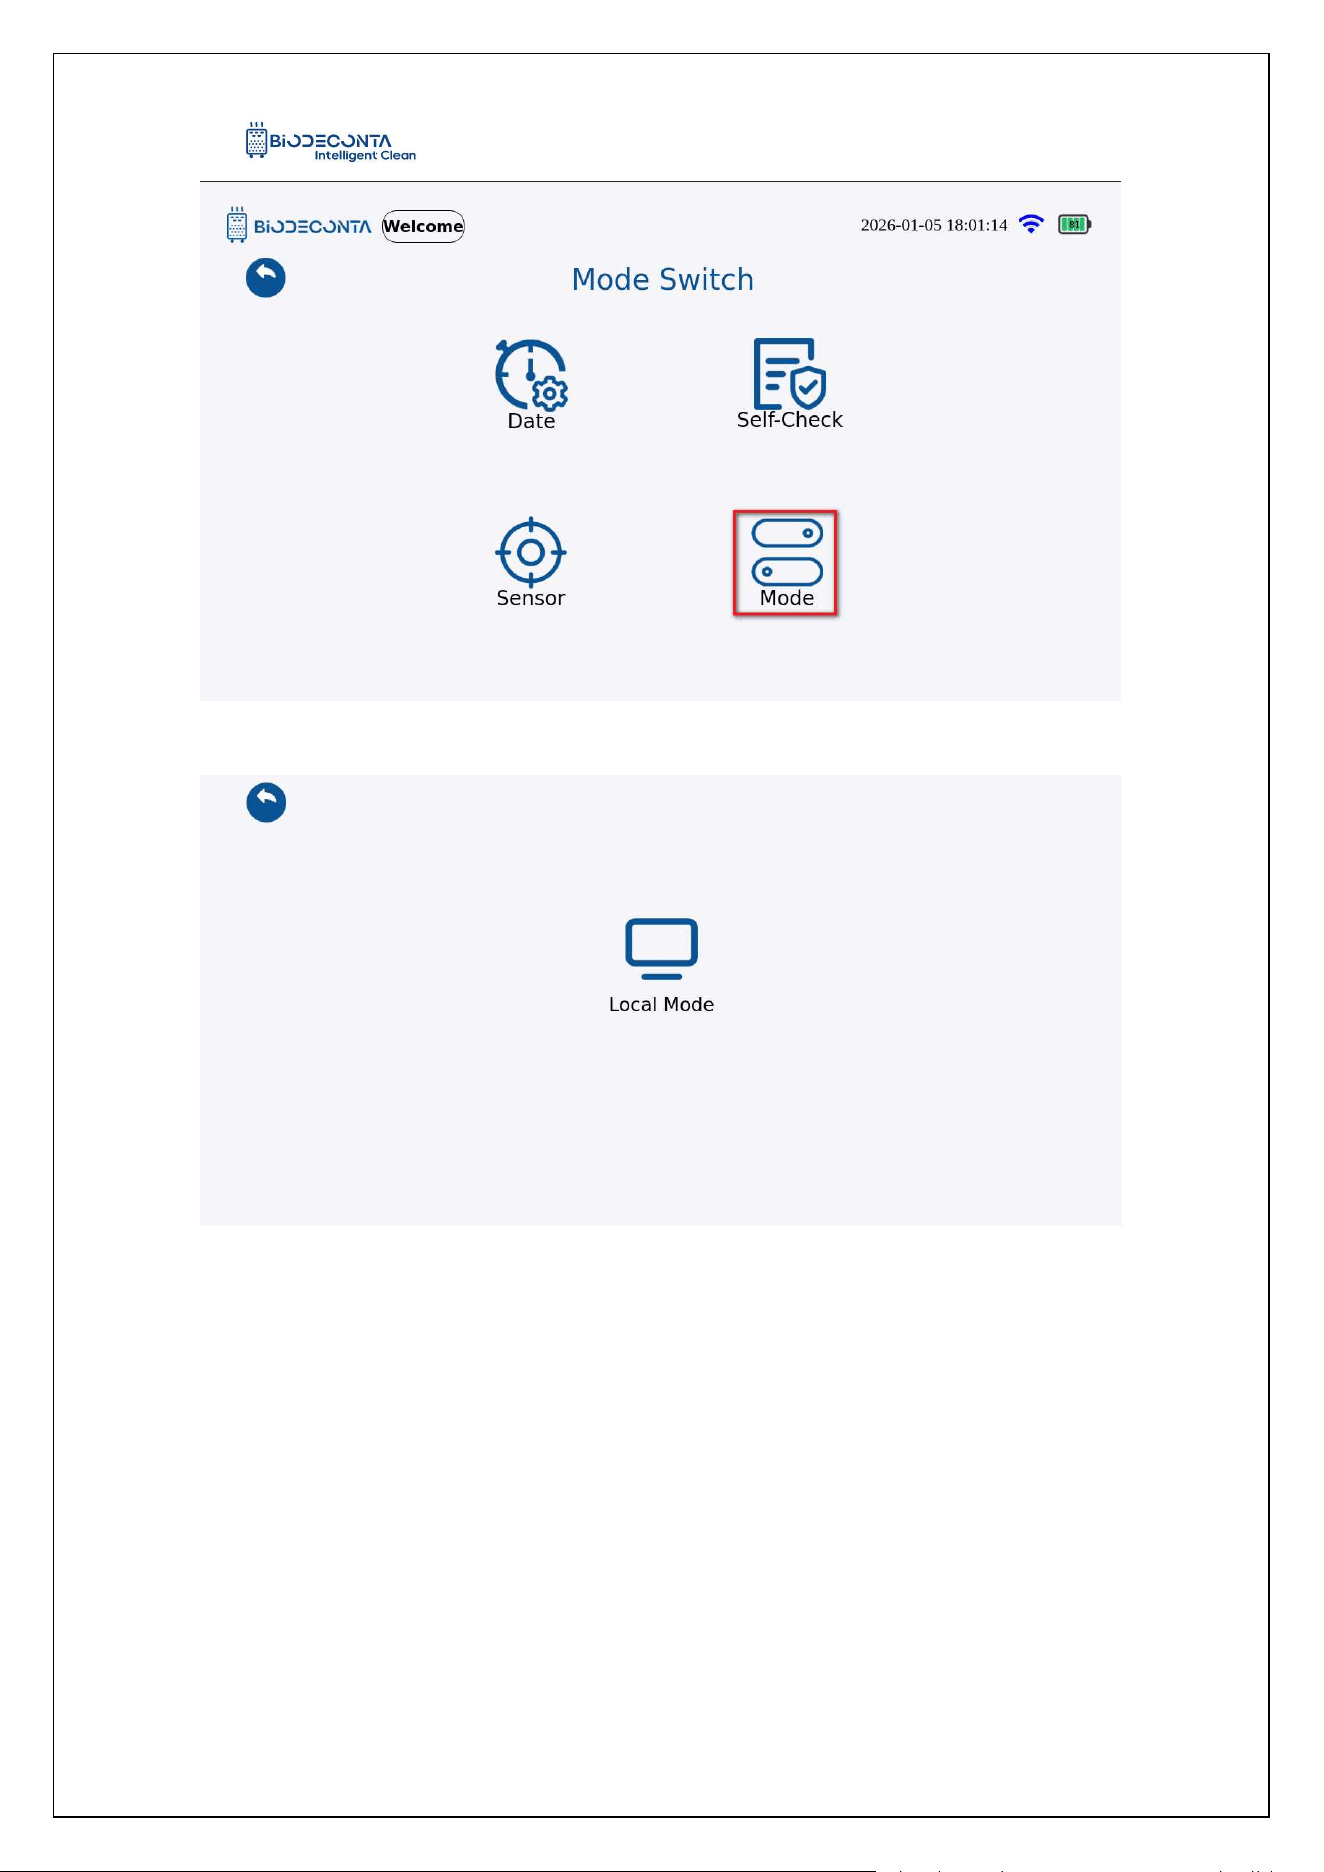
Click on the [ ] icon on the test interface, as shown in Figures 11-1.33 and
11-1.34, the page will then jump to the page will jump to the pages of [Test Parameter],
[Historical data], [Logs], [Users], [Switch mode], [System information] pages. Click on
[Switch mode] , as shown in Figure 11-1.35, and the page will jump to the [Date],
[Language ], [Self-Check], [Sensor], [Mode] pages. Click on [Mode], as shown in
Figure 11-1.36, and the page will jump to the [Local Mode] page, this sub-module
mainly involves the Mode operation.
Intelligent Safe and Clean
www.biodeconta.com
102
Figure 11.1-33 "Mode 1"
Figure 11.1-34 "Mode 2"
Intelligent Safe and Clean
www.biodeconta.com
103
Figure 11.1-35 "Mode 3"
Figure 11.1-36 "Mode 4"
11.12 Remote Mode:
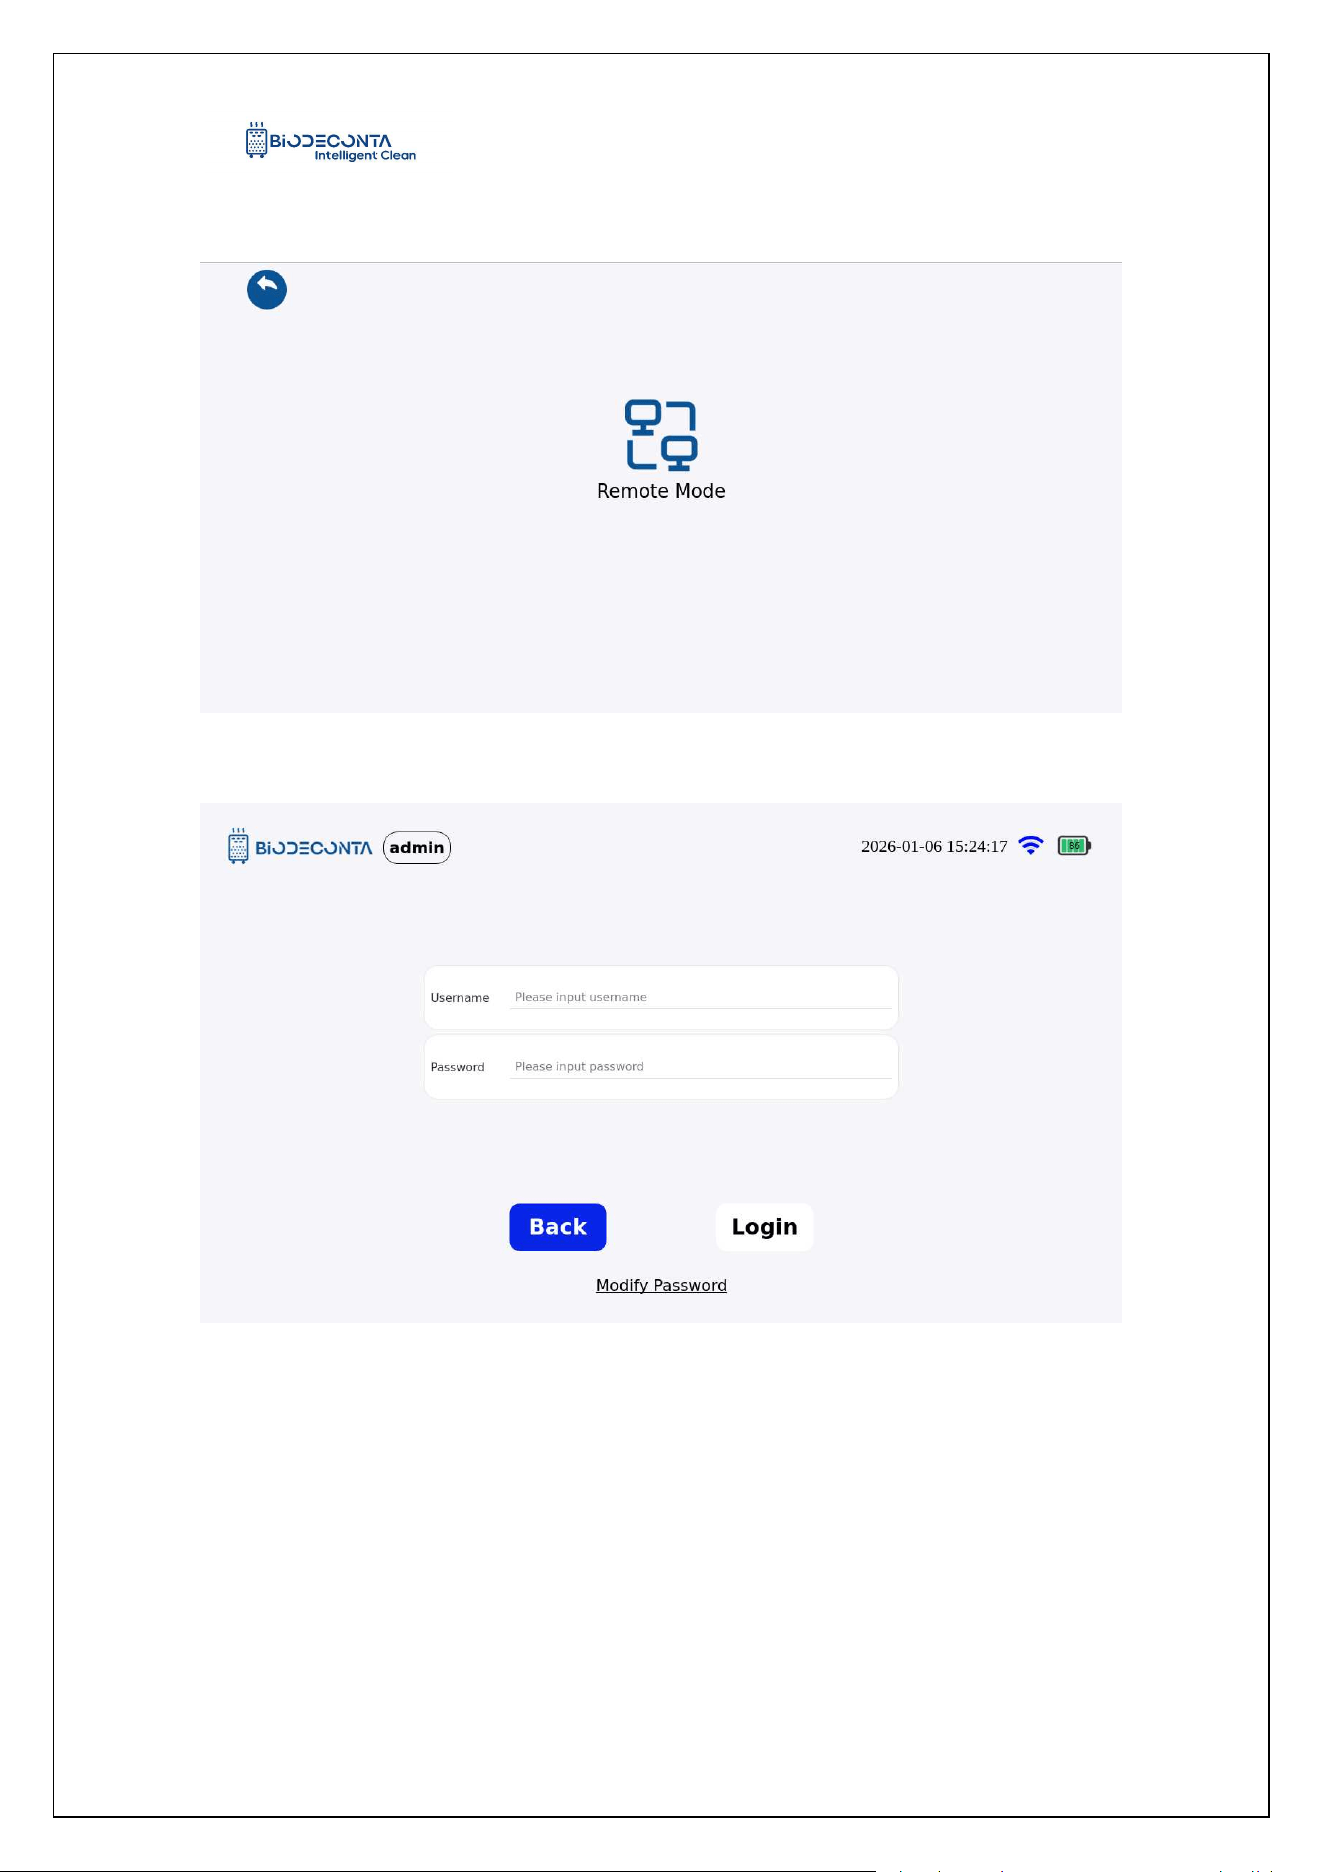
In the local mode, click on [Mode] as shown in Figure 11-1.37, the page will then
jump to [Remote Mode]. Click on "Local Mode", as shown in Figure 11-1.38, and the
page will jump to the login interface, fill in the account and password data, and click
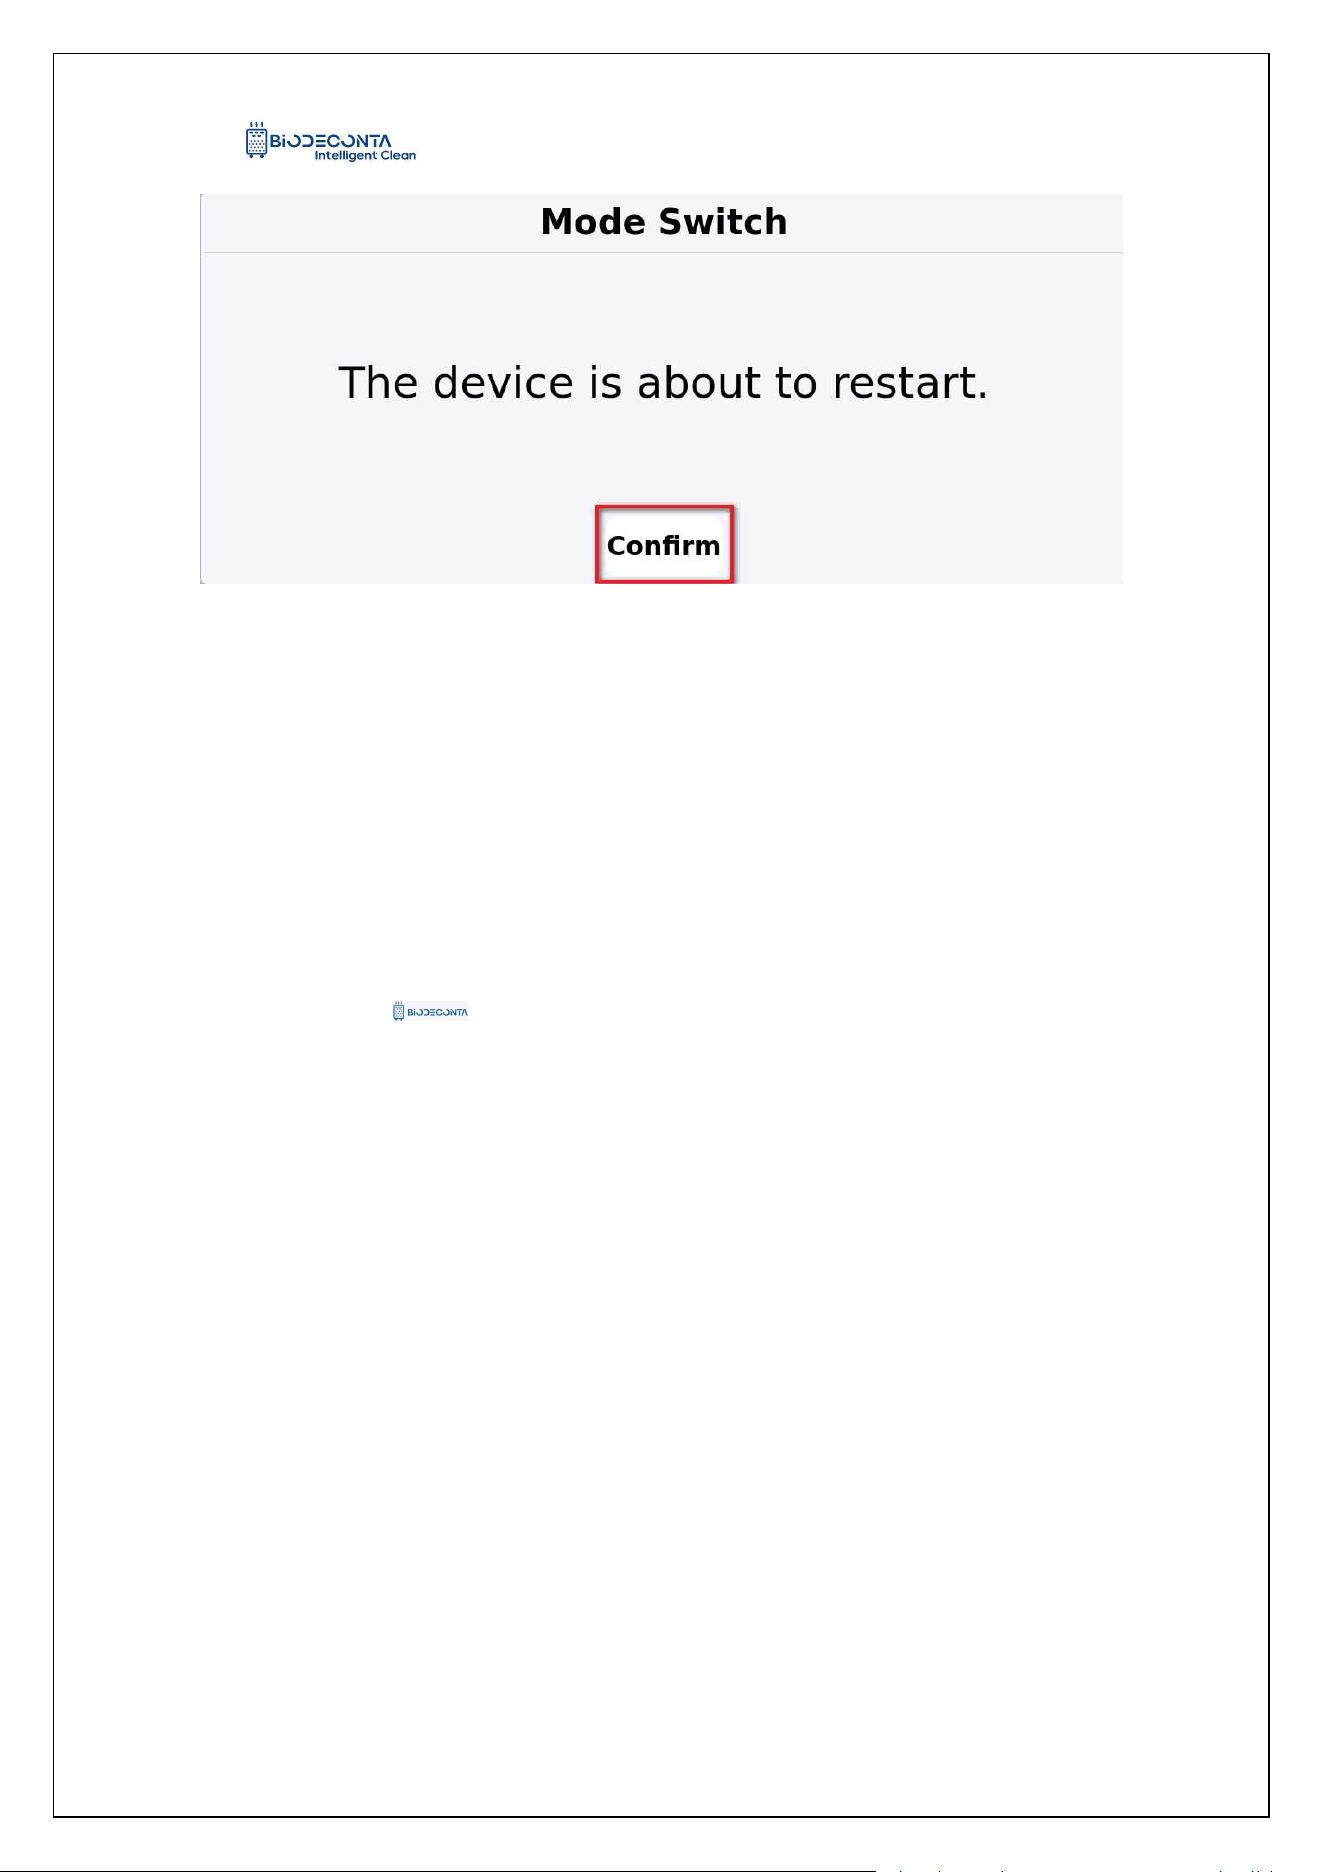
the "Login" button. As shown in Figure 11-1.39, a message "The device is about to
restart" will pop up. Click the "Confirm" button, after the device restarts, you can
Intelligent Safe and Clean
www.biodeconta.com
104
switch to the remote mode interface.
Figure 11.1-37 "Mode 1"
Figure 11.1-38 "Mode 2"
Intelligent Safe and Clean
www.biodeconta.com
105
Figure 11.1-39 "Mode 3"
Chapter 12 System information
12. System information
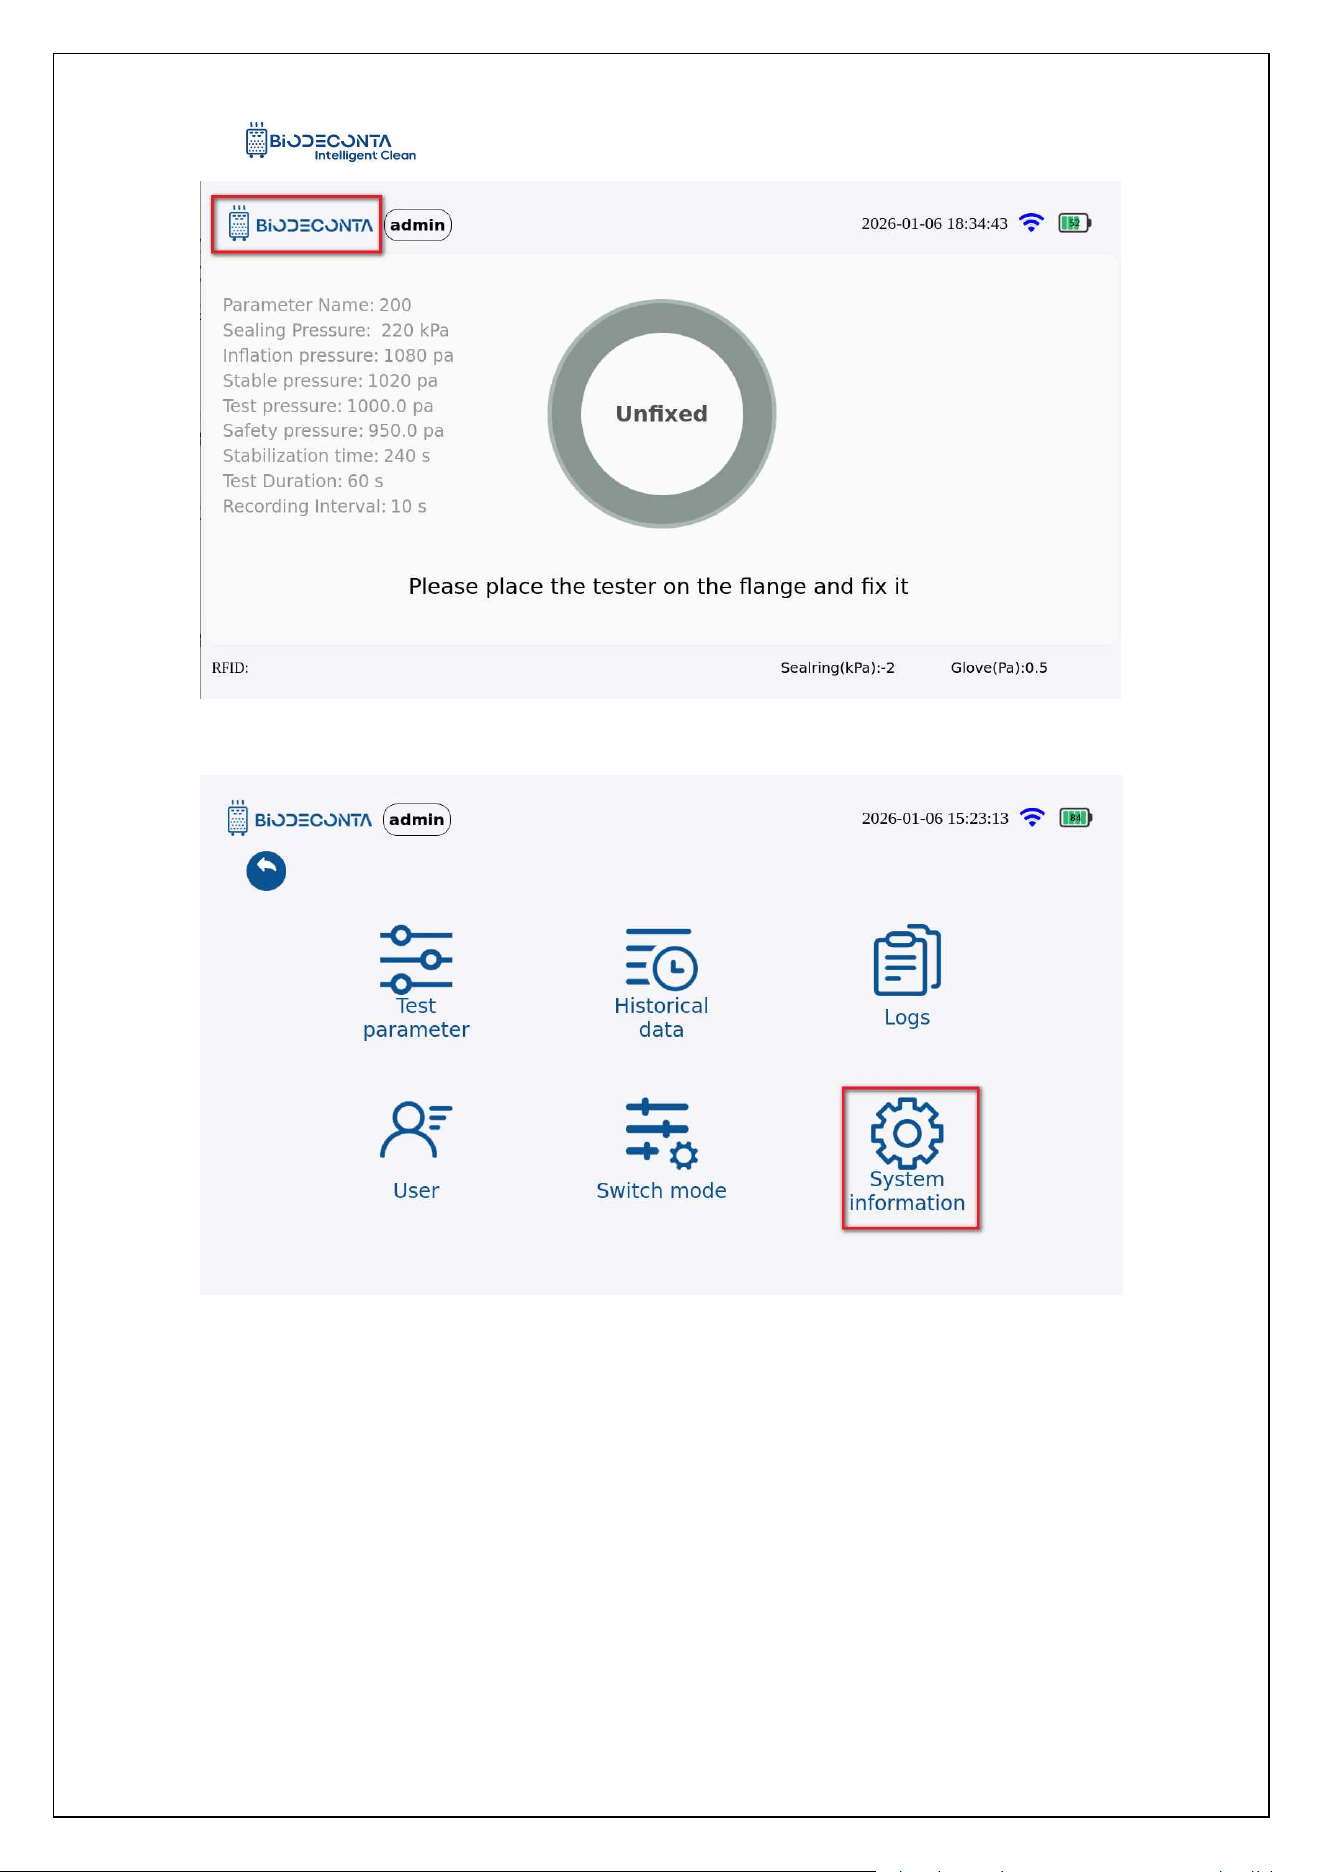
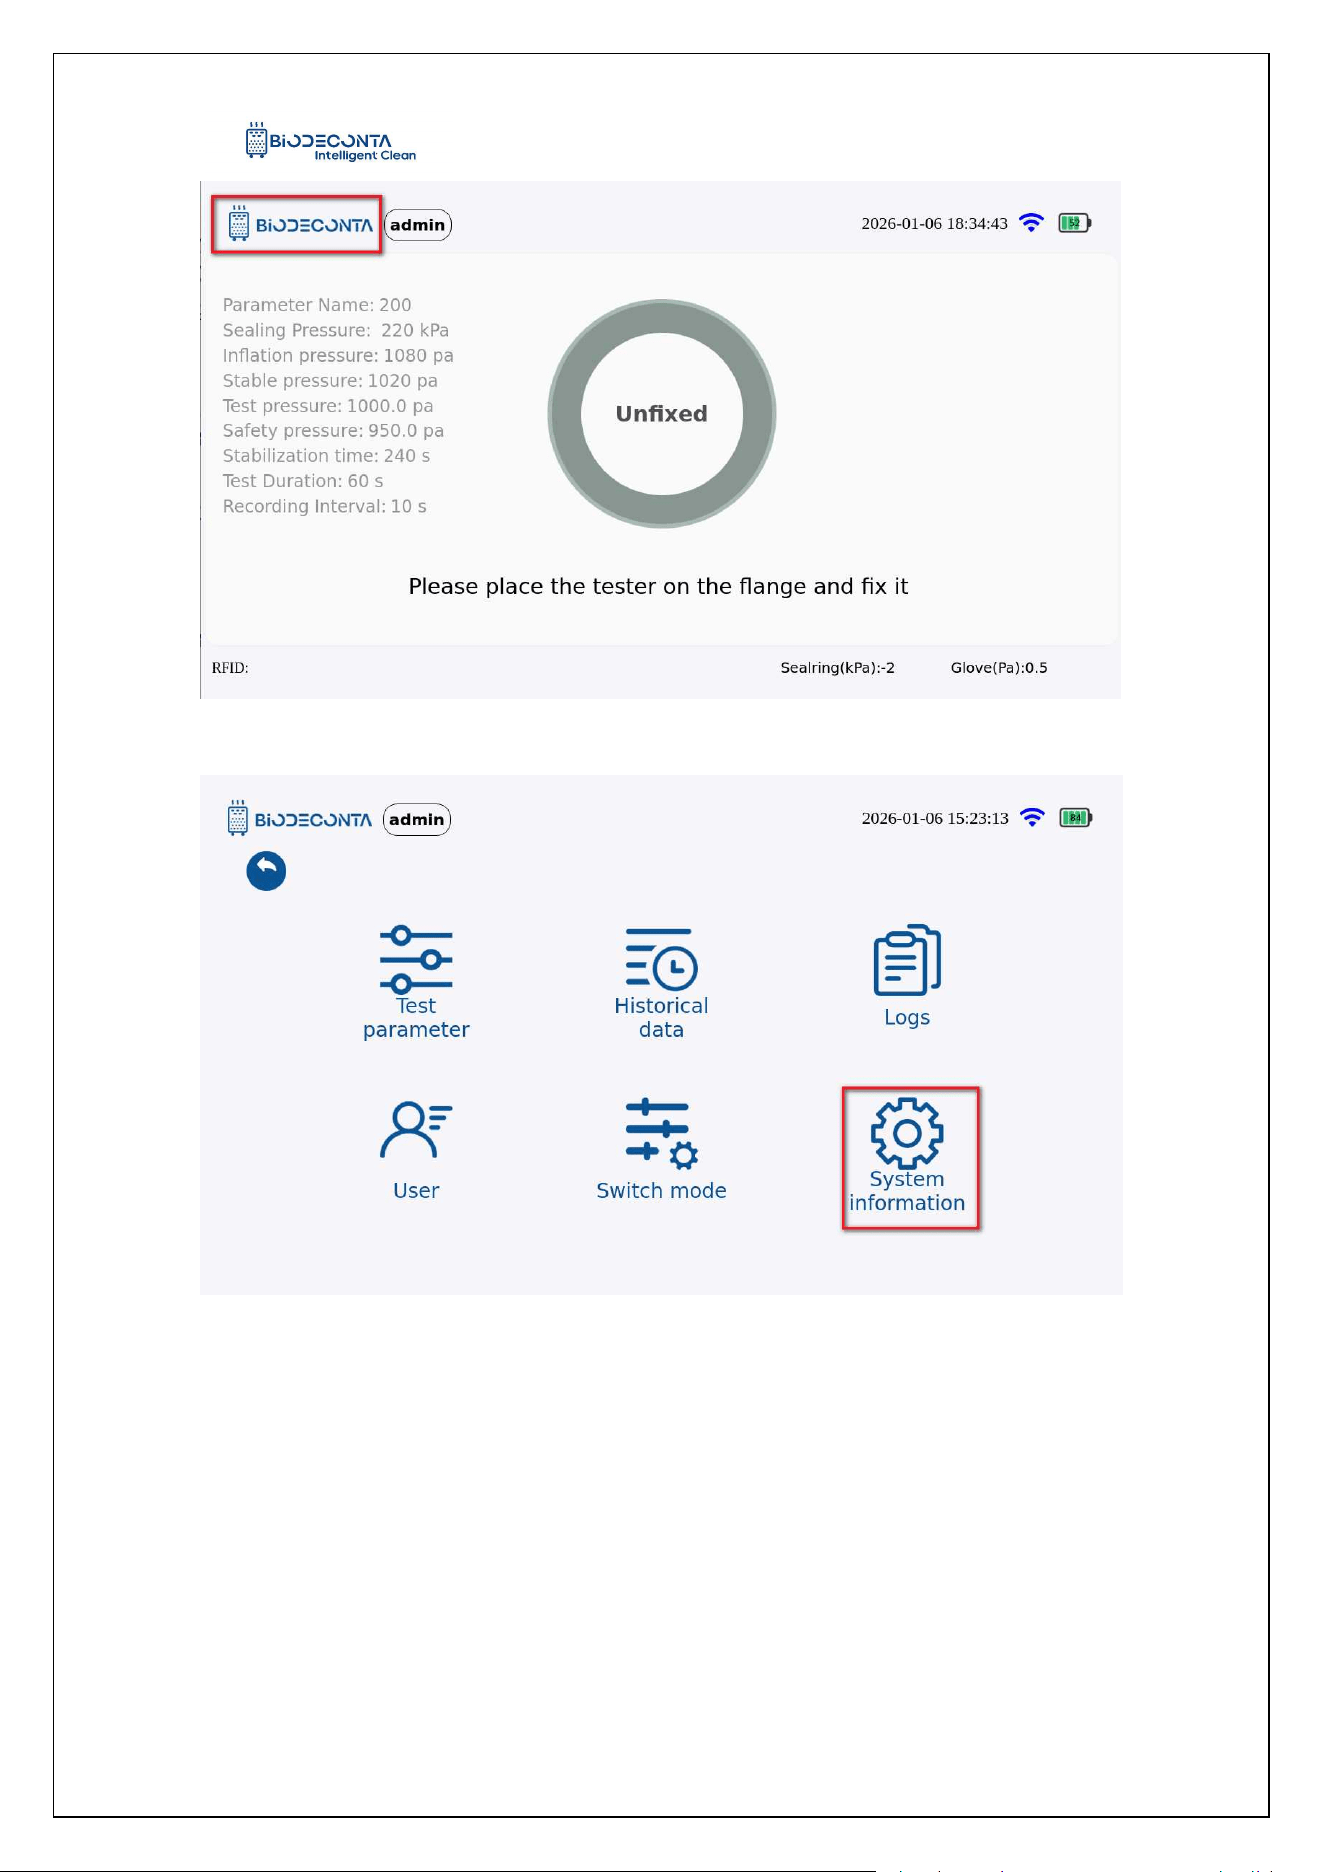
Click on the [ ] icon on the test interface, as shown in Figures 12-1.1 and
12-1.2, the page will then jump to the page will jump to the pages of [Test Parameter],
[Historical data], [Logs], [Users], [Switch mode], [System information] pages. Click
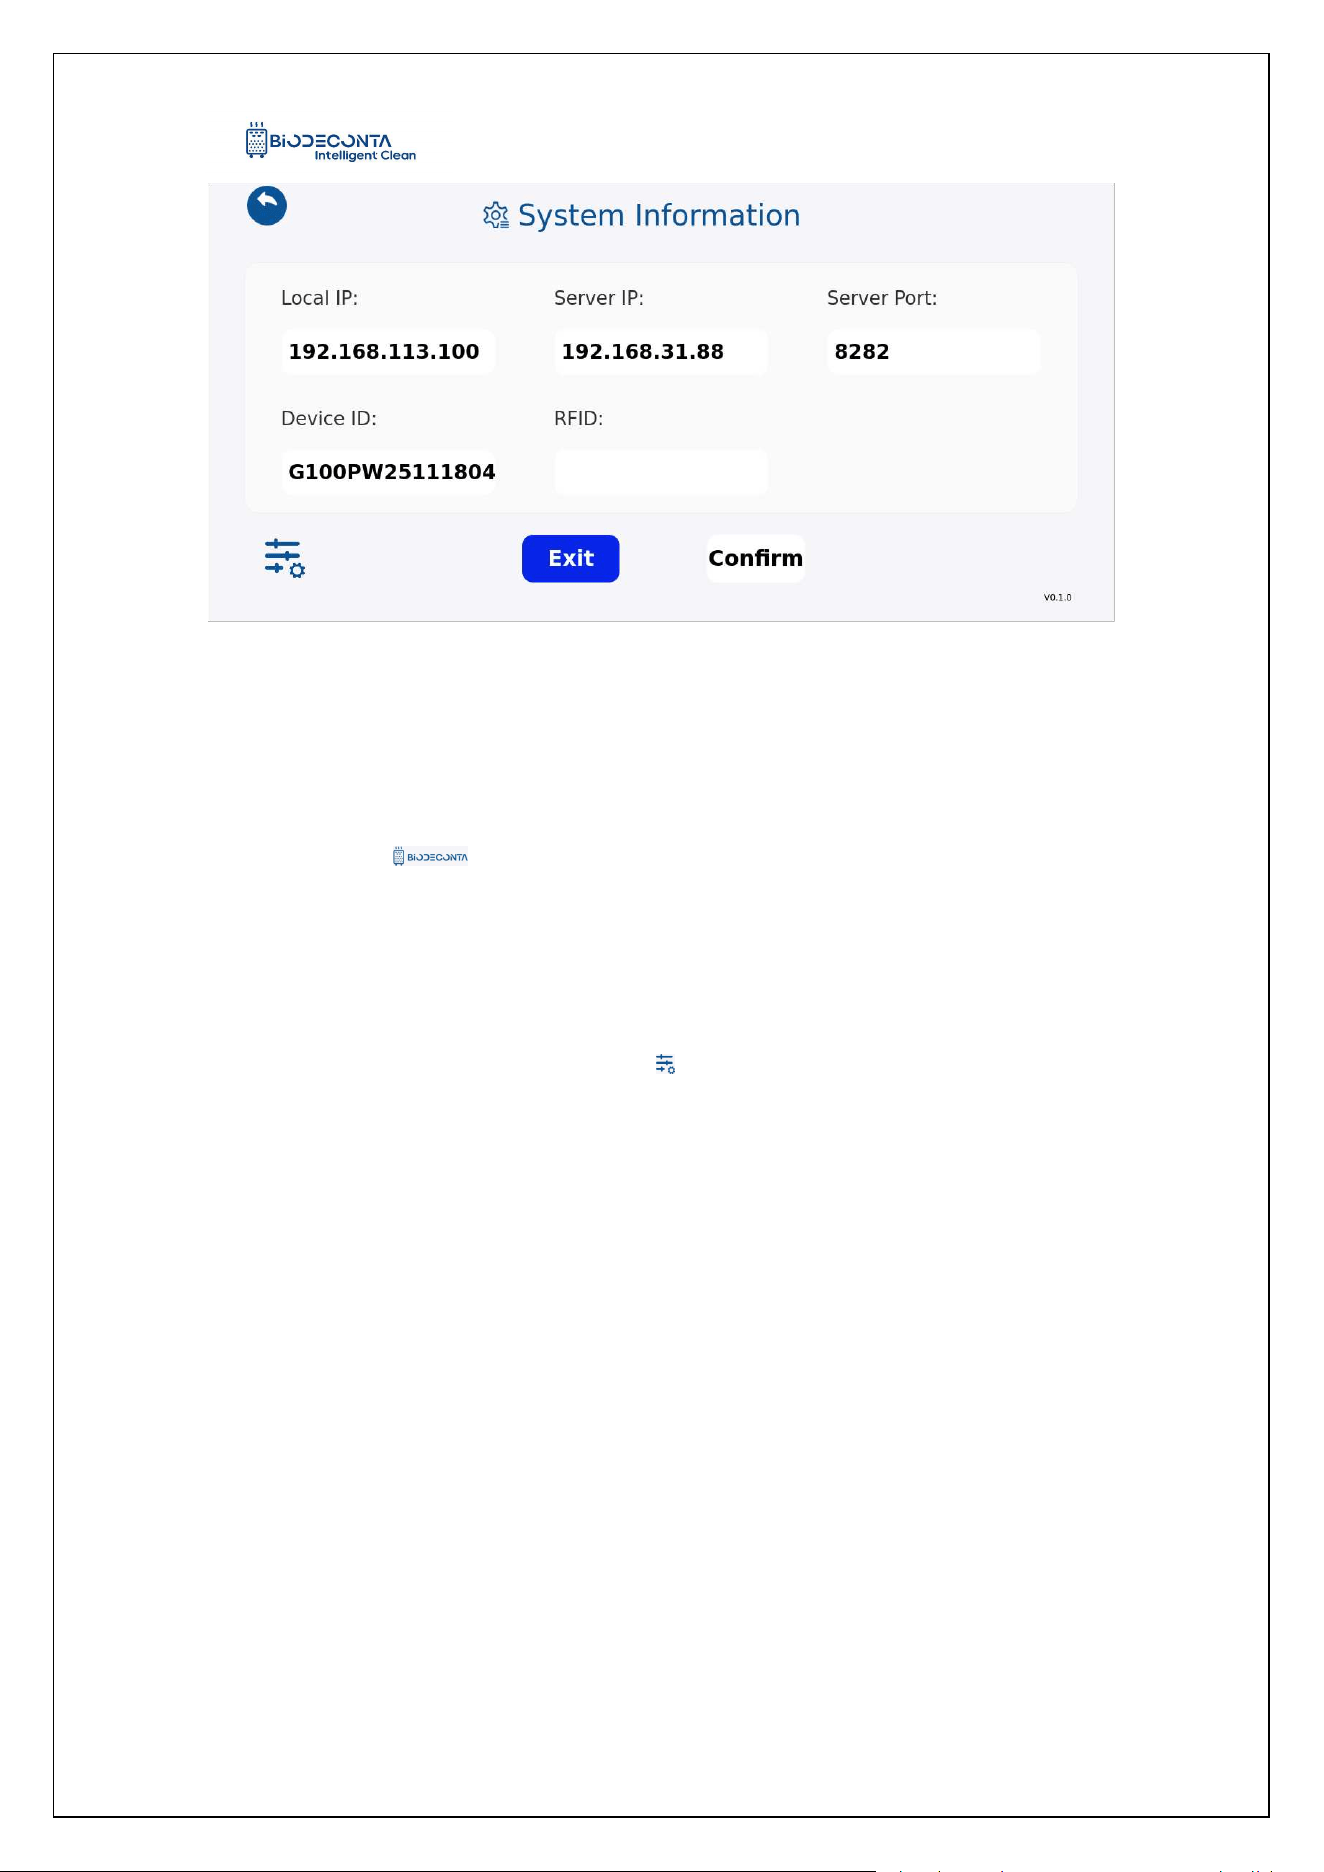
on[System information], as shown in Figure 12.1-3, and the page will jump to the
"System Information "page. This module is mainly for the determination of system
information.
Intelligent Safe and Clean
www.biodeconta.com
106
Figure 12.1-1 "System Information 1"
Figure 12.1-2 "System Information 2"
Intelligent Safe and Clean
www.biodeconta.com
107
Figure 12.1-3 "System Information 3"
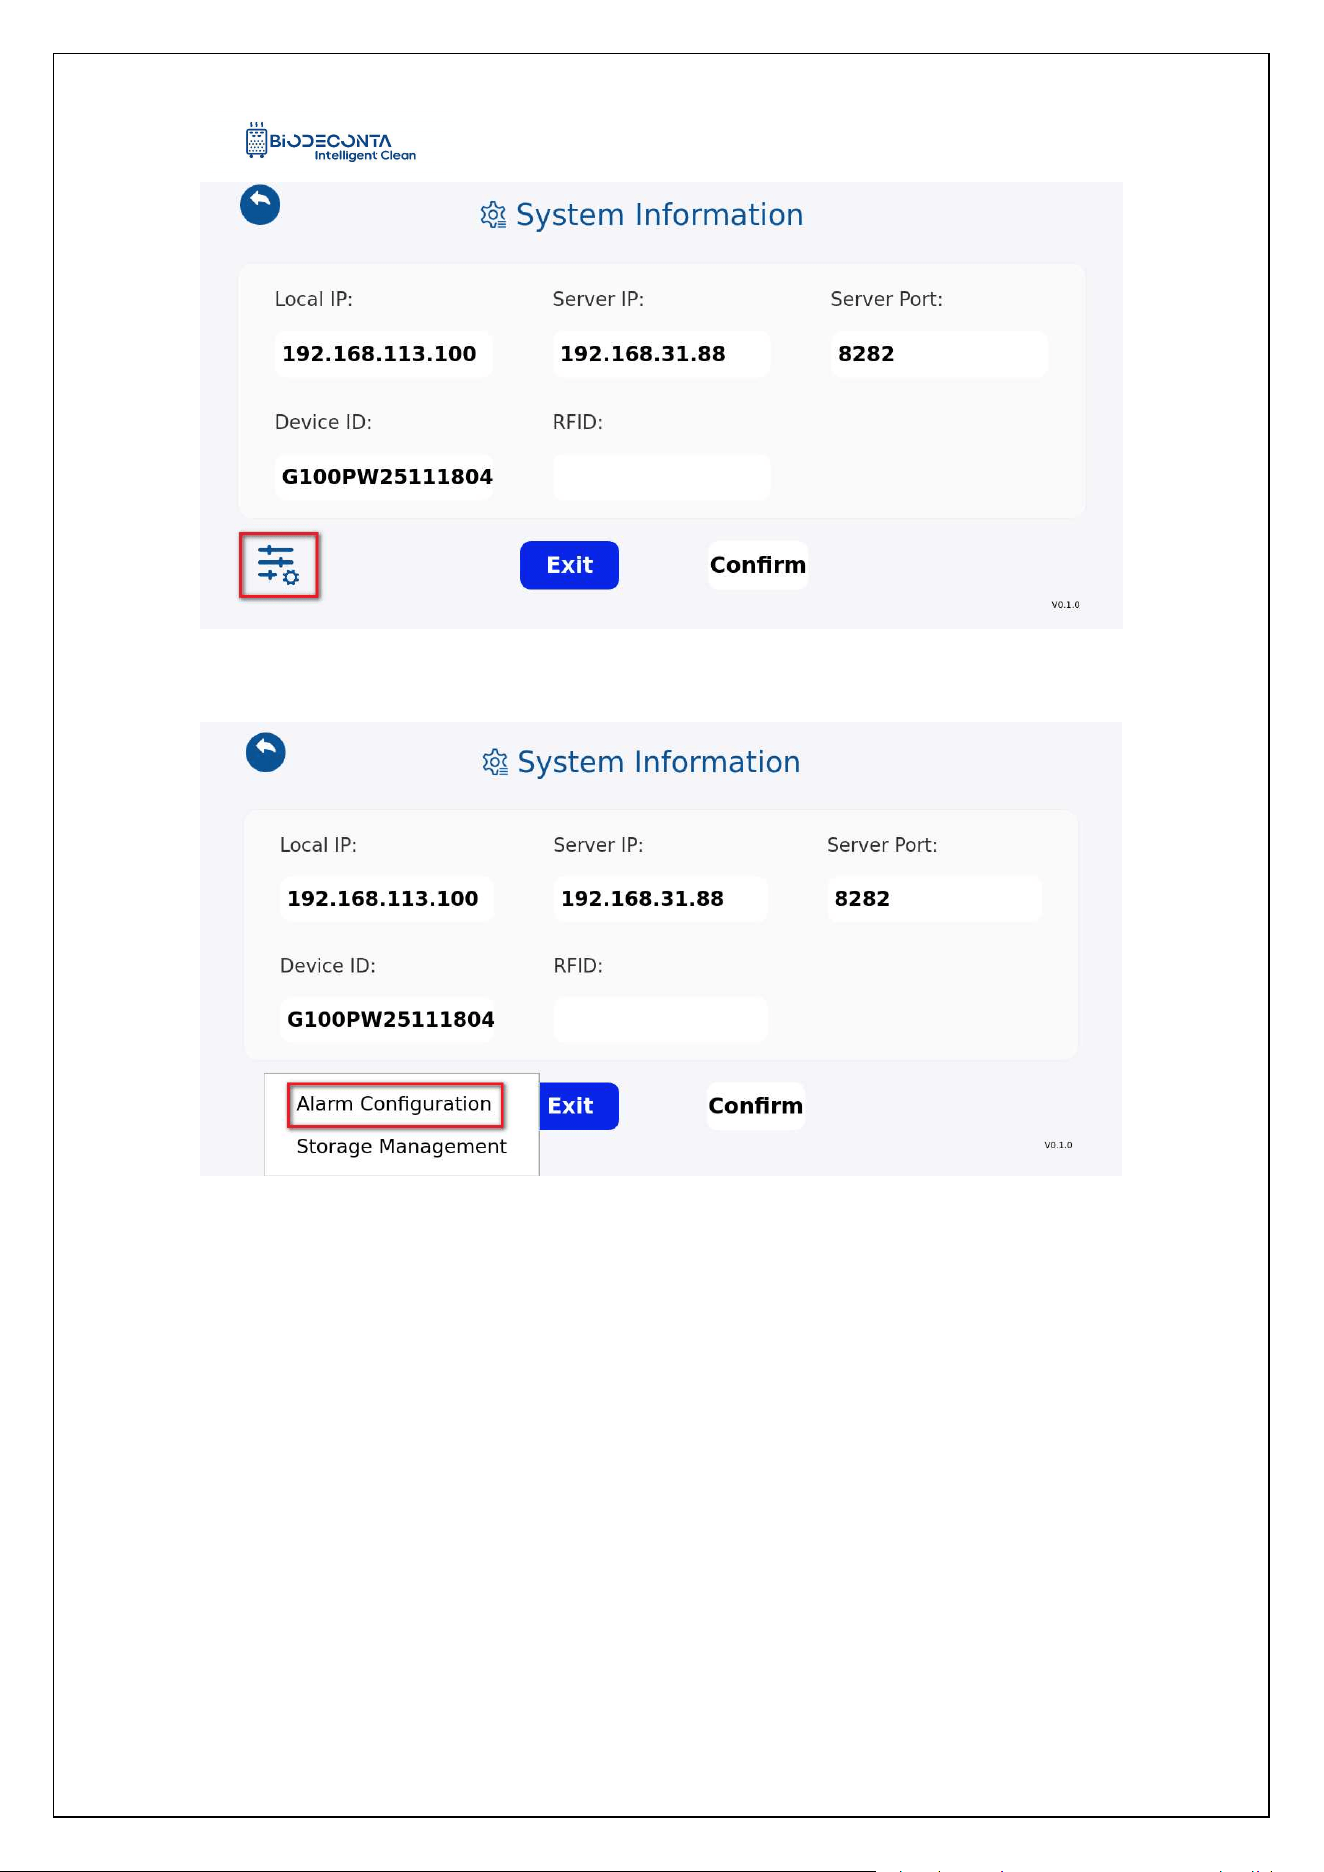
12.1 System information-Alarm Configuration:
Click on the [ ] icon on the test interface, as shown in Figures 12-1.4 and
12-1.5, the page will then jump to the page will jump to the pages of [Test Parameter],
[Historical data], [Logs], [Users], [Switch mode], [System information] pages. Click
on[System information]. as shown in Figures 12-1.6, and the page will jump to the
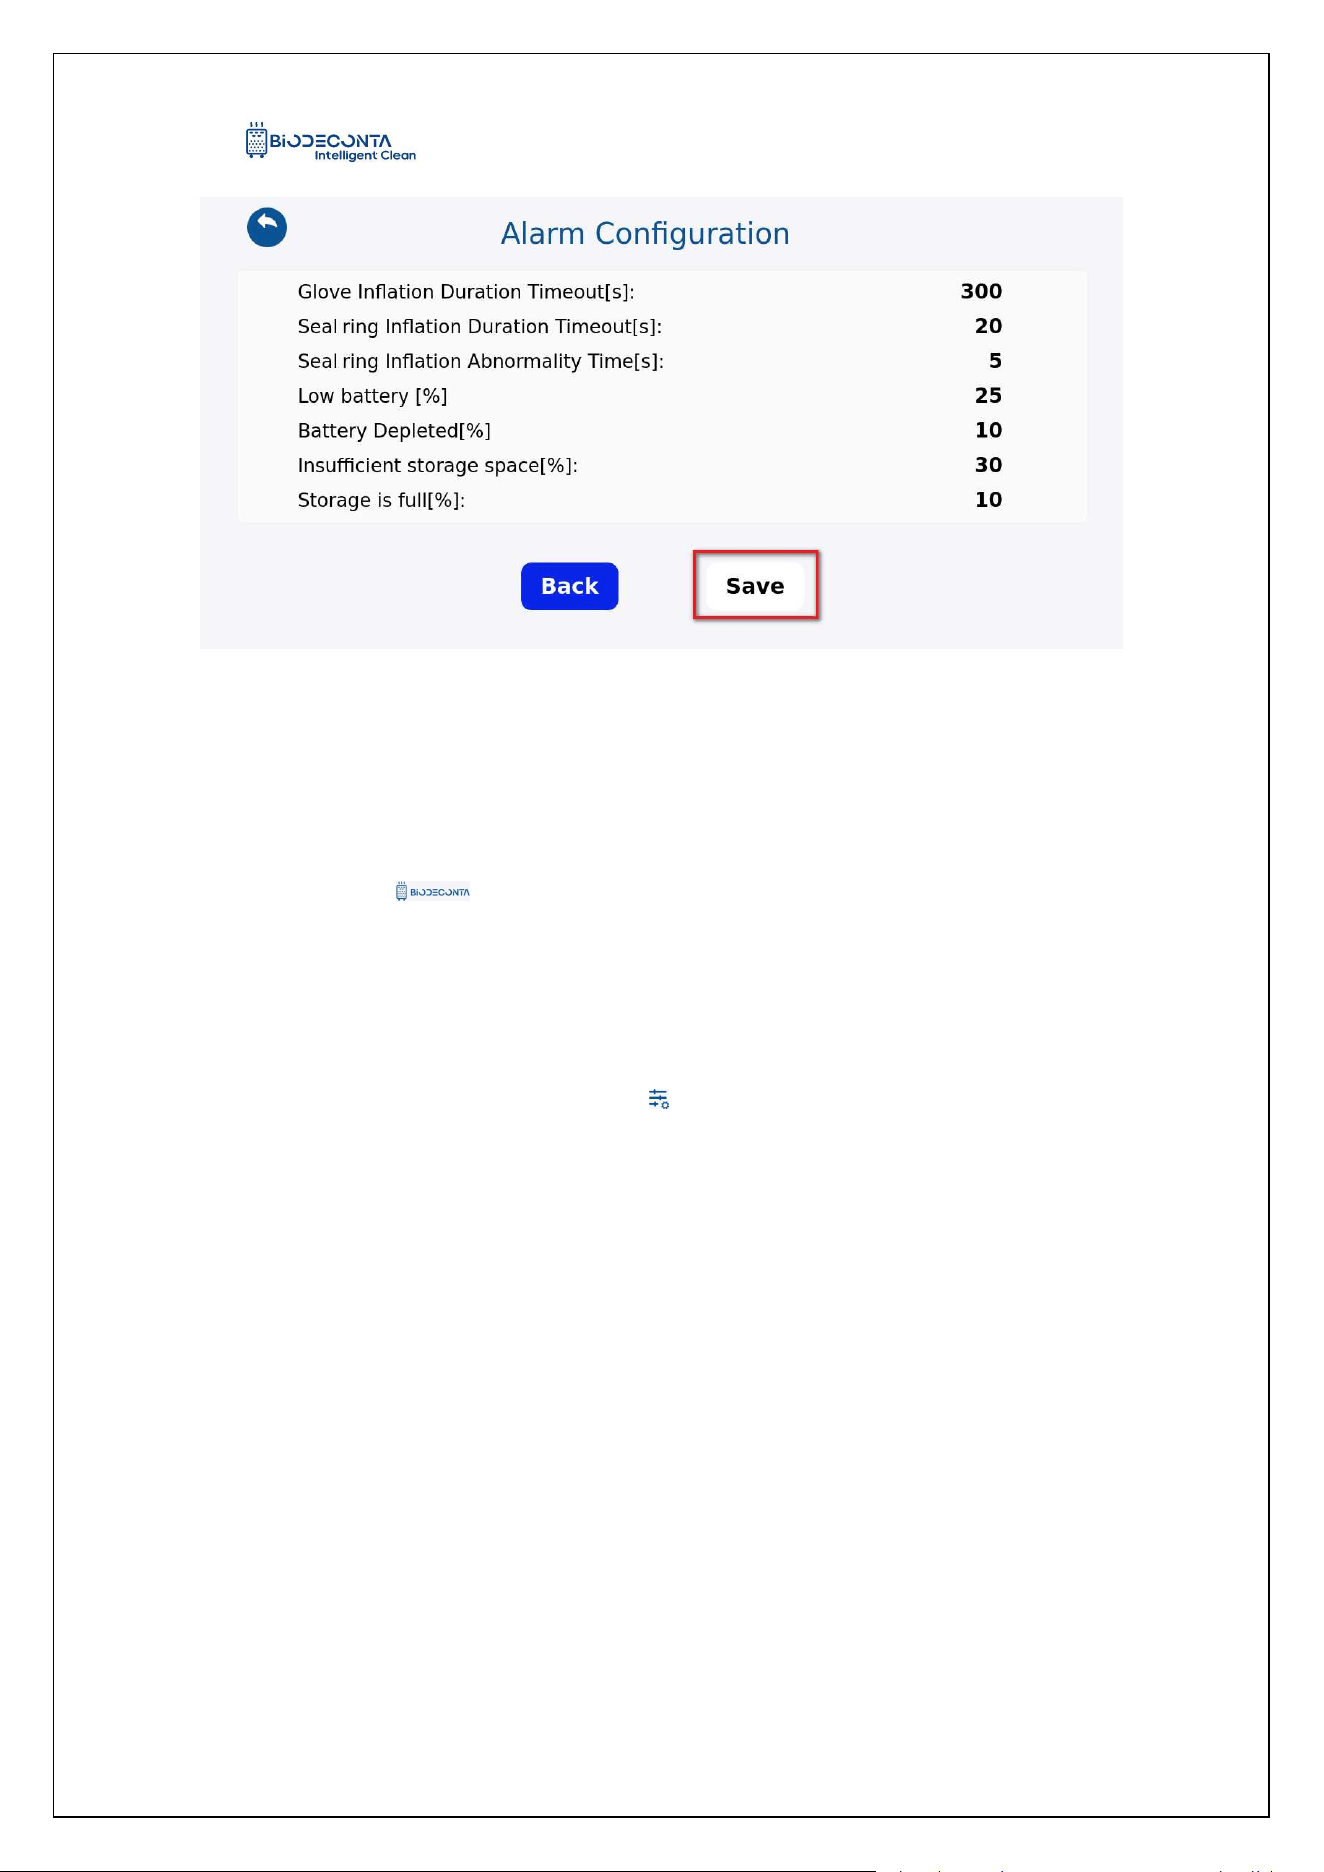
"System Information" page, click on the [ ] icon, as shown in Figures 12-1.7, click
on[Alarm Configuration], as shown in Figures 12-1.8, the page is redirected to the
"Alarm Configuration" page, select the alarm data that needs to be set, and click the
"Save" button, to complete the alarm setting operation.
Intelligent Safe and Clean
www.biodeconta.com
108
Figure 12.1-4 "Alarm Configuration 1"
Figure 12.1-5 "Alarm Configuration 2"
Intelligent Safe and Clean
www.biodeconta.com
109
Figure 12.1-6 "Alarm Configuration 3"
Figure 12.1-7 "Alarm Configuration 4"
Intelligent Safe and Clean
www.biodeconta.com
110
Figure 12.1-8 "Alarm Configuration 5"
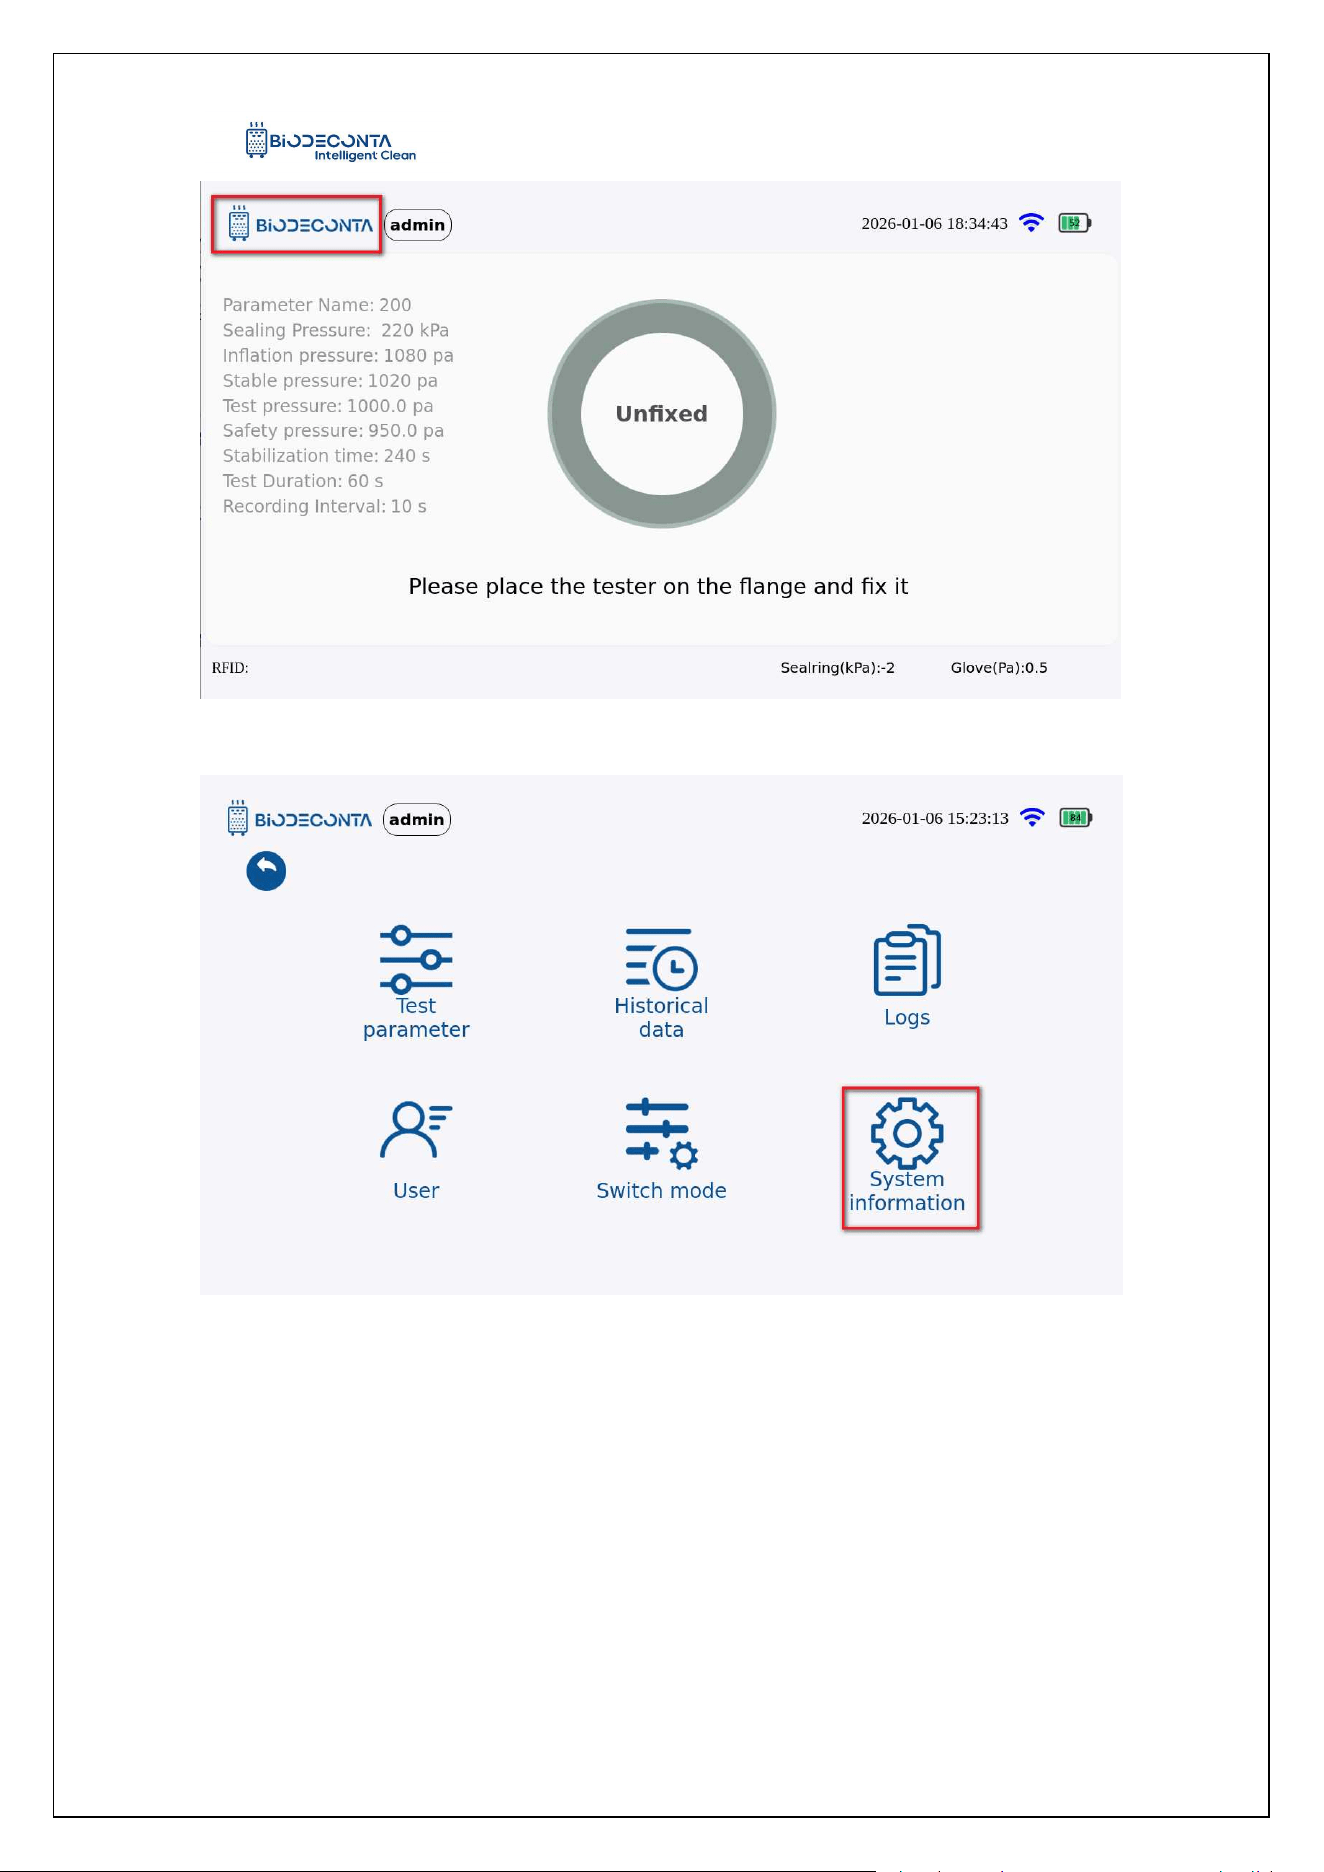
12.2 System information-Storage Management
Click on the [ ] icon on the test interface, as shown in Figures12-1.9 and
12-1.10, the page will then jump to the page will jump to the pages of [Test Parameter],
[Historical data], [Logs], [Users], [Switch mode], [System information] pages, click on
[System information]. As shown in Figures 12-1.11, and the page will jump to the
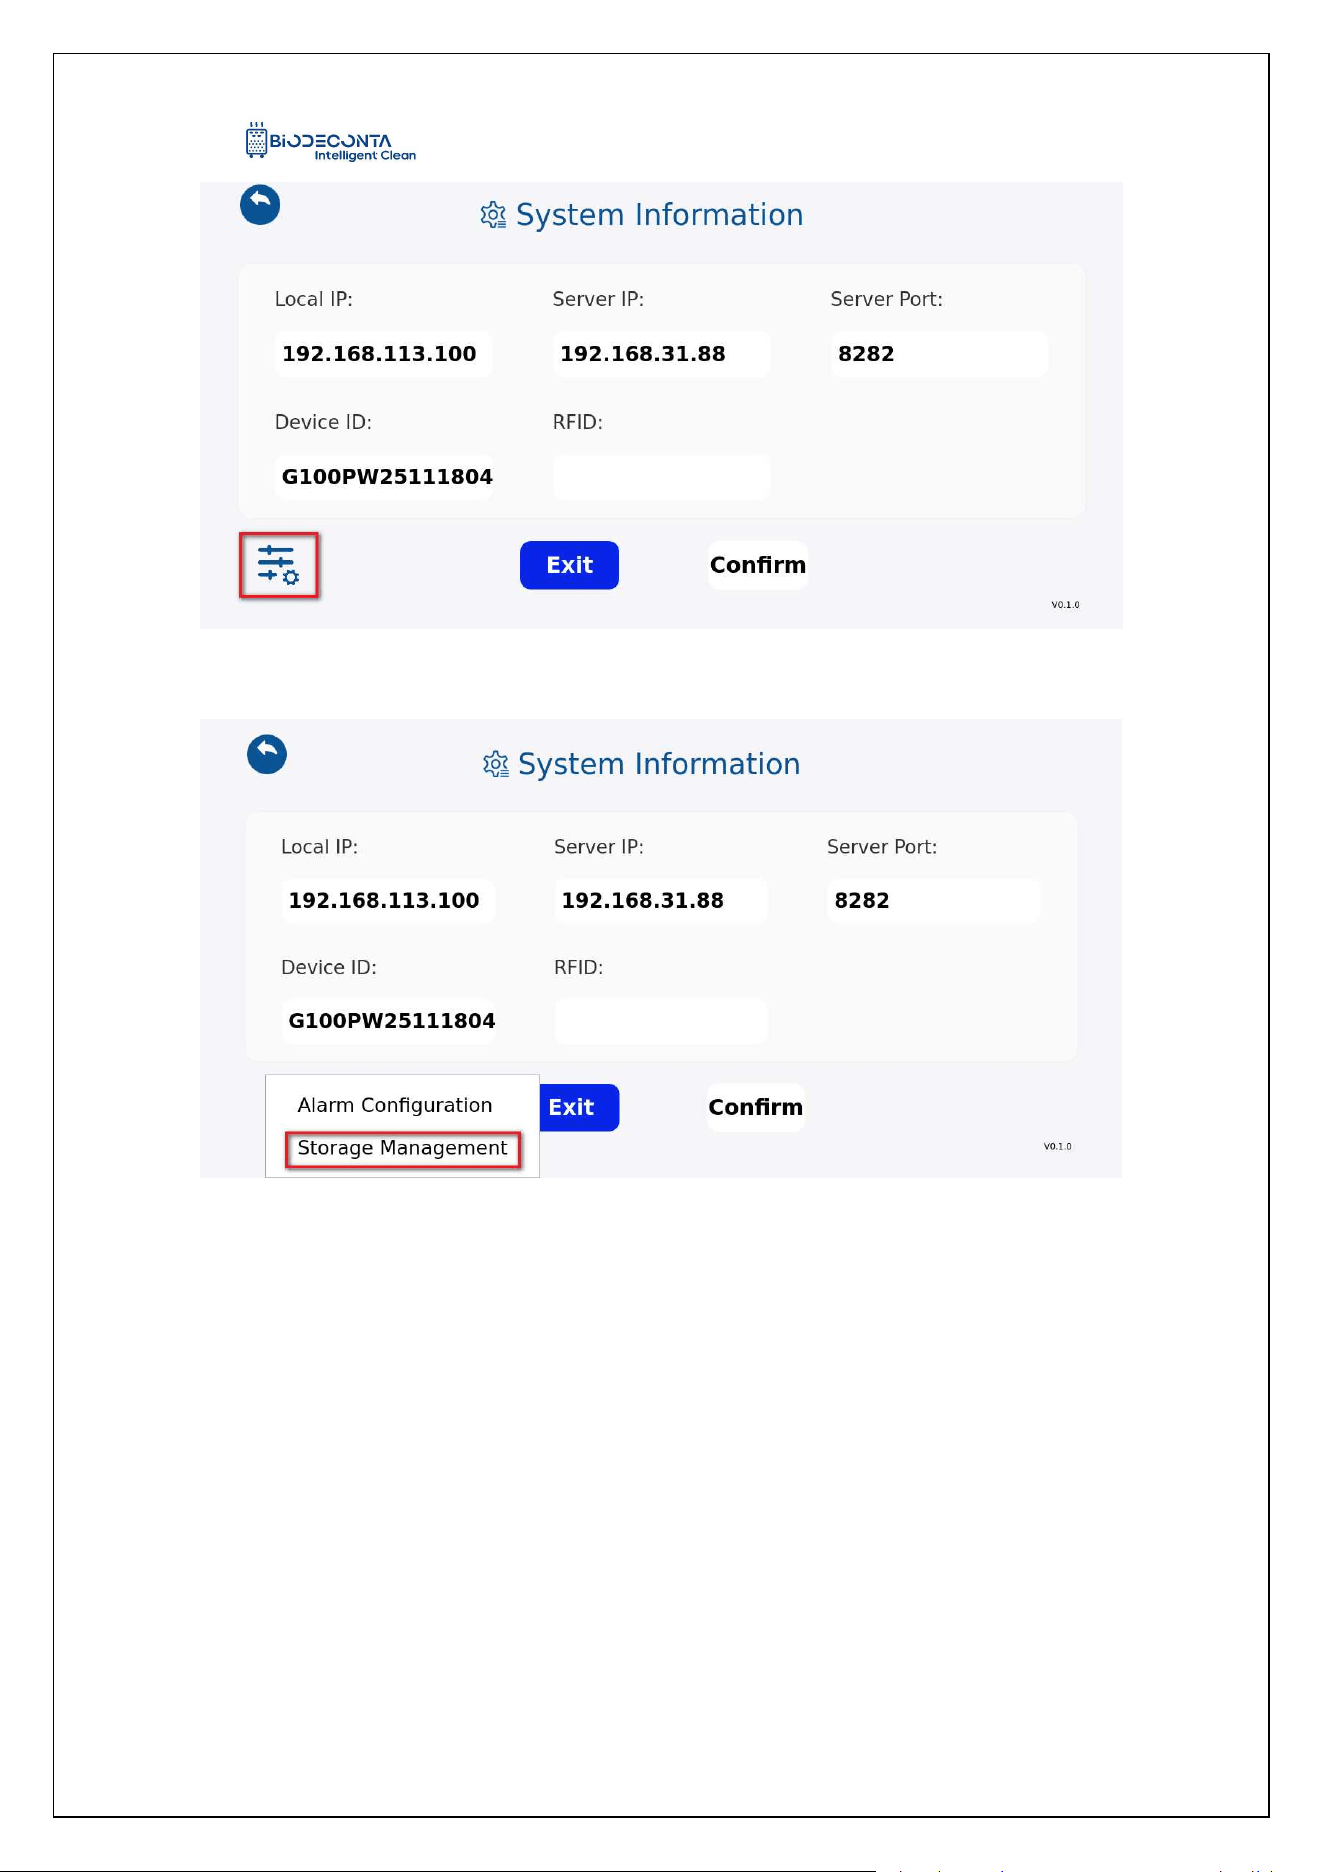
"System Information" page, click on the [ ] icon, as shown in Figures 12-1.12, click
on[Storage Management]. As shown in Figures 12-1.13, the page is redirected to the
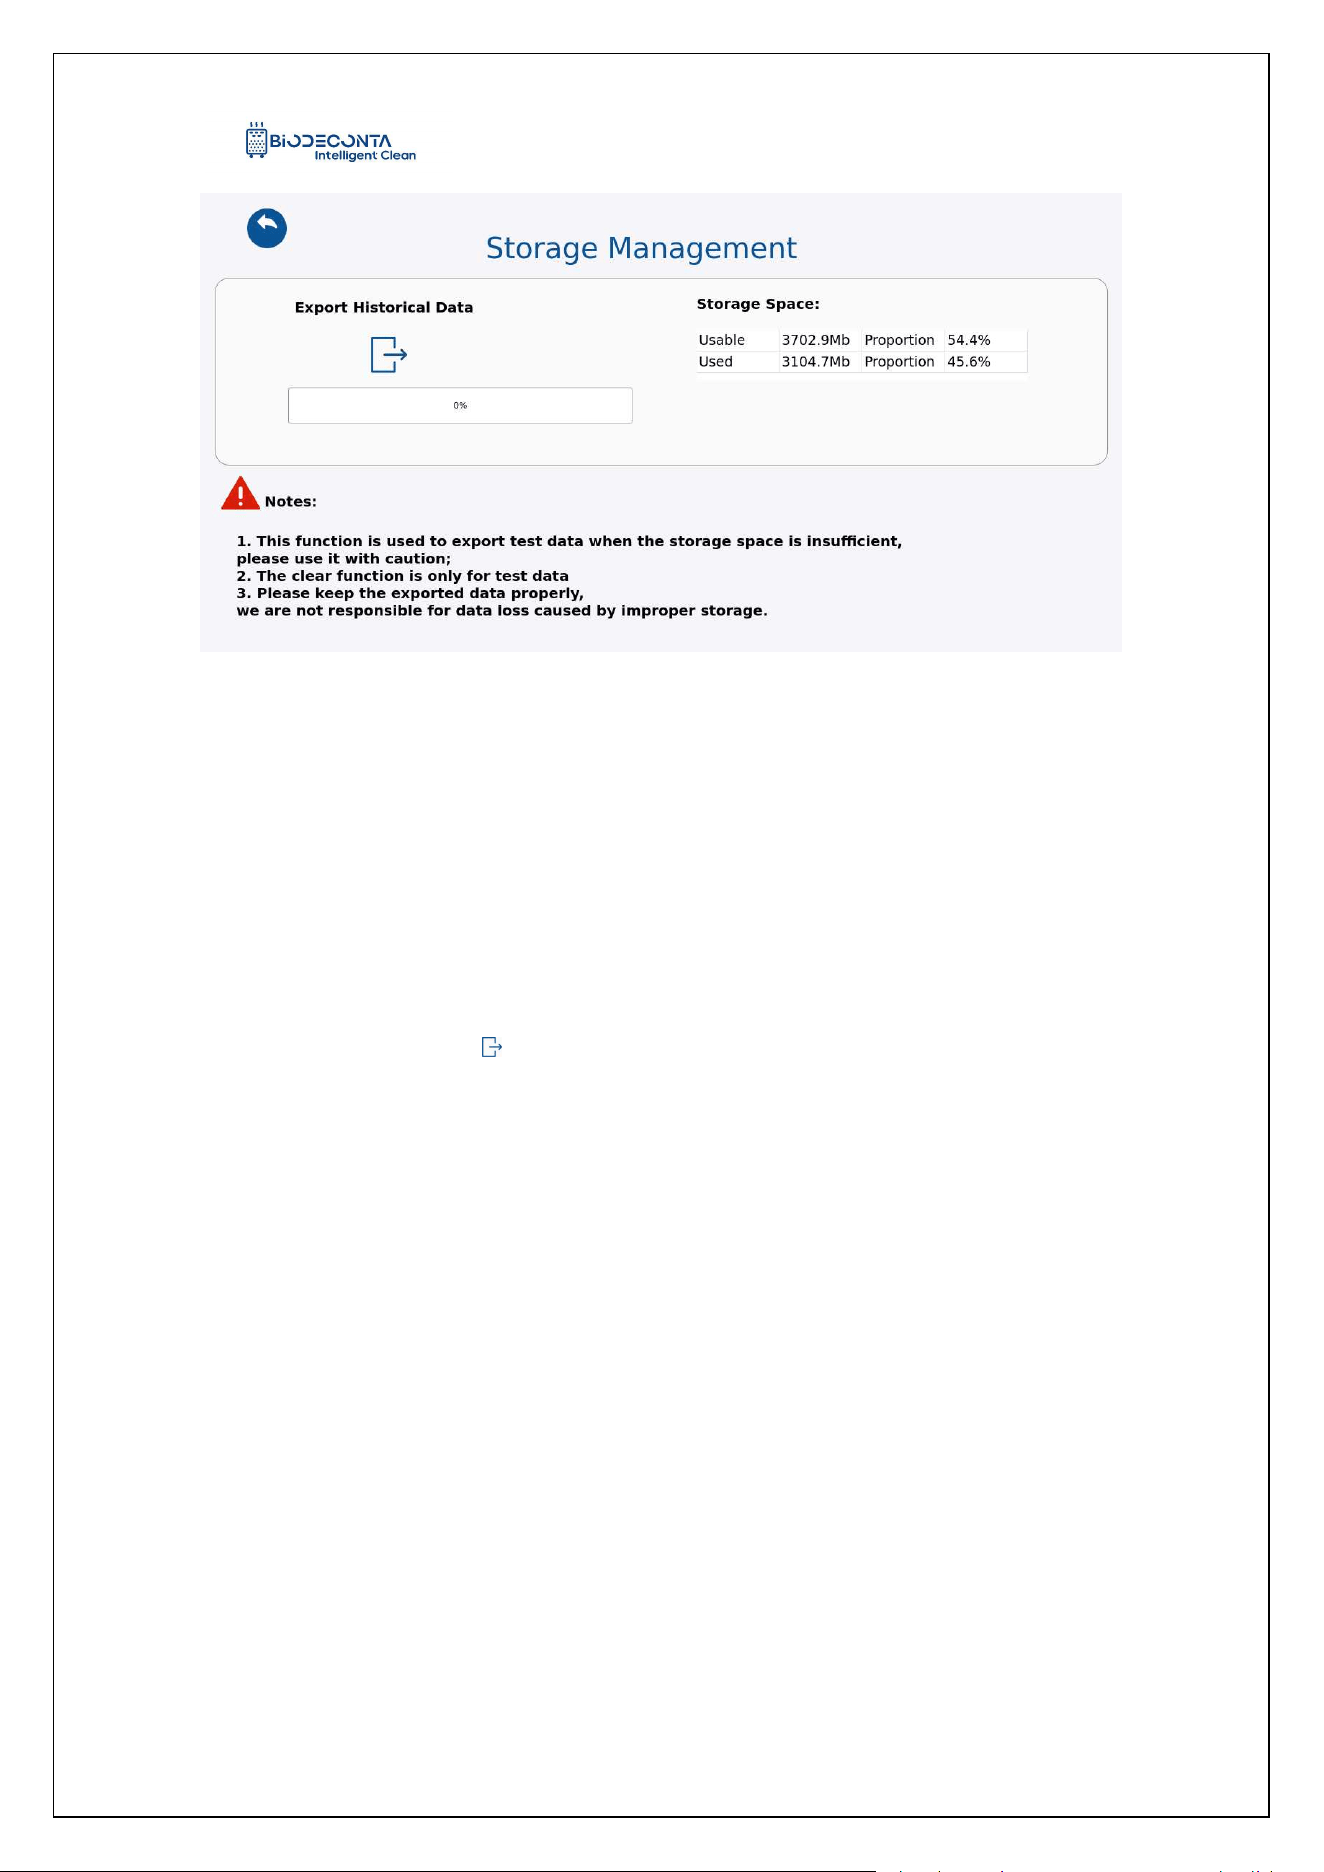
"Storage Management" page, This module mainly handles the export and deletion
operations of storage management.
Intelligent Safe and Clean
www.biodeconta.com
111
Figure 12.1-9 "Storage Management 1"
Figure 12.1-10 "Storage Management 2"
Intelligent Safe and Clean
www.biodeconta.com
112
Figure 12.1-11 "Storage Management 3"
Figure 12.1-12 "Storage Management 4"
Intelligent Safe and Clean
www.biodeconta.com
113
Figure 12.1-13 "Storage Management 5"
12.3 Export:
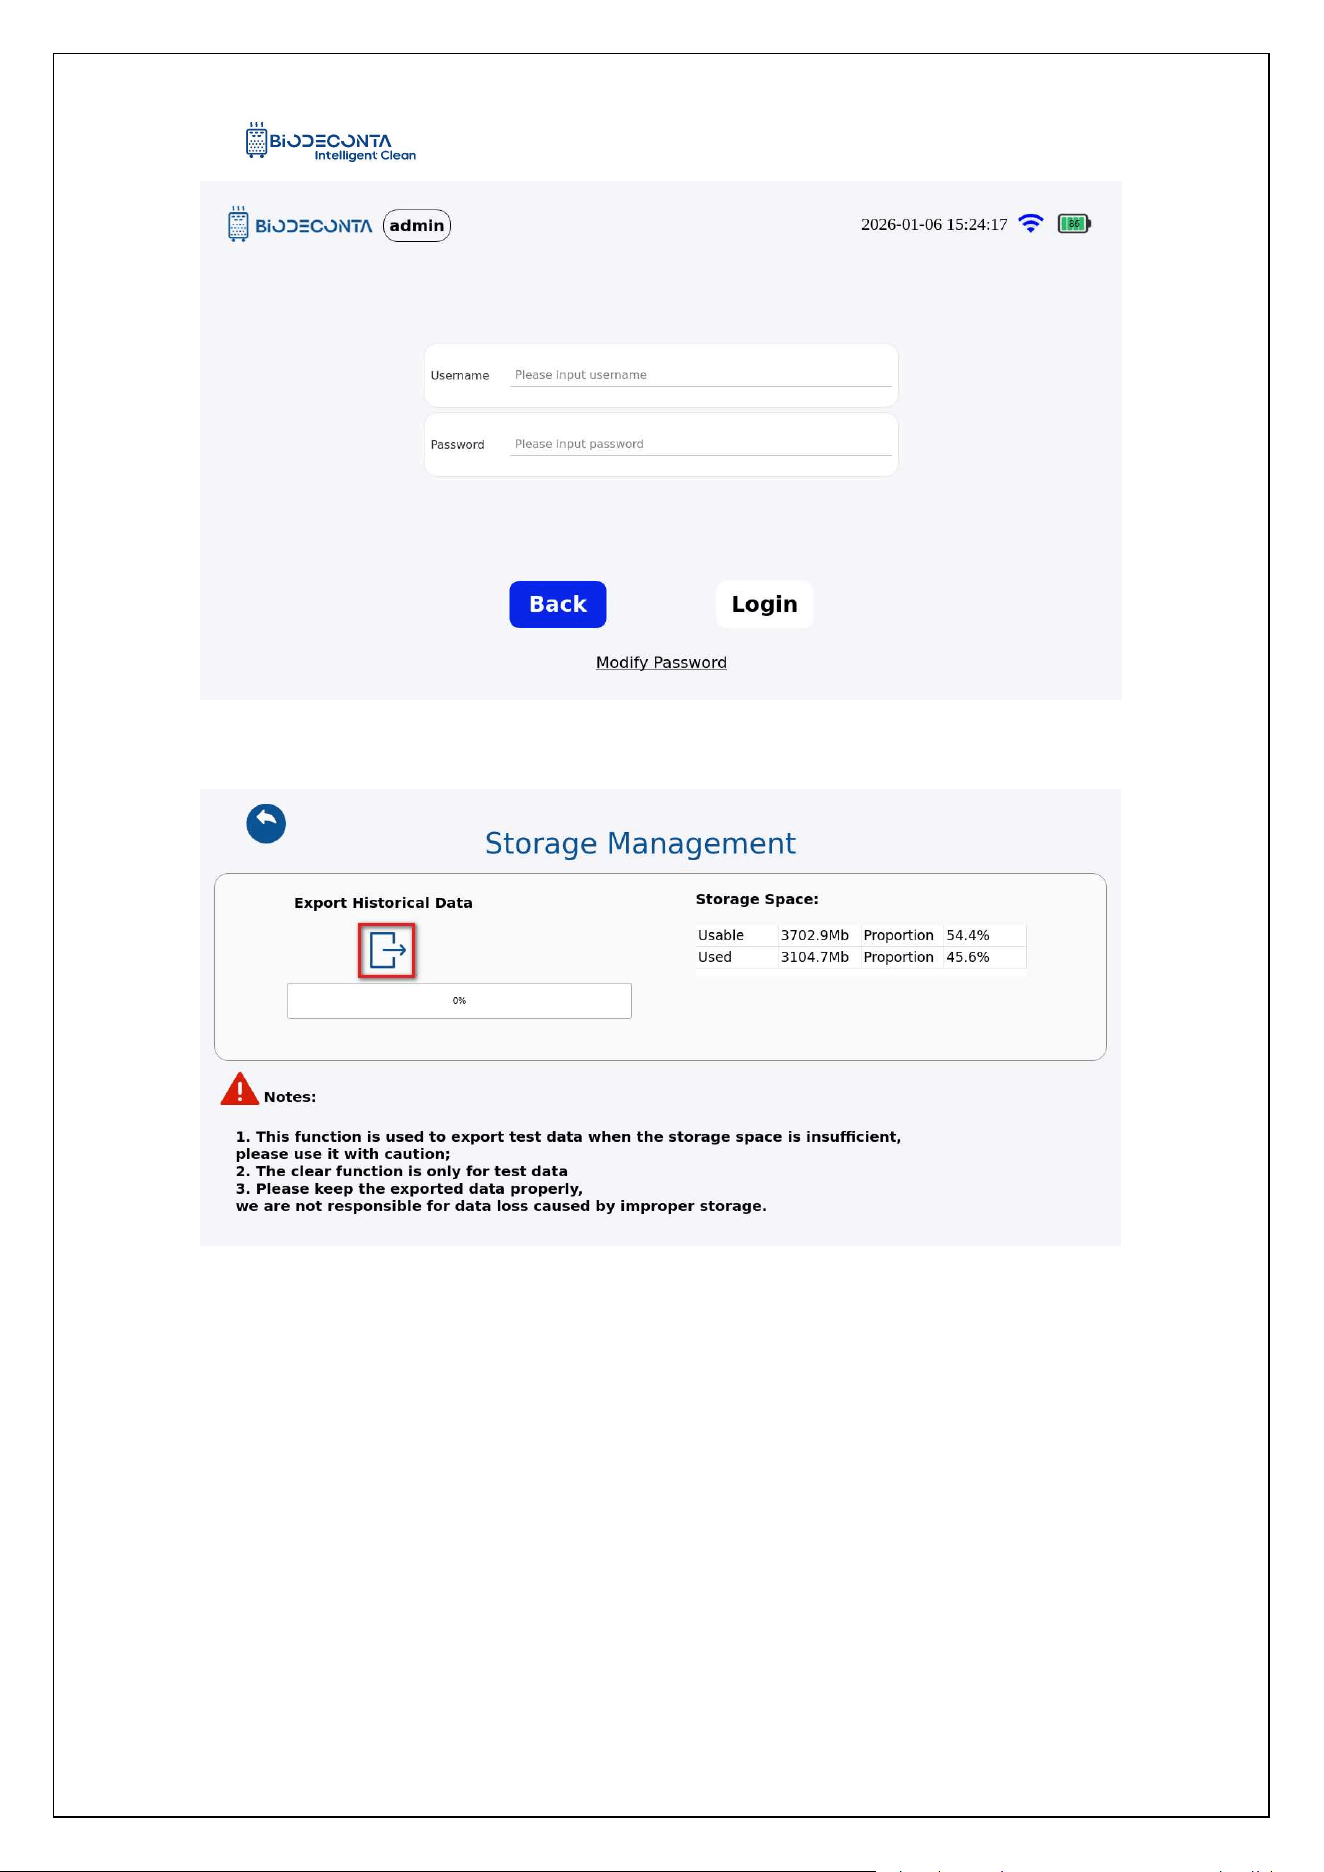
Click the [Storage Management], as shown in Figure 12.1-14, and the page will
jump to the login interface. Fill in the account and password data, and click the "Login"
button. The page will then jump to the "Storage Management" page, as shown in
Figure 12.1-15, click the [ ] icon, the page will jump to the login interface, fill in the
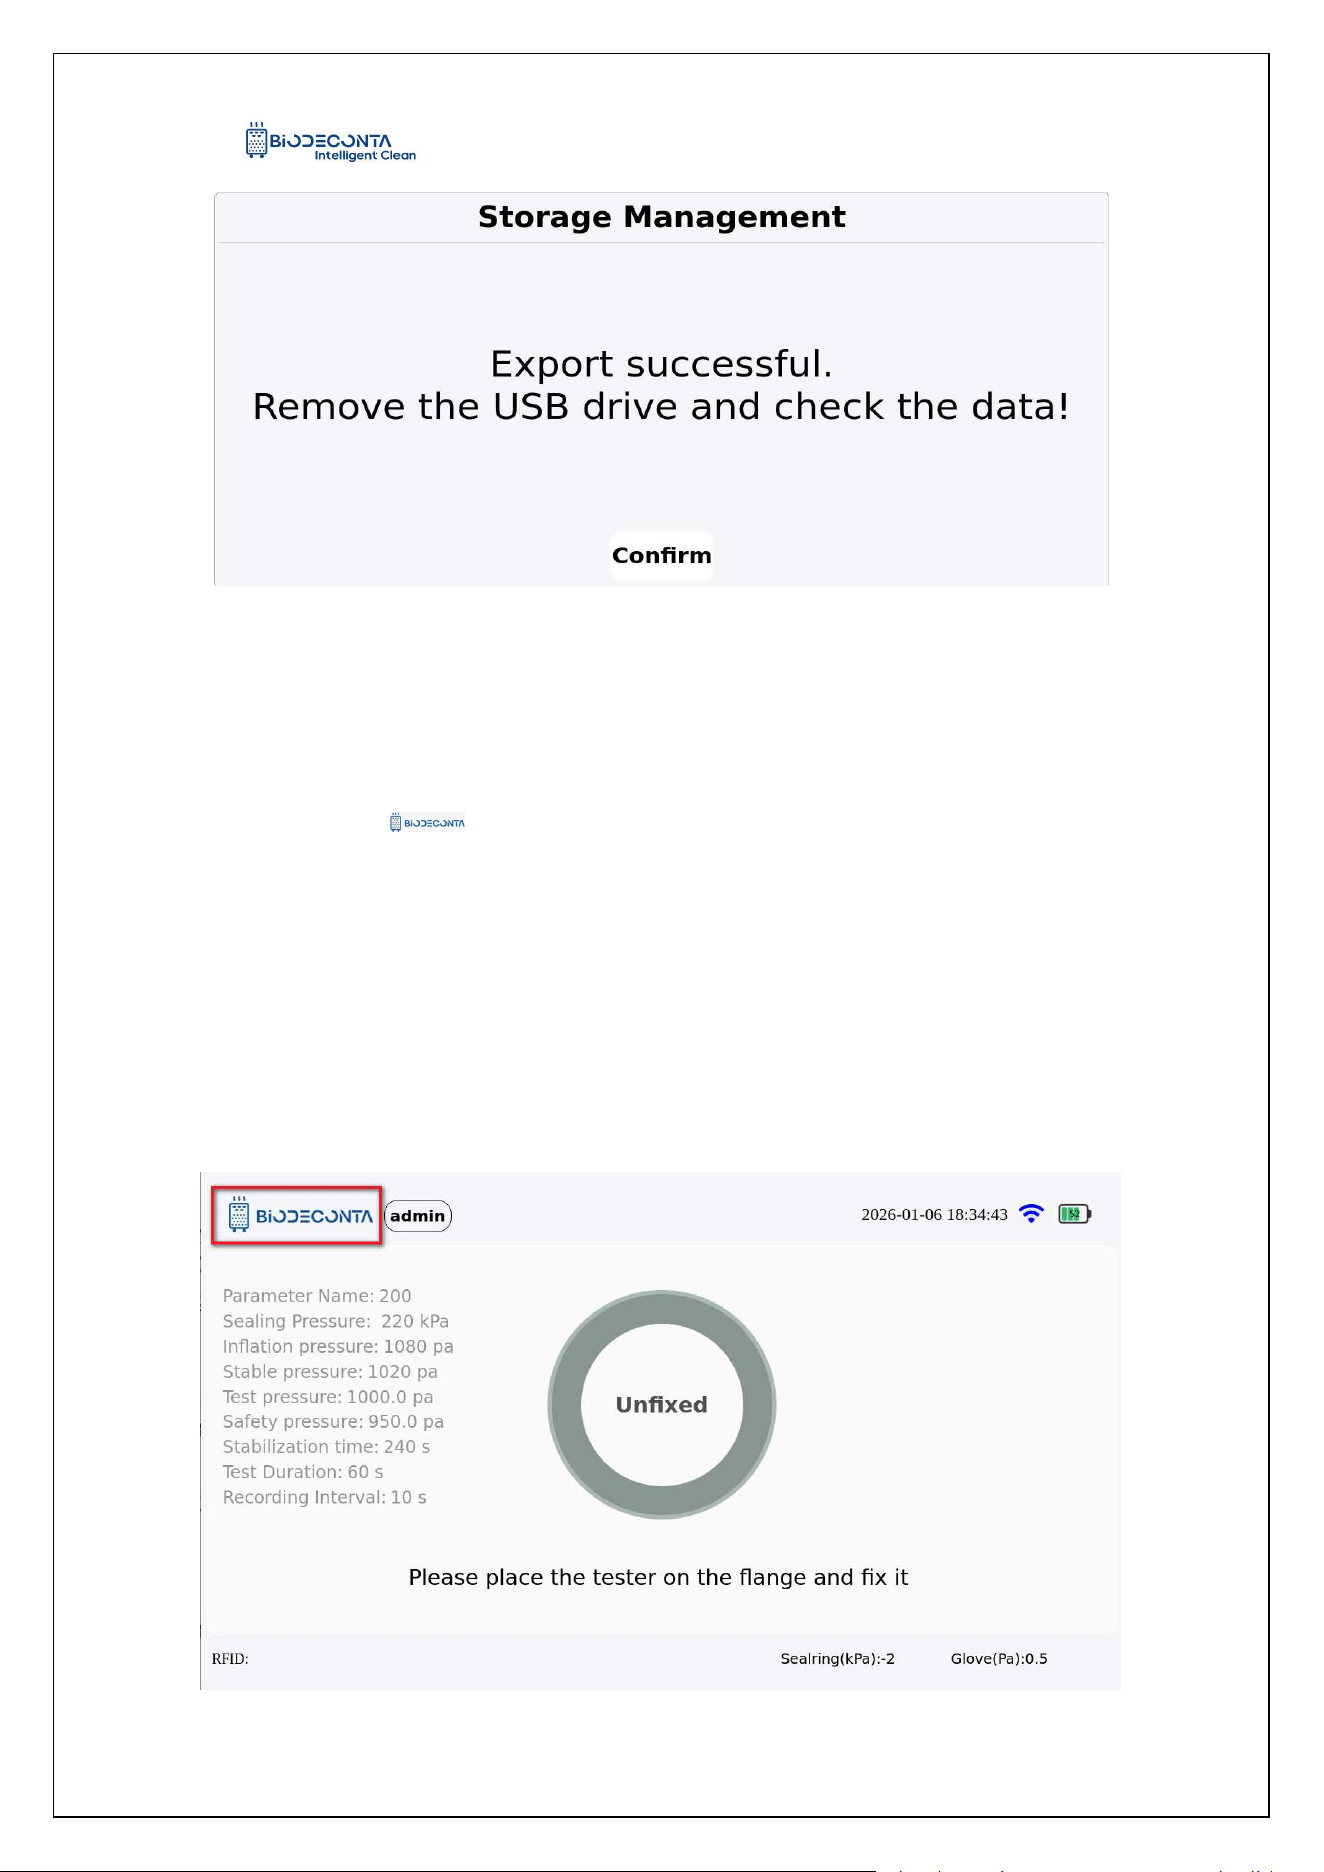
account and password data, and click the "Login" button, as shown in Figure 12.1-16,
the page will pop up an "Export successful. Remove the USB drive and check the
data!" dialog box, click the "Confirm" button, to complete the export operation.
Intelligent Safe and Clean
www.biodeconta.com
114
Figure 12.1-14 "Export 1"
Figure 12.1-15 "Export 2"
Intelligent Safe and Clean
www.biodeconta.com
115
Figure 12.1-16 "Export 3"
12.4 System information-Backup and Recovery:
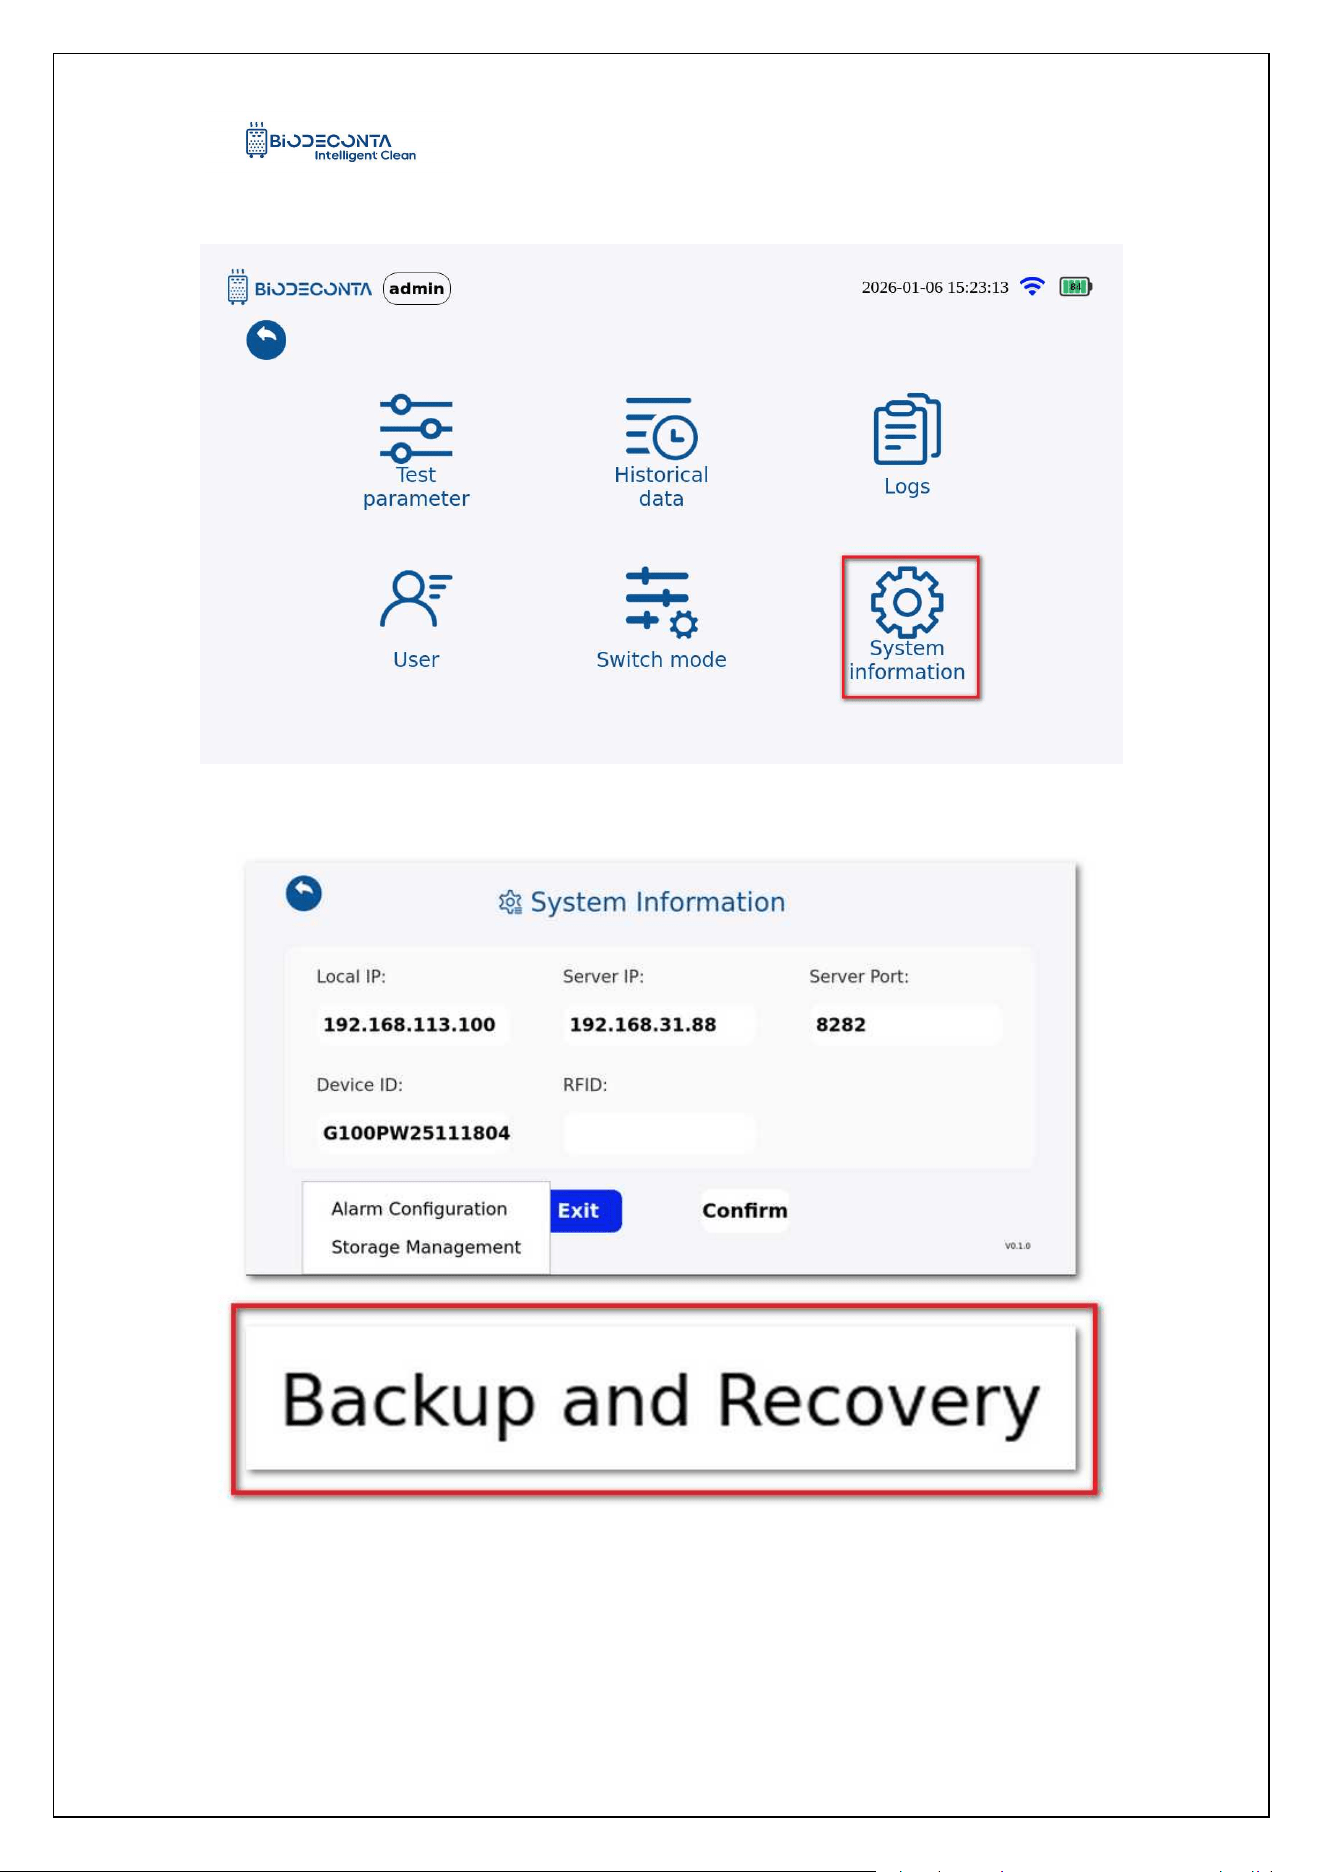
Click on the [ ] icon on the test interface, as shown in Figures 12-1.17 and
12-1.18, the page will then jump to the page will jump to the pages of [Test Parameter],
[Historical data], [Logs], [Users], [Switch mode], [System information] pages. Click
on[System information]. As shown in Figures 12-1.19, and the page will jump to the
"System Information" page, click on[Backup and Recovery]. As shown in Figures
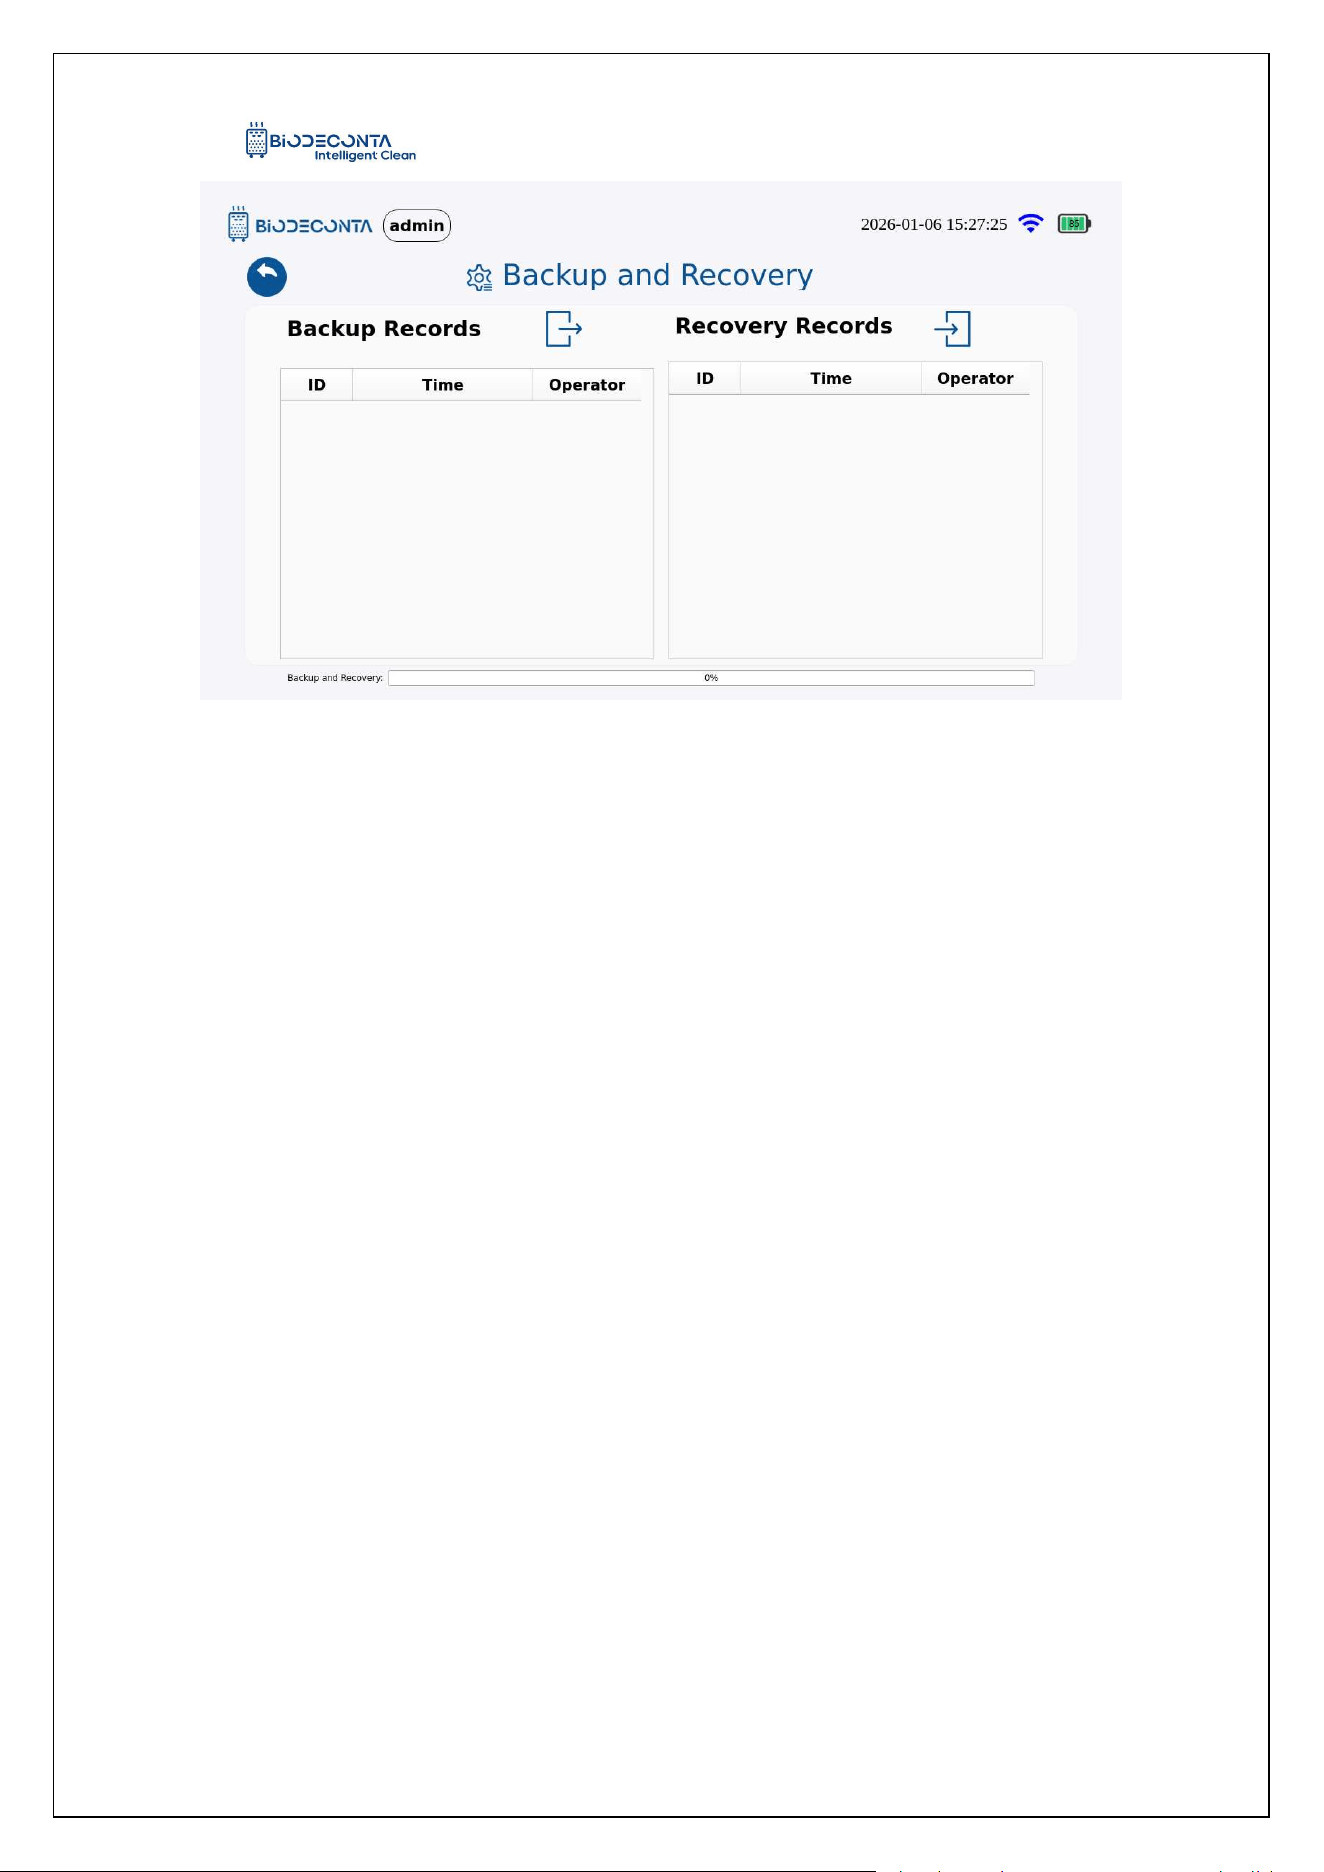
12-1.20, The page is redirected to the "Backup and Recovery" page. This module is
mainly responsible for the export operation of system information.
Intelligent Safe and Clean
www.biodeconta.com
116
Figure 12.1-17 "Backup and Recovery 1"
Figure 12.1-18 "Backup And Recovery 2"
Figure 12.1-19 "Backup And Recovery 3"
Intelligent Safe and Clean
www.biodeconta.com
117
Figure 12.1-20 "Backup And Recovery 4"
12.5 Export:
Intelligent Safe and Clean
www.biodeconta.com
118
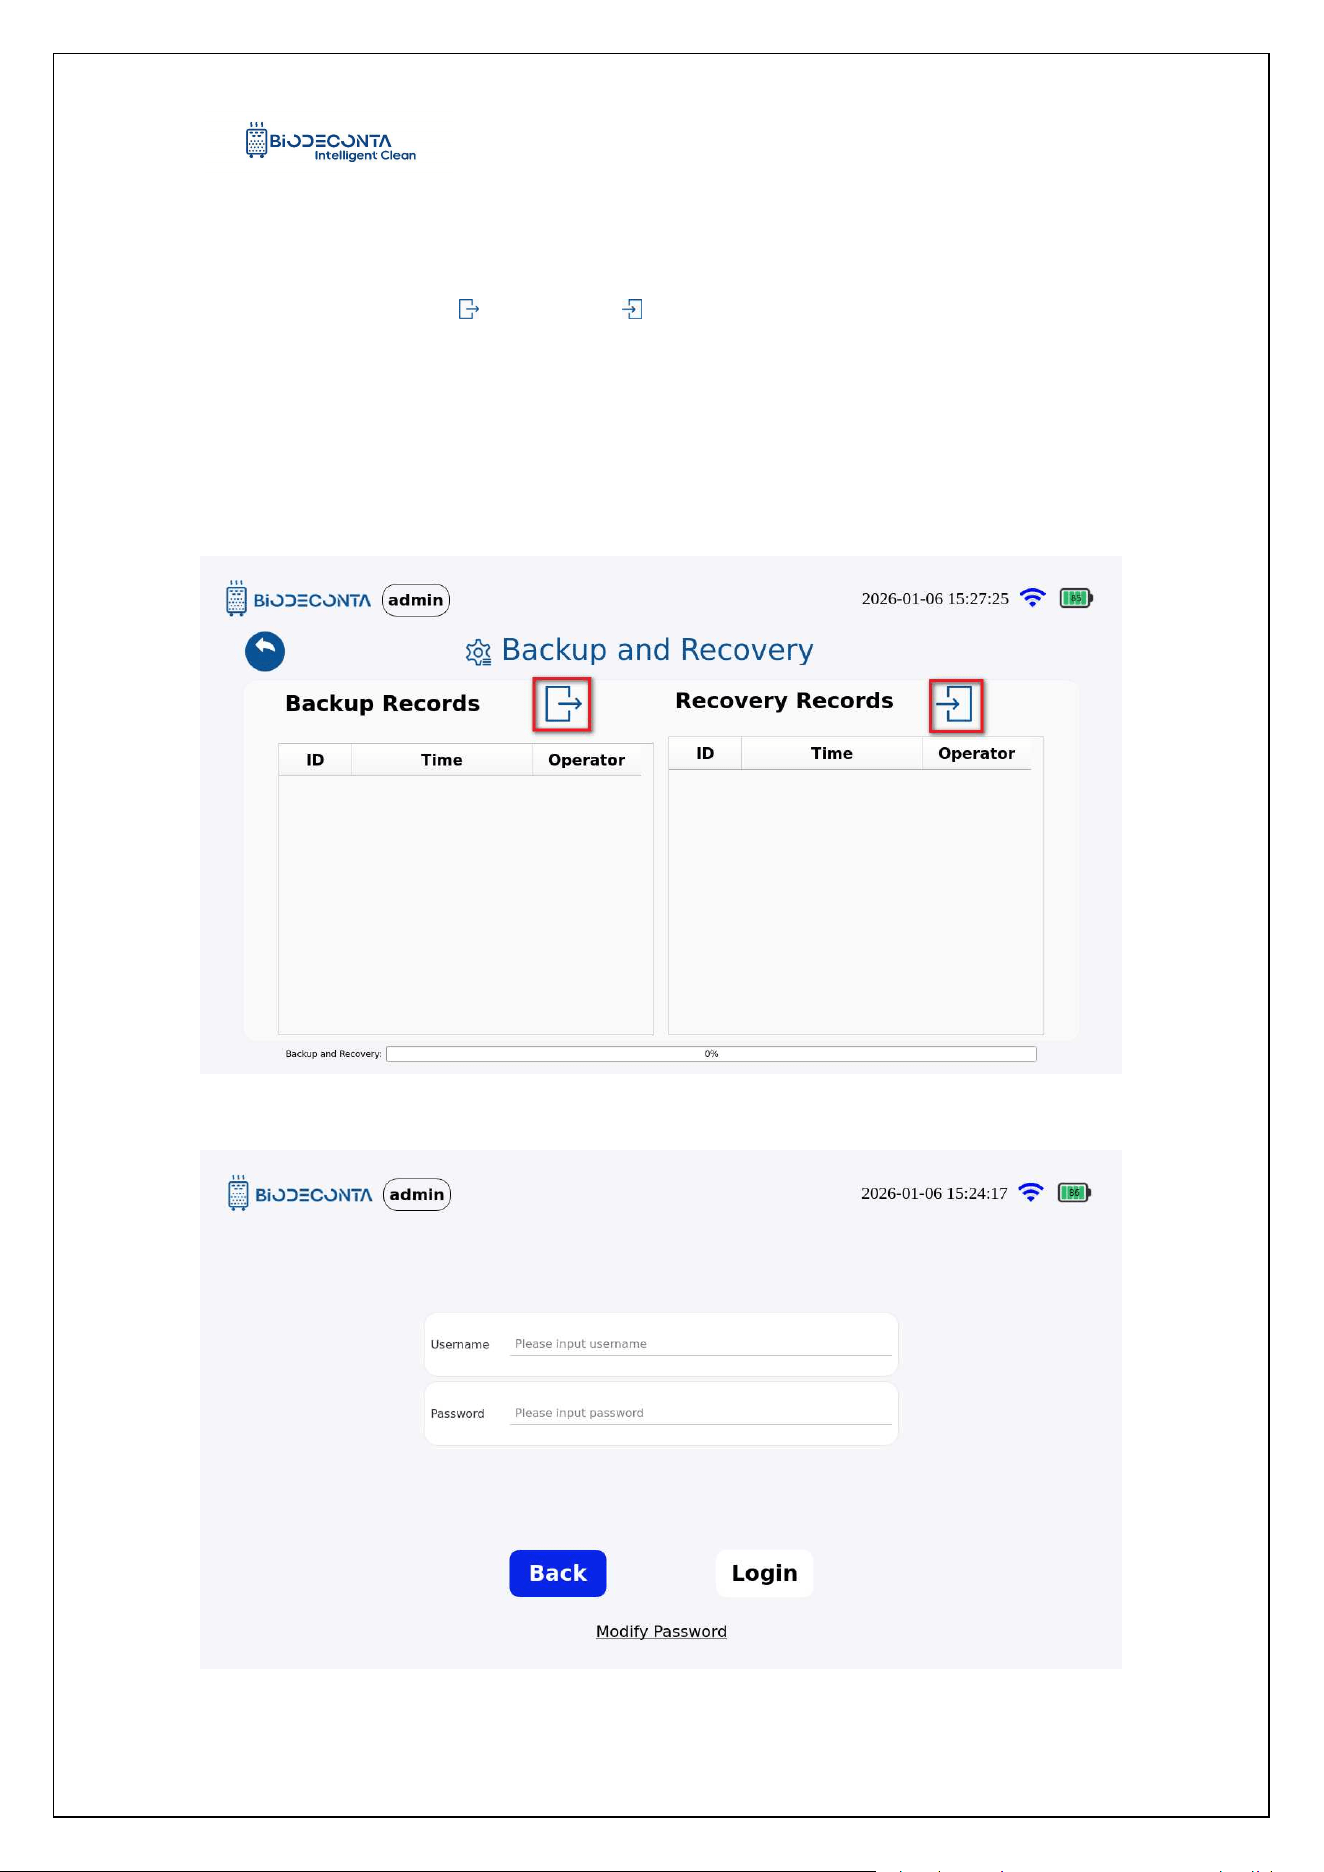
Click the [Backup and Recovery], as shown in Figure 12.1-21, and the page will
be redirected to the "Backup and Recovery" page, select the records that need to be
exported, and click the [ ] icon or the [ ] icon. As shown in Figure 12.1-22, the page
will jump to the login interface, fill in the account and password data, and click the
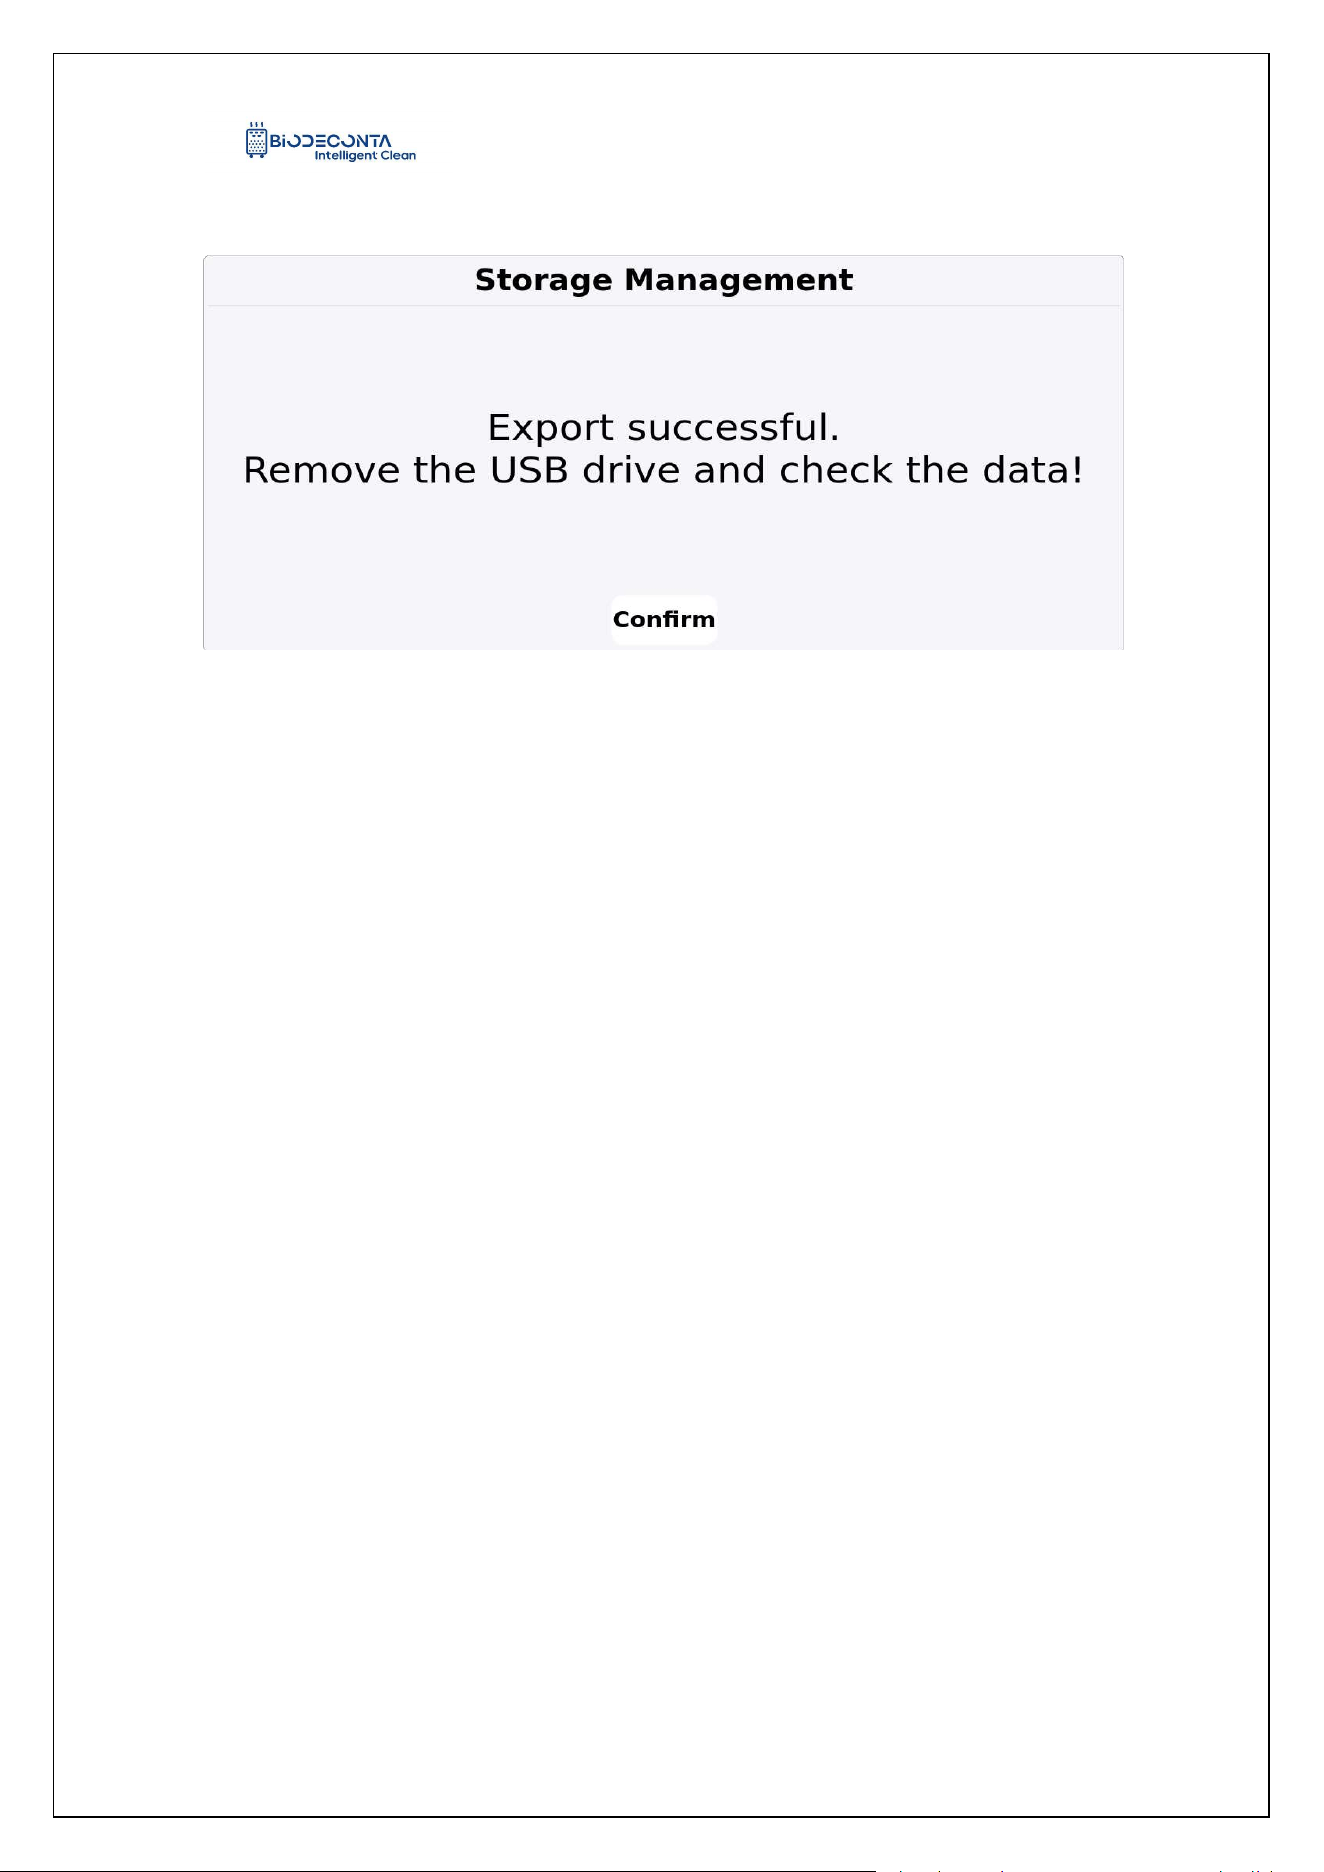
"Login" button. As shown in Figure 12.1-23, the page will pop up an "Export
successful. Remove the USB drive and check the data!" dialog box, click the
"Confirm" button, to complete the export operation.
Figure 12.1-21 "Export 1"
Intelligent Safe and Clean
www.biodeconta.com
119
Figure 12.1-22 "Export 2"
Figure 12.1-23 "Export 3"

Intelligent Safe and Clean
www.biodeconta.com
120
Chapter 13 FCC Warning Message
13. FCC Warning Message
13.1 Labeling requirements
This device complies with part 15 of the FCC Rules. Operation is subject to the
following two conditions: (1) This device may not cause harmful interference, and (2)
this device must accept any interference received, including interference that may
cause undesired operation.
13.2 Information to user.
Any Changes or modifications not expressly approved by the party responsible
for compliance could void the user's authority to operate the equipment.
13.3 Information to the user.
Note: This equipment has been tested and found to comply with the limits for a
Class B digital device, pursuant to part 15 of the FCC Rules. These limits are
designed to provide reasonable protection against harmful interference in a residential
installation. This equipment generates uses and can radiate radio frequency energy
and, if not installed and used in accordance with the instructions, may cause harmful
interference to radio communications. However, there is no guarantee that
interference will not occur in a particular installation. If this equipment does cause
harmful interference to radio or television reception, which can be determined by
turning the equipment off and on, the user is encouraged to try to correct the
interference by one or more of the following measures:
-Reorient or relocate the receiving antenna.
-Increase the separation between the equipment and receiver.
-Connect the equipment into an outlet on a circuit different from that to which the
receiver is

Intelligent Safe and Clean
www.biodeconta.com
121
connected. -Consult the dealer or an experienced radio/TV technician for help.
* RF warning for Portable device:
The device has been evaluated to meet general RF exposure requirement. The
device can be used in portable exposure condition without restriction.

Intelligent Safe and Clean
www.biodeconta.com
122
Chapter 14 Technical Support and Contact Information
For technical support or service inquiries, please contact:
Biodeconta Service Department
Email: service@biodeconta.com
Website: www.biodeconta.com
Release Date: March 11th, 2026
All trademarks mentioned in this manual are the property of their respective owners.
This manual is intended for authorized users.