OK
I/M
LAUNCH
FRESDEITRUPTPO
Przewodnik szybkiego uruchomienia
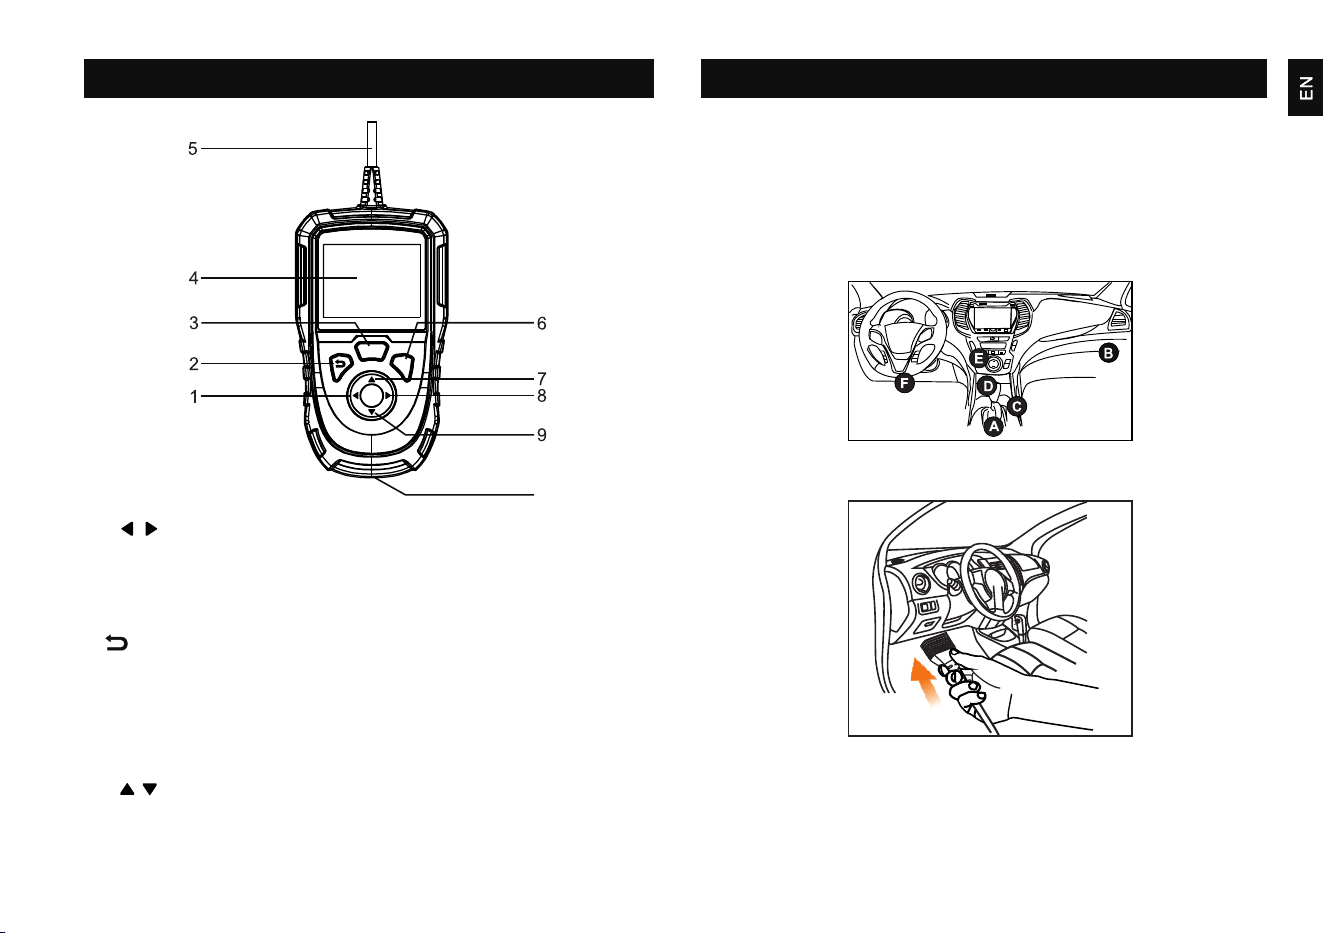
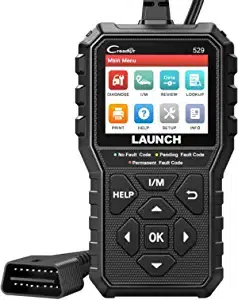
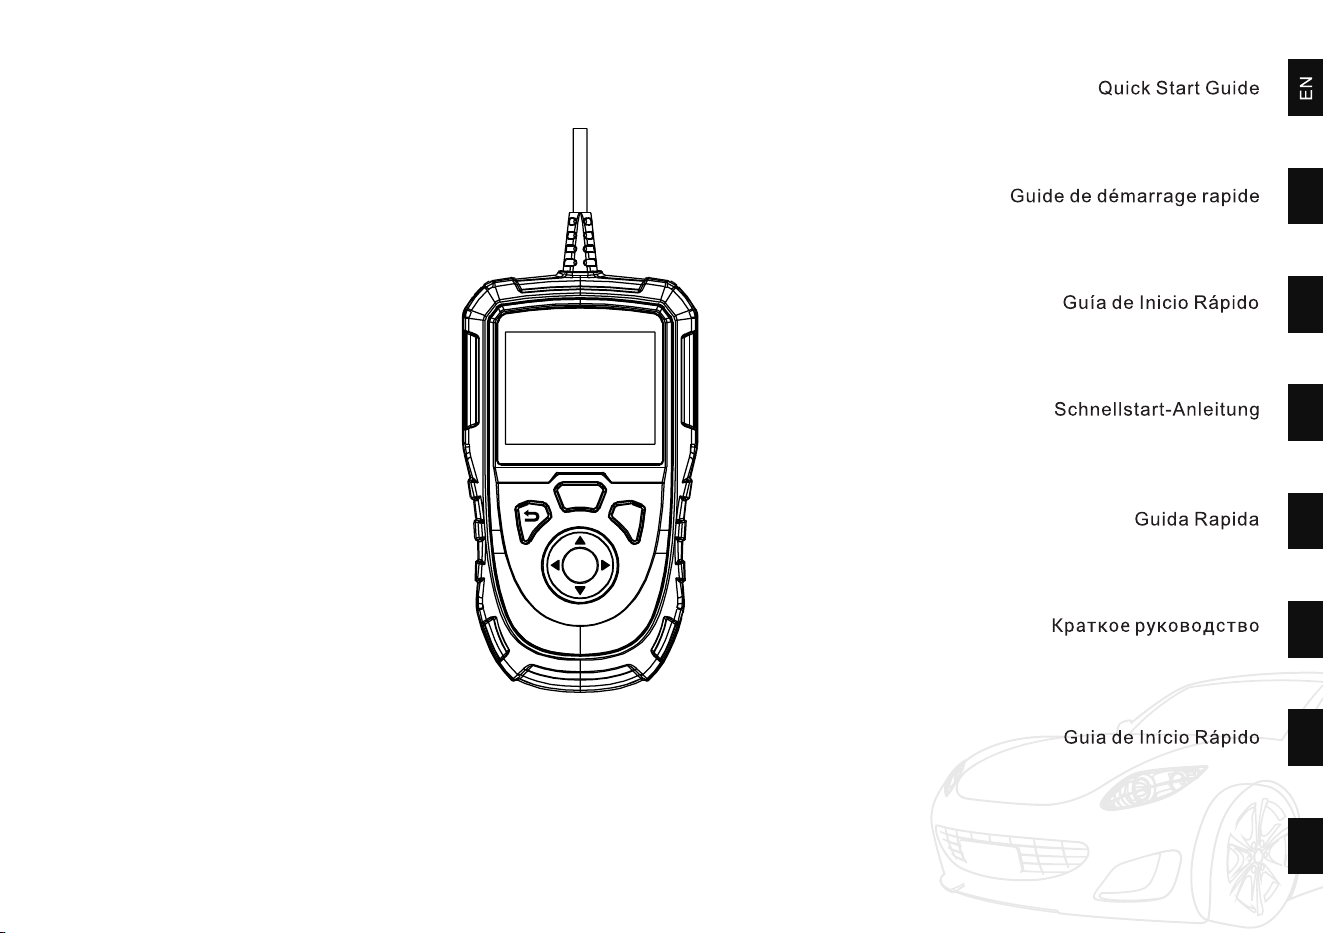
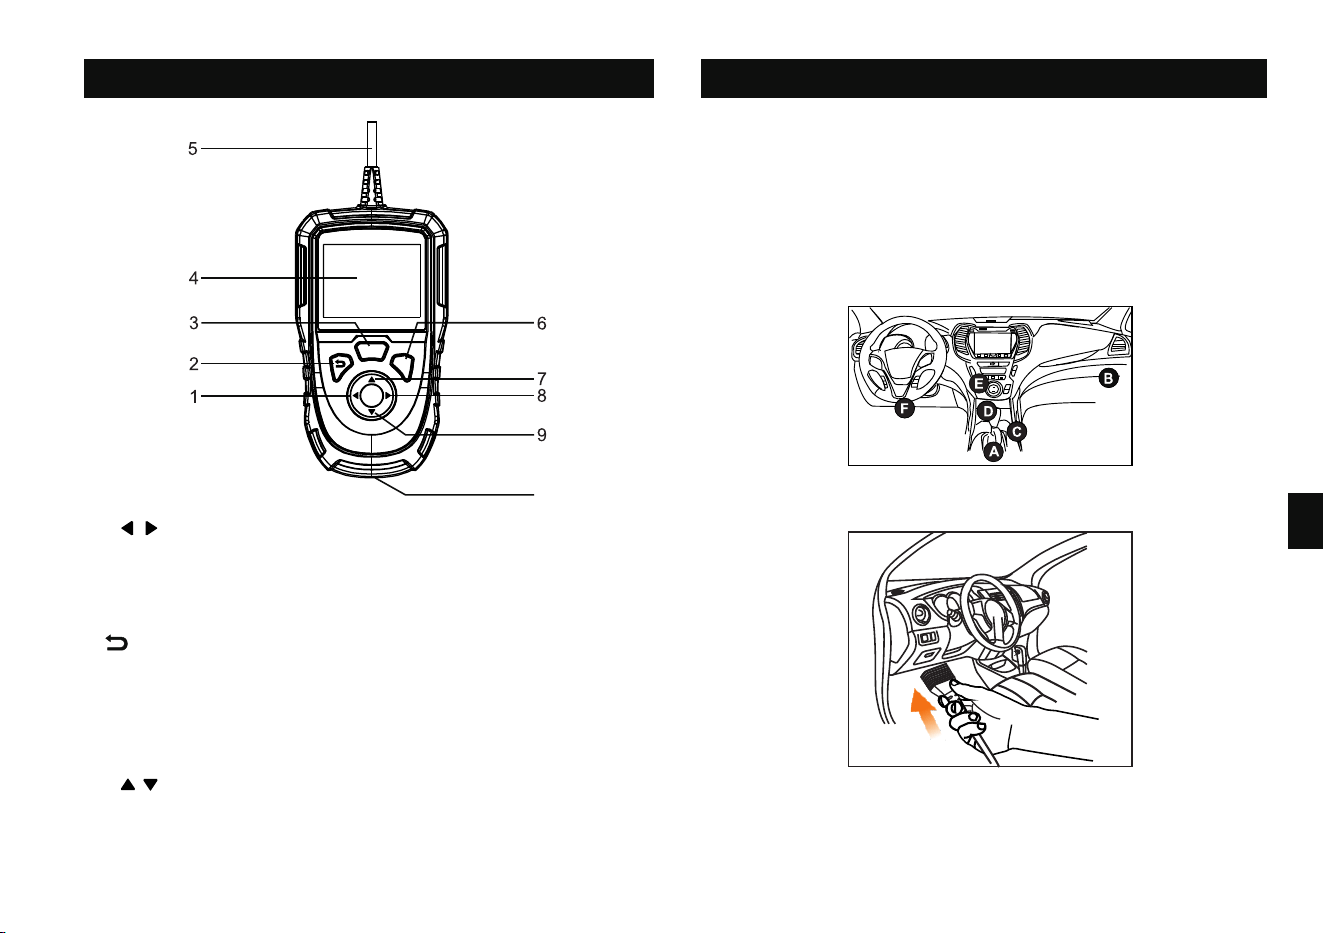
Components & Controls Diagnose
1/8. / Selection Button
Ÿ When in MENU mode, scroll LEFT/RIGHT through the menu and
submenu selection options.
Ÿ When LINKED to a vehicle, scroll through the screen data to the
PREVIOUS/NEXT page.
2. BACK Button - Returns to previous menu.
3. I/M Button - Quick access to I/M readiness function.
4. LCD Screen
5. Diagnostic Cable
6. OK Button - Confirms a selection (or action) from a MENU
list.
7/9. / Selection Button
When in MENU mode, scroll DOWN/UP through the menu and
submenu selection options.
10. USB Port - Connects it to PC for device upgrade/data
exchange.
*All information, illustrations, and specifications in this manual are
based on the latest information available at the time of publication. The
right is reserved to make changes at any time without notice.
OK
I/M
LAU NCH
4. Turn on the ignition. Engine can be off or running. Now it is
ready for diagnostics.
1. Turn the ignition off.
This scanner is specially designed to work with all OBD II
compliant vehicles with 11-14volts.
2. Locate the vehicle's 16-pin Data Link Connector (DLC). Refer to
the following figure for possible DLC location. For some
vehicles with special designs, the DLC may vary.
3. Plug the diagnostic cable into vehicle's DLC port.
10
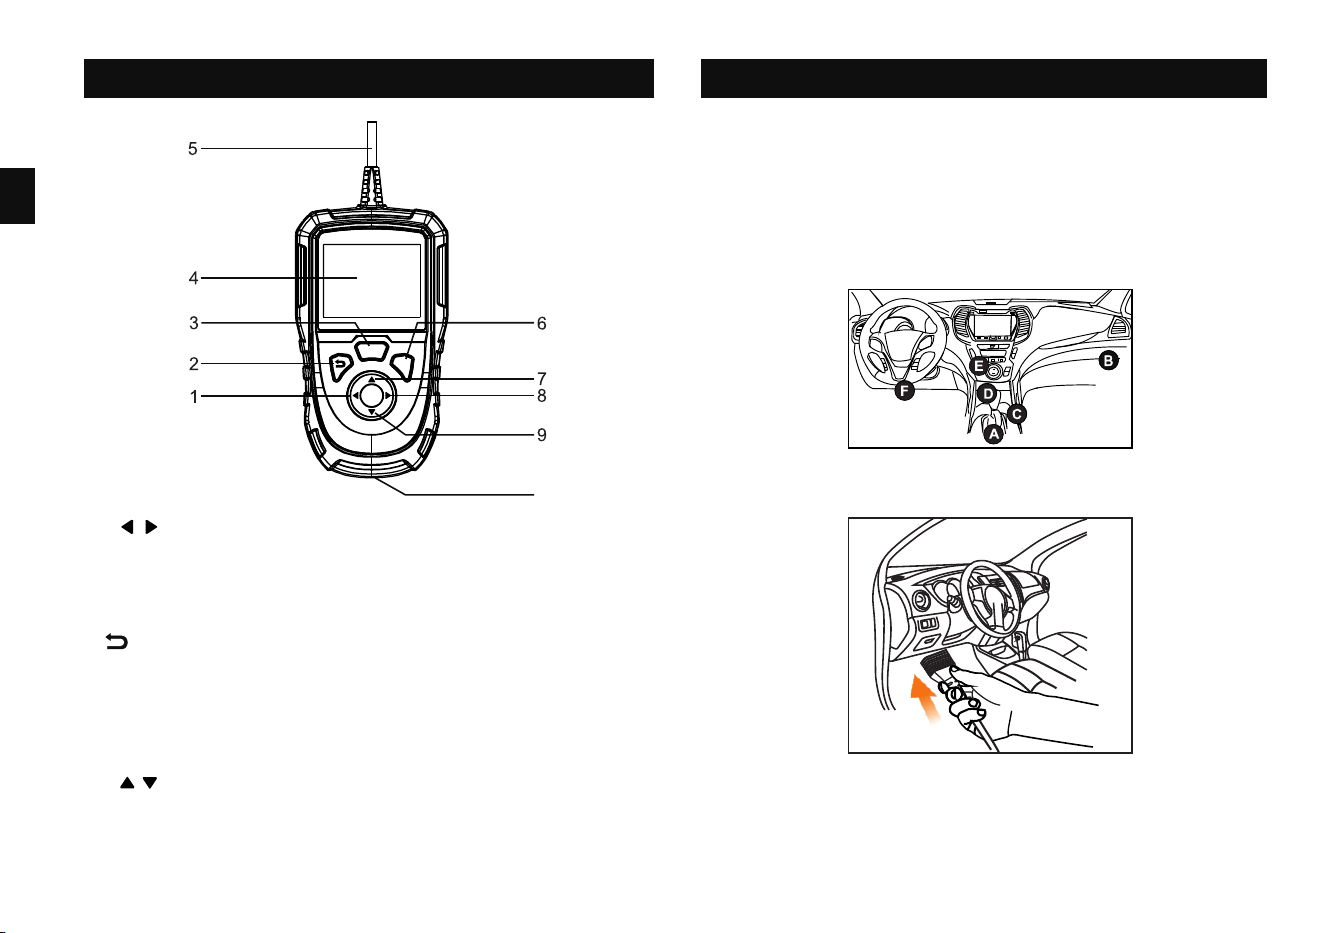
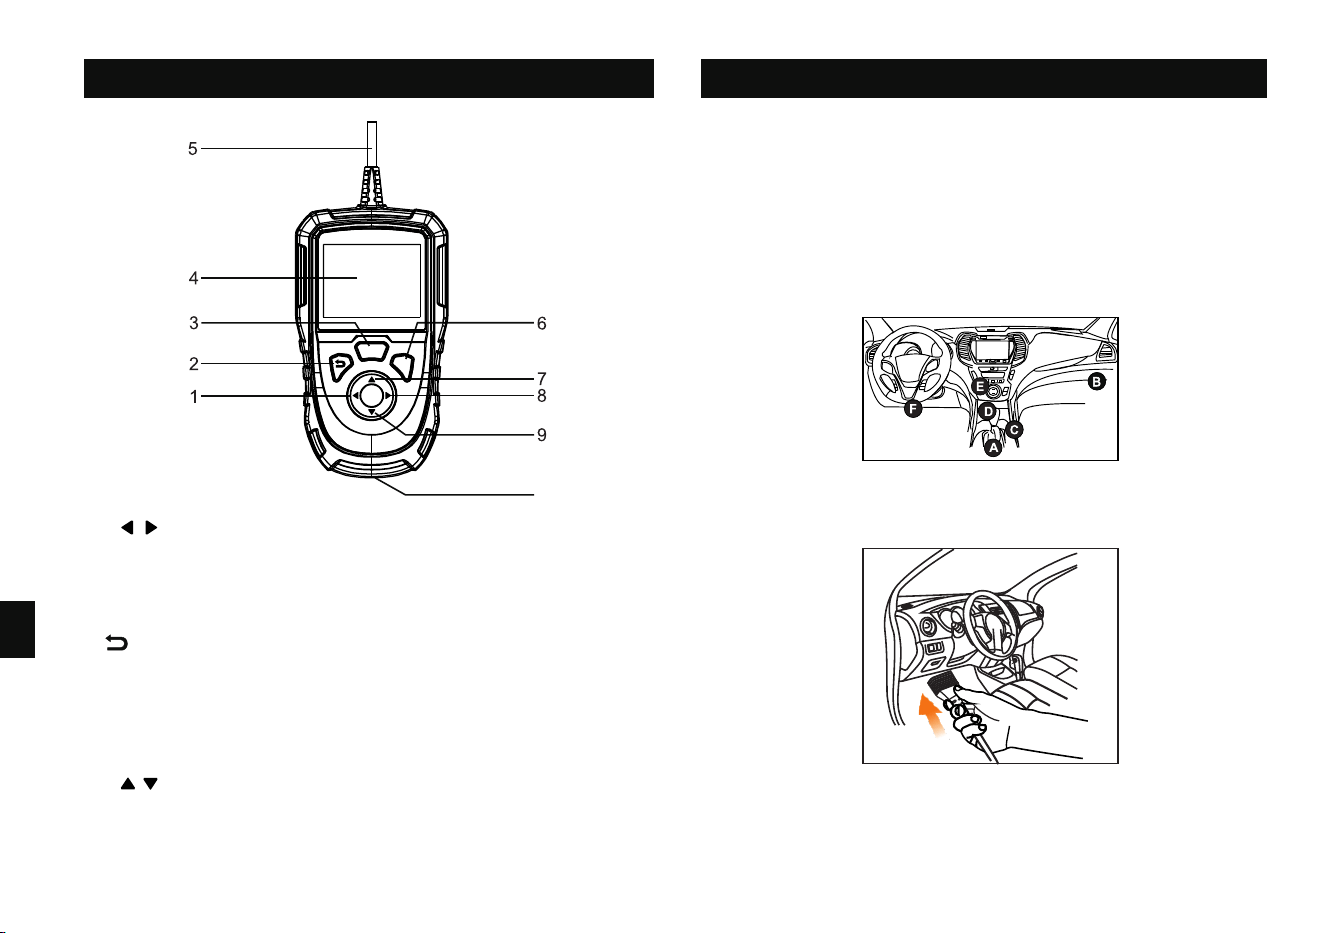
Composants et contrôles Diagnostic
En mode MENU, faites défiler vers le bas/vers le haut dans les
options de sélection du menu et du sous-menu.
6. Bouton OK - Confirme une sélection (ou une action) à partir
d'une liste MENU.
7/9. / Bouton de sélection
10. Port USB - Connecte le câble USB au PC pour la mise à niveau
du périphérique/échange de données.
Ÿ En mode MENU, faites défiler GAUCHE/DROITE dans les
options de sélection du menu et du sous-menu.
1/8. / Bouton de sélection
2. Bouton ARRIÈRE - Retour au menu précédent.
3. Bouton I/M - Accès rapide à la fonction de préparation I/M.
4. ÉCRAN LCD
Ÿ Lorsque vous êtes LIÉ à un véhicule, faites défiler les données
de l'écran vers la page PRÉCÉDENTE/SUIVANTE.
5. Câble de diagnostic
*Toutes les informations, illustrations et spécifications de ce manuel
sont basées sur les dernières informations disponibles au moment de la
publication. Le droit est réservé pour apporter des changements à tout
moment et sans préavis.
4. Mettez le contact. Le moteur peut être désactivé ou en cours
de fonctionnement Maintenant, il est prêt pour les diagnostics.
1. Tourner le commutateur d'allumage à la position OFF.
2. Localisez le connecteur de liaison de données (DLC) à 16
broches du véhicule. Reportez-vous à la figure suivante pour un
emplacement DLC possible. Pour certains véhicules avec des
conceptions spéciales, le DLC peut varier.
Ce scanner est spécialement conçu pour fonctionner avec tous les
véhicules conformes à la norme OBD II avec 11-14volts.
3. Connectez le câble de diagnostic au DLC du véhicule, l'outil
sera automatiquement mis sous tension.
FR
OK
I/M
LAU NCH
10
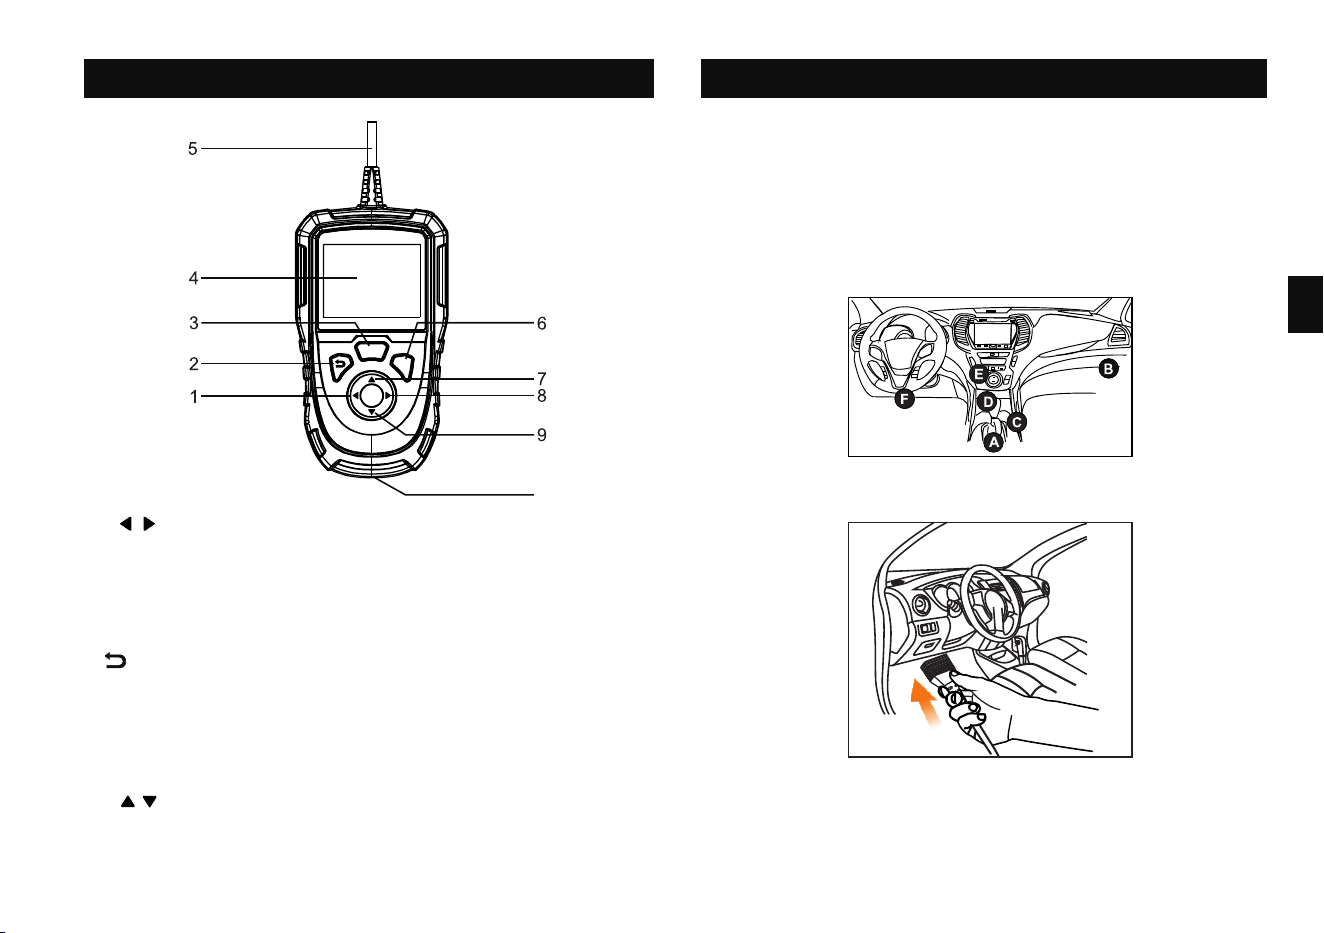
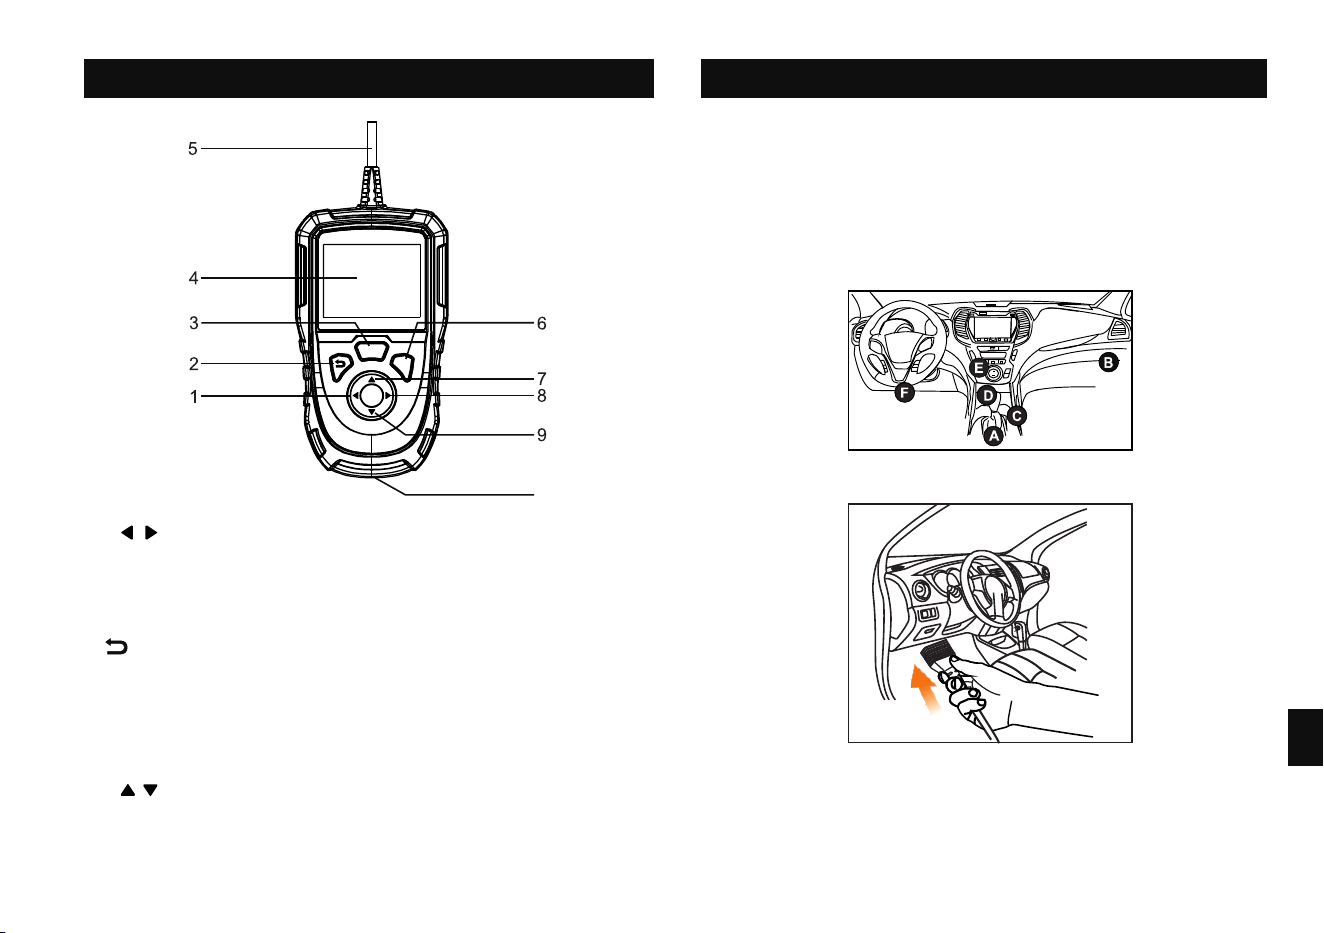
Componentes y Controles Diagnóstico
6. BOTÓN OK - Confirme una selección (o acción) de una lista
MENÚ.
7/9. / Botón Selección
3. BOTÓN I/M - Acceso rápido a la función de preparación de I/M.
4. PANTALLA LCD
2. BOTÓN ATRÁS - Vuelve al menú anterior.
5. Cable de diagnóstico
Cuando esté en modo MENÚ, desplácese hacia ABAJO/HACIA
ARRIBA a través de las opciones de selección de menú y submenú.
Ÿ Cuando esté en modo MENÚ, desplácese a la
IZQUIERDA/DERECHA a través de las opciones de selección de
menú y submenú.
10. Puerto USB - Conecta el cable USB a la PC para la
actualización del dispositivo/intercambio de datos.
1/8. / Botón Selección
Ÿ Cuando esté VINCULADO a un vehículo, desplácese por los
datos de la pantalla hasta la página ANTERIOR/SIGUIENTE.
*Toda la información, las ilustraciones y las especificaciones de este
manual se basan en la última información disponible en el momento de la
publicación. Nos reservamos el derecho a realizar cambios en cualquier
momento sin previo aviso.
4. Encienda el encendido. El motor puede estar apagado o
estar en marcha. Ahora está listo para el diagnóstico.
1. Apague el encendido.
2. Localice el Conector de Enlace de Datos (DLC) de 16 pines del
vehículo. Consulte la siguiente figura para ver la posible
ubicación del DLC. Para algunos vehículos con diseños
especiales, el DLC puede variar.
Este escáner está especialmente diseñado para funcionar con
todos los vehículos compatibles con OBD II con 11-14 voltios.
3. Conecte el cable de diagnóstico al DLC del vehículo, la
herramienta se encenderá automáticamente.
ES
OK
I/M
LAU NCH
10
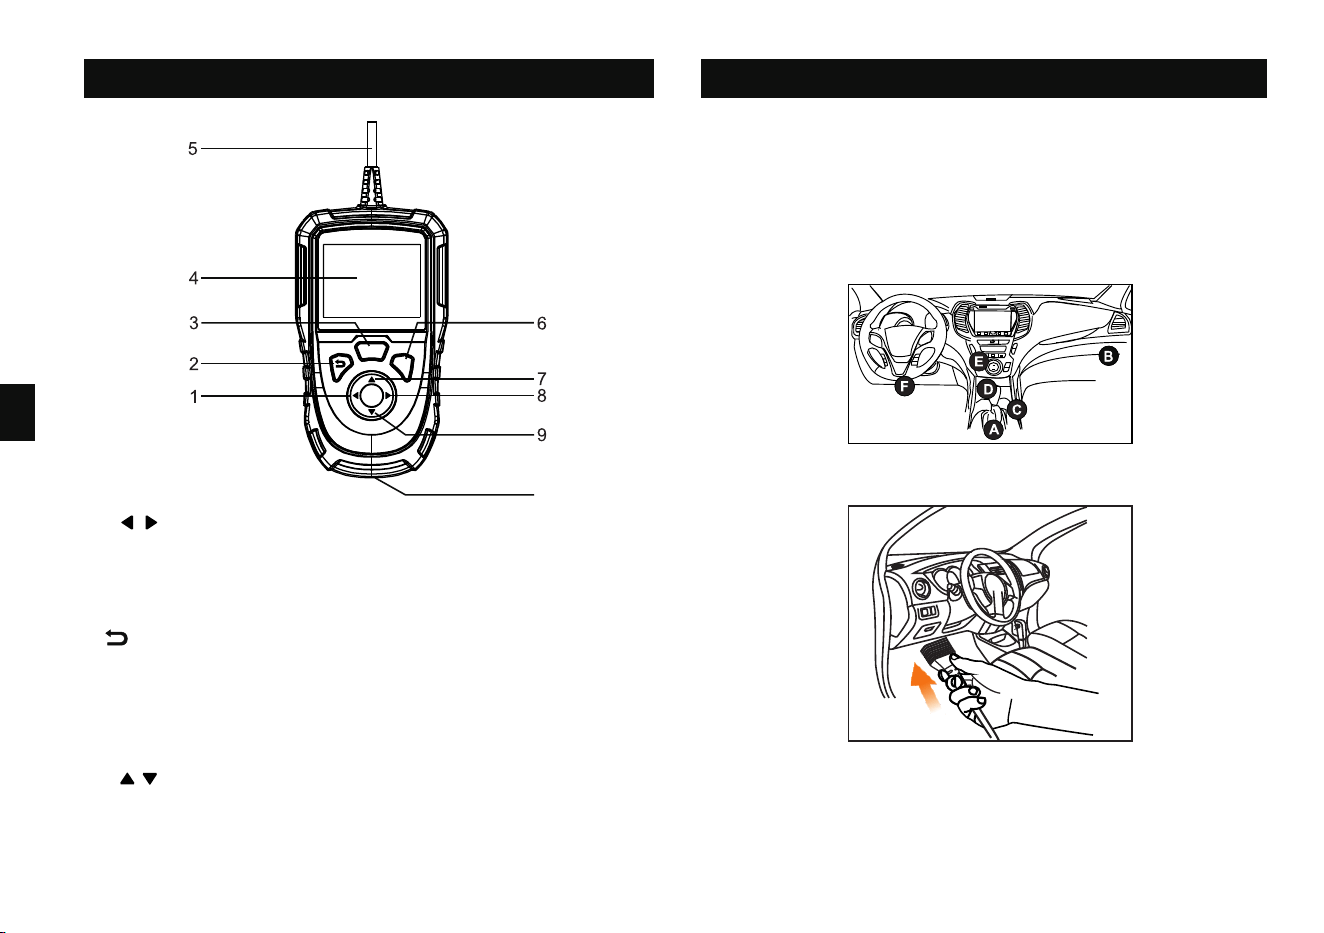
Komponenten & Steuerungen Diagnose
7/9. / Pulsante di selezione
Quando in modalità Menù, attraverso le opzioni di selezione menù
e menù secondario.
10. USB-Anschluss
1/8. / Auswahltaste
3. I/M-TASTE - Schnellzugriff auf die Funktion I/M-Bereitschaft.
Schließt das USB-Kabel an PC, um das Gerät zu
aktualisieren/Datenaustausch.
4. LCD-BILDSCHIRM
Ÿ Im Menümodus blättern Sie nach LINKS/RECHTS durch die
Auswahloptionen des Menüs und des Untermenüs.
5. Diagnosekabel
Ÿ Wenn mit einem Fahrzeug VERBUNDEN ist, blättern Sie durch
die Bildschirmdaten zur VORHERIGEN/NÄCHSTEN Seite.
2. ZURÜCK-TASTE - Kehrt zum vorherigen Menü zurück.
6. OK-TASTE - Bestätigt eine Auswahl (oder Aktion) aus einer
Menüliste.
*Alle Informationen, Abbildungen und Spezifikationen in diesem
Handbuch basieren auf den neuesten Informationen zum Zeitpunkt der
Veröffentlichung. Wir behalten und das Recht vor, jederzeit und ohne
Vorankündigung Änderungen vorzunehmen.
4. Schalten Sie die Zündung ein. Der Motor kann ausgeschaltet
werden oder laufen. Jetzt ist der Scanner bereit für die
Diagnose.
Dieser Scanner ist speziell für die Arbeit mit allen OBD II-
konformen Fahrzeugen mit 11-14 Volt ausgelegt.
1. Schalten Sie die Zündung aus.
2. Suchen Sie den 16-poligen Datenübertragungsstecker (DLC)
des Fahrzeugs. Die folgende Abbildung zeigt die mögliche
Position von DLC an. Bei einigen Fahrzeugen mit speziellen
Designs kann der DLC variieren.
3. Schließen Sie das Diagnosekabel an DLC des Fahrzeugs an.
Das Gerät wird automatisch eingeschaltet.
DE
OK
I/M
LAU NCH
10
Componenti e Controlli Diagnosi
1/8. / Pulsante di selezione
Ÿ Quando COLLEGATO ad un veicolo, scorrere attraverso i dati
dello schermo alla pagina precedente/successivo.
3. Pulsante I/M - Accesso veloce alla funzione readiness I/M.
5. Cavo diagnostico
6. Tasto OK - Conferma una selezione (o azione) da una lista
menù.
7/9. / Pulsante di selezione
Quando in modalità Menù, attraverso le opzioni di selezione menù
e menù secondario.
10. Porto USB - Collega il cavo USB al PC per aggiornare il
dispositivo/scambio di dati.
Ÿ Quando in modalità Menù, scorrere Sx./Dx. Attraverso il menù e
le opzioni di selezione menù secondario.
2. Pulsante Indietro - Ritorna al menù precedente.
4. Schermo LCD
*Tutte le informazioni, illustrazioni e le specifiche tecniche riportate in
questo manuale sono basate sulle informazioni più recenti disponibili al
momento della pubblicazione. Si riserva il diritto di apportare modifiche
in qualsiasi momento senza preavviso.
4. Girare la chiave su marcia. Il motore può essere spento o in
moto. Ora è pronto per la diagnosi.
Questo scanner viene appositamente progettato per funzionare
con tutti veicoli conformi OBD II con 11-14V.
1. Girare la chiave su STOP.
2. Individuare la presa di diagnosi 16-pin DLC(Connettore
collegamento dati) del veicolo. Fare la figura di seguenti per
posizione DLC(Connettore per diagnosi) possibile Fare
riferimento alla figura seguente per una possibile posizione del
DLC (presa di diagnosi).
3. Collegare il cavo diagnostico al DLC del veicolo, lo strumento
sarà acceso automaticamente.
IT
OK
I/M
LAU NCH
10
Компоненты и управление Диагностики
2. Кнопка Назад - Возврат к предыдущему меню.
5. Диагностический кабель
3. Кнопка I/M - Для быстрого доступа к I/M функции готовности.
10. USB-порт - чтобы подключить USB-кабель к ПК для
обновления прибора обмена данными./
6. Кнопка OK - Подтверждает выбор (или опцию) из списка
МЕНЮ.
Ÿ При подключении к автомобилю прокрутите экран
вверх/вниз.
Когда находится в режиме МЕНЮ, прокручивайте ВНИЗ /
ВВЕРХ по опциям выбора меню и подменю.
7/9. / Кнопка выбора
4. ЖК-дисплей
Ÿ Когда находится в режиме МЕНЮ, прокручивайте ВЛЕВО /
ВПРАВО по опциям выбора меню и подменю.
1/8. / Кнопка выбора
*Вся информация, иллюстрации и спецификации в этом руководстве
основаны на наиболее свежей информации, доступной на момент.
Мы оставляем за собой право вносить изменения в любое время без
предварительного уведомления.
4. Включите зажигание. Двигатель может быть выключен
или запущен. Теперь готов к диагностике.
2. Найдите 16-контактный разъем канала передачи данных (DLC)
автомобиля. На следующем рисунке показано возможное
расположение DLC. Для некоторых автомобилей со
специальной конструкцией расположение DLC может
отличаться.
1. Выключить зажигание.
Этот сканер особенно разработан для работы со всеми
автомобилями, совместимыми с OBD II, с напряжением 11–14
вольт.
3. Подключите один конец диагностического кабеля к
диагностическому разъему DLC, инструмент будет
автоматически включен.
RU
OK
I/M
LAU NCH
10
Componentes & controles Diagnóstico
3. BOTÃO de I/M - Acesso rápido à função de prontidão de I/M.
10. Porta USB - Conecta-o ao PC para atualização de dispositivo /
troca de dados.
6. BOTÃO OK - Confirma uma seleção (ou ação) de uma lista de
MENU.
1/8. / BOTÃO de seleção
2. BOTÃO de VOLTAR - Retorna ao menu anterior.
4. TELA de LCD
5. Cabo de diagnóstico
7/9. / BOTÃO de seleção
Quando no modo MENU, role PARA BAIXO/PARA CIMA pelas
opções de seleção de menu e submenu.
Ÿ Quando LINKADO a um veículo, role pelos dados da tela para a
página ANTERIOR/SEGUINTE.
Ÿ Quando no modo MENU, role para a ESQUERDA/DIREITA pelas
opções de seleção de menu e submenu.
*Todas as informações, ilustrações, e especificações neste manual
são baseadas nas informações mais recentes disponíveis no
momento da publicação. O direito é reservado para fazer alterações a
qualquer momento sem aviso prévio.
4. Ligue a ignição. O motor pode estar desligado ou
funcionando. Agora está pronto para o diagnóstico.
2. Localize o Conector de Link de Dados (DLC) de 16 pinos do
veículo. Consulte a seguinte figura para possível localização do
DLC. Para alguns veículos com designs especiais, o DLC pode
variar.
1. Desligue a ignição.
Este scanner é especialmente projetado para funcionar com todos
os veículos compatíveis com OBD II com 11-14 volts.
3. Conecte cabo de diagnóstico ao soquete de DLC do veículo.
PT
OK
I/M
LAU NCH
10
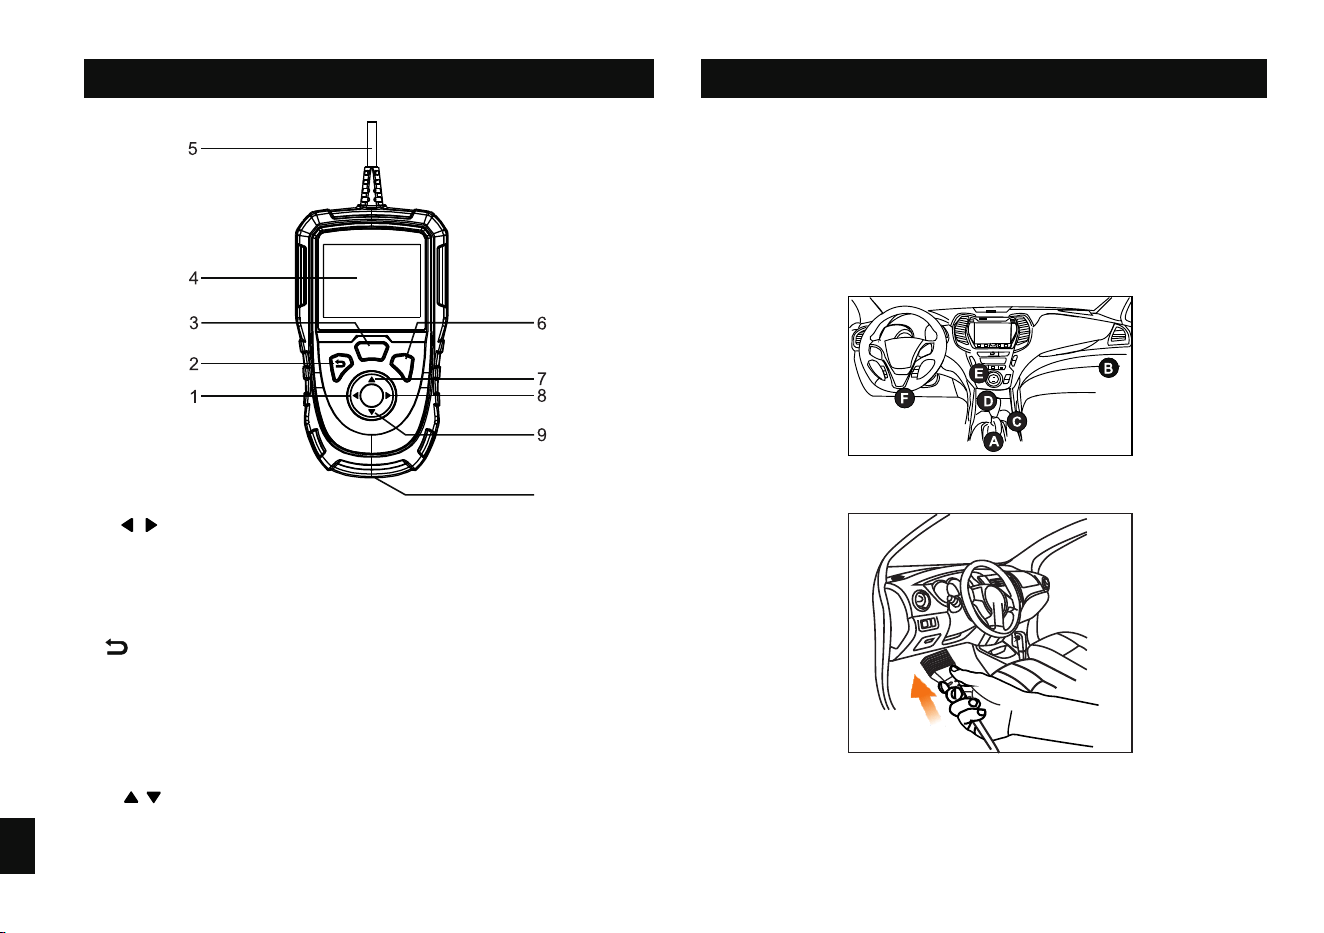
Komponenty i elementy sterujące
Diagnostyka
4. Wyświetlacz LCD
6. Przycisk OK – potwierdza wybór (lub działanie) z listy
MENU.
W trybie MENU przewijaj w DÓŁ/GÓRĘ przez opcje wyboru
menu i podmenu.
2. Przycisk WSTECZ – powrót do poprzedniego menu.
3. Przycisk I/M. – szybki dostęp do funkcji gotowości I/M.
1/8. / Przycisk wyboru
Ÿ W trybie MENU przewijaj w LEWO/PRAWO przez opcje
wyboru menu i podmenu.
Ÿ Po podłączeniu do pojazdu przewijaj dane na ekranie,
wybierając POPRZEDNIĄ/NASTĘPNĄ stronę.
5. Kabel diagnostyczny
7/9. / Przycisk wyboru
10. Port USB - Podłącza go do komputera w celu uaktualnienia
urządzenia/wymiany danych.
* Wszystkie informacje, ilustracje i specyfikacje zawarte w niniejszej
instrukcji oparte są na najnowszych informacjach dostępnych w
momencie publikacji. Zastrzega się prawo do wprowadzania zmian w
dowolnym czasie bez powiadomienia.
4. Włącz zapłon. Silnik może być wyłączony lub pracować. Teraz
można przystąpić do diagnostyki.
Ten skaner jest przeznaczony specjalnie do pracy ze wszystkimi
pojazdami zgodnymi z OBD II o napięciu 11–14 V.
1. Wyłącz zapłon.
2. Zlokalizuj 16-pinowe złącze Data Link Connector (DLC)
pojazdu. Możliwą lokalizację DLC przedstawiono na poniższej
ilustracji. W przypadku niektórych pojazdów o specjalnej
konstrukcji DLC może się różnić.
3. Podłącz kabel diagnostyczny do gniazda DLC pojazdu.
PL
OK
I/M
LAU NCH
10

LAUNCH
V1.00.000 107013636

装订方式:原始为210mmx148mm横向纸张大小,
按1:1比例输出,打钉装订,确保内页的语言标签与
封面的语言标签对齐
制作要求:
印刷要求:单色印刷,80g书写纸