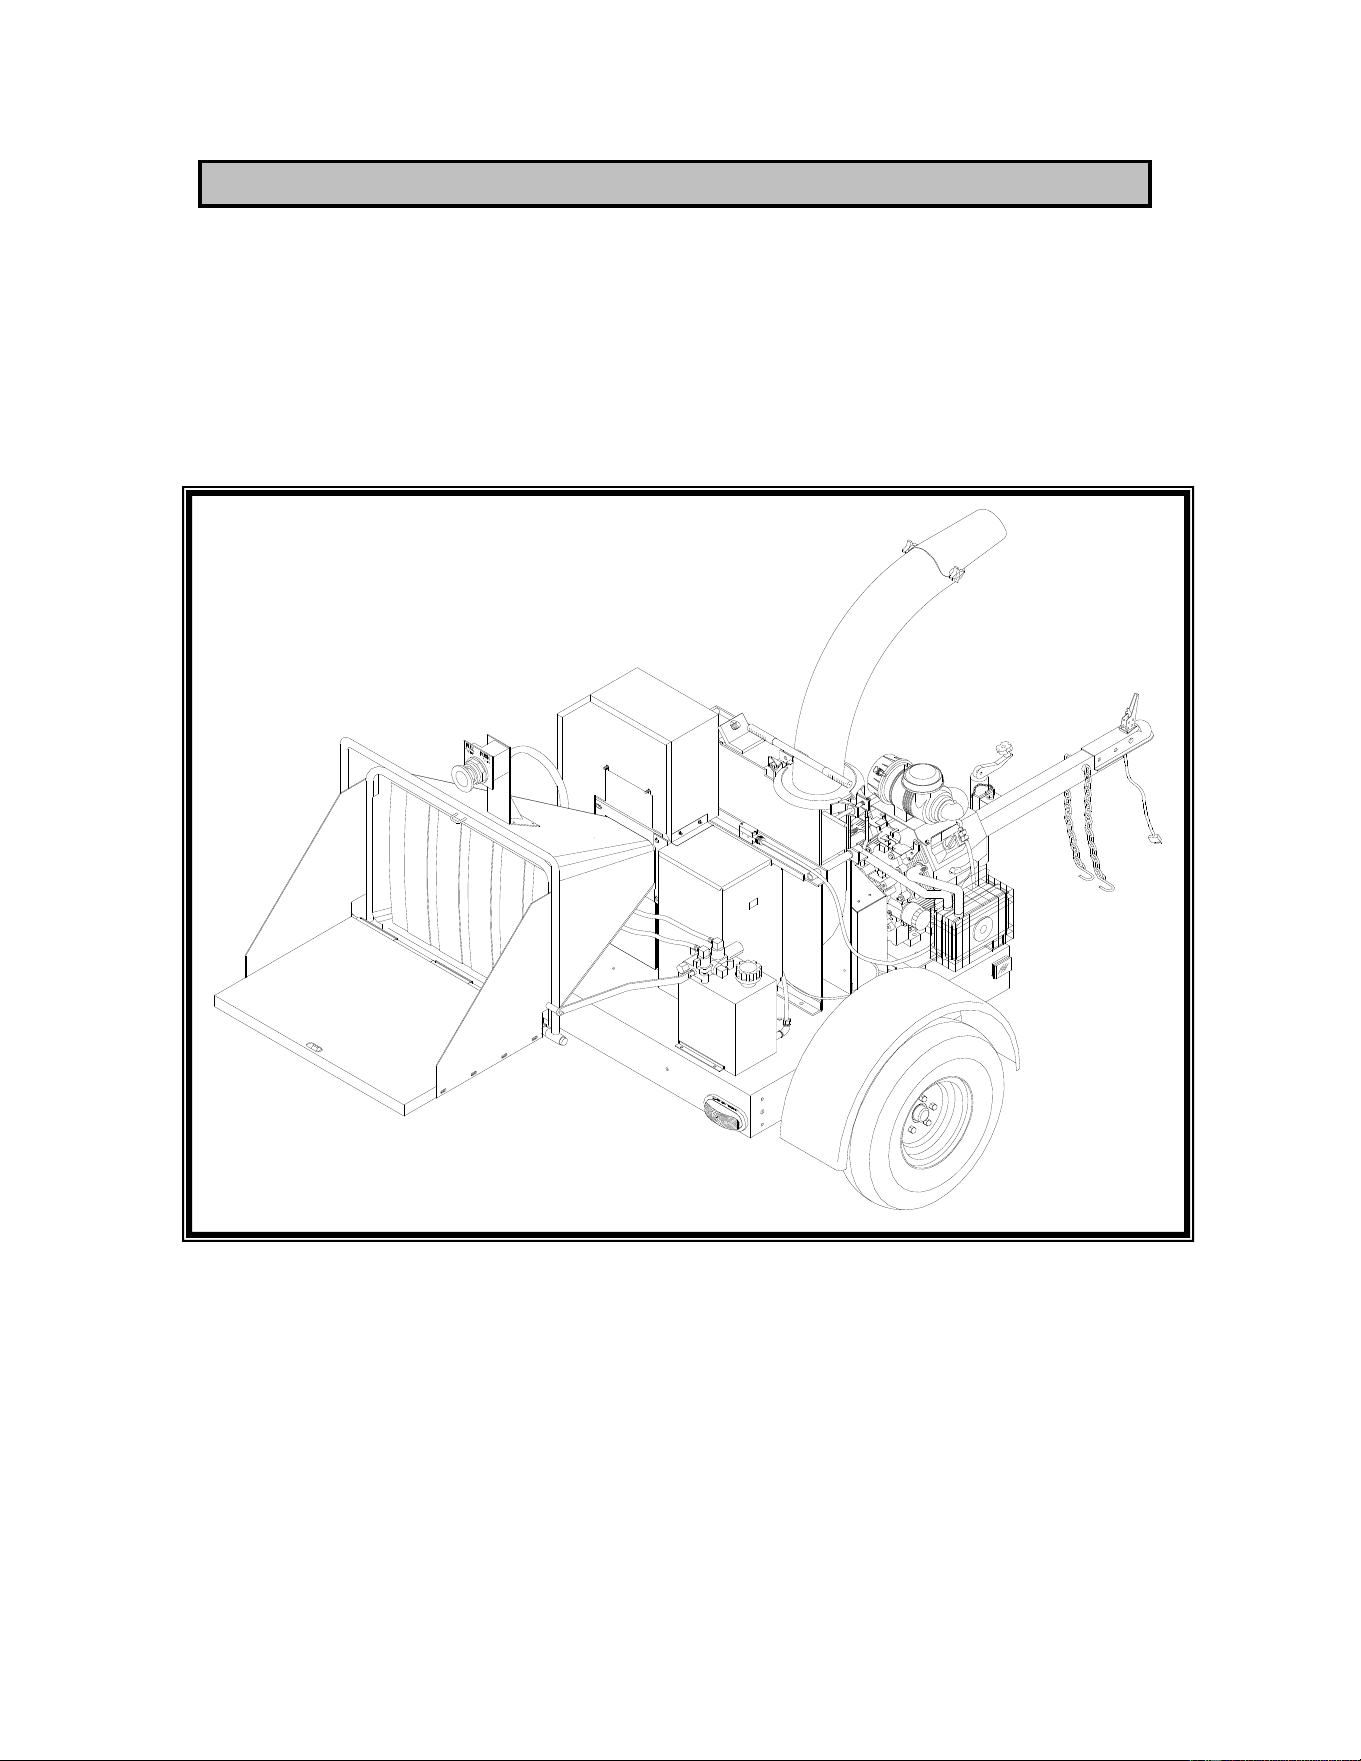
Model 727 POWERTEK
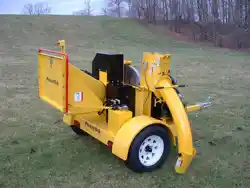
Model 727/731 Hydraulic Feed Chipper
Operation & Maintenance Manual
PowerTek Inc.
P.O. Box 3
Lebanon, IN 46052
1-877-769-7835
3-26-09
SAFETY POWERTEK
WARNINGS
WARNING
WARNING TO PURCHASERS OF INTERNAL COMBUSTION ENGINE
EQUIPPED MACHINERY OR DEVICES IN THE STATE OF
CALIFORNIA:
The equipment that you have purchased does not have a spark arrester muffler.
If this equipment is to be used on any forest and brush covered land or grass
covered un-improved land in the state of California, the law requires that a spark
arrester muffler be installed and be in effective working order. The spark arrester
must be attached to the exhaust system and comply with Section 4442 of the California
Public Resources Code.
The engine exhaust from this equipment contains chemicals known to the State of
California to cause cancer, birth defects or other reproductive harm.
WARNING
This manual contains vital information for the safe use and efficient operation of this
equipment. Carefully read this Operation Maintenance Manual before using this
equipment, as failure to adhere to the instructions could result in death, serious bodily
injury and/or property damage.
This wood chipper is to be used only for chipping wood. Using this machine for
any other purpose may cause injury and or property damage. Improper use of
this chipper will void the warranty.
1

TABLE OF CONTENTS POWERTEK
SAFETY
Warnings………………………1
Table of Contents…….………2
GENERAL OPERATING RULES
General Operating Rules...….3
Safety Rules ..………………..4
Work Zone ...……………….5
INITIAL INSPECTION
Engine .…………………….…6
Tires......……………………….6
Blades and Anvil ..…………..6
Loose Parts ………………….6
Freight Damage Inspection ..6
Battery…………………………6
Belts……………………………6
ON SITE SET UP
Jack Stand…………………….7
Engine ………………………...7
Discharge Chute……………...7
OPERATION
Starting Gas Engine………….8
Feeding Material……………...8
Cleaning Out Debris………….8
Stopping……………………….8
Emergency Stop Switch..……8
Starting Hydraulic Feed…… ..9
MAINTENANCE
Engine..…..……………………10
Fuel..…..………………………10
Battery.......……………………10
Ignition....……………………...10
Cooling .…….…………………10
Air Cleaners…………………..11
Clutch………………………….11
Flywheel Bearings……………11
Wheel Bearings.……..……….11
Hour Meter…………………… 11
Discharge Chute.…..………...11
Drive Belts ..…………………..12
Chipper Blades ..……………..12
Anvil Adjustment……………...13
Maintenance Schedule ..…….14
SPECIFICATIONS
General Specifications……….14
Performance Specifications ...14
HYDRAULIC SYSTEM MAINT.
Cleaning Hydro System ...…..15
Hydraulic Oil…………………..15
Hydro Motor Shaft……………15
Hydraulic System Pressure…15
TROUBLE SHOOTING
Diagnostic Procedures ..……16
Chipping Systems . …………17
Electronic Feed Control……...17
Setting Electronic Board……..18
Notes ……………………...…..19
ELECTRICAL SCHEMATIC
31 HP Vanguard Schematic…19
Electrical Schematic………….20
PARTS LIST
Exploded View (General) …...21
Parts List (General)..…………22
Exploded View (Hydro)….…..23
Parts List (Hydro)….…………24
OWNERS INFORMATION
Record Information ..………..25
WARRANTY
Warranty Information …..…...26
Warranty Procedure………….26
Warranty Procedure (Cont.)…27
2

GENERAL OPERATING RULES POWERTEK
PREPARATION RULE
1. Always inspect the chipper before and after each
use to ensure safety and optimum performance.
2. Inspect the tires, safety chains, and towing hitch for
any malfunctions. Fix or replace any parts if found
to be defective.
3. Check that the running lights and turn signals are
working properly.
4. Inspect that all decals are legible and in place.
Replace any defective decals.
5. Inspect the entire chipper for loose nuts and bolts.
Properly tighten if any are found.
6. Check all chamber bolts, blade bolts and anvil bolts.
Torque to the specified torque as mentioned later in
the manual.
7. Remove and store flywheel safety pin before starting
the unit.
8. Grease all required and marked lubrication points.
9. Check all fluid levels in the engine. Fill if required.
10. Check all belts for wear, cracking or misalignment.
Replace if required.
11. Check all belts for proper tension. If loose retighten
to proper tension.
12. Inspect clutch shoes for wear. Replace if fiber pad is
worn from shoe.
13. Inspect knives and make sure they are sharp and
properly installed. If there are round edges or nicks
that would not allow the blades to operate properly,
re-sharpen them. If the blades are cracked or
chipped replace them or they could cause serious
injury or property damage. Torque all blade bolts to
the proper torque.
14. Inspect that all hydraulic hoses are in good working
order and are not cracked, worn, or leaking.
15. Check that all safety devices and switches are
functioning properly before use.
16. Always shut chipper engine off, allow flywheel to
stop turning, disconnect the spark plug wires and
remove the key from the engine: before servicing
any part of the chipper.
17. Always insert safety pin into the flywheel before
replacing or servicing blades and anvils.
18. Read the manual from cover to cover before using
chipper.
19. Know the capabilities and limitations of the chipper
before using it.
20. THINK SAFETY!
TOWING
1. Before towing, inspect the safety latch on the hitch
coupler to make sure it is closed, latched, and pinned
to prevent premature uncoupling of chipper hitch.
2. Safety chains should be crossed under the tongue of
the chipper and hooked securely to the frame of the
towing vehicle.
3. Before towing be sure to rotate jack stand into the
transport position and make sure it is properly
secured.
4. Make sure that the person who will be towing the
chipper has been properly instructed about local and
state rules of the road and towing procedures.
5. DO NOT tow chipper faster than 45 MPH or chipper
may tip over when going around corners.
3

SAFETY POWERTEK
SAFETY RULES
DO’S
DO make sure that anyone who operates this chipper
reads and understands all operating instructions as to its
proper use and operation as well as all safety
instructions.
DO block the tires of chipper before using. DO check
engine oil level before starting. DO wipe up spilled fuel
right away from the engine and chipper before starting.
DO make sure there are no obstructions in the in feed
chute before starting the engine.
DO make sure all bolts, nuts and parts are tight before
starting.
DO make sure the discharge chute and deflector shield
are properly adjusted to dispatch chips in a safe
direction, away from pedestrians, animals, homes or
other property that could be injured or damaged.
DO keep children and pets away from the work area
while you are operating the chipper.
DO take care when chipping dead or frozen wood in
order to avoid kickback.
DO make sure that all safety decals are read and
understood before operating the chipper.
DO survey work area for any potential dangers for the
operators of equipment.
SAFETY GEAR
DO wear appropriate safety clothing. It is crucial to
protect the operator from serious injury.
DO wear eye protection (safety glasses or helmet with
safety face shield.)
DO wear hearing protection. (Ear plugs or muffs.)
DO wear gloves, heavy work shoes, and protective
clothes.
DO NOT’S
DO NOT operate the chipper alone. DO NOT allow
children to operate the chipper.
DO NOT use your feet or hands to force material into
the feed chute. Use a push stick to push smaller or stuck
branches into chute.
DO NOT ride or allow anyone else to ride on or in the
chipper.
DO NOT override any safety devices that have been
factory installed.
DO NOT operate chipper with upper chamber open.
DO NOT attempt to clear any debris from any chute or
chamber while the chipper is running. Disconnect spark
plug wires and remove the key before any clean out is
attempted.
DO NOT smoke or use any type flame or spark near the
chipper. Always refuel the engine in an open area and
with the engine shut off or the fuel may explode causing
serious injury or property damage.
DO NOT use the chipper under the influence of alcohol
or drugs or you may cause serious injury to yourself or
someone else.
DO NOT for any reason, reach into feed area or
chamber while chipper is running or serious injury or
death can result.
DO NOT wear loose clothing that may become
entangled in brush or machinery or serious injury or
death may occur.
DO NOT wear any strings on clothing that may become
entangled in brush or machinery or serious injury or
death may occur.
DO NOT wear any jewelry that may become entangled
in the brush or machinery or serious injury or death may
occur.
4
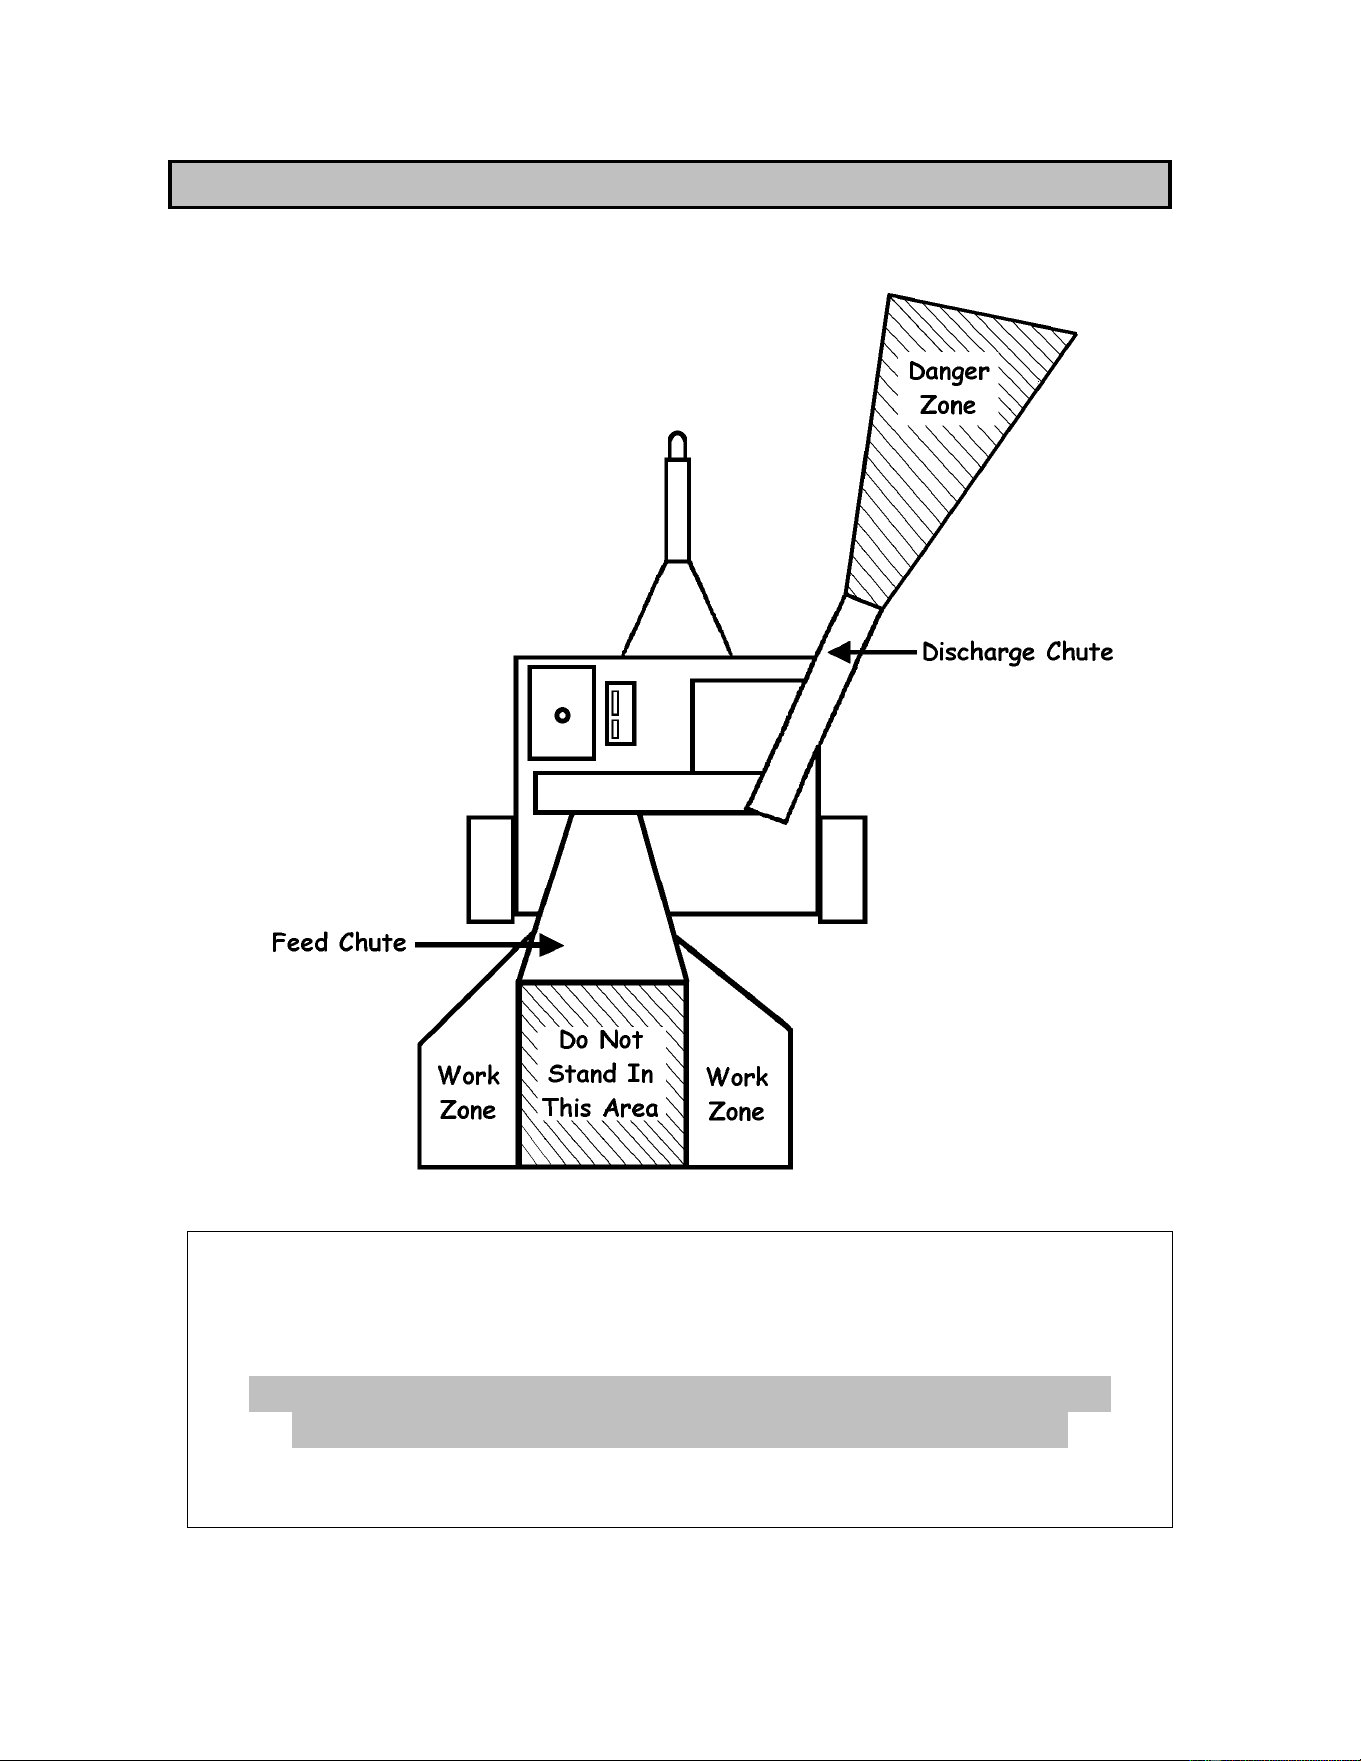
WORK ZONE POWERTEK
! ! WARNING ! !
When operating this unit do not allow anyone to be in the danger
zone while chipper is running or serious injury may occur.
5
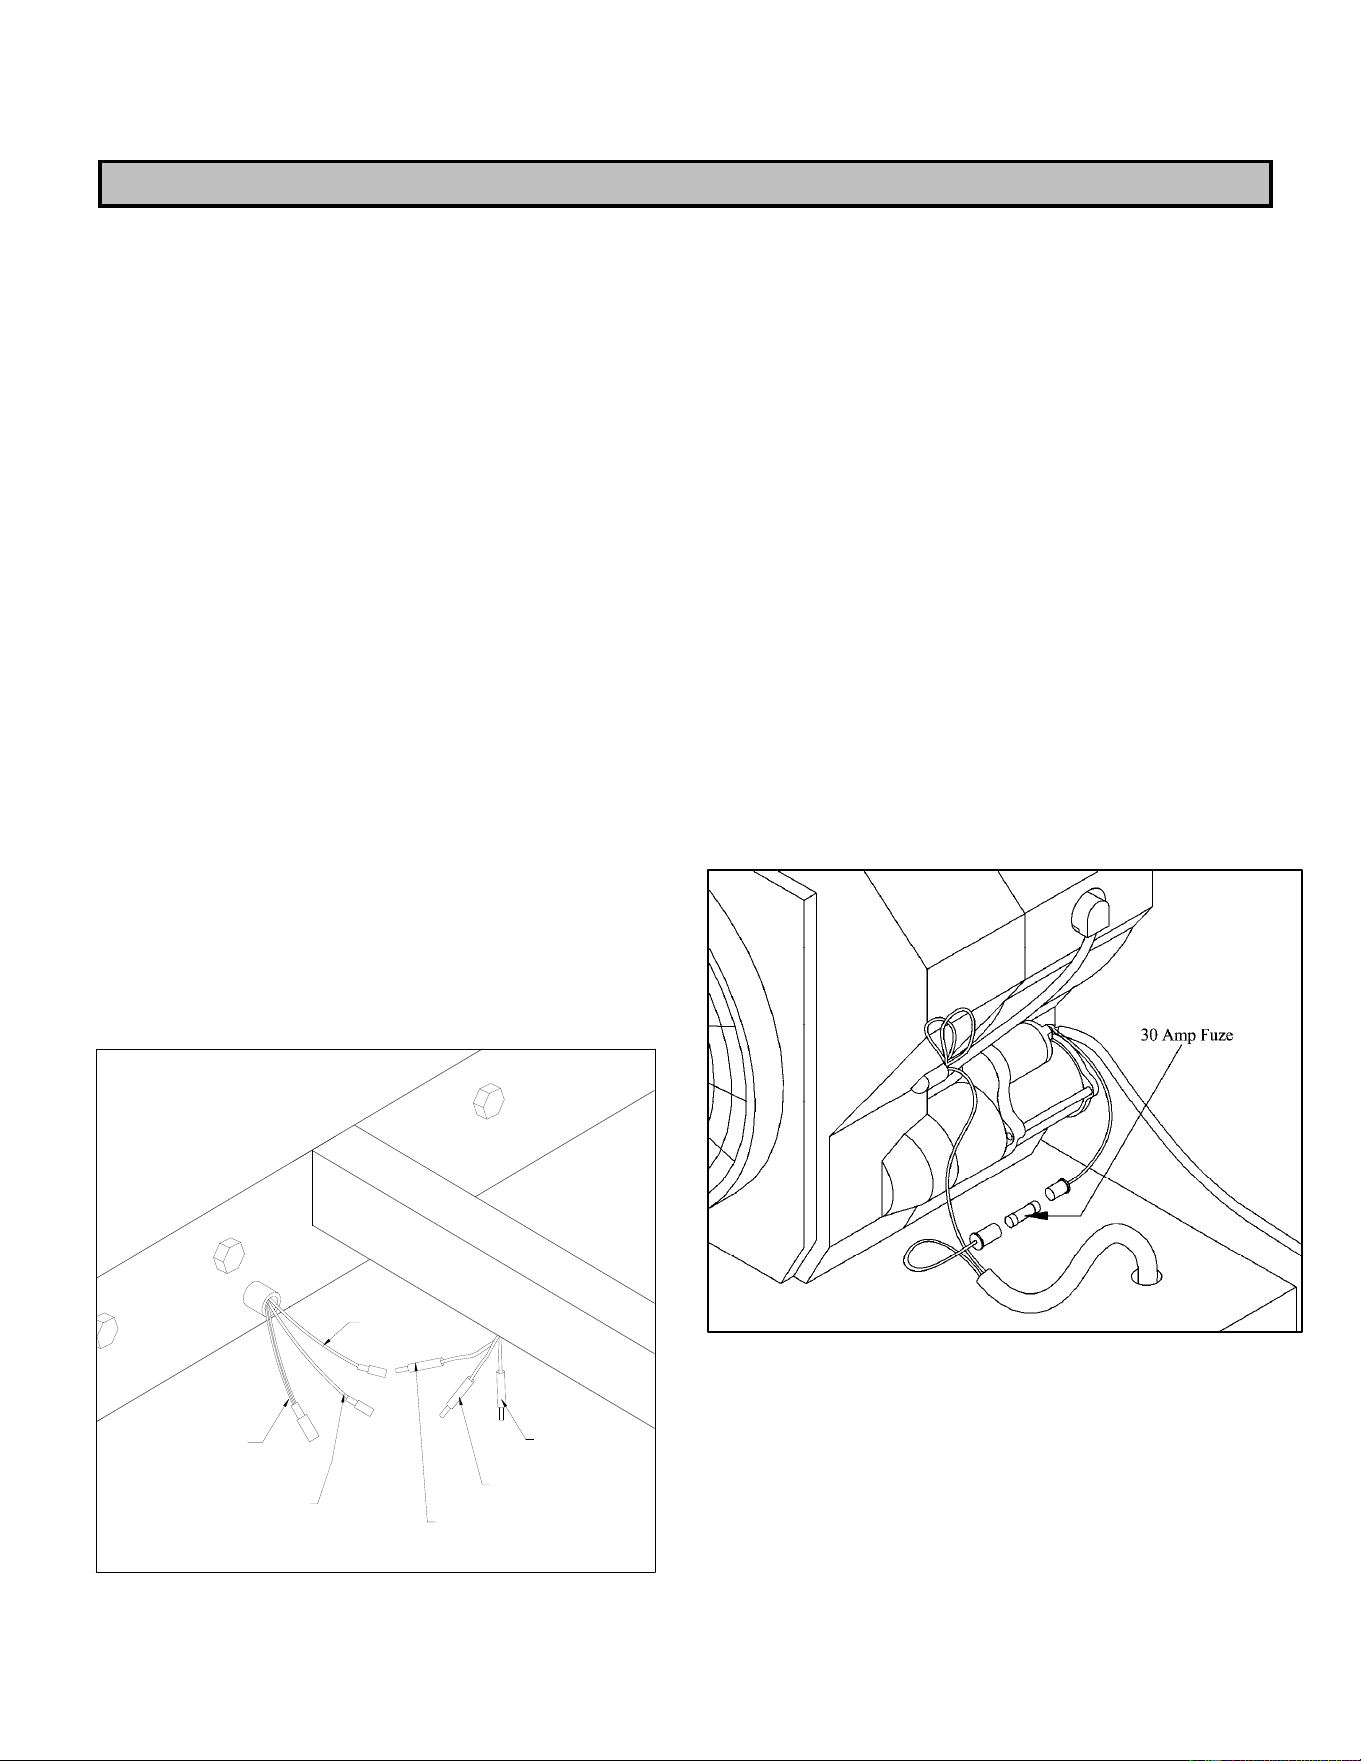
BLACK TO BLACK
Left Turn & Stop
RED TO RED
Tail Light
BLUE TO GREEN
Right Turn & Stop
GREEN
RED
BLACK
INITIAL INSPECTION POWERTEK
Important! Upon receiving your chipper inspect and report any shipping damage to the
carrier immediately. POWERTEK is not responsible for damage received during transport.
ENGINE
The chipper engine was shipped with the proper amount
of oil. However, you should check the oil level and add
to or change fluids if conditions warrant. (See engine
manufacturer’s manual for full details.)
TIRES
Inflation pressure may change with temperature and/or
altitude. Check and adjust tire pressure to manufacturers
recommended pressure when necessary. Maximum tire
pressure is printed on sidewall of tire.
DRAWBAR & WIRING
Remove plastic wrap. Lift unit off of skid and block it up.
Unpack the drawbar and discharge chute. Slide the
drawbar into front opening and bolt it on using hardware
already attached to unit. Plug in wiring as illustrated in
(Fig. 2)
LOOSE PARTS
Check to make sure all nuts and bolts are tight and all
safety guards are securely in place.
FREIGHT DAMAGE INSPECTION
Upon receiving your chipper, inspect and report any
shipping damage to the carrier immediately.
BATTERY & IN-LINE FUZE
For your convenience the battery is shipped fully
energized. However, as a safety precaution the in-line
fuze has been disconnected. After removing the unit from
its pallet, remove the tape holding the 30A fuze into one
side of the fuze holder and reconnect. (See Fig. 1)
(Fig 1)
(Fig 2)
6
ON SITE SETUP POWERTEK
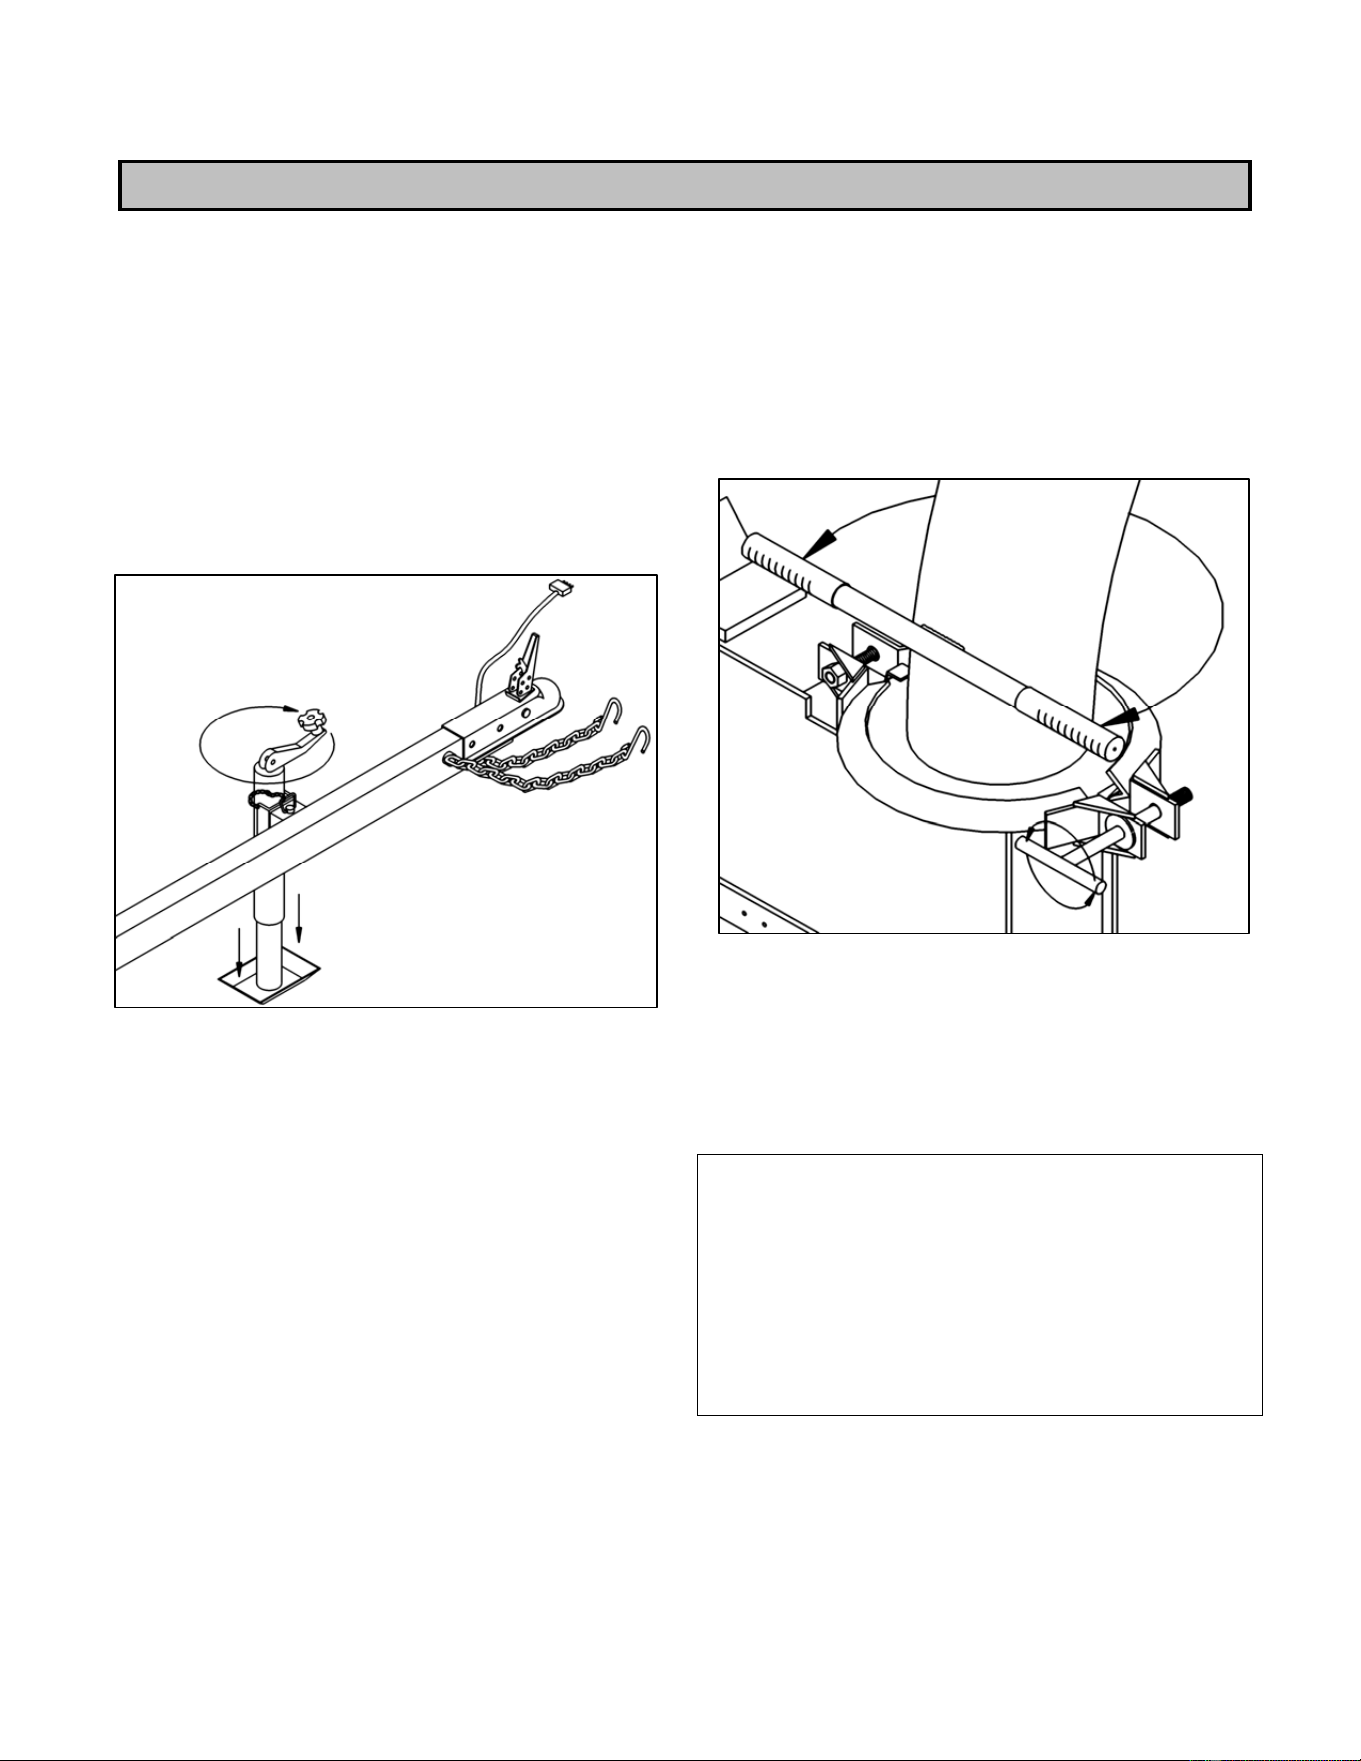
JACK STAND
Once at your destination the chipper can be uncoupled
from or left attached to the towing vehicle. In either
case, the weight should be transferred from the vehicle
by lowering the jack stand. The wheels should be
blocked front & back as a safety precaution or
machine may move causing damage to property or
bodily harm. (See Fig. 2)
(Fig. 2)
ENGINE
Check the level of engine crankcase oil. If necessary,
add oil following the instructions in the maintenance
section of engine manual.
Check air filters for excessive dirt and oil and clean as
required following the instructions in the maintenance
section of engine manual.
DISCHARGE CHUTE
Loosen the discharge chute clamp and rotate the chute
to the desired position. Then tighten the chute clamp
to lock it into place. (See Fig. 3)
(Fig. 3)
! ! CAUTION: ! !
Make sure discharge chute is directed
away from pedestrians, homes, or other
potential safety hazards or injury or
property damage may occur.
7
OPERATION POWERTEK
STARTING GAS ENGINE
Set the throttle to idle speed. If the engine is cold set the
choke, then turn the key to “START” position. If the
engine does not start within 10 seconds allow a 60 second
cool down period between attempts. When the engine
starts let the key return to “RUN” position.
Allow the engine to warm up at an idle speed, for 30
seconds then open the throttle. As the centrifugal clutch
engages the flywheel will gradually come up to speed, the
process should take 30-35 seconds. Run the engine at full
RPMS.
Important! If engine is allowed to idle for long periods,
clutch damage will occur.
FEEDING MATERIAL
When feeding material into the hopper avoid pieces larger
than 7” in diameter or limbs that are not easily handled.
Stand to either side of the intake and feed limbs and
branches large end first.
If brush tends to hang in hopper alternate with small
branches and limbs, do not
attempt to push brush into the
cutter by hand.
If the flywheel speed slows, stop feeding until unit regains
momentum. If speed is not regained shut the unit down by
putting feed bar in neutral and turning key to the off
position and inspect for clogging in the chute and flywheel
chambers as described in following section. Also check
the automatic feed control system to see if it is operating
properly.
CLEARING OUT DEBRIS
! ! WARNING ! !
Always shut down the unit and wait for all moving parts
to fully stop before clearing or adjusting the discharge
chute, flywheel or feedbox. Remove key from engine
before clearing machine and remove wires from spark
plug.
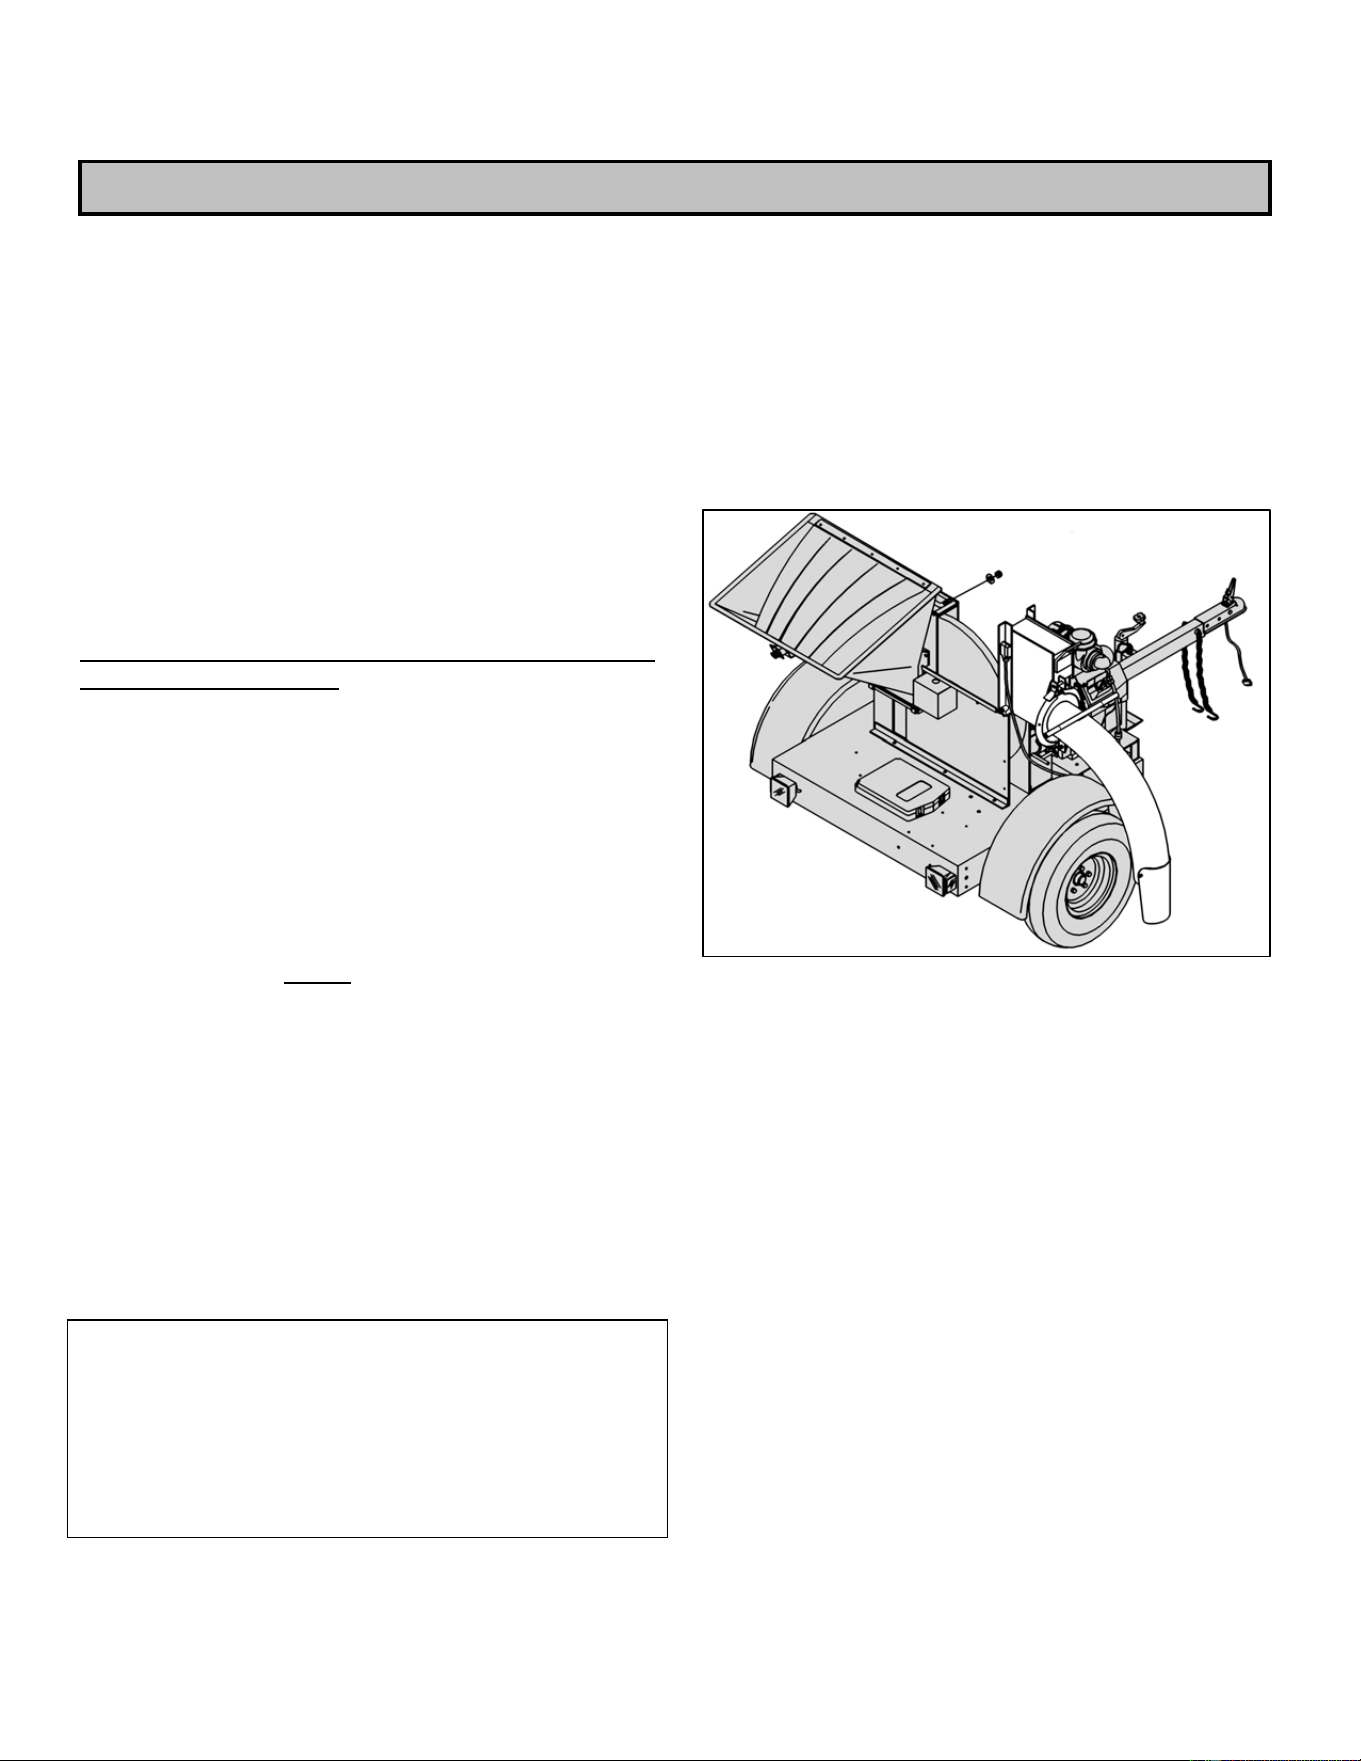
To clear the discharge chute: Remove the chute clamp,
take the chute off, and clear out any debris.
To clear the flywheel housing: First rotate the chute
around until it is pointing away from the chipper and is
parallel to the flywheel. Then remove the lock nut from
the housing with a 1 1/16” box wrench and tilt the chute
back slowly. (See Fig. 4) Check the housing and clear out
any debris.
(Fig. 4)
STOPPING
Always allow the chipper to run at full speed for a few
minutes before shutting down to clear chips so machine is
clean for next use. Do not leave any chips in chipper
because they may cause a hazard on the next start up.
Turn key to the “off” position while at full throttle. An
electronic fuel shut off will automatically stop fuel from
entering engine. Allow flywheel to stop turning before
working on the chipper. As a safety precaution always
remove the key before working on the machine or leaving
it unattended.
EMERGENCY STOP SWITCH
An emergency stop switch is supplied with this unit. The
red safety button is located at the top of the feed hopper.
Push the button to shut the chipper down. When button is
pushed the engine and feed roller will stop. The engine
will not restart until button is reset.
8
OPERATION POWERTEK
STARTING HYDRAULIC FEED
When chipping always run the engine at full throttle. Auto
feed will not work at a lower RPM.
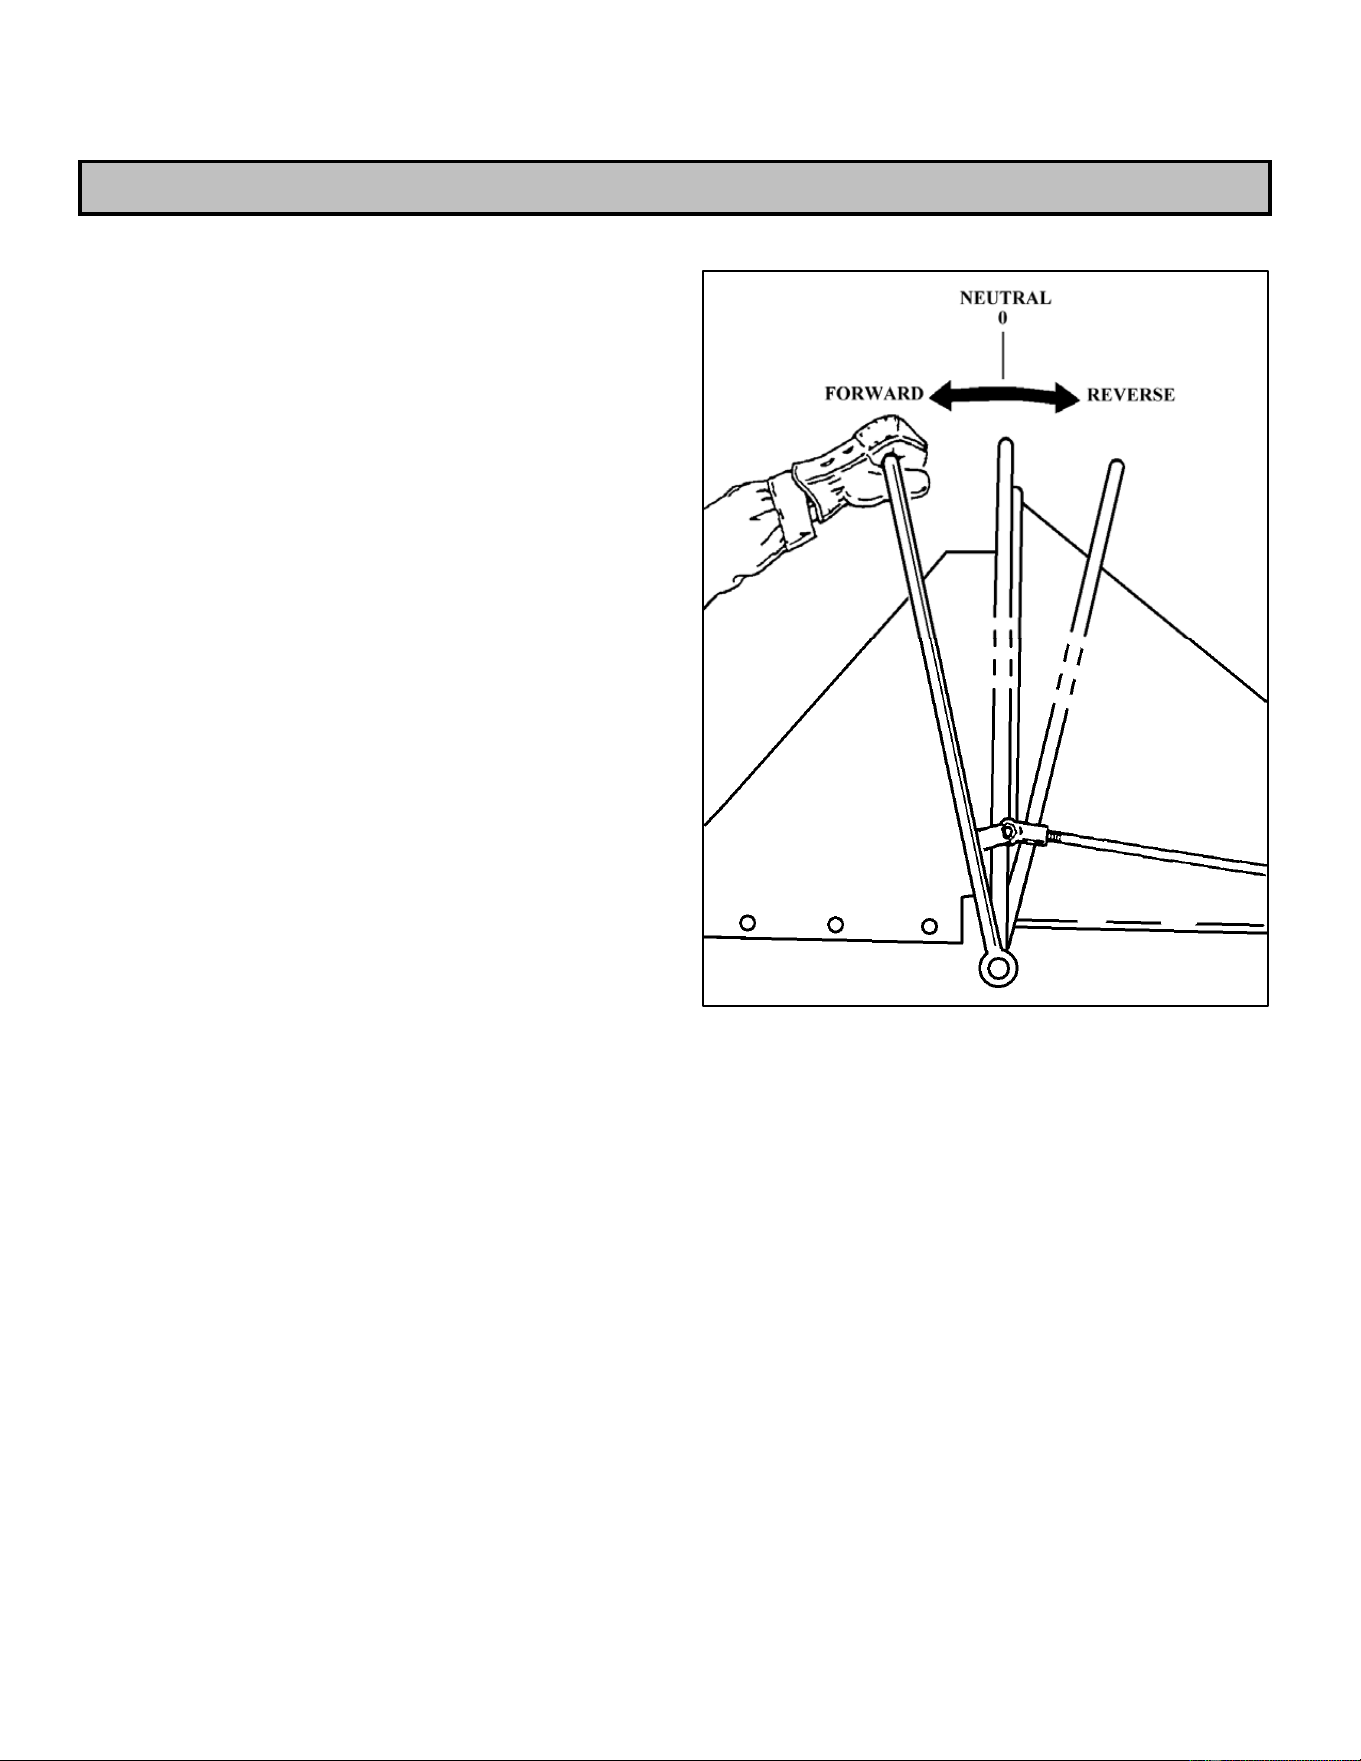
When the control bar is in the upright position it is in
neutral and the feed rollers should not be turning.
To engage the feed roller, pull the bar towards you. Now
you may start feeding brush into the hopper. To reverse
the feed roller, push the control bar away from you. (See
Fig. 5)
The hydraulic feed system will not work unless engine is
running 3100 rpm.
(Fig. 5)
9

MAINTENANCE POWERTEK
ENGINE
Check engine crankcase oil before each start. Make
sure unit is filled with proper type and quantity of
oil. Refer to engine manufacturers manual. Use high-
quality detergent oil of API service class SF.
Viscosity should be the same as oil currently in
engine.
To check oil, park unit on a level surface and allow
oil time to drain into sump. Wipe dirt and debris
from around fill cap and tube. Remove the dipstick
and wipe clean. Return the dipstick fully into the
tube. Pull it out again and check the fluid level
registering on the stick. If necessary add oil to keep
it in the engine’s operating range.
In a new engine oil should be replaced after the first
5 hours if operation. For subsequent changes see
engine manual.
For best results drain oil when engine is warm.
Remove the oil drain plug and dipstick. Allow oil to
drain into a clean resealable container to facilitate
recycling. Reinstall drain plug and fill to the “F”
mark with the appropriate type of oil. See
manufacturer’s specifications. Discard oil according
to local codes
FUEL
For best results, use regular grade unleaded gasoline
with octane rating of 87 or higher. When refueling
do not overfill the tank, leave room for expansion.
Due to it’s extreme flammability never add gasoline
to a hot or running engine.
WARNING
Do not attempt to perform any maintenance procedures while engine or any other parts
are in motion or while keys are in the ignition. Always remove wires from spark plugs
or serious injury may occur.
BATTERY
Each week or every 25 hours of operation check the
electrolyte level of each battery cell. If a cell is low
add distilled water to bring it up to the level
indicator.
If battery is sealed disregard this instruction. When
replacing or recharging the battery use extreme care
to avoid shorting between positive and negative
terminals. To reduce risk of accidental shorting,
disconnect the negative cable first when removing
and reconnect it last when installing.
IGNITION
The gas engine is equipped with a electronic ignition
system which requires very little maintenance.
However, every 100 hours of operation the spark
plug should be removed for inspection.
Before removing, clean the area around the plug to
prevent dirt and debris from falling into the cylinder.
Remove and check for fouling, cracked porcelain, or
incorrect electrode gap. If necessary replace the plug
with manufacturer recommended plug and gap as
needed.
COOLING
To prevent overheating and excessive wear, cooling
fins should be cleaned every 25 hours or sooner if
plugged. Fins can be cleaned by removing cooling
shrouds and scraping away dirt and matted material.
It is important to reinstall shrouds to insure proper
airflow.
10
MAINTENANCE POWERTEK
AIR CLEANERS
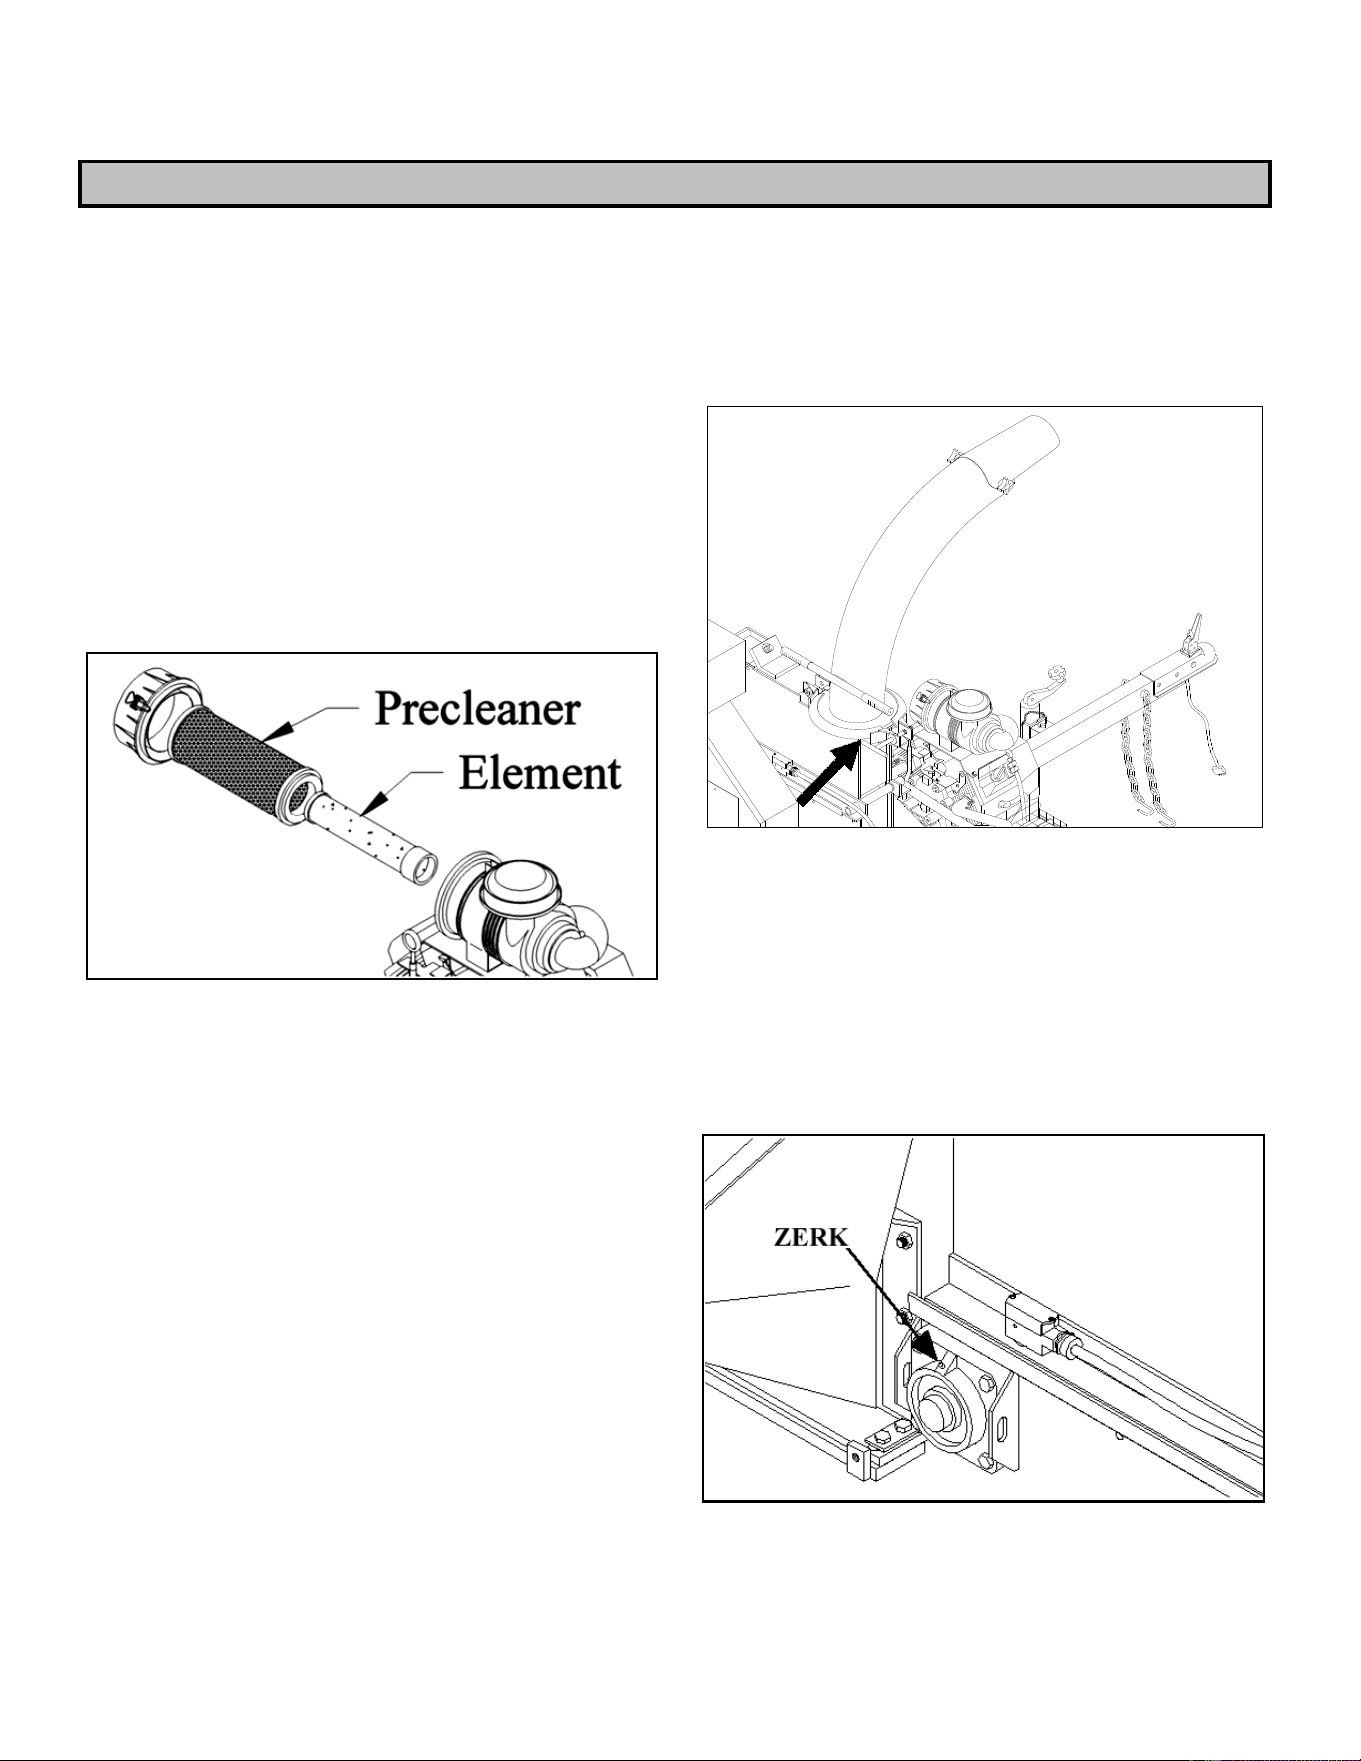
Combustion air is supplied to the engine via a high-
density air cleaner element and its surrounding
precleaner. To ensure a sufficient air supply to the
carburetor, remove and rinse the precleaner every 25
hours of operation. Check engine manual.
Every 25 operating hours inspect the paper element
while cleaning the prefilter. Gently tap the flat side of
the paper element to dislodge surface dirt. If unit is
excessively dirty, bent, or damaged replace element.
Re-install both paper filters and secure.
(Fig. 6)
WHEEL BEARINGS
To prevent wheel bearings from burning out or
locking up during transport, check and repack wheel
bearings every 3 months.
HOUR METER
The meter is fully automatic with a display that may
be read at all times, whether the engine is on or off.
During running times, engine RPM is shown; after
shut down, accumulated running time is shown.
After 25 hours of running time, the meter will
automatically blink as a signal for oil change. It
will continue to blink for a (2) hour period of
accumulated running time (ie., 25 to 27 hours). The
next alert will automatically appear in 25 hours. No
re-set is required.
DISCHARGE CHUTE
If the discharge chute becomes difficult to rotate,
grease at the fitting on the underside of the chute base
do not over grease or chute will collect dirt. (Fig. 7)
(Fig. 7)
FLYWHEEL BEARINGS
To prevent excessive friction and wear, grease
flywheel-bearing blocks on each side of the flywheel
every 5 hours of operation. Do not over grease or
bearings will collect dirt and wear out prematurely
(Fig. 8).
(Fig. 8)
11
MAINTENANCE POWERTEK
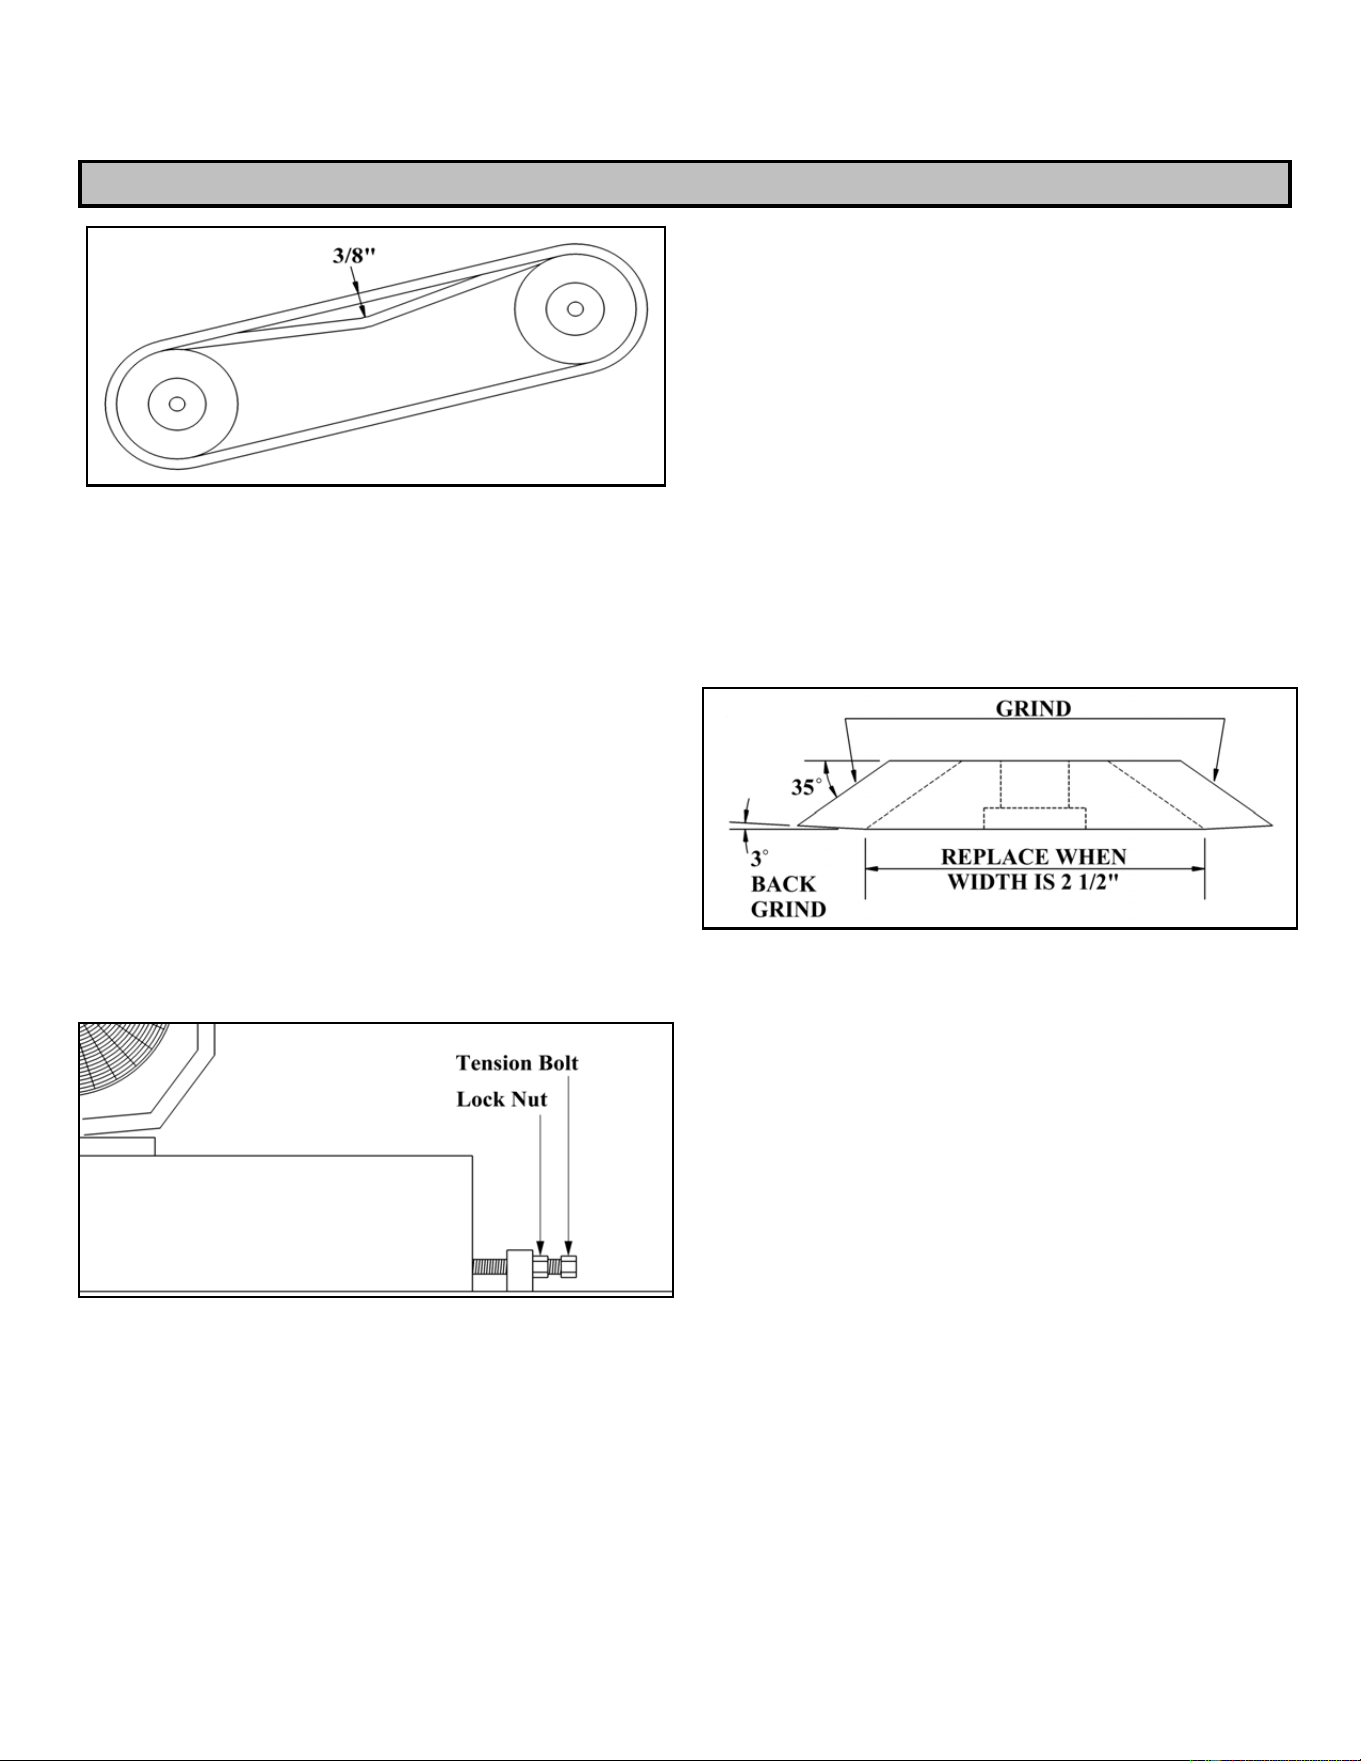
(Fig. 9)
DRIVE BELTS
The flywheel is driven by belts directly from the
clutch. The belt must be kept properly tensioned.
When properly tensioned, the belts should give a 3/8”
deflection under fifteen lbs. of pressure (approx.) at the
center span. To adjust belt tension, loosen the four
engine sled bolts. Loosen lock nuts on the two tension
bolts and adjust the bolts equally to keep the clutch
and flywheel pulleys aligned. When the correct tension
is achieved secure the lock nuts and mounting bolts. If
the belts are excessively worn or can no longer be
adjusted to the proper tension they must be replaced. It
is extremely important to replace belts in matched sets
to ensure uniform power transfer between engine and
the flywheel. To replace belts follow the belt
tensioning procedure. As stated below.
(Fig. 10)
After loosening tension bolts lock nuts, unscrew bolts
and slide engine towards the flywheel until belts can
be removed. Install new belts then finish tensioning
procedure.
CHIPPER BLADES
For optimum cutting potential chipper blades must be
kept sharp. To inspect the blades open the flywheel
housing using the procedures for clearing the housing.
Rotate the flywheel around by hand and check the
blades for dulling. If the blades need sharpening or
replacing use the following procedures:
1. Insert safety pin to keep flywheel from rotating
2. Remove cutter blades by using a ¾” box wrench
on the lock nuts and a ¾” socket on the bolt and
turn simultaneously.
Note: Anytime you remove blades, check hardware for
wear and damage. Replace if needed. When a new set
of blades is installed, replace the old hardware with
new hardware kit part number 72506A.
(Fig 11)
3a. If blades need rotating:
Blades may be rotated so that the other edges of
the knife may be used. To rotate, simply turn the
blade and reinstall.
3b. If blades need sharpening: it is important to
maintain the original angle of 35º and the
backgrind angle of 3º. Remove equal amounts of
material from each blade to avoid vibrations
caused by an unbalanced flywheel (blades should
weigh within 1/10 oz. of each other).
3c. If blades need replacing:
Replace blades when they become damaged or
repeated sharpening has reduced their width to 2
½”. Simply remove the old blades and replace with
new ones.
4. Once you have reinstalled the blades make sure the
jam nuts are tightened to 50 ft. lbs. of torque and
the lock nut to 105 ft. lbs. Then adjust the
clearance between the anvil and blades using the
procedures in the Anvil Adjustment section.
12
MAINTENANCE POWERTEK
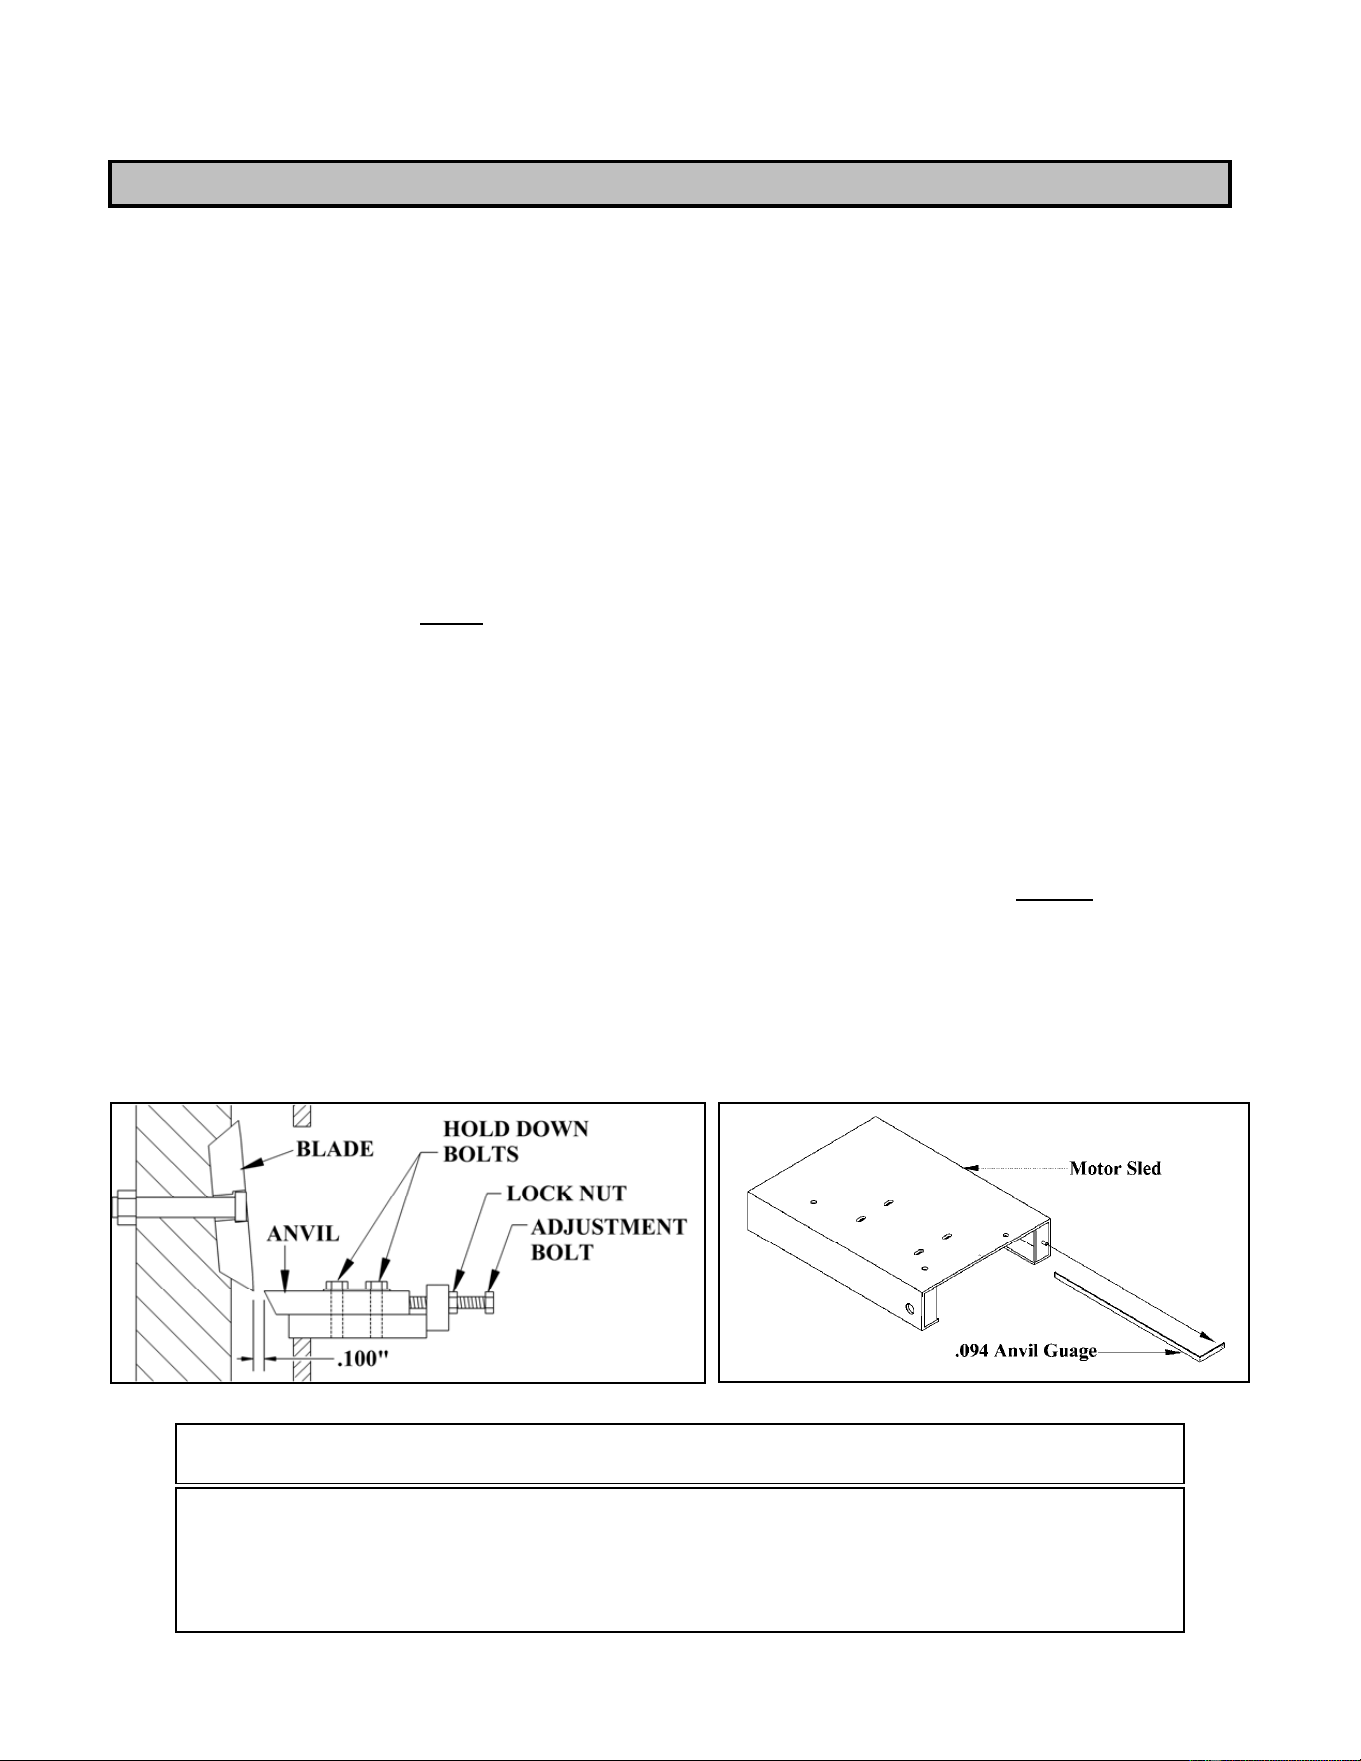
ANVIL ADJUSTMENT
IMPORTANT! You must adjust the clearance between the anvil and blades every time you sharpen or
replace the blades. At this time you must also re-torque all anvil bolts to the proper torque setting of
120-ft.lbs.
Steps in anvil adjustment:
1. Remove the ¾” nylock nut from the upper chamber, and rotate the upper chamber open.
2. Loosen the anvil adjustment bolts and all four of the anvil hold down bolts.
3. Lock flywheel using the locking pin provided with unit.
4. Remove and sharpen or replace blades as required. Re-torque all blade bolts to 135-ft. lbs.
5. Remove the locking pin. Rotate the flywheel so that the flat of the blade is parallel with the
Anvil edge at the inside
edge of the blade.
6. Slide the gauge, located under engine sled as shown below, into the opening of the upper
housing and or through the anvil slot in the side of the chamber. Position the gauge between
the blade and anvil.
7. Push the Anvil up against the gauge and tighten down the anvil mounting bolt. Set anvil-
blade gap at no less than .075” and no more than .125”. The optimum gap is .100”. The anvil
gauge supplied with the chipper is .094”.
8. Rotate the flywheel to see if the opposite blades gap is less than .075” or more than .100”. If
so repeat steps 6 & 7 for gapping this side as well.
9. Rotate the flywheel so that the blade is parallel with the anvil on the outside edge of the
blade. Repeat steps 6 thru 8 for outer edge of blade.
10. Double check anvil-blade gap so that the gap is more than .075” but less than .125”.
Remove gauge. Rotate flywheel to make sure everything is assembled correctly.
11. Torque anvil hold down bolts to 135-ft. lbs. each.
12. Tighten the anvil adjusting bolt lock nuts.
13. Close the upper chamber and tighten the ¾” nylock nut.
WARNING
THIS PROCEDURE MUST BE FOLLOWED TO ENSURE THE
WOOD DOES NOT GET WRAPPED
AROUND THE FLYWEEL AND JAM THE MACHINE
AND CAUSE SERIUS INJURY OR DAMAGE TO PROPERTY
13
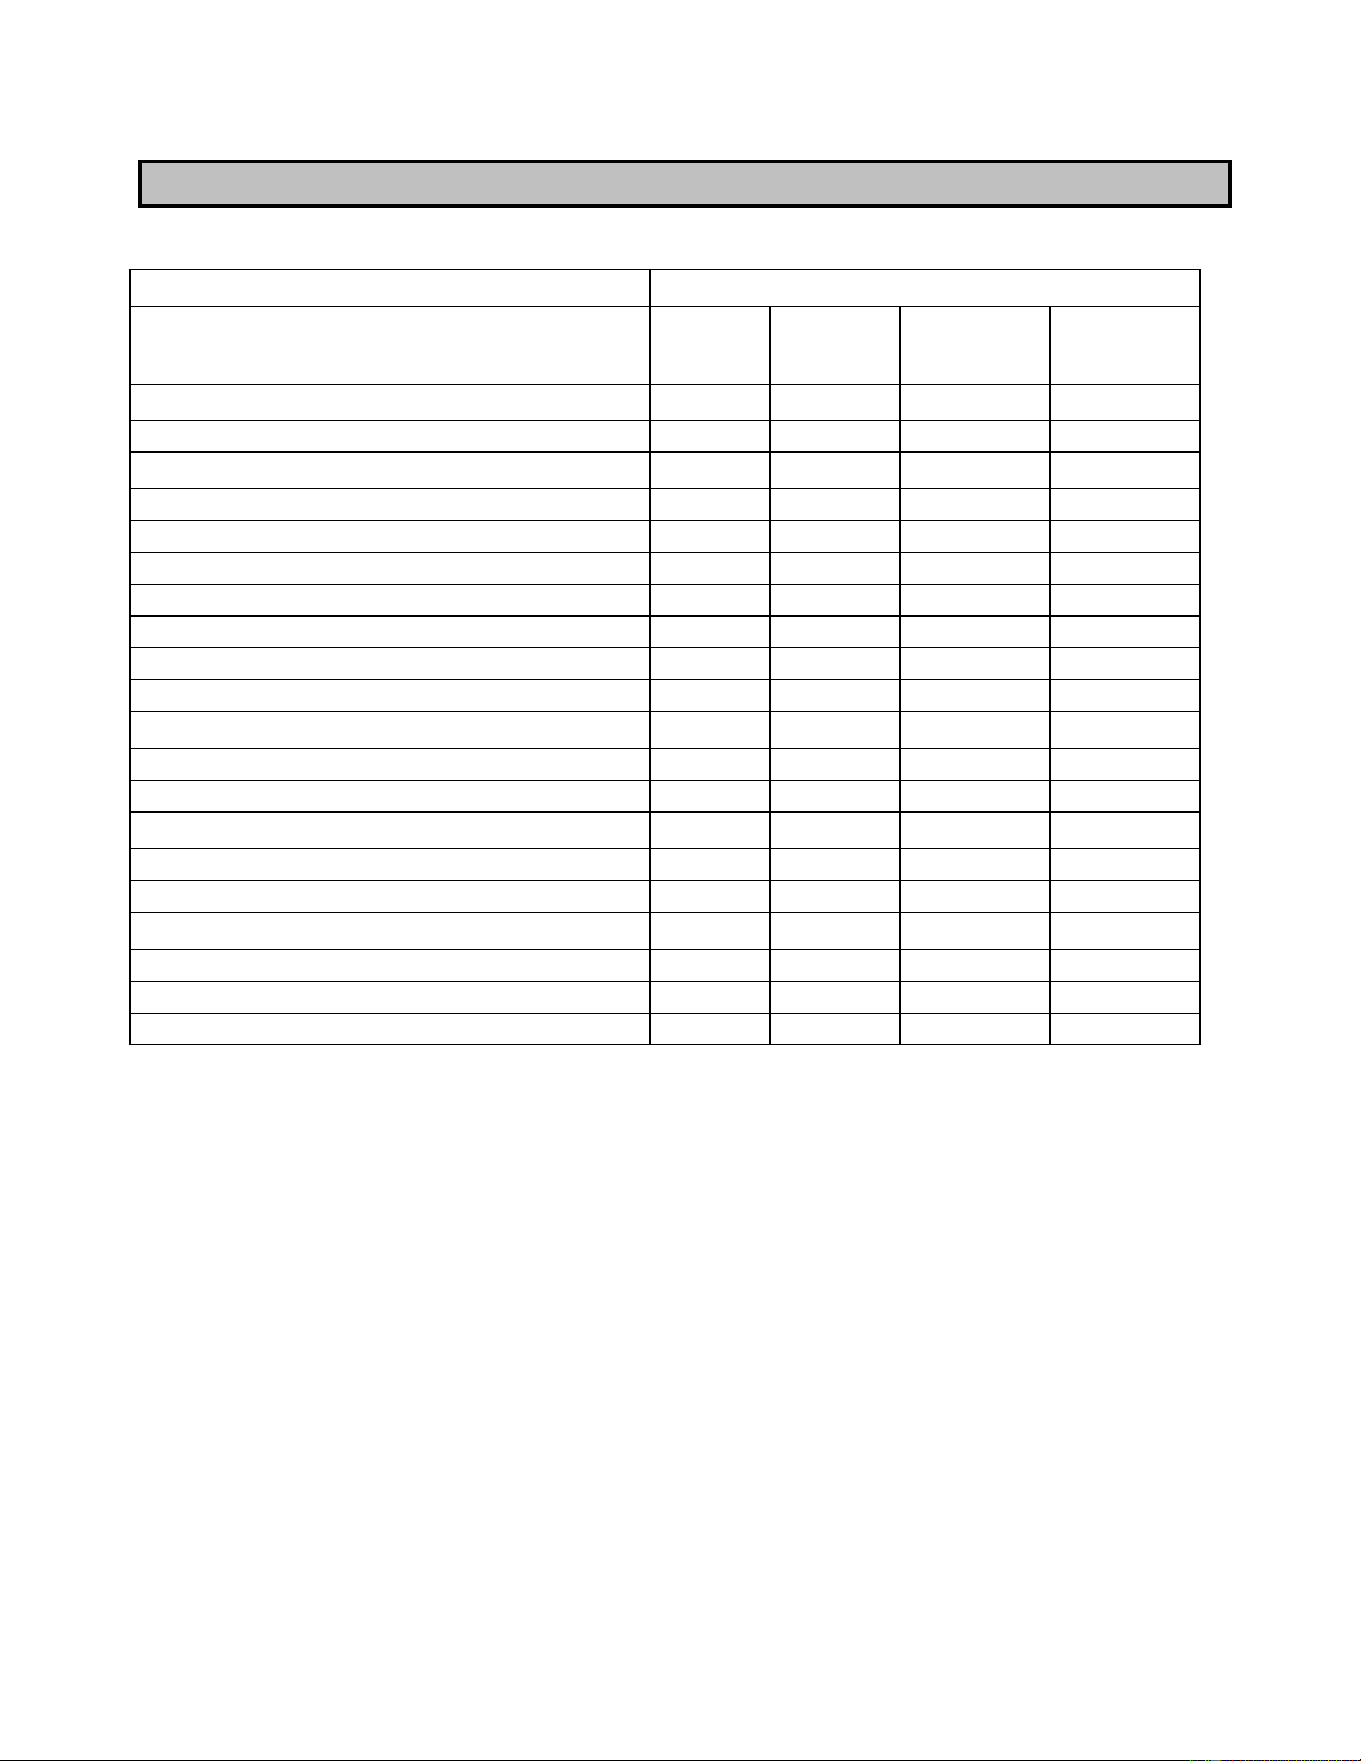
MAINTENANCE SCHEDULE POWERTEK
MAINTENANCE SCHEDULE
DAILY WEEKLY MONTHLY
YEARLY
OR AS
REQUIRED
Check engine oil
X
Check machine tire pressure
X
Inspect/Check engine cooling fins or radiator
X
Check for loose hydraulic fittings or hoses
X
Check for loose bolts and nuts
X
Check hitch and safety chains
X
Check blades and anvil for sharpness
X
Check hydraulic fluid level
X
Check tail lights and turn signals
X
Check anvil and blade gap (.100)
X
Check that guards are in place
X
Check Air Cleaner
X
Grease bearings
X
Check belts for proper tension
X
Check clutch shoes for wear
X
Check rubber guards
X
Grease discharge chute
X
Grease hydraulic motor shaft
X
Check hydraulic filter
X
Check and gap spark plugs
X
SPECIFICATIONS
GENERAL
Length………………...…….…….120”
Width……………………….………68”
Height………………………………76”
Weight……………………...…1680 lb.
Input Feed……………..……Hydraulic
Hopper Opening……31 1/2” x 23 3/8”
In-Feed Angle to flywheel…….…...90º
Feed Throat…………………....9” x 7”
Blade Bolt Torque………….135 ft. lbs.
Engine…..25 hp elect. start, ovhd valve
Fuel Tank Capacity……………....8 gal.
Clutch……………………...….centrifugal
Tires……………….………… 205/75R14
Suspension………….…...Rubber Torsion
Hitch…..….(class 2) 2” Ball-3500 lb. cap.
Hub…………..…………………….5 Lug
Tail Lights……..………….……Standard
Flywheel…..30” Dia, 1 ½” Thick (312 lb.)
Knives……...……….Two 10” Reversible
Anvil……………1/2” x 3 7/16” x 12 1/2”
Anvil Bolt Torque………..…..120-ft.lbs.
PERFORMANCE
Cutting Capacity……………..7” Dia.
Discharge Distance……...Up to 20 ft.
14
HYDRAULIC SYSTEM MAINTENANCE POWERTEK
CLEANING HYDRAULIC SYSTEM
Keep the system clean. The hydraulic pump will last
longer with few repairs if the system is kept clean.
Keep the oil clean. Debris and dirt in the oil can clog
the relief valves and other parts resulting in poor pump
performance. Replace the hydraulic oil filter after the
first 100 hours of operation and then every 200 hours
of operation thereafter. The canister is replaceable.
HYDRAULIC OIL
Do not operate the chipper if the hydraulic oil level is
too low. This will cause the pump to overheat. Use a
hydraulic oil equivalent to Dextron III ATF. Oil level
is 1” from top of reservoir.
HYDRAULIC MOTOR SHAFT
The spline on the end of the hydraulic motor shaft
needs to be greased about every 100 hours of
operation. Remove the motor and apply 3-4 squirts
from a grease gun inside the shaft then replace the
motor.
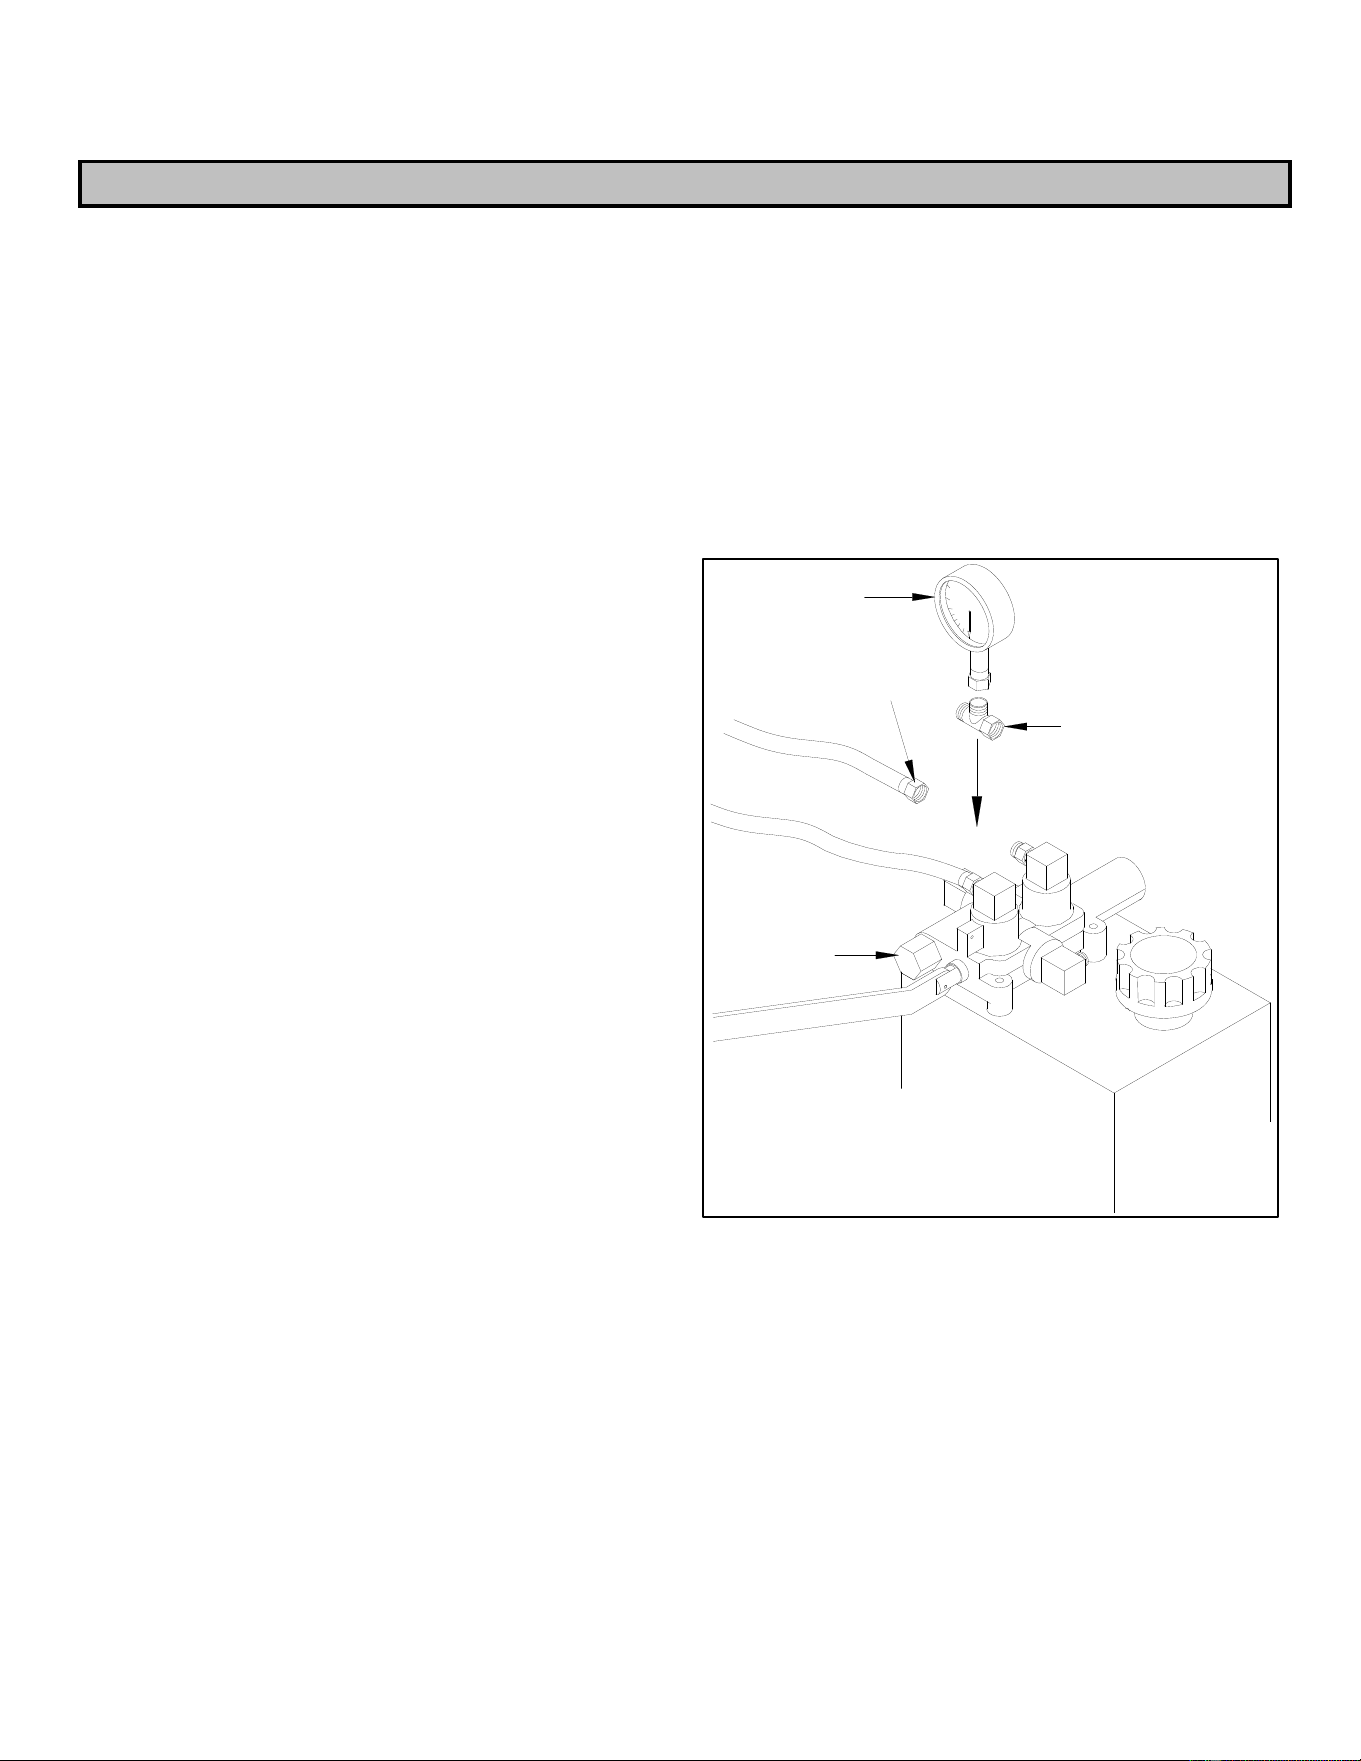
HYRAULIC SYSTEM PRESSURE
The hydraulic system on the Model 727 Chipper turns
at approximately 50 PSI, at this pressure the feed roller
should be turning at 50 RPM when turning in the
“feed” position. A suitable inline T-fitting and
pressure gauge put inline between the control valve
elbow and the pressure line to the feed roller motor is
where pressure should be tested
(fig. 13).
PRESSURE
GUAGE
SUITABLE
"T" FITTING
HYDRO
CONTROL
VALVE
PRESSURE LINE
TO MOTOR
(Fig. 13)
15
TROUBLESHOOTING POWERTEK
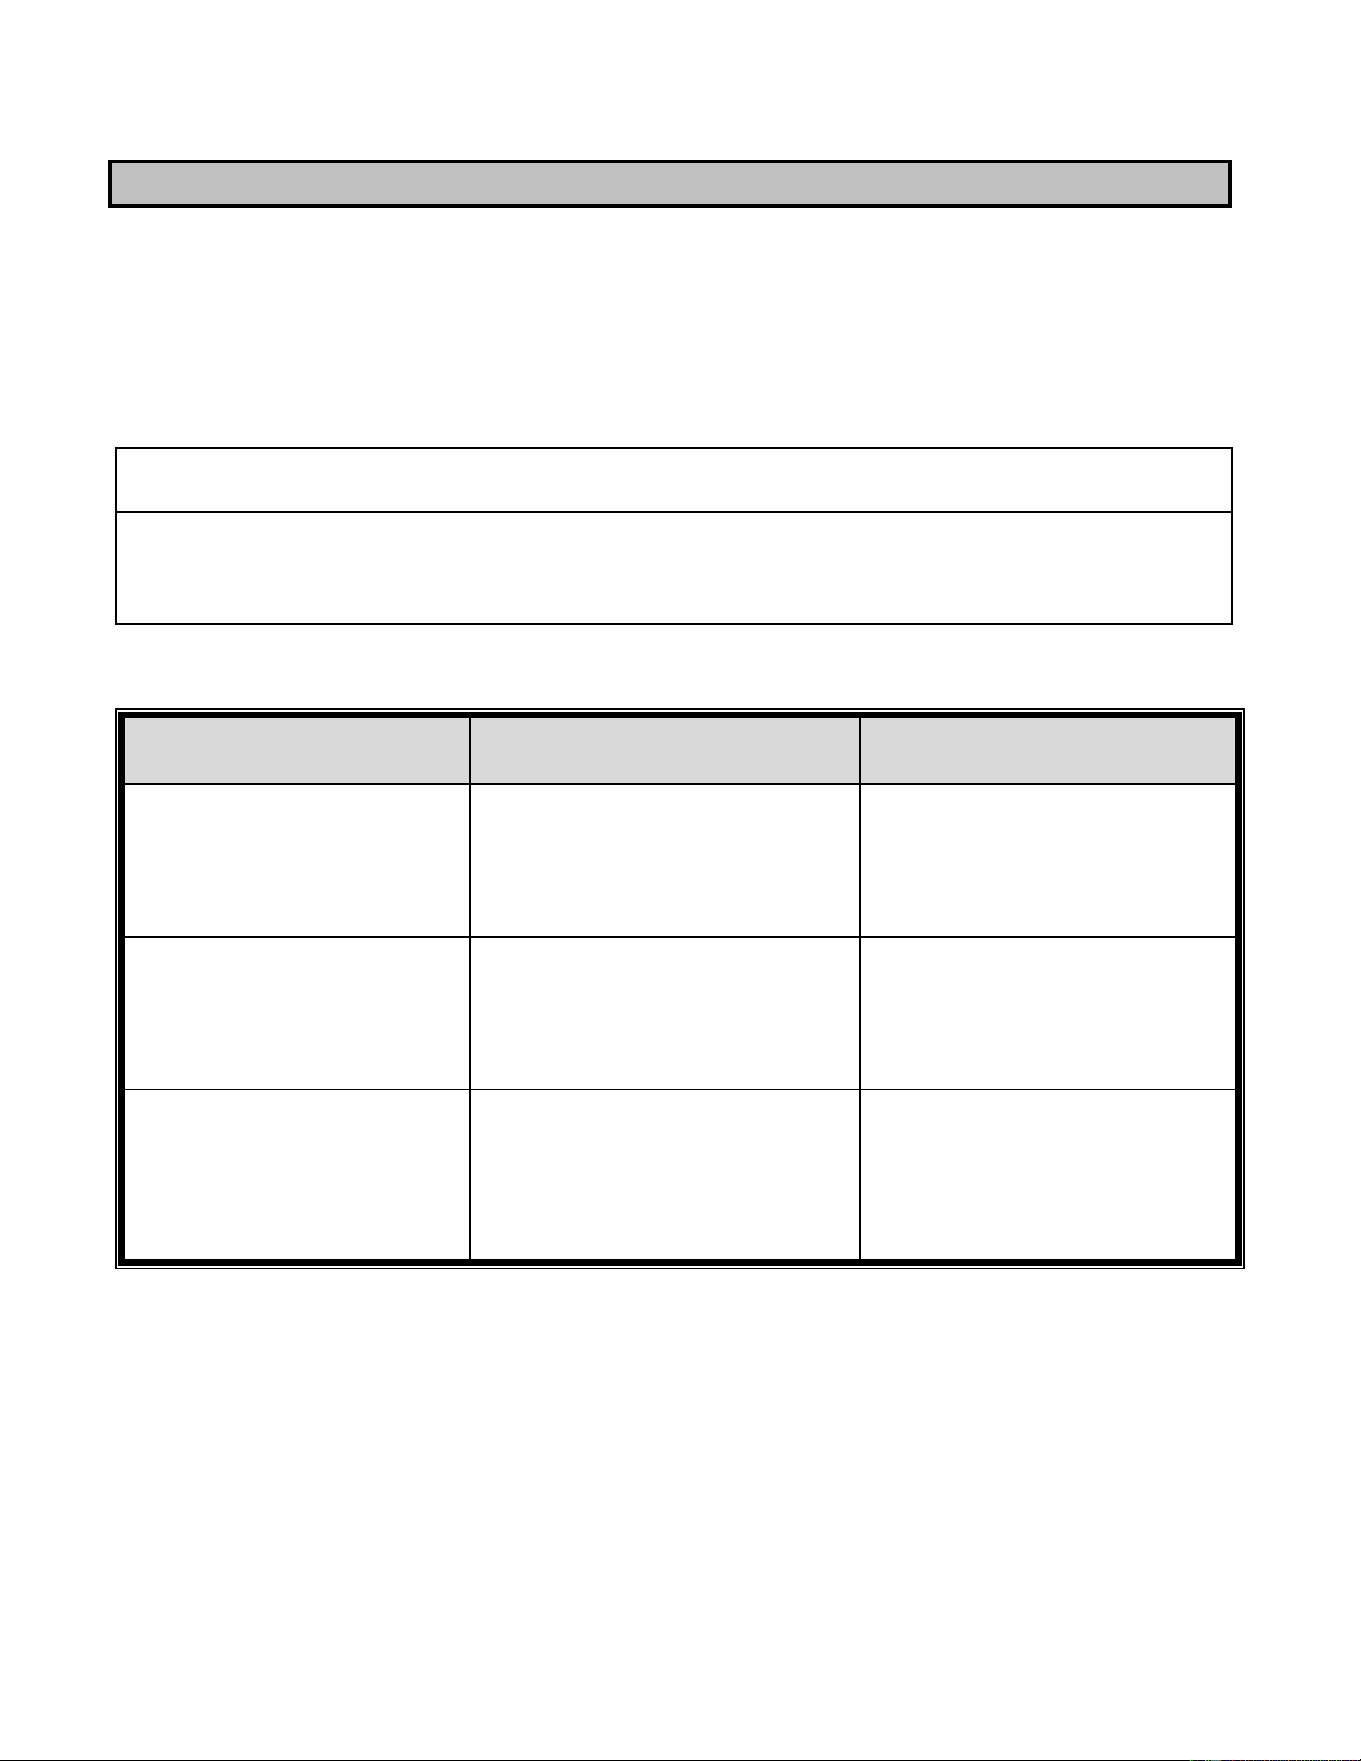
DIAGNOSTIC PROCEDURES
Trouble shooting procedures are provided in the chart below. To use these procedures, first locate the
problem description that best describes the trouble that you have encountered. Check the possible causes
one at a time. Correct any problems that are found and operate the brush chipper again to verify that you
have eliminated the problem.
CAUTION
SHUT OFF THE ENGINE, WAIT UNTIL ALL MOVING PARTS HAVE COMPLETELY
STOPPED, AND REMOVE KEY FROM THE IGNITION BEFORE TROUBLE SHOOTING
OR PERFORMING MAINTENANCE.
PROBLEM CAUSE SOLUTION
Feed roller turns at normal speed
but does not feed brush properly.
1. Low oil level
2. Worn pump
3. Worn feed teeth
4. Low pressure setting
A. Add hydraulic oil
B. Replace pump
C. Grind teeth to sharpen or
replace
D. Check pressure setting
Feed roller turns at normal speed
but slows down or stops when
brush is fed.
1. Pump coupling worn
2. Relief valve worn or dirty
3. Worn pump
4. Worn hydraulic motor
A. Replace coupling.
B. Clean valve or replace
C. Replace pump
D. Replace motor
Hydraulic temperature is very
hot and slows the system down
1. Worn pump
2. Relief valve stuck open or opens
too easily
3. Worn or damaged hose
4. Clogged oil filter
5. Worn hydraulic motor
A. Replace pump
B. Clean, readjust or replace relief
valve
C. Replace hose
D. Replace filter
E. Replace motor
Note: If help is needed to perform repairs contact PowerTek customer service.
16
TROUBLESHOOTING POWERTEK
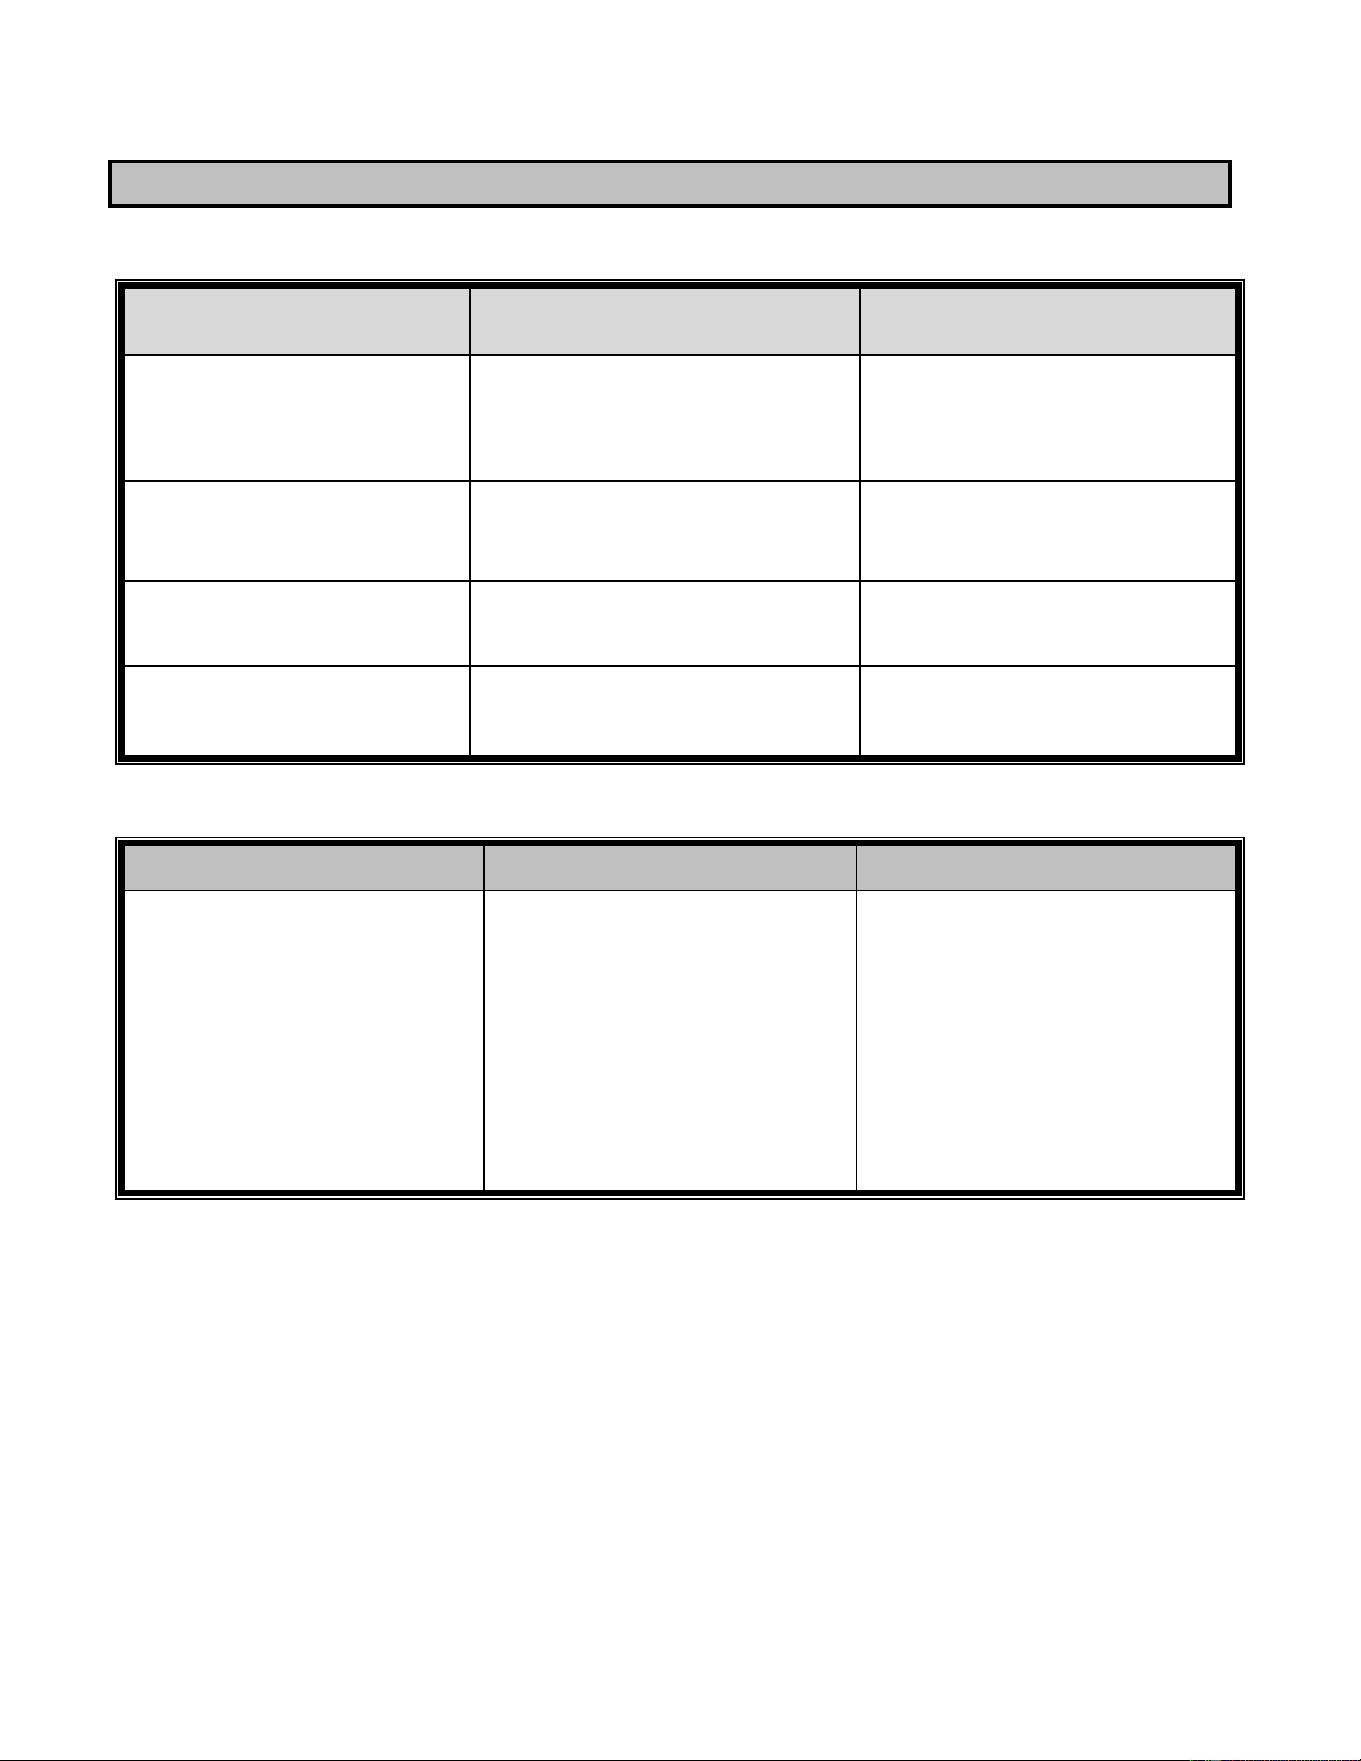
CHIPPING SYSTEM
PROBLEM CAUSE SOLUTION
Chipper feeds poorly
or chips unevenly
2. Dull blades
3. Anvil is misaligned
4. Anvil is worn
A. Rotate or sharpen blades
B. Check anvil and blade
clearance
C. Remove and re-grind anvil
Discharge chute plugs
1. Engine speed is low
2. Material bridge in chute
3. Over-Feeding
A. Increase engine RPM
B. Remove obstruction
C. Mix small and large material
Chipper blade hits anvil
1. Insufficient clearance
2. Worn Bearing
A. Reset blade clearance
B. Check Bearings
High bearing temperature
1. Improper lubrication
2. Worn bearings
A. Grease bearing blocks
B. Replace bearings
ELECTRONIC FEED C0NTROL SYSTEM
PROBLEM CAUSE SOLUTION
Feed roller does not turn
1. Feed control handle in neutral
2. Unit is not at full speed
3. Speed control settings
incorrect
A. Position handle in feed
position
B. Increase engine throttle
C. Check speed control settings
17
TROUBLESHOOTING POWERTEK
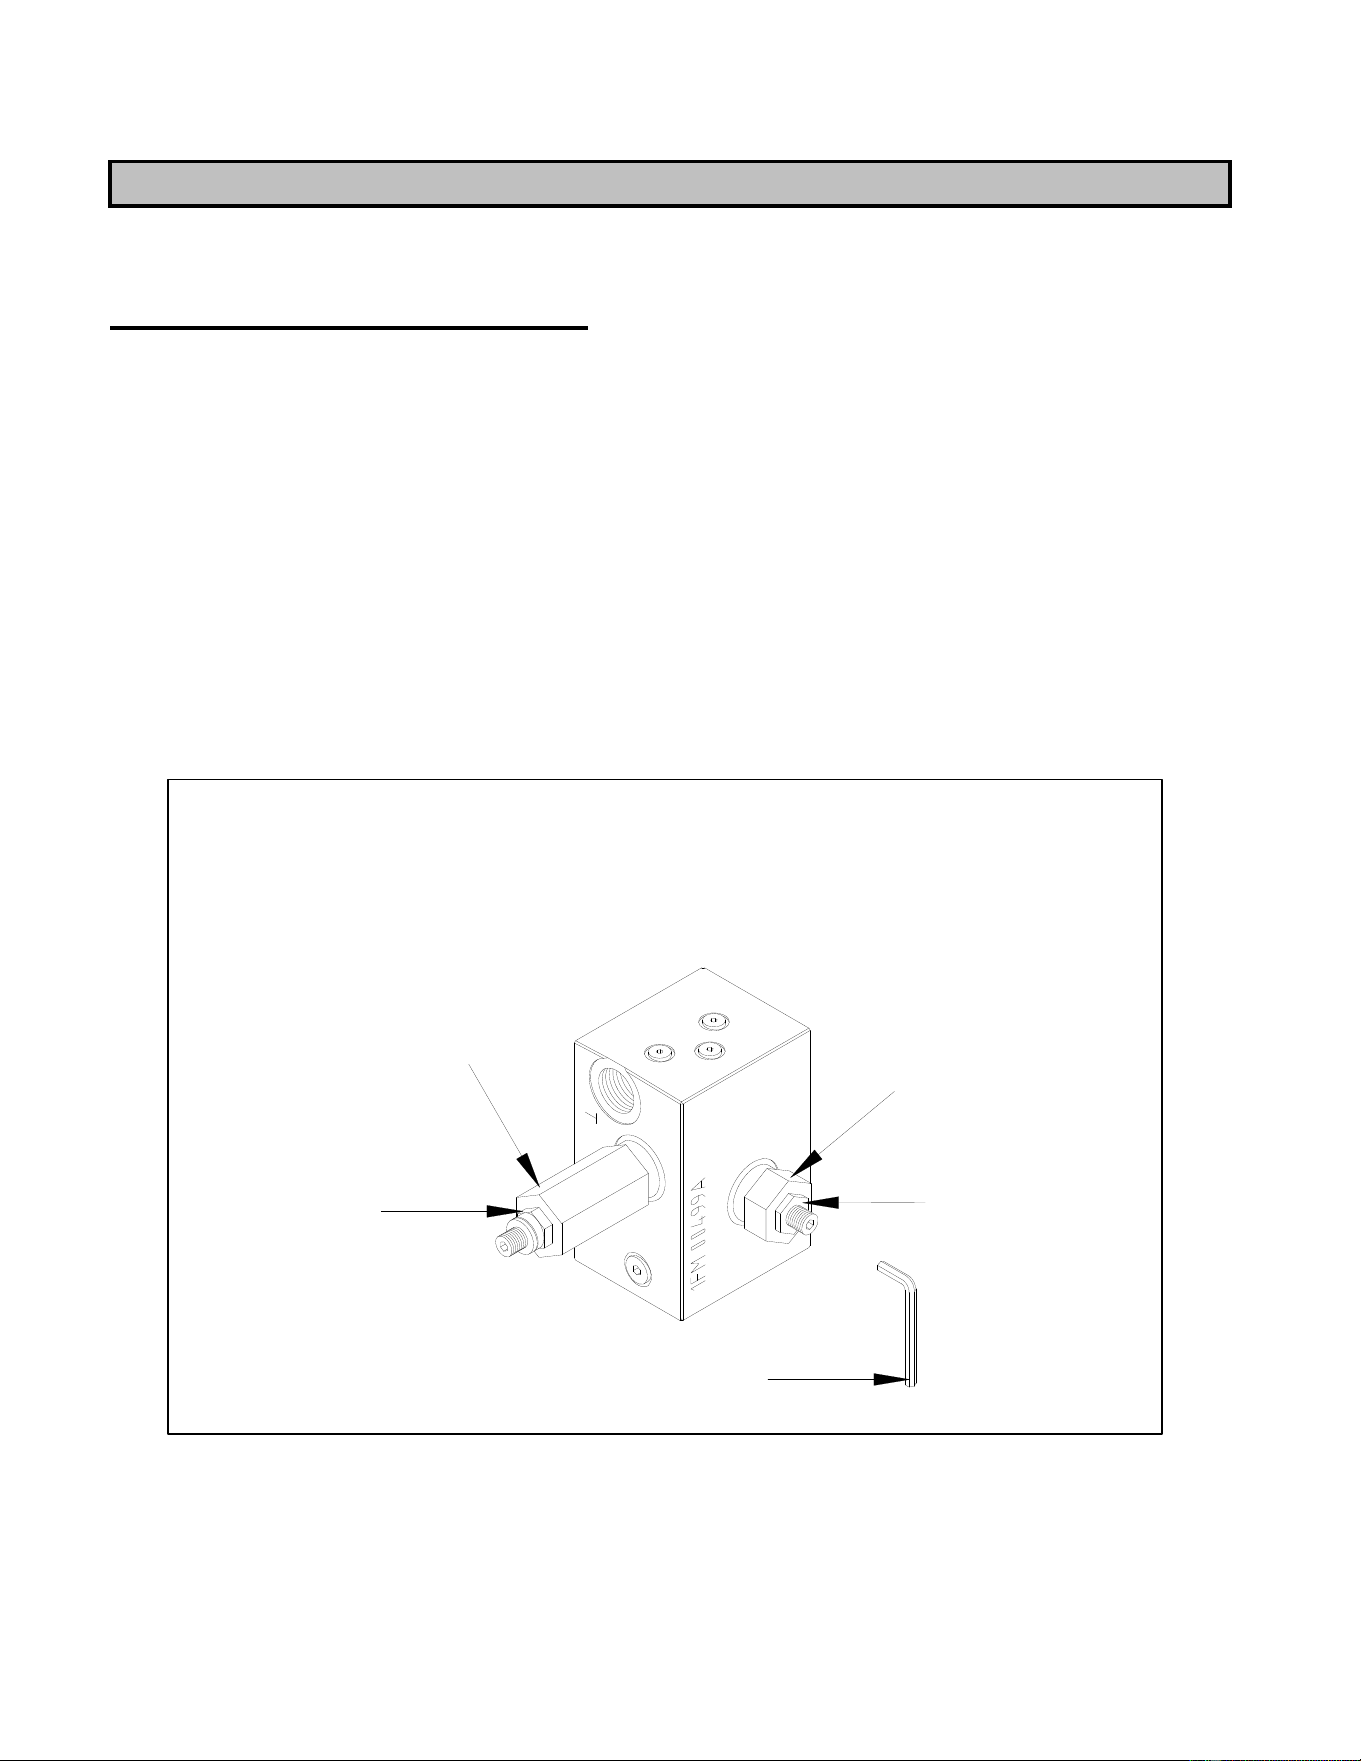
SETTING PRIORITY VALVE
1. Loosen lock nuts on the flow control valve and sequence valve.
2. Turn both set screws counterclockwise to stops with a #5 allen wrench.
3. Turn set screw on flow control valve 5 turns clockwise.
4. Turn set screw on sequence valve clockwise 2 1/2 turns.
5. Set engine RPM to 2600
6. Put the control handle into the feed position. If roller is not turning, turn set screw on flow control
valve clockwise until roller turns.
7. Increase engine speed to 3000 RPM
8. Check roller, if it is not turning to full speed (50 RPM) then turn set screw on sequence valve
counterclockwise to achieve 50 RPM.
FLOW CONTROL
VALVE
SEQUENCE VALVE
LOCK NUT
LOCK NUT
PRIORITY VALVE
#5 ALLEN WRENCH
(FIG. 14)
18
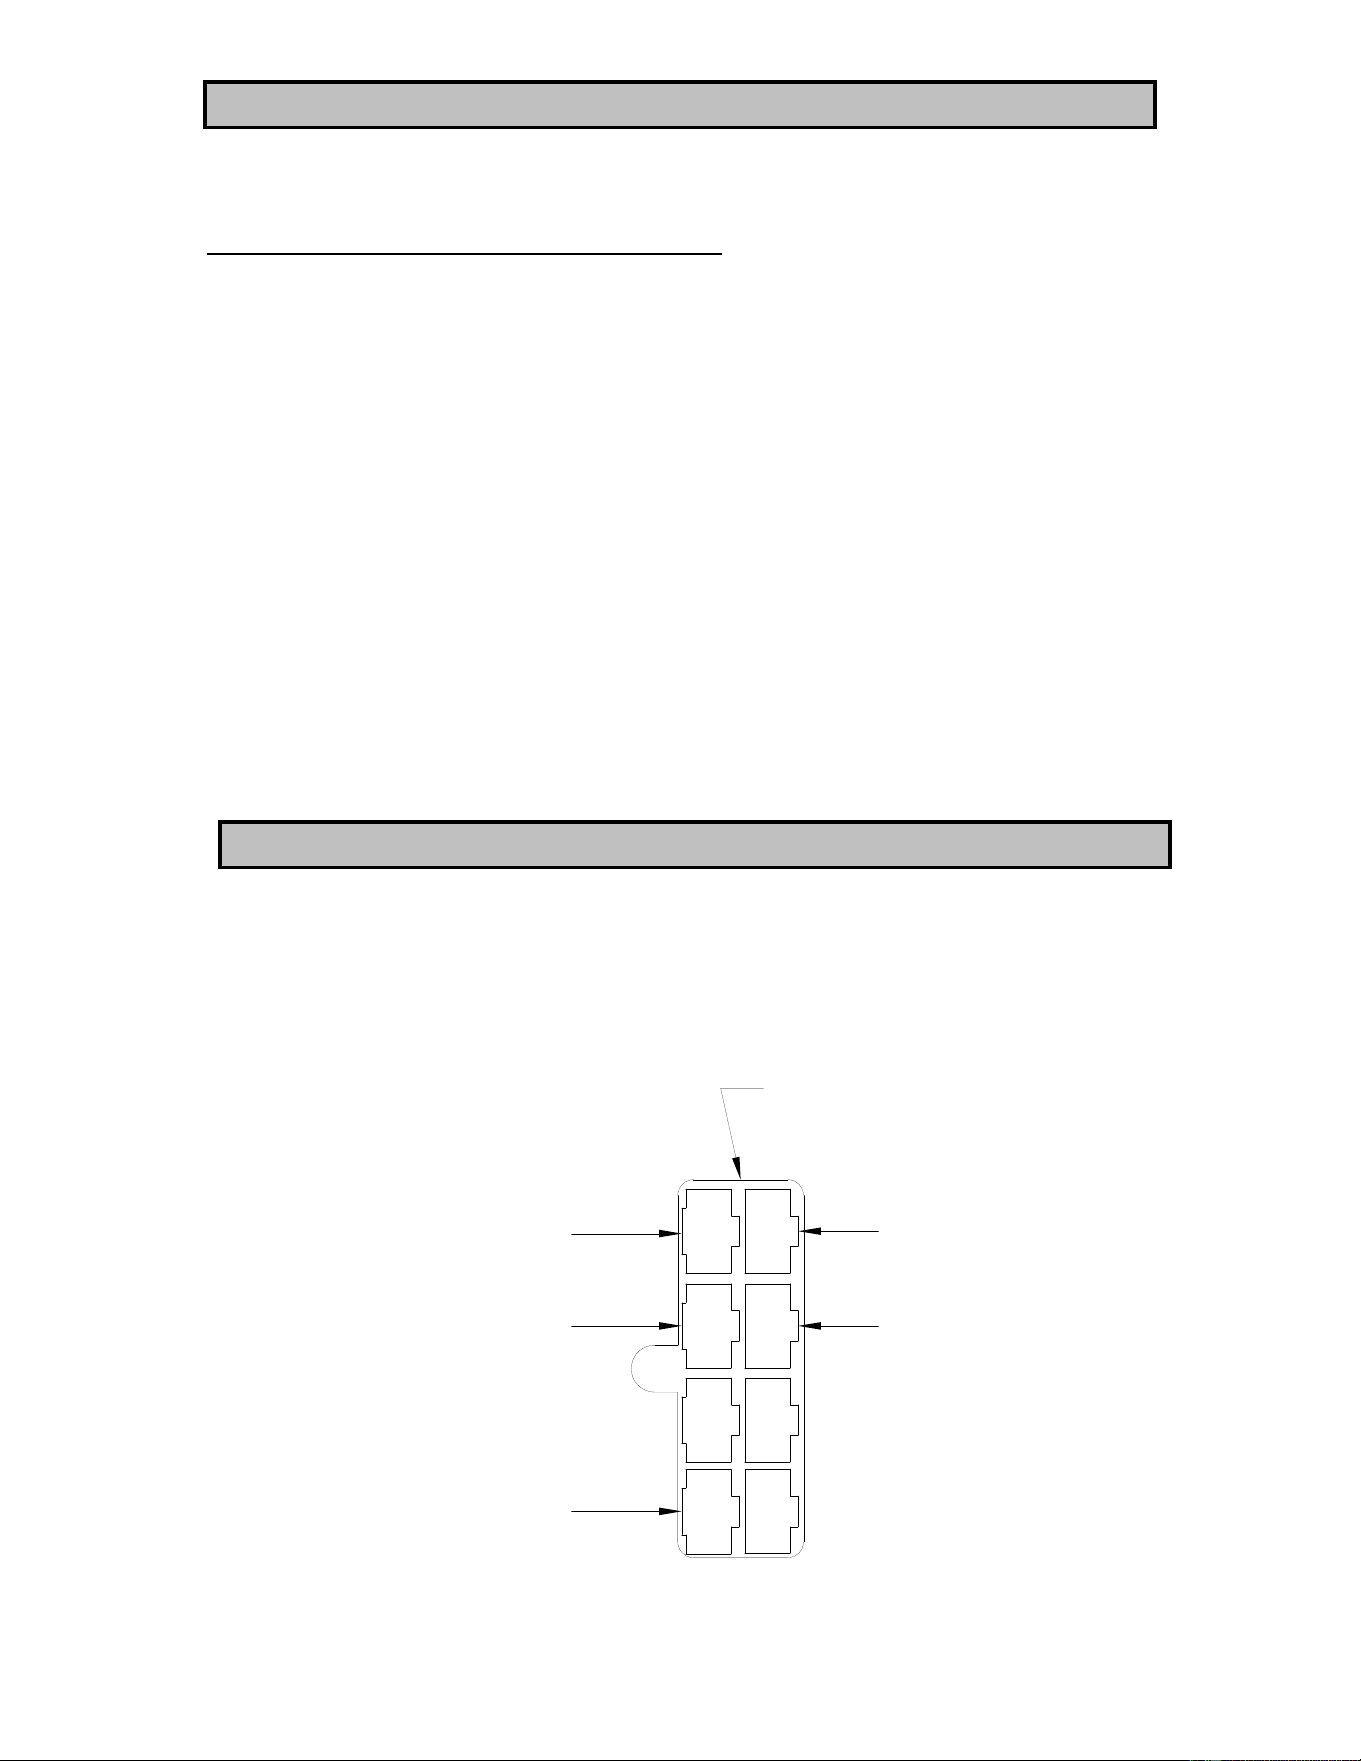
GROUND (BROWN)
* IGNITION (BLACK)
VOLTAGE REGULATOR (RED)
STARTER SOLENOID (YELLOW)
FUEL CUT-OFF (GRAY)
NOTE: COLORS ARE HARNESS WIRE COLORS ON ENGINE SIDE
PACKARD/PIONEER
8 CIRCUIT HOUSING
HOUSING #2965972
MALE PUSH-ON TERMINALS
TERMINAL #2965481
31 HP Vanguard Schematic, Customer Side
* TO KILL ENGINE CONNECT TO GROUND
NOTES:
TROUBLESHOOTING POWERTEK
ELECTRICAL SCHEMATIC POWERTEK
19
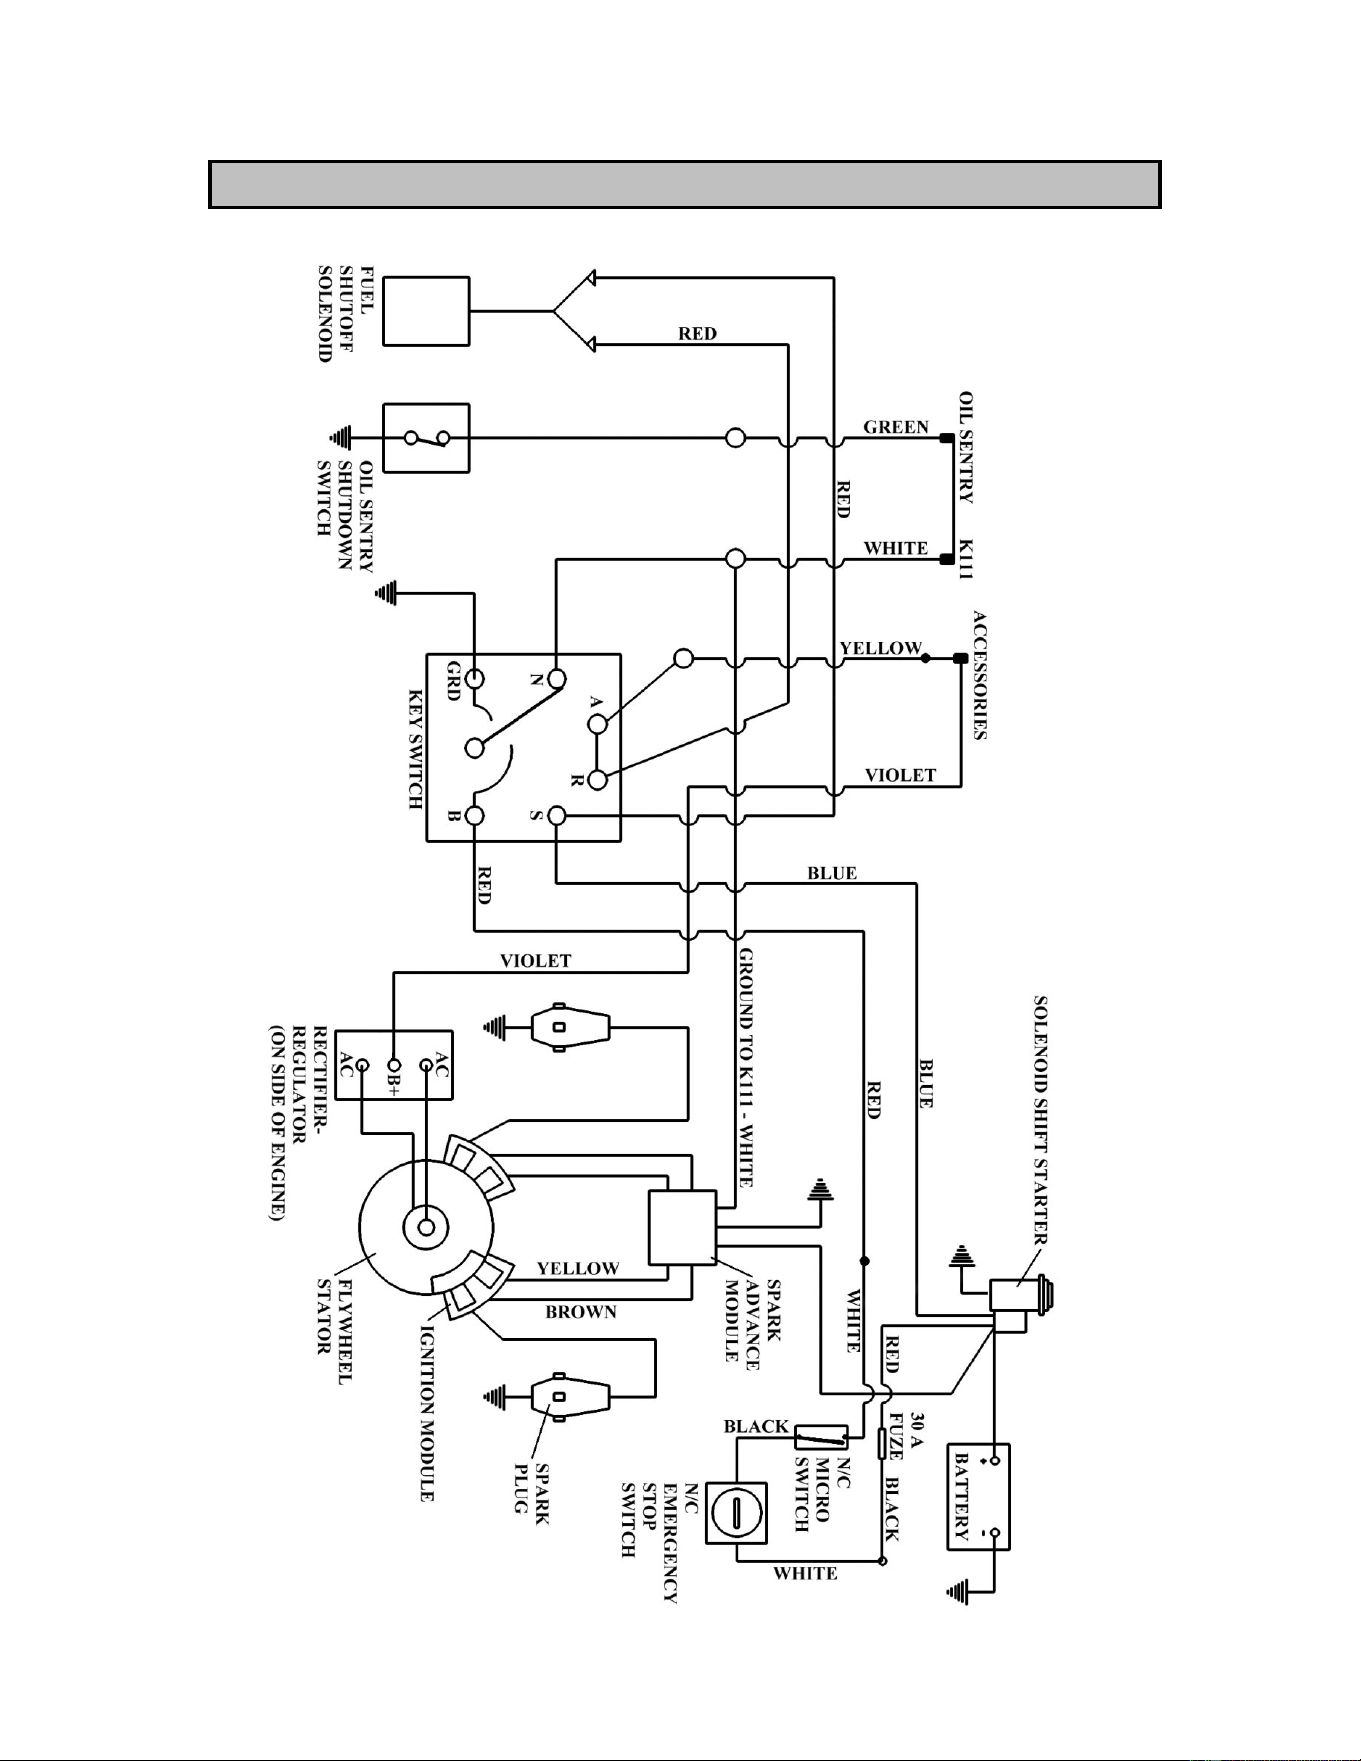
ELECTRICAL SCHEMATIC (727) POWERTEK
20
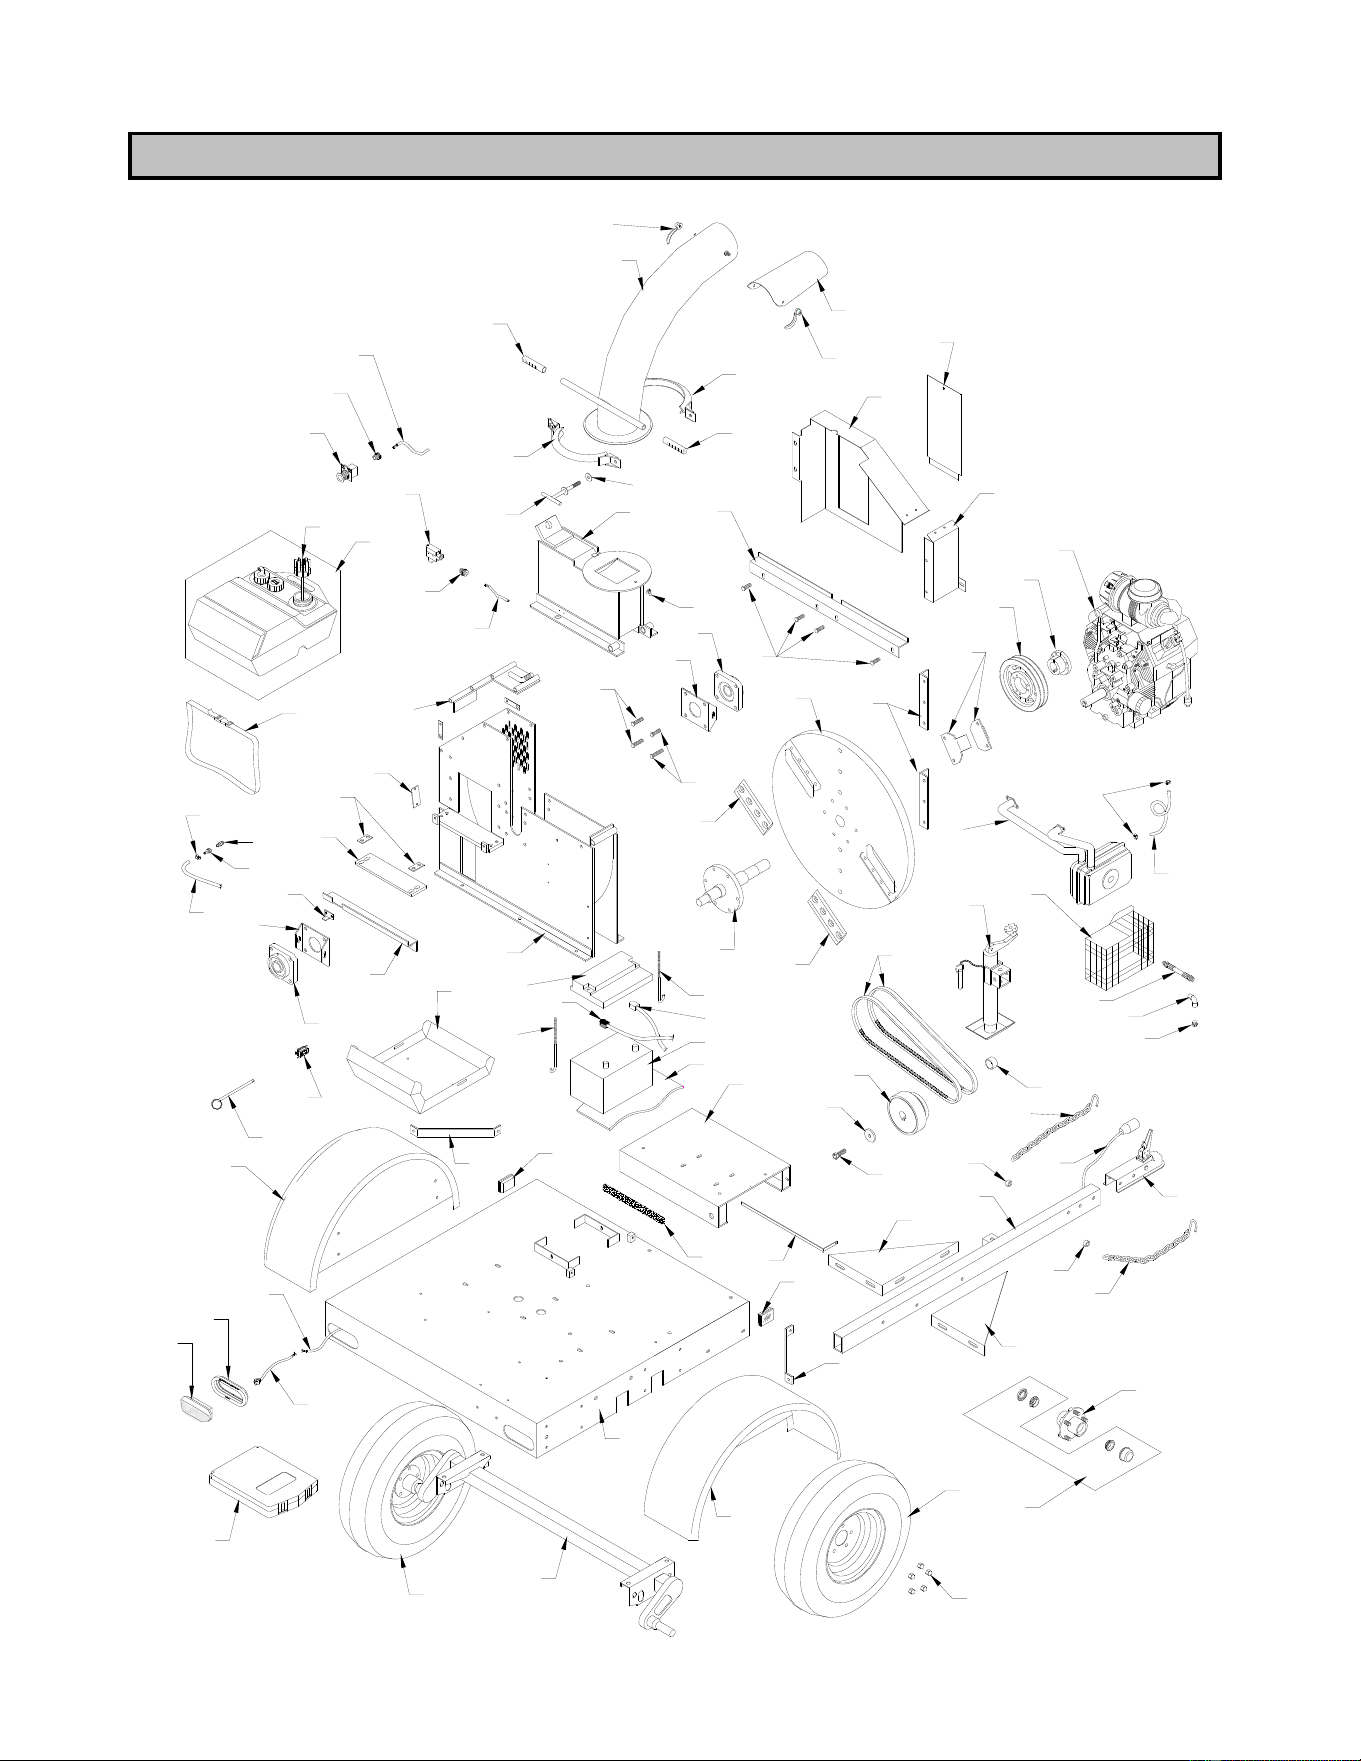
PARTS BREAKDOWN (727 GENERAL PARTS)
10
3
4
5
6
6
7
8
8
9
2
11
12
13
13
14
16
17
18
19
19
20
22
23
26
27
28
31
32
33
34
35
36
37
38
38
42
44
45
46
51
63
63
64
65
67
67
68
72
73
78
75
75
76
76
74
30
49
52
77
47
48
50
24
25
15
55
56
57
77
58
71
71
29
59
1-29-09
61
80
53
49
69
70
70
54
62
79
81
82
83
84
66
21
87
91
88
1
86
79
59
89
90
94
93
30
46
94
21

PARTS LIST (727/731 GENERAL PARTS) POWERTEK
Key Part No. Description Key Part No. Description
1 72501 Lower Housing 52 72552 Wire Clamp Nut
2 72502 Upper Housing 53 72552 Stop Switch
3 72503 Discharge Chute 54 72554 Muffler Assembly, Kohler
4 72504 Discharge Chute Deflector 55 72555 Bearing Kit
5 72505 Anvil 56 72556 Hub
6 72506 Chipper Knife 57 72557 Battery Pad
7 72507 Flywheel Hub & Shaft Assembly 58 72558 Battery
8 72508 Bearing Bracket 59 72559 Fuel Line
9 72509 Flywheel 61 72609 Gas Cap thru s/n 62581
10 72510 Removable Casing Assembly 16216 Gas Cap s/n 62582/up
11 72511 Pulley Guard thru s/n 62561 62 72621 Muffler Guard
72647 Pulley Guard s/n 62562/up 63 16211 J-Bolts, Battery Hold Down
12 72512 Motor Sled, Kohler 64 72642 Positive Cable, Red
72672 Motor Sled, Vanguard 65 72643 Negative Cable, Black
13 72513 Discharge Clamp Half 66 16215 Hour meter/Tach, thru s/n 62549
14 72514 T-Handle, Discharge Chute 72646 Hour meter/Tach, Flush mount
15 72515 Anti Wrap Guard s/n 62550/up
16 72516 Impeller 67 45107 Hand Grip, ¾” Handle
17 72517 Angle Flange, Power Side 68 5001002 ½” Lug Nut
18 72518 Angle Flange, Feed Side 69 5001225 ½” x 1 ½’ Stud
19 72519 Bearing 70 5002516 ½” x 2” Stud (Bearings)
20 72520 Clutch thru s/n 62581 71 3751016 Handle Nut
72649 Clutch s/n 62582/up 72 51601 2” Ball Coupler
21 72521 Clutch Spacer thru s/n 62581 73 51602 Jack
Only 74 72640A Recessed Tail Light
22 72522 Clutch Retainer 75 51624 Safety Chain
23 72523 Clutch Retainer Bolt 76 51625 Safety Chain Spacer
24 72524 Pulley 77 28907 Trailer Connector
25 72525 Pulley Bushing 78 72640B Grommet, Recessed Tail Light
26 72526 Belt 79 28839 Fuel Line Clamps
27 72527 Gas Tank, Includes Cap thru 80 72623 ½” Romex Connector
s/n 62581 81 72624 Fitting 90° 3/8 FP-3/8 FP
72654 Gas Tank, Includes Cap Kohler
s/n 62582/up 82 72640C Pigtail/Plug, Recessed Tail light
28 72528 Grease Fitting 83 72636 Anvil Gauge
29 72529 Safety Switch 84 72587 Guard Access Panel
30 72530 Fender Assembly 86 45061 Nylon Washer
31 72531 Engine, 25HP Kohler Elect. 87 46219 Foam Seal, Anti-Vibration
72673 Engine, 31HP B&S Vanguard 88 16233 Gas Tank Strap s/n 62582/up
32 72532 Flywheel Safety Pin 89 16236 Male Fuel Coupler
33 72533 Trailer Frame 90 16237 Female Fuel Coupler
34 72534 Trailer Tongue 91 725338 Gas Tank Mount s/n 62582/up
35 72535 Trailer Tongue Brace, RH 92 72677 Oil Drain Tube, Vanguard
36 72536 Trailer Tongue Brace, LH 93 72680 Anti Wrap Angle
37 72537 Suspension axle w/hub 94 72681 Fender Brace
38 72538 Wheel 51650 Decal, Danger Stop Engine
42 72542 Anvil Support Spacer 51656 Decal, Caution Safety Chains
44 72544 Pulley Guard Front thru 51660 Decal, Caution Read Owner Man.
s/n 62561 51662 Decal, Warning Flying Wood
72648 Pulley Guard Front thru 51665 Decal, Warning Operatror w/I 10ft
s/n 62562/up 72595 Decal, Danger Feed From Side
45 72545 Gauge Cover 72596 Decal, Danger Do Not Open…
46 72646 Side Marker, Amber 72597 Decal, Warning Torque Anvil…
47 72547 Oil Drain Tube, Kohler 72598 Decal, Warning Do Not Sit-Ride
48 72548 Plug, Oil Drain, Kohler 72599 Decal, Grease Fitting
49 72549 Wire Harness, Safety Switch 51669 Decal, Powertek
50 16339 Manual Pak 162171 Float Assembly 3&6 Gal. tank
51 72551 Battery Hold Down Cap 162172 Pick-up Assembly 3&6 Gal. tank
3-12-08
22
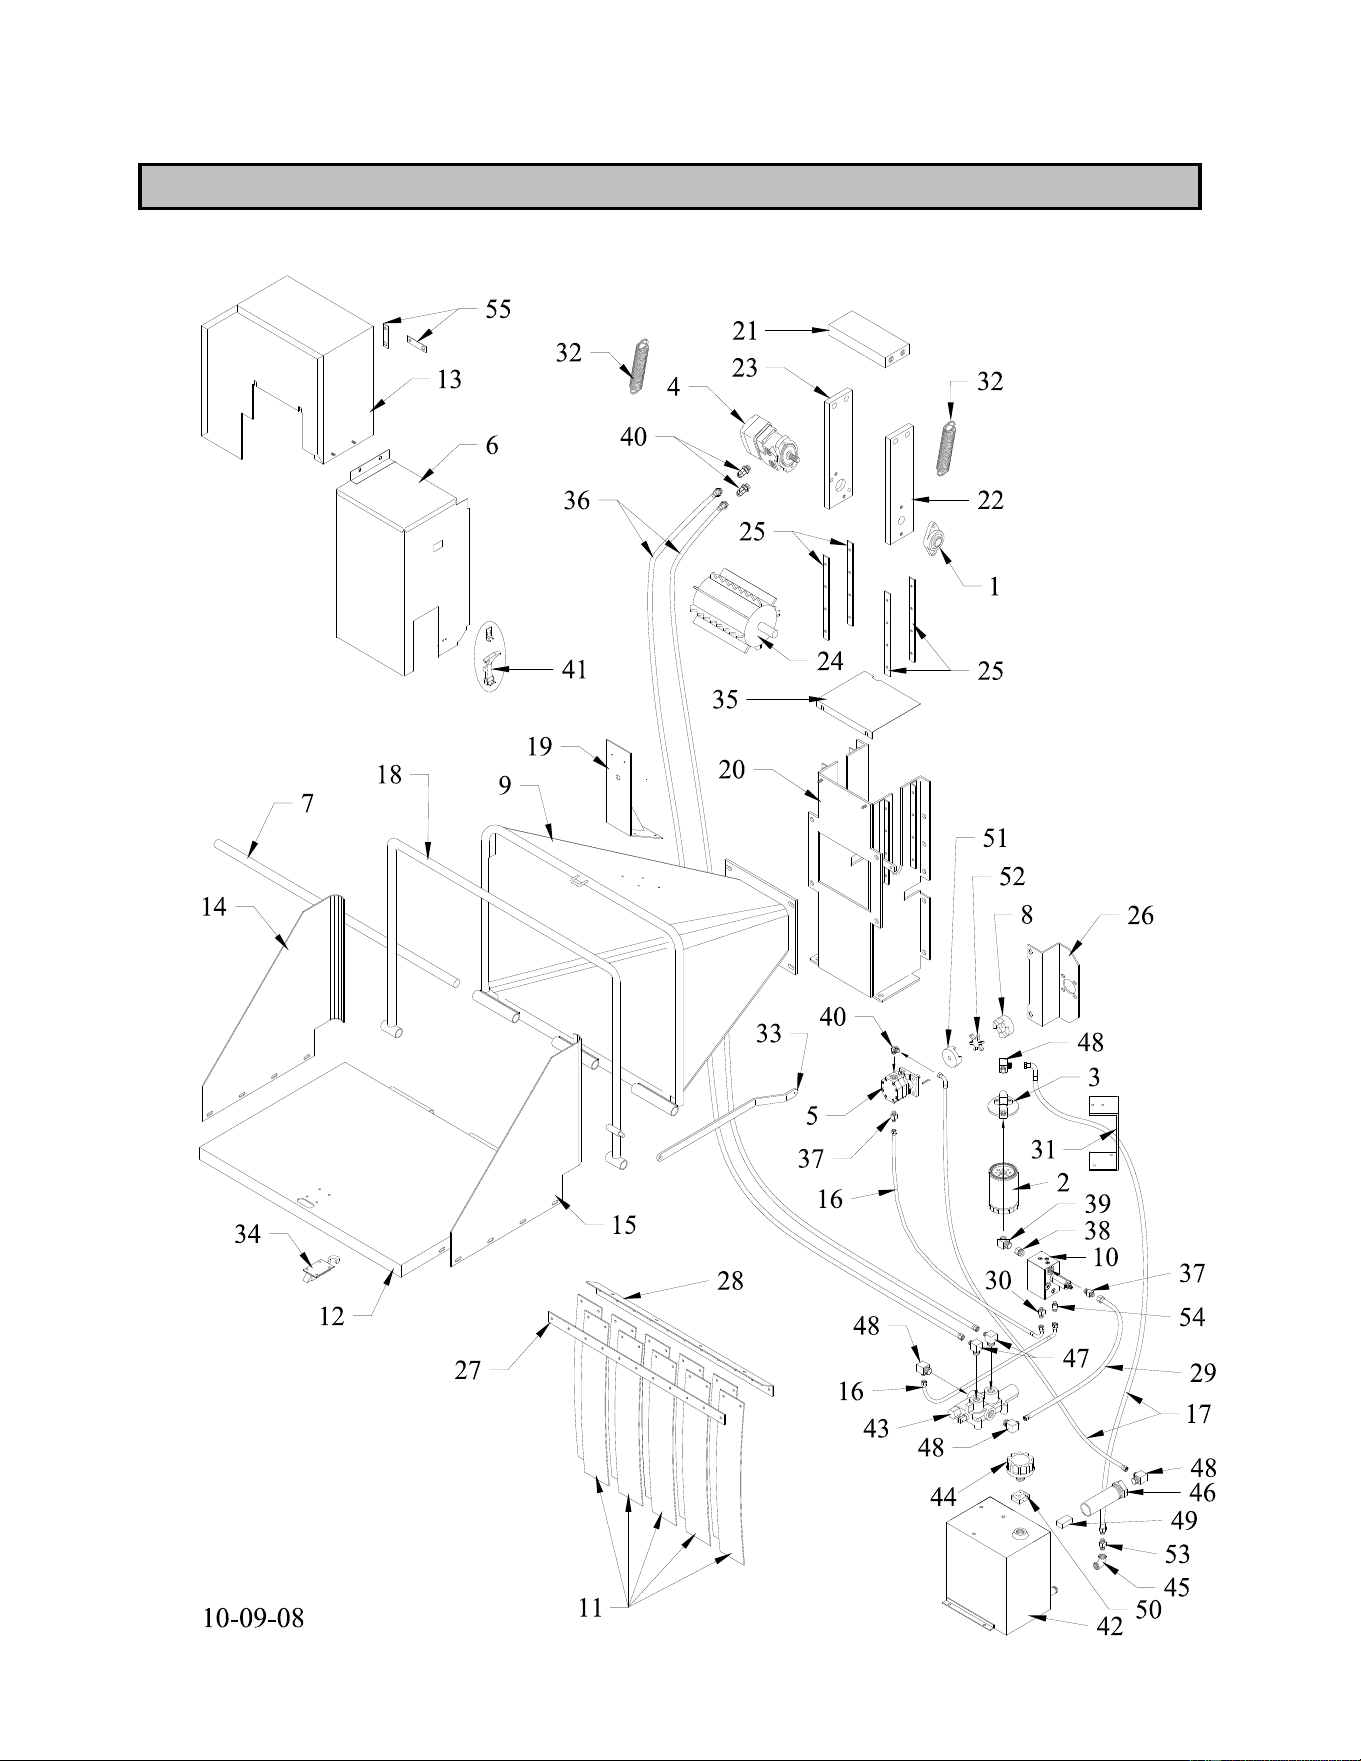
PARTS BREAKDOWN (727 HYDRO PARTS)
23

PARTS LIST (727 HYDRO PARTS) POWERTEK
Key
1
2
3
4
5
6
7
8
9
10
11
12
13
14
15
16
17
18
19
20
21
22
23
24
25
26
27
28
29
30
31
32
33
34
35
36
37
38
39
40
Part No.
Description
72561 Flange Bearing
72562 Filter Element
72563 Filter Head
72564 Hyd. Motor, Roller thru s/n 62818
72693 Hyd. Motor, Roller s/n 62819/up
72669 Hyd. Pump, 727 Speed Ass’y
72662 Hydro Guard, 727
72567 Door Hinge Pin
72663 Coupling Jaw, 1 1/8”
72569 Hyd. Feed Chute
72658 Priority Control Ass’y
72571 Rubber Flap
72572 Chute Door
72661 Guard Box Ass’y
72574 L.H. Chute Guide
72575 R.H. Chute Guide
72664 Hose, ¾FJIC-3/4 FJIC w/90°x 18”
72665 Hose, ¾FJIC-3/4 FJIC w/90°x 28”
72578 Chute, Lever Ass’y
72579 Mount, Stop Switch
72580 Hyd. Feed Housing
72581 Stabilizer Plate
72582 R.H. Bearing Guide
72583 L.H. Bearing Guide
72584 Roller, Hyd. Feed thru s/n 62818
72692 Roller, Hyd. Feed s/n 62819/up
72585 U.H.M.W. Roller Guide
72666 Pump Mount Bracket
72588 Guard Strip
72589 Guard Bracket
72667 Hose, ¾FJIC-3/4 FJIC x 16”
72668 Fitting, 9/16 O-ring to ¾ MJIC
72592 Filter Mount
72594 Spring, Roller Guide
72601 Activator Lever
72605 Door Latch
72608 Chamber Cover
72611 Hose, 1/2" FJIC-1/2"FJIC x 48"
72613 Fitting, 1/2" MJIC-3/4" o-ring
72614 Fitting, 1/2" FJIC-3/4" o- ring
72615 Fitting-45º, 1/2" MJIC-3/4" MP
72617 Fitting-90º, 1/2" MJIC-7/8" o-ring
Key
41
42
43
44
45
46
47
48
49
50
51
52
53
54
55
Part No.
Description
72638 Latch and Strike, Rubber Ball
51605 Hyd. Tank
51613 Hyd. Control Valve
51620 Hyd. Tank Breathers
51621 1/2" Pipe Elbow
51630 Strainer
51639 Fitting-90°, 1/2" FP-1/2" MP
51641 Fitting-90°, 1/2" MJIC-3/4" MP
51643 Magnet
51677 Cap Foam
82512B Coupling Jaw ½”
72695 Spider Coupling, Urethane
72616 Fitting, ½”MJIC-1/2”MP
72670 Check Valve, Priority Control
72682 Mount Tab, Guard
2-20-08
24

OWNERS INFORMATION POWERTEK
Additional or replacement manuals may be obtained from your local PowerTek distributor. When chipper is
received, complete the following record.
SERIAL NUMBER: ____________________________
DATE OF PURCHASE: _________________________
WHERE PURCHASED: _________________________
Always mention the machine's model and serial number when ordering or writing about parts.
For convenience in ordering, parts are listed by part number, description and quantity. Always supply part
number and complete description when ordering. When assemblies can be used, order them to save time
assembling individual parts. Prior arrangements must be made before returning chipper for warranty service.
Service calls should be directed to Customer Service at 1-877-769-7835.
To insure correct and prompt shipment of parts, always provide the following information when ordering.
1. Quantity of each part wanted
2. Part number and description
3. Model and serial number of chipper
4. Preferred method of shipment: by mail, UPS, or airfreight
25

WARRANTY POWERTEK
WARRANTY INFORMATION
Each new product is warranted against manufacturing defects in workmanship and/or materials
under normal use and service for a period of 12 months from the date of delivery of the product to the
original purchaser. PowerTek Inc.'s obligation under this warranty shall be limited to the replacement to the
original purchaser of any part which, as delivered to the original purchase, and upon PowerTek Inc.'s
examination, is shown to PowerTek Inc.'s satisfaction, to be defective due to faulty workmanship or
materials at the factory.
This warranty does not apply to damage in transit, damage caused by user misuse, negligence,
accident, normal wear, or alterations or repairs done outside the factory and/or authorized service stations
as determined by PowerTek Inc.
All parts claimed to be defective must be returned to PowerTek Inc.'s factory for inspection, repair
or replacement, with all transportation or mailing charges prepaid. It is the exclusive responsibility of the
purchaser to bear the transportation or mailing charges on any warranty claim.
This warranty specifically excludes engines or batteries, which are warranted separately by their
respective manufacturers, all claims for defective batteries, engines or engine parts must be made in
accordance with the battery and /or engine manufacturer's warranty. This warranty also specifically
excludes costs of regular maintenance and replacement of service items such as belts, hoses, blades, and
similar items.
PowerTek Inc. reserves the right to make changes upon PowerTek Inc.'s products without imposing
any obligation upon PowerTek Inc. to install the same on a product manufactured prior to the change.
PowerTek Inc. makes no other warranties, representations or promises other than those set forth
herein. PowerTek Inc. specifically disclaims any and all implied warranties of fitness for particular
purpose and merchantability.
The remedies available to a distributor, dealer, and/or purchaser in connection with PowerTek Inc.'s
warranty are set forth above. In no event will PowerTek Inc. be liable for special, incidental or
consequential damages.
POWERTEK INC. WARRANTY PROCEDURE
A. All requests for warranty must have approval from PowerTek Inc. and/or distributor before work starts,
or the warranty claim will be denied.
B. All requests for warranty must be made on an OPEI or equivalent warranty claim form. This form is
available from PowerTek Inc. or an authorized PowerTek Inc. distributor or dealer on a no charge basis.
C. It is the responsibility of the distributor or dealer to complete the form warranty claim and
submit it to PowerTek Inc..
1. The form must be filled out completely. Claims received without serial numbers, model
numbers, replacement part numbers, purchase dates, repair dates, purchaser's correct address,
signature or other information requested by PowerTek Inc. shall be denied.
2. Warranty claims that are illegible will be returned without service. Please type or print in black
ink.
3. PowerTek Inc.'s warranty makes no allowance for the time spent to fill out the warranty claim.
Any such claim will be denied.
26

WARRANTY POWERTEK
WARRANTY PROCEDURE (CONTINUED)
4. All parts shall be retained and tagged for a period of 60 days or until credit is issued.
5. The factory my request parts to be returned for examination or analysis. These parts shall be
sent by prepaid freight to PowerTek Inc. Returns sent freight collect, without express,
written permission from PowerTek Inc. shall not be accepted.
6. It is the responsibility of the dealer to review the claim and to comply fully with all
procedures set forth herein. Failure to do so shall result in the denial of the warranty claim.
D. Any warranty payments by PowerTek Inc. will be paid by credit memo to the distributor, dealer.
E. All warranty claims, which are denied, will be returned with a reason for denial.
F. Labor Allowance.
1. The warranty labor rate is $35.00 per hour.
2. The actual time is divided into tenths of an hour. The warranty form should show the time to
the nearest tenth of an hour.
3. Labor credit is based on the actual time required only to make the repair.
G. Items not covered by warranty.
1. Mileage and transportation costs of any kind. All warranty is "Bench Work" only. The
warranty specifically states that any transportation charges in connection with a warranty
repair is the exclusive responsibility of the purchaser.
2. Postage, delivery, telephone calls or similar communications.
3. Normal maintenance or adjustments. This includes set up and service.
4. Battery, engine or engine parts. Warranty on batteries, engines, engine parts or other vender
parts is covered by the component manufacturer's warranty and must be handle by that
component manufacturer's representative.
5. Failure caused by neglect, normal wear, or abuse. PowerTek Inc. depends on its distributor
and dealer network to accurately determine when such conditions occur.
6. Any alteration of the original design of the unit or the use of unauthorized or non-PowerTek
Inc. parts. Any claim submitted containing such unauthorized alteration repairs shall be
rejected.
7. Freight or transportation damage. All such damage is the responsibility of the carrier and any
claim for damages must be made with the carrier.
8. Compound or repeat warranties caused by negligent/improper repair.
9. Any claim for warranty where the date of repair exceeds sixty (60) days from the submission
of the warranty claim.
10. Any claim for warranty on the entire unit.
11. Warranty claims involving oils or fluids of any kind.
12. Any warranty claims for leaking, punctured, blown, flat, or otherwise damaged tires on units
that have been placed in service.
13. Lost time, lost rentals, lost profits, or other economic loss due to warranty work.
Voluntary cooperation with the entire warranty procedure will make the program work better for
both the purchaser and PowerTek Inc.
27