Save This Manual for Future Reference
MODEL NUMBER
FOR YOUR SAFETY
SERIAL NUMBER
PURCHASE DATE
Both model number and serial
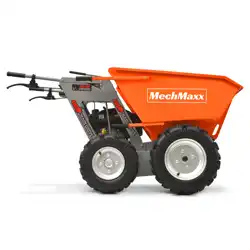
Mini dumper
number may be found on the
main label. You should record
both of them in a safe place for
future use.
Operator’s Manual
READ AND UNDERSTAND THE ENTIRE MANUAL BEFORE OPERATING MACHINE

MAX performance,MAX Value,MAX Support that’s
Mini Dumper
Your new Mini Dumper offers quality construction,
and is easy and safe to operate. With proper use and
care, it is designed to give you many years of
dependable service.
Prepare to experience the durability to take on any job
with the ease, portability, and convenience of your new
Mini Dumper !
Introduction
Transporting&Storing
1
3
4
5
7
11
13
15
20
21
8
9
10
1
Maintenance
Supplement
Parts Diagram
Parts List
About You Dumper
Specifications
Safety
Machine Operating
Installation
Operating
Know Your Machine
Backed by decades of proven manufacturing expertise
Enhanced design features come standard
Engineered for the best user experience
Quality metal parts are used instead of plastic
A robust warranty supports all products
Budget-friendly prices make it practical
TABLE OF CONTENTS
Introduction
Mini Dumper Operator’s Manual
2
Introduction
ENGINE MANUAL
MODEL AND SERIAL NUMBERS
DISCLAIMER
EMISSION CONTROL SYSTEM
ENVIRONMENTAL
Record the model and serial number as well as date
and place of purchase for future reference. Have this
information available when ordering parts or optional
accessories and when making technical or warranty
inquiries.
The
Engine Manufacturer
is responsible for all engine-
related issues with regards to performance, power
rating, specifications, warranty and service. Please refer
to the
Engine Manufacturer's
owner/operator's manual,
packed separately with your unit, for more information.
This equipment and or its engine may include exhaust
and evaporative emission control system components
required to meet U.S. Environmental Protection Agency
(EPA) and/or California Air Resources Board (CARB)
regulations. Tampering with emission controls and
components by unauthorized personnel may result
in severe fines or penalties. Emission controls and
components can only be adjusted by an authorized
engine manufacturer's service center.
Mini Dumper reserves the right to discontinue, change,
and improve its products at any time without notice
or obligation to the purchaser. The descriptions and
specifications contained in this manual were in effect at
printing. Equipment described within this manual may be
optional. Some illustration may not be applicable to your
unit.
Carefully read through this entire operator’s manual
before using your new unit.Pay attention to all cautions
and warnings.
Recycle unwanted materials instead of disposing of
them as waste. All tools, hoses and packaging should
be resorted, taken to the local recycling center and
disposed of in an environmentally safe way.

ABOUT YOU DUMPER
3 Introduction & Symbols
PRODUCT INTRODUCTION
WARRANTY
This machine is a kind of small dump-truck, change tradi-
tional mode of human pushing walking and adopt
unique four-wheel-drive form by power. All these
advance its working ability in the field.
Its body adopts sheet metal structure, not only reduce
gross weight, but also increase its loading capacity.
There are four forward gears and 1 reverse gear. The
operator has more choices under different work environ-
ment.
It uses reverse control to brake, which is easy to operate. It
also use an emergency button on the engine, so that the
power can be cut off at any moment. The protection for
tire is reasonable, not only safe, but also beautiful. Accord-
ing to different configuration, the machine can be used in
loading sand, soil, stone.mud, wood, fodder and brick, etc,
it is prohibited to load hot materials such as hot steel
plates, hot asphaltum etc.
There may be technical or typesetting errors, so our
company will update the manual regularly, and put revised
content in new version. Our company have the right of
improving & updating product at any time It is (these are)
subject to change without notice.
In writing manual, there is errors and omissions inevitably,
please forgive us and your correction is welcomed.
However, our company will not take responsibility. If you
did not show any written disagreement on the manual, so
we think that you agree to all the contents of the manual.
Warranty: 1 year
4
3
2
1
N
R
OWNER/OPERATOR/RENTER TRAINING
RENTAL COMPANIES
ENGINE INSTRUCTIONS
Read and follow all instructions and safety precautions
presented throughout this manual. A summary of
important safety information can be found at the end of
the manual. Keep this manual for reference and review.
If the owner of this unit is different than the operator,-
give a copy of this manual to any operator to read.
Advise all persons who will operate the machine to read
it. You should also provide personal instruction on how
to safely operate the dumper and remain available to
answer any questions a renter/borrower might have. If
videos are available have renter watch training video.
For detailed engine operation and maintenance informa-
tion, always refer to the engine Owner's Manual
furnished with the dumper.

Mini Dumper Operator’s Manual
Model Number
Displacement
Engine
Net Power
Loading Capacity
Transmission
Driven
4Specifications
SPECIFICATIONS
660 lb
4 forward /1 reverse speed
Chain driven 4x4
0.07 in
front 4.00-10, rear 4.00-8
Mechanical
20 degree
Recoil
37 in
28 in
18 in
67*30*34 in
344/291 lb
Tipping Bucket Thickness
Wheels
Transmission Type
Limited Grade Ability
Overall Size
Start
Box Length
Box Width
Box Depth
G.W./N.W.
RATO
201cc
3.8kw
GENERAL SAFETY RULES
SAFETY
SAFETY
B
5 Safety
1. No loading with corrosive, toxic objects; No overloading
(rated load 660 lb); No carrying people
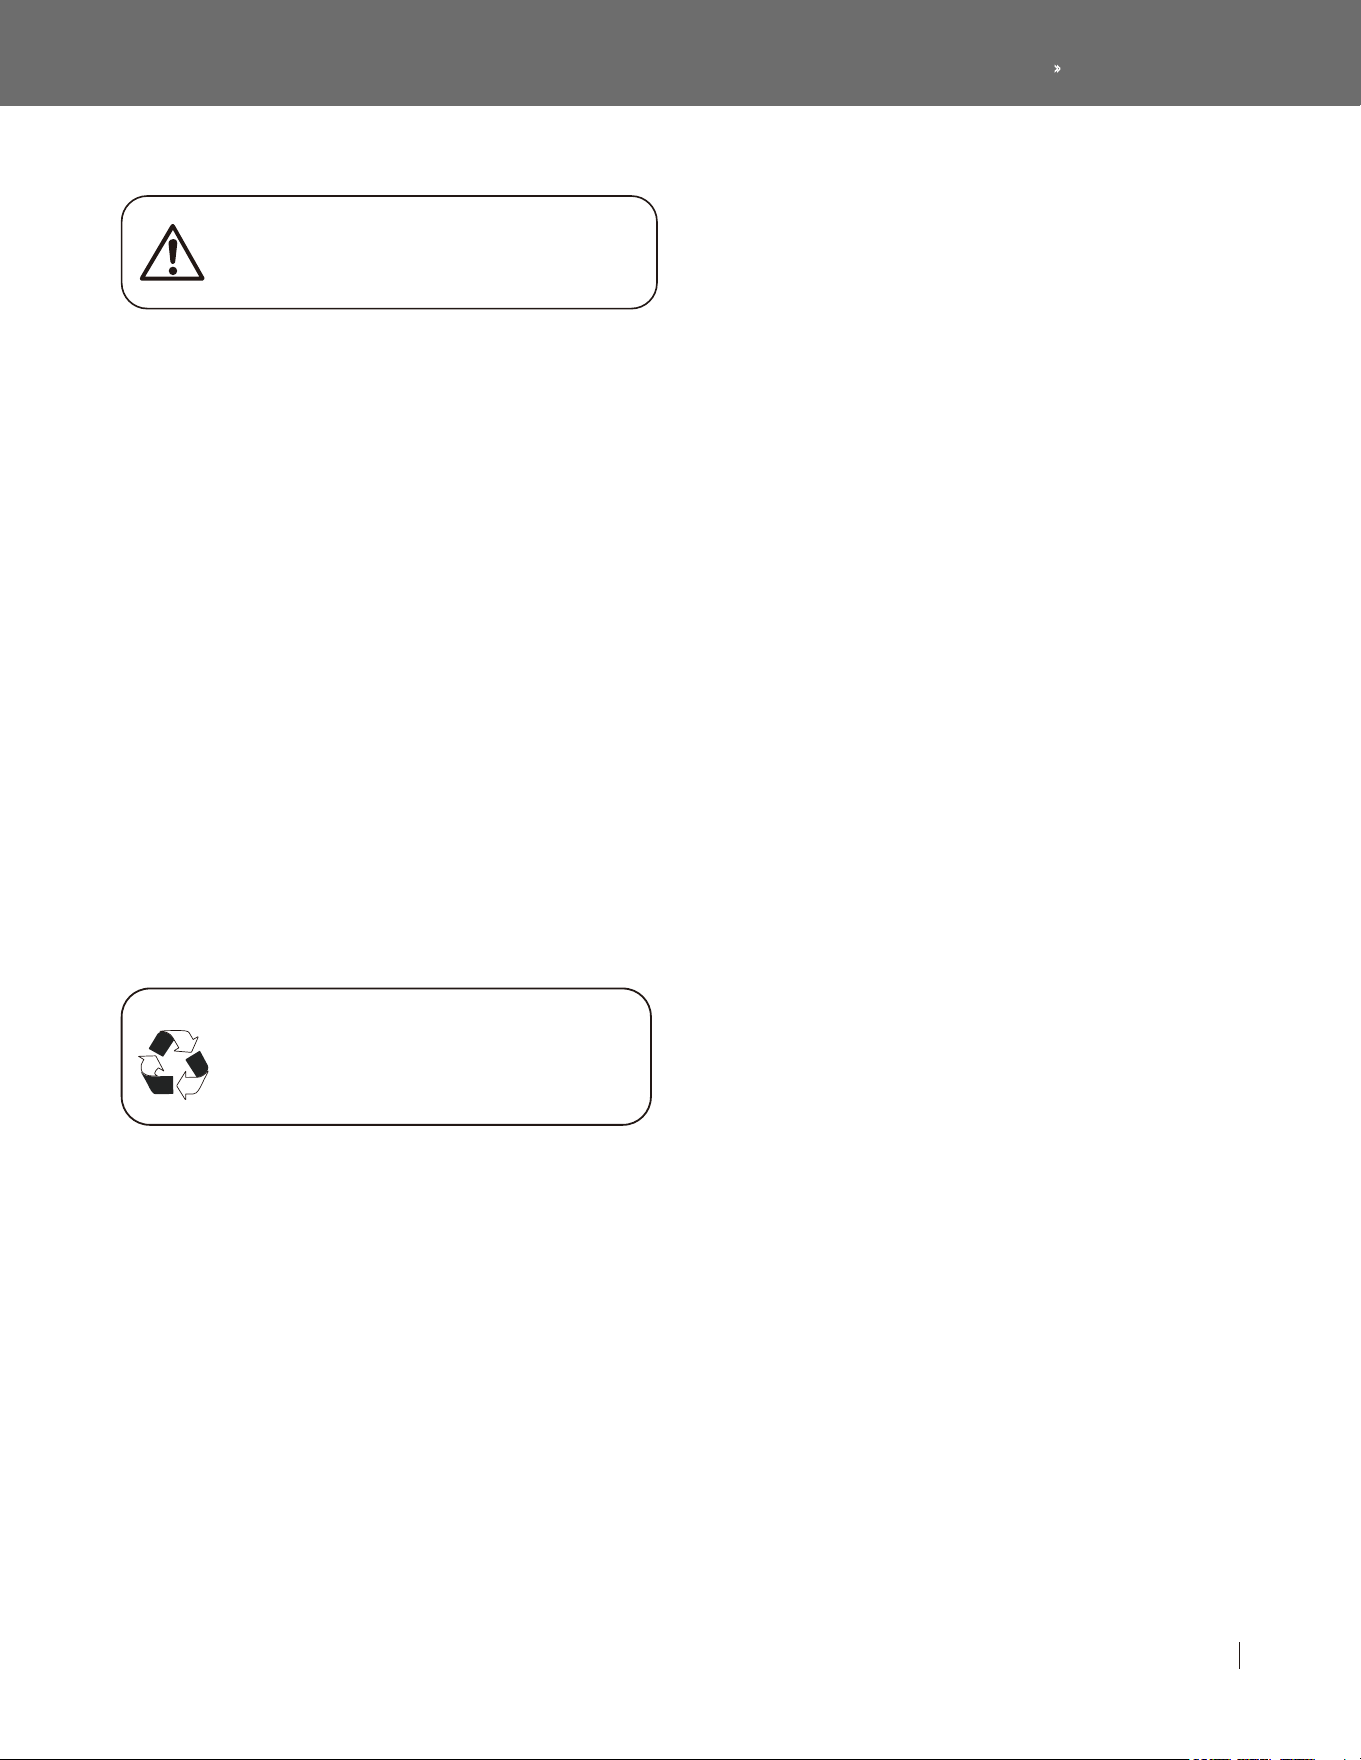
2. During the course of operation, any emergency, please
release brake handle(B) on le hand immediately, then press
emergency stop switch(A) quickly
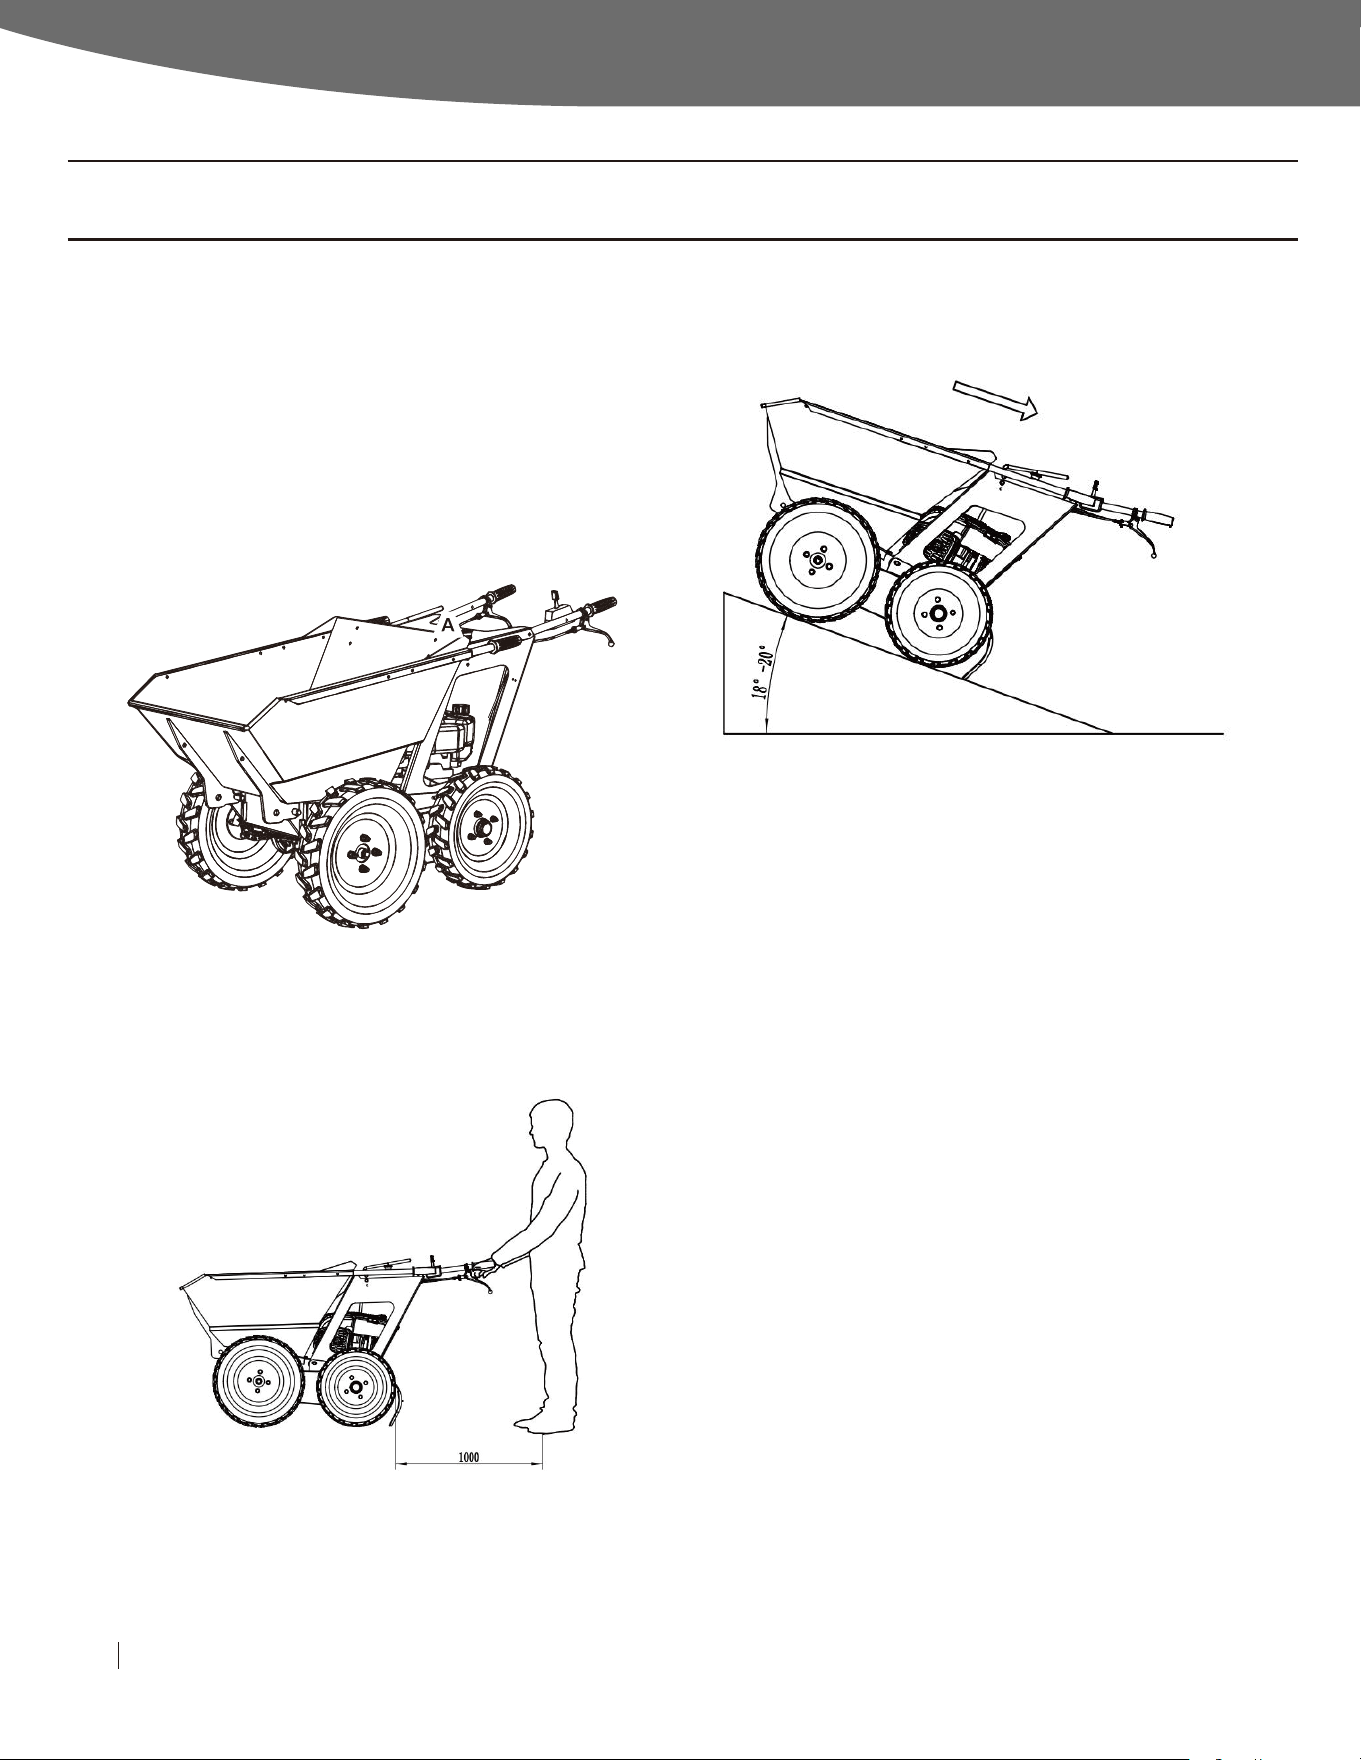
3. During working, people should stand in the middle of the
two handles, and keep a certain space from engaged wheel,
so that avoid injuries of foot touching engaged wheel during
walking.
5. There is some vibration and noise when working. If work for
a long-term continuous, please wear appropriate ear-protec-
tor, so as not to.cause hearing damage. There would be some
harmful emissions gas when start gasoline engine.
6. Before loading, machine should be placed in flat place. No
overloading (rated load 660 lb). When loading scattered
granular objects, please loading averagely. Not allow filling to
one side, so as to avoid overturning. When loading solid or
larger than volume of bucket, it should be tied up firmly
7. When machine is working, any part of your body don't
touch the surface or gap between tire and machine body, so
as to avoid body injury
8. When working or unloading, please confirm there is no
people in the front or side of machine. Also obstructions of
easy collision and friction are not allowed.
9. Not allowed running or unloading in the so muddy road,
so as to avoid quagmire and overturning Don't work in
slippery road to avoid danger out of control.
10. Not allowed running or working in the place with
fireworks to prevent fires. If body of machine is on fire, please
use dry powder fire extinguisher.
11. Don't working under tire pressure below the rated
pressure (drive wheel: 25-30 psi, engaged wheel 25-30 psi,
transition wheel: 10-15 psi) and tire burst, otherwise it will
cause danger to people and affect useful-time of machine.
4. When the gradient of 18-20°, and running downgrade
under rated load, only running backward is allowed to prevent
overturning accidents.

Wood Chipper Operator’s ManualMini Dumper Operator’s Manual
6Safety
a. close engine, let engine cooling for two minutes at least,
then remove fuel tank cover.
b. Inspect gasoline in outdoors or in well-ventilated area.
c. do not make gasoline spill.
d. check equipment which easy to crack or leak, such as
tubing, fuel tanks, fuel tank cover. If necessary, replace
easy-damaged parts.
13. Starting engine
a.ensure spark plug, muffler, air filter of fuel cover to a normal
position.
b.do not start engine by rotating cranksha under spark plug
removed.
c. If gasoline overflows, please wait its volatilization and then
restart.
d.If gasoline comes into engine, please set choke as
OPEN/RUN, and air throttle as FAST, then rotating cranksha
till engine started.
12.Adding gasoline
14. Operating equipment
Do not block carburetor prevent engine stop working
15. Transit equipment
Please confirm no gasoline in oil tank.
16. Store gasoline or equipment under the condition of oil
tank without gasoline Keep gasoline or equipment far away
from melting pot, stove, water heater or other pilot flame
even fire source, because they may ignite gasoline vapour.
17. There may be spark phenomenon when start engine.
When start engine, flammable gas nearby may be ignited and
cause an explosion or fire. If there is leakage of natural gas or
liquefied petroleum gas, do not start engine there.
18. When start engine, please pull start rope slowly before
feeling resistance, then pull start rope quickly If take start
rope back too quickly (rebound), there may lead to your arm
towards to engine and can't release rope in time, then result-
ing in bone fragmentation, fracture, bruise or sprain.
19. Don't start or operate engine in a closed area, even if the
window is open. When start engine, it releases carbon monox-
ide that is colorless, odorless toxic gas. Inbreathing carbon
monoxide may lead to nausea, syncope or even death.
20. Touch engine just aer cooling of muffler, engine
cylinder and heat sink and clear flammable materials
accumulated in cylinder near muffler region. Engine under
working can emanate heat especially muffler's temperature
is very high. Touching with parts with high temperature will
lead to serious thermal burns. Debris objects like leave, grass,
brush and others will be easy to get fire.
MACHINE OPERATING
7 Safety
Never open oil fill port while engine is running.
Hot oil can spray over face and body.
WARNING: Burn Hazard
WARNING: Gasoline fire/explosion hazard
WARNING: Fuel leak hazard
PRE-START CHECK LIST & PROCEDURES
CHECK CONTROLS
CHECK TIPPING BUCKET&BUCKET CATCH LEVER
A new engine is shipped without oil. You must add the correct
amount of oil to engine crankcase otherwise the engine will
be damaged beyond repair. (Note: #92 gasoline fuel and
10w-30 engine oil.)
Before starting the engine, you have to complete the follow-
ing procedures:
1. Checking Controls.
2. Checking Tipping Bucket.
3. Checking Bucket Catch Lever.
4. Checking Belts and Tires.
5. Checking/Adding Oil.
6. Filling mini dumper Gasoline Tank.
7. Inspecting Fuel System for Leaks.
8. Wearing Personal Protection.
9. Clearing Area of People and Objects.
10. Working During the day or above 500 lux in lighting condi-
tions.
All guards are in place and tight. Operator presence bar
switch is free moving. Inspect tires and rims for looseness,
damage, and tire inflation.
Inspect tipping bucket for tightness and the bucket catch
lever can work normally. Only use factory-approved parts for
repair.
CHECKING BELTS AND TIRES
Check the tension of the belts and check the tire pressure.
CHECK/ADD OIL
Check the oil level using the dipstick and add oil as needed.
Using a funnel, add oil up to the FULL mark o the dipstick with
the recommended oil type for your engine and expected
ambient conditions. (See engine Owner's Manual for oil type
and capacity, and more detailed oil check/fill instructions).
FILL MINI DUMPER GASOLINE TANK
INSPECT FUEL SYSTEM/CHECK FOR LEAKS
Gasoline is highly flammable and explosive. Heat, sparks and
flames can ignite gasoline vapors, which can become
widespread during fueling. A flash fire ignition and/or explo-
sion could result and cause serious injury or death. The
following conditions could result in gasoline ignition/explo-
sion:
Gas vapor collection inside enclosures.
Static electric sparks.
Sparks from electric wiring or running engines.
Sources of heat (such as a hot engine or exhaust).
A leaking fuel line no matter how small can be the source of a
fire or explosion when starting or operating the engine.
Inspect the entire fuel system. Look for: Signs of leaks or
deterioration, chafed or spongy fuel hose, loose connections,
loose or missing fuel hose clamps, damaged gasoline tank, or
defective gasoline shut-off valve
If dumper is in an enclosed area and you smell gas, DO NOT
start engine! DO NOT light a match. DO NOT flip on an electri-
cal switch.
Exit area immediately leaving doors open and call fire depart-
ment.
Inspect fuel system & check for leaks BEFORE starting
dumper.
Check the gasoline level in the engine's fuel tank. If needed,
fill tank with fresh unleaded gasoline from a portable contain-
er, aer first reading the warnings and instruction below.
- DO NOT fill the gas tank to the top. Gasoline may spill when
operating on a slope.
- DO NOT overfill the gasoline tank. Allow at least 1" of empty
space below the fill neck to allow for fuel expansion.
#92 gasoline fuel and 10w-30 engine oil
Mini Dumper Operator’s Manual
PERSONAL PROTECTION
CLEAR AREA
WORKING DURING DAYLIGHT HOURS
INSTALLATION
8Safety & Unpacking the Container
Use approved protective clothing and approved protective
equipment when using the machine.
Always wear safety shoes and a full-face shield.
The use of ear plugs or other hearing protection device is also
recommended for persons working longer than a few
minutes. Hearing can be damaged from prolonged, close-
range exposure to the type of noise produced by this dumper
Remarks: Ear noise and vibration values
Wear long pants to protect legs from sparks and hot engine.
Never wear jewelry or loose-fitting clothing when starting or
operating the dumper or any mechanical device. Loose or
dangling apparel, jewelry or hair can become entangled in
moving parts.
Neither the machine as a whole nor its internal components
are intended for use in potential explosive atmospheres.
Move away barrier that may interfere with your work.
Only use the machine in daylight or illuminance above
500lux. Never operate the dumper aer dark.
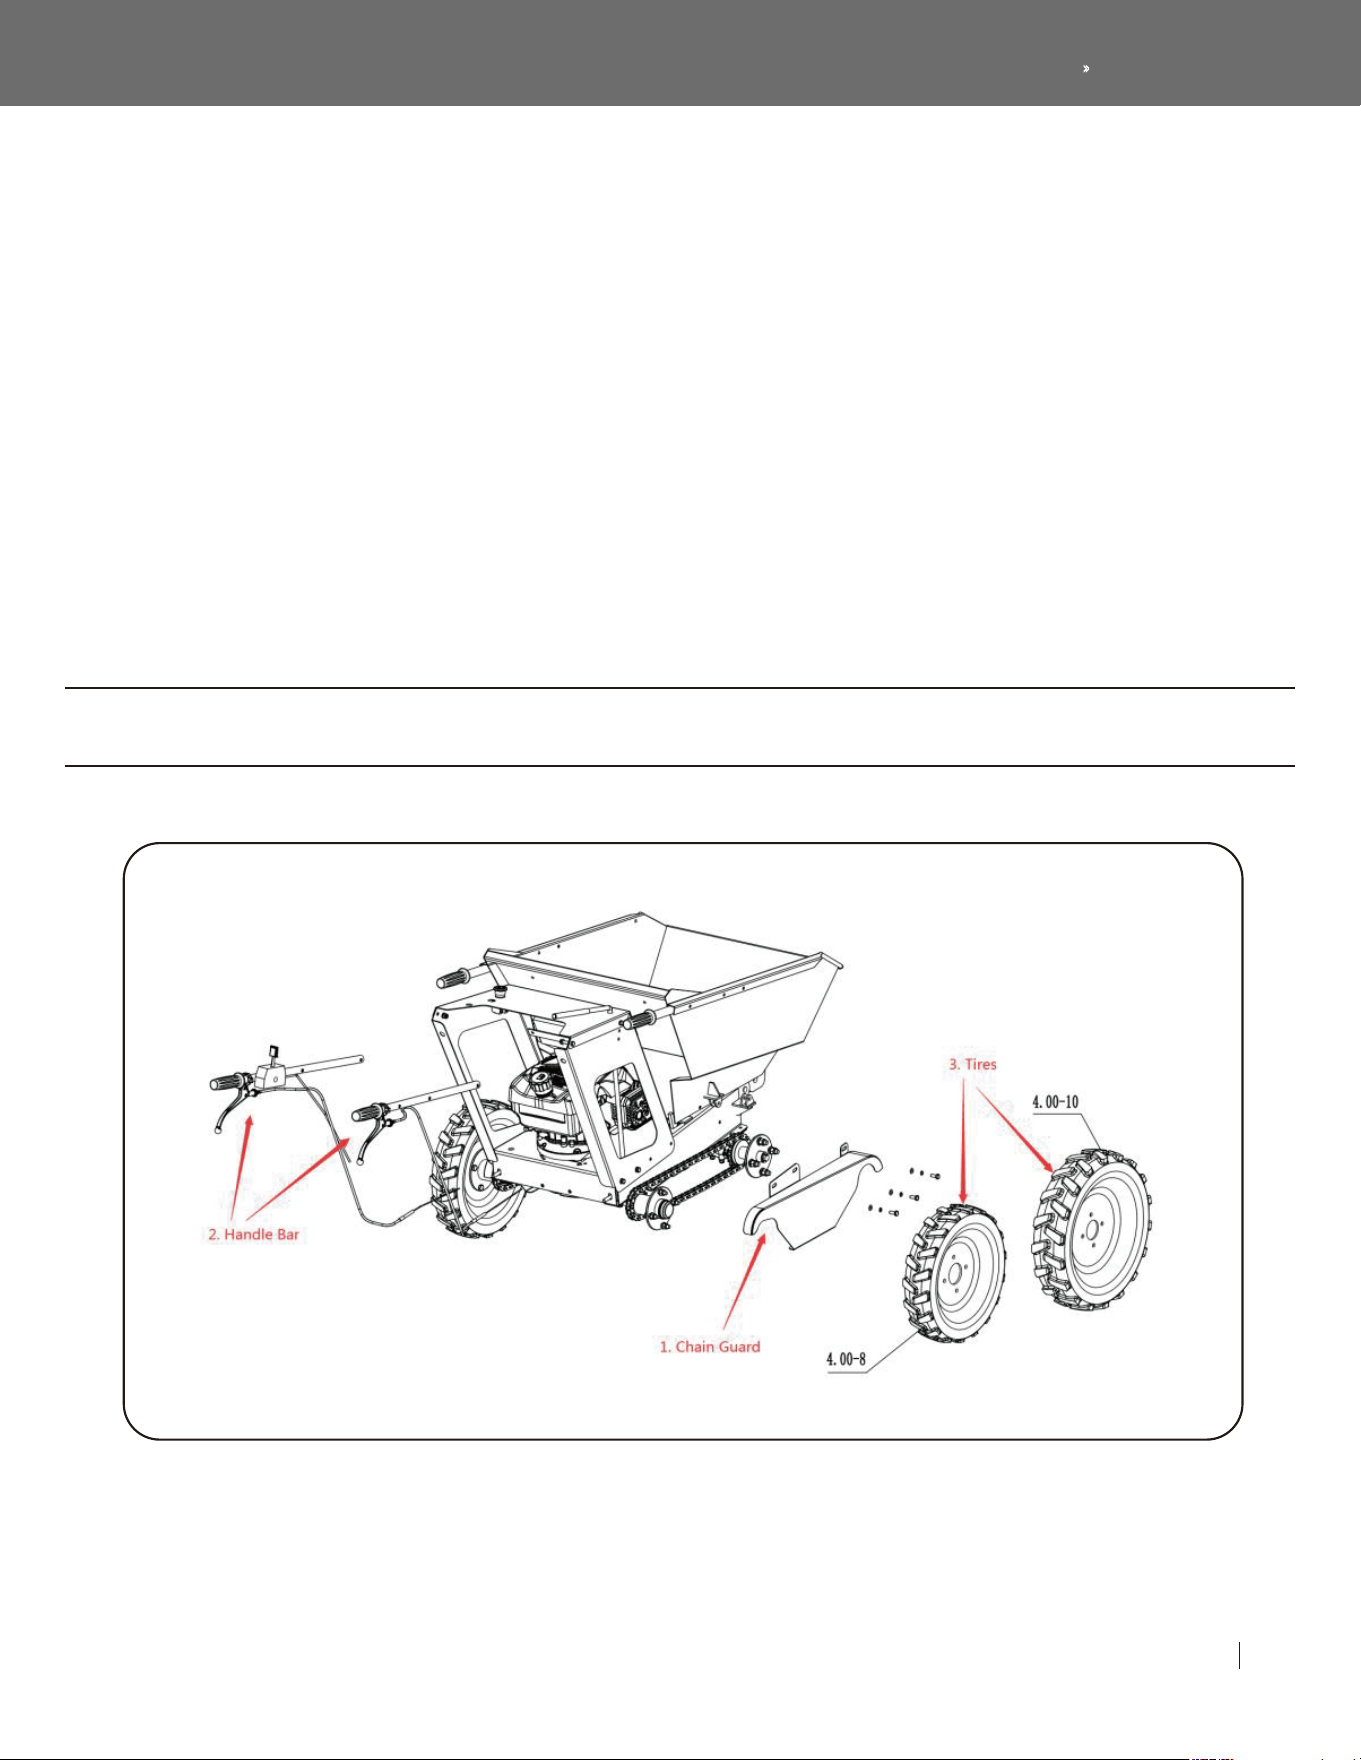
Pis note that the loose bolts are for assembling, just unscrew
them, put correct parts on, then tighten the bolts, job done!
1. Unscrew those 3 bolts, put the chain guard on and tighten
the bolts.

OPERATING
Contents Supplied
1) TO START
Fill tank with unleaded gasoline.
Set machine on firm ground and check oil levels.
To Start the engine, push the throttle lever(a) fully backward
to engage the choke. Check if the emergency button is
released.
Move throttle lever(a) forwards slightly to disengage the
choke and set the engine speed to fast. Allow the engine to
warm up.
Move throttle lever(a) forwards slightly to disengage the
choke and set the engine speed to fast. Allow the engine to
warm up.
Fill tank with unleaded gasoline.
Set machine on firm ground and check oil levels.
To Start the engine, push the throttle lever(a) fully backward
to engage the choke.Check if the emergency button is
released.
Move throttle lever(a) forwards slightly to disengage the
choke and set the engine speed to fast. Allow the engine to
warm up.
Disengage the skip release lever(c) with right hand.
Li up the tipping bucket handle(e) with le hand to dump
the load.
Manually pull the skip back into the machine.
The locking catch will automatically engage.
Release the clutch lever(b).
Push the throttle lever(a) fully backward to power off the
engine.
Emergency Stop: press the Emergency Button(Red Button) to
stop engine when emergency.
Aer engine power off, please release the emergency
button(Turn it as the direction show on the button).
2) To Move Forward
3) To Reverse
4) To Empty Skip
5) To Reset Skip
6) To Stop
For additional engine starting instructions see your gasoline
engine manual.
For cold engine, move choke lever to the CLOSED position.
To restart a warm engine, leave choke lever in OPEN position.
Turn engine switch to the ON position.
Fill tank with unleaded gasoline.
Set machine on firm ground and check oil levels.
To Start the engine, push the throttle lever(a) fully backward
to engage the choke. Check if the emergency button is
released.
2. Put the handle bars in place according to the picture,
tighten the bolts.
3. Put tires 4.00-8 in rear and put tires 4.00-10 in front,
tighten the bolts
4. Trailer: unscrew and screw tightly. (Optional)
5. High baffle: unscrew and screw tightly. (Optional)
NOTE:
NOTE:
Mini Dumper Operator’s Manual
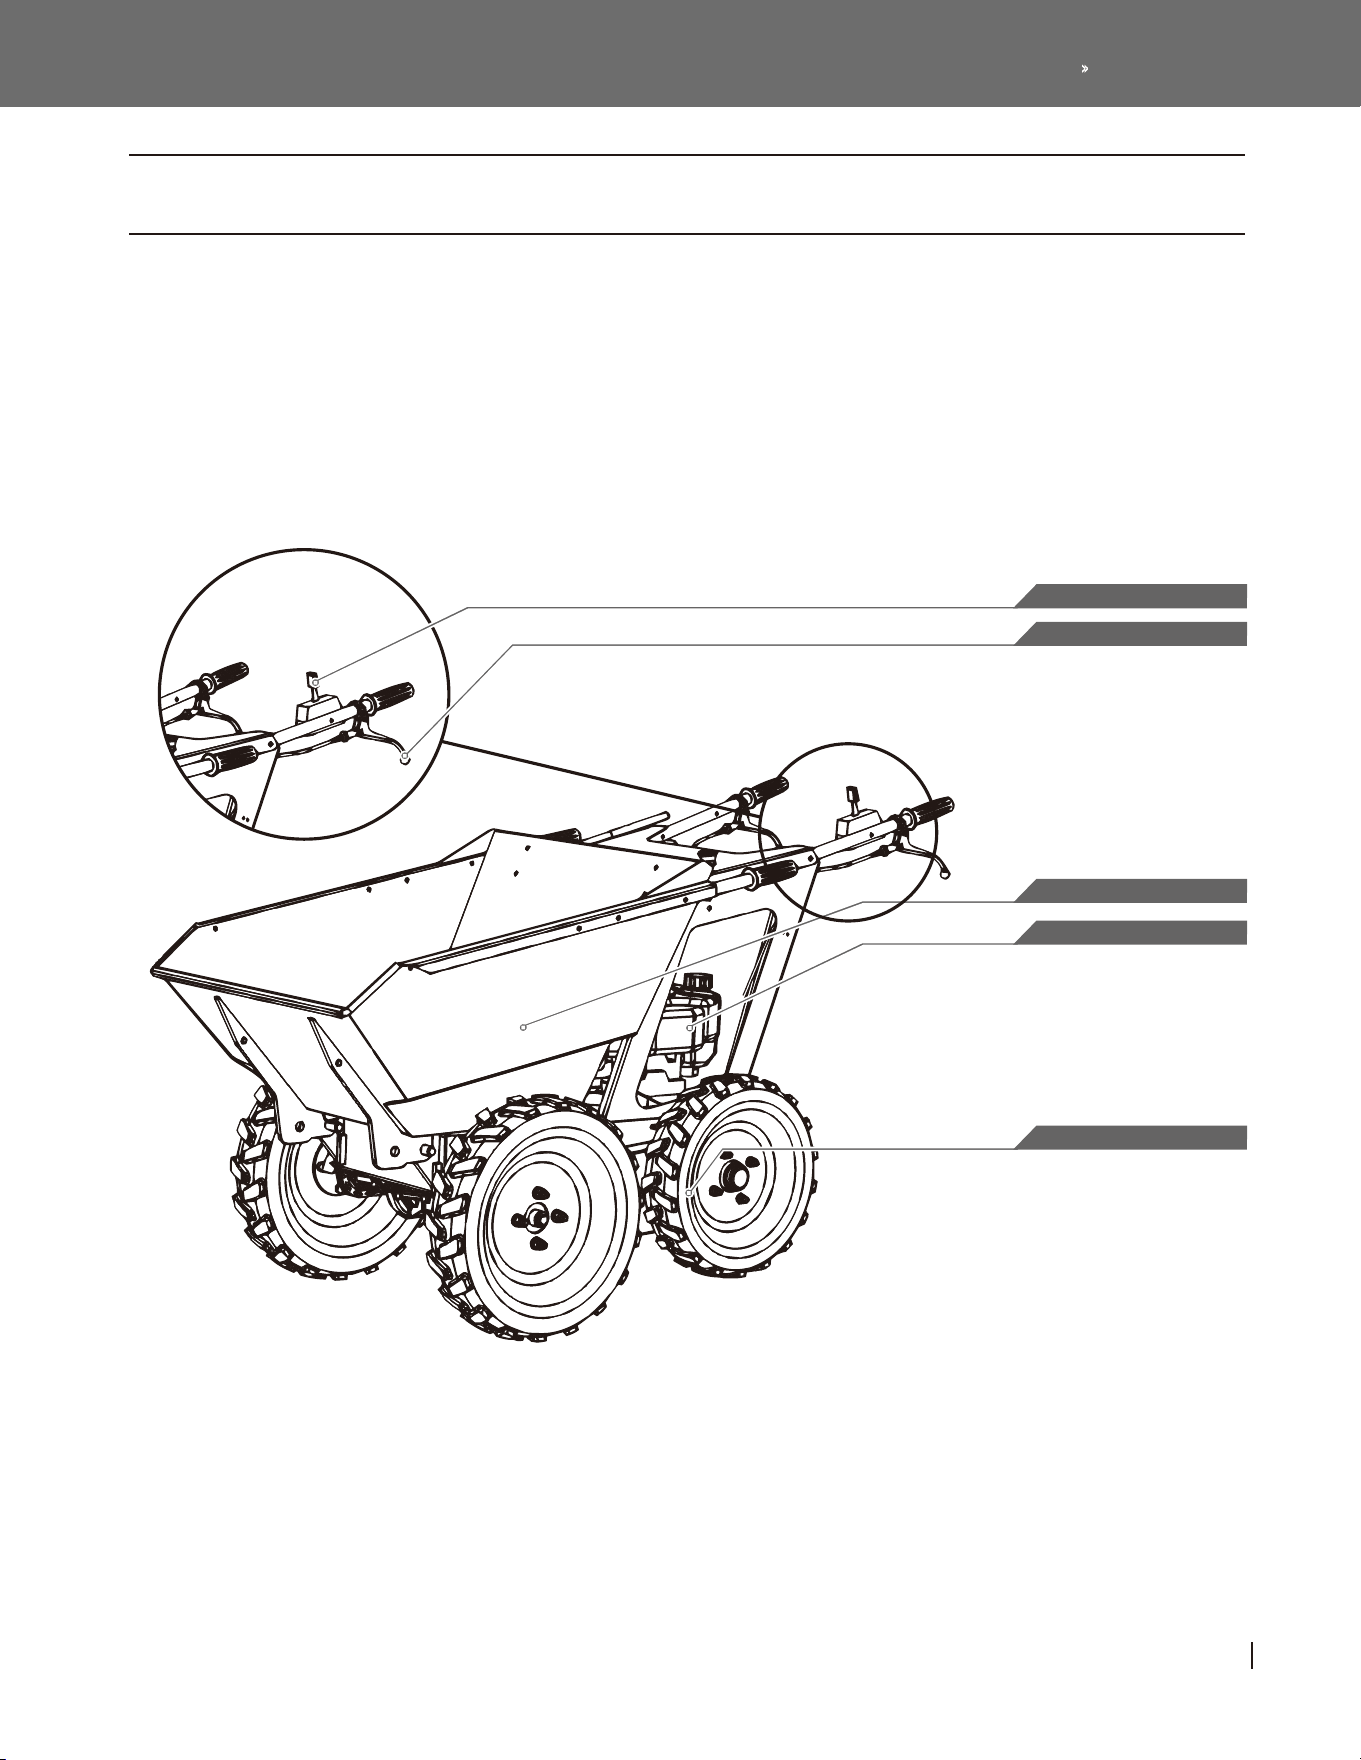
KNOW YOUR MACHINE
FEATURES AND CONTROLS
10
Assembly
Dump Box
Clutch control handle
Throttle controller
Wheels
Engine
TRANSPORTING
STORING
COOL ENGINE
TRANSPORTING&STORING
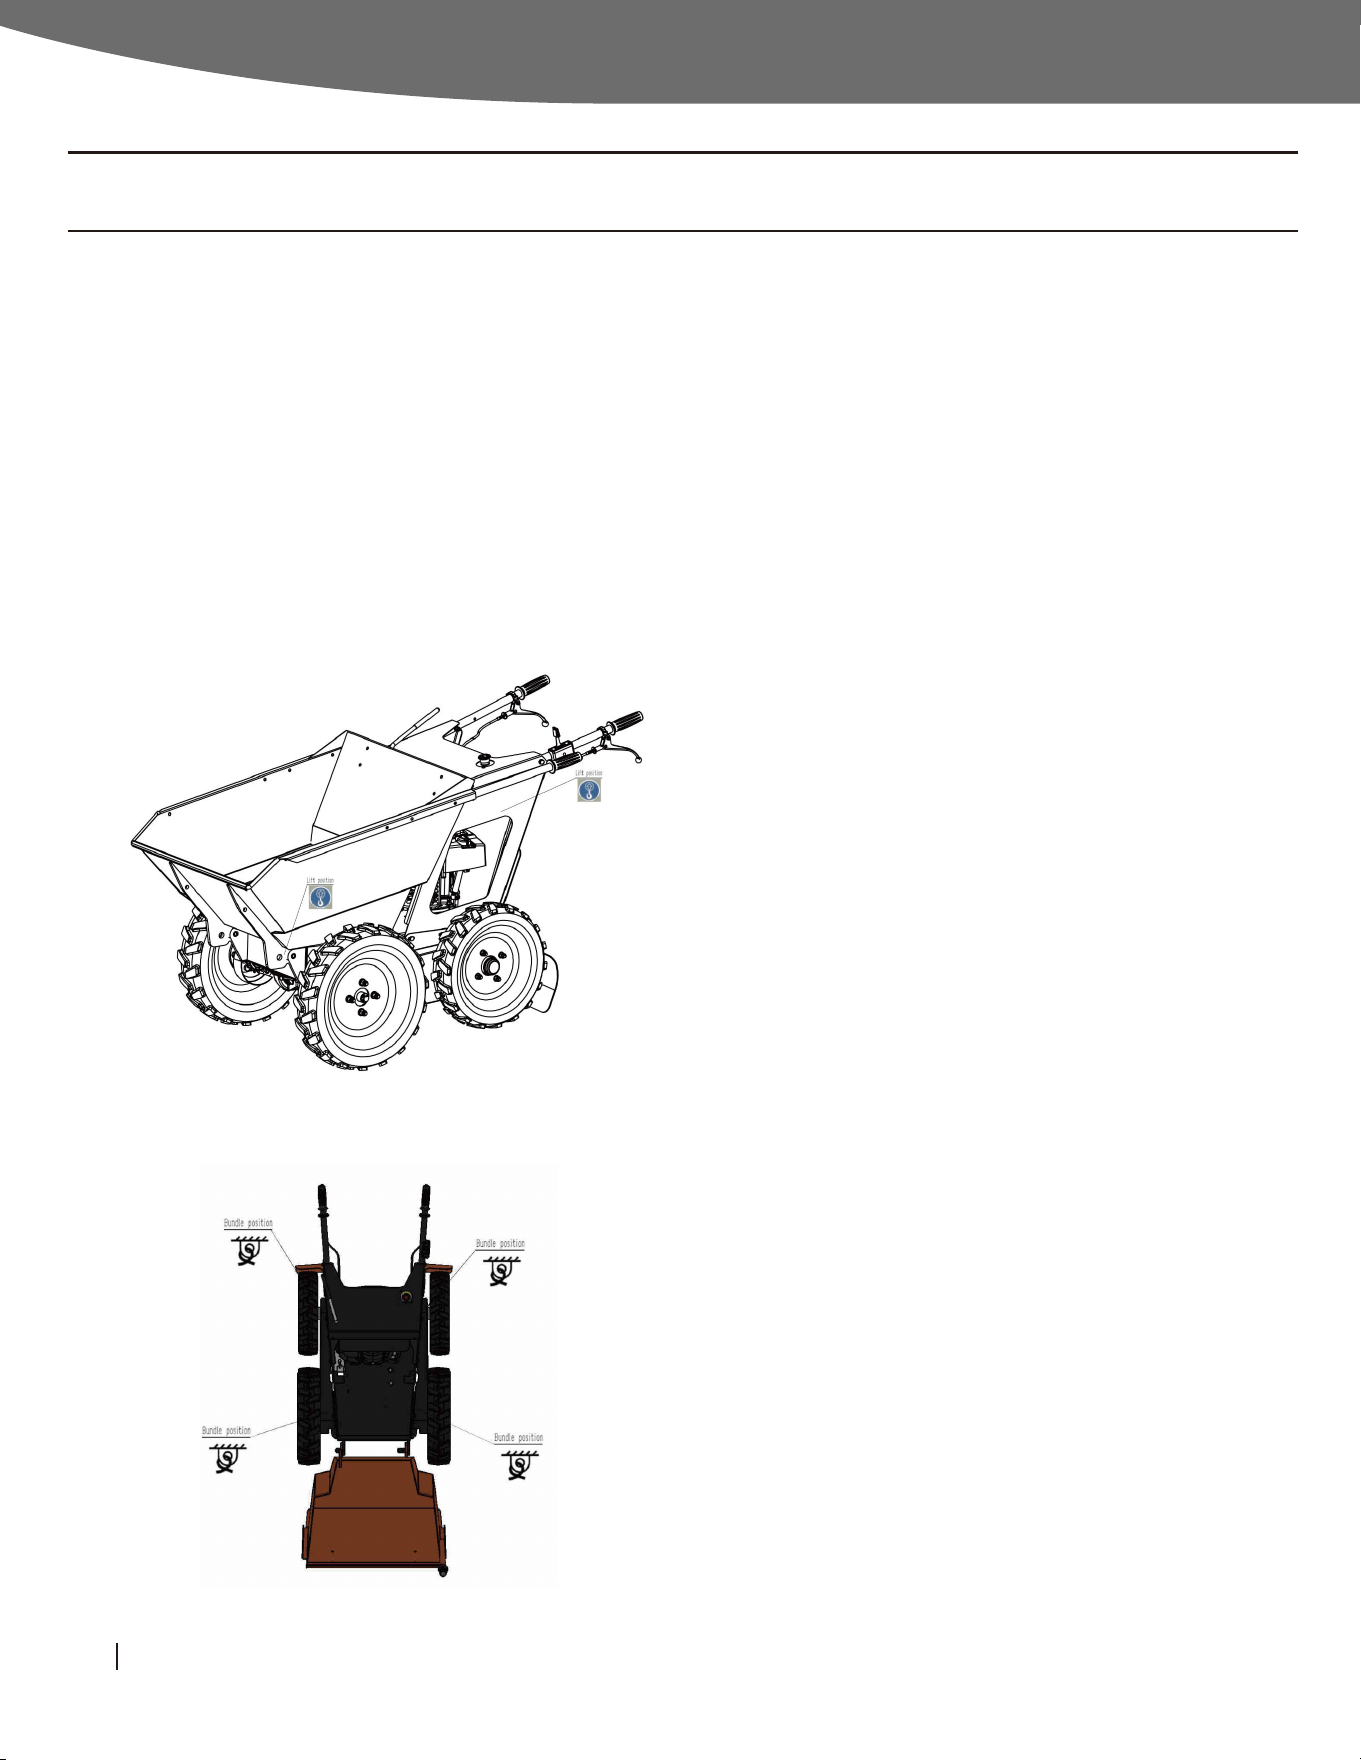
11 Assembly
The mini dumper is designed to be transported via a van or
small trailer. The machine is equipped with grab bars that are
to be used for both liing the machine, and strapping it down.
This machine weighs approximately 291 lb and should only
be lied using correct apparatus.
Note: There are legal road requirements for transiting mini
machines. It is the owner's responsibility to be aware of these
laws and to adhere to them.
When you finished using the dumper and it has cooled, you
must
1) Cool engine before storage.
2) Clean the dumper.
3) Inspect for worn or damaged parts.
4) Choose covered storage location.
5) Prevent accidental starting.
6) Plan on exercising the engine at least monthly unless the
dumper is prepared for long term storage
Let engine cool for at least 30 minutes before storing.A hot
engine can be a fire hazard.
CLEAN DUMPER
Clean all grease, dirt, mud and other foreign matter from the
machine. Touch up paint damage to prevent rust.
INSPECT DUMPER
Inspect the machine for worn or damaged parts and Pay
particular attention to the tipping bucket.tighten any nuts or
screws that may have become loose.
CHOOSE A STORAGE LOCATION
Store the dumper in a location that is:
Clean and dry.
Away from sources of heat, open flames, sparks, or pilot
lights, even if the dumper's gas tank is empty. Residual
gasoline could ignite.
Away from extreme high or low temperatures.
Cover it for extra protection.
REMOVE SPARK PLUG
Remove spark plug, in order to ensure the dumper .cannot be
started in a storage location or untrained persons or children.
1. When the mini dumper is packaged in the plywood case, we
can carry machine by forkli.
2.Without package, we can li the machine at the point of li
label shown.
3.Tie the machine at the point of tying label when transport
for long distance to keep the machine stable.
Remark: Please note there are two more liing labels at the
same position on the other side.
Mini Dumper Operator’s Manual
12Know Your Machine
WARNING: Gasoline fire / explosion hazard
START DUMPER EVERY 4 WEEKS
SPREPARE ENGINE FOR LONG TERM (SEASONAL)
STORAGE IF NEEDED
The dumper should be started regularly. At least every 4
weeks, start the engine and let it run for 10 to 15 minutes.
Monthly exercising of the dumper will dry out any moisture
that has accumulated, lubricate cylinders, and clean out old
gas in the carburetor. Moisture, old gas, and dry mechanical
parts cause deterioration in stored engines.
If you will not be able to start the dumper regularly, you must
prepare the engine for long term storage to prevent gum
deposits from forming and causing malfunction of the
engine.
Prepare engine for long term storage by:
Removing all gasoline from the tank and carburetor OR
Adding fuel stabilizer to the gasoline (following manufactur-
er's instructions)
Fuel stabilizer steps:
1. Ensure gas tank is full.
2. Add fuel stabilizer to fuel tank.
3. Run engine at least 10 minutes aer adding stabilizer to
allow it to enter the fuel system.
4. Shut off engine.
5. Disconnect spark plug wire and remove spark plug.
6. Add one teaspoon oil through spark plug hole.
7. Place rag over spark plug hole and turn starter (or pull the
recoil) a few times to lubricate the combustion chamber.
8. Replace spark plug, but do not reconnect the spark plug
wire.
Gasoline is highly flammable and explosive. Drain the fuel into
an approved container OUTDOORS and far away from open
flame. NEVER store an engine with fuel in the tank indoors or
in poorly ventilated spaces where fuel vapor can come in
contact with
Static electric sparks.
Sparks from electric wiring, batteries, or running engines.-
Sources of heat (such as a hot engine or exhaust).
Open flames, including pilot lights.
ALWAYS shut off the engine, make sure the engine is
cool, and disconnect the spark plug before cleaning,
adjusting, or servicing the dumper. Make sure all
guards and shields are replaced before using.
13
Know Your Machine & Operation
REGULAR MAINTENANCE PARTIAL ADJUSTMENT
NOTE:
List of tools needed:
Name
Open-jawed
Spanner
Open-jawed
Spanner
Open-jawed
Spanner
Model
11-13 2
1
1
12-14
17-19
Quantity Remark
Maintenance of gasoline engine see gasoline engine manual.
Inspecting mini dumper routinely will ensure unnecessary
trouble, reduce damnification and save working time. The
following is periodic table for part needing inspection and
maintenance aer use.
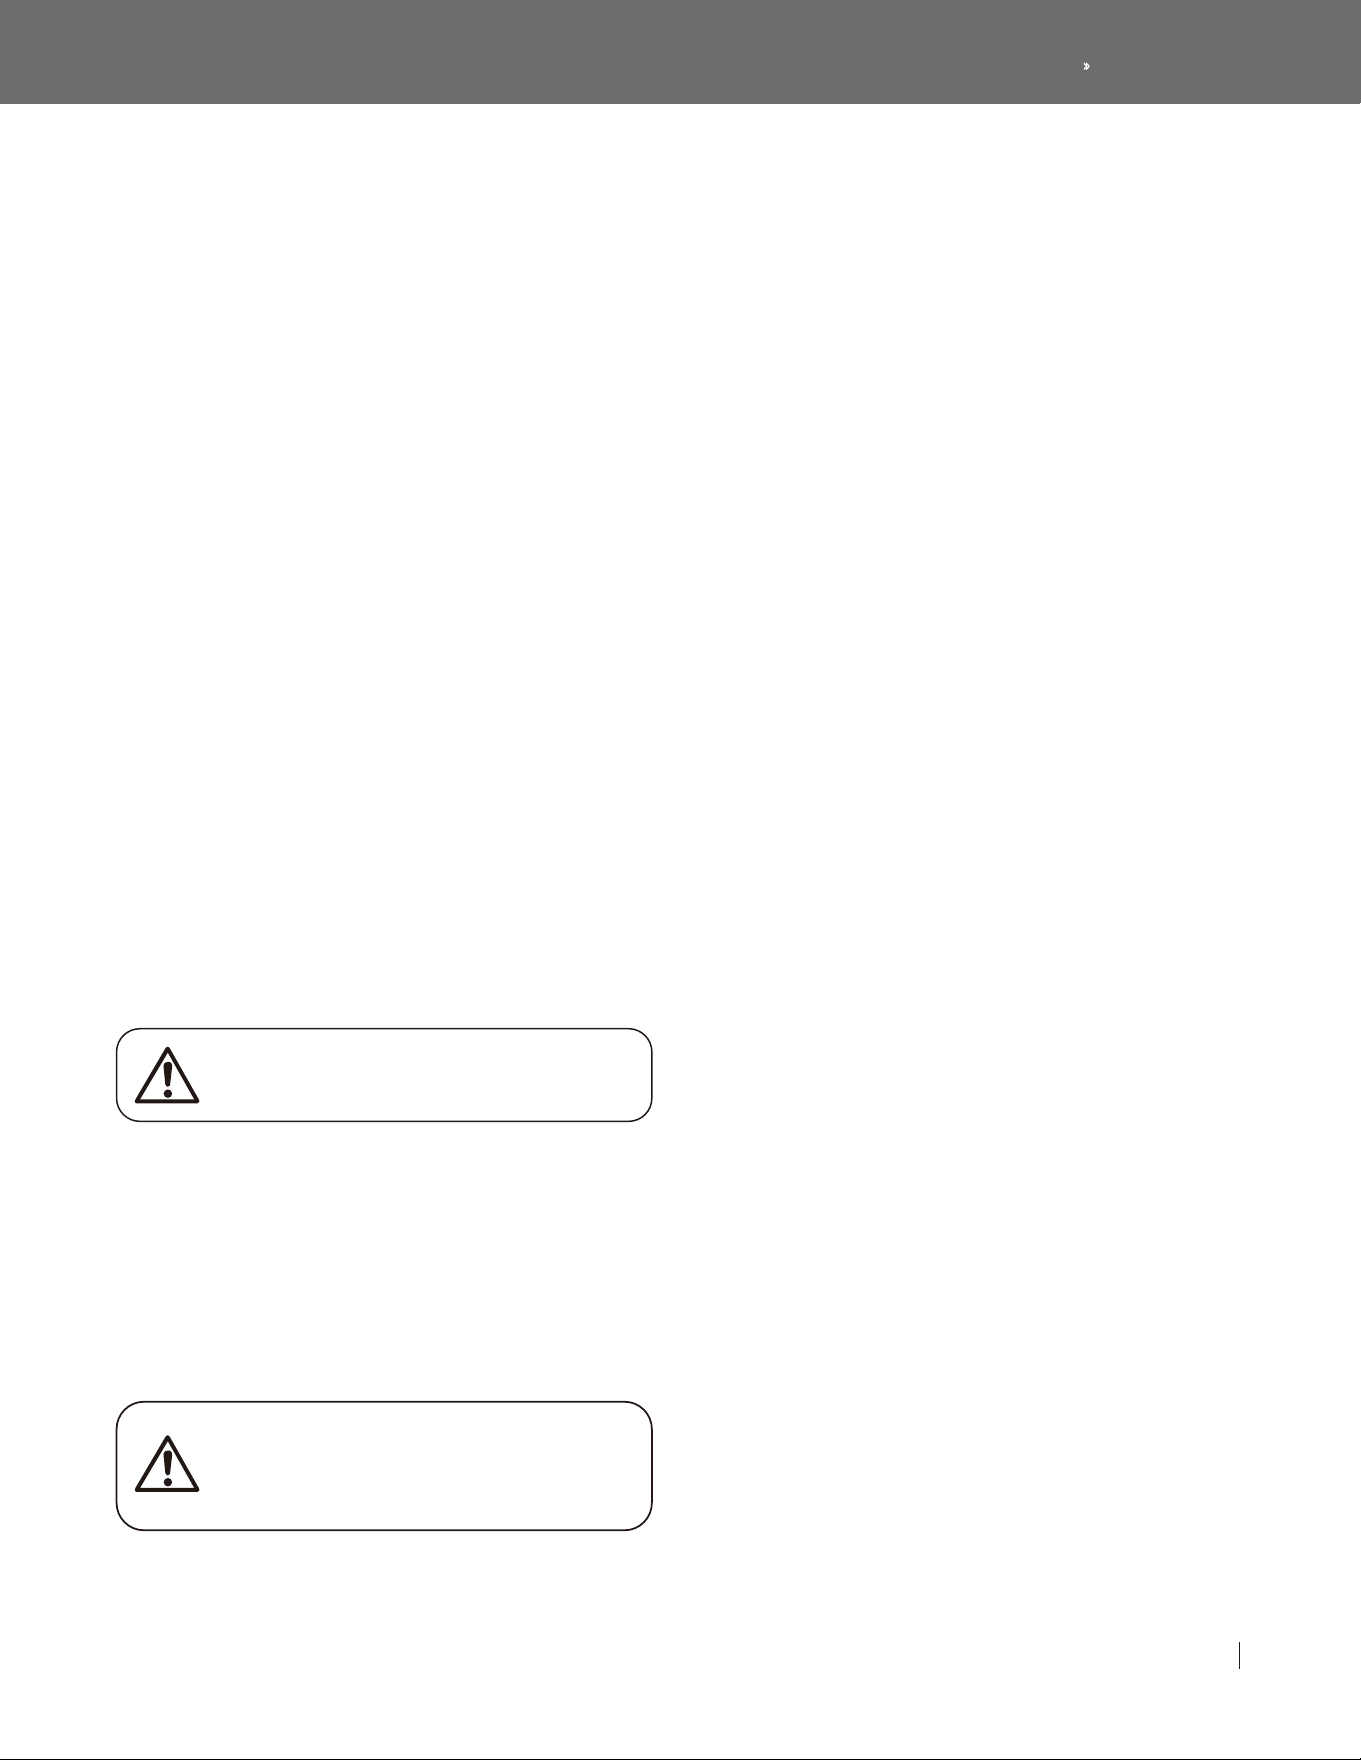
1) Adjusting control rope of the bucket
Loosen bolt in A
Up tighten control rope in B
Tighten bolt in A
Loosen nut counterclockwise 3-5 mm in C, tighten nut in C.
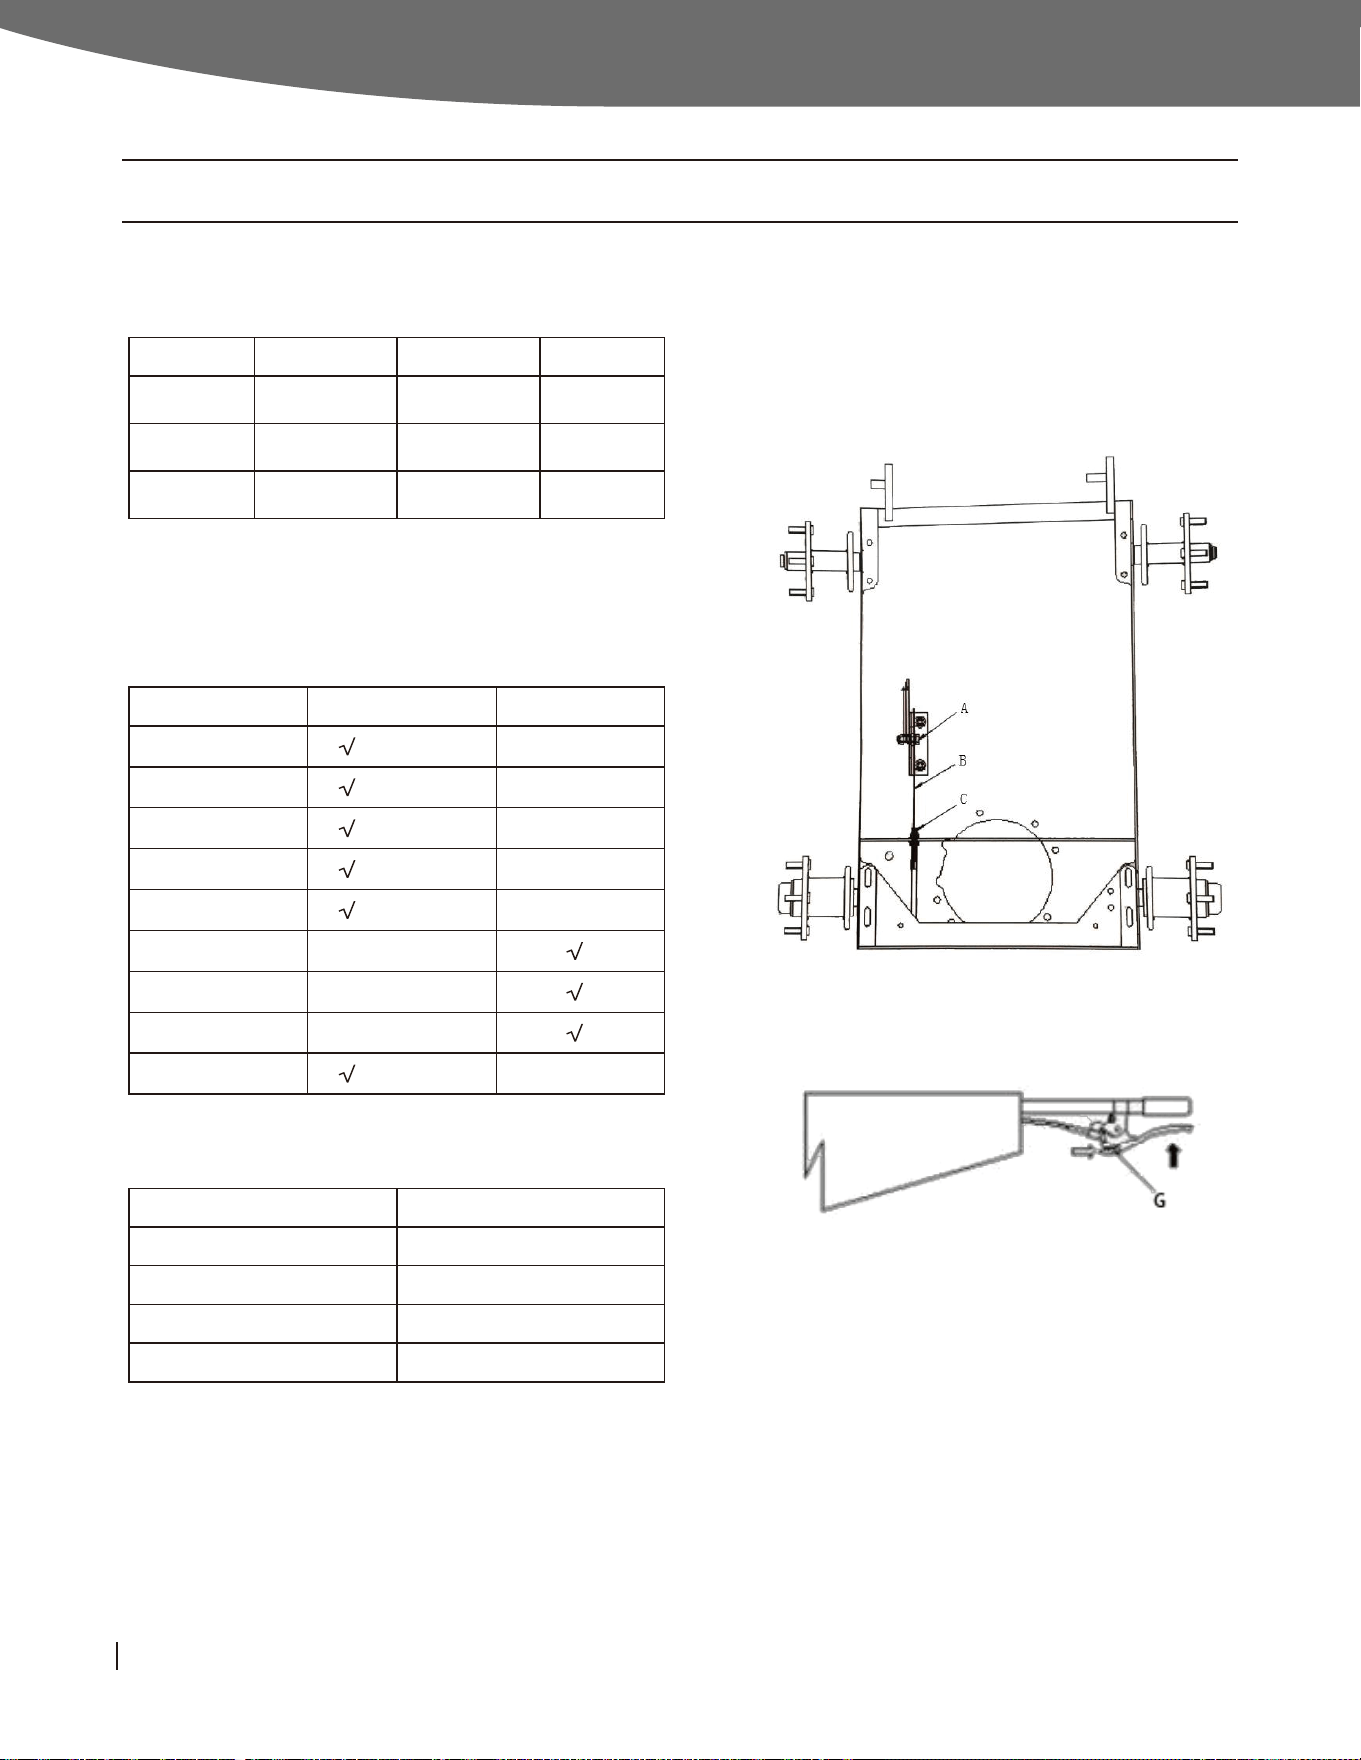
2) Adjusting relaxation or drop of belt
Hang brake handle to inverted tooth (G)
Loosen nut and retaining ring off belt (E).
Belt enter pulley completely (B).
Upward pull tension gear (C).
Belt through middle baffle (D) and 0.2 in front from le &
right. Upward tighten control rope (F), then tighten nut (F)
During inspection and maintenance, please change the parts
if meet condition like following:
If a part needs replacement, only use parts that meet the
manufacturer's specifications. Replacement parts that do not
meet specifications may result in a safety hazard or poor
operation of the dumper.
MAINTENANCE
Extension Spring
Belt
Tyre
Control Rope
Accelerator Switch
Spring relaxant
Worn badly, relaxant
Stripe worn badly, deform
Partly rupture
Malfunction, damage
Name
Extension Spring
Belt Tension
Brake Adjustment
Control Rope
Air Filters
Tyre Pressure
All Bolt&Nut
Chain
Clean
Daily Weekly
Wood Chipper Operator’s ManualMini Dumper Operator’s Manual
14
Operation
Tighten retaining right of nut (E)
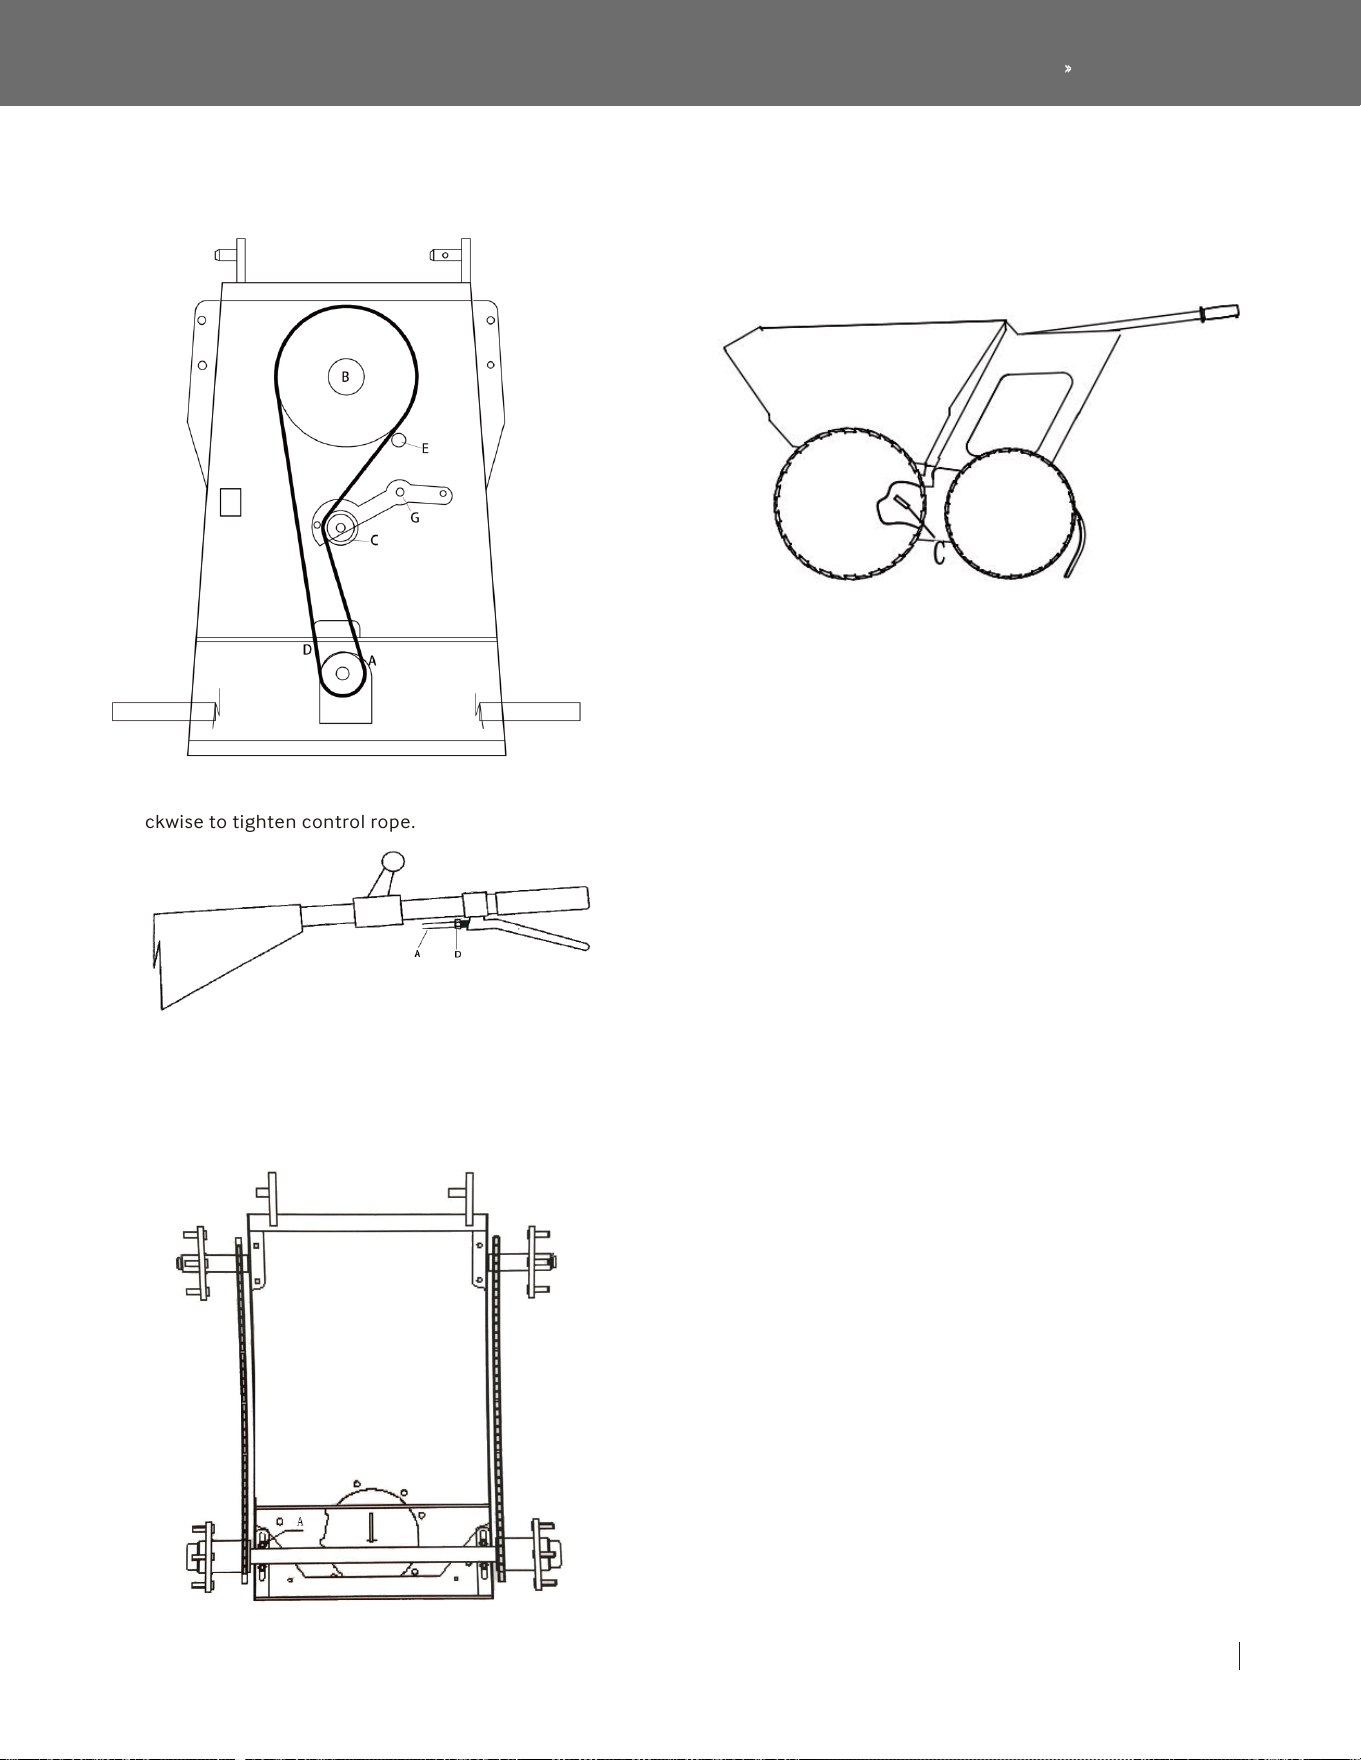
Belt outside adjustment:Loosen the nut B, rotate A counter-
clockwise to tighten control rope.
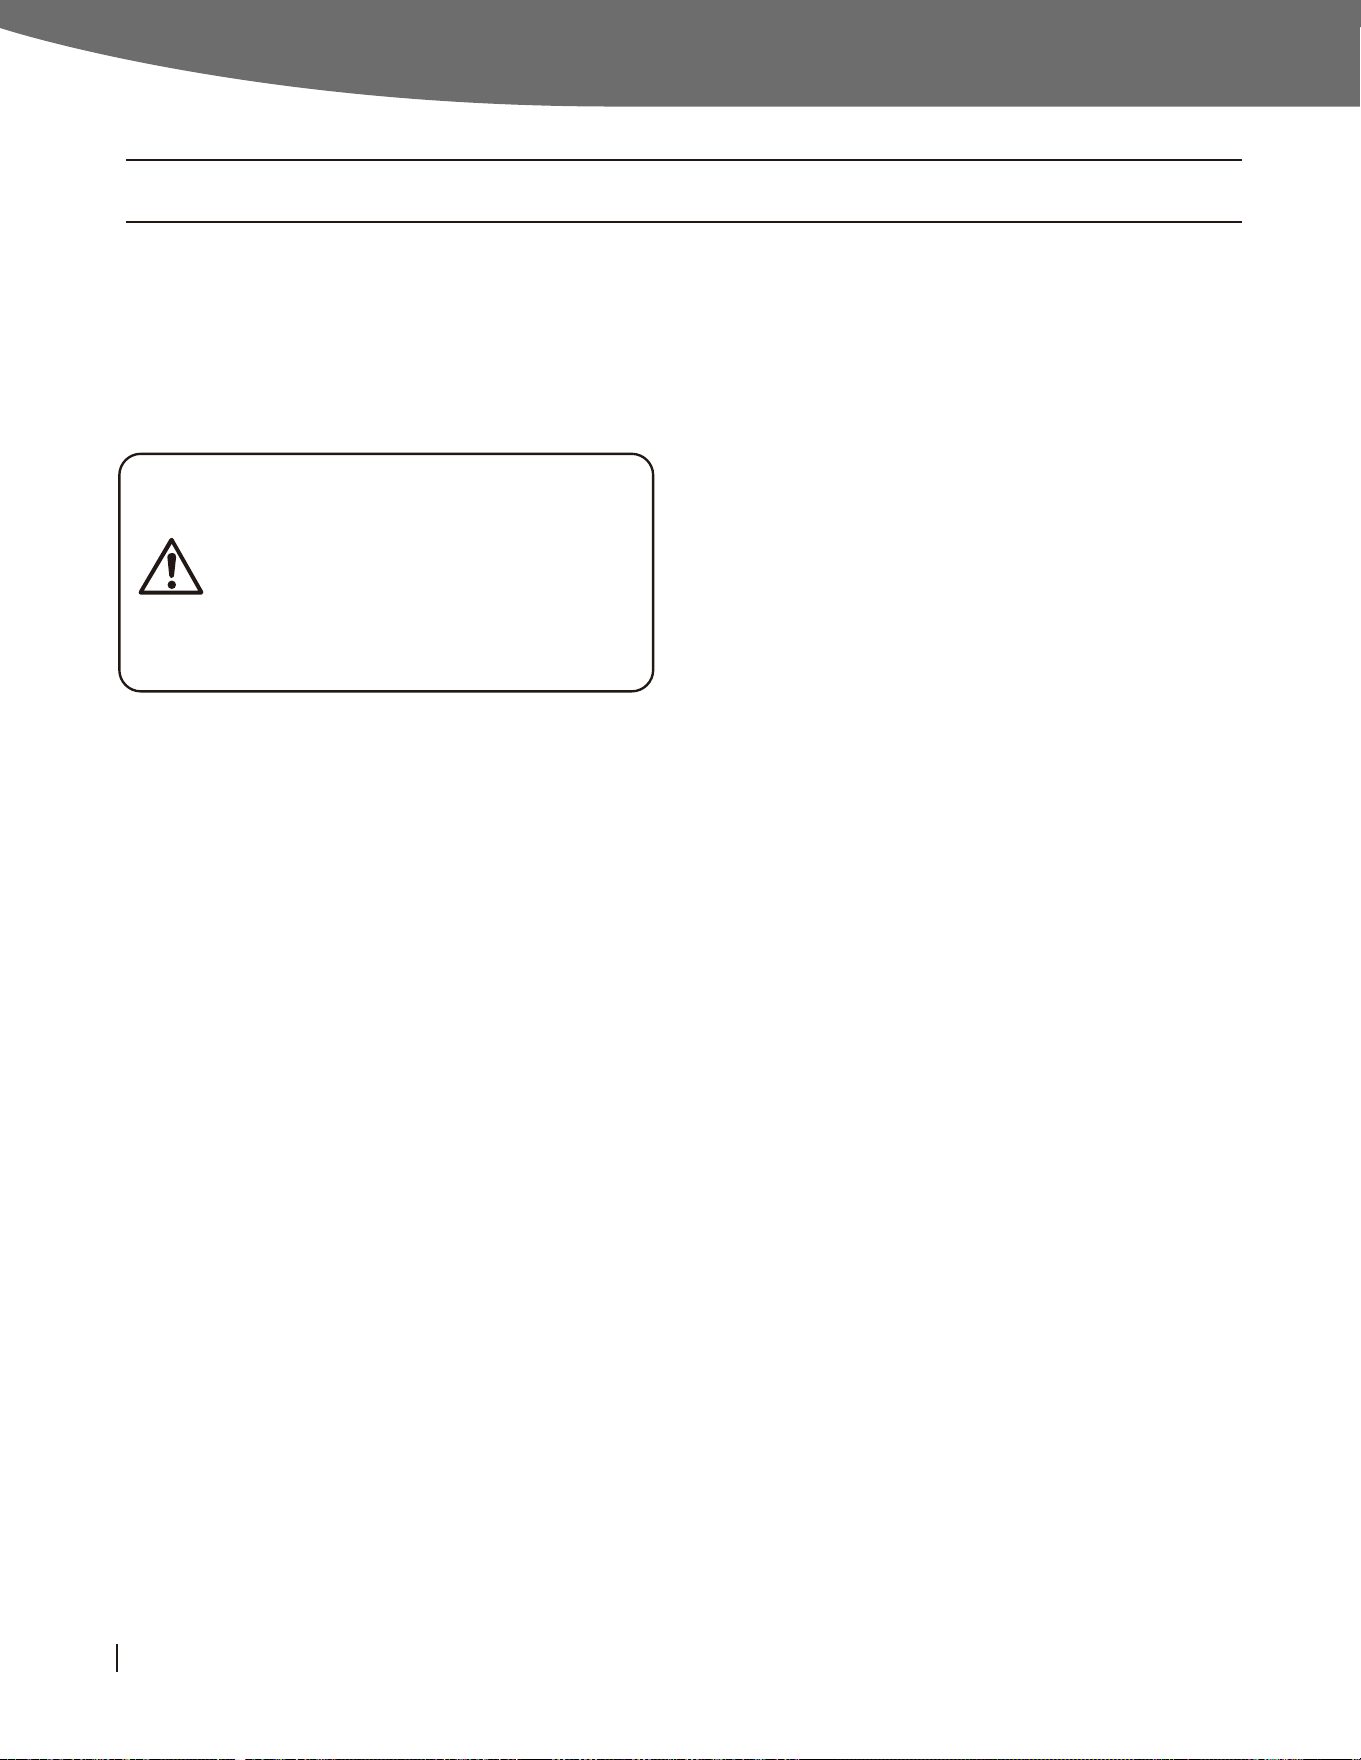
3) Adjusting chain
Loosen nut (A).
According to picture strain.
Tighten retaining ring of nut (A).
4) Adjusting stop brake
Rotate nut C counterclockwise to tighten brake(once each
month)
15
Operation
SUMMARY OF IMPORTANT SAFETY INFORMATION
SAFETY - BEFORE USE
PERSONAL PROTECTIVE EQUIPMENT
GENERAL
PROHIBITION AGAINST MODIFICATIONS
SUPPLEMENT
This section provides a summary of the various safety proce-
dures and measures that have been presented throughout
the manual. Keep this summary handy and refer to it to
refresh your memory about how to safely use your dumper.
Read manual. Read this Owner's Manual and the engine
Owner's Manual completely before attempting to use and
service the dumper. Serious injury or death can result if
safety instructions are not followed.
Instruct operators. The dumper owner or rental company
must instruct all operators in safe dumper set-up and opera-
tion. Do not allow anyone to operate the dumper who has not
read the Owner's Manual and been instructed on its safe use.
Make sure Owner's manual is within the attached storage
tube on the dumper.
Adults only. Only trained adults should operate and service
the dumper. Do not let children operate.
Under the influence. Never operate, or let anyone else
operate, the dumper while under the influence of alcohol,
drugs, or medication
Intended use. Carefully read about and understand the
intended use of this dumper. Do not use for other purposes,
as unforeseen hazards or equipment damage may result
Controls and safety labels. Learn how to use the machine and
its controls safely. Understand and follow all safety labels.
Weather. Never use in foul, bad or questionable weather,
which causes a slippery ground condition.
Fuel/exhaust system. Never modify the exhaust system, fuel
tanks, or fuel lines. Carbon monoxide poisoning, fire, or explo-
sion could result.
Guards. Do not operate dumper unless all guards and cover
shields, which prevent access to moving parts and pinch
points, are in place. Failure to guard the power transmission
mechanisms may result in serious injury or death.
Review safety rules. Before use of this dumper, review the
"Rules for Safe Operation."
Know how to operate. Be thoroughly familiar with all controls
and with the proper use of the equipment. Know how to stop
the dumper quickly if needed.
Flying debris. Clear area of objects such as stones, toys, steel
wire, etc. that could become caught in moving machine parts
and ejected as a projectile.
Operate OUTSIDE only -dangerous carbon monoxide exhaust!
Dumpers give off carbon monoxide exhaust, a poisonous gas
that can kill. You CANNOT smell it, see it, or taste it. ONLY run
dumper OUTDOORS and at least 20 feet (6m) from the home,
away from windows, vents and air intakes, to allow proper
ventilation. If you start to feel sick, dizzy, or weak while using
the dumper, shut off the engine and get to fresh air RIGHT
AWAY. NEVER run dumper engine inside homes, garages,
sheds, or other semi-enclosed spaces. These spaces can trap
poisonous gases.
Cooling ventilation. The dumper needs adequate, unob-
structed flow of air to allow for proper cooling of engine. Do
not allow debris to accumulate and block airflow.
Transporting. During transporting, take precautions to make
sure dumper will not tip over and cause a fuel leak hazard.
Hot exhaust - fires. Exhaust from engine can be extremely hot
and cause fire. Position muffler at least 7eet (2m) from
combustible objects during operation.
Foot protection. The use of safety shoes or other foot
protection device is recommended for those in close proxim-
ity to the dumper while it is operating.
Ear protection. Wear approved earmuff protection when
operating the dumper.
Face protection. A helmet with protective glasses is recom-
mended.
Know how to operate
Getting Ready
Never modify or alter the dumper in any way. Modifications
can create serious safety hazards and will also void the
warranty.
Carefully read and make sure you understand the
following safety information before using the dumper.
Improper use or maintenance of the dumper can result
in serious injury or death from fire/explosion, carbon
monoxide poisoning, lacerations, entanglement or
burns. Damage can also occur to windows, siding,
vehicles, and bystanders from wheels and debris
which can become projectiles.

Wood Chipper Operator’s ManualMini Dumper Operator’s Manual
16
Transporting & Maintenance
GASOLINE SAFETY
SAFETY - DURING USE
Loose/dangling. Loose or dangling apparel, jewelry or hair
can become entangled in moving parts. Never wear jewelry
or loose-fitting clothing when operating the dumper.
Long pants. Wear long, heavy-duty pants to protect legs from
ejected materials.
Gasoline is highly flammable and explosive. You can be
burned or seriously injured when handling fuel. Use extreme
care when handling gasoline:
Safety equipment / controls. Always operate the dumper
with all safety covers, guards, and barriers in place and in
good working order, and all controls properly adjusted for
safe operation.
Controls. Stay in the OPERATOR POSITION while actuating
controls.Know how to stop.
Know how to stop the dumper quickly if needed by releasing
the operator presence bar. If this does not work, do the
following in order until unit is stopped.1. Push the stop
button on the control panel. 2. Use on/off switch on engine
(or ignition switch on electric start models). 3. Engage full
choke by flooding the engine.
"Kickback". Machine can experience significant "kickback"
when operating on large slope
Slipping/Falling. Operating in wet or icy conditions could
lead to losing your footing and slipping or falling.
Damaged. Do not operate the dumper with damaged,
missing, incorrectly adjusted, or broken parts.
Check for gas leak before starting. Aer opening gasoline
valve, smell for gas before starting engine. If you smell gas,
DO NOT start engine. DO NOT light a match. DO NOT flip on
an electrical switch. Exit area immediately and call fire
department.
Carbon monoxide exhaust. The running engine gives off
carbon monoxide, a poisonous gas that can kill you. You
CANNOT smell it, see it, or taste it. If you start to feel sick,
dizzy, or weak while using the dumper, shut off the engine
and get to fresh air RIGHT AWAY. See a doctor. You may have
carbon monoxide poisoning.
Other exhaust dangers. This product contains or emits
chemicals to cause cancer, birth defects or other reproduc-
tive harm. Avoid inhalation of exhaust.
Smoking/sparks. Never smoke near the running dumper,
and never operate near sources of sparks or flames.
Hot muffler. Never touch hot muffler or hot exhaust
manifold. Exhaust and engine parts can be very hot and will
burn you.
Machine's moving parts. Keep hands, feet, and apparel away
from drive belts, wheels and other moving parts. Never
remove any drive belt or guard while the unit is operating.
Contact with belt will cause personal injury.
Refueling. DO NOT refuel the engine until it has cooled at
least 30 minutes.
Malfunction during operation. Always shut the machine off if
any unusual noise or vibration occurs.
Vibration. Overexposure to machine vibration on a daily basis
may lead to circulatory or nerve damage.
Adjusting / repairing. Always turn off dumper and remove
spark plug or spark plug wire before working on the dumper
to prevent accidental starting.
Fuel outdoors. Fill fuel tank outdoors - never indoors. Gaso-
line vapors can ignite if they collect inside an enclosure.
Explosion can result.
Use approved container. Never pump fuel directly into
engine at gas station. Static charge can build and ignite fuel.
Use an UL approved fuel container to transfer gas to the
engine.
Running/hot engine. A running engine is hot enough to
ignite fuel. Never add fuel or remove gas cap if engine is
running or still hot. Stop the engine and allow to cool at least
two minutes before adding fuel.
Heat / flames /sparks. Keep sources of heat, flame, or sparks
away while adding fuel.
Don't fill to the top. DO NOT overfill the gas tank. Allow at
least 1" of empty space below the fill neck to allow for fuel
expansion and operation on slopes.
Don't fill to the top. Do not fill the gas tank to the top. Gaso-
line may spill when operating on a slope.
Replace cap. Replace gas cap securely before starting engine.
Spills. Clean up fuel spills immediately. Move grinder away
from spilled fuel on the ground. Wipe fuel off engine and wait
5 minutes for excess fuel to evaporate before starting engine.
Gas soaked rags should be disposed of properly.
On skin / clothes. If gasoline is spilled on your skin or clothes,
change clothes and wash skin immediately.
Inspect fuel system. Check fuel system on a regular basis.
Look for signs of leaks, deterioration, chafed or spongy fuel
hose, loose or missing fuel hose clamps, damaged fuel tank,
or a defective fuel shut-off valve. Do not start dumper until
needed repairs have been completed.
Gasoline storage. Store gasoline in a cool, dry place in an
UL-approved, tightly sealed container away from children.

17 Maintenance
SAFETY - AFTER USE
SAFETY - INSPECTION / MAINTENANCE
FILLING PORTABLE CONTAINERS AT SERVICE
STATIONS:
ABOUT STATIC ELECTRICITY AND FUELING
TYPICAL SOURCES OF STATIC ELECTRIC HAZARDS
DURING FUELING
SPECIAL SAFETY INFORMATION ON STATIC
ELECTRICITY
Cleaning the Jam: If the machine is jammed, stop the engine
before attempting to clear any jams in the unit. Stop all work,
turn off dumper, and ensure the engine is turned off and
cooled before performing any diagnostics or repairs.
Use a portable container to fill dumper tank. Never fill the
dumper's gas tank directly from the service station's fuel
dispenser pump — the dumper's tank is not grounded and
the high velocity flow of gasoline from a fuel pump can cause
static electric build-up. Use an approved portable container
to transfer gasoline to the dumper's tank.
Use a portable container made of metal or conductive plastic.
It will dissipate charge to ground more readily.
Fill container on the ground. Never fill the portable gas
container while it is sitting inside a vehicle, trailer, trunk, or
pick-up truck bed. ALWAYS place container on the ground to
be filled.
Touch a grounded metal object before starting. Always
dissipate static charge from your body before beginning the
fueling process by touching a grounded metal object at a safe
distance away from fuel sources.
Keep nozzle in contact with container. Keep fuel dispenser
nozzle in contact with the portable container at all times
while filling at a service station. Do not use the nozzle
lock-open device on the dispenser hose.
Many common objects can accumulate and retain a static
electric charge. Objects made of non- conductive materials
(e.g. plastics) easily accumulate and retain static electric
charge, as can objects made of conductive material (e.g.
metal, water) if they are not electrically grounded. The static
electric charge on an object, such as a human body or plastic
fuel tank/container, can reach as high as several thousand
volts!
A static electric spark can be generated if the static electric
charge stored on an object "jumps" to another, less charged
object. Such a spark can ignite invisible gasoline vapors that
are present during fueling situations.
The following objects can accumulate a static electric charge
and cause an ignition spark in typical fueling situations:
Ungrounded tanks/containers. Any ungrounded fuel tank or
container can accumulate a static electric charge as a result
of contact with other objects or friction during transporta-
tion. This static electricity can discharge as a spark to the
grounded gasoline dispenser nozzle, as the nozzle is first
brought close to the tank/container at the beginning of the
fueling process.
Cool engine before storing. Let engine cool for at least five
minutes before storing. A hot engine can be a fire hazard.
Shut off fuel supply. Make sure gasoline shut-off valve is in
the OFF position.
Prevent accidental starting. When dumper is not in use, shut
off the stop button in order to ensure that dumper cannot be
started in a storage location or by untrained persons.
Storage location. Store the dumper in a dry location away
from sources of heat, open flames, sparks or pilot lights -
such as water heaters, space heaters, furnaces, clothes
dryers, or other gas appliances -EVEN IF the dumper's gas
tank is empty. Residual gasoline could ignite.
Exercise regularly. Exercise dumper every four weeks to dry
out moisture that accumulates in the win dings. If dumper
cannot be exercised on a regular basis, prepare dumper for
long term storage
Inspect and maintain your dumper on a regular basis and
repair as needed to keep it in safe working condition:
Turn off dumper. Always turn off dumper and remove spark
plug or spark plug wire before working on the engine or
dumper to prevent accidental starting.
Replace guards / shields. Make sure all guards and shields
are replaced aer servicing the dumper.
Burns. Do not touch hot muffler. Muffler will be hot even if
unit is stopped. Allow unit to cool before servicing.
Replacement parts. If a part needs replacement, only use
parts that meet the manufacturer's specifications. Replace-
ment parts that do not meet specifications may result in a
safety hazard or poor operation of the dumper and will void
the warranty.
Static electricity and filling gasoline: Static electricity can
initiate from ungrounded gasoline tanks or containers,from
flowing gasoline, and from persons carrying a static electric
charge
Static electricity on numerous occasions has explosively
ignited gasoline vapors that were present during fueling
processes, resulting in serious burns to nearby persons.To
avoid static electricity while fueling, certain steps must be
followed before and during the fueling process in order to
minimize and safely dissipate static charge build-up.
Wood Chipper Operator’s ManualMini Dumper Operator’s Manual
18
Maintenance
LIMITED WARRANTY POLICY
WARRANTY PERIOD
Flowing gasoline. Most people are not aware that gasoline
accumulates static electric charge while flowing through a
hose or pipe. This charge then transfers to and accumulates
in the gas tank or container that is being filled. The total
amount of charge accumulation depends on the amount of
gas pumped into the container, the speed with which it is
pumped, and whether or not the tank/container is grounded.
If sufficient static electric charge accumulates in the fuel
tank or container during the fueling process, the tank/con-
tainer may discharge a spark to the grounded gasoline
dispenser nozzle.
Persons. A person dispensing the gasoline can carry a static
electric charge on their body, typically resulting from contact
with their car seat or electronics. The static electricity can
discharge as a spark between that person's hand and either
the grounded dispenser nozzle or the fuel tank opening.
Dear Valued Customer:
The mini dumper you just purchased is built with the finest
material and crasmanship. Use this product properly and
enjoy the benefits from its high performance. By purchasing
our product, you show a desire for quality and durability. Like
all mechanical equipment this unit requires a due amount of
care. Treat this unit like the high quality piece of machinery it
is. Neglect and improper handling may impair its perfor-
mance.
Thoroughly read the instructions and understand the opera-
tion before using your product. Always contact our Product
Support prior to having any service or warranty work
performed, as some services performed by parties other than
our approved service centers may void this warranty. This
limited warranty is in lieu of any other warranty expressed or
implied, written or oral and we assumes no other responsibili-
ty or liability outside that expressed within this limited
warranty.
Weldments
1 year from date of purchase by user
Wear Parts
In addition to the normal warranty, we shall warrant some
normal wear items from defects in material or workmanship
for a period of 30 days from the date of purchase by user.
Normal wear items covered under this warranty are limited
to: tires, belts, grease zerks, bearings, bolts, clutches, switch-
es, wires, cables. Routine maintenance items such as
lubricants, clutch adjustments, tune ups are not covered
under warranty
Engine
The engine warranty is covered under the terms and condi-
tions as outlined by the engine manufactures warranty
contained herein and is the sole responsibility of the engine
manufacturer. Normal engine maintenance such as spark
plugs, oil changes, air filters, adjustments, fuel system clean-
ing and obstruction due to build up is not covered by our
limited warranty.
"Consumer use" means personal residential household use
by a consumer. "Commercial use" means all other uses,
including, but not limited to, use for commercial, income
producing or rental purposes or when purchased by a
business.
This limited warranty applies to the original purchaser of the
equipment (verification of purchase, in the form of a receipt,
is the responsibility of the buyer), is non-transferable, and
covers parts and labor. Parts will be replaced or repaired at no
charge, except when the equipment has failed due to lack of
proper maintenance. If a part is no longer available, the part
may be replaced with a similar part of equal function. Any
misuse, abuse, alteration or improper installation or opera-
tions will void warranty. Determining whether a part is to be
replaced or repaired is the sole decision of ours. We will not
provide for replacement of complete products due to defec-
tive parts. Any costs incurred due to replacement or repair of
items outside of a ours approved facility is the responsibility
of the buyer and not covered under warranty. Transportation
costs to and from service center and/or service calls are the
responsibility of the customer.

19
Storage & Troubleshooting
This limited warranty specifically excludes the following;
failure of parts due to damage caused by accident, fire, flood,
windstorm, acts of God, applications not approved by our in
writing, corrosion caused by chemicals, use of replacement
parts which do not conform to manufacturer's specifications,
damage related to rodent and/or insect infestation and
damage caused by vandalism. Additional exclusions: loss of
running time, inconvenience, loss of income, or loss of use,
including any implied warranty of merchantability of fitness
for a specific use.
Also, outdoor power equipment needs periodic parts and
service to perform well, and this limited warranty does not
cover instances when normal use has exhausted the life of a
component or the engine.
This limited warranty does not cover any personal injury or
damage to surrounding property caused by failure of any
part, misuse or inability to use the product. Alteration of the
product, including safety features, shall void this limited
warranty.
Repair or replacement of parts does not extend the warranty
period. This limited warranty gives you specific legal rights.
You may also have other rights that vary by state.
Please have model number, item number and serial number
on hand prior to making a warranty claim or inquiry.
Wood Chipper Operator’s ManualMini Dumper Operator’s Manual
20
Troubleshooting
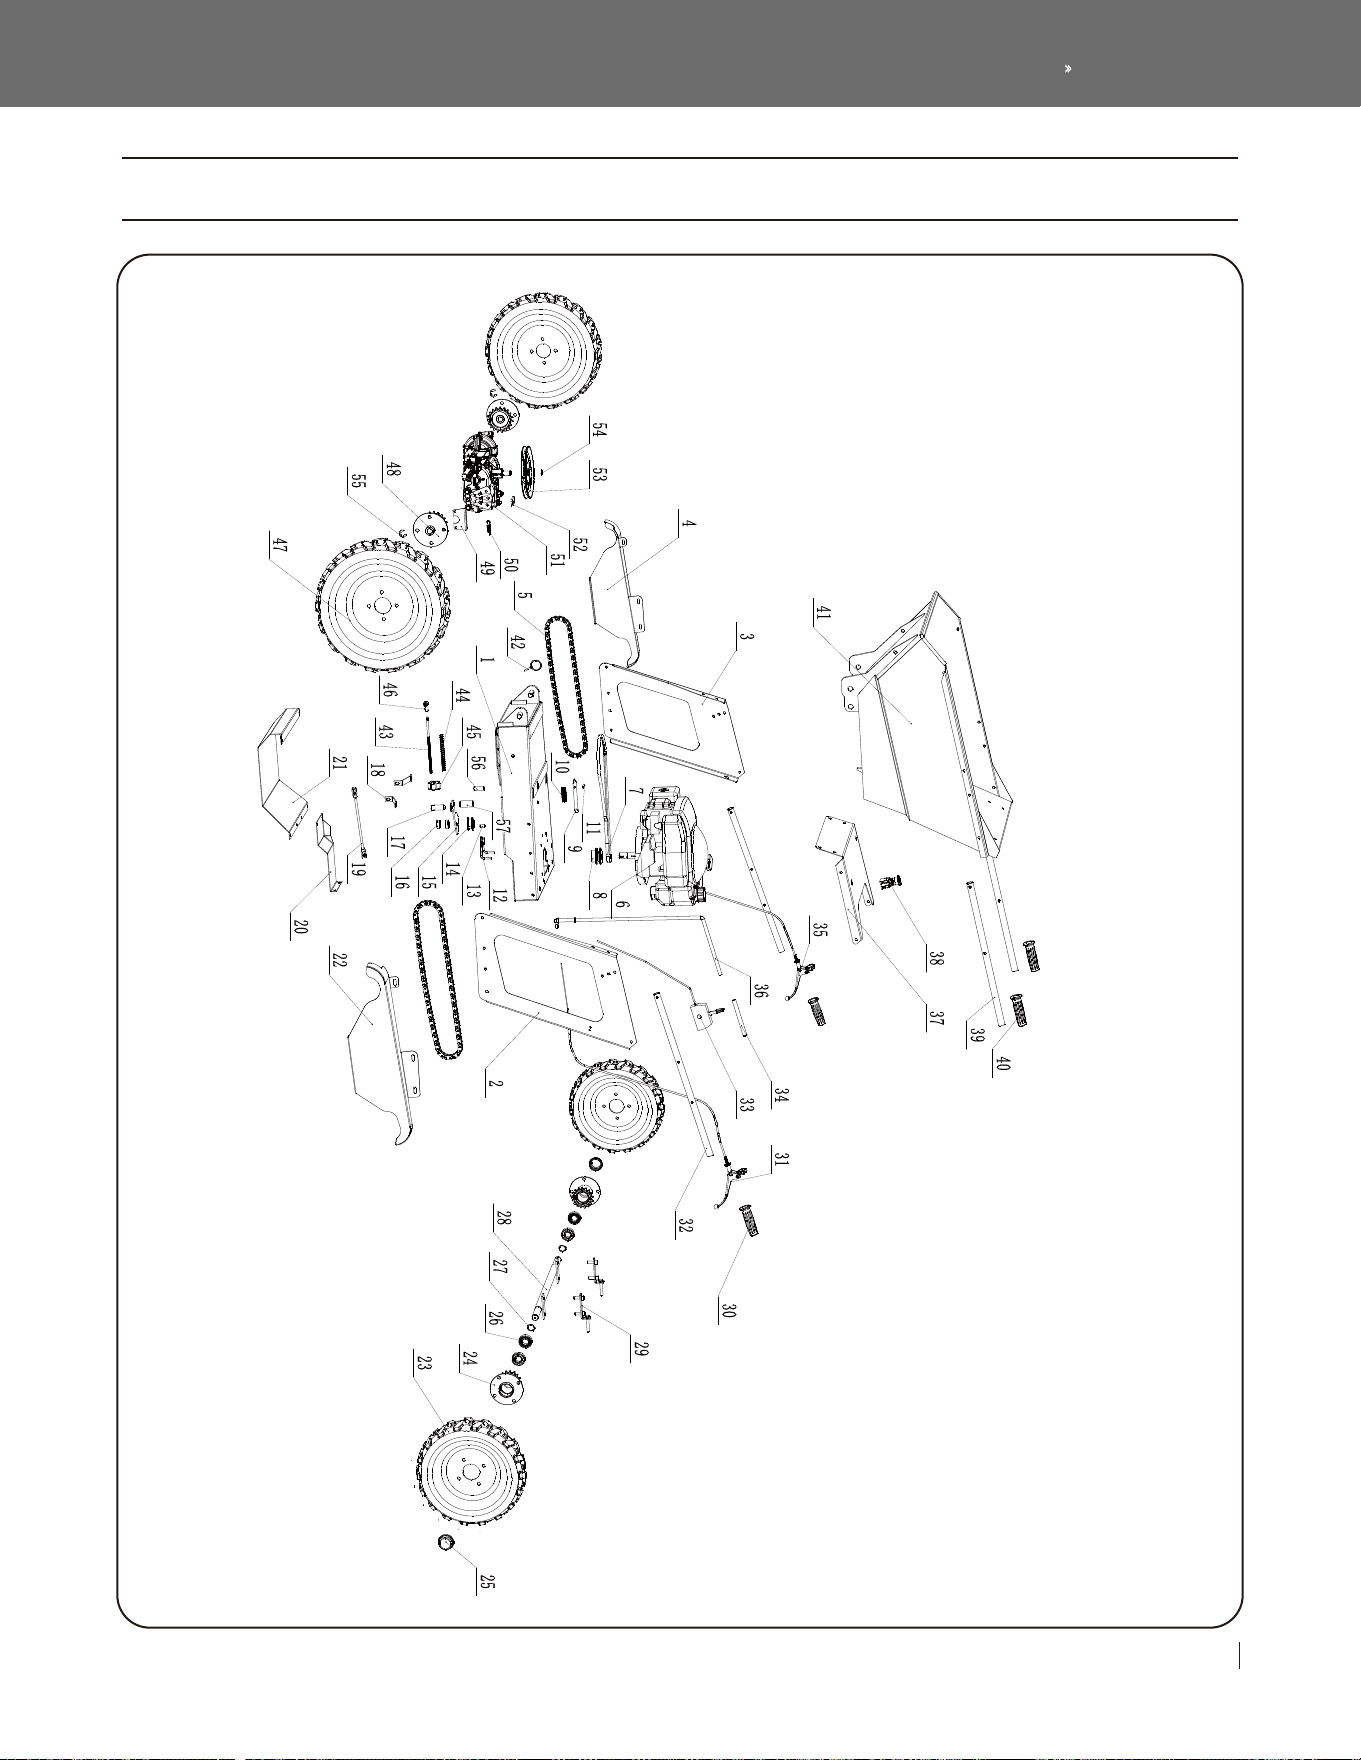
PARTS DIAGRAM

21
Tarts Diagram
PARTS LIST
No.
Description
QTY.
1
2
3
4
5
6
7
8
9
10
11
12
13
14
15
16
17
18
19
20
21
22
23
24
25
26
27
28
29
30
31
32
33
34
35
36
37
38
39
40
41
Chassis
Le mounting plate
Right mounting plate
Right chain guard plate
Chain
DV 196 engine 5.5HP
Kevlar belt 13x1219LI
Engine pulley
Bucket pin
Spring
Elastic cylindrical pin
Belt positon limiter
Sha sleeve
Tension wheel
Belt mounting plate
Bearing
Belt adjustment
Transaxle support plate
Shi connection rod
Rear backplate
Front backplate
Le chain guard plate
4.00-8 tire
Rear sprocket assembly
Wheel bearing cover
Bearing
Elastic collar
Rear axle
Chain adjustment plate
Handlebar grip
Clutch control handle
Push rod
Throttle controller
Shi lever grip
Bucket control handle
Shi lever
Control console
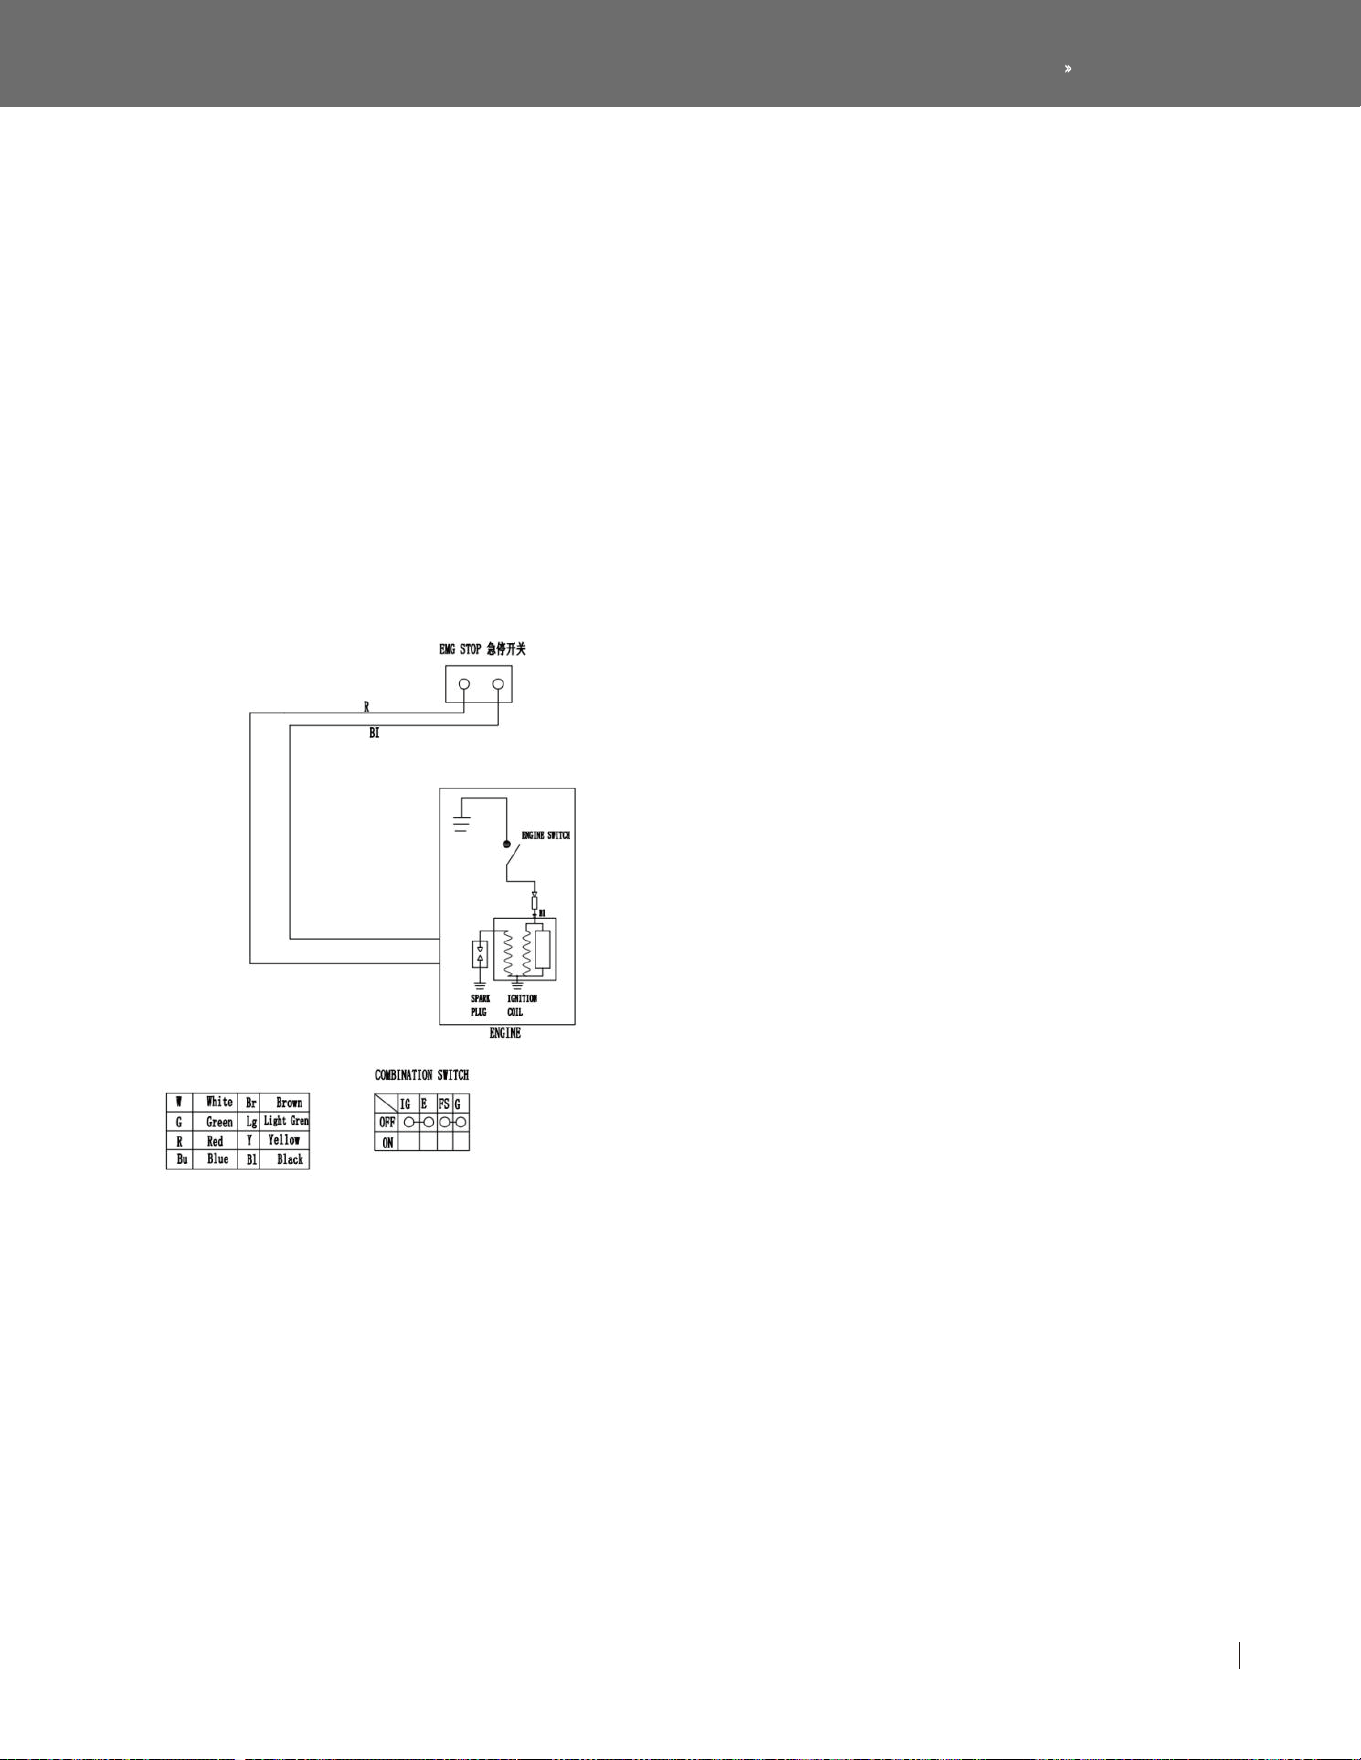
Emergency stop button
Bucket push rod
Hnadlebar grip
Bucket
1
1
1
1
2
1
1
1
1
1
1
1
1
1
1
2
1
2
1
1
1
1
2
2
2
4
2
1
2
2
1
2
1
1
1
1
1
1
2
2
1
42
43
44
45
46
47
48
49
50
51
52
53
54
55
56
57
No.
Description
QTY.
1
1
1
1
1
2
2
1
1
1
1
1
1
2
1
1
Bayonet
Clutch control lever
Spring
M8 nut
M8 ball head joint
4.00-10 tire
Front sprocket assembly
Brake limit plate
Brake return spring
Transaxle
Paddle shi
Drive pulley
Elastic collar
Split washer
Belt limit sleeve
Locating sleeve

Wood Chipper Operator’s ManualMini Dumper Operator’s Manual
22
Parts List