
EG2115 (SIN045) EG2111 (SIN045) EG2111 (SIN045)
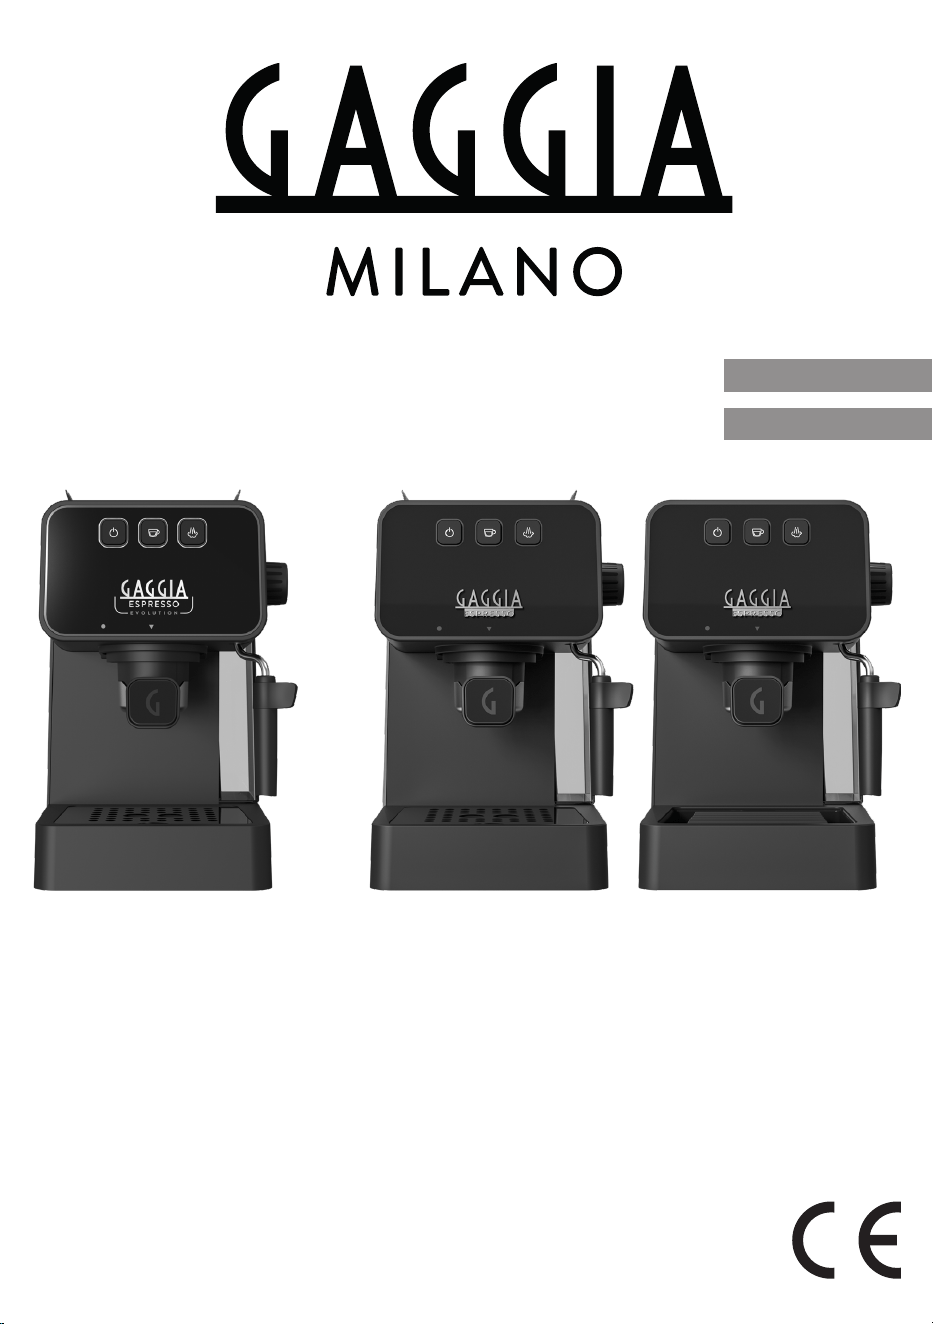
ESPRESSO
STYLE
ESPRESSO
DE LUXE
ESPRESSO
EVOLUTION
Manuale d'istruzione
User manual
ENGLISH
ITALIANO
54
321
11
10
9
8
7
6
19
20
18
17
16
15
14 13 12

3
Italiano
Informazioni di sicurezza importanti
Questa macchina è dotata di funzionalità di sicurezza. Tuttavia, leggete e seguite con attenzione le istruzioni di
sicurezza e utilizzate la macchina solo come descritto in questo manuale per evitare lesioni accidentali o danni
dovuti a un uso improprio. Tenete a portata di mano questo libretto sulla sicurezza per eventuali riferimenti
futuri.
Avvertenza
Indicazioni generali
- Prima di collegare l’apparecchio, verificate che la tensione riportata sulla macchina corrisponda alla tensione
disponibile.
- Collegate la macchina a una presa di corrente dotata di messa a terra.
- Assicuratevi che il cavo di alimentazione non penda dal bordo del tavolo o del piano di lavoro e non lasciate
che tocchi superfici calde.
- Per evitare il pericolo di scosse elettriche, non immergete mai la macchina, la spina o il cavo di
alimentazione in acqua o in qualsiasi altro liquido.
- Non versate liquidi sul connettore del cavo di alimentazione.
- Per evitare il pericolo di ustioni, tenete le parti del corpo lontane dai getti di acqua calda prodotti dalla
macchina.
- Non toccate le superfici calde. Utilizzate impugnature e manopole.
- Spegnete la macchina dall’interruttore principale sulla parte posteriore (
se presente
) e rimuovete la spina di
alimentazione dalla presa di corrente nei seguenti casi:
- In caso di malfunzionamento.
- Se pensate di non usare l’apparecchio per un lungo periodo di tempo.
- Prima di pulire la macchina.
- Tirate la spina e non il cavo di alimentazione.
- Non toccate la spina con le mani bagnate.
- Non utilizzate la macchina se la spina, il cavo di alimentazione o la macchina stessa sono danneggiati.
- Non apportate modifiche alla macchina o al cavo di alimentazione.
- In caso di riparazioni rivolgetevi esclusivamente a un centro di assistenza autorizzato Gaggia per evitare
pericoli.
- La macchina non deve essere usata da bambini di età inferiore agli 8 anni.
- Questa macchina può essere usata da bambini di età superiore agli 8 anni e da persone con capacità
mentali, fisiche o sensoriali ridotte, prive di esperienza o conoscenze adatte, a condizione che tali persone
abbiano ricevuto assistenza o formazione per utilizzare la macchina in maniera sicura e capiscano i
potenziali pericoli associati a tale uso.
- La manutenzione e la pulizia possono essere eseguite da bambini purché di età superiore agli 8 anni e in
presenza di un adulto.
- Tenete la macchina e il relativo cavo lontano dalla portata di bambini di età inferiore agli 8 anni.
- Adottate le dovute precauzioni per evitare che i bambini giochino con la macchina.
- Fate attenzione quando erogate acqua calda. All’inizio dell’erogazione possono verificarsi brevi spruzzi di
acqua calda. Prima di rimuovere l’erogatore di acqua calda attendete che il ciclo di erogazione termini.

4
Italiano
Attenzione
Indicazioni generali
- Questa macchina è destinata esclusivamente a un uso domestico. Non deve essere utilizzata in ambienti
quali cucine dei dipendenti all’interno di punti vendita, uci, aziende agricole o altri ambienti lavorativi.
- Posizionate sempre la macchina su una supercie piana e stabile. Tenetela in posizione verticale, anche
durante il trasporto.
- Non posizionate la macchina su una piastra calda o vicino a un forno caldo, un calorifero o fonti di calore
simili.
- Inserite esclusivamente caffè macinato nel portaltro. L’inserimento di caffè in grani, caffè solubile, caffè in
grani non tostato, caffè d'orzo o qualsiasi altra sostanza potrebbe danneggiare la macchina. In questo caso
un’eventuale riparazione non è coperta da garanzia.
- Lasciate raffreddare la macchina prima di inserire o rimuovere qualsiasi componente. Le superci riscaldanti
potrebbero trattenere calore residuo dopo l’uso.
- Se presente, non toccate mai il tubo di scarico dell’acqua durante l’utilizzo perchè potrebbe diventare
bollente. Lasciatelo prima raffreddare.
- Non riempite mai il serbatoio dell’acqua con acqua calda, bollente o frizzante per evitare di danneggiare il
serbatoio stesso e la macchina.
- Non usate prodotti o sostanze abrasive o detergenti aggressivi, come benzina o acetone, per pulire la
macchina. Utilizzate semplicemente un panno morbido inumidito con acqua.
- Eseguite regolarmente la pulizia anticalcare della macchina. In mancanza di tale pulizia l’apparecchio
smetterà di funzionare correttamente. In questo caso un’eventuale riparazione non è coperta da garanzia.
- Non lasciate la macchina a temperature inferiori a 0°C/32°F. L’acqua lasciata nel sistema di riscaldamento
potrebbe congelarsi e causare danni.
- Non lasciate acqua nel serbatoio quando la macchina non verrà utilizzata per un lungo periodo di tempo.
L’acqua potrebbe diventare contaminata. Utilizzate acqua fresca tutte le volte che usate la macchina.
- Non utilizzate mai accessori o parti di altri produttori oppure componenti non consigliati in modo specico
da Gaggia. In caso di utilizzo di tali accessori o parti, la garanzia si annulla.
- Una regolare pulizia e manutenzione prolungano la vita utile della macchina e assicurano un caffè dal gusto
e dalla qualità ottimale.
- La macchina è esposta continuamente a umidità, caffè e calcare. Pertanto è molto importante pulire
regolarmente la macchina ed eseguire la manutenzione come descritto nel manuale dell’utente e mostrato
sul sito WEB. Se non si eseguono queste procedure di pulizia e manutenzione, la macchina potrebbe anche
smettere di funzionare. In questo caso un’eventuale riparazione non è coperta da garanzia.
- Non lavate il portaltro in lavastoviglie e non utilizzate detersivi per piatti o detergenti, poiché potreste
provocare il malfunzionamento del portaltro e il sapore del caffè potrebbe risentirne.
- Non asciugate il gruppo infusore con panni per evitare l’accumulo di bre al suo interno.
- Non ingerite mai la soluzione erogata durante il processo di rimozione del calcare.
- Non disinseirire (
togliere
) mai il portaltro in pressione durante l’erogazione del caffè. Durante la fase di
riscaldamento del gruppo erogazione caffè possono uscire gocce d’acqua calda.
- La macchina non deve essere posizionata in un armadietto quando in uso.

5
Italiano
Macchine con il pannarello classico
Avvertenza
- Per evitare il pericolo di ustioni, prestate attenzione: l’erogazione potrebbe essere preceduta da piccoli getti
di acqua calda.
- Non toccate mai il pannarello classico a mani nude perché potrebbe diventare bollente.
Utilizzate solo l’impugnatura protettiva appropriata.
Attenzione
- Dopo aver preparato la schiuma di latte, pulite velocemente il pannarello classico erogando una piccola
quantità di acqua calda in un contenitore. Rimuovete quindi la parte esterna del pannarello classico e
lavatela con acqua tiepida.
Campi elettromagnetici (
EMF
)
Questa macchina è conforme a tutti gli standard e alle norme applicabili relativi all’esposizione a campi
elettromagnetici.
Riciclaggio
- Questo simbolo indica che il prodotto non può essere smaltito con i normali riuti domestici
(
2012/19/UE
).
- Ci sono due situazioni in cui potete restituire gratuitamente il prodotto vecchio a un rivenditore:
1 Quando acquistate un prodotto nuovo, potete restituire un prodotto simile al rivenditore.
2 Se non acquistate un prodotto nuovo, potete restituire prodotti con dimensioni inferiori a 25 cm
(
lunghezza, altezza e larghezza
) ai rivenditori con supercie dedicata alla vendita di prodotti
elettrici ed elettronici superiore ai 400 m
2
.
- In tutti gli altri casi, attenetevi alle normative di raccolta differenziata dei prodotti elettrici
ed elettronici in vigore nel vostro comune: un corretto smaltimento consente di evitare
conseguenze negative per l’ambiente e per la salute.

6
Italiano
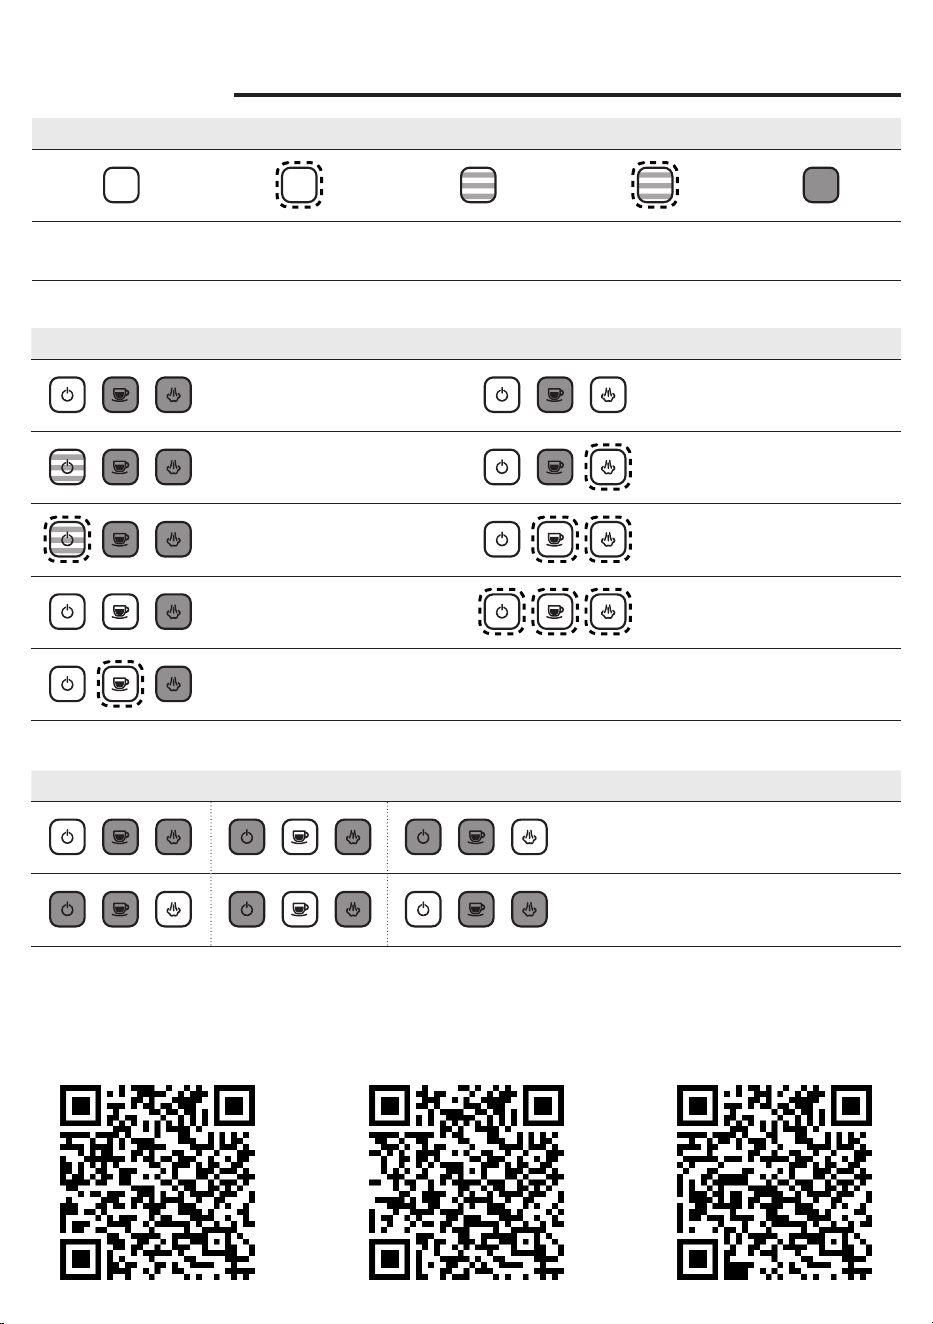
Segnali LED
Espresso Style Espresso De Luxe Espresso Evolution
Leggenda
Bianco
Fisso
Bianco
Lampeggiante
Arancione
Fisso
Arancione
Lampeggiante
Spento
Segnale LED Messaggio Segnale LED Messaggio
Macchina accesa Pronto Vapore
Richiesta decalcicazione Riscaldamento Vapore
Reset decalcicazione
Richiesta raffreddamento da
Vapore
Pronto macchina Allarme chiudi pomello vapore
Riscaldamento caffè/acqua
calda
Segnale LED Messaggio
Sequenza di avvenuta attivazione e
memorizzazione della MEMO
Sequenza di avvenuta disattivazione
della MEMO

7
Italiano
Congratulazioni per l’acquisto della Gaggia Espresso!
La preparazione di un buon espresso è un’arte che richiede un po’ di pazienza, una
certa precisione e una buona dose di pratica. Questa macchina espresso di Gaggia
rappresenta il primo passo nel mondo del barista a casa, per coloro che non sono
degli esperti, ma che vogliono gustarsi un buon espresso imparando in maniera
semplice i rituali del barista, fatto di piccoli gesti.
In questo manuale trovate tutte le informazioni necessarie per installare, utilizzare,
pulire e decalcificare la vostra macchina. Prima di utilizzarla per la prima volta
leggete attentamente la sezione sulla sicurezza e conservatela per eventuali
riferimenti futuri

8
Italiano
Indice
Segnali LED ................................................................................................................................................................................................................................................................................................................................................................................................................................................................................................................................................................................................................................................................................................................................................................................................................................................................................................................................................................................................................................................................................................................................................................................................................6
Panoramica della macchina ..........................................................................................................................................................................................................................................................................................................................................................................................................................................................................................................................................................................................................................................................................................................................................................................................................................................................................................................................................9
Componenti lavabili in lavastoviglie ................................................................................................................................................................................................................................................................................................................................................................................................................................................................................................................................................................................................................................................................................................................................................................................................9
Introduzione ........................................................................................................................................................................................................................................................................................................................................................................................................................................................................................................................................................................................... ...........................................................................................................................................................................................................................................................................................................................................................................................................................................................................................................................................................................................10
Filtri in dotazione .................................................................................................................................................................................................................................................................................................................................................................................................................................................................................................................................................. ..................................................................................................................................................................................................................................................................................................................................................................................................................................................................................................................................................10
Filtro crema perfetta 2 tazze ...............................................................................................................................................................................................................................................................................................................................................................................................................................................................................................10
Filtro crema perfetta 1 tazza e cialda monodose + “Pod System” ..........................................................................................................................................................................................................................................................10
Prima installazione ..........................................................................................................................................................................................................................................................................................................................................................................................................................................................................................................................................................................................................................................................................................................................................................................................................................................................................................................................................................................................................................................................................11
Caricamento circuito ..........................................................................................................................................................................................................................................................................................................................................................................................................................................................................................................................................................................................................................................................................................................................................................................................................................................................................................................................................................................................................................................11
Come inserire ed estrarre il portaltro ........................................................................................................................................................................................................................................................................................................................................................................................................................................................................................................................................................................................................................................................................................................................................12
Primo utilizzo o dopo un periodo di inattività superiore alle 2 settimane ......................................................................... .........................................................................12
Preparazione di un caè ....................................................................................................................................................................................................................................................................................................................................................................................................................................................................................... .......................................................................................................................................................................................................................................................................................................................................................................................................................................................................................13
Con caè premacinato ..................................................................................................................................................................................................................................................................................................................................................................................................................................................................................................................................13
Con caè in cialde ............................................................................................................................................................................................................................................................................................................................................................................................................................................................................................................................................................13
Funzione memo .............................................................................................................................................................................................................................................................................................................................................................................................................................................................................................................................................................. ..............................................................................................................................................................................................................................................................................................................................................................................................................................................................................................................................................................14
Come memorizzare il vostro espresso .................................................................................................................................................................................................................................................................................................................................................................................................................................14
Come disattivare la funzione memo .................................................................................................................................................................................................................................................................................................................................................................................................................................................14
Emulsione del latte per la preparazione di un cappuccino ................................................................................................................................................................................................................................................................................................................................................................................................15
Come abbassare la temperatura della caldaia ............................................................................................................................................................................................................................................................................................................................................................................................................................................................................................................................................................................................................16
Erogazione acqua calda ....................................................................................................................................................................................................................................................................................................................................................................................................................................................................................................................................................................................................................................................................................................................................................................................................................................................................................................................................................................................17
Risparmio energetico ..............................................................................................................................................................................................................................................................................................................................................................................................................................................................................................................................................................................................................................................................................................................................................................................................................................................................................................................................................................................................................................17
Pulizia e manutenzione ................................................................................................................................................................................................................................................................................................................................................................................................................................................................................................. .................................................................................................................................................................................................................................................................................................................................................................................................................................................................................................17
Pulizia del pannarello .........................................................................................................................................................................................................................................................................................................................................................................................................................................................................................................................................17
Pulizia del portaltro, dei ltri e del sistema per cialde “Pod system” .......................................................................................................................................................................................................................................18
Pulizia della doccetta ...........................................................................................................................................................................................................................................................................................................................................................................................................................................................................................................................................19
Pulizia della griglia e della vasca raccogligocce .......................................................................................................................................................................................................................................................................................................................................................................19
Pulizia del serbatoio acqua ......................................................................................................................................................................................................................................................................................................................................................................................................................................................................................................20
Decalcicazione ......................................................................................................................................................................................................................................................................................................................................................................................................................................................................................................................................................................................................................................................................................................................................................................................................................................................................................................................................................................................................................................................................................................................20
Risoluzione dei problemi .................................................................................................................................................................................................................................................................................................................................................................................................................................................................................. ..................................................................................................................................................................................................................................................................................................................................................................................................................................................................................22
Accessori GAGGIA ................................................................................................................................................................................................................................................................................................................................................................................................................................................................................................................................... ...................................................................................................................................................................................................................................................................................................................................................................................................................................................................................................................................23
Dati tecnici ..............................................................................................................................................................................................................................................................................................................................................................................................................................................................................................................................................................................................................................................................................................................................................................................................................................................................................................................................................................................................................................................................................................................................................................................................................24
9
Italiano
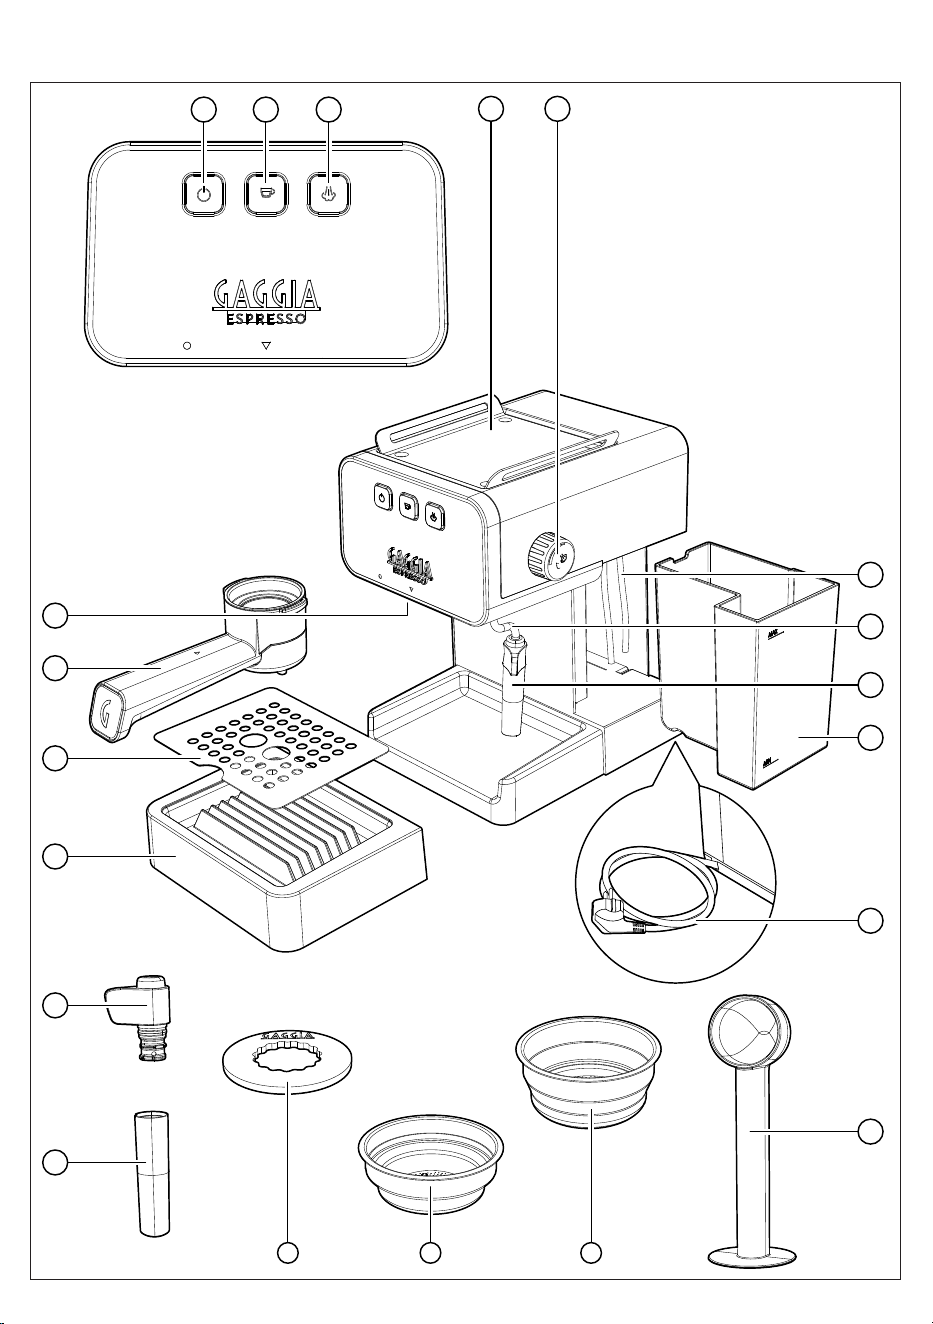
Panoramica della macchina
1 Tasto ON/OFF 11 Misurino caffè/Pressino caffè
2 Tasto Caffè 12 Filtro crema perfetta 2 tazze
3 Tasto VAPORE 13 Filtro crema perfetta 1 tazza / Cialda monodose
4
Poggia tazze in acciaio
Espresso De Luxe ed Espresso Evolution
14 Sistema per cialde "Pod System"
5 Manopola del vapore/acqua calda 15 Parte inferiore Pannarello classico
6 Tubi in silicone serbatoio acqua 16 Parte superiore Pannarello classico
7 Tubo vapore/acqua calda 17 Vasca raccogligocce
8 Pannarello classico 18
Griglia vasca raccogligocce
Espresso De Luxe ed Espresso Evolution
9 Serbatoio acqua 19 Portaltro
10 Cavo di alimentazione 20 Gruppo erogatore
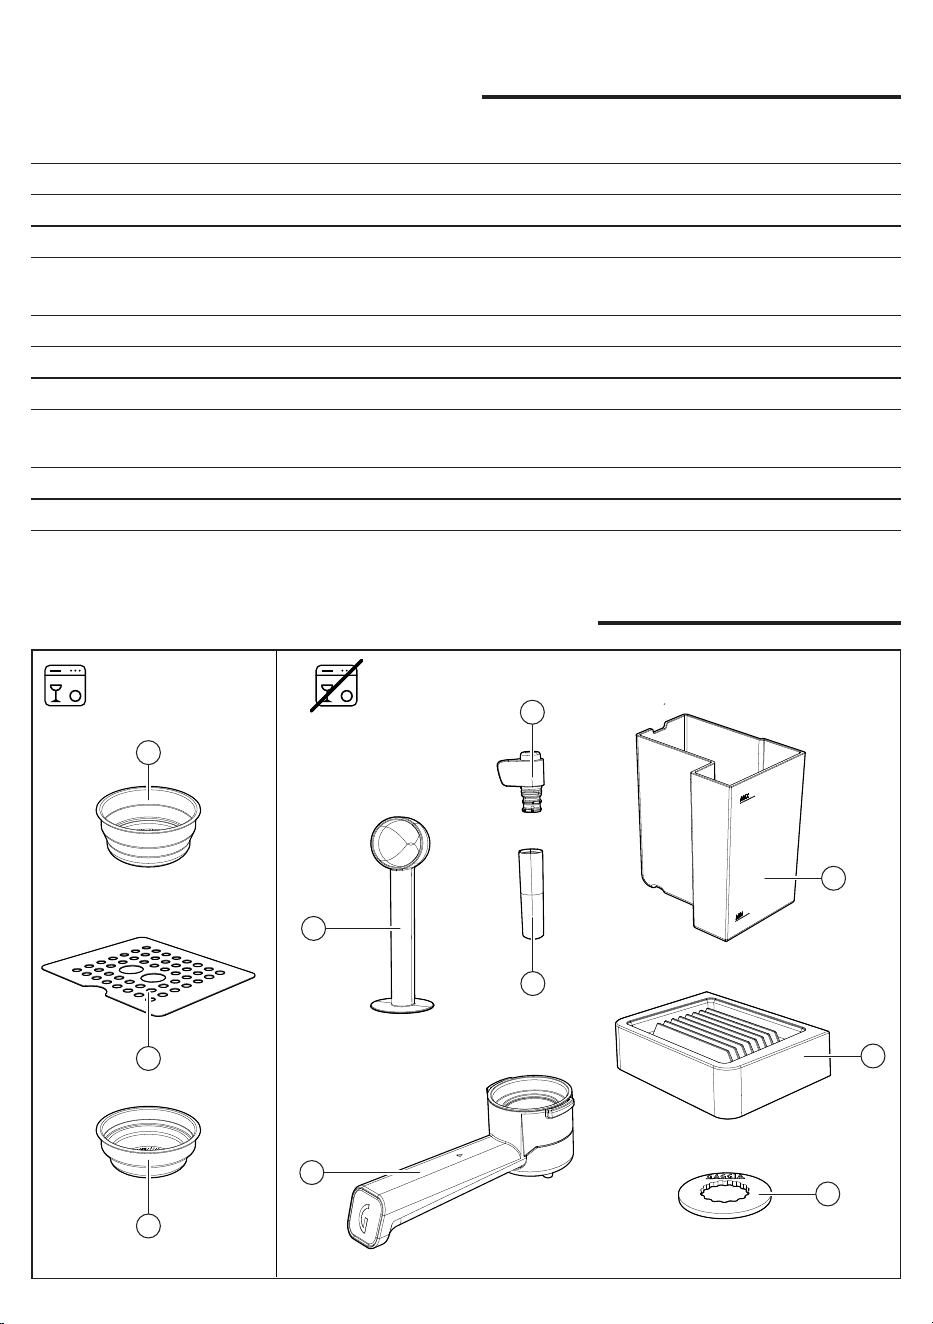
Componenti lavabili in lavastoviglie
9
14
19
11
15
13
12
16
18
17
10
Italiano
Introduzione
Un espresso perfetto con la tipica crema che lo caratterizza dipende da molti
fattori tra i quali:
• il tipo di caffè utilizzato. Il mercato offre diverse qualità di caffè, i chicchi
maggiormente indicati per un buon espresso sono le tostature più scure che
liberano più aroma ed hanno un gusto più intenso.
• la granulometria del caffè macinato. Assicuratevi di acquistare la miscela
desiderata con un grado di macinatura adatto per l’utilizzo con macchine da
caffè espresso. Potete anche macinare all’istante utilizzando un macinacaffè a
marchio Gaggia.
• la quantità. È importante utilizzare la giusta dose di caffè macinato per evitare
di erogare un caffè troppo acquoso (
poco caffè
) o troppo amaro dal sapore
bruciato (
troppo caffè
).
• la pressione esercitata per compattare la cialda di caffè. Assicuratevi di
pressare il caffè in maniera regolare ed uniforme mantenendo la superce
parallela al bordo del portaltro, per evitare che si creino degli spazi che
permettono all’acqua di inltrarsi, senza bagnare omogeneamente tutta la
cialda estraendo soltanto una parte degli aromi del caffè.
• la preinfusione. La macchina ha una preinfusione impostata di fabbrica che
favorisce una migliore estrazione degli aromi del caffè. L’acqua calda bagna la
pastiglia per qualche secondo prima dell’erogazione.
• la temperatura. È mantenuta costante per garantire sempre la miglior
estrazione.
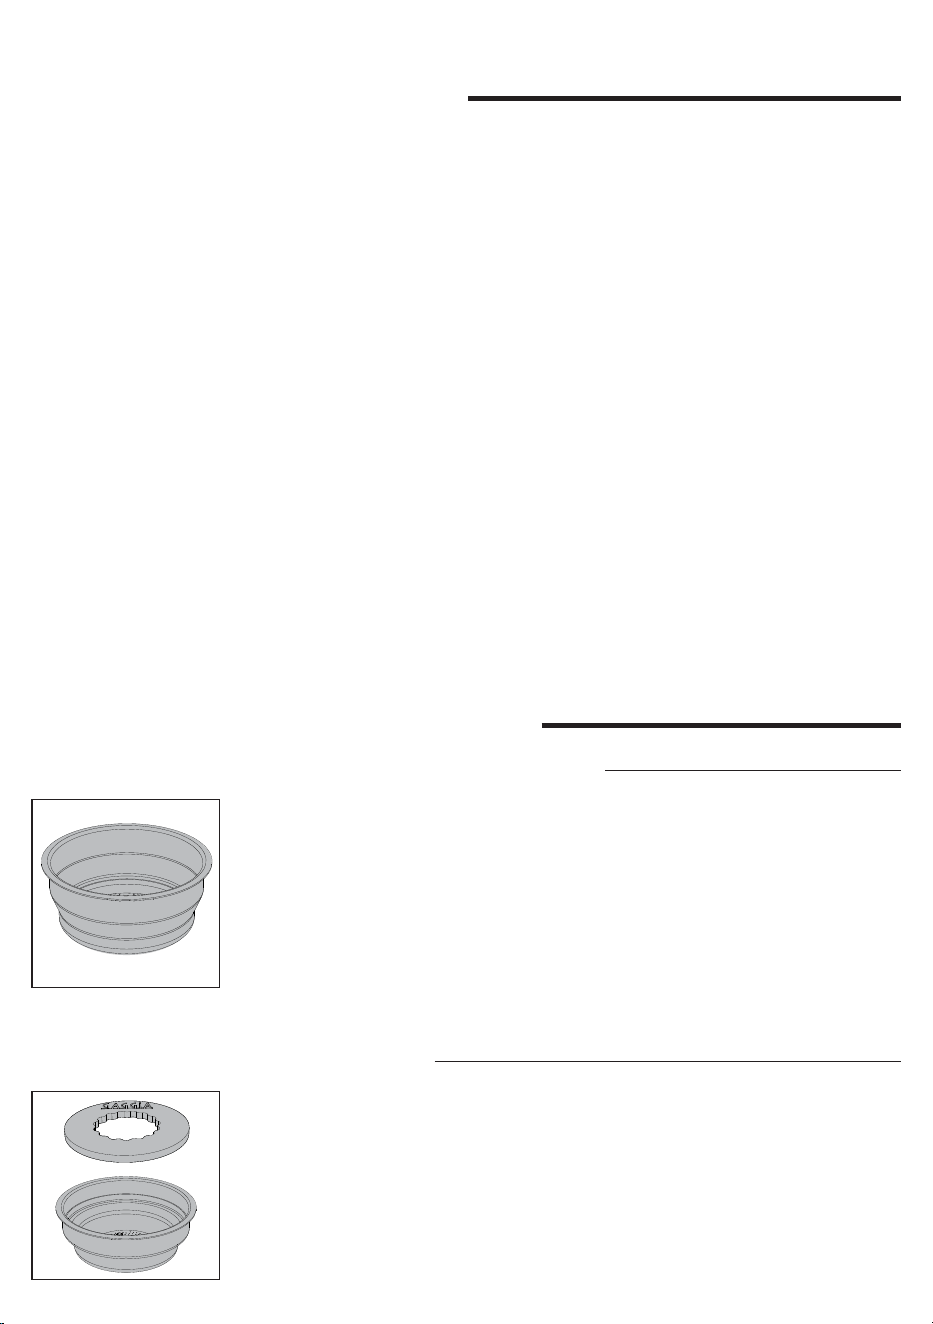
Filtri in dotazione
Filtro crema perfetta 2 tazze
Il ltro per due tazze crema perfetta è già montato sul portaltro e permette di
preparare un ottimo espresso con crema anche ai principianti.
Filtro crema perfetta 1 tazza e cialda monodose +
“Pod System”
Questo ltro può essere utilizzato per erogare una tazza di espresso con caffè
premacinato o per erogare con le cialde monodose utilizzando l’esclusivo sistema
“Pod system”.
11
Italiano
Prima installazione
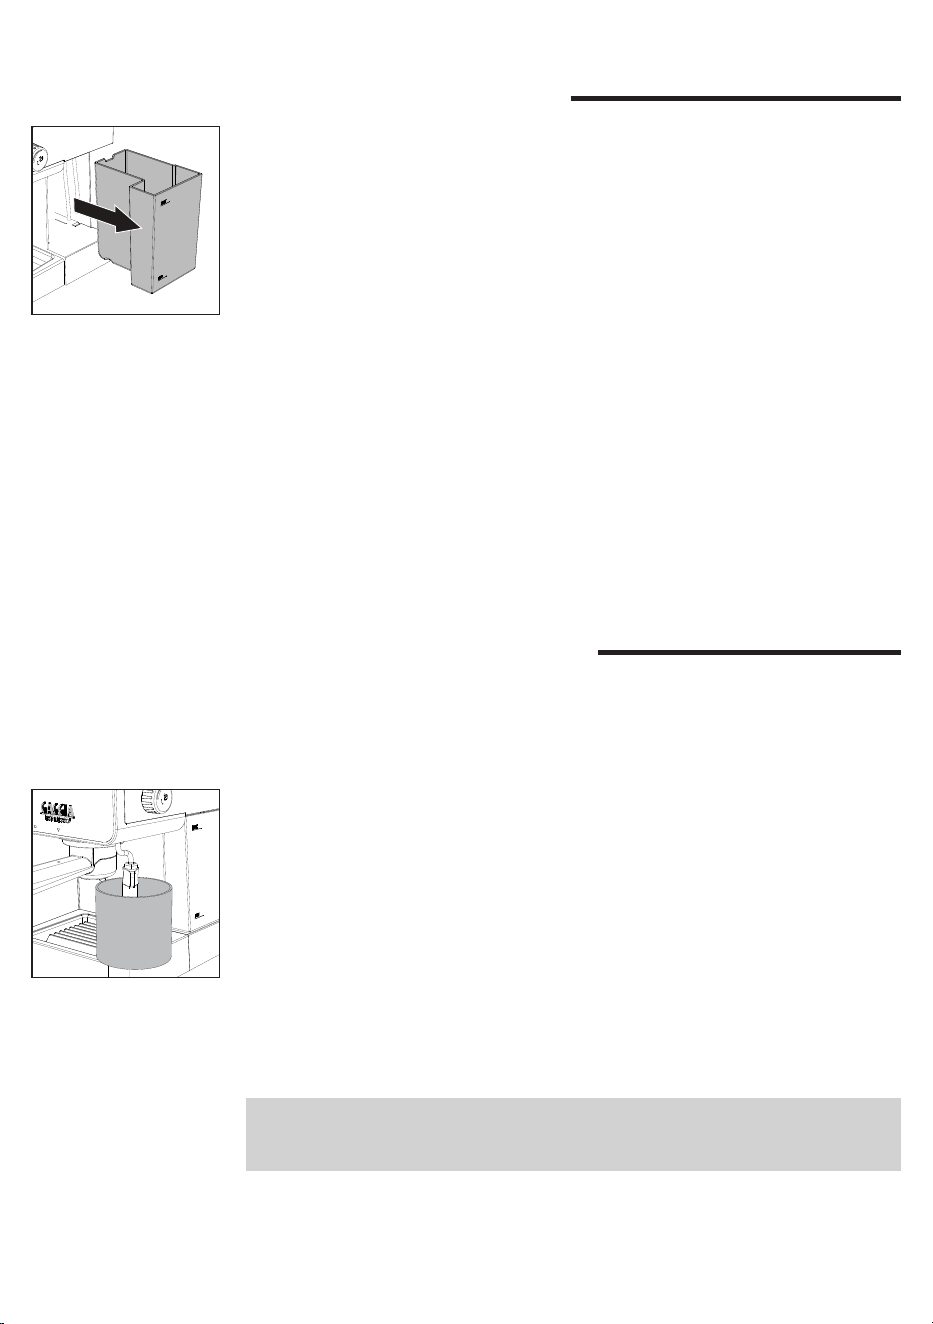
1 Estraete il serbatoio dell’acqua (9), sciacquatelo e riempitelo con acqua fredda
no al livello MAX.
Caricamento circuito
Il circuito deve essere sempre caricato al primo utilizzo o dopo aver terminato
l’acqua nel serbatoio:
1 Riempite il serbatoio con acqua fredda no al livello MAX.
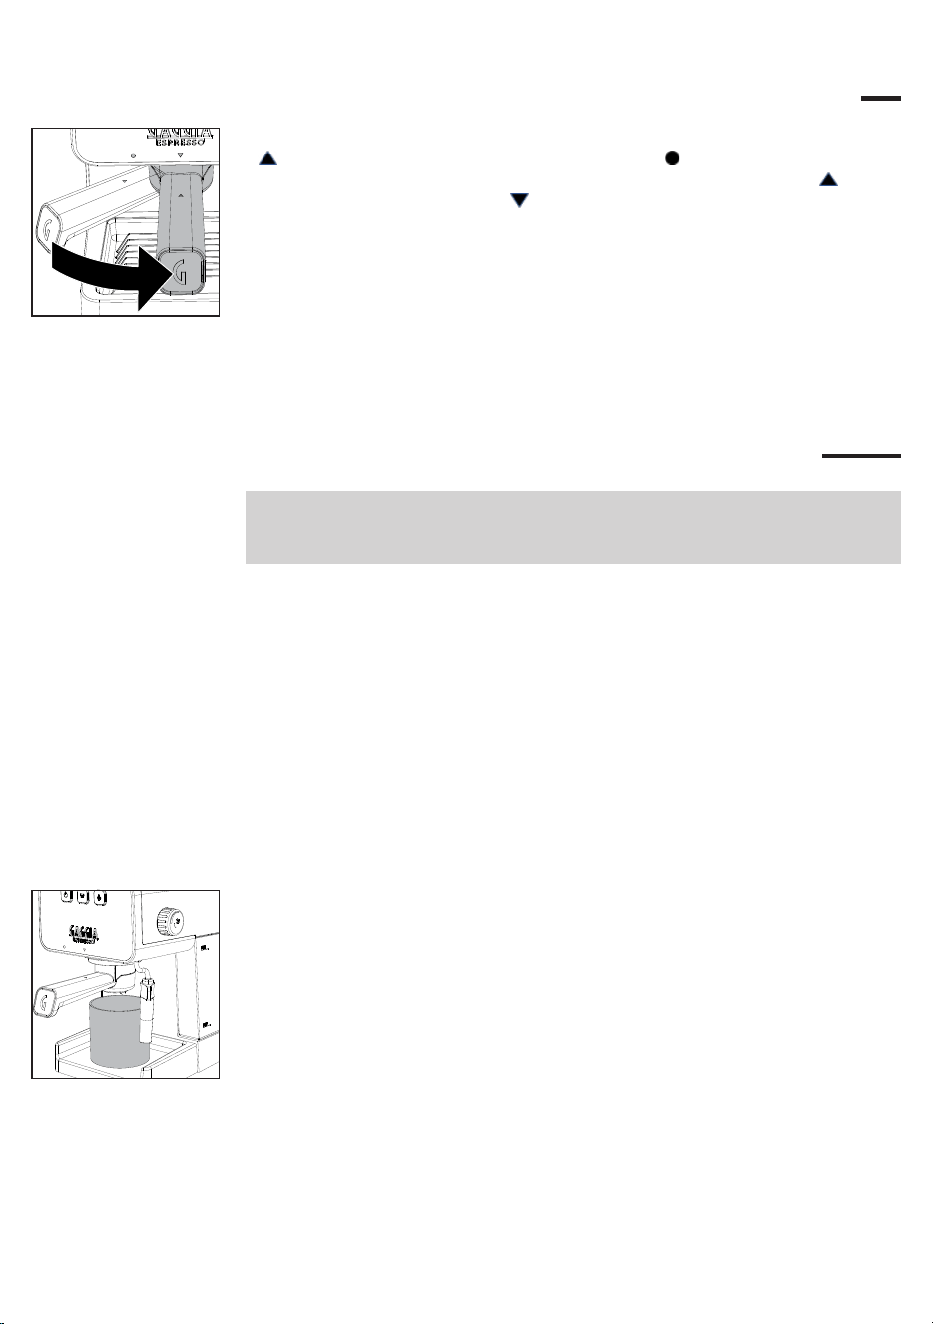
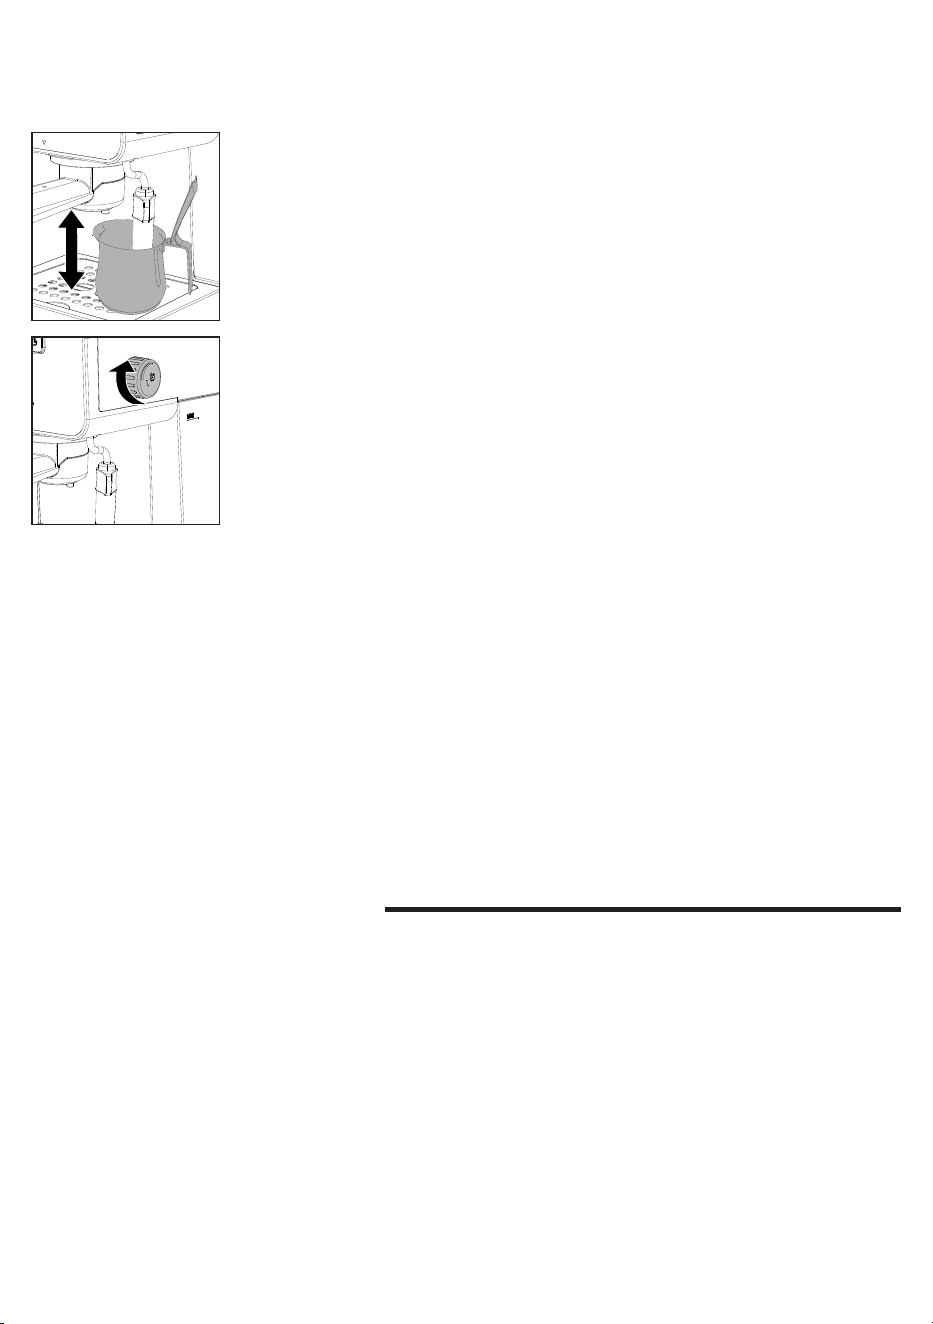
2 Collocate un contenitore sotto al pannarello.
3 Ruotate la manopola acqua calda/vapore (5) in senso antiorario ed erogate
acqua dal pannarello (8) nche’ non fuoriesce un getto regolare.
4 Per terminare l’erogazione ruotate la manopola acqua calda/vapore in senso
orario e svuotate il contenitore.
Nota: la macchina non segnala la mancanza di acqua nel serbatoio, se la pompa è
molto rumorosa è necessario riempire il serbatoio ed effettuare il caricamento del
circuito.
2 Inserite la spina del cavo di alimentazione in una presa di corrente a muro con
tensione adeguata.
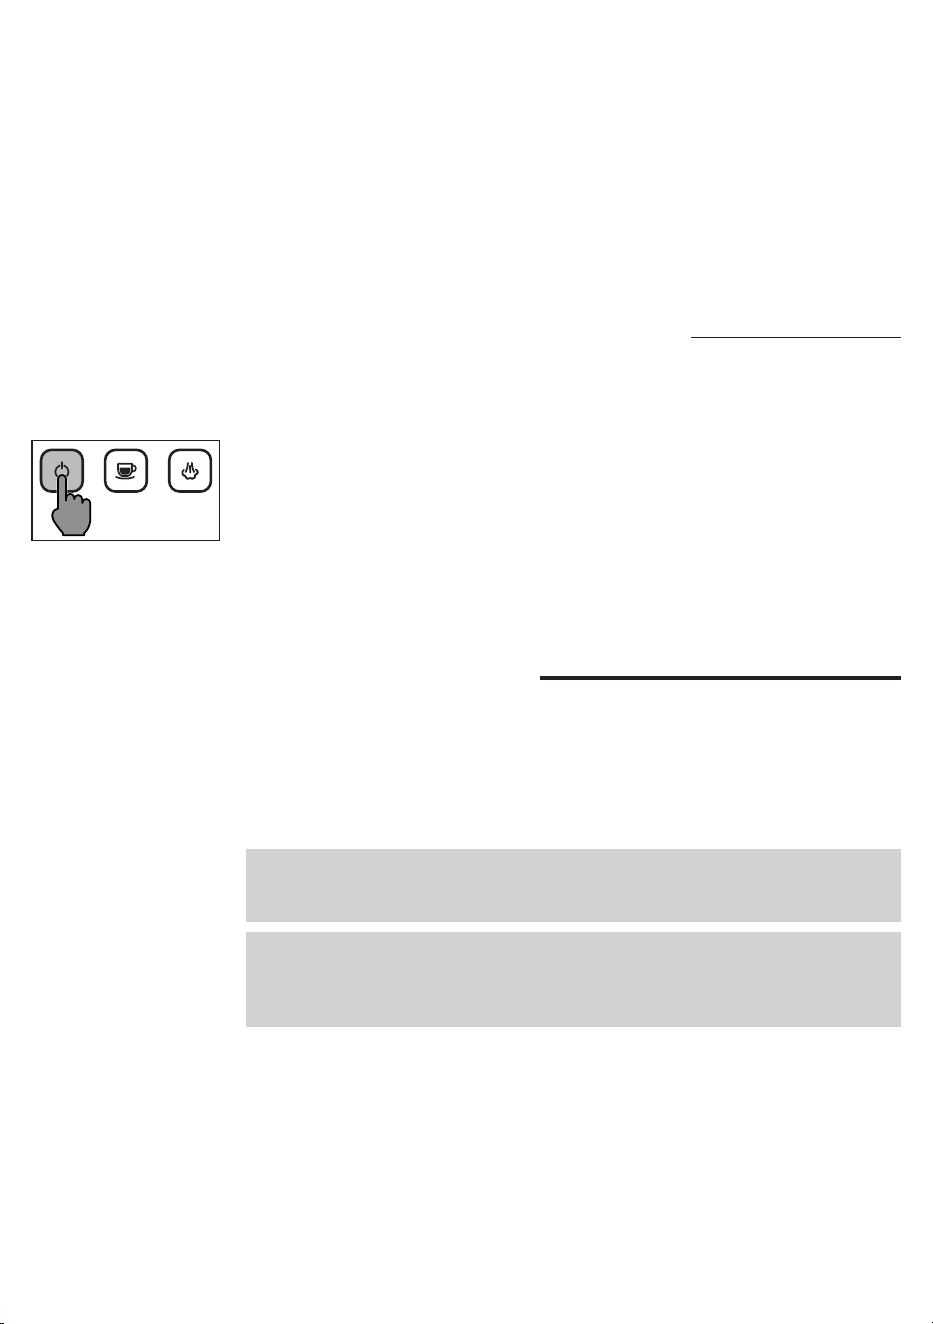
3 Premete il tasto di accensione/spegnimento (1), che inizierà a lampeggiare.
4 Collocate un contenitore sotto al pannarello (8), ruotate la manopola acqua
calda/vapore (5) in senso antiorario ed erogate acqua nche' tutti e tre i
tasti di accensione/spegnimento (1), caffè (2) e vapore (3) lampeggiano
simultaneamente ad indicare di chiudere la manopola.
5 Il tasto di accensione/spegnimento si accende sso ed il tasto caffè (2) inizia
a lampeggiare diventando sso quando raggiunge la temperatura impostata
di fabbrica.
12
Italiano
Primo utilizzo o dopo un periodo di
inattività superiore alle 2 settimane
Nota: L’acqua erogata durante questo processo deve essere buttata e non può
essere utilizzata per l’alimentazione. Se il contenitore si riempie, durante il ciclo,
fermate l’erogazione e vuotatelo prima di riprendere l’operazione.
1 Rimuovete la vasca raccogligocce (17) e collocate un contenitore sotto al
pannarello (8).
2 Estraete il serbatoio dell’acqua (9) sciacquatelo e riempitelo con acqua fredda
no al livello MAX.
3 Ruotate la manopola vapore/acqua calda (5) in senso antiorario ed erogate
acqua calda dal pannarello no a raggiungere il livello MIN del serbatoio
acqua.
4 Per terminare l’erogazione ruotate la manopola acqua calda/vapore in senso
orario.
5 Riempite nuovamente il serbatoio acqua no al livello MAX.
6 Inserite il portaltro (19) nel gruppo erogatore (20) ruotandolo da sinistra a
destra, come descritto nel paragrafo corrispondente.
7 Collocate un contenitore adeguato sotto al portaltro.
8 Premete il tasto caffè (2) ed erogate acqua no al raggiungimento del livello
MIN del serbatoio acqua.
9 Per terminare l’erogazione premete nuovamente il tasto caffè e svuotate il
contenitore.
10 Reinserite la vasca raccogligocce (17).
11 Rimuovete il portaltro ruotandolo da destra verso sinistra e sciacquatelo con
acqua corrente.
Come inserire ed estrarre il portaltro
Inserite il portaltro (19) nel gruppo erogatore dal basso, allineando il triangolino
presente sul manico del portaltro con il simbolo presente sulla carcassa,
ruotando da sinistra verso destra nche’ il triangolo presente sul manico non è
allineato a quello sulla carcassa o leggermente spostato verso destra.
Per rimuovere il portaltro ruotate in senso contrario da destra verso sinistra.
13
Italiano
12 Riempite il serbatoio acqua no al livello MAX.
13 La macchina è ora pronta all’uso.
Preparazione di un caè
Con caè premacinato
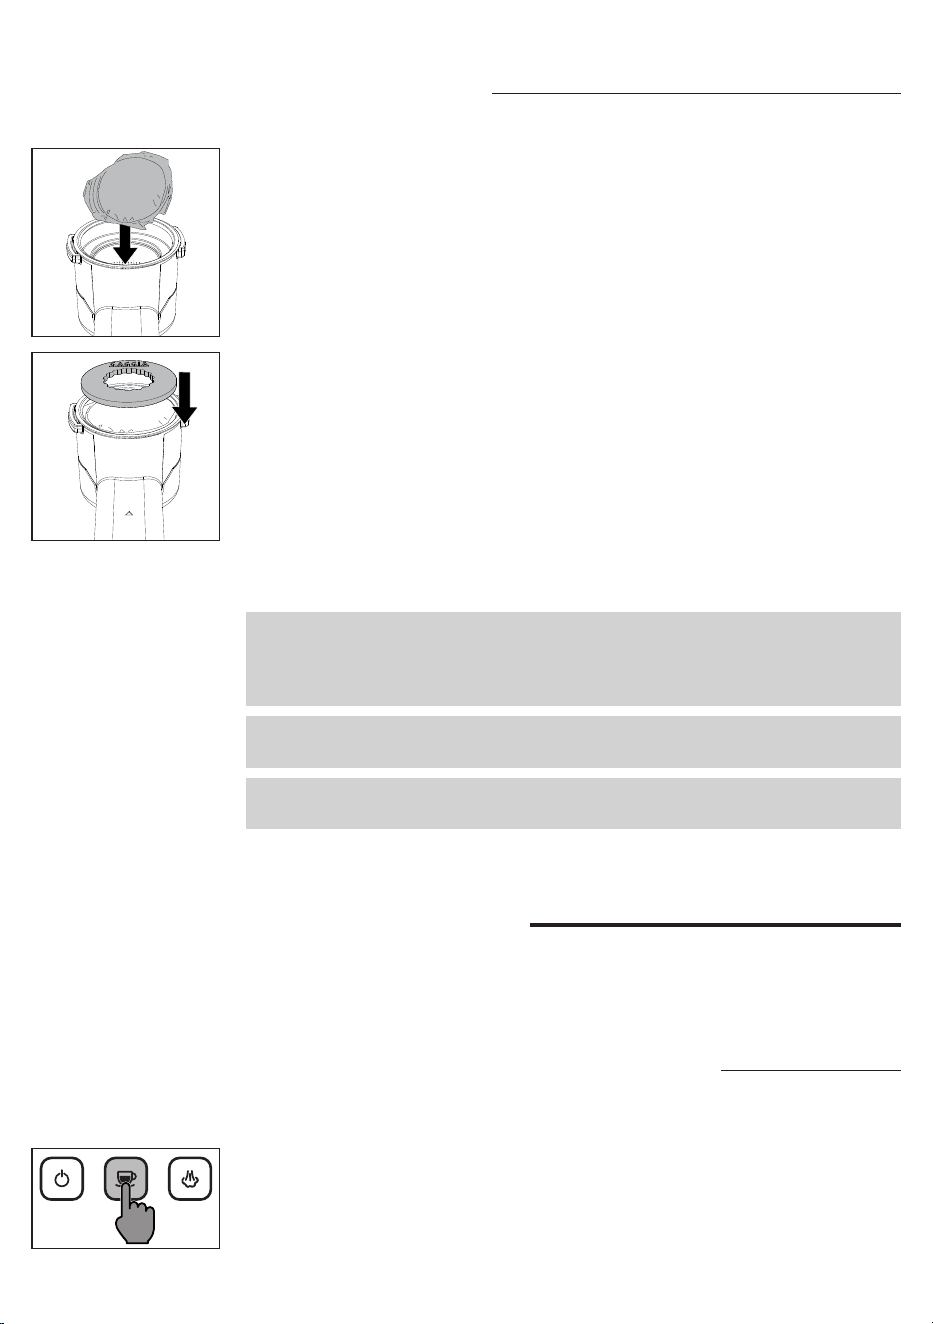
Il portaltro monta il ltro per 1 (13) o 2 tazze (12).
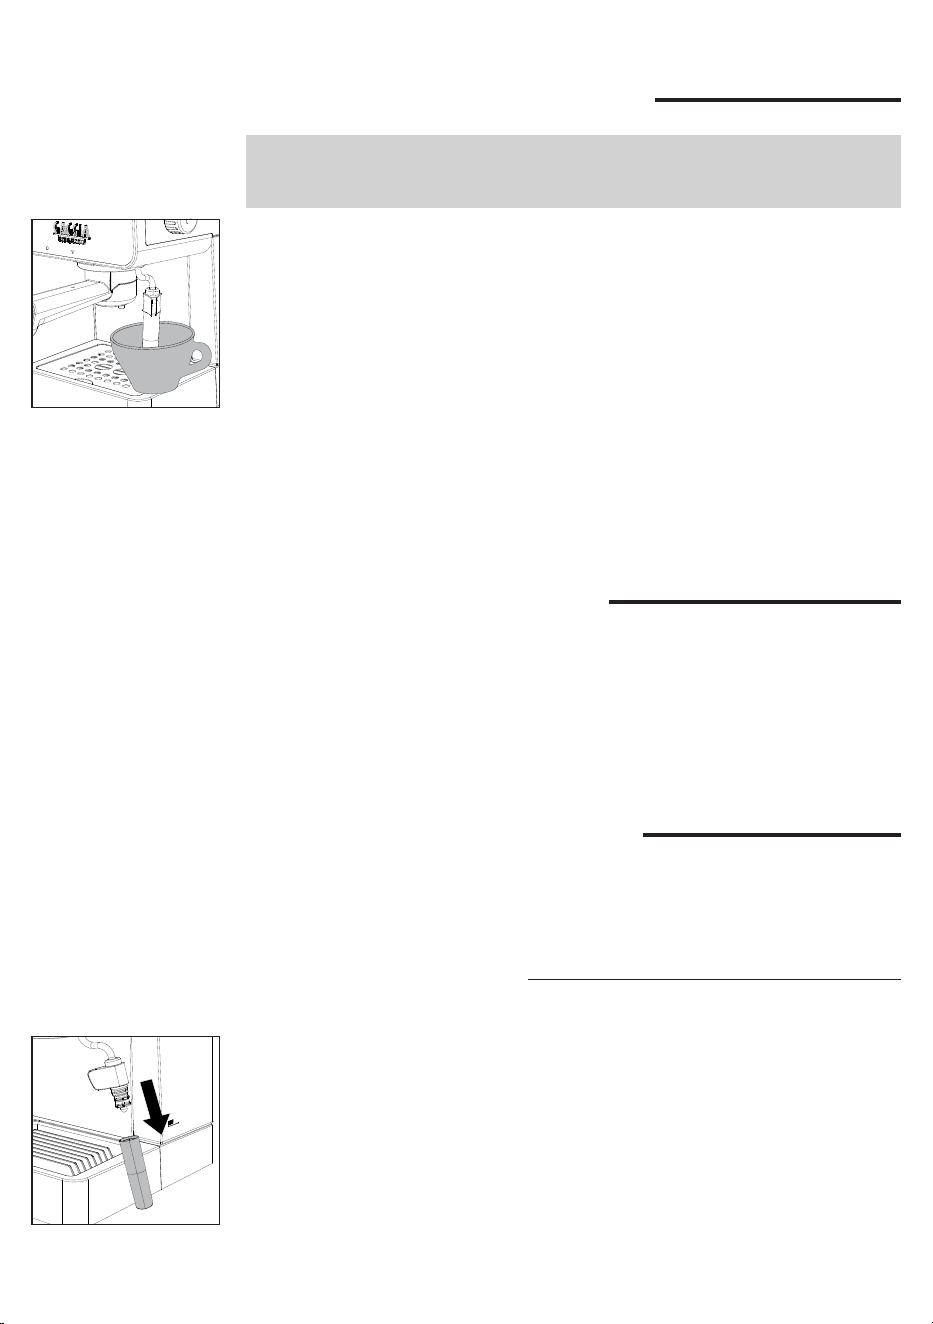
Per erogare il primo caffè è necessario preriscaldare prima il portaltro:
1 Inserite il portaltro (19) con il ltro 1 o 2 tazze nel gruppo erogatore (20).
2 Collocate una tazza sotto al portaltro e premete il tasto caffè (2) quando è
illuminato sso erogando una tazza di acqua (
circa150ml
).
3 Rimuovete il portaltro eliminando eventuali residui di acqua.
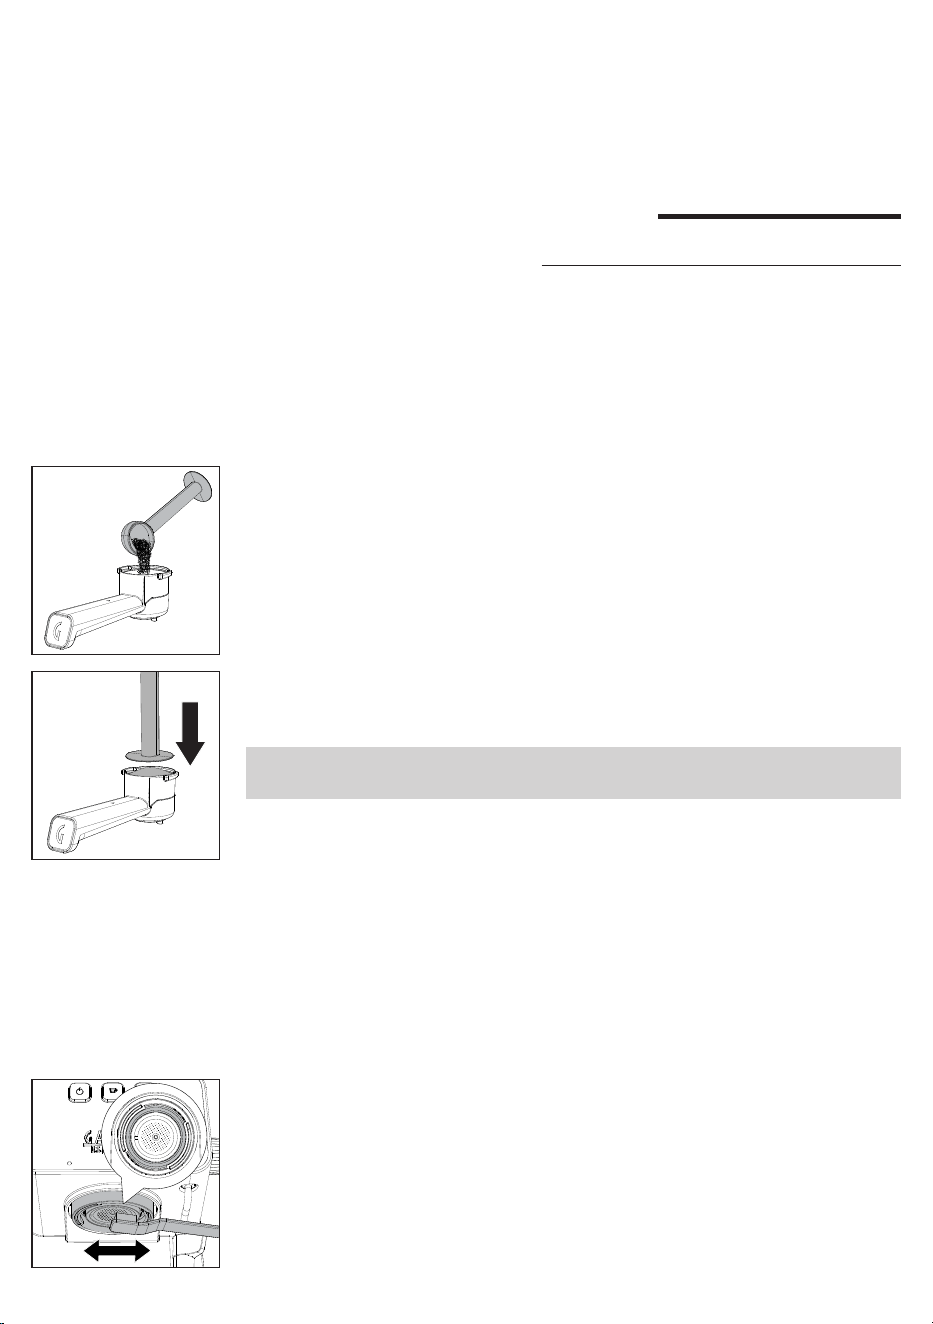
4 Riempite il portaltro con 1 misurino di caffè premacinato per un caffè singolo
o con 2 misurini rasi per un caffè doppio, battendo leggermente il portaltro
per pareggiare la polvere di caffè
5 Pressate il caffè utilizzando l’apposito pressino dato in dotazione. La
pressatura deve avvenire in maniera uniforme e la superce del caffè deve
essere ben livellata senza scanalature, parallela al bordo del portaltro.
Nota: le dimensioni e la forma del pressino sono state studiate appositamente per
permettere una pressatura ottimale sia con il ltro 1 tazza che con il ltro 2 tazze.
6 Pulite il bordo del portaltro da eventuali residui di caffè.
7 Inserite il portaltro correttamente (
come descritto nel paragrafo
corrispondente
).
8 Posizionate 1 o 2 tazzine sotto al portaltro.
9 Attendete che il tasto caffè sia illuminato sso prima di premerlo per iniziare
l’erogazione.
10 Quando si raggiunge il volume desiderato ripremete il tasto caffè per
interrompere l’erogazione.
11 Al termine dell’erogazione estraete il portaltro, togliete i fondi dal ltro e
possibili residui dalla guarnizione e dalla doccetta.
14
Italiano
Con caè in cialde
1 Per la preparazione del caffè utilizzate l’apposito ltro per le cialde (13).
2 Inserite la cialda nel ltro ed assicuratevi che la carta della cialda non
fuoriesca dal portaltro.
3 Posizionate il sistema per cialde "Pod System" (14) sulla cialda.
4 Seguite le istruzioni per la preparazione di un caffè con caffè premacinato dap
punto 7.
Nota: Attendete circa 10 secondi prima di togliere il portaltro, rimuovetelo
lentamente ed attentamente ruotandolo verso sinistra. Con l’utilizzo di caffè
premacinato fate attenzione a non scottarvi con l’eventuale acqua rimasta sui
fondi di caffè.
Nota: nel portaltro rimane una piccola quantità di acqua; questo è normale ed è
dovuto alle caratteristiche del portaltro.
Nota: Un po’ d’acqua continuerà a sgocciolare una volta rimosso il portaltro.
Questo è dovuto alla pressione dell’acqua nel sistema.
Funzione memo
Tramite questa funzione potete memorizzare il tempo di erogazione del vostro
caffè. Ad ogni pressione del tasto caffè la macchina erogherà la quantità di caffè
nel tempo precedentemente settato.
Come memorizzare il vostro espresso
1 Preparate il caffè come indicato nel capitolo “preparazione di un caffè con
caffè pre-macinato”.
2 Tenete premuto il tasto caffè quando è acceso sso. Dopo qualche secondo,
la macchina entrerà in modalità MEMO ed inizierà l’erogazione.
15
Italiano
3 Raggiunto il volume desiderato rilasciate il tasto caffè, si spegneranno tutti
i tasti e per due volte in sequenza si accenderanno il tasto di accensione/
spegnimento (1), il tasto caffè (2) ed il tasto vapore (3) a confermare
l’avvenuto salvataggio della bevanda.
4 Ad ogni pressione del tasto caffè la macchina ora erogherà la quantità di caffè
nel tempo settato.
5 È possibile modicare il tempo di erogazione ripetendo il procedimento
sopradescritto che andrà a sovrascrivere il tempo precedentemente
memorizzato.
Come disattivare la funzione memo
Disattivando la funzione memo la macchina ad ogni pressione del tasto caffè
richiederà di ripremere nuovamente il tasto caffè per interrompere l’erogazione.
1 Tenete premuto il tasto accensione/spegnimento, dopo qualche secondo
si spegneranno tutti i tasti ed in sequenza per due volte si accenderanno il
tasto vapore (3), il tasto caffè (2) ed il tasto di accensione/spegnimento (1) a
confermare l’avvenuta disattivazione della funzione memo.
Emulsione del latte per la preparazione
di un cappuccino
Per garantire un risultato ottimale consigliamo di utilizzare latte intero freddo
(
a circa 5°C
) con un contenuto di proteine di almeno il 3% e con almeno il 3,5%
di grassi. Le proteine faranno incorporare l'aria nell'emulsione, mentre i grassi
la renderanno densa e compatta. Buoni risultati si ottengono anche con il latte
vaccino parzialmente scremato, alcuni tipi di latte senza lattosio, la bevanda di
soia, di mandorla e di avena.
Attenzione: All’inizio dell’erogazione possono vericarsi brevi spruzzi di acqua
calda. Il tubo d’erogazione può raggiungere temperature elevate, evitate di toccarlo
direttamente con le mani.
Attenzione: Prima e dopo l’erogazione di vapore potrebbero vericarsi fuoriuscite
di acqua calda e/o vapore dal gruppo caffè. Raccomandiamo di tenere inserito
il portaltro per evitare scottature. Prima di rimuoverlo premete il tasto vapore e
raffreddate la macchina.
1 Premete il tasto vapore (3), il tasto caffè si spegnerà ed il tasto vapore
comincerà a lampeggiare.
2 Quando il tasto vapore si accenderà sso la macchina sarà pronta per
l’erogazione di vapore.
3 Prima di iniziare l’emulsione del latte eliminate l’eventuale condensa dal tubo
vapore aprendo per qualche secondo la manopola vapore/acqua calda no a
quando non fuoriesce solo vapore, richiudete la manopola.
4 Riempite un bricco con latte freddo per circa1/3.
5 Inserite il pannarello nel latte.
16
Italiano
8 Quando si raggiunge l’emulsione desiderata, chiudete la manopola vapore/
acqua calda in senso orario per interrompere l’emulsione.
Come abbassare la temperatura della
caldaia
1 Collocate un contenitore o una tazza grande sotto al pannarello.
2 Aprite la manopola vapore/acqua calda ruotandola in senso antiorario ed
erogate no a quando tutti e tre i tasti accensione/spegnimento, caffè e
vapore lampeggeranno simultaneamente ad indicare di chiudere la manopola.
3 Chiudete la manopola ruotandola in senso orario ed il tasto caffè si accenderà
sso.
4 La macchina è ora pronta per l’erogazione di un caffè.
9 Terminata l’emulsione si consiglia di battere leggermente il bricco su un piano
e lasciar riposare ca. 30 secondi. Il latte diventa così più omogeneo.
10 Premete il tasto vapore per uscire dalla funzione.
11 Entrambi i tasti vapore e caffè lampeggeranno contemporaneamente ad
indicare che la temperatura è troppo elevata per erogare un caffè.
12 Pulite il circuito aprendo per qualche istante la manopola vapore/acqua
calda in senso antiorario per eliminare eventuali residui di latte e richiudete la
manopola.
Per abbassare la temperatura della caldaia più velocemente seguire le istruzioni
indicate nel paragrafo corrispondente.
6 Ruotate la manopola vapore/acqua calda in senso antiorario no a completa
apertura per iniziare ad emulsionare il latte.
7 Emulsionate il latte spostando delicatamente il bricco con movimenti circolari
verso l'alto ed il basso.
17
Italiano
Erogazione acqua calda
Attenzione: All’inizio dell’erogazione possono vericarsi brevi spruzzi di acqua
calda. Il tubo d’erogazione può raggiungere temperature elevate, evitate di toccarlo
direttamente con le mani.
1 Collocate una tazza o un bicchiere da tè sotto al pannarello.
2 Ruotate la manopola vapore/acqua calda in senso antiorario no a completa
apertura per iniziare l’erogazione dell’acqua calda dal pannarello.
3 Ottenuta la quantità desiderata chiudete la manopola vapore/acqua calda
ruotandola in senso orario.
Risparmio energetico
La macchina è dotata di funzione di spegnimento automatico per il risparmio
energetico.
Per riavviare la macchina è suciente premere il tasto di accensione/spegnimento
che si accenderà sso ed il tasto caffè lampeggerà no a quando non si raggiunge
la temperatura impostata.
Pulizia e manutenzione
Una pulizia ed una manutenzione regolare mantengono la macchina in condizioni
ottimali e garantiscono un caffè di ottimo gusto per un lungo periodo di tempo, un
usso costante di caffè e una schiuma di latte eccellente.
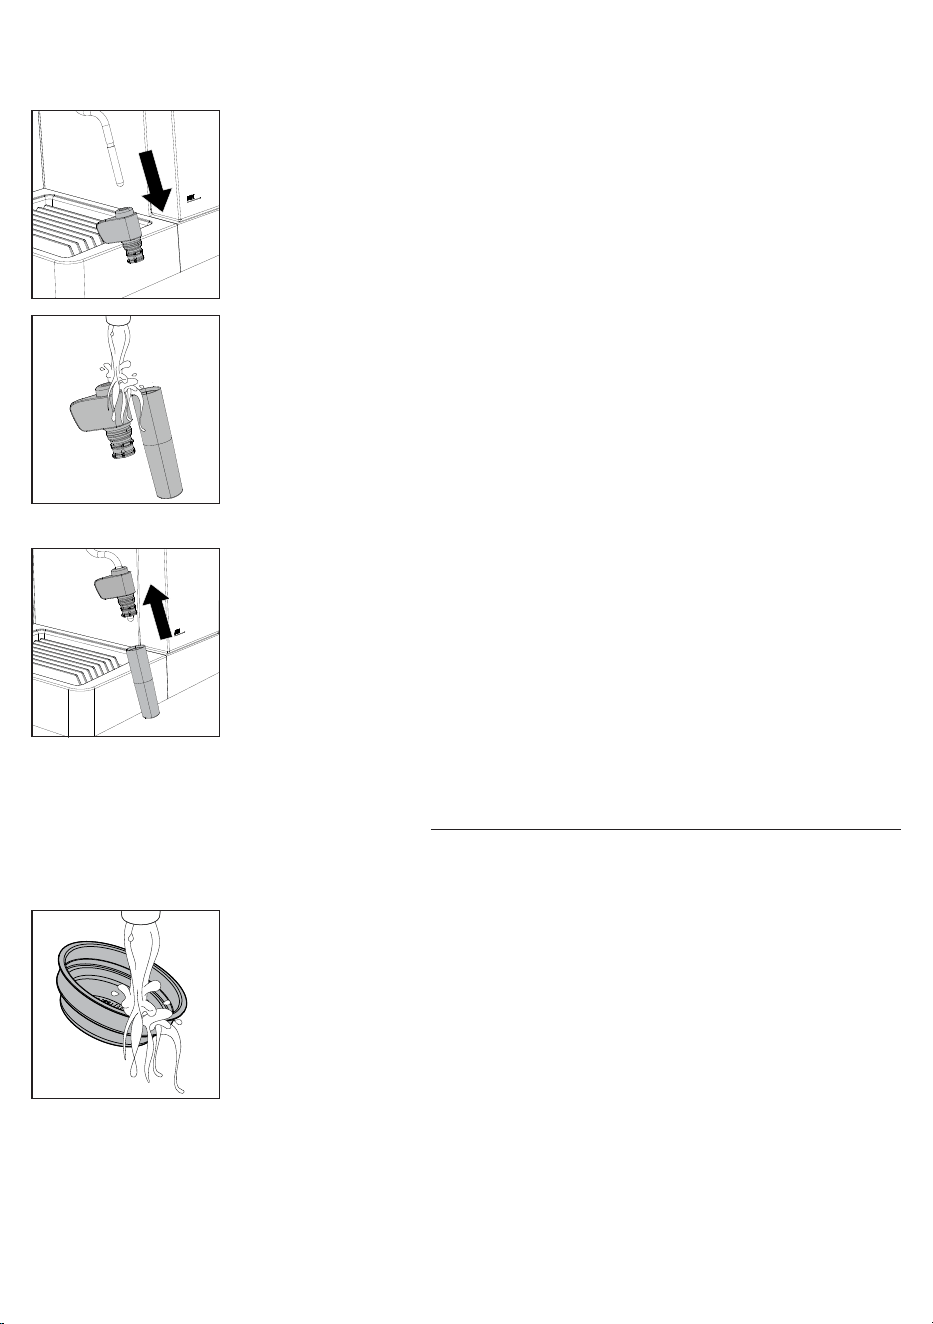
Pulizia del pannarello
Giornalmente:
1 Rimuovete la parte inferiore del pannarello (15), sciacquatelo con acqua
corrente e rimontatelo.
2 Aprite per qualche istante la manopola vapore/acqua calda in senso antiorario
per eliminare eventuali residui di latte e richiudete la manopola.
18
Italiano
2 Risciacquateli con acqua corrente.
3 Pulite il tubo vapore con un panno umido.
4 Rimontate la parte superiore e inferiore del pannarello sul tubo vapore.
Pulizia del portaltro, dei ltri e del sistema per cialde
“Pod system”
I ltri devono essere mantenuti puliti per garantire un perfetto risultato.
Quotidianamente:
1 Togliete il ltro dal portaltro e lavate entrambi con acqua tiepida.
Settimanalmente:
1 Rimuovete la parte inferiore del pannarello (15) e slate la parte superiore
(16).
19
Italiano
2 Lavate se utilizzato anche il sistema per cialde “pod system” sempre con
acqua tiepida.
10 min.
3 Nel caso in cui si notasse un malfunzionamento nell’erogazione del caffè,
immergete i ltri in acqua bollente per 10 minuti e successivamente
sciacquateli con acqua corrente.
4 Per una migliore pulizia dei ltri, consigliamo l’acquisto delle pastiglie GAGGIA
per la pulizia appositamente realizzate per mantenere in perfetta ecienza la
vostra macchina.
Attenzione: La rimozione del ltro deve avvenire solo a raffreddamento completo
del portaltro per evitare scottature.
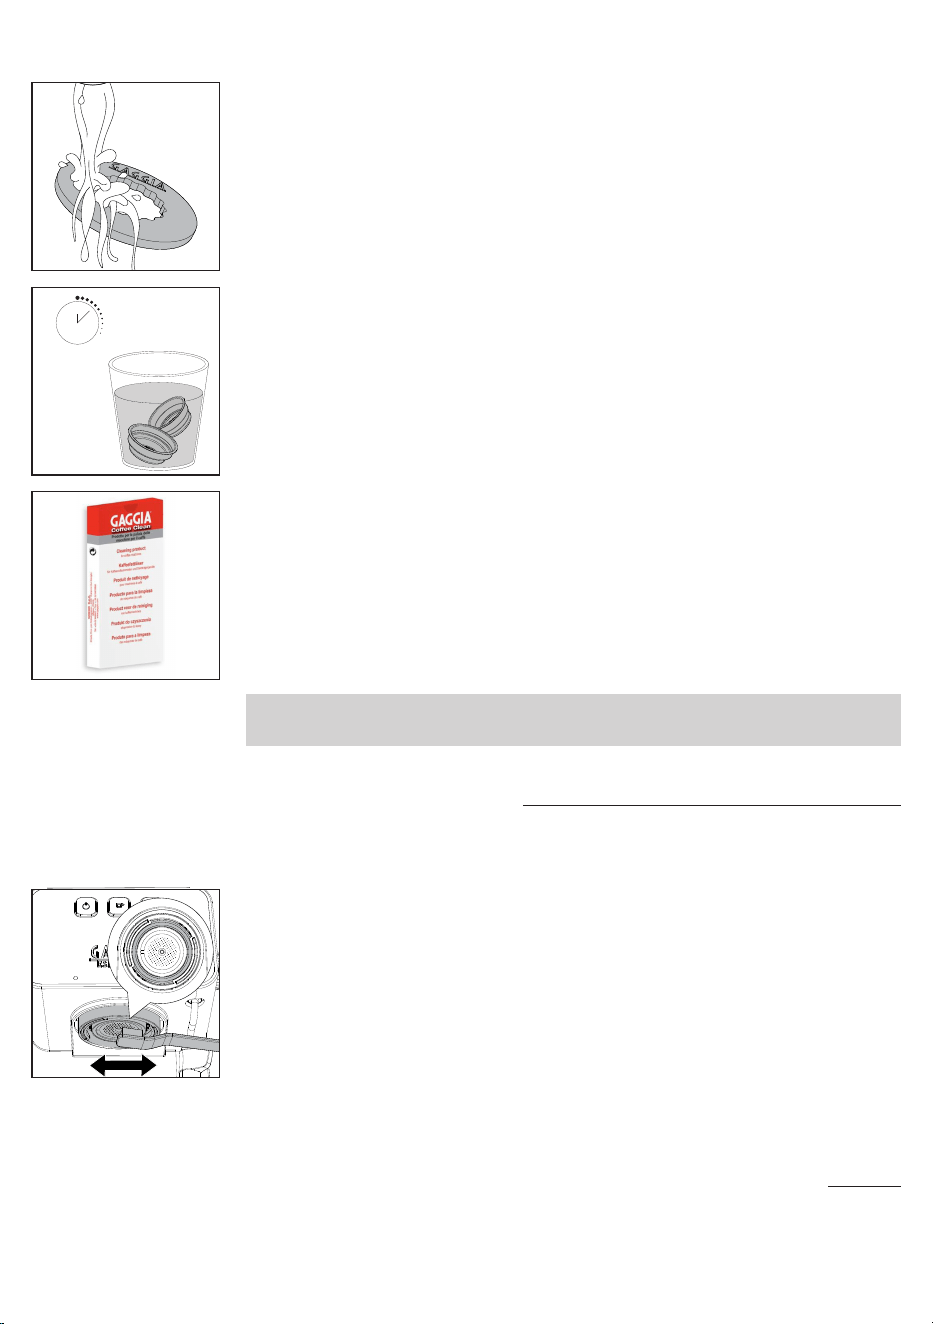
Pulizia della doccetta
Dopo ogni erogazione caffè:
1 Rimuovete il portaltro dal gruppo ruotandolo da destra verso sinistra.
2 Eliminate eventuali residui di fondi caffè dalla guarnizione e dalla doccetta
utilizzando uno spazzolino.
3 Effettuate una pulizia con acqua calda, premendo il tasto caffè ed erogando
una tazza di acqua.
Pulizia della griglia e della vasca raccogligocce
Estraete la vasca raccogligocce (17) e la griglia se presente (18) e lavatele con
acqua corrente. Non usate prodotti abrasivi.
20
Italiano
Decalcicazione
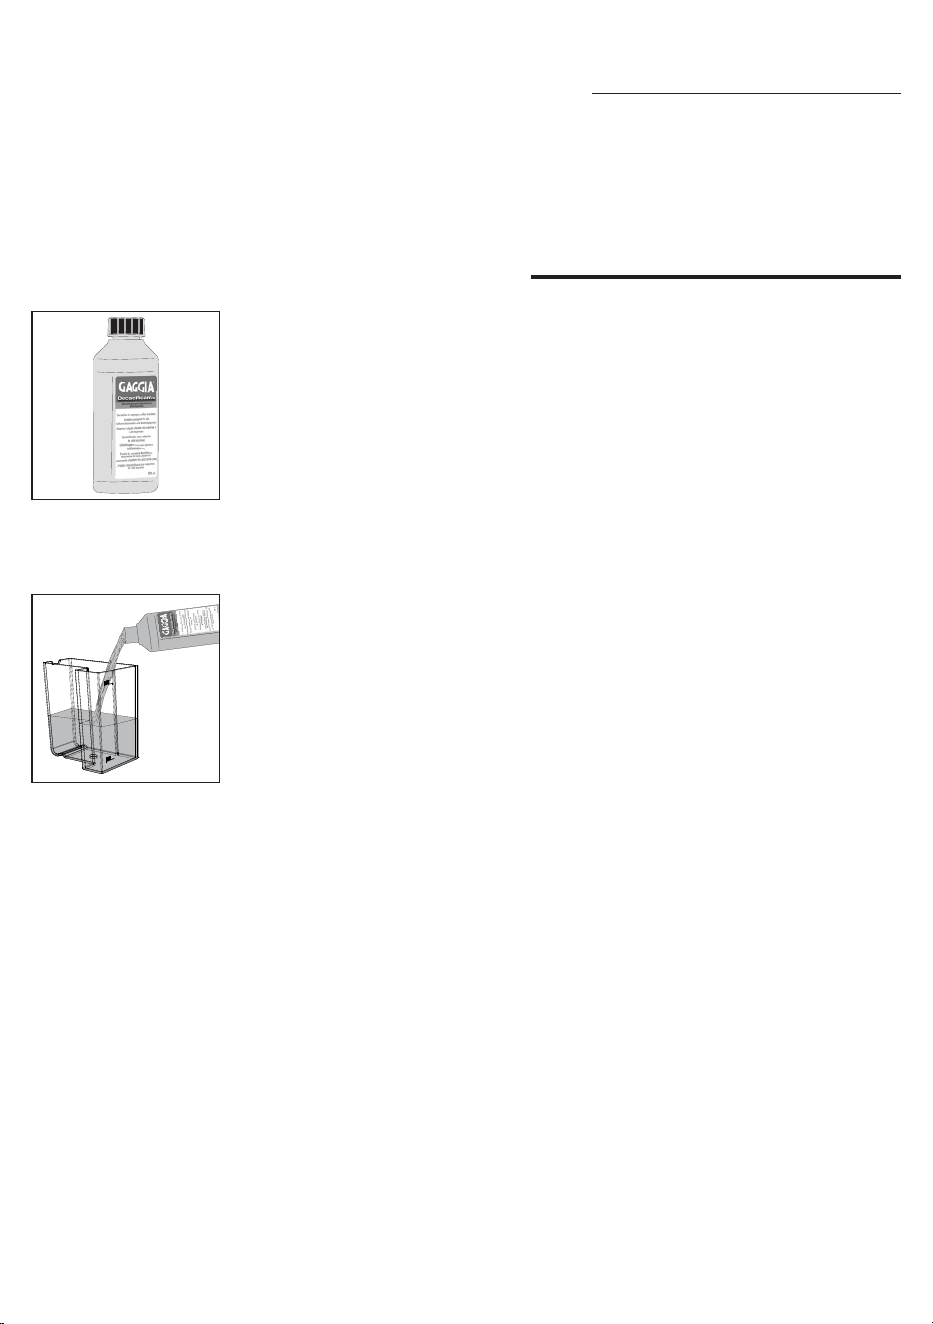
Quando il tasto di accensione/spegnimento diventa arancione è necessario
eseguire la decalcicazione. Utilizzate esclusivamente la soluzione decalcicante
Gaggia che è stata progettata per garantire prestazioni ottimali della macchina.
L'uso di altri prodotti potrebbe danneggiare la macchina e lasciare residui
nell'acqua. La mancata decalcicazione della macchina invaliderà la garanzia.
1 Disattivate la funzione MEMO se presente e rimuovete il portaltro dal gruppo
erogatore (20).
2 Rimuovete e svuotate il serbatoio dell’acqua.
3 Versate METÀ del contenuto della bottiglia di decalcicante concentrato
Gaggia nel serbatoio dell’acqua e riempitelo con acqua no al livello MAX.
4 Rimuovete il pannarello (8) se installato sul tubo vapore.
5 Accendete la macchina premendo il tasto di accensione/spegnimento.
6 Premete il tasto caffè ed erogate dal gruppo erogatore 1 tazza (
circa 150 ml
)
di acqua.
7 Aprite la manopola vapore/acqua calda ed erogate 1 tazza di acqua (
circa 150
ml
) anche dal tubo vapore.
8 Spegnete la macchina premendo il tasto di accensione/spegnimento.
9 Lasciate agire il decalcicante circa 15-20 minuti con la macchina spenta.
10 Riaccendete la macchina premendo il tasto di accensione/spegnimento.
11 Erogate dal gruppo erogatore 1 tazza (
circa 150 ml
) di acqua ed un’altra tazza
di acqua (
circa 150 ml
) anche dal tubo vapore.
12 Successivamente spegnete la macchina premendo il tasto di accensione/
spegnimento e lasciatela spenta per 3 minuti.
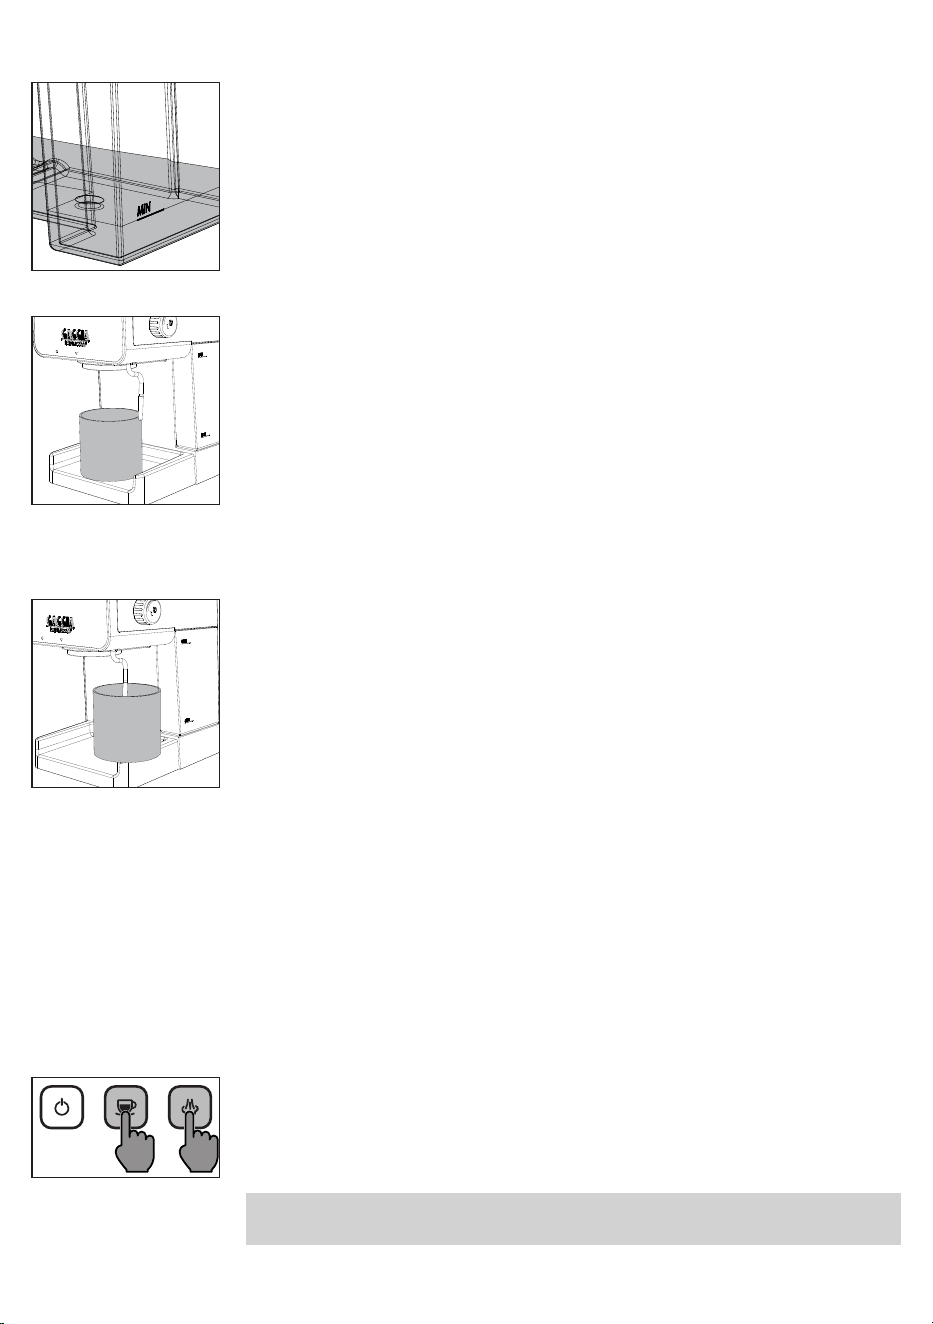
Pulizia del serbatoio acqua
1 Rimuovete il serbatoio acqua (9) e lavatelo con acqua corrente.
2 Reinserite il serbatoio assicurandovi che i tubi in silicone (6) siano all’interno
del serbatoio e non siano né attorcigliati né bloccati.
21
Italiano
13 Ripetete le operazioni descritte dal punto 10 no a raggiungere il livello MIN
del serbatoio acqua.
14 Risciacquate il serbatoio con acqua fresca e riempitelo no al livello MAX.
15 Inserite un contenitore capiente sotto al gruppo erogatore.
16 Accendete la macchina premendo il tasto di accensione/spegnimento.
17 Premete il tasto caffè ed erogate acqua dal gruppo erogatore no a quando
l’erogazione si ferma automaticamente circa a metà del serbatoio acqua.
18 Posizionate un contenitore capiente sotto al tubo vapore.
19 Aprite la manopola vapore/acqua calda ruotandola in senso antiorario ed
erogate dal tubo vapore l’acqua rimasta nel serbatoio no a raggiungere il
livello MIN.
20 Per fermare l’erogazione chiudete la manopola vapore/acqua calda
ruotandola in senso orario.
21 Riempite il serbatoio no al livello MAX erogate tutta l’acqua dal gruppo
erogatore no a raggiungere il livello MIN.
22 Ripetete l’operazione erogando un serbatoio completo anche dal tubo vapore.
23 Il ciclo di decalcicazione è così concluso.
24 Inserite il portaltro nel gruppo erogatore dopo averlo sciacquato con acqua
corrente e rimontate il pannarello.
25 Tenete premuti i tasti caffè e vapore per circa 5 secondi, il tasto di
accensione/spegnimento lampeggerà un istante e la macchina sarà
nuovamente pronta ad erogare caffè resettando il led arancione.
Nota: se necessario effettuate il caricamento del circuito come descritto nel
paragrafo corrispondente.

22
Italiano
Risoluzione dei problemi
Questo capitolo riassume i problemi più comuni che potreste riscontrare con la
macchina. Se non riuscite a risolvere il problema con le informazioni riportate
sotto, visitate il sito www.gaggia.com o www.gaggia.it. per un elenco di domande
frequenti o contattate il Centro assistenza clienti o distributori del vostro Paese.
Problema Causa Soluzione
La macchina non si
accende.
La macchina non è collegata. Vericate che il cavo di alimentazione sia
inserito correttamente.
La pompa è molto
rumorosa.
Manca acqua nel serbatoio. Riempite il serbatoio e ricaricate il circuito
come descritto nel capitolo corrispondente.
Non si forma la
schiuma nel latte.
Il tipo di latte utilizzato non è adatto
a produrre schiuma.
Secondo il tipo di latte, la quantità e la qualità
di schiuma prodotte sono diverse (
Capitolo
"Emulsione del latte per la preparazione di un
cappuccino"
).
Pannarello sporco. Pulite il pannarello (
Capitolo "Pulizia del
pannarello"
).
Manca acqua nel serbatoio. Riempite il serbatoio e ricaricate il circuito
come descritto nel capitolo corrispondente.
Non esce caffè dopo
aver premuto il tasto
caffè.
Portaltro otturato. Premete nuovamente il tasto caffè.
Spegnete la macchina ed attendete che si
raffreddi (
circa 1 ora
). Successivamente
rimuovete e lavate bene il portaltro. Se il
problema si presenta nuovamente contattate il
centro assistenza.
Il caffè è troppo freddo. Portaltro non inserito per il
preriscaldamento.
Preriscaldate il portaltro (
Capitolo
"Preparazione di un caffè"
).
Tazzine fredde. Preriscaldate le tazzine con acqua calda.
Il caffè fuoriesce troppo
velocemente, non si
forma crema.
Troppo poco caffè nel portaltro. Aggiungete caffè.
Macinatura troppo grossa. Usate una miscela diversa.
Pressatura troppo leggera e/o con
scanalature.
Pressate maggiormente il caffè in polvere
tramite l'apposito pressino facendo attenzione
che non si formino scanalature.
Caffè o cialde non freschi. Usate una miscela diversa o un'altra cialda.
Il caffè non fuoriesce o
fuoriesce a gocce.
Mancanza di acqua nel serbatoio. Riempite il serbatoio e ricaricate il circuito
come descritto nel capitolo corrispondente.
Macinatura troppo ne. Usate una miscela diversa.
Caffè troppo pressato nel
portaltro.
Pressate il caffè con meno forza.
Troppo caffè nel portaltro. Riducete la quantità di caffè nel portaltro.
Macchina calcicata. Decalcicate la macchina come descritto nel
capitolo corrispondente.
Filtro nel portaltro otturato. Pulite il ltro (
Capitolo "Pulizia del portaltro,
dei ltri e del sistema per cialde "Pod system""
).
23
Italiano
Problema Causa Soluzione
Il caffè fuoriesce dai
bordi.
Portaltro inserito male nel gruppo
erogazione caffè.
Inserite il portaltro come descritto nel capitolo
corrispondente.
Bordo superiore del portaltro
sporco.
Pulite il bordo del portaltro.
Troppo caffè nel portaltro. Riducete la quantità di caffè utilizzando il
misurino.
Guarnizione doccetta sporca. Pulite la guarnizione della doccetta come
descritto nel capitolo corrispondente.
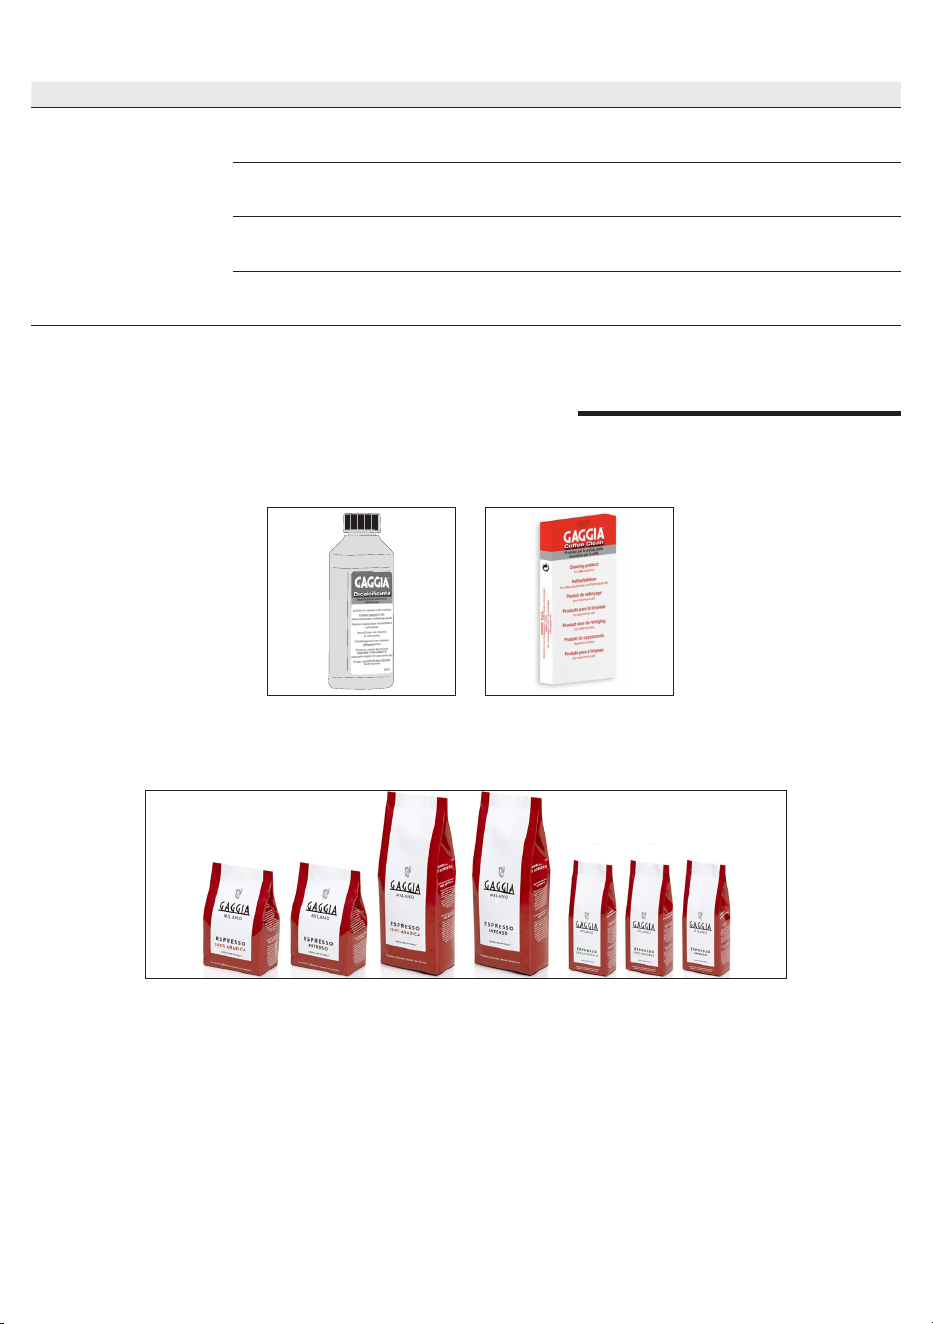
Accessori GAGGIA
Il caffè e gli accessori sono disponibili presso i centri autorizzati (
Italia
), o i
distributori del vostro paese.
Decalcicante
Gamma caffè disponibile in grani e in polvere: 100% Arabica / Intenso / Decafeinato
Pastiglie sgrassanti
24
Italiano
Dati tecnici
Tensione nominale - Potenza
nominale - Alimentazione
Vedi targhetta posta nel vano del
serbatoio acqua
Materiale corpo Termoplastico
Dimensioni 255 x 199 x 303 mm
Peso 3,7 kg
Lunghezza cavo 900 mm
Pannello comando Frontale
Dimensioni tazze
Fino a 76 mm con vasca
raccogligocce inserita, senza 102
mm
Serbatoio acqua 1,2 litri - Estraibile
Pressione pompa 15 bar
Caldaia Caldaia Inox
Dispositivi sicurezza
Termofusibile - Valvola di massima
pressione

25
English
Important safety information
This machine is equipped with safety features. Nevertheless, read and follow the safety instructions carefully
and only use the machine as described in these instructions, to avoid accidental injury or damage due to improp-
er use of the machine. Keep this safety booklet for future reference.
Warning
General
- Check if the voltage indicated on the machine corresponds to the local mains voltage before you connect
the appliance.
- Connect the machine to an earthed wall socket.
- Do not let the power cord hang over the edge of a table or worktop and do not let it touch hot surfaces.
- To avoid the danger of electric shock, never immerse the machine, mains plug or power cord in water or any
other liquid.
- Do not pour liquids on the power cord connector.
- To avoid the danger of burns, keep body parts away from hot water jets produced by the machine.
- Do not touch hot surfaces. Use handles and knobs.
- Switch off the machine with the main switch located on the back (if present) and remove the mains plug
from the wall socket:
- If a malfunction occurs.
- If you are not going to use the appliance for a long time.
- Before you clean the machine.
- Pull at the plug, not at the power cord.
- Do not touch the mains plug with wet hands.
- Do not use the machine if the mains plug, the power cord or the machine itself is damaged.
- Do not make any modifications to the machine or its power cord.
- Only have repairs carried out by a service center authorized by Gaggia to avoid a hazard.
- The machine should not be used by children younger than 8 years old.
- This machine can be used by children aged from 8 years and above and by persons with reduced physical,
sensory or mental capabilities or lack of experience and knowledge if they have been given supervision or
instruction concerning use of the machine in a safe way and if they understand the hazards involved.
- Cleaning and user maintenance shall not be made by children unless they are older than 8 and supervised.
- Keep the machine and its cord out of the reach of children aged less than 8 years.
- Children should be supervised to ensure that they do not play with the machine.
- Be carefull when you dispense hot water. Dispensing may be preceded by small jets of hot water. Wait until
the end of the dispensing cycle before you remove the hot water dispensing spout.

26
English
Caution
General
- This machine is intended for normal household use only. It is not intended for use in environments such as
staff kitchens of shops, oces, farms or other work environments.
- Always put the machine on a at and stable surface. Keep it in upright position, also during transport.
- Do not place the machine on a hotplate or directly next to a hot oven, heater or similar source of heat.
- Only put ground coffee in the lter holder. Putting coffee beans, instant coffee, unroasted coffee beans,
barley coffee or any other substance in the lter holder may cause damage to the machine. In this case
repair is not covered by warranty.
- Let the machine cool down before you insert or remove any parts. The heating surfaces may retain residual
heat after use.
- Never touch the water drain hose (
if any
) when using the machine, since it could be hot. Let it cool down
rst.
- Never ll the water tank with warm, hot or sparkling water, as this may cause damage to the water tank and
the machine.
- Never use souring pads, abrasive cleaning agents or aggressive liquids such as petrol or acetone to clean
the machine. Simply use a soft cloth dampened with water.
- Descale your machine regularly. Not doing this will make your appliance stop working properly. In this case
repair is not covered by your warranty.
- Do not keep the machine at temperatures below 0°C/32°F. Water left in the heating system may freeze and
cause damage.
- Do not leave water in the water tank when you are not going to use the machine for a long period of time.
The water can become contaminated. Use fresh water every time you use the machine.
- Never use any accessories or parts from other manufacturers or that Gaggia does not specically
recommend. If you use such accessories or parts, your warranty becomes invalid.
- Regular cleaning and maintenance prolongs the lifetime of your machine and ensures optimum quality and
taste of your coffee.
- The machine is exposed continuously to moisture, coffee and scale. Therefore it is very important
toregularly clean and maintain the machine as described in the user manual and shown on the website.
If you do not perform these cleaning and maintenance procedures, your machine eventually may stop
working. In this case repair is not covered by warranty.
- Do not clean the lter holder in the dishwasher and do not use washing-up liquid or a cleaning agent to clean
it. This may cause the lter holder to malfunction and may have a negative effect on the coffee taste.
- Do not dry the brew group with a cloth to prevent bers from collecting inside the brew group.
- Never drink the solution dispensed during the descaling process.
- Do not remove the lter holder while brewing coffee. Hot water drips may spill out during the warm-up phase
of the brew group.
- The machine shall not be placed in a cabinet when in use.
27
English
Machines with classic milk frother
Warning
- To avoid the danger of burns, be aware that dispensing may be preceded by small jets of hot water.
- Never touch the classic milk frother with bare hands, as it may become very hot. Use the appropriate
protective handle only.
Caution
- After frothing milk, quickly clean the classic milk frother by dispensing a small quantity of hot water into a
container. Then remove the external part of the classic milk frother and wash it with lukewarm water.
Electromagnetic elds (
EMF
)
This machine complies with all applicable standards and regulations regarding exposure to electromagnetic
elds.
Recycling
- This symbol means that this product shall not be disposed of with normal household waste
(
2012/19/UE
).
- Follow your country’s rules for the separate collection of electrical and electronic products.
Correct disposal helps prevent negative consequences for the environment and human health.
28
English
LED indicators
Legend
White
Steady
White
Flashing
Orange
Steady
Orange
Flashing
Off
LED indicator Message LED indicator Message
Machine ON Steam ready to use
Descaling needed Steam heating up
Descaling reset Cooling down steam needed
Machine ready to use Alarm “Close the steam knob”
Coffee/hot water heating up
LED indicator Message
Successful MEMO activation and
storage sequence
Successful MEMO disabling sequence
Espresso Style Espresso De Luxe Espresso Evolution

29
English
Congratulations on your purchase of Gaggia Espresso!
Preparing a perfect espresso is a fine art that requires a bit of patience, some
precision and a good dose of practice. This Gaggia espresso machine is the first
step into becoming a barista at home, for those who aren’t experts but would like
to enjoy a good espresso by learning the barista rituals made of small gestures in
an easy way.
This user manual provides all the information needed to install, use, clean and
descale your machine. Before using it for the first time, read the safety section
carefully and keep it for future reference.

30
English
Contents
LED indicators ........................................................................................................................................................................................................................................................................................................................................................................................................................................................................................................................................................................ ........................................................................................................................................................................................................................................................................................................................................................................................................................................................................................................................................................................28
Machine overview ..........................................................................................................................................................................................................................................................................................................................................................................................................................................................................................................................................................................................................................................................................................................................................................................................................................................................................................................................................................................................................................................................................................31
Dishwasher safe components ..................................................................................................................................................................................................................................................................................................................................................................................................................................................................................................................................................................................................................................................................................................................................................................................................................................................................................31
Introduction .............................................................................................................................................................................................................................................................................................................................................................................................................................................................................................................................................................................................. ..............................................................................................................................................................................................................................................................................................................................................................................................................................................................................................................................................................................................32
Filters supplied .................................................................................................................................................................................................................................................................................................................................................................................................................................................................................................................................................................. ..................................................................................................................................................................................................................................................................................................................................................................................................................................................................................................................................................................32
2-Cup Crema Perfetta lter ......................................................................................................................................................................................................................................................................................................................................................................................................................................................................................................32
1-Cup Crema Perfetta lter and single-dose pod + “Pod System” .........................................................................................................................................................................................................................................................32
First installation ............................................................................................................................................................................................................................................................................................................................................................................................................................................................................................................................................................ ............................................................................................................................................................................................................................................................................................................................................................................................................................................................................................................................................................33
Circuit priming ....................................................................................................................................................................................................................................................................................................................................................................................................................................................................................................................................................................... .......................................................................................................................................................................................................................................................................................................................................................................................................................................................................................................................................................................33
How to insert and remove the lter holder ................................................................................................................................................................................................................................................................................................................................... ...................................................................................................................................................................................................................................................................................................................................34
Upon machine rst operation or after a period of inactivity of more than 2 wks .............. ..............34
Preparing a coee .......................................................................................................................................................................................................................................................................................................................................................................................................................................................................................................................................... ..........................................................................................................................................................................................................................................................................................................................................................................................................................................................................................................................................35
With pre-ground coee ................................................................................................................................................................................................................................................................................................................................................................................................................................................................................................................................35
Using coee pods ...............................................................................................................................................................................................................................................................................................................................................................................................................................................................................................................................................................36
Memo function ....................................................................................................................................................................................................................................................................................................................................................................................................................................................................................................................................................................... .......................................................................................................................................................................................................................................................................................................................................................................................................................................................................................................................................................................36
How to save your espresso .....................................................................................................................................................................................................................................................................................................................................................................................................................................................................................................36
How to disable the Memo function .........................................................................................................................................................................................................................................................................................................................................................................................................................................................37
Frothing milk to prepare a cappuccino ................................................................................................................................................................................................................................................................................................................................................................ ................................................................................................................................................................................................................................................................................................................................................................37
How to lower the boiler temperature .................................................................................................................................................................................................................................................................................................................................................................................... ....................................................................................................................................................................................................................................................................................................................................................................................38
Hot water dispensing ................................................................................................................................................................................................................................................................................................................................................................................................................................................................................................................. .................................................................................................................................................................................................................................................................................................................................................................................................................................................................................................................39
Energy saving ........................................................................................................................................................................................................................................................................................................................................................................................................................................................................................................................................................................................................................................................................................................................................................................................................................................................................................................................................................................................................................................................................................................................................................39
Cleaning and maintenance ......................................................................................................................................................................................................................................................................................................................................................................................................................................................................................................................................................................................................................................................................................................................................................................................................................................................................................................................................39
Cleaning the Pannarello ........................................................................................................................................................................................................................................................................................................................................................................................................................................................................................................................39
Cleaning the lter holder, lters and the “Pod System” .............................................................................................................................................................................................................................................................................................................................40
Cleaning the screen ..................................................................................................................................................................................................................................................................................................................................................................................................................................................................................................................................................41
Cleaning the grid and drip tray .................................................................................................................................................................................................................................................................................................................................................................................................................................................................................41
Cleaning the water tank ...........................................................................................................................................................................................................................................................................................................................................................................................................................................................................................................................42
Descaling ....................................................................................................................................................................................................................................................................................................................................................................................................................................................................................................................................................................................................................................................................................................................................................................................................................................................................................................................................................................................................................................................................................................................................................................................................................................42
Troubleshooting .......................................................................................................................................................................................................................................................................................................................................................................................................................................................................................................................................................... ..........................................................................................................................................................................................................................................................................................................................................................................................................................................................................................................................................................44
GAGGIA accessories .................................................................................................................................................................................................................................................................................................................................................................................................................................................................................................................. ..................................................................................................................................................................................................................................................................................................................................................................................................................................................................................................................45
Technical specications ........................................................................................................................................................................................................................................................................................................................................................................................................................................................................................ ........................................................................................................................................................................................................................................................................................................................................................................................................................................................................................46
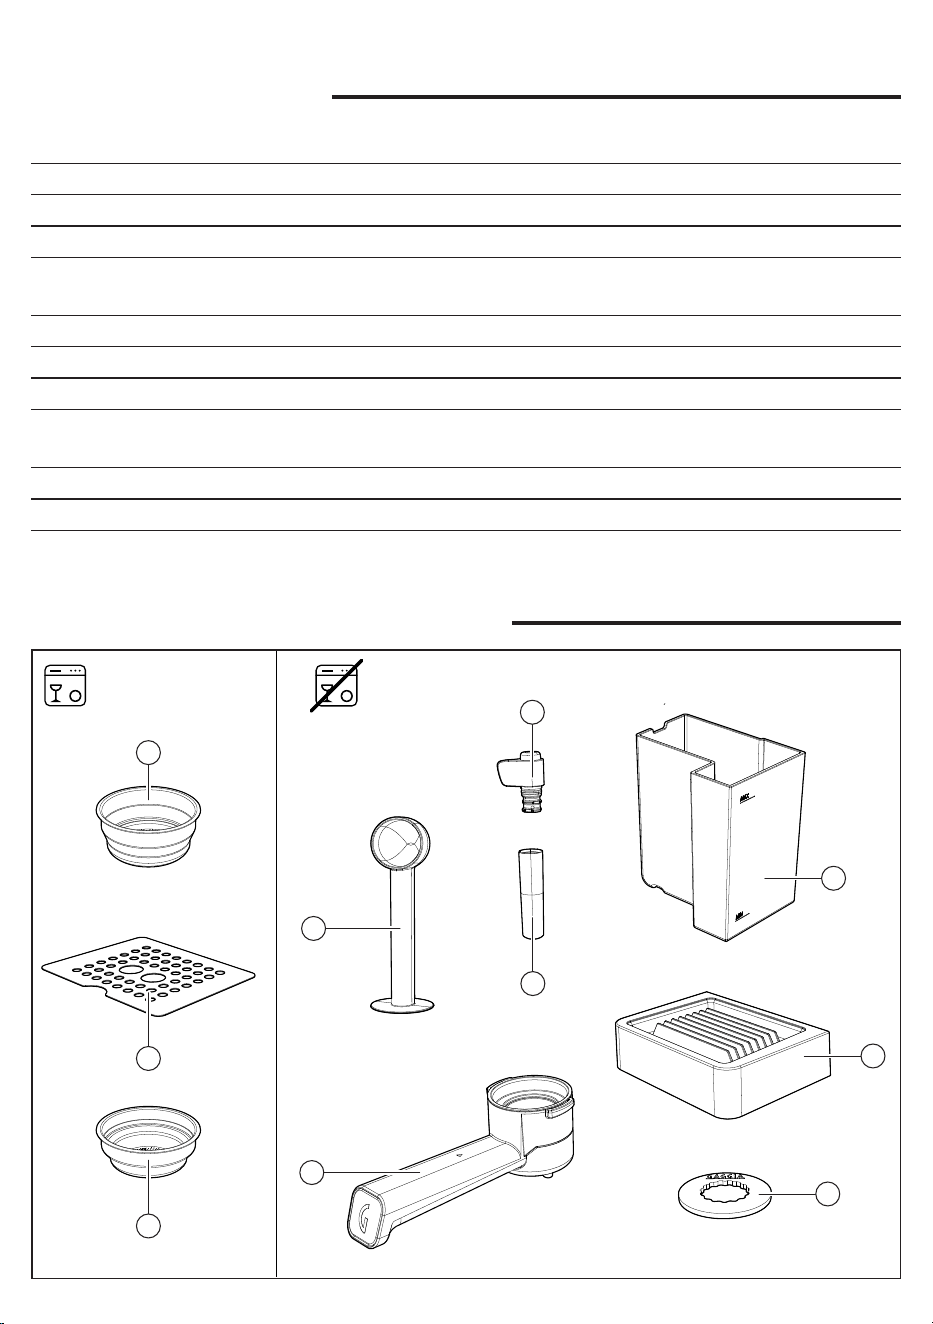
31
English
Machine overview
1 ON/OFF button 11 Coffee scoop/tamper spoon
2 COFFEE button 12 2 cups “Crema perfetta” lter
3 STEAM button 13 1 cup “Crema perfetta” lter/single dose pod
4
Stainless steel cup plate
Espresso De Luxe ed Espresso Evolution
14 Pod System
5 Steam/hot water knob 15 Classic Pannarello lower part
6 Water tank silicon hoses 16 Classic Pannarello upper part
7 Steam/hot water tube 17 Drip tray
8 Classic Pannarello 18
Drip tray grid
Espresso De Luxe ed Espresso Evolution
9 Water tank 19 Filter holder
10 Power cord 20 Brew group
Dishwasher safe components
9
14
19
11
15
13
12
16
18
17

32
English
Introduction
A perfect espresso with the distinctive crema on top depends on many factors
including:
• the type of coffee used. There are different qualities of coffee available on the
market, but the best beans for a good espresso are the darker roasts which
release a richer aroma and a more intense avour.
• the coarseness of the pre-ground coffee. Make sure you purchase the desired
blend with a grind setting that is suitable for use with espresso machines.
You can also freshly grind right before you brew using a Gaggia brand coffee
grinder.
• the amount. Using just the right dose of pre-ground coffee is key to avoiding
watery coffee (
not enough coffee
) or one that is too bitter with a burnt taste
(
too much coffee
).
• the pressure applied to compress the coffee grounds. Be sure to tamp the
coffee evenly and smoothly. Keep the surface parallel to the lter holder rim so
as to avoid gaps where the water can seep through without evenly wetting the
whole pod, thus only partially extracting the coffee aromas.
• pre-brewing. The machine uses factory set pre-brewing that favours the best
possible extraction of coffee aromas. Hot water soaks the puck for a few
seconds before brewing.
• temperature. Which is kept constant to ensure the best extraction every time.
Filters supplied
2-Cup Crema Perfetta lter
The Two Cup Crema Perfetta lter is already tted to the lter holder and allows
even beginners to prepare an excellent espresso with crema.
1-Cup Crema Perfetta lter and single-dose pod +
“Pod System”
This lter can be used to brew 1 cup of espresso with pre-ground coffee or by
using a single-dose pod with our exclusive “Pod system”
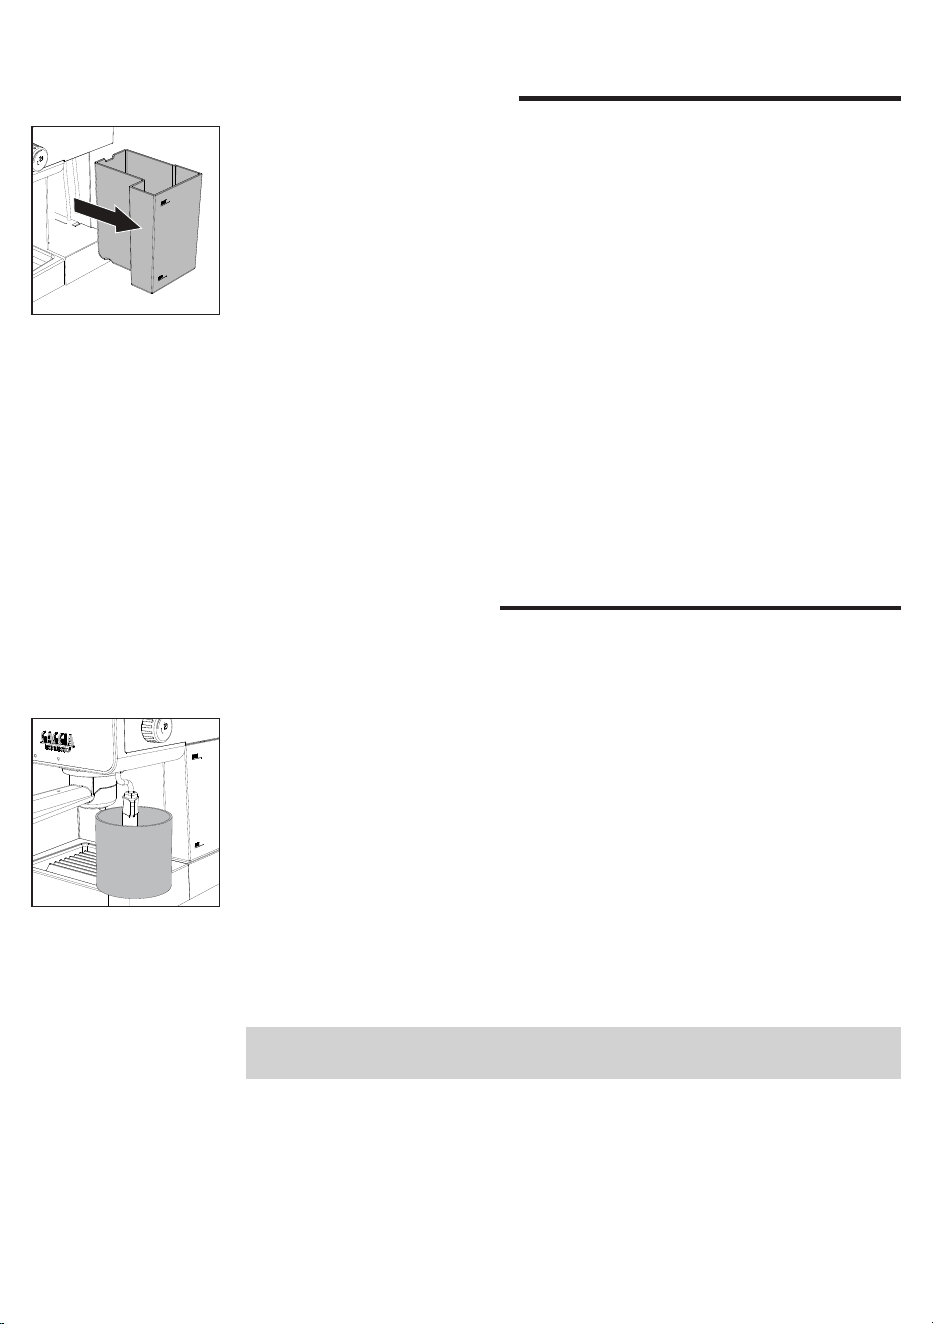
33
English
First installation
1 Remove the water tank (9), rinse it and ll it with cold water up to the MAX
level.
Circuit priming
The circuit must be primed upon machine rst operation or when the water tank is
empty:
1 Fill the water tank with cold water up to the MAX level.
2 Place a container under the Pannarello
3 Turn the steam/hot water knob counter clockwise and dispense water from
the Pannarello (8) until a steady jet comes out.
4 To nish dispensing, turn the steam/hot water knob clockwise and empty the
container.
Note: the machine does not signal a shortage of water in the tank; if the pump is
very noisy, rell the tank and prime the circuit.
2 Insert the power cord plug into a wall socket with suitable power voltage.
3 Press the on/off button (1), which will start ashing.
4 Place a container under the Pannarello (8), turn the steam/hot water knob (5)
counter clockwise and dispense hot water until all three on/off (1), coffee (2)
and steam (3) buttons ash simultaneously, signalling for you to turn the knob
off again.
5 The on/off button will come on steady and the coffee button (2) will start
ashing, turning steady once the factory set temperature is reached.
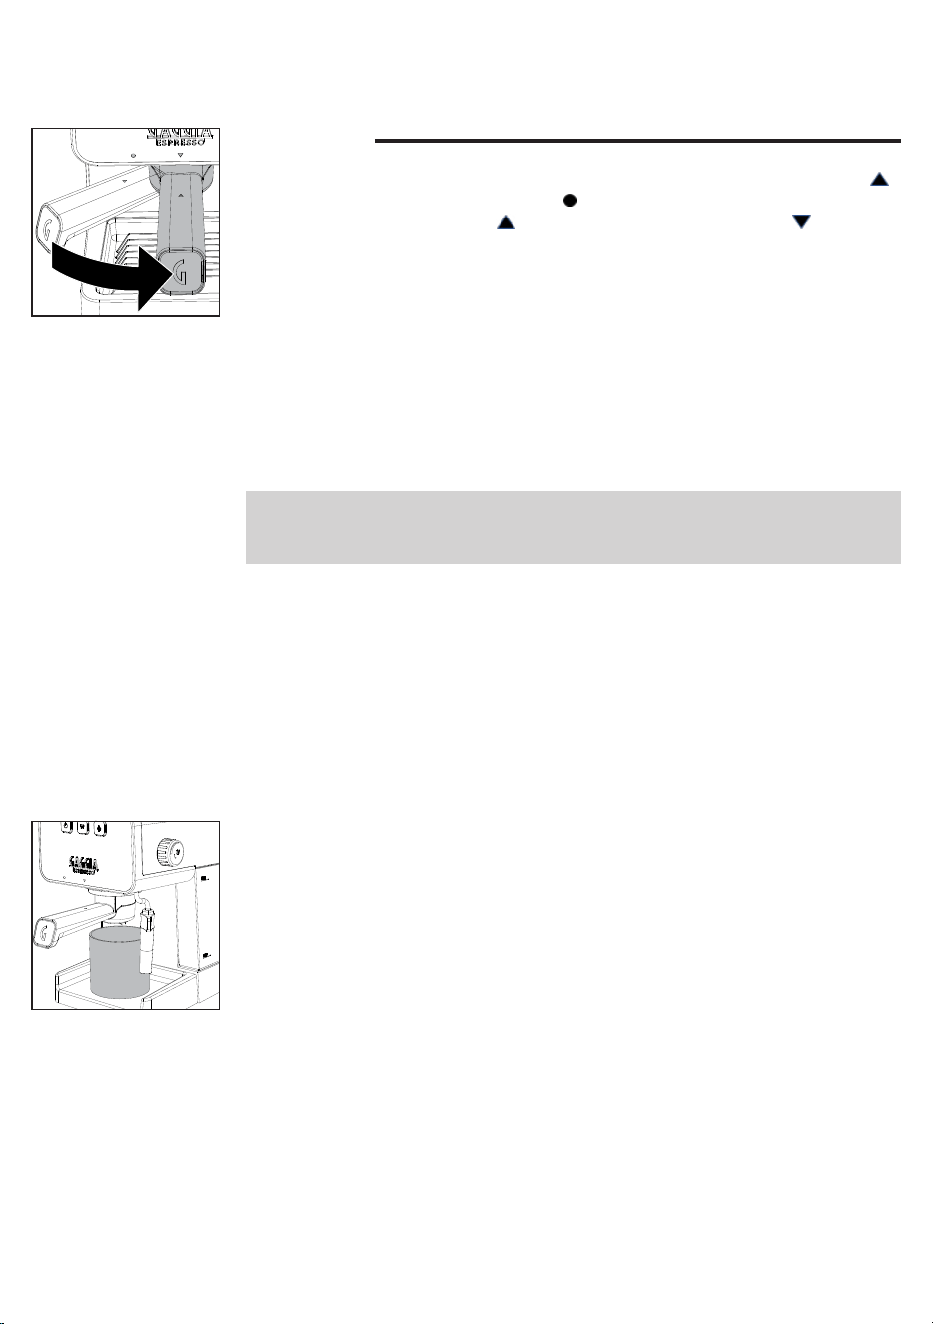
34
English
Upon machine rst operation or after a
period of inactivity of more than 2 weeks
Note: water dispensed during this process must be thrown away and is not
suitable for food use. If the container lls up during the cycle, stop dispensing
water and empty the container before resuming the operation.
1 Remove the drip tray (17) and place a container underneath the Pannarello
(8).
2 Remove the water tank (9), rinse it and ll it with cold water up to the MAX
level.
3 Turn the steam/hot water knob (5) counter clockwise and dispense hot water
from the Pannarello until the MIN level of the water tank is reached.
4 Turn the steam/hot water knob clockwise to nish dispensing.
5 Fill the water tank up to the MAX level again.
6 Put the lter holder (19) into the brew group (20) by turning it from left to right
as described in the relevant chapter.
7 Place a suitable container under the lter holder.
8 Press the coffee button (2) and dispense water until the MIN level of the water
tank is reached.
9 Press the coffee button again to nish dispensing and then empty the
container.
10 Put the drip tray back in place (17).
11 Remove the lter holder by turning it from right to left and rinse it with running
water.
12 Fill the water tank up to the MAX level.
13 The machine is now ready for use.
How to insert and remove the lter
holder
Insert the lter holder (19) into the brew group from below, aligning the triangle
on the lter holder handle with the icon on the housing, turning from left to right
until the triangle on the handle is aligned with that on the housing or slightly
shifted rightwards.
Turn the lter holder in the opposite direction, from right to left, to remove it.
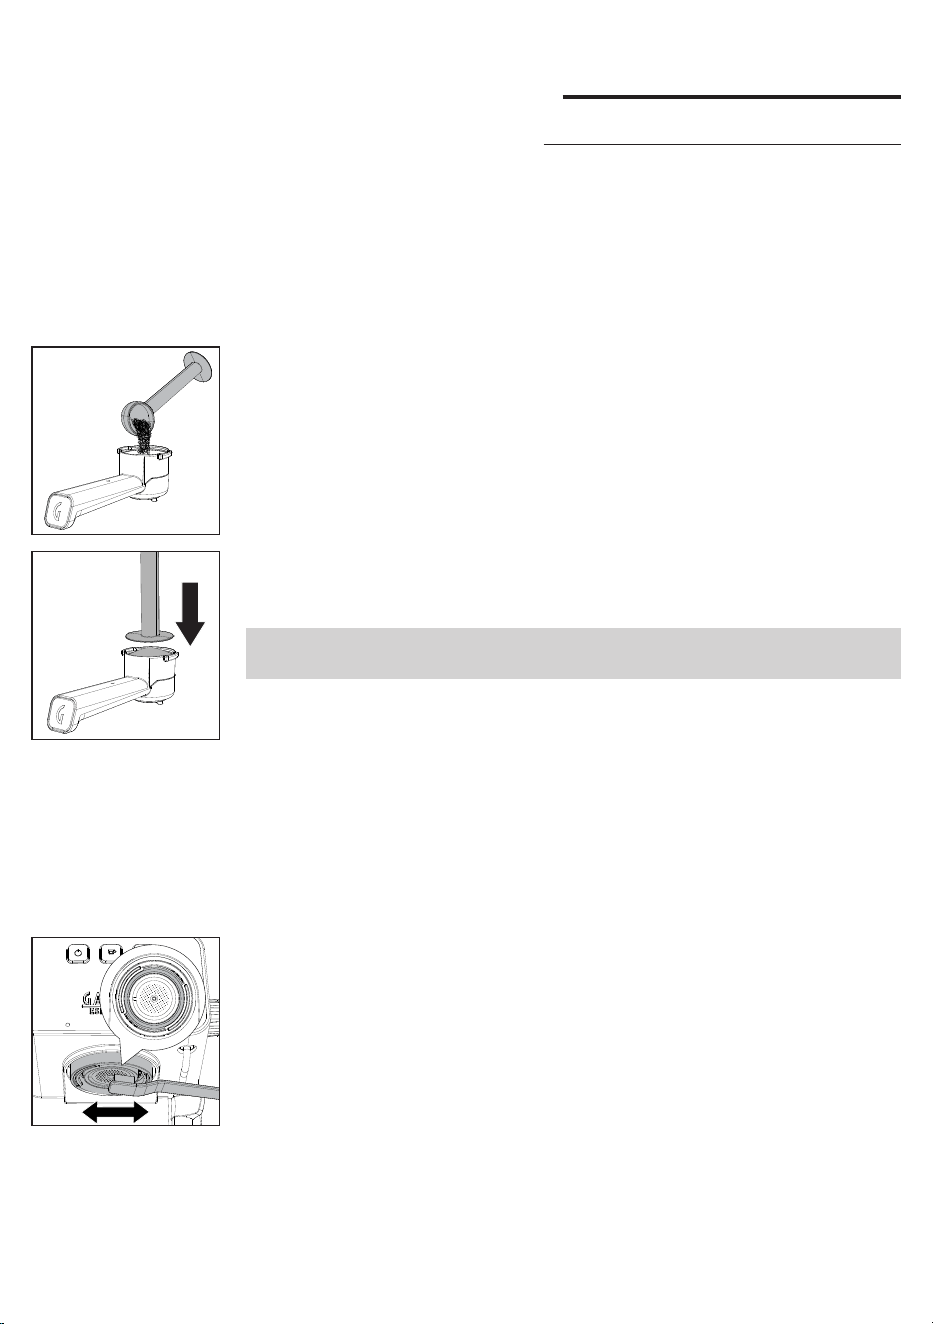
35
English
Preparing a coee
With pre-ground coee
The lter holder ts a lter for 1 (13) or 2 cups (12).
You need to preheat the lter holder before brewing the rst coffee:
1 Insert the lter holder (19) with the lter for 1 or 2 cups into the brew group
(20).
2 Place a cup beneath the lter holder and press the coffee button (2) when it is
on steady to dispense a cup of water (
about 150ml
).
3 Remove the lter holder and wipe away any traces of water.
4 Fill the lter holder with 1 measuring scoop of pre-ground coffee for a single
shot or with 2 level measuring scoops for a double shot, then lightly tap the
lter holder to even out the coffee ground powder.
5 Tamp the coffee using the Tamper supplied. Tamping should be evenly
distributed and the coffee surface perfectly smooth without ridges, running
parallel to the lter holder rim.
Note: the size and shape of the tamper has been specically designed to get the
best results with both 1 and 2 cup lters
6 Wipe any exceeding ground coffee from the lter holder rim.
7 Insert the lter holder correctly (
as described in the relevant Chapter
).
8 Place 1 or 2 cups under the lter holder.
9 Wait for the coffee button to come on steady before pressing it to start
brewing.
10 Once you have the desired quantity, press the coffee button again to stop
brewing.
11 When brewing is over, remove the lter holder and empty the puck from the
lter, as well as any residue from both gasket and screen.
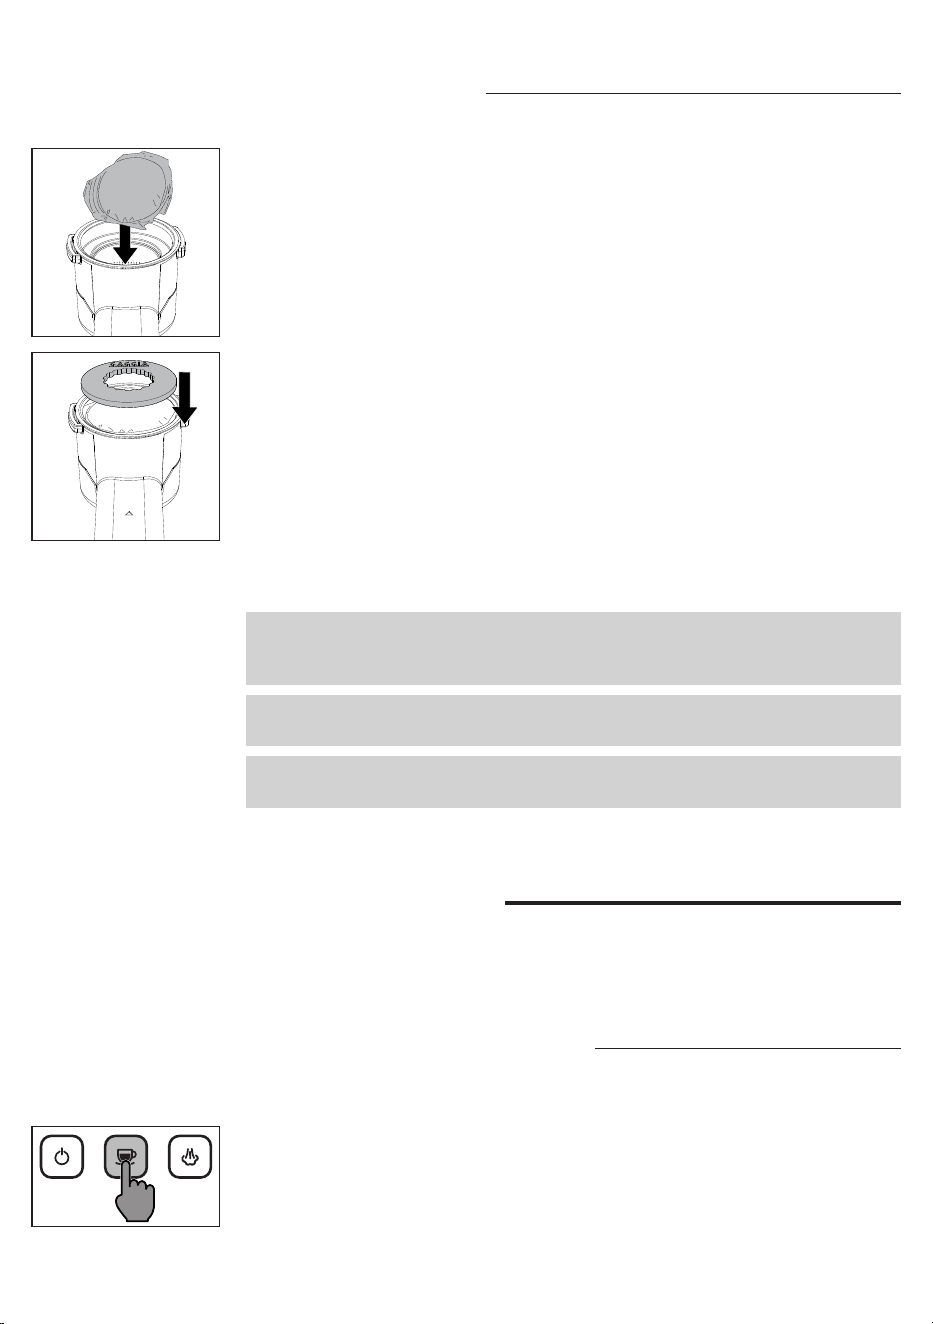
36
English
Using coee pods
1 Use the special pod lter (13) to prepare your coffee.
2 Place the pod into the lter and make sure that the paper of the pod does not
stick out of the lter holder.
3 Place the “Pod System” (14) on to the pod.
4 Follow the same instructions for preparing coffee using pre-ground coffee
from point 7.
Note: wait about 10 seconds before removing the lter holder. Remove it slowly
and carefully by turning it leftwards. When using pre-ground coffee, be careful not
to scald yourself with any water left on top of the coffee puck.
Note: if a small quantity of water remains in the lter holder, this is considered
absolutely normal and is due to the lter holder features.
Note: some water will continue dripping once the lter holder has been removed.
This is due to the water pressure in the system.
Memo function
This function allows you to save the brewing time of your coffee. Each time you
press the coffee button, the machine will brew the coffee amount for the previously
set time.
How to save your espresso
1 Prepare the coffee as described in the chapter "Preparing coffee using pre-
ground coffee".
2 Hold the coffee button when it comes on steady. The machine will go into
MEMO mode after a few seconds and begin brewing.
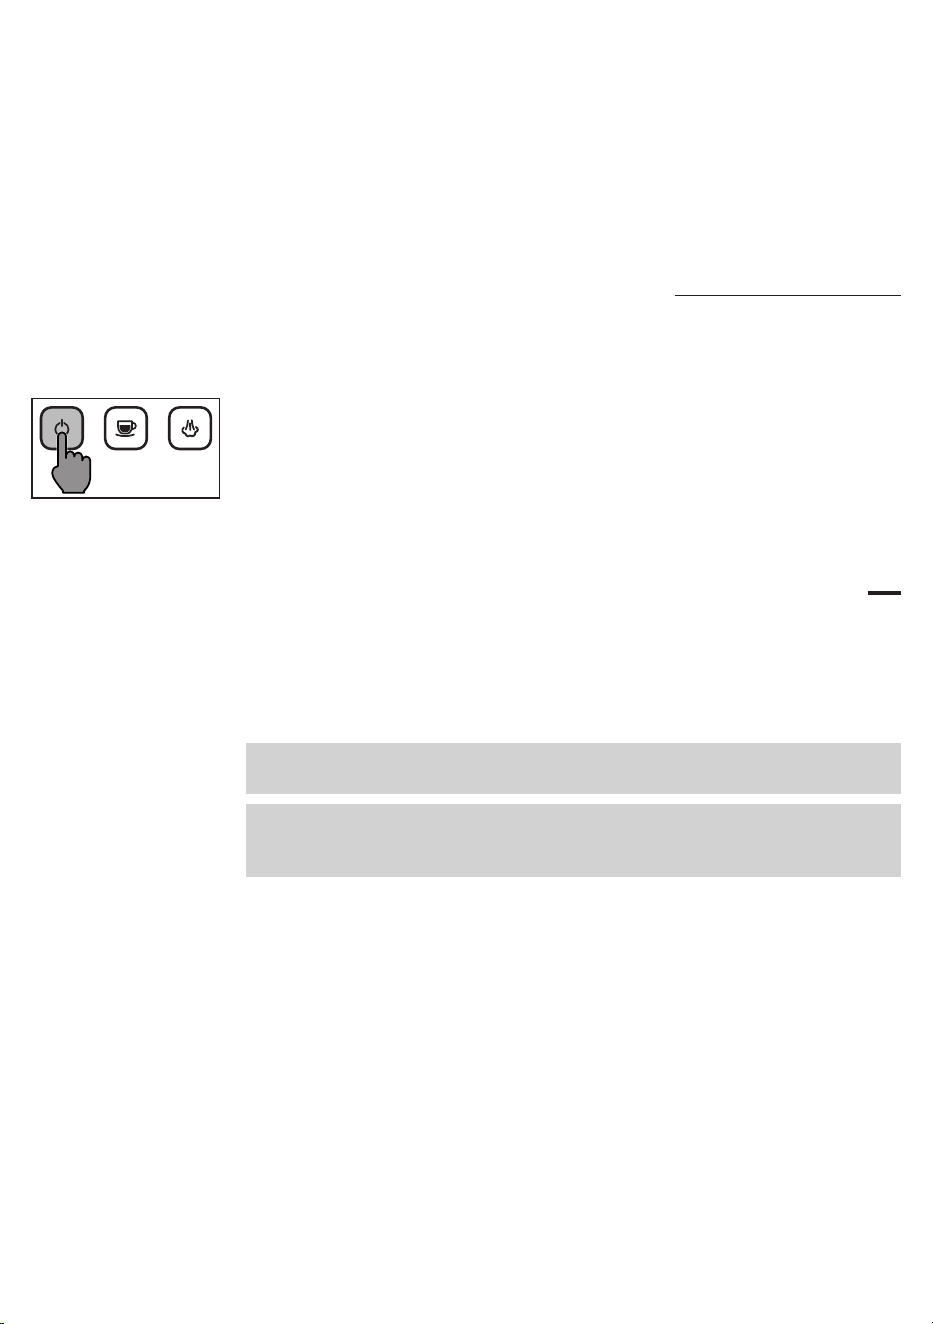
37
English
3 Once you have reached the desired quantity, release the coffee button, all the
buttons will go off and then the on/off (1), coffee (2) and steam (3) buttons
will light up twice in a row to conrm that your beverage has been saved.
4 Each time you press the coffee button, the machine will brew the coffee
amount for the set time.
5 You can edit the brewing time by repeating the above procedure which will
overwrite the previously stored time
How to disable the Memo function
Disabling the memo function means that each time you press the coffee button to
begin brewing a coffee, you will also need to press it again to end brewing.
1 Hold the on/off button for some seconds. All buttons will switch off after a
few seconds; then, the steam (3), coffee (2) and on/off (1) buttons will all light
up twice in a row to conrm that the memo function has been disabled.
Frothing milk to prepare a cappuccino
To ensure a perfect result, we recommend using cold whole milk (
at about 5°C
)
with a protein content of at least 3% and a fat content of at least 3.5%. The proteins
will make the air be incorporated into the froth, while the fats will make it thick and
rm. Good results can also be obtained using semi-skimmed cow’s milk, some
types of lactose-free milk, soy, almond as well as with oat beverages.
Warning: dispensing may be preceded by small jets of hot water. The dispensing
tube may reach high temperatures: Never touch it with bare hands
Warning: before and after dispensing some jets of hot water and/or steam may
come out from the brew group. Keep the lter holder inserted to avoid scalds and
remove it only after exiting the steam function and bringing down the temperature
1 Press the steam button (3), the coffee button will go out and the steam button
will start ashing.
2 The machine is ready to dispense steam once the steam button comes on
steady.
3 Before you start frothing the milk, purge the steam tube by turning the steam/
hot water knob for a few seconds until only steam comes out, and then turn it
off again.
4 Fill a jug with cold milk about 1/3 full.
5 Put the Pannarello into the milk.
6 Turn the steam/hot water knob counter clockwise as far as it goes to start
frothing the milk.
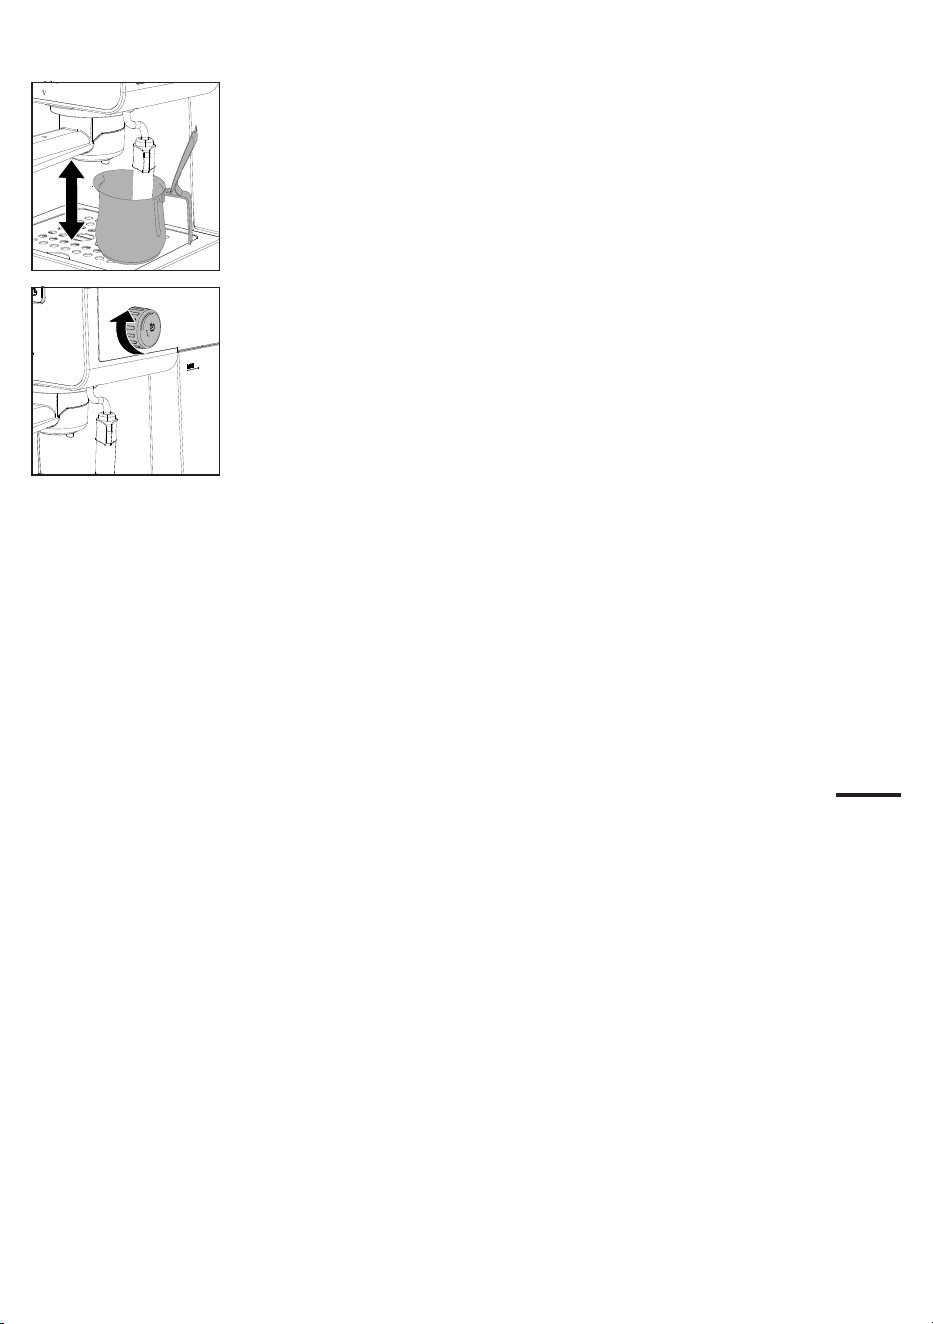
38
English
8 Once you have the desired froth, turn the steam/hot water knob clockwise to
stop frothing.
How to lower the boiler temperature
1 Place a container or a large cup under the Pannarello.
2 Turn the steam/hot water knob counter clockwise and dispense hot water
until all three on/off, coffee and steam buttons ash simultaneously, signalling
for you to turn the knob off again.
3 Turn the knob clockwise and the coffee button will come on steady.
4 The machine is now ready to brew coffee.
9 Once you have nished frothing, lightly tap the jug on a worktop and let it rest
for about 30 seconds. This makes the milk smoother.
10 Press the steam button to exit this function.
11 Both the steam button and coffee button will ash simultaneously to indicate
that the temperature is too high to brew a coffee.
12 Clean the circuit by turning the steam/hot water knob counter clockwise for a
few moments to remove any milk residue and turn it off again.
Follow the instructions in the relevant section to bring the boiler temperature down
faster.
7 Froth the milk by gently swirling the jug and moving it up and down.
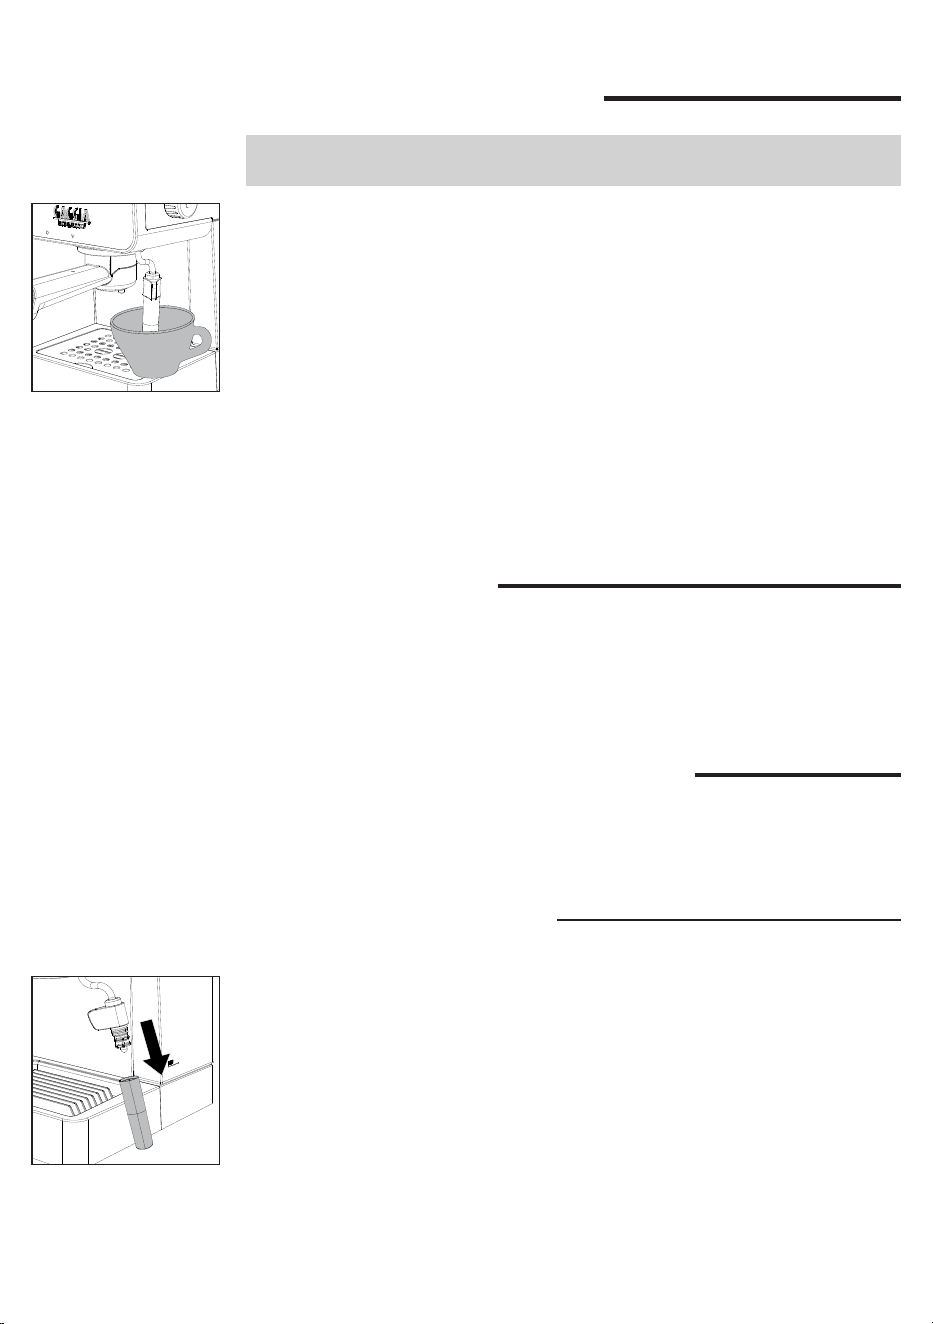
39
English
Hot water dispensing
Warning: dispensing may be preceded by small jets of hot water. The dispensing
tube may reach high temperatures: Never touch it with bare hands.
1 Place a tea cup or glass under the Pannarello.
2 Turn the steam/hot water knob counter clockwise as far as it goes to start
dispensing hot water from the Pannarello.
3 Once you have the desired quantity, turn the steam/hot water knob off by
turning it clockwise.
Energy saving
The machine is equipped with an auto power-off function for energy saving.
To restart the machine, just press the on/off button; it will come on steady and the
coffee button will start ashing until the set temperature is reached.
Cleaning and maintenance
Regular cleaning and maintenance keep the machine in perfect conditions and
ensure perfect coffee avour, a constant coffee ow and excellent milk froth for a
long period of time.
Cleaning the Pannarello
Daily:
1 Remove the lower part of the Pannarello (15), rinse it with running water and
put it back on.
2 Turn the steam/hot water knob counter clockwise for a few moments to
remove any milk residue and turn it off again.
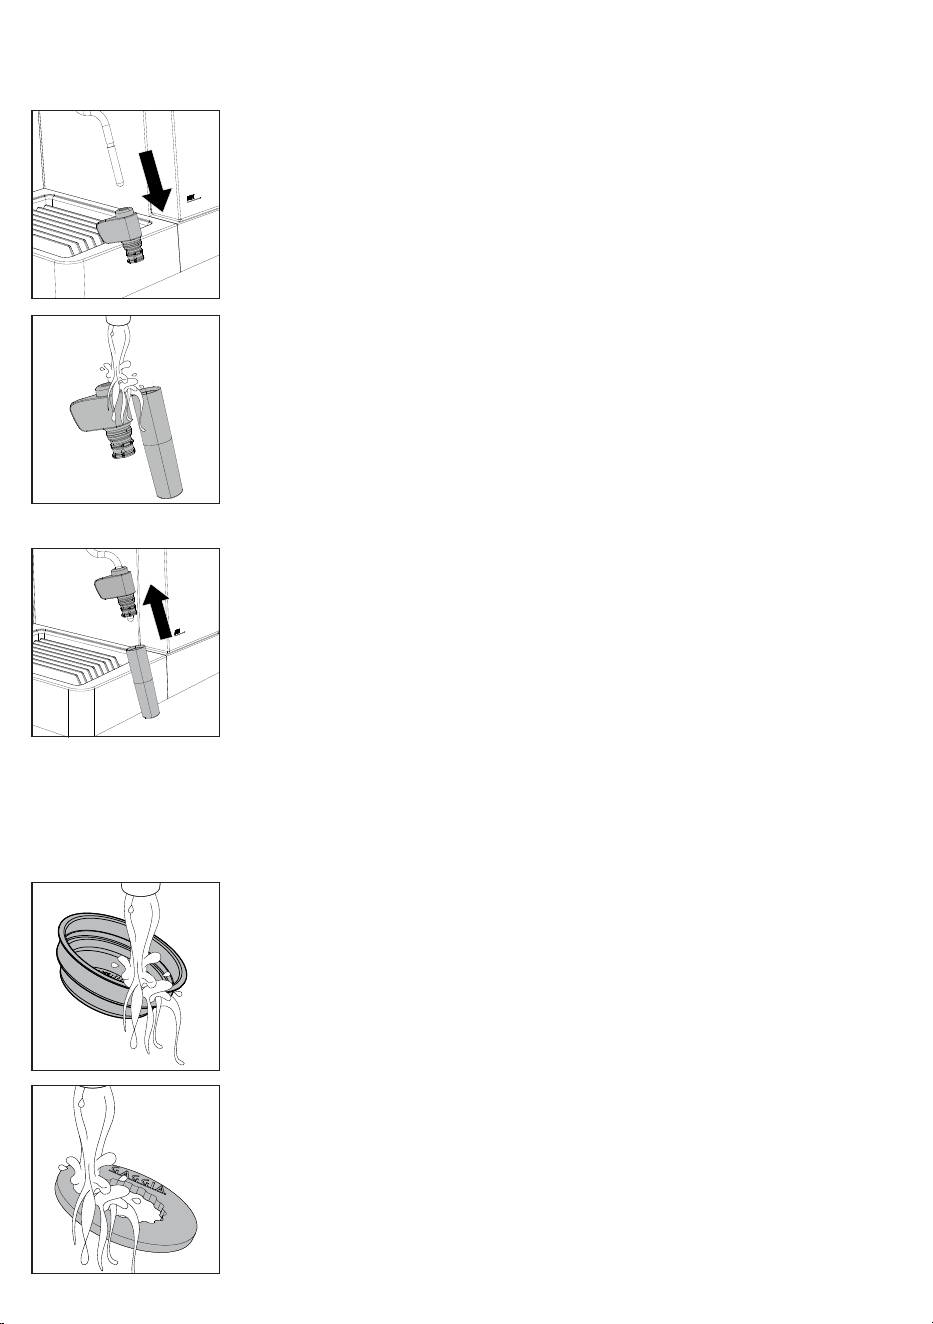
40
English
2 Wash the “Pod System” with warm water too if it has been used.
2 Rinse with running water
3 Clean the steam tube using a damp cloth.
4 Ret the upper and lower part of the Pannarello to the steam tube.
Cleaning the lter holder, lters and the “Pod System”
Filters should be kept clean to guarantee perfect results.
Daily:
1 Remove the lter from the lter holder and wash them both with warm water.
Weekly:
1 Remove the lower part of the Pannarello (15) and slide off the upper part (16).
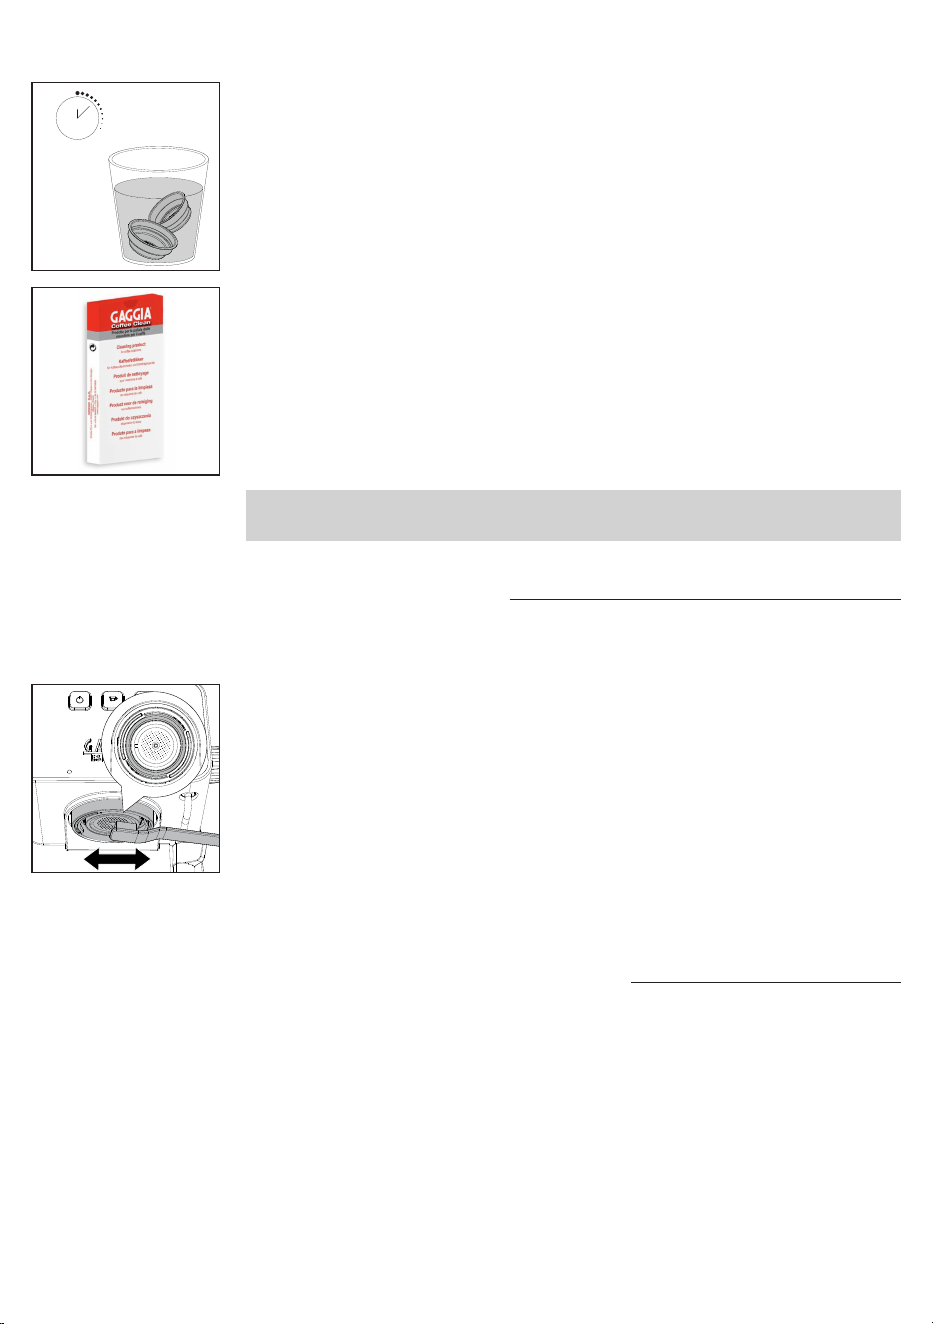
41
English
10 min.
3 If you notice a malfunction when brewing coffee, steep the lters in boiling
water for 10 minutes and then rinse them with running water.
4 To clean the lters more thoroughly, we recommend using the GAGGIA
cleaning tablets specically designed to keep your machine in perfect working
order.
Warning: the lter must only be removed when the lter holder has cooled down
completely to avoid scalds
Cleaning the screen
After each coffee brew:
1 Remove the lter holder from the unit by turning it from right to left.
2 Brush away any coffee puck residue from both gasket and screen.
3 Clean with hot water by pressing the coffee button and dispensing one cup of
water.
Cleaning the grid and drip tray
Remove the drip tray (17) and grid if present (18) and wash them with running
water. Do not use abrasive products.
42
English
Descaling
When the on/off button turns orange, it is time to descale the machine. Use only
the Gaggia descaling solution designed to guarantee high quality performance of
the machine. The use of different products could damage the machine and leave
residues in the water. Failure to descale the machine will void the warranty.
1 Disable the MEMO function if present and remove the lter holder from the
brew group (20).
2 Remove and empty the water tank.
3 Pour HALF the content of the Gaggia concentrated descaling solution into the
water tank and then ll it with water up to the MAX level.
4 Remove the Pannarello (8) if tted on the steam tube.
5 Turn the machine on by pressing the on/off button.
6 Press the coffee button and dispense 1 cup of water (
about 150ml
) from the
brew group.
7 Turn the steam/hot water knob and dispense 1 cup of water (
about 150ml
)
from the steam tube as well.
8 Turn the machine off by pressing the on/off button.
9 Let the descaler sit for about 15-20 minutes with the machine off.
10 Turn the machine back on by pressing the on/off button.
11 Dispense 1 cup of water (
about 150ml
) from the brew group and another cup
of water (
about 150ml
) from the steam tube as well.
12 Next, turn the machine off by pressing the on/off button and leave it switched
off for 3 minutes.
Cleaning the water tank
1 Remove the water tank (9) and wash it with running water.
2 When reinserting the tank, make sure that the silicon hoses (6) are inside the
tank and that they are neither twisted nor blocked.
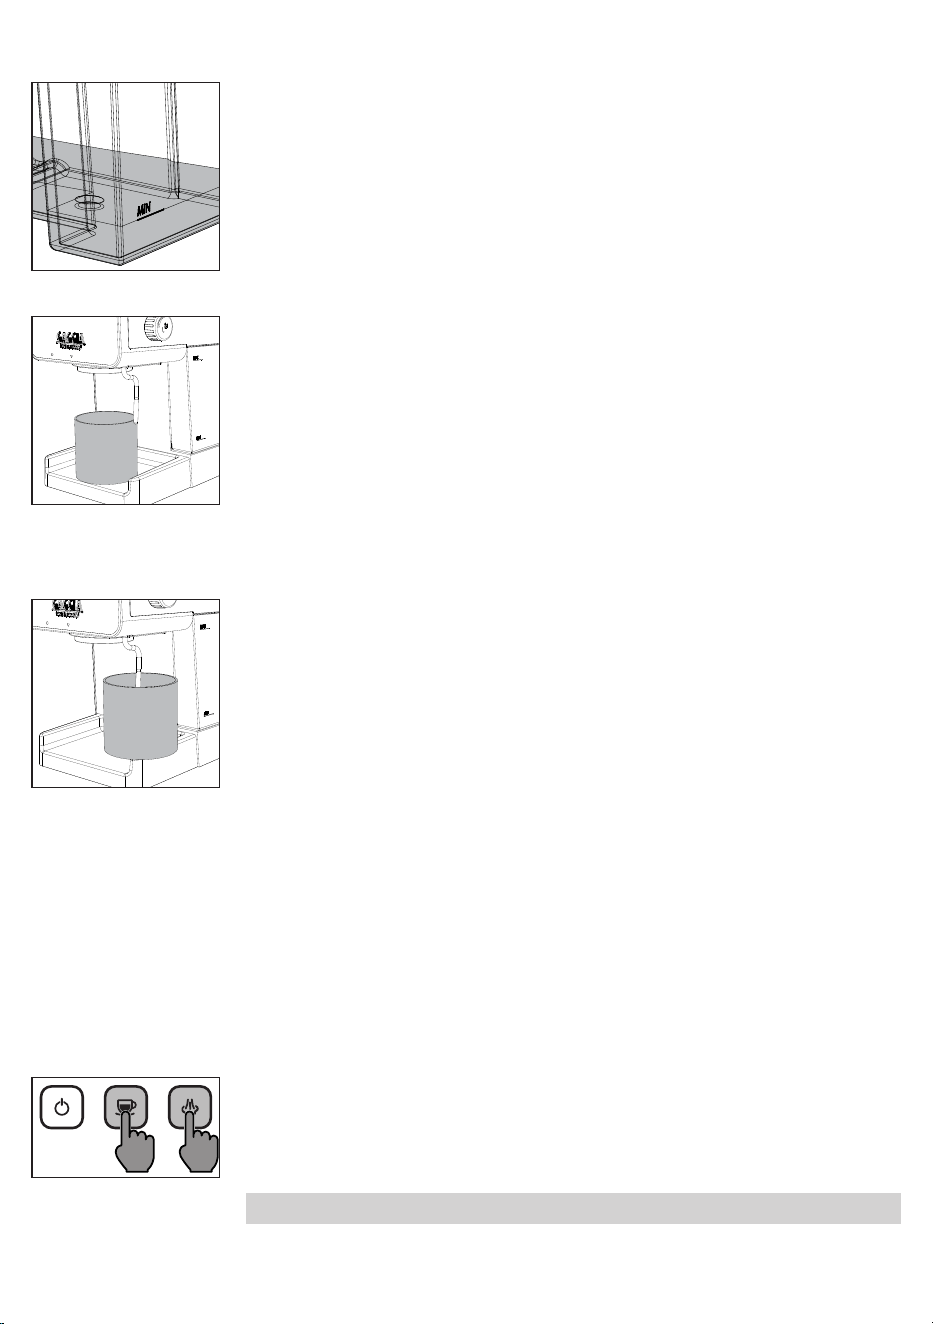
43
English
13 Repeat the steps from point 10 until the MIN level in the water tank has been
reached.
14 Rinse the tank with fresh water and ll it up to the MAX level.
15 Place a large container under the brew group.
16 Turn the machine on by pressing the on/off button.
17 Press the coffee button and dispense water from the brew group until
dispensing automatically stops about halfway down the water tank.
18 Place a large container under the steam tube.
19 Turn the steam/hot water knob counter clockwise and dispense any water left
in the tank until the MIN level is reached.
20 To stop dispensing, turn the steam/hot water knob off by turning it clockwise.
21 Fill the tank up to the MAX level and dispense all the water from the brew
group until the MIN level is reached.
22 Repeat the operation dispensing a full tank from the steam tube as well.
23 The descaling cycle is now complete.
24 Insert the lter holder into the brew group after rinsing it with running water
and ret the Pannarello.
25 Hold the coffee and steam buttons for about 5 seconds; the on/off button will
ash for a moment and then machine is ready to brew coffee again once the
orange LED is reset.
Note: if necessary, prime the circuit as described in the relevant section.

44
English
Troubleshooting
This chapter outlines the most common problems you may encounter while using
the machine. If you are unable to solve the problem using the information provided
below, visit the FAQ sections on www.gaggia.com or www.gaggia.it or contact
either the Customer Service Centre or the local distributors in your country.
Problem Cause Solution
The machine does not
turn on.
The machine is not connected to
the electric network.
Connect the machine to the electric network.
The pump is very noisy. There is no water in the water tank. Fill the water tank and prime the circuit as
described in the relevant chapter.
The milk does not froth. The type of milk used is not
suitable for foaming.
The amount and the quality of froth vary
depending on the type of milk (
Chapter
"Frothing milk to prepare a cappuccino"
).
The Pannarello is dirty. Clean Pannarello (
Chapter "Cleaning the
Pannarello"
).
There is no water in the water tank. Fill the water tank and prime the circuit as
described in the relevant chapter.
No coffee is brewed
after pressing the coffee
button.
The lter holder is clogged. Press the coffee button again.
Turn the machine off and let it cool down
(
approx. 1 hour
). Then remove and wash the
lter holder thoroughly. If the problem persists,
contact the service centre.
Coffee is too cold. The lter holder is not inserted for
preheating.
Preheat the lter holder (
Chapter "Preparing a
coffee"
).
The cups are cold. Preheat the cups with hot water.
The coffee is brewed
too fast, crema does
not form.
There is too little coffee in the lter
holder.
Add coffee.
The grind is too coarse. Use a different blend.
Coffee has not been tamped or
tamped too lightly.
Tamp a bit harder with the supplied tamper
paying attention to avoid possible gaps.
The coffee or the coffee pod is not
fresh.
Use a different blend or coffee pod.
Coffee does not come
out or drips only.
There is no water in the water tank. Fill the water tank and prime the circuit as
described in the relevant chapter.
The grind is too ne. Use a different blend.
Coffee has been tamped too hard
in the lter holder.
Tamp the coffee more lightly.
There is too much coffee in the
lter holder.
Reduce the quantity of coffee in the lter
holder.
The machine has limescale build-
up.
Descale the machine as described in the
relevant Chapter.
The lter in the lter holder is
clogged.
Clean the lter (
Chapter "Cleaning the lter
holder, lters and the "Pod System""
).

45
English
Problem Cause Solution
Coffee ows out of the
rim.
The lter holder is not correctly
inserted in the brew group.
Insert the lter holder as described in the
relevant chapter.
The upper rim of the lter holder
is dirty.
Clean the rim of the lter holder.
There is too much coffee in the
lter holder.
Reduce the quantity of coffee using the
measuring scoop.
The screen gasket is dirty. Clean the screen gasket as described in the
relevant Chapter.
GAGGIA accessories
Coffee and machine accessories can be ordered in the authorised centres in Italy
or dealers in your country.
Descaler
Coffee range - available in beans and powder: 100% Arabica / Intense / Decaffeinated
Coffee oil remover pads
46
English
Technical specications
Nominal voltage - Power rating -
Power supply
See the data plate inside the water
tank compartment
Machine body material Thermoplastic
Dimensions 255 x 199 x 303 mm
Weight 3,7 kg
Power cord length 900 mm
Control panel Frontal
Cup size
Up to 76 mm with drip tray inserted,
102 mm without it
Water tank 1,2 liters - Removable
Pump pressure 15 bar
Boiler Stainless steel boiler
Safety devices Thermal fuse


COD . - Rev.01 - 13/07/23
GAGGIA S.p.A.
Sede Amministrativa/Administrative Oce
Via Torretta, 240
40041 Gaggio Montano - Bologna - Italia
+39 0534 771111
www.gaggia.it www.gaggia.com
GAGGIA S.p.a. si riserva il diritto di apportare tutte le modiche ritenute necessarie.
GAGGIA S.p.A. reserves the right to make any necessary modication.
