
USER MANUAL (US STANDARD)
NINGBO AQUART ENVIRONMENTAL APPLIANCE CO.,LTD.
Thank you very much for choosing our brand's product.
To ensure your safety, proper, and efficient use of this
product, please read the instructions carefully and keep
them properly.
AAP60-2301说明书
BC0240429001
2024/07/22
143×210 mm
128g铜版纸
双面彩印,上油,骑马钉
四页空白页放在封面、封底背面 其它放最后
Emall:sean@edendirect-brand.com
Product Structure
Control Panel Instructions
Product Introduction
Function Description
Timer Switch Instructions
Defrost Method
Timer Switch Instructions
Precautions
Troubleshooting
Specifications
Special Reminder
Installation Method
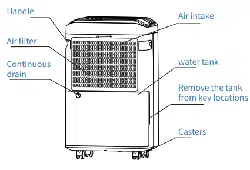
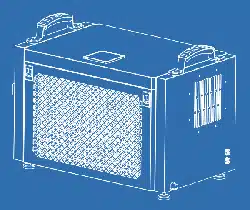
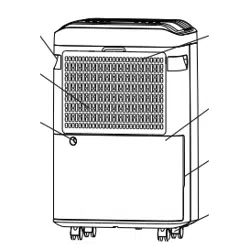
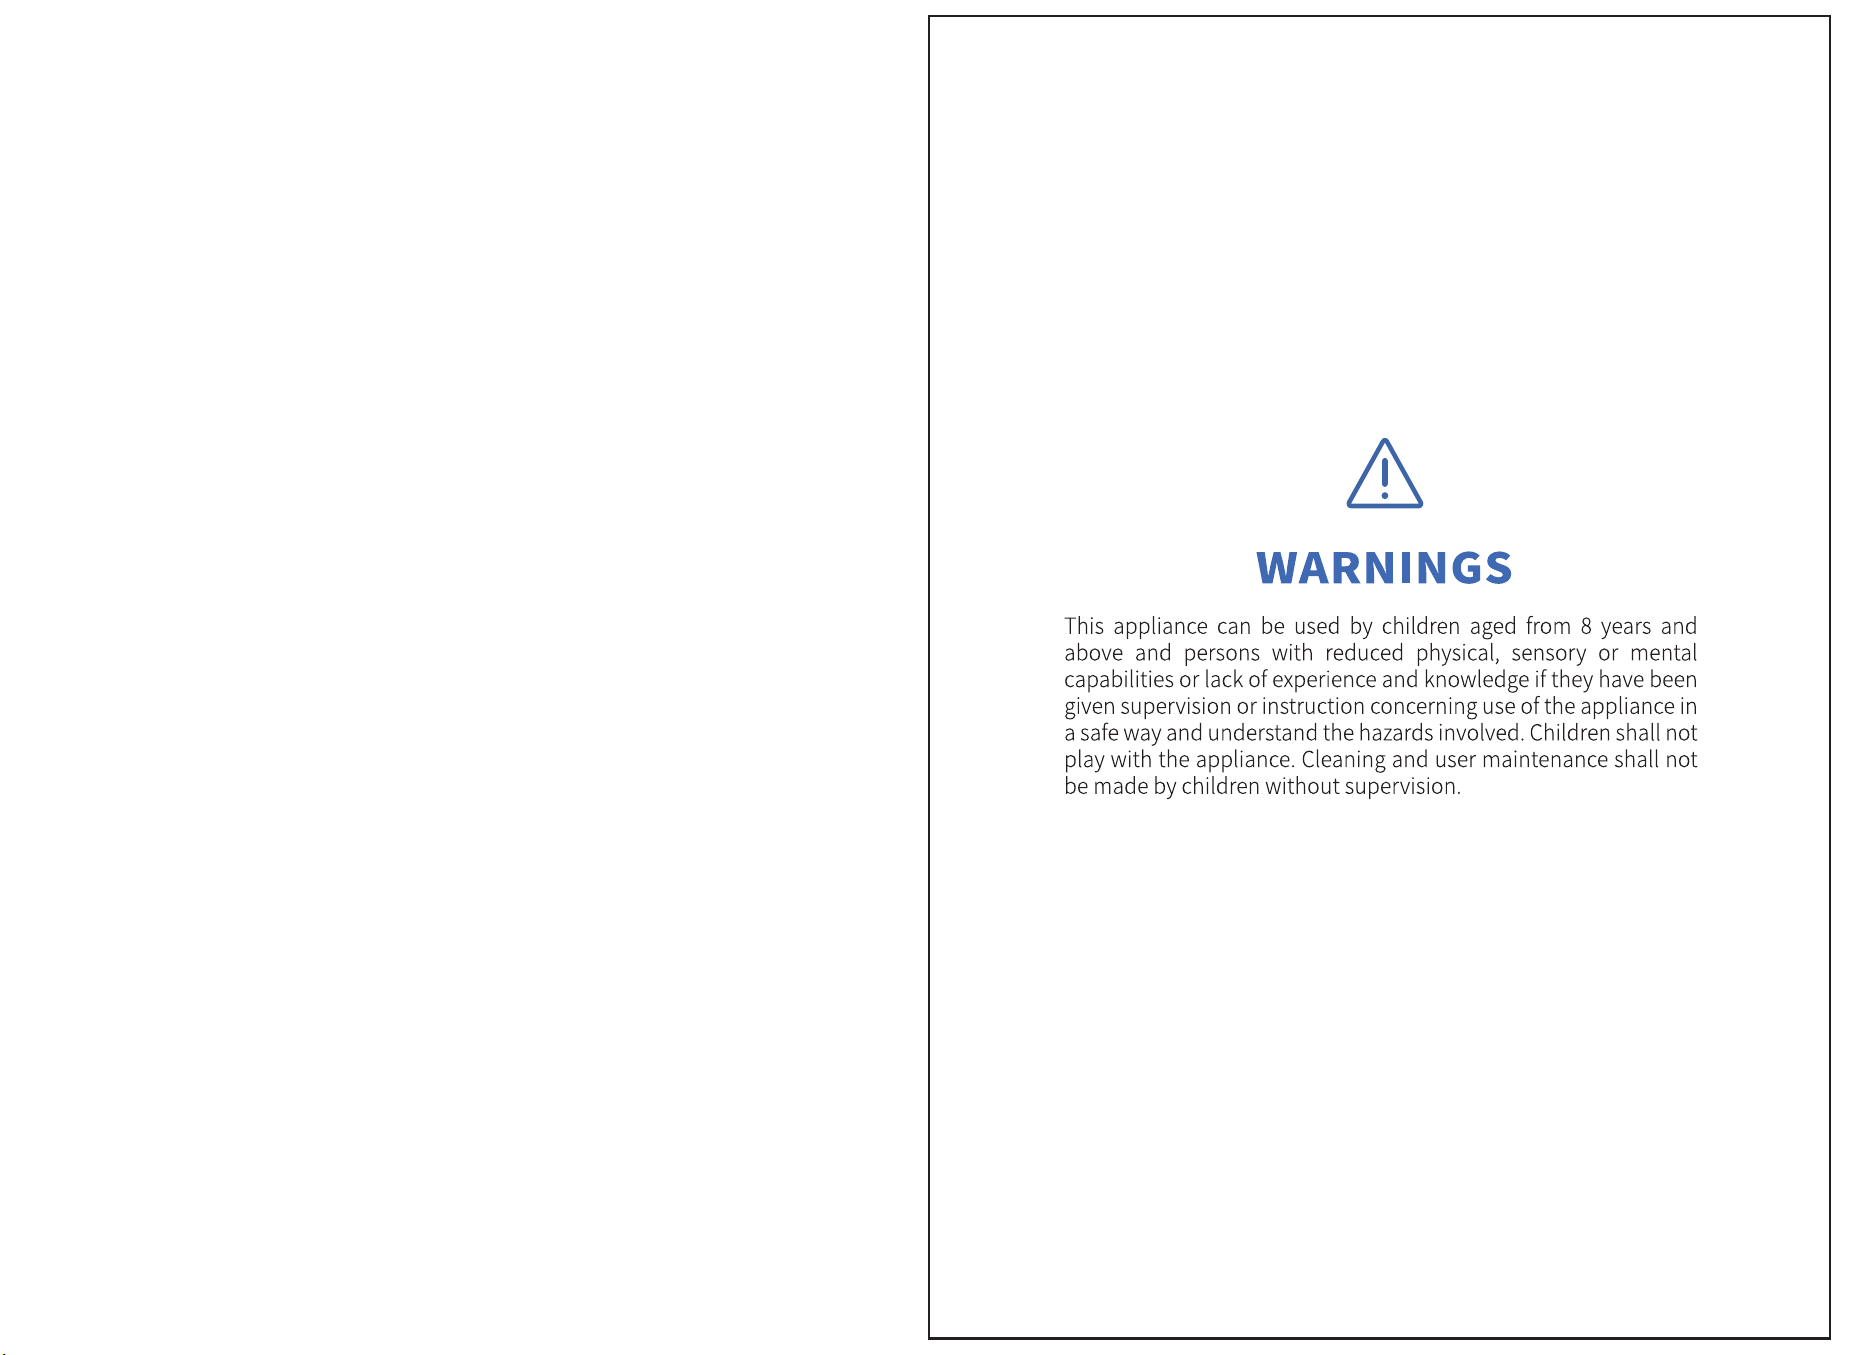
PRODUCT STRUCTURE
Control
Panel
Air Inlet
Left Side
Panel
Front Shell
Lower Cover
Swivel
Casters
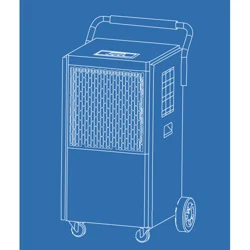
Upper Steel
Pipe
Air Outlet
Right Side
Panel
Large
Wheels
Product Structure
01
01
06
08
11
02
07
09
12
DEHUMIDIFIER
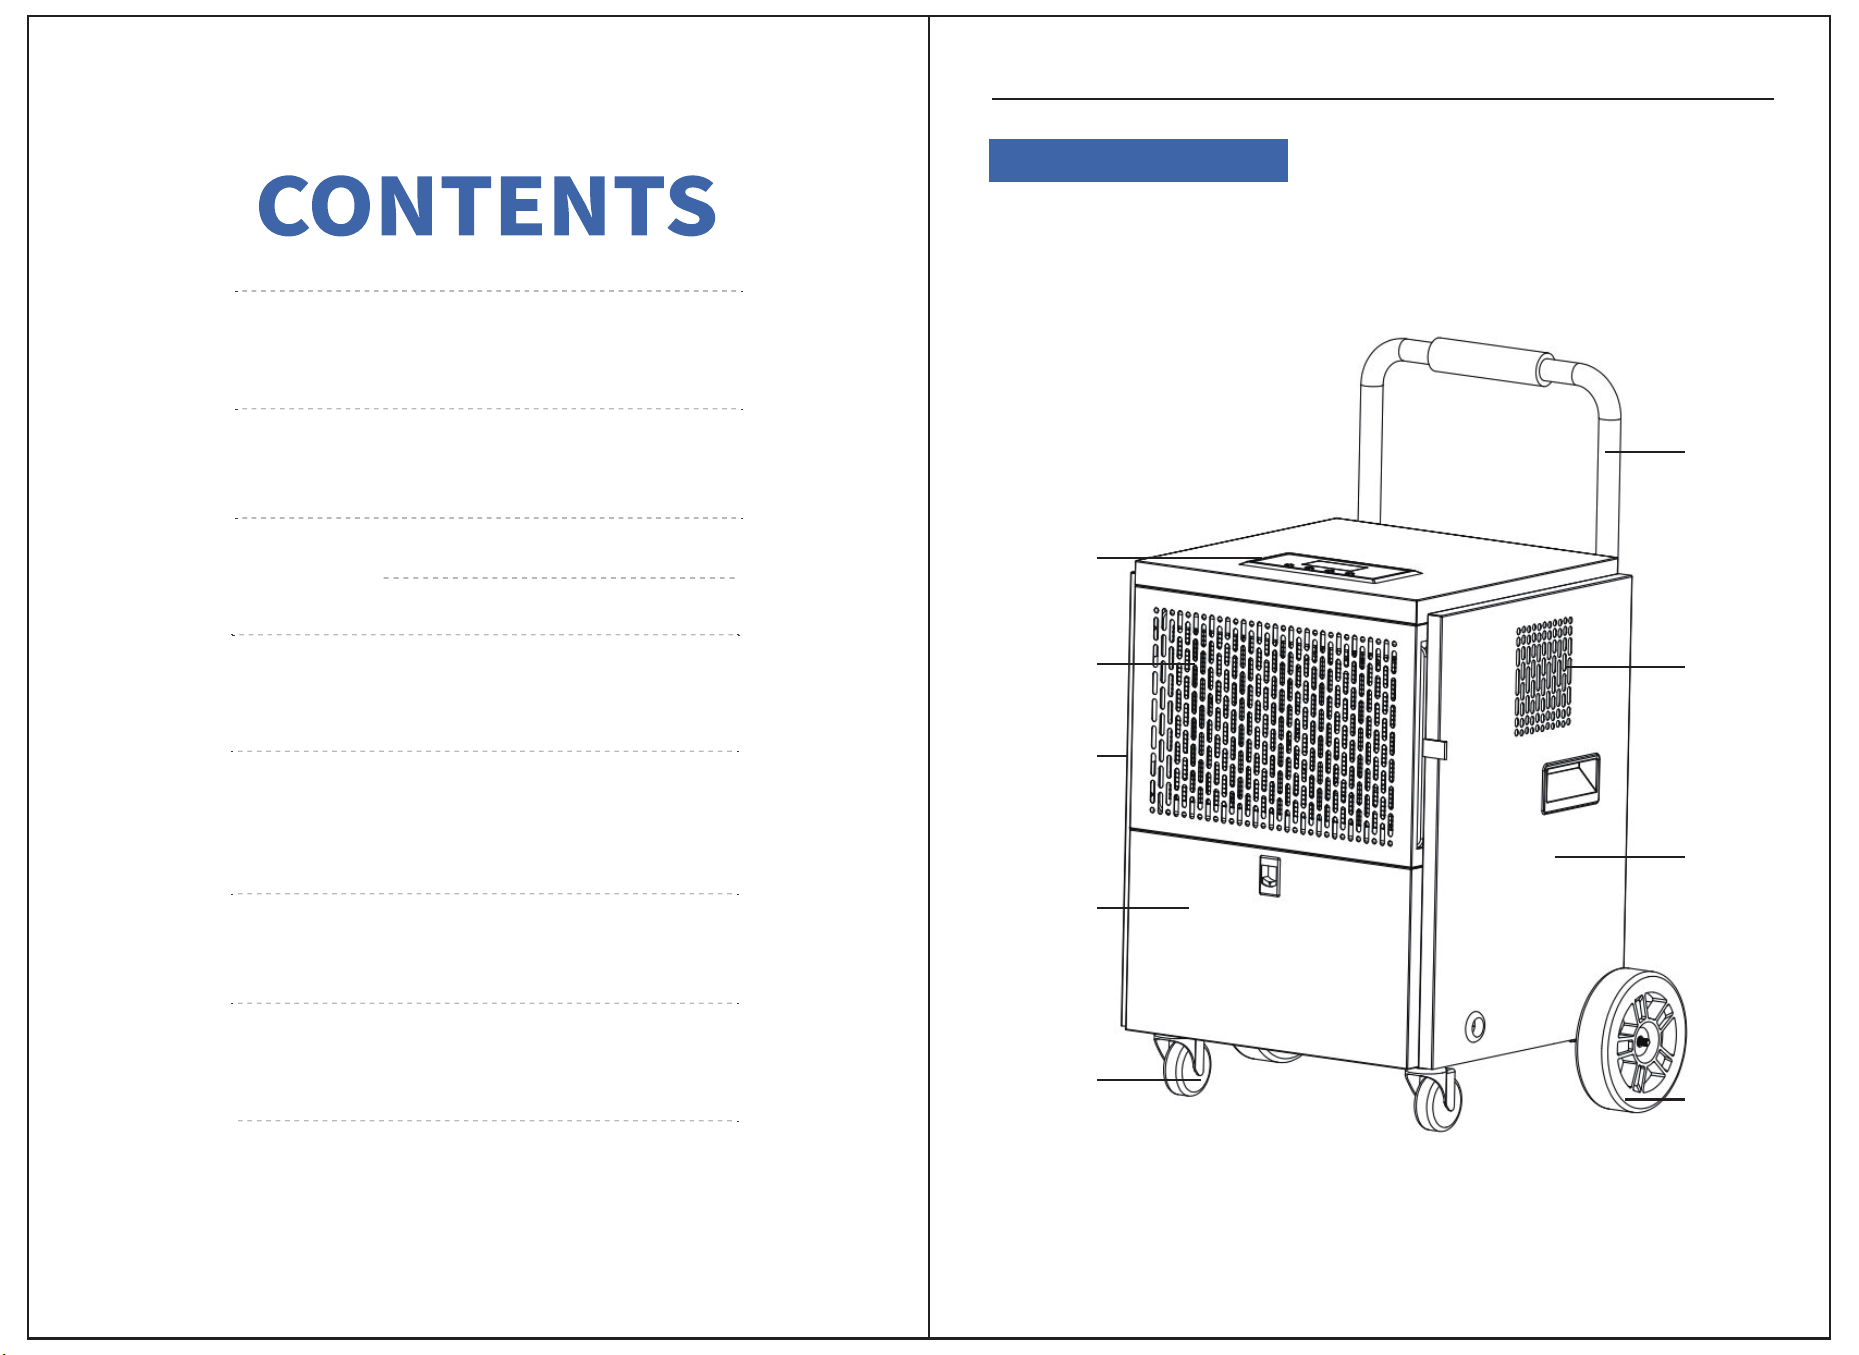
Installation Method
DEHUMIDIFIER
Take out the whole machine, caster shaft, caster and screw from the accessory box in
the packaging box, tilt the whole machine, as shown in Figure 1, first align and fix the
caster shaft with 2 screws on the whole machine, and then align and fix the caster on
both sides of the caster shaft. After installation, place the whole machine upright.
02 03
1.Installation method of casters:
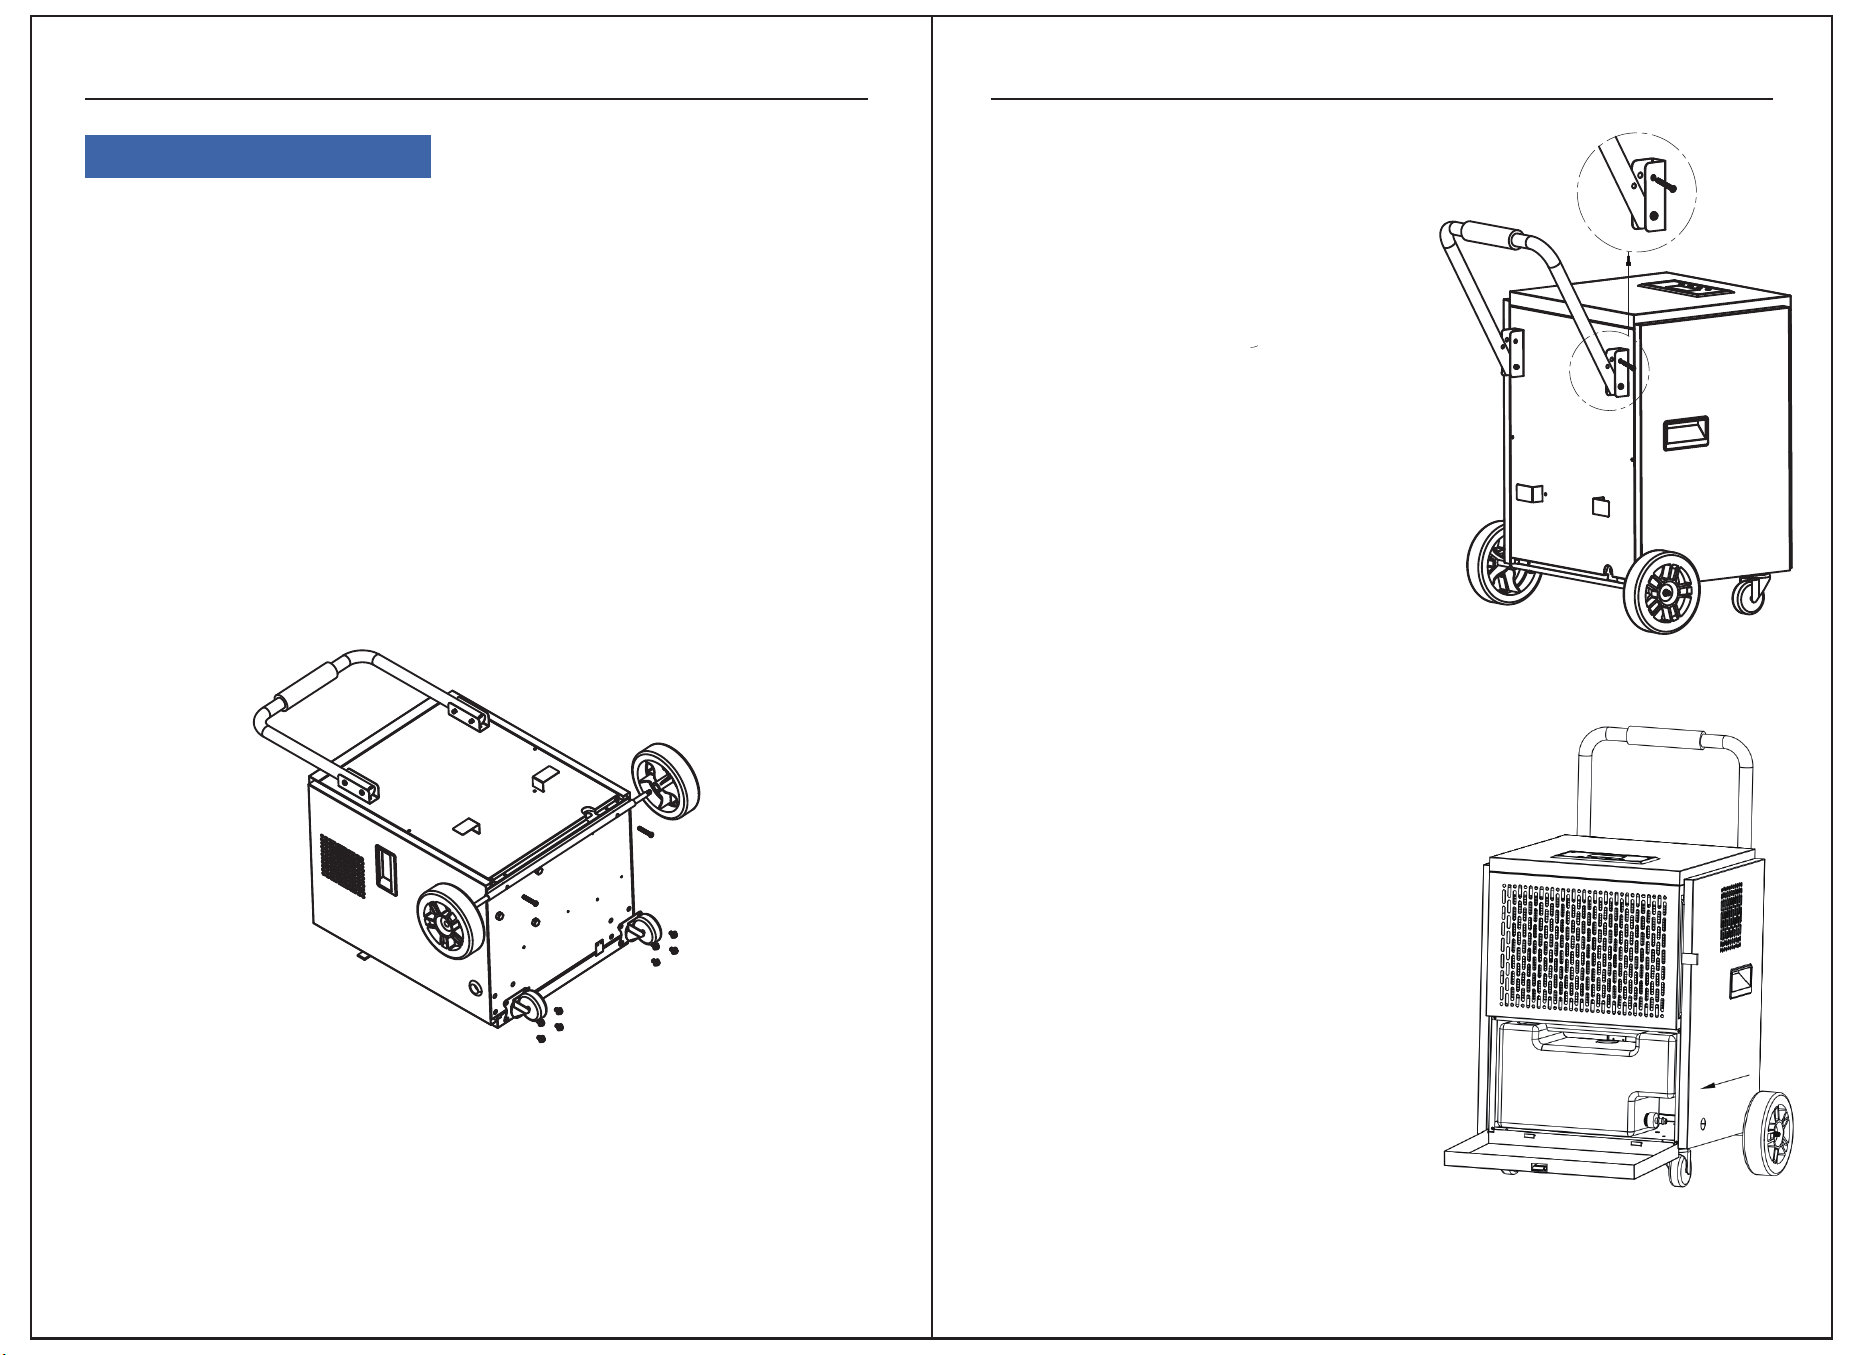
Figure 2
Figure 3
Figure 1
Remove the two universal casters from the packaging box and accessory box, tilt the
whole machine, and first fix the caster shaft to the whole machine with 8 triple
combination screws as shown in Figure 1. After installation, place the whole machine
upright.
2.Installation method of universal casters:
as shown in Figure 2, unscrew the two screws
above the machine body, then rotate the
upper steel pipe 180 ° upwards, and use the
removed screws to align and fix the upper
steel pipe.
3.The installation method of the upper steel pipe:
There are two ways to use the water tank. One
is for direct use. When the water tank is full,
the machine stops running and enters stand-
by mode. The full water indicator light will
turn on and the buzzer will sound an alarm. At
this point, open the water tank panel and
remove the water tank (as shown in Figure 3).
After pouring out the water, reinstall the water
tank to continue working,. Another method is
continuous drainage. Open the water tank
panel to remove the water tank, unplug the
water plug, install the drainage pipe (as
shown in Figure 4), install the water tank on
the machine, close the water tank panel, and
thread the drainage pipe through the right
side panel, as shown in Figure 5.
4.The usage method of the water tank:
Tip: After the whole machine is installed,
please let it sit for 2 hours before turning
it on for use.
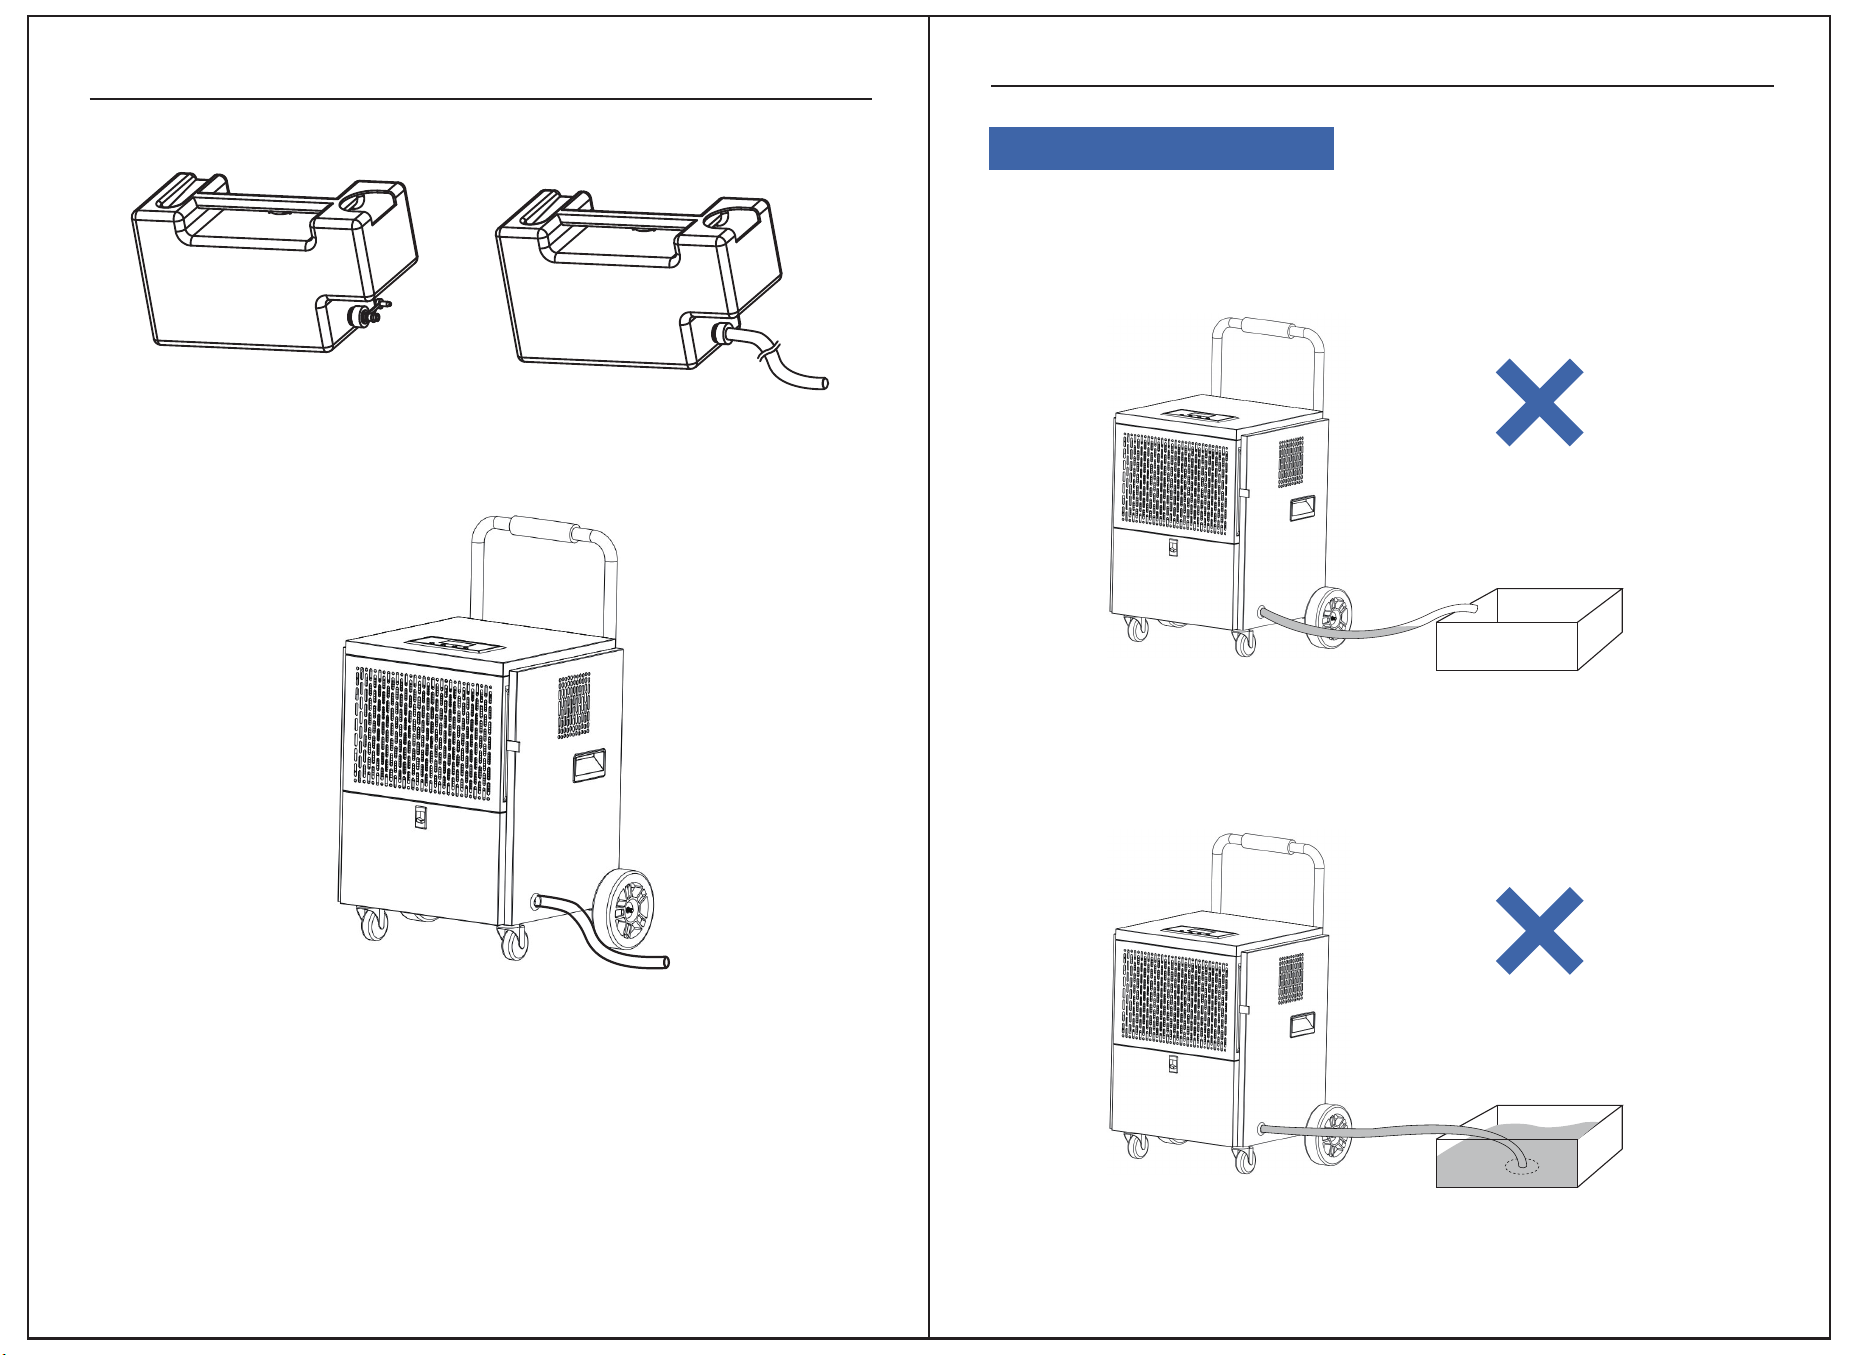
wrong use Metnoaso
DEHUMIDIFIER
DEHUMIDIFIER
04 05
Figure 4
If there is a U shape or a V shape between two ends of the hose, the increasing
accumulation of water in the valley may stop water from draining to the water
collecting vessel. It eventually leads to a backflow to water tank or a water leak from
other lower parts of the appliance.
If there is no space between the outlet of hose and the water collecting vessel, the
increasing pressure of water caused by raising water level may result in a failure of
drainage from the appliance. It eventually leads to a backflow to water tank or a
water leak from other lower parts of the appliance.
Tip: During continuous drainage, the height of the drainage pipe outlet should
not exceed the height of the water tank
Warning: If the power cord is damaged, it must be replaced by professionals
from the manufacturer, their repair department, or similar departments to avoid
danger.
Figure 5
No space between the outlet of hose and the vessel
An accumulation of water
06
Product Introduction
The dehumidifier is used to reduce the air humidity in the installed space to make it
suitable for people's living and item storage. Our dehumidifier uses a branded
compressor and microcomputer humidity control. Humidity display is clear and
intuitive, the appearance is beautiful, the performance is superior, and the operation
is simple. It is widely used in scientific research, industry, medical and health, instru-
mentation, commodity storage, underground engineering, computer rooms, data
rooms, archives, warehouses, baths, etc., to prevent instruments, meters, comput-
ers, telecommunication materials, commodities, and materials from moisture, corro-
sion, and mildew.
DEHUMIDIFIER
07
●When the humidity drops to the compressor stop condition, the fan delays 10
seconds to shut down.
●Power outage memory: If the system suddenly encounters a power outage while
working, it automatically stores the current operating state. When powered on again,
the system will automatically enter the previous operating state and continue opera-
tion.
2、Detailed Function Description:
●After the first power connection, press the power button to enter the startup mode.
The humidity defaults to 50%RH, displaying the current humidity and temperature.
The entire machine operates with both the compressor and fan starting.
●Press the Mode button to enter the timer setting function. Press “+” or “-” to set
the shutdown timer. The timer indicator on the screen will flash. Adjust the time with
“+” or “-” (range 0~24H). If no operation is made within 5 seconds, the system
automatically executes the current timer function setting.
● Press the Mode button again to enter the humidity adjustment function.Press “+”
or “-” to set the humidity (range 10%-95%-CO). The “CO” mode is a forced dehumidi-
fication mode, regardless of temperature and humidity, with the fan and compressor
continuously operating.
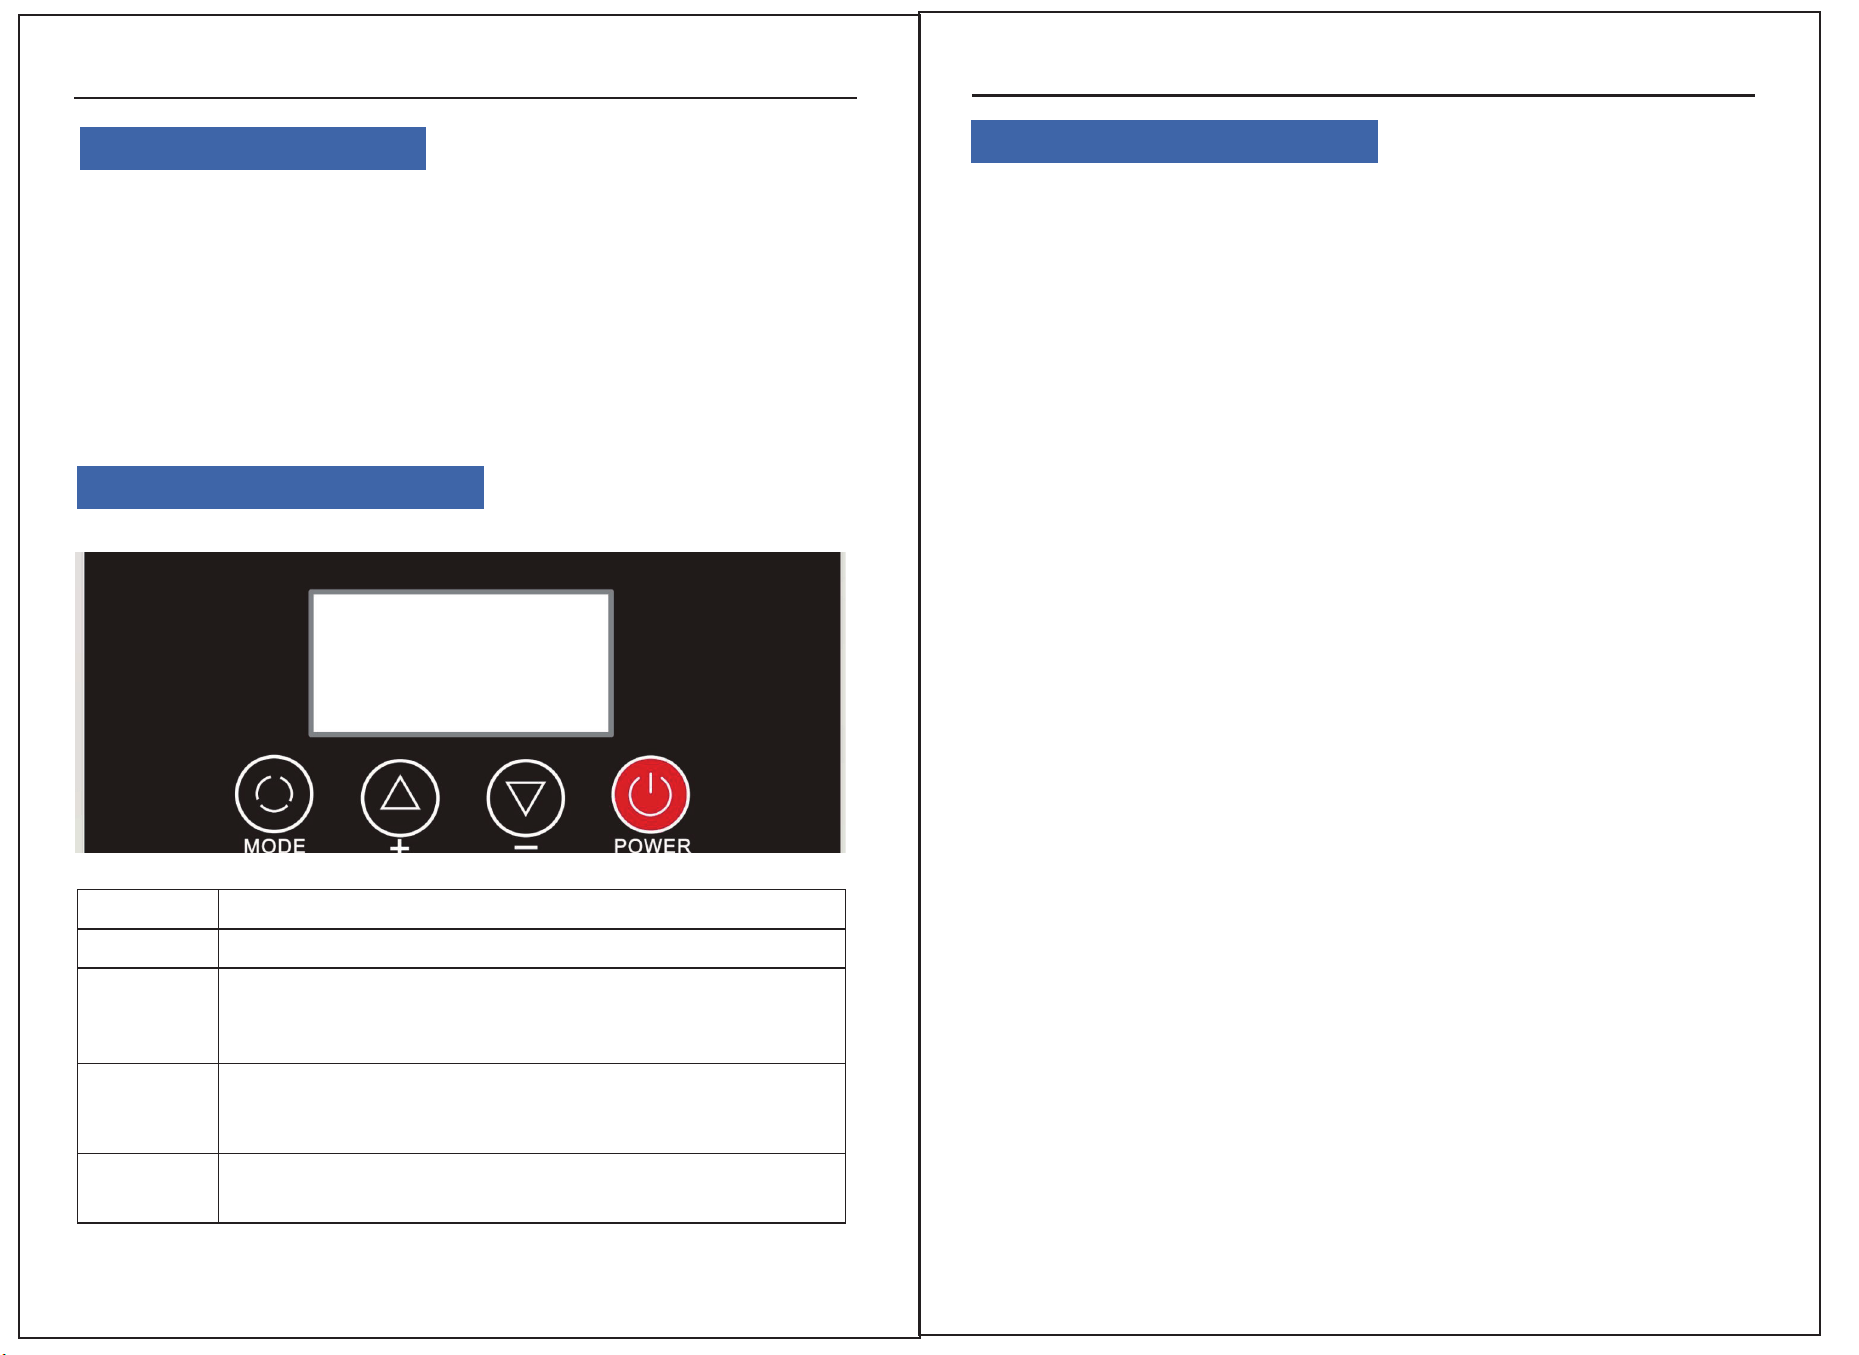
Control Panel Instructions
Function Description
DEHUMIDIFIER
1、Humidity Control:
When the set humidity is reached, both the fan and compressor stop. When the
humidity exceeds the set level, both the fan and compressor operate.
Notes
●When the humidity setting is at the lowest value, it defaults to continuous dehu-
midification mode.
If the humidity sensor fails, it switches to continuous dehumidification mode.
●If the coil sensor fails, it switches to a fixed timed defrost mode (see Defrost
Method).
●Upon startup, the compressor delays 3 seconds, and upon shutdown, the fan
delays 3 seconds.
KEYPAD DESCRIBE
POWER
Press once to toggle between on and off.
Adjust different settings in different states.
1.Increase humidity setting value (range RH10%~95%)
2.Increase timer setting value (range 00~24 hours)
Adjust different settings in different states.
1.Decrease humidity setting value (range RH10%~95%)
2.Decrease timer setting value (range 00~24 hours)
Press briefly once to cycle through setting timer and humidity
adjustment functions and exit.
MODE
+
-

Defrosting Method Description
Automatic Defrost
Timed Defrost
Sensor is normal
Conditions:
When the compressor runs
continuously for 30 minutes
and the coil temperature is ≦
30℉, it enters defrost mode.
During defrost, the compressor
stops and the fan continues to
run
In defrost mode, the system defrosts for 8 minutes.
After the time is up, it exits defrost mode.
4、Timer Switch Instructions
● In the on state, a shutdown timer can be set. In the off state, a startup timer can be
set. Setting both simultaneously enters a cyclic timer state.
● Timer Startup Setting: In the off state, press the “mode” button. The “timer on”
icon flashes, and the time display area flashes the set time. Adjust the time with “+”
or “-”. The buzzer beeps once for each press. Holding the button for 2 seconds allows
continuous adjustment. After 10 seconds without operation, the machine accepts
the setting, and the “timer on” icon flashes (range 0~24H).
3、Defrost Method
Precautions Troubleshooting
DEHUMIDIFIER
● Timer Shutdown Setting: In the on state, press the “Mode” button. The “timer
off” icon flashes, and the time display area flashes the set time. Adjust the time with
“+” or “-”. The buzzer beeps once for each press. Holding the button for 2 seconds
allows continuous adjustment. After 10 seconds without operation, the machine
accepts the setting, and the “timer off” icon flashes (range 0~24H).
09
DEHUMIDIFIER
08
If the dehumidifier malfunctions, immediately cut off the power and check the
following items:
Malfunction
Cause
Solution
Machine won’t run
Poor
dehumidification
Noise
Water leakage
No power display
Power plug not inserted
properly
Fuse on control board
blown
Transformer on conteol
board damaged
Power display
Entire machine is
defrosting
Inlet/outlet is
obstructed
Windows are open
Room temperature is
too low
Uneven ground
Machine not placed
stably
Machine is tilted
Drain pipe/drain outlet
blocked
Power outage or socket
without power
Insert the power plug into
the socket
Replace the fuse
Replace the transformer
Environment humidity lower
than set humidity
Wait for defrost to finish
Remove obstruction
Close doors and windows
Do not use
Reposition the machine
Reposition stably
Level the machine
Remove front panel and
clean blockage

DEHUMIDIFIER
Special Reminder
11
1.If the above checks do not resolve the issue, contact sean@edendirect-brand.com
or dealer directly. Do not disassemble the machine yourself.
2.During operation, the sound of refrigerant circulating is normal. The exhaust air
outlet discharges warm air, causing a 34-37℉ increase in room temperature, which is
normal.
3.When moving, do not tilt the machine more than 45 degrees to prevent compressor
damage.
4.The machine operates at 41-95℉.
5.When the room temperature is below 50℉ and absolute humidity is very low, using
the dehumidifier may not be necessary.
6. Keep the air inlet and outlet at least 1 meter away from walls or obstructions to
avoid affecting the dehumidification effect.
7.Dust accumulation on the air filter will affect dehumidification and may cause
malfunctions. Clean it regularly, at least once a month. In dusty environments, clean
weekly or even daily. Gently tap the filter or use a vacuum cleaner to remove dust. For
severe dust, rinse with water and dry before reinstalling.
8. If there is a fault code during the operation of the machine, please shut down and
stop running. Immediately report to the after-sales staff for repair
9. Continuous 24-hour operation of the machine will affect its service life. It is recom-
mended to stop the machine for 2 hours after every 10 hours of operation. If the user
has special requirements, the machine must be operated 24 hours a day and must be
supervised by dedicated personnel. Otherwise, in case of accidents, our company
will not be held responsible.
Safety Precautions
1.Humidity sensors are precision components that can cause sensor failure when
used in environments with strong corrosive gases and large dust.
2. This machine does not have explosion-proof function and is strictly prohibited
from use in environments with special requirements such as flammable, explosive
gases, dust, chemical products, and biological products.
3. If used in the above environment, causing damage to the machine is not covered
by the warranty.
4. When installing this machine, be sure to take grounding protection measures to
ensure safe use.
5. After running the machine for a period of time, water will be discharged. Please pay
attention to the treatment of drainage.
6.To reduce malfunctions and extend service life, do not use brute force when operat-
ing buttons.
Error Codes
DEHUMIDIFIER
10
Malfunction
Cause Analysis
Solution
Machine won't
run
No power display
Power outage or socket
without power
Check if the power is normal
Power plug not inserted
properly
Insert the power plug into
the socket
Fuse on control board
blown
Replace the fuse
Transformer on control
board damaged
Replace the transformer
Power display
Environment humidity
lower than set humidity
Reset as needed
Entire machine is
defrosting
Wait for defrost to finish
Poor
dehumidification
Inlet/outlet is obstructed Remove obstruction
Windows are open
Close doors and windows
Room temperature is
too low
Do not use
Uneven ground
Noise
Reposition the machine
Machine not placed s
tably
Reposition stably
Water leakage
Machine is tilted Level the machine
Drain pipe/drain outlet
blocked
Remove front panel and clean
blockage
Ε1
Coil sensor fault
Switch to timed defrost, cancel
system fault function,
recoverable
E2
Temperature sensor fault
Temperature sensor fault
Replace temperature sensor
E3 Humidity sensor fault Replace humidity sensor

12
DEHUMIDIFIER
Specifications
Specification Table:
MODEL
Power Supply
Rated Power (86°F 80% RH)
Rated Current (86°F 80% RH)
Low Side Pressure
High Side Pressure
Refrigerant:
Motor Compressor
Product size
Gross weight
Applicable temperature
AP60-2301
AC 115V/60Hz
860 W
8 A
290psig
650psig
R32/(9.17oz)(260g)
RLA:5.52A ;LRA:27A
19.92*18.74*24.41 in
70.5 lb
41-95℉
7. The humidity sensor may deviate slightly from the actual humidity due to its
location, environment, and temperature, which is a normal phenomenon.
8.During machine operation, the cooled air will be discharged through the condenser
after drying, and the outlet temperature is higher than the ambient temperature. It is
normal to discharge hot air.
9. The dehumidification capacity is related to the ambient temperature and humidi-
ty. High temperature and humidity result in a large dehumidification capacity; Under
low temperature or low humidity conditions, the dehumidification capacity will
decrease, which is a normal phenomenon.