
DEHUMIDIFIER

01 02
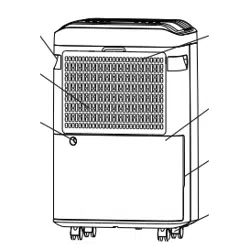
Air Outlet
Dry button
Negative ion button
Timer keys
Humidity status indicator
Humidity button
Wind speed button
Standby button
Water full indicator
Defrost indicator
Digital display
Wind speed indicator
Power Cord
Control Panel
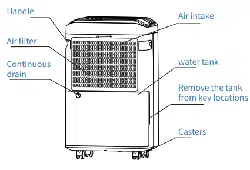
Handle
Air filter
Continuous
drain
Air intake
water tank
Remove the tank
from key locations
Casters
Applicable Place
Wide range of applicable places:
basement, storage room, library, archives, living room, bedroom, cloakroom, toilet, etc
Position it correctly:
In order to better play the perfor-
mance of the dehumidifier, the main
engine air inlet is used during use
Keep a certain distance from shelters
such as walls
03 04
Usage Method Usage Method
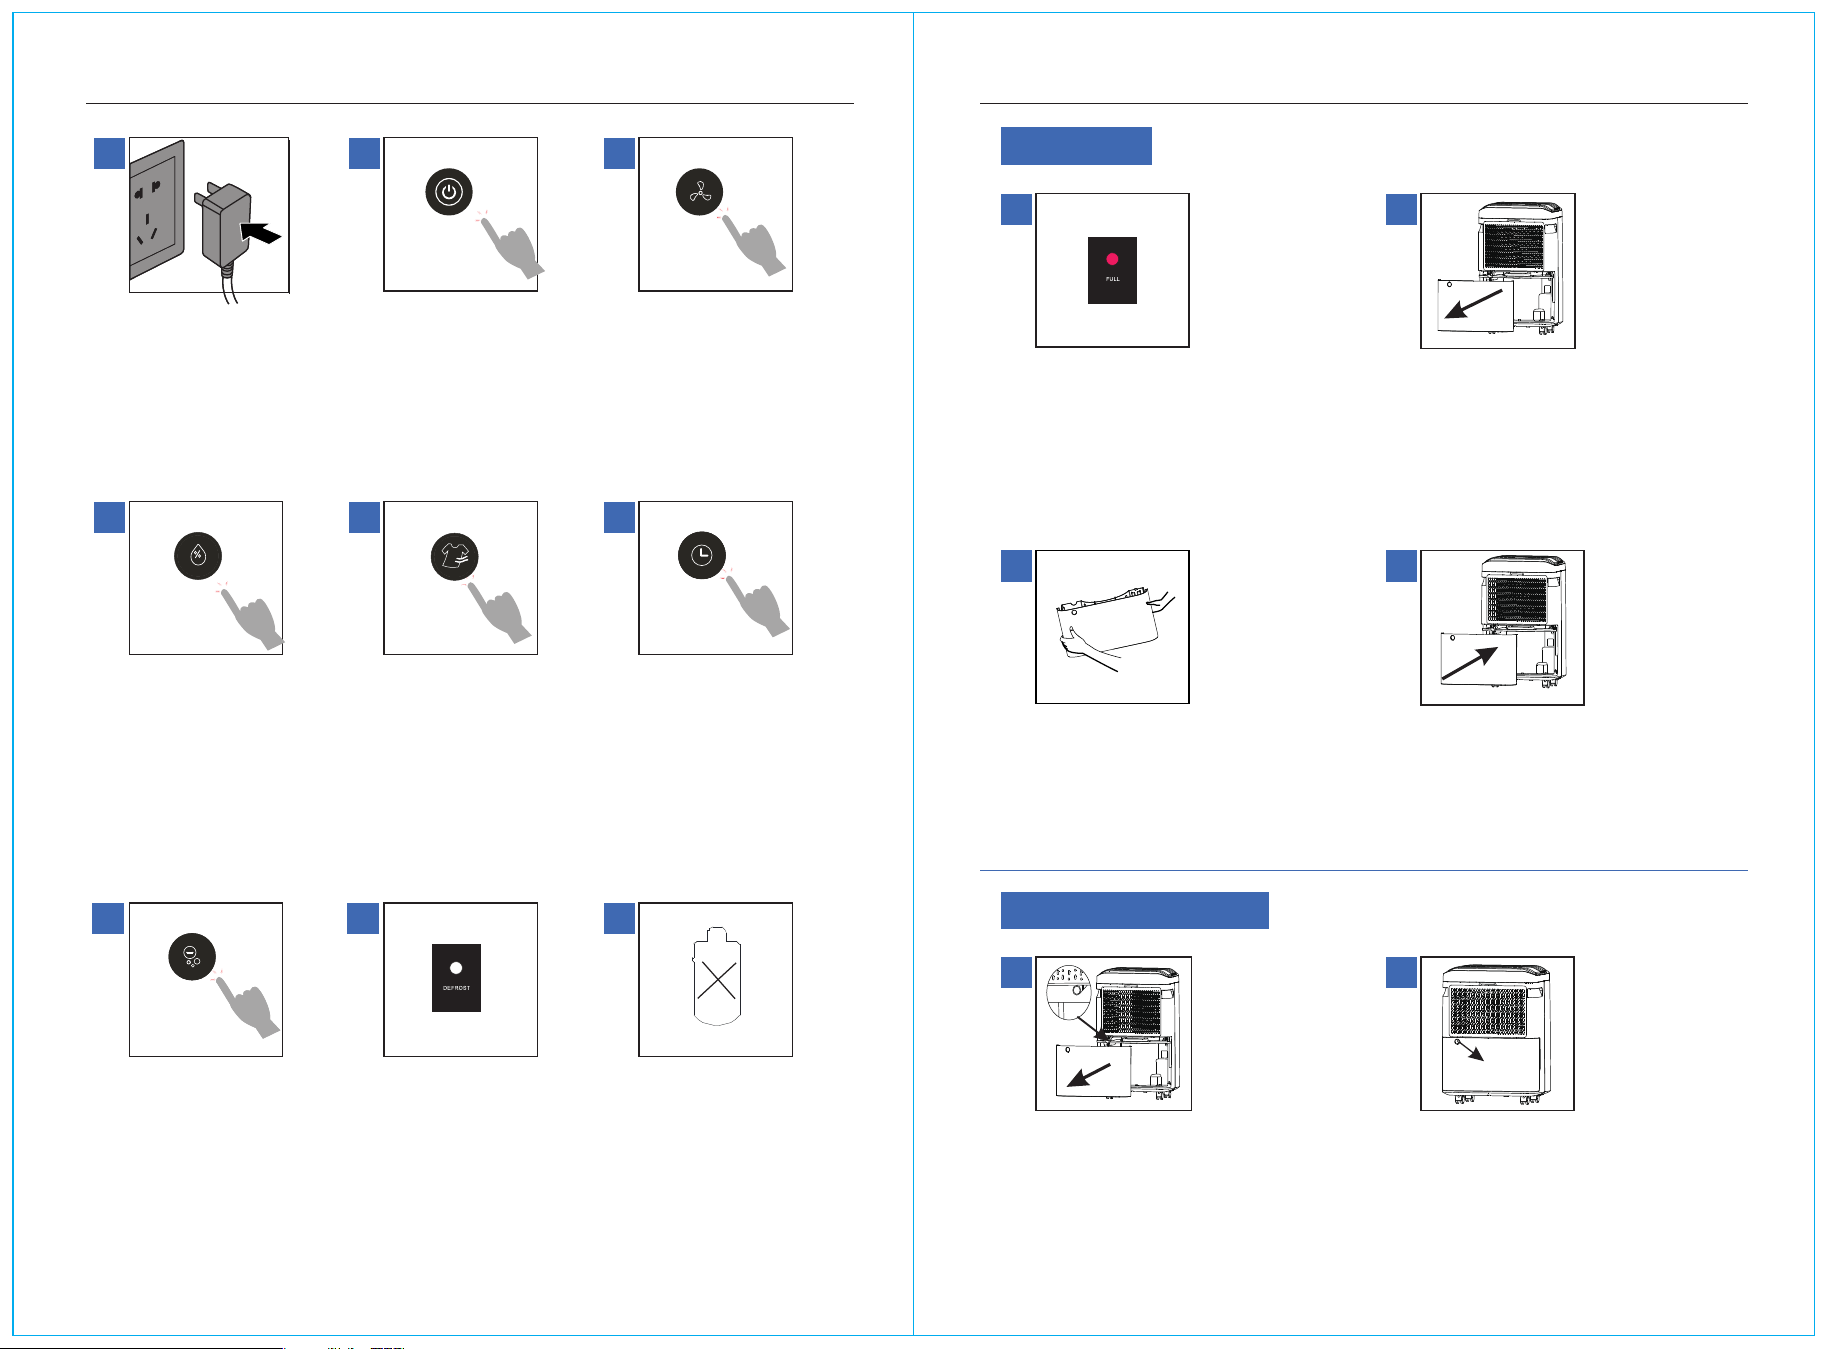
1
Plug in the power
supply, prompt the
sound,
The machine is
powered on
1
Continuous drain
2
Continuous drain pipe
1
Full of water
2
Remove the water tank
3
Pour water
4
Put back in the tank
2
Press the standby button,
the corresponding indicator
light is on,Displays the
system default operating
mode. again,Press the
switch key once to shut
down
3
Pour water
Continuous drainage
Press the wind speed selection
key to switch,There are three
modes of low wind, medium
stroke, and high wind ring
4
In the standard mode
state, press Wet,Degree
key, humidity can be
RH40%-80% and Cyclic
selection between CO
(continuous dehumidifi-
cation).
5
Press the dry button, the dry
clothes icon lights up,Dry
mode start; Press down on
the dry suit again,The dry
button goes off and returns
to standard mode;
6
In the shutdown state, press
the timing key to make an
appointment for 0-24 hours
and start the machine at a
fixed time;
Under the power-on state,
press the timing key to
conduct 0-24 hours of timed
shutdown
7
Press the negative ion
bond to start the
negative ion work
Yes, the negative ion
indicator is on
8
Intelligent detection of
dehumidification system
temperature, turn on
Defrost mode to ensure low
temperature environment
Maintain efficient dehumidi-
fication performance
9
Compressor power failure
protection
Continuous drain
Grasp the sides of the tank
and pour the water clean
When the water tank is full of water, the
machine will automatically stop
dehumidification, and the full water
indicator will light up to indicate that
water needs to be poured
Grasp the handles on both sides of the
water tank and pull outward to take out
the water tank
Remove the tank and see the
continuous drain location
Put the tank back and get back to work,
If the water tank is not placed in place, the
machine
The device does not work, and the full
water indicator is on
Insert the water pipe into the continuous
drain, put back into the tank, pipe mouth
facing to ensure that the condensate is
discharged smoothly
05 06
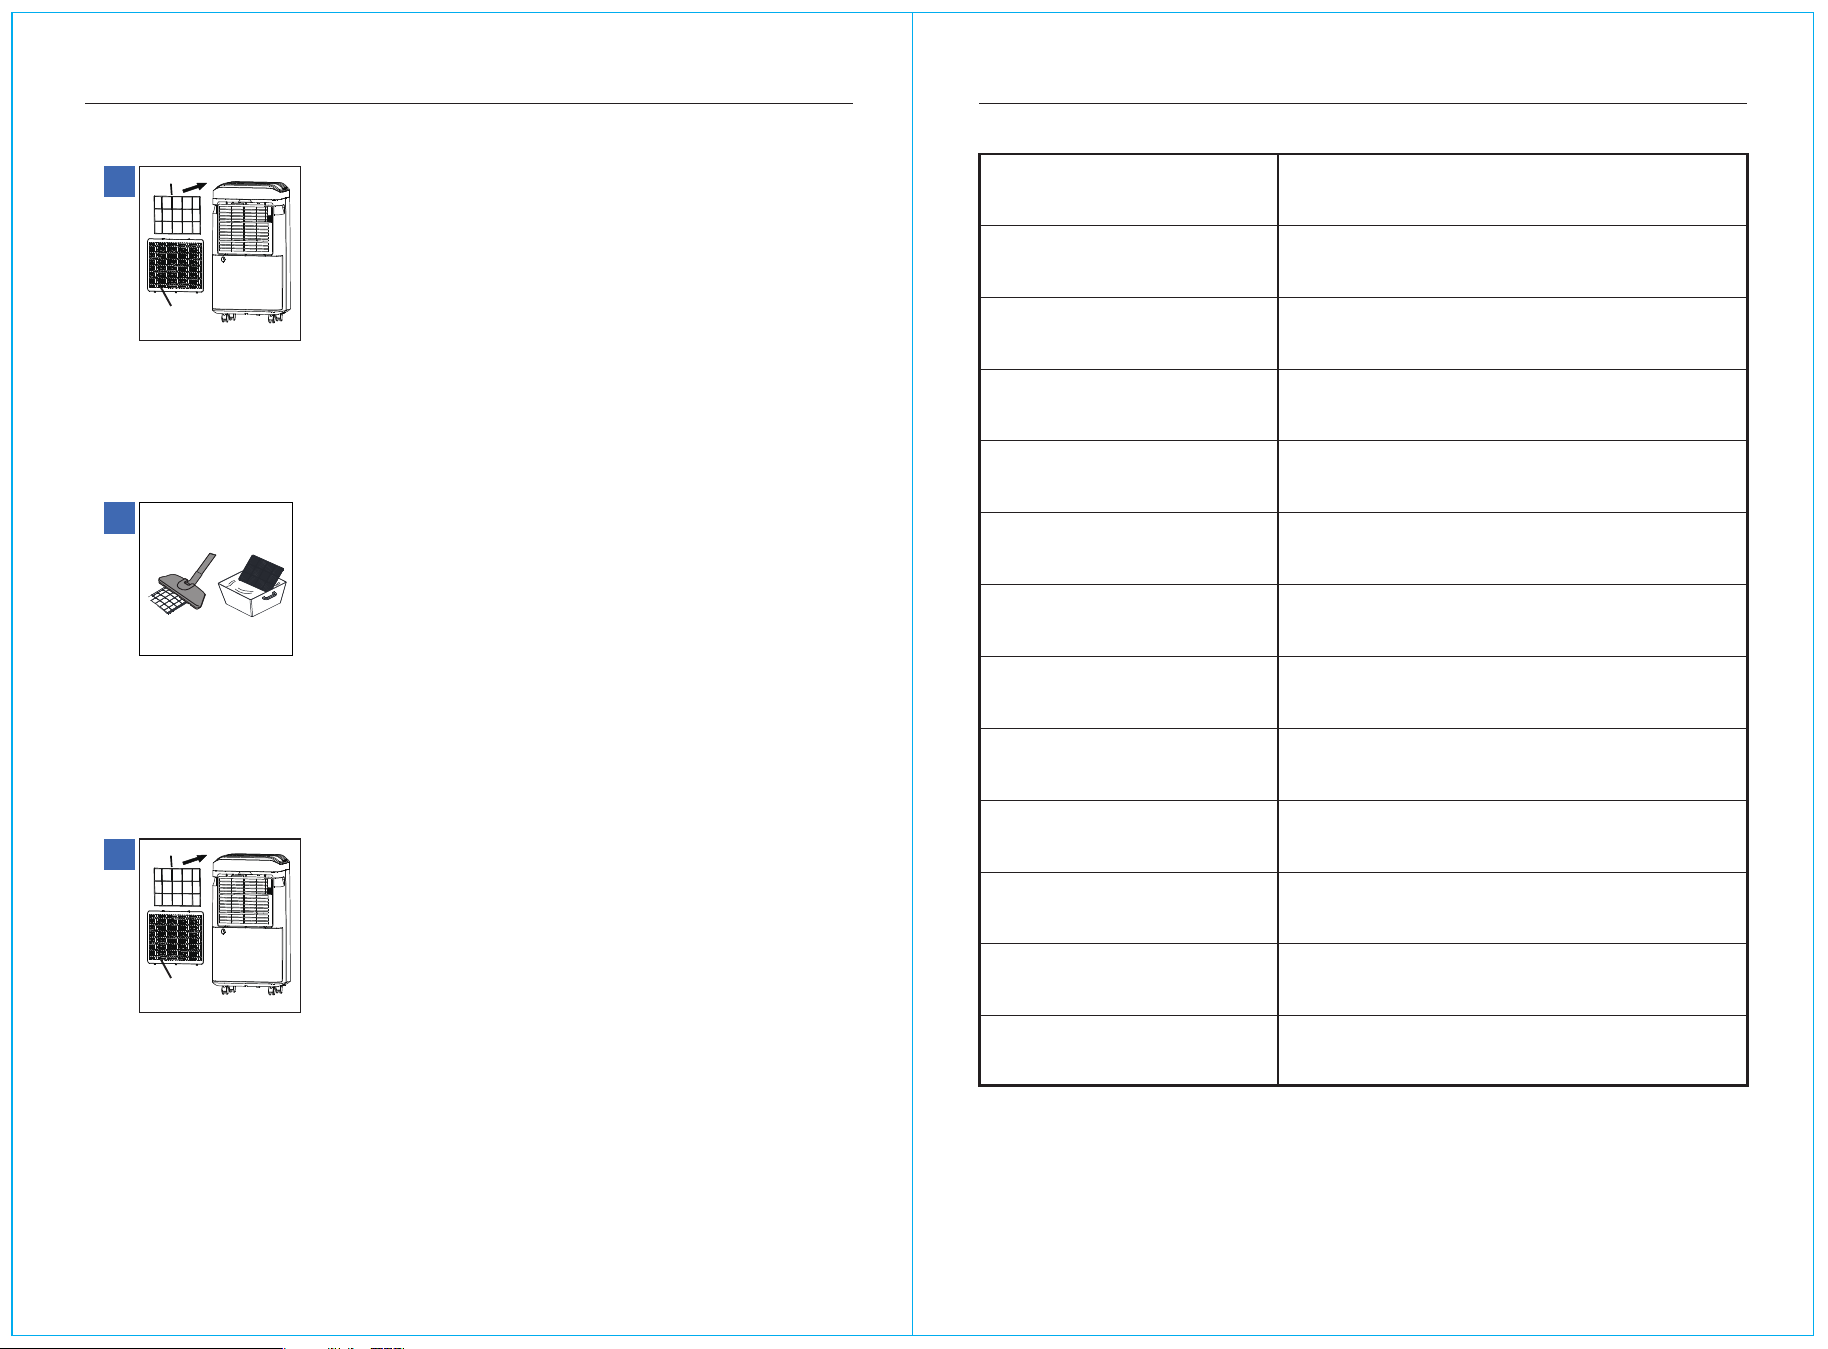
Air inlet grille
Filter screen
Air inlet grille
Filter screen
Clean the strainer BASIC PARAMETER INFORMATION
1
Remove the filter frame
First remove the inlet grille,Then remove the filter frame
2
Dust cleaning
First use the dust collector to dust the air filter, and dry it after cleaning
3
Install the filter frame
nstall the filter screen onto the air inlet grille, and then install the air inlet grille
onto the machine
Product Model
Power Supply
Rated Power/current
Rated Dehumidification Capacity
Daily Dehumidification
Operating Ambient Temperature
Compressor
Refrigerants
Water Tank Volume
Product Weight
Form Factor
Execution Standards
Remark
If the technical parameters are subject to
change, the nameplate shall prevail
AP25-2003EE
115~60Hz
305W/3.11A
0.42KG/H
25L/D
41-86℉
Reciprocating
R134a/5.82oz
4.8L
31.75lb
38×26.8×52cm
GB4706.1-2005 GB4706.32-2012
GB/T19411-2003
(DB80℉ RH60%)
(DB80℉ RH60%)
(DB86℉ RH80%)

07 08
Matters Needing Attention Common troubleshooting
◆ Keep the machine in an upright position, ensure that there is at least 25cm
space distance around the machine;
◆ After transportation or tilting, the machine needs to stand for 2 hours before it
can be connected to the power supply;
◆ The air inlet and outlet shall not be blocked by other objects, so as not to affect
the performance of the product;
◆ Before moving the machine, please turn off the machine and cut off the power,
and then empty the water in the tank before moving;
◆ It is strictly forbidden to use bad or flammable detergents to clean the machine;
◆ When the machine fails, please shut down and cut off the power first;
◆ Must use a three-core socket power supply with ground wire;
◆ If the power cord is damaged, in order to avoid danger, it must be replaced by
professionals from the manufacturer, its maintenance department or similar
departments;
◆ If the machine is not used for a long time, please turn off the power and unplug
the power cord, drain the water in the water tank and dry the water tank, clean the
air filter, and store it in a cool and dry place;
◆ After 3-6 months of use of the air filter, it is recommended to clean it.
Warm Tips
It is necessary to prevent the drainage pipeline from freezing in cold environment
Symptom
The machine
does not work
Noisy
Analysis of possible causes Processing method
The wind wheel does not
rotate or the air output is
small
1. The machine is placed uneven or the
ground is uneven to introduce vibration
2. The water full indicator light is on
(the water tank is full or the water tank
is not placed in place)
3. The humidity of the room is lower
than the humidity setting value of the
machine
1. The air filter is too dirty to cause poor
air inlet or foreign objects to block the
air outlet
2. The doors and windows are not closed
3. The room temperature is lower than
5°C or the room humidity is low
1.Resonance caused by uneven machine
placement or uneven ground
2.The air filter is blocked
1.The wind wheel is stuck
2.The air filter is blocked
3. Compressor starting period
1.Check the power supply of the
socket to ensure that there is
power
2. Drain the water in the tank or
replace the tank to ensure that it is
in place
3. Reset the humidity setting value of
the machine to ensure that it is lower
than the humidity of the room
1.Clean the air filter or clean up
foreign matter at the air outlet
2.Close the doors and windows
3. This is a normal phenomenon
1.Place the machine on the
horizontal ground
2. Clean the air filter
1.Reassemble the wind wheel or
remove foreign objects
2.Clean the air filter
3. The compressor will disappear
by itself in a few minutes after
starting the work
The machine does not
dehumidify or has poor
dehumidification effect