8. LOW BATTERY INDICATOR
It is recommended to replace the two “AAA” batteries when the Low
Battery indicator
appears
D
on the display.
9. DEVICE CALIBRATION
NOTE: After the user’s calibration, the device will automatically replace
the original factory calibration settings with the user’s settings.
1. Turn off the device and place it upright on a at, smooth, and
solid surface.
2. If the device tilt exceeds 5°, the display will read ERR indicating
that the user cannot proceed with the calibration.
3. Press and hold the MODE button
6
rst, then press the ON/OFF
button. The display will read “CAL 1”.
4. Press the MODE button
6
again. The “CAL 1” reading on the
display will start ashing
5. Rotate the device 180° without picking it up so that the display
faces away from you.
6. Press the MODE button
6
again. The display will read “CAL
2” and ash. After the “CAL 2” reading disappears, the user’s
calibration will be completed and the display will show the
current angle with high accuracy.
10. CLEANING
Be sure the device is turned off and wipe with a clean, dry, lint-free
cloth. DO NOT use abrasive cleaners or solvents.
11. STORAGE
Remove batteries when device is not in use for a long time. Do not
expose to high temperatures or humidity. After a period of storage in
extreme conditions exceeding the limits mentioned in the Description
section, allow the device to return to normal operating conditions
before using.
12. DISPOSAL/RECYCLE
Do not place electronic equipment in the trash. It must be properly
disposed of or send for recycling in accordance with local regulations.
FIG. A
FIG. B
WRONG
CORRECT
3. GENERAL OPERATION
The “ ” icon
A
indicates the measured surface is horizontal
or vertical;
The “
” and “ ” icons
A
indicate the measured
surface deviates from the horizontal or vertical position;
OPERATION INSTRUCTIONS
Read, understand, and follow these instructions to ensure safe
operation. Failure to observe these warnings can result in serious
injury and/or property damage.
IMPORTANT! Always wear approved eye protection.
CAUTION! No user-serviceable parts; do not attempt to repair.
1. INSTALLING/REPLACING BATTERIES
Loosen the screw and remove the rear battery cover.
Install two new AAA batteries noting proper polarity.
Replace the rear battery cover and secure with screw.
2. POWER ON/OFF
Put the device on a level surface. Press
button
1
to turn on the
device. The display will show the actual slope in degrees. Press and
hold
button
1
for about 3 seconds to turn off the device. After 3
minutes of inactivity, the device will turn off automatically.
The “ ” icons indicate the direction of adjusting the measured surface
to the horizontal or vertical.
“ERR” will appear on the display when the device is tilted 30°
backward or forward. At these angles, the device cannot perform
accurate measurements.
4. UNIT OF MEASUREMENT SELECTION
When the device is on, press the MODE button
6
to change the
measurement unit.
Continue to press the MODE button
6
to choose between degrees
(°), percent (%), mm/m, or IN/FT (in 1/8-inch increments)
5. RELATIVE ANGLE MEASUREMENT
To set the current angle shown on the display to zero, press the ZERO
button
3
and keep the device still for 3 seconds. The measurement
value on the display will change to zero. The
icon
C
will appear
and remain on the display to indicate the device is in the Relative
Angle Measurement mode.
To exit this mode and return to measuring true value, short press the
ZERO button
3
again.
6. MEASUREMENT HOLD
To freeze the measurement value on the display, press the HOLD
button
7
. The
icon
B
will appear on the display.
To return to measuring mode, press the HOLD button
7
again.
7. AUDIBLE INDICATOR
To turn on the alert beeping sound that indicates how close or away
the device is from the horizontal or vertical position, press the
button
1
. The
icon
E
will appear on the display.
The alert sound is continuous when the device is leveled horizontally
or vertically.
The alert sound frequency increases when the device is closer to a
leveled position.
To turn off the audible indicator, short press the
button
1
again.
DESCRIPTION
Digital Angle Gauge and Level is a tool for measuring or setting angles
and checking relative angles. It can also be used as a digital level.
• Measurement range: 4 x 0-90°
• Measurement accuracy: ±0.1° at 0° and 90°
±0.2° at other angles
• Units of measurement: ° (degree), % (percent), mm/m, IN/FT
• Powerful built-in magnet on the bottom of housing secures
attachment to ferromagnetic metals
• The V-groove around the entire perimeter of the device easily
aligns to the axis of conduit and pipes.
• Battery type: 2×1.5V “AAA” batteries included
• Operating temperature: 32° to 104°F (0° to 40°C)
• Storage temperature: 14° to 122°F (-10° to 50°C)
• Dimensions (LxWxH): 2.83"x2.36"x1.26" (72x60x32 mm)
• Net weight (without batteries): 3.63 oz (103 g)
• Drop protection: 5 ft (1.5 m)
• Ingress protection: IP42 Dust and Water
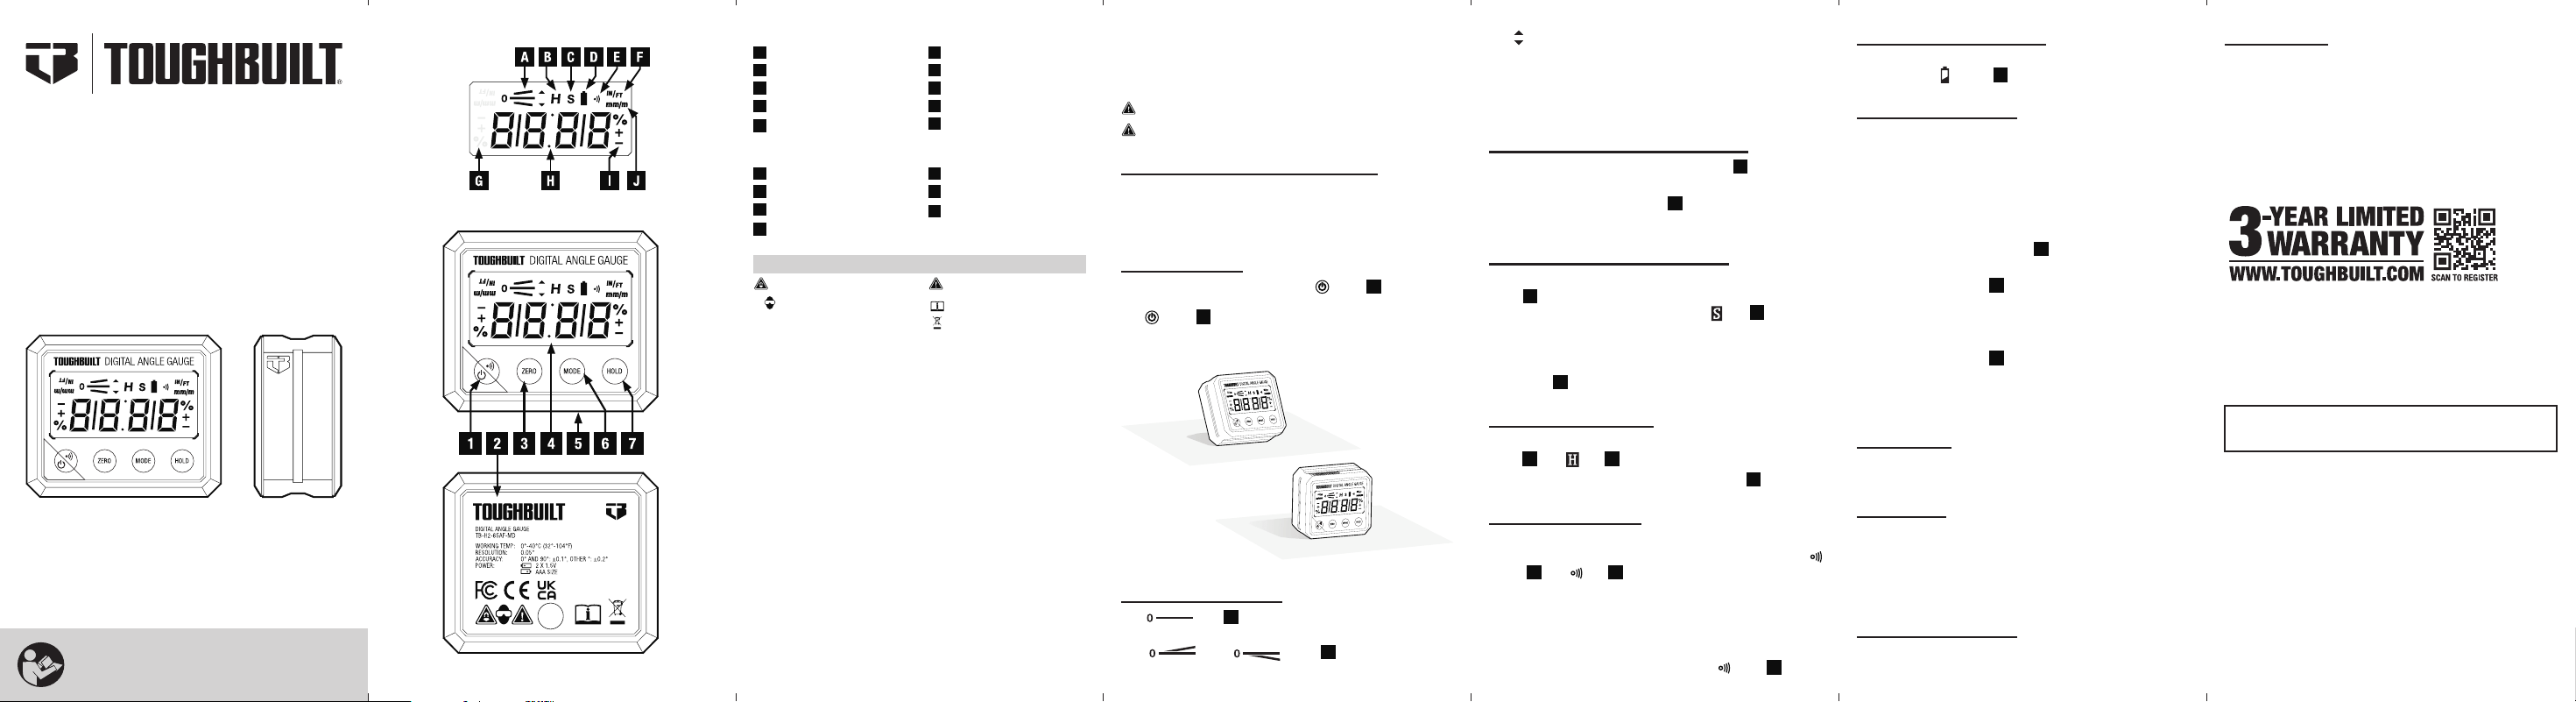
FIG. A LCD DISPLAY
A
Inclination Icon
B
Hold Icon
C
Relative Angle Mode Icon
D
Battery Icon
E
Audible Icon
F
Inch / Foot Icon
G
Reverse Display Icons
H
Measurement Value
I
Accuracy Tolerance Icon
J
Millimeter / Meter Icon
FIG. B DEVICE
1
Power / Audible Indicator
2
Battery Door
3
ZERO Button
4
LCD Display
5
Magnetic Base
6
MODE Button
7
HOLD Button
Strong Magnetic Field
Wear Approved Eye
Protection
Warning or Caution
Read Instructions
Disposal / Recycle
WARNING SYMBOLS ON PRODUCT
TB-H2-65AF-MD
Digital Angle Gauge and Level
OPERATING / SAFETY
INSTRUCTIONS
IMPORTANT!
Read all safety warnings and all
instructions before using.
English
13. WARRANTY
3-YEAR LIMITED WARRANTY
(Proof of purchase is required to register the product)
Alkaline batteries that are shipped with the instrument are not
warranted by ToughBuilt
®
. For warranty details,
visit www.toughbuilt.com
Online Registration
1. Visit https://toughbuilt/register-your-product or scan
the QR code below to begin the product registration.
2. Fill in the form and upload the proof of purchase.
For product registration support, please call our
Customer Service Line:
US: 1 (800) 288-4695
Mexico: +52 55 9225 6212
Canada: +1 844 5751923
Specications are subject to change without notice.
Have product and purchase information available when
contacting ToughBuilt
®
Industries for product support.
TOUGHBUILT INDUSTRIES, INC.
6671 S. Las Vegas Blvd.
Building D, Suite 210
Las Vegas, NV 89119 USA
Made in China
TB-H2-65AF-MD.v8
Date: 2023-01-16
FIG. A
FIG. B
TB-H2-65AF-MD
Calibre y Nivel de Ángulo Digital
INSTRUCCIONES DE
OPERACIÓN/SEGURIDAD
¡IMPORTANTE!
Lea todas las advertencias de seguridad y todas
las instrucciones antes de usar.
Español
INCORRECTO
CORRECTO
3. FUNCIONAMIENTO GENERAL
El ícono “ ”
A
. indica que la supercie medida es horizontal
o vertical.
Los íconos “
” y “ ”
A
. indican que la supercie
medida varía de la posición horizontal o vertical.
8. INDICADOR DE BATERÍA BAJA
Se recomienda cambiar las dos baterías “AAA” cuando aparece el indicador
D
de batería baja en la pantalla.
9. CALIBRACIÓN DEL DISPOSITIVO
NOTA: Después de la calibración del usuario, el dispositivo reemplazará
automáticamente los ajustes de calibración originales de fábrica por los
ajustes del usuario
.
1.
Apague el dispositivo y colóquelo recto sobre una supercie plana, lisa
y sólida.
2. Si la inclinación del dispositivo supera los 5º, la pantalla indicará ERR lo
que signica que el usuario no podrá continuar con la calibración.
3. Mantenga presionado el botón MODO
6
primero; luego presione el
botón ENCENDIDO/APAGADO. En la pantalla se mostrará “CAL 1”.
4. Presione el botón MODO
6
nuevamente. La lectura de “CAL 1” en la
pantalla comenzará a parpadear.
5. Gire el dispositivo 180º sin levantarlo para que la pantalla se aleje de usted.
6. Presione el botón MODO
6
nuevamente. La pantalla mostrará “CAL
2” y parpadeará. Después de que desaparezca la lectura “CAL 2”, la
calibración del usuario estará completa y la pantalla mostrará el ángulo
actual con gran precisión.
10. LIMPIEZA
Asegúrese de que el dispositivo esté apagado y límpielo con un paño seco
y sin pelusa. NO use limpiadores abrasivos o solventes.
11. ALMACENAMIENTO
Quite las baterías cuando el dispositivo no se use por un largo tiempo.
No lo exponga a altas temperaturas o humedad. Después de un período
de almacenamiento en condiciones extremas que excedan los límites
mencionados en la sección Descripción, deje que el dispositivo regrese a
las condiciones de operación normales antes de usarlo.
12. DESECHO/RECICLAJE
No coloque equipos electrónicos en la basura. Se deben desechar de manera
adecuada o enviarse a un centro de reciclaje de acuerdo con las normas locales.
13. GARANTÍA
GARANTÍA LIMITADA DE 3 AÑOS.
(Se requiere comprobante de compra para registrar el producto)
Las pilas alcalinas que se envían con la herramienta no están
garantizadas por ToughBuilt
®
. Para obtener detalles de la garantía,
visite www.toughbuilt.com.
Registro en Línea
1. Visite https://toughbuilt/register-your-product o escanee el código
QR a continuación para comenzar el registro del producto.
2. Rellena el formulario y sube el comprobante de compra.
Para soporte de registro de productos, por favor llame a nuestra Línea
de Servicio al Cliente:
EEUU:
1 (800) 288-4695
México: +52 55 9225 6212
Canadá: +1 844 5751923
Las especificaciones están sujetas a cambios sin previo aviso.
Tenga a mano la información del producto y de la compra cuando se
comunique con ToughBuilt
®
Industries para obtener soporte del producto.
INSTRUCCIONES DE OPERACIÓN
Lea, comprenda y siga estas instrucciones para garantizar el funcionamiento
seguro. El incumplimiento de estas advertencias puede causar lesiones
graves o daños a la propiedad.
¡IMPORTANTE! Siempre protección ocular aprobada.
PRECAUCIÓN! No contiene piezas que puedan ser reparadas por el usuario.
1. INSTALACIÓN Y REEMPLAZO DE BATERÍAS
Aoje el tornillo y quite la tapa de batería trasera.
Instale dos baterías AAA nuevas según la polaridad adecuada.
Reemplace la tapa de batería trasera y asegúrela con un tornillo.
2. ENCENDIDO/APAGADO
Coloque el dispositivo en una supercie plana. Presione el botón
1
. ara encender el dispositivo. La pantalla mostrará la pendiente actual en
grados. Mantenga presionado el botón
1
por unos 3 segundos para
apagar el dispositivo. Después de 3 minutos de inactividad, el dispositivo
se apagará automáticamente.
Los íconos “ ” indica la dirección de ajuste de la supercie medida
horizontal o vertical.
Aparecerá “ERR” en la pantalla cuando el dispositivo esté inclinado a 30º
hacia adelante o hacia atrás. En estos ángulos, el dispositivo no puede
realizar mediciones exactas.
4. SELECCIÓN DE UNIDAD DE MEDIDA
Cuando el dispositivo esté encendido, presione el botón MODO
6
para
cambiar la unidad de medición.
Continúe presionando el botón MODO
6
para elegir entre grados (°),
porcentaje (%), mm/m o IN/FT (en incrementos de 1/8 pulgadas [0,30
cm]).
5. MEDICIÓN DE ÁNGULO RELATIVO
Para establecer el ángulo actual que se muestra en la pantalla a cero,
presione el botón CERO
3
y mantenga el dispositivo quieto por 3
segundos. El valor de medición en la pantalla cambiará a cero. El ícono
C
aparecerá y permanecerá en la pantalla para indicar que el
dispositivo está en modo de Medición de ángulo relativo.
Para salir de este modo y regresar al valor de medición verdadero, vuelva
a presionar el botón CERO
3
.
6. RETENCIÓN DE MEDICIÓN
Para congelar el valor de medición en la pantalla, presione el botón
RETENER
7
. El ícono
B
aparecerá en la pantalla.
Para regresar al modo de medición, vuelva a presionar el botón
B
.
7. INDICADOR AUDIBLE
Para encender el sonido de pitido de alerta que indica a qué distancia se
encuentra el dispositivo de la posición horizontal o vertical, presione el
botón
1
. El ícono
1
aparecerá en la pantalla.
El sonido de alerta es continuo cuando el dispositivo se encuentra
nivelado horizontal o verticalmente.
La frecuencia del sonido de alerta aumenta cuando el dispositivo está
más cerca de una posición nivelada.
Para apagar el indicador audible, presione nuevamente el botón
1
.
DESCRIPCIÓN
El indicador de ángulo digital y nivel es una herramienta para medir y
establecer ángulos y comprobar los ángulos relativos. También se puede
usar como nivel digital.
• Rango de medición: 4 de 0 a 90°
• Precisión de medición: ±0,1° a 0° y 90°±0,2° a otros ángulos
• Unidades de medición: ° (grado), % (porcentaje), mm/m, IN/FT
• Imán potente incorporado en la parte inferior de la carcasa asegura
la adhesión a los metales férricos
• La ranura en V alrededor de todo el perímetro del dispositivo se
alinea fácilmente con el eje de las tuberías y los conductos.
• Tipo de batería: 2 baterías “AAA” de 1,5V incluidas
• Temperatura de operación: de 32° a 104°F (de 0° a 40°C)
• Temperatura de almacenamiento: de 14° a 122°F (de -10° a 50°C)
• Dimensiones (Largo x Ancho x Alto): (72 x 60 x 32mm) 2,83x 2,36x1,26
• Peso neto (sin baterías): 3,63oz (103g)
• Protección contra caídas: 5ft (1,5m)
• Protección contra el ingreso: IP42 resistente al polvo y al agua
FIG. A PANTALLA LCD
A
Ícono de inclinación
B
Ícono de retención
C
Ícono de modo de ángulo relativo
D
Ícono de batería
E
Ícono audible
F
Ícono de pulgada/pie
G
Íconos de pantalla inversa
H
Valor de medición
I
Ícono de tolerancia de precisión
J
Ícono de milimetro/metro
FIG. B DEVICE
1
Indicador de encendido/audible
2
Puerta de la batería
3
Botón CERO
4
Pantalla LCD
5
Base magnética
6
Botón MODO
7
Botón RETENER
Campo magnético fuerte
Usar protección ocular aprobada
Advertencia o precaución
Leer instrucciones
Desecho/Reciclaje
SÍMBOLOS DE ADVERTENCIAS DEL PRODUCTO
Solamente para propósito de México:
Importado por: Toughbuilt Industries México S. De R.l. De C.V.
Calle Amado Nervo, Núm. Ext: 785, Núm. Int.: B,
Col. Ladrón de Guevara, Guadalajara, Jalisco,
México. C.P. 44600, R.F.C.
TIM190726DAA
Hecho en China
