

User Manual
CORDLES S S NOW S HOVEL
S S 1201
geprufte
Sicherheit
Read all safety rules and instructions carefully before operating this tool.
afters er vice@s napfr es hpr o.com
www.snapfr es htools .com

CONTENTS
Contents
..................................................................................................................................................................................
2
.................................................................................................................................................................
.........................................................................................................................................................
9
4-8
..............................................................................................................................................
10
..............................................................................................................................................................
11
...................................................................................................................................................
...............................................................................................................................................................................
13-15
16-17
Connecting the poles
.....................................................................................................................................................
12
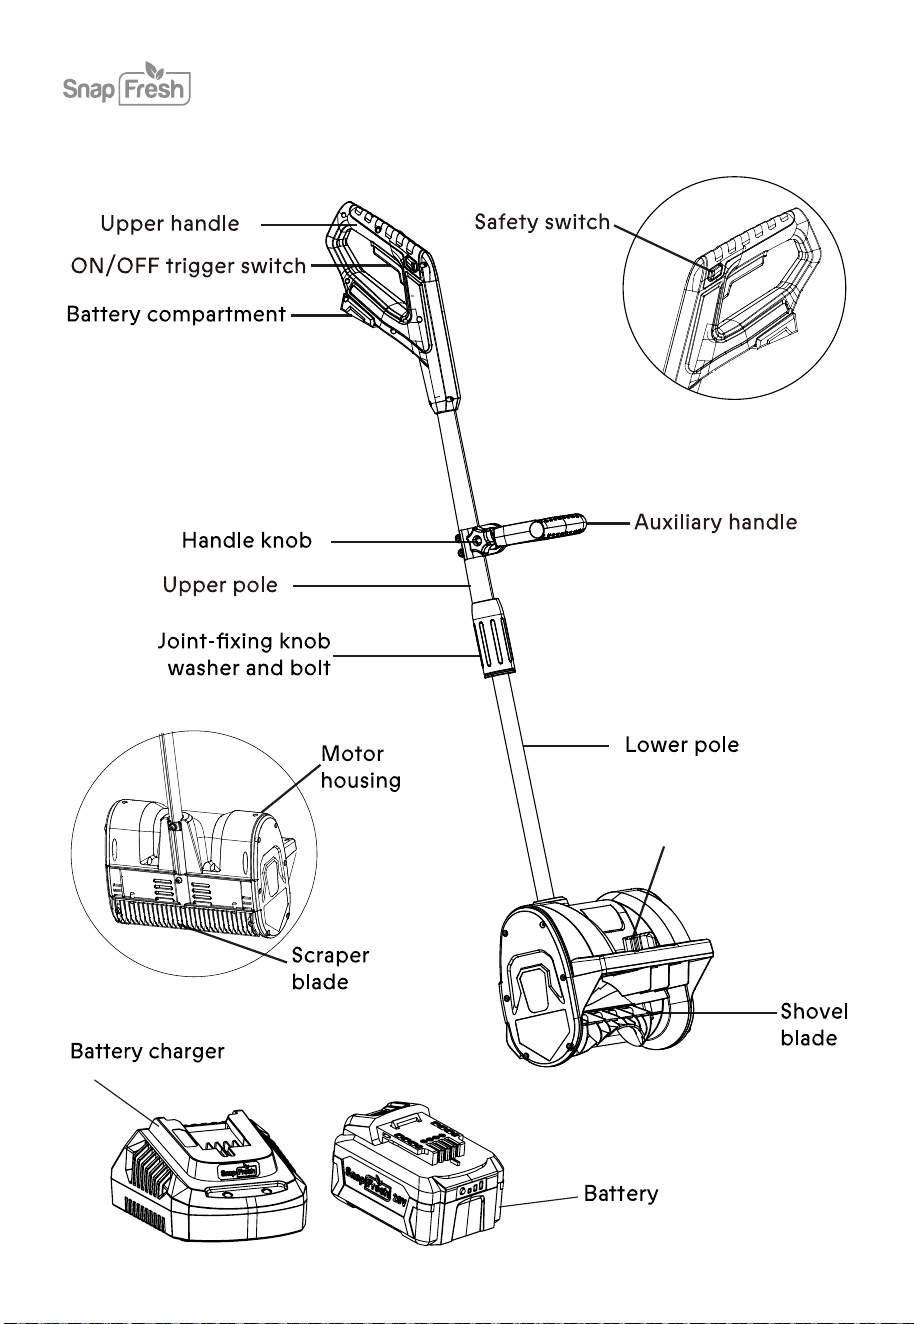
Know your snow shovel
Battery
.............................................................................................................................................................................
..............................................................................................................................................................................
18
19
Maintenance
Warranty
General asfety warnnings
Machine information
Safety warnings
........................................................................................................................................................................................
3
Symbols
Specific safety rules
2

Observe caution and safety notes.
SYMBOLS
3
Read the user manual.
The following symbols are used in the user manual or on the product:
Wear hearing protection, dust protection mask, protective
glasses and protective gloves, heavy footwear.
Dispose of packaging and appliance
in an environmentally friendly way!

SAFETY WARNINGS
GENERAL POWER TOOL SAFETY WARNINGS
WARNING! Read all safety warnings and all instructions. Failure to follow the warnings and
instructions may result in electric shock, fire or serious injury.
Save all warnings and instructions for future reference.
The term “power tool” in the warnings refers to your mains-operated (corded) power tool or
battery-operated (cordless) power tool.
1)
Work area safety
.
.
.
.
.
.
.
.
.
Keep the work area clean and well lit. Cluttered or dark areas invite accidents.
Do not operate power tools in explosive atmospheres, such as in the presence of flammable
liquids, gases or dust. Power tools create sparks which may ignite the dust or fumes.
Keep children and bystanders away while operating a power tool. Distractions can cause you to
lose control.
2) Electrical safety
Power tool plugs must match the outlet. Never modify the plug in any way. Do not use any
adapter plugs with earthed (grounded) power tools. Unmodified plugs and matching outlets
will reduce the risk of electric shock.
Avoid body contact with earth
ed or grounded surfaces, such as pipes, radiators, ranges and
refrigerators. There is an increased risk of electric shock if your body is earthed or grounded.
Do not expose power tools to rain or wet conditions. Water entering a power tool will increase
the risk of electric shock.
Do not abuse the cord. Never use the cord for carrying, pulling or unplugging the power tool.
Keep cord away from heat, oil, sharp edges or moving parts. Damaged or entangled cords
increase the risk of electric shock.
When operating a power tool outdoors, use an extension cord suitable for outdoor use. Use of
a cord suitable for outdoor use reduces the risk of electric shock.
If operating a power tool in a damp location is unavoidable, use a residual current device (RCD)
protected supply. The use of an RCD reduces the risk of electric shock.
4

5
.
.
3)
Personal safety
Stay alert, watch what you are doing and use common sense when operating a power tool. Do not
use a power tool while you are tired or under the influence of drugs, alcohol or medication.
A moment of inattention while operating power tools may result in serious personal injury.
Use personal protective equipment. Always wear eye protection
.
Protective equipment such as
dust mask, non-skid safety shoes, hard hat, or hearing protection used for appropriate conditions
will reduce personal injuries.
.
.
.
.
.
Prevent unintentional starting. Ensure the switch is in the off-position before connecting to power
source or battery pack, picking up or carrying the tool. Carrying power tools with your finger
on the switch or energizing power tools that have the switch on invites accidents.
Remove any adjusting key or wrench before turning the power tool on. A wrench or a key left
attached to a rotating part of the power tool may result in personal injury.
Do not overreach. Keep proper f
ooting and balance at all times. This enables better control of the
power tool in unexpected situations.
Dress properly. Do not wear loose clothing or jewelry. Keep your hair, clothing and gloves away
from moving parts. Loose clothes, The jewelry or long hair can be caught in moving parts.
If devices are provided for the connection of dust extraction and collection facilities, ensure these
are connected and properly used. The use of dust-collection can reduce dust, related hazards.
.
.
.
.
.
.
.
4)
Power tool use and care
Do not force the power tool. Use the correct power tool for your application. The correct power
tool will do the job better and safer at the rate for which it was designed.
Do not use the power tool if the switch does not turn it on and off. Any power tool that cannot be
controlled with the switch is dangerous and must be repaired.
Disconnect the plug from the power source and/or the battery pack from the power tool before
making any adjustments, changing ac
cessories, or storing power tools. Such preventive safety
measures reduce the risk of starting the power tool accidentally.
Store idle power tools out of the reach of children and do not allow persons unfamiliar with the
power tool or these instructions to operate the power tool. Power tools are dangerous in the
hands of untrained users.
Maintain power tools. Check for misalignment or binding of moving parts, breakage of parts and
any other condition that may affect the power tool’s operation. If damaged, have the power tool
repaired before use. Many accidents are caused by poorly maintained power tools.
Keep cutting tools sharp and clean. Properly maintained cutting tools with sharp cutting edges are
less likely to bind and are easier to control.
The use of the power tool, accessories and tool bits, etc. in accordance with these instructions,
taking into account the working conditions and the work to be performed. Use of the power tool
for operations different from those intended could result in a hazardous situation.

•
6
.
.
.
5)
Battery tool use and care
Recharge only with the charger specified by the manufacturer. A charger that is suitable for one
type of battery pack may create a risk of fire when used with another battery pack.
Only use power tools with specifically designated battery packs. Use of any other battery packs
may create a risk of injury and fire.
When the battery pack is not in use, keep it away from other metal objects, like paper clips, coins,
keys, nails, screws or other small metal objects that can make a connection from one terminal to
another. Shorting the battery terminals together may cause burns or a
fi
re.
.
Under abusive conditions, liquid may be ejected
from the battery; avoid contact. If contact
accidentally occurs, flush with water. If liquid contacts eyes, additionally seek medical help.
Liquid ejected from the battery may cause irritation or burns.
6)
Service
Have your power tool serviced by a qualified repair person using only identical replacement
parts. This will ensure that the safety of the power tool is maintained.
.
.
.
Do not use a battery pack or tool that is damaged or modified. Damaged or modified batteries
may exhibit unpredictable behaviour resulting in fire, explosion or risk of injury.
Do not expose a battery pack or tool to
fi
re or excessive temperature. Exposure to
fi
re or
temperature above 130 °C may cause explosion. NOTE The temperature „130 °C“ can be replaced
by the temperature „265 °F“.
Follow all charging instructions and do not charge the battery pack or tool outside the
temperature range speci
fi
ed in the instructions. Charging improperly or at temperatures outside
the speci
fi
ed range may damage the battery and increase the risk of
fi
re.
•
Never service damaged battery packs. Service of battery packs should only be performed by the
manufacturer or authorized service providers.

If under extreme conditions any electrolyte should escape from the battery, it's essential to
avoid contact with skin. If electrolyte does come into contact with your skin, rinse it off with
water. In the event of electrolyte contact with your eyes, it's essential to consult a doctor.
7
•
•
•
Before the use of the charger and the battery pack, read the instruction manual for it carefully.
During the charging process, the current used should correspond to the current of the battery
charger.
Never let moisture, rain or splashed water reach the charging location. The ambient temperature
must not be less than 0ºC nor exceed 40ºC when charging. Do not use or store snow shovel or
batteries in temperatures in excess of 49ºC.
•
Battery packs which are defective or damaged, or can no longer be re-charged, must be
disposed of as hazardous waste. Hand them over at a special collection point. Never harm our
environment. Do not throw unusable battery packs away into the domestic waste, into fire or
into water.
•
If the electrical cable is damaged, it may only be replaced by the supplier or by his repair
workshop. Have repairs carried out only by an authorized specialist only.
•
Use only battery packs that have been produced by the original manufacturer. Use only the
charger supplied with your snow shovel.
•
Always keep the surface of the charger free from dust and dirt.
•
Insert the battery pack into the charger. Follow the guidelines provided concerning polarity.
•
Always remove the battery pack before working on the snow shovel.
•
When the battery pack is outside the snow shovel, cover the contacts to avoid short circuits
(e.g. from tools or metal surfaces)
•
•
•
Do not throw battery packs into water or fire, risk of explosion!
Protect the battery pack from impacts, and don’t attempt to open it.
Never discharge the battery pack completely, and recharge occasionally if not used for a
prolonged period.
BATTERY PACK AND CHARGER SAFETY INSTRUCTIONS
Charge only BBT-DC20A and BBT-DC40A type rechargeable battery packs with the charger.
Other types of batteries may burst causing personal injury and damage.

Wear hearing protection while operating the power tool.
Wear eye protection while operating the power tool.
Use a dust mask or respirator for applications that generate dust.
Wear foot protection while operating the power tool.
It is recommended that the charger is always supplied via a residual current device with a
rated current of 30mA or less.
8

MACHINE INFORMATION
Technical Specifications
9
Only use the following batteries of the SnapFresh
power 20V battery platform. Using any other
batteries could cause serious injury or damage the tool.
BBT-DC20A 20V, 2Ah Lithium-ion
BBT-DC40A 20V, 4Ah Lithium-ion
The following charger can be used to charge these batteries.
BBT-YFT20V Quick charger
BBT-XH20V Rapid charger
Model No.
SS1201
Rated voltage 20V
Clearing width 12'' / 305mm
Maximum cleaning depth
Maximum cleaning width
Maximum throwing distance 5m
Weight 7.7 lb
The batteries of the SnapFresh power 20V battery platform are interchangeable with all the
SnapFresh power 20V battery platform tools.
Model Number
BBT-DC40A
Battery type
Lithium-ion
Voltage
20V
Capacity
4.0 Ah
Recommended charger
BBT-YFT20V BBT-XH20V
Weight
0.6 kg
Model Number
BBT-XH20V
Charger input
100-240V~60Hz 65W
Charger output
21V
2.5A
Charging time 2Ah battery
60 minutes
Charging time 4Ah battery
120 minutes
Recommended batteries
BBT-DC20A, BBT-DC40A
Weight
0.36 kg

10
ALL OPERATORS MUST READ THESE INSTRUCTIONS BEFORE USE
ELECTRICAL SAFETY
GENERAL SAFETY WARNINGS
Before using this tool or any of its accessories, read this manual and follow all Safety Rules
and Operating Instructions. The important precautions, safeguards and instructions appearing
in this manual are not meant to cover all possible situations. It must be understood that
common sense and caution are factors which cannot be built into the product.
Use proper circuit protection.
Ventilation openings in batteries and chargers must always be to allow cooling air to circulate
freely. Air vents that are blocked, restricted or covered may result in the battery or charger
overheating. Overheating may lead to damage to the tool or cause a fire resulting in possible
serious injury.
WORK AREA SAFETY
Keep work area clean and well lit. Cluttered or dark areas invite accidents.
Do not operate snow shovel in explosive atmospheres, such as in the presence of flammable
liquids, gases, or dust. Power tools create sparks which may ignite dust or fumes.
Keep children and bystanders away while operating a power tool.
Distractions can cause you to lose control.
Do not expose the snow shovel to rain or wet locations. Water entering a shovel will increase the
risk of electric shock.
WEAR EYE PROTECTION
WEAR A FACE MASK
WEAR EAR PROTECTION

To clear the rotor housing:
1. Shut the motor off and remove the battery.
2. Wait 10 seconds to be sure the rotor blades have come to a complete stop.
3. Always use a clean-out tool, not your hands, to free the rotating blades.
Check all fasteners at frequent intervals for proper tightness to ensure that the equipment is In
safe working condition.
Always refer to the operators’ manual for important details, such as how to properly store your
cordless snow shovel for an extended period of time.
Maintain or replace safety and instruction labels as needed.
Run the machine a few minutes after throwing snow to prevent the rotor blades from freezing.
11
Clearing a clogged rotor housing
Maintenance and storage
SPECIFIC SAFETY RULES
Read, understand and follow all instructions on the machine and in the manual before
operating this unit.
Hand contact with the rotating rotor blades Inside the rotor housing is the most common
cause of Injury associated with cordless snow shovels. Never use your hands to clear a
clogged rotor housing.
.
.
.
.
.
.
.
Thoroughly familiarize yourself with the controls and the proper use of the equipment. Know
how to stop the unit and disengage the controls quickly.
Children should never be allowed access to the equipment. Adults should never operate the
equipment without carefully reading and understanding these instructions
Keep the area of operation clear of all persons, particularly small children and Exercise caution
to avoid slipping or falling.
Thoroughly inspect the area where the equipment is to be used and remove all doormats, sleds,
boards, wires and other foreign objects.
Do not attempt to clear snow from a gravel or crushed rock surface. This product is intended for
use only on paved surfaces.
Never attempt to make any adjustments while the motor is running (except when specifically
recommended by the manufacturer).
Do not put hands or feet near or under rotating parts. Keep clear of the discharge opening at all
times.
Exercise extreme caution when operating on or crossing gravel drives, walks or roads. Stay
alert for hidden hazards or traffic.
After striking a foreign object, stop the motor. Thoroughly inspect the cordless snow shovel for
any damage, and repair the damage before restarting and operating the cordless snow shovel.
If the unit should start to vibrate abnormally, stop the motor and check the unit immediately to
ascertain the cause. Vibration is generally a sign of trouble.
Stop the motor and remove the battery whenever you leave the operating position, when
transporting the unit, before unclogging the rotor blade housing and when making any repairs,
adjustments or inspections to the unit.
When cleaning, repairing or inspecting the cordless snow shovel, make sure that all moving
parts have come to a complete stop before beginning work. Exercise extreme caution when
operating on slopes.
Look behind and use care when backing up with the cordless snow shovel. Never operate the
cordless snow shovel without good visibility or light. Always be sure of your footing, and keep a
firm hold on the handles. Walk, never run with the unit.
.
.
.
.
.
.
.
.
.
12
KNOW YOUR SNOW SHOVEL
Adjustable lever
(Adjustsnow
throwing direction)
13
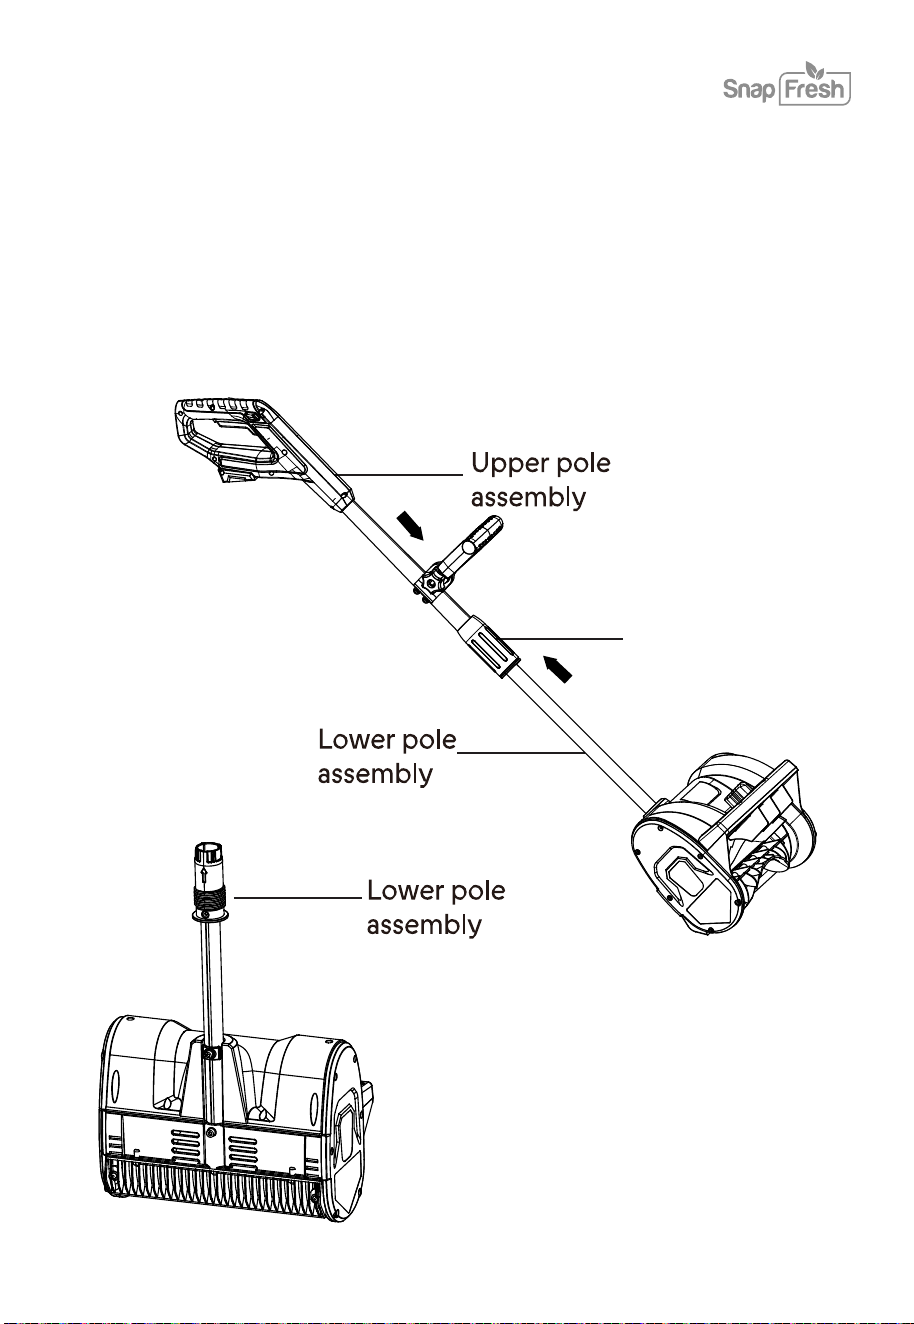
CONNECTING THE POLES
NOTE: You may have to carefully move the wiring inside the tube to one side if it. Blocks the path of
the bolt.
2.Assemble the upper pole and lower pole with the joint-fixing knob.
1. Ensure that both the upper pole and lower pole are properly aligned and ready for installation.
Joint-fixing knob
14
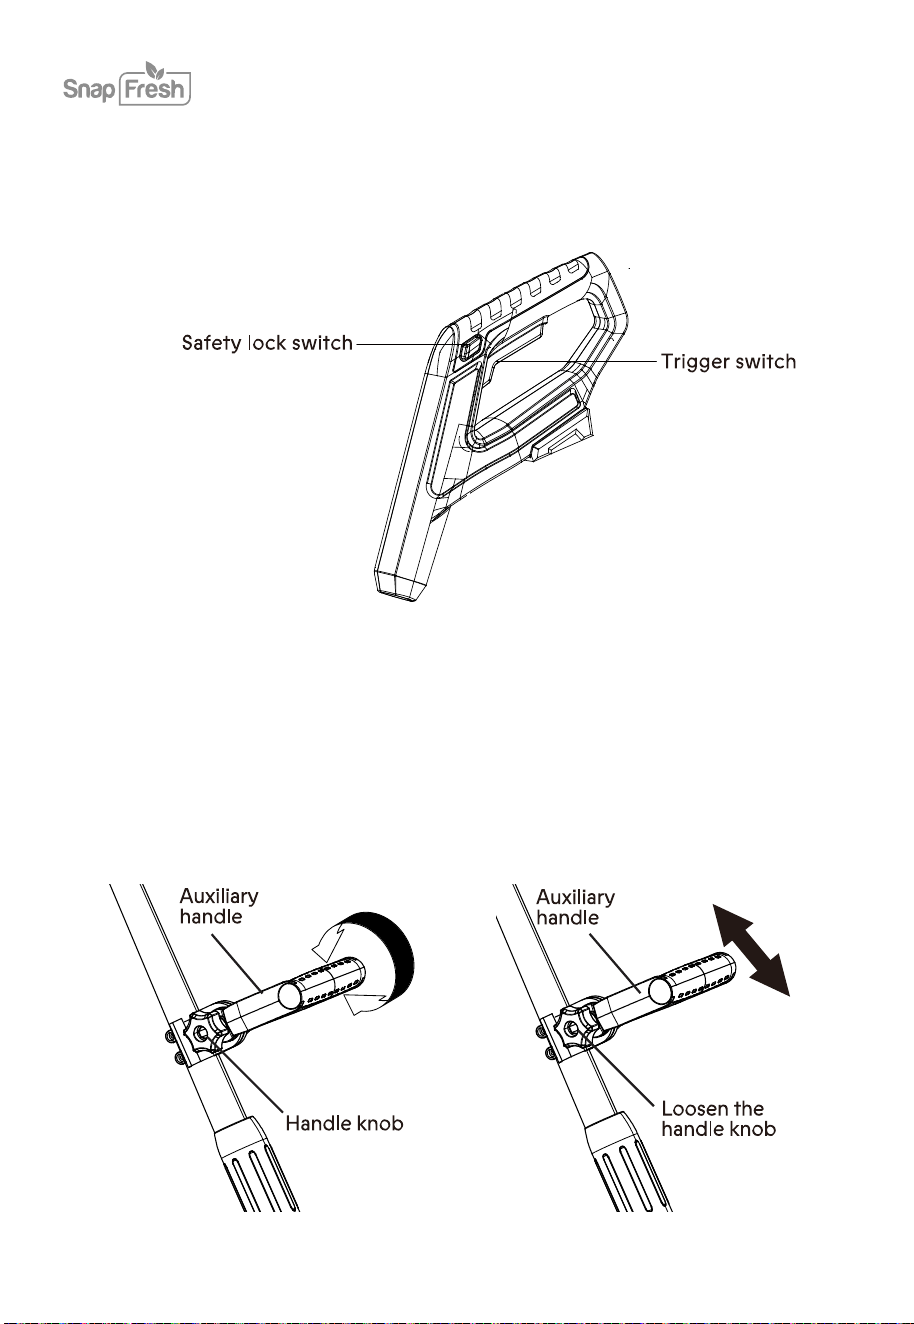
Starting the machine
To start the cordless snow shovel, push and hold the safety lock switch on the side of the handle
grip with your thumb and then squeeze the trigger switch with your fingers. Once the machine
powers on, you can release the safety lock switch and proceed with operation.
To stop the cordless snow shovel, release the trigger switch.
To adjust the angle of the auxiliary handle, follow the instructions below.
1. Stop the machine and remove the battery. Wait until the blade comes to a complete stop.
2. Loosen the auxiliary handle by turning the handle knob counterclockwise Rotate the auxiliary
handle to a comfortable position.
Handle adjustment

15
3. Fix the handle by tightening the handle knob. Insert the battery and resume working
To adjust the location of the auxiliary handle, follow the instructions below.
1. Stop the machine and remove the battery. Wait until the blade comes to a complete stop.
2. Loosen handle knob slightly and slide auxiliary handle as needed to desired location. Retighten
handle knob securely Insert the battery and resume working NOTE: In order to prevent the
auxiliary handle from moving around or sliding on the pole, be sure to tighten securely.
1. Start the cordless snow shovel. Push the shovel forward at a comfortable rate, yet slow enough
to clear the path completely. The clearing width of the snow shovel and the depth of snowfall
should dictate your forward speed.
2. Direct the snow discharge to the right or to the left by holding the cordless snow shovel at a
slight angle.
3. To remove snow most efficiently, throw the snow downwind and slightly overlap each swath.
4. This cordless snow shovel cuts a path 12 /305mm wide and up to 5.11 / 103mm deep.
5. When clearing deeper drifts, hold the cordless snow shovel by the upper and lower handles and
use a swinging or sweeping motion.
6. Remove the battery after using the cordless snow shovel. Hang the shovel so it will not be
misplaced or damaged.
Operating Tips
16
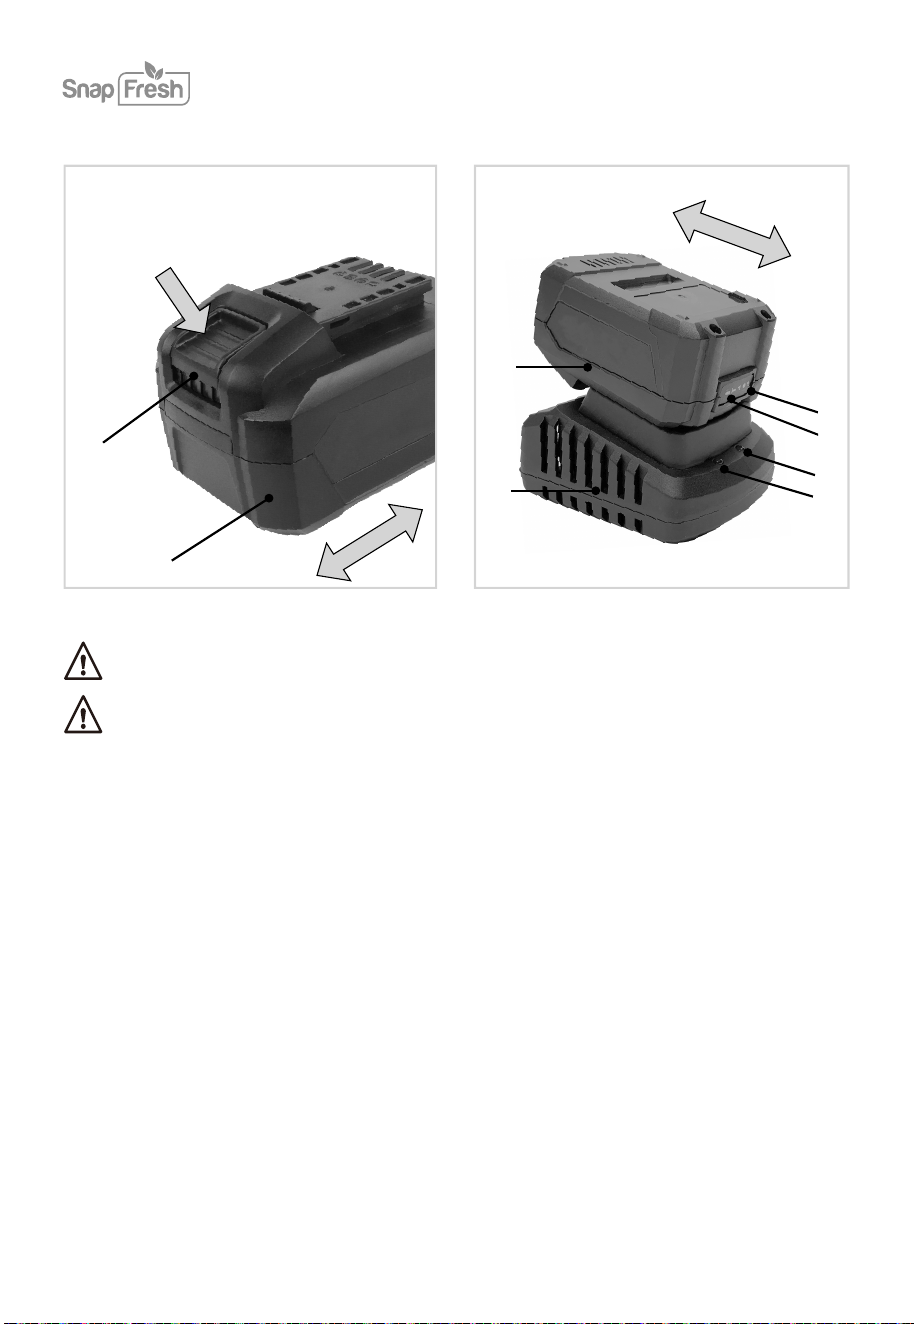
BATTERY
2
1
1
4
6
6
3
5
Before any work on the power tool, remove the battery.
The battery must be charged before first use.
1. Battery
2.
3.
Battery unlock button
4. Battery LED indicators button
5.
Battery LED indicators
6.
Charger
DESCRIPTION
Charger LED indicators

17
•
To check the battery charge status, push the button on battery shortly.
•
The battery has 3 lights indicating the charge level, the more lights that burn, the more charge
the battery has left.
•
When the lights are not burning it means the battery is empty and must be charged immediately.
•
Take the battery (1) from the machine.
•
Turn the battery (1) to upside down position and slide it onto the charger (5).
•
Push the battery until it is fully pushed into the slot.
•
Plug the charger plug into an electrical outlet and wait for a while. The LED indicators (3)
charger (5) will lighten up and show the charger status.
•
Fully charging the 2Ah battery may take up to 60 minutes.
•
Fully charging the 4Ah battery may up to 120 minutes.
After the battery is fully charged remove the charger plug from the outlet and remove the battery
from the charger.
The LED indicators (3) will lighten up and show the charger status.
Red LED Status
Off
Off
Off
On
On
Off
No power
Standby mode:
-No battery is
inserted or,
-Battery inserted
but charging has
finished
Battery charging in
progress
Green LED status Charger status
Checking the battery charging status
Charging the battery with the charger

18
MAINTENANCE
Attention! Always remove the battery before carrying out any work on the machine.
To clean the tool, use a dry or moist, but not wet towel. Many cleaning agents contain chemical
substances which may cause damage to the plastic parts of the tool. Do not use any strong or
flammable cleaners such as petrol, paint thinner, turpentine or similar cleaning agents. Always
keep air ventilation holes free of dust deposits to prevent overheating. Wear a dust mask and
use a soft brush to clean the ventilation holes.
Servicing this tool must be done by a qualified person only. Service or maintenance performed
by unqualified personnel could result in a risk of injury.
If the tool does not work properly, return the tool to a service facility for repair.
If the electrical cable is damaged, it may only be replaced by the supplier or by his repair
workshop.
Battery disposal:
This symbol indicates that the batteries supplied with this product must not be treated as
general household waste. To remove them safely, you must bring them to your retailer or
discard them in special containers provided for the community. At the end of the device's
life, remember to remove the batteries.

WARRANTY
Ningbo Winbay Technology Co.,Ltd. (Hereinafter referred to as Babytec) warrants this product
against defects in materials and/or workmanship under normal use for a period of ONE (1) YEAR
from the date of purchase by the original purchaser (’Warranty Period’).
The following circumstances are excluded from this guarantee:
•
Repairs and or alterations have been made or attempted to the machine by unauthorized service
centers;
•
Normal wear and tear;
•
The tool has been abused, misused or improperly maintained;
•
Non-original spare parts have been used.
If a defect arises and a valid claim is received within the Warranty Period, at its option, Babytec
will either 1) repair the defect at no charge, using new or refurbished replacement parts, or 2)
replace the product with a new product that is at least functionally equivalent to the original
product, or provide a store credit in the amount of the purchase price of the original product.
A replacement product or part, including a part installed in accordance with instructions product
by Babytec, assumes the remaining warranty of the original product. When a product or part is
exchanged, any replacement item becomes your property and the replaced item becomes
Babytec’s property. When a store credit is given, the original product must be returned to Babytec
and becomes Babytec’s property.
To obtain warranty service, e-mail Babytec Warranty Service at [email protected].
Please be prepared to describe the product that needs service and the nature of the problem.
To extend your warranty, please register at snapfreshpro.vip
Allrightsreservedby Ningbo Babytec Technology Co.,Ltd
(Monday - Friday 9 a.m. - 5 p.m. EST 6 a.m. - 2 p.m. PST)
+1 833 635 0955
19