USER MANUAL
SLUSHMACHINE
MAX 62oz
MIN 16oz
Model No.: HXR-18
For your safety and correct use of the product,
please read the instructions carefully before use.


CONTENTS
SAFETY INSTRUCTIONS ······················ 1
···················· 4
FEATURES OF THE PRODUCT
····················· 4
KNOWING YOUR MACHINE
························
4
Component Introduction
····························
5
Operation Panel
··························
5
Function Instructions
························
10
························
11
The Standard Of Sugar
The Standard Of Alcohol
····························
11
Pre-Cleaning
····························
12
Parts Cleaning
······················
7
OPERATION INSTRUCTIONS
·······················
10
MATERIAL REQUIREMENT
···················· 11CLEANING AND MAINTENANCE
························· 13TROUBLESHOOTING
SAFETY INSTRUCTIONS
Please read all the instructions, read and review the operation and use instructions.
1
Read and review the instructions for operation and use.
Indicates that there is a risk of personal injury, death or significant property
damage if the warning contained in this symbol is ignored.
Indicates that there is a risk of personal injury, death or significant property.
Flammable material.
For indoor and home use only.
When using electrical appliances, the basic safety precautions should always be followed,
including:
There is a risk of fire or explosion. Use a flammable refrigerant. Do not puncture the refriger-
ant line. Appropriately handle the product under applicable federal or local regulations on
flammable refrigerants.
Danger:
To reduce the risk of personal injury, fire, electric shock or property damage, basic safety
precautions must always be followed, including the following warnings and subsequent
instructions.
When using electrical appliances, the basic safety precautions should always be followed,
including:
1. Read all the instructions on the electrical appliances and their accessories.
2. Observe and obey all warnings and instructions. Possible user problems concerning about
electrical connections and moving components contained.
3. Check all content lists to ensure you have all parts needed to operate the equipment
safely.
4. Turn off the device and then unplug the device from the power outlet when not in use.
Before cleaning, assembling or removing the parts, unplug the plug. Pull out the plug from
the socket and never by grabbing and pulling the power cord lines.
Warning:

SAFETY INSTRUCTIONS
2
5. Have access to food. Perform the operation according to the washing instructions
involved in this manual.
6. Do not operate any equipment with damaged wires or plugs, or after the equipment fails
or falls off or damaged. This device has removable parts. If damaged, please contact the
after-sales service for repair.
7. This device has important marks on the plug. The entire power cord cannot be replaced. If
damaged, please contact the after-sales service.
8. Extension cord should not be used with this device.
9. To prevent electric shock, the power cord is not allowed to contact any form of liquid.
10. Do not let the wire wrap around the label or the edge of the counter. The wires may get
stuck and pull the equipment out of the working surface.
Do not allow equipment or wires to touch hot surfaces, including stoves and other heating
appliances.
11. Always use the machine on the dry and flat surfaces.
Children are not allowed to operate this device or use as a toy. Close supervision must be
performed when any appliance is used near the children.
12. The device is not intended to be used by persons with reduced sensory or mental capaci-
ty or lacking experience and knowledge unless they are supervised by individuals responsi-
ble for their safety or with guidance regarding the use of that knowledge.
13. Only use accessories supplied by the product or recommended by the manufacturer. The
use of accessories not recommended or sold may cause fire, electric shock or injury. During
operation, keep the hands, hair, and clothing away from the container.
14. Avoid contacting with moving parts when operating and handling appliances. Do not
heat containers or accessories in the microwave.
15. Always maintain ventilation openings in the equipment housing or built-in structure to
avoid obstacles. Do not use mechanical equipment or other methods to accelerate the
defrosting process except with the equipment recommended by the manufacturer.

SAFETY INSTRUCTIONS
3
16. Do not damage the refrigerant circuit.
17. Do not add frozen fruits, frozen vegetables, or ice to the running machine.
18. Do not add hot ingredients.
19. Do not fill the container beyond the maximum line. Do not leave the machine unattended
when in use.
20. Maintain air circulation at the rear and both sides of the unit so that the compressor can
operate normally and do not overheat.
21. When using appliance, ensure that the sides and back are at least 4 inches (10.2cm) from
the wall.
22. Pay attention to the formula of raw materials that the sugar content must contain more
than 10%, soda content must contain more than 16%, alcohol (wine, beer, etc.) must contain
between 2.8% and 16% so as not to affect the normal use of the machine and damage the
machine.
23. The machine shall not be inverted during transportation, and the tilt angle shall not
exceed 45 degrees when inclined.
24. Please do not turn over the machine. If there is any inversion, it is recommended that the
machine be placed for 2 hours before turning on.
25. For the installation, keep the machine away from direct sunlight, and choose a flat, dry,
dust-free and well-ventilated ground or table. The ambient temperature should not be
higher than 90℉(32℃)and keep the machine far away from the heat source.
26. Reach your hands into the base of the machine, lift it up and gently place it on the
countertop.
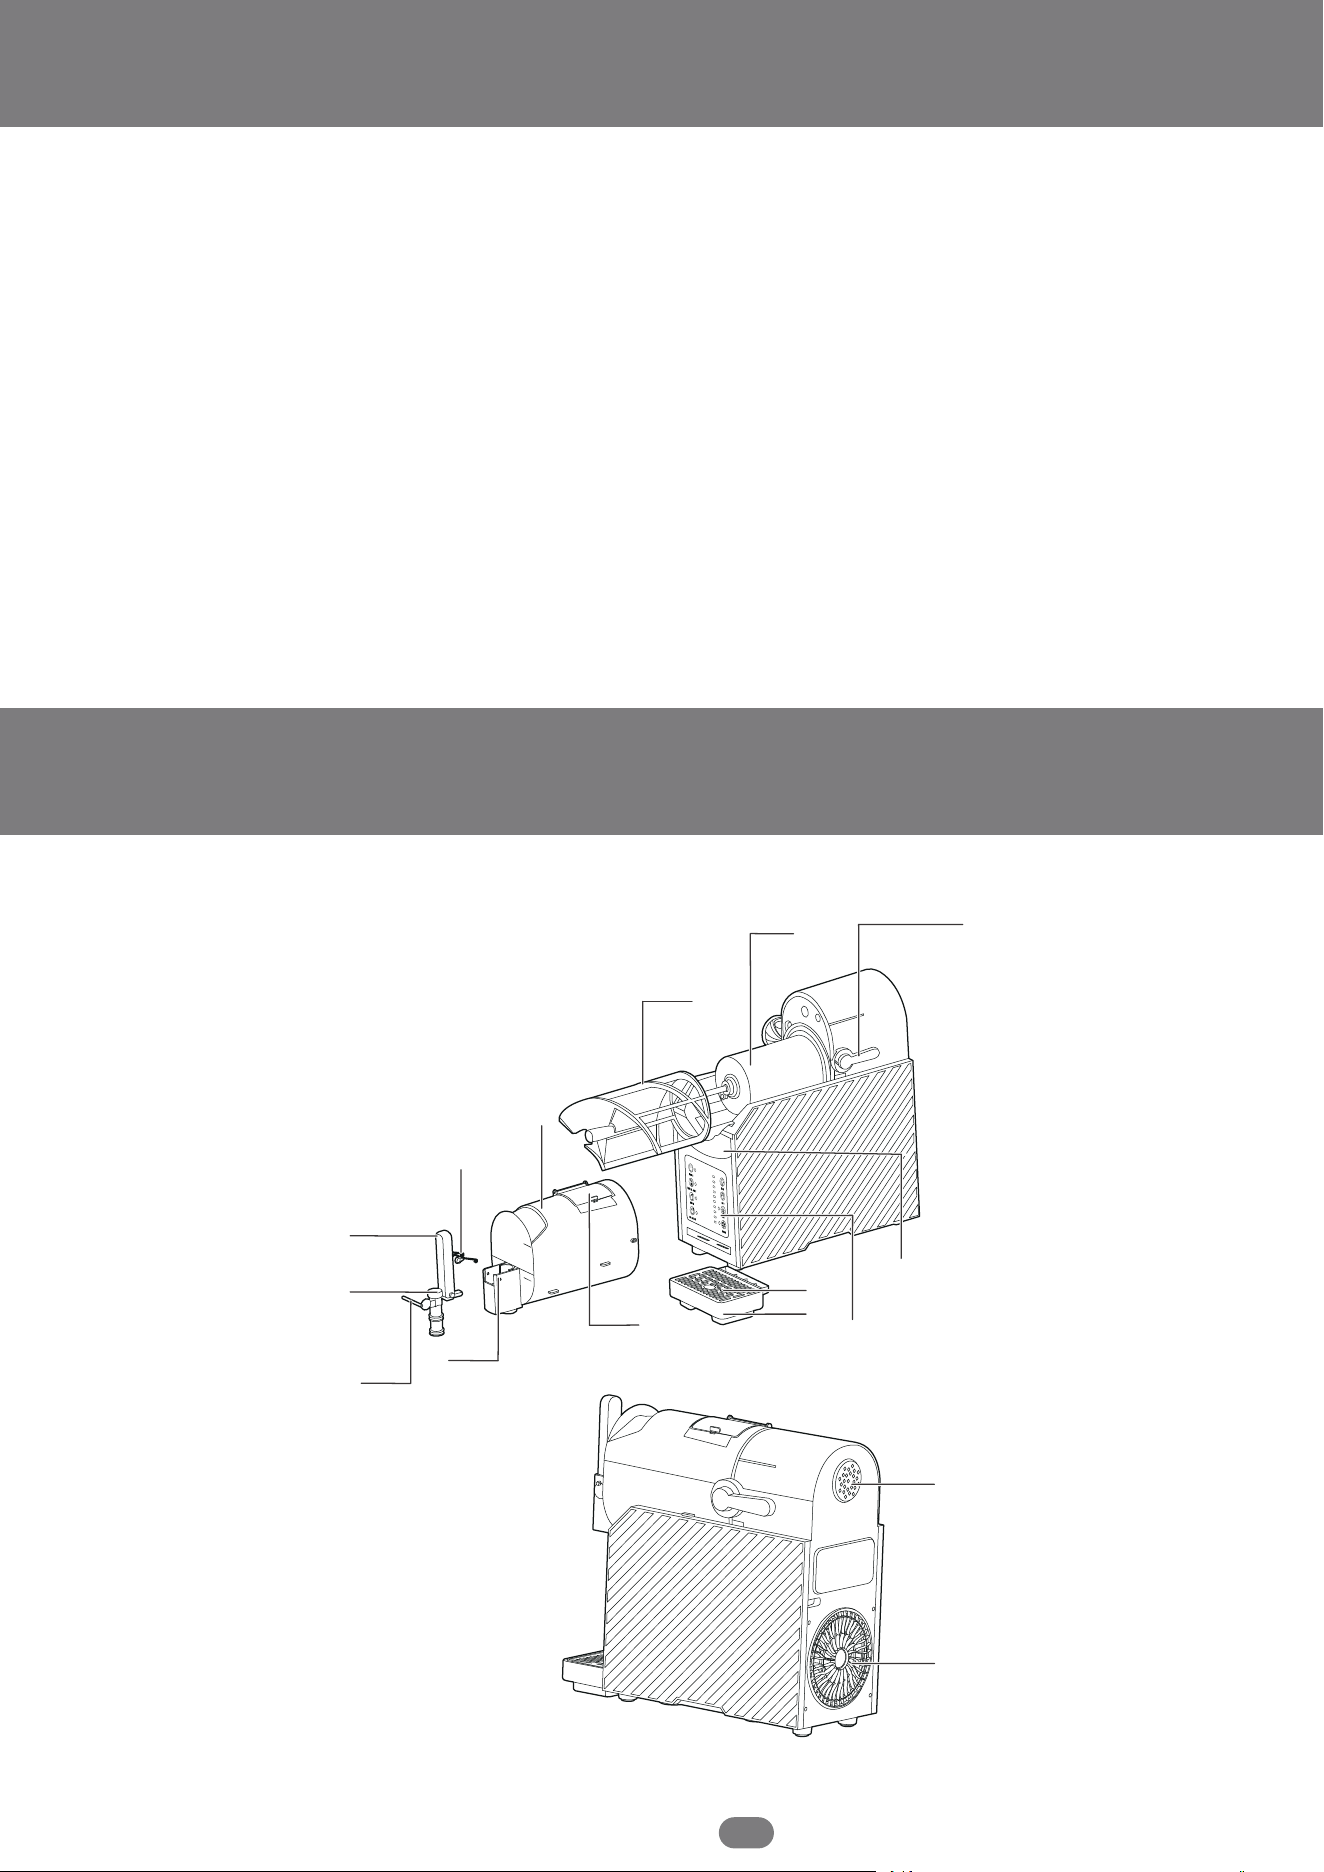
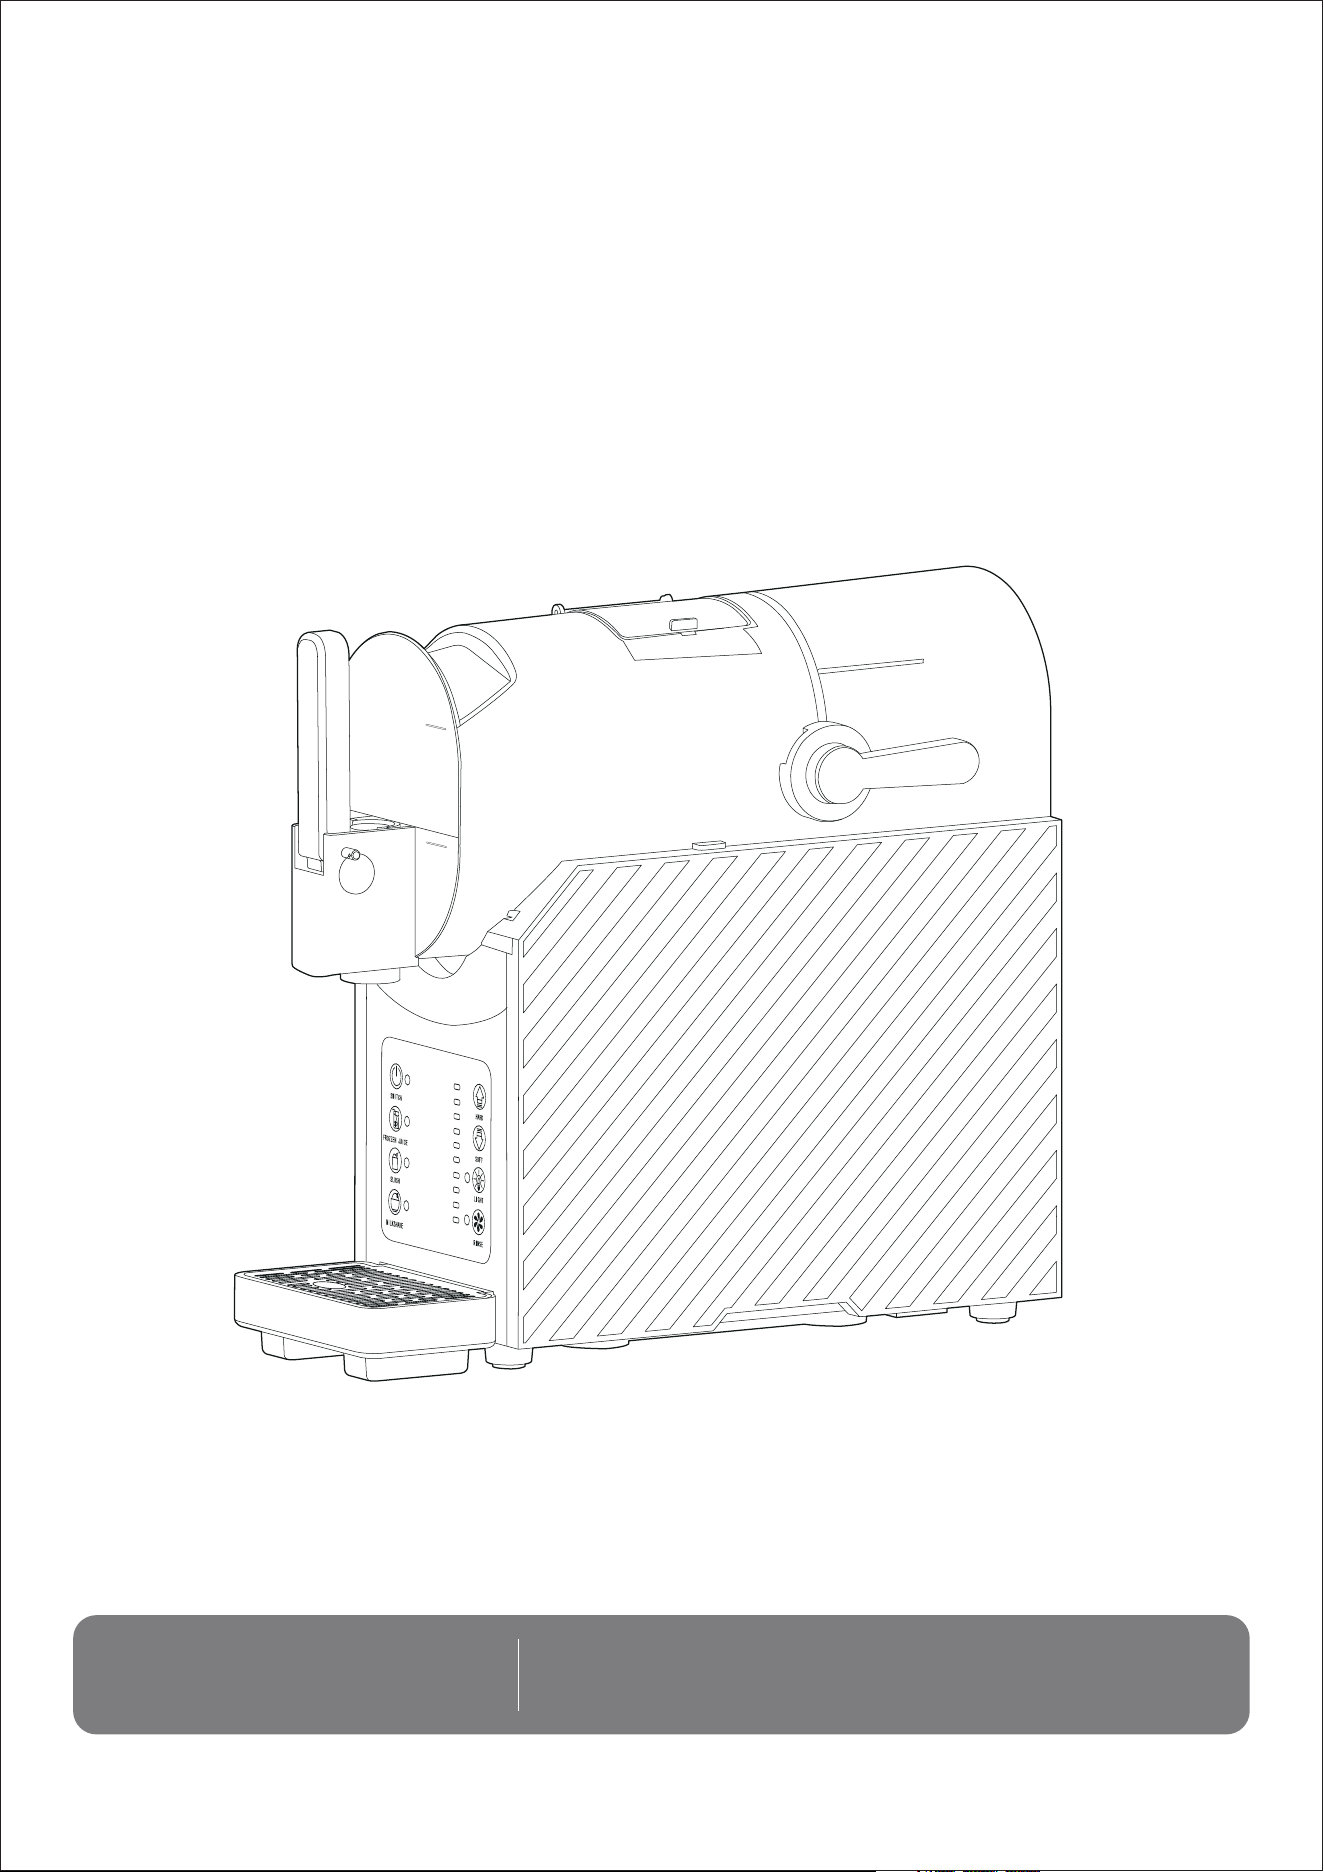
FEATURES OF THE PRODUCT
KNOWING YOUR MACHINE
4
Component Introduction
11
10
MAX 62oz
MIN 16oz
8
9
14
6
3
5
7
1
2
4
12
13
16
15
1 - Elegant and fashionable appearance.
2 - Fast formation and delicate taste of the drinks.
3 - Customization of your favorite taste.
4 - Intelligent and quiet mixing.
5 - Electricity saving, make it last longer.
7 - Quick installation and detachment of the bucket for convenient cleaning.
8 - With human body sensing and intelligent refrigeration.
9 - Detachable parts for easy clean and healthy use.
Suitable for a large amount of drinks, snow melt, milkshake, soda, coffee, beer and
other recipes.
6 -
KNOWING YOUR MACHINE
5
Operation Panel
Function Instructions
NO
1 Handle
Latch
Handle Joint
Bucket Lid
Evaporator
Operation Panel
DripTray
AirInlet
Spring
ValveRod
Bucket
Mixer
Residue Pan
Drip Plate
Fastening Rod
AirOutlet
3
5
7
9
11
13
15
NO
2
4
6
8
10
12
14
16
Part Name Part Name
Increase the hardness
Reduce the hardness
Turn the light on or off
Cleaning mode
Power on or off
Indicator light
Cold drink mode
Snowmelt mode
Milkshake mode
1. Power Switch
After plugging in, press the SWITCH button to enter the standby mode, the SWITCH
indicator will light, then you can press any button to activate the corresponding func-
tion. Press the SWITCH button again to return to the standby mode.
Hardness display bar

KNOWING YOUR MACHINE
6
2. Cleaning Mode
In the standby mode, press the RINSE button, the mixer will be driven by the stirring motor.
After discharging the remaining drinks, fill the bucket with warm water and keep drinks
outlet open to clear the residual drinks and odors. Repeat the step twice.
During cleaning, the mixer will work for about 20 minutes, then the machine will automati-
cally return to the standby mode.
3. Working Mode Selection
In the standby mode, press any of the three buttons (FROZEN JUICE, SLUSH, MILKSHAKE) to
start the production. During the working process, you can switch the three modes, adjust
the hardness and turn on or off the light at any time. The next time you select the mode, it
will operate according to the hardness you set.
Each mode corresponds to different forming temperatures according to the optimal taste
of different drinks, and ultimately produces drinks with different ice content. When the
machine detects that the corresponding temperature is reached, it will stop working, the
corresponding indicator will stop flashing and keep solid.
Equipped with the human body induction, the mixer will start to rotate when you approach
the machine. Hold the handle and push it down to discharge the drinks out.
NOTE: With the influence of various factors, including but not limited to the amount,
temperature, sugar content of the material, ambient temperature, etc., the forming time of
the ingredients in the same mode may vary. While waiting, you can switch the working
mode and hardness or add different ingredients to change the sugar content or tempera-
ture of the drinks to accelerate the process, or just serve it directly.
4. Hardness Control
If necessary, adjust the hardness by pressing the HARD or SOFT to obtain the required taste.
One gear of hardness means an adjustment of 0.36℉(0.2℃). The greater the hardness, the
more amount of smoothie.
5. Light
Press the LIGHT button to turn on or turn off the light inside the back part of the bucket.
KNOWING YOUR MACHINE
OPERATION INSTRUCTIONS
7
6. Motor Protection Function
If the hardness is set too hard or the sugar/soda content of the ingredients are not enough,
the drinks will become harder and harder. The motor protection device will automatically
stop the motor from working.
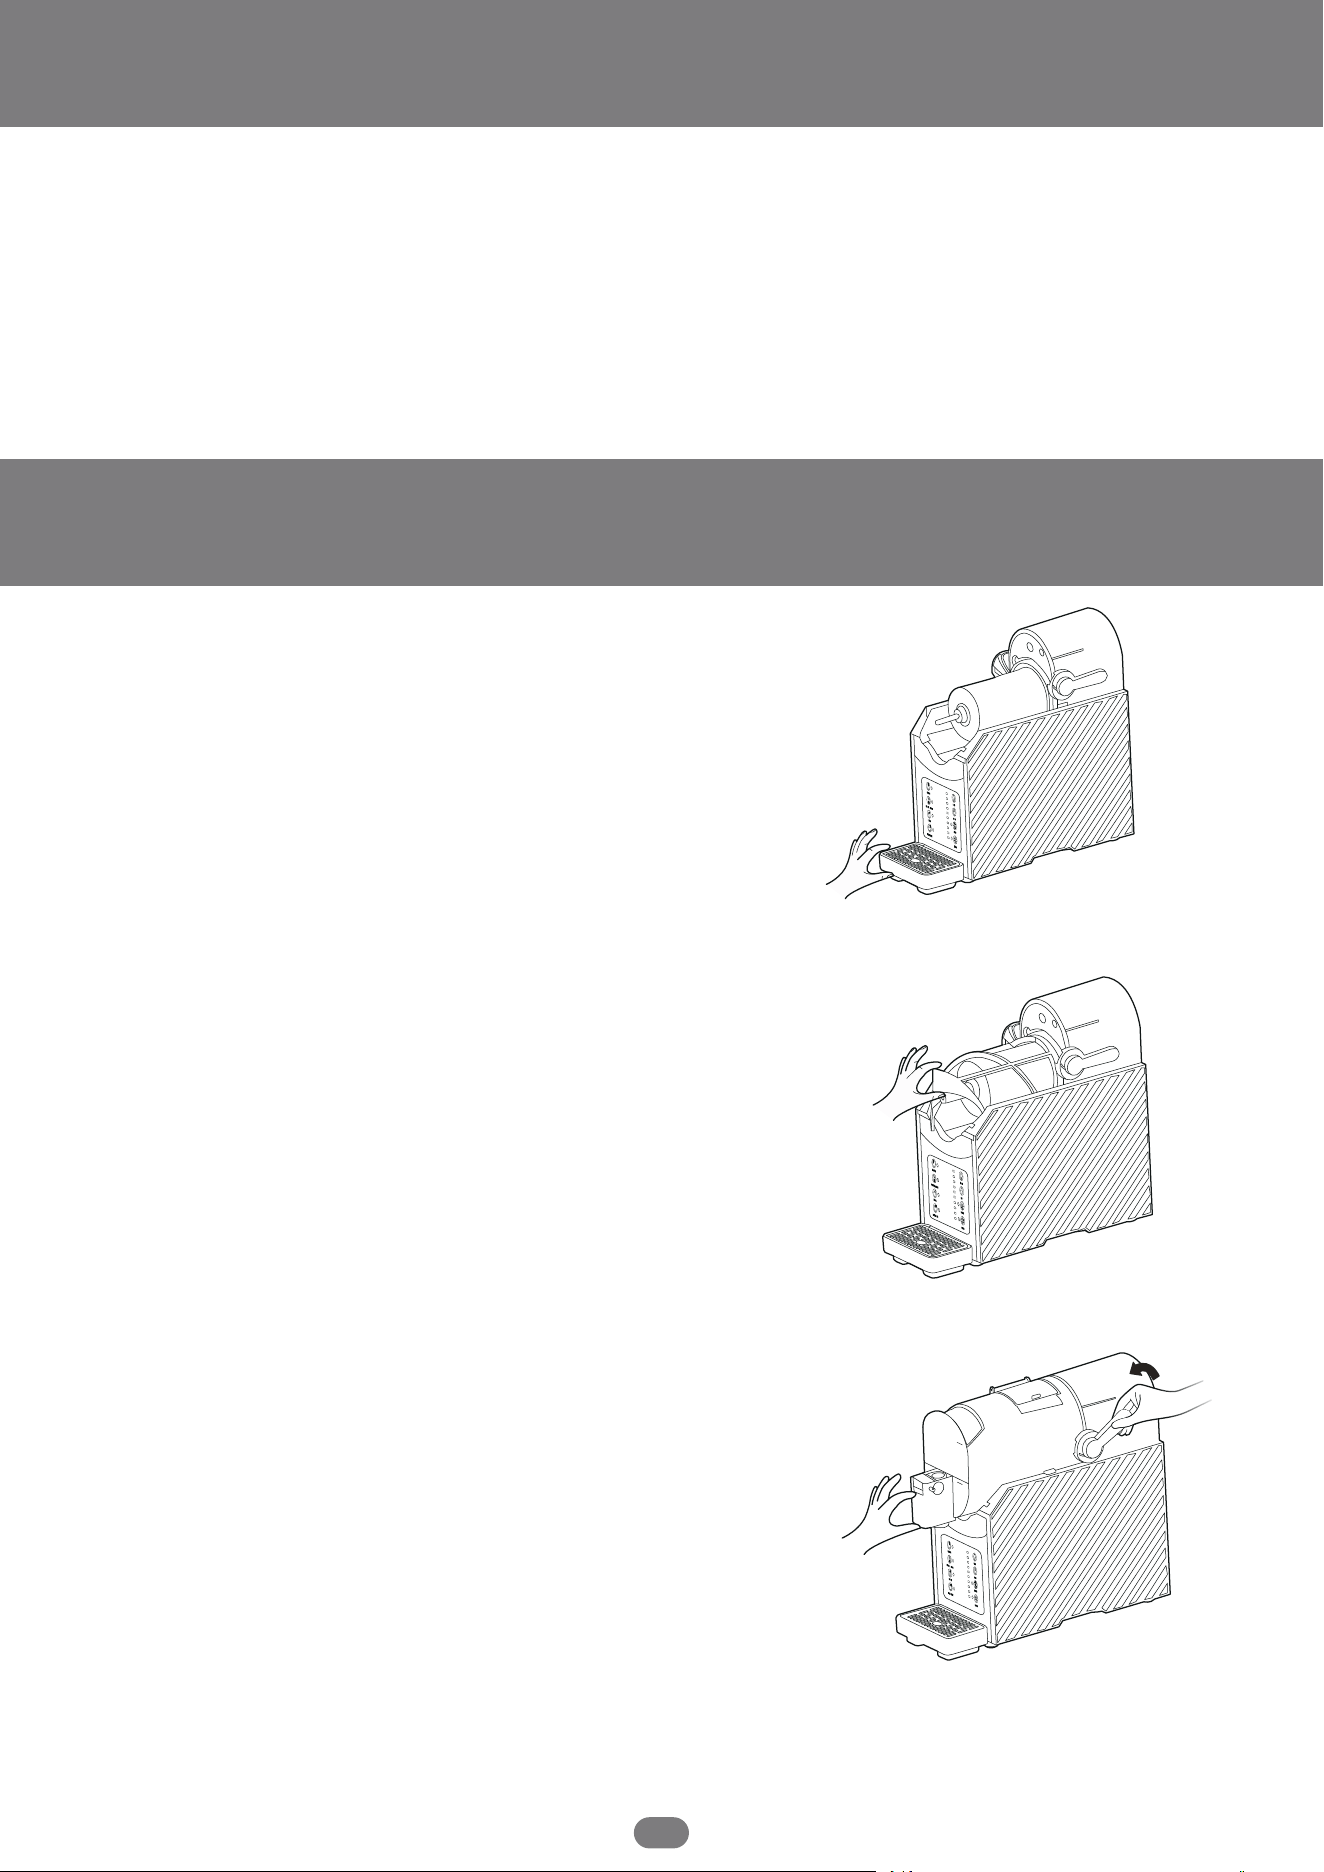
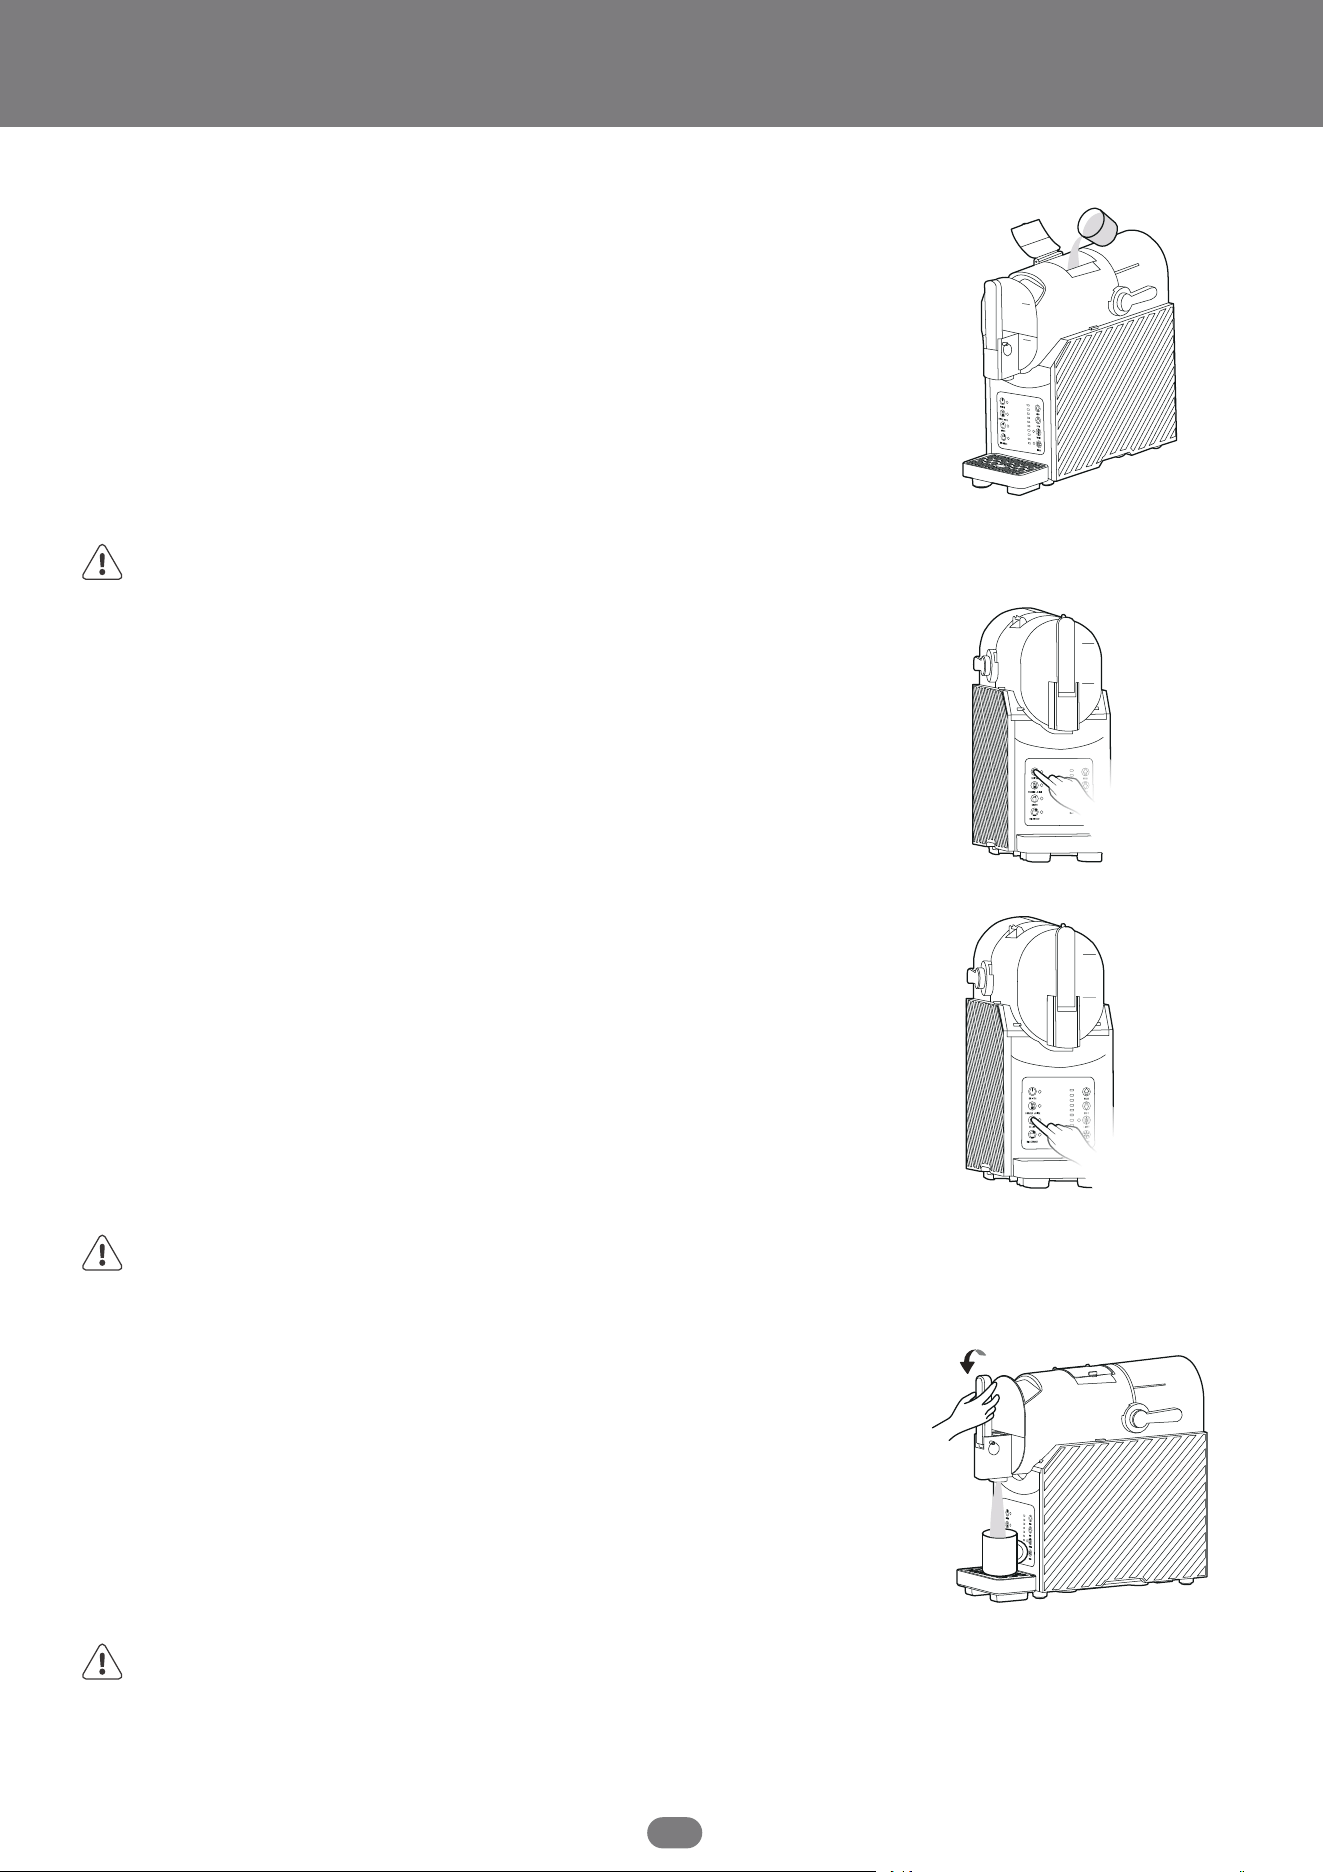
1. After confirming that all the parts are com-
plete, install the drip tray and drip plate.
2. Attach the mixer to the evaporator.
3. Turn the fastening rod anticlockwise, then
insert and install the bucket on the machine.
MAX 62oz
MIN 16oz
OPERATION INSTRUCTIONS
8
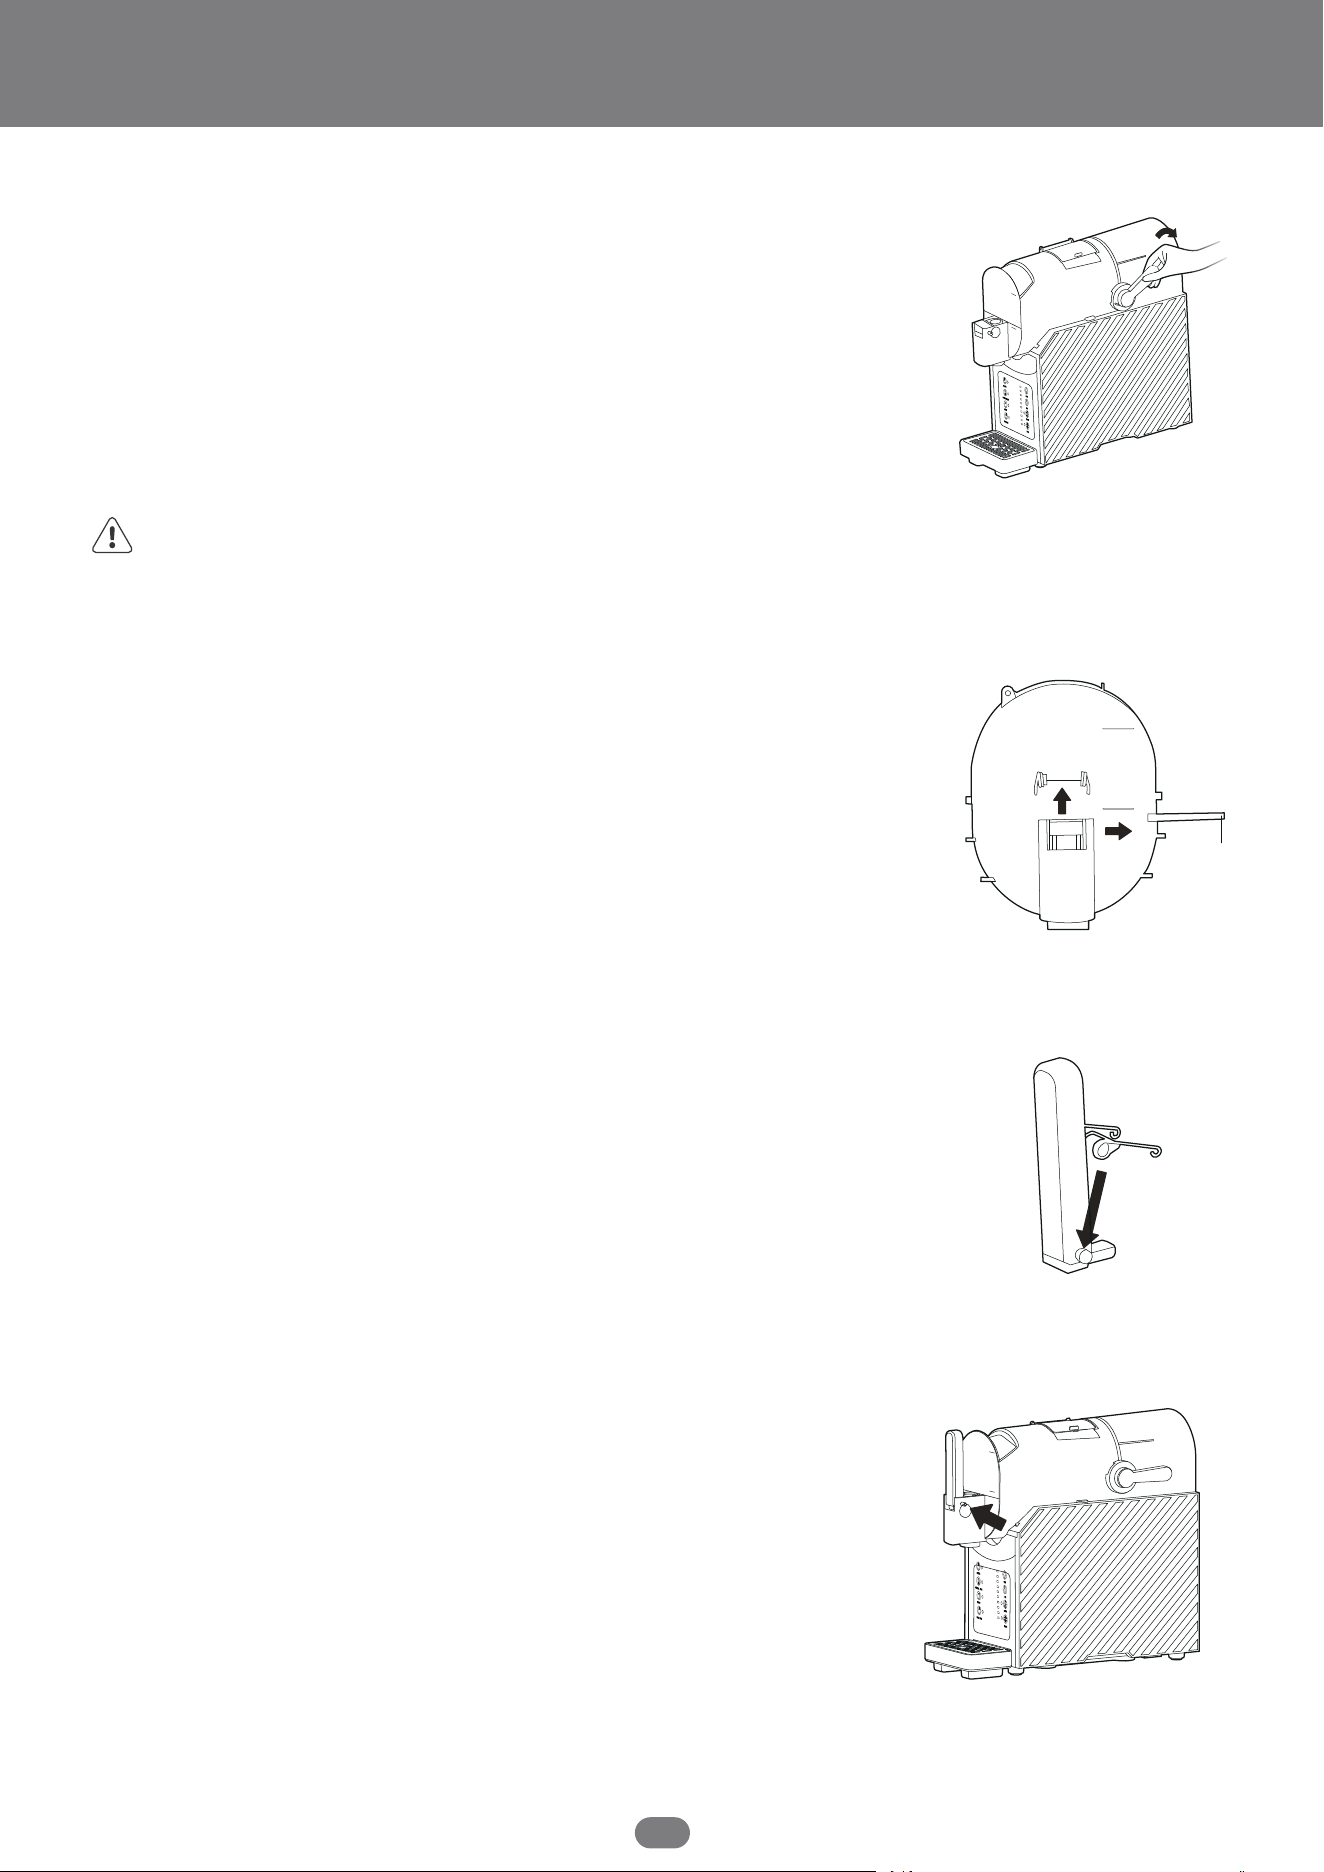
4. Turn the fastening rod clockwise to secure
the bucket assembly firmly.
NOTE: When the bucket is removed during working, the hardness display bar will show
the light flashing, and the machine will stop for self-protection.
MAX 62oz
MIN 16oz
5. Pull out the latch and take out the spring
from the handle joint.
MAX 62oz
MIN 16oz
6. Clamp the spring on both sides of the
handle and install back into the handle
joint (Note the orientation of the spring as
shown). The valve rod should be moved up
so that the bulge of the handle is inserted
into the groove of the valve rod.
7. Insert the latch through the handle joint
into the holes to secure it.
MAX 62oz
MIN 16oz
OPERATION INSTRUCTIONS
9
NOTE: Do not start the machine when there is no ingredient in the bucket, otherwise it will
do damage to the unit.
NOTE: When the machine is working, the corresponding mode indicator flashes, and the
indicator will be solid after the cycle.
NOTE: After one cycle is done, the mixer will automaticaly rotate for about two minutes
every ten minutes to maintain the beverage status.
8. Open the bucket lid to add the ingredients
(above the MIN mark, but shall not exceed the
MAX mark) and close the bucket lid.
9. Plug in the machine and press the SWITCH
button to enter the standby mode.
MAX 62oz
MIN 16oz
10. Press the desired working mode button.
Then the machine will work until the ingredi-
ents reach the default hardness. Or you can
adjust the setting as needed.
MAX 62oz
MIN 16oz
MAX 62oz
MIN 16oz
11. Slowly pull the handle during the process or
after the completion to discharge the drinks. Do
not pull the handle too hard to prevent the handle
from falling off the valve rod.
MATERIAL REQUIREMENT
10
The Standard Of Sugar
Please refer to the beverage / liquid nutrition label to ensure that the sugar content meets
the minimum requirements recommended below:
In either mode, the hardness setting can be manually adjusted to achieve the desired
effect.
The sugar content must be more than 10% and soda content must exceed 16%.
★ Low sugar content alert: When the machine detects that the sugar content of the ingredi-
ents is too low, the hardness display bar will flash to alarm.
To achieve the required sugar content, you can add 1-2 tablespoons flavored syrup, juice,
sugar, date sugar, coconut sugar, maple syrup, agave, honey, etc. to the ingredients before
pouring into the bucket.
NOTE: Sugar-free substitutes or sweeteners will not help to meet the minimum sugar
content requirements, where diet drinks cannot be made.
Mode Recommended IngredientsDefault Setting
Frozen Juice
A sugary / soda / alcoholic drink
A sugary / soda / alcoholic drink
Dairy products and creamy beverages
Slush
Milkshake
The Amount Of Ingredients
Minimum Sugar Content
8oz (240ml)
12oz (355ml)
20oz (591ml)
24g
36g
60g

MATERIAL REQUIREMENT
CLEANING AND MAINTENANCE
11
The Standard Of Alcohol
Pre-Cleaning
Please refer to the beverage / liquid nutrition label to ensure that the Alcohol content meets
the minimum and maximum requirements recommended below:
1. In standby mode, place a cup on the tray.
2. Press the RINSE button to activate the mixer. Pull the
handle to discharge the remaining drinks in the bucket.
3. After empty the residual drinks, add warm water to the
MAX mark. Slowly discharge the water from the device
after filling.
4. Repeat the step twice with warm water to clear residual
drinks and odors, then press the SWITCH button to turn off
the machine.
5. Repeat above steps if necessary until the drink is
flushed off from the evaporator.
Alcohol (wine, beer, etc.) must contain between 2.8% and 16%.
The Amount Of Ingredients
Maximum Alcohol Content
24oz (710ml)
36oz (1065ml)
48oz (1420ml)
4oz (118ml)
6oz (177ml)
8oz (237ml)
MAX 62oz
MIN 16oz
CLEANING AND MAINTENANCE
12
Parts Cleaning
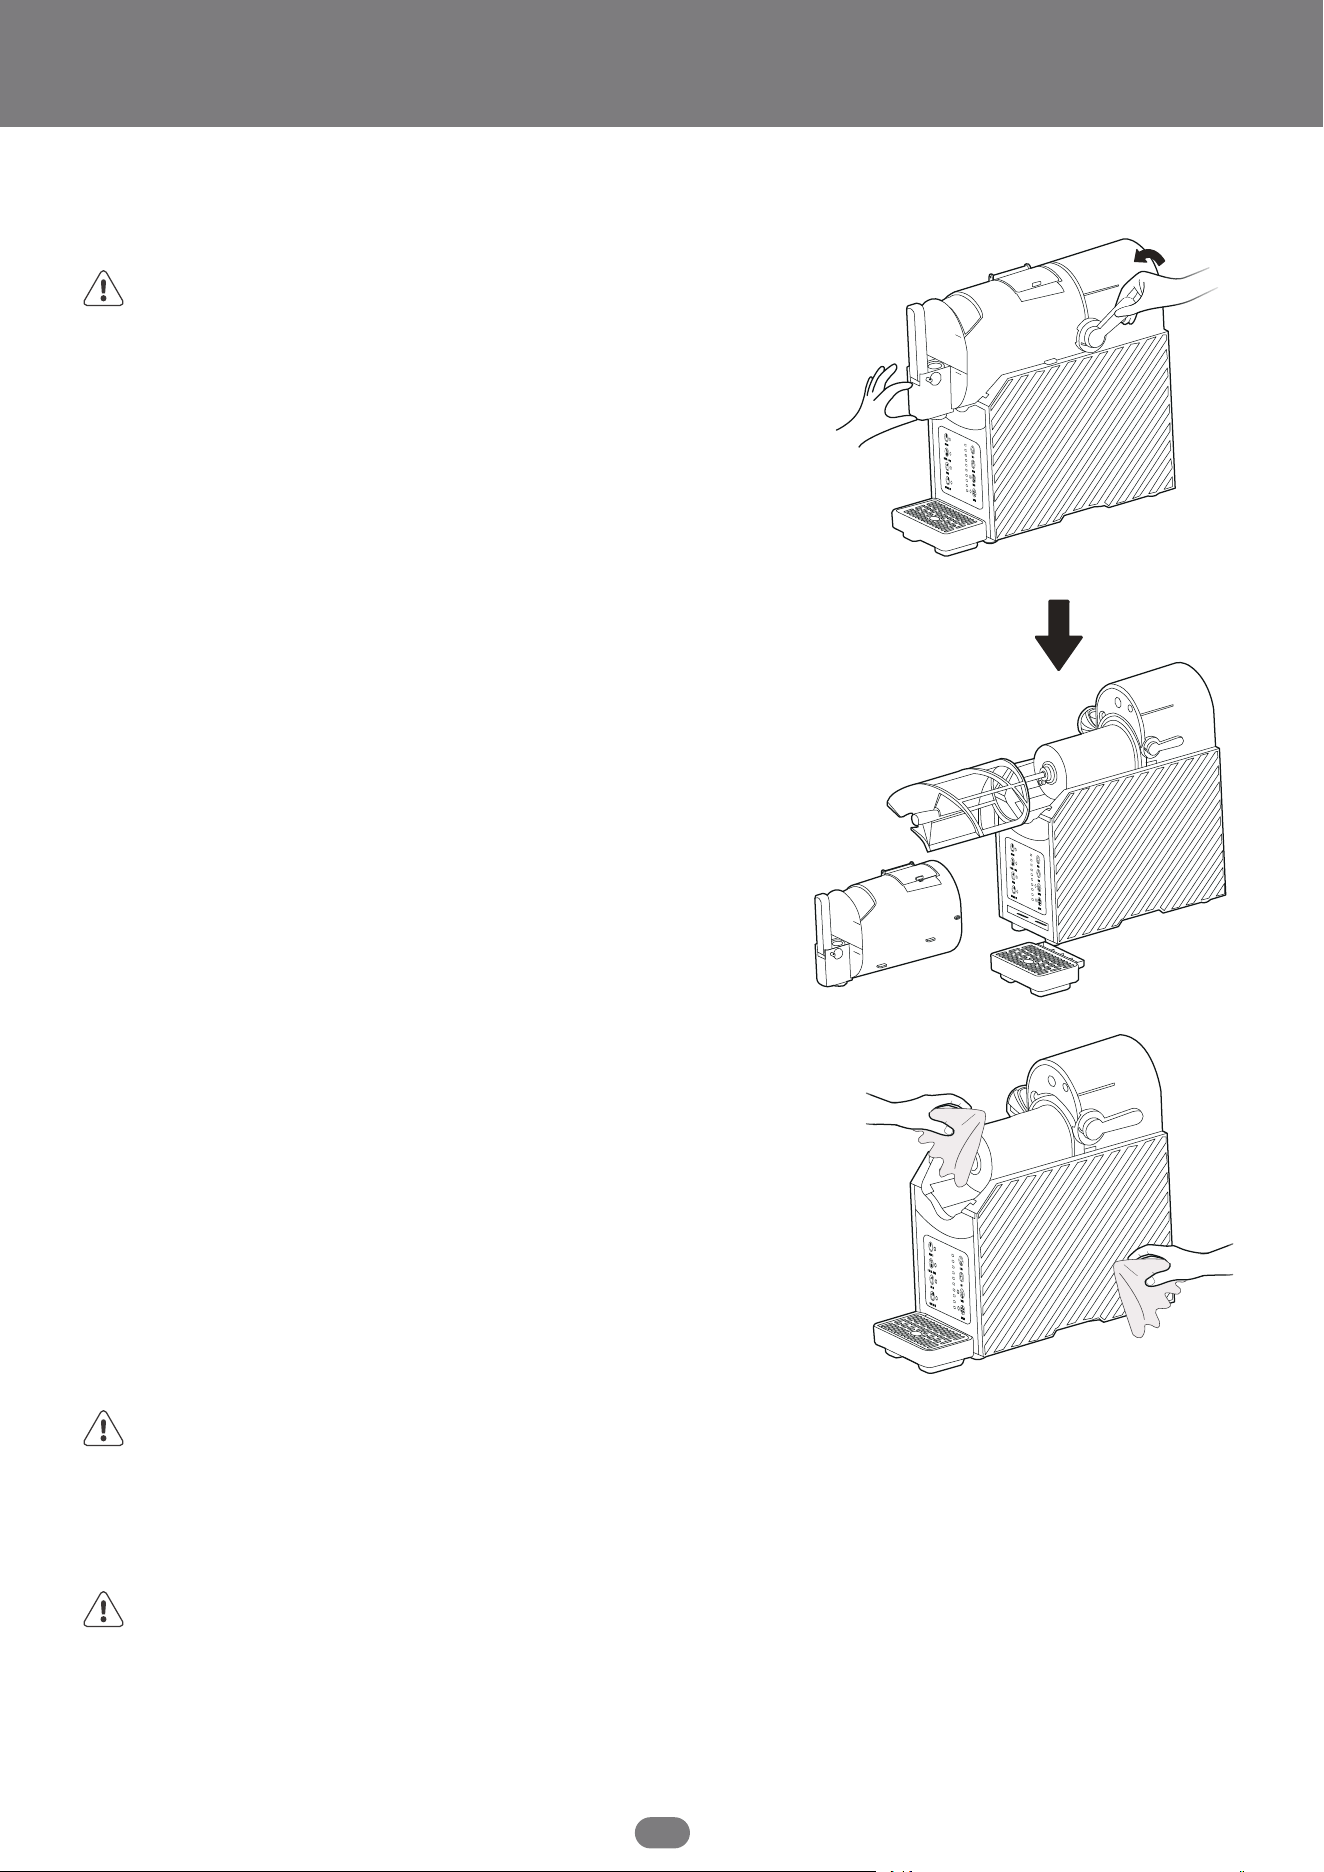
1. Turn the fastening rod anticlockwise to remove
the bucket, mixer and residue pan, and detach
the drip plate and drip tray, etc.
2. Detach the handle as the direction opposite to
the installation steps.
3. Wipe the evaporator with a sterilized warm wet
cloth. Clean all parts with a warm detergent if nec-
essary.
4. Wipe the operation panel and shell with steril-
ized warm wet cloth.
5. Dry all parts and install them back.
NOTE:
Water of more than 176℉(80℃) is not allowed.
MAX 62oz
MIN 16oz
MAX 62oz
MIN 16oz
1. Do not use sharp objects to clean the evaporator.
2. Unplug the machine before cleaning to avoid possible electric shock.
3. Do not immerse the machine in water or spill the water into the air
outlet/inlet.
WARNING:
NOTE:
1. The cleaning method must meet the current local hygiene standards.
2. Do not allow children or disabled people to operate without any guidance or
supervision.

TROUBLESHOOTING
13
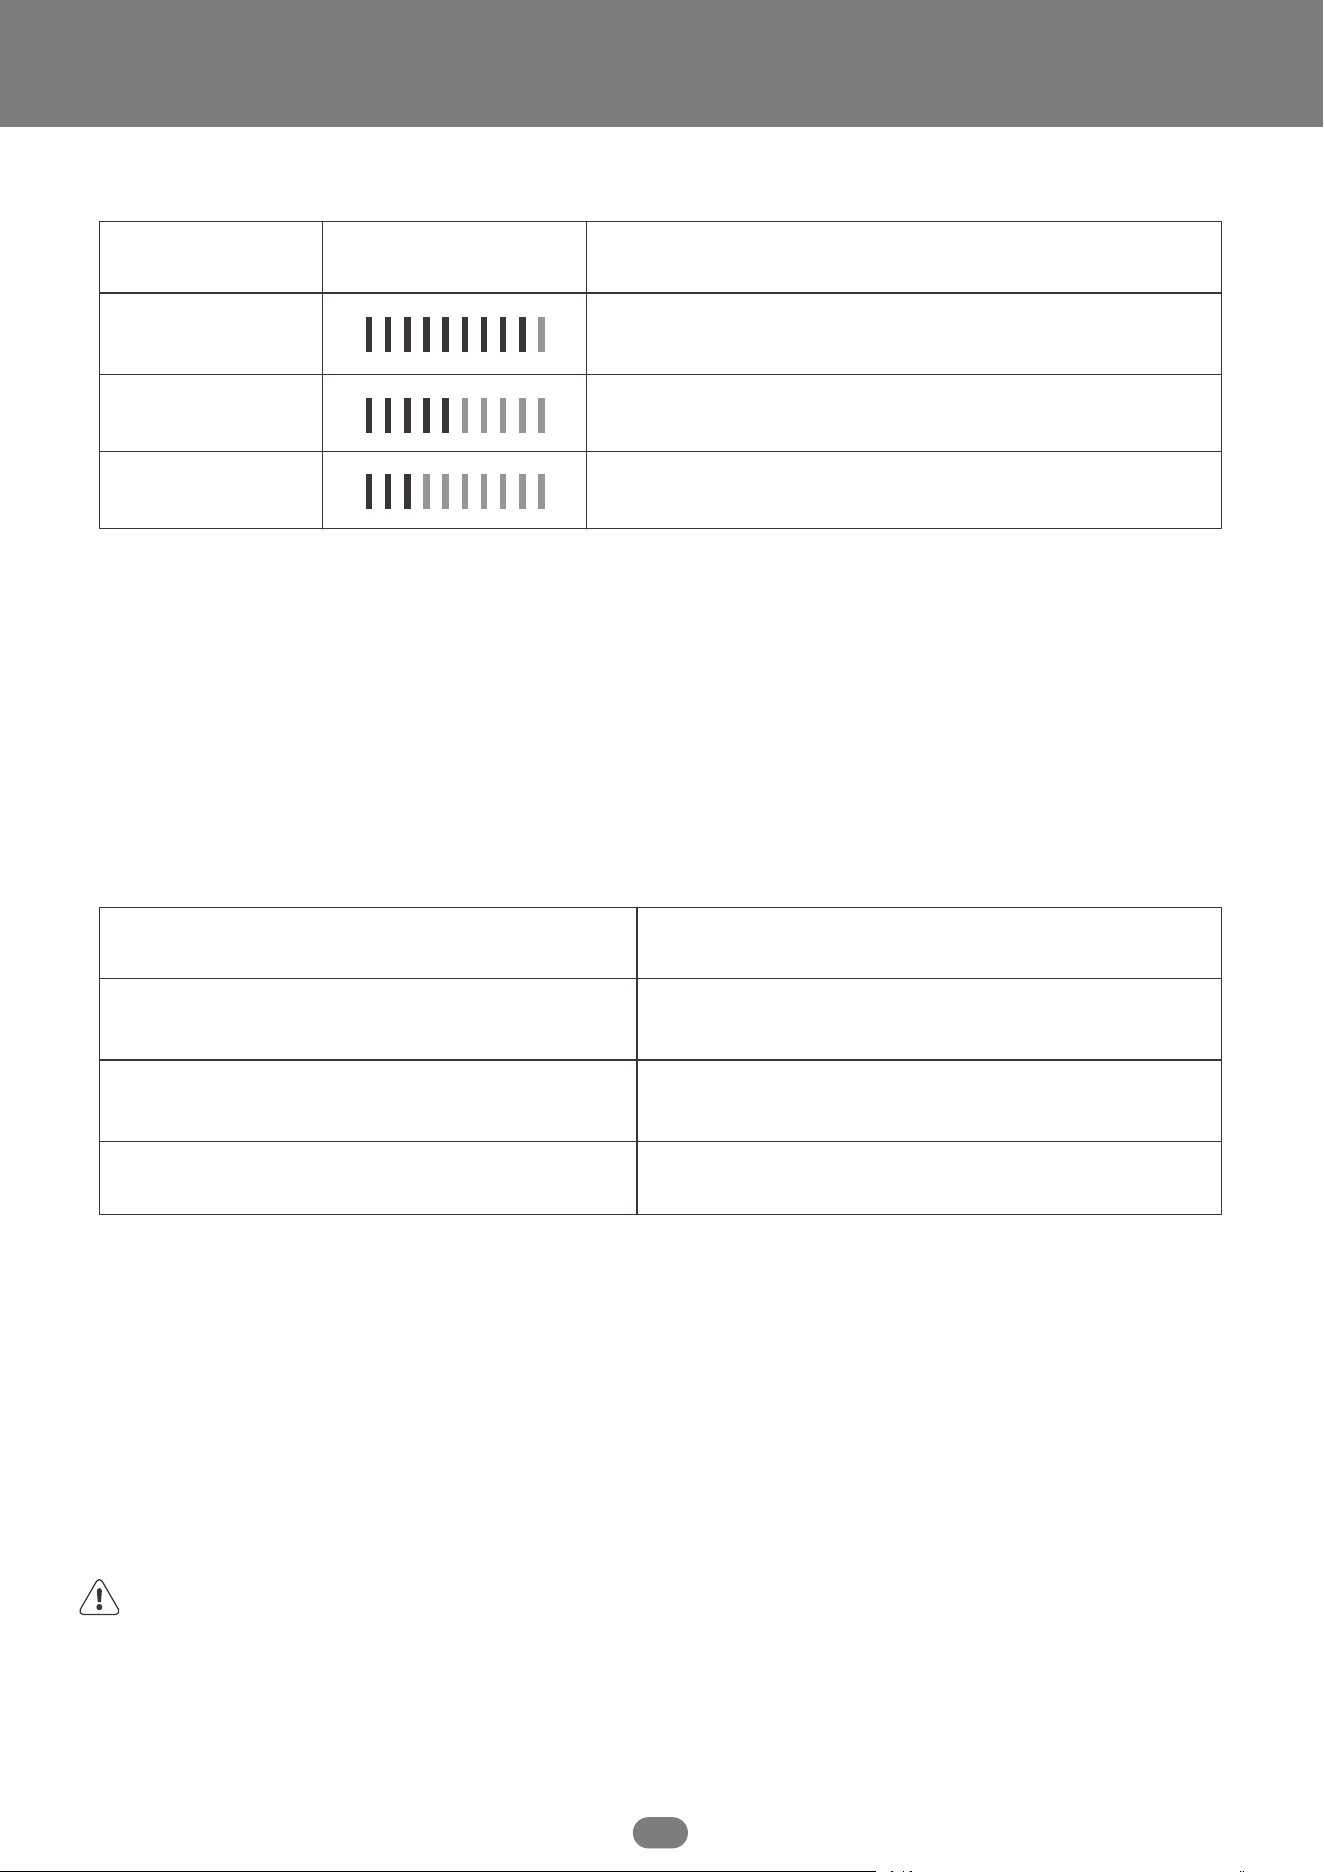
PROBLEM Cause analysis Countermeasure
The last indicator of the
hardness bar flashes, and it
will not be displayed after
10s or when turned on.
The bottom 2 indicators of
the hardness bar flash.
The mode light flashes and
the bottom 4 indicators of
the hardness bar flash.
The mode light flashes and
the bottom 3 indicators of
the hardness bars flash.
The ambient temperature
sensor is faulty.
Replace the sensor.
Turn off and restart
the machine.
Connect the profes-
sional personnel to
check the compressor
and the motor.
The machine will
automatically reset
after shutdown.
Refrigeration temperature
sensor is faulty.
Refrigeration effect is bad.
Motor failure warning.

ROWAN ELECTRIC APPLIANCE LLC
Phone: 213-446-7172
Thank you for purchasing this product! lf you have any question
about the product, such as missing parts, damaged products, product
assembling, and operation, please contact us via customer service
number: 213-446-7172.
IMPORTANT
Please call our customer service department for any con-
sulting
213-446-7172
(8:30am-5:30pm P.S.T.)
DATED PROOF OF PURCHASE IS REQUIRED FOR WARRANTY
SERVICE.
AVIS
Veuillez appeler le service à la clientèle pour toutes ques-
tions au:
213-446-7172
(8:30am-5:30pm P.S.T.)
PREUVE D'ACHAT ORIGINALE REQUISE POUR SERVICE DE
GARANTIE.
IMPORTANTE
Sólo hay que llamar nuestro departamento de servicio
al cliente en caso de tener preguntas o inguietudes:
213-446-7172
(8:30am-5:30pm P.S.T.)
SE REQUIERE PRUEBA DE COMPRA CON FECHA PARA
SERVICIO BAJO GARANTÍA.