
Technical Support and E-Warranty Certificate www.vevor.com/support
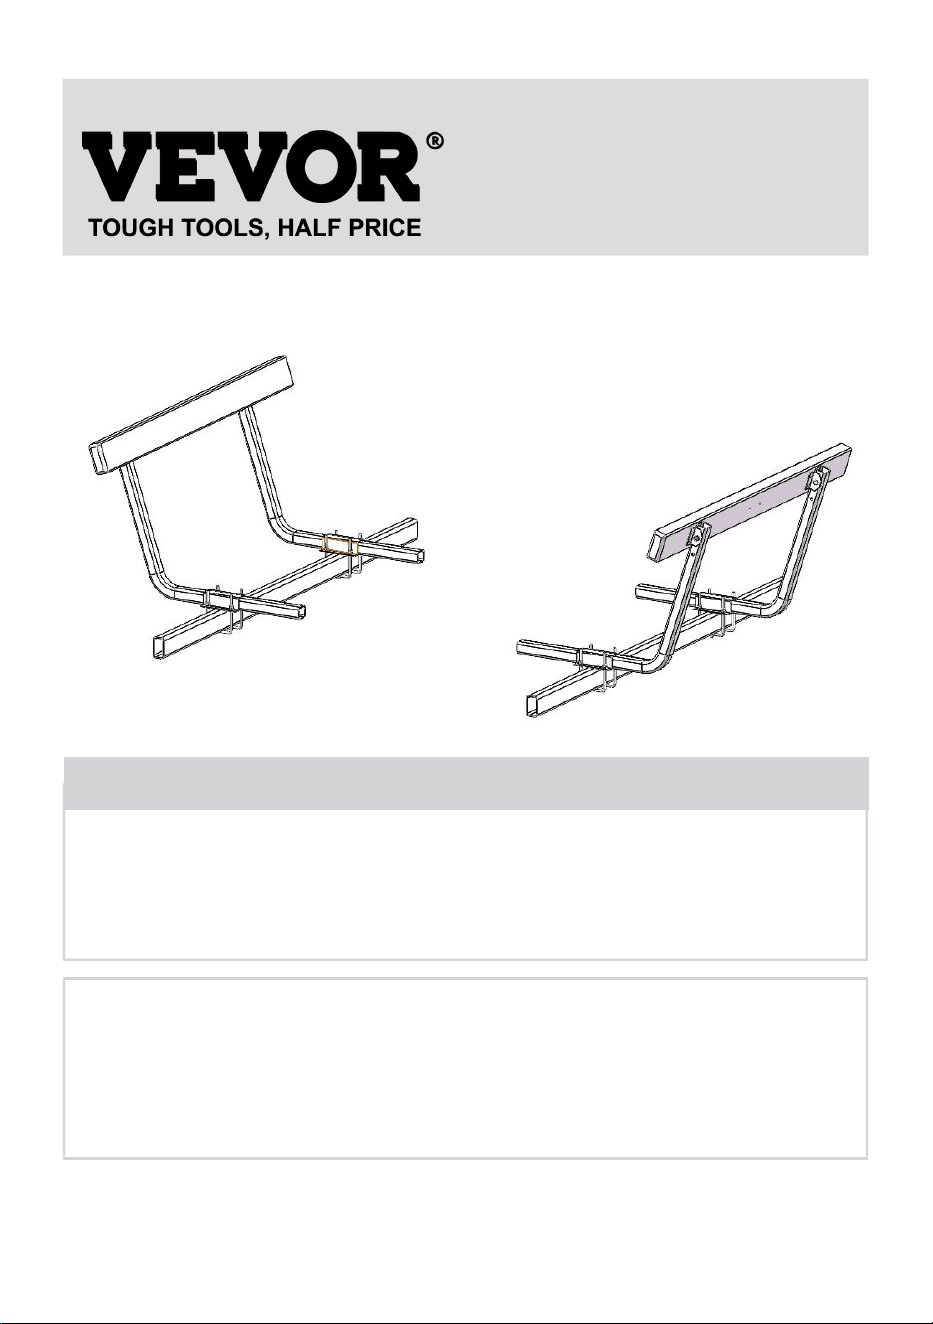
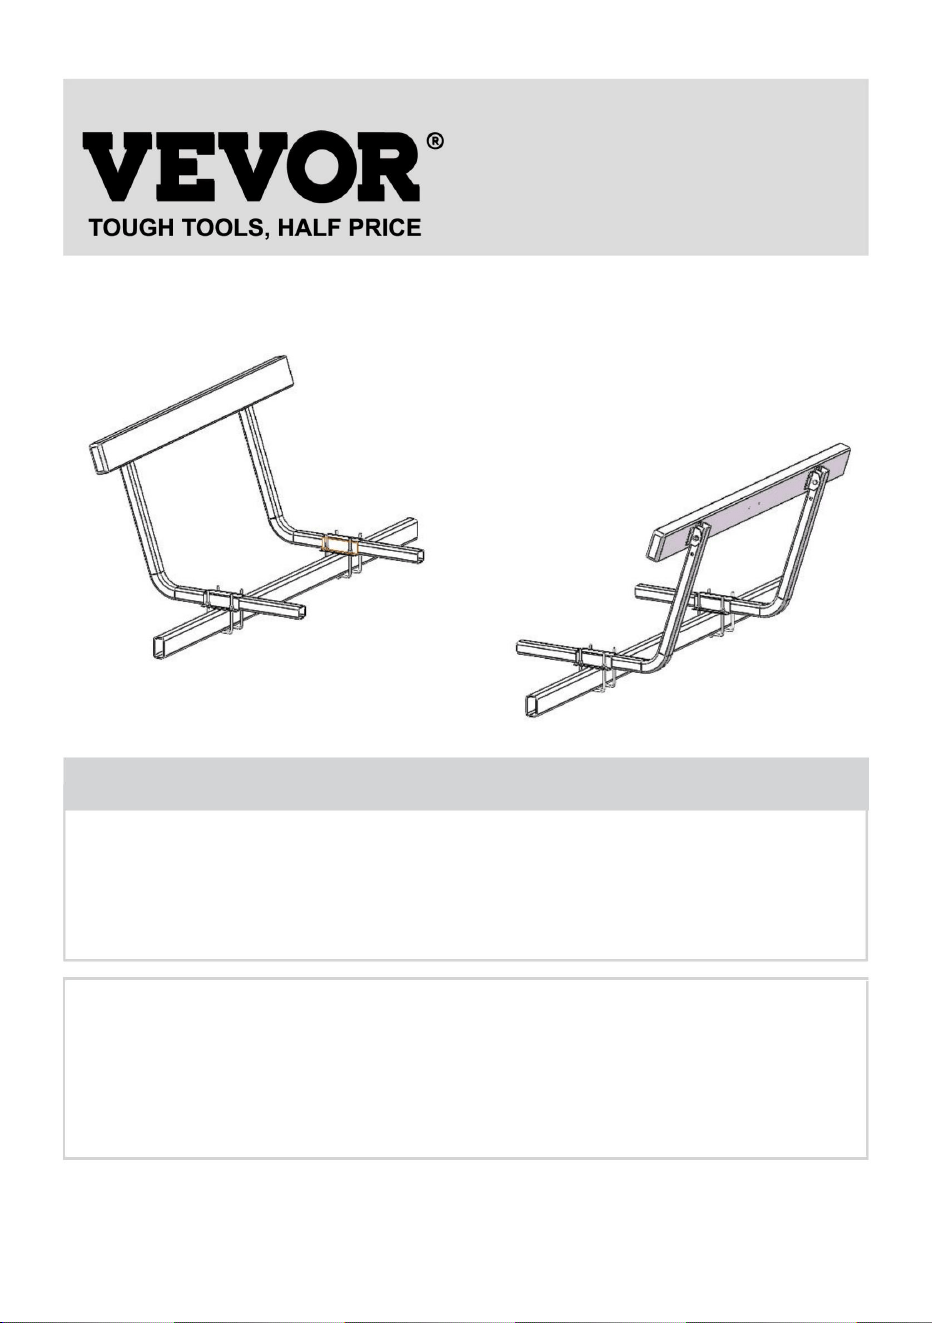
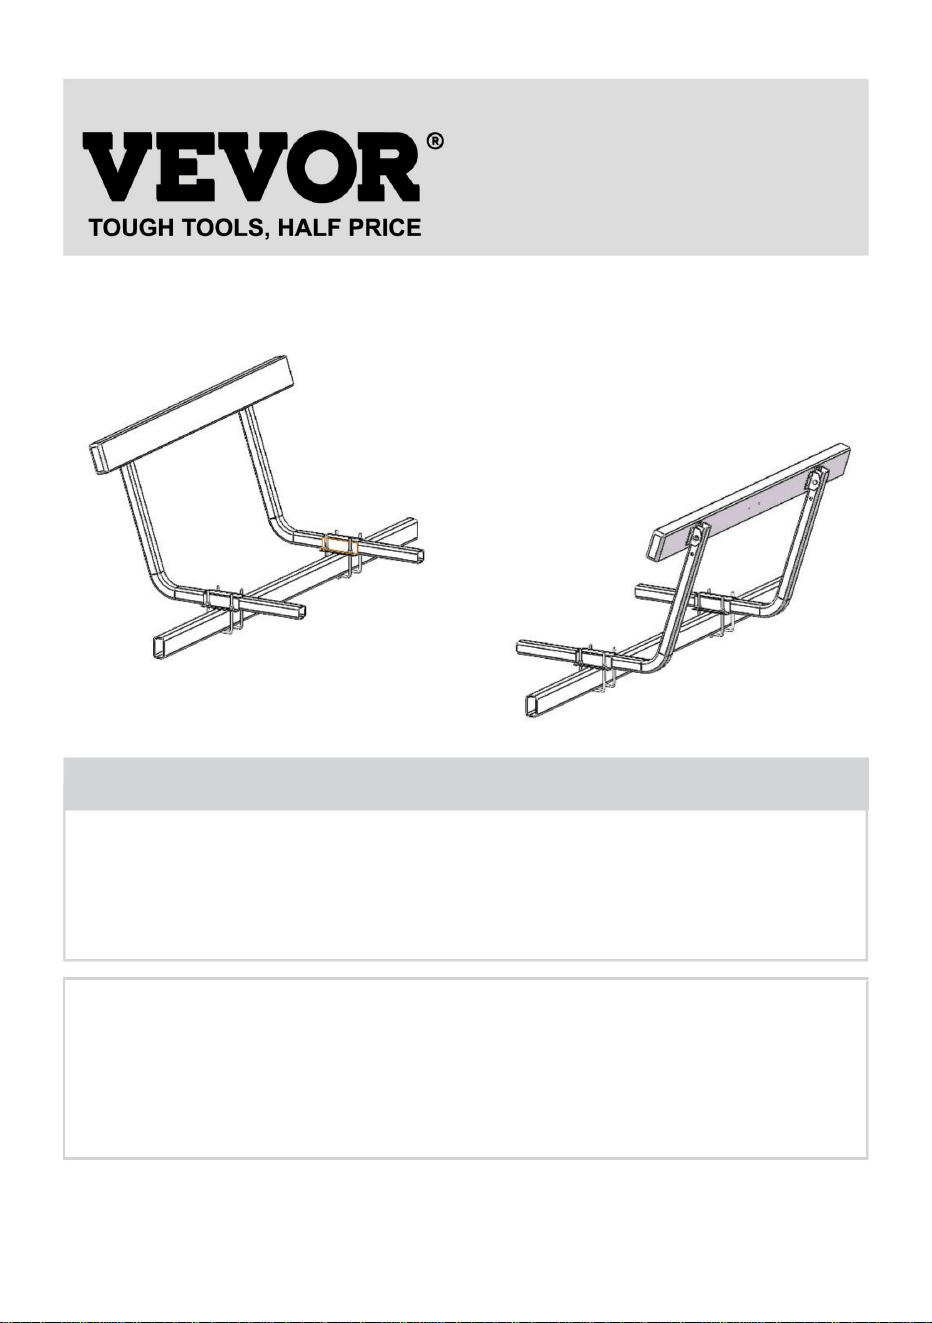
BOAT TRAILER GUIDES
MODEL: XSJ-23-F004
We continue to be committed to provide you tools with competitive price.
"Save Half", "Half Price" or any other similar expressions used by us only represents an
estimate of savings you might benefit from buying certain tools with us compared to the major
top brands and does not necessarily mean to cover all categories of tools offered by us. You
are kindly reminded to verify carefully when you are placing an order with us if you are
actually saving half in comparison with the top major brands.
- 1 -
MODEL: XSJ-23-F004
Have product questions? Need technical support? Please feel free to
contact us:
Technical Support and E-Warranty Certificate
www.vevor.com/support
NEED HELP? CONTACT US!
This is the original instruction, please read all manual instructions
carefully before operating. VEVOR reserves a clear interpretation of our
user manual. The appearance of the product shall be subject to the
product you received. Please forgive us that we won't inform you again if
there are any technology or software updates on our product.
BOAT TRAILER
GUIDES

- 2 -
IMPORTANT SAFEGUARDS
WARNING: Read and understand this entire manual before
operating or servicing this product. Failure to follow these
warnings and instructions can cause personal injury or
damage to valuable property.
Avoid children using boat trailer guides. And this product is not a toy. Do
not allow children to play with.
Keep away from sharp points,blades and other items.
Assembly precautions.
1. Assemble only according to these instructions. Improper assembly can
create hazards.
2. Wear ANSI-approved safety goggles and heavy-duty work gloves during
assembly.
3.Keep assembly area clean and well-lit.
4.Keep bystanders out of the area during assembly.
5.Do not assemble when tired or when under the influence of alcohol,
drugs or medication.
6.Product capabilities apply to properly and completely assembled product
only.
7. For additional information regarding the parts listed in the following
pages, please refer to the Assembly Diagram of this manual. Unwrap and
separate all parts in a clean work area. Please keep small spare parts out of
children's reach.
SAVE THESE INSTRUCTIONS
- 3 -
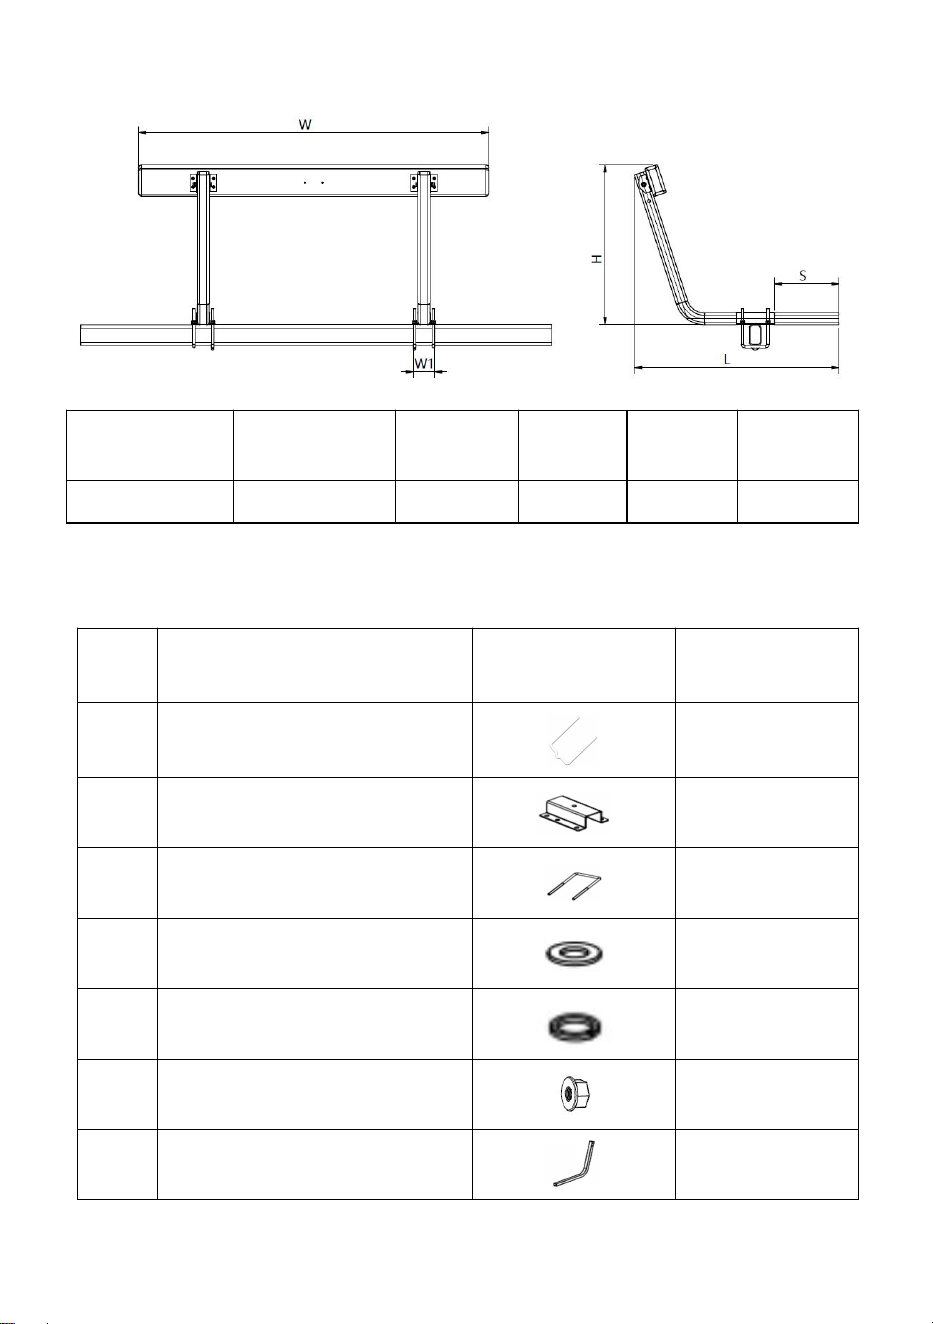
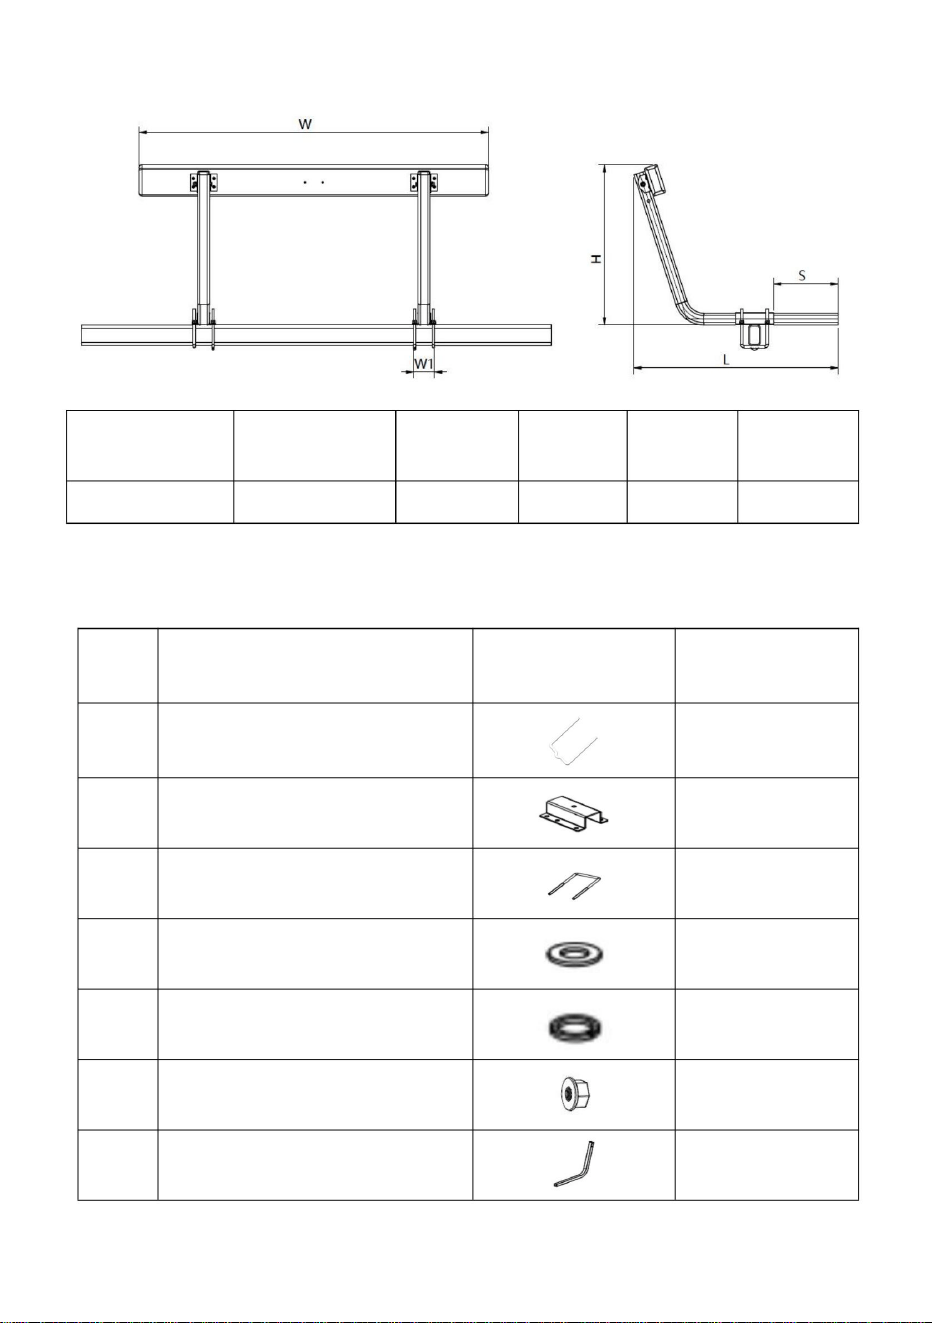
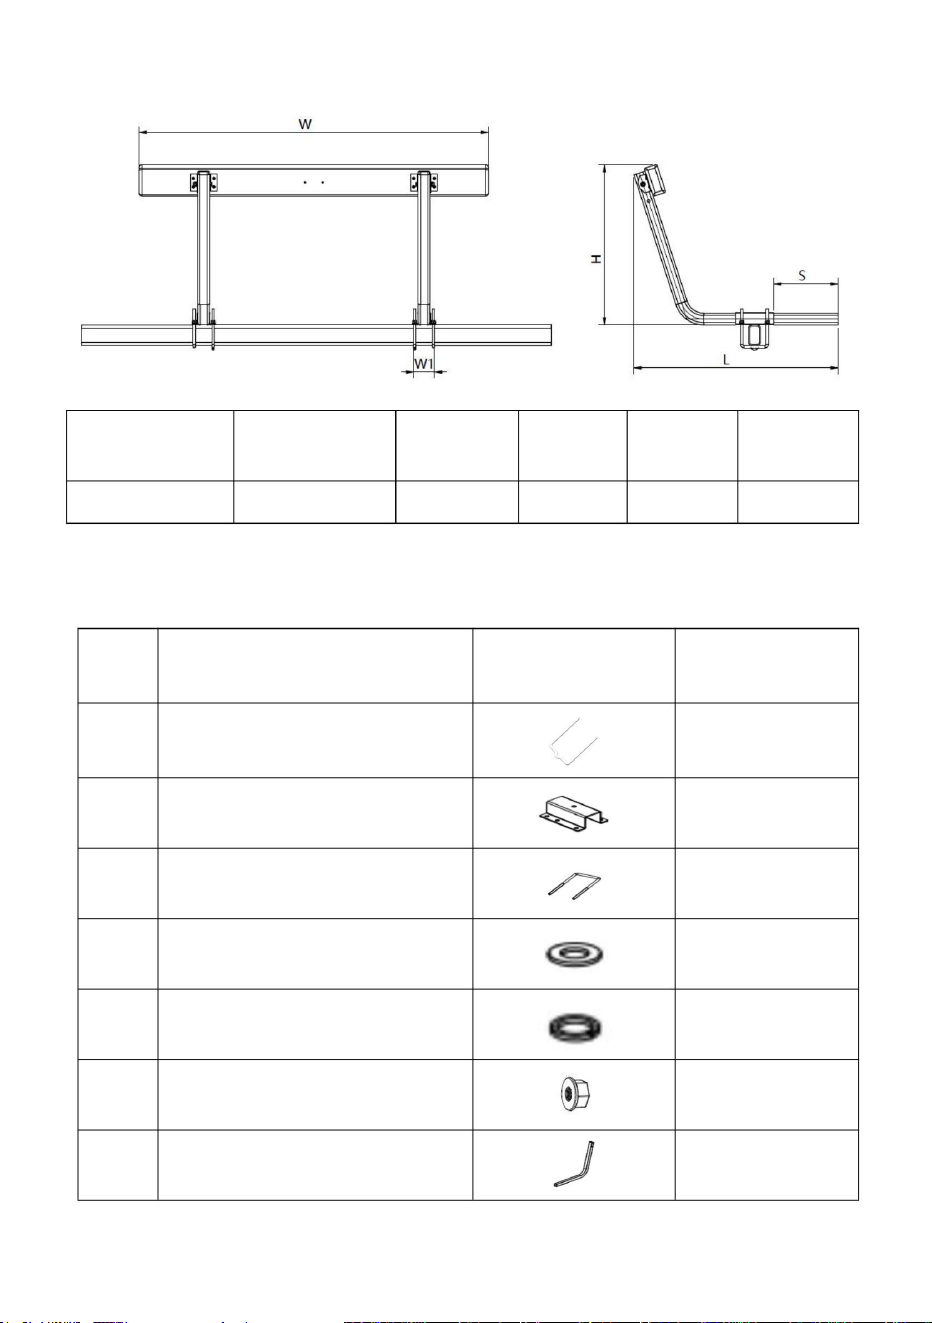
PRODUCT SPECIFICATIONS:
Model
L
(mm)
H
(mm)
W
(mm)
W1
(mm)
S
(mm)
XSJ-23-F004
700
510
1190
85
330
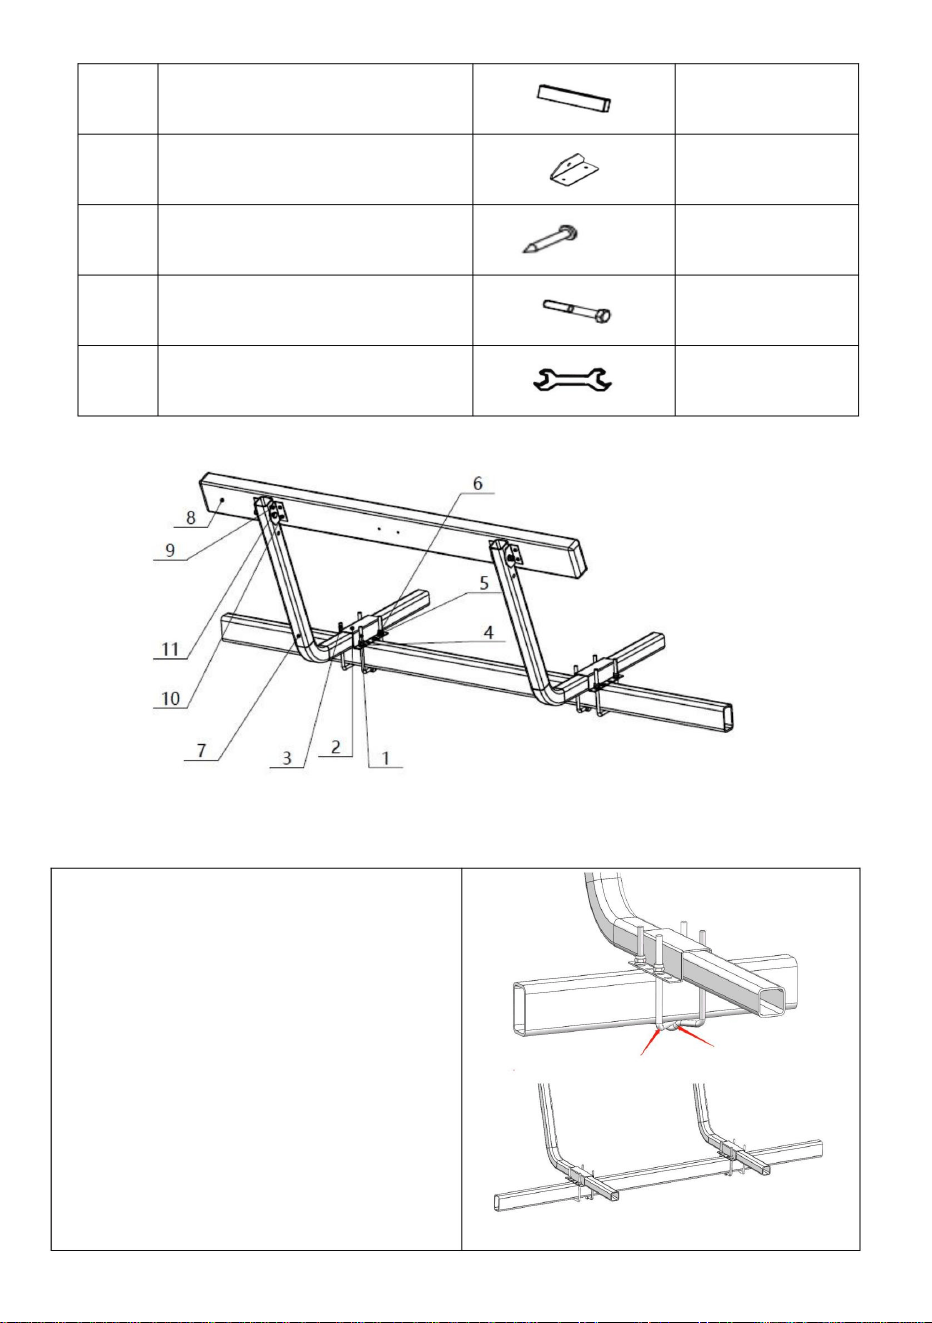
PACKAGE INCLUDE
No
Components
Picture
QTY
1
u-bolt-2
4pcs
2
U-shaped slot plate
4pcs
3
u-bolt-1
4pcs
4
flat washer
20pcs
5
Spring washer
20pcs
6
nut
20pcs
7
L-bracket
4pcs
- 4 -
8
Cushion
2pcs
9
L-shaped support plate
8pcs
10
Tapping screw
16pcs
11
bolt
4pcs
12
wrench
1pc
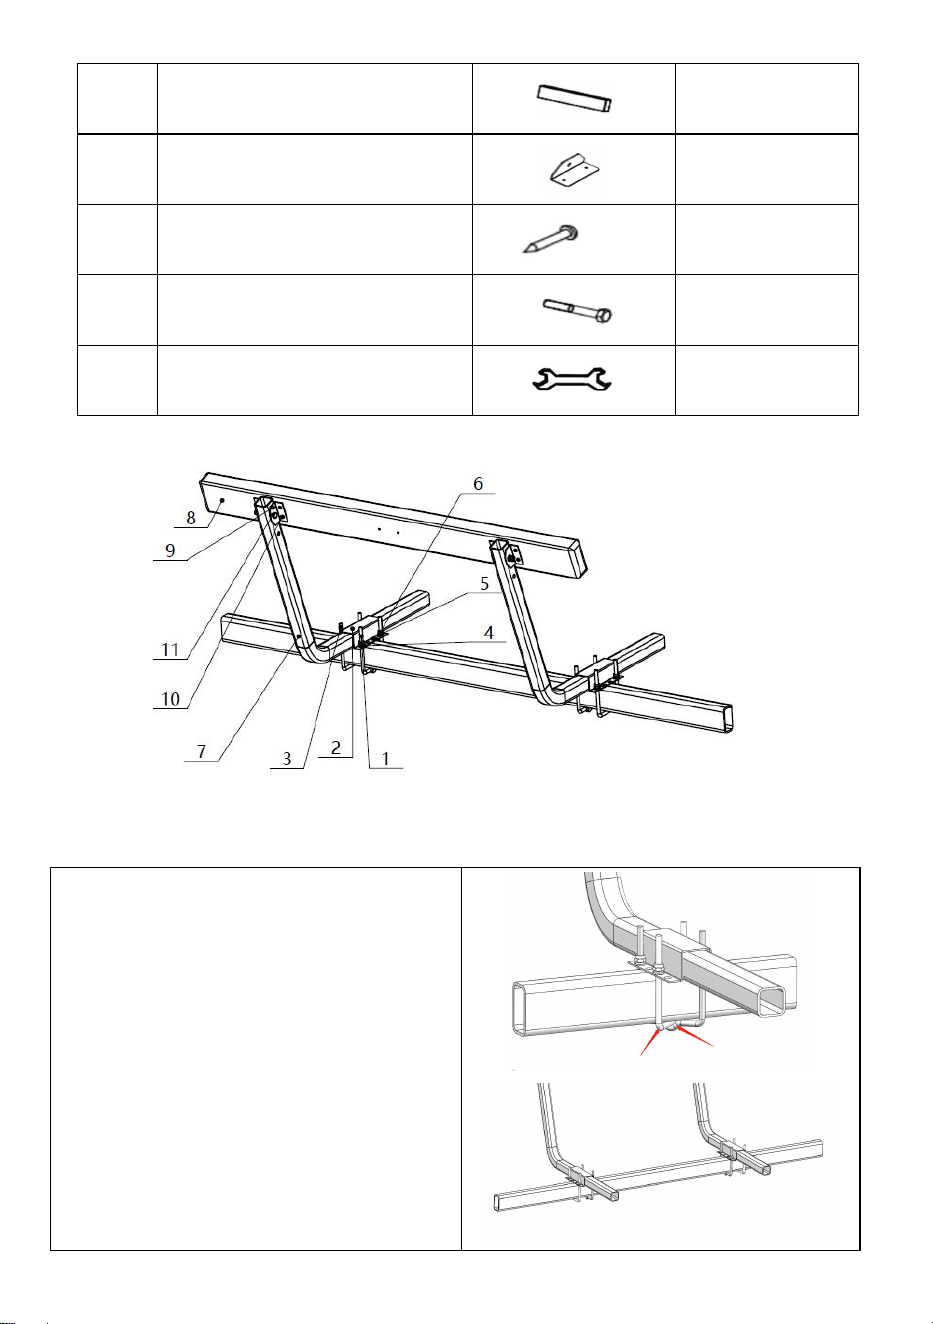
SIMPLE INSTRUCTION
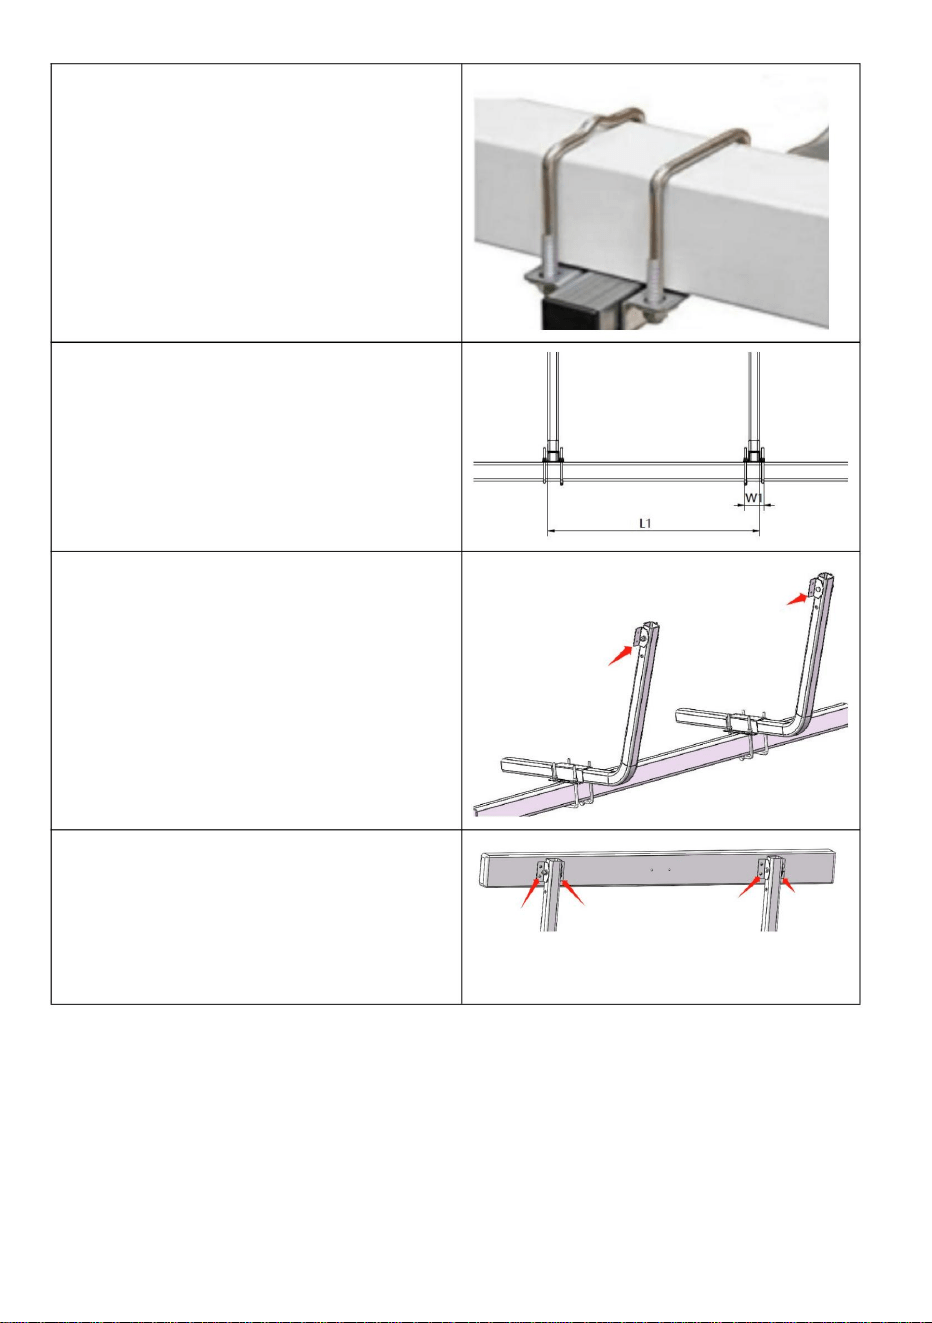
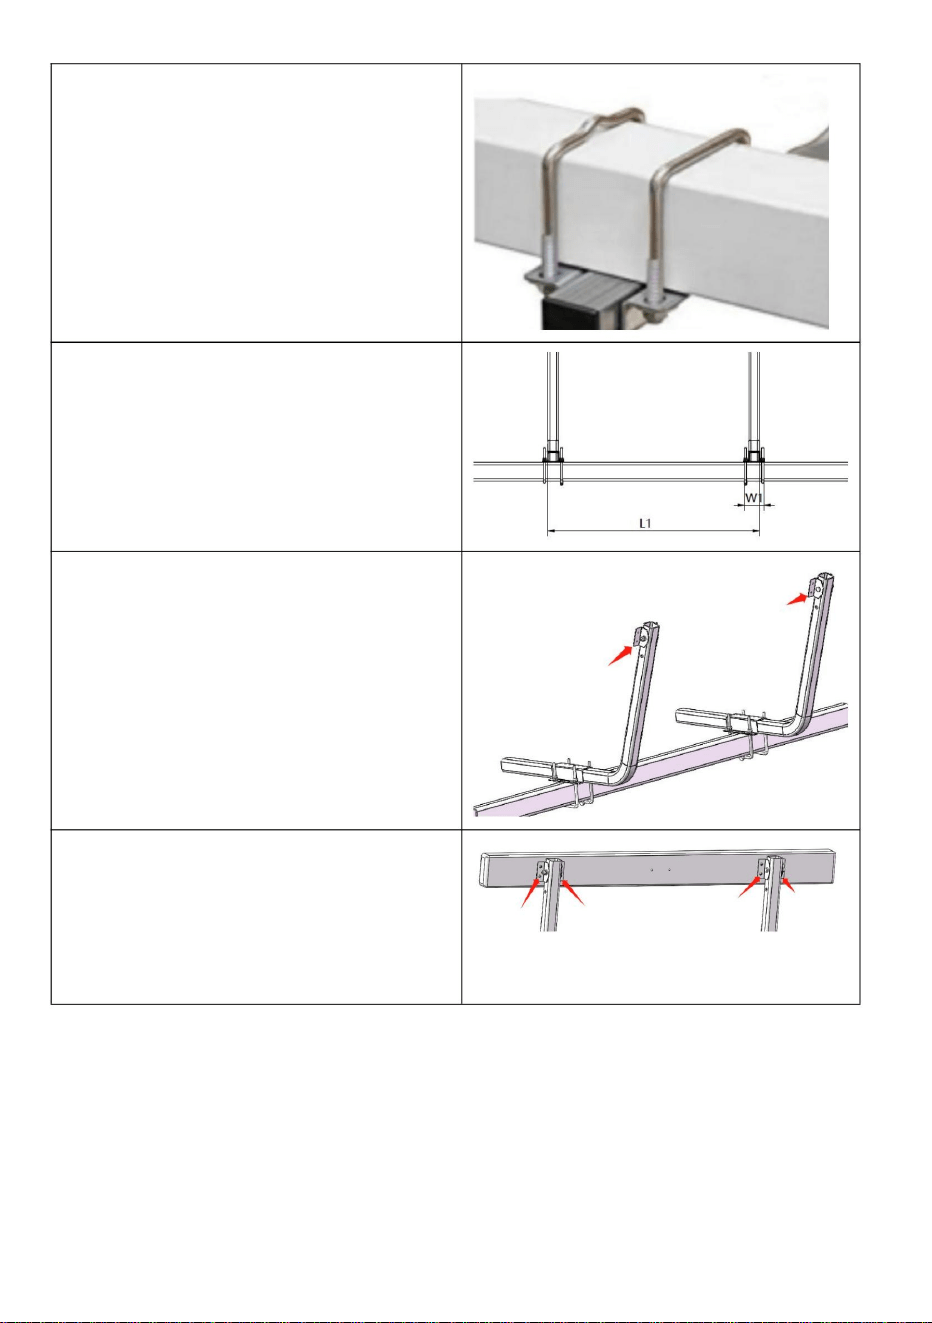
Step 1: Fix the
L-bracket
to the beam
frame of the carrier with U-shaped
bolts. You can install U-bolts in the two
ways shown in the figure according to
the actual situation.
It has an adjustment distance on one
side,and that depending on where the
rail needs to be installed for the width
of your boat.

- 5 -
ATTENTION:
It is recommended to find someone to assist with the installation.
Ensure that the guide rail is installed in the correct position, and finally
tighten the screws with the plate handle.
You can also mount the rail assembly
under the trailer beam
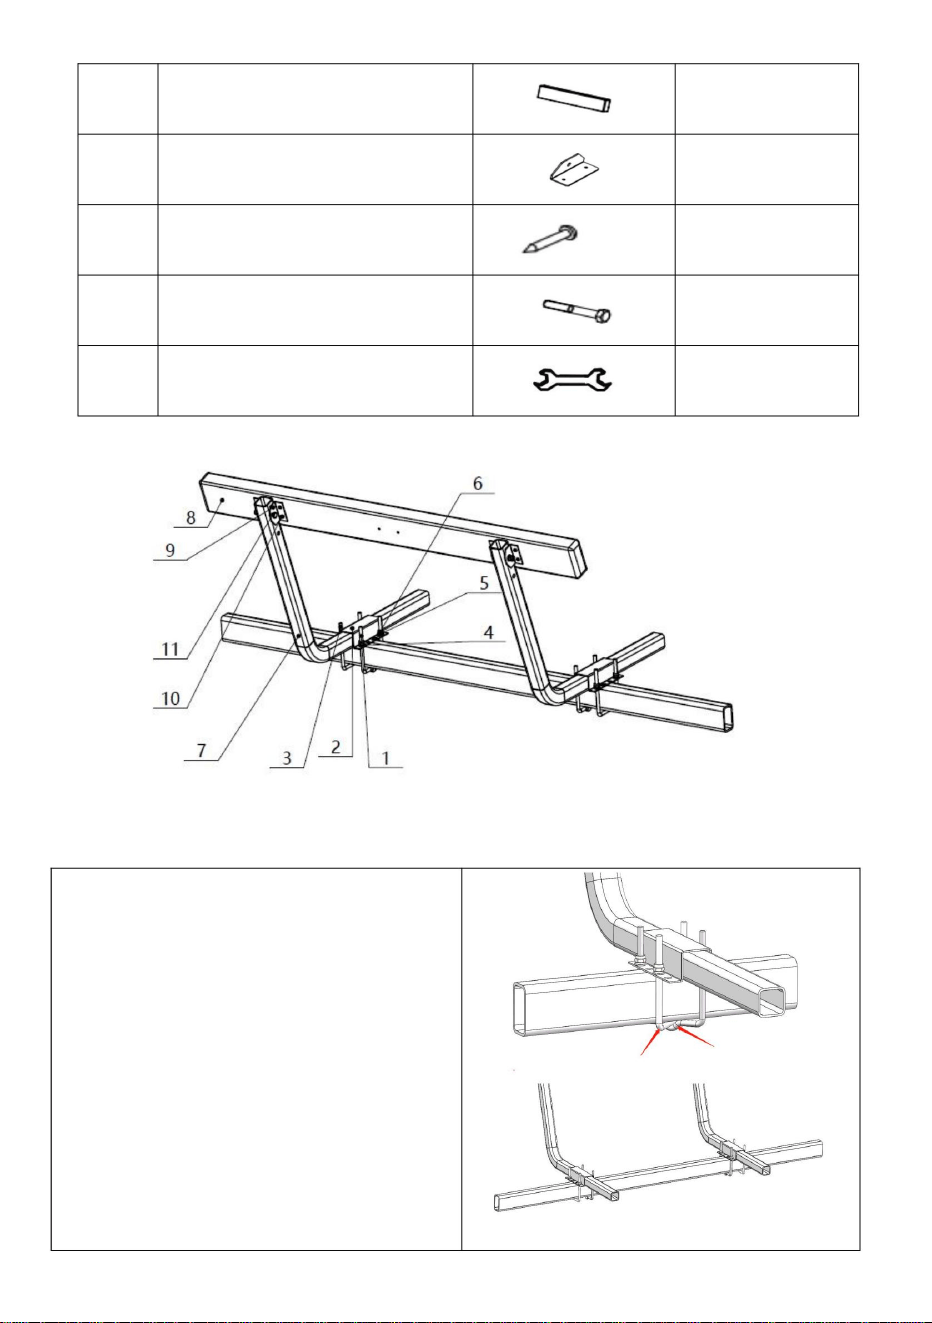
Step2:Measure the distance L1
between the two brackets 6.Make the
other side of the bracket 6 installed in
the same position and distance.
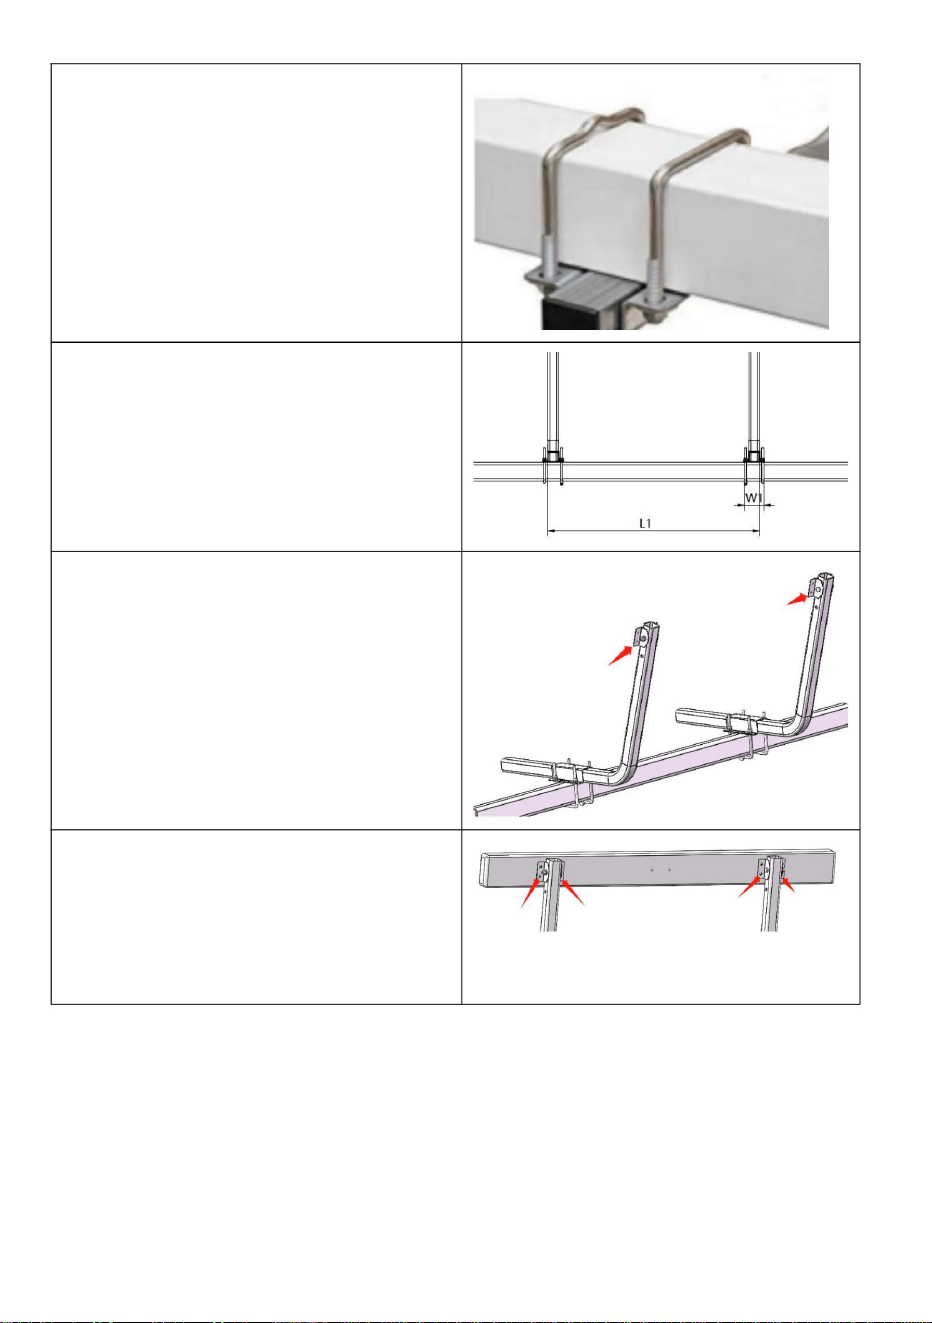
Step3:
Fix the L-shaped support
plate (9) on the upper end of
L-bracket (7) and tighten it with
components (4),(5), (6) and(11),
making sure that the L-shaped
support plate (9) is aligned with
support (7).
Step4:Use 8 Tapping screws(10) to
install the cushion (7) into the proper
position, taking care to make the
installation position in the middle of the
cushion.

- 6 -
Manufacturer: Shanghaimuxinmuyeyouxiangongsi
Address: Shuangchenglu 803nong11hao1602A-1609shi, baoshanqu, shanghai
200000 CN.
Imported to AUS: SIHAO PTY LTD. 1 ROKEVA STREETEASTWOOD NSW 2122
Australia
Imported to USA: Sanven Technology Ltd. Suite 250, 9166 Anaheim Place,
Rancho Cucamonga, CA 91730
REP
UK
YH CONSULTING LIMITED.
C/O YH Consulting Limited Office 147, Centurion
House, London Road, Staines-upon-Thames,
Surrey, TW18 4AX
REP
EC
E-CrossStu GmbH
Mainzer Landstr.69,
60329 Frankfurt am Main.


MODÈLE:XSJ23F004
«Économisezlamoitié»,«Moitiéprix»outouteautreexpressionsimilaireutiliséeparnousnereprésente
qu'uneestimationdeséconomiesquevouspourriezréaliserenachetantcertainsoutilscheznousparrapport
auxgrandesmarquesetnecouvrepasnécessairementtouteslescatégoriesd'outilsquenousproposons.
Nousvousrappelonsdebienvouloirvérifiersoigneusementlorsquevouspassezunecommandechez
noussivouséconomisezréellementlamoitiéparrapportauxgrandesmarques.
Nouscontinuonsànousengageràvousfournirdesoutilsàdesprixcompétitifs.
GUIDESPOURREMORQUESDEBATEAU
Assistancetechniqueetcertificatdegarantieélectroniquewww.vevor.com/support
Machine Translated by Google
BESOIND'AIDE?CONTACTEZNOUS!
Assistancetechniqueetcertificatdegarantie
électroniquewww.vevor.com/support
Ils'agitdelanoticed'utilisationd'origine.Veuillezlireattentivementtouteslesinstructionsdu
manuelavantdel'utiliser.VEVORseréserveledroitd'interpréterclairementnotremanueld'utilisation.
L'apparenceduproduitdépendduproduitquevousavezreçu.Veuilleznousexcuser,nousne
vousinformeronsplusencasdemiseàjourtechnologiqueoulogicielledenotreproduit.
MODÈLE:XSJ23F004
Vousavezdesquestionssurnosproduits?Vousavezbesoind'assistancetechnique?N'hésitezpasà
nouscontacter:
GUIDES
REMORQUEPOURBATEAU
1
Machine Translated by Google

àlaportéedesenfants.
2
1.Assemblezuniquementseloncesinstructions.Unassemblageincorrectpeut
7.Pourplusd'informationssurlespiècesrépertoriéescidessous
Teniràl’écartdesobjetspointus,deslamesetautresobjets.Précautions
d’assemblage.
seulement.
séparertouteslespiècesdansunezonedetravailpropre.Veuillezgarderlespetitespiècesderechangehorsdeportée
AVERTISSEMENT:Lisezetcomprenezl'intégralitédecemanuelavant
créerdesdangers.
assemblée.
pages,veuillezvousréférerauschémad'assemblagedecemanuel.Déballezet
2.Portezdeslunettesdesécuritéapprouvéesparl'ANSIetdesgantsdetravailrobustespendant
lesavertissementsetlesinstructionspeuvententraînerdesblessurescorporellesou
4.Gardezlesspectateurshorsdelazonependantl’assemblage.
d'utiliseroud'entretenirceproduit.Lenonrespectdeces
3.Gardezlazonedemontagepropreetbienéclairée.
nepaslaisserlesenfantsjoueravec.
6.Lescapacitésduproduits'appliquentauproduitcorrectementetcomplètementassemblé.
dommagesauxbiensdevaleur.Évitez
quelesenfantsutilisentlesguidesderemorquedebateau.Etceproduitn'estpasunjouet.
5.Nemontezpaslorsquevousêtesfatiguéousousl'influencedel'alcool,dedroguesoudemédicaments.
MESURESDESÉCURITÉIMPORTANTES
CONSERVEZCESINSTRUCTIONS
Machine Translated by Google

LEFORFAITCOMPREND
4pièces
4pièces
20pièces
20pièces
4pièces
boulonenU2
rondelleplate
SupportenL
PlaqueàfenteenU
Rondelleélastique
Composants
2
5
6
Non
4pièces
boulonenU1
20pièces
Qté
3
noix
1
4
7
Image
DANS
Modèle
510
330
L
(mm)
W1
XSJ23F004
1190700 85
(mm) (mm)(mm) (mm)
H
S
CARACTÉRISTIQUESDUPRODUIT:
3
Machine Translated by Google

côté,etceladépenddel'endroitoùsetrouvele
manièresillustréesdanslafigureselon
Ildisposed'unedistancederéglagesurun
leraildoitêtreinstallépourlalargeur
boulons.VouspouvezinstallerdesboulonsenUdanslesdeux
lasituationactuelle.
cadreduporteurenformedeU
Étape1:FixezlesupportenLàlapoutre
devotrebateau.
INSTRUCTIONSIMPLE
Visautotaraudeuse
10
8
16pièces
boulon
Coussin
11
9
12
2pièces
4pièces
8pièces
1pièce
PlaquedesupportenL
clé
4
Machine Translated by Google

Assurezvousqueleraildeguidageestinstallédanslabonneposition,etenfin
Ilestrecommandédefaireappelàunepersonnepourvousaideràprocéderàl’installation.
ATTENTION:
serrerlesvisaveclapoignéedelaplaque.
Étape2:MesurezladistanceL1entreles
deuxsupports6.Faitesle
Étape3:FixezlaplaquedesupportenL(9)sur
l'extrémitésupérieuredusupportenL(7)et
serrezlaaveclescomposants(4),(5),(6)et(11),
envousassurantquelaplaquedesupportenL(9)
estalignéeaveclesupport(7).
souslapoutredelaremorque
Vouspouvezégalementmonterl'assemblagederail
l'autrecôtédusupport6installédans
lamêmepositionetlamêmedistance.
Étape4:Utilisez8visautotaraudeuses(10)pour
installerlecoussin(7)danslabonneposition,en
prenantsoindefairelapositiond'installationau
milieuducoussin.
5
Machine Translated by Google

REPRÉSENTANTDELACE
REPRÉSENTANTDUROYAUMEUNI
ImportéenAustralie:SIHAOPTYLTD.1ROKEVASTREETEASTWOODNSW2122
Australie
YHCONSULTINGLIMITÉE.
Maison,LondonRoad,StainesuponThames,
200000CN.
ImportéauxÉtatsUnis:SanvenTechnologyLtd.Suite250,9166AnaheimPlace,Rancho
Cucamonga,CA91730
Adresse:Shuangchenglu803nong11hao1602A1609shi,baoshanqu,Shanghai
Fabricant:Shanghaimuxinmuyeyouxiangongsi
Surrey,TW184AX
ECrossStuGmbH
MainzerLandstr.69,
60329FrancfortsurleMain.
A/SYHConsultingLimitedBureau147,Centurion
6
Machine Translated by Google


MODELL: XSJ-23-F004
„Sparen Sie die Hälfte“, „Halber Preis“ oder andere ähnliche Ausdrücke, die wir verwenden, stellen nur eine
Schätzung der Ersparnis dar, die Sie beim Kauf bestimmter Werkzeuge bei uns im Vergleich zu den großen
Topmarken erzielen können, und decken nicht unbedingt alle von uns angebotenen Werkzeugkategorien ab. Wir
möchten Sie freundlich daran erinnern, bei Ihrer Bestellung bei uns sorgfältig zu prüfen, ob Sie im Vergleich
zu den großen Topmarken tatsächlich die Hälfte sparen.
Wir sind weiterhin bestrebt, Ihnen Werkzeuge zu wettbewerbsfähigen Preisen anzubieten.
Bootsanhänger-Ratgeber
Technischer Support und E-Garantie-Zertifikat www.vevor.com/support
Machine Translated by Google

Brauchen Sie Hilfe? Kontaktieren Sie uns!
Technischer Support und E-Garantie-Zertifikat
www.vevor.com/support
Sie haben Fragen zu unseren Produkten? Sie benötigen technischen Support? Dann kontaktieren
Sie uns gerne:
MODELL: XSJ-23-F004
Dies ist die Originalanleitung. Bitte lesen Sie alle Anweisungen sorgfältig durch, bevor Sie
das Gerät in Betrieb nehmen. VEVOR behält sich eine klare Auslegung unserer Bedienungsanleitung
vor. Das Erscheinungsbild des Produkts richtet sich nach dem Produkt, das Sie erhalten
haben. Bitte verzeihen Sie uns, dass wir Sie nicht erneut informieren, wenn es Technologie- oder
Software-Updates für unser Produkt gibt.
LEITFADEN
BOOTSANHÄNGER
- 1 -
Machine Translated by Google

außerhalb der Reichweite von Kindern aufbewahren.
- 2 -
2. Tragen Sie ANSI-zugelassene Schutzbrillen und schwere Arbeitshandschuhe während
Warnungen und Anweisungen können zu Verletzungen oder
4. Halten Sie während der Montage unbeteiligte Zuschauer vom Bereich fern.
Betrieb oder Wartung dieses Produkts. Die Nichtbeachtung dieser
3. Halten Sie den Versammlungsbereich sauber und gut beleuchtet.
Erlauben Sie Kindern nicht, damit zu spielen.
6.Produktfunktionen gelten für ordnungsgemäß und vollständig montierte Produkte
Schäden an wertvollem Eigentum. ÿ
Vermeiden Sie, dass Kinder Bootsanhängerführungen verwenden. Und dieses Produkt ist kein Spielzeug.
5. Nicht zusammenbauen, wenn Sie müde sind oder unter dem Einfluss von Alkohol, Drogen oder
Medikamenten stehen.
1. Die Montage muss gemäß dieser Anleitung erfolgen. Eine unsachgemäße Montage kann
7. Weitere Informationen zu den im Folgenden aufgeführten Teilen finden Sie
ÿ Von scharfen Spitzen, Klingen und anderen Gegenständen fernhalten. ÿ
Vorsichtsmaßnahmen bei der Montage.
nur.
Trennen Sie alle Teile in einem sauberen Arbeitsbereich. Bitte bewahren Sie kleine Ersatzteile außerhalb
WARNUNG: Lesen Sie das gesamte Handbuch sorgfältig durch, bevor Sie
Gefahren schaffen.
Montage.
Seiten finden Sie im Montagediagramm dieses Handbuchs. Auspacken und
BEWAHREN SIE DIESE ANWEISUNGEN AUF
WICHTIGE SICHERHEITSHINWEISE
Machine Translated by Google

1190700 85
(mm) (mm)(mm) (mm)
H
S
IN
Modell
510
330
M
(mm)
W1
XSJ-23-F004
6
NEIN
4 Stück
U-Bolzen-1
20 Stück
Menge
3
Nuss
1
4
7
Bild
4 Stück
20 Stück
4 Stück
20 Stück
4 Stück
U-Bolzen-2
Unterlegscheibe
L-Winkel
U-förmiges Schlitzblech
Federscheibe
Komponenten
2
5
PAKET BEINHALTET
PRODUKTSPEZIFIKATIONEN:
- 3 -
Machine Translated by Google

EINFACHE ANLEITUNG
Seite, und je nachdem, wo die
in der Abbildung gezeigten Möglichkeiten gemäß
Es verfügt über einen Einstellabstand auf einer
Schiene muss für die Breite montiert werden
Sie können U-Bolzen in den beiden
die tatsächliche Situation.
Rahmen des Trägers mit U-förmigen
Schritt 1: Befestigen Sie die L-Klammer am Balken
Ihres Bootes.
Kissen
11
9
12
2 Stück
4 Stück
8 Stück
1 Stück
L-förmige Trägerplatte
Schlüssel
Blechschraube
10
8
16 Stück
Bolzen
- 4 -
Machine Translated by Google
- 5 -
Schritt 2: Messen Sie den Abstand L1
zwischen den beiden Halterungen 6.
Schritt 3: Befestigen Sie die L-förmige Stützplatte
(9) am oberen Ende der L-Halterung (7)
und ziehen Sie sie mit den Komponenten (4),
(5), (6) und (11) fest. Achten Sie dabei darauf,
dass die L-förmige Stützplatte (9) mit der
Stütze (7) ausgerichtet ist.
unter dem Anhängerträger
Sie können die Schienenbaugruppe auch montieren
andere Seite der Halterung 6 montiert in
die gleiche Position und Entfernung.
Schritt 4: Befestigen Sie das Kissen (7) mithilfe
von 8 Blechschrauben (10) an der richtigen Stelle.
Achten Sie dabei darauf, dass sich die
Montageposition in der Mitte des Kissens befindet.
ÿ Stellen Sie sicher, dass die Führungsschiene in der richtigen Position installiert ist, und schließlich
ÿ Es wird empfohlen, jemanden zu finden, der bei der Installation hilft.
AUFMERKSAMKEIT:
Ziehen Sie die Schrauben mit dem Plattengriff fest.
Machine Translated by Google

Vertreter der EG
UK REP
Nach AUS importiert: SIHAO PTY LTD. 1 ROKEVA STREETEASTWOOD NSW 2122
Australien
YH CONSULTING LIMITED.
Haus, London Road, Staines-upon-Thames,
Adresse: Shuangchenglu 803nong11hao1602A-1609shi, Baoshanqu, Shanghai
Importiert in die USA: Sanven Technology Ltd. Suite 250, 9166 Anaheim Place, Rancho
Cucamonga, CA 91730
200000 CN.
Hersteller: Shanghaimuxinmuyeyouxiangongsi
Surrey, TW18 4AX
Mainzer Landstr.69,
E-CrossStu GmbH
60329 Frankfurt am Main.
C/O YH Consulting Limited Office 147, Centurion
- 6 -
Machine Translated by Google


MODELLO: XSJ-23-F004
GUIDE PER RIMORCHI PER BARCHE
Supporto tecnico e certificato di garanzia elettronica www.vevor.com/support
Continuiamo a impegnarci per fornirvi strumenti a prezzi competitivi.
"Risparmia la metà", "Metà prezzo" o qualsiasi altra espressione simile da noi utilizzata rappresenta
solo una stima del risparmio che potresti ottenere acquistando determinati utensili con noi rispetto ai
principali marchi principali e non significa necessariamente coprire tutte le categorie di utensili da noi
offerti. Ti ricordiamo gentilmente di verificare attentamente quando effettui un ordine con noi se
stai effettivamente risparmiando la metà rispetto ai principali marchi principali.
Machine Translated by Google
HAI BISOGNO DI AIUTO? CONTATTACI!
Hai domande sui prodotti? Hai bisogno di supporto tecnico? Non esitare a contattarci:
MODELLO: XSJ-23-F004
Questa è l'istruzione originale, si prega di leggere attentamente tutte le istruzioni del
manuale prima di utilizzare. VEVOR si riserva una chiara interpretazione del nostro manuale
utente. L'aspetto del prodotto sarà soggetto al prodotto ricevuto. Vi preghiamo di
perdonarci se non vi informeremo di nuovo se ci sono aggiornamenti tecnologici o software sul
nostro prodotto.
GUIDE
RIMORCHIO PER BARCA
Supporto tecnico e certificato di garanzia
elettronica www.vevor.com/support
- 1 -
Machine Translated by Google

alla portata dei bambini.
funzionamento o la manutenzione di questo prodotto. La mancata osservanza di queste
3. Mantenere l'area di assemblaggio pulita e ben illuminata.
separare tutte le parti in un'area di lavoro pulita. Si prega di tenere piccole parti di ricambio fuori
le avvertenze e le istruzioni possono causare lesioni personali o
4. Tenere gli astanti fuori dall'area durante l'assemblaggio.
5. Non riunirsi quando si è stanchi o sotto l'effetto di alcol, droghe o farmaci.
danni a beni di valore. ÿ Evitare che i
bambini utilizzino le guide del rimorchio della barca. E questo prodotto non è un giocattolo. Non
non permettere ai bambini di giocarci.
6. Le capacità del prodotto si applicano al prodotto correttamente e completamente assemblato
ÿ Tenere lontano da punte affilate, lame e altri oggetti. ÿ Precauzioni di
montaggio.
soltanto.
1. Montare solo secondo queste istruzioni. Un montaggio improprio può
7. Per ulteriori informazioni sulle parti elencate di seguito
2. Indossare occhiali di sicurezza approvati ANSI e guanti da lavoro resistenti durante
creare pericoli.
pagine, fare riferimento allo schema di montaggio di questo manuale. Scartare e
ATTENZIONE: leggere e comprendere l'intero manuale prima
assemblaggio.
SALVA QUESTE ISTRUZIONI
IMPORTANTI MISURE DI SICUREZZA
- 2 -
Machine Translated by Google
(mm) (mm)
700 85
S
H
(mm) (mm)
510
330
IN
Modello
1190
(mm)
XSJ-23-F004
L La1
IL PACCHETTO INCLUDE
SPECIFICHE DEL PRODOTTO:
Quantità
Piastra a fessura a forma di U
3
4 pezzi
NO
bullone a U-1
20 pezzi
6
4 pezzi
Immagine
noce
20 pezzi
1
4
7
Staffa a L
rondella piatta
bullone a U-2
4 pezzi
4 pezzi
20 pezzi
2
5
Componenti
Rondella elastica
- 3 -
Machine Translated by Google
Ha una distanza di regolazione su uno
lato, e che dipende da dove il
la situazione reale.
della tua barca.
bulloni. È possibile installare i bulloni a U nei due
modi mostrati nella figura secondo
telaio del trasportatore con forma a U
Fase 1: Fissare la staffa a L alla trave
è necessario installare la rotaia per la larghezza
- 4 -
ISTRUZIONI SEMPLICI
2 pezzi
4 pezzi
9
12
chiave
Piastra di supporto a forma di L 8 pezzi
1 pz.
10
Vite autofilettante
Cuscino
16 pezzi
11
8
bullone
Machine Translated by Google

ÿ Assicurarsi che la guida sia installata nella posizione corretta e infine
stringere le viti con la maniglia della piastra.
ÿ Si consiglia di trovare qualcuno che vi assista durante l'installazione.
ATTENZIONE:
Passaggio 2: Misurare la distanza L1
tra le due staffe 6. Realizzare il
altro lato della staffa 6 installata in
sotto la trave del rimorchio
È anche possibile montare il gruppo ferroviario
stessa posizione e distanza.
Fase 3: Fissare la piastra di supporto a L (9)
sull'estremità superiore della staffa a L
(7) e serrarla con i componenti (4), (5), (6)
e (11), assicurandosi che la piastra di
supporto a L (9) sia allineata con il supporto
(7).
Fase 4: utilizzare 8 viti autofilettanti (10) per
installare il cuscino (7) nella posizione corretta,
facendo attenzione a posizionare la
posizione di installazione al centro del cuscino.
- 5 -
Machine Translated by Google

- 6 -
Australia
Importato negli USA: Sanven Technology Ltd. Suite 250, 9166 Anaheim Place, Rancho
Cucamonga, CA 91730
CONSULENZA YH LIMITATA.
C/O YH Consulting Limited Ufficio 147, Centurion
Indirizzo: Shuangchenglu 803nong11hao1602A-1609shi, baoshanqu, shanghai
Importato in AUS: SIHAO PTY LTD. 1 ROKEVA STREETEASTWOOD NSW 2122
200000 NC.
Produttore: Shanghaimuxinmuyeyouxiangongsi
Casa, London Road, Staines-upon-Thames,
E-CrossStu GmbH
Magonza Landstr.69,
Viale della Vittoria, 18/A
60329 Francoforte sul Meno.
RAPPRESENTANZA DEL REGNO UNITO
Rappresentante della CE
Machine Translated by Google


MODELO:XSJ23F004
Seguimoscomprometidosabrindarleherramientasaprecioscompetitivos.
"Ahorrelamitad","mitaddeprecio"ocualquierotraexpresiónsimilarqueutilicemossolorepresenta
unaestimacióndelahorroquepodríaobteneralcomprarciertasherramientasconnosotrosencomparación
conlasprincipalesmarcasynonecesariamentesignificaquecubratodaslascategoríasdeherramientas
queofrecemos.Lerecordamosque,alrealizarunpedidoconnosotros,verifiquecuidadosamentesi
realmenteestáahorrandolamitadencomparaciónconlasprincipalesmarcas.
GUÍASDEREMOLQUESPARABARCOS
Soportetécnicoycertificadodegarantíaelectrónicawww.vevor.com/support
Machine Translated by Google

¿NECESITAAYUDA?¡CONTÁCTENOS!
Soportetécnicoycertificadodegarantía
electrónicawww.vevor.com/support
Estassonlasinstruccionesoriginales,leaatentamentetodaslasinstruccionesdelmanual
antesdeutilizarelproducto.VEVORsereservaunainterpretaciónclaradenuestromanualde
usuario.Laaparienciadelproductoestarásujetaalproductoquerecibió.Perdónenosporno
informarlenuevamentesihayactualizacionesdetecnologíaosoftwareennuestroproducto.
MODELO:XSJ23F004
¿Tienepreguntassobreelproducto?¿Necesitaasistenciatécnica?Nodudeenponerseencontacto
connosotros:
GUÍAS
REMOLQUEPARABARCO
1
Machine Translated by Google

alcancedelosniños.
2
1.Realiceelmontajeúnicamentedeacuerdoconestasinstrucciones.Unmontajeincorrectopuede
7.Paraobtenerinformaciónadicionalsobrelaspiezasenumeradasacontinuación,
Manteneralejadodepuntasafiladas,cuchillasyotroselementos.
Precaucionesdemontaje.
solo.
Separetodaslaspiezasenunáreadetrabajolimpia.Mantengalaspiezasderepuestopequeñasfueradelalcancedelosniños.
ADVERTENCIA:Leaycomprendatodoestemanualantesde
crearpeligros
asamblea.
páginas,consulteeldiagramadeensamblajedeestemanual.Desenvuelvay
2.UsegafasdeseguridadaprobadasporANSIyguantesdetrabajoresistentesdurante
Lasadvertenciaseinstruccionespuedencausarlesionespersonaleso
4.Mantengaalostranseúntesfueradeláreaduranteelmontaje.
operarorepararesteproducto.Elincumplimientodeestas
3.Mantengaeláreadereuniónlimpiaybieniluminada.
Nopermitirquelosniñosjueguencon.
6.Lascapacidadesdelproductoseaplicanaproductosensambladosdemaneracorrectaycompleta.
dañosabienesvaliosos.Eviteque
losniñosutilicenlasguíasderemolquesdeembarcaciones.Esteproductonoesunjuguete.
5.Norealizarelmontajecuandoseencuentrecansadoobajolainfluenciadealcohol,drogas
omedicamentos.
GUARDEESTASINSTRUCCIONES
MEDIDASDESEGURIDADIMPORTANTES
Machine Translated by Google

ELPAQUETEINCLUYE
4piezas
4piezas
20piezas
20piezas
4piezas
pernou2
Arandelaplana
SoporteenL
PlacaderanuraenformadeU
Arandeladeresorte
Componentes
2
5
6
No
4piezas
pernou1
20piezas
CANTIDAD
3
tuerca
1
4
7
Imagen
EN
Modelo
510
330
yo
(mm)
W1
XSJ23F004
1190700 85
(mm) (mm)(mm) (mm)
yo
S
ESPECIFICACIONESDELPRODUCTO:
3
Machine Translated by Google

lado,yesodependiendodedondeesté
formasquesemuestranenlafigurasegún
Tieneunadistanciadeajusteenuno
Esnecesarioinstalarunrielparaelancho
Pernos.PuedesinstalarpernosenUenlosdos
Lasituaciónactual.
MarcodelportaequipajeconformadeU
Paso1:FijeelsoporteenLalaviga
detubarco.
INSTRUCCIÓNSIMPLE
Tornilloderosca
10
8
16piezas
tornillo
Almohadón
11
9
12
2piezas
4piezas
8piezas
1pieza
PlacadesoporteenformadeL
llaveinglesa
4
Machine Translated by Google
Asegúresedequeelrielguíaestéinstaladoenlaposicióncorrectay,finalmente,
Serecomiendaencontraraalguienqueayudeconlainstalación.
ATENCIÓN:
Aprietelostornillosconelmangodelaplaca.
Paso2:MidaladistanciaL1entrelos
dossoportes6.Hagala
Paso3:Fijelaplacadesoporteenformade
L(9)enelextremosuperiordelsoporte
enL(7)yapriételaconloscomponentes
(4),(5),(6)y(11),asegurándosedequela
placadesoporteenformadeL(9)esté
alineadaconelsoporte(7).
debajodelavigadelremolque
Tambiénpuedesmontarelconjuntoderiel.
otroladodelsoporte6instaladoen
lamismaposiciónydistancia.
Paso4:Utilice8tornillosautorroscantes(10)
parainstalarelcojín(7)enlaposición
adecuada,teniendocuidadodehacerla
posicióndeinstalaciónenelmediodelcojín.
5
Machine Translated by Google

6
ImportadoaAustralia:SIHAOPTYLTD.1ROKEVASTREETEASTWOODNSW2122
Australia
YHCONSULTINGLIMITADA.
Casa,LondonRoad,StainesuponThames,
200000MN.
ImportadoaEE.UU.:SanvenTechnologyLtd.Suite250,9166AnaheimPlace,Rancho
Cucamonga,CA91730
Dirección:Shuangchenglu803nong11hao1602A1609shi,baoshanqu,shanghai
Fabricante:Shanghaimuxinmuyeyouxiangongsi
Surrey,TW184AX
ECrossStuGmbH
MainzerLandstraße69,
60329FráncfortdelMeno.
C/OYHConsultingLimitedOficina147,Centurion
REPRESENTANTECE
REPRESENTANTEDELREINOUNIDO
Machine Translated by Google


MODEL: XSJ-23-F004
PRZEWODNIKI PO PRZYCZEPACH ŁODZI
Wsparcie techniczne i certyfikat gwarancji elektronicznej www.vevor.com/support
„Oszczędź połowę”, „Połowa ceny” lub inne podobne wyrażenia używane przez nas stanowią
jedynie szacunkowe oszczędności, jakie możesz uzyskać, kupując u nas określone narzędzia w
porównaniu z głównymi markami i niekoniecznie oznaczają one objęcie wszystkich kategorii narzędzi
oferowanych przez nas. Uprzejmie przypominamy, aby dokładnie sprawdzić, czy składając u nas
zamówienie faktycznie oszczędzasz połowę w porównaniu z głównymi markami.
Nadal staramy się oferować Państwu narzędzia w konkurencyjnych cenach.
Machine Translated by Google

Masz pytania dotyczące produktu? Potrzebujesz wsparcia technicznego? Skontaktuj się z
nami:
MODEL: XSJ-23-F004
To jest oryginalna instrukcja, przed użyciem należy uważnie przeczytać wszystkie
instrukcje. VEVOR zastrzega sobie jasną interpretację naszej instrukcji obsługi. Wygląd
produktu będzie zależał od produktu, który otrzymałeś. Prosimy o wybaczenie, że nie
poinformujemy Cię ponownie, jeśli w naszym produkcie pojawią się jakiekolwiek aktualizacje
technologiczne lub oprogramowania.
POTRZEBUJESZ POMOCY? SKONTAKTUJ SIĘ Z NAMI!
PRZEWODNIKI
PRZYCZEPA ŁODZIOWA
Wsparcie techniczne i certyfikat gwarancji
elektronicznej www.vevor.com/support
- 1 -
Machine Translated by Google

obsługi lub serwisowania tego produktu. Nieprzestrzeganie tych
3. Utrzymuj miejsce zgromadzenia w czystości i zapewnij dobre oświetlenie.
oddzielić wszystkie części w czystym miejscu pracy. Proszę trzymać małe części zamienne z dala od
ostrzeżenia i instrukcje mogą spowodować obrażenia ciała lub
4. Nie dopuść, aby osoby postronne przebywały w pobliżu podczas montażu.
5. Nie przychodź na spotkania, jeśli jesteś zmęczony lub pod wpływem alkoholu, narkotyków lub leków.
uszkodzenia cennego mienia. Unikaj
korzystania przez dzieci z prowadnic przyczepy łodzi. Ten produkt nie jest zabawką. Nie
Nie pozwalaj dzieciom bawić się.
6. Możliwości produktu odnoszą się do produktu prawidłowo i całkowicie zmontowanego
Trzymać z dala od ostrych punktów, ostrzy i innych przedmiotów. Środki
ostrożności podczas montażu.
tylko.
1. Montaż należy wykonywać wyłącznie zgodnie z niniejszą instrukcją. Nieprawidłowy montaż może
7. Aby uzyskać dodatkowe informacje dotyczące części wymienionych poniżej,
2. Podczas pracy należy nosić okulary ochronne i wytrzymałe rękawice robocze zgodne z normą ANSI.
stwarzać zagrożenia.
strony, zapoznaj się ze schematem montażu w tym podręczniku. Rozpakuj i
OSTRZEŻENIE: Przed przystąpieniem do użytkowania należy przeczytać i zrozumieć całą instrukcję.
montaż.
dostępne dla dzieci.
ZAPISZ TE INSTRUKCJE
WAŻNE ZABEZPIECZENIA
- 2 -
Machine Translated by Google

ZAWARTOŚĆ PAKIETU
(mm) (mm)
700 85
S
H
(mm) (mm)
510
330
W
Model
1190
(mm)
XSJ-23-F004
L W1
DANE TECHNICZNE PRODUKTU:
Podkładka sprężysta
ILOŚĆ
4 szt.
3
20 szt.
U-śruba-1
NIE
6
Zdjęcie
4 szt.
nakrętka
20 szt.
1
4
7
podkładka płaska
Wspornik L
U-śruba-2
4 szt.
4 szt.
20 szt.
2
5
Komponenty
Płyta szczelinowa w kształcie litery U
- 3 -
Machine Translated by Google
sytuacja rzeczywista.
Posiada regulację odległości na jednym
strona i to w zależności od tego, gdzie
śruby. Możesz zainstalować śruby U w dwóch
sposoby pokazane na rysunku zgodnie z
rama nosidełka z U-kształtem
Krok 1: Zamocuj wspornik L do belki
Twojej łodzi.
szyna musi być zainstalowana na szerokość
- 4 -
PROSTA INSTRUKCJA
2 szt.
4 szt.
9
12
klucz
Płyta podporowa w kształcie litery L 8szt
1 szt.
10
Wkręt samogwintujący
Poduszka
16 szt.
11
śruba
8
Machine Translated by Google
Upewnij się, że prowadnica jest zamontowana w prawidłowej pozycji i na koniec
dokręć śruby za pomocą uchwytu płytki.
Zaleca się, aby przy instalacji pomóc komuś innemu.
UWAGA:
Krok 2: Zmierz odległość L1 między
dwoma wspornikami 6. Wykonaj
druga strona wspornika 6 zamontowana w
pod belką przyczepy
Można również zamontować zespół szyn
Krok 3: Zamocuj płytkę podporową w kształcie
litery L (9) na górnym końcu wspornika L
(7) i dokręć ją za pomocą elementów (4), (5),
(6) i (11), upewniając się, że płytka podporowa
w kształcie litery L (9) jest wyrównana ze
wspornikiem (7).
w tej samej pozycji i odległości.
Krok 4: Użyj 8 wkrętów samogwintujących
(10), aby zamontować poduszkę (7) we właściwej
pozycji, upewniając się, że miejsce montażu
znajduje się na środku poduszki.
- 5 -
Machine Translated by Google

Przedstawiciel UE
REP WIELKIEJ BRYTANII
Importowane do USA: Sanven Technology Ltd. Suite 250, 9166 Anaheim Place, Rancho
Cucamonga, CA 91730
Australia
YH CONSULTING LIMITED.
C/O YH Consulting Limited Biuro 147, Centurion
Adres: Shuangchenglu 803nong11hao1602A-1609shi, baoshanqu, Szanghaj
Importowane do AUS: SIHAO PTY LTD. 1 ROKEVA STREETEASTWOOD NSW 2122
200000 CN.
Producent: Shanghaimuxinmuyeyouxiangongsi
Dom, London Road, Staines-upon-Thames,
E-CrossStu GmbH
60329 Frankfurt nad Menem.
Surrey, TW18 4AX
Mainzer Landstr.69,
- 6 -
Machine Translated by Google


MODEL: XSJ-23-F004
Wij streven er voortdurend naar om u gereedschappen tegen concurrerende prijzen te leveren.
"Save Half", "Half Price" of andere soortgelijke uitdrukkingen die wij gebruiken, geven alleen een schatting van de
besparingen die u kunt behalen door bepaalde gereedschappen bij ons te kopen in vergelijking met de grote topmerken
en betekent niet noodzakelijkerwijs dat alle categorieën gereedschappen die wij aanbieden, worden gedekt. Wij
herinneren u eraan om zorgvuldig te controleren of u daadwerkelijk de helft bespaart in vergelijking met de grote
topmerken wanneer u een bestelling bij ons plaatst.
BOOTAANHANGWAGEN GIDSEN
Technische ondersteuning en e-garantiecertificaat www.vevor.com/support
Machine Translated by Google

Dit is de originele instructie, lees alle handleidingen zorgvuldig door voordat u het product
gebruikt. VEVOR behoudt zich een duidelijke interpretatie van onze gebruikershandleiding voor.
Het uiterlijk van het product is afhankelijk van het product dat u hebt ontvangen. Vergeef ons
dat we u niet opnieuw zullen informeren als er technologie- of software-updates voor ons product zijn.
MODEL: XSJ-23-F004
Heeft u vragen over het product? Heeft u technische ondersteuning nodig? Neem dan gerust
contact met ons op:
Technische ondersteuning en e-
garantiecertificaat www.vevor.com/support
HULP NODIG? NEEM CONTACT MET ONS OP!
GIDSEN
BOOTAANHANGWAGEN
- 1 -
Machine Translated by Google

bereik van kinderen.
- 2 -
5. Ga niet in de winkel staan als u moe bent of onder invloed van alcohol, drugs of medicijnen.
1. Monteer alleen volgens deze instructies. Onjuiste montage kan
7. Voor aanvullende informatie over de onderdelen die in de volgende lijst staan vermeld,
ÿ Uit de buurt houden van scherpe punten, messen en andere voorwerpen. ÿ
Voorzorgsmaatregelen bij de montage.
alleen.
scheid alle onderdelen in een schone werkruimte. Houd kleine reserveonderdelen uit de buurt
WAARSCHUWING: Lees en begrijp deze hele handleiding voordat u
montage.
gevaren creëren.
2. Draag tijdens het werk een door de ANSI goedgekeurde veiligheidsbril en stevige werkhandschoenen.
pagina's, raadpleeg dan het montageschema van deze handleiding. Uitpakken en
waarschuwingen en instructies kunnen persoonlijk letsel of
4. Houd omstanders uit de buurt tijdens de montage.
3. Zorg dat de montageplek schoon en goed verlicht is.
het bedienen of onderhouden van dit product. Het niet naleven van deze
kinderen niet toestaan om ermee te spelen.
6. Producteigenschappen zijn van toepassing op een correct en volledig gemonteerd product
schade aan waardevolle eigendommen. ÿ
Vermijd dat kinderen boottrailergidsen gebruiken. En dit product is geen speelgoed. Doe
BEWAAR DEZE INSTRUCTIES
BELANGRIJKE VEILIGHEIDSMAATREGELEN
Machine Translated by Google

PAKKET INBEGREPEN
4 stuks
Afbeelding
20 stuks
20 stuks
u-bout-2
4 stuks
L-beugel
vlakke ring
U-vormige sleufplaat
Componenten
Veerring
2
5
6
Nee
u-bout-1
20 stuks
4 stuks
Hoeveelheid
3
moer
1
4
7
4 stuks
S
IN
Model
510
330
Ik W1
(mm)
1190
XSJ-23-F004
700 85
(mm)(mm) (mm) (mm)
H
PRODUCTSPECIFICATIES:
- 3 -
Machine Translated by Google

manieren die in de figuur worden weergegeven volgens
Het heeft een aanpassingsafstand op één
kant, en dat afhankelijk van waar de
rail moet voor de breedte worden geïnstalleerd
frame van de drager met U-vormig
de werkelijke situatie.
bouten. U kunt U-bouten in de twee plaatsen
Stap 1: Bevestig de L-beugel aan de balk
van uw boot.
- 4 -
EENVOUDIGE INSTRUCTIE
moersleutel
Tapschroef
10
8
bout
16 stuks
Kussen
11
9
12
4 stuks
2 stuks
8 stuks
1 stuk
L-vormige steunplaat
Machine Translated by Google

ÿ Zorg ervoor dat de geleiderail op de juiste positie is geïnstalleerd en ten slotte
ÿ Het is raadzaam om iemand in te schakelen die u kan helpen met de installatie.
AANDACHT:
Draai de schroeven met de plaatgreep vast.
onder de aanhangwagenbalk
Stap 4: Gebruik 8 tapschroeven (10) om het
kussen (7) in de juiste positie te installeren,
waarbij u erop let dat de installatiepositie
in het midden van het kussen komt.
Stap 2: Meet de afstand L1 tussen de
twee beugels 6. Maak de
U kunt de railmontage ook monteren
dezelfde positie en afstand.
andere kant van de beugel 6 geïnstalleerd in
Stap 3: Bevestig de L-vormige steunplaat (9)
aan het bovenste uiteinde van de L-
beugel (7) en draai deze vast met
componenten (4), (5), (6) en (11), waarbij u
ervoor zorgt dat de L-vormige steunplaat
(9) uitgelijnd is met de steun (7).
- 5 -
Machine Translated by Google
EC-REP
VK REP
Australië
Geïmporteerd naar AUS: SIHAO PTY LTD. 1 ROKEVA STREETEASTWOOD NSW 2122
Geïmporteerd naar de VS: Sanven Technology Ltd. Suite 250, 9166 Anaheim Place, Rancho
Cucamonga, CA 91730
Huis, London Road, Staines-upon-Thames,
200000 CN.
YH CONSULTING LIMITED.
Adres: Shuangchenglu 803nong11hao1602A-1609shi, baoshanqu, shanghai
Fabrikant: Shanghaimuxinmuyeyouxiangongsi
Surrey, TW18 4AX
E-CrossStu GmbH
Mainzer Landstr.69,
60329 Frankfort aan de Main.
C/O YH Consulting Limited Kantoor 147, Centurion
- 6 -
Machine Translated by Google


MODELL: XSJ-23-F004
BÅTTRAILERGUIDE
Teknisk support och e-garanticertifikat www.vevor.com/support
"Spara hälften", "halva priset" eller andra liknande uttryck som används av oss representerar
bara en uppskattning av besparingar du kan dra nytta av att köpa vissa verktyg hos oss jämfört med
de stora toppmärkena och betyder inte nödvändigtvis att täcka alla kategorier av verktyg som erbjuds
av oss. Du påminns vänligen om att noggrant kontrollera när du gör en beställning hos oss om
du faktiskt sparar hälften i jämförelse med de främsta stora varumärkena.
Vi fortsätter att vara engagerade i att ge dig verktyg till konkurrenskraftiga priser.
Machine Translated by Google

BEHÖVER HJÄLP? KONTAKTA OSS!
Har du produktfrågor? Behöver du teknisk support? Kontakta oss gärna:
MODELL: XSJ-23-F004
Detta är den ursprungliga instruktionen, läs alla instruktioner noggrant innan du
använder den. VEVOR reserverar sig för en tydlig tolkning av vår användarmanual. Utseendet
på produkten är beroende av den produkt du fått. Ursäkta oss att vi inte kommer att
informera dig igen om det finns någon teknik eller mjukvaruuppdateringar på vår produkt.
GUIDE
BÅTTRAILER
Teknisk support och e-garanticertifikat
www.vevor.com/support
- 1 -
Machine Translated by Google

barns räckvidd.
använda eller serva denna produkt. Underlåtenhet att följa dessa
3. Håll monteringsområdet rent och väl upplyst.
separera alla delar i ett rent arbetsområde. Vänligen håll undan små reservdelar
varningar och instruktioner kan orsaka personskada eller
4. Håll åskådare borta från området under monteringen.
5. Sätt dig inte ihop när du är trött eller påverkad av alkohol, droger eller medicin.
skada på värdefull egendom. ÿ
Undvik att barn använder båttrailerguider. Och den här produkten är inte en leksak. Do
inte tillåta barn att leka med.
6. Produktegenskaper gäller för korrekt och fullständigt monterad produkt
ÿ Håll dig borta från vassa spetsar, knivar och andra föremål. ÿ
Försiktighetsåtgärder vid montering.
endast.
1. Montera endast enligt dessa instruktioner. Felaktig montering kan
7. För ytterligare information om delarna som listas nedan
2. Bär ANSI-godkända skyddsglasögon och kraftiga arbetshandskar under
skapa faror.
sidorna, se monteringsdiagrammet i denna manual. Packa upp och
VARNING: Läs och förstå hela denna manual innan
montering.
SPARA DESSA INSTRUKTIONER
VIKTIGA SÄKERHETSÅTGÄRDER
- 2 -
Machine Translated by Google
PAKET INGÅR
(mm) (mm)
700 85
S
H
(mm) (mm)
510
330
I
Modell
1190
(mm)
XSJ-23-F004
W1L
PRODUKTSPECIFIKATIONER:
Fjäderbricka
ANTAL
4 st
3
20 st
Inga
u-bult-1
6
Bild
4 st
mutter
20 st
1
4
7
platt bricka
L-fäste
u-bult-2
4 st
4 st
20 st
2
5
Komponenter
U-formad slitsplatta
- 3 -
Machine Translated by Google

ENKEL INSTRUKTION
- 4 -
den faktiska situationen.
Den har ett justeringsavstånd på en
sida, och det beroende på var
skena måste installeras för bredden
bärarens ram med U-formad
sätt som visas i figuren enligt
bultar. Du kan installera U-bultar i de två
Steg 1: Fäst L- fästet på balken
av din båt.
2 st
4 st
9
12
rycka
L-formad stödplatta 8 st
1 st
10
Tappskruv
Dämpa
16 st
11
8
bult
Machine Translated by Google

- 5 -
Steg 2: Mät avståndet L1 mellan de två
fästena 6. Gör
andra sidan av fästet 6 installerad i
under trailerbalken
Du kan även montera skenenheten
Steg 3: Fäst den L-formade
stödplattan (9) på den övre
änden av L-fästet (7) och dra åt
den med komponenterna (4), (5), (6)
och (11), och se till att L- formad
stödplatta (9) är i linje med stödet
(7).
samma position och avstånd.
Steg 4: Använd 8 gängskruvar (10) för att
installera dynan (7) i rätt läge, var noga med att
göra installationspositionen i mitten av
dynan.
ÿ Se till att styrskenan är installerad i rätt läge och slutligen
dra åt skruvarna med plåthandtaget.
ÿ Det rekommenderas att hitta någon som kan hjälpa till med installationen.
UPPMÄRKSAMHET:
Machine Translated by Google
EC REP
UK REP
Importerad till USA: Sanven Technology Ltd. Suite 250, 9166 Anaheim Place, Rancho
Cucamonga, CA 91730
Australien
YH CONSULTING LIMITED.
C/O YH Consulting Limited Office 147, Centurion
200 000 CN.
Importerad till AUS: SIHAO PTY LTD. 1 ROKEVA STREETEASTWOOD NSW 2122
Adress: Shuangchenglu 803nong11hao1602A-1609shi, baoshanqu, shanghai
Tillverkare: Shanghaimuxinmuyeyouxiangongsi
E-CrossStu GmbH
House, London Road, Staines-upon-Thames,
Surrey, TW18 4AX
Mainzer Landstr.69,
60329 Frankfurt am Main.
- 6 -
Machine Translated by Google

