
OWNER’S MANUAL
For Household Use Only

WIRING DIAGRAM
TABLE OF CONTENTS
TECHNICAL DETAILS
2
Voltage 120 volt
Amperage 4.1 amp
Air volume 7.13 gal/s / 27.1 l/s
Airflow 57 CFM
Water lift 19 in H
2
O
Filter bag capacity
1.45 gal / 5.5 l
Weight without cord 12.8 lb / 5.8 kg
Weight with cord 15.4 lb / 7 kg
Power head width 12.2 in / 31 cm
Power head clearance 6 in / 15.2 cm
Brush height adjustment 4 levels
Cord length 30.24 ft / 9.25 m
Machine Height 45.6 in / 115.8 cm
Brush drive Toothed belt
Brush speed 2800-3200 rpm
Impeller speed 17000 rpm
To contact SEBO in the United States of America:
SEBO America, LLC
Telephone: (800) 334-6614
Fax: (303) 792-9196
Website: www.sebo.us
For warranty coverage details please refer to your
Warranty Card included with your SEBO vacuum cleaner.
To contact SEBO in Canada:
SEBO Canada
Telephone: (877) 258-5005
Fax: (800) 270-4807
Website: www.sebocanada.ca
For warranty coverage details and to register your
SEBO vacuum cleaner, go to www.sebocanada.ca
HOW TO CONTACT SEBO
Technical Details 2
Wiring Diagram 2
How To Contact SEBO 2
Important Safety Instructions 3
SEBO SOFTCASE CE12 Lightweight Features 4
Standard Features of all SEBO Vacuums 4
SEBO’s Filtration System 4
Identification of Parts 5
Assembly 5
Operating Instructions 7
Starting the Machine 7
Operating Positions 7
The Height Adjustment Wheel 7
Maintenance 8
Changing the Filter Bag 8
Changing the Brush Roller 8
Clog Removal 9
Clogs in the Airflow Pathway 9
Clogs in Entrance to Filter Bag 9
Clogs in the Bag Housing Air Channel 9
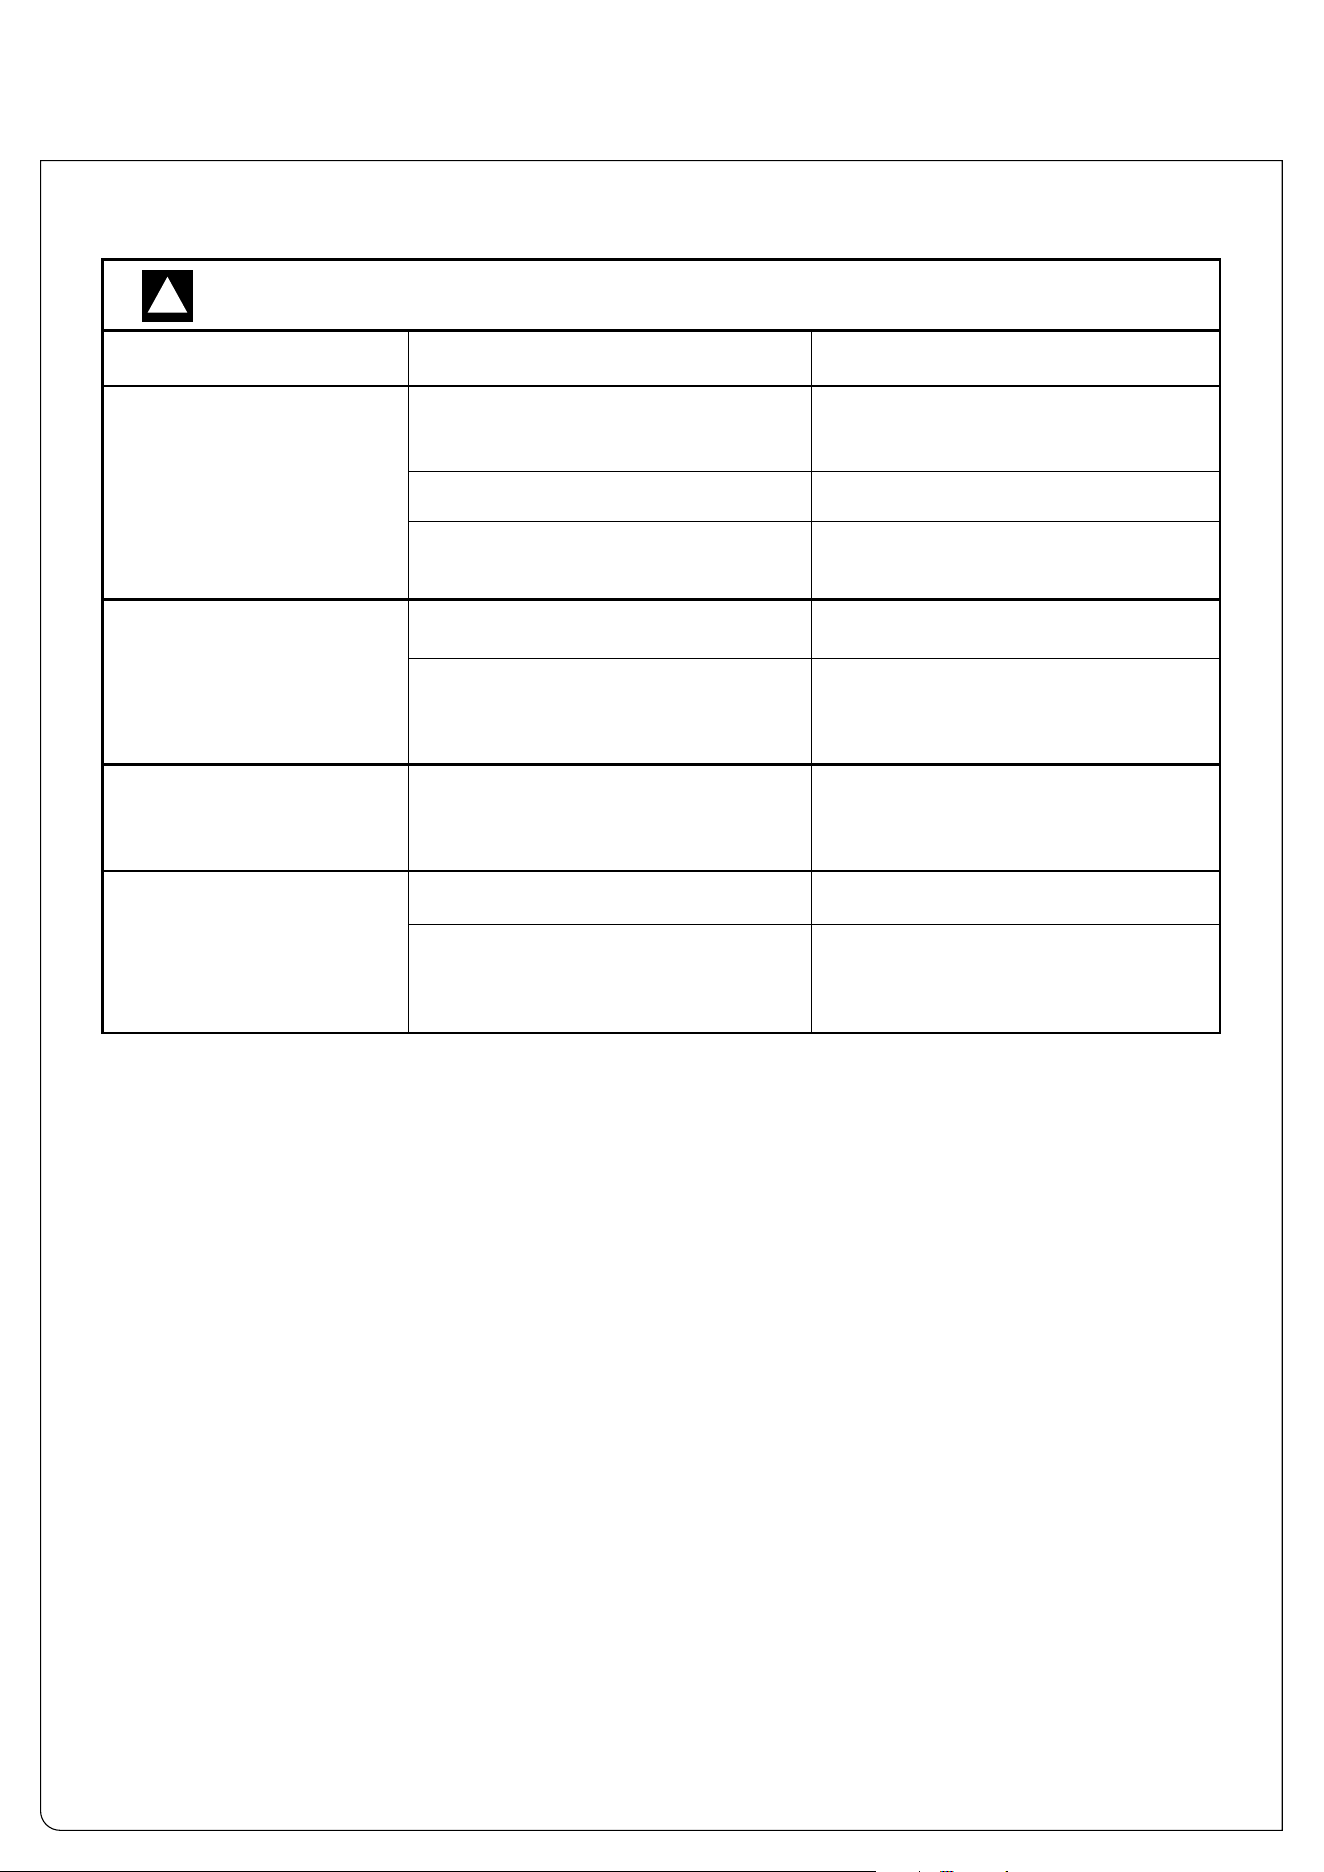
Trouble-shooting Guide 10
SOFTCASE CE12 Lightweight Bag Housing and Handle Schematic and Part Numbers 11
SOFTCASE CE12 Lightweight Power Head Schematic and Part Numbers 12

1. Do not leave vacuum while plugged in. Unplug from
outlet when not in use and before servicing.
2. Do not use outdoors or on wet surfaces.
3. Do not use near small children or pets. Do not allow
to be used as a toy. Use of this product by children
should always be supervised by an adult.
4. Use only as described in this manual. Use only
manufacturer-recommended attachments.
5. Do not use with a damaged cord or plug. If vacuum is
not working as it should, has been dropped, damaged,
left outdoors, or dropped into water, take it to a SEBO
service center.
6. Do not pull or carry by cord, use cord as a handle,
close a door on cord, or pull cord around sharp
edges or corners. Do not run vacuum over cord.
Keep vacuum cleaner and cord away from heated
surfaces.
7. Do not unplug by pulling on cord. To unplug, grasp
the plug – not the cord.
8. Do not plug in if switch is in the “I” (ON) position.
9. Do not use outlets above counters to plug in vacuum –
damage to items in the surrounding area could
occur.
10. Always carry the vacuum over steps and sills.
11. Do not handle plug or vacuum handle with wet hands.
12. Do not put any object into vacuum openings. Do not use
machine with any openings blocked. Keep openings
free of lint, hair, and anything that may reduce air flow.
13. Do not re-use filter bags or wash the filters.
14. Do not remove any screws from vacuum.
15. Do not vacuum up anything that is burning or
smoking, such as cigarettes, matches, or hot ashes.
16. Do not use vacuum without filter bag and/or filters in
place.
17. Turn off all machine controls before unplugging.
18. Use extra care when cleaning on stairs.
19. Do not use machine to vacuum up flammable or
combustible liquids such as gasoline or use in areas
where they may be present.
20. Machines can cause a fire when operated near
flammable vapors or materials. Do not operate this
vacuum near flammable fluids, dust or vapors.
21. Maintenance and repairs must be done by qualified
personnel.
22. Use only original SEBO replacement parts.
23. Do not use vacuum as a step.
24. If vacuum is used on plush carpet or carpet with thick
padding, do not leave machine standing in one place
with machine turned on.
25. Keep hair, loose clothing, fingers, and all parts of body
away from vacuum openings and moving parts. Do not
place fingers or other body parts under vacuum unless
it is unplugged.
26. Do not place the power head over rug or carpet edges.
27. Store the vacuum in a dry place at room temperature.
When the vacuum is not in use, you should wrap the
cord on the cable hooks.
28. Any other servicing should be performed by an
authorized service representative.
29. Always turn off this appliance before connecting or
disconnecting power head with brush.
IMPORTANT SAFETY INSTRUCTIONS
READ ALL INSTRUCTIONS BEFORE USING THIS MACHINE
3
When using an electrical appliance, basic precautions must always be followed.
To reduce the risk of electric shock, this vacuum cleaner has a polarized plug; one blade is wider than the
other. This plug will fit in a polarized outlet only one way. If the plug does not fit fully in the outlet, reverse the plug. If
it still does not fit, contact a qualified electrician to install the proper outlet. Do not change the plug in any way.
Connect only to the outlet type specified on the serial number plate underneath the machine.
SAVE THESE INSTRUCTIONS.
WARNING: To reduce the risk of fire, electric shock, or injury:
!

SEBO SOFTCASE CE12 LIGHTWEIGHT PRODUCT FEATURES
4
Impeller Technology - The impeller, with up to 17,000 rota-
tions per minute, is driven by a toothed belt. The impeller
sucks in the dirt picked up by the rotating brush and transports
it through the air channel into the removable filter bag. A sim-
ple and effective system, it generates an astonishing volume
flow of 7.13 gallons per second despite the relatively low rated
power of 400 watts!
Designed for All Floor Surfaces: Four-level Manual Brush
Height Adjustment – The brush height can be manually
adjusted up or down for optimal cleaning effectiveness. And,
to
protect flooring surfaces, the brush will raise off the floor
when the handle is in the
upright locked position.
Easy Brush Roller Removal – Quick brush cleaning or
replacement is easy, and no tools are required!
Thirty-foot Cord – A 30-foot cord saves time because it mini-
mizes the number of electrical outlets needed during use.
Automatic Shut-off - In case of a blockage or overload, the
vacuum switches off automatically.
Durable Heavy-duty Belts - The reinforced toothed belts do not
slip or stretch, resulting in a more efficient use of power, and
they should last the life of the machine.
A Flat-to-the-floor, 6-inch Profile – Such a low profile makes
cleaning under furniture and beds easy!
Multi-layer Microfilter Bag with Extra-large Volume - The
four-layer electrostatic filter bag has a high rate of microfil-
tration and has an amazing volume of 1.45 gallons - a lot of
dust fits in there.
Filter Bag Housing Made of Lightweight, Textile Material -
The filter case of the SEBO SOFTCASE CE12 is made from a
soft textile material with a 2-way-zip. This lightweight, durable
material is shockproof and easy to move by hand.
STANDARD FEATURES OF ALL SEBO VACUUMS:
Designed and Manufactured in Germany – Legendary quality,
reliability and performance make SEBO vacuums the first
choice of cleaning professionals throughout the world.
World’s Best Pet Vacuums – Because of superior power-head
and brush-roller technology, SEBO vacuums are the world’s
best for pet hair removal.
Reliable, Commercial-grade Components – All SEBO vacu-
ums are constructed with thick, reinforced, ABS plastic, alu-
minum and metal parts, steel axles and bearings, and high-
end, quality motors. Therefore, SEBO users own reliable,
long-lasting vacuum cleaners. Competing vacuums are made
with thin, flimsy, inexpensive, plastic materials, none of which
are reinforced, and typically have useful lifespans of one or
two years.
Rubber Wheels and Soft Bumpers Protect Homes – Smooth-
gliding, rubber wheels protect hard floors and provide excep-
tional maneuverability. In addition, the bumper that surrounds
the power head protects furniture, walls, and the vacuum
housing from incurring scuffs and scratches during use.
Advanced, Brush-Roller Technology – SEBO’s brush rollers
are uniquely designed to funnel hair and debris into the power
head’s airflow channel, which improves vacuum cleaning per-
formance on all flooring surfaces.
Changing Bags is Easy and Clean – SEBO filter bags can be
changed in just a few seconds, and a hygiene cap keeps dust
sealed inside during removal and disposal.
Save Money! SEBO Vacuums Last for Years and Extend
Carpet Life! – If properly maintained, SEBO vacuums save
ordinary, residential users hundreds of dollars, by providing
excellent performance for ten to fifteen years or more, and
their deep-cleaning, power-brush technology extends the life
of carpets. Typical vacuums perform poorly, even when new,
and usually do not last beyond two years. So six or seven “dis-
posable vacuums” must be purchased during the average life
expectancy of just one SEBO machine.
SEBO’s FILTRATION SYSTEM:
Bagged vs. Bagless . . . Bags are Better! – Top-fill filter bags
are an integral part of SEBO’s filtration system because they
hold virtually all the dirt captured by the vacuum. They also
ensure continuously strong suction because dirt enters from
the top, deposits at the bottom, accumulates upward, and air
exits through the sides, which allows unimpeded airflow as
they fill to capacity. And they can be tightly sealed with a
hygiene cap when full, so no dust can escape into the air dur-
ing bag removal and disposal.
In contrast, without bags to hold nearly all the captured dirt,
the microfilters on bagless vacuums quickly clog from exces-
sive dirt build-up and must be replaced often, or a loss of suc-
tion and cleaning effectiveness will occur. In addition, dust
becomes airborne when emptying bagless dirt containers.
Lastly, bagless vacuum microfilters are expensive, usually
costing more than a multi-year supply of SEBO filter bags.
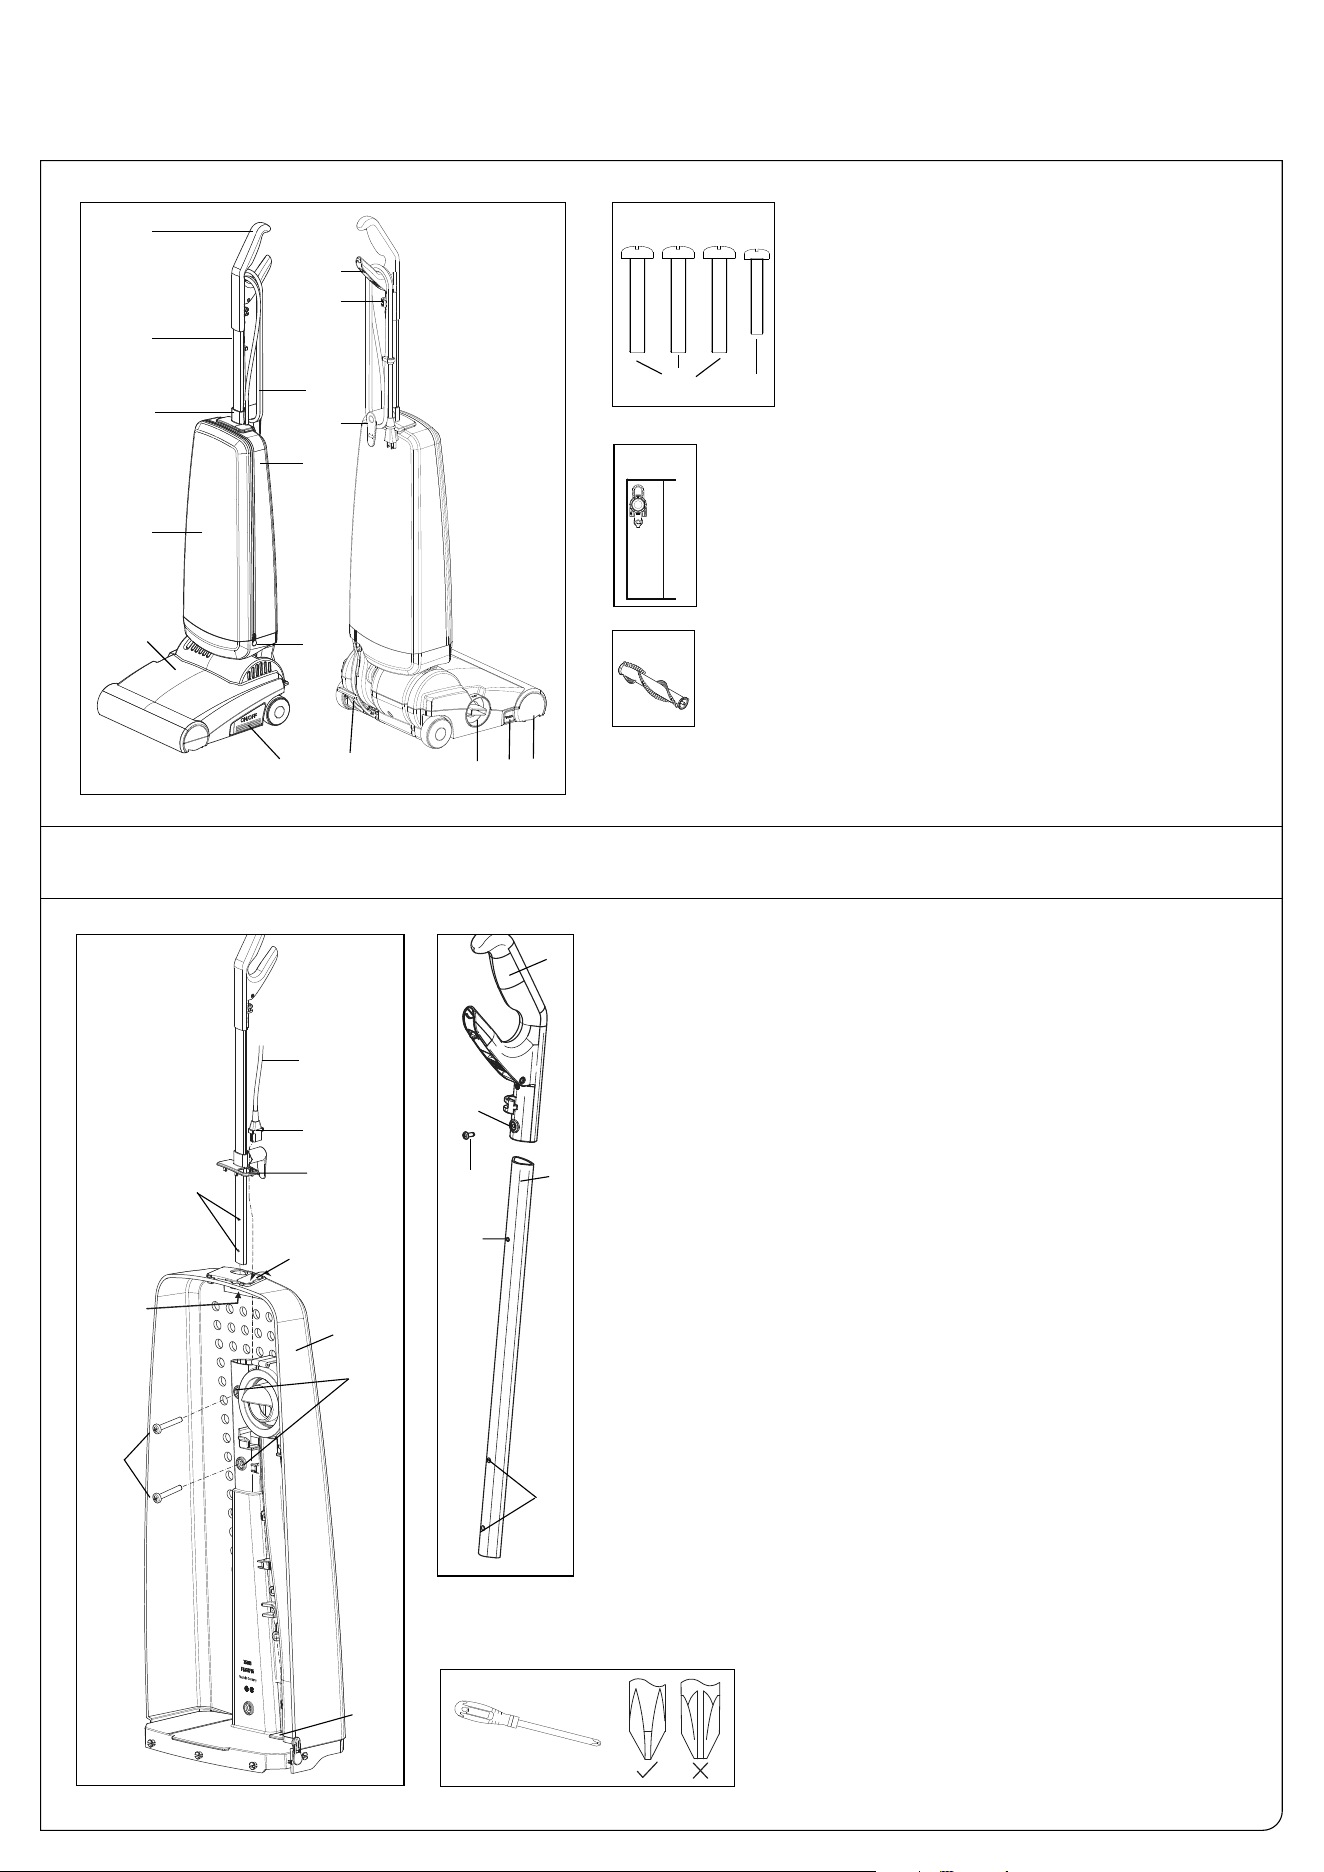
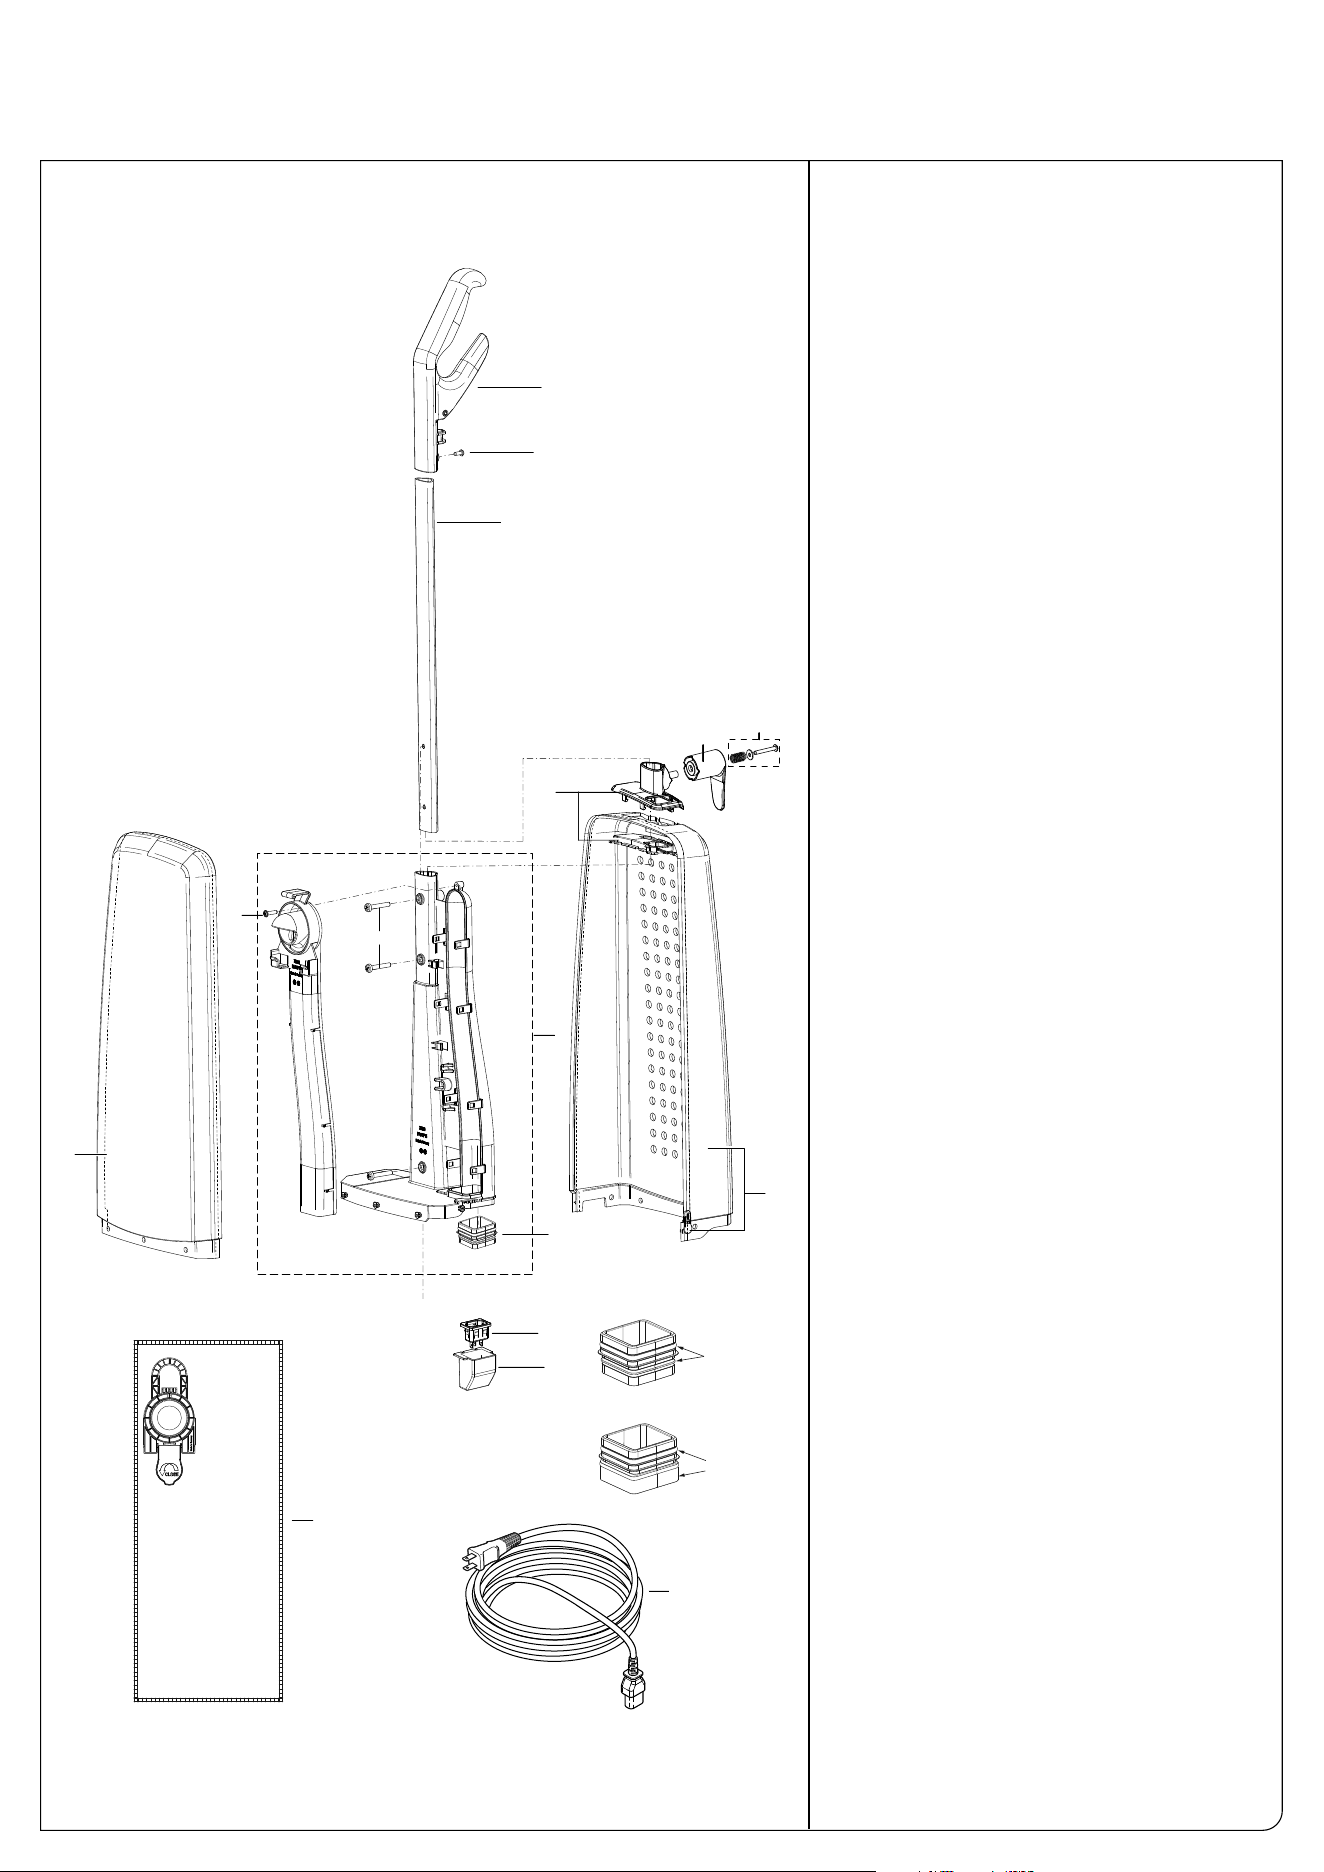
IDENTIFICATION OF PARTS
5
ASSEMBLY
1. Handle grip
2. Handle tube
3. Cable (cord)
4. Handle guide
5. Bag housing
6. Front cover
7. Cover release zipper
8. Power head
9. On/Off switch
10. Strain relief catch
11. Cable guide for mains cable
12. Cable (cord) rotating hook
13. Foot pedal
14. Pile adjustment knob
15. Brush release button
16. Side plate for brush housing
17. Screw set: 17a (3) M5x30, 17b (1) M4x10
18. Filter bag
19. Brush roller
17
1
2
4
6
8
18
19
17a
3
5
7
9
Use a phillips-head screw-
driver to affix all included
screws, not a flat-head
screwdriver. Screwdriver is
not included.
Figure 2
Step 2 (figures 1 & 2): Unzip the front cover of the bag housing (5)
completely. Note: The bag housing cover cannot be removed com-
pletely! It has been omitted in the illustrations to improve clari-
ty. Open the flap (25) in the base of the shaft guide. This flap can be
unlocked with the latch (26) from inner side of the filter housing.
Guide the power cable (3) through the upper part of the shaft guide
(23) as indicated by the dash-dot line. Loosely route the cable plug
(22) to the bottom of the filter housing (28).
Insert the handle assembly into the lower shaft guide and slide it
down until the screw holes in the handle tube (24) line up with the
lower screw holes (27), and attach using 2 M5x30 screws (17a)
from the screw set. Use a phillips-head screwdriver (not included).
3
23
25
26
22
24
27
17a
10
11
12
13
14 15 16
28
5
17b
Step 1 (figure 1): Insert the handle grip (1) into the handle tube (2).
Slide it down until the screw hole in the handle (21a) lines up with
the screw hole in the handle tube (21b). Secure with the M4x10
screw (17b) using a phillips-head screwdriver (not included).
17b
1
21b
21a
2
Figure 1
24
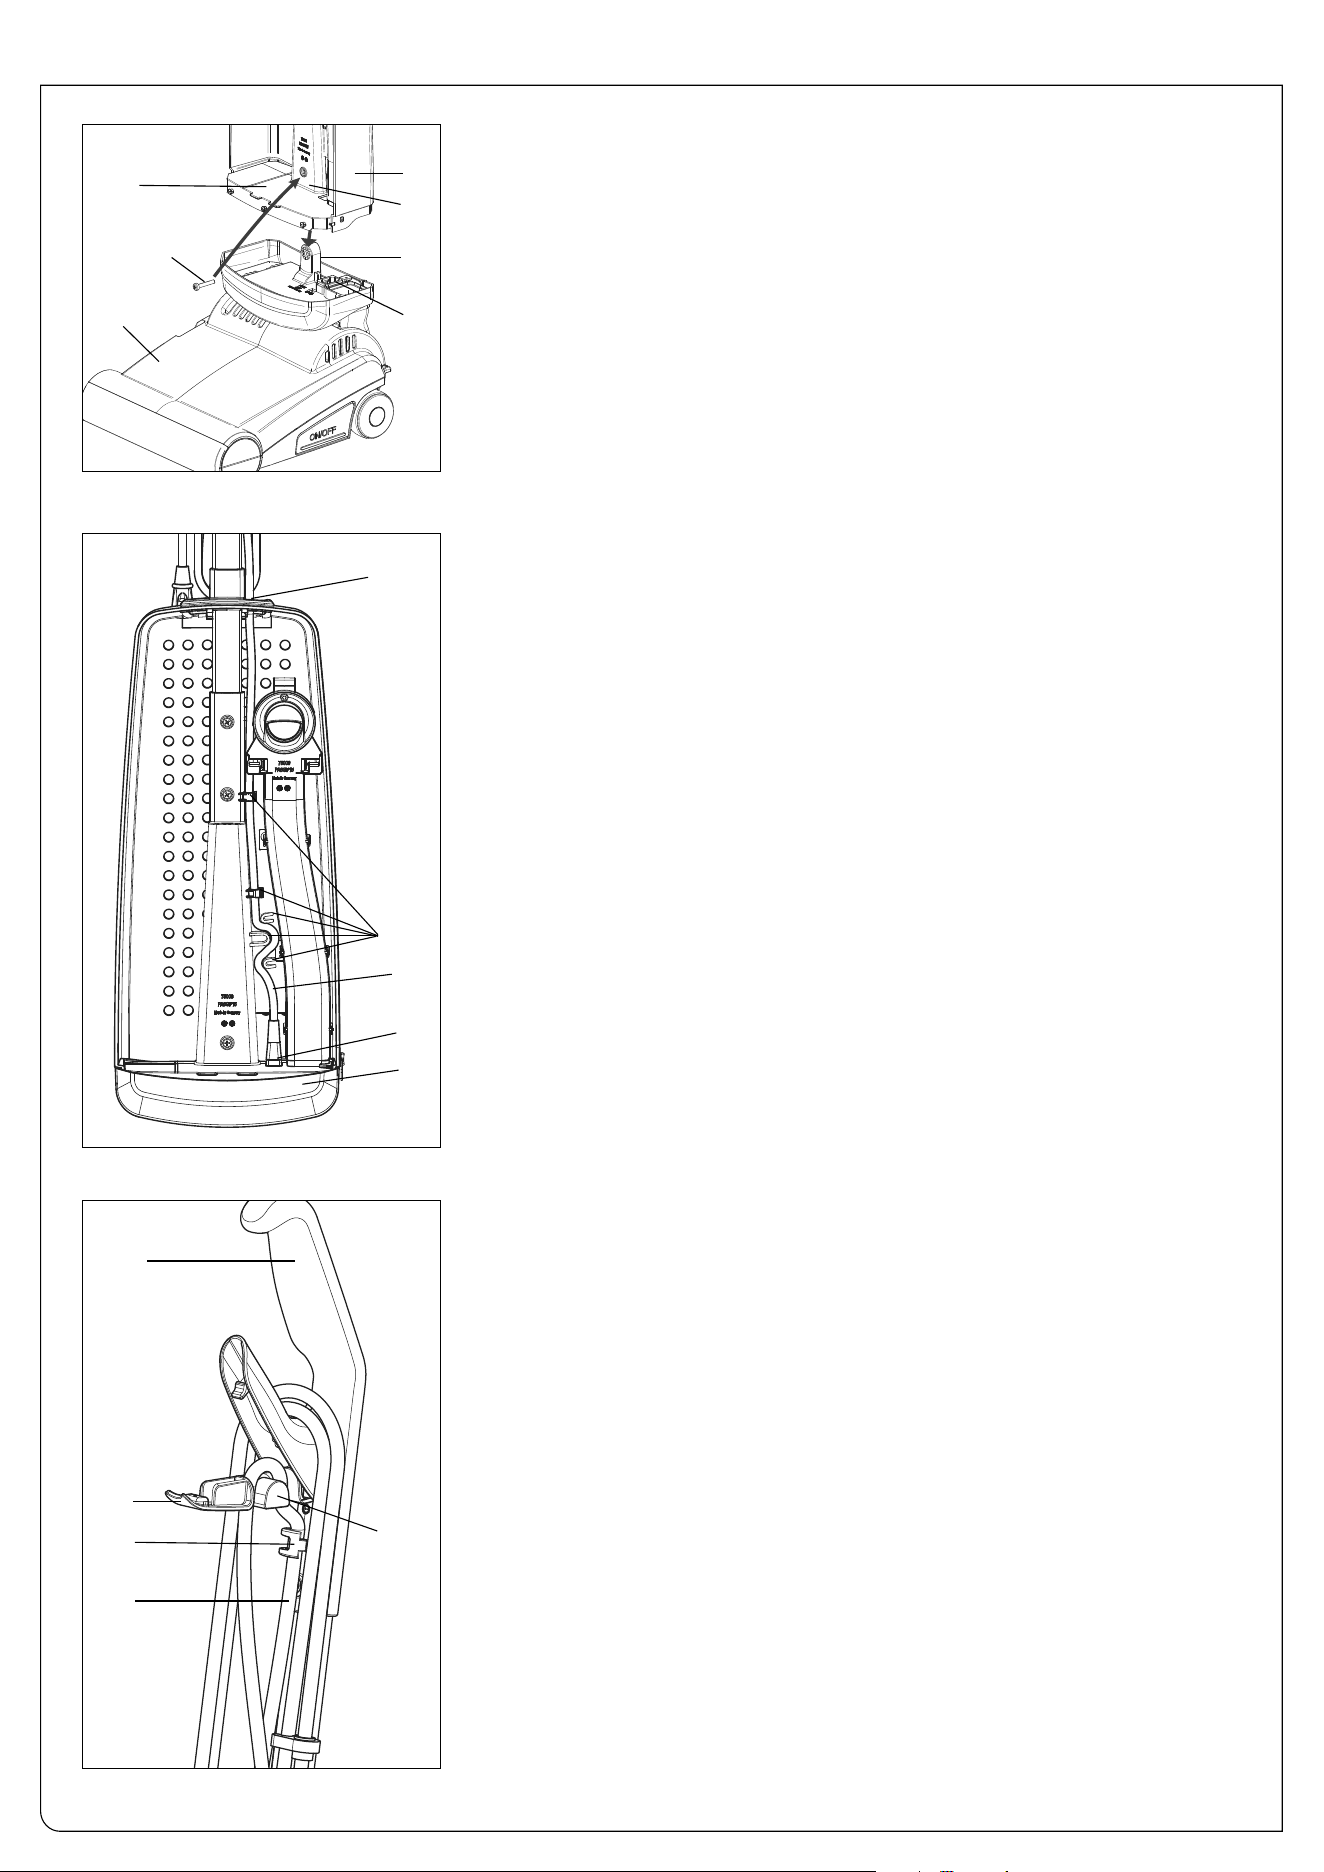
6
Step 3 (figure 3): Place the power head (8) on the floor. Place the bag housing (5)
on the power head so that the connecting piece on the power head (32) fits into
the corresponding opening in the bottom of the bag housing (31). Unzip the front
cover of the bag housing completely. Press down on the bottom of the bag hous-
ing (34) with the flat of your hand and gently push into place. Alternately, use the
handle assembly to align the upper and lower parts of the machine. When both
parts fit correctly, secure the connection of the connecting piece (32) and the
opening in the bag housing (31) with the remaining M5x30 screw (17a) from the
screw set. Use a phillips-head screwdriver (not included). Adjust the ends of the
zipper to fit into the bottom part of the housing. Note: The bag housing cover can-
not be removed completely! It has been omitted in the illustrations to improve
clarity.
5
31
32
33
Figure 3
17a
8
Step 4 (figure 4): Plug the cable plug (22) into the outlet in the power head (#33,
figure 3). Route the cable as shown from bottom to top using fixing points (35). All
remaining cable length will then move to the top through the shaft guide. Close
the shaft guide flap (26). Continue threading the cable up into the strain relief (see
step 5). Note: The bag housing cover cannot be removed completely! It has been
omitted in the illustrations to improve clarity.
8
22
26
35
3
Figure 4
Figure 5
Step 5 (figure 5): Open the strain relief catch (10) in the handle grip (1). Insert the
cable (3) into cable guide (11) and the strain relief (36), looping as shown, with
some slack toward the machine. When closing the strain relief catch, the addi-
tional length distributes itself automatically or can be reduced by pulling gently.
Step 6: Install the filter bag (see page 8 for detailed instructions).
1
10
36
11
3
34
7
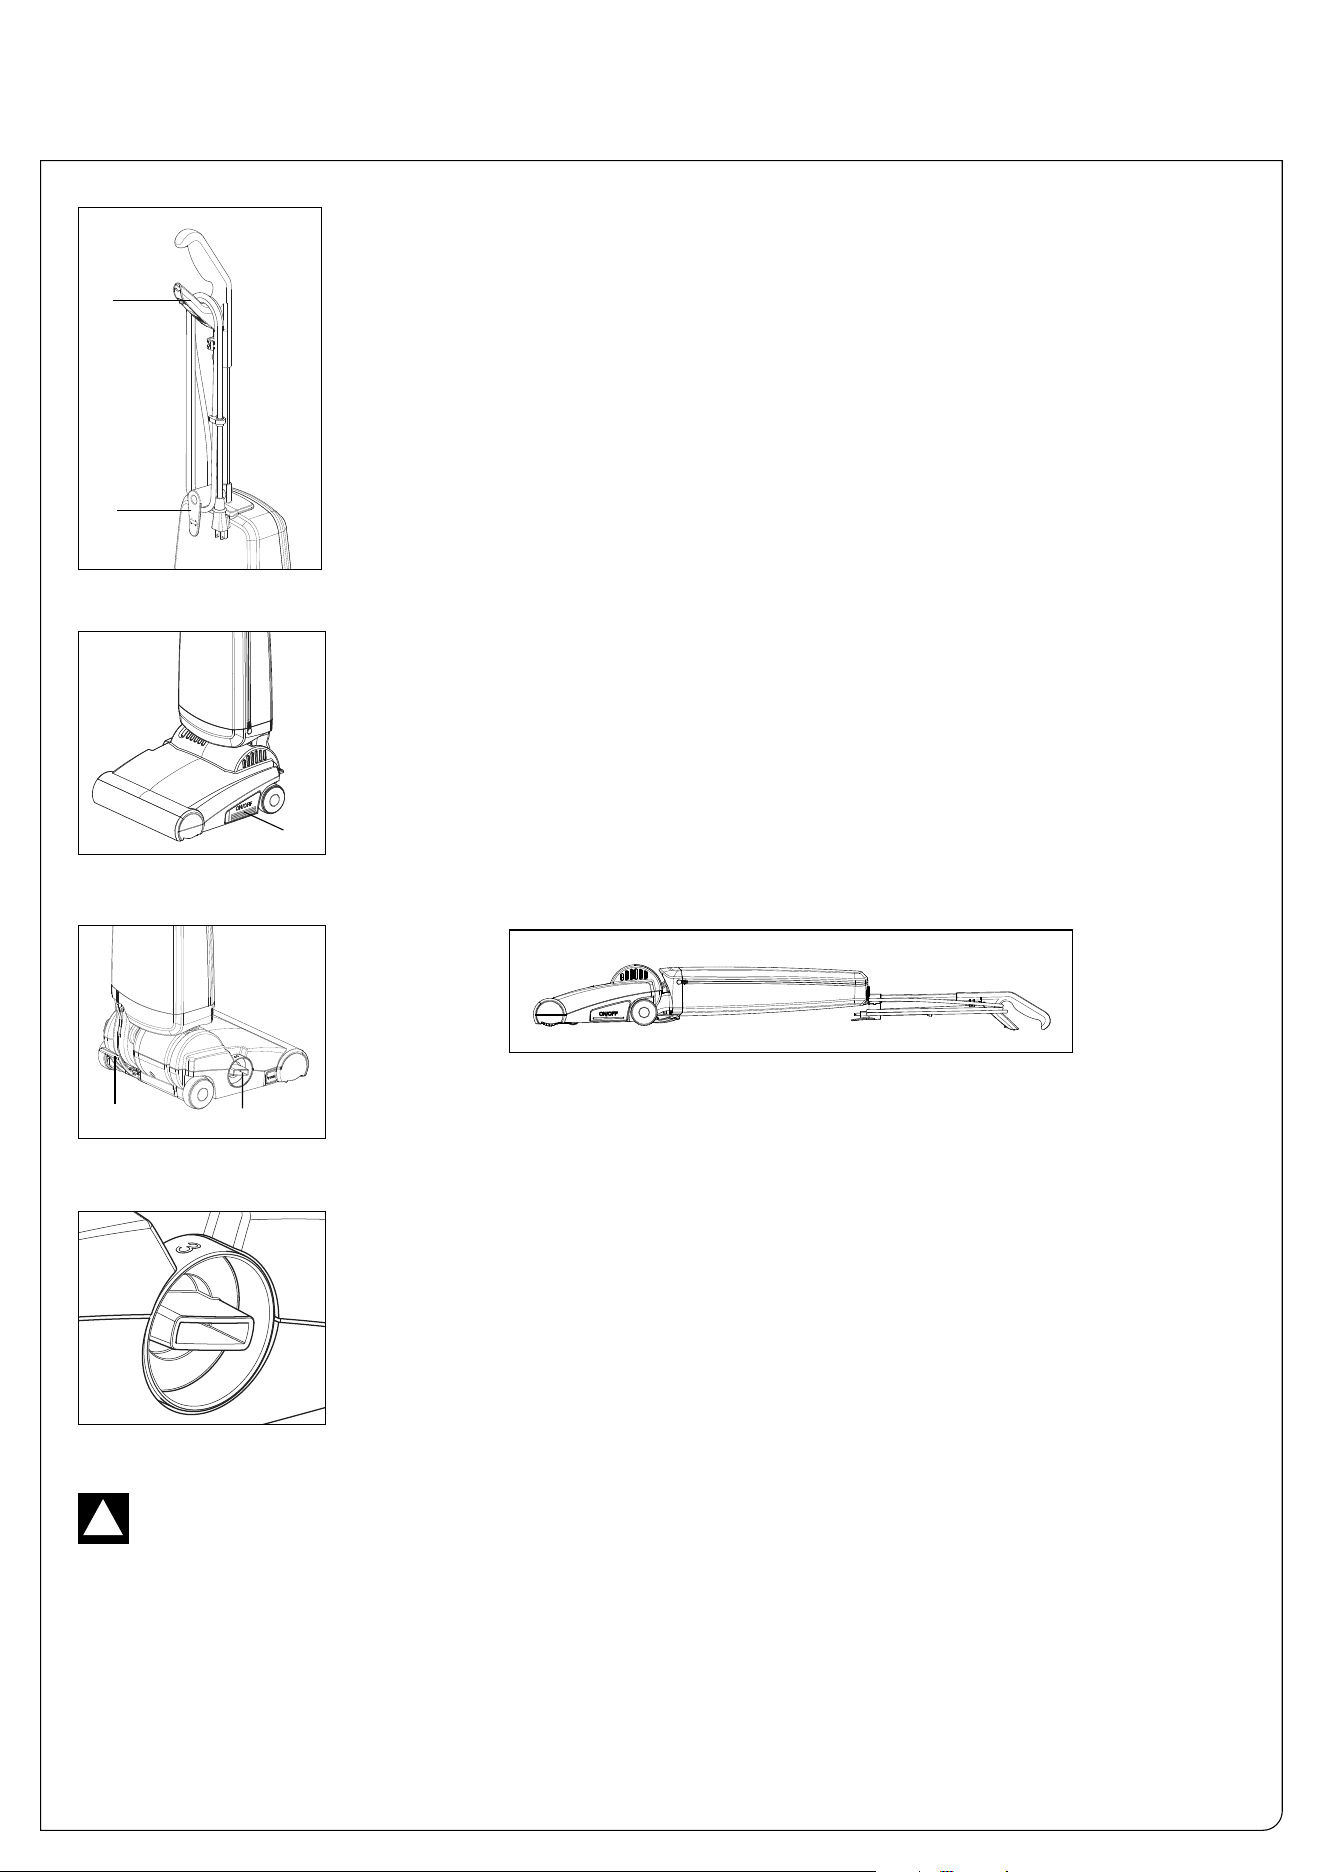
OPERATING INSTRUCTIONS
Starting The Machine
- Figures 6 & 7
Before turning on your vacuum cleaner, make sure that the vacuum handle is in its upright
locked position and that you have a firm hold on the handle grip to keep the machine from
moving forward.
1. Turn the quick release cable hook (12) to the up position by moving it to the left or
right (figure 5).
2. Release the power cord plug from the cord and lift the cord off of the upper cord
hook (37) on the handle grip.
3. With the on/off button (9) in the OFF position (figure 7), plug the polarized power
cord into a 120 volt outlet located near the floor.
4. Gently push the on/off button (9) with your foot or hand to turn it on. Gently push
again to turn it off.
Operating Positions
- Figures 8 & 9
To release the machine from the upright locked position, press down on the foot pedal (13) and
lower the handle into the normal operating position. The handle can be lowered to a horizon-
tal position useful for vacuuming under beds (figure 9).
When finished or pausing, the handle must be placed in the upright locked position. Push the
handle upward until the foot pedal snaps in place to lock. To protect flooring surfaces, the
brush will raise off the floor when the handle is in the
upright locked position.
WARNING! The quality, condition, coating, texture, age and manufacturing technique of all floor surfaces vary. There-
fore, upright vacuums with rotating brushes, including your SEBO, may damage some floor coverings or surfaces. Some
types of high-gloss hardwood floors, cushion vinyl, berber carpets, long shag, and delicate or hand-woven carpets are partic-
ularly vulnerable to damage by rotating brushes. When possible, consult the materials supplied by your floor’s manufactur-
er for information on proper upkeep and cleaning. To ensure that your new SEBO vacuum cleaner is compatible with your
floor, please test the vacuum cleaner on each type of flooring surface in a small inconspicuous area to determine if any
damage occurs. If damage occurs, stop using the vacuum cleaner immediately! Care must be taken to ensure that the
bottom of the machine does not contact the floor. If this happens, damage to the floor could occur. If damage occurs, stop
using the vacuum cleaner immediately!
!
Figure 6
Figure 7
Figure 9
37
12
9
13
14
Figure 8
The Pile Adjustment Knob - Figures 8 & 10
The pile adjustment knob (14) has 4 brush height settings. Setting 1 is the lowest brush setting
for lower pile carpeting and setting 4 is the highest brush setting for higher pile. When starting
the vacuum, always start with the knob set at 4, then lower knob settings until the brush reach-
es the proper height.
With these settings, the optimal balance between flooring protection, pushing force and brush
roller wear can be achieved. If the cleaning performance is not sufficient, even in position 1, the
brush roller is worn and needs to be replaced.
Figure 10
8
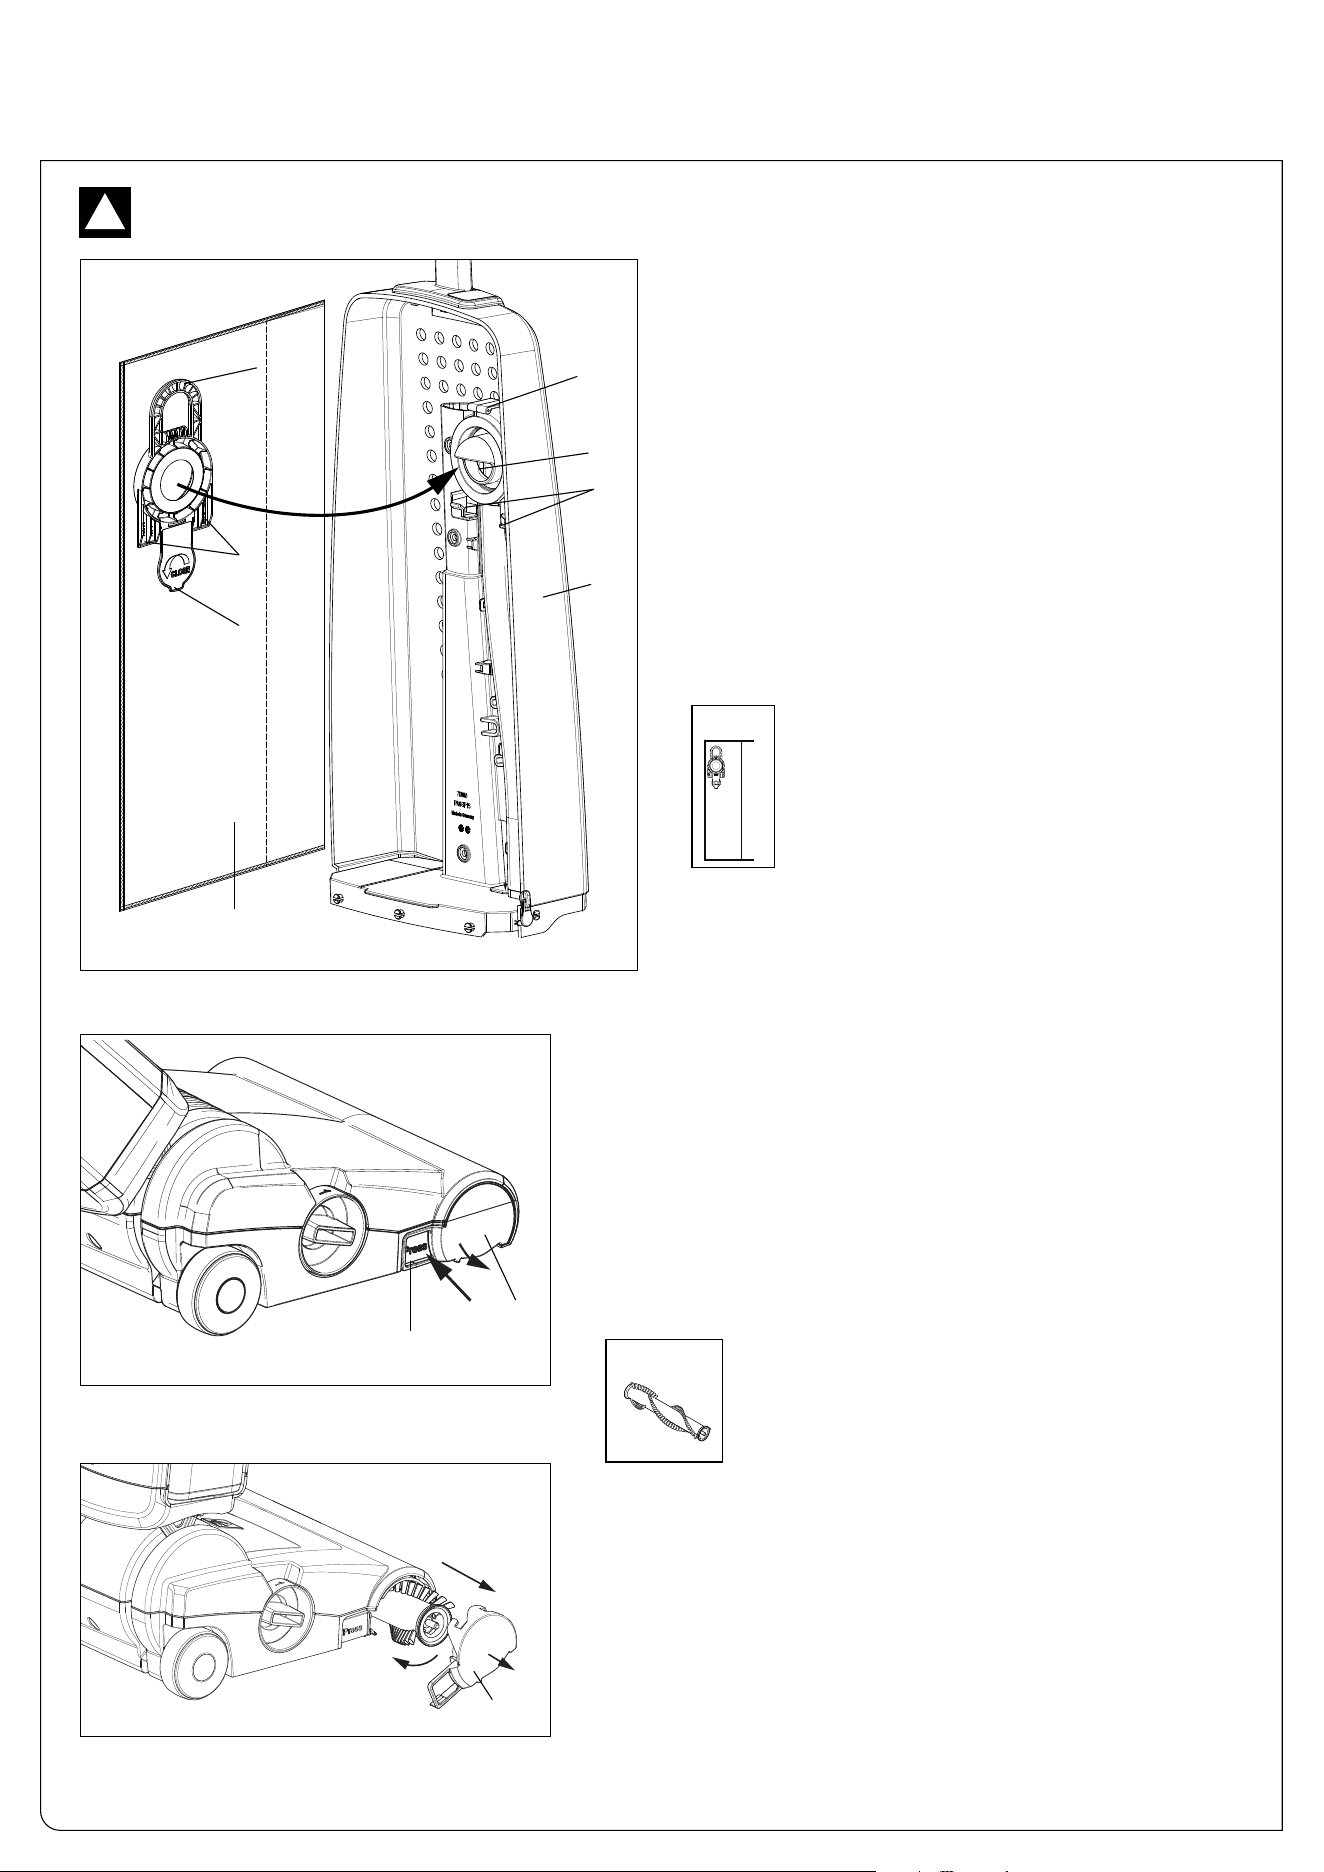
MAINTENANCE
Figure 12
Figure 11
Always unplug vacuum from outlet before dismantling any part of the machine!
!
Changing the Filter Bag - Figure 11
Removing the filter bag: Unzip the front cover of the bag
housing (5). Lift the latch (38) slightly with your thumb and
pull the green handle (39) on the filter bag up and out. Seal
the filter bag with the attached lid (40).
Installing the filter bag: Unzip the front cover of the bag
housing (5). Insert the tabs (41a) of the filter bag (18) into the
grooves (41b) in the vacuum. Tilt it upward until the latch (38)
locks in place. The filter bag will be automatically positioned
onto the air channel opening (42). Close the front cover (6).
Note: The filter bag should hang smoothly and straight in the
unit to ensure maximum suction power and dust collection.
18
Changing the Brush Roller - Figures 12 & 13
To change the brush roller (19), firmly push the release button (15),
rotate the side plate (16) downward and remove it. Turn the brush
clockwise a quarter of a turn, and pull the old brush roller out. Slide
the new brush roller into the brush housing and turn it until it locks
into position. Rotate the side plate (16) upward back into the locked
position.
Check the brush roller regularly for coiled yarn or hair and remove
them for optimal brush roller action.
18
19
5
42
38
39
40
41a
41b
Figure 13
15
16
16
Filter bag pack of 8 x 75150
Part #75175AM
Brush roller
Part #5010AM
9
CLOG REMOVAL
Clogs in Entrance to Filter Bag - Figure 16
Unzip the front cover of the bag housing (5). To remove the filter bag, lift the latch (38)
slightly with your thumb and pull the green handle (39) on the filter bag up and out.
Clean out air channel opening (42) and/or entrance to bag (46).
Figure 14
Figure 15
44
44
45
Figure 16
5
39
38
42
46
5
Figure 17
17a
8
47
Clogs in the Bag Housing Air
Channel - Figures 17 & 18
If you suspect a blockage in the bag housing
air channel (47), unzip the front cover of the
bag housing and remove the filter bag (see
above). Unplug cable plug in machine (22),
remove screw (17a) and separate power
head (8) and bag housing (5). The air channel
(47) in the filter compartment can then be
checked from the bottom (48). Do not try to
open the air channel, as this will damage
the machine!
Note: To avoid damaging the machine,
never use a stick or other hard object to
clear blockages or clogs.
22
47
Clogs in the Airflow Pathway -
Figures 14 & 15
Most clogs can be removed by accessing the
airflow pathway via the orange access door
(44) located on the underside of the power
head. Push the latch (45) to release the door
and swing it open (figure 15). After removing
the blockage, swing the access door (44)
closed until the latch (45) clicks shut.
Figure 18
48
42
Always unplug vacuum from outlet before dismantling any clogs!
!
10
TROUBLE-SHOOTING GUIDE
PROBLEM
Does not turn on
Decreased suction or no
suction.
Machine shuts off.
Poor brush performance.
REASON
1. Not plugged into good outlet.
2. Cable worn.
3. Internal plug is unconnected or
loose.
1. Filter bag is full.
2. Clog in airflow pathway, entrance
to filter bag or bag housing air
channel.
1. Brush roller is blocked.
1. Brush worn.
2. Incorrect brush setting.
SOLUTION
1. Use another outlet.
2. Replace cable.
3. Re-seat the plug. See page 6,
figure 3.
1. Replace bag. See page 8.
2. See Clog Removal on page 9.
2. Check bottom of machine and
brush roller. See pages 8 and 9.
1. Replace brush. See page 8.
2. Adjust the brush by turning the pile
adjustment knob up or down.
Always unplug vacuum from outlet before dismantling any part of the machine!
!
11
SOFTCASE CE12 LIGHTWEIGHT
x
7
5
1
4
7
7
5
1
4
6
751
46
1
161
2
3
4
5
165
160
20
10
11
7
8
15
4
6
One narrow and
one wide, white
sealing
Two narrow, white
sealings
75146
75147
Bag Housing and Handle
#94251AM SOFTCASE CE12 Lightweight - USA
#94251FC SOFTCASE CE12 Lightweight - Canada
#94251AM SOFTCASE CE12 Lightweight - USA
#94251FC SOFTCASE CE12 Lightweight - Canada
Arctic White/Black Machine
Pos. Part # Description
1 75103GS Grip SOFTCASE CE, cpl., gray black
2 75033 Handle rod SOFTCASE CE, 557mm
3 75156GS Handle guide, 2 pcs., gray black
4 75101 Bag housing, assembled
5 75102ER Air guide, complete, assembled
6 75146 Sealing adapter, cable
7 75026GS Cable hook, gray black
8 75158ER Mounting set cable hook
10 8177ER Mains connector, 2-wire
11 75032GS Protection cover
15 75031 Cable, 2-wire, 9,25m 2x17 AWG,
US-plug
20 75175AM Filter bag (8 x 75150)
160 0111 Screw AM5x30, 7985
161 0127 Screw M4x10, DIN 7985
165 01036 AMTEC screw M4x14, TX 20
All screws without item number = 01016
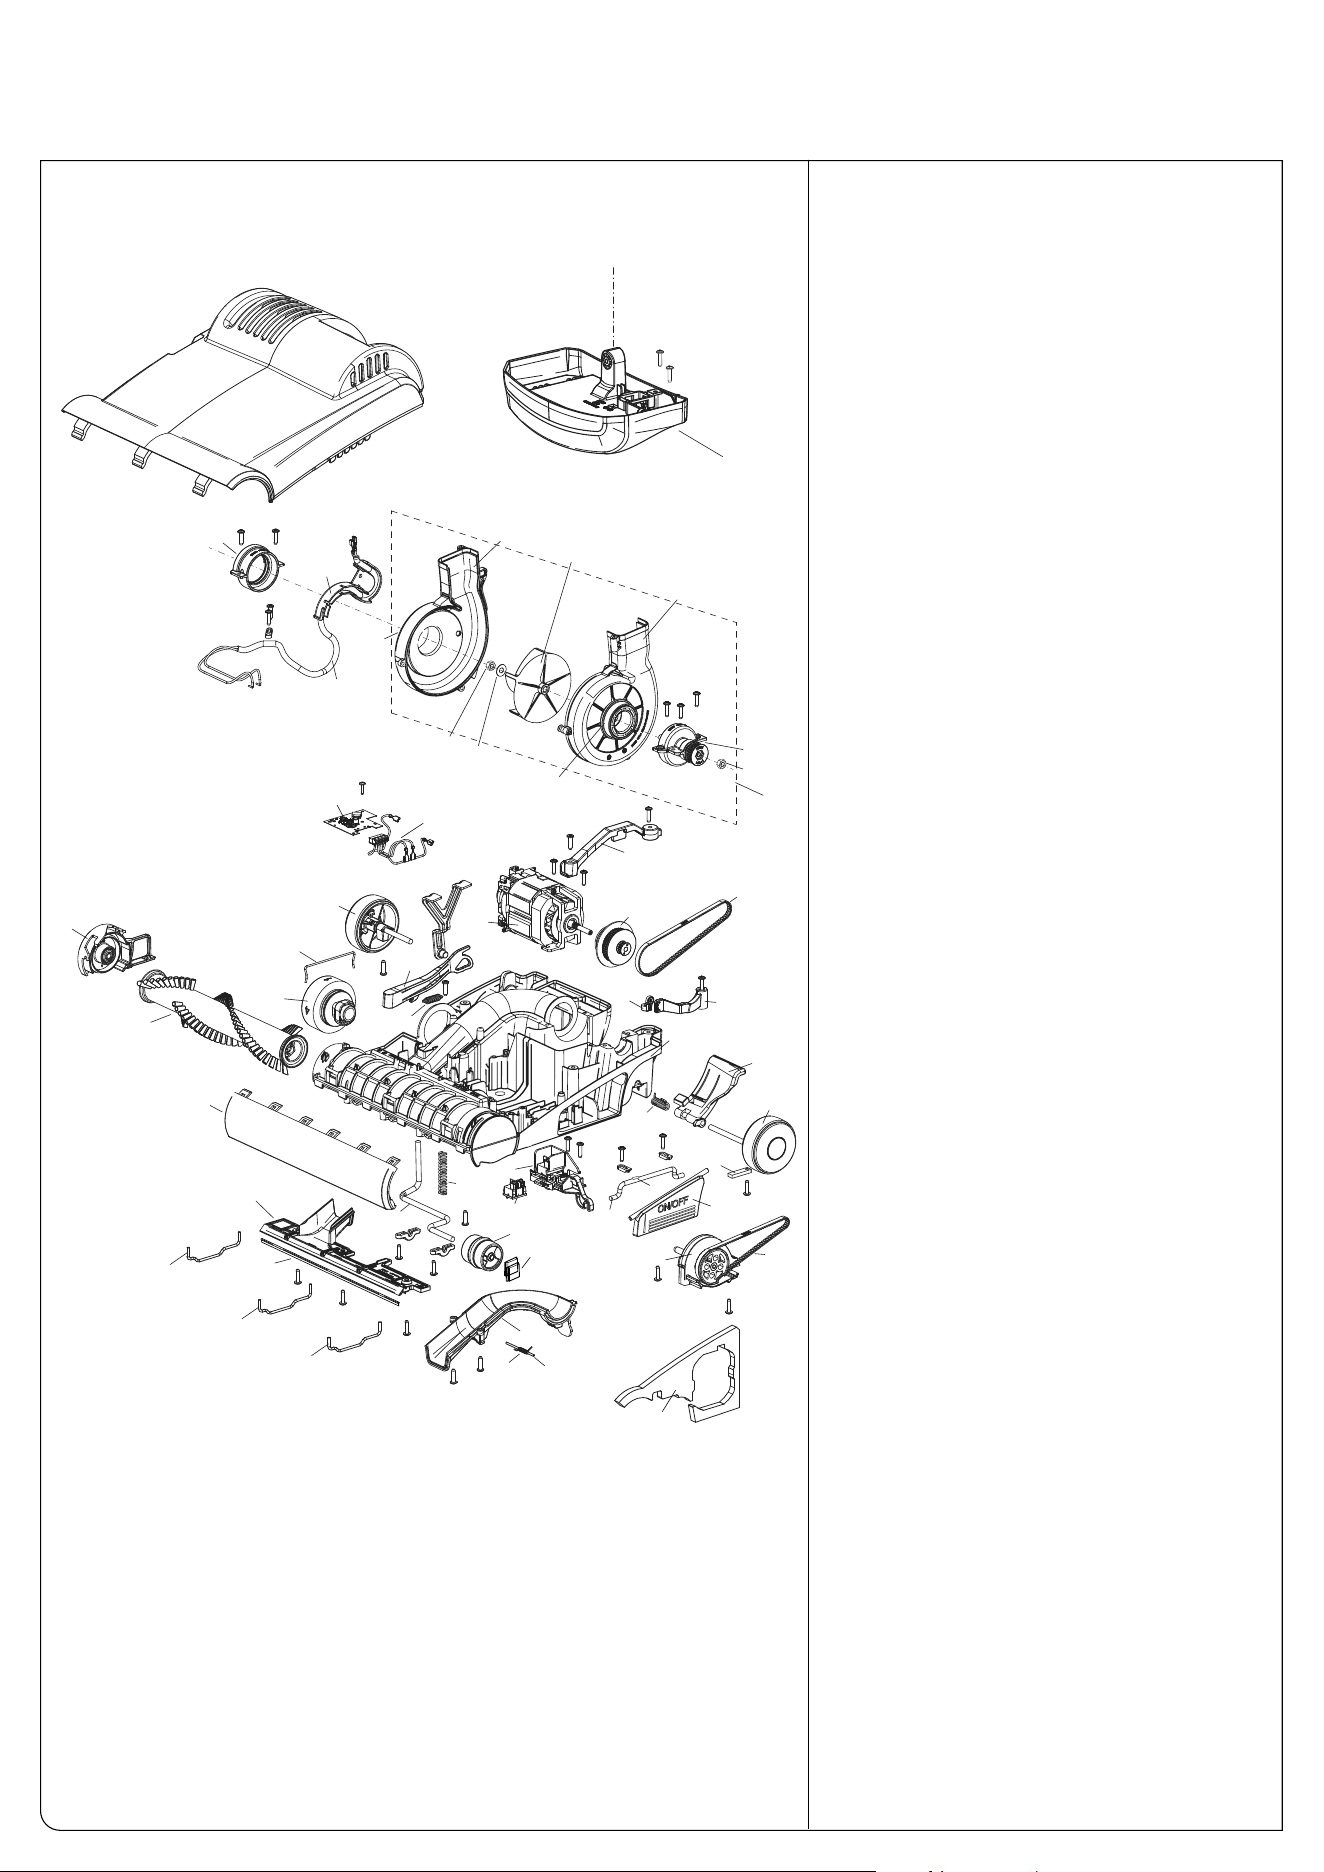
12
SOFTCASE CE12 LIGHTWEIGHT
x
(1)
106
111
112
113
110
114
115
116
118
119
117
114
167
168
167
120
121
122
125
131
130
126
128
123
124
127
132
133
129
134
137
136
135
139
140
141
145
146
147
148
149
150
151
152
157
142
154
155
156
158
157
157
143
138
144
153
164
170
169
171
(1) When mounting, marking on this side
Power Head
#94251AM SOFTCASE CE12 Lightweight - USA
#94251FC SOFTCASE CE12 Lightweight - Canada
#94251AM SOFTCASE CE12 Lightweight - USA
#94251FC SOFTCASE CE12 Lightweight - Canada
Arctic White/Black Machine
Pos. Part # Description
106 75229WESE Central support, arctic white,
assem.
110 75289CEER Top cover SEBO SOFTCASE CE12,
arctic white
111 75129 Swivel neck support, r.h.
112 75066GS Cable channel
113 75117 Swivel neck cable, 2-wire
114 75067 Swivel neck support bushing
115 75064GS Blower housing rh, gray black
116 75060HE Rotor, light ivory
117 75063GS Blower housing lh, gray black
118 75116 Swivel neck support, l.h., cpl.
119 75138ER Blower/swivel neck, gray black,
assembled
120 75126ER PCB 120 V~
121 75118 Motor cabling, 2-wire for 2-wire
& 3-wire machines
122 75080HG Motor bridge, light gray
123 75053ER Motor 120 V~
124 75110ER Torque sensor, SOFTCASE
125 2923 Toothed belt 333 HTD 3M 6
126 75059 Latching bracket
127 75076OR Selector brush height
128 75086 Slider height adjustment
129 4019 Spring
130 75122 Support lever
131 75112GS Wheel w/axle, assembled
132 75096ER Magnet support, assembled
133 75079ER Magnet lever, assembled
134 75133SE Bottom unit
135 75093 Spring foot pedal
136 75062OR Foot pedal
137 75119GS Wheel w/axle foot pedal, lh
138 2849 Bracket
139 75124ER Switching unit, assembled
140 05112ER Rocker switch
141 75094 Switching rod
142 75061OR On/Off button
143 75114GS Bearing block rh
144 5010AM Brush roller 31 cm
145 75068GS Bumper SOFTCASE, gray black
146 75095 Pile adjustment axle
147 75090 Spring pile adjustment
148 75121GS Pile adjustment wheel, assembled
149 5155GS Rubbing plate
150 75113 Bearing block lh
151 75098 Toothed belt 318 HTD 3M 6
152 75134GS Rear base plate
153 5400-4 Sealing strip SOFTCASE, 259 mm
154 75120SE Cover air channel, gray black/orange
155 5304 Spring
156 2910 Bearing pin
157 5402 Wire tie, long
158 75097UL Air separator
160 0111 Pan head screw AM 5x30 4.8
161 0127 Screw M4 x 10
162 01016 Pan head screw STS 4x16 T20
163 01021 Pan head screw, F 3,9x13
164 01029 Screw C 2,9x13 DIN 7981
165 01036 AMTEC screw M4x14, TX 20
166 01037 Screw 3,0x16, TX 10
167 0262ER Nut M6, left hand thread
168 0150ER Washer B 4,3 DIN 9021
169 2494ER Plastic bracket
170 1030UL Strain relief
171 75075ER Axle bracket
All screws without item number = 01016