Use & Care Guide
Manuel D'entretien Et D'utilisation
Manual de Uso Y Cuidado
Model No / Référence de Modèle / N° de Modelo.
UB0302E
Bagged Upright Vacuum Cleaner
www.vacmaster.com
Distributed By / Distribué Par / Distribuido Por:
Suzhou Cleva Electric Appliance Co., Ltd.
No.8 Ting Rong Street
Suzhou Industrial Park, Suzhou
Jiangsu Province, China
Made in China

-2-
SECTION
Important Safety Instructions...................................................................................................................
Warranty..................................................................................................................................................
Technical Data.........................................................................................................................................
Getting To Know Your Vacuum................................................................................................................
General Assembly Instructions...............................................................................................................
Operating Instructions............................................................................................................................
Maintaining Your Vacuum.......................................................................................................................
Troubleshooting.....................................................................................................................................
3
4
4
5
7
10
18
25
TABLE OF CONTENTS
PAGE
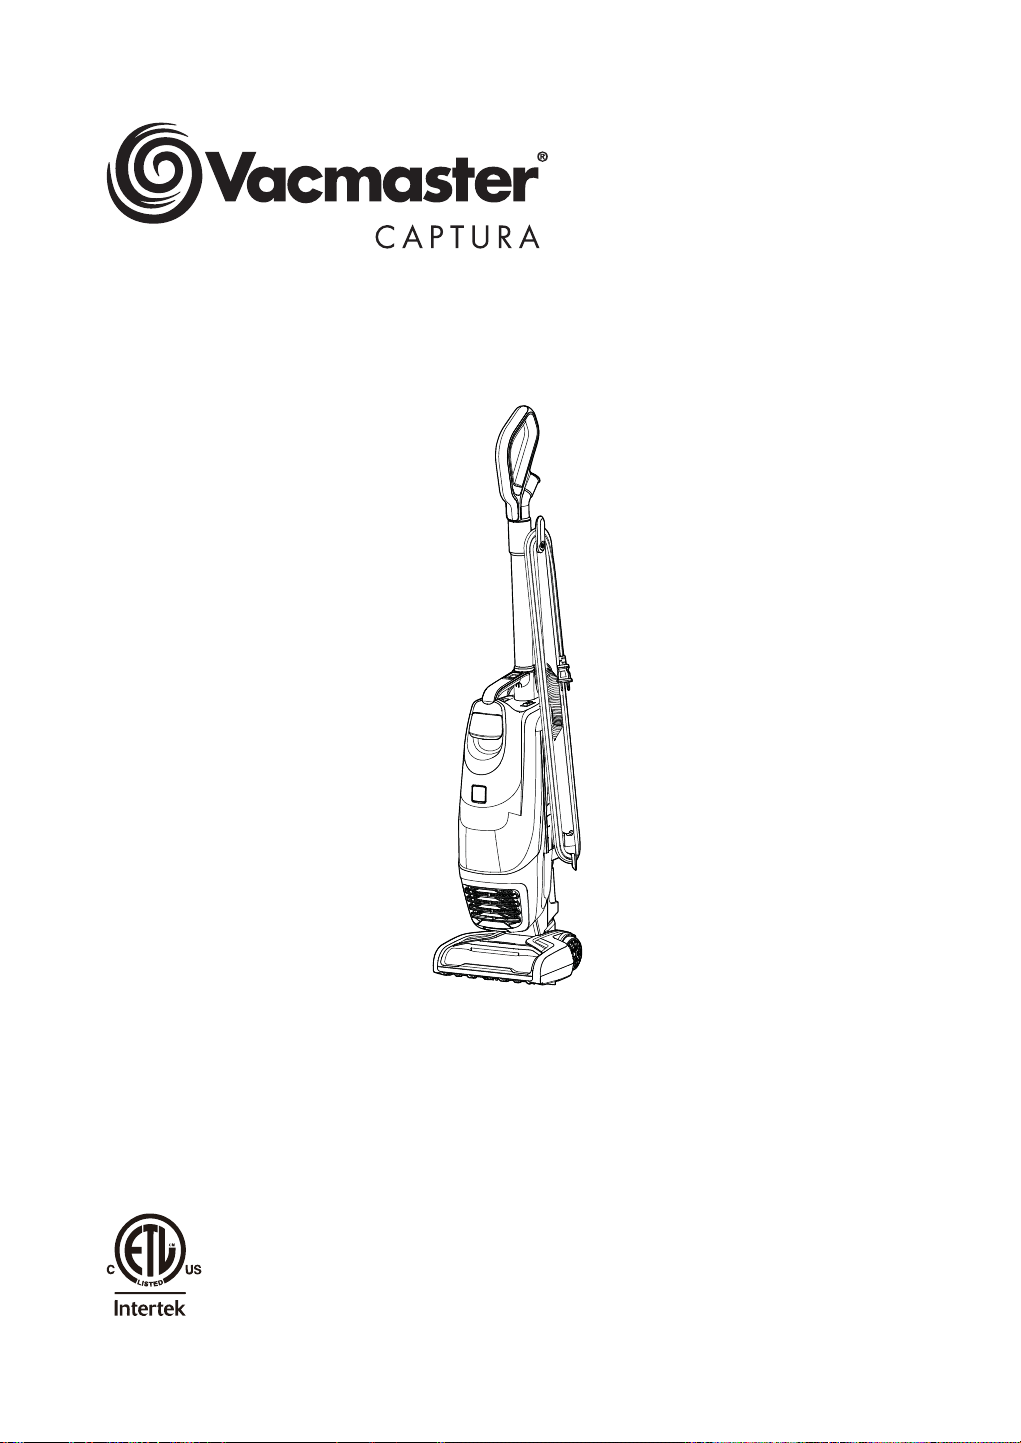
Thank you for purchasing this Vacmaster
®
vacuum cleaner. With it you are
obtaining a high-quality product that is engineered for optimal performance.
FOR YOUR SAFETY
Read and understand this manual before use.
Keep this manual and your sales check (receipt) in a safe place for future
reference.

-3-
IMPORTANT SAFETY INSTRUCTIONS
When using an electrical appliance, basic precautions should always be followed,
including the following:
READ ALL INSTRUCTIONS BEFORE USING THIS VACUUM CLEANER
)DLOXUHWRIROORZWKHZDUQLQJVDQGLQVWUXFWLRQVPD\UHVXOWLQHOHFWULFVKRFN¿UH
and/or serious injury.
WARNING -
7RUHGXFHWKHULVNRI¿UHHOHFWULFVKRFNRULQMXU\
• Do not leave appliance when plugged in. Unplug from outlet when not in use
and before servicing.
• Do not use outdoors or on wet surfaces.
• Do not allow to be used as a toy. Close attention is necessary when used by or
near children.
• Use only as described in this manual. Use only manufacturer’s recommended
attachments.
• Do not use with damaged cord or plug. If appliance is not working as it should,
has been dropped, damaged, left outdoors, or dropped into water, contact with
customer service.
• Do not pull or carry by cord, use cord as a handle, close a door on cord, or pull
cord around sharp edges or corners. Do not run appliance over cord. Keep cord
away from heated surfaces.
• Do not unplug by pulling on the cord. To unplug, grasp the plug, not the cord.
• Do not handle plug or appliance with wet hands.
• Do not put any objects into openings. Do not use with any opening blocked;
NHHSIUHHRIGXVWOLQWKDLUDQGDQ\WKLQJWKDWPD\UHGXFHDLUÀRZ
.HHSKDLUORRVHFORWKLQJ¿QJHUVDQGDOOSDUWVRIERG\DZD\IURPRSHQLQJVDQG
moving parts.
• Turn off all controls before unplugging.
• Use extra care when cleaning on stairs.
'RQRWSXWYDFXXPFOHDQHURQFKDLUVWDEOHVHWF.HHSXQLWRQWKHÀRRU
'RQRWXVHYDFXXPFOHDQHUWRSLFNXSÀDPPDEOHRUFRPEXVWLEOHOLTXLGVVXFK
as gasoline, or use in areas where they may be present.
• Do not pick up anything that is burning or smoking, such as cigarettes, matches,
or hot ashes.
'RQRWXVHYDFXXPFOHDQHUZLWKRXWGXVWEDJDQGRU¿OWHUVLQSODFH
SAVE THESE INSTRUCTIONS
Household use only

-4-
FOR ONE YEAR from the date of sale, this product is warranted against defects
in material or workmanship when it is assembled, operated and maintained
according to all supplied instructions.
WITH PROOF OF SALE, a defective appliance will be replaced free of charge.
For warranty coverage details to obtain free replacement, visit the web page:
www.vacmaster.com or call 1-866-384-8432.
7KLVZDUUDQW\GRHVQRWFRYHU¿OWHUVRUEHOWZKLFKDUHH[SHQGDEOHSDUWVWKDW
can wear out from normal use within the warranty period.
• This warranty is void if this product is ever used for other than private household
purposes.
7KLVZDUUDQW\JLYHV\RXVSHFL¿FOHJDOULJKWVDQG\RXPD\DOVRKDYHRWKHU
rights which vary from state to state.
TECHNICAL DATA
Bagged Upright Vacuum Cleaner
Model: UB0302E
Rated Voltage: 120V AC
Rated Frequency: 60Hz
Nominal Current: 8.0A
WARRANTY
TECHNICAL DATA
-5-
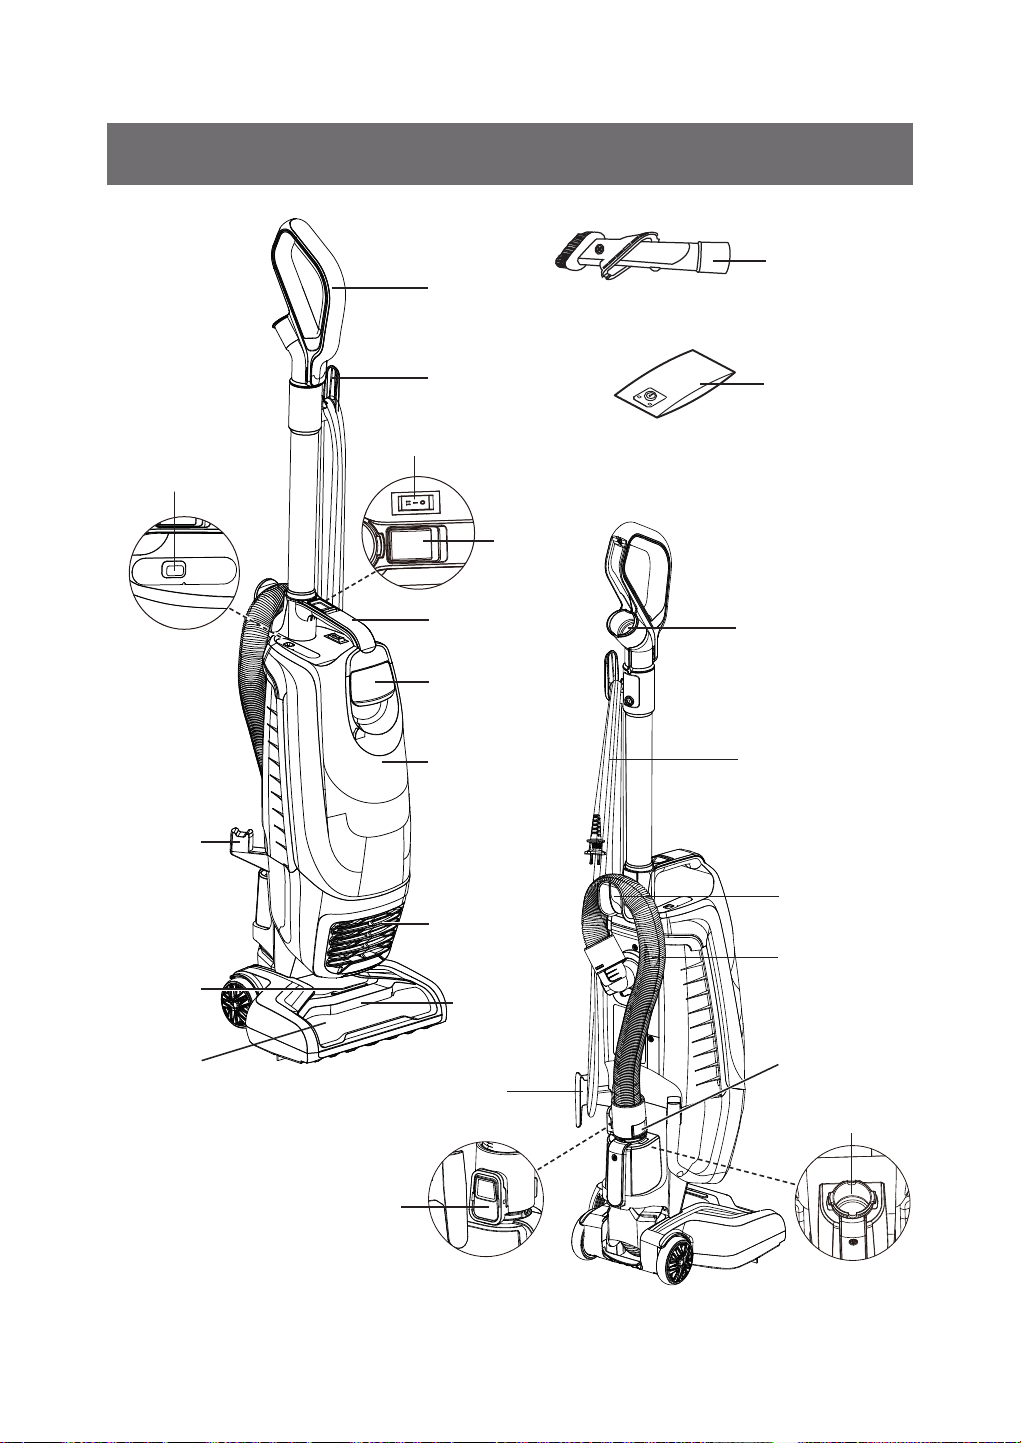
GETTING TO KNOW YOUR VACUUM
3-in-1
Combination Tool
Dust Bag
(Pre-installed in
Vacuum)
Handle
Wand
Release
Button
Carrying
Handle
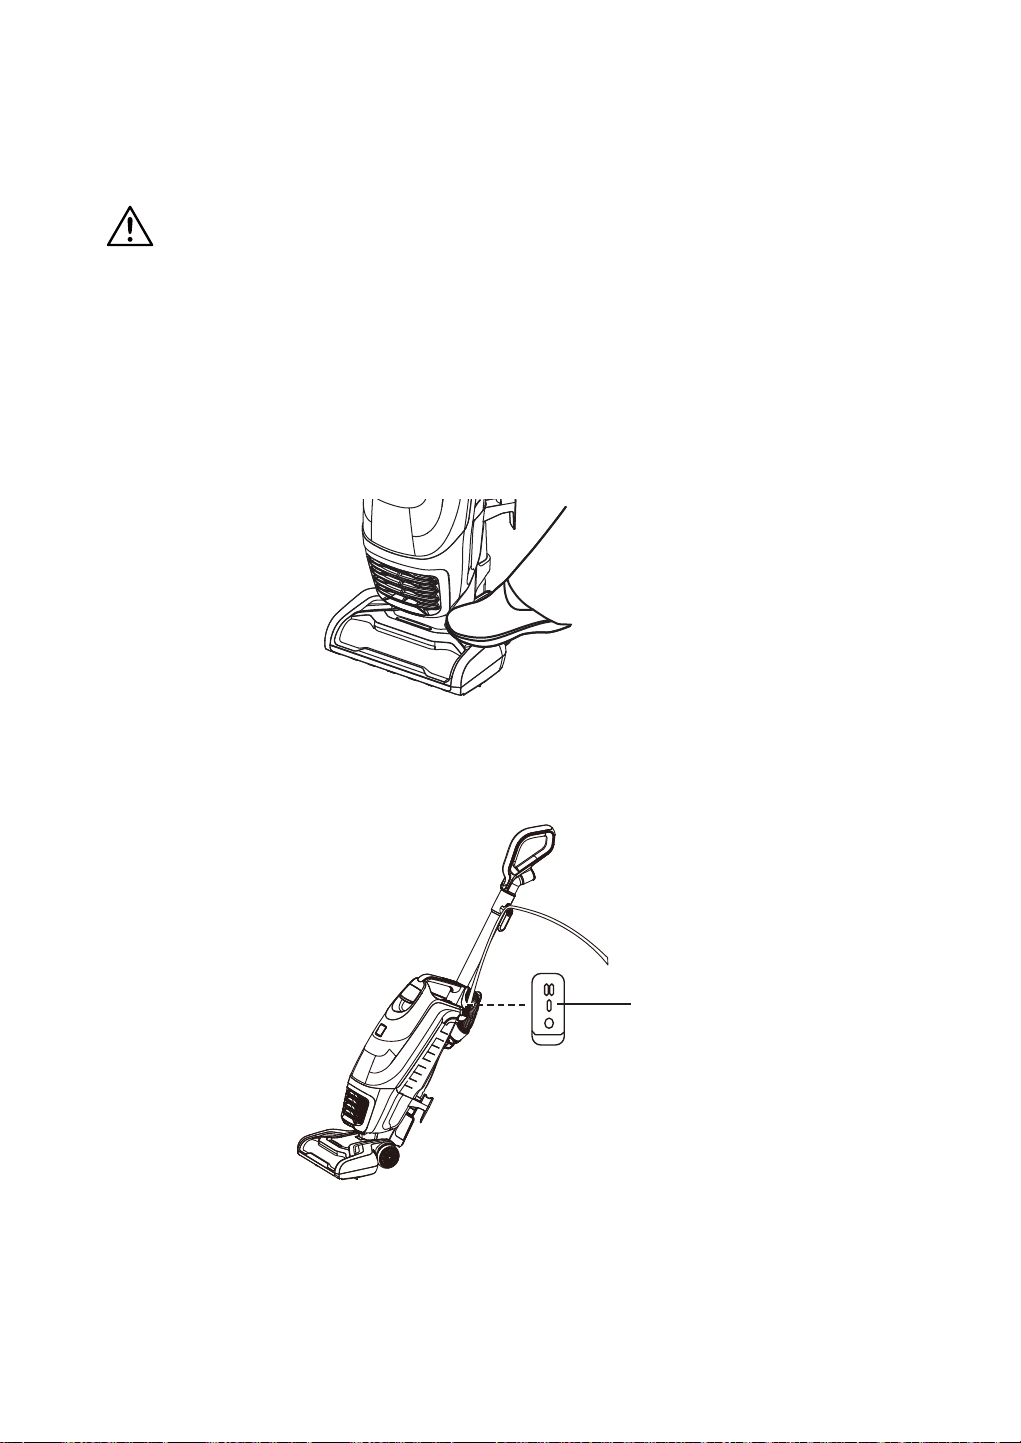
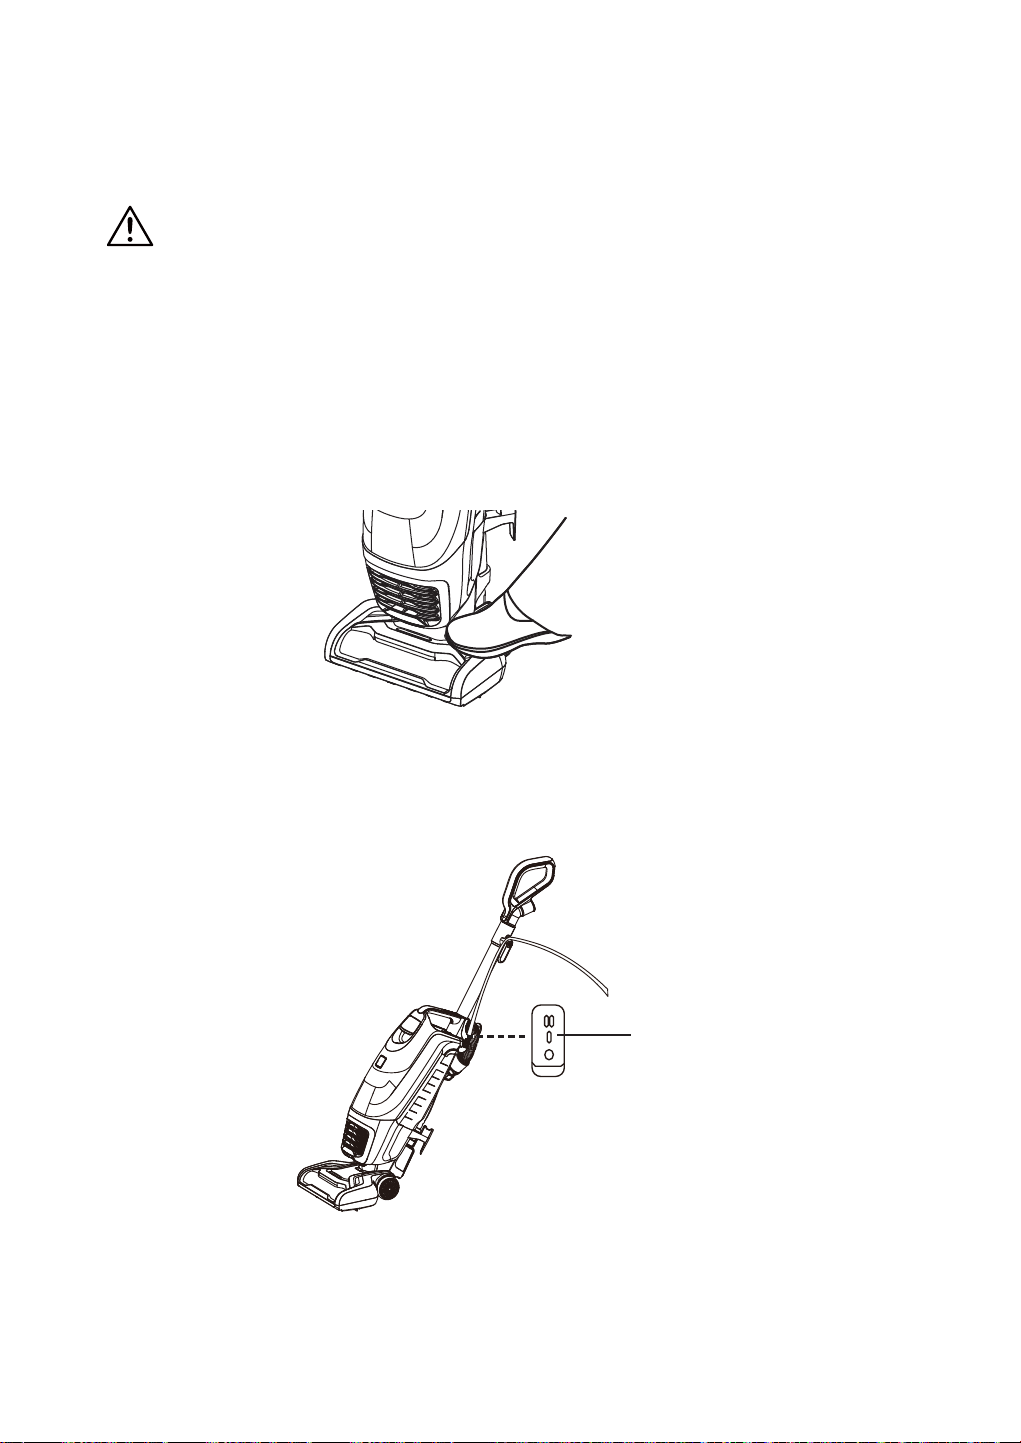
On/Off Switch
Check Bag
Indicator
Dust Bag
Chamber
Cover Release
Dust Bag
Chamber
Cover (Dust
Bag Inside)
Exhaust
Filter Cover
(HEPA Media
Exhaust Filter
Inside)
Headlight
Motorized
Nozzle
Brushroll
Status
Indicator
Light
Accessory
Storage
Upper Cord
Hook
Upper Hose
Connection
Hose Storage
Lower Hose
Connection
Power Cord
Suction Control
Hose Release
Button
Flexible Hose
Lower Cord
Hook

-6-
Replacement Parts
Available online at www.vacmaster.com or call 1-866-384-8432.
Item Part No.
Foam Filter
561060125
HEPA Media Exhaust Filter
561055118
3-in-1 Combination Tool
571034106
Dust Bag (6-pack)
521355
Flexible Hose
571034107
Handle
571034101
Filter Kit (HEPA Exhaust +
Foam Filter)
561060184
-7-
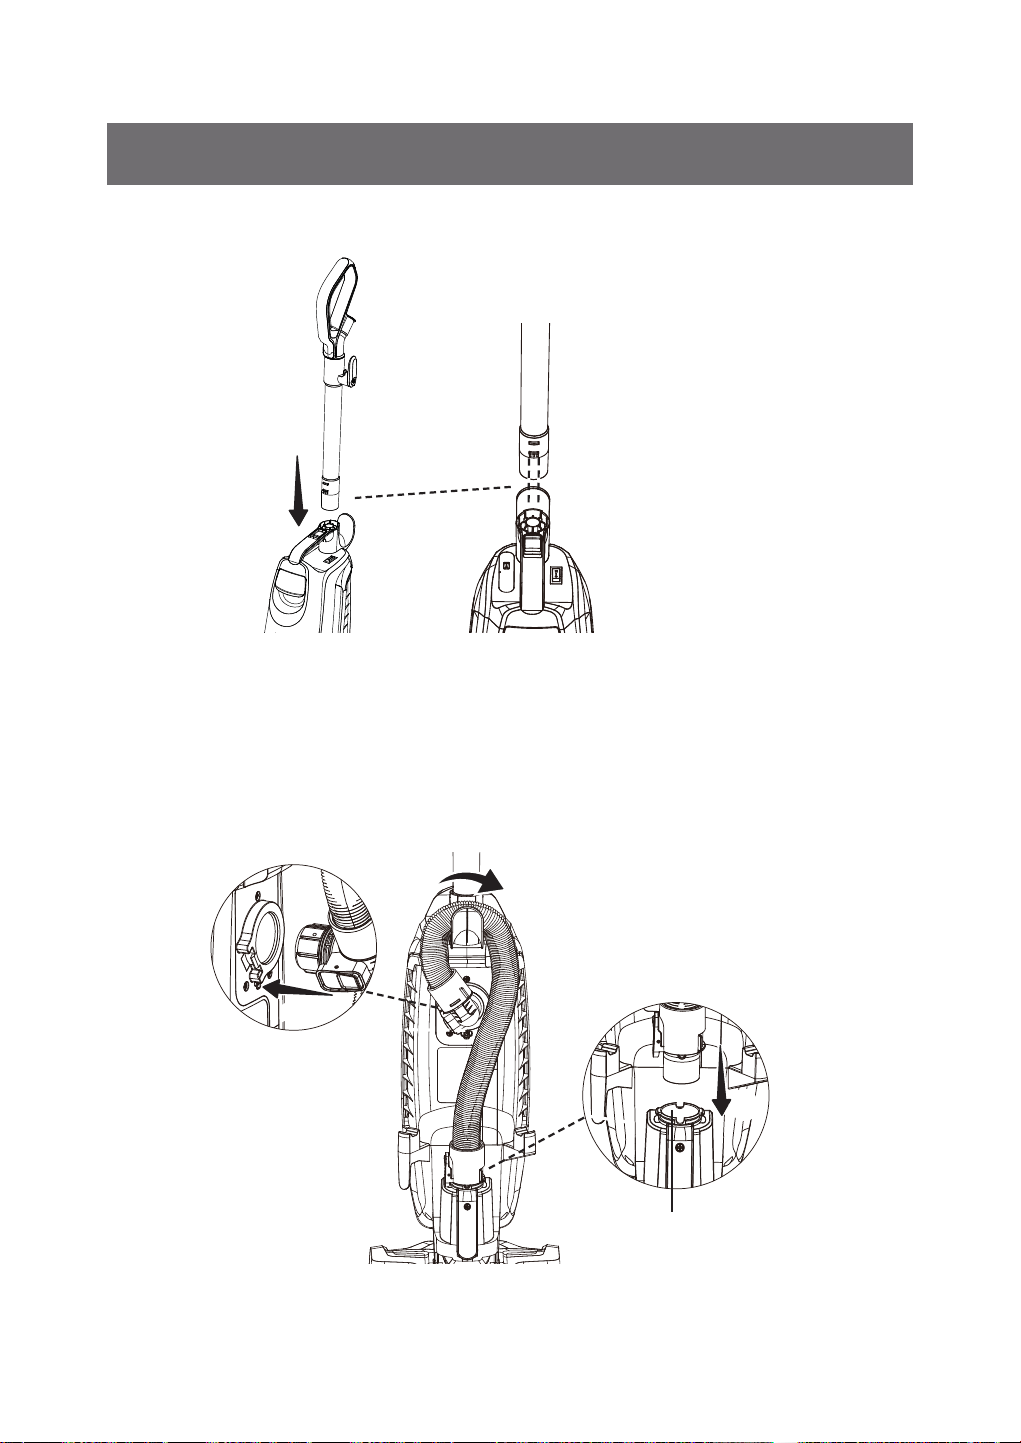
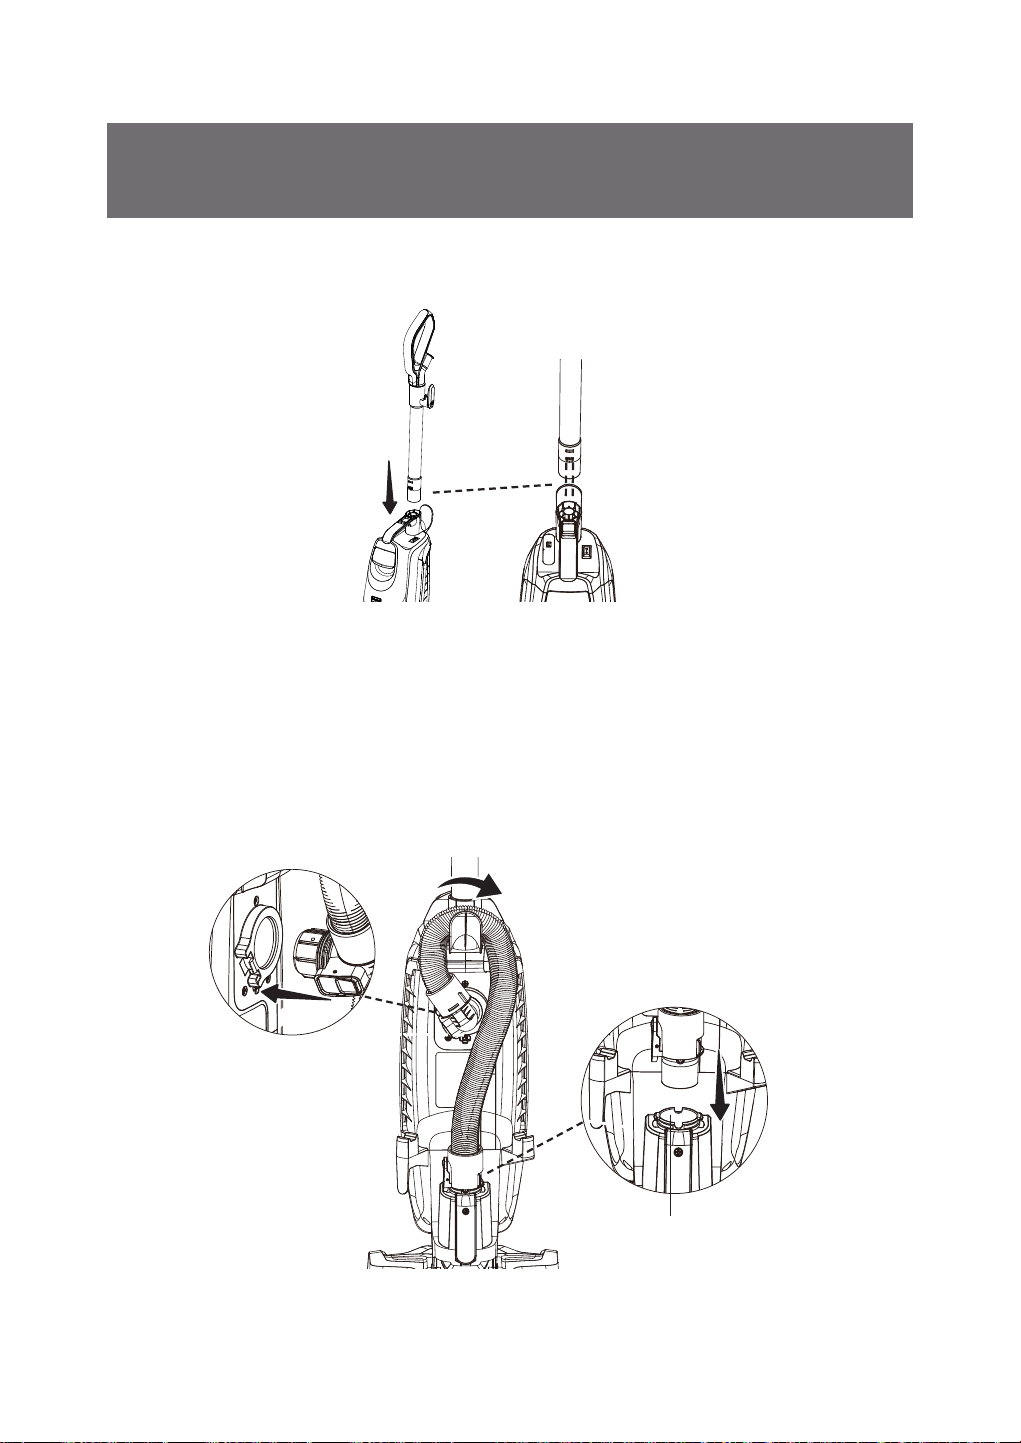
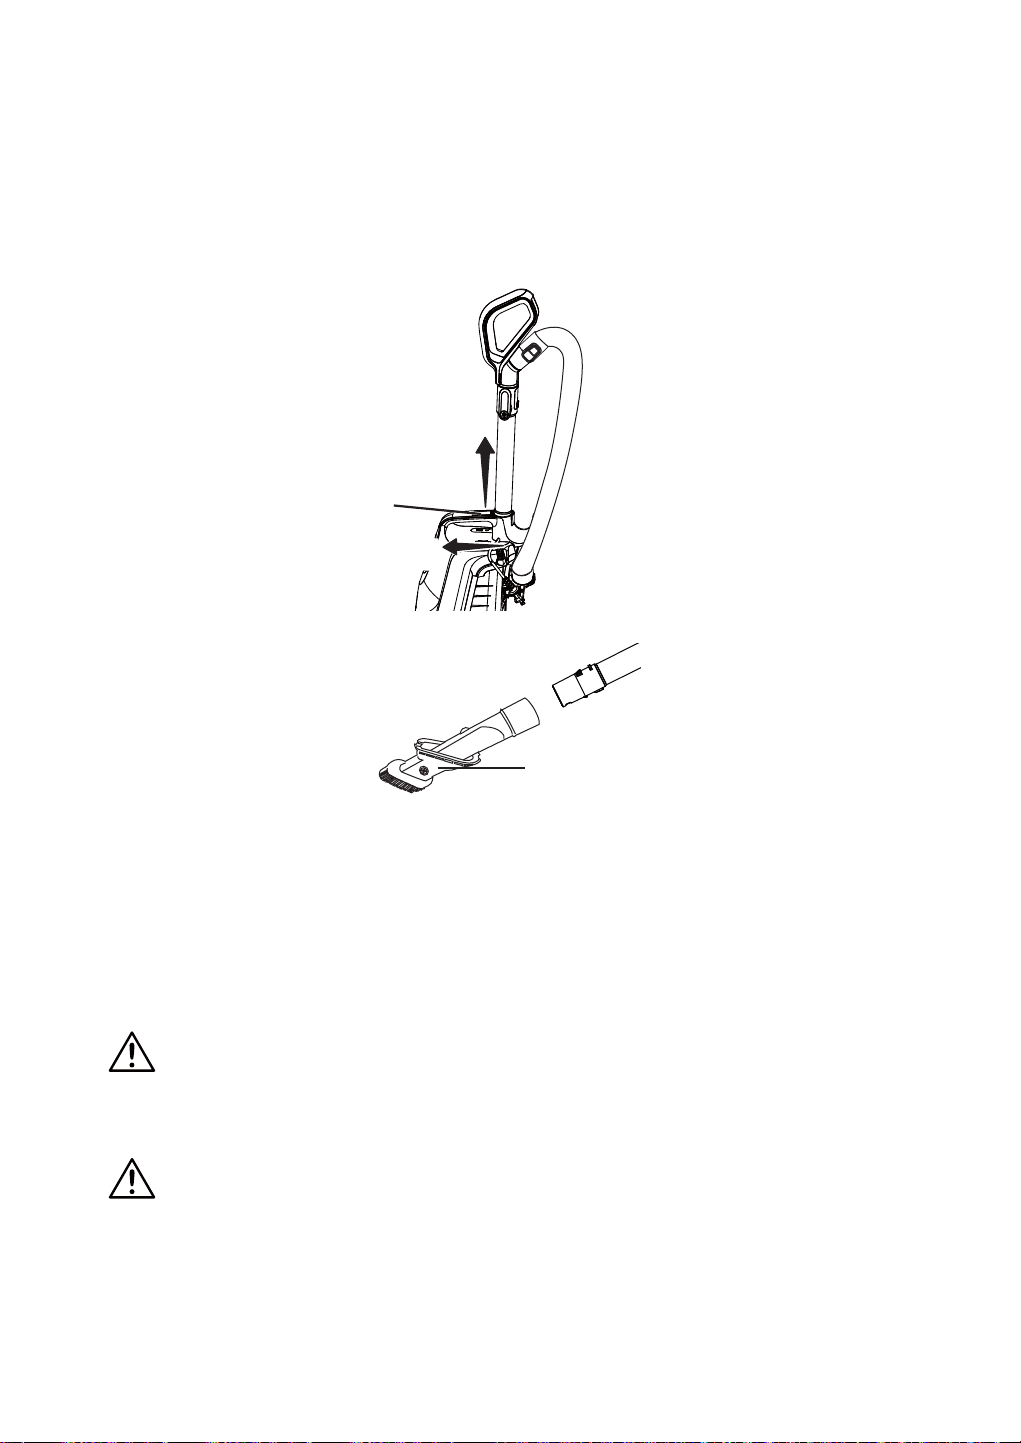
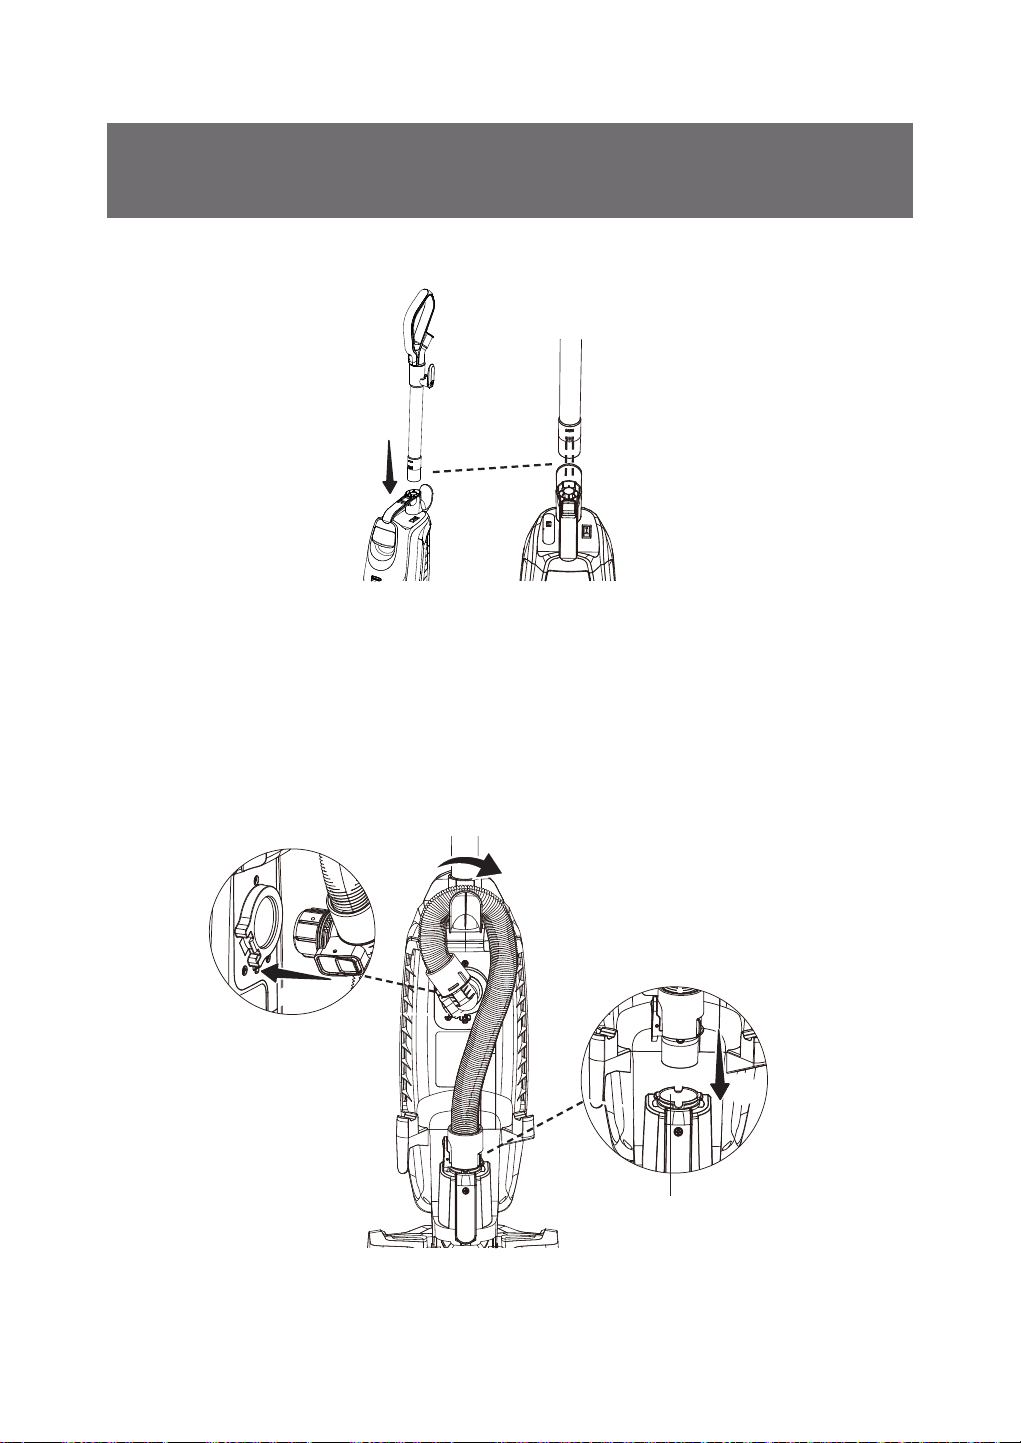
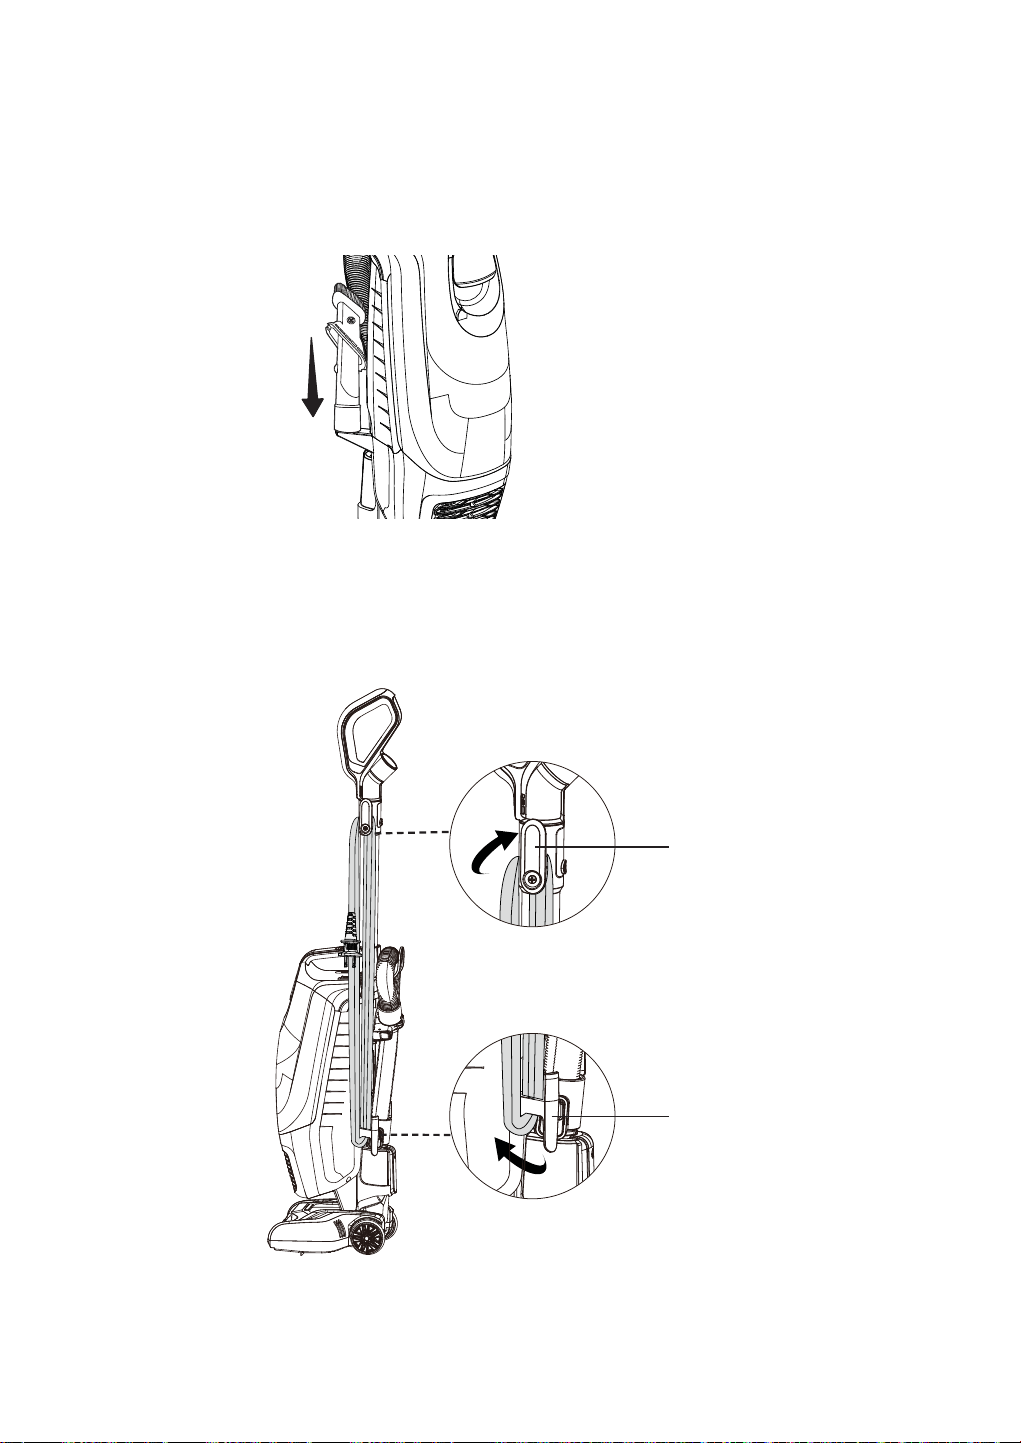
,QVHUWWKHULJKWDQJOHHQGRIWKHÀH[LEOHKRVHLQWRWKHPDLQERG\DVVKRZQXQWLO
\RXKHDUDµFOLFN¶7KHQUXQWKHÀH[LEOHKRVHRYHUWKHKRVHVWRUDJH,QVHUWWKH
other end of the hose into the lower hose connection as shown until you hear a
‘click’.
127( It is recommended to slightly rotate the hose end when inserting the hose.
Make sure both hose ends are clicked into place.
GENERAL ASSEMBLY INSTRUCTIONS
1. Insert the handle into the main body until you hear a ‘click’.
Lower Hose
Connection
1
2
3
-8-
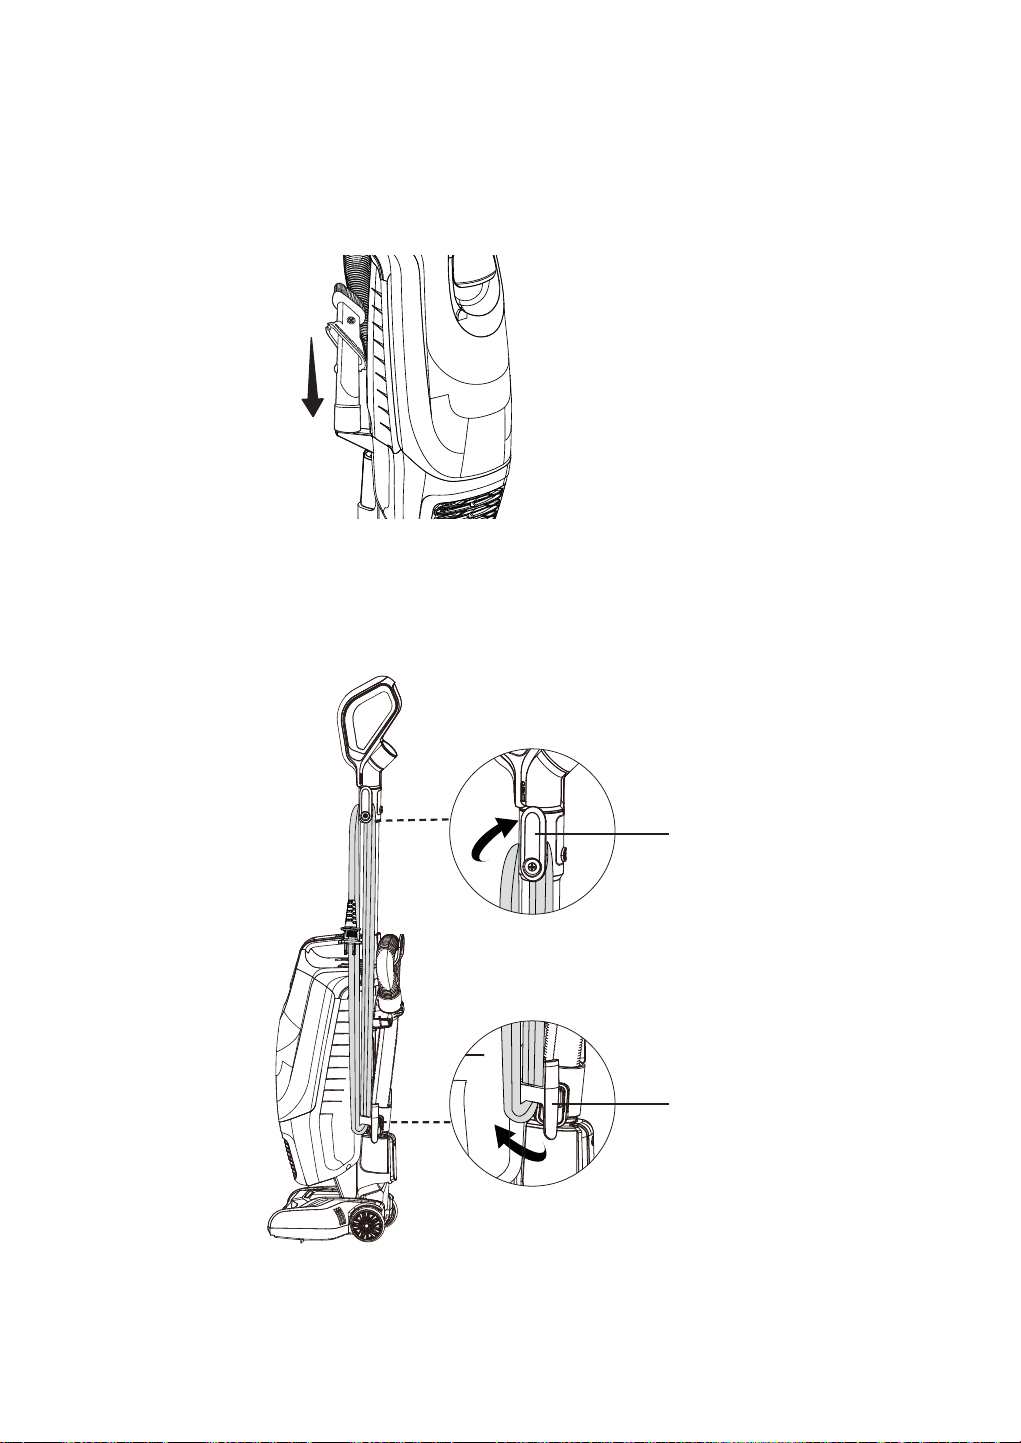
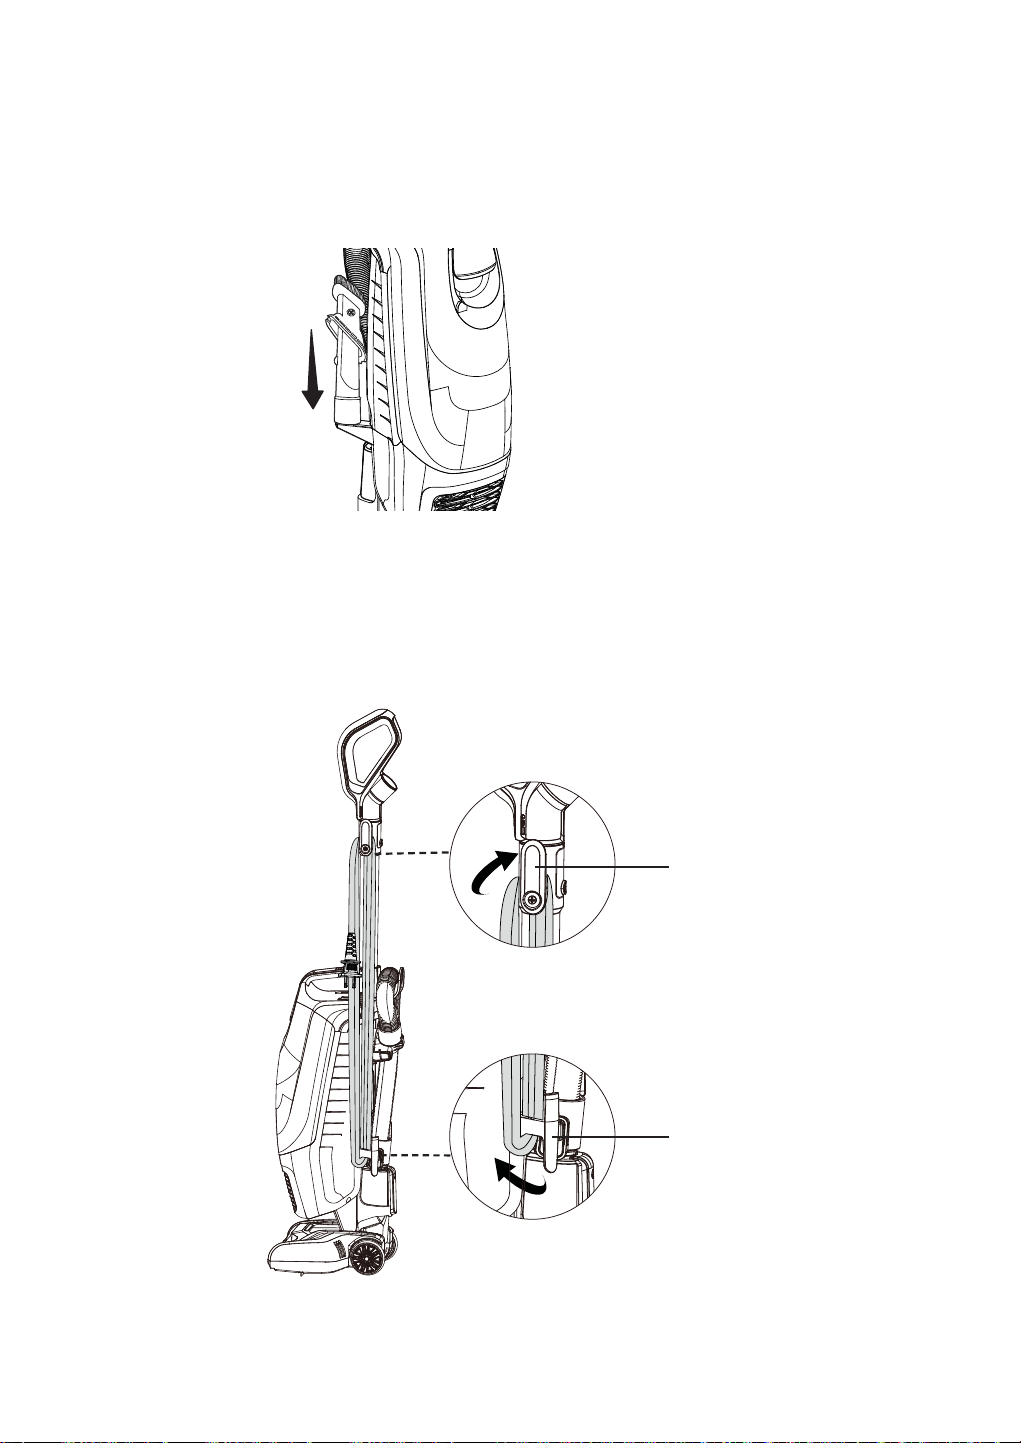
3. Insert the combination tool onto the accessory storage as shown.
4. Make sure the upper and lower cord hooks are in the proper position as
shown. Wrap the power cord loosely around the upper and lower cord hooks.
127(0DNHVXUHWRZUDSWKHSRZHUFRUGDURXQGWKHXSSHUFRUGKRRN¿UVWDQG
then around the lower cord hook to avoid damaging the power cord.
Upper Cord Hook
Lower Cord Hook

-9-
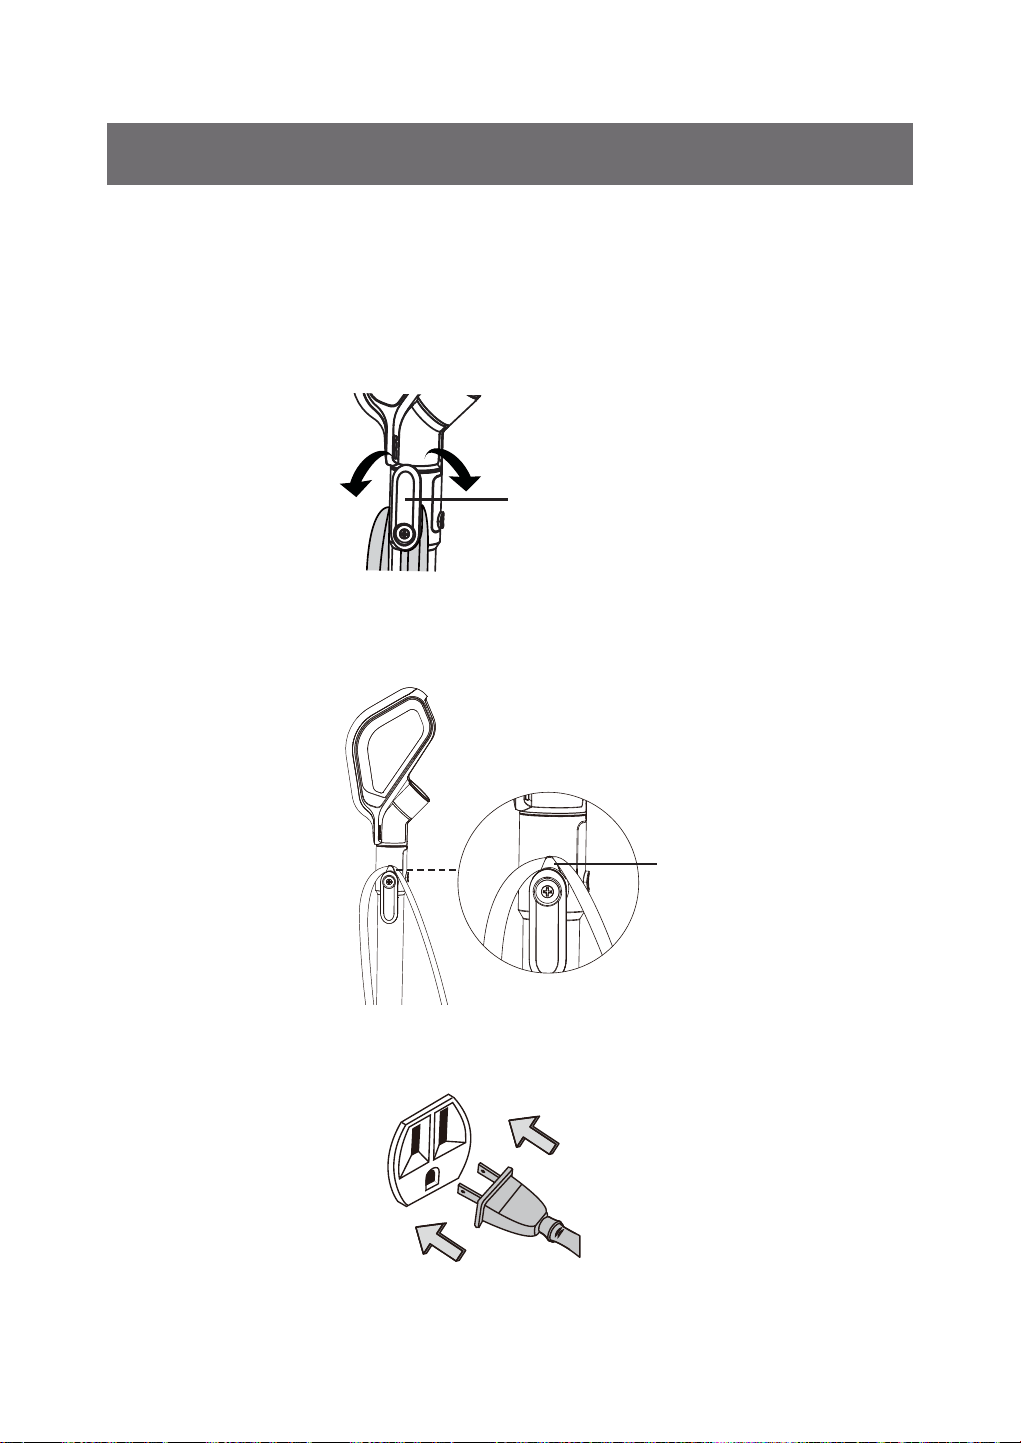
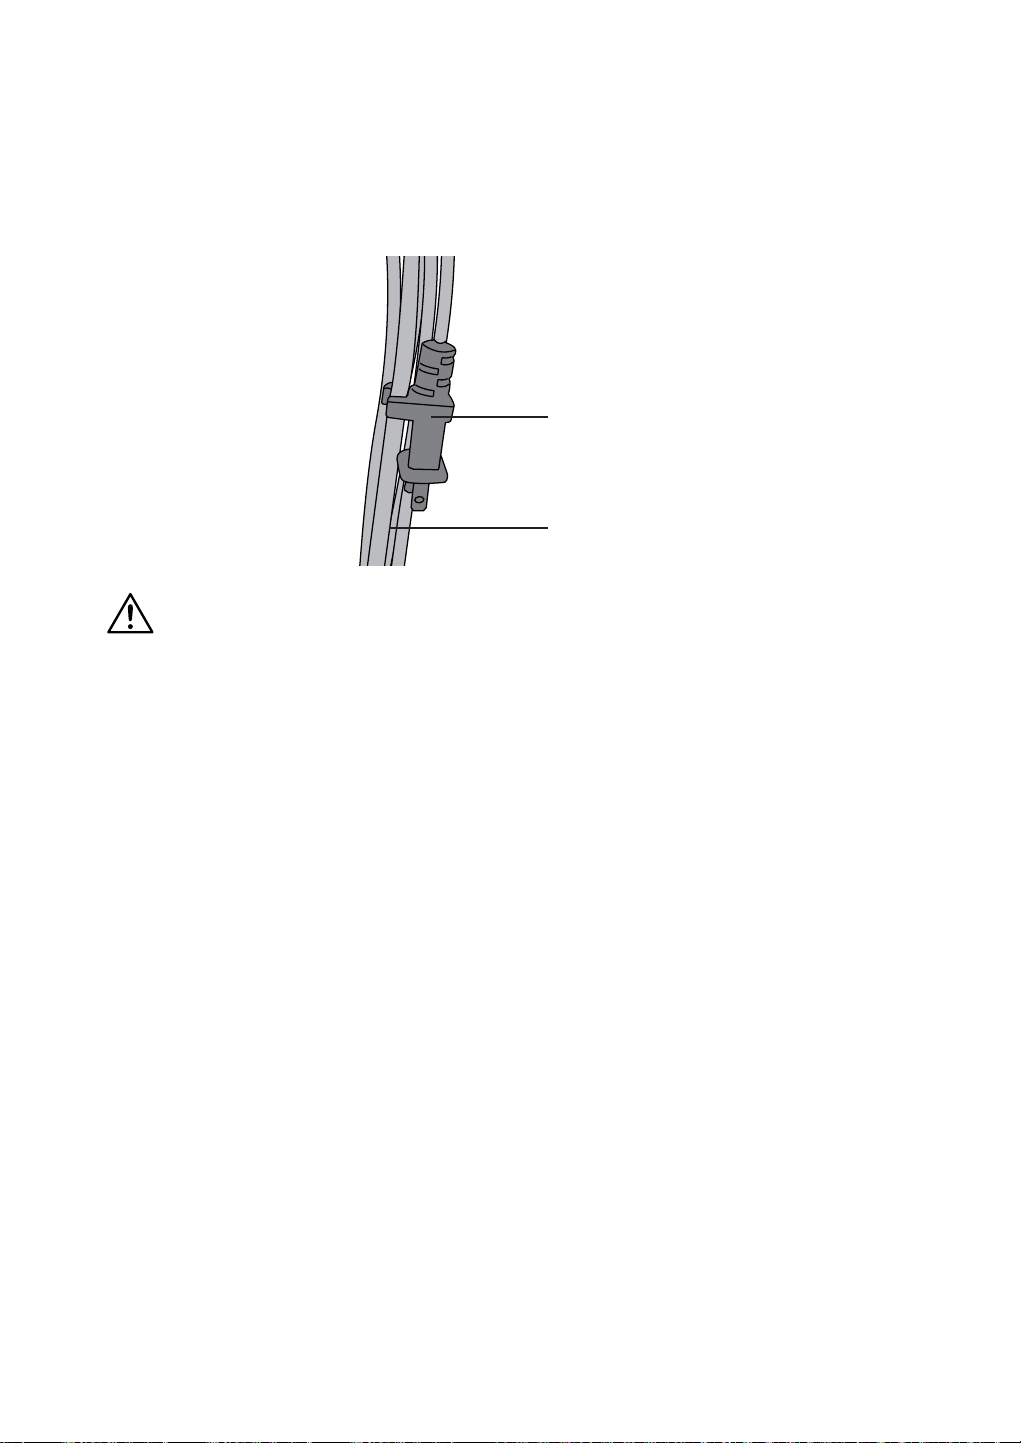
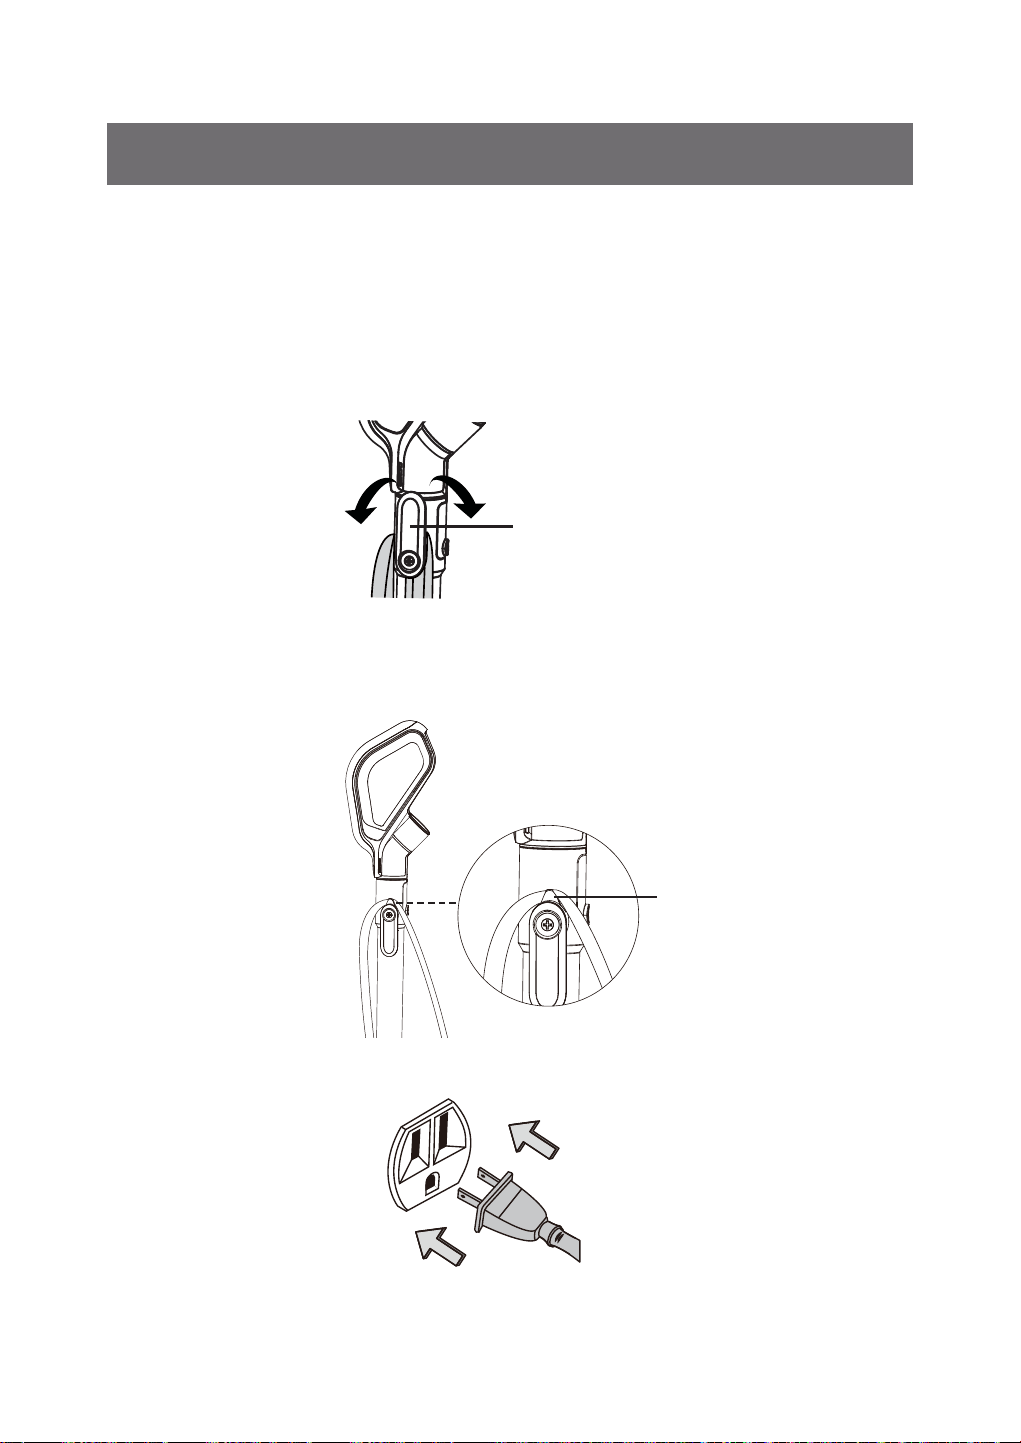
5. Lock power cord plug onto the power cord.
WARNING
Wrapping the cord too tightly with excessive stress on the cord may cause cord
damage. A damaged cord is an electrical shock hazard and could cause personal
injury or damage.
Power Cord Plug
Power Cord
-10-
Using Your Upright Vacuum Cleaner
127(Make sure the vacuum cleaner is completely assembled. Do not operate
vacuum cleaner without dust bag in place.
127(Make
VXUHWKHÀH[LEOHKRVHLVLQVWDOOHGFRUUHFWO\LQWRWKHPDLQERG\SDJH
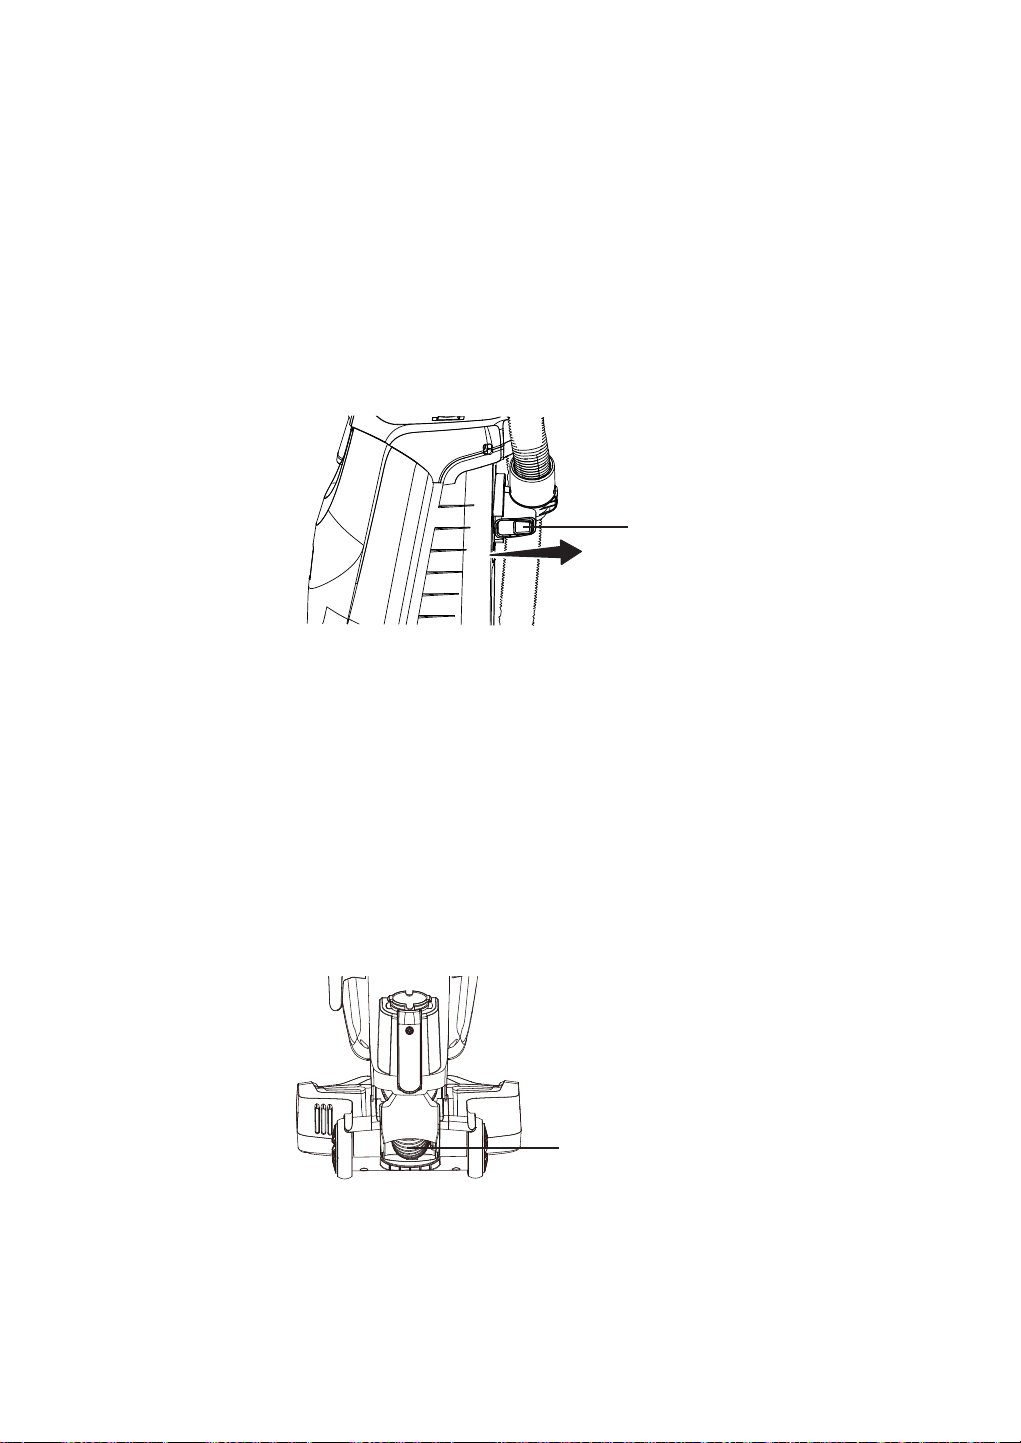
1. Turn the upper cord hook to either side and down to release the power cord.
2. Detach the power cord plug from the power cord.
3. Be sure the power cord is locked into the upper locking notch as shown. This
will help manage the power cord when operating the vacuum cleaner.
3OXJWKHSRZHUFRUGLQWRDQRXWOHWORFDWHGQHDUWKHÀRRU
OPERATING INSTRUCTIONS
Upper Locking Notch
Upper Cord Hook
-11-
WARNING
To reduce the risk of electric shock, this appliance has a polarized plug (one blade
LVZLGHUWKDQWKHRWKHU7KLVSOXJZLOO¿WLQDSRODUL]HGRXWOHWRQO\RQHZD\,IWKH
SOXJGRHVQRW¿WIXOO\LQWKHRXWOHWUHYHUVHWKHSOXJ,ILWVWLOOGRHVQRW¿WFRQWDFWD
TXDOL¿HGHOHFWULFLDQWRLQVWDOOWKHSURSHURXWOHW'RQRWFKDQJHWKHSOXJLQDQ\ZD\
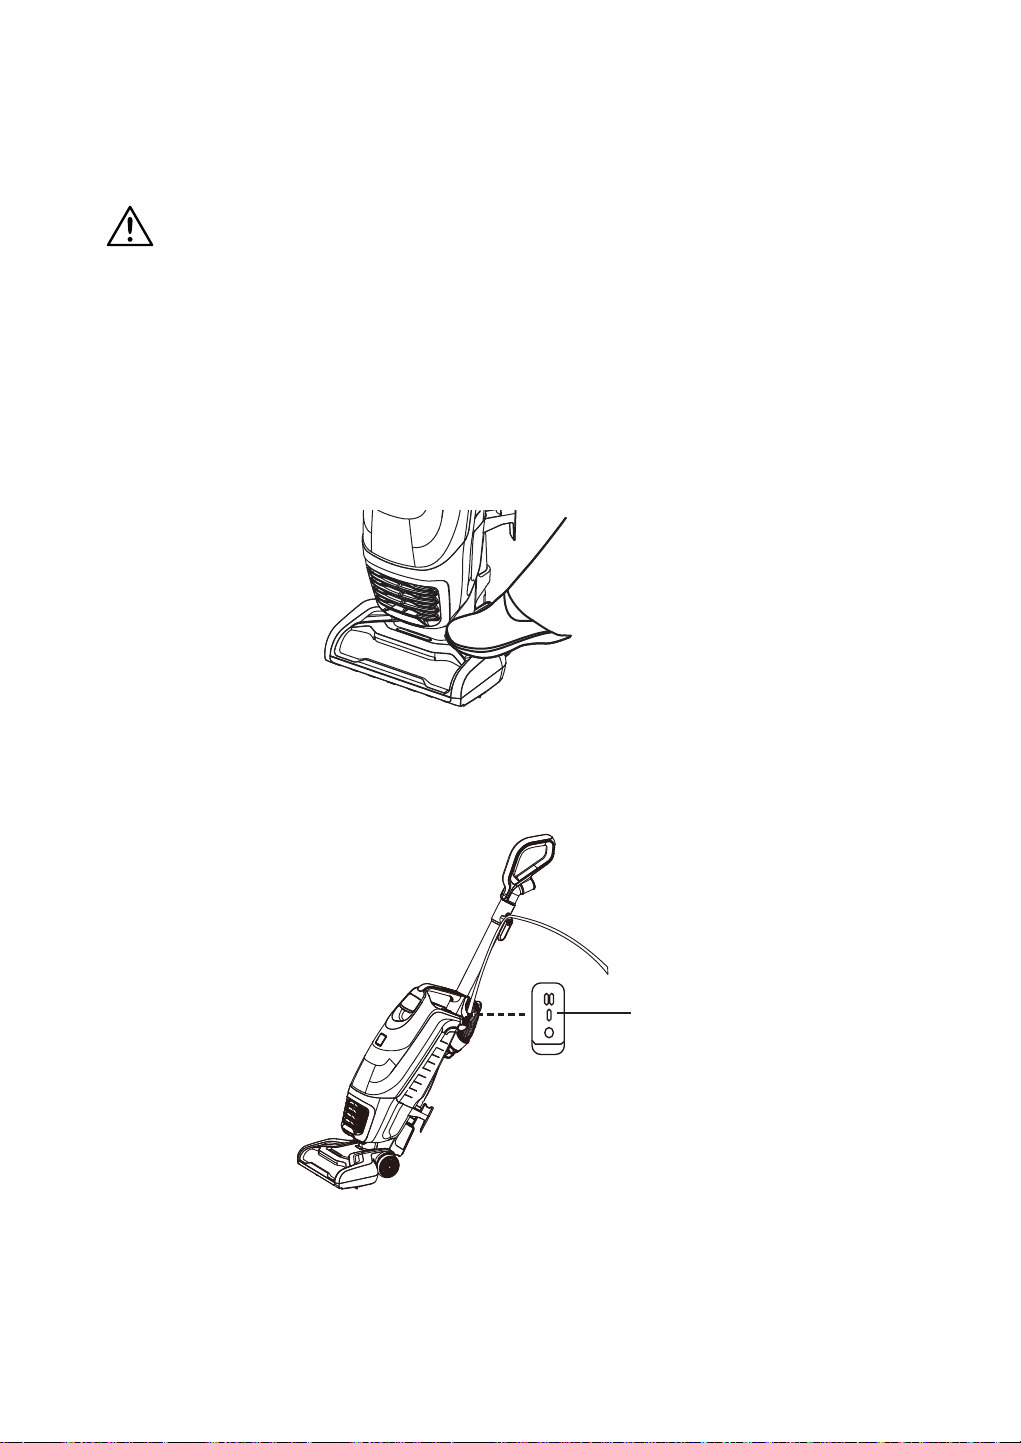
5. Release the handle by placing a foot on the nozzle and pulling back to change
the handle position.
6. Turn on the vacuum cleaner by pressing the On/Off switch to the “I” position
IRUFOHDQLQJEDUHÀRRUVDQGVPDOODUHDUXJV
127(The brushroll does not rotate when the vacuum cleaner is in the “I”
position.
7. Press the switch to the “II” position for cleaning carpets or rugs.
127(The brushroll rotates when the vacuum cleaner is in the “II” position.
On/Off Switch
-12-
8. Once you have completed vacuuming, switch to the “O” position and unplug
the power cord from the power outlet.
127( Select the right mode when using this vacuum cleaner. Do not press
WKHVZLWFKWRWKH³,,´SRVLWLRQZKHQFOHDQLQJWKHEDUHÀRRURWKHUZLVHLWFRXOG
SRWHQWLDOO\GDPDJHWKHÀRRU
9. To store power cord after use, turn the upper cord hook to the upright position.
Then wrap cord loosely around cord hooks.
CAUTION
Do not allow the vacuum cleaner to remain in one spot for any length of time
when the brushroll is turning. Damage to carpet may occur.
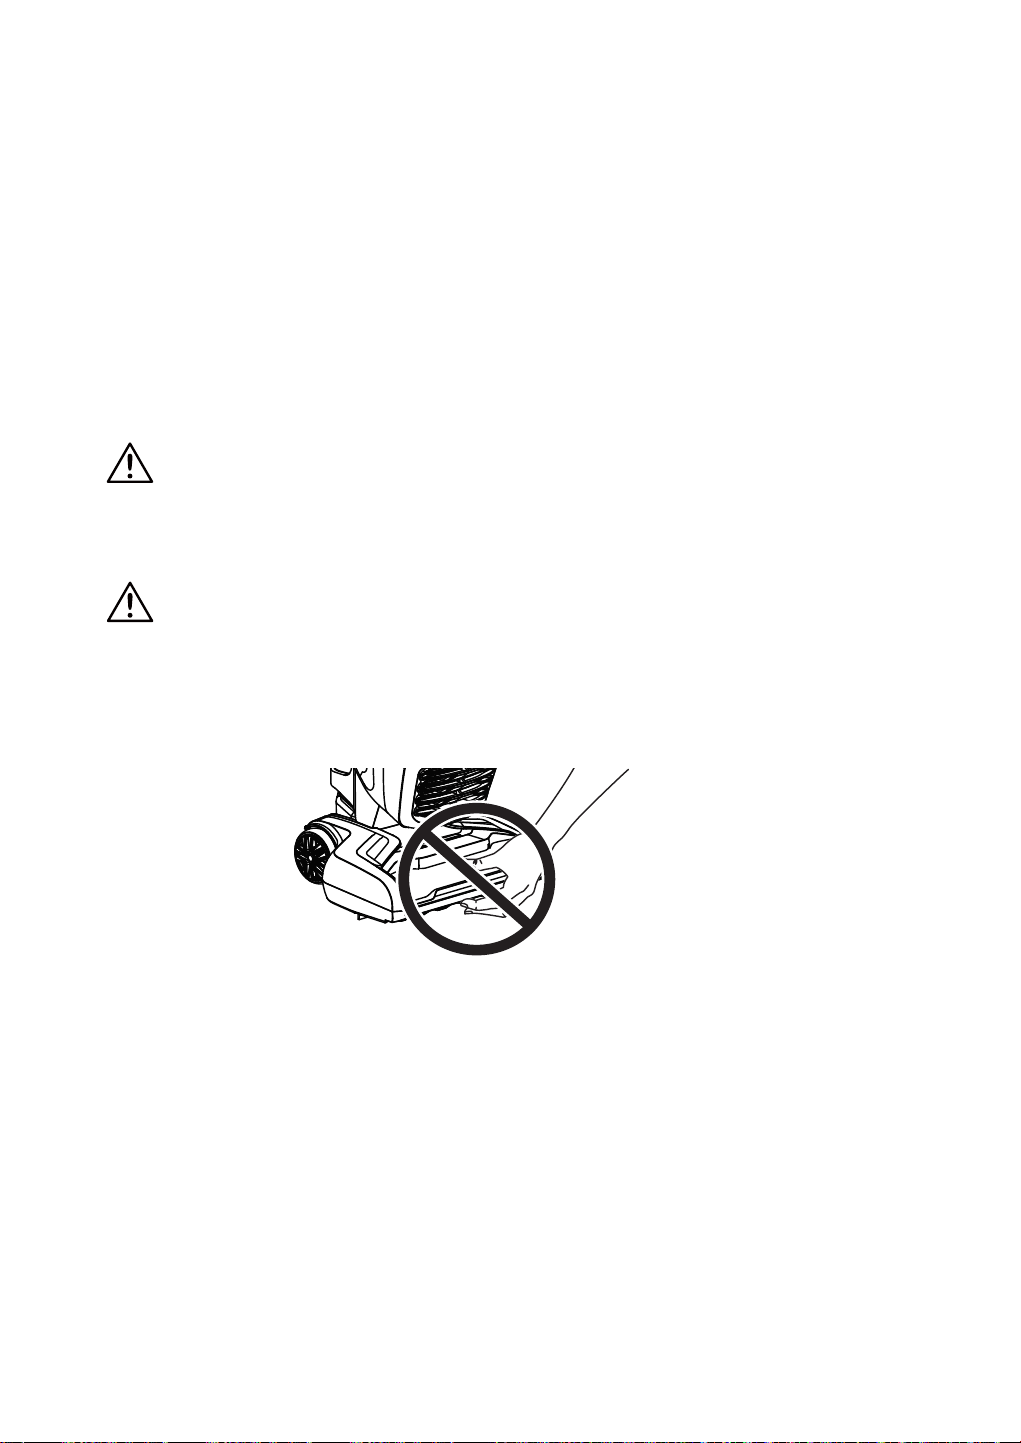
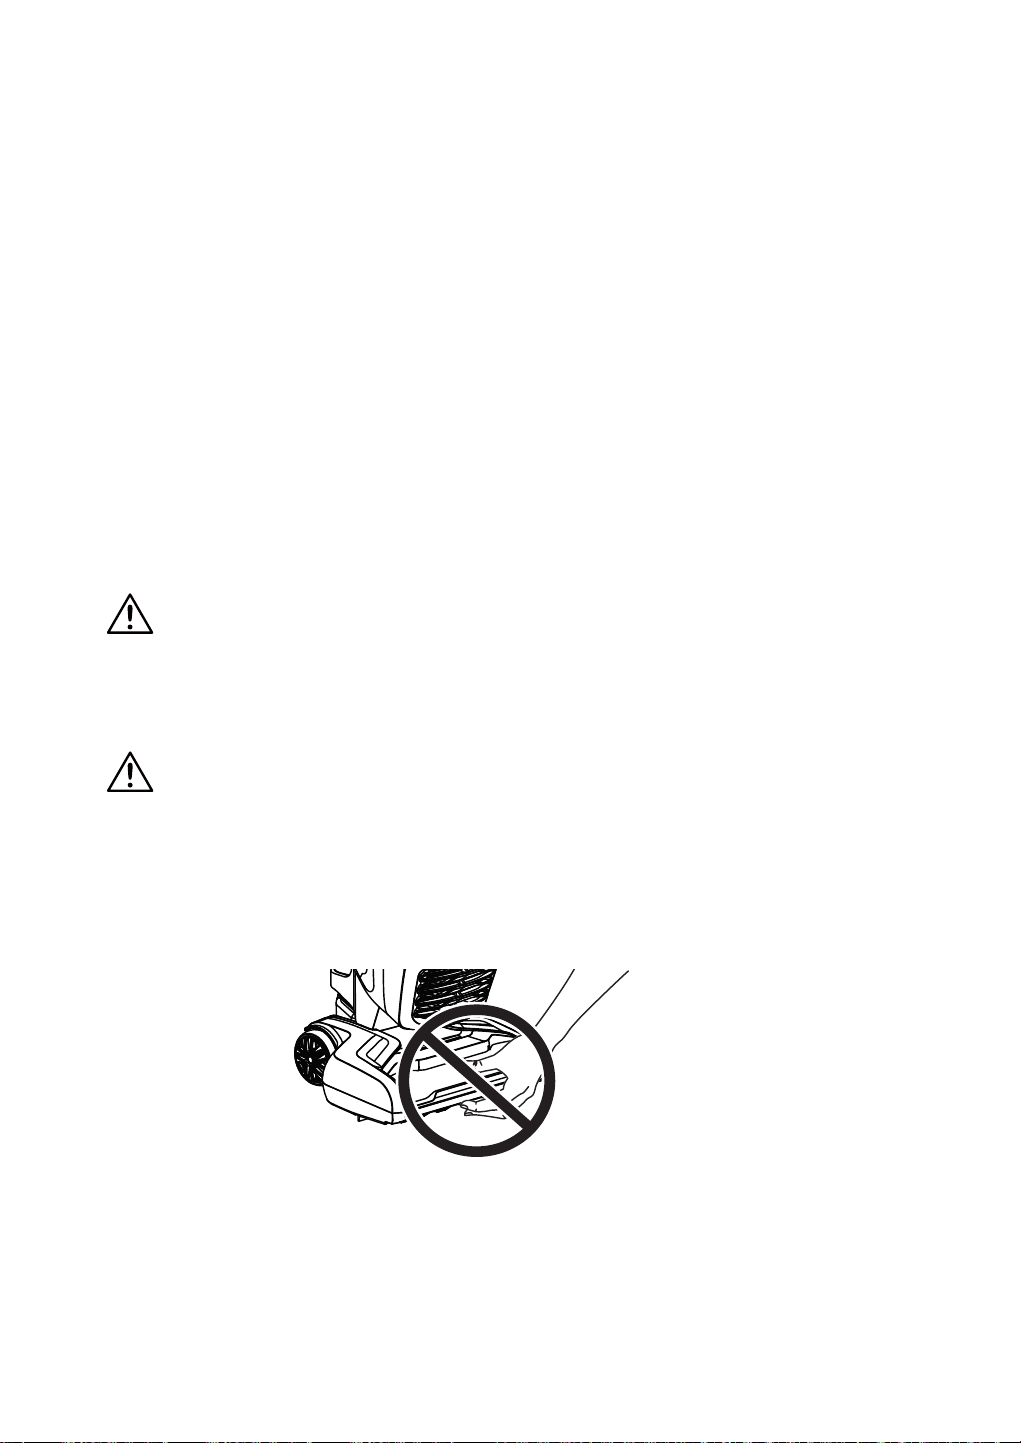
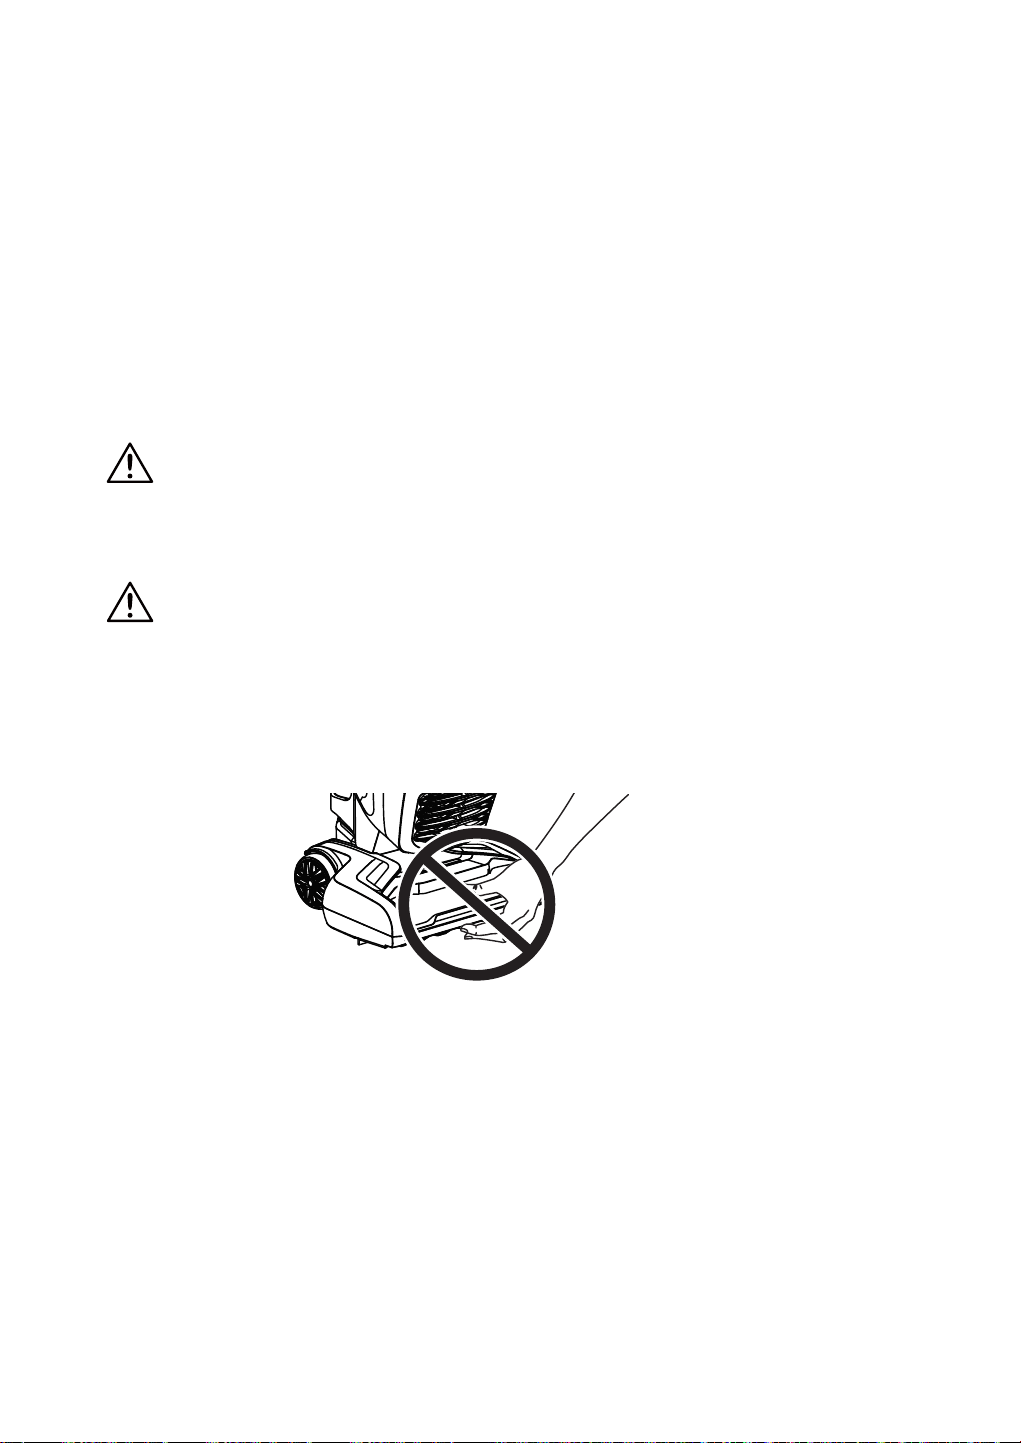
CAUTION
Moving parts! To reduce the risk of personal injury, DO NOT touch the brushroll in
WKHÀRRUQR]]OHZKHQWKHYDFXXPLVRQ&RQWDFWLQJWKHEUXVKUROOZKLOHLWLVURWDWLQJ
can cause injuries. Disconnect electrical supply before servicing or cleaning the
vacuum cleaner. Use caution when operating near children.
CHECK BAG INDICATOR
:KHQWKHYDFXXPFOHDQHULVUXQQLQJZLWKQRUPDODLUÀRZWKH&+(&.%$*
LQGLFDWRULVJUHHQ7KHLQGLFDWRUWXUQVWRGDUNUHGZKHQHYHUWKHDLUÀRZEHFRPHV
blocked.
,IWKDWRFFXUVFKHFNWKHGLVSRVDEOHGXVWEDJWKH¿OWHUDQGWKHDLUSDWKIRU
possible clog locations shown in Removing Clogs (page 23).
127( The indicator may activate when using certain attachments due to reduced
DLUÀRZWKURXJKDWWDFKPHQW
-13-
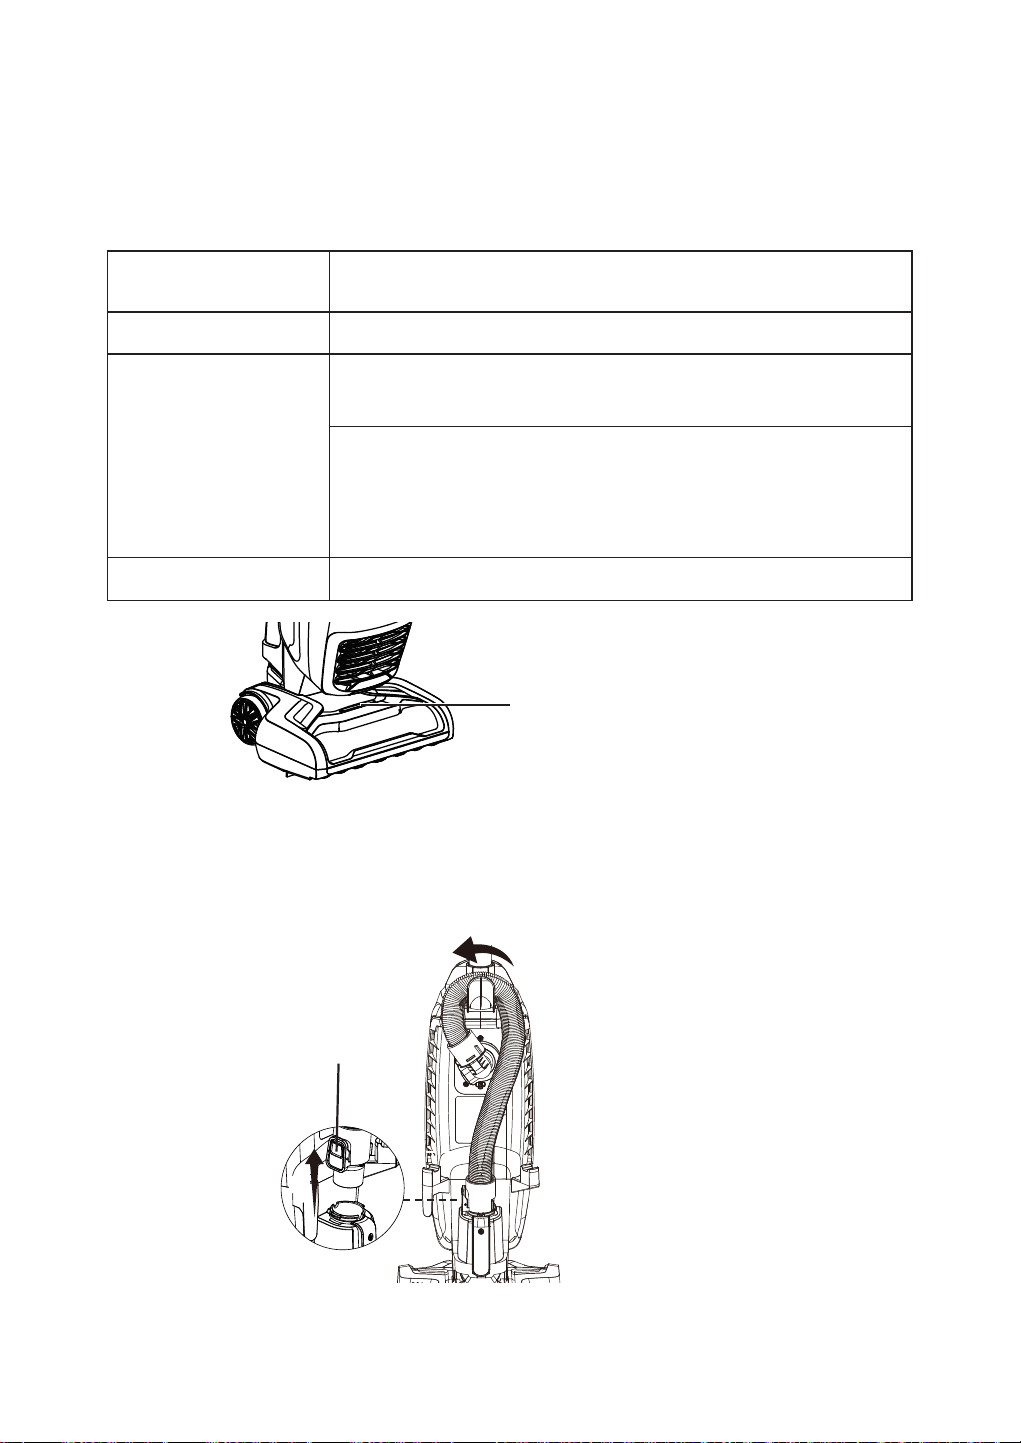
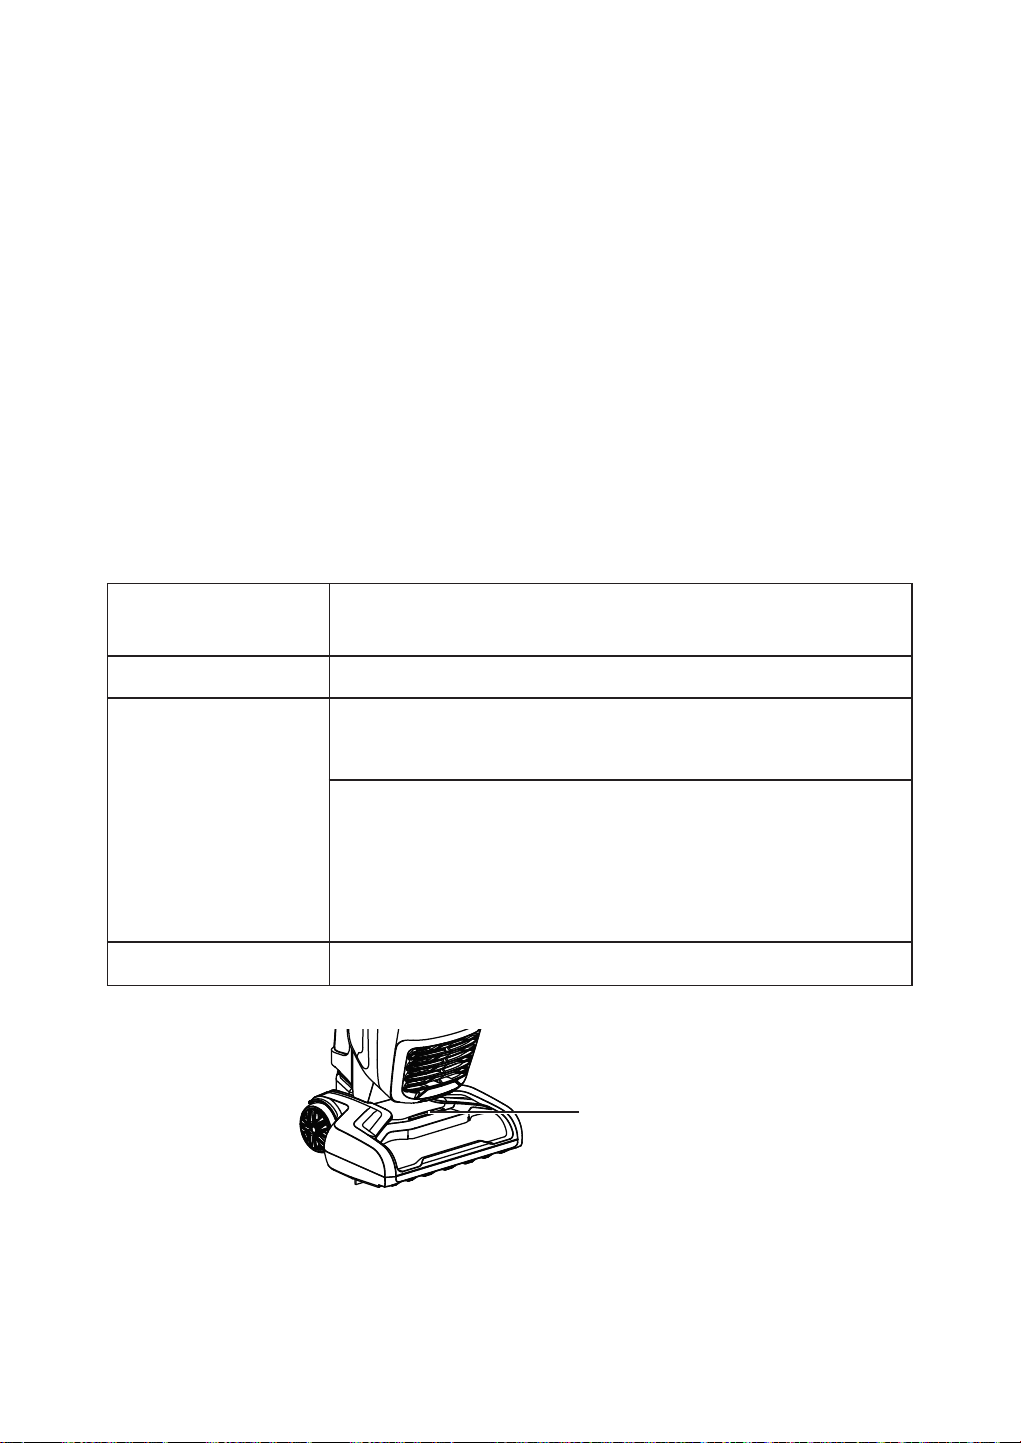
BRUSHROLL STATUS INDICATOR LIGHT
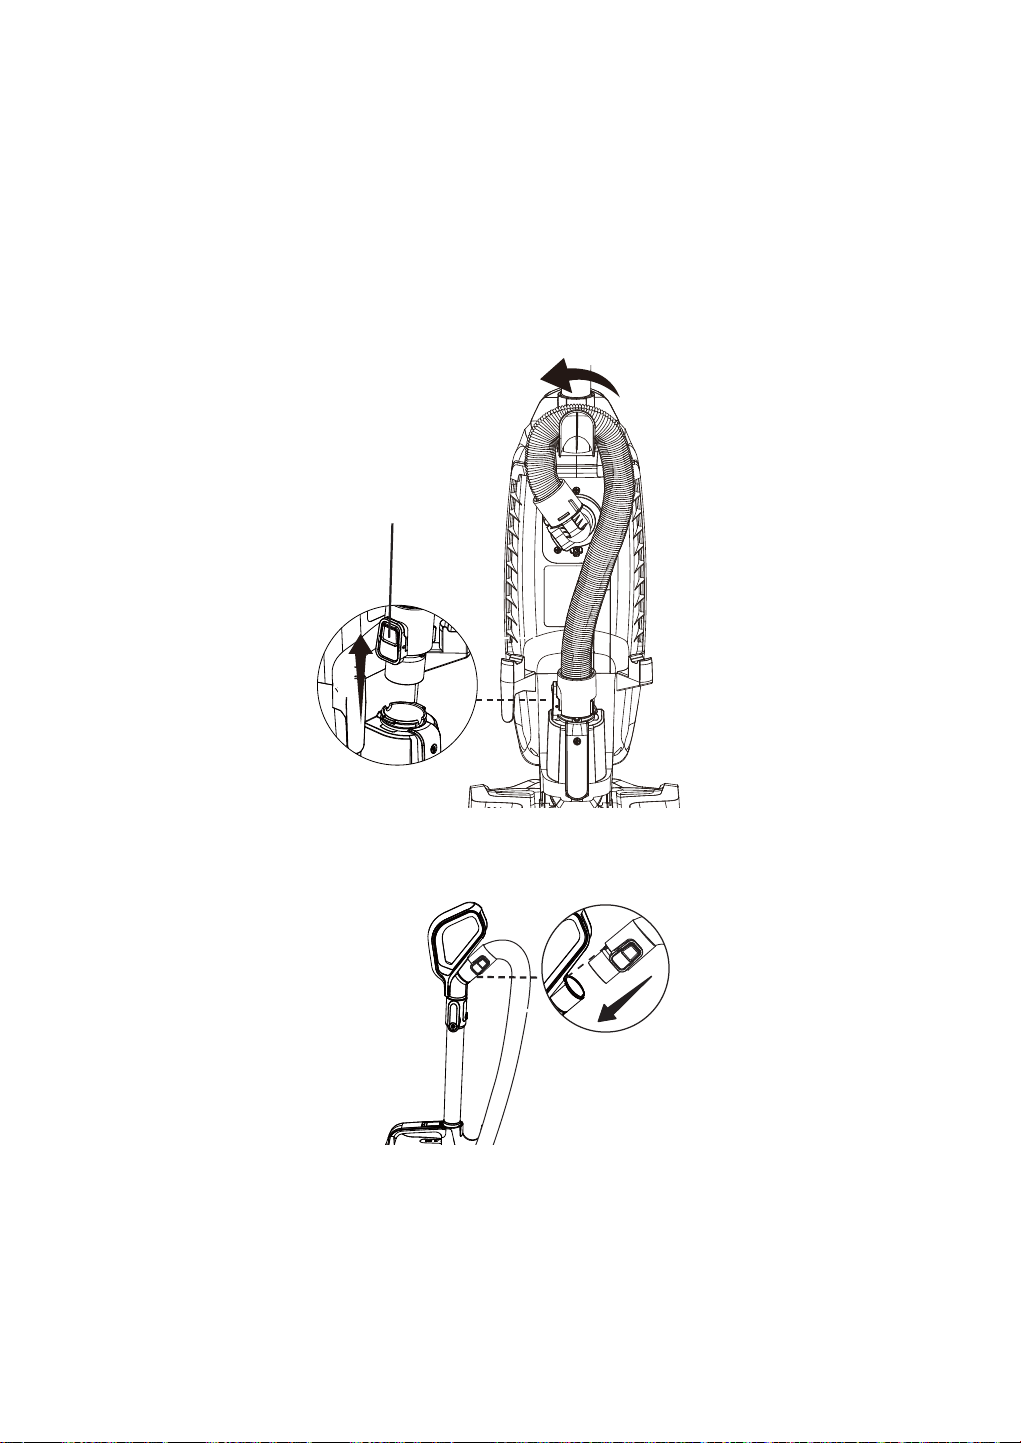
8VLQJ<RXU9DFXXP&OHDQHUZLWK$FFHVVRU\
1. Place the vacuum cleaner in the upright locked position.
2. Press the hose release button and pull up to release the lower hose end from
the lower hose connection.
Brushroll Status
Indicator Light
Brushroll Status
Indicator Light
Status
Green, Continuous The brushroll is spinning and working as it should.
Red, Continuous
There is a jam in the brushroll area. Turn off and unplug
the vacuum, and remove any blockages in the nozzle.
The brushroll motor is overheated. Turn off and unplug the
vacuum. Check and clear the air path to make sure it is
free of obstructions. Check and change the dust bag if full.
Then plug in vacuum and turn it on.
No Light The brushroll is off.
Hose Release Button
2
1
-14-
3. Insert the hose end into the upper hose connection as shown until you hear a
‘click’.
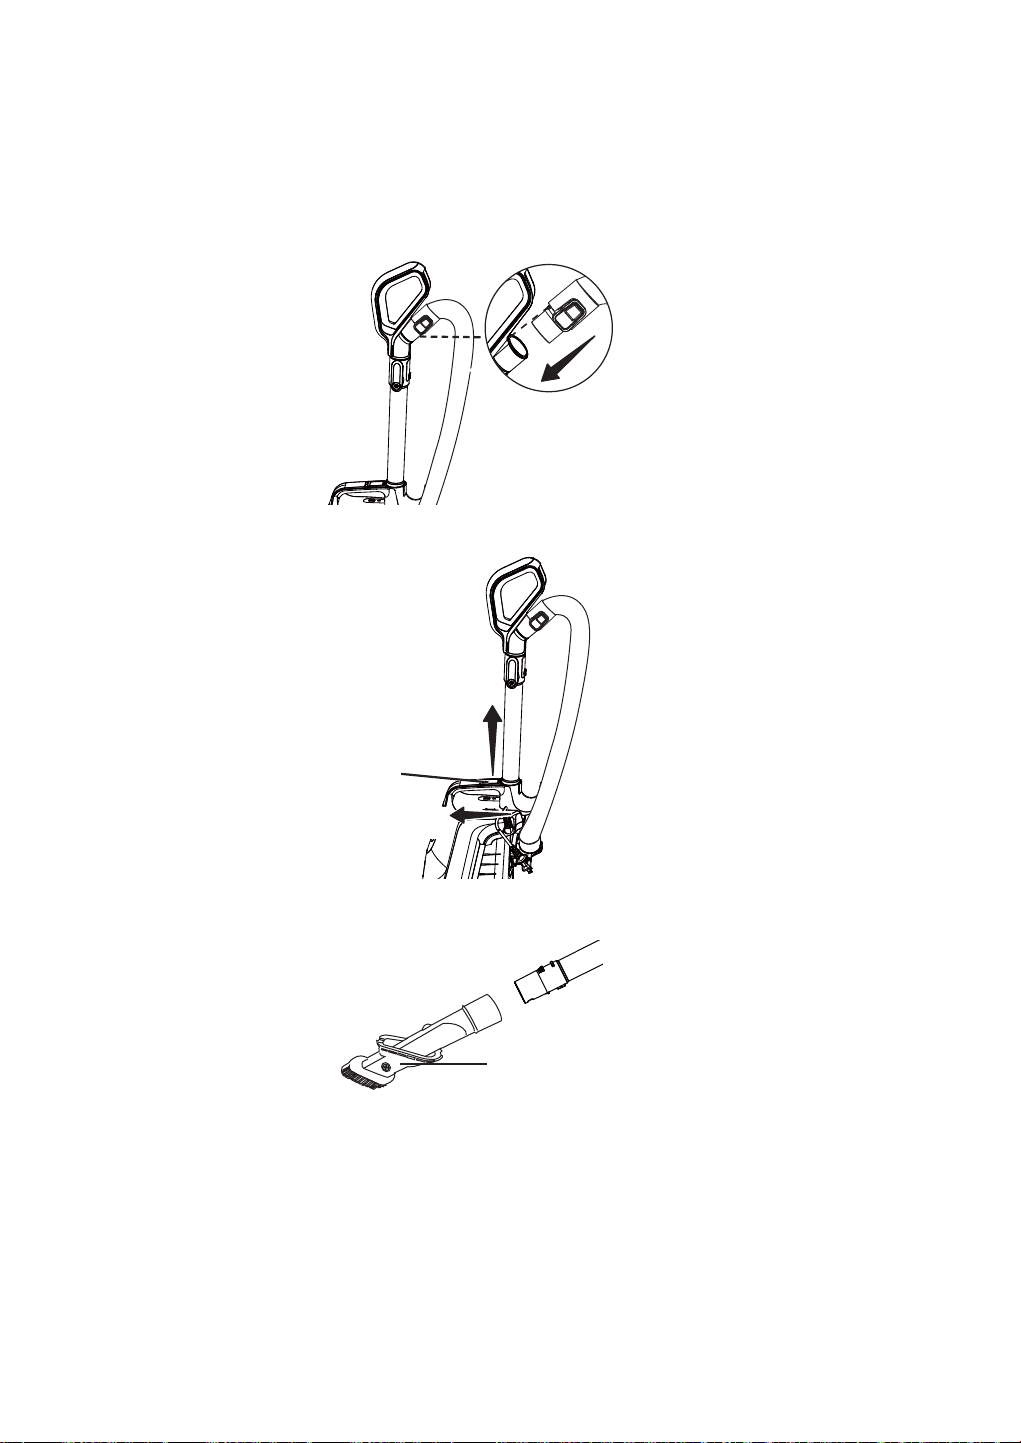
6OLGHWKHZDQGUHOHDVHEXWWRQDQGOLIWXSWKHKDQGOHIRUDERYHÀRRUFOHDQLQJ
5. Choose the desired accessory and insert it into the handle.
6. Turn on the vacuum cleaner by pressing the switch to the “I” position.
7. Once you have completed vacuuming, switch to the “O” position and unplug
the power cord from the power outlet.
,03257$170DNHVXUHWRUHLQVHUWWKHKRVHHQGLQWRWKHORZHUKRVH
connection before using the vacuum in uprignt mode.
3-in-1 Combination Tool
1
2
Wand Release
Button
-15-
CAUTION
When using accessories, be careful not to overextend the hose when reaching to
avoid tipping the vacuum over.
CAUTION
DO NOT pull the vacuum cleaner around the room by the hose. Property damage
or personal injury could result.
$FFHVVRU\
3-IN-1 COMBINATION TOOL
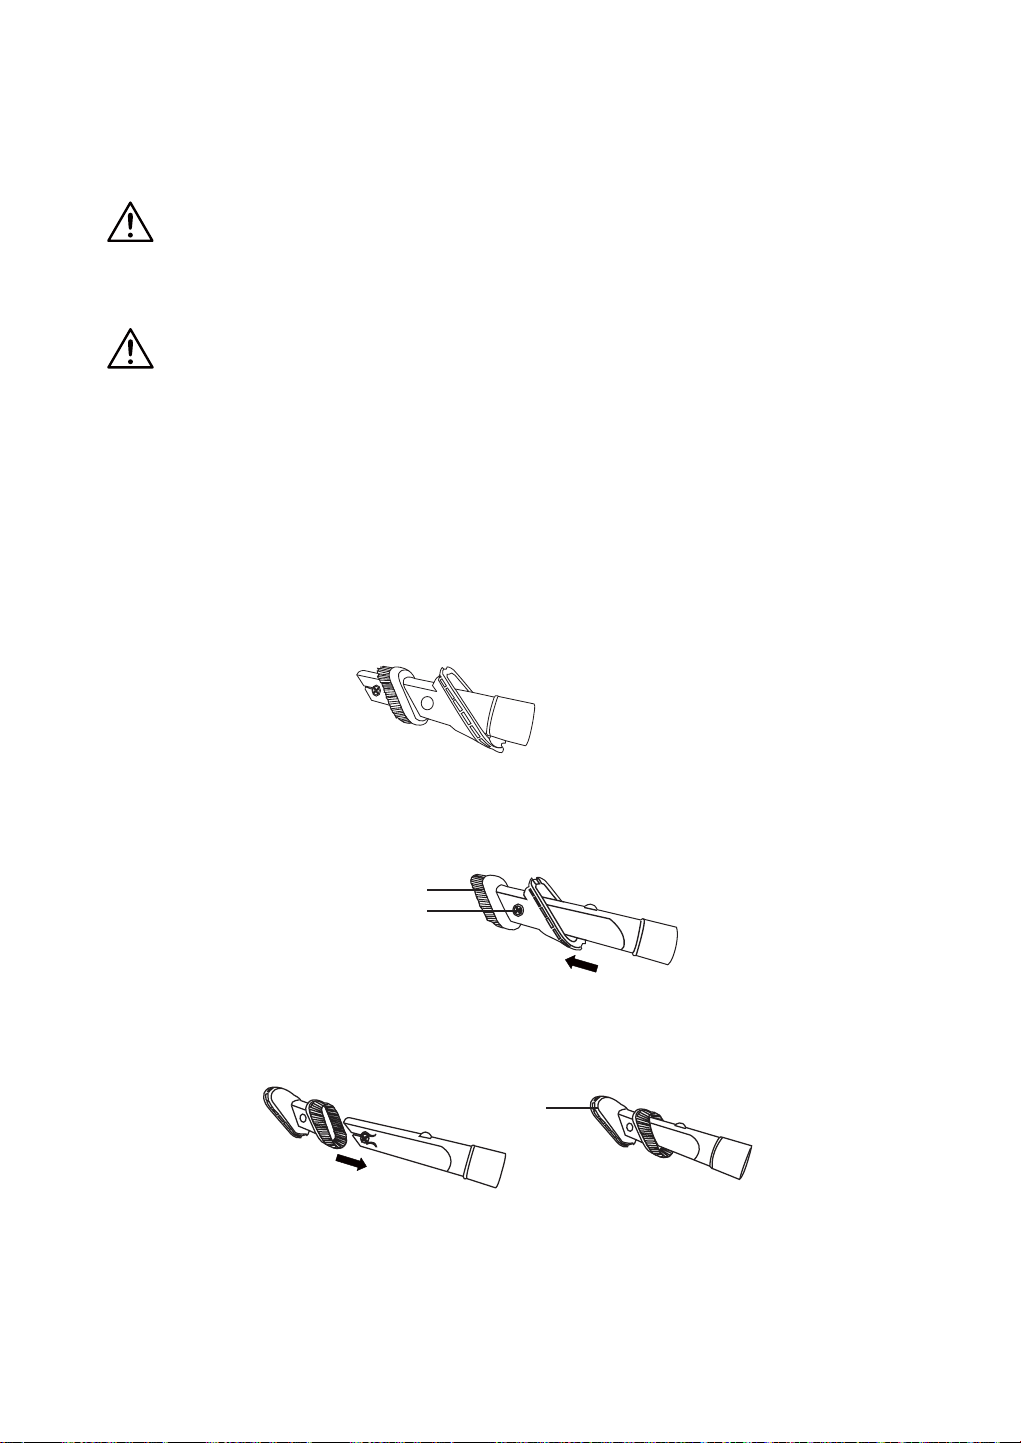
The 3-in-1 combination tool can be attached to the handle. Slide the collar of the
tool over the open end of the handle.
Use the 3-in-1 combination tool in crevice tool mode for cleaning in tight spaces
such as furniture, between cushions, and stairs.
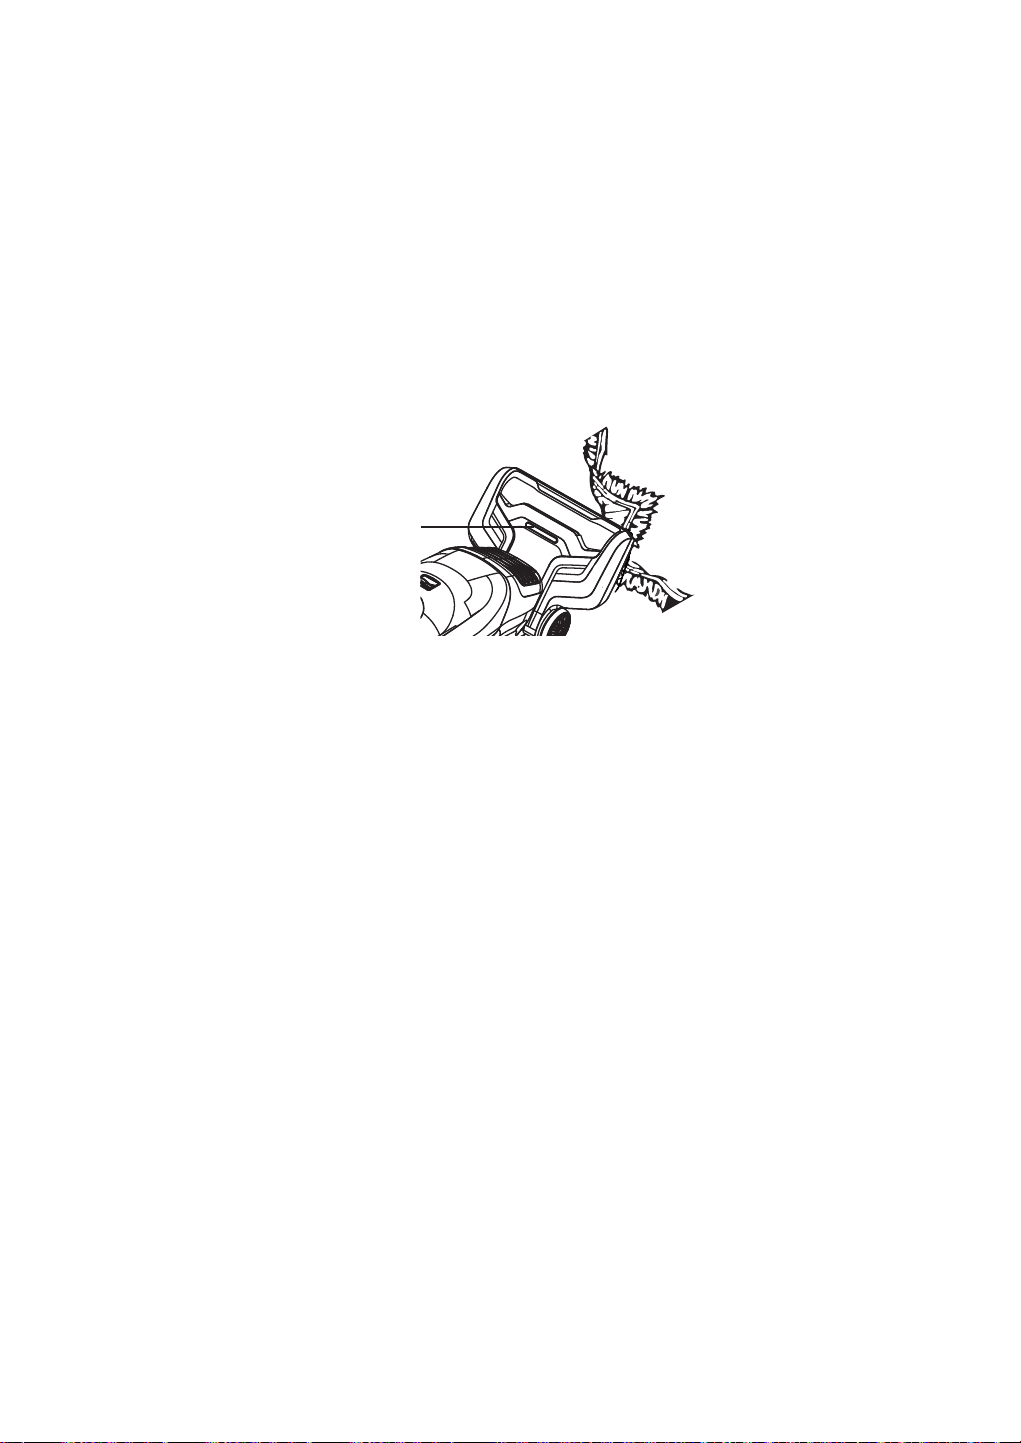
Set the combination tool in dusting brush mode by pressing the release button
and sliding the dusting brush side of the brush tool to the end of the combination
tool. Use in dusting brush mode for cleaning loose surfaces such as drapes.
Press the release button to remove the brush tool. Set the combination tool in
upholstery brush mode as shown. Use in upholstery brush mode for cleaning
fabric surfaces such as fabric sofa.
To return the combination tool to crevice tool mode, press the release button and
slide the brush tool down the combination tool.
127( Always clean accessory before using on fabrics.
Dusting Brush
Release Button
Upholstery
Brush

-16-
Thermal Protector
This vacuum cleaner has a thermal protector which automatically trips to protect
WKHYDFXXPFOHDQHUVXFWLRQPRWRU,IDFORJSUHYHQWVWKHQRUPDOÀRZRIDLUWRWKH
motor, the thermal protector turns the motor off automatically. This allows the
motor to cool in order to prevent possible damage to the vacuum cleaner.
7RUHVHWWKHUPDOSURWHFWRUTurn the vacuum cleaner off and unplug the power
cord from the outlet to allow the vacuum cleaner to cool and the thermal protectors
to reset.
CAUTION
Always return the vacuum cleaner to the upright position before using the hose
and accessory. Failure to do so may result in overheating of the brushroll motor
and can cause the thermal protectors to trip.
Check for and remove clogs, and replace dust bag if necessary. Also check and
FOHDQDQ\FORJJHG¿OWHUV:DLWDSSUR[LPDWHO\PLQXWHVEHIRUHUHVWDUWLQJYDFXXP
cleaner.
%\3DVV9DOYH
This vacuum cleaner has a By-Pass Valve which prevents motor overheating and
damage. The valve opens to provide cooling air when a clog prevents normal air
ÀRZWRWKHYDFXXPFOHDQHUVXFWLRQPRWRU<RXZLOOQRWLFHDFKDQJHRIVRXQGDVDLU
rushes through the valve opening.
7RFRUUHFWWKHSUREOHP5HPRYHDQ\FORJVFKHFNDQGUHSODFH¿OWHUVLIQHHGHG
check and install new dust bag if needed.
127(The By-Pass Valve may open when using attachments or when
FOHDQLQJQHZFDUSHWGXHWRUHGXFHGDLUÀRZRUDLUSDWKLVEORFNHGFDXVHGE\WKH
DWWDFKPHQWVWKHPVHOYHVRUE\QHZFDUSHWOLQW¿OOLQJWKHGXVWEDJTXLFNO\
Brushroll Reset
The brushroll has built-in protection against motor damage should the brushroll
jam. If the brushroll slows down or stops, the brushroll overload protector shuts
off the brushroll motor and the brushroll status indicator light emits a red light. The
vacuum cleaner suction motor will continue to run.
-17-
7RVROYHWKHSUREOHPTurn off and unplug vacuum cleaner, remove obstruction,
then plug the vacuum cleaner back in and turn on the vacuum cleaner.
127(Once the brushroll motor shuts down, clear jam from brushroll and then
restart the vacuum cleaner. If the problem persists, call 1-866-384-8432 for
assistance.
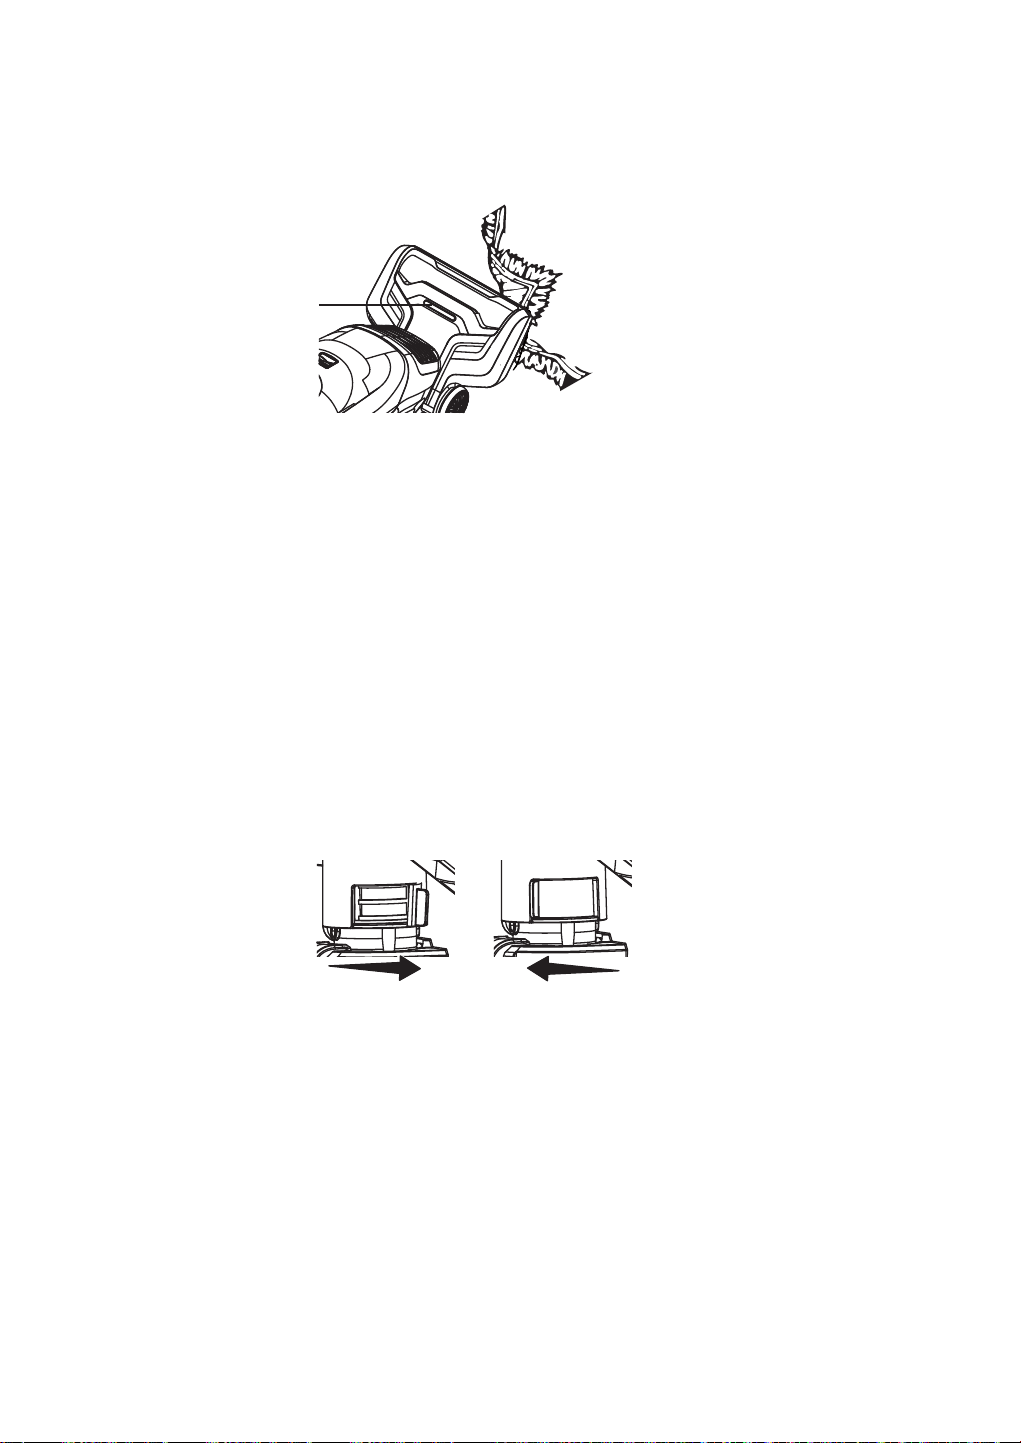
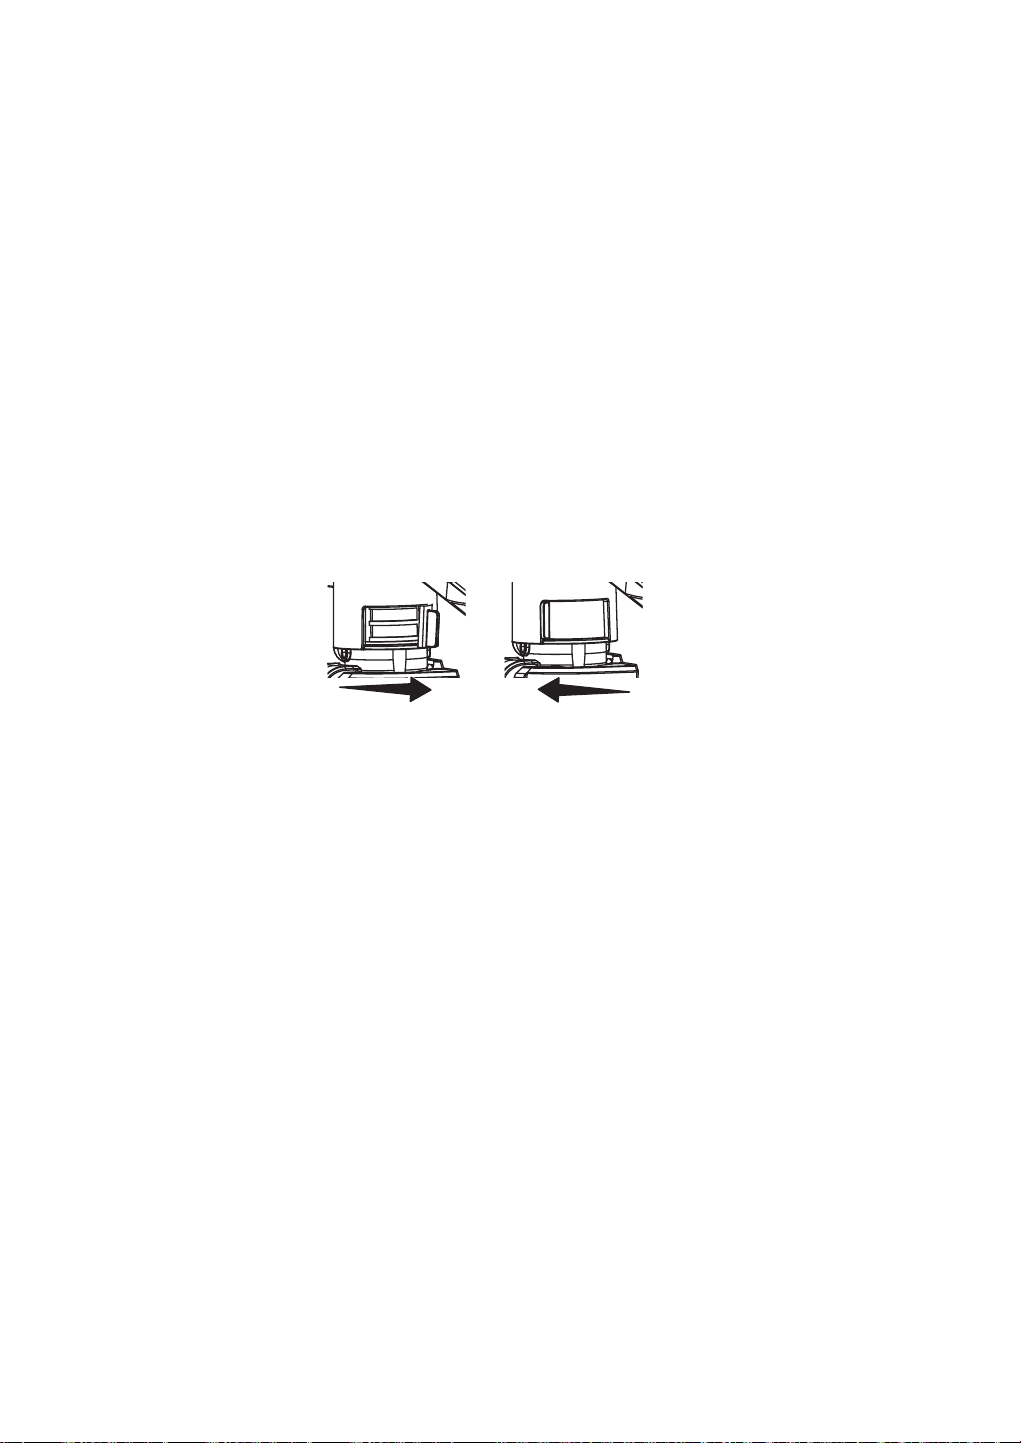
Suction Control
To assist with push/pull force of the vacuum on surfaces like thick carpet, the
suction control valve can be opened to help reduce suction. Note that for best
cleaning results, the suction control valve must be fully closed.
1. Slide to the right to open the suction control and decrease suction. Opening
suction control decreases suction for draperies and lightweight rugs.
2. Slide to the left to close the suction control and increase suction. Closing
suction control increases suction for upholstery and carpets.
6WRULQJ\RXUYDFXXP
1. Ensure the hose is locked into place and the accessory is stored on-board.
2. Gather the cord and wrap it loosely around the upper and lower cord hooks.
Lock the power cord plug onto the power cord.
6WRUHWKHYDFXXPFOHDQHULQDGU\LQGRRUDUHDRQWKHÀRRUZLWKWKHKDQGOH
locked in the upright position.
Brushroll Status
Indicator Light
Decrease Suction
Increase Suction
-18-
CAUTION
To reduce the risk of shock, turn off and disconnect the power cord before
performing any service or maintenance.
127(Use dry cloth to clean the outside of the unit. Do not allow any kind of
liquid to enter the unit. Wash the accessory in warm soapy water, rinse and air dry
for 24 hours. Do not clean in dishwasher.
Replacing the Dust Bag
For best cleaning results, the dust bag should be changed often. The CHECK
%$*LQGLFDWRUZLOOWXUQWRUHGZKHQWKHEDJQHHGVWREHFKDQJHGRUWKHDLUÀRZLV
blocked.
127(Always pay attention to the CHECK BAG indicator.
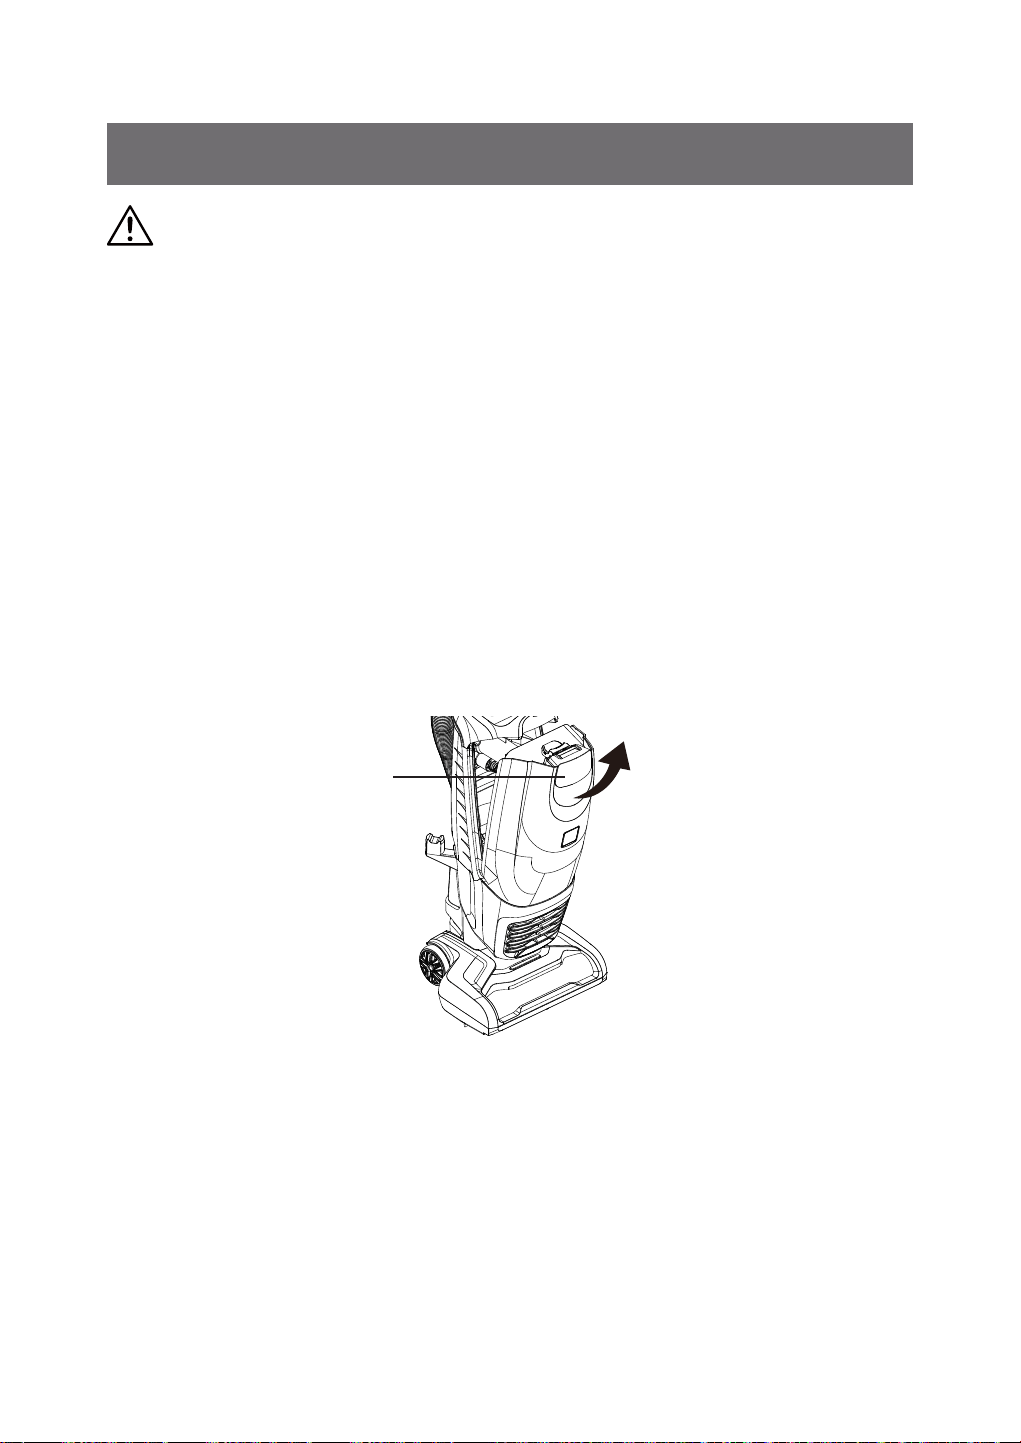
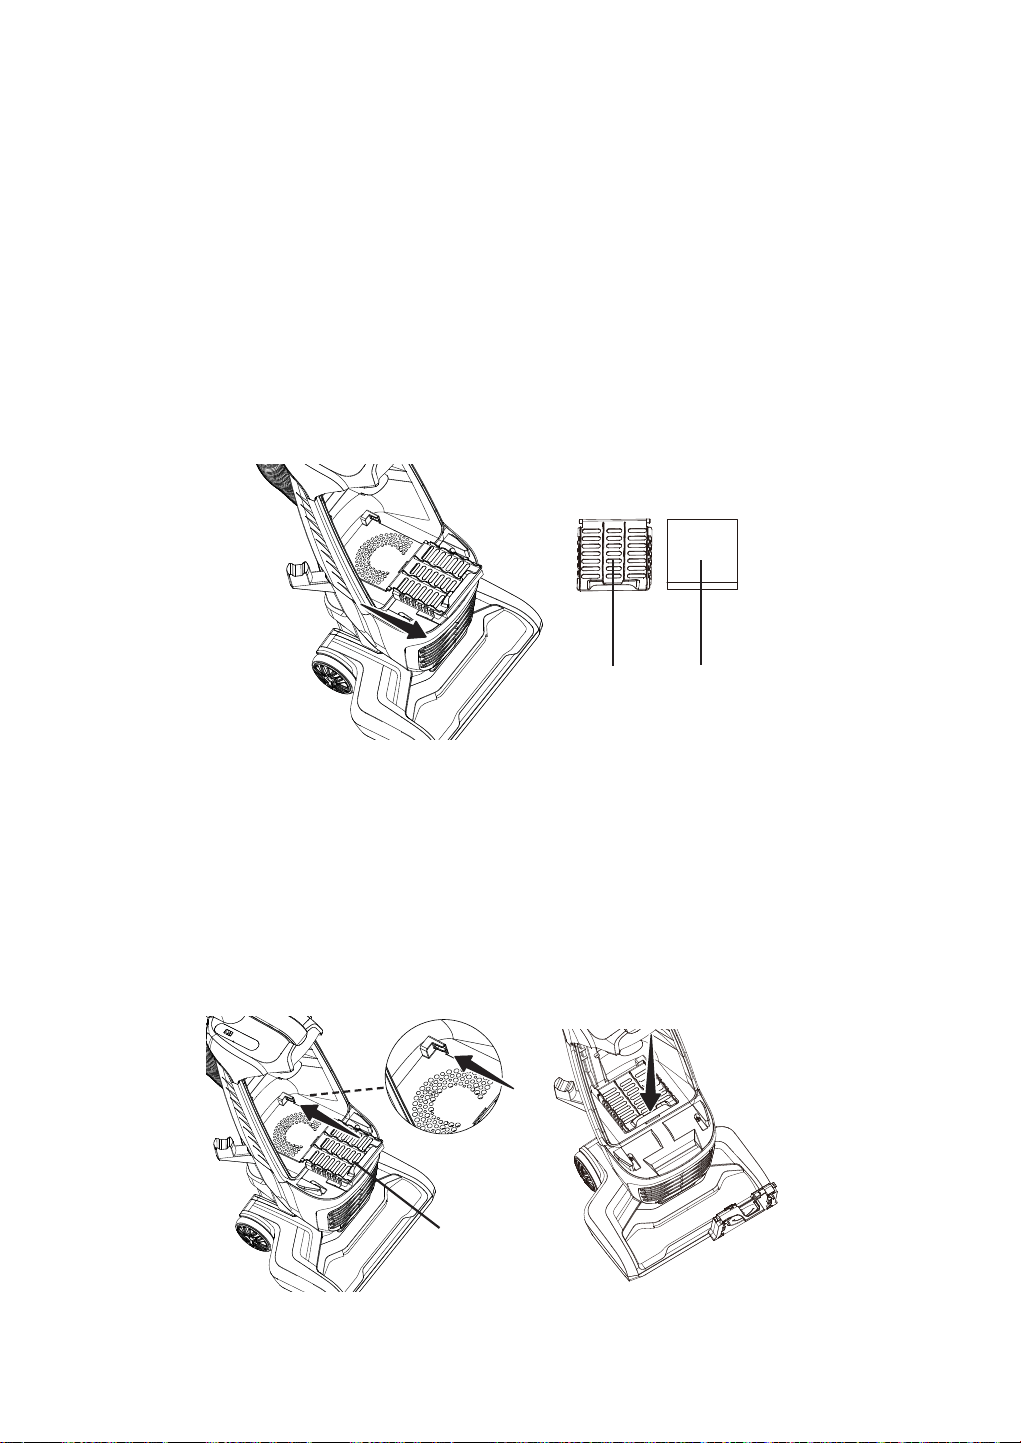
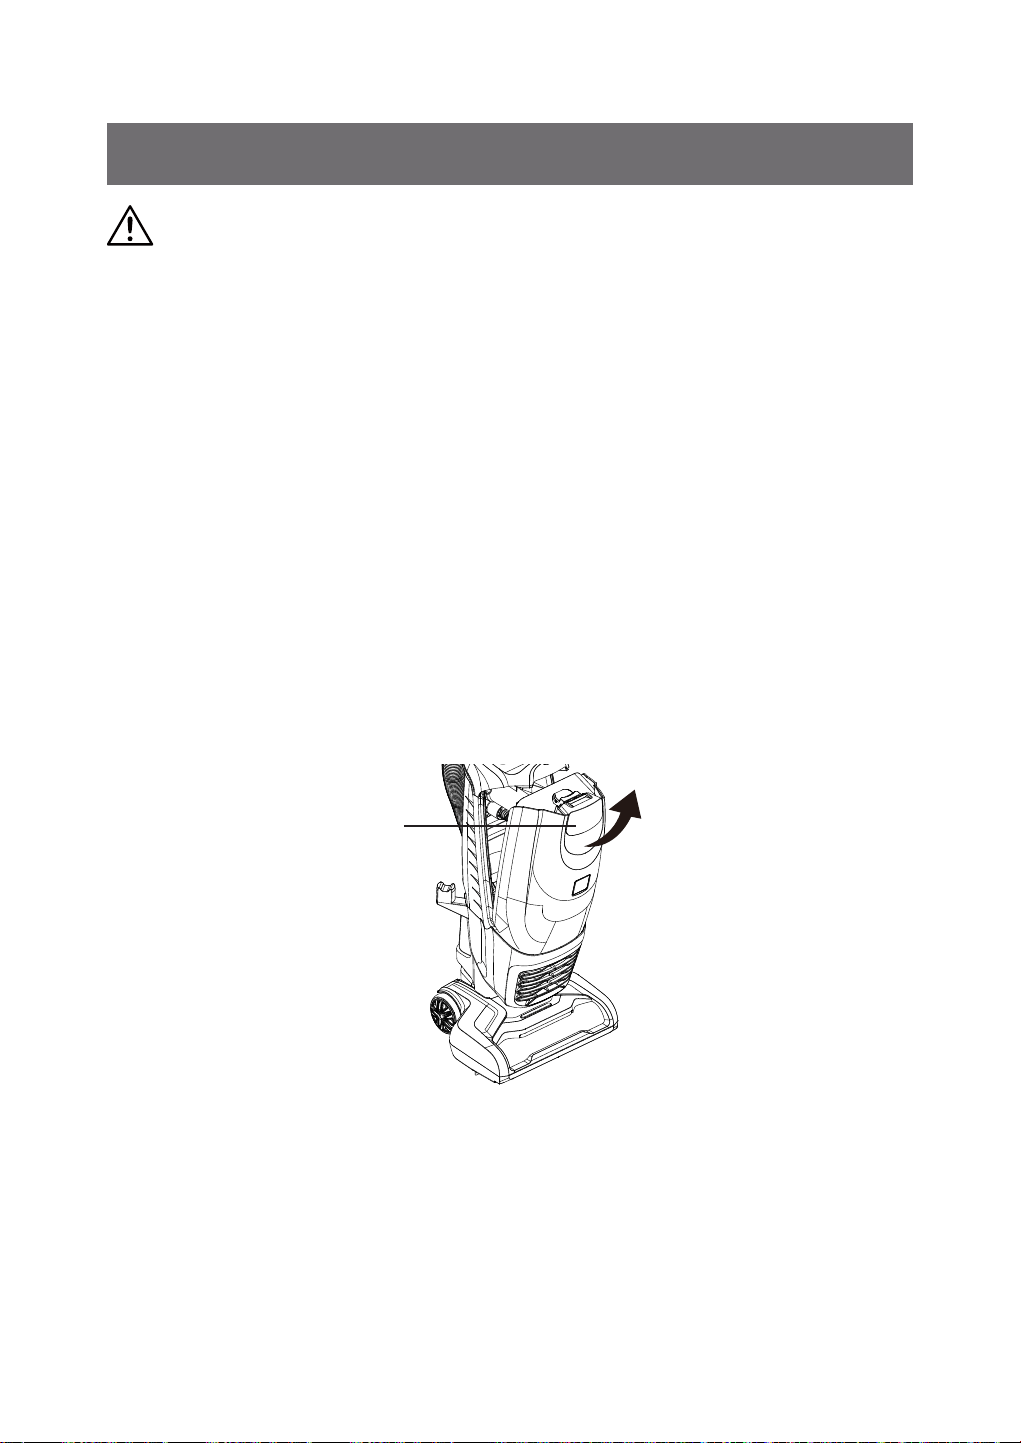
1.
Pull bag chamber cover release handle out and up, hold the cover using the handle.
127(Do not press the dust bag release button when releasing bag chamber
cover, or the dust bag will drop down automatically.
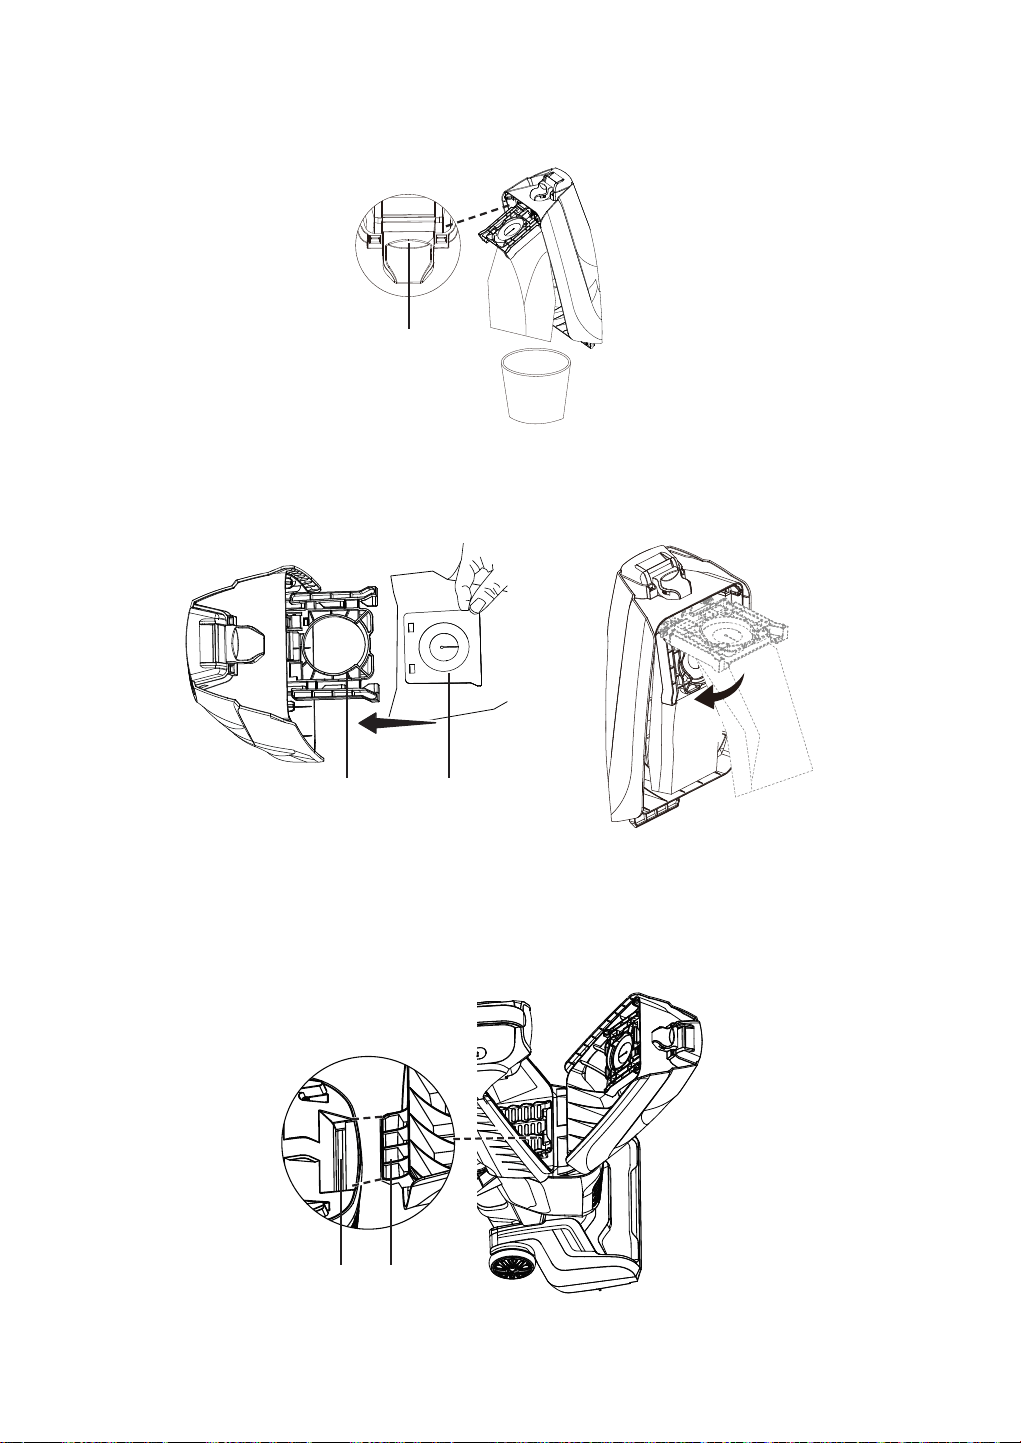
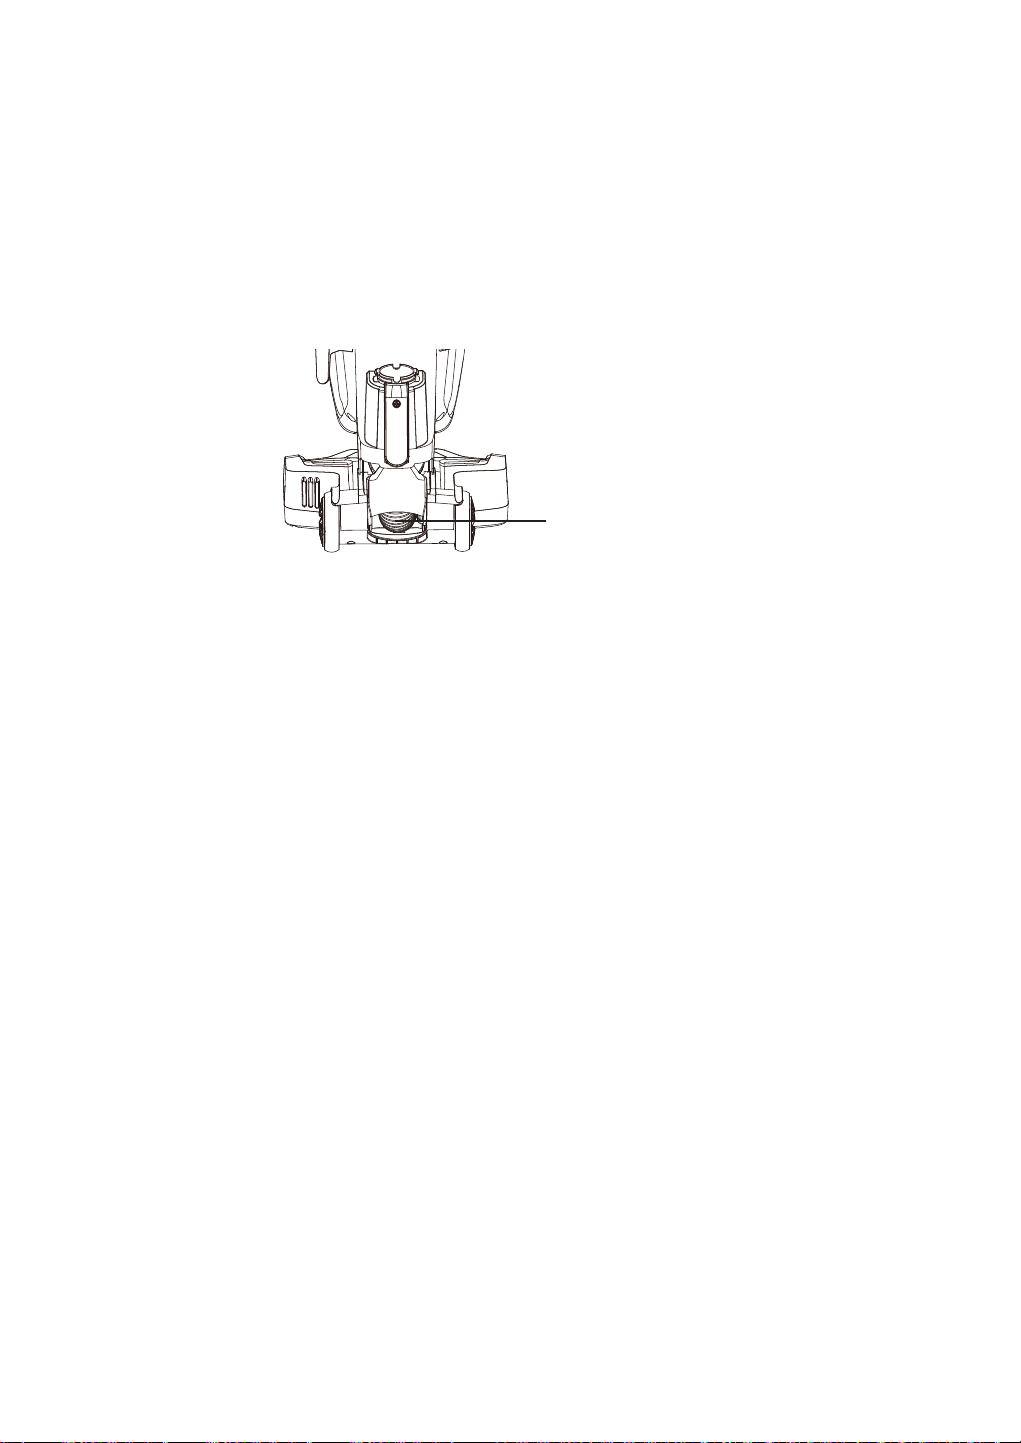
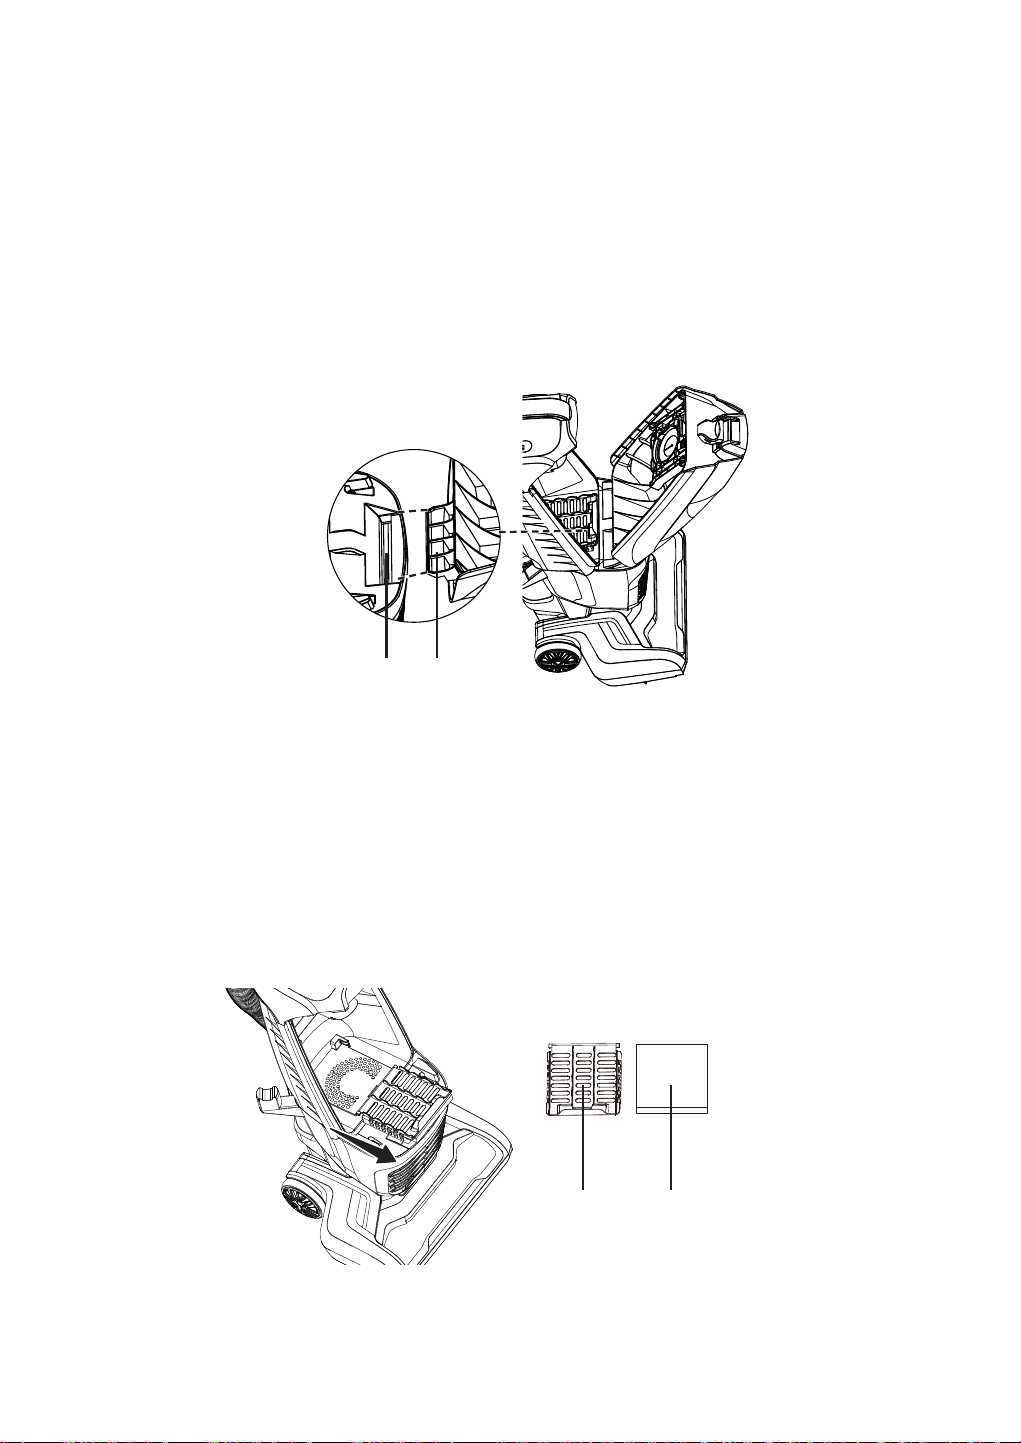
2. Tilt the bag chamber as shown. Press dust bag release button and the dust
bag drops down automatically.
MAINTAINING YOUR VACUUM
Dust Bag Chamber
Cover Release
-19-
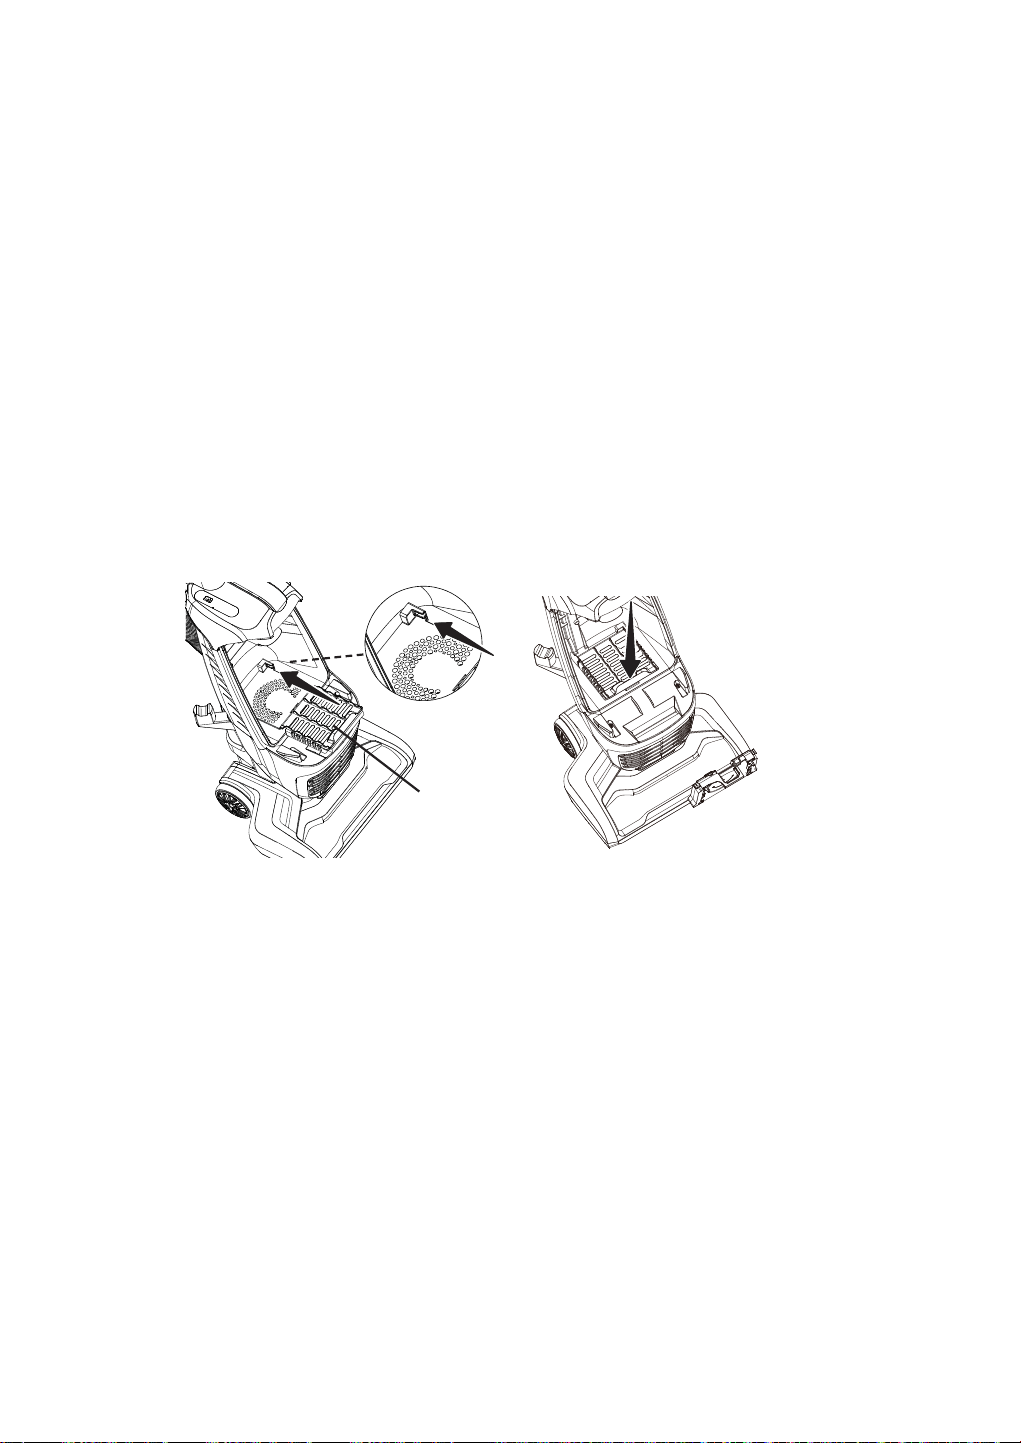
3. To install a new dust bag, insert the dust bag collar into bracket until you hear
a ‘click’, and then rotate bracket down until another ‘click’ can be heard. Tuck
WKHEDJLQWRWKHGXVWEDJFKDPEHU%HVXUHDOOVLGHVRIWKHGXVWEDJDUHÀDW
within the bag chamber.
4. Place the tab on the dust bag chamber cover in the slot on the vacuum
cleaner. Push the dust bag chamber cover into place until a ‘click’ is heard.
127(Make sure the dust bag is locked into place before pushing the dust bag
chamber cover. The dust bag chamber cover can’t be assembled successfully if
dust bag is missing or not installed into place.
Dust Bag
Release Button
Click
Click
Bracket
Dust Bag Collar
Slot
Tab
-20-
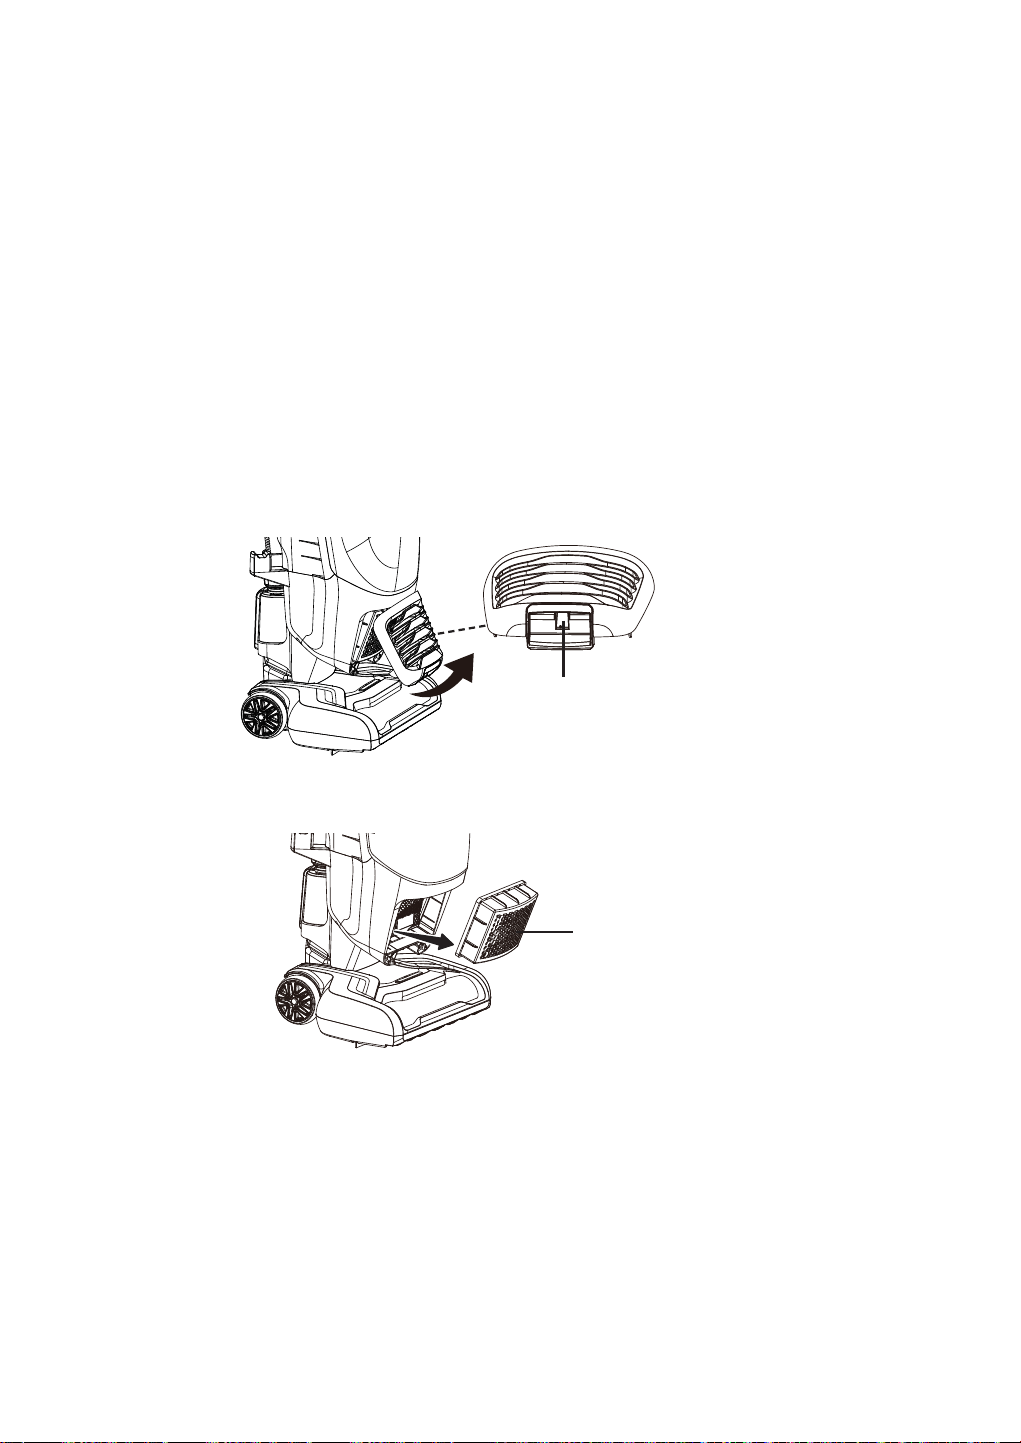
Cleaning the Foam Filter
&KHFNWKHIRDP¿OWHUIUHTXHQWO\DQGFOHDQZKHQGLUW\
:KHQWKHFOHDQLQJRIWKHIRDP¿OWHUQRORQJHUUHVWRUHVYDFXXPFOHDQHUVXFWLRQWR
IXOOSRZHURUWKH¿OWHULVZRUQRUEURNHQUHSODFHWKH¿OWHU
5HJXODUO\FOHDQDQGUHSODFHWKH¿OWHUWRNHHSWKHYDFXXPVVXFWLRQSRZHURSWLPDO
1. Remove the dust bag as outlined in the Replacing the Dust Bag (page 18).
5HPRYHWKHIRDP¿OWHUFRYHUDQGWKHIRDP¿OWHU
:DVKWKH¿OWHULQZDUPVRDS\ZDWHUULQVHDQGGU\WKRURXJKO\E\VTXHH]LQJWKH
H[FHVVZDWHURXWRIWKH¿OWHUDQGDOORZLQJWRDLUGU\IRUKRXUV
127('2127RSHUDWHZLWKRXWIRDP¿OWHULQVWDOOHG
,03257$17
7KH¿OWHUPXVWGU\FRPSOHWHO\EHIRUHUHXVH
5HLQVWDOOWKHIRDP¿OWHULQWRWKHIRDP¿OWHUFRYHUDQGVOLGHLWWRWKHVORWVXQWLOLW
is in place. Press the cover to lock it into place until a ‘click’ can be heard.
127(5HSODFHWKHIRDP¿OWHULILWLVZRUQRUEURNHQ
Foam Filter and
Foam Filter
Cover
Foam Filter
Cover
Foam Filter
-21-
5. Reinstall the dust bag as outlined in the Replacing the Dust Bag (page 19).
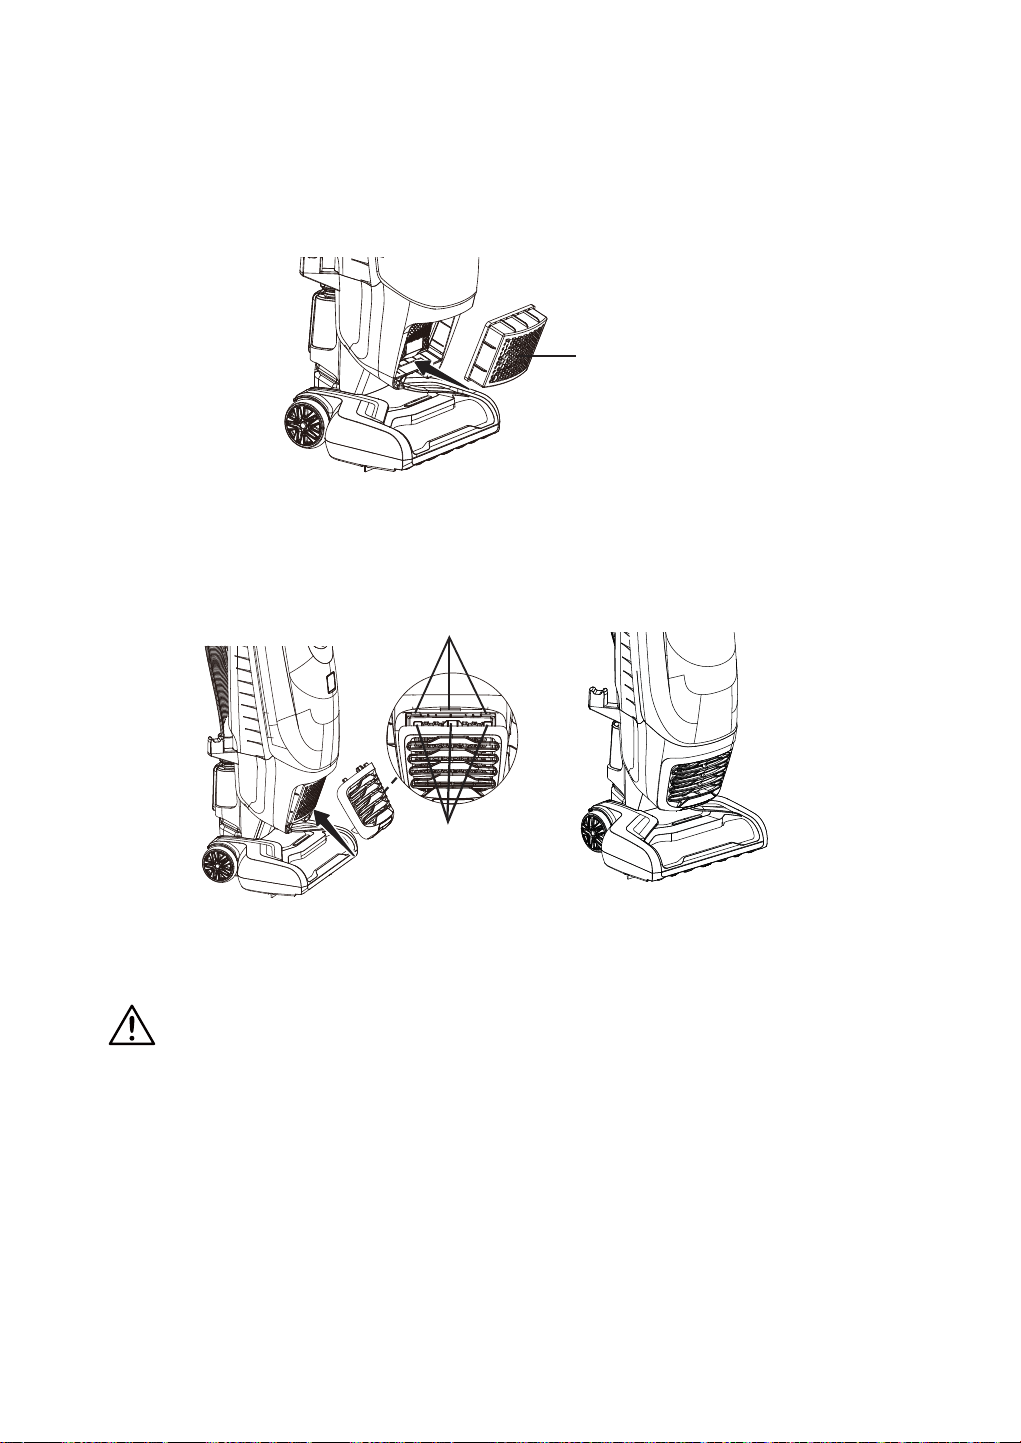
Cleaning the HEPA Media Exhaust Filter
,WLVUHFRPPHQGHGWRFOHDQWKH+(3$PHGLDH[KDXVW¿OWHUZLWKFROGZDWHUHYHU\
year.
127(:KHQWKHFOHDQLQJRIWKH¿OWHUQRORQJHUUHVWRUHVYDFXXPFOHDQHUVXFWLRQ
WRIXOOSRZHURUWKH¿OWHULVZRUQRUEURNHQUHSODFHWKHH[KDXVW¿OWHU
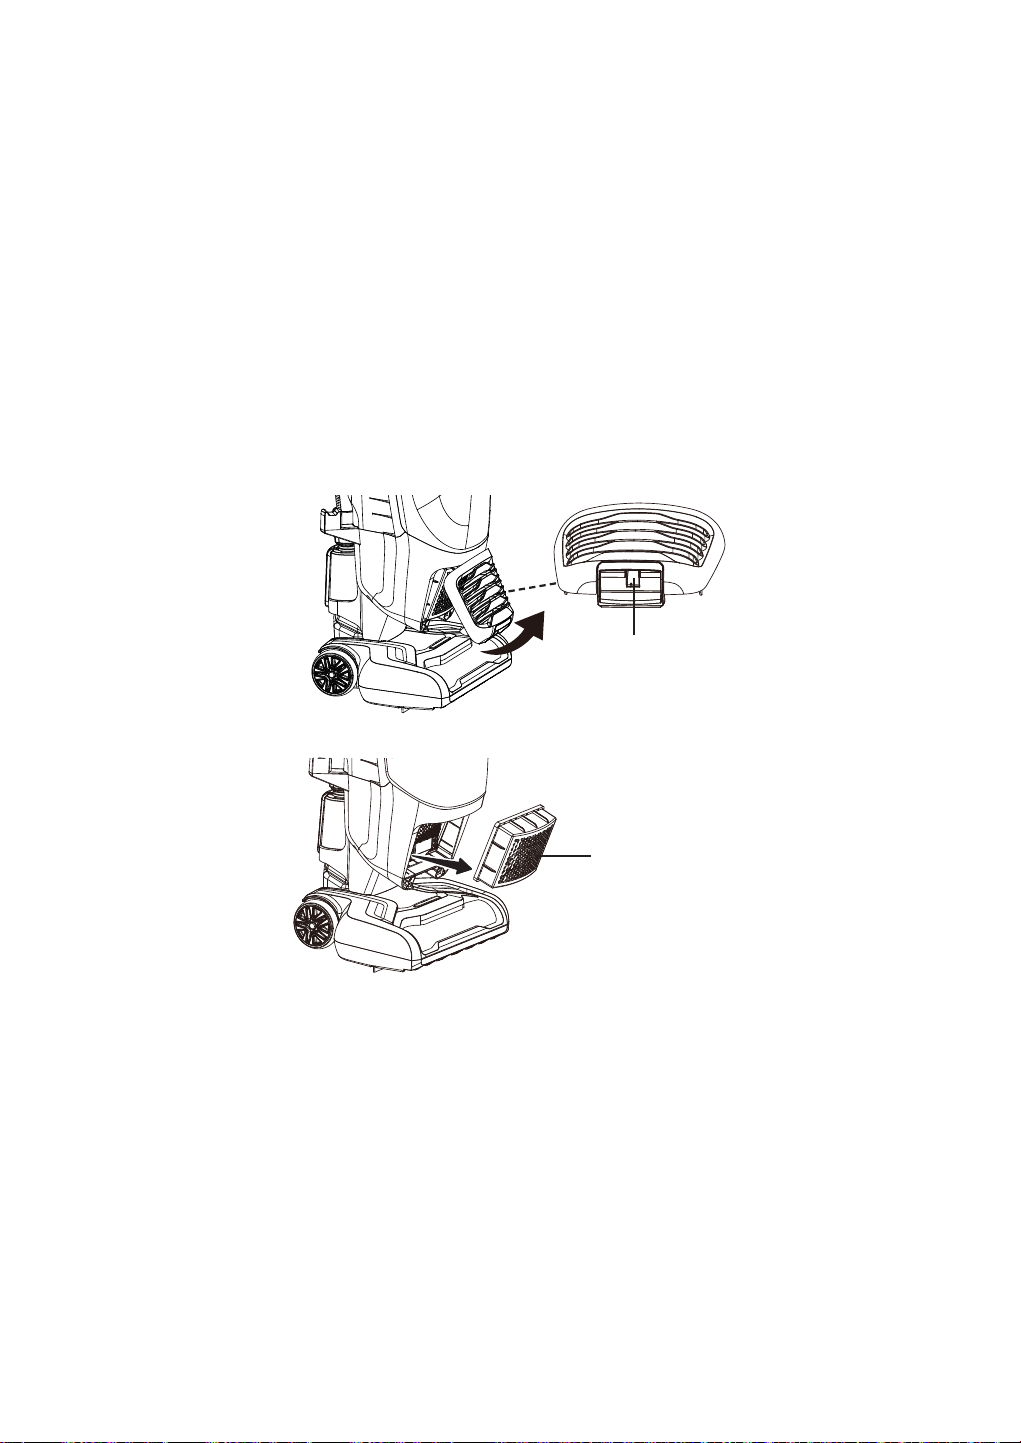
5HPRYHH[KDXVW¿OWHUFRYHUE\SXOOLQJWKHVTXDUHKROHRXWZDUGDWWKHERWWRP
of the cover.
5HPRYHWKH+(3$PHGLDH[KDXVW¿OWHUIURPYDFXXPFOHDQHU
3. Wash with cold water only, DO NOT use detergent or soap. Allow to air dry.
Allow parts to dry 24 hours before putting back into vacuum cleaner.
127('2127RSHUDWHZLWKRXW+(3$PHGLDH[KDXVW¿OWHULQVWDOOHG
,03257$17
7KH¿OWHUPXVWGU\FRPSOHWHO\EHIRUHUHXVH
Square Hole
HEPA Media
Exhaust Filter
-22-
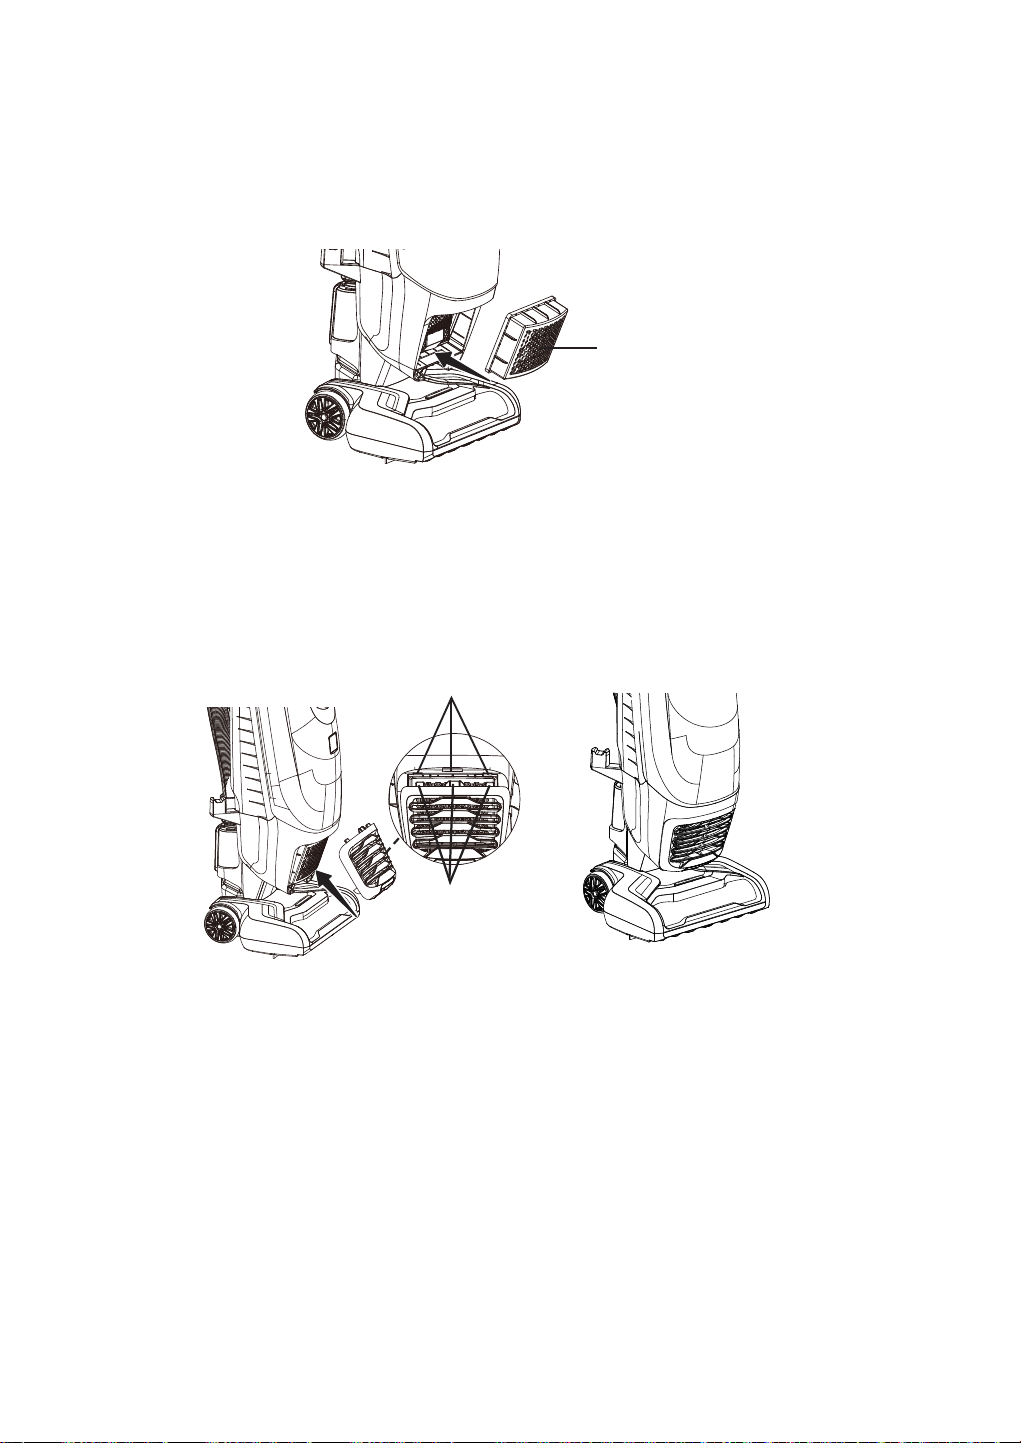
5HLQVWDOOWKH+(3$PHGLDH[KDXVW¿OWHULQWRWKHYDFXXPFOHDQHU
,QVHUWWKHH[KDXVW¿OWHUFRYHUWDEVLQWRWKHXSSHUVORWVDQGORFNWKHH[KDXVW
¿OWHUFRYHULQWRSODFHE\SUHVVLQJWKHERWWRPRIWKHFRYHUXQWLODFOLFNLVKHDUG
127(0DNHVXUHWKHH[KDXVW¿OWHUFRYHULVSURSHUO\LQVWDOOHG
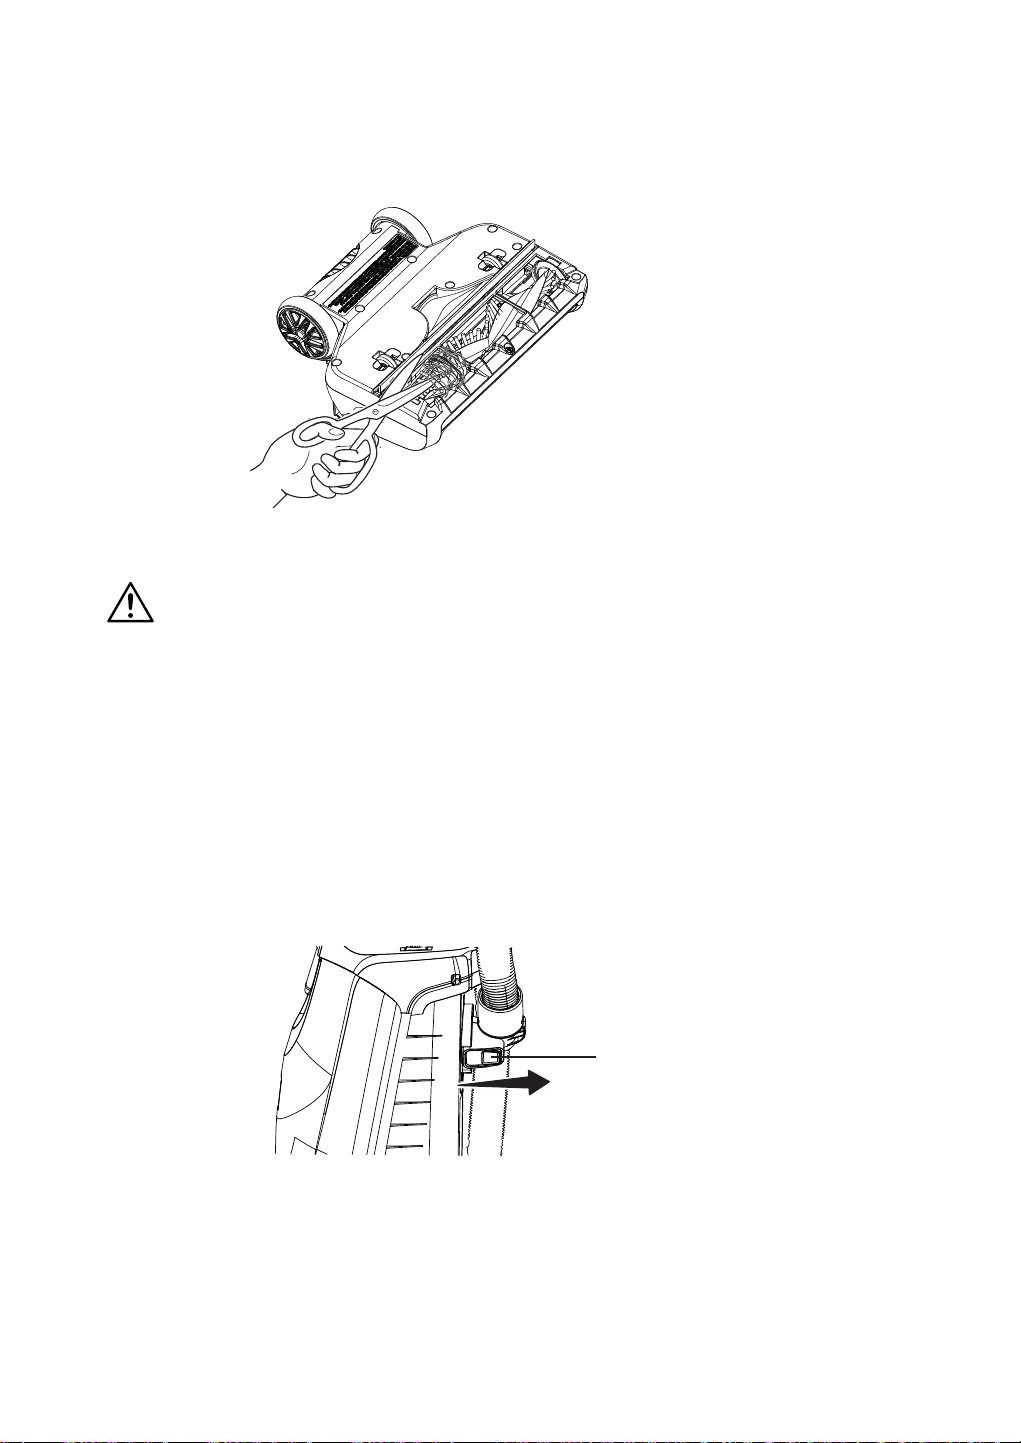
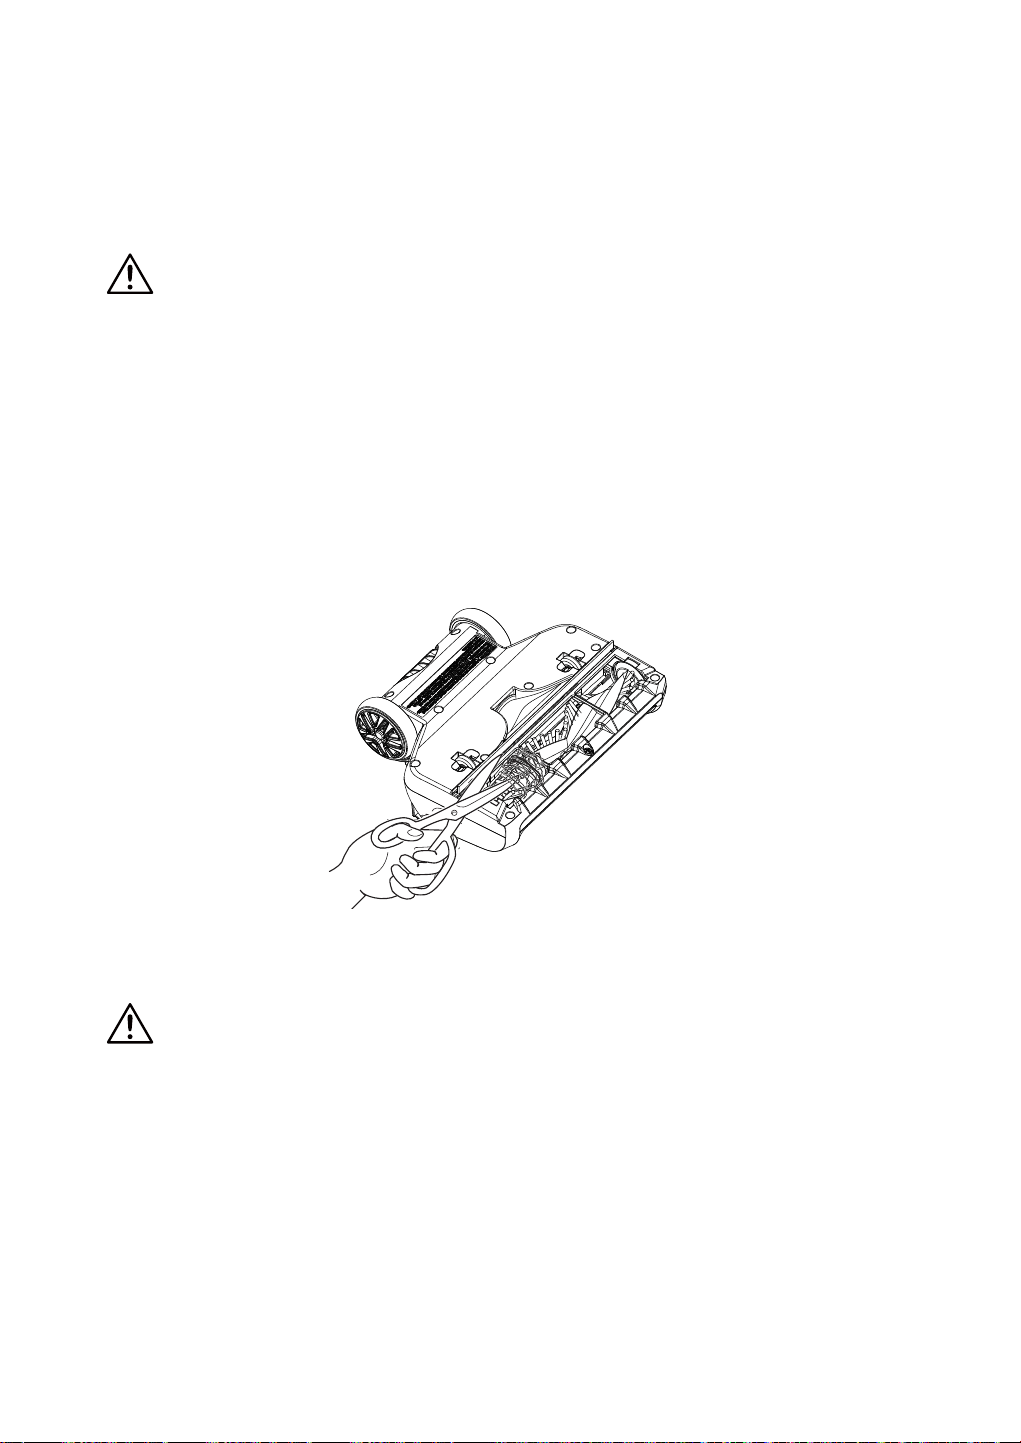
Cleaning the Brushroll
WARNING
Always unplug the power cord from an electrical outlet before performing
maintenance to the vacuum cleaner.
7RPDLQWDLQHI¿FLHQWFOHDQLQJWKHEUXVKUROOPXVWEHNHSWIUHHRIFDUSHW¿EHU
string, or hair build-up. If the brushroll is jammed, unplug and turn vacuum cleaner
RYHUDQGFKHFNEUXVKUROOIRU¿EHUDQGKDLUEXLOGXS8VHVFLVVRUVWRUHPRYHDQ\
build-up entangled around the brushroll. Cleaning the brushroll periodically is
recommended for best performance.
Slots
Tabs
HEPA Media
Exhaust Filter
-23-
Removing Clogs
WARNING
Disconnect electrical supply before removing clogs. Failure to do so could result
in electrical shock or personal injury.
&KHFNLQJWKHKRVHIRUFORJV
If there is noticeable abnormal noise when using the vacuum or the suction power
suddenly drops, it is necessary to check the hose for clogs.
Frequently check the air path to make sure it is free of obstructions.
1. Press the hose release button and remove the hose from the main body.
Release the other end of the hose from the lower hose connection.
&KHFNDQGUHPRYHDQ\FORJVLQWKHÀH[LEOHKRVH
5HLQVWDOOWKHÀH[LEOHKRVHWRWKHYDFXXPFOHDQHU6HHGENERAL ASSEMBLY
INSTRUCTIONS (page 7).
Hose Release
Button
-24-
&KHFNLQJFRQQHFWLRQKRVHIRUFORJV
1. Release the hose end from the lower hose connection.
2. Check and remove any clogs in the connection hose.
5HDWWDFKWKHÀH[LEOHKRVHRQWRWKHORZHUKRVHFRQQHFWLRQ
Connection Hose

-25-
TROUBLESHOOTING
Should you have any problem(s) with your vacuum cleaner, review the table
below for solutions to minor performance issues.
PROBLEM POSSIBLE CAUSE SOLUTION
Vacuum cleaner
will not run.
The plug is not plugged into the
wall outlet.
Be sure power cord plug is fully
plugged into outlet.
The On/Off switch is not pressed
to start the vacuum cleaner.
Press the On/Off switch to “I” or “II”
position.
Defective wall outlet.
Check with a good appliance or lamp.
Have outlet properly serviced.
The vacuum body is overheated.
Unplug the power cord and let the
vacuum cool down for 50 minutes.
The motor is damaged. Call 1-866-384-8432 for assistance.
Poor job of dirt
pick-up.
The hose and accessories are
not installed correctly.
Check the hose and accessories for
correct installation and ensure they are
VQDSSHG¿UPO\LQSODFH
The hose is not installed in the
correct place when using the
upright mode.
Check and ensure the hose is installed
correctly into the main body (page 7).
Dust bag is not installed
correctly.
Check dust bag for correct installation
DQGHQVXUHLWLVVQDSSHG¿UPO\LQ
place.
Full or clogged dust bag. Change the dust bag.
There is a clog in the air path.
Check and remove all clogs. Follow
instructions on page 23.
Suction control is in open
position.
Adjust the suction control to increase
suction. Follow instructions on page
17.
WARNING
Disconnect electrical supply before performing maintenance to the vacuum
cleaner. Failure to do so could result in electrical shock or personal injury.

-26-
PROBLEM POSSIBLE CAUSE SOLUTION
Poor job of dirt
pick-up.
7KHIRDP¿OWHURU+(3$PHGLD
H[KDXVW¿OWHUQHHGVWREH
cleaned or replaced.
&OHDQRUUHSODFHWKHIRDP¿OWHURU
+(3$PHGLDH[KDXVW¿OWHU)ROORZWKH
IRDP¿OWHUFOHDQLQJRU+(3$PHGLD
H[KDXVW¿OWHUFOHDQLQJLQVWUXFWLRQVRQ
page 20 or 21.
The hose is worn.
Replace the hose. Purchase online at
www.vacmaster.com or call 1-866-384-
8432.
The connection hose is worn. Call 1-866-384-8432 for assistance.
The brushroll is worn. Call 1-866-384-8432 for assistance.
The belt is worn or broken. Call 1-866-384-8432 for assistance.
Dust escapes
from vacuum.
Dust bag or dust bag chamber
cover is not installed correctly.
Check the dust bag or dust bag
chamber cover for correct installation
DQGHQVXUHWKH\DUHVQDSSHG¿UPO\LQ
place. Follow instructions on page 19.
+(3$PHGLDH[KDXVW¿OWHULV
installed incorrectly.
&KHFNH[KDXVW¿OWHUIRUFRUUHFW
installation. Follow instructions on page
21.
The dust bag is worn or broken. Check and replace the dust bag.
)RDP¿OWHURU+(3$PHGLD
H[KDXVW¿OWHULVZRUQRUEURNHQ
&KHFNDQGUHSODFHWKHIRDP¿OWHURU
WKH+(3$PHGLDH[KDXVW¿OWHU
Brushroll does
not turn.
Handle is in fully upright position.
Move handle from the fully upright
position.
Wrong mode selected.
Press the switch to the “II” position to
start the brushroll.
Brushroll is jammed.
Remove obstruction. Follow
instructions on page 22.
Brushroll is not installed
correctly.
Call 1-866-384-8432 for assistance.

-27-
PROBLEM POSSIBLE CAUSE SOLUTION
Brushroll does
not turn.
The brushroll motor is
overheated.
Turn off and unplug vacuum cleaner.
Check and clear the air path to make
sure it is free of obstructions. Check
and change the dust bag if full. Then
plug in vacuum and turn it on.
The belt is not routed correctly. Call 1-866-384-8432 for assistance.
Fault in PCB section of the
motorized nozzle.
Call 1-866-384-8432 for assistance.
Sound changes.
([KDXVW¿OWHUFRYHULVLQVWDOOHG
incorrectly.
3RVLWLRQH[KDXVW¿OWHUFRYHUFRUUHFWO\
DQGVQDS¿UPO\LQWRSODFH)ROORZ
instructions on page 22.
Air path is blocked.
Check for and remove any clogs and
clean the air path. Follow instructions
on page 23.
Accessories in use restrict air
ÀRZ
Check accessories for fuzz, lint, pet
hair or other debris.
Vacuum turns
off on its own.
The power cord plug is loose
from the outlet when using the
vacuum.
Reinsert the power cord plug fully into
the outlet. Avoid pulling or dragging the
power cord when using the vacuum.
Thermal protector is activated.
Turn the vacuum cleaner off and
unplug it. Check the air path and dust
bag. Allow the vacuum cleaner to cool
for a minimum of 50 minutes. Plug in
vacuum and turn it on.
The motor is damaged. Call 1-866-384-8432 for assistance.

-28-
PROBLEM POSSIBLE CAUSE SOLUTION
CHECK BAG
Indicator activates.
Full or clogged dust bag. Change bag.
'LUW\¿OWHUV &OHDQFKDQJH¿OWHUV
%ORFNHGDLUÀRZSDVVDJH
Turn off and unplug vacuum cleaner.
&OHDUEORFNDJHIURPDLUÀRZSDVVDJH
Plug in vacuum and turn it on.
Certain attachment tools.
This is normal. The indicator will turn to
green when tool is removed.
Brushroll status
indicator light emits
red.
There is a jam in the brushroll
area.
Turn off and unplug the vacuum.
Remove any blockages in the brushroll.
See page 22.
The brushroll is worn or
broken.
Call 1-866-384-8432 for assistance.
Faulty brushroll motor or
PCB section of the motorized
nozzle.
Call 1-866-384-8432 for assistance.
The brushroll motor is
overheated.
Turn off and unplug the vacuum. Check
and clear the air path to make sure
it is free of obstructions. Check and
change the dust bag if full. Then plug in
vacuum and turn it on.
Dust bag chamber
cover can’t be
installed.
Dust bag is missing. Install the dust bag.
Dust bag collar is not installed
into bracket correctly or the
bracket is not rotated down
into place.
Insert the dust bag collar into bracket
until you hear a ‘click’. Rotate bracket
down until another ‘click’ can be heard.
Follow instructions on page 19.
The bracket is broken. Call 1-866-384-8432 for assistance.

-1-
SECTION
Consignes importantes de sécurité.........................................................................................................
Garantie..................................................................................................................................................
Fiche technique........................................................................................................................................
Familiarisez-vous avec votre aspirateur..................................................................................................
Instructions relatives au montage général...............................................................................................
Instructions d'utilisation..........................................................................................................................
Entretien de votre aspirateur..................................................................................................................
Dépannage............................................................................................................................................
2
4
4
5
7
10
20
28
SOMMAIRE
PAGE
Nous vous remercions pour l'acquisition de cet aspirateur Vacmaster
®
. Vous avez
un produit de haute qualité, conçu pour des performances optimales.
POUR GARANTIR VOTRE SÉCURITÉ
Lisez et comprenez ce manuel avant toute utilisation de l’appareil.
Veuillez conserver en lieu sûr le présent manuel ainsi que votre ticket de caisse
UHoXD¿QGHSRXYRLUYRXV\UpIpUHUXOWpULHXUHPHQW

-2-
Lors de l'utilisation d'un appareil électrique, des précautions de base doivent
toujours être prises, notamment les suivantes :
VEILLEZ À LIRE TOUTES LES CONSIGNES AVANT TOUTE UTILISATION DU
PRÉSENT ASPIRATEUR.
Le non-respect des avertissements et consignes ci-dessous peut entraîner des
risques d'explosion, d'incendie et/ou de blessures graves.
AVERTISSEMENT -
$¿QGHUpGXLUHWRXVULVTXHVG¶LQFHQGLH
G¶pOHFWURFXWLRQRXGHEOHVVXUHV
• Ne pas laisser l’aspirateur branché. Pensez à le débrancher de la prise lorsque
vous ne l'utilisez pas ou avant de le réparer ou de l’entretenir.
• Ne pas utiliser l’appareil à l’extérieur ni sur des surfaces humides.
1HSDVSHUPHWWUHTXHO¶DSSDUHLOVRLWXWLOLVpFRPPHXQMRXHW6R\H]WUqVDWWHQWLIVLO
est utilisé par des enfants ou si des enfants se trouvent à proximité.
• Utilisez cet appareil exclusivement conformément aux descriptions fournies
dans le présent manuel d’utilisation. Utilisez exclusivement les accessoires
recommandés par le fabricant.
1HSDVXWLOLVHUODSSDUHLOVLOHFRUGRQRXOD¿FKHHVWHQGRPPDJpH(QFDVGH
G\VIRQFWLRQQHPHQWGHFKXWHGHGpWpULRUDWLRQG¶DEDQGRQjO¶H[WpULHXURXGH
FKXWHGDQVGHO¶HDXGHO¶DVSLUDWHXUDSSHOH]OHVHUYLFHFOLHQWqOH
• Ne pas tirer ni porter l'appareil en utilisant le cordon. Ne pas utiliser celui-ci
comme poignée ou pour fermer une porte et ne pas l'enrouler autour de bords
coupants ou d'arêtes vives. Ne pas faire passer l’aspirateur sur le cordon.
Maintenez le cordon à l’écart de toutes surfaces chaudes.
• Ne pas débrancher l’appareil en tirant sur le cordon. Pour débrancher le
SURGXLWVDLVLVVH]OD¿FKHSDVOHFRUGRQ
1HSDVPDQLSXOHUOD¿FKHG¶DOLPHQWDWLRQRXO¶DVSLUDWHXUDYHFGHVPDLQV
mouillées.
1¶LQWURGXLUHDXFXQREMHWGDQVOHVRUL¿FHVGHO¶DSSDUHLO1HSDVXWLOLVHU
O¶DSSDUHLOVLXQRUL¿FHHVWERXFKp)DLWHVHQVRUWHTXHOHVRUL¿FHVQHVRLHQW
SDVHQFRPEUpVGHSRXVVLqUHVSHOXFKHVFKHYHX[RXGHWRXWHDXWUHREMHW
susceptible de gêner la circulation de l'air.
• Maintenez vos cheveux, vêtements amples, doigts et toutes parties du corps à
O¶pFDUWGHVRUL¿FHVHWGHVSLqFHVPRELOHV
• Coupez toutes les commandes de l’appareil avant de le débrancher.
CONSIGNES IMPORTANTES DE
SÉCURITÉ

-3-
)DLWHVWUqVDWWHQWLRQORUVTXHYRXVQHWWR\H]GHVHVFDOLHUV
• Ne pas poser le produit sur des chaises, des tables, etc. Maintenez-le sur le
plancher.
1HSDVXWLOLVHUO¶DSSDUHLOSRXUDVSLUHUGHVOLTXLGHVLQÀDPPDEOHVRX
combustibles, notamment de l’essence, et ne pas l’utiliser dans des endroits où
ces substances peuvent être présentes.
1HSDVDVSLUHUGHPDWLqUHVHQFRPEXVWLRQRXTXLGpJDJHQWGHODIXPpHWHOOHV
que des cigarettes, des allumettes ou des cendres chaudes.
1HSDVXWLOLVHUODVSLUDWHXUVDQVXQVDFjSRXVVLqUHHWRX¿OWUHVHQSODFH
VEUILLEZ CONSERVER LES PRÉSENTES CONSIGNES
Conçu pour une utilisation domestique exclusivement

-4-
PENDANT UN AN à compter de la date de vente, ce produit est garanti contre
tout défaut de matériau ou de fabrication lorsqu'il est assemblé, utilisé et
entretenu conformément aux instructions fournies.
MUNI D’UNE PREUVE DE VENTE, tout produit défectueux peut être retourné au
UHYHQGHXUDX[¿QVGHUHPSODFHPHQWJUDWXLW
Pour connaître les détails de la couverture de la garantie et obtenir un
remplacement gratuit, visitez la page Web : www.vacmaster.com ou appelez le
1-866-384-8432.
6RQWH[FOXVGHODJDUDQWLHOHV¿OWUHVRXOHVFRXUURLHVTXLVRQWGHVSLqFHVj
usage unique susceptibles de s’user durant la période de garantie des suites
d’un usage normal.
• La présente garantie sera nulle et non avenue en cas d’utilisation éventuelle de
FHSURGXLWjWRXWHVDXWUHV¿QVTXHSHUVRQQHOOHVHWSULYpHV
/DSUpVHQWHJDUDQWLHYRXVDFFRUGHGHVGURLWVVSpFL¿TXHVOpJDX[PDLVYRXV
pouvez également avoir d'autres droits qui varient selon les États.
TECHNICAL DATA
Aspirateur Vertical Muni De Sac
0RGqOH8%(
Tension nominale : 120V AC
Fréquence nominale : 60 hertz
Courant nominal : 8,0A
GARANTIE
FICHE TECHNIQUE

-5-
FAMILIARISEZ-VOUS AVEC VOTRE ASPIRATEUR
Outil À Usages
Multiples 3 en 1
6DF¬3RXVVLqUH
(Pré-installé dans
l’aspirateur)
Manche
%RXWRQ'H
Dégagement
Du Tube
Poignée de
transport
Commutateur On/Off
(Marche/Arrêt)
9R\DQWGHYpUL¿FDWLRQ
de l’état du sac
Dispositif
D’Ouverture Du
Couvercle De
L’Enceinte À Sac
¬3RXVVLqUHV
Couvercle De
L’Enceinte
À Sac À
3RXVVLqUHV6DF
¬3RXVVLqUHV¬
L'intérieur)
Couvercle Du
Logement Du
Filtre D'évacuation
(Filtre
D'évacuation À
Cartouche HEPA à
l'Intérieur)
Phare
Électro-
brosse
9R\DQW
Lumineux
de l’État de
OD%URVVH
À Rouleau
Emplacement de
rangement des
accessoires
Crochet
D’Enroulement
Supérieur Du
Cordon
Raccordement
6XSpULHXU'X7X\D
Rangement
GHWX\DX
Raccordement
,QIpULHXU'X7X\DX
Cordon
d’alimentation
%RXWRQ'H
Dégagement Du
7X\DX
Régulation
d'aspiration
7X\DX
Flexible
Crochet
D’Enroulement
Inférieur Du
Cordon

-6-
PIÈCES DE RECHANGE
Achetez en ligne à www.vacmaster.com ou appelez le 1-866-384-8432.
Élément N
o
GH3LqFH
Filtre en mousse
561060125
Filtre d’Évacuation À Cartouche
HEPA
561055118
Outil À Usages Multiples 3 en 1
571034106
6DF¬3RXVVLqUHV/RWGH
521355
7X\DX)OH[LEOH
571034107
Manche
571034101
Kit de Filtres (Filtre d’Évacuation
HEPA + Filtre En Mousse)
561060184
-7-
,QVpUH]OH[WUpPLWpjDQJOHGURLWGXWX\DXÀH[LEOHGDQVOHFRUSVSULQFLSDODLQVL
qu’illustré, jusqu'à ce que vous entendiez un « déclic ». Faites passer ensuite
OHWX\DXÀH[LEOHSDUGHVVXVO¶HPSODFHPHQWGHUDQJHPHQWGXWX\DX,QVpUH]
ODXWUHH[WUpPLWpGXWX\DXGDQVOHUDFFRUGHPHQWLQIpULHXUGXWX\DXDLQVL
qu’illustré, jusqu'à ce que vous entendiez un « déclic ».
5(0$548(1RXVYRXVUHFRPPDQGRQVGHWRXUQHUOpJqUHPHQWOH[WUpPLWpGX
WX\DXORUVGHVRQLQVHUWLRQ$VVXUH]YRXVTXHOHVGHX[H[WUpPLWpVGXWX\DXVRQW
convenablement enclenchées en place.
1. Insérez le manche dans le corps principal jusqu'à ce que vous entendiez un «
déclic ».
Raccordement
,QIpULHXU'X7X\DX
1
2
3
INSTRUCTIONS RELATIVES AU
MONTAGE GÉNÉRAL
-8-
3. Insérez l'outil combiné sur le rangement des accessoires comme indiqué.
4. Assurez-vous que les crochets d’enroulement supérieur et inférieur du
cordon sont correctement positionnés, ainsi qu'illustré. Enroulez le cordon
d'alimentation sans le serrer autour des crochets d’enroulement supérieur et
inférieur du cordon.
5(0$548(Veillez à enrouler le cordon d'alimentation autour du crochet
d’enroulement supérieur en premier, puis autour du crochet d’enroulement
LQIpULHXUD¿QG¶pYLWHUGHQGRPPDJHUOHFRUGRQGDOLPHQWDWLRQ
Crochet
D’Enroulement
Supérieur Du Cordon
Crochet
D’Enroulement
Inférieur Du Cordon
-9-
9HUURXLOOH]OD¿FKHGXFRUGRQGDOLPHQWDWLRQVXUOHFRUGRQGDOLPHQWDWLRQ
AVERTISSEMENT
L’enroulement trop serré du cordon soumis à un stress excessif risque
d'endommager celui-ci. Un cordon endommagé présente des risques
d’électrocution et peut entraîner des blessures corporelles ou des dommages.
Fiche Du Cordon D'alimentation
Cordon d’alimentation

-10-
8WLOLVDWLRQGHYRWUHDVSLUDWHXUYHUWLFDO
5(0$548($VVXUH]YRXVTXHODVSLUDWHXUHVWHQWLqUHPHQWPRQWp1HSDVIDLUH
IRQFWLRQQHUODVSLUDWHXUVDQVVDFjSRXVVLqUHHQSODFH
5(0$548($VVXUH]YRXVTXHOHWX\DXÀH[LEOHHVWFRUUHFWHPHQWLQVWDOOpGDQV
le corps principal (page 7).
1. Tournez le crochet d’enroulement supérieur du cordon vers un côté ou l’autre,
puis vers le bas pour dégager le cordon d'alimentation.
'pWDFKH]OD¿FKHGXFRUGRQGDOLPHQWDWLRQGXFRUGRQGDOLPHQWDWLRQ
3. Assurez-vous que le cordon d'alimentation est verrouillé dans l'encoche de
verrouillage supérieure, ainsi qu'illustré. Cela permet de mieux gérer le cordon
d'alimentation lors de l'utilisation de l'aspirateur.
%UDQFKH]OD¿FKHGXFRUGRQGDOLPHQWDWLRQjXQHSULVHGHFRXUDQWVLWXpHSUqVGX
plancher.
,16758&7,216'¶87,/,6$7,21
Encoche Supérieure De
Verrouillage
Crochet D’Enroulement Supérieur Du Cordon
-11-
AVERTISSEMENT
$¿QGHUpGXLUHWRXWULVTXHG¶pOHFWURFXWLRQFHWDSSDUHLOFRPSRUWHXQHSULVH
SRODULVpHXQHODPHHVWSOXVODUJHTXHODXWUH,OQ¶\DTX¶XQHIDoRQG¶LQVpUHUOD
¿FKHGDQVXQHSULVHSRODULVpH6LOD¿FKHQHV¶LQVqUHSDVHQWLqUHPHQWGDQVOD
SULVHLQYHUVH]OD¿FKH6LHOOHQHVLQVqUHWRXMRXUVSDVFRUUHFWHPHQWFRQWDFWH]
XQpOHFWULFLHQTXDOL¿pD¿QTX¶LOLQVWDOOHXQHSULVHDGDSWpH1HPRGL¿H]HQDXFXQ
FDVOD¿FKH
'pJDJH]OHPDQFKHHQSODoDQWXQSLHGVXUODEXVHHWHQOHWLUDQWYHUVODUULqUH
D¿QGHFKDQJHUODSRVLWLRQGXPDQFKH
6. Mettez l'aspirateur en marche en positionnant le commutateur On/Off (Marche/
$UUrWVXU©,ªSRXUOHQHWWR\DJHGHVVROVQXVHWGHVSHWLWVWDSLV
5(0$548(La brosse à rouleau ne tourne pas lorsque vous positionnez le
commutateur On/Off (Marche/Arrêt) sur « I ».
$SSX\H]VXUOHFRPPXWDWHXUSRXUOHSRVLWLRQQHUVXU©,,ªSRXUOHQHWWR\DJH
des tapis et des moquettes.
Commutateur On/Off
(Marche/Arrêt)
-12-
5(0$548(La brosse à rouleau tourne lorsque le commutateur On/Off
(Marche/Arrêt) de l'aspirateur est positionné sur « II ».
8. Une fois que vous avez terminé de passer l'aspirateur, positionnez le
commutateur On/Off (Marche/Arrêt) sur « O », puis débranchez le cordon
d'alimentation de la prise de courant.
5(0$548( Sélectionnez le mode approprié lorsque vous utilisez cet
DVSLUDWHXU1HSDVDSSX\HUVXUOHFRPPXWDWHXUSRXUOHSRVLWLRQQHUVXU©,,ª
ORUVTXHYRXVQHWWR\H]OHSODQFKHUQX'DQVOHFDVFRQWUDLUHYRXVULVTXH]
d'endommager le plancher.
3RXUUpWDEOLUOHFRUGRQGDOLPHQWDWLRQDSUqVXWLOLVDWLRQSRVLWLRQQH]jODYHUWLFDOH
le crochet d’enroulement supérieur du cordon. Enroulez ensuite le cordon sans
le serrer autour des crochets d’enroulement du cordon.
ATTENTION
Ne pas laisser l'aspirateur rester au même endroit pour quelque durée que
ce soit lorsque la brosse à rouleau est en rotation. La moquette risque d’être
endommagée.
ATTENTION
3LqFHVPRELOHV$¿QGHUpGXLUHWRXWULVTXHGHEOHVVXUHV1(3$6WRXFKHUOD
brosse à rouleau lorsque l'aspirateur est en marche. Tout contact avec la brosse à
rouleau en rotation peut provoquer des blessures. Coupez l'alimentation électrique
DYDQWGHSURFpGHUjOHQWUHWLHQjODUpSDUDWLRQRXDXQHWWR\DJHGHODVSLUDWHXU
Faites preuve de prudence lorsque vous utilisez l’aspirateur en présence d'enfants.
-13-
92<$17'(9e5,),&$7,21'(/¶e7$7'86$&
/RUVTXHODVSLUDWHXUIRQFWLRQQHDYHFOHÀX[GDLU1RUPDOOHYR\DQW&+(&.%$*
9pUL¿FDWLRQGHOpWDWGXVDFHVWYHUW/HYR\DQWYLUHDXURXJHVRPEUHHQFDV
GREVWUXFWLRQGXÀX[GDLU
6LFHSKpQRPqQHVHSURGXLWYpUL¿H]OpWDWGXVDFjSRXVVLqUHMHWDEOHOH¿OWUHHWOH
FRQGXLWGDLUSRXUYRLUVLOQ\DSDVGREVWUXFWLRQFRPPHLQGLTXpGDQVODVHFWLRQ
Éliminations Des Obstructions (page 26).
5(0$548(/HYR\DQWVDOOXPHORUVTXHYRXVXWLOLVH]FHUWDLQVDFFHVVRLUHV
SHUPHWWDQWGHUpGXLUHOHÀX[GDLUjWUDYHUVFHX[FL
92<$17/80,1(8;'(/¶e7$7'(/$%5266(¬528/($8
9R\DQW/XPLQHX[
de l’État de la
%URVVH¬5RXOHDX
9R\DQW/XPLQHX[GH
O¶eWDWGHOD%URVVH¬
5RXOHDX
eWDW
9HUW¿[H La brosse à rouleau tourne et fonctionne comme il se doit.
5RXJH¿[H
Présence de bourrage dans la zone de la brosse à
rouleau. Mettez hors tension et débranchez l'aspirateur,
puis éliminez les obstructions présentes dans la buse.
Le moteur de la brosse à rouleau est surchauffé. Mettez
KRUVWHQVLRQODVSLUDWHXUSXLVGpEUDQFKH]OH9pUL¿H]HW
GpJDJHUO¶pWDWGXFRQGXLWGDLUD¿QGHYRXVDVVXUHUGH
O¶DEVHQFHGHWRXWHVREVWUXFWLRQV9pUL¿H]HWFKDQJH]OH
VDFjSRXVVLqUHVLOHVWSOHLQ%UDQFKH]ODVSLUDWHXUSXLV
mettez-le sous tension.
Absence d’allumage La brosse à rouleau est arrêtée.
-14-
8WLOLVDWLRQGHYRWUHDVSLUDWHXUDYHFVHVDFFHVVRLUH
1. Positionnez l'aspirateur verrouillé à la verticale.
$SSX\H]VXUOHERXWRQGHGpJDJHPHQWGXWX\DXSXLVH[HUFH]XQHSRXVVpH
YHUVOHKDXWSRXUGpJDJHUOH[WUpPLWpLQIpULHXUHGXWX\DXGXUDFFRUGHPHQW
LQIpULHXUGXWX\DX
%RXWRQ'H'pJDJHPHQW'X
7X\DX
2
1
,QVpUH]OH[WUpPLWpGXWX\DXGDQVOHUDFFRUGHPHQWVXSpULHXUGXWX\DXDLQVL
qu’illustré, jusqu'à ce que vous entendiez un « déclic ».
-15-
4. Faites glisser le bouton de dégagement du tube, puis soulevez le manche pour
HIIHFWXHUGHVQHWWR\DJHVDXGHVVXVGXSODQFKHU
1
2
%RXWRQ'H'pJDJHPHQW
Du Tube
5. Choisissez l'accessoire souhaité, puis insérez-le dans le manche.
Outil À Usages Multiples 3 en 1
0HWWH]VRXVWHQVLRQODVSLUDWHXUHQDSSX\DQWVXUOHFRPPXWDWHXU2Q2II
(Marche/Arrêt) pour le positionner sur « I ».
7. Une fois que vous avez terminé de passer l'aspirateur, positionnez le
commutateur On/Off (Marche/Arrêt) sur « O », puis débranchez le cordon
d'alimentation de la prise de courant.
,03257$171HSDVRXEOLHUGHUpLQVpUHUOH[WUpPLWpGXWX\DXGDQVOH
UDFFRUGHPHQWLQIpULHXUGXWX\DXDYDQWGXWLOLVHUODVSLUDWHXUHQPRGH9HUWLFDO
ATTENTION
/RUVTXHYRXVXWLOLVH]GHVDFFHVVRLUHVYHLOOH]jQHSDVWURSWLUHUVXUOHWX\DXSRXU
éviter de faire basculer l'aspirateur.
ATTENTION
1(3$6WLUHUODVSLUDWHXUSDUOHWX\DXGDQVODSLqFH&HODULVTXHG¶HQWUDvQHUGHV
dommages matériels ou blessures corporelles.

-16-
ACCESSOIRE
OUTIL À USAGES MULTIPLES 3 EN 1
/¶RXWLOjXVDJHVPXOWLSOHVHQSHXWVH¿[HUVXUOHPDQFKH)DLWHVJOLVVHUOH
collier de l'outil sur l'extrémité ouverte du manche.
Utilisez l'outil à usages multiples 3 en 1 en mode Suceur pour effectuer le
QHWWR\DJHGDQVOHVHVSDFHVUHVWUHLQWVWHOVTXHOHVPHXEOHVHQWUHOHVFRXVVLQVHW
dans les escaliers.
0HWWH]ORXWLOjXVDJHVPXOWLSOHVHQPRGH%URVVHjpSRXVVHWHUHQDSSX\DQWVXUOD
WRXFKHGHGpJDJHPHQWHWHQIDLVDQWFRXOLVVHUOHF{Wp%URVVHjpSRXVVHWHUGHOD
EURVVHMXVTXjOH[WUpPLWpGHORXWLOjXVDJHVPXOWLSOHV8WLOLVH]OHPRGH%URVVHj
pSRXVVHWHUSRXUQHWWR\HUOHVVXUIDFHVLQVWDEOHVQRWDPPHQWOHVULGHDX[
$SSX\H]VXUODWRXFKHGHGpJDJHPHQWSRXUUHWLUHUO¶RXWLOEURVVH5pJOH]ORXWLOj
XVDJHVPXOWLSOHVHQPRGH%URVVHjPHXEOHVDLQVLTXLOOXVWUp8WLOLVH]OHPRGH
%URVVHjPHXEOHVSRXUQHWWR\HUOHVVXUIDFHVHQWLVVXQRWDPPHQWOHVFDQDSpVHQ
tissu.
3RXUUHPHWWUHORXWLOjXVDJHVPXOWLSOHVHQPRGH6XFHXUDSSX\H]VXUOHERXWRQ
de dégagement, puis faites coulisser la brosse vers la partie inférieure de l'outil à
usages multiples.
5(0$548(7RXMRXUVQHWWR\HUOHVDFFHVVRLUHVDYDQWGHOHVXWLOLVHUVXUGHV
tissus.
%URVVH¬eSRXVVHWHU
%RXWRQ'H/LEpUDWLRQ
%URVVH¬
Meubles

-17-
'LVSRVLWLI'H3URWHFWLRQ7KHUPLTXH
Cet aspirateur est doté d'un protecteur thermique qui se déclenche
automatiquement pour protéger le moteur d'aspiration de l'aspirateur. En cas e
congestion empêchant l’écoulement normal d’air vers le moteur, le dispositif de
protection thermique éteint automatiquement le moteur. Cela permet au moteur
GHUHIURLGLUD¿QG¶pYLWHUG¶HQGRPPDJHUpYHQWXHOOHPHQWODVSLUDWHXU
3RXUUpLQLWLDOLVHUOHSURWHFWHXUWKHUPLTXHMettez hors tension l'aspirateur,
puis débranchez le cordon d'alimentation de la prise de courant pour permettre à
l'aspirateur de refroidir et aux protecteurs thermiques de se réinitialiser.
ATTENTION
5HPHWWH]WRXMRXUVODVSLUDWHXUjODYHUWLFDOHDYDQWGXWLOLVHUOHWX\DXHWOHV
accessoires. Le non-respect de cette consigne peut entraîner une surchauffe du
moteur de la brosse à rouleau et provoquer le déclenchement des protecteurs
thermiques.
9pUL¿H]ODSUpVHQFHG¶REVWUXFWLRQVSXLVpOLPLQH]FHOOHVFL(QVXLWHUHPSODFH]OH
VDFjSRXVVLqUHDXEHVRLQ9pUL¿H]pJDOHPHQWO¶pWDWGHV¿OWUHVSXLVQHWWR\H]WRXV
OHV¿OWUHVERXFKpV3DWLHQWH]SHQGDQWHQYLURQPLQXWHVDYDQWGHUHGpPDUUHU
l’aspirateur.
6RXSDSH'H'pULYDWLRQ
Cet aspirateur est équipé d'une soupape de dérivation qui permet de prévenir
surchauffe et endommagement du moteur. La soupape s'ouvre pour fournir de
ODLUGHUHIURLGLVVHPHQWORUVTXXQHFRQJHVWLRQHPSrFKHOHÀX[GDLUQRUPDOYHUV
le moteur d'aspiration de l'aspirateur. Vous remarquerez un changement sonore
ORUVTXHODLUSpQqWUHSDUORXYHUWXUHGHODVRXSDSH
3RXUFRUULJHUOHSUREOqPHpOLPLQH]WRXWHVREVWUXFWLRQVpYHQWXHOOHV9pUL¿H]
O¶pWDWGHV¿OWUHVSXLVUHPSODFH]OHVDXEHVRLQ(QVXLWHYpUL¿H]O¶pWDWGXVDFj
SRXVVLqUHSXLVLQVWDOOH]HQXQQHXIDXEHVRLQ
5(0$548(La Soupape De Dérivation peut s'ouvrir lors de l'utilisation
GDFFHVVRLUHVRXORUVGXQHWWR\DJHGXQHPRTXHWWHQHXYHHQUDLVRQGXQH
réduction du débit d'air ou d'une obstruction du conduit d'air, causé par les
accessoires eux-mêmes ou par des peluches provenant de la moquette neuve et
UHPSOLVVDQWUDSLGHPHQWOHVDFjSRXVVLqUH
-18-
5e,1,7,$/,6$7,21'(/$%5266(¬528/($8
La brosse à rouleau est dotée d'une protection intégrée contre l’endommagement
du moteur en cas de blocage de la brosse à rouleau. En cas de ralentissement ou
d’arrêt de la brosse à rouleau, le dispositif de protection contre les surcharges de
ODEURVVHjURXOHDXFRXSHOHPRWHXUGHODEURVVHjURXOHDXHWOHYR\DQWOXPLQHX[
de l’état de la brosse à rouleau vire au rouge. Le moteur d'aspiration de l'aspirateur
continue de tourner.
3RXUUpVRXGUHFHSUREOqPHMettez hors tension l'aspirateur, puis débranchez-
le. Ensuite, éliminez toutes les obstructions, puis rebranchez l'aspirateur et
mettez-le sous tension.
5(0$548(Une fois que le moteur de la brosse à rouleau s'arrête, il convient
d’éliminer tout bourrage de la brosse à rouleau et de redémarrer l'aspirateur. Si le
SUREOqPHSHUVLVWHYHXLOOH]FRPSRVHUOHQXPpURSRXUREWHQLUGH
l’aide.
9R\DQW/XPLQHX[GH
O¶eWDWGHOD%URVVH¬
Rouleau
-19-
5e*8/$7,21'$63,5$7,21
Pour s’aider de la force de poussée/traction de l'aspirateur sur des surfaces
comme les moquettes épaisses, la soupape de régulation d'aspiration peut être
ouverte pour permettre de réduire l’aspiration. Remarque importante : pour obtenir
GHVUpVXOWDWVGHQHWWR\DJHRSWLPDX[ODVRXSDSHGHUpJXODWLRQGDVSLUDWLRQGRLW
rWUHHQWLqUHPHQWIHUPpH
• Faites glisser vers la droite pour ouvrir la régulation d’aspiration et réduire
l’aspiration. L'ouverture de la régulation permet de réduire l'aspiration pour ce
qui concerne draperies et tapis légers.
• Faites glisser vers la gauche pour fermer la régulation d'aspiration et
augmenter l'aspiration. La fermeture de la régulation augmente l’aspiration
pour ce qui concerne tapisserie pour meubles et moquettes.
5DQJHPHQWGHODVSLUDWHXU
$VVXUH]YRXVTXHOHWX\DXHVWYHUURXLOOpHQSODFHHWTXHODFFHVVRLUHHVWUDQJp
à bord.
2. Rassemblez le cordon, puis enroulez-le sans le serrer autour des crochets
d’enroulement supérieur et inférieur du cordon. Verrouillez le dispositif de
UHWHQXHGHOD¿FKHVXUOHFRUGRQGDOLPHQWDWLRQ
3. Rangez l'aspirateur dans un endroit sec, à l'intérieur, sur le plancher, avec le
manche verrouillé à la verticale.
Réduire la puissance
d’aspiration
Augmenter la
puissance d’aspiration
-20-
ATTENTION
Pour réduire le risque d'électrocution, éteignez et débranchez le cordon
d'alimentation avant d'effectuer tout entretien ou toute maintenance sur votre
aspirateur.
5(0$548(8WLOLVH]XQFKLIIRQVHFSRXUQHWWR\HUOH[WpULHXUGHODSSDUHLO1H
ODLVVH]DXFXQOLTXLGHSpQpWUHUGDQVODSSDUHLO/DYH]OHVDFFHVVRLUHVjOHDXWLqGH
VDYRQQHXVHULQFH]OHVSXLVODLVVH]OHVVpFKHUjODLUOLEUH1HSDVQHWWR\HUDX
lave-vaisselle.
5HPSODFHPHQW'X6DF¬3RXVVLqUH
3RXUGHPHLOOHXUVUpVXOWDWVGHQHWWR\DJHOHVDFjSRXVVLqUHGRLWrWUHFKDQJp
VRXYHQW/HYR\DQW&+(&.%$*9pUL¿FDWLRQGHOpWDWGXVDFSDVVHDXURXJH
ORUVTXHOHVDFGRLWrWUHUHPSODFpRXTXHOHÀX[GDLUHVWEORTXp
5(0$548()DLWHVWRXMRXUVDWWHQWLRQjOHYR\DQW&+(&.%$*9pUL¿FDWLRQGH
l'état du sac).
1.
7LUH]ODSRLJQpHGHGpYHUURXLOODJHGXFRXYHUFOHGHO¶HQFHLQWHjVDFjSRXVVLqUHYHUV
l'extérieur et vers le haut, tenez le couvercle à l'aide de la poignée.
5(0$548(1HSDVDSSX\HUVXUOHERXWRQGHGpYHUURXLOODJHGXVDFj
SRXVVLqUHORUVTXHYRXVUHWLUH]OHFRXYHUFOHGHO¶HQFHLQWHjVDFjSRXVVLqUH'DQV
OHFDVFRQWUDLUHOHVDFjSRXVVLqUHVDEDLVVHDXWRPDWLTXHPHQW
ENTRETIEN DE VOTRE ASPIRATEUR
Dispositif D’Ouverture
Du Couvercle De
L’Enceinte À Sac À
3RXVVLqUHV

-21-
,QFOLQH]O¶HQFHLQWHGXVDFDLQVLTX¶LOOXVWUp$SSX\H]VXUOHERXWRQ
GHGpJDJHPHQWGXVDFjSRXVVLqUHHWOHVDFjSRXVVLqUHV¶DEDLVVH
automatiquement.
3RXULQVWDOOHUXQQRXYHDXVDFjSRXVVLqUHLQVpUH]OHFROOLHUGXVDFjSRXVVLqUH
dans le support jusqu'à ce que vous entendiez un « déclic », puis faites pivoter
le support vers le bas jusqu'à ce qu'un autre « déclic » se fasse entendre.
5HQWUH]OHVDFGDQVO¶HQFHLQWHjVDFjSRXVVLqUH$VVXUH]YRXVTXHWRXVOHV
F{WpVGXVDFjSRXVVLqUHVRQWjSODWGDQVO¶HQFHLQWHjVDFjSRXVVLqUH
%RXWRQ'H
Dégagement Du
6DF¬3RXVVLqUHV
'pFOLF
'pFOLF
Support
Collier du Sac à
SRXVVLqUHV
-22-
3ODFH]ODODQJXHWWHGXFRXYHUFOHGHO¶HQFHLQWHjVDFjSRXVVLqUHGDQVOD
IHQWHGHODVSLUDWHXU$SSX\H]VXUOHFRXYHUFOHGHOHQFHLQWHjVDFjSRXVVLqUH
jusqu'à ce qu'un « déclic » se fasse entendre.
5(0$548($VVXUH]YRXVTXHOHVDFjSRXVVLqUHHVWYHUURXLOOpHQSODFHDYDQW
G¶DSSX\HUVXUOHFRXYHUFOHGHOHQFHLQWHjVDFjSRXVVLqUH,PSRVVLEOHGHPRQWHU
OHFRXYHUFOHGHO¶HQFHLQWHjVDFjSRXVVLqUHDYHFVXFFqVVLOHVDFjSRXVVLqUHHVW
absent ou n'est pas installé en place.
Fente
Ergot
1HWWR\DJH'X)LOWUH(Q0RXVVH
9pUL¿H]IUpTXHPPHQWOH¿OWUHHQPRXVVHHWQHWWR\H]OHORUVTXLOHVWVDOH
/RUVTXHOHQHWWR\DJHGX¿OWUHHQPRXVVHQHSHUPHWSOXVGHUpWDEOLUODSXLVVDQFH
GDVSLUDWLRQGHODVSLUDWHXURXVLOH¿OWUHHVWXVpRXFDVVpUHPSODFH]OH¿OWUH
1HWWR\H]HWUHPSODFH]UpJXOLqUHPHQWOH¿OWUHSRXUTXHODSXLVVDQFHGDVSLUDWLRQ
de l'aspirateur reste optimale.
5HWLUH]OHVDFjSRXVVLqUHDLQVLTXLOOXVWUpGDQVODVHFWLRQ5HPSODFHPHQW'X
6DF¬3RXVVLqUHSDJH
5HWLUH]OHFRXYHUFOHGXORJHPHQWGX¿OWUHHQPRXVVHDLQVLTXHOH¿OWUHHQ
mousse.
Couvercle Du
Logement Du
Filtre En Mousse
Filtre en mousse
-23-
/DYH]OH¿OWUHjOHDXWLqGHVDYRQQHXVHULQFH]OHHWVpFKH]OHVRLJQHXVHPHQW
HQSUHVVDQWOH[FqVGHDXGX¿OWUHHWHQOHODLVVDQWVpFKHUjODLUOLEUHSHQGDQW
24 heures.
5(0$548(1(3$6XWLOLVHUVDQV¿OWUHHQPRXVVHLQVWDOOp
,03257$17
/HV¿OWUHVGRLYHQWVpFKHUFRPSOqWHPHQWDYDQWGrWUH
réutilisés.
5pLQVWDOOH]OH¿OWUHHQPRXVVHGDQVOHFRXYHUFOHGXORJHPHQWGX¿OWUHHQ
mousse, puis faites-le coulisser dans les fentes jusqu'à ce qu'il soit en place.
$SSX\H]VXUOHFRXYHUFOHSRXUOHYHUURXLOOHUHQSODFHMXVTXjFHTXXQ©GpFOLFª
se fasse entendre.
5(0$548(5HPSODFH]OH¿OWUHHQPRXVVHVLOHVWXVpRXEULVp
5pLQVWDOOH]OHVDFjSRXVVLqUHDLQVLTXLOOXVWUpGDQVODVHFWLRQ5HPSODFHPHQW
'X6DF¬3RXVVLqUHSDJH
Filtre En Mousse
et Couvercle Du
Logement Du
Filtre En Mousse
-24-
1HWWR\DJH'X)LOWUH'pYDFXDWLRQ¬&DUWRXFKH+(3$
1RXVYRXVUHFRPPDQGRQVGHQHWWR\HUOH¿OWUHGpYDFXDWLRQ+(3$jOHDXIURLGH
tous les ans.
5(0$548(/RUVTXHOHQHWWR\DJHGX¿OWUHQHUpWDEOLWSOXVODSOHLQHSXLVVDQFH
GDVSLUDWLRQGHODVSLUDWHXURXORUVTXHOH¿OWUHHVWXVpRXEULVpUHPSODFH]OH¿OWUH
d'évacuation.
5HWLUH]OHFRXYHUFOHGXORJHPHQWGX¿OWUHGpYDFXDWLRQHQWLUDQWOHWURXFDUUp
vers l'extérieur au fond du couvercle.
5HWLUH]OH¿OWUHGpYDFXDWLRQjFDUWRXFKH+(3$GHODVSLUDWHXU
3. Lavez-le à l'eau froide uniquement. NE PAS utiliser de détergents ou du savon.
/DLVVH]OHVpFKHUjODLUOLEUH/DLVVH]OHVSLqFHVVpFKHUKHXUHVDYDQWGHOHV
remettre dans l'aspirateur.
5(0$548(1(3$6XWLOLVHUOHSURGXLWVDQVOH¿OWUHG¶pYDFXDWLRQjFDUWRXFKH
HEPA installé.
,03257$17
/HV¿OWUHVGRLYHQWVpFKHUFRPSOqWHPHQWDYDQWGrWUH
réutilisés.
Trou Carré
Filtre d’Évacuation
À Cartouche HEPA
-25-
5pLQVWDOOH]OH¿OWUHGpYDFXDWLRQjFDUWRXFKH+(3$GDQVODVSLUDWHXU
,QVpUH]OHVODQJXHWWHVGXFRXYHUFOHGXORJHPHQWGX¿OWUHGpYDFXDWLRQGDQV
OHVIHQWHVVXSpULHXUHVSXLVYHUURXLOOH]OHFRXYHUFOHGXORJHPHQWGX¿OWUH
GpYDFXDWLRQHQSODFHHQDSSX\DQWVXUOHIRQGGXFRXYHUFOHMXVTXjFHTXXQ
déclic se fasse entendre.
5(0$548($VVXUH]YRXVTXHOHFRXYHUFOHGXORJHPHQWGX¿OWUHGpYDFXDWLRQ
est correctement installé.
Filtre d’Évacuation À
Cartouche HEPA
Fentes
Languettes
-26-
1HWWR\DJH'H/D%URVVH¬5RXOHDX
AVERTISSEMENT
Débranchez toujours le cordon d'alimentation de la prise électrique avant
d'effectuer tous travaux d’entretien sur l'aspirateur.
3RXUTXHOHQHWWR\DJHVRLWHI¿FDFHODEURVVHjURXOHDXGRLWrWUHH[HPSWH
G¶DFFXPXODWLRQGH¿EUHVGHPRTXHWWHVGH¿FHOOHVRXGHSRLOVRXFKHYHX[(Q
cas de blocage de la brosse à rouleau, débranchez et retournez l'aspirateur, puis
YpUL¿H]ODSUpVHQFHGDFFXPXODWLRQGH¿EUHVHWGHSRLOVRXFKHYHX[VXUODEURVVH
jURXOHDX8WLOLVH]GHVFLVHDX[SRXUpOLPLQHUWRXWHDFFXPXODWLRQGH¿EUHVGHSRLOV
RXFKHYHX[HPSrWUpVDXWRXUGHODEURVVH1RXVYRXVUHFRPPDQGRQVGHQHWWR\HU
UpJXOLqUHPHQWODEURVVHD¿QG¶REWHQLUGHVUpVXOWDWVRSWLPDX[
eOLPLQDWLRQ'HV2EVWUXFWLRQV
AVERTISSEMENT
Coupez l'alimentation électrique avant d'éliminer les obstructions. Le non-respect
de cette disposition vous expose à des risques d’électrocution ou à des blessures
corporelles.
9pUL¿FDWLRQGHODSUpVHQFHG¶REVWUXFWLRQVGDQVOHWX\DXÀH[LEOH
6LO\DXQEUXLWDQRUPDOSHUFHSWLEOHORUVGHOXWLOLVDWLRQGHODVSLUDWHXURXVL
ODSXLVVDQFHGDVSLUDWLRQFKXWHVRXGDLQHPHQWLOHVWQpFHVVDLUHGHYpUL¿HUOD
-27-
présence d’obstructions dans le conduit d'air.
9pUL¿H]IUpTXHPPHQWO¶pWDWGXFRQGXLWGDLUD¿QGHYRXVDVVXUHUGHO¶DEVHQFHGH
toutes obstructions.
$SSX\H]VXUOHERXWRQGHGpJDJHPHQWGXWX\DXSXLVUHWLUH]OHWX\DXGXFRUSV
SULQFLSDO'pWDFKH]ODXWUHH[WUpPLWpGXWX\DXGXUDFFRUGHPHQWLQIpULHXUGX
WX\DX
9pUL¿H]HWpOLPLQH]WRXWHVOHVREVWUXFWLRQVSUpVHQWHVGDQVOHWX\DXÀH[LEOH
5pLQVWDOOH]OHWX\DXÀH[LEOHVXUODVSLUDWHXU9RLUODVHFWLRQ,16758&7,216
RELATIVES AU MONTAGE GÉNÉRAL (page 7).
9pUL¿FDWLRQGHODSUpVHQFHG¶REVWUXFWLRQVGDQVOHWX\DXGHUDFFRUGHPHQW
'pWDFKH]OH[WUpPLWpGXWX\DXGXUDFFRUGHPHQWLQIpULHXUGXWX\DX
9pUL¿H]ODSUpVHQFHG¶REVWUXFWLRQVpYHQWXHOOHVGDQVOHWX\DXGHUDFFRUGHPHQW
puis éliminez-en celles-ci, le cas échéant.
)L[H]jQRXYHDXOHWX\DXÀH[LEOHVXUOHUDFFRUGHPHQWLQIpULHXUGXWX\DX
%RXWRQ'H'pJDJHPHQW
'X7X\DX
7X\DXGH5DFFRUGHPHQW

-28-
DÉPANNAGE
6LYRXVUHQFRQWUH]XQRXSOXVLHXUVSUREOqPHVDYHFYRWUHDVSLUDWHXUFRQVXOWH]OH
WDEOHDXFLGHVVRXVSRXUWURXYHUGHVVROXWLRQVDX[SUREOqPHVGHSHUIRUPDQFHPLQHXUV
352%/Ê0( &$86(3266,%/( SOLUTION
L’aspirateur ne
fonctionne pas.
/D¿FKHQHVWSDVEUDQFKpH
dans la prise murale.
$VVXUH]YRXVTXHOD¿FKHGXFRUGRQ
d'alimentation est bien branchée dans
la prise.
Le commutateur On/Off (Marche/
$UUrWQHVWSDVDSSX\pSRXU
démarrer l'aspirateur.
$SSX\H]VXUOHFRPPXWDWHXU2Q2II
(Marche/Arrêt) pour le positionner sur
« I » ou sur « II ».
Prise de courant défectueuse.
9pUL¿H]O¶pWDWGHODSULVHjO¶DLGHG¶XQ
bon appareil ou d’une bonne lampe.
Faites réparer correctement la prise de
courant.
Le corps de l'aspirateur est
surchauffé.
Débranchez le cordon d'alimentation,
puis laissez refroidir l'aspirateur
pendant 50 minutes.
Le moteur est endommagé.
Veuillez composer le numéro 1-866-
384-8432 pour obtenir de l’aide.
Mauvaise
récupération
des saletés.
/HWX\DXHWOHVDFFHVVRLUHVQH
sont pas installés correctement.
9pUL¿H]O¶pWDWGXWX\DXHWGHV
DFFHVVRLUHVD¿QGHYRXVDVVXUHU
qu’ils sont correctement installés et
fermement enclenchés.
/HWX\DXQHVWSDVLQVWDOOpDX
bon endroit lorsque vous utilisez
le mode Vertical.
9pUL¿H]HWDVVXUH]YRXVTXHOHWX\DX
est correctement installé dans le corps
principal (page 7).
/HVDFjSRXVVLqUHQHVWSDV
installé correctement.
9pUL¿H]O¶pWDWGXVDFjSRXVVLqUHD¿Q
de vous assurer qu’il est correctement
installé et fermement enclenché.
AVERTISSEMENT
Coupez l’alimentation électrique avant d’effectuer l’entretien de l’aspirateur. Le
non-respect de cette disposition vous expose à des risques d’électrocution ou à
des blessures corporelles.

-29-
352%/Ê0( &$86(3266,%/( SOLUTION
Mauvaise
récupération
des saletés.
/HVDFjSRXVVLqUHHVWSOHLQRX
obstrué.
5HPSODFH]OHVDFjSRXVVLqUH
Présence d’obstructions dans le
conduit d'air.
9pUL¿H]ODSUpVHQFHG¶REVWUXFWLRQV
éventuelles dans le conduit d’air,
puis éliminez-en toutes celles-ci, le
cas échéant. Suivez les instructions
données en page 26.
La régulation d'aspiration est
ouverte.
Réglez la régulation d'aspiration pour
augmenter l'aspiration. Suivez les
instructions données en page 19.
/H¿OWUHHQPRXVVHRXOH¿OWUH
d'évacuation à cartouche HEPA
GRLWrWUHQHWWR\pRXUHPSODFp
1HWWR\H]RXUHPSODFH]OH¿OWUHHQ
PRXVVHRXOH¿OWUHGpYDFXDWLRQ
à cartouche HEPA. Suivez les
LQVWUXFWLRQVGHQHWWR\DJHGX¿OWUHHQ
PRXVVHRXGX¿OWUHGpYDFXDWLRQj
cartouche HEPA données en page 22
ou 24.
/HWX\DXHVWXVp
5HPSODFH]OHWX\DX$FKHWH]HQOLJQH
à www.vacmaster.com ou appelez le
1-866-384-8432.
/HWX\DXGHUDFFRUGHPHQWHVW
usé.
Veuillez composer le numéro 1-866-
384-8432 pour obtenir de l’aide.
La brosse à rouleau est usé.
Veuillez composer le numéro 1-866-
384-8432 pour obtenir de l’aide.
La courroie est usée ou brisée.
Veuillez composer le numéro 1-866-
384-8432 pour obtenir de l’aide.
'HODSRXVVLqUH
s’échappe de
l’aspirateur.
/HVDFjSRXVVLqUHRXOH
couvercle de l’enceinte à sac
jSRXVVLqUHQHVWSDVLQVWDOOp
correctement.
9pUL¿H]O¶pWDWGXVDFjSRXVVLqUH
ou du couvercle de l’enceinte à sac
jSRXVVLqUHD¿QGHYRXVDVVXUHU
qu’ils sont correctement installés et
fermement enclenchés. Suivez les
instructions données en page 21-22.

-30-
352%/Ê0( &$86(3266,%/( SOLUTION
'HODSRXVVLqUH
s’échappe de
l’aspirateur.
/H¿OWUHGpYDFXDWLRQjFDUWRXFKH
HEPA est mal installé.
9pUL¿H]O¶pWDWGX¿OWUHGpYDFXDWLRQD¿Q
de vous assurer qu’il est correctement
installé. Suivez les instructions
données en page 24.
/HVDFjSRXVVLqUHHVWXVpRX
brisé.
9pUL¿H]O¶pWDWGXVDFjSRXVVLqUHSXLV
remplacez-le, le cas échéant.
/H¿OWUHHQPRXVVHRXOH¿OWUH
d'extraction à cartouche HEPA
est usé ou brisé.
9pUL¿H]O¶pWDWGX¿OWUHHQPRXVVHRXGX
¿OWUHGpYDFXDWLRQjFDUWRXFKH+(3$
puis remplacez-le.
La brosse à
rouleau ne
tourne pas.
Le manche est positionné
HQWLqUHPHQWjODYHUWLFDOH
Déplacez le manche de la position
HQWLqUHPHQWYHUWLFDOH
Mauvais mode sélectionné.
$SSX\H]VXUOHFRPPXWDWHXUSRXUOH
positionner sur « II » pour démarrer la
brosse à rouleau.
La brosse à rouleau est bloquée.
Éliminez l’obstruction. Suivez les
instructions données en page 26.
La brosse à rouleau n'est pas
installée correctement.
Veuillez composer le numéro 1-866-
384-8432 pour obtenir de l’aide.
Le moteur de la brosse à
rouleau est surchauffé.
Mettez hors tension l'aspirateur, puis
GpEUDQFKH]OH9pUL¿H]HWGpJDJHUO¶pWDW
GXFRQGXLWGDLUD¿QGHYRXVDVVXUHU
de l’absence de toutes obstructions.
9pUL¿H]HWFKDQJH]OHVDFjSRXVVLqUH
VLOHVWSOHLQ%UDQFKH]ODVSLUDWHXUSXLV
mettez-le sous tension.
La courroie n'est pas acheminée
correctement.
Veuillez composer le numéro 1-866-
384-8432 pour obtenir de l’aide.
Défaillance dans la section
du circuit imprimé de l’électro-
brosse.
Veuillez composer le numéro 1-866-
384-8432 pour obtenir de l’aide.

-31-
352%/Ê0( &$86(3266,%/( SOLUTION
Le son change.
Le couvercle du logement du
¿OWUHGpYDFXDWLRQQHVWSDV
installé correctement.
Positionnez correctement le couvercle
GXORJHPHQWGX¿OWUHGpYDFXDWLRQSXLV
enclenchez-le fermement en place.
Suivez les instructions données en
page 25.
Le conduit d’air est bouché.
9pUL¿H]ODSUpVHQFHG¶REVWUXFWLRQV
éventuelles dans le conduit d’air, puis
pOLPLQH]HQFHOOHVFLHWQHWWR\H]OH
conduit d’air. Suivez les instructions
données en page 26.
Les accessoires utilisés peuvent
réduire le débit d'air.
9pUL¿H]O¶pWDWGHVDFFHVVRLUHVD¿QGH
détecter la présence de duvets, de
peluches, de poils d'animaux familiers
ou de tous autres débris.
L’aspirateur se
met hors tension
tout seul.
/D¿FKHGXFRUGRQGDOLPHQWDWLRQ
s’est détachée de la prise de
courant lors de l’utilisation de
l'aspirateur.
5pLQVpUH]OD¿FKHGXFRUGRQ
d'alimentation à fond dans la prise de
courant. Évitez de tirer ou de traîner
le cordon d'alimentation lorsque vous
utilisez l'aspirateur.
Le protecteur thermique est
activé.
Mettez hors tension l'aspirateur, puis
GpEUDQFKH]OH9pUL¿H]O¶pWDWGXFRQGXLW
GDLUHWGXVDFjSRXVVLqUH/DLVVH]
refroidir l'aspirateur pendant au moins
PLQXWHV%UDQFKH]ODVSLUDWHXUSXLV
mettez-le sous tension.
Le moteur est endommagé.
Veuillez composer le numéro 1-866-
384-8432 pour obtenir de l’aide.

-32-
352%/Ê0( &$86(3266,%/( SOLUTION
/H9R\DQW
&+(&.%$*
S'allume.
6DFjSRXVVLqUHSOHLQRX
bouché.
Remplacez le sac.
Filtres sales. 1HWWR\H]UHPSODFH]OHV¿OWUHV
3DVVDJHVGXÀX[G¶DLUERXFKpV
Mettez hors tension l'aspirateur,
puis débranchez-le. Éliminez toute
REVWUXFWLRQGXSDVVDJHGXÀX[GDLU
%UDQFKH]ODVSLUDWHXUSXLVPHWWH]OH
sous tension.
Certain outils d'accessoires.
,OV¶DJLWG¶XQSKpQRPqQHQRUPDO/H
YR\DQWSDVVHDXYHUWORUVTXHORXWLOHVW
retiré.
/HYR\DQW
lumineux de
l'état de la
brosse à rouleau
vire au rouge.
Présence d’obstructions dans la
zone de la brosse à rouleau.
Mettez hors tension l'aspirateur,
puis débranchez-le. Éliminez toutes
obstructions éventuelles présentes
dans la brosse à rouleau. Voir la page
26.
La brosse à rouleau est usée ou
brisée.
Veuillez composer le numéro 1-866-
384-8432 pour obtenir de l’aide.
Moteur de la brosse à rouleau
RXSDUWLH3&%GHO¶pOHFWUREURVVH
défectueux.
Veuillez composer le numéro 1-866-
384-8432 pour obtenir de l’aide.
Le moteur de la brosse à
rouleau est surchauffé.
Mettez hors tension l'aspirateur, puis
GpEUDQFKH]OH9pUL¿H]HWGpJDJHUO¶pWDW
GXFRQGXLWGDLUD¿QGHYRXVDVVXUHU
de l’absence de toutes obstructions.
9pUL¿H]HWFKDQJH]OHVDFjSRXVVLqUH
VLOHVWSOHLQ%UDQFKH]ODVSLUDWHXUSXLV
mettez-le sous tension.
-33-
352%/Ê0( &$86(3266,%/( SOLUTION
Impossible
d’installer le
couvercle de
l’enceinte à sac
jSRXVVLqUH
/HVDFjSRXVVLqUHHVWDEVHQW ,QVWDOOH]OHVDFjSRXVVLqUH
/HFROOLHUGXVDFjSRXVVLqUH
n'est pas installé correctement
dans le support ou le support
n'est pas tourné en place.
,QVpUH]OHFROOLHUGXVDFjSRXVVLqUH
dans le support jusqu'à ce que vous
entendiez un « déclic ». Faites pivoter
le support vers le bas jusqu'à ce que
vous entendiez un autre « déclic ».
Suivez les instructions données en
page 21.
Le support est brisé.
Veuillez composer le numéro 1-866-
384-8432 pour obtenir de l’aide.

-1-
SECCIÓN
Instrucciones de seguridad importantes..................................................................................................
Garantía...................................................................................................................................................
Datos Técnicos.........................................................................................................................................
Conozca su aspiradora............................................................................................................................
Instrucciones generales de ensamblaje...................................................................................................
Instrucciones de uso................................................................................................................................
Mantenimiento para su aspiradora.........................................................................................................
Resolución de problemas......................................................................................................................
2
3
3
4
6
9
19
27
TABLA DE CONTENIDOS
PÁGINA
Gracias por comprar esta aspiradora Vacmaster
®
. Con esta aspiradora, estás
obteniendo un producto de alta calidad diseñado para un rendimiento óptimo.
POR SU SEGURIDAD
Lea y comprenda este manual antes de usar el producto.
Guarde este manual y su boleta (recibo) de venta en un lugar seguro para usarlos
como referencia a futuro.

-2-
Al utilizar un producto eléctrico se deben tomar siempre precauciones básicas,
incluyendo las siguientes:
LEA TODAS LAS INSTRUCCIONES ANTES DE UTILIZAR ESTA ASPIRADORA.
No seguir las advertencias e instrucciones puede provocar explosiones, incendios
o lesiones graves.
ADVERTENCIA -
Para reducir el riesgo de incendio, descarga
eléctrica o lesiones:
• No deje la aspiradora desatendida cuando esté enchufada. Desenchúfela de la
toma de corriente cuando no esté en uso y antes de realizar el mantenimiento.
1RXWLOLFHHOSURGXFWRHQH[WHULRUHVQLVREUHVXSHU¿FLHVPRMDGDV
• No permita que se utilice como un juguete. Se debe prestar estricta atención
cuando el aparato lo usen niños o cuando se use cerca de ellos.
• Utilice el producto solo como se describe en este manual. Utilice solo los
accesorios recomendados por el fabricante.
• No la utilice si la clavija o el cable están dañados. Si la aspiradora no funciona
como debería, si se ha caído, dañado, dejado en exteriores o si se ha caído al
agua, llame al servicio al cliente.
• No tire o transporte el aparato utilizando el cable como a modo de empuñadura,
QRDSULHWHHOFDEOHDOFHUUDUSXHUWDVQLSDVHHOFDEOHFHUFDGHERUGHVD¿ODGRVR
esquinas. No use la aspiradora sobre su cable. Mantenga el cable alejado de
VXSHU¿FLHVFDOLHQWHV
• No desconecte tirando del cable. Para desconectarlo tire de la clavija, no del
cable.
• No sujete el enchufe ni aspire con las manos mojadas.
• No ponga ningún objeto sobre las aberturas. No lo utilice si las aberturas
están bloqueadas; tenga cuidado que no haya polvo, cabellos, pelusas en las
DEHUWXUDVRFXDOTXLHUFRVDTXHSXHGDUHGXFLUHOÀXMRGHDLUH
• Mantenga su cabello, ropas holgadas, dedos y partes de su cuerpo lejos de las
aberturas y piezas móviles del producto.
• Apague todos los controles antes de desconectar el dispositivo.
• Tenga precaución adicional al limpiar en escaleras.
• No la ponga sobre sillas, mesas, etc. Manténgala sobre el piso.
1RXVHHOSURGXFWRSDUDDVSLUDUOtTXLGRVFRPEXVWLEOHVRLQÀDPDEOHVFRPR
gasolina, ni lo use en zonas donde puedan existir tales elementos.
• No aspire elementos que estén en llamas o humeando, tales como cigarrillos,
fósforos o cenizas calientes.
1RXVHODDVSLUDGRUDVLQODEROVDSDUDSROYR\R¿OWURVLQVWDODGRV
GUARDE ESTAS INSTRUCCIONES
Solo para uso doméstico
INSTRUCCIONES DE SEGURIDAD
IMPORTANTES

-3-
DURANTE UN AÑO a contar de la fecha de venta, este producto está garantizado
contra defectos en sus materiales o fabricación cuando se ensambla, opera y
mantiene siguiendo todas las instrucciones proporcionadas.
Un producto defectuoso puede reemplazarse por uno nuevo, de manera gratuita,
considerando que se presente una PRUEBA DE VENTA.
Para obtener detalles de la cobertura de la garantía para obtener un reemplazo
gratuito, visite la página web: www.vacmaster.com o llame al 1-866-384-8432.
(VWDJDUDQWtDQRFXEUHORV¿OWURVQLFRUUHDVODVFXDOHVVRQSLH]DVGHVHFKDEOHV
que pueden desgastarse debido al uso normal dentro del periodo de garantía.
• Esta garantía queda nula si el producto llega a usarse para algún propósito que
no sea el uso privado doméstico.
(VWDJDUDQWtDOHHQWUHJDGHUHFKRVOHJDOHVHVSHFt¿FRVTXHSXHGHQYDULDUVHJ~Q
su estado (podría tener otros derechos adicionales).
TECHNICAL DATA
Aspiradora vertical con bolsa
Modelo: UB0302E
Tensión nominal: 120V AC
Frecuencia nominal: 60 Hz
Corriente nominal: 8.0 A
GARANTÍA
DATOS TÉCNICOS

-4-
CONOZCA SU ASPIRADORA
Herramienta
combinada 3 en 1
Bolsa de polvo
(Preinstalado en
la aspiradora)
Empuñadura
Botón de
liberación
de la vara
Empuñadura
Interruptor de
encendido/apagado
Indicador de revisión
de la bolsa
Liberación de
la cubierta de
la cámara de la
bolsa de polvo
Cubierta de la
cámara de la
bolsa de polvo
(bolsa de polvo
en el interior)
&XELHUWDGHO¿OWUR
GHHVFDSH¿OWUR
de escape de
medios HEPA)
Luz
Boquilla
motorizada
Luz
indicadora
de estado
del cepillo
de rodillo
Almacenamiento
de accesorios
Gancho superior
del cable
Conexión de
manguera
superior
Colgador de
la manguera
Conexión de
manguera inferior
Cable de
alimentación
Botón de
liberación de la
manguera
Control de
succión
Manguera
ÀH[LEOH
Gancho
inferior del
cable

-5-
PIEZAS DE REPUESTO
Disponible en línea en www.vacmaster.com o llamando al 1-866-384-8432.
Artículo Nro. de parte.
Filtro de espuma
561060125
Filtro de escape de medios HEPA
561055118
Herramienta combinada 3 en 1
571034106
Bolsa de polvo (paquete de 6)
521355
0DQJXHUDÀH[LEOH
571034107
Empuñadura
571034101
.LWGH¿OWURV(VFDSH+(3$¿OWURGH
espuma)
561060184
-6-
,QWURGX]FDHOH[WUHPRFRQHOiQJXORUHFWRGHODPDQJXHUDÀH[LEOHHQHOFXHUSR
SULQFLSDOFRPRVHLQGLFDHQOD¿JXUDKDVWDHVFXFKDUXQFOLF$FRQWLQXDFLyQ
SDVHODPDQJXHUDÀH[LEOHVREUHHOFROJDGRUGHODPDQJXHUD,QWURGX]FDHORWUR
extremo de la manguera en la conexión de manguera inferior como se indica
HQOD¿JXUDKDVWDHVFXFKDUXQFOLF
NOTA: Se recomienda girar levemente el extremo de la manguera al introducir la
PDQJXHUD$VHJ~UHVHGHTXHDPERVH[WUHPRVGHODPDQJXHUDVHKD\DQ¿MDGR
en sus posiciones con un clic.
,QWURGX]FDODHPSXxDGXUDHQHOFXHUSRSULQFLSDOKDVWDHVFXFKDUXQFOLF
Conexión de
manguera inferior
1
2
3
INSTRUCCIONES GENERALES DE
ENSAMBLAJE
-7-
3. Inserta la herramienta combinada en el almacenamiento de accesorios como
se muestra.
4. Asegúrese de que los ganchos superior e inferior del cable estén en la
posición correcta como se indica. Envuelva el cable de alimentación sin
apretar alrededor de los ganchos superior e inferior del cable.
NOTA: Asegúrese de enrollar el cable de alimentación en el gancho superior
primero y, luego, alrededor del gancho inferior para así evitar dañar el cable.
Gancho superior
del cable
Gancho inferior del
cable

-8-
5. Fije el enchufe correspondiente al cable de alimentación.
ADVERTENCIA
(QUROODUHOFDEOHGHPDVLDGR¿UPH\FRQWHQVLyQH[FHVLYDSXHGHSURYRFDUGDxRV
Un cable dañado representa un peligro de descarga eléctrica y podría causar
lesiones a las personas o daños.
Enchufe del cable de alimentación
Cable de alimentación
-9-
Uso de su aspiradora de pie
NOTA: Asegúrese de que la aspiradora esté completamente ensamblada. No use
la aspiradora sin la bolsa de polvo instalada.
NOTA: $VHJ~UHVHGHTXHODPDQJXHUDÀH[LEOHHVWpLQVWDODGDFRUUHFWDPHQWHHQHO
cuerpo principal (página 6).
1. Gire el gancho superior del cable hacia cualquier lado y abajo para liberar el
cable de alimentación.
2. Separe la clavija del cable de alimentación.
3. Asegúrese de que el cable de alimentación esté bloqueado en la muesca
de bloqueo superior como se indica. Esto ayudará a controlar el cable de
alimentación mientras se esté usando la aspiradora.
4. Enchufe el cable de alimentación a un tomacorriente que se encuentre cerca del
piso.
INSTRUCCIONES DE USO
Muesca de bloqueo
superior
Gancho superior del cable
-10-
ADVERTENCIA
Para reducir el riesgo de descarga eléctrica, este electrodoméstico posee una
clavija polarizada (una punta es más ancha que la otra). Esta clavija calzará en
la toma de corriente de pared polarizado solo en una posición. Si la clavija no
entra completamente en la toma de corriente, póngala al revés. Si aún no calza,
FRQWDFWHDXQWpFQLFRHOHFWULFLVWDFDOL¿FDGRTXHSXHGDD\XGDUOHDLQVWDODUODWRPD
GHFRUULHQWHLQGLFDGR1RPRGL¿TXHODFODYLMDGHQLQJ~QPRGR
5. Suelte la empuñadura colocando el pie sobre la boquilla y tire para cambiar la
posición de la empuñadura.
3XOVHHOLQWHUUXSWRUGHHQFHQGLGRDSDJDGRHQODSRVLFLyQ,SDUDHQFHQGHUOD
aspiradora para limpiar pisos no cubiertos y pequeños tapetes de área.
NOTA: El cepillo de rodillo no gira cuando la aspiradora está en la posición “I”.
3UHVLRQHHOLQWHUUXSWRUHQODSRVLFLyQ,,SDUDOLPSLDUDOIRPEUDVRWDSHWHV
NOTA: El cepillo de rodillo gira cuando la aspiradora está en la posición “II”.
8. Tras haber terminado de aspirar, mueva el interruptor a la posición “O” y
Interruptor de encendido/
apagado
-11-
desconecte el cable de alimentación de la toma de corriente.
NOTA: Seleccione el modo recto al usar esta aspiradora. No presione
HOLQWHUUXSWRUHQODSRVLFLyQ,,DOOLPSLDUXQSLVRQRFXELHUWRRSRGUtD
potencialmente dañar el piso.
9. Para restablecer el cable de alimentación después del uso, coloque el gancho
superior del cable en posición recta. Luego, enrolle el cable con holgura
alrededor de los ganchos.
PRECAUCIÓN
No deje la aspiradora en un solo lugar por ninguna cantidad de tiempo mientras
el cepillo de rodillo esté encendido. Podría dañar la alfombra.
PRECAUCIÓN
¡Piezas móviles! Para reducir el riesgo de lesiones personales, NO toque
el cepillo de rodillo de la boquilla para el suelo mientras la aspiradora esté
encendida. El contacto con el cepillo de rodillo mientras está girando podría
causarle otras lesiones. Desconecte la aspiradora de la toma de corriente antes
de repararla o limpiarla. Preste cuidado al usar el aparato cerca de niños.
INDICADOR DE REVISIÓN DE LA BOLSA
&XDQGRODDVSLUDGRUDHVWpDQGDQGRFRQXQÀXMRGHDLUHQRUPDOHOLQGLFDGRU
CHECK BAG estará de color verde. El indicador se vuelve de color rojo oscuro
FXDQGRHOÀXMRGHDLUHVHEORTXHD
6LHVWRRFXUUHUHYLVHODEROVDGHSROYRGHVHFKDEOHHO¿OWUR\ODYtDGHDLUHHQ
busca de posibles obstrucciones, que se indican en Cómo Quitar Obstrucciones
(página 25).
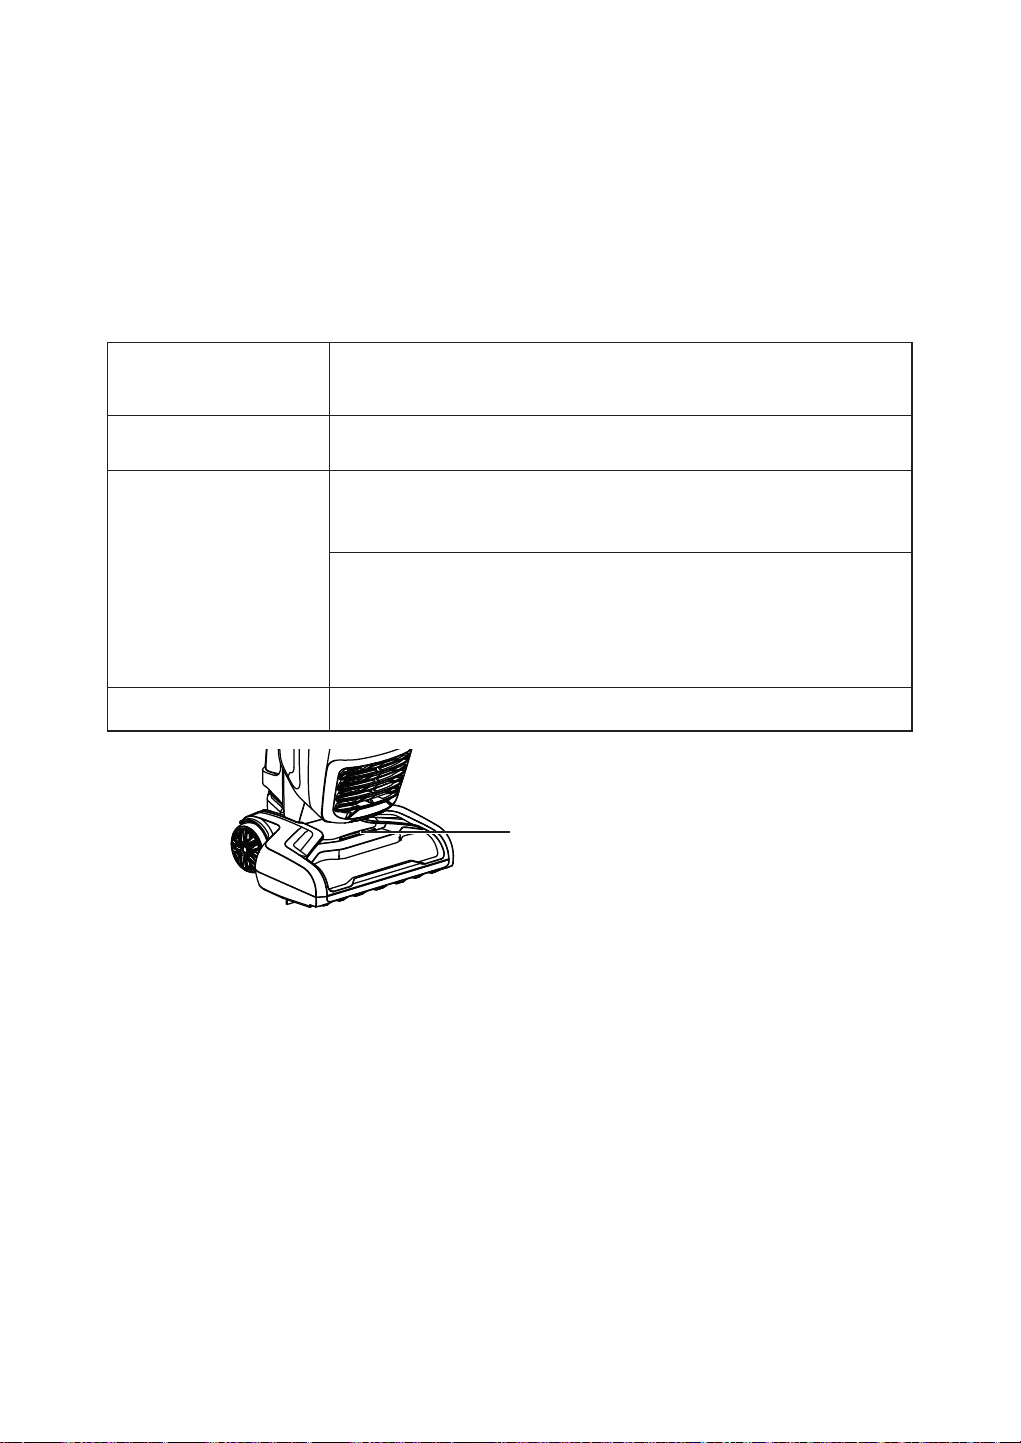
-12-
NOTA: El indicador podría activarse al usar ciertos accesorios, debido a un
PHQRUÀXMRGHDLUHDWUDYpVGHODFFHVRULR
LUZ INDICADORA DE ESTADO DEL CEPILLO DE RODILLO
Luz indicadora
de estado del
cepillo de rodillo
Luz indicadora de
estado del cepillo
de rodillo
Estado
Verde, continuo
El cepillo de rodillo está girando y funcionando como
debería.
Rojo, continuo
Hay un atascamiento en el área del cepillo de rodillo.
Apague y desconecte la aspiradora; luego, quite cualquier
bloqueo de la boquilla.
El motor del cepillo de rodillo se ha recalentado. Apague y
desconecte la aspiradora. Revise y despeje la vía de aire
para asegurarse de que no tenga obstrucciones. Revise
y cambie la bolsa de polvo si está llena. A continuación,
conecte la aspiradora y enciéndala.
No hay luz El cepillo de rodillo está apagado.
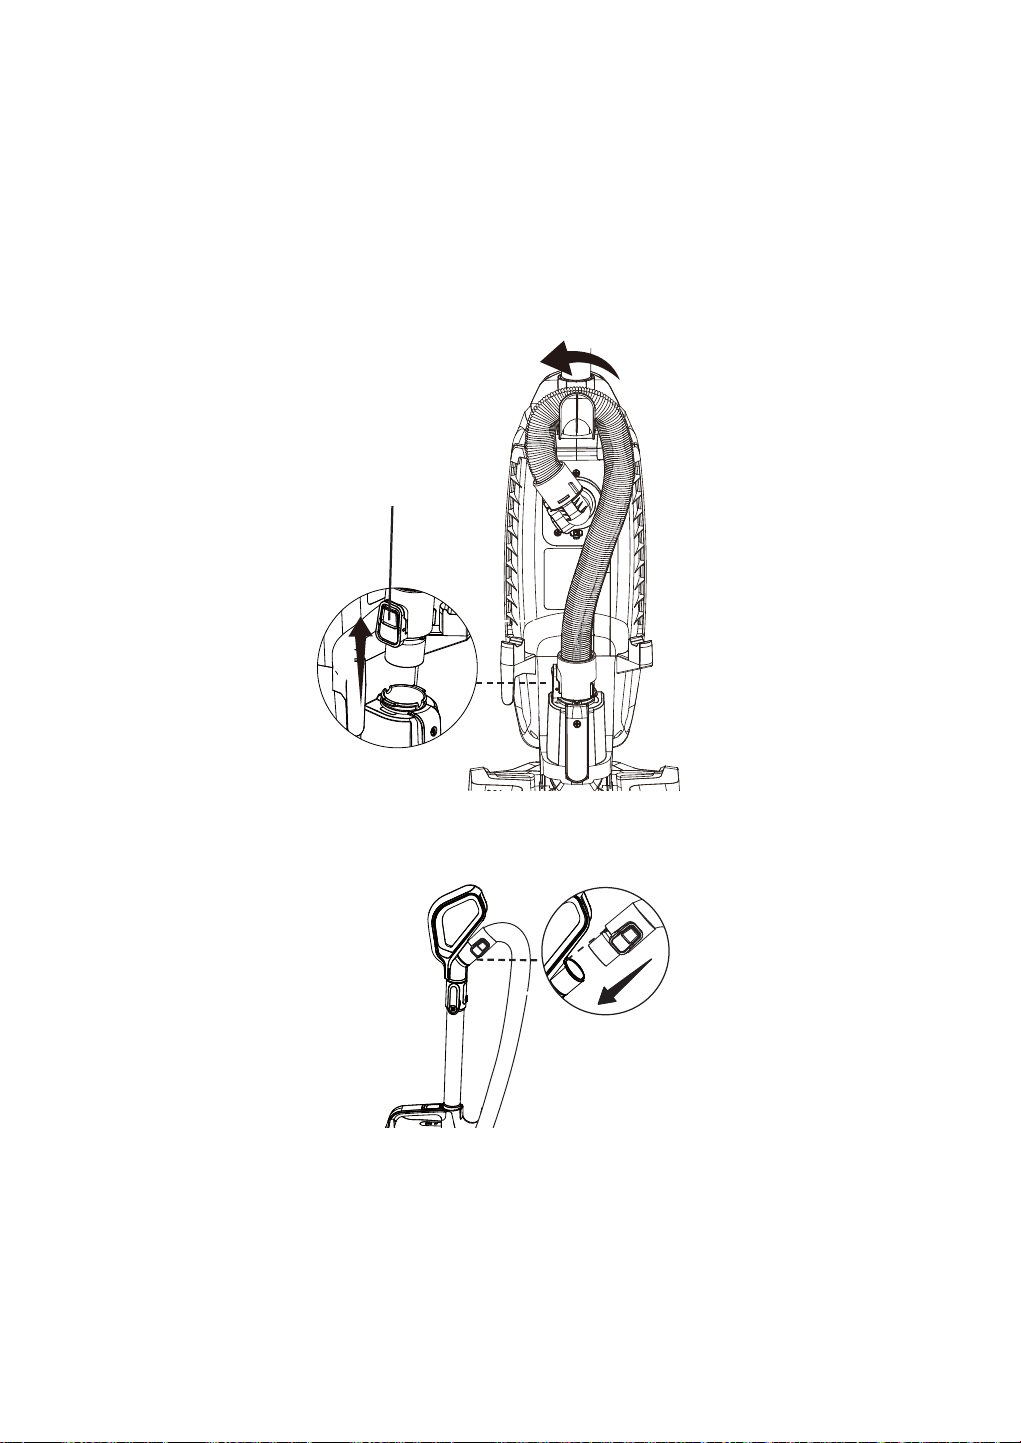
-13-
Uso de tu aspiradora con accesorios
1. Coloque la aspiradora en posición de bloqueo recta.
2. Pulse el botón de liberar manguera y tire hacia arriba para liberar el extremo
inferior de la manguera de la conexión de manguera inferior.
Botón de liberación de la
manguera
2
1
3. Introduzca el extremo de la manguera en la conexión de manguera superior
FRPRVHPXHVWUDHQODLPDJHQKDVWDHVFXFKDUXQFOLF
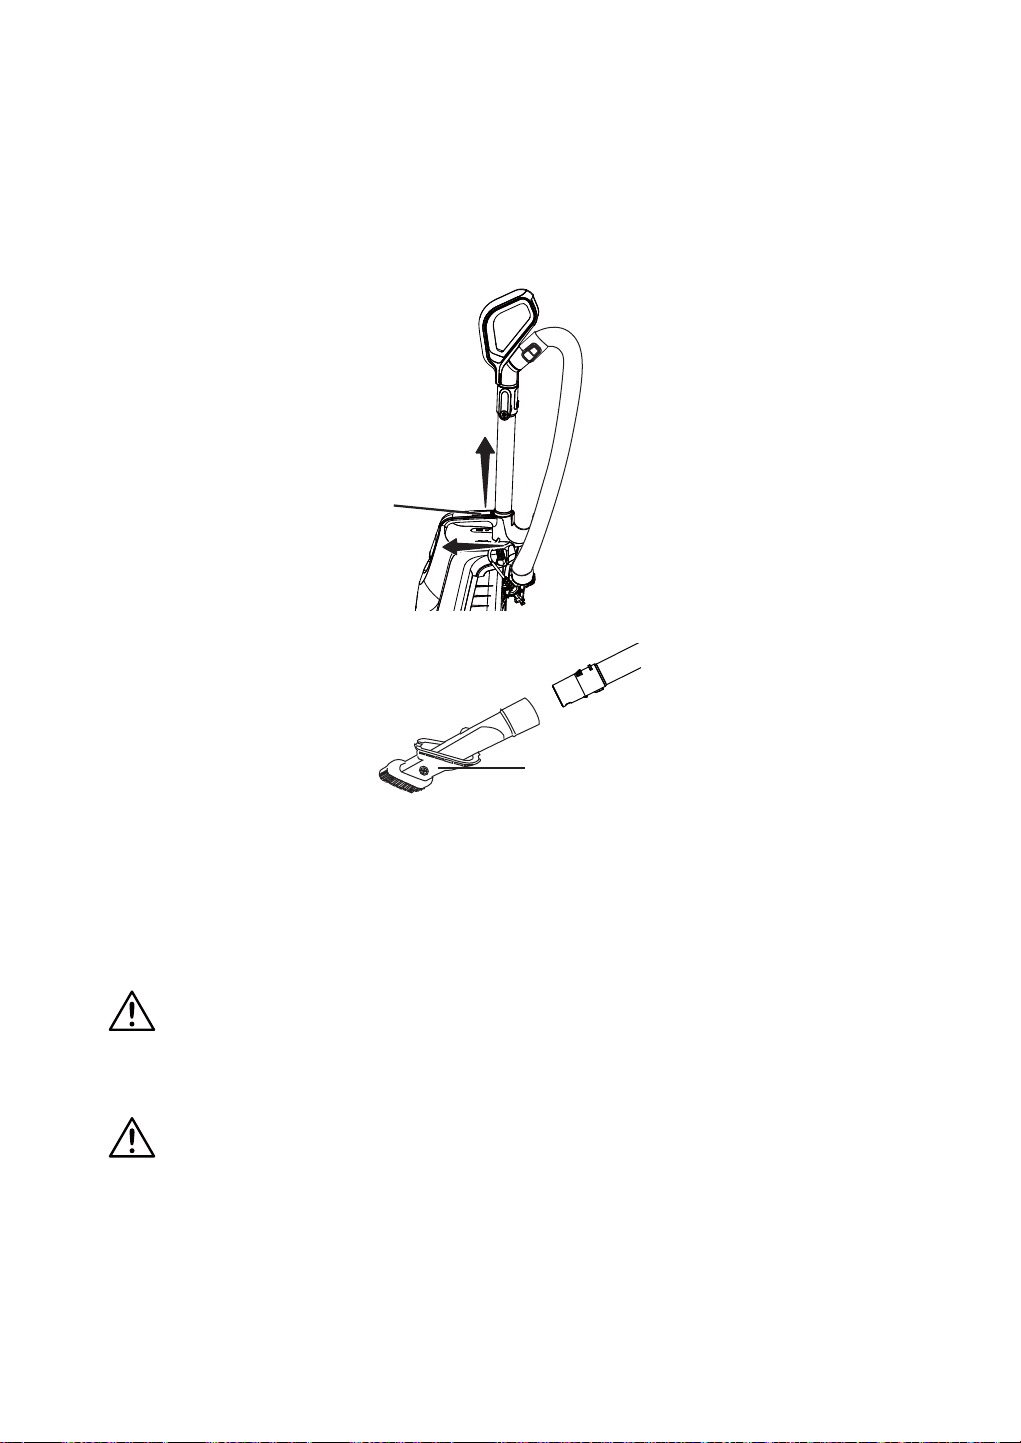
-14-
4. Deslice el botón de liberación de la vara y levante la empuñadura para limpiar
más arriba del suelo.
1
2
Botón de liberación
de la vara
5. Elija el accesorio que desee e insértelo en la empuñadura.
Herramienta combinada 3 en 1
6. Encienda el motor moviendo el interruptor de encendido a la posición “I”.
7. Tras haber terminado de aspirar, mueva el interruptor a la posición “O” y
desconecte el cable de alimentación de la toma de corriente.
IMPORTANTE: Recuerde volver a introducir el extremo de la manguera en
la conexión de manguera inferior antes de usar la aspiradora en el modo
vertical.
PRECAUCIÓN
Al usar accesorios, tenga cuidado de no sobreestirar la manguera al estirarse
para así evitar que la aspiradora se incline y se caiga.
PRECAUCIÓN
NO tire de la manguera para mover la aspiradora dentro de la habitación. Podrían
producirse daños a la propiedad o lesiones personales.
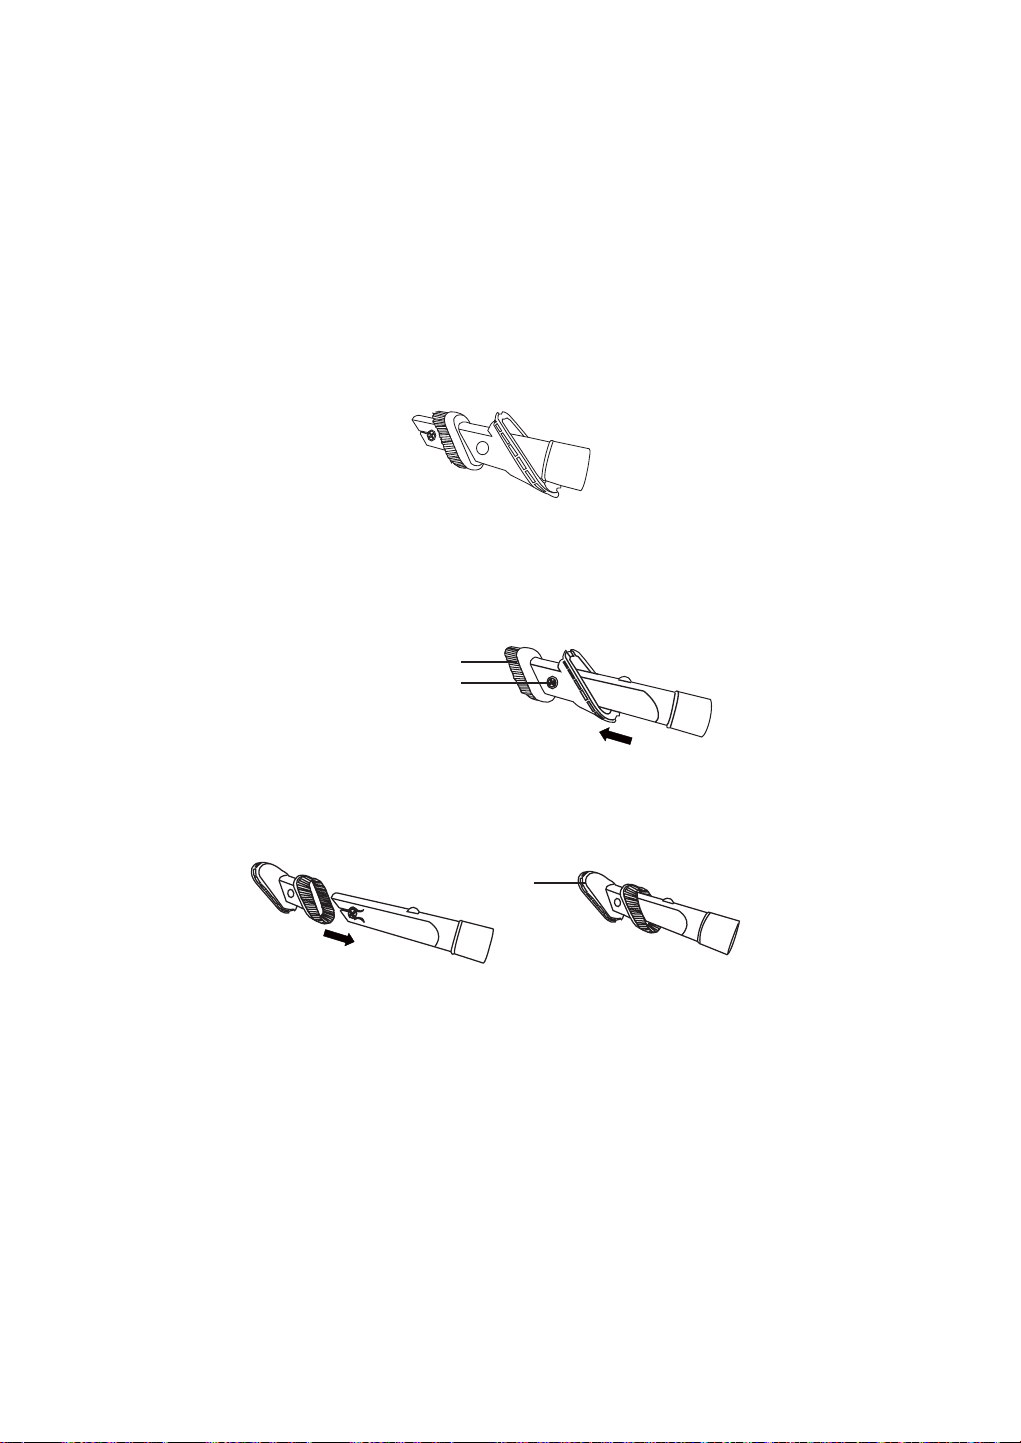
-15-
Accesorio
HERRAMIENTA COMBINADA 3 EN 1
/DKHUUDPLHQWDFRPELQDGDHQSXHGH¿MDUVHDODHPSXxDGXUD'HVOLFHHO
collarín de la herramienta sobre el extremo abierto de la empuñadura.
Utilice la herramienta combinada 3 en 1 en modo herramienta para hendiduras
para limpiar espacios angostos en muebles, entre cojines y en escaleras.
&RQ¿JXUHODKHUUDPLHQWDFRPELQDGDHQPRGRFHSLOORSDUDOLPSLDUSROYR
presionando el botón de liberación y deslizando el costado con cepillo de la
herramienta hacia el extremo de la herramienta combinada. Use en modo cepillo
SDUDOLPSLDUSROYRSDUDOLPSLDUVXSHU¿FLHVKROJDGDVFRPRFRUWLQDV
3UHVLRQHHOERWyQGHOLEHUDFLyQSDUDVDFDUHOFHSLOORSDUDOLPSLDUSROYR&RQ¿JXUH
la herramienta combinada en cepillado para tapiz como se indica. Use en modo
WDSL]DGRSDUDOLPSLDUVXSHU¿FLHVGHWHODFRPRVRIiVHWF
Para devolver la herramienta combinada a modo hendiduras, presione el botón
de liberación y deslice el cepillo por la herramienta combinada.
NOTA: Limpie siempre los accesorios antes de usarlos en telas.
Thermal Protector
Esta aspiradora tiene un protector térmico que se activa automáticamente para
SURWHJHUDOPRWRUGHVXFFLyQGHODDVSLUDGRUD6LXQWDSyQHYLWDHOÀXMRQRUPDOGH
aire hacia el motor, el protector térmico apaga el motor automáticamente. Esto
Cepillo para desempolvar
Botón de liberación
Cepillo para
tapices

-16-
GHMDHQIULDUHOPRWRUD¿QGHHYLWDUSRVLEOHVGDxRVDODDVSLUDGRUD
Para restablecer el protector térmico: Apague la aspiradora y desconecte el
cable de alimentación desde la toma de corriente para dejar enfriar la aspiradora
y que el protector térmico se restablezca.
PRECAUCIÓN
Vuelva a colocar siempre la aspiradora en posición recta antes de usar la
manguera y los accesorios. No hacerlo puede provocar sobrecalentamiento del
motor del cepillo de rodillo y la activación del protector térmico.
Revise y saque los tapones; vacíe la bolsa de polvo si fuese necesario. Además,
FRPSUXHEH\OLPSLHORV¿OWURVWDSDGRV(VSHUHDSUR[LPDGDPHQWHPLQXWRV
antes de volver a encender la aspiradora.
Válvula De Paso
Esta aspiradora tiene una válvula de paso que evita que el motor se sobrecaliente
y se dañe. La válvula se abre para proporcionar refrigeración por aire cuando un
tapón evita el paso normal del aire hacia el motor de succión de la aspiradora.
Observará un cambio en el sonido cuando el aire entre por la válvula.
Para corregir el problema: saque cualquier obstrucción, revise y cambie los
¿OWURVVHJ~QVHDQHFHVDULRUHYLVHHLQVWDOHXQDQXHYDEROVDGHSROYRVLHV
necesario.
NOTA: La válvula de paso podría abrirse al usar accesorios o al limpiar una
DOIRPEUDQXHYDGHELGRDXQPHQRUÀXMRGHDLUHRDXQDYtDDpUHDWDSDGD
provocado por los accesorios mismos o por un exceso de pelusas de la alfombra
nueva en la bolsa de polvo, lo que la llenaría rápidamente.
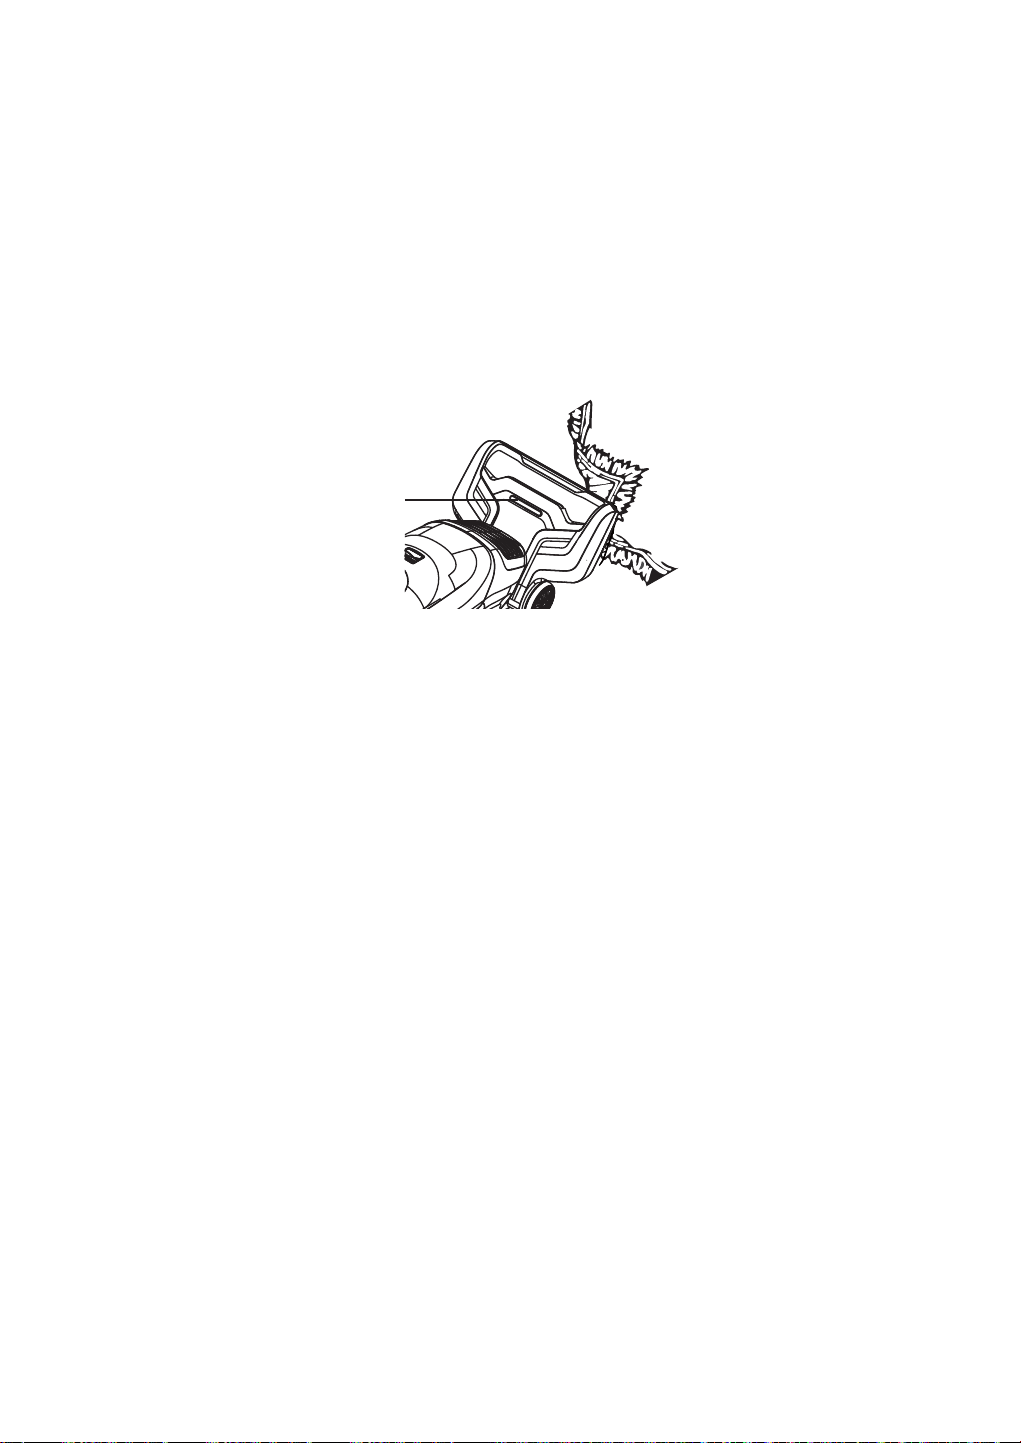
-17-
RESTABLECIMIENTO DEL CEPILLO DE RODILLO
El cepillo de rodillo tiene una protección integrada contra daños al motor por si el
cepillo de rodillo se atascara. Si el cepillo de rodillo se pone lento o se detiene, la
protección de sobrecarga del cepillo de rodillo apaga el motor del cepillo de rodillo
y la luz indicadora de estado del cepillo de rodillo se enciende en rojo. El motor
de succión de la aspiradora sigue funcionando.
Para resolver el problema: Apague y desconecte la aspiradora, quite la
obstrucción, luego vuelva a conectar la aspiradora y encienda la aspiradora.
NOTA: Cuando el motor del cepillo de rodillo se apague, quite el atascamiento
del cepillo y vuelva a encender la aspiradora. Si el problema continúa, llame al
1-866-384-8432 para obtener ayuda.
Luz indicadora
de estado del
cepillo de rodillo
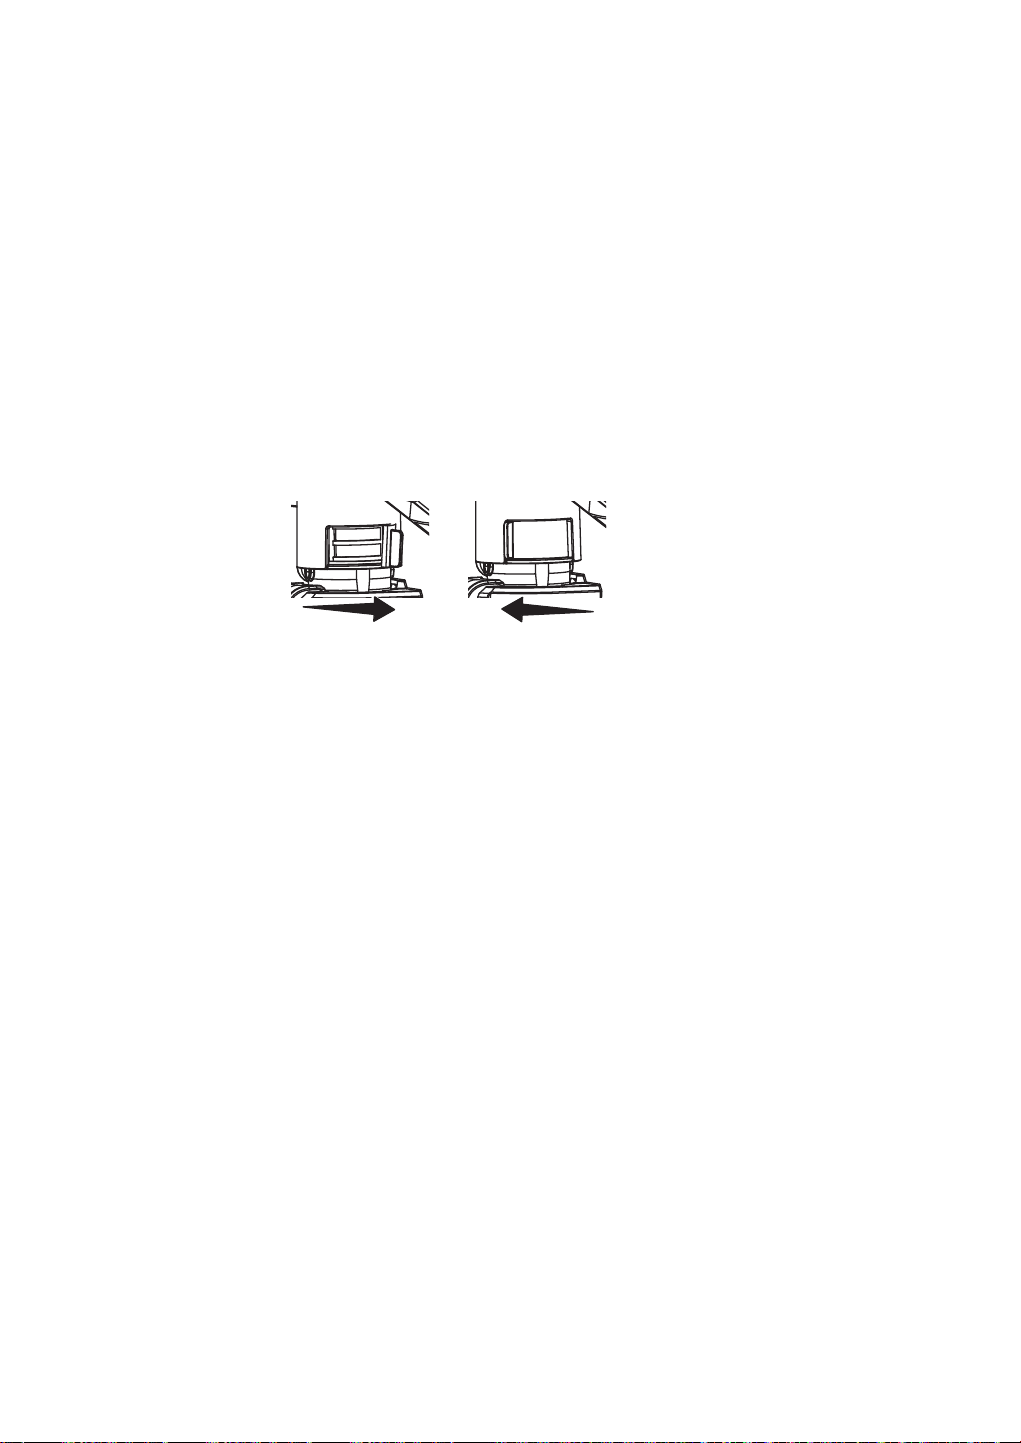
-18-
CONTROL DE SUCCIÓN
Puede abrir la válvula de control de succión para ayudar con la fuerza de succión/
HPSXMHGHODDVSLUDGRUDHQVXSHU¿FLHVWDOHVFRPRDOIRPEUDVGHQVDVD¿QGH
reducir la succión. Tenga en cuenta que para lograr los mejores resultados
posibles, la válvula de control de succión debe estar totalmente cerrada.
• Deslice hacia la derecha para abrir el control de succión y reducir la succión.
Abrir el control reduce la succión sobre cortinas y alfombras ligeras.
• Deslice hacia la izquierda para cerrar el control de succión y aumentar la
succión. Al cerrar el control se aumenta la succión, para tapizado y alfombras.
Almacenamiento de la aspiradora
1. Asegúrate de que la manguera esté bloqueada en su lugar y que el accesorio
esté guardado a bordo.
2. Reúna el cable y enróllelo con holgura alrededor de los ganchos superior e
inferior del cable. Bloquee el retén de la clavija en el cable de alimentación.
3. Guarde la aspiradora en un área seca en interior, en el piso con la
empuñadura trabada en posición vertical.
Reducir la succión
Aumentar la succión
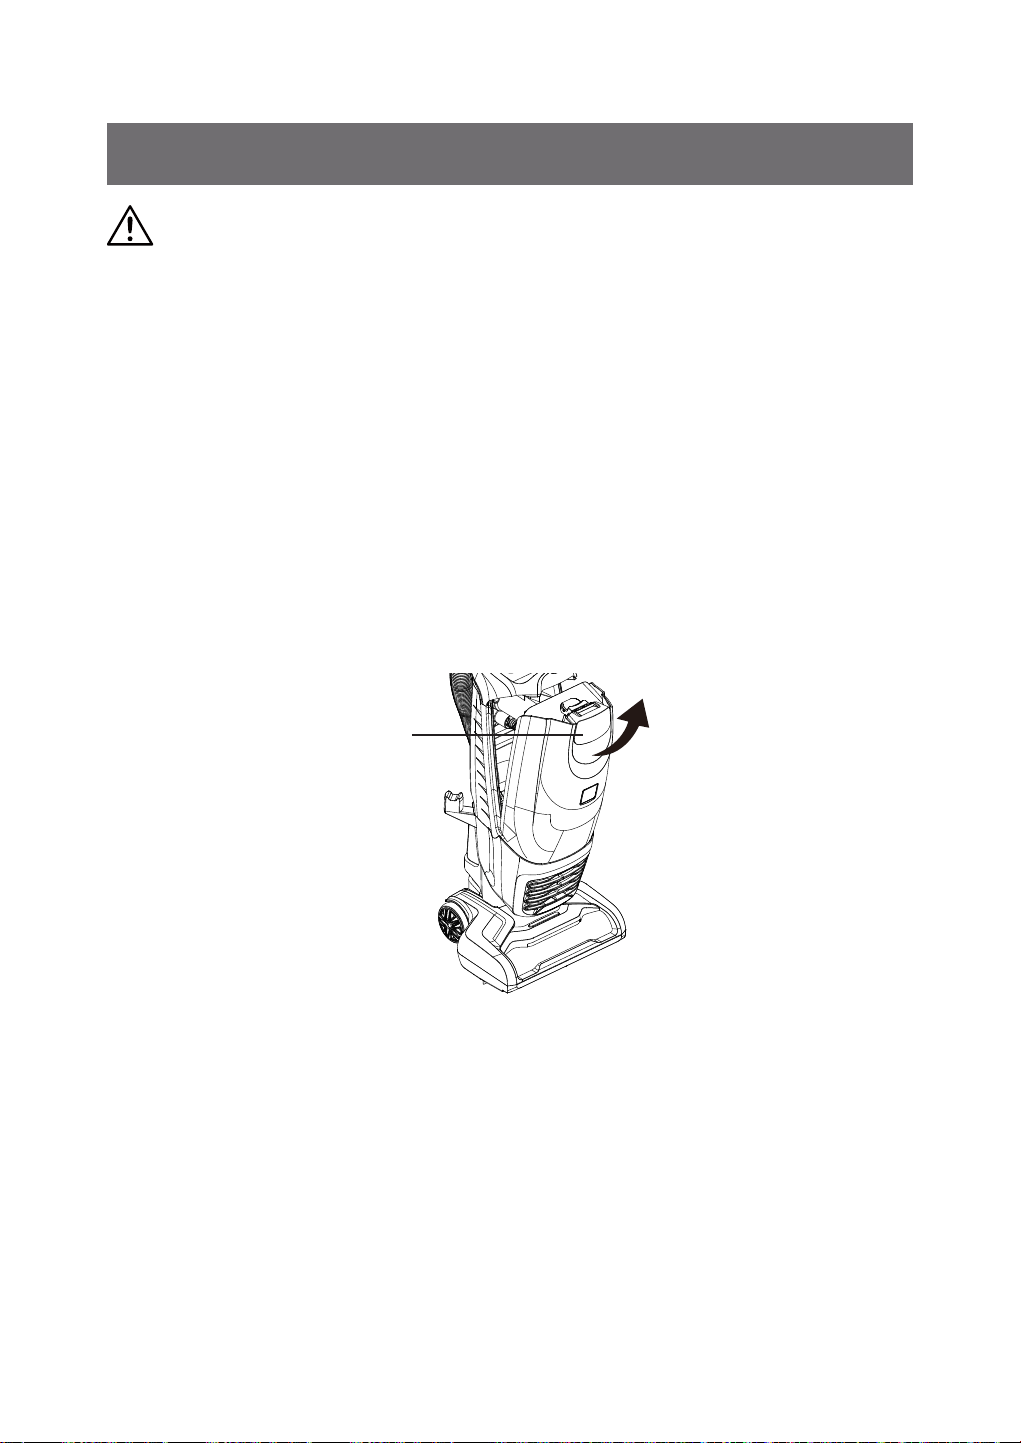
-19-
PRECAUCIÓN
Para reducir el riesgo de descarga eléctrica, apaga y desconecta el cable de
alimentación antes de realizar cualquier servicio o mantenimiento.
NOTA: Use un paño seco para limpiar el exterior del producto. No permita que
ningún tipo de líquido ingrese a la unidad. Lave los accesorios en agua tibia
jabonosa, enjuague y seque al aire. No limpiar en lavavajillas.
Cambio De La Bolsa Para Polvo
Para obtener los mejores resultados de limpieza, la bolsa de polvo debe
cambiarse a menudo. El indicador CHECK BAG se encenderá de color rojo
FXDQGRODEROVDGHEDFDPELDUVHRFXDQGRHOÀXMRGHDLUHHVWpEORTXHDGR
NOTA: Preste siempre atención al indicador CHECK BAG.
1.
Extraiga y levante el asa de liberación de la cubierta de la cámara de la bolsa de
polvo y sostenga la cubierta con la empuñadura.
NOTA: No presiones el botón de liberación de la bolsa de polvo al soltar la
cubierta de la cámara, o la bolsa de polvo caerá automáticamente.
MANTENIMIENTO PARA SU ASPIRADORA
Liberación de la cubierta
de la cámara de la
bolsa de polvo
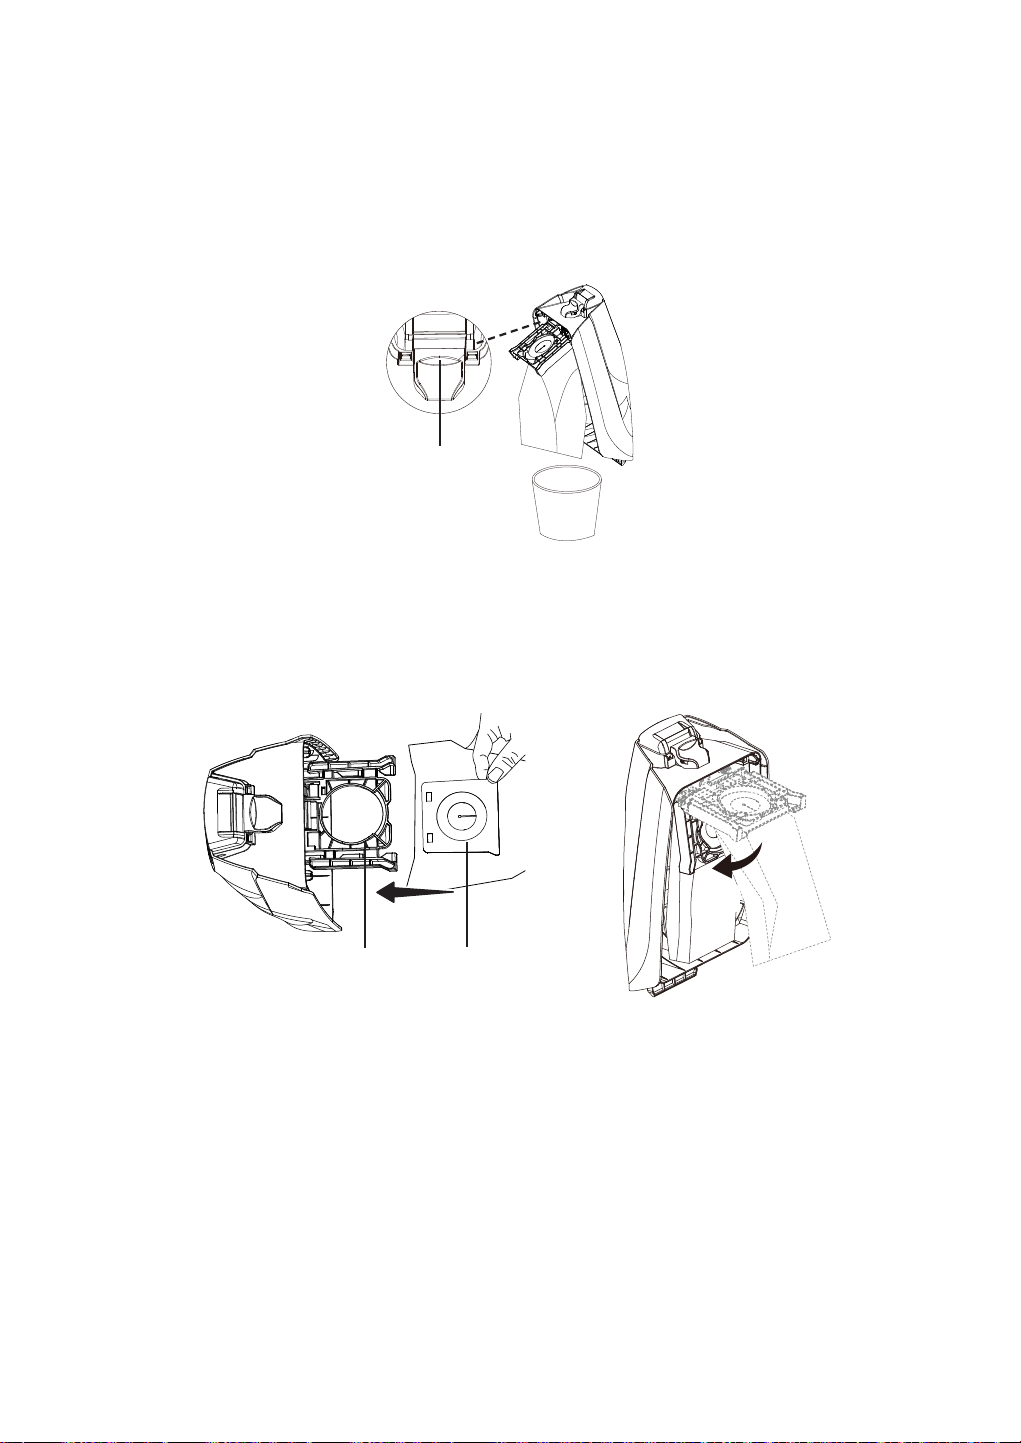
-20-
2. Incline la cámara de la bolsa tal como se indica. Presione el botón de
liberación de la bolsa de polvo y la bolsa de polvo caerá automáticamente.
3. Para instalar una nueva bolsa de polvo, inserte el collarín de la bolsa de polvo
en el soporte hasta escuchar un “clic” y luego gire el soporte hacia abajo
hasta escuchar otro “clic”. Inserte la bolsa en la cámara de la bolsa de polvo.
Asegúrese de que todos los lados de la bolsa de polvo calcen bien dentro de
la cámara de polvo.
Botón de
liberación de la
bolsa de polvo
Clic
Clic
Soporte
Collarín de la bolsa
de polvo

-21-
4. Coloque la pestaña de la cámara de la bolsa de polvo en la ranura de la
aspiradora. Presione la cubierta de la cámara de la bolsa de polvo hacia su
posición hasta escuchar un “clic”.
NOTA: $VHJ~UHVHGHTXHODEROVDGHSROYRTXHGH¿MDDQWHVGHSUHVLRQDUOD
cubierta de la cámara de la bolsa de polvo. La cubierta de la cámara de la bolsa
de polvo no se puede ensamblar exitosamente si la bolsa no está instalada ni en
posición.
Ranura
Pestaña
Limpieza Del Filtro De Espuma
5HYLVHIUHFXHQWHPHQWHHO¿OWURGHHVSXPD\OtPSLHORFXDQGRHVWpVXFLR
&XDQGROLPSLDUHO¿OWUR\DQRUHVWDXUHODSRWHQFLDGHVXFFLyQGHODDVSLUDGRUDR
FXDQGRHO¿OWURVHKD\DJDVWDGRRGDxDGRFiPELHOR
/LPSLH\UHHPSODFHUHJXODUPHQWHHO¿OWURSDUDPDQWHQHUODSRWHQFLDGHVXFFLyQ
de la aspiradora a un nivel óptimo.
1. Saque la bolsa de polvo como se indica en Cambio De La Bolsa De Polvo
(página 19).
6DTXHODFXELHUWDGHO¿OWURGHHVSXPD\HO¿OWURGHHVSXPD
&XELHUWDGHO¿OWUR
de espuma
Filtro de espuma
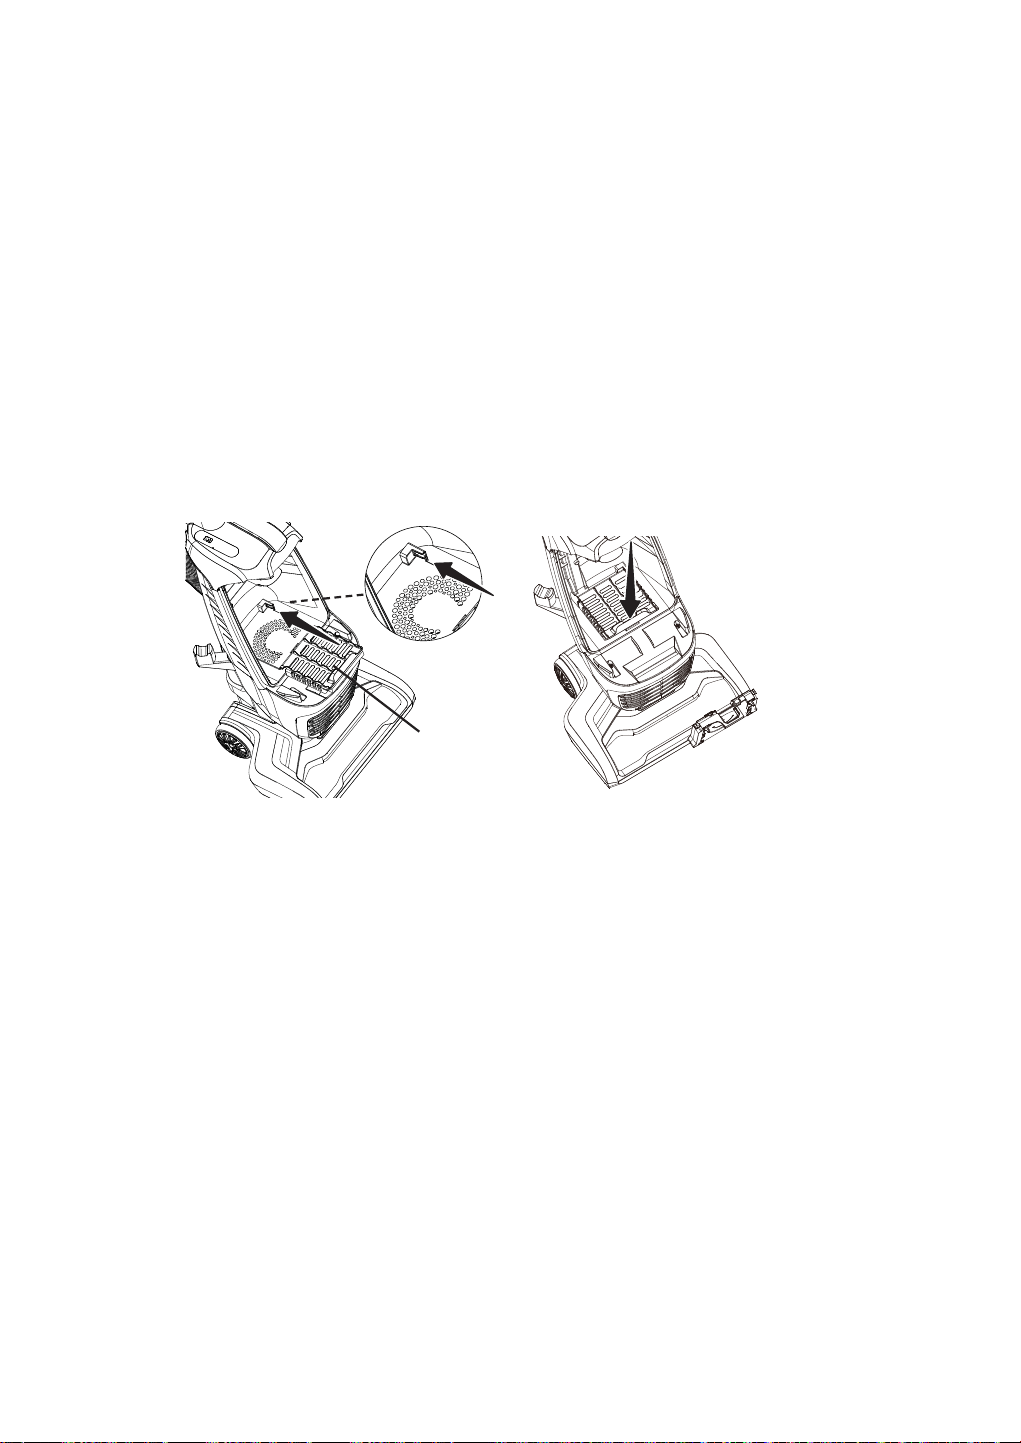
-22-
/DYHHO¿OWURFRQDJXDMDERQRVDWLELDHQMXDJXH\VHTXHH[KDXVWLYDPHQWH
HVWUXMDQGRHOH[FHVRGHDJXDGHO¿OWUR\GHMiQGRORVHFDUGXUDQWHKRUDV
NOTA: 12XVDUVLQHO¿OWURGHHVSXPDLQVWDODGR
IMPORTANTE:
/RV¿OWURVGHEHQHVWDUFRPSOHWDPHQWHVHFRVDQWHVGH
reutilizarlos.
5HLQVWDOHHO¿OWURGHHVSXPDHQODFXELHUWDGHO¿OWUR\GHVOtFHORKDFLDODV
ranuras hasta que quede en posición. Presione la cubierta para bloquearla en
posición hasta escuchar un “clic”.
NOTA: &DPELHHO¿OWURGHHVSXPDVLHVWiURWRRJDVWDGR
5. Reinstale la bolsa de polvo como se indica en Cambio De La Bolsa De Polvo
(página 20).
Filtro de espuma
y cubierta del
¿OWURGHHVSXPD
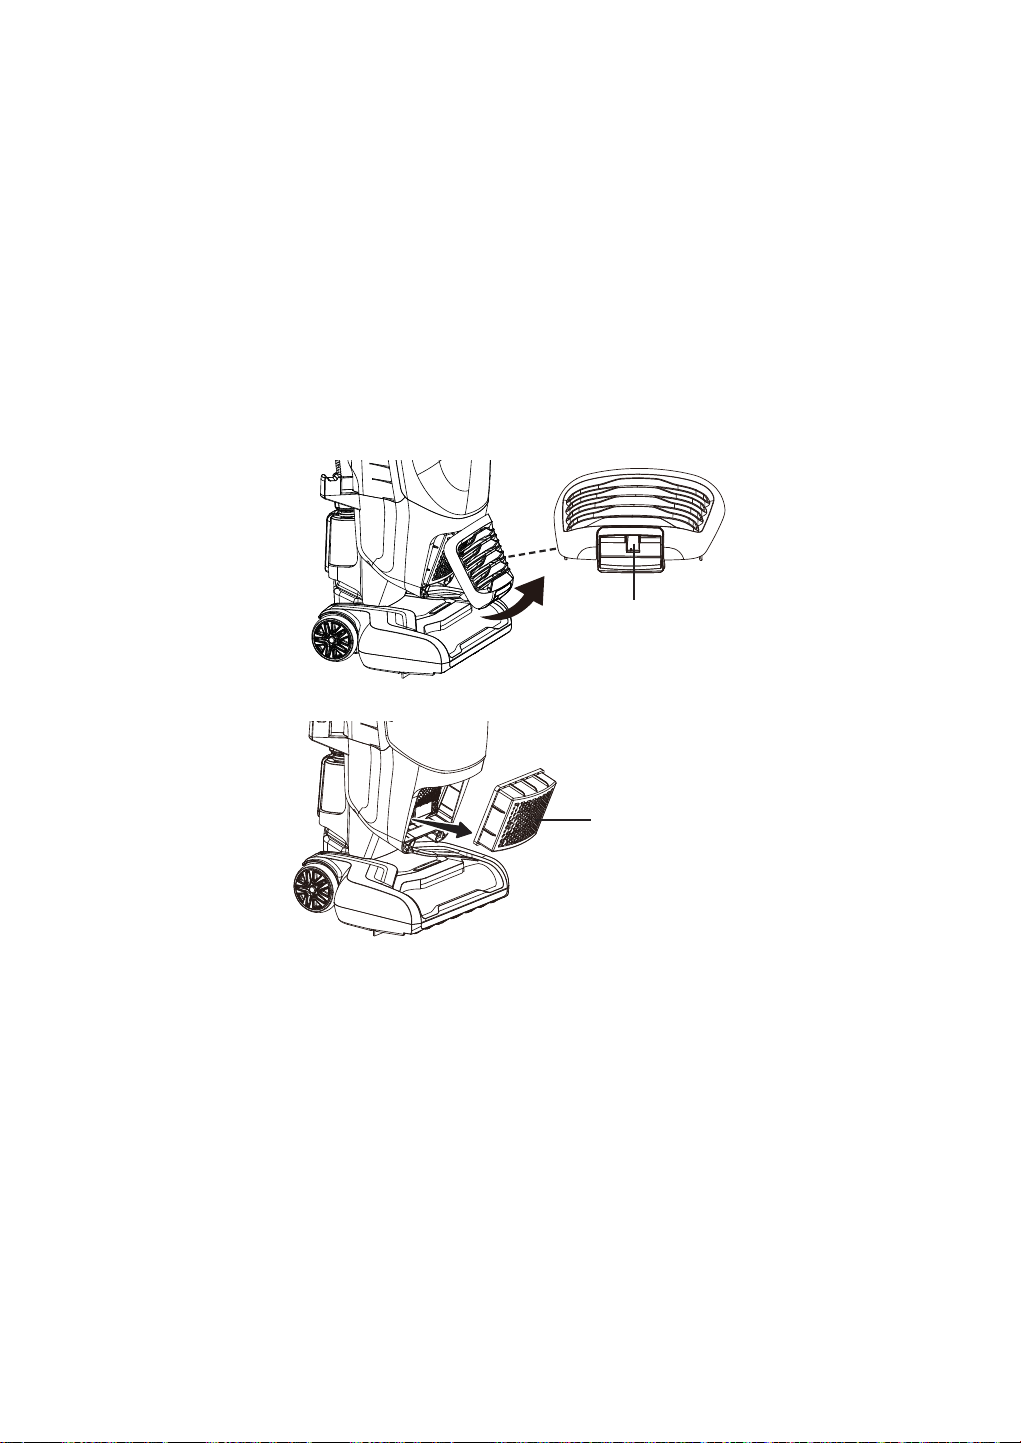
-23-
Limpieza Del Filtro De Escape De Medios HEPA
5HFRPHQGDPRVOLPSLDUHO¿OWURGHHVFDSHGHPHGLRV+(3$FRQDJXDIUtDXQDYH]
al año.
NOTA:&XDQGROLPSLDUHO¿OWUR\DQRUHVWDXUHODSRWHQFLDGHVXFFLyQGHOD
DVSLUDGRUDRFXDQGRHO¿OWURVHKD\DJDVWDGRRGDxDGRFiPELHOR
7LUHGHORUL¿FLRFXDGUDGRKDFLDDIXHUDHQODSDUWHGHDEDMRGHODFXELHUWDGHO
¿OWURGHHVFDSHSDUDTXLWDUOD
6DTXHHO¿OWURGHHVFDSHGHPHGLRV+(3$GHODDVSLUDGRUD
3. Lave usando solo agua fría, NO use detergentes o jabón. Deje secar al aire.
Deje secar las piezas durante 24 horas antes de volver a colocarlas en la
aspiradora.
NOTA: 12RSHUHVLQHO¿OWURGHHVFDSHGHPHGLRV+(3$LQVWDODGR
IMPORTANTE:
/RV¿OWURVGHEHQHVWDUFRPSOHWDPHQWHVHFRVDQWHVGH
reutilizarlos.
2UL¿FLRFXDGUDGR
Filtro de escape de
medios HEPA
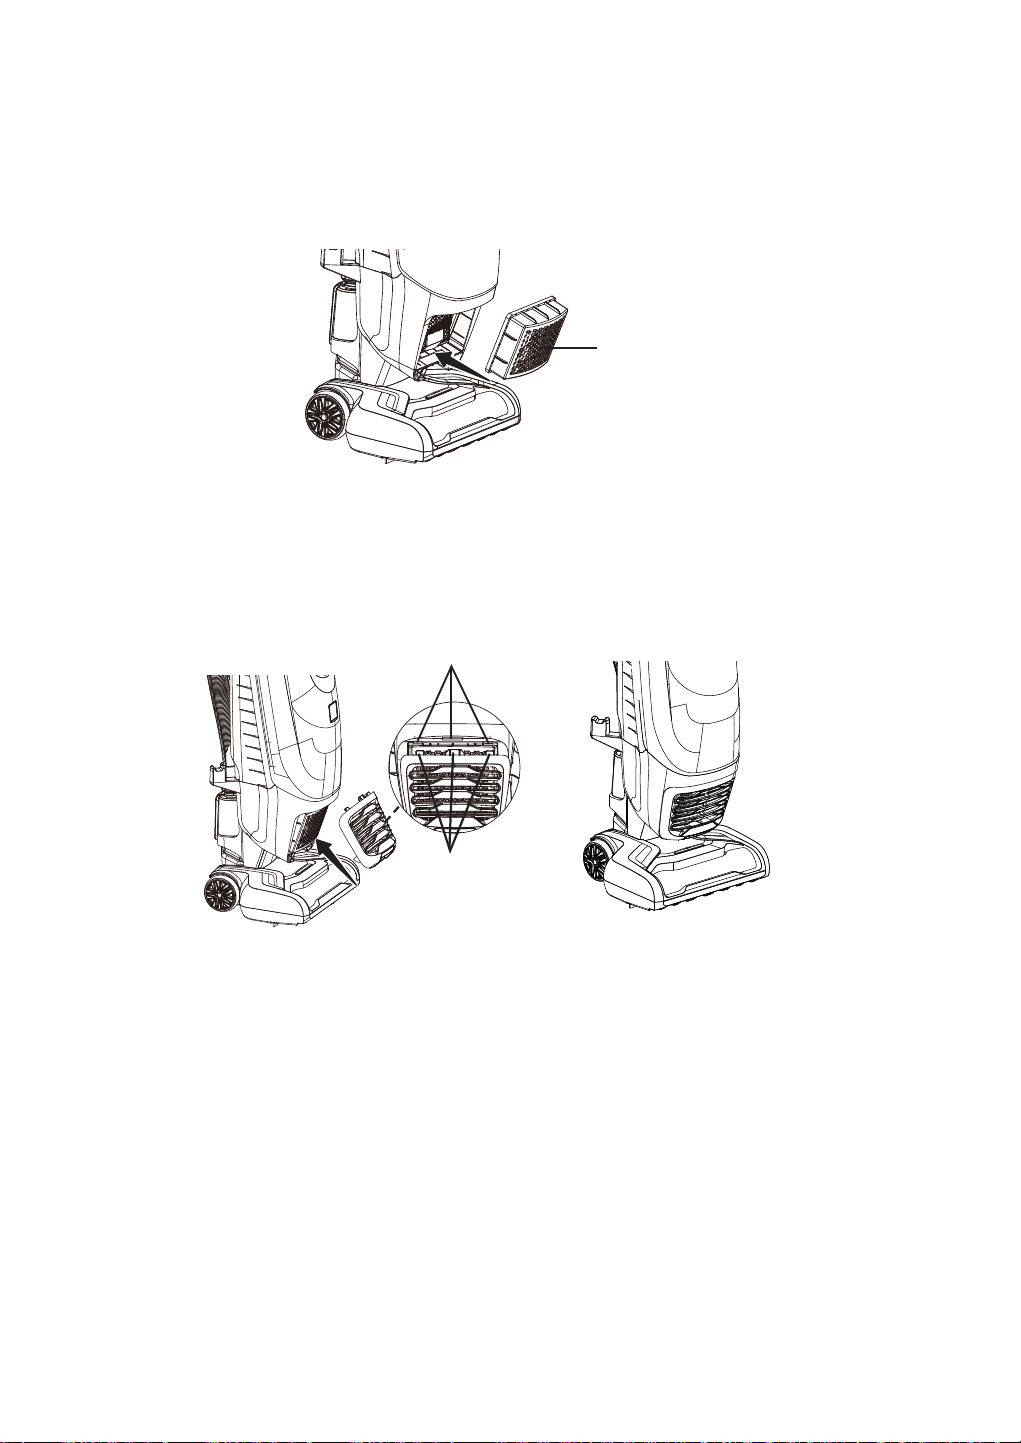
-24-
5HLQVWDOHHO¿OWURGHHVFDSHGHPHGLRV+(3$HQODDVSLUDGRUD
,QWURGX]FDODVSHVWDxDVGHODFXELHUWDGHO¿OWURGHHVFDSHHQODVUDQXUDV
VXSHULRUHV\¿MHODFXELHUWDGHO¿OWURGHHVFDSHHQVXOXJDUSUHVLRQDQGROD
parte inferior de la cubierta hasta escuchar un clic.
NOTA:$VHJ~UHVHGHTXHODFXELHUWDGHO¿OWURGHHVFDSHHVWpLQVWDODGD
correctamente.
Filtro de escape
de medios HEPA
Ranuras
Pestañas

-25-
Limpieza Del Cepillo De Rodillo
ADVERTENCIA
Desenchufe siempre el cable de alimentación de la toma de corriente antes de
realizar tareas de mantenimiento en la aspiradora.
3DUDPDQWHQHUXQDOLPSLH]DH¿FLHQWHHOFHSLOORGHURGLOORGHEHHVWDUOLEUHGH
¿EUDGHDOIRPEUDVKHEUDVXREVWUXFFLRQHVGHFDEHOOR6LHOFHSLOORGHURGLOORHVWi
atascado, desconecte y voltee la aspiradora para revisar que el cepillo de rodillo
QRWHQJDDFXPXODFLRQHVGH¿EUDV\SHORV8VHXQDVWLMHUDVSDUDVDFDUFXDOTXLHU
objeto enredado en el cepillo de rodillo. Recomendamos limpiar el cepillo de
rodillo periódicamente para lograr el máximo desempeño.
Cómo Quitar Obstrucciones
ADVERTENCIA
Desconecte la fuente de alimentación antes de quitar obstrucciones. El no seguir
estas indicaciones puede provocar lesiones personales o descargas eléctricas.
&RPSUREDFLyQGHREVWUXFFLRQHVHQODPDQJXHUDÀH[LEOH
:
En caso de haber un ruido anormal al usar la aspiradora, o si la potencia de
succión cae súbitamente, es necesario revisar que no haya obstrucciones en la
vía aérea.
Revise frecuentemente la vía de aire para asegurarse de que no tenga
obstrucciones.
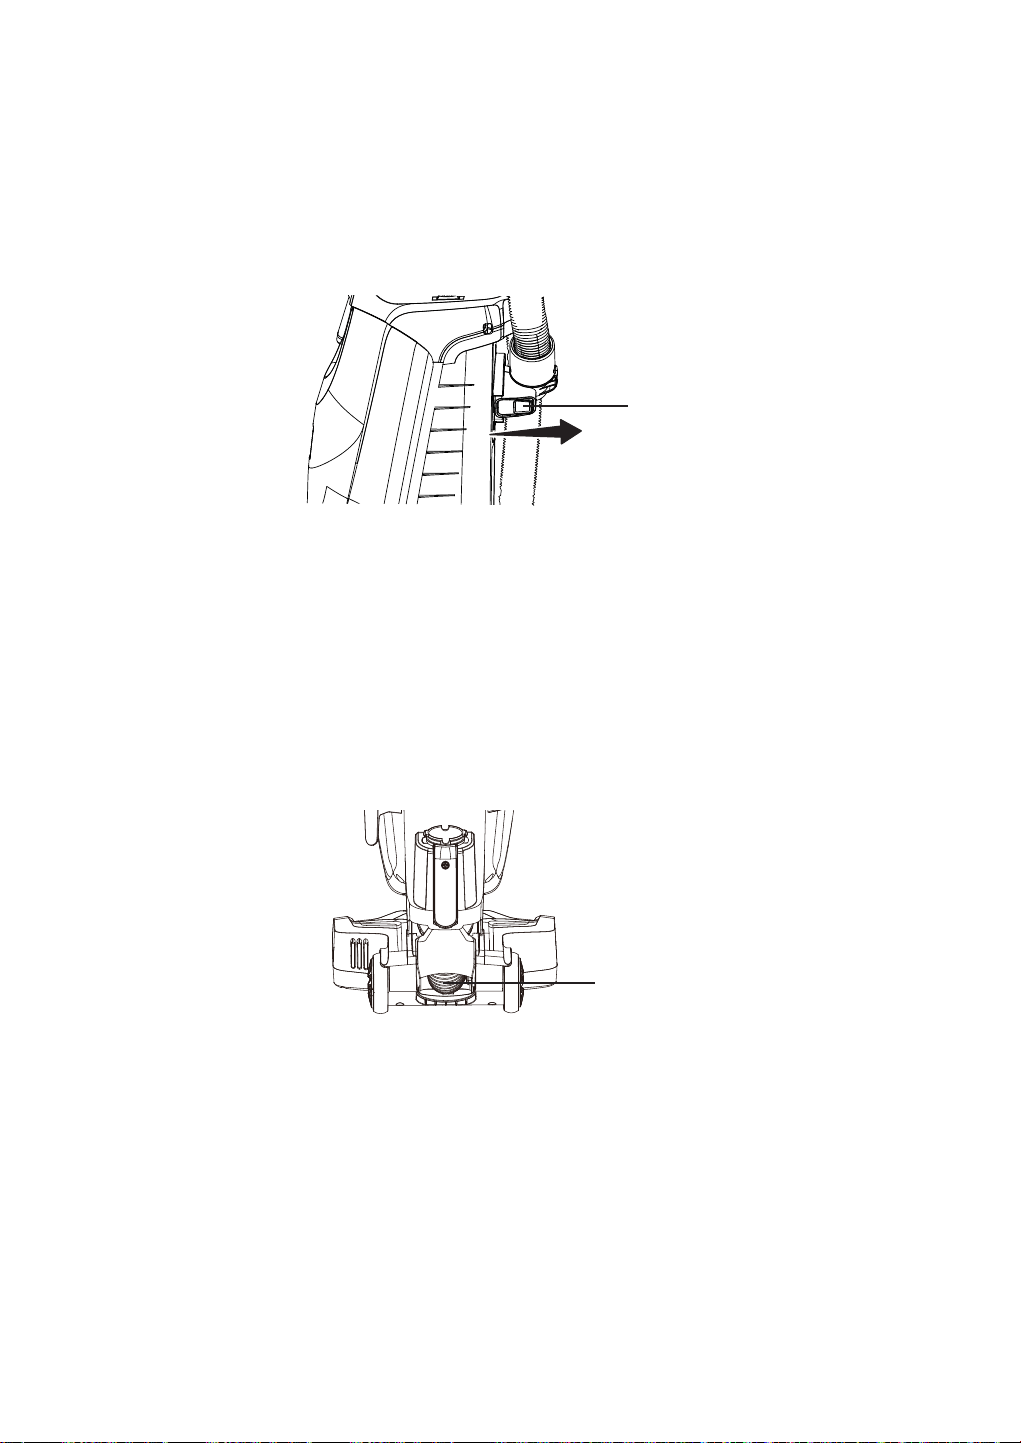
-26-
1. Presione el botón de liberar la manguera y extraiga la manguera del cuerpo
principal. Libere el otro extremo de la manguera de la conexión de manguera
inferior.
5HYLVH\VDTXHFXDOTXLHUWDSyQGHODPDQJXHUDÀH[LEOH
5HLQVWDOHODPDQJXHUDÀH[LEOHHQODDVSLUDGRUD&RQVXOWH,16758&&,21(6
GENERALES DE ENSAMBLAJE (página 6).
Comprobación de obstrucciones en la manguera de conexión:
1. Libere el extremo de la manguera de la conexión de manguera inferior.
2. Revise y quite cualquier obstrucción de la manguera de conexión.
9XHOYDDFRQHFWDODPDQJXHUDÀH[LEOHHQODFRQH[LyQGHPDQJXHUDLQIHULRU
Botón de liberación de
la manguera
Manguera de conexión

-27-
RESOLUCIÓN DE PROBLEMAS
Si tiene algún problema con su aspiradora, revise la tabla a continuación para
encontrar soluciones a problemas de rendimiento no críticos.
PROBLEMA CAUSA PROBABLE SOLUCIÓN
La aspiradora
no funciona.
El enchufe no está conectado
en la toma de corriente.
Asegúrese de que el enchufe del cable
de alimentación esté completamente
insertado en el tomacorriente.
No está presionado el interruptor
de encendido/apagado para
encender en la aspiradora.
Presione el interruptor de Encender/
$SDJDUHQODSRVLFLyQ,R,,
Toma de corriente defectuosa.
Pruebe usando una lámpara o
electrodoméstico que funcione
correctamente. Haga que reparen
correctamente la toma de corriente.
El cuerpo de la aspiradora está
sobrecalentado.
Desconecte el cable de alimentación
y deje enfriar la aspiradora durante 50
minutos.
El motor está dañado.
Llame al 1-866-384-8432 para obtener
ayuda.
Recolección
de suciedad
LQH¿FLHQWH
La manguera y accesorios no
están instalados correctamente.
Revise que la manguera y accesorios
estén bien instalados y asegúrese de
TXHVHFRQHFWHQ¿UPHPHQWH
La manguera no está instalada
en el lugar correcto cuando se
usa el modo vertical.
Revise y asegúrese de que la
manguera esté instalada correctamente
en el cuerpo principal (página 6).
La bolsa de polvo no está
instalada correctamente.
Revise que la bolsa de polvo esté
bien instalada y asegúrese de que se
FRQHFWH¿UPHPHQWH
Bolsa de polvo llena o tapada. Cambie la bolsa de polvo.
ADVERTENCIA
Desconecte el suministro eléctrico antes de realizar cualquier trabajo de
mantenimiento en la aspiradora. El no seguir estas indicaciones puede provocar
lesiones personales o descargas eléctricas.

-28-
PROBLEMA CAUSA PROBABLE SOLUCIÓN
Recolección
de suciedad
LQH¿FLHQWH
Hay una obstrucción en la vía
aérea.
Revise y saque cualquier tapón. Siga
las instrucciones de la página 25.
El control de succión está en
posición abierta.
Ajuste el control de succión para
aumentar la potencia. Siga las
instrucciones de la página 18.
Debe limpiar o reemplazar
HO¿OWURGHHVSXPDR¿OWURGH
escape de medios HEPA.
/LPSLHRUHHPSODFHHO¿OWURGHHVSXPD
R¿OWURGHHVFDSHGHPHGLRV+(3$
Siga las instrucciones de limpieza o
FDPELRGHO¿OWURGHHVFDSHGHPHGLRV
HEPA que se indican en la página 21 o
23.
La manguera está gastada.
Cambie la manguera. Puede comprar
en línea en www.vacmaster.com o
llamando al 1-866-384-8432.
La manguera de conexión está
gastada.
Llame al 1-866-384-8432 para obtener
ayuda.
El cepillo de rodillo está gastado.
Llame al 1-866-384-8432 para obtener
ayuda.
La correa está gastada o rota.
Llame al 1-866-384-8432 para obtener
ayuda.
Hay un escape
de polvo en la
aspiradora.
La bolsa de polvo o la cubierta
de la cámara de la bolsa de
polvo no están correctamente
instaladas.
Revise que la bolsa de polvo o cubierta
de la cámara de la bolsa de polvo
estén bien instaladas y asegúrese de
TXHVHFRQHFWHQ¿UPHPHQWH6LJDODV
instrucciones de la página 20-21.
(O¿OWURGHHVFDSHGHPHGLRV
HEPA está mal instalado.
5HYLVHTXHHO¿OWURGHHVFDSHHVWpELHQ
instalado. Siga las instrucciones de la
página 23.
La bolsa de polvo está gastada
o rota.
Revise y cambie la bolsa de polvo.

-29-
PROBLEMA CAUSA PROBABLE SOLUCIÓN
Hay un escape
de polvo en la
aspiradora.
(O¿OWURGHHVSXPDRHO¿OWURGH
escape de medios HEPA están
gastados o rotos.
5HYLVH\UHHPSODFHHO¿OWURGHHVSXPD
R¿OWURGHHVFDSHGHPHGLRV+(3$
El cepillo de
rodillo no gira.
La empuñadura está en posición
totalmente recta.
Mueva la empuñadura desde su
posición totalmente recta.
Modo seleccionado incorrecto.
Presione el interruptor en la posición
,,SDUDHQFHQGHUHOFHSLOORGHURGLOOR
El cepillo de rodillo está
atascado.
Quite la obstrucción. Siga las
instrucciones de la página 25.
El cepillo de rodillo no está
instalado correctamente.
Llame al 1-866-384-8432 para obtener
ayuda.
El motor del cepillo de rodillo se
ha recalentado.
Apague y desconecte la aspiradora.
Revise y despeje la vía de aire
para asegurarse de que no tenga
obstrucciones. Revise y cambie
la bolsa de polvo si está llena. A
continuación, conecte la aspiradora y
enciéndala.
La correa no está bien colocada.
Llame al 1-866-384-8432 para obtener
ayuda.
Falla en la sección PCB de la
boquilla motorizada.
Llame al 1-866-384-8432 para obtener
ayuda.
El sonido
cambia.
/DFXELHUWDGHO¿OWURGHHVFDSH
no está instalada correctamente.
Coloque correctamente la cubierta
GHO¿OWURGHHVFDSH\KiJDODFDO]DU
FRQ¿UPH]DHQSRVLFLyQ6LJDODV
instrucciones de la página 24.
La vía aérea está bloqueada.
Revise y quite cualquier obstrucción
y despeje la vía aérea. Siga las
instrucciones de la página 25.

-30-
PROBLEMA CAUSA PROBABLE SOLUCIÓN
El sonido
cambia.
Los accesorios en uso restringen
HOÀXMRGHDLUH
Revise que los accesorios no tengan
pelusas, pelo de mascotas u otros
sedimentos.
La aspiradora
se apaga sola.
La clavija del cable de
alimentación se suelta de la
toma de corriente al usar la
aspiradora.
Reinserte la clavija del cable de
alimentación en la toma de corriente.
Evite tirar del cable de alimentación o
arrastrarlo al usar la aspiradora.
Protector térmico activado.
Apague la aspiradora y desconéctela.
Revise la vía aérea y bolsa de polvo.
Deje enfriar la aspiradora durante un
mínimo de 50 minutos. Conecte la
aspiradora y enciéndala.
El motor está dañado.
Llame al 1-866-384-8432 para obtener
ayuda.
El indicador
CHECK BAG se
activa.
Bolsa para polvo llena o tapada. Cambie la bolsa.
Filtros sucios. /LPSLHFDPELHORV¿OWURV
Pasaje de aire bloqueado.
Apague y desconecte la aspiradora.
Limpie el bloqueo del pasaje de aire.
Conecte la aspiradora y enciéndala.
Ciertas herramientas
accesorias.
Lo cual es completamente normal. El
indicador se volverá verde al sacar la
herramienta.

-31-
PROBLEMA CAUSA PROBABLE SOLUCIÓN
La luz
indicadora de
estado del
cepillo de rodillo
está de color
rojo.
Hay un atascamiento en el área
del cepillo de rodillo.
Apague y desconecte la aspiradora.
Saque cualquier bloqueo del cepillo de
rodillo. Consulte la página 25.
El cepillo de rodillo está gastado
o roto.
Llame al 1-866-384-8432 para obtener
ayuda.
Falla en el motor del cepillo de
rodillo o en la sección PCB de la
boquilla motorizada.
Llame al 1-866-384-8432 para obtener
ayuda.
El motor del cepillo de rodillo se
ha recalentado.
Apague y desconecte la aspiradora.
Revise y despeje la vía de aire
para asegurarse de que no tenga
obstrucciones. Revise y cambie
la bolsa de polvo si está llena. A
continuación, conecte la aspiradora y
enciéndala.
La cubierta de
la cámara de la
bolsa de polvo
no se puede
instalar.
No hay bolsa de polvo. Instale la bolsa de polvo.
El collarín de la bolsa de polvo
no está instalado correctamente
en el soporte o el soporte no
se giró hacia abajo hasta su
posición correcta.
Introduzca el collarín de la bolsa de
polvo en el soporte hasta escuchar
XQFOLF*LUHHOVRSRUWHKDFLDDEDMR
KDVWDHVFXFKDURWURFOLF6LJDODV
instrucciones de la página 20.
El soporte está roto.
Llame al 1-866-384-8432 para obtener
ayuda.