Instruction Manual
CM1666
Espresso Coffee Machine
Voltage: ���V~ ��Hz

CONTENT
Chapter1. Important Safety Instructions
Chapter 2. Specifications
Chapter 3. Know Your Coffee Machine
Chapter 4. Control Panel
Chapter 5. Initial Use
Chapter 6. Making the Espresso
Chapter 7. Frothing Milk
Chapter 8. Over-heat Protection
Chapter 9. Resetting Default Mode
Chapter 10. Auto Shut-off
Chapter 11. Cleaning and Maintenance
Chapter 12. Descaling
Chapter 13. Trouble Shooting
Chapter 14. Warranty
1
2
2
3
4
5
5
7
7
7
7
8
8
10
Manufacturer: Hardshell Technology (Foshan) Co.,LTD
Add: No.�, Zhong Jian Road, Zhong Chong Village, Leliu Town, Shunde District, Foshan City,
Guangdong Province
Contact: Emily Tel: +�(���)��� ���� E-Mail: info@iamzchef.com

Chapter1.Important Safety Instructions
�. This equipment is not intended for use by children under � years of age. This equipment may be
used by children � years of age and older, persons with physical, sensory, or mental impairments,
or persons who lack experience and knowledge, provided they are supervised or instructed in the
safe use of the equipment and understand the hazards involved.
�. Check the appliance before each use and ensure that the appliance, power cord and plug are
not damaged and no parts have come loose.
�. If the supply cord is damaged, it must be replaced by the manufacturer, its service agent or
similarly qualified persons in order to avoid a hazard.
�. The appliance must not be immersed in water.
�. The heating element surface is subject to residual heat after use.
�. Cleaning and user maintenance shall not be made by children without supervision.
�. Never touch the hot appliance parts like the steam/hot water outlet, the metal part of the
portafilter or the filter during or shortly after use.
�. Never take the portafilter off while the appliance performs a brewing process or steams milk-the
appliance is pressurized!
�. Never point the steam/hot water wand towards persons, animals or steam and moisture
sensitive furniture! The escaping steam or the water is very hot and could cause scalding!
��. Only cups and tamper may be placed on the cup warmer. Do not place any other items on the
appliance.
��. Do not leave the espresso machine unattended when in use. This applies especially when
children are nearby.
��. Oils or lubricants must not be used with this appliance.
��. Pull the plug after every use. Only then, the appliance is fully switched off.
CAUTION:
The appliance becomes very hot during use! Allow the appliance to cool down before removing
or attaching parts, moving, relocating or cleaning it.
CAUTION:
FOR HOUSEHOLD USE ONLY.
After prolonged use, the cup warmer gets so hot that you might scald yourself on it!
1
Chapter2.Specifications
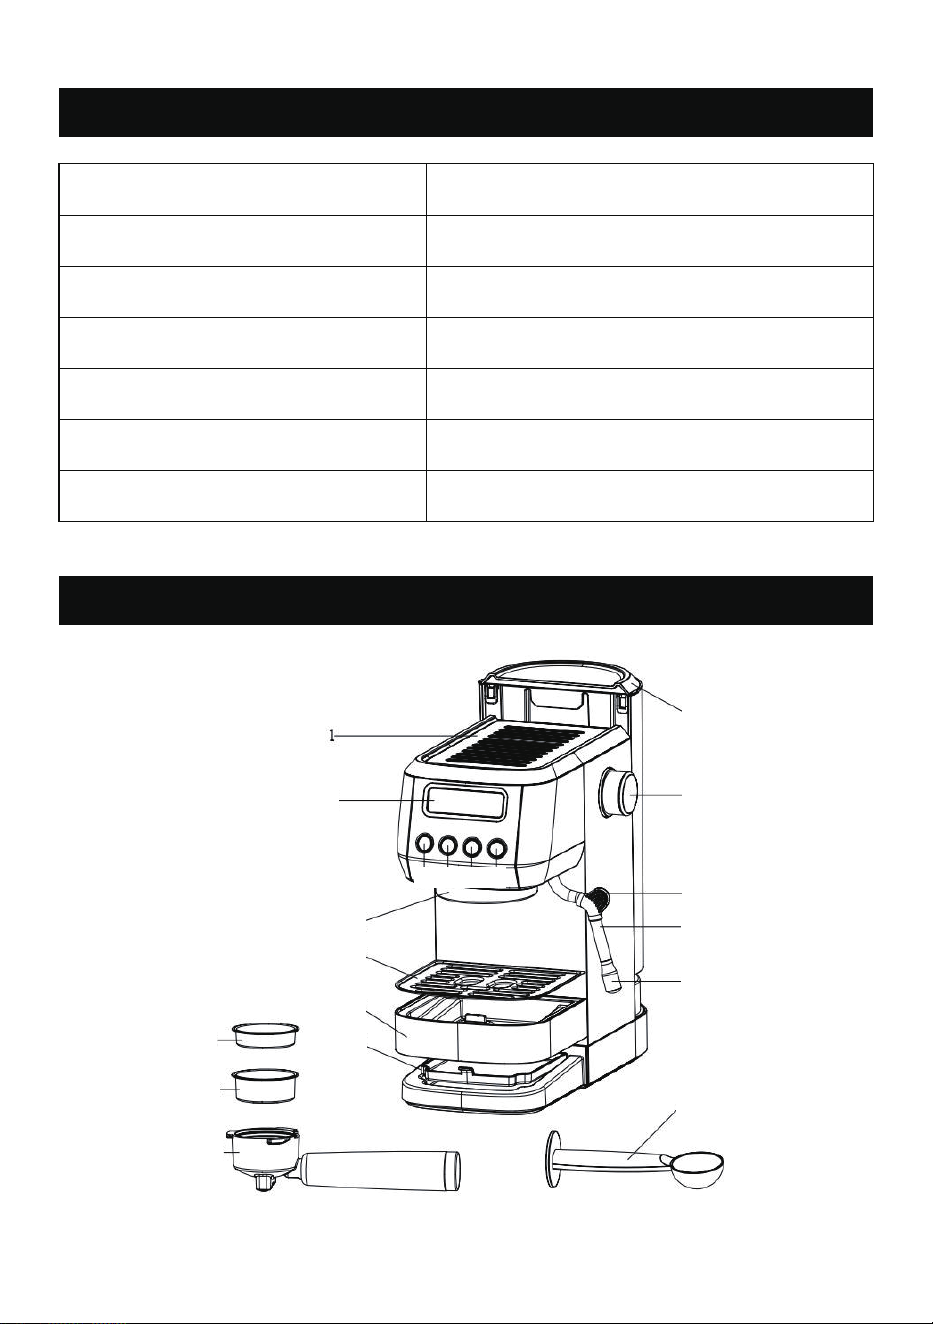
Chapter3.Know Your Coffee Machine
Model:
Voltage:
Power:
Espresso Pressure:
Capacity of Water Tank:
Product Size:
Product Weight:
CM����
���V~ ��Hz
����W
�� Bar
�.�L/��.�OZ
���*���*���MM/��*�.�*��.�INCH
�.��KGS/�.�LBS
❶
❷
❼
❽
❾
❿⓫
⓬
⓭
⓳
⓲
⓱
⓰
⓯
⓮
❸❹❺❻
2

Chapter4.Control Panel
❶
❷
❼
❽
❾
❿
⓫
⓬
⓭
⓳
⓲
⓱
⓰
⓯
⓮
❸
❹
❺
❻
Cup Warmer
Display Screen
ON/OFF Button
Coffee Brewing Button
Temperature Button
Steam Button
Brew Head
Drip Tray Grid
Drip Tray
Inner Drip Tray
Single Shot Filter
Double Shot Filter
Filter Holder
Removable Water Tank
Steam Knob
Thermo-insulated Handle
Steam Wand
Steam Nozzle
Measure Spoon with Tamper
A
B
ON/OFF Power Button
LCD Display
Press to turn on/off the power
Show the working status clearly
3
Chapter5.Initial Use
�. Fill the water tank with cold water up to the MAX level of the tank.
�. Press the Power button, the Power indicator light turns on and the coffee machine starts to
preheat automatically. Once the preheating is finished, all the buttons will light up continuously.
This preheating process takes about � minutes.
�. Place a cup under the Steam Wand. Turn on the steam knob. Let the hot water flow out of the
steam wand for about � seconds, then turn off the steam knob. This process is let the water flow
into the empty pump for the first use.
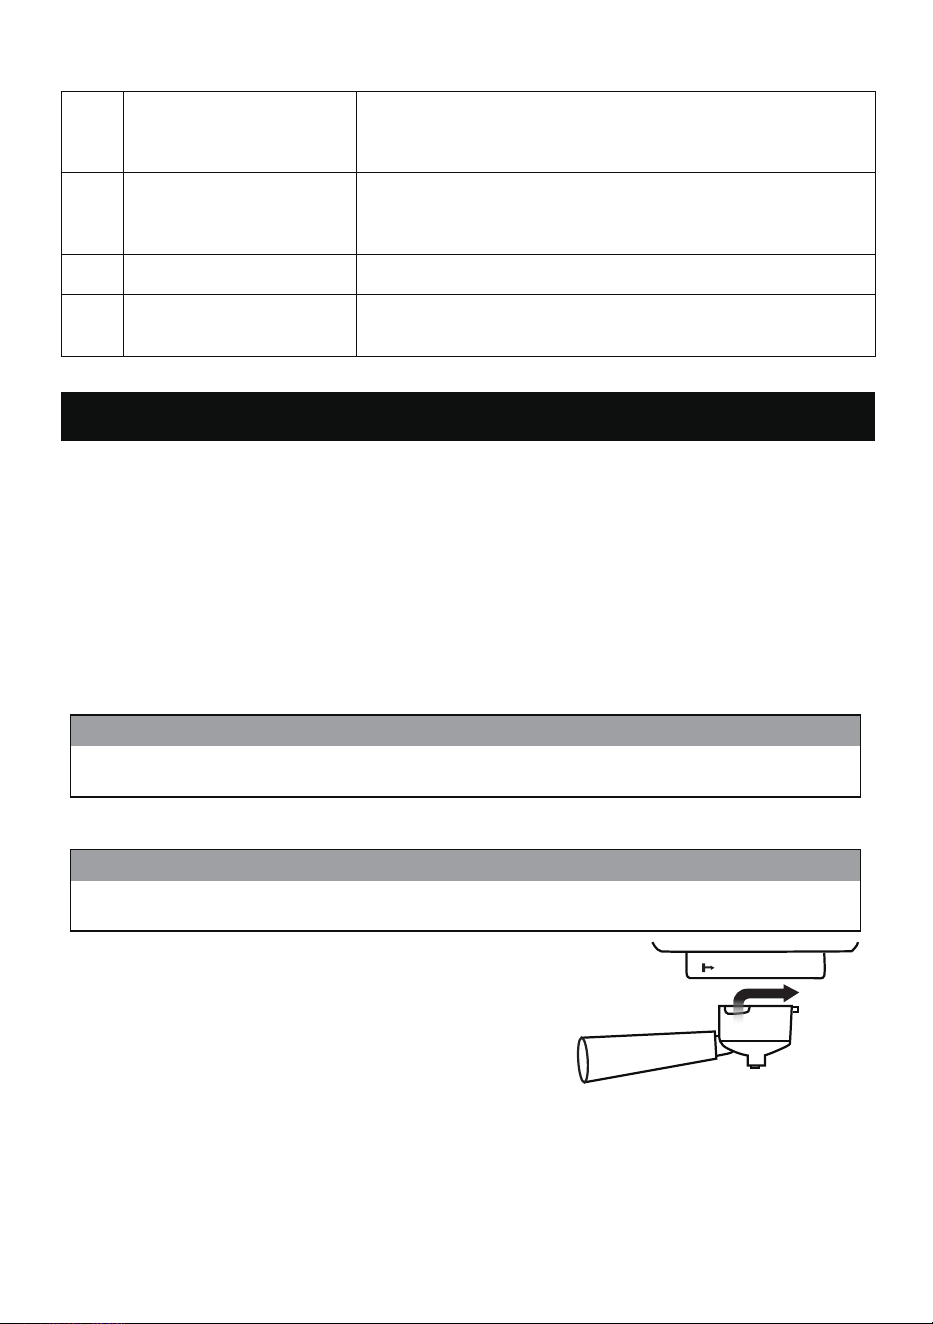
�. Insert the Filter into the Filter holder.
�. Offset the filter holder without coffee grounds ��° to the
left and insert into the brewing head, turn it to the right to
lock it in place. The completed filter holder must be installed
perpendicular to the machine or slightly tilted to the right.
There will be a loud noise and little shake when the machine running first time. It's normal
for a ��bar pump. The noise will be weak in the future using.
NOTE
The filter might be a litter tight and hard to take it out from filter holder when you want to
change the filter. You can use another filter to pry it out.
NOTE
�.Place an empty cup under the filter holder and press the single or double button to brew.
�.After the brewing cycle has finished, pour the water out.
Now your coffee machine is ready to use.
C
Coffee Brewing Button
Press once to make single shot
Press twice to make double shots
Press three times for manual coffee brewing
D
E
Temperature Button
Default mode = Standard temperature coffee brewing mode
Press once to switch to low temperature mode
Press twice to switch to high temperature mode
Steam Button Press to enter or quit steam mode
F
Steam Knob
Turn conterclockwise to open to make steam or hot water
Turn clockwise when finish steam or hot water
t Lock
4

Cold filter holders, filters and cups reduce the extraction temperature, which affects the quality of
the espresso. We recommend to ran a brewing cycle without coffee ground to preheat them before
extraction.
�.Remove the filter holder and fill the filter with coffee grounds using the tamp spoon provided
with the machine.
� We recommend �g for single shot and ��g for double shot. The amount will vary depending on
your preferences and the coffee grounds you used.
�.Tamp the coffee grounds with the tamp spoon. The coffee grounds must be pressed evenly to
obtain a well levelled and flat surface.
Chapter7.Frothing Milk
Chapter6.Making the Espresso
� After selecting the mode you want, machine will start to work �s later.
� When in manual mode, press again the Coffee Brewing Button to stop when reach to your
desired amount, or the machine will stop automatically after ��s. The max time for manual
should not exceed � min.
� We do not recommend using finer coffee powder from the grinding bean gear below �
levels for extraction, which will cause the filter to clog and cause a lack of water indication. If
the screen flashes a water shortage sign when there is water in the tank, remove the filter
and soak in boiling water for about �� mins, and replace the coarser powder for
re-extraction.
NOTE
�.Make sure the steam knob is on “OFF” position.
�.Press the temperature and the coffee brewing button according to your favor.
Continue as follows:
�. Press the steam button. The machine will start to preheat and corresponding icon on screen will
start to flash if the temperature is not high enough to make steam. Once the preheating has
finished, the Preheat icon will disappear, only steam icon will be shown.
�. Turn the steam knob slightly counterclockwise to eliminate any condensation from the wand
then turn the knob off again.
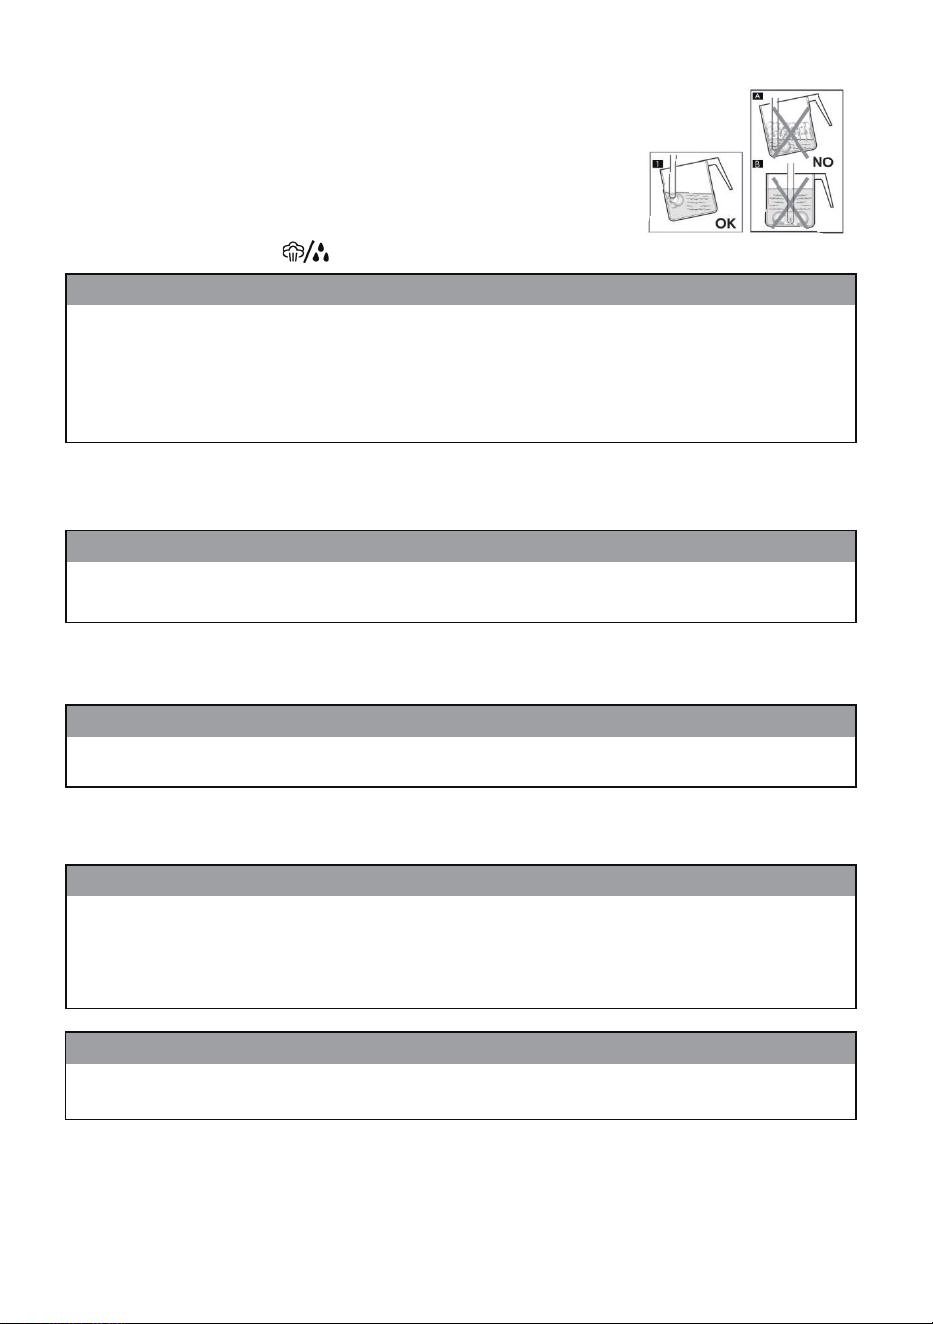
�. Place the jug, half-filled with cold milk, under the steam wand.
Before starting, it is important to slightly move the steam wand outwards in order to insert the jug
directly under it and facilitate the movements required to froth the milk correctly.
The flavor of your coffee will depend on many factors, such as the type of coffee beans, degree of
roast, freshness, coarseness or fineness of the grind, dose of ground coffee, and tamping pressure.
Experiment by adjusting these factors just one at a time to achieve the taste of your preference.
5
�. Press the steam button again to quit the steam mode. Pour the frothed milk into the coffee.
�. Turn the steam knob on to eliminate any residue milk from the wand then turn the knob off again.
�. Once the desired result has been achieved, turn the steam knob to “OFF" position to stop
dispensing steam and remove the jug.
�. Once the desired frothing result has been achieved, the steam nozzle must be pushed deeper to
heat the milk well.
�. Turn the steam knob to “ ” position. The steam will come out of the steam wand.
� When finished the steam, be sure to close the steam knob.
� After finish the steam function, press the steam button to return to standby mode.
� After steam function, the machine is under overheat protecting. (Refer to Over-heat protec-
tion to cool up the machine)
NOTE
� The entire operation should last no longer than � minutes, because the machine will stop
making steam automatically after � minutes of continuous steaming.
� To froth the milk correctly, the steam nozzle must always be in contact with the milk and not
with the froth. Therefore, as the layer of froth increases, the jug must be slightly raised trying
to keep the Steam Tube in contact with the milk, without touching the bottom of the jug.
NOTE
It is advisable to always keep a hand on the rounded part of the jug to feel the temperature
increase of the unfrothed milk.
NOTE
To make the froth more compact, it is advisable to lightly tap the jug on a flat surface after
frothing.
NOTE
The steam wand may be very hot during and after use. To avoid burns, move it only by
placing your fingers on the rubber tip fitted on the steam wand.
WARNING
�. Place the steam nozzle just below the surface of the milk. If it is
inserted too deep or not deep enough, the milk will not be frothed
correctly. It is important to keep the Steam Tube not at the center but
close to the edge of the jug, with an appropriate angle to produce a
stronger vortex.
6

Cleaning the Filter Holder and the filters
If you find that the filter is blocked with a very fine powder while brewing coffee, immerse the filter
in boiling water for �� minutes to dredge it, then rinse it with running water.
When the machine returns to standby mode after steam function (the maximum continuous steam
cannot be more than ��� seconds), an overheating icon flashes on the screen, indicating that the
coffee machine is under overheating protection. Do not make coffee immediately, the temperature
of boiler is very high and must be cooling down first, or the coffee will be burnt and may come out
of the filter holder.
Please proceed as below � steps to cool up the machine:
a. Under the overheat protection, turn the steam knob “ ” position to make hot water.
b. Let hot water come out from the steam wand to cool down the boiler.
c. Once the temperature of boiler is cool down, the Overheat icon will be disappear on the screen.
d. Turn the knob back to the "OFF" position, and the coffee machine is ready for the next brew.
To reset the machine to the default mode, keep pressing the coffee brewing and temperature
buttons simultaneously for � seconds. The machine will beep � times, and all the buttons will flash
� times. The machine will return to its original default settings.
Chapter8.Over-heat Protection
Chapter11.Cleaning and Maintenance
Chapter9.Resetting Default Mode
The machine will shut off automatically if no operation is selected after �� minutes on standby
mode. All the buttons will turn off. To start the machine, press the Power button again.
Chapter10.Auto Shut-off
lf you still want to brewing coffee without cooling down the machine, press again the Coffee
Brewing Button and machine will start working. (We do not recommend it because the
coffee will have a burnt taste.)
NOTE
� To avoid burns, the filter must only be removed when the filter holder has cooled down
completely and wash them with warm water.
� Do not wash any of the parts in the dishwasher.
WARNING
7
Cleaning the Steam Wand
Immediately after frothing milk, turn steam knob on to purge out any residual milk from the wand.
Clean the wand with a damp cloth. If the hole of the steam nozzle become blocked, ensure the
steam knob is in the STANDBY position. Press the power button to turn the machine off and allow
to cool. Use a thin iron wire to unblock the hole.
Cleaning the Brew Head
Regularly remove any coffee grounds from the brew head using a brush, insert the filter holder
into it without using coffee grounds. Place a cup under the brew head and press the coffee
brewing button twice to fill the cup. Then remove the filter holder from the brew head and clean it
with a dry cloth.
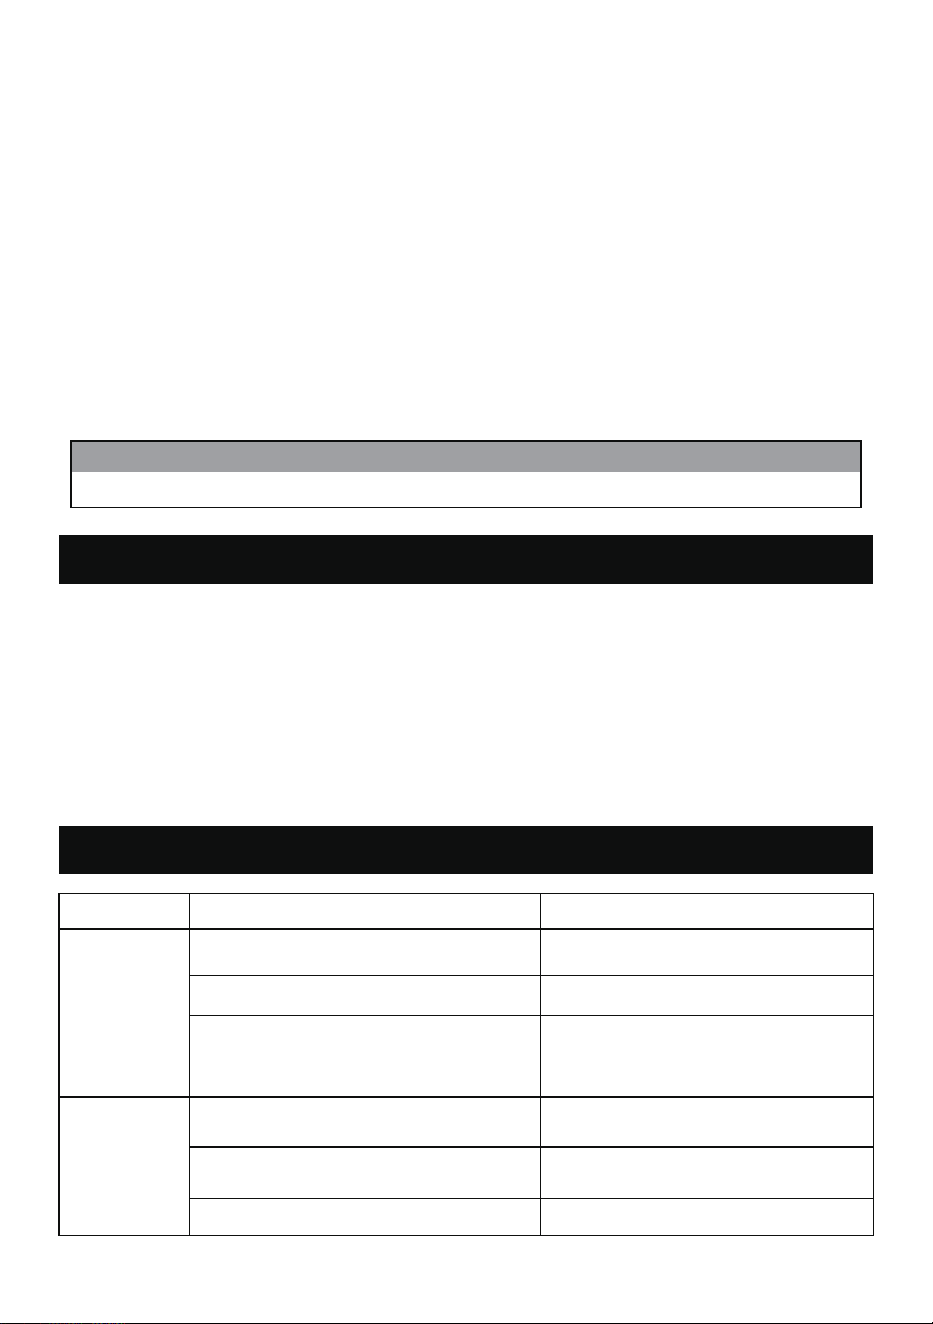
Chapter13.Trouble Shooting
Chapter12.Descaling
Do not try to disassemble the brew head. It will damage the Brew Head and lead to leakage.
WARNING
After ��� brew cycles, it is necessary to run a descaling cycle, otherwise a descaling warning will
appear at each start-up.
Fill the water with descaling agent (� parts water to � part descaling agent) into the water tank up
to the Max marking. Place a cup on the drip tray and keeping press the Temperature and Steam
button together for � seconds. The machine will start the descaling cycle and run � minutes then
stop automatically. Repeat the previous steps until the water with descaling agent is running out.
Next, repeat the process two more times using only CLEAN TAP WATER without any descaling
agent.
Whether the water tank is stuck in place. Reassemble the water tank.
Symptom Cause Corrections
No water
Whether there is water in the water tank.
Add an appropriate amount of water
into the water tank.
No steam
Whether there is water in the water tank.
Add an appropriate amount of water
into the water tank.
Steam outlet is blocked.
Poke the steam outlet with a thin
iron wire.
Whether the water tank is stuck in place.
Still no water after ���s operation or the
water tank is empty or the coffee maker
is idle for too long.
Reassemble the water tank.
Add some water to the tank, install it
and use the hot water function one
time.
8
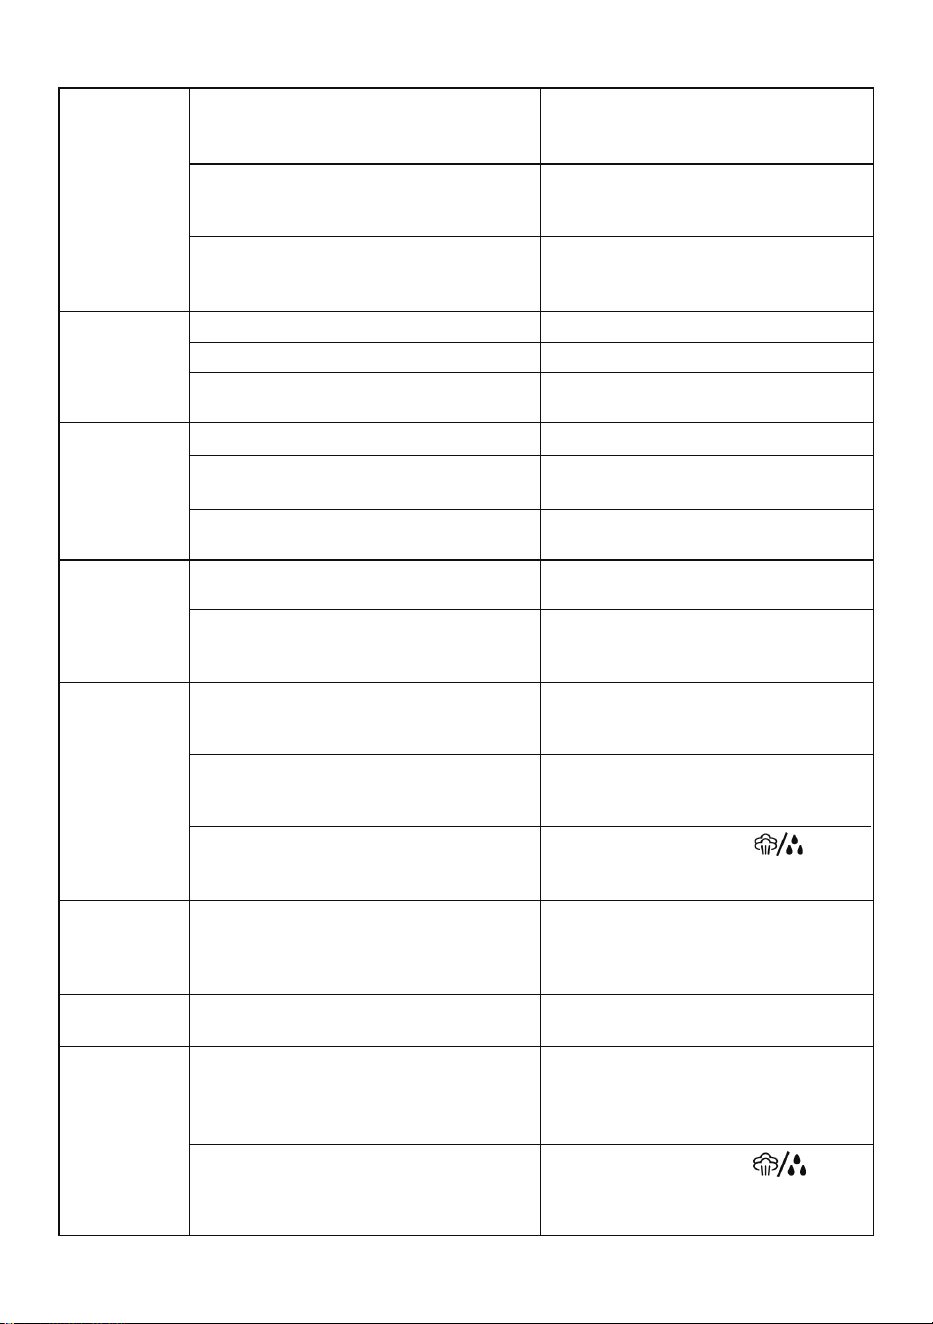
Less steam
Whether the steam button is pressed
and preheating is completed.
Press the “Steam button" and waiting
until the indicator light changes from
flashing into being always on.
Poor milk
froth
Whether the whole milk is used. Use whole milk.
Less grease
Coffee powder is too coarse. Replace the coffee powder.
Coffee powder is not compacted.
Compact the coffee powder with an
appropriate pressure.
Make coffee right after frothing milk.
Make sure the coffee machine is
completely cooled before using.
Whether the refrigerated milk is used. Refrigerate milk to �-�degrees.
Whether the steam nozzle is inserted too
deep into the milk.
Insert the steam nozzle into the
�CM-deep milk surface.
Whether to start the steam function
when the coffee machine is cold.
Whether the "steam knob" rotates to the
max position.
Operate double cups coffee brewing
function or wait for preheat finished in
Steam mode before milk frothing.
Slowly unscrew the "Steam knob"
until the steam sprays out when milk
frothing.
Funnel
overflow
coffee
Make coffee right after frothing milk.
Make sure the coffee machine is
completely cooled before using.
Coffee is
brewed slowly
or in small
quantities
Too much coffees powder.
The coffee powder should not be to
crude or too fine, should be in
standard quality and quantity.
Single or
double-cup
strainer stuck
in the machine
The bump of the strainer is not far from
the funnel notch.
Insert the funnel into the machine and
turn it left and right until the strainer
falls down.
Whether the ground coffee is too fine.
The coffee powder please use espresso
machine special coffee powder and
cannot be too fine.
The coffee is
too cold
Whether to brew coffee in low tempera-
ture mode.
Brew coffee in high temperature
mode.
Is there no water in the boiler.
Turn the steam knob to “ ”
position to let the water flow out of the
steam pipe about ���ml.
Whether the coffee powder on the
edge of the funnel is cleaned after
filling the ground coffee.
Clean the coffee powder on the edge
of the funnel with a brush or by
hand.
Funnel
overflow
coffee
Whether to brew coffee in a cold state
before the machine is preheated.
Operate double cups coffee brewing
function without coffee powder or
wait for preheat finished in coffee
mode before brewing.
Whether the boiler empty of water
before preheating.
Turn the steam knob to “ ”
position to let the water flow out of
the steam pipe about ���ml.
9

register AMZCHEF super member.
Please note: Please send us your order number within 2 weeks of receiving the
goods to ensure successful registration.
You will automatically get 1 year of warranty, and upgrade to full replacement
guarantee.
If anything goes wrong with your product, we will provide you with a brand
new unit as a replacement, or provide you with a full refund.
If there is a problem with your parts and accessories, you can replace them
for free.
Once the email is successfully sent:
VIP
SERVICE
Extension for excellent after-sales service
Plus up to 12 months
Send:
Subject:
Amazon Order ID:
Warranty
info01@iamzchef.com
10