begin to flash. When the system is up to temperature, all 4 buttons on the
control panel will illuminate.
8. Turn the function control dial to STEAM. Allow the hot steam to purge the line
for at least 45 seconds.
9. Press the double shot ( )button, then empty the hot water, until the entire
tank of water is purged through the system.
10. In hard water environments, it is recommended to repeat this procedure.
11. After descaling, remove the water tank and refill with fresh, cold water.
Repeat steps 7 through 9 to thoroughly rinse the Espresso Maker.
WARNING! Never immerse power cord, plug or Espresso Machine in water or any
other liquid. The water tank should never be completely emptied during
descaling.
12. When the flow has stopped, press the POWER button. Make sure the all
indicator lights OFF. Unplug the Espresso Maker from the wall outlet when not in
use.
13. Remove portafilter, containers or cups and rinse with hot water for next use.
Instruction Manual
20 Bar Espresso Maker
Brand:amzchef
EM-2205A
120V~ 60Hz 1300W
PLEASE READ INSTRUCTIONS CAREFULLY BEFORE ASSEM-
BLYRETAIN THIS MANUAL FOR FUTURE REFERENCE
1. Before cleaning your Espresso Maker, make sure the function control dial is in
the STANDBY position and the appliance has been disconnected from the wall
outlet.
2. Fill the water tank with 1 part white vinegar to 3 parts cold water.
3. Attach empty portafilter and any filter basket.
4. Plug the Espresso Maker into 120V AC electrical outlet.
5. Center a wide-mouth spouted container or cup under the 2-spout portafilter.
Place the steam wand’s tip into the frothing jug. Place an empty container
under the water dispenser.
6. Plug the unit into a 120V AC electrical outlet.
7. Press the POWER button. The single shot ( ) and double shot ( )buttons will

begin to flash. When the system is up to temperature, all 4 buttons on the
control panel will illuminate.
8. Turn the function control dial to STEAM. Allow the hot steam to purge the line
for at least 45 seconds.
9. Press the double shot ( )button, then empty the hot water, until the entire
tank of water is purged through the system.
10. In hard water environments, it is recommended to repeat this procedure.
11. After descaling, remove the water tank and refill with fresh, cold water.
Repeat steps 7 through 9 to thoroughly rinse the Espresso Maker.
WARNING! Never immerse power cord, plug or Espresso Machine in water or any
other liquid. The water tank should never be completely emptied during
descaling.
12. When the flow has stopped, press the POWER button. Make sure the all
indicator lights OFF. Unplug the Espresso Maker from the wall outlet when not in
use.
13. Remove portafilter, containers or cups and rinse with hot water for next use.
Contents
�. IMPORTANT SAFEGUARDS
2. TECHNICAL PARAMETERS
3. THE ART OF EXTRACTING ESPRESSO
4. GETTING TO KNOW YOUR ESPRESSO MAKER
5. FUNCTION KEYS OPERATION GUIDE
6. BEFORE USING FOR THE FIRST TIME
7. MEMORY FUNCTION
8. MAKE A PERFECT CUP OF CONCENTRATE
9. MILK FROTHING GUIDE
10. USER MAINTENANCE INSTRUCTIONS
11. CARE & CLEANING INSTRUCTIONS
12. DESCALING
13. TROUBLESHOOTING
14. COFFEES TO TRY
15. WARRANTY
�
�
�
�
�
�
�
��
��
��
��
��
��
��
��
1. Before cleaning your Espresso Maker, make sure the function control dial is in
the STANDBY position and the appliance has been disconnected from the wall
outlet.
2. Fill the water tank with 1 part white vinegar to 3 parts cold water.
3. Attach empty portafilter and any filter basket.
4. Plug the Espresso Maker into 120V AC electrical outlet.
5. Center a wide-mouth spouted container or cup under the 2-spout portafilter.
Place the steam wand’s tip into the frothing jug. Place an empty container
under the water dispenser.
6. Plug the unit into a 120V AC electrical outlet.
7. Press the POWER button. The single shot ( ) and double shot ( )buttons will

begin to flash. When the system is up to temperature, all 4 buttons on the
control panel will illuminate.
8. Turn the function control dial to STEAM. Allow the hot steam to purge the line
for at least 45 seconds.
9. Press the double shot ( )button, then empty the hot water, until the entire
tank of water is purged through the system.
10. In hard water environments, it is recommended to repeat this procedure.
11. After descaling, remove the water tank and refill with fresh, cold water.
Repeat steps 7 through 9 to thoroughly rinse the Espresso Maker.
WARNING! Never immerse power cord, plug or Espresso Machine in water or any
other liquid. The water tank should never be completely emptied during
descaling.
12. When the flow has stopped, press the POWER button. Make sure the all
indicator lights OFF. Unplug the Espresso Maker from the wall outlet when not in
use.
13. Remove portafilter, containers or cups and rinse with hot water for next use.
�. IMPORTANT SAFEGUARDS
When using electrical appliances, basic safety precautions should always
be followed including the following:
1. Read all instructions.
2. Do not touch hot surface. Use handles or knobs.
3. When in use, the appliance is under pressure and should never be left
unattended.
4. To protect against fire, electric shock and injury to persons, do not place
cord, plugs, or appliance in water or other liquid.
5. This appliance is not intended for use by persons (including children) with
reduced physical, sensory or mental capabilities, or lack of experience and
knowledge, unless they have been given supervision or instruction concerning
use of the appliances by a person responsible for their safety.
6. Close supervision is necessary when any appliance is used by or near
children.
7. Unplug from outlet when not in use and before cleaning.
8. Allow Espresso Maker to cool before putting on or taking off parts, and
before cleaning the appliance.
9. Do not operate any appliance with a damaged cord or plug or after the
appliance malfunctions, or has been damaged in any manner. Contact
Consumer Service for examination, repair or adjustment.
10. The use of any accessory not evaluated for use with this appliance and not
recommended by the appliance manufacturer may cause fire, electric shock or
injuries to persons.
NOTE:
DO NOT ATTEMPT TO REPAIR THE UNIT YOURSELF. THIS WILL VOID THE
WARRANTY.
11. Do not use outdoors.
12. Do not let cord hang over edge of table or counter, or touch hot surfaces.
13. Do not place on or near a hot gas or electric burner, or in a heated oven.
14. If this appliance begins to malfunction during use, press the POWER button;
turn the function control to STANDBY. Then immediately unplug the cord. Do
not use or attempt to repair the malfunctioning appliance.
15. Never use the appliance without water.
CAUTION
Relieve pressure through steam wand before removing cup or filter basket.
1. Before cleaning your Espresso Maker, make sure the function control dial is in
the STANDBY position and the appliance has been disconnected from the wall
outlet.
2. Fill the water tank with 1 part white vinegar to 3 parts cold water.
3. Attach empty portafilter and any filter basket.
4. Plug the Espresso Maker into 120V AC electrical outlet.
5. Center a wide-mouth spouted container or cup under the 2-spout portafilter.
Place the steam wand’s tip into the frothing jug. Place an empty container
under the water dispenser.
6. Plug the unit into a 120V AC electrical outlet.
7. Press the POWER button. The single shot ( ) and double shot ( )buttons will
1

begin to flash. When the system is up to temperature, all 4 buttons on the
control panel will illuminate.
8. Turn the function control dial to STEAM. Allow the hot steam to purge the line
for at least 45 seconds.
9. Press the double shot ( )button, then empty the hot water, until the entire
tank of water is purged through the system.
10. In hard water environments, it is recommended to repeat this procedure.
11. After descaling, remove the water tank and refill with fresh, cold water.
Repeat steps 7 through 9 to thoroughly rinse the Espresso Maker.
WARNING! Never immerse power cord, plug or Espresso Machine in water or any
other liquid. The water tank should never be completely emptied during
descaling.
12. When the flow has stopped, press the POWER button. Make sure the all
indicator lights OFF. Unplug the Espresso Maker from the wall outlet when not in
use.
13. Remove portafilter, containers or cups and rinse with hot water for next use.
ADDITIONAL IMPORTANT SAFEGUARDS
16. Do not use this appliance for other than its intended use.
17. Be certain lids are securely in place before operating appliance.
18. Scalding may occur if the lids are removed during the brewing cycle.
19. To disconnect, press the POWER button; turn the function control to
STANDBY. Then remove plug from wall outlet.
20. Do not set hot glass carafe on a wet or cold surface.
1. All users of this appliance must read and understand this Instruction Manual
before operating or cleaning this appliance.
2. The cord to this appliance should be plugged into a 120V AC electrical outlet
only.
3. Use water only in this appliance! Do not put any other liquids or food
products in this appliance. Do not mix or add anything to the water placed in
this appliance, except as instructed in the Descaling section of this Instruction
Manual.
4. DO NOT attempt to move an appliance containing hot liquids. Allow appli-
ance to cool completely before moving.
5. Keep appliance at least 4 inches away from walls or other objects during
operation.
FOR HOUSEHOLD USE ONLY
CAUTION
The Espresso Maker must be allowed to cool down sufficiently before
adding more water to avoid splattering.
WARNING
To avoid the risk of injury, do not open the brew chamber during the brew
process.
WARNING
This appliance generates heat and escaping steam during use. Proper
precautions must be taken to prevent the risk of burns, fires, or other injury
to persons or damage to property.
6. Place the appliance on a surface that is resistant to heat.
7. Prior to connecting or disconnecting plug from wall outlet, press the POWER
button; turn the function control to STANDBY.
8. If this appliance falls or accidentally becomes immersed in water or any
other liquid, unplug it immediately. Do not reach into the water! immersed in
water. Contact Consumer Service for examination and repair.
9. Always use fresh, cool water in your appliance. Warm water or other liquids,
except as described in the descaling section, may cause damage to the Espres-
so Maker.
1. Before cleaning your Espresso Maker, make sure the function control dial is in
the STANDBY position and the appliance has been disconnected from the wall
outlet.
2. Fill the water tank with 1 part white vinegar to 3 parts cold water.
3. Attach empty portafilter and any filter basket.
4. Plug the Espresso Maker into 120V AC electrical outlet.
5. Center a wide-mouth spouted container or cup under the 2-spout portafilter.
Place the steam wand’s tip into the frothing jug. Place an empty container
under the water dispenser.
6. Plug the unit into a 120V AC electrical outlet.
7. Press the POWER button. The single shot ( ) and double shot ( )buttons will
2
begin to flash. When the system is up to temperature, all 4 buttons on the
control panel will illuminate.
8. Turn the function control dial to STEAM. Allow the hot steam to purge the line
for at least 45 seconds.
9. Press the double shot ( )button, then empty the hot water, until the entire
tank of water is purged through the system.
10. In hard water environments, it is recommended to repeat this procedure.
11. After descaling, remove the water tank and refill with fresh, cold water.
Repeat steps 7 through 9 to thoroughly rinse the Espresso Maker.
WARNING! Never immerse power cord, plug or Espresso Machine in water or any
other liquid. The water tank should never be completely emptied during
descaling.
12. When the flow has stopped, press the POWER button. Make sure the all
indicator lights OFF. Unplug the Espresso Maker from the wall outlet when not in
use.
13. Remove portafilter, containers or cups and rinse with hot water for next use.
2. TECHNICAL PARAMETERS
1. All users of this appliance must read and understand this Instruction Manual
before operating or cleaning this appliance.
2. The cord to this appliance should be plugged into a 120V AC electrical outlet
only.
3. Use water only in this appliance! Do not put any other liquids or food
products in this appliance. Do not mix or add anything to the water placed in
this appliance, except as instructed in the Descaling section of this Instruction
Manual.
4. DO NOT attempt to move an appliance containing hot liquids. Allow appli-
ance to cool completely before moving.
5. Keep appliance at least 4 inches away from walls or other objects during
operation.
6. Place the appliance on a surface that is resistant to heat.
7. Prior to connecting or disconnecting plug from wall outlet, press the POWER
button; turn the function control to STANDBY.
8. If this appliance falls or accidentally becomes immersed in water or any
other liquid, unplug it immediately. Do not reach into the water! immersed in
water. Contact Consumer Service for examination and repair.
9. Always use fresh, cool water in your appliance. Warm water or other liquids,
except as described in the descaling section, may cause damage to the Espres-
so Maker.
1. Before cleaning your Espresso Maker, make sure the function control dial is in
the STANDBY position and the appliance has been disconnected from the wall
outlet.
2. Fill the water tank with 1 part white vinegar to 3 parts cold water.
3. Attach empty portafilter and any filter basket.
4. Plug the Espresso Maker into 120V AC electrical outlet.
5. Center a wide-mouth spouted container or cup under the 2-spout portafilter.
Place the steam wand’s tip into the frothing jug. Place an empty container
under the water dispenser.
6. Plug the unit into a 120V AC electrical outlet.
7. Press the POWER button. The single shot ( ) and double shot ( )buttons will
120V~
1300W
60Hz
≤20bar
1000ml
10℃~40℃
297*154*288 mm/11.7*6.1*11.3 inch
3kg/6.6lb
Rated Voltage
Rated Frequency
Rated Power
Pressure
Tank Volume
Environmental Temperature
Sizes
Weights
3

begin to flash. When the system is up to temperature, all 4 buttons on the
control panel will illuminate.
8. Turn the function control dial to STEAM. Allow the hot steam to purge the line
for at least 45 seconds.
9. Press the double shot ( )button, then empty the hot water, until the entire
tank of water is purged through the system.
10. In hard water environments, it is recommended to repeat this procedure.
11. After descaling, remove the water tank and refill with fresh, cold water.
Repeat steps 7 through 9 to thoroughly rinse the Espresso Maker.
WARNING! Never immerse power cord, plug or Espresso Machine in water or any
other liquid. The water tank should never be completely emptied during
descaling.
12. When the flow has stopped, press the POWER button. Make sure the all
indicator lights OFF. Unplug the Espresso Maker from the wall outlet when not in
use.
13. Remove portafilter, containers or cups and rinse with hot water for next use.
3. THE ART OF EXTRACTING ESPRESSO
Consistency is key when it comes to a great shot of espresso. Optimal flavor
is achieved as the brewing temperature is maintained. Grounds are pre-in-
fused with low, steady water pressure before extraction. Shot volumes are
automatically dispensed and can be adjusted to taste. The result is a
perfectly balance, rich and flavorful espresso. The perfect espresso shot is
all about achie
ving a balance of acidity, sweetness and bitterness. Many
factor play a major role: temperature of the water: portafilter, and serving
cups are crucial. Filter baskets and steam wand must be clean: coffee beans
fresh and perfectly roasted. The fineness or coarseness of the grind, dose of
ground coffee, and tamping pressure should be consistent when experi-
menting to achieve your perfect pull.
1. Before cleaning your Espresso Maker, make sure the function control dial is in
the STANDBY position and the appliance has been disconnected from the wall
outlet.
2. Fill the water tank with 1 part white vinegar to 3 parts cold water.
3. Attach empty portafilter and any filter basket.
4. Plug the Espresso Maker into 120V AC electrical outlet.
5. Center a wide-mouth spouted container or cup under the 2-spout portafilter.
Place the steam wand’s tip into the frothing jug. Place an empty container
under the water dispenser.
6. Plug the unit into a 120V AC electrical outlet.
7. Press the POWER button. The single shot ( ) and double shot ( )buttons will
4
begin to flash. When the system is up to temperature, all 4 buttons on the
control panel will illuminate.
8. Turn the function control dial to STEAM. Allow the hot steam to purge the line
for at least 45 seconds.
9. Press the double shot ( )button, then empty the hot water, until the entire
tank of water is purged through the system.
10. In hard water environments, it is recommended to repeat this procedure.
11. After descaling, remove the water tank and refill with fresh, cold water.
Repeat steps 7 through 9 to thoroughly rinse the Espresso Maker.
WARNING! Never immerse power cord, plug or Espresso Machine in water or any
other liquid. The water tank should never be completely emptied during
descaling.
12. When the flow has stopped, press the POWER button. Make sure the all
indicator lights OFF. Unplug the Espresso Maker from the wall outlet when not in
use.
13. Remove portafilter, containers or cups and rinse with hot water for next use.
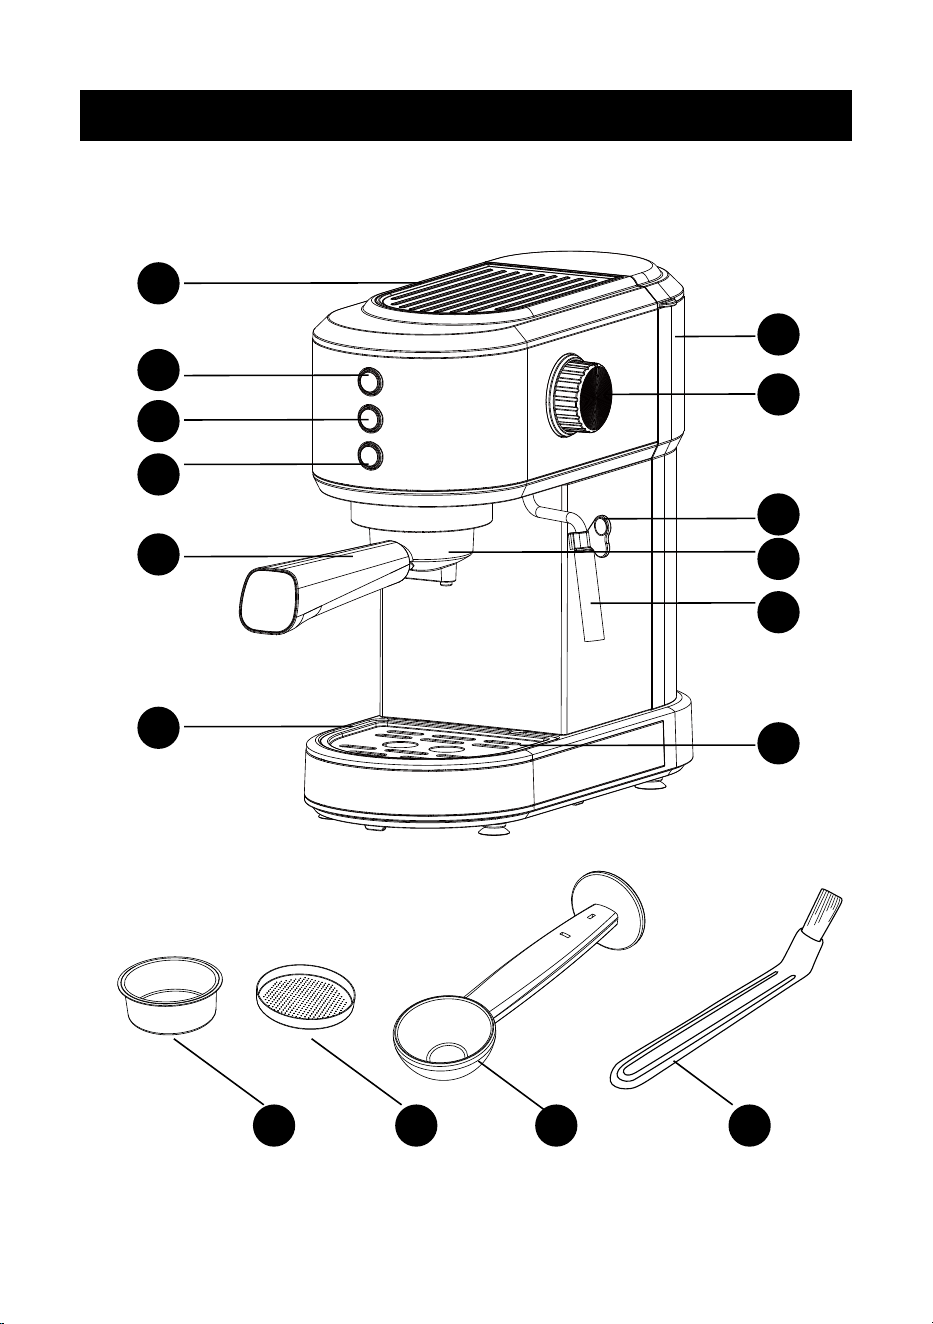
4. GETTING TO KNOW YOUR ESPRESSO MAKER
2
3
8
9
7
11
15 161413
1
4
5
6
10
12
Product may vary slightly from illustration
1. Before cleaning your Espresso Maker, make sure the function control dial is in
the STANDBY position and the appliance has been disconnected from the wall
outlet.
2. Fill the water tank with 1 part white vinegar to 3 parts cold water.
3. Attach empty portafilter and any filter basket.
4. Plug the Espresso Maker into 120V AC electrical outlet.
5. Center a wide-mouth spouted container or cup under the 2-spout portafilter.
Place the steam wand’s tip into the frothing jug. Place an empty container
under the water dispenser.
6. Plug the unit into a 120V AC electrical outlet.
7. Press the POWER button. The single shot ( ) and double shot ( )buttons will
5
begin to flash. When the system is up to temperature, all 4 buttons on the
control panel will illuminate.
8. Turn the function control dial to STEAM. Allow the hot steam to purge the line
for at least 45 seconds.
9. Press the double shot ( )button, then empty the hot water, until the entire
tank of water is purged through the system.
10. In hard water environments, it is recommended to repeat this procedure.
11. After descaling, remove the water tank and refill with fresh, cold water.
Repeat steps 7 through 9 to thoroughly rinse the Espresso Maker.
WARNING! Never immerse power cord, plug or Espresso Machine in water or any
other liquid. The water tank should never be completely emptied during
descaling.
12. When the flow has stopped, press the POWER button. Make sure the all
indicator lights OFF. Unplug the Espresso Maker from the wall outlet when not in
use.
13. Remove portafilter, containers or cups and rinse with hot water for next use.
1
2
3
4
5
6
7
8
9
10
11
12
13
14
15
16
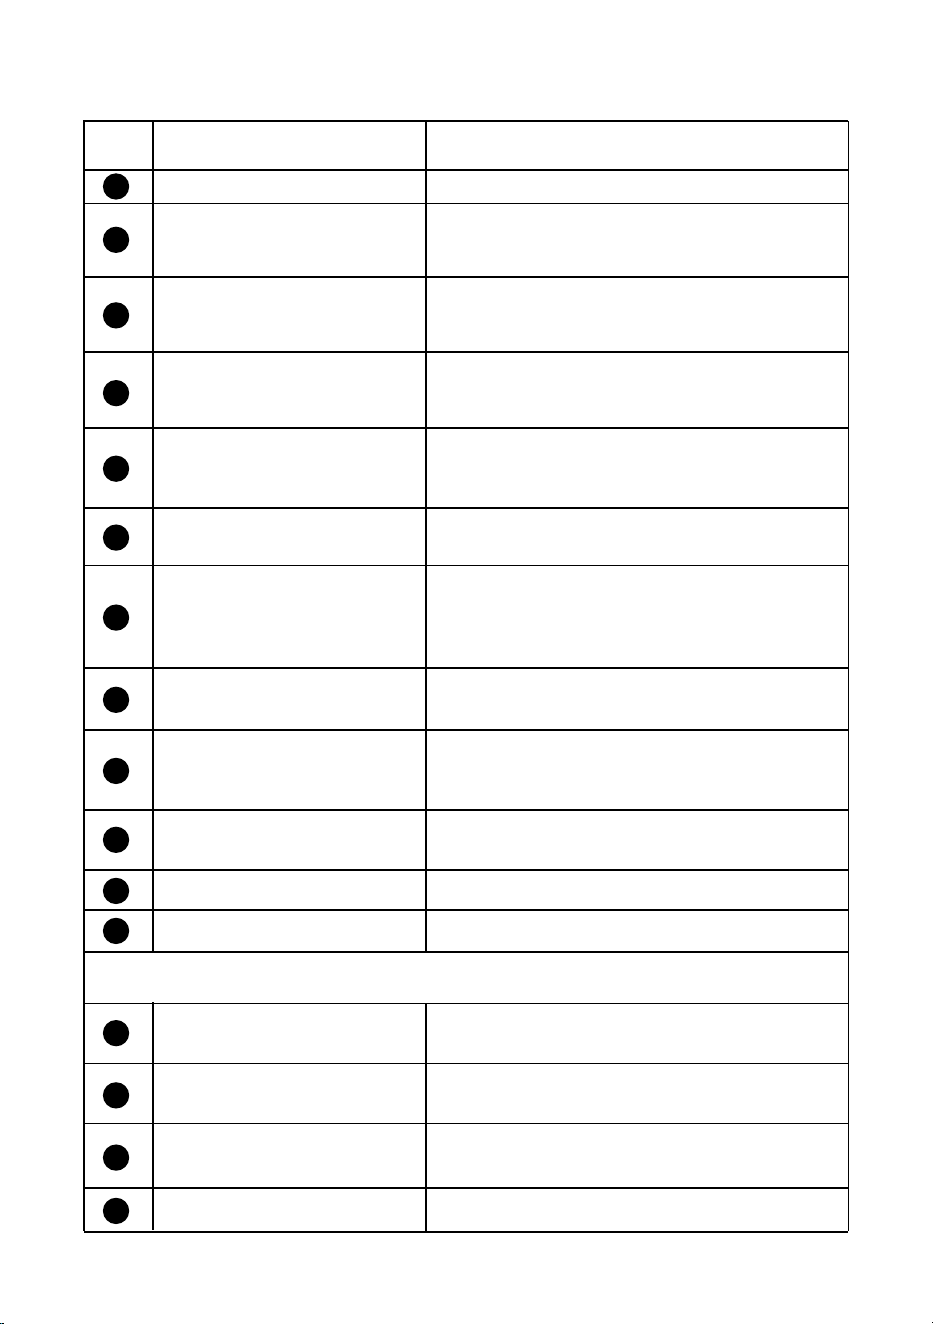
Re. Description
Heated Warming Plate
Heats up and dries cups
STEAM Button
34 oz Removable WaterTank
Specifification
Accessories
Push back the tank lid & fill with clean
water,or remove the water tank by opening
the lid.
Press the MANUAL button to start and stop
the brewing
Steam Pipe Handle
Allows for moving the steam wand without
burning fingers.
Funnel Handle
Holds and fixes the filter to achieve a better
coffee extraction.
Double Cup
51mm Double Cup Filter.Holds 2.5 oz.of
ground coffee.
Single Cup
51mm Single Cup Filter.Holds 1 oz.of
ground coffee.
2-in-1 Coffee Tamper Spoon
Cleaning Brush
Used to measure the amount of coffee
powder, compacted powder
Coffee Brewing Head Cleaning Brush
Removable Drip Tray
Removable for easy cleaning.
Power Button(Not shown)
For turning on/off the machine.
Brew Head
Compatible with coffee grinds or pod
espresso.Has two positions, lock and unlock,
for easy cleaning.
Function Control Dial
Once pressure is built and the STEAM
button is illuminated (stops flashing), turn
the dial to activate the STEAM wand.
1 SHOT Button
- Press once to initiate a 1 oz. extraction.
- Press and hold for 3 seconds to set the
amount you want.
2 SHOT Button
- Press once to initiate a 2.5 oz. extraction.
- Press and hold for 3 seconds to set the
amount you want.
Steam Wand with Silicone Tab
Ball joint movement with a stainless steel
cover.Able to create silky smooth
micro-foam in the milk under the right
steam pressure.
1. Before cleaning your Espresso Maker, make sure the function control dial is in
the STANDBY position and the appliance has been disconnected from the wall
outlet.
2. Fill the water tank with 1 part white vinegar to 3 parts cold water.
3. Attach empty portafilter and any filter basket.
4. Plug the Espresso Maker into 120V AC electrical outlet.
5. Center a wide-mouth spouted container or cup under the 2-spout portafilter.
Place the steam wand’s tip into the frothing jug. Place an empty container
under the water dispenser.
6. Plug the unit into a 120V AC electrical outlet.
7. Press the POWER button. The single shot ( ) and double shot ( )buttons will
6

begin to flash. When the system is up to temperature, all 4 buttons on the
control panel will illuminate.
8. Turn the function control dial to STEAM. Allow the hot steam to purge the line
for at least 45 seconds.
9. Press the double shot ( )button, then empty the hot water, until the entire
tank of water is purged through the system.
10. In hard water environments, it is recommended to repeat this procedure.
11. After descaling, remove the water tank and refill with fresh, cold water.
Repeat steps 7 through 9 to thoroughly rinse the Espresso Maker.
WARNING! Never immerse power cord, plug or Espresso Machine in water or any
other liquid. The water tank should never be completely emptied during
descaling.
12. When the flow has stopped, press the POWER button. Make sure the all
indicator lights OFF. Unplug the Espresso Maker from the wall outlet when not in
use.
13. Remove portafilter, containers or cups and rinse with hot water for next use.
5. FUNCTION KEYS OPERATION GUIDE
FUNCTIONALITY PROCEDURE
Restore Factory Mode
During standby mode press and hold boththe
SINGLE shot and DOUBLE shot buttons for 3 seconds,
then the SINGLE and DOUBLEindicator lights will
flash 5 times. This indicates that the coffee volume
has been reset andthe unit will then return to
standby mode.
Preheat
Press the STEAM button and the indicator light will
begin to flash indicating that the unit is preheat-
ing.Once the STEAM button indicator light is solidly
lit; this indicates that the unitis heated to the correct
temperature. Rotate the knob on the side of the unit
to the steamposition. The water pump will start
working and the STEAM button indicator light will
flash.Rotate the knob back to the off position, and
the steam function will turn off and the unitwill
return to the standby mode.
Heat Dissipation After
Using Steam
The SINGLE and DOUBLE shot buttons will flash
quickly.Rotate the knob to the HOT WATER position.
Place the steam wand over the drip tray, into acup or
frothing pitcher. Hot water will start to come out of
the steam wand and the SINGLEindicator light will
flash. When the boiler has cooled down, and the
temperature is lowenough to brew coffee, the water
pump will stop working and the SINGLE, DOUBLE
and STEAM indicator lights will begin to flash. Rotate
the knob to the OFF position and the unit will return
to the standby mode and you will be able to brew
coffee.
Hot Water
During standby mode rotate the knob to the HOT
WATER position and both the SINGLE and DOUBLE
indicator lights will be solidly lit. Hot water will begin
to come out of the steamwand. Rotate the knob back
to the OFF position and the hot water will shut off
and the unitwill return to standby mode.
Automatic Switch-Off
During standby mode the unit will automatically shut
off after 30 minutes if no function ispressed.
Note
The steam function maximum working time is 1.5 minutes, and the hot water
function themaximum working time is 1 minute.
1. Before cleaning your Espresso Maker, make sure the function control dial is in
the STANDBY position and the appliance has been disconnected from the wall
outlet.
2. Fill the water tank with 1 part white vinegar to 3 parts cold water.
3. Attach empty portafilter and any filter basket.
4. Plug the Espresso Maker into 120V AC electrical outlet.
5. Center a wide-mouth spouted container or cup under the 2-spout portafilter.
Place the steam wand’s tip into the frothing jug. Place an empty container
under the water dispenser.
6. Plug the unit into a 120V AC electrical outlet.
7. Press the POWER button. The single shot ( ) and double shot ( )buttons will
7
begin to flash. When the system is up to temperature, all 4 buttons on the
control panel will illuminate.
8. Turn the function control dial to STEAM. Allow the hot steam to purge the line
for at least 45 seconds.
9. Press the double shot ( )button, then empty the hot water, until the entire
tank of water is purged through the system.
10. In hard water environments, it is recommended to repeat this procedure.
11. After descaling, remove the water tank and refill with fresh, cold water.
Repeat steps 7 through 9 to thoroughly rinse the Espresso Maker.
WARNING! Never immerse power cord, plug or Espresso Machine in water or any
other liquid. The water tank should never be completely emptied during
descaling.
12. When the flow has stopped, press the POWER button. Make sure the all
indicator lights OFF. Unplug the Espresso Maker from the wall outlet when not in
use.
13. Remove portafilter, containers or cups and rinse with hot water for next use.
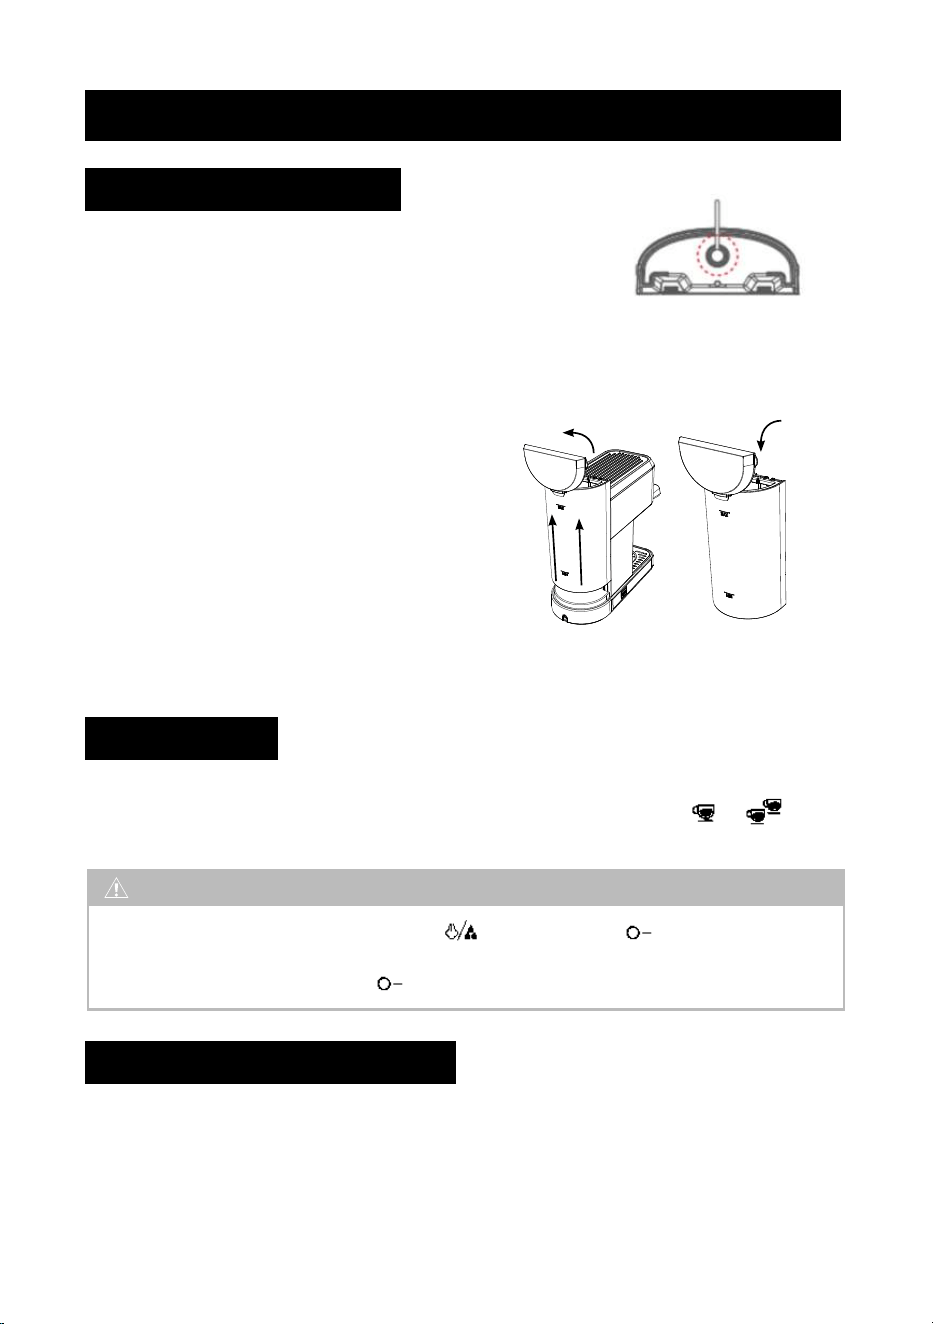
6. BEFORE USING FOR THE FIRST TIME
• Fill Water Tank
• Power
• Insert Portafilter
Step 1 - Please make sure that the rubber plug of thewater
outlet of the water tank is removed.
Plug in the power supply, then press the power switch on the side to start the
machine, the machine will beep, the indicator light on the front " " " "
button will flash intermittently, the product is in the heating state.
1. Before cleaning your Espresso Maker, make sure the function control dial is in
the STANDBY position and the appliance has been disconnected from the wall
outlet.
2. Fill the water tank with 1 part white vinegar to 3 parts cold water.
3. Attach empty portafilter and any filter basket.
4. Plug the Espresso Maker into 120V AC electrical outlet.
5. Center a wide-mouth spouted container or cup under the 2-spout portafilter.
Place the steam wand’s tip into the frothing jug. Place an empty container
under the water dispenser.
6. Plug the unit into a 120V AC electrical outlet.
7. Press the POWER button. The single shot ( ) and double shot ( )buttons will
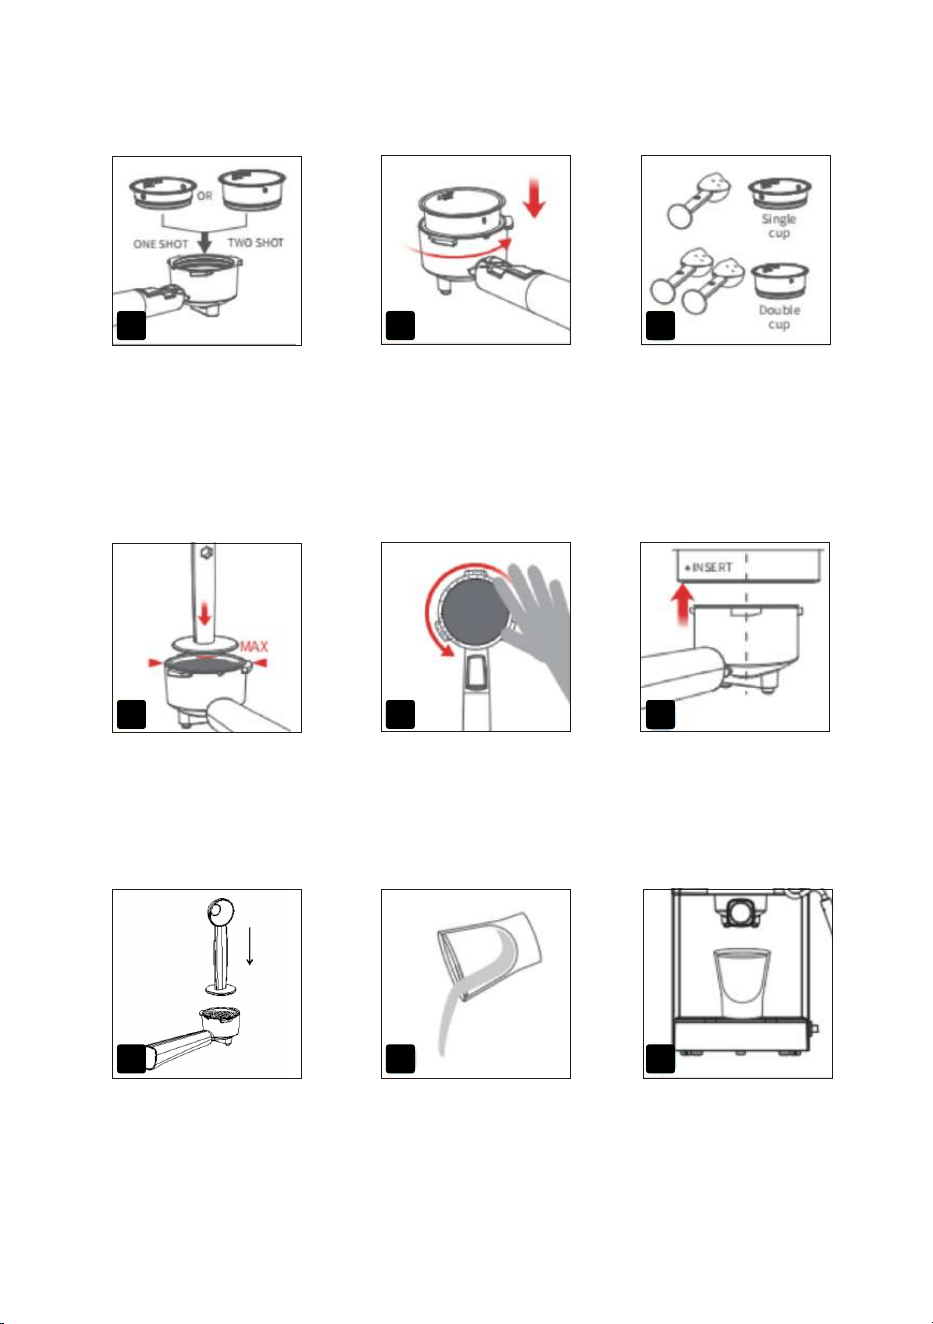
Step 1 - Align the marking don’t on the filter with the portafilter's groove, and
then install the filter to the portafilter, twist and fix the filter.
Step 2 - Hold the machine with one hand and the portafilter with the other hand.
Step 2 - Extract the tank by pulling it upwards.
Step 3- Open the lid and fill enough pure water (recommended) in advance but not
exceed the MAX line of the water tank, and do not add too little water otherwise
when the water runs out the water pump will make a loud noise and affect the
coffee effect.
Step 4 - Set up the water tank vertically and
align the buckles to the hole on the back of
the machine, and then press it down to be
parallel to the top of the machine.
Step 5 - Connect to the power supply. While in
standby mode, turn the knob to the HOT WATER
setting to start the flow of water from the steamwand. Wait until the water is
finished running for self-cleaning.
WARNING
Ensure the steam knob is set to the " ". If it is set to " " or any other
position, the machine will beep 5 times as a reminder. Rotate the steam
knob clockwise back to the " ".
Step 3 - Place the portafilter under neath the group
head so that the handle is aligned with the INSERT
position. Insert the portafilter into the group head and
rotate the handle towards the center until resistance is
felt.
8
begin to flash. When the system is up to temperature, all 4 buttons on the
control panel will illuminate.
8. Turn the function control dial to STEAM. Allow the hot steam to purge the line
for at least 45 seconds.
9. Press the double shot ( )button, then empty the hot water, until the entire
tank of water is purged through the system.
10. In hard water environments, it is recommended to repeat this procedure.
11. After descaling, remove the water tank and refill with fresh, cold water.
Repeat steps 7 through 9 to thoroughly rinse the Espresso Maker.
WARNING! Never immerse power cord, plug or Espresso Machine in water or any
other liquid. The water tank should never be completely emptied during
descaling.
12. When the flow has stopped, press the POWER button. Make sure the all
indicator lights OFF. Unplug the Espresso Maker from the wall outlet when not in
use.
13. Remove portafilter, containers or cups and rinse with hot water for next use.
7. MEMORY FUNCTION
• Cleaning
˙When using the machine for the first time, or if the machine has not been used
for a long time, please clean it with water (Note:attach the portafilter handle to
the machine and clean them together)
˙Press the " " button to activate the machine,This will initiate the desired
action to allow water to pass through the electromagnetic pump and clean the
entire internal pipework of the machine.
˙Empty the water from the cup and repeat a few times to finish cleaning. The
machine can now be used as usual.
1. Before cleaning your Espresso Maker, make sure the function control dial is in
the STANDBY position and the appliance has been disconnected from the wall
outlet.
2. Fill the water tank with 1 part white vinegar to 3 parts cold water.
3. Attach empty portafilter and any filter basket.
4. Plug the Espresso Maker into 120V AC electrical outlet.
5. Center a wide-mouth spouted container or cup under the 2-spout portafilter.
Place the steam wand’s tip into the frothing jug. Place an empty container
under the water dispenser.
6. Plug the unit into a 120V AC electrical outlet.
7. Press the POWER button. The single shot ( ) and double shot ( )buttons will
1.Once the machine has finished preheating, the " " and " " indicator
lights will remain on. Press and hold the " " button for 3 seconds to start
brewing coffee. When the desired amount has been reached, press the corre-
sponding " " button again to stop making coffee. The amount of one cup will
be adjusted accordingly, and the next time you make a cup, it will be remember
you set with the desired amount.
2.After the coffee machine finishes preheating, the " " and " " indicator
lights will turn on. Then, press and hold the " " button for 3 seconds to start
brewing the coffee. Finally, press the matching " " button to dispense your
desired amount of coffee. When the desired amount has been achieved, press the
" " button again to stop the coffee-making process. The amount of coffee
designated for one cup has been altered. The next time a cup of coffee is
prepared, it will be dispensed in accordance with the designated amount.
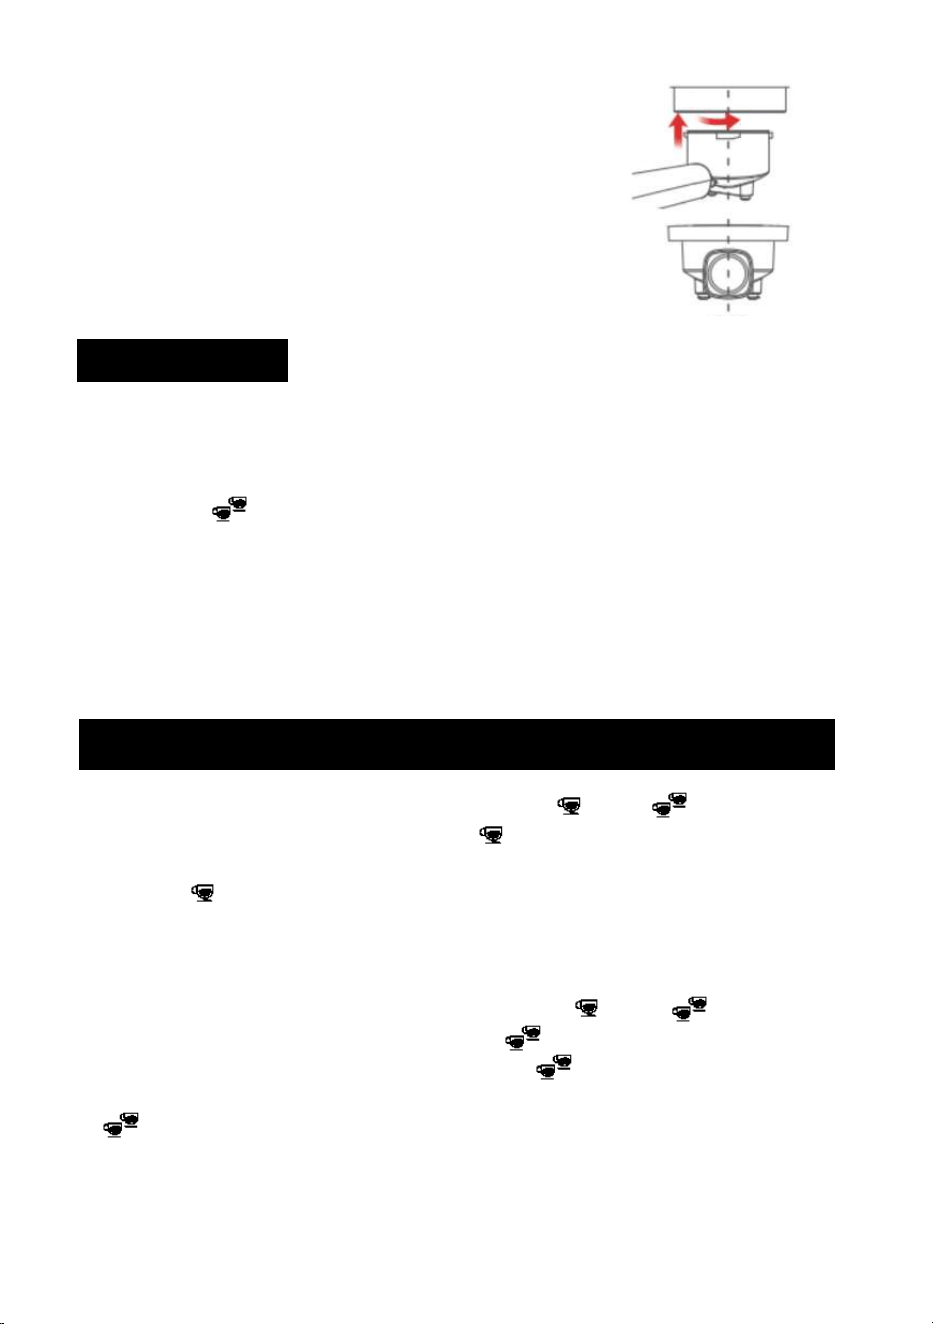
Step 1 - Align the marking don’t on the filter with the portafilter's groove, and
then install the filter to the portafilter, twist and fix the filter.
Step 2 - Hold the machine with one hand and the portafilter with the other hand.
Step 3 - Place the portafilter under neath the group
head so that the handle is aligned with the INSERT
position. Insert the portafilter into the group head and
rotate the handle towards the center until resistance is
felt.
˙INSERT
2.TURN
CE NTRE
1.ALIGN
& INSERT
9
begin to flash. When the system is up to temperature, all 4 buttons on the
control panel will illuminate.
8. Turn the function control dial to STEAM. Allow the hot steam to purge the line
for at least 45 seconds.
9. Press the double shot ( )button, then empty the hot water, until the entire
tank of water is purged through the system.
10. In hard water environments, it is recommended to repeat this procedure.
11. After descaling, remove the water tank and refill with fresh, cold water.
Repeat steps 7 through 9 to thoroughly rinse the Espresso Maker.
WARNING! Never immerse power cord, plug or Espresso Machine in water or any
other liquid. The water tank should never be completely emptied during
descaling.
12. When the flow has stopped, press the POWER button. Make sure the all
indicator lights OFF. Unplug the Espresso Maker from the wall outlet when not in
use.
13. Remove portafilter, containers or cups and rinse with hot water for next use.
8. MAKE A PERFECT CUP OF CONCENTRATE
The secret to a perfect espresso shot is all about achieving the perfect balance of
acidity, sweetness, and bitterness. Many factors play a major role: temperature of
the water; portafilter, and serving cups are crucial, filter baskets and steaming
wand should be clean; coffee beans must be fresh and perfectly roasted. The
fineness or coarseness of the grind, dose of ground coffee, and tamping pressure
should be consistent when experimenting to achieve your perfect pull.
1. Before cleaning your Espresso Maker, make sure the function control dial is in
the STANDBY position and the appliance has been disconnected from the wall
outlet.
2. Fill the water tank with 1 part white vinegar to 3 parts cold water.
3. Attach empty portafilter and any filter basket.
4. Plug the Espresso Maker into 120V AC electrical outlet.
5. Center a wide-mouth spouted container or cup under the 2-spout portafilter.
Place the steam wand’s tip into the frothing jug. Place an empty container
under the water dispenser.
6. Plug the unit into a 120V AC electrical outlet.
7. Press the POWER button. The single shot ( ) and double shot ( )buttons will
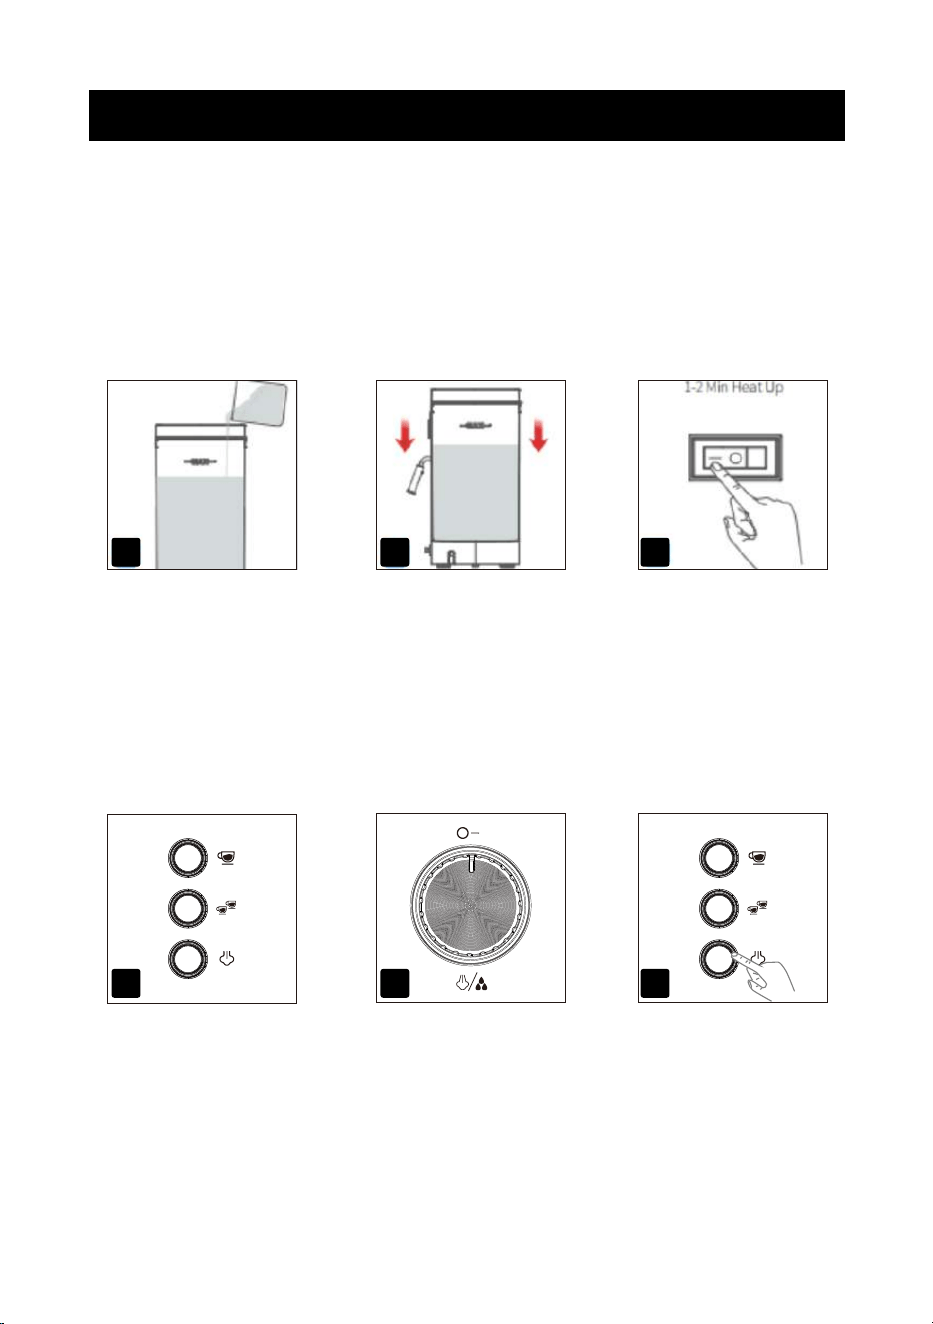
Extract the tank by pulling
itupwards. Fill the water
tank with clean water(Do
not exceed the MAX line).
Set up the water tank
vertically and align the
buckles to the hole on the
back of the machine, and
then press it down to be
parallel to the top of the
machine.
Insert the Power Plug.
Press the ON/OFF button
to turn the machine on,
the 3 buttons start to blink
blue light slowly to
indicateit's heating up.
LIGHTS all fully illuminat-
ed Espresso Machine is
ready for use.
Place a cup under the
Group Head. Turn the
knob to coffeeic on.
Press the 1 SHOT button
to dis-pense water. Half fill
the cup with hot water to
preheat the cup.
1 2 3
4 5 6
10
begin to flash. When the system is up to temperature, all 4 buttons on the
control panel will illuminate.
8. Turn the function control dial to STEAM. Allow the hot steam to purge the line
for at least 45 seconds.
9. Press the double shot ( )button, then empty the hot water, until the entire
tank of water is purged through the system.
10. In hard water environments, it is recommended to repeat this procedure.
11. After descaling, remove the water tank and refill with fresh, cold water.
Repeat steps 7 through 9 to thoroughly rinse the Espresso Maker.
WARNING! Never immerse power cord, plug or Espresso Machine in water or any
other liquid. The water tank should never be completely emptied during
descaling.
12. When the flow has stopped, press the POWER button. Make sure the all
indicator lights OFF. Unplug the Espresso Maker from the wall outlet when not in
use.
13. Remove portafilter, containers or cups and rinse with hot water for next use.
1. Before cleaning your Espresso Maker, make sure the function control dial is in
the STANDBY position and the appliance has been disconnected from the wall
outlet.
2. Fill the water tank with 1 part white vinegar to 3 parts cold water.
3. Attach empty portafilter and any filter basket.
4. Plug the Espresso Maker into 120V AC electrical outlet.
5. Center a wide-mouth spouted container or cup under the 2-spout portafilter.
Place the steam wand’s tip into the frothing jug. Place an empty container
under the water dispenser.
6. Plug the unit into a 120V AC electrical outlet.
7. Press the POWER button. The single shot ( ) and double shot ( )buttons will
Place a filter into the
portafilter. Select either
the Single-cup filter or the
Double-cup filter.
Align the marking don’t
on the filter with the
portafilter's groove, and
then install the filter to the
portafilter, twist and fix
the filter.
Dose the filter with coffee
grinds
- One spoon offine grinds
for the Single cup filter.
- Two spoons of fine
grinds for the Double cup
filter.
Evenly tamp(press) the
grinds to the level
indicated.
Wipe away any excess
grinds to clear the edges
of the portafilter.
Place the portafilter
underneath the group
head so that the handle is
aligned with the INSERT
position.
Insert the portafilter into
the group head and rotate
the handle towards the
centeruntil resistance is
felt.
Empty the cup. Position the cup on the
driptray, under the
portafilter. Remove the
drip tray cover if the cup is
too tall.
7 8 9
10 11 12
13 14 15
11
begin to flash. When the system is up to temperature, all 4 buttons on the
control panel will illuminate.
8. Turn the function control dial to STEAM. Allow the hot steam to purge the line
for at least 45 seconds.
9. Press the double shot ( )button, then empty the hot water, until the entire
tank of water is purged through the system.
10. In hard water environments, it is recommended to repeat this procedure.
11. After descaling, remove the water tank and refill with fresh, cold water.
Repeat steps 7 through 9 to thoroughly rinse the Espresso Maker.
WARNING! Never immerse power cord, plug or Espresso Machine in water or any
other liquid. The water tank should never be completely emptied during
descaling.
12. When the flow has stopped, press the POWER button. Make sure the all
indicator lights OFF. Unplug the Espresso Maker from the wall outlet when not in
use.
13. Remove portafilter, containers or cups and rinse with hot water for next use.
1. Before cleaning your Espresso Maker, make sure the function control dial is in
the STANDBY position and the appliance has been disconnected from the wall
outlet.
2. Fill the water tank with 1 part white vinegar to 3 parts cold water.
3. Attach empty portafilter and any filter basket.
4. Plug the Espresso Maker into 120V AC electrical
outlet.
5. Center a wide-mouth spouted container or cup under the 2-spout portafilter.
Place the steam wand’s tip into the frothing jug. Place an empty container
under the water dispenser.
6. Plug the unit into a 120V AC electrical outlet.
7. Press the POWER button. The single shot ( ) and double shot ( )buttons will
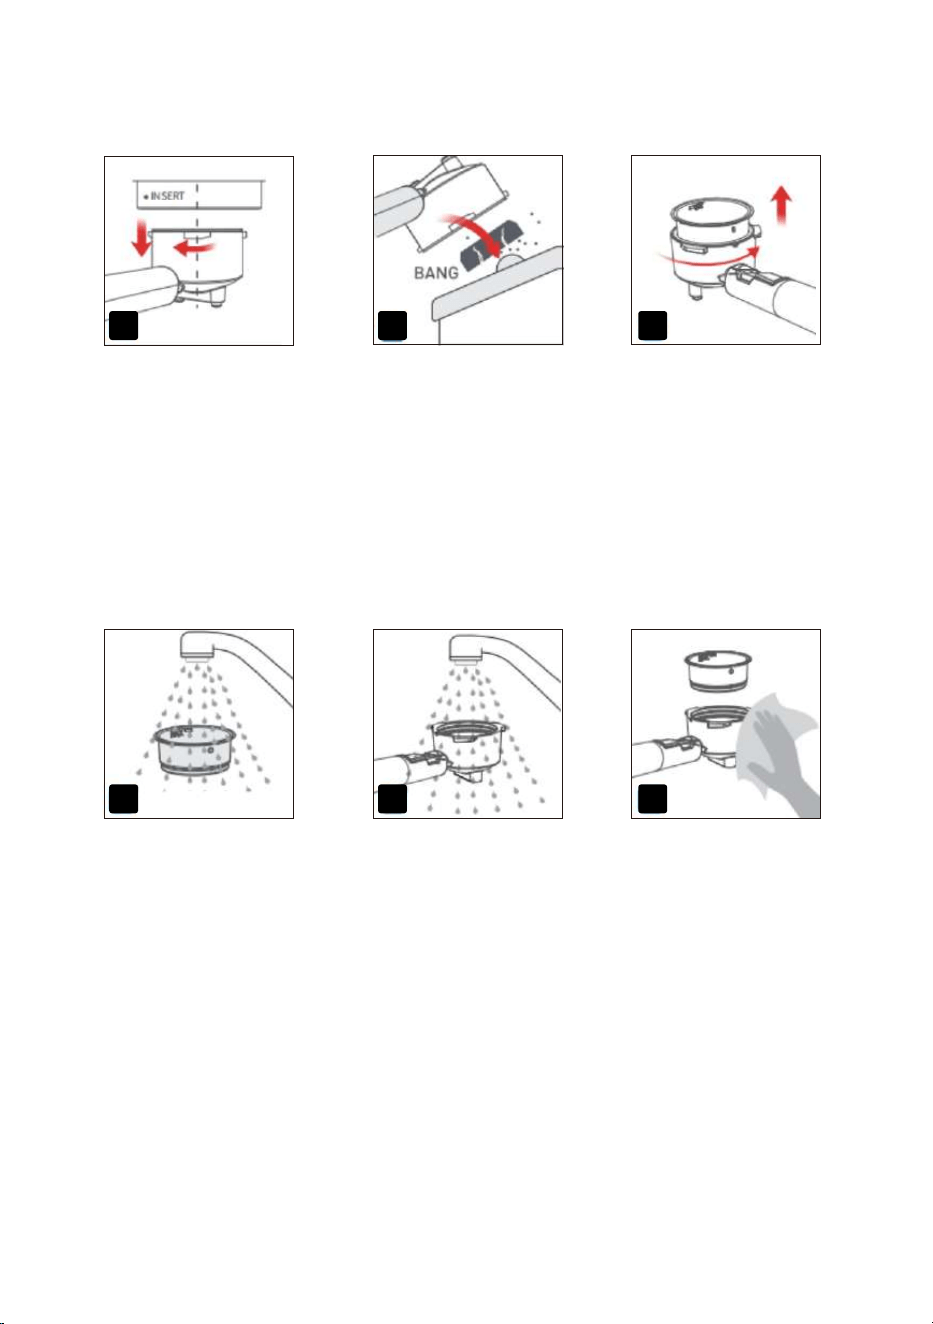
Wait 20 seconds to let the
machine relieve the
pressure then twist the
portafilter out of the
machine clockwise to
avoid coffee grinds in the
portafilter splashing and
collapsing, and accompa-
nied by a "bang" sound.
Discard the coffee puck in
the portafilter.
Align the marking don’t
on the Filter Basket with
the groove on the
portafilter and remov eit
from the portafilter.
Rinse the front and back
of the filter basket under
the faucet, and finally
rinse the inner holes and
the outer holes with water.
Rinse the inner and outer
holes of the portafilter
with clean water. Do not
wash it with any descaler.
Use a clean cloth to wipe
the filter and portafilter
dry.
16 17 18
19 20 21
12
begin to flash. When the system is up to temperature, all 4 buttons on the
control panel will illuminate.
8. Turn the function control dial to STEAM. Allow the hot steam to purge the line
for at least 45 seconds.
9. Press the double shot ( )button, then empty the hot water, until the entire
tank of water is purged through the system.
10. In hard water environments, it is recommended to repeat this procedure.
11. After descaling, remove the water tank and refill with fresh, cold water.
Repeat steps 7 through 9 to thoroughly rinse the Espresso Maker.
WARNING! Never immerse power cord, plug or Espresso Machine in water or any
other liquid. The water tank should never be completely emptied during
descaling.
12. When the flow has stopped, press the POWER button. Make sure the all
indicator lights OFF. Unplug the Espresso Maker from the wall outlet when not in
use.
13. Remove portafilter, containers or cups and rinse with hot water for next use.
9. MILK FROTHING GUIDE
1. Before cleaning your Espresso Maker, make sure the function control dial is in
the STANDBY position and the appliance has been disconnected from the wall
outlet.
2. Fill the water tank with 1 part white vinegar to 3 parts cold water.
3. Attach empty portafilter and any filter basket.
4. Plug the Espresso Maker into 120V AC electrical outlet.
5. Center a wide-mouth spouted container or cup under the 2-spout portafilter.
Place the steam wand’s tip into the frothing jug. Place an empty container
under the water dispenser.
6. Plug the unit into a 120V AC electrical outlet.
7. Press the POWER button. The single shot ( ) and double shot ( )buttons will
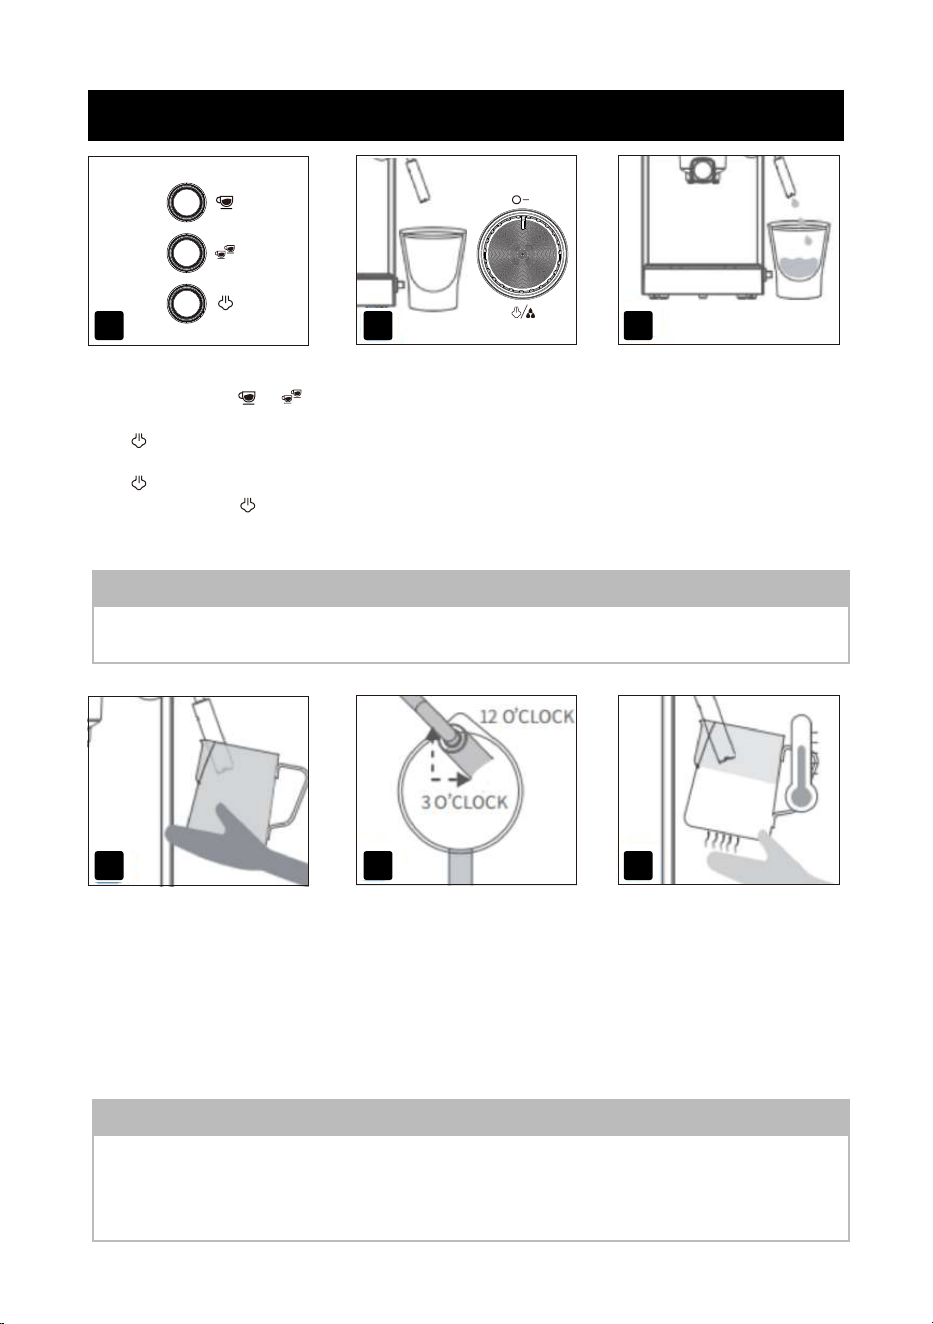
When the indicator light of
the front button " ""
" is always on, then press
the " " button, at this
time, the indicator light of
the " " button starts
flashing until the " "
indicator becomes
normally lit.
Place a cup on countertop
and position Steam Wand.
Turn the Knob to the
steam icon.
Release some steam out
from the steam wand
before performing milk
frothing.
Hold the position below
the tip of the milk foam
cup and the bottom of the
milk foam cup with your
left hand, and hold the
handle of the milk fo am
cup with your right hand.
The steam wand arm is at
12o'clock. The steam
wand out letis at 3 o'clock.
The milk is just soak to the
2mm position of thes
team wand outlet.
Milk frothing is complete
when the base of the milk
foam cup is too hot to
touch for 3 seconds
Note
Release a little water from the steam pipe before frothing the milk.
TIPS
After the milk foam cup base is too hot to touch for 3 seconds, the milk
frothing is finished. If you need more milk froth.you can continue to froth or
stopaccording to your needs.
1 2 3
4 5 6
13
begin to flash. When the system is up to temperature, all 4 buttons on the
control panel will illuminate.
8. Turn the function control dial to STEAM. Allow the hot steam to purge the line
for at least 45 seconds.
9. Press the double shot ( )button, then empty the hot water, until the entire
tank of water is purged through the system.
10. In hard water environments, it is recommended to repeat this procedure.
11. After descaling, remove the water tank and refill with fresh, cold water.
Repeat steps 7 through 9 to thoroughly rinse the Espresso Maker.
WARNING! Never immerse power cord, plug or Espresso Machine in water or any
other liquid. The water tank should never be completely emptied during
descaling.
12. When the flow has stopped, press the POWER button. Make sure the all
indicator lights OFF. Unplug the Espresso Maker from the wall outlet when not in
use.
13. Remove portafilter, containers or cups and rinse with hot water for next use.
10. USER MAINTENANCE INSTRUCTIONS
11. CARE & CLEANING INSTRUCTIONS
This appliance requires little maintenance. It contains no user serviceable parts.
Do not try to repair it yourself. Any servicing requiring disassembly must be
performed by a qualified appliance repair technician.
1. When espresso making is complete, press the POWER button; turn the
function control to STANDBY. Unplug the Espresso Maker from the electrical
outlet and allow to cool completely before cleaning.
1. Before cleaning your Espresso Maker, make sure the function control dial is in
the STANDBY position and the appliance has been disconnected from the wall
outlet.
2. Fill the water tank with 1 part white vinegar to 3 parts cold water.
3. Attach empty portafilter and any filter basket.
4. Plug the Espresso Maker into 120V AC electrical outlet.
5. Center a wide-mouth spouted container or cup under the 2-spout portafilter.
Place the steam wand’s tip into the frothing jug. Place an empty container
under the water dispenser.
6. Plug the unit into a 120V AC electrical outlet.
7. Press the POWER button. The single shot ( ) and double shot ( )buttons will
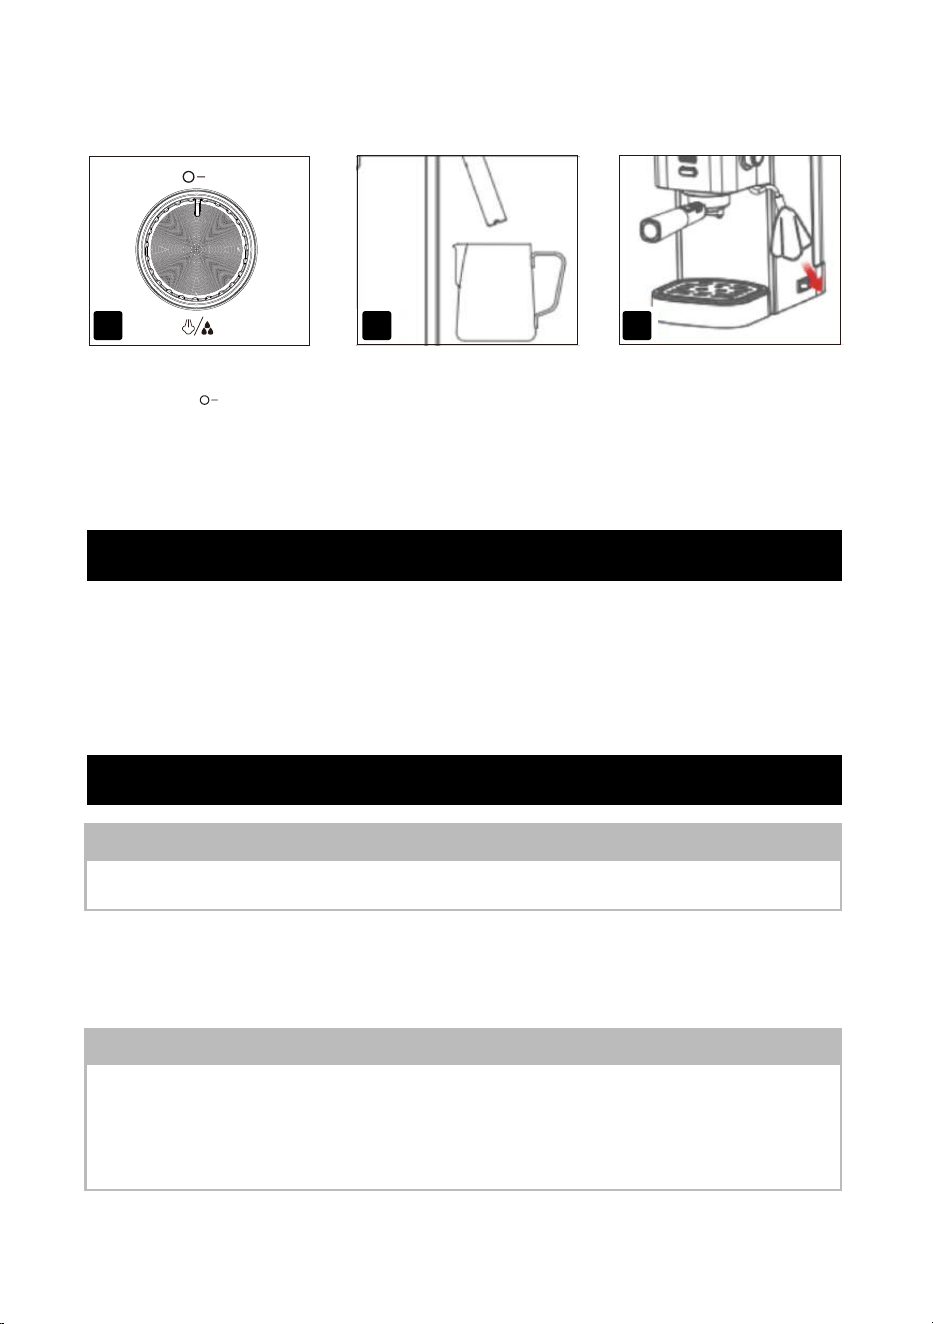
After production,turn the
Knob to the“ ”.
Remove the milkfoam cup
away from the steam
wand.
Wrap the Steam wand
cover with a damp cloth,
turn on the steam to clean
the steam pipe.
CAUTION
NEVER IMMERSE THE ESPRESSO MAKER IN WATER OR ANY OTHER LIQUID.
CAUTION
The Espresso Maker creates hot water and steam under pressure. To avoid
burns on fingers or hands, always make sure the POWER light is off. NEVER
touch the filter basket holder or steam wand immediately after brewing or
steaming. Allow all parts to cool thoroughly before touching.
7 8 9
14

begin to flash. When the system is up to temperature, all 4 buttons on the
control panel will illuminate.
8. Turn the function control dial to STEAM. Allow the hot steam to purge the line
for at least 45 seconds.
9. Press the double shot ( )button, then empty the hot water, until the entire
tank of water is purged through the system.
10. In hard water environments, it is recommended to repeat this procedure.
11. After descaling, remove the water tank and refill with fresh, cold water.
Repeat steps 7 through 9 to thoroughly rinse the Espresso Maker.
WARNING! Never immerse power cord, plug or Espresso Machine in water or any
other liquid. The water tank should never be completely emptied during
descaling.
12. When the flow has stopped, press the POWER button. Make sure the all
indicator lights OFF. Unplug the Espresso Maker from the wall outlet when not in
use.
13. Remove portafilter, containers or cups and rinse with hot water for next use.
12. DESCALING
2. Clean the steam wand and water dispenser. After frothing milk or dispensing
hot water, twist to remove the water dispenser tip and the frothing tip from the
steam wand and clean thoroughly.
3. Insert the cleaning pin’s larger wire into both the water dispenser’s and
steam wand’s outlet to clear. Rinse and screw the clean water reservoir tip and
frothing tip securely back into the wands.
4. Remove the drip plate, FULL bar, and slide the drip tray straight out. Empty
any collected water. Dry with a clean cloth and reassemble.
5. Wipe the outside of the Espresso Maker and brew head with a damp cloth.
Descaling reminder: The coffee machine is designed to undergo descaling every
300 uses, including for coffee, steam and hot water. When this limit is reached,
the " " and " " indicator light will blink slowly in sequence until the descaling
process is completed, after which the machine will return to normal operation.
1. Before cleaning your Espresso Maker, make sure the function control dial is in
the STANDBY position and the appliance has been disconnected from the wall
outlet.
2. Fill the water tank with 1 part white vinegar to 3 parts cold water.
3. Attach empty portafilter and any filter basket.
4. Plug the Espresso Maker into 120V AC electrical outlet.
5. Center a wide-mouth spouted container or cup under the 2-spout portafilter.
Place the steam wand’s tip into the frothing jug. Place an empty container
under the water dispenser.
6. Plug the unit into a 120V AC electrical outlet.
7. Press the POWER button. The single shot
( ) and double shot ( )buttons will
6. Clean the stainless steel frothing jug, tamper, by hand.
7. No parts of the Espresso Maker should be cleaned in the dishwasher.
IMPORTANT
The portafilter and filter basket should be emptied and rinsed thoroughly
with warm water after every use.
WARNING
Never use solvents or any detergents that may scratch or damage the surface
of the machine.
15
begin to flash. When the system is up to temperature, all 4 buttons on the
control panel will illuminate.
8. Turn the function control dial to STEAM. Allow the hot steam to purge the line
for at least 45 seconds.
9. Press the double shot ( )button, then empty the hot water, until the entire
tank of water is purged through the system.
10. In hard water environments, it is recommended to repeat this procedure.
11. After descaling, remove the water tank and refill with fresh, cold water.
Repeat steps 7 through 9 to thoroughly rinse the Espresso Maker.
WARNING! Never immerse power cord, plug or Espresso Machine in water or any
other liquid. The water tank should never be completely emptied during
descaling.
12. When the flow has stopped, press the POWER button. Make sure the all
indicator lights OFF. Unplug the Espresso Maker from the wall outlet when not in
use.
13. Remove portafilter, containers or cups and rinse with hot water for next use.
13. TROUBLESHOOTING
1. Before cleaning your Espresso Maker, make sure the function control dial is in
the STANDBY position and the appliance has been disconnected from the wall
outlet.
2. Fill the water tank with 1 part white vinegar to 3 parts cold water.
3. Attach empty portafilter and any filter basket.
4. Plug the Espresso Maker into 120V AC electrical outlet.
5. Center a wide-mouth spouted container or cup under the 2-spout portafilter.
Place the steam wand’s tip into the frothing jug. Place an empty container
under the water dispenser.
6. Plug the unit into a 120V AC electrical outlet.
7. Press the POWER button. The single shot ( ) and double shot ( )buttons will
Problem Possible Cause Solution
Coffee runs
down the
side of the
portafilter.
Portafilter is not attached correctly, or
has not been tightened sufficiently.
Re-insert the portafilter into the
brew head. Make sure the handle
is facing outward and is firmly
engaged on the brew head.
Coffee pod is not properly fitted in
thefilter basket.
Make sure that no part of the coffee
pod filter hangs over the lip of the
filter basket.
Edge of filter insert is not free of coffee
granules.
Clean around the top edge of the
filter and wipe the brew head with a
clean, damp cloth.
The brew head is dirty.
Wipe brew head with a clean, damp
cloth.
Brew head rubber seal is damaged or
worn.
Contact Customer Service.
Espresso is
not streaming.
No water in the water tank. Fill tank with water.
Water tank is incorrectly assembled.
Press firmly down on the water
tank to make sure it is correctly
positioned.
Brewing filter may be blocked.
See “Descaling” section of this
Instruction Manual
16
begin to flash. When the system is up to temperature, all 4 buttons on the
control panel will illuminate.
8. Turn the function control dial to STEAM. Allow the hot steam to purge the line
for at least 45 seconds.
9. Press the double shot ( )button, then empty the hot water, until the entire
tank of water is purged through the system.
10. In hard water environments, it is recommended to repeat this procedure.
11. After descaling, remove the water tank and refill with fresh, cold water.
Repeat steps 7 through 9 to thoroughly rinse the Espresso Maker.
WARNING! Never immerse power cord, plug or Espresso Machine in water or any
other liquid. The water tank should never be completely emptied during
descaling.
12. When the flow has stopped, press the POWER button. Make sure the all
indicator lights OFF. Unplug the Espresso Maker from the wall outlet when not in
use.
13. Remove portafilter, containers or cups and rinse with hot water for next use.
1. Before cleaning your Espresso Maker, make sure the function control dial is in
the STANDBY position and the appliance has been disconnected from the wall
outlet.
2. Fill the water tank with 1 part white vinegar to 3 parts cold water.
3. Attach empty portafilter and any filter basket.
4. Plug the Espresso Maker into 120V AC electrical
outlet.
5. Center a wide-mouth spouted container or cup under the 2-spout portafilter.
Place the steam wand’s tip into the frothing jug. Place an empty container
under the water dispenser.
6. Plug the unit into a 120V AC electrical outlet.
7. Press the POWER button. The single shot ( ) and double shot ( )buttons will
The filter basket is blocked, coffee
grounds are too fine or tamped down
too hard.
Empty filter basket and rinse under
water to clean. Use the cleaning
pin to clear holes in the base of the
Wipe the brew head with a cloth.
Redose the filter with a coarser
offee grind and tamp with less
pressure.
Espresso does
not have any
or enough
cream.
Coffee is old or dry.
Use freshly roasted and ground
coffee. Always store in an airtight
container.
Coffee not compacted firmly enough.
Tamp coffee grounds with more
pressure.
Coffee grind is too coarse.
Use a finer grind of pre-ground
coffee or grind the coffee beans to a
finer texture.
Dose is too small. Increase dose
Coffe is
too cold.
Cups, filter and filter hand are cold.
Run a blank shot to pre-heat cups,
portafilter and filter baskets.
If making a cappuccino or latte the milk
may not be heated enough.
Ensure that milk is heated properly
during texturing, but DO NOT boil
the milk.
No steam from
the steam
nozzle.
Steam nozzle is blocked. See “Care & Cleaning Instructions.”
Not enough
froth when
texturing.
Milk is not fresh. Begin again with fresh milk.
Milk temperature is too warm. Always use cold milk(41℉)
Texturing jug is warm
Refrigerate or run cold water into
the jug before use.
Steam nozzle is blocked. See “Care & Cleaning Instructions.”
Milk has been boiled. Start again with fresh, chilled milk.
The milk is making large bubbles rather
than microbubbles.
The tip of the steam nozzle should
be positioned just below the
surfaceof the milk.
Cups are
unevenly filled.
Uneven tamping or obstruction in the
pouring spouts.
Make sure coffee is tamped evenly
and check that both pouring spouts
on the portafilter are unobstructed.
See “Care & Cleaning Instructions.”
Espresso
tastes burnt.
Change the type of coffee being used.
Experiment with various types and
brands of coffee beans.
Appliance has not been rinsed after
descaling.
Purge a full water tank through
the spresso Maker before pulling
another espresso shot.
17

begin to flash. When the system is up to temperature, all 4 buttons on the
control panel will illuminate.
8. Turn the function control dial to STEAM. Allow the hot steam to purge the line
for at least 45 seconds.
9. Press the double shot ( )button, then empty the hot water, until the entire
tank of water is purged through the system.
10. In hard water environments, it is recommended to repeat this procedure.
11. After descaling, remove the water tank and refill with fresh, cold water.
Repeat steps 7 through 9 to thoroughly rinse the Espresso Maker.
WARNING! Never immerse power cord, plug or Espresso Machine in water or any
other liquid. The water tank should never be completely emptied during
descaling.
12. When the flow has stopped, press the POWER button. Make sure the all
indicator lights OFF. Unplug the Espresso Maker from the wall outlet when not in
use.
13. Remove portafilter, containers or cups and rinse with hot water for next use.
1. Before cleaning your Espresso Maker, make sure the function control dial is in
the STANDBY position and the appliance has been disconnected from the wall
outlet.
2. Fill the water tank with 1 part white vinegar to 3 parts cold water.
3. Attach empty portafilter and any filter basket.
4. Plug the Espresso Maker into 120V AC electrical
outlet.
5. Center a wide-mouth spouted container or cup under the 2-spout portafilter.
Place the steam wand’s tip into the frothing jug. Place an empty container
under the water dispenser.
6. Plug the unit into a 120V AC electrical outlet.
7. Press the POWER button. The single shot ( ) and double shot ( )buttons will
Pump makes
an unusually
loud noise.
Not enough water in the tank, or the
water tank is empty.
Fill the water tank. The water tank
should always be filled past the
MIN (5 oz.) mark. NEVER operate
the Espresso Maker with an empty
water tank.
Water tank is incorrectly assembled.
Press firmly down on the water
tank to make sure it is correctly
positioned.
Machine does
not operate.
Portafilter may be blocked.
Remove portafilter and clean
brewing head. See “Care &
Cleaning Instructions.”
Machine blocked by scale buildup. See “Descaling.”
MANUFACTURERS: FOSHAN WEKING HOME APPLIANCE CO., LTD
ADD: 3rd FLOOR of BUILDING NO.2, NO.6-7 SHUNYUAN NORTH RD, WUSHA,
DALIANG, SHUNDE, FOSHAN GUANGDONG CHINA
Contact:Emily Tel: +1(838)910 8317 E-Mail:[email protected].
18

begin to flash. When the system is up to temperature, all 4 buttons on the
control panel will illuminate.
8. Turn the function control dial to STEAM. Allow the hot steam to purge the line
for at least 45 seconds.
9. Press the double shot ( )button, then empty the hot water, until the entire
tank of water is purged through the system.
10. In hard water environments, it is recommended to repeat this procedure.
11. After descaling, remove the water tank and refill with fresh, cold water.
Repeat steps 7 through 9 to thoroughly rinse the Espresso Maker.
WARNING! Never immerse power cord, plug or Espresso Machine in water or any
other liquid. The water tank should never be completely emptied during
descaling.
12. When the flow has stopped, press the POWER button. Make sure the all
indicator lights OFF. Unplug the Espresso Maker from the wall outlet when not in
use.
13. Remove portafilter, containers or cups and rinse with hot water for next use.
14. COFFEES TO TRY
1. Before cleaning your Espresso Maker, make sure the function control dial is in
the STANDBY position and the appliance has been disconnected from the wall
outlet.
2. Fill the water tank with 1 part white vinegar to 3 parts cold water.
3. Attach empty portafilter and any filter basket.
4. Plug the Espresso Maker into 120V AC electrical outlet.
5. Center a wide-mouth spouted container or cup under the 2-spout portafilter.
Place the steam wand’s tip into the frothing jug. Place an empty container
under the water dispenser.
6. Plug the unit into a 120V AC electrical outlet.
7. Press the POWER button. The single shot ( ) and double shot ( )buttons will
Espresso (Short Black)
Espresso is a concentrated, full bodied coffee with a stable layer of crema on top.
An espresso is the foundation of allca fe coffee.
• Espresso glass (3 oz).
• Single or double shot of espresso (1-2 oz).
Ristretto
A ristretto is an extremely short espresso, distinguished by its intense flavor,
aftertaste and its thin crema on top.
• Espresso cup (1 oz).
• Half a single shot of espresso (0.5 oz).
Long Black (Americano)
Astandard espresso with hot water added. The hot water is added first so that
the crema is maintained.
• Cup (6 oz).
• Hot Water (to preference).
• Single or double shot of espresso (1-2 oz).
Con Panna
Con Panna, Italian for "with cream", made up of an espresso topped with lightly
whipped cream, It can also be dusted with cinnamon or chocolate.
•Сup(6 oz).
• Single or double shot of espresso (1-2 oz).
•Lightly whipped cream - dusted cinnamon.
Macchiato
Macchiato, Italian for ,'to stain or mark'. Traditionally served as a standard
espresso with a dash of cold or frothed milk & a small dollop of foam into the
middle of the crema.
• Espresso glass (3 oz).
• Single or double shot of espresso (1-2 oz).
• Dash of cold or frothed milk & small dollop of foam.
19

begin to flash. When the system is up to temperature, all 4 buttons on the
control panel will illuminate.
8. Turn the function control dial to STEAM. Allow the hot steam to purge the line
for at least 45 seconds.
9. Press the double shot ( )button, then empty the hot water, until the entire
tank of water is purged through the system.
10. In hard water environments, it is recommended to repeat this procedure.
11. After descaling, remove the water tank and refill with fresh, cold water.
Repeat steps 7 through 9 to thoroughly rinse the Espresso Maker.
WARNING! Never immerse power cord, plug or Espresso Machine in water or any
other liquid. The water tank should never be completely emptied during
descaling.
12. When the flow has stopped, press the POWER button. Make sure the all
indicator lights OFF. Unplug the Espresso Maker from the wall outlet when not in
use.
13. Remove portafilter, containers or cups and rinse with hot water for next use.
1. Before cleaning your Espresso Maker, make sure the function control dial is in
the STANDBY position and the appliance has been disconnected from the wall
outlet.
2. Fill the water tank with 1 part white vinegar to 3 parts cold water.
3. Attach empty portafilter and any filter basket.
4. Plug the Espresso Maker into 120V AC electrical
outlet.
5. Center a wide-mouth spouted container or cup under the 2-spout portafilter.
Place the steam wand’s tip into the frothing jug. Place an empty container
under the water dispenser.
6. Plug the unit into a 120V AC electrical outlet.
7. Press the POWER button. The single shot ( ) and double shot ( )buttons will
Flat White
An espresso with frothed milk & a thin layer of foam milk on top. The wider
cup will create the slim layer of foam, the signature of the flat white.
• Wide cup (6 oz).
•Single or double shot of espresso (1-2 oz).
• Frothed milk & foam.
Latte
An espresso with frothed milk & a finger width layer of foam milk on top. The
narrower cup will create the thicker layer of foam.
• Glass or Cup (7 oz).
• Single or double shot of espresso (1-2 oz).
• Frothed milk & foam.
Cappuccino
An espresso with 1/3 steamed frothed milk, topped with 1/3 creamy foam & a
dusting of chocolate.
• Cup (6-8 oz).
• Single or double shot of espresso (1-2 oz).
• 1/3 frothed milk, 1/3 foam-dusted with chocolate.
Mocha
Made in a similar way to a cappuccino but with the addition of chocolate.
Simply stir the chocolate into the espresso prior to adding the steamed milk &
foam
• Cup or tall glass (6-8 oz).
• Single or double shot of espresso (1-2 oz).
• Chocolate Syrup (to preference).
• 1/3 Frothed milk, 1/3 foam.
Babyccino
Steamed frothed milk with a layer of foamed milk. It can also be dusted with
chocolate.
• Small cup (3 oz).
• No shot of espresso.
• Frothed milk & foam- dusted with chocolate.
20

begin to flash. When the system is up to temperature, all 4 buttons on the
control panel will illuminate.
8. Turn the function control dial to STEAM. Allow the hot steam to purge the line
for at least 45 seconds.
9. Press the double shot ( )button, then empty the hot water, until the entire
tank of water is purged through the system.
10. In hard water environments, it is recommended to repeat this procedure.
11. After descaling, remove the water tank and refill with fresh, cold water.
Repeat steps 7 through 9 to thoroughly rinse the Espresso Maker.
WARNING! Never immerse power cord, plug or Espresso Machine in water or any
other liquid. The water tank should never be completely emptied during
descaling.
12. When the flow has stopped, press the POWER button. Make sure the all
indicator lights OFF. Unplug the Espresso Maker from the wall outlet when not in
use.
13. Remove portafilter, containers or cups and rinse with hot water for next use.
1. Before cleaning your Espresso Maker, make sure the function control dial is in
the STANDBY position and the appliance has been disconnected from the wall
outlet.
2. Fill the water tank with 1 part white vinegar to 3 parts cold water.
3. Attach empty portafilter and any filter basket.
4. Plug the Espresso Maker into 120V AC electrical
outlet.
5. Center a wide-mouth spouted container or cup under the 2-spout portafilter.
Place the steam wand’s tip into the frothing jug. Place an empty container
under the water dispenser.
6. Plug the unit into a 120V AC electrical outlet.
7. Press the POWER button. The single shot ( ) and double shot ( )buttons will
21