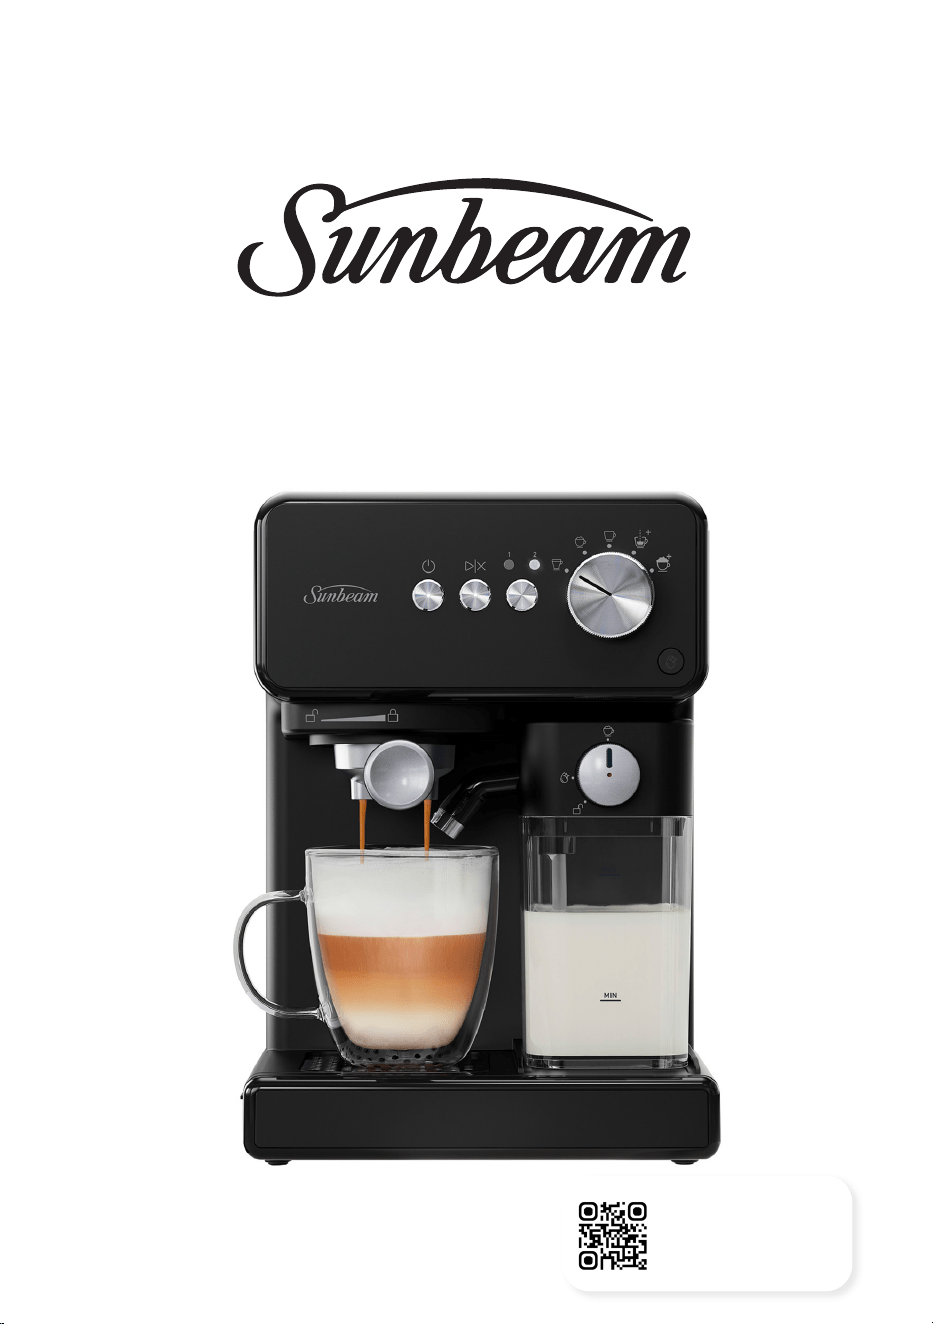
Prima Latte Espresso Machine
User Guide
EMP5100BK
SCAN HERE
For more
information
Sunbeam’s safety precautions 1
Getting to know your espresso machine 2-3
Using the adjustable cup platform 4
Before using your appliance for the first time 5
Selecting the right coffee 6
Let’s make a coffee 7
Using the group handle 8
Select the function 10
Cleaning your machine 13
Troubleshooting guide 17
Contents
Important instructions - retain for future use

1
SAFETY PRECAUTIONS FOR YOUR SUNBEAM
ESPRESSO MACHINE.
• Always place the unit on a flat, level surface.
• Do not operate without water in reservoir.
• Do not remove the filter holder during
water flow or coffee flow as the unit is
under pressure. Removing the filter holder
during operation can lead to a scalding or
injury.
• Clean the steam nozzle only when the unit
has been switched off and allowed to cool.
• Disconnect the plug from the power outlet
if there is any problem during the coffee
making process or prior to cleaning your
appliance.
• Do not allow the power cord to come into
contact with the hot parts of the appliance
(cup warming plate, filter holder, steam
nozzle).
• Keep hands away from hot parts of the
appliance, including the cup warming
plate, filter holder and steam nozzle.
• Misuse may potentially cause injury or
physical damage to the user.
• The heating element surface is subject to
residual heating after use.
• Cleaning and user maintenance shall not
be made by children without supervision.
• Do not place in a cabinet when in use.
Sunbeam is very safety conscious when
designing and manufacturing consumer
products, but it is essential that the product user
also exercise care when using an electrical
appliance. Listed below are precautions which
are essential for the safe use of an electrical
appliance:
• Read carefully and save all the instructions
provided with an appliance.
• Always turn the power off at the power
outlet before you insert or remove a plug.
Remove by grasping the plug - do not pull
on the cord.
• Turn the power off and remove the plug
when the appliance is not in use and before
cleaning.
• Do not use your appliance with an extension
cord unless this cord has been checked and
tested by a qualified technician or service
person.
• Always use your appliance from a power
outlet of the voltage (A.C. only) marked on
the appliance.
• This appliance is not intended for use by
persons (including children) with reduced
physical, sensory or mental capabilities,
or lack of experience and knowledge,
unless they have been given supervision or
instruction concerning use of the appliance
by a person responsible for their safety.
• Children should be supervised to ensure that
they do not play with the appliance.
• The temperature of accessible surfaces may
be high when the appliance is operating.
• Never leave an appliance unattended while
in use.
• Do not use an appliance for any purpose
other than its intended use.
• Do not place an appliance on or near a hot
gas flame, electric element or on a heated
oven.
• Do not place on top of any other appliance.
• Do not let the power cord of an appliance
hang over the edge of a table or bench top
or touch any hot surface.
• Do not operate any electrical appliance with
a damaged cord or after the appliance has
been damaged in any manner. If damage
is suspected, return the appliance to the
nearest Sunbeam Appointed Service Centre
for examination, repair or adjustment.
• For additional protection, Sunbeam
recommends the use of a residual current
device (RCD) with a tripping current not
exceeding 30mA in the electrical circuit
supplying power to your appliances.
• Do not immerse the appliance in water or
any other liquid unless recommended.
• This appliance is not intended to be
operated by means of an external timer or
separate remote control system.
• This appliance is intended to be used in
household and similar applications such
as: staff kitchen areas in shops, offices and
other working environments; farm houses;
by clients in hotels, motels and other
residential type environments; bed and
breakfast type environments.
If you have any concerns regarding the performance and use of your appliance,
please visit www.sunbeam.com.au or contact the Sunbeam Consumer Service Line.
Ensure the above safety precautions are understood.
Sunbeam’s safety precautions
2
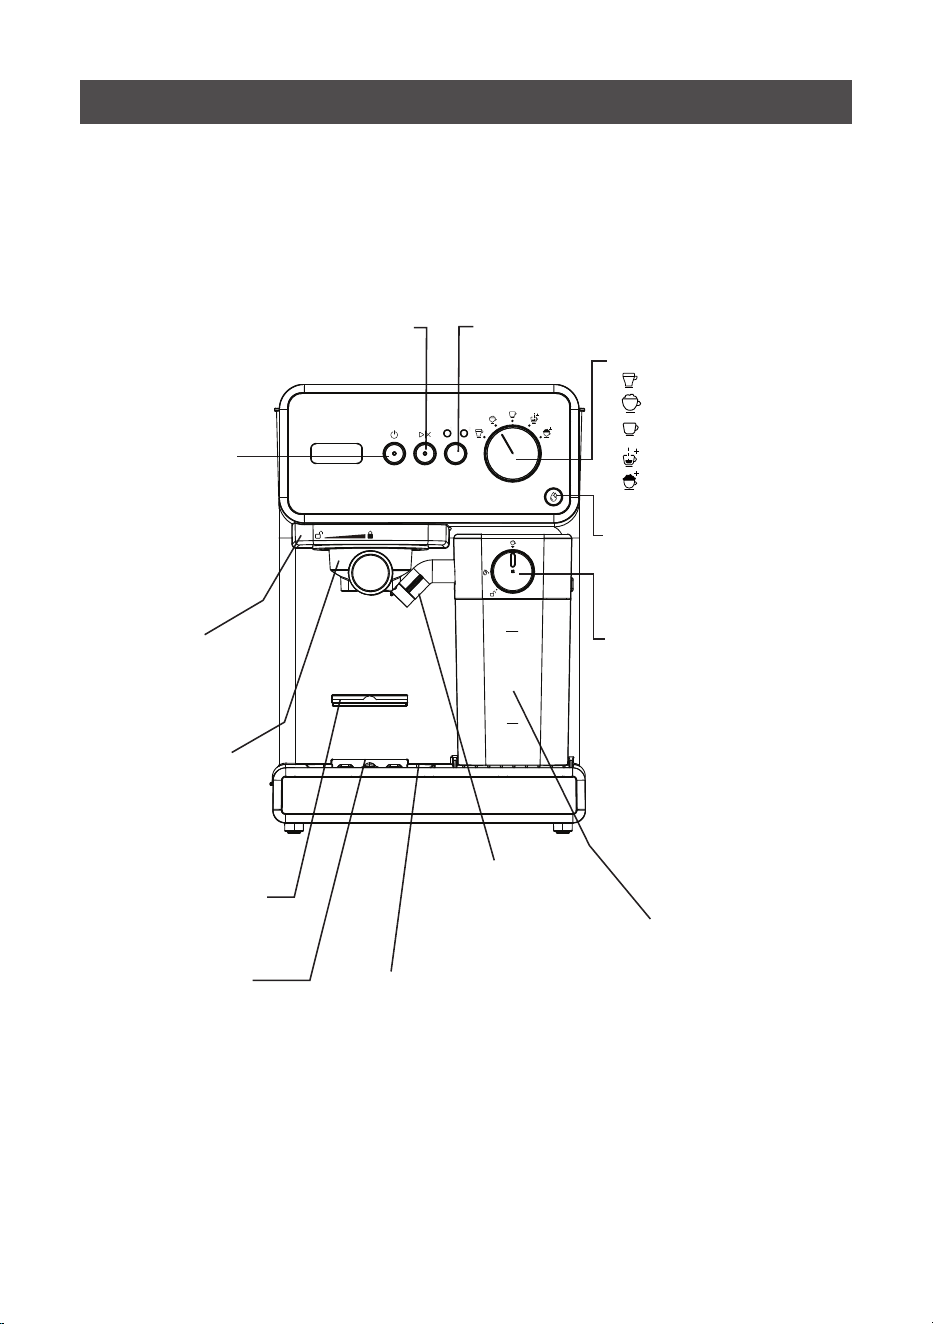
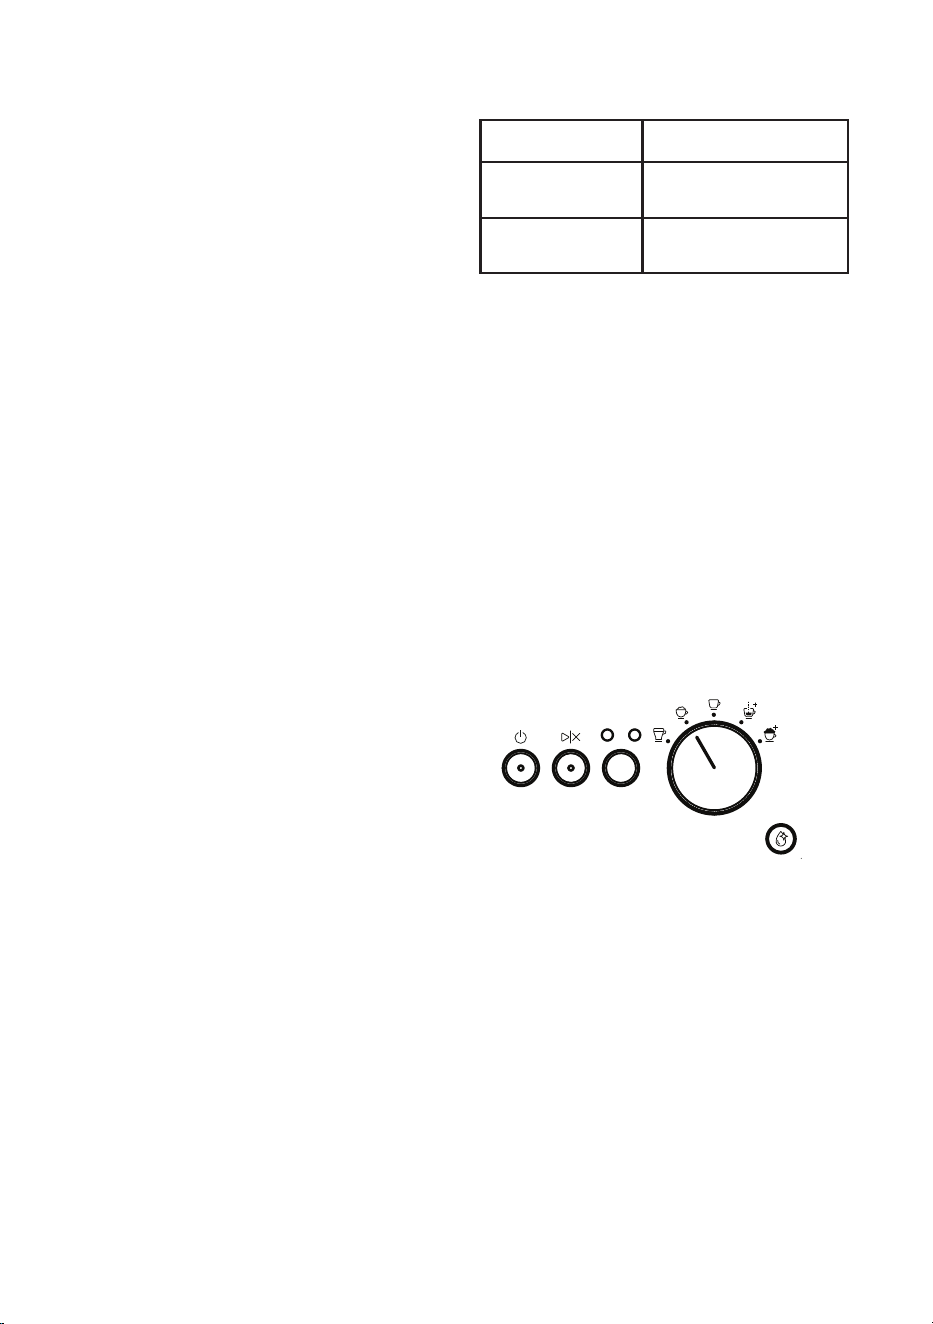
Start/Stop Button
The LED stays
fully illuminated
when ready. When
pressed, the LED
pulses on and off to
signal that brewing
is in progress.
Shot Selection Button
1 Shot: When selected, pours a single
shot of espresso or a small capp/latte.
2 Shot: When selected, pours a double
shot of espresso or a large capp/latte.
NOTE: The last selected (single shot or
double shot) will always be illuminated
until changed.
On/Off Power Button
The LED illuminates
and pulses on and
off to indicate that
the unit is heating
up. When ready,
it remains fully
illuminated and
ready for use.
Brew Head
See “Placing the
Group Handle”
section for detailed
information.
Group Handle
See “Placing the
Filter on the Group
Handle” and “Placing
the Group Handle”
sections for detailed
information.
Height Adjusting Slot
For small cups.
Drip Tray Water Level
Float
See “Cleaning the Drip
Tray” section.
Frothed Milk
Dispensing Tube
Dispense froth milk
to your beverage.
Removable Milk Tank
See “Filling the Milk
Tank” in the “Let’s
Make a Coffee”
section for detailed
information.
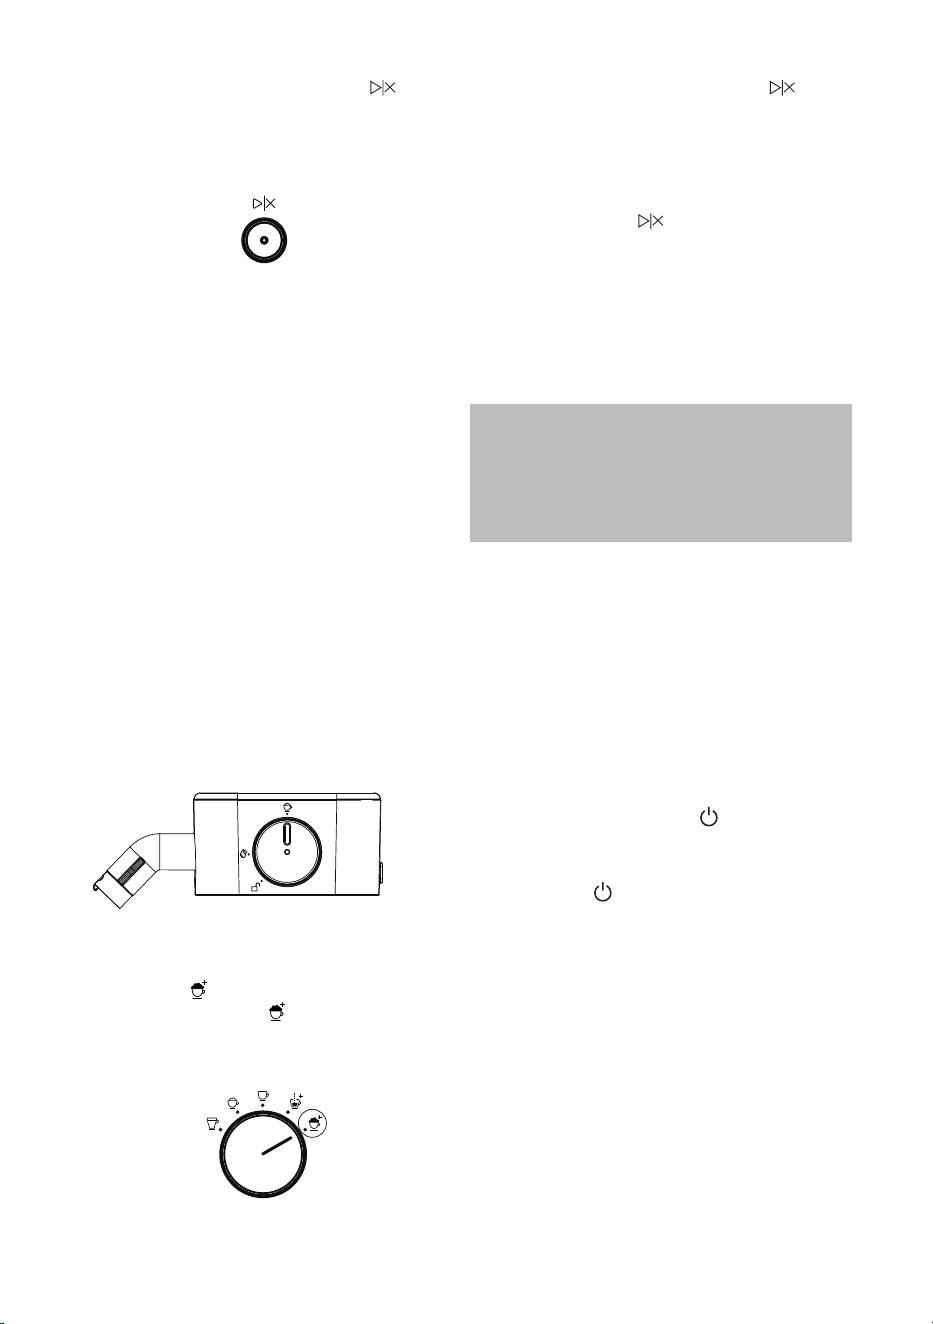
Milk Tank Knob
Allows you to switch
between:
• Milk Froth: See “Filling the
Milk Tank” in the “Let’s
Make a Coffee” section.
• Clean: See “Cleaning the Mik
Tank and Frothing System”
section.
• Unlock: See “Cleaning the
Milk Tank and Frothing
System” section.
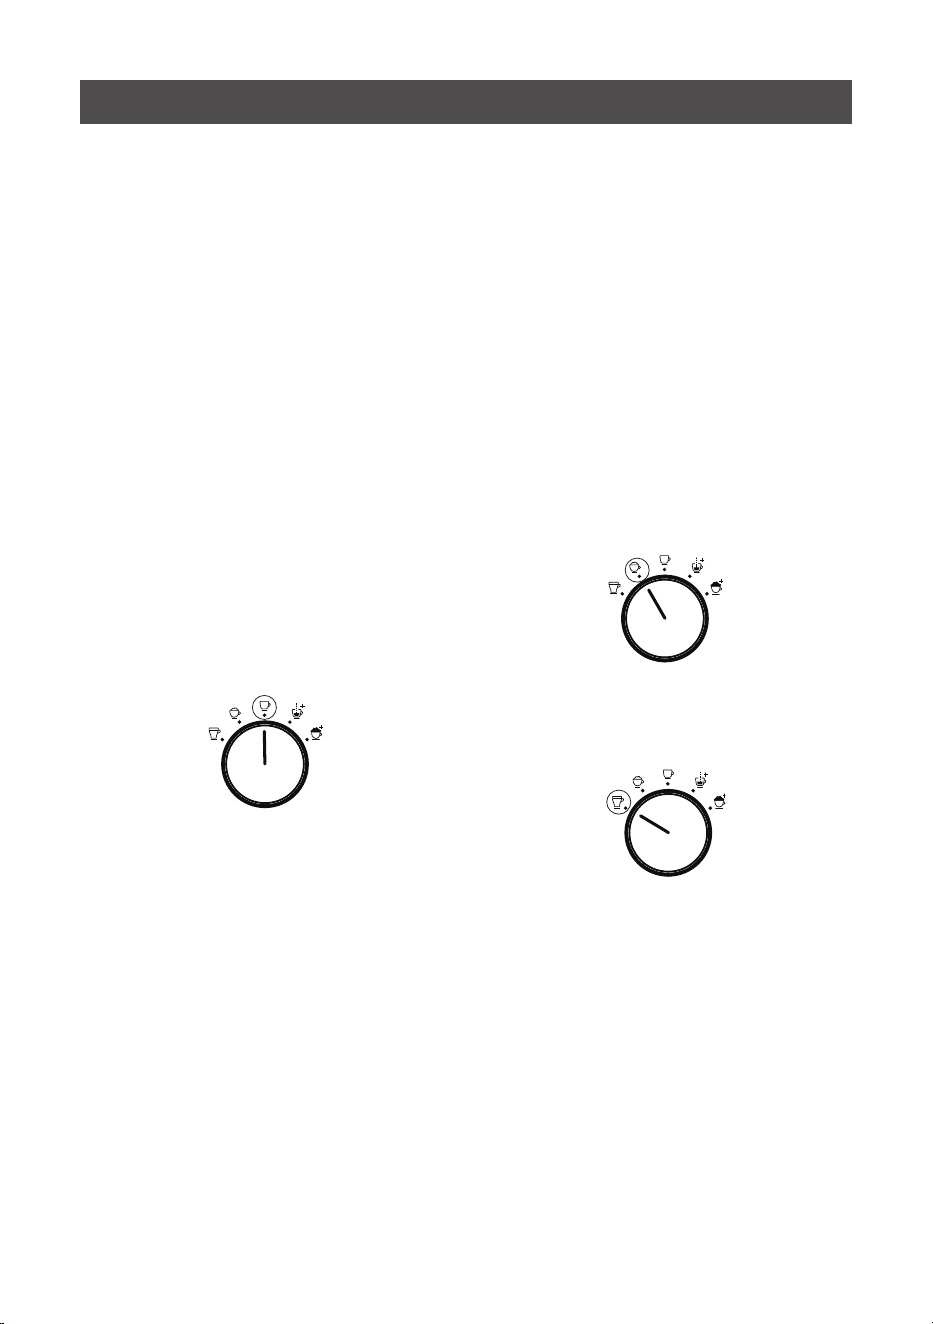
Mode Selection Knob
Latte
Cappuccino
Espresso
Manual Espresso
Manual Milk
Frothing
Adjustable Cup Platform
For small cups.
The adjustable cup
platform can be removed
and inserted into
the height-adjusting
slot. Refer to “Using
the Adjustable Cup
Platform”.
Clean Button
See “Deep Cleaning
Notification” section for
detailed information.
MIN
MAX
21
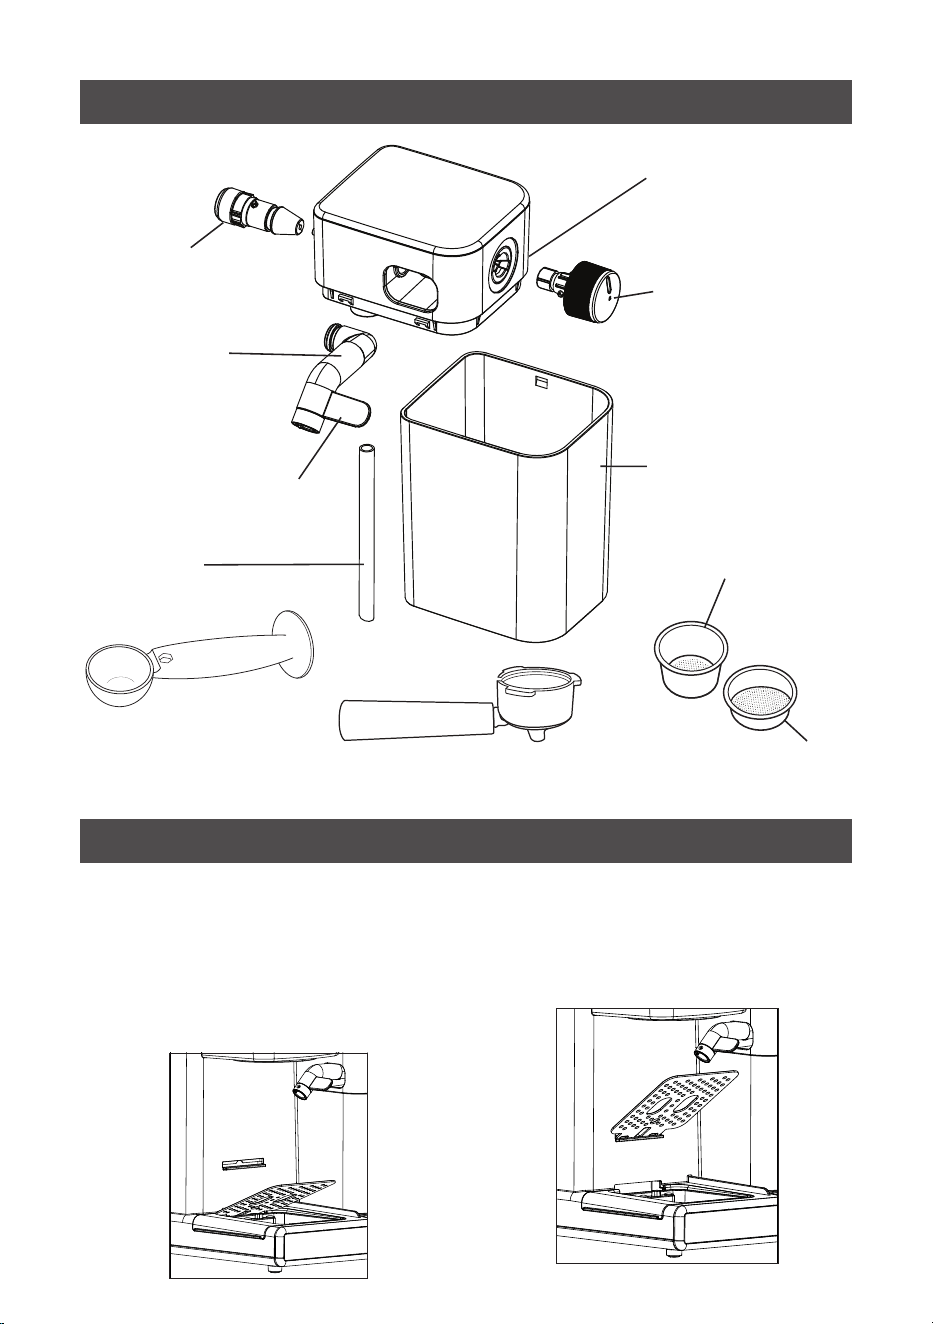
Getting to know your espresso machine
3
Measuring Scoop and
Tamp
Group Handle
Filter for Double Shot
of Espresso
Filter for Single Shot
of Espresso
Steam
Nozzle
Frothed Milk
Dispensing Tube
Frothed Milk Dispensing
Tube Guide Lever
Milk Tank Knob
Milk Straw
Milk Tank (550 mL)
Milk Tank Lid
Release Button
Getting to know your espresso machine
Using the adjustable cup platform
You can remove the adjustable cup
platform to clean the drip tray or use
it in the height-adjusting slot when
using a small cup.
To remove the adjustable cup
platform, tilt it at a 45° angle while
pulling it out.
.
To insert the adjustable cup platform
into the height-adjusting slot, tilt it at
a 45° angle while inserting it into the
slot.
4
Congratulations! You have selected the new and innovative Sunbeam
®
Prima Latte
Espresso Machine. This unique appliance has been designed to help you prepare
delicious espressos, cappuccinos, and lattes quickly, conveniently, and automatically
with the touch of a button: Café Classics made simple!
Please read ALL the instructions and notes in this manual carefully before using this
appliance. When this unit is used, some parts and accessories get hot and need to cool
down. Proper care and maintenance will ensure your Prima Latte Espresso Machine’s
long life and trouble-free operation. Save these instructions and refer to them often for
cleaning and care tips.
This espresso machine uses ground coffee. You can buy your coffee ground for espresso
or grind beans freshly in a separate coffee grinder.
Introduction to café classics made simple
ESPRESSO
Espresso is a unique method of coffee
brewing in which hot water is forced
through finely ground coffee. Popular
across Australia and New Zealand, it is a
far richer and more full-bodied brew than
traditional filter coffee. Because of its
richness, espresso is usually served in 30
to 60 mL portions in espresso cups.
CAPPUCCINO
A drink made with about 1/3 espresso and
2/3 steamed/frothed milk.
LATTE
A drink made with about 1/4 espresso and
3/4 steamed/frothed milk.
5
CLEAN YOUR ESPRESSO MACHINE PRIOR
TO FIRST USE
Please refer to the “Getting to Know
Your Espresso Machine” section to
familiarise yourself with the product and
identify all its parts.
1. Ensure the Prima Latte Espresso
Machine is not plugged into any
electrical outlet.
2. Remove stickers and labels from the
unit.
3. Remove red plug from the bottom of
the water reservoir.
4. Firstly, wash all 13 parts below in
warm water with a mild detergent:
- Drip Tray Mesh
Milk Frothing System parts:
- Milk Tank Lid
- Steam Nozzle
- Frothed Milk Dispensing Tube
- Milk Straw
- Milk Tank
Important: Below 7 parts are NOT
DISHWASHER SAFE:
- Group Handle
- Single and Double Filter Baskets
- Milk Tank Knob
- Measuring Scoop/Tamp
- Drip Tray
- Water Tank
5. Before placing or removing the Group
Handle and any filter from the unit,
refer to the instructions in the “Placing
the Group Handle” section.
6. To clean the inside of the appliance,
follow the steps listed in the “Deep
Cleaning Procedure” section using
water in both the water reservoir and
milk tank and no ground coffee in the
filter.
CAUTION: Do not immerse the
main body of the appliance or power
cord and plug in water or attempt to
reach any of its internal parts.
IMPORTANT - PRIME YOUR MACHINE
PRIOR TO FIRST USE
1. Fill the water reservoir up to the
“MAX” line and ensure that the
reservoir is securely placed back in the
unit with its lid closed.
2. Fill the milk tank with water up to
the MAX level, then slide it back into
place. You should feel the milk tank
click into position.
3. Select either a single or double
espresso filter and place it in the Group
Handle. Insert the Group Handle into
the brew head, ensuring it is securely
locked by gradually turning the handle
to the right until it is aligned with the
unit’s full lock symbol “ ”, and the
Group Handle handle facing directly
towards you. Then, position a large
empty cup (with at least 325 mL
capacity) underneath.
4. Plug the appliance into an appropriate
outlet.
5. Press the Power button “ ” located
on the front of the unit. The LED on
the button illuminates and pulses to
indicate warming up. When ready, the
button remains fully illuminated and
enters Standby mode.
6. Press the Shot Selection button to
choose the double shot (2) option. The
indicator LED (2) will illuminate.
7. Use the Mode Selection knob to select
the Latte option “ ”.
8. Press the Start/Stop button “ ” to
allow the unit to brew with water until
it stops automatically. The LED on
the button will illuminate and pulse
on and off to signal that brewing is in
progress.
9. Empty the water from the cup and return
it to the unit. Additionally, ensure that
the tip of the frothed milk dispensing
tube is directed into the cup.
Before using your appliance for the first time
6
10. Turn the Milk Tank knob anti-clockwise
until it clicks into the clean position “
”.
11. Press the Clean button to activate the
cleaning function. The Clean button
LED pulses on and off to signal the
cleaning cycle is in progress. Allow
the cleaning cycle to run until it
stops automatically, which will take
approximately 30 seconds.
12. Repeat steps 8-11 to ensure the unit
is fully primed.
13. Empty any remaining water in the milk
tank and then slide it back into place.
You should feel the milk tank click into
position.
14. Adjust the Milk Tank knob back to the
vertical Milk Froth position“ ”.
IMPORTANT: This is critical to ensure
correct operation for the next espresso/
milk cycle.
15. Empty the water from the cup.
16. Now, your unit has been primed and is
ready to be used.
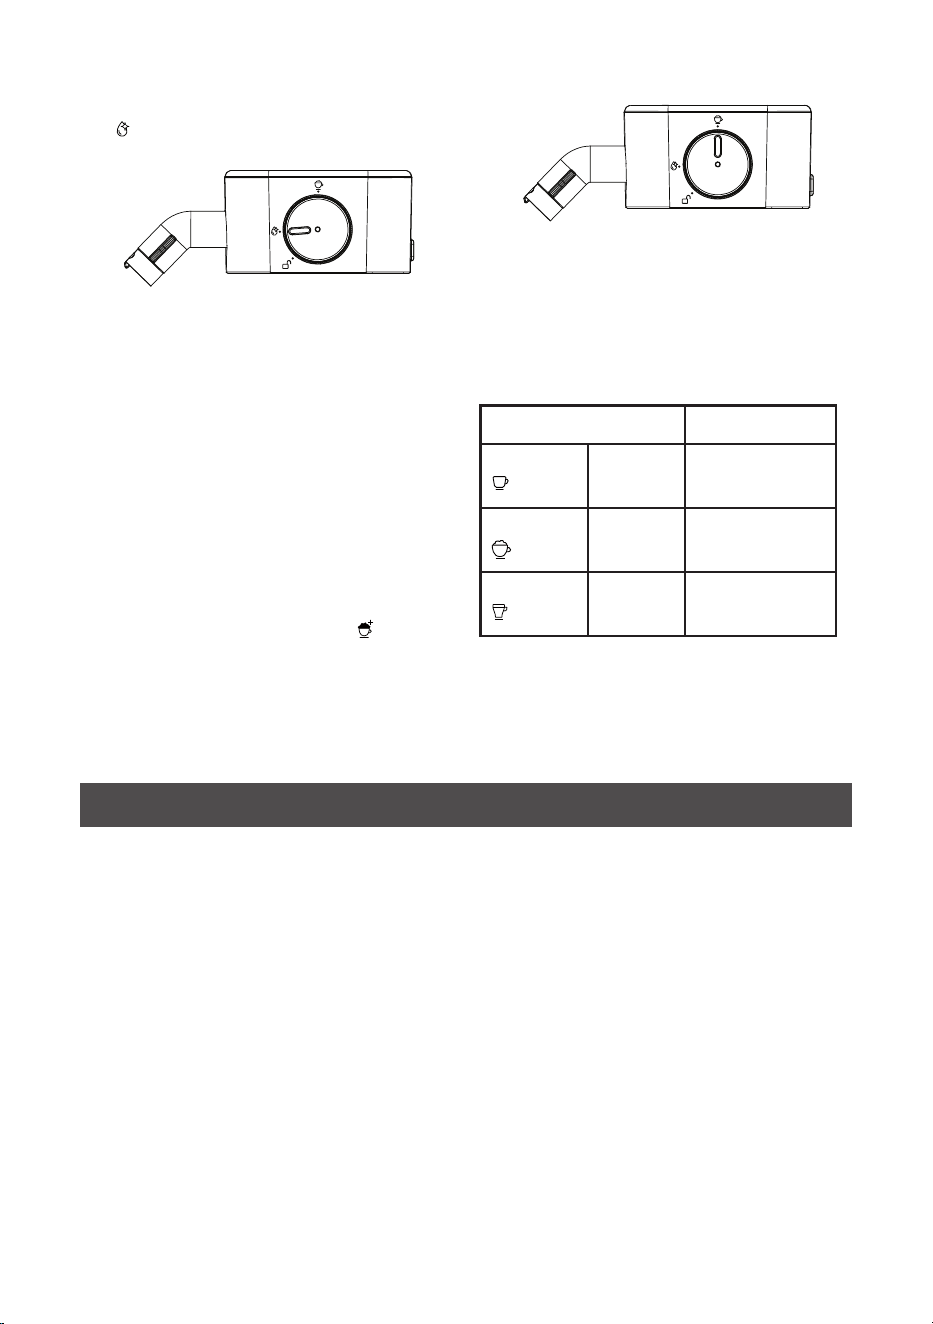
HOW TO SELECT THE RIGHT CUP
Please make sure to select your cup
according to the following chart:
BEVERAGE
SUGGESTED CUP
Espresso Single (1)
Double (2)
70 mL
100 mL
Cappuccino Small (1)
Large (2)
250 mL
300 mL
Latte Small (1)
Large (2)
350 mL
450 mL
The total volume of the beverage can vary
based on the type of milk and the amount
of froth used.
THE COFFEE
For the best flavour, use quality coffee,
freshly ground specifically for espresso
coffee. Keep in mind that pre-ground
coffee only retains its flavour for about
7 to 8 days, provided it is stored in an
airtight container in a cool, dark place.
Avoid storing coffee in the refrigerator or
freezer.
THE GRIND
If you have a separate grinder, it is
recommended that whole beans are
ground just before use. Coffee beans
can maintain their flavour for up to
4 weeks when stored in an airtight
container.
Alternatively, buy ground coffee
specifically for espresso use and keep it
sealed.
Check that the grind is right for espresso:
• The ideal grind should have a texture
like that of table salt: powder with a bit
of grit.
• If the coffee grind is too fine, water
cannot flow through it, even under high
pressure. These grinds resemble powder
when rubbed between the fingers.
• If the coffee grind is too coarse, the
water flows through it too quickly,
resulting in a less flavourful extraction.
These grinds resemble coarse sea salt.
Selecting the right coffee
7
TURNING THE PRIMA LATTE ESPRESSO
MACHINE ON
1. Ensure that the Prima Latte Espresso
Machine is plugged into an appropriate
electrical outlet.
2. Press the Power button “ ” located
on the front of the unit. The LED on
the button illuminates and pulses to
indicate warming up. When ready, the
button remains fully illuminated and
enters Standby mode.
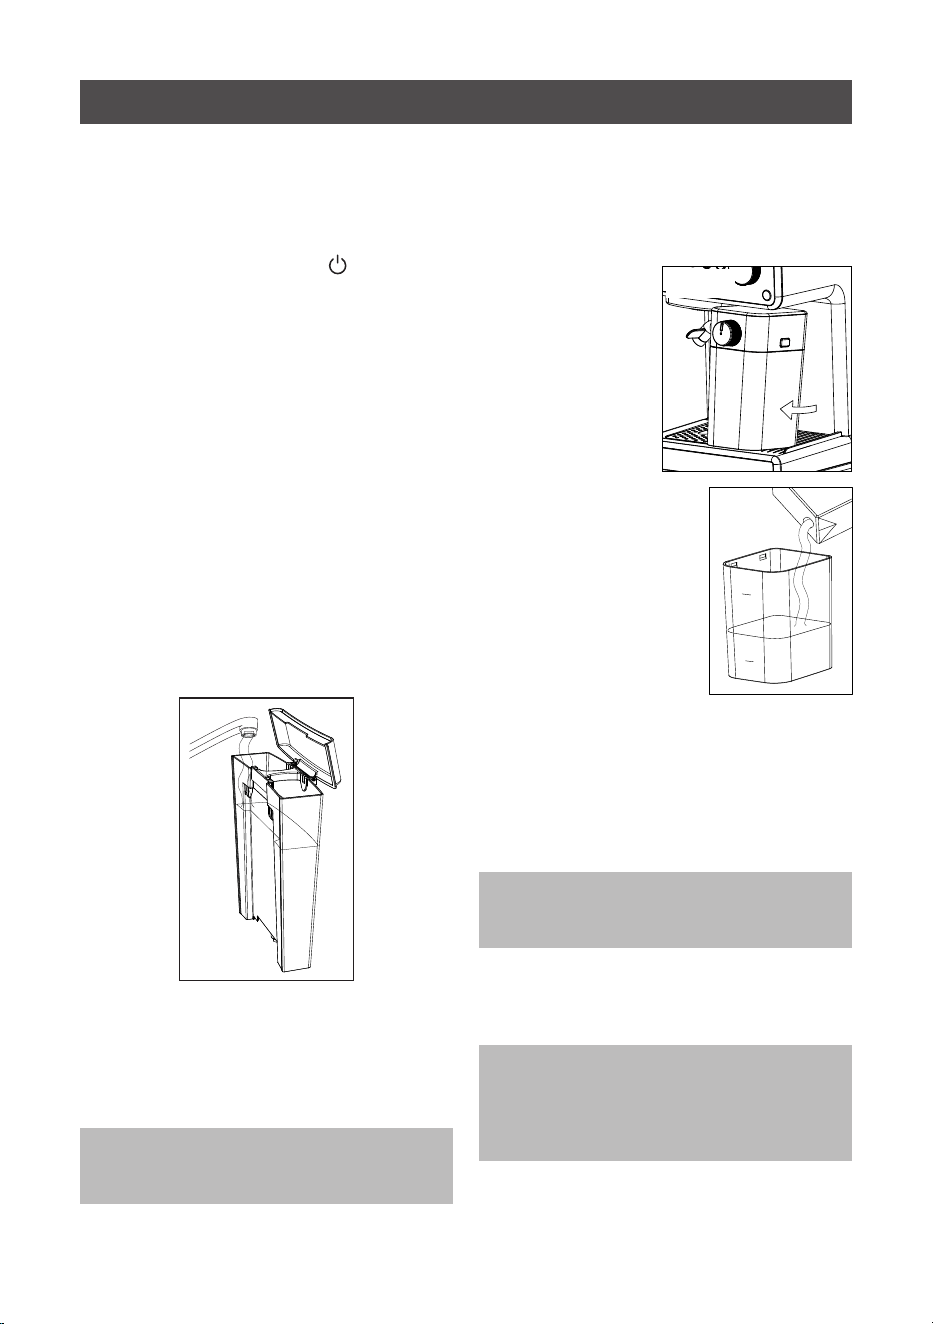
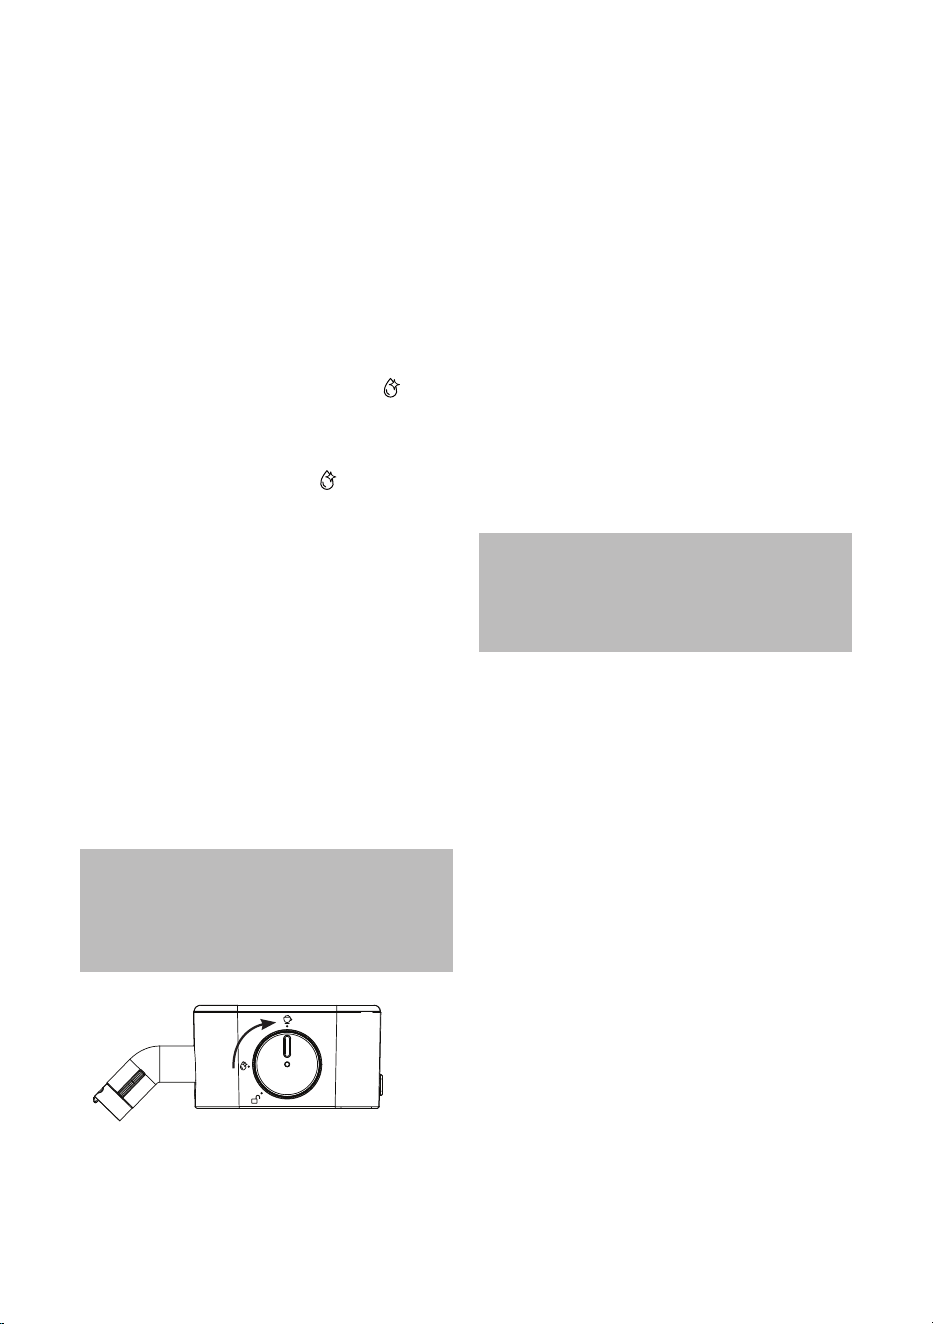
FILLING THE WATER RESERVOIR
1. Fill the water reservoir with water (see
Figure 1). You may use a pitcher or
remove it from the unit and then fill
it under a tap. Fill the reservoir with
the desired amount of water below
the “MAX” level. Always use room
temperature water to fill the water
reservoir; DO NOT use warm or hot
water. Recommend using filtered water
to improve the coffee taste. Filtered
water is also recommended in areas
with hard water.
Figure 1
2. Ensure the water reservoir lid is closed
after refilling. If you have removed
the reservoir from the unit for filling,
then close the lid before replacing the
reservoir back on the unit to prevent
spillage.
NOTE: If no water is in the reservoir,
the unit’s pump auto shuts off after
approximately 20 seconds.
FILLING THE MILK TANK
1. To prepare a cappuccino or latte, gently
pull the milk tank forward holding onto
the middle of the tank (see Figure 2),
then remove the milk frothing system by
pressing the lid
release button at
the side.
2. Pour the desired
quantity of cold
milk you estimate
you will need,
ensuring it is
below the “MAX”
level on the tank
(see Figure 3).
Filling to the “MIN”
mark will allow one of
any milk beverages to
be made.
3. Refit the milk frothing
system by pressing
it back in place until
the lid release button
clicks to lock. Then,
slide the milk tank back onto the unit.
You should feel the milk tank click into
position.
4. If any milk remains in the tank after you
make your beverage, you can store it in
the refrigerator. Typically, milk should
be consumed within 3 days of opening.
NOTE: The milk path should be flushed
after each use. Refer to “Frothing
System Cleaning”.
You can use all milk types and achieve
great results, but for best results with
non-dairy milk, we recommend using
specific barista variations.
NOTE: When inserting the milk tank
you should feel the milk tank click into
position. The best grip to remove and
insert is holding at the middle of the
milk tank.
If the milk tank is attached after the
machine has warmed up, the Power
LED will pulse while the milk frothing
system does a top-up warm up.
Figure 2
MIN
MAX
Figure 3
Let’s make a coffee
8
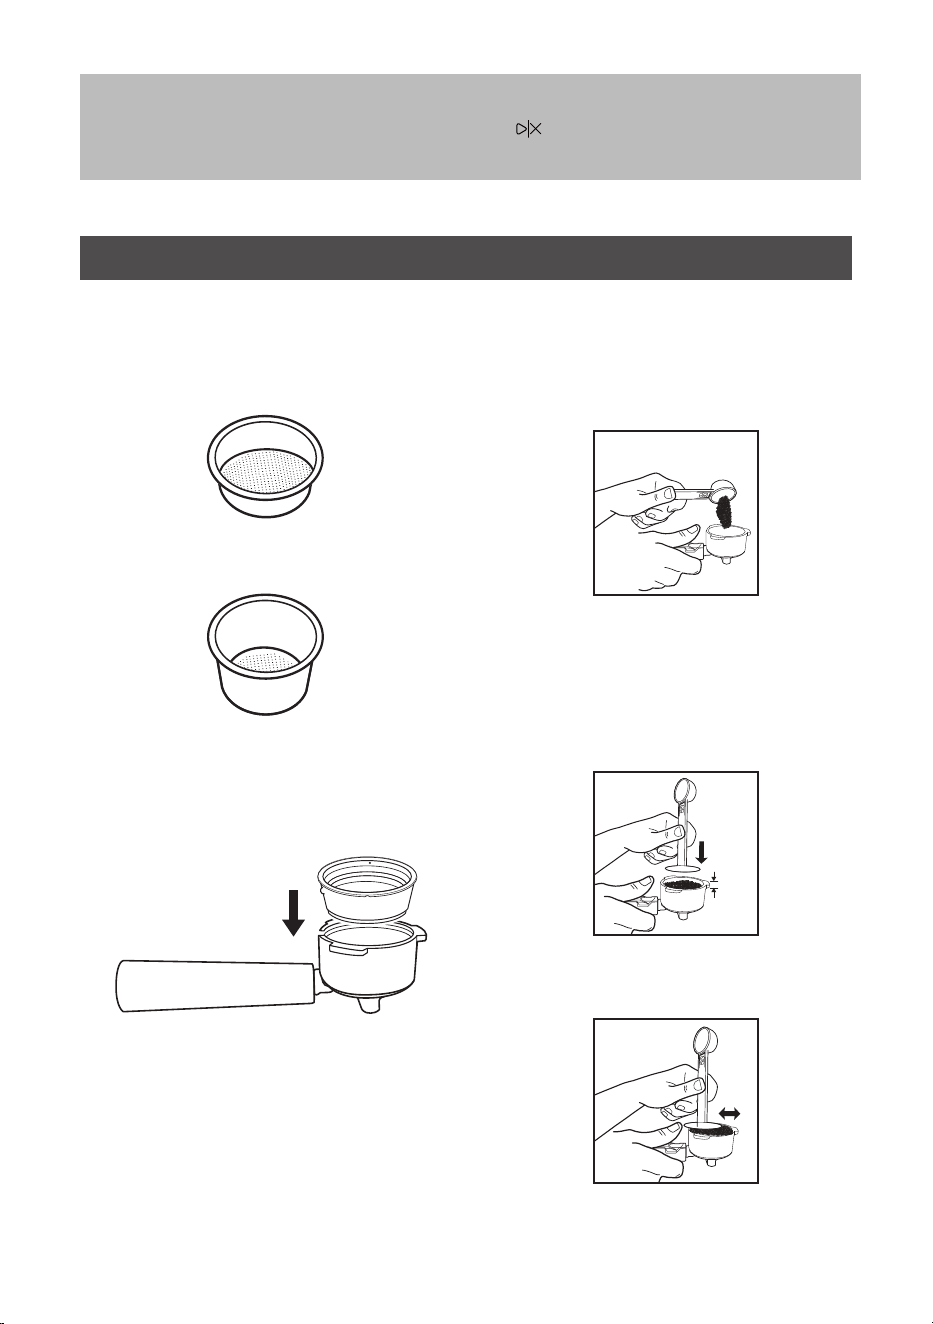
CHOOSING THE FILTER
Select the filter to be used as follows:
1. FOR A SINGLE ESPRESSO SHOT: Use the
single filter basket.
2. FOR A DOUBLE ESPRESSO SHOT: Use the
double filter basket.
PLACING THE FILTER IN THE GROUP
HANDLE
1. Firmly press the filter into the Group
Handle until it clicks.
2. To remove the filter from the Group
Handle for cleaning, use your finger to
grip the edge of the filter and push it
upward until it detaches.
WARNING: Ensure the filter has cooled
down before removing it from the Group
Handle.
FILLING WITH COFFEE
USE GROUND COFFEE:
1. Fill the filter with fresh, finely ground
espresso coffee, leaving about 3mm
from the rim (DO NOT overfill).
1.
2. Using the tamping part of the scoop,
firmly press the coffee grounds down to
ensure they are compact and even.
The top of the straight section of the
tamp should be approximately level with
the rim of the filter to ensure that your
espresso grounds are compact and level.
3 mm
2.
3. Wipe away any excess coffee from the
rim to ensure a proper fit under the
unit’s brew head.
3.
NOTE: If the milk tank is not attached to
the unit, only the espresso and manual
espresso functions will work. If the
latte, cappuccino, or manual milk froth
functions are selected, the function will
not proceed, and the Start/Stop button
“ ” LED will flash.
Using the group handle

9
PLACING THE GROUP HANDLE
1. Place the Group Handle under the unit’s
brew head.
1.
2. Align the handle with the unit’s open
lock icon “ ” to fit into the groove.
2.
3. Gradually turn the handle to the right
until it is aligned with the unit’s full
lock symbol “ ”, and the Group
Handle handle facing directly towards
you.
Make sure you avoid accidentally
pressing any of the buttons.
CAUTION: The Group Handle MUST be
in the locked lock “ ” position before
brewing.
3.
PLACING THE CUP
1. For any milk-based beverages, adjust
the adjustable cup platform so that the
cup’s rim is close to the milk spout by
moving it to whichever of the height
adjustment slots is most suitable.
2. If you use a larger cup to brew
cappuccino or latte, keep the adjustable
cup platform on the drip tray.
3. For tall cups and “To Go Cups,” both
the drip tray plate and the drip tray can
be removed. When both are taken out
and the cup is placed directly on the
machine’s base, the maximum height
for a cup is approximately 140 mm.
MIN
MAX
21
MIN
MAX
21
NOTE: When brewing a cappuccino or
latte, make sure to use the frothing
tube lever to position the frothed milk
dispensing tube inside the cup’s rim.
10
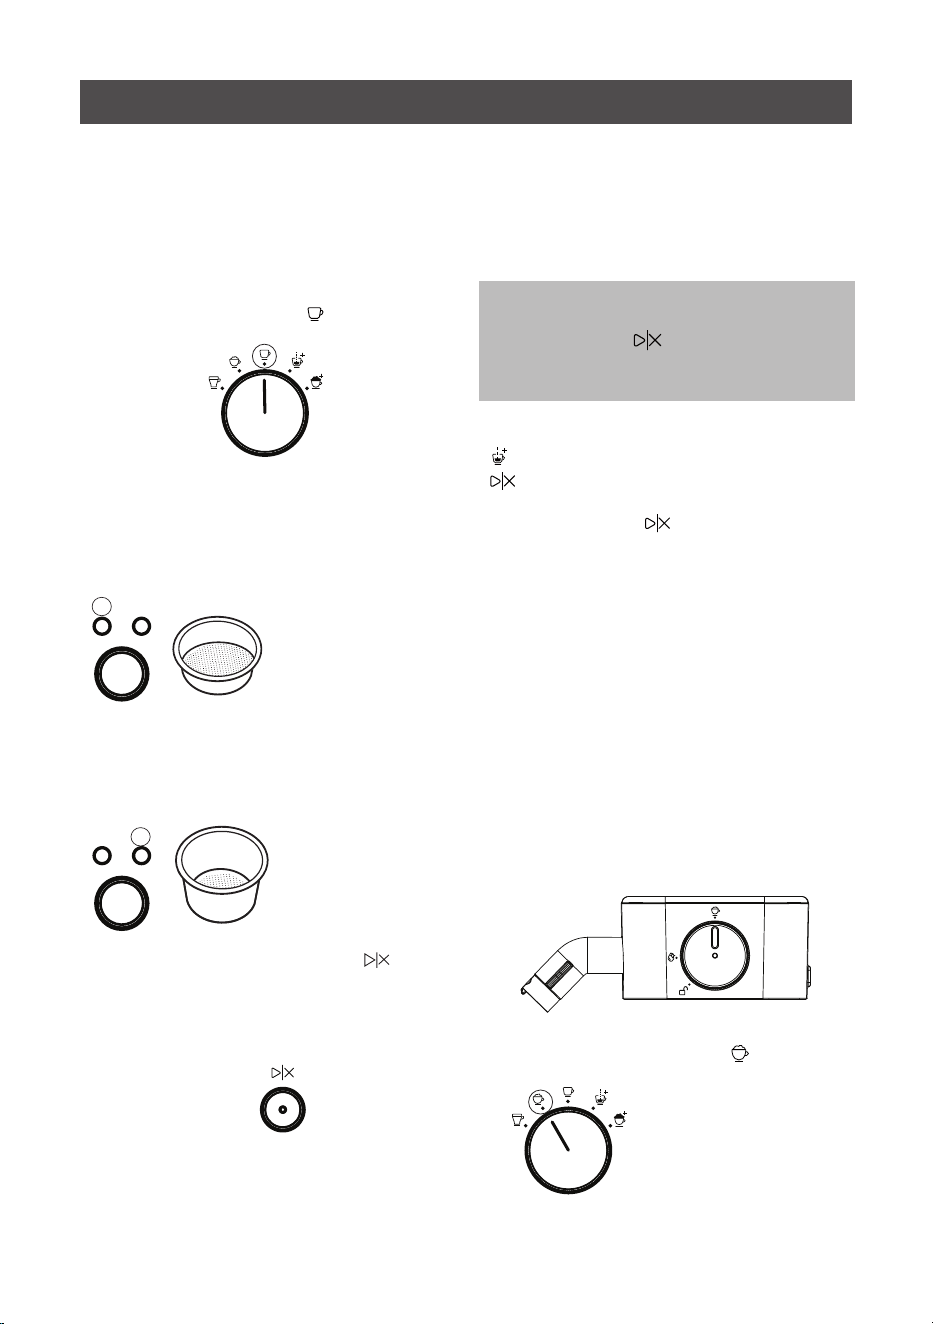
PREPARING ESPRESSO
If you are brewing only espresso, it isn’t
necessary to attach the milk tank. When the
milk tank is not attached, the Prima Latte
Espresso Machine will only allow you to
select espresso buttons.
1. Use the Mode Selection knob to select
the Espresso option “ ”.
2. Do one of the following:
• Press the Shot Selection button
to choose option (1) for brewing a
single-shot espresso. The indicator
LED (1) will illuminate to signify a
single-shot espresso.
= 30 mL shot of
espresso
MIN
MAX
21
• Press the Shot Selection button
to choose option (2) for brewing a
double-shot espresso. The indicator
LED (2) will illuminate to signify a
double-shot espresso.
= 60 mL shot
of espresso
MIN
MAX
21
3. Press the Start/Stop button “ ” to
begin brewing. The LED on the button
will illuminate and pulse on and off to
signal that brewing is in progress.
MIN
MAX
21
4. The machine will begin brewing the
espresso based on your selection. Once
the brewing process is complete, it will
automatically stop and go into Standby
mode. Your delicious espresso is now
ready to enjoy!
NOTE: If you want to brew less coffee
than the preset amount, press the Start/
Stop button “ ” at any time during
the brewing process to stop when you
reach your desired amount of coffee.
To brew manually, use the Mode Selection
knob to select the Manual Shot option
“ ”, and then press the Start/Stop button
“ ” to begin brewing. When you have
the desired amount of espresso, press the
Start/Stop button “ ” again to stop the
machine.
If not manually stopped in this mode, the
unit will automatically stop brewing after
200ml (or around 1 minute).
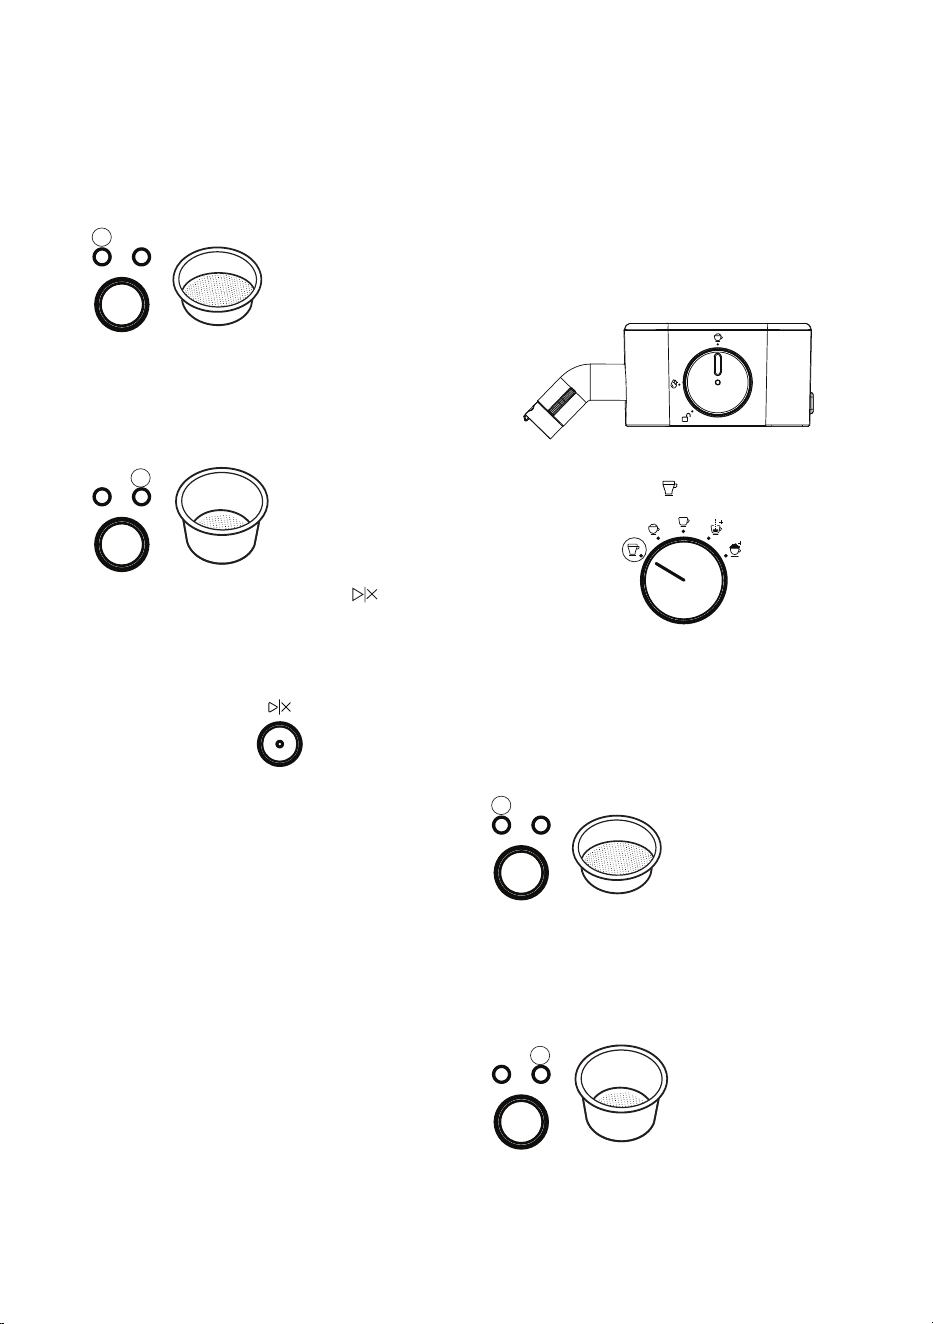
PREPARING CAPPUCCINO
1. Remove the milk tank from the Prima
Latte Espresso Machine and add the
amount of cold milk you need into the
tank. Place the milk tank back in place.
Refer to the “Filling the Milk Tank”
section for detailed instructions.
2. Turn the Milk Tank knob to the to the
vertical Milk Froth position.
3. Use the Mode Selection knob to select
the Cappuccino option “ ”.
Select the function
11
4. Do one of the following:
• Press the Shot Selection button to
choose option (1) for brewing a small
cappuccino. The indicator LED (1)
will illuminate when a small cup of
cappuccino is selected.
= 30 mL shot
of espresso &
steamed/frothed
milk*
MIN
MAX
21
• Press the Shot Selection button to
choose option (2) for brewing a large
cappuccino. The indicator LED (2)
will illuminate when a large cup of
cappuccino is selected.
= 60 mL shot
of espresso &
steamed/frothed
milk*
MIN
MAX
21
5. Press the Start/Stop button “ ” to
begin brewing. The LED on the button
will illuminate and pulse on and off to
signal that brewing is in progress.
MIN
MAX
21
6. The machine will begin brewing the
cappuccino based on your selection.
Once the brewing process is complete,
it will automatically stop and go into
Standby mode.
Your delicious cappuccino is now ready to
enjoy!
PREPARING LATTE
1. Remove the milk tank from the Prima
Latte Espresso Machine and add the
amount of cold milk you need into the
tank. Place the milk tank back in place.
Refer to the “Filling the Milk Tank”
section for detailed instructions.
2. Turn the Milk Tank knob to the to the
vertical Milk Froth position.
3. Turn the Mode Selection knob to select
the Latte option“ ”.
4. Do one of the following:
• Press the Shot Selection button to
choose option (1) for brewing a small
latte. The indicator LED (1) will
illuminate when a small cup of latte
is selected.
= 30 mL shot
of espresso &
steamed/frothed
milk*
MIN
MAX
21
• Press the Shot Selection button to
choose option (2) for brewing a large
latte. The indicator LED (2) will
illuminate when a large cup of latte is
selected.
= 60 mL shot
of espresso &
steamed/frothed
milk*
MIN
MAX
21
* See table page 6 for suggested cup size/volume per beverage.
12
5. Press the Start/Stop button “ ” to
begin brewing. The LED on the button
will illuminate and pulse on and off to
signal that brewing is in progress.
MIN
MAX
21
6. The machine will begin brewing the
latte based on your selection. Once
the brewing process is complete, it will
automatically stop and go into Standby
mode.
Your delicious latte is now ready to enjoy!
PREPARING FROTHED MILK
The Prima Latte Espresso Machine also
allows you to prepare frothed milk alone.
To add more foam to your beverage or to
prepare frothed milk for other drinks like a
macchiato, hot chocolate, or chai latte, do
the following:
1. Remove the milk tank from the Prima
Latte Espresso Machine and add the
amount of cold milk you need into
the tank. Place the milk tank back in
place. Refer to the “Filling the Milk
Tank” section for detailed instructions.
2. Turn the Milk Tank knob to the vertical
Milk Froth position.
3. Use the Mode Selection knob to
choose the Manual Milk Frothing
option “ ”. When the Manual Milk
Frothing option “ ” is selected,
the Shot Selection option (1 or 2) is
inactive.
4. Press the Start/Stop button “ ”.
The LED on the button will illuminate
and pulse on and off to signal that
frothing is in progress.
5. When you have the desired amount
of frothed milk, press the Start/
Stop button “ ” again to stop the
machine.
The unit will automatically stop
dispensing frothed milk after 45
seconds if not manually stopped.
AFTER PREPARING YOUR BEVERAGES
WITH MILK
NOTE: After you finish preparing your
beverage with milk, always remember to
flush the milk frothing system after each
use. This can also be done with milk in the
milk tank (see Frothin System Cleaning –
with Milk in Tank).
After flushing the milk system, you have
two options for handling the milk tank:
either store the unit’s milk tank directly in
the refrigerator for future use or dispose of
any leftover milk.
AUTO-OFF FEATURE
After 15 minutes of inactivity, the Prima
Latte Espresso Machine automatically
turns off. When the unit is turned off, all
LED indicators are turned off and inactive.
Press the Power button “ ” to awaken
the unit.
After use, the unit should be turned off
by pushing “ ”. Leaving it in” Auto
shut off” mode is not recommended
for extended periods. Also, when not
using the machine for longer periods,
unplugging or turning off the electrical
outlet is recommended.

13
The cleaning LED will remain illuminated
when your machine is ready for a cleaning
cycle. Always turn the power off, unplug,
and allow it to cool before removing parts
for cleaning.
CLEANING THE DRIP TRAY
Empty the drip tray as needed. If the
red Drip Tray Water Level Float is visible
through the adjustable cup platform,
remove it (see “Using the Adjustable
Cup Platform”) and carefully empty the
drip tray. The drip tray can be lifted by
gripping its handle.
Additionally, clean the drip tray and
adjustable cup platform weekly using
warm water and a small amount of mild
detergent. Rinse and dry them thoroughly
afterward.
FROTHING SYSTEM CLEANING – WITH
MILK IN TANK
It is important to flush the milk frothing
system after each use.
NOTE: The cycle to flush the milk frothing
system runs for approximately 30 seconds.
1. Ensure the milk tank and frothing
system are properly attached.
2. Place a large empty cup (at least
325 mL capacity) under the froth
dispensing tube.
3. Turn the milk tank knob anti-clockwise
until it clicks into the clean position “ ”.
4. Press the Clean button “ ” once
to activate the clean function. The
Prima Latte Espresso Machine will
release steam through the froth
dispensing tube. When no more water
is coming out of the tube, the cycle has
completed and the Clean icon “ ” will
turn off. Dispose of the water in the
cup.
5. Rotate the Milk Tank knob back to the
Froth position. This is critical to ensure
correct operation for the next beverage.
CLEANING THE MILK TANK AND
FROTHING SYSTEM
Although leftover milk can be stored in
the milk tank in the refrigerator, it is
important to manually clean the tank and
frothing system regularly to avoid clogging
and residue build-up and to maintain
frothing performance.
1. Remove the milk tank & frothing system
by gently pulling forward. The best
grip is at the middle of the milk tank
(Figure 1).
Figure 1
2. Remove the frothing system from the
top of the tank using the lid release
button at the side.
Cleaning your machine

14
3. Remove all parts from the frothing
system (Figure 2): the milk dispensing
tube, the straw, the milk tank knob, and
the steam nozzle.
Remove the milk tank knob by turning
it to the unlock icon (Figure 3).
Then pull the knob towards you to
detach it. Once it is removed, make
sure to rinse the ventilation hole in
warm, soapy water.
You will find the unlock and lock
positions of the steam nozzle at the
back of the milk tank (Figure 4). Unlock
to remove and remember to lock it
again when reattaching it to the milk
tank after cleaning.
4. Dispose of any milk, then wash the
milk tank and frothing system parts
thoroughly with warm, soapy water.
Rinse and dry them well. DO NOT use
abrasive cleaners and scouring pads, as
they will scratch the finish.
NOTE: We recommend hand washing all
parts, even if some parts are dishwasher
safe (see p. 5).
CLEANING THE BREW HEAD, THE GROUP
HANDLE AND FILTERS
1. Press the Power button “ ” to turn
the Prima Latte Espresso Machine OFF.
The unit is off when the LED on the
Power button is off. Unplug the power
cord from the electrical outlet.
CAUTION: Some metal parts may still
be hot. DO NOT touch them with your
hands until they cool down.
2. Remove the Group Handle and discard
the used coffee grounds. Thoroughly
wash both the Group Handle and filter
with warm, soapy water, then rinse and
dry them well.
NOTE: DO NOT wash the Group Handles
and filters in the dishwasher. For
instructions on how to deep clean them,
see the “Group Handle and Filters Deep
Cleaning Procedure” section.
3. Use a damp cloth or paper towel to
wipe the lower part of the brew head in
the unit, removing any leftover coffee
grounds.
4. Place the Group Handle without the
filter back into the brew head and
securely lock it in place.
5. Place a large, empty cup (at least
325 mL capacity) beneath the Group
Handle.
6. Plug the power cord into the electrical
outlet. Press the Power button “ ” to
turn the unit ON. The LED on the Power
button will illuminate.
7. Press the Shot Selection button to
select the double shot (2) option. The
indicator LED (2) will illuminate.
8. Turn the Mode Selection knob to the
Espresso option “ ”.
9. Press the Start/Stop button “ ” to
allow the unit to brew with water until it
stops automatically.
10. Empty the water from the cup.
Ventilation Hole
Figure 3
Figure 4
Figure 2
15
CLEANING THE WATER TANK
If water is left in the water tank for an
extended period, it is recommended that it
is emptied and cleaned.
1. Dispose of the remaining water by
removing the water tank, detaching the
lid, and turning it upside down over
the sink.
2. Thoroughly wash the water tank,
handle, and lid with warm, soapy
water. Ensure they are well-rinsed and
dried.
CAUTION: DO NOT immerse main body of
the appliance or power cord and plug in
water or any other liquid.
CLEANING THE PRIMA LATTE ESPRESSO
MACHINE
Clean the housing with a soft, damp cloth.
Avoid using abrasive cleaners or scouring
pads, as they can scratch the finish.
DESCALING
Build-up of mineral deposits in the Prima
Latte Espresso Machine will affect the
operation of the appliance. Your appliance
needs descaling when you begin to notice
an increase in the time required to brew
espresso, or when there is excessive
steaming. Also, you may notice a build-up
of white deposits on the surface of the
brew head.
The frequency of cleaning depends
upon the hardness of the water used.
The following table gives the suggested
cleaning intervals.
SUGGESTED DESCALING INTERVALS
Type of Water Cleaning Frequency
Soft Water
(Filtered Water)
Every 80 Brew
Cycles
Hard Water
(Tap Water)
Every 40 Brew
Cycles
Use Sunbeam Eco-friendly Descaler
to descale your Prima Latte Espresso
Machine. To purchase, contact your
retailer or the Sunbeam Customer Service
team (details are on the back page of this
User Guide).
Alternatively, use a descaling solution
comprising 50% white vinegar and 50%
clean water.
To descale the unit, use the Deep Cleaning
Procedure described on the next page.
DEEP CLEANING NOTIFICATION
After 200 beverage cycles, the Cleaning
Indicator LED lights up brightly to signal
that a cleaning cycle is needed.
MIN
MAX
21
The Cleaning Indicator LED will remain
on as a notification until the cleaning
procedure is completed.
1. If you brew another espresso, latte,
or cappuccino, the Cleaning Indicator
LED will turn off momentarily but start
flashing after the brew is complete.
2. The Cleaning Indicator LED will turn
off when the Prima Latte Espresso
Machine is powered off.
3. The Cleaning Indicator LED will turn
off when the unit powers down and
goes into sleep mode.
16
DEEP CLEANING PROCEDURE
The deep cleaning procedure includes
descaling of internal parts and frothing
system cleaning.
You can use a Sunbeam Eco-friendly
Descaler or alternatively, create a
descaling solution of 50% white vinegar
and 50% clean water.
1. Pour the descaling solution into the
water tank and allow it to fully mix or
dissolve.
2. Rotate the Milk Tank knob until it
clicks into the clean position “
”. Place a large cup (at least 475
mL capacity) under the frothed milk
dispensing tube.
3. Press the Clean button“ ” for 5
seconds to activate the deep clean
mode. The LED on the Start/Stop
button will begin to flash.
• Press the Start/Stop button. The
pump will turn on and off multiple
times for about 7.5 minutes. The
cleaning light will then turn off,
indicating the cleaning process is
completed.
4. Pour out any remaining solution from
the water tank and fill with clean water
up to the “MAX” level line.
5. Repeat Steps 2 - 4 as necessary, using
only tap water to remove any remaining
traces of the descaling solution.
NOTE: Make sure to turn the Milk Tank
Knob back to the vertical Milk Froth
position after cleaning. This is critical
to ensure the next beverage can be
brewed correctly.
GROUP HANDLE AND FILTERS DEEP
CLEANING
Deep clean your group handle and
filters every 90 days for optimal brewing
performance and to keep your coffee
tasting great. Follow these disassembly
instructions and rinse the pieces in a
large bowl of warm water. Once rinsed
thoroughly, wipe dry and reassemble.
1. To remove the filter from the Group
Handle, use your finger to grip the
edge of the filter and push it upward
until it detaches.
2. Wash the Group Handle and filters
with warm soapy water. Make sure to
rinse and dry them well.
3. Reassemble by firmly pressing the
filter into the Group Handle until you
hear it click.
NOTE: DO NOT store the Group Handle
in the brew head. This can adversely
affect the seal between the brew head
and the Group Handle during espresso
brewing.
17
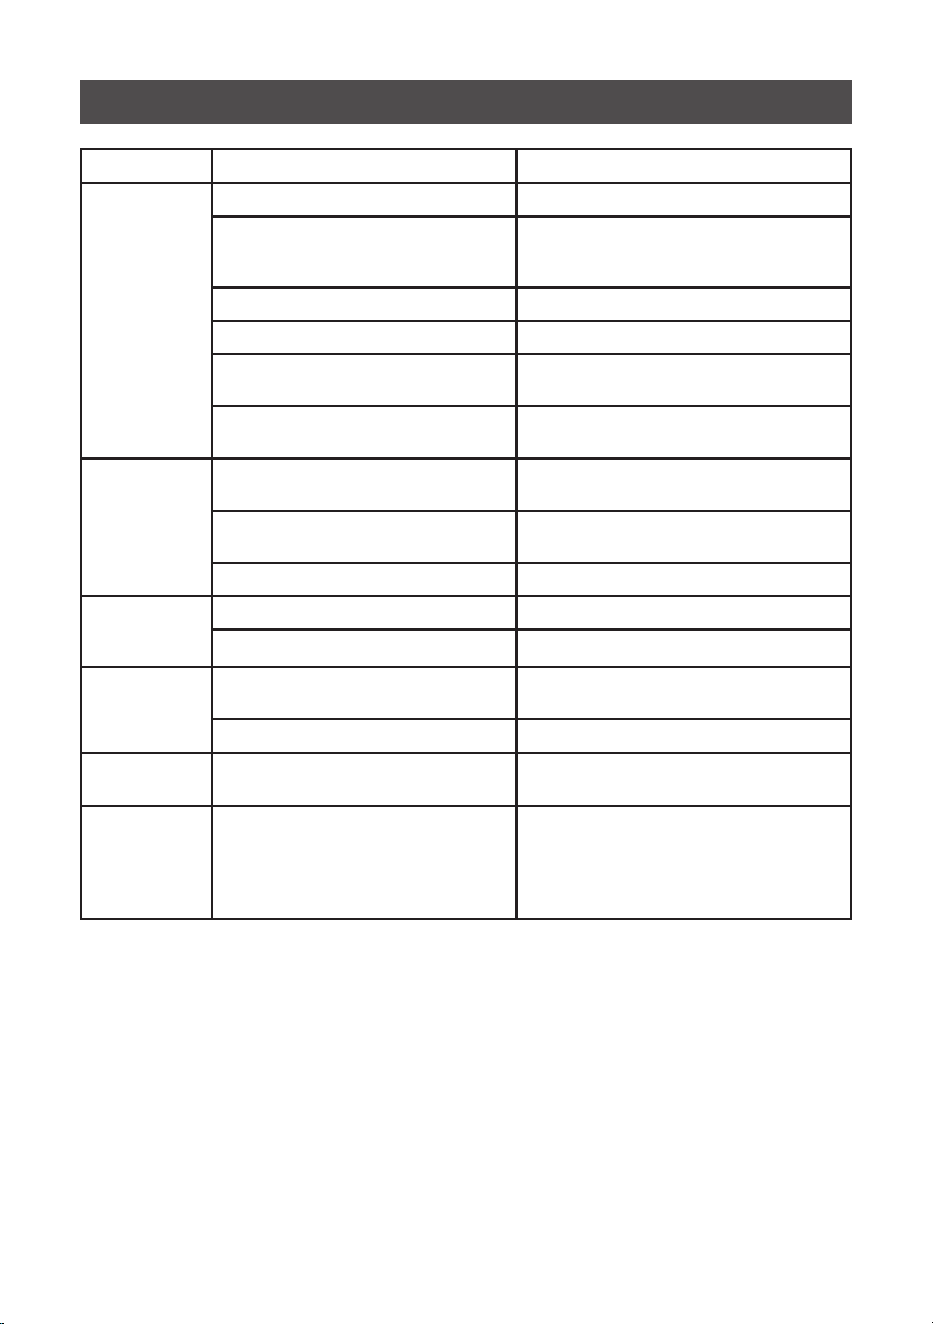
PROBLEM CAUSES SOLUTIONS
Coffee does
not come
out.
• No water in reservoir. • Add water.
• Unit is not primed. • Prime the unit (refer to “Important
- Prime the Prima Latte Espresso
Machine” section).
• Coffee grind is too fine. • Grind medium ground coffee.
• Too much coffee in the filter. • Fill filter with less coffee.
• Appliance was not turned on
or plugged in.
• Plug unit into electrical outlet and
turn it on.
• Coffee has been tamped/
compressed too much.
• Refill filter basket with coffee and
TAMP GENTLY.
Coffee
comes out
around the
edge of
the Group
Handle.
• Group Handle not rotated to
full lock position.
• Rotate filter holder to full lock
position.
• Coffee grounds around the
filter basket rim.
• Wipe off rim.
• Too much coffee in the filter. • Fill with less coffee.
Coffee
comes out
too quickly.
• Ground coffee is too coarse. • Use a finer grind.
• Not enough coffee in filter. • Fill filter with more coffee.
Coffee is too
weak.
• Using single filter for double
shot of espresso.
• Use double filter for double shot
of espresso.
• Ground coffee is too coarse. • Use a finer grind.
Coffee is not
hot enough.
• Cup too cold. • Warm up cup with hot water
before use.
Coffee puck
is wet or
hard to
remove after
brewing.
• Normal for Dual Wall filters. • Leave the handle to sit on the drip
tray until the water is absorbed.
Scrape out the coffee grinds with
a teaspoon and rinse.
Troubleshooting guide
18
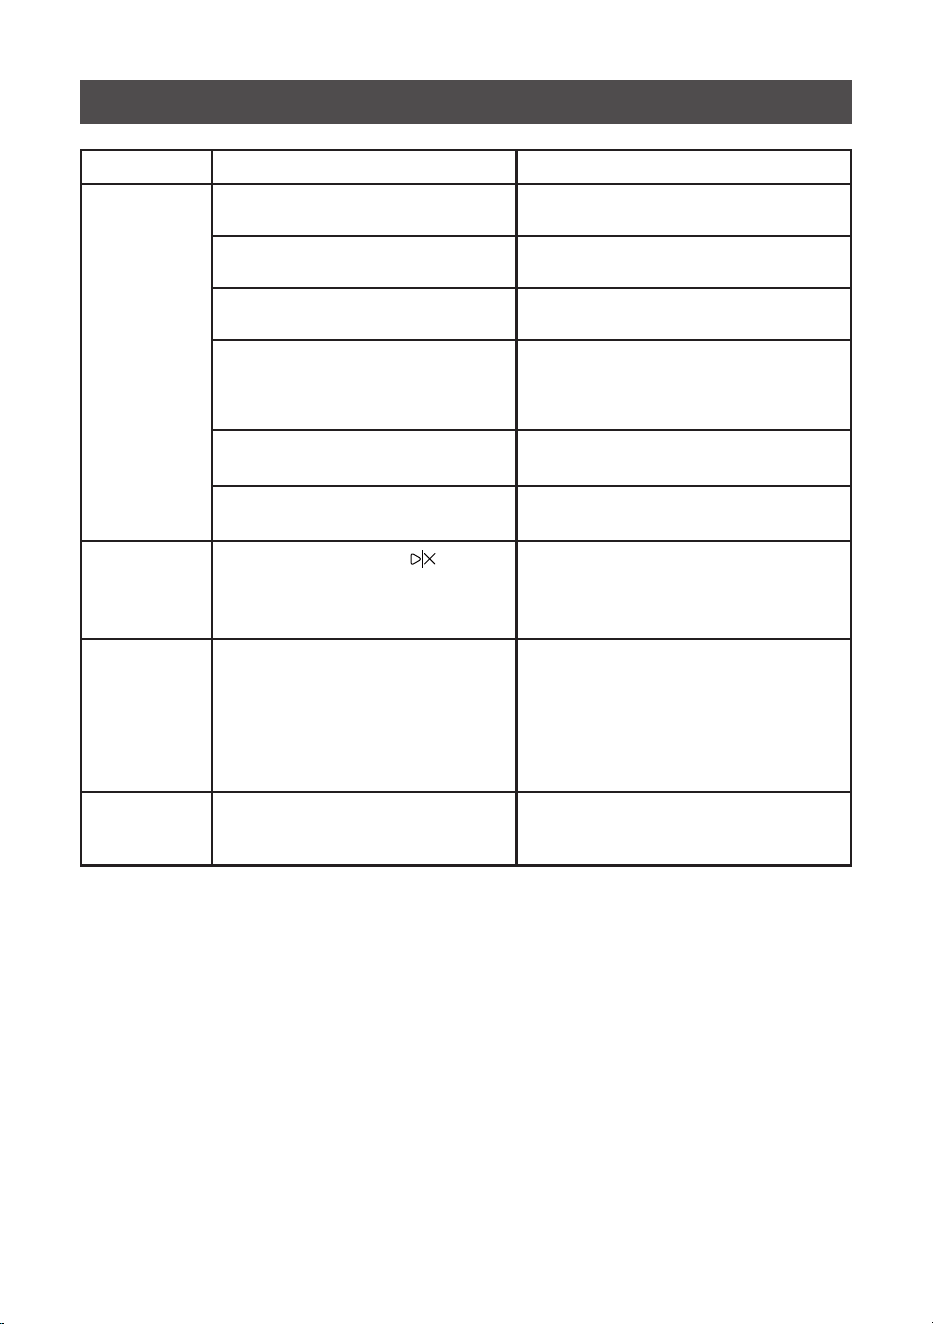
PROBLEM CAUSES SOLUTIONS
Milk is not
foamy after
frothing
or it is not
coming
out of the
frothing
tube.
• Ran out of steam. • Ensure there is enough water in
the water reservoir.
• Milk is not cold enough. • Chill milk prior to making
cappuccino or latte.
• Frothing system is blocked. • Follow the instructions to clean
the frothing system.
• Milk tank is not in position. • Check that the milk tank has
clicked into position and is
attached properly to fully engage
with the espresso maker.
• Milk Tank Knob is not in the
vertical position.
• Rotate the knob to the vertical
froth position.
• Blocked vent hole in the Milk
Tank Knob.
• Remove knob and wash or soak in
warm soapy water.
The control
panel LEDs
are flashing.
• Start/Stop button “ ” was
pressed prior to the LEDs
solidly illuminated to indicate
that the machine is ready.
• Wait until the LEDs are solidly
illuminated to indicate the
machine is ready.
1 Shot and
2 Shot
LEDs blink
together
• Low water in reservoir. • Refill water reservoir and run
priming procedure (refer to
“Important - Prime The Prima
Latte Espresso Machine” section).
Note: It is normal to see some
steam/water coming out of the
Frothed Milk Dispensing Tube.
Cleaning
LED remains
on.
• Your machine is letting you
know it is ready for a cleaning
cycle to be performed.
• Perform cleaning cycle (see the
“Cleaning Notification” section).
Troubleshooting guide
19
Australia
www.sunbeam.com.au
1300 881 861
New Zealand
www.sunbeam.co.nz
0800 786 232
To assist us in managing warranty claims,
we recommend you register your product as
soon as practicable after purchase, on our
Sunbeam website and uploading a copy of
your original receipt. View the Support
section of the Sunbeam website.
extend beyond 3 months if the product is
used in commercial, industrial, educational
or applications (other than for internal or
own use in an office environment).
Under our warranty, should your product
develop any defect within 12 months of
purchase because of faulty materials or
workmanship, we will replace or repair it, at
our discretion, free of charge. A product
presented for repair may be replaced by a
refurbished product of the same type rather
than being repaired. Refurbished parts may
be used to repair the product.
Warranty

Need help with your appliance?
Contact our customer service team or visit
our website for information and tips on
getting the most from your appliance.
Australia | visit www.sunbeam.com.au
| phone 1300 881 861
New Zealand
| visit www.sunbeam.co.nz
| phone 0800 786 232
Newell Australia Pty Ltd. ABN 68 075 071 233
Sunbeam is a registered trade mark.
Made in China to Sunbeam’s specification.
Due to minor changes in design or otherwise,
the product you buy may differ slightly from the one shown here.
Approved by the appropriate electrical regulatory authorities.
©Copyright Sunbeam 2025.
08/25
COOK1949_EMP5100BK_25EM3 (ANZ)_GCDS-JC
P.N. NWL0001756205 Rev B