
Technical Support and E-Warranty Certificate www.vevor.com/support
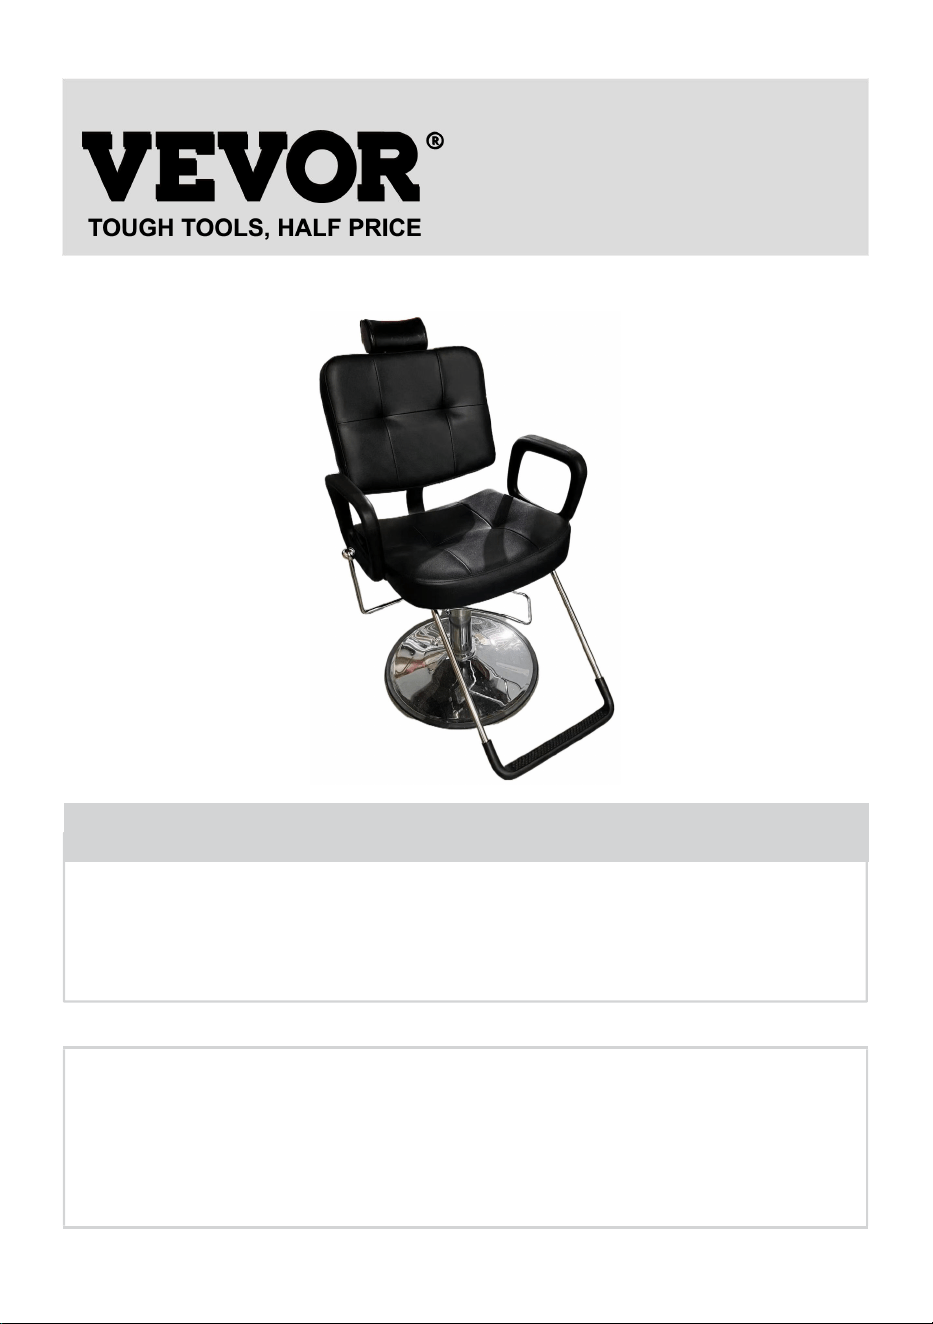
SALON CHAIRS
USER MANUAL
We continue to be committed to provide you tools with competitive price.
"Save Half","Half Price" or any other similar expressions used by us only represents an
estimate of savings you might benefit from buying certain tools with us compared to the major
top brands and does not necessarily mean to cover all categories of tools offered by us. You
are kindly reminded to verify carefully when you are placing an order with us if you are
actually saving half in comparison with the top major brands.

1
HZ8838
Have product questions? Need technical support? Please feel free to
contact us:
Technical Support and E-Warranty Certificate
www.vevor.com/support
NEED HELP? CONTACT US!
This is the original instruction,please read all manual instructions carefully
before operating. VEVOR reserves a clear interpretation of our user
manual. The appearance of the product shall be subject to the product
you received. Please forgive us that we won't inform you again if there
are any technology or software updates on our product.
SALON CHAIRS

2
Safety precautions
WARNING:
Read this instructions before using this product. Failure to do so can result in
serious injury. the basic precautions should always be followed,including the
following:
1. The salon chairs may not be used or stored in hazardous areas. It is not
allowed to use the appliance in hazardous locations.
2. The salon chairs must be checked to ensure that it is in proper working order
and is operating safely prior to use. Otherwise,the appliance must not be used.
3. Use as intended only.
4. The operator must use the salon chairs properly. He must consider the local
conditions and must pay attention to third parties,in particular children,when
working with the salon chairs .
5. This salon chairs is not intended for use by persons (including children) with
reduced physical,sensory or mental abilities or lacking experience and/or
knowledge,unless they are super- vised by a person responsible for their safety or
are instructed by these persons on the use of the device. Children should be
supervised,to ensure that they do not play with the salon chairs.
SAVE THESE INSTRUCTIONS
3
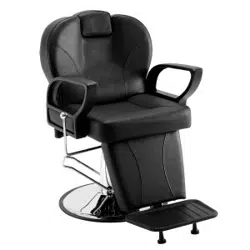
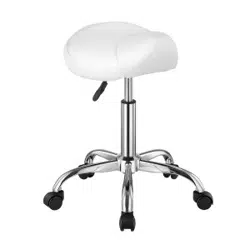
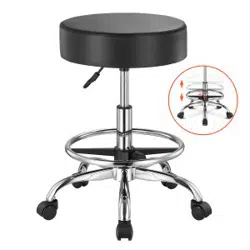
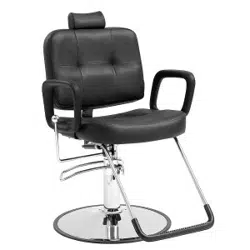
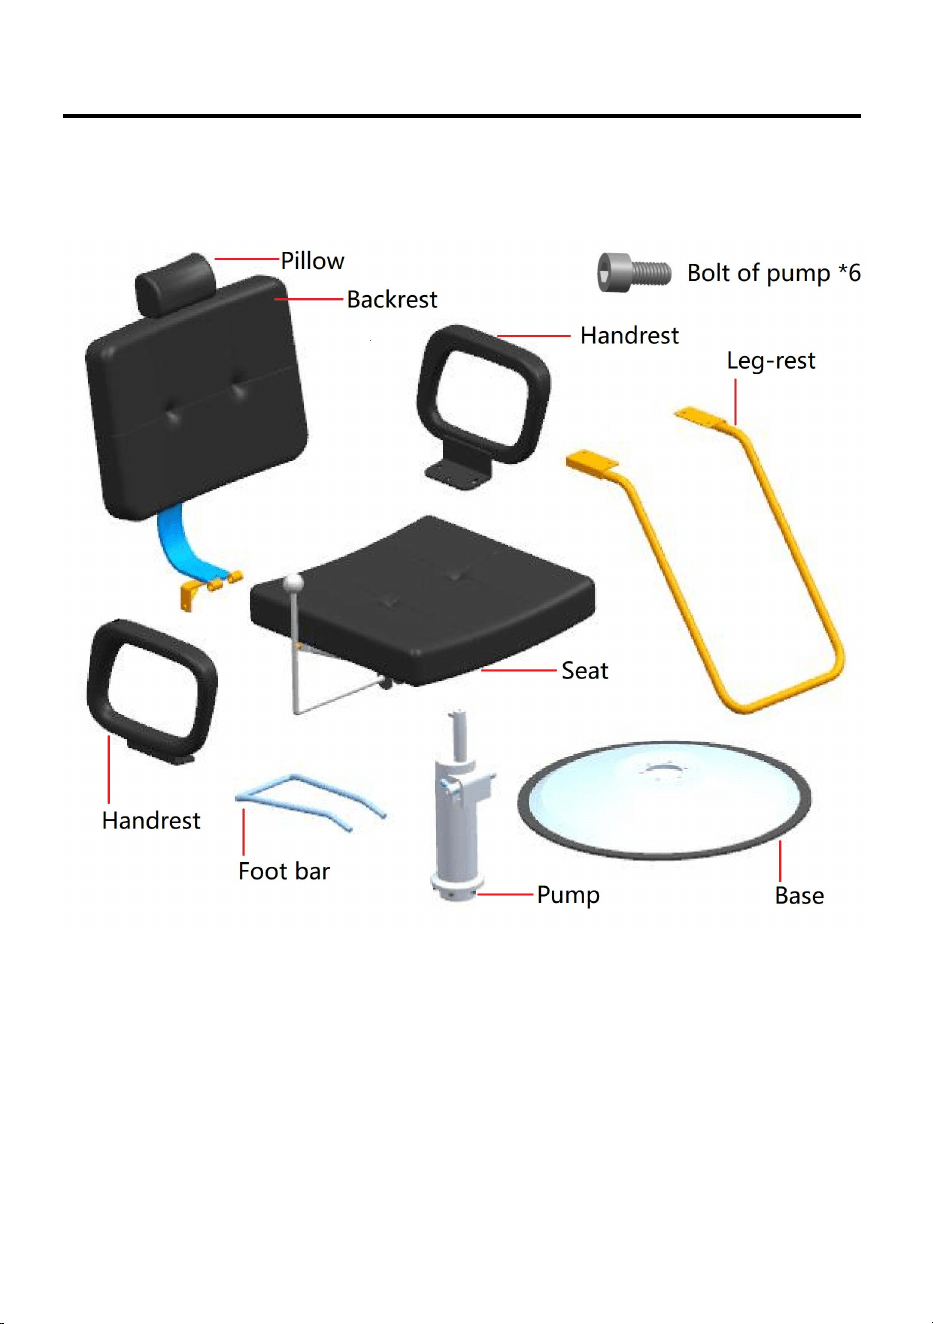
Product LIst
4
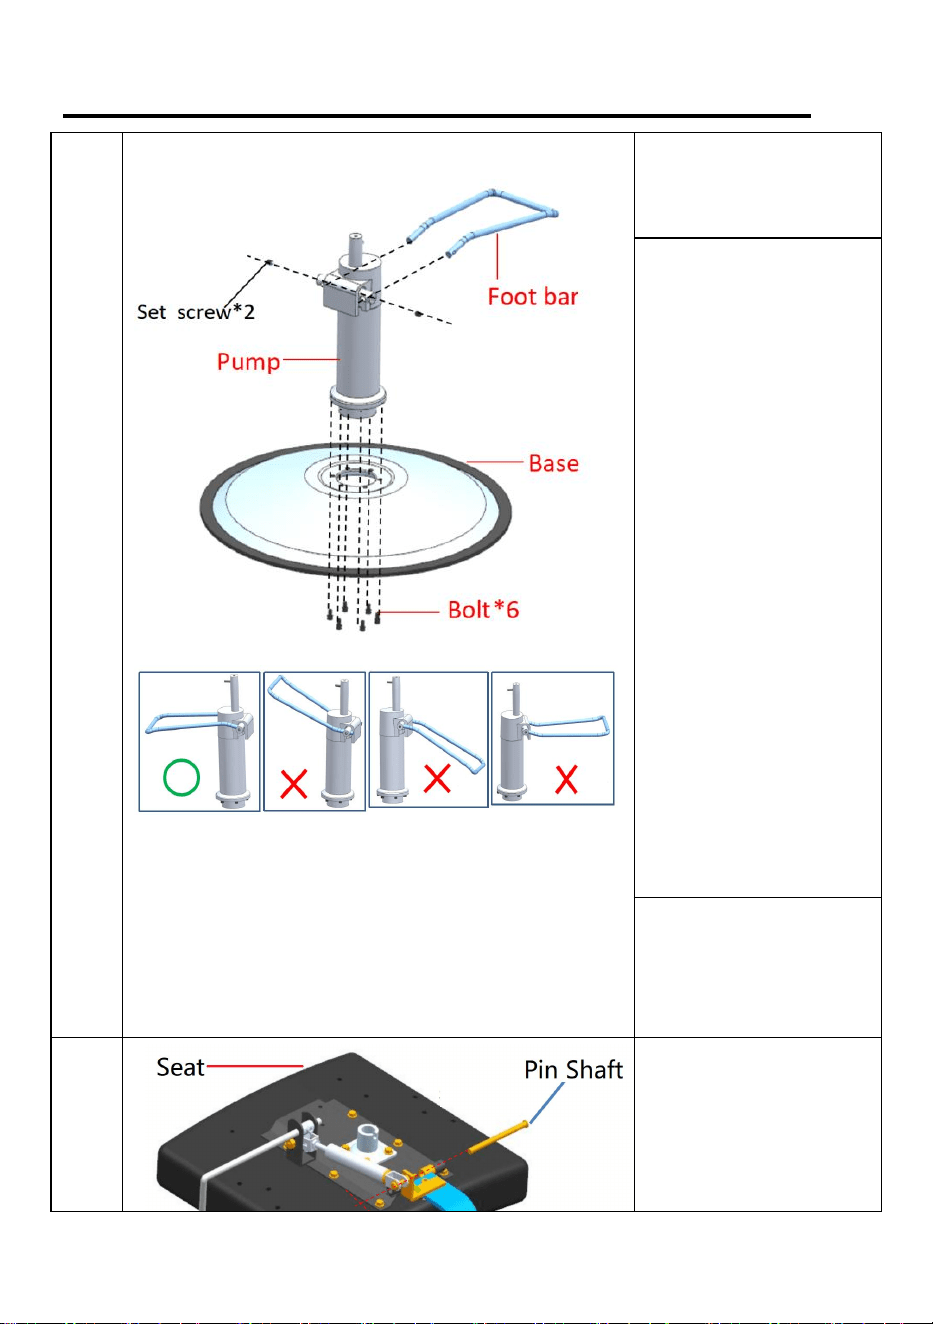
Product Assembly
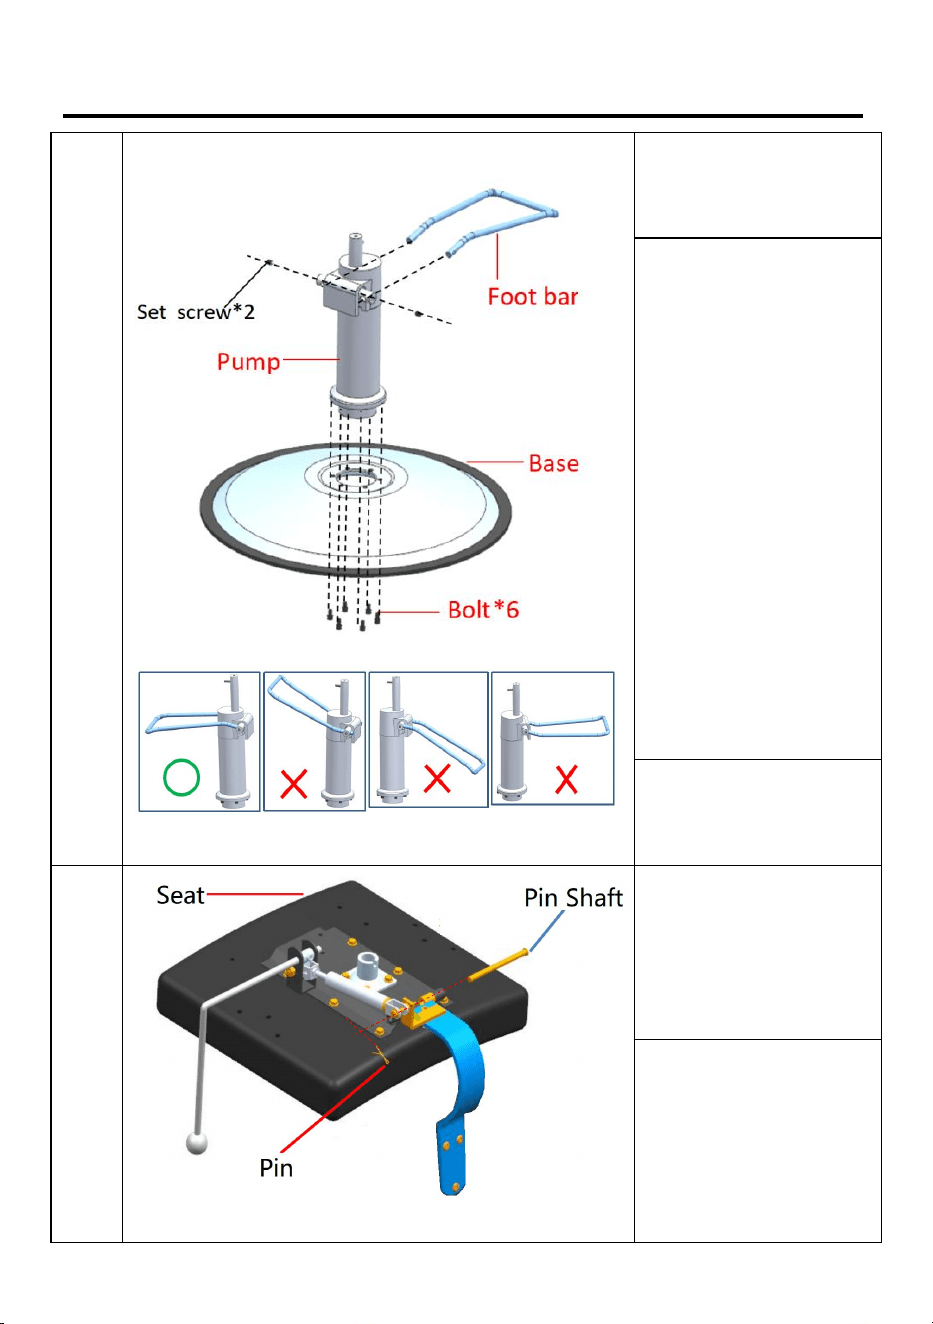
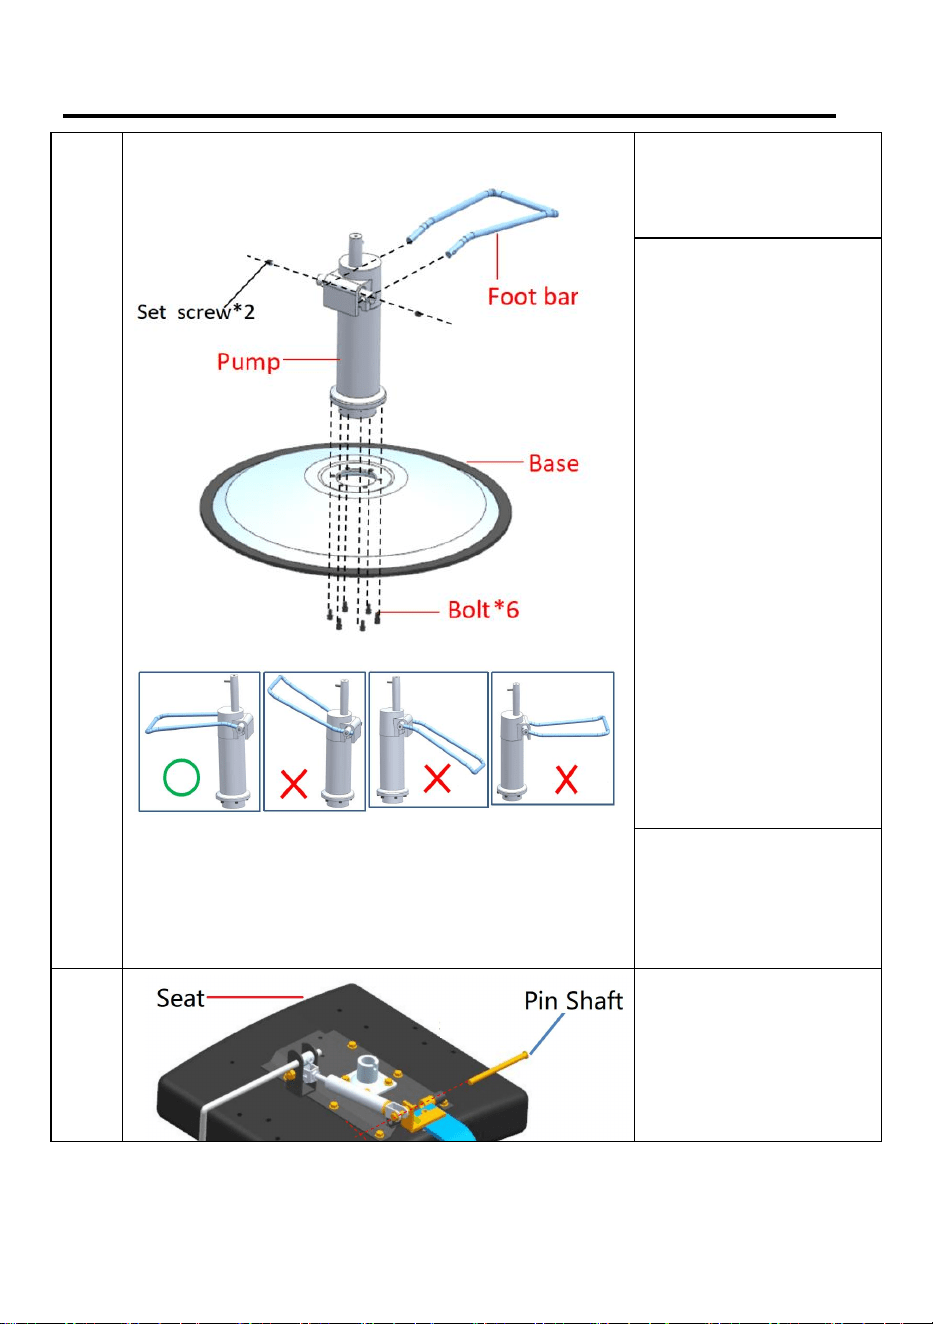
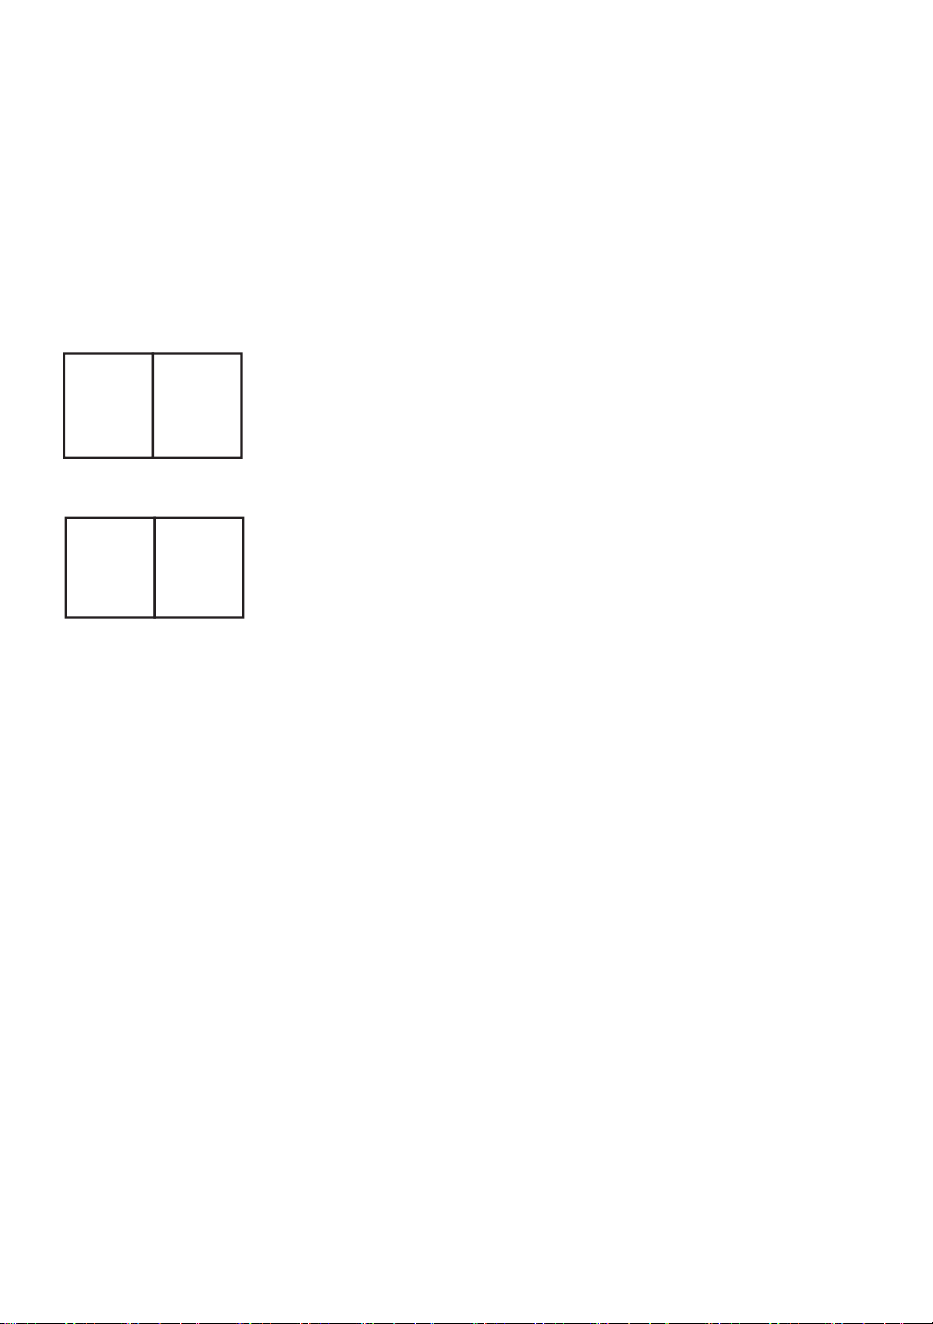
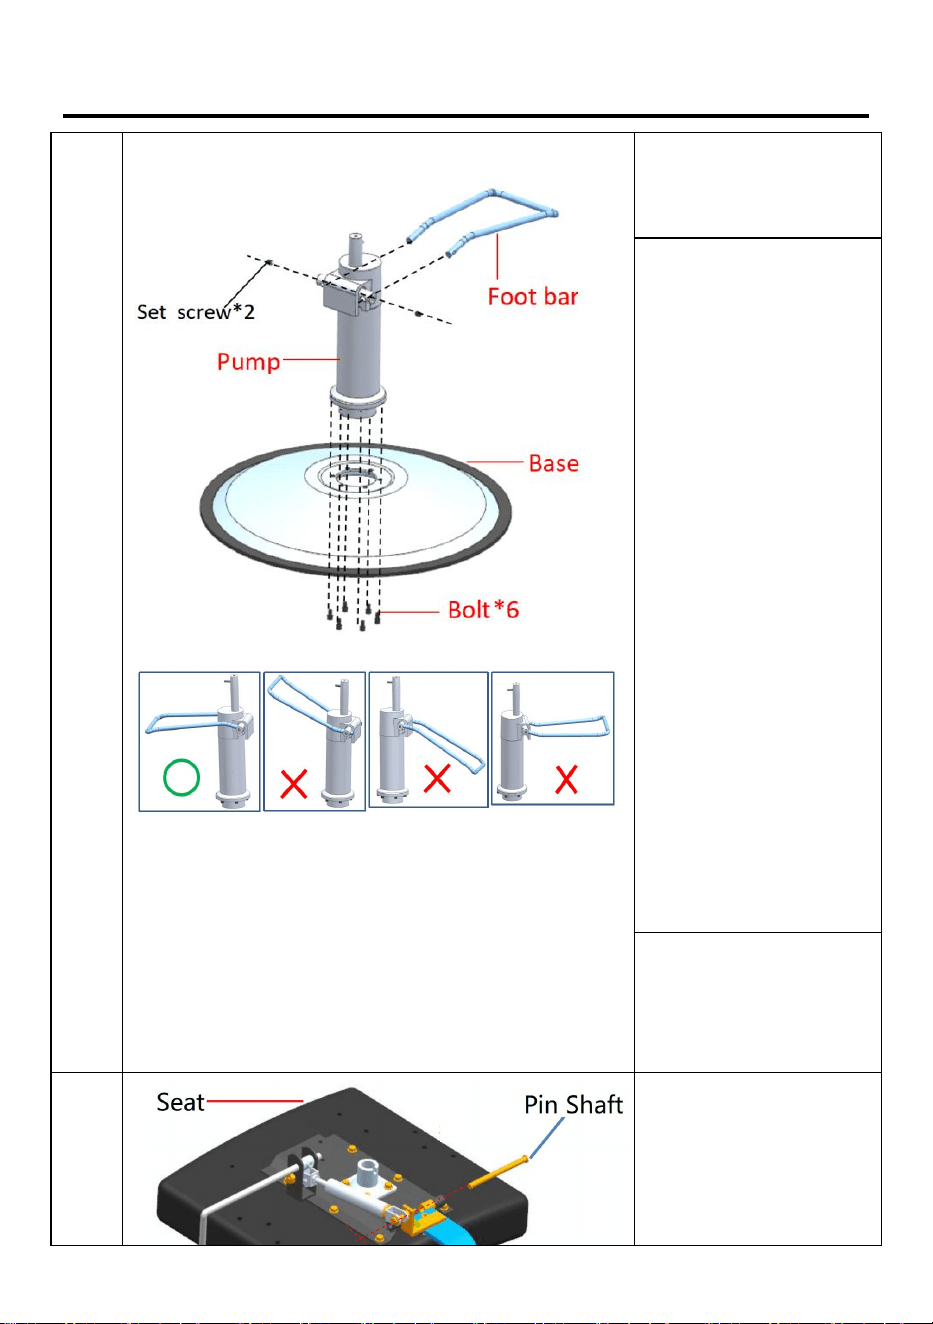
1
Install the pump to the
base with the 6 black
bolts.
Place assembled Base &
Pump on floor.
Use Allen Wrench to
loosen the screws in the
crossbar. See photo
besides.
Insert Foot Bar into the
holes of the crossbar.
(May require slightly
squeezing ends of
Foot Bar towards
each other, and
some maneuvering
for the bar ends to
go into place.)
Tighten the 2 set
screws to firmly hold
the Foot Bar in place.
2
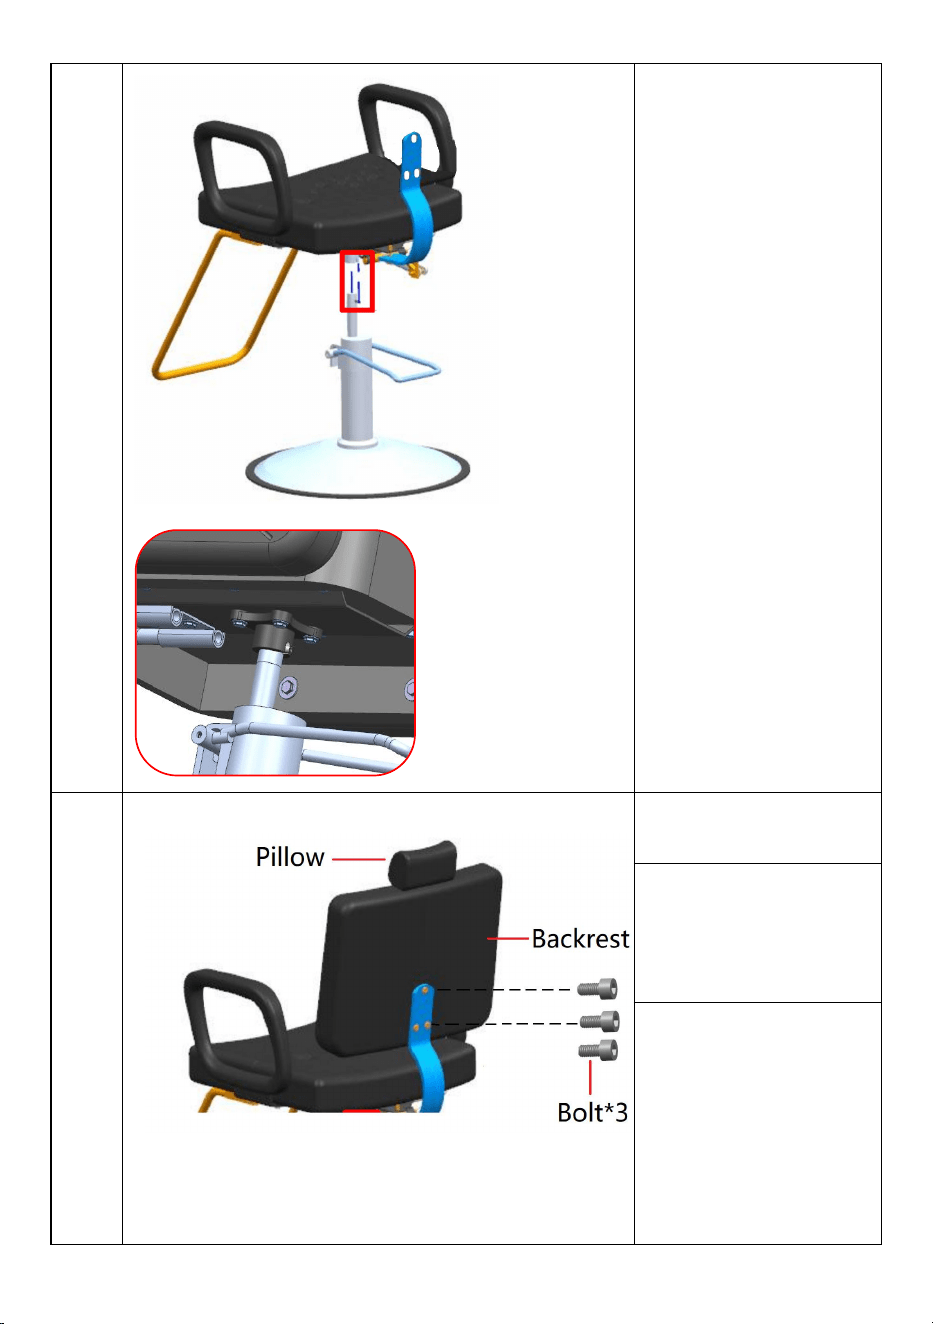
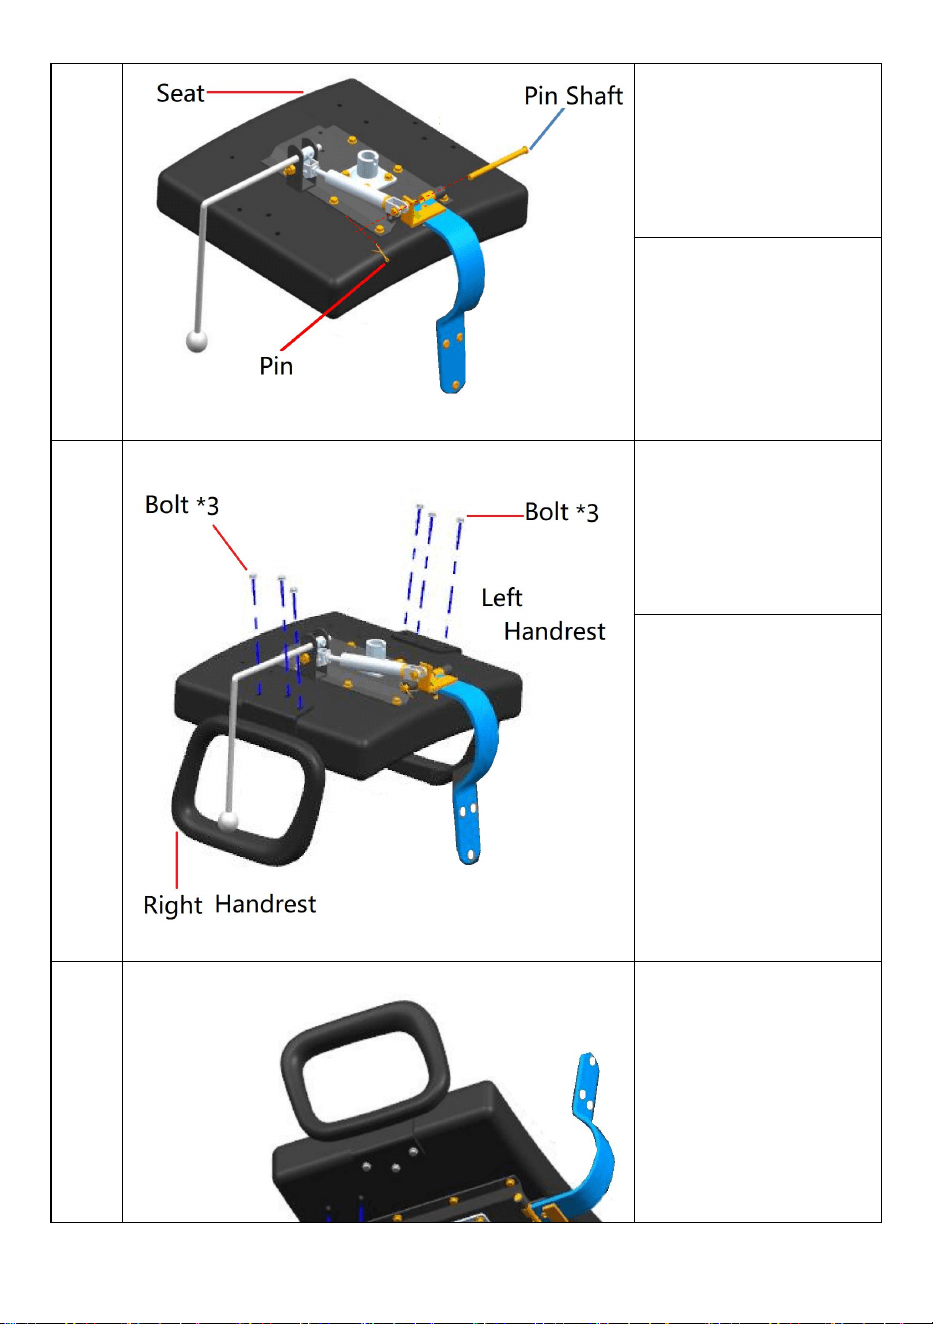
Remove the pin
shaft and pin on
the backrest.
Fix the backrest to
the seat with a pin
and pin.
5
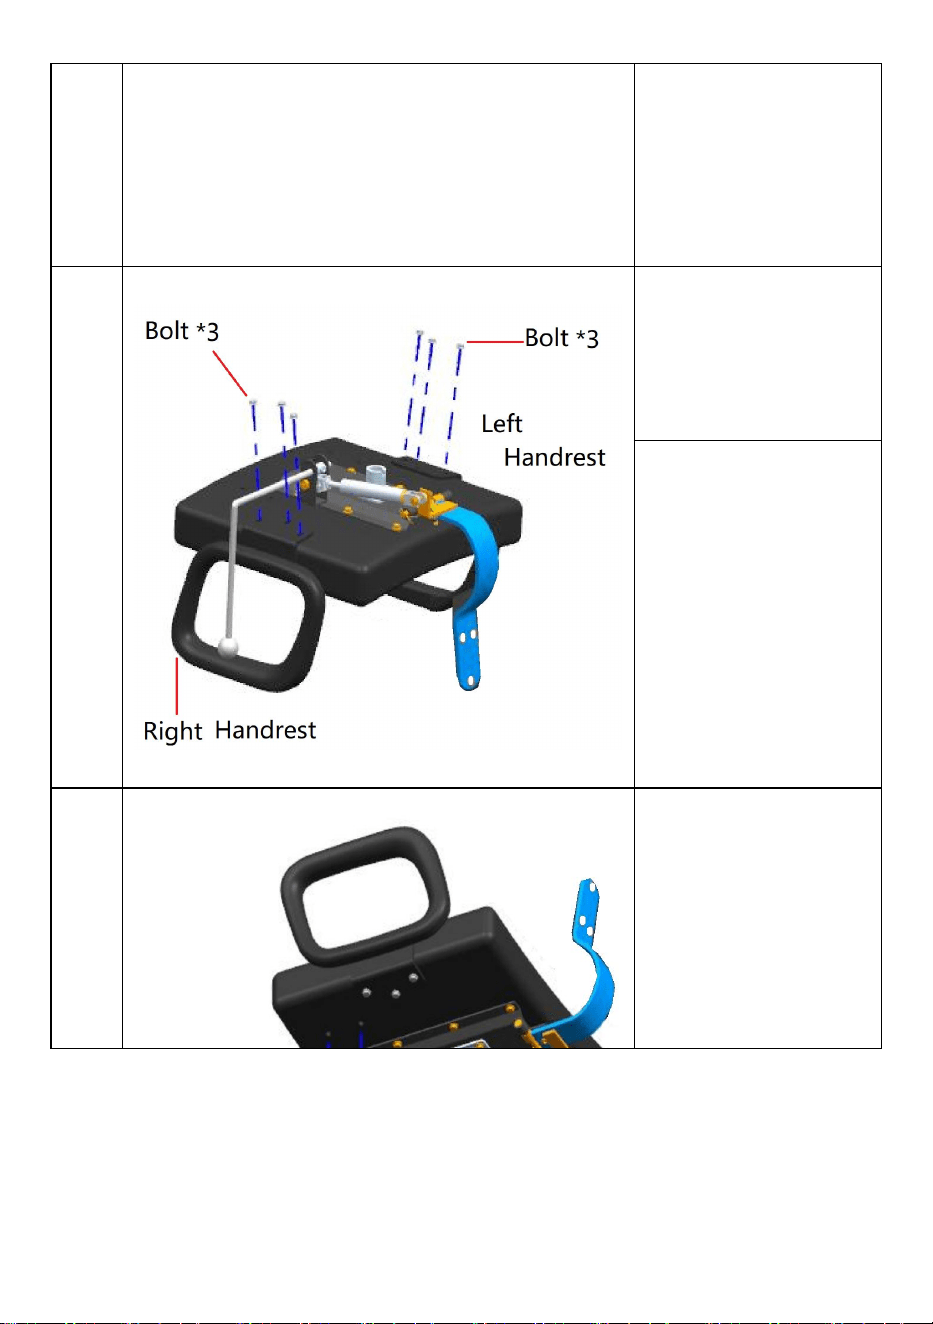
3
Remove the 6 bolts
installed on the seat
cushion.
Install the left and
right handrest onto the
seat cushion with the
removed bolts.
4
Remove the 4 bolts
installed on the seat
cushion.
Install the foot pedal
onto the seat cushion
with the removed bolts.
6
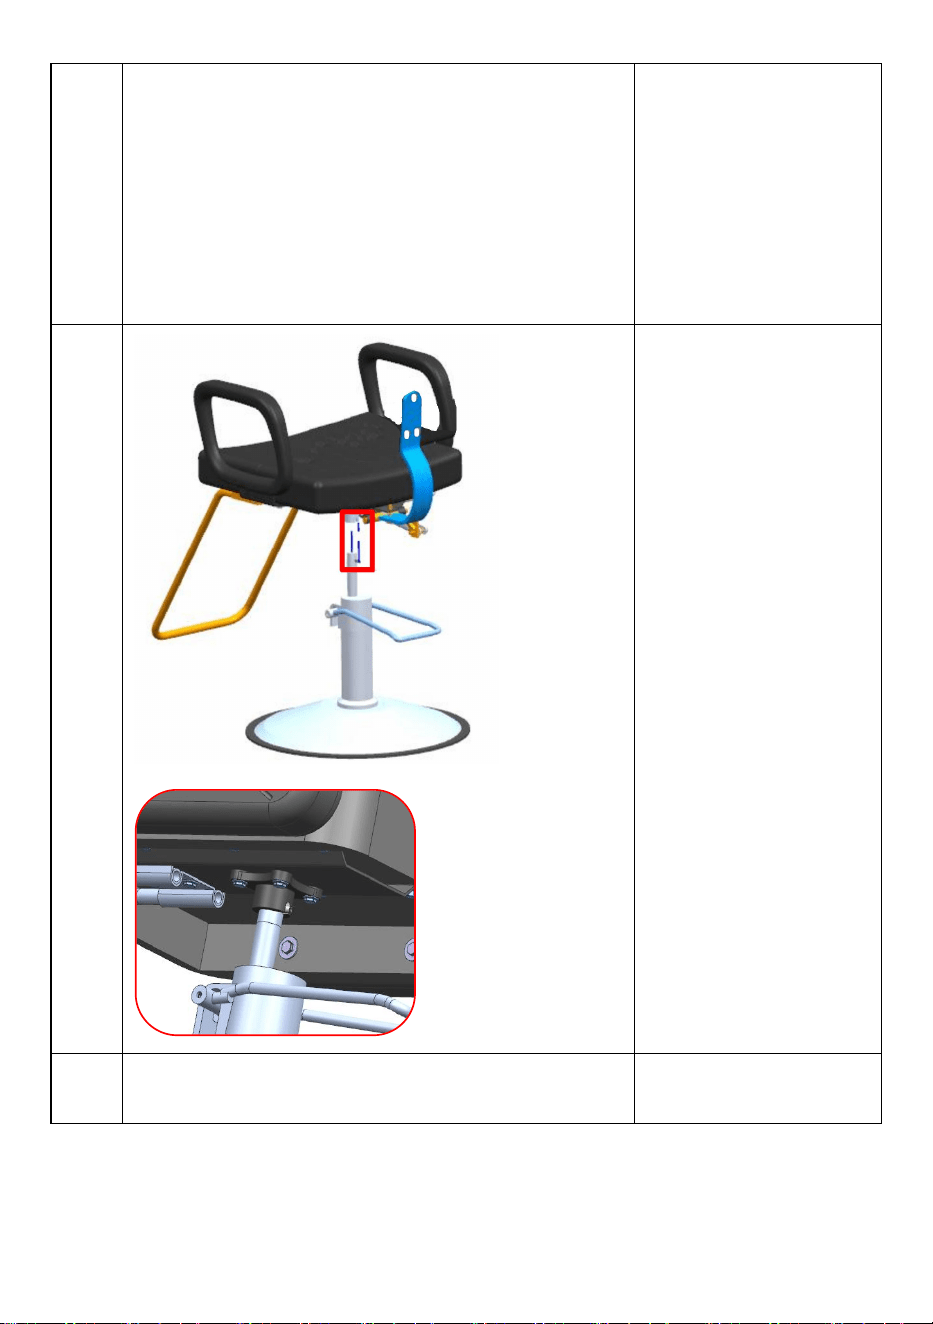
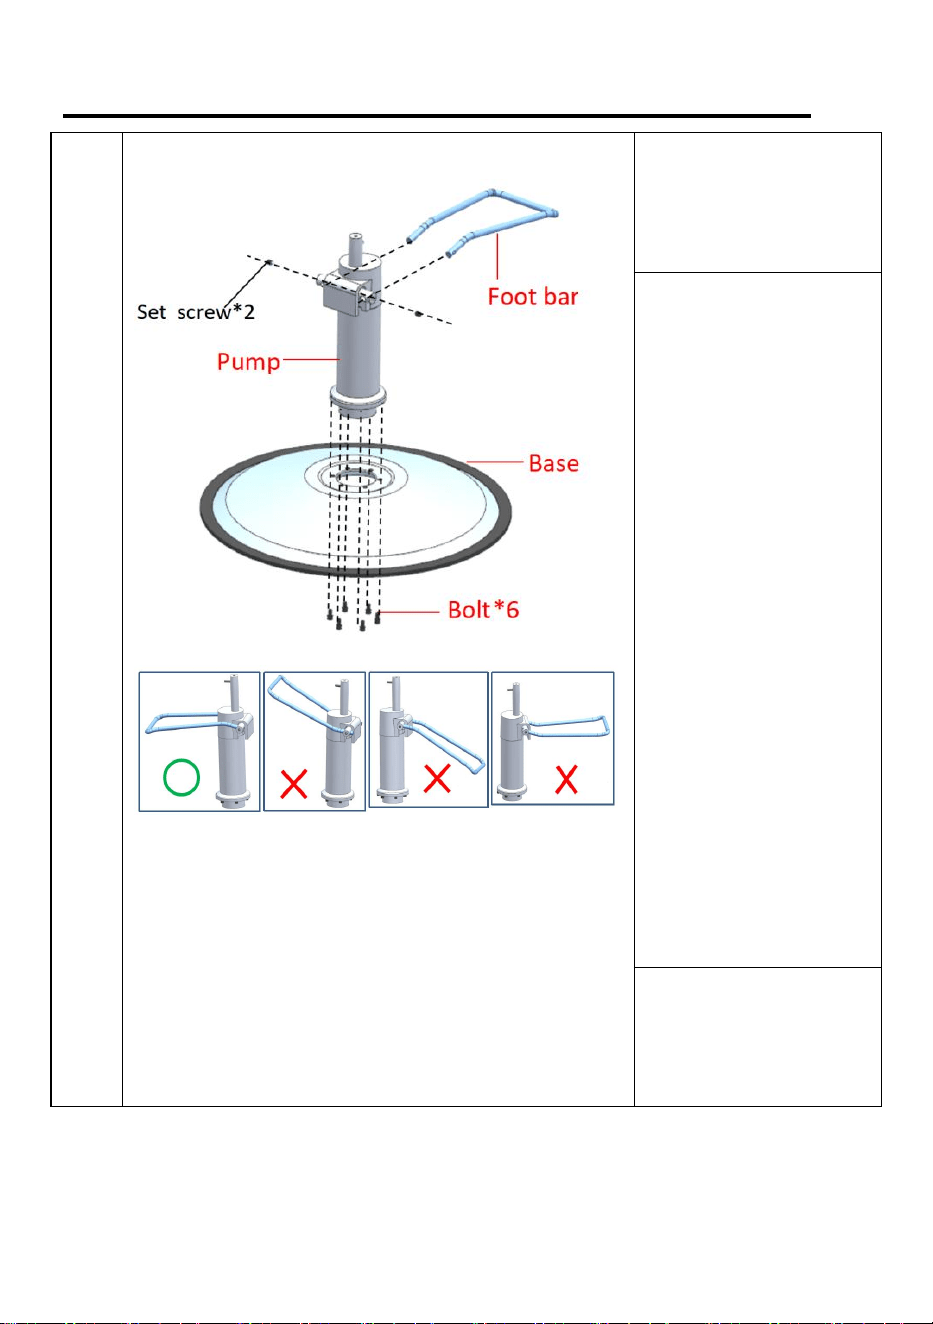
5
Install the seat to the
oil pump.
6
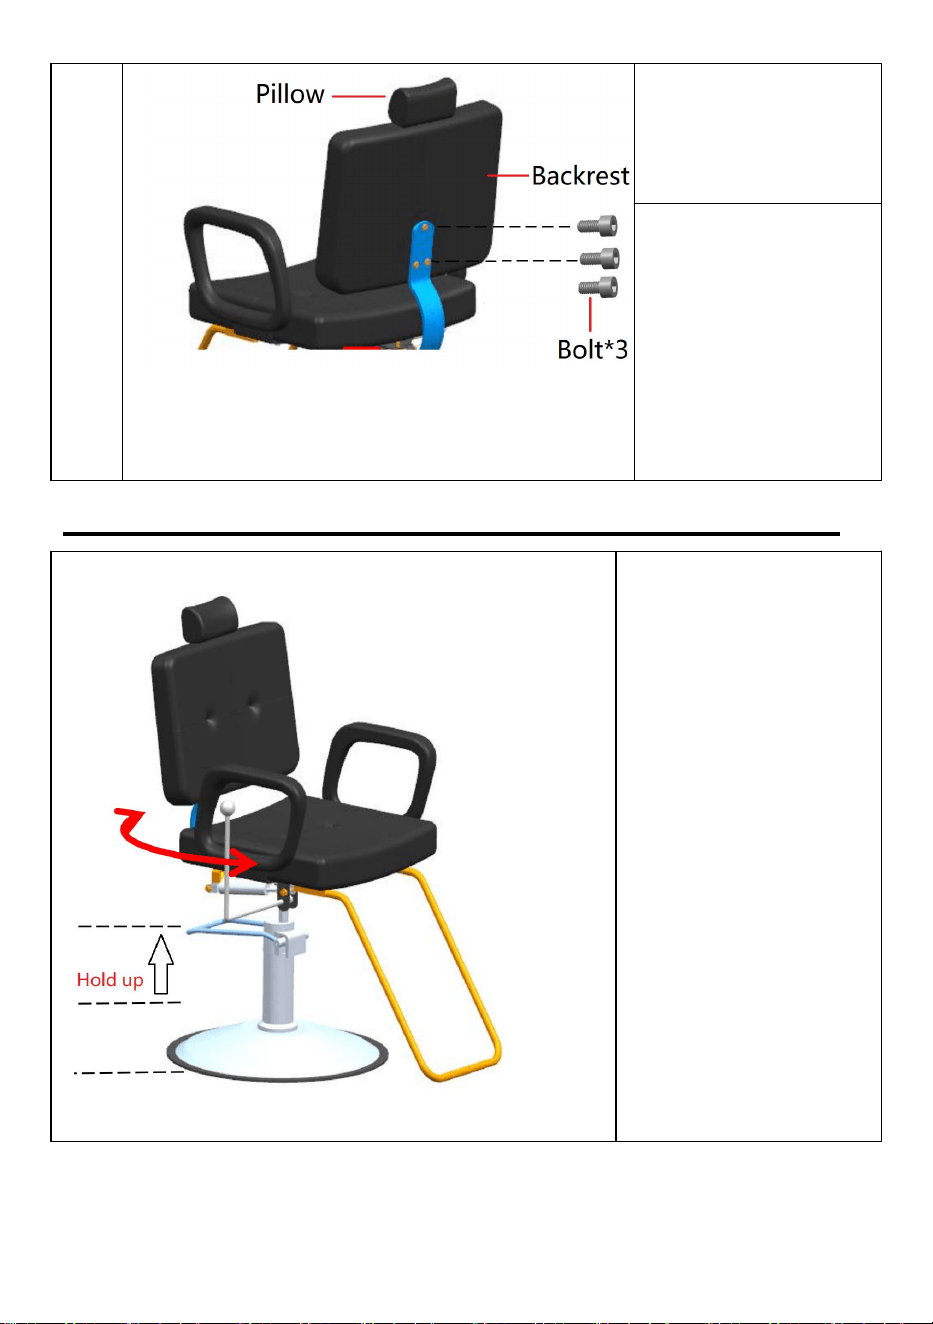
Remove the 3 bolts on
the backrest.
Install onto the backrest
with the removed bolts.
Insert the pillow
according to the position
shown in the picture.
7
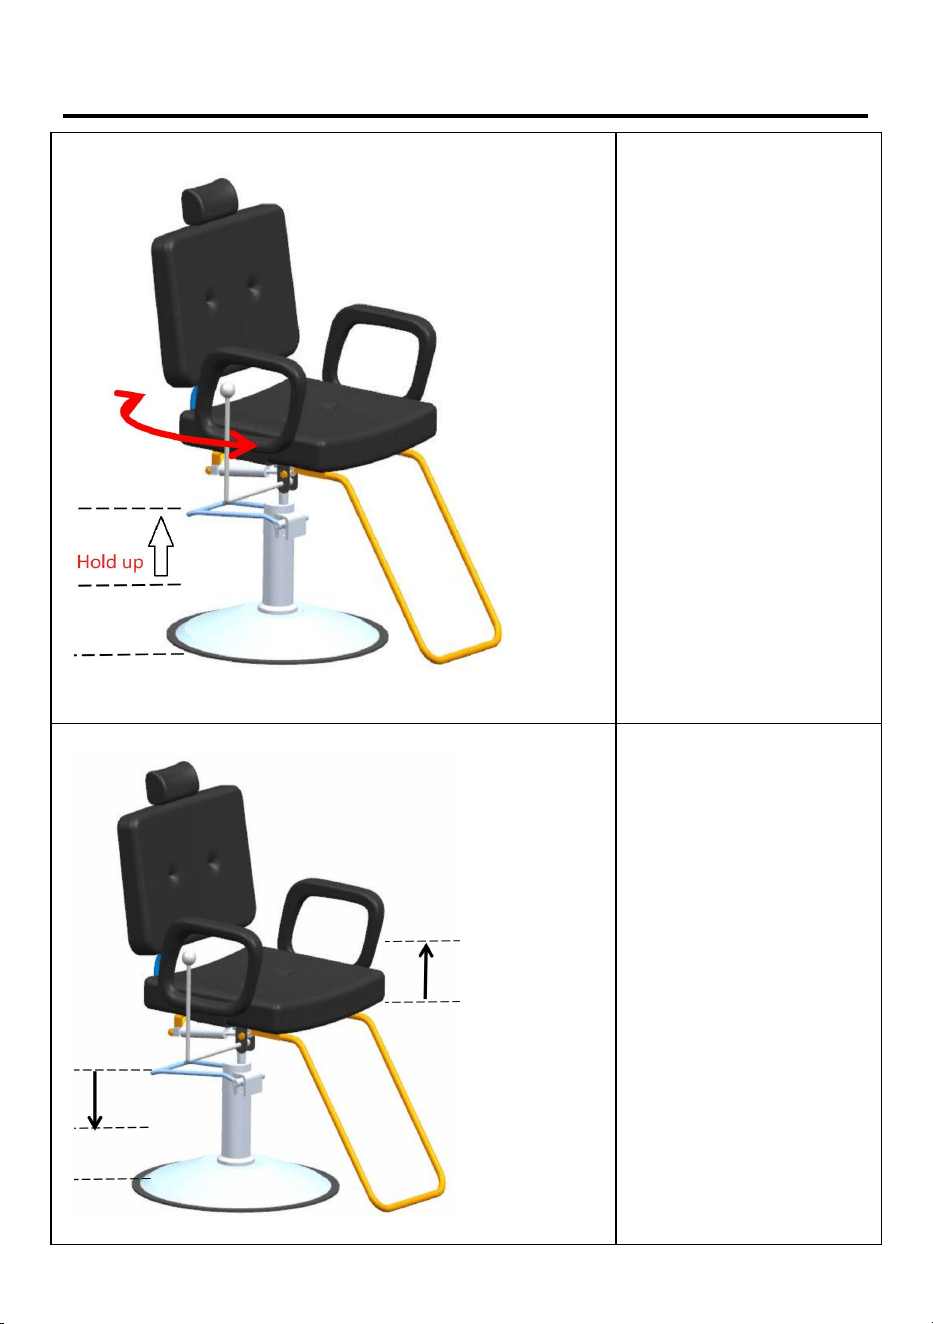
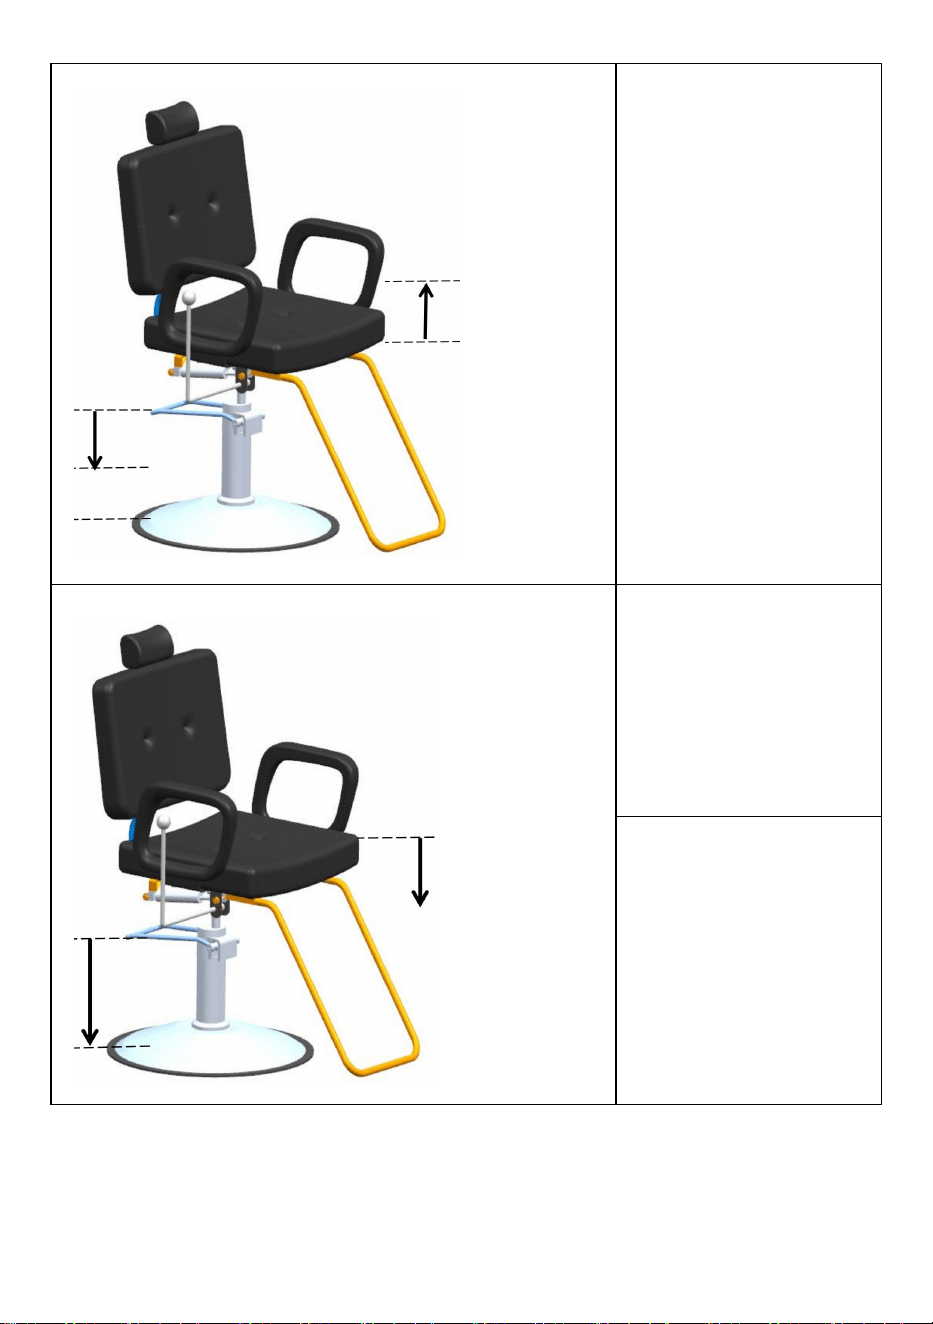
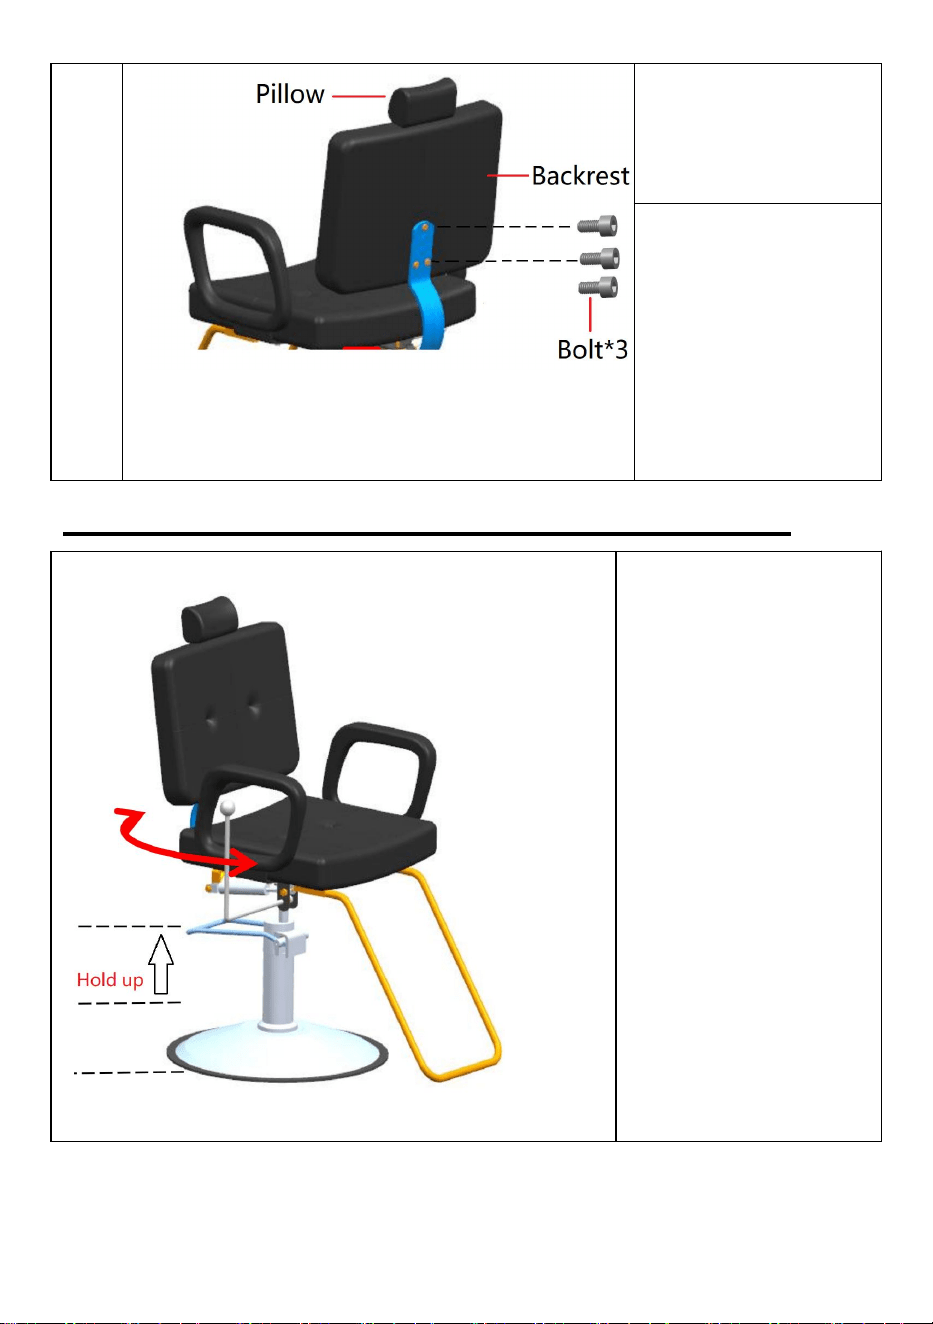
Product Use
1. In the natural state, the
upper part of the pump can
rotate freely on the rotation
axis of the pump;
2. Elevate the foot bar and
rotate the lock.
Step down on the Foot Bar
repeatedly to raise
the chair to the desired
height.
Do not over-extend the
chair, creating the risk of
falls or tipping the
chair and its occupant
over, resulting in injury.
8
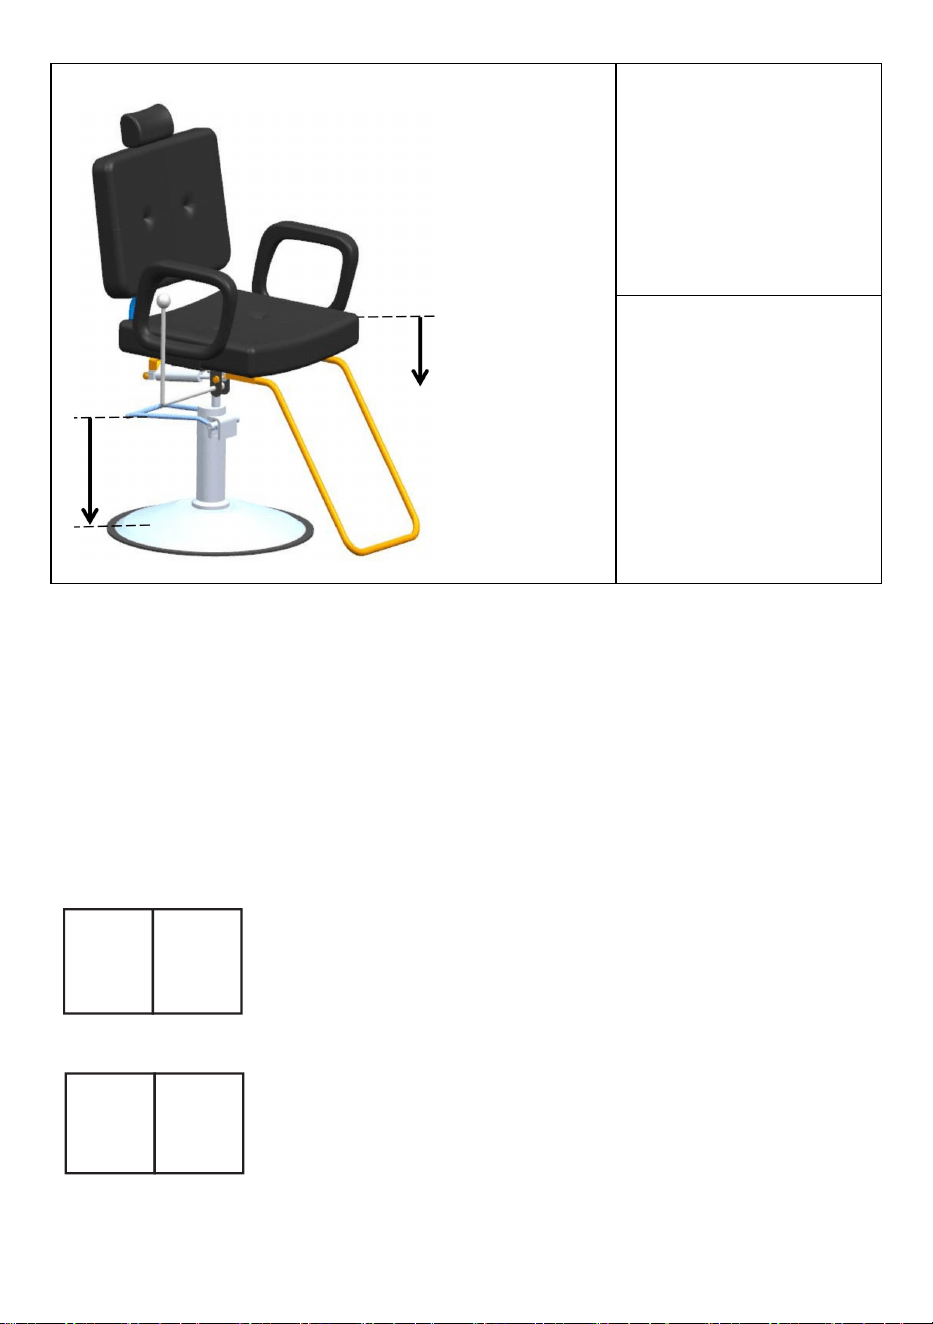
Step down and hold the
Foot Bar to allow chair to
lower.
Do not over-extend
the chair,creating
the risk of falls or
tipping the chair and
its occupant
over,resulting in
injury.
Address
:
Baoshanqu Shuangchenglu 803long 11hao 1602A-1609shi
Shanghai
Imported to AUS: SIHAO PTY LTD. 1 ROKEVA STREETEASTWOOD
NSW 2122 Australia
Imported to USA: Sanven Technology Ltd. Suite 250, 9166 Anaheim
Place, Rancho Cucamonga, CA 91730
REP
UK
Pooledas Group Ltd
Unit 5 Albert Edward House, The Pavilions
Preston, United Kingdom
REP
EC
SHUNSHUN GmbH
Römeräcker 9 Z2021, 76351
Linkenheim-Hochstetten, Germany
Made In China


Teknisk Support och e-garanticertifikat www.vevor.com/support
SALONGSSTOLAR
ANVÄNDARMANUAL
We continue to be committed to provide you tools with competitive price.
"Save Half","Half Price" or any other similar expressions used by us only represents an
estimate of savings you might benefit from buying certain tools with us compared to the major
top brands and does not necessarily mean to cover all categories of tools offered by us. You
are kindly reminded to verify carefully when you are placing an order with us if you are
actually saving half in comparison with the top major brands.


1
HZ8838
Have product questions? Need technical support? Please feel free to
contact us:
Technical Support and E-Warranty Certificate
www.vevor.com/support
NEED HELP? CONTACT US!
This is the original instruction,please read all manual instructions carefully
before operating. VEVOR reserves a clear interpretation of our user
manual. The appearance of the product shall be subject to the product
you received. Please forgive us that we won't inform you again if there
are any technology or software updates on our product.
SALON CHAIRS

2
Säkerhetsåtgärder
VARNING:
Läs dessa instruktioner innan du använder denna produkt. Underlåtenhet att
göra det kan resultera i allvarliga skador. de grundläggande
försiktighetsåtgärderna bör alltid följas, inklusive följande:
6. Salongsstolarna _ får inte användas eller förvaras i farliga områden. Det är inte
tillåtet att använda apparaten på farliga platser.
7. Salongsstolarna _ måste kontrolleras för att säkerställa att den är i korrekt
fungerande skick och fungerar säkert före användning. I annat fall får apparaten
inte användas .
8. Använd endast som avsett.
9. Operatören måste använda salongsstolarna ordentligt. Han måste ta hänsyn
till de lokala förhållandena och måste vara uppmärksam på tredje part, särskilt
barn , när han arbetar med salongsstolarna .
10. Denna salong stolar är inte avsedd att användas av personer (inklusive barn)
med nedsatta fysiska, sensoriska eller mentala förmågor eller som saknar
erfarenhet och/eller kunskap , såvida de inte övervakas av en person som
ansvarar för deras säkerhet eller instrueras av dessa personer om användningen
av enheten. Barn bör övervakas för att säkerställa att de inte leker med
salongsstolarna .
SPARA DESSA INSTRUKTIONER

3
Produktlista _
4
Produktmontering _
1
Installera pumpen på
basen med de 6 svarta
bultarna .
Placera den monterade
basen och pumpen på
golvet.
Använd insexnyckel för
att lossa skruvarna i
tvärbalken. Se bild
dessutom.
Föra in Foot Bar in i
hålen i tvärbalken.
(Kan kräva att
ändarna av
fotstången pressas
lätt mot varandra,
och en del
manövrering för att
ståndens ändar ska
komma på plats.)
Dra åt de 2
ställskruvarna för att
fint hålla fotstången på
plats.
2
Ta bort stiftet axel
och stift på
ryggstödet .

5
Fäst ryggstödet på
sätet med stift och
stift .
3
Ta bort de 6 bultarna
som är installerade på
sittdynan .
Installera vänster och
högerhandsstöd på
sittdynan med de
borttagna bultarna .
4
Ta bort de 4 bultarna
monterad på sittdynan .

6
Montera fotpedalen
på sittdynan med de
borttagna bultarna .
5
Montera sitsen på
oljepump .
6
Ta bort de 3 bultarna på
ryggstödet.

7
Montera på ryggstödet
med de borttagna
bultarna.
Sätt in kudden enligt
positionen som visas på
bilden .
Produktanvändning _
1. I naturligt tillstånd kan
den övre delen av pumpen
rotera fritt på pumpens
rotationsaxel;
2. Höj fotstången och vrid
låset .
8
Kliv ner på Foot Bar
upprepade gånger för att
höja
stolen till önskad
höjd.
Förläng inte för mycket
stol, vilket skapar risk för
fall eller tippning
stolen och dess åkande
över, vilket resulterar i
skada .
Kliv ner och håll fotstången
så att stolen kan sänkas.
Förläng inte stolen
för mycket, vilket
skapar risk för fall
eller att stolen välter
och dess åkande,
vilket resulterar i
skada.
Adress: Baoshanqu Shuangchenglu 803long 11hao 1602A-1609shi
Shanghai

9
Importerad till AUS: SIHAO PTY LTD . 1 ROKEVA STREETEASTWOOD
NSW 2122 Australien
till USA: Sanven Technology Ltd. Suite 250, 9166 Anaheim Place, Rancho
Cucamonga, CA 91730
REP
UK
Pooledas Group Ltd
Unit 5 Albert Edward House, The Pavilions
Preston, United Kingdom
REP
EC
SHUNSHUN GmbH
Römeräcker 9 Z2021, 76351
Linkenheim-Hochstetten, Germany
Tillverkad i Kina


Técnico Soporte y certificado de garantía electrónica www.vevor.com/support
SILLAS DE SALÓN
MANUAL DE USUARIO
We continue to be committed to provide you tools with competitive price.
"Save Half","Half Price" or any other similar expressions used by us only represents an
estimate of savings you might benefit from buying certain tools with us compared to the major
top brands and does not necessarily mean to cover all categories of tools offered by us. You
are kindly reminded to verify carefully when you are placing an order with us if you are
actually saving half in comparison with the top major brands.


1
HZ8838
Have product questions? Need technical support? Please feel free to
contact us:
Technical Support and E-Warranty Certificate
www.vevor.com/support
NEED HELP? CONTACT US!
This is the original instruction,please read all manual instructions carefully
before operating. VEVOR reserves a clear interpretation of our user
manual. The appearance of the product shall be subject to the product
you received. Please forgive us that we won't inform you again if there
are any technology or software updates on our product.
SALON CHAIRS

2
Precauciones de seguridad
ADVERTENCIA:
Lea estas instrucciones antes de usar este producto. De lo contrario, se pueden
producir lesiones graves. Siempre se deben seguir las precauciones básicas ,
incluidas las siguientes:
11. las sillas del salon No se puede utilizar ni almacenar en zonas peligrosas. No
está permitido utilizar el aparato en lugares peligrosos.
12. las sillas del salon Se debe verificar para garantizar que esté en buenas
condiciones de funcionamiento y que funcione de manera segura antes de su uso.
De lo contrario , no se debe utilizar el aparato.
13. Úselo únicamente según lo previsto.
14. El operador debe utilizar los sillones del salón. adecuadamente. Debe tener
en cuenta las condiciones locales y prestar atención a terceros , en particular a los
niños , al trabajar con los sillones de salón. .
15. Estas sillas de salón no está destinado a ser utilizado por personas
(incluidos niños) con capacidades físicas , sensoriales o mentales reducidas o que
carezcan de experiencia y/o conocimientos , a menos que estén supervisados por
una persona responsable de su seguridad o sean instruidos por estas personas
sobre el uso de el dispositivo. Los niños deben ser supervisados para asegurarse
de que no jueguen con las sillas del salón .
GUARDA ESTAS INSTRUCCIONES

3
Lista de productos

4
Montaje del producto
1
Instale la bomba en la
base con los 6 pernos
negros .
Coloque la base y la
bomba ensambladas en
el piso.
Utilice una llave Allen
para aflojar los tornillos
de la barra transversal.
Ver foto al lado.
Insertar Barra para pies
en los agujeros del
travesaño.
(Es posible que sea
necesario apretar
ligeramente los
extremos de la barra
para pies entre sí y
realizar algunas
maniobras para que
los extremos de la
barra encajen en su
lugar).
Apriete los 2 tornillos
de fijación para sujetar
firmemente la barra
para pies en su lugar.
2
quitar el pasador
eje y pasador en el
respaldo .

5
Fije el respaldo a
el asiento con un
pasador y un
pasador .
3
Retire los 6 pernos
instalados en el cojín del
asiento .
Instale la izquierda y
Descanse la mano
derecha sobre el cojín
del asiento con los
pernos retirados .
4
Retire los 4 tornillos
Instalado en el cojín del
asiento .

6
Instale el pedal
sobre el cojín del asiento
con los pernos retirados .
5
Instale el asiento en el
bomba de aceite .
6
Retire los 3 tornillos del
respaldo.

7
Instálelo en el respaldo
con los pernos retirados.
Inserta la almohada
según la posición que se
muestra en la imagen .
Uso del producto
1. En estado natural, la
parte superior de la bomba
puede girar libremente
sobre el eje de rotación de
la bomba;
2. Eleve la barra para los
pies y gire el bloqueo .

8
Baje la barra para pies
repetidamente para elevar
la silla a la deseada
altura.
No extienda demasiado el
silla, creando riesgo de
caídas o vuelco.
La silla y su ocupante se
caen, provocando
lesiones .
Bájese y sostenga la barra
para pies para permitir que
la silla baje.
No extienda
demasiado la silla,
ya que existe riesgo
de caídas o de que
la silla y su
ocupante se
vuelquen, lo que
podría provocar
lesiones.

9
Dirección: Baoshanqu Shuangchenglu 803long 11hao 1602A-1609shi
Shanghai
Importado a AUS: SIHAO PTY LTD . 1 ROKEVA STREETASTWOOD
NSW 2122 Australia
Importado a EE. UU.: Sanven Technology Ltd. Suite 250, 9166 Anaheim
Place, Rancho Cucamonga, CA 91730
REP
UK
Pooledas Group Ltd
Unit 5 Albert Edward House, The Pavilions
Preston, United Kingdom
REP
EC
SHUNSHUN GmbH
Römeräcker 9 Z2021, 76351
Linkenheim-Hochstetten, Germany
Hecho en china


Tecnico Supporto e certificato di garanzia elettronica www.vevor.com/support
SEDIE DA SALONE
MANUALE D'USO
We continue to be committed to provide you tools with competitive price.
"Save Half","Half Price" or any other similar expressions used by us only represents an
estimate of savings you might benefit from buying certain tools with us compared to the major
top brands and does not necessarily mean to cover all categories of tools offered by us. You
are kindly reminded to verify carefully when you are placing an order with us if you are
actually saving half in comparison with the top major brands.

1
HZ8838
Have product questions? Need technical support? Please feel free to
contact us:
Technical Support and E-Warranty Certificate
www.vevor.com/support
NEED HELP? CONTACT US!
This is the original instruction,please read all manual instructions carefully
before operating. VEVOR reserves a clear interpretation of our user
manual. The appearance of the product shall be subject to the product
you received. Please forgive us that we won't inform you again if there
are any technology or software updates on our product.
SALON CHAIRS

2
Misure di sicurezza
AVVERTIMENTO:
Leggere queste istruzioni prima di utilizzare questo prodotto. In caso contrario si
potrebbero causare lesioni gravi. È necessario seguire sempre le precauzioni di
base , incluse le seguenti:
16. Le sedie del salone non può essere utilizzato o conservato in aree pericolose.
Non è consentito utilizzare l'apparecchio in luoghi pericolosi.
17. Le sedie del salone deve essere controllato per garantire che sia in buone
condizioni di funzionamento e funzioni in sicurezza prima dell'uso. In caso
contrario l'apparecchio non deve essere utilizzato.
18. Utilizzare solo come previsto.
19. L'operatore deve utilizzare le poltrone salone correttamente. Egli deve
considerare le condizioni locali e prestare attenzione a terzi , in particolare ai
bambini , quando lavora con le poltrone da parrucchiere .
20. Queste sedie da salone non è destinato all'uso da parte di persone
(compresi i bambini) con ridotte capacità fisiche , sensoriali o mentali o prive di
esperienza e/o conoscenza , a meno che non siano supervisionate da una
persona responsabile della loro sicurezza o siano istruite da queste persone
sull'uso di il dispositivo. I bambini devono essere sorvegliati per assicurarsi che
non giochino con le sedie del salone .
CONSERVA QUESTE ISTRUZIONI

3
Elenco prodotti

4
Assemblaggio del prodotto
1
Installare la pompa alla
base con i 6 bulloni
neri .
Posizionare la base e la
pompa assemblate sul
pavimento.
Utilizzare la chiave a
brugola per allentare le
viti nella traversa. Vedi
foto inoltre.
Inserire Barra
poggiapiedi nei fori della
traversa.
(Potrebbe essere
necessario premere
leggermente le
estremità della barra
poggiapiedi l'una
verso l'altra e alcune
manovre affinché le
estremità della barra
entrino in posizione.)
Stringere le 2 viti di
fissaggio per tenere
saldamente in
posizione la barra
poggiapiedi.
2
Rimuovere il perno
albero e perno lo
schienale .
5
Fissare lo
schienale a
il sedile con perno
e perno .
3
Rimuovere le 6 viti
installate sul cuscino del
sedile .
Installare la sinistra e
appoggiare la mano
destra sul cuscino del
sedile con i bulloni
rimossi .
4
Rimuovere i 4 bulloni
installato sul cuscino del
sedile .
6
Installare il pedale
sul cuscino del sedile
con i bulloni rimossi .
5
Installare il sedile su
pompa dell'olio .
6
Rimuovere i 3 bulloni
sullo schienale.
7
Installare sullo schienale
con i bulloni rimossi.
Inserisci il cuscino
secondo la posizione
mostrata in figura .
Utilizzo del prodotto
1. Allo stato naturale, la
parte superiore della
pompa può ruotare
liberamente sull'asse di
rotazione della pompa;
2. Sollevare la barra
poggiapiedi e ruotare il
blocco .

8
Scendere ripetutamente
sulla barra poggiapiedi per
sollevarsi
la sedia a piacimento
altezza.
Non estendere
eccessivamente il
sedia, creando il rischio di
cadute o di ribaltamento
la sedia e il suo occupante
si rovesciano, provocando
lesioni .
Scendere e tenere la barra
poggiapiedi per consentire
alla sedia di abbassarsi.
Non estendere
eccessivamente la
sedia, creando il
rischio di cadute o
di ribaltamento della
sedia e del suo
occupante, con
conseguenti lesioni.
Indirizzo: Baoshanqu Shuangchenglu 803long 11hao 1602A-1609shi

9
Shanghai
Importato in AUS: SIHAO PTY LTD . 1 ROKEVA STREETEASTWOOD
NSW 2122 Australia
Importato negli Stati Uniti: Sanven Technology Ltd. Suite 250, 9166
Anaheim Place, Rancho Cucamonga, CA 91730
REP
UK
Pooledas Group Ltd
Unit 5 Albert Edward House, The Pavilions
Preston, United Kingdom
REP
EC
SHUNSHUN GmbH
Römeräcker 9 Z2021, 76351
Linkenheim-Hochstetten, Germany
Made in China


Techniczny Certyfikat wsparcia i e-gwarancji www.vevor.com/support
KRZESŁA SALONOWE
INSTRUKCJA OBSŁUGI
We continue to be committed to provide you tools with competitive price.
"Save Half","Half Price" or any other similar expressions used by us only represents an
estimate of savings you might benefit from buying certain tools with us compared to the major
top brands and does not necessarily mean to cover all categories of tools offered by us. You
are kindly reminded to verify carefully when you are placing an order with us if you are
actually saving half in comparison with the top major brands.


1
HZ8838
Have product questions? Need technical support? Please feel free to
contact us:
Technical Support and E-Warranty Certificate
www.vevor.com/support
NEED HELP? CONTACT US!
This is the original instruction,please read all manual instructions carefully
before operating. VEVOR reserves a clear interpretation of our user
manual. The appearance of the product shall be subject to the product
you received. Please forgive us that we won't inform you again if there
are any technology or software updates on our product.
SALON CHAIRS

2
Środki ostrożności
OSTRZEŻENIE:
Przeczytaj tę instrukcję przed użyciem tego produktu. Niezastosowanie się do
tego może spowodować poważne obrażenia. należy zawsze przestrzegać
podstawowych środków ostrożności , w tym:
21. Krzesła salonowe nie wolno używać ani przechowywać w obszarach
niebezpiecznych. Nie wolno używać urządzenia w miejscach niebezpiecznych.
22. Krzesła salonowe przed użyciem należy sprawdzić, czy jest w dobrym stanie
i czy działa bezpiecznie. W przeciwnym razie nie wolno używać urządzenia.
23. Używaj wyłącznie zgodnie z przeznaczeniem.
24. Operator musi korzystać z krzeseł salonowych odpowiednio. Podczas pracy
z krzesłami salonowymi musi wziąć pod uwagę warunki lokalne i zwracać uwagę
na osoby trzecie , w szczególności dzieci .
25. To krzesła salonowe nie jest przeznaczony do użytku przez osoby (w tym
dzieci) o ograniczonych zdolnościach fizycznych , sensorycznych lub umysłowych
lub nieposiadające doświadczenia i/lub wiedzy , chyba że znajdują się pod
nadzorem osoby odpowiedzialnej za ich bezpieczeństwo lub zostaną przez te
osoby poinstruowane w zakresie obsługi urządzenie. Dzieci powinny być
nadzorowane , aby mieć pewność, że nie bawią się krzesłami w salonie .
ZACHOWAJ TE INSTRUKCJE

3
Lista produktów
4
Montaż produktu
1
Zamontuj pompę do
podstawy za pomocą 6
czarnych śrub .
Umieść zmontowaną
podstawę i pompę na
podłodze.
Użyj klucza
imbusowego, aby
poluzować śruby w
poprzeczce. Zobacz
zdjęcie obok.
Wstawić Stopkę włóż w
otwory poprzeczki.
(Może wymagać
lekkiego ściągnięcia
końców drążka do
siebie i pewnych
manewrów, aby
końce drążka weszły
na swoje miejsce.)
Dokręć 2 śruby
ustalające, aby mocno
przytrzymać podnóżek
na miejscu.
2
Wyjmij szpilkę
wałek i kołek
oparcie .

5
Przymocuj oparcie
do
siedzisko ze
szpilką i szpilką .
3
Wykręć 6 śrub
zamontowanych na
poduszce siedzenia .
Zainstaluj lewy i
prawą podpórkę na
poduszkę siedzenia po
odkręceniu śrub .
4
Wykręć 4 śruby
montowany na poduszce
siedziska .

6
Zamontuj pedał nożny
na poduszkę siedzenia
za pomocą wykręconych
śrub .
5
Zamontuj siedzisko na
Pompa olejowa .
6
Odkręć 3 śruby z
oparcia.

7
Zamontuj na oparciu za
pomocą wykręconych
śrub.
Włóż poduszkę zgodnie
z pozycją pokazaną na
rysunku .
Zastosowanie produktu
1. W stanie naturalnym
górna część pompy może
się swobodnie obracać na
osi obrotu pompy;
2. Podnieś podnóżek i
obróć blokadę .

8
Aby się podnieść,
kilkakrotnie opuść stopkę
na drążek
krzesło do pożądanego
wysokość.
Nie należy nadmiernie
rozciągać
krzesło, stwarzając ryzyko
upadku lub przewrócenia
się
przewrócenie się krzesła i
osoby na nim siedzącej, co
może skutkować
obrażeniami .
Zejdź na dół i przytrzymaj
podnóżek, aby umożliwić
opuszczenie krzesła.
Nie należy
nadmiernie
rozciągać krzesła,
stwarzając ryzyko
upadku lub
przewrócenia
krzesła i jego
pasażera, co może
skutkować
obrażeniami.
9
Adres: Baoshanqu Shuangchenglu 803long 11hao 1602A-1609shi
Szanghaj
Import do AUS: SIHAO PTY LTD . 1 ROKEVA STREETEASTWOOD
NSW 2122 Australia
Import do USA: Sanven Technology Ltd. Apartament 250, 9166 Anaheim
Place, Rancho Cucamonga, Kalifornia 91730
REP
UK
Pooledas Group Ltd
Unit 5 Albert Edward House, The Pavilions
Preston, United Kingdom
REP
EC
SHUNSHUN GmbH
Römeräcker 9 Z2021, 76351
Linkenheim-Hochstetten, Germany
Wyprodukowano w Chinach


Technisch Support- und E-Garantie-Zertifikat www.vevor.com/support
SALONSTÜHLE
BENUTZERHANDBUCH
We continue to be committed to provide you tools with competitive price.
"Save Half","Half Price" or any other similar expressions used by us only represents an
estimate of savings you might benefit from buying certain tools with us compared to the major
top brands and does not necessarily mean to cover all categories of tools offered by us. You
are kindly reminded to verify carefully when you are placing an order with us if you are
actually saving half in comparison with the top major brands.


1
HZ8838
Have product questions? Need technical support? Please feel free to
contact us:
Technical Support and E-Warranty Certificate
www.vevor.com/support
NEED HELP? CONTACT US!
This is the original instruction,please read all manual instructions carefully
before operating. VEVOR reserves a clear interpretation of our user
manual. The appearance of the product shall be subject to the product
you received. Please forgive us that we won't inform you again if there
are any technology or software updates on our product.
SALON CHAIRS

2
Sicherheitsvorkehrungen
WARNUNG:
Lesen Sie diese Anweisungen, bevor Sie dieses Produkt verwenden.
Andernfalls kann es zu schweren Verletzungen kommen. Die grundlegenden
Vorsichtsmaßnahmen sollten immer befolgt werden , einschließlich der folgenden:
26. Die Salonstühle dürfen nicht in explosionsgefährdeten Bereichen verwendet
oder gelagert werden. Es ist nicht gestattet, das Gerät in explosionsgefährdeten
Bereichen zu verwenden.
27. Die Salonstühle Vor der Verwendung muss überprüft werden, ob es
ordnungsgemäß funktioniert und sicher funktioniert. Andernfalls darf das Gerät
nicht verwendet werden.
28. Nur bestimmungsgemäß verwenden.
29. Salonstühle benutzen richtig. Er hat die örtlichen Gegebenheiten zu
berücksichtigen und beim Arbeiten mit den Salonstühlen Rücksicht auf Dritte ,
insbesondere Kinder , zu nehmen .
30. Diese Salonstühle ist nicht für den Gebrauch durch Personen (einschließlich
Kinder) mit eingeschränkten körperlichen , sensorischen oder geistigen
Fähigkeiten oder mangels Erfahrung und/oder mangels Wissen bestimmt , es sei
denn, sie werden durch eine für ihre Sicherheit zuständige Person beaufsichtigt
oder erhielten von dieser Person Anweisungen zum Gebrauch das Gerät. Kinder
sollten beaufsichtigt werden , um sicherzustellen, dass sie nicht mit den
Salonstühlen spielen .
ANLEITUNG AUFBEWAHREN

3
Produktliste _
4
Produktmontage _
1
Befestigen Sie die
Pumpe mit den 6
schwarzen Schrauben
am Sockel .
Stellen Sie die
zusammengebaute
Basis und Pumpe auf
den Boden.
Lösen Sie die Schrauben
in der Querstange mit
einem Inbusschlüssel.
Siehe Foto außerdem.
Einfügen Fußstange in
die Löcher der
Querstange einführen.
(Es kann erforderlich
sein, die Enden der
Fußstange leicht
aufeinander zu
drücken und etwas
zu manövrieren,
damit die Enden der
Fußstange
einrasten.)
Ziehen Sie die 2
Stellschrauben fest,
um die Fußstange
festzuhalten.
5
2
Entfernen Sie den
Stift Schaft und
Stift aufstecken die
Rückenlehne .
Befestigen Sie die
Rückenlehne an
Den Sitz mit einem
Stift und Stift
befestigen .
3
Entfernen Sie die 6 am
Sitzkissen angebrachten
Schrauben .
Installieren Sie die linke
und
Setzen Sie die rechte
Handstütze mit den
entfernten Schrauben
auf das Sitzkissen .
4
Entfernen Sie die 4
Schrauben
auf dem Sitzkissen
montiert .

6
Installieren Sie das
Fußpedal
mit den entfernten
Schrauben am
Sitzkissen befestigen .
5
Installieren Sie den Sitz
am
Ölpumpe .
6
Entfernen Sie die 3
Schrauben an der
Rückenlehne.

7
Mit den entfernten
Schrauben an der
Rückenlehne befestigen.
Legen Sie das Kissen
ein entsprechend der im
Bild gezeigten Position .
Produktnutzen _
1. Im natürlichen Zustand
kann sich der obere Teil
der Pumpe frei auf der
Drehachse der Pumpe
drehen;
2. Heben Sie die
Fußstange an und drehen
Sie die Verriegelung .

8
Treten Sie zum Anheben
wiederholt auf die
Fußstange
den Stuhl auf die
gewünschte Position
Höhe.
Überdehnen Sie das Gerät
nicht
Stuhl, wodurch die Gefahr
eines Sturzes oder
Umkippens besteht
Der Stuhl und seine
Person könnten umkippen,
was zu Verletzungen
führen kann .
Treten Sie nach unten und
halten Sie die Fußstange
fest, damit sich der Stuhl
absenken kann.
Überdehnen Sie
den Stuhl nicht, da
sonst die Gefahr
besteht, dass er
stürzt oder den
Stuhl und seine
Person umkippt,
was zu
Verletzungen
führen kann.

9
Adresse: Baoshanqu Shuangchenglu 803long 11hao 1602A-1609shi
Shanghai
Importiert nach AUS: SIHAO PTY LTD . 1 ROKEVA
STREETEASTWOOD NSW 2122 Australien
Importiert in die USA: Sanven Technology Ltd. Suite 250, 9166 Anaheim
Place, Rancho Cucamonga, CA 91730
REP
UK
Pooledas Group Ltd
Unit 5 Albert Edward House, The Pavilions
Preston, United Kingdom
REP
EC
SHUNSHUN GmbH
Römeräcker 9 Z2021, 76351
Linkenheim-Hochstetten, Germany
In China hergestellt


Technique Assistance et certificat de garantie électronique
www.vevor.com/support
CHAISES DE SALON
MANUEL DE L'UTILISATEUR
We continue to be committed to provide you tools with competitive price.
"Save Half","Half Price" or any other similar expressions used by us only represents an
estimate of savings you might benefit from buying certain tools with us compared to the major
top brands and does not necessarily mean to cover all categories of tools offered by us. You
are kindly reminded to verify carefully when you are placing an order with us if you are
actually saving half in comparison with the top major brands.


1
HZ8838
Have product questions? Need technical support? Please feel free to
contact us:
Technical Support and E-Warranty Certificate
www.vevor.com/support
NEED HELP? CONTACT US!
This is the original instruction,please read all manual instructions carefully
before operating. VEVOR reserves a clear interpretation of our user
manual. The appearance of the product shall be subject to the product
you received. Please forgive us that we won't inform you again if there
are any technology or software updates on our product.
SALON CHAIRS

2
Précautions de sécurité
AVERTISSEMENT:
Lisez ces instructions avant d'utiliser ce produit. Ne pas le faire peut entraîner
des blessures graves. les précautions de base doivent toujours être suivies ,
notamment les suivantes :
31. Les fauteuils de salon ne peut pas être utilisé ou stocké dans des zones
dangereuses. Il est interdit d'utiliser l'appareil dans des endroits dangereux.
32. Les fauteuils de salon doit être vérifié pour s’assurer qu’il est en bon état de
fonctionnement et qu’il fonctionne en toute sécurité avant utilisation. Dans le cas
contraire , l'appareil ne doit pas être utilisé.
33. Utiliser uniquement comme prévu.
34. L'opérateur doit utiliser les fauteuils de salon correctement. Il doit tenir
compte des conditions locales et doit faire attention aux tiers , en particulier aux
enfants , lorsqu'il travaille avec les fauteuils de salon .
35. Ces chaises de salon n'est pas destiné à être utilisé par des personnes (y
compris des enfants) ayant des capacités physiques , sensorielles ou mentales
réduites ou manquant d'expérience et/ou de connaissances , à moins qu'elles ne
soient supervisées par une personne responsable de leur sécurité ou qu'elles ne
soient instruites par ces personnes sur l'utilisation de le dispositif. Les enfants
doivent être surveillés pour s'assurer qu'ils ne jouent pas avec les chaises du
salon .
CONSERVEZ CES INSTRUCTIONS

3
Liste de produits
4
Assemblage du produit
1
Installez la pompe à la
base avec les 6
boulons noirs .
Placez la base et la
pompe assemblées sur
le sol.
Utilisez une clé Allen
pour desserrer les vis de
la barre transversale.
Voir photo d'ailleurs.
Insérer Barre de pied
dans les trous de la barre
transversale.
(Peut nécessiter de
serrer légèrement
les extrémités de la
barre de pied l'une
vers l'autre et
quelques
manœuvres pour
que les extrémités
de la barre se
mettent en place.)
Serrez les 2 vis de
réglage pour maintenir
fermement la barre de
pied en place.
2
Retirez la goupille
arbre et goupille
dessus le dossier .

5
Fixez le dossier à
le siège avec une
épingle et une
épingle .
3
Retirez les 6 vis
installées sur le coussin
du siège .
Installez le côté gauche
et
la main droite repose sur
le coussin du siège avec
les boulons retirés .
4
Retirez les 4 boulons
installé sur le coussin du
siège .

6
Installez la pédale
sur le coussin du siège
avec les boulons retirés .
5
Installez le siège sur le
la pompe à huile .
6
Retirez les 3 boulons du
dossier.

7
Installez-le sur le dossier
avec les boulons retirés.
Insérez l'oreiller selon la
position indiquée sur
l'image .
Utilisation du produit
1. À l’état naturel, la partie
supérieure de la pompe
peut tourner librement sur
l’axe de rotation de la
pompe ;
2. Élevez la barre de pied
et faites pivoter le verrou .

8
Abaissez la barre de pied à
plusieurs reprises pour
relever
la chaise à la position
souhaitée
hauteur.
N'étendez pas trop la
chaise, créant un risque de
chute ou de basculement
du
chaise et son occupant,
entraînant des blessures .
Descendez et maintenez la
barre de pied pour
permettre au fauteuil de
s'abaisser.
N'étendez pas trop
le fauteuil, ce qui
créerait un risque
de chute ou de
renversement du
fauteuil et de son
occupant, ce qui
entraînerait des
blessures.
9
Adresse : Baoshanqu Shuangchenglu 803long 11hao 1602A-1609shi
Shanghai
Importé en Australie : SIHAO PTY LTD . 1 ROKEVA STREETASTWOOD
NSW 2122 Australie
Importé aux États-Unis : Sanven Technology Ltd. Bureau 250, 9166
Anaheim Place, Rancho Cucamonga, CA 91730
REP
UK
Pooledas Group Ltd
Unit 5 Albert Edward House, The Pavilions
Preston, United Kingdom
REP
EC
SHUNSHUN GmbH
Römeräcker 9 Z2021, 76351
Linkenheim-Hochstetten, Germany
Fabriqué en Chine


Technisch Ondersteuning en e-garantiecertificaat www.vevor.com/support
SALON STOELEN
HANDLEIDING
We continue to be committed to provide you tools with competitive price.
"Save Half","Half Price" or any other similar expressions used by us only represents an
estimate of savings you might benefit from buying certain tools with us compared to the major
top brands and does not necessarily mean to cover all categories of tools offered by us. You
are kindly reminded to verify carefully when you are placing an order with us if you are
actually saving half in comparison with the top major brands.

1
HZ8838
Have product questions? Need technical support? Please feel free to
contact us:
Technical Support and E-Warranty Certificate
www.vevor.com/support
NEED HELP? CONTACT US!
This is the original instruction,please read all manual instructions carefully
before operating. VEVOR reserves a clear interpretation of our user
manual. The appearance of the product shall be subject to the product
you received. Please forgive us that we won't inform you again if there
are any technology or software updates on our product.
SALON CHAIRS

2
Veiligheidsmaatregelen
WAARSCHUWING:
Lees deze instructies voordat u dit product gebruikt. Als u dit niet doet, kan dit
leiden tot ernstig letsel. de basisvoorzorgsmaatregelen moeten altijd worden
gevolgd , waaronder de volgende:
36. De salonstoelen mag niet worden gebruikt of opgeslagen in gevaarlijke
gebieden. Het is niet toegestaan het apparaat op gevaarlijke locaties te gebruiken.
37. De salonstoelen moet vóór gebruik worden gecontroleerd om er zeker van
te zijn dat deze in goede staat verkeert en veilig werkt. Anders mag het apparaat
niet worden gebruikt.
38. Alleen gebruiken zoals bedoeld.
39. De exploitant moet de salonstoelen gebruiken op de juiste manier. Hij moet
rekening houden met de plaatselijke omstandigheden en moet bij het werken met
de salonstoelen rekening houden met derden , in het bijzonder kinderen .
40. Deze salonstoelen is niet bedoeld voor gebruik door personen (inclusief
kinderen) met verminderde lichamelijke , zintuiglijke of geestelijke vermogens of
gebrek aan ervaring en/of kennis , tenzij zij onder toezicht staan van een persoon
die verantwoordelijk is voor hun veiligheid of door deze personen zijn geïnstrueerd
over het gebruik van het apparaat. Op kinderen moet toezicht worden gehouden ,
om er zeker van te zijn dat ze niet met de salonstoelen spelen .
BEWAAR DEZE INSTRUCTIES

3
Product lijst
4
Productmontage _
1
Installeer de pomp op
de basis met de 6
zwarte bouten .
Plaats de gemonteerde
basis en pomp op de
vloer.
Gebruik een inbussleutel
om de schroeven in de
dwarsbalk los te draaien.
Zie daarnaast foto.
Invoegen Voetstang in
de gaten van de
dwarsbalk.
(Het kan nodig zijn
de uiteinden van de
voetstang lichtjes
naar elkaar toe te
drukken, en wat
manoeuvreren om
de uiteinden van de
stangen op hun
plaats te krijgen.)
Draai de 2
stelschroeven vast om
de voetstang stevig op
zijn plaats te houden.
2
Verwijder de pen
as en pin erop de
rugleuning .

5
Bevestig de
rugleuning aan
de stoel met een
pin en pin .
3
Verwijder de 6 bouten
die op het zitkussen zijn
geïnstalleerd .
Installeer de linker en
rechterhand rust op het
zitkussen met de
verwijderde bouten .
4
Verwijder de 4 bouten
geïnstalleerd op het
zitkussen .

6
Installeer het voetpedaal
op het zitkussen met de
verwijderde bouten .
5
Installeer de stoel op de
oliepomp .
6
Verwijder de 3 bouten op
de rugleuning.
7
Installeer op de
rugleuning met de
verwijderde bouten.
Plaats het kussen
volgens de positie
weergegeven in de
afbeelding .
Productgebruik _
1. In natuurlijke staat kan
het bovenste deel van de
pomp vrij rond de rotatieas
van de pomp draaien;
2. Breng de voetstang
omhoog en draai aan de
vergrendeling .

8
Stap herhaaldelijk op de
voetstang om omhoog te
komen
de stoel naar wens
hoogte.
Verleng de
stoel, waardoor het risico
bestaat dat u valt of kantelt
stoel en de inzittende
omvallen, met letsel tot
gevolg .
Ga naar beneden en houd
de voetstang vast zodat de
stoel omlaag kan.
Verleng de stoel
niet te ver,
waardoor het risico
bestaat dat u valt of
dat de stoel en de
inzittende omvallen,
wat tot letsel kan
leiden.
Adres: Baoshanqu Shuangchenglu 803long 11hao 1602A-1609shi

9
Shanghai
Geïmporteerd naar AUS: SIHAO PTY LTD . 1 ROKEVA
STREETEASTWOOD NSW 2122 Australië
Geïmporteerd naar de VS: Sanven Technology Ltd. Suite 250, 9166
Anaheim Place, Rancho Cucamonga, CA 91730
REP
UK
Pooledas Group Ltd
Unit 5 Albert Edward House, The Pavilions
Preston, United Kingdom
REP
EC
SHUNSHUN GmbH
Römeräcker 9 Z2021, 76351
Linkenheim-Hochstetten, Germany
Gemaakt in China