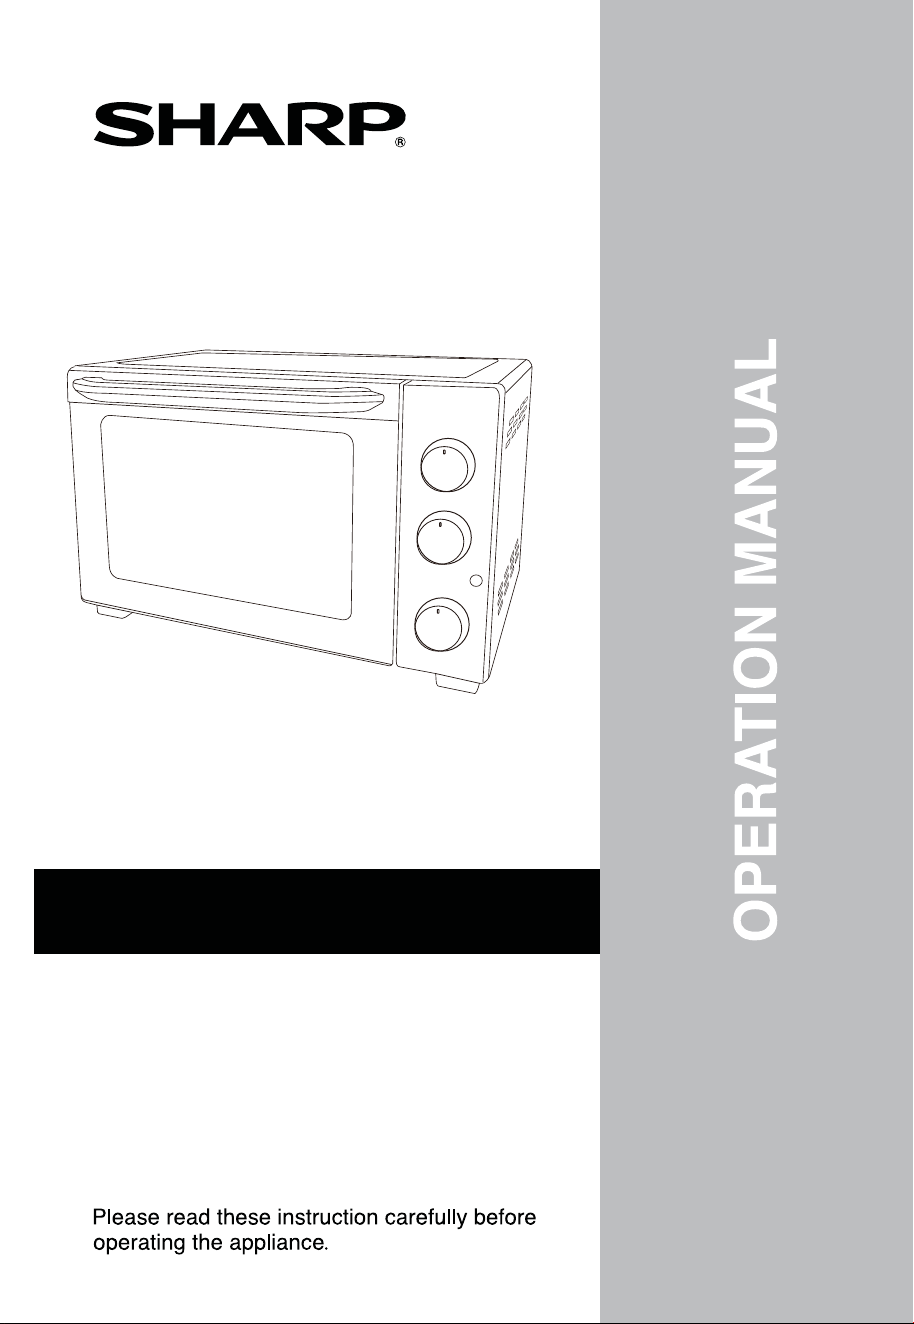
EO-327R-BK
EO-327R-ST
EO-327RT-BK
EO-327RT-ST
ELECTRIC OVEN
EO-B32RCV-BK


Safety Precautions
Product Components Specifications &
Operating Instructions
Cleaning and Maintenance
Troubleshooting
Page
3-7
14
15
CONTENTS
&
-2-
8
9-13
Please follow this instruction manual stri
ctly to operate this unit correctly.
To avoid any personal injury and property loss, please comply with the following
safety notices. Accidents may occur if the user does not comply with the
BEFORE THE FIRST USE:
Remove and unpack all packing materials. Check that all parts and
components are complete and not damaged. If any part of the appliance
is found to be damaged, it must be brought to appointed SHARP service
center to be checked, repaired or replaced to prevent any hazards occurring.
Please do not dismantle or repair the appli
ance by yourself for safety
purposes.
Clean the unit according to the “Cleaning and Maintenance” section
before using.
safety notices and operates the unit incorrectly.
SAFETY PRECAUTIONS
•
•
severe injuries
-3-
This appliance is only applicable for household usage. Please
If the power cord is damaged, the appliance must be brought
pair or replacement to
• Do not damage or alter the power cord arbitrarily. It should not be
twisted, extended, bundled up or placed near hot places. Do not place
heavy objects on the power cord or place the cord in the gap between
objects.
• Do not let the power cord hang over the edge of table or countertop.
Do not place the power cord on hot surfaces.
• If the power cord or power plug is damaged or failed to function normally,
(e.g. being expanded, deformed, changed in color, part of the power cord
is hotter than usual, power cord is loosened in the socket, or power is on
and off from time to time), please stop using it. Send it to a SHARP service
center for repair services.
Use a wall grounded socket individually (>10A, AC 220-240V~
50/60Hz); please ensure that the output voltage of the grounded
socket matches the appliance.
• Using socket with low rate current or sharing the socket with other
appliances may cause partial overheating and may lead to fire hazard
or electrical shock.
• A voltage stabilizer can be used to avoid damages.
• Please ensure the power plug is fully secured into the socket before
When the appliance is not in use or undergoing maintenance, please
turn off the power supply and remove the plug from socket.
• Please hold onto the plug firmly when removing it from power socket
and prohibit pulling the power cord.
• Do not touch the power plug with wet hands to avoid electrical shock.
• If there is dust or dirt on the power plug, please wipe them away with a dry
cloth, otherwise it may lead to fire hazard. Never use a wet cloth or water
switching on the power.
to clean the power plug.
misuse the appliance for purposes other than its actual function.
operate the unit according to the operation manual, and do not
prevent any hazards occurring.
to appointed SHARP service center for re
-4-
Do not disassemble or repair the appliance or replace any components
• For repair services, please contact SHARP service center to avoid
electric shock, short circuit, fire hazard, etc.
If the appliance happens to be dropped or is broken, stop using it and
please
send it to the SHARP service center for repair services
.
• Otherwise, it may result in electric shock or even fire hazard.
• If the appliance is dropped into the water, do not reach for it. Switch off
• Do not use the appliance on inflammable objects like paper, cloth, carpet
or plastic bags.
• Do not use the appliance on uneven places.
• When using the appliance, do not place appliance near the wall or furni-
The appliance must not be immersed into the water.
• The appliance will be damaged, and it may cause short circuit or
If the oven is positioned close to a wall, the wall will have burn or stain
• Please ensure that hanging fabrics are not placed nearby or in ????contact
Do not put anything between the bottom of oven and the surface
•
Any object so placed could be burned or deformed.
Do not put anything on th
e oven during operation.
• The heat could cause deformation, cracking, etc.
by yourself. Only components supplied by SHARP can be used.
all power sources, drain the water away then only retrieve the appliance
to be sent for repairs.
ture or under the sunlight, or places where it may be splashed by oil.
electric shock.
marks.
with the oven body.
it is set on.
Keep the appliance away from water and fire, and do not use the
appliance on an inclined or unstable platform, to avoid from any
accidents or damages.
-5-
Please operate the appliance correctly according to the operating
instructions.
• Avoid fire hazard or electric shock caused by improper operation, such
Any bottled or canned food must
not be heated directly.
• The bottle or tin can would explode and cause severe damages and
injuries.
Do not place foil wrapped food into the oven.
•
Remove all protective wrapping prior to placing food in the oven.
During operation, do not move the appliance and do not get too close
• Please keep face and hands away from the appliance to avoid scalding.
• The temperature of the accessible surface may be high when the
• Immediately after using the oven, please be careful as the metal parts
would be extremely hot.
Always use the tray handle when
inserting or removing the tray.
•
Touching the hot tray/rack will cause severe burns.
When the appliance is hot, do not appl
y any water to the glass window.
• It may cause the glass to break and may result in personal injury.
Do not start cleaning until the appliance is cooled down.
• Avoid touching any hot part of the appliance or it may cause scalds.
Clean the appliance each time after using.
• Do not use steel scrubs, abrasive cleansers or corrosive liquid (e.g.
Gas or Acetone) to clean the appliance.
Be sure to switch off the appliance after operating to ensure safety.
• Ensure that the power switch is off in order to avoid any unforeseen
accidents.
as liquid overflowing to the connector between power cord and cooker.
to the appliance or touch any hot part of the appliance.
and glass window of the door
Please turn off the power supply before remove the baking tray.
appliance is operating.
-6-
-7-
The appliance is not intended to be operated by means of an external
timer or separate remote control system.
Children should be supervised to ensure that they do not play with
The surface is liable to get hot during use.
This appliance is not intended for use by persons (including children)
with reduced physical, sensory or mental capabilities, or lack of
experience and/or knowledge, unless they have been given supervision
or instruction in the safe use of the appliance and have understood the
potential risk.
the appliance.
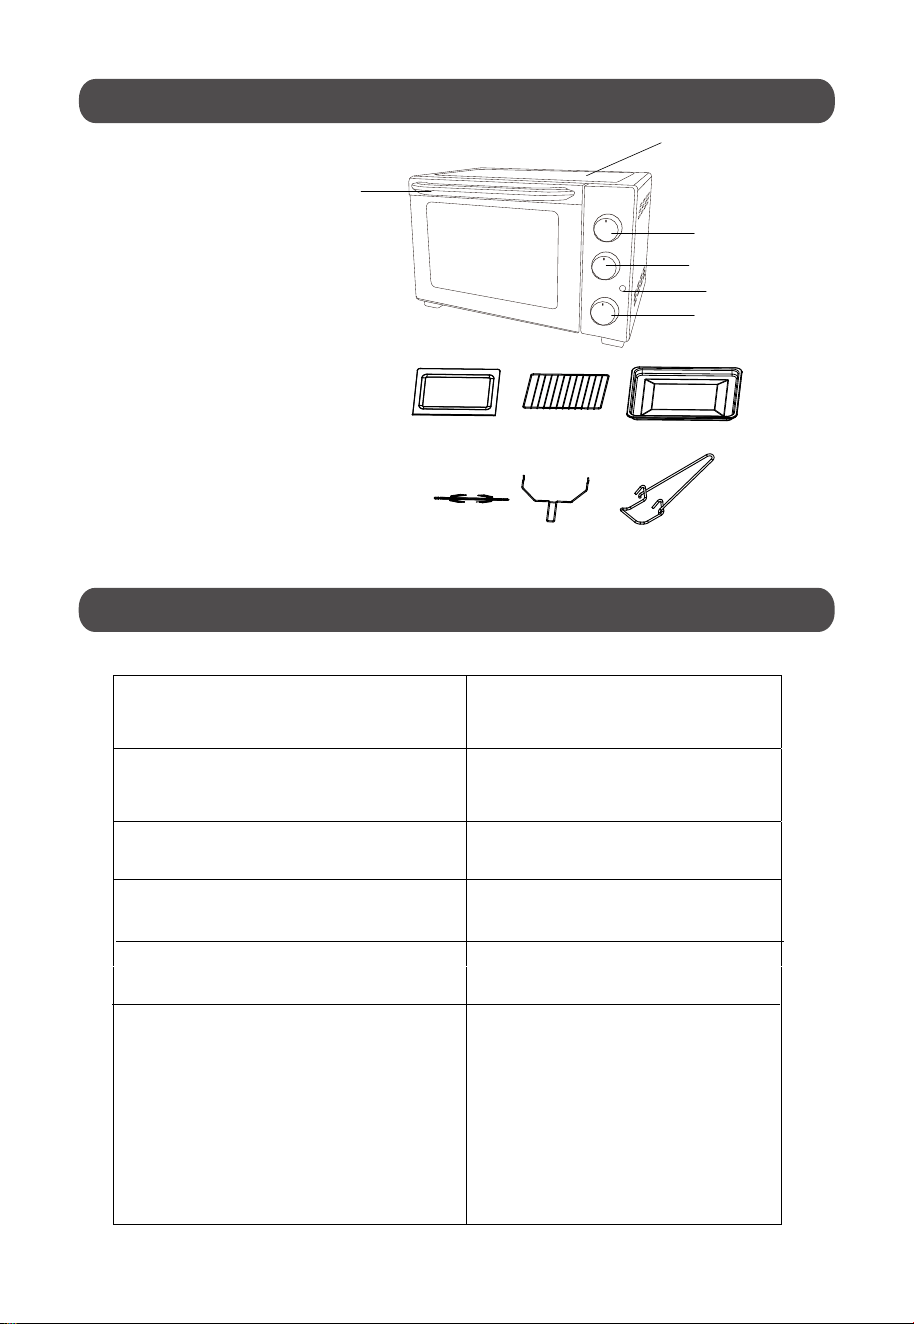
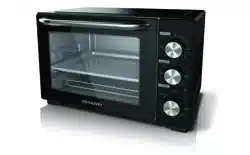
Main body
Temperature knob
Function knob
Timer knob
Door handle
7. Crumb tray
8. Baking rack
9. Baking tray
10. Rotisserie fork
11. Rotisserie handle
Rating Voltage 220-240V
Rating Frequency 50/60Hz
Rating Power 1500W
Capacity 32L
Product Dimension
495 x 385 x 325mm
7
8
9
10
1 1
Accessories
(W x D
H
)
x
12
12. Tray handle
PRODUCT COMPONENTS
PRODUCT SPECIFICATIONS
1
2
3
4
5
Crumb tray (x1)
Baking rack (x2)
Baking tray (x2)
Rotisserie fork (x1)
Rotisserie handle (x1)
Tray handle (x1)
1.
2.
3.
4.
5.
6.
6
Indicator light
-8-
~
Before using the appliance, please refer to “Cleaning and Maintenance” in order to
clean the components properly.
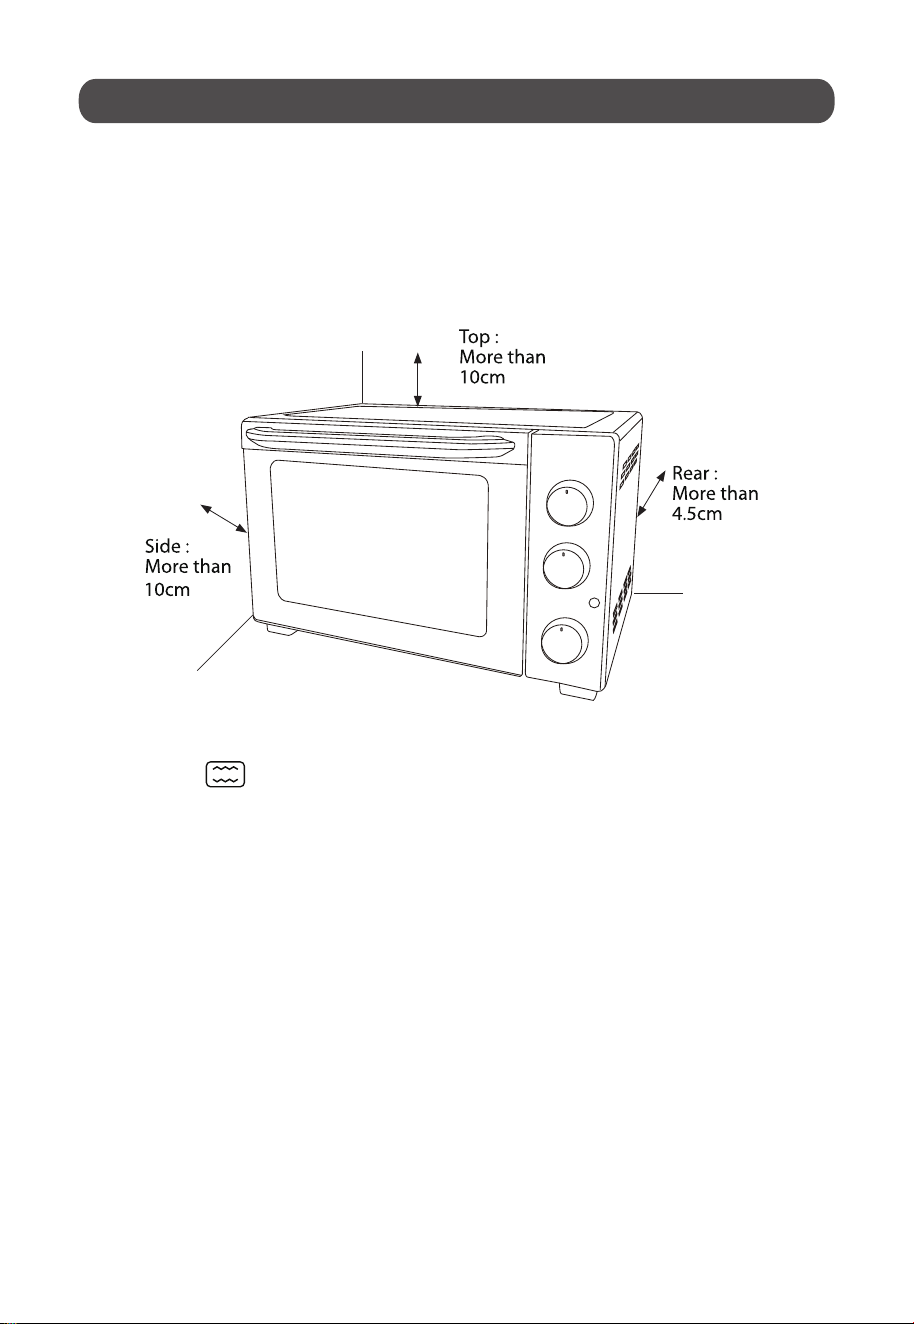
Before operating the appliance, ensure that there is at least 10cm distance of
space on the front and both sides of the oven for adequate air circulation. Please
ensure the crumb tray is properly installed before using.
For the first time of usage, set the temperature knob to the MAX, with function
setting on , and the timer to 15 minutes. This will help to burn off any
NOTE: The oven may emit smoke during this process. This is normal for a new
oven and will not last for more than 10-15 minutes.
OPERATING INSTRUCTIONS
oil which are still remained in the oven.
-9-
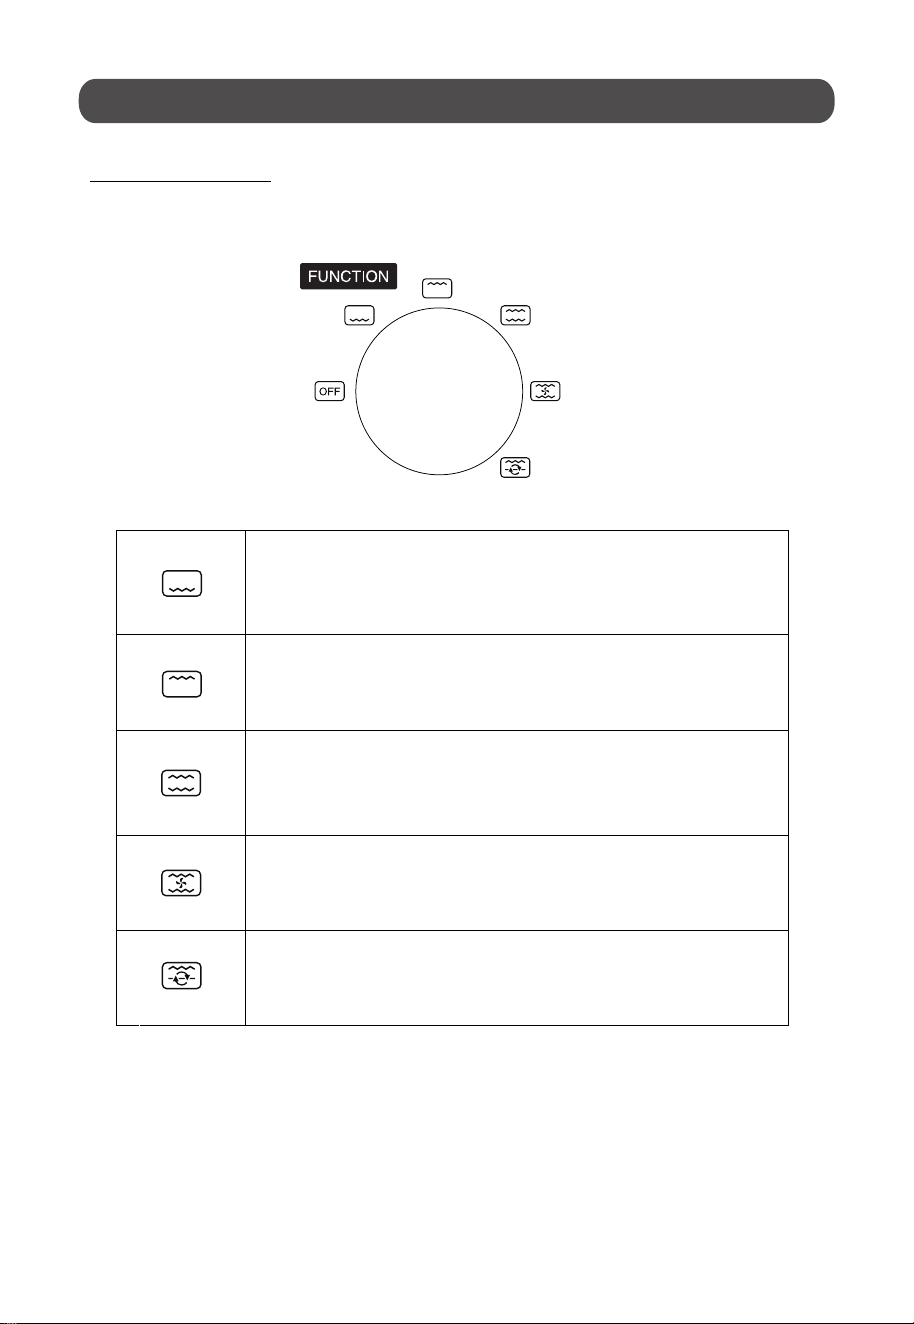
Function Settings
This electric oven offers 5 different functions for versatile cooking all in one
appliance.
The lower heating elements will be heating up during this
function.
The upper heating element will be heating up during this function.
Both the upper and lower heating elements will be heating up
during this function.
The upper and lower electric heating elements, and the
motor fan will be working in this function.
The upper electric heating elements, along with the
Rotisserie motor will be working in this function.
CONTROL SETTINGS
O
360
-10-
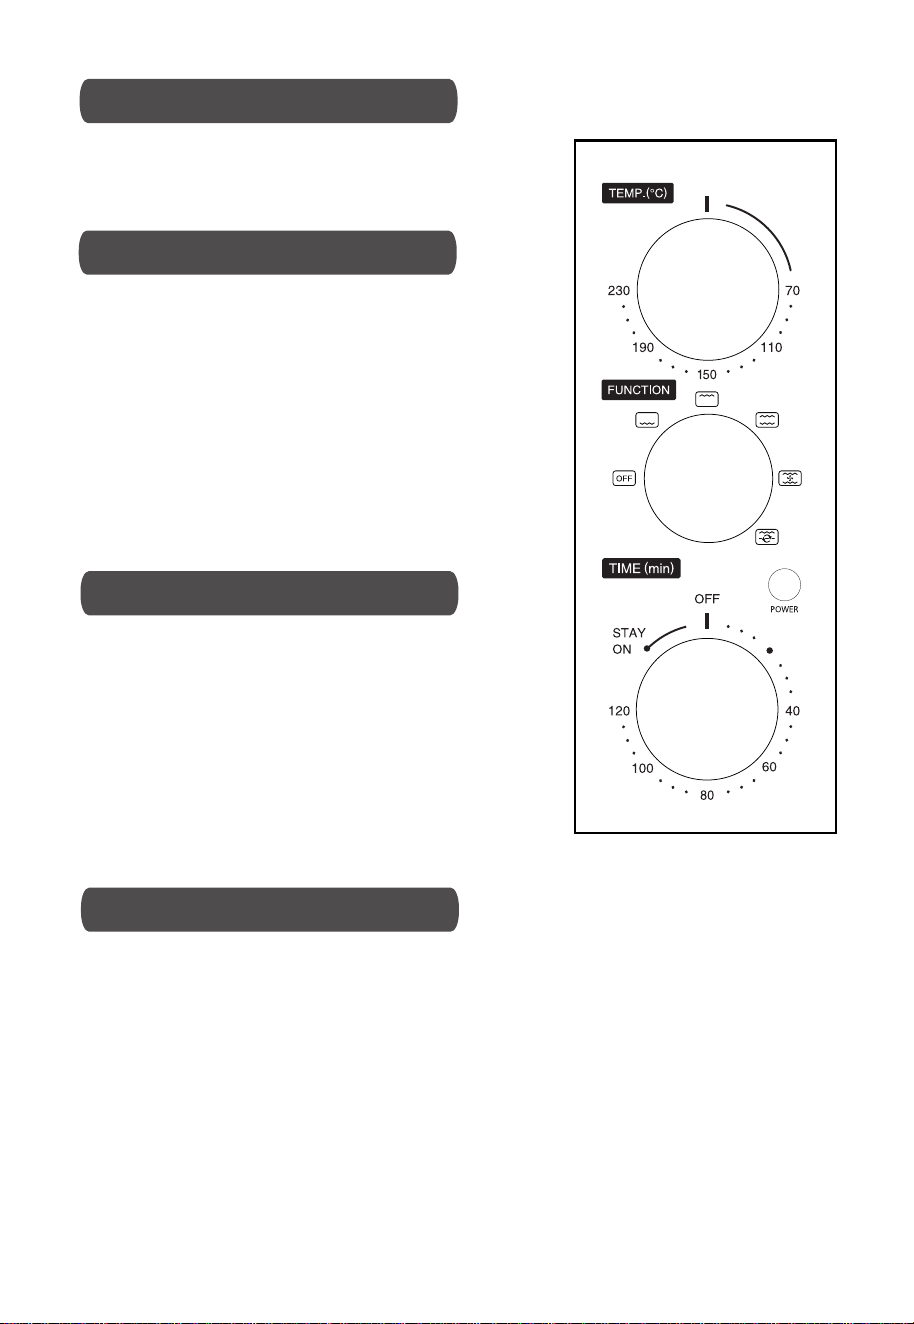
• Turn the “Temperature” knob clockwise to the
desired temperature setting. The temperature can
be set from 70 to 230 .
• The timer can be set up to 120 minutes.
• The oven will not begin operation if the timer has
not been set. To set the timer, turn the “Timer”
knob clockwise to the desired time.
• The light indicator will be lit up only when the
timer has been set.
• When the timer has reached the “OFF” position, a
bell sound will be heard to indicate completion of
operation. The power supply will be cut off
automatically until the timer is being set again.
• The timer can be changed and adjusted even
during the cooking period. Just turn the timer
knob to the newly desired time and let the oven
continue cooking.
• NOTE: When setting the “Timer” knob to 5
minutes or less, always rotate the timer to over 20
minutes first, then only rotate it back to the user’s
chosen time. This will ensure a safe and accurate
timer setting.
• To use the oven without any timer setting, turn the “Timer” knob to the “STAY
• In this case, the oven will operate until the user decides to stop the operation
by turning the knob to the “OFF” position.
• NOTE:
Close supervision is necessary when using "STAY ON" function.
It is applicable to all functions.
ON” position. Then turn "Temperature" knob to desired setting.
TIMER SETTINGS
ADJUSTING TIMER SETTINGS
“STAY ON” FUNCTION
TEMPERATURE SETTINGS
C
O
C
O
-11-

1. Please ensure that an oven-proof container is being used in the oven. Do
not use a plastic or cardboard container in the oven.
2. Do not use glass or ceramic type of pan and lid.
3.
4. Before cooking, please set the temperature as suggested by the recipes.
5. Please ensure the oven door is securely close at all times before and
during the cooking of the food in the oven.
1. Place the baking rack in a position that will accommodate the height of the
food to be cooked.
2. Set the food on the baking rack.
3. Set the “Function” knob towards desired function ( , , ,
4. Rotate the “Temperature” knob towards desired cooking temperature.
5. Rotate the “Timer” knob towards desired cooking time.
6. The oven will begin operating for the desired length of cooking time under
the desired function and cooking temperature.
7. When the cooking is finished, a bell sound will be heard.
8. Check the temperature of the cooked food to ensure that the proper
internal temperature of the food have been reached to avoid having food
that are not fully cooked.
9.
:
:
and ).
Always use the tray handle when inserting or removing the tray. Touching
Bake with only one tray at a time for more ideal baking result.
NOTE:
the hot tray/ rack will cause severe burns.
BEFORE OPERATING THE APPLIANCE
TO OPERATE THE APPLIANCE AND COOK THE FOOD
For easy cleaning, please use the crumb tray at all times when cooking.
-12-
1. Remove the baking rack from the oven and set aside.
2. Place the baking tray at the lowest level of the oven. This is to prevent the drips
function without placing the baking pan at the correct position in the oven.
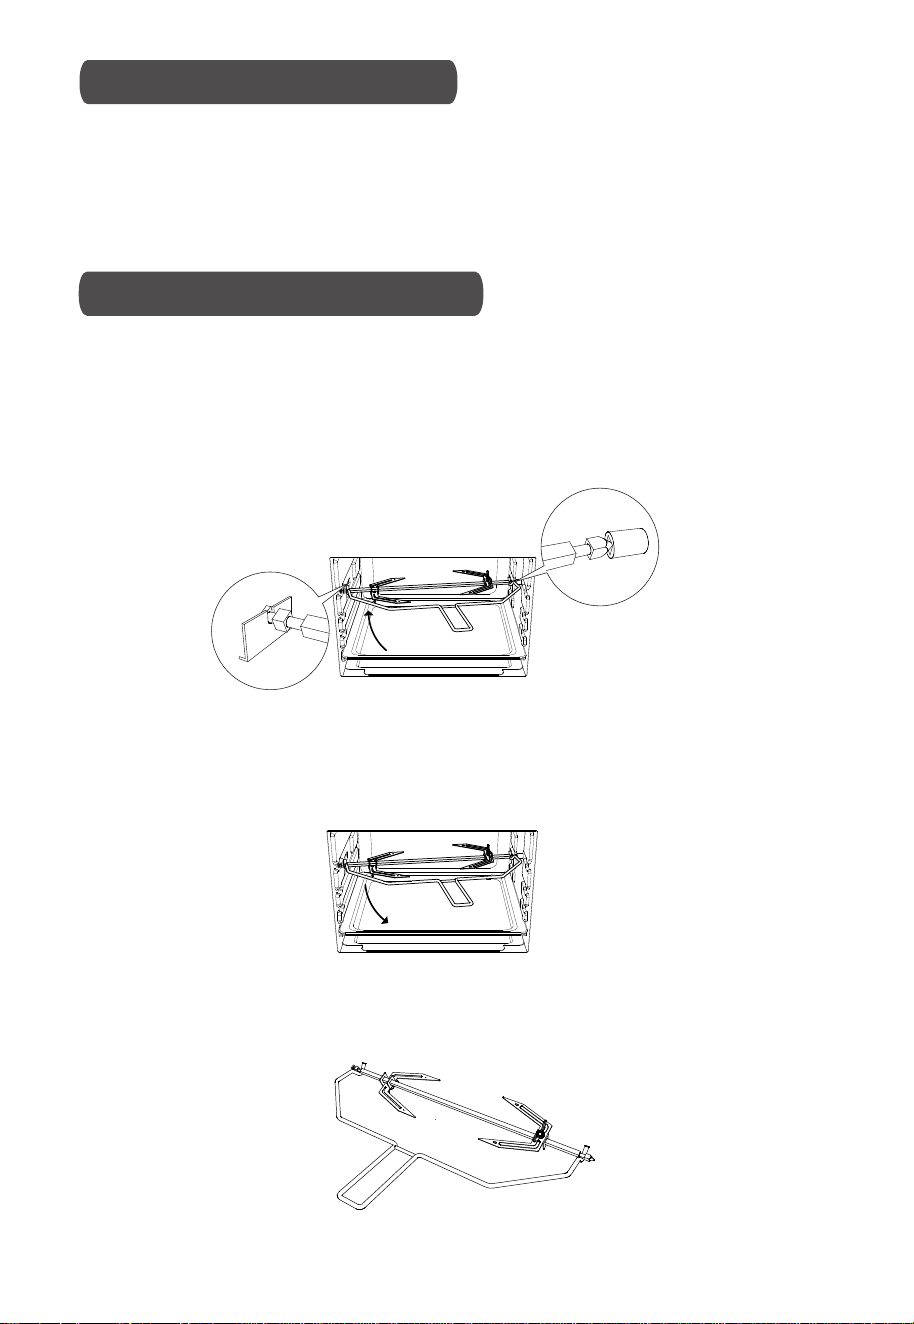
ROTISSERIE FUNCTION
USING THE ROTISSERIE FORK
come out from the food during cooking. Please do not attempt to use the Rotisserie
Use with rotisserie fork:
-
With this function, even baking tray provided can be used as a drip tray.
Install rotisserie fork:
Install the rotisserie fork to the rotisserie fork
holder, and then put it to the
.
-
•
•
rotisserie tray.
Remove rotisserie fork:
Use the rotisserie handle to remove the rotisserie fork from the
-
Beware of hot dripping oil.
Rotisserie handle:
-
Always use rotisserie handle to remove the rotisserie fork.
-
•
•
rotisserie
fork holder.
-13-

1. Please wait for the appliance to fully cool down before washing and cleaning.
2. Please ensure the switch and power supply is off before cleaning the
appliance.
3. Please clean the appliance promptly after using.
4. Do not clean the main unit with water directly; use only damp cloth or soft
sponge to wipe the surface and interior of the appliance.
5. To clean the door, use a damp cloth saturated with detergent or soap to wipe it,
then use a clean and dry cloth to wipe it dry.
6. Wash all attachments including the rack and baking tray with mild, soapy
water.
7. Do not use abrasive cleaners, scrubbing brushes and chemical cleaners as
this will cause damages to the coating of the baking tray.
8. Please keep the appliance dry and avoid it being exposed to the sun
when storing it.
9. Before storing, please ensure that the appliance is completely clean and dry.
Important Notices:
1. Surfaces that are always in contact with food should be cleaned regularly to
avoid cross contamination from different types of food.
2. The use of hot clean water with a mild detergent is advisable when dealing
with these kind of surfaces that will be in regular contact with food.
3. Correct food hygiene practices should always be followed at all times to avoid
the possibility of any food poisoning or even cross contamination.
.
CLEANING AND MAINTENANCE
-14-
T ROUBLESHOOTING
.
Malfunction
Phenomenon
Possible Causes Troubleshooting Method
Oven will not turn
on.
The oven is not plugged in
securely.
Remove the plug from outlet,
wait for 10 seconds then reinsert
the plug.
The circuit breaker or fuse in
your home is tripped.
Reset the circuit breaker or
replace the fuse in your home.
There is a problem with the
power outlet.
Insert a different appliance’s
power plug into the outlet to
check if the outlet is working.
Oven smokes
excessively
during cooking.
A wrong cooking function may
have been selected.
Check if you have selected the
correct cooking function for the
dish.
Wrong accessories/ cookware
may have been used for selected
cooking function.
Check if you have used the
correct accessories/ cookware.
Wrong cooking temperature may
have been selected.
Check if the temperature
selected is correct.
Food deposits sticking onto the
enamel coating inside the oven
becomes charred and creates
both smoke and unpleasant
odors.
Regular cleaning is necessary to
remove grease build-up.
Grease or food spatters can also
cause excessive smoking
Regular cleaning is necessary to
remove grease build-up.
Food is not being
cooked properly.
A wrong cooking function may
have been selected.
Check if you have selected the
correct cooking function for the
dish.
Wrong cooking temperature may
have been selected.
Check if the temperature
selected is correct.
Rack position may be incorrect
for the cooking function selected.
Check if the tray is placed at the
recommended height.
Wrong accessories/ cookware
may have been used for selected
cooking function.
Check if you have used the
correct accessories/ cookware.
Notice: Above listed are common malfunctions and troubleshooting methods.
Regarding other types of malfunction, please contact SHARP service center for
repair services.
-15-

You can help protect the environment!
Please remember to respect the local regulations: hand in the non-
working electrical equipment to an appropriate waste disposal center.
ENVIRONMENT FRIENDLY DISPOSAL
-16-