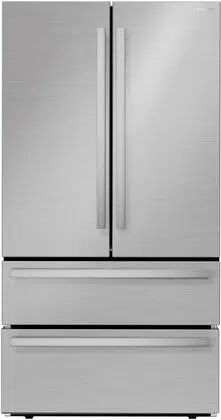
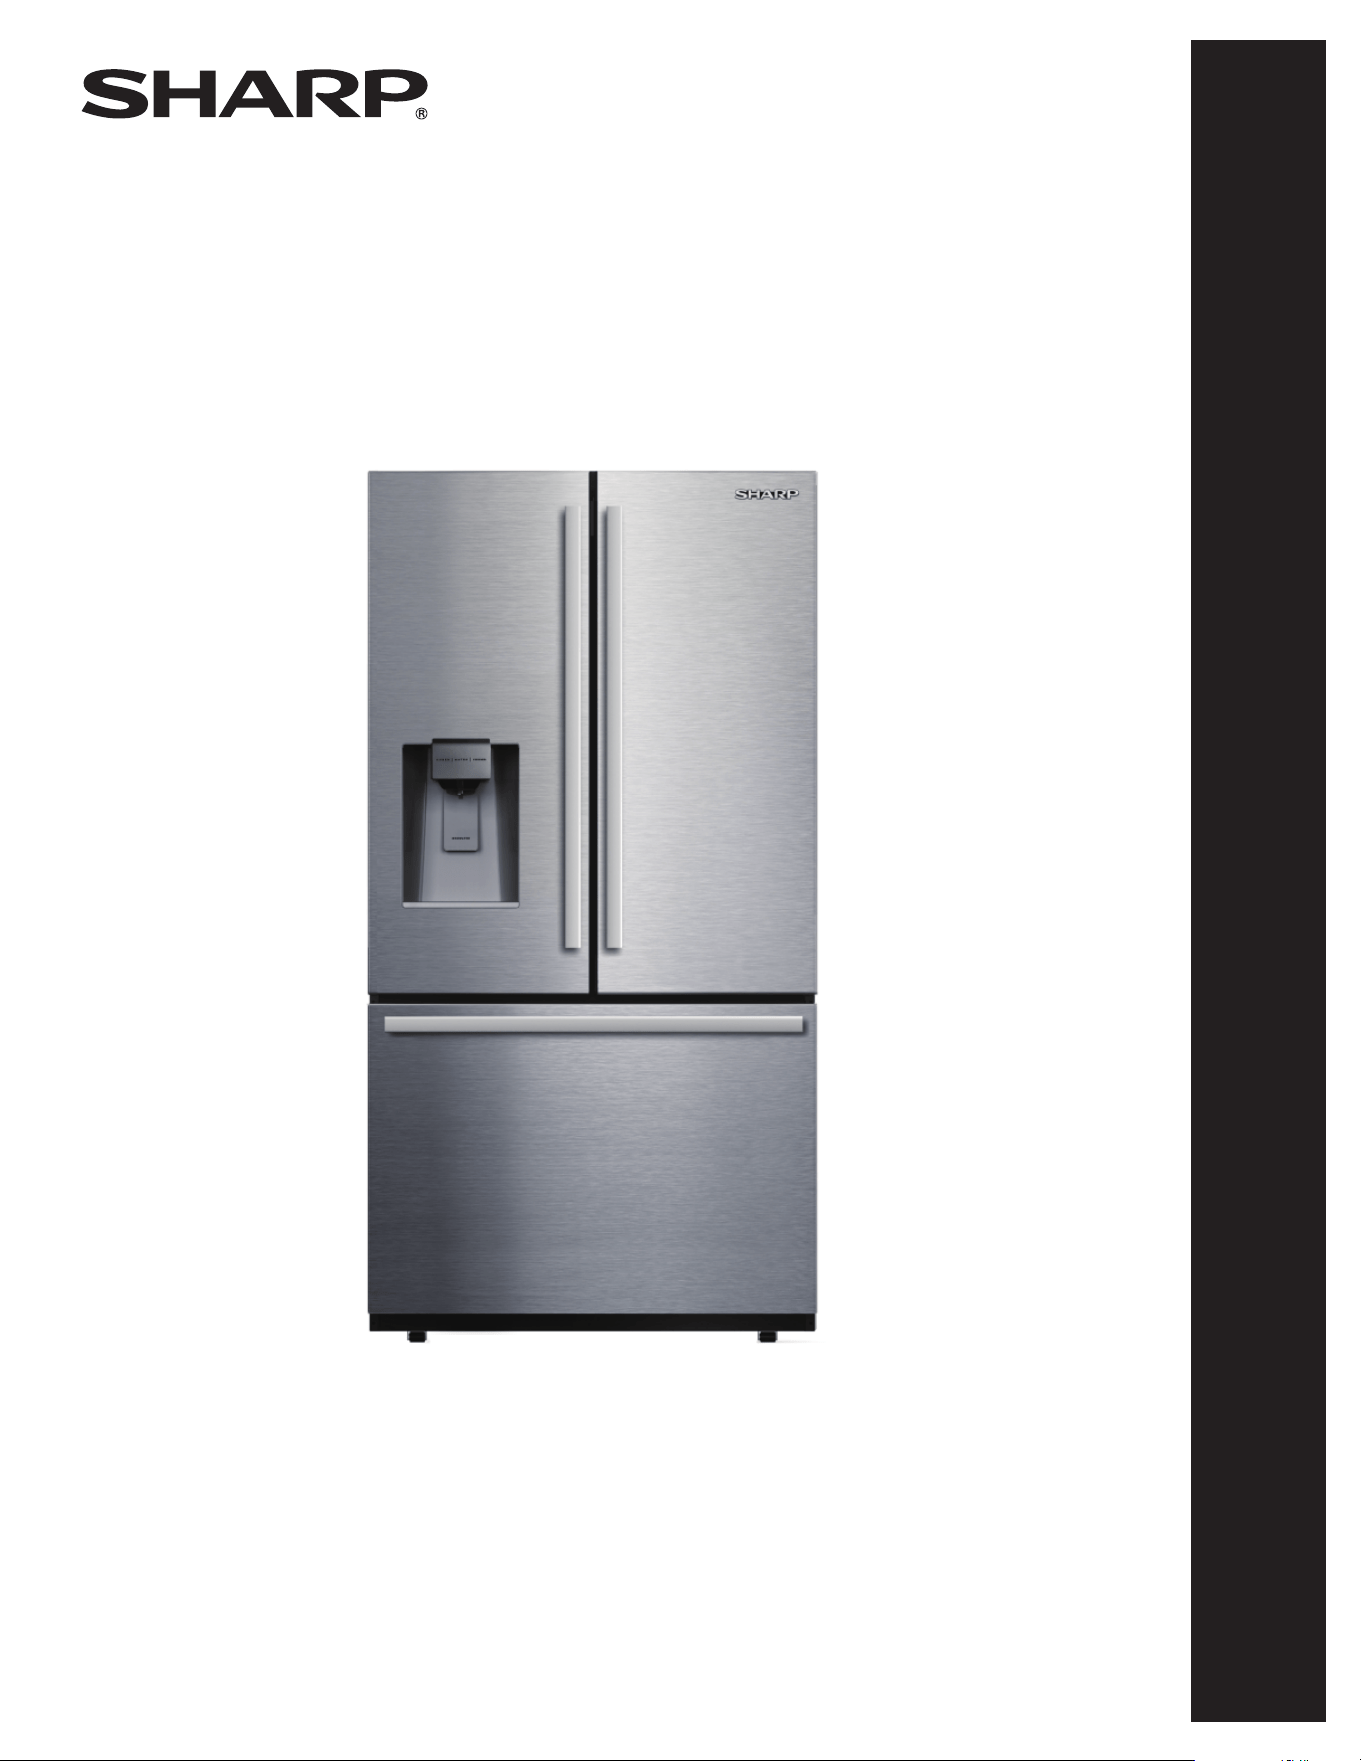
Refrigerator
: Model SJF2955MS
OPERATION MANUAL
& INSTALLATION INSTRUCTIONS
MODEL : SJF2955MS
CUSTOMER ASSISTANCE ................................... 2
CONSUMER LIMITED WARRANTY .......................... 3
IMPORTANT SAFETY INSTRUCTIONS ...................... 4
INSTALLATION INSTRUCTIONS ............................. 7
APPEARANCE OVERVIEW ..................................14
CONTROL AND DISPLAY PANEL ...........................16
OPERATING REFRIGERATOR...............................17
CARE AND CLEANING ......................................19
TROUBLESHOOTING .......................................21
REFRIGERATOR
2
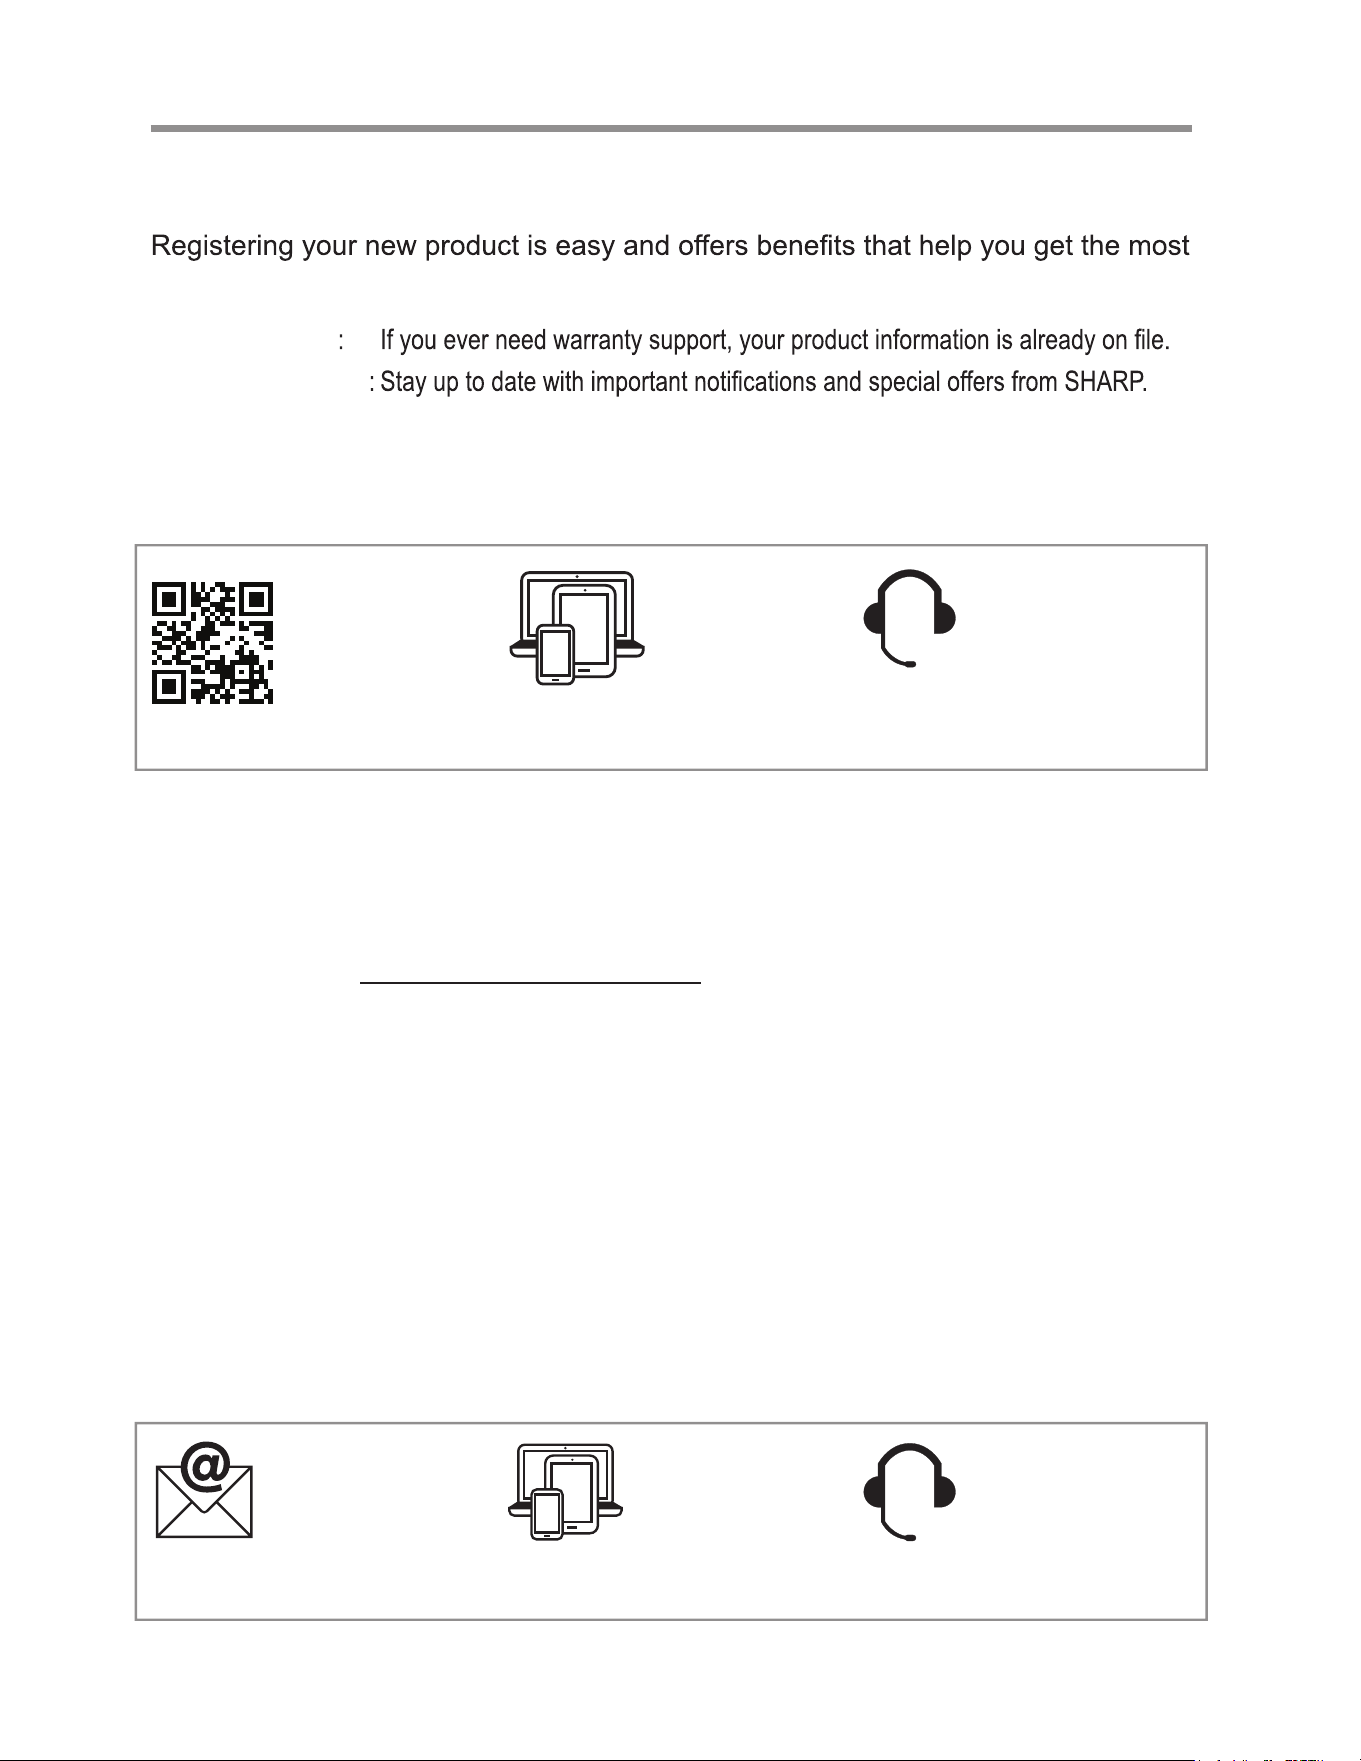
CUSTOMER ASSISTANCE UNITED STATES ONLY
REGISTER YOUR PRODUCT
out of your Sharp product including:
Convenience
Communication
Support: Quickly access support content including Owner’s Manuals, FAQ’s,
How-to Videos, and much more.
3 EASY WAYS TO REGISTER TODAY!
PRODUCT SUPPORT
If you have questions about the setup or operation of your product, please refer to
the corresponding section within this manual.
Additionally, visit www.sharpusa.com/support to access exclusive content about your
product including:
FAQ’s and How-To Videos
Find or Request Service
Extended Warranty Options
Downloads including the Installation Guide, Spec Sheet, and Owner’s Manual
CONTACT US
If at any time you have questions or comments concerning your SHARP product,
please contact the SHARP Customer Assistance Center. We are available to
assist you through multiple contact methods for your convenience:
Scan this QR Code on your mobile device Visit http://www.sharpusa.com/register
ONLINE
Visit our sites to
learn more about
your product at
sharpusa.com and
sbl.sharpusa.com
See the Contact Us section on our sites U.S. | www.sharpusa.com/support Contact a Sharp Advisor on the phone
Contact a Sharp Advisor on the phone
CALL US
US 800-BE-SHARP
800-237-4277
Mon-Fri: 7am-7pm CST
Sat-Sun: 9am-7pm CST
CALL US
US 800-BE-SHARP
800-237-4277
Mon-Fri: 7am-7pm CST
Sat-Sun: 9am-7pm CST
EMAIL
Available 24/7
US: sharpusa.com
CHAT ONLINE
Mon-Fri: 7am-7pm CST
Sat-Sun: 9am-7pm CST
SCAN
Use the camera or
QR code scanning
application on your
mobile device

CONSUMER LIMITED WARRANTY
3
“Product”), when shipped in its original container, will be free from defective workmanship and materials, and agrees that it will,
at its option, either repair the defect or replace the defective Product or part thereof with a new or remanufactured equivalent at no
charge to the purchaser for parts or labor for the period(s) set forth below.
This warranty does not apply to any cosmetic or appearance items of the Product nor to the add
itional excluded item(s) set forth below
nor to any Product the exterior of which has been damaged or defaced, which has been subjected to misuse, abnormal service or
the purchaser should follow the steps set forth below and provide proof of purchase to the servicer.
The limited warranty described herein is in addition to whatever implied warranties may be granted to purchasers by law. ALL
IMPLIED WARRANTIES INCLUDING THE WARRAN
TIES OF MERCHANTABILITY AND FITNESS FOR USE ARE
LIMITED TO THE PERIOD(S) FROM THE DATE OF PURCHASE SET FORTH BELOW. Some states do not allow limitations
on how long an implied warranty lasts, so the above limitation may not apply to you.
Neither the sales personnel of the seller nor any other person is authorized to make any warranties other than those described herein,
or to extend the duration of any warranties beyond the time p
eriod described above on behalf of Sharp. The warranties described
herein should be the sole and exclusive warranties granted by Sharp and should be the sole and exclusive remedy available to the
all liabilities and responsibilities of Sharp to the purchaser with respect to the Product, and should constitute full satisfaction of all
claims, whether based on contract, negligence, strict liability or otherwise.
In no event should Sharp be liable, or in any way responsible,
for any damages or defects in the Product which were caused by repairs or attempted repairs performed by anyone other than a Sharp
authorized servicer. Nor should Sharp be liable or in any way responsible for any incidental or consequential economic or property
damage. Some states do not allow the exclusion of incidental or consequential damages, so the abo
ve exclusion may not apply to you.
THIS LIMITED WARRANTY IS VALID ONLY IN THE FIFTY (50) UNITED STATES, THE DISTRICT OF COLUMBIA AND
PUERTO RICO.
Product model number &
description:
SJF2955MS, Refrigerator/Freezer
Warranty period for this product: One (1) year parts and labor, including in-home service.
Five (5) years parts and labor, for sealed system (condenser, dryer, connecting tube and
evaporator) and compressor, including in-home service.
Additional item(s) excluded from
warranty coverage:
Commercial, non-residential, or use inconsistent with published installation and product
op
erational instructions.
Light bulbs.
Any food or medicine loss due to refrigerator or freezer product failures.
In home instruction on how to use your product.
What to do to obtain service: In-home service is provided for one (1) year from date of purchase. Service can be arranged
by calling 1-800-BE-SHARP. Be sure to have Proof of Purchase, Model, and Serial Number
available.
TO OBTAIN SUPPLY, ACCESSORY OR PRODUCT INFORMATION, CALL 1-800-BE-SHARP or
visit www.sharpusa.com.
SAVE THE PROOF OF PURCHASE AS IT IS NEEDED SHOULD YOUR REFRIGERATOR/FREEZER EVER REQUIRE
WARRANTY SERVICE.
SHARP ELECTRONICS CORPORATION (“Sharp”) warrants to the first consumer purchaser that this Sharp brand product (the
purchaser. Correction of defects, in the manner and for the period of time described herein, should constitute complete fulfillment of
handling, or which has been altered or modified in design or construction. In order to enforce the rights under this limited warranty,
4
IMPORTANT SAFETY INSTRUCTIONS
MEANING OF SAFETY WARNING
SYMBOLS
PROHIBIT
This is a prohibition symbol. Failure to follow instructions
marked with this symbol may result in damage to the product
or endanger the personal safety of the user.
WARNING
This is a warning symbol. All instructions marked with the
warning symbol must be strictly followed. Failure to do so
may result in damage to the product or personal injury.
CAUTION
This is a caution symbol. Instructions marked with this symbol
require special caution. Insufficient caution may result in slight
or moderate injury, or damage to the product.
State of California Proposition 65 Warnings:
WARNING: This product contains one or more chemicals
known to the State of California to cause cancer.
WARNING: This product contains one or more chemicals
known to the State of California to cause birth defects or
other reproductive harm.
SAFETY WARNINGS
WARNING
RISK OF FIRE/FLAMMABLE MATERIALS
t This appliance is intended for use in residential environments
for the storage of food items. It may also be used in similar
environments such as: staff kitchen areas in offices, shops,
farmhouses and hospitality locations such as hotels, motels
and bed and breakfast establishments. It is NOT intended for
commercial, industrial environments to be used as storage for
non-food items or medical.
t This appliance is not intended for use by persons (i
ncluding
children) with reduced physical, sensory or capabilities, or
lack of experience and knowledge, unless they have been
given supervision or instruction concerning use of the
appliance by a person responsible for their safety. Children
should be supervised to ensure that they do not play with
the appliance.
t If the supply cord is damaged, it must be replaced by the
manufacturer, its service agent or similarly qualified persons
in order to avoid a hazard.
t Do not store explosive subs
tances such as aerosol cans with
flammable propellant in this appliance.
t The appliance has to be unplugged after use and before
carrying out user maintenance on the appliance.
t Do not use extension cords or ungrounded (two prong)
adapters.
t The refrigerator must be disconnected from the source
of electrical supply before attempting the installation of
accessory.
WARNING
WARNING
t Keep ventilation openings, in the appliance enclosure or in
the built-in structure, clear of obstruction.
t Do not use mechanical devices or other means such as
blow dryers, portable heaters, heat guns, hot water, etc.
to accelerate the defrosting process, other than those
recommended by the manufacturer.
t Do not damage the refrigerant system.
t Do not use electrical appliances inside the food storage
compartments of
the refrigerator, unless they are of the
type recommended by the manufacturer.
t Follow all local laws and regulations to properly dispose of
refrigerators as units contain environmentally hazardous
and flammable materials and refrigerant.
t When positioning the appliance, ensure the supply cord is
not trapped or damaged.
t Do not use multiple outlet power strips or portable power
supplies at the rear of the appliance.
Risk of child entrapment. Before you throw away your
refrigerator or freezer:
t Take off the doors.
t Leave the shelves in place so that children may not easily
climb inside.
t To prevent a child from being entrapped, keep out of reach
of children or keep a child away from the vicinity of the
appliance.
Refrigerant and cyclopentane foaming material used for the
appliance are flammable. Therefore, when the appliance is
scrapped, it shall be kept away from any fire source and be
recovered by a qualified company with proper equipment rather
than disposed of by any other means to prevent damage to the
environment or any other harm.
Children should be supervised to
ensure that they do not play
with the appliance.
This appliance can be used by children aged from 8 years and
older and persons with reduced physical sensory or mental
capabilities or lack of experience and knowledge if they have
been given supervision or instruction concerning use of the
appliance in a safe manner and understand the hazards involved.
Cleaning and required maintenance shall not be made by
children wi
thout supervision. Children should not be allowed
to load and unload refrigerating appliances.
FOR FOOD SAFETY
To avoid contamination of food, please follow these instructions:
t
increase of the temperature in the compartments of the
Opening the door for long periods can cause a significant
appliance.
t Regularly clean surfaces that come in contact with food and
accessible drainage systems.
5
IMPORTANT SAFETY INSTRUCTIONS
t Flush the water system connected to a water supply if water
has not been used for 5 days.
t Store raw meat and fish in suitable containers in the
refrigerator, so that they do not come in contact with or drip
onto other food.
t If the refrigerating appliance is left empty for long periods,
switch off, defrost, clean, dry and leave the door open to
prevent mold developing inside the appliance.
WARNING
t To avoid tipping hazard due to instability of the appliance,
it must be installed in accordance with the instructions.
t Connect to potable water supply only. (Suitable for ice
making machine.)
ELECTRICITY RELATED WARNINGS
t Do not pull the power cord when pulling the power plug of
the refrigerator. Please firmly grasp the plug and pull it out
from the electrical outlet directly.
t To ensure safe use, do not damage the power cord or use the
power cord when it is damaged or worn.
WARNING
t Please use a dedicated electrical outlet; A 115 Volt AC,
60 Hz, 15- or 20-amp fused, the electrical outlet shall not
shared with other electrical appliances. The power plug
should be firmly contacted with the electrical outlet to
reduce risk of fire.
t Please ensure that the grounding electrode of the electrical
outlet is equipped with a reliable grounding circuit.
t In case of gas leak, please turn off the valve of the leaking
gas and then open the doors and windows. Do not unplug
the refrigerator and other electrical appliances. this
may cause a spark that could ignite a fire.
PROHIBIT
t Do not use electrical appliances on the top of the
refrigerator, unless they are of the type recommended
by the manufacturer.
WARNINGS FOR USING
PROHIBIT
t Do not arbitrarily disassemble or reconstruct the
refrigerator, nor damage the refrigerant circuit;
maintenance of the appliance must be conducted by a
qualified serviceperson.
t Damaged power cord must be replaced by the
manufacturer, its maintenance department or qualified
technicians in order to avoid danger.
t Do not allow any child to get into or climb on the
refrigerator; suffocation or injury from falling may
occur.
WARNING
t The space between the refrigerator doors and the internal
compartments is small. Use caution to avoid accidental
injuries to hands and fingers when reaching inside for items.
t Close refrigerator door gently to avoid causing items to fall
over within the appliance.
t rezeerf eht ni sreniatnoc ro sdoof eldnah ro hcuot ton oD
with wet hands when the refrigerator is running, especially
metal containers, in order to avoid injury.
CAUTION
t Do not place heavy objects on the top of the refrigerator
considering that objects may fall when closing or opening
the door, potentially causing serious injury.
t Disconnect power supply in case of power failure or
cleaning. Do not connect the refrigerator to power supply
within five minutes to prevent damage to the compressor
due to successive starts.
6
IMPORTANT SAFETY INSTRUCTIONS
WARNINGS FOR PLACEMENT OF
ITEMS
WARNING
• 'R QRW SXW IODPPDEOH H[SORVLYH YRODWLOHDQG KLJKO\
FRUURVLYHLWHPVLQWKHUHIULJHUDWRUWRSUHYHQWGDPDJHWRWKH
DSSOLDQFHDQGWRDYRLGFDXVLQJÀUH
• 'R QRW SODFH ÁDPPDEOH LWHPV QHDU WKH UHIULJHUDWRU WR
DYRLGÀUHV
• 7KH UHIULJHUDWRU LVLQWHQGHG IRU KRXVHKROGXVH VXFK DV
VWRUDJHRIIRRGVLWVKDOOQRWEHXVHGIRURWKHUSXUSRVHV
VXFKDVVWRUDJH RIEORRG PHGLFDO VXSSO\ RU ELRORJLFDO
SURGXFWVHWF
• 'R QRWVWRUH EHHU FDUERQDWHG EHYHUDJHV RU RWKHU ÁXLGV
VWRUHG LQ SUHVVXUL]HG FRQWDLQHUVLQ WKH IUHH]HU RI WKH
UHIULJHUDWRUWKHERWWOHVRUHQFORVHGFRQWDLQHUVPD\FUDFN
GXHWRIUHH]LQJFDXVLQJGDPDJHWRWKHDSSOLDQFHDQGRWKHU
IRRGLWHPV
• 'RQRWVWRUHLWHPVLQUHIULJHUDWRURUIUHH]HUIRUWLPHSHULRGV
H[FHHGLQJIRRG PDQXIDFWXUHUV UHFRPPHQGHG H[SLUDWLRQ
GDWHV
WARNINGS FOR ENERGY
5HIULJHUDWLQJDSSOLDQFHV PLJKW QRWRSHUDWH FRQVLVWHQWO\
SRVVLELOLW\RIGHIURVWLQJRIFRQWHQWVRUWHPSHUDWXUHEHFRPLQJ
WRRZDUPLQWKHIUHH]HUZKHQVLWWLQJIRUDQH[WHQGHGSHULRG
RIWLPHLQDQHQYLURQPHQWLQZKLFKWKHDPELHQWWHPSHUDWXUH
LV WRR IDU DERYHRU EHORZ WKH UHFRPPHQGHG DPELHQW
WHPSHUDWXUHLQZKLFKWKHDSSOLDQFHZDVGHVLJQHGWREHXVHG
8VHQHFHVVDU\ SUHFDXWLRQV WR SUHYHQW DQ XQGXH ULVH LQ
WKH WHPSHUDWXUHRI WKH IUR]HQ IRRG ZKLOH GHIURVWLQJ WKH
IUHH]HUVXFKDVZUDSSLQJWKHIUR]HQIRRGLQVHYHUDOOD\HUV
RIQHZVSDSHURUWUDQVIHUULQJLWHPVWRDFRROHUWHPSRUDULO\
5LVLQJWHPSHUDWXUHVFRXOGUHVXOWLQIUR]HQIRRGVGHIURVWLQJ
ZKHQSHUIRUPLQJPDLQWHQDQFHRUFOHDQLQJVKRUWHQLQJWKH
IRRGVVWRUDJHOLIH
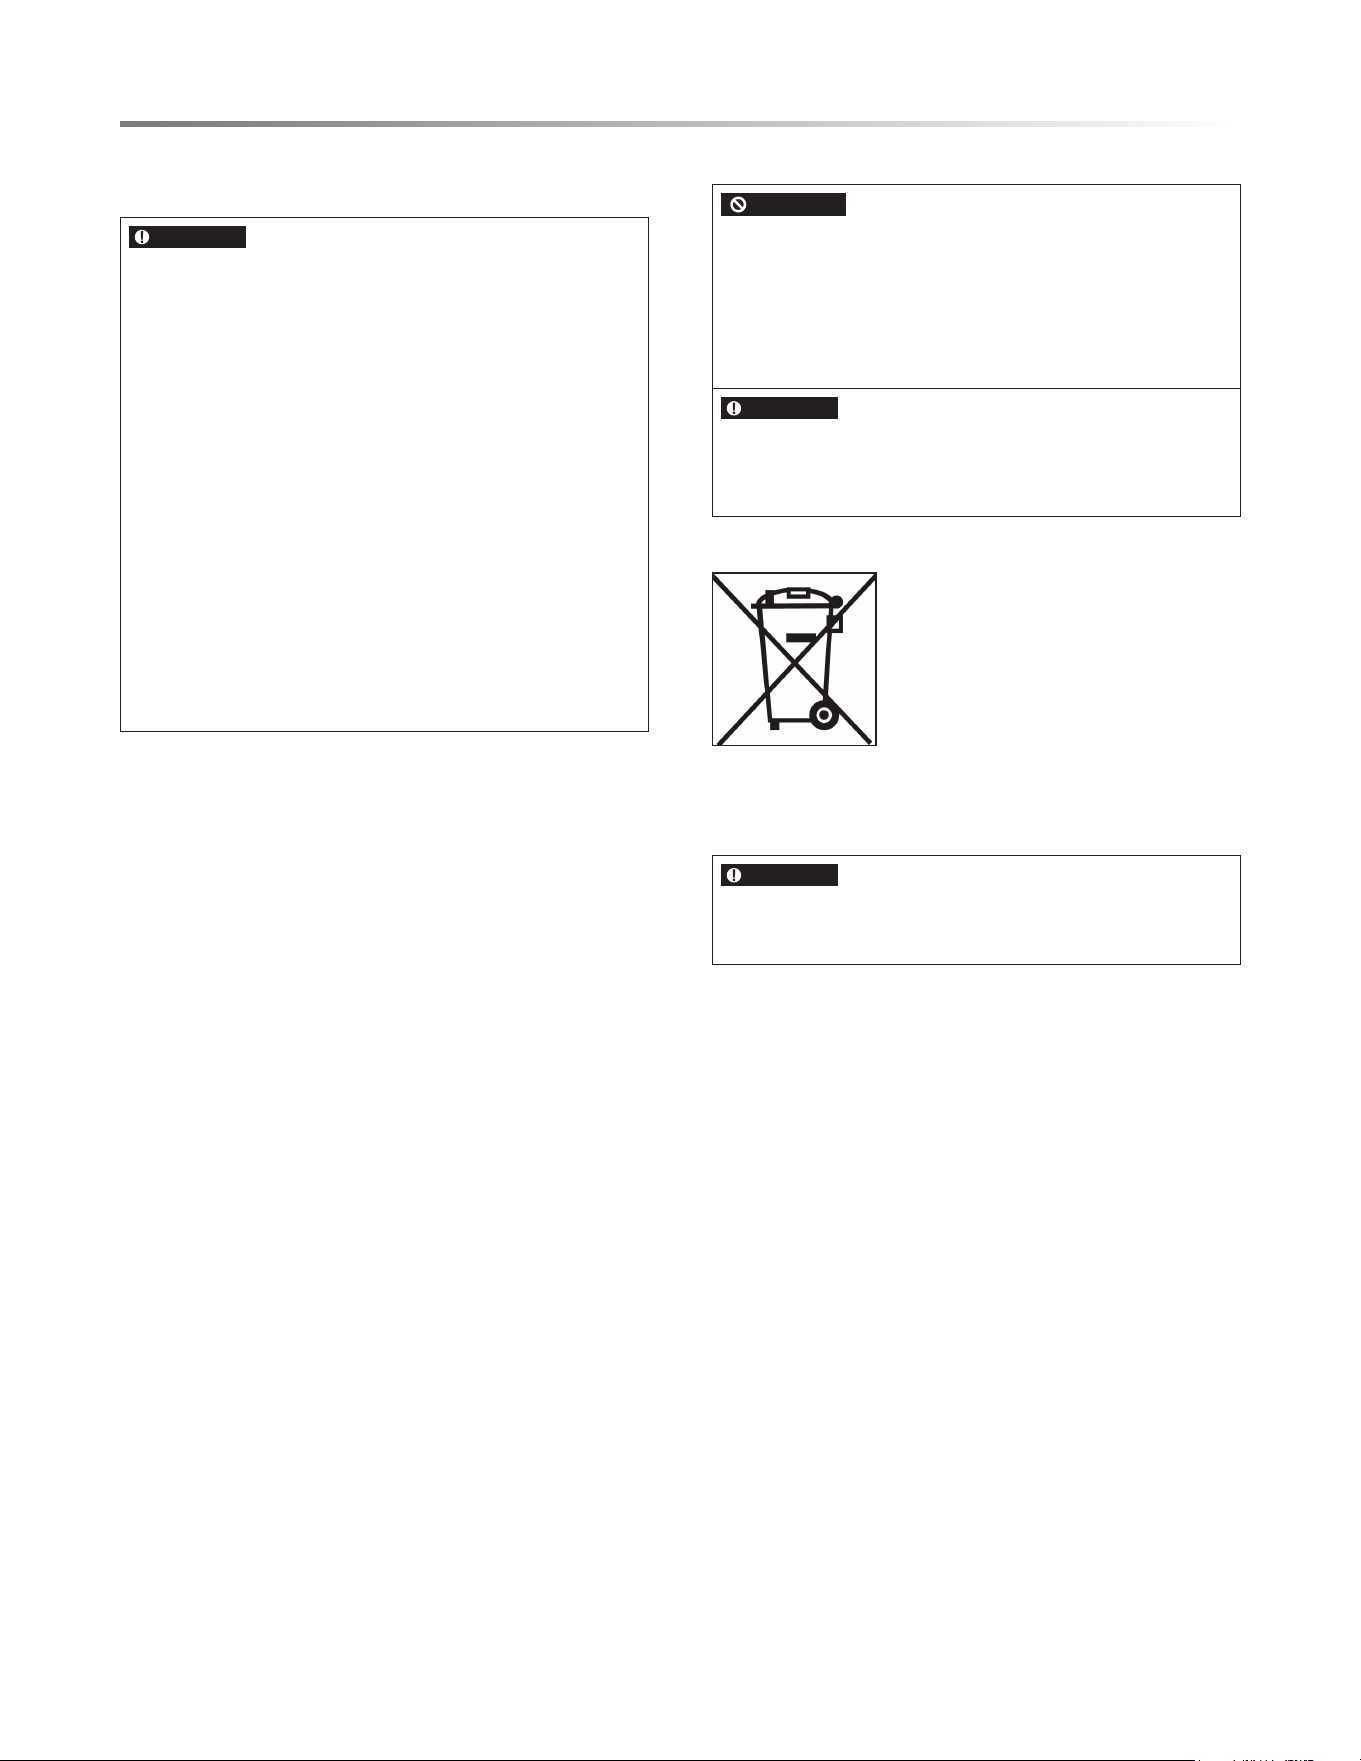
WARNINGS FOR DISPOSAL
PROHIBIT
5HIULJHUDQWDQGF\FORSHQWDQHIRDPLQJPDWHULDOXVHGIRUWKH
UHIULJHUDWRUDUHÁDPPDEOH7KHUHIRUHZKHQWKHUHIULJHUDWRU
LVUHF\FOHGLWVKDOOEHNHSWDZD\IURPDQ\ÀUHVRXUFHDQGEH
UHFRYHUHGE\ DTXDOLÀHG UHFRYHULQJ FRPSDQ\ZLWK SURSHU
HTXLSPHQW WRSUHYHQW GDPDJH WR WKH HQYLURQPHQW RU DQ\
RWKHUKDUP
WARNING
:KHQWKHUHIULJHUDWRULVUHF\FOHGGLVDVVHPEOHWKHGRRUVDQG
UHPRYHJDVNHWRIGRRUVDQGVKHOYHVSXWWKHGRRUVDQGVKHOYHV
LQDSURSHUSODFHWRSUHYHQWWUDSSLQJRIDQ\FKLOG
Correct Disposal of this product
7KLVPDUNLQJLQGLFDWHVWKDWWKLVSURGXFW
VKRXOG QRWEH GLVSRVHG RIZLWK RWKHU
KRXVHKROG ZDVWHV 7R SUHYHQW SRVVLEOH
KDUPWRWKHHQYLURQPHQWRUKXPDQKHDOWK
IURPXQFRQWUROOHGZDVWHGLVSRVDOUHF\FOH
LWUHVSRQVLEO\WRSURPRWHWKHVXVWDLQDEOH
UHXVHRIPDWHULDOUHVRXUFHV7RUHWXUQ\RXU
XVHG GHYLFH SOHDVH XVH WKH UHWXUQ DQG
FROOHFWLRQV\VWHPVRUFRQWDFWWKHUHWDLOHUZKHUHWKHSURGXFWZDV
SXUFKDVHG7KH\FDQWDNHWKLVSURGXFWIRUHQYLURQPHQWDOO\VDIH
UHF\FOLQJ
WARNING
WARNING:&DQFHUDQG5HSURGXFWLYH+DUP
ZZZ3:DUQLQJVFDJRY
7
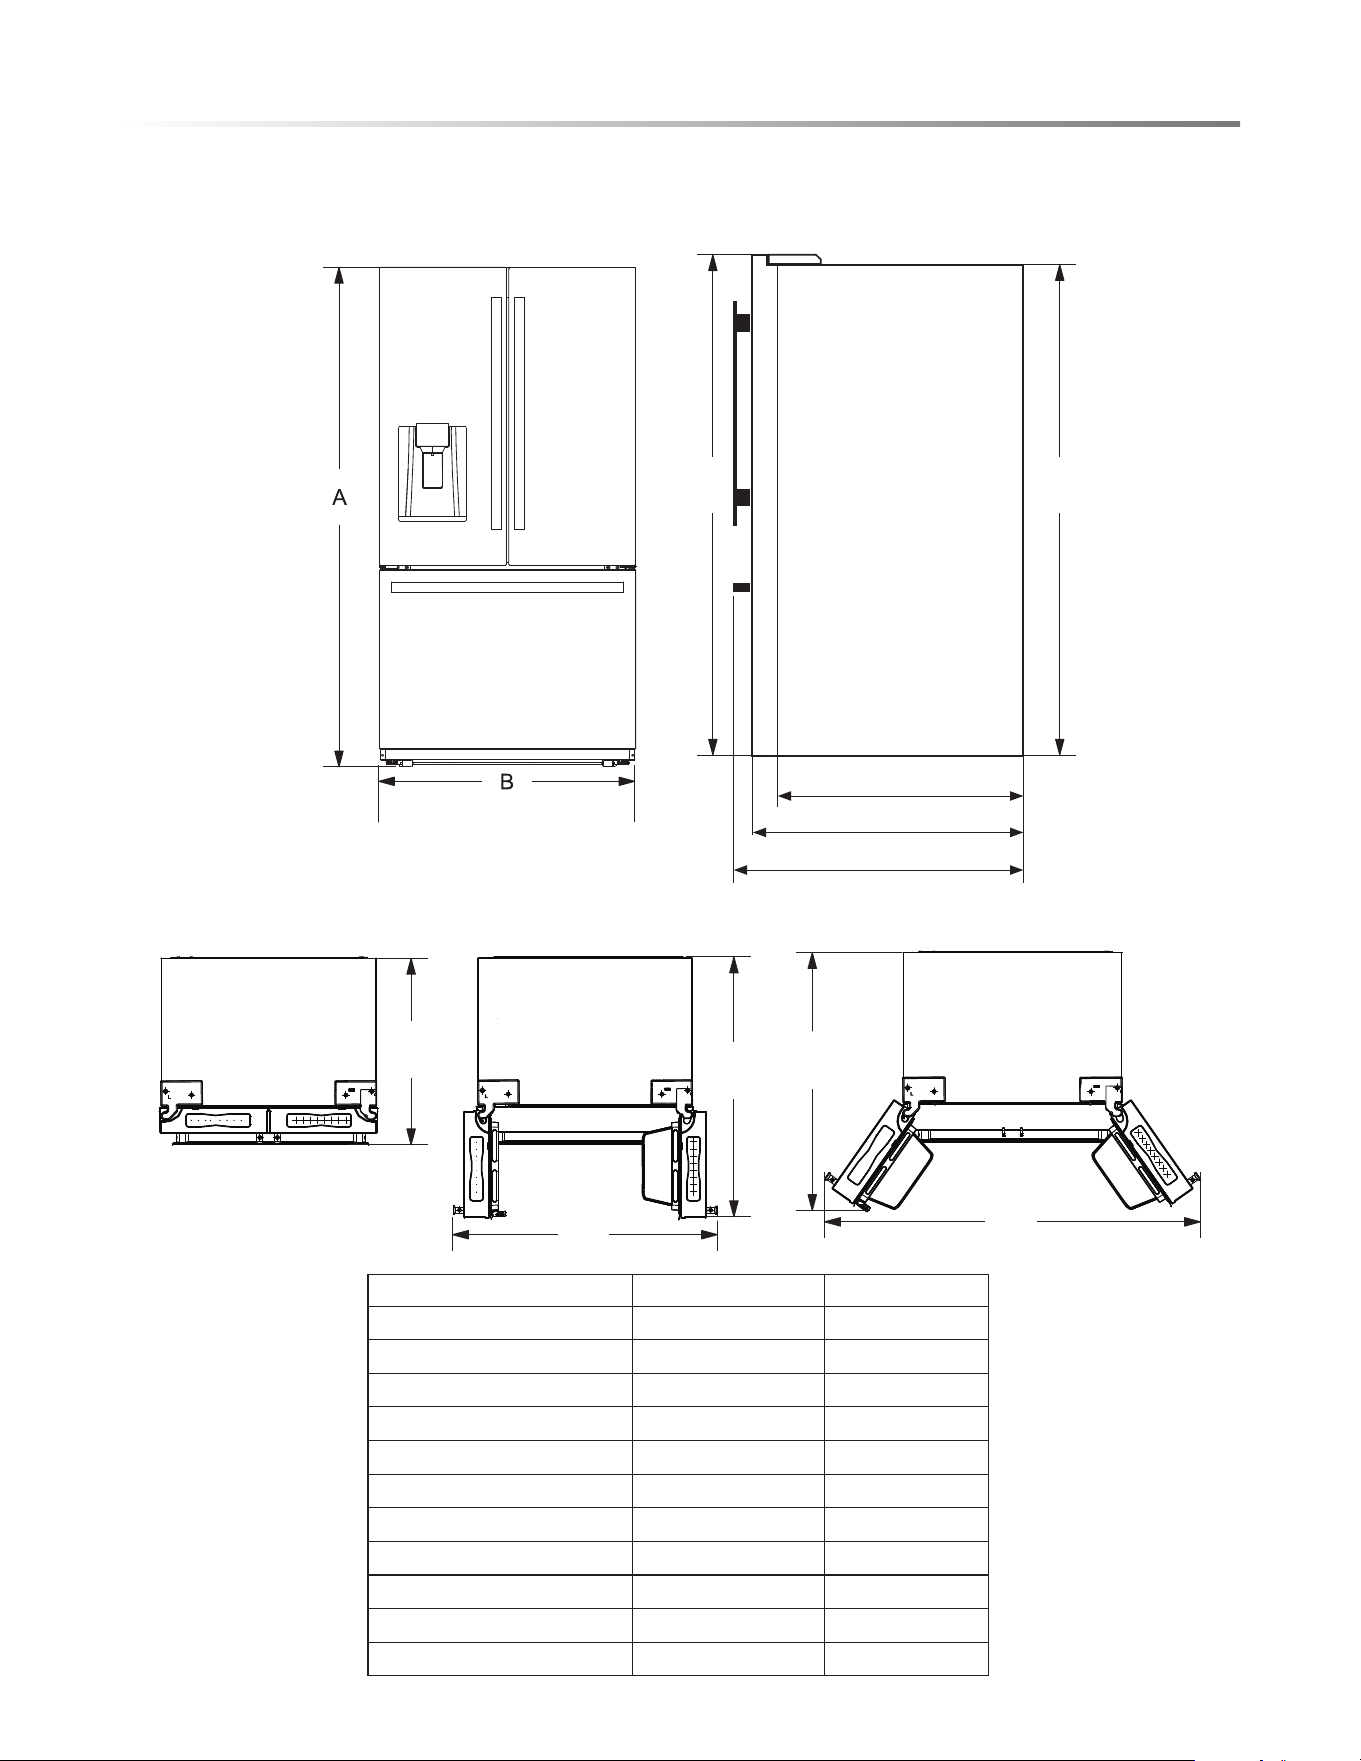
INSTALLATION INSTRUCTIONS
A
B
FRONT VIEW SIDE VIEW
TOP VIEW
C
F
G
C2
C1
C
E
D
APPLIANCE/INSTALLATION DIMENSIONS
DIMENSIONS SIZE (INCHES)
Overall height to top of door A 69.9
Height to top of hinge cover A1 69.9
Height to top of case A2 68.8
Width B 35.8
Depth without Doors C2 29.7
Depth without Handles C1 34.3
Depth with Handles C 36.5
Door open 90° Depth D 48.5
Door open 90° Width E 44.8
Door open 135° Depth F 46.5
Door open 135° Width G 64.7
FRONT VIEW SIDE VIEW
C2
C
C1
A1 A2
8
INSTALLATION INSTRUCTIONS
WARNING
Precautions before installation:
Before installation or adjusting of accessories, it shall be
ensured that the refrigerator is disconnected from power.
Precautions shall be taken to ensure that the handle has been
securely attached in order to prevent personal injury when
opening the door.
INSTALLATION LOCATION
t This refrigerator is designed for indoor, household use only.
t Keep away from heat and avoid direct sunlight or places near
a heat source, such as an oven or a radiator.
t Do not place the refrigerator in moist or damp places to
prevent rust or reduction of its insulating function of the
electrical components and food storage compartments.
t The refrigerator should be placed in a dry and well-ventilated
indoor place.
t The ground shall be level, and sturdy (rotate the adjustable
leg left or right to adjust for leveling if unstable).
t The ambient temperature of the appliance's location should
range from a minimum of 55°F to a maximum of 110°F.
However, for better energy usage and superior cooling, the
temperature is recommended to be between 60°F and 90°F.
t
t Spare enough space for convenient opening of the doors and
drawers, especially when the refrigerator is installed next to
a fixed wall to allow the door to swing open.
DISASSEMBLY OF REFRIGERATOR
DOORS/DRAWERS
In some cases you need to remove the fridge doors and drawer
doors to move the refrigerator through a doorway. The doors
can be removed by the following steps. IF NOT NECESSARY,
DO NOT REMOVE THOSE DOORS.
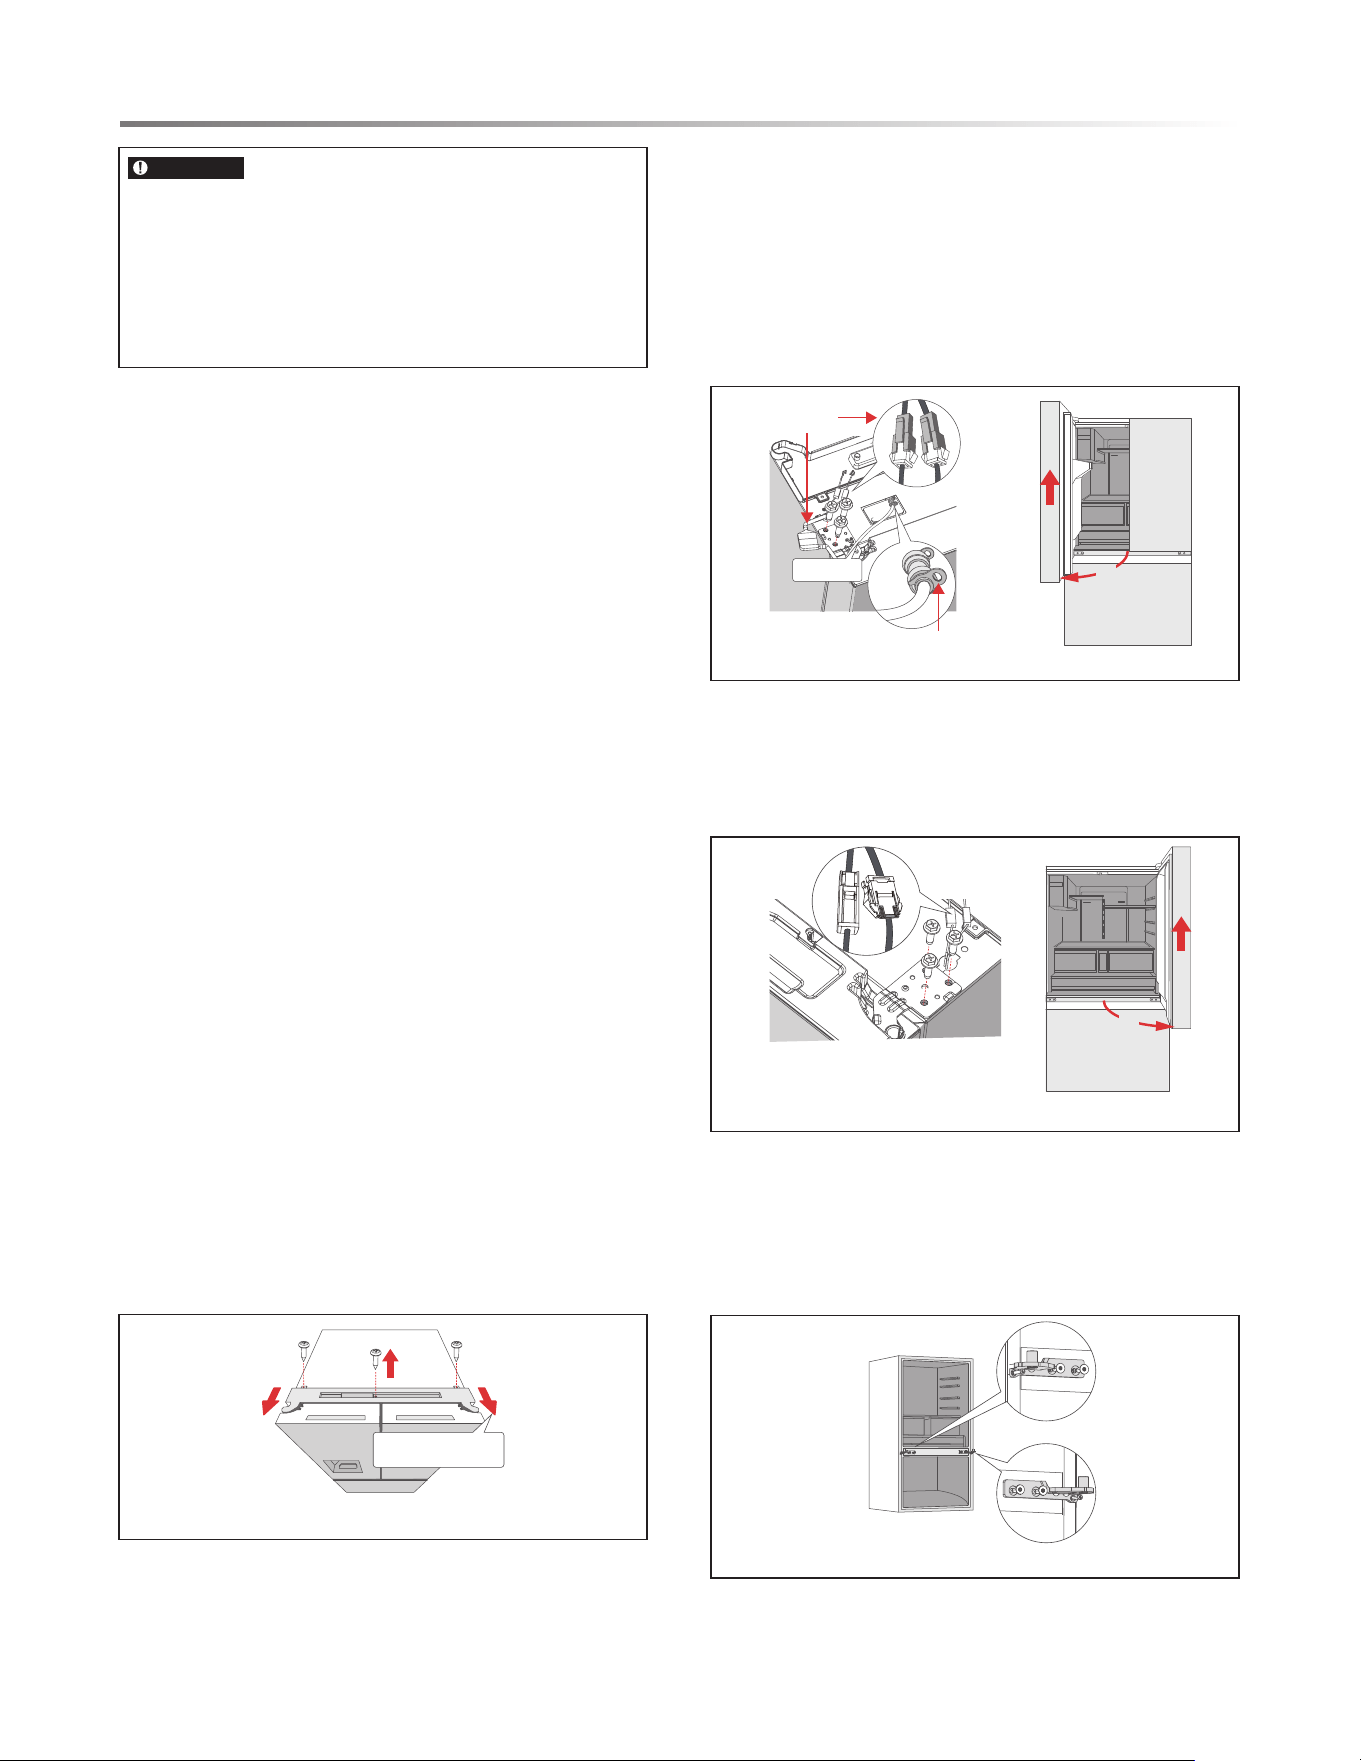
DISASSEMBLY OF REFRIGERATOR DOORS
1. Use screw driver to remove the 3 screws, and then remove
the upper hinge cover of the left door. See Figure 1.
Figure 1
2.
Figure 2
Figure 3
Figure 4
A. Remove the hinge cover and disconnect the 3
harness quick connectors.
B. Pull out the blue retaining clip from the quick
release one way valve, remove the blue door water
line.
C. Remove th e 3 screws and left upper hinge from the
product.
D. Open the left door 90°, lift it up, then remove the
door from the product. See Figure 2.
3. A. Disconnect the 2 harness quick connectors, and
4
remove the 3 scr
ews and right upper hinge from the
product.
B. Open the right door 90°, lift it up, then remove the
door from the product. See Figure 3.
Pull the hinge cover
in this direction
IJ
ij
ij
Harness quick
connector
Blue retaining clip
Water line
90°
90°
Remove the middle hinge with allen driver and phillips
screwdriver from the product.
Note: When the width of the door is less than 32 inches,
remove the middle hinge. When the width of the door is
more than 32 inches, don’t remove middle hinge.
See Figure 4.
For proper air circulation and electric connections, 4" of
clearance from each adjacent wall and the ceiling is
recommended when installing the refrigerator. If not available,
minimum 2" of clearance is strongly recommended.
9
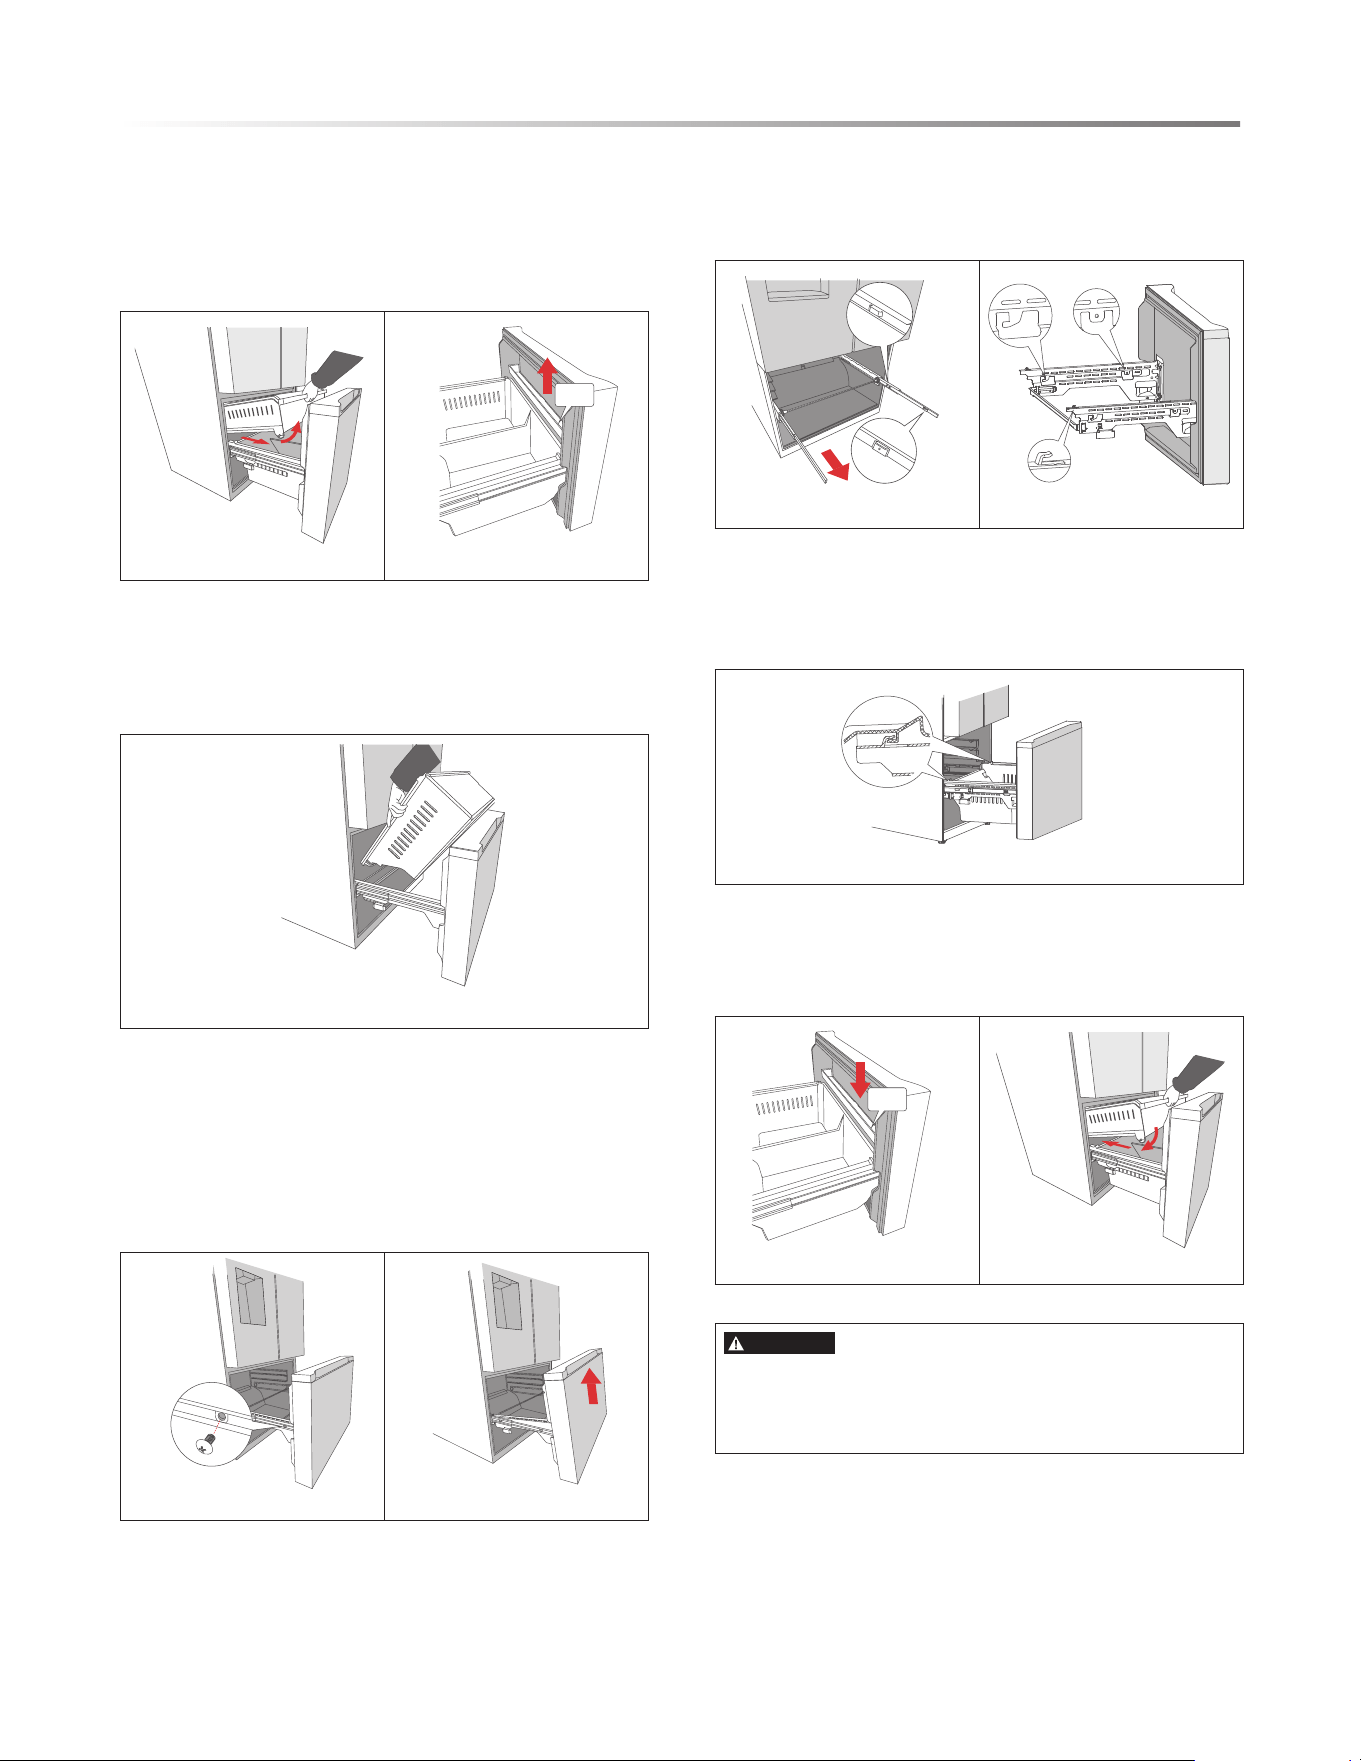
DISASSEMBLY OF FREEZER DRAWER
INSTALLATION INSTRUCTIONS
1. Fully open the freezer door, take out the upper
FREEZER DOOR ASSEMBLY
1.
drawer. Operating instructions: Pull the drawer out
for a distance, and then rotate it upwards to take it
out. See Figure 5.
Move up and take out the shelf. See Figure 6.
2.
Shelf
Figure 5 Figure 6
Figure 8 Figure 9
Shelf
Figure 13 Figure 14
Figure 10 Figure 11
3. Take out the lower drawer. Operating instructions:
Pull the drawer out for a distance, move it up,then
rotate it upwards and take it out. See Figure 7.
Figure 7
Figure 12
4. Use a crosshead screwdriver to remove the two screws
that fix the supporters and rails. Note: Do not discard
the screws, which need to be reinstalled when
reattaching the freezer door. See Figure 8.
5. Rotate the freezer door upwards and take it out. See
Figure 9.
Fully open the rails. See Figure 10.
Gently pick up the freezer door and insert the hooks of
supporters into the holes of rails. See Figure 11.
2. Reattach the two screws. See Figure 8.
Insert the lower drawer back into its position.
Note: the lower drawer should b
e inserted into the
supporter’s hooks on both sides. See Figure 12.
3. Insert the shelf back into its position. See Figure 13.
Insert the upper drawer back into its position.
Note: the front wheel should be inside the side wall of
the lower drawer. See Figure 14.
Front mounting hole
Rear mounting hole
Back hook
Front hook
Hook to fix drawer
CAUTION
t
t
Be careful not to scratch or dent the rail assembly.
Make sure you mount the freezer baskets in thecorrect
positon.
10
INSTALLATION INSTRUCTIONS
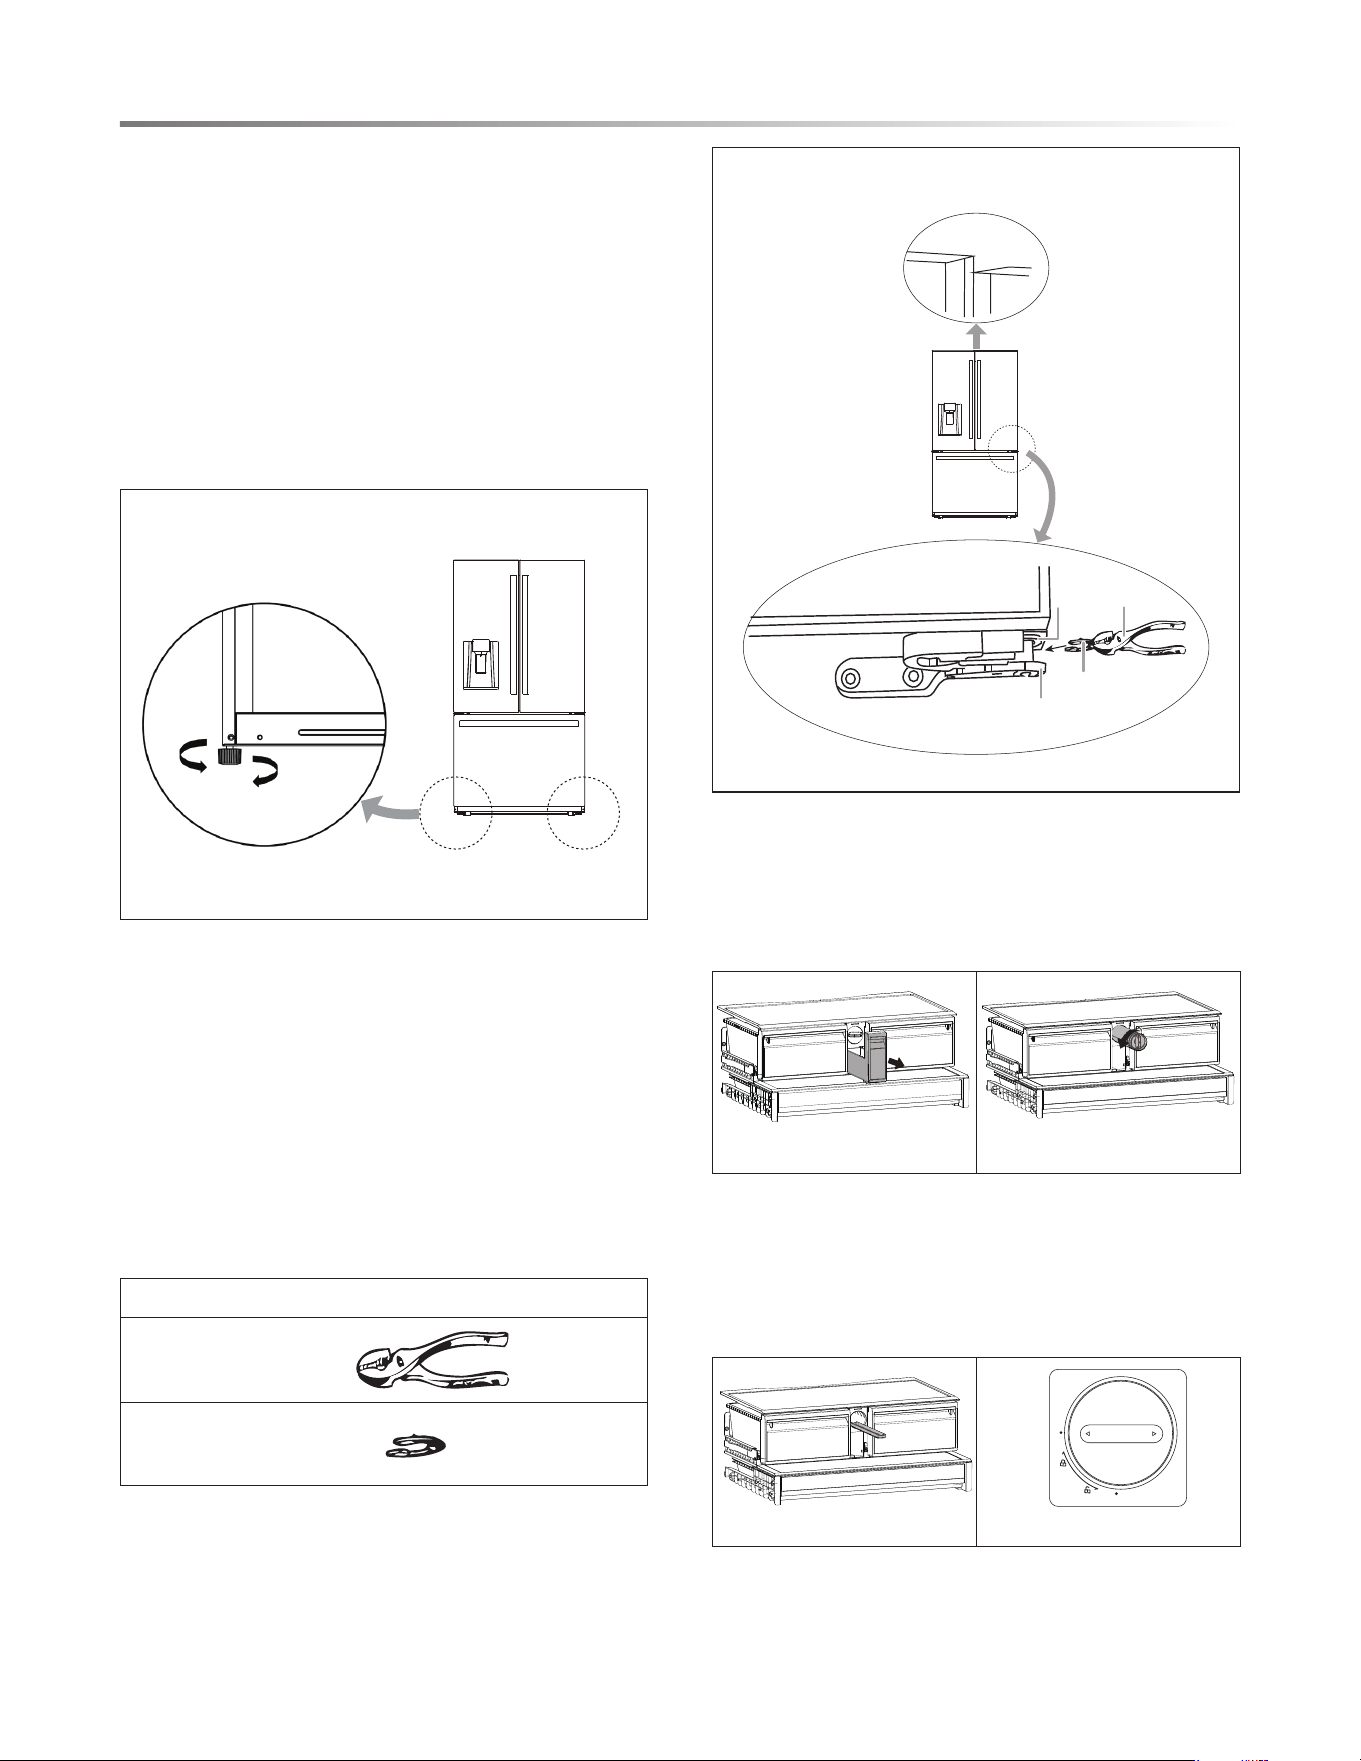
LEVELING THE REFRIGERATOR
Precautions before operation
1. Before operation of accessories, it shall be ensured that
the refrigerator is disconnected from power source. Before
adjusting the leveling feet, precautions shall be taken to
prevent any personal injury.
2. Adjusting procedures, see Figure 15:
A. Turn the feet clockwise to raise the refrigerator.
B. Turn the feet counterclockwise to lower the refrigerator.
C. Adjust the right
and left feet based on the procedures
above to a horizontal level.
Diagram of the leveling feet.
Lower
Higher
Figure 15
LEVELING THE DOORS
Precautions before operation
1. taht derusne eb llahs ti ,seirossecca fo noitarepo erofeB
the refrigerator is disconnected from power source. Before
adjusting the door, precautions shall be taken to prevent any
personal injury.
2. Raise the lower door up to the level of the higher door.
3. Insert the supplied fastener-rings by using pliers in the gap
between the hinge-grommet and the lower hinge.
The number of fastener-rings you will
need to insert depends
on the gap. See Figure 16.
LIST OF TOOLS AND PARTS
P
Fastener-rings (supplied) x3
liers
Diagram of adjusting the door.
Pliers
Fastener-ring
Hinge
grommet
Lower hinge
Not level
Figure 16
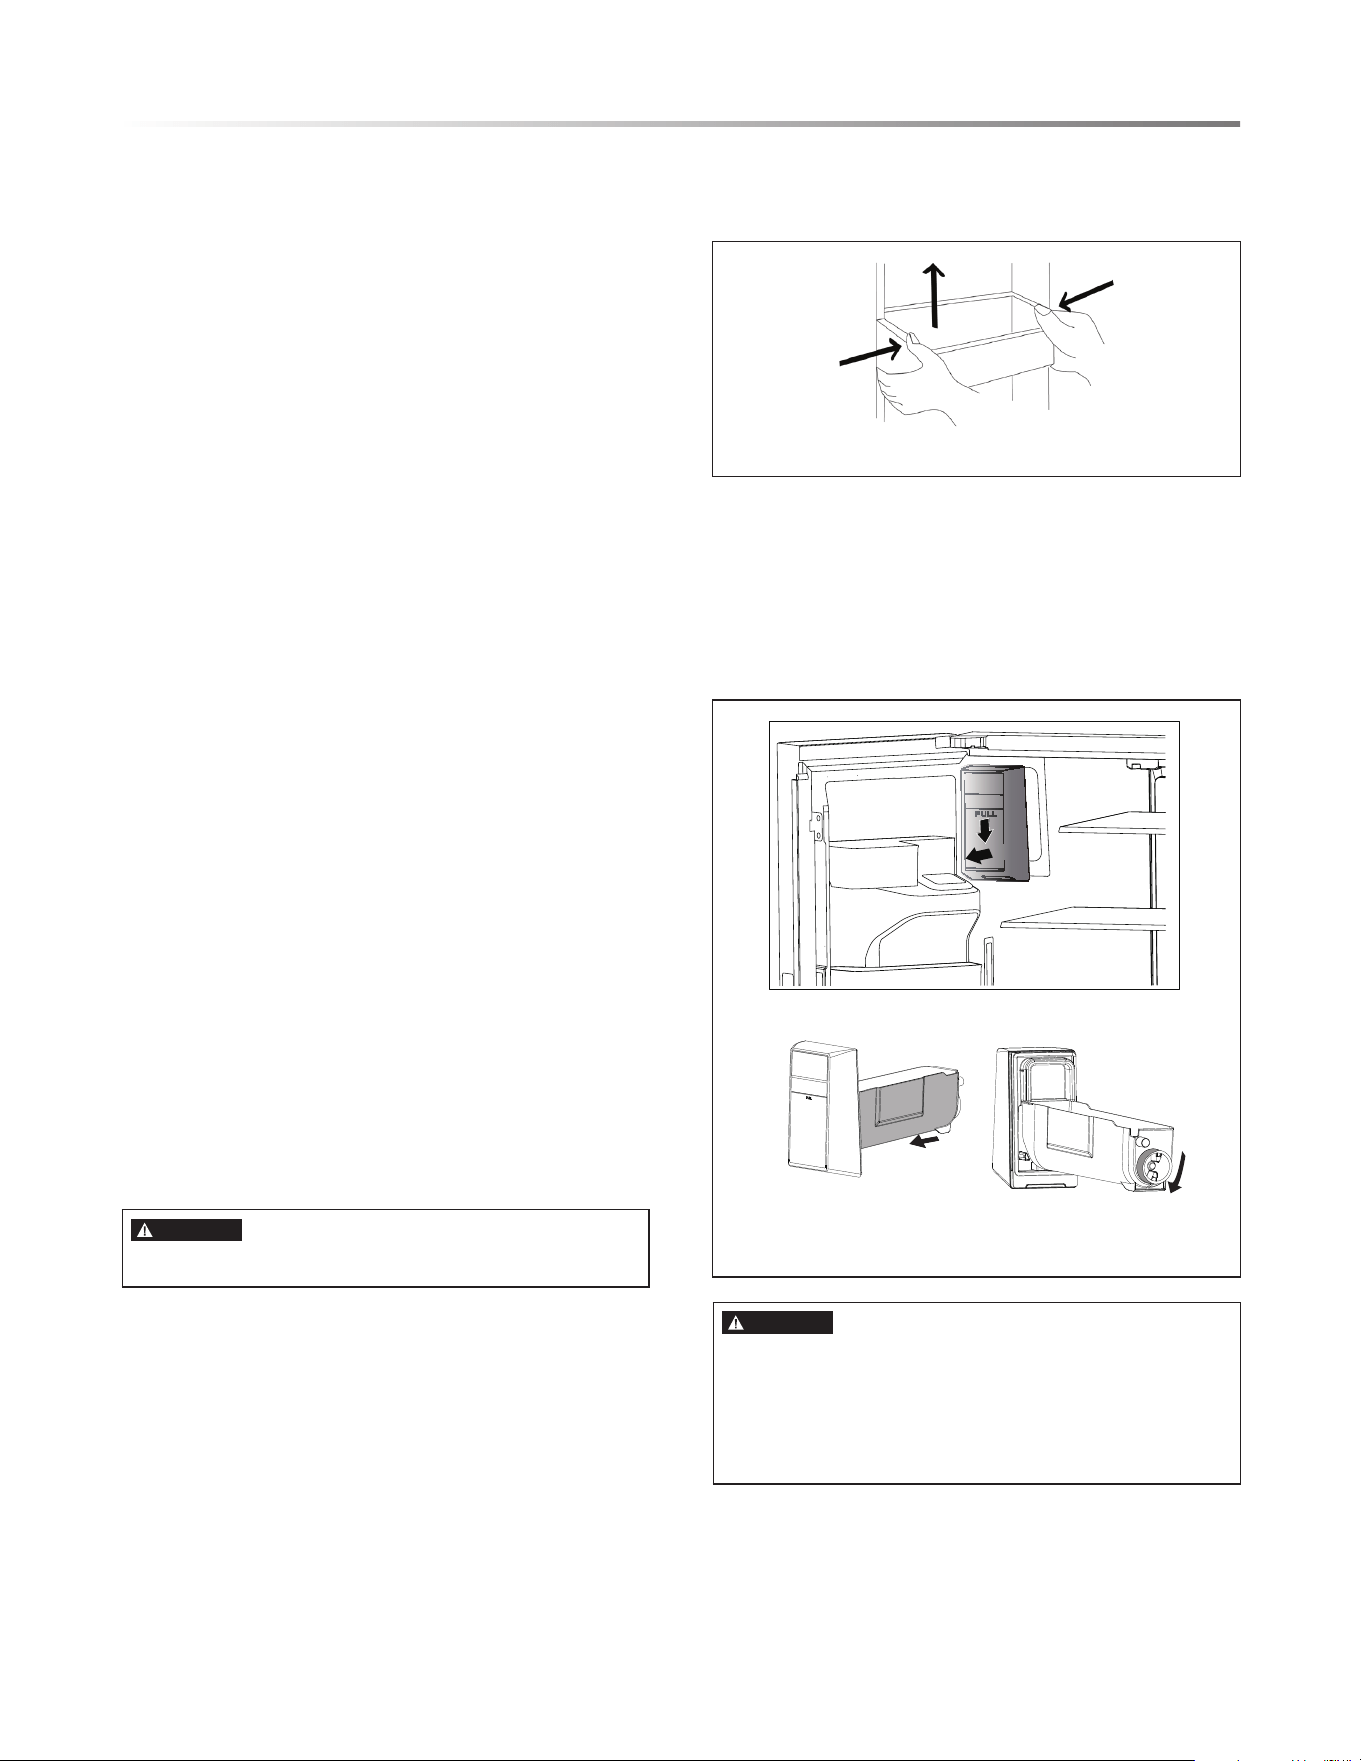
INSTALLING THE WATER FILTER
1. Pull out the small drawer in the middle. See Figure 17.
Press the filter knob and rotate 90° counterclockwise,
the filter will disengage from the connector and the
filter can be removed. See Figure 18.
2.
Figure 17 Figure 18
Figure 19 Figure 20
3.
4.
5.
Check the water tray under the strainer with your finger,
take out and dump the overflow water. See Figure 19.
Insert a replacement filter into the filter slot and rotate the
filter knob clockwise all the way until it stops. Make sure
that the knob is fully locked with the dot on the filter handle
aligned with the dot on the housing. See Figure 20.
The filter is recommended to be replaced every six months.
For the replacement water filter (part# SJWF300), please
call 1-800-BE-SHARP.
11
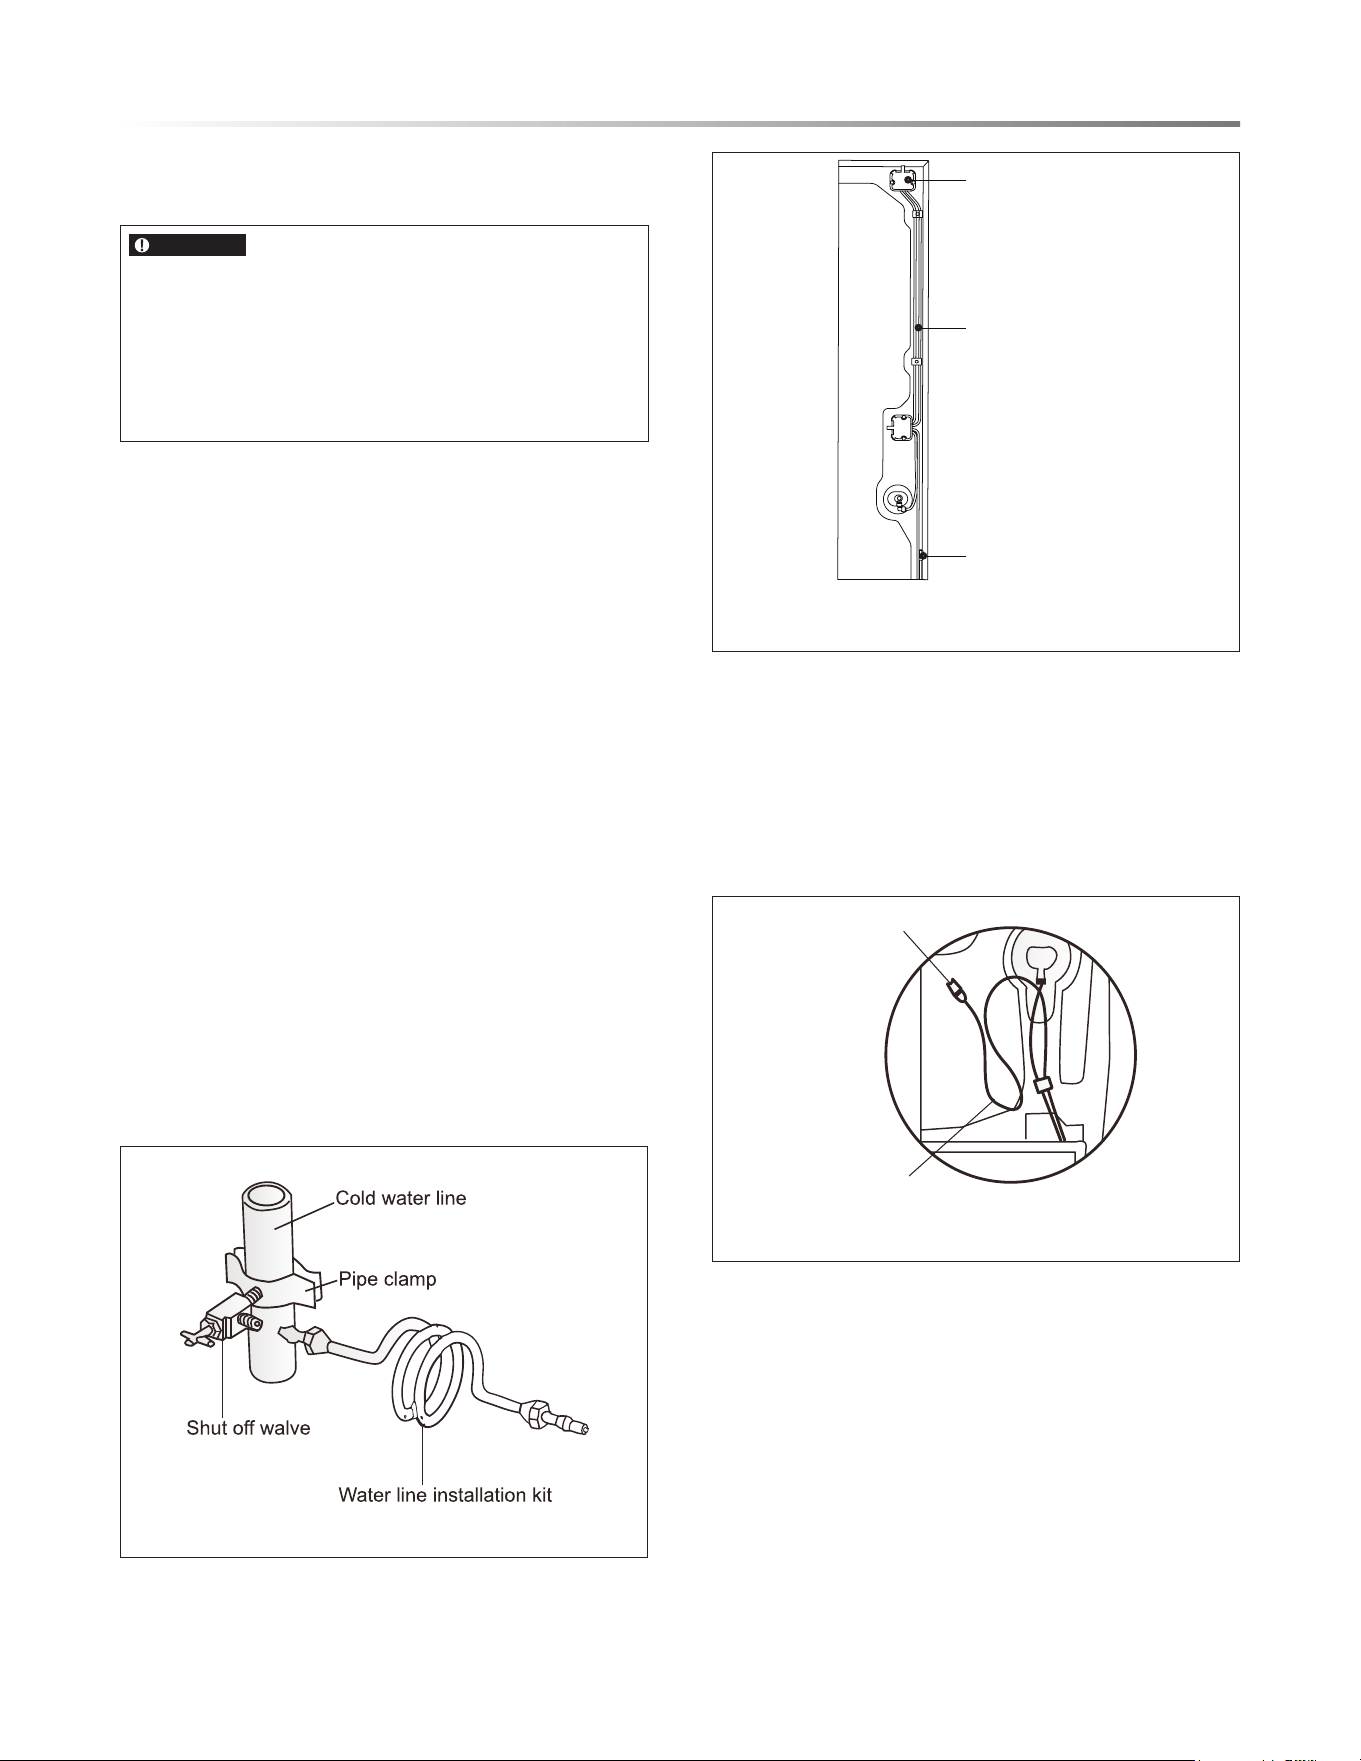
CONNECTING THE WATER LINE
WATER CONNECTION
WARNING
Risk of electric shock and damage to the appliance:
t Disconnect the appliance from the power source before
performing any work on the water connection.
t Only a qualified installation technician may connect the
appliance to the water supply in accordance with plumbing
and relevant water utility company regulations.
Connect the appliance to a drinking water line only:
t Minimum pressure: 0.28 MPa (2.76 bar, 40psi)
t Maximum pressure: 0.69 MPa (6.89 bar, 100psi)
t Pressure over 0.69 MPa (6.89 bar, 100 psi): install a pressure
limiter between drinking water connection and hose set.
The water supply should be connected only by a competent
plumber according to the local regulations of the appropriate
water supply company.
A cold water connection is necessary for operating the ice
maker. The water pressure must be between 0.28 MPa (2.76
bar, 40 psi) and 0.69 MPa (6.89 bar, 100 psi). The installation
must correspond to the local plumbing regulations.
A separate shut-off valve should be installed in the cold-water
inflow.
The shut-off valve should not be located behind the appliance.
It is recommended that you m
ount the shut-off valve directly
next to the appliance or at another place that is easily accessible.
See Figures 21-22.
When installing the water connection, pay attention to the
permissible installation area for the water line.
For connection to the drinking water line, use only water pipes
that are suitable for drinking water. Observe local regulations
and the connection conditions of the local water supply
companies.
Figure 21
Figure 22
INSTALLATION INSTRUCTIONS
Connecting the Water Line to A Drinkable Water
Source.
If your water line is not drinkable, please add an external
water filter.
If you must repair or disassemble the water line, cut off
the plastic tubing to make sure you get a snug, leak-free
connection. See Figures 23.
Water connector
Water tube
Power cord hook
Water line
Water connector
Figure 23

12
$WWDFKWKHKDQGOHE\URWDWLQJWKHKDQGOHVFUHZ3FORFNZLVH
XQWLOLWVWRSVWRWKHHQGJHQWO\VKDNHWKHKDQGOHWRHQVXUHLW
KDVEHHQDWWDFKHGVHFXUHO\
3XWWKHVFUHZ KROHFDS 4 RQ WKH KDQGOH VFUHZ KROH WR
FRPSOHWHWKLVLQVWDOODWLRQ
1RWHWKHVFUHZKROHFDSLVQRWUHPRYDEOHRQFHDSSOLHG
Figure
Figure
INSTALLATION INSTRUCTIONS
CONNECTING THE WATER LINE
:DWHU OLQHLQVWDOODWLRQ NLWV DUH DYDLODEOH DV DQ DGGLWLRQDO
DFFHVVRU\IURP\RXUGHDOHURUDWDORFDOKDUGZDUHVWRUH
6KXWRIIWKHPDLQZDWHUVXSSO\OLQH
,QVWDOODVKXWRIIYDOYHDQGZDWHUOLQH[FRPSUHVVLRQ
WKUHDG816DFFHVVLEOHZLWKSURGXFWLQSODFH5HIHU
WRORFDOFRGHDQGLQVWUXFWLRQVZLWKZDWHUOLQHLQVWDOODWLRQNLW
QRWLQFOXGHG
&RQQHFW WKH QHZO\LQVWDOOHG ZDWHU VXSSO\ OLQH % WR WKH
UHIULJHUDWRU ZDWHULQOHW FRQQHFWRU $ WLJKWHQXVLQJ WRRO
6HH)LJXUH
*HQWO\WXJRQWKHZDWHUVXSSO\OLQHWRHQVXUHDSURSHUILWDQG
ULVNRIGDPDJHZKHQSXOOLQJRUSXVKLQJWKHXQLWIRUFOHDQLQJ
7XUQPDLQZDWHUEDFNRQDQGFKHFNIRUOHDNV
$IWHUFRQQHFWLQJWKHZDWHUOLQHSOHDVHIOXVKRQHJDOORQRI
ZDWHUWKURXJKWKHILOWHUEHIRUHGULQNLQJRUXVLQJWKHZDWHU
IURP\RXUUHIULJHUDWRU)OXVKDSSUR[LPDWHO\PLQXWHV7R
IOXVKSUHVVDODUJHJODVVRUFXSDJDLQVWWKHZDWHUGLVSHQVHU
OHYHU)LOOWKHJODVVWKHQHPSW\LW5HSHDWXQWLO\RXGLVSHQVH
DERXWRQHJDOORQRIZDWHU
B
A
Figure
INSTALLING DOOR HANDLES
Precautions shall be taken to prevent handle falling off and
causing any personal injury.
LIST OF TOOLS AND PARTS
Phillips screwdriver
Allen wrench (Supplied)
Handle screws (Supplied) x6
Hole caps (Supplied) x6
INSTALLATION PROCE DURES
7DNH RXW EROW 1 IURP DFFHVVRU\ EDJ WKHQ XVH3KLOOLSV
VFUHZGULYHUWRVHFXUH WKH EROW1LQWRWKHEROW KROH2 of
UHIULJHUDWRUGRRUV6HH)LJXUH
$WWDFKWKHKDQGOHRIWKHGRRUWKURXJKWKHEROWKROH1 and
PDNHVXUHWKDWWKHKDQGOHPDNHVFRQWDFWWRWKHGRRUVXUIDFH
FORVHO\6HH)LJXUH
13
Notes:
1 Bolt 3 +DQGOHVFUHZ
2 Bolt hole 4 6FUHZKROHFDS
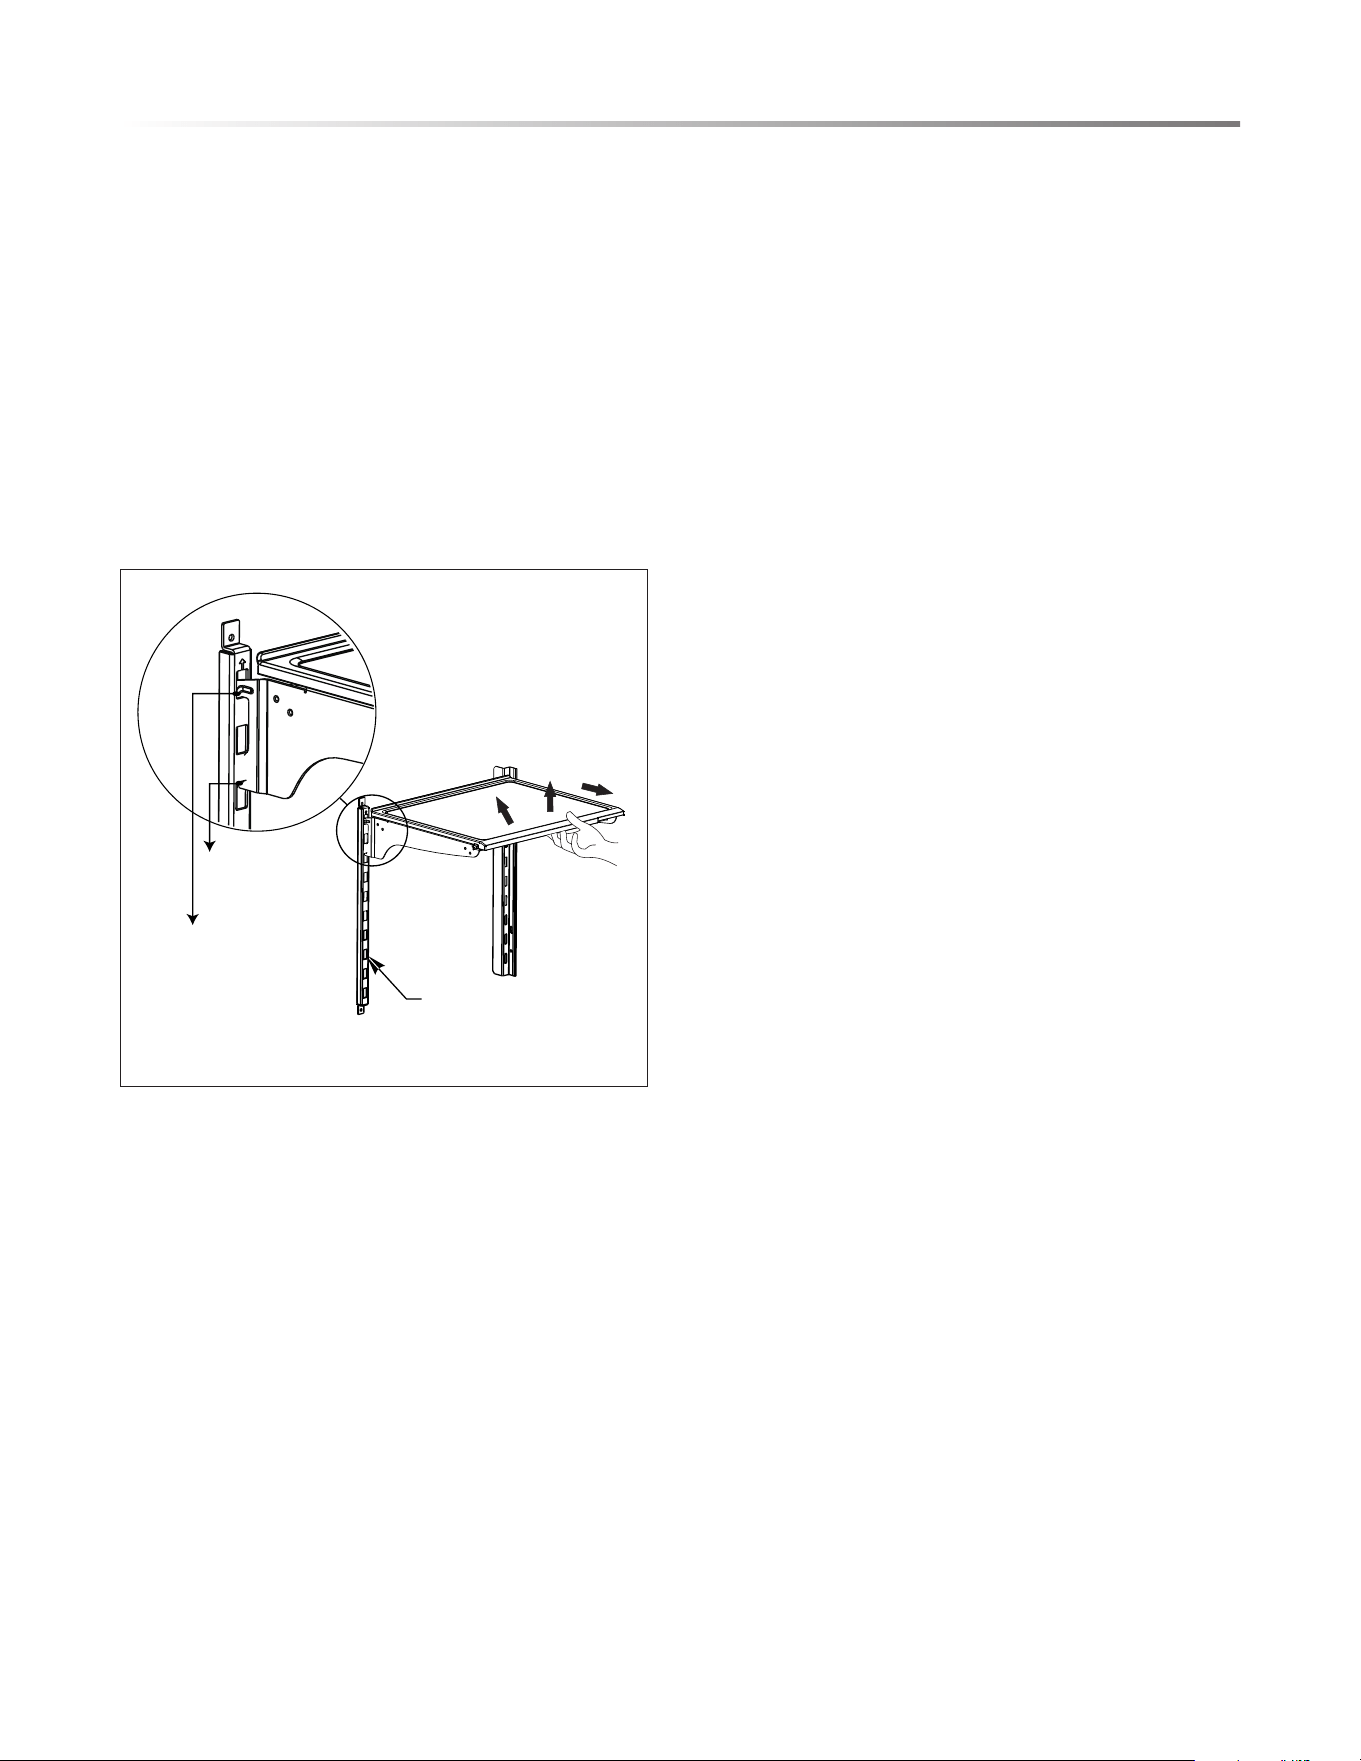
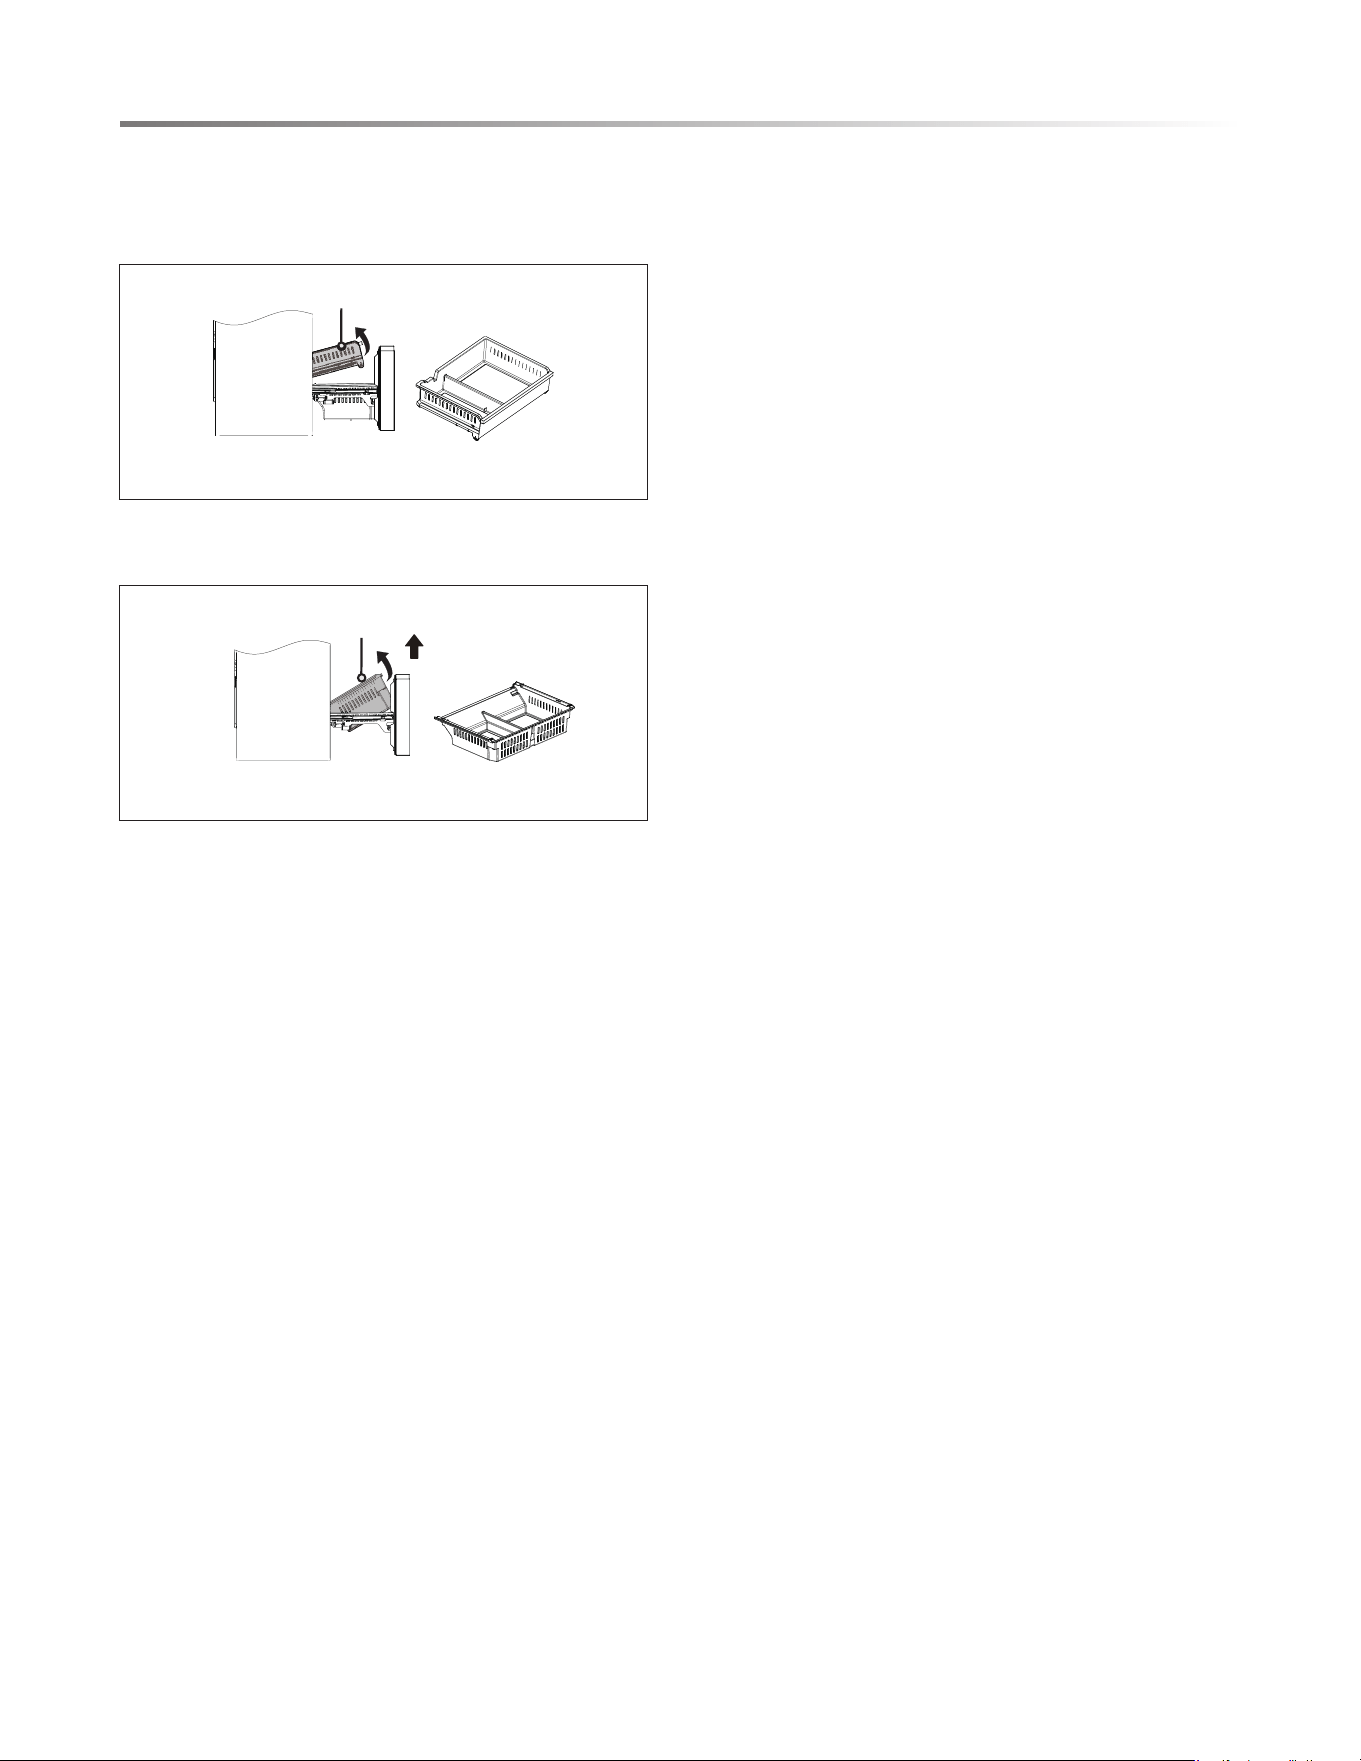
ADJUSTING THE SHELVES
7KHFDQWLOHYHUUDFNFRXOGEHDGMXVWHGWRWKHSURSHUKHLJKWDV
UHTXLUHGE\IRRG
• 7R DGMXVW WKH FDQWLOHYHU UDFNSOHDVH IROORZ WKH DUURZV DV
VKRZQLQ)LJXUH
• 5DLVHLWXSZDUGILUVWDQGWKHQWDNHLWRXWE\WLOWLQJLWXSZDUG
• 'XULQJLQVWDOODWLRQSXWWKHXSSHUHQGRIWKHIL[HGOHJLQWR
RQHRIWKHXSSHUVORWVRQWKHVXSSRUWLQJLURQILUVWDQGWKHQSXW
WKHORZHUHQGRIWKHIL[HGOHJLQWRWKHWKLUGVORWRQWKHORZHU
SDUWRIWKHVXSSRUWLQJLURQ
Slot
Upper end
of fixed leg
Lower end
of fixed leg
1
2
3
Figure 2
BEFORE USING THE REFRIGERATOR
• %HIRUHXVHUHPRYHDOOSDFNLQJPDWHULDOVLQFOXGLQJERWWRP
FXVKLRQVIRDPSDGVDQGWDSHLQVLGHRIWKHUHIULJHUDWRUWHDU
RIIWKHSURWHFWLYHÀOPRQWKHGRRUVDQGWKHUHIULJHUDWRUERG\
• %HIRUHWXUQLQJWKHUHIULJHUDWRURQNHHSWKHUHIULJHUDWRUVWLOO
IRUKRXUVEHIRUHFRQQHFWLQJLWWRSRZHUVXSSO\
INSTALLATION INSTRUCTIONS
• %HIRUH SXWWLQJDQ\ IUHVK RU IUR]HQ IRRGV WKH UHIULJHUDWRU
VKRXOGKDYHUXQIRUKRXUVRUIRUDERXWKRXUVLQVXPPHU
ZKHQWKHDPELHQWWHPSHUDWXUHLVKLJK
ENERGY SAVING TIPS
• 7KHDSSOLDQFHVKRXOGEHORFDWHGLQWKHFRROHVWDUHDRIWKH
URRPDZD\IURPKHDWSURGXFLQJDSSOLDQFHVRUKHDWLQJGXFWV
DQGRXWRIWKHGLUHFWVXQOLJKW
• /HWKRW IRRGV FRRO GRZQWR WKHURRPWHPSHUDWXUH EHIRUH
SODFLQJLQWKHDSSOLDQFH2YHUORDGLQJWKHDSSOLDQFHIRUFHV
WKHFRPSUHVVRUWRUXQORQJHU)RRGVWKDWIUHH]HWRRVORZO\
PD\ORVHTXDOLW\RUVSRLO
• %H VXUH WR ZUDS IRRGV SURSHUO\DQG ZLSH FRQWDLQHUV GU\
EHIRUHSODFLQJWKHPLQWKHDSSOLDQFH7KLVFXWVGRZQRQIURVW
EXLOGXSLQVLGHWKHDSSOLDQFH
• $SSOLDQFHVWRUDJHELQ VKRXOGQRW EHOLQHGZLWK DOXPLQXP
IRLOZD[SDSHURUSDSHUWRZHOLQJ/LQHUVLQWHUIHUHZLWKFROG
DLUFLUFXODWLRQPDNLQJWKHDSSOLDQFHOHVVHIÀFLHQW
• 2UJDQL]HDQGODEHOIRRGWRUHGXFHGRRURSHQLQJVDQGH[WHQGHG
VHDUFKHV5HPRYHDVPDQ\LWHPVDVQHHGHGDWRQHWLPHDQG
FORVHWKHGRRUDVVRRQDVSRVVLEOH
14
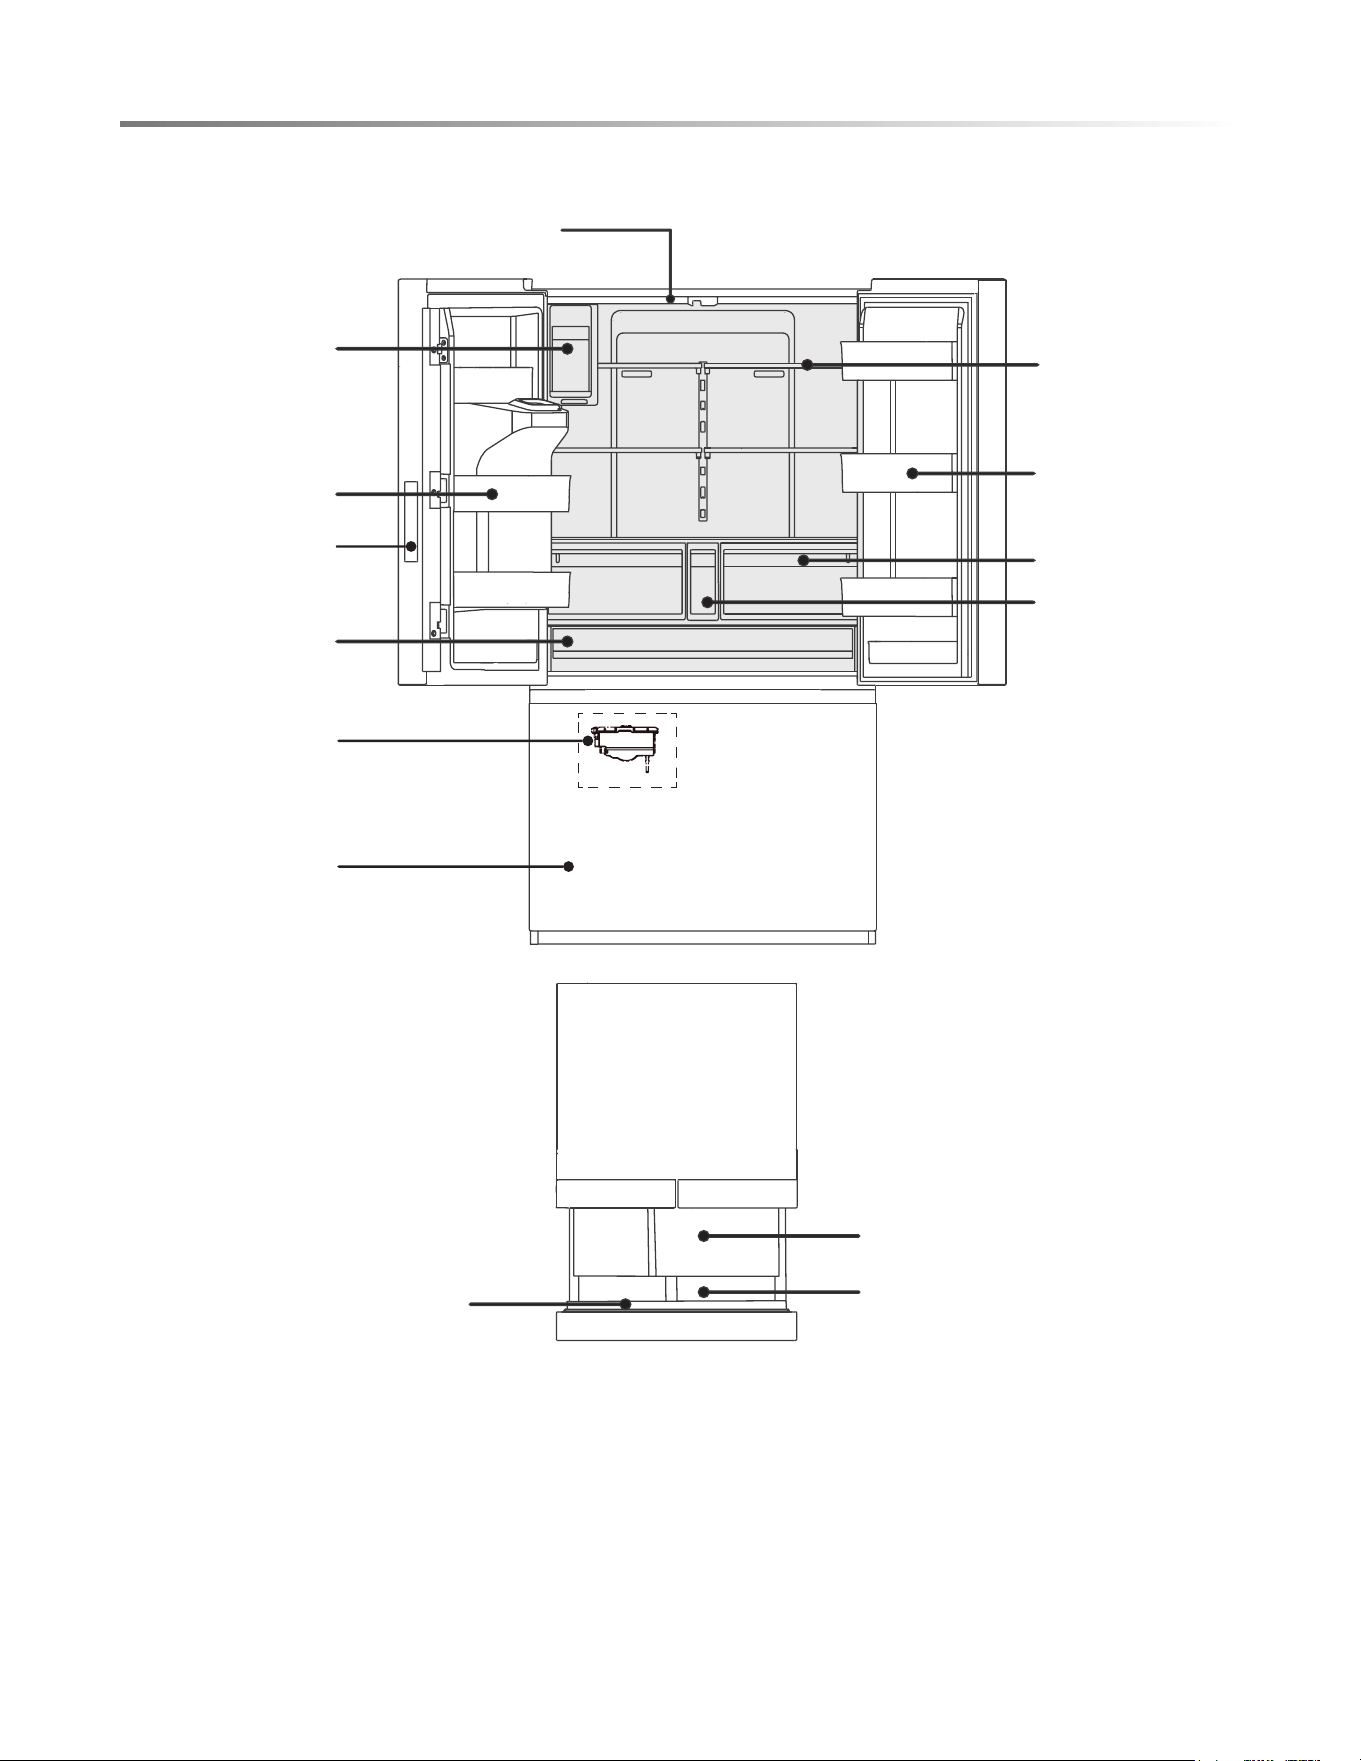
APPEARANCE OVERVIEW
LED Lighting
Water Filter
Ice Maker
Pullout Drawer
TOP VIEW
Door Tray
Freezer Drawer
Control Panel
Freezer Tray
Pantry Drawer
Ice Maker
Slide-in Shelf
Humidity Controlled
Crispers
Door Bin
Freezer Drawer

15
APPEARANCE OVERVIEW
REFRIGERATOR
t The refrigerator is suitable for storage of a variety of fruits,
vegetables, beverages, and other foods consumed in the short
term.
t Cooked foods should not be put in the refrigerator until cooled
down to the room temperature.
t Foods are recommended to be sealed in appropriate
containers before placing inside the refrigerator.
t The glass shelves can be adjusted up or down for a desired
storage space and ease of use.
t
FREEZER DRAWER
t The freezer drawer may keep food fresh for a long time and
is primarily used to store frozen foods.
t
entrées and intended for foods that will not be consumed in
the short term.
The freezer drawer is suitable for storage of meat, fish, frozen
t It is recommended to divide large cuts of meat into smaller
portions for easier defrosting.
To prevent spoilage and food-borne illness, consume all foods
before expiration date.
Note: Storage of too much food during oper
ation after the
initial connection to power may adversely affect the freezing
performance of the appliance. Food stored should not block
the air outlet or otherwise the freezing performance will also
be adversely affected.
To optimize the humidity control of the crisper drawers,
slide the sector to the following positions.
Lower humidity for fruit:
High for vegetable:
16
CONTROL AND DISPLAY PANEL
DISPLAY SCREEN
Refrigerator Indicator
Freezer Indicator
Temperature Display
Filter Replacement Icon
Chill Boost
Freeze Boost
Refrigerator Ice Maker
Freezer Ice Maker
OPERATION KEY
A.
A
B
C
D
E
F
Temperature Increase
B. Temperature Zone Selection
C. Temperature Decrease
D. Chill Boost/Freeze Boost
E. Ice Maker On/Off
F. Lock/Unlock
DISPLAY
Main Display Control (display control on refrigerator left door)
Ice/Water Dispenser Display and Control
When the power is connected for the first time, the display
will illuminate and the start-up chime will sound, and then the
display will enter normal operation. (When the appliance is
powered on for the first time, the temperatures of the refrigerator
DQGWKHIUHH]HUDUHVHWDWÛ)Û)UHVSHFWLYHO\
Under normal conditions, if no doors are opened and no keys
are pressed for 30 seconds, the control panel will be locked,
and the display will turn off after 30 seconds. If any key is
pressed when the display is off, the display screen will wake
up and show the current status.
When the refrigerator is powered on for the first time, the
dispenser display and control will illuminate for 3 seconds
and then enter normal operation. The default setting is wate
r
dispensing function.
17
OPERATING REFRIGERATOR
LOCK/UNLOCK
TEMPERATURE MODE
TEMPERATURE SETTING
REFRIGERATOR
BOOST MODE SETTINGS
CHILL BOOST
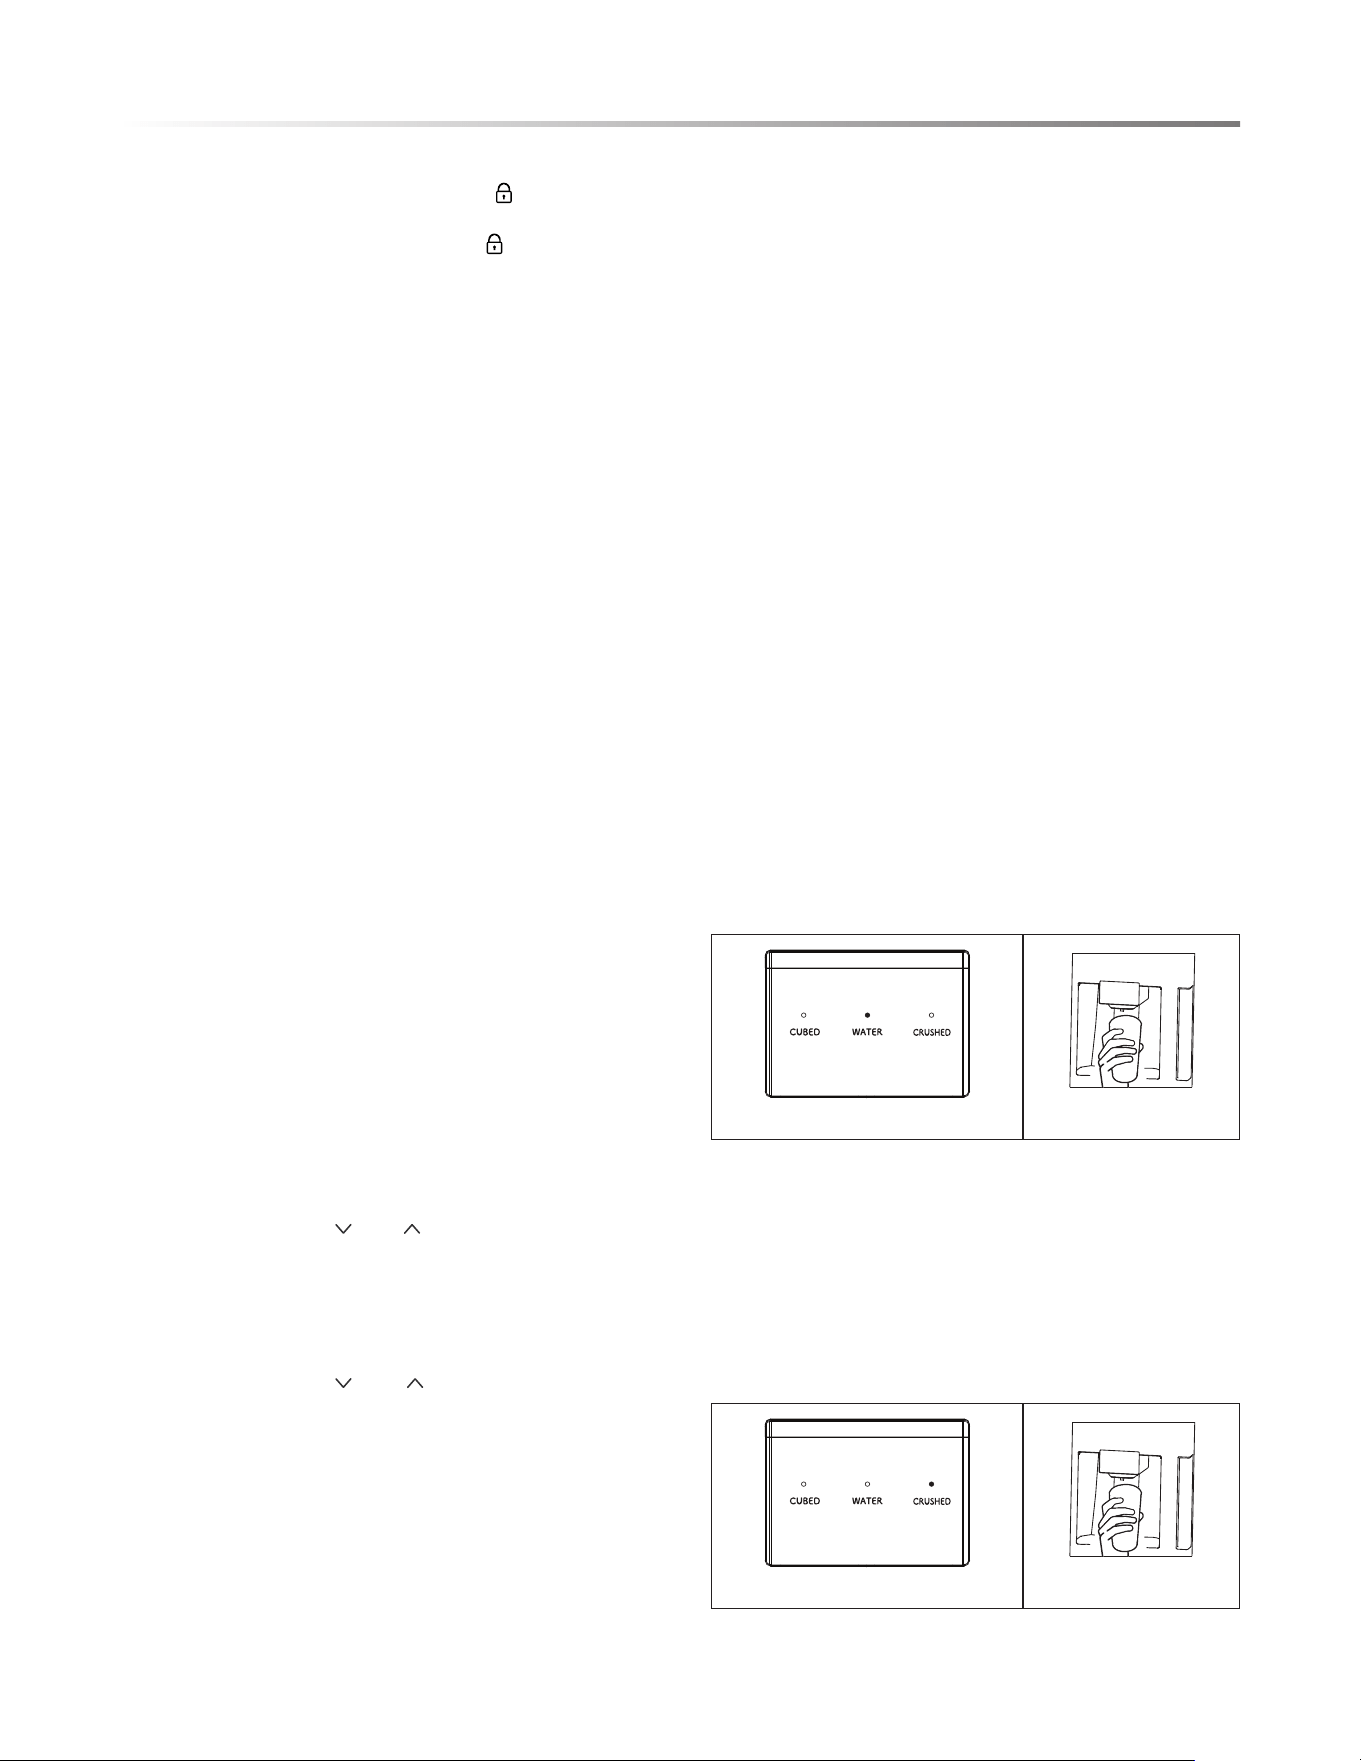
ICE/WATER DISPENSER
The ice/water dispenser is located on the outside of refrigerator
door. You may select cubed ice, crushed ice or cold water. The
dispenser only works when the refrigerator door is closed.
FOR COLD WATER
1. Press the WATER key until the indicator light turns on.
See Figure 28.
2. Gently press a glass or cup against the lever until water is
dispensed. To end, release the lever. See Figure 29.
Figure 28
Figure 29
It will enter the lock state if there is no opening door action or
any buttons operation within 30 seconds.
The alarm sound can be stopped by pressing any one button in
lock state, but all other button operations need to be performed
in unlock state.
FREEZE BOOST
FREEZER DRAWER
ICE MAKER ON/OFF
SABBATH MODE
FILTER ELEMENT TIME RESET
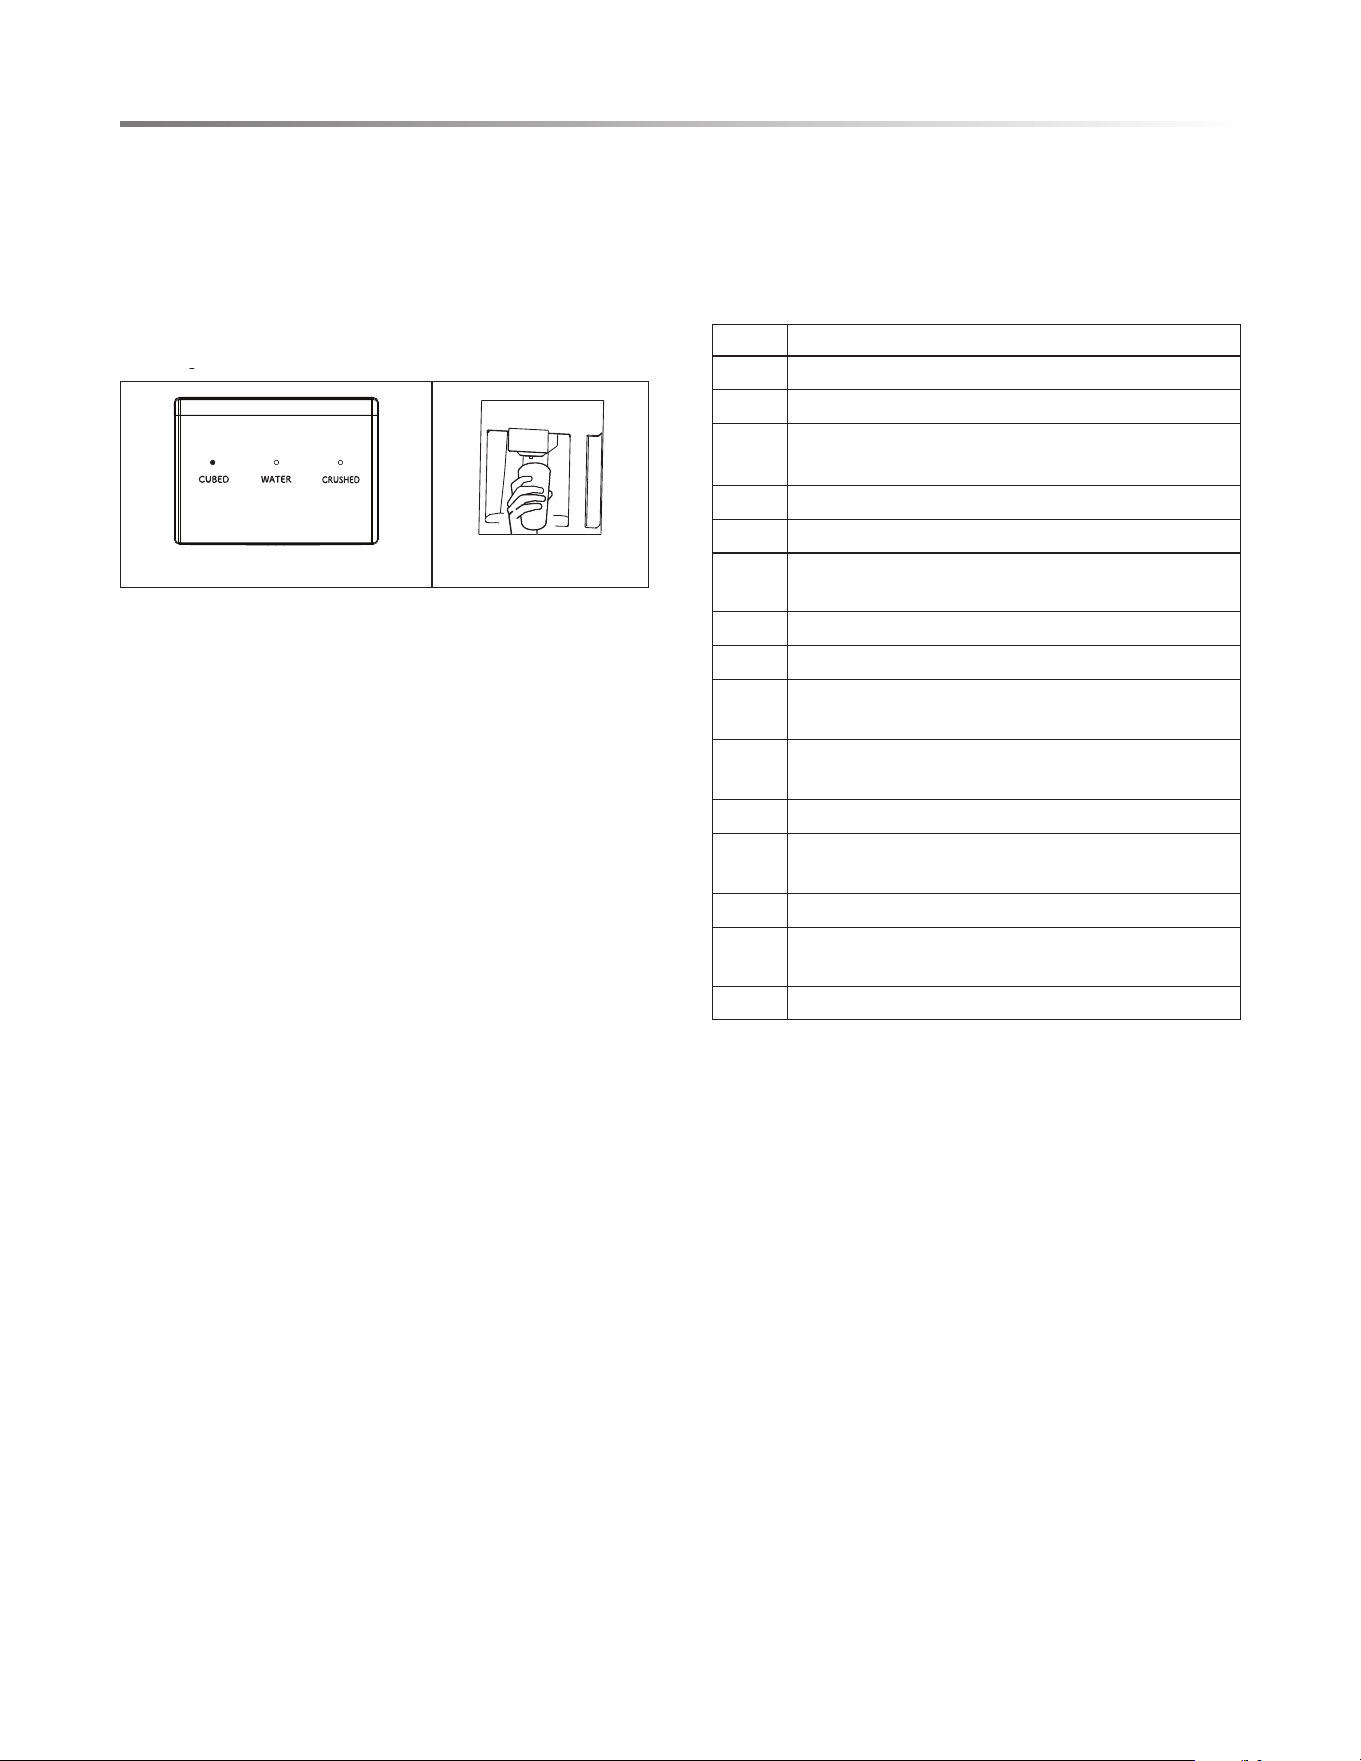
FOR CRUSHED ICE
1. Press the CRUSHED key until the indicator light turns on.
See Figure 30.
2. Gently press a glass or cup against the lever until crushed
ice is dispensed. To
end, release the lever. See Figure 31.
NOTE: Align the top of the glass or cup with the opening
of the dispenser to prevent ice from spilling over the glass
or cup and onto the floor.
Figure 30
Figure 31
In the unlock state, press and hold the button for 3 seconds to
enter the lock state and the buzzer sound rings.
In the lock state, press and hold the button for 3 seconds to
enter the unlock state and the buzzer sound rings.
To change the temperature default mode to Celsius or Fahrenheit,
press "TEMP SELECT" and hold for 3 seconds.
Hold down "CHILL/FREEZE BOOST" for 3 seconds to reset the
Water Filter icon. At this time, the filter aging data is cleared.
To activate or deactivate Sabbath mode, press "TEMP SELECT"
and "CHILL/FREEZE BOOST" simultaneously for 3 seconds.
Press the UnLock key effect immediately. Otherwise, the lock
automatically takes effect in about 30 seconds. When the
refrigerator is in Sabbath mode, the display, the internal lights
and the buzzer do not function, and the dispenser indicates the
selected function in low brightness.
When "REF" on the display panel illuminates. press "CHILL/
FREEZER BOOST" to turn on the CHILL BOOST mode.
The refrigerator room is set at 34˚F/1˚C automatically, and the
CHILL BOOST icon illuminates. When the CHILL BOOST
mode is deactivated, the refrigerator temperature automatically
returns to the temperature set before the CHILL BOOST mode
was activated.
When "FRZ" on the display panel illuminates, press "CHILL/
FREEZER BOOST" to turn on the FREEZE BOOST mode.
The freezer room is set at -7˚F/-22˚C automatically, and the
FREEZE BOOST icon illuminates. When the FREEZE BOOST
mode is deactivated, the freezer temperature automatically
returns to the temperature set before the FREEZE BOOST
mode was activated.
Press "ICE ON" to turn on or off the ice makers and the indicators
of the activated ice maker will illuminate on the control panel.
It will toggle the ice maker mode as below. Refrigerator Ice
Maker On → Freezer Ice Maker On → Refrigerator/Freezer Ice
Makers On → Refrigerator/Freezer Ice Makers Off
Press "TEMP SELECT" until "REF" on the display panel
illuminates. Then press " " or " " temperature control keys
between 44˚F/7˚C and 34˚F/1˚C.
Press "TEMP SELECT" until "FRZ" on the display panel
illuminates. Then press " " or " " temperature control keys
to adjust the temperature. The temperature can change in a range
between 7˚F/-14˚C and -7˚F/-22˚C.
18
FOR CUBED ICE
1. Press the CUBED key until the indicator light turns on. See
Figure 32.
2. Gently press a glass or cup against the lever until cubed ice
is dispensed. To end, release the lever. See Figure 33.
NOTE: Align the top of the glass or cup with the opening
of the dispenser to prevent ice from spilling over the glass
or cup and onto the floor.
Figure 32
Figure 33
OPERATING REFRIGERATOR
ERROR CODE
CO DE NAME
EH The humidity sensor fails
F5 Ice maker fails to release ice
F4 The sensor at the bottom of refrigerator ice
maker fails
CC The defrosting sensor in ice making chamber fails
C9 The sensor in ice making chamber fails
CA The communication between main control board
and ice making board fails
F6 The initialization of refrigerator ice maker fails
E0 The initialization of freezer ice maker fails
E1 The temperature sensor in the refrigerator
chamber fails
E2 The temperature sensor in the freezer
chamber fails
E5
Frosting sensor for freezer fails
E6 The communication between display board and
main control board fails
E7 The ambient temperature fails
EE The sensor at the bottom of freezer ice maker
fails
EP Freezer ice maker fails to turn over ice
When the following tips to appear on the display screen, it
indicates a problem with the refrigerator. Although the refrigerator
in the following fault case can still provide cool/freeze functions,
but the user should contact maintenance personnel, ensure the
normal use of refrigerator.
19
CARE AND CLEANING
OVERALL CLEANING
t Regularly clean the dust and debris behind the refrigerator
appliance and the floor to improve cooling performance and
energy savings.
t Check the door gasket regularly to make sure there is no
debris. Clean the door gasket with a soft cloth dampened
with soapy water or diluted detergent.
t The interior of the refrigerator should be cleaned regularly
to avoid odor.
t Please unplug the power supply before cleaning interior,
remove all foods, drinks, shelves, drawers, etc.
t Us
e a soft cloth or sponge to clean the inside of the refrigerator,
with two tablespoons of baking soda and a quart of warm
water. Then rinse with water and wipe clean. After cleaning,
open the door and let it air dry before applying power supply.
For areas that are difficult to clean in the refrigerator (such
t
as narrow spaces, gaps or corners), it is recommended to
wipe them regularly with a soft rag, soft brush, etc. and when
necessary, combined with some auxiliary tools (such as thin
sticks) to ensure no contaminants or bacterial accumulation
are in these areas.
t Do not use soap, detergent, scrub powder, spray cleaner, etc.,
as these may cause odors in the interior of the refrigerator
or contaminate food.
t Clean the bottle frame, shelves and drawers with a soft cloth
dampened with soapy water or diluted detergent. Dry wit
h a
soft cloth or air dry.
t Wipe the outer surface of the refrigerator with a soft cloth
dampened with soapy water, detergent, etc., and then wipe dry.
t Do not use hard brushes, clean steel balls, wire brushes,
abrasives (such as toothpastes), organic solvents (such as
alcohol, acetone, banana oil, etc.), boiling water, acid or
alkaline items, which may damage the refrigerator interior.
Boiling water and organic so
lvents such as benzene may
deform or damage plastic parts.
t Do not rinse directly with water or other liquids during
cleaning to avoid short circuits or damage to electrical
insulation after immersion.
CAUTION
CLEANING OF DOOR BINS
t drawpu ti hsup ,nib eht ezeeuqs dna dloh ot sdnah htob esU
then remove. See Figure 34.
Figure 34
t After washing the bin, reinstall and adjust height as needed.
CLEANING OF ICE MAKER BOX
t
Figure 35
Refrigerator Ice Maker
Ice maker cutter inside. DO NOT place your hands or anything
inside.
When installing, pushed the ice bin compartment all the way
inside from the bottom. If it cannot be pulled out, it means its
installed properly.
DANGER
Please unplug the refrigerator for defrost and cleaning.
Hold the handle of the ice storage box with your hand, press it
gently, and then pull it out horizontally. Push the ice storage box
in slightly after cleaning. See Figure 35.
20
DEFROSTING
The refrigerator is designed based on the air-cooling principle
and thus has an automatic defrosting function. Frost formed
due to change of season or temperature may also be manually
removed by disconnecting the appliance from power supply or
by wiping with a dry towel.
CLEANING OF FREEZER DRAWER
REPLACING THE WATER FILTER
CHANGING THE LIGHT
OUT OF OPERATION
t Power failure: In case of power failure, foods inside the
appliance can be kept for sev
eral hours; during the power
failure, the times of door opening should be reduced and no
more fresh food should be put into the appliance.
t Not use for extended time: The appliance should be unplugged
and then cleaned; the doors should be left open to prevent
odor.
t Moving: Before the refrigerator is moved, remove all items
from inside the appliance, secure the glass partitions,
vegetable holder, all drawers, etc. with t
ape and tighten the
leveling feet; close the doors and secure them with tape.
During moving, the appliance should not be laid upside down,
horizontally or vibrated; the inclination during movement
should be no more than 45˚.
CARE AND CLEANING
Pullout drawer: Open the freezer door to the maximum stroke,
lift the tail of the upper drawer of the freezing chamber, take out
the pullout drawer. See Figure 36.
Pullout Drawer
Freezer drawer
Figure 36
Freezer drawer: Open the freezier door to the maximum stroke,
Lift the end of the freezer drawer and lift it up. See Figure 37.
Note: Don’t remove the lower freezer drawer if not necessary.
Figure 37
The water filter must be replaced every 6 months or if a noticeable
reduction in the water flow occurs. When replace is recommended,
the Filter Replacement icon will be lit. At this time, replace the
water filters following "INSTALLING THE WATER FILTER
(P10). To reset the Filter Replacement icon, hold down "CHILL/
FREEZE BOOST" for 3 seconds and the filter aging data is
cleared. For the replacement water filter (Part# SJWF300),
please call 1-800-BE-SHARP.
Any replacement or maintenance of the LED Lamps and others,
please call 1-800-BE-SHARP.

21
TROUBLESHOOTING
%HIRUHFDOOLQJIRUVHUYLFHWKHIROORZLQJLQIRUPDWLRQPD\KHOSGHWHUPLQHSRWHQWLDOFDXVHRIDSSOLDQFHFRQFHUQ3OHDVHFRQWDFW\RXU
ORFDOGHDOHURU%(6+$53IRUIXUWKHUDVVLVWDQFH
$SSOLDQFHKDVQRSRZHU • &RQÀUPWKHDSSOLDQFHLVFRQQHFWHGWRDSRZHUVRXUFHDQGVHFXUHO\SOXJJHGLQWRHOHFWULFDORXWOHW
• &RQÀUPHOHFWULFDORXWOHWKDVSRZHULIQRWFKHFNFLUFXLWEUHDNHUER[IRUWULSSHGFLUFXLW
2GRUIURP
UHIULJHUDWRURUIUHH]HU
FRPSDUWPHQWV
• )RRGVQRWVHFXUHO\VHDOHGLQFRQWDLQHUV
• 6SRLOHGIRRGVLQVLGHDSSOLDQFH
• $SSOLDQFHKDVQRWEHHQSURSHUO\FOHDQHGLHIRRGDQGGLUWKDYHDFFXPXODWHGLQVLGHWKHXQLW
([FHVVLYHFRPSUHVVRU
operation
• /RQJRSHUDWLRQRIWKHUHIULJHUDWRULVQRUPDOLQVXPPHUZKHQWKHDPELHQWWHPSHUDWXUHLVKLJK
• 7RRPDQ\IRRGLWHPVKDYHEHHQSODFHGLQVLGHWKHDSSOLDQFHLQFUHDVLQJHQHUJ\GHPDQG
• )RRGVQRWSURSHUO\FRROHGEHIRUHSODFLQJLQVLGHDSSOLDQFH
• 7KHGRRUVDUHRSHQHGWRRIUHTXHQWO\
/LJKWGRHVQRWFRPHRQ • &RQÀUPDSSOLDQFHLVFRQQHFWHGWRSRZHUVXSSO\DQGWKDWWKHOLJKWLVQRWGDPDJHG
• +DYHWKHOLJKWUHSODFHGE\DTXDOLÀHGVHUYLFHWHFKQLFLDQ
'RRUVGRQRWFORVH
properly
• )RRGLVREVWUXFWLQJWKHGRRURSHUDWLRQ
• 7KHUHIULJHUDWRULVQRWOHYHO
Rattling noise • &RQÀUPÁRRUDQGUHIULJHUDWRUDUHOHYHODQGDSSOLDQFHLVQRWWLOWHG
• &RQÀUPZDWHUÀOWHULVVHFXUHO\LQVWDOOHG
Door does not seal
properly
• &RQÀUPGRRUVHDOVDUHFOHDQDQGIUHHRIREVWUXFWLRQ
:DWHUSDQRYHUÁRZV • 7KHUHLV WRR PXFK IRRG LQ WKH IUHH]HU RU IRRG VWRUHG FRQWDLQV WRR PXFKZDWHU UHVXOWLQJLQ KHDY\
GHIURVWLQJ
• 7KHGRRUVDUHQRWFORVHGSURSHUO\UHVXOWLQJLQIURVWLQJGXHWRHQWU\RIDLUDQGLQFUHDVHGZDWHUGXHWR
GHIURVWLQJ
+RWKRXVLQJ • +HDWGLVVLSDWLRQRIWKHEXLOWLQFRQGHQVHUYLDKRXVLQJZKLFKLVQRUPDO
• :KHQKRXVLQJ EHFRPHV KRW GXHWR KLJK DPELHQWWHPSHUDWXUH DQG VWRUDJHRI WRR PXFK IRRG LWLV
UHFRPPHQGHGWRSURYLGHSURSHUYHQWLODWLRQWRIDFLOLWDWHKHDWGLVVLSDWLRQ
6XUIDFHFRQGHQVDWLRQ • &RQGHQVDWLRQRQWKHH[WHULRUVXUIDFHDQGGRRUVHDOVRIWKHUHIULJHUDWRULVQRUPDOZKHQWKHDPELHQW
KXPLGLW\LVWRRKLJK5HPRYHWKHFRQGHQVDWLRQZLWKDFOHDQWRZHO
$EQRUPDO1RLVH • %X]]7KHFRPSUHVVRUPD\SURGXFHEX]]LQJVRXQGGXULQJRSHUDWLRQDQGWKHEX]]LQJLVORXGSDUWLFXODUO\
XSRQVWDUWRUVWRS7KLVLVQRUPDO
• &UHDN5HIULJHUDQWÁRZLQJLQVLGHRIWKHDSSOLDQFHPD\SURGXFHFUHDNZKLFKLVQRUPDO
,FHPDNHUGRHVQRW
PDNHLFH
• $IWHU\RXLQVWDOOWKHZDWHUOLQHDQGVWDUWWKHUHIULJHUDWRULWWDNHVKRXUVWRVWDUWLFHPDNLQJ
• 3OHDVHWXUQRQWKHLFHPDNLQJIXQFWLRQVHHSDJHLQVWUXFWLRQV
• &KHFNZKHWKHUWKHZDWHUSUHVVXUHPHHWVSVLDQGZKHWKHUWKHZDWHUOLQHLVFRQQHFWHGSURSHUO\
• &KHFNZKHWKHUWKHZDWHUVXSSO\YDOYHLVRSHQDQGZKHWKHUWKHZDWHUSLSHKDVDUHVWULFWLRQ
• &KHFNZKHWKHUWKHLFHVWRUDJHER[LVLQVWDOOHGSURSHUO\

22
,FHGLVSHQVHUGRHVQRW
ZRUN
• &RQÀUPWKHUHLVLFHLQWKHLFHVWRUDJHER[
• ,ILFHGLVSHQVHUKDVQRWEHHQXVHGIRUDQH[WHQGHGSHULRGRIWLPHLFHZLOOPHOWDQGVWLFNWRJHWKHU7XUQ
RIILFHPDNHUHPSW\LFHVWRUDJHER[DQGUHSODFH7XUQRQLFHPDNHU
• &RQÀUPWKHZDWHUVXSSO\OLQHLVFRQQHFWHGSURSHUO\WKHZDWHUVXSSO\YDOYHLVRSHQHGDQGWKHZDWHU
SLSHKDVQRUHVWULFWLRQ
• 7KHLFHGLVSHQVHUFDQRQO\EHXVHGZKHQWKHUHIULJHUDWRUGRRULVFORVHG
• &RQÀUPWKHLFHVWRUDJHER[LVLQVWDOOHG
Water dispenser does
QRWZRUN
• &RQÀUPZDWHUVXSSO\OLQHLVFRQQHFWHGSURSHUO\WKHZDWHUVXSSO\YDOYHLVRSHQHGDQGWKHZDWHUSLSH
KDVQRUHVWULFWLRQ
• &RQÀUPWKHZDWHUÀOWHULVLQVWDOOHGLQSODFH
Water dispenser is too
slow
• &RQILUPWKHZDWHUSUHVVXUHLVSVL
• 5HSODFHWKHZDWHUILOWHU
:DWHUGULSVIURPWKH
water dispenser
• ,WLVQRUPDOWKDW DIHZGURSVRIZDWHUPD\GULSIURPWKHZDWHUGLVSHQVHU+RZHYHULIZDWHUNHHSV
GULSSLQJSOHDVHFKHFNWKHFRQQHFWLRQRIWKHZDWHUOLQH
7KHZDWHUWDVWHVEDG • ,IWKHUHIULJHUDWRULVQRWXVHGIRUPRUHWKDQGD\VGUDLQDWOHDVWJDOORQRIZDWHU
• 5HSODFHWKHZDWHUÀOWHUDQGIROORZSURSHUJXLGHOLQHVIRUÀOWHUUHSODFHPHQWVFKHGXOH
TROUBLESHOOTING


SHARP ELECTRONICS CORPORATION • 100 Paragon Drive • Montvale, New Jersey 07645 • USA
March 10, 2025