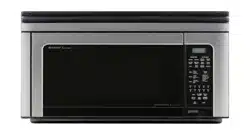
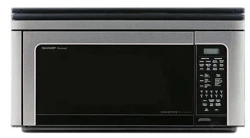
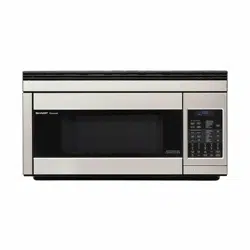
OPERATION MANUAL Microwave Oven
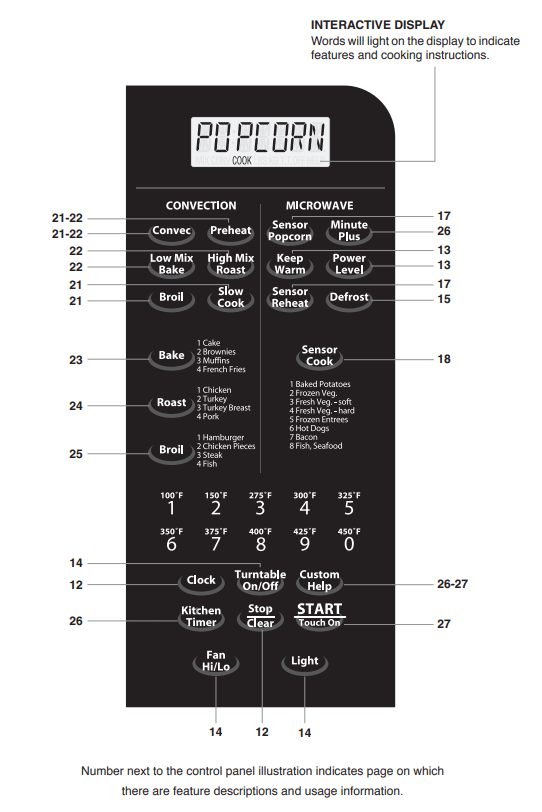
PART NAMES
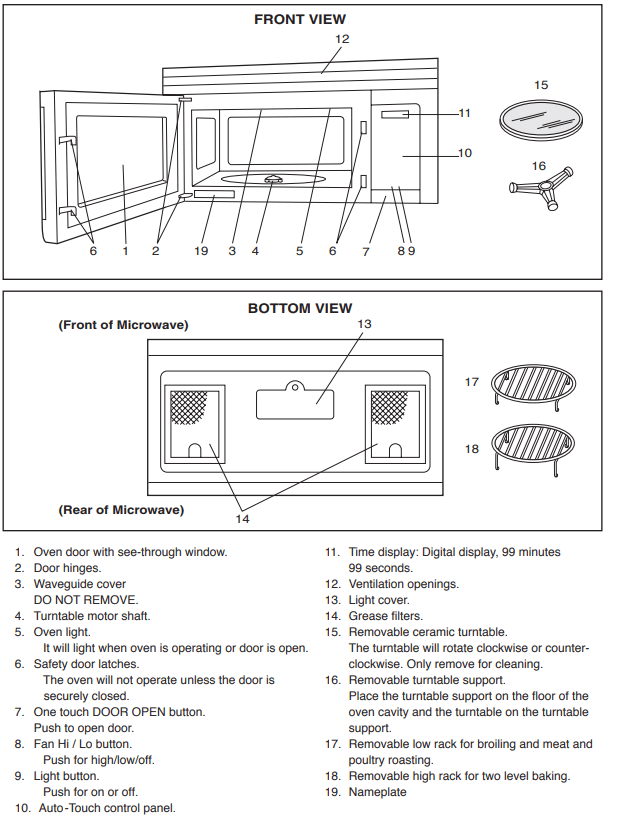
TOUCH CONTROL PANEL
BEFORE OPERATING
Before operating your new microwave oven make sure you read and understand this operation manual completely. • Before the oven can be used, follow these procedures:
- Plug in the oven. Close the door. The oven display will show WELCOME; PRESS; CLEAR; AND; PRESS; CLOCK .
- Touch the Stop/Clear pad. : will appear.
- Touch Clock and follow directions to set.
TO SET THE CLOCK
- Suppose you want to enter the correct time of day 12:30 (A.M. or P.M.)
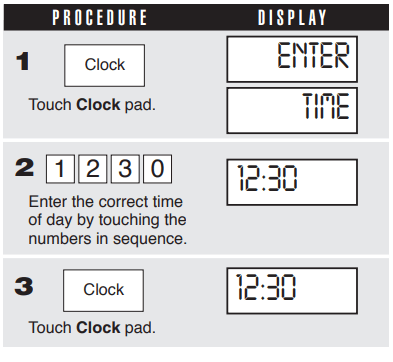
This is a 12 hour clock. If you attempt to enter an incorrect clock time, ERROR will appear in the display. Touch the Stop/Clear pad and re-enter the time
- If the electrical power supply to your microwave oven should be interrupted, the display will intermittently show WELCOME; PRESS; CLEAR; AND; PRESS; CLOCK after the power is reinstated. If this occurs during cooking, the program will be erased. The time of day will also be erased. Simply touch Stop/Clear pad and reset the clock for the correct time of day.
NOTE: Your oven can be programmed with the door open except for START/Touch on, Minute Plus, Sensor Reheat, Keep Warm and Popcorn.
STOP/CLEAR
Touch the Stop/Clear pad to:
- Erase if you make a mistake during programming.
- Cancel kitchen timer.
- Stop the oven temporarily during cooking.
- Return the time of day to the display.
- Cancel a program during cooking, touch twice.
MANUAL MICROWAVE OPERATION
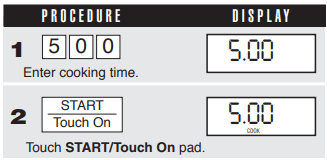
TIME COOKING - MICROWAVE
Your oven can be programmed for 99 minutes 99 seconds (99.99). Always enter the seconds after the minutes, even if they are both zeros.
- Suppose you want to cook for 5 minutes at 100%
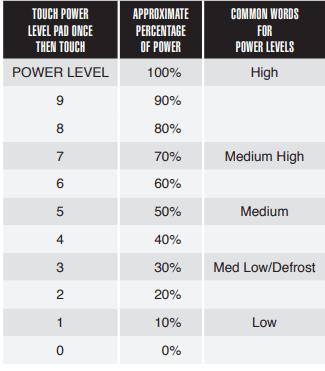
TO SET POWER LEVEL
- There are eleven preset power levels.
- Using lower power levels increases the cooking time which is recommended for foods such as cheese, milk and long slow cooking of meats. Consult cookbook or recipes for specific recommendations.
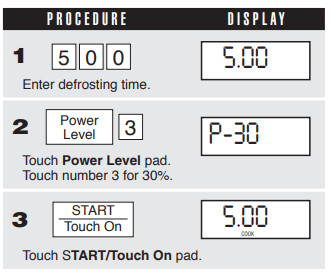
- Suppose you want to defrost for 5 minutes at 30% with the turntable on.
KEEP WARM
- Keep Warm can only be programmed with manual cooking or as a separate program.
- Suppose you want to cook a baked potato for 4 minutes at 100% power and you want to keep it warm after cooking for 30 minutes.
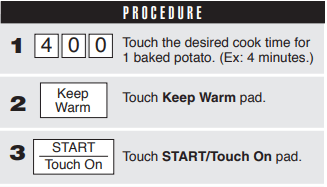
At the end of cook time, Keep Warm will run for 30 minutes, unless you touch "Stop/Clear" button.
- To use Keep Warm as a separate program, touch KEEP WARM pad within 3 minutes after cooking. Keep Warm will run for 30 minutes unless you touch "Stop/Clear" button or open door.
TURNTABLE ON/OFF
- For most cooking, the turntable should be on; however the turntable can be turned off so that it does not rotate when extra large dishes, such as the popular 13”x9”x2” glass utility casserole, are used. The casserole should be placed on the turntable so that it is level.
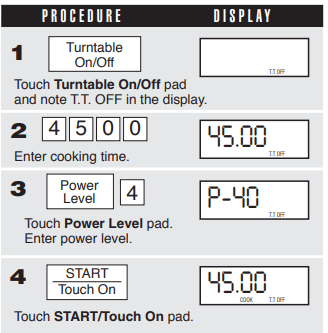
- Suppose you want to cook lasagna in a 13”x9”x2” casserole for 45 minutes on 40% power
NOTE:
- The door can be opened for checking food and the turntable will stay in the off position. After checking, close door and touch START/Touch On.
- The turntable will stay off for one minute after door is opened when time-of-day appears in the display. It is possible to reprogram the oven during that minute without touching the Turntable On/Off pad. The display always indicates whether the turntable is off or on.
- THE TURNTABLE SHOULD ALWAYS BE ON WHEN USING THE SPECIAL FEATURES. On/Off function can be used with manual cooking modes and Sensor Reheat. Turntable “off” condition will automatically change to “on” condition when you select auto cooking except Sensor Reheat and Bake.
- When cooking large quantities of food which cannot be stirred, it is best to use a lower power level such as 40 or 50%. You may speed cooking of large amounts by programming 5 to 10 minutes on 100% power (HIGH) followed by the desired time on lower power. See page 26 for how to program multiple sequences. You may wish to reverse a large casserole once during cooking; simply open door, reposition casserole, close door and touch START/Touch On
FAN HI/LO
- The fan will automatically start when heat rises from range surface units or burners. This protects the microwave oven from excessive temperature rise. The fan will stay on until the temperature decreases. It cannot be turned off manually during this time.
- For other uses, press Fan Hi/Lo pad to select fan speed or turn fan off. When fan is manually turned on, “H” will be shown on the display.
- When the fan is turned off, “H” will disappear from display.
LIGHT
- Press the Light pad one time for on and press again to turn it off.
MICROWAVE FEATURES
DEFROST
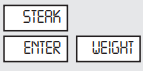
- Defrost automatically defrosts ground meat, steak, chicken pieces.
- Suppose you want to defrost a 2.0 pound steak
| PROCEDURE |
DISPLAY |
|
1. 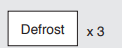
Touch Defrost pad once. Then touch Defrost pad two more times to select steak
|
 |
|
2. 
Enter weight by touching the number pads. (Ex. 2.0 lb)
|
 |
|
3. 
Touch START/Touch On pad.
The oven will stop and directions will be displayed. Follow the indicated message.
|
 |
|
4. After the 1st stage, open the door. Turn steak over and shield any warm portions. Close the door.

Touch START/Touch On pad
|
 |
|
5. After the 2nd stage, open the door. Shield any warm portions. Close the door.

Touch START/Touch On pad.
|
 |
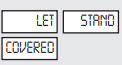
| 6. After defrost cycle ends, cover and let stand as indicated in chart below. |
|
NOTE:
- The weight can be entered in increments of 0.1 lb. If you attempt to enter more or less than the allowed amount ERROR, WEIGHT, TOO, SMALL, or TOO, LARGE will appear in the display.
- Defrost can be programmed with More or Less Time Adjustment.
- To defrost other foods or foods above or below the weights allowed on Defrost Chart, use time and 30% power. See Manual Defrost
DEFROST CHART
| T O U C H DEFROST PAD* |
FOOD |
F O R AMOUNT |
PROCEDURE |
| once |
Ground Meat |
0.5 - 3.0 lb |
Remove any thawed pieces after each stage. Let stand, covered, for 5 to 10 minutes. |
| twice |
Steak |
0.5 - 4.0 lb |
After each stage of defrost cycle, rearrange and if there are warm or thawed portions, shield with small flat pieces of aluminum foil. Remove any meat that is nearly defrosted. Let stand, covered, for 10 to 20 minutes. |
| 3 times |
Chicken Pieces |
0.5 - 3.0 lb |
After each stage of defrost cycle, if there are warm or thawed portions, rearrange or remove. Let stand, covered, for 10 to 20 minutes. |
* Number of touches AFTER initial touch to access Defrost.
NOTE:
- Check foods when oven signals. After final stage, small sections may still be icy. Let stand to continue thawing. Do not defrost until all ice crystals are thawed.
- Shielding prevents cooking from occurring before the center of the food is defrosted. Use small smooth strips of aluminum foil to cover edges and thinner sections of the food.
MANUAL DEFROST
- If the food that you wish to defrost is not listed on the Defrost Chart or is above or below the limits in the “Amount” column on the chart, you need to defrost manually.
- You can defrost any frozen food, either raw or previously cooked, by using power level 3. Follow the exact 3-step procedure found under To Set Power Level on page 13. Estimate defrosting time and press Power Level pad 8 times for 30% when you select the power level.
- For either raw or previously cooked frozen food, the rule of thumb is approximately 5 minutes per pound. For example, defrost 5 minutes for 2-3 cups of casserole or 1 pound of frozen spaghetti sauce.
- Always stop the oven periodically to remove or separate the portions that are defrosted. If food is not defrosted at the end of the estimated defrosting time, program the oven in 1 minute increments on power level 3 until totally defrosted.
- When using plastic containers from the freezer, defrost only long enough to remove from the plastic in order to place food in a microwave-safe dish.
SENSOR COOKING
Sharp’s Sensor is a semi-conductor device that detects the vapor (moisture and humidity) emitted from the food as it heats. The Sensor adjusts the cooking times and power level for various foods and quantities. It takes the guesswork out of microwave cooking.
Using Sensor Settings:
- Room temperature should not exceed 95˚F.
- Be sure the exterior of the cooking container and the interior of the oven are dry. Wipe off any moisture with a dry cloth or paper towel.
- Sensor cooking can only be entered within 3 minutes after cooking, opening and closing the door or touching the Stop/Clear pad.
- During the first part of sensor cooking, SENSOR REHEAT , SENSOR POPCORN REGULAR or SNACK , BAKED POTATO , FROZEN VEG , SOFT FRESH VEG , HARD FRESH VEG , FROZEN ENTREE , HOT DOGS , BACON or FISH will appear on display. Do not open oven door or touch Stop/Clear during this part of the cooking cycle. The measurement of vapor will be interrupted. If this occurs, ERROR will appear and sensor cooking will be interrupted. To continue cooking, touch the Stop/Clear pad and select cooking time and power. Normally when sensor detects the vapor emitted from the food, remainder of cooking time will appear. Door may be opened when remaining cooking time appears on display. At this time, you may stir or season food, as desired.
- Check food for doneness after cooking with sensor settings. If additional time is needed, continue to cook with variable power and time.
- If the sensor does not detect vapor, ERROR will appear and the oven will shut off.
- At the end of any cycle, open oven door or touch Stop/Clear pad. The time of day will reappear on the display.
- Any sensor setting can be programmed with More or Less Time Adjustment.
Selecting Foods:
- The sensor works with foods at normal storage temperature. For example, foods for reheating would be at refrigerator temperature and potatoes for baking would be room temperature.
- More or less food than the quantity listed in the charts should be cooked by time and variable power.
Covering Foods: Some foods work best when covered. Use the cover recommended in the Sensor Cooking chart for these foods.
- Casserole lid.
- Plastic wrap: Use plastic wrap recommended for microwave cooking. Cover dish loosely; allow approximately 1/2 inch to remain uncovered to allow steam to escape. Plastic wrap should not touch food.
- Paper towel: Use paper towels to absorb excess fat and moisture when cooking bacon and potatoes. Line the turntable when baking potatoes.
- Wax paper: Cover dish completely; fold excess wrap under dish to secure. If dish is wider than paper, overlap two pieces at least one inch to cover.
INSTANT SENSORS
- Your oven has Instant Sensor Popcorn and Instant Sensor Reheat. To use either of the Instant Sensors, simply touch the chosen pad. The oven will start automatically. Any sensor setting can be programmed with More or Less Time Adjustment
SENSOR REHEAT
- Turntable on: You can reheat many foods by touching just one pad. You don’t need to calculate reheating time or power level. To reheat food with turntable on, simply touch the Sensor Reheat pad
- PROCEDURE:
 :
:
- Touch Sensor Reheat pad. (Note : Sensor Reheat can be programmed with turntable on or off).
- SENSOR REHEAT will be displayed repeatedly. When sensor detects the vapor emitted from the food, remainder of cooking time will appear. After cooking, LET STAND COVERED will be displayed.
- Turntable off: You may reheat using a 11”x8”x2” or 13”x9”x2” casserole with the turntable off. First touch Turntable On/Off and note indicator. Then touch Sensor Reheat. The display will indicate turntable off and oven will start automatically. After cooking, LET STAND COVERED will be displayed.
SENSOR POPCORN
- Suppose you want to pop a 3.5 oz bag of popcorn.
- PROCEDURE

- Touch Sensor Popcorn pad once. (Ex: Touch Sensor Popcorn once for regular size bag.)
- SENSOR POPCORN REGULAR will be displayed repeatedly. After cooking, END will be displayed.
- This sensor setting works well with most brands of microwave popcorn. You may wish to try several and choose your favorite. Pop only one bag at a time. Unfold the bag and place in oven according to directions.
SENSOR POPCORN CHART
| T O U C H S E N S O R POPCORN PAD |
FOR AMOUNT |
| Once |
3.0 and 3.5 oz bag (Regular size) |
| Twice |
1.2 and 1.75 oz bag (Snack size) |
- Use only popcorn packaged for microwave oven use and only one package at a time. Try several brands to decide which you like best. Do not try to pop unpopped kernels. More or Less Time Adjustment can be used to provide adjustment needed for older popcorn or individual tastes.
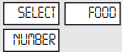
SENSOR COOK
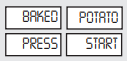
- Suppose you want to cook a baked potato.
| PROCEDURE |
DISPLAY |
|
1. 
Touch Sensor Cook pad
|
 |
|
2. 
Select desired sensor setting. Touch to cook baked potatoes.
|
 |
|
3.  Touch START/ Touch On pad. When sensor detects the vapor emitted from the food, the remainder of cooking time will appear. Touch START/ Touch On pad. When sensor detects the vapor emitted from the food, the remainder of cooking time will appear.
|
 |
Open oven door or touch Stop/Clear pad. The time of day will appear in the display
MANUAL CONVECTION/AUTOMATIC MIX OPERATION
- This section of the Operation Manual gives you specific cooking instructions and procedures. Please consult your Sharp Carousel Convection Microwave Cookbook for helpful hints for convection and combination cooking.
- The oven should not be used without the turntable in place, and it should never be restricted so that it cannot rotate. You may remove the turntable when preheating the oven and when preparing food to be cooked directly on the turntable.
CONVECTION COOKING
- During convection heating, hot air is circulated throughout the oven cavity to brown and crisp foods quickly and evenly. This oven can be programmed for ten different convection cooking temperatures for up to 99 minutes, 99 seconds. Use normal temperature; no temperature or time adjustment required.
TO COOK WITH CONVECTION
- Suppose you want to cook at 350˚F for 20 minutes
4.  Touch START/Touch On pad. Touch START/Touch On pad. |
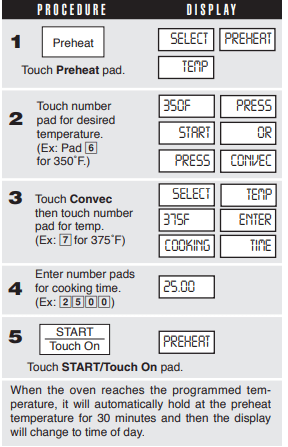
TO PREHEAT AND COOK WITH CONVECTION
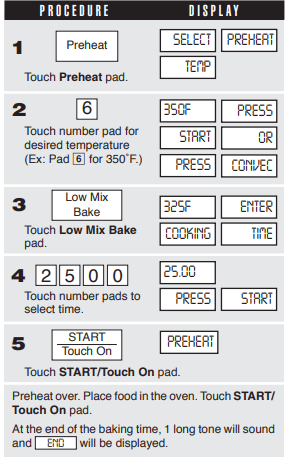
- Your oven can be programmed to combine preheating and convection cooking operations. You can preheat at the same temperature as the convection temperature or change it to a higher or lower temperature.
- Suppose you want to preheat until 350˚F and then cook 25 minutes at 375˚F convection.
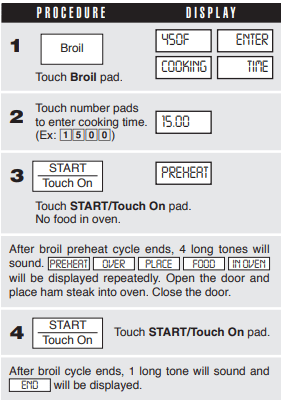
TO BROIL
- In the Broil setting, preheating is automatic. Just enter the actual broiling time and wait for preheat to be over before adding food. (Preset 450˚F). Oven temperature cannot be changed.
- Suppose you want to broil a ham steak for 15 minutes.
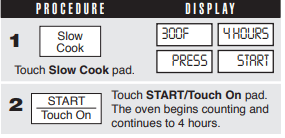
TO SLOW COOK
- Slow Cook is a preset at 300˚F. Slow Cook is programmed for 4 hours. Oven temperature can be changed to temperature below 300˚F. Simply touch the Slow Cook pad and touch the desired numbered pad with temperature below 300˚F.
AUTOMATIC MIX COOKING
- This oven has two pre-programmed settings that make it easy to cook with both convection heat and microwave automatically
| |
OVEN TEMPERATURE |
MICROWAVE POWER |
| High Mix Roast |
325˚F |
30% |
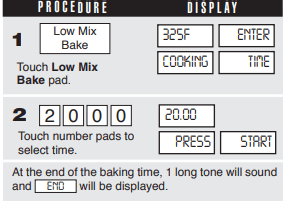
| Low Mix Bake |
325˚F |
10% |
- With the exception of those foods that cook best by convection heating alone, most foods are well suited to mix cooking using either Low Mix Bake or High Mix Roast.
- The marriage of these two cooking methods produces juicy meats, moist and tender cakes and fine textured breads, all with just the right amount of browning and crispness.
- The temperature can be changed; however, the microwave power cannot.
- The oven temperature can be changed from 100˚F to 450˚F. To change the temperature, first touch High Mix Roast or Low Mix Bake, then touch the same pad again. When the display says SELECT TEMP , touch desired temperature pad. Ex: High Mix Roast, High Mix Roast, pad 7, enter cooking time and START/Touch On. The mix temperature will change automatically.
TO COOK WITH AUTOMATIC MIX
- Suppose you want to bake a cake at low mix for 20 minutes
TO PREHEAT AND COOK WITH AUTOMATIC MIX: Your oven can be programmed to combine preheating and Automatic Mix cooking operations. You can preheat at the same temperature as the preset combination temperature or change it to a different temperature.
- Suppose you want to preheat until 350˚F and then cook 25 minutes on 325˚F Low Mix Bake.
CONVECTION AUTOMATIC MIX FEATURES
- This section of the Operation Manual offers instructions for preparing 12 popular foods using Bake, Roast and Broil.
- After selecting the desired feature, follow the directions indicated in the display.
- For helpful hints, simply touch Custom Help anytime HELP is lighted in the display.
BAKE
Bake automatically bakes cakes, brownies, muffins and French fries.
- Suppose you want to bake a 13”x9”x2” cake.
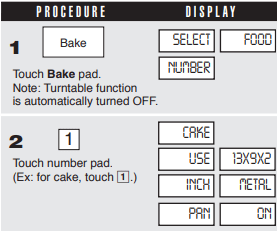
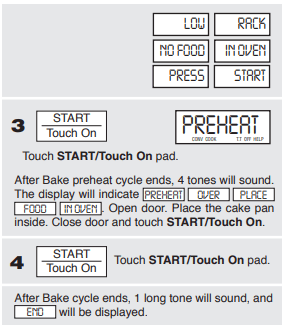
NOTE:
- Bake can be programmed with More or Less Time Adjustment.
- To bake other food, see the Sharp Carousel Convection Microwave Cookbook’s Baking Section.
ROAST
Roast automatically roasts chicken, unstuffed turkey, turkey breast or pork loin.
- Suppose you want to roast a 2.5 pound chicken.

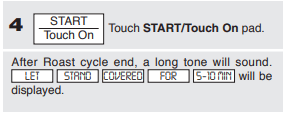
NOTE:
- Roast can be programmed with More or Less Time Adjustment.
- If you attempt to enter more or less than the allowed weight ERROR WEIGHT TOO LARGE PRESS CLEAR or ERROR WEIGHT TOO SMALL PRESS CLEAR will appear in the display.
- To roast other food or foods above or below the weights allowed on the chart below, check the Sharp Carousel Convection Microwave Cookbook’s Combination Roasting Chart.
OTHER CONVENIENT FEATURES
MULTIPLE SEQUENCE COOKING
- The oven can be programmed for up to 4 automatic cooking sequences for the microwave mode and 3 automatic cooking sequences for convection mode, switching from one setting to another automatically.
- Sometimes cooking directions tell you to start on one power level and then change to a different power level. Your oven can do this automatically.
- Suppose you want to cook roast beef for 5 minutes at 90% and then continue to cook for 30 minutes at 50%.

NOTE:
- If Power Level pad is touched once, HIGH will be displayed.
- If you wish to know power level, simply touch the Power Level pad. As long as your finger is touching the Power Level pad, the power level will be displayed
MORE OR LESS TIME ADJUSTMENT
- More : Should you discover that you like any of the Defrost, Roast, Bake, Broil, Sensor Cook or Instant Sensor settings slightly more done, touch the Power Level pad once after touching your choice of pads.
- Less : Should you discover that you like any of the Defrost, Roast, Bake, Broil, Sensor Cook or Instant Sensor settings slightly less done, touch the Power Level pad twice after touching your choice of pads.
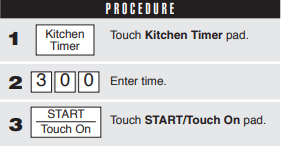
KITCHEN TIMER
- Suppose you want to time a 3 minute long distance phone call.
MINUTE PLUS
- Minute Plus allows you to cook for a minute at 100% by simply touching the Minute Plus pad. You can also extend cooking time in multiples of 1 minute by repeatedly touching the Minute Plus pad during manual cooking using microwave, convection, mix or broil.
- Suppose you want to heat a cup of soup for one minute.
 |
Touch Minute Plus pad. |
NOTE:
- Touch Minute Plus pad within 3 minutes after cooking, closing the door, touching the Stop/Clear pad or during cooking. Minute Plus cannot be used to start the oven if any program is on display.
- Minute Plus cannot be used with Special Features.
DEMONSTRATION MODE
- To demonstrate, touch Clock, 0 and START/Touch On and hold for three seconds. DEMO ON DURING DEMO NO OVEN POWER and DEMO will appear on the display. Cooking operations and special features can now be demonstrated with no power in the oven. For example, touch Minute Plus, and the display will show 1.00 and count down quickly to 0 and the END .
- To cancel, touch Clock, the number 0 and Stop/Clear.
CLEANING AND CARE
- EXTERIOR: The outside surface is precoated metal and plastic. Clean the outside with mild soap and water; rinse and dry with a soft cloth. Do not use any type of household or abrasive cleaner. DOOR Wipe the window on both sides with a damp cloth to remove any spills or spatters. Metal parts will be easier to maintain if wiped frequently with a damp cloth. Avoid the use of harsh abrasives.
- TOUCH CONTROL PANEL: Care should be taken in cleaning the touch control panel. If the control panel becomes soiled, open the oven door to inactivate the control panel before cleaning. Wipe the panel with a cloth dampened slightly with water only. Dry with a soft cloth. Do not scrub or use any sort of chemical cleaners. Avoid the use of excess water. Close door and touch Stop/Clear.
- INTERIOR - AFTER MICROWAVE COOKING: The oven walls, ceiling and floor are stainless steel. Cleaning after microwave cooking is easy because no heat is generated to the interior surfaces; therefore, there is no baking and setting of spills or spattering. To clean the interior surfaces, wipe with a soft cloth and warm water. DO NOT USE ABRASIVE OR HARSH CLEANERS OR SCOURING PADS. For heavier soil, use mild soap; rinse thoroughly with hot water.
- INTERIOR- AFTER CONVECTION, MIX OR BROIL COOKING: Spatters may occur because of moisture and grease. Wash immediately after use with hot, soapy water. Rinse and polish dry. Harder to remove spatters may occur if oven is not thoroughly cleaned or if there is long time/high temperature cooking. If so, you may wish to purchase an oven cleaner pad with liquid cleaner within it-not a soap filled steel pad-for use on stainless or porcelain surfaces. Follow manufacturer’s directions carefully and be especially cautious not to get any of the liquid cleaner in the perforations on the wall or ceiling or any door surfaces. Rinse thoroughly and polish dry.
- WAVEGUIDE COVER: The waveguide cover is located on the ceiling in the oven cavity. It is made from mica so requires special care. Keep the waveguide cover clean to assure good oven performance. Carefully wipe with a damp cloth any food spatters from the surface of the cover immediately after they occur. Built-up splashes may overheat and cause smoke or possibly catch fire. DO NOT REMOVE THE WAVEGUIDE COVER. ODOR REMOVAL Occasionally, a cooking odor may remain in the oven. To remove, combine 1 cup water, grated peel and juice of 1 lemon and several whole cloves in a 2-cup glass measuring cup. Boil for several minutes using 100% power. Allow to set in oven until cool. Wipe interior with a soft cloth.
- TURNTABLE/TURNTABLE SUPPORT: The ceramic turntable and turntable support can be removed for easy cleaning. Wash them in mild, sudsy water; for stubborn stains use a mild cleanser and scouring sponge as described above. They are also dishwasher-safe using top rack.

- OVEN RACKS: The high and low baking racks can be removed for easy cleaning and stored away from the microwave oven when racks are not needed. After each use, wash them in mild, sudsy water. For any stubborn stains, use a mild kitchen cleanser and scouring sponge as described above. They are dishwasher-proof.

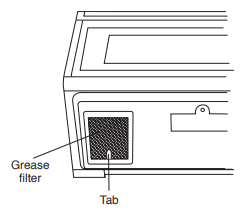
GREASE FILTERS
Filters should be cleaned at least once a month. Never operate the fan or oven without the filters in place.
- Pull the tab toward the front of the oven, down slightly and remove the filter. Repeat for the other filter.
- Soak the filters in a sink or dish pan filled with hot water and detergent. DO NOT use ammonia or other alkali; they will react with the filter material and darken it.
- Agitate and scrub with a brush to remove embedded dirt.
- Rinse thoroughly and shake dry.
- Replace by fitting the filter back into the opening.
FAN
The fan will automatically start when heat rises from range surface units or burners and when convection, high mix, low mix or the broil settings are used. This protects the microwave oven from excessive temperature rise. The fan will stay on until the temperature decreases. It cannot be turned off manually during this time.
For other uses, select either high or low speed.
PRECAUTIONS FOR PROPER USE:
- DO NOT leave range unattended while using high temperatures. Automatic fan may start and provide excessive air to the surface units. This may cause spattering or boilover.
- Avoid burning food.
- Keep grease filters clean.
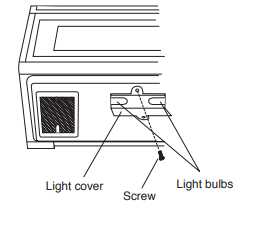
LIGHT
- To replace light bulbs, first disconnect power to the oven at the circuit breaker panel or by unplugging.
- To release cover remove the screw on the light cover. (See illustration.)
- Replace bulbs only with equivalent watt bulbs available from a Sharp Authorized Servicer or parts distributor. Bulbs are also available at most hardware stores or lighting centers. DO NOT USE A BULB LARGER THAN 30 WATTS.
- Close light cover and secure with screw removed in step 2.
CAUTION: Light cover may become very hot. Do not touch glass when light is on. Do not use light as a night light.
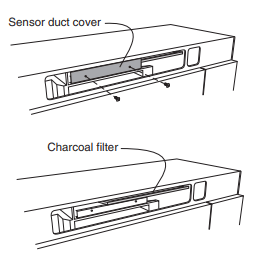
CHARCOAL FILTER
Charcoal Filter, Sharp Part Number RK-220 is used for Non-vented, recirculated installation. The filter should be changed every 6 to 12 months depending on use.
- Disconnect power to the oven at the circuit breaker panel or by unplugging.
- Remove 3 screws that secure louver.
- Remove louver by inserting flat edge screwdriver over each tab pressing the tab down and moving louver away from unit.
- Pull the louver away from the oven.
- Remove 2 screws that secure the sensor duct cover.
- Remove the sensor duct cover.
- Remove old charcoal filter (if one is installed).
- Slide new Charcoal Filter into position on the support tabs.
- Reattach sensor duct cover and secure with 2 screws.
- Push louver back into place and gently snap tabs into place by hand (engaging both the bottom and top tabs) and replace the 3 screws to secure louver.
OVEN LIGHT
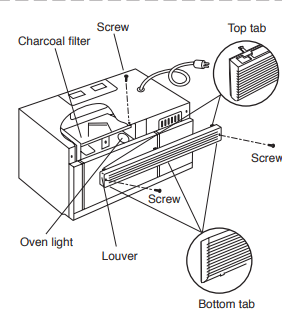
Remove the louver per instructions 1-4 above and charcoal filter, if used.
- Slide the light cover forward and lift up.
- Remove old light bulb and replace only with an equivalent watt bulb available from a Sharp Authorized Servicer or parts distributor. Bulbs are also available at most hardware stores or lighting centers. DO NOT USE A BULB LARGER THAN 30 WATTS.
- Replace the oven light cover and charcoal filter, if used; push louver back in place (engaging both the bottom and top tabs) and replace the louver mounting screws.
SERVICE CALL CHECK
Please check the following before calling for service:
1. Place one cup of water in a glass measuring cup in the oven and close the door securely. Operate the oven for two minutes at HIGH 100%.
- A. Does the light come on in the oven? YES _____ NO _____
- B. Does the cooling fan work? YES _____ NO _____ (Put your hand over the top ventilation openings.)
- C. Does the turntable rotate when the Turntable On/Off YES _____ NO _____ pad is touched and TURNTABLE ON is in the display? (It is normal for the turntable to turn in either direction when TURNTABLE ON is in the display.)
- D. Is the water in the oven warm? YES _____ NO _____
- E. Does “H” appear on the display when fan is manually turned on? YES _____ NO _____
2. Remove the water from the oven and program: 
- A. Do CONV and COOK light? YES _____ NO _____
- B. After the oven shuts off, is the inside of the oven hot? YES _____ NO _____
If “NO” is the answer to any of the above questions, please check electrical outlet, fuse and/or circuit breaker. If either or both are not functioning properly, CONTACT YOUR NEAREST SHARP AUTHORIZED SERVICER. A microwave oven should never be serviced by a “do-it-yourself” repair person.
NOTE: If time appearing in the display is counting down very rapidly, check Demonstration Mode on page 26 and cancel.
SPECIFICATIONS
| AC Line Voltage: |
UL Rating: Single phase 120V, 60Hz, AC only
CSA Rating: Single phase 116V, 60Hz, AC only
|
| AC Power Required: |
UL Rating: 1600 W 13.2 amps.
CSA Rating: 1500 W 13.0 amps.
|
| Output Power Microwave*: |
850 W |
| Convection Heater: |
1400 W |
| Frequency |
2450 MHz |
| Outside Dimensions: |
29 15/16” (W) x 16 11/32” (H) x 15 9/32” (D) |
| Cavity Dimensions: |
17 1/8” (W) x 81/16” (H) x 13 13/16” (D) |
| Oven Capacity**: |
1.1 Cu.Ft. |
| Cooking Uniformity: |
Turntable, diameter 13” & Stirrer Fan |
| Weight |
Approx. 71 lbs |
★ The International Electrotechnical Commission’s standardized method for measuring output wattage. This test method is widely recognized.
★★ Internal capacity is calculated by measuring maximum width, depth and height. Actual capacity for holding food is less.