
Technical Support and E-Warranty Certificate www.vevor.com/support
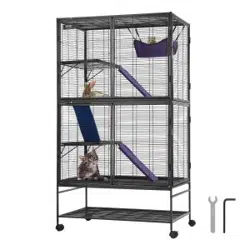
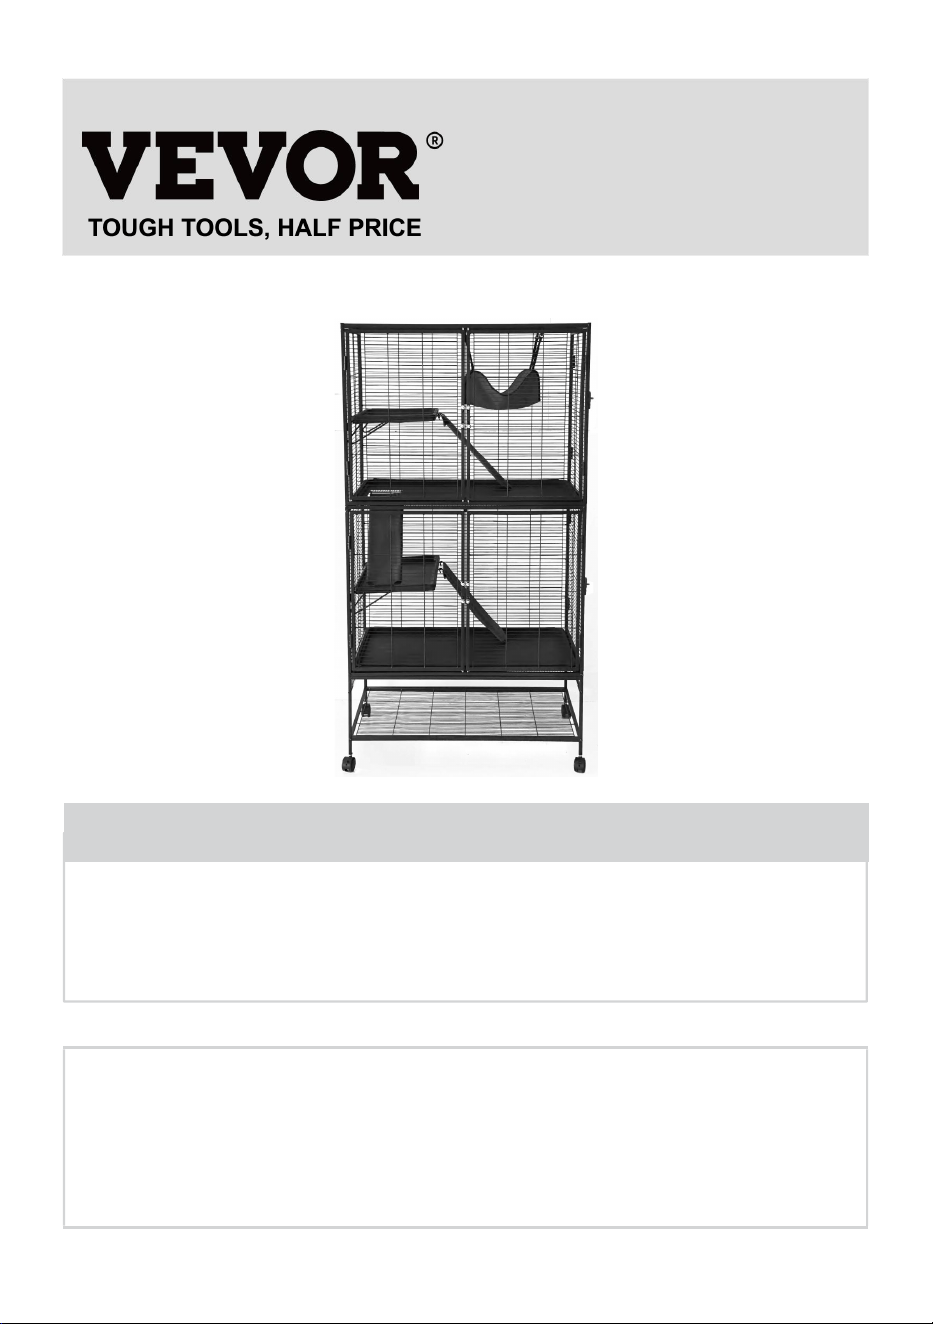
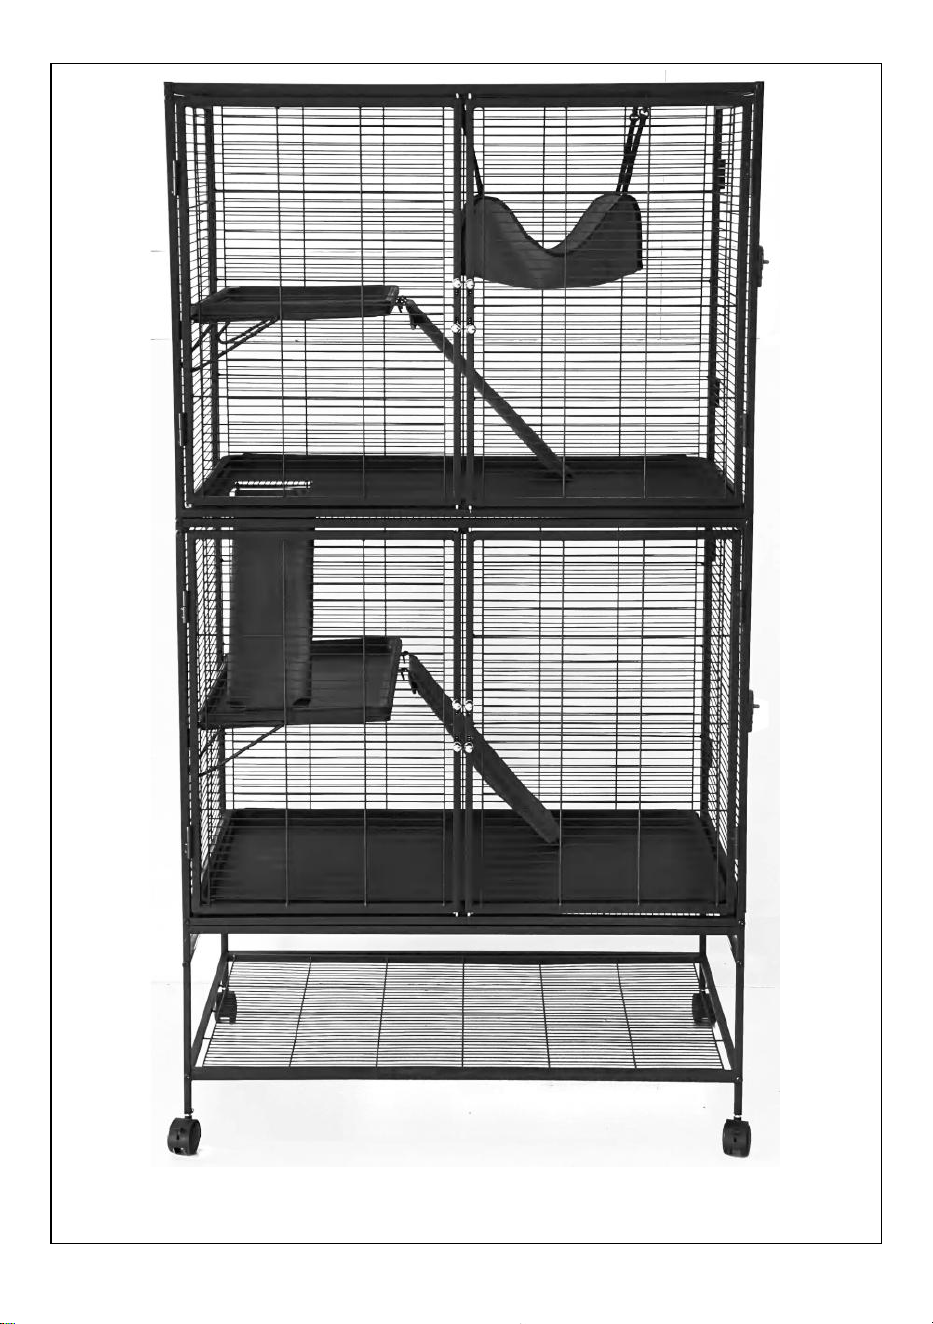
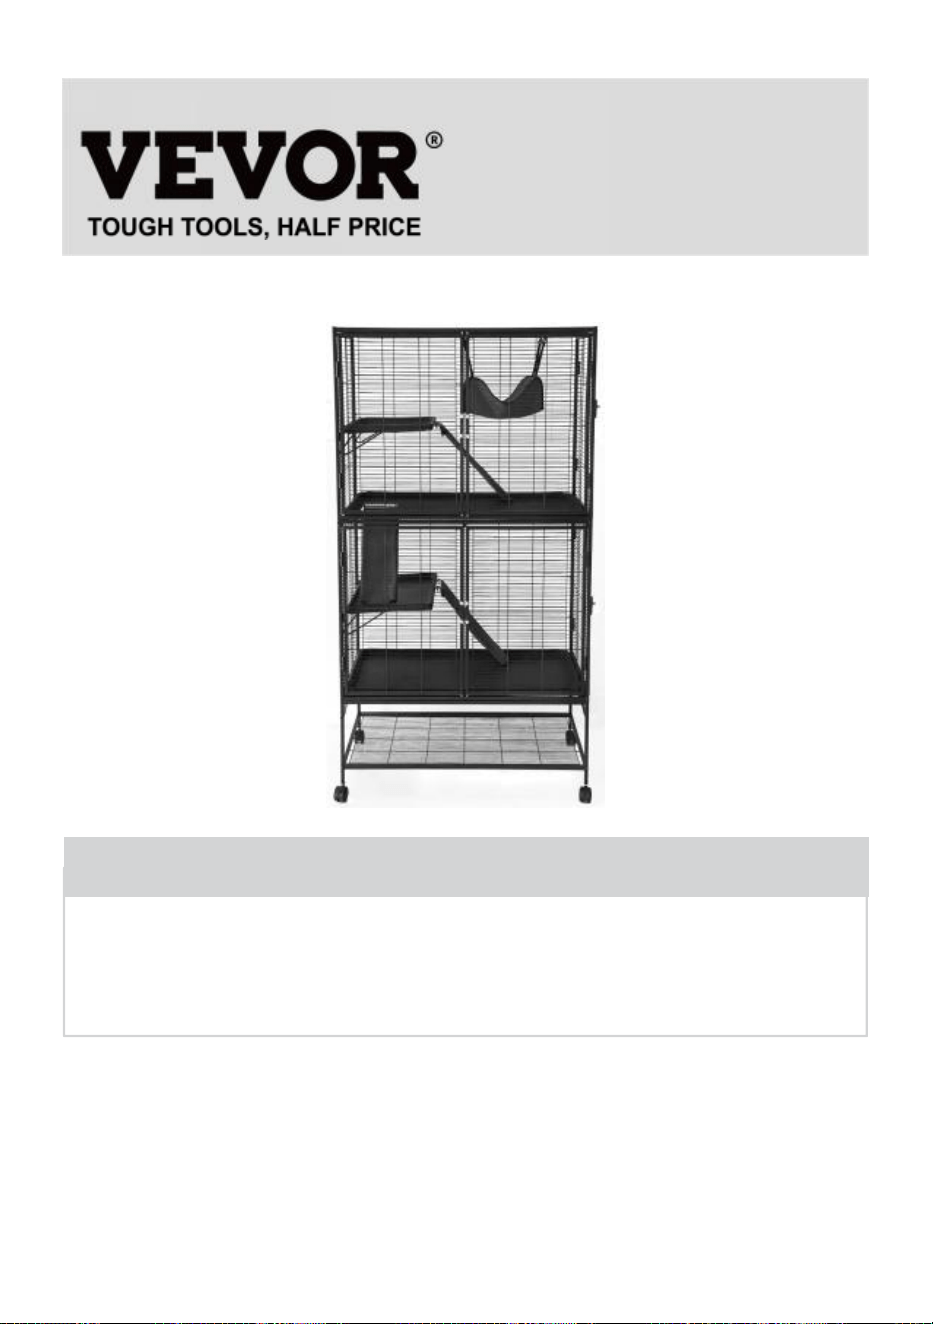
METAL FERRET CAGE
USER MANUAL
We continue to be committed to provide you tools with competitive price.
"Save Half","Half Price" or any other similar expressions used by us only represents an
estimate of savings you might benefit from buying certain tools with us compared to the major
top brands and does not necessarily mean to cover all categories of tools offered by us. You
are kindly reminded to verify carefully when you are placing an order with us if you are
actually saving half in comparison with the top major brands.

1
JM-XC-084
Have product questions? Need technical support? Please feel free to
contact us:
Technical Support and E-Warranty Certificate
www.vevor.com/support
NEED HELP? CONTACT US!
This is the original instruction,please read all manual instructions carefully
before operating. VEVOR reserves a clear interpretation of our user
manual. The appearance of the product shall be subject to the product
you received. Please forgive us that we won't inform you again if there
are any technology or software updates on our product.
METAL
FERRET CAGE

2
Safety precautions
WARNING:
Read this instructions before using this product. Failure to do so can result in
serious injury. the basic precautions should always be followed,including the
following:
1. The metal ferret cage may not be used or stored in hazardous areas. It is not
allowed to use the appliance in hazardous locations.
2. The metal ferret cage must be checked to ensure that it is in proper working
order and is operating safely prior to use. Otherwise,the appliance must not be
used.
3. Please press the brakes of the wheel gram to prevent Meta ferret from
moving.
4. The operator must use the metal ferret cage properly. He must consider the
local conditions and must pay attention to third parties,in particular children,when
working with the metal ferret cage.
5. This metal ferret cage is not intended for use by persons (including children)
with reduced physical,sensory or mental abilities or lacking experience and/or
knowledge,unless they are super- vised by a person responsible for their safety or
are instructed by these persons on the use of the device. Children should be
supervised,to ensure that they do not play with the metal ferret cage.
SAVE THESE INSTRUCTIONS
3
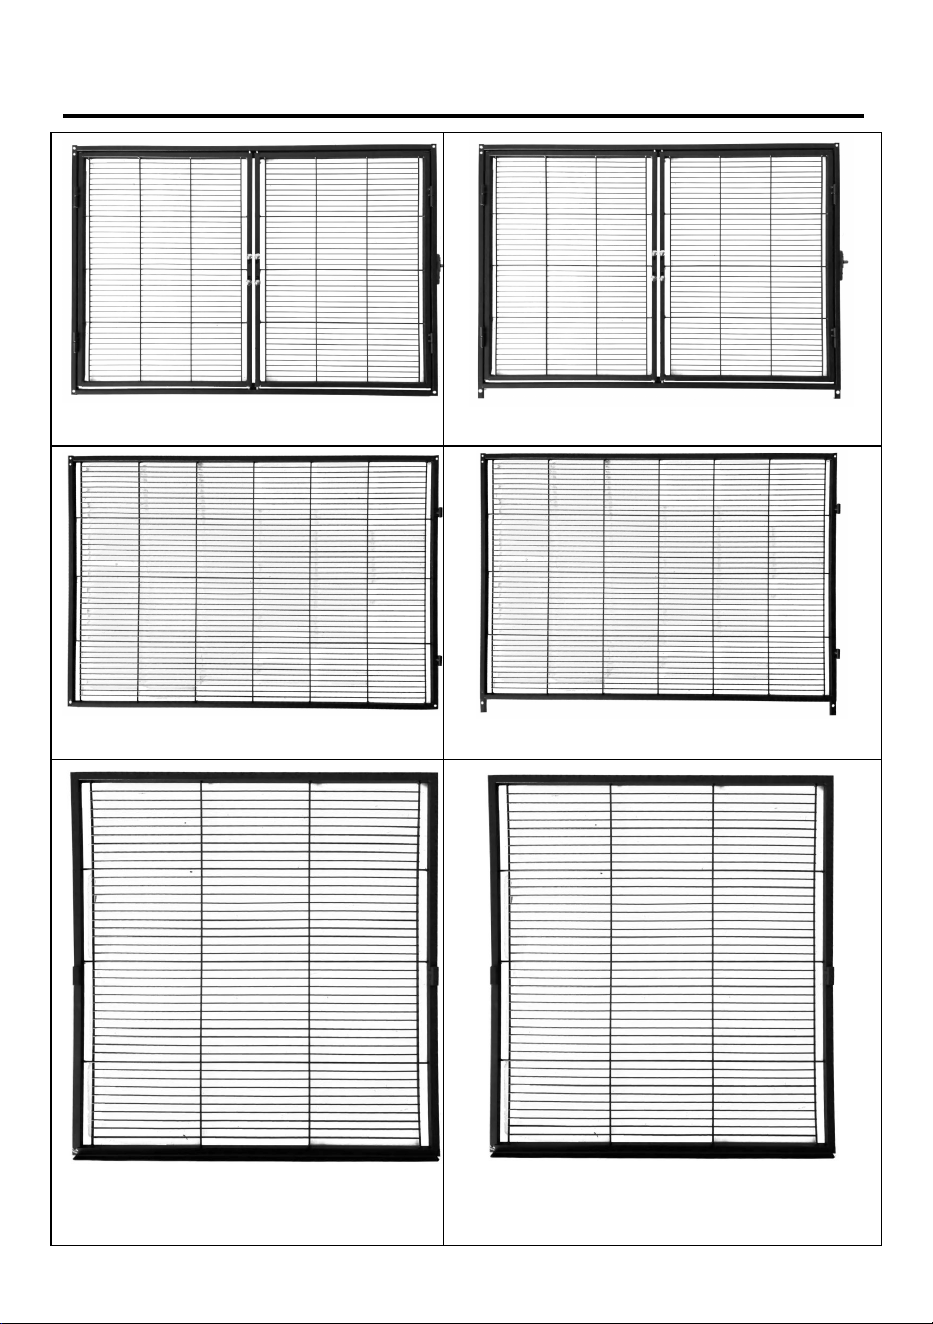
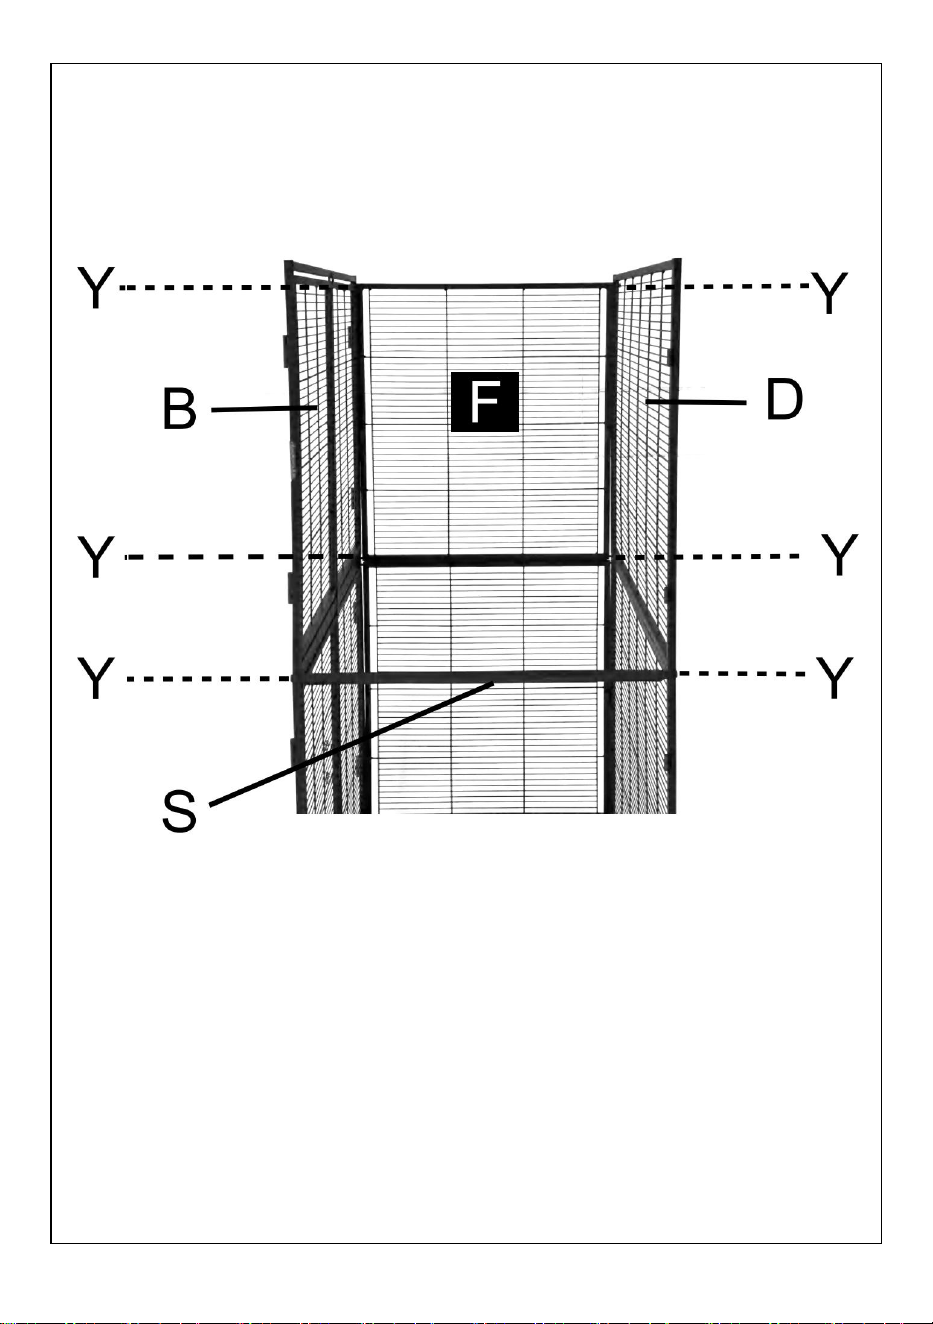
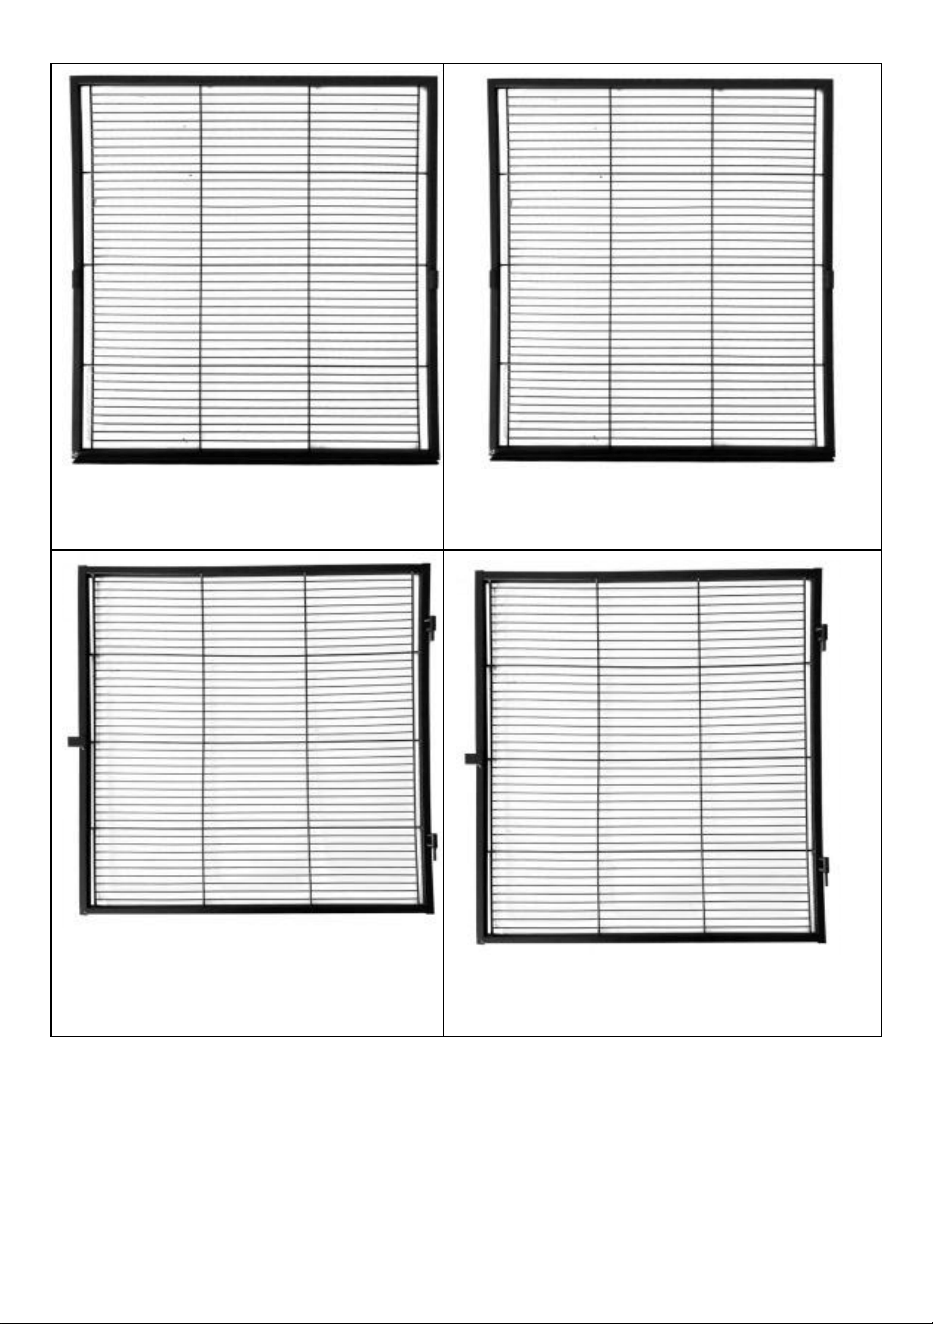
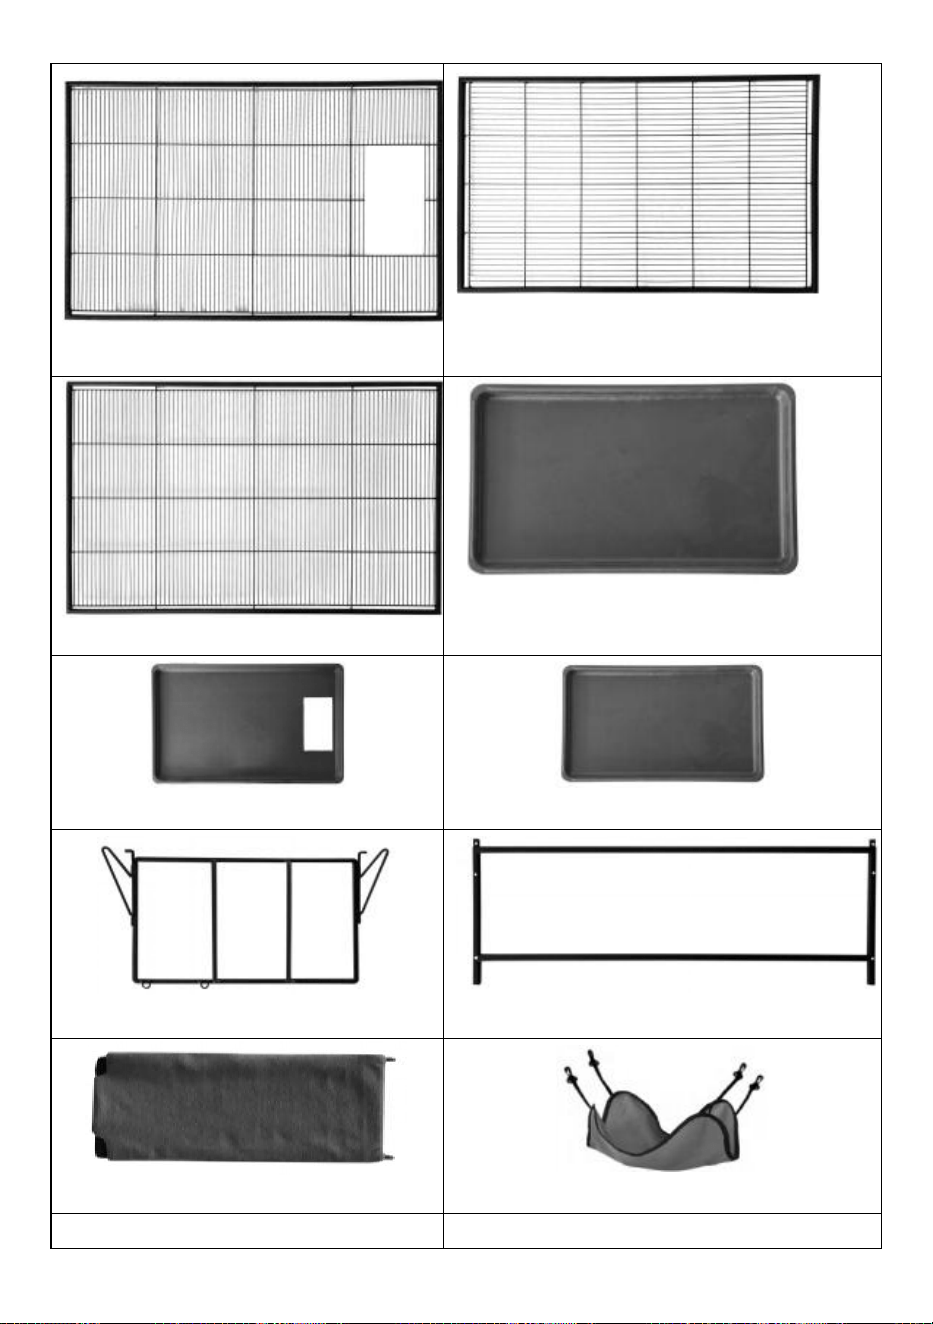
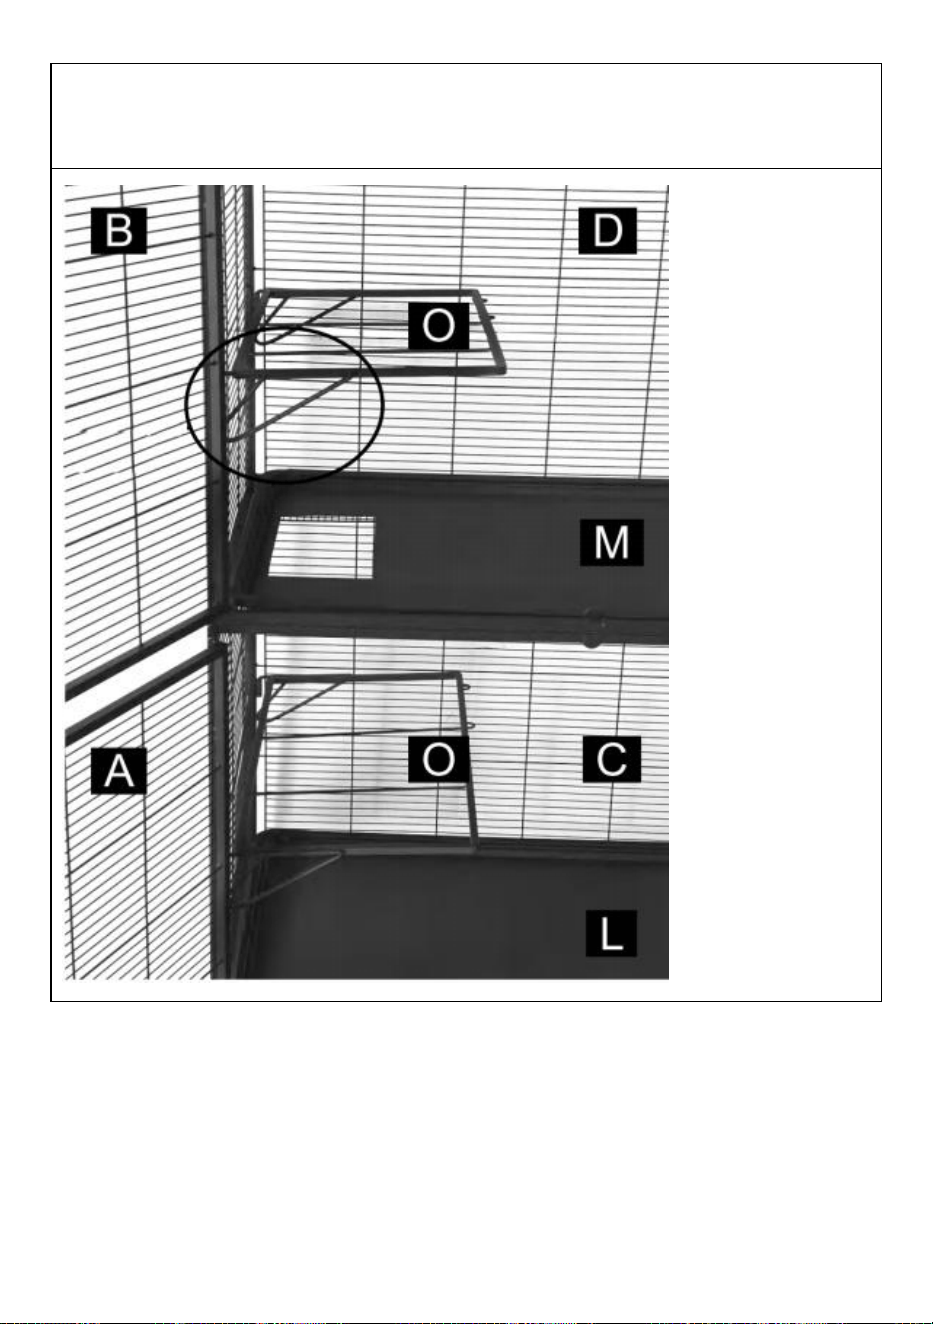
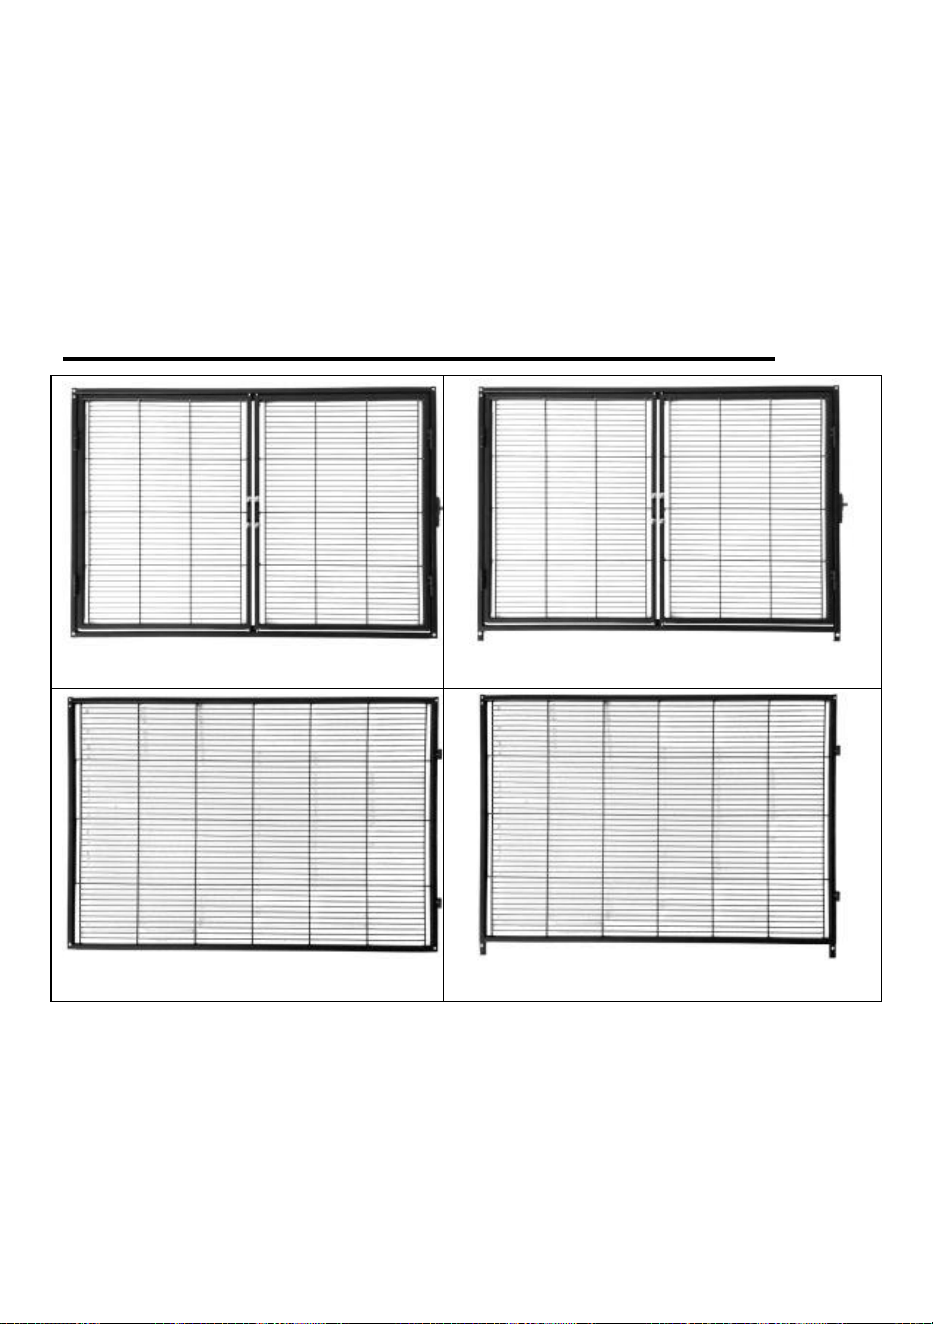
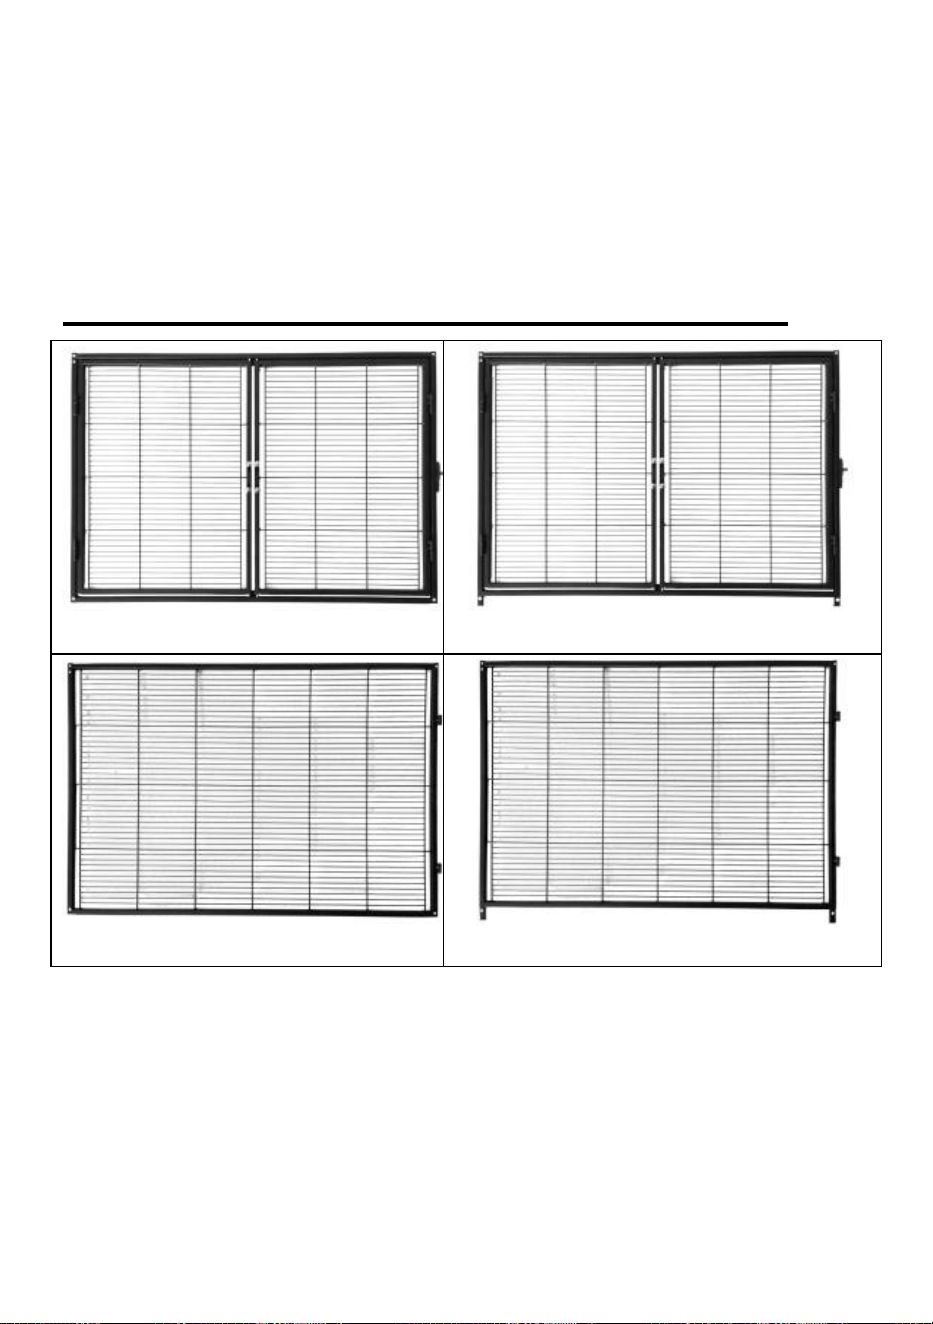
Product List
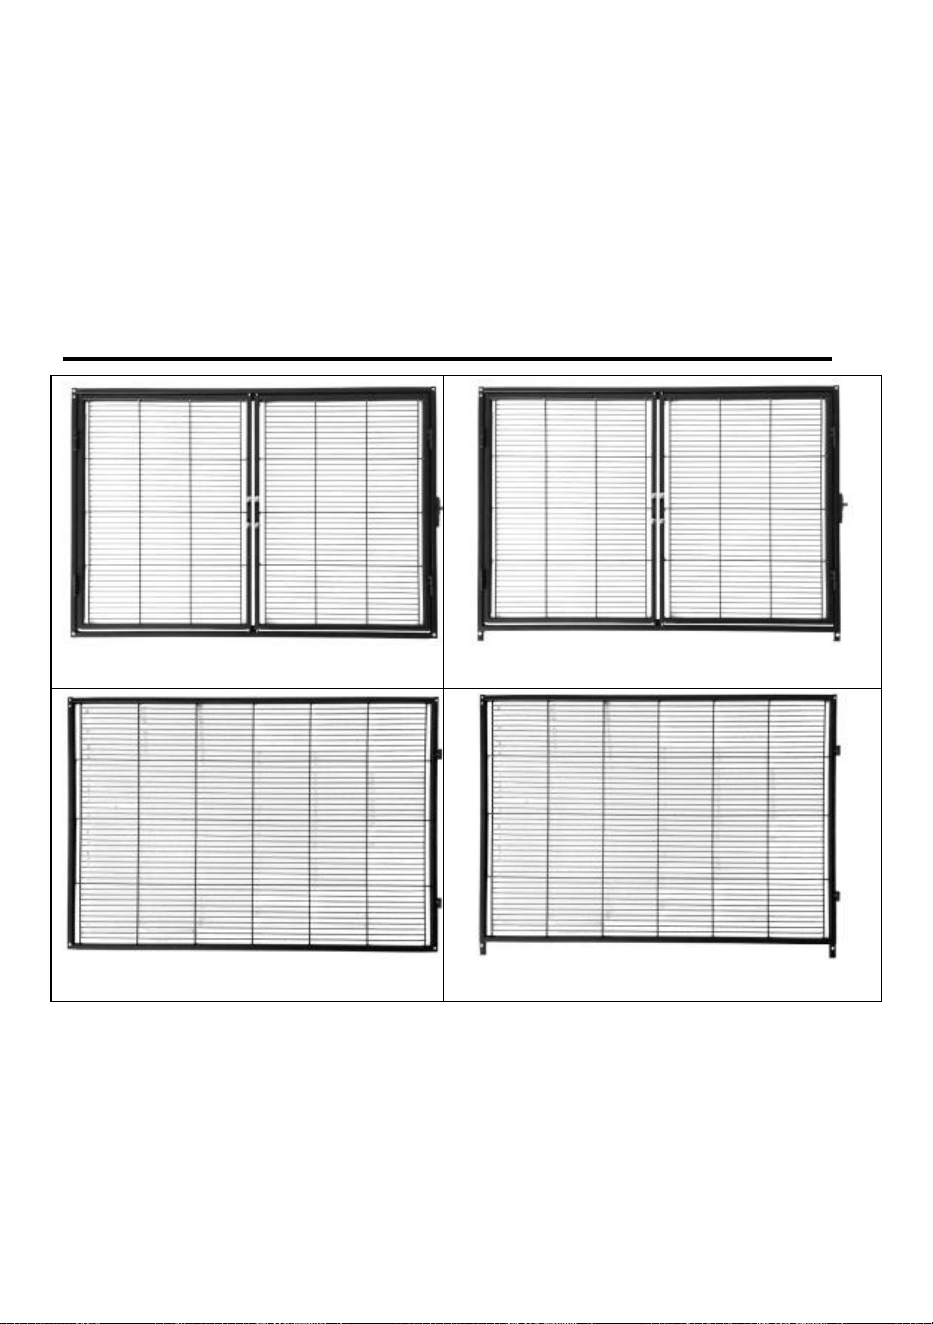
A Lower Front Panel
B Upper Front Panel
C Lower Back Panel
D Upper Back Panel
E Lower Side Panel
55X62.5 cm
F Upper Side Panel
55X64 cm
4
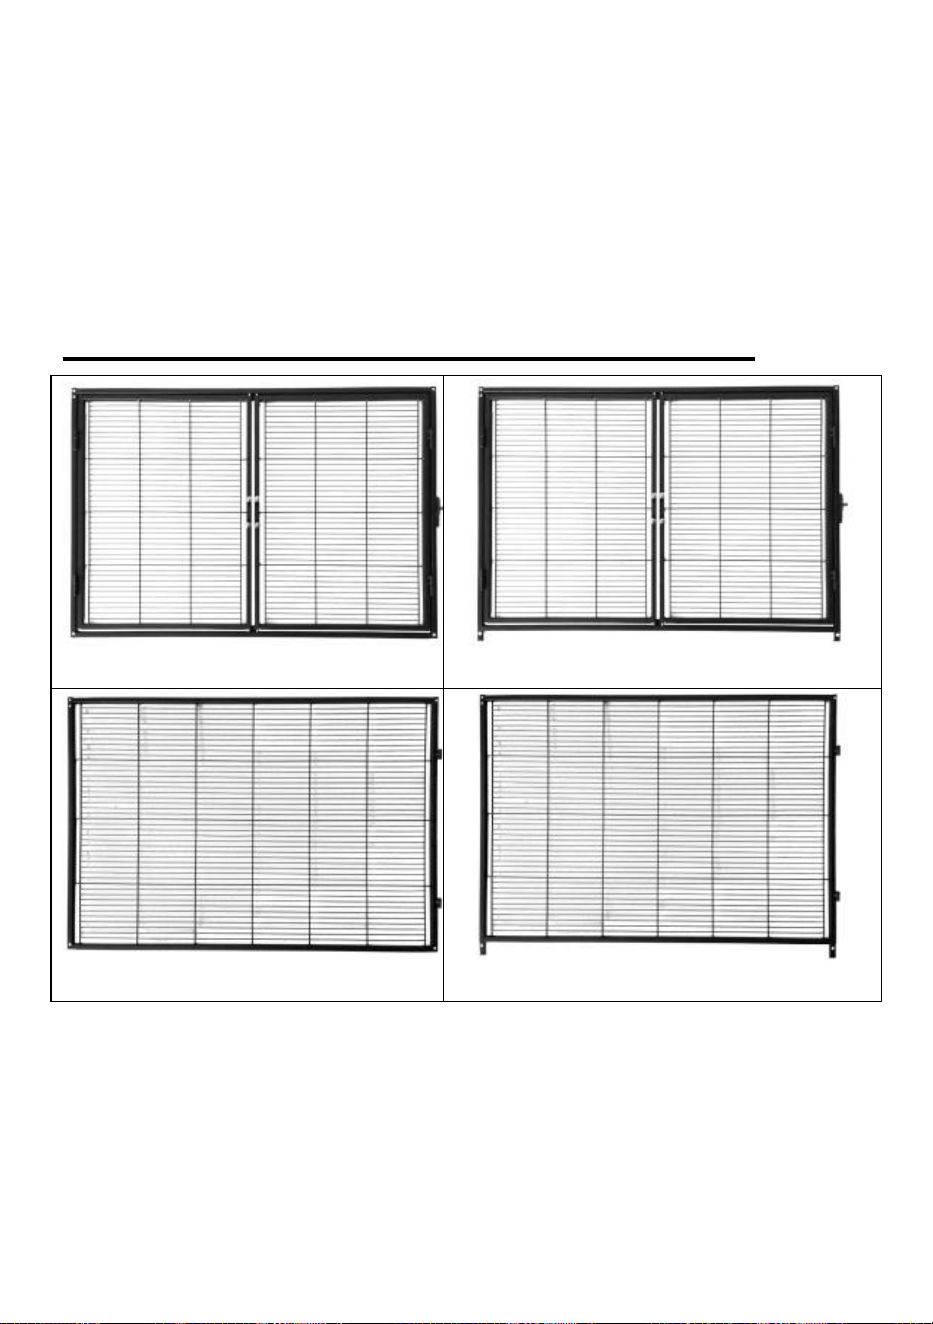
G Lower Door
54.5X60.5 cm
H Upper Door
54.5X62 cm
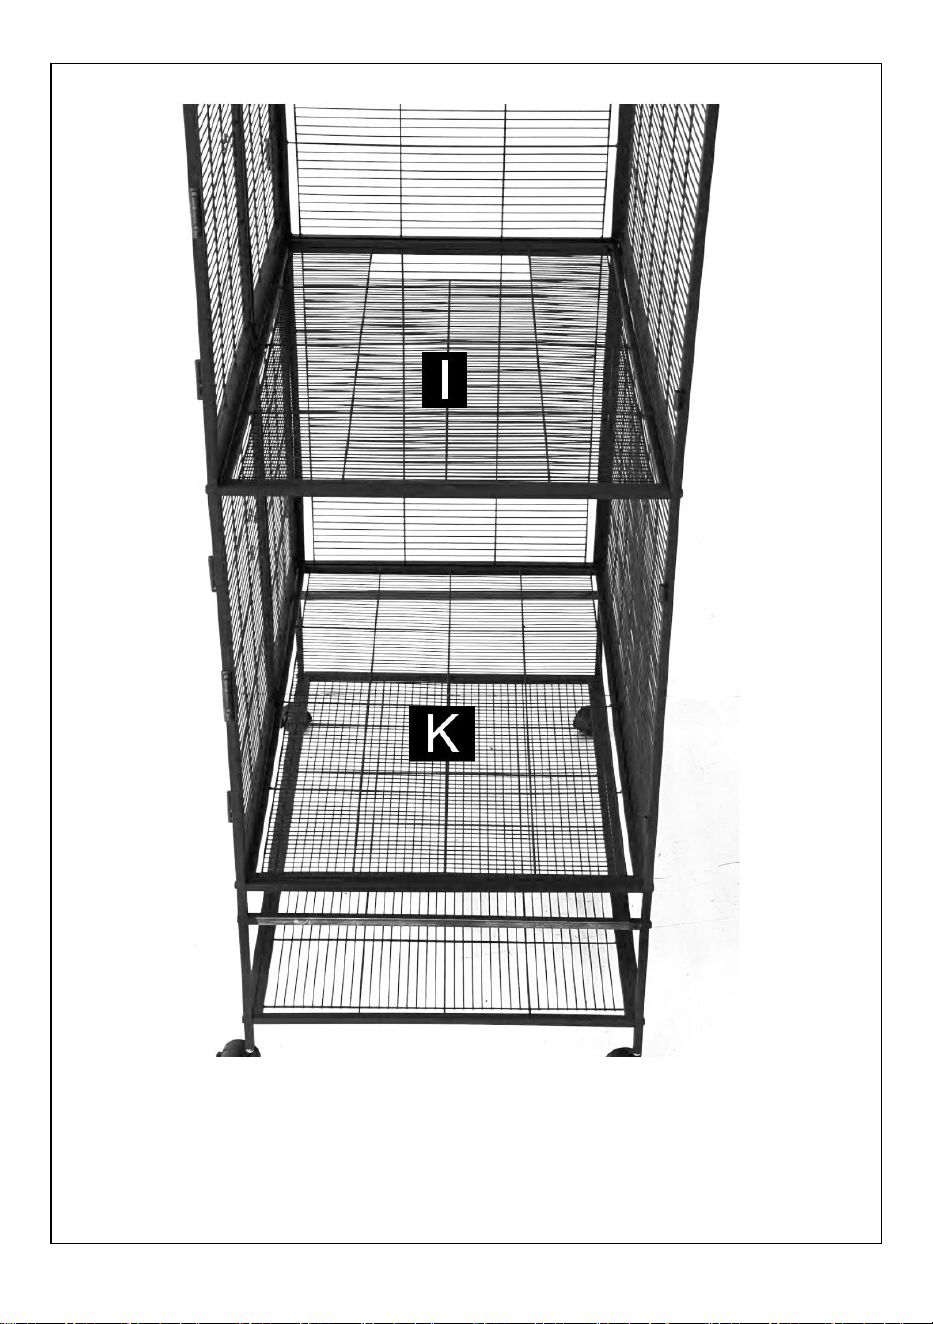
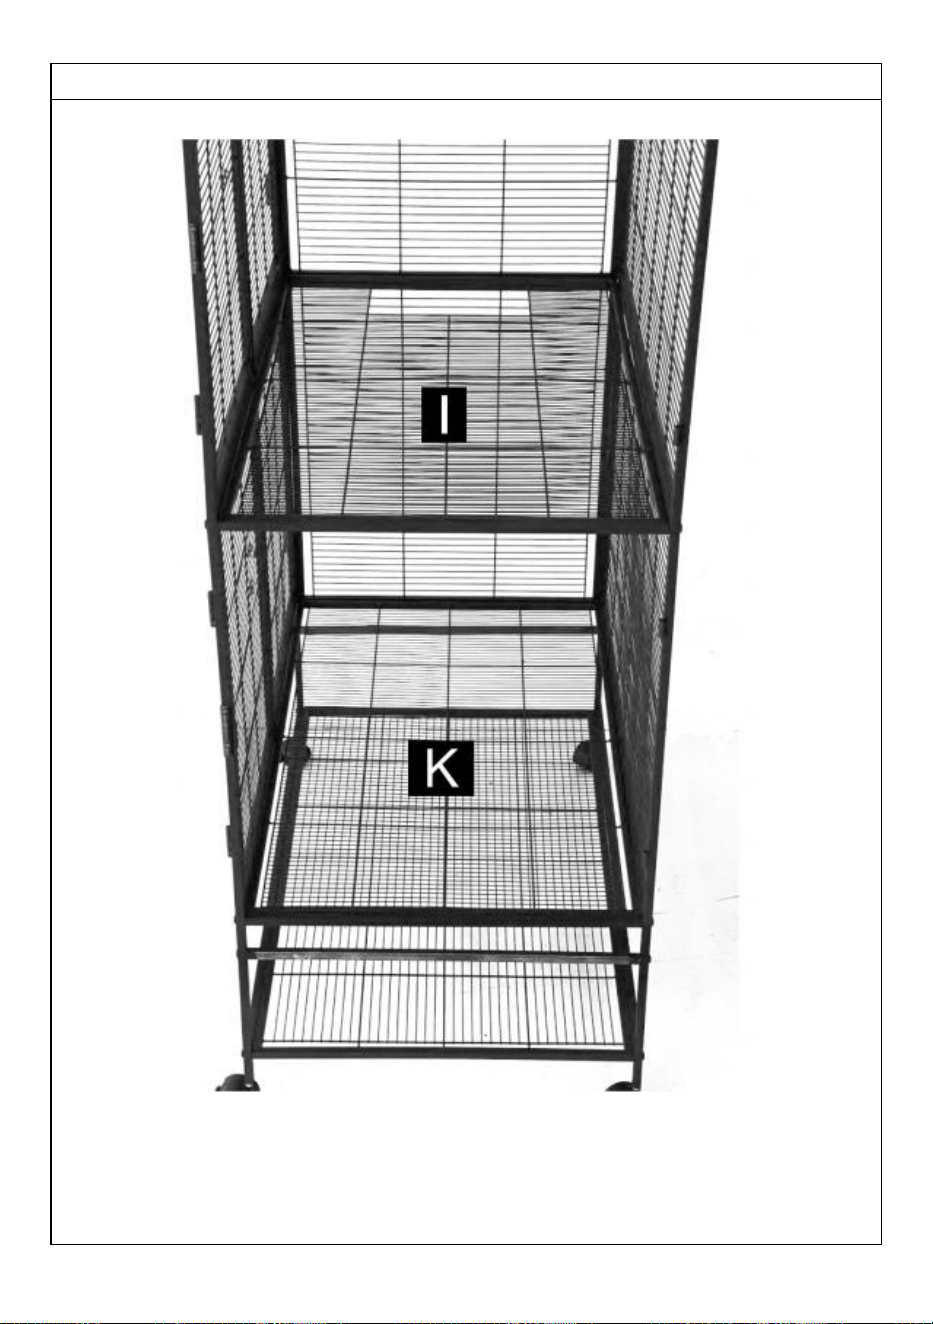
I Upper Bottom Panel
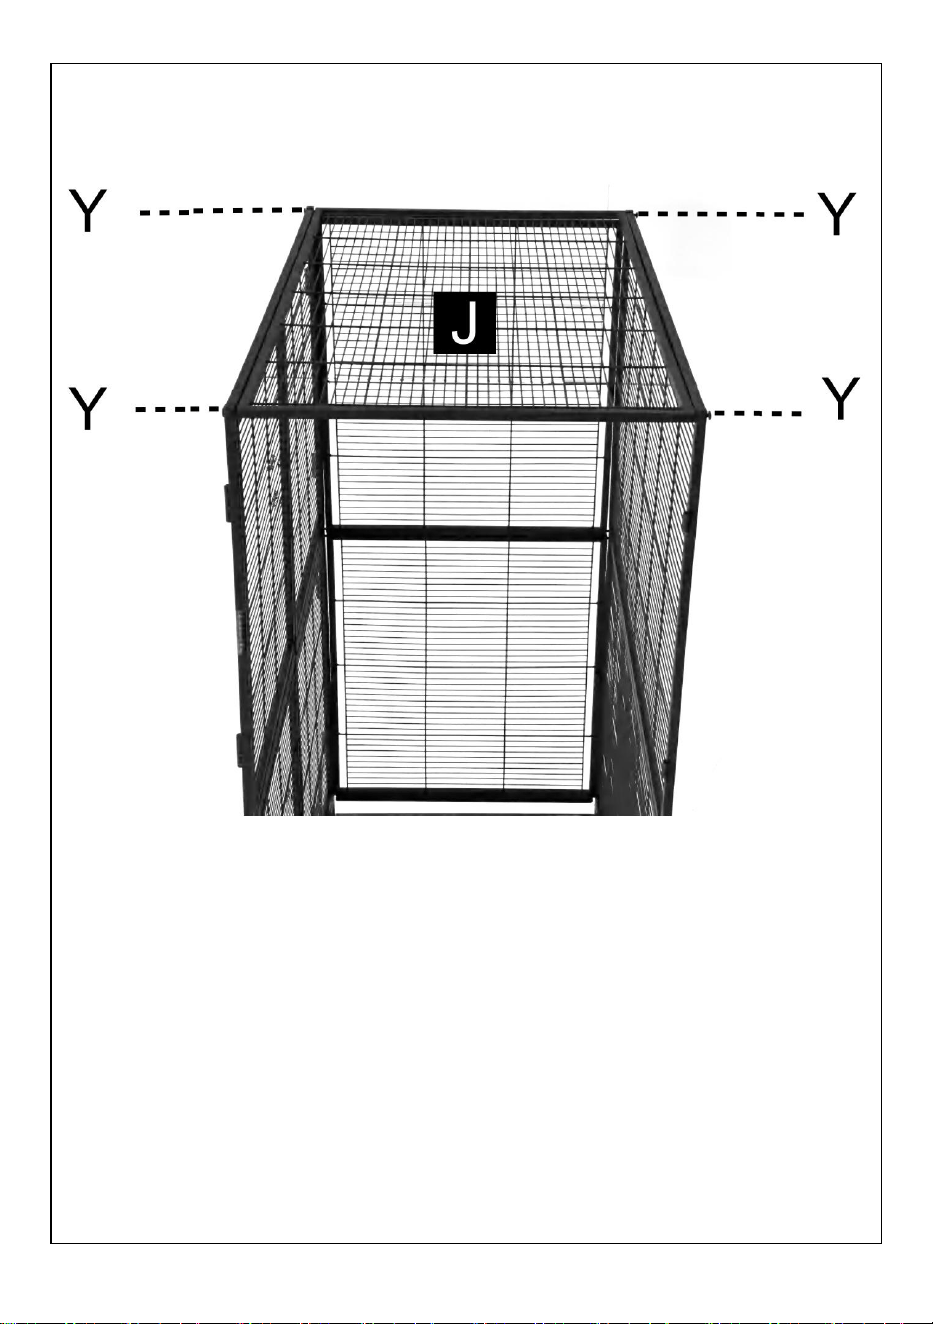
J*2 Roof & Lower Bottom Panel
92X55.3 cm
K Middle Botom Panel 89X55
cm
L
5
M
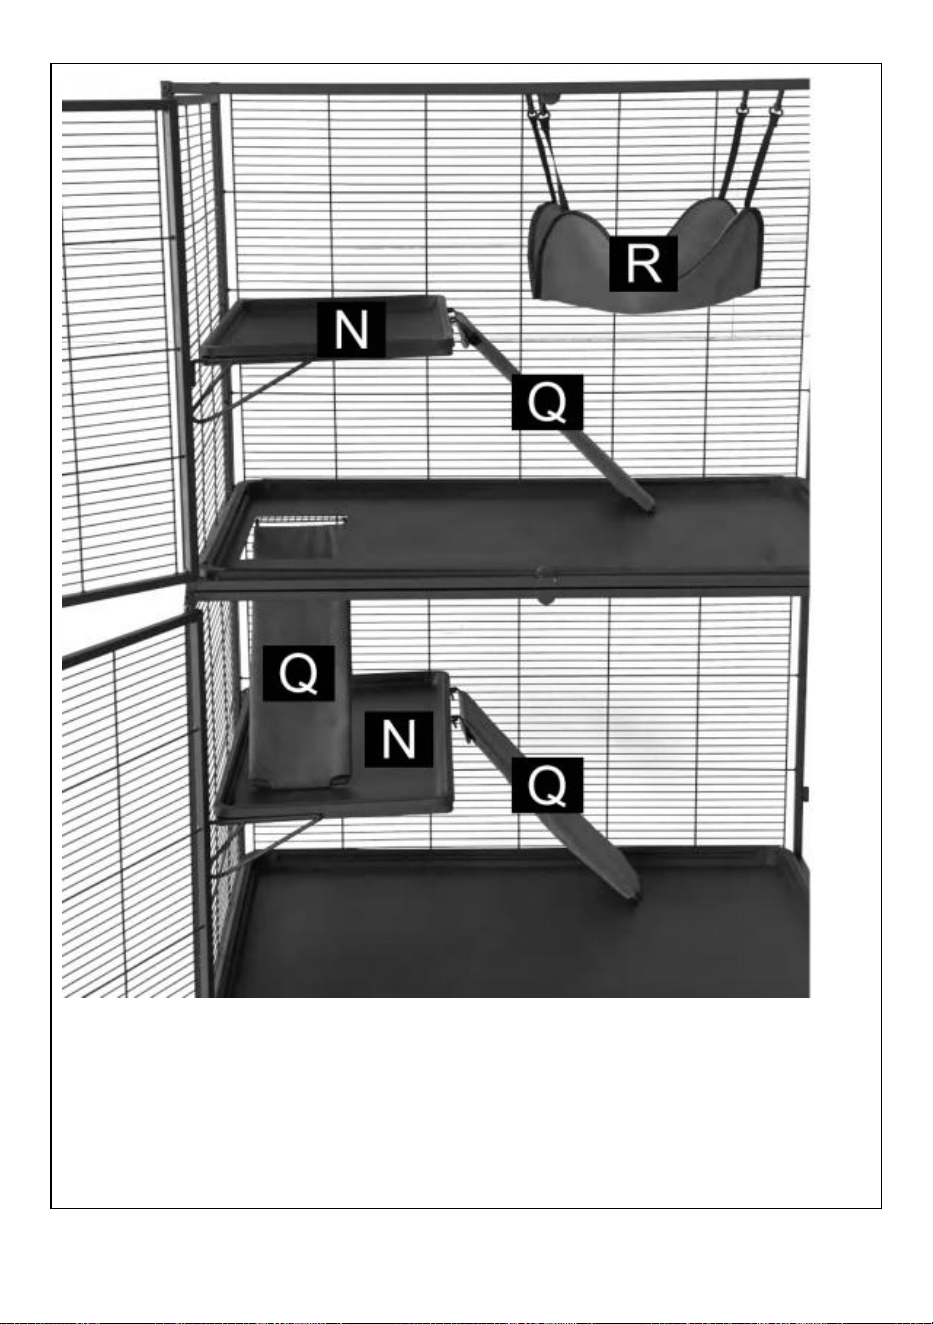
N*2
O
*2
P
*2
Q*3 Ramp With Covers
R Hammock
S*2
T*2
U*2
V*2
W
X
Y*24(longer)
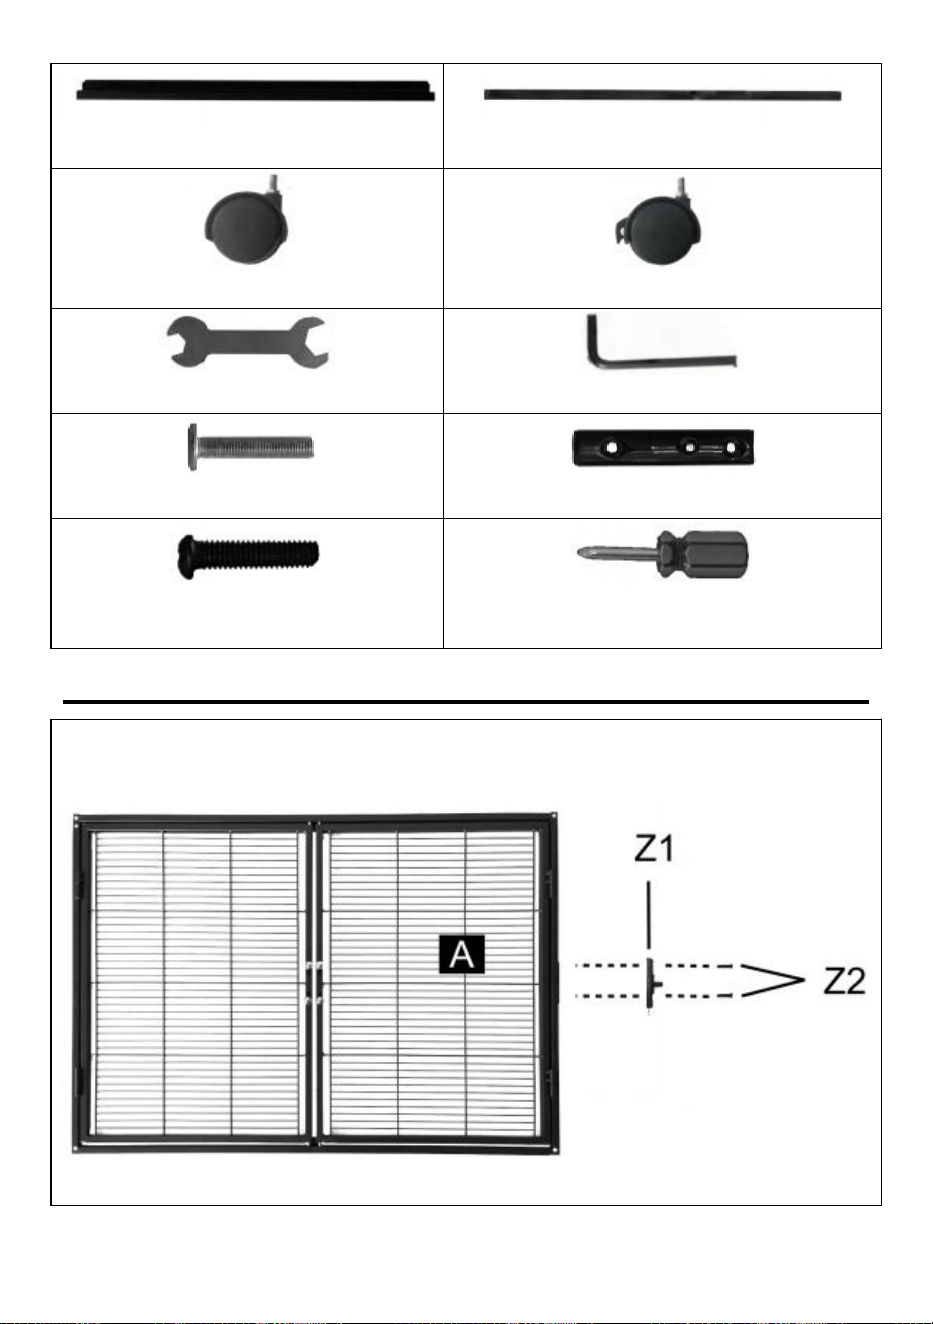
Z1*2
Z2*4(shorter)
Z3
6
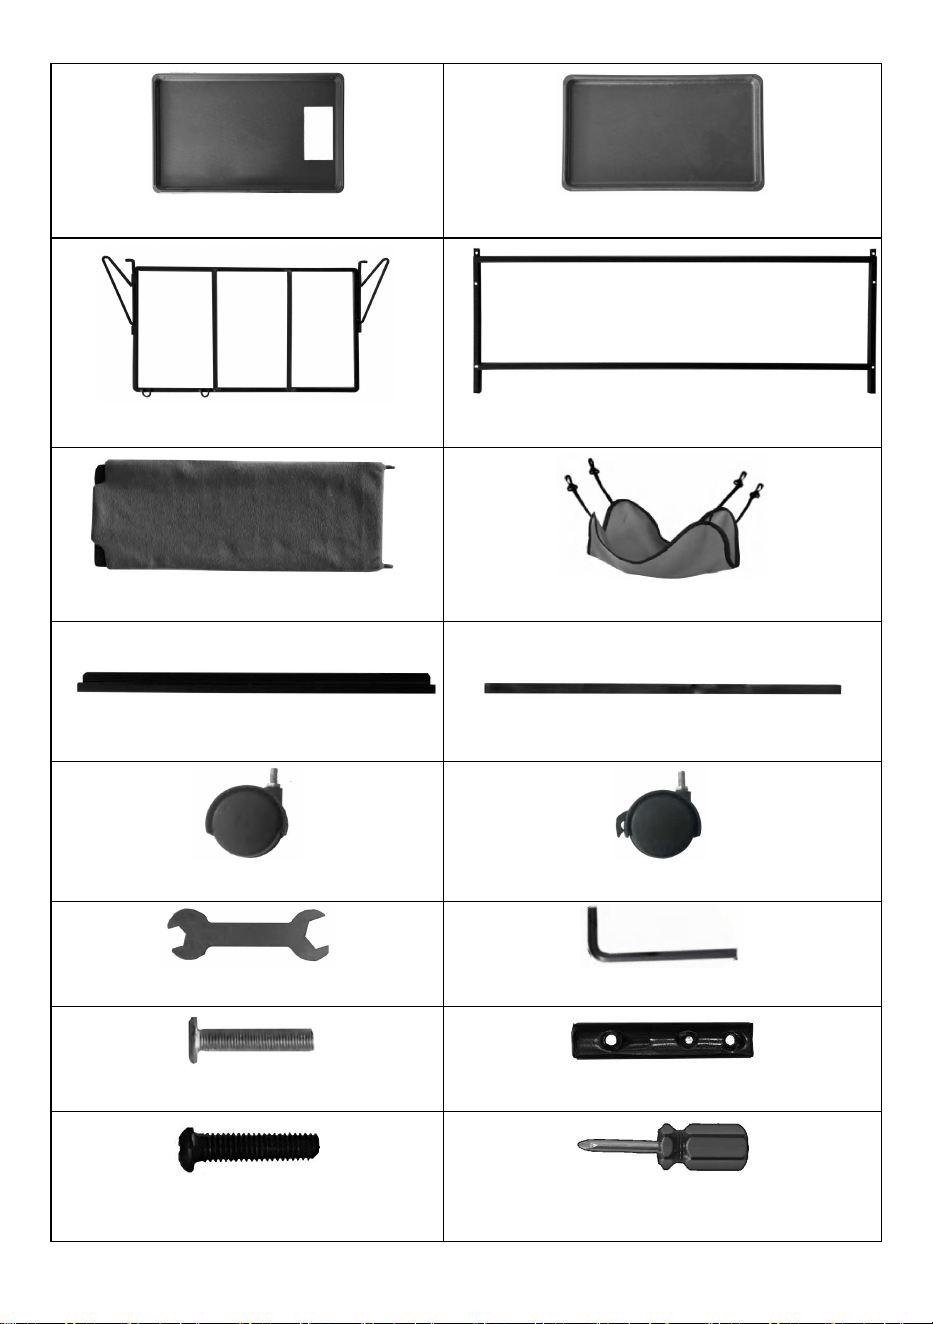
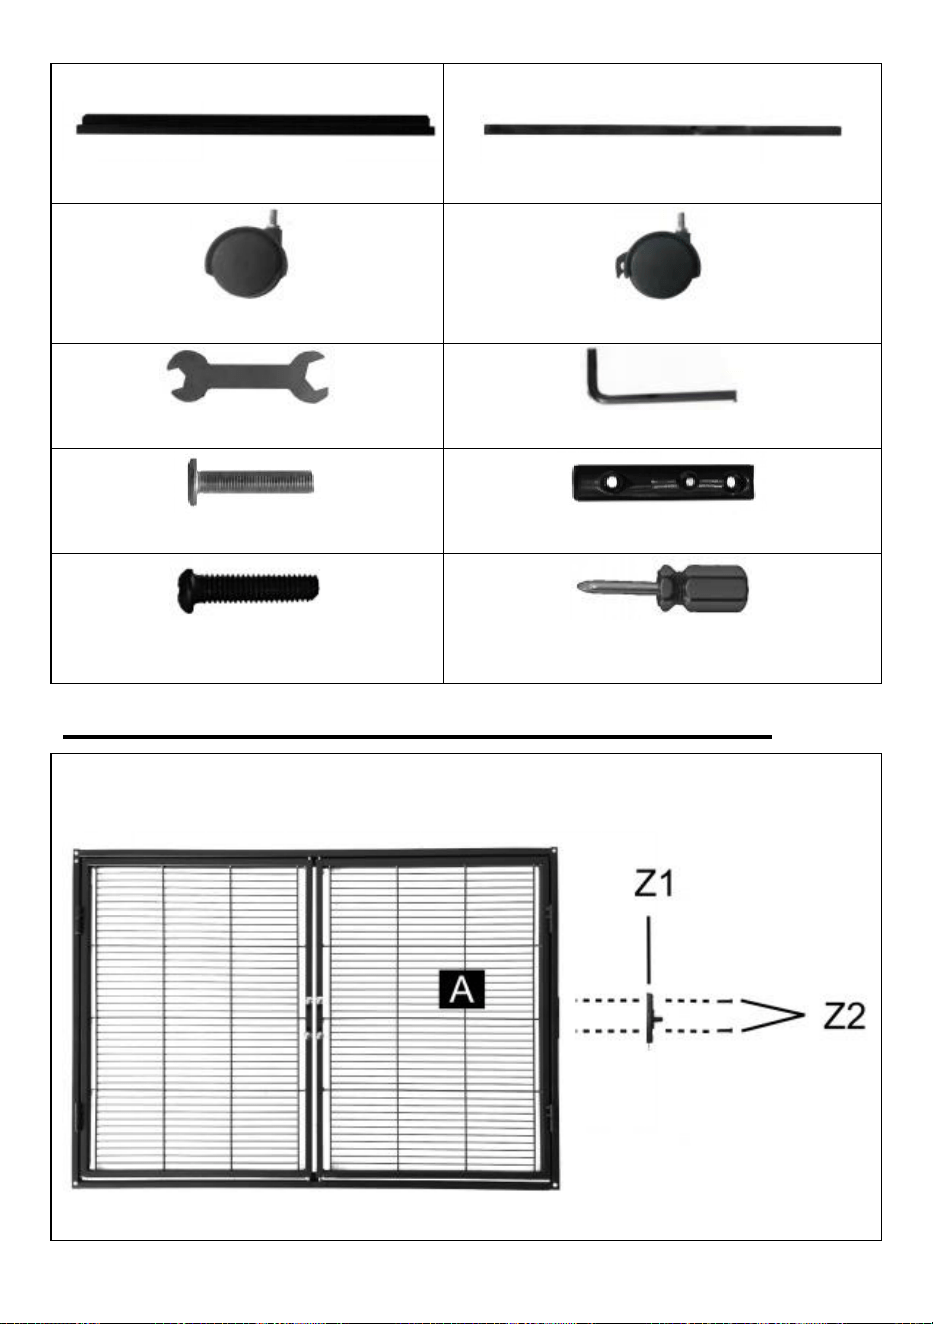
Product Description
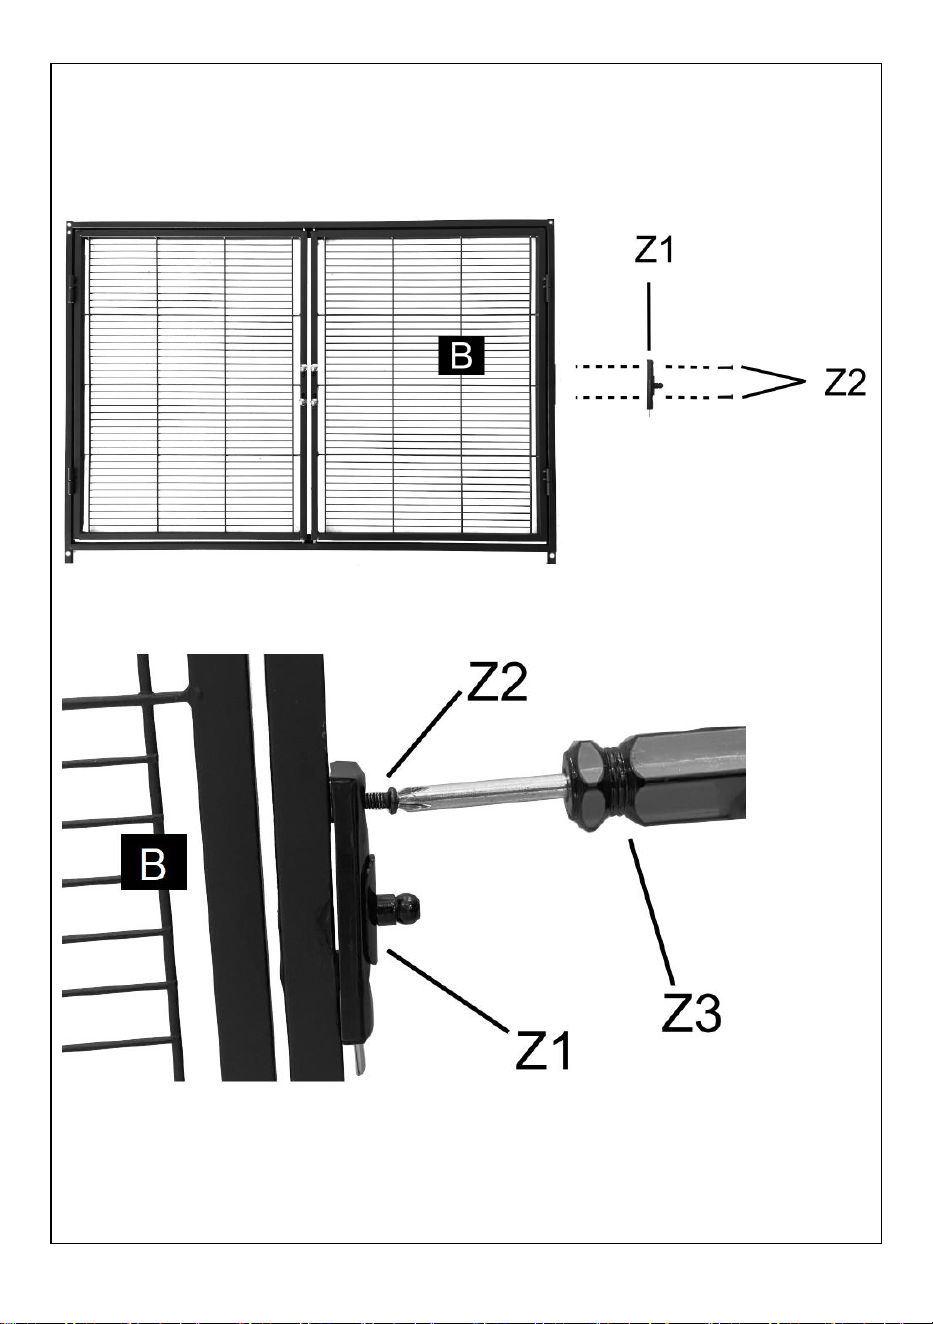
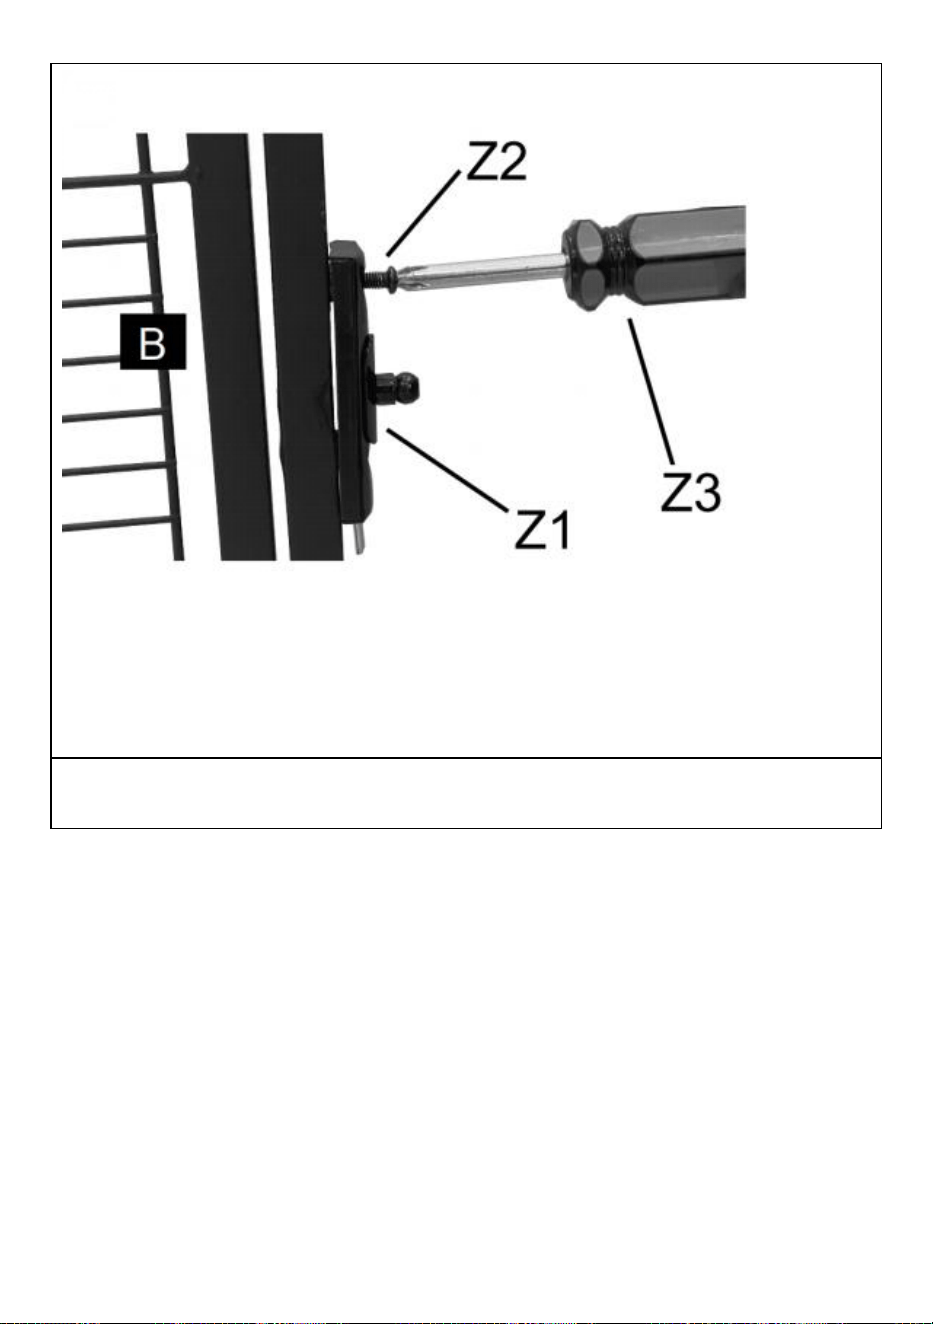
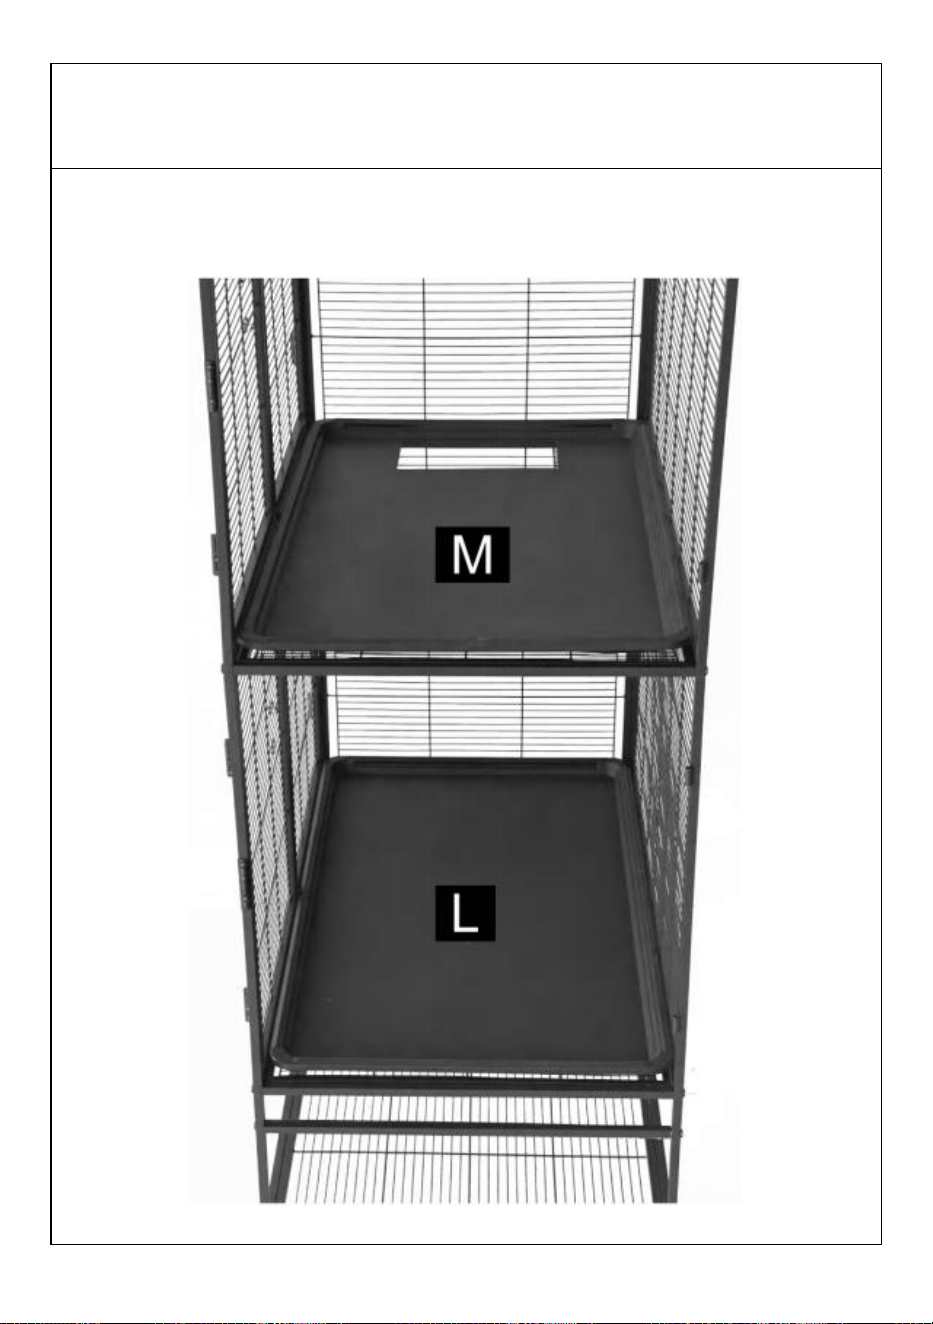
Using tool Z3, install the door lock Z1 with 2 screws Z2 on the front mesh A.
7
Using tool Z3, install the door lock Z1 with 2 screws Z2 on the front mesh B.
8
Tips:Do not tighten screws fully until all parts are connected!
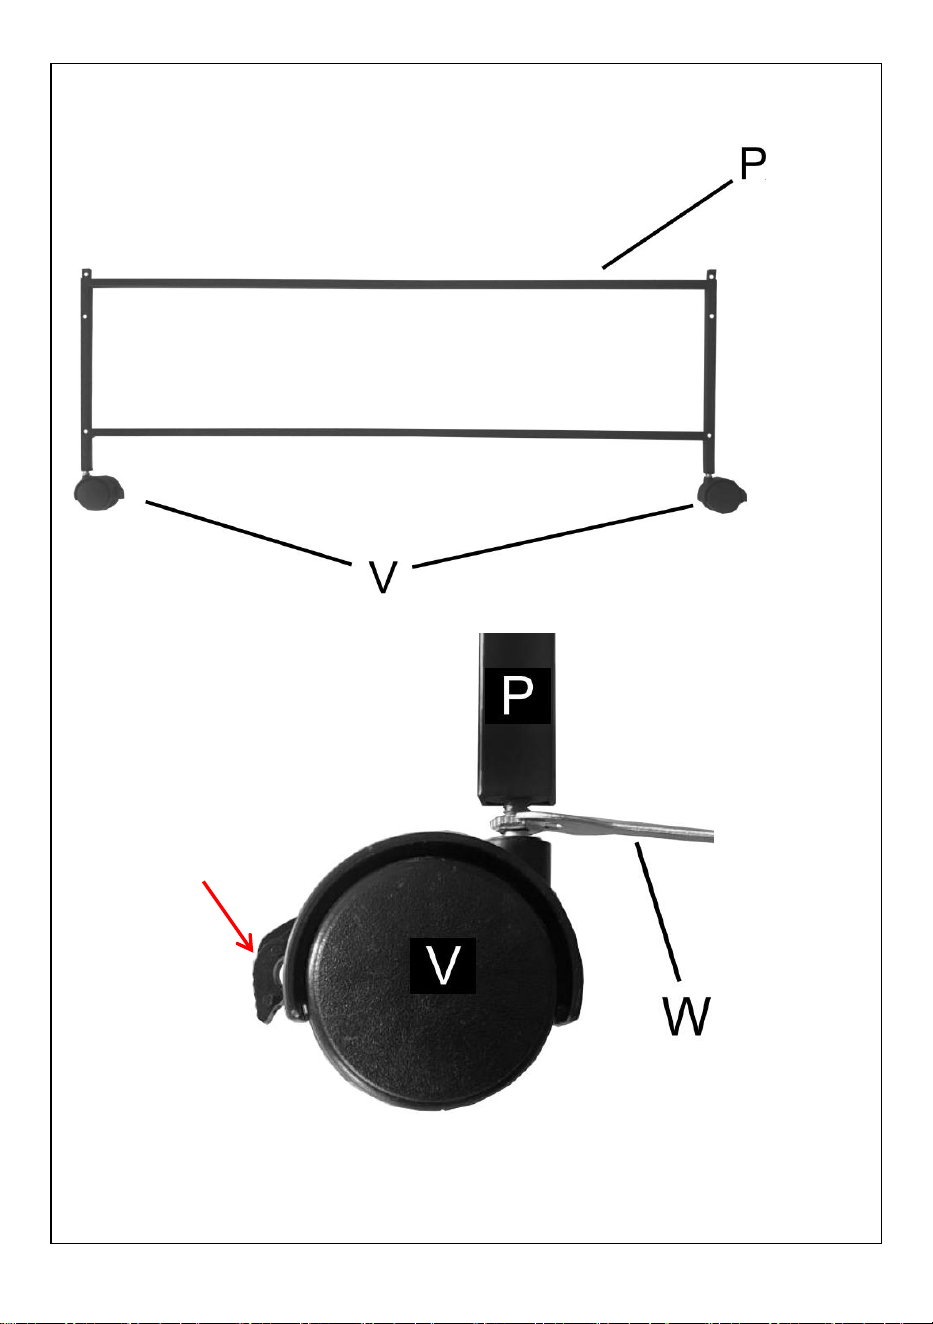
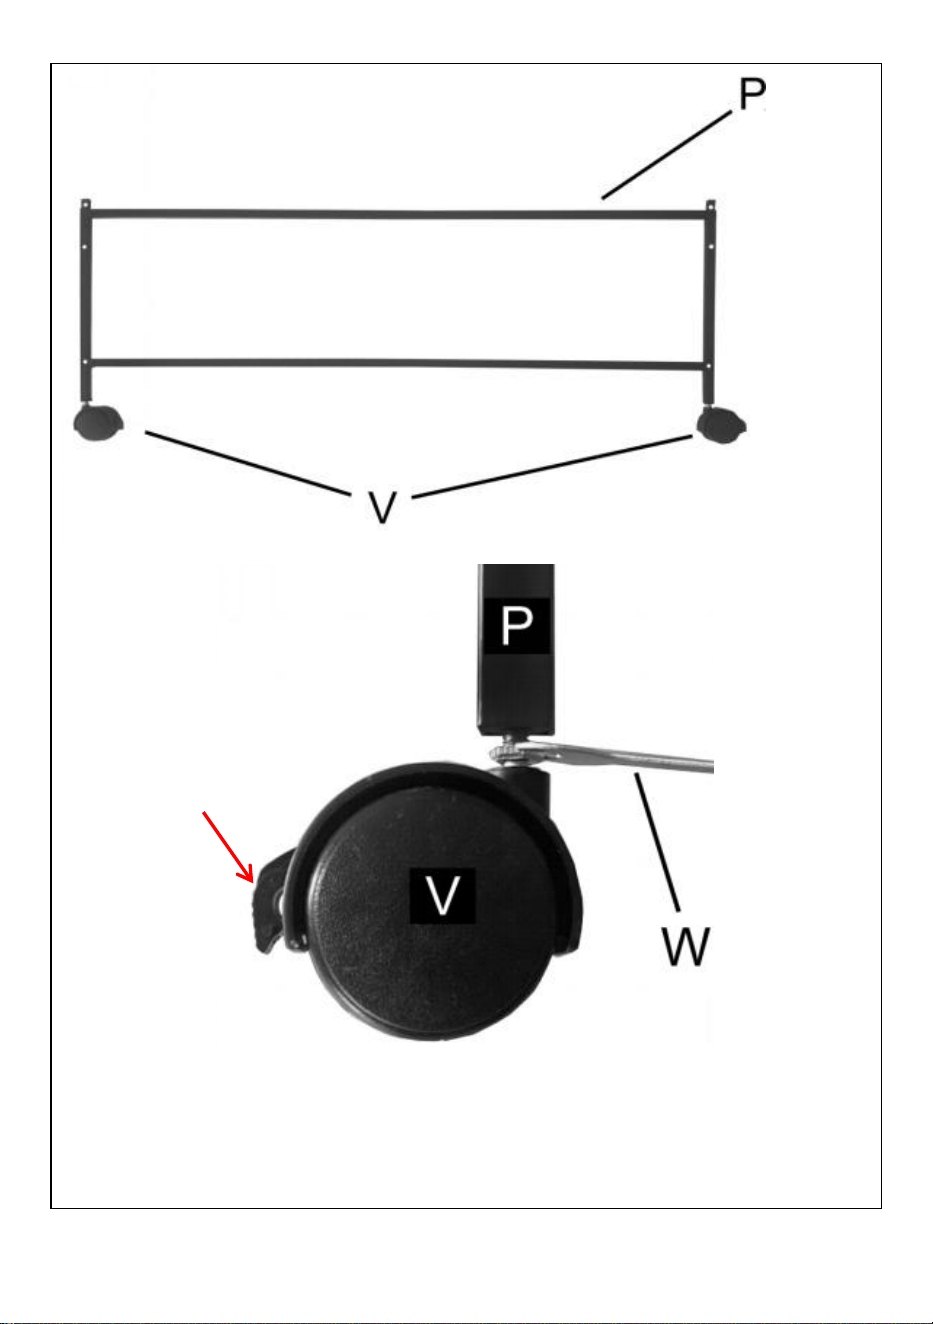
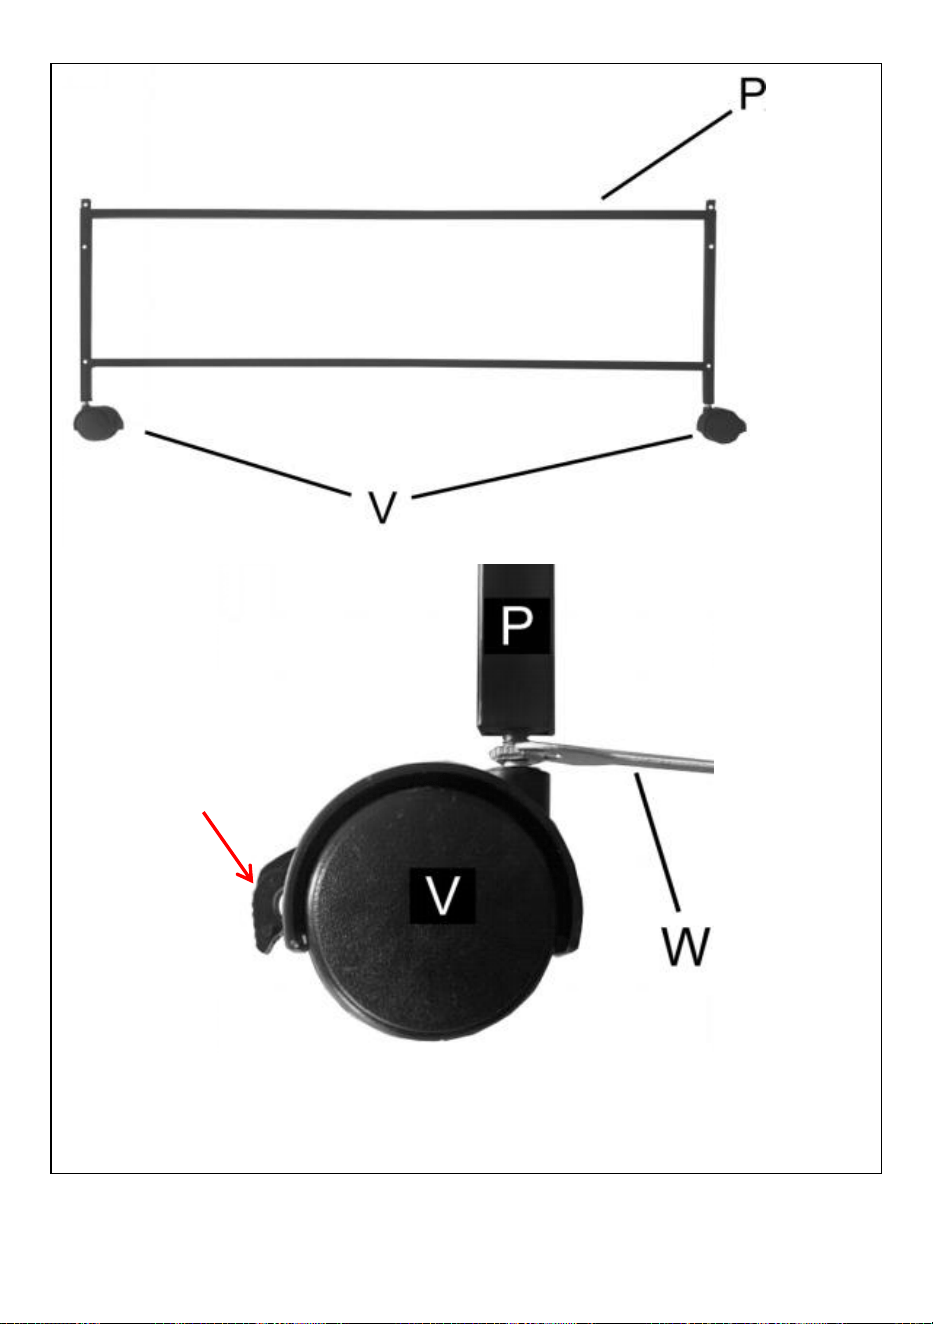
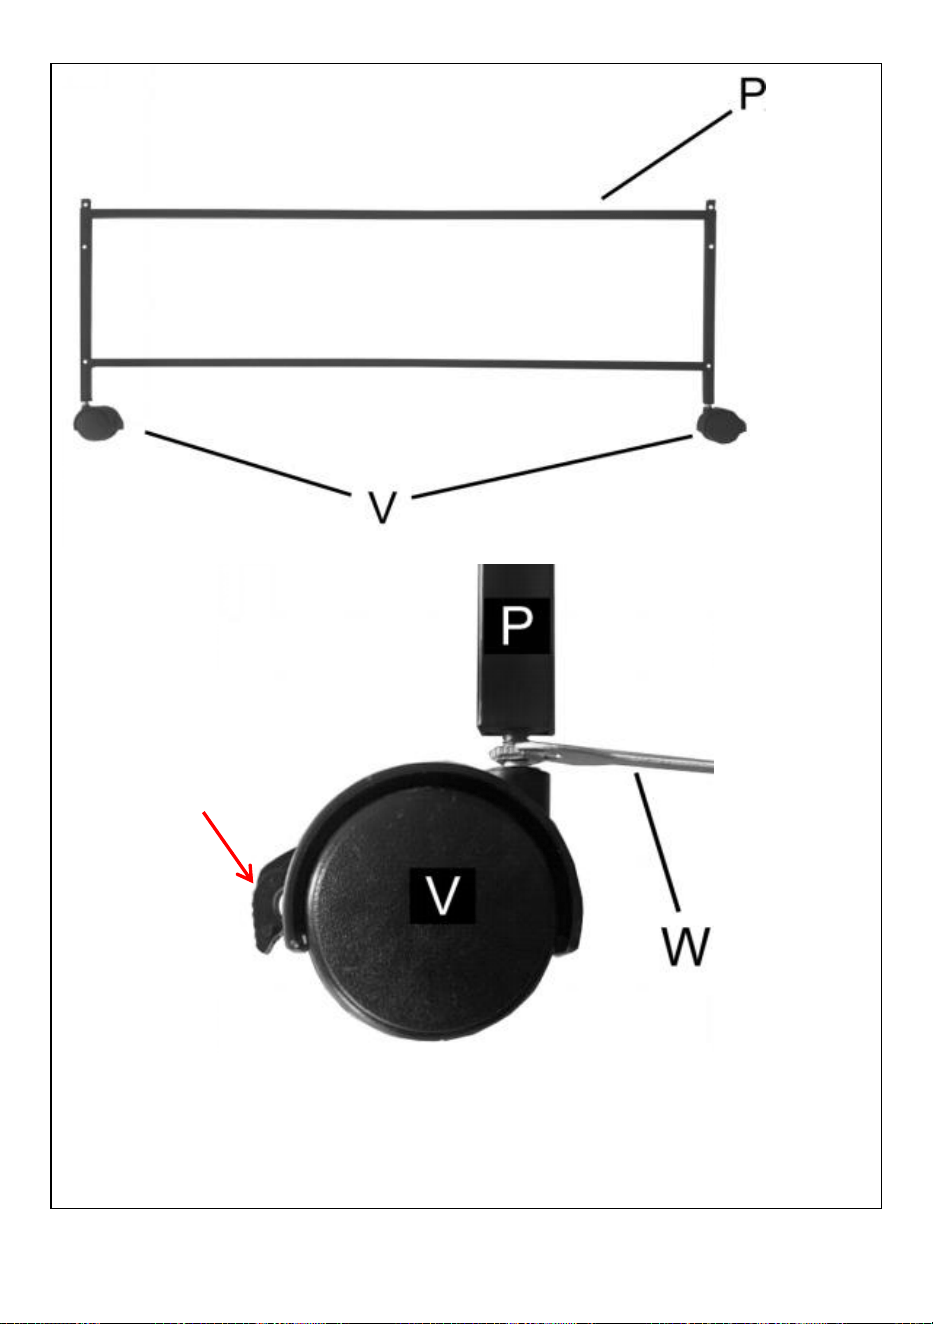
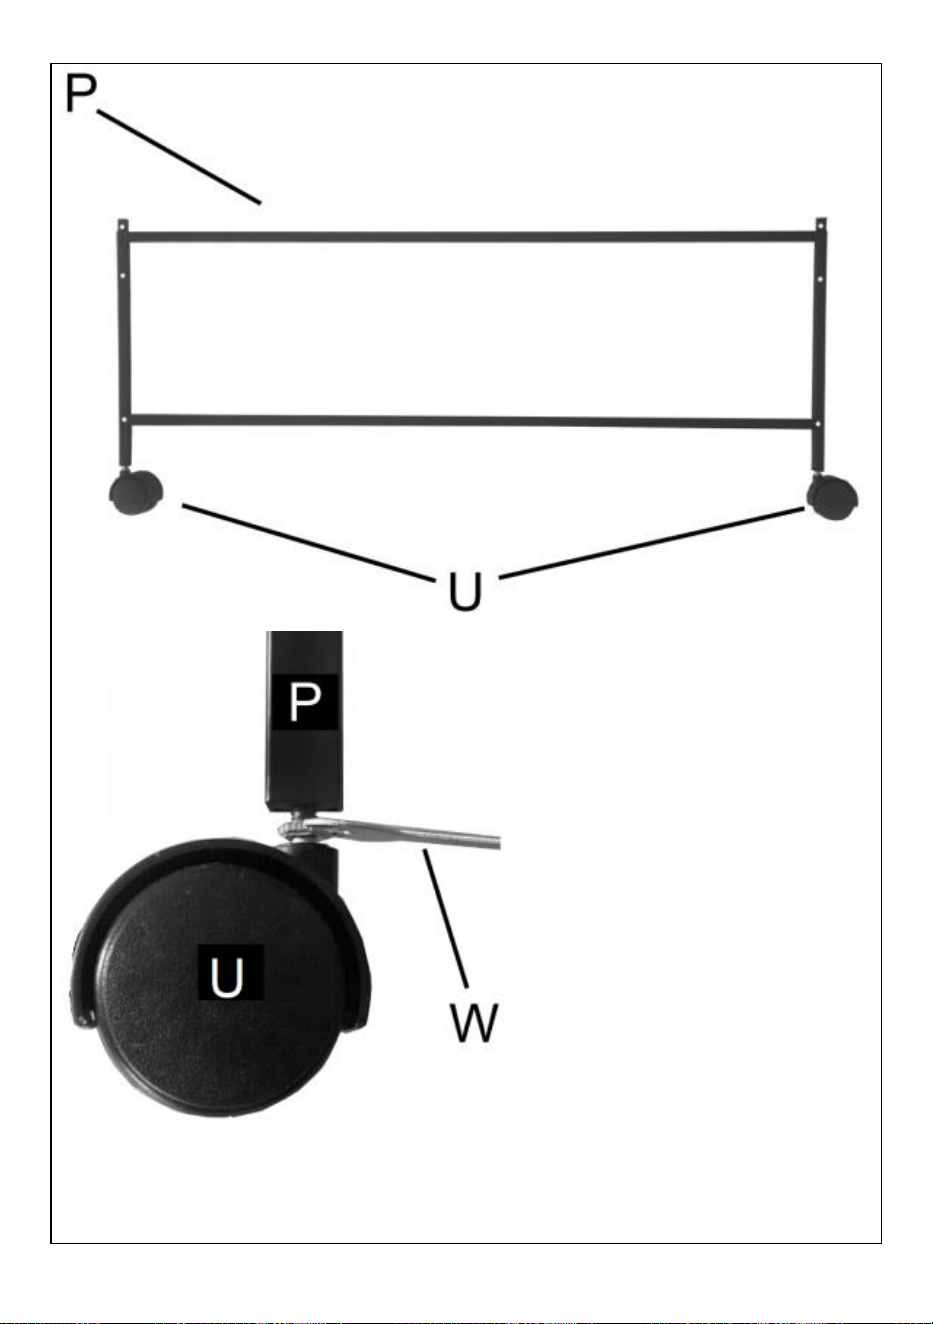
Install the caster V on the bottom frame P with tool W (refer to the detail drawing).
Brake
9
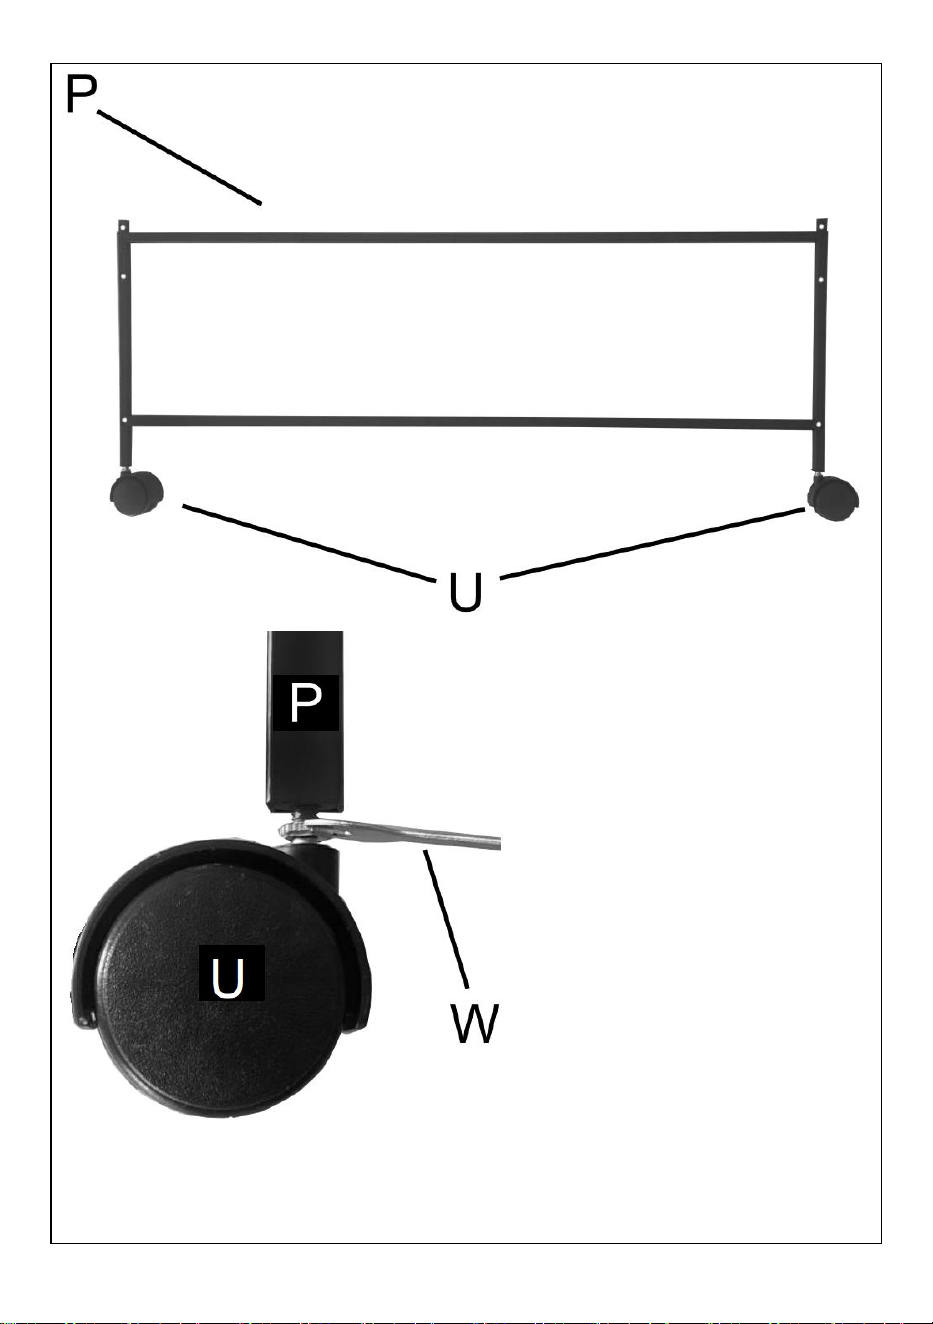
Install the caster U on the bottom frame P with tool W (refer to the detail drawing)
10
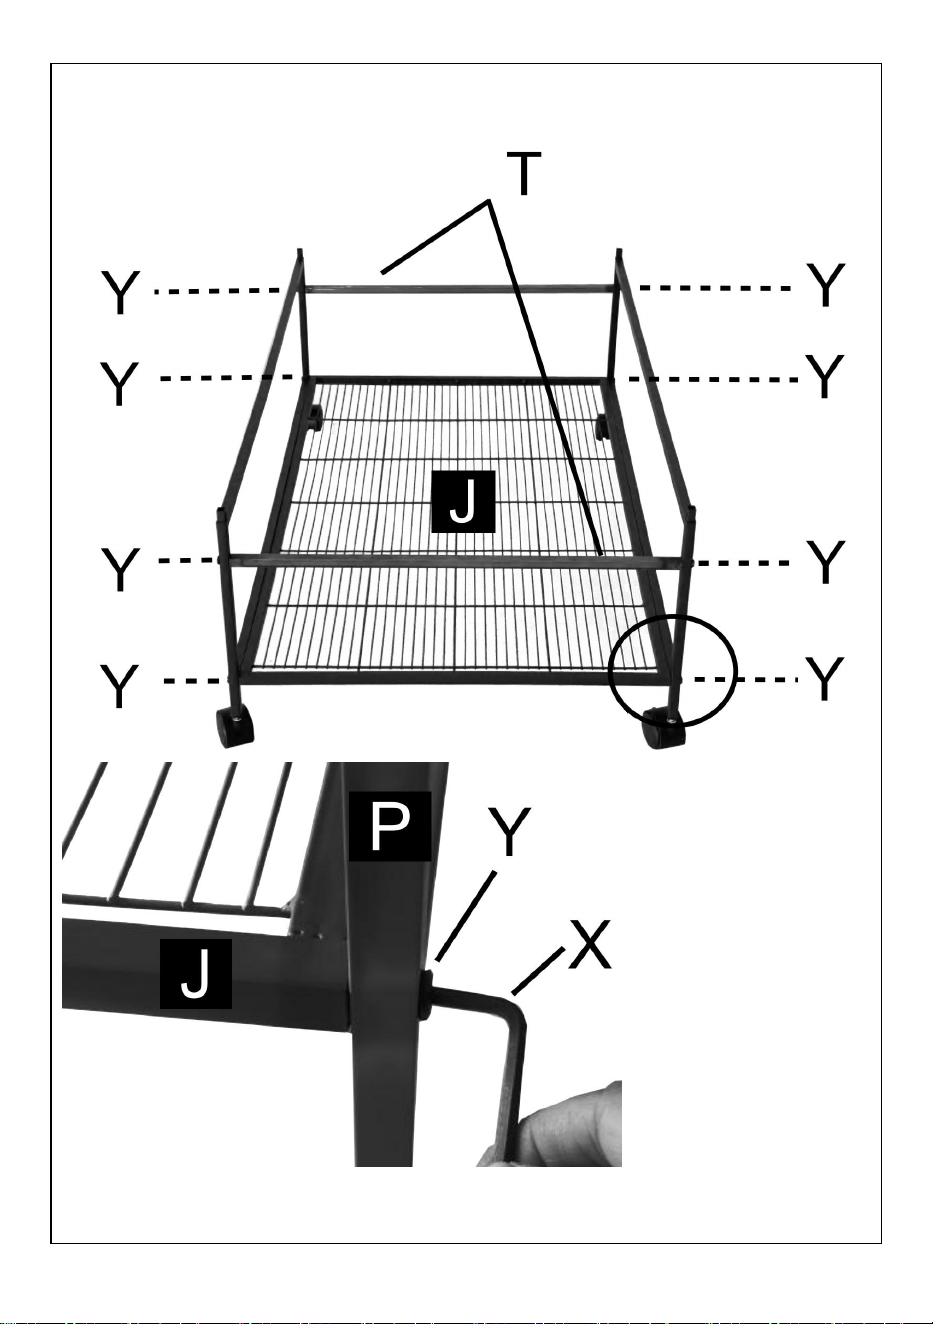
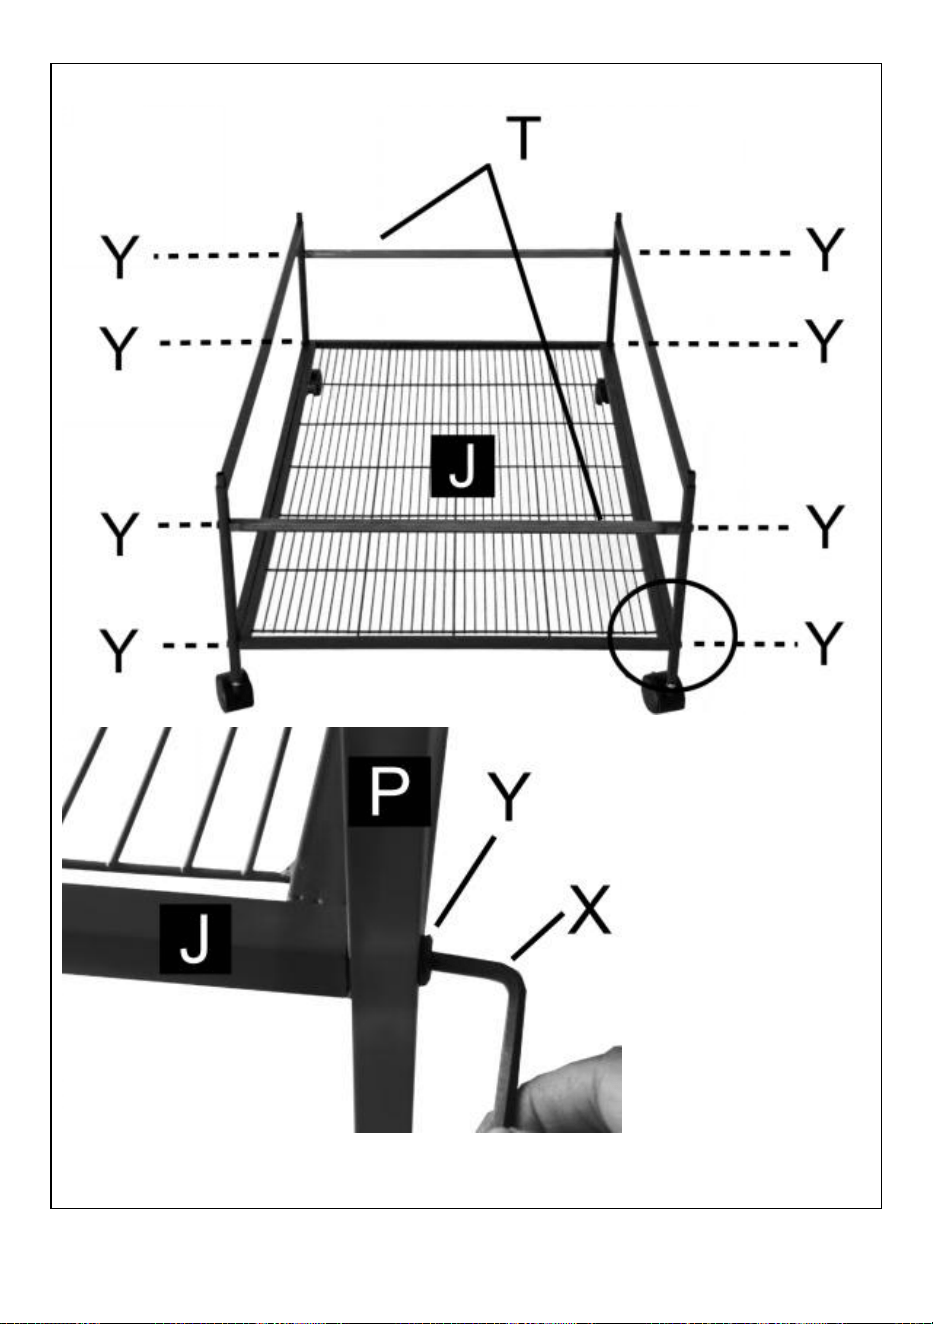
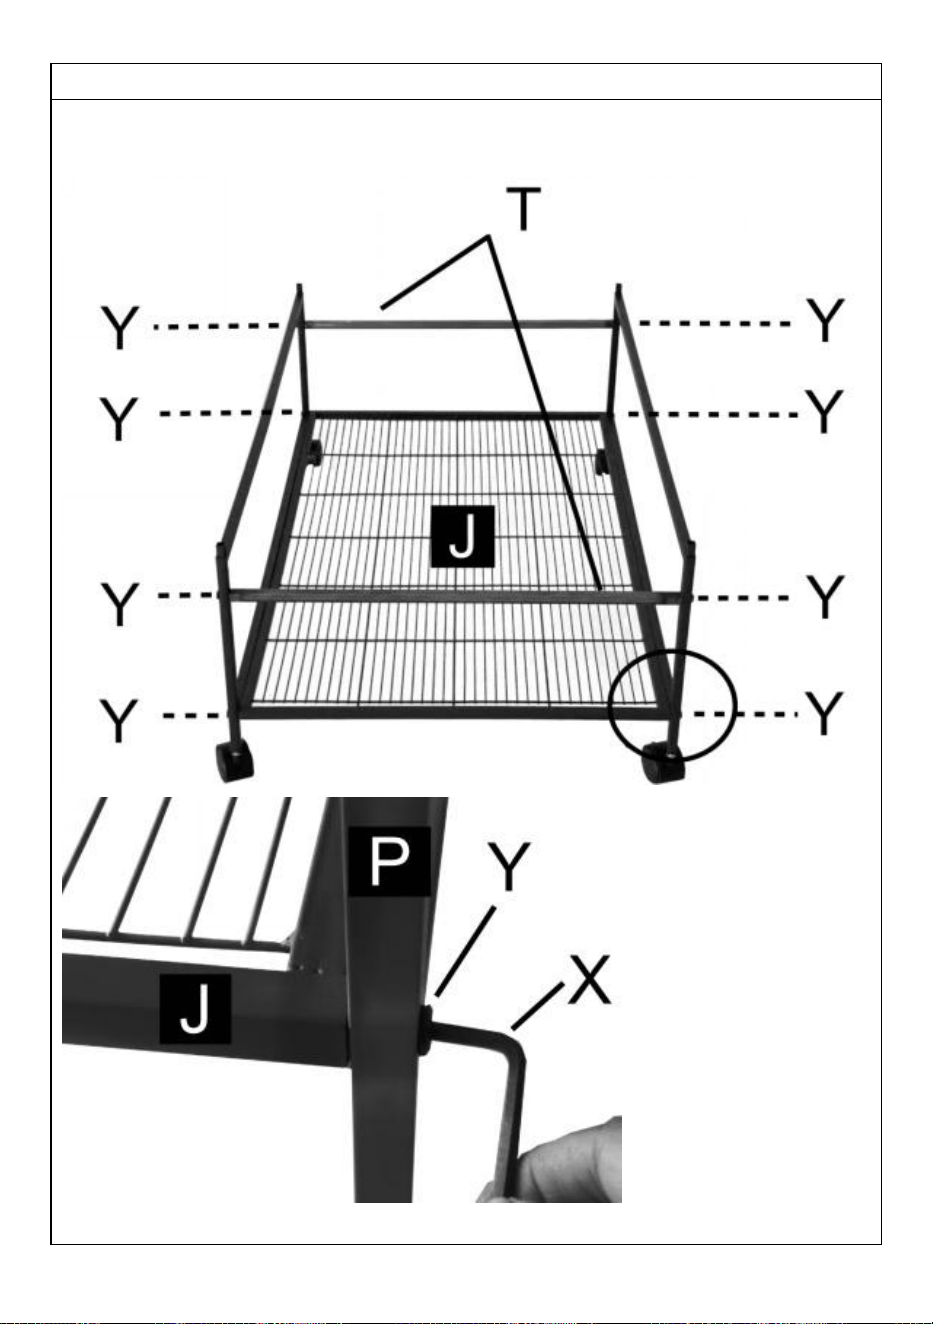
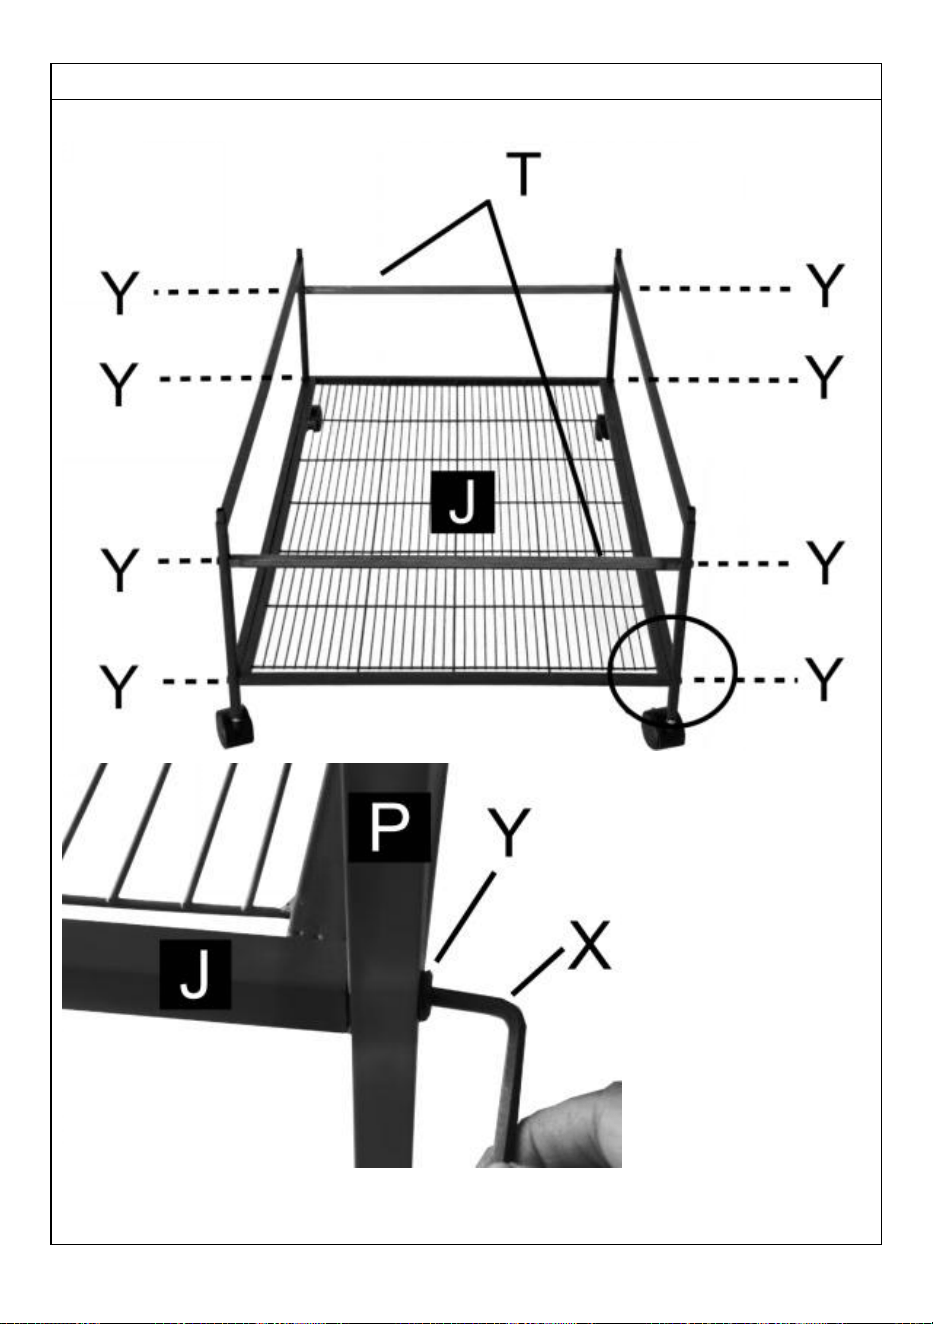
As shown in the figure, assemble the bottom mesh J, 2 bottom frame connecting
rods T.
The bottom frame P and the bottom screen J are connected with screw Y, and tool
X is required (as shown in the detailed drawing)

11
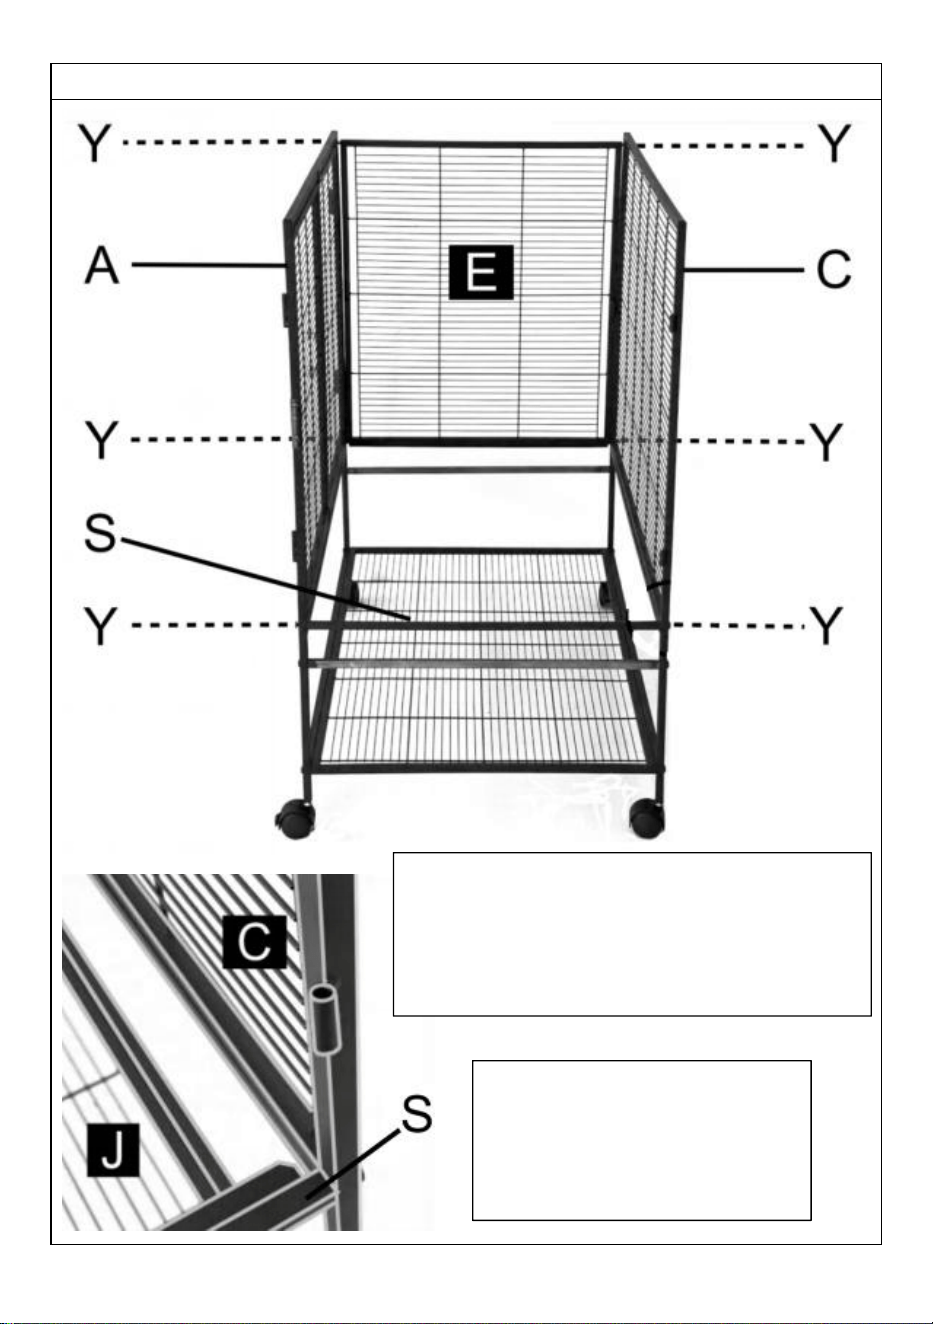
Insert the front lower mesh A and the rear
lower mesh C into the bottom frame P, and
then assemble the side lower mesh E and
the connecting rod S.
Note: The iron chute on the
connecting rod S needs to be
facing inward (as shown in the
detail drawing)
12
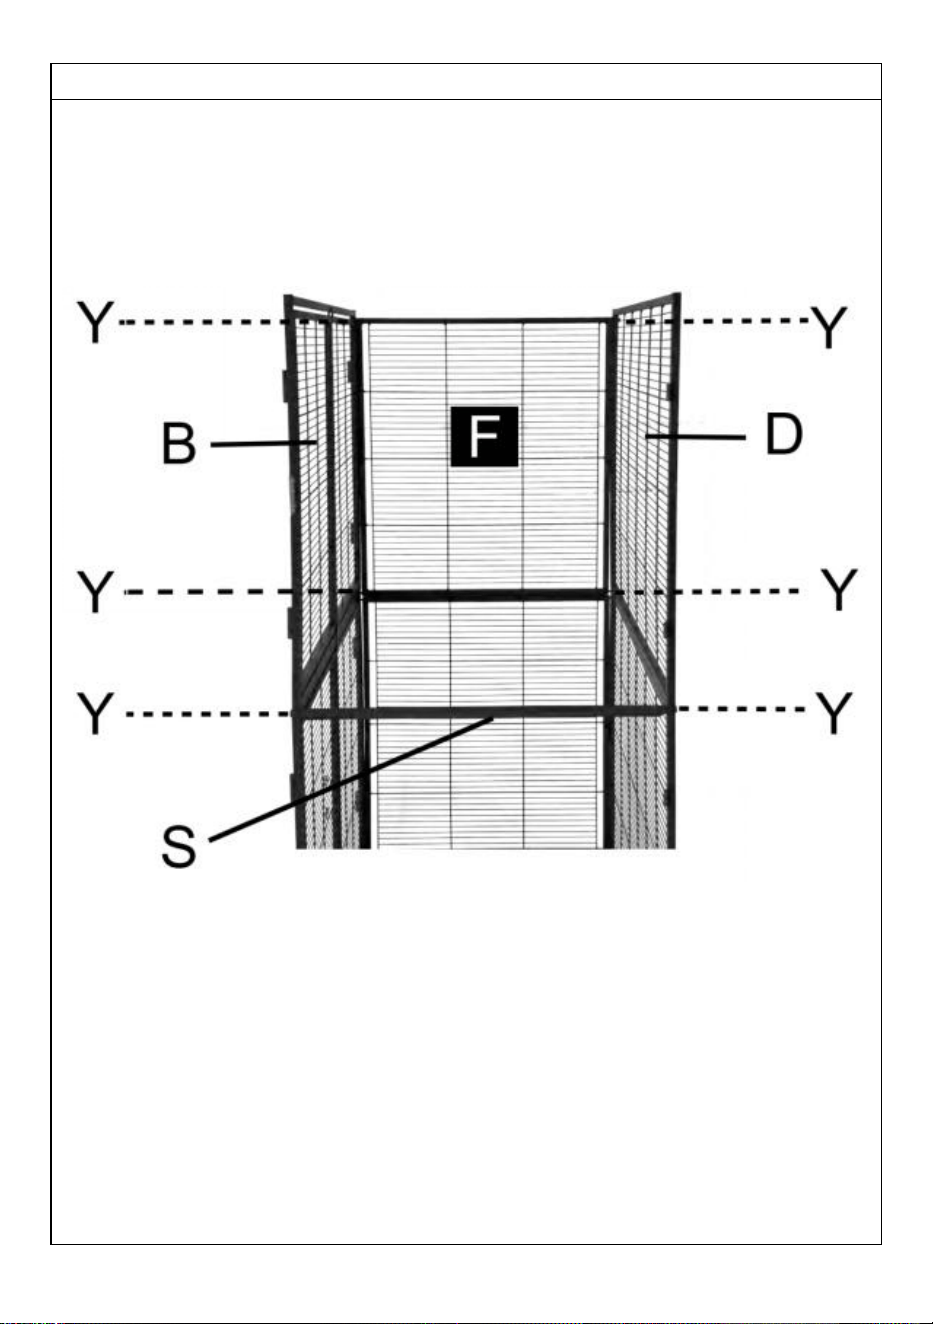
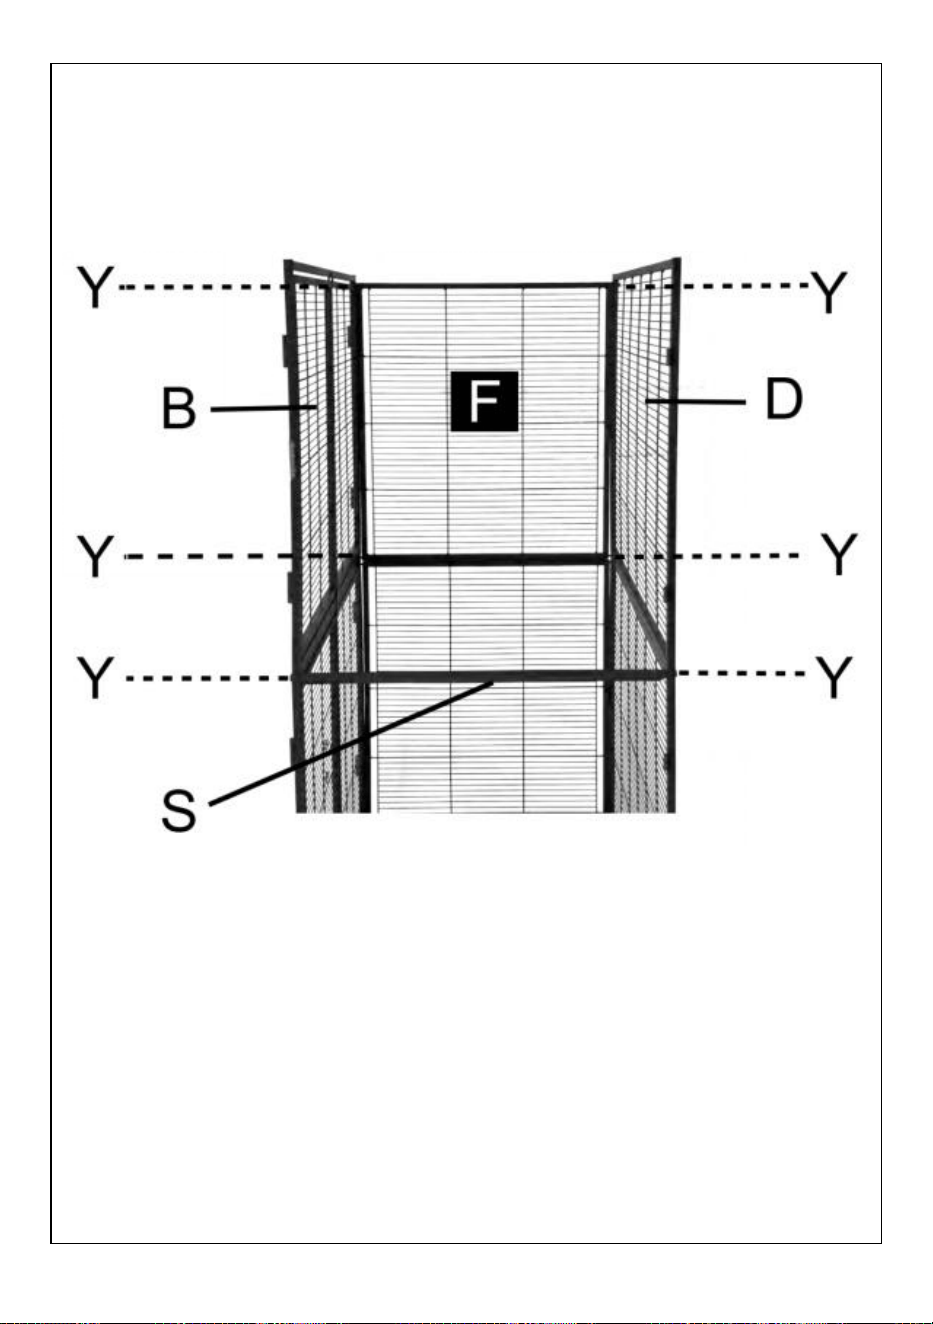
Insert the front screen piece B into the front lower screen A, insert the rear screen
piece D into the rear lower screen piece B, and then assemble the side screen
piece F and the connecting rod S.
13
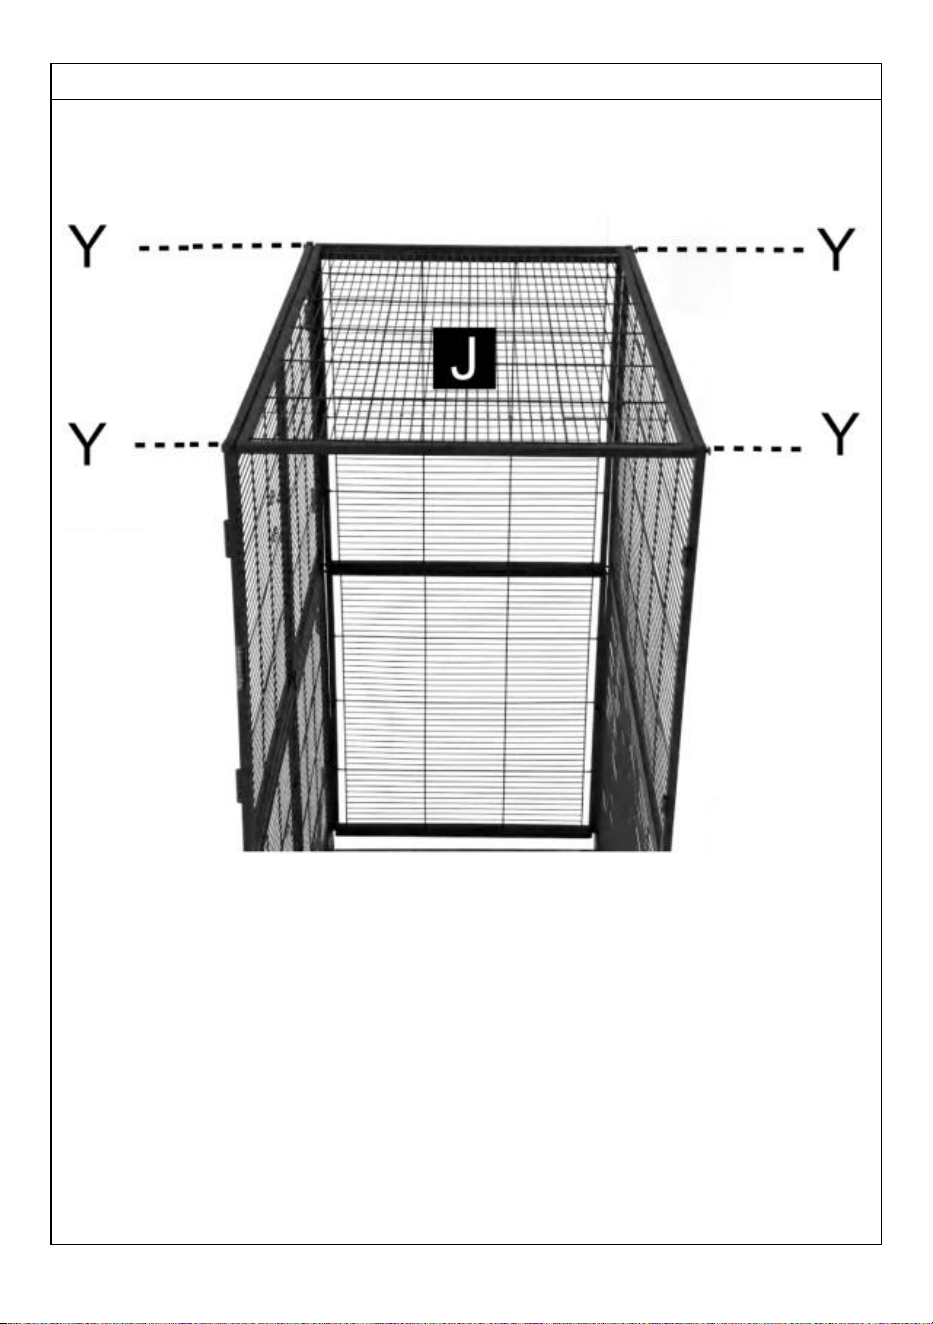
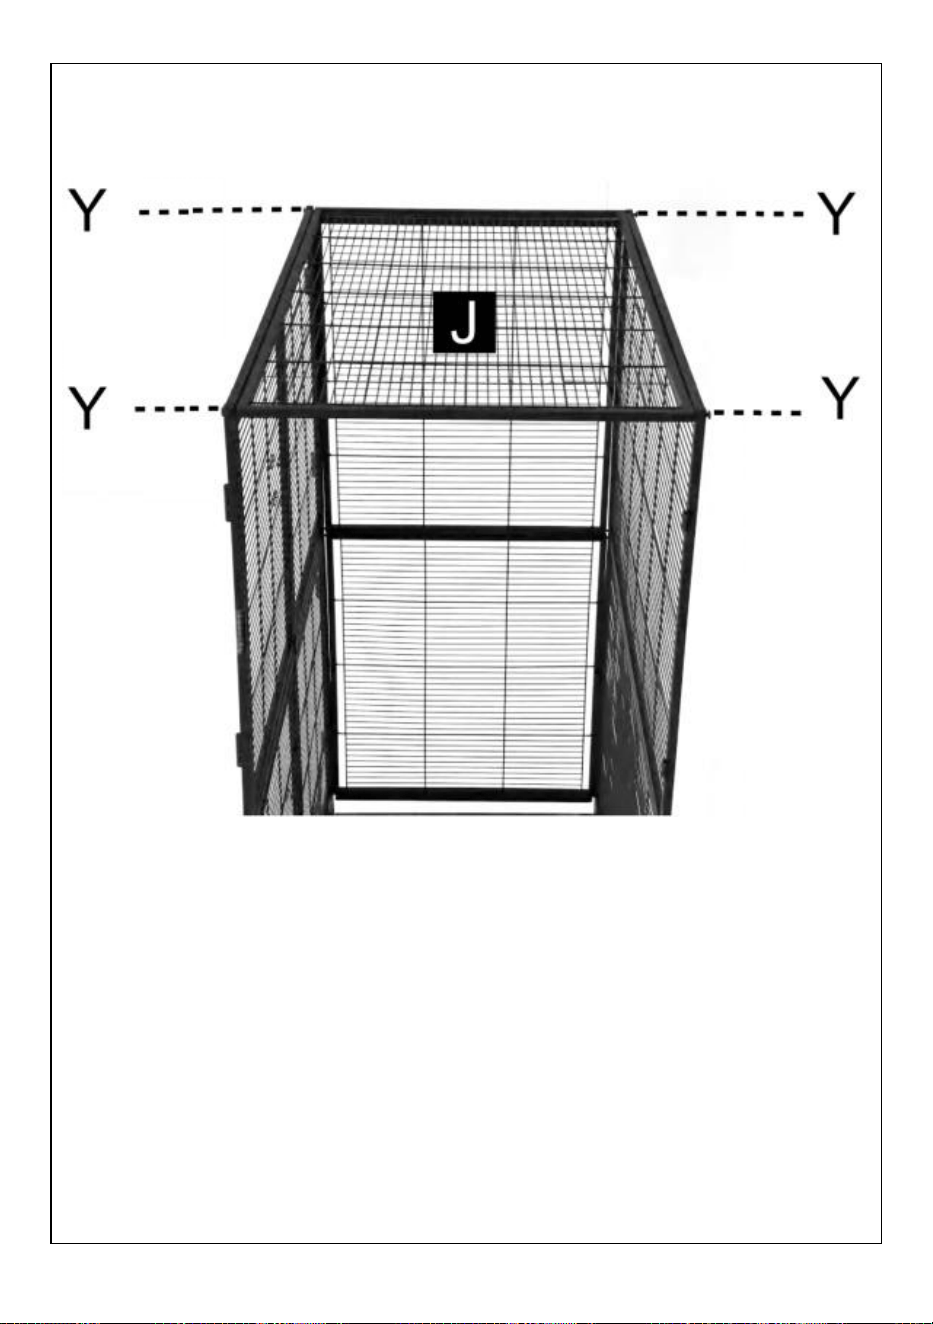
Assemble the top mesh J. Tighten all the screws used in the previous steps.
14
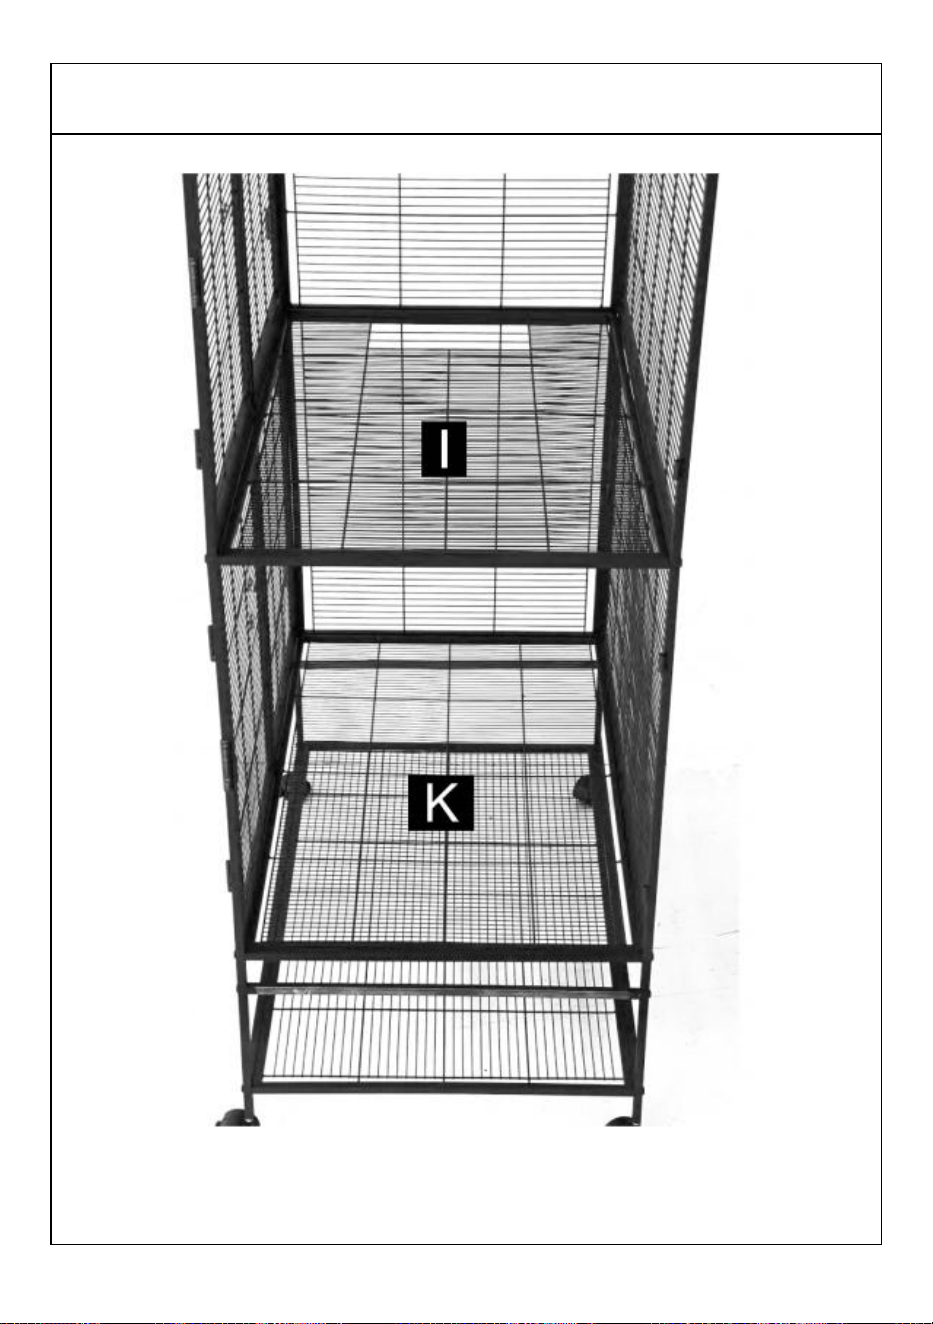
Put I and K in the position in the figure.
Note that the holes on the I are placed in the direction shown in the figure
15
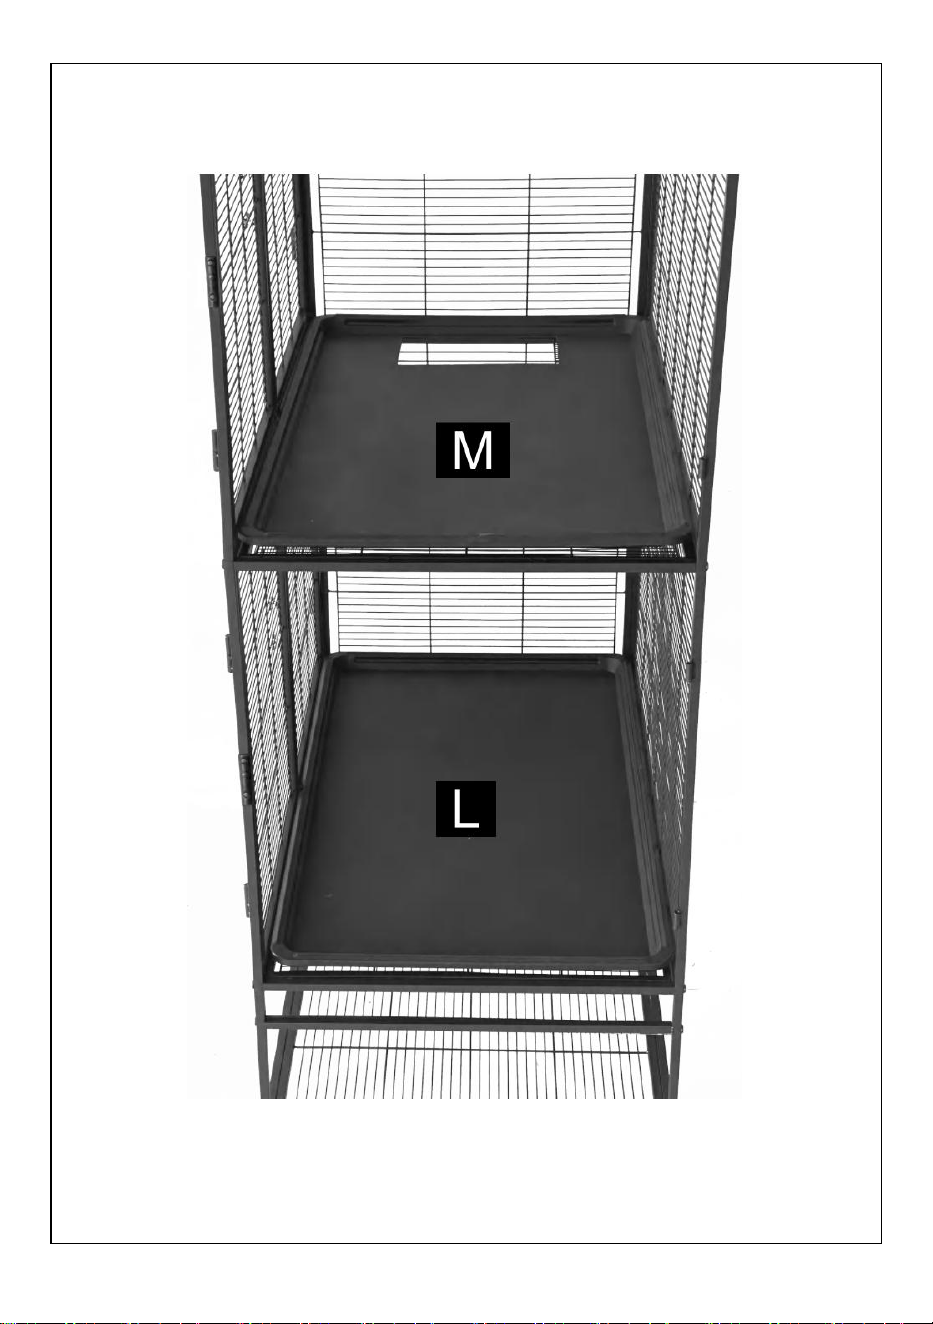
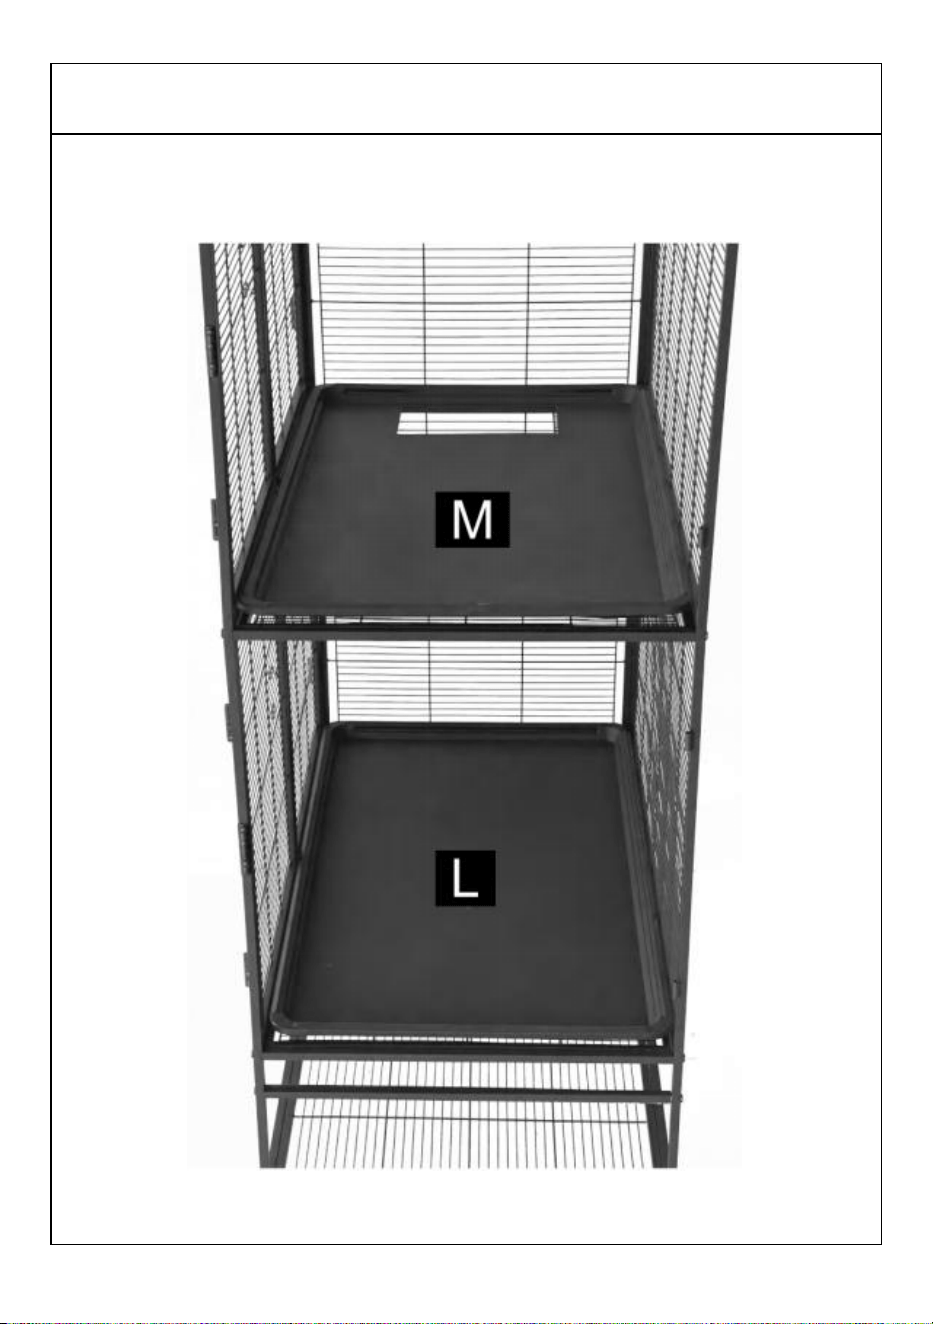
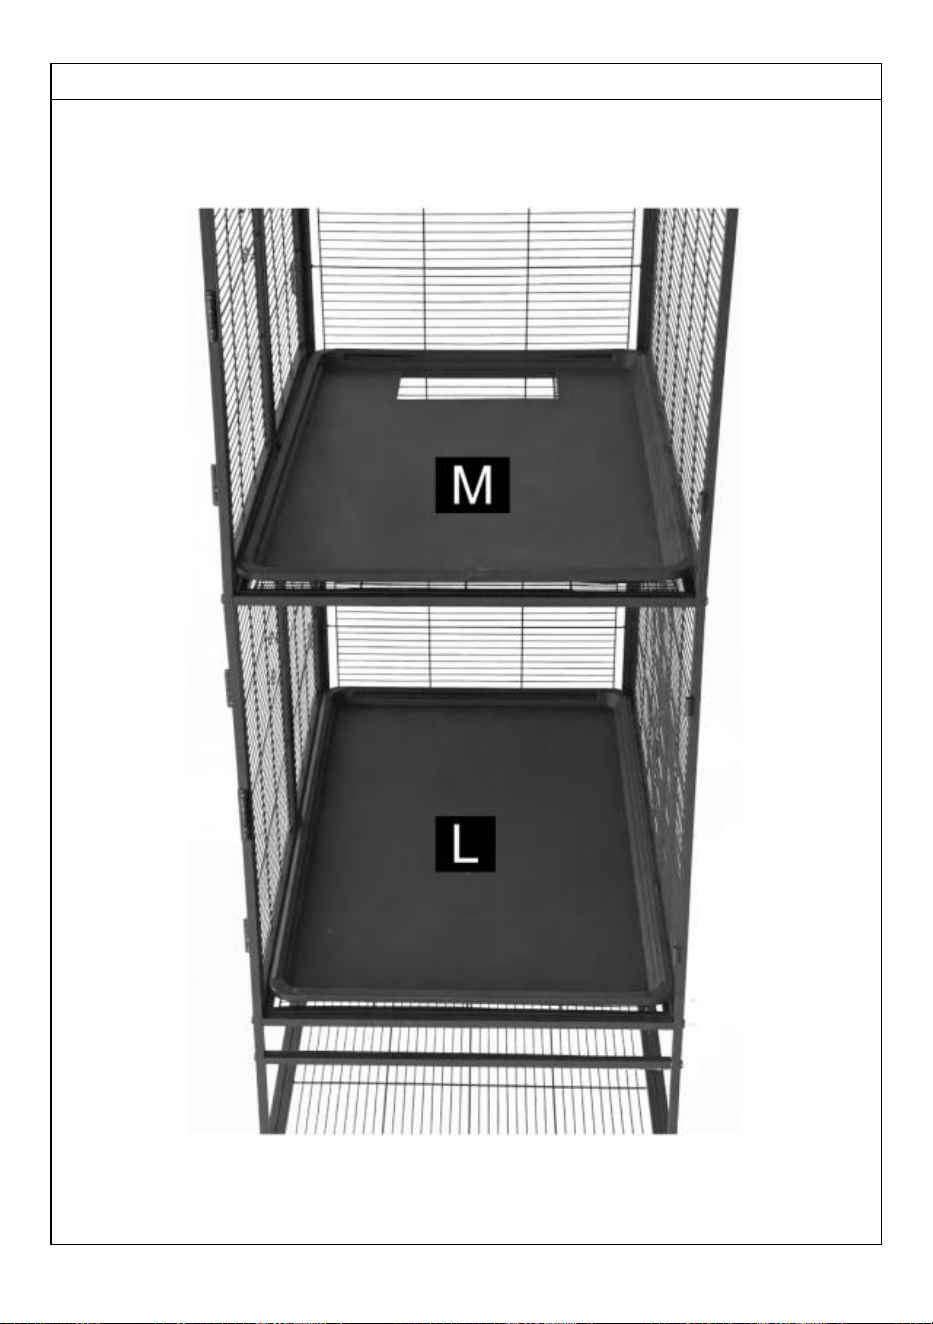
Place the plastic pallets M and L in the position in the figure.
16
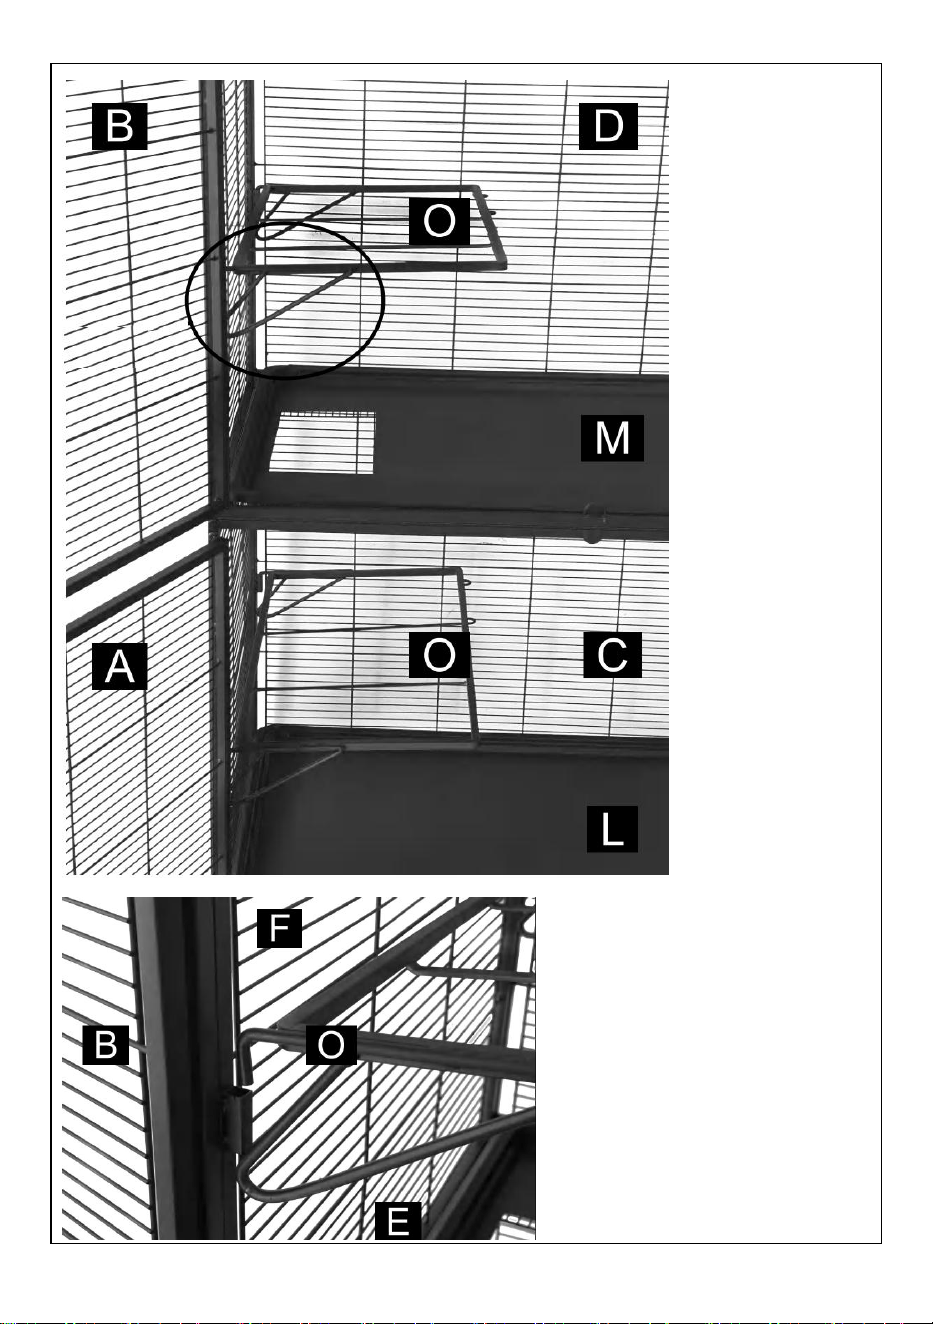
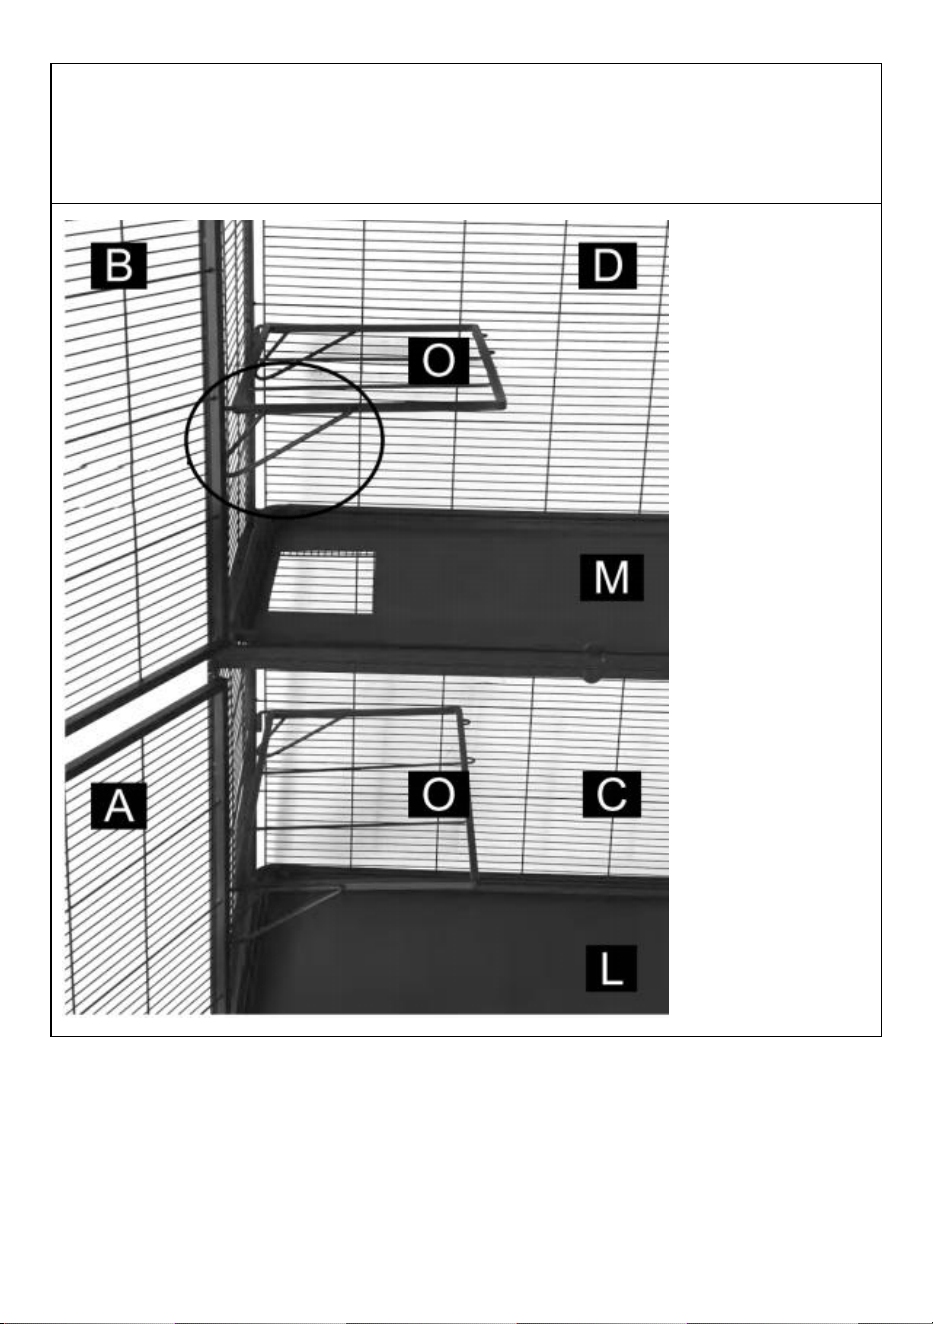
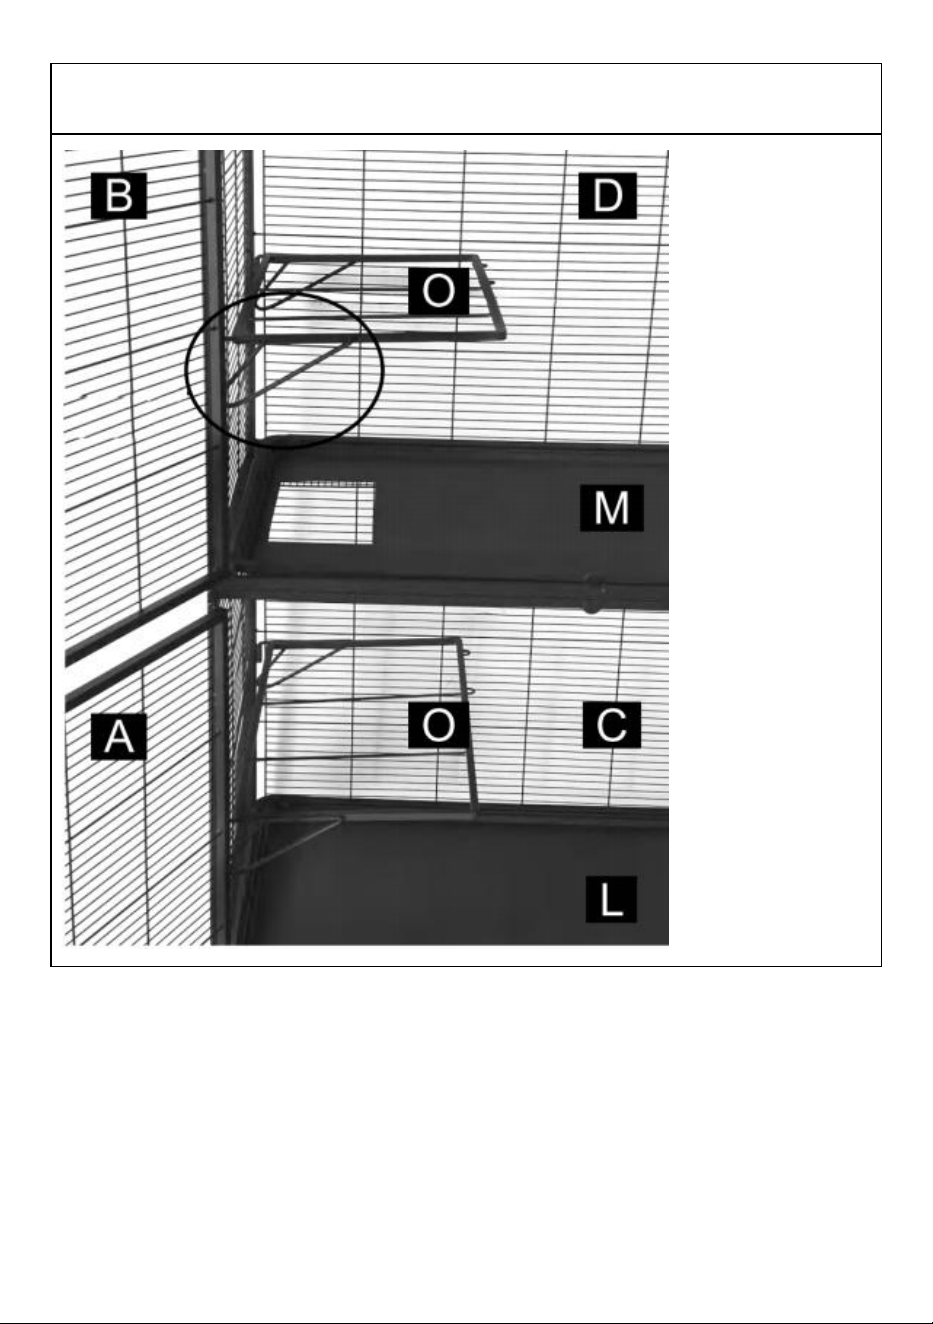
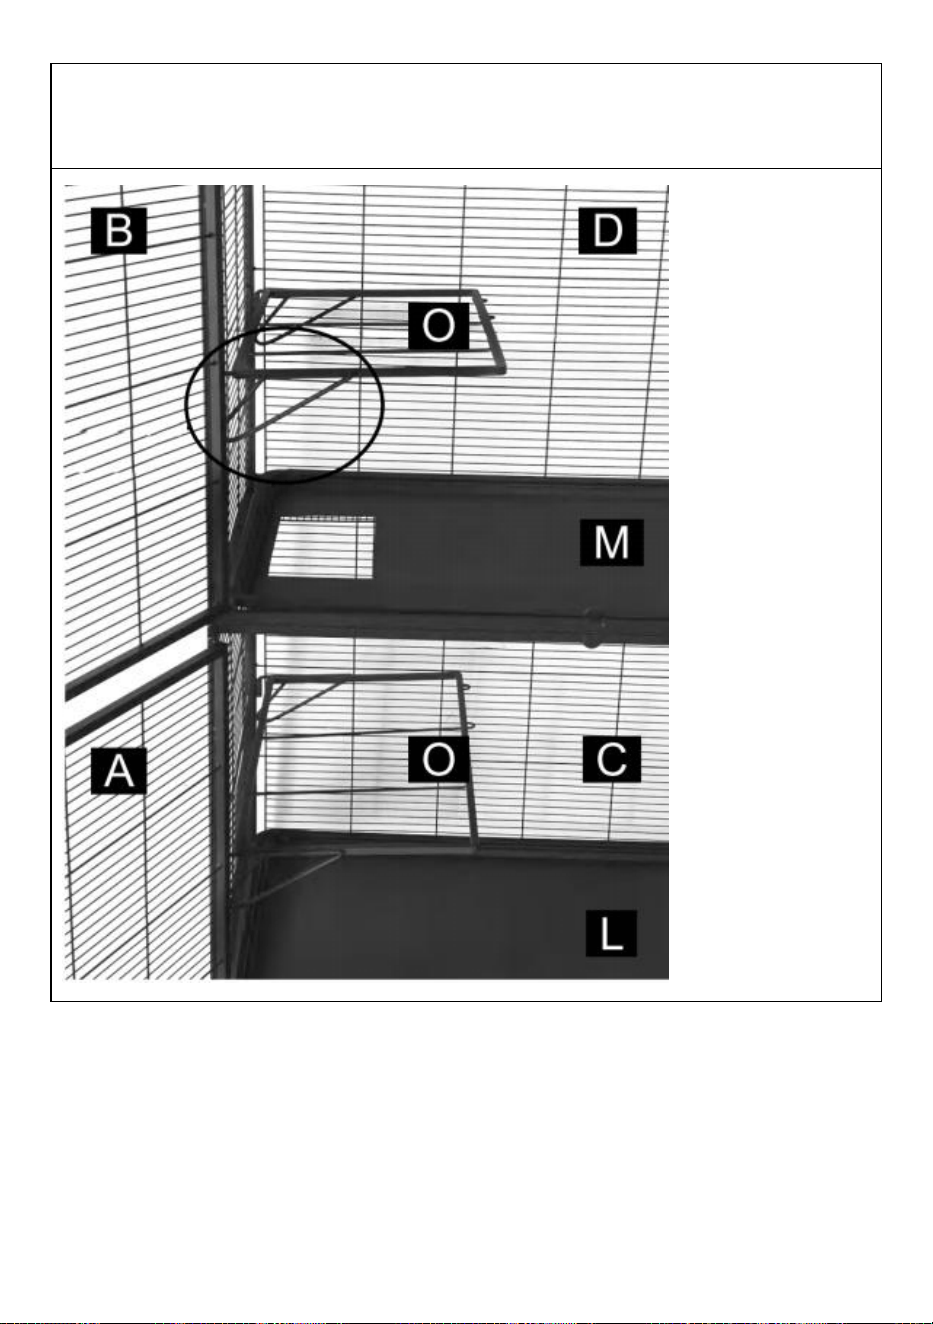
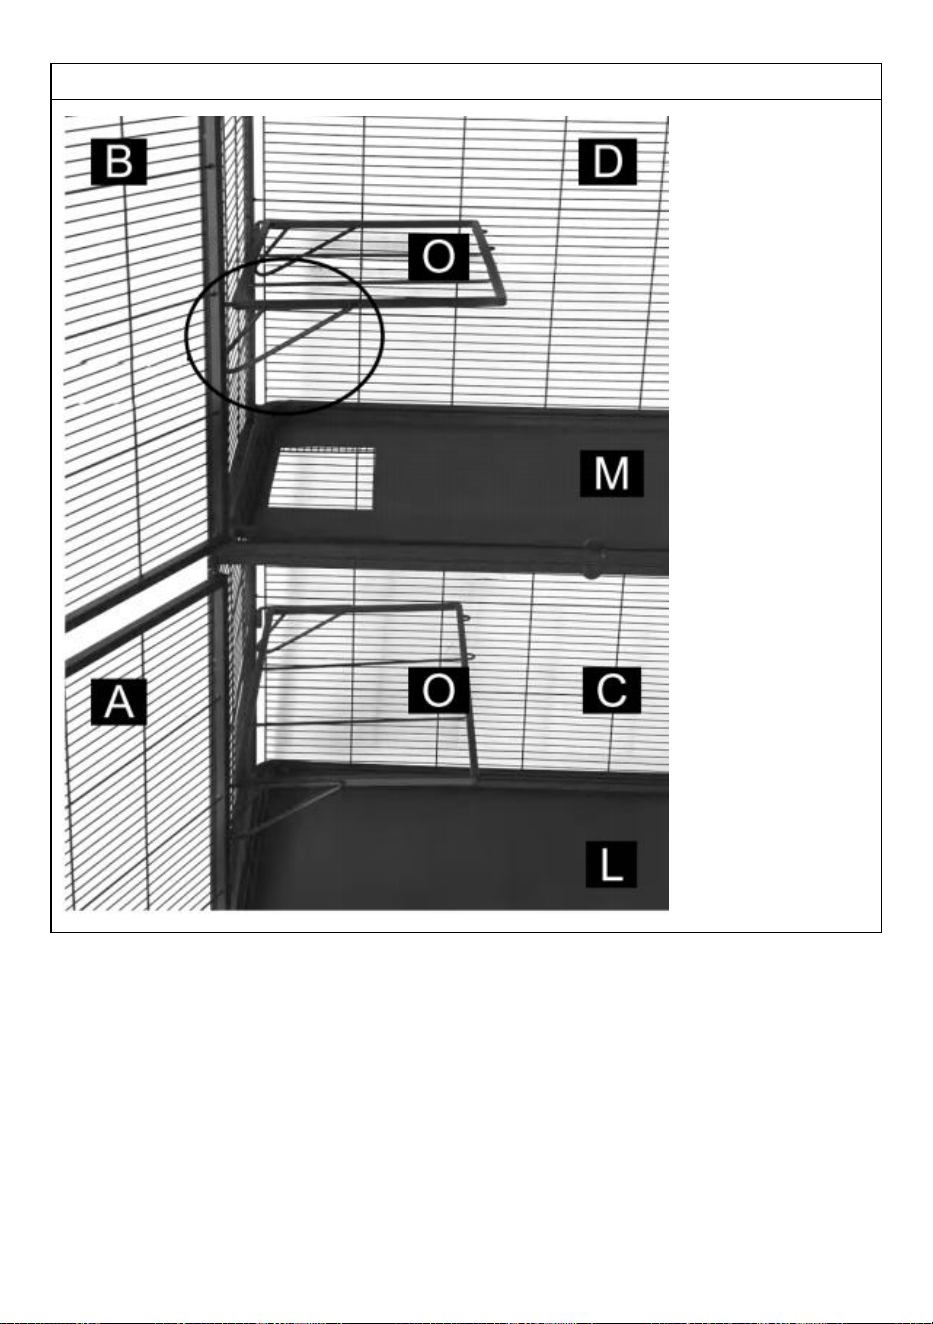
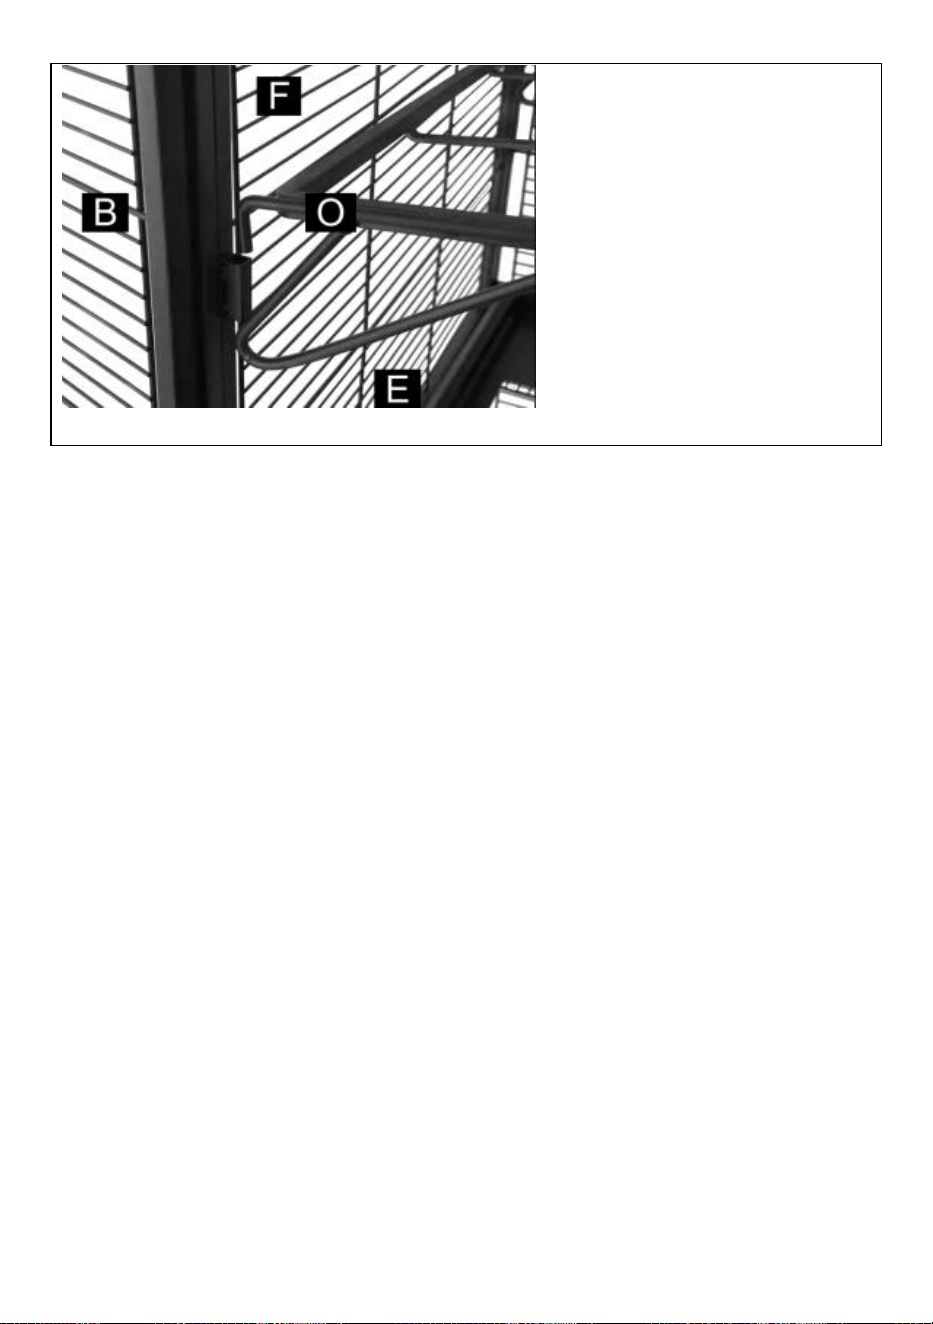
Assemble 2 pallet
racks O.
Tray rack O and side
piece connection (as
shown in the details)
17
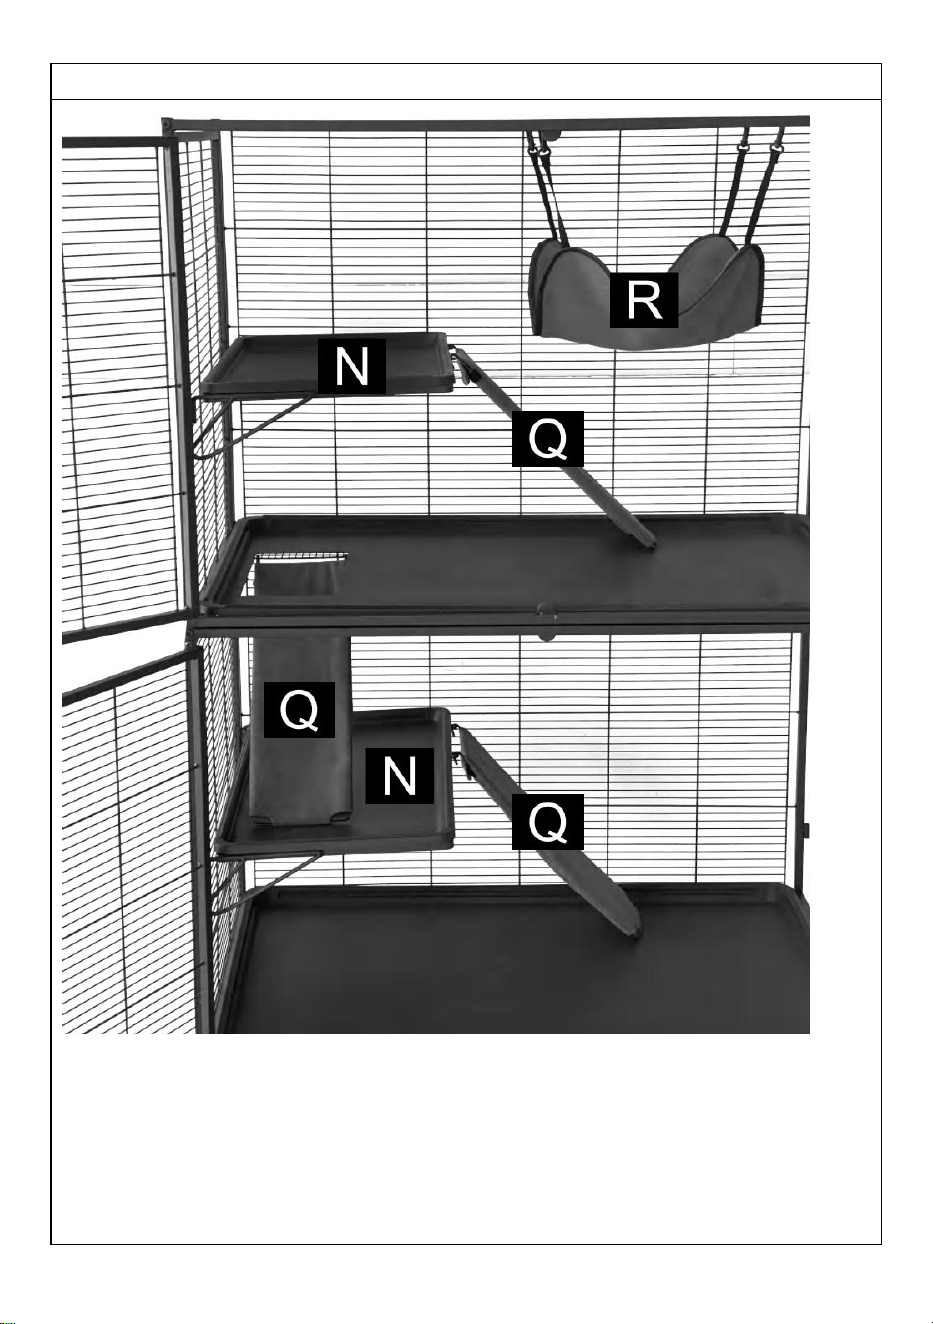
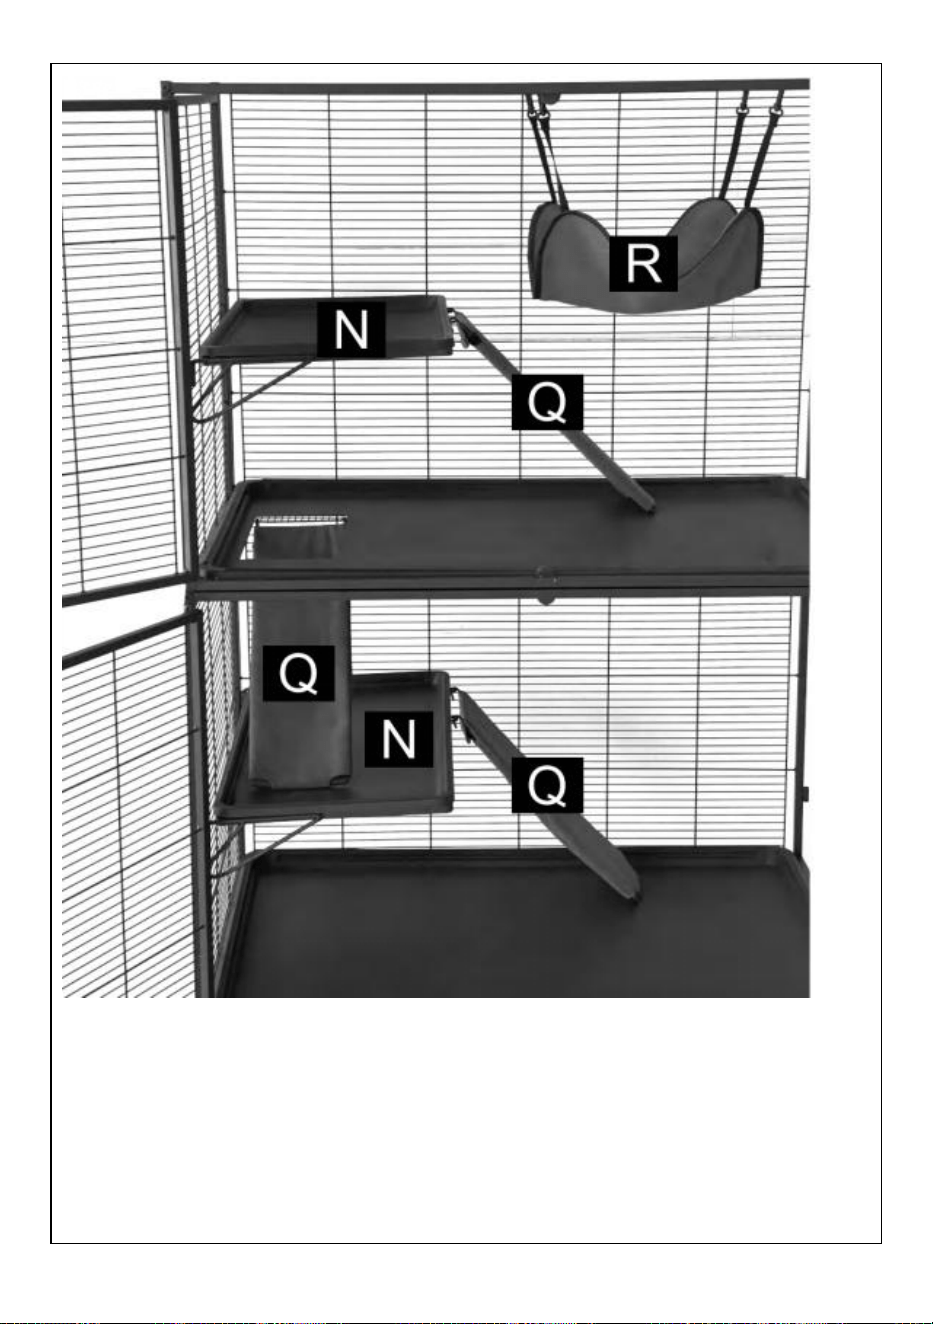
As shown in the figure, assemble 2 small pallets N, 3 and ladder Q and hammock
R
18
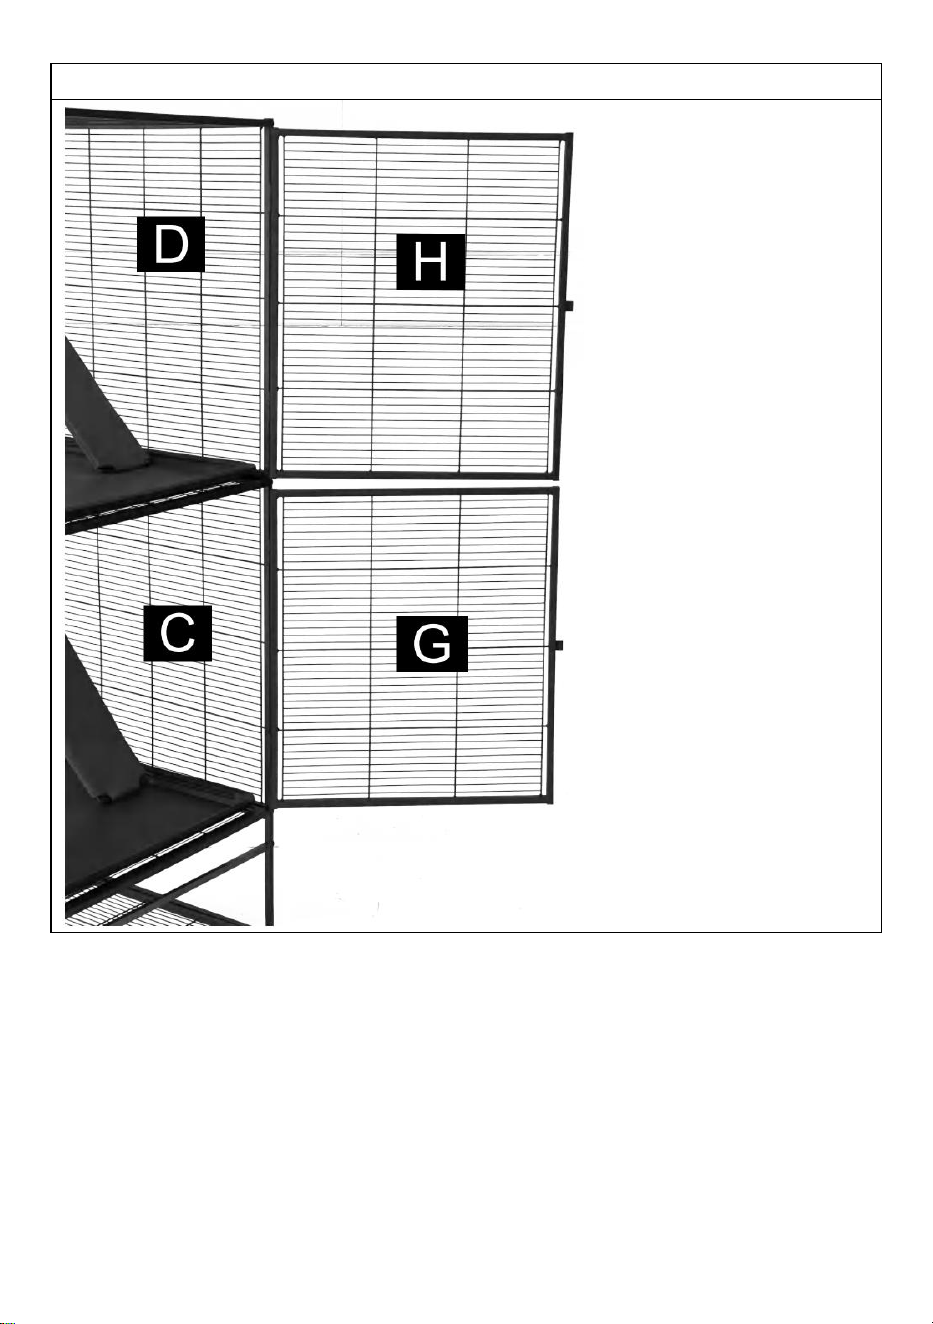
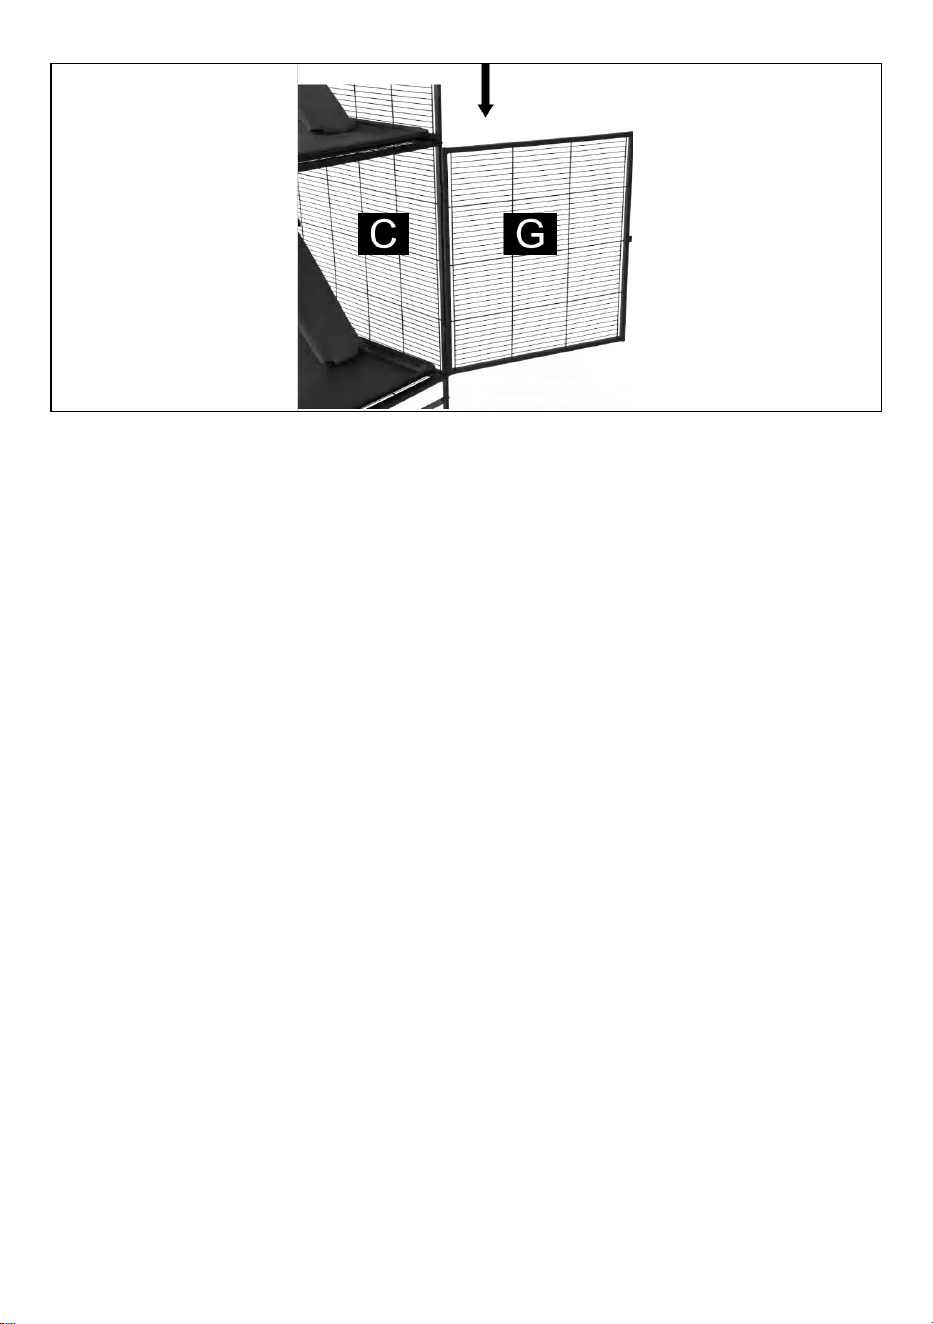
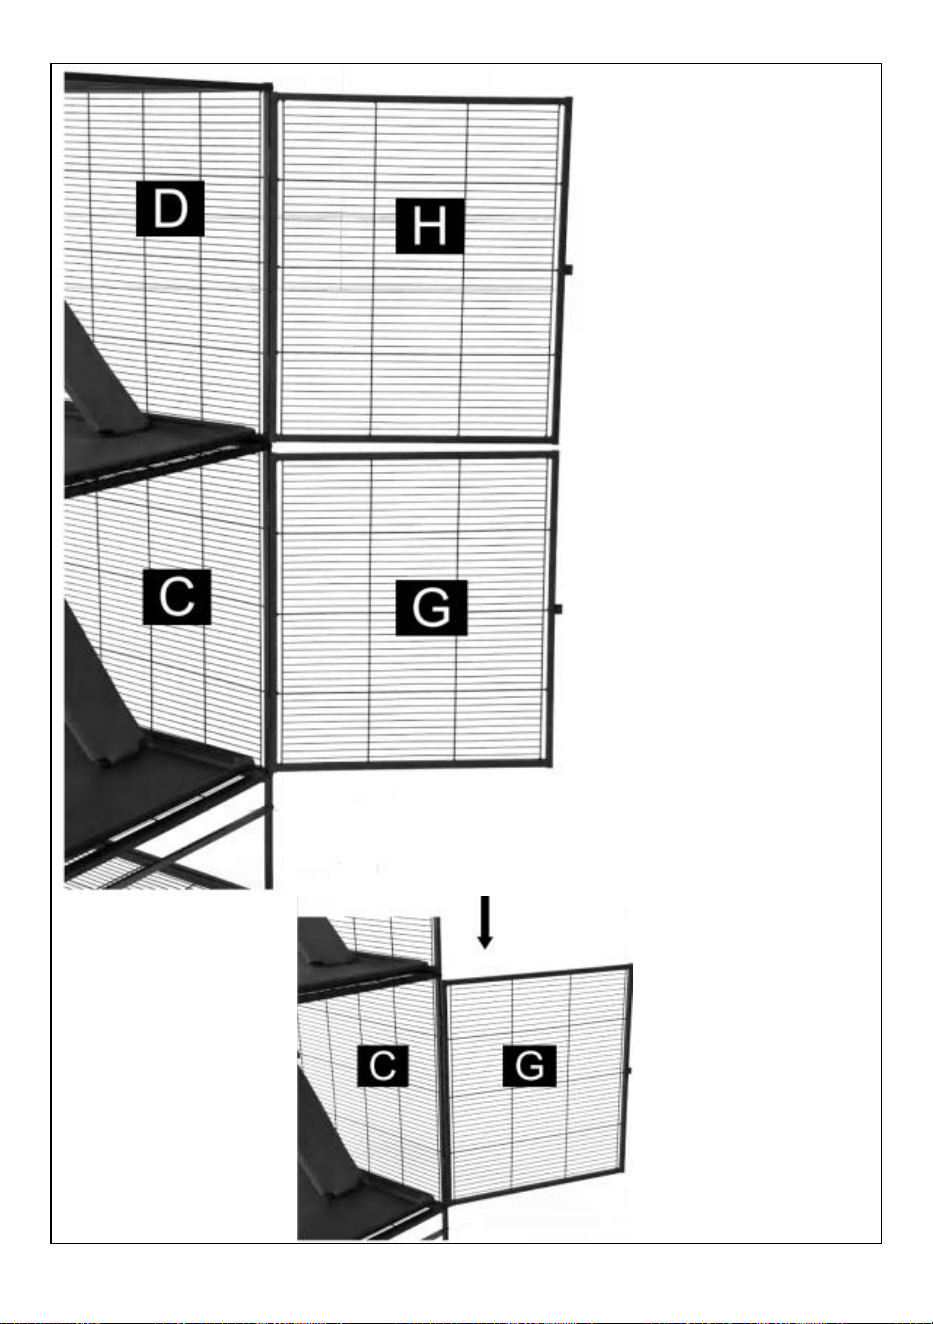
H and G are fixed on the
right side of the cage by
inserting the latches on the
side doors H and G into the
empty tubes on the rear
pieces C and D.
19
20
Assembled.

21
Manufacturer:Shanghaimuxinmuyeyouxiangongsi
Address: Shuangchenglu 803nong11hao1602A-1609shi, baoshanqu,
shanghai 200000 CN.
Imported to AUS: SIHAO PTY LTD. 1 ROKEVA STREETEASTWOOD
NSW 2122 Australia
Imported to USA: Sanven Technology Ltd. Suite 250, 9166 Anaheim
Place, Rancho Cucamonga, CA 91730
REP
EC
E-CrossStu GmbH
Mainzer Landstr.69, 60329 Frankfurt am Main.
REP
UK
YH CONSULTING LIMITED.
C/O YH Consulting Limited Office 147, Centurion House,
London Road, Staines-upon-Thames, Surrey, TW18 4AX


Technisch Support und E-Garantie-Zertifikat www.vevor.com/support
METALLKÄFIG FÜR FRETTCHEN
BENUTZERHANDBUCH
We continue to be committed to provide you tools with competitive price.
"Save Half","Half Price" or any other similar expressions used by us only represents an
estimate of savings you might benefit from buying certain tools with us compared to the major
top brands and does not necessarily mean to cover all categories of tools offered by us. You
are kindly reminded to verify carefully when you are placing an order with us if you are
actually saving half in comparison with the top major brands.


1
JM-XC-084
Have product questions? Need technical support? Please feel free to
contact us:
Technical Support and E-Warranty Certificate
www.vevor.com/support
NEED HELP? CONTACT US!
METAL
FERRET CAGE

2
This is the original instruction,please read all manual instructions carefully
before operating. VEVOR reserves a clear interpretation of our user
manual. The appearance of the product shall be subject to the product
you received. Please forgive us that we won't inform you again if there
are any technology or software updates on our product.
Sicherheitsvorkehrungen
WARNUNG:
Lesen Sie diese Anweisungen, bevor Sie dieses Produkt verwenden.
Andernfalls kann es zu schweren Verletzungen kommen. Die grundlegenden
Vorsichtsmaßnahmen sollten immer befolgt werden , einschließlich der folgenden:
6. Der Frettchenkäfig aus Metall darf nicht in explosionsgefährdeten Bereichen
verwendet oder gelagert werden. Der Einsatz des Gerätes in
explosionsgefährdeten Bereichen ist nicht gestattet.
7. Der Frettchenkäfig aus Metall muss vor Inbetriebnahme auf
Funktionstüchtigkeit und Betriebssicherheit geprüft werden. Andernfalls darf das
Gerät nicht verwendet werden.
8. Bitte betätigen Sie die Bremsen des Radgramms, um Meta zu verhindern
verhindern , dass es sich bewegt.
9. Der Betreiber muss den Metallkäfig für Frettchen verwenden Er muss die
örtlichen Gegebenheiten berücksichtigen und bei der Arbeit mit dem
Metall-Frettchenkäfig auf Dritte , insbesondere Kinder , achten .
10. Dieser Frettchenkäfig aus Metall ist nicht für den Gebrauch durch Personen
(einschließlich Kinder) mit eingeschränkten körperlichen , sensorischen oder
geistigen Fähigkeiten oder mangels Erfahrung und/oder mangels Wissen
bestimmt , es sei denn, sie werden durch eine für ihre Sicherheit zuständige
Person beaufsichtigt oder erhielten von dieser Person Anweisungen zum
3
Gebrauch das Gerät. Kinder sollten beaufsichtigt werden , um sicherzustellen,
dass sie nicht damit spielen Frettchenkäfig aus Metall .
ANLEITUNG AUFBEWAHREN
Produktliste
Eine untere Frontplatte
B Obere Frontplatte
C Unteres Rückenteil
D Oberes Rückenteil

4
E Untere Seitenwand
55X62,5 cm
F Obere Seitenwand
55X64 cm
G Untere Tür
54,5 x 60,5 cm
H Obere Tür
54,5 x 62 cm

5
I Obere untere Platte
J*2 Dach und untere Bodenplatte
92X55,3 cm
K Mittlere untere Platte 89 x 55
cm
L
M
N*2
O *2
P *2
Q *3 Rampe mit Abdeckungen
R Hängematte

6
S*2
T*2
U*2
V*2
B
X
Y*24
(
länger
)
Z1*2
Z2*4 ( kürzer )
Z3
Produktbeschreibung

7
Mittels Werkzeug Z3 das Türschloss Z1 mit 2 Schrauben Z2 am Frontgitter A
montieren .
Brake

8
mit dem Werkzeug Z3 das Türschloss Z1 mit 2 Schrauben Z2 am Frontgitter B.
Schrauben erst vollständig festziehen, wenn alle Teile verbunden
sind!

9
Montieren Sie die Laufrolle V mit dem Werkzeug W am unteren Rahmen P (siehe
Detailzeichnung) .
Brake
Brake

10
Montieren Sie die Laufrolle U mit dem Werkzeug W am unteren Rahmen P (siehe
Detailzeichnung).

11
Montieren Sie, wie in der Abbildung gezeigt, das untere Netz J und die beiden
unteren Rahmenverbindungsstangen T.
Der untere Rahmen P und das untere Sieb J sind mit der Schraube Y verbunden

12
und es ist Werkzeug X erforderlich (wie in der Detailzeichnung dargestellt).
Insert the front lower mesh A and the rear
lower mesh C into the bottom frame P, and
then assemble the side lower mesh E and
the connecting rod S.
Note: The iron chute on the
connecting rod S needs to be
facing inward (as shown in the
detail drawing)

13
Setzen Sie das vordere Siebteil B in das vordere untere Sieb A ein, setzen Sie das
hintere Siebteil D in das hintere untere Siebteil B ein und montieren Sie
anschließend das seitliche Siebteil F und die Verbindungsstange S.

14
Montieren Sie das obere Netz J. Ziehen Sie alle in den vorherigen Schritten
verwendeten Schrauben fest.

15

16
Setzen Sie I und K an die Position in der Abbildung.
Beachten Sie, dass die Löcher auf dem I in der in der Abbildung gezeigten
Richtung angeordnet sind
17
Platzieren Sie die Kunststoffpaletten M und L an der in der Abbildung gezeigten
Position .
Assemble 2 pallet
racks O.
Tray rack O and side
piece connection (as
shown in the details)

18

19
Wie in der Abbildung gezeigt, montieren Sie 2 kleine Paletten N, 3 und Leiter Q
und Hängematte R

20
H and G are fixed on the
right side of the cage by
inserting the latches on the
side doors H and G into the
empty tubes on the rear
pieces C and D.

21
Gebaut.

22
Hersteller : Shanghaimuxinmuyeyouxiangongsi
Adresse: Shuangchenglu 803nong11hao1602A-1609shi, Baoshanqu,
Shanghai 200000 CN.
Nach AUS importiert: SIHAO PTY LTD. 1 ROKEVA
STREETEASTWOOD NSW 2122 Australien
Importiert in die USA: Sanven Technology Ltd. Suite 250, 9166 Anaheim
Ort, Rancho Cucamonga, CA 91730
REP
EC
E-CrossStu GmbH
Mainzer Landstr.69, 60329 Frankfurt am Main.
REP
UK
YH CONSULTING LIMITED.
C/O YH Consulting Limited Office 147, Centurion House,
London Road, Staines-upon-Thames, Surrey, TW18 4AX


Technique Assistance et certificat de garantie électronique
www.vevor.com/support
CAGE À FURET EN MÉTAL
MANUEL DE L'UTILISATEUR
We continue to be committed to provide you tools with competitive price.
"Save Half","Half Price" or any other similar expressions used by us only represents an
estimate of savings you might benefit from buying certain tools with us compared to the major
top brands and does not necessarily mean to cover all categories of tools offered by us. You
are kindly reminded to verify carefully when you are placing an order with us if you are
actually saving half in comparison with the top major brands.


1
JM-XC-084
Have product questions? Need technical support? Please feel free to
contact us:
Technical Support and E-Warranty Certificate
www.vevor.com/support
NEED HELP? CONTACT US!
METAL
FERRET CAGE

2
This is the original instruction,please read all manual instructions carefully
before operating. VEVOR reserves a clear interpretation of our user
manual. The appearance of the product shall be subject to the product
you received. Please forgive us that we won't inform you again if there
are any technology or software updates on our product.
Précautions de sécurité
AVERTISSEMENT:
Lisez ces instructions avant d'utiliser ce produit. Ne pas le faire peut entraîner
des blessures graves. les précautions de base doivent toujours être suivies ,
notamment les suivantes :
11. La cage à furet en métal ne peut pas être utilisé ou stocké dans des zones
dangereuses. Il est interdit d'utiliser l'appareil dans des endroits dangereux.
12. La cage à furet en métal doit être vérifié pour s’assurer qu’il est en bon état de
fonctionnement et qu’il fonctionne en toute sécurité avant utilisation. Dans le cas
contraire , l'appareil ne doit pas être utilisé.
13. Veuillez appuyer sur les freins du gramme de roue pour empêcher Meta
fur et de bouger.
14. L'opérateur doit utiliser la cage à furet en métal correctement. Il doit tenir
compte des conditions locales et faire attention aux tiers , en particulier aux
enfants , lorsqu'il travaille avec la cage métallique pour furet .
15. Cette cage à furet en métal n'est pas destiné à être utilisé par des personnes
(y compris des enfants) ayant des capacités physiques , sensorielles ou mentales
réduites ou manquant d'expérience et/ou de connaissances , à moins qu'elles ne
soient supervisées par une personne responsable de leur sécurité ou qu'elles ne
soient instruites par ces personnes sur l'utilisation de le dispositif. Les enfants
doivent être surveillés pour s'assurer qu'ils ne jouent pas avec le cage à furet en
3
métal .
CONSERVEZ CES INSTRUCTIONS
Liste de produits
Un panneau avant inférieur
B Panneau avant supérieur
C Panneau arrière inférieur
D Panneau arrière supérieur
4
E Panneau latéral inférieur
55X62,5cm
F Panneau latéral supérieur
55X64cm
G Porte inférieure
54,5X60,5cm
H Porte supérieure
54,5X62cm
5
I Panneau inférieur supérieur
J*2 Toit et panneau inférieur inférieur
92X55,3cm
K Panneau inférieur central
89X55 cm
L
M.
N*2
O *2
P *2
Q *3 Rampe avec couvercles
R. Hamac

6
S*2
T*2
U*2
V*2
W
X
Y*24 (plus longtemps)
Z1*2
Z2*4 ( plus court )
Z3
Description du produit

7
A l'aide de l'outil Z3 , installez la serrure de porte Z1 avec 2 vis Z2 sur le grillage
avant A .
Brake

8
A l'aide de l'outil Z3 , installez la serrure de porte Z1 avec 2 vis Z2 sur le grillage
avant B.
Conseils : Ne serrez pas complètement les vis tant que toutes les
pièces ne sont pas connectées !
9
Installez la roulette V sur le cadre inférieur P avec l'outil W (se référer au dessin
détaillé) .
Brake
Brake

10
Installez la roulette U sur le cadre inférieur P avec l'outil W (se référer au dessin
détaillé)

11
Comme le montre la figure, assemblez le treillis inférieur J, les 2 bielles du cadre
inférieur T.
Le cadre inférieur P et l'écran inférieur J sont reliés par la vis Y et l'outil X est
12
requis (comme indiqué dans le dessin détaillé).
Insert the front lower mesh A and the rear
lower mesh C into the bottom frame P, and
then assemble the side lower mesh E and
the connecting rod S.
Note: The iron chute on the
connecting rod S needs to be
facing inward (as shown in the
detail drawing)
13
Insérez la pièce d'écran avant B dans l'écran inférieur avant A, insérez la pièce
d'écran arrière D dans la pièce d'écran inférieur arrière B, puis assemblez la pièce
d'écran latéral F et la bielle S.
14
Assemblez le treillis supérieur J. Serrez toutes les vis utilisées dans les étapes
précédentes.

15
16
Mettez I et K à la position sur la figure.
Notez que les trous sur le I sont placés dans le sens indiqué sur la figure
17
Placez les palettes en plastique M et L dans la position indiquée sur la figure .
Assemble 2 pallet
racks O.
Tray rack O and side
piece connection (as
shown in the details)

18

19
Comme le montre la figure, assemblez 2 petites palettes N, 3 et l'échelle Q et le
hamac R.

20
H and G are fixed on the
right side of the cage by
inserting the latches on the
side doors H and G into the
empty tubes on the rear
pieces C and D.

21
Assemblé.

22
Fabricant : Shanghaimuxinmuyeyouxiangongsi
Adresse : Shuangchenglu 803nong11hao1602A-1609shi, baoshanqu,
Shanghai 200000 CN.
Importé en Australie : SIHAO PTY LTD. 1 ROKEVA STREETASTWOOD
NSW 2122 Australie
Importé aux États-Unis : Sanven Technology Ltd. Suite 250, 9166
Anaheim
Lieu, Rancho Cucamonga, CA 91730
REP
EC
E-CrossStu GmbH
Mainzer Landstr.69, 60329 Frankfurt am Main.
REP
UK
YH CONSULTING LIMITED.
C/O YH Consulting Limited Office 147, Centurion House,
London Road, Staines-upon-Thames, Surrey, TW18 4AX


Technisch Ondersteuning en e-garantiecertificaat www.vevor.com/support
METALEN FRETTENKOOI
HANDLEIDING
We continue to be committed to provide you tools with competitive price.
"Save Half","Half Price" or any other similar expressions used by us only represents an
estimate of savings you might benefit from buying certain tools with us compared to the major
top brands and does not necessarily mean to cover all categories of tools offered by us. You
are kindly reminded to verify carefully when you are placing an order with us if you are
actually saving half in comparison with the top major brands.


1
JM-XC-084
Have product questions? Need technical support? Please feel free to
contact us:
Technical Support and E-Warranty Certificate
www.vevor.com/support
NEED HELP? CONTACT US!
METAL
FERRET CAGE

2
This is the original instruction,please read all manual instructions carefully
before operating. VEVOR reserves a clear interpretation of our user
manual. The appearance of the product shall be subject to the product
you received. Please forgive us that we won't inform you again if there
are any technology or software updates on our product.
Veiligheidsmaatregelen
WAARSCHUWING:
Lees deze instructies voordat u dit product gebruikt. Als u dit niet doet, kan dit
leiden tot ernstig letsel. de basisvoorzorgsmaatregelen moeten altijd worden
gevolgd , waaronder de volgende:
16. De metalen frettenkooi mag niet worden gebruikt of opgeslagen in gevaarlijke
gebieden. Het is niet toegestaan het apparaat op gevaarlijke locaties te gebruiken.
17. De metalen frettenkooi moet vóór gebruik worden gecontroleerd om er zeker
van te zijn dat deze in goede staat verkeert en veilig werkt. Anders mag het
apparaat niet worden gebruikt.
18. Druk alstublieft op de rem van de wielgram om Meta te voorkomen aarzel
niet om te bewegen.
19. De exploitant moet de metalen frettenkooi gebruiken op de juiste manier. Hij
moet rekening houden met de plaatselijke omstandigheden en moet bij het werken
met de metalen frettenkooi rekening houden met derden , in het bijzonder
kinderen .
20. Deze metalen frettenkooi is niet bedoeld voor gebruik door personen (inclusief
kinderen) met verminderde lichamelijke , zintuiglijke of geestelijke vermogens of
gebrek aan ervaring en/of kennis , tenzij zij onder toezicht staan van een persoon
die verantwoordelijk is voor hun veiligheid of door deze personen zijn geïnstrueerd
over het gebruik van het apparaat. Op kinderen moet toezicht worden gehouden ,

3
om er zeker van te zijn dat ze niet met het apparaat spelen metalen frettenkooi .
BEWAAR DEZE INSTRUCTIES
Product lijst
Een lager voorpaneel
B Bovenste voorpaneel
C Onderste achterpaneel
D Bovenste achterpaneel

4
E Onderste zijpaneel
55X62,5 cm
F Bovenste zijpaneel
55X64 cm
G Onderste deur
54,5X60,5 cm
H Bovendeur
54,5X62 cm
5
I Bovenste onderste paneel
J*2 Dak en onderste bodempaneel
92X55,3 cm
K Middenbodempaneel 89X55 cm
L
M
N*2
O *2
P *2
Q *3 Oprit met afdekkingen
R Hangmat
6
S*2
T*2
U*2
V*2
W
X
Y*24 (langer)
Z1*2
Z2*4 ( korter )
Z3
Productomschrijving

7
met behulp van gereedschap Z3 het deurslot Z1 met 2 schroeven Z2 op het
voorrooster A .
Brake
8
met behulp van gereedschap Z3 het deurslot Z1 met 2 schroeven Z2 op het
voorrooster B.
de schroeven pas volledig vast als alle onderdelen zijn aangesloten!

9
Installeer het zwenkwiel V op het onderframe P met gereedschap W (zie de
detailtekening) .
Brake
Brake

10
Installeer het zwenkwiel U op het onderframe P met gereedschap W (zie de
detailtekening)

11
Monteer, zoals weergegeven in de afbeelding, het onderste gaas J en de 2
verbindingsstangen van het onderste frame T.
Het onderste frame P en het onderste scherm J zijn verbonden met schroef Y, en

12
gereedschap X is vereist (zoals weergegeven in de gedetailleerde tekening)
Insert the front lower mesh A and the rear
lower mesh C into the bottom frame P, and
then assemble the side lower mesh E and
the connecting rod S.
Note: The iron chute on the
connecting rod S needs to be
facing inward (as shown in the
detail drawing)

13
Steek het voorschermstuk B in het voorste onderste scherm A, steek het achterste
schermstuk D in het achterste onderste schermstuk B en monteer vervolgens het
zijschermstuk F en de drijfstang S.

14
Monteer het bovenste gaas J. Draai alle schroeven vast die u in de vorige stappen
hebt gebruikt.

15
16
Zet I en K op de positie in de figuur.
Merk op dat de gaten op de I in de richting zijn geplaatst die in de afbeelding wordt
weergegeven
17
Plaats de plastic pallets M en L in de positie in de figuur .
Assemble 2 pallet
racks O.
Tray rack O and side
piece connection (as
shown in the details)

18

19
Monteer, zoals weergegeven in de afbeelding, 2 kleine pallets N, 3 en ladder Q en
hangmat R

20
H and G are fixed on the
right side of the cage by
inserting the latches on the
side doors H and G into the
empty tubes on the rear
pieces C and D.

21
Geassembleerd.

22
Fabrikant : Shanghaimuxinmuyeyouxiangongsi
Adres: Shuangchenglu 803nong11hao1602A-1609shi, baoshanqu,
shanghai 200000 CN.
Geïmporteerd naar AUS: SIHAO PTY LTD. 1 ROKEVA
STREETEASTWOOD NSW 2122 Australië
Geïmporteerd in de VS: Sanven Technology Ltd. Suite 250, 9166
Anaheim
Plaats, Rancho Cucamonga, CA 91730
REP
EC
E-CrossStu GmbH
Mainzer Landstr.69, 60329 Frankfurt am Main.
REP
UK
YH CONSULTING LIMITED.
C/O YH Consulting Limited Office 147, Centurion House,
London Road, Staines-upon-Thames, Surrey, TW18 4AX


Teknisk Support och e-garanticertifikat www.vevor.com/support
ILLERBUR AV METALL
ANVÄNDARMANUAL
We continue to be committed to provide you tools with competitive price.
"Save Half","Half Price" or any other similar expressions used by us only represents an
estimate of savings you might benefit from buying certain tools with us compared to the major
top brands and does not necessarily mean to cover all categories of tools offered by us. You
are kindly reminded to verify carefully when you are placing an order with us if you are
actually saving half in comparison with the top major brands.


1
JM-XC-084
Have product questions? Need technical support? Please feel free to
contact us:
Technical Support and E-Warranty Certificate
www.vevor.com/support
NEED HELP? CONTACT US!
METAL
FERRET CAGE

2
This is the original instruction,please read all manual instructions carefully
before operating. VEVOR reserves a clear interpretation of our user
manual. The appearance of the product shall be subject to the product
you received. Please forgive us that we won't inform you again if there
are any technology or software updates on our product.
Säkerhetsåtgärder
VARNING:
Läs dessa instruktioner innan du använder denna produkt. Underlåtenhet att
göra det kan resultera i allvarliga skador. de grundläggande
försiktighetsåtgärderna bör alltid följas , inklusive följande:
21. Illerburen i metall får inte användas eller förvaras i farliga områden. Det är inte
tillåtet att använda apparaten på farliga platser.
22. Illerburen i metall måste kontrolleras för att säkerställa att den är i korrekt
fungerande skick och fungerar säkert före användning. I annat fall får apparaten
inte användas.
23. Vänligen tryck på bromsarna på hjulet gram för att förhindra Meta fer r et
från att flytta.
24. Operatören måste använda illerburen av metall ordentligt. Han måste ta
hänsyn till de lokala förhållandena och vara uppmärksam på tredje part , särskilt
barn , när han arbetar med illerburen av metall .
25. Denna illerbur i metall är inte avsedd att användas av personer (inklusive barn)
med nedsatta fysiska , sensoriska eller mentala förmågor eller som saknar
erfarenhet och/eller kunskap, såvida de inte övervakas av en person som ansvarar
för deras säkerhet eller instrueras av dessa personer om användningen av
enheten. Barn bör övervakas för att säkerställa att de inte leker med illerbur av
metall .
3
SPARA DESSA INSTRUKTIONER
Produktlista
En nedre frontpanel
B Övre frontpanel
C Nedre bakpanel
D Övre bakpanel

4
E Nedre sidopanel
55x62,5 cm
F Övre sidopanel
55x64 cm
G Nedre dörr
54,5x60,5 cm
H Övre dörr
54,5x62 cm

5
I Övre bottenpanel
J*2 Tak & nedre bottenpanel
92x55,3 cm
K Mellersta bottenpanel 89X55
cm
L
M
N*2
O *2
P *2
Q *3 Ramp med skydd
R Hängmatta

6
S*2
T*2
U*2
V*2
W
X
Y*24 (längre)
Z1*2
Z2*4 ( kortare )
Z3
Produktbeskrivning

7
Använd verktyget Z3 för att montera dörrlåset Z1 med 2 skruvar Z2 på det främre
nätet A.
Brake

8
Använd verktyget Z3 för att montera dörrlåset Z1 med 2 skruvar Z2 på det främre
nätet B.
Tips: Dra inte åt skruvarna helt förrän alla delar är anslutna!
9
Montera hjulet V på bottenramen P med verktyg W (se detaljritningen) .
Brake
Brake

10
Montera hjulet U på bottenramen P med verktyg W (se detaljritningen)
11
Som visas i figuren, montera bottennätet J, 2 vevstakar T för bottenramen.
Bottenramen P och bottenskärmen J är förbundna med skruv Y, och verktyg X
krävs (som visas på den detaljerade ritningen)

12
Insert the front lower mesh A and the rear
lower mesh C into the bottom frame P, and
then assemble the side lower mesh E and
the connecting rod S.
Note: The iron chute on the
connecting rod S needs to be
facing inward (as shown in the
detail drawing)

13
Sätt in det främre skärmstycket B i den främre nedre skärmdelen A, sätt in det
bakre skärmstycket D i det bakre nedre skärmstycket B och montera sedan
sidoskärmstycket F och vevstaken S.

14
Montera det övre nätet J. Dra åt alla skruvar som användes i de föregående
stegen.
15
Sätt I och K i positionen i figuren.

16
Observera att hålen på I:et är placerade i den riktning som visas i figuren
Placera plastpallarna M och L i positionen i figuren .

17
Assemble 2 pallet
racks O.
Tray rack O and side
piece connection (as
shown in the details)

18
19
Som visas i figuren, montera 2 små pallar N, 3 och stege Q och hängmatta R

20
H and G are fixed on the
right side of the cage by
inserting the latches on the
side doors H and G into the
empty tubes on the rear
pieces C and D.

21
Monteras.

22
Tillverkare : Shanghaimuxinmuyeyouxiangongsi
Adress: Shuangchenglu 803nong11hao1602A-1609shi, baoshanqu,
shanghai 200000 CN.
Importerad till AUS: SIHAO PTY LTD. 1 ROKEVA STREETEASTWOOD
NSW 2122 Australien
Importerad till USA: Sanven Technology Ltd. Suite 250, 9166 Anaheim
Place, Rancho Cucamonga, CA 91730
REP
EC
E-CrossStu GmbH
Mainzer Landstr.69, 60329 Frankfurt am Main.
REP
UK
YH CONSULTING LIMITED.
C/O YH Consulting Limited Office 147, Centurion House,
London Road, Staines-upon-Thames, Surrey, TW18 4AX


Técnico Soporte y certificado de garantía electrónica www.vevor.com/support
JAULA METÁLICA PARA HURONES
MANUAL DE USUARIO
We continue to be committed to provide you tools with competitive price.
"Save Half","Half Price" or any other similar expressions used by us only represents an
estimate of savings you might benefit from buying certain tools with us compared to the major
top brands and does not necessarily mean to cover all categories of tools offered by us. You
are kindly reminded to verify carefully when you are placing an order with us if you are
actually saving half in comparison with the top major brands.

1
JM-XC-084
Have product questions? Need technical support? Please feel free to
contact us:
Technical Support and E-Warranty Certificate
www.vevor.com/support
NEED HELP? CONTACT US!
METAL
FERRET CAGE

2
This is the original instruction,please read all manual instructions carefully
before operating. VEVOR reserves a clear interpretation of our user
manual. The appearance of the product shall be subject to the product
you received. Please forgive us that we won't inform you again if there
are any technology or software updates on our product.
Precauciones de seguridad
ADVERTENCIA:
Lea estas instrucciones antes de usar este producto. De lo contrario, se pueden
producir lesiones graves. Siempre se deben seguir las precauciones básicas ,
incluidas las siguientes:
26. La jaula metálica para hurones No se puede utilizar ni almacenar en zonas
peligrosas. No está permitido utilizar el aparato en lugares peligrosos.
27. La jaula metálica para hurones Se debe verificar para garantizar que esté en
buenas condiciones de funcionamiento y que funcione de manera segura antes de
su uso. De lo contrario , no se debe utilizar el aparato.
28. Presione los frenos del gramo de la rueda para evitar Meta fer r et por
moverse.
29. El operador debe utilizar la jaula metálica para hurones. adecuadamente. Al
trabajar con la jaula metálica para hurones debe tener en cuenta las condiciones
locales y prestar atención a terceros , en particular a los niños .
30. Esta jaula de metal para hurones no está destinado a ser utilizado por
personas (incluidos niños) con capacidades físicas , sensoriales o mentales
reducidas o que carezcan de experiencia y/o conocimientos , a menos que estén
supervisados por una persona responsable de su seguridad o sean instruidos por
estas personas sobre el uso de el dispositivo. Los niños deben ser supervisados
para asegurarse de que no jueguen con el Jaula metálica para hurones .
3
GUARDA ESTAS INSTRUCCIONES
Lista de productos
Un panel frontal inferior
B Panel frontal superior
C Panel trasero inferior
D Panel superior trasero

4
E Panel lateral inferior
55X62,5cm
F Panel lateral superior
55X64cm
G Puerta inferior
54,5X60,5cm
H Puerta superior
54,5X62cm

5
I Panel superior inferior
J*2 Techo y panel inferior inferior
92X55,3cm
k Panel Inferior Medio 89X55 cm
l
METRO
N*2
O *2
* 2
Q *3 Rampa Con Cubiertas
R Hamaca

6
S*2
T*2
U*2
V*2
W.
X
Y*24 (más largo)
Z1*2
Z2*4 ( más corto )
Z3
Descripción del Producto

7
Usando la herramienta Z3 , instale la cerradura de la puerta Z1 con 2 tornillos Z2
en la malla frontal A.
Brake

8
Usando la herramienta Z3 , instale la cerradura de la puerta Z1 con 2 tornillos Z2
en la malla frontal B.
Consejos: ¡No apriete los tornillos completamente hasta que todas
las piezas estén conectadas!

9
Instale la rueda V en el marco inferior P con la herramienta W (consulte el dibujo
detallado) .
Brake
Brake

10
Instale la rueda U en el marco inferior P con la herramienta W (consulte el dibujo
detallado)
11
Como se muestra en la figura, ensamble la malla inferior J, 2 bielas del marco
inferior T.
El marco inferior P y la pantalla inferior J están conectados con el tornillo Y y se

12
requiere la herramienta X (como se muestra en el dibujo detallado)
Insert the front lower mesh A and the rear
lower mesh C into the bottom frame P, and
then assemble the side lower mesh E and
the connecting rod S.
Note: The iron chute on the
connecting rod S needs to be
facing inward (as shown in the
detail drawing)

13
Inserte la pieza de la luneta delantera B en la luneta inferior delantera A, inserte la
pieza de la luneta trasera D en la pieza de la luneta inferior trasera B y luego
ensamble la pieza de la luneta lateral F y la biela S.

14
Ensamble la malla superior J. Apriete todos los tornillos utilizados en los pasos
anteriores.
15

16
Coloque I y K en la posición de la figura.
Tenga en cuenta que los agujeros en I están colocados en la dirección que se
muestra en la figura.
17
Coloque los pallets de plástico M y L en la posición que se muestra en la figura .
Assemble 2 pallet
racks O.
Tray rack O and side
piece connection (as
shown in the details)

18
19
Como se muestra en la figura, monte 2 pallets pequeños N, 3 y la escalera Q y la
hamaca R.

20
H and G are fixed on the
right side of the cage by
inserting the latches on the
side doors H and G into the
empty tubes on the rear
pieces C and D.

21
Montado.

22
Fabricante : Shanghaimuxinmuyeyouxiangongsi
Dirección: Shuangchenglu 803nong11hao1602A-1609shi, baoshanqu,
shanghai 200000 CN.
Importado a AUS: SIHAO PTY LTD. 1 ROKEVA STREETASTWOOD
NSW 2122 Australia
Importado a EE. UU.: Sanven Technology Ltd. Suite 250, 9166 Anaheim
Lugar, Rancho Cucamonga, CA 91730
REP
EC
E-CrossStu GmbH
Mainzer Landstr.69, 60329 Frankfurt am Main.
REP
UK
YH CONSULTING LIMITED.
C/O YH Consulting Limited Office 147, Centurion House,
London Road, Staines-upon-Thames, Surrey, TW18 4AX


Tecnico Supporto e certificato di garanzia elettronica www.vevor.com/support
GABBIA PER FURETTI IN METALLO
MANUALE D'USO
We continue to be committed to provide you tools with competitive price.
"Save Half","Half Price" or any other similar expressions used by us only represents an
estimate of savings you might benefit from buying certain tools with us compared to the major
top brands and does not necessarily mean to cover all categories of tools offered by us. You
are kindly reminded to verify carefully when you are placing an order with us if you are
actually saving half in comparison with the top major brands.


1
JM-XC-084
Have product questions? Need technical support? Please feel free to
contact us:
Technical Support and E-Warranty Certificate
www.vevor.com/support
NEED HELP? CONTACT US!
METAL
FERRET CAGE

2
This is the original instruction,please read all manual instructions carefully
before operating. VEVOR reserves a clear interpretation of our user
manual. The appearance of the product shall be subject to the product
you received. Please forgive us that we won't inform you again if there
are any technology or software updates on our product.
Misure di sicurezza
AVVERTIMENTO:
Leggere queste istruzioni prima di utilizzare questo prodotto. In caso contrario,
si potrebbero verificare lesioni gravi. È necessario seguire sempre le precauzioni
di base , incluse le seguenti:
31. La gabbia per furetti in metallo non può essere utilizzato o conservato in aree
pericolose. Non è consentito utilizzare l'apparecchio in luoghi pericolosi.
32. La gabbia per furetti in metallo deve essere controllato per garantire che sia in
buone condizioni di funzionamento e funzioni in sicurezza prima dell'uso. In caso
contrario l' apparecchio non deve essere utilizzato.
33. Si prega di premere i freni della ruota per evitare che Meta ferr et dal
muoversi.
34. L'operatore deve utilizzare la gabbia metallica per furetti correttamente.
Quando lavora con la gabbia metallica per furetti deve considerare le condizioni
locali e prestare attenzione ai terzi , in particolare ai bambini .
35. Questa gabbia per furetti in metallo non è destinato all'uso da parte di persone
(compresi i bambini) con ridotte capacità fisiche , sensoriali o mentali o prive di
esperienza e/o conoscenza , a meno che non siano supervisionate da una
persona responsabile della loro sicurezza o siano istruite da queste persone
sull'uso di il dispositivo. I bambini devono essere sorvegliati per assicurarsi che
non giochino con il gabbia per furetti in metallo .
3
CONSERVA QUESTE ISTRUZIONI
Elenco prodotti
Un pannello frontale inferiore
B Pannello frontale superiore
C Pannello posteriore inferiore
D Pannello posteriore superiore

4
E Pannello laterale inferiore
55X62,5cm
F Pannello laterale superiore
55X64 cm
G Sportello inferiore
54,5X60,5 centimetri
H Porta Superiore
54,5X62 cm

5
I Pannello inferiore superiore
J*2 Tetto e pannello inferiore inferiore
92X55,3 cm
K Pannello Fondo Centrale
89X55 cm
l
M
N*2
O *2
P *2
Q *3 Rampa con coperture
R Amaca

6
S*2
T*2
U*2
V*2
W
X
Y*24
(
più lungo
)
Z1*2
Z2*4
(
più corto )
Z3
Descrizione del prodotto

7
Utilizzando l'attrezzo Z3 , installare la serratura Z1 con 2 viti Z2 sulla rete anteriore
A.
Brake

8
Utilizzando l'attrezzo Z3 , installare la serratura Z1 con 2 viti Z2 sulla rete anteriore
B.
Suggerimenti: non serrare completamente le viti finché tutte le parti
non sono collegate!
9
Installare la ruota V sul telaio inferiore P con l'attrezzo W (fare riferimento al
disegno dettagliato) .
Brake
Brake

10
Installare la ruota U sul telaio inferiore P con l'attrezzo W (fare riferimento al
disegno dettagliato)
11
Come mostrato in figura, assemblare la rete inferiore J, 2 bielle telaio inferiore T.
Il telaio inferiore P e lo schermo inferiore J sono collegati con la vite Y ed è
necessario l'utensile X (come mostrato nel disegno dettagliato)

12
Insert the front lower mesh A and the rear
lower mesh C into the bottom frame P, and
then assemble the side lower mesh E and
the connecting rod S.
Note: The iron chute on the
connecting rod S needs to be
facing inward (as shown in the
detail drawing)
13
Inserisci il pezzo dello schermo anteriore B nello schermo inferiore anteriore A,
inserisci il pezzo dello schermo posteriore D nel pezzo dello schermo inferiore
posteriore B, quindi assembla il pezzo dello schermo laterale F e la biella S.
14
Assemblare la rete superiore J. Stringere tutte le viti utilizzate nei passaggi
precedenti.

15
Metti I e K nella posizione in figura.

16
Si noti che i fori sulla I sono posizionati nella direzione mostrata in figura
Posizionare i pallet di plastica M e L nella posizione in figura .
17
Assemble 2 pallet
racks O.
Tray rack O and side
piece connection (as
shown in the details)
18

19
Come mostrato in figura, assemblare 2 pallet piccoli N, 3, la scala Q e l'amaca R
20
H and G are fixed on the
right side of the cage by
inserting the latches on the
side doors H and G into the
empty tubes on the rear
pieces C and D.

21
Assemblato.

22
Produttore : Shanghaimuxinmuyeyouxiangongsi
Indirizzo: Shuangchenglu 803nong11hao1602A-1609shi, baoshanqu,
shanghai 200000 CN.
Importato in AUS: SIHAO PTY LTD. 1 ROKEVA STREETEASTWOOD
NSW 2122 Australia
Importato negli Stati Uniti: Sanven Technology Ltd. Suite 250, 9166
Anaheim
Luogo, Rancho Cucamonga, CA 91730
REP
EC
E-CrossStu GmbH
Mainzer Landstr.69, 60329 Frankfurt am Main.
REP
UK
YH CONSULTING LIMITED.
C/O YH Consulting Limited Office 147, Centurion House,
London Road, Staines-upon-Thames, Surrey, TW18 4AX


Techniczny Certyfikat wsparcia i e-gwarancji www.vevor.com/support
METALOWA KLATKA DLA FRETEK
INSTRUKCJA OBSŁUGI
We continue to be committed to provide you tools with competitive price.
"Save Half","Half Price" or any other similar expressions used by us only represents an
estimate of savings you might benefit from buying certain tools with us compared to the major
top brands and does not necessarily mean to cover all categories of tools offered by us. You
are kindly reminded to verify carefully when you are placing an order with us if you are
actually saving half in comparison with the top major brands.


1
JM-XC-084
Have product questions? Need technical support? Please feel free to
contact us:
Technical Support and E-Warranty Certificate
www.vevor.com/support
NEED HELP? CONTACT US!
METAL
FERRET CAGE

2
This is the original instruction,please read all manual instructions carefully
before operating. VEVOR reserves a clear interpretation of our user
manual. The appearance of the product shall be subject to the product
you received. Please forgive us that we won't inform you again if there
are any technology or software updates on our product.
Środki ostrożności
OSTRZEŻENIE:
Przeczytaj tę instrukcję przed użyciem tego produktu. Niezastosowanie się do
tego może spowodować poważne obrażenia. należy zawsze przestrzegać
podstawowych środków ostrożności , w tym:
36. Metalowa klatka dla fretek nie wolno używać ani przechowywać w obszarach
niebezpiecznych. Nie wolno używać urządzenia w miejscach niebezpiecznych.
37. Metalowa klatka dla fretek przed użyciem należy sprawdzić, czy jest w dobrym
stanie i czy działa bezpiecznie. W przeciwnym razie nie wolno używać urządzenia.
38. Naciśnij hamulce koła, aby zapobiec Meta nie ruszaj się.
39. Operator musi używać metalowej klatki dla fretek odpowiednio. Podczas
pracy z metalową klatką dla fretek musi wziąć pod uwagę lokalne warunki i
zwracać uwagę na osoby trzecie , w szczególności na dzieci .
40. Ta metalowa klatka dla fretek nie jest przeznaczony do użytku przez osoby (w
tym dzieci) o ograniczonych zdolnościach fizycznych , sensorycznych lub
umysłowych lub nieposiadające doświadczenia i/lub wiedzy , chyba że znajdują
się pod nadzorem osoby odpowiedzialnej za ich bezpieczeństwo lub zostaną
przez te osoby poinstruowane w zakresie obsługi urządzenie. Dzieci należy
nadzorować , aby mieć pewność, że nie bawią się urządzeniem metalowa klatka
dla fretek .
3
ZACHOWAJ TE INSTRUKCJE
Lista produktów
Dolny panel przedni
B Górny panel przedni
C Dolny panel tylny
D Górny panel tylny

4
E Dolny panel boczny
55X62,5cm
F Górny panel boczny
55X64cm
G Dolne drzwiczki
54,5 x 60,5 cm
H Górne drzwi
54,5 x 62 cm

5
I Górny panel dolny
J*2 Dach i dolny panel dolny
92X55,3cm
K Środkowy panel dolny 89X55
cm
L
M
N*2
O *2
P *2
Q *3 Rampa z osłonami
R Hamak
6
S*2
T*2
U*2
V*2
W
X
Y*24 (dłużej)
Z1*2
Z2*4 ( krótszy )
Z3
Opis produktu

7
Za pomocą narzędzia Z3 zamontuj zamek drzwi Z1 za pomocą 2 śrub Z2 na
przedniej siatce A .
Brake

8
Za pomocą narzędzia Z3 zamontuj zamek drzwi Z1 za pomocą 2 śrub Z2 na
przedniej siatce B.
Wskazówki: Nie dokręcaj śrub całkowicie, dopóki wszystkie części
nie zostaną połączone!

9
Zamontuj kółko V na dolnej ramie P za pomocą narzędzia W (patrz rysunek
szczegółowy) .
Brake
Brake
10
Zamontuj kółko U na dolnej ramie P za pomocą narzędzia W (patrz rysunek
szczegółowy)

11
Jak pokazano na rysunku, zamontuj dolną siatkę J, 2 łączniki ramy dolnej T.
Dolna rama P i dolna osłona J są połączone śrubą Y i wymagane jest narzędzie X
(jak pokazano na rysunku szczegółowym)

12
Insert the front lower mesh A and the rear
lower mesh C into the bottom frame P, and
then assemble the side lower mesh E and
the connecting rod S.
Note: The iron chute on the
connecting rod S needs to be
facing inward (as shown in the
detail drawing)

13
Włóż część przedniej szyby B do przedniej dolnej szyby A, włóż tylną część szyby
D do tylnej dolnej części szyby B, a następnie zmontuj boczną część szyby F i
korbowód S.

14
Zamontuj górną siatkę J. Dokręć wszystkie śruby użyte w poprzednich krokach.

15
Umieść I i K w pozycji pokazanej na rysunku.
Zwróć uwagę, że otwory na I są rozmieszczone w kierunku pokazanym na
16
rysunku
Umieść plastikowe palety M i L w miejscu pokazanym na rysunku .

17
Assemble 2 pallet
racks O.
Tray rack O and side
piece connection (as
shown in the details)

18

19
Jak pokazano na rysunku, zmontuj 2 małe palety N, 3 i drabinkę Q oraz hamak R

20
H and G are fixed on the
right side of the cage by
inserting the latches on the
side doors H and G into the
empty tubes on the rear
pieces C and D.

21
Zmontowane.

22
Producent : Shanghaimuxinmuyeyouxiangongsi
Adres: Shuangchenglu 803nong11hao1602A-1609shi, baoshanqu,
szanghaj 200000 CN.
Import do AUS: SIHAO PTY LTD. 1 ROKEVA STREETEASTWOOD NSW
2122 Australia
Import do USA: Sanven Technology Ltd. Suite 250, 9166 Anaheim
Place, Rancho Cucamonga, Kalifornia 91730
REP
EC
E-CrossStu GmbH
Mainzer Landstr.69, 60329 Frankfurt am Main.
REP
UK
YH CONSULTING LIMITED.
C/O YH Consulting Limited Office 147, Centurion House,
London Road, Staines-upon-Thames, Surrey, TW18 4AX