Model:DU4LB-WY
Huizhou Dudu Pet Products Co.,ltd
12 Months Warranty
US: Petultr[email protected]
EU: suppo@imipaw.com
English / Español
Specication
Capacity: 4L
Power supply: DC 5V/1A power adapter
Power adapter: AC110-240V input, DC5V output
Gross weight: 1.29kg
Dimensions: 195mm x 190mm x 340mm
BD-041-D
Automatic Pet Feeder
User Manual
WIFI Type

02
03
04
05
06
07
10
12
CONTENTS
English
01-SAFETY PRECAUTUONS
02-IN THE BOX
03-PRODUCT IMAGE
04-BUTTONS AND DISPLAY OVERREVIEW
05-FCC WARNING
06-INSTRUCTIONS
07-PETTECH APP SPECIFIC OPERATIONS
08-TROUBLESHOOTING

CONTENIDO
Español
14
15
16
17
18
19
22
24
01-PRECAUCIONES DE SEGURIDAD
02-EN LA CAJA
03-IMAGEN DEL PRODUCTO
04-BOTONES Y PANTALLA VISTA GENERAL
05-ADVERTENCIA FCC
06-INSTRUCCIONES
07-PETTECH APP OPERACIONES ESPECÍFICAS
08-SOLUCIÓN DE PROBLEMAS
English
01
Warning
·Dispose of all packaging materials properly. Some items may be packed in poly-bags; these bag could cause suocation;
keep away from children and pets.
·
Do not allow small children to play with, in or around the pet feeder.
·
To reduce the risk of inju, please keep close supeision when an appliance is used near children.
·
Do not use the feeder with pets not able to reach the food tray or with any physical disability
·
Do not immerse the base pa in water at any time as it may damage electronic components like the control panel.
·
Do not place any foreign object in the pet feeder.
·
Do Not use outdoors. Check operation frequently to be sure the unit is dispensing properly.
·
Do not use wet, canned or moist food.
·
Do not disassemble the unit other than as instructed in the user guide.
·
Do not use the feeder for anything other than its intended use.
·
Only use attachments recommended or sold by the manufacturer. The use of attachments not recommended or sold by
the manufacturer may cause an unsafe condition. Do not modify the pet feeder.
·
Do not operate any appliance if the unit is malfunctioning or has been damaged. Do not attempt repairs on the pet feeder
yourself. Contact our customer seice immediately for fuher instructions.
·
Always unplug when not in use and before cleaning.
·
Never pull on the electrical power cord to remove the plug from the wall outlet.
·
If the plug of this device gets wet, turn on electricity to that wall outlet. Do not attempt to unplug.
·
Examine the feeder after installation. Do not plug in if there is water on the power cord or plug.
·
To avoid tripping, always position power cord out of the way of foot trac.
SAFETY PRECAUTUONS
CAUTION
·Do not allow pets to chew on or swallow any pas.
·
If an extension cord is necessa, one unit with a proper rating should be used.
·
Do not install or store the feeder where it will be exposed to weather or temperatures below -10℃.
·
Use alkaline D batteries to power. Do not use rechargeable batteries.
·
Check the batteries regularly. Before leaving for extended time, always replace batteries with new ones.
·
Do not life the pet feeder by lid, food tank, or food tray. Lt and car it using both hands and the base, while keeping the
unit in an upright position.
·
Suitable for d food only, with kibble size ranging from 2-10mm. Larger kibble may get stuck as the food outlet.
·
Read and obsee all impoant notices listed on the pet feeder and in the packaging.
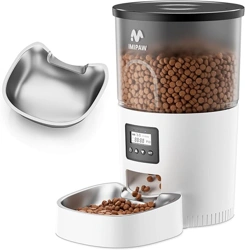
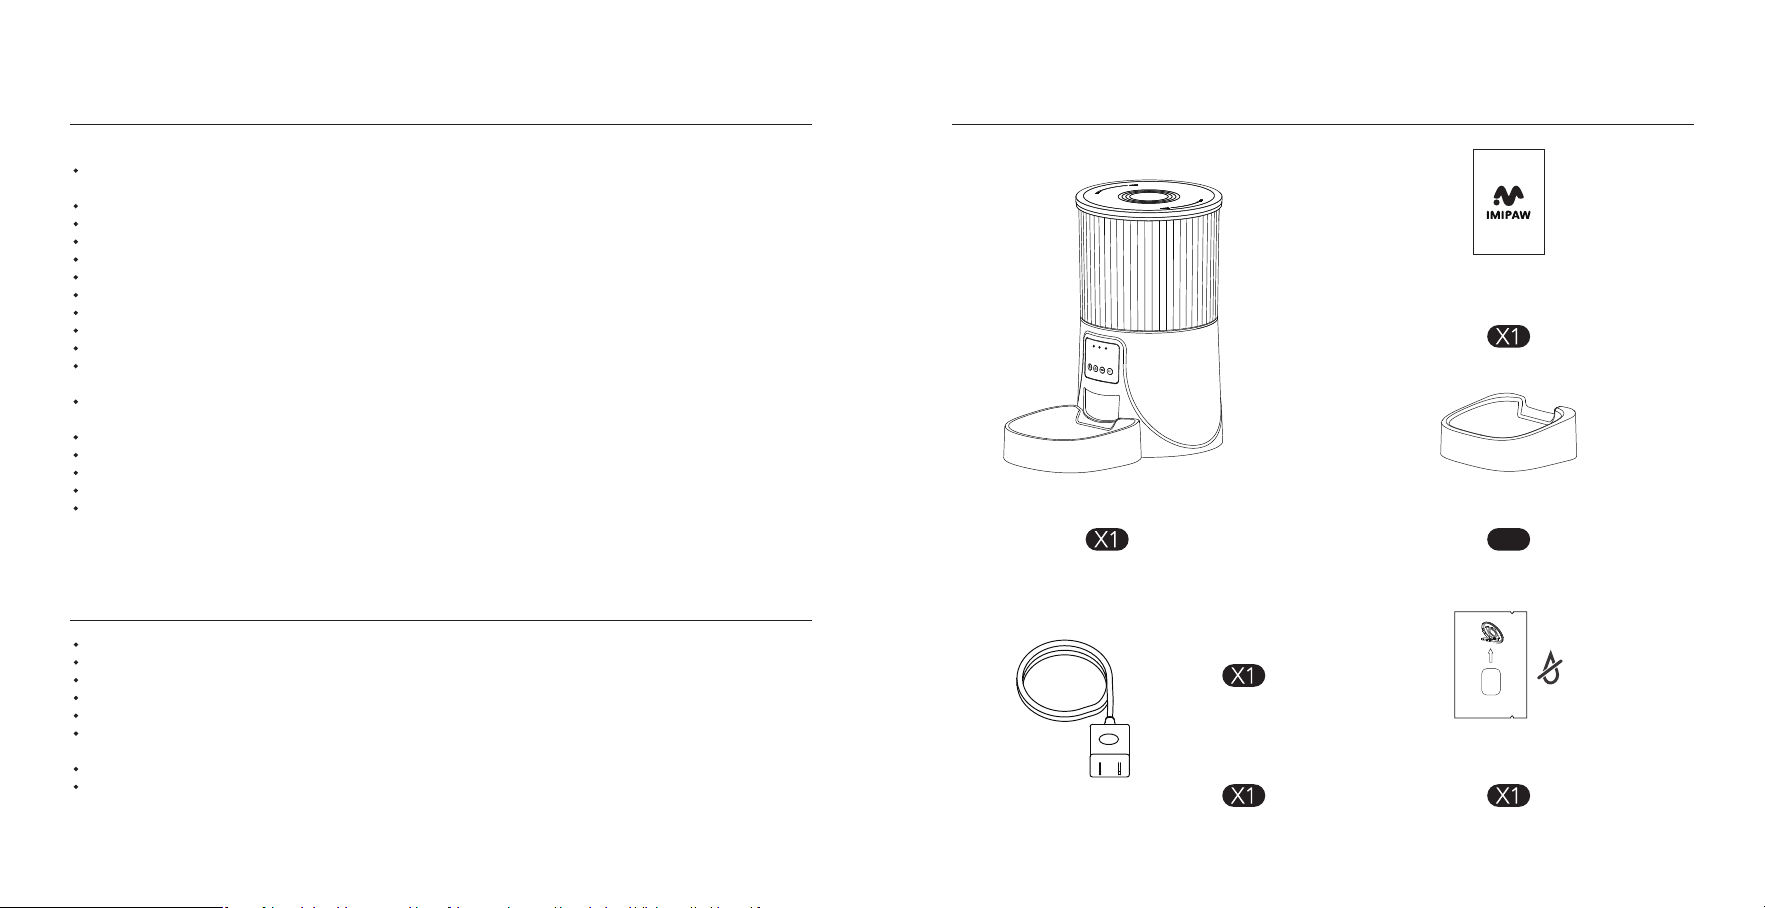
IN THE BOX
Automatic Cat Feeder
Desiccant Bag
Do Not Eat
Bowl Tray
User Manual
X1
Power Cable
Power Adapter
02 03
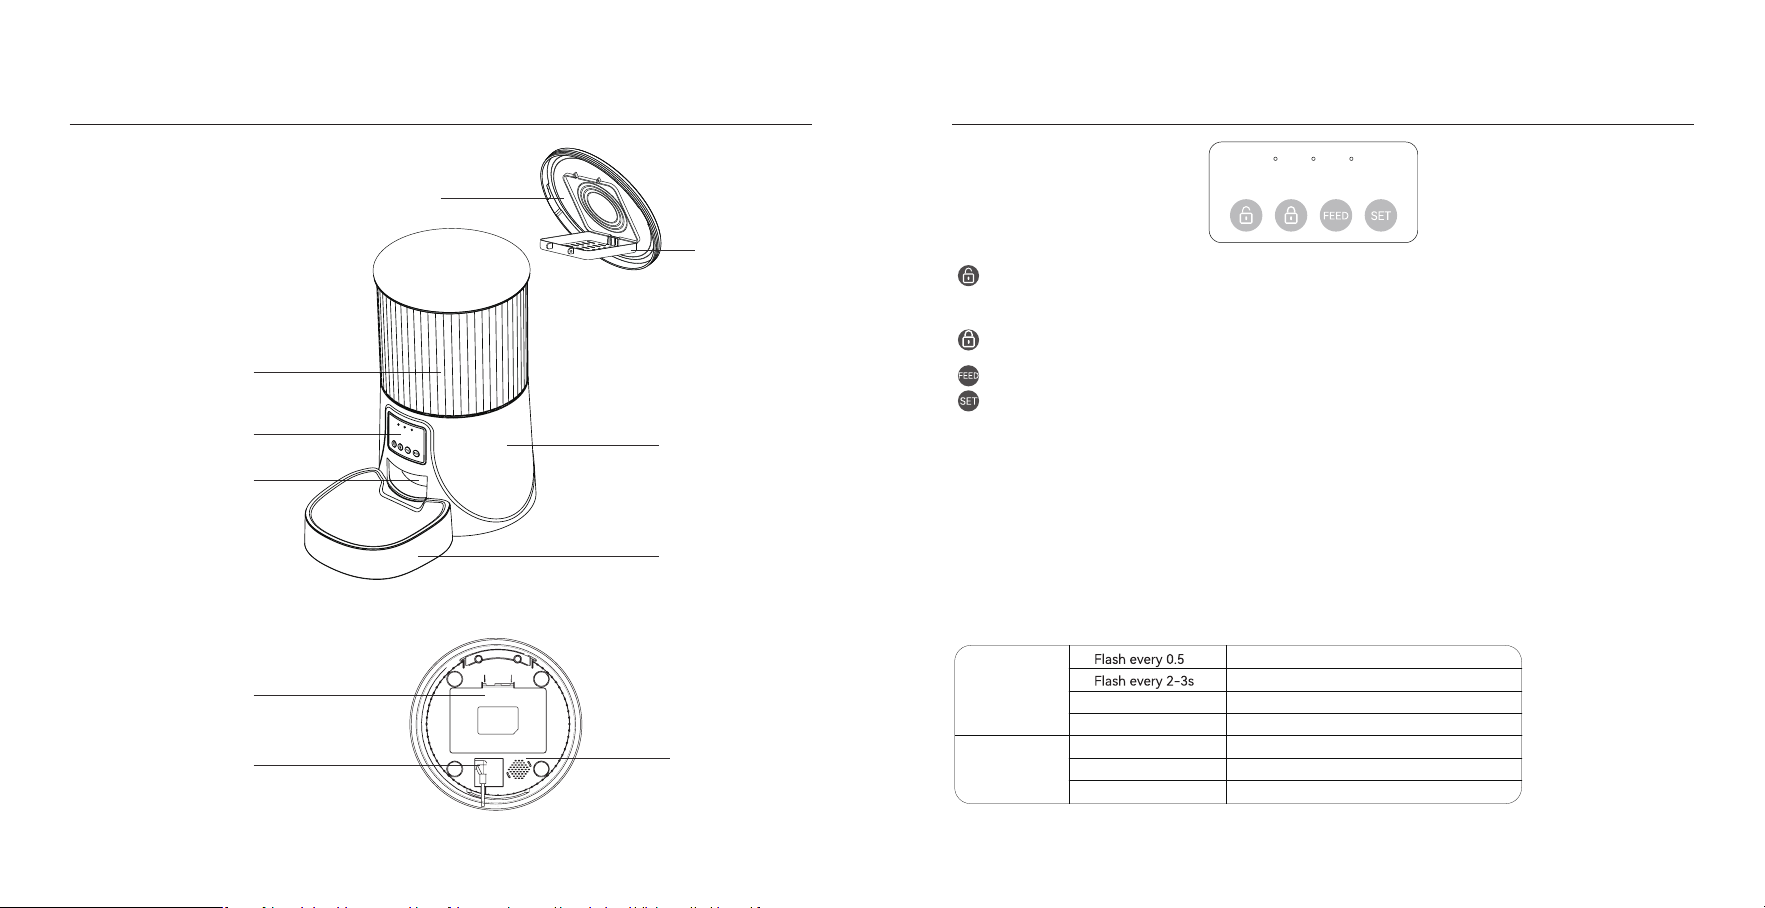
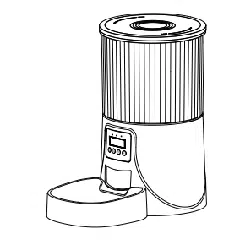
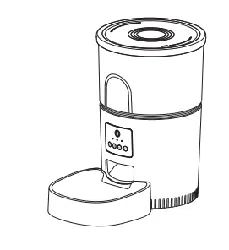
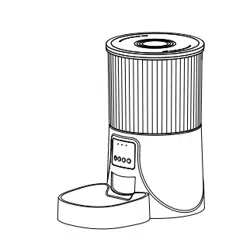
PRODUCT IMAGE BUTTONS AND DISPLAY OVERREVIEW
Unlock Button: Press and hold for 6 seconds. When you hear a beep, the red light ashes twice, indicating successful
unlocking.
Locked Button: Under unlock state, long press for 6s and the red led light ashes twice, lock the device.
Set Button: When the power is turned on and the network is not congured, the blue indicator ashes quickly by
default, which is WiFi conguration mode. Press and hold for 7 seconds to hear three beeps, the red indicator is on for 6
seconds and the blue indicator switches to slow ashing, which is hot spot network conguration mode. Repeat the
operation to switch between the two network modes.
Feed Button: When the feeder is unlocked, press once to feed a poion manually.
Notice:
When the device is locked, press and hold the settings button for 6 seconds to restore facto settings.
LED INDICATORS
Red
Flash
Flash Twice
Locked/Unlocked
Abnormal or low voltage
Stay for about 6s
WiFi mode/Hot Spot mode switch
Blue
Stay Solid
Stay for about 6s
WiFi mode/Hot Spot mode switch
Connected to WiFi and fully operational
The feeder is in WiFi mode, ready to connect with App.
The feeder is in hot spot mode, ready to connect with App.
Front view
Bottom View
Desiccant Carrier
Lid
Food Tank
Base
Bowl
Control Pannel&LCD Display
Food Outlet
Batte Compament
Power Socket
Speaker
04 05
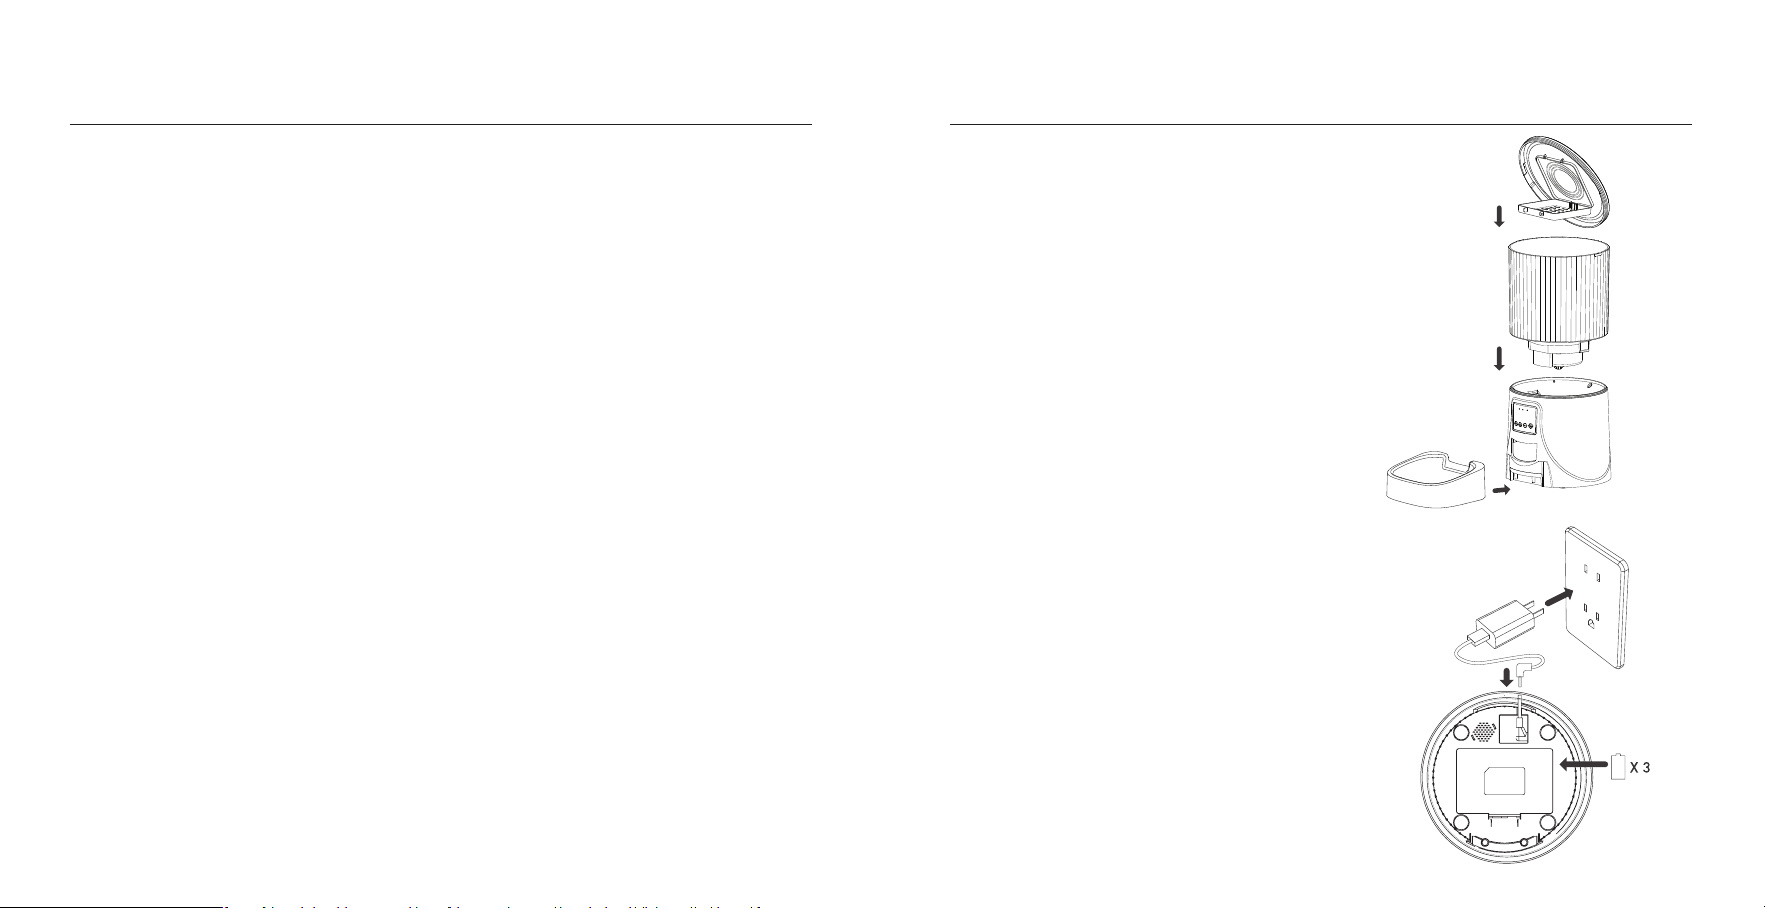
1) Take out the food bowl inside the food tank.
2) Check the food tank is in place.
3) Install the food bowl.
Attach the bowl to the designated notches
underneath the feeder base.
1) Inse the 5V power adapter into a wall socket.
Plug in the power socket of the feeder.
2) Open the batte compament at the button of
the unit, and install 3 alkaline D batteries (not
included) in case of outage.
Warning: Please use the original 5V power supply.
Note:
◎ Before moving the feeder, press the bowl down
to remove it from the feeder base. If there is grain
in the food bowl, handle it gently to avoid spilling.
◎ Hold the base instead of any other pas when
lifting the feeder.
Note:
◎ Batte NOT included.
◎ Before connecting to power, make sure all
pas are clean and complete d.
◎ The batte should power with an output of
4-5V.
INSTRUCTIONS
01 | Assembling Food Tray
02 | Connection Power
This device complies with pa 15 of the FCC Rules. Operation is subject to the following two conditions : (1) this device may
not cause harmful inteerence, (2) and this device must accept any inteerence received,inc luding inteerence that may
cause undesired operation.
Any changes or modications not expressly approved by the pay responsible for compliance could void the user's
authority to operate the equipment.
NOTE:This equipment has been tested and found to comply with the limits for a Class B digital device, pursuant to Pa l5
of the FCC Rules. These limits are designed to provide reasonable protection against harmful inteerence in a residential
installation. This equipment generates, uses and can radiate radio frequency energy and, if not installed and used in
accordance with the instructions, may cause harmful inteerence to radio communications.
However, there is no guarantee that inteerence will not occur in a paicular installation. If this equipment does cause
harmful inteerence to radio or televis ion reception, which can be determined by turning the equipment o and on, the
user is encouraged to t to correct the inteerence by one or more of the following measures:
-- Reorient or relocate the receiving antenna.
-- Increase the separation between the equipment and receiver.
-- Connect the equipment into an outlet on a circuit dierent
from that to which the receiver is connected.
-- Consult the dealer or an experienced radio/TV technic ian for help.
To maintain compliance with FCC's RF Exposure guidelines,This equipment should be installed and operated with minimum
distance between 20cm the radiator your body: Use only the supplied antenna.
FCC WARNING
D Size
Batte
06 07
Do Not Eat
10mm
The desiccant bag can remove the moisture and
odor inside the tank, protect the pet food from
oxidation damage, and always be fresh.
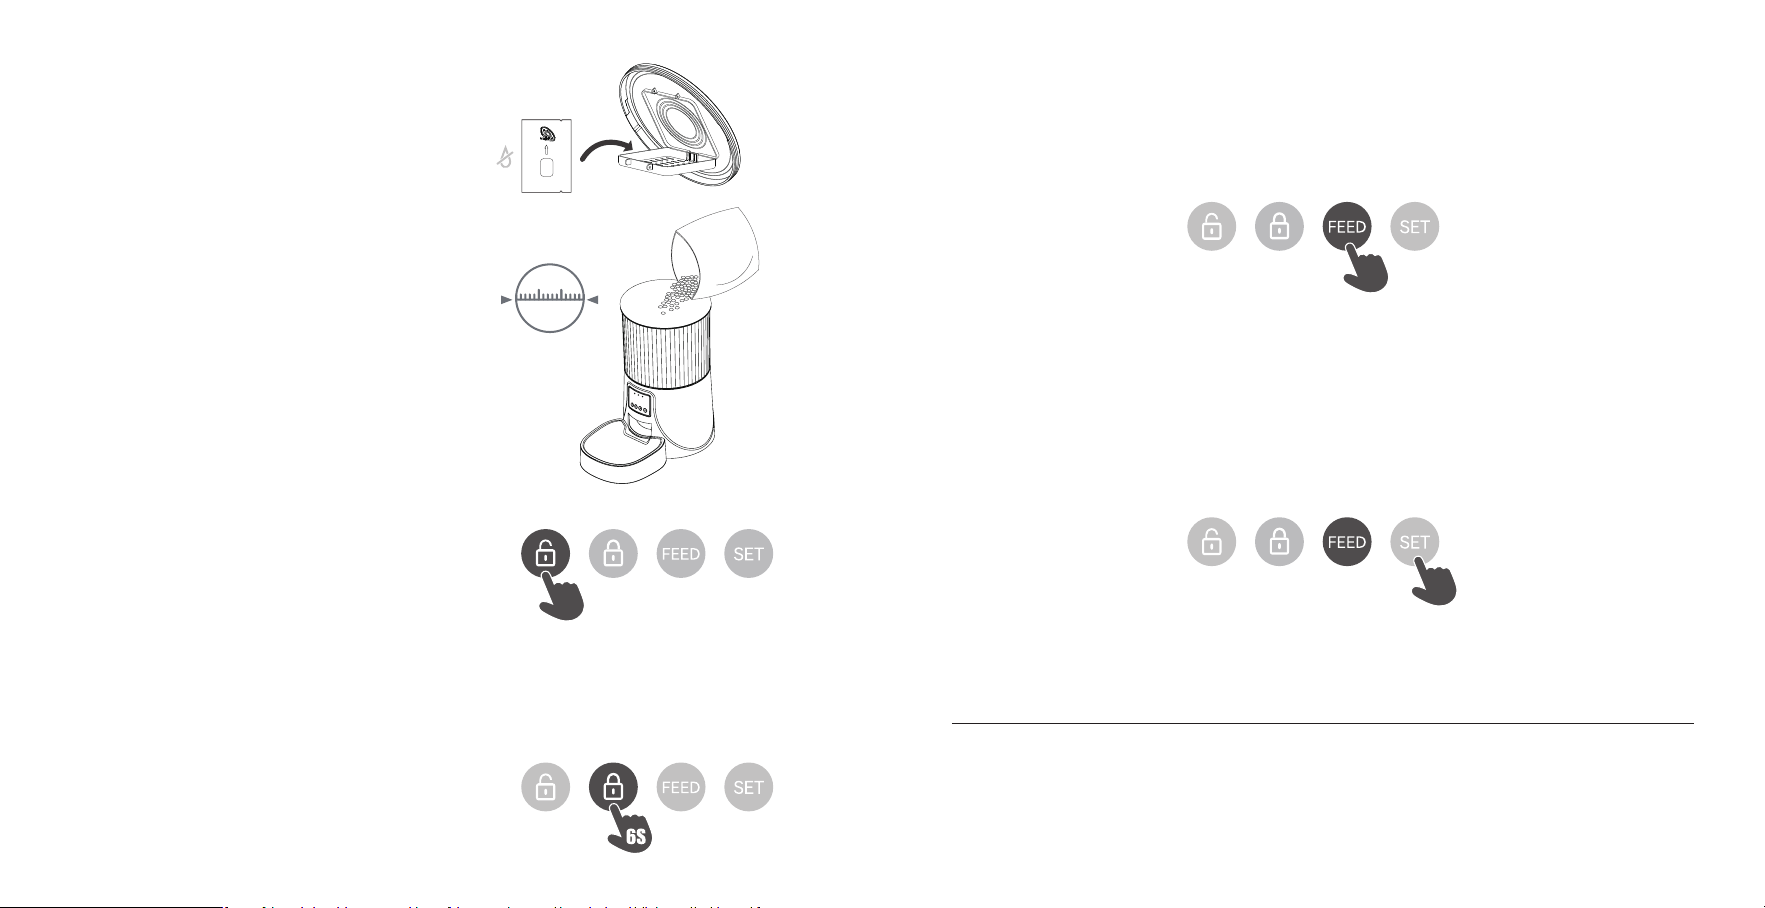
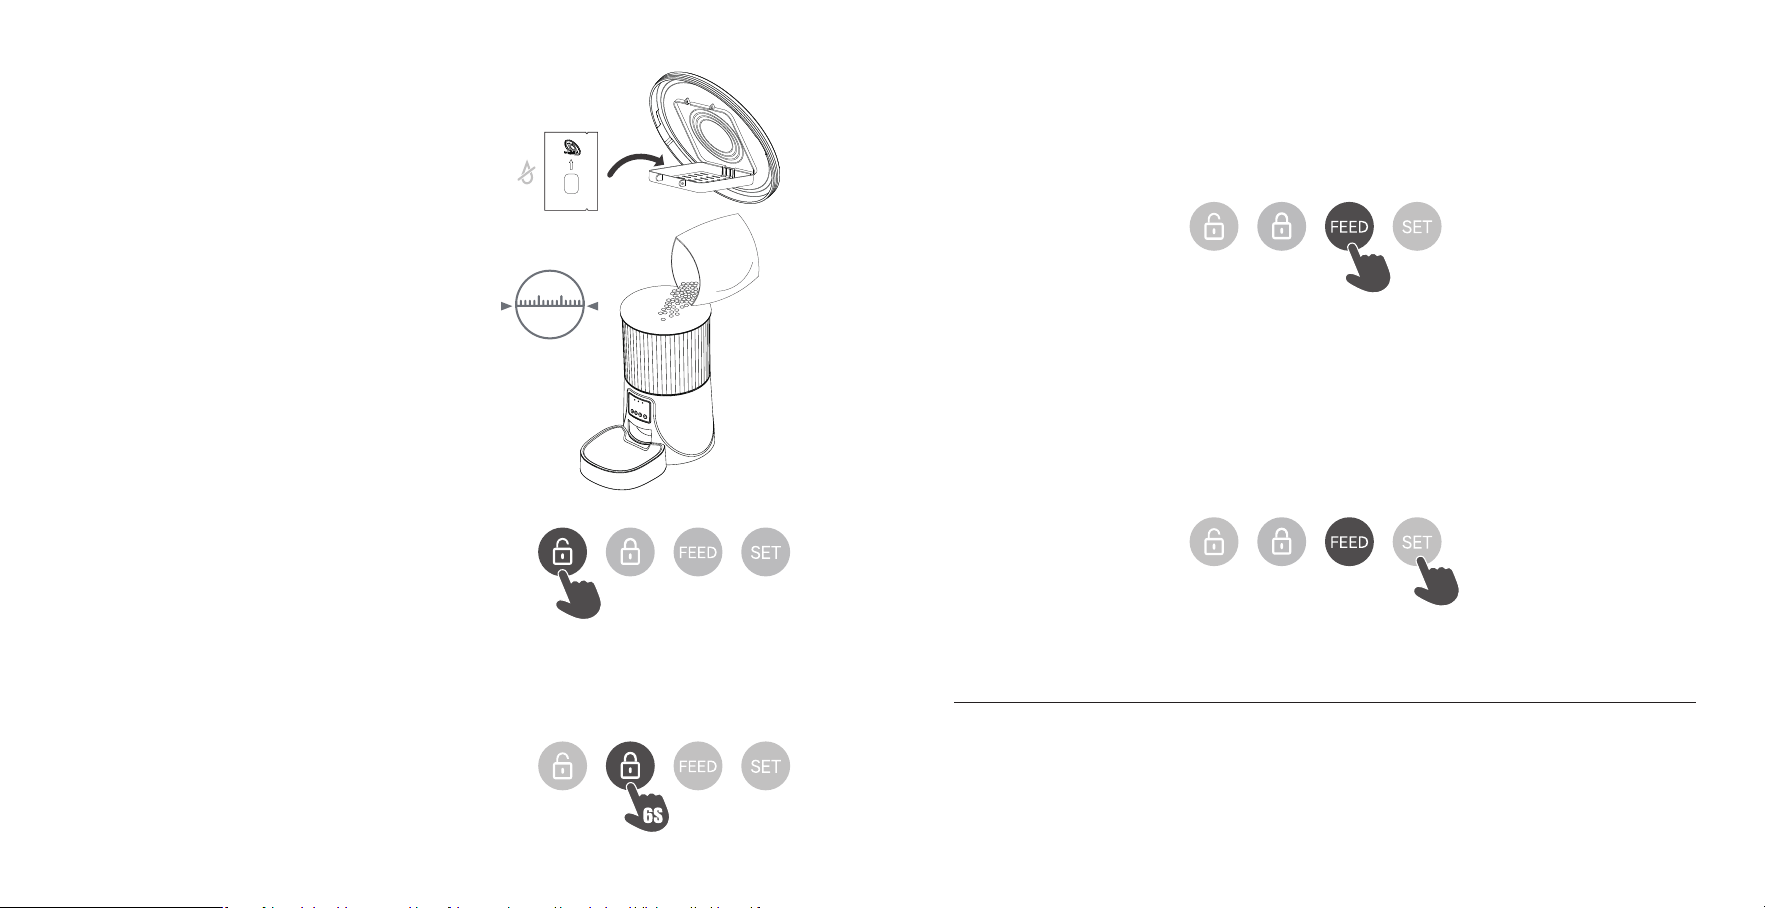
03 | Put the desiccant bag into the carrier under the lid
Add d pet food to the food tank.
Note:
◎ Do NOT use canned, wet or moist pet food.
◎ Recommend kibble size ranging from
2-10mm/0.07-0.4in in diameter.
04 | Filling Food Tank
Please clean the feeder regularly to keep your pet's health.
When it stas to get diy and a lot of loose food in the food trough, you can remove thefood cover to clean it.
Use a soft damp cloth to clean the base of the feeder and the control panel. Do not get wetthis pa, and do not to clean it
with running water.
Do not put the product in the dishwasher, otherwise it will be permanently damaged!
CLEANING AND MAINTENANCE
05 | Unlock
◎ Press and hold for 6 seconds. When you hear a beep, the
red light ashes twice, indicating successful unlocking.
6S
06 | Lock button
◎ Under unlock state,Long press for 6 seconds and the
red indicator light ashes twice to lock the machine.
Note:
Pressing the feeding button in the locked state does not
work, it must be unlocked for normal use.
The APP operation is not aected in the locked state.
07 | Feeding
◎ Manual feeding: sho press to see 1 poion.
Note:
The feeding plan will not be aected.
08 | Reset
◎ Switching the network conguration mode: When the power is turned on and the network is not congured, the blue
indicator ashes quickly by default (WiFi quick connection conguration mode), press and hold for 7 seconds to hear three
beeps, The red/blue indicator is always on for 6 seconds and then switches to slow ashing (hot spot network conguration
mode). Repeat the operation to switch between the two network modes.
Note:
When the device is locked, press and hold the settings button for 6 seconds to restore facto settings.
7S
08 09
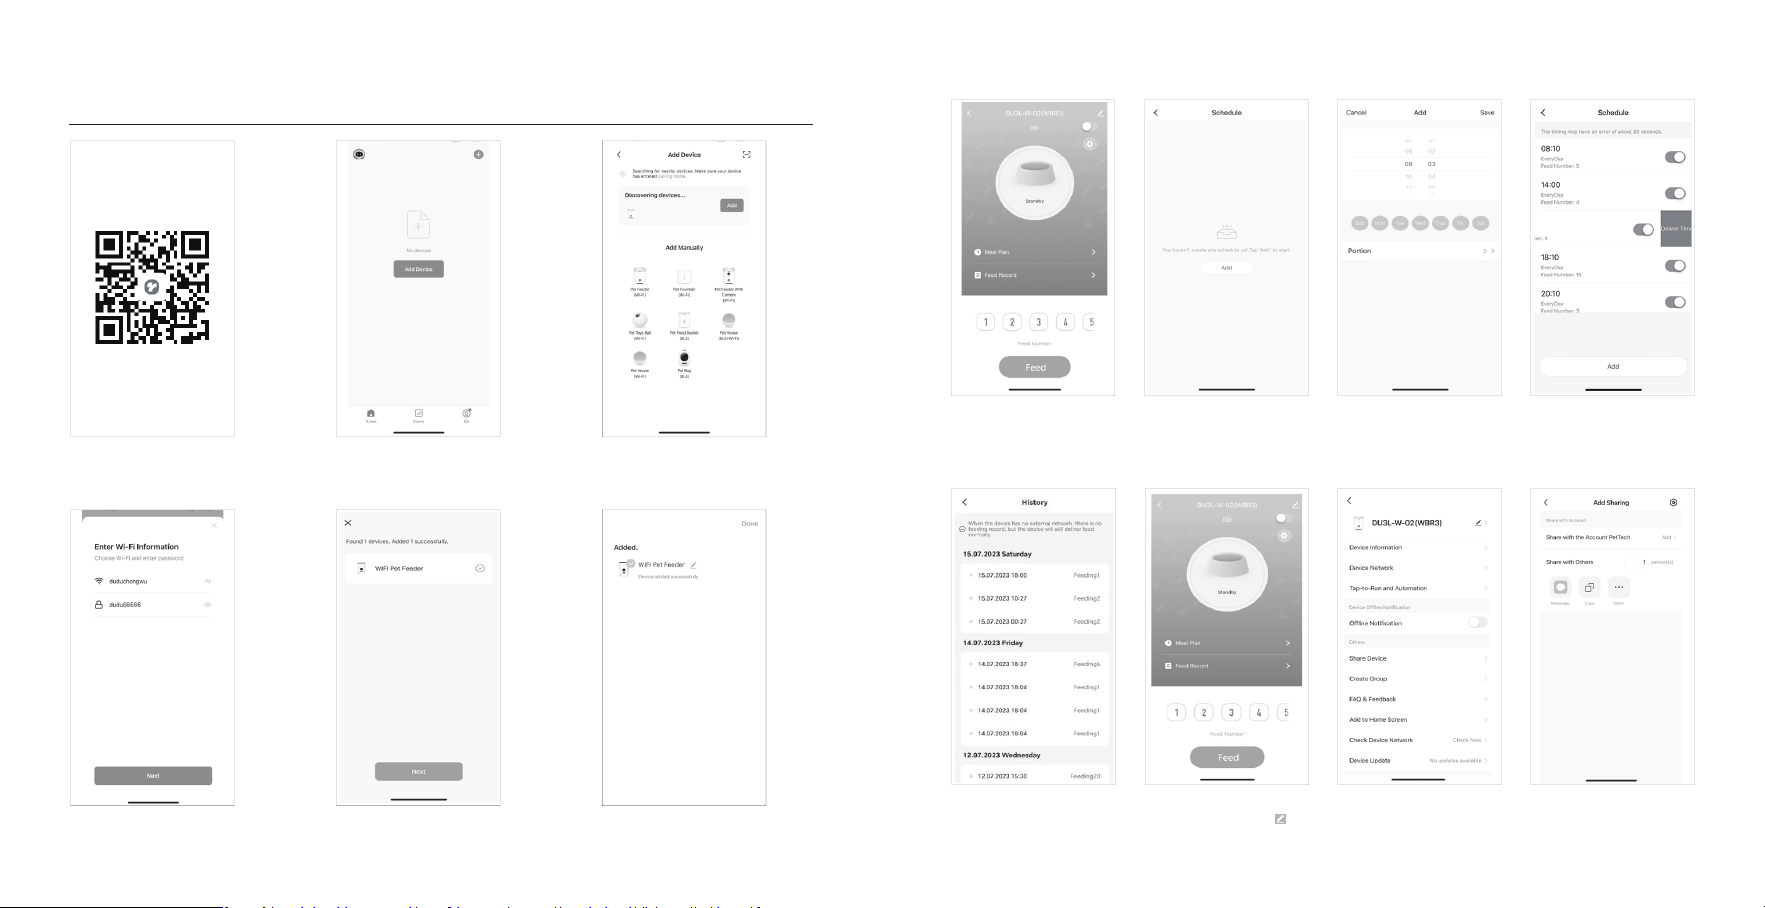
PETTECH APP SPECIFIC OPERATIONS
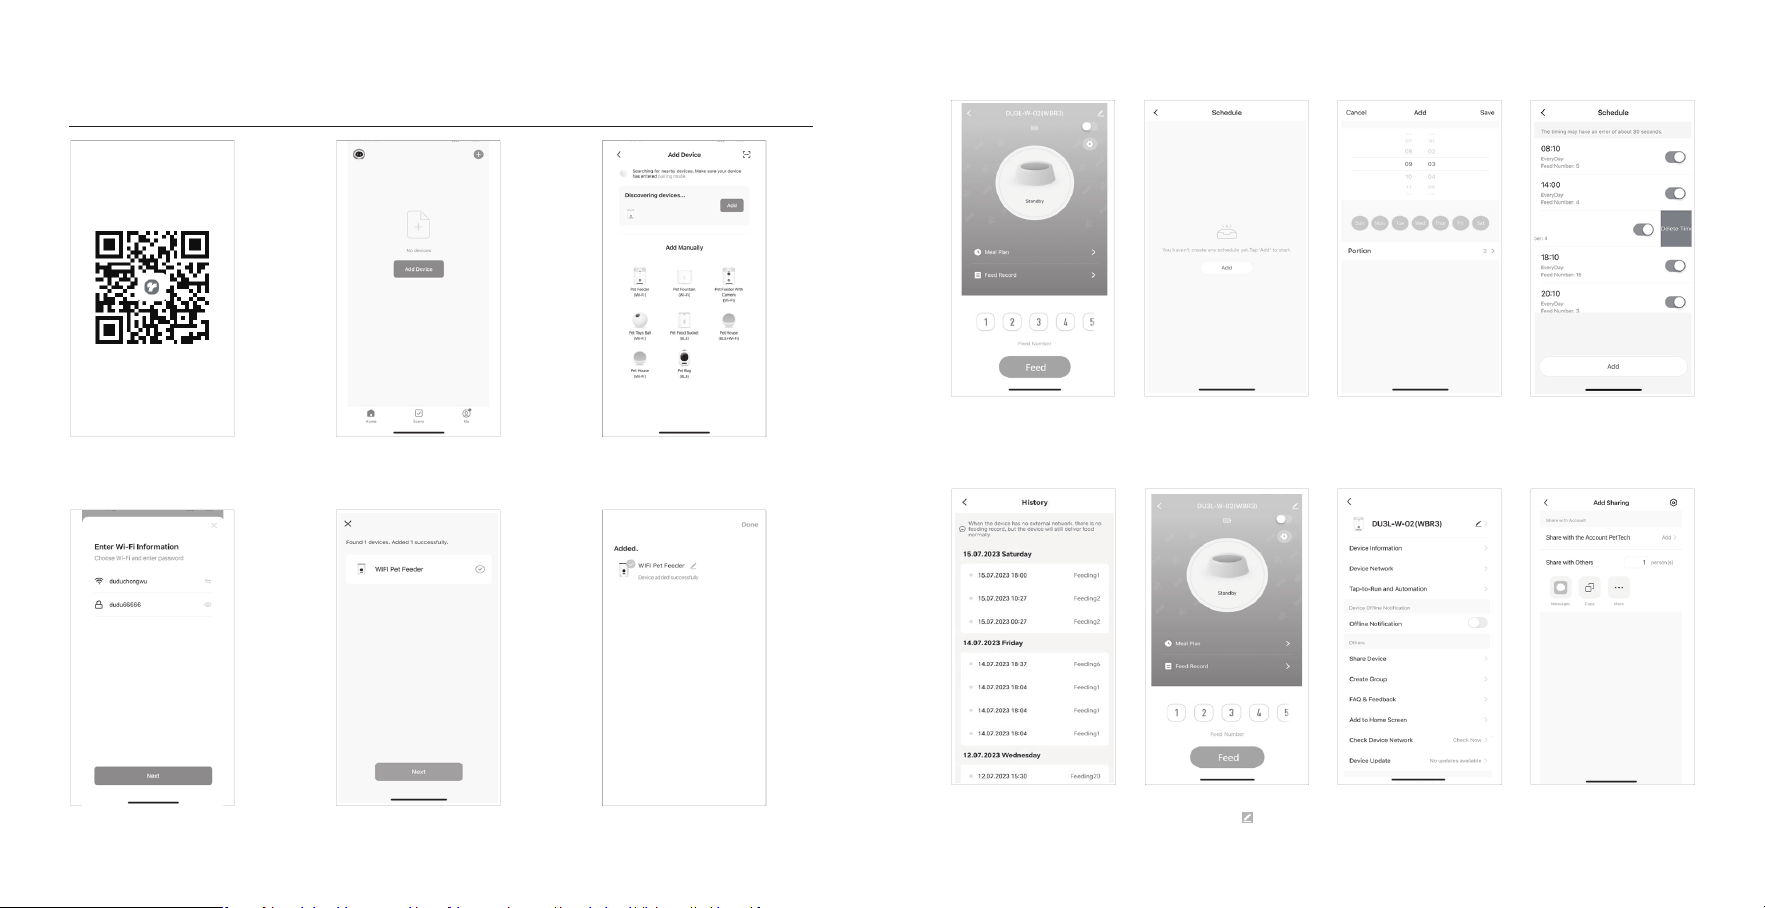
1. Scan the QR code or search for
“PETTECH” on APP Store to download the
app.Sign up or log in to your account
4. Enter a WiFi password (the name cannot
be used in Chinese, the password cannot be
used for special symbols)
7. Manually Feeding: enter the inteace,
you can choose the poions as
requirement, click”Feed”to feed
immediately
11. View the logs: click”Feed Record”,
you can view the feeding records
8. Click“ Meal Plan” on the main
inteace to add feeding schedule
12. Share your feeder: enter the
inteace, click the icon in the upper
right corner to enter the settings option
9. Choose feeding time, feeding days,
and feed number. Click “save”
13. Enter the setting menu option and
click”Share Device”
10. Slide the scheduletimer to delete it
14. Click”Add” and enter the account
and save. Share the device with multiple
people
2. Open the APP, select Home page, tap
“Add Device”or"in the upper right
corner
5. Waiting for the device to connect the
network, showing successfully added,
then next step
3. Turn on the Bluetooth on your phone.
Enter the inteace, wait for the device
“DU3L-W-02(WBR3)” to be discovered
automatically, then click add
6. After successful, you can customize
the name of device, click on the upper
right corner to nishe this step
10 11

Español
Question Answer
Q: The food won’t come out
A: 1) Please be sure to ll in with d food; kibble size should range from 2-10mm / 0.07-0.4 inch in diameter.
2)Check whether any foreign objects are placed - disassemble the food tank and check the chute. Also check the food
outlet.
3)Check whether it’s low batte level-whether the power adapter is connected or there is any outage when no batte is
installed.
Q: Food volume for each poion is not the same
A: The rst few poions may va, and it doesn’t mean a faulty equipment. After about 6 feedings it should be almost even.
Q: I can't congure the feeder on my mobile
A:Incorrect account and password format
Use only number and letter for username and password, 12 digits at most.
5G not suppoed- Please use 2.4G wireless network.
Application problem - Some program conicts may happen. Please resta your mobile
Q: Feeders appears disconnected from WiFi
A: Weak disconnection -Please check that the distance between your feeder and router is no more than 10m/33ft, and no
concrete walls or too many obstacles between them. Otherwise the WiFi network can be weak and cause unstable
connection.
Hotspot distribution network (optional)
Please follow the button instructions to switch the network distribution mode to hotspot distribution. When the feeder's
LED light ashes slowly, the specic operation steps are as following:
1. Open the PETTECH APP, select Add Device - Manually Add - Pet Feeder (Wi-Fi) - Enter the WiFi Password Next - Click
"Next", select “Blink Slowly” - Click " Go to Connect" - then go to connect the PETTECH APP -XXXX WiFi signal.
2. After connecting, return to the previous inteace, and then enter the network conguration inteace to wait for the
connection.
TROUBLESHOOTING
12 13

Adveencia
·Deseche todos los materiales de embalaje de forma adecuada. bolsa podría causar asxia, manténgala alejada de niños
y mascotas.
·
No permita que los niños pequeños jueguen con, dentro o alrededor del comedero para mascotas.
·
Para reducir el riesgo de lesiones, manténgase cerca de los niños.
·
No utilice el comedero con mascotas que no puedan alcanzar la bandeja de comida o con alguna discapacidad física.
·
No sumerja la pae de la base en agua en ningún momento, ya que podría dañar componentes electrónicos como el panel
de control.
·
No coloque objetos extraños en el comedero.
·
No lo utilice al aire libre. Compruebe el funcionamiento con frecuencia para asegurarse de que la unidad dispensa
correctamente.
·
No utilice alimentos húmedos, enlatados o mojados.
·
No desmonte la unidad si no es siguiendo las instrucciones de la guía del usuario.
·
No utilice el comedero para otro uso que no sea el previsto.
·
Utilice únicamente los accesorios recomendados o vendidos por el fabricante. El uso de accesorios no recomendados o
vendidos por el fabricante puede causar una condición insegura. No modique el comedero para mascotas.
·
No utilice ningún aparato si la unidad no funciona correctamente o ha sufrido daños. No intente reparar usted mismo el comedero
para mascotas. Póngase en contacto inmediatamente con nuestro seicio de atención al cliente para obtener más instrucciones.
·
Desenchufe siempre el aparato cuando no lo utilice y antes de limpiarlo.
·
No tire nunca del cable de alimentación eléctrica para desenchufarlo de la toma de corriente.
·
Si el enchufe de este aparato se moja, conecte la electricidad a esa toma de pared, No intente desenchufarlo.
·
Examine el alimentador después de la instalación. No lo enchufe si hay agua en el cable de alimentación o en el enchufe.
·
Para evitar tropiezos, coloque siempre el cable de alimentación fuera del paso de alimentos.
PRECAUCIONES DE SEGURIDAD
PRECAUCIÓN
·No permita que las mascotas mastiquen o se traguen ninguna pieza.
·
Si es necesario utilizar un cable alargador, utilice una unidad con la capacidad adecuada.
·
No instale ni almacene el comedero en lugares expuestos a la intemperie o a temperaturas inferiores a -10'C.
·
Utilice pilas alcalinas D para la alimentación. No utilice pilas recargables.
·
Compruebe las pilas con regularidad. Antes de dejarlo durante un tiempo prolongado, cambie siempre las pilas por otras nuevas.
·
No levante el comedero para mascotas por la tapa, el depósito de comida o la bandeja de comida. Colóquelo y transpóe-
lo utilizando ambas manos y la base, manteniendo la unidad en posición veical.
·
Adecuado sólo para comida seca, con croquetas de un tamaño comprendido entre 2 y 10 mm. Las croquetas más grandes
pueden atascarse en la salida del alimento.
·
Lea y obsee todos los avisos impoantes indicados en el comedero para mascotas y en el embalaje.
EN LA CAJA
Comedero automático para gatos
Cable de alimentación
Adaptador de corriente
Bolsa desecante
Do Not Eat
Bandeja
Manual del usuario
X1
14 15
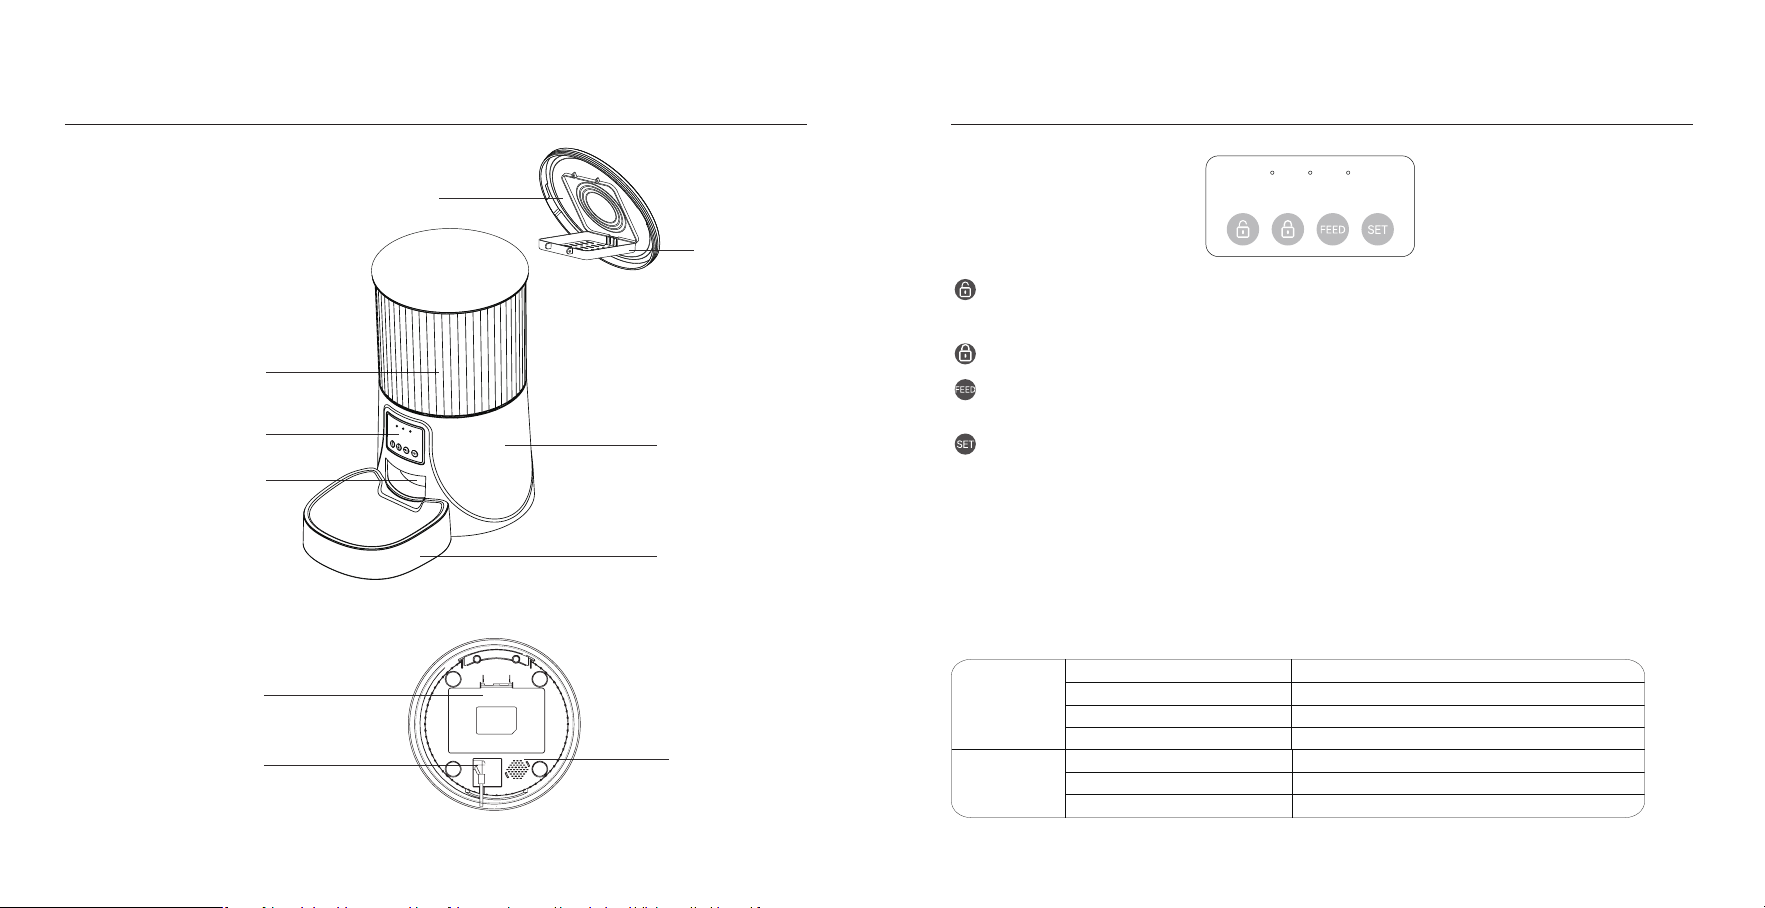
IMAGEN DEL PRODUCTO
Botón de desbloqueo: Manténgalo pulsado durante 6 segundos. Cuando oiga un pitido, la luz roja parpadeará dos
veces, indicando que el desbloqueo se ha realizado correctamente.
Botón de bloqueo: Cuando el alimentador está desbloqueado, pulse una vez para alimentar una porción manualmente.
Botón Set: Mantenga pulsado durante 7 segundos para escuchar tres pitidos, el indicador rojo se enciende durante 6
segundos y el indicador azul cambia a parpadeo lento, que es el modo de conguración de red hot spot. Repita la operación
para cambiar entre los dos modos de red.
Botón de alimentación: Cuando el alimentador está encendido y la red no está congurada, el indicador azul
parpadea rápidamente por defecto, es el modo de conguración WiFi.
Nota:
Cuando el dispositivo esté bloqueado, mantenga pulsado el botón de conguración durante 6 segundos para
restablecer la conguración de fábrica.
Indicadores LED
Rojo
Parpadea
Parpadea dos veces
Bloqueado/Desbloqueado
Tensión anormal o baja
Permanecer unos 6s
Modo WiFi/interruptor de modo Hot Spot
Azul
Permanece jo
Permanece durante unos 6s
Parpadeo cada 2-3s
Parpadeo cada 0,5
Conmutación modo WiFi/modo Hot Spot
Conectado a WiFi y totalmente operativo.
El alimentador está en modo WiFi, listo para conectarse con la App.
El alimentador está en modo hot spot, listo para conectarse con App.
RESUMEN DE BOTONES Y PANTALLA
Vista frontal
Vista inferior
Desecador
Tapa
Base
Cuenco
Compaimento de la batería
Enchufe
Altavoz
Tanque de alimentos
Panel de control&Pantalla LCD
Salida de alimentos
1716

1) Saca el comedero del interior del depósito de comida.
2) Compruebe que el depósito de comida está en su sitio.
3) Instale el cuenco de comida.
Fije el cuenco en las muescas designadas debajo de la base del comedero.
1) Insee el adaptador de corriente de 5v en un
enchufe de pared.
Enchúfelo a la toma de corriente del comedero.
2) Abra el compaimento de las pilas situado en el
botón de la unidad e instale 3 pilas alcalinas D (no
incluidas) en caso de apagón.
Adveencia: Por favor, utilice la fuente de alimentación original de 5V.
Nota:
◎ Antes de mover el comedero, presione el cuenco
hacia abajo para sacarlo de la base del comedero, Si
hay grano en el cuenco de comida, manipúlelo con
cuidado para evitar que se derrame.
◎ Sujete la base en lugar de cualquier otra pieza
cuando levante el comedero.
Nota:
◎ Pila no incluida.
◎ Antes de conectar a la corriente asegúrese de que
todas las piezas están limpias y completamente secas.
◎ La batería debe alimentar con una salida de 4-5V
INSTRUCCIONES
01 | Montaje de la bandeja de comida
02 | Conexión eléctrica
Este dispositivo cumple con la pae 15 de las normas de la FCC. El funcionamiento está sujeto a las siguientes dos
condiciones: (1) este dispositivo no puede causar inteerencias dañinas, (2) y este dispositivo debe aceptar cualquier
inteerencia recibida, incluidas las inteerencias que puedan causar un funcionamiento no deseado.
Cualquier cambio o modicación no aprobado expresamente por la pae responsable del cumplimiento podría anular la
autoridad del usuario para operar el equipo.
NOTA: Este equipo ha sido probado y cumple con los límites para un dispositivo digital Clase B, de conformidad con la Pae
l5 de las Reglas de la FCC. Estos límites están diseñados para proporcionar una protección razonable contra inteerencias
dañinas en una instalación residencial. Este equipo genera, usa y puede irradiar energía de radiofrecuencia y, si no se instala
y usa de acuerdo con las instrucciones, puede causar inteerencias dañinas en las comunicaciones por radio.
Sin embargo, no hay garantía de que no se produzcan inteerencias en una instalación en paicular. Si este equipo causa
inteerencias dañinas en la recepción de radio o televisión, que se puede determinar apagando y encendiendo el equipo,
Se recomienda al usuario que intente corregir la inteerencia mediante una o más de las siguientes medidas:
--Reorientar o reubicar la antena receptora.
--Aumente la separación entre el equipo y el receptor.
Conecte el equipo a una toma de corriente de un circuito diferente al que está conectado el receptor.
--Consulte al distribuidor o a un técnico experimentado en radio/TV para obtener ayuda.
Para mantener el cumplimiento de las pautas de exposición a RF de la FCC, este equipo debe instalarse y operarse con una
distancia mínima de 20 cm entre el radiador y el cuerpo: utilice únicamente la antena suministrada.
ADVERTENCIA FCC
D Size
Batte
18 19
Do Not Eat
La bolsa desecante puede eliminar la humedad y el olor
dentro del tanque, proteger la comida para mascotas de
daños por oxidación, y estar siempre fresca.
03 | Coloque la bolsa desecante en el sopoe debajo de la tapa
Añada comida seca para mascotas al depósito de comida.
Nota:
◎ NO utilice comida enlatada, húmeda o mojada.
◎ Se recomiendan croquetas de
2-10mm/0.07-0.4in de diámetro.
04 | Llenado del depósito de comida
Bitte reinigen Sie den Futterog regelmäßig, um die Gesundheit Ihres Tieres zu erhalten.
Wenn der Futterog schmutzig wird und sich viel loses Futter darin bendet, können Sie die Futterabdeckung abnehmen,
um ihn zu reinigen.
Reinigen Sie die Basis des Futterautomaten und das Bedienfeld mit einem weichen, feuchten Tuch. Legen Sie diese Teile
nicht ins Wasser.
Geben Sie das Gerät nicht in die Spülmaschine, da es sonst dauerhaft beschädigt wird!
REINIGUNG UND PFLEGE
05 | Desbloqueo
◎ Mantenga pulsado durante 6 segundos. Cuando oiga
un pitido, la luz roja parpadeará dos veces, lo que indica
que el desbloqueo se ha realizado correctamente.
6S
06 | Botón de bloqueo
◎ bajo estado de desbloqueo,Pulsación larga durante 6 segundos y la
luz indicadora roja parpadea dos veces para bloquear la máquina.
Aviso:
Presionando el botón de alimentación en el estado bloqueado no
funciona, debe ser desbloqueado para el uso normal.
El funcionamiento de la APP no se ve afectado en el estado bloqueado.
07 | Alimentación
◎ Alimentación manual: pulsación coa para seir 1 ración.
Aviso:
El plan de alimentación no se verá afectado
08 | Revisión
◎ Commutazione della modalità di congurazione della rete: Quando l'apparecchio è acceso e la rete non è congurata,
l'indicatore blu lampeggia rapidamente per impostazione predenita (modalità di congurazione della connessione rapida
WiFi), tenere premuto per 7 secondi per udire tre segnali acustici, L'indicatore rosso/blu è sempre acceso per 6 secondi e poi
passa a lampeggiare lentamente (modalità di congurazione della rete hot spot). Ripetere l'operazione per passare da una
modalità di rete all'altra.
Aviso:
Quando il dispositivo è bloccato, tenere premuto il pulsante delle impostazioni per 6 secondi per ripristinare le impostazioni
di fabbrica.
7S
10mm
20 21
PETTECH APP OPERACIONES ESPECÍFICAS
1. Escanee el código QR o busque
"PETTECH" en APP Store para descargar la
app.Regístrese o inicie sesión en su cuenta
4. Introduzca una contraseña WiFi (el
nombre no se puede utilizar en chino, la
contraseña no se puede utilizar símbolos
especiales).
7. Alimentación manual: entre en la
inteaz, puede elegir las porciones según
sus necesidades, haga clic en "Alimentar"
para alimentar inmediatamente
11. Ver los registros: haga clic en
"Registro de alimentación", puede ver
los registros de alimentación
8. Haga clic en "Plan de comidas" en la
inteaz principal para añadir el horario
de alimentación
12. Compaa su alimentador: entre en
la inteaz, haga clic en el icono en la
esquina superior derecha para entrar en
la opción de conguración.
9. Elija la hora, los días y el número de
comidas. Haga clic en "Guardar"
13. Entre en el menú de conguración y
haga clic en "Share Device"
10. Deslice el programador para
borrarlo
14. Pulsa "Add", introduce la cuenta y
guarda. Compair el dispositivo con
varias personas
2. Abra la APP, seleccione la página de
inicio, pulse "Añadir dispositivo" o "+" en
la esquina superior derecha
5. Esperar a que el dispositivo para conectar la
red, mostrando añadido con éxito, entonces el
siguiente paso
3. Enciende el Bluetooth de tu teléfono.
Entra en la inteaz, espera a que el
dispositivo "DU3L-W-02(WBR3)" se
descubra automáticamente, después
pulsa añadir
6. Después del éxito, puede personalizar
el nombre del dispositivo, haga clic en
la esquina superior derecha para
nalizar este paso.
22 23

P: La comida no sale
R: 1) Por favor, asegúrese de rellenar con comida seca; el tamaño de las croquetas debe oscilar entre 2-10mm / 0,07-0,4
pulgadas de diámetro.
2)Compruebe si hay objetos extraños - desmonte el depósito de comida y compruebe el conducto. Compruebe también
la salida de alimentos.
3)Compruebe si el nivel de batería es bajo - si el adaptador de corriente está conectado o si hay algún coe cuando no
hay batería instalada.
P: El volumen de comida de cada porción no es el mismo
R: Las primeras porciones pueden variar, y no signica un fallo del
equipo. Después de unas 6 alimentaciones debería ser casi uniforme.
R: Formato incorrecto de cuenta y contraseña
Utilice sólo números y letras para el nombre de usuario y la contraseña, 12 dígitos como máximo.
5G no sopoado- Por favor, utilice la red inalámbrica 2.4G.
Problema con la aplicación - Algunos conictos de programa pueden ocurrir. Por favor, reinicie su móvil
P: El alimentador aparece desconectado del WiFi
R: Desconexión débil - Por favor, compruebe que la distancia entre su alimentador y el router no es superior a 10m/33ft, y
no hay paredes de hormigón o demasiados obstáculos entre ellos. De lo contrario, la red WiFi puede ser débil y causar una
conexión inestable.
Red de distribución de zonas activas (opcional)
Siga las instrucciones del botón para cambiar el modo de distribución de red al modo de distribución de punto de acceso.
Cuando la luz LED del alimentador parpadee lentamente, los pasos de operación especícos son los siguientes:
1. Abra la aplicación PETTECH, seleccione Agregar dispositivo - Agregar manualmente - Alimentador de mascotas (Wi-Fi) -
Ingrese la contraseña de Wi-Fi Siguiente - Haga clic en "Siguiente", seleccione "Parpadeo lento" - Haga clic en "Ir a conectar"
- luego vaya a conectar la señal Wi-Fi de la aplicación PETTECH -XXXX.
2. Después de conectarse, regrese a la inteaz anterior, y luego ingrese a la inteaz de conguración de red para esperar la
conexión.
SOLUCIÓN DE PROBLEMAS
24